Nelly i-Size - Car seat Lionelo - Free user manual and instructions
Find the device manual for free Nelly i-Size Lionelo in PDF.

User questions about Nelly i-Size Lionelo
0 question about this device. Answer the ones you know or ask your own.
Ask a new question about this device
Download the instructions for your Car seat in PDF format for free! Find your manual Nelly i-Size - Lionelo and take your electronic device back in hand. On this page are published all the documents necessary for the use of your device. Nelly i-Size by Lionelo.
USER MANUAL Nelly i-Size Lionelo
natural_image
Line drawing of a lionelo car seat assembly (no text or symbols)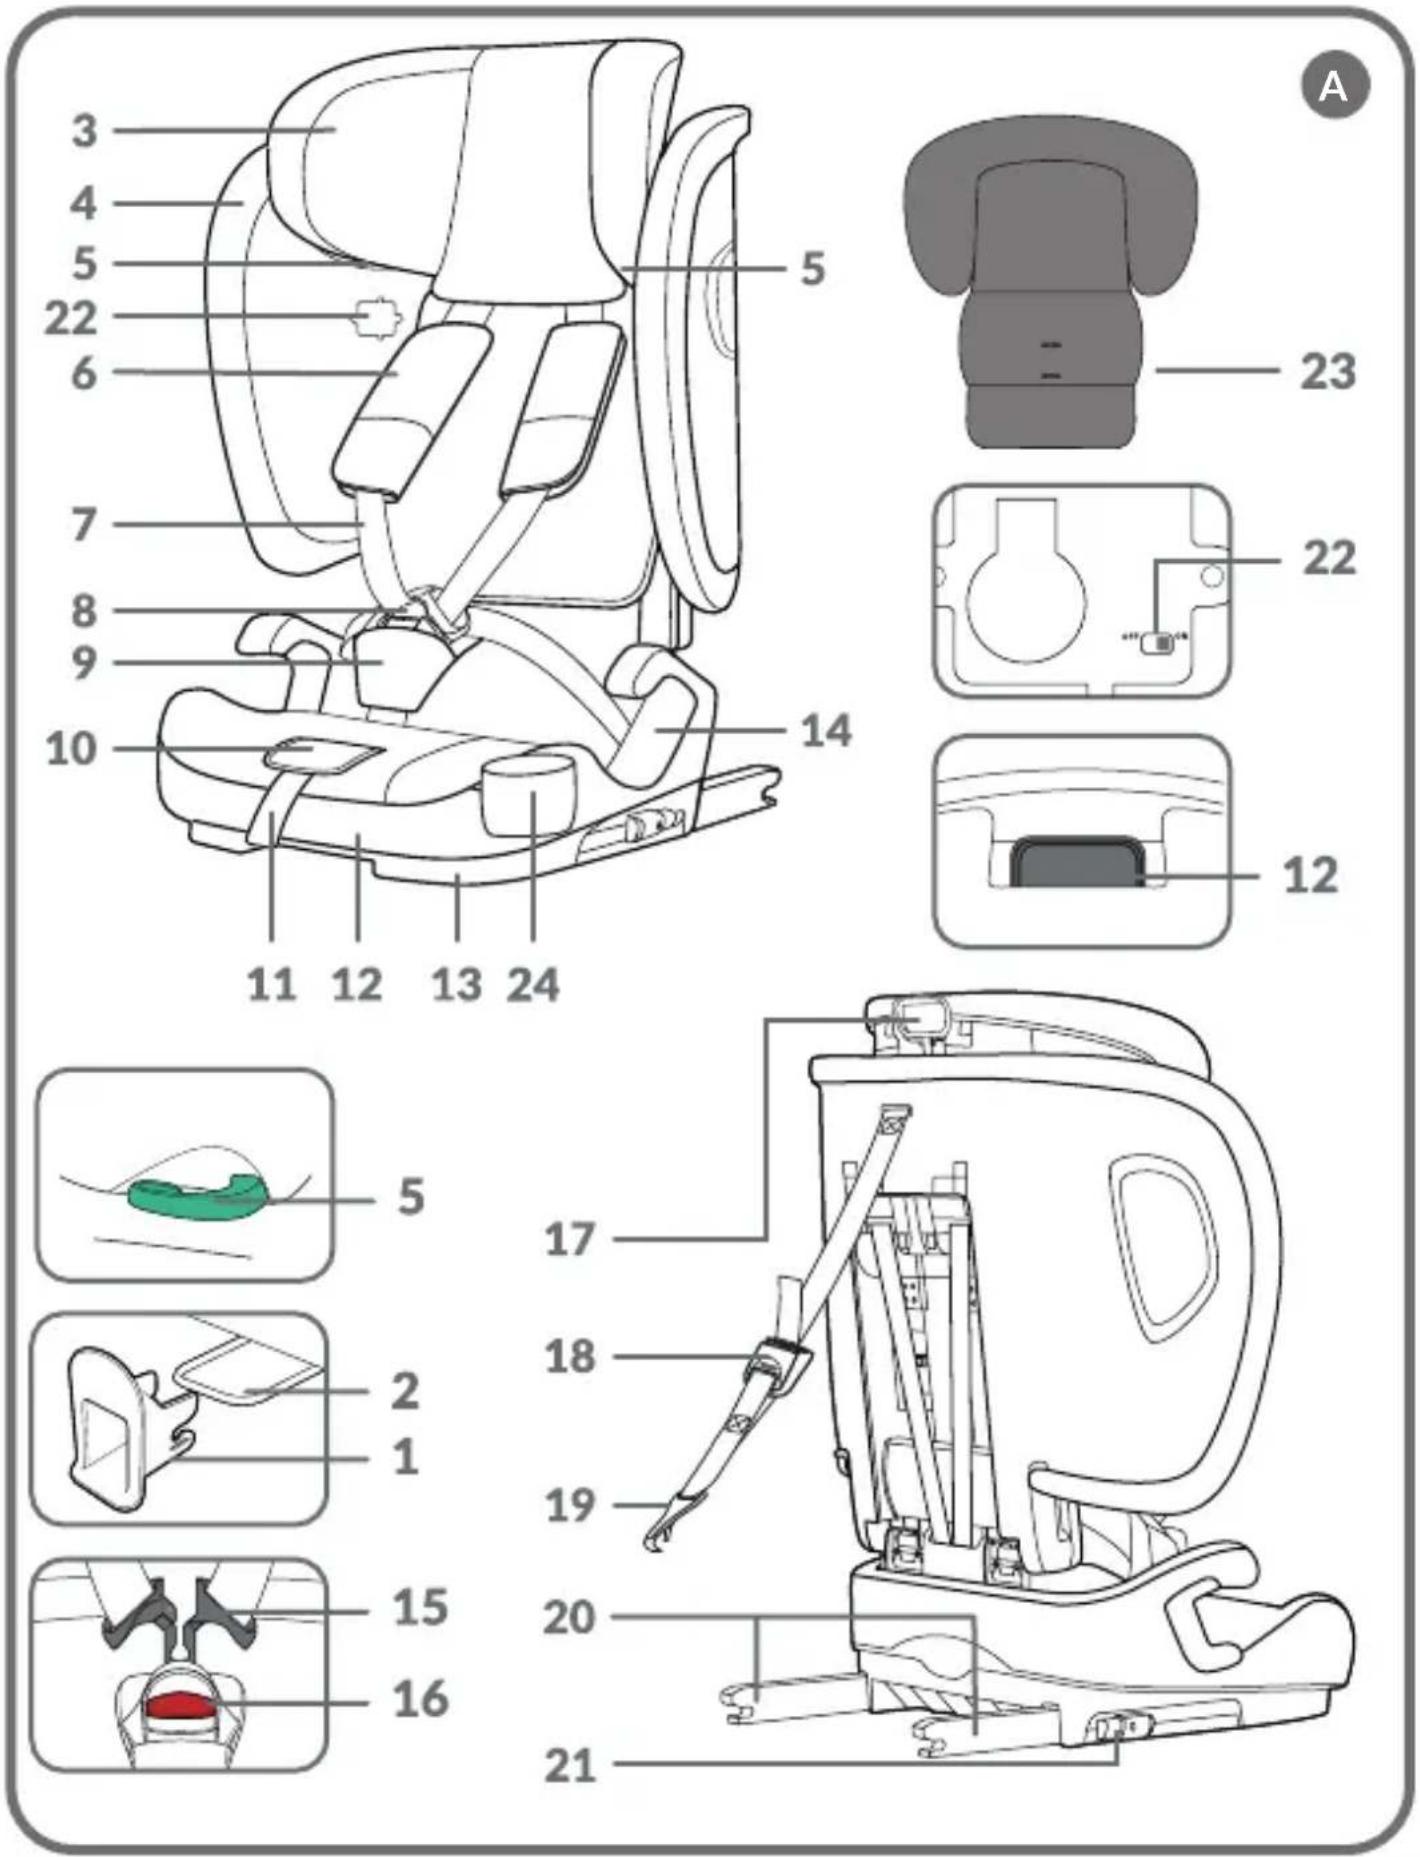


natural_image
Technical line drawing of a mechanical assembly with no visible text or symbols
EN
Dear customer!
Should you have any remarks or questions concerning the product, please do not hesitate to contact us: help@lionelo.com
Producer:
BrandLine Group Sp. z o. o.
Information for the 76–105 cm height range
NOTICE:
This is an i-Size Enhanced Child Restraint System. It is approved according to UN Regulation No 129, for use in, i-Size compatible vehicle seating positions as indicated by vehicle manufacturers in the vehicle users' manual.
If in doubt, consult either the Enhanced Child Restraint System manufacturer or the retailer.
Information for the 105–150 cm height range
NOTICE:
This is a i-Size booster seat Enhanced Child Restraint System. It is approved according to UN Regulation No 129, for use primarily in "i-Size seating positions" as indicated by vehicle manufacturers in the vehicle user's manual.
If in doubt, consult either the Enhanced Child Restraint System manufacturer or the retailer.
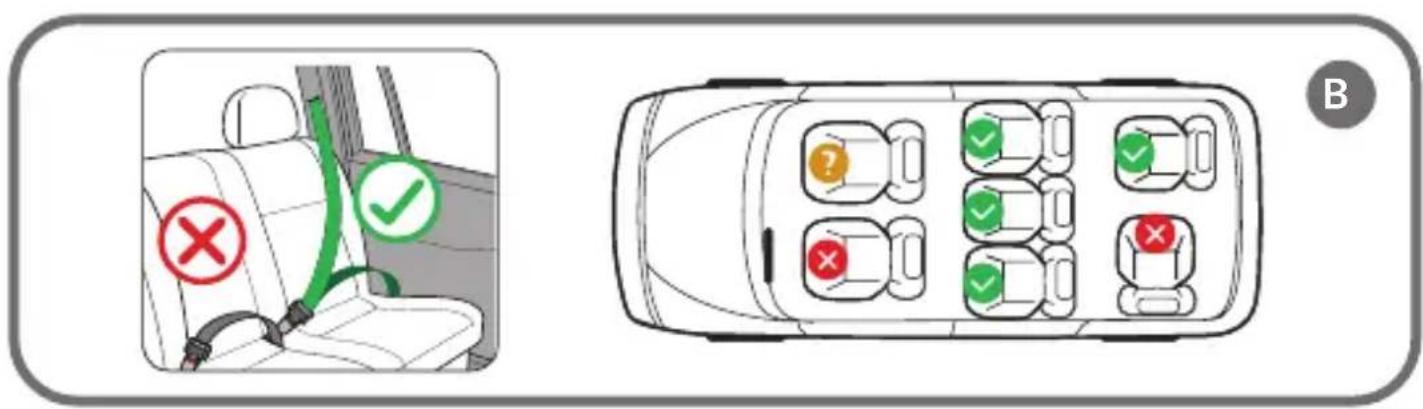
The product is suitable for installation only in the seating positions marked with Fig. A, designated as i-Size.
The product is suitable for installation in the seat marked with in Fig. A only in the forward-facing position and with the airbag deactivated. It is recommended that the seat should only be used in the rear seats of the car.
WARNINGS
- Important! Do not use the seat if your child is younger than 15 months.
- The hard and plastic components of the child restraint system must be positioned and installed in a manner that prevents them from being caught by a sliding seat or vehicle door during normal vehicle operation.
- The product is designed for children in the height range from 76 to 150 cm.
- Child restraint systems must be appropriately sized for the child. The straps must not be twisted.
- The belts securing the child restraint system to the vehicle must be tight.
- Make sure that the hip straps are positioned low to properly protect the child's pelvis.
- If the product has been subjected to significant forces, such as impact, it should be replaced.
- Do not modify the seat or add any new components without authorisation of the relevant approval authority. For maximum safety of your child, make sure to attach and use the system in accordance with the instructions in the manual.
- The plastic components of the seat may heat up in the sun and cause burns on the child's skin.
- Never leave a child unattended in the seat inside a vehicle.
- Luggage and similar items must be properly secured to prevent injuries in case of a collision.
- Do not use the seat without the fabric cover.
- Do not substitute the cover with an item from another set. It is an integral component of the set and affects the operation of the restraint system.
-
Consult the user manual provided by the vehicle manufacturer.
-
The device may not fit all approved vehicles if adjusted for the height range above 135 cm.
- Always keep this user manual with you for future use.
BATTERY INFORMATION
- WARNING: This product contains a coin/button battery. A coin/button battery can cause serious internal chemical burns if swallowed.
- WARNING: Dispose of used batteries immediately. Keep new and used batteries away from children. If you think batteries may have been swallowed or placed inside any part of the body, seek immediate medical attention.
- Do not charge disposable batteries.
- Do not mix batteries of different types or old (used) batteries with new batteries.
- Insert batteries into the compartment according to the polarity (+ and -) and markings inside the battery compartment.
- Always remove a dead battery. A battery left in the product may leak or explode and destroy the product.
- Do not short-circuit the battery terminals.
- To ensure proper operation of the product, make sure C/LR14 type batteries are used.
- If the product is not used for a long time, remove the batteries from the compartment.
- Keep the batteries away from children.
- Do not throw batteries into fire. Explosion hazard.
- Dispose of batteries according to regulations by disposing of them in specially designated containers.
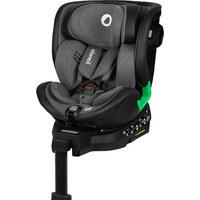
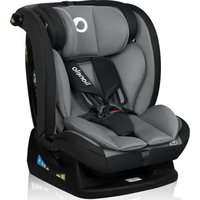
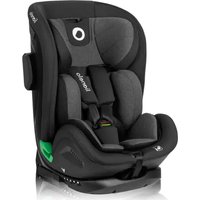
PRODUCT PART DESCRIPTIONS (Fig. A)
- ISOFIX guide
- Fixing points
- Headrest
- Backrest cover
- Shoulder strap guide
- Harness pads
- 5-point seat harness
- Harness buckle
- Buckle protector
- Strap tension adjustment button
- Harness tension adjustment strap
-
Tilt adjustment lever
-
Base
- Hip strap guide
- Harness connectors
- Harness release button
- Headrest adjustment lever
- Top Tether length adjuster
- Top Tether
- ISOFIX connectors
- ISOFIX lever
- Alarm switch
- Reduction insert with leg extension
- Cup holder
INSTALLATION IN THE CAR
| Seat installation Seat orientation Seat position Child size | |||
| - Installation by means of ISOFIX and Top Tether- Child restrained by harness strapsPosition the seat in one of the 5 available recline positions. | Forward-facing |  | Between 76 and 105 cmChild weight: maximum 18 kg. |
| - Installation by means of ISOFIX and car safety belts- Child restrained by the car's safety belt alonePosition the seat in one of the 5 available recline positions. | Forward-facing | 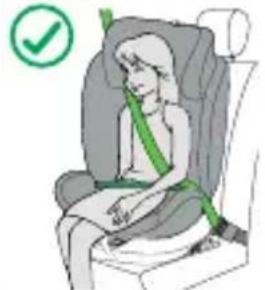 | Between 105 and 150 cm |
FORWARD-FACING MOUNTING (76-105 CM)
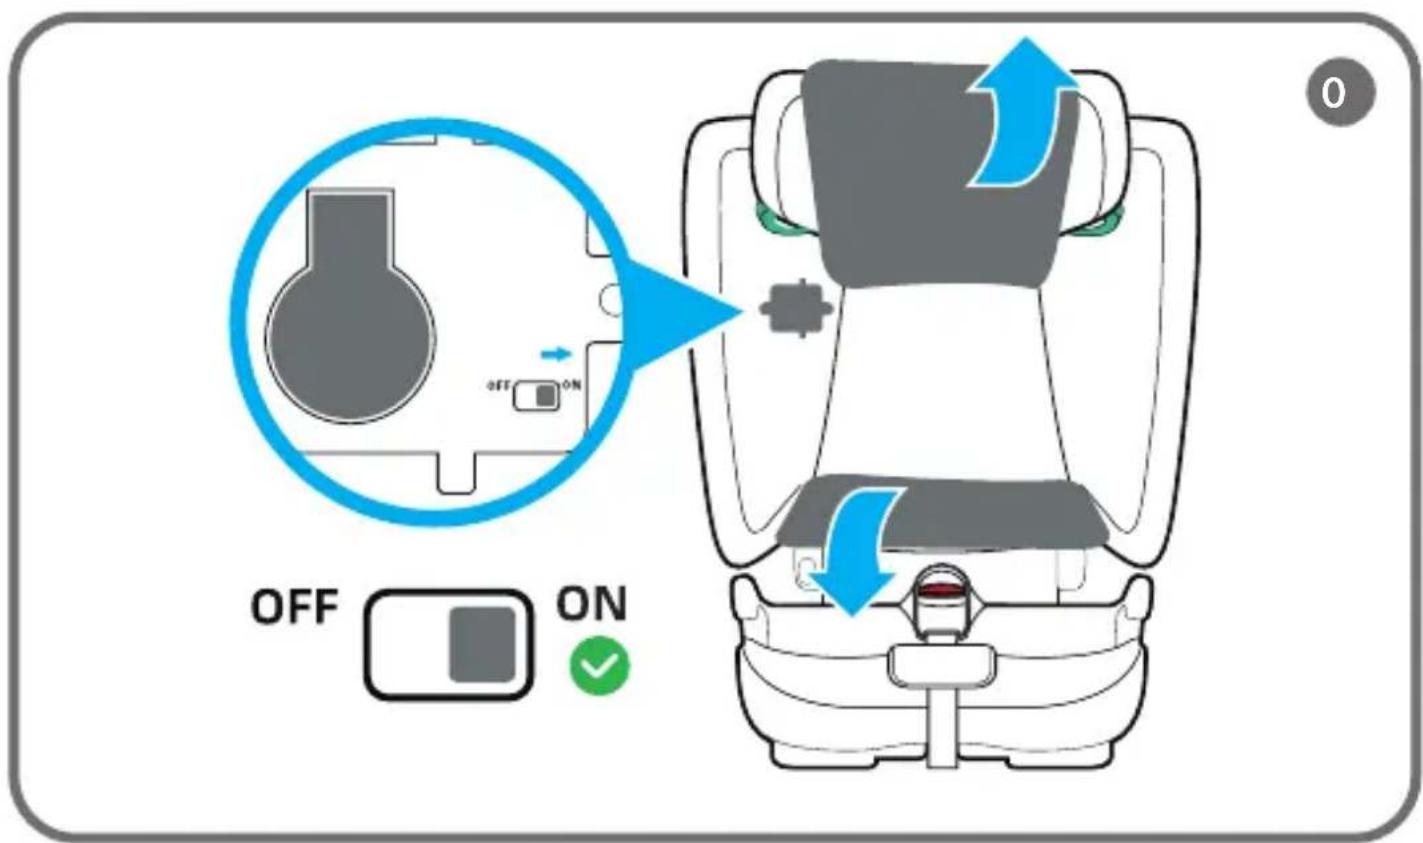
CAUTION! Before installation make sure that the TT unbuckling alarm is activated (Fig. 0). To activate the alarm, move the switch to "ON", to switch it off, move it to "OFF".
- Place the child seat on the car seat in the designated installation area.
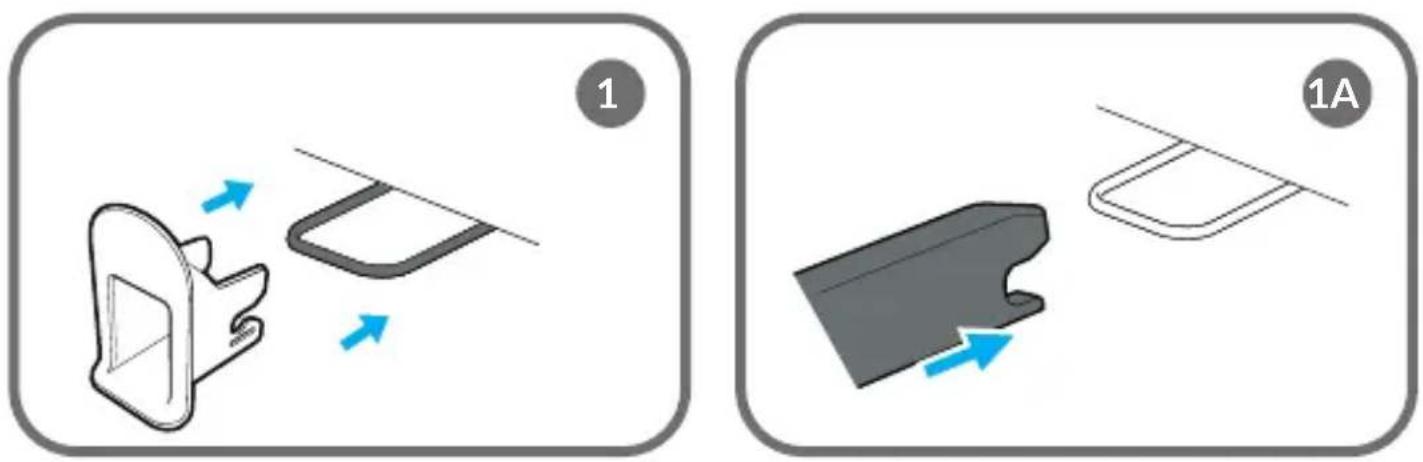
- Push in the ISOFIX lever (21, Fig. A), and extend the Isofix arms (Fig. 2). Anchor the ISOFIX arms into the attachments located in the car seat. The arms will interlock and you will hear a characteristic click (Fig. 1).
Important! If your car is not equipped with suitable ISOFIX guides, use the adapters (Fig. 1A).
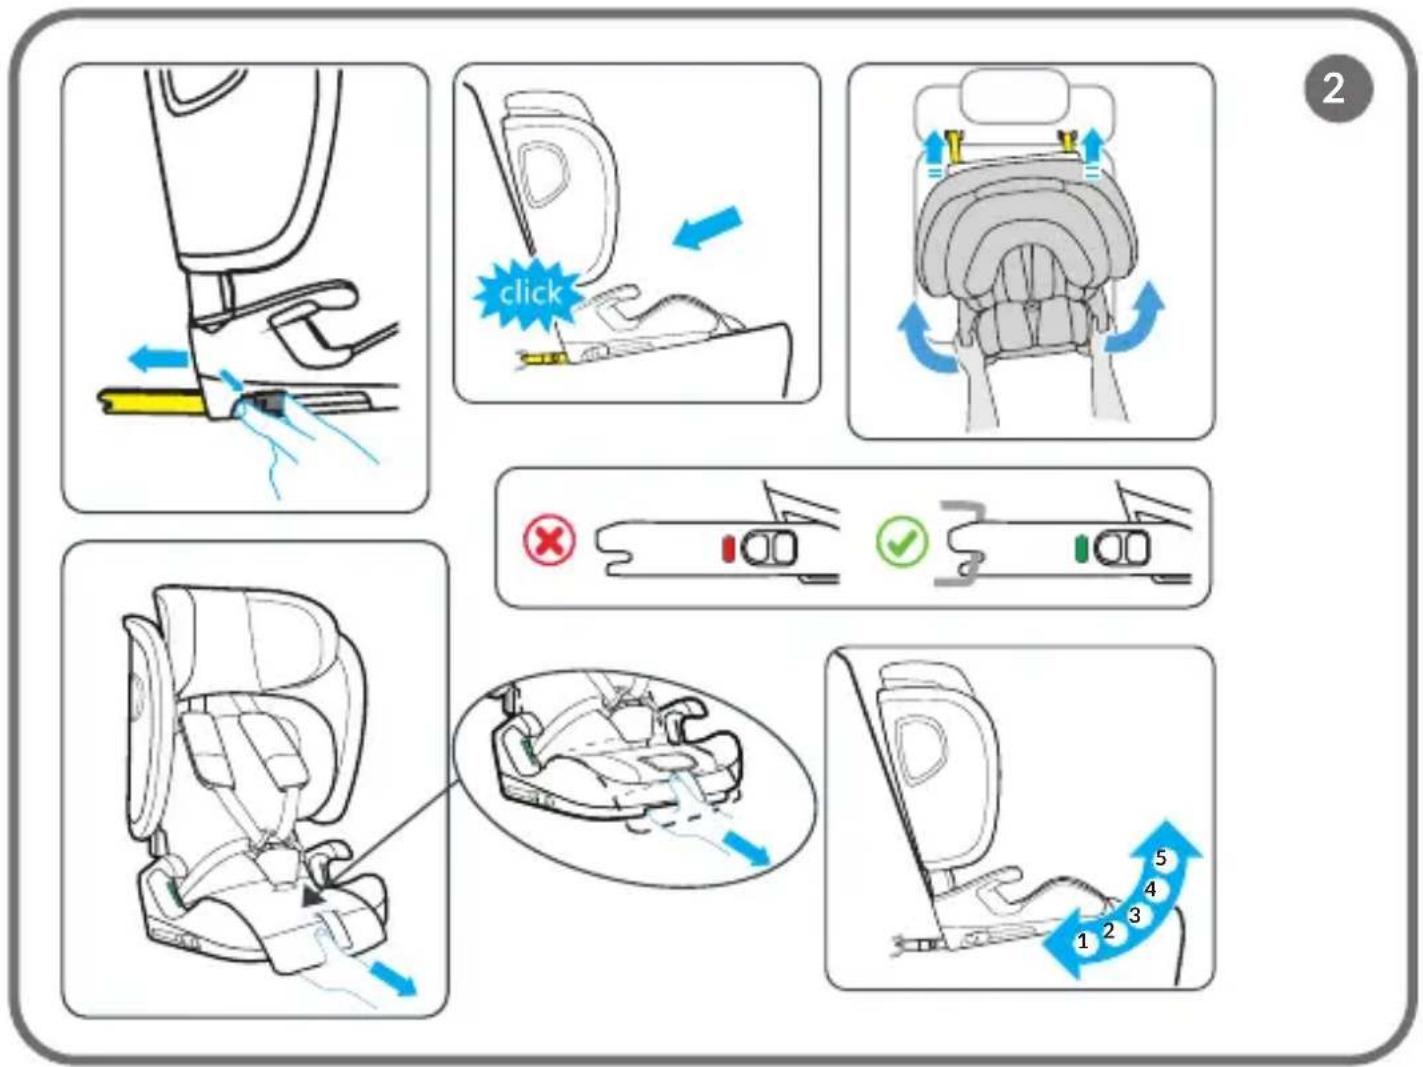
- The green indicator on the ISOFIX button must be visible on both sides (Fig. 2).
- Press the child seat firmly against the backrest of the car seat. Apply a left-right movement to push the seat base towards the backrest to ensure it is tightly secured against the car seat.
- Adjust the seat tilt to one of the 5 available positions using the tilt adjustment lever (12, Fig. A).
CAUTION! Any change in the recline of the backrest during seat use requires length readjustment of the Top Tether.
-
Extend the Top Tether and press the length adjuster (Fig. 6) to adjust the length of the belt. Next, move the buckle and hook to the end of the belt.
-
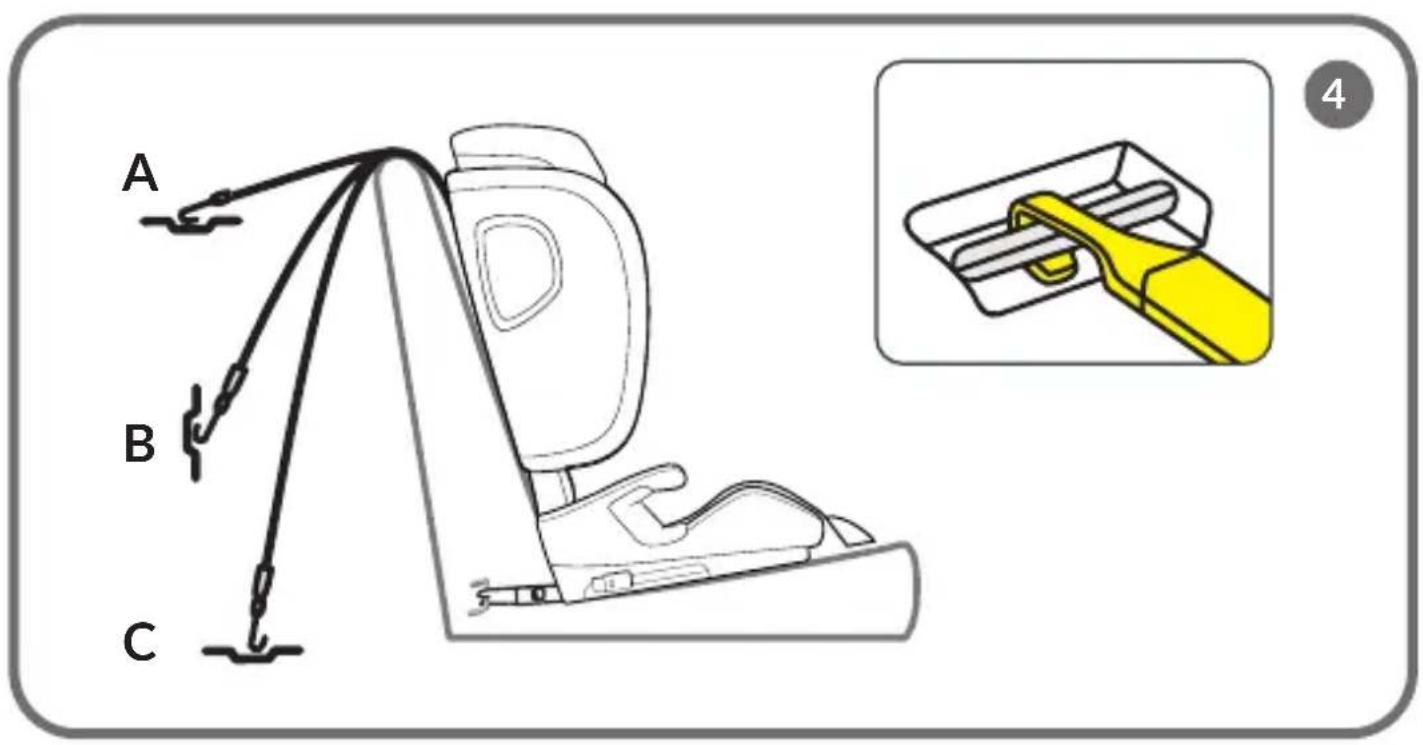
Guide the Top Tether towards the anchor points, if necessary, guide it under the car seat headrest (Fig. 3).
-
Attach the Top Tether to the anchor point in the car (Fig. 4). Anchor points may be located in different places, depending on the vehicle.
-
Tighten the Top Tether as much as possible and check to make sure that the indicator is green (Fig. 5).
-
Place the child in the seat.
-
Fasten the harness (see: Fastening and unfastening of harness).
-
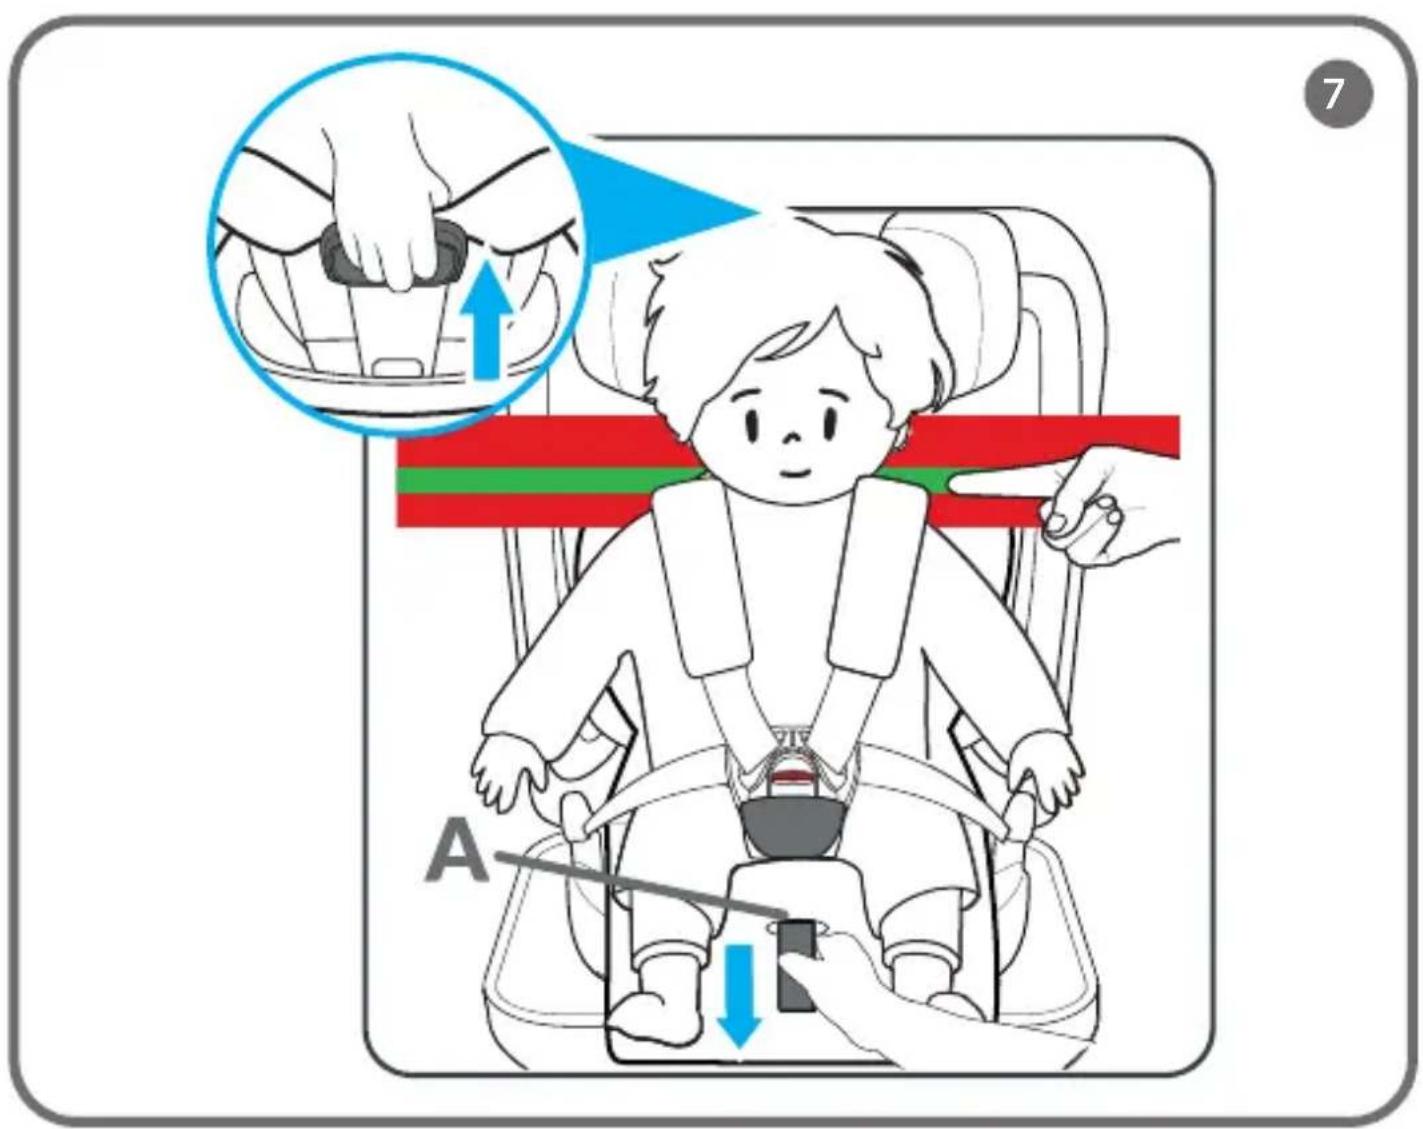
Adjust the headrest (Fig. 7) (see: Headrest adjustment).
FORWARD-FACING INSTALLATION (105–150 cm)
CAUTION! Before installation make sure that the TT unbuckling alarm is deactivated (Fig. 0).
- Retract the Top Tether (see: Top Tether retraction).
- Retract the harness (see: 5-point harness retraction).
- Place the child seat on the car seat in the designated installation area.
Important! For installation without ISOFIX, skip steps 4 to 6.
- Push in the ISOFIX lever (21, Fig. A), and extend the ISOFIX arms (Fig. 2). Anchor the ISOFIX arms into the attachments located in the car seat. The arms will interlock and you will hear a characteristic click (Fig. 1).
Important! If your car is not equipped with suitable ISOFIX guides, use the adapters (Fig. 1A).
- The green indicator on the ISOFIX button must be visible on both sides (Fig. 2).
- Press the child seat firmly against the backrest of the car seat. Apply a left-right movement to push the seat base towards the backrest to ensure it is tightly secured against the car seat.
-
Adjust the seat tilt to one of the 5 available positions using the tilt adjustment lever (12, Fig. A).
-
Place the child in the seat and adjust the headrest(see: Headrest adjustment).
- Pull out the car safety belt as far as possible and fasten it; you will hear a clicking sound.
- Thread the hip section of the belt through the green hip belt guide (Fig. 12).
- Thread the shoulder section of the belt through the green shoulder belt guide located under the headrest (Fig. 12).
- Tension the car safety belt by pulling it towards the retractor. The car safety belt should fit tightly around the child's body. Make sure the straps are not twisted.
- Check that the straps are correctly positioned in the guides and tight, and that the buckle is not too close to the hip belt guide (Fig. 12).
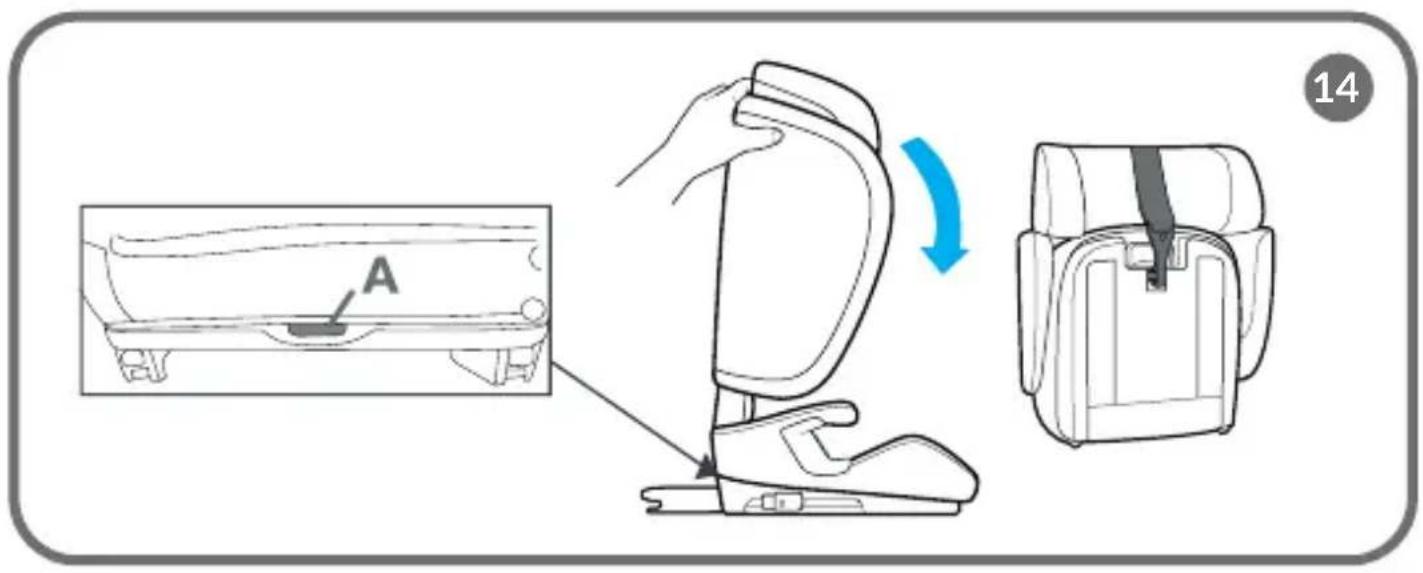
FOLDING THE CAR SEAT
To fold the child seat for transport, press the button (A, Fig. 14) and then push the backrest forward. Secure the child seat with the Top Tether (Fig. 14).
FASTENING AND UNFASTENING OF HARNESS
- Loosen the harness by pressing the tension adjustment button (10, Fig. A) and pulling on the straps.
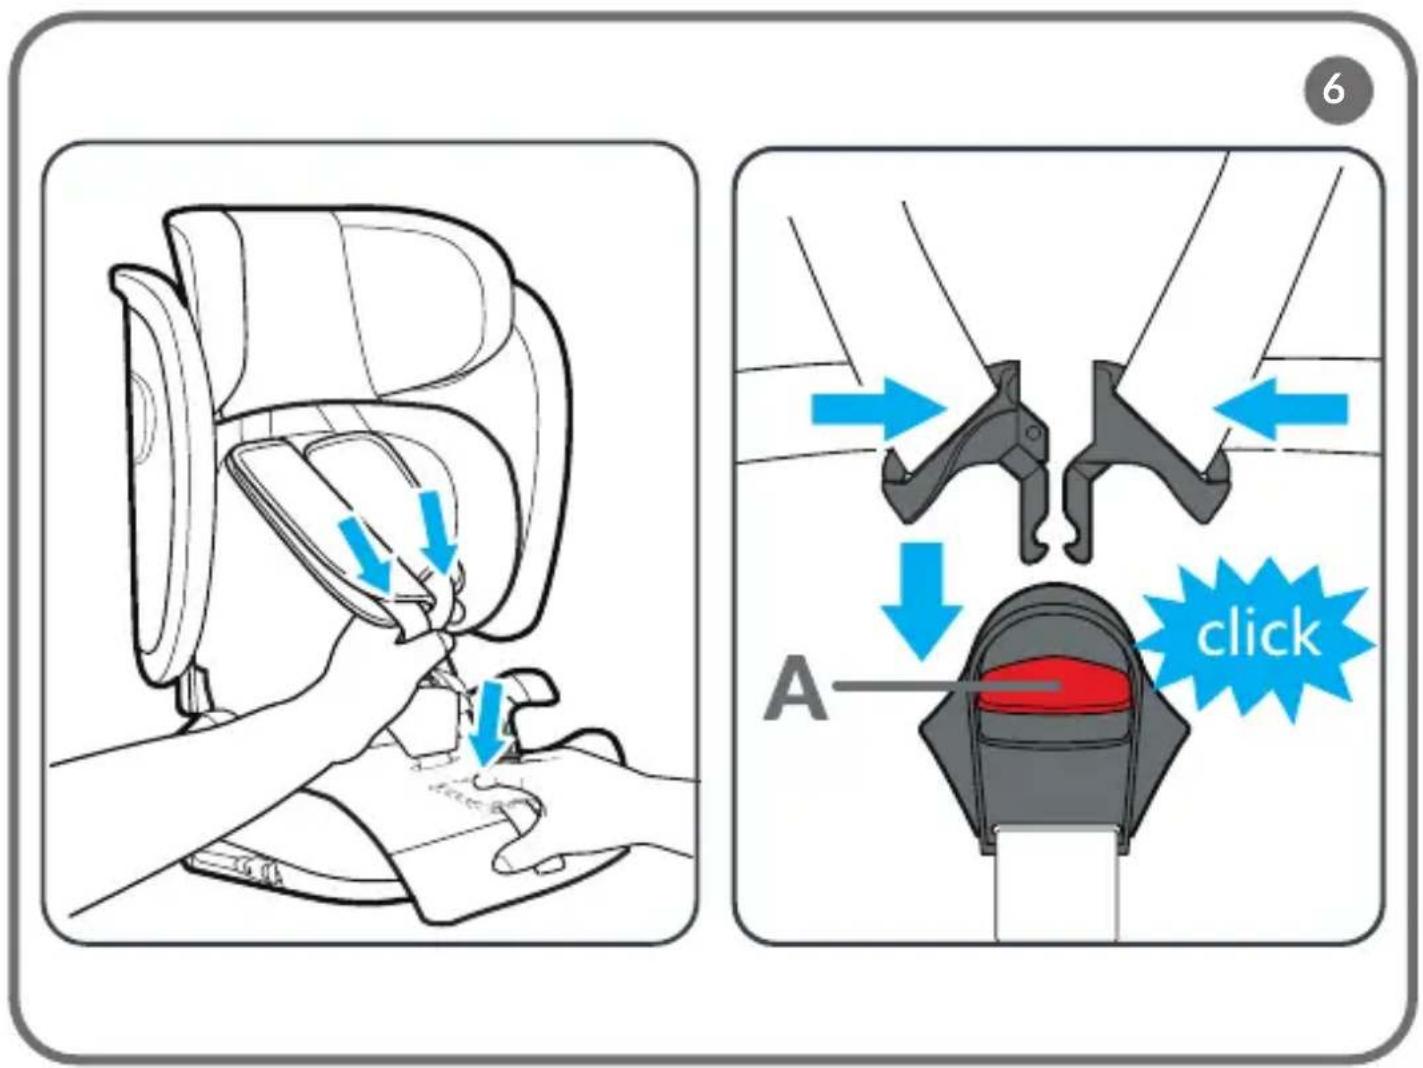
- Unbuckle the straps by pressing the red button on the buckle (A, Fig. 6).
- Place the child in the seat.
- Connect the belt connectors (Fig. 6) and then insert them into the buckle. You will hear a clicking sound.
- Adjust the headrest.
- To tighten the harness, pull the tension adjustment strap (A, Fig. 7). To loosen the harness, press the adjustment button and pull on the shoulder straps.
Important! Make sure that the harness is tightened properly, fits the child's body snugly, and the straps are not twisted. Check that the hip straps are positioned low to protect the child's pelvis. The straps should be tight against the child's body, but not too tight and causing discomfort.
HEADREST ADJUSTMENT
- Loosen the straps by holding down the tension adjustment button (10, Fig. A). This will make it easier to adjust the height of the headrest.
- Pull the headrest adjustment lever (17, Fig. A).
The height of the shoulder straps is synchronised with headrest height. Adjusting the height of the headrest will automatically adjust the height of the shoulder straps.
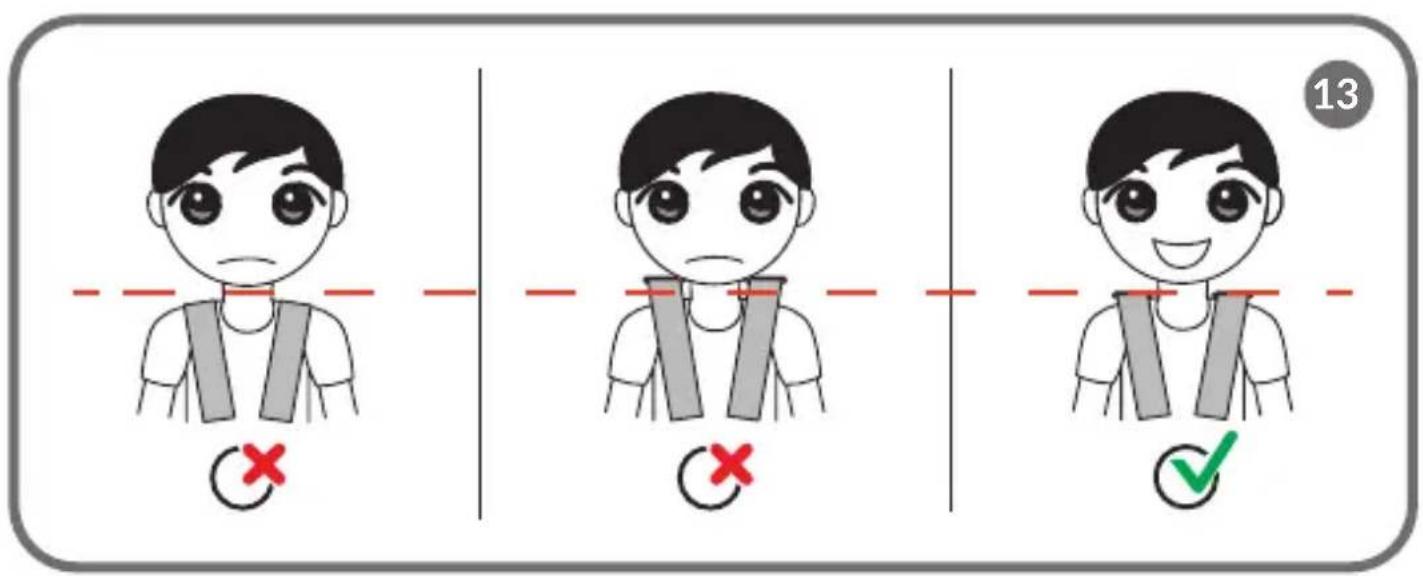
Important! Adjust the headrest so that the shoulder straps are not positioned too high (at or above the ear line) or too low (behind the child's back). The shoulder straps should be positioned at the height of the child's shoulders (Fig. 13).
REDUCTION INSERT
Important! Children up to 105 cm in height must use the reduction insert (23, Fig. A). Remove the reduction insert when the child exceeds 105 cm in height and continues to use the seat.
TOP TETHER RETRACTION
Deactivate the TT alarm (Fig. 0), roll up the Top Tether and stow it along with the length adjuster in the rear outer part of the seat. Make sure the strap is secured with Velcro.
5-POINT HARNESS RETRACTION
NOTE! The information below applies to children in the 105–150 cm height range.
- Unbuckle the harness by pressing the red button on the buckle (A, Fig. 6).
- Remove the harness buckle protector (9, Fig. A) and the harness pads (6, Fig. A).
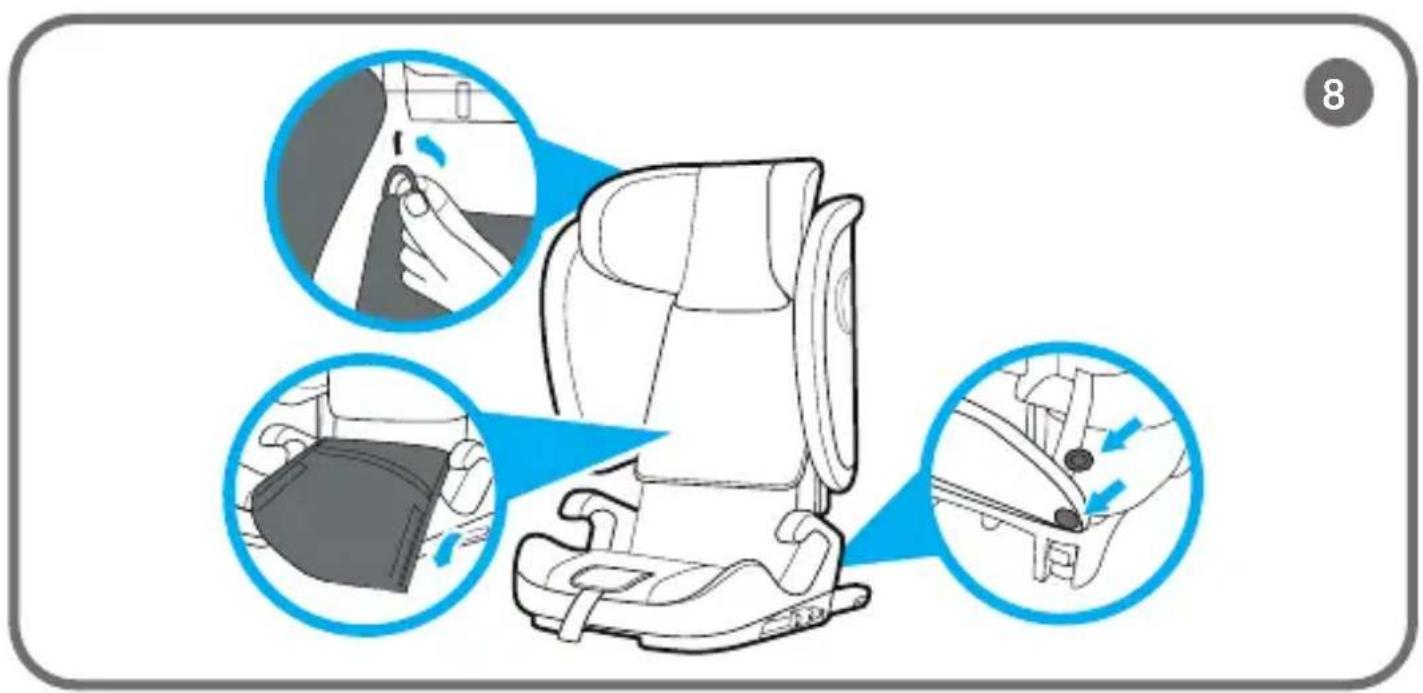
- Remove the seat base cover by detaching is from the base and backrest and unfastening the metal snaps at the back of the seat (Fig. 8).
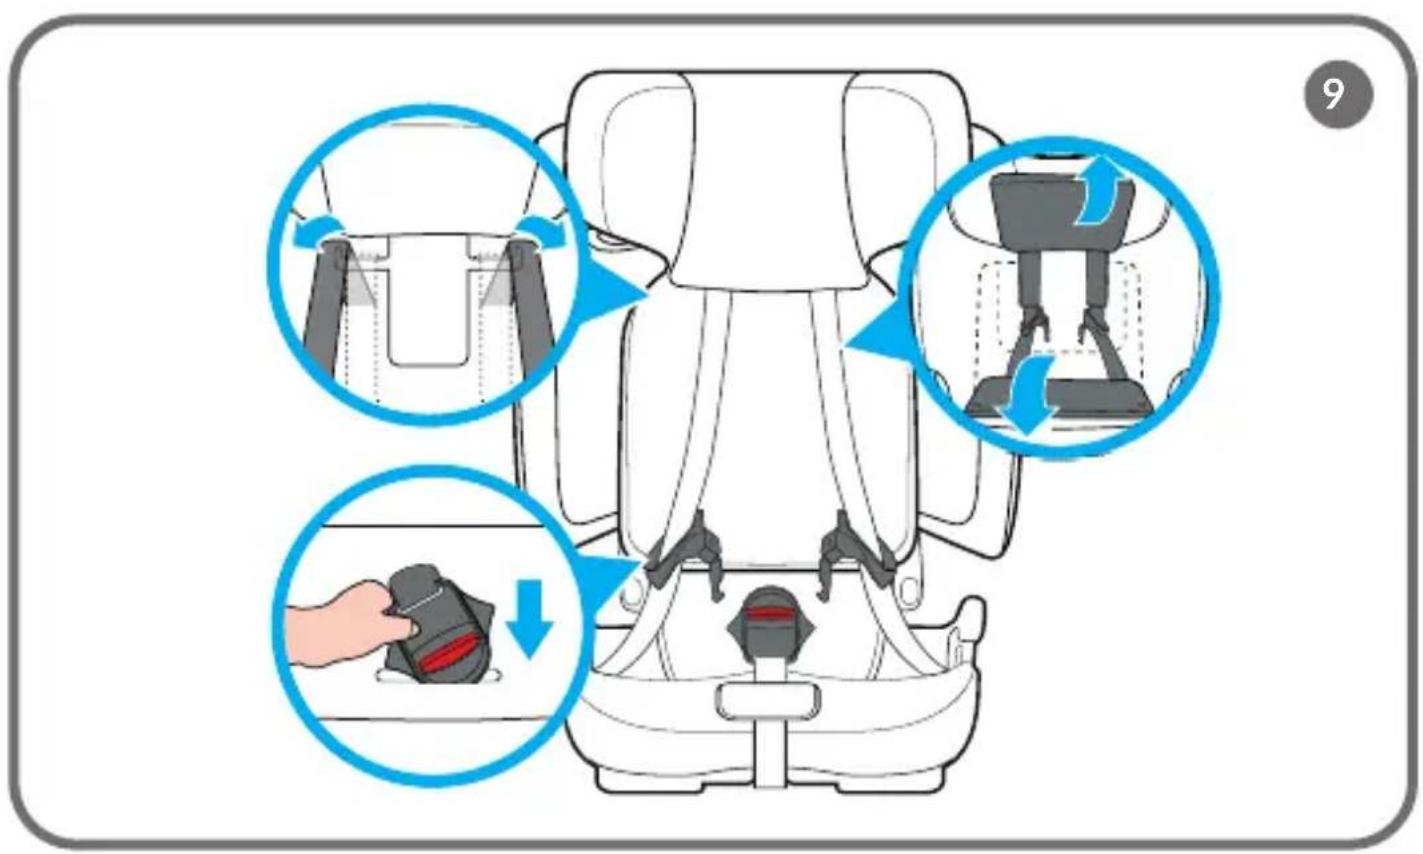
- Thread the buckle and shoulder straps through the cover (Fig. 9).
- Extend the harness, bring the strap connectors together and then insert them into the buckle (Fig. 10). You will hear a clicking sound.
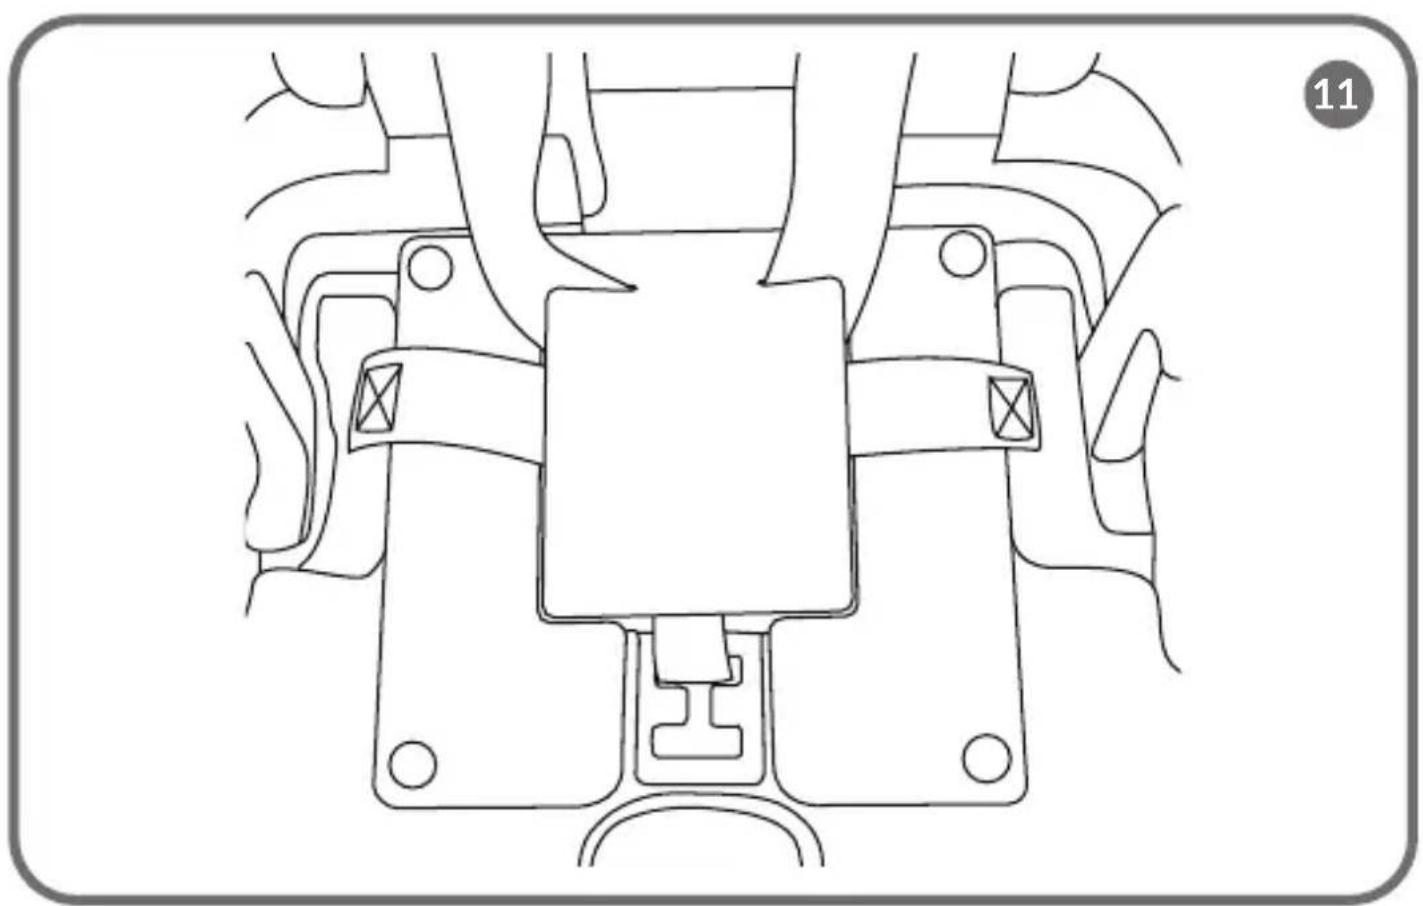
- Place the fastened harness buckle in the storage compartment in the seat, under the cover (Fig. 11). Close the compartment and put the cover back on.
SEAT REMOVAL - ISOFIX
To detach the ISOFIX arms, push in the ISOFIX lever (21, Fig. A). The arms can be extended from the base (the indicator on the ISOFIX button turns red). Pull the ISOFIX retractor lever to slide the arms into the seat base on both sides.
SEAT REMOVAL - TOP TETHER
Loosen the belt. Detach the Top Tether from the anchor points in the car. The indicator turns red.
SEAT TILT ADJUSTMENT
To adjust the recline of the seat, push the tilt adjustment lever (12, Fig. A) and slide the seat to the desired position. The child seat has 5 settings for backrest tilt adjustment. A clicking sound indicates that the element is engaged correctly.
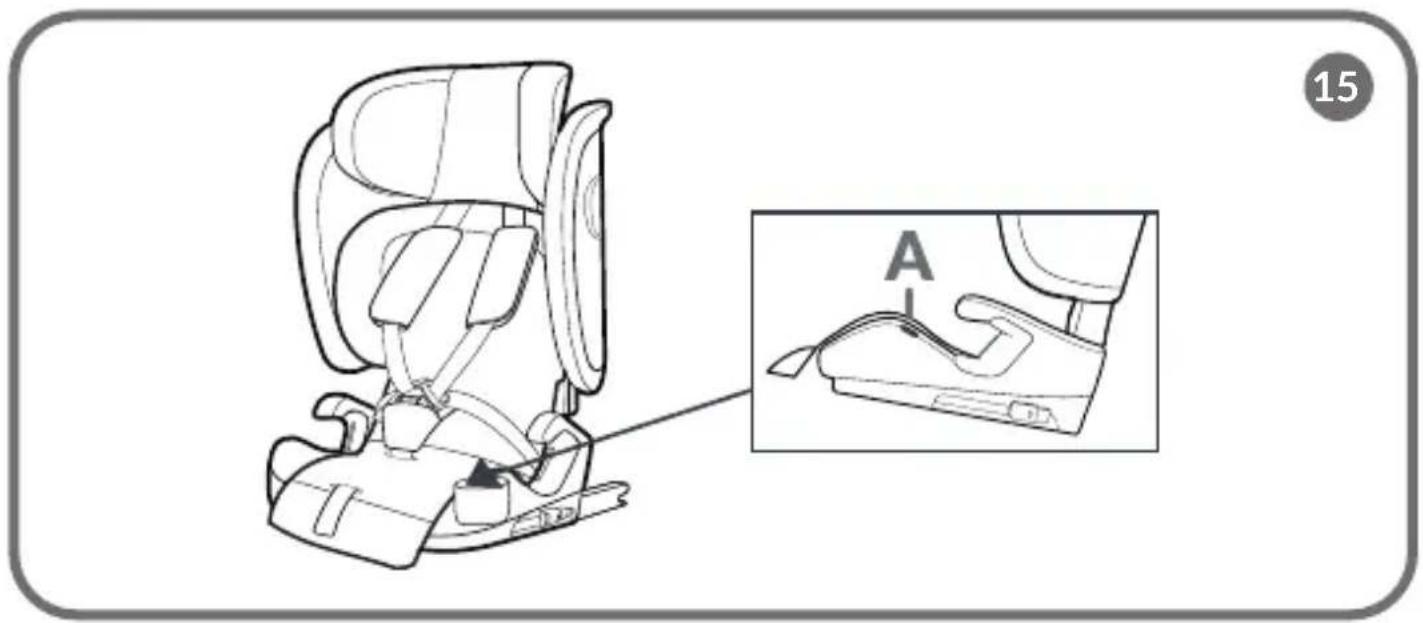
INSTALLATION OF CUP HOLDER
To install the cup holder, push it as far as possible into the corresponding slot on the child seat (A, Fig. 15). To remove the cup holder, simply slide it out of the child seat.
REMOVING AND INSTALLING CAR SEAT COVER
- Raise the headrest to the highest setting (see: Headrest adjustment).
- Unbuckle the harness (see: Fastening and unfastening of harness).
- Remove the protective pads from the harness.
- Remove the top cover from the seat and headrest, then unfasten the metal snaps and unhook the elastics securing the bottom cover.
- Remove the cover.
CLEANING AND MAINTENANCE
- The cover can be hand-washed at temperatures up to 30^ C.
- Do not tumble dry.
- Do not expose the cover to sunlight for drying.
- To clean the plastic parts, use a damp cloth and a mild detergent.
- Avoid using harsh detergents or bleaching agents.
The photos are for reference only, the actual appearance of products may differ from the photos.
PL
Drogi Kliencie!
BrandLine Group Sp. z o.o.
A TOP TETHER ÖV ELREJTÉSE
JUSTERING AV NACKSTÖDET
DALA APRAKSTS (att. A)
EN: The product complies with the requirements of European Union directives. In accordance with Directive 2012/19/EU, this product is subject to separate collection. The product should not be disposed of with municipal waste as it may pose a risk to the environment and human health. Return the used product to the recycling centre for electrical and electronic equipment.