1320 AA - Saw SKIL - Free user manual and instructions
Find the device manual for free 1320 AA SKIL in PDF.

User questions about 1320 AA SKIL
0 question about this device. Answer the ones you know or ask your own.
Ask a new question about this device
Download the instructions for your Saw in PDF format for free! Find your manual 1320 AA - SKIL and take your electronic device back in hand. On this page are published all the documents necessary for the use of your device. 1320 AA by SKIL.
USER MANUAL 1320 AA SKIL
Sliding litre saw 1320
INTRODUCTION
- This tool is intended as a stationary machine for lengthways and crossways cutting of wood with straight cuts as well as angle cuts (horizontal metre angles of -50^ to +50^ as well as vertical bevel angles of -48^ to +45^ are possible)
- Read and save this instruction manual ②
- This tool is not intended for professional use
- Only use the tool when correctly and completely assembled (be aware that Skil cannot be hold responsible for tool damage and/or personal injuries resulting from the incorrect assembly of the tool)
TECHNICAL DATA①
TOOLELEMENTS ⑧
A Lower guard
B Switch handle
C Locking pin for transport
D Upper guard
E Transport handle
F Mounting holes
G Support foot
H Dust bag
J Dust port
K Extension bars
L Knobs for locking extension bars
M Clamp for mounting workpiece
N Support hole
P Knob for fastening clamp
Knob for adjusting clamp
R Clamping lever
S Fence
T Hex screws for adjusting fence (4x)
U Sliding fence
V Knob for fastening sliding fence
W Locking knob (bevel angles)
X Bevel angle indicator
Y Screw for adjusting bevel angle (right)
Z Screw for adjusting bevel angle (left)
AA Adjustable end stop
AB Right bevel release lever
AC Laser light
AD On/off switch laser
AE Locking handle (mitre angles)
AF Mitre detent release lever
AG Mitre angle indicator
AH Locking knob for slide device
AI On/off switch
AJ Safety lever
AK Cutting depth limiter
AL Depth stop
AM Depth stop nut
AN Hex key
AO Storage for hex key
AP Spindle-lock button
AQ Cover plate screw
AR Blade bolt
AS Flange
AT Table insert
AU Dust deflector
AV Cable clip
SAFETY
GENERAL POWER TOOL SAFETY WARNINGS
WARNING Read all safety warnings, instructions, illustrations and specifications provided with this power tool. Failure to follow all instructions listed below may result in electric shock, fire and/or serious injury.
Save all warnings and instructions for future reference.
The term "power tool" in the warnings refers to your mains-operated (corded) power tool or battery-operated (cordless) power tool.
1) WORK AREA SAFETY
a) Keep work area clean and well lit. Cluttered or dark areas invite accidents.
b) Do not operate power tools in explosive atmospheres, such as in the presence of flammable liquids, gases or dust. Power tools create sparks which may ignite the dust or fumes.
c) Keep children and bystanders away while operating a power tool. Distractions can cause you to lose control.
2) ELECTRICAL SAFETY
a) Power tool plugs must match the outlet. Never modify the plug in any way. Do not use any adapter plugs with earthed (grounded) power tools. Unmodified plugs and matching outlets will reduce risk of electric shock.
b) Avoid body contact with earthed or grounded surfaces such as pipes, radiators, ranges and refrigerators. There is an increased risk of electric shock if your body is earthed or grounded.
c) Do not expose power tools to rain or wet conditions. Water entering a power tool will increase the risk of electric shock.
d) Do not abuse the cord. Never use the cord for carrying, pulling or unplugging the power tool. Keep cord away from heat, oil, sharp edges or moving parts. Damaged or entangled cords increase the risk of electric shock.
e) When operating a power tool outdoors, use an extension cord suitable for outdoor use. Use of a cord suitable for outdoor use reduces the risk of electric shock.
f) If operating a power tool in a damp location is unavoidable, use a residual current device (RCD) protected supply. Use of an RCD reduces the risk of electric shock.
3) PERSONAL SAFETY
a) Stay alert, watch what you are doing and use common sense when operating a power tool. Do not use a power tool while you are tired or under the influence of drugs, alcohol or medication. A moment of inattention while operating power tools may result in serious personal injury.
b) Use personal protective equipment. Always wear eye protection. Protective equipment such as a dust mask, non-skid safety shoes, hard hat, or hearing
protection used for appropriate conditions will reduce personal injuries.
c) Prevent unintentional starting. Ensure the switch is in the off-position before connecting to power source and/or battery pack, picking up or carrying the tool. Carrying power tools with your finger on the switch or energising power tools that have the switch on invites accidents.
d) Remove any adjusting key or wrench before turning the power tool on. A wrench or a key left attached to a rotating part of the power tool may result in personal injury.
e) Do not overreach. Keep proper footing and balance at all times. This enables better control of the power tool in unexpected situations.
f) Dress properly. Do not wear loose clothing or jewellery. Keep your hair and clothing away from moving parts. Loose clothes, jewellery or long hair can be caught in moving parts.
g) If devices are provided for the connection of dust extraction and collection facilities, ensure these are connected and properly used. Use of dust collection can reduce dust-related hazards.
h) Do not let familiarity gained from frequent use of tools allow you to become complacent and ignore tool safety principles. A careless action can cause severe injury within a fraction of a second.
4) POWER TOOL USE AND CARE
a) Do not force the power tool. Use the correct power tool for your application. The correct power tool will do the job better and safer at the rate for which it was designed.
b) Do not use the power tool if the switch does not turn it on and off. Any power tool that cannot be controlled with the switch is dangerous and must be repaired.
c) Disconnect the plug from the power source and/ or remove the battery pack, if detachable, from the power tool before making any adjustments, changing accessories, or storing power tools. Such preventive safety measures reduce the risk of starting the power tool accidentally.
d) Store idle power tools out of the reach of children and do not allow persons unfamiliar with the power tool or these instructions to operate the power tool. Power tools are dangerous in the hands of untrained users.
e) Maintain power tools and accessories. Check for misalignment or binding of moving parts, breakage of parts and any other condition that may affect the power tool's operation. If damaged, have the power tool repaired before use. Many accidents are caused by poorly maintained power tools.
f) Keep cutting tools sharp and clean. Properly maintained cutting tools with sharp cutting edges are less likely to bind and are easier to control.
g) Use the power tool, accessories and tool bits etc., in accordance with these instructions, taking into account the working conditions and the work to be performed. Use of the power tool for operations different from those intended could result in a hazardous situation.
h) Keep handles and grasping surfaces dry, clean and free from oil and grease. Slippery handles and grasping surfaces do not allow for safe handling and control of the tool in unexpected situations.
5) SERVICE
a) Have your power tool serviced by a qualified repair person using only identical replacement parts. This will ensure that the safety of the power tool is maintained.
SAFETY INSTRUCTIONS FOR MITRE SAWS
- Mitre saws are intended to cut wood or wood-like products, they cannot be used with abrasive cut-off wheels for cutting ferrous materials such as bars, rods, studs, etc. Abrasive dust causes moving parts such as lower guard to jam. Sparks from abrasive cutting will burn the lower guard, the kerf insert and other plastic parts.
- Use clamps to support workpiece whenever possible. If supporting the workpiece by hand, you must always keep hand at least 100mm from either side of the saw blade. Do not use this saw to cut pieces that are too small to be securely clamped or held by hand. If your hand is placed too close to the saw blade, there is an increased risk of injury from blade contact.
- The workpiece must be stationary and clamped or held against both the fence and the table. Do not feed the workpiece into the blade or cut "freehand" in any way Unrestrained or moving workpieces could be thrown at high speeds, causing injury.
- Push the saw through the workpiece. Do not pull the saw through the workpiece. To make a cut, raise the saw head and pull it out over the workpiece without cutting, start the motor, press the saw head down and push the saw through the workpiece Cutting on the pull stroke is likely to cause the saw blade to climb on top of the workpiece and violently throw the blade assembly towards the operator.
- Never cross your hand over the intended line of cutting either in front or behind the saw blade. Supporting the workpiece "cross handed" i.e. holding the workpiece to the right of the saw blade with your left hand or vice versa is very dangerous.
- Do not reach behind the fence with either hand closer than 100mm from either side of the saw blade, to remove wood scraps, or for any other reason while the blade is spinning. The proximity of the spinning saw blade to your hand may not be obvious and you may be seriously injured.
- Inspect your workpiece before cutting If the workpiece is bowed or warped, clamp it with the outside bowed face toward the fence. Always make certain that there is no gap between the workpiece, fence and table along the line of the cut Bent or warped workpieces can twist or shift and may cause binding on the spinning saw blade while cutting. There should be no nails or foreign objects in the workpiece.
- Do not use the saw until the table is clear of all tools, wood scraps, etc, except for the workpiece. Small debris or loose pieces of wood or other objects that contact the revolving blade can be thrown with high speed.
- Cut only one workpiece at a time Stacked multiple workpieces cannot be adequately clamped or braced and may bind on the blade or shift during cutting.
-
Ensure the litre saw is mounted or placed on a level, firm work surface before use. A level and firm work surface reduces the risk of the litre saw becoming unstable.
-
Plan your work! Every time you change the bevel or mitre angle setting, make sure the adjustable fence is set correctly to support the workpiece and will not interfere with blade or the guarding system Without turning the tool "ON" and with no workpiece on the table, move the saw blade through a complete simulated cut to assure there will be no interference or danger of cutting the fence.
- Provide adequate support such as table extensions, saw horses, etc. for a workpiece that is wider or longer than the table top. Workpieces longer or wider than the metre saw table can tip if not securely supported. If the cut-off piece or workpiece tips, it can lift the lower guard or be thrown by the spinning blade.
- Do not use another person as a substitute for a table extension or as additional support Unstable support for the workpiece can cause the blade to bind or the workpiece to shift during the cutting operation pulling you and the helper into the spinning blade.
- The cut-off piece must not be jammed or pressed by any means against the spinning saw blade If confined, i.e. using length stops, the cut-off piece could get wedged against the blade and thrown violently.
Always use a clamp or a fixture designed to properly support round material such as rods or tubing Rods have a tendency to roll while being cut, causing the blade to "bite" and pull the work with your hand into the blade. - Let the blade reach full speed before contacting the workpiece. This will reduce the risk of the workpiece being thrown.
- If the workpiece or blade becomes jammed, turn the litre saw off. Wait for all moving parts to stop and disconnect the plug from the power source and/or remove the battery pack. Then work to free the jammed material. Continued sawing with a jammed workpiece could cause loss of control or damage to the litre saw.
After finishing the cut, release the switch, hold the saw head down and wait for the blade to stop before removing the cut-off piece Reaching with your hand near the coasting blade is dangerous. - Hold the handle firmly when making an incomplete cut or when releasing the switch before the saw head is completely in the down position The braking action of the saw may cause the saw head to be suddenly pulled downward, causing a risk of injury.
ADDITIONAL SAFETY INSTRUCTIONS
- Inrush currents cause short-time voltage drops; under unfavourable power supply conditions, other equipment may be affected (if the system impedance of the power supply is lower than 0.219 Ohm, disturbances are unlikely to occur); if you need further clarification, you may contact your local power supply authority
GENERAL
- Only use the tool for cutting wood
- Always check that the supply voltage is the same as the voltage indicated on the nameplate of the tool
-
Do not stand on tool or its stand Serious injury may occur if the tool is tipped or if the cutting tool is accidentally contacted. Do not store materials on or near the tool such that it is necessary to stand on the tool or its stand to reach them.
-
Always disconnect plug from power source before making any adjustment or changing any accessory
- Always disconnect plug from power source before transporting the metre saw Unplug, lower head assembly and lock into position, use the carry handle and one of the hand indentations in the saw base.
- Do not leave tool until it comes to a complete stop
- When cutting irregularly shaped workpieces, plan your work so it will not slip and pinch the blade and be torn from your hand
- This tool should not be used by people under the age of 16 years
- This tool is not suitable for wet cutting
OUTDOOR USE
- When used outdoors, connect the tool via a fault current (FI) circuit breaker with a triggering current of 30mA maximum, and only use an extension cord which is intended for outdoor use and equipped with a splashproof coupling-socket
BEFORE USE
- Use completely unrolled and safe extension cords with a capacity of 16 Amps (U.K. 13 Amps)
- Wear protective glasses, hearing protection, and protective gloves
- Dust from material such as paint containing lead, some wood species, minerals and metal may be harmful (contact with or inhalation of the dust may cause allergic reactions and/or respiratory diseases to the operator or bystanders); wear a dust mask and work with a dust extraction device when connectable
- Certain kinds of dust are classified as carcinogenic (such as oak and beech dust) especially in conjunction with additives for wood conditioning; wear a dust mask and work with a dust extraction device when connectable
- Follow the dust-related national requirements for the materials you want to work with
- Do not work materials containing asbestos (asbestos is considered carcinogenic)
- Never use the tool without the original protection guard system
- Check the protective guard for proper closing before each use
- Do not operate the saw if the protective guard does not move freely and close instantly
- Never clamp or tie the protective guard into the open position
- Never use the tool without the table insert; replace a defective or worn table insert
- Remove all obstacles on top of as well as underneath the cutting path before you start cutting
- Avoid damage that can be caused by screws, nails and other elements in your workpiece; remove them before you start working
ACCESSIONS
- Never use grinding/cutting discs with this tool
- SKIL can assure flawless functioning of the tool only when the correct accessories are used which can be obtained from your SKIL dealer
- For mounting/using non-SKIL accessories observe the instructions of the manufacturer concerned
-
Use only saw blades that correspond with the characteristic data given in these operation instructions and that are tested and marked in accordance with EN 847-1
-
Use only accessories with an allowable speed matching at least the highest no-load speed of the tool
- Never use saw blades made of high speed steel (HSS)
- Do not use a saw blade which is cracked, deformed or dull
- Only use saw blades with a hole diameter which fits the tool spindle without play; never use reducers or adaptors to fit large-hole saw blades
- Protect accessories from impact, shock and grease DURING USE
- Do not force the tool (apply light and continuous pressure in order to avoid overheating the blade tips and, in case of cutting plastics, melting the plastic material)
- Keep fingers, hands and arms away from the rotating saw blade
- If the saw blade becomes blocked, switch off the tool immediately and disconnect the plug; only then remove the wedged workpiece
- In case of jamming or electrical or mechanical malfunction, immediately switch off the tool and disconnect the plug
- If the cord is damaged or cut through while working, do not touch the cord, but immediately disconnect the plug
- Never use the tool when the cord is damaged; it must be replaced by a specially prepared cord available through the service organization.
LASER RADIATION
- Do not direct the laser beam at persons or animals and do not stare into the direct or reflected laser beam yourself, not even from a distance (you could blind somebody, cause accidents or damage your eyes)
- If laser radiation strikes your eye, you must deliberately close your eyes and immediately turn your head away from the beam
- Do not make any modifications to the laser equipment
- Do not look into the laser beam (laser radiation)
- Do not use any magnifying optical tools (such as magnifying glasses, telescopes, or binoculars) to view the laser beam
- Do not operate the tool in the presence of flammable liquids, gases or dust
- Do not operate the tool with children around
- Do not replace the installed laser with another laser type
AFTER USE
After switching off the tool, never stop the rotation of the accessory by a lateral force applied against it
- Only remove cut-offs or other parts of the workpiece from the cutting area when all moving parts have come to a complete standstill
- The saw blade becomes very hot during use; do not touch it before it has cooled down
- Store the tool indoors in a dry and locked-up place, out of reach of children
EXPLANATION OF SYMBOLS ON TOOL
② Read the instruction manual before use
③ Wear protective glasses and hearing protection
Danger area! No hands zone. Keep hands, fingers or arms away from this area.
⑤ Double insulation (no earth wire required)
Do not dispose of electric tools and batteries together with household waste material
⑦ Laser radiation / Do not stare into beam / Class 2 laser product
WHEN CONNECTING NEW 3-PIN PLUG (U.K. ONLY):
-
Do not connect the blue (= neutral) or brown (= live) wire in the cord of this tool to the earth terminal of the plug
-
If for any reason the old plug is cut off the cord of this tool, it must be disposed of safely and not left unattended
USE
Assembly
-assemble the transport handle E with 2 bolts using hex key AN
-assemble the litre lock knob AE into the front of the table 10
-assemble the sliding fence U (see Adjusting sliding fence(s))
- Transport/working position
For releasing the tool (working position)
-press handle B8 downward with one hand while pulling out locking pin C with the other hand 11a
-guide the head assembly slowly upward
For securing the tool (transport position)
-slide the head assembly to the stop in the direction of fence S (keep approx. 5 cm distance) and tighten locking knob AH 1b
-set the bevel angle to 0^ (see Setting bevel angle)
-set the litre angle to 45^ left or right (see Setting litre angle)
-press handle B downward with one hand while pushing locking pin C with the other hand
-wind up the power cord
-use transport handle E 8 for carrying the tool 11d
-alternatively, use the side handles for carrying the tool 11e
! never lift the tool by holding the main handle, or the power cord
- Mounting tool on working surface 12
! for safe handling always mount tool on a flat and stable working surface (e.g. workbench)
-use 4 mounting holes F for attaching the tool with suitable screws to the working surface
- you may also clamp the tool to the working surface with commercially available screw clamps
-for stabilizing the tool the height of support foot G can be adjusted
-alternatively, the tool can be mounted onto a litre saw stand
! read all the warnings and instructions included with the saw stand
Dust/chip extraction 13
mount dustbag H/vacuum cleaner as illustrated
-empty dust bag regularly for optimal dust pick-up performance
! never let the vacuum cleaner hose interfere with the lower guard or the cutting operation
- Saw table extension 14
-use knobs L to fasten extension bars K (on either side of the tool)
-the length of extension bars K is stepplessly adjustable from minimum to maximum
- Clamping the workpiece 15
! for optimum working safety always firmly clamp the workpiece with the adjustable clamp supplied
-do not work with workpieces that are too small to clamp
for maximal workpiece dimensions use table 16 as reference
-fasten workpiece clamp into support hole N with knob P (on either side of the tool)
-the workpiece clamp has 2 grooves for easy locking; 1 for thin workpieces (up to 5cm ) and 1 for larger workpieces (over 5cm )
-press the workpiece firmly against fence S
-unlock lever R
-adapt clamp to the workpiece
-firmly clamp the workpiece by locking lever R
! for some litre and bevel combinations, or depending on the size of the workpiece, it may be necessary to use commercially available screw clamps instead of the workpiece clamp
-
Setting mitre angles 17
-
loosen locking handle AE
-pull litre detent release lever AF
-rotate the saw table to the left or right and set the desired litre angle (from 0^ to 50^ ) by using indicator AG
-release lever AF
tighten locking handle AE (do not tighten the handle too firmly)
-for quick and precise setting of often used litre angles (0^,15^,22.5^,31.6^,45^) the litre detent lever
AF clicks into place at the corresponding positions; to prevent this, lever AF can be locked in released position ⑦b
- Setting bevel angles 18
-loosen three-legged knob W
-swing the saw head to the left until bevel angle indicator X points to the desired bevel angle
-adjustable bevel end stop AA (45^) can be used to stop at 45^ or continue until 48^ b
-hold the saw head in this position and tighten knob W -for beveling to the right first tilt the saw head slightly to the left, rotate right bevel release knob AB (approx.
60^ ), then swing the saw head to the desired right bevel angle 18^
-when you swing back the saw head to the left the right bevel release knob AB will automatically reset to 0^
end stop; this can be prevented by rotating the knob to approx. 90^ instead of 60^ 18d
Compound cuts 19
-compound cuts require both a litre angle setting and a bevel angle setting
! do not operate the saw in certain of the metre and bevel combinations which may result in interference between the sliding and stationary parts of the saw or between the sliding parts and the workpiece – to make the cut remove sliding fence, sliding fence lock knob and work clamp knob as required.
! always test out first on a piece of scrap material
Adjusting the sliding fences 20
-loosen knob V to allow sliding of the fence(s) U
-loosen knob V further to allow removal / assembly of the fence(s)
-tighten knob V to secure the desired position
I make sure that the sliding fences are secured firmly before operating the tool
! for some litre and bevel combinations it may also be necessary to remove the knob
Laser line 21
-for guiding tool along desired line of cut marked on the workpiece
-switch on/off laser line by pressing switch AD
! before starting a job, check the alignment of the laser line with the actual line of cut by making a trial cut on a piece of waste material
-
Sawing without slide movement (small workpieces)
-
loosen locking knob AH in case it is tightened
-slide the saw head to the stop in the direction of fence S and retighten locking knob AH
! failure to lock the mechanism can cause the blade to suddenly climb up on the top of the workpiece and force itself toward you
-set tool into working position
! ensure that the workpiece is firmly clamped against the saw table and fence S
- switch on the tool by releasing the lock-off AJ and pulling the main switch AI
! do not cross your arms when operating the saw head ② a
-saw through the workpiece with uniform advancing
! the tool should run at full speed before the blade enters into the workpiece
-switch off the tool by releasing switch Al
-wait until the sawblade has come to a complete
standstill before guiding the saw head slowly upward
- Sawing with slide movement (wide workpieces)
! be aware that the method described below is the only safe one
-do not pull the saw through the workpiece
-loosen locking knob AH in case it is tightened
! ensure that the workpiece is firmly clamped against the saw table and fence S
- pull the saw head away from fence S far enough so that the saw blade is in front of the workpiece 24
-switch on the tool by releasing the lock-off ② and pulling the main switch
I do not cross your arms when operating the saw head ② a
- push the saw head in the direction of fence S and saw through the workpiece with uniform advancing 24
! the tool should run at full speed before the blade enters into the workpiece
! if the lower guard does not automatically open which can happen under certain conditions (e.g. a workpiece which is very close to the maximum capacity) you may have to open the guard by hand 23b
-switch off the tool by releasing switch AI
-wait until the sawblade has come to a complete standstill before guiding the saw head slowly upward
- Sawing grooves 25
-set the desired depth with depth stop AK and lock it in place by tightening nut AM
-a wooden spacer shall be placed between the workpiece and the fence for a consistent depth over the full length of the groove
! ensure that the saw blade does not get jammed in the workpiece
! always test out first on a piece of scrap material
- Changing saw blade
! disconnect the plug
-take hex key AN from storage AO
-hold protective guard A in open position
- loosen cover plate screw AQ (do not unscrew the screw completely) 26a
-rotate protective guard A completely backwards b
-push spindle-lock button AP and hold it while you remove blade bolt AR by turning hex key AN CLOCKWISE (= in same direction as arrow printed on saw blade)
! push spindle-lock button AP only when tool is at a standstill
-release spindle-lock button AP
-remove flange AS and saw blade
! change saw blade with saw teeth and arrow printed on saw blade pointing in same direction as arrow on protective guard A
-mount flange AS ② 6 c
-push spindle-lock button AP and hold it while you tighten blade bolt by turning hex key AN COUNTER CLOCKWISE 1/8 turn past finger tight (ensures slippage of saw blade when it encounters excessive resistance thus reducing motor overload and saw kickback)
-tighten cover plate screw AQ
- Replacing table insert AT 26
Replace a defective or worn table insert as follows:
! disconnect the plug
-take hex key AN from storage AO
-remove all 6 screws as illustrated
-remove old table insert by first lifting it at the front and then pulling it out completely - place new table insert
! firmly tighten all 6 screws
- Checking/adjusting of 90^ blade alignment 28
! disconnect the plug
-rotate the saw table to the 0^ litre position and lock in place
-swing the saw head to 0^ bevel position
-lower the saw head and lock in place
-check for a 90^ angle between blade and table with a square
-if necessary, adjust the 90^ blade alignment as follows:
-
loosen three-legged knob W
-
adjust screw Y with a 4 mm hex key (not standard included) ② b
-
re-check with square
-
reset the bevel indicator to 0^ 28c
-
Checking/adjusting of 45^ blade alignment 29
! disconnect the plug
-rotate the saw table to the 0^ litre position and lock in place
-loosen three-legged knob W
-setadjustablebevelendstopAAto 45^ b
-swing the saw head to the left
-check for a 45^ angle between blade and table with a litre square 29a
-check that bevel indicator X is on the 45^ mark
-if necessary, adjust the 45^ blade alignment as follows:
-
adjust screw Z with a blade wrench 10 (not standard included)
-
re-check with litre square
-if necessary, repeat for the 45^ setting to the right -lower the saw head and lock in place
- Checking/adjusting of 90^ fence alignment 30
! disconnect the plug
-rotate the saw table to the 0^ litre position and lock in place
-lower the saw head and lock in place
-check for a 90^ angle between blade and fence S with a square (ensure the square contacts the saw blade body and not its teeth)
-if necessary, adjust the 90^ fence alignment as follows:
1. loosen 4 hex screws T
2. adjust fence until blade and fence have full contact with the square
3. tighten 4 hex screws T
4. reset the litre indicator to 0^ c
- Cable clip 31
-use the cable clip AV to prevent the power cord to get clamped between the moving and stationary parts of the tool
APPLICATION ADVICE
-
Special workpieces
-
always support the free ends of a long workpiece
-ensure that curved or round workpieces are especially secured against slipping ③
-at the cutting line no gap may exist between the workpiece and the fence or saw table
-if necessary, fabricate an auxiliary fence; the holes in the sliding fence shall be used to secure the auxiliary fence 34
! the auxiliary fence can only be used at 0^ bevel
- For working with floor mouldings illustration used as reference
Always face the good side of the workpiece down to ensure minimum splintering - Only use sharp saw blades of the correct type
-quality of cut improves by the number of teeth
-carbide tipped blades stay sharp up to 30 times longer than ordinary blades
MAINTENANCE / SERVICE
Always keep tool and cord clean (especially the ventilation slots at the back-end of the motor h
- Develop a regular check to make sure the lower guard is working properly. Clean the lower guard of any sawdust build up with a damp cloth.
-disconnect the plug before cleaning
-lift the lower guard to the fully open position and release it; if it does not immediately and fully close it should be checked by an after-sales service centre for SKIL power tools
- Clean saw blade immediately after use (especially from resin and glue)
- the saw blade becomes very hot during use; do not touch it before it has cooled down
- Clean the laser light AC with a soft brush after each use to keep a good visibility of the laser line (make sure that you do not change the setting of the laser)
-
If the tool should fail despite the care taken in manufacturing and testing procedures, repair should be carried out by an after-sales service centre for SKIL power tools
-
send the tool undismantled together with proof of purchase to your dealer or the nearest SKIL service station (addresses as well as the service diagram of the tool are listed on www.skil.com)
-
Be aware that damage due to overload or improper handling of the tool will be excluded from the warranty
(for the SKIL warranty conditions see www.skil.com or ask your dealer)
ENVIRONMENT
- Do not dispose of electric tools, batteries, accessories and packaging together with household waste material (only for EU countries)
-in observance of European Directive 2012/19/EC on waste of electric and electronic equipment and its implementation in accordance with national law, electric tools that have reached the end of their life must be collected separately and returned to an environmentally compatible recycling facility
-symbol ⑥ will remind you of this when the need for disposing occurs
NOISE
Measured in accordance with EN 62841 the sound pressure level of this tool is 100.0dB(A) and the sound power level 109.5dB(A) (uncertainty K = 3dB
The noise emission level has been measured in accordance with a standardised test given in EN 62841; it may be used to compare one tool with another and as a preliminary assessment of exposure to noise when using the tool for the applications mentioned
-using the tool for different applications, or with different or poorly maintained accessories, may significantly increase the exposure level
-the times when the tool is switched off or when it is running but not actually doing the job, may significantly reduce the exposure level
F
WAARSCHUWING Lees alle
1) SIKKERHET PÅ ARBEIDSPLASSEN
2) ELEKTRISK SIKKERHET
VEDLIKEHOLD / SERVICE
- Ajustar as guias moveris 20
-desaperte o botao V para permitir que a(s) guia(s) se mova(m) U
PeKOMeHdyETcOuHCTnTb HNCTpyMeHT OT nbIIN NOcJIe KaHDoRO NcNoJIb3OBAHnI.
XpaHeHne
-Heo6xoJMO XpaHnTb B cyXOM MeCTe
-Heo6xOJIMO XpaHHTb BdaJIOn OT NCTOCHIKOB
IOBbIeHHbIX TempeaTyp IN BO3dEiCTBnA COJIHeuHbIX Lyuei
-прихранени Heo6xOДМо n36eRaTb pe3KOrOpepenada TempepaTyp
-xpaHHe 6e3 ynaKOBn He dOnyChaeTcA
-NoDpo6HbIe Tpe6oBaHnK YcNoBnM XpaHeHn CMOTpnte B FOCT 15150 (YcNoBne 1)
TpaHcnpTpOpBbA
-KaTeOpnueckn He DonyCkAeTcnaDeHne nIIObIe MExaHnueChne Bo3deNCTBnHa yNaKOBky npn TpaHCnpTIpOBKe
-npnpa3rpy3Ke/norpy3Ke He donyckaeTc
NcnoB3OBAHne IIO6oB O BnDa TeXnKn,pa6oTaIOueI IO npINuNy 3aKIMa yNaKOBKn
-NoDpo6HbIe Tpe6oBaHnK yCIOBnAM TpaHCnpTIpOBKn CMOTpnte B FOCT 15150 (YcIOBne 5)
BHIMAHNE!
B clyuae BO3HnKHOBeHn nepe6oB pa6oTe 3JeHTPOHHCTpyMeHtA BCJIeDCTBHe NOHORO nIN qactNCHoro npekpaueHn 3HEPROCHA6KeHn nIN NOBpeHXDeHn cENn ynpaBLeHn 3HEPROCHA6KeHnem yCTaHOBHTe BbIKIOUcATENB B noLOXHeHne BbIKI, y6eHNBwncb, YTO OH He 3a6JIOHNPOBaH (pni erO HAIuHn) I OTKIOUHTe CeTeByO BVILky OT PO3ETKn INIOTcoEduHNTe CbEMhBI anKHyMylTOp (3TNIM npedOTBpaaaetcRe HKOHTPOINPyEmBI NOBTOHPBli 3aNyC)
BBEDEHNE
Данн布局ИнстугштпрдзнayенДл
ИСПОЛБ3OBAHINBAКачESТBE HeNOДВИKHHOM MaSHINHBI,
БыПОЛНЯЮSE ПРОДЛБИУ И NOПЕЧИУ NOPE3KU
ДереваянбIx 6pycKOB NOД ПРЯМВIM YrIOM N NOД
pa3JIuHbIMN KOCbIMN yrIaMn PACnHla (BO3MOJHO
ЗадаВаТь Гориэ�ТаьHbieугlbI cKocA ot -50°do +50°,
ВерТиKaJIbHbIe yrIbI cKocA ot-48°do +45°)
- PpoHTaIte n COxpaHITe C daHHoN HcTpyKuNe ②
ДаньиИНСТРУМЕNT He NOДХОДNT ДЯ ПОНБIJIeHHORO ИСПОЛБ3OBAHNY
IcnoB3ynte HnCTpyMeHrTOJIbHO B NOJIHOCTbIO H npabHbHO c6paHHOM BnDE (KOMnaHry Skil He HecET OTBeTCTBEHHOCtB 3a IOBpeJKeHHe NHCtpyMeHTa H/INITpABMbI, BO3HNKaIOUne BCJeDCTBNE HeBepHOc6OpKn IHCTpyMeHTa)
TEXHnueCHe DAHHbIE ①
CTPAHA N3TOTOBJIEHN
CdeIaHO BHTae
DETAJIHCHTPYMEHTA⑧
A HnKHee orpaKaDeHne
B PykorTa C BbIKIOUaTeJeM
C ΦHKCaTOPdIaTpaHcNOpTpIOBKN
D BepxHnKoHuyX
E PykoTka Ira TpaHcnpTnpOBKn
F MoHTaXHbIe OTBepCTnA
G Onopa
H IbIe6bOpHy MeoK
J OTBepTne 1n oTbOda nblnn
K ydHHTeH
L PuykK kpenJeHnYdHnHTeJe cToJa
M 3aHIM dIg KpeJIeHn 3aTOTOBK
N Onophoe oTBepcThe
P Puyka KpeIeHn3aHmHa
Q Pyka peryilipOBKn 3aHnMa
R 3aHHMOH pbyar
s Ynop
T IecntnnpaHbIe BnHTbl dIpepylnpoBn noIOKeHHy npopa (4x))
U CmeuaembIynp
V Puyka fKcaun cmeuaemoro ynpa
W Pyka qnKcaun (BepTnKaJIbHbIe yIbI cKOca)
X INHINKaTOP BepTNKaIbHOrO yrJa cKOca
Y BnHT dIypeRyIIpOBHN BepTnKaIbHOrO yra cKoca (npabbl)
Z BnHTIpapeyIINPOBKnBepTnKaJIbHOrO yra cKoca (JeBbI)
AA PerylnpyembI KOHcEBoYnp
AB Pyuar fKcaun npaboro BepTKaIbHoro yrna cKocA
AC Ia3epHbI lyu
AD Ia3ep BbIKIOUOATEeBbJI/BbIKI
AE PyKoRTKa 6IIOKINPOBKN (rOpN3OHTaJIbHbIe yIbI cKOcA)
AF PyuagnKcaunrnpntaIbHoro yra cKocA
AG INHdkaTop ropn3oHTaIbHoro yrJa cKoca
AH Pukka Kcaunn Ira noI3yHka
AI BbIKIOUOaTeJIb BKJI/BbIKI
AJ PpeoopaHnTeIb
AK OrpaHnHTeJIb Iy6HbI npoHnla
AL OrpaHnHTeJIb Iy6INHbI
AM RaHa oRpaHnHTeJI rIy6bHbI
AN KJIIOU-UIeCTnIgpaHHN
AO OTdeneHne dIe WecTnrgpahHoro KIOUa
AP Hhonka 6loKupOBKn UHHnHdJIa
AQ KpeeJHbI BnHT 3aunTHoN KpbuHKn
AR BoNT KpeIeHnpeKuIero Dncka
AS Φlaheu
AT BCTaBkcaTolA
AU DeΦJIeKTop nbIIN
AV 3aKIM dJa Ka6eJI
BE30NACHOCTb
OBUHNA3AHNIO TEXNHKE B3ONACHOCTN OB-PAUENC 3JIeKTPOHHCTPYMEHTAMN
BHMMAHNE! CneJyET O3HaHOMNtbcr CO BcEMn npabnilamm TexHHN 6e3oNaChOCTn, HNCTpyHcIaMn, HJIIOCTpaunrMaM N TexHHueCkMn DaHHbIMN, coepHaunmnc B npuIraeMbIX K 3TOMy 3JeHTponHCTpyMeHTy MaTePnaJax. Heco6IoJeHne HHepeueNCleHHbIX INCTpyKcMn B NOIHom o6BeMe MOKeT NOBHeB IopaeHHe 3JeKTpUeCKM TOKOM, NoKap H/INn cepbe3HyTOpaBMY.
CoxpanHrTe 3TN HNCTpyKuIN yKa3aHNn dIy6dyuero hCNoJIb3OBAHH.
HcnoIb3OBAHHoe B HACTOaunx INHCTpyuXn yka3aHnx NOHrTne "3JIeKTPoHNCTpymENT"pacnpoctpaanreTcHa 3JIeKTPoHNCTpymENT C nITaHnEM OT cETn (C Ka6eJem NITaHnOT 3JIeKTPocTeN) n Ha aKKyMylTophBn 3JIeKTPoHNCTpymENT (6e3 Ka6eJnITaHnO T 3JIeKTPocTeN).
1) B63ONACHOCTb PA6OYERO MECTA
a) Co6IIOdaIte YnCTOTy n NOdepHbAHTe HAnLeHaSyIO OCBeUeEHHOCTb Ha pa6OcH MeCTe. BeCnpApOK Ha pa6OcH MeCTe NII erO IIIOXoe OCBeUeHHe MOrY T pINBecTn K HeChAcTHbIM ClyuAaM.
b) He nCnoJb3yIte c 3JeKtpOnHCTpyMeHTOM BO B3pbIBOONacHO CpeDe, T.e. B HENOCpeDCTBeHHOH 6JIH3OCTn OT JeRHOBCnJaMeHaUxxCa HNDIOCTe, ra3OB nII nblIN. B npouecce pa6oTbI 3JeKtpOnHCTpyMeHT NCKpIT N NCKpI MOrYT BOCnJaMeHHTb Ra3bl IIN PbIJb.
c)Пи pa6ote c 3JIeHTponHCTpyMeHTOM He dOnyckaIte DeTei HIN NOCTOPoHHnx Ha BaWe pa6ooye meCTo. OTBJeHeHne BaWero BHMaHnA
MOKET npBecTn K nOtepe KOHTpOJa HaD pa6oToI 3JIeKTPoHnCtpyMeNTa.
2) 3JIeHTPnueCKA B630nACHOCTb
a) 3JIeKTHPOHCTPymEtA DOJHKHa COOTBcTcBOBaTb PO3eTHe 3JIeKTHPOcETn. He BHOcHTe HNKAHN N3MeHenn B KOHcTpyKcHIO BVKN. He NCNoJIb3yIte aAnTopbl DnE 3JIeKTHPOHCTPymEtCA 3aUHTbIM 3a3EmLeHnEM. 3aBOdCKHe 3JIeKTHbHbIe BVKN I COOTBcTCTByOuIe IM CeTeBbIe po3eTKn CyUcEChBeHHo CHINKaOT BepoAHTHOCTb 3JIeKTHPOwoka.
b)ИзбeraиTeMexaHnueChnxKoHTaHTOB C TaHIMN 3a3eMJIeHHbIMN NOBepXHOCTaMn, KaH Tpy6OpnoBOdbl,CnCTembl OTOnJIeHHa, PJIHTbI N XOLOJNbHNKn.Пri copnIKocHOBeHm NyeIOBeKa C 3a3eMJIeHHbIMN PpeDMTaMn BO BpEmpa60TbI INCHtpMeHtOM BepoTHOCTb 3JIeKTPoWoka cyuceCTBeHHO Bo3pactaET.
c) 06eperaIte 3JIeHTpOHHCTpymeHT OT BO3dEInCTBnI DOxIaN IbnI. IonaIaHne BOdbI B 3JIeKTPoIHCTpymeHT NOBbIaET BepoTHocTb 3JIeKTPuYeCKOrO ydapa.
d) NcnoJb3yIte Ha6eJIb cTpO rNo Ha3HaueHIO. He donycKaetc TnHyTb n nepeDburatb 3JeHTponHCTpyMeNT 3a Ka6eJIb nn HcNOJb3OBaTb Ka6eJIb Ira BbITarHBAHN BnIHn H3 po3ETN. O6eperaIte Ha6eJIb IHCTpyMeNTa OT BO3DeIcTBNA BBICOHX TeMnepaTyp, MacJa, OCTpbIX KpOMOH NN DBrHcyUxxCra YacteY 3JeHTponHCTpyMeNTa. NOBpeKdEHHb IIN CNyTaHHb Ka6eJIb NOBbIaet BO3MOHXOCtB 3JeKTpUYeCKrO Yoapa.
e) Pn pa6oTe Ha yInue HcNoIb3yIte Ye dInHHTeB, npedHa3HaueHbI AJa pa6Otbl BHe NOMEueHna. IcnoJb3OBAHne TaKOrO ydInHHTeJIa CHINKaET BepoAHTHOCTb 3JIeKTPnueCKOrO yDapa.
f) EcIn HeBO3MOHHO H36eHaTb npMHeHn 3JeHTPOINHCTpyMeHtA B cbIpOM NOMEueHn, TO yCTaHaBnBaIte YcTPOINCTBO 3aunTbI OT yTeHN B 3emlIO. IcNoJIb3OBAHne yCTpOnCTBa 3aunTbI OT yTeHN B 3emlIO CHNkaET pNCK 3JeKTPnueckoro nopaKeHn.
3) JIINHAR BE3ONACHOCTb
a) BydTe BHNMaTeIbHbI, cIeIte 3a TeM, yTo BbI DeJaete N BbINoJIrHe pa6Oy 06dymaHNo. He noIb3yInTeCb 3JeKTPoHHCTpyMeHTOM, ecNb Bbl YcTaII HxOAnTEcB NOB 03DeIcTBHe M TpaHKnIIN3aTOpOB, aIKOROJIaH MeDnIHCHNX npenapaTOB. CeKHyIHaJ NoTepa KOHcEHTpaCmN B pa6Ote C 3JeKTPoHHCTpyMeHTOM MOHET npINBeCTN K cepbe3HbIM TpaBMam.
b) IcnoIb3yIte cpeCTBa HndBnDyaIbHOB 3aunTbI. 3aunTHbIe OChN 06a3aTeJbHbI. CpeCTBa INdINbUdYalbHOH 3aunTbI, TaHne KaK npOTNbOblJeBOB peCnnpaTOp, HeckoJIb3aJuaJ 3aunTHaJ 06yBb, WJIem-KACKa, CpeCTBa 3aunTbI opraHOB Clyxa npIMehrIOTCB COOTBeTCTByUOx YcIOBnM pa60TbI 06CTOaTeJIbCTBax N MInHMn3npyKt BO3MOHHOCTh TpabM.
c)ПпсдOTВрааITE He npeДнAmepeHHe BkIIOueHne 3JIeKTPoHHCTpyMeHTa.IpeD NOdKIIIOueHem 3JIeKTPoHHCTpyMeHTa K 3JIeKTPoHHTaHnIO n/Nn H aKKyMylrTOpy y6eINTeCb B BbIKIOueHHom COCTOHRN N 3JIeKTPoHHCTpyMeHTa.EcIn Bbl npi TpaHCnOpTnPoBKe 3JIeKTPoHHCTpyMeHTa
dpeHnTe naneu Ha BbIKIOUaTeJe NIN BKIOUeHHbI 3JIeKTPoIHCTpymEt NT ONDKIOUaTe K CETN IITAHn,TO 3TO MOKeT pNBecTN K HecCACTHOMy ClyuAIO.
d) Bo n36eHnne TpaBm nepeBkIIOueHnem 3JIeKTPoHHCTpyMeHTa ydaJInte peryIINpOBOHybI IIN raeHbI KIIIOU h3 BpaAioSeIcYacTH 3JIeKTPoHHCTpyMeHTa.
e) He nepeoehnBaIte CBOH BO3MOHHocT.N TbePdo cToiTe Ha Horax n ydePHNBAIte paBHOBeCne. B TaKOM NIOJOxEHNI Bbl CMOXHe TE LyUHe KOHTPOJINPOBaTb 3JIeKTPOHHCTpyMeHT B HeOHNDaAHhBX CNTYaUnx.
f) NcnoIb3yIte noxOJyU paOuyo OeHdy. He naeBaIte CboOdHyO OeHdy u KpaWenHn. DeHHnte BOIOcbl N OeHdy BdaHn OT DBNHyXxCa ChTei. CboOHaJra OeHda, yKpaWeHNn IIN dINHHbIE BOIOcbl IerKO MOrYT nonactb B DBNHyUncsca Actn 3JIeKtpOnHCTpyMeHTa.
g) Pn Hauuynn NblneoTcablaiox n nbIe6bOpHbIX npncnooc6JeHn y6eAnTecb B TOM, qTO OHN NOCoEHNHeBHy INCNoB3yOTca HaJekhaum 06pa3om. PnpMeHHe NblneoTcoa MOKe TCHN3HTb ONaCHOCTN, CO3DaBaEMbIe NblbIO.
h) XopoOoee 3HaHHe 3JeHTpOHcTpymeHToB, NOJyueHHoe B pe3yIbTaTe qaCTORO HX NCNoJIb3OBAHnH, He DoJHXo npHBODHTb K CamOyBepeHHocTH u HrOpHnpOBaHnIO TexHNK6e3OnacHOCTu O6paUeHNc 3JeHTpOHcTpymeHTAm. OdHo He6peJHoe DeiCTBHe 3a DOLIO CEkyHdbI MOxET pINBeCTN K cepbe3HbIM TpaBMam.
4) 3HcπIyATAUINYXOД3A 3JIeHTPOINHCTPYMEHTOM
a) He neperpyhaite 3neKtpoHnCTpymeHT. NcnoJb3yIte TOT 3neKtpoHnCTpymeHT, KOTOpbi npedHa3HaueH dJaDaHHo pa6Otbl. C noDxOJaIM 3neKtpoHnCTpymeHTOM Bbl BbINOJIHnTe pa6Oty LyuWe HnadeJHei, NcnoJb3yR BeCb DnAna3OH erO BO3MOxHOCTei.
b) He nCnoJb3yIte 3JeHrponHcTpymeHT c HEnCnpaBHybIM BbIKIOuTeJIem. INcTpymeHT C HEnCnpaBHybIM BbIKIOUaTeJIem ONaceH INoJIeKHT peMOHTy.
c) Do haayana hanaHn 3eKtpoHHCTpyMeHTa, 3amehbl npnaIeJHKOCTe Hn npeKpaueHn pa60tI OTKIOUaTe WTeNCelbHyO BnHy O T po3ETN CeTH n/nn BbInbTe, ecIn 3TO BO3MOXHO, aKhyMylrTOP. DaHHa MEPa npeIOCTOPoHHOCHTn ppeOTBpauaet CnyauHoe BkIIOUeHne 3eKTPoHHCTpyMeHTa.
d) XpaHnTe HeHCNoB3yEmbI 3JeHTpOHnCTpyMeH T HHeOCTynHom DnA DeTeN MeCte N He NO3BOJnTE HcNOb3OBaTb Ero NnCaM, He yMeIOUm C Hm O6paUaTbcN HnN He O3HaKOMJIeHHbIM C nHCTpyKuNeN NO 3HCnLyatauNN. 3JeHTpOHnHCTpyMeHtbl PpeDCTabJIaOT c6oB onaCHOCTb B pyKax HeONbITbIX NoMb3OBaTeJIeN.
e) TuaTeNbHO yXaHnBaHTe 3a 3JeHTPOHHCTpyMeHTOM n npHaJdJIeHHOCTm. IpOBepaIte 6e3ynpceHHocTbФyHHcIN NOBUNHHbIX qAcTei, IerKoCTb Hx XOA, cEIOCTHOCTb BCex qAcTei N OTCyTCTBne NOBpeHDeHN, KOTOpBe MOryt HERatNBHO cKa3aTbcra Ha pa6ote IHCTpyMeHTa. PpN 06hApUHeHN IOBpeHDeHN cdaITe IHCTpyMeHT B pEmOH. BoIbWoE YNClo HeCuaCTbIX CNYaEB
CBRAHO C HeyOBIeTBOpHTeHbHbIM yXoOM 3a 3JIeKTPoHHCTpyMeHToM.
f) PeHuIe HaCTn HNCTpyMeHTa Heo6xOIMNOIOEHPHBtB 3aTOUeHHOM N YHCTOM COCTOHH. IpnHaJIeKaIeM yXoJe 3a peHuIIMN IprHAnJExKHOCTaMn C OCTpbIMN KpOMhAMN OHn peKe 3aKlInHbAIOTCr INHCTpyMeHT JyUe NODaETcR KOHTPOJIIO.
g) NcnoJb3yIte 3JIeKTpOHnCTpyMeHT, npHnAdJeHHOCTH, 6HTbI n T.D. B COOTBETCTBnC DaHHbIMN IHCTpyHKUHM, HCxOJa H3 ocObeHHocTeY yCIOBn H xapaHTepa BbINOJIHReMo pa60tbl. HcnoJb3OBAHHe 3JIeKTpOHnCTpyMeHTa He No Ha3HaueHnIO MOKeT pPBeCTn K ONaCHbIM NocJIeDCTBnM.
h) DepeHnTe pyuHn HOBepxHOCTn 3axBaTa cyXHMn HnCTbIMn, CLeIeNTe YTO6bHa HnX YTO6bHa HnX He 6blIO XnIDHO nn KOHCnCTeHTHO mca3HN. CkOJIb3KHe pyuHn HOBepxHOCTn 3axBaTa npenrTCTByIOT 6e3oNacHOMy o6paueHIO C INHCTpyMeHTOM n He daIoTHaEKeHNO KOHTpOJInpoBaTbe O B HEnpeDbIeHHbIX CnTyauJx.
5) CEPBNUCHOE OBCJYXHBAHNE
a) NpepaBaiTe 3neKtpOnHcTpymeHT Ha cepBnchoe 06cnyHbAHne TOIbHO HbAINHnUnpoBaHHomy nepcoHaIy, hCNoIb3yIOUeMy TOIbHO NOIINHHbIE 3anachbIe YactN. 3To 06ecneHT coXpAnHeHne 6e3onacHocTH 3neKtpOnHcTpymeHTa.
IPABNIA TEXHNKBE3ONACHOCTNI PPH PABOTE C TOPUOBO-YCOBOYHbIMN INJAMN
TopoBO-yCOOByIe NnblippeHa3HaueHbI
IJIyNIIeHNu3DeHInu3 DepeBa nNoDObhIX
MaTePuaIOB.Nx HeNb3ra NcNoIb3OBaTb C
a6pa3NBbIM OTpe3HbIM KpyROM IJr pe3Kn
H3DeHINu3 YepHBIX MetaIIIOB (npTyBeB,
CTepXHei, uHJIeK uT. n.) A6pa3NBHAR nblb
PiNBOIDNT K 3aKNHINBAHHIO DBNHyUHXCyaCTeN, TaHX
KaK HNNHNI KOHyX. NcKpbI O t a6pa3NBHO Pe3Kn MOryt
IpOKeYb HNNHNI KOHyX, BCTaBky Co UKHALON IN dpyrne
PiJaCTMaCCOBbie DeTaJI.
-ПО BO3MOHNOHOCTH HcNoJIb3yIte 3aHHMblДЯ
ФИнcaUIN 3aROTOBHN. YdePknBaJ 3aROTOBHy
pyKamn, pacNoJIaraiTe pyKn Ha pacCTOAHN He
MeHee 100 MM ot KaHdoJ cTOpOHbI NIIbHOro
dNcHa. 3aNpeuaeTc HcNoJIb3OBAbT NIIy DnA
pe3HN 3aROTOBOK, KOTOpBIE CInuHOM MaJIbI,
YTO6bI IN MOHNO 6bIIO NaDEHNO 3aΦHKCnPOBaTb
3aHHMaMn INn pyKoJ EcIn Bbl paCnoJIoKHTe pyKn
CInuHOM 6bIIN3HO K INJIbHOMy DnCKY, Bo3paCTaET pNCH
TpabMnPOBaHn I3-3a KOHTaKTa C NOJOTHOM.
3arotobHa doJIHHa 6bItb HenoDbHKnHO H 3aHcnpoBaHHo Hn ydepHNaBtbc npHAtO Hynopy n K CTony. HnHorda He noTaKNaBte 3arotOBHy K NOIOTHy N He nbITaHTecb BblNOJHATb pe3Hy, ydepHNBa3arotOBHy TOnbHO pyhAmn He3akpenHeHHbe Hn DnBuHcyuNecr 3arotOBKn MoryT 6bItb OT6poWeHb C BbICOKO CKOPoCTbIO, YTO MOKeT npHBecTN K TpaBMam.
- Pn pe3Ke BeDHTe NnIy NO 3arOTOBHe TOLKaIOUHM DnHexHEm. TaHyTb NnIy NO 3arOTOBHe Ha Ce6n HeIb3r. Ia BblONHeHnpe3Kn NoDHmnte NnIbHyIO rOLOBky n CdbHbTe ee TaH, YTO6bl OHa
OHa3aIacb Ha3aROTOBHO, 3aTeM 3anyCTHe DBHrAteIb, HAHMMTE Ha rOIOBHy BHN3 N TOJHKoUmm DnHexHHem HAnpaBbTe NHy B 3aROTOBHy Pe3Ka TReHyUmm DnHexHHem C60JIbWoB BePOARHOCTbIO npNBeDEt K TOMy, YTO NJIbHOe NOLOTHO NOHNMeTcHa BEPxHIOU YoCTb 3aROTOBKn IJe3BHe 6yEt pe3KO BbIbPoWeHO B CTOpOHy Opeapota.
HnKOrda He nomeuaTe pyKn Ha npednoIaraemoi Hnnpe3Kn Bnepeu NnloN03aDn NnIbHoro Dncha YdepnBaHne 3arOTOBKn pyKaMn «KpctHaKpeCT》,Korda JEBa pyKa DePknT 3arOTOBky Cnpaba NnHaobopot,npdctabJIeT cepbe3HyIO onaCHOCTb.
He TAHNTecb H3-3a ynopa pyKo, npotraHbae ee K Bpaauooucmy nIbHomy dNcKy c IIO6oI cTOpOHbl 6nHexe Yem Ha 100 MM, YTO6bl y6paTb 06pe3Kn nn No KaHOJ-NI6o dpyro npuHHe Bbl MoKeTe He 3aMeTHTb, KaBpaauOuHcra DNCK np6IIN3NTcR K BaWei pyKe, N NOlyuHTb cepbe3HyIO TpaBMy.
Ocmotpnte 3arotOBHy, npexHe qem pe3aTb ee. EcIn OHa n3OrHyTa HnI NOKOp6JeHa, Hado 3aHmAtb ee BbICTyNaHOSe CTOPOHOH K yNOpY. Bcerda cIeHNTe 3a Tem, YTO6bl NO IINHN Pe3a He 6bIIO 3a3OpOB MeMy 3arOTOBHoi, yNOpOM n CTOLOM N3oHTbIe HnI NOKOp6JIeHHbIe 3arOTOBHIMORYT CKpyHBaTbCRAHn CDBrA TbCBn B pe3yJbTaTe CEIIARTBcra 3a BpaauoUncn DaCK BO BpeMa pe3KN. B 3arOTOBHe He DoJIHKHO 6bITb rBO3dE nn DpyHX noCTOPOHHHx IpEIMTOB.
He hauhnaite pa6oty c nHIOJ, noka He 6ydyT y6paHbI BCE HnCTpyMeHTbI, o6pe3HN dpeBecnHbI n T. n Ha CToJe He octaHETcra HnUero, KpOme 3arOTOBH N O6pe3KN, KcKNI DepeBa nn DpyrHe npEmdetbl pnp COpnKoCHOBENC BpauaIOUMCn DnCKOM MOYt 6bITb OT6poWeHbIC BBICOKOH CKOPoCTbIO.
3aOIN pa3 MoHHO pe3aTb TOIbHO OHy 3arOTOBHy Pn WtabeHInPOBaHHN HeCKoJIbKHX 3arOTOBOKNX HEBO3MOJHO 3aΦHKcnpoBaTb HaJIeKaUIM O6pa3OM BO BPEMpe3Kn OHN MOrY cIeJIraTbcra 3a NIIbHbI DnCH INI CDBnraTbcra.
Ipeed nCnoB3OBAHnEM TOpOBO-yCOBOUHOI NJIbI y6eHNTecb, YTO OHa yCTaHOBHeHa Ha POBHOI npOH NOBepxHocTH. PoBHAR I npOuHA IOBepxHOCTb CHNkaET pICH NTepn yCTOnuBOCTN IIJIbl.
3apahee nlaHpyte cBOH deCTBn! KaHdbi pa3 npu H3MeHeHH HAcTPOHN BepTHKaIbHO rnnrnpu3oHTaJIbHO rYna CHOca npOBepaTe, 6ydet npeYlnpyeMbHy npop npabNbHO noDepKHBatb 3aOTOBky n He OAnKeTcRn OHa Ha npTu peHuJyero DNCAHn 3aUHTHO KHXya Be3 BkIIOUeHH NHCtpymEnTa n 6e3 3aTOBKn Ha CTOJIe BbINOJIHnTE HmHTaunIO npedctOJeH pe3Kn, nepemeaa NIIbHoe NOLOTHO Ha BCIO DInHy, YTObbl6eINTBcB OTCyTCTBn NOMex IOnaCHOCTn pa3pe3aHH ynpa.
- EcIn 3arOTOBa dInHHee nIn shpe cToJa TopoBO-yCOBOuHOHnnbl, npedyCMOTpnte NOxOHaIyUO onOpY, HAnpHMeP yDlnHnTeJI CTOnla, NINbHbIe KO3NbI uT. T. TaKHe KpynhBie 3arOTOBH MOrTy ONpOKHyTbcra, ecIn He oBeCneHTb IM HaJeHHyO onOpY. B Clyuae onpOKnDbIBaHNr OTpE3aHHa YacTh b nn CaMa 3arOTOBKa MOKeT NoDHTb HNNHn KOHXn OTCKOHtB OT BpaauoJceroa DnCKa.
He npBneKaIte dpyrnx IIOeI nOdepHH
3aROTOBHN BMEcTo HcNoJIb3OBAHnHa YdHnHHeTJe CToJa Hn ONOpbI HeycTouHBa NpDepKKa 3aROTOBKN MOJET Bbl3BaTb 3aCTpeBaHne DnCKa Hn CMeUeHne 3aROTOBKn BO Bpemr pe3Kn, B pe3yIbTaTe Yero Bac N BaWero NOMOuHKa NotHanE K BpauaIOUeMcy DNCKy.
- Otpe3aHHa YacTh He DoJIHHa 3aUeMlA Tbcn Hnn KaHm-Jn6o Obpa3om npHHMaTbcn K BpaauoOeMyc HnIbHOMy DnCHy B clyuae noOpnpa, HnprnMp npn NcNoJIb3OBAHN OrpAHuHTeJe dInHbI, Otpe3aHHa YacTh MoKeT 6bITb 3auePHe HaNCHOM n C cnIOB bIbpoWeHa.
Bcerda nCnoJb3yIte 3aHMMnHnFncatop, npedHa3NaeHHbI dIra 3aKpeNJIeHHa 3aROTOBOK kpyIoro CeueHHa, TaHx KaH cTePHHu Hn Tpy6bl CTeHHu Yacto npOBopaunBaIOcra BO BpeM pe3KN, yTO BblBaet 6neHHe DNCKa I pNITARNBaET 3aROTOBky BmecTe C BaWe pyKo K peKyuEmy NpIoTHy.
-ДаиTe ПИьHOMу ДИСЧу HabpaTb NOIHyIO ChOPOCTb nepeД KOHTaKToM C 3aROTOBHOr 3TO CHN3NT PnCK BbIbpaCbIBaHnA 3aROTOBKN.
Ecnn 3arotobha nn dncn OHaHyTc 3aHaTbIMN, BbIKIOHTe TOPOBO-ycOBouHyo nIy. DOKNTecb OCTAHOBKn BCex dBNHyuxxCraCTe N DOCTaHbTe BNHy n3 PO3ETn n/nn n3BLeHNTE aKHyMylrTOP. Nocne 3TORO OCBO6OnTe 3aueMeHHbMyepnaI PpOdoJIKeHHe pe3kn 3aueMeJHHO 3arOTOBKn MOKeT npINBeCTn K Notepe KOHTpOJa IIN NOBpeKdEHHIO TOpOBO-YCOBOUHOH nIIbl.
- OOnOHuaHn pe3HN OTNcyTNE BbIKIOUaTeNB, ydepeHHBa HINbHyIO rOLOBHy B HnHHem NOLOHeHH, DOHNTEcB NlHOJOCaHOBHN Dncha nepeD TeM, KaH y6paTb OTpe3aHHyO qAcTb Pn6JIHKaTB pyKN K DBNKyuEmyCn IO INHePcHn DNCKy ONaCHO.
- DepeHnTe pyKoRTHy KpenHo, KOrda deJaete HeNoHbI npOnH I NocJe OTNycHaHH BByIKIOuHaTeJI, NOHa NIIbHa RA OJIOBHa HE ONyCTNTCA NOJIHOCTbIO B HINXHeE NOLOKeHHe TopMOKeHne NIIbIMoKet PpNBecTNI K BHE3aHOMy ONyCKaHnIO NIIbHOr TOLOBKn IN ONaCHOCTNI NOJUYeHHa TpaBMbl.
DONJIHNTIELHBIE HNCTPYKUNI NO TEXHNHE BE30NACHOCTN
- PpOueCbI BKHIOUeHnB bI3bIBaOT KpaTHKOBpeMeHHoe CHHXeHne HAnpJXeHn; npn He6laTOnpNrTHbIX YcNoBnX B cETn MoKeT Bo3HNKHyTB OTPuCaTeJIbHOe BInHHe Ha dpyIe np6Opbl (PpHmPeJaHce Cetn MeHbWe, Yem 0,219 Om, KaHne-JI6o HApUeHn He OxHdAOTc); 3a pa3bAcHEHnMn Ipocm O6paTNTbcR K OprAHn3aunm - NoCTabuHam 3JeKToP0eHepnB BaWem pernohe
OBUUEE
- IcnoIb3yIte nnly nckIIOHTeIbHO nIpe3Kn dpeBa
- 063aTeIbHo y6eIITecb, yTO HApJxHeHne nHTaHn COOTBeTCTByET HaPjxHeHIO, yKa3aHHOMy Ha φHpMeHHOM wTemnene IHCTpyMeHTa
He ctaHOBntecb Ha IHCTpymeHT Hn erO CTeHd OnpOKnDbIbAHne IHCTpymeHTa Hn CnyaHbI KOnTaKT CpeKyuIm IHCTpymeHTOM MOrY TnpNBecTn K cepBe3HbIM TpaBMam. He xpaHITe MaTePnaJIbHa IHCTpymeHTe Hn pAdom C Hm — B MeCte, Dn ADOCTyPa K KOtOpOMy HyXHO BCTaTB Ha IHCTpymeHT Hn Ha erO CTeHd.
Ipeed perylnpoBHOHcMeHO npHaJekHOCTeO6aTebHO BbInbTe BnHy H3 cTeBOH po3ETH
Ipeep nepemeeHnem TOPoBO-ycoBOOH nnblb Bcerda BbIHMaTe BNHLHy n3 po3eTN OTKIOUHTe HNCTpyMeHT OT CeTH, 3aΦHKcnpyIte peKyuTOIobKy B HnKHeM NIOJKeHnH, NCIOJIb3yIte pyKoRTKy IЯ npeHoCKn IOHO n3 yrJy6JIeHn dЯ pyKn B OCHOBaHNn PnJIbl.
He OTxOInde OT HNCTpyMeHTa, NOna OH He octAHOBHTc NOIHOCtBIO
- Pn pe3ne 3aROTOBON HeCTaHdapTHoI φOpMbI nlaHpynte CBON DeIcTBn TAn, YTO6bl 3aROTOBHa He COCHOB3HyJa, He 3aUeEMnla DnCK N He BbIPBaJacb N3 BaWnX pyK
- INHCTpymENT HeIb3a HcNoIb3OBaTb IInIaM B BO3paCTe do 16 JeT
3TOT INCTpymEn HnpiroJeH DJIpe3Ku CCMaUBAHHeM
HcNoJIb3OBAHNE BHE NOMEUeHnA
- Ppi pa6ote BHe NOMEHn, NOKJIIOuHaTe INHCTpyMeHTepe3 npEdoxpaHnteIb KopoTkoI 3aMbIkaHnra (FI) cMaKcIMaIbHbIM NcKOBbIM TOKOM 30 MA I NCNoJIb3yITeTOJbKO yDNHNHTeJIbHbIM UHyp, PpeDHa3HaYeHHbI dJaBHEWHnx pa6OT n O6OpYDoBaHHbI 3aUHsEHHoI OT6pbI3r po3eTKoI
NEPEDNCHOJIb3OBAHHEM
IcnoJIb3yIte NOHOCbIO pa3MOtaHHbIe 6e3OnacHbIe yINHITeIN, paccHTaHHbIe Ha TOK He MeHee 16 A
OeBaITe 3aunTHbIe OUKN, CpeCDTBA 3aunTbI BOLOC, N 3aunTHbIe nepuATKn
ПььгOT TaHIN MaTePnaIIOB, KaC CBnHcOBOcoDEpHaaJ KpaCa, HeKOTOpbIe NopoDbI DepeBa, MInHepaJIbI IN MeTaN, MoHcET 6bITb BPeDHa (KOHTaHCT C TaKoN IpbIbIO NIIe Ee BDbIXaHne MOxET CTaTb PnUHNOH BO3NHKHOBeHnY ONEpATopA NII HaxOJaXxCra PraDom Nluc aAnleprHuecknx peakun N/lln pecnPapToPbIX 3a6OJIeBaHn); HaDeBaIte pecnPapToP n pa6OtaHtec NblJeydaIauOuIm ycTpoIcTBOM npn BnJIoueHHN HHCTpyMeNTa
HeKOTOpbIe BnDbl nbIIN KJIacCNHcNpUpyTcKa KaKaHcpeoreHHbIe (HaNPmep,dy6oBaJnn 6yKOBaIpbIb),OCo6eHHBO CooTeAHN Cdo6aBkAmn dJa KOHNIOHOPOBAHNA DpeBecnHb;HaDeBaHTepecnnpatop npapobTaIte c nbIeYdaJIauOuImyCTpOJCTBOM pnp BNIOUeHHN HhCTpyMeHTa
CJeNyIe npHrTbIM B BaWei CtpaHe Tpe6oBaHnRm/ HopMaTHBAM OTHOCHTeNbHO NbIN DnT Eax MaTePnaIOB, C KOTOpbIMN Bbl Co6HpaeTEc bpaOtaTb
He 6b6a6b1BaTe MaTePnaIbI C oOpKaHnEm ac6ecTa (ac6eCT cHTaETcK aHceporeHOM)
3aIpeaaeTcHcNIOb3OBaTB HnCTpyMeHT 6e3 uTaTHO nCTEmbl 3aUINTHbIX UNTKOB
Ipeed KaJdbim HcnoJb3ObaHne HNCTpyMeHa npOBepaTe npaBnIbHOCTb 3aKpbIBaHn 3aUNTHORo KOHyxa
He BkIIOuayTe Nny, ecn 3aunTHbKoKyx He DBrIraeTc CBO6OJHO H He 3aKpbIbaeT peKyuN DNCH
HnKOrda He 3aKpenIaTe n He npBraBaIte 3aunTHbIKoKHyX BOTKpbITOM NOJIOKeHN
HnKoIa He pa6oTaIe C HNCTpyMeHTOM 6e3 BCTaBKn CTOla; 3aMeHnTe NOBpeKdEHHbIe NIN N3HOWeHHbIe BCTaBKn
IpeJde yem npncTynntb K pe3He, ydaJIte BCE npenrTCTBna HaT TpaekTopne pe3aHn nOd Hei
- I36eraIte noBpeKdHn, KOtOpbIe MOryT 6blTb
BbI3BaHbI BnHTaMn, rBO3dAMN INpOcHM 3JeMeHTaMn, HaxoJHmncB O6pa6aTbI BaEMOM ppeMeTe; npeed NaJom pa60tby Hx HyKHO ydaJIITb
PNUHADJIEXHOCTN
B DaHHOM HNCTpyMeHTe He dOnyckaeTc npImeHeHne UINFOBaIbHbIX/OTpe3HbIX KpyROB
SKIL obecneuHbaeT haedKHypo pa60Tu HnCTpyMeHTa TOLbKO npn HCNOJb3OBAHN COOTBeTCTByIOue OCHACTN, KOtOpyMOHNO npno6peTny BaWero DJIepaΦnpMbI SKIL
- Pπu yctaHOBKe/ncnoJIb3OBAHmH hacaIOK He OT ΦnPMBi SKIL, co6JIoJaTe HNCTpyKcHn COOTBeTCTByIOUeero 3aBOda-N3rTOBOTeJIa
-ПиMuMeHЯTe TOJbKO IINJIbHbIe DnCKn CnapaMeTpamN, yKa3aHHbIMN B 3TOM pyKOBoDcTBe NO 3KcnIyatauN, KOtOpBIE NcblTaHbI NO EN 847-1 n IMeIoT COOTBeTCTByIOUe o6O3HaueHne
IcnoJb3OBA TbToJIbKO npHaJNeJxHOCTH, npeJeIBHO DOnyCTUMa CHOPoCTb BpaUeHnRA KOToPbIX He MeHbIe, HEM MaKcImaJIbHa ChOPoCTb BpaUeHnRA pN6opa Ha XOJOCTOM XOy
HeOnyckaeTcNcNoIb3ObaTbpeKyuIeIuCKn, n3rTOBLeHHbIe N36bICTpopeKyuIe cTaIIN
He nCnoIb3yIte DeΦOpMnPoBaHhbIe, TyIbIe nnKn/ DNCHN T.I.N NIIKN/DNCKN C TpeuHaMu
IcnoJb3ynte ToIbKo peKyuNe DnCHN C DnAmETpOM KpeJHKHOrO OTBepCTnA,ObecneHBAUUM NIOTHOE HaDeBaHHe UINHdJIg HCTpyMeHTa 6e3 IIOΦTa; HNKOrDa He IcNoJb3yTe MyTbI INI NEpeXODHNi DNRA KpeJIeHnPeKyuXn DnCKOB C BoJIbUm DnAmETpOM KpeJHKHOrO OTBepCTnA
- IpeoxpaHnTe HacAnOT Bo3deIcTBnYdApHbIX Harpy3OK NnonaHaHn Ha HNX CMA3KN
BO BPEM IHCNOJIb3OBAHNA
He npnKnaabBaTe K HnHCTpyMeHTy qpe3MepHbIX ycnnn (HaJHM DOJIKeH 6bITb IeRKM IN paBHOMepHBIM, YTO6bl OCTpna JIe3BnA He nepepeNcB N, B Clyuae pa3pe3aHnI PnactIKOBbIX DeTaJe, He HaaJI PIIaBNTbcr PnactIK)
- DepeKHTe pyKN, KNTN n naIbCuI 3a npedeJAmN 30HbI BpaueHn peKyuIero DnCKa
Ecn peKyuI INCK 3a6IOHPOBaH, HEmeJIeHHOBBbIKIOHTe INHCTPymENT N BblpeHNTE UHyp NTaHINrN3 PO3ETNI; TOlbKO NOcNE 3TOTO N3BJIeKaITe3aHINHBWyIO INCK 3aTOTOBky
Bcnyae 3aednna nn KaKoJ-Ni6o 3JeKtpueeckOnnn MExaHueckO HeNCppaBHOCTn HemeJeHHO OTKIOHTe IHCTpyMeHT N BbIHbTe BNkY n3 po3eTK
- PnIOBpeKJdeHnn nn pa3pe3aHHn CeTeBOrO shHpya BO Bpempa60TbI He npKacaiTecb K Hemy, IN HemeJeHHo BbIHbTe BnIKy n3 po3eTKn
HnKoIa He noJIb3yIteCb HNCTpyMeHTOM C nOBpeKeHHbIM Ka6eIeM NITaHINr; erO Heo6xOdHMO 3aMeHHTb CneUaJIbHbIM Ka6eIeM NITaHINr, 6bpaTnBwIncB B cepBnCHyIO oprAHn3aUHO.
CINHMTNY INKINbny
He HanpaBnIte Lyu Ia3epa Ha IIOe HIN HBOTbIX n CamH He CMOTpTE Ha IprMoH NIO OtpaKaembl Lyu Ia3epa (3TOT Lyu MOKeT CJIeNTb IIOe, CTaTB npuHOn HecactHO rClyuaH NIOBpeDntb rna3a)
Bcnyae nonaHaHnaIa3epHoro LyuBa rla3 rla3a HyHKHO HaMepeHHO 3aKpbItb N HeMeJHeHHo OTBepHyTbcraOT LyuA
- He meHnTe HnueRo B na3epHom ycTpoNCTBe
He cmToTne Ha Ia3epHbI JLyu (la3epHoe H3JyueHne)
He cIeJyET HcnoJIb3OBA Tb yBEnuHTeJIbHbIX ONTHueCKNX IHCTpyMeHTOB (HaNP., yBeJIuHTeJIbHbIE CTekla, TeLeEckONbl IIN 6HHOKIn) dIra paccMaTpPbAHnI Na3epHOro Lyya
He cIeJeTy HcIOJIb3OBAt bHCTpyMeHT B npCytCTBn IeRKOBCnJaMeHraIOUxxCa JNdkoCTe, ra3OB nIbIIN
He cIeJyET HcnoJIb3OBAbT INHCTpyMeHT B npHCyTCTBnN dete
He 3aMeHnTe yCTaHOBJIeHHbI Ja3ep Ja3epaMn dpyrNX TINOB
NOCJI INCIOJIb3OBAHIN
IocLe BbIKIOUeHnIHCTpyMeHTa HNKOrda He bItaTeCb OCTaHOBtB BpaueHne HaCaOK npJIOXHeHem NonepeuHcNJIbI
- U6npaIte CTpyKHN, OINIKN INI YACTN 3aROTOBOK N3 30Hb pe3KN TOJIbKO NOCLe TORO, KaK BCE DBNKUcneCn DeTaJIN NOJHOCTbIO OCTaHOBUNICb
- PexyünДиCK OueHb CInIbHO HArpeBaeTcB BO BpEmpa6oTbI; He DToPaHbAaTEcB Do Hero, NOKA DnCK He OCTbIHET
XpaHHTe INHCTpymENT B NOMeUeHNB CYXOM, 3aHnpaemOM, He DOCTyNHOM DnIeTeN MeCte
IORCHEHNE K YCJIOBHBIM OBO3HAUENM HA HNCTPYMEHTE
② IpepeIHCNoJIb3OBAHHeM O3HaKOMbTEcB C pyKOBOdCTBOM NO 3KcNJIyatauIN
③ OeBaIte 3aunTHbIe OUKN CpeIcTBA 3aunTbI BOLOC
④ Onachna 30ha! 30ha onachoctn dny. DepHnte pyH N CTOPOHE OT 3TOI 3OHbl.
⑤ДВонагиЗОЛЯЦИ(3a3eMЯHOUПIN pOBOd He Tpe6yETc)
He BbIKnDbIbAaTe 3JIeKTpOHnHCTpyMeHT n 6aTapeH BmecTe C 6bITOBbIM MycOpOM
⑦ Ia3epHnpaHa/He cmoTpnte Ha lyu/ Ia3epHoe n3dJIne Klacca 2
NcNoJIb3OBAHNE
C60pka
-ycTaHOBHTe pyKoTky Ira TpaHcnpTIpOBKn E c nOMOu2 6oJTOB IN KIOUa-WeCTnRpaHHNkA AN⑨
-ycTaHOBnTe pyKy fHcTopa yrna cKoca AE b nepeHIOu Yactb cTOna ⑩
-ycTaHOBnTE CMeUaEmbIynpU (CM.NyHKT «PeryInpOBkA CMeUaEmbIX ynpOB»)
-ПолжehнТраHCNOpTIPOBKN/pa60tbl PacklaBbAHne INHCTpyMeHTa (ПОLOжehnpepa60TbI) -надаВITEHa pyKoTky B8 OHDиpyHoi NBITaHNTe 1KcaTop C npyroI a -MeДLEHNO NOДHMITE rOLOBky BBepx CKlaDbBaHne INHCTpyMeHTa (ПОLOжehn e TpahcnpTIPOBKn)
-cBnHbTe roOBHy do KOHa B HappaBHeHn ynpa S (co6IIOaIte pacCTOHNe np6I.5cm) n 3aTaNHTe pyKcauH AH b
-ycTaHOBnTe BepTnKaIbHbIyrOJ CKOca Ha 0^ (CM. nyHKT «YCTaHOBka BepTnKaIbHbIX yrIOB CKOca»)
-ycTaHOBnTe RopN3OHTaIbHbIy rOJ CKOca Ha 45^ BJIeBO nINBnPaBO (CM. NyHKT «YCTaHOBka RopN3OHTaIbHbIX yrIOB CKOca»)
-HaIaBHTe Ha pyKoTky B OJHO pyKOi,
OJHOBPemEHNO HaHIMMaHa φHKCaTOP C dpyroi
-CMOTaHTe UHyp NTaHn
-NCNoB3yTe pyKoTky Ira TpaHcnpTnpoBKn E ⑧ dI napeHoNCKn HcTpyMeHaTa ①d
-ИИN ИСПОЛБ3уIte 60KOBbIe pyHKn IЯпepeHOCn INHCTpyMeNTa ①e! HNKOrda He NOdHMaTe INHCTpyMeNT 3a OCHOBHyO pyKoRTHy IIN WHyp NITAHn
KpenJIeHHe IHCTpyMeHTa Ha pa6oey NOBepxHocTn ② !IINOBecNEeEHn6E3OanCHOpa60tBI Bcerda yCTaHaBnBaIte HNCTpyMeHT Ha IIOcHOu ycToiYHBOI pa6oey NOBepxHocTH (HaPmEp, Ha Bepctake)
-NCNoB3yIe4KpeEnKhbIXOTBepCTnF DJI KpeIeHnIHcTpymeHTaKpa6oeyNobepxHOCTN IOXODJUMMBHTAMN
-нсчмпгТакгьо монно зakpenNTь habapбочи NOBepxHOCTN C NOMOью DOCTyINbIX B npdaKe CTpy6uH
-TO6bl npdaTb HnCTpymEnTy yCTOuHBOe NOLOKeHHe, MOKHO OTpeYlnpOBaTB BbcOTy ONopbl G
-B KaueCTBe aJIbTePHaTINbI INHCTpyMeHT MOKHO YcTaHOBnTB Ha cTeHd Ia TOpOBO-ycOBoHoi nIIbl! npOHTte Bce npEynpeJxdeHnI INHCTpyKuHH, npJIraeMbIe K cTeHdy dJIy nIIbl
- 60pKa 6pe3HO/0nIOK 13
-ycTaHOBHTeNbIEc6OpHbI MeWOK H/ntleCoc, KaK Noka3aHo Ha pucyHke
-onyctoaaTe nbilec6opHbMeWOK peryIpaHO dJI
0ececneeynOONTMaJIbHOROOTcoca bIIN
!He donychaTe,HTo6blIaHaNr nbilecoCa MeaJ
HHHEmy uTHy nII npoueccy nIleHn
- YdHHeHne nnbHoro cToJa 14
-нспльзутepyнLдяфикасиуdИнHTeJIeCTOJaK(cobexxCtopoHnHCTpymenta)
-ДИNHу yДиNHInTeJIe n cToJa K moJHo peRyIinpoBaTb NOshaROBO,OT MHNIMaJIbHOrO Do MaKcHMaJIbHOrO 3HaueHn
KpenJIeHHe 3arOTOBn 15
!nOeCneueHMAHCIMaIbHO6e3OnaCHOCTn pa60TbBCerdaHaedeHHo3aHpeNJIte3arOTOBky cKo6oHn3KOMnJIeKta
-He pa6oTaIe C 3aTOTOBKAMN, KOTOpbIE CJINJHKOM MaJIbI, YTO6bI N3 HaJeHHO 3aKpeHITb
MaKcHMaJIbHbIe ra6apHTbIe pa3Mepbl 3aROTOBKN, CM Ta6nuy
-3aKpeNTE 3aHIM DnIa3aROTOBKN B ONOPHOM OTBepCTNI N C nOmoUbIO pyuHIN P (no o6eHm CTOpOHAM INHCTpyMeHTa)
-3aKIM 3aROTOBKN IMeET 2 n3a 4nla ydo6HoH
fHKcauHH:1 dIy TOHIX 3aROTOBOK (D05cm) I 1 dJI
6oJee KpyNbIX (6oJee 5 cm)
-ПЛOTНО ппнмITE загOTOBКу npopy S
-pa36loKpyItepbIarR
-NoIIOHOHInTe 3aJIM K 3aTOrTOBKe
-HaJeXHO 3aXMnTe 3arOTOBky fHKcnpyIOUm pbYarom R
!HnHEKOTOpbIX KOM6HaUrIROP3OHTaJIbHbIX INBepTHHaJIbHbIX YrIOB CHOCA HIN B 3aBNCMHOCTHOT pa3Mepa 3aROTOBHN BMEcTO 3aHHMOB MOrYTNotpe6OBaTbcra Tpy6uHbI (npno6peTaOTcOnOTdJIbHO)
- YCTAHOBKa TOpN3OHTaJIbHbIX yTIOB cKoCA ⑰
-ocla6bTe pyKoTHy 6JIoHnIPOBKn AE
-NotAHnTe pbIur HKcaunrROPn3oHTaJIbHOrO yraCKoca AF
-IOBepHnTe NINbHbI CToI BLeBO HnN BnpaBO I
yCTaHOBHTe Heo6xOIMbI TROP3OHTaJIbHbI yROJ CkOca (OT 0^ do 50^ ) c NOMOuIO INdNkAtopa AG -OTNyCTNTe pbUar AF
-
3aTHe pyKoTHy 6IOKInpOBKn AE (He 3aTnBaTe ee CInuKOM CNJbHO)
-ДЯбсpoинTOHOnHAcTpOuKnHaCTO
HcnoB3yEmbix yrIob cKoca (0^,15^,22,5^,31,6^, 45^) pbIarФИКcaUIN rOpI3OHTaJIbHOrO yrIa cKocA
AF coIeJIHOMФИKcNpyETcB COOTBeTCTByIOx
NoJIOKeHnX;YTO6bl IpeDOrTbPaTtB 3TO,MOHHO
3a6IokpOBaTb pbIar AF B OToNyUeHHOM NoLOKeHHN
7b -
YctaHOBka BepTnKaJIbHbIy yrIOB cKoCA 18
-OTnycTnTe pyuKy TpeHOrn W
-NOBepHnTe NnIbHyTO rOIOBHy BIneBO, NOKa INDnKaTOp
BepTKKaJIbHbIX yrIOB X He yKaKeT Ha HyKhbI
BepTKKaJIbHbI yrOI
-MOJHO HcnoJIb3OBaTb peYInpyEmbIKoHcEBoYnop AA (45^) IJN OCTaHOBKn NOD yRLOM 45^ IINIPOdoJIKNTB, NOKa He 6yTe TocTHHy T yOr 48°18 b
-yyepKHBa NnIbHyIO rOIOBky B 3TOM nOIOKeHHN, 3aTAHNTe pyHcy W
-ДЯ NOJUeHЯ CHOcA BnpaBO ChaHaJa CJIerKa HAKIOHHTe NINbHyIO ROLOBky BIneBO, NOBepHITe FHKCaTOp npaboro BepTKaJIbHorO yrIa cKocA AB (Pn6I. 60°), 3aTeM NOBepHITe NINbHyIO ROLOBky Do HJHHORO yrIa cKocA BnpaBO18C
-Korda Bbl NOBepHeTe NINbHyIO rONOBky BLeBO,
KHCATOp npaBOrO BepTKKaIbHOrO yrLa cKOca AB
ABTOMaTHueCKn BepHeTCB NIOJKeHne KOHcEBORo
yNopa 0^ 3TOrO MOxHO H36eKaTb, NOBepHyB pyKoRTKy
Ha OTMeTKy 90^ BmecTo 60^ 18d
CIOXHbIe npoINbl 19
-cloHHbe nponHbI Tpe6yO1 3aHaHnRopn3OHTaJIbHbIX HBPtHKaJIbHbIX yTIOB CkOca
!He pa6oTaIe C nIIOJ, IcNoJIb3y TaHne KOM6nHaUuB ePTNaHbIbIX N rOpN3OHTaJIbHbIX YrIIOB CHOCA, KOtOpbie MOrY TnpIBecTHK CTOLHHOBeHNIO MeHd y DBNHUYsIMHCN H HeNOdBnHbIMN qAcTAMN nIIbl NnMeHdy DBNHySMMCRACTAMN N 3aOTOBKO. YTO6bl BblONHHTb pe3Ky, CHMNTe CMeuaEMbiyynop,pykny KpeJIeHNr CMeuaembIX ynopoB IN NOBepHInTe pykHy 3aHmna No Mepe Heo6xOUMOCTn.
!Bcerda cnaqana Tecnpyte Ha 06pa3e MetaIIOJOMA
- PerylnipOBka cmeaembix ynopob 20
-ocna6bTe pyuV, yTo6bl MOxHO 6blIO CmecTnTBynop(b)U
-ocna6bTe pyky V eue HEMHORO, yTO6bl MOHO 6blIO CHaTb/YCTaHOBnTB yNOP(bI)
-3aTAHNTe pyKy V, yTO6bI 3aΦHKcnpoBaTb yNop(b) B HJHHOM NIOJOKeHIN
! neped ncnolb3OBaHHem HnHCTpymeHTa y6eHTecb, qTO Cmeeaaembie ynpbl HaedeKHO 3akpenJIeHbl
!nHHeKOTOpbIX KOM6Haucn BepTnHaJIbHbIX nROPn3OHTaJIbHbIX yRIOB CkOca MoHcT TaHKe NOTpe6oBaTbcr CHrTb pyHy
- JINHINJIa3epa ②1
-NCNoB3yeTcIJaHaPaBHeHnIHCTpyMeHTa BDoJI Tpe6yEmo IINHH npOnnla, pa3MeeHHOH Ha 3aROTOBKe
-BKIOUHTe/OTKIOUHTe JINHIN Ja3epa HaKaB nepeKIOUATEb AD
I nepeH hauanom pa6oTbI, npOBepbTe COBnaeHne IHHn Ia3epa C HameyeHHo JINHei npOnHa, CdJIaB npObHbI HaJpe3 Ha HeHyKHom KycOHe MaTePnAna
PacnIb6e3ckOJIbXeHn(He6oJIbUne 3aROTOBn)
-ocna6bTe pyKy fHKcaun AH,ecn OHa 3aTHyTa
-cBnHbTe NIIbHyIO rOIOBHy DO KOHcA B HApBaJIeHNy npopa S n 3aTaNHTe pyuKcaun AH
! ecn He 3a6loHpoBaTb MexaHn3M, 3TO MOKeT npHBecTH K TOMy, yTO NJIbHOE NOJOTHO NOHMETcN IOBepx 3arotobn n 6ydet OT6poeHo B cTOpOHy onepaTopa
-ycTaHOBnTe HnCTpymEnT Ba6ooye NoIIOHeHne
! y6eHNTecb, YTO 3aROTOBHa HAdEHHo npHnHaTa K nIbHOMy CToIy N Kynopy S
-BKIOHHTe HNCTpymENT,OTNycTNB PHKcaTop AJ INpeekIOUHBbIKIOHaTeIb AI
! He nepeKpeuBaIe pyKn npn pa6Ote c NJIbHOJ roIobHOJ 23a
-pacnINBaIe 3aTOBky paBHOMepHO npHHMa pyKoTky
I INHCTpymEn He DoJIHeH pa6oTaTb Ha nOJIHOI CHOPoCTn, NOKa peJxuN DNCH He BOJDeT B 3aROTOBHy
-BbIKIIOHTe HHTpyMeH NTyCTNB BbIKIOHaTeIb AI
-DOHNTEcb, NOKa peKyuui DNCK NOHOCtBuO
OCTaHOBHTc, npeKHe Yem MeIeHHO HApBaHTb NIIbHyIO TOnOBKy KBepxy
- Pacnnc co cokolbkeHem (Wnpne 3aRoTOBKn)
!NOMHHTe,TTO ONHCaHHbI HnHe cNoCo6 ABnAetcEduHCTBeHHbIM 6e3OnaChbIM
-TaHrTb NnIy No 3arOTOBHe Ha Ce6r HeIb3r
-ocna6bTe pyky finkcaun AH,ecn OHa 3aTaryta
! y6eHNTecb, YTO 3aROTOBHa HAdEHHo npHnHaTa K nHbHomy cToIy H Kynopy S
-OTBeINTE NIIbHyIO TOnOBky OT ynpa S DoCTaTOHODaleko, YTO6bl NIIbHbI DNCK HaxOuJIcra NepeD3aTOrOBKO 24
-BHIOUHTe HNCTpyMeHT,OTNcyTNBΦHKCaTop2 N IpeekIIOuB BbIKIOuHaTeJIb
! He nepeKpeuBaIte pyKn npn pa6oTe c nHbHO roLOBHO 23a
-HaKMITE Ha NnIbHyIO rOIOBky B HAppaBHeHIn ynpopa S n npoPiNlTe 3arOToBky, npKnaDbBa paBHOMepHoe ycHne 24
I INHCTpymEn He DoJIHeH pa6oTaTb Ha NoJIHOI CKOpOCTn, NOKa peHcyuN dNcK He BOJDeT B 3aROTOBHy
!ecnHnHHn KOHX He OTHpbIBaetc
ABTOMaTHueChN, YTO MOHeT pOONCXoNDtB npH
ONpeJeIeHHbIX yCIOBnXx (HaNPmep, npn pa6oTe
C KpyNHOn 3arOTOBKn), BO3MOHNO, NOTpe6yETc
OTKpbITb erO BpyHyU 23b
-BbIKIOHHTe INCHPTyMeNT OTNCTNB BbIKIOUaTeIb AI
-DOKINTEcb, NOKa peKHyuN DNCK NOHOCTBIO OCTaHOBNTc, PpeKdYeEM MeJEnHo HApBaNTb INIbHyTOJOLOBky KBepxv
-Пиьнtie na3bl 25
-ycTaHOBnTe Tpe6yEmyIgIy6nHy C NOMOuBIO orpaHnHTeJIgIy6nHbI AK n 3aKpeNITe raHkoA M
-MeHdy 3aROTOBKOuYnOpOMdoJHHa6bItb
yctaHOJIeHa DepeBHHa paCnOpKa, Yo6bl
ObeCneHTb OINHakOByIO Tny6HHy NO BcE JInHe Na3a
!cIeITe,HTO6bI HnHbHbI dNCH He 3aCTpR B 3arOTOBKe
! Bcerda cHaqana Tectnyte Ha 06pa3e MetaJIOJOMA
- Cmeha peKyuIero dNcKa
26
!pa3beHNHTb wTeNCelhBn pa3bEM
-DocTaHbTe KIOU-WeCTnRpaHHNK AN n3 Jaunka AO
-ynepKnBaTe 3aunTHbI KOHX A B OTKpbITOM NOJKeHIN
-ocna6bTe KpeeneHHbI BnHT 3aunTHoN KpbHKn AQ (He BBInpyuBaIe BnHT NoJIHOCTbIO)26a
-NoBepHnTe 3aunTHbI KOxUx A Ha3aI Do ynpa26b
-нанкмerte коньу 6лokировишпнделAP
IydepHnBaIte ee HaKaToB BCE Bpemr, noka BbIHMaTe KpeEnKhHi 6oIT peKyuIero DNCKa
ARMOHTaHHbIMKIOHOM-WeCTIgpaHHNKOMANNO
YACOBOCTPEJHE (= B HappaBHeHn,yKa3aHHOM CTpeJIKOHa peKyuem DnCke)
!HAnMaTe KHOHy ⅢHHdJIAPToIbKo npn NOHOr OCTAHOBHe HhCTpyMeHa
-OCBO6OInde 6JIOKINPOBOHyU KHOHHy IINHdJIAP
-CHIMITE ΦλaHeU AS npeKyuπι DNCK
! 3aMeHInTe peHcyuyn dNcK; 3y6bI NnblI n CTpeHna, HaHeceHHa H aNcK,doJIHHbI 6bITb HnPaBLeHbI OOnHaHOBO CO CTpeHKOH Ha 3aunTHOM KOHyXe A
-ycTaHOBNTeΦaHeu AS26c
-HaKMITE 6LOKINPOBOHYIO KHOINky UINHDeJIy AP I DEpKHTe ee, NOKa HE 3aTAYHTE 60I NT NOIOTHa, NOBepHyB KIOU-WeCTNrpAHNNK AN Ha 1/8 o6Opota IPOTNB YACOBOJ CTPEJHN nocHe 3aTAAKN NaIbZAMN (rapaHTnpuyET npocKaJIb3bIBaHne NOIOTH INIbl pRn N3bIToOHOM COpOTNBLeHm MaTePnAla YTO CHNHaet neperpy3Ky MOTopa n OTdauY INIbl)
-3aTAHNTe KpeeneHHbI BnHT 3aunTHoN KpbuHKN AQ
- 3ameha BCTabkntoJa AT 26
IpoceDypa 3aMeHbIOBpeKdEHHoN IIN N3HOeHHOHBCTABKn CToJa:
!pa3beHNHTb wTeNCelhBHy pa3bE
-DocTaHbTe KIOUo-WeCTnIpaHHNK AN n3 JAnuKa AO
-CHIMITE BCE 6 BnHTa KaK NOKa3aHO Ha pncyHKe
-CHIMNECTapkyOBCTaBcyCTOla,CHaHa
npiHdHMNTe ee 3a nepedHIO yactb, 3aTeM n3BJIeKHTe NOJHOCTbIO
-yCTaHOBNTE HOByIO BCTABky CToJa
!HaJeKHo 3aTaNHTe BCE6 BNHTa
- OTnycTne pyuKy TpeHOr W
2.OTperyIpyTe BnHT Y c NOMOIOKIOHJUa- WecTINrpaHHNka Ha 4 MM (He BXoINT B CTAHApTHbIM KOMnJIeKT NoCTaBKn) 28b
-
NOBTOpHO npoBepbTe c nOmoaIy yOrJbHnKa
-
c6pocbTe HndnKaTOp BepTNKaJIbHbIX yrIOB Ha 0° 28c
-Поберка/рergyнровka NOLOЖЕпяДИСКА NOД yrnom 45° 29
!pa3beHNHTb wTeNCelhBHy pa3bE
-IOBepHnTe NIIbHbI CToN B NOLOKeHne IJIrTopu3OHTaJIbHOrO cKocA nD yrIOM O° n 3aΦHKcpyTeero
-OTnycTnte pyuKy TpeHOrn W
-ycTaHOBnTe peRyIpyEmbKoHcEBoY npA H aOTMeTHy 45° 29b
-NOBepHnTe NINbHyIO rOIOBky BIneBO
-πpoBepbTe yroI 45° MeJdy IINCHOM IN CTOLOM C NOMOJIbIO MaIKN 29a
-ПровьTe,ЧTo ИнДиКаТО ВерТИКальБиX nOKa3bIBAeT 3HaueHne 45°
-πρn Heo6xOaHmocTn Otperyu npy Te yroI dNcKa 45° CneDyUoUIM o6pa30m:
- OTPeryIpyTe BnHT Z c NOMOuIO CneuaJIbHOrO KIOUa 10 (He BXoIIT B CTaHApTHbI KOMPJIeKT NOCTaBHN)
-
NOBTOPO NPOBEBPte C NOMOu MoJIKN
-нри Heo6xOДIMOCn NOBTopNte DeIeCTBnA DnA yctaHOBKn yrna 45° BnpaBO
-ONyCTNTE NINbHyo rOIOBHy u 3aΦnKcnpyTe ee -
Поберка/рergyноровka полженья упopa под углOM 90° 30
!pa3beHnHTb wTeNCJIbHbI pa3bEM
-IOBepHnTe NIIbHbI CToI B NOIOKeHne IJIa TOpu3OHTaJIbHOrO ChOca nOy yIOM 0^ n 3aΦNkCnpyTe erO
-ONyCTHTe NnIbHyIO rOIOBky I 3aΦNkCnpyTe ee
- npoBepbTe yroI 90° MeJdy nIcHOM uynopom S c NOMOu yroJIbHnKa (y6eIITecb, yTO yroJIbHnK KacaTcra NobepxHOCTn peHcyIero dNcKa, a He ToIbHo ero 3y6ou)
-πρη Heo6xOaHmOCTn OTpeyIpyuTe yroJ ynpa 90° cnEduoumM o6pa30m:
- ocla6bTe 4 BnHTa c WecntrpaHHbIMI rOIOBkaMNT
- OTPerynpyte noIooHeHne ynpa, noka ynop nDnck He 6ydyT kacaTbCra yroJIbHnka BCEI NIOCKOCTbIO
- 3aTaNHTe 4 BnHTa C WecTNrpaHHbIMI rOIOBkAMN T
- c6pocbTe uHdHaTOp rOpu3oHTaIbHbIX yrJIOB cKoca Ha 0° 30c
3aJHMdJaKa6eJr ③
-NCNoJIb3yIte 3aJHIM dIg Ka6eJIg AV, YTO6bl He DONYCTNTb 3aKaTINr 7Hypa NITaHn MEKdy IIOBUNHHbIMN HEnoDINHHbIMN YaCTAMN INCHTpymeHTa
COBETbI NO HcNoJb3OBAHHIO
CneuaHbHbe 3aROBKn
-BCeIa KlaIITe Ha onOpy CBo6oHbIe KOHcIy IINHHbIX 3arOTOBOK
-y6eHNTecb, YTO fHypHbIe HIN KpyIbIe 3aROTBn HADeKHO 3aKpeNJIeHbI OT pOcKaJIb3bIBaHIN 33
-HaJIHHHpe3KNOTCYTCTBYOT 3a3OpbIMeKdY 3aROTOBKOHNyNOPOMNININHBHIMCTOJOM
-πρn Heo6xOДIMOCrN CMOHTnpyIe DoONHITeJIbHbI ynp;3aKpeINTe erO,NCIOJIb3yI OTBepCTnB CMeUaEMOM ynpoe ②
!DOnOHnTeBHyI yOp MOHHO HcNoJb3OBA TbJbHO npn HAcTpoHKe BepTKaJIbHOro yrJa CkOca Ha 0^
Pa6oTa c nJIInHTyCamn, cm .pncyHOK 35
ДяобсесенmaHIMMaJIbHOro paCSeIeHn3aRToBky paCNoJaarTe 6pa6oTaHHo CToPOHOB HIN3
Iob3yntecb TObKO ocTpbIMn peKyuUMN DNCKAMN HndJeKaUero Tnna
-KaueCTBO npoIIna yIyUshaetcC yBeJIuHHeHem YnCla 3y6beB
-peKyuIe DNCHN C TBepDOcPnlaBHBIM NlaCTNHkAmCnyKaT B 30 pa3doJIbIe, Yem O6bIuHbIe peKyuIe DNCKN
TEXO6CJYHKINBAHNE/CEPBNC
CopeKHTe HNCTpyMeHT N SHyP NITaHnB YHCToTe (OCo6eHNO BeHTnJIuOHHbIe OTBepCTnB 3aJHeYacTn KOHyXa DnIraTeJIa)
- Perylaepno npoBepaIte npabHbHocTb pa60tbi HnKHeRo KOxhyxa. OunpaIte HnHHN KOxHyX OT cKONHBUNXcra ONIOK BlnKHOH TkaHbIO.
-NepeD HcTko HcTpymeHTa BbHbTe BnIKy N3 p03ETK
-NOHMnTE HNHN KOKyX B NOHOCbIO OTHpBIToe
IIOJKeHne N OTNyCTNE eRO; eCNI OH He 3aKpoETcR
Cpa3y NoHOCbIO, eRO CNeDyET nPoBepNTb B
aBTOpN3OBaHHo CEpbHcHO MaCTepCKoI dJa
3JIeKTPoHHCTpyMeHTOB SKIL
-Пюпьдгучску peжуцero ДСКа CPAЗУ He nocle нспльзовиня (OCO6eHHO OT CMOLBIИ KLEER) -ржуши дИСК OЧЕнБ CINьно HarpeBaETCЯ BO BPEMЯ разы; He DoTpaHnBaITeCb Do Hero, NOKA DnCK He OCTbIHET
OuHaaIe Ia3ep AC MraKoI 1eTKoI nocLe KaHdoRo HcNoIb3OBaHn, YTO6bl NINr Ia3epa 6bIa XopoWo BnHa (y6eIITecb, YTO BbI He H3MeHNl HaCTpOKn Ia3epa)
- EcHn HNCTpyMeHT, HecMOTpHa Ha TuaTeIbHbIe MeToDbI N3rTOBLeEHn I NCbITaHn, BblJET n3 CTPOA, TO peMOHT CLEyET npOn3BOIDnTb CNlAmn ABTOPn3OBaHHoCepBnCHoM MaCTepCKoI dIra 3JIeKTPoHNCTpyMeHTOB φnpMbI SKIL
-OTnpaBtE Hepa3o6paHbI INHCTpyMeHT CO CBnTeJIbCTBOM NOKyHKn BaWemy DInIepy IIN B 6nnKaIyIO CTAnuIO O6CnyHbAHHNΦnPMbl SKIL (aDpeca n CXema ObcnyHbAHn INHCTpyMeHa npBeDeHbIB Be6caIte www.skil.com)
IprnMnte K CBeDeHNO, YTO NOBpeJdeHnB BCJeDCTBne neperpy3Kn nn HeHaJleKaJepo O6paueHnC nHCTpymEnTOM He 6ydy TBKJIIOyeHb I B rapaHTnO (ycNoBnra panaHTn SKIL cm. Ha caTe www.skil.com nn y3NaTe y dInlepa B Baem pernohe)
OXPAHA OKPYKAIIOUeN CPEbl
He BbIKNbIBaIte 3JIeHTponHCTpyMeH,6aTapeN, npHaJdJIeKHOCTn U yNaHOBky BmecTe C 6bITOBbIM Mycopom (ToIbKO dIra cTpaH EC)
-BO INCNOJHHeE BpOneNcKo DnpeKTHBbl 2012/19/ EC 06 yTnIIN3aunn OTCnyHNBwero CBOI cPOH 3JIeKTPnueckoro n 3JIeKTPoHnHO O6OpyIDOBaHHn I B COOTBeTCTBn C DeICTByIOUIM 3aKHOHaTeJIbCTBOM, yTnIIN3aunn 3JIeKTPoHnHCTpyMeHTOB pOnIHBOdITCR OTDeJIbHo OT dpyTHX OTxODOB Ha NpeDnPnTnIX,
COOTBETCTBYIOUHX YCIOBnM 3K0JIOIurHeCKOJI 6e3oNaCHOCTN
-3HaOK 6 HAnOMHHT Bam 06 3TOM, KOrda NoRbNTcH Heo6xOdMOCt b CdaTb 3JIeKTPoHnCTpyMeHT Ha yTuIN3aUIO
WYM
- YpOBeHb 3ByKOBOrO DaBJIeHnA TTOr HNCTpyMeHTa, n3MpeHHbI B COOTBeTCTBn CO CTahApTOM EN 62841,coCTaBJIaRET 100,O D(B(A),a ypOBeHb 3ByKOBoMouHocTn -109,5D(A)(nOrpeuHoCt b K = 3 dE)
- UpoBHeH 6bIIN3MpeH B COOTBETCTBHN CO CTaHdApTn3NPOBaHHbIM NcblTaHHeM, PpNBedeHHom B cTaHdApTe EN 62841; daHHaXapaKtepnCTNa MoKeT HcNoJIb3OBAtbcra IpaBHeHn OHOrO IHCTpyMeHTa C dpyrIM, a TaKHe IJRA ppeBapnteJIbHOJ OueHKn BO3DeIcTBnA 6yMa npu INCNoJIb3OBAHH DaHHOro IHCTpyMeHTa IrykAsaHHbIX ceJeI
-ри ИспОьзOBaHIM INHCTpyMeHTa Bpynx ZeIAX IIN C dpyrHm/HeNCnPaHBbIMN BCNOMOraTeJbHbIMN npICNoC6ObJIeHnA M yPOBeHb BO3DeIcTBnB N6paCm MOKET 3HaUHTeJbHO NOBbIuTaTbC8
-B NepnoDbI, KOrda HNCTpyMeHT OTKHIOueH IIN ΦyHKUHOHNpye 6e3 faKTHueCHoro BbINOJIHeHn pa60TbI, yPOBeHb BO3DeIeCTBnB BV6paun MOKeT 3HaHTeJIbHO CHNHaTbCRA
UA
TopuBaIbHa nla IJI Bnpi3aHHn iD Kytom
1320
BCTYN
LcHCTpymEnE ctaioHapHO MaunHO, BIN npn3haeHN dIg N03doBHHbO rTa nonepeHoro po3nHIOBAHHdpeBHN pprMMn po3pi3amn a taHOK po3pi3amn iD Kytom (ropn3oHTaJIbHi KyTN CkOcy BiD -50° Do +50°, BEptnKaJIbHi KyTN CkOcy BiD -48° Do +45°)
- PpOHTaIe i 36epexiTb IcI HcTpkyciIO 3 ekCnnyatauii ②
-LeiHCTpyMeHT He npHaTHn IJa IpnOMncIOBOrO BHKOPMCTaHHJ
BnKOpHcTOByte ueiHCTpyMeHTIbKnIOBHCtTo Ta npabNlboHO 3iopaHm (nam'raTae, zo KOMNaHs Skil He Hece BiNobdaIbHicTb 3a noKoDKeHHa HCTpyMeHTy Ta/a6o TpaBMyBaHHO cIpuHHeHi HeipabNlBuHM 36npaHHM iHCTpyMeHTy)
TEXHIYDAHI ①
EJEMHTH IHCTPYMEHTA⑧
A HnKHi o6mKeYBaay
B PyuKa 3 BmMkaueM
C Φikcatop nla TpaHcnOpTyBaHH
D Bepxhi uHTOK
E Puyka dIra TpaHcnOpTyBaHHa
F MoHTaXHi OTBOpN
G Onopa
H MiwoK
J KaHaJI dIy nIy
K PoiobKyBaui
L Puykn 7n6IokyBaHHnoDObKyuBaiv CToJa
M 3aTnckau nla3aKpInnHnHa 3arToBKn
N Otvip onopn
P Puyka dIa KpinIeHHa 3aTnckaHa
Q Pyka dner peryIIOBHaHHaTnCKaHa
R 3aTnCKHn BaXJIb
S O6MeKHyBaY
T WeCTnIpaHHN IBNHT DIA
peryIIOBaHHo6MeHyBaHa(4x)
U PyxomnO6MeJyBaY
V Pyka dIa KpInJIeHHpyxOMoO o6MeJyBaay
W CToOpHa pyka (BepTnKaJIbHi KyTu cKocy)
X IHHKaTOp BepTNKaJIbHOrO KyTa cKocy
Y BnHT nIpeRyIIOBAAHH BepTnKaJIbHOrO KyTa CkOcy (npabn)
Z IyTa CKOcy (JIbN)
AA PerylboBaHm KInueBn ynop
AB IpaBn BaJIb BInyCk yack
ACIa3epHn npomHb
ADIa3epBIMnKaHa
AE CToIopHa pyUka (ropnOHTaJIbHI KytN cKocy)
AF BaJIb po36IokyBaHHaIKCaTOpa KytA Haxnly
AG IIndkaTop ropn3oHTaIbHOro KyTa CkOcy
AH Ctonopha pyuHa dIa KOB3HnX npncTpoIB
AI BIMNKauch KINBJIeHHr
AJ 3anobixHHK
AK O6MeKHyBaU BnCOTn po3nIy
AL O6meKvBaYrIi6Hn
AMraHka 06MeKHyBaayraIINH
AN WeCTnrgpaHHN KJIIOH
AO KOnTeHep nIy 36epeXeHHn IecTnIpaHOrO KJIouHa
AP HOnKa 6NoKyBaHHa WnHdJIa
AQ BnHT 3axHcHoi KpnuHKN
AR BoNT KpInnEHH pIkyUO DnCKy
AS Φlaheu
AT BctabKa cToJa
AU NIOBIOIDINBAU
AV 3aTnckau Jn Ka6eI
BE3NEKA
3AΓΑJBHI BHA3IBKN 3 TEXHIK N E3NEHNIOBODKEHHRA EJEKHTPOIHCTPYMEHTAMN
NIOPEDHEHHA YBaHNO BNBiTb 3aNo6iHn3axoHa Ta iHoctpaui, a TaHOK npOHTaIte BHa3iBnTaTexHi yMOBn, 0o BXoJrB HOMJIeHTnoCTabKn cboRo eJeHTpoHcTpyMeHTy. HeoTpMaHHHnKHepeIueHx Bka3IBOK y NobHomy o6c3i MoKe cnpuHHTu ypaKeHHa eJeKTpHnM CTPymOM, NoKeHy Ta/ a6o cepNo3Hy TpaBMy.
Dio6pe 36epiraTe Ha MaIbTyTHc 1i nonepeJxHeHHa i Bka3IBKn.
ПиД NOHAЯМ "eLEKtpponpnaD" B uXx nonepeJxehnax MaETbCSHa yBa3i eLEKtpponpnaI, 10 npaIcE BiMpeXi (3 eLEKtpoKa6eIem) a6O Bi d akymyIaTOpHOi 6aTapei (6e3 eLEKtpoKa6eJIIO).
1) B63NEHA HA POBOOYMICU
a) PpmaTe cBcO pOboe Micce B YnCTOTi Ta np6npaTe Noro. Be3laA abo norahe ocBITlenHna po6Oohmy Micci MoKytb npN3BOdHTn Do HeuacnX BnnaKnB.
b) He npaioIte 3 npnlaIom y cepeoBnui, de icHyc He6e3neHa Bn6yH BnacIIO nPncTyHocTi ropouhns piin, ra3iB a60 nnny. EneKtponpnuIadm MOHyTb nopOJxBaTu iCkpi, BiD RAHX MoHe 3aImMaTnca nnl a6o napn.
c)Пдчac npaцOBaHH3 npuJaOM He niDnycKaHTe Do po6oYoro Micza diTe Ta iHxN xIIOe. Bn MOKeTe BTPaTHTN KOHTpOJIb NaI npuJaOM,ЯKIo BaHa yBara 6yde BiDbepHyTa.
2) EJIEKTPNCHBAE3NEHA
a) 7TeNceIb npnlaNy noBHeH nacyBaTH Do po3eTHN. He do3BoJraTbcra 9o-He6ydb mHaTb B wTeNceJI. DnApo6OTn 3 npnlaadam, 9o MaIOTB 3axNChe 3a3emLeHH, He BnKOpNCTOByte aadAnTePN. BnKOpNCTaHH oprighaJIbHO r 7TeNceJI Ta HaJIeHHo! po3eTKI 3MeHwE pnsIK ydApy eJeKTPnuHIM CTpyMOM.
b) YHnHaTe KOHTaKrTy YaCTeT Tla i3 3a3emLeHmN NOBepXHrMn, Ra HAp., Tpy6amu, 6aTapeaMn OanaleHH, neyAmu Ta XoJIoDnIbHNHcAMn. KOni BaWe TiNo 3a3eMHe, icHyE 36ilbWeHa He6e3neKa ydapy eJeKTPnuHm CTrpymom.
c) 3axuatae npnaad BiD douy Ta BOIOnn. IonaanHb BOIN B eJeKtpoiHCTpyMeHT 36iNbUye pn3NK yIapy eJeKtpnHm CTPymOM.
d) He BnHOpncToByIte Ka6eIb IJIa nepHeceHH npHaJy, nIDBiWyBaHH a6o BNTaRyBaHH wTeNcEJIa 3 po3EtH. 3axuzaIte Ka6eJIb BiJ hapn, oII, roctpIX HpaIB Ta deTalei npHaJy, zo pyXaOTbcI. PoIkoJHEnH a6o 3akpyeHn Ka6eJIb 36ilb7yE pnsIK yIapy eJIeKTPnHIM cTpymOM.
e)ДЯ 3OBHiwHix po6it o6OB'3HOBO BnHOpNCTOByTe LHe TaHn NOOBHyBaU, Oo DOnyueHn DnA 3OBHwHix po6it. BnKOpNCTaHH NaOBoHyBaU, Ioo po3paxOBaHn Ha 3OBHiWi po6OTn, 3MeHwye pN3NK ydApY eJekTpNHm CTpyMOM.
f) Anho He MoKHa 3anO6irTu BnHOpNCTaHHo eJeHTpOpiuIady y BoIoromy cepeoBnUi, BnHOpNCTOByTe npNCTpii 3axNCTy BiD BnTOky B 3emLIO. BnKOpNCTaHHra 3pNCTpoio 3axNCTy BiD BnTOky B 3emLIO 3MeHJyepn3NK yIapy eJeHTpNCHNM CTpyMOM.
3) Bé3πEHA JIODEI
a) Bydte yBaHHMn, cIiHynte 3a Tm, 1o Bn po6nte, ta po3cyIINBO NOOBtce nIac po6OTn 3 eIeHTponpHnlaDom. He KopncTyTeCn npHnAdom, kIoo Bn CTOMJIeHi a60 3haxOHTce nIid dieH HApKhotNkIB, CNPTHnx HanoiB a60 IiK. MItb HeyBaXHoCTi pni KopncTyBaHHi npHaDom MoKe npH3BOuNTn Do cepNo3HxTpaBM.
b) BДЯгаTe OcO6NcTe 3axnche cnopdHeHH Ta o6OB'raHOBo BДягaTe 3axnchi OnyJIapn. BДяганнЯ OcO6NcTOrO 3axnCHOrO cnopdHeHH, RaHAp..-B 3aJIeJHKoCTi BiD BuIy po6it - 3axnCHOI MaChN, CpeuB3yTT, lo He KOB3aEbC8, KaChN a6o HabyuHNKIB,3MeHwye pnsck TpaBM.
c) YHnHaTe HeHaBMnCHOrO BMnHaHH. Nepu HIX BMnKaTH eJeKTPoPnpHnAD B eJeKTPomEpEny a60 BCTpOMJrAn yMynTOpHy 6aTapeU, 6paTn Horo B pyKn a6o nepeHoCHTN, BneBnItbcn B TOMy, 10 eJeKTPoPnpHnAD BmKHyTN. TpMaHH naIbca Ha BMnKaHi niD qac npeHeceHHeJeKTPoPnpHnAdy a60 BCTpOMJrHHB pO3eTKy YBIMKHytORo npHnady MoHe npN3BOIDHTNo TpaBM.
d) Ipeed THM, An BMHaTHn npHnaI, npn6epiB HalaorodHyBaJIbHI IHCTpyMeHTn Ta raHOBn KIOU. 3haxoJKeHHa HalaorodHyBaJIbHOrO IHCTpyMeHTa a60 KIOUca B DeTalI, lo o6ePTaEcbc, MoHe npn3BOdHTN Do TpaBM.
e) He nepeoiciHoiTe ce6e. 36epiraTe ctiHe nolooHenHa Ta 3aBHN 36epiraTe pIBHObary. Lcdo3BOiHTb Bam kpaue 36epirAtn KOHTpoJIb HaI npJlAOM y HecnoiBaHx CNTyauiX.
f) BdraTe npdaTHn OJr. He BdraTe npocToPi nOJr Ta npKpacn. He niDctabTne BOLOccn OJr Do DeTaeJe, 0p yxaOTbc. IpocToPi OJra, npKpacn Ta DObre BOLOCCmOHyb nonaATn B Detani, 0p pyxaOTbc.
g)RkuO icHye MOHJIbIcTB MOHTyBaTn NIOBIDCMoHTyBaJIbHI a60 NIOLOYOBIOBaJIbHi npNCTpoi, nepeKoHaIteC, 6o6 BOHn 6yJn Do6pe NiD'EDHAI Ta npaBnJIbHO BnKOpNCTOByBaJInc. BnKOpNCtAHHЯ NIOBIDCMoHTyBaJIbHOro npNCTpoI MOKe 3MeHUnTH He6e3IeKIn, 3yMOBJIeHI NlOM.
h) Do6pe 3HaHH eJeHTpoHCTpymeHTiB, OTPMaHe B pe3yIbTaTI qACTORO iX BHKOpNCaHH, He NOBHHo npn3BOdNTn DO CAMOBneBHeHOci N irHopyBaHH npnHcnnIB texNik6e3NeHN. Heo6epeKHa diR MoKe B ONDy MNTb Pn3BecTn DO BAKKOITpaBMN.
4) INPABINbHE NOBOJXEHHRA TAKOPNUCTYBAHH EJEKTPONPNIAADAMN
a) He nepeBaHTaJyIte npJaD. BnKOpncTObYTe TaHn npJa, 0c cneuaJIbHo npHa3NaYeHn dJa neBHOi po6OTn. 3 npHaTHm npJaADom Bu 3 MeHsIM pN3HKOM OTpMaTe Kpaui pe3yIbTaTH po6OTn, RaKIO 6yJeTe npauOBaTN B 3a3HaueHomy diAna3OHi notyHXoCTi.
b) He KopnctyItec npnaJOM 3 noWHOJHeHMMBIMnHaem. PpnaIa, RaHr He MOxHa yBIMKHyTu a6o BmKHyTu, e He6e3neuHm i Ioro Tpe6a BiDpemOHTyBaTu.
c)петд.TM,як рулвати lo-He6ydb Ha npiladi, mihrtn npiladny a6o xobatn npilad, BHTarHITb wTeNceIb i3 po3eTHn Ta/a60 BHTarHITb anymylTOpHy 6aTapeIO, RAIO BOHa 3HimaetbCra. Li nonepeJkyBaJIbHi 3axOJn 3TexhIKn 6e3neKn 3MeHswIOTb pN3NK HeHABMNCHOrO 3anycky npilady.
d) 36epiraTe eIeHTpOpiHn, IaHmN Bn came He HOpncTyTecb, daJIeHO bID iTei. He do3BoJaTe KOpNCyBaTnCra eIeHTpOpiHn aDom Oco6am, 0o He 3HaJomi 3 NOro pOboTOo a6o He YHTaJIu ZI Bha3iBKn. Y pa3i 3acTOcyBaHHr HeIOcBiJeHmN Oco6amn npilaHn HecytB cObi He6e3neKy.
e) CtapaHNO dOrJaIaIte 3a eJekTpoIHcTpymEntamn i npHaIaIam. IpebipTe, o6 pyxomi detani npHaIy 6e3dorAHNo npauOBAHn Ta He 3aIaHn, He 6yHn nolamaHmN a6o HactiIbKn NOnWKoHKeHMn, 06 ce MorIO BnInHyTN Ha FynKcioHyBaHH npHaIy. NOnKOHeH Detani Tpe6a BiPemontyBatn B aBtOpn3OBaHm MaNCtepHi, nepu HIX HmM MoXHa 3HOBy HOpNCTyBatncr. BeINka KJIbKicTb HeUacHN BnJaIKIB CnpuHReTbcra NOrAHM DOrJaDM 3a eJekTPOpnpHaIaAMn.
f) Tpmaite pi3aIbHI iHCTpyMeHTn Do6pe HaroctpeHmN Ta B uHcTOTi. CtapaHNO dOgJIHyTi pi3aIbHi iHCTpyMeHTN 3 rOCTpHm pi3aIbHM KpaEM MeHwe 3acTpJIOb Ta ix IeIe BEcTn.
g) BnKOpNCToBvIe eJeHTpOpiHJaI, npHJaIaIdo Hnx,po6oqi IHCTpyMeHTn T.i. BiIDNoBIdHO do cIHX BHa3iBOk. Bepitb Do yBaH npu cBOMy yMOBn po6OT Ta CneUPhiKy BnKOHyBaHOi po6OTn. BnKOpNCtAHNReEJIeTPOpnPraIaIb DnIpo6IT, dIra RKnX BOHn He nepeJ6aueHi, MoKe npu3BoDHTn Do He6e3NeuHx cnTuayi.
h) TpHMaIe pyHOaTHn i NOBepXHi 3axBaTy cyXHMn i HcTMMn, cIiHyIe, 0o6 Ha Hx He 6yIo OJNBn a6o rYcToRo MaCTnHa. CIn3bKi pyKoAaTHn i NOBepXHi 3axBaTy yHEMOHXJIIBNIOHTb 6e3neHHe NOBOXdKeHHa 3 eJeKTPoIHCTpyMeHTOM Ta IHO RO KOHTPOIIOBAHN B HeOuyBaHnx CNTyaIqIax.
5) CEPBIC
a) BiДаВаTe cBi npHJaHa peMOHT IиWe KBaIiΦiKOBaHmФaxiBcA rTa IиWe 3 BnKOpHCTaHHM oprHaJIbHnx 3aNchaTnH. Le 3a6e3neuTb 6e3neuHicTb npHaNy Ha DoBriYac.
IHCTPYK3 3 TEXHIKN BE3NEKN JIATOPUOBALbHOI INJIN
TopuOBaIbHi nII npn3Haeyi dI py i3aHn depeBHN a6o depeBOponi6Hnx Bnpo6iB, BOHn He MoKyTB BVHOpNCTOByBaTHc3 a6pa3NBHMn BiDpi3HMn Hpyramn IJ pyi3AHn MeTaJIeBNx MaTePiaJIb, TaHnx JIK npTyN, CTpnHHi, UINlbHn i T.D., a6pa3NBHI nII BNKInKaE 3aklnHIOBAHH pyXOMNX YACTIN, TaHX JIK NHKHI KOKyX. Ickpn BiD a6pa3NBHO p3aHHN cnaJIb HNKHI KOKyX, Bpi3Hn OTBip Ta IHNIPLactIKOBI DeTani.
- De ue MOHJIINBO, 3aCTOCOBYIte 3aTnCaui, 0o6 3aΦiKCyBAtN Bnpi6, 1o 06pO6JIeTBcR. RaIO BV TpIMaTe 3aROTOBHy pyHAMn, TO 3aBKn TpIMaHTe pyHy Ha BiDCTaHI He MeHwe 100 MM 3 o6ox cToPiH Ie3a NIIH. He BnHOpNCbOByTe 1o NIIHy dIpa Ii3aHHa WMaTHIB, Aki 3aHaJTo MaJI, 1o6 ix MoHHa 6yNo HAdiHNO 3aTHCHyTH a6o BTPmAtn pyHO. RaIoo Ba7a pyKa 3hAxOAnTbcra 3aHaJTO 6IIn3bKO do Ie3a NIIH, iChye nIDBnuIeHn pU3NK OTpIMaHHra TpaBMn BiD KOHTaKTy 3Je3OM.
3aROTOBHa Ma6 ByTH MlUHO 3aTnCHyToIO a60 npHpInIeHO IO DO O6MeHyBaUa, Ta i Do CTOny. Hi B HOMy pa3i He NODaBAuTe 3aROTOBHy Do Ie3a Ta He PiXTe "BiD pyH" He3aKpinIeHi YI pyxomi 3aROTOBKn MOHyTb 6ByTH BKNHyTi 3 BeJIHKoHO UWBnHICrTO Ta 3aBDaTH TpaBM.
- WTOBxaIte Nnly Kpi3b 3arOTOBHy. He TargHtB Nnly Kpi3b 3arOTOBHy. Lio6 3po6nTu po3pi3, NiDhImiTb roJOBHy NnN i BHTaRHiTb ii HaD 3arOTOBHO 6e3 pi3aHHa, 3anyctiB dBHy, HATNCHTb roJOBHy NnN BHN3 i WTOBxaIte NnLy Kpi3b 3arOTOBHy Pi3aHHa BNTaRyBaHHi, MIOBipHo, PnH3BeDe Do TORO, Ioo Je3o NnN niDhIMetbcra Ha 3arOTOBHy i 3 CnIoIO BiDKHe By30 nDCHa do OepaTopa.
Hikoi He nepetHaTe pyKIOHAMiyeHy liHIO po3pi3y Hi cnepey, Hi 33aIy Ie3a IIIN TpIMaTI 3aROTOBky "CxpeueHmpyKaMn", TO6To TpIMaTI 3aROTOBky npabopyu BiI INbHOrO DnCKa LiBOHO pyKOIO Ta HABNAI, dyke He6e3neHo.
He npocrae pyHy 3a 06MeHyBauch 6nHcH He Hha 100 MM 3 o6ox cTopih ne3a nnH, 0o6 BndaJNTn DepeBHI 06pi3HN, a6o 3 6yDb-koI iHWOI npuHH, KOJI ne3O 06epTaEcHa6nnKeHHN ne3a nnH, 0o 06epTaEcBcR, do BaWoI pyKn MoKe 6yTu HoeUeBnHm, i Bu MoKeTe OtpMaTH cepNo3Hy TpaBMy.
OrnaHbTe 3arOTOBHy nepei pi3aHHAM RAIO 3arOTOBb BnRhyta a6o deOpMOBaHa, 3aTnCHiB II 3OBHIshbOu BnRHYTOO CTOPHO DO O6MeHyBa. 3abHd nCTeHTe 3a THM, 06 MIX 3arOTOBHO, 06MeHyBaem i cToIOM He 6ylo 3a3opy No Iihii po3pi3y BnHyTi a6o deOpMOBaHi 3arOTOBK MoKyTB CKpyyBaTnCra 60MiUyBaTnCra IMoKyTb 3aTnCKaTN NOJIoTHo Ie3a NiINPiJ cac Pi3aHH. 3arOTOBKa He MaicMICTHTB C6bi CBaxIB a6o CTOpOHix PpeMetIB.
He BnHOpNCTOByIte NnIky, NOH CTIN He OUYIeHO BiD yicix IHCTpymeHTiB, 06pi3KIB DepeBHH ToIO, 3a BnHATKOM 3aROTOBHN DiOHe CmITTA a6o He3aKpinJIeHi UMaTHKn DEpeBa a6o iHUnx PpeMeTIB, IO KOHTaTKYOTb 3Je3OM, MoKyTb 6ByTN KHyTi 3 BnCOKOIO WBNDKICTO.
Pixte TIlbKn OHy 3arOTOBky 3a pa3 CklaJeHi KJIbKa 3arOTOBOK He MoKyTb 6yTu HaJIeKHM UINHom 3aTnCHytI a60 3akpinHe I MoKyTb 3aTnCHytN Je3o a60 3CyHyTncr NiJ vacPiahHra.
- Ipeed BnKOpHCTaHHaNnepekoHaTecra,TO TOPoBaJIbHa Nla 3aKnPiJIeHO a6o BcTaHOBHeHO Ha pIBHI TBePdIpo6OiINOBepxHi.PiBa i TBepda po6Oa NOBepXHa 3HnHyE pn3NK TORO,IO TOpOBAJIbHa Nla 6yde HeCTa6IbHoIO.
IpaHyTe cBOO p60Ty! HoKeH pa3, KOnB 3mHcTe HanaWtBuHaNry KyTa haxNy a6o fachn, nepeHOaHTecra, yO peryIbOBaHN O6MeKByBaC BCTAHOBHeO npABnJIbHO dIy NiITpUMHn 3arOTOBHn i BIn He 3aBAKaTHmeJe3y a6o cnCTeMI 3axNCTy He BMkaIOU IHCTpyMeHT Ta 6e3 3arOTOBKn Ha CTOLi, nepeMICITb Je3O NIIIN, IMITyOuH NOBHN po3pi3, Ioo6 nepeKoHaTnc, 10 He 6yDe HiaKHX nepeXKOd a6o He6e3neKN po3pi3aHHN O6MeKByBaYa.
3a6e3neuty aedeBathy niTpMHky, TaHy naIOOBhybayi cTolib, KOzIy dIy NIIyHHa, TaIHwe dIy 3arotobHN, hka wnpwe abo doBwe ctIbHnCi. 3arotobKn 6ilbwoIO DOBXHNu YI WIPHNH, HIX CTIN dIy TopouBaJIbHOI NIIH, MOxHTb nepeKOCHTNCRA, RIKUO BOHn He 6dyTB HaidinHO 3akpinLeHi. B KInci Biip3y deTaJIb a60 3arotobKa MoKe NiHrTHn HHHH 3anO6iKHNk a60 ByTu KNHYTA OBeptOBHM Jle3OM.
He BnKOpNCToByTe iHsU JIOHy B AHOCTi 3aMIHNoOBHyBaay CTOy a60 B AHOCTI DOaTHBOI onopn HecTa6iBHa onopa dIra 3arOTOBKn MoKe npNBecTn Do 3aTnCKaHHN Je3a a60 3MiueHHN 3arOTOBKn NiJ Yac Pi3aHH, BTraryuOn Bac i NOMiYHnKa B o6ePTObe Ie30.
Bippi3ybaHa DeTalb He Ma6 6ytn 3aTnchTy a60 npHTncHyta 6ydb-ANKM YHOM Do o6eptOBORo Je3a Nnnr KkO BOHa O6MeKeHa, HapnKlnd, 3a DOnomoroIO O6MeJyBaiv DOBXHHN, BiDpi3aHa DeTaIb MOKe 3aKnHHTn Je3o Ta BiDJIeTIu 3 BeJIHKOIO WBNDKICTIO.
3aBKnBuHOpncTOByte 3aTnckau a60 npnctocyBaHHn, npn3hauehe dI npabNbHOi nIDtpmKn KpyrIoro MaTepiany, TAKOra NK CTpnKHi a6o Tpy6n CtpnnHI rki MAIO TB TEHNeUIO KOTNTcR nIq Yac piaHHn, 3MyuOuN Ie3o "3aKyuBaTu" i 3aTAYBaTH MaTepian pa3OM 3 pyKOIO nIe3o.
JaTeJe3yHa6patn NOBHOI WBNHOCti 06epTaHHdo HOHTaHTy i3 3arOTOBHOU LcE 3MeHNITb PN3NK TORO,IO 3arOTOBHy 6yde KINHYTO.
- RaTOBHy a6o Je3o 3aKnHnNo, BmHnITb TopOBAIbHy nny. DouekaTec 3ynHHn BCix pYXOMnx YactnH, Bi'edHaHTe BNky BiD dHepeNa HNBHeHr Ta/a6o BmMItb akymyIaTOp. Notim BnBilbHtB MaTepiA, 0o 3aKnHnB PpOdBxehn
ПИЯHHЯ 3aKINHeHOI 3aROTOBKN MOKe ПиЗВecTи DO BTPaTN KOHTpOJIH a60 NOWKODKeHnT TopIOBaJIbHOI PIIIN.
Iicra 3aBepweHH po3pi3y BmHnHtB nepemHaay, ytpmyte roOBHy nIIKN OnyueHO i NoeKaHTe, noHNJe3O 3ynHHTbcR, nepw HIX BnMaTH BIdpiaHy cactHy TaryTHcR pyKOIO do Je3a, 0o o6epTaetbC, He6e3neHNo.
MiueHOTpmae pyu npn BHKoHaHHi HENOBHOro po3pi3y a60 npn BmHaHHi nepemKaa do TOrO, RaTOLBknn NOBHCIO ONCTNbCra TaMbMBA iINIMoKe pNBecTu DO TOrO, 10rTOJOBKa paNTOBOnCTNTbC, 10MOKe pN3BeCTNu Do TpaBM.
DOATHOBI BHA3IBH3 TEXHIHN 6E3NEHN
Hnndn ctpmy BnKlnkaotb KopoTkoachi nepenadn Happyr; npn HecnpnyTINBx yMOBX ehepro3a6e3neeyHH MoJInBn BnInB Ha iHwe BCTaTHyBaHH (HKIO impeHaC cnTeMn HNKe 0,219 Om, mAlOnMoBipHe BnHKnHeHH HeCnpaBHOcte); RkUo Bam Notpi6Hi DoDAtKOBi Po3'rcHeHH, BN MOKeTe 3BepHyTNC B MlCeBy opraHiaciio eHepronoctaayHH
3AΓAJIbHE
BnKOpncToByyTe ue IHcTpymeH TLWe DpO3NJIIOBAHHdpeBHN
- Ipeepo60toIO nepeBipTe BiIDnoBIDHicTb CTpyMBy Mepekei3 CTpyMOM, No3HaueHi Ha iHCTpyMeHTi
He ctiIte Ha iHCTpymenti a6o horo nictabuI IpeeknidaaHHr iHCTpymehTy a6o BnnaikOBn KOHTAHT 3 iHCTpymENTOM MOKytb npn3BecTNo cepno3HNx TpaBM. He 36epiraTe MaTePiaJn Ha iHCTpymenti a6o npuy 3 Hm TaHm YHOM, u6o Do Hnx MoKHs 6yIo DOTARHYTNC, liNe CTOrHn Ha iHCTpymenti a6o horo nictabuI.
Ipeep peryloBaHnA a6o 3amHO npnaa o6OB'3HOBO BnIMtB BNHy i3 ciTbOoi po3eTHN
3aBKn BiID'cHyIe BnIky BiD dKepeJa HnBHeHHnpeed TpaHcnpTyBaHHm TopoBaJIbHOI nNn BiE'ndHaIte BnIKy, onyctITb By30J rOIOBkn i 3aFikcyIe II B Notpi6Homy NIOJOKeHHi, BnKOpNCTOByIte pyKy IJn nepenecEHn I OJHe 3 aRJIb6JeHb IJr pyKn B OCHOBI nNkN.
He 3aHwaIte IHCtpymeHT 6e3 Hargy do Tnx nip, NOHN BIN NOBHCIO He 3ynHHtbcra
- Ppi pi3aHHI 3aROTOBOK HnPaBnBHOi FOPMN pnaHynte CBOIO PO60Ty TaH, 0o6 BOHN He 3icKOB3yBaHn, He 3aueMJIaN Ne3o i He BnPBaHnca 3 BaOoi pyKn
Ley iHCTpymeHT He MOxHa BnKOpNCTOByBaTH OCO6aM BIKOMdo16 pOKiB
- Léi iHCTpymeHT He πiIXoJNTb dIa MOKporo po3nIIIOBaHHa
BHKOPNCTAHH NO3A PPMIeHHrM
Ipi npo60ti HaDbopi niKlnHouaTe iHCTpyMeHTpee3 3anobixHHNK KOPOTKOrO 3amHKaHHra (FI)i3 MaKcImaJIbHM NyCKOBm CTPymOM 30 mA TaBnKOpNCTOByte NOOBKyBaU, pni3HaueHn Dnla3OBHIuHIX po6IT, 0o O6IaHaHn 3axNCTOM BID 6pNi3IB
NEPEBVKOPNCTAHHJM
BnKOpNCToByTe NOBHCIOpo3rOpHeHm shyp nooBHyBaHa, KIn MOKe BHTpIMyBaTn HaBaHTaKeHHB 16 Amnp
- OДягайт e 3axиси Oулари, 3ac6и 3axиcty BOLOCs, Ta 3axиch i pykabuyn
-ПИЛВIDТAKNX MaTepiajIB,ЯС CBINHQUOByTpmyUOy aфap6a,ДeякI npoOДn DepeBa,МиepaJIM MeTAl, MOHe 6bTy NkIdJIbBIM (KoHTaKT i3 TaKIM NIIOM a60 IOrO BdIXaHH MoKe CTATN pInuHIOB HnHKHeHH B OnepaTopa a6o ocio, lo nepe6yBaIOTb nopyu, anepriHnx peakui /a6o pecnipaTopHx 3axBOpIOBaHb); NaIraTe pecnipatop i npauToTe 3 nIOBnDAJIauOUM npIcTpoE m nd yBIMKHeHHI hCTpyMeNTa
-ДянИ ВИДИ ПИЛУ KIACNФИКИТСЯ.KAHUCEPOREHHI (HAnpIKIaI,Д.убOBиAбOБKOBиПИ),OC6BnBO B CNoJyUeHHi 3 Do6aBKaMn IJI KAHNZIOBAHHI DepeBUNH;HaJaRaIte pecnPiaTop i npaioTe 3 ПИLOВДАЛЮЧМnpHcTpoEm nId Yac yBIMKHeHHI HcTpymEnTa
CiiyTe iHCTpyiAm no po6oTi 3 MaTePiaIaMn, npOduyUOuHMN nII
He 06po6nIe MaTepiA,io MicTb ac6ect (ac6ecTBaHaTbcra KaHcepeoreHHM)
HikoJI He BnKOpNCToBMyTe CEi INCTpyMeHT 6e3 opnirHaJIbHOI CnCTeMn 3axnxNxO6MeJyBaUIB
- Ipeep KOHHM BHKOpNCtAHHm nepeBiprTe npabNlbHicTb 3aKpnTTraXnCHOrO KOHyxa
3a6opohraetbcBnKOpncToByBaTHnnky,KuO 3axnHKOxyHe pyxaetbcBilbHO Ta Opa3y He 3aKpNbBaETcb
3a6opohreTbcfikcyBaTHnH npNB'3yBaTHn 3axnCHn KOHyx y BiDkPNTOMy nIoKeHHi
3a60pHReTcBnBnKOpNCTOByBaTHiHCTpyMeHT 6e3 BCTaBKn CToJa; 3aMIHiTb DeΦeKTHy HN 3HOWeHy BCTaBky CToJa
- Iepw hiX noaTu po3nIIOBaHH, BndaIiB Cbi nepeuKOi Ha nobepxHi Ta nid liHieO po3nIy
He donyckaIte nookdKeHb, kIMoKHyTb HaHeCTN shpyuH, uBxin iHui eIemEnTHn BaUOMy Bnpo6y; BndaiITb ix neped noatkom po6OTn
ARCECYAPN
Hikon He BnKOpncToBnyTe B cBomy iHcTpymEnTI uifyBaIbHi /piKyuDiNCH
SKIL rapaHTye hainy po6Oty IHCTpyMeHa TINbKN npn BHKOpNCtAHHi BiIOBIDHO npNla, rHI MOHHa oTpMaTu y BaWoOro duJepa ipMn SKIL
- Ipn yctahOBu/BnKOpncTaHHi HacaOnk He BiD fipMN SKIL, DToTpMyntecb IHcTpkyuB iDnOBiHoro 3aBOda-BnPO6HnKa
BnKOpNCToByIe NIIe NIIJIbHI DNCKH,IO BIDNOIBaIOb XapaKTepNCTIKAM,3a3HaueHIMBcii IHcTpkyuii,nepeBiPeHi 3a EN 847-1 Ta MaIOb BiINoBIdHe MapkipyBaHH
BnKOpncToBynte nIne npnaTn, npnyctnMa 1WbNdkicTb o6epTaHHraKO rK MinIMyM BiNDOBiae HauBnui WbNdkoCTi IHcTpymeHTa 6e3 HabaHTaKeHHa
Hikoln He BnKOpncToBnyTe Ie3a, BnroToBneHi 3. uBnDkopi3aIbHoI cTani (HSS)
He BnKOpNCTOByIe Tyni, DeΦopMoBaHi Ta NOLaMaHi HJIK
BnKOpNCTOByIeJe3a3OTBOPOM,RAHNI TOHO BIDNOBIAe WNNHNeJIIO IHCTpyMeHTa 6e3 IIOΦTy; 3a6oPONHeTbCBAHKOpNCTOByBaTH MyΦTN Hn nepexiHNIKn DnI npNlaWtYBaHHra Je3 3 OTBOPOM 6iNbWoOrDiAmETpy
- BepeKiTb HacaKn BiD yApiB, CtpyciB i MacTuHaPiD YAC BHKOPNUCTAHH
BnHOpNCTOBHyOuHInCTpyMeHT,He DOHJaDaIte HaMipHO 3cunJIa (3cunJIa MaE 6yTu NOMiPHMa T aNoCTiHMM, uo6 3anobirn nepeprpBaHHIO BICTPJe3a
Ta, Ka o po3pi3aIObCra nlaCTNKOBi DeTani, nlaBHeHHIO nlaactnka)
TpmaTe naIbci Ta pykn noani BiJ ne3a, 0o o6epTaetbcra
JaKuoJe3o 3actprrno,HeaHNO BmHKHITb iHCTpyMeHTi BnMItb BNkHy 3po3EtN;IINe NICJra CbOro BNTARHITb 3a6IOKObaHy 3arOTOBky
- Y BnnaKy eJleKtpnHoiQ mexaHiHoI HeCnpaBHOCTi HeraHOB BmKHITb IHCTpyMeHT Ta BnMIb BnIKy 3 po3eTKN
- RaHpO uHyp noWKoDHexHn a60 npopiz3Hn npn p6oToI, He doTOpKaHTecrdo HbOrO i HeaHHO BNTaRHTb NOrO 3 po3eTKn
KateropnHO 3a6oPOnEbCk KopnctyBaTHcHCTpymENTOM npn NOxKOJKeHHI eNeKTpNHO Hypa;3amHa Ha aHaIOUHyNH NiROTOBLeHHuHyp NobHHa npOBODNTNCr opraH3aueio 3 o6cLyroByBaHH.
JIa3EPHE BnIPOMIHIOBAHHI
He HanpaBraTe Ia3epHn npomihb Ha IIOeI a6o TBapHH, i cami He DnBItbcHa npramn a6o BiO6paHbAHn Ia3epHn npomihb (BH MoKe 3aclinHT IHINX IIOeI, CnpHnHITn HeUaChi BInaDKn a6o NowKOHTN Oci)
- Y paazi noTpaJIaHHHaIa3epHoro npOMeHb OKo, HABMnche 3aIIIOuItb oOi i BiJaPa3y BiIBePHiTbcra BiD npOMeHr
HiHOro He mInaIe Tb Ia3epHomy npncTpoi
He nBItbcB npomihb na3epa (na3ephe BnnpomHHOBAHH)
He nBItbca Ha npomHb Ia3epa uepe3 6ydb-ri ONTnHi npIaI (Taki k 36ilbUyBaIbHe cKIO, Teleckon qn 6iHoKnb)
He Kopnctyntec npnlaom y Micx, de e 3auncti piHNH, raN nn
He Kopnctyntec npnilaon, koi npopye dITN
He 3amHIOIte BCTaHOBJIeHn Ia3ep Ia3epom IHJoro Tnny
NICJIY BHKOPNUCTAHH
Iicra BmKHeHH HcTpMeHTa HiKOn He HaMaarTecb 3ynHnTH OeepTaHH HacaOk 3a DonomoroIO npKaadaHH nonepueHo i cn
-ПибраiteобпizнчиinuiчacTNH3aROTOBKNi3 30HNpi3AHJNJIuIe nicJIrTO,KOJINBCIPyXOMi qactHHIOBHICTU 3ynHHTbcR
- JIe3O NIIKIN CINbHO HArpIBaEbCn iID Yac pOboTn; He TopKaItecJe3a, NOH BOHO HE OXOJIoHe
36epiratn iHCTpymeHT y npmiiueHHI B cyxomy, He DOCTynHomy dIra diTei micui
IORCHEHHA DO YMOBHINX N03HAQOK HA IHCTPYMEHTI
②Перед ВИКОРИСТАНДМ почитугкцию i3 3aCTOCYBAHHH
③ OyraTe 3axnChi oyjnp Ta 3ac06n 3axnCTy BOLOCC
He6e3neuHa 30Ha! 30Ha 6e3 pyK. He Ha6nkyTe pyKn, naIbci a6o nepednniuyr do ciEi 30Hn.
⑤ PódbiHa i3oJauj (3a3eMJIIOUOHy npoBiHneNoTpi6eH)
⑥ He BnHJaTe eJeKtpoiHcTpymeHT Ta 6aTapei pa3om 3i 3BnHaHm CMITTM
⑦ Ja3epHe BnnpomHOBaHH/He DnBiTbC8B npOMHb /Ja3epHn npOyKT 2 KIacy
BNIKOPNCTAHH
- MoHTaH -chpiitb TpaHcnpTHy pyKy E 6oIaMn 23a DonomoroIO WecTnRpaHHoro KIOuHa AN
-BCTaBTe pyKy fikCaTopa TopuBaIbHoI nIIIN AE B nepeHIO uactHy CTOnly 10
-BCTaHOBIb pyxOMnO6MeKyBaU (mB. po3di PeryIOBAHHpyxOMrO O6MeKyBaa)
ΦiKcyBaHHIhCTpyMeHTa (NIOJXeHHI
TpaHcnpOpTyBaHHa):
-NotCyHbTe By30J rOIOBKn Do yNOpY B HnPpMky
obMeKyBaA S (TpImaTe BiDcTaHb npu6I. 5 cm) i
3aTnHtB cTOnOpHy pyHy AH ①b
-BCTaHOBITb KyT faACKn Ha 0^ (DINB. po3dI
(DnB. po3in YcTaHOBKa KyTa TOPIOBaHHa
-HaTnChiItbpykB BnH3OdHiieIO pykoIO, ODHouacHO
HaTnckKaIOUCh CTOnOpHNI WITnOCT CInHOpyKIO
-HaMoTaHTe UHyp KINBJIeHHA
-BINKOpNtOByIe TpaHcnpTHy pyuKy E⑧ nla
nepeheceHHIHCptymHtY ⑪d
-КрIM TOrO, BnKOpNCtOBuYTe 6iHi pyuKn DJIa
nepeHeceHHH IHCTpyMeHTy ⑪e
!HikOnHe nDhimaTe iHcTpMeHT,TPMaOuOuNcb
3a oCHOBHy pyuHy a6o uHyp HnBJIeHHA
BcTaHOBHeHH iHCTpyMeHTa Ha po6Oy noBepxHIO 12
!dIa6e3neuHocTI BHKOpNCtAHn 3aBKn BCTaHOBNIoTe IHcTpymEnT Ha pIBHy Ta CTiHy po6Oy NOBepxHIO (HaNPnKlaD, BepCTaN)
-BNKOpncToBnyTe 4 MOHTaXHi OTbOpn F dJa KpInIeHHA
IHCtpymeHTa do po6ooi NOBepxHi BiINOBiHNMn GBHNTAMN
-MoXHa TaKoK KpiINHTiHCTpyMeHT Do po6oOIO NOBepxHi 3a DonOMOrIO HaABHNx y npOdaHy cTpy6uH
-ДЯ CTa6iI3auiI INCTpyMeHTy MoKHa peYIIOBaTIN BnCOTy onOpHOI HiKKn G
-BKOCTI aJIbTePhaTHINIHCtpyMeHT MOXHa BCTaHOBNTN Ha iNDCTaBky Iyra TopuOBAJIbHoI NIIIN
!npoHTaHTe Bci nonepdHexHH Ta iHcTpyKui, 0doaOTbc Do niCTabHn DJI nnH
- Pn6paHnO6pi3KIB/CTpyKHH 13
KOM6iHOBaHi po3piN 19
-KOM6iHOBaHI p03piH BImaraIOTb yCTaHOBJIeHHRAJK TOpN3OHTaIbHorO, TaK i BeptnKaIbHorO KytIB CkOcy
!He BnHOpNCTOByIte NHyB DeAHKx KOM6iHaicix HaxNy iΦaChn, Aki MOKyTb npNBecTH Do BHHKHeHHa nepeWkoM iK HOB3HOIO I HepyXOMO YoACTNHAMn PnIN a6o MIX HOB3HMn YactNHAMn i 3aTOBHO- o6 3po6HTn PO3pi3, 3HIMtbyPxyOMN O6MeKByBa, pyHy 6JIOHYBaHHpyxOMOro 06MeKByBa4a i pyKy p6oOro 3aTnCKa4, Rnso nOtpi6Ho.
! 3aBKnCnoaTy TecTyIe Ha B3ipci metaio6pyxTy
- PerylnoBaHHpyxomnxObMeKyBaiv 20
-nocla6te pyky V, 06BnBilbHHTn OMeKByaU (-i) U -nocla6te pyky V 6Ibse, 06 MoKHa 6yIIO 3HrTn BCTaHOBTn OMeKByaU (-i)
-3aTHiB pyKv V, uo6 3aΦiKcyBaTu nOToPi6He NOLOXeHHA
! neped nochatom po60tn 3 iHctpymeHTOM nepehoHaTeCra, oO pyxomi o6MeHyBaui HaIiHo 3aKpinJeHo
!ДЯDEAHKHX KOM6iHaciHaxnIy iΦaCHN TaHOH MOHe 3HaDo6HTNCr 3HrTNpyHy
JIiHiaIa3epy ②
-ДлгспreamOBуBaHHI INCTpyMeHTy NO3dOBH Heo6xIDHII liiH pO3pi3y,Яka NaKpeCJIeHa Ha Bnpo6i -BKNIOuATn Ta BHKIOUaTn LiHr Ja3epy 3a DonomoroHO HATNCKAHH KNONKn AD
!do noatny po60tn, nepebipte cn cibnadae liinna3epy i3 HamiyeHO LiHieo nponny Ta 3po6itb np6hni Hapip3 Ha Henotpi6Homy mMaTochmy MaTepiany
- Po3nHIOBaHH6e3 KOB3HNx pyxIB (mJI Bnpo6n)
-ncna6Te pyky fikcatopa AH y BnnaHy, kso BOHa 3aTaryTa
-ncyhTe roIobky nnn Do ynpO B hAprrMHy
06MeHcyBaay S i 3HOBy 3aTnHiTy pyuKy fikCaTopa AH
! RaHcHe 3a6bNoKByBAtm Mexahi3M, ToJe3o
MOHe panTOBO 3acOHTn Ha BepXHIO qactHy
3aROTOBKn Ta pyxatmEtbcr y 6iH onepaTopa
-yctahOBiB iHCTpyMeHT ypo6oNeNoJoxeHHA
! nepeHOHaTecn, 0o 3aROToBHa MiHOn npHKpINHeHa Do PO3NIIHOBaIbHOrO CToJa Ta o6MeKyBaay S
- yBIMKHiTb IHCTpymENT, BiDnyctNBuN 6JIOkyBaHHA J i NOTARHYBUN 3a RoJIOBHN BIMNKaU AI
! He nepexpeuynTe pyu npn po6oTi 3 roIobHOIO nnu ② a
-розилгп Te 3arOToBky i3 piBHomipHm npocyBaHHM
! nepw, hix ne3o nnTOpKHeTbCn Bnpo6y, IHCTpyMeHT MaC npaOBAtHa NOBHy WBNHicTb
-BIMKHIb IHCTpymeT, BiDnyCTNBuBn BmNKaH Al
-3aueKaIte, nOKn Ie3o nnHIO NBHCIO 3yHHNtbcra, nepu HIX NOBILbHO NiHrTn rOLOBky nnH
P03NIIIOBAHH3 KOB3HM pyxOM (Wnpoki 3aROTOBKN)
!nam'raTae, 0o onncan nn daJI MeTOd e cENHM 6e3neuHMM MeToDM
-He TaHitb Nmny Kpi3b 3arotOBky
-NotraTe pyHky fikcaTopa AH y BnnaHy, kkuo BOHa 3aTyrHyTa
I nepehoHaTeCn, 0o 3arOToBHa MiHOpnpKpInHeHa Do po3nnIOBaIbHOrO cTolTa o6MeHyBaVa S
-BiCyHbTe TOnOBHy NnBn BiD O6MeHyBaay S Ha TaKy BiDcTaHb, 06 Je3o NnNn 3hAxOuNocnpeed 3aROTOBkoio (24)
- yBIMKHTb IHCTpyMeHT, BiDnyCTNBsN 6LOKyBaHH 2 i NOTARHYBUN 3a RoJIOBH NBMnKa
! He nepexpeuTy peyn npn po60Ti 3 roIobHOIO nn 23a
-ITOBXaIte roIOBky nINy HAnpRmky Do O6MeHyBaHa S Ta po3nHIOte 3arOTobHy i3 pIBHomipHIM npocvBaHHM 24
! nepw, hix ne3o nnTOpKHeTBcBnPo6y, IHCTpyMeHT Mae npaOBAtHa NOBHy WbndKiCtB
!HnHnHn HOKyX He BiDHPuBaetbcr ABTOMaTHUHO,IO MOKe CTaTHc3a NEBHX yMOB(HaNPnHLaAD,3arOTOBKa,po3Mip RaHOI dyKe 6n3bKn Do MaHCmMaJIbHorO),BaM,MOHNBO, DOBeTeBCa BiHKPTN KOHyx BpyHy 23b
-BIMKHIb IHCTpymeT, BiDnyCTBUN BmHKaH Al
-3aueKaHTe, nOKn Ie3o nnIIOBHCtO 3ynnHtbcra, nepHIK NOBilbHO NiIDHTN rOLOBky nnI
BunnIOBaHH npop3iB 25
-BCTaHOBIb NOTpiHy rIi6HHy 3a DOnOMorOIO 06MeKyBaCa rIi6BHN AK i 3aΦiKcyIe Ha MicCe, 3aTfRhyBwn raIKy AM
-DepeB'Ha npoklaKa Ma6 6yTu NomiueHa MIX3aROTOBkoIO I O6MeKyuBaHcMa NoCTiHy rIn6Hy NOBCi DOBKnHi KaHaBKn
I nepekoHaTeCn, 0o Ie3o He 3aCTprae B 3arotobu
! 3aBKnCnoaTHy TecTyIte Ha B3ipci metaio6pyxty
- 3amHaIe3a nnHn 26
!BnHATN BnIky 3 po3eTHN
-Bi3bMitb WeCTnIpaHHN KIOH AN 3 KOHTeHepa AO -TpImaTe 3axnCHN KOxH A y BiKpntOMy NOJKeHHI
- nocna6Te rBnHT KpuiuA AQ (He BnHpyuYte rBnHT nobHicTHO 26a
-NoBepHiTb 3axnCHN KOxUx A NOBHCtHO Ha3aJ 26b -HaTnCHiTb KhoNky 6loKyBaHHu 7nnHdJeAP Ta yTPmYnte II,doN He 3HimTe 6oIT Je3a AR,
3ATODHHHKOBOIOCTPIIHOIO(=yHaNPaMky CTpiIKN,3o6paKeHoIHaJeziPiNKn)
!HaTnchaiTe KhoNHy 6IohyBaHnHa WnHdJIeAp, TiIbHN KOJIN HoDHi eIeMeHT IHCTpyMeHTa He pyxAcTbcra
-Biynctitb KhoNky 6nOkyBaHHa nnHdA
-3HIMITbФlaHeuB ASI ne3o nnnK
1 3amHIOHe Ie3o NnHN, BCTaHOBIOUOHy Noro TaHIM YHHOM, 0o6 3y6ci Ta cTpiHa Ha Je3i BHa3yBaIN B TOMy HnHaPmHy, 0o H cTpiHa Ha 3axnCHOMy KOxyA
-BCTaHOBtB Φnaneu AS 26c
-HaTnCHiTB KONKy 6IOKyBaHHJ IINHdJIAP iYTPMMyTE II, NOKN Bn 3aTAYcTe 6OJI TJe3a, NOBepTaOnuN WeCTnRpaHHN KIOU AN IPOTNI FOINHHIKOBOI CTPIIKHa 1/8 o6oPoTy IJIbHiJe HIX MOKHa NaIbCuAMN (3a6e3NeUe npocIn3aHHN POLOTHA Je3a, KOIN BOHO CTnKaEtbcra 3 HaIMipHNOM ONOPM, TaKIM YINHom 3MeHsUOCh npeBaHTaHexHHJ DBNrHyHa i BiDaCy NiLi)
-3aTnHtBnHT 3axnchoi naheJI AQ
- 3amHa BCTaBKn CToJa AT ②6
Ipoueypa 3amHn DeΦeKTHoi YN cnpaocboHaOH BCTaBKn CTOLA:
!BnHrTn BnIky 3 pO3eTK
-Bi3bMitb WectnnpaHHN KIOU AN 3 KOHTeHepa AO
-BNkpyTb yci 6 rBnHTn, kNOKa3aHo Ha MaJIIOHky
-3HIMITbCTapy BCTaBky CTOla, NOCyHyBwN II CNOuatKy Bnepei, a NOTIM BNTYrHyBwN II NOBHICTIO
-BCTaBTe HOBy BCTaBHy CToJa
!MiUHO 3aTnCHiB yci 6 rBnHTa
- IpeBipKa/peryIIOBaHHBnpiBHOBaHHna 90° 28
! BnHrTn BnKHy 3 po3eTHN
-NoBepHITb CTIN NIN B NOLOXeHNHaHXUY 0^ i 3aikcyte Ioro Ha Micci
-NOBepHiTb roIOBky nIIN B NOJIOHEHHaACKN 0^
-Onyctitb roJbKny nnni 3aqiKcynTe II Ha Micci
-inepeBipTe HaABHicThyTa 90° mixIe3OM i cToIOM 3a DOnOMOrOIO KocINHua
-3a Notpe6n, BCTaHOBiB JIe3O Ha 90^ TaKIM YINHOM:
1. BiDnyctitb puKy TpuHOrn W
2. BiDpyrIIOTe rBnHT Y WeCTnIpaHHM KIOUcH 4 MM (He BXODNTb B CTaHapTHy KOMJIeKtaIQHO)②b
3. nepebipTe ue pa3 KBaDpaTOM
4. cKnHbTe iHdHaTOp faChn Ha 0° 28c
-ПepeBipka/peryIIOBaHHn BnpiIBHIOBaHHn Ie3a Ha 45° 29!BnHrTN BuNkY 3 po3ETHn
-NoBepHbTcIINnINBnoJKeHHaXnly 0^ i
3aΦiKcynTe Horo Ha Micui
-BiDnycTiB pyuKy TpuHOrn W
-BCTaHOBIbperyIbOBAHn KInCeBn ynp fackn AA Ha 45^ 29b
-IOBepHItbToIOLBkyNIIKINBIIBO
-NepeBipTe HaABHicThb KyTa 45° mix ne3om i cToIOM 3a DOnOMOrOIO MaIKN 29a
-inepeBipTe,io6 iHnKaTOp BepTKaJIbHIX KyTIB cKocy X 6yb Ha no3Ha4ci 45^
-3a nTope6n, BCTaHOBiB JIe3o Ha 45^ TaKIM YINHOM:
- BiDpyrIIOHTe TBHNT ZJe3OBm KJIouem Ha 10 (He BXOINTB BCTaHdAPTHy KOMPNeKTAuio)
- NOBTOPO nepeBipTe KyT KOCHHcEM
-3a notpe6n noBtopitb npoceDpy dny yctaHOBN 45° Bnpabo
-onycitb roJOBky nnni 3aqiKcyte II Ha Micci
- IpeBipKa/peryIIOBaHHBnpiIBHOBAHHO6MeKvBaHa 90°
!BnHATN BnIky 3 pO3eTHN
-IOBepHItb CTIN NINB NOLOKeHHa Haxnly 0^ i 3aikcyte noHa Micci
-onyctitb roIobky nnni 3aΦikcyuTe II Ha Micci
-NepeBipTe HABHicTb KyTa 90°MiK Ie3om i o6MeKyuBaem S KocnHcem (nepeKoHaIteCra, IoO KocnHeCb TopKaETbcr DnCKa Ie3a NnIKn, a He Noro 3y6iB)
-3a nOTpe6n, BCTaHOBITb 06MeKyBaH Ha 90^ TaKHM YIHOM:
- BiDnyCtiB 4 WecTnrgpaHHnx rBuHtA T
- BiDperyIIOHe OMeHcyBa, DOKJIe3O Ta OMeHcyBaH He TopKaTHMyTbCRA KOCINU BCIEO IIOUHOIO
- 3aTHiTb 4 WeCTurpaHHNX TBHNTa T
- CKNHbTe IHdNkAtOp HaxNy Ha 0^ 30c
3aTnckayJaKa6eI ③IO
-BNKOPNCOTOBYTe 3aTnCKaH NJI KAbeJIIO AV,0o6 3aN06IITN 3aTnCKaHHIO UHypa HINBLeHHr MiK pyxOMOIO I HepyXOMOQUACTHaMNIHCtpyMeHTy
IOPADNI NO BHKOPNCTAHIO
CneuaJIbHi 3arOTOBK
-3aBHN TpMaTe Ha onopax BInbHi KINi DOBIOI 3aROTOBNI
-NepeKoHaITeC, 00 fIrpyHni KpyrLi3aRToBKN 3aΦiXcOBAHI OcO6JIbNO MiUHO, 106 3anO6irTn iX KOB3aHHIO ③
-Ha liHii pi3aHH He Maé 6yTu IiINH MIX 3aROTOBkoHO Ta 06MeKyuBaHem a6o po3nIIOBAJIbHM CTOJOM
-3a NOTpe6n BnroTOBTe DOnOMIXHHN O6MeKHyBa; OTBOpN BpyXOMomy 6MeKHyBaHi MaOtB 6yTIn
BnKOpNCaHI Jn KpInJIeHHJ DOIOMIXHORO 06MeKyBaHa34
!DONOMIXHHN O6MeHcyBaay MOxHa BnHOpNCTOyBaTH TiIbKN npn facci 0^
- P06Ota 3 nIHTycAMN,ДИВ. MaIIOHOK ③5
3aBxJn po3TaOByTe Bpi6 IInCbOBOIO CTOpHOIO DOHN3y, 106 3a6e3neHTn MiHimaIbHn pN3NK po3KoJIIOBAHHA
BnKOpNCToBnyTe IInuE roCTpi Ie3a nnN BiDnOBiDHoro Tnny
-RAKCTb PO3NIIIOBAAHH NOKpaUyETbC3i 36IbWeHHM KJIbKOci 3y6IB ne3a
-TBepdoocnlaabHJIe3a3aannuaTbcra roctpmmy 30 pa3iDobwe, HIX 3BnuaHJIe3a
DOrIaIOBcIyROByBAHH
3aBKnTpMaIte iHCTpyMeHT i dpIT KINBLeHHaNCTUMN (OCO6JIbBO BEHTnlauiHi OTBOpn Ha 3aDHiYactNIH Kopnyc y DnryHa)
PeryIaRHO nepeBipnTe,IO HnKHi KOKyX npaioe HaJIeHHM YHOM. OunchTb HNHHI KOxYBX BID TnpCNI, IO HAKOINyEYCB, BOLOTOI TKAHINHOIO.
-NepeI HCTKOIO IHCPTy Heo6xIDHO po3'eHaTNI TTeNCEbHn po3"IM
-ПДИМITb HNнHи KOKHy x Y NOBHCtIO BiKpIte
ПОLOXENHЯ Ta BiDnyctiTb NOrO; RaHcO Bin He BiDpa3y
i NOBHCtIO 3aKPNBaETbcA, NOrO cIiNepeBipNTu B
CEPBICHOMy ueHTpi NicJnnpoDaHHoro O6ClyROByBaHHa
eJIekTpoinCTpyMeHTIB SKIL
- PpOuHCTiTb Ie3o nnHn HeraHNo nicra BnKOpncTaHHa (ocO6JIbBO BiD 3aJIuWkIB pe3Hn Ta KHeIO)
-JIe3O NIIJHK CINJbHO HarpIbaεTbcg NiID HaC po6OTn; He TopKaItecJIe3a, POKN BOHO HE OXOJOHe
OunuTe Ia3epHn npomih AC m'koIO uitkoio nicna KOxHoro BnKOpNCtAHN, 0o6 3a6e3neuHTXopoWy BVIMcTb Ia3epHOI lii (pekeKaHTEcra, 0o Bu He 3MiHoTe HaJauTyBaHHra Ia3epa)
-Якшо He3BaKaioHn Ha peTeIbHy TexHoIorBnroTOBHeHHi I nepeBipKn IHCTpyMeHT BCE-TaKn BnJDe3 NaNy, NOro peMOHT Do3BOJIeTBcR BnKOHyBaTHnNlneB aBtOpn3OBAHi cepBicHi MaNCTepHi dIeEJIeKTpponpnaIDIB SKIL
-HaIIiNilb Hepo3i6paHn IHCTpymeHT pa3OM 3doKa3om KynibI do BaWoro dIlepa a6o Do Hau6lnKyOTo CEHTpy o6cLyroByBaHHa SKIL (aDpeCn, a TaKoJ Diarpama O6cLyroByBaHHa PnucTPOU, NdaHOtbcra Ha caTI www.skil.com)
Bizbmitbdo BIDOMa, 0u ykoDkeHHBhacIIOK nepeBaHTaKeHH a6o HeHaJIeHHORIOBOdKeHH 3 iHCTpyMeHtOM He 6ydyTB BkIoUeHi B rapaHTIO (ymoBn rapaHTi SKIL dNB. Ha caNTi www.skil.com a6o doBidaTecra B dInepa y Baowomy periohi)
OXOPOHA HABKOLINHbO'CEPEI
He BnHnDaIte eIeHTpoIHcTpymEHT,6aTapei, npHaJLeJHKHOCTa yIaNKOBHy pa3OM 3I 3BnHaHNm cmITTM (TilbKn IIN KpaIH EC)
-BiDnOBiDn DO eBponecBkoI dnpeKTHBn 2012/19/EC
Uo yTnI3aui CTapnx eKeKtpuHnx Ta eKeKtpoHHx
Pnlaib,B 3aJIeKHOCTi 3 MICueBIM 3aKHOdaBCTBOM,
eKeKtpoiHCTpyMeHT,Якni nepe6yBaB B EKcnLyataui
NoHNHe 6yTN yTnI3OBAHn OKpeMo, 6e3neuHm DnA
HaBKoINHbOrO CEpeOBOuHa aJXOM
-MaJIIOHOK ⑥ Haraiae Bam npo Ce
LWM
BumipHn BiIDNoiDHO EN 62841 pBeH 3ByKOBOrO TcKy dIa boro IHCTpyMeHTy cTahOBnTB 100,0 dB(A), a pBeHb 3ByKOBoi NotyXHocTi 109,5 dB(A) (KoephiieHT HeToUHocTi K = 3 dB)
PibHb 6yB Bmipn H BiINOBiHO Do cTaNapTN3ObaHOro BNnpo6yBaHHa, HabeDeHoro B EN 62841; BIn MoHe 6yTH BnKOpNCtAHN IJr NopIBHH OHDHO iHCTpyMeHTy 3 iHIM I B JKOCTI nonepeHbooi OuiHN BnJIBy 6My npn BnKOpNCtAHHi iHCTpyMeHT y IJr 3a3HaHeHnx 3aCTOCyBaHb
- npn BnKOpncTaHHi iHcTpymeHaB iHux zilax a6o 3 iHUnm/HecnpaBHmDOnomixHHmnpCTocyBaHHMaPiBeHb BnInBy Bi6paui MoKe 3HaHo NiDbNcyBaTnC
-y nepioi, KOJI nHCTpyMeHT BmNKeHn a6o ΦyHKUHOYe 6e3 faKTNUHOrO BkKOHaHHr po60TN, pIBeHb BnINBy Bi6paui MoHe 3HaHNo 3HNHyBaTnC
GR
AQ BnHT Ha noKpNBHaTa nloa
AR BoNT 3a ocTpneTo
AS Φlaheu
AT BLOKKHtA6Ha
AU DeΦJIeKTop 3a npax
AV Ka6eJHa ⅢnHa
BE30NACHOCT
OBUHVA3AHNA 3A BE3ONACHA PABOTA C EJEKHTPOINHCTPYMEHTN
N PEPDyPENEXHEHNE IpOoTe BCnKn npEpypeHdEHHa 3a 6e30anacnoCT, HNCTpyKcHn, NIOCTpaun cneuHaucaun, DOCTaBeHc TOn3n eIeHTponHCtpyment. HeCnA3BaHeTo Ha BCnKu OINCAHN NO-DONY INHCTpyKcHm MOHe Da IOBeDe Do TOKOB yJap, NOxap N/NIIn TEKKHO HapaHbAhe.
3ana3eTE BCnHn npedynpeKdEHHN yHa3aHH 3a noI3BaHe B 6bdeJe.
I3noJ3BaHnT IIO-DOJy TepMHN "eJIeKtpOHCTpyMeHT" ce OTHaCJ Do 3axpaHbAHN OT eJIeKtpUYeCKaTa MpeKa eJIeKtpOHCTpyMeHTN (cBc 3axpaHbau Ka6eJ) N do 3axpaHbAHN OT aKymylaTopHa 6aTePna eJIeKtpOHCTpyMeHTN (6e3 3axpaHbau Ka6eJ).
1) B3ONACHOCT HA PAEOTHOTO MRACTO
2) BE30NACHOCT INPNA PABOTA C EJEHTPNUECHN TOK
a) NopdIbpaHae pa60THOTc mMCTO u n opeheo. Be3npaIbKbT HIN HeOCTaTBHOTOCBETJIeHHe MOrTa Da CNOMOrHaT 3a Bb3HNKBaHETo Ha TpyoBa 3JIOJyKa.
b) He pa6oTeTe c eJeKtpOnHcTpymeHTa B cpeDa C NOBnWeHa ONaCHOCT OT Bb3HNKBaHe Ha EHCnIO3N, B 6IIN3OCT Do IecHO3aIaNIMn TeuHOCTn, Ra3OBe HIn npaxoo6pa3HN MaTePnaI. No Bpeme Ha pa6oTa B eJeKtpOnHcTpymeHTte Ce OTdJIeT NcKpn, KOITOM ORat Da Bb3IIaMeHrT Ipaxoo6pa3HN MaTePnaI INI napn.
c)Дрьнтdeuaи ctpaHnHn Hnca Ha 6e3onacHo pa3ctoHnne,doKaTo pa6oTnte c eIeKTPoHnCtpyMeHTa.AKO BHIMaHHeTO Bn 6bDe OTHIOHeHO,MOKe Da 3aRy6nte KOHTpOJa HaI eJIeKTPoHnCtpyMeHTa.
a) UenctbHa eentponHcTpymeHTa Tpa6Ba da e NOxOra3a No3BaHHa KOHT. B HnKaBb CnyaH He ce donycha n3MeHHe Ha KOHCTpyKuYrTa Ha uenceHa. Korato pa6OTte cbc 3aHyJeHn eIeHTpoyei, He n3no3BaTe aadantepn 3a uenceHa. IOn3BaHeTo Ha opnHaJIHn UeNceHn KOHTaKTn HaMaJIyBa pUcHa OT Bb3HNKBaHe Ha TOKOB ydap.
b) N368raBte DOnnpa Ha TAnTo Bn Do 3a3eMeHn TeHa, HAp. Tpb6n, OTOnnTeHNu ypeN, Neu n XlaHnHnUc. Horato TaIto Bn e 3a3eMeHo, PnckbT OT Bb3HnKBaHe Ha ToKOB yap e No-ToJAM.
c) PpeJa3BaHte eJeHTpOHHCTpyMeHtCaOT dBJKdN
3) B630NACEH HAHIN HA PABOTA
Bnara. IpoHKBaHeTo Ha BOda B eIeKtpOHcTpymeHTa IOBnBaBA ONaCHOCTTa OT TOKOB yap.
d) He n3noI3BaIte 3axpaHbAun Ha6eI 3a ceI, 3a KOHTO ToH He e npEbnIeH, HAp. 3a da HocHTe eIeKTPoINHCTpyMeHTa 3a Ka6eIa IIN Da I3BaIte IeNcEla OT KONTaHTa. PpeIa3BaIte Ka6eLa OT HarpRAHe, OmacJIraBaHe, DOnHP Do OcTpN Pb6Obe IIN DO NODBnHN 3BeHa Ha MaUnH. TOBpeDeH INy UcyKaHn Ka6eIyVeJIuHaBt PnCKa OT Bb3HnKBaHe Ha TOKOB yIap.
e) Horato pa6oTHe c eIeKToHHCTpyMeHT HaBbH, n3noJ3BaIte cAmO yIbJIHnTeJIHn Ka6eJI, npedHa3NaYeHN 3a pa6oTa Ha OTKpHTo. H3noJ3BaHeTO Ha yIbJIHnTeJI, npedHa3NaYeH 3a pa6oTa Ha OTKpHTo, HamaJIraBa pIcKa OT Bb3HnKBaHe Ha ToKOB yIap.
f) Ako ce HaIara n3noJI3BaHeTo Ha eIeHTponHCTpyMeHTa BbB BlaJHHa CpeDa, n3noJI3BaIte npedna3eH npekbcBaay 3a yTeHN ToKOB. N3noJI3BaHETo Ha npedna3eH npekbcBaay 3a yTeHN ToKOB HaMaJIraBa OnachocTTa OT Bb3HNIkBaHe Ha ToKOB yIap.
a)БdTe KOHcEHTpnpaHn, cIeTe BHNMaTeJHo DeiCTBnTa cn n NoCTbNBAite npedna3JIHBO np a3ymHO. He n3noJ3BaIte eJeHTponHcTpymeHa, HORato cTe yMopeHN nn NOB BnHneTo Ha HapHotuHn BeueCTBa, anKoxoI nn yNoBaun lekapCTBa. EINH mR pa3ceHocT npn pa60Ta c eJeKTponHcTpymeT MoKe Da nMa 3a NocJeCTBne N3KJIIOUHTeJIHO TeKKn HapaHraBaHn.
b) Pa6oTeTe c npedna3BaIo pa6oTHO o6JeHIO n BnHarc n ppeNa3Hn OuHa. HocHeTo Ha noDxOJaU 3a NOL3BaHnE eKeTPOINHCTpyMeHT N3BbPWBaHaTa DeHOC TnnHn PpeIpa3Hn CpeIDCTBa, KaTO dXaTeJIHa MaCKa, 3dpaBN IIbTHO3aTBOpEH O6yBKn CbC CTa6HIne H rpaHep, 3aUNTHa KAcKa NII NwMo3aIyWHTeN (aHTnfoH), HamaJIra Ba PNCA OT Bb3HNKBaHe Ha TpyDoBa 3IOnOJyKa.
c) N368RaBte onaHocCTTa OT BnIOUbaHe Ha eIeHTPOINHCTpyMeHTa NO HeBHIMaHne. IpeHn Da BnIOuHTe igeCela B 3axpaHbAuaTa MpeHa nn Da NoCTabNTe aKymyNaTOPhata 6aTePnra, ce yBepRABaTte, Ye nycOBnT pKeHbCBaue B noLoXHeHne hKIIIOUeHO. Ako, KOraTO HOCHTe eJIeHTPOINHCTpyMeHTa, DbpHXITe npbCTa CN BbPxY nycOBnI pKeHbCBaH, NN aKO NODaBaTe 3axpaHbAio Ha npExeHne Ha eIeHTPOINHCTpyMeHTa, KOraTo e BkLIQUeH, CbIeCTByBa ONaCHOCT OT Bb3HNKBaHe Ha TpyDoBa 3JIoNOLyKa.
d)ПредидыВКЛIOUHTe eJENTPONHCTpyMeHTa,ce yBepraBaIte,Ye CTE OTCTpaHINOT Hero BCNUH NOMOuHN HNCTpyMeHTn IraeHN KJIIOvOBe. ПOMoSeH INHCTpyMeHT,3a6paBeH Na BbptTnO Ce 3BeHO, MOnKe Da npuHn TpaBMn.
e) He HauceHbAte Bb3MOxHocHTe cn. Pa6oTeB Cta6nHIO NOLOHeHne Ha TAnO To BB BcEHNMoment NODbPHaIte paBHOBeCne.Taka ue MOKeTeDa KOHTpOInpaTe eJeKTPoHNCTpyMeHtA No-Do6pe NNo-6e3OnaCHO, Ako Bb3HnKHe HeoHaKaBaHa cHTyaunr.
f) Pa6oTeTe c noxOaHIO 06JeHIO. He pa6oTe c HInpOnn dpexn nn yKpaWeHHN. DpbHKeocata n dpexnte cn Ha 6e3onacHO pa3cTOrHne OT dBnKeu
ce 3BeHa. HnpOKHe npexn, yKpaSeHnraTa, IbJIrnte KOCN MOraT da 6bDaT 3axBaHaTHn yBLeueHn OT BbPTAun Ce 3BeHa.
4) BHIMATEJIHO OTHOWEHNE KbM EJEHTPOINHCTPYMEHTN
g) AHO e Bb3MOJHo N3NoJ3BaHeTo Ha BbHJHa acnnpauOnHha cncTeMa, ce yBepraBaIte, Ye TRe BKnUOeHa HcynKcNOnHpa N3npaBHO. N3noJ3BaHeTo Ha acnnpauOnHha cncTeMa HamaJIba pncKOBete, DblJaUcCe Ha OTdEJIaTa ce npn pa60Ta npax.
h) Do6poTo No3HaBaHe Ha eJekTpOnHCTpyMeHTa BCJeDCTBHe Ha YecTa pa6Ota C Hero He e NOBd 3a HamaJIbBaHe Ha BHNMaHHeTO IpeHe6peBaHe Ha MepKHe 3a 6e3oNaCHOCT. EHO HeBHMaTeJIHO DeIcTBHe MoKe Da npEiN3BnKa TeKKn HapaHbAHn CaMo 3a Yaactn OT cekyHdaT.
a) He npetobapBaTe eJeHTponHCTpyMeHTa. H3noI3BaTe eJeHTponHCTpyMeHTte camo cbo6pa3Ho T8XHOTOppeHa3HaueHHe. 1e pa60Tnte no-dO6pe nNo-6e3OanCHO, KOrato h3noI3BaTe noDxOJaIIeJeKTPoHNCTpyMeHT B 3aJaDeHn OTo npOn3BOIDTEJI DaIana3OH Ha HATOBapBaHe.
b) He n3noJI3BaIte eJeKTPoHnCTpyMeHT, YnHTo nycKOB npEhcbaue nOBpeDeH. EJeKTPoHnCTpyMeHT, KOHTo He MoKeJa 6bJde N3KJIIOuBaH IN BHKIOUcBAH NO npEeBnIeHnAOT pOOn3BOAnTeHaun, e ONaCeH n TpR6Ba Da 6bJde peMOHTnpaH.
c) IpeiHa n3BbPWBaTe KaKBTo n da e DeHocTn no eIeHTponHCTpyMeHTa, HAnp. HAcTpoBaHe, cMaHa Ha pa6OteH NHCtpymEt, HAnTO H Korato r npH6upate, n3HIOuBaYte qenCeJa OT HOHTaTa, pecn. n3BaJdaIte 6aTePnTa, aHO e Bb3MOxHo. Ta3n MpaRHa npemaxBa OnaCHOCTTa OT 3aJeNCTBaHe Ha eJIeKTPoHNCTpyMeHTa NO HeBHIMaHHe.
d) CbXpaHbAaTe eIeHTponHCTpyMeHTte Ha MeCTa, HbDeTo He MOraT Da 6bDaT DOCTnHAtN OT Deca. He DonychaTe Te Da 6bDaT N3NoJ3BaHN OT LInca, HOtO He Ca 3aNo3HaTH C NaUHa Ha pa60Ta C TEx N He ca npOeJIte3n HnCTpyKcHn. Korato ca B pBcTeHa HEONITHn NOTpe6nteJI, eIeHTponHCTpyMeHTte MORaT Da 6bDaT N3KnOHTeJHO OnaCHN.
e) IopdbpkaHTe do6pe eIektpoHnCTpyMeHTte cn n aKcecoapnte Hm. PpOBepaBte daJI NIOBHHNTe 3BeHa FyHKUONHPaT 6e3yOpHO,daJI He 3aJIINHBAT,daJI NIm CaYNeH NII NOBpeHn DeTaJIIn, KOHTO HApUaBaT NII N3MeHAT FyHKUHNTe Ha eIeHTponHcTPymEHTa. IpTei Da H3NoJ3BaTe eIektpoHnCTpyMeHTa, ce IORpnHeTe NOBpeHnTE DeTain Da 6bDat pemOHtnpaHn. MHOrOT TpyIDOBHTe 3IOnOJyHN Ce dJIbNkAT Ha HeIO6pe IopdbpKaHn eIekTPoHnCTpyMeHTn UypeHn.
f) PpKaTe peKeuTe HcTpymeHTBnHaTdo6pe 3atoeHN uNCTn. D6pe npDbpKaHNTepeKeu INcTpymeHTC octpn p6OBe OKa3BaT NOMaJIKO CbIpOTNBLeHne n Ce BODrT No-JeKO.
g) N3noJ3BaIte eJeHTponHCTpyMeHTnte, DOJIbHITeJIHNTe npncnOco6JIeHHa,pa6OTHHe HcTpyMeHTn n T.H., cbo6pa3HO HcTpyKUHTne Ha npOn3BOdnteJI.C DeHocTN n pOceDpyN, EBeHTyALHO npedncaHN OT pa3JIuHn HopMaTHBHN DOkymeHTn. N3noJ3BaHeTo Ha eJeHTponHCTpyMeHTn 3a pa3JIuHn OT npdeBnDeHNTe OT npOn3BOdnteJI
PnIOKeHnIOBnIaBa ONaCHOCTTa OT Bb3NkBaHe Ha TpyOBN 3JIoNoJyKn.
h) IopdIbprKaHte dpbHHNTE n pbHOXBaTHNTE cyxn, HCTn H HeomacJIeHN. XJIb3raBHTe dpbKnn pboKoXBaTHn He no3BOJBAr 6e3OJaCHaTa pa6ota n Do6pTo KOHTPOJIpaHe Ha eJeKTpoINcTpyMeHTa npn Bb3HnKBaHe Ha HeoayKaBaHa cITyaUria.
5) IOdIbPxAHE
a) DonycHaTe peMOHTbT Ha eJenKTPoHnCTpyMeHTte Bn da ce H3BbPwBa cAmO OT KBAJIHΦnIpaHH CneuHaNtch n Camo C n3NoJ3BaHeTo Ha opHnHaHn pe3epBn Yactn. ITO3n HaHH ce rapaHTnpa CbXpAraHBe Ha 6e30NaChocTTa Ha eJenKTPoHnCTpyMeHTa.
HNCHTPYKUIN 3A B3O3NACHOCT INPN PA6OTA C HACTOJIHN NOTANJU NUPHYLAPN
HactoHNHTe notanAunu cyhnyIapn ca 3aMncJeHn 3a p3aHe Ha dbpBO HIN NIOO6Hn H3deJInn, Te He MORaT Da ce n3noJ3BaT c abpa3HBn Pexeun DnCHOBe 3a pr3aHe Ha cbDbPbHaun HeJIa30 MaTePnAIn, Kato rpeDn, npbTOBe, rbo3dEi np. A6pa3NBnT npax BOn Do 6loKnpahe Ha DBNKeUHTe ce qactn (KATO HAnpIMep DOJHnpypoTeKToP). NcKPnTe OT a6pa3NBHO To p3aHe ue nporopT DOJHn npoteKToP, BLOXKaTa C npope3 n dpYrnte PIACTMaCOBn Yactn.
HoroTo e Bb3MOHNO, H3NoI3BaTe CTERn 3a 3axBaUaHe Ha O6pa6oTBaHHa DeTaN. Ako NOdInpate pa6oTHNJaTeaJHa pBka, Tp86Ba BnHarn Da DpbHnTe pbhata Ha MmHmym 100 mm OT BCraHa CTpaHa Ha cHyIaRPNHa DNCH. He H3NoI3BaHTe To3n TpnoH 3a P3aHe Ha eJeMeHTn, KOnTO Ca TBbpDe MaHN, 3a Da ce 3aKpePrt 6e3ONaCHO Hn Da Ce DbpHnat C PbHa AKO PbKaTa BN e NoCTaBeHa TBbpDe 6n3o Do cHyIaRPNHa DNCK, NMa yBeJIuHepn CKOT HapaHbAHe OT KOHTaKT C DNCKa.
- 06pa6oTBaHnT DeTaJ Tp86Ba Da e HEnoDBnHeH N Da e 3axBaHaT NIn 3aDbPxAH KaHTO KbM nperpaDATA, TaHa N KbM Macata. He NoDABaTe o6pa6oTBaHn DeTaJn KbM Dncha N He peXeTe NO HnHaKbB NaHH "cAmO c pBuCe" HeorpaHnueHnTe NIN DBnHexu Ce o6pa6oTBaHn DeTaJIn MOrat Da ce N3XBbPJIr C BnCoka CKOpocN Da npHuHnT HapaHnBaHe.
- HaTnCHete u npKyIpa np3 o6pa6oTBaHna deTaII. He n3TeJrJIte u npKyIpa np3 o6pa6oTBaHna deTaII. 3a n3BbPbBaHe ha npope3 nobDnHhe Tlabata Ha u npKyIpa n a n3TeJrIe Tpe3 o6pa6oTBaHna deTaII 6e3 p3aHe, cTaptnpaIte MOTopa,HaTnCHete rIaBata Ha u npKyIpa HdoIy n HaTnCHete u npKyIpa np3 o6pa6oTBaHna deTaII Cp3BaHTo npxOda no n3TeJrIHe moKe da npuHn N3KaUBaHe Ha u npKyIpaHn DaNc DOrope Bbpxy o6pa6oTBaHna deTaII n CnHIO da n3XBbPn MoDyla Ha DnCKa KbM OnePaTopa.
HnKora He npekapBaIte pBHa npe3 npoeHTnpaHaTa IHHra Ha p3aHe OTnped HnO T3ad Ha cHyprnna DNck NOpdbpKaHTo Ha deTaNa "c KpbCTocAHnPBue", T.e. 3aDbpKaHTo Ha DeTaNa BDACHOOTcPbKyIpaHn DaCK C JABaTa pBka, HnI O6paTHo, e MHORO ONaCHO.
He6bpaTe3a nperpadaTc pbHa Ha no-6n30 ot 100 mm OT KOrTO n da e ctpaHa Ha cnHpyIrpHna
DnCK 3a OTCTpaHBAHe Ha OCTaTbU O T bPBO HnI NO KAHBATO N da e npuHHa, DOkato DnCKbT Ce BbPTN BnI3OCTTa Ha BVpTAAuCe cIpKyJIpeH DnCK Do pKaTa BN MOKe Da He E BnIMa N MOKe Da CE HapaHtE cepno3Ho.
- Hcnehtpaate 6pb6oTBaHnI DeTaN Ipei np3aHe. AHO 6pb6oTBaHnI DeTaN E H3BNT nI npErbHAT, 3axBaHete Ro C BbHsHaTa N3BtA cTpHa KbM npEpaDATA. BnHaN Ce yBepraBATE, Ye HMa npOlyKa MeHdy 6pb6oTBaHnI DeTaN, npEpaDATA m Macata NO dblHNHATA Ha p3aHTo H3BHTte nI npErbHATn DeTaN MoRat Da ce ycuyat nI IN3MeCTT n MOrAT da npuHrt 3aueNBaHe Ha BbPTaunCe ciPckyIapEn DnCK npri p3aHe. He Tp6Ba Da nMa rBO3DeH nIIN YJHn IpEmdTe B o6pa6oTBaHn I deTaII.
He n3noJ3BaIte cnpHylapa, aHO macaTa He e NOUHCTeHa OT BCnHKn HNCTpyMeHTN, DbpBeHN OCTaTbUcN I dp. N BbpxHy He He e OCTaHaI camo 6pb6OtBAHNr T detaMankHe 3ambpcaBaHH NIN CBO6OdHnTe NaPceHua DbpBO NIN dpyrN ppeMeTHN MORaT Da BLe3HaT B KOHTA K BbpTAAuCe DNCK N da 6bDaT N3XBpJIeHN C BVCOKa ChOpocT. - Pekte cmo no eHn o6pa6oTbAH DeTaJn HabeHbK HApynaHnte Ha KynuHa o6pa6oTbAHn DeTaJIn He MoraT aKeKBaTHO da ce 3axBaUaT NIN 3aTgat N MoRat Da ca Ce 3axBaHaT BbpxY DnCKa NIN da ce IN3MeCTr npn pRaHe.
- YBepaBeTe Ce, Ye HactoHnna Notanu, uPhyIap e MOHTupan nn NoCTaBen Ha paBHa, 3dpaba pa60Tha OCHOBA npEn ynotpe6a. PaBHata n 3dpaba pa60Tha OCHOBa HamaJIraBa pNcKa OT TOBa HactoHnrt Notanu, uPhyIap da CTaHe HectaBnHe.
-Планнраиte pa6oTaTaN! BceHn nT,Horato npomehTe HacToPoiKaTaNbIbHa Ha p3aHe nHa Na ChocBaHe,ce yBepaBaiTe,ye peryInpPyemata nperpadae npabNHO noCTaBeHa,Taha Ye da noDnnpa 6pa6oTBaHHaTeaIIuHa He npeyHa Dncha Hnnpedna3Ha TcStema 5e3 Da BVIOUOBaTe HHCTpyMeHTa N6e3 Da Ima DeTaN Bbpxy Macata, npemeCTe TcNPKyIparHn DAck Pne3 cIy CmYIpauh Cpe3,3a Da rapaHTnPate,Ye HMa Da Ima C6JIbCKBaHe NN OnaCHOCT OT Cpr3BaHe Ha nperpadaTaN.
OcHrypBaTe aAeHbTaHa onopa, Hato HapnpMepe ybJIkeHn Ha Macata, cToHN 3a p3aHe n dp. 3a o6pa6oTbAH detaI, KOHTo e NO-wnpOH nn NO-dblr OT nIOta. DeTaNITE, KONTO ca No-dbln INI NO-WhPOKn OT Macata Ha HACTOnHn Notanu CHPkyIrp, MORAT Da ce npe0bphat, AHO He ca CNpyHO 3aKpeHen. AKO OTPzAHATA qact INI DeTaNtCe HAHIOHr, TOBA MOKe Da nOBdHre DOJHn IpoTeKTop INI Da CE CTNRHe Do NxBpbIhne OTE BbpTAAUnc Ce Dnck.
He n3noJ3BaIte dpyr QOBek KaTo 3aMeCTnteHa ydbJIKeHHeTO Ha Macata Hn KaTo DonbJIHHTeHa onopa HectaBnIHATA Onopa 3a DeTaNla MoKe da HaKapa DNcBt Da Ce 3axBaHe Nn O6pa6oTBaHnRT DeTaNl Da ce N3MeCTn NO BpeMe Ha pa6oTata No pR3aHe, KOeTO Ue N3TeRn Bac N NOMOuHKa BN KbM BbpTJUe Ce DnCK. - OTP3aHaTa qact He Tp6Ba Da ce 6LoHnpa Hn npntncA NO dpyr NaHbM BbPraCnCe UHPyIepen Dnck AHO e orpaHueH, T.e. aKO ce N3NOJ3BaT CToepn Ha DbJIHKHaTa, OTP3aHaTa Yact MOKe Da ce 3aKInHn KbM DnCKa N Da ce N3XBbPnN C rOJIma Cnla.
BHHaHn H3noJ3BaIte ChO6a HIn φHKcaTOp,
npoeHTnpaH3a npabHNO NOHnpaHe Ha KpbTbI MaTePnA, Hato HanpHMepeBTHINTPb6n PtpNTte IMAT TeHdEunia da ce n3TpBpKylBaT, DOkATO ce peKaT, Koeto ue hakapa dNCKbT da "3axane" IN N3TerIe DetaiNa 3aeDnO c pKaTa Bn HapaboB DnCKa.
Octabete nncbTa da octnHe nbHn 60pOtn, npedn da Bne3He b KOHTaTc c DetaHa ToBa ue HamaJI pNcKa OT nXbPJIaHe Ha detaJa.
AHO DetaHbT N dncbT ce 6loKnpaT, n3KnIOyete HactoHnna Notanpa TcNpKnyap. N3caHaite BCnuHN DBNHeuN Ce yactn da cnpat n pa3KaueTe ueCenela OT KOnTaHa n/nnn N3BaDeTe aKymlaTopHaTa 6aTePn. CneT TOBa OChrypeTe OCBO6OJaBaHe Ha 6loKnapn MaTePnAn PpoDbJIkaBaHeTo Ha p3aHeTO c 6loKnpaH DeTaI MoKe Da IOBeDe Do 3ary6a Ha KOHTPOI IIN NOBpeDa Ha HAcToHnna NotaNa TcNpKnyap.
Cne3aBbPbBaHe Ha cpe3a OTnycHete npebKIOUOBATEJI, 3aDPbKTe HADOly rIaBaTa Ha cnphyIpa n3uKaHaTe DNChbT Da CnPpeN da N3BaHdTe OTP3aHaTa Yact PpTaRaHeTo Ha pKa 6n3o Do DnHexeJNaCe No INHePzra DNCK e OnaCHO.
3aDpBHTe DpbHHaTa 3dpabo, KOrato npabnte HEnbIeH Cpe3 HnN KOrato OTnycHate npebKIOUbaTeJI, Npeu rIaBaTa Ha cHyjra Pa da 3actaHe HAnbHO B DoJIHa No3nua CnpaTo DeiCTBHe HA cHyjraMa MoKe Da HaKapa rIaBaTa Ha cHyjraPa BHe3aHOb Da ce n3TeJIH HApOly, BoeKn DO pNCK OT HapaHBAhe.
ДОПьЛНITEЛHи YKA3AHИЗ 3A BE3ОПАСHA PABOTA
- PnBkHIOUBaHe Ha MoUH eJeKtpOpyeH e B3MOxHO B3HNKBaHTo HA KpaTHOBpeMeHH KOle6aHH Ha HApEHEHcTO B 3axpaHbAaTa MpeKa; npn CbBnaDeHne Ha He6laTOnpIaTHN ObCToRrTeJIcTBa e B3MOXHO yBpeJdaHe Ha DpyrN BkHoueHN BmpKaTa ypeH (PnHmPeHaHC Ha 3axpaHbAaTa MpeKa, no-MaBk OT 0,219 Ω CmyeHnra Ta ca nphe6peHmMo MaIK); aKO ce HxJaTeOT dONbJIHntEHn pa3rCheHn, MoJy o6bPhete Ce KbM BaWn loHaJIe cNeuaJIncT OT EJeKTPoCHA6IbaHe
OБцИ
-Изпольвайе Инструмента само за ряазе На дырBO
-ПпeДиВКЛIOUcBaHeHaИHCTpyMeHTaВKOHTaCe yBepTe,YeМpeKOBOTHaInpEKeHneOTROBapr Ha HAppeKeHnETo,ObO3HaueHoHaΦIpMeHaTa Ta6JIka Ha INHCTpyMeHTa
He cToIe Bbpy HNCTpyMeHTa HIN Bbpy CToHata My Cepno3HO HapaHbAhe MOKe Da Ce NOLyu, aKO INHCTpyMeHTbT Ce HAnIOHN IIN aKO peKeJeHT HNCTpyMeHT Ce DOKOCHe HNcUdEHTHO. He cbxpaHbAte MaTePnAJIbBpy HIN B6JN3OCT Do INHCTpyMeHTa,aKO e Heo6XoDmO Da 3aCtAHete Bbpy HNCTpyMeHTa HIN CTOnKaTa My, 3a Da Tn DOCTnHETe.
-Ппедин3BbPшВаHToHa KaHbToида 6ио
НасТрОйКИ Ил CMЯнHa пинадлжHOC
Виharи n3BaJdAηte ΜeNCEla OT KOHTaHTa Ha
eJIeKТрO3axpaHbAHeto
BHHar np3nauaTe 1e nceTa ot n3toHnHa ha eIeHTpuecTBO, npEi Da TpaHcnpOpTpate HactoHnna Notanu u npHyJap OTKaYe, CHNKeTe MOyla Ha rnaBaTa u 3aKIOUeTe Ha MCTO, N3noI3BaIte dpbXkKaTa 3a HOceHe n EDA h O T BdNb6HaTHNHTE 3a pbKa B OCHOBA Ta Ha cHpyJra.
He octabryte uHctpymeHTa,doHaTo He cnpe HAnbIHO
Korato peheTe deTaNc HnnpabHnaΦopMa, nlaHpaTe pa6oTaTa cn TaKa, Ye da He ce nnb3HaT n npHTncHa DNcha N da He n3JNa3aT OT pbHaTa BN
MaunHaTa He Tp8Ba Da ce n3no13Ba OT Iuca noi 16
To3n HcTpyMeHT He e NOxOJaU 3a MOKpo p3aHe
YNOTPEBA HA OTHPNTO
-Пиуnotpe6aHaOTKpIto,CbbpKeTe INHCTpyMeHTa NocpeDCTBOM eJIeKtpnueeCKn ppeKcbBaay (FI) c MaKcImaJIeH hauJIeH ToK 30 mA,И nI3noJ3BaIte eINHCTBeHO Ka6eJa,пeДha3HaueH 3a yNoTpe6a Ha OTKpIto H Cha6dEh CbC 3aUHTeHn CbeDInHtEnH KOHTaKTn
NPEДN YIOTPEBA
- ɪnəʊlɪsɪbʌaɪte Hɑnʌbɪnəʊ paɪsɪbɪntɪ n ɒeəsɪənæcɪnɪ pɑːkɪnəʊnɪtɪeɪn c kɑːnɑuɪntɪeɪ T 16 A
Hocete 3aunTHn Ouila, Taun 3a yu, n 3aunTHn pKaBn
IpaXbT OT HAnKoMaTePnaJI, KaTo HaNpImep CbDbpJHaaO OLOBO 608, HAnKo BnIOBe DbPBeCnHa, MnHepaJI N MeTaJI MoKe Da 6bDe BpeDeH (KOHTaKT IIN BdNWBaHe Ha TaKbB Ipax MORaT Da npuHrA T aIepnUHN peakun N/IIu pecnnpaTOphN 3a6oJIbaHn Ha OePaTopa NIn CTOnuTE Ha6n3O Jnua); H3NoJ3BaIte npOTNbONpaxOBa MACHa N pa6oTeTc acnnpupaio npaxTa yCTpoiCTBO, HORato TaHOBa MOHe Da 6bDe CBbP3aHo - OnpeJeHn BnInBe npax ca KlnacnHnIpaHn KaTo KapunHOReHHN (KaTo npax OT n6bK) Oco6eHo KOraTO ca KOMbHNpaHn C doabKn 3a noo6pBaHe Ha cTcTOnHHeTo Ha dbpBecnHaTa; H3NoJ3BaTe npOTbONpaxOBA MaCha n pa6oTe c acnnpaio npaxTa ycTpoiCtBO, HORato TaHOBa MoHe da 6bDe CBbp3aHO
CneBaIte DePhiHnHpaHInTe No BDC N3NcKBaHnOTHOCHOaPaSeHoCTTa 3a MaTePnaJIte, KOHTeJHeJaTe Da o6pa6oTBate
He 6pa6oTbaIte a36ecToCbDbpHauMATEpHaI (a36ecTbTe KaHcepeoreHen)
He H3noJ3BaIte HnKOra HnCTpyMeHTa 6e3 opHnHaJIHaTa My npedna3Ha CnCTema - ПобереTe 3auntHnKa Kanak 3a npaBnHNo 3aTbapHe npedn BcKa ynotpe6a
He pa6oTeTe C TpnoHa, Ako 3aunTHnT My KaanK He ce DvHc CBO6OHO Hc Ce 3aTBapra He3a6abHO
HnKora He fHKcapaTe n He Bp3BaTe 3aunTHna KaanB OTBOpeHa NO3nua
HnKora He n3noJ3BaIte HNCHTpyMeHa 6e3 BLOKKaTa 3a macata; 3ameHeTe DeΦeKTHa IJIIN N3HOceHa BLOXKa-Ta6la - Ppemaxhe TE BCNUKn IpnrTCTBnBbpxy NOBbpxHOCTTa, a CbIo N IOI PbTn Ha p3aHe, Ipei Da 3anOHTe pr3aHTo
ИЗбягвайт по蜱д,在 сю могадьдатпчненOTВINTOBe,ГВОздиДугметални elementnВобрабованядэл;OTCTpaHete rnpedn da 3anoHHeTe pa6ota
AHCECOAPN
CTO3nHnCTpyMeHT HNKORA He H3NOJ3BaITeUINΦOBaU/peKHeu DnCKOBe
SKIL MoHe da ocHrypn 6e3aBapnHa pa6oTa Ha eJeKtpOnHCTpyMeHTa caMo aKO ce H3NoI3BaT NOxOJaUHTe KOHCymaTHBn, KOnTO MoKeTe Da HamePnte npn OToPi3uPaHnTe DInCTpN6yTopn Ha SKIL
- PnMOHTnpaHe ynoTpe6a Ha KOHCymaTHBn, He npOn3BeHEn O T SKIL, CJIeBaIte HNCTpyKcHInTe Ha CBOTBEHNr pOn3BODNTeJ
I3noJI3BaIe cAmO uNpHyIaRPN DnCKOBe, KOnTO CbOTBeTCTBaT Ha NOCoYEnTe B TOBa pBkoBOJCTBO 3a EKcIIoAtauJa DaHHu Ca I3nTuHaNo EN 847-1 n O603HaueHn No CbOTBeTHra HauH. - I3noI3BaIte cAmo npHauJeHKHOCTN, YIHTO DOYUCTMAMCKOPCT Ha BbptHe e NOrJMa HIN paBHa HA MaKcImaJIHaTa CKOpOCT Ha BbptHe Ha IpaSeH XOD HaeEKeTPOHHCTpyMeHTA
- HnKora He n3noJ3BaIte peKeIu IINCKOBe, n3pa6oTeHnOT 6b3pOpeKeIa CTOMHa (HSS)
He n3no3BaIte peKeeua JeHTa, KOrTo e HanyKaHa, DeΦoPmUpaHa nn 3aTbNeHa - I3noI3BaIte peKeIeIu DNCKOBe cAmO cDnAmE TbP Ha OTBopa, KOITo CbBnaJa C UINHJeLa HA INHCTpyMeHTa 6e3 Xla6NuHa; HIKORA He I3NoI3BaIte peDyKTOpN IIN aIaIaTePN 3a Da HApachTe peKeIeU DNCKOBe cTolam OTBop
- Na3eTe KOHcymATNBITE OT ydapn n CbTpceHnnpy NOTPE6A
He hacnBaTe HNCTpyMeHTa (npnoKeTe Jek HEnpeKbChat HaTNC, 3a Da He npepeRT BbpXOBeTe HapeKeuIte OcTpna N B Clyua, Ye ce peke PnaactMaca -Da He Ce TOIN MaTePnaTbT) - Na3eTe npbCTnTE,ДlaHnTE n pBcTe cHacTpahn OTo BbpTЯиcapeKHeu DnCK
AkopekeiayTnck6bde6loKnpaH,He3a6abHO n3KIOUHTe INCTpyMeHTaN 3BaTe TEIe IeNCeIa;edBa cJeTOBaOTCTpaHEte 3AHINHeHNeDeTaJl
BcnyaHa 3aJdaHe nIeEKeTpuecha IIMexAHnUHa HEn3PpABHOC T He3a6abHO N3KIOUteHnCTpyMeHTa N3BaTe UenCeLa OT KOHTaTa
AHO Ka6eIbT Ce NOBpeHnI CpeHe No BpeMe Ha pa6oTa, He ro DOKOCBaHrTe, BeDHaHa n3HIOUcTe UenCeHa, HNKORA He n3NoJ3BaHrTe INHCTpyMeHTa C nobpeDeH Ka6eI
Hikora He n3noJ3BaIte HNCTpyMeHTa, aKO Ka6eJIbTe NOBpeDeH; ToT Tp8Ba Da 6bJe 3aMeHeH CbC CneuaJHo NODrTOBeH Ka6eJ, HAIueH ppe3 cepBu3HaT OprAHn3aun.
JIa3EPHO JbueHHe
He HacoBaIte Ia3epHnJIbU KbM Xopa N HINBOTNn BHNMaBaIte Da He NorIeHHe THeNoCpeDCTBeHO CpeSy Ia3epHnJIbU HIN CpeSy HerOBO OtpaXHeHne (TaKa MoKeTe Da 3acJeNITE Xopa, Da npuHHnTe TpyIOBn 3IoONyKn HIn Da npEiIN3BnKaTe yBpeKdaHe Ha OHTe)
AkoIa3epHnT IbU NOnaDHe B OcHTe, Hn 3aTBopTe Bb3MOxHO Ha-6bP3O INOTpBnHete TnaBaTa Cn OT Ia3epHnT IbU
He n3BbPbBaIte n3MeHEnrno Ia3epHoTo 606pydBaHe
- He rIeJaTe B Ia3epHnIbU (Ia3epHo IbYeHne)
He n3noJI3BaIte KaKBInTo y da 6nlo yBeJIInuTeJIInOnTtueeCHn INCTpyMeHTN (KaTO HAp. OUnJa, TeLeeCHOINnn 6Hokn), 3a Da rJeDaTe Ja3epHnJy IbU
- He pa6oTeTe C nHcTpymeHTa B npicbCTBne Ha
Bb3nJIaMeHNmI TeuHOCTn, Ra3OBe NIN Ipax
He pa6oTeTe c HnCTpyMeHTa, aKo HaOKoIIO IMa deua
He nOMeHnTe HcTaInpaHnJa3ep C npTn Ja3ep CJEPA6OTA
CJIeI KaTO I3HIOUHTe HNCTpyMeHTa, HNKORA He npHlaarTe DOINbIHNTeJIHa Cnla 3a da cnpeTe BbpTeHeTo Ha aKCEcoapnte
OTcpanhaTe 06pe3Kn nn npyH qacTn OT deTaJna OT 3OHata Ha p3aHe eBb CneI KaTO BCNUK n DBNKeUnc Ce Yactn Ca Ce yCTaHOBNn N3CJIIO B NOKOIN
- IIO Bpeme Ha ynoTpe6a, peXeunr Dnck CTaba MHORO ropeu; He rdoKocBaTe DoKaTo He n3CTnHe HAnbIHO
CbXpaHbAaTe HnCTpyMeHTa Ha 3aKnTO B cyxu IN CnHyPHN NOMEeHn, HeoCTbHn 3a Deca
OBRCHEHNE HA CIMBOJNTE NO INHCTPYMEHTA
②Предиуnotpe6a npoHTe pboBOOCTBTOc yka3AHN
③ HocTe 3aunTHn OuJna n TaH 3a yu
④ Onacha 30ha! 30ha 6e3 pbue. Na3eTe pbuete npbCTNTe cn daJeY OT Ta3N 30ha.
⑤ДВоинИЗОЛАЦИ(He ceИЗИСКВа Ka6eI 3a 3a3eMЯBaHe)
He n3xBpIaTe eIeKTpOpyeIte I6aTeepn 3aeHc 6HTOBN OTNaDbuN
⑦ Ia3epHoIbueHne/He rIeJaTeBlbUa/la3epen npOdyKT Klaac 2
YNOTPEBA
- MoHTnpaHe
-crIIO6eTe TpaHcNOpTHaTa DpbXHaE C 2 60JIa, KaTO n3nOJ3BaTe WeCTOrpamHnK NIOU AN
-crIIO6eTeΦHcHpaUaTa pKoXBaTKaHa cKocBaHeTo AE B npedHaT auct Ha Macata 10
-crlo6eTe nIb3raaata nperpada U (Bx. Perylnpahe Ha nIb3raaata nperpada(n))
TpaHcnpTHa/pa6oTHa no3nua
3a da npBBeTe B dBXeHne INHCTpyMeHa (pa6oTHa no3nua)
-HaTnCHeTe DpbKkata B8 HAdony c eHna pbka,doKato n3TeIraTe 3aKnIOuBaunr uNΦT C c dpyrata 11a
-HacouTe MoylaHa rIaBaTa 6abHO Harope 3a o6e3oNaocraBaHe Ha nHcTpymeHTa (TpaHcnpTHa I03nU)
-Ⅱb3HeMeMoUyKaKbMΓaBaTaDoCTonepaNo NocokaHa nperpaDAtaS (noDtpKaIte np6I.5cm pa3ToHne) ⅢaTeHETe fHKpauata pBkoXBtKa AH b
-HaCtpoIe bIbIa Ha pIaHe Ha 0^ (BHK. HAcTpoIHa Ha bIbIa Ha pIaHe)
-HaCtpoIte bIbla Ha cKocBaHe Ha 45^ OTJIBO NIM OTJACHO (Bk. HAcTpoIka Ha bIbla Ha cKocBaHe)
-HaTnCHete DpBHKaTa B HAnOly c eHna pBka,doKaTo 136yTBaTe 3aHIOUbBaUNIg CcDpyrata -HamotaTe eNEKTPnueckn Ka6eI
-3nOJI3BaIte TpaHCnOpTHaTa DpbKHa E83a IpeHacrHe Ha HNCTpyMeHTa ⑪d
-ajTepHaTINBHO 3nOJ3BaIte CtpaHnHHTe DpbKKn 3a IpeHacrHe Ha HnCTpyMeHtA 1e
!HnKora He NOBnraIte HNCTpyMeHTa, KaTO rO dbpxHrTe 3a OCHOBHATA dpbKa NIN 3a eJeKTPnueckna Ka6eI
- MoHTnpaHe Ha HnCTpyMeHtA Bbpxy pa6oTHa NOBbpxHOCT ⑫
!3a6e30nacHO MaHnnyInpaHe BnHaHm MOHTnpaTe HnCTpyMeHtA Bbpxy NLOcHa n Cta6HnHa pa6oTHa NOBbpxHOCT (HanpHmep pa6oTeHnOT)
-и3нольваite 4 мотаяхн OТБОРа F за д ппкpenite INHCTpymehTa C NOДХODИ N BИНTOBE KbM pa6OTHaT a NOBbpxHOCT
-MoKeTe CbIoo Da 3aTeHHeTe HnCTpyMeHTa KbMa60THaTnOBbpxHOCT C O6nKHOBeHN BnHTOBn CkO6N
-3a CStaNnHpaHe Ha HnCTpyMeHTa MoKe da ce peRyInpA BnCOuHnHa TaONOpHTo Kpaue G
-ALTepHaTHBHO HNCTpyMeHTbT MOHe da CE MOHTnpa Bbpxy CToIka 3a HaCToJIeH NotaIIu CnIPKynp
I npooyete BCnHn npdeynpeKHeHn HnHCTpyHcN, BKNIOeHN KbM CToHaTa 3a cnnpyJpa
- N3TeTJIaHe Ha npax/CTpyKHH 13
-MOHTnpaTe Top6aTa 3a npax H/npaxocmykaKaTa, KaKTo e Noka3aHO
-иЗпраЗВаTe TOpьИнKaТа 3a npax peДОВНо 3a ONTIMmaJIepe3yIITaT npn npaxONImcMyKBaHeto
!BnHmabaIe Tp6aTa Ha npaxocMykaHata Da He npeuHa doJHna npedna3ntel nnHa onepaunraHa pRa3aHe
- yDJIKeHHe Ha MacaTa Ha cIpyJaPa 14
-инольайт eрбкoxbaTknte L 3a 3aTЯга He ydblkHtelenHte rpeu K (OT BCЯKa cTpaHa Ha INHcTpymeHTa)
-ДьннHaTa Ha yDbHnTeHnTe rpeN K ce perynpa nlaBHO OT MInHMym Do MaKcHmym
ΦHKcnpaHnTaHa 15
!3a onTImaHa 6e3oNaChocT Ha Tpyda, BnHaHnΦnKcnpaIte HEnoDbNHHO DeTaJa C npedoctaBeHaTa perylnpemya Chob6a
-He pa6oTeTe c DeTaJIH, KOHTO ca TBbPde MaIKn 3a Da 6bDaTΦHKcnpaHH
3a MaHcHMaJIHn pa3Mepn Ha DeTaIJa H3NoI3BaITe Macata 16 KaTO eTaIOH
- npnkpene Te cTgata 3a deTaNla B OTbopa Ha onopata N c pbkoxBaTaP (OT BCraHa CtpaHa Ha INHcTpymeHTa)
-CTraTa 3a DeTaNla NMa 2 JHe6a 3a JeCHO 3aJIIOuBaHe;1 3a TbHKn DeTaJIn (do 5 cm) n 1 3a No-roJeMn DeTaJIn (HaD 5 cm)
- npntncheTe 3dpabo DeTaJa cpeuy npedna3nTeJ S -OTKIOUcTe IocTa R
-HarlaTeCTraTaKbMdeTnla
-3aKpeneTe HEnoDbNxHNo DeTaJa Upe3 3aKJIuOyBaunr JocT R
!3a HANKOM6HnHaUNOTCHOCAHe n p3aHE NINB3aBNCMOCT OT pa3Mepa Ha DeTaIa MOKe Da e HxHNO Da CE N3NoJ3BAT HAJIuHN B TbProBcHaTa MpeKa BNHTOBN CTeRn BMeCTO CTrRaT a 3a DeTaIa
3aabahe Ha bIHa cKocBahe 17
-ocbo6oede3aKlouBaAaTa pblkoxBaTkA AE
-и3TeIeTe JIOCTa 3a OcBO6OJaBaHe Ha OrpaHnHTeHa CKoCBAhe AF
-3aBbPteTe Macata Ha cIpyKyIpa HAIBAO NIN HAJRCHO n HAcTpoTe JHeJIaHnBaHa CkOcRaHe (OT 0^ Do 50^ ), KaTO n3NoI3BaTe INdNkAtop AG
-ocbo6oTe JocTa AF
-3aterHeTe 3aKIOUOBAuTa pBkoXBatha AE (He 3aTgraTe pBHOXBathaTbbpDe 3DpaBO)
-3a 6bp3a nIpeu3Ha HAcTpoHbHa YecTo
H3noJIbAHn bIIn Ha cKocBaHe (0^,15^,22,5^ 31,6^,45^) IocTbHa OpaHHTeHa cKocBaHe AF ce 3actOnOpRa Ha cbOTBeTHnte N03uN; 3a
IpeDtBpTaBAHe Ha TOBa IocTbT AF MoKe da ce
3akIOHn BOCBO6OdeHa No3uNIA ⑦ b
3aabaHa bTnHa p3aHe 18
-ocbo6oDeTe TpncTpaHnHO To KOnue W
-OTKIOHETeTnabTaHaUnpKyIpaHaJIaBO,DOKaTO
HINKAtOpbT 3a bIbI Ha pR3aHe X nocOHN JekAHHa Ibl Ha pR3aHe
-PeryIpyemnT KpaenCTonep 3a p3aHe AA (45^) MoKe Da ce n3noJ3Ba 3a cnnpaHe Ha 45^ nn npoBnKaBaHe do 48^ 18b
-3aPbKTeIaBaTaHaCnPHyJaPaB Ta3nNo3uYn 3aTeHHepebKOXBaKaTaW
-3a pЯзаHe Naясно ПьрBO HaнлонeTe rJaBaTaHa 甲pКулЯрalekoHaJIBO,3aBbPteTe pKoxBaTKaTa 3a ocBo6OxJaBaHe Ha pЯЗанTo OTДяСHOb AB (npi6I. 60^ ,cIeTToBA 3aBbPteTe rJaBaTaHa zIpKuLyraPa KbM JekalHnBaJHa pЯЗа He OTДяСHo C
-KORATo HAKIOHInTe 06paTHO rIaBaTa Ha cIpKyIpa HAIABo, pBKOXBaTKaTa 3a OCBO6OxJaBaHe Ha pR3aHETo OTdRCHO AB aBTOMaTHO Ie ce HyInpa Do KpaHnA CTOpE Ha 0^ TOBa MoKe Da ce npDeOTbPaTu 4pe3 3aBbPtaHe Ha pBKOXBaTKaTa Do np6JI. 90^ BMEcTO 60^ 18d
- OTPaBnnoD pa3nueH bTb1 ⑲
-praHnraTpa3nueHbIuH3nCKBaT KaKTo 3aDaBaHe Ha bHa cKocBaHe, TaKa I 3aDaBaHe Ha bIHa pr3aHe
!He n3no3BaIte cIpyHyalpa B onpeJeHn KOM6nHaun 3a ChocraBaHe n p3aHe, KOHTO MORaT da DOBeDaT do C6JIbCHBaHe MeHdy PJIb3raUnte Ce n CTauNoHapHN qactn Ha cIpyHylpa HIn MeHdy PJIb3raUnte CE qactn IN DeTaJna - 3a H3rotBHe Ha Cpe3a CBaIeTe PJIb3raUata Nperpada, FInHCnPaUata PbHOXBaTHa 3a PJIb3raUata Nperpada n PbHOXBaTHaTa Ha pa6oTHata CTra Cnped HyHOTO.!BHHarHn H3npo6BaIte NbpBO Bbpxu HeHyHNO napYe MaTePnA1
- PerylnipaHe Ha nIb3rauTe nperpapn 20
-pa3xla6eTe pboKoXBaTKaTa V, 3a da no3BOJNTe nnb3rahe Ha nperepaData(nte) U
-paXla6eTe pBkoXBaTKaTa V Oue, 3a da no3BOInte CBAJIHe/CrNo6BaHe Ha nperpaData(HTe)
-3aTeHHeTe pbKoXBaTHaTa V, 3a da ΦHKcnpate HeJaHaTa No3nur
! yBepTe ce, Ye nIb3rauIte nperpauN ca ΦnKcnpaHn nIbTHO npedn n3noJ3BaHe Ha HHCTpyMeHTa
! 3a HЯнон KMбинану OT ChocяBaHe И ряза He bIcTAta MoHKe Дa e Heo6xOДИМо Дa ce CBaJIb pBHOXBaTHaTa
-ⅡHnHna3ep 21
-3a BODEHe Ha HNCTpymeHTa No JKeIHaTa JINHnHa Pa3aHe,OT6eJI3aHa Bbpxy DetaJa
-BHIOUBaIe/H3KIOUBaIe IINHnTa JIA3ep KaTO npDnBnKBaTe KIOUAD
I npedn da 3anoheTe pa60Ta, npoBepeTe
NoPabHraBaHeTo Ha IHHraTa Ia3ep CnpMa
DeiCTBnteHaTAt NHHa Ha p3aHe, Hato
HanpaBte np6Ho pa3p3BaHe Bbpxy napye
HeHyKeMaTepnai
- Pязане 6e3 nIb3raHe (MaJIHn DeTaHIn)
-pa3BnIe fHcnpaata pboXbTaHa AH, B cnyaay e 3aTeHaT
-ⅡIb3HeTe rIaBaTa Ha cIpyJIpa KaBcTonepa B nOcKa Ha npEpaDaTa S 3aTeHete nobTopHo fHKpauaTa pKoXbaTHa AH
! aHOMexaHn3MbT He Ce 3aHIOU,INCKbT
BHe3aHNO MoHe Da Ce BdHrHe Bbpxy DeTaIJa N Da ce 3acnN KbM Bac
-yCTaHOBete HHTpymeHTa Bpa60THO NOIOXHeHne
! yBepTe ce, ye DeTaIbIe HEnoDbNHHO fHcpanh cnpmo macata Ha TpnoHa n npedna3nteTnS
-BKIOUOte HNCTpyMeHTa Ype3 OCBO6OJaBaHe Ha 6JIOHINPOBkata AJ u N3TeTne rIaNbHn IpeBKnIOyBaTeI Al
!He KpbctocBaIte pbcTe CN, KORATO pa6oTnte C rnaBata Ha cnpkyIpa2a
-pexte DeTnla C NOCTOHHo PnpdBnKBaHe
I npedn pekeuHT dNcK da Bne3e B deTaJa, HNCTpymeHTbT Tp6Ba da pa60Tu Ha nbJHa CKOpocT
-и3KIOHcTe HcHTpyMeHa KaTO OTNychTe BkIOUbaTeJI A
-ИЗчakайт,ДOKATOpeKeHcIaTДИСКспeнБЛНО,прдиBaBnHTeгlaBaTaHaцИрKулЯрабabHoHarope
- P3aHe c nIb3raHe (WnpOn 06pa6oTBaHn deTaJIn)
!HMaIte npEaBn,Ye OINcAHnT NO-DOy MeToe eHNCTBeHHrT, KOHTo e6e3OnaceH
-He n3TeTnIe Tc npKyIpa npes DeTaIIa
-pa3BnIte fHKcnpaata pboXbTaKa AH, B cnyaay e 3aTeHaTa
! yBepTe ce, ye DetaIbTe HEnoDbNkHo ΦHcpanh cnpMaMo Macata Ha TpNoHa n npedna3nteTnS
-3dtpnaiTe rnaBataHa u npKyIpa DoCTaTbH0 HactpaHn OT npperpaTaS, TaKa Ye u npKyIpaHnRT Dnck Da e nped o6pa6oTBaHn DeTaJ ②
-BHIOUOte HNCTpyMeHTa Ype3 OCBO60JaBAHe Ha 6JIOKINPOBkata ② Nn3TeIeTe IJIaBHnI pEBKIOUyBaTeJ
!He KpbctocBaIte pBcTe Cn,Horato pa6oTnte c rnaBaTa Ha cnpyJnpa ② a
-6yTHETe rnaBata Ha uHpKnyIpaBa NocKaTaHa nperpadaTAs pa3peKeTe o6pa6oTBaHHa Detai c paBHOMepHO HappeDaHe 24
!npedn peKeiHT dNCH da BHe3e B DeTaIIa, HNCTpyMeHbT TpR6Ba da pa60Tu Ha NbJIHa CKOpOcT
! aHO DoJIHHrT npOTEHTOp He ce OTBOPn
aBTOMaTHUHO, KOEtO MoHe Da Ce ClyuH nPn
ONpeJeIeHN YcIobNra (HaNP. DetaH, KoITo e
MHORO 6JIN30 Do MaHCMaJIHNA HanaIHTe), MOHe
Da TPr6Ba Da OTBOpHTe npOTEHTopa c PbHa2b
-ИЗКИLOЧЕ ИСHTРМЕТА КATO OTПСHETE BKNIOUBAteJI A
-ИЗчakайт,ДOKATOpeKeHecnTДСКспeнТьЛНО,прддаВдгнete ГлаваТаHaцИркУлЯрабabHOnHarope
- P3aHe Ha Jle6OBe 25
-3aJaTe JKeHaHaTa IbIbOcHnA CbC CTOnepa 3a Dbl6OuHa AK n ro 3acToOpTe Upe3 3aTgRaHe Ha raKaTa AM
-ДБРВЕн pa3далечпел TрЯбв Да ce NOCTaВИ MEЖДу DeТаиla И перрадота 3a NOCTOЯнHa DьЛбОчиНа NO YIJIATA DBJHINHa Ha JIJIe6a
!yBepTe ce, Ye npHyIaRPNHnT dNcH He ce 3aKlnHbBA B DeTaHa
! BnHaHn H3npo6BaIte IbPBO Bbpxy HeHyXHO napYe MaTepnai
CmHaHapeXeUyIINCK 26
!n3KIOUeTe UeNceLa
-B3eMeTe 电ctOteHHN KIOH AN OT KOMnIeKTA AO
-3aApbKTe npeJa3HnI npoTeKTop A B O TBopeHa nO3nui
pa3xla6eTe BnHTa 3a NOKpNBaaTa TnOcKocT AQ (He OTBnBaIte BnHTa DOKpa) 26a
-3aBbPteTe npedna3HnI npoteKTop AdoKpaHazad 26b
-HaTnCHeTe 6yToHa 3a 6IOnHpaHe Ha IINHdela AP Iro 3aDpBkTe DOKaTO OTCpaHInTe 6OJIta Ha DNcKa, AR KaTO BbPTInTe WeCTOCTeHHN KJIIOH AN IO
YACOBHNIKOBATACTPEJIHA(=BCbIaTnOcoKa, KaKTo e nOKa3aHO CbC CTpeJIka Bbpxy peKeuia N1CK)
!HaTnChTe6JIoHpaunBbPteHeTo 6yToH AP camoHorato HNCTpyMeHTbTe HAnbIHO cnprJ
-ocbo6oTe 6IoknpaunBbPteHeTo 6yToH AP -OTcTaPeTe 7IaHeca AS npeKeuNn
I cmehepeeueaHnch, KaTo 3b6nteHa TpnoHa n cTpeJnHaT, O3NaueHa Bbpxy peHeuHa nCh, coatB cbuaTa NocOHa, HAnTo n CTePnHaTa Bbpxy npedna3nteA
-IOCTaBeTe ΦlaHeua AS 26c
-HaTnCHeTe 6IOKnpaUHnINHdEHa 6yToH AP n ro 3aApbKTe, DOKaTO 3aTeRHeTe 6oJI Ta Ha dNcKa C IecTOcTeHen KIOu AN O6PATHO HA YACOBHnHA Ha 1/8 o6opOT cIeD no3nTuHa Na pBHyO 3aTgAHe (no3BOJBA npInIIb3BaHe Ha zIpKyIprHn DaCK npn rOJaMO cbnpOTNBJeHne, KoEt HoHaMaJIraBa npTeOBapBaHeTo Ha MOTopa H OTKaTa Ha zIpKyIpa)
-3aterheTe BnHTa Ha nokpmbHaTa nloa AQ
- CmraHa BaBLOKKaTa-Ta6Na AT ②6
3aMeHeTe DeeKTHa NnNn3HoCeHa BLOXKa-Ta6Na KaKTo CJIeDba:
I n3nKoyTe eencena
-B3eMeTe 电ctOteHHN AN OT KOMnIeKta AO
-OTCTpaHeTe BCNUKHTe 6 BnHTa, KaKTTo e NIOCTpnpaHO
-OTCTpaHeTe CTapaTa BNoKHa-Ta6Na, KaTo NpBPO
NOBdHHeTe OTnped n CLeD TOBa r N3TeTJIte N3ZrJIo
-IOCTaBeTe HOBA BLOHka-Ta6na
!3aterheTe 3paBO u6-Te BnHTa
-Поберкa/peгулране Ha 90° opneHTnpaHTo Ha dinca
I n3nIOyTe eencena
-3aBbPTeMeMacataHaCnPKyIpaDoNo3nIpyTaHaCKOcBaHe 0^ n3aKIOUcTeHaMRCTO
-OTKIOHETe rIaBaTa Ha cIpKyIpa Do nO3nIyTa Ha pIaHe 0^
-CMbKHeTe TlaBaTa Ha LcHpyJaPa N 3aKJIouYe Ta MRCTO
-роверетe bгьа 90° mexу ДИСКИ ВLOЖHAТСпорпендуняр
-aHoe Heo6xOdmo, peryIpaTte 90^ opneHTnpaHeTo Ha NsCKa KaKTo cJeDbA:
1.OCB6oBeTe TpncTpaHHoTo KOnHe W
-
perylnpaTe BnHTa Y c 4 mm wectorpamEn KIOU (He e BkIIOueH CTaHApTHO B OKOMJIeKTOBkata) (28 b
-
3aTeHHeTe OTHOBOCbBnHK
-
HynpaTe INdNkAToPa 3a p3aHe Ha 0^ C
-Поберka/peгуларе Ha 45° opneHTnpaHTo HaДИСKa
!n3KIOUeTeIe
-3aBbPTeMeMacTaHaUpKyIpaDoNo3nIpyTaHaCKOcBaHe 0^ n3akIIOHcTeHaMRCTO
-OCBO6oDeTe TpncTpaHHOTOKONHe W
-3aainTe pepynpyemna Kpaen cToep 3a pnahe AA ha 45^ 29b
-OTKIOHETeTlaBaTaHaZnPkyIpaHaJIABO
- npOBepTe bIbIa 45° MeHdy dNcKa N BIOXHaTa C bIbI 45° a
-проверета дди Индкаторт за вгл на рязанe X ce hamupa Вьрху обозанeнeTo 45°
-aHc e Heo6xOdmo, peryIpaIte 45^ opneHTnpaHeTo Ha DaCKa KaHTo CJIeDBA:
- perylnpaTBe BnHTa Z c raeueH KIOU 10 (He e BKJIOUeH CTAHApTHO B OKOMJIeKTOBkata)
- npoBepeTe OTHOBO C bIbJIHnK 3a cKOceHN bIIN
-akoe HnyHNO, NOBTOpeTe 3a NaCTPOHkata O T 45^ HanaCHO
-СMbKHeTe ГlaBaTa HaцИрКулЯри 3aKЛIOчeTe Ha MRCTO
-Пюверka/peулране Ha 90^ opиентupaHTOHa npedna3ntela 30
!n3KIOUeTe Uencela
-3aBbptTe Macata Ha cHpyJra Pa No3nIyra Ta HcKocBaHe 0' n 3aHIOHTe Ha MACTO
-CMbKHeTe rIaBaTa Ha cIpyIpa N 3aKJIouTe Ha MRCTO
- npoBepeTe 3a bTbI 90^ MeJy DnCKa n
npedna3nteJI S c nepEnHnKyIarp (yBepTe ce, Ye
pePnEHnKyIarpbT DOKOCBa TJIOTO Ha DnCKa, a He
3b6nte My)
-ako e Heo6xOdmo,peylnpaTte 90^ opneHTnpaHToHa npedna3ntela KaKTO cJeDbA:
1.OCB06oTe4-TeIeCTOCTEHNNBnHTaT
2. perylnpaTe npedna3nte,doKaTo ce noJyuN nbJeH KOHTaKT Ha DnCKa N npedna3nteJc nepneHnKnyla pa
3. 3aTeHHeTe 4-Te WecToCTeHHN BnHTa T
4. HynpaTe INdkaTopa 3a ckocBaHe Ha 0^ c
KaBeJHa 31
-3n0J3BaIte Ka6eHaTa 3a npedOTbpaTBAHe Ha 3axBaUaHe Ha eJeKtpnueChn Ka6eMeJy DmHKeUTe Ce n CtauHOapHn qactn Ha HNCTpyMeHTA
YKA3AHN 3A PABOTA
CneuaHnIeTaHnI
-BINHARINoIbPkaTe CBO6OHNTE KpaIuHa Ha IbIgN DeTaJIIn
-уверете ce, Ye 3ao6bIeHn nI IN KpbIg N DeTaIIN ca 06e3onaceHn CneuaHNO CpeuN H3nB3BaHe 33
-He MoKe Ia NMa Xla6bHa HIO JInHnra Ta Ha pR3aHe MeKdy DeTaIJa HnpEJa3nTeJIy IIN Ta6Jata Ha TpNoHa
-ako e HxHNO, n3rotBeTe cNoMaTaTeHa nnHa; OTBOpHTe B nIb3raaata nperpada Tp6Ba da ce N3no3BaT 3a 3aKpenBaHe Ha cnomaraTeHaTa nnHaKa 34
! cnomarateHaTa PAnHnMoXe Da ce n3noJ3Ba camo npn p3aHe ot 0°
3a paobota c noobn fopMOBaHnMoKe da ce n3noI3Ba HIOCTpaun 35 KaTO eTaIOH
BnHnO6pb7aIteIO6paTa CtpaHa Ha 6pa6oTbAHnJ DeTaHn HADony,3a Da OCNpyrTe MHNMaHNO OTcENBaHe Ha TpeCKN
- 13no13BaIte cAmO octpnppeKeuDnCKOBeOT
IOXOJA TIN
-HaueCTBOTO Ha p3aHe ce noOobpBa npn NO-TOJAM 6poi Ha 3b6nte
-peKeuIN DnCKOBe C Kap6nDeH BpBx OCTaBAT OCTPN DO 30 nTn NO-dbIro BpeMe OT o6nKHOBeHnte peKeuIN DnCKOBe
IODAPbJXHA/CEPBn3
BnHn noDbPkaIte HNcTpMeHTa nHypa qHCTn (CneuHaHO BENTnIipaunte npope3n Ha 3aHnKpa Na Kopnyca Ha DnIraTeJI)
Pa3pa6oTeTe peOBoHn npOBePka 3a rapaHTnpaHe Ha ToBa, Ye DoJIHHrT npOeKToP pa6oTu npabUInHO. POnuCTeTe DOJIHHn npOeKToP ot HATpyNaHn CTbproTHn C MOKbp napcaI.
-πpeiNouchTaHe N3KluOte Te enCeIa
-NOBUNHHeTe DOJINH INPOTEKTOP Do HAnbJIHO OTBOpEHa
No3nIuN I TO OCBO6OJeTe; aKO ToI He Ce 3aTBoPn
He3a6abHo N HApbJIHo, TpR6Ba Da ce npOBepn
OT cHTbp 3a CNeDnpoJaKBeHO 06cJyXBaHe 3a
eJeENTponHCTpyMeHTn Ha SKIL
-ПоунstВаитpepeeцднck HeNoCpeDCTBeHo cIeДуnotpe6a (ocObeHOOTcMOJaNleHnlo)-no BpeMe Ha yNotpe6a,peKeuTdNCK CTaba MHOrOropeu;He ro DOKOCBaYTe DoKaTO He n3CTnHe HAnbInHO
-Почист Ba�е Лазэрпата CBETлнha ACс мека четха слд BCянуnotpe6a,3a Да подьржate Добра ВДИМоCT Ha Лазэрпата Линь (yВереTe ce,ЧЕ He npOMeHЯт e HAcTpoiKaTa Ha Лазера)
AkoBbnpekn npeu3HOTOpno3BOcTBO u BHMaTeJHO 3NNTBaHE Bb3HNKHe NOBpeJa, INCTpyMeHTa da ce 3aHece 3a peMOHT B OTOpU3npaH cepBn3 3a eJeKtpoHHCTpyMeHTHa SKIL
-3aHeceTe HnCTpyMeHTa B Hepa3rno6eH Bn 3aeHOCdoKa3aTeJIcTBO 3a NOKyIKAta My B TbpROBCKN06Kt,OTkbJeTO CTe FO3aHyNIIIN,INB H Na-6JN3KNCEpBN3 Ha SKIL (adpecnTe, KaKTo IN cxemata 3acepBN3HO 06CnyKBaHe Ha eJeEKTponHCTpyMeHTa,MOKeTe Da HamePnte Ha adpec www.skil.com)
- IMaIte npEdbn, ye nobpea nopaI npetobapBaHe nn HEnpaBnH0 MaHnnyInpaHe C NHCptpyMeHTa ige 6bDaT n3NIOUeHN OT rapaHcIyTA (3a ycNoBnTa Ha rapaHcIyTA ot SKIL BnK Ha INTEpHET aDpec: www.skil.com nn nonntaTe Baunr dItp)
ОпАЗВАЕ HA OКOLHATA CРЕДА
He n3xBbpynTe eEnktpoypeDnte,6aTepn, npncnoc6beHnTa n OAnKOBHnTe 3aeDHO C 6HTOBn OTnaDbu (cAmO 3a cTpaHn ot EC)
-cb6pa3Ho DnpeKTHBaTa Ha EC 2012/19/EG OTHOCHO3HOceHN eJIeKTPnueCKN eJIeKTPoHHN ypeDN IOTpa3RABaHETo B HauNoHaJHOTo 3aHOHOdaTeJCTBO H3HOceHNTE eJIeKPOyPeDN CJIeDb Da ce Cb6npaT OTdEJIHO N Da CE npeDaBt 3a peuKnIpaHe CnopeDN 3NcKBaHHaTAt 3a ONa3BaHe Ha OKoJHaTa CpeDA-3a TOBA yKa3Ba CNMBOblT⑥ TORaBA KOraTO Tp6Ba Da 6bDat YHnOKeHN
LYM
- I3mepeHO B cBoTBcETBnE c EN 62841, HNBOTo Ha 3ByKOBOTo HAJIraHe Ha TO3n INHCTpyMeHT e 100,0 dB(A), a HNBOTo Ha 3ByKOBaTa MoUHocTe 109,5 dB(A) (HeonpeJeIeHocT K = 3 dB)
HnBOTO Ha emncna Ha 乌m e n3MepeHO B cBoTBcTbHe CbC CTaHaptn3npaHn Tect, ONpeJeHn B EN 62841; TO MOKe Da ce H3NoJ3Ba 3a CpabHeHne Ha eHN INCTpyMeNT C npyI N KaTO ppeDbapntHa OueHka Ha NODlaHaTe Ho Ha 乌m npu H3NoJ3BaHeTo Ha INCTpyMeHTa 3a NOCOeHnTe npnloKeHn
-ИЗПОЛ3ВаHETO Ha INHCTpyMeHTA 3a pa3IuH N OTe3N IprilIOKeHn IIN CДуTn, IIN IOso NOIDbPHaHn AKCECoApn MoKe 3HaUHTeJIHO da NOBUn HNBOTO Ha KOEt OTe NOIIOKeHn
-NepeHOnTe OT BpeMe, KOraTo INHcTpymeHTa e N3KIOUeH NII CbOTBeTHO BHIOUeH, HO C Hero He Ce pa60Tu B MOMeTa MoRat 3HaunTeJIHO Da HamaJIaT HIBOTO Ha KOeTO CTe NOILOKeHN
SK
AU Vychylovac prachu
AV Spona na kabel
BEZPECNOST
VSEOBECNE BEZPECNOSTN UPOZORNENIA TYKAJUCE SA ELEKTRICKEHO NARADIA
VYSTRAHA Precitajte si vsetky bezpecnostne vystrahy, Pokyny, ilustracie a technické udaje, ktoré su dodané s tymto elektrkym nastrojom. Nedodrzanie vsetkych niżsie uvedenych pokynov moze viest' k poraneniu elektrkym prudom, poziaru a/alebo vaźnemu poraneniu.
Vsetky upozornenia a Pokyny si odloztne na d'alsie pouzitie.
DALSIE BEZPECNOSTNE POKNY
DODATNA UPUTSTVA O SIGURNOSTI
- Naleti struje dovode do kratkotrajnih padova napona; pod nepovoljinim uslovima napajanja moze da bude pogodena druga oprema (ako je impedanca napajanja el. energijom manja od 0,219 om, ne postoji verovatnoca da ce doci do poremecaja); ak o vam je potrebno dodatno objasnjenje, mozete se obrati vašem lokalnom organu za snabdevanje el. energijom
OPSTA
- Ovaj alat koristiteismo za rezanje driveta
- Uvek se uverite da je napon struje isti kao i napon naveden na pločici sa nazivom alatu
- Nemojte stajati na alatu ili njegovom postolju Moze doci do ozbiljne povrede ako je alat nagnut ili ako se slucajno dotakne rezni alat. Ne ostavlajte materijale na alatu ili blizu njega takao da je potrebno da stanete na alat ili njegovo postolje da biste ih dohvatili.
- Obavezno iskopćajte alat iz elektricne utićnice pre nego što izvršite bilo kakva podesavanja ili zamenu pribora
- Uvek iskopcjte utikač iz izvora napajanja pre premeštanja kružne testere Iskopcjte, spustite sklop glave i zakljucajte u položaj, koristite rucku za nošenje i jakno od udubljenja u osnovi testere.
- Ne ostavljaje alat dok se ne zaustavi potpuno
- Prilikom rezanja radnih predmeta nepravilnog oblika, isplanirajte svoj rad kako vam ne bi iskliznuo i stegnuo list testere i bio istrgnut iz ruke
- Ovaj alat ne treba da koriste osobe ispod 16 godina
- Ovaj alat nije podesan za vlažno sečenje
KORISÇENJE NA OTVORENOM
- Prilikom primene alata napolju, prikljucite ga preko Fl sklopke sa strujom iskligenja od maksimalnih 30mA i koristite samo jegan produzni gajtan, koji je dreviden za korscenje na otvorenom i koji ima utikač zašićen od prodora vode
PRE UPOTREBE
- Produzni kabl koji koristite mora da bude sasvim odmotan i siguran, sa kapacitetom od 16 A
- Nosite zašitne naočari, zašitu za sluh, i zašitne rukavice
- Prašina od materijala, kao što su boa koja sadrži olovo, neke vrste drveta, minerali i metal, moze biti opasna (dodir ili udisanje prasine moze prouzrokovati alergjske reakcije i/ili respiratorna oboljenja rukovaoca i lica u blizini); nosite masku protiv prasine i radite uz uključeni urežaj za ekstrakcjtu prasine kada radite na mestima gde ju je moguce priključiti
- Odreene vrste prasine su klasifikovane kao kancerogene (kao sto su prasina hrastovine i bukovine), posebno u sadejstvu sa aditivima za priremu driveta; nosite masku protiv prasine i radite uz uključeni urežaj za ekstrakciju prasine kada radite na mestima gde ju je moguce priklujčiti
- Prati nacionalne propise vezane za prasinu koja se proizvodi prilikom rada na obradivanim materijalima
- Ne obradjute nikakav materijal koji sadrži azbest (azbest važi kao izazivać raka)
-
Nemojte nikada da koristite elektrichi alat bez originalnog systemd za zašitu
-
Pre svake upotrebe proverite da li je zašitni mehanizam propisno zatvoren
- Nemojte upotrebljavati testeru ako se zašitni mehanizam ne kreće slobodno i ako se odmah ne zatvara
- Nikada nemoje da stezete ili blokirate zašitni mehanizam u otvorenom položaju
- Nikada nemojte da koristite alat bez umetka za sto; zamenite umetak ako je ostecen ili astrosen
- Pre Ngo što započnete sećenje, uklonite sve preprekna vrhu, kao i ispod putanje sećenja
- Izbegavajte ostecenja od šrafova, eksera i drugih predmeta na vašem području rada; uklonite ih pre nego sto započnete rad
PRIBOR
Uz ovaj elektricni alat nikad nemoje da koristite diskove za oštrejen/seecenje
- SKILMZe priznati garanciju samo ukoliko je korišcen odgovarajuci pribor koji mozete da nabavite kod svog SKIL prodavca
- Za postavljanje i korišćenje pribora koji nisu SKIL, pogledajte uputstva proizvodaca
- Upotrebljavaje samlo listove testere, koji odgovaraju karakteristikama koje su navedene u ovom uputstvu za rad i prekontrolisani prema EN 847-1 i odgovarajuce obeleženi
- Koristite samo pribor Čija je dozvoljena brzina u najmanju ruku Jednaka najvećoj brzini pri praznom hodu elektricnog alata
- Nemojte nikada da koristite testere napravljene od HSS celika
- Ne koristite secivo koje je napuklo, deformisano ili tupo
- Koristiteismo seciva ciji prechnik otvora odgovara vretenu alata; nikada nemojte da koristite reduktore ili adaptere
Zastitite pribor od potresa, udara i masnih povrsina TOKOM UPOTREBE
- Ne koristite silu dok rukujete alatom (primenite blag i kontinuiran pritisak da biste izbegli pregrevanje vrhova ostrica i, ukoliko secete plastiku, topljenje plastičnog materijala)
- Pazite da vam secivo tokom rada ne zahvati prste, šake ili ruke
- Ako se sečivo zaglavi, odmah iskljucite alat i izvucite utikač; tek posle toga izvucite zaglavljeni komad driveta
U slučaju atipičnog ponašanja ili nepoznatih zvukova odmah isklujcite alat i izvucite prekidač iz struje
- Ako se kabl oštei ili preseću toku rada, odmah ga iskopčajte i nemojte ga dodirivati
- Nikada nemojte koristiti alat kada je kabl ostecen; on mora da se zameni posebnim kablom koji je dostupan u servisnoj organizaciji.
LASERSKA RADIJACIJA
- Ne usmeravajte laserski zrak na osobe iliŽivotinje i sami ne gledajte u direktan ili reflektujuci laserski zrak (na taj nacin možete dazaslepite lica, prouzrokujete nezgode ili da ošetite oči)
- Ako lasersko zračenje dode u oko, morate svesno da zatvorite oko i da glavu odmah okrenete od zraka
- Nemoje da vrsite promene na laserskoj opremi
- Nemojte da gledate u laserski zrak (laserska radijacija)
- Nemojte da gledate laserski zrak pomocu optickih pomagala za uvecavanje (kao sto su lupe, teleskopi ili dvogledi)
- Nemojte da koristite alatku u blizini zapaljivih tecnosti, gasova ili prašine
- Nemojte da koristite alatku ukoliko su u blizini deca
- Montirani laser nemojte da zamenjujete drugim tipom lasera
NAKON UPOTREBE
- Nakon isključivanja elektricnog alata, nikada nemojte da zaustavlje obranje pribora primenom bočne sile
- Odsečene delove komada koji obradujete uklonite iz radnog područa tek nakon što se sviPokretni delovi potpuno zaustave
- Sečivo se prilikom upotrebe zagreva; ne dodirujte ga dok se ne ohladi
- Cuvajte alat na suvom unjegovu i zakljucanom mestu, van domasaja dece
OBJASNJENJE SIMBOLA NA ALATU
② Procitajte uputstvo za korijscenje pre prve upotrebe
③ Nosite zaṭitne naočari i zaṭitu za sluh
④ Opasna oblast! Zona zabranjena za ruke. Drzite prste daleko od ove oblasti.
⑤ Dvostruka izolacija (nije potrebna za za uzemljenje)
⑥ Ne odlažite elektricne alate i baterije u kučne otpatke
⑦ Laserska radijacija / Nemoje da gledate u laserski zrak / Laserski proizvod klase 2
UPUTSTVO ZA KORISÇENJE
Montaza
-ručku za prenošenje E montirajte sa 2 zavrtnjima pomocu imbus kluča AN
-sastavite okretnu ručku za blokadu AE na prednji deo stola 10
-sastavite kliznu vodicu U (pogledajte Podesavanje klizne vodice)
NURGASAAGIDE OHUTUSJUHISED
TAIENDAVAD OHUTUSJUHISED
APKALPOŠANA / APKOPE
Vienmér raugieties, lai instruments un vads butu tiri (it ipaşi, gaisa atveres motora korpusa aizmugures dalā
- Regulari veiciet pbaraudi, lai parliecinatos, ka apaksejais aizsargs darbojas pareizi. Notiriert no apaksejā aizsarga zagu skaidas, izmantojot mitru dranu.
-pirms instrumenta tirisanas atvienojiet to no elektrotikla
-Paceliet apaksejo aizsargu lidz galam atverta
stavokli un atlaidiet to; ja tas uzreiz un pilinibā netiek
aizverts, tas japarbauda SKIL elektroinstrumentu
pecpardoşanas servisa centra
1) B63B6HOCHT HA PABOTHOTO MECTO
a) OdpkyBajTe ro BaWeTo pa6oTHO MeCTO uHcTOn HypeNo. HeypeDen nn TeMeH pa6oTeH npocTo mKe Da npEdu3BnKaat He3rOuN.
b) HemojTe da pa6oTHe co ypeDoT BO cpeHnHa BO Koja mma onaCHOCT OJ eHCnIO3nJa, BO Koja mma 3anaJIINB TeuHOCTn, rAcOBn n PpaunHa. EJeKTPnuHnTe aIaN TPon3BeyBaat NCKpn KOn MoHaT da 3anaIaT npaUNHa nn Napea.
c) 3a Bpeme Ha ynoTpe6ata Ha eIeKtpnHnot aIaT, Deuata N octaHaTne Iua pKeTe rN nOdaJeKy O MeCTOTo Kaede pa60ntte. ODbpaKaHe, 6n MoKeJle da H3ry6nte KOHTPOna Bp3 ypeDoT.
2) EJEKTPNUHA CNYPHOCT
a) YtHKaH Mopa Da OJRObapa Ha npHKlyOHO. HnKaHo He cMee Da ce npBaT n3MeHn Ha wTeKePOT. He KOpNCteTe aAnTepcHn wTeHep 3aeHNO co ypeoT KOJ e 3aWHTTHo 3a3emjeH. He npOMeHn wTeKePn I COoDBeTHn npHKlyOuI r Ho HamaLyBaat pN3HkOT oI eJeKTPnuEh ydap.
b) N36erHyBaJTe DOnnHa TeNoTo Co 3a3emjeHn NOBpUnHH, KaHO uTO Ce ueBHN, paAnjatOpN, pepHn HΦpnHnIepn. NocToN 3roJeMa HApacHoCT Od CTpyeH ydap,doKoJIky BaWeTo Teno e 3a3emJeHo.
c) Yybajte ro ypeodot noaaleky oddoHN BJara. IpoIpaHbTo Ha BOda BO eJeKtpnHnOT ypeJ ja 3roJemyBa onaCHOCTa OD cTpyeH yap.
d) He 3noynotpe6ybajte ro npnHnyhnOT ha6eI 3a Hoche, 6ceHe Ha ypeoT nIi 3a H3BLekyBaBe Ha uTehePOT oMpeHHNOT npnKlyOc. CybaJte ro Ka6eIOT noJaIeHy oTOnJIHa, Maclo, octpn pa6obu nn DeIOBHTe Ha anapaTOT KOn Ce DBNHAt. OwteteHn IINI 3anIeTKaHn Ka6n ja 3roJeMyBaat onacHOCTa OD CTpyeH yap.
e) Hora ro ynoTpe6yBaTe NOHaCyT HaBOp, KopnCTeTe npoDolHeH Ka6e HoJ e CoOdBTeH 3a yNoTpe6a Ha OTBOpEn npocTOp. PnpMeHaTa Ha npoDoJIKeH Ka6eI COoDBeTeH 3a pa6Ota Ha OTBOpE H npocTOp ja HamaIyBa onacHOCTa Od CTpyeH ydap.
f)Донлну He moHe da ce n36erHe pa6oTa co eIeHTPNuHnOT aIaT BO BlaJHa cpeiHa, HOpNCTeTe npEHNHyBaY 3a CtpyjHa 3auTnTa npuTexnHn npo6lemN. YnoTppe6aTa Ha npEKNHyBaYOT 3a CtpyjHa 3aHTnTa npn TexnHKn PpO6lemn FO HaMaLyBa pN3nKOT od eJIeKTPnuH yap.
3)JIINHHA3ALITNTA
a)Бидete BHNMaTeJIHn,BHNMaBJTe WTo npaBnte nNoCTanyBaJTe BHNMaTeJIHo DoJeHa pa6OTnTe co eIeHTpUHnOt aIaT. He pa6OTe co ypeDTo DOHOJHy cTe yMOpHn IIN NOd JeCTBO Ha dpora, aJHOxOJI NII JekOBn. EdeH MOMeHT Ha HeBNMaHHe npu yNtpe6aTa MoKe da DoBeDe do CENo3Hn NobpeDi.
b) Hocete ja JInuHaTa 3aWHTnTa onpema n ceKoraw Hocete 3aWHTnO uNla.HocbeTo Ha JInuHaTa 3aWTnTa ONPema, KaHO UTO e MacKaTa 3a npaUnHa, 6e36eHOncHata OJleKa KoJa He Ce JIN3ra, 3aWHTteH IJIEM NII IN WHTnIK 3a Cnyx, 3aBNCHO OD BIDOT IN npImeHaTa Ha eJeKTPnuHnot aIaT, Ja HamaJyBa OnaCHOCTa OD NOBpeDa.
c) N36erHyBaJTe HeBHMMaTeJHNO BkLyUyBaHe 3a BpeMe Ha pa6oTata. OcnrypajTe ce npKeHHyBaOt Da 6nIe Bo "OFF" no3nJia nped da ro cTaBnte WTeHepOT BO npHnyOHOT. DOKOLky Ro Hocnte eJIeKtpuHnOT aJat CO npCTOT Ha npKeHHyBaOT nJrTO npHKnUyBaTe anapaTOT KoJ e npHKnUyen Co HaNojyBaHe Ha cTpyja, MoJCe da npEdu3BnKaTe He3roDn.
d) PpeBnkyBaHe Ha ypeoT, TprHete rHa aIaTne 3a noDecyBaHe nn KnyOT 3a HABpTyBaHe. AlaTOT nn KnyOT KOJ ce Haora BO BPTInBnO T deI Ha ypeoT, MOKe da npedn3BnKa He3roDa.
e) He r n pneuhenybajte cBOHTe cnooc6hoctn. 3aB3emete cnrypeH n CTaHJIeH CTAB H BO CEHOJ MOMENT ODPHyBaJTe pAMHOTeHa.Ha ToJ HaYIN MOKeTe IIOObpo Da rO KOHTpOJIpaTe ypeoT Bo HEouekyBaHN CITYaAUN.
f) Hocete cooDbetHa o6leHa. He hocete wnpoha
6nDat noaJeky od noBHHNte deIOBN. Hnpokata 6nke, HAKITOT nIN DOJIrata KOCA MOHe da ce 3aKaayat 3a NOBHHNTE DEIOBN.
g)ДOKOLKMyMOHeJaCEMOHTnpaATHaPpABN3a BwmykyBaHBe NΦaKaHBe npaunHa, npoBepete DaJInc Ce BnlyeHN N daJIb MoHAt NCnpaBHO Da CE KOpHcTaT. PpImeHaTa Ha OBHe HAppaBN Ja HamaIyBa onacHOCTa OJ npaUnHaTa.
h) He do3BOJyBajTe nCHcYCTBOTO cTeKHATO co yeCTa ynotpe6a Ha aIaTnte Da Be HnPaBn cNoHOJH N da rHnrOpnpate 6e36eHOCHTe npHHcHn npn HerOBOTO KOpNCTeHe. HeBnMaTeJIHO dBnKeHe moKe da npedn3BnKa cepno3HN noBpeN BO deI od ceHynda.
4) BHIMATEJIHA YNOTPEBA IN PAHYBAHc CO EJEKTPNUHNTAJATN
a) He ro npeonTepeTyBajTe ypeIoT. Ipn BaWata pa6ota kOpncTeTe ro npedBnDeHnot eJeKtpuye H aIat 3a Taa yNoTp6a. Co cooDBeTHNO tJeKtpuye H aIat Ke pa6OTHe NOIObpo I NocNrypHO BO HaBeDeHaTa FyHKUHOHaHa Oblact.
b) He Kopnctete eIektpnueh anat qnj npeknHybae HncnpaBen. EkeKtpnHnot aJAT KOJ NOBeKe He MoKe Da ce BknyBa n NcKlyyBa e onaceH mopa da ce nonpaBn.
c) Nchnyte ro eIeKtpnHnot aalat od ctpya n/nnn H3BaTe ro KOMnIeTOT co 6aTepeHH, ao ce OndenyBa, nped Da npabite HeKaHBn npHaOyBaHa, MeHyBaTe DOnOHnTeHa onpema nn da ro ChnaInpaTe eIeKtpnHnot aIat. Co OBne MEPnHa BHNMaTeJIHOCT Ke ce N36erHe HEBHmATEJIHOTO BKNyBaBe Ha ypeDToT.
d) Tprhete ro eIeKtpnHnot aHaT KOJ He ro HOpNCTnte od dOnnpot Ha decaTa. He donyuTajte pa6ota co ypeoT ha Iua Kaon He ce 3aNo3Haen Co Hero nn KOn Ro Hemaat npOHTaHO Oba yNaTCTBO. EKeKtpnHnte aHaTn ce onaChn DOKOLky CO HNB pa6oTa HENCKUcHn Iua.
e) OdpHyBaJTe ro eIeHTpHnHOT aHaT n DOONHHeJIHaTa ONPema. HmajTe KOHTpOla OKOly Toa DaJI N DBHHeuHnte DeIOBn Ha ypeoT pa6Otat 6ecnpekOpHo n DaII He ce 3aRnaBeHN, DaII DeIOBHe CE cKpWeHN IIN OWTeTeHN Do Taa MepHa wTo He MoNe Da Ce 06e36eHn FyHHCuOnHpaHe Ha ypeoT. Ppei npMeHaT, OBne OWTeTeHN DeIOBn Tpe6a Da ce nonpaBat. PpUHnHa 3a MHOry He3rOdn e loWTo ODpHyBaHnOT eJeKTPnuH en aHaT.
f) Alaatnte 3a ceehe OdpKyBaJte rN ocTp n uHCTn. BHIMATEIHO oDpKyBaHnte aIaTn 3a ceyebe co ocTp n ouTpni NOMaIHy Ke ce 3aIaByBaaT n CO HNB pa6oTaTa Ke 6nde noJeCha.
g) EJeHtpnHnO t aIaT, np6Op, pa60TH nAaTH, Tpe6a Da rH KopnCTHe cnpoeD OBHe yNaTcTBA, H aHaun HoJ e Onnuah 3a COoBETnO Tn Ha ypeI. Pn Toa, 3emTe rN ppeBnD pa60HTHe ycIOBn N pa60TaTa HOJa ce H3BpUyBa. YnoTppe6aTa Ha eJeKtpnHnTe aIaN 3a DpyrN ueN KOi He ce PpeBnDEHN, MoKe Da npEIN3BnKa ONaCHn CNTyaUuN.
h) Pauchne I NOBpuHHnTe 3a dpHebe OdpHybajTe rncybn, nCTn HEn3MaCTeHN. Pauchne I NobpHnHTe 3a dPKeHe bIto Ce IIN3raat He OBO3MOxYBaat 6e36eDHO paKyBaBe I KOHTpOla Ha aJlAToT BO HeooyekyBaHn CInTuaun.
5)CEPBNCIPAhe
a) EJektpnHNO t aIAT cepBncpajTe ro Haj KbaJIHΦNHyBaHO IInCe KOe KopnCTn cAmO NdeHTnH pe3epBHN DeIOBN. Co OBA ce 06e36eYBa 6e36eNo oDPrKyBaHe Ha eJektpnHNO aIaT.
BE3BEOCHNYATCTBA3A AROJIHN NINJIN
AroHnTe nHnCe HameHeTH 3a CeYeHe dpBO nH npOn3BODn CInuHN Ha dpBO, Tne He MoHaT da ce Kopnctat co a6pa3nBn TpHaJa 3a CeYeBe Ha mATEpnjahn wTO codPnAT JeNe3o, KaHO wTO ce peWeTHn, PpaKn, CTOnnHbHa, nTH. A6pa3nBnHaTa npaunHa npedn3BnKyBa 3arIabyBaHbe Ha noDnNkHnTe DeJOBn, KaO wTo e DOnHnOT WtHTNH. Nckpnte od abpa3nBHO CEyeHe Ke Ito n3rOpat DoJHnOT WtHTNH, DeJot wTO ce OTCeKYBa n DpyrIne PnaCTnHn DeJIOBn.
HopncTe cTern 3a napyeTo 3a o6pa6oTHa ceHoraW hora Toa e MoHHo. AHO ro dpHnTe pa60HTO npue co papa, ceHoraW mopa paHaTa da BN 6nIe HajMaJIky 100 mm odJaIaeHea OD dBete cTpaHn Ha CEuNlOTo Ha NIIaTa. He KopncTe ja OBaa NIIa 3a CeYebe NapHbA wTO ce npemHory MaHn H He MOHAT 6e36ENo Da ce CTERHat Hn Da ce DpHnat Co paka Ako BaWata paka e NoCTaBeHa npemHORY 6n3y Do CEuNlOTo Ha NIIaTa, NOCTO 3rOJEMeH PN3NK O ND NobpeDa Pn KONTAKT CO CEHIOTO.
Pa6oTHOTOpnapeMopaDa 6nDe cTaTnHNOΦaTeHO co Ctera HIN Da ce DpHN NOTnpeHo HA orpaData n Ha Macata. He CTabajTe ro pa6oTHOTOpnapye 3a o6pa6oTHa BO CEuHIoTO HIN HEmoJTe ,CNo6oHDo" Da ro Ceyete Ha Koj 6nlo HauHH HenpnucBpcTeHInTe HIN NODBnKHTe pa6oTHN NapuHa MoKe Da 6nDaT OToPJIeHN CO rOleMa 6p3Ha, PpeDu3BnKByBajKn NOBpeA.
Typkajte ja nnilata haHanpeh Hn3 pa60THOT npaue. He nobLekybajte ja nnilata hHa3ad Hn3 pa60THOT npaue. 3a da hapabnte pe3, noDnHete ja rlabata Ha nnilata u noctabeTe ja Hnd pa60THOT npaue 6e3 ceyebe, Bnlyuye To motopoT, npHTncheTe ja rlabata Ha nnilata HaDony u Tykajte ja nnilata HaHAnpeh Hn3 pa60THOT npaue Ydapot npn ceyeBe CO NobLekyBaHe hHa3ad HajBepoJAtHO Ke npdeN3BnKa ceynloto Ha nnilata Da ce KaHy Ha rOpHnO T eI Opa60THOT npaue HacnHDo a ro OTppln cKnlonot Ha ceynloto KOH onepatopot.
HnKoraw noctabyBajte ja paHaTa npeky npedBndeHaTnnHja 3a cehe He nnnped Hn 3ad CeHIOTo Ha nIaTAp60THo napYe, T.e. DpKeHeTo Ha pa60THo napYe Ha DeCHO od CEHIOTo Ha nIaTaco IeBaTa pKa nn 6paTHO e MHOry onaCHO.
He nocerhybajte 3aD orpaata co HHTy eHa paHa no6ncky od 100 mm od Koja 6nlo cTpHa Ha ceHnoto Ha nIATA 3a Da OTcPaHnte OCTaTOU OD dpBO Hn 3apadn Koja 6nlo dpyra npuHa DoeHa ceHnoto ce BPTN Bn3nHaTa Ha CEnuIOTo Ha nIATA uTO Ce BPTN DO BaWAta pKa MoKeJa He e OuyrJeHa m MoKeTe Da 6nDEte cepno3HO NobpeHn.
IpoBepete ro BaWeTo pa60THo napYe nped da ro nceye Ako pa60THo napYe cBneHo nn HcKnPBHeHO, 3aterHete ro Co HaDBopeuHOTO CBnEHO IInCe KOH orpaDATA. Cekoraaw OcnHyPnte ce DeKa Hema npa3HHa NOMery pa60THo napYe, orpaDATA u macata no DoJHHaTa Ha JInHjata Ha ceuehe CBnEHte NIn NcKpNBHeH pa60THn napHHa
MOHaT Da CE H3BpTaT Nn Da Ce NOMEcTa T MoKe Da npEdn3BnKaat Bp3yBaHe 3a CeuNlOTo Ha potnpaKata nIla npn CeueHe. He Tpe6a Da Ima WajKn Nn CTpaHn npedmetn BO pa6oTHOTn napYe.
He hOpncTe ja nHnata cdoeKa He rTprHete Od macata cHTe aHaTHN, OCTaTOUo OD pBO u CJI. oCBEN pa60THOTO napYe MaIInTE OCTaTOUu IIA6abNTe napHHa dPBO NIN dpYrHTe ppeMETn wTo HMaat KONTaKT co potnapKOTO ceHHIO MOKe da 6nDaT OTpPLeHN CO rONema 6p3Ha.
CeyeTe cmo eoHO pa6oTHO napue BO hcto BpeMe NobeKe pa6oTHn npaHb a noCTaBEH eHOb BP3 dpyro He MOHaT da 6uAt COODBeTHO CTerHaTu NN orpaHnueHn MoKe Da CE BP3aT CO CeuNIOTo nn da ce nomecTyBaA t 3a BpeMe Ha ceYeHeTo.
Ocnrypnte ce deha arolHaTa nnla e MOHTnpaHa nnnoctabeha Ha HnBeJInpaHa, QBpCTa pa60Tha noBpuHnHa nped ynoTpe6a. HnBeJInpaHaTa n CBpCTa pa60THa NOBpuHnHa ro HamaIyBa p3IKOT aroHnTa nnla da cTaHe HeCTa6nHa.
- Планраjet ja Bawaata pa6ota! Cekoj nat kora he ro npomehte aroJOT ha ceyeHe nIn noCTaBybaBeTo Ha aroJOT Ha 3aHocEHOCT, npOBepTe daIn e npabnHIO npilaarOdea hnpilaarOdInbata orpaDa 3a Da ro npdpKByBa pa6tHOTo nape H deHa Hema Da Ro nonpeyBa ceHIoTO HnCCTeMOT Ha WHTTHNz Be3 BkIyUBAhe Ha anAtKaTa Ha ,ON" H 6e3 pa6tHo napYe Ha Macata, NOMcTeTe ro ceHIoTO Ha PnlaTata 3a ZeIocHO cmyUnpah pe3 3a da CE ocHypate DeKa Hema Da nMa nonpeyeHOCT nIn onaCHOCT Od ceyeHe Ha orpaJaTa.
06e36eTe COoBcTHa NoDpWHa KaHO wTO ce npOuHpyBaHa Ha Macata,NotnOpHN KOHcTpYKnH n cI. 3a pa6oTHo napYe Koe e nooHPOKO Hn npOJRO Od ropHNO TcL oMacaT. Pa6oTHnTe npuHa pOoJIr Hn Hn NOuPOKn Od Macata 3a aOrHa Hnla MoKe Da ce npeBpTaT aKo He ce 6e36eHn npuCBpCTeHn. AHO Ce npeBpTaT OTceEHnTe npuHa Hn pa6oTHOTo napYe,MOKe Da rO NOiHnat DOHnOT WHTTHN Hn Da 6uDat OTpPJeHn OD potnpaHkOTO ceuJIO.
He HopncTepeIyRo Iuie Hako 3aMeHa 3a npoDolHeTOK Ha Macata Nn KaHO DOnOJIHHTeJHa noDpShKa HecTa6nIHata NoDpShKa Ha pa6OTHO napYe MoKe Da npedN3BnKa Bp3yBaHc Ha CeuNIOTo nn NomecTyBaHc Ha pa6OTHO napYe 3a BpeMe Ha Oepaujata 3a ceHbe, NOBLeKyBajKn Be Bac n NOMOHNKOT BO potpaHKO TO CEuNIOTO.
- OtceheHTo napYe He cMee Da ce 3aIaBn HIn Da 6nnde npTncHaTo co wTO 6nlo Bp3 potnpaHoto ceHIO Ha nlaTa Ako e 3apo6eHo, T.e. co ynoTpeBa Ha orpaHnUyBaun 3a DoJHKnHaTa, OTceHeHTo napYe MoKe Da ce 3aJIeHN Ha ceHIoTO n Da 6nde HacnIHo OTpPJeHO.
Cekoraw KOpncTe cTera nHn npuBpctyBaU d3ajHnpaH 3a npabNlHO NOTKpenyBaHe Ha kpyhen MaTePnjaJI, KaHO wTO Ce npaKn Hn UeBn PpaKnTe hMaat TeHdEHNJa Da ce TPKaHaat Doeka ce ceayat, ppeu3BvkyBajKn CeuNIOTo Da ,prn3e" n da ro BJeue pa6oTHO napYe co paKaTa BO ceuNIOTo.
Octabete ro ceuHIOTo da DOCTnHre celOcna 6p3Ha nped da HMa KOHTaKT co pa6oTHOTnpaue ObaKe ro HaMaJI pN3IKOT od OTpPnaHe Ha pa6oTHOT npaue.
AHO pa6oTHOTO napye HIN ceHnIto ce 3aRJaBaT, ncknyte ja aorJHaTa nnla. NoeKeajTe cnte
IOBHHN DeIOBN Da 3aCTaHaT N HcHnyute
TO pINKlyyOKOT ON h3BOPOT Ha HanojyBaHe N/
Hn n3BaTe ja 6atepnjata. Notoa, pa6otete
Ha ocIbOdyBaBe Ha 3arlaBeHNOT MaTepnjA
IpOdoJIKeHTo CeYeBe co nnlaTa co 3arlaBeHo
pa6oTHo napYe MoKe Da npEdu3BnKa rSybe He
KoHTPOJlATA NN OwTeTyBaHe Ha aOrJaHa Tnla.
- Ito 3aBpyBaHe Ha ceyeheTo, ocNo6oTe ro npEKNHyBaOT, dpKeTe ja rnaBata Ha nHnata HANOly N NOeKajTe Da ce 3anpe ceuNtO To nped Da Ro OTCTpaHnte OTCceHcHTo NapYe. OnacHo e da nocerHyBaTe co paKaTa BO 6IIN3Ha Ha ceuNlOTO.
-Држete ja paHhataцbpcto hora npabnte
ножлбуbaheин кога ro ocnobodybaTe
п配电инвayotnpedглаваТаHa nlaTа
6nde celenocho BO cnuyteHa noJox6a DejCTBOTO
Ha coNIPAhe Ha nIIaTa MoKe da npedn3BnKa
rIaBaTa Ha nIIaTa OeDnaW da ce nobIeue haIOny,
npedn3BnKBybajKn p3NK od nobpeDa.
DONOJIHNTELHH YNATCTBA 3A 6E36EHOCT
Haletn Ha ctpya doBeybaaTdo KpaKTToPajn naOBn Ha HanoNHot; NOHenoBOnn YcNoBn Ha HanojyBaHe MoKe Da 6nDe OWTeTeHa Dpyrata onpema (DOKOLky mOeHNDaHunjaTa Ha HanojyBaHe co eJeKTPnHa eHepnJa e NomaIa oD 0,219 Oma, He NOCTOn MOxHocT Da DoJde DO HapUyBaHa); DOKOLky Bn e NotpebHO dONOHHTenHO ObjachyBaHe, MochTe da ce Obpatte Do IOKaHata Cny6a 3a ChabyBaHe co eJeKTPnHa eHepnJa
ONWTH
KopncTeTe ro OoJ aJat cMo 3a ceYebe npBO
- Cekoraш npobepyBajTe HanoHOT da e nCT co Ohoj KoJ e Ha3NaueH Ha nIOuKaTHa aIaTOT
Hemojte da cTOnTe Ha aIaNtOT HnHa HceroBaTa nOJnora MoKe Da dojDe Do cepno3Ha nobpeDa aKO aIaNtKaTa Ce npBpTrn HnA KO CnyajHO DojDe DO KONTaKT Co aIaNtKaTa 3a ceHeBe. He CyBaJTe MaTepnJaN Ha aIaNtKaTa Hn BO Hej3nHa 6bn3nHa DOKoJIky e NOTpe6Ho Da cTOnTe Ha aIaNtOT HnHa HceroBaTa nOJIOra 3a Da rN DOCTNRHeTe.
06e36eTe ce anaTOT da e nchnyeh od ctpya nped da BpHnte 6nlo KaHBO noDecyBaBe Hnn 3aMeHa Ha np6opot
Cekorau HcKnyyBajte ro npHKnyOkOT od n3Bopot Ha HanojyBaBe nped da ja TpaHcnOptnpate arOlHaTnla NckIyTe ro npHKnyOkOT, cnYtTeTo cKJONOT Ha dOnHnOt DeJ Ha rJaBaTa n 3aKlyHeTe RO BO NOLOK6a, KopncTeTe ja paKaTa 3a HoCeHe n EaHa OD BdJa6HaTHInTE 3a paKaTa BO OCHOBaTa Ha nnlaTa.
He octabajte ja aIaTHaTa DoeHa He 3anpe cenocho
Kora ceyete pa60THn napuHa co HnnpaBnHa fOpMa, nCnlaHnpajTe ja BawaTa pa6oTa 3a napyeTo Da He Ce IIN3He N da He ro npHTnche ceynloto n da He BN 6nnde nctprHaTO od paKaTata
- Oboj aIaT He Tpe6a da ro Kopnctat Iuca no1d 16 roDHH
- Oboj aIaT He e Iooceen 3a ceuehe BO npncyctBO Ha Bnara
KOPNCTEHe HA OTBOPEHO
Kora ro kopncntte Ha otBopeHo, nobp3eTe ro aIaTOnpeKy ocNrgyBaay 3a cTpyja (Fl) 3a norpeuHNOJyBaBe BO cTpyja 3a npeKHyBaBe CO MaKcMym 30 mA n KopncTeTe npoDJIkeH Ka6eI KoJwTo e HameHeT 3a yNoTpe6a Ha otBopeHo n OnpeMeH CO BDOOTnOpEn npNKlyuOK
PNEД yNOTPEBA
- PpOIoJIeHnOt Ka6eI KOJ rO KOpNCTnTe, Mpa Ia 6nE cOcema ODMOTAH n 6e36eDen, CO KanaunTe o1 16 A
Hocete 3aHTTHOuHa, 3aHTTa 3a yHTe, 3aHTTHpaKaBn - IpaunHaT O MATEpnaJIaN KAKO 6oja Koja CoDPHNOBO, HekON BINOBN DpBO, MNHEpaIN MTeaJIN, MOKe Da 6nDE WTeTHa 3a 3dpabjeto (KoHTaKTOT CO npaunHaTaHIn HeJ3NHOTO BnUyBaHbe MOHe Da WpeIN3BnKa aIepnn N/Inn 6OleCTn Ha nnuHnTE oprAHn 3a OHOJ KOJ pa60TN co aIaNtOT nIN LyreTO BO 6In3nHa); Hocete Macka 3a npaunHa n pa60TeTe co npabocmykAhn DOKOHLMy MoKeTe da rN NOBP3eTe
- HeKoBn BINOHa Ha npaunHa ce KaHeporeHn (KaHO Ha npimep npaunHaTa Od da6 nIn 6yHa), oO6eHo 3aeDHO CO aINTNBu 3a ODPKyBaHe Ha dpBOTo; HocTe MaCha 3a npaunHa n pa6oTe co npabocmykAn DOKOLky MoKeTe Da rN NOBp3eTe
CneTe rnpoueypnte Ha BaWata 3emja 3a npaunHaTkoja ce jabyBa KaKo pezIaT OMaTePnJaJIInTe co KOn pa6OTHe
He 06pa6otybajte HnkaHOB MaTepnjaJ HoJ coOpHN a36ecT (a36ecTOT BaJn 3a npedn3BnkyBaH Ha paK)
Hikorai He KopncTeTe eJeKtpueh anat 6e3 opnHaJIeN CNTem 3a 3auTHTa - Поберете щаштита淘汰и有很大 влно заюпрд сека уnotpe6a
He Bknyybajte ro znpkynapo t ako 3aunTaTa He ce DBNHN CIOBOHO N BeDnAe Ce 3aTbopa - Hikorawhe cterajte HHTy He Bp3yBajTe 3a 3aHTnTaT aBO OTBOpeHa nO3nju
Hikorai He KopicTeTe ro aIaTOT 6e3 noMeTOK 3a Macata. 3ameHete oWTeTeH nn n3a6eH noMetOK 3a Macata - PpeIa NoHHeTe Co CeYeHe,OTCTpaHHeTe rN CHTe npueKn Ha N IO MeTOTo KaDe CeYeTe
I36erHyBajTe OwTeTyBaHa oJ WTPaΦOBN, WajKn I pyrN ppeDMETn BO MecTOTO Kaede pa6OTHTe; TprHETe r nped Da noyHeTe CO pa6Ota
ПРИБОР
HnKorawHe KOpncTeTe DnCKOBn 3a OwTppe/ceyehe co OBOJ eJeKTpnueh anat
SKIL MoHe Da npn3Hae rapaHcunJa caMo DOKoHky e KopncTeH COOBeTeH npbOp KoJ MoKe Da ce Ha6aBO BO CHTe SKIL npoDaBHNu
3a nocTaByBaHe n KopncTeHBe Ha npn6Opnte KOn He ce SKIL norJeHete ro yNaTcTBOTo Ha npOn3BODnteIoT
KopncTe cAmo InCTOBn 3a nnla, kon OndroBapaaT Ha HabeDeHnTE nOdaTOCuN BO OBA yNaTCTBO 3a yNtpe6a nnCe npobepen Cnpoped EN 847-1 n ce coodBeTHO 03HaueHN
- KopncTeTe cAmo npn6op Yna do3BOJeHa 6p3Ha e Bo HajMaIpaKa eDHaKBa Ha HajroJeMaTa 6p3Ha npn npa3eH od Ha eJEnKTpyHHOT aIaT
- HNKORaH He KOpNCTeTe CeuHa 3a PnIi HaPaBeHn Od 6p3oPoTnpaayKu yeLH (HSS)
He Kopnctete ceuBO uTo e HanyKHato, deOpMnpaHO nn TaTO
- KopncTeTe rncamcceuBaTa 3a nnu co dnujaMetap Ha OTBOPOT KOJUTo CE BKNLOyBa Ha o6oDT Ha aIaTOT 6e3 da ceMpda; HNKORAù He KopncTePeDyKTOpn nnu aanTepn 3a ceuBa od nnu 3a roJeMn OTBOpN
3aWHTnTeTe ro npu6oPoT oD nOTopeCN, ydapN mChn noBpunHn
BO TEKOT HA YNOTPE6ATA
He npimehybajte cnla Bp3 aJatOT (npimehete
JIeceH N KOHTHynpaH npNTUCOK 3a da n36erHeTe IpepeBaHe Ha BpBOBnTE Ha CeYnBaTa N BO Cnyaj Ha ceYeBe pAACTNkA, TONEHe Ha PIACTuHnOT MaTePnJaJ)
- YyBaJTe rI npCTnTe,ДlaHKnTe n paTe nOdaJIeKу Od potnpaKToCeuNoHa cIpyLapoT
Akoce6IoknpaceuBOTO,BeHaHsNCKnyteTo aIaTOTnPpeKHNHeTe rHONojyBaHBeTo;DpyrTOraW n3BaTe rnapTeo wTo rpo6nBaTe
Bo cnyaj Ha aTINnHNO OndecyBaHbe nIHN HeNo3HaTN 3ByuN, BeDHaW NCHLyUeTe Ro aIaNToT N I3BLeYeTe Ro WTeKePoT OD eJIeKTPnHnOT pInKJLyO
Ako Ka6eIOT ce OHTN NnI npeceye 3a BpeMe Ha pa6oTaT, BeNau NcNlyUte ro He Ro DonnpajTe
HnKorau He KopncTeTe ro aIaTOT Kora Ka6eIOT e OwTeTeH; ToJ Mopa Da ce 3aMeHN CO cneuJaHNO nOgrotBeH Ka6eI DoCTaEN IpekY opraHn3aunjata Ha ycnyrN.
!6nTe CBeChn DeHa MeToOTo ONnWan NoDOny e 电HCTBHeHOT 6e36eHMeToA
-HeBneueTe jaNnlaTaHn3pa6oTHOTo naphe
-0na6aBeTe ro konyeTo 3a 3aHnyyBaHe AH BO cnyaj da e 3aTeHaTO
!npoBepete daHn napyeTo 3a o6pa6Otha e Ubpcto cTerHaTo Ha Ta6IaTa 3a ceueHe n Do 3awTntata S
-NoBleueTe ja rIaBaTa Ha nIIaTa daIeKy od orpaDaTa
SdoBolHo, TaKa ITO ceHnTo Ha nHaTa e nped pa6oTHo napye 24
-BKnyte ja aIaNtKaTa co OcIO6OyBaHBe Ha 3aKnYyBaHbTeTO 2N NOBKeKYBaHBe Ha rIaBHnOT npeKNHyBa
!He npekpctyBajTe rpaete Kora pakyBaTe co TnaBata Ha nlaata23a
-TyPHeTe ja rIaBaTa Ha nIInaTa BO HAcOHa Ha orpaDaTa
S n ceye Hn3 pa60HTo npaue co pamHomepHo HanpeyBaHe 24
! eIeKtpnHnO t anat 6n Tpe6aIoo da ce Haora BO nONHa 6p3nHa nped ceyHIoTo da dojde BO dOnnp co MeCTOTo Hade ce pa60Tu
! aHO DOJHNOt WHTHnK He ce OTBOpn ABTOMaTCHN, WTO MOHe Da ce Cnyu NOD OndpeDeHN ycNoBN (Ha np. pa6oTHO napue KOe e MhOry 6Iln3y Do MAHCmAMHNOt KanaUTeT), MoHe6n Ke Tpe6a da FO OTBOpNTe WHTHnKOT paHNO b
-нслуteTo aIaTOT co nyTaHbe Ha npeknHyBaoyt Al
-NoeKaTe DoEka NnIaTa He DoJde Do cenocen 3acToj Ppe Da ja HacOHTe rIaBaTa Ha NnIaTa NoIeKa Harope
- Ceehebe Jle60Bv 25
-NotabeTe ja cakahata dnaobounha co orpaHcybau Ha nlaobounhata AK n 3aKlyyeTe ro Ha MeCTo co 3aTeRhyBaHe Ha 3aBPTkata AM
-Tpe6a da ce noCTabn dPBEH nIcTaHcep nomery pa60THOTo napye n orpaJATA 3a nocTojHa dJa6OuHa Bp3 eJalaTdoJlnHnHa Ha Jle60T
! ochrypnte ce ceuHIOTo Ha nHaTa da He ce 3aRnabN BO pa6oTHOto napue
Cneunjahnnapnha3pa6oTa
-ceKorauHOTnTnpajTe rnclo6oHNHTe KpaEBNHa doIroTo napye 3a pa60Ta
-πpOBepeTe DaJI 3aKOCeHITe NIN TpKaJIe3HITe NapuHbA 3a pa6oTa ce OcO6eHo 06e36eHn Od IIN3raHe (33)
-He Cmee Da Ima npozen Kaj IInHjata 3a ceYe MeIy napyeTo 3a o6pa6OTha N 3aUHTaTa IIN Macata Co cnPKyJapOT
-DOKOLky e NOTpe6Ho, fapnkyBajTe NOMOHa orpada; DyNKHe BO JIN3raYkata orpada Ke ce KOpNCtAT 3a o6e36eDyBaHc Ha nomoHaTa orpada
!nOMoHata orpaJa MoHe Ja ce HOpNCTn cMo Ha arOJ Ha 3aHOceHoCT Od 0°
- Pn pa6oTa co noDHN w6noH, cInKaTa 5 MoKe da ce KopncTn KaHo pepepeHua
-Добраразстара на образовская секогаши Вртete щаюл, за посядени минимално Кшеве на mateрпajANO - KopnctTe cAmO octpn CeuHla, OoCoDBeTeH BnD -KBaJIHTeTOT Ha ceueHeTo ce IooobpyBa co 6pojot Ha 3aInte
-ceuIata co Kap6nJeH BpB octaHyBaat ocTpni 30 nTn noJIOro oD o6uHHTe ceuIa
OДРЖУBAHБ/CEPBИСИРАНБ
CekorauyBajTe n anaToH Ka6eIoT NcCTn (oco6eHO OTBOpHTe 3a BeHTnlauJa oD3aN Ha Kpaj OJ KyKnWTeTO Ha MOTopoT)
Pa3BnjTe peoOBHa npOBepKa 3a da 6nJeTe cnrypHn DeKa DOJHNOt wTHTNk pa6Otn npabuHNo. NcHCTeTe ro DoJHNOt wTHTNk Od HaTaIOKeHaTa nIIeBuHa CO BJaXHa Kpna.
-nped uHcTeHe n3BaTeTe ro aIaTOT od npKnyokOT -NoiHHeTe ro DOHNOT wTNTHNK BO CELOCHO OTBOpHa PO3njuA nOCIObOteTe ro; DOKOLHy He ce 3aTBOPN BeDaH u CELOcHO, Tpe6a Da ce npOBepn BO cepBuceH cENTap 3a eEleKtpuHn aIaTu Ha SKIL
- CeuHIoTO Ha nIaTa IcHcTeTe ro HEnocpeHNO no KopHeTo (Oco6eHO OJ CMOJa IJIenak) -ceHbOTO MHOrCe BKeEHTyBa BO TEKOT Ha paBotaTa. He donnpajTe ro nped da ce 3laDi
IcHCTeTo IacepckOTo CBeTIO AC co MeKa YETka Noccekoja yNtpe6a 3a Ja ja 3aDpKHTe Do6paTa BnDnBOCTHa IacepckAra LInHJa (OCnryptte Ce DeKa He jaMeHyBaTe NoCTabKaTAt Ha Iacepot) - DOKOLKY aIaTOT N NOKpaj BHNMaTeJIHOTo pa6OteHe N KOHTPOJa HEKORAa OTKaHe, NonpaBkata Mopa Ja ja 3BpUn HekoJ OBlaCTeH SKIL cepBnC 3a eJeKtpuHn aIaNr
-BO Cnyaj Ha npime6a, HcnpaTeTe ro aIaNTOHepacKnoneH, 3aeEDHO CO CMEKONOTBpdaTa, DOBaHNOt npOdaBau nHaj6bnCknOT SKIL cepBnC(aDpeCnTe ce HabeDeHn Ha www.skil.com)
- Имajte npedBnД да OwTeTyBaHBeTo HacTaHaTO 3apaAn npeOnTobayBaHbe ИИн He npaBnHNo paHyBaHc co aIaTOT ja OTpPra rapaHunjaTa (BnTe Ha www.skil.com ИИnpaawajTe ro npoDaBaYOT 3a yCIOBHTe Ha rapaHUnjata Ha SKIL)
3AHTNTA HA JHBOTHATA CPEINHA
He ce ocno6oodybajte od eJeKTHuHn aHaTn, 6aTeepn, ypeHn Hn am6aIaHa npeHy HNBHO pPnaBe BO domaHTo rY6pe (cAmO 3a 3emjnte Ha EY)
-cnopeE EbpockaT DaIpeKTHBa 2012/19/EC 3a OcNo6OyBaHe oEneKtpnHa n eJeKTPoHcKa Onpema N Hej3Ha HmPleMeHTaunJa BO COrlaChOC T CO HaOnHaJIHHe 3aKOH, eNeKtpnHHe aJatn KOn FO DoCTnHale Kpaot Ha CBOJOT XINBOTeH BEk Mopa Da 6uDat Co6paHn Noc6Ho N Da 6uDat BpaTeH N Bo COoDBeTeH Objekt 3a peuHKInpapaBe
-CMBOJOT 6 Ke Be NOTcetyBa Ha Oba Kora Ke Dojde Bpeme aIaTOT da ro pJInte
6y4ABA
- I3mepeno cnopeEN 62841, HNBOTo Ha 3ByueH npntncOK kaj oBoj aJat e 100,0 dB(A) n HNBOTo Ha 3ByuHa MoKHOCT e 109,5 dB(A) (npomeHJIINBOcT K = 3 dB)
HnBOTO Ha emTnpaHe Ha 6yaba Koe e HabeDeHO Ha 3aAnHnot DeI Ha OBA yNaTCTBO e N3MpeHo BO corlaChOc T co CTaHdapmN3npaHNO T Ee T aDcH BO EN 62841; MoKe Da ce KopncTu 3a Da ce CnpoeN eDen aJat Co dpyr, I KaKo npBnuHa OueHka 3a N3IOKeHocTa Ha 6yUba Kora Ce KopncTu aJaTOT 3a CnOmeHaTHTe npimEni
-KopncTeHeTo Ha aIaTOT 3a pa3Hn npImeHn, HIN CO pa3JIuHn HIN HePaBUNHO CyBaHN DeIOBN, MOKe Da IOBeDe IOnaJHo 3roJeMyBaBe Ha HNBOTO Ha N3IOKeHOCT
-Kora aIaTOT e NCKnyeH HIN KORA aIaTOT e BKNyueH HO He BPsiN HeKaBa pa6ToA, MoKe da JoJe do 3HaHTeJIHO HamanyBaBe Ha HIBOTO a N3IOKeHOCT
AL
Sharre kornizash teleskopike 1320
HYRJE
Kjo pajisje ehte projektuar si njve vegel e palevizshme per prerje gjatessore dhe tenthore n dru me prerje te
gaaaegaae gaaaijgajgag
Jy jLj 1, y 5 Jy 5 g y Lqai,
1 gus glalai jai
L L U (La)La, Li J V 1
2≤jg(+)-(L)(L)
S OBC = S COD + S BOC - S BOC
① s|a|
≤wol(/yogj1gjAD 10
(ggsgLgdo)
J 1000 AH
Lg 1000000000000000000000000000000000000000000
1AHHJ
g,15 a b3 59. a jil g5i jj,24 i cui uai joo
Lolg Lai Caw
1
0j 0j 0j 0j 0j 0j 0j 0j 0j 0j 0j 0j 0j 0j
S L
JgAl golL/1gjLJIgAJIgJ
a
S OBC = S ABC + S_ BOC
gL a 2jg j g Jg Jg Jg Jg
Jolck aaj aai aai jai iia 2L p1j aai aiei j
()
4012j 45
2g000000000000
15
J 1 J 1 1 1 1 1 1 1 1 1 1 1 1 1 1 1 1 1 1 1 1 1 1 1 1 1 1 1 1 1
0j0j0j0j0j0j0j0j0j0j0j0j0j0j0j0j0j0j0j0j0j0j0j0j0j0j0j0j0j0j0j0j0j0j0j0j0j0j0j0j0j0j0j0j0j0j0j0j0j0
S
JyLg 0jai Li jS Lai j ai a
E
1 L a 20
1
1g200g 1g200g 1g200g
1 1
g≤a0b3a1g1a0c2gawgjgJolcsjgljz0oJg!
12 84 10
(yL)
juiiLw a gaiy jiyaiy iay S Laiy, yj y aycgso
JLao 1000 a y gos 1y jw w 1000 0000
g0 g aagaaa aai 5 aai
- i.s
4g1j 4
(20 1
GolololooaasLuljLbLbLbLbLbLb
1
2021 13
12 12 12 12
e LcLalai Jg jgs gaaasj aay
i 1
15 000
L 1
32S( y1S2) ( y2S1) ( y3S_0)
jgws j1sJgss g 2j
LaiwJ 5g 5g 5g L g
yLjyJg 4a yj jy Jy
psgololjds Jolo jinob1jglgs 50
ypaia jyjLwJoloo gol Golsaiae
L 1
1,1,2,3,4,5,6,7,8,9,10,11,12,13,14,15,16,17,18,19,20,21,22,23,24,25,26,27,28,29
1
y0s 00000000000000000000000000000000000
aaii 1
jLj 100000000000000000000000000000000000000000000
2.50
V
AE 1
AF 1y
Lg(°0·0°j)olg32yJgglgJgJgJg
AG 15 p.hii j.liu
AF≤101,
AE = 1 - DE = 2 - 35DE = 1 - 35t = 1 - 35 × 109 = 13
(20.01,7.01,0.01,0.0)
jraa gla 1sL bLa j AF
Vb 1J aJf Jf Jf AF pJg jg
14
1 W 1
aIol algXyogagjL
| ### | |
| ### | |
| ### | |
| ### | |
| ### | |
| ### | |
| ### | |
| ### | |
| ### | |
| ### | |
| ### | |
| ### | |
| ### | |
| ### | |
| ### | |
| ### | |
| ### | |
| ### | |
| ### | |
| ### | |
| ### |
15 a 5g jn nn g n g g g L, oJ .pL 5g 11
11 J 15 a 5g 0o 100
a 5g 0j 400
a 5g 0j 400
a 5g 0j 400
cww jL aebj jie "glio" gws jL ae b jy pss
y j 1
aaiiie iiai iaii iaii iaii iaii iaii iaii iaii iaii iaii iaii iaii iaii iaii iaii iaii iaii iaii iaii iaii iaii iaii iaii iaii iaii iaii iaii iaii iaii iaii iaii iaii iaii iaii iai
0s0s 15 L sgs cieia aies oaiu 1j 1y j 4i i 1
a 15 a b 15 a b c d e f g h i j k l m n o p q r s t
jssg jjks chw s 0000000000000000000000000000000000000000000000000000
aaii jia glaas Jala glabla aagaae i 10000000000000000000000000000000000000000000000000000000000000000000000000
e b 10000000000000000000000000000000000000000000000000000000000000000
yds 1sclly dgs yds aess s l jss oaii
L 100 L 100 100 100 100 100 100 100 100 100 100 100
J 1000000000000000000000000000000000000000000000000000000000000000000
y 1 y Lg 1 1 1 1 1 1 1 1 1 1 1 1 1 1 1 1 1 1 1 1 1 1 1 1 1 1 1 1
yjg jaggi 0aai yjg jhio aow ayj b jj
1 auiu uuiu uuiu uuiu uuiu uuiu uuiu uuiu uuiu uuiu uuiu uuiu uuiu uuiu uuiu uuiu uuiu uuiu uuiu uuiu uuiu uuiu uuiu uuiu uuiu uuiu uuiu uuiu uuiu uuiu uuiu uuiu uuiu uuiu uaiu uaiu uaiu uaiu uaiu uaiu uaiu uaiu uaiu uaiu uaiu uaiu uaiu uaiu uaiu uaiu uaiu uaiu uaiu uaiu uaiu uaiu uaiu uaiu uaiu uaiu uaiu uaiu uaiu
15 2003 1 1 1 1 1 1 1 1 1 1 1 1 1 1 1 1 1 1 1 1 1 1 1 1 1 1 1 1 1 1 1 1 1 1 1 1 1 1 1 1 1 1 1
1 1 1 1 1 1 1 1 1 1 1 1 1 1 1 1 1 1 1 1 1 1 1 1 1 1 1 1
a 10
10
10
10
10
golal 131 0johao Lgolal 1oal 1golal 2golal 2golal 2golal 2golal 2golal 2golal 2golal 2golal 2golal 2golal 2golal 2golal 2golal 2golal 2golal 2golal 2golal 2golal 2golal 2golal 10000000000000000000000000000000000000000000000000000000000000000
jao puiuig. lgeio so g Laa aag aLwll wJl acgso Jalei Jauil oclg aaiiui w
j 1
1 2
1
1
1
1
1
1
1
1 11111111111111111111111111111111111111111
1000 1000
aiee eae aee eae ae eae aee aee aee aee aee aee
J 150000000000000000000000000000000000000000000000
gill ic jglglc yhwh aas d. 1yssll
aIgSlllgo aIgI gai jaoi 2 Jg21 no Jg sL
no aaiu uaiuagaiyai yai yai gai jia
. aIgSlll caiuai
Laae 85 Loeic aieyagll cdoaall jbs sly. Laoe aaiwgl aolal y
sIg lgl 1000000000000000000000000000000000000000000000000000000000000000
Jaae a Jlss Jlaeai jaoa eae 4y 4y 4y 4y 4y 4y 4y 4y 4y 4y 4y
a 10000000000000000000000000000000000000000000000
1j 1 j 1 1 1 1 1 1 1 1 1 1 1 1 1 1 1 1 1 1 1 1 1 1 1 1 1 1 1 1 1 1 1 1
aIglllgl 1yagagagagagagagagagagagagagagagagagagagagagagagagagagagagagagagagagagagagagagagagagagagagagagagagagagagagagagagagagagagagagagagagagagagagagagagagagagagagagagagag
aegll
cljIcIbIgaiiaaIIwIiIgii 2. aWllo wLdo 1 (
lll lLl; 25,111; Igai jn c 1c iJlaIgaiy gai
asaiil gaiy Jgaiy yaiy gaiiaiai
ayaiy gaiyagaiy gaiy gaiy gaiy gaiy gaiy gaiy gaiy
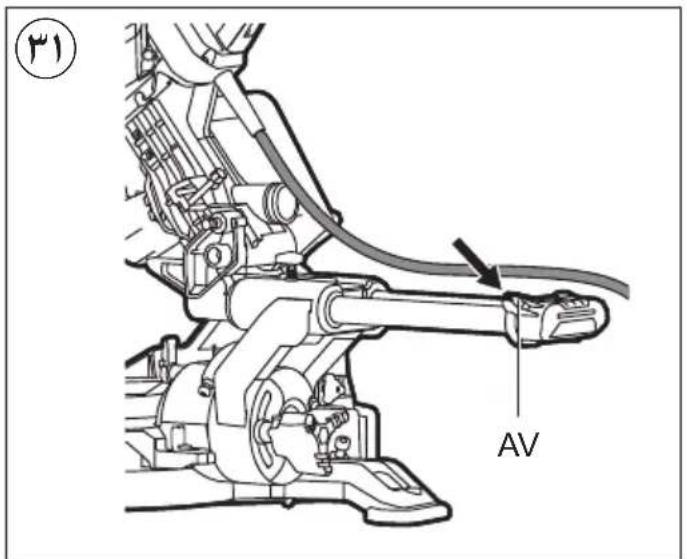
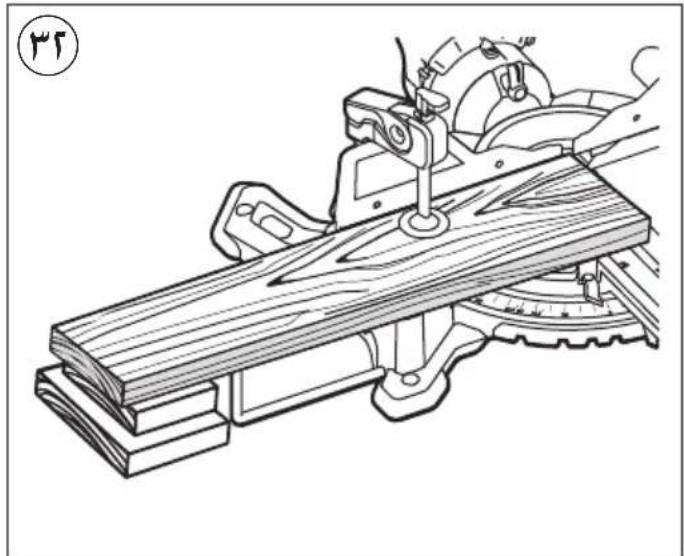
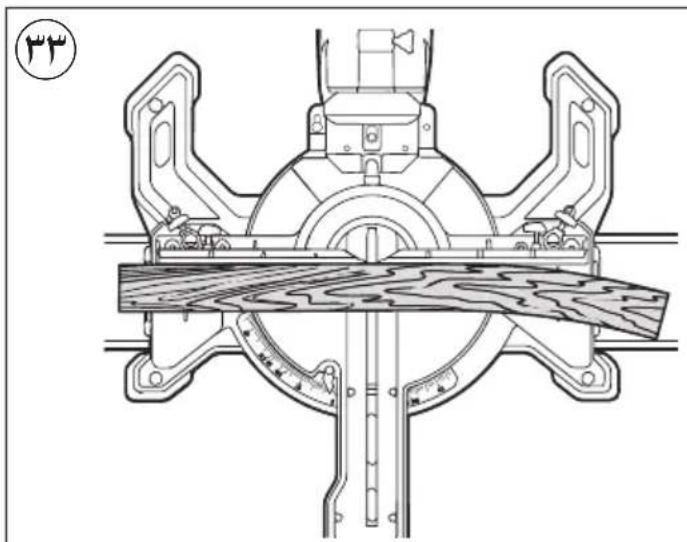
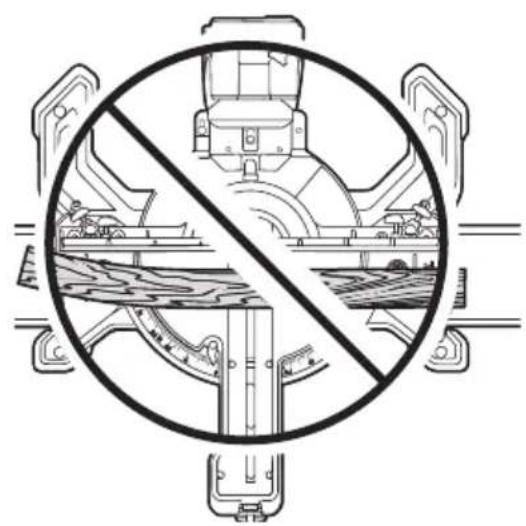

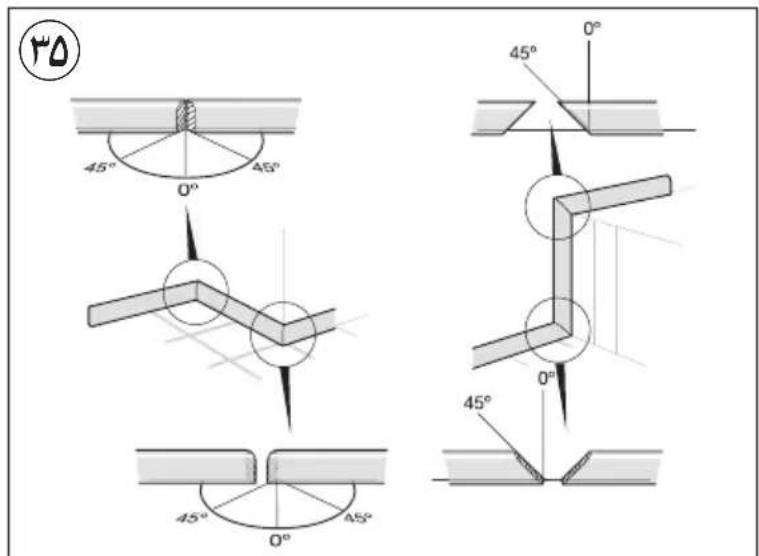

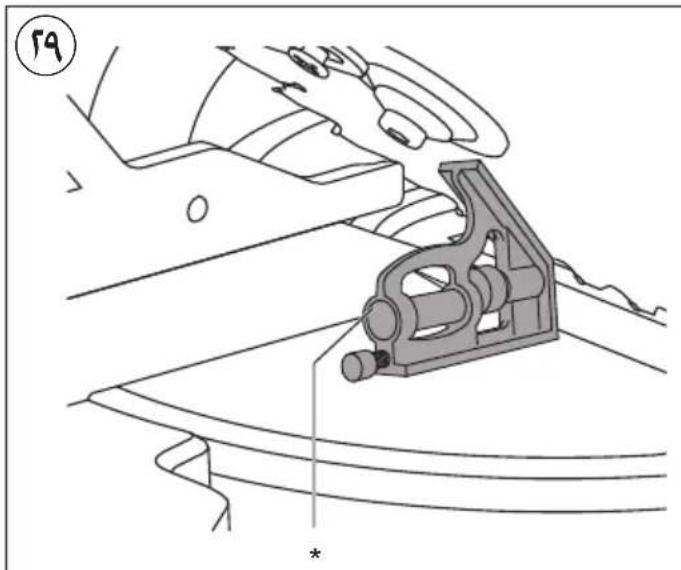

1
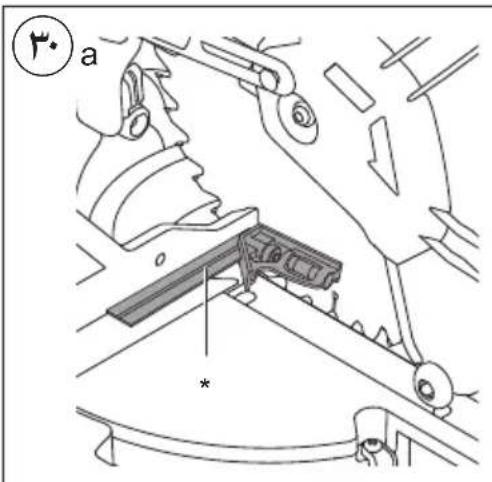

C
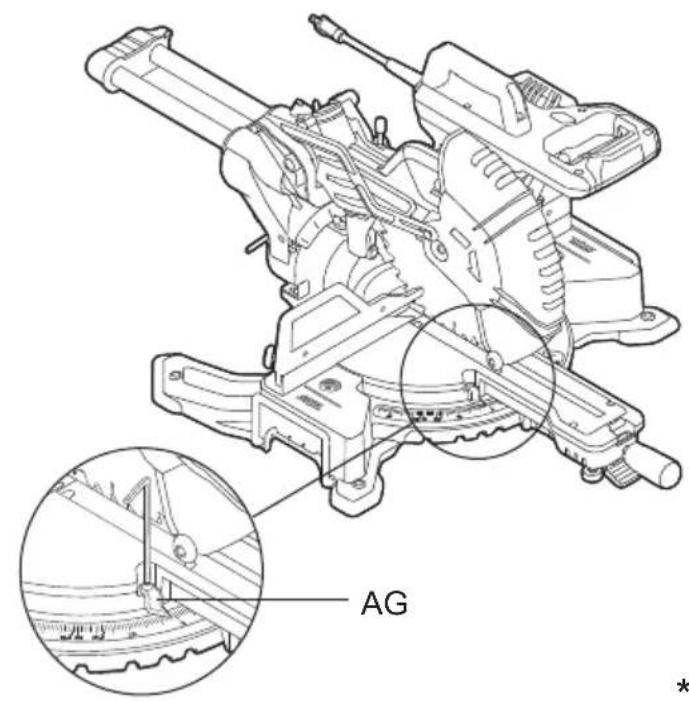
1 1
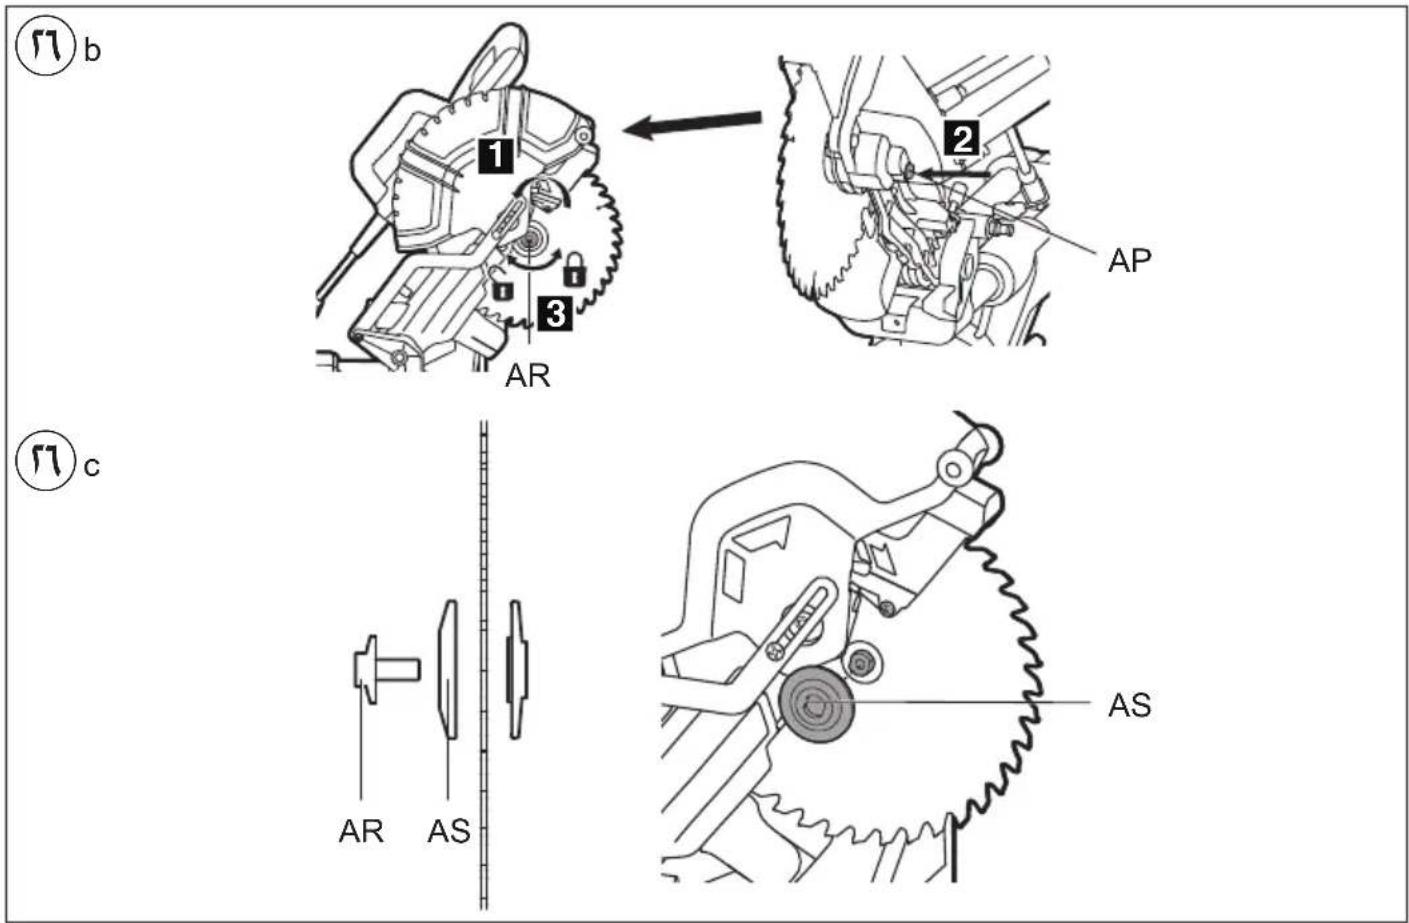
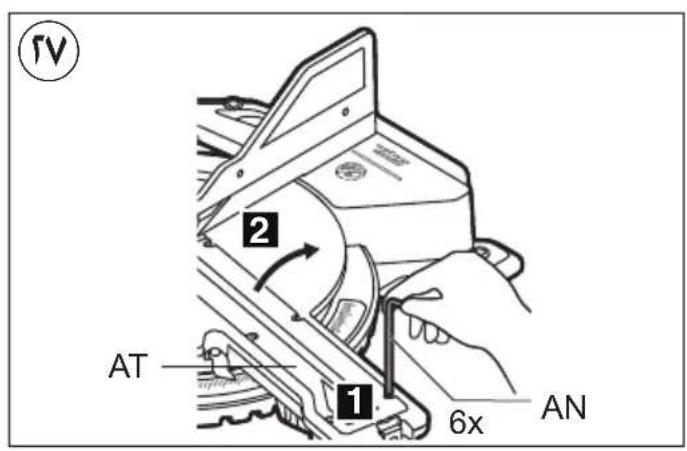
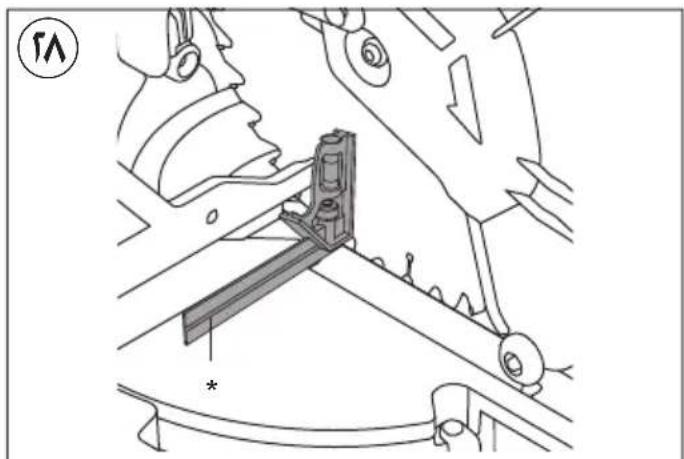
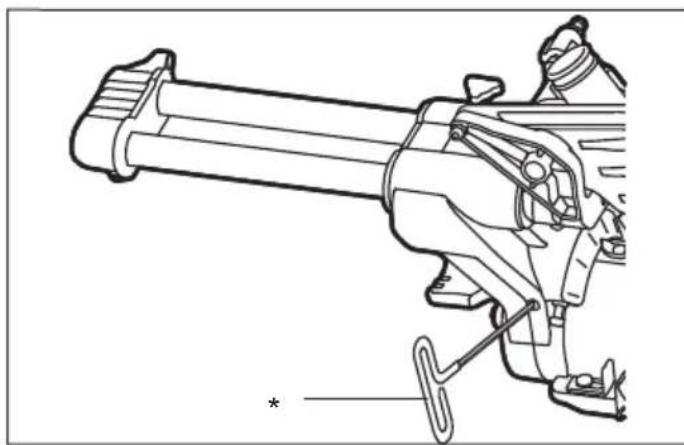
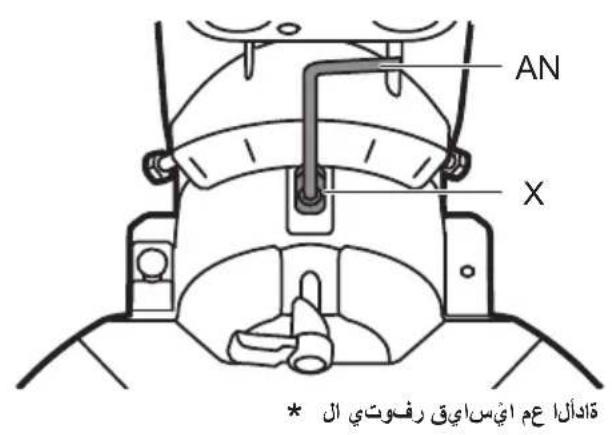
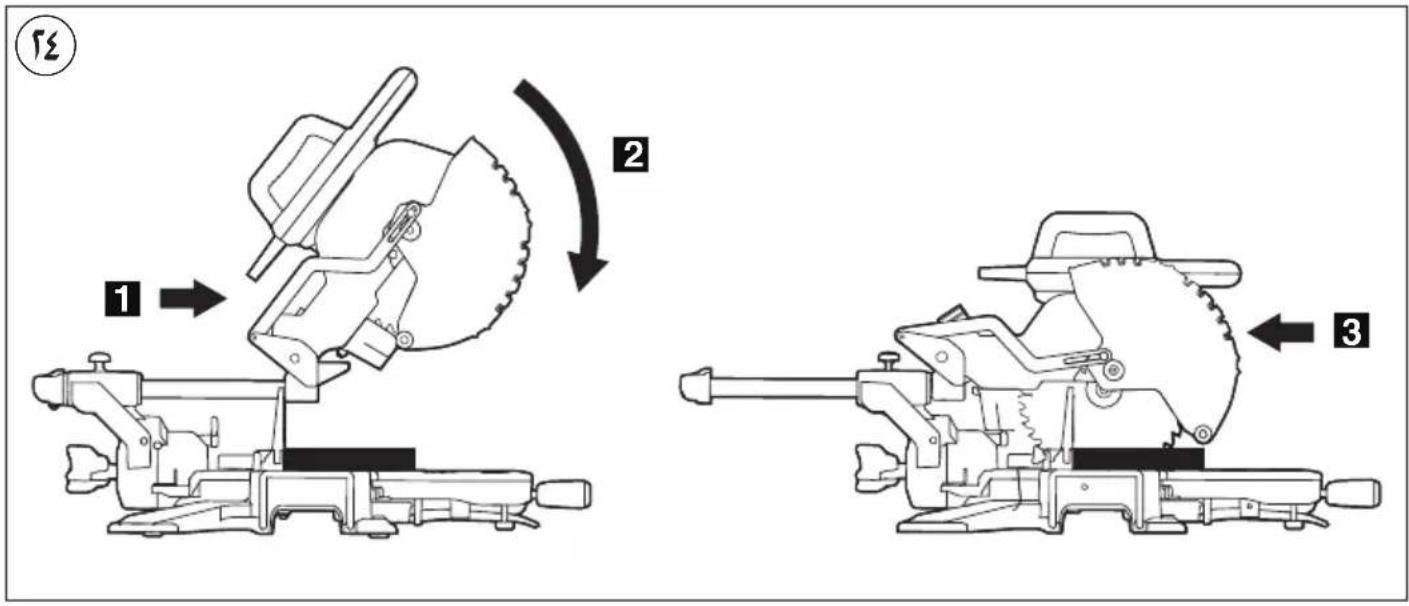
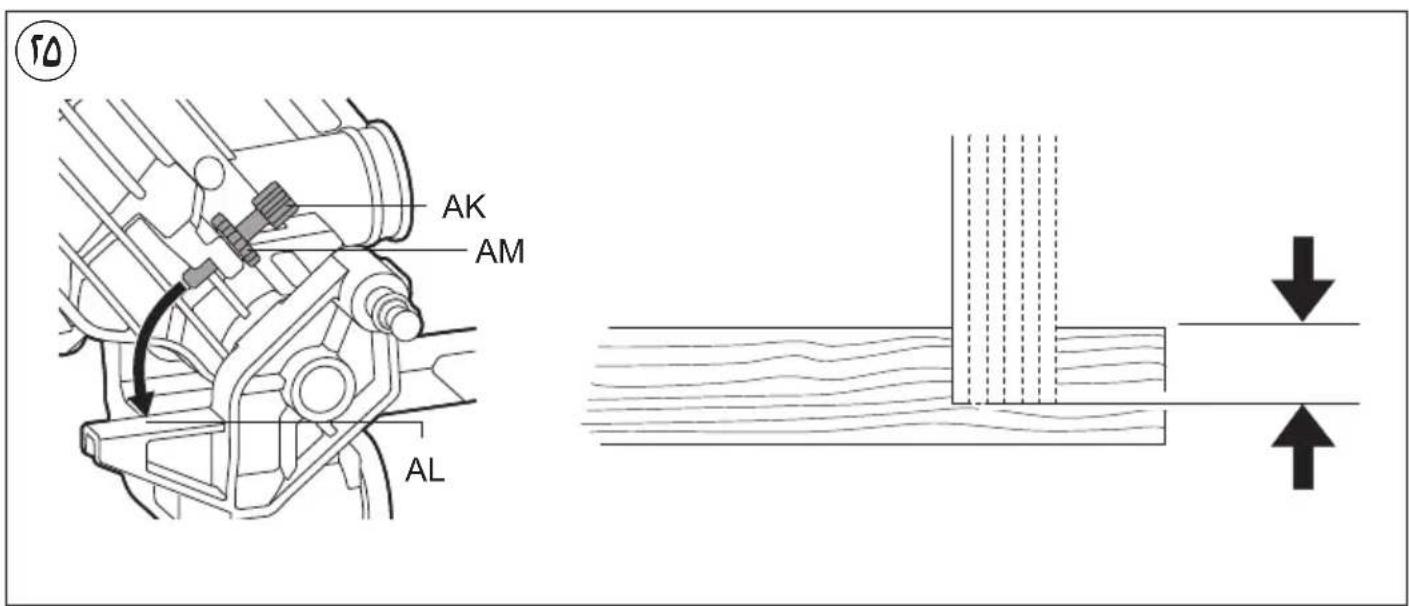
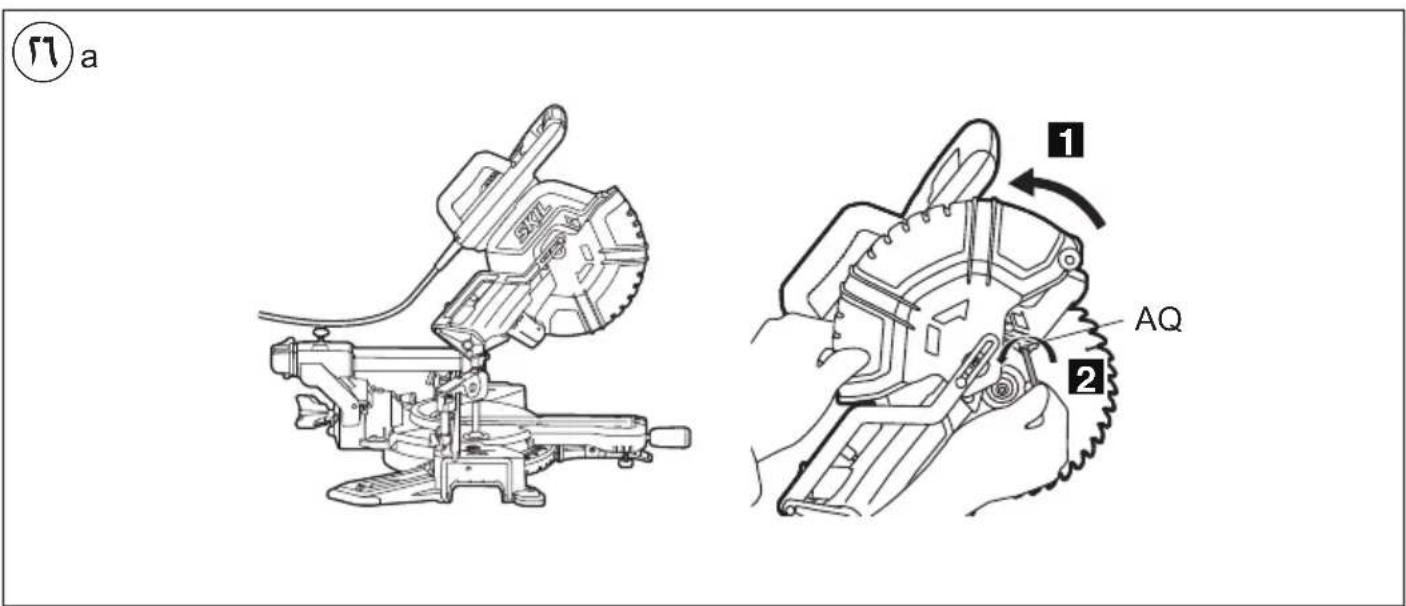
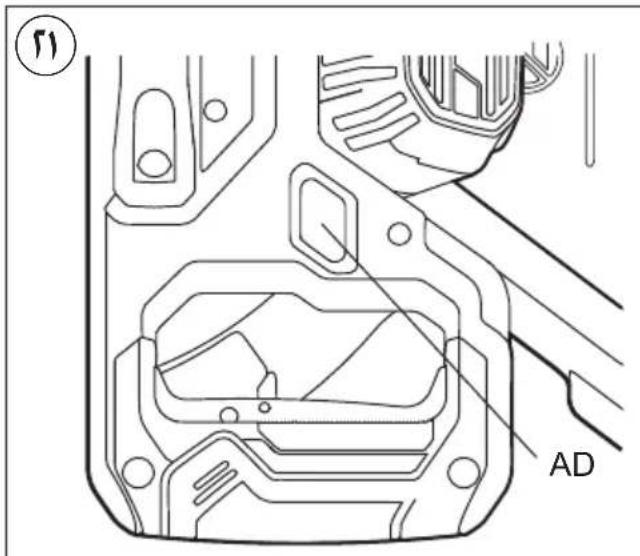
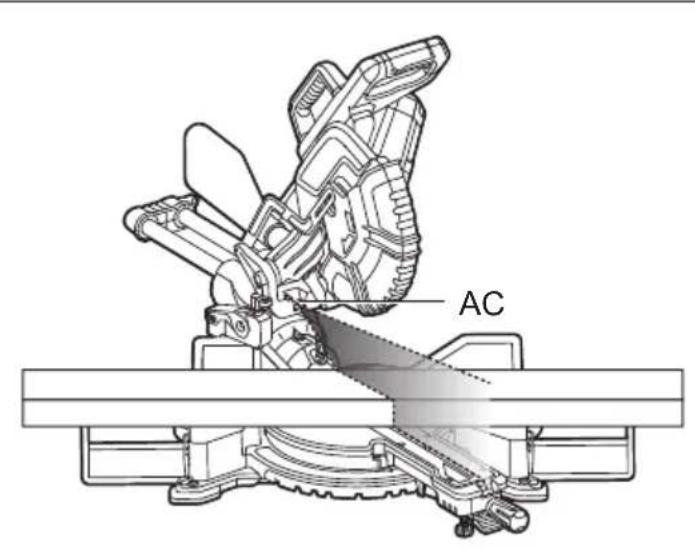
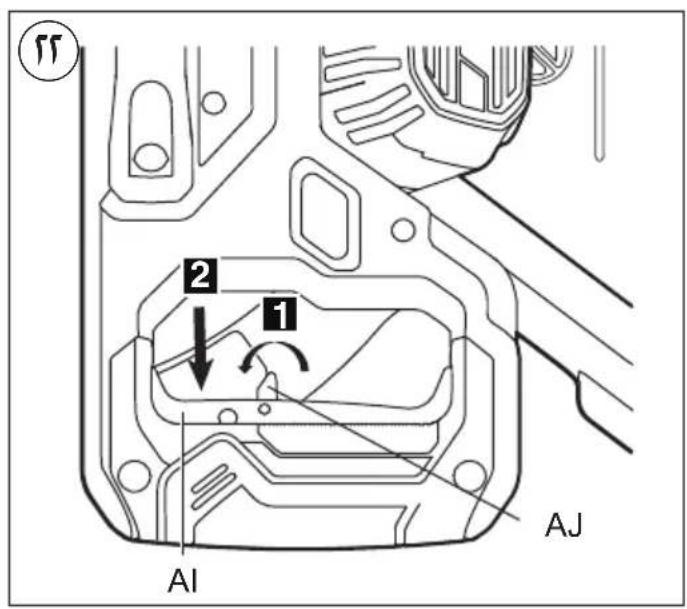
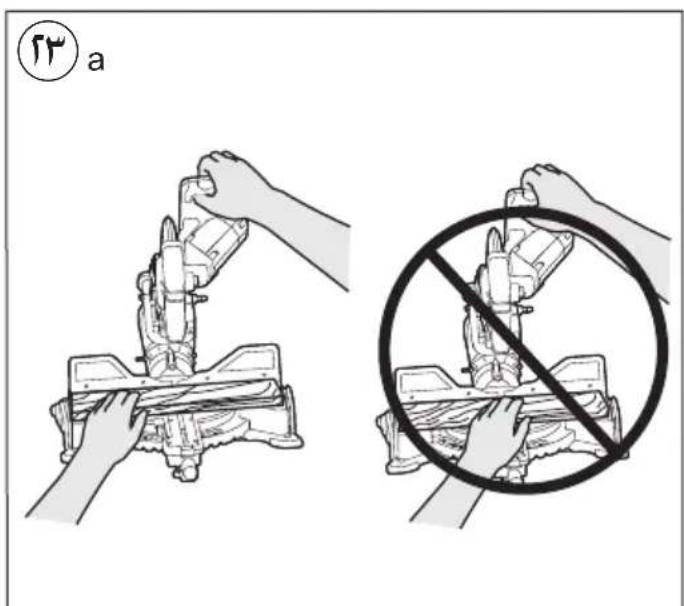
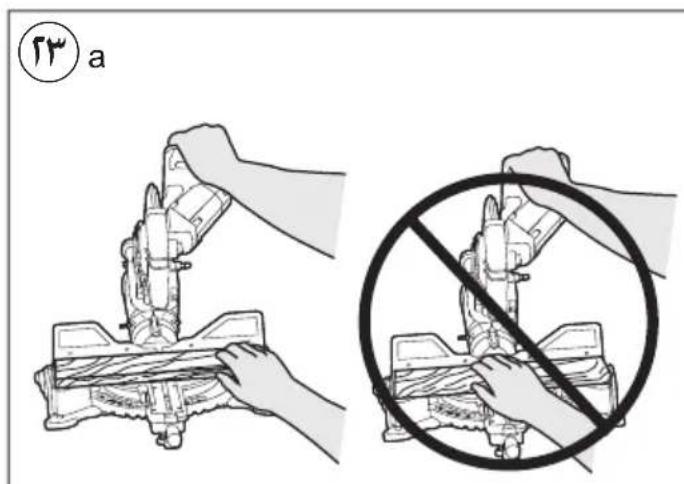
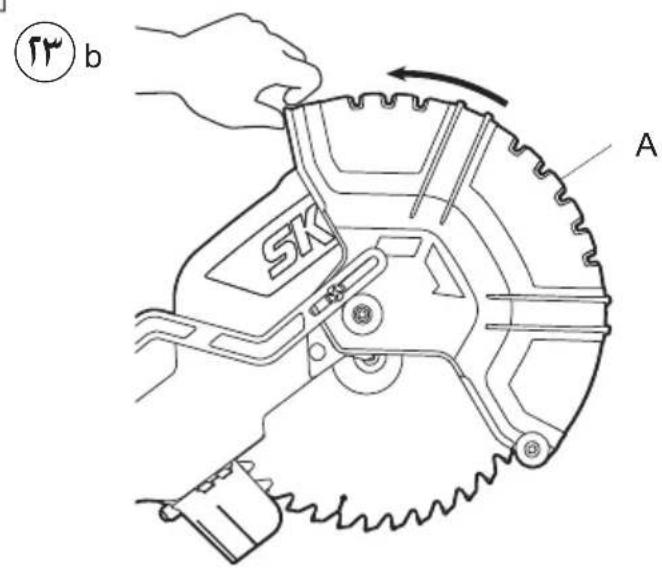
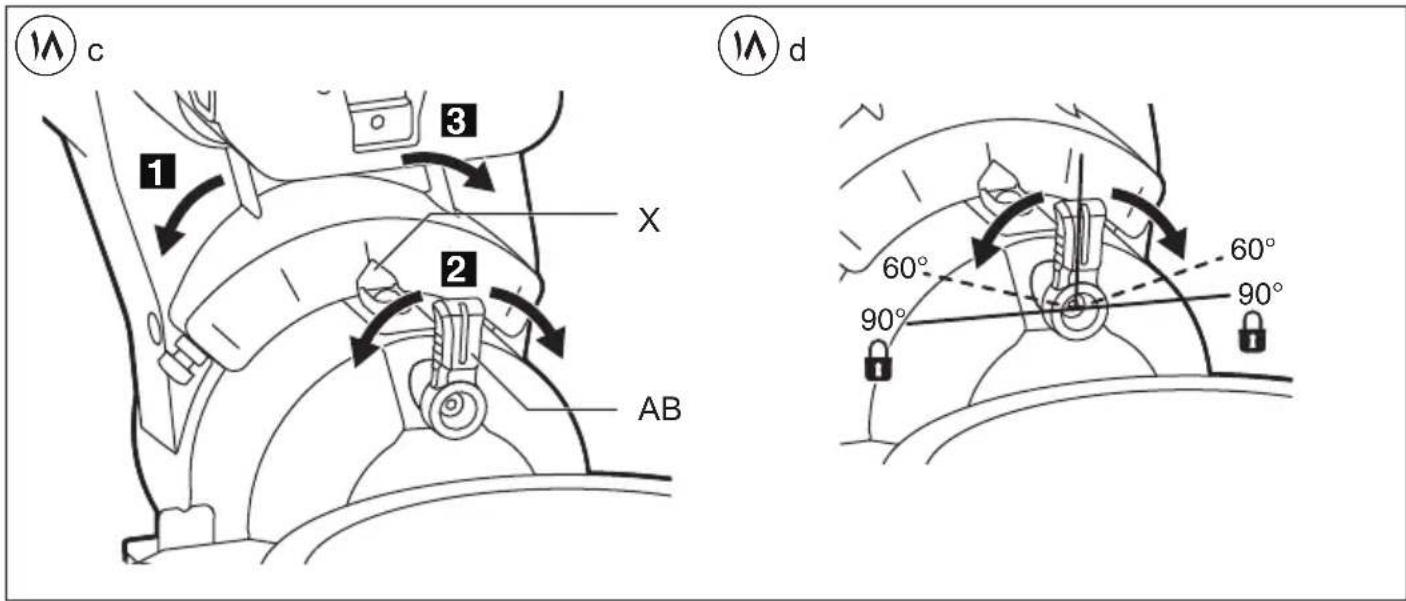
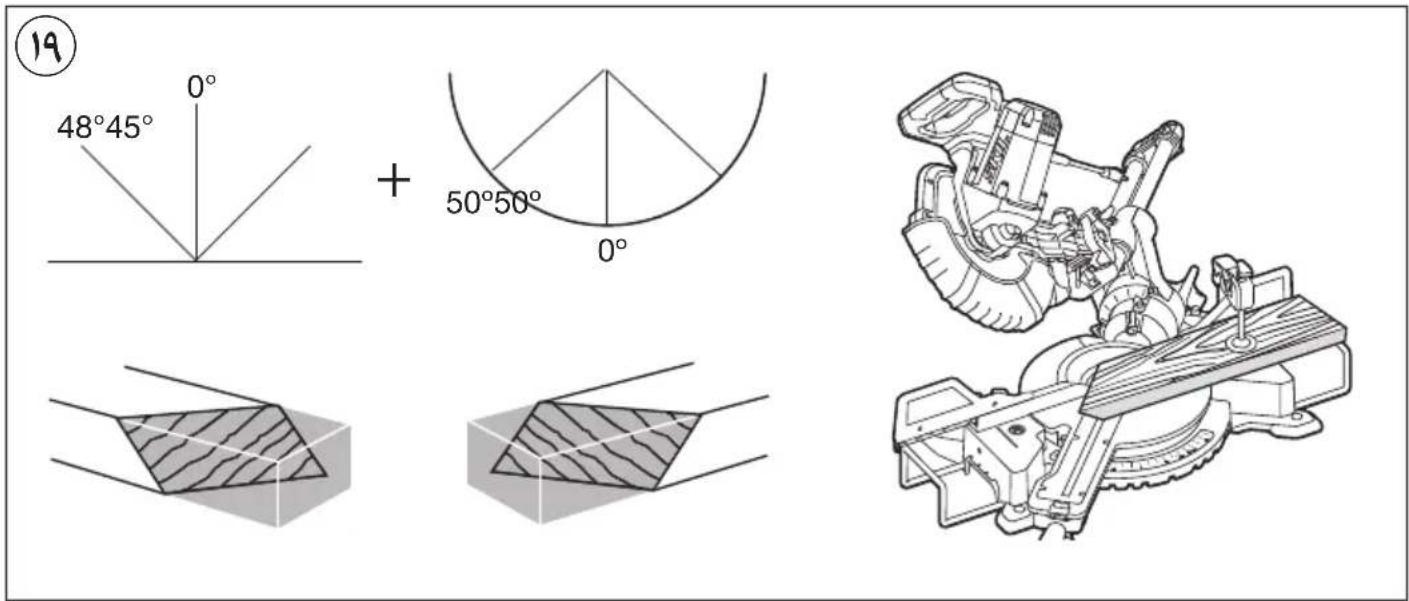

| 45° 45' | 45° 45' | Max A x Max B | |
| 0° 0° | A B | 90 x 300 mm | |
| 45° 0° | A B | 40 x 300 mm | |
| 0° 45° | A B | 90 x 210 mm | |
| 45° 45° | A B | 40 x 210 mm | |
| 45° 0° | A B | 25 x 300 mm | |
| 45° 45° | A B | 25 x 210 mm |
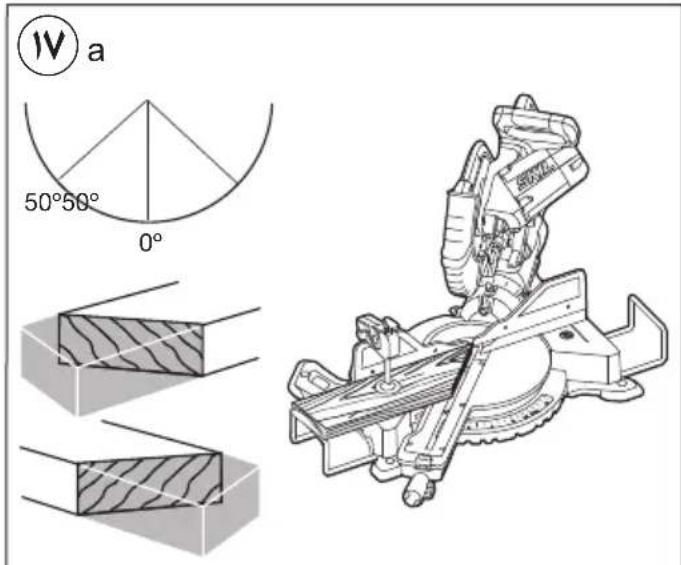
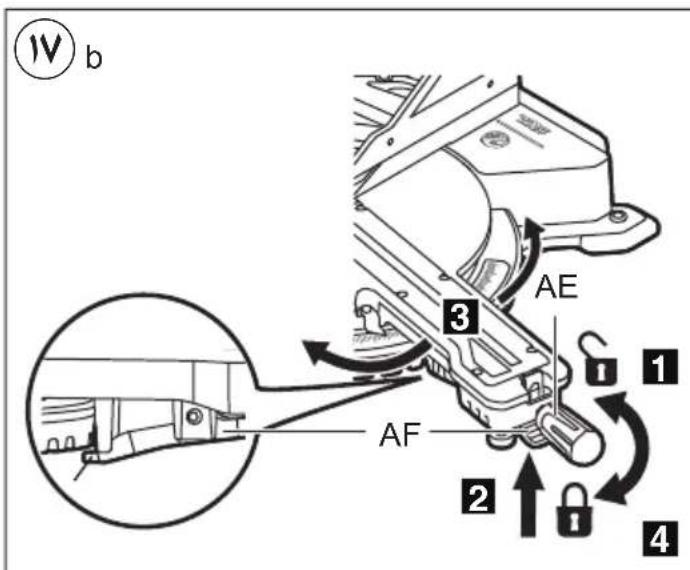
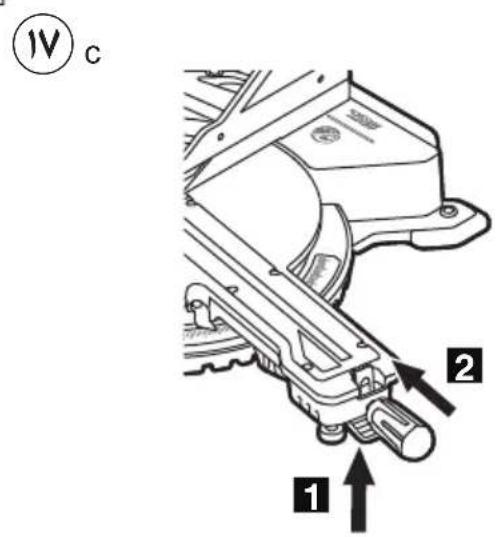
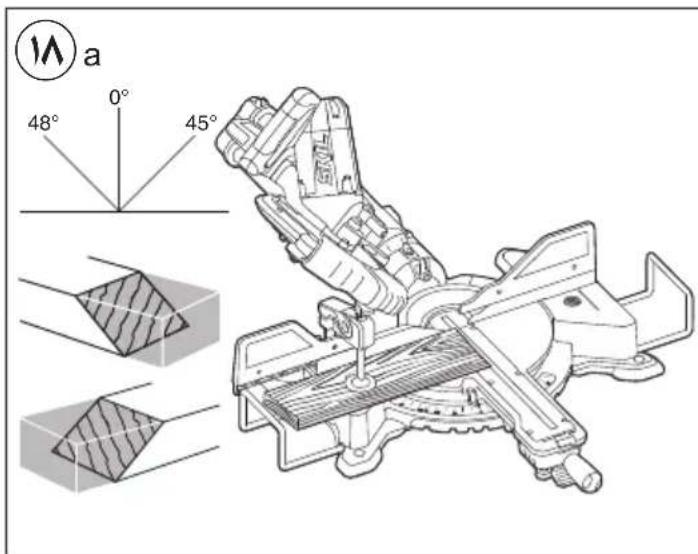
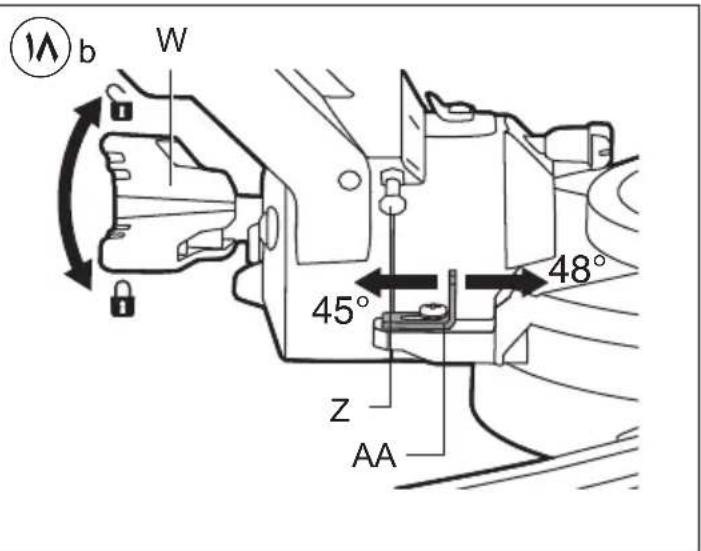
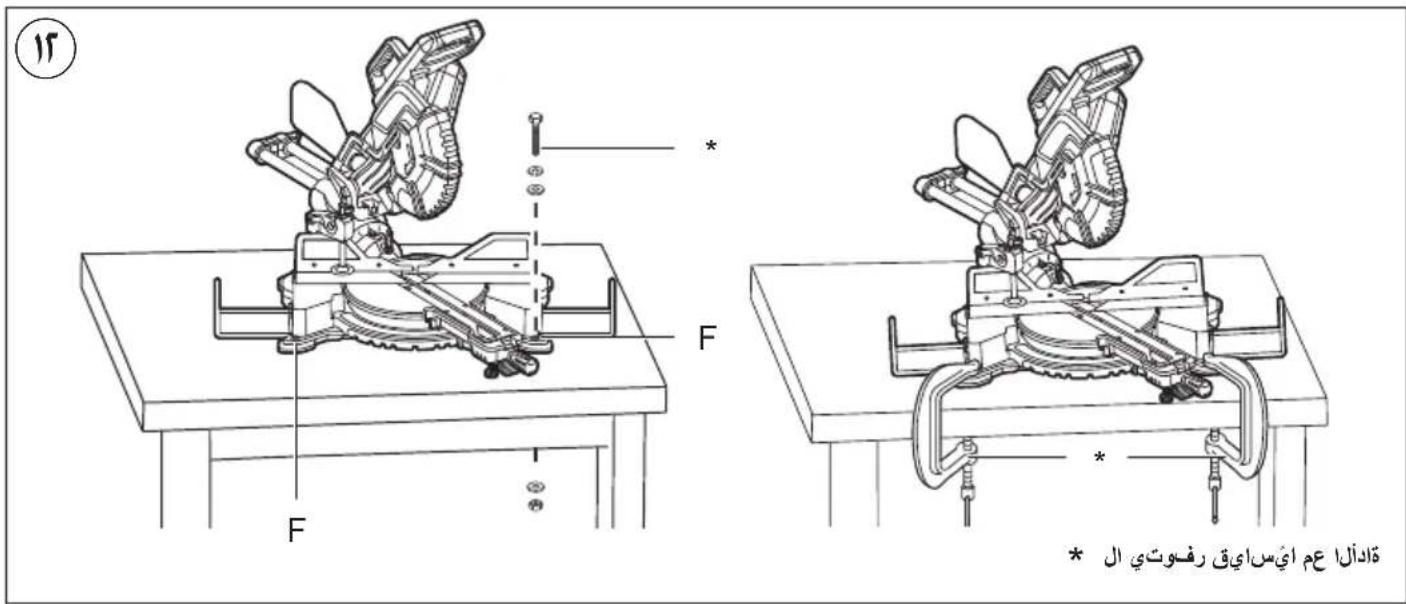
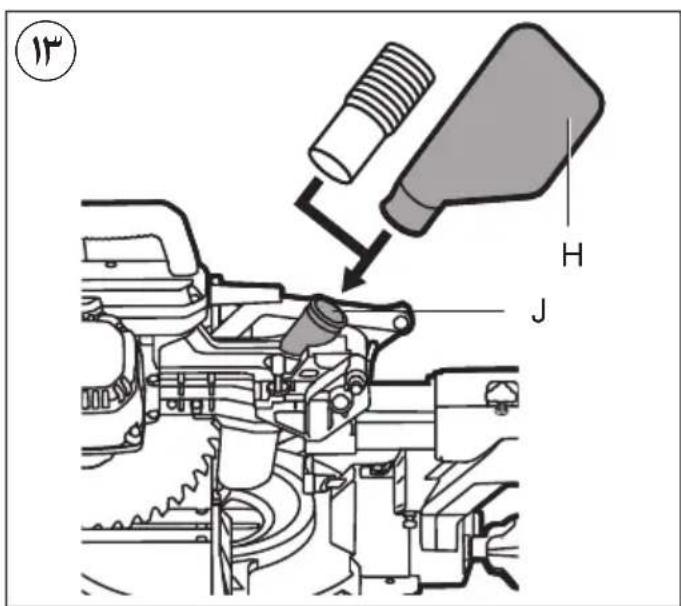
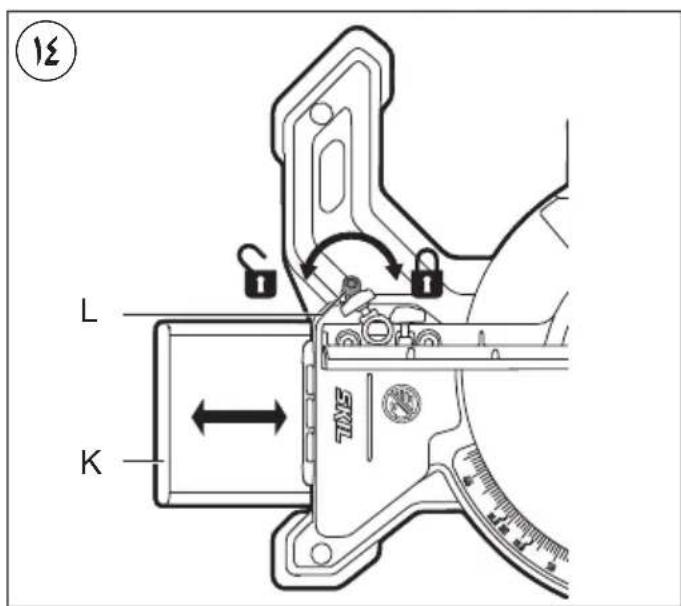

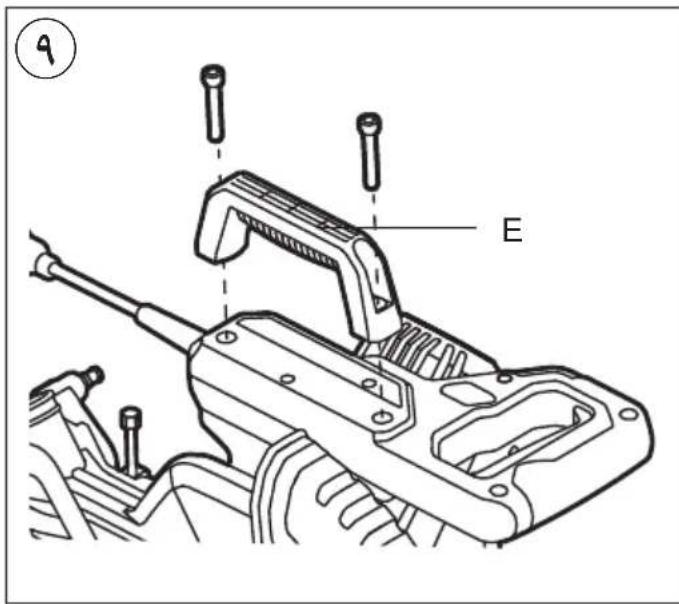
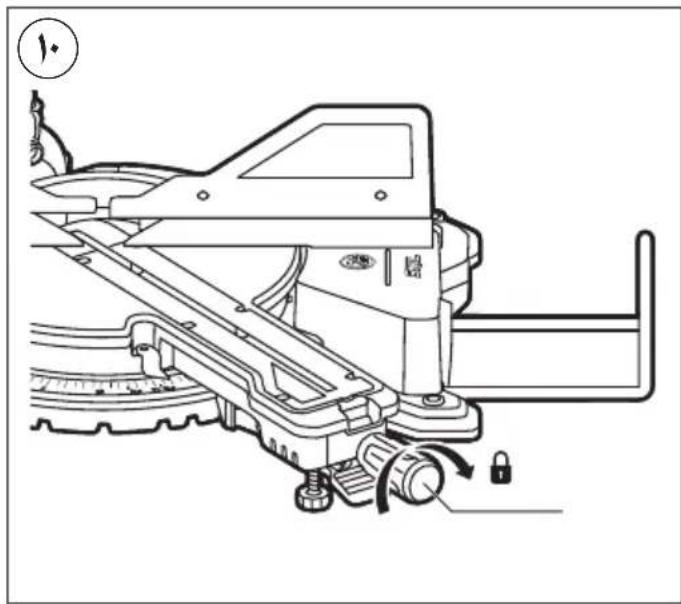

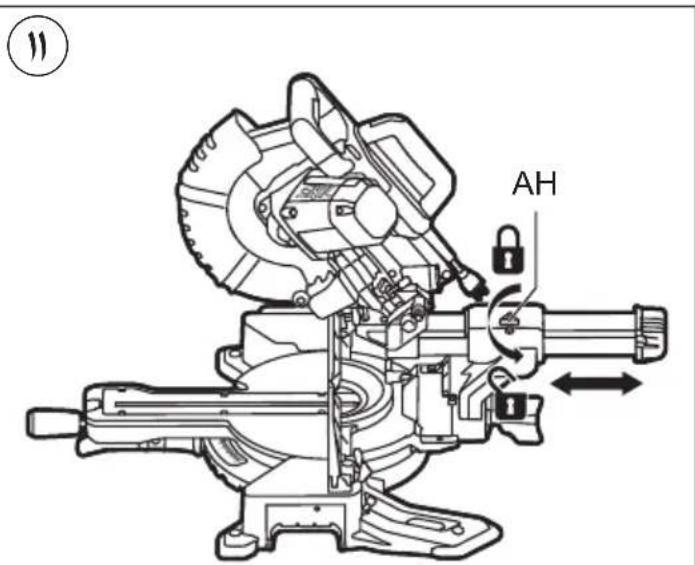
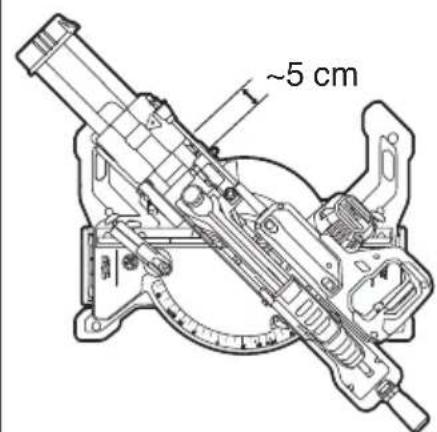
11cd 11
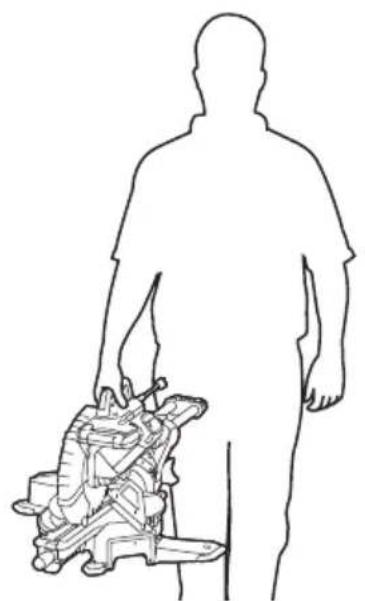
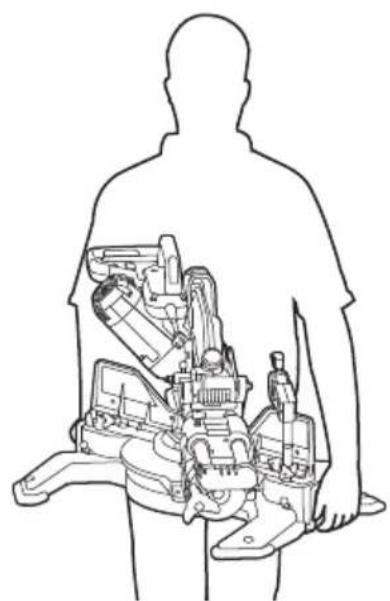

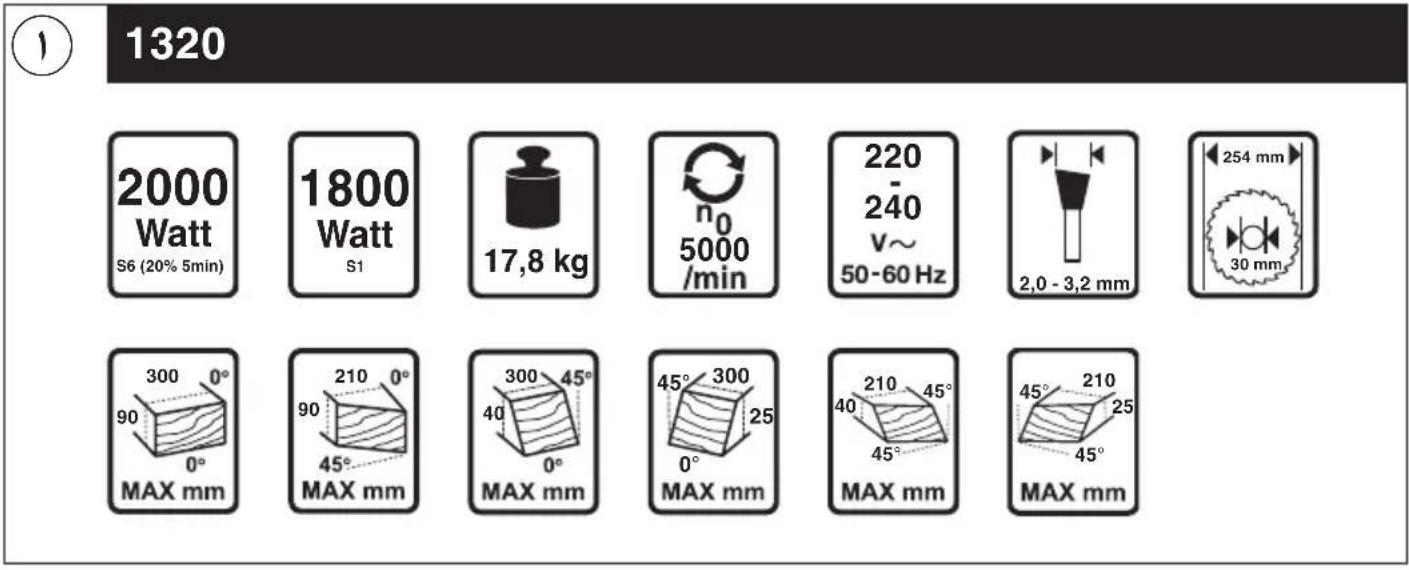
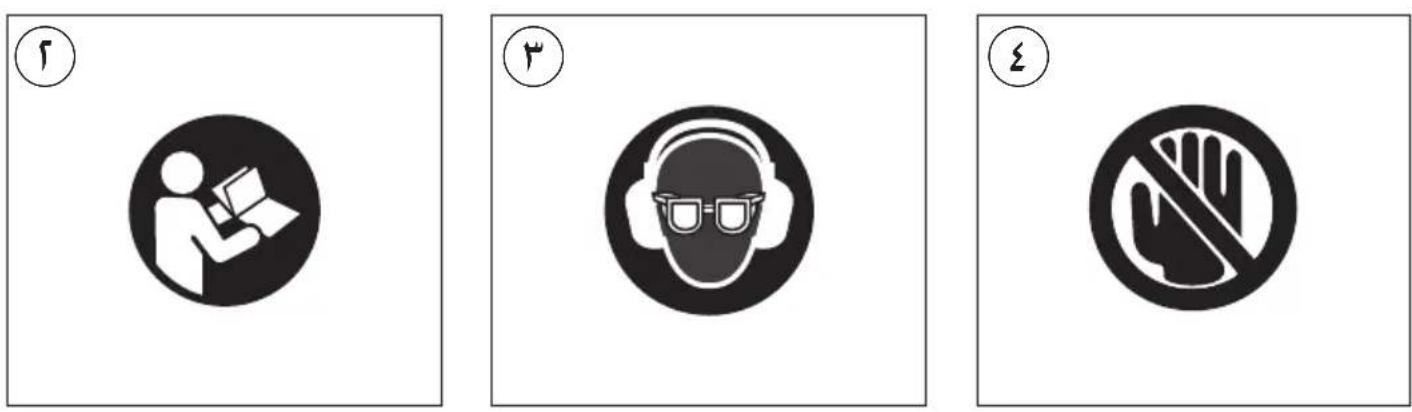
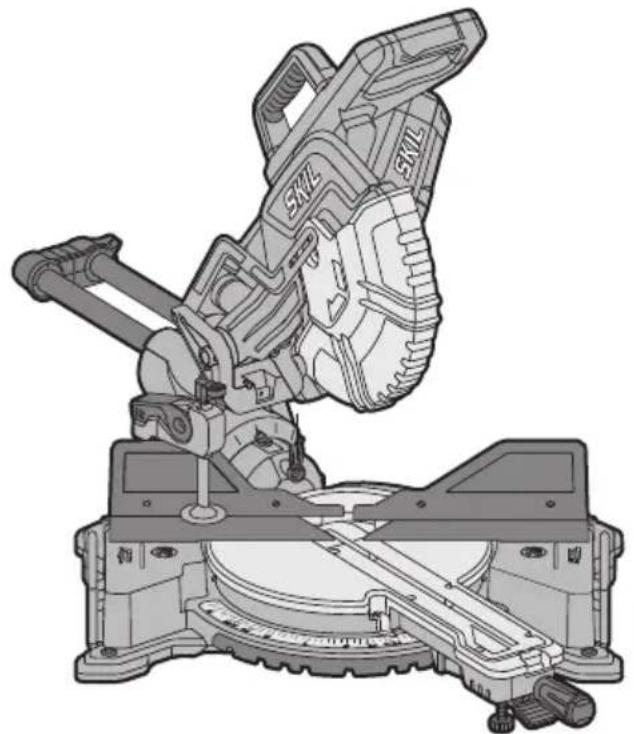
JL
FA