
TenderLink - Medical Equipment Accu-Chek - Free user manual and instructions
Find the device manual for free TenderLink Accu-Chek in PDF.
| Product type | Subcutaneous insulin infusion device |
| Brand | Accu-Chek |
| Model | TenderLink |
| Usage | Single use |
| Sterility | Sterile and apyrogenic if package intact |
| Composition | Soft cannula, tubing, guide needle, adhesive patch, Luer connection system |
| Recommended insertion angle | 20 to 45 degrees |
| Cannula fill volume (insulin 100 U) | 0.7 U (0.007 mL) |
| Replacement frequency | Every 2 to 3 days |
| Shelf life | Store in a cool, dry place at room temperature |
| Indications | Subcutaneous insulin infusion via external pump for diabetes |
| Contraindications | Use with blood or blood products (i.v. infusion) |
| Maintenance | Do not clean or resterilize; discard after single use |
| Precautions for use | Check package integrity; do not reinsert the guide needle; do not reconnect without filling the tubing |
| Implantation sites | Areas recommended by healthcare professional (abdomen, etc.) |
| Disposal | Guide needle in sharps container; used device according to biological waste regulations |
| Customer service | Contact the service provider (France: Roche Diabetes Care) |
Frequently Asked Questions - TenderLink Accu-Chek
User questions about TenderLink Accu-Chek
0 question about this device. Answer the ones you know or ask your own.
Ask a new question about this device
Download the instructions for your Medical Equipment in PDF format for free! Find your manual TenderLink - Accu-Chek and take your electronic device back in hand. On this page are published all the documents necessary for the use of your device. TenderLink by Accu-Chek.
USER MANUAL TenderLink Accu-Chek
ACCU-CHEK, ACCU-CHEK TENDERLINK and AKKY-ЧЕК are trademarks of Roche.
© 2021 Roche Diabetes Care
Made in Mexico

Unomedical
A Convelec Company

Unomedical a/s
Aaholmvej 1–3, Osted
4320 Lelre, Denmark
www.infusion-set.com
Last update: 2020-06
CE0459
Distributed by:
Roche Diabetes Care GmbH
Sandhofer Strasse 116
68305 Mannheim, Germany
03692051001/R

Instructions for use 4
Gebrauchsanweisung 20
Instructions d'utilisation 36
Istruzioni per l'uso 52
Instrucciones de uso 68
Instruções de utilização 84
Gebruiksaanwijzing 100
Brugsanvisning 116
Bruksanvisning 132
Bruksanvisning 148
Käyttöohje 164
Οδηγίες χρήσης 180
Instrukcja obsługi 196
Návod k použití 212
The Accu-Chek TenderLink infusion set is indicated for subcutaneous infusion of insulin administered by an external pump. The infusion set is indicated for single use.
Intended use
The infusion set is indicated for subcutaneous infusion of insulin in the treatment of diabetes. The infusion set has been tested to be compatible with insulin approved for subcutaneous infusion.
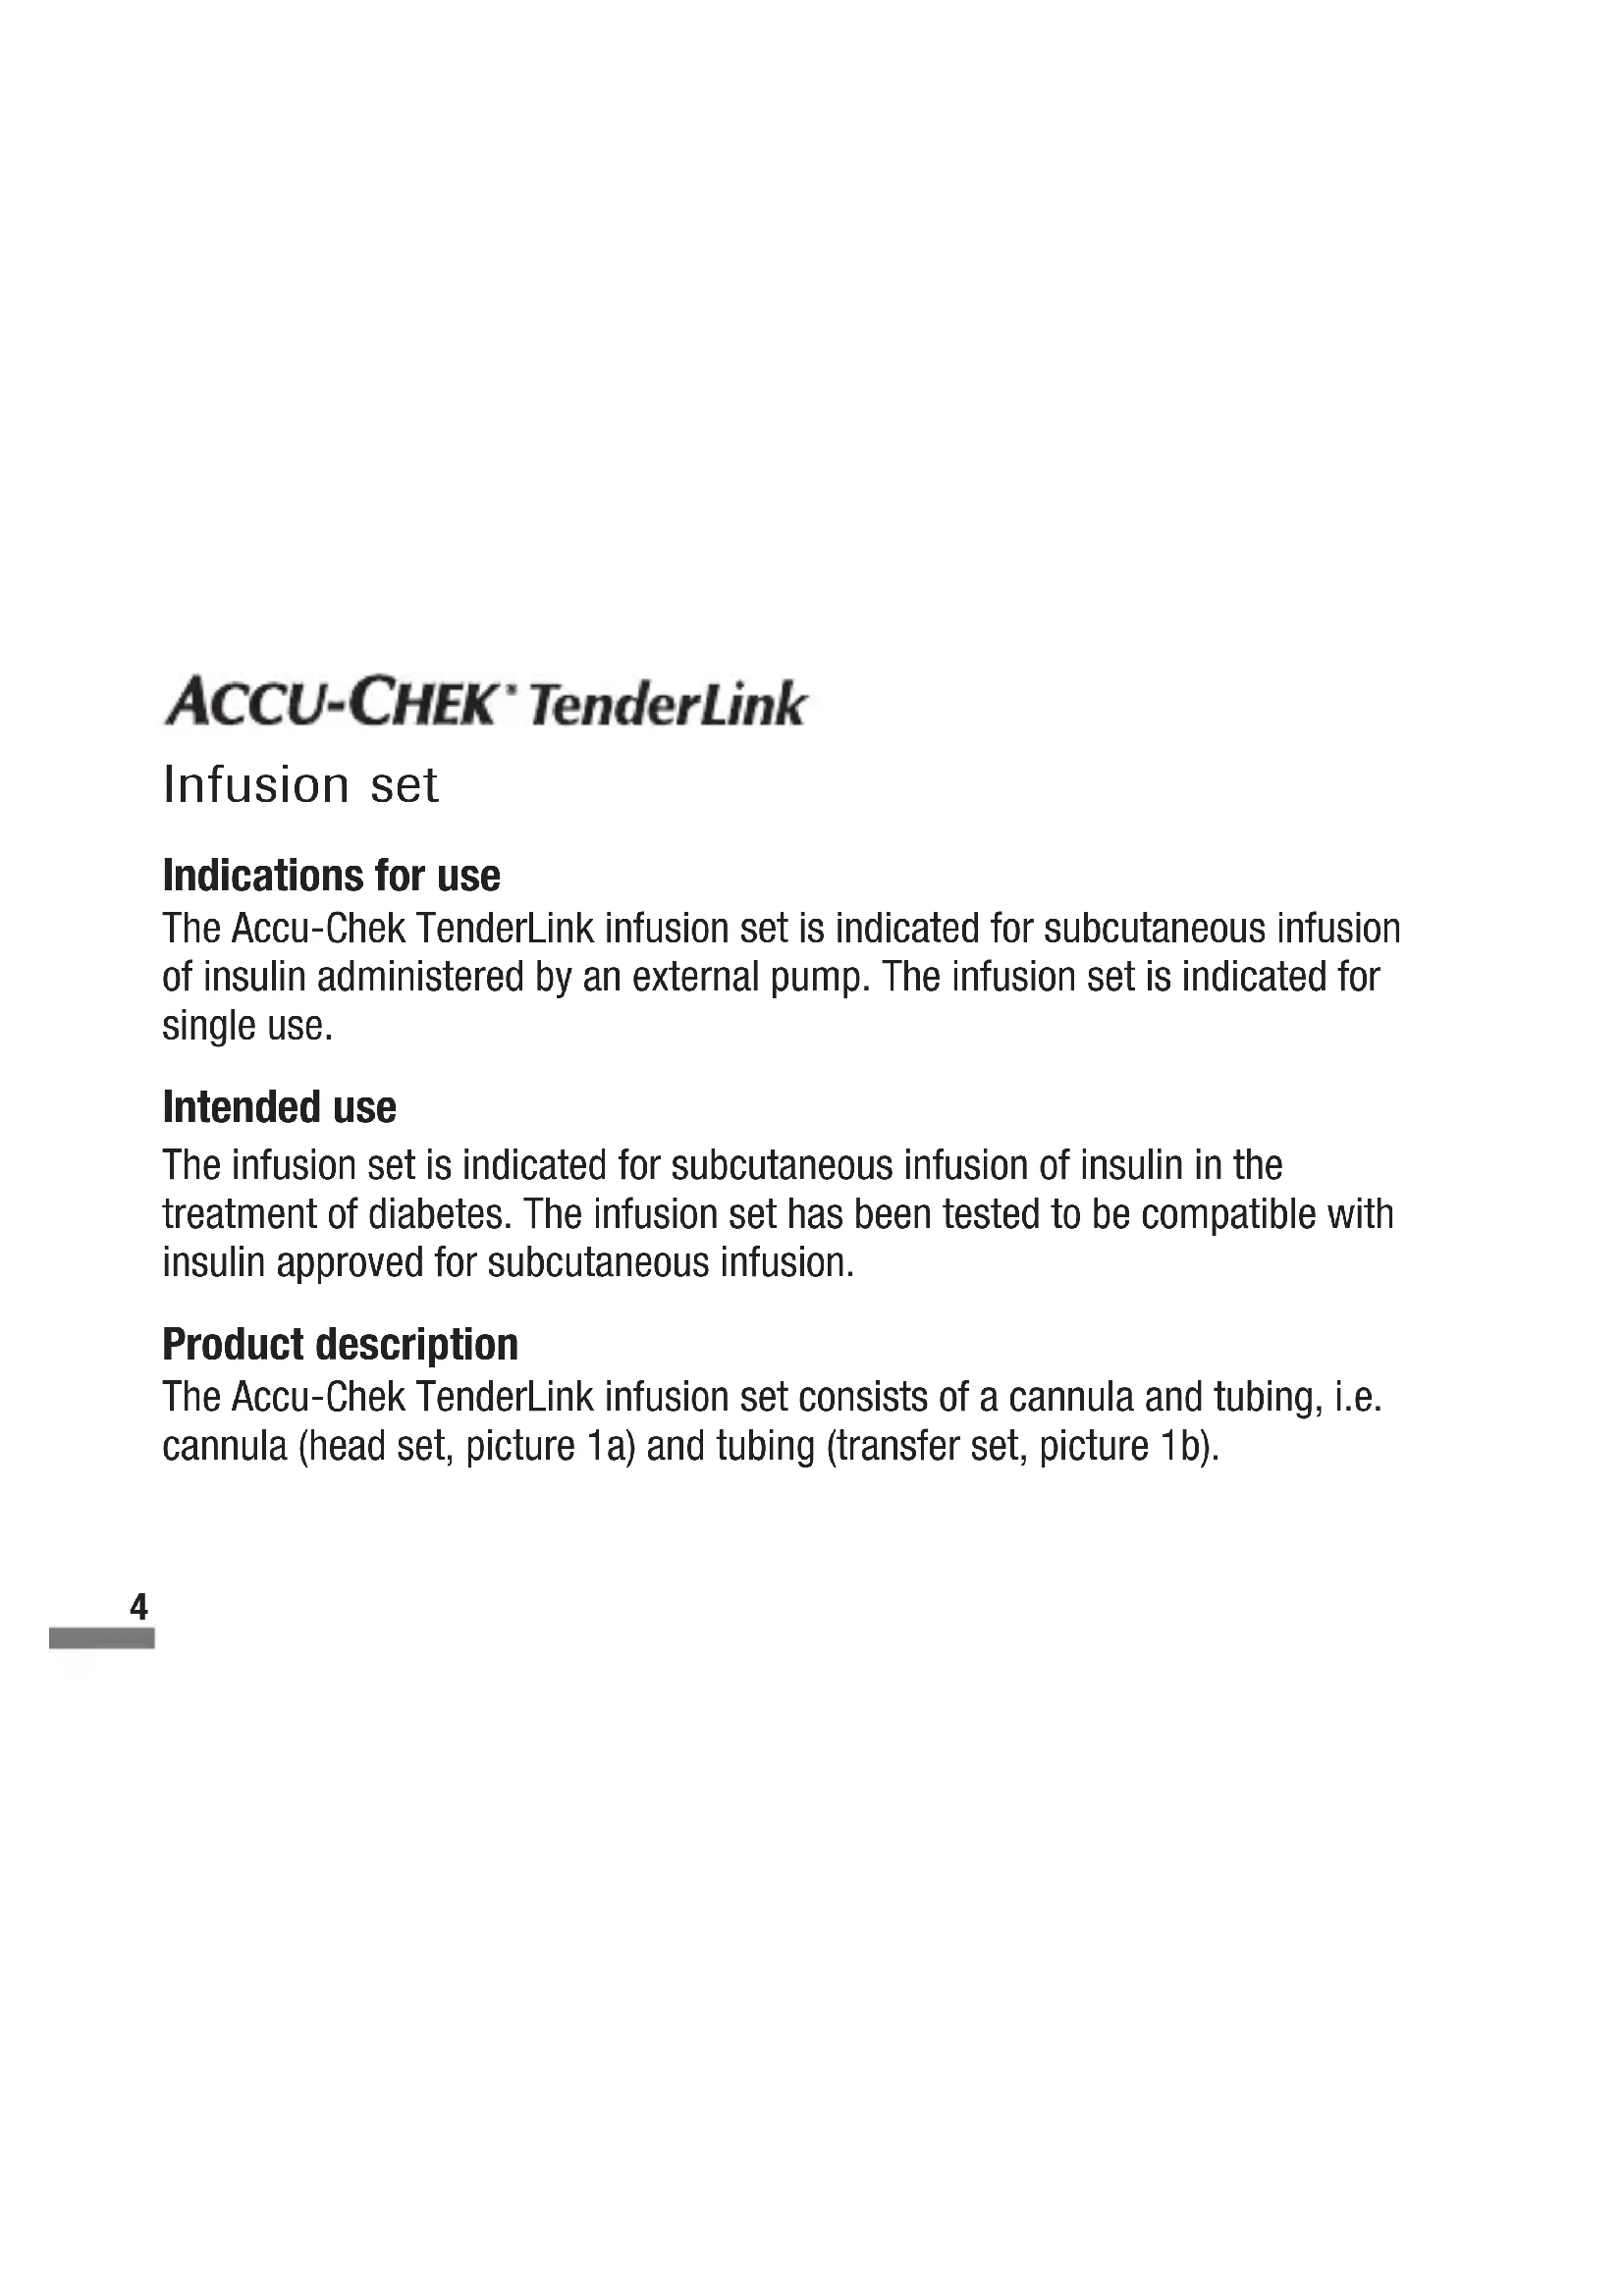
Product description
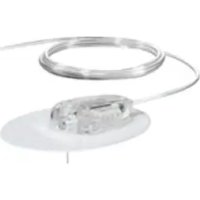
The Accu-Chek TenderLink infusion set consists of a cannula and tubing, i.e. cannula (head set, picture 1a) and tubing (transfer set, picture 1b).
Contraindications
Accu-Chek TenderLink infusion set is neither intended nor indicated for use with blood or blood products (I.V. infusion).
! WARNINGS
- Carefully examine the instructions for use before inserting Accu-Chek TenderLink infusion set. Failure to follow instructions may result in pain or injury.
- The Accu-Chek TenderLink infusion set is only sterile and non-pyrogenic if the packaging is undamaged and unopened. Do not use it if the packaging is already open or is damaged.
- When using Accu-Chek TenderLink infusion set for the first time, do so in the presence of a healthcare professional.
- Inaccurate medication delivery, site irritation or infection may result from improper insertion and maintenance of infusion site.
-
Do not re-insert the introducer needle into the infusion set. This could cause a tearing or damage of the soft cannula and may lead to unpredictable medication flow.
-
Reuse of the infusion set may cause site irritation or infection and may lead to inaccurate medication delivery.
- Be sure that the needle cover is removed before insertion is made.

PRECAUTIONS
- Never try to fill or free a clogged tubing while the infusion set is inserted. This may result in unpredictable medication flow.
- Do not leave air in the infusion set. Make sure to fill the tubing completely. Consult pump manufacturer's instructions for use.
- Accu-Chek TenderLink infusion set is a single use item, which must be disposed of after usage. Do not clean or re-sterilise.
- Check the infusion set frequently to ensure that the soft cannula remains firmly in place. Replace with a new infusion set at a new site, if the infusion set is not in place. Since the cannula is soft, it will not cause any pain if it slips out, and this may happen without notice. The soft cannula must always be completely inserted to receive the full amount of medication.
-
Do not in any way put disinfectants, perfumes, deodorants or other products containing disinfectants in contact with the luer lock connector or the tubing. This may impact the integrity of the infusion set.
-
Replace the infusion set if the adhesive pad becomes loose.
- Replace the infusion set every two to three days, or per your healthcare professional's instructions.
- If the infusion site becomes irritated or infected, replace the infusion set and use a new site until the first site has healed.
- Use aseptic techniques when temporarily disconnecting Accu-Chek TenderLink infusion set. Consult with healthcare professional on how to compensate for missed medication when disconnected.
- People with small or large amounts of subcutaneous fat should choose the insertion angle carefully, as the cannula could be placed in underlying muscle or dermal layer which may lead to unpredictable medication delivery. Normal insertion angle is between 20–45°. Consult your healthcare professional concerning this matter.
Recommendations
- Check your blood glucose level one to three hours after insertion of the Accu-Chek TenderLink infusion set. Measure your blood glucose on a regular basis. Discuss this with your healthcare professional.
-
Do not change infusion set just prior to bedtime, unless blood glucose can be checked one to three hours after insertion.
-
If your blood glucose level becomes unexplainably high, or occlusion alarm occurs, check for clogs and leaks. If in doubt, change infusion set since soft cannula could be dislodged. Discuss plan to bring down your blood glucose level with your healthcare professional should any of these problems arise. Test blood glucose level to make sure problem is corrected.
- Carefully monitor blood glucose levels when disconnected and after reconnecting.
- If, during the use of this device or as a result of its use a serious incident has occurred, please report it to the manufacturer and to your national authority.
Storage & disposal
- Store infusion sets in a cool, dry location at room temperature. Do not store infusion sets in direct sunlight, or in high humidity.
- Store and handle insulin according to the manufacturer's instructions.
- Dispose of the introducer needle in a proper sharp container according to local laws, to avoid risk of needle stick.
- Dispose of a used infusion set according to local regulations for biohazardous waste.
en

Preparation and insertion
Contents
A Needle cover
B Soft cannula
C Adhesive pad
D Introducer needle
E Cannula casing
F Tubing
G Connector with connector needle
H Circular protective cap
I Disconnect cover
natural_image
Illustration of hands holding a tool or device with a vertical line above, no text or symbols present
en
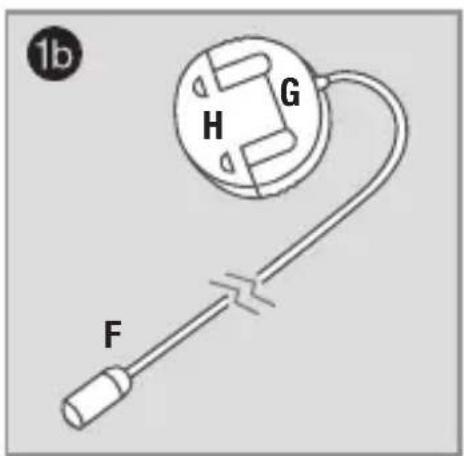
Wash your hands. Suggested insertion sites. Choose an insertion site as recommended by your healthcare professional.

natural_image
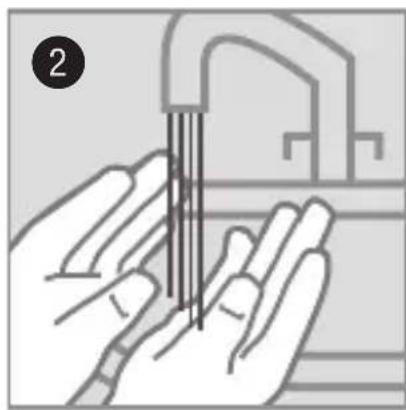
Hand holding a textured surface with a finger, no visible text or symbolsClean the area of insertion with a disinfectant as directed by your healthcare professional. Leave skin to air dry for at least 30 seconds.

natural_image
Illustration of hands assembling a mechanical component (no text or symbols visible)Remove the front paper from the adhesive pad.

Gently twist and pull to remove the needle cover. Make sure the soft cannula does not exceed the introducer needle.

natural_image
Illustration of hands performing a medical procedure on skin with surgical tools (no text or symbols visible)Pinch the skin and insert the infusion set at a 20–45-degree angle.

natural_image
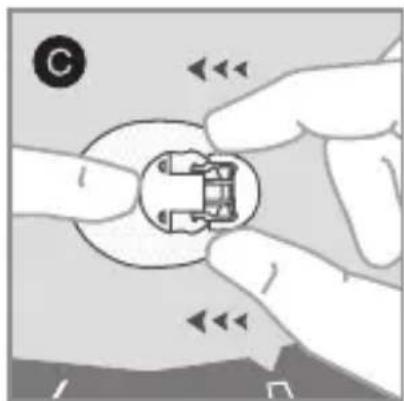
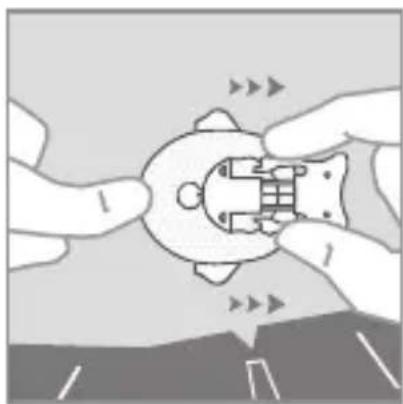
Illustration of hands assembling a mechanical component with arrows indicating motion (no text or symbols)Place a finger in front of the cannula casing and remove the introducer needle by pressing on the grips on the side of the introducer needle and pulling straight out.
natural_image
Illustration of hands holding a circular component with a mechanical symbol, no text or symbols presentKeep your finger in front of the cannula casing and remove the back paper from the adhesive pad. Gently massage the adhesive pad onto the skin.

Remove paper from the tubing and circular protective cap from the tubing connector needle. Fill the tubing until medication dispenses from the tip.
11
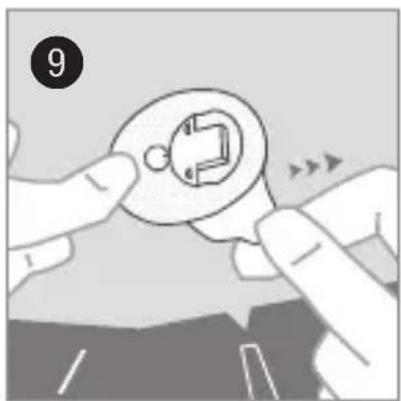
Consult pump manufacturer's instructions for use when connecting infusion set to the insulin pump.

natural_image
Illustration of hands holding a small electronic component with arrows indicating movement or change (no text or symbols)Place a finger in front of the cannula casing and push the connector needle straight in.

natural_image
Illustration of hands using a tool to adjust or install a circular component (no text or symbols visible)Click.
14
Fill the empty space in the cannula with the following fill volume:
U100 insulin:
0.7 U (0.007 mL)
Disconnect

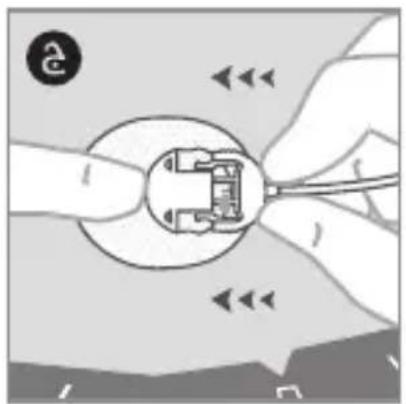
Place a finger in front of the cannula casing. Disconnect the connector needle by pressing the grips on the side and pulling straight out.

natural_image
Close-up of hands holding a small electronic component with arrows indicating direction (no text or symbols)Connect the circular protective cap to the connector needle.
natural_image
Close-up of hands holding a small mechanical component with directional arrows indicating movement (no text or symbols)Connect the disconnect cover to the cannula casing.
Reconnect

Remove circular protective cap from the connector needle and if necessary, fill the tubing.

natural_image
Diagram showing hands holding a circular component with internal components, no text or symbols presentRemove disconnect cover from the cannula casing. Place a finger in front of the cannula casing and push the connector needle straight in.

natural_image
Illustration of hands holding a circular component with a tool, no text or symbols presentClick.
Distributed in the United Kingdom by:
Roche Diabetes Care Limited
Charles Avenue, Burgess Hill
West Sussex, RH15 9RY, United Kingdom
Accu-Chek Pump Careline 1):
UK Freephone number: 0800 731 22 91
ROI Freephone number: 1 800 88 23 51
1) calls may be recorded for training purposes
Some mobile operators may charge for calls to these numbers.
burgesshill.insulinpumps@roche.com
www.accu-chek.co.uk
www.accu-chek.ie
Australia
Roche Diabetes Care
Australia Pty. Limited
Insulin Pump Support: 1800 633 457
australia.insulinpumps@roche.com
www.accu-chek.com.au
Roche Diabetes Care South Africa (Pty) Ltd.
Hertford Office Park, 90 Bekker Road
Vorna Valley, 1686
South Africa
Tel: +27 (11) 504 4600
Email: info@accu-chek.co.za
www.accu-chek.co.za
ACCU-CHEK\* TenderLink
Infusionsset
Anwendungsgebiete
natural_image
Illustration of hands holding a mechanical component with a numbered label (2), no text or symbols present.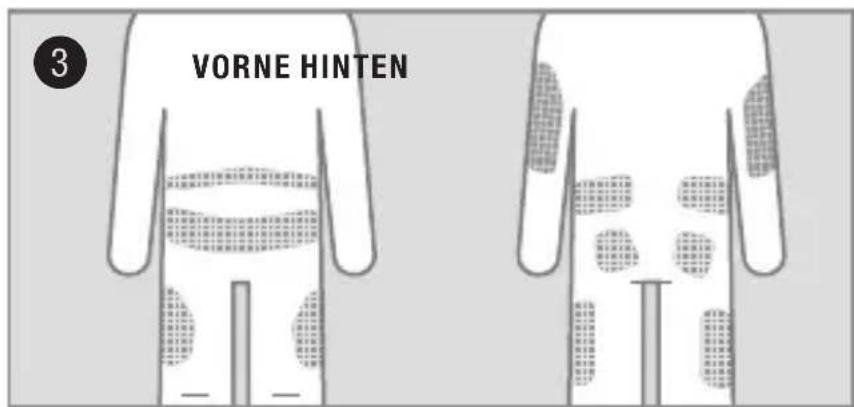
natural_image
Illustration of a hand pressing down on a textured surface, with page number 4 in the corner (no text or symbols on the diagram itself)natural_image
Illustration of hands assembling a mechanical component with arrows indicating motion (no text or symbols)natural_image
Illustration of hands performing a medical procedure on skin with surgical tools (no text or symbols visible)natural_image
Illustration of hands assembling a mechanical component with arrows indicating motion (no text or symbols)natural_image
Illustration of hands holding a circular component with a small inset showing a mechanical part (no text or symbols)natural_image
Illustration of hands holding a small electronic component with arrows indicating movement (no text or symbols)natural_image
Illustration of hands using a tool to adjust or install a circular component (no text or symbols visible)Klick.
14
natural_image
Close-up of hands holding a small electronic component with visible internal structure and directional arrows (no text or symbols)natural_image
Close-up of hands holding a small mechanical component with directional arrows indicating movement (no text or symbols)natural_image
Diagram showing hands holding a small electronic component with arrows indicating direction (no text or symbols)natural_image
Illustration of hands holding a circular component with a tool, no text or symbols presentKlick.
Deutschland
Accu-Chek Kundenservice:
Kostenfreie Telefonnummer 0800 4466800
natural_image
Illustration of hands holding a tool with parallel lines, no text or symbols present
natural_image
Hand holding a textured surface with a finger, no visible text or symbolsnatural_image
Illustration of hands assembling a mechanical component (no text or symbols visible)natural_image
Illustration of hands performing a medical procedure on skin with surgical tools (no text or symbols visible)natural_image
Illustration of hands assembling a mechanical component with arrows indicating motion (no text or symbols)natural_image
Illustration of hands holding a circular component with a mechanical symbol, no text or symbols presentnatural_image
Illustration of hands holding a small electronic component with arrows indicating movement or change (no text or symbols)natural_image
Illustration of hands using a tool to adjust or install a circular component (no text or symbols visible)Cliquez.
14
natural_image
Close-up of hands holding a small electronic component with arrows indicating direction (no text or symbols)natural_image
Close-up of hands holding a small mechanical component with directional arrows indicating movement (no text or symbols)natural_image
Diagram showing hands holding a small electronic component with arrows indicating direction (no text or symbols)natural_image
Illustration of hands holding a circular component with a tool, no text or symbols presentCliquez.
natural_image
Illustration of hands holding a tool with parallel lines, no text or symbols present
natural_image
Close-up of a hand pressing down on a textured surface, no text or symbols visiblenatural_image
Illustration of hands assembling a mechanical component (no text or symbols visible)natural_image
Illustration of hands performing a medical procedure on skin with surgical tools (no text or symbols visible)natural_image
Illustration of hands assembling a mechanical component with arrows indicating motion (no text or symbols)natural_image
Illustration of hands holding a circular component with a mechanical symbol, no text or symbols presentnatural_image
Illustration of hands holding a small electronic component with arrows indicating movement or change (no text or symbols)natural_image
Illustration of hands using a tool to adjust or install a circular component (no text or symbols visible)Si sente un clic.
14
natural_image
Close-up of hands holding a small electronic component with visible internal structure and directional arrows (no text or symbols)natural_image
Close-up of hands holding a small mechanical component with directional arrows indicating movement (no text or symbols)natural_image
Illustration of hands holding a small electronic component with arrows indicating direction (no text or symbols)natural_image
Illustration of hands holding a circular component with a tool, no text or symbols presentSi sente un clic.
Italia
natural_image
Illustration of hands holding a tool or device with a vertical line above, no text or symbols present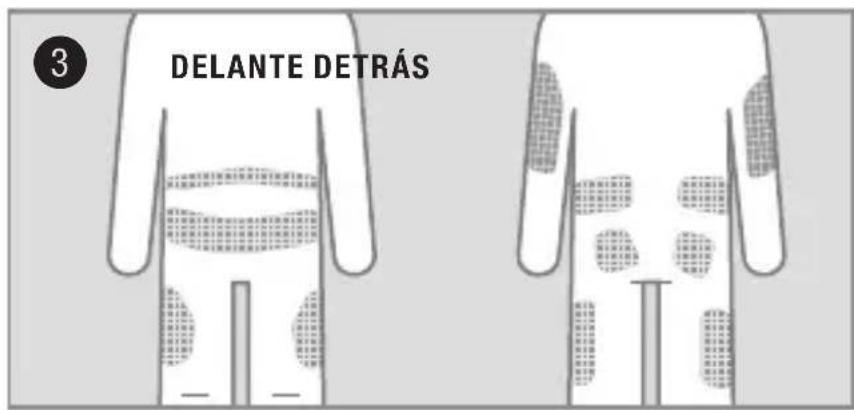
natural_image
Close-up of a hand pressing down on a textured surface, no text or symbols visiblenatural_image
Illustration of hands assembling a mechanical component (no text or symbols visible)natural_image
Illustration of hands performing a medical procedure on skin with surgical tools (no text or symbols visible)natural_image
Illustration of hands assembling a mechanical component with arrows indicating motion (no text or symbols)natural_image
Illustration of hands holding a circular component with a mechanical symbol, no text or symbols presentnatural_image
Illustration of hands holding a small electronic component with arrows indicating movement (no text or symbols)natural_image
Illustration of hands using a tool to adjust or install a circular component (no text or symbols visible)Clic.
14
natural_image
Close-up of hands holding a small electronic component with visible internal structure and directional arrows (no text or symbols)Conecte la tapa protectora circular a la aguja del conector.

natural_image
Close-up of hands holding a small mechanical component with directional arrows indicating movement (no text or symbols)natural_image
Diagram showing hands holding a small electronic component with arrows indicating direction (no text or symbols)natural_image
Illustration of hands holding a circular component with a tool, no text or symbols presentClic.
Chile
natural_image
Illustration of hands holding a tool or device with a vertical line above, no text or symbols present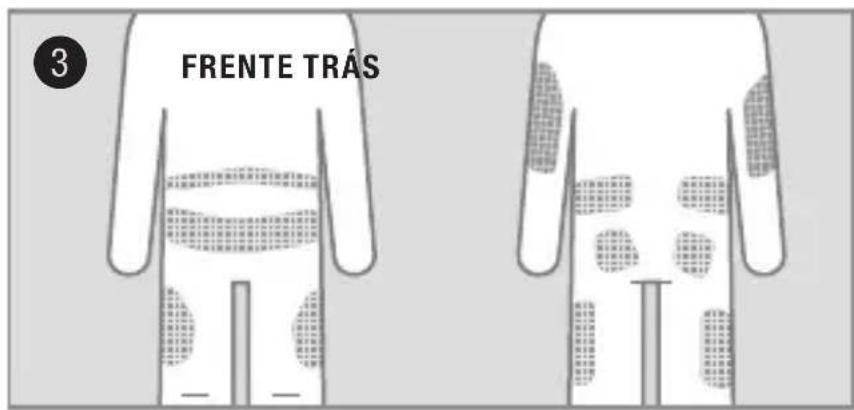
natural_image
Illustration of a hand pressing down on a textured surface, with page number 4 in the corner (no text or symbols on the diagram itself)natural_image
Illustration of hands assembling a mechanical component (no text or symbols visible)natural_image
Illustration of hands performing a medical procedure on skin with surgical tools (no text or symbols visible)natural_image
Illustration of hands assembling a mechanical component with arrows indicating motion (no text or symbols)natural_image
Illustration of hands holding a circular component with a mechanical symbol, no text or symbols presentnatural_image
Illustration of hands holding a small electronic component with arrows indicating movement or change (no text or symbols)natural_image
Illustration of hands using a tool to adjust or install a circular component (no text or symbols visible)Estalido.
14
natural_image
Illustration of hands holding a small electronic component with directional arrows indicating movement (no text or symbols)natural_image
Close-up of hands holding a small electronic component with visible internal structure and directional arrows (no text or symbols)natural_image
Close-up of hands holding a small mechanical component with directional arrows indicating movement (no text or symbols)natural_image
Diagram showing hands holding a small electronic component with arrows indicating direction (no text or symbols)natural_image
Illustration of hands holding a circular component with a tool, no text or symbols presentEstalido.
Portugal
natural_image
Illustration of hands holding a tool with parallel lines, no text or symbols present
natural_image
Hand holding a textured surface with a finger, no visible text or symbolsnatural_image
Illustration of hands assembling a mechanical component (no text or symbols visible)natural_image
Illustration of hands performing a medical procedure on skin with surgical tools (no text or symbols visible)natural_image
Illustration of hands assembling a mechanical component with arrows indicating motion (no text or symbols)natural_image
Illustration of hands holding a circular component with a mechanical symbol, no text or symbols presentnatural_image
Illustration of hands holding a small electronic component with arrows indicating movement or change (no text or symbols)natural_image
Illustration of hands using a tool to adjust or install a circular component (no text or symbols visible)Klik.
14
natural_image
Close-up of hands holding a small electronic component with internal circuit lines (no text or symbols visible)natural_image
Close-up of hands holding a small mechanical component with directional arrows indicating movement (no text or symbols)natural_image
Illustration of hands holding a circular component with internal components, no text or symbols presentnatural_image
Illustration of hands holding a circular component with a tool, no text or symbols presentKlik.
nl
Nederland
Roche Diabetes Service
Tel. 0800-022 05 85
www.accu-chek.nl
België
Tel: 0800-93626 (RocheDiabetes Service)
www.accu-chek.be
nl
ACCU-CHEK\* TenderLink
Infusionssæt
natural_image
Illustration of hands holding a tool with parallel lines, no text or symbols present
natural_image
Illustration of a hand pressing down on a textured surface, with page number 4 in the corner (no text or symbols on the diagram itself)natural_image
Illustration of hands assembling a mechanical component (no text or symbols visible)natural_image
Illustration of hands performing a medical procedure on skin with surgical tools (no text or symbols visible)natural_image
Illustration of hands assembling a mechanical component with arrows indicating motion (no text or symbols)natural_image
Illustration of hands holding a circular component with a mechanical symbol, no text or symbols presentnatural_image
Illustration of hands holding a small electronic component with arrows indicating movement or change (no text or symbols)natural_image
Illustration of hands using a tool to adjust or install a circular component (no text or symbols visible)Klik.
14
natural_image
Close-up of hands holding a small electronic component with internal circuit lines (no text or symbols visible)natural_image
Close-up of hands holding a small mechanical component with directional arrows indicating movement (no text or symbols)natural_image
Illustration of hands holding a small electronic component with arrows indicating direction (no text or symbols)Fjern beskyttelseshætten Klik. ved frakobling fra kanylehuset. Placér en finger foran på kanylehuset, og skub koblingsstykkets nål direkte ind.

natural_image
Illustration of hands holding a circular component with a tool, no text or symbols presentKlik.
Danmark
Accu-Chek Kundeservice:
Tlf. 80 82 84 71
www.accu-chek.dk
da
ACCU-CHEK\* TenderLink
Infusjonsett
natural_image
Illustration of hands holding a tool with parallel lines, no text or symbols present
natural_image
Illustration of a hand pressing down on a textured surface, with page number 4 in the corner (no text or symbols on the diagram itself)natural_image
Illustration of hands assembling a mechanical component (no text or symbols visible)natural_image
Illustration of hands performing a medical procedure on skin with surgical tools (no text or symbols visible)natural_image
Illustration of hands assembling a mechanical component with arrows indicating motion (no text or symbols)natural_image
Illustration of hands holding a circular component with a mechanical symbol, no text or symbols presentnatural_image
Illustration of hands holding a small electronic component with arrows indicating movement or change (no text or symbols)natural_image
Illustration of hands using a tool to adjust or install a circular component (no text or symbols visible)Klikk.
14
Fyll tomrommet i kanylen med følgende fyllevolum:
U100-insulin:
0,7 U (0,007 mL)
Koble fra

natural_image
Close-up of hands holding a small electronic component with internal circuit lines (no text or symbols visible)natural_image
Close-up of hands holding a small mechanical component with directional arrows indicating movement (no text or symbols)Sett beskyttelseskappen på kanylehuset.
Koble til igjen

natural_image
Illustration of hands holding a small electronic component with arrows indicating direction (no text or symbols)natural_image
Illustration of hands using a tool to adjust a circular component with a handle (no text or symbols visible)Klikk.
Norge
Accu-Chek Kundesenter: 21 400 100
www.accu-chek.no
ACCU-CHEK\* TenderLink
Infusionsset
natural_image
Illustration of hands holding a tool with parallel lines, no text or symbols present
natural_image
Illustration of a hand pressing down on a textured surface, with page number 4 in the corner (no text or symbols on the diagram itself)natural_image
Illustration of hands assembling a mechanical component with arrows indicating motion (no text or symbols)natural_image
Illustration of hands performing a medical procedure on skin with surgical tools (no text or symbols visible)natural_image
Illustration of hands assembling a mechanical component with arrows indicating motion (no text or symbols)natural_image
Illustration of hands holding a circular component with a mechanical symbol, no text or symbols presentnatural_image
Illustration of hands holding a small electronic component with arrows indicating movement or change (no text or symbols)natural_image
Illustration of hands using a tool to adjust or install a circular component (no text or symbols visible)Du hör ett klick.
14
natural_image
Close-up of hands holding a small electronic component with internal circuit lines (no text or symbols visible)natural_image
Close-up of hands holding a small mechanical component with directional arrows indicating movement (no text or symbols)natural_image
Illustration of hands holding a small electronic component with arrows indicating direction (no text or symbols)natural_image
Illustration of hands using a tool to adjust a circular component with a handle (no text or symbols visible)Du hör ett klick.
Sverige
Accu-Chek Kundsupport:
natural_image
Illustration of hands holding a tool with parallel lines, no text or symbols present
natural_image
Close-up of a hand pressing down on a textured surface, no text or symbols visiblenatural_image
Illustration of hands assembling a mechanical component (no text or symbols visible)natural_image
Illustration of hands performing a medical procedure on skin with surgical tools (no text or symbols visible)natural_image
Illustration of hands assembling a mechanical component with arrows indicating motion (no text or symbols)natural_image
Illustration of hands holding a circular component with a mechanical symbol, no text or symbols presentnatural_image
Illustration of hands holding a small electronic component with arrows indicating movement or change (no text or symbols)natural_image
Illustration of hands using a tool to adjust or install a circular component (no text or symbols visible)Klik.
14
Käytä seuraavaa
täyttötilavuutta
natural_image
Close-up of hands holding a small electronic component with visible internal structure and directional arrows (no text or symbols)natural_image
Close-up of hands holding a small mechanical component with directional arrows indicating movement (no text or symbols)natural_image
Illustration of hands connecting a component into a circular housing with arrows indicating direction (no text or symbols)natural_image
Illustration of hands holding a circular component with a tool, no text or symbols presentKlik.
Suomi
natural_image
Illustration of hands holding a mechanical component with a numbered label (2), no text or symbols present.
natural_image
Hand holding a textured square object with a finger, no visible text or symbolsnatural_image
Illustration of hands assembling a mechanical component (no text or symbols visible)natural_image
Illustration of hands performing a medical procedure on skin with surgical tools (no text or symbols visible)natural_image
Illustration of hands assembling a mechanical component with arrows indicating motion (no text or symbols)natural_image
Illustration of hands holding a circular component with a mechanical symbol, no text or symbols presentnatural_image
Illustration of hands holding a small electronic component with arrows indicating movement or change (no text or symbols)natural_image
Illustration of hands using a tool to adjust or install a circular component (no text or symbols visible)Klik.
14
natural_image
Close-up of hands holding a small electronic component with arrows indicating direction (no text or symbols)natural_image
Illustration of hands holding a small mechanical component with directional arrows indicating movement (no text or symbols)natural_image
Diagram showing hands connecting a component to a circular housing, with arrows indicating direction (no text or symbols)natural_image
Illustration of hands holding a circular component with a tool, no text or symbols presentKλικ.
Ελλάδα
natural_image
Illustration of hands holding a tool with parallel lines, no text or symbols present
natural_image
Hand holding a textured square object with a finger, no visible text or symbolsnatural_image
Illustration of hands assembling a mechanical component (no text or symbols visible)natural_image
Illustration of hands performing a medical procedure on skin with surgical tools (no text or symbols visible)natural_image
Illustration of hands assembling a mechanical component with arrows indicating motion (no text or symbols)natural_image
Illustration of hands holding a circular component with a mechanical symbol, no text or symbols presentnatural_image
Illustration of hands holding a small electronic component with arrows indicating movement or change (no text or symbols)natural_image
Illustration of hands using a tool to adjust or install a circular component (no text or symbols visible)Klik.
14
natural_image
Close-up of hands holding a small electronic component with visible internal structure and directional arrows (no text or symbols)natural_image
Close-up of hands holding a small mechanical component with directional arrows indicating movement (no text or symbols)natural_image
Illustration of hands holding a small electronic component with arrows indicating direction (no text or symbols)natural_image
Illustration of hands holding a circular component with a tool, no text or symbols presentKlik.
Polska
Obsługa klienta:
Telefon: +48 22 481 55 23
www.accu-chek.pl
Infolinia na terenie Polski: 801 080 104*
natural_image
Illustration of hands holding a tool with parallel lines, no text or symbols present
natural_image
Hand holding a textured surface with a finger, no visible text or symbolsnatural_image
Illustration of hands assembling a mechanical component with arrows indicating motion (no text or symbols)natural_image
Illustration of hands performing a medical procedure on skin with surgical tools (no text or symbols visible)natural_image
Illustration of hands assembling a mechanical component with arrows indicating motion (no text or symbols)natural_image
Illustration of hands holding a circular component with a mechanical symbol, no text or symbols presentnatural_image
Illustration of hands holding a small electronic component with arrows indicating motion (no text or symbols)natural_image
Illustration of hands using a tool to adjust or install a circular component (no text or symbols visible)Zazní cvaknutí.
14
natural_image
Close-up of hands holding a small electronic component with visible internal structure and directional arrows (no text or symbols)natural_image
Close-up of hands holding a small mechanical component with directional arrows indicating movement (no text or symbols)natural_image
Illustration of hands holding a small electronic component with arrows indicating direction (no text or symbols)natural_image
Illustration of hands using a tool to adjust a circular component with a handle (no text or symbols visible)Zazní cvaknutí.
Česká republika
natural_image
Illustration of hands holding a tool or device with a vertical line above, no text or symbols present
natural_image
Close-up of a hand pressing down on a textured surface, no text or symbols visiblenatural_image
Illustration of hands assembling a mechanical component with arrows indicating motion (no text or symbols)Odstráňte ochranný papier z náplasti.

natural_image
Illustration of hands performing a medical procedure on skin with surgical tools (no text or symbols visible)natural_image
Illustration of hands assembling a mechanical component with arrows indicating motion (no text or symbols)natural_image
Illustration of hands holding a circular component with a mechanical symbol, no text or symbols presentnatural_image
Illustration of hands holding a small electronic component with arrows indicating movement or change (no text or symbols)Položte prst pred ochranný kryt kanyly a zatlačte spojovaciu ihlu priamo dovnútra.

natural_image
Illustration of hands using a tool to adjust or install a circular component (no text or symbols visible)Klik.
14
natural_image
Illustration of hands holding a small electronic component with directional arrows indicating movement (no text or symbols)natural_image
Close-up of hands holding a small electronic component with visible internal structure and directional arrows (no text or symbols)natural_image
Close-up of hands holding a small mechanical component with directional arrows indicating movement (no text or symbols)Pripojte zaslepovaciu zástrčku k ochrannému krytu kanyly.
Opätovné pripojenie

natural_image
Diagram showing hands holding a small electronic component with arrows indicating direction (no text or symbols)Odstráňte zaslepovaciu zástrčku z ochranného krytu kanyly. Položte prst pred ochranný kryt kanyly a zatlačte spojovaciu ihlu priamo dovnútra.

natural_image
Illustration of hands holding a circular component with a tool, no text or symbols presentKlik.
Slovensko
natural_image
Illustration of hands using a tool to adjust a circular component (no text or symbols visible)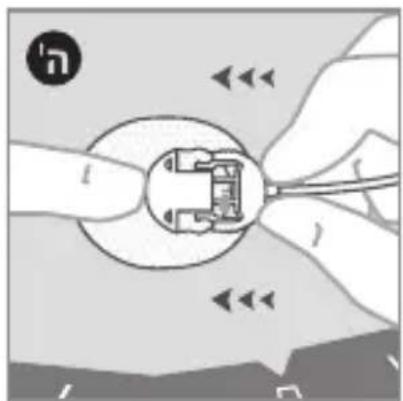
natural_image
Illustration of hands holding a circular component with internal components, no text or symbols present
natural_image
Illustration of hands holding a small mechanical component with directional arrows indicating movement (no text or symbols)natural_image
Close-up of hands holding a small electronic component with internal circuitry (no visible text or symbols)natural_image
Illustration of hands holding a small electronic component with directional arrows indicating motion (no text or symbols)natural_image
Illustration of hands using a tool to adjust or install a circular component (no text or symbols visible)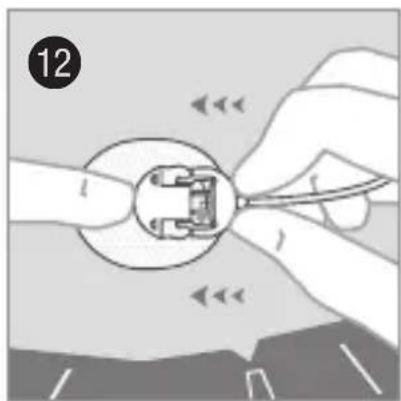
natural_image
Illustration of hands using a tool to adjust or install a mechanical component (no text or symbols visible)natural_image
Illustration of hands holding a circular mechanical component with a small inset view (no text or symbols)natural_image
Illustration of hands assembling a mechanical component with arrows indicating motion (no text or symbols)natural_image
Illustration of hands performing a manual task with motion arrows and tools (no text or symbols)natural_image
Illustration of hands holding a small object with arrows indicating motion (no text or symbols)natural_image
Illustration of hands fastening a mechanical component with arrows indicating motion (no text or symbols)natural_image
Hand holding a textured square object with a finger, no visible text or symbolsnatural_image
Illustration of hands holding a tool with a vertical line, no text or symbols present. D'T 1900
תְרָה בְּרָה
תַלְרָה
הכלה
תְקָרִי אַלְבָה
תְקַרָה בְּרָה
תְרָה בַלְשִׁ
תְבָרִי בְּרִי הַע
תְרָהִיָם
.הכלההוּרָהוּרָהוּרָהוּרָהוּרָהוּרָהוּרָהוּרָהוּרָהוּרָהוּרָהוּרָהוּרָהוּרָהוּרָה
תְבַרָה בְּשָׁא
•.שְׁתָה
• הַרְקּ
.הכלההוּרָהוּרָהוּרָהוּרָהוּרָהוּרָהוּרָהוּרָהוּרָהוּרָהוּרָהוּרָהוּרָהוּרָהוּרָה
natural_image
Illustration of hands holding a tool or device with parallel lines, no text or symbols present
natural_image
Close-up of a hand pressing down on a textured surface, no text or symbols visiblenatural_image
Illustration of hands assembling a mechanical component with arrows indicating motion (no text or symbols)natural_image
Illustration of hands performing a medical procedure on skin with surgical tools (no text or symbols visible)natural_image
Illustration of hands assembling a mechanical component with arrows indicating motion (no text or symbols)natural_image
Illustration of hands holding a circular component with a mechanical symbol, no text or symbols presentnatural_image
Illustration of hands holding a small electronic component with arrows indicating movement or change (no text or symbols)natural_image
Illustration of hands using a tool to adjust or install a circular component (no text or symbols visible)natural_image
Close-up of hands holding a small electronic component with arrows indicating direction (no text or symbols)natural_image
Close-up of hands holding a small mechanical component with directional arrows indicating movement (no text or symbols)natural_image
Diagram showing hands holding a circular component with internal components, no text or symbols presentnatural_image
Illustration of hands holding a circular component with a tool, no text or symbols presentnatural_image
Illustration of hands holding a tool or device with a vertical line above, no text or symbols present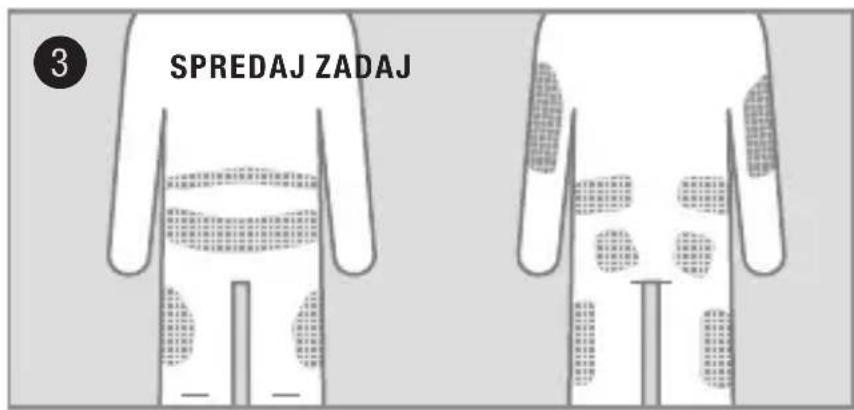
natural_image
Hand holding a textured surface with a finger, no visible text or symbolsnatural_image
Illustration of hands assembling a mechanical component (no text or symbols visible)Odstranite sprednji papir z obliža.

Nežno zasukajte in povlecite, da odstranite pokrovček za iglo. Prepričajte se, da mehka kanila ne sega prek uvodne igle.

natural_image
Illustration of hands performing a medical procedure on skin with surgical tools (no text or symbols visible)Naredite kožno gubo in vstavite infuzijski set pod kotom 20–45 stopinj.
natural_image
Illustration of hands assembling a mechanical component with arrows indicating motion (no text or symbols)natural_image
Illustration of hands holding a circular component with a mechanical symbol, no text or symbols presentnatural_image
Illustration of hands holding a small electronic component with arrows indicating movement or change (no text or symbols)natural_image
Illustration of hands using a tool to adjust or install a circular component (no text or symbols visible)Pritisnite, da zaslišite klik.
14
natural_image
Close-up of hands holding a small electronic component with visible internal structure and directional arrows (no text or symbols)natural_image
Close-up of hands holding a small mechanical component with directional arrows indicating movement (no text or symbols)natural_image
Illustration of hands holding a mechanical component with a numbered label (2), no text or symbols present.
natural_image
Close-up of a hand pressing down on a textured surface, no text or symbols visiblenatural_image
Illustration of hands assembling a mechanical component with arrows indicating motion (no text or symbols)natural_image
Illustration of hands performing a medical procedure on skin with surgical tools (no text or symbols visible)natural_image
Illustration of hands assembling a mechanical component with arrows indicating motion (no text or symbols)natural_image
Illustration of hands holding a circular component with a mechanical symbol inside, no text or symbols presentnatural_image
Illustration of hands holding a small electronic component with arrows indicating movement or change (no text or symbols)natural_image
Illustration of hands using a tool to adjust or install a circular component (no text or symbols visible)Înclichetați.
14
natural_image
Close-up of hands holding a small electronic component with arrows indicating direction (no text or symbols)natural_image
Close-up of hands holding a small mechanical component with directional arrows indicating movement (no text or symbols)natural_image
Illustration of hands holding a small electronic component with arrows indicating direction (no text or symbols)natural_image
Illustration of hands holding a circular component with a tool, no text or symbols presentÎnclichetați.
România
Helpline 0800 080 228 (apel gratuit)
www.accu-chek.ro
ACCU-CHEK\* TenderLink
Инфузионный набор
natural_image
Illustration of hands holding a tool or device with a vertical line, no text or symbols present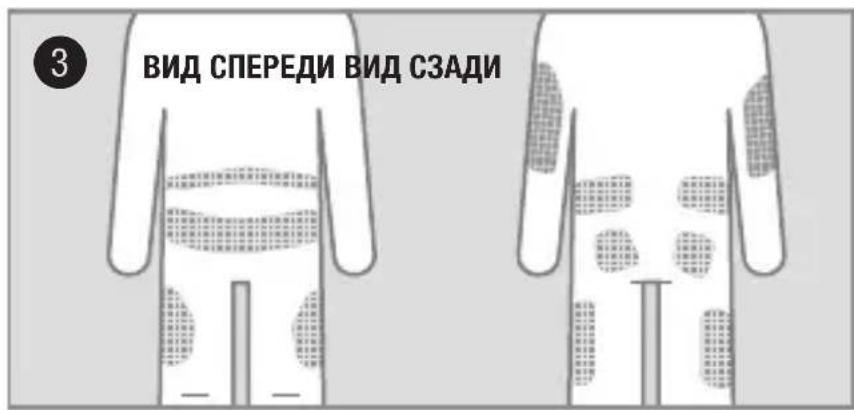
natural_image
Hand holding a textured surface with a finger, no visible text or symbolsnatural_image
Illustration of hands assembling a mechanical component with arrows indicating motion (no text or symbols)natural_image
Illustration of hands performing a medical procedure on skin with surgical tools (no text or symbols visible)natural_image
Illustration of hands assembling a mechanical component with arrows indicating motion (no text or symbols)natural_image
Illustration of hands holding a circular component with a mechanical symbol, no text or symbols presentnatural_image
Illustration of hands holding a small electronic component with arrows indicating movement or change (no text or symbols)natural_image
Illustration of hands using a tool to adjust or install a circular component (no text or symbols visible)natural_image
Close-up of hands holding a small electronic component with visible internal structure and directional arrows (no text or symbols)natural_image
Illustration of hands holding a small mechanical component with directional arrows indicating movement (no text or symbols)natural_image
Illustration of hands holding a small electrical socket with wires, no text or symbols presentnatural_image
Illustration of hands holding a circular component with a tool, no text or symbols presentnatural_image
Illustration of hands holding a tool or device with a vertical line, no text or symbols present
natural_image
Hand holding a textured surface with a finger, no visible text or symbolsnatural_image
Illustration of hands assembling a mechanical component with arrows indicating motion (no text or symbols)natural_image
Illustration of hands performing a medical procedure on skin with surgical tools (no text or symbols visible)natural_image
Illustration of hands assembling a mechanical component with arrows indicating motion (no text or symbols)natural_image
Illustration of hands holding a circular component with a mechanical symbol inside, no text or symbols presentnatural_image
Illustration of hands holding a small electronic component with arrows indicating movement or change (no text or symbols)natural_image
Illustration of hands using a tool to adjust or install a circular component (no text or symbols visible)natural_image
Close-up of hands holding a small electronic component with visible internal structure and directional arrows (no text or symbols)natural_image
Illustration of hands holding a small mechanical component with directional arrows indicating movement (no text or symbols)natural_image
Illustration of hands connecting a component into a circular housing, with directional arrows indicating movement (no text or symbols)natural_image
Illustration of hands holding a circular component with a tool, no text or symbols presentnatural_image
Illustration of hands holding a tool with parallel lines, no text or symbols present
natural_image
Hand holding a textured square object with a finger, no visible text or symbolsnatural_image
Illustration of hands fastening a mechanical component with arrows indicating motion (no text or symbols)natural_image
Illustration of hands performing a medical procedure on skin with surgical tools (no text or symbols visible)natural_image
Illustration of hands assembling a mechanical component with arrows indicating motion (no text or symbols)natural_image
Illustration of hands holding a circular component with a mechanical symbol, no text or symbols presentnatural_image
Illustration of hands holding a small electronic component with arrows indicating movement or change (no text or symbols)natural_image
Illustration of hands using a tool to adjust or install a circular component (no text or symbols visible)Klöpsake.
14
natural_image
Close-up of hands holding a small electronic component with visible internal structure and directional arrows (no text or symbols)natural_image
Close-up of hands holding a small mechanical component with directional arrows indicating movement (no text or symbols)natural_image
Illustration of hands connecting a component into a circular housing with arrows indicating direction (no text or symbols)natural_image
Illustration of hands holding a circular component with a tool, no text or symbols presentKlöpsake.
Eesti
natural_image
Illustration of hands holding a tool or device with a vertical line, no text or symbols presentNomazgājiet rokas.

natural_image
Close-up of a hand pressing down on a textured surface, no text or symbols visiblenatural_image
Illustration of hands assembling a mechanical component with arrows indicating motion (no text or symbols)natural_image
Illustration of hands performing a medical procedure on skin with surgical tools (no text or symbols visible)natural_image
Illustration of hands assembling a mechanical component with arrows indicating motion (no text or symbols)natural_image
Illustration of hands holding a circular component with a mechanical symbol, no text or symbols presentnatural_image
Illustration of hands holding a small electronic component with arrows indicating movement or change (no text or symbols)natural_image
Illustration of hands using a tool to adjust or install a circular component (no text or symbols visible)Klikškis.
14
natural_image
Close-up of hands holding a small electronic component with arrows indicating direction (no text or symbols)natural_image
Close-up of hands holding a small mechanical component with directional arrows indicating movement (no text or symbols)natural_image
Illustration of hands holding a circular component with internal components, no text or symbols presentnatural_image
Illustration of hands holding a circular component with a tool, no text or symbols presentKlikškis.
Latvija
natural_image
Illustration of hands holding a tool with parallel lines, no text or symbols present
natural_image
Hand holding a textured square object with a finger, no visible text or symbolsnatural_image
Illustration of hands assembling a mechanical component with arrows indicating motion (no text or symbols)natural_image
Illustration of hands performing a medical procedure on skin with surgical tools (no text or symbols visible)natural_image
Illustration of hands assembling a mechanical component with arrows indicating motion (no text or symbols)natural_image
Illustration of hands holding a circular component with a mechanical symbol, no text or symbols presentnatural_image
Illustration of hands holding a small electronic component with arrows indicating movement or change (no text or symbols)natural_image
Illustration of hands using a tool to adjust or install a circular component (no text or symbols visible)Spragtelėjimas.
14
natural_image
Close-up of hands holding a small electronic component with visible internal structure and directional arrows (no text or symbols)natural_image
Close-up of hands holding a small mechanical component with directional arrows indicating movement (no text or symbols)natural_image
Illustration of hands connecting a component to a circular socket, with arrows indicating direction (no text or symbols)natural_image
Illustration of hands holding a circular component with a tool, no text or symbols presentSpragtelėjimas.
Lietuva
natural_image
Illustration of hands using a tool to adjust or install a mechanical component (no text or symbols visible)يصدر صوت نقرة.
natural_image
Illustration of hands holding a small mechanical component with arrows indicating direction (no text or symbols)natural_image
Illustration of hands holding a plug with a fuse and cable, showing electrical connections (no text or symbols)natural_image
Illustration of hands holding a small mechanical component with directional arrows indicating movement (no text or symbols)natural_image
Close-up of hands holding a small electronic component with internal circuitry (no visible text or symbols)natural_image
Illustration of hands using a tool to adjust or install a circular component (no text or symbols visible)
natural_image
Illustration of hands holding a small electronic component with arrows indicating motion or movement (no text or symbols)natural_image
Illustration of hands holding a plug socket and cable, with no visible text or symbolsnatural_image
Illustration of hands holding a circular component with a small inset showing a mechanical part (no text or symbols)natural_image
Illustration of hands assembling a mechanical component with arrows indicating motion (no text or symbols)natural_image
Illustration of hands performing a sewing or sewing process with no visible text or symbolsnatural_image
Illustration of hands holding a small object with arrows indicating motion (no text or symbols)natural_image
Illustration of hands assembling a mechanical component (no text or symbols visible)natural_image
Hand holding a textured square object with a circular icon labeled 'E' in the corner (no text or symbols on the object itself)natural_image
Illustration of hands holding a tool or device with a curved interface (no text or symbols visible)أغسل يديك.
الtersغير والإدغال
المмотويات
أ غطاء الإبرة
بolenية اللينة
ت全产业链ة
ث إبرة الإدغال
ج عبوة Quintية
ح الأنبوب


- Unomedical
- CE0459
- Intended use
- Product description
- Contraindications
- ! WARNINGS
- PRECAUTIONS
- Recommendations
- Storage & disposal
- Preparation and insertion
- Contents
- 11
- 14
- Disconnect
- Reconnect
- Australia
- South Africa
- ACCU-CHEK\* TenderLink
- Anwendungsgebiete
- Deutschland
- Italia
- Chile
- Portugal
- Nederland
- België
- Danmark
- Koble fra
- Koble til igjen
- Norge
- Sverige
- Suomi
- Ελλάδα
- Polska
- Česká republika
- Opätovné pripojenie
- Slovensko
- תְרָה בְּרָה
- תַלְרָה
- תְבַרָה בְּשָׁא
- România
- Eesti
- Latvija
- Lietuva
Brand : Accu-Chek
Model : TenderLink
Category : Medical Equipment