
FlexLink - Medical Equipment Accu-Chek - Free user manual and instructions
Find the device manual for free FlexLink Accu-Chek in PDF.

| Product type | Subcutaneous infusion set for insulin pump |
| Brand | Accu-Chek |
| Model | FlexLink |
| Intended use | Subcutaneous insulin infusion |
| Sterilization | Sterilized with ethylene oxide |
| Maximum cannula wear time | 3 days |
| Maximum tubing wear time | 6 days |
| Main components | Infusion set, cannula, tubing, disconnection cap |
| Available tubing lengths | 30 cm, 60 cm, 80 cm, 110 cm |
| Tubing fill volume (30 cm) | Approximately 6 units (60 μL) for 100 U insulin |
| Tubing fill volume (60 cm) | Approximately 11 units (110 μL) for 100 U insulin |
| Tubing fill volume (80 cm) | Approximately 14 units (140 μL) for 100 U insulin |
| Tubing fill volume (110 cm) | Approximately 18 units (180 μL) for 100 U insulin |
| Storage conditions | Room temperature, protected from moisture, sunlight and heat |
| Important precautions | Avoid contact with disinfectants, perfumes, deodorants or insect repellents |
| Safety | Choking hazard from small parts; strangulation risk from tubing |
| Disposal | According to local regulations; do not clean or sterilize |
| After-sales service (France) | Roche Diabetes Care France SAS, 2 Avenue du Vercors, B.P. 59, 38240 Meylan Cedex |
Frequently Asked Questions - FlexLink Accu-Chek
User questions about FlexLink Accu-Chek
0 question about this device. Answer the ones you know or ask your own.
Ask a new question about this device
Download the instructions for your Medical Equipment in PDF format for free! Find your manual FlexLink - Accu-Chek and take your electronic device back in hand. On this page are published all the documents necessary for the use of your device. FlexLink by Accu-Chek.
USER MANUAL FlexLink Accu-Chek
ACCU-CHEK and ACCU-CHEK FLEXLINK are trademarks of Roche.
© 2021 Roche Diabetes Care
Made in Mexico

Roche Diabetes Care GmbH
Sandhofer Strasse 116
68305 Mannheim, Germany
www.accu-chek.com
Instructions for use
Infusion set

natural_image
Close-up of two metallic mechanical components with a textured base (no visible text or symbols)ACCU-CHEK*
| Instructions for use 4 | Brugsanvisning | 88 | |
| Gebrauchsanweisung | 16 | Bruksanvisning | 100 |
| Instructions d’utilisation 28 | Bruksanvisning | 112 | |
| Istruzioni per l’uso 40 | Käyttöohje | 124 | |
| Instrucciones de uso 52 | Instrukcja obsługi 136 | ||
| Instruções de utilização 64 | Návod k použití 148 | ||
| Gebruiksaanwijzing | 76 |
| Instructions for use |
| Gebrauchsanweisung |
| Instructions d’utilisation |
| Istruzioni per l’uso |
| Instrucciones de uso |
| Instruções de utilização |
| Gebruiksaanwijzing |
| Brugsanvisning |
| Bruksanvisning |
| Bruksanvisning |
| Käyttöohje |
| Instrukcja obsługi |
| Návod k použití |
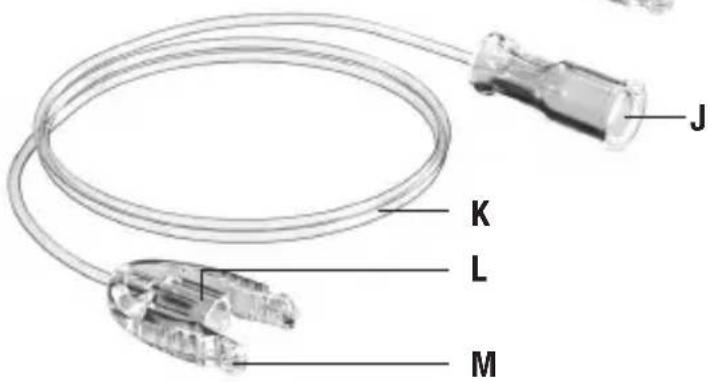
ACCU-CHEK\* FlexLink
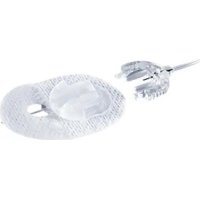
Infusion set
Disconnect cover
Head set Transfer set
A
B
C
D
E
F


Description
Head set
A Handling aid
B Side wings
C Adhesive pad
D Protective film
E Cannula
F Introducer needle
G Needle cover
H Cannula casing
Disconnect cover
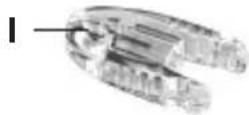
I Disconnect cover
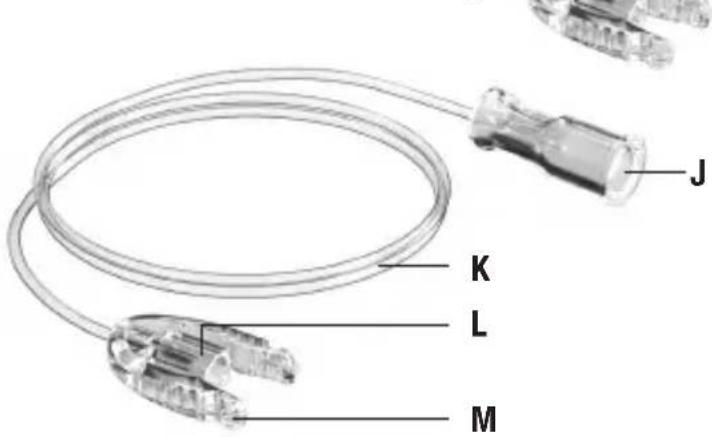
Transfer set
J Luer-lock connector
K Tubing
L Connector
M Side wings
Contents of the pack
There are two packages with different contents:
Infusion set Infusion set cannula
- Head set
- Head set
- Disconnect cover
- Disconnect cover
- Transfer set
The head set from the infusion set cannula package must be used with the transfer set from the infusion set package.
Intended use
The Accu-Chek FlexLink infusion set is intended for the subcutaneous infusion of insulin administered with an insulin pump.
These instructions for use feature the following symbol:

This symbol draws your attention to a warning. A warning must be heeded because it indicates a risk of injury or of damage to your health or the health of others. Not heeding the warnings can lead to life-threatening situations.
General warnings

- Read these instructions for use carefully before using the infusion set. Also read the information about insulin pump therapy contained in the User's Manual of the insulin pump.
- When you use the infusion set for the first time, your healthcare team must be present.
- Prepare the infusion site as instructed by your healthcare professional before you insert the cannula.
- This product is sterile packaged. Do not use the product if the package has already been opened or is damaged.
-
Protect the product from excessive humidity, sunlight and heat. Store the product at room temperature.
-
Do not allow the infusion set to come into contact with disinfectants, perfumes, deodorants or insect repellents.
- Dispose of the used product according to local regulations. Do not clean or sterilise the used product.
- Avoid mechanical stress on the infusion set and infusion site.
- The infusion set contains small parts. There is a risk of suffocation if small parts are swallowed. Keep all parts of the infusion set away from persons who may not be aware of the risks and may put small parts in their mouth, for example, small children.
- Pay attention to the tubing of the infusion set connected to your body. There is a risk of strangulation if the tubing becomes wrapped around your neck. In case of doubt,
use the shortest tubing length to minimise the risk of strangulation.
Product-specific warnings

- Change the cannula at least every 3 days and the transfer set at least every 6 days. Otherwise, there is a risk that the infusion site may become inflamed or the insulin may not be as effective.
- If the infusion site is inflamed, replace the infusion set immediately and choose another infusion site.
- Check your blood glucose level at least four times a day and at least once within 1 to 3 hours of replacing the transfer set or cannula.
-
Do not replace the cannula or transfer set immediately before going to bed.
-
If your blood glucose level should unexpectedly increase, or if an occlusion alarm occurs, check the infusion set for occlusions or leaks. If you are not sure whether the infusion set is working properly, replace it immediately.
- Never fill the tubing or attempt to remove an occlusion in the tubing while the infusion set is connected to your body as you may deliver an uncontrolled quantity of insulin.
- The soft cannula can kink while you are inserting it or when you are wearing it. Check regularly that the cannula is not kinked and that it is completely under the skin. If the cannula is kinked or has slipped out, replace it immediately.
- Check the connection between the luer-lock connector and the tubing every 3 hours
and before you go to bed. If the connection is damaged, replace the transfer set immediately.
- Do not insert the removed introducer needle back into the cannula as this may damage the cannula.
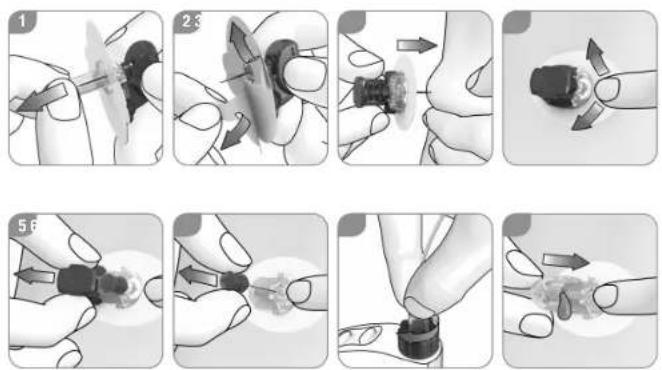
Attaching the infusion set
▶Choose an infusion site away from your waistline, any scar tissue, bones, navel and recent infusion sites.
▶Wash your hands.
▶Disinfect the chosen infusion site as instructed by your healthcare team.
▶Let your skin dry completely.
1
▶Hold the head set by the handling aid (A). Remove the needle cover (G).

To avoid contamination or injury, do not touch the introducer needle or cannula after removing the needle cover.
Keep the needle cover. You will need it later to safely dispose of the introducer needle.
2
Remove both parts of the protective film (D) from the adhesive pad (C).
3
Form a skin fold at the chosen infusion site.
Insert the introducer needle quickly and vertically (at a 90° angle) into the skin fold. Ensure that the cannula does not kink.

Make sure you insert the introducer needle into the skin quickly and in a single motion. Otherwise, the cannula may kink and you may receive a reduced amount of insulin or no insulin at all.
4
▶Press the adhesive pad (C) onto the skin.
5
▶Hold the adhesive pad (C) in place.
▶Press the side wings (B) of the handling aid (A) together.
Remove the handling aid (A) in the direction of the arrow.
6
▶Hold the cannula casing (H) in place.
Remove the introducer needle straight upwards.
▶Dispose of the introducer needle in such a way that it will not cause injury to anyone. Place the introducer needle back into the needle cover or into a cannula disposal container.
7
Screw the luer-lock connector (J) into the insulin pump adapter.

Do not use any tools to screw the luer-lock connector into the insulin pump adapter as this may damage the luer-lock connector.
8
Fill the transfer set as described in the User's Manual of the insulin pump until insulin drips from the needle inside the connector (L). There must not be any air bubbles in the cartridge or transfer set.
Fill volume of the transfer set (U100 insulin)
| Length Units Volume |
| 30 cm / 12” approx. 6 U approx. 60 μL |
| 60 cm / 24” approx. 11 U approx. 110 μL |
| 80 cm / 31” approx. 14 U approx. 140 μL |
| 110 cm / 43” approx. 18 U approx. 180 μL |

You must fill up the transfer set completely before you connect it to the cannula. The transfer set must not contain any air bubbles.
▶Hold the cannula casing (H) in place.
▶Push the connector (L) onto the cannula casing (H). You must hear and feel the connector click into place.

If you do not hear and feel the connector click into place, replace the head set and the transfer set.
Fill the cannula casing (H) with a U100 insulin bolus of 1.0 U (10 μL).

If you do not fill the cannula casing with an insulin bolus, you will receive too little insulin.
Connecting and disconnecting the insulin pump
This infusion set allows you to disconnect and remove the insulin pump for showering and swimming, for example. You can reconnect the insulin pump without having to replace the infusion set.

Consult your healthcare team on how to compensate for any missed insulin while you are disconnected from the insulin pump.
Disconnecting the insulin pump
▶Hold the adhesive pad (C) in place.
▶Press the side wings (M) of the connector (L) together.
Remove the connector (L) from the cannula casing (H).
▶Push the disconnect cover (I) onto the cannula casing (H).
Connecting the insulin pump
▶Hold the adhesive pad (C) in place.
Press the side wings of the disconnect cover (I) together.
Remove the disconnect cover (I) from the cannula casing (H).
Push the connector (L) onto the cannula casing (H). You must hear and feel the connector click into place.
After connecting the insulin pump, you do not need to fill the cannula casing with an insulin bolus.
Replacing the head set or transfer set
▶Disconnect the transfer set from the cannula casing (H); see section “Disconnecting the insulin pump”.
Replacing the head set
Insert a new cannula. Start with step 1 in the section "Attaching the infusion set".
Replacing the transfer set
Connect the new transfer set to the insulin pump. Start with step 7 in the section "Attaching the infusion set".

|
Customer support
Australia
Roche Diabetes Care Australia Pty. Limited
Insulin Pump Support: 1800 633 457
australia.insulinpumps@roche.com
www.accu-chek.com.au
Roche Diabetes Care South Africa (Pty) Ltd.
Hertford Office Park, 90 Bekker Road
Vorna Valley, 1686
South Africa
Tel: +27 (11) 504 4600
Email: info@accu-chek.co.za
www.accu-chek.co.za
Singapore
Accu-Chek ExtraCare line: 6272 9200
www.accu-chek.com.sg
Distributed in the United Kingdom by:
Roche Diabetes Care Limited
Charles Avenue, Burgess Hill
West Sussex, RH15 9RY, United Kingdom
Accu-Chek Pump Careline ^1) :
UK Freephone number: 0800 731 22 91
ROI Freephone number: 1 800 88 23 51
^1) calls may be recorded for training purposes Some mobile operators may charge for calls to these numbers.
burgesshill.insulinpumps@roche.com
www.accu-chek.co.uk
www.accu-chek.ie
ACCU-CHEK\* FlexLink Infusionsset
Verschluss-kappe
Kanüle Schlauch


Beschreibung
Kanüle
Accu-Chek Kundenservice:
Kostenfreie Telefonnummer 0800 4466800

Description
Dispositif cutané
Descrizione
Agocannula
30 cm / 12" circa 6 U circa 60 μL
60 cm / 24" circa 11 U circa 110 μL
80 cm / 31" circa 14 U circa 140 μL
110 cm / 43" circa 18 U circa 180 μL


Descripción
Cabezal
Descrição
Cânula de infusão

Beskrivelse
Hovedsæt
Skru luerlåsen (J) ind i insulinpumpens adapter.

natural_image
Two transparent cylindrical electronic components labeled I and J, shown from different angles (no text or symbols beyond labels)
Beskrivelse
Kanyle
Beskrivning
Kanyldel
Liitososan
suojus

natural_image
Two transparent mechanical components labeled I and J, shown from different angles (no text or symbols beyond labels)
Kuvaus
Kanyyliosa
Zatyczka

Opis
Zestaw główny
Caution, refer to safety-related notes in the instructions for use accompanying this product.
Do not use if package is damaged
Keep away from sunlight
Sterilized using ethylene oxide
This product fulfils the requirements of the European Directive 93/42/EEC on medical devices.

- ACCU-CHEK\* FlexLink
- Infusion set
- Description
- Head set
- Disconnect cover
- Transfer set
- Contents of the pack
- Infusion set Infusion set cannula
- Intended use
- General warnings
- Product-specific warnings
- Attaching the infusion set
- 1
- 2
- 3
- 4
- 5
- 6
- 7
- 8
- Connecting and disconnecting the insulin pump
- Disconnecting the insulin pump
- Connecting the insulin pump
- Replacing the head set or transfer set
- Replacing the head set
- Replacing the transfer set
- Customer support
- Australia
- South Africa
- Singapore
- Distributed in the United Kingdom by:
- ACCU-CHEK\* FlexLink Infusionsset
- Beschreibung
- Kanüle
- Dispositif cutané
- Descrizione
- Agocannula
- Descripción
- Cabezal
- Descrição
- Cânula de infusão
- Beskrivelse
- Hovedsæt
- Kanyle
- Beskrivning
- Kanyldel
- Kuvaus
- Kanyyliosa
- Opis
- Zestaw główny
Brand : Accu-Chek
Model : FlexLink
Category : Medical Equipment