
BGS700 - Grinder SCHEPPACH - Free user manual and instructions
Find the device manual for free BGS700 SCHEPPACH in PDF.
| Product Type | Combined bench grinder and belt sander |
| Brand | Scheppach |
| Model | BGS700 |
| Dimensions (L x W x H) | 400 x 305 x 355 mm |
| Weight | 10 kg |
| Rated voltage | 230-240 V ~ 50 Hz |
| Power consumption | 250 W (S1) / 370 W (S2 30min) |
| No-load speed | 2980 min⁻¹ |
| Grinding wheel diameter | 150 mm |
| Grinding wheel thickness | 20 mm |
| Grinding wheel bore | 12.7 mm |
| Max peripheral speed (wheel) | 23.4 m/s |
| Abrasive belt | 686 x 50 mm |
| Belt speed | 15.6 m/s |
| Sound pressure level LpA | 79 dB (K=3 dB) |
| Sound power level LWA | 92 dB (K=3 dB) |
| Main functions | Grinding, belt sanding, sharpening |
| Safety equipment | Adjustable spark deflector, protective guard, on/off switch, automatic overload shutdown |
| Supplied accessories | 1 grinding wheel, 1 sanding belt, 1 wheel dresser |
| Wear parts | Abrasives (wheel, belt) – not covered by warranty |
| Maintenance | Regular cleaning with damp cloth and mild soap; replacement of wheel and belt |
| Mounting | On workbench (4 mounting holes) |
| Warranty | Legal warranty against material or manufacturing defects |
Frequently Asked Questions - BGS700 SCHEPPACH
User questions about BGS700 SCHEPPACH
0 question about this device. Answer the ones you know or ask your own.
Ask a new question about this device
Download the instructions for your Grinder in PDF format for free! Find your manual BGS700 - SCHEPPACH and take your electronic device back in hand. On this page are published all the documents necessary for the use of your device. BGS700 by SCHEPPACH.
USER MANUAL BGS700 SCHEPPACH
natural_image
Industrial milling machine with a golden flathead and control panel, no visible text or symbols on the device itself.
Made in P.R.C.
BGS700
| DE | KombinationsschleifmaschineOriginalbedienungsanleitung | 5 |
| GB | Combination grinding machineTranslation of original instruction manual | 18 |
| FR | Ponceuse à bande combinéeTraduction des instructions d'origine | 28 |
| IT | Molatrice combinataLa traduzione dal manuale di istruzioni originale | 39 |
| NL | Combinatie schuurmachineVertaling van de originele gebruikshandleiding | 50 |
| ES | Rectificadora combinadaTraducción del manual de instrucciones original | 61 |
| PT | Máquina retificadora combinadaTradução do manual de operação original | 72 |
| CZ | Kombinovaná bruskaPřeklad originálního návodu k obsluze | 83 |
| SK | Kombinovaná brúskaPreklad originálneho návodu na obsluhu | 93 |
| HU | Kombinált köszörűgépEredeti használati utasítás fordítása | 104 |
| PL | Szlifierka kombinowanaTłumaczenie oryginalnej instrukcji obsługi | 115 |
| HR | Kombinirani stroj za brušenjePrijevod originalnog priručnika za uporabu | 127 |
| SI | Kombinirani brusilni strojPrevod originalnih navodil za uporabo | 137 |
| EE | KombinatsioonlihvmasinOriginaalkäitusjuhendi tõlge | 147 |
| LT | Kombinuotosios šlifavimo staklèsOriginalios naudojimo instrukcijos vertimas | 157 |
| LV | Kombinētā slīpmašīnaOriginālās lietošanas instrukcijas tulkojums | 168 |
| SE | KombinationsslipmaskinÖversättning av original-bruksanvisning | 178 |
| FI | YhdistelmähiomakoneKäännös alkuperäisestä käyttöohjeesta | 188 |
| DK | Kombi-slibemaskineOversættelse fra den oprindelige betjeningsvejledning | 198 |
| NO | KombinasjonsslipemaskinOversettelse av den originale brukerveiledningen | 208 |
| BG | Комбинирана шлифовъчна машинаПревод на оригиналното ръководство заексплоатация | 218 |
| GR | Συνδυασμένος λειαντήραςΜετάφραση του πρωτοτύπου των οδηγιών χρήσης | 230 |
| RO | Maşină de ślefuit combinatăTraducere din manualul de exploatare original | 242 |
| RS | Kombinovana brusilicaPrevod originalnog uputstva za upotrebu | 253 |
| TR | Kombine taşlama makinesiOrijinal kullanım talimatı çevirisi | 264 |
1


natural_image
Close-up of a mechanical device with a central component and labeled section A (no readable text or symbols beyond label)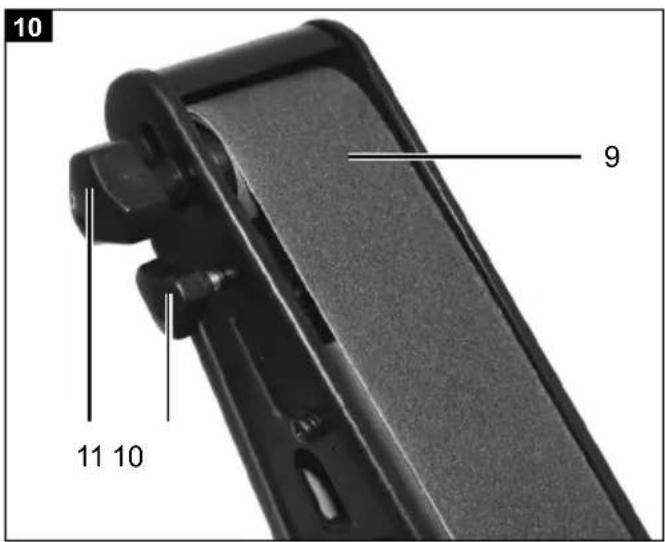
natural_image
Close-up of a mechanical component with labeled parts (12 and 17), no readable text or symbols beyond labelsGünzburger Straße 69
D-89335 Ichenhausen
Verehrter Kunde,
Explanation of the symbols on the equipment
 | Read the operating instructions to reduce the risk of injury |
 | Wear ear-muffs. The impact of noise can cause damage to hearing. |
 | Wear a breathing mask. Dust which is injurious to health can be generated when working on wood and other materials. Never use the device to work on any materials containing asbestos! |
 | Wear safety goggles. Sparks generated during working or splinters, chips and dust emitted by the device can cause loss of sight. |
| ⚠ Attention! | These operating instructions provide places concerning your safety which are marked with this indication. |
| ⚠ Caution! | Failure to follow these instruction may cause light to medium risk of injury. |
| ⚠ Warning! | Failure to follow these instructions may cause danger to life or danger of serious injuries. |
 | The product complies with the applicable European directives. |
 | The product complies with the applicable Serbian directives. |
Table of contents: Page:
- Introduction....20
- Device description (Fig. 1 - 3)....20
- Scope of delivery 20
- Intended use 21
- Safety information....21
- Technical data.... 24
- Before operation 24
- Operation 25
- Cleaning and maintenance....26
- Storage/Transport 26
- Electrical connection 26
- Disposal and recycling.... 27
- Troubleshooting 27
- Declaration of conformity 277
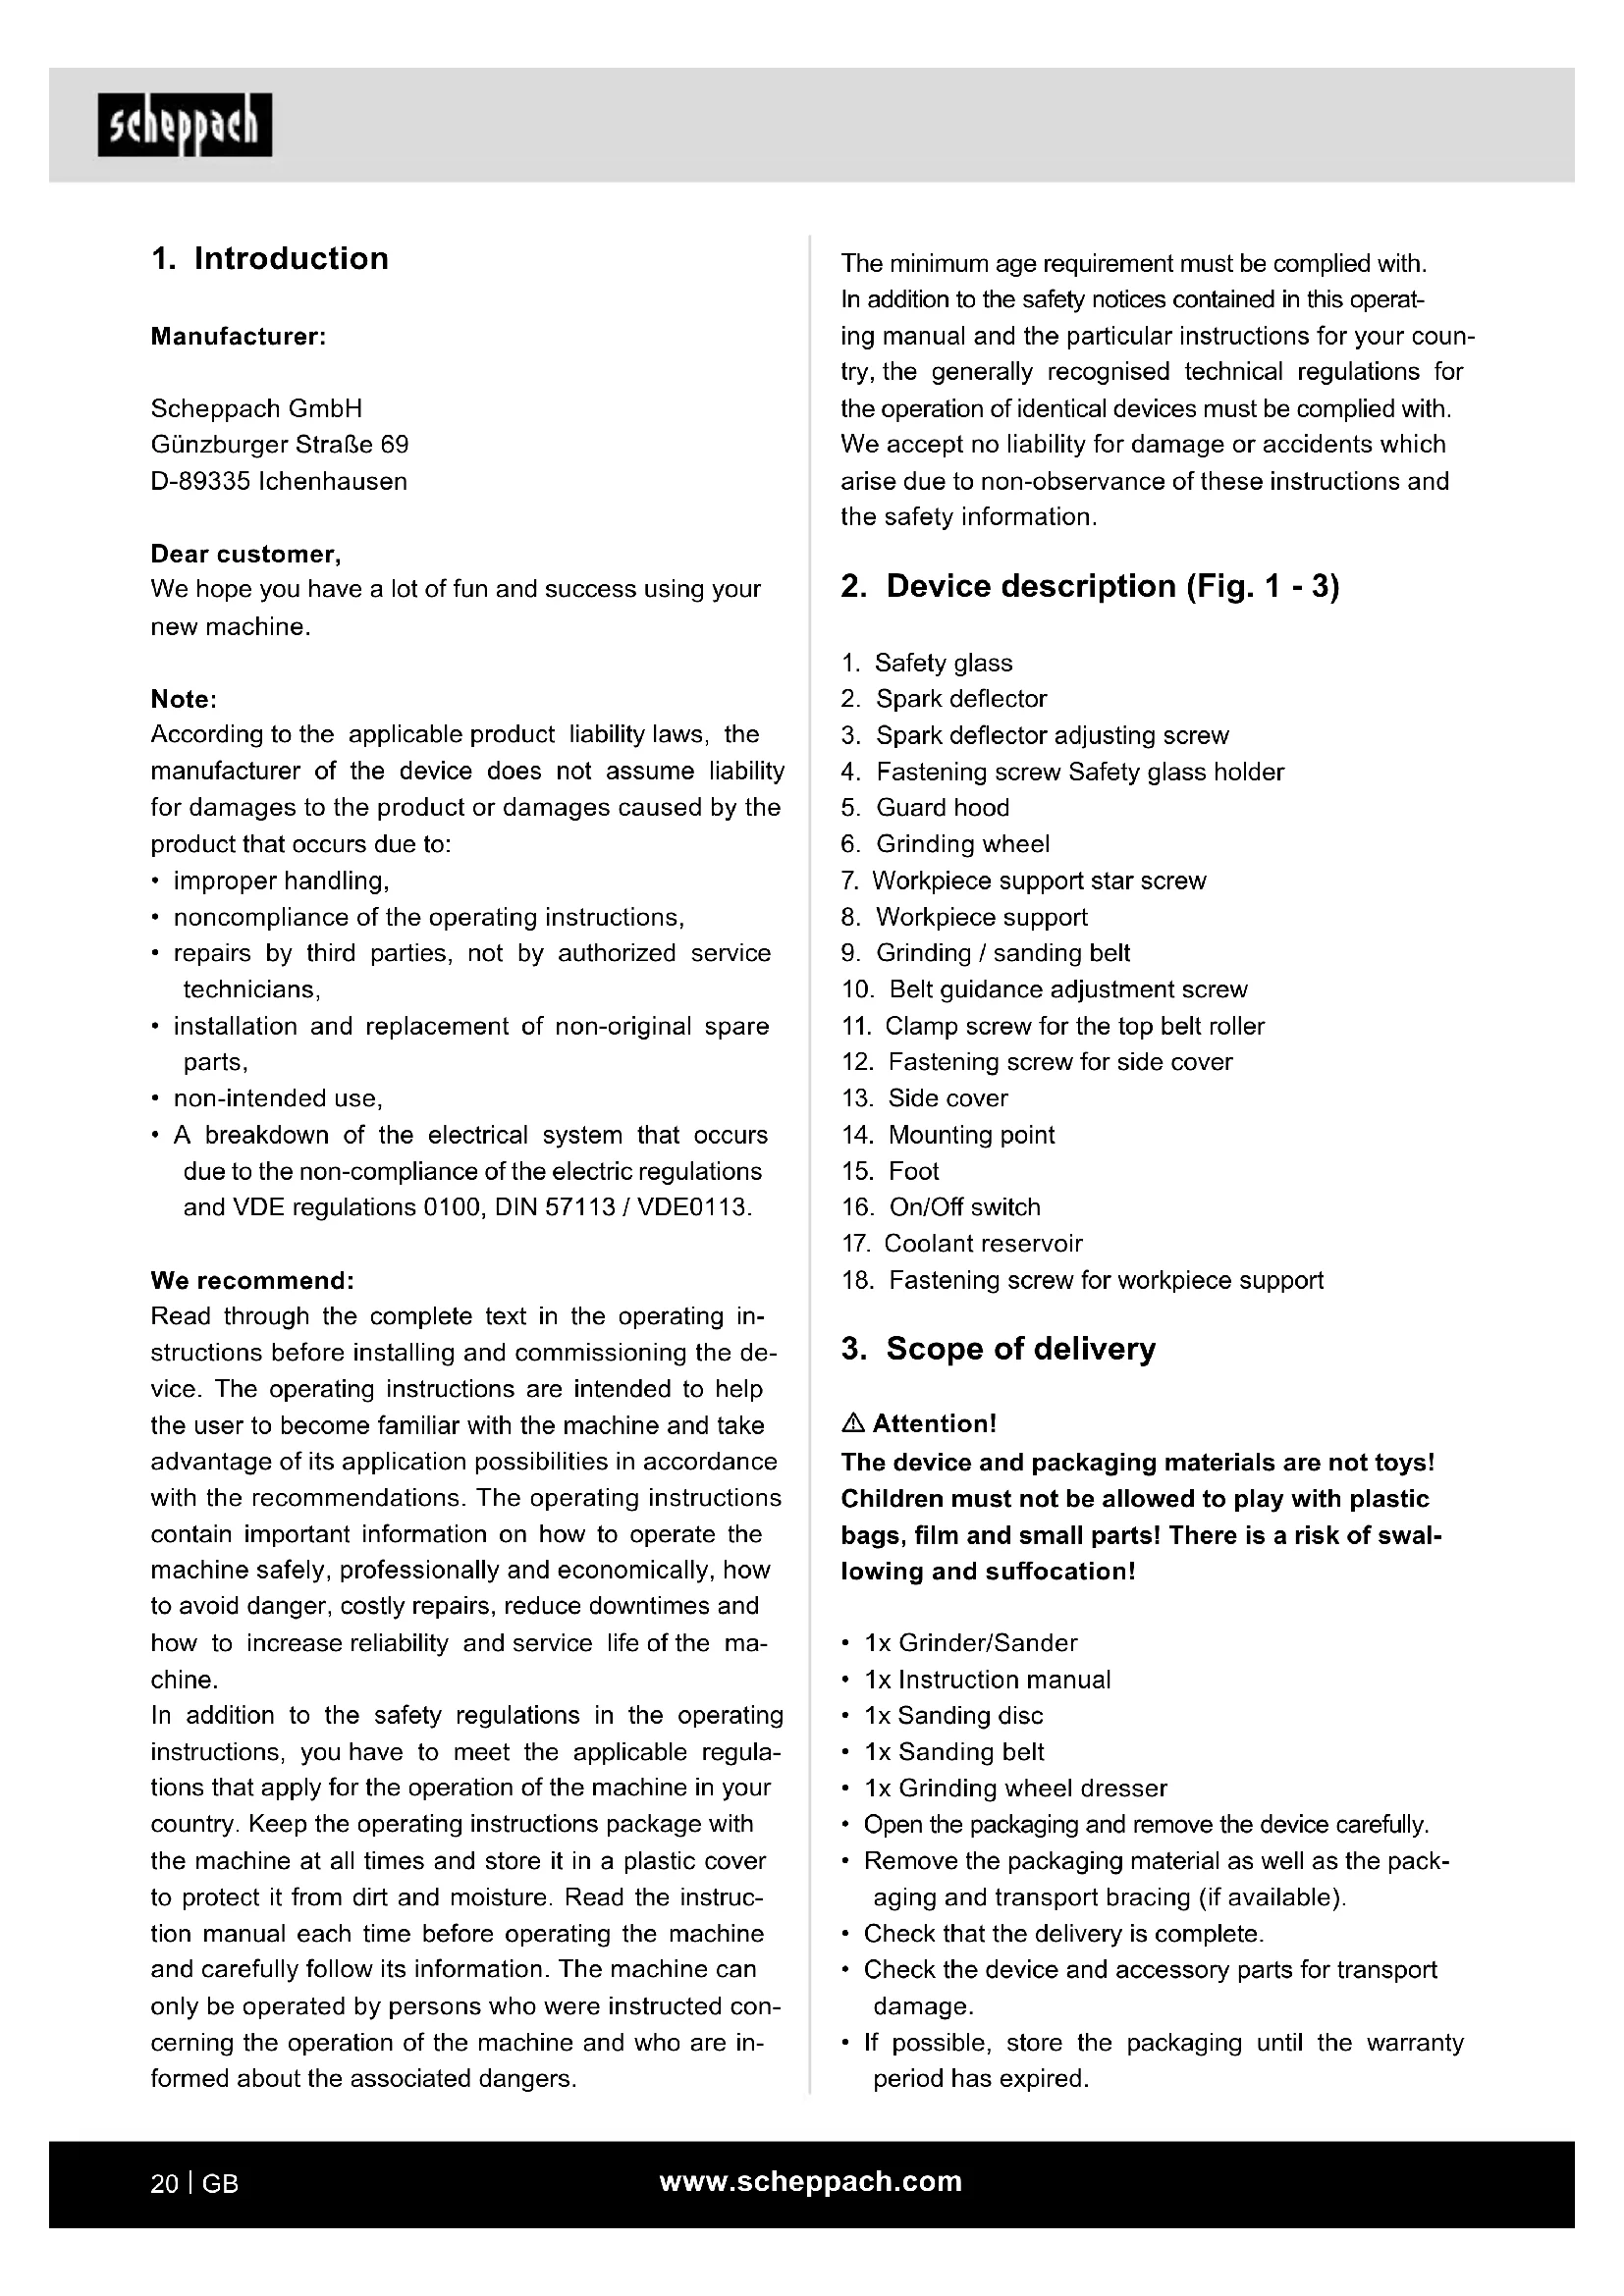
1. Introduction
Manufacturer:
Scheppach GmbH
Günzburger Straße 69
D-89335 Ichenhausen
Dear customer,
We hope you have a lot of fun and success using your new machine.
Note:
According to the applicable product liability laws, the manufacturer of the device does not assume liability for damages to the product or damages caused by the product that occurs due to:
- improper handling,
• noncompliance of the operating instructions, - repairs by third parties, not by authorized service technicians,
- installation and replacement of non-original spare parts,
• non-intended use, - A breakdown of the electrical system that occurs due to the non-compliance of the electric regulations and VDE regulations 0100, DIN 57113 / VDE0113.
We recommend:
Read through the complete text in the operating instructions before installing and commissioning the device. The operating instructions are intended to help the user to become familiar with the machine and take advantage of its application possibilities in accordance with the recommendations. The operating instructions contain important information on how to operate the machine safely, professionally and economically, how to avoid danger, costly repairs, reduce downtimes and how to increase reliability and service life of the machine.
In addition to the safety regulations in the operating instructions, you have to meet the applicable regulations that apply for the operation of the machine in your country. Keep the operating instructions package with the machine at all times and store it in a plastic cover to protect it from dirt and moisture. Read the instruction manual each time before operating the machine and carefully follow its information. The machine can only be operated by persons who were instructed concerning the operation of the machine and who are informed about the associated dangers.
The minimum age requirement must be complied with. In addition to the safety notices contained in this operating manual and the particular instructions for your country, the generally recognised technical regulations for the operation of identical devices must be complied with. We accept no liability for damage or accidents which arise due to non-observance of these instructions and the safety information.
2. Device description (Fig. 1 - 3)
- Safety glass
- Spark deflector
- Spark deflector adjusting screw
- Fastening screw Safety glass holder
- Guard hood
- Grinding wheel
- Workpiece support star screw
- Workpiece support
- Grinding / sanding belt
- Belt guidance adjustment screw
- Clamp screw for the top belt roller
- Fastening screw for side cover
- Side cover
- Mounting point
- Foot
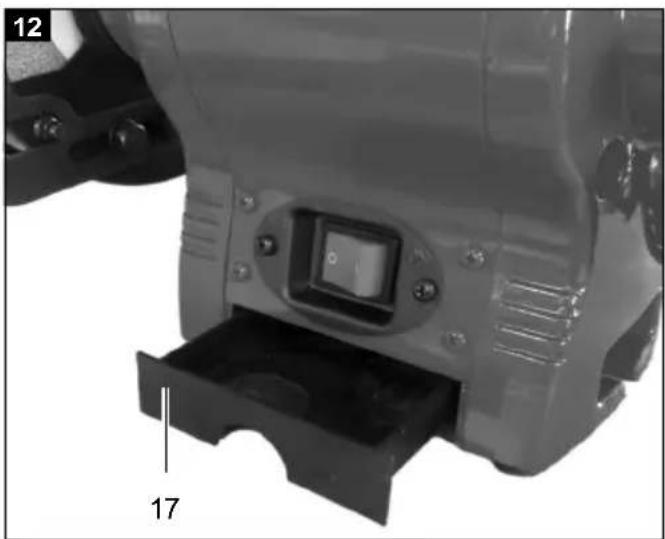
- On/Off switch
- Coolant reservoir
- Fastening screw for workpiece support
3. Scope of delivery
⚠ Attention!
The device and packaging materials are not toys! Children must not be allowed to play with plastic bags, film and small parts! There is a risk of swallowing and suffocation!
- 1x Grinder/Sander
• 1x Instruction manual - 1x Sanding disc
- 1x Sanding belt
• 1x Grinding wheel dresser - Open the packaging and remove the device carefully.
- Remove the packaging material as well as the packaging and transport bracing (if available).
- Check that the delivery is complete.
- Check the device and accessory parts for transport damage.
- If possible, store the packaging until the warranty period has expired.
4. Intended use
The grinder/sander is a combination device for the coarse and fine grinding/sanding of metals, woods of all kinds and other materials using the appropriate grinding/sanding wheel or belt.
The machine may only be used with grinding/sanding wheels or belts which are suitable for it and comply with the characteristic data in these instructions. The machine is allowed to be used only for it intended purpose! Even when the equipment is used as prescribed it is still impossible to eliminate certain residual risk factors. The following hazards may arise in connection with the machine's construction and layout:
- Contact with the grinding wheel where it is not covered.
- Catapulting parts out of damaged grinding wheels.
- Catapulting of workpieces and parts of workpieces.
- Damage to hearing if essential ear-muffs are not used.
- Harmful emissions of wood dust when used in closed rooms.
- The rotating parts of the device cannot be covered for functional reasons. Therefore you must exercise care and hold the workpiece firmly to prevent it slipping which could result in your hands coming into contact with the grinding/sanding belt.
The equipment is allowed to be used only for its prescribed purpose. Any other use is deemed to be a case of misuse. The user/operator and not the manufacturer will be liable for any damage or injuries of any kind resulting from such misuse.
Please note that our equipment has not been designed for use in commercial, trade or industrial applications. Our warranty will be voided if the equipment is used in commercial, trade or industrial businesses or for equivalent purposes.
5. Safety information
General power tool safety warnings
⚠ WARNING!
Read all safety warnings, instructions, illustrations and specifications provided with this power tool.
Failure to follow all instructions listed below may result in electric shock, fire and/or serious injury.
Save all warnings and instructions for future reference.
The term "power tool" in the warnings refers to your mains-operated (corded) power tool or battery-operated (cordless) power tool.
1. Work area safety
a) Keep work area clean and well lit. Cluttered or dark areas invite accidents.
b) Do not operate power tools in explosive atmospheres, such as in the presence of flammable liquids, gases or dust. Power tools create sparks which may ignite the dust or fumes.
c) Keep children and bystanders away while operating a power tool. Distractions can cause you to lose control.
2. Electrical safety
a) Power tool plugs must match the outlet. Never modify the plug in any way. Do not use any adapter plugs with earthed (grounded) power tools. Unmodified plugs and matching outlets will reduce risk of electric shock.
b) Avoid body contact with earthed or grounded surfaces, such as pipes, radiators, ranges and refrigerators. There is an increased risk of electric shock if your body is earthed or grounded.
c) Do not expose power tools to rain or wet conditions. Water entering a power tool will increase the risk of electric shock.
d) Do not abuse the cord. Never use the cord for carrying, pulling or unplugging the power tool. Keep cord away from heat, oil, sharp edges or moving parts. Damaged or entangled cords increase the risk of electric shock.
e) When operating a power tool outdoors, use an extension cord suitable for outdoor use. Use of a cord suitable for outdoor use reduces the risk of electric shock.
f) If operating a power tool in a damp location is unavoidable, use a residual current device (RCD) protected supply. Use of an RCD reduces the risk of electric shock.
3. Personal safety
a) Stay alert, watch what you are doing and use common sense when operating a power tool. Do not use a power tool while you are tired or under the influence of drugs, alcohol or medication. A moment of inattention while operating power tools may result in serious personal injury.
b) Use personal protective equipment. Always wear eye protection. Protective equipment such as a dust mask, non-skid safety shoes, hard hat or hearing protection used for appropriate conditions will reduce personal injuries.
c) Prevent unintentional starting. Ensure the switch is in the off-position before connecting to power source and/or battery pack, picking up or carrying the tool. Carrying power tools with your finger on the switch or energising power tools that have the switch on invites accidents.
d) Remove any adjusting key or wrench before turning the power tool on. A wrench or a key left attached to a rotating part of the power tool may result in personal injury.
e) Do not overreach. Keep proper footing and balance at all times. This enables better control of the power tool in unexpected situations.
f) Dress properly. Do not wear loose clothing or jewellery. Keep your hair and clothing away from moving parts. Loose clothes, jewellery or long hair can be caught in moving parts.
g) If devices are provided for the connection of dust extraction and collection facilities, ensure these are connected and properly used. Use of dust collection can reduce dust-related hazards.
h) Do not let familiarity gained from frequent use of tools allow you to become complacent and ignore tool safety principles. A careless action can cause severe injury within a fraction of a second.
- Power tool use and care
a) Do not force the power tool. Use the correct power tool for your application. The correct power tool will do the job better and safer at the rate for which it was designed.
b) Do not use the power tool if the switch does not turn it on and off. Any power tool that cannot be controlled with the switch is dangerous and must be repaired.
c) Disconnect the plug from the power source and/or remove the battery pack, if detachable, from the power tool before making any adjustments, changing accessories, or storing power tools. Such preventive safety measures reduce the risk of starting the power tool accidentally.
d) Store idle power tools out of the reach of children and do not allow persons unfamiliar with the power tool or these instructions to operate the power tool. Power tools are dangerous in the hands of untrained users.
e) Maintain power tools and accessories. Check for misalignment or binding of moving parts, breakage of parts and any other condition that may affect the power tool's operation. If damaged, have the power tool repaired before use. Many accidents are caused by poorly maintained power tools.
f) Keep cutting tools sharp and clean. Properly maintained cutting tools with sharp cutting edges are less likely to bind and are easier to control.
g) Use the power tool, accessories and tool bits etc. in accordance with these instructions, taking into account the working conditions and the work to be performed. Use of the power tool for operations different from those intended could result in a hazardous situation.
h) Keep handles and grasping surfaces dry, clean and free from oil and grease. Slippery handles and grasping surfaces do not allow for safe handling and control of the tool in unexpected situations.
- Service
a) Have your power tool serviced by a qualified repair person using only identical replacement parts. This will ensure that the safety of the power tool is maintained.
ATTENTION!
This power tool generates an electromagnetic field during operation. This field can impair active or passive medical implants under certain conditions. In order to prevent the risk of serious or deadly injuries, we recommend that persons with medical implants consult with their physician and the manufacturer of the medical implant prior to operating the machine.
Safety instructions for table-top grinding machines
a) Do not use damaged tool inserts. Check tool attachments such as grinding discs for chipping and cracks before each use. Once you have checked and used the tool attachment, ensure that you and all other persons in the vicinity remain outside the plane of the rotating tool attachment and allow the device to run for 1 min. at the maximum speed.
Damaged tool attachments usually break during this test period.
b) The permissible rotational speed for tool attachments must be at least as high as the maximum speed cited on the electric tool. Accessories that rotate faster than permitted can break and fly off at high speed.
c) Never grind on the side surfaces of the grinding disc. Grinding on the side surfaces can cause the grinding disc to break and fall apart.
Special safety information
- Always wear safety goggles, protective gloves and ear-muffs while carrying out grinding, brushing and cutting jobs.
- Check that the rotating speed shown on the wheel is equal to or higher than the rated speed of rotation for the tool.
- Make sure that the grinding wheel is of the correct size for the grinder.
- Grinding wheels must be handled and stored with care in accordance with the manufacturer's instructions. Examine the grinding wheel each time before using it. Never use grinding wheels which have parts broken off or are cracked or in any other way damaged.
- Be sure to use only grinding wheels and brushes which are marked with a speed at least as high as the speed indicated on the rating plate of the electric tool.
- Check that grinding wheels are fitted in accordance with the manufacturer's instructions.
- Make sure that intermediate layers are used if they are supplied with and required for the grinding wheel.
- Make sure that the grinding disk is correctly fitted and secured before you start to use the tool. Allow the machine to run without load and in a safe position for 5 minutes. Stop the machine immediately if severe vibrations arise or any other defects are noticed. If this should be the case, examine the machine to find the cause.
- The electric tool must never be used without the guard hood supplied with it.
- Never use separate reducer sleeves or adapters to make grinding wheels with larger holes fit on the machine.
- Take precautions to ensure that flying sparks do not cause any danger, e.g. that they do not hit anyone or cause inflammable substances to ignite.
- Always wear safety goggles and ear-muffs; use other personal safety equipment such as gloves, an apron and a helmet if necessary.
- The workpiece becomes hot during grinding.
Important! Risk of burns!
Let the workpiece cool down. The material may become glowing hot during the grinding. On longer jobs, allow the workpiece to cool down occasionally.
- Do not use coolant or the like.
- Before you use the grinder, carry out a ring test on the grinding wheels (perfect grinding wheels emit a clear tone when hit lightly with e.g. a plastic hammer). This also applies when you fit new grinding wheels (damage in transit). It is essential to subject the machine to an unloaded test run of at least 5 minutes. Leave the danger zone while the test is in progress.
- Use only grinding wheels which are marked with details of the manufacturer, the type of bonding agent used, dimensions and the permissible RPM.
- Grinding wheels must be stored in a dry place, ideally at a constant temperature.
- Use only the clamping flanges supplied with the equipment to mount the grinding wheels.
- Use only clamping flanges of identical size and identical shape to mount the grinding wheels. The intermediate layers between the clamping flange and the grinding wheel must be comprised of elastic materials, e.g. rubber, soft cardboard, etc.
- Never enlarge a grinding wheels' mounting hole by subsequent drilling.
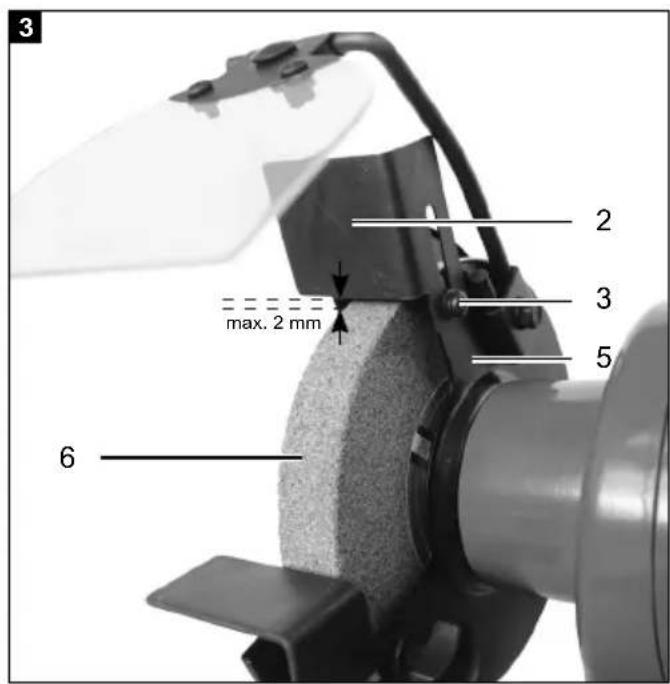
- The workpiece supports and the top adjustable safety guards must always be moved as close as possible to the grinding wheel (max. 2 mm clearance).
- Grinding wheels are not allowed to be used without the safety device. The following clearances must not be exceeded: Workpiece support/grinding wheel: max. 2 mm Safety guard/grinding wheel: max. 2 mm
- The guard holder, workpiece support and transparent guard must be fitted before the double grinder is used.
- The power plug must be pulled out before changing the grinding wheel.
- The max. circumferential speed of the dry grinding wheel is: 23 m/s m/s = (d x 3.14 x n) / (60 x 1000) d = diameter of the grinding wheel in mm n = motor revolutions per minute
- Max. permitted motor housing temperature: 80°C
- Before starting work, firmly screw the grinder to the workbench by using the 4 mounting points on the base plate.
-
Adjust the spark deflector periodically in order to compensate the wear of the wheel. Please note that the distance between the spark deflector and the wheel is to be kept as small as possible and should in no case exceed 2 mm.
-
The grinding wheel must be replaced at the latest when the spark deflector and the workpiece support can no longer be set a maximum distance of 2 mm from the grinding wheel.
Residual risks
Even if you use this electric power tool in accordance with instructions, certain residual risks cannot be ruled out. The following hazards may arise in connection with the equipment's construction and layout:
- Lung damage if no suitable protective dust mask is used.
- Damage to hearing if no suitable ear protection is used.
- Health damage caused by hand-arm vibrations if the equipment is used over a prolonged period or is not properly guided and maintained.
Keep this safety information in a safe place.
6. Technical data
| Dimensions L x W x H | 400 x 305 x 355 mm |
| ø Grinding wheel 150 mm | |
| Grinding wheel thickness | 20mm |
| ø Grinding wheel hole | 12.7 mm |
| Max. circumferential speed 23.4 m/s | |
| Belt speed 15.6 m/s | |
| Grinding /sanding belt L x W | 686 x 50 mm |
| Weight | 10 kg |
| Drive | |
| Rated voltage V/Hz | 230-240 V~ / 50 Hz |
| Power rating | S1 250 WS2 30rpm 370 W |
| Idle speed n _o | 2980 rpm |
Load factor:
A load factor of S2 30 min (intermittent periodic duty) means that you may operate the motor continuously at its nominal power level (370 W) for no longer than 30 minutes ON period. If you fail to observe this time limit the motor will overheat. During the OFF period the motor will cool again to its starting temperature.
Noise:
Sound values were measured in accordance with EN 62841.
| Sound pressure level L_pA | 79 dB |
| Uncertainty K_pA | 3 dB |
| Sound power level L_WA | 92 dB |
| Uncertainty K_WA | 3 dB |
Wear ear-muffs.
The impact of noise can cause damage to hearing.
Limit the noise to a minimum!
- Only use appliances which are in perfect working order.
• Service and clean the appliance regularly. - Adapt your working style to suit the appliance.
- Do not overload the appliance.
- Have the appliance serviced whenever necessary.
- Switch the appliance off when it is not in use.
- Wear protective gloves.
7. Before operation
Before you connect the equipment to the mains supply make sure that the data on the rating plate are identical to the mains data.
Always pull the power plug before making adjustments to the equipment.
- The machine must be set up so that it stands firmly, i.e. it must be securely screwed to a work bench or similar.
- The grinder should be fixed permanently at a suitable place. To attach the grinder to a hard and flat surface, there are two mounting points on the grinder. The tool support should be approximately at the height of your elbow. The working area is in front of the machine - keep it free of obstacles.
- All covers and safety devices have to be properly fitted before the equipment is switched on.
- It must be possible for the grinding wheel to run freely.
Assembling the spark deflector (Fig. 1-3)
- Slide the spark deflector (2) under the guard hood (5). Screw the spark deflector (2) to the guard hood (5) by using the spark deflector adjustment screw (3).
-
Use the spark deflector adjustment screw (3) with the spring washer and the washer to fix the spark deflector (2). To secure you will need a screwdriver (Fig. 2).
-
Adjust the spark deflector (2) using the spark deflector adjusting screw (3) so that the distance between the dry grinding wheel (6) and the spark deflector (2) is as small as possible and certainly does not exceed 2 mm. (Fig.3)
- Adjust the spark deflector (2) periodically to compensate for wear on the wheel.
Fitting the workpiece supports (Fig. 1/4/5/6)
- Secure the workpiece supports (8) to the grinder/sander using the workpiece support star screw (7) on belt side and the 2 fastening screws for workpiece support (18) on grinding wheel (5) side.
Adjusting the workpiece supports (Fig. 5+6)
- Adjust the workpiece supports (8) using the fastening screws for workpiece support (18) and the workpiece support star screw (7) so that the distance between the dry grinding wheel (6) or the grinding/sanding belt (9) and the workpiece supports (8) is as small as possible and certainly does not exceed 2 mm.
- Adjust the workpiece supports (8) periodically to compensate for wear on the dry grinding wheel.
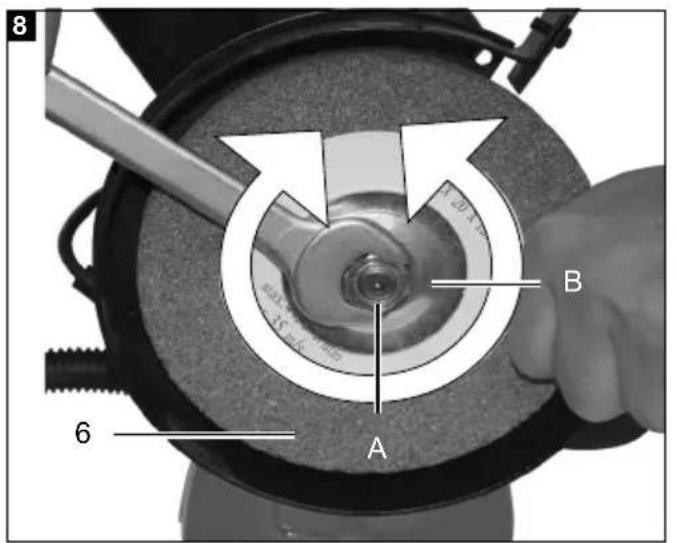
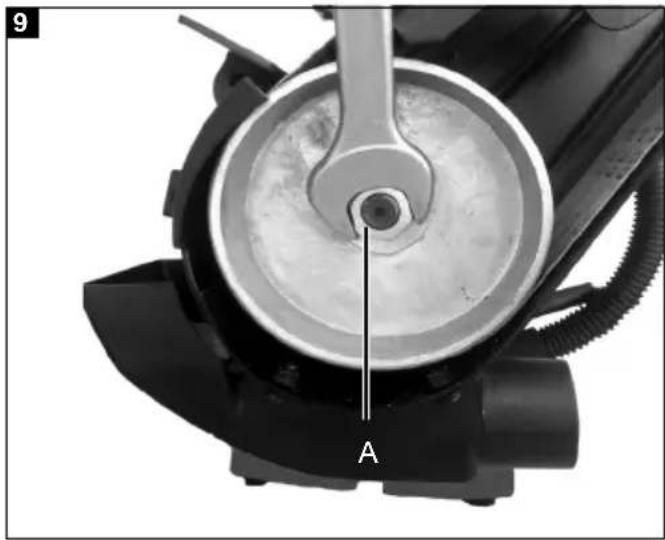
Changing the grinding wheel (Figs. 1/7-9)
Loosen the 3 fastening screws (12) for side cover (12) holding the grinding wheel side cover (13), turn anti-clockwise and take it off (Fig. 7). Slacken the nut (Fig. 8/A) (important: the grinding/ sanding wheel is fastened with a lefthanded thread) by holding the nut (Fig. 9/A) of the grinding/sanding belt roller on the opposite side. Then remove the flange (B) and replace the grinding wheel (6). The grinding wheel is mounted with the help of a rag. Mount the flange (B) on the shaft and screw on the nut (A) hand-tight (Fig. 8).
To tighten the nut (A), hold the grinding wheel (6) with a rag and tighten the nut (A) (Fig. 8).
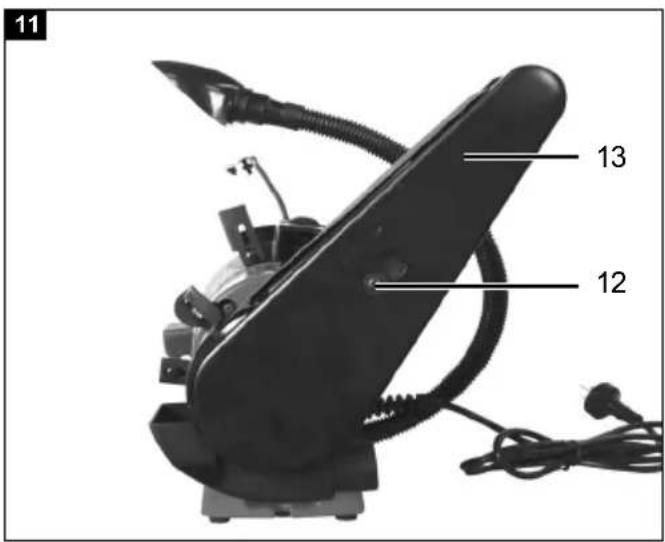
Changing the grinding/sanding belt (Fig. 1/10-12)
- Loosen the fastening screw for side cover (12) and remove the side cover (13).
- Slacken the clamp screw for the top belt roller (11) by a few turns.
- Push the top belt roller downwards and pull the grinding/sanding belt out off the rollers.
- Place the new grinding/sanding belt (9) in the center of the top and bottom rollers and release the clamping top belt roller.
- Now tighten the clamp screw for the top belt roller (11) and fit the side safety guard.
- With the belt guidance adjustment screw (10) on the side you can adjust the belt run by turning. Precise adjustment of the belt run is best done by turning the grinding/sanding belt by hand.
⚠ Attention!
After replacing the grinding wheel or sanding belt, all guards must be reassembled.
8. Operation
⚠ Attention!
Always make sure the product is fully assembled before commissioning!
On/Off switch (16)
- To switch on the equipment set the On/Off switch (16) to position 1.
- Move the On/Off switch (16) to position 0 to switch off the equipment. After switching on, wait for the equipment to reach its maximum speed of rotation. Only then should you begin with the grinding.
Grinding
- Place the workpiece onto the workpiece support (8) and slowly guide the workpiece towards the grinding wheel (6) at the desired angle to the point where workpiece and grinding wheel make contact.
- Move the workpiece slightly back and forth to produce an optimal grinding result. This way the grinding wheel (6) will be evenly worn. Allow the workpiece to cool down occasionally.
Grinding/sanding with the belt
• Always hold the workpiece firmly during grinding/sanding.
- Do not exert excessive pressure.
- The workpiece should be moved on the belt to prevent the paper wearing on one side.
- Important! Pieces of wood should always be sanded with the grain to prevent them splitting.
Using the grinding wheel dresser
The grinding wheel dresser is a tool for straightening of grinding wheels.
- Press lightly against grinding wheel – without creating sparks. Move the dresser sideways over the entire width of wheel.
⚠ Attention! Always wear safety goggles.
⚠ Attention!
If the grinding wheel or the grinding/sanding belt becomes jammed during operation, please remove the workpiece until the tool reaches its top speed again.
9. Cleaning and maintenance
Always pull out the mains power plug before starting any cleaning work.
Cleaning
- Keep all safety devices, air vents and the motor housing free of dirt and dust as far as possible. Wipe the equipment with a clean cloth or blow it with compressed air at low pressure.
• We recommend that you clean the device immediately each time you have finished using it. - Clean the equipment regularly with a moist cloth and some soft soap. Do not use cleaning agents or solvents; these could attack the plastic parts of the equipment. Ensure that no water can seep into the device.
Maintenance
There are no parts inside the equipment which require additional maintenance.
Service information
Please note that the following parts of this product are subject to normal or natural wear and that the following parts are therefore also required for use as consumables.
Wear parts*: grinding medium
* Not necessarily included in the scope of delivery!
Spare parts and accessories can be obtained from our Service Centre. Spare parts and accessories can be obtained from our Service Centre.
10. Storage/Transport
Store the equipment and accessories out of children's reach in a dark and dry place at above freezing temperature. The ideal storage temperature is between 5 and 30 °C. Store the electric tool in its original packaging.
⚠ Attention! Unplug the machine!
The appliance must unconditionally be secured against falling or turning down during transport.
The appliance can be lifted on the left and right grinding wheel / belt sander cover.
Power cable, flexible lamp shaft etc. should not be used for transport purpose.
11. Electrical connection
The installed electric motor is factory connected ready for operation. The connection meets the applicable VDE and DIN regulations. The connection made by the customer as well as any extension cables used must comply with all relevant regulations.
Damaged electrical connection cable
The insulation on electrical connection cables is often damaged.
This may have the following causes:
• Passage points, where connection cables are passed through windows or doors.
- Kinks where the connection cable has been improperly fastened or routed.
- Places where the connection cables have been cut due to being driven over.
- Insulation damage due to being ripped out of the wall outlet.
- Cracks due to the insulation ageing.
Such damaged electrical connection cables must not be used and are life-threatening due to the insulation damage.
Check the electrical connection cables for damage regularly. Make sure that the connection cable does not hang on the power network during the inspection.
Electrical connection cables must comply with the applicable VDE and DIN provisions. Only use connection cables with the marking „H05VV-F“.
The printing of the type designation on the connection cable is mandatory.
AC motor
• The mains voltage must be 230-240 V\~
- Extension cables up to 25 m long must have a cross-section of 1.5 mm ^2 .
Connections and repairs of electrical equipment may only be carried out by an electrician.
Please provide the following information in the event of any enquiries:
- Type of current for the motor
• Machine data - type plate - Motor data - type plate
Important note
The motor rating is S 1. This means that when overloaded it switches off automatically. After a cooling period (can vary) you may switch it on again.
Connection type Y
If the mains connection cable of this device is damaged, it must be replaced by the manufacturer, their service department or a similarly qualified person to avoid dangers.
12. Disposal and recycling
Notes for packaging


The packaging materials are recyclable. Please dispose of packaging in an environmentally friendly manner.
Notes on the electrical and electronic equipment act [ElektroG]
![SCHEPPACH BGS700 - Notes on the electrical and electronic equipment act [ElektroG] - 1](/content/2026/03/573077/images/9762bde43fd30b3f8393eef43d85ab23746a5245fa8abaa5eb164f80e4ad065e.jpg)
Waste electrical and electronic equipment does not belong in household waste, but must be collected and disposed of separately!
- Used batteries or rechargeable batteries that are not installed permanently in the old appliance must be removed non-destructively before disposal. Their disposal is regulated by the battery law.
-
Owners or users of electrical and electronic devices are legally obliged to return them after use.
-
The end user is responsible for deleting their personal data from the old device being disposed of!
- The symbol of the crossed-out dustbin means that waste electrical and electronic equipment must not be disposed of with household waste.
- Waste electrical and electronic equipment can be handed in free of charge at the following places:
- Public disposal or collection points (e.g. municipal works yards)
- Points of sale of electrical appliances (stationary and online), provided that dealers are obliged to take them back or offer to do so voluntarily.
- Up to three waste electrical devices per type of device, with an edge length of no more than 25 centimetres, can be returned free of charge to the manufacturer without prior purchase of a new device from the manufacturer or taken to another authorised collection point in your vicinity.
- Further supplementary take-back conditions of the manufacturers and distributors can be obtained from the respective customer service.
- If the manufacturer delivers a new electrical appliance to a private household, the manufacturer can arrange for the free collection of the old electrical appliance upon request from the end user. Please contact the manufacturer's customer service for this.
- These statements only apply to devices installed and sold in the countries of the European Union and which are subject to the European Directive 2012/19/EU. In countries outside the European Union, different regulations may apply to the disposal of waste electrical and electronic equipment.
13. Troubleshooting
| Problem Possible Cause Action | ||
| Motor doesn’t start a) ON/OFF switch damaged.b) ON/OFF cable damaged.c) ON/OFF relay damaged.d) Fuse blown.e) Motor burnt. | a-d) Replace all damaged parts before you use your machine again.e) Contact your local service centre. Every attempt to carry out a repair, can be dangerous if it is not done by skilled personnel. | |
| Machine gets slower during work. | Too much pressure put on the workpiece. | Reduce the pressure on the work-piece. |
| Sanding belt comes off the drive pulleys. | Belt does not run straight. | Reset the track. |
| The wood gets burnt during sanding. | a) Sanding disc or belt covered with grease.b) Excessive pressure on workpiece. | a)Replace disc or belt.b) Reduce pressure on workpiece. |
Günzburger Straße 69
D-89335 Ichenhausen
Cher Client,
Günzburger Straße 69,
D-89335 Ichenhausen
Egregio cliente,
Günzburger Straße 69
D-89335 Ichenhausen
Beste klant,
Günzburger Straße 69
D-89335 Ichenhausen
Estimado cliente,
Interruptor ON/OFF (16)
Günzburger Straße 69
D-89335 Ichenhausen
Caro Cliente,
Günzburger Straße 69
D-89335 Ichenhausen
Vážený zákazníku,
Günzburger Straße 69
D-89335 Ichenhausen
Vážený zákazník,
Günzburger Straße 69
D-89335 Ichenhausen
Tisztelt vásárló!
Günzburger Straße 69
D-89335 Ichenhausen
Szanowny kliencie,
Günzburger Straße 69
D-89335 Ichenhausen
Poštovani kupci,
Günzburger Straße 69
D-89335 Ichenhausen
Spoštovana stranka,
Želimo Vam veliko veselja in uspeha pri delu z Vašo novo napravo scheppach.
Nasvet:
Negotovost K_pA 3 dB
Nivo zvočne moči L _WA 92 dB
Negotovost K_WA 3 dB
Omejite hrupnost in vibracije na minimum!
Günzburger Straße 69
D-89335 Ichenhausen
Hea klient,
Günzburger Straße 69
D-89335 Ichenhausen
Gerbiamas Kliente,
Günzburger Straße 69
D-89335 Ichenhausen
Cienijamais klient,
Günzburger Straße 69
D-89335 Ichenhausen
Ärade Kund,
Günzburger Straße 69
D-89335 Ichenhausen
Arvoisa asiakas,
Günzburger Straße 69
D-89335 Ichenhausen
Kære kunde,
Günzburger Straße 69
D-89335 Ichenhausen
Kjære kunde,
Günzburger Straße 69
D-89335 Ichenhausen, Германия
Уважаеми клиенти,
Günzburger Straße 69
D-89335 Ichenhausen
Αξιότιμε πελάτη,
Günzburger Straße 69
D-89335 Ichenhausen
Stimate client,
Günzburger Straße 69
D-89335 Ichenhausen
Poštovani kupče,
Günzburger Straße 69
D-89335 Ichenhausen
İthalatçı:

EU Declaration of Conformity
| 2000/14/EG_2005/88/EG | |
| Noise: measured LWA= xx dB; guaranteed LWA= xx dB | |
| Annex V | |
| Annex VI | |
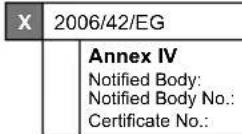
| X 2006/42/EG | |
| Annex IV Notified Body: Notified Body No.: Certificate No.: | |
| 2016/1628/EU | |
| Emission. No: |
Standard references:
EN 62841-1:2015+A1:2022; EN 62841-3-4:2016+A11:2017+A12:2020+A1:2020; EN IEC 55014-1:2021;
EN IEC 55014-2:2021; EN IEC 61000-3-2:2019+A1:2021; EN 61000-3-3:2013+A1:2019+A2:2021
This declaration of conformity is issued under the sole responsibility of the manufacturer.
The object of the declaration described above fulfils the regulations of the directive 2011/65/EU of the European Parliament and Council from 8th June 2011, on the restriction of the use of certain hazardous substances in electrical and electronic equipment.
Subject to change without notice
Documents registrar: Dawid Hudzik
Günzburger Str. 69, D-89335 Ichenhausen
EU Declaration of Conformity
| 2000/14/EG_2005/88/EG | |
| Noise: measured LWA= xx dB; guaranteed LWA= xx dB | |
| Annex V | |
| Annex VI | |
| 2016/1628/EU | |
| Emission. No: |
Standard references:
EN 62841-1:2015+A1:2022; EN 62841-3-4:2016+A11:2017+A12:2020+A1:2020; EN IEC 55014-1:2021;
EN IEC 55014-2:2021; EN IEC 61000-3-2:2019+A1:2021; EN 61000-3-3:2013+A1:2019+A2:2021
This declaration of conformity is issued under the sole responsibility of the manufacturer.
The object of the declaration described above fulfils the regulations of the directive 2011/65/EU of the European Parliament and Council from 8th June 2011, on the restriction of the use of certain hazardous substances in electrical and electronic equipment.
Subject to change without notice
Documents registrar: Dawid Hudzik
Günzburger Str. 69, D-89335 Ichenhausen
EU Declaration of Conformity
AB uygunluk beyanı
CE
Scheppach GmbH, Günzburger Str. 69, D-89335 Ichenhausen
| DE | erklärt folgende Konformität gemäß EU-Richtlinien und Normen für den Artikel |
| GB | hereby declares the following conformity under the EU Directive and standards for the following article |
| BG | декларира съответното съответствие съгласно Дирек-тива на ЕС и норми за артикул |
| RS | potvrđuje sledeću usklađenost prema smernicama EZ i normama za artikal |
Article name: COMBINATION GRINDING MACHINE - BGS700
Ürün Tanım:


Standard references:
EN 62841-1:2015+A1:2022; EN 62841-3-4:2016+A11:2017+A12:2020+A1:2020; EN IEC 55014-1:2021;
EN IEC 55014-2:2021; EN IEC 61000-3-2:2019+A1:2021; EN 61000-3-3:2013+A1:2019+A2:2021
This declaration of conformity is issued under the sole responsibility of the manufacturer.
The object of the declaration described above fulfils the regulations of the directive 2011/65/EU of the European Parliament and Council from 8th June 2011, on the restriction of the use of certain hazardous substances in electrical and electronic equipment.
First CE: 2022
Subject to change without notice
Documents registrar: Dawid Hudzik Günzburger Str. 69, D-89335 Ichenhausen
Garantie DE
Apparent defects must be notified within 8 days from the receipt of the goods. Otherwise, the buyer loses its rights of claim due to such defects are invalidated. We guarantee for our machines in case of proper treatment for the time of the statutory warranty period from delivery in such a way that we replace any machine part free of charge which provably becomes unusable due to faulty material or defects of fabrication within such period of time. With respect to parts not manufactured by us we only warrant insofar as we are entitled to warranty claims against the upstream suppliers. The costs for the installation of the new parts shall be borne by the buyer. The cancellation of sale or the reduction of purchase price as well as any other claims for damages shall be excluded.
Garantie FR
Apparent defects must be notified within 8 days from the receipt of the goods. Otherwise, the buyer's rights of claim due to such defects are invalidated. We guarantee for our machines in case of proper treatment for the time of the statutory warranty period from delivery in such a way that we replace any machine part free of charge which provably becomes unusable due to faulty material or defects of fabrication within such period of time. With respect to parts not manufactured by us we only warrant insofar as we are entitled to warranty claims against the upstream suppliers. The costs for the installation of the new parts shall be borne by the buyer. The cancellation of sale or the reduction of purchase price as well as any other claims for damages shall be excluded.
Záruka CZ
Apparent defects must be notified within 8 days from the receipt of the goods. Otherwise, the buyer is rights of claim due to such defects are invalidated. We guarantee for our machines in case of proper treatment for the time of the statutory warranty period from delivery in such a way that we replace any machine part free of charge which provably becomes unusable due to faulty material or defects of fabrication within such period of time. With respect to parts not manufactured by us we only warrant insofar as we are entitled to warranty claims against the upstream suppliers. The costs for the installation of the new parts shall be borne by the buyer. The cancellation of sale or the reduction of purchase price as well as any other claims for damages shall be excluded.
Garantii EE
Apparent defects must be notified within 8 days from the receipt of the goods. Otherwise, the buyer's rights of claim due to such defects are invalidated. We guarantee for our machines in case of proper treatment for the time of the statutory warranty period from delivery in such a way that we replace any machine part free of charge which provably becomes unusable due to faulty material or defects of fabrication within such period of time. With respect to parts not manufactured by us we only warrant insofar as we are entitled to warranty claims against the upstream suppliers. The costs for the installation of the new parts shall be borne by the buyer. The cancellation of sale or the reduction of purchase price as well as any other claims for damages shall be excluded.
гаранция BG


- BGS700
- Verehrter Kunde,
- Explanation of the symbols on the equipment
- Table of contents: Page:
- Introduction
- Manufacturer:
- Dear customer,
- Note:
- We recommend:
- Device description (Fig. 1 - 3)
- Scope of delivery
- ⚠ Attention!
- Intended use
- Safety information
- ⚠ WARNING!
- Work area safety
- Electrical safety
- Personal safety
- Special safety information
- Important! Risk of burns!
- Residual risks
- Technical data
- Load factor:
- Noise:
- Wear ear-muffs.
- Limit the noise to a minimum!
- Before operation
- Always pull the power plug before making adjustments to the equipment.
- Assembling the spark deflector (Fig. 1-3)
- Fitting the workpiece supports (Fig. 1/4/5/6)
- Adjusting the workpiece supports (Fig. 5+6)
- Changing the grinding wheel (Figs. 1/7-9)
- Changing the grinding/sanding belt (Fig. 1/10-12)
- Operation
- On/Off switch (16)
- Grinding
- Grinding/sanding with the belt
- Using the grinding wheel dresser
- Cleaning and maintenance
- Cleaning
- Maintenance
- Service information
- Storage/Transport
- ⚠ Attention! Unplug the machine!
- Electrical connection
- Damaged electrical connection cable
- AC motor
- Important note
- Connection type Y
- Disposal and recycling
- Notes for packaging
- Notes on the electrical and electronic equipment act [ElektroG]
- Waste electrical and electronic equipment does not belong in household waste, but must be collected and disposed of separately!
- Troubleshooting
- Cher Client,
- Egregio cliente,
- Beste klant,
- Estimado cliente,
- Interruptor ON/OFF (16)
- Caro Cliente,
- Vážený zákazníku,
- Vážený zákazník,
- Tisztelt vásárló!
- Szanowny kliencie,
- Poštovani kupci,
- Spoštovana stranka,
- Nasvet:
- Hea klient,
- Gerbiamas Kliente,
- Cienijamais klient,
- Ärade Kund,
- Arvoisa asiakas,
- Kære kunde,
- Kjære kunde,
- Уважаеми клиенти,
- Αξιότιμε πελάτη,
- Stimate client,
- Poštovani kupče,
- İthalatçı:
- EU Declaration of Conformity
- Standard references:
- AB uygunluk beyanı
- Garantie DE
- Garantie FR
- Záruka CZ
- Garantii EE
- гаранция BG
Brand : SCHEPPACH
Model : BGS700
Category : Grinder