SC 4 Deluxe EasyFix Premium - Steam cleaner Kärcher - Free user manual and instructions
Find the device manual for free SC 4 Deluxe EasyFix Premium Kärcher in PDF.
| Product type | Steam cleaner with removable water tank |
| Brand | Kärcher |
| Model | SC 4 Deluxe EasyFix Premium |
| Dimensions (L × W × H) | 400 × 270 × 300 mm |
| Weight (without accessories) | 6.8 kg |
| Power supply | 220-240 V ~ 50 Hz |
| Heating power | 2200 W |
| Maximum working pressure | 0.4 MPa |
| Heating time | Approximately 3 minutes |
| Continuous steam output | 60 g/min |
| Maximum steam burst | 150 g/min |
| Water tank capacity | 1.3 L |
| Steam boiler capacity | 0.5 L |
| Protection rating | IPX4 |
| Protection class | I |
| Floor nozzle type | EasyFix |
| Included accessories | Pencil jet nozzle, small and large round brushes, Power nozzle, crevice brush, hand suction nozzle, microfiber cover, extension tubes, microfiber mop, carpet glide |
| Safety | Safety thermostat, boiler thermostat, maintenance closure with safety valve, child safety lock on steam trigger |
| Special functions | Steam flow adjustment (3 levels), boiler drainage in CLE mode, descaling recommended every 50 to 100 refills depending on water hardness |
| Maintenance | Boiler rinse every 10 refills, descaling with KÄRCHER agent, wash mops at max 60°C without fabric softener |
| Spare parts and repairability | Original accessories and spare parts available at www.kaercher.com, authorized after-sales service |
| Warranty | According to country conditions, manufacturing defects covered upon presentation of the invoice |
Frequently Asked Questions - SC 4 Deluxe EasyFix Premium Kärcher
User questions about SC 4 Deluxe EasyFix Premium Kärcher
0 question about this device. Answer the ones you know or ask your own.
Ask a new question about this device
Download the instructions for your Steam cleaner in PDF format for free! Find your manual SC 4 Deluxe EasyFix Premium - Kärcher and take your electronic device back in hand. On this page are published all the documents necessary for the use of your device. SC 4 Deluxe EasyFix Premium by Kärcher.
USER MANUAL SC 4 Deluxe EasyFix Premium Kärcher
Environmental protection 11
Accessories and spare parts.. 11
Scope of delivery 11
Warranty. 11
Safety devices 11
Description of the device 11
Installation 12
Operation 12
Important application instructions. 13
How to use the Accessories 13
Care and service 15
Troubleshooting guide 15
Technical data 16
General notes

Read these original operating instructions and the enclosed safety instructions before using the device for the first
time. Proceed accordingly.
Keep both books for future reference or for future owners.
Intended use
Only use the appliance in private households. The appliance is intended for cleaning with steam and can be used with appropriate accessories as described in these operating instructions. Detergents are not required. Observe the safety instructions.
Environmental protection

The packing materials can be recycled. Please dispose of packaging in accordance with the environmental regulations.

Electrical and electronic appliances contain valuable, recyclable materials and often components such as batteries, rechargeable batteries or oil, which - if handled or disposed of incorrectly - can
pose a potential threat to human health and the environment. However, these components are required for the correct operation of the appliance. Appliances marked by this symbol are not allowed to be disposed of together with the household rubbish.
Notes on the content materials (REACH)
Current information on content materials can be found at: www.kaercher.com/REACH
Accessories and spare parts
Only use original accessories and original spare parts. They ensure that the appliance will run fault-free and safely.
Information on accessories and spare parts can be found at www.kaercher.com.
Scope of delivery
The scope of delivery for the appliance is shown on the packaging. Check the contents for completeness when unpacking. If any accessories are missing or in the event of any shipping damage, please notify your dealer.
Warranty
The warranty conditions issued by our relevant sales company apply in all countries. We shall remedy possible malfunctions on your appliance within the warranty period free of cost, provided that a material or manufacturing defect is the cause. In a warranty case, please contact your dealer (with the purchase receipt) or the next authorised customer service site.
(See overleaf for the address)
Safety devices
CAUTION
Missing or modified safety devices
Safety devices are provided for your own protection. Never modify or bypass safety devices.
Symbols on the device
(according to type of appliance)
| Risk of burns, surface of appliance be- comes hot during operation | |
| Risk of scalding from steam | |
| Read operating instructions |
Pressure controller
The pressure controller keeps the pressure in the steam boiler as constant as possible during operation. The heating is switched off when the maximum operating pressure is reached in the steam boiler and is activated if there is a pressure drop in the steam boiler as a result of a steam removal.
Safety thermostat
The safety thermostat prevents the device from overheating. If the pressure regulator and the boiler thermostat fail and the unit overheats, the safety thermostat switches the unit off. Before resetting of the safety thermostat, contact the responsible KÄRCHER Customer Service.
Boiler thermostat
The boiler thermostat switches off the heating in the event of a fault; for example, if there is no water in the steam boiler and the temperature in the steam boiler rises.
As soon as you refill the water, the device is ready for use again.
Maintenance lock
The maintenance lock seals the steam boiler from the steam pressure present. The maintenance cap is also a pressure relief valve. If the pressure regulator is defective and the steam pressure in the steam boiler rises, the pressure relief valve opens and steam is escapes through the lock.
Prior to restarting the device, contact the responsible KÄRCHER Customer Service.
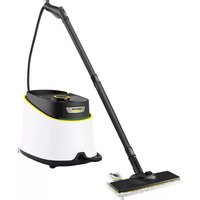
Description of the device
The maximum amount of equipment is described in these operating instructions. Depending on the model used, there are differences in the scope of delivery (see packaging).
For the illustrations, refer to the graphics page. Illustration A
① LED lights
2 selector switch
3 Accessory storage area
4Carrying handle
5Water reservoir
6 Main connection cable with main plug
⑦ display - OFF position
8 Min. steam stage
9Med. steam stage
10Max. steam stage
1 Maintenance lock
(12) Park bracket for floor nozzle
13 Steering roller
14 Steam gun
15 Steam lever
Unlocking button
Child lock
(18) Steam hose
19 Spotlight nozzle
20 Round brush (small)
(2)Round brush (large)
2Power nozzle
(23) Crevice brush
(24) Manual nozzle
25 Manual nozzle microfibre cover
(26) Extension tubes (2 x)
(27)Unlocking button
28 Floor nozzle
29 Hook and loop fastener
30 Microfibre floor cloth (1 x)
(31)^ Microfibre floor cloth (2×)
(32)^ Carpet glider
**SC 4 Deluxe EasyFix Premium
Installation
Installing accessories
- Push the open end of the accessory onto the steam gun so that the unlocking button on the steam gun engages.
Illustration F
- Push the open end of the accessory onto the spotlight nozzle.
Illustration G
- Connect the extension tubes with the steam gun.
a Push the 1st extension tube onto the steam gun so that the unlocking button on the steam gun engages.
The connection pipe is connected.
b Push the 2nd extension tube onto the 1st extension tube.
The connection pipes are connected.
Illustration H
- Push the accessory and / or the floor nozzle onto the free end of the extension tube.
Illustration I
The accessory is connected.
Disconnecting accessories
- Move the child lock back.
The steam lever is locked.
- Press the unlocking button and pull the parts apart.
Illustration N
Operation
Filling water
The water reservoir can be removed at any time for filling or be filled directly at the device.
ATTENTION
Damage to the device
Unsuitable water can block the nozzles or damage the water level indicator.
Do not fill in pure distilled water. Use a maximum of 50% distilled water mixed with tap water.
Do not use condensation from the clothes dryer for filling.
Do not use collected rain water for filling.
Do not use cleaning agents or other additives (e.g.
scents) for filling.
Removing the water reservoir for filling
- Pull the water reservoir vertically upwards. Illustration B
- Fill the water tank vertically with tap water or a mixture of tap water and no more than 50% distilled water.
- Insert the water reservoir and press downwards until it locks into place.
Filling the water reservoir directly on the device
- Fill tap water or a mixture of tap water and no more than 50% distilled water from a vessel into the filling hole of the water reservoir.
Illustration C
Switching on the device
Note
If there is no or too little water in the steam boiler, the water pump starts to run and pumps water from the water reservoir into the steam boiler. The filling process can take several minutes.
Note
The device briefly closes the valve every 60 seconds causing an audible soft click. Closing prevents the valve from clogging. This does not affect the steam output.
-
Place the device on a firm surface.
-
Insert the main plug into a socket.
- Turn the selector switch from the OFF position to the steam setting selection range.
Illustration D
The LED strip is in fading red.
- The LED light lights up a continuous green after approx. 3 minutes. The device is ready for use.
Illustration E
- Press the steam lever.
Illustration F
Steam leaks out.
Regulating the steam volume
The expelled steam volume is regulated using the selector switch for steam volume. The selector switch has three positions.
| Maximum steam volume | |
| Medium steam volume | |
| Minimum steam volume |
- Set the selector switch for the steam volume to the required steam volume.
- Press the steam lever.
- Before cleaning, point the steam gun at a cloth until steam is expelled evenly.
Refilling water
If there is not enough water in water reservoir, the LED light rapidly flashes red and a signal tone sounds.
Note
The water pump fills the steam boiler at intervals. If the filling is successful, the LED light is quick flashing red.
Note
If there is no or too little water in the steam boiler, the water pump starts to run and pumps water from the water reservoir into the steam boiler. The filling process can take several minutes.
ATTENTION
Damage to the device
Unsuitable water can block the nozzles or damage the water level indicator.
Do not fill in pure distilled water. Use a maximum of 50% distilled water mixed with tap water.
Do not use condensation from the clothes dryer for filling.
Do not use collected rain water for filling.
Do not use cleaning agents or other additives (e.g. scents) for filling.
- Fill the water tank with tap water or a mixture of tap water and no more than 50% distilled water. The device is ready for use.
Switching off the device
- Turn the power switch to the "OFF" position.
Illustration L
The device is switched off.
- Press the steam lever until steam is no longer released.
Illustration M
The steam boiler is depressurised.
- Move the child lock back.
The steam lever is locked. - Pull the main plug out of the socket.
- Drain the water reservoir.
Rinsing out the steam boiler
Rinse the device's steam boiler out after every tenth filling of the tank.
- Switch the device off; see Chapter Switching off the device.
- Allow the device to cool down.
- Drain the water reservoir.
- Remove the accessory / accessories from the accessory storage area.
- Open the maintenance lock. To do this place the open end of an extension tube on the maintenance lock, insert this into the guide so it engages and open it.
Illustration R
- Fill the steam boiler with water and swing it around vigorously. Lime residue which has been deposited on the bottom of the steam boiler will be released as a result.
- Drain the water completely out of the steam boiler.
Illustration S
Clearing the boiler
The water in boiler can be empty by CLE Mode:
1. Remove the water reservoir.
2. Turn on the device.
3. Press the steam trigger for 3 times until the LED light flashes green and a long beep is emitted.
4. Steam will be available until the water in the boiler is empty.
Storing the device
- Connect the extension tubes to the large mounts for accessories.
-
Connect a manual nozzle and spotlight nozzle to each extension tube.
-
Fasten the large round brush to the spotlight nozzle.
- Hang the floor nozzle in the park bracket.
Illustration O
- Wrap the cable and place it in the accessory compartment.
Illustration Q
- Wrap the steam hose and place it in the accessory storage area.
Illustration P
- Place the small round brush and crevice brush in the accessory storage area.
- Store the device in a dry location that is protected ed from frost.
Important application instructions
Cleaning the floor areas
We recommend sweeping the floor or vacuum cleaning it before using the appliance. In this way the floor will be cleared of dirt and loose particles before the wet cleaning.
Freshening up textiles
Prior to using the appliance, always check the compatibility of the textiles at a concealed point: Steam down the textile, allow it to dry and then check it for any change in colour or shape.
Cleaning coated or painted surfaces
ATTENTION
Damaged surfaces
Steam can loosen wax, furniture polish, plastic coatings or paint and edge band from edges.
Do not direct the steam at glued laminated edges as the edge band may loosen.
Do not use the appliance for cleaning unsealed wood or parquet floors.
Do not use the appliance for cleaning painted or plastic coated surfaces such as kitchen or living room furniture, doors or parquet.
- To clean these surfaces, steam a cloth briefly and use it to wipe over the surfaces.
Glass cleaner
ATTENTION
Glass breakages and damaged surfaces
Steam can damage sealed points of the window frame and, at low outside temperatures, lead to tension on the surface of window panes and hence to glass breakages. Do not direct the steam at sealed points on the window frame.
At low outside temperatures, heat up the window panes by gently steaming the full surface of the glass.
- Clean the window area with a manual nozzle and cover. To remove the water, use a squeezegee or wipe the surfaces dry.
How to use the Accessories
Steam gun
The steam gun can be used for the following applications without accessories:
- For removing slight creases from the hanging clothing items: Steam the clothing item from a distance of 10 - 20cm .
- For wiping damp dust: Steam a cloth briefly and use it to wipe over the furniture.
Spotlight nozzle
The spotlight nozzle is suitable for cleaning areas, joins fittings, drains, sinks, WCs, blinds or radiators that are difficult to access. The closer the spotlight nozzle is to the soiled area, the greater the cleaning efficiency will be as the temperature and steam volume are at their highest at the nozzle opening. Larger lime deposits can be treated before steam cleaning with a suitable detergent. Allow the detergent to soak in for approx. 5 minutes and then steam it off.
- Slide the spotlight nozzle onto the steam gun.
Illustration F
Round brush (small)
The small round brush is used for cleaning stubborn dirt. Stubborn dirt can be removed more easily by brushing.
ATTENTION
Damaged surfaces
The brush may scratch sensitive surfaces. It is not suitable for cleaning sensitive surfaces.
- Fit the round brush to the spotlight nozzle.
Illustration G
Round brush (large)
The large round brush is suitable for cleaning large rounded surfaces, e.g. wash basin, shower tray, bath tub, kitchen sink, etc.
ATTENTION
Damaged surfaces
The brush may scratch sensitive surfaces. It is not suitable for cleaning sensitive surfaces.
- Fit the large round brush to the spotlight nozzle.
Illustration G
Power nozzle
The power nozzle is used for cleaning stubborn dirt and for blowing down corners, on joints, etc.
- Install the power nozzle onto the spotlight nozzle according to the round brush.
Illustration G
Crevice brush
- The crevice brush is used for cleaning narrow gaps e.g. window recess and cranks in the walls.
Illustration G
Manual nozzle
The manual nozzle is used for cleaning small areas that can be washed down, shower cubicles and mirrors.
- Push the manual nozzle onto the steam gun according to the spotlight nozzle.
Illustration F
- Pull the cover over the manual nozzle.
Floor nozzle
The floor nozzle is used for cleaning washable wall and floor coverings e.g. stone floors, tiles and PVC floors.
ATTENTION
Damage due to build-up of steam
Heat and moisture can lead to damage.
Check the heat resistance and steam effect on an inconspicuous area using a minimal volume of steam prior to use.
Note
Detergent residue or care emulsions on the surface to be cleaned can lead to streaks during steam cleaning, which will disappear however once these have been used several times.
We recommend sweeping the floor or vacuum cleaning it before using the device. In this way the floor will be cleared of dirt and loose particles before the wet cleaning commences. Work slowly on surfaces that are heavily soiled so that the steam has longer to take effect.
- Connect the extension tubes with the steam gun. Illustration H
- Push the floor nozzle onto the extension tube. Illustration I
- Fasten the floor cleaning cloth to the floor nozzle. a Place the floor cleaning cloth with the hook and loop fastener strips pointing upwards on the floor. b Place the floor nozzle onto the floor cleaning cloth, applying slight pressure. Illustration J The floor cleaning cloth will stick to the floor nozzle of its own accord due to the hook and loop fastener.
Removing the floor cleaning cloth
- Place one foot on the bottom corner of the floor cleaning cloth and lift the floor nozzle up.
Ustration J
Note
Initially, the floor cleaning cloth's hook and loop fastener strip is very strong and cannot be removed from the floor nozzle easily. After the floor cleaning cloth has been used several times and washed, it is easier to remove from the floor nozzle and it has reached the optimum adhesion.
Parking the floor nozzle
- Hang the floor nozzle in the park bracket during breaks in work.
Illustration O
Carpet glider
The carpet glider is used for freshening up carpets.
ATTENTION
Beware of damaging the carpet glider and carpet
Contamination on the carpet glider, as well as heat and moisture penetration, can result in the carpet being damaged.
Prior to the application, also check the heat resistance and impact of steam on the carpet at an insignificant spot using as small an amount of steam as possible.
Observe the cleaning instructions from the carpet manufacturer.
Prior to using the carpet glider, make sure that the carpet has been vacuumed and that stains have been removed.
Prior to application and following operating pauses, remove any possible water accumulation (condensate) in the appliance by means of evaporating the condensate into a drain (without floor cleaning cloth / with accessories).
Only use the carpet glider with a floor cleaning cloth on the floor nozzle.
Steam clean with a weak steam stage when using the carpet glider.
In order to prevent too much moistening and to avoid the risk of damage due to temperature effects, do not direct the steam continuously onto one spot (maximum 5 seconds).
Do not use the carpet glider on deep-pile carpets.
Fastening the carpet glider to the floor nozzle
-
For fastening the floor cleaning cloth to the floor nozzle, please refer to chapter Floor nozzle. Illustration J
-
Using a little force, allow the floor nozzle to slide into the carpet glider and engage there.
Illustration K
- Start cleaning the carpet.
Removing the carpet glider from the floor nozzle
CAUTION
Beware of burns to your feet
The carpet glider can heat up during the steaming process.
Do not operate or remove the carpet glider bare-footed or using open sandals.
Only operate or remove the carpet glider using suitable footwear.
- Press the strap on the carpet glider downwards using the front of toe-capped shoes.
- Lift the floor nozzle upwards.
Illustration J
Care and service
Descaling the steam boiler
Note
Since the lime clogs the appliance, we recommend descending the appliance based on the number of times the water reservoir is filled as specified in the table (TF=tank fillings).
| Hardness range °dH | mmol/l TF | |||
| I soft 0 | -7 0-1.3 100 | |||
| II Med | um 7-14 | 1.3-2.5 | 90 | |
| III | Hard | 14-21 | 2.5-3.8 | 75 |
| IV | Very hard | >21 | >3.8 | 50 |
Note
Your water board or municipal utilities authority can provide information on hardness of tap water.
ATTENTION
Damaged surfaces
The descaler may corrode sensitive surfaces.
Fill and empty the appliance carefully.
- Switching off the device, see chapter Switching off the device.
- Allow the device to cool down.
- Drain the water reservoir.
- Remove the accessory/accessories from the accessory storage area.
- Open the maintenance lock. To do this place the open end of an extension tube on the maintenance lock, insert this into the guide so it engages and open it.
Illustration R
- Drain the water completely out of the steam boiler.
Illustration S
ATTENTION
Appliance damage due to descaler
An unsuitable descaler or incorrect dosing of the descaler may damage the appliance.
Only use KARCHER descaler.
Use 1 dosing unit of the descaler for 0.5I water.
- Apply descaler solution to the descaler according to the details.
- Fill the descaler solution into the steam boiler. Do not seal the steam boiler.
-
Allow the descaler solution to take effect for approx. 8 hours.
-
Drain descaler solution completely out of the steam boiler.
- Repeat the descending process if necessary.
- Rinse the steam boiler 2-3 times with cold water in order to drain all the descaler solution residue.
- Drain the water completely out of the steam boiler. Illustration R
- Dry the mounting for the grid connection cable.
- Close the maintenance lock with an extension tube.
Care of accessories
(Accessories - depending on scope of delivery)
Note
The micro fibre cloths are not suitable for dryer.
Note
When washing the cloths, observe the instructions on the washing tag. Do not use any liquid softeners as this will affect the ability of the cloths to pick up dirt.
- Wash the floor cleaning cloths and covers at a max. temperature of 60^ in the washing machine.
Troubleshooting guide
Malfunctions often have simple causes that you can remedy yourself using the following overview. When in doubt, or in the case of malfunctions not mentioned here, please contact your authorised Customer Service.
WARNING
Risk of electric shock and burns
Trying to eliminate faults while the appliance is connected to the mains or has not yet cooled down is always dangerous.
Remove the mains plug.
Allow the appliance to cool down.
Reduced steam quantity
The steam boiler is scaled
- Descale the steam boiler.
The LED light is in quick flashing red and a signal tone sounds
No water in the water reservoir.
- Fill the water reservoir.
The steam lever cannot be pressed
The steam lever is locked with the child lock.
- Move the child lock forward.
The steam lever is released.
Long heating-up time
The steam boiler is scaled.
- Descale the steam boiler.
High water output
The steam boiler is scaled.
- Descale the steam boiler.
Technical data
| SC 4 Deluxe EasyFix | SC 4 Deluxe EasyFix Premium | ||
| Electrical connection | |||
| Voltage V 220 - | 240 | 220 - 240 | |
| Phase ~ 1 1 | |||
| Frequency Hz 50 50 | |||
| Protection class IPX4 IPX4 | |||
| Protection category I I | |||
| Device performance data | |||
| Heating capacity | W 2200 | 2200 | |
| Maximum operating pres-sure | MPa 0.4 | 0.4 | |
| Heating-up time | Min-utes 3 | 3 | |
| Continuous steaming | g/min 60 60 | ||
| Maximum steam blast | g/min 150 | 150 | |
| Filling quantity | |||
| Water reservoir | 1 | 1.3 | 1.3 |
| Steam boiler | 1 | 0.5 | 0.5 |
| Dimensions and weights | |||
| Weight (without accesso-ries) | kg 6.8 | 6.8 | 6.8 |
| Length | mm 400 | 400 | 400 |
| Width | mm 270 | 270 | 270 |
| Height | mm 300 | 300 | 300 |
Subject to technical modifications.
Contenu
Remarques generales 16
Prima di un trattamento con l'apparecchio, controlling the moment, is a good idea. It is important to be aware that the time of the event is not precisely defined.
Geen water in de watertank.
- De watertank vullen.
Stoomhendel kan nicht worden ingedrukt
(alt after maskintype)
Reduceret dampmangde
Znua otic emipaviecs
O atuoc uTopei va atokolnosei kepi, loaotpo einnwv, ouvTeikec EITATPwaes, xpwia kai TepiEETPIKn Taivia aTo TAI.
Mn otpepetov atuo navw oe kOaIneves acuEs dioti
mtopei va atokoalntheta i KoaIneyn taivia.
Mnv xponaipoite t ouakeun yia tov kaapiou o np
oteyawv danedowv ano luao n napke.
Mnv xponaipoite t ouakeun yia tov kaapiou
louatpapiouevvw n eTveDsbuevww eTnpaveiwv onwsc
π.x. emllkouzivac, npres n napke.
- Tia ToV kaBapioa oauu vTwv ETTipaveivw yekaoTe Aiyo e aTou eva Tavi kai Tepaote e auto Tnv ETTipaveia.
Znua otic emipaveies
To diaLupa aapaieoans alarwv mnpoei va npokaleo iiaBpw an otic euaiothetae etiipaveies.
3NeKtpnueckne n 3NeKtpoHHbI yCtpoNCTBa
yacto coepkataHHbI MaTePnAbl,
npurohble dna BToPHNo nepepa60Kn, n
3aayactyo TaKne KOMnoHeHTbl, KaK 6atapen,
akMyIATOpbl Nm MacNo, KOToPbIe npn HEnpaBnHbOM 6paueHnn Nn HeHaJnHexaSey yTnIn3aunnpedCTabNIAOT NOteHuaNbHyO onachocTB dnn 3OpOBbY n 3KOnorHn. TeM He Mehee, daHHbE KOMnoHeHTb Heo6xOaMbI dnn npBaBnHbHO paobtby UcTpoiCTBa. YcTpoiCTBa, o603HaueHHbIe 3TNM CmBOJOM, 3anpeuHo yTuIN3nPoBaTb BMeTe C 6bITOBbIMn OTXdAMn.
Yka3aHnno nHrpdeNeHTam (REACH)
EcnB6akeIINBObI HeIOCTaTOUHO BObl, CBToIOHOHaJ lamMa 6bICTpo MnaeT KpaCHbIM CBeTom n pa3daetc 3ByKOBoCnHaJ.
PpumeyaHue
BodHou hacoc 3anoJHraem napoeo pe3epeyap c onpepehenbIMu uHmepeanamU. Ecnu 3aonHeue npowno ycneuho, ceemoduohbu uHukamop 6bicmpo muaem KpacbIM cemom.
PpumeyaHue
Ecnu eoda a napoeom pe3epbyape omcymcmeyem unu ee cnuukom mano, 3anyckaemca o0raHou hacoc, komopbu nodaem eody u3 baka dna eodbe napoob
pe3ep8yap. Ppouecc 3aonHeHua MoXem 3aHmB HeCKoJIbKO MuHym.
BHUMAHVE
PoepekeHua ycmpoucmaa
Ppu uCnoIb3oBaHuu eOdbI HecOoMeemcMeyoue20 KauecmEa MoKem npou3oUm 3acopHeue conen U noBpeXdHeue uHoukamopa ypo8Ha eOdbI.
He 3aueamb yucmo ducmunnpoahnyo body. NcnoB308ammb MaKcumym 50% ducmunnpoahHou odbie cmecu c bodonpoedho eodou.
He 3aueamb KOHcHcaUOHHyO body u3 cyuunbHOu MaunHbl.
He 3aJIueamb co6paHHyIO doxKdeSyIO body.
He 3aueamb moouue cpecdmea unu dpyue doabaku (hanpumep, apomamu3amopbl).
1.3an0JHnTB6akIJIaBODblBOOIpOBoHOBBOIOIIMCmecbIO,COCTOJIeN3BOOIpOBoHOBBOIIMAKC.50%INCTUJIINpOBaHHoBIObl.YcTPOIcTBoROTOBOKNCIOJIb3OBAHIO.
BbIKIIOUeHne ycTPOINCTBa
- YctaHOBnTB BbIKNIOuATEnel B nONoXeHne «BbIKN.». PucyHOK L YcTpoiCTBO BbIKNIOUeHo.
- Haximatb pbIar noaH npapa, noka He npekpaTITcBbIXoN npaa.
PucyHok M
PapOBo pe3epByap HaxOuNTcB 6e3HaIOpHOM COCTOHH.
- CdBnHyTb 6JIOKIpOBky OT DeTeH Ha3aD. Pyhar noDaH napa 3a6NoKIpOBAH.
- 13Bnech wTeNceJIbHyIO BUNky n3 po3eTKn.
- OnopoxKnHtB 6ak dIa B0dbl.
Ppombbka napoBoro pe3epByapa
PpomBaT npoBoN pe3epByap yCTpoiCTBa nocKe KaKdoN DecaToN 3anpaBkn 6aka.
- BbIKHouHTy yCTpoiCTBO ,CM. rnaBy BbIKnOHeHue ycmpoucmea.
- DaTb yCTpoiCTBy OCTbITb.
- OnopoknHt6aK dJa BOdJI.
- BbHyTb npHaJnHexHOCTn n3 OTceKa dI npHaJnHexHOCTe.
- OTKpbIb 3amOK JnTexHnueCKOrO o6ClyKnBAHnA.
Jnra 3TOr yCTaHOBnTB 0TKpbIbKoHeu
yDInHnTeJIbHO Tpy6Kn Ha 3AMOK 3aTBoP
HcNEKcNOHHoro OTBepCTnA, 3aΦNKcnpOBaTb B
HaNPabJIHOUeN IOBepHyTb.
PucyHOK R
- HanonHntb napOBoB pe3epByap BOOn u cnIbHo no6oNTaTb B3aD-BnpePe, 3To OCBO6OxJaET OT octaTKOB n3BeCTn, OTIOXINBUNXcR Ha dHe napOBoro pe3epByapa.
- Поннocью сипь Body n3 napoBoro peЗepByapa. PucyHOK S
OnopoxHeHne napoBoro pe3epByapa
Cnntb BODy n3 6oJIpepa MoXHo B peXmE CLE:
- ChTb 6ak DnI BODbl.
2.BKJIIOHTb yCTPOIcTBO. - HaxaTb napoBoB BbIKIHOuAteJb 3 pa3a, noka CBETOIOHOHa JAMNa He 3AmnraeT 3eNEHbIM UBeTOM N He pa3dAcTcR dINHHbI 3ByKOBOcRHaJI.
- Nap doctyneH do Tex nop, noka B napobom pe3epByape He 3aKOHHTcB Oda.
XpaHHeYyCTpOyCTBa
- Bctabntb ydnnHnTeBnyo Tpy6ky B depxaTeIb dna npHaadJeXHOCTe 60nbWoro pa3Mepa.
- YctaHOBntb pyHyIO HacaKy n ToueyHoe conJIO Ha 1 ydnnHnTeIbHyIO Tpy6ky.
- 3aKpeNtB 6oNbSyH KpyrIyU uEeKu Ha ToeHOM conJIe.
- Повеспь насяку дя пona в napковонец кpenленье.
PncyHok O
- CMOTaTB Ka6eBn XpaHHTb erO BOTceKe dI npuHaJdJIeXHOCTeI.
PncyHok Q
- CmotaB napOBoi JIaHn I xpaHntb ero B OTCeKe DnI npHaDJIeKHOCTei.
PncyHok P
- NomeCTnB MaIeHbKyIO KpyrIyIO UTeKy I UeTky Dnla WBOB B OTEcK Dnla PnHaIeNekHoCTeN.
- XpaHntb yCTpOInCTBO B cyXOM n 3aunueHHOM OT MOp03OB MeCTe.
Baxhble yka3aHnno npimHeHIO
OuNTka noJIOB
Ipeed npimHeHnem yctpoicTBa mbl peKoMeHyem noMeCTn nn nponbIneocntb non. Blaorapr 3tomy nOyke do BnaXHO OHNCTKN 6ydet OCBO6xKeH OT 3arpa3HeHn I Mycopa.
OcbexeHne TeKCTNJIA
Ipeed o6pa6oTko yctpoiCTBOM o63aTeNbHO npOBepuTB TeKCTNlB Ha nepeHocMOCtB, BbIbpaCkpbItbIy uYactOK: o6pa6oTaTB TeKCTNlB napom, DaTb npocxHyTB, a 3aTeM npOBepuTB Ha npEdMeT n3MeHeHn IcBeTa NIIΦOpMbI.
OuHCTKa NMeIOUxN OOKpbITNe IIN OKpaSeHHbIX NOBepXHocTei
BHIMAHHE
NoepkdeHHbIe noepxHocmu
Nap cnocoben omcnaueambb ock, Mebehnyo nonumpy, nonumephble nokpbimura uu Kpacky u Okneuky ha Kpomkax. He hapaabnmpnap Ha cKneeHHbIe KpOMku, m.K. 3mo moxem npueecmu K omcoedunehuO kneuku. He ucnoJb30aemb ycmpoucmeo dnn ouucmku He naKupoBaHHbIX depeeHHbIX u napKemHbIX NOOB. He ucnoJb30aemb ycmpoucmeo dnn ouucmku OKpaewHHbIX unu umeUux nnacmuKooe OOKpbimue noBepxHocme, Napumep KxohHO u XUNOu Mebenu, depeu u napkema.
- Дя очирки takи NOBepxHocTe CneДуET KOpOTko obpa6oTaTb napOM TprAnky И npOtepeTb eIo NOBepxHocTb.
OuNTka CTeKna
BHIMAHHE
Bou cmekna u nopekdeHHa noepxHocmb
Iap mojem nopeodumb nakupoaaHbte yacmku OKHOpaMbbl, a npu H3KUX BHeuHX Memnpamypax cmmb npuunHO e03HukHOeHuHa npaeHuHa noepxHocmu OKHHbx CmeKoU ux pa3pyueHu.
He Hanpaenmbcmpyio npapaHa naKupoBaHHbIe yacMKU OKOHou paMbI.
Ipu Hux hewhux memepamypax cnedyem Haapemb OKOHbIe cmeKna, Kopomko opa6omae napom eio oeepxHocmb meKna.
OuHCTb OKHO NOMOcBIO pyHoi HacaKn uexna.ДЯ ydaJIeHn BOI bOCNoB3OBaTbcBaOcROHOM INN BItepb NOBepXHOCTN HAcyxo.
McnoJIb3OBAHHe npHaadJeXHoCTe
Papoboi nuctoJeT
IapOBoN nIcTOnET MOxHO uCnOJb30BaTb 6e3 npHnAdnEeKHOCTeB CNeDyUOuX CNyuaX:
- YctpaHHeH He6OJIbXnCKIaDOK Ha BnCraIIN npEpmetax OeJdb: o6pa6aTbIBatb npEImet OeJdbI napOM c pacCToHn 10-20 cm.
BnaJHnay y60pKa nbnn: KopoTko 6pa6oTaTab npom caJIpeKy nIpoTepeTbe eO Me6enb.
Toeyhoe conno
ToeyHoe cTpyHoe conIIO npedHa3NaeHO dIy ONUCTKN TpyNDIOCTUYHBIX MEcT, CTbIKOB, CMEcHTeNei, CTOKOB, paKOBn, yHnTa3OB, kAnIO3N upaHApOBo. Yem 6bnKe TouyHoe cTpyHoe conIO K 3aqr3HeHHOMy MeCtY, TEM BblE 3ΦΦeKTNBHOCTb ONUCTKn. 3TO OByCNOBNEHO Tem, YTO TeMnePaTypa N KOJIInueCTBO napa MaKcImaJIbHbI B MecTe BbIXOda N3 CONna. CNbHbIe N3BeCtKOBbIe OTNoXeHnpeD ONUCTKOJ napOM MOxHO o6pa6oTaTB NOxDoxJaIM NCHTAUm cpeDCTBOM. BpEm BO3dEiCTBnY UcTCTAeero cpeDCTBa - OKONO 5 MNHyT, IocJe Yero o6pa6oTaTB napOM.
- HaNBNHyTb ToeHoe CtpyHoe cOnNo Ha napoBoi nuctOJeT.
PncyHok F
Kpyrnaa 电Tka (maja)
MaJra Kpyrnaa 1eTka noDxOuNT dny ydaJeHnA cToKnx 3aRpa3HeHn. O6pa6oTKa 1eTKo n03BOJnAETnerue OUnIaTb NOBepXHOCTOn OT cToKnx 3aRpa3HeHn.
BHIMAHHE
NoepexdeHHbIe noepxHocmu
Uemka moxem noapanamb yscmbenbHbIe noepxhocmu.
OHa He nodxodum dna ouucmku yecmeumenbHbIX noeepxHocmeu.
- CMOHTIPOBAtb Maanyo Kpyrnyu UeTKy Ha ToyeHOM CTpyHOM CONne.
PncyHok G
Kpyrnaa ueTa, 6onbwa
Bolbwa Kpyraa 1eTka npedHa3HaeHa dna ONUCTKn BOnbux Okpyrblx nobepxHocTe, HanpImep yMbBaJbHNKOB, DyueBbIX, BaHH, KxOHbIX MOEK N.T.D.
BHUMAHVE
NoepexdeHHbIe nooeepxHocmu
Uemka moxem noapanamb y8cmumelhble noeepxnocmu.
OHa He nodxodum dna ouucmku yecmeumenbHbIX noeepxHocmeu.
- 3aKpeNtB 6oJbIyIO KpyrIyIO UeTKy Ha ToeHOM coJIe.
PncyHok G
Moohoe conno
MoHnA 1eTka nOxOHTIy ydaJIeHnA CToKnx 3aRpa3HeHn, npOyBKn yrJIOB, CTbIKOB nT.D.
- YcTaHOBnTb MoUHyU UeTKy Ha ToeHHeo ConNo, NOxOJaee DnKpyrIou UeTKn.
PucyHok G
UeTkaDnIyWBOB
Pn NMOUcKoJIb3aueH HacaKn dJa KOBpa MoXHO 1NCTNTb KOBpbI.
BHUMAHNE
PoepekeHua Koepa u cKoJIb3raueu HacaDu nKa Koepa
3aap3Heu cokb3aueu HacaKu dna Koepa, a maKe blicKaJ meMnepamypa u EanXHocmb Moaym npueecmu K noBpeKdeHuO Koepa.
Ipepe npumehuem Heo6xodmo npoeepumb mepmocmoukocmb u eo3eucmeue npa Ha koep e MaNo3amemHom Mecme c MuHMaJIbHbIM KOJIuuecmBOM npa.
Cobnodambyka3aHna no ouucmke om u3aomoumena koepa.
Ybeumbcry, ymo Koep neped npumehenuem cKoJIb3aueu Hacaaku dna Koepa Ouauen om nbun u narnen.
Ipepe npumehuem u nocne nepepbieoe e paobome ydaunmb bblnapueaHuem cmoK (6e3 mkaH du Mybmb nonacpuhaednHexhocmbu) ckonueuyoc body (kohdehcam) u3 ycmpoucmea.
NcnoB308ambckOJIb3aUHacAdKy dJa Koepa moIbKO c mKaHbIO dJa MbImBa nJa Ha HacaKe dJa nona.
Ouucmky napom npu ucnolb3oeaHu cKoIb3aue Hacaadku dna KOBpa npoeodumb Ha Hu3koU cmyneHu npa.
He Hanpaenb nap nocmHNo 8 oHy moKy (He 6oJee 5 cekyHO) eo u36ekaHue u36bimOnHO2O e03eUcmua enaU u pucka noepexdeHua u3-3a ebicokou memnpamypbl.
He uCnoB3oBamb cKoJIb3aIyU HacaOky OJRA KOepa Ha KOepax C BvICOKUM BOPCOM.
3aKpenenne cKoJIb3aIeH HacaIKN IJI KOBpa Ha HacaIKe IJI NOJa
- 3akpenJIeHn e TkaHn IJMaMbITbJa NOJa Ha HacaIKe JIa NOna CM.BIabe HacadKa dJa nOJa. PucyHok J
- BBeCTn HacaIky dIy IOna c JERKIM HaxaTneM BCKOJIb3aIyU HacaIky dIy KOBpa Do qHKcaUN. PucyHOK K
3.Ппсчтпь кочик Ковр.
CHaTne cKoJIb3aJeuHacaKn dJa KOBPOB C HacaKn dJa NOJa
△OCTOPOXHO
Oxosu cmonbl
CkOB3aHacaKa dKa KOepa MoXem Haapeambcb npu npodyeke napom.
He uCnoB3o8ambu He cHumambckonb3auy HacaDky dny Koepa bocukom unu e omkpblmoi obyu. NcnoB3o8ambu chumambckonb3auy HacaDky dny Koepa moIbko 8 nOdoxodaeu obyu.
NoepkdeHHbIe noepxHocmu
Pacmeop dny ydaenu haKunu moxem pa3pywumb uecmueHbIe noeepxhocmu.
3anonnmbu onopoknmb ycmpoicmeo ocmopoxHO.
- BbIKHouHTb ycTpoIcTBO, CM. rnaBy BbIKnOueHue ycmpoUcmea.
- DaTb yctpoicTByOCTbTb.
- OnopoxHnTb 6ak dIa BObl.
- BbHyTb npHaJnEJXHOCTn n3 OTcKa dI npHaJnEJXHOCTeN.
- OTKpbIb 3aMOK dIy TeXHueCKOro 06cJIyKINBaHnA. IJRA 3TORO yCTAHOBITb OTKpbIbI KOHEU yDINHHTeNBHO Tpy6Kn Ha 3aMOK 3aTBOP INCNEKUNOHNO OTBepCTN, 3aΦNKCuPOBaTb B HAnpaBnIouSei n NOBepHyTb.
PucyHok R
- ПОПНOCТьСЛТь BODY n3 napOBOrO pe3epByapa. PucyHOK S
BHIMAHHE
NopekdeHue ycmpoucmea cpedcmom dnydaneHu haku
Icnonb3oBaHue Hnodxodmaezo cpedmea dna ydaenu Hakunu u owubouhag dozupobka moaym npueecmu K nopekdeHuO ycmpoucmea.
Icnonb3yume monbko cpedcmeo dny ydaenHua Hakuu KARCHER.
Icnonb3yume 1 do3y cpecdmea dna ydaeneHua Hakuu Ha 0,5 n bdi.
7.Использовать pactвор срета Дя удаленя
нakини сорлacho Инструкши.
8. 3aJIITb pactBop cpeICTBa IyJaJIeHnHaKInn B napOBon pe3epByap. He 3aKpbIbATb napOBon pe3epByap.
9. OctaBntb pactBop cpeiCTBa dIy ydaIeHna HAKINn DeIcTBoBaTb np6I. Ha 8 YacOB.
10.Понhoeьсntb pactbop cpectBaДя удалени Нakinnи n3 napoboro pe3epByapa.
11. NOBtopuTb npoecc ydaeneHne hakn, ecnn 3TO Heo6xoDIMO.
12. Napobon pe3epByap npombIb 2 nnn 3 pa3a xoIOHOB BOIO, yTO6bl ydaJIITb BCE OCTaTKI pactbopa cpeCTBa dnydaneHnHaKnII.
13. PAnHocTbIO CnITb BOdy n3 napOBoro pe3epByapa. PncyHOK R
IomoupbnHEncnpaBHOCTX
3aactyio HecnpabHocTn IMeIOT npocTbe IpnuHbI, PO3OMy C NOMOUsbIO CNeDyUoero 0630pa IX MOxHO yCTpaHHTb CAMOCToTeNbHO. B cnyae comHeHn IIN BO3HNKHOBeHn HcONcaHHbIX 3deCb HeCNpabHocTei cNeDuYer ObaaTaBcB A ABTOpN3OBaHHyO cepBnCHyo cNyX6y.
△PENDyNPEXDEHNE
Onachocmb ydapa mokom u nojyehu oxo208 YcmpaHmB HeucnpaBnOcmu Ha nOdKnUoyenHOM K 3neKmpuueckou cemu unu pa3oepemom ycmpoicmee onaCHO.
BbHymb cemeo umekep.
damb ycmpoucmey ocmbim.
OrpaHnueHoe KOnHecTBo napa
B napobom pe3epByape o6pa3oBaanacb haknib.
- YdaJIITb HAKINb n3 npoBOrO pe3epByapa.
CBeToIOoHnA JAmNa 6bIcTpO Mmraet KpaCHbIM CBeTOM, pa3daetc3ByKOBoi CnHaJ
B6akeIINBAOblOTcyTCTByeTBOda.
HanoJIHTb6akdIyBOIbl.
HeBo3MoXHo HaxKaTb pbIar noJaH napa
PbUar noa npa 3aboknpoBaH 3auToT OTei.
CdBnHyTb 6nOKnPOBky OT DeTeBnpei. Pbyar noaun napa pa36nOKnPOBaH.
Dionroe BpemHaPeBaHn
B napobom pe3epByape 6pa3oBaIacb haknIb.
- YdaJIInTb HAKINb n3 napOBoro pe3epByapa.
3NaHTeJIbHbI BbIbPoc BObl
B napobom pe3epByape 6pa3oBaIacb haknbl.
- YdaJIITb HAKINb n3 napOBoro pe3epByapa.
TexHnueckne XapaKTepncTnKn
SC4 SC4
Deluxe Deluxe
www.kaercher.com/REACH
AkpHaJIHn HOpopMaIg OTHOCO CbCTaBH NBeIeCTBa MoKeTe Da HamepuTe TyK: www.kaercher.com/REACH
Akecoapn npeepBnu qactn
I3no3BaIte cAmO opuHnHaHn AkceCoapn OpunHnAHH pe3epBHN qactn, NO To3n HaunocrypbaTe 6e3oNaChata n 6e3npobEmhaeknloataaHa ypeDa.
HOpMaun OTHOCO akcecoapn pe3epBHN Yactn 1e HamepuTe Tk: www.kaercher.com.
06XBaT Ha DoCTaBka
0xbatbHa docTabkata Ha ypea e n3o6pa3eH Bbpxy onakobkata. Pn pa3oNAKOBAHe npOBepete cbdbpkaHTo 3a qyIOCT. Pn nnCBAuAn akcecoapn nnPn TpaHCNOPTHN UETN, MOJ, O6bpHTe ce Kbm Baunn dinctpn6bytop.
Rapanzna
BbB BcKaJaIbPkaBa Ca BaIIaHn I3daJeHrTe OT HaaHn OToPn3InpaH AnCTpN6yTop rapaHcUOnHH yCIOBnA. EBeHTyaJIHn NOBpeHn Ha BaIaHn UpeJ ue OTCTpaHm B paMKte Ha rapaHcUOnHHn Cpok 6e3nPaTHo, aKo ce Kacae 3a DeΦeKT B MaTePnaJIte Nn npOImBOJCTBeH nDeΦeKT. B cIyauHa npeJraBaHe Ha npaBo Ha rapaHcU, ce 06bpHete KbM BaIaHn AnCTpN6yTop nN KbM Hau-6blN3Kn OToPn3InpaH cepBn3, KaTO npEcdTaBnTE KacOBaTa 6beJexKk. (Adpec, Bk. 3aAnHaTa CTpaHa)
PpeDna3Hn yctpOuCtBa
△PENPA3JINBOCT
Junceauu uu npomeHenu npedna3Hu ycmpoucma
Ipeodn3Hume ycmpoucmea cnyxam 3a Bawama 3auuma.
Hukoza He npomehme unu npene6pe2aume npedn3hu ycmpoucmea.
CnmboN Bbpxy ypea
(cnopeTnna ypei)
| Опасноct OT ИЗgarян, NOВьрховская на уреда се наgoresses в no Враиме на работа | |
| Опасноct OT ИЗgarян ot napata | |
| Прочete пькововсковто за ekсплοатουя |
PerylaTop Ha HanelraHeTo
PerylaTopbHa HaHaIraHTo NoDtbpKa HaHaIraHTo B NapoctpyHnKOTeMaKcMmaHNO NOCToHHNo BpeMe Ha paObTaHa HarpaBaHTo Ce n3KnIOvBa npu DoCTnHa He MaKcMmaJIHOTo pa60THo HAnraHe B NapoctpyHnKOTeN I pN CnAd Ha HaHaIraHTo B napoctpyHnKOTeN BCNeDCTBHe Ha OTdEJIaHTo Ha npa Ce BKIOUcBA OTHBO.
PpeDna3eH TepMoCTaT
Ipeɪnə3HnT TepMoCTat IpeɪoTbPaTЯBa IpeprBaHe Ha ypeJa. Ako perylaTOpbT Ha HanaTHeTo n KOTeHnT TepMoCTaT OTkKaT B CnyaH Ra IpeuKaHa ypeBt IpePee, Toraba Ipeɪna3HnT TepMoCTaT N3KnUcBa ypeJa. 3a BpBuAHe B N3XoJHO NOLOKeHne Ha Ipeɪnə3HnT TepMoCTaTe Ce o6bPheTe KbM OtopuHaHn cepBn3 Ha KÄRCHER.
Koteneh Tepmoctat
KotelHnT TepMoCTaT u3KnUoyBa HarpBaHeto B cnuyaHa rpeuKa, Hanp. KoratoB NapoctpyHnR KOTeHrMa BOda n TempepatypaTa B Hero ce nokaYBa. Korato Ce dOJe e BOda, ypeBt OTHOB e roTOB 3a ekCnIloatauia.
Pebu3noHkoNaue
Pebn3noHHoTo kanaue 3aTbapr napoctpyHnraKOTen cpeuy nobuwaBaHe Ha harnraHTo. Pebn3noHHoTo kanaue e cbueBpeMeHHo n BeHTn 3a CBpbXHaIraHe. Ako peryIaTopbT Ha HAnraHTo e deFeKeTeH n HAnraHTo Ha napata B napoctpyHnraKOTen ce NOKaUBA, BeHTnblT 3a CBpbXHaIraHe ce OTbapr n napata ce OTBeXJa HabbN ppe3 peBn3noHHoTO kanaue. Ppei Da npchete OTHOBOpeda B ekCnloataucn, ce o6bpHeTe KbM OTOpun3npaH cepBn3 Ha KARCHER.
OnncaHne Ha ypeDa
B TOBA pIbKOBOcTBo 3a ekCnNoatauJe oNICAHO MAKcMAmHTo OobopyDbaHe. B KOMnJIeKtHa HOCTaBKkATA HMa pa3NIKN B 3aBNCmOcT OT MOdEJa, BVXkTe ONAKOBkATA.
BuxTe n3o6paXeHnraTa Ha cTpaHncaTa C rpaΦnK. Φnrypa A
CBeToaNoDnJaAMnn
② IpeKbcbaH 3a n36op
③ YeKMeJKe 3a npHaIeNExHOctn
4 DpbKka 3a HocHe
⑤ Pe3epBoaap 3a BoDa
6 MpekoB 3axpaHbau Ka6e n c uencen
7 INHdkauna -no3nou OFF
MHHMaHa cTeNeH Ha napa
⑨ CpeHa CTeneH Ha npa
10 MaKcMaJIHa CTeNEH Ha napa
1 PeBn3NoHNO KaNaue
12 Hocay 3a napkpnpane 3a nooBbata dno3a
13Boedeepa ponka
14 NapoctpyeH nictoNET
(15) NocT 3a npa
16 Bytoh 3a De6noknpaHe
(17) 3aunita 3a deua
18 NapoctpyeH Mapkyu
19 ToykoBa ctpyuHa dio3a
(20) Kpbrrna YetKa, MaIIka
(21) Kpbbrna qetka, rojma
22 **CnIOBaIIO3a
23 YeTeKa 3aФуTN
(2)PbUHaДIO3a
25 MmKpoΦn6bpho nokpnTne 3a pbuHata d03a
26 YdbjnxntnH npb6n (2 6po8)
(27)Бутон за дебиокиранe
28ПоюваДJO3a
29 Cbbp3BaHe cbc caMo3aIenBaIa neHtA
30 MmKpoΦn6bphNa Kpbna 3a noD (16pO)
(31) MnkpoΦn6bphα Kbpna 3a noq (2 6poj)
32 **PpucTabka 3a KUNIMN
**SC 4 Deluxe EasyFix Premium
MoHTax
MOHTIpaHe Ha npHaJnEJXHOCTNe
- NocTabete OTBopeHnKpA Ha npHaJnEJXHOCTTa Bbpxy NapoctpyHnI NCTOJET HATNCHETe, DOKaTO UpaKHe 6yToHbT 3a De6JIOKnpaHe Ha napoctpyHnI NCTOJET.
Фигра F
- NocTabete OTBOpENHa Kpa Ha npHaJnEJXHOCTTa Bbpxy ToKOBaTa CTpyHa DHO3a.
Фигура G
- Cbpxkete ydbnxntnHnTe Tpb6n c npoctpynn nuctoNET.
a NocTabete npBbata yDblnKntenHa Tpb6a Ha napoctpyHnna nCToNET nHaTnCHete,doKaTo ⅢpaKHe 6yTOhT 3a De6noknpaHe Ha napoctpyHnna nCToNET.
CbeHNHnHnHa Tpb6a e CbBp3aHa.
b NocTabete BToPata yDbJNKeTEnHa Tpb6a Bbpxy npBpata yDblKntEnHa Tpb6a.
CbeHNHTeHHTe Tpb6n ca Cbbp3aHn.
Фигра H
- NocTabete npHaJnEJXHOCCTTa n/nnI noObaTa IIO3a Ha CBO6oHNHa Kpa Ha yDbJxKInHHaTa Tpb6a.
#
PnHaIeXHoCTTa e Cbbp3aHa.
YpeBbTe BROTOBHOCT3aEKCnIIOaTaun.
N3KJIIOUBaHe Ha ypeDa
- NocTaBete npeKbcBaHa Ha ypeHa "OFF". Φnrypa L
YpeBTe n3KnHoueH.
- Hattickaite JIOCTa 3a npapa,doKaTO cnpe da n3nna npapa.
Фигра M
PapoctpyHnT KOTe eOCBO6oHeO HT HaIraHaTeO.
3.ПьзhteHa3aД 3aunTaTa 3a Deua.
JoctbT 3a npape6nokupaH.
4.ИЗвадеtmpeхковиценьглОТКоhardta.
5. ɪnɪpaɪrɪpeɪpɪeɪpɪbɪaɪs 3a Bɔːd.
N3nJaKBaHe Ha napoctpyHnK KOTeJ
I3nnakBaIte npoctpyHnKOTen Ha ypea cneD BcKO DeceTo nbJIHeHe Ha pe3epBoapa.
- ɪnʌkɪnjuəte ypeəda, Bʌk. rɪnaBAɪnʌkɪnjuɔeəhe Haɪypeəda.
- OctabeTe ypeDa da ce oxlaan.
- ɪnɪpaɪrɪpeɪpɪeɪpɪbɪəpɪaɪsɪtɪyaɪ
- 3BaTe npHaJnEeKHOCTTa OT OTeJeHHeTO 3a npHaJnEeKHOCTN.
- OTBOpTe peBn3NOHHTO Kanae. 3a ceINaIOCTaBeTe OTBOpEHnKpa H a yDbJXnTeJIHaTATp6bA BbpxpeBn3NoHHTo KaNae, qNKcpaTeRo BB BODaHa N rO 3aBnTe.
- HanbIhHe napoctpyHnH KOTeI C B0a I rpo pa3KnateTe Do6pe. No To3n HauHH ce pa3TbaprOctTaTbUHTe OT BAPOBHK, OTIOXKeHN NO DbHOTOMY.
- Ⅲtoye Te 3zraNo BODaTa OT napoctpyHnKoTeJ. Urypa S
M3npa3BaHe Ha napoctpyHnKoTeJ
Bodata B 60nepa moke da ce n3npa3Hn ue3 peKIma CLE:
- CbaTe pe3epBoapa 3a B0da.
- Bknioute ypeja.
- Hatnche Te npekbcaa 3a npa 3 nbtn,dokaTo CBeTOIOHOHaTa IaMna Mura B 3eneHo N Cyete npoDbJIknteJHe 3ByKOB CnHaJ.
- Napata e HaniuHa, IDOKATO mMa BOda BnapoctpyHnKOTen.
CbxpahHeHa ypeda
- NocTaBete yDbJnxTeHnHte Tpb6n B rOJeMnte Hocaun 3a npHaadNekHOCTn.
- NocTabete pBHa dO3a n ToKoBa cTpyHa dO3a Bbpxy BcKa eHa yDbJKNTeHn TaPb6a.
- 3aKpeTe roJMaTa KpbIgNa YeTKa KbM ToUKObaTa CtpuHa DIO3a.
- 3aKaUeTe noIOBaTa IHO3a B Hocaya 3a napKnpaHe. Urypa O
- HamotaTe Ka6ena n np6epeTe B OTdeneHneTo 3a npHaJLeXHOCTN.
Q - HamotaTe npoctpyHnma Mapkyu ro npnbepete B OTdeHeHnTo 3a npHaJnxKHOCTn. Hrpya P
- Пиберете малкata Крлma cheTka n cheTkata 3a Фугв В OTделенeto 3a пинадлжхoctn.
- CbXpaHraBaIte ypeHa Ha cyxo n 3aunTeHo OTO 3ampb3BaHe MRCTO.
BaxHH yka3aHnna 3a ynoTpe6a
NouchBaHe Ha nooOBn NOBbpxHOCTN
IpenopbUbaMe npEn n3non3BaHe Ha ypeDa noBt da ce n3MeTe nn Da ce Noocn C npaxocmykaKa. Taka Ooie npEn BnaXHOTo NOcHCTBaHe NOBt Ce OCBO6OxJaBA OT MPbCOTnN CBO6OHN YacTnN.
OcbexaBaHe Ha TeKCTnJ
IpeNi TpEtnpaHe C ypeDa BnHaH npoBepBaIte
yCTOnuNBOCTTa Ha TEKCTUINHTe TbKaHn Ha cKPNTO
MRCTo: O6NeTe TEKCTUINHaTa TbKaHc napa, ocTaBeTe
da N3CbxHe H CneD TOBA npoBepTe 3a IpOMEH B
CBEta INIΦoMaTa.
NouchBaHe Ha noBbpxHOCTn c nokpnTne
IINJaKpAHN NOBbpxHocTN
BHIMAHHE
Poepeenuoebpxhocmu
Napama moke da pa3meopu 8ocbk, Mebehen naK, u3kycmbeHu nokpumua un6ou, KaKmo u neunomo, c Koemo ca 3aIenHmu Me6nHume KaHmoe.
He hacoueaume napama kbl menehu Me6enHu KaHMOE, mbu kamo nenulomo, c Koemo ca 3aIeneHu, MoKe da ce pa3meOpu.
He u3non3aume yeda 3a noucmbahe Ha nakupaHu _bp_ehu nodoe unnapkm.
He u3non38aume ypeda 3a noucmeane Ha nakupaHu unu cna6dehu c u3kycmeeho nokpumue noebpxhocmu, kamo Hanp. KxheHcku U cmaHn Me6enu, epamu unu napkem.
- 3a NOHcTBaHeTo Ha Te3n NOBbpxHOCTn O6JeTte 3a KpaTKO eHa KbPna C npapa Nn36bPwTe NOBbpxHOCTnTe C HeJ.
NouchBaHe Ha CTbKJIO
BHIMAHNE
CyueneHa hcmbknomo u noepedeHu noebpxHocmu
Napama moke da nopedu 3aneuamaHu Mecma no npo3opehama pamka u npu Hucku ebhuHu memnepamypu da doeede do Hanpexeknue no npobpxhocmHa npo3opehomo cmbknlo, a c moea u do cyynebahe Ha cmbknomo.
He hacoueame napama KbM 3aneyamahu Mecma no npo3opeyuHa pAMKa.
Ipu Hucku bHuHm meMnepamypu 3a2preaume npo3opeyuHOMO cMbKIO, kamo neko oBJuEame C npa unama noBbpxHocm Ha cMbKnomo.
NopeheHu noebpxHocmu
Yemkama Moke da Haopacka yecmeumenu noebpxHocmu.
He e nodxodra 3a noucmehe Ha yecmeumnHu no6bpxHocmu.
- MoHTnpaIte MaJIkata KpbIgna Yetka Ha ToKOBaTa CTpyHa DIO3a.
Фигура G
Kpbrrna yetka, rojma
TolmaKa KpbIgA YeTa e NoDxOJaIa 3a NoHcTBaHe Ha rolemn 3ao6IeHN NOBbPxHOCTN, HAp. yMBAJIHILU, DyIOBE, BAHN, KxXHeHCKN MMBKN I dp.
BHUMAHNE
NoepedeHu noeBpxHocmu
Yemkama Moke da HaopaKa yecmeumenu NoebpxHocMu.
He e nodxodra 3a noucmeane Ha yecmeumnH uoeBpxHocmu.
- 3akpenete roJMaTa KpbIgna YeTka KbM ToKOBaTa CtpuHa DIO3a.
Фигура G
Cunoba dio3a
CnnoBataI03a e noDxOJa7a 3a noUcTbaHe Ha ynopTu 3aMbpcBaHnHa npOdyXbAHe Ha brrn, dyu n T.H.
- MoHTnpaTe CnIOBATA IIO3a Bbpyx IOXOJa 3a KpbIgnta YETKa TOUKOBA CTpyHa IIO3a.
Фигура G
YeKa 3a Fyurn
- YeTkata 3a cyr n ce n3noJ3Ba 3a noocTbaHe Ha TeCHn npoceN, kato Hapm. MeKdynpo3Op bHn npocTpahCTBa N3BnBKn B CteHaT.
Фигура G
PbUHaIIO3a
PbHaTaNIO3a e NOxOJa7a 3a noNCTBaHc Ha MaIKN MneuCe NOBpxHOCTn, dyu Ka6HHn OrJeDana.
- NocTabete pBnuHaTa IIO3a aHAnIOnuHo Ha TOUKObaTcTpyHa IIO3a Ha napocTpynn HnCTOJET.
Phiypa F
- ⅢterneTe nokpmbanTo Bbpxy pbHataIO3a.
IopOBAIIO3a
Iodobata IIO3a e NOxOJa 3a noNCTBaHe Ha Mneu Ce CTeHHn N IOOBn HAcTNIKn, HAp. KaMeHHn NOObE, NIOcKn N IOObE ot PVC.
BHIMAHHE
Iopepu ecnecmue Ha eb3deucmEuemo Ha napama
Cunha monnua u obnaXnBeaHe Mozam da doeedam do nospedu.
Ipeyuynompebama npoeepreaume ycmouueocmna Ha cunha monnuha u 8b3deucmbuemo Ha napama Ha He3a6eJekUMO Mcmo C MaNKo KOnuEcmeo napa.
yKa3aHue
Ocmambu om noucmbau npenapamu unu noobpbkaeu emyncuu, haunu ebpxu noebpxhocmma, kormo ue ce noucmba, npu
noucmehe c npa mozam da dobedam do nemha, koumo u3e6am npu MHO2OKpamHo npunoKeHue. IpenopbUbame npedn 3non3BaHe Ha ypeDa noBt Da ce n3MeTe nn da ce nouchTc npaxocMykaKa. Taka oJe npdN BnaXHOTo NOUCHBaHe noBt Ce OCbo60jdaBA OT MPcOTn N CBO6OHN YactuN. CnIHO 3ambpceHnTE NOBpXHOCTn O6pa6OBTaBaiTe 6abHO, 3a Da BB3deNCTBa napata No-DbJiro Bpeme.
1.Cb bpjKeTe yDblknteHnTe Tpb6n c npoctpyHnnaCTOJET.
Фигра H
- NocTabete IIOOBaTa IIO3a Ha yIbIXeIHHaTa Tpb6a.
ΦnrgypaI
- 3akpenete Kbpnata 3a noi KbM nooBaTa IIO3a. a NocTabe T Kbpnata 3a noi CbC 3anenBaunTe neHTn Harope Bbpxy nOa.
b C JneK HATnCK NocTaBete NoIOBaTa IIO3a Bbpxy KbpNaTAta 3a NOI.
Φnrypa J
Блардупени на захpenBaHETO с пеленки Кьрпата 3a по пиелпВа АТOMATИЧNO Кьм пооватуюз.
CbaHHe Ha KbpNaTa 3a noD
- NocTabete eDHHN KpaK Bbpxy nnaHkata 3a o6cnykBaHe C KpaK Ha Kbpnata 3a noi NOBdHrHeTe NoOBAtA DIO3a Harope.
ΦnγpaJ
YKa3aHue
B haanomo deucmeuemo Ha Jenehkama Ha Kbpnama 3a noe ece oue MHO2o cunHo u eepommo mJe ce omdenmpydoho om nodoba ma dO3a.CneD HeokolokpamHa ynompe6a u ced u3npaHe Ha Kbpnama 3a noD nocedHama moKe da ce omdeJlecho om nodoba ma dO3a u e nocmuehana onmmannama adxe3ua.
NapknpaHe Ha noDoBa IIO3a
NopedeHu noebpxHocmu
Pa3meOpb m 3a noucmbahe Ha cepobuka moke da pa3rde yycmbumHume noebpxhocmu.
Hantbnaume u u3npa3eaune ypeda bHumamenno.
- ɪnʌkɪnjuːte ypeəda, Bʌk.ɪŋaBAɪnʌkɪnjuːeəHaɪypeəda.
- OcTaBeTe ypeDa da ce oxlaAn.
3.Изра3HeTe pe3epBoapa 3a BOJa.
4.ИЗваде Te npинадлесхноCTTa OTOTeJIeHneTO 3a npинадлесхноCTn. - OTBopete peBn3IOHHOTo KaNaYe. 3a ceI Ta nocTaBeTe OTBopeHnKpa Hya yDbJXnTeJIHaTa Tpb6a Bbpy PeBn3IOHNOTo KaNaYe, fNkCnpaTe Ro BB BOdau N rO 3aBnTe.
Фигура R
Tarvikute monteerimine
AkyJIbHI BiOMOCTI npo KOMNOHEHTn HabeJeHi Ha caTI: www.kaercher.com/REACH
PpunaTata3anachi deTani
CnID BVKOpNCTOBByBaTNI NIIe OpiRiHaNbHe npNuJaDra Ta opRiHaNbHi 3anachi YactHn, TOMy IIO came BOH rapaHTyOToB 6e3neuHy ta 6e3nepe6iMy EKcnIpyataciio npncTroIO.
Inopmaia yoio npnaadra Ta 3anachnx qactnH MICNTbca Ha caTti www.kaercher.com.
KOMnJIeKT NOCTaBKn
KoMnIeKaTuaI npIcTpo 3a3HaueHa Ha ynaKobu.IiD
Uac po3nakyBaHH npIcTPO nepeBipNTu
KoMnIeKaTuIO. Y pa3i HeCTaI npINJaAa a60
yUkoJKeHb, OtpmAHnx iD qac TpaHCnOpTyBaHH,
CNI d NOBIOMTN Ipo ce ToproBeNbHi opraHiaaii, Jka
npOdaI npIcTpiI.
TapaHTi
Ykochni kpaHni DiIOb BiINOBiDi rapaHTnHi yMOBn, BCTaHOJIeHI yNOBHObaKeHOO oprAH3aIciO 36yTu Haoo npOdyKuII B ci KpaHlMi. MoKnBI HeCnpabHocTi npnaHy npOTrrom rapaHTnHoro cTPOky MM yCyBaEMo 6e3KOuTobHO, RaIO npUPhHa HecnPabHocTI noJrae B deΦeKTax MaTePiaJIb abo Bnpo6bHuOmy 6paky. Y pa3i BHNKHeHHN ppTeH3i nPoTARom rapaHTnHoro cTPOky npoxAHn 3BepTaTnc, MaOUn npu Co6i Yek npo NOKynk, do ToproBeNbHOI oprAH3aui, Io npOdaNa npOdyKT, abo Do hau6bnXQoi yNOBHObaKeHoI cnjx6n cepBicHOr o6cIyRObyBaHH. (Adepcn DnB. Na 3Bopoti)
3an06ixhhi npncTpoi
△OBEPEXHO
Biodcymi a6o 3mHehi 3anobixhi npucmpoi
3anobixhi npucmpoi npuzhahehi dner eauo20 3axumy. 3abopohrembcra 3minnobamu 3anobixhi npucmpoi yu Hexmyeamu Hmu.
CnmboHnHa npncTpoi
(3anexhoBIDTnnynpnctroo)
He 3aunueamu 3i6paHy douo8y body.
3a6bopohraembcra doabamuy body Muoyi 3acobu yiu hwi doabaeku (Hapukna d, apomamu3amopu).
3HimahHH6aka Dn BODn 3 MeTOHO HAnOBHeHH
- Notarynti 6ak dna BODn BeptnkabHNo yropy. ManIOHOK B
- HanOBHnTb6ak DnB OoN BOONPOBIHO BOOHO a6o cymiuho BOONPOBIHO BDO3 MaKcMym 50% nuctnbObaHOI BOIN, TpIMaOHNo IORo BEPTkAJIbHO.
- Bctabntn 6ak JIy BOIN Ta HATNCHTN Ha HbOro BHn3 Do oikcauii.
HANOBHeHHa 6aka Iy BOnI 6e3nocepEnbO Ha npucTpoi
- Yepe3 OTBip 6aka Дян Налвань BOДи 3aIHTN BOОnpOBiHy BOу CymiW BOОnpOBiHOI BOДи 3 MaKcIMyM 50 % ДиCTиNbOBAHOI BOДи.
MaJIHOHOK C
YbimKHeHH npncToPO
Bka3ieka
Kaio npoobomy pe3epeyapi bodu Hemaac a60 3aHaMo Mano, mo nouHae npauoeamu bodn Hu haooc, kui nodaec body 3 baky dny bodu e napoBu pe3epeyap. Ipouec HanobHeHH MoKe mpuamu KInbKa XeunuH.
Bka3ieka
KoJHi 60 cekHy npucmpiu KopomkoyacHo 3akpuBaKJanaH, npu ubomy yumHO muxe KnaaHH.
He 3aueamu 3ibpaHy douooy body.
3a6bopohraembcrdoabamuy bodymuoyi 3acobu y iHwi do6aKu (HanpuKnad, apomamu3amopu).
- HanOBHTN 6ak DЯ BOJN BOJONPOBIDHO BOJOHO a6o cymiuHBOJONPOBIDHO BOJN 3 MaKcIMMyM 50 % dNCTINbOBAHOI BOJN.
Pnpctpi roTOBm do BVKOpncTAHn.
BmKHeHH npncTopo
- BCTaHOBbTN BmMkaU npucTpoU B nIOJoxKeHHA «OFF»
MaJIIOHOK L
ПпстpiВьмКнeHo.
- Hatnckatn BaxiNb noaui napn dOn, DOKn He npnnHtbcra Buxid napn.
MaJIHOHOK M
Tnck y napobomy pe3epByapi BiicytHi.
- BiCyHyTu Ha3a3 3axnCT BiD iTei.
Baxkib noaui napn 3a6koBaHo. - Bntarhytn wTeNceJbHy BNkny 3 po3eTkn.
- CnpoXnTb 6ak nIy BoDn.
PozraJkyBaay KInnMIB
3a donomoro1o po3rnaJxvBaay KINIMIB MOKHa NOKpaUyBaTn 3OBHlHiBnIgNIMIB.
yB4A
NookoeHHa KUIma ma po3naQyBa a KUnumie
3a6pydHenn po32anaKyaHa KUnumie, a makoBucoka memnepamypa ma HacuHicmb bOno20MOxymb npu3becmu do nowkodKeHHa KUnuma.
Kpim mozo, neped KopucmyaHHm cnid nepeebummu mepmocmiikcmb kunuma i ennue Ha hbozo bonozu Ha manonomimHIi dinHui 3 haMehuO KInbkiCmIO napu. Dompumyamucb Incmpykui i3 yuueHHraeedehux bupo6hukom kunuma.
Ipekeohamuc, zo neped eukopucmaHHm po3aadkybaya kuNumie KUnum 6yNo OuyuueHo 3a donomooio nulococa u 6yNo budaneHo nJrMa.
Ipeed eukopucmaHHm i nicn nepepe 8 ekcnnyamau cnil uynom eunapoeybaHnae udaNumu y 3nue (6e3 mkaHnU dnpi ndnou /i3 dodaKOBum obnadHaHm) Moknue ckynneHHraDou (KoHdeHcam) y npucmpiu.
PozanaDkyeau Kunumie bukopucmoeyama nuwe 3 mkaHnHO dnny iidnou Ha hacadzi dny iidnozu. Y pa 3i bukopucmaHHa pozanaDkyaHa Kuumie 3acmocoeyamu nuwe HuzkuipieHb nomyKhoCn ouuueHH npoU.
He hnpaenmu npy npomzom mpueanzo yacy ha odhe Micue (He doewe 5 cekyhd), uo6 yhukhymu CUJIbHO2O 380JoxKeHHN U pu3UKy NowKOxKeHH Nid dioc bucoKoi memnepamypu.
He eukopucmooyamu po3anaedkyeaH kunumie Ha KUNUMAX i3 EUCOKUM BOPCOM.
KpinneHn po3rnaJyBaay KInmib Ha Hacaui dny nIiJorN
- KpinneHHN Tk aHnHn dny nIiNnHa hacaDi nIaIiNn, nIB. rnaBy Hacadka dny niDnozu.
MaJIHOHOKJ
- JIeKIM HATNCKaHHaB BBeCTn i 3aΦikCyBaTu HacaKy dny niDnOu B po3rJaXyBaU KInmIB. ManIOHOK K
- Po3nooyatn OuyuHHeHHa KJImma.
3HimAHnpo3rnaJxuBaKaKnIMiB 3 HacaKn dnn iDnorn
△OBEPEXHO
Oniku Hie
Iid yac o6p6ku npoio po32naedxyea Kullumie moke Haepiabumc.
He eukopucmoeyamu u He 3Himamu pozanaadxyeau Kuniumie bocohix abo y eidkpumux cahdanx.
Bukopucmoeyamu 3himamu pozanaadkyeauch kunumie nuue y npudamHomy ezymmi.
- HatnchTyHa Ja3nyok po3rJaXyBaYa KINIMIB KIHNYKOM MiHOrO B3yTTT.
2.Пднги Насдку дя niDnorg.
MaJIHOHOKJ
Dorna TaTexHicHe 06cnyroByBaHHa
BndaJIeHnHaKnny 3 napoBOro pe3epByapa
Bka3ieka
Ockibku y npucpoi bioknaadaembcra hakun, Mu pekomehymo nicnnehoi kibkocmi 3anoheh6aka dny bodu (3E = 3anoeHHeH6aka), JaK 3a3Haeho e ma6nuci, eudammu hakun i3 npucmpoio.
| ДIANAZH TVERDOSTI | dH | Мольь/л | 3Б | |
| I M'Яка | 0-7 0-1,3 100 | |||
| II | середny | 7-14 | 1,3-2,5 | 90 |
| III | ТВерда | 14-21 | 2,5-3,8 | 75 |
| IV | Дужete Верда | >21 | >3,8 | 50 |
Bka3ieka
Ompumamu doiokny npo meepdicmb eodonpoeioho BoMu MoKHa y eodooocnoapcbkomy iidomcmbi a6o 6 MicbkuX KOMyHaJIbHuX cnxy6ax.
yB4A
Noukoedxeni noepxhi
P034uH dnn budaneHHHaKuny MoKe 3pyuHy6amu yymnuei nobepxHi.
Hanoeamu ma cnopoxhoeamu npucmpiu ohepexho.
- BmKHyTn npucptpi, nVB. rnaBy BumKHeHH npucmpoio.
- DAtn npictpoO oxoJohTyN.
- CnpoXnTn 6ak dIy BOIDN.
- DiCTaTI npIJIaIaIaI3 BiDciKy.
- BiKpnTn 3aRnykU pyTeXHiHOro
obCnyROBaHHraBcBO BCTaBHTn KHeu
noDObKyBaJIbHOI Tpy6Kn B 3aTBop IHcneKuiHoro
OTBOPy, 3aFikCyBaTu II B HApPmHi Ta HaBHTn.
MaJIOHOK R - Повсгю зин Body 3 napOBOro pe3epByapa.
ManpoHok S
yB4A
Nowokdkenn npucmpo3ac6om dna budaneHHn HAKUNY
BukopucmaHHaHnepudamHOz3ac06y dna buaeneHHaKuny, a maKoX uOzo HnpaeunbHe do3oyeaHHaMoxym npu3eodumdo nowkodKeHH npucmpoIO. Bukopucmoyeamu buKnUoHNo 3aci6d nra buaeneHHaKuny KARCHER.
Iodamau 1 do3amop 3acoby Ha 0,5 n eodu.
- BnKOpncToBvBaTn po3uH nIaBuaJeHHaKaNpy BiINObiHDo iHCTpykui.
- 3aJIHTn po3uHn IJIY BuaIaHeHHaHKIny B napOBn pe3epByap. He 3akPbBaTu npOBn pe3epByap.
- 3aIIuHTn po3HH nIy BuaJIeHnHaKIny np6Jn3HO Ha 8 roINn dnn iI.
10.Повсichtу злптю розундя вдаленинся napoboro pe3epbyapa.
11.Якwo notpi6Ho, noBtOpTu npoec BuaaeneHHaKauny. - Ppomntn napobn pe3epByap 2 a6o 3 pa3n XOIOHO BOIOO, IO6 BuaJIHTN 3aIIuKIN p03HHy dIy BuaJIeHHHaKIny.
13.Повсгюзпун Body 3 napOBOro peЗерByapa. ManJOHOK R - Порocушитк крпльеня мереково kaбелю.
15.ПигВИNTIN3aRnyuKуДЯТexHicHOrO 6cIyROByBaHHNoIOdOBKyBaJIbHoI Tpy6n.
Dorla3a npnaandm
- TkaHnH nIy niIIOrTa yOxNn npaTn y npaJIbHi MaunHn 3a TempepaTyn He Bnue 60°C.
Donomora B pa3i HecnpaBHOCTe
Hecnpabhocti yacto Mahtb npocTy npuHy, kky MoXHa ycHyTu camOCTiHo 3a donomorIO IHctpyKci, HabeDeHHnx Hxue. 3a HaBbocTi cymHBiB a6o B pa3i HeHa3BaHnx HecnpabhocTe cnid 3BeptTaTnCdo ABTopn3OBaHOi cepBicHOi cnKy6n.
△NONEPEDXKEHH
He6e3neka ypaaxeHH eJekmpuHUM cmpymom i omppumHaOnikie
Doku npucmpiu nid'edhaHui do eJeKmpuHoi MepeXi a6o ue He oxolohye, npucmyamu do yCyHeHHa Hecnpaehocme Hbe3neHo.
BuHmu wmeIcEnbHy bunKy.
Damu npucmpoio oxonohymu.
06mexeHa kijbkiCTb napn
Hakun y napobomy pe3epByapi.
Budanitn Hakn3napoBoro peepByapa.
CbitIOIOHN iHnKaTop wBnKo 6JnMae
HepBoHm i LyHaC 3ByKOBn CnRHaN
Ybaizi HemaebOdi.
- HanobHHTn 6ak JnBODn.
BaxiNb noaqi napn 6inbue He HataNcKaTbcra
Baxijb noaui napi 3a6lokoBaHn 3axntom BiD iTei.
NocyuTn 3axnt BiD iTei ynepei. Baxinb noaui napi po36nokoBaHO.
TpBane HarpibaHH
Hakim y napobomy pe3epByapi.
Bndaanitn haknn i3 napoBoro pe3epByapa.
Benvikn Bvxid BoDn
Hakun y napobomy pe3epByapi.
Budanitn hakni i3 napoBoro pe3epByapa.
TexhiHiXapaKTepeNCTnKn
| SC 4 | SC 4 |
| Deluxe | Deluxe |
| EasyFix | EasyFix |
| Premiu | |
| m |
EneKtpnue nikNoeHHa
| Hanpyra | B | 220 - | 220 - | ||
| 240 | 240 | ||||
| Φa3a | ~ | 1 | 1 |
Uactota 5050
CTyniHb 3axnctTy IPX4 IPX4
Knap 3axncty
Papametpn po6oynx xapaKTepeNtNK
By rehepaTopbIH 6ocaty
BoIIepderi cybl CLE pexmiHde afb3yfa 6oIaIbI:
- Cy 6aBH uewin anbHb3.
- KypbInfBihb KocbHb3.
- KapbikdnoTbIK WAM Xacbl TycneH XblnbIbIKtafAHwa XHe y3ak Dbl6bcIbTk CnHaI ectinreHwe 6y KockblubH 3 pet 6acblb3.
4.By rehepaTopbIHda cy TaycblrFaHwa 6y KOn JeTImdi 6oNaIbI.
KypbIrfHbI yCTay
- ¥3apTkblI TyTikTePdi KOHdbIpMaHbIH YNKeH TyTkblBHa CaJIbIbI3.
- Kon KoHdbipmacbimeh HkyTeiik WymekTiH eP6ipih 1-y3apTkbiu TyTikke KnirisiH3.
- YJkeH deHreKe WTeKHe HkyTeJI WyMeKke 6eKiTiHj3.
- EdeH KOHdbipMacbIH TypaKa KOIO TyTkblbHa CaJIbIHbI3. Cypet O
-
Kaebjbi opan, OHbI KOHdbIpfbInapra apHaJIraH 6eimde caKaTahbl3. Cypet Q
-
By shaHricin opan, OHbI KOHdbipfbInapFa apHaIraH 6eImde caKaTahbI3. Cypet P
- KiUKeHTaIeHReJIeK WTeTKeHI JHe TereIcTeY WTeTKeCiH KOHDbIPbIInapFa apHaIraH 6eImDe CaKTaHbI3.
- KypblfblHbI Kypfak XeHe aar3daH KopfaIHaH opblHa caKaTaHbI3.
KoIdaHyfa apHaIFaH MaHbI3dBi eCKeptyJnep
EeH 6etIN Ta3apTy
KpybInfbHbKonDaHy aIdbIHda eEHHH 6eTih
waHcOpfbWneh copyra Hemece cbInbpyfKa KeHec
6epinei.OcbnaWbaBnrafDbTa3apTydAn 6ypbH
edeH nac neH 6TeH 3aTtapdaH Ta3apTbJaBl.
MaTaHbI KaHaP Ty
KypbInHbI naDanaH6ac 6ypbH 6ypkeyni JepmeMaTaMeH yuNeciminirH apKaaHn TeKcepH3: MaTaHbI 6ymeH eHden, KeTpiH3, CoCbH TycHn Hemece niUIMiHn E3repreHH TeKcepH3.
KeIka6aTTbI Hemece JaKaTaNFaH 6eTTepDi Ta3apTy
HA3AP AYdAPbIHbI
3aKbIMdaanFaH 6emmep
By baaybi3dbi, kuaa3 na2bH, nnaemuk ka6bHapobi Hemece wemmepiin 6oaybMeH XancbipMaCbH epimin Xi6epe anadbl.
BybjiXenimdeIeH wemmepiHe 6aBbImmaHaB3, KaNCbIPMaCbI KamnapaHybl MyMKIH.
Kypandbi Kopramaraa araw Hemece napkem eedehepei ma3apmyra kondaan6aHbI3.
KypbIfnbIbI 6oIbnH HeMece nIacmuknEe Hka6bnFaH 6empei, acyu HeMece yu Kuaha3bH, ecikmepei Hemece napkemmi ma3aJayra KOJaHa6aHb13.
- OcbI 6eTepi Ta3apTy yuiH, MATAHbI 6ymeH Kbicka yaKbIT eHdien, OHbIMeH 6etIH cyptiH3.
ÖnHeKti Ta3apTy.
HA3AP AYdAPbIHbI
UHeKmiCbHybiXe He6emmin3aKbIMdaIybl
By mepe3e kakmaybHbIH kAncbipbIraH bNikmepiH 3aKbIMdaybI kHe cbIp mMeMnepamypacbi mMeH 6oIraH Ke3de mepe3e eUHezi BemHe Kyu myCiyHe eKeIyi, HAmuxeciHde OHbIH cbHybl MyMKiH. By mepe3e kakmaybHbIH kAncbipbIraH bNikmepiH 6aBbImmaHaI3.
山 山 HeKmH 6yKIn 6emH 6ymeH MyKur mKeHn eHoey apKbInbI aUHeKmePdi cbIp mMeNepamypacbl meMeH 6oJraH Ke3de Kbi3dbipb1b13.
Tepe3eHin 6etIH KOHdbipMa-ueTkAmeh Ta3aIaN, MKNpotaIbIbIKKa apHaIFaH aIbIH6aI bMaIbIKtB1 Ta3apTbIHbI3. Cybl KIOYsiH, aIaydbI naJaIahHbIbI3 Hemece 6etIH KypTaBIn KeTIpiH3.
KoHdbipMaJapDbI KOJaHy
By tananwacbi
By nntoTeIH MbHa KaFdaaIapda Kypamdac 6eikTepci3 naDanaHyra 6onaBb:
IinHIn TyprAh KImDi eri KeHIN KbIpTbICapDbl KOHO yuiH: KmIdi Gymen 10-20 cm KaWbIKTBikTaH eHneHi3.
- WAnDbI bIlFaImeH KOHO yuH: MaJIbIKTbI 6yMeH XeHJEN EHN, OHbIMeH XnHa3DbI cyptiH3.
HykTeiik wymek
HyKTeNik WymeKeNen KInB IN KOJ XeTeTIN aIMaKTapDbI, TIRicTeP, pHTNHrTeP, cyarap, WYHfbJIwA, EKeTxAna, XaIIHOHN HeMece paNaTOPnapDbI Ta3aNAyra 6OJaB. HyKTeNik WymeK NaCTAHFaH XePrE KaKbIH 6OJFaH caBnH, Ta3apTy acepi Jxorapb I 60JaB, ce6ebi WymeKTeH WbIKKaH Ke3derI TempePaTypa MeH 6y MEnWeepi Eh KxorapbI. KaTbI eK WeirHdinepih 6ymeH Ta3apTy anDbIHda CcNkec KenetIH KByfBiW KypalmeH eHdeYe 6OJaB. KByfBiW KypaIdbI WaamMeH 5 MNHY epeKeT etyre KaNbbpBIn, 6ymeH eHDeHi3.
- HykTeiik wymeKi 6y tanHaacbHa bicbpHb3.
Cyper F
Dehrenek wTe (kiwkeHTa)
KiukeHTaIeHreNEK WeTKe KaTTbI KipDi KeTipy WsiH Kbl3Met KepCteDi. UetKa apKbInbI ecki NaCTapDbI KOIO OHai.
HA3AP AYdAPbIHbI
3aKbIMdaIraH 6emmep
LJemka KymcaK gemmepoi cbi3bn macmaybIMyMkiH. KymcaK gemmepoi masapmyra aphanmaHaH.
- KiUKeHTaI DeHReNEK UeTKeHI HYKeTI To3aHdaTy KOHdbIpMacbHa OPhTaHbI3.
Cyper G
YJKeH DeHreIeK WTeK
YnkeH deHreNEk WtKE WHyfbIuHa, ce6e3ri Ka6nHacbl, BaHha, ac yN KyfbIuBcNAtKbI YnKeH deHreNEk 6etTepdi Ta3aJayFa KonaBnbl BoBnTa6bIaNbl.
HA3AP AYdApbIHbI
Akaynap Ke3iHderi KomeK
AkaaynapdbIH c6bentepi kEN karaaIda keneci wonydb naaanaHy apkblbE3diirHeH KOHOfa 6oJtBHa KaapanabIM 6oJaDb. KydkTeP 6oJca Hemece ocj Kepde KepcetimereH akaynap 6oJrH Ke3e, pecmN cepBnC opTaNbIFbHa xa6apnacBbI3.
△ECKEPTY
Kyukmp Kayni Xhe 3neKmp moBHaH kapaKam any
KypbIfbl Kyam Ke3iHe KocBny Ke3de Hemece CybImarH K3de, akaynapobbl KOIO Kayinmi.
Jenik umekepdi poemkadaH wifapbin anbHb3.
KypbblfBhlCybImblHb3.
TemehdetijreH 6y Meupei
By rehepaTopb KaKneH Xa6bJnFaH.
By rehepaTopbHdaftb KaKtTa3aHaHbI3.
KapbIKnOHTbIK wa Kbi3bIN 6oNbIN Te3 XbInbIbIKTaIbIXeHcBbICTbIK CnHAn ectinei BaKaTc cy kok.
Cy6aTbHTOJTbIpbHb3.
By teiri 6acblMaibdi
By tetiri 6aapanapan Koprhaicneh Kynbintanfah.
- BanaanapdaH Kopfay KylnbH anFa cbipfbTbHbI3. By tetiri KylbINTah WbIFapbINFAH.
¥3aKa yaKbIT Kb13aDbI
By rehepaTopbi KaKneH Ka6bIHaH.
By reHepaTopbIH KaKaTah Ta3apTbHbI3.
Cy wbfibHbX Kofapbl
By rehepaTopbi KaKneH Ka6bIinFaH.
By reHepaTOpbiH KaKaTH Ta3apTbIhbl3.
TexHnKaJIbIK MaFnyMaTTap
| SC 4 Deluxe EasyFix | SC 4 Deluxe EasyFix Premiu m | ||
| Эльекгжелicîne кosity | |||
| КерneyВ220- | 240 | 220 - 240 | |
| Фаза~1 | 1 | ||
| Жилік Гú 50 50 | |||
| Корганыс Клась | IPX4 | IPX4 | |
| КорRAY Клась | I | ||
| Курьлфынбий Бимділiri Tураьы Деректөр | |||
| Жыліч КуаТы | Вт | 2200 | 2200 |
| Мakсимал жуMbіс | Мпа | 0,4 | 0,4 |
| Кысымы | |||
| Кызу укыты | Минут | 3 | 3 |
| Тар | |||
| Узідікіз 6-byлал жібіту | r/MиH | 60 | 60 |
| Мakсимал 6у有很大ульci | r/MиH | 150 | 150 |
| Сынымділів | |||
| Су 6агы | I | 1,3 | 1,3 |
| Бу reнераTopы | I | 0,5 | 0,5 |
| Θлшем'dеріmen салмafы | |||
| Салмafы(Tолымданшыларсыз) | КГ | 6,8 | 6,8 |
| Yзындаыfы | MM | 400 | 400 |
| Енi | MM | 270 | 270 |
| Биіktіri | MM | 300 | 300 |
TexnkaIbIK e3repicTepeyKcat etinreH.
Jabul ala> alwog ogo jolllgj
pU JJIabUl a> alw g
2j = 0| j : j|
jglbcl>1j0j
Jusgio Jolll
JlJI aIe JcJllKJI alljLp
sllljic
Jusoo Jusu J>oo
JlJ>o no Lwksll allj!
auiu
| SC 4 Deluxe EasyFix Premium | SC 4 Deluxe EasyFix | ||
| الصحيى | |||
| -220 | -220 | ف��得了 | الصحيى |
| 240 | 240 | ||
| 1 | 1 | ~ | العربي |
| 50 | 50 | شامز | الترجمة |
| IPX4 | IPX4 | العربية | |
| الرّب | الرّب | العربية | |
| الإستعمال | |||
| 2200 | 2200 | بُلْع | الإستعمال |
| 0.4 | 0.4 | مُّلُّلُّلُّلُّلُّلُّلُّلُّلُّلُّلُّلُّلُّلُّلُّلُّلُّلُّلُّلُّلُّلُّلُّلُّلُّلُّلُّلُّلُّلُّلُّلُّلُّلِ | |
| 3 | 3 | دَالَّج | العربية |
| 60 | 60 | /\(مُّلُّلُّلُّلُّلُّلُّلُّلُّلُّلُّلُّلُّلُّلُّلُّلُّلُّلُّلُّلُّلُّلُّلُّلُّلُّلُّلُّلُّلُّلُّلُّلُّlc) | الإستعمال |
| 150 | 150 | /\(مُّلُّلُّلُّلُّلُّلُّلُّلُّلُّلُّلُّلُّلُّلُّلُّلُّلُّلُّلُّلُّلُّلُ" | العربية |
| الصحيى | |||
| 1.3 | 1.3 | الرّب | العربية |
| 0.5 | 0.5 | الرّب | العربية |
| العربية | |||
| 6.8 | 6.8 | سَعَمَ | (العربية) ب直升玲玲玲玲玲玲玲玲玲玲玲玲玲玲玲玲玲玲玲玲玲玲玲玲玲玲玲玲玲玲玲玲玲玲玲玲玲玲玲玲玲玲玲玲玲玲玲玲玲玲玲玲玲玲玲玲玲玲玲玲玲玲玲玲玲玲玲玲玲玲玲玲玲玲玲玲玲玲玲玲玲玲玲玲玲玲玲玲玲玲玲玲玲玲玲玲玲玲玲玲铃 |
| 400 | 400 | مُّلُّلُ | العربية |
| 270 | 270 | مُّلُّلُ | العربية |
| 300 | 300 | مُّلُّلُ | العربية |
Jzll aol ailllgloll
J
10gla//u/2gj a//g/aj//ol//o//a//
jguai lioluyuuc a> jg> aoJUWl
4
juaa/kaawll
awlu//abwU//uLk//allj/ cbbu slgo sjj jKs
j1j1
jgl//slz/
-
JaaJIbJ
-
S_ AOB = 12 · OB · AB = 12 × 4t
-
a : a x,y,z
4..uJusJ
- _gws
pui jlll l 10 UI Jc allbuiUI
a>g a
aLiia! oJgR
- j j
a>la o0g0S
aui
jll allj/ olo 1j jio
gio aullluc acjIg aoLio julc dJ/ oIo p1zow
jzjzjzjzjz
JukARCHEF
j/a5i jai/1 a/1j/01o 02>1g o2lo 02>g p2xw
.
jJoo pGgLay JauKill allj! Jgl>0p2swl7.
JlJrJrJrJrJrJrJrJrJrJrJrJrJrJrJrJrJrJrJrJrJrJrJrJrJrJrJrJrJrJrJrJrJrJrJrJrJrJrJrJrJrJr
JUILJI JJI JALAC JSSJUULI j09.11
gJ alljU Jd UaJU JI JI JI JI JI JI JI JI JI JI JI JI JI JI JI JI JI JI JI JI JI JI JI JI JI JI JI JI JI JI JI JI JI JI JI JI JI
JUSSJJI JGLJLOL
J. J. J. J. J. J. J. J. J. J. J. J. J. J. J. J. J. J. J. J. J. J. J. J. J. J. J. J. J. J. J. J. J. J. J. J. J. J. J. J. J. J. J. J. J. J. J. J. J. J. J.
a>la|0gR
Jill Jgog JIgJol> .14
.15
JLLJLJIaJI
()
J
.aaalawllo w/ 1J// aed) adwlaI
sJ
Jusj Jusw//o w/ g/11 11 dIw/11 oI cI
Sai ju/lll/ pio pivw/pc. wlaIg bgal
.0>0g0,0b1wU/ bla// 0c wlaal
gssagj>ggdsacBulg jU1 Jw1 1.
aJwJ 60
JllcIdd>Jl>ddclw
galee dai kaiyabayuuyuui UU
gI dUu> Jlll pJll jaiwUl ablu
euaa aoo 11gill gol i0gso rUuio
.oo
4^
19 a 2011
a1 = 23,a2 = - 43,b1 = 58,b2 = - 34
00gSg,2yjgljll4s, j0g jqj//la/1b
UlllUl lclldll
a/1w/
- | x,y| = 2 | y,z| = 2| z,1|
aiaeaio Jai aias
JSSIO JSSI J
JJI JJ 100000000000000000000000000000000000000
aJlI>Ul gUll, Jw aogj LED aJ
aALLUJgcloo
.
jllgljbso jie
J 100g Jg jg g Jg Jg Jg Jg Jg Jg Jg Jg Jg Jg Jg Jg Jg Jg Jg Jg Jg Jg Jg Jg Jg Jg Jg Jg Jg Jg Jg Jg Jg Jg Jg Jg Jg Jg Jg Jg Jg Jg Jg Jg Jg Jg Jg Jg Jg Jg Jg Jg Jg Jg J g
a>la|0g0
aww/1gaw/1caw/auaio
a>la oG G
1...bai jui
aJsOjDima oIw
0sJUJI aIJIaIJI 0sJIJI 0sJIJI 0sJIJI
Jol>Jjell jol>Jll Jlss
1...sJJI Jol> aiojU U ced, jdojU joijU jol>
a
oJuaa//kaaw/
JSSsio 15uWU JgU uU> JSLsWU oL
a
slllgl slll pia jiall
sagb/1g odssll aigw/ lgl slw/ paei / slailll .oLw/ jol gJ/ / yj 1
aogla oJrall no gazll lc p/sxwU/ jg JyI / li
no aas Jg/ p/sxwU/ llc no slw/ lc JyI/ g aizll
.0xl/ no bgslo mc ggoo lc JyI/
aia/ agzll nc oerslal / cblw / olcl, oJr
.
a a/ll gall no alilg slwll c aull baw gao 12 wll poio plzwl l q
no alil jlc Jaiuill ad rj oog ploxlwll jq oj
uill JL no jlgll (cixio clo) aliaea / aiaa / ceaill
(cwla/s / aioj adnio ng) oal ao g jzl / dljg
auuUl caio lc auoUl adnio go U / slwll poio pruiu U
le jll slwll cbiu lc slwll poio plzwi/sic oj
.
(5)2019 11/11/11/11/11/11/11/11/11/11/11/
aaiS aliy sIw Jc Iy wll poio pxtuui U
aJU 1000
Cio Jdall jbi, aoi UI cio 1c aoi U1 aaiu 1.
a>la|ojgd
2
Ji# aSjg
a>la|0.8
3.
aJU aGg no aa Jaaal al gll aag all jy
4a
· 2 l//
yll lsc slwll poio yu j
gogc/lll lll lllllllllllll
Slll plxwulgo Jgj bui
jI jI I Jg aJU U g aJU 1
a
Jgbl ojol jlll p 1
1.1
a>la|g
.2
a>la|ojgd
aall glg jc aaiil alaaal lalll
20-10 aIwJLsUlll aIe:
cogoojolwaoa:abllg j
- 与 1 U
bai jui aio
a aaii iiaaii iiaii
g>glgagagaaagagagagagagagagagagagagagagagagagagagagagagagagagagagagagagagagagagagagagagagagagagagagagagagagagagagagagagagag
aio 1i iie. iiaaiall g iigill g IolaoIg Jus
J 1
jIJI JIOJIOJIOJIOJIOJIOJIOJIO
JwLio abia 1000
15 5 0 0
aLac e|g
1
a2 > a1 ②
(o)oo
LullUl fupj ggo wll llo yddal all ohrall
oioi oioi oioi oioi oioi oioi oioi
Lswj JS
4w
aia/
aaww/1gaww/1g2g/1g0laow/1s
J
ollll 100000000000000000000000000000000000000
/laJlalI JIOJI IaI JIOIaIgJae
goloo//aJalalac
a
jglz11,
joo 1001 0g> g/ 6ia/4 1sui/2g> p
clll jslalpvlwjcbclla
225% 50 awi pi iui/1./i/, jla//jba//sla//
aiz//oolo go ablig 129 oJbaal/olla//
1.1y/ ylll / 49LwC ccll lal / clalp
1.11 4a20111101100100
.(llio jIb2/1)U/s> afo/1go g/ caiu 1go s/ e.lu
cloggssssssssssssssssssssssssssssssssssssssssssssssssssssssssssssssssssssssssssssssssssssssssssssssssssssssssssssssssssssssssssssssss
a50.9>5%
Jiaiill Jieoo jgIgS
jgl
1."JgUg
a>la oga L
.
- cg > c g
a|la|0gM
alall gioe jolll
3..
joo j001
J. 4
.1aJjEpa5
Jj
auiuuiuie J 10 jgljll jg
jgl11 jol 1
S - S = 0
cllljg 3.
.1b bgs>Ul UgUu LED 2
Jkui UI uill LED aol cui jgl3 Jg> 4
Jia mill 1i jgJUgK.
E a>la|0g
JzlljzIe Iaizai 5
F a>la|0g
J
122 405
a aas
| سُفَرِبْلَبْنَهُّةِ | ⁄⁄ |
| الإستعمالِلَبْنَهُّةِ | ⁄⁄ |
| الترجمةِلَبْنَهُّةِ | ⁄⁄ |
agc jll jll aos lc jll aos yzj zao laol .1
JzJIgJcIaJI 2
a9 a9 1e jll Jg
sglu Jkuu
clll Jo JLaSswl
aJaaogjclal jzg afool aagss
aog oJw! Jg jg UL gUu aCLED
aLac plaJ ic. gao Juy Jy all Jy o slal axio jai
JUULIJIILLED 2000
12aOjUI
( 4) a = b + c
14
15
16
17]UabUl
(18)
19,baijui
(20) (a,20).
②()o.
20gai
231g>allolu
24.59.2 Cioio
(25)s9aJU Cua
(26)
27
28
-
- U
30
31
32
SC 4 Deluxe EasyFix Premium**
#
claxall
Aa
Jlll
F aDlaOg
aill jlll cio lalssu gssall 2
G( a > 1) ( a > 1)
J 1
wua 1 gUaJIbawU Ogwoa a
Jll J 1
algo Jgul oJgulo
oogwloJe auiu alliuwul oogwlo >b
JUJI AJIJAJI
Jooogoljgwo jaoicg
H aDlaOg
gssalllgljyulglgJlssJ> .4
aJUwUl oJgwsL
a2 > a1
algo
clalall
.1
jdo jdo
Lg 2
m : x = 1 或 3x + 4y + 1 = 0
N a|la|Og
J
clllcjo
jglj0a aia p 1g alal all jgs
aolll jz
4a
a/1g/a/ll/aollw/
1y/ aollll jgjglj u
jgljlljc jg0
(jgljjb
Juswll cwlj jzjj 2a

jolllg>glsljbs

Jj

alai
cll lll lll lll lll lll lll lll lll lll lll lll lll lll lll lll lll lll lll lll lll lll lll lll lll lll lll lll lll lll lll lll lll lll lll lll lll lll lll lll lll lll lll lll lll lll lll lll lll lll lll lill
JUJI
J. 1 JkJjJgJgJgJgJgJgJgJgJgJgJgJgJgJgJgJgJgJgJgJgJgJgJgJgJgJgJgJgJgJgJgJgJgJgJgJgJgJgJgJgJgJgJgJgJgJgJgJgJgJgJ
elacaojJaiikARCHE
J. JUJI JIJIJ
Jjolli iIwgoji
Lllo 1111111111111111111111111111111111111111111
eai jaiui 2jai sji o jgljoi j
aIall aixi9
aeg .c. aal alal alal alal alal alal alal alal alal alal alal alal alal alal alal alal alal alal alal alal alal alal alal alal alal alal alal alal alal alal alal alal alal alal alal alal alal alal alal alal alal alal alal alal alal alal alal alal alal alal alal
KÄRCHER.
jglglllao|go
100 1234567890
(ogjll) pdoosol jgai lcl dlacld gai
. a>luuallgeuW uall a>J
a>la| oJgA
1LED
(2)U>UI
g>2g>0 15.ogjlljc gao jgeJl pww sgi 3
4JaaJIaagIJI JbAsI JgJaiil aLac n c 5u
5aJU
,SG ,SG
g>g>g j0 sL .ogjll jc jao jgejll puiu g2o gaiu si iia 1 aaii aie
jai jai jai jai jai jai jai jai jai jai jai jai jai jai jai jai jai jai jai jai jai jai jai jai jai jai jai jai jai jai jai jai jai jai jai jai jai jai jai jai jai jai jai
aill go aill alog
jU jU sGIMO
IawgaiI JzaiSgiio
gUJLs
6 15 Lg JI IJU UU UU UU UU UU UU UU UU UU UU UU UU UU UU UU UU UU UU UU UU UU UU UU UU UU UU UU UU UU UU UU UU UU UU UU UU UU UU UU UU UU UU UU UU UU UU UU UU UU UUUUUUUUUUUUUUUUUUUUUUUUUUUUUUUUUUUUUUUUUUUUUUUUUUUUUUUUUUUUUUUUUUUUUUUUUUUUUUUUUUUUUUUUUUUUUUUUUUUUUUUUUUUUUUUUUUUUUUUUUUUUUUUUUUUUUUUUUUUUUUUUUUUUUUUUUUUUUUUUUUUUUUUUUUUUUUUUUUuuuuuuuuuuuuuuuuuuuuuuuuuuuuuuuuuuuuuuuuuuuuuuuuuuuuuuuuuuuuuuuuuuuuuuuuuuuuuuuuuuuuuuuuuuuuuuuuuuuuuuuuuuuuuuuuuuuuuuuuuuuuuuuuuuuuuuuuuuuuuuuuuuuuuuuuuuuuuuuuuuuuuuuuuuuuuuuuuuuuuuuuuuuuuuuuuuuuuuuu uu u u u u u u u u u u u u u u u u u u u u u u u u u u u u u u u u u u u u u u u u u u u u u u u u uu uu uu uu uu uu uu uu uu uu uu uu uu uu uu uu uu uu uu uu uu uu uu uu uu uu uu uu uu uu uu uu uu uu uu uu uu uu uu uu uu uu uu uu uu uu uu uu uu uu uu uu uu uu uu uu uu uu uu uu uu uu uu uu uu uu uu uu uu uu uu uu uu uu uu uu uu uu uu uu uu uu uu uu uu uu uu uu uu uu uu uu uu uu uu uu uu uu uu uu uu xu xu xu xu xu xu xu xu xu xu xu xu xu xu xu xu xu xu xu xu xu xu xu xu xu xu xu xu xu xu xu xu xu xu xu xu xu xu xu xu xu xu xu xu xu xu xu xu xu xu xu xu xu xu xu xu xu xu xu xu xu xu xu xu xu xu xu xu xu xu xu xu xu xu xu xu xu xu xu xu xu xu xu xu xu xu xu xu xu xu xu xu xu xu xu xu xu xu xu xu Xu Xu Xu Xu Xu Xu Xu Xu Xu Xu Xu Xu Xu Xu Xu Xu Xu Xu Xu Xu Xu Xu Xu Xu Xu Xu Xu Xu Xu Xu Xu Xu Xu Xu Xu Xu Xu Xu Xu Xu Xu Xu Xu Xu Xu Xu Xu Xu Xu Xu Xu Xu Xu Xu Xu Xu Xu Xu Xu Xu Xu Xu Xu Xu Xu Xu Xu Xu Xu Xu Xu Xu Xu Xu Xu Xu Xu Xu Xu Xu Xu Xu Xu Xu Xu Xu Xu Xu Xu Xu Xu Xu Xu Xu Xu Xu Xu Xu Xu Xu Du du du du du du du du du du du du du du du du du du du du du du du du du du du du du du du du du du du du du du du du du du du du du du du du du du du du du du du du du du du du du du du du du du du du du du du du du du du du du du du du du du du du du du du du du du du du du du du du du du du du du DuDuDuDuDuDuDuDuDuDuDuDuDuDuDuDuDu Du Du Du Du Du Du Du Du Du Du Du Du Du Du Du Du Du Du Du Du Du Du Du Du Du Du Du Du Du Du Du Du Du Du Du Du Du Du Du Du Du Du Du Du Du Du Du Du Du Du Du Du Du Du Du Du Du Du Du Du Du Du Du Du Du Du Du Du Du Du Du Du Du Du Du Du Du Du Du Du Du Du Du Du Du Du Du Du Du Du Du Du Du Du Du Du Du Du Du DuDuDuDuDuDuDuDuDuDuDuDuDuDuDuDuDuDuDuDuDuDuDuDuDuDuDuDuDuDuDuDuDuDuDuDuDuDuDuDuDuDuDuDuDuDuDuDuDuDuDuDuDuDuDuDuDuDuDuDuDuDuDuDuDuDuDuDuDuDuDuDuDuDuDuDuDuDuDuDuDuDuDuDuDuDuDuDuDuDuDuDuDuDuDuDuDuDuDuDuDu
11. loUl J
g g g g g g g g g g g g g g g g g g g g g g g g g g g g g
Ea 100s loic Jlao jlaal oj Jl
aagaiiaaaalgall gge jllbcu 1
aee eae aoe jgol gogol
(a)abJl a>adJl Jc U|gioJI
alglal
5
5
5
5
5
5
5
5
6
6
7 1
7
8
9
9
aolc|d|

Jgl Jgldjdsddoocj jy aulllll 1 1 1
.111 100
101234567890
JUJU
aJlU JI UU I
jzJl. jzJ1JI JaoWJzJI liD
CHERaE aiaaiaeaiiuiu 5kagjauu, aaiu u
duc.aegnclabiaill. jauuill Jdu gogall kwl
. aullllalwJolr
auiu a,la

100 100 100 100 100 100 100 100 100 100 100 100 100 100 100 100 100 100 100 100 100 100 100 100 100 100
jU.aau oJgJ jgeJI Jzau aJyooJI UoJ UaJIaJI UaJIaJI go JoJI IqO Jaal OJgU Uo
)UgdiallJg>dsJREACH(
:gajlgluog>allgoJg> aJl>llloglaal
www.kaercher.com/REACH
Jgglg gagaaalakalalal
auiUI jglgagului auslll pssu UUUI UI no jlcjw jlgjLJg uu g Jcui glgagauuall aolll llogal
. www.kaercher.com g9
Jd

THANK YOU!
MERCI! DANKE! iGRACIAS!
Register your product and benefit from many advantages.
www.kaercher.com/welcome ★★★★★
Rate your product and tell us your opinion.
www.kaercher.com/dealersearch
Alfred Kärcher SE & Co. KG
Alfred-Karcher-Str.28-40
71364 Winnenden (Germany)
Tel.: +49 7195 14-0
Fax: +49 7195 14-2212