
DS 3 - Steam cleaner Kärcher - Free user manual and instructions
Find the device manual for free DS 3 Kärcher in PDF.
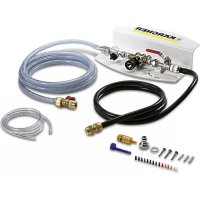



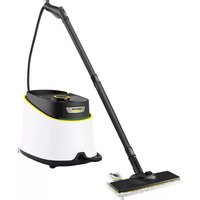
| Product Type | Steam cleaner |
| Brand | Kärcher |
| Model | DS 3 |
| Power | 1500 W |
| Steam pressure | 3.5 bar |
| Steam temperature | 100 °C |
| Water tank capacity | 1 L |
| Heating time | 6 to 8 minutes |
| Cable length | 5 m |
| Weight | 3.8 kg |
| Dimensions (L × W × H) | 350 × 250 × 300 mm |
| Main functions | Steam cleaning for hard floors, textiles, windows |
| Included accessories | Floor nozzle, spot nozzle, microfiber cloth, dosing attachments (14 colors) |
| Safety | Safety lock, safety valve, automatic shut-off |
| Maintenance | Regular descaling, nozzle cleaning |
| Spare parts | Nozzles, seals, tank available |
| Warranty | 2 years |
| Manufacturer | Kärcher |
| Use | Indoor |
Frequently Asked Questions - DS 3 Kärcher
User questions about DS 3 Kärcher
0 question about this device. Answer the ones you know or ask your own.
Ask a new question about this device
Download the instructions for your Steam cleaner in PDF format for free! Find your manual DS 3 - Kärcher and take your electronic device back in hand. On this page are published all the documents necessary for the use of your device. DS 3 by Kärcher.
USER MANUAL DS 3 Kärcher
Please read and comply with these instructions prior to the
initial operation of your appliance. Retain these operating instructions for future reference or for subsequent possessors.
Contents
Safety instructions 6
Function 6
Proper use 6
Advantages 6
Special features 6
Scope of delivery 6
Environmental protection 6
Overview 6
Wall mount 7
Assembly 7
Operations 7
Troubleshooting 8
Warranty 8
Safety instructions
For operator:
Please ensure that all users of the machine have read and understood the contents of this Operating Instructions Manual and are familiar with the local regulations about work safety. The users must have been technically trained to use this appliance.
For users:
Please read and comply with these instructions prior to the initial operation of your appliance.
Symbols in the operating instructions
Note
indicates useful tips and important information.
Function
With the ABS detergent dosing wall mount, water and detergent are mixed with the prescribed mixing ratio and filled directly into the tank of floor cleaning systems.
Proper use
Use this appliance only as directed in these operating instructions.
This device has been designed to fill floor cleaning systems that are not equipped with their own dosing device.
Advantages
- No waste of water and detergent.
- Allows an efficient mixture due to its 14-colour calibrated dosing nozzles (0.2-13.5%).
- Includes a complete connection kit. Operation under pressure. Is also suited for use with Karcher rapid fill.
Special features
- Is connected directly to the tap.
- Operates without electricity or compressed air.
- Venturi system with environmentally friendly valve.
Scope of delivery
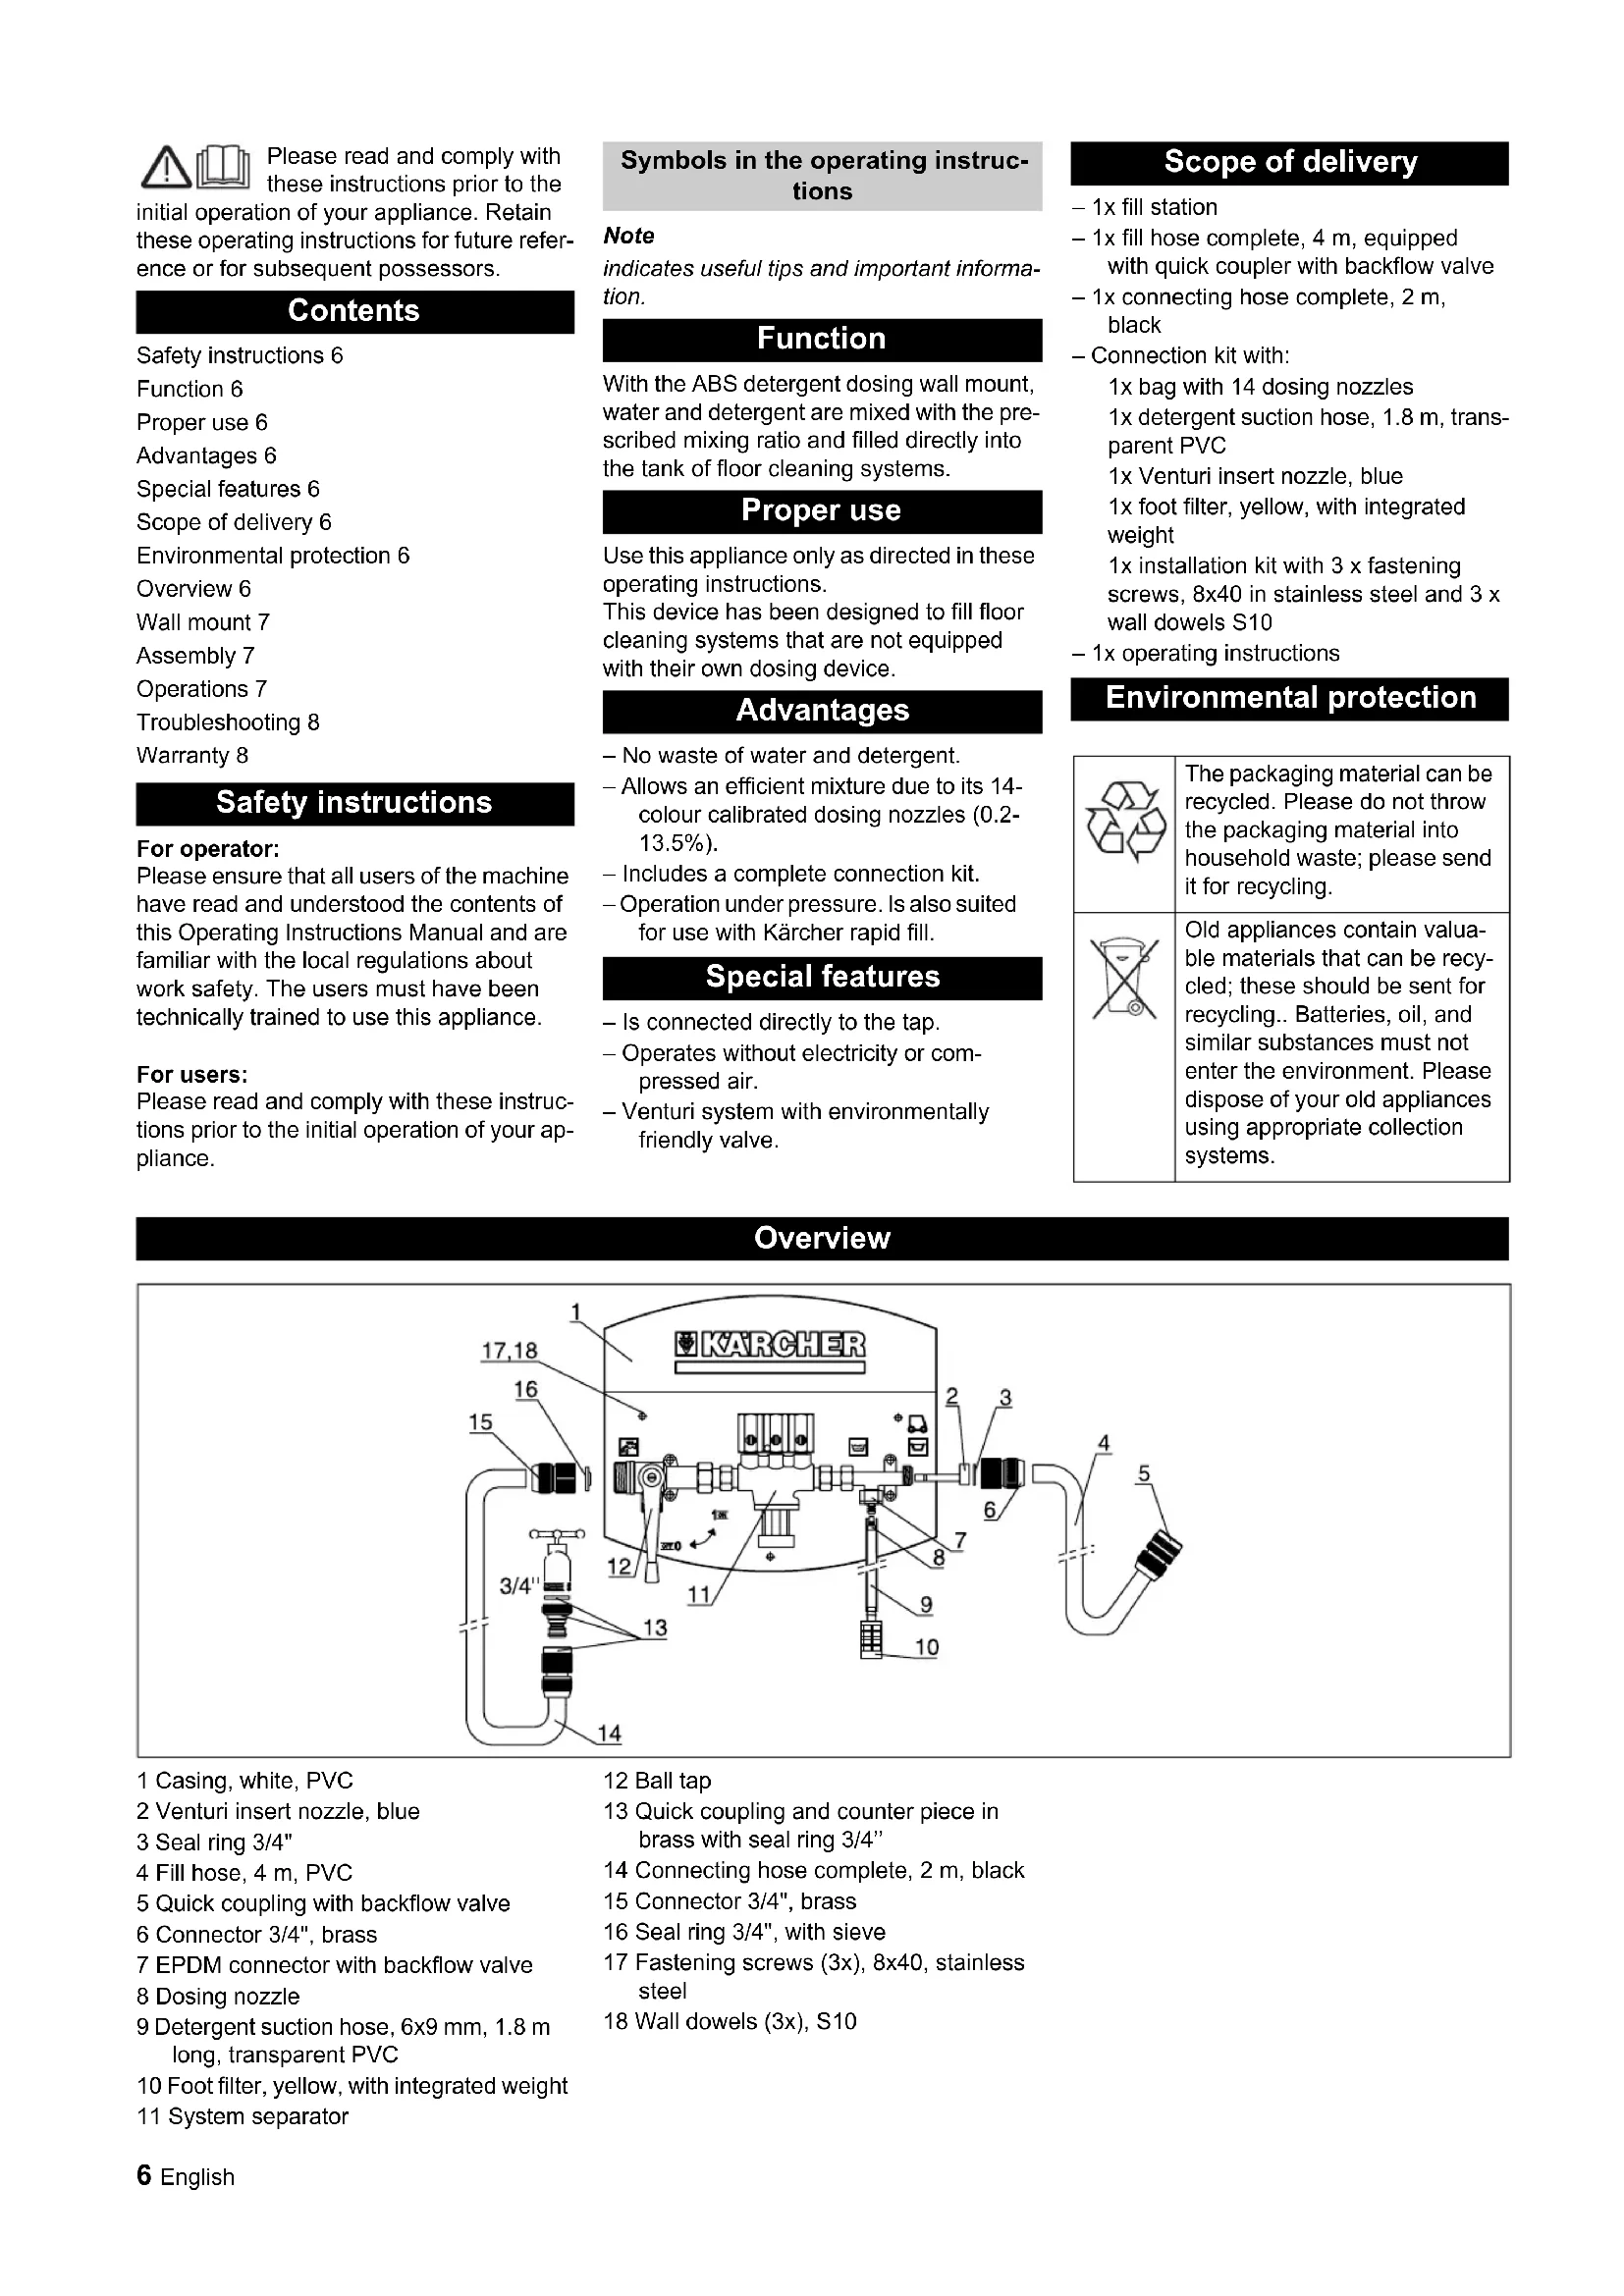
- 1x fill station - 1x fill hose complete, 4 m, equipped with quick coupler with backflow valve - 1x connecting hose complete, 2 m, black - Connection kit with:
1x bag with 14 dosing nozzles, 1x detergent suction hose, 1.8 m transparent PVC, 1x Venturi insert nozzle, blue, 1x foot filter, yellow, with integrated weight, 1x installation kit with 3 x fastening screws, 8x40 in stainless steel and 3 x wall dowels S10
- 1x operating instructions
Environmental protection

The packaging material can be recycled. Please do not throw the packaging material into household waste; please send it for recycling.

Old appliances contain valuable materials that can be recycled; these should be sent for recycling. Batteries, oil, and similar substances must not enter the environment. Please dispose of your old appliances using appropriate collection systems.
Overview
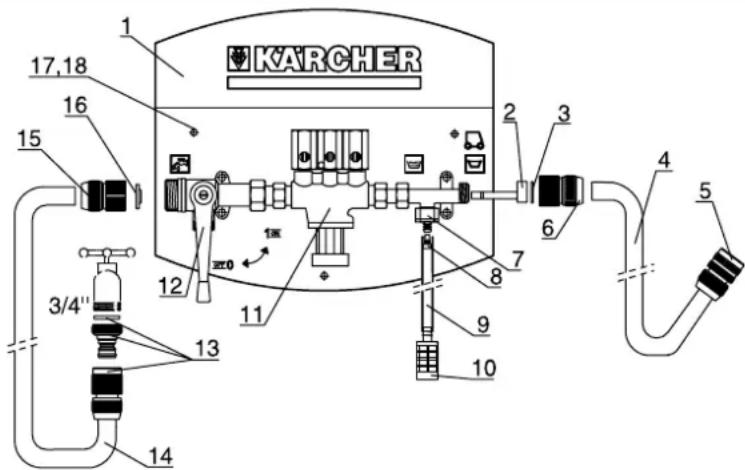
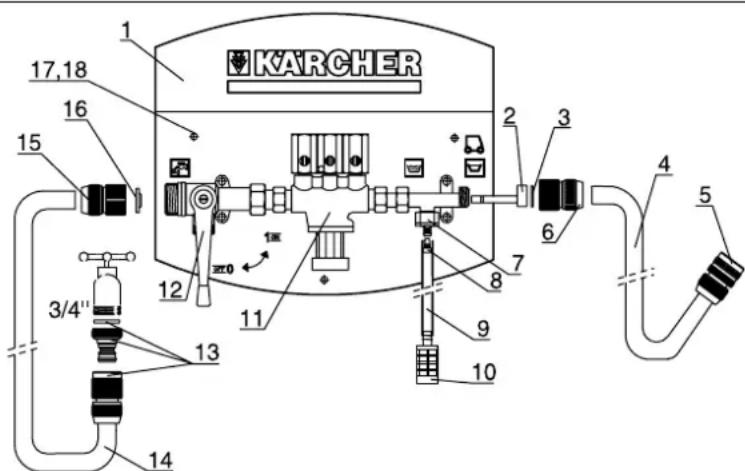
1 Casing, white, PVC 2 Venturi insert nozzle, blue 3 Seal ring 3/4" 4 Fill hose, 4 m, PVC 5 Quick coupling with backflow valve 6 Connector 3/4", brass 7 EPDM connector with backflow valve 8 Dosing nozzle 9 Detergent suction hose, 6 x 9 mm, 1.8 m long, transparent PVC 10 Foot filter, yellow, with integrated weight 11 System separator
12 Ball tap 13 Quick coupling and counter piece in brass with seal ring 3/4" 14 Connecting hose complete, 2 m, black 15 Connector 3/4", brass 16 Seal ring 3/4", with sieve 17 Fastening screws (3x), 8x40, stainless steel 18 Wall dowels (3x), S10
Wall mount
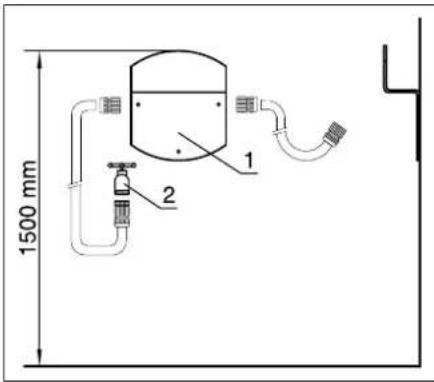
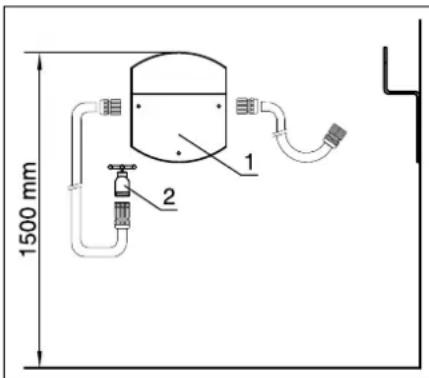
1 Casing, white, PVC 2 Tap, 3/4" with a water pressure between 2 and 6 bar
Find an installation site close to a tap (see illustration). The tap must have a water pressure between 2 and 6 bar. Hold the casing against the wall so that its top edge is aligned at 1,500 mm. Mark all three borings on the wall and drill as deep as the dowels into the wall with a 10 mm diameter stone drill. Insert the wall dowels into the wall and attach the casing to the wall using the three stainless steel fastening screws diam. 8x40.
Assembly
Water inlet connection
Unscrew the quick coupling from the ball tap and connect it to the open hose end of the black connecting hose. Insert the 3/4" seal ring with the sieve into the quick coupling and screw the quick coupling onto the ball tap.
Note
Prior to screwing the quick coupling to the ball tap, make sure that the seal ring with the sieve has been inserted.
Screw the counter piece of the quick coupling with the 3/4" seal onto the water tap. Stick the connecting hose with the quick coupling onto the counter piece at the water tap.
Note
Do not turn on the tap yet!
Water outlet connection
Unscrew the quick coupling from the Venturi outlet and connect it to the open hose end of the fill hose. Insert the blue Venturi nozzle into the nozzle intake. Insert the 3/4" seal ring with the quick coupling and screw the quick coupling into the Venturi output.
Connect the detergent hose
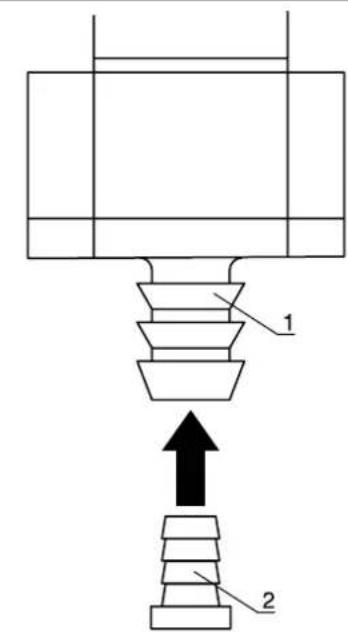
1 EPDM connector with backflow valve 2 Dosing nozzle
Drill a 10 mm hole into the cover of the detergent bottle. Insert the detergent suction hose through the hole in the cover and attach the foot filter to the hose end on the inside of the cover. Screw the cover onto the detergent bottle and drop the foot filter to the bottom of the bottle.
Note
The foot filter must stand up straight on the bottom of the detergent bottle. Insert the respective dosing nozzle into the EPDM lock.
Note
The respective dosing volumes of the individual dosing nozzles can be taken from the "dosing table". Slide the detergent suction hose onto the EPDM connector.
If the detergent suction hose is too long, it can be shortened as needed.
Note
When shortening the detergent suction hose, make sure that the foot filter is still standing straight up on the bottom of the detergent bottle.
Operations
Make sure that all hose connections are connected. Make sure a detergent bottle is connected and that a sufficient amount of detergent is present in the bottle. The ball tap must be set to "OFF". Make sure the correct dosing nozzle is installed for the desired mixing ratio.
Note
The respective dosing volumes of the individual dosing nozzles can be taken from the "dosing table".
Insert the fill hose into the fill opening of the floor detergent tank to be filled. With floor cleaners with fill system, the quick lock of the fill hose can be connected to the filling system. Open tap. Set the ball tap to "ON".
Note
With the first use or while changing the dosing nozzle, there will be air in the detergent hose.
An optimal mixing ratio is reached if the tank of the floor cleaner is filled after the detergent hose is completely filled with detergent.
The tank of the floor cleaner is filled with water and the desired mixture of detergent. After the fill procedure, close the tap. Set the ball tap to "OFF" and wait a brief moment until the fill hose has been drained. Then remove the fill hose from the tank or disconnect it from the fill system and coil it onto the hose storage at the top of the casing.
Replacing the dosing nozzles
The use of different detergents or different types of surfaces to be cleaned require different mixing ratios of water and detergent. In order to achieve different mixing ratios, the dosing nozzles can be replaced as follows.
Set the ball tap to "OFF". Pull the detergent hose off the EPDM connector. Pull the dosing nozzle off the EPDM connector. Insert the respective dosing nozzle with the desired mixing ratio into the EPDM connector. Then reattach the detergent hose to the EPDM connector.
Overview of dosing nozzles
The following table shows the colour encoding of the different dosing nozzles and their mixing ratio in %.
Dosing Table
| Colour encoding Mixing ratio* | |
| Pink 0,20 % | |
| Purple 0,50 % | |
| Turquoise 0,65 % | |
| Yellow 1,20 % | |
| Brown 1,50 % | |
| orange 1,90 % | |
| Green 2,60 % | |
| Light brown 3,20 % | |
| Blue 4,80 % | |
| White 5,80 % | |
| Red 7,90 % | |
| Beige 10,50 % | |
| Black | 12,50 % |
| Grey | 13,50 % |
*The values listed in the table are average values, which were generated under the following conditions: water pressure 3 bar, fill hose 4 m.
Troubleshooting
Detergent is not getting sucked in
Check water pressure. The water pressure must be between 2 bar and 6 bar. Check the detergent suction hose for obstructions, kinks and clamping, clean or replace if necessary. Check the dosing nozzle for obstructions, clean or replace if necessary. Check the foot filter for obstructions, clean or replace if necessary. Check the sieve in the seal ring of the ball tap for obstructions, clean or replace if necessary.
Warranty
The warranty terms published by our competent sales company are applicable in each country. We will repair potential failures of your appliance within the warranty period free of charge, provided that such failure is caused by faulty material or defects in fabrication. In the event of a warranty claim please contact your dealer or the nearest authorized Customer Service center. Please submit the proof of purchase.

The device is designed for refilling washing machines that do not have their own dispenser.
Advantages
Eliminates excessive consumption of detergent. - Allows effective mixing of fragrances and color calibration with dispenser nozzles (0.2-13.5%). Contains a complete set for connection. - Operation is under pressure. Also suitable for use with a quick-fill system for powder.
Features
Connects directly to the water tap. - Operation without using electricity or compressed air. The system is equipped with an ecologically safe valve.
Scope of delivery
1x refill station - 1x refill hose, assembled, 4 m, equipped with a quick-release coupling with a check valve 1x suction hose, assembled, 2 m, with a filter - Connection set: 1x set with 14 dispenser nozzles
1x suction hose for detergent, 1.8 m, with strainer, transparent
1x Venturi nozzle, spare 1x filter, yellow, with built-in weight
1x mounting set with 3x mounting screws 8x40 made of high-quality steel and 3x wall plugs
-1x operating instructions
Environmental protection

Packaging materials are suitable for recycling. Please do not dispose of the packaging with household waste, but take it to a collection point for recyclable materials.

Old devices contain recyclable materials and must be taken to collection points for recyclable materials. Batteries, oil, and similar materials must not enter the environment. Therefore, dispose of old devices through appropriate waste collection systems.
Overview
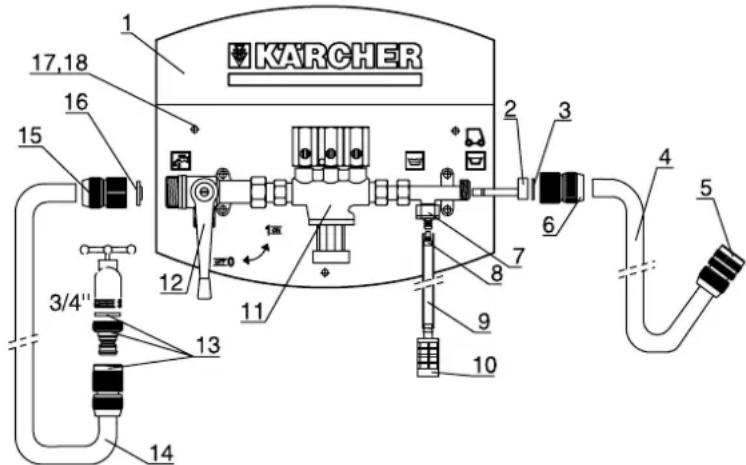
1 Body, white, polypropylene
2 Spray nozzle, siphon
3 Sealing ring 3/4"
4 Filling hose, 4 m, polypropylene 5 Quick-release coupling with non-return valve 6 Connecting piece 3/4", brass 7 EPDM seal (ethylene-propylene-diene monomer) with non-return valve 8 Dosing nozzle 9 Suction hose for detergent, 6x9 mm, length 1.8 m, polypropylene, transparent 10 Inlet filter, mesh, with built-in weight. 11 System separator 12 Ball valve 13 Quick-release coupling and original part made of brass with sealing ring 3/4" 14 Hose for connection, 2 m, grey 15 Connecting piece 3/4", brass 16 Sealing ring 3/4", with mesh filter 17 Mounting screws (3x) 8x40, high-quality steel 18 Wall plugs (3x), S10
Wall mounting
1 Body, white, polypropylene 2 Water tap, 3/4", with water pressure between 2 and 6 bar The installation location should be chosen not far from the water tap (see diagram). The water pressure in the tap must be between 2 and 6 bar. Attach the body to the wall, with the top edge of the body at a height of 1500 mm. Mark the three holes on the wall and drill them with a masonry drill bit 10 mm, according to the diameter of the wall plugs. Insert the wall plugs into the wall and secure the body to the wall with the three mounting screws 8x40 made of high-quality steel.
Assembly
Water connection
Unscrew the quick-release coupling from the ball valve and
connect the open end of the black connecting hose. Insert the sealing ring 3/4" with mesh filter into the quick-release coupling and screw the quick-release coupling onto the ball valve.
Note
Before screwing the quick-release coupling onto the ball valve, check that the sealing ring is inserted together with the mesh filter.
→ Screw the mating part of the quick-release coupling with 3/4" thread onto the water tap. Fit the connecting hose with the quick-release coupling onto the connecting piece.
Note
Do not open the water tap yet!
Safety instructions
For the user:
Make sure that all operators using the device are familiar with this instruction manual and with the national regulations on labor protection. Operators must be competently trained in the maintenance of the device.
For operators:
Before using the device for the first time, read and follow the instruction manual carefully.
Symbols in the instruction manual
Indication
Indicates important information when using the device.
Function
With the dosing pump, the water and the cleaning agent are mixed in a pre-set mixing ratio and are fed directly into the device for floor cleaning.
Intended use
Use this device only in accordance with the instructions in this operating manual. This device is intended for professional use for cleaning floors without its own dosing system.
Advantages
- Prevents water and cleaning agents from splashing. - Allows effective cleaning thanks to the 14-bit calibration of the dosing range (0.2-13.5%). Complete accessory set for connection. Works under pressure. It is also suitable for use with the high-pressure cleaner.
Features
This device is intended for inhalation. Operation without current or under voltage. The system is safe for the environment.
Delivery contents
1x dust filter 1x dust filter 4 m, with quick coupling with return valve 1x connecting hose 2 m, with accessories: 1x bag with 14 dosing nozzles 1x suction nozzle for liquid preparations 1.8 m, PVC transparent 1x dosing valve for ventilation, blue 1x additional filter kit. Text 1x mounting kit with 3x fastening bolts 8x40 for wall mounting 1x wall mounting plate S10 1x instruction manual
Environmental conditions
1 EPDM seal with return valve
2 Dosing
In the cap of the bottle for liquid preparations, pierce a 10 mm hole. → Insert the suction nozzle for liquid preparations through the hole in the cap, and on the edge of the nozzle on the inside of the cap place the additional filter. → Screw the cap of the bottle for liquid preparations and tighten.
additional filter on the bottom of the bottle.
Note
The additional filter must be attached to the bottom of the bottle for liquid preparations.
→ Place the appropriate dose for dosing in the EPDM seal.
Note
The appropriate dosing quantities for the individual dosing nozzles can be seen in the "Dosing table".
→ Place the suction nozzle for liquid preparations on the EPDM. If the suction nozzle for liquid preparations is stiff, it can be bent.
Note
Remove the detergent marking cap for the detergent. To do this, press the cap and turn it counterclockwise until it points to the water inlet of the detergent container.
Maintenance
→ Check that all markings and hoses are connected. → Check that the detergent container is connected and that there is enough detergent in the container. → The shut-off valve must be on OFF. → Check that the required dose is set for the desired mixing ratio.
Instruction
The corresponding dosing quantities for the individual dosing stages can be seen in the "Dosing table". → Set the filling level marking in the filling opening of the detergent reservoir for water filling, which fills.
When adjusting the water supply with the filling system, the rapid closure of the filling level marking can be connected to the filling system.
Open the water valve. → Turn the switch to "ON".
Instruction
During initial start-up or when changing the dosing stage, the detergent marking is filled with air.
The optimal mixing ratio is achieved when the detergent reservoir for water filling is filled exactly to the point where the marking
for detergent is exactly filled with detergent.
→ The detergent reservoir for water filling is filled with water and the desired addition of detergent. → Close the water supply valve. → Set the switch to "OFF" and press it until the filling level marking is empty. → Remove the filling level marking from the reservoir and remove the filling system and store it in the storage location or on the upper side of the housing.
Changing the dosing stages
Due to the use of different detergents or due to cleaning different surfaces, different mixing ratios of water and detergent are required. To achieve different mixing ratios, the dosing stages can be changed as follows.
→ Set the switch to "OFF". → Remove the detergent marking from the EPDM gasket. → Remove the dosing stage from the EPDM gasket. → Insert the appropriate dosing stage for the desired mixing ratio into the EPDM gasket. Then put the detergent marking back on the EPDM gasket.
Instructions for use
The table below shows the light output of the individual lamps for use and the ratio of the mixture.
Table for use
| Цвetedою кODиранe | ОТношени на смесванe* |
| Розова 0,20% | |
| Виrolетова 0,50% | |
| Тюркоазени 0,65% | |
| Жылты 1,20% | |
| Кафява 1,50% | |
| оранжев 1,90% | |
| Зелега 2,60% | |
| СBSTLOКAFЯва 3,20% | |
| Синя 4,80% | |
| Баяla 5,80% | |
| Черва 7,90% | |
| Бекова | 10,50% |
| Черна | 12,50% |
| СИВа 13,50% |
*The values in the table are average values obtained under the following conditions: - Water pressure 3 bar. - Marking for dust 4 m.
Help with problems
Before using the device, read this
instruction manual and keep it. Keep this instruction manual for future use and for the next owners.
Overview
Safety rules 81
Designation 81
Proper use 81
Operation 81
Features 81
Scope of delivery 81
Environmental protection 81
Orn 81
HaCtiHHM MoTAtk 82
CknaaHn8 82
Ekcnnyataia 82
Dionomora npu ycyhenhi Henoanaok 83
Tapahtia 83
PpaBnla 6e3neKei
Дякорисьа:
IpekoHaTeCb y Tomy, 0o Bci KopncTyBaCi O3HaHOMJIeHi 3i 3MiCTOM zufo noc6nka 3 ekcnnyatauii, a TAKoK 3 HaioHaJIbHMn npnncAHrMaN IoDo 6e3neKn EKnNyatauii. KopncTyBaCi MaIO TB 6Tu KBAIΦIKOBaHO pOiohctpykTobAh Ioo Do 06cnyroByBaHH npntpoio.
Дякорисьа:
Ipeid nepuim 3actocybaHHm npnlaCy cnid npnuHTa nHaadi NDOTpmyBaTncra IIO IHCTpykuio 3 ekcnnyataui.
3HaKn y noci6Hnky
Bka3ieka
O3haue 8ka3ieku no 3acmocybaHHIO ma eaxnuey iHopmauio.
Pn3HaueHn
With the correct installation of the system and the dosing device, the water and the dosing agent are changed in the previously installed corresponding amount and can be filled directly into the reservoir of the filling machines.
Proper use
Use this device strictly in accordance with the instructions in this manual. This device is intended for filling machines that do not have their own dispenser.
Warnings
It turns on the automatic consumption of water and dosing agent. - Allows effective mixing thanks to 14-color calibrated dosing forms (0.2-13.5%). - Contains a complete set of connections. - Operates under pressure. Also suitable for use with liquid filling systems for chemicals.
Features
- It is connected directly to the water tap.
- Electrical connection without an electric shock hazard. The ventilation system with a safe low-voltage control circuit.
Delivery set
1x control panel 1x control panel mounting bracket, 4 pcs, complete with liquid-tight cable gland 1x drain pipe mounting bracket, 2 pcs, black - set of mounting accessories 3: 1x set of 14 spray nozzles
1x humidifier installation kit 1.8 m, complete, transparent 1x ventilation fan nozzle, blue 1x lower filter, cover with mounting. Tgapev
1x mounting kit with 3x screws 8x40 made of high-quality steel and 3x spare parts S10 - 1x operating instructions
Environmental protection

Packaging materials are recyclable. Please do not dispose of packaging materials with household waste; dispose of them for recycling.

Old devices contain valuable materials that can be reused. Batteries, oil, and similar materials must not enter the environment. Therefore, please dispose of old devices through special waste collection systems.
Orna
1 Body, 6 pcs, floor-standing 2 Water supply tap, with filter 3 Sealing ring 3/4"
4 Supply hose, 4 m, floor-standing 5 Flexible connection with check valve
6 Connection piece 3/4", brass 7 Lock with EPDM (ethylene-propylene diene monomer) with check valve 8 Dosing nozzle
9 Supply hose for detergent, 6 mm, 1.8 m long, floor-standing, transparent 10 Lower filter, hose, with installed gasket 11 Separator system 12 Ball valve 13 Flexible connection and connector made of brass with sealing ring 3/4" 14 Hose for connection to sewer, 2 m, with siphon 15 Connection piece 3/4", brass 16 Sealing ring 3/4", with mesh filter 17 Screws (3x) 8x40, stainless steel 18 Wall plugs (3x), S10
Installation parts
1 Body, floor-standing 2 Water supply tap, 3/4", with pressure gauge between 2 and 6 bar
→ Installation site must be near the water supply tap (see figure). The water supply tap must indicate pressure between 2 and 6 bar. →Attach the body to the wall so that the upper edge of the body is placed at a height of 1500 mm. Mark all three holes on the wall and drill in the center with a drill bit 10 mm, according to the diameter of the wall plugs. Insert the wall plugs into the wall and fix the body to the wall using three screws 8x40 made of stainless steel.
Assembly
Connection
Remove the flexible connection from the ball valve and close the shut-off valve of the water line. Install the sealing ring 3/4" with mesh filter and secure the flexible connection to the ball valve.
Instructions
Before connecting the flexible connection to the ball valve, check that the sealing ring
was installed together with the mesh filter.
→On the water supply tap, install the connector piece with flexible connection and union nut 3/4". Attach the supply hose to the connector piece of the water supply tap with the flexible connection.
The drain valve must not be opened!
Filling the tank
Remove the plug from the outlet of the tank and tilt the tank to open the filler neck. Insert the blue tank cap into the cap opening. Install the 3/4" union fitting and secure the union fitting on the tank outlet.
Fill the tank with the recommended oil for the pump.
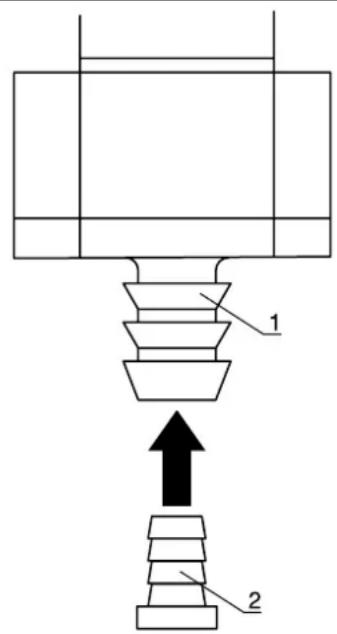
1 Lock with EPDM (ethylene-propylene-diene monomer) with check valve 2 Dosing nozzle
Drill a 10 mm diameter hole in the pump cover with the oil pump. Insert the oil pump through the hole in the cover and screw the filter onto the end of the pump on the inside of the cover. Install the pump cover with the oil pump and lower the filter to the bottom of the pump.
Indication
The lower filter must be positioned vertically at the bottom of the pump.
Indication
Install the appropriate dosing nozzle in the lock with EPDM (ethylene-propylene-diene monomer). For the correct number of doses of individual dosing nozzles, see the "Dosing table". → Prepare the oil pump for the lock with EPDM (ethylene-propylene-diene monomer).
If the oil pump for the pump is too long, it can be shortened if necessary.
Indication
When shortening the oil pump for the pump, care must be taken to ensure that the lower filter remains in a vertical position at the bottom of the pump.
Operation
→ Turn off the water supply and disconnect the hose. → Check that the hose is not kinked and that there is a sufficient amount of water in the tank. → The ball valve must be set to the OFF position. → Check that the required nozzle-dispenser for the desired detergent is installed.
Instructions
The exact amount of dosing for individual nozzles-dispensers can be found in the "Dosing table". The filling hose is installed in the machine's detergent tank, which should be filled.
The detergent tank is filled through the filling system, so the filling system can be connected to the water supply.
Open the water supply valve. Set the ball valve to the OFF position.
Instructions
When using the nozzle-dispenser for the first time or after replacing it, the detergent must be primed.
The optimal detergent mixture is achieved when the machine's detergent tank is first filled, and when the detergent is mixed with water in the correct proportion.
→ The machine's detergent tank is filled with the required amount of detergent. → After filling, close the water supply valve. Set the ball valve to the OFF position and wait until the filling hose is empty.
→ Remove the filling hose from the tank, or disconnect it from the filling system, and wind it onto the holder for storing the hose on the front side of the device.
Cleaning the nozzle-dispenser
When using different detergents or with detergent residues on surfaces, different detergent mixtures and detergents are required. The nozzle-dispenser can be cleaned with different mixtures in the following way.
Set the ball valve to the OFF position. Remove the hose for the detergent from the EPDM (ethylene-propylene-diene-monomer) lock. → Remove the nozzle-dispenser from the EPDM (ethylene-propylene-diene-monomer) lock. Insert the appropriate nozzle-dispenser for the desired detergent mixture into the EPDM (ethylene-propylene-diene-monomer) lock. Press the hose for the detergent onto the EPDM (ethylene-propylene-diene-monomer) lock.
Cleaning the nozzles-dispensers
The following table shows the color coding of individual nozzles-dispensers and the detergent mixtures 8 %
Karcher FZE, P.O. Box 17416, Jebel Ali Free Zone (South), Dubai, United Arab Emirates,
+971 4 886-1177, www.kaercher.com
AT Alfred Karcher Ges.m.b.H., Lichtblaustrasse 7, 1220 Wien,
+43-1-25060-0, www.kaercher.at
AU Karcher Pty. Ltd., 40 Koornang Road, Scoresby VIC 3179, Victoria,
+61-3-9765-2300, www.karcher.com.au
CA Karcher Canada Inc., 6535 Millcreek Road, Unit 67, Mississauga, ON, L5N 2M2
+1-905-672-8233, www.karcher.ca
CH Karcher AG, Industriestrasse, 8108 Dällikon, Karcher SA, Croix du Pêage, 1029 Villars-Ste-Croix,
0844 850 864, www.kaercher.ch
CN Karcher (Shanghai) Cleaning Systems, Co., Ltd., Part F, 2nd Floor, Building 17, No. 33, XI YA Road, Waigaogiao Free Trade, Pudong, Shanghai, 200131
+86-21 5076 8018, www.karcher.cn
CZ Karcher spol. s.r.o., Modletice c.p. 141, CZ-251 01 Ricany,
+420/323/606 014, www.kaercher.cz
GBKärcher (U.K.) Ltd., Kärcher House, Beaumont Road, Banbury, Oxon OX16 1TB,
+44-1295-752-000, www.karcher.co.uk
GRKärcher Cleaning Systems A.E., 31-33, Nikitara str. & Konstantinoupoleos str., 136 71 Ahames,
+30-210-2316-153, www.karcher.gr
HKKärcher Limited, Unit 10, 17/F., Apec Plaza, 49 Hoi Yuen Road, Kwun Tong, Kowloon,
++(852)-2357-5863, www.karcher.com.hk
HUKärcher Hungaria KFT, Tormásrét ut 2., (Vendelpark), 2051 Biatorbagy,
+36-23-530-64-0, www.kaercher.hu
IKarcher S.p.A., Via A. Vespucci 19, 21013 Gallarate (VA),
+39-848-998877, www.karcher.it
IEKärcher Limited (Ireland), 12 Willow Business Park, Nangor Road, Dublin 12,
(01) 409 7777, www.kaercher.ie
JPKärcher (Japan) Co., Ltd., Irene Kärcher Building, No. 2, Matsusaka-Daira 3-chome, Taiwa-cho, Kurokawa-gun, Miyagi 981-3408,
+81-22-344-3140, www.karcher.co.jp
KRKarcher Co. Ltd. (South Korea), 2nd Floor, Youngjae Building, 50-1, 51-1, Sansoo-dong, Mapo-ku, Seoul 121-060,
+82-2-322 6598, www.karcher.co.kr
MX Karcher Mexico, SA de CV, Av. Gustavo Baz Sur No. 29-C, Col. Naucalpan Centro, Naucalpan, Edo. de Mexico, C.P. 53000 Mexico.
+52-55-5357-04-28, www.karcher.com.mx
MY Karcher Cleaning Systems Sdn. Bhd., 71 & 73 Jalan TPK 2/8, Taman Perindustrian Kinrara, Seksyen 2, 47100 Puchong, Selangor Darul Ehsan, Malaysia,
+603 8073 3000, www.karcher.com.my
NL Karcher B.V., Postbus 474, 4870 AL Etten-Leur, 0900-3366633, www.karcher.nl
NO Kärcher AS, Stanseveien 31, 0976 Oslo, Norway
+47 815 20 600, www.karcher.no
NZ Karcher Limited, 12 Ron Driver Place, East Tamaki, Auckland, New Zealand.
+64 (9) 274-4603, www.karcher.co.nz
PL Kärcher Sp. z o.o., UI. Stawowa 140, 31-346 Kraków,
+48-12-6397-222, www.karcher.pl
RO Karcher Romania srl, Sos. Odaii 439, Sector 1, RO-013606 BUKAREST,
+40372709001, www.kaercher.ro
RU Karcher Ltd. Service Center, Leningradsky avenue, 68, Building 2, Moscow, 125315
+7-495 789 90 76, www.karcher.ru
SE Kärcher AB, Tagenevagen 31, 42502 Hisings-Kärra,
+46 (0)31-577 300, www.karcher.se
SG Kärcher South East Asia Pte. Ltd., 5 Toh Guan Road East, #01-00 Freight Links Express Distripark, Singapore 608831,
+65-6897-1811, www.karcher.com.sg
SK Kärcher Slovakia, s.r.o., Beniakova 2, SK-94901 NITRA,
+421 37 6555 798, www.kaercher.sk
TR Kärcher Servis Ticaret A.S., 9 Eylül Mahallesi, 307 Sokak No.6, Gaziemir / Izmir,
+90-232-252-0708, +90-232-251-3578, www.karcher.com.tr
TW Karcher Limited, 7/F, No.66, Jhongijheng Rd., Sinjhuang City, Taipei County 24243, Taiwan,
USA To locate your local dealer please visit our web site at http://www.karchercommercial.com or call us at 888.805.9852
ZA Kärcher (Pty) Ltd., 144 Kuschke Street, Meadowdale, Edenvale, 1614,
+27-11-574-5360, www.karcher.co.za
- CONTENTS
- SAFETY INSTRUCTIONS
- FOR OPERATOR
- FOR USERS
- SYMBOLS IN THE OPERATING INSTRUCTIONS
- NOTE
- FUNCTION
- PROPER USE
- ADVANTAGES
- SPECIAL FEATURES
- SCOPE OF DELIVERY
- ENVIRONMENTAL PROTECTION
- OVERVIEW
- WALL MOUNT
- ASSEMBLY
- WATER INLET CONNECTION
- WATER OUTLET CONNECTION
- CONNECT THE DETERGENT HOSE
- OPERATIONS
- REPLACING THE DOSING NOZZLES
- OVERVIEW OF DOSING NOZZLES
- TROUBLESHOOTING
- DETERGENT IS NOT GETTING SUCKED IN
- WARRANTY
- FEATURES
- WATER CONNECTION
- FOR THE USER
- FOR OPERATORS
- SYMBOLS IN THE INSTRUCTION MANUAL
- INDICATION
- INTENDED USE
- DELIVERY CONTENTS
- ENVIRONMENTAL CONDITIONS
- MAINTENANCE
- INSTRUCTION
- CHANGING THE DOSING STAGES
- INSTRUCTIONS FOR USE
- HELP WITH PROBLEMS
- PPABNLA 6E3NEKEI
- ДЯКОРИСЬА
- HAKN Y NOCI6HNKY
- BKA3IEKA
- PN3HAUEHN
- WARNINGS
- DELIVERY SET
- ORNA
- INSTALLATION PARTS
- CONNECTION
- INSTRUCTIONS
- FILLING THE TANK
- FILL THE TANK WITH THE RECOMMENDED OIL FOR THE PUMP
- OPERATION
- CLEANING THE NOZZLE-DISPENSER
- CLEANING THE NOZZLES-DISPENSERS
Brand : Kärcher
Model : DS 3
Category : Steam cleaner