WV 4 Plus Solo - Steam cleaner Kärcher - Free user manual and instructions
Find the device manual for free WV 4 Plus Solo Kärcher in PDF.

| Product type | Steam cleaner |
| Brand | Kärcher |
| Model | WV 4 Plus Solo |
| Dimensions (H x W x D) | 313 x 282 x 133 mm |
| Weight | 660 g |
| Power supply | Lithium-ion battery 3.6-3.7 V, max 4.2 V |
| Protection type | IPX4 |
| Rated power | 10 W |
| Runtime | Up to 40 minutes (2.5 Ah battery) |
| Dirty water tank capacity | 150 ml |
| Sound level | 50 dB(A) |
| Intended use | Cleaning smooth, wet surfaces (windows, mirrors, tiles) |
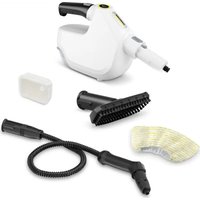
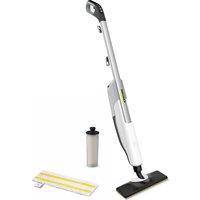
| Included accessories | Microfiber cover, squeegee holder, adapter, spray head, spray bottle, separator, suction nozzle, removable lip |
| Optional accessories | Additional charger and battery pack (Battery Power 4 V series) |
| Compatible detergents | Kärcher RM 500, RM 503, RM 508 |
| Microfiber cover care | Hand or machine wash at 60°C max, no fabric softener or dryer |
| Cleaning the lip and nozzle | Disassemble and rinse under running water |
| Max suction liquid weight | 25 ml (on horizontal surface) |
| Safety | Overheating protection, charge indicator, automatic shut-off in case of fault |
| Storage | Vertical, in a dry, frost-free place |
| Warranty | According to country conditions, material or manufacturing defects |
Frequently Asked Questions - WV 4 Plus Solo Kärcher
User questions about WV 4 Plus Solo Kärcher
0 question about this device. Answer the ones you know or ask your own.
Ask a new question about this device
Download the instructions for your Steam cleaner in PDF format for free! Find your manual WV 4 Plus Solo - Kärcher and take your electronic device back in hand. On this page are published all the documents necessary for the use of your device. WV 4 Plus Solo by Kärcher.
USER MANUAL WV 4 Plus Solo Kärcher
WV 4-4 Plus Battery Set
natural_image
Line drawing of two different types of hair blower tools, one upright and one tilted (no text or symbols)Deutsch 7
English 12
Français 17
Italiano 22
Nederlands 27
Español 32
Português 37
Dansk 42
Norsk 47
Svenska 52
Suomi 57
Ελληνικά 62
Türkçe 67
Русский 72
Magyar 78
Čeština 83
Slovenščina 88
Polski 93
Românește 98
Slovenčina 103
Hrvatski 108
Srpski 113
Български 118
Eesti 123
Latviešu 128
Lietuviškai 133
Українська 138
Қазақша 143
中文 148
العربيya 153
A
natural_image
Diagram of a door with a teardrop-shaped opening and label '5' pointing to it (no text or symbols on the diagram itself)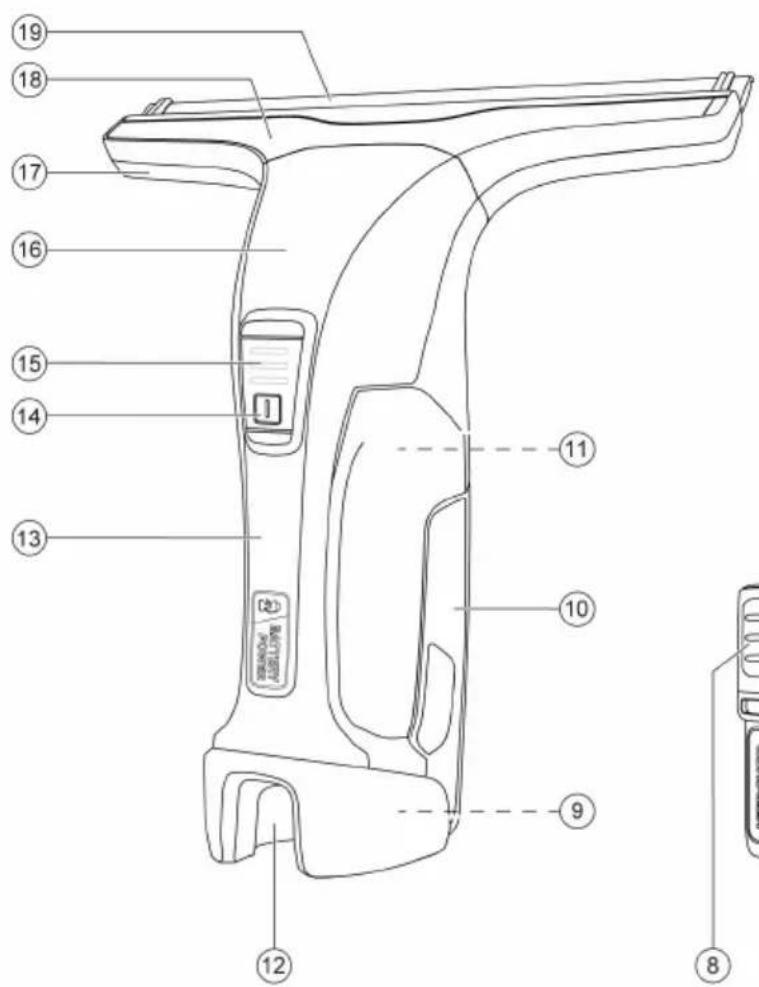

natural_image
Illustration of a robotic arm with red arrows indicating motion or force direction (no text or symbols)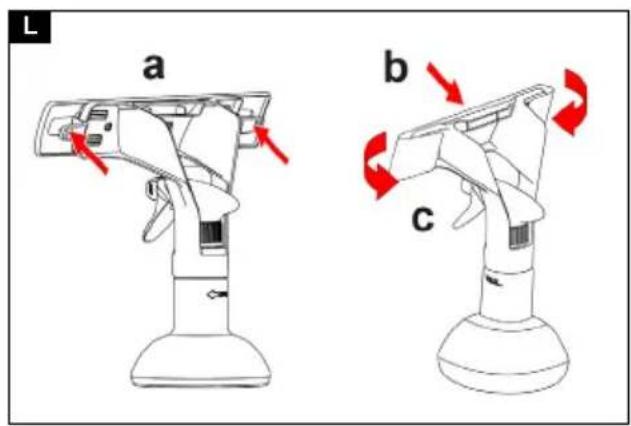
natural_image
Hand holding a cleaning tool with a red arrow indicating downward motion (no text or symbols)
natural_image
Line drawing of a kitchen sink with a hand mixer and water droplets (no text or symbols)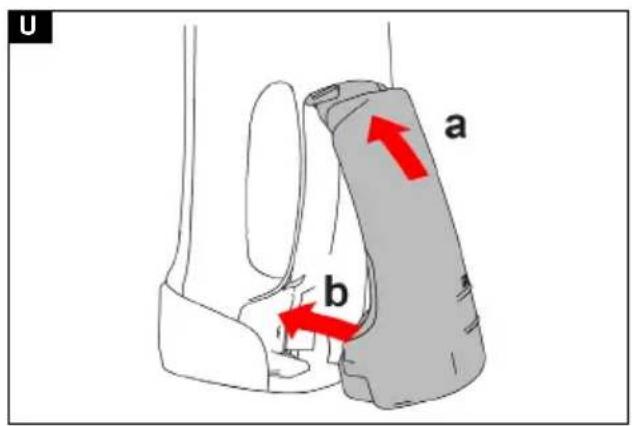
natural_image
Line drawing of cleaning tools including a spray gun, brush, and cleaning tool (no text or symbols)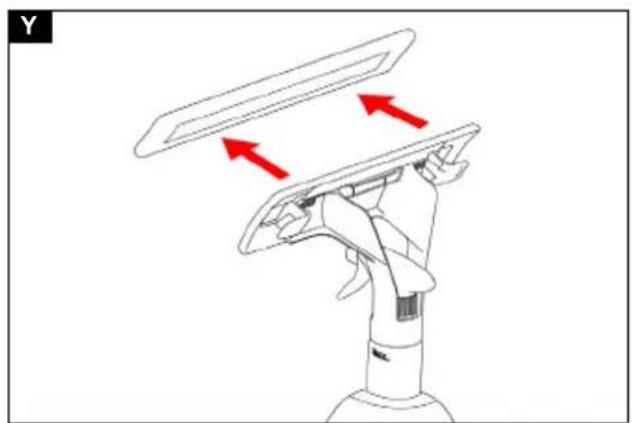
natural_image
Illustration of a robotic arm holding a flat blade with red arrows indicating force or movement (no text or symbols)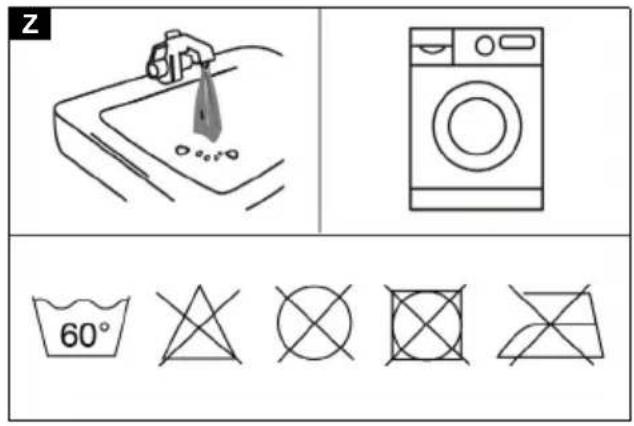
natural_image
Illustration of a mechanical assembly with exploded view and tool, showing part details and motion (no text or symbols)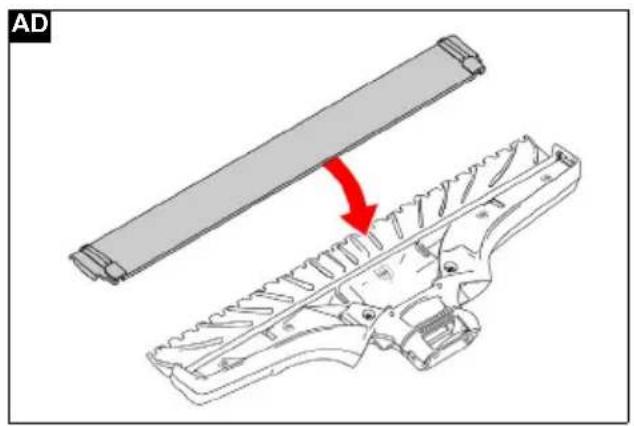
natural_image
Technical illustration of a mechanical component with a red arrow indicating a process or assembly (no text or symbols present)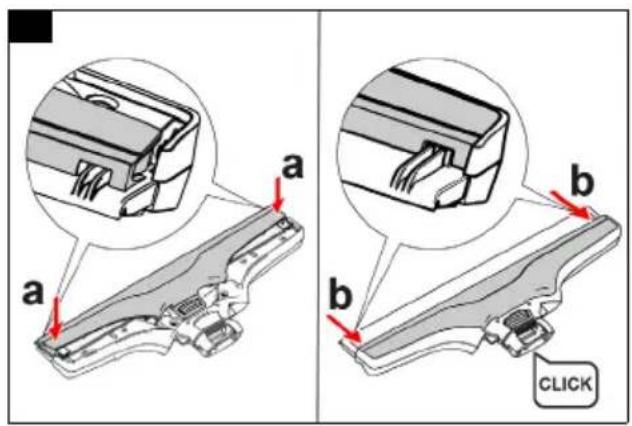
Inhalt
Safety instructions 12
Intended use.... 12
Environmental protection.... 13
Accessories and spare parts 13
Scope of delivery.... 13
Description of the unit.... 13
Mount device 13
Battery pack charging.... 13
Inserting the battery pack 13
Charge indicator 13
Removing the battery pack.... 13
Prepare spray bottle 13
Operation.... 14
Transport 14
Storage.... 14
Care and maintenance 14
Troubleshooting guide.... 15
Warranty 16
Technical data 16
Safety instructions
Read these original instructions and safety instructions as well the original instructions and safety instructions supplied with the battery pack and charger
before using the device for the first time.
Act in accordance with them.
Keep all operating instructions for future reference or for future owners.
In addition to the notes in the operating instructions, you also need to take into consideration the general safety regulations and accident prevention guidelines applicable by law.
Hazard levels
⚠️DANGER
- Indication of an imminent threat of danger that will lead to severe injuries or even death.
⚠ WARNING
- Indication of a potentially dangerous situation that may lead to severe injuries or even death.
⚠CAUTION
- Indication of a potentially dangerous situation that may lead to minor injuries.
ATTENTION
- Indication of a potentially dangerous situation that may lead to damage to property.
General instructions
⚠️ DANGER • Risk of asphyxiation. Keep packaging film out of the reach of children. • Do not immerse the device in water. • Never touch contacts or lines.
⚠ WARNING • Persons with reduced physical, sensory or mental capabilities and persons lacking experience and knowledge may only use the appliance if they are properly supervised, have been instructed on use of the appliance safely by a person responsible for their safety, and understand the resultant hazards involved. • Children must be supervised to prevent them from playing with the appliance. • Children from the minimum age of 8 may use the appliance if they are properly supervised or have been instructed in its use
by a person responsible for their safety, and if they have understood the resultant hazards involved. ● Children may only perform cleaning work and user maintenance under supervision. ● Children must not play with the appliance.
⚠️ CAUTION • Safety devices are provided for your own protection. Never modify or bypass safety devices.
ATTENTION • Only store the device indoors.
Risk of electric shock
⚠️ DANGER • Do not expose the device with the battery pack to strong sunlight, heat or fire. • Do not direct the spray jet directly onto consumables containing electrical components, e.g. the interior spaces of ovens.
⚠ WARNING • The appliance contains electrical components - do not clean the appliance under running water.
Operation
⚠ WARNING • Risk of injury. Do not direct the spray jet onto the eyes.
⚠ CAUTION • Do not use the appliance if it has been dropped beforehand, is visibly damaged or if it is leaking.
ATTENTION • Do not introduce any objects into the air outlet. • Do not insert any objects into the battery mount except for battery packs of the KÄRCHER Battery Power 4 V system. • Test the microfibre wiping cloth on a spot that is not noticeable before you use the window cleaner on sensitive (high-gloss) surfaces. • Switch off the appliance and empty the die waste water tank when the level in the waste water tank reaches the MAX mark. • Store the appliance only so that it is standing upright. • Store the appliance only in dry rooms.
Type plate
The major device information is specified on the type plate.
The location of the type plate on the device is specified in the "Device description" chapter.
Intended use
Only use the device in private households.
Only use the device with battery packs and chargers from the KÄRCHER Battery Power 4 V system.

Suitable battery packs are marked with the BP 4 V symbol.
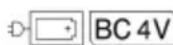
Only charge the battery pack with the chargers approved for charging.
The battery-powered device is designed for cleaning moist, smooth surfaces such as window panes, mirrors or tiles.
- Do not use the device as a dry vacuum cleaner.
- The device can absorb max. 25 ml fluid from horizontal surfaces, e.g. from a toppled drinking glass.
- Only use the device with the following KÄRCHER detergents: RM 500, RM 503, RM 508.
Do not use conventional window cleaning agents (no spirit, no foam cleaners, etc.). - Only use the appliance with accessories and spare parts approved by KÄRCHER.
Any other use is prohibited. The user shall be liable for hazards arising as a result of improper use.
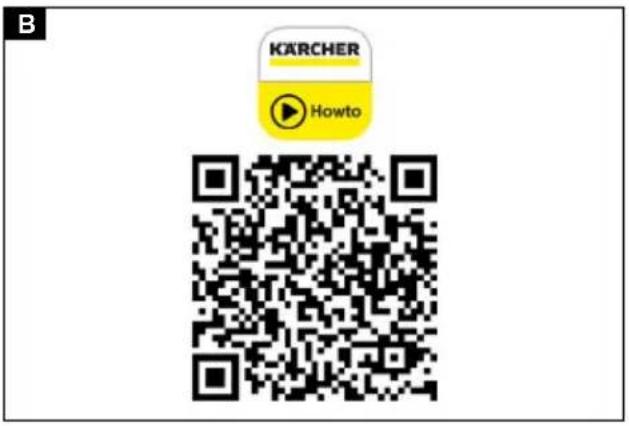
You can find a QR Code ^® to call up an application video in:
Illustration B
Trademarks
QR-Code ^® is a registered trademark of DENSO WAVE INCORPORATED.
Environmental protection

The packing materials can be recycled. Please dispose of packaging in accordance with the environmental regulations.

Electrical and electronic devices contain valuable, recyclable materials and often components such as batteries, rechargeable batteries or oil, which - if handled or disposed of incorrectly - can pose a potential danger to human health and the environment. However, these components are required for the correct operation of the device. Devices marked by this symbol are not allowed to be disposed of together with the household rubbish.
Notes on the content materials (REACH)
Current information on content materials can be found at: www.kaercher.de/REACH
Accessories and spare parts
Only use original accessories and original spare parts. They ensure that the appliance will run fault-free and safely.
Information on accessories and spare parts can be found at www.kaercher.com.
Scope of delivery
The scope of delivery for the appliance is shown on the packaging. Check the contents for completeness when unpacking. If any accessories are missing or in the event of any shipping damage, please notify your dealer.
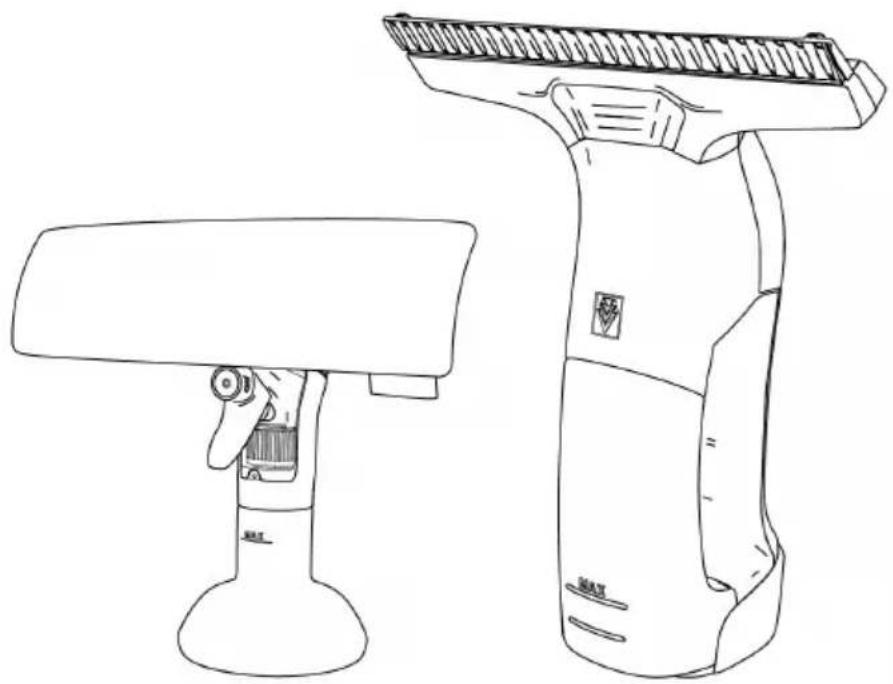
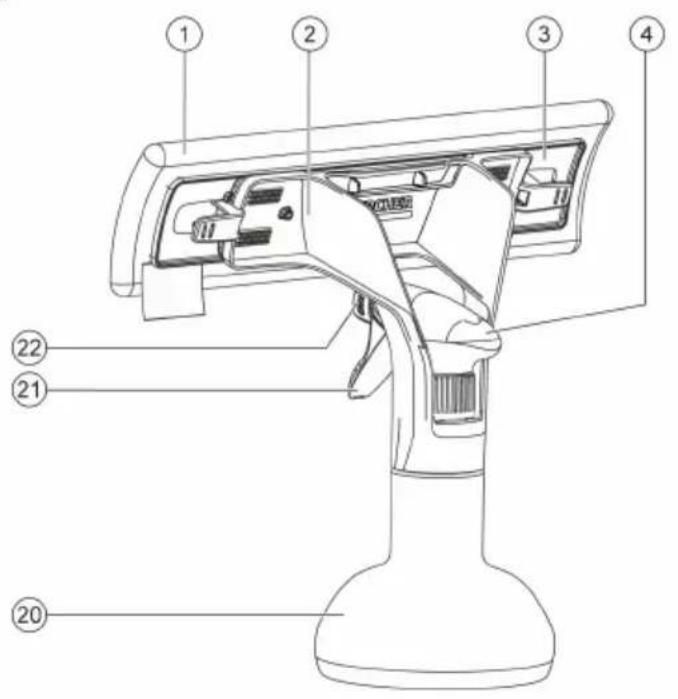
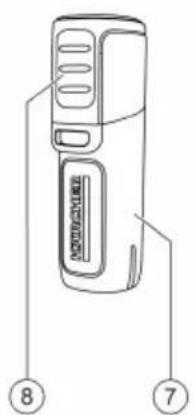
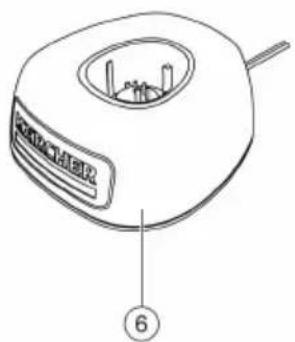
Description of the unit
For the illustrations, refer to the graphics page Illustration A
① Microfibre wipe cover
② Place the wiping attachment
③ Adapter
④ Spray head
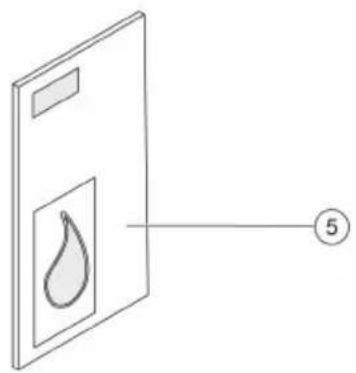
⑤ Detergent
⑥*Charger (KÄRCHER Battery Power 4 V)
⑦ Battery Pack (KÄRCHER Battery Power 4 V)
⑧*Battery pack unlocking button
⑨Type plate (visible when the waste water tank is removed)
⑩ Waste water tank
⑪ Waste water tank lock (visible when the waste water tank is removed)
⑫ Battery mount
⑬ Handle
⑭ ON/OFF button
⑮ Charge indicator
⑯ Separator
17 Suction nozzle
⑱Clamping rail
19 Squeegee blade
20 Spray bottle
21 Spray lever
22 Spray nozzle
* WV 4-4 Plus: additionally required and available separately
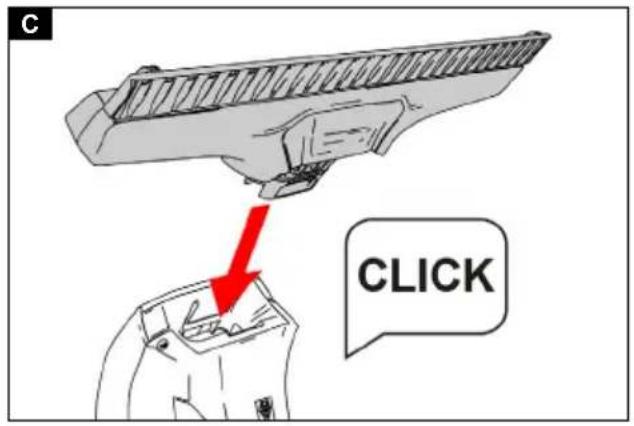
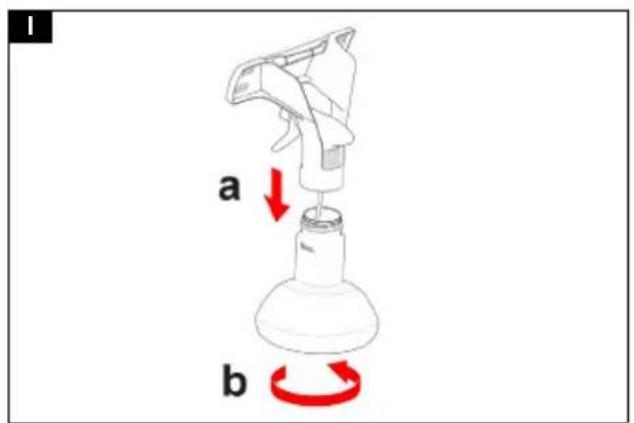
Mount device
- Put the suction nozzle on the separator until it audibly clicks into place. Illustration C
Battery pack charging
- Charge the battery pack (see operating instructions and safety instructions for the battery pack and the charger).
Inserting the battery pack
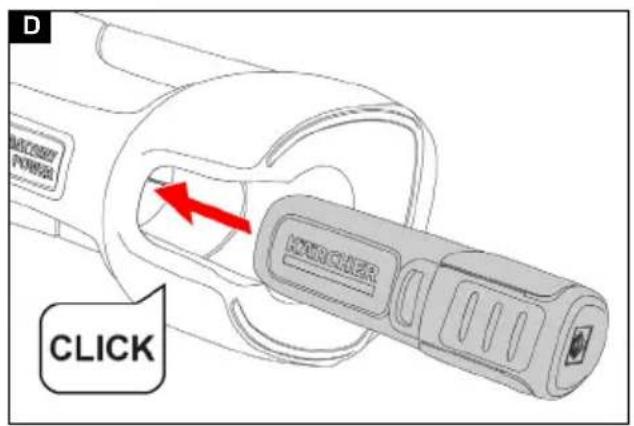
- Press the battery pack into the battery mount on the device until it you feel it latch into place. Illustration D
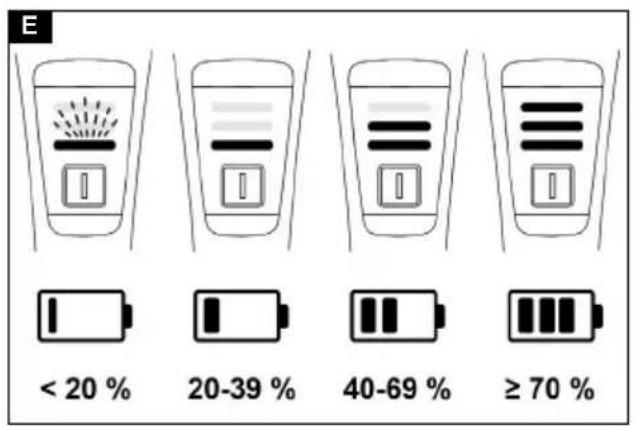
Charge indicator
After the device has been switched on, the charging state of the battery pack is displayed.
Illustration E
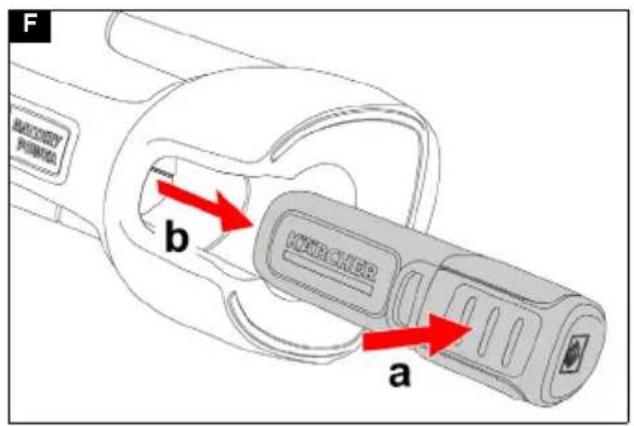
Removing the battery pack
Note
During longer work breaks, remove the battery pack from the device and secure it against unauthorised use.
- Press the ON / OFF button to switch off the device.
- Press the battery pack unlocking button, and pull the battery pack out of the battery mount.
Illustration F
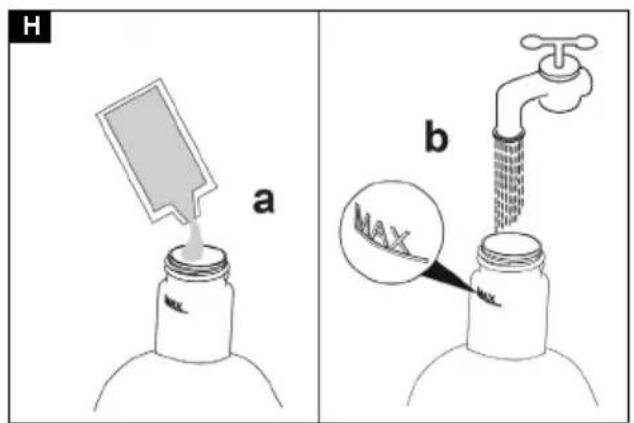
Prepare spray bottle
- Fit the spray head onto the wiping attachment. Illustration G
- Fill the detergent into the spray bottle. Illustration H
- Slowly fill clean water into the spray bottle up to the MAX marking.
- Close the spray bottle. Illustration I
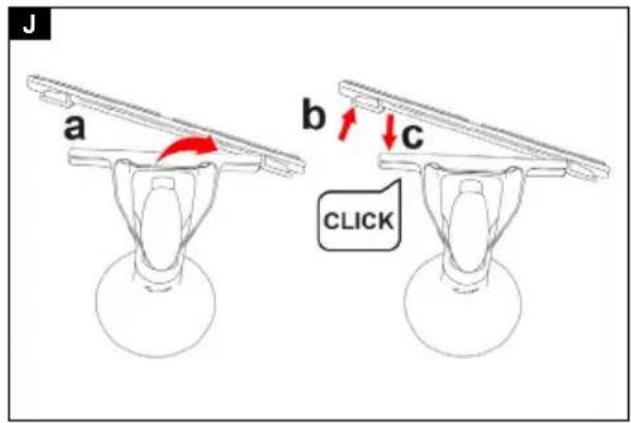
- Attach the adapter to the wiping attachment on one side and snap it into place on the other side. Illustration J
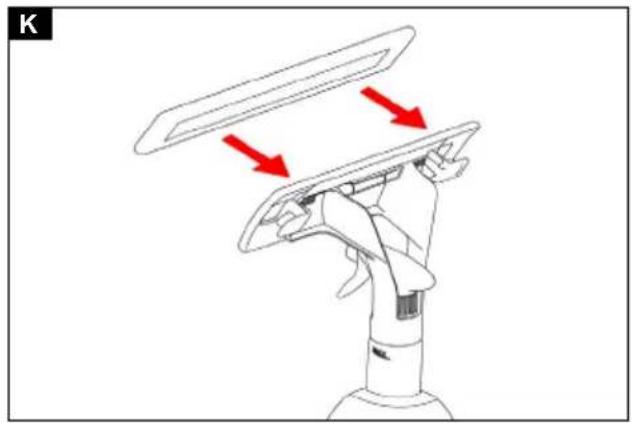
- Attach the microfibre wipe cover to the adapter. Illustration K
- For small areas, disengage and remove the adapter on the wiping attachment. Illustration L
- Attach the microfibre wipe cover to the wiping attachment and fold it back to the side.
Operation
Starting operation
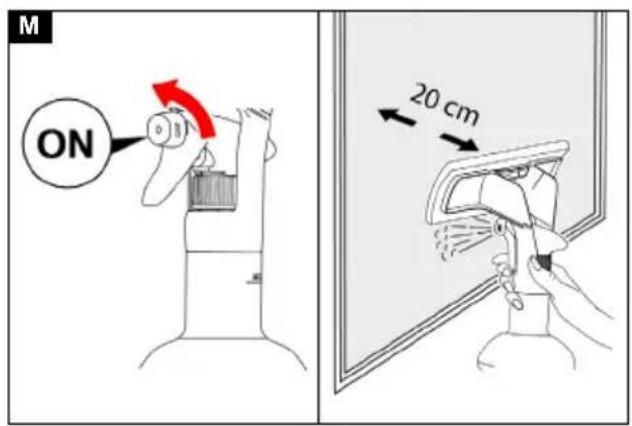
- Turn the spray nozzle to "ON". Illustration M
- Operate the spray lever several times and spray the detergent evenly onto the surface to be cleaned from a distance of approx. 20 cm.
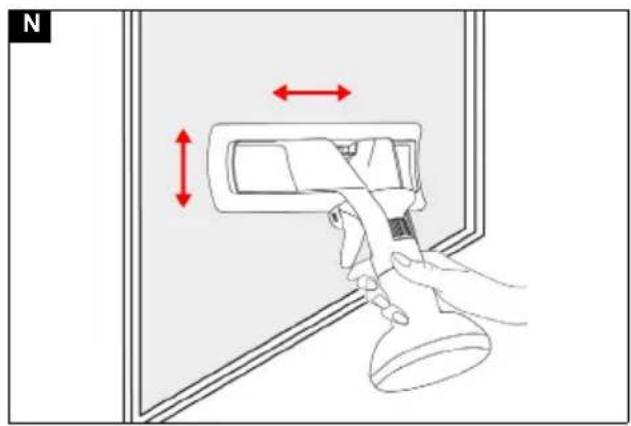
- Loosen the dirt with the microfibre wipe cover. Illustration N
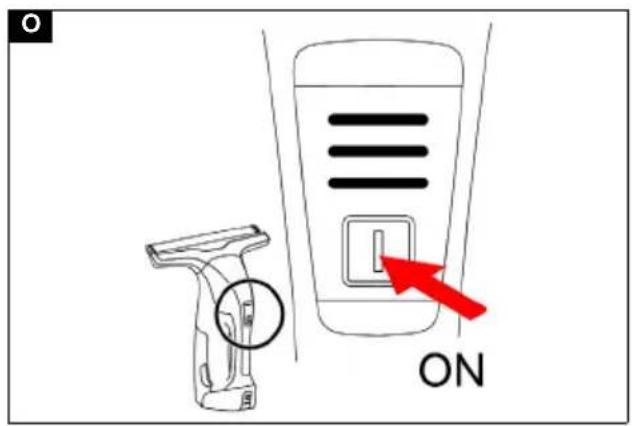
- Press the ON / OFF button to switch the device on.
Illustration O
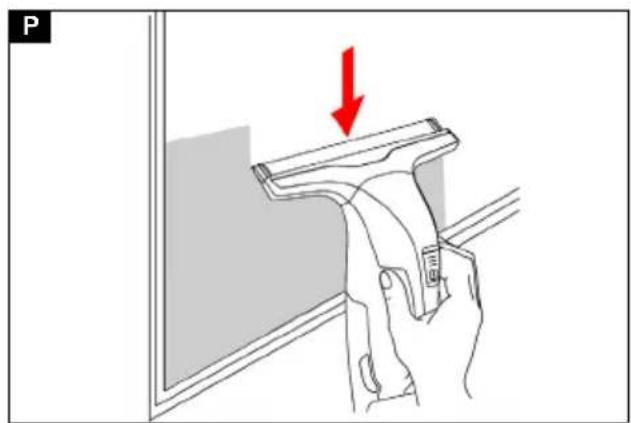
The charge indicator shows the current charging state of the battery pack, see chapter Charge indicator. - Pull the squeegee blade over the surface to be cleaned to suck up the waste water. Illustration P
ATTENTION
Work with the device only until the MAX marking on the waste water tank is reached. Switch off the device and empty the waste water tank, see chapter on Emptying the waste water tank.
Observe the following points to prevent streaks appearing:
- Do not press the squeegee blade too hard against the surface to be cleaned, just glide over it.
- Hold the device at the correct angle to the surface to be vacuumed. The distance between the lower end of the device and the surface should be approx. 10 cm.
- Use only KÄRCHER detergents, as these are specially designed for the device.
- Spray a sufficient amount of detergent on the surface so that the surface is not too dry.
- Clean the squeegee blade regularly, see chapter Clean the squeegee blade and suction nozzle.
- If worn, the squeegee blade must be replaced, see chapter Clean the squeegee blade and suction nozzle.
- Do not clean in direct sunlight or when it is too hot or cold.
Interrupting operation
-
Press the ON / OFF button to switch off the device. Illustration Q
-
Place the device on a level surface.
Emptying the waste water tank
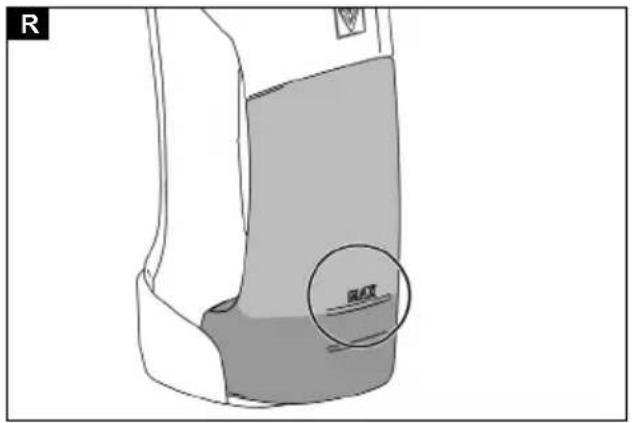
Empty the waste water tank as soon as it is filled up to the MAX marking.
Illustration R
-
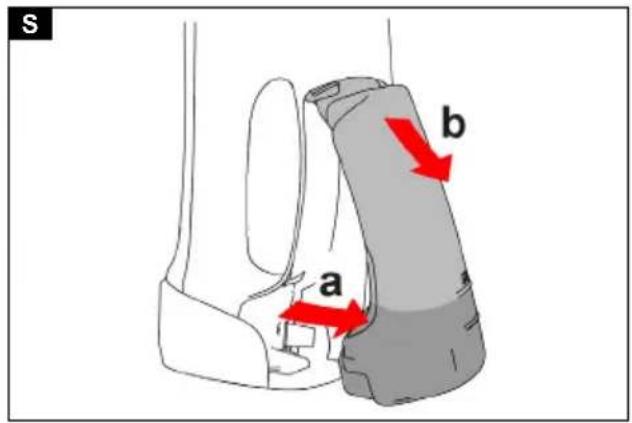
Press the ON / OFF button to switch off the device. Illustration Q
-
Remove the waste water tank. Illustration S
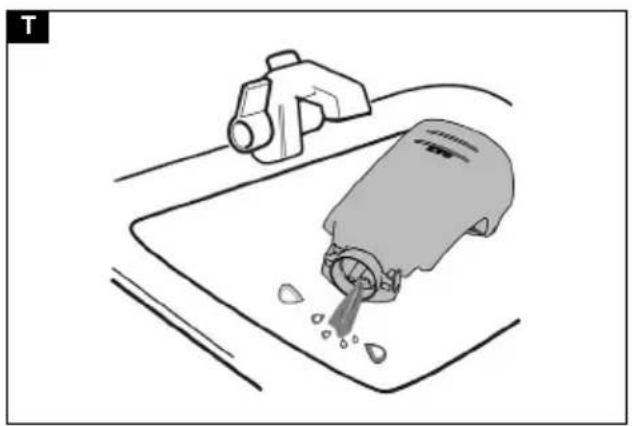
-
Drain the waste water tank and rinse it with clean water. Illustration T
-
Fit the empty waste water tank into the device. Illustration U
Ending operation
- Press the ON / OFF button to switch off the device. Illustration Q
-
Clean the waste water tank, see chapter Cleaning the waste water tank.
-
Remove the battery pack, see chapter Removing the battery pack.
- Clean the microfibre wipe cover, see chapter Clean the microfibre wipe cover.
- Clean the squeegee blade and the suction nozzle, see chapter Clean the squeegee blade and suction nozzle.
- Allow the device to dry.
- Assemble the device.
- Charge the battery pack, see operating instructions with safety instructions for the battery pack and the charger.
Transport
△CAUTION
Failure to observe the weight
Risk of injury and damage
Be aware of the weight of the device during transportation.
- Remove the battery pack, see chapter Removing the battery pack.
- Secure the device against slipping and tipping over when transporting in vehicles.
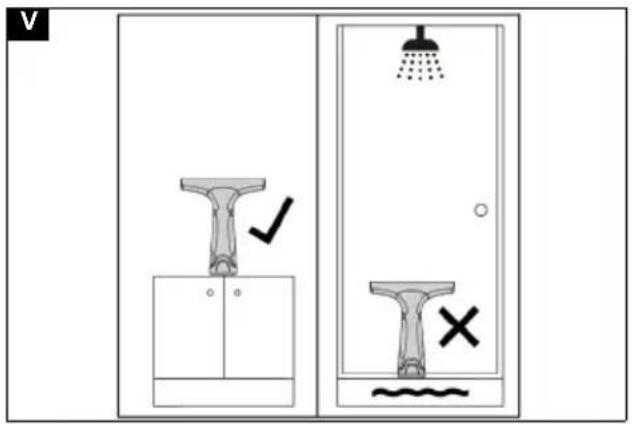
Storage
⚠CAUTION
Failure to observe the weight
Risk of injury and damage
Be aware of the weight of the device during storage.
ATTENTION
Danger of frost
Incompletely emptied devices can be destroyed by frost.
Completely empty the device and accessories.
Protect the device from frost.
-
Remove the battery pack, see chapter Removing the battery pack and store it properly, see the operating instructions for the battery pack.
-
Store the cleaned device upright in a clean, dry place, protected from frost and dust. Illustration V
Care and maintenance
⚠ WARNING
Improper cleaning
Risk of injury from electric shock, risk of fire, risk of damage
Turn off the device and remove the battery pack before cleaning the device.
Do not immerse the device in liquids.
Never clean the device under running water.
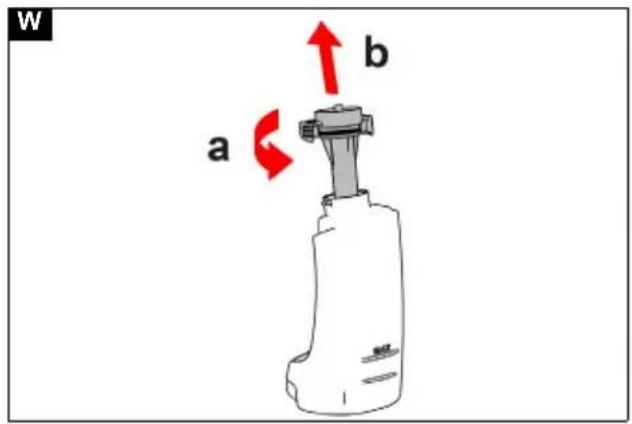
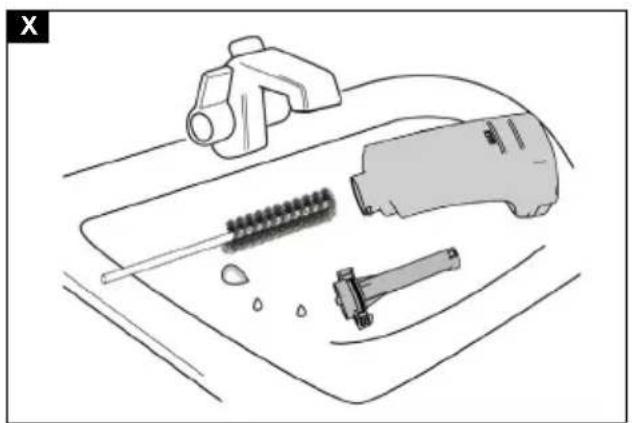
Cleaning the waste water tank
- Empty the waste water tank, see chapter Emptying the waste water tank.
- Remove the waste water tank lock. Illustration W
- Clean the waste water tank and lock by hand. Illustration X
Clean the microfibre wipe cover
- Remove the microfibre wipe cover from the wiping attachment or adapter.
Illustration Y
-
Wash the microfibre wipe cover under running water.
-
Alternatively, the microfibre wipe cover can be washed in the washing machine at max. 60°C.
Illustration Z
Observe the following care instructions:
- Do not bleach the microfibre wipe cover.
- Do not use fabric softeners.
- Do not dry the microfibre wipe cover in the dryer.
- Do not iron the microfibre wipe cover.
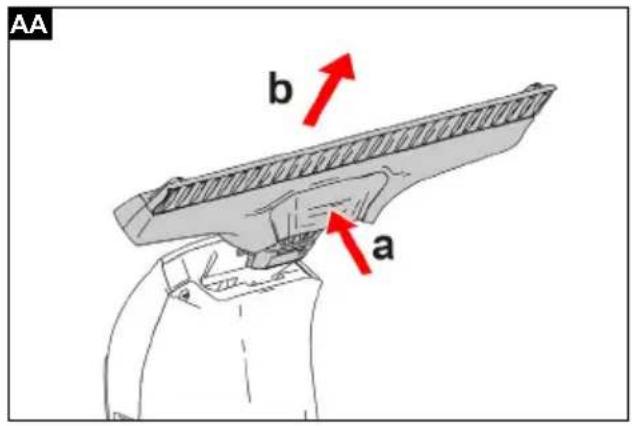
Clean the squeegee blade and suction nozzle
- Switch off the device.
- Press the unlocking button at the bottom of the suction nozzle and pull the suction nozzle off the device. Illustration AA
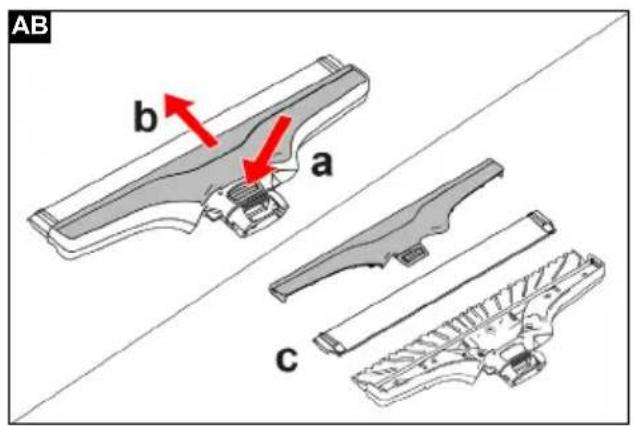
- Press the unlocking button on the top of the suction nozzle and slide the clamping rail off the suction nozzle.
Illustration AB
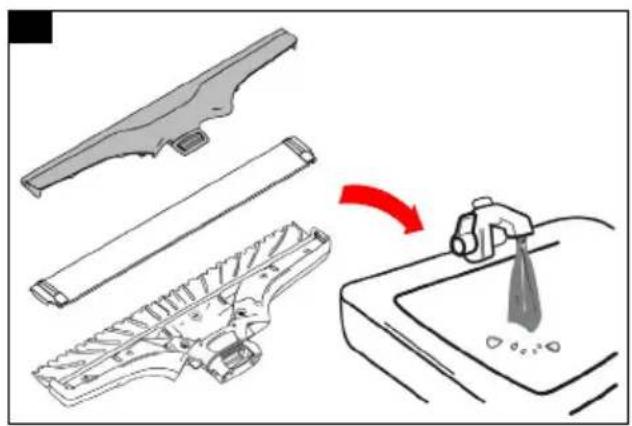
- Remove the squeegee blade from the suction nozzle.
- Clean the squeegee blade, suction nozzle and clamping rail under running water.
Illustration AC
- After drying, insert the squeegee blade into the suction nozzle.
Illustration AD
- Place the clamping rail on the squeegee blade and push it backwards until it audibly engages in the suction nozzle. Make sure that the clamping rail slides sideways correctly into the guides on the suction nozzle.
Illustration AE
Troubleshooting guide
| Malfunctions often have simple causes that you can remedy yourself using the following overview. When in doubt, or in the case of malfunctions not mentioned here, please contact your authorised Customer Service. |
| As the battery pack ages, even if it is looked after, the battery capacity reduces such that the full run time will no longer be reached when fully charged. This does not indicate a defect. |
| Fault Cause Rectification | ||
| The device is not working. | The battery pack is not sitting properly in the device. | 1. Push the battery pack into the battery mount on the device until it you feel it latch into place. |
| The charging state of the battery pack is too low. | 1. Charge the battery pack, see chapter Bat-tery pack charging. | |
| The battery pack is overheated. 1. Take the battery pack out of the device and let it cool down, see chapter Removing the battery pack.NoteThe battery pack can get very warm.2. Do not the place the device and battery pack in direct sunlight. | ||
| The battery pack or charger is defective. | 1. Replace the battery pack or charger, see chapter Intended use. | |
| The spray bottle is not working. | There is no detergent in the spray bottle. | 1. Fill the spray bottle with detergent, see chapter Prepare spray bottle. |
| The pump mechanism in the spray head is defective. | 1. Contact the service department. | |
| Streaking occurs during operation. | 1. To avoid streaking, see chapter Starting operation. | |
Error codes and error descriptions
| Charge indicator Error description Error correction | ||
| The lower LED flash-es slowly and the motor is off. | The battery pack is fully discharged. | 1 Charge the battery pack or replace it with a charged battery pack. |
| All LEDs flash twice every 2 seconds and the motor is running. | Temperature warning: The temperature of the battery pack is close to the permissible upper limit. | 1 Operate and store the appliance at temperatures usual for living areas. |
| All LEDs flash twice every 2 seconds and the motor is off. | Battery pack temperature too high or low. | 1 Allow the device to cool down/heat up.Operate and store the appliance at temperatures usual for living areas. |
| All LEDs flash five times every 2 s. | Permanent fault of the battery pack. | 1 Remove the battery pack from the device and put it back in again.2 If the fault persists, please contact your dealer or authorised Customer Service. |
| All LEDs flash quickly simultaneously. | Motor blockage or internal device fault. | 1 Check if there is a foreign object in the device and if so, remove it.2 Remove the battery pack from the device and put it back in again.3 If the fault persists, please contact your dealer or authorised Customer Service.4 Do not use the appliance to absorb larger quantities of fluids from horizontal surfaces.5 Do not use the appliance to absorb dust or solids.6 Empty the waste water tank when the MAX mark is reached at the latest.7 Only use suitable detergents, no spirits, no foam cleanser. Window cleaner concentrates from KÄRCHER are best suited for cleaning. |
Warranty
The warranty conditions issued by our sales company responsible apply in all countries. We shall remedy possible malfunctions on your device within the warranty period free of cost, provided that a material or manufacturing defect is the cause. In a warranty case, please contact your dealer (with the purchase receipt) or the next authorised customer service site. (See overleaf for the address)
Technical data
| Electrical connection | ||
| Battery pack nominal voltage V 3,6 - 3,7 | ||
| Maximum voltage of the battery pack | V | 4,2 |
| Degree of protection IPX4 | ||
| Dimensions and weights | ||
| Height mm 313 | ||
| Width mm 282 | ||
| Depth mm 133 | ||
| Weight g 660 | ||
| Waste water tank capacity ml | 150 | |
| Device performance data | ||
| Nominal power | W | 10 |
| Operation duration with fully charged battery pack 2.5 Ah | Minutes | 40 |
| Sound level (EN 60704-2-1) | dB(A) | 50 |
Subject to technical modifications.
Contenu
⑦ Accupack (KÄRCHER Battery Power 4 V)
⑧*Ontgrendelingsknop accupack
⑦ Akumulator (KÄRCHER Battery Power 4 V)
www.kaercher.com/REACH
附件和备件
.DENSO WAVE INCORPORATED
المحتويات
153 إرشادات Csلامة
natural_image
Symbol of a trash bin with crossed lines indicating no waste or restriction, and a solid black rectangle below (no text or labels)natural_image
Black hand icon giving a thumbs-up gesture (no text or symbols)THANK YOU!
MERCI! DANKE! iGRACIAS!

Register your product and benefit from many advantages.
www.kaercher.com/welcome


Rate your product and tell us your opinion.
natural_image
Icon showing a gear and wrench inside a square frame (no text or symbols)www.kaercher.com/dealersearch
Alfred Kärcher SE & Co. KG
Alfred-Kärcher-Str. 28-40
71364 Winnenden (Germany)