
STA1500 - Multitools EGO - Free user manual and instructions
Find the device manual for free STA1500 EGO in PDF.
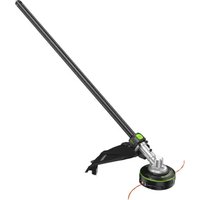
| Product Type | Edger Attachment |
| Brand | EGO |
| Model | STA1500 |
| Weight (without battery) | 1.59 kg |
| Cutting Width | 38 cm |
| Line Diameter | 2.4 mm (twisted nylon) |
| No-load Speed | 5000 - 6000 min⁻¹ |
| Cutting Mechanism | Bump Head (tap on ground) |
| Compatibility | EGO power heads PH1400E / PH1420E / PHX1600 |
| Operating Temperature | 0°C to 40°C |
| Storage Temperature | -20°C to 70°C |
| Guaranteed Sound Power Level | 96 dB(A) |
| Applications | Cutting grass and weeds |
| Maintenance | Regular cleaning, gear lubrication every 50 hours |
| Safety | Wear eye protection, hearing protection, gloves, safety shoes; maintain a safety distance of 15 m |
| Package Contents | Edger attachment, protective guard, hex key, multifunction key, user manual |
| Warranty | Refer to egopowerplus.eu |
Frequently Asked Questions - STA1500 EGO
User questions about STA1500 EGO
0 question about this device. Answer the ones you know or ask your own.
Ask a new question about this device
Download the instructions for your Multitools in PDF format for free! Find your manual STA1500 - EGO and take your electronic device back in hand. On this page are published all the documents necessary for the use of your device. STA1500 by EGO.
USER MANUAL STA1500 EGO
natural_image
Line drawing of a mechanical lever with a cylindrical base and fulcrum (no text or symbols)STA1500
LINE TRIMMER
ATTACHMENT
FOR USE ONLY WITH THE 56V LITHIUM-ION POWER HEAD PH1400E/PH1420E/PHX1600
EN Line trimmer attachment 5
HE vin for it is 327
natural_image
Line drawing of a portable electronic device with control panel and buttons (no text or symbols)CH2100E, CH3200E, CH5500E, CH7000E, CH7000E-T
B
natural_image
Line drawing of a person in protective gear using a long-handled spray gun to spray plants (no text or symbols)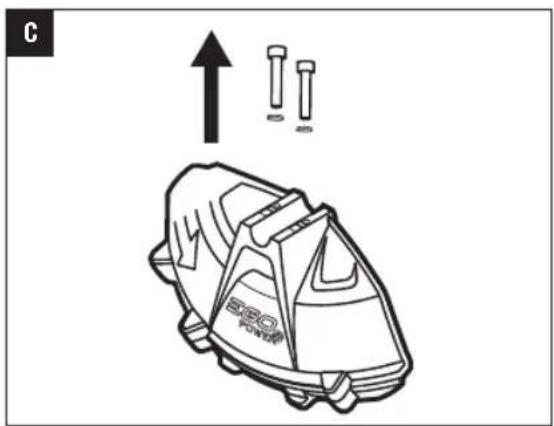
natural_image
Technical line drawing of a mechanical tool with a lever and three cylindrical components, no text or symbols present.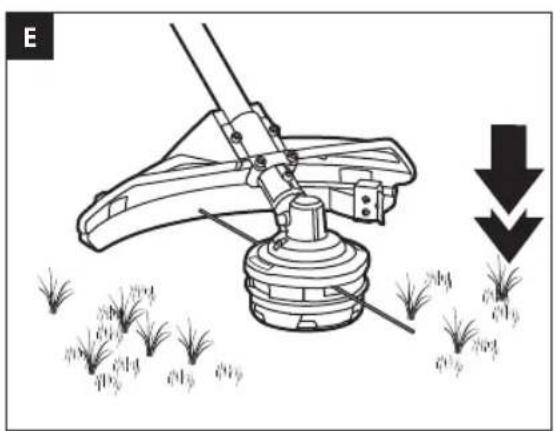
natural_image
Diagram of a manual lawn saw cutting a seed drill, showing blade and base components with downward arrows indicating flow direction (no text or symbols)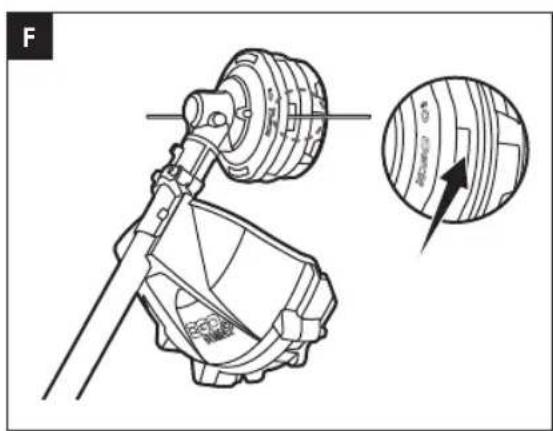
natural_image
Technical line drawing of a mechanical assembly with a magnified inset showing a circular component detail (no text or symbols)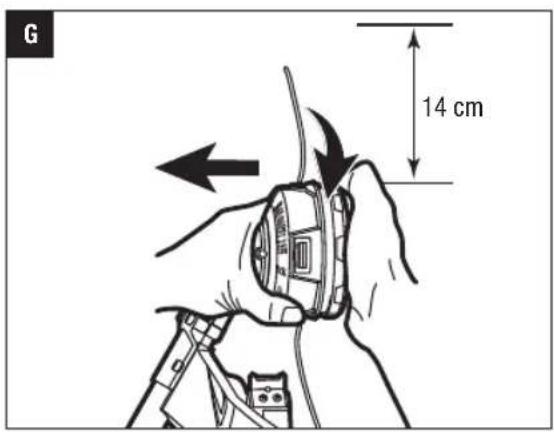
natural_image
Technical line drawing of a mechanical assembly with a flanged component and a lever mechanism (no text or symbols)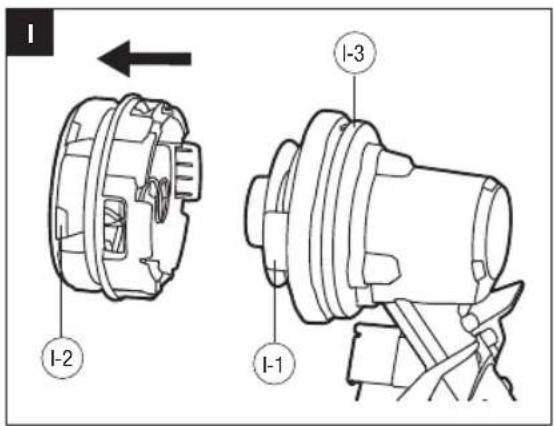
natural_image
Illustration of hands assembling a mechanical component with a downward arrow indicating assembly (no text or symbols present)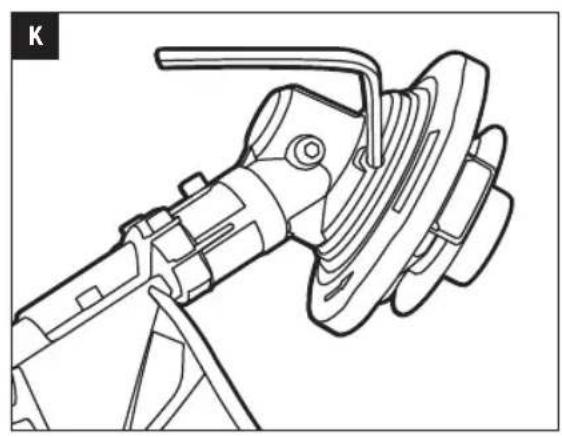
natural_image
Technical line drawing of a mechanical device with a central rotating component and a base mount (no text or symbols)
natural_image
Mechanical assembly diagram showing a hand turning a gear with a wrench, no text or symbols present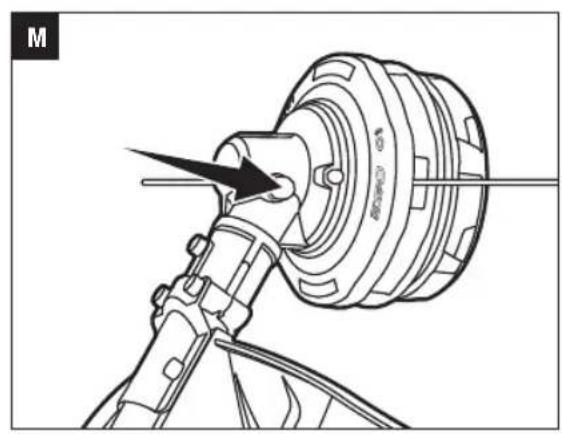
natural_image
Mechanical assembly diagram showing a rotating component with a black arrow indicating motion direction (no text or symbols)READ ALL INSTRUCTIONS!

READ OPERATOR'S MANUAL
WARNING: To ensure safety and reliability, all repairs and replacements should be performed by a qualified service technician.
SAFETY SYMBOLS
The purpose of safety symbols is to attract your attention to possible dangers. The safety symbols and the explanations with them deserve your careful attention and understanding. The symbol warnings do not, by themselves, eliminate any danger. The instructions and warnings they give are no substitutes for proper accident prevention measures.
WARNING: Be sure to read and understand all safety instructions in this Operator's Manual, including all safety alert symbols such as "DANGER," "WARNING," and "CAUTION" before using this tool. Failure to follow all instructions listed below may result in electric shock, fire, and/or serious personal injury.
SYMBOL MEANING
SAFETY ALERT SYMBOL: Indicates DANGER, WARNING, or CAUTION, may be used in conjunction with other symbols or pictographs.

WARNING: The operation of any power tools can result in foreign objects being thrown into your eyes, which can result in severe eye damage. Before beginning power tool operation, always wear safety goggles or safety glasses with side shields and a full face shield when needed. We recommend a Wide Vision Safety Mask for use over eyeglasses or standard safety glasses with side shields.
SAFETY INSTRUCTIONS
This page depicts and describes safety symbols that may appear on this product. Read, understand, and follow all instructions on the machine before attempting to assemble and operate it.
 | Safety Alert | Indicates a potential personal injury hazard. |
 | Read Operator's Manual | To reduce the risk of injury, user must read the operator's manual. |
 | Wear Eye Protection | Always wear safety goggles or safety glasses with side shields and a full face shield when operating this product. |
 | Wear Ear Protection | Always wear sound barriers (ear plugs or ear mufflers) to protect your hearing. |
 | Wear Head Protection | Wear an approved safety hard hat to protect your head. |
 | Wear Protective Gloves | Protect your hands with gloves when handling blade or blade guard. Heavy-duty, nonslip gloves improve your grip and protect your hands. |
 | Wear Safety Footwear | Wear non-slip safety footwear when using this equipment. |
 | Cutting Width | The Max. cutting width of line trimmer |
 | Line Diameter | The Diameter of the nylon cutting line |
 | Disconnect battery before maintenance. | Disconnect the battery pack from the line trimmer before carrying out maintenance or cleaning work |
 | Beware of thrown objects | Thrown objects can ricochet and result in personal injury or property damage. |
 | Keep Bystanders Away | The distance between the machine and bystanders shall be at least 15m. |
 | Beware of blade thrust | Warn the operator of the danger of blade thrust. |
 | CE | This product is in accordance with applicable EC directives. |
 | UKCA | This product is in accordance with applicable UK legislation. |
 | WEEE | Waste electrical products should not be disposed of with household waste. Take to an authorized recycler. |
EN
| Noise | Guaranteed sound power level. Noise emission to the environment according to the European community's Directive. | |
| V Volt Voltage | ||
| mm Millimeter Length or size | ||
| cm Centimeter Length or size | ||
| kg Kilogram Weight | ||
| n_D | No Load Speed | Rotational speed, at no load |
| min^-1 | Per Minute Revolutions per minute | |
GENERAL MACHINE SAFETY WARNINGS
WARNING! Read all safety warnings, instructions, illustrations and specifications provided with this machine. Failure to follow all instructions listed below may result in electric shock, fire and/or serious injury.
SAVE ALL WARNINGS AND INSTRUCTIONS FOR FUTURE REFERENCE.
The term "machine" in the warnings refers to your mains-operated (corded) machine or battery-operated (cordless) machine.
WORK AREA SAFETY
- Keep work area clean and well lit. Cluttered or dark areas invite accidents.
- Do not operate machines in explosive atmospheres, such as in the presence of flammable liquids, gases or dust. Machines create sparks which may ignite the dust or fumes.
- Keep children and bystanders away while operating a machine. Distractions can cause you to lose control.
ELECTRICAL SAFETY
■ Machine plugs must match the outlet. Never modify the plug in any way. Do not use any adapter plugs with earthed (grounded) machines. Unmodified plugs and matching outlets will reduce risk of electric shock.
- Avoid body contact with earthed or grounded surfaces, such as pipes, radiators, ranges and refrigerators. There is an increased risk of electric shock if your body is earthed or grounded.
■ Do not operate the machine in rain or wet conditions. Water entering the machine may increase the risk of electric shock or malfunction that could
result in personal injury.
- Do not abuse the cord. Never use the cord for carrying, pulling or unplugging the machine. Keep cord away from heat, oil, sharp edges or moving parts. Damaged or entangled cords increase the risk of electric shock.
- When operating a machine outdoors, use an extension cord suitable for outdoor use. Use of a cord suitable for outdoor use reduces the risk of electric shock.
■ If operating a machine in a damp location is unavoidable, use a ground fault circuit interrupter (GFCI) protected supply. Use of a GFCI reduces the risk of electric shock.
PERSONAL SAFETY
■ Stay alert, watch what you are doing and use common sense when operating a machine. Do not use a machine while you are tired or under the influence of drugs, alcohol or medication. A moment of inattention while operating machines may result in serious personal injury.
■ Use personal protective equipment. Always wear eye protection. Protective equipment such as a dust mask, non-skid safety shoes, hard hat or hearing protection used for appropriate conditions will reduce personal injuries.
■ Prevent unintentional starting. Ensure the switch is in the off-position before connecting to power source and/or battery pack, picking up or carrying the machine. Carrying machines with your finger on the switch or energizing machines that have the switch on invites accidents.
■ Remove any adjusting key or wrench before turning the machine on. A wrench or a key left attached to a rotating part of the machine may result in personal injury.
■ Do not overreach. Keep proper footing and balance at all times. This enables better control of the machine in unexpected situations.
■ Dress properly. Do not wear loose clothing or jewelry. Keep your hair and clothing away from moving parts. Loose clothes, jewelry or long hair can be caught in moving parts.
- If devices are provided for the connection of dust extraction and collection facilities, ensure these are connected and properly used. Use of dust collection can reduce dust-related hazards.
- Do not let familiarity gained from frequent use of machines allow you to become complacent and ignore machine safety principles. A careless action can cause severe injury within a fraction of a second.
MACHINE USE AND CARE
- Do not force the machine. Use the correct machine for your application. The correct machine will do the job better and safer at the rate for which it was designed.
■ Do not use the machine if the switch does not turn it on and off. Any machine that cannot be controlled with the switch is dangerous and must be repaired.
■ Disconnect the plug from the power source and/or remove the battery pack, if detachable, from the machine before making any adjustments, changing accessories, or storing machines. Such preventive safety measures reduce the risk of starting the machine accidentally.
■ Store idle machines out of the reach of children and do not allow persons unfamiliar with the machine or these instructions to operate the machine. Machines are dangerous in the hands of untrained users.
- Maintain machines and accessories. Check for misalignment or binding of moving parts, breakage of parts and any other condition that may affect the machine's operation. If damaged, have the machine repaired before use. Many accidents are caused by poorly maintained machines.
- Keep cutting machines sharp and clean. Properly maintained cutting machines with sharp cutting edges are less likely to bind and are easier to control.
■ Use the machine, accessories and machine bits etc. in accordance with these instructions, taking into account the working conditions and the work to be performed. Use of the machine for operations different from those intended could result in a hazardous situation.
- Keep handles and grasping surfaces dry, clean and free from oil and grease. Slippery handles and grasping surfaces do not allow for safe handling and control of the machine in unexpected situations.
BATTERY MACHINE USE AND CARE
■ Recharge only with the charger specified by the manufacturer. A charger that is suitable for one type of battery pack may create a risk of fire when used with another battery pack.
■ Use machines only with specifically designated battery packs. Use of any other battery packs may create a risk of injury and fire.
- When battery pack is not in use, keep it away from other metal objects, like paper clips, coins, keys, nails, screws or other small metal objects, that can make a connection from one terminal to another. Shorting the battery terminals together may cause
burns or a fire.
■ Under abusive conditions, liquid may be ejected from the battery; avoid contact. If contact accidentally occurs, flush with water. If liquid contacts eyes, additionally seek medical help.
Liquid ejected from the battery may cause irritation or burns.
■ Do not use a battery pack or machine that is damaged or modified. Damaged or modified batteries may exhibit unpredictable behavior resulting in fire, explosion or risk of injury.
■ Do not expose a battery pack or machine to fire or excessive temperature. Exposure to fire or temperature above 130 °C may cause explosion.
■ Follow all charging instructions and do not charge the battery pack or machine outside the temperature range specified in the instructions. Charging improperly or at temperatures outside the specified range may damage the battery and increase the risk of fire.
TRAINING
- Read the instructions carefully. Be familiar with the controls and the proper use of the machine.
■ Never allow people unfamiliar or children with these instructions to use the appliance. Local regulations can restrict the age of the operator.
- Keep in mind that the operator or user is responsible for accidents or hazards occurring to other people or their property.
PREPARATION
■ Never operate the machine while people, especially children, or pets are nearby.
■ Wear eye protection and stout shoes at all times while operating the machine.
■ The distance between the machine and bystanders shall be at least 15m.
■ Never operate the machine while the operator is tried, ill or under the influence of alcohol or other drugs.
OPERATION
■ Use the machine only in daylight or good artificial light.
■ Never operate the machine with damaged guards or shields or without guards or shields in place.
■ Switch on the motor only when the hands and feet are away from the cutting means.
■ Always disconnect the machine from the power supply (i.e. remove the battery pack).
■ whenever leaving the machine unattended;
■ before clearing a blockage;
■ before checking, cleaning or working on the machine.
■ after striking a foreign object;
■ whenever the machine starts vibrating abnormally.
■ Take care against injury to feet and hands from the cutting means.
■ Always ensure that the ventilation openings are kept clear of debris.
MAINTENACE AND STORAGE
■ Disconnect the machine from the power supply (i.e. remove the battery pack) before carrying out maintenance or cleaning work.
- Use only the manufacturer's recommended replacement parts and accessories.
- Inspect and maintain the machine regularly. Have the machine repaired only by an authorized repairer.
■ When not in use, store the machine out of the reach of children.
OTHER SAFETY WARNINGS
- Avoid Dangerous Environments – Don't use appliances on damp or wet slope.
- Keep guards in place and in working order.
- Keep hands and feet away from the cutting area.
■ To reduce the risk of injury, never work on a ladder or on any other insecure support. Never hold the cutting unit above waist height.
- Check the cutting unit at regular short intervals during operation, or immediately if there is a noticeable change in cutting behavior.
■ For best results, your battery should be charged in a location where the temperature is greater than 5^ C and less than 40^ C. Do not store it outside or in vehicles.
■ If you are approached, stop the motor and cutting uni
■ Warn the operator of the danger of blade thrust (only using with 3-teeth blade).
■ Blade thrust may occur when the spinning blade contacts an object that it does not immediately cut.
■ Blade thrust can be violent enough to cause the unit and/or operator to be propelled in any direction, and possibly lose control of the unit.
■ Blade thrust can occur without warning if the blade snags, stalls or binds.
■ Blade thrust is more likely to occur in areas where it is difficult to see the material being cut.
- Do not attach any blade to a unit without proper installation of all required parts. Failure to use the proper parts can cause the blade to fly off and seriously injure the operator and/or bystanders. Discard blades that are bent, warped, cracked, broken, or damaged in any way. Use a sharp blade A dull blade is more likely to snag and thrust (only using with 3-teeth blade).
- A coasting blade/line can cause injury while it continues to spin after the motor is stopped or trigger is released. Maintain proper control until the blade/line has completely stopped rotating.
- Battery tools do not have to be plugged into an electrical outlet; therefore, they are always in operating condition. Be aware of possible hazards even when the tool is not operating. Take care when performing maintenance or service.
■ Do not wash with a hose; avoid getting water in motor and electrical connections.
■ If situations occur that are not covered in this manual, use care and good judgment. Contact the EGO Customer Service Center for assistance.
■ Use only with battery packs and chargers listed in fig.A
SPECIFICATIONS
| Cutting Mechanism Bump Head | ||
| Line Diameter | 2.4 mm nylon twist line | |
| Cutting Width 38 cm | ||
| No-Load Speed 5000/6000 min | -1 | |
| Weight (Without battery pack) 1.59 kg | ||
| Recommended Operating Temperature | 0°C-40°C | |
| Recommended Storage Temperature | -20°C-70°C | |
| Measured sound power level L_WA | 93.2 dB(A)K=2.2 dB(A)(PH1400E) | |
| 93.89 dB(A)K=1.46 dB(A)(PH1420E) | ||
| 92 dB(A)K=3.1 dB(A)(PHX1600) | ||
| Sound pressure level at operator's ear L_PA | 73.2 dB(A)K=3 dB(A)(PH1400E) | |
| 81.6 dB(A)K=3 dB(A)(PH1420E) | ||
| 86 dB(A)K=3 dB(A)(PHX1600) | ||
| Guaranteed sound power level L_WA (measured according to 2000/14/EC) | 96 dB(A) | |
| Valuation of vibration a_h | Front-assist handle | 4.2 m/ s^2 K=1.5 m/ s^2 (PH1400E) |
| 2.23 m/ s^2 K=1.5 m/ s^2 (PH1420E) | ||
| 4.85 m/ s^2 K=1.5 m/ s^2 (PHX1600) | ||
| Rear handle | 2.7 m/ s^2 K=1.5 m/ s^2 (PH1400E) | |
| 2.03 m/ s^2 K=1.5 m/ s^2 (PH1420E) | ||
| 2.67 m/ s^2 K=1.5 m/ s^2 (PHX1600) | ||
■ The above parameters are tested and measured equipped with power head PH1400E/PH1420E/PHX1600.
■ The declared vibration total value has been measured in accordance with a standard test method and may be used for comparing one tool with another;
■ The declared vibration total value may also be used in a preliminary assessment of exposure.
NOTICE: The vibration emission during actual use of the power tool can differ from the declared value in which the tool is used; In order to protect the operator, user should wear gloves and ear protectors in the actual conditions of use.
PACKING LIST
| PART NAME QUANTITY | |
| Line Trimmer Attachment 1 | |
| Guard 1 | |
| Hex Wrench 1 | |
| Multi-Function Wrench 1 | |
| Operator's Manual 1 |
About recommended cutting line, please visit the website egopowerplus.eu or refer to the EGO Product Catalogue.
DESCRIPTION
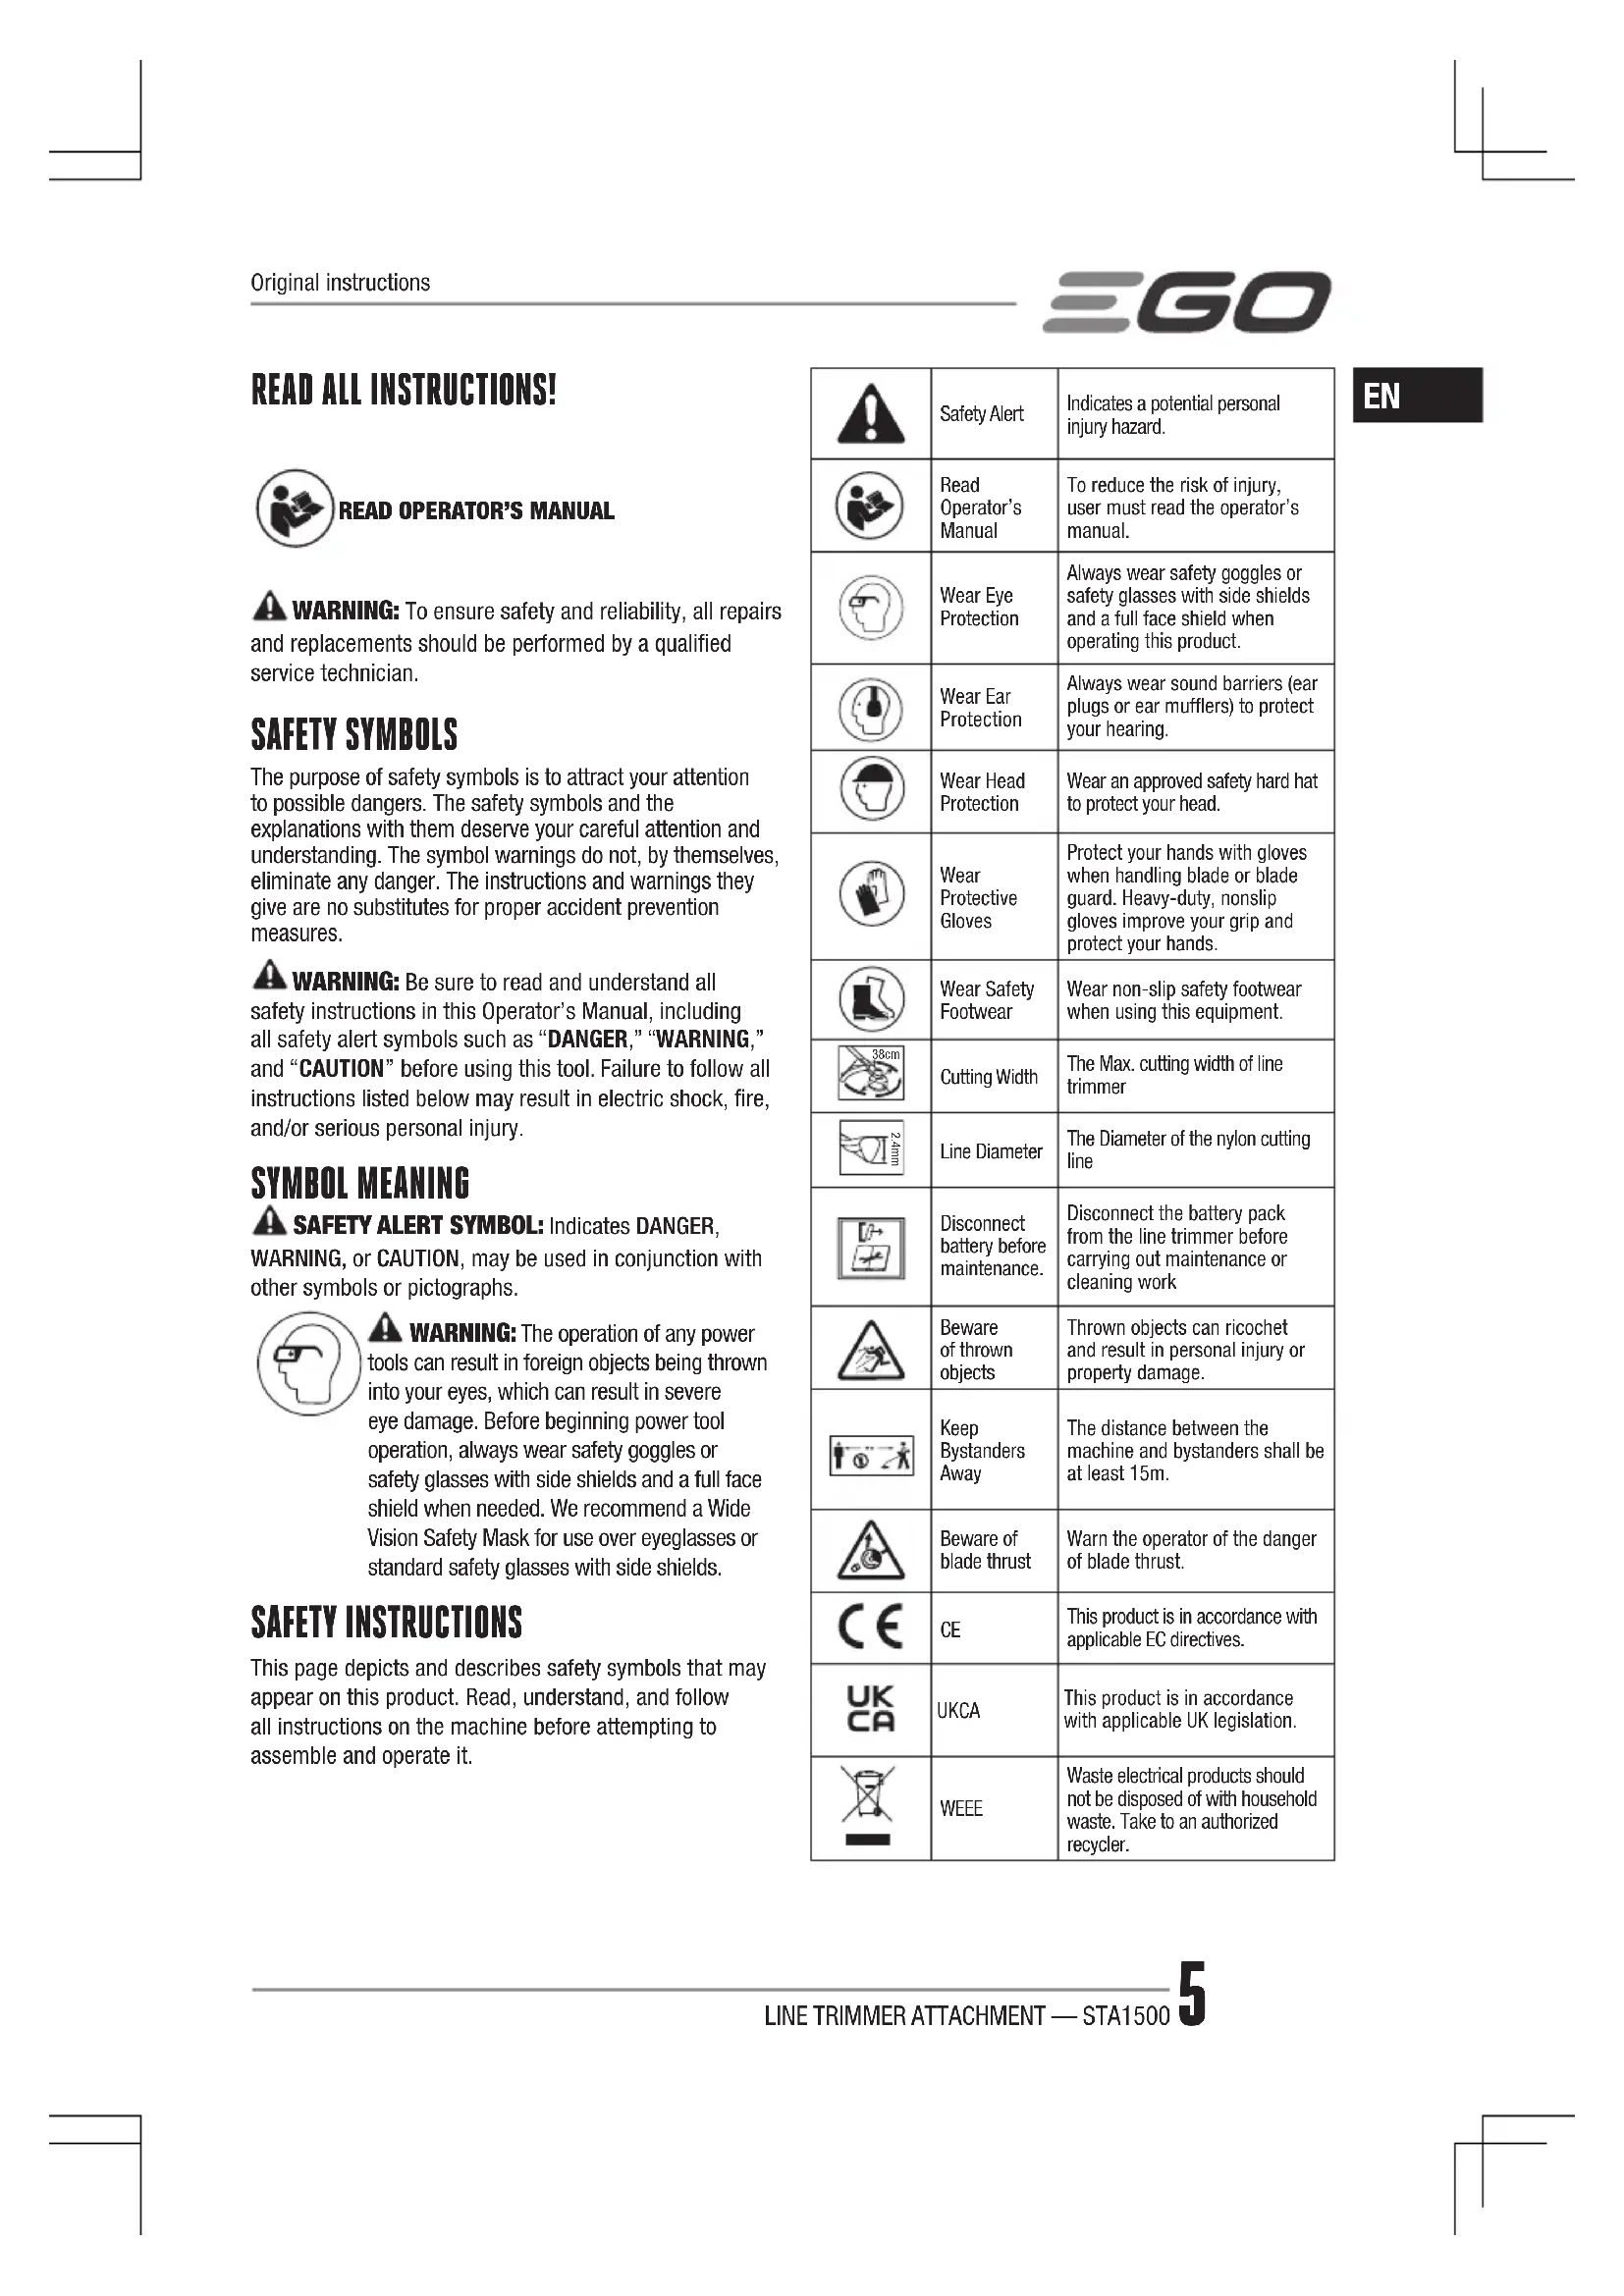
KNOW YOUR LINE TRIMMER ATTACHMENT (Fig. A)
- End Cap
- Line trimmer Shaft
- Cutting Line
- Trimmer Head (Bump Head)
- Release Tab
- Line-cutting Blade
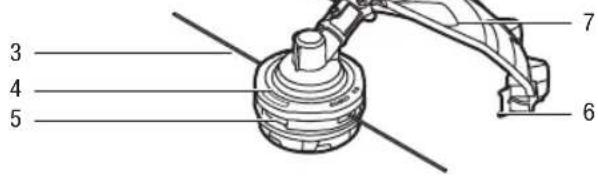
- Guard
- Hex Wrench
- Multi-Function Wrench
WARNING: Never operate the tool without the guard firmly in place. The guard must always be on the tool to protect the user.
ASSEMBLY
⚠ WARNING: If any parts are damaged or missing, do not operate this product until the parts are replaced. Use of this product with damaged or missing parts could result in serious personal injury.
WARNING: Do not attempt to modify this product or create accessories not recommended for use with this line trimmer. Any such alteration or modification is misuse and could result in a hazardous condition leading to possibly serious personal injury.
⚠ WARNING: To prevent accidental starting that could cause serious personal injury, always remove the battery pack from the machine when assembling parts.
MOUNTING THE GUARD
EN
WARNING: Always wear gloves when mounting or replacing the guard. Take care of the blade on the guard and protect your hand from cutting.
WARNING: Never operate the machine without the guard firmly in place. The guard must always be on the machine to protect the user! When the guard is fixed, never attempt to remove or adjust the guard, if a replacement is needed, it should be performed by a qualified service technician!
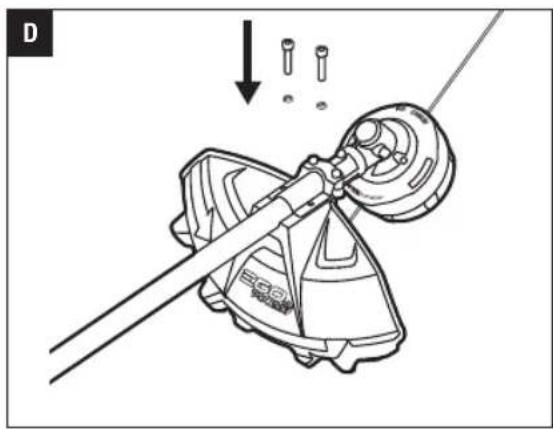
Loosen and remove the two screws from the guard (Fig. C), align the guard mounting holes with the assembly holes and then lock the guard onto the shaft base with the two screws, together with two spring washers (Fig. D).
Make sure the guard is fixed according to Fig. C & D, any reverse fixing will cause great danger!
CONNECTING THE LINE TRIMMER ATTACHMENT TO THE POWER HEAD
This line trimmer attachment is designed for use with EGO Power Head PH1400E/PH1420E/PHX1600.
See "INSTALLING AN ATTACHMENT TO THE POWER HEAD" section in the power head PH1400E/PH1420E/PHX1600 operator's manual.
OPERATION
WARNING: Do not allow familiarity with this product to make you careless. Remember that a careless fraction of a second is sufficient to inflict serious injury.
WARNING: Always wear eye protection, along with hearing protection. Failure to do so could result in objects being thrown into your eyes and other possible serious injuries.
APPLICATIONS
You may use this product for the purpose listed below:
■ Trimming grass and weeds from around porches, fences, and decks
NOTICE: The tool is to be used only for its prescribed purpose. Any other use is deemed to be a case of misuse.
Before each use check for damaged/worn parts
Check the trimmer head, guard and front-assist handle and replace any parts that are cracked, warped, bent, or damaged in any away.
The line-cutting blade on the edge of the guard can dull over time. It is recommended that you periodically sharpen it with a file or replace it with a new blade.
WARNING: Always wear gloves when mounting or
replacing the guard or when sharpening or replacing the blade. Note the location of the blade on the guard and protect your hand from injury.
WARNING: To prevent serious personal injury, remove the battery pack from the power head before servicing, cleaning, changing attachments or removing material from the unit.
USING THE LINE TRIMMER WITH POWER HEAD
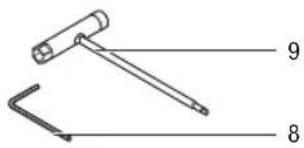
WARNING: Dress properly to reduce the risk of injury when operating this tool. Do not wear loose clothing or jewelry. Wear eye and ear/hearing protection. Wear heavy, long pants, boots and gloves. Do not wear short pants or sandals or go barefoot.
WARNING: Clear the area to be cut before each use. Remove all objects, such as rocks, broken glass, nails, wire, or string that can be thrown or become entangled in the cutting attachment. Clear the area of children, bystanders, and pets. At a minimum, keep all children, bystanders and pets at least 15m away; there still may be risk to bystanders from thrown objects. Bystanders should be encouraged to wear eye protection. If you are approached, stop the motor and cutting attachment immediately.
For safe and better operation, put on the shoulder strap across the shoulder. Adjust the shoulder strap in a comfortable operating position. Hold the line trimmer with your one hand on the rear handle and your other hand on the front-assist handle. Keep a firm grip with both hands while in operation. The line trimmer should be held at a comfortable position with the rear handle about hip height. The trimmer head should be parallel to the ground such that it easily contacts the material to be cut without the operator having to bend over (Fig. B).
WARNING: The shoulder strap is also a quick release mechanism in hazardous situation. When emergency occurs, take it off from your shoulder immediately, no matter what way the strap is in.
After each use, clean the trimmer
See the MAINTENANCE section for cleaning instructions.
TO START/STOP THE TOOL
See "STARTING/STOPPING THE POWER HEAD" section in the power head PH1400E/PH1420E/PHX1600 operator's manual.
ADJUSTING CUTTING LINE LENGTH
The trimmer head allows the operator to release more cutting line without stopping the motor. As line becomes frayed or worn, additional line can be released by lightly tapping the trimmer head on the ground while operating the trimmer (Fig. E).
NOTICE: Line release will become more difficult as the cutting line becomes shorter.
WARNING: Do not remove or alter the line-cutting blade assembly. Excessive line length will cause the motor to overheat and may result in serious personal injury.
LINE REPLACEMENT
NOTICE: Always use the recommended nylon cutting line with a diameter that does not exceed 2.4 mm. Using line other than that specified may cause the line trimmer to overheat or become damaged.
WARNING: Never use metal-reinforced line, wire, or rope, etc. These can break off and become dangerous projectiles.
- Remove the battery pack
- Remove the remaining cutting line, if necessary. Simply pull it out by hand.
- Cut 4m long cutting line, Insert the line into the mounting hole inside the eyelet (Fig. F). Push and pull the line from the other side until equal amounts of line appear on both sides of the spool.
- Press, while rotating the lower cover assembly in the arrow direction, to wind the line onto the spool until approximately 14cm of line is showing on each side (Fig. G).
- Push the lower cover assembly down while pulling on the lines to manually advance the line and to check for proper assembly of the trimmer head.
When the cutting line breaks from the line outlet or the cutting line is not released when tapping the trimmer head, follow the steps below:
- Remove the battery pack.
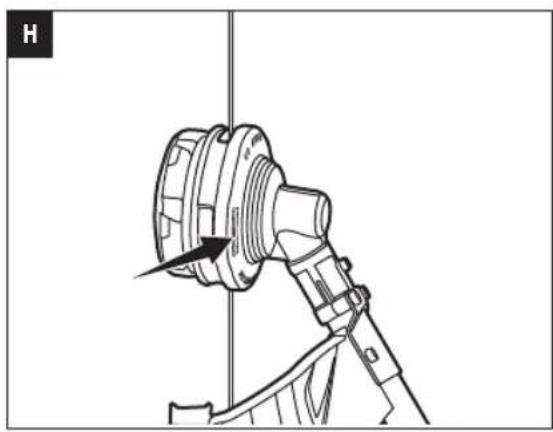
- Press the release tabs on the upper cover and remove the lower cover assembly by pulling it straight out (Fig. H&I).
- Remove the cutting line from the spool.
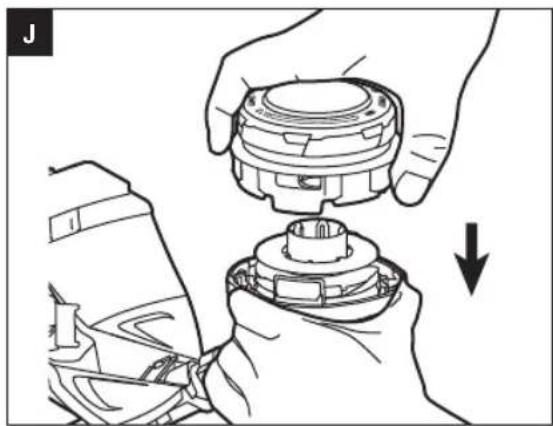
- With one hand holding the Upper cover, use the other hand to grasp the lower cover assembly and align the tabs on the upper cover with the holes lower cover assembly base (Fig. J); use your palm to press and rotate the lower cover assembly left and right until the tabs lock with the upper cover (Fig. K).
- Following the instructions in "LINE REPLACEMENT" to reload the cutting line.
When the tool is intended to use as a brush cutter, follow the steps as Fig. L & M shown to disassemble the trimmer head.
MAINTENANCE
WARNING: Before inspecting, cleaning or servicing the unit, stop the motor, wait for all moving parts to stop, and remove the battery pack. Failure to follow these instructions can result in serious personal injury or property damage.
WARNING: When servicing, use only identical replacement parts. Use of any other parts can create a hazard or cause product damage. To ensure safety and reliability, all repairs, other than the items listed in these maintenance instructions, should be performed by a qualified service technician.
GENERAL MAINTENANCE
Avoid using solvents when cleaning plastic parts. Most plastics are susceptible to damage from various types of commercial solvents and may be damaged by their use. Use clean cloths to remove dirt, dust, oil, grease, etc.
CLEAN THE UNIT
■ Clear any grass that may have wrapped itself around the motor shaft or trimmer head.
■ Use a small brush or a small vacuum cleaner to clean the air vents on the rear housing.
■ Clean the unit using a damp cloth with a mild detergent.
- Do not use any strong detergents on the plastic housing or the handle. They can be damaged by certain aromatic oils, such as pine and lemon, and by solvents such as kerosene. Moisture can also cause a shock hazard. Wipe off any moisture with a soft dry cloth.
The transmission gears in the gear case need be lubricated periodically with gear grease. Check the gear case grease level about every 50 hours of operation by removing the sealing screw on the side of the case.
If no grease can be seen on the flanks of the gear, follow the steps below to fill with gear grease up to 3/4 capacity.
Do not completely fill the transmission gears.
- Hold the line trimmer on its side so that the sealing screw is facing upwards.
- Use the multi-function wrench provided to loosen and remove the sealing screw.
- Use a grease syringe (not included) to inject some grease into the screw hole; do not exceed 3/4 capacity.
- Tighten the sealing screw after injection.
EN
STORING THE UNIT
■ Remove the battery pack from the trimmer.
■ Clean the tool thoroughly before storing it.
■ If the line trimmer attachment is removed from the power head and stored separately: Fit the end cap on the attachment shaft to avoid dirt getting into the coupler.
■ Store the unit in a dry, well-ventilated area, locked-up or up high, out of the reach of children. Do not store the unit on or adjacent to fertilizers, gasoline, or other chemicals.
Protecting the environment
Do not dispose of electrical equipment, used battery and charger into household waste! Take this product to an authorized recycler and make it available for separate collection. Electric machines must be returned to an environmentally compatible recycling facility.
TROUBLESHOOTING
| PROBLEM CAUSE SOLUTION | |
| Line trimmer fails to start. | The battery pack is not attached to the power head.No electrical contact between the power head and the battery pack.The battery pack is depleted.The lock-off lever and trigger are not depressed simultaneously. Attach the battery pack to the power head.Remove battery, check contacts and reinstall the battery pack until it snaps into place.Charge the battery pack with EGO chargers listed in this manual.Press down the lock-off lever and hold it, then depress the trigger to turn on the line trimmer. |
| Line trimmer stops while cutting. | The guard is not mounted on the trimmer, resulting in an overly long cutting line and motor overload.Heavy cutting line is used.The motor shaft or trimmer head is bound with grass.The motor is overloaded.The battery pack or line trimmer is too hot.The battery pack is disconnected from the tool.The battery pack is depleted. Remove the battery pack and mount the guard of the trimmer.Use recommended nylon cutting line with diameter no greater than 2.4 mm.Stop the trimmer, remove the battery, and remove the grass from the motor shaft and trimmer head.Remove the trimmer head from the grass. The motor will recover when the load is removed. When cutting, move the trimmer head in and out of the grass to be cut and remove no more than 20 cm of length in a single cut.Allow the battery pack or trimmer to cool until the temperature drops below 67°C.Re-install the battery pack.Charge the battery pack with EGO chargers listed in this manual. |
EN
EN
| PROBLEM CAUSE SOLUTION | ||
| Trimmer head will not advance line. | ■ The motor shaft or trimmer head is bound with grass.■ There is not enough line on the spool.■ The trimmer head is dirty.■ The line is tangled in the trimmer head assembly.■ The line is too short. | ■ Stop the trimmer, remove the battery, and clean the motor shaft and trimmer head.■ Remove the battery and replace the cutting line; follow the section “LINE REPLACEMENT” in this manual.■ Remove the battery and clean the spool, lower cover assembly and upper cover.■ Remove the battery, remove the line from the spool and rewind; follow the section “RELOAD THE CUTTING LINE” in this manual.■ Remove the battery and pull the lines manually while alternately pressing down and releasing the trimmer head. |
| Grass wraps around trimmer head and motor housing. | ■ Cutting tall grass at ground level. | ■ Cut tall grass from the top down, removing no more than 20 cm in each pass to prevent wrapping. |
| The blade is not cutting the line. | ■ The line-cutting blade on the edge of the guard has become dull. | ■ Sharpen the line-cutting blade with a file or replace it with a new blade. |
| Cracks on the trimmer head or the lower cover assembly comes loose with spool base. | ■ The trimmer head is worn out. | ■ Replace the trimmer head immediately; follow the section “TRIMMER HEAD REPLACEMENT” in this manual. |
| During line replacement, the line can’t be loaded into the trimmer head properly. | ■ The string line is not correctly inserted into the mounting hole in the eyelet. | ■ Align the LOAD lines with the eyelets firstly, then insert the line into the mounting hole, which is located inside the eyelet. |
WARRANTY
EGO WARRANTY POLICY
Please visit the website egopowerplus.eu for full terms and conditions of the EGO Warranty policy.
Protecting the environment
ANDERE VEILIGHEIDSWAARSCHUWINGEN
DE BESCHERMING MONTEREN
HET APPARAAT SCHOONMAKEN
HET APPARAAT OPBERGEN
RENG∅RING AF APPARATET
OPBEVARING AF APPARATET
SIKKERHET PÅ ARBEIDSOMRÅDET
VEDLIKEHOLD OG LAGRING
GENERELT VEDLIKEHOLD
BEZPIECZEŃSTWO W MIEJSCU PRACY
POLITYKA GWARANCYJNA EGO
CITIȚI MANUALUL DE INSTRUCTIUNI
UPORABA IN NEGA STROJA
ÜLDISED MASINA OHUTUSHOIATUSED
■ Trimming grass and weeds from around porches, fences, and decks
■ Trimming grass and weeds from around porches, fences, and decks
OSTALA SIGURNOSNA UPOZORENJA
- Izbjegavajte opasna okruženja – ne upotrebljavajte uređaje na vlažnom ili mokrom nagibu.
■ Trimming grass and weeds from around porches, fences, and decks
NAPOMENA: alat se smije koristiti samo za prethodno opisanu namjenu. Svaka druga uporaba smatra se nepropisnom uporabom.
■ ยก fuels demand for cost of goods, including costs and expenses.
■ Money Money Issues: 306000000000000000000000000000000000000000000000000000
■ Asszmbomgng dmabdsjdgmo qsbol bodgol lsgmbolu djlsbd (dbmwnq 3-zdomsbsho qsbol dgmbzsd0).
■ qosbol dodzo aglusdemns dmbcqbl hmcqglsg dabngbsno qosb s dggbgds olgon lsgsbl, hmdgmsg dyolugfsgo zgm dmftmol.
OSTALA SIGURNOSNA UPOZORENJA
- Izbegavajte opasna okruženja – Ne koristite uređaje na vlažnim ili mokrim nagibima.
■ Držite štitnike na svom mestu i u radnom stanju.
■ Držite šake i stopala dalje od mesta sečenja.
■ Da biste smanjili rizik od povreda, nikada nemojte raditi na lestvama ili na bilo kojoj nestabilnoj površini. Nikada nemojte držati jedinicu za sečenje iznad visine struka.
■ Proveravajte jedinicu za sečenje redovno u kratkim intervalima za vreme korišćenja, ili odmah ako ima primetnih promena u ponašanju sečenje.
■ Za najbolje rezultate, bateriju treba puniti na mest gde je temperatura veća od 5 °C i manja od 40 °C. Ne skladištite je na otvorenom prostoru ili u vozilima. - Ako vam neko pride, zaustavite motor i jedinicu za sečenje.
■ Upozorite korisnika na opasnosti od odbijanja noža (samo kad se koristi sa 3-zubim nožem). - Do odbijanja noža može doći kada nož koji se okreće dođe u dodir sa predmetom koji ne preseče istog trenutka.
■ Odbijanje noža može biti dovoljno silovito da izazove da jedinica i/ili korisnik budu odgurnuti u bilo kojem smeru, i moguć je gubitak kontrole nad jedinicom.
■ Do odbijanja noža može doći bez upozorenja ako se nož zakači, zaguši ili zaplete.
■ Veće šanse za odbijanje noža postoje na mestima gde je teško videti materijal koji se kosi.
■ Nemojte pričvrstiti nož na jedinicu bez pravilne instalacije svih potrebnih delova. Nekorišćenje odgovarajućih delova može izazvati da nož odleti i ozbiljno povredi operatera i/ili prolaznike. Odbacite noževe koji su savijeni, iskrivljeni, naprsli, polomljeni ili oštećeni na bilo koji način. Koristite oštar nož. Tup nož ima veće šanse da se zakači i odbije (samo kad se koristi sa 3-zubim nožem).
■ Kretanje noža/strune može da izazove povredu dok nastavlja da se vrti nakon zaustavljanja motora ili puštanja okidača. Održavajte pravilnu kontrolu dok se nož/struna ne zaustavi potpuno.
- Alati na baterije ne moraju da budu uključeni u utičnicu; oni su stoga uvek u radnom stanju. Budite svesni mogućih opasnosti čak i kada se alat ne koristi. Budite pažljivi kada održavate ili servisirate.
■ Ne perite crevom; izbegavajte ulaženje vode u motor i električne veze.
- Ako dođe do situacija koje nisu obrađene u ovom priručniku, primenjujte oprez i zdravo rasuđivanje. Obratite se EGO korisničkoj službi za pomoć.
- Koristite samo sa baterijama i punjačima navedenim na slici A.
SPECIFIKACIJE
| Mehanizam sečenja Izbočena glava | ||
| Prečnik strune | 2,4 mm najlonska upletena struna | |
| Širina sečenja 38 cm | ||
| Brzina bez opterećenja 5000/6000 min | -1 | |
| Težina (bez baterije) 1,59 kg | ||
| Preporučena radna temperatura 0°C-4 | 0°C | |
| Preporučena temperatura skladištenja | -20°C-70°C | |
| Izmereni nivo jačine zvuka L_WA e | 93,2 dB(A)K=2,2 dB(A)(PH1400E) | |
| 93,89 dB(A)K=1,46 dB(A)(PH1420E) | ||
| 92 dB(A)K=3,1 dB(A)(PHX1600) | ||
| Nivo zvučnog pritiska kod uha rukovaoca L_PA | 73,2 dB(A)K=3 dB(A)(PH1400E) | |
| 81,6 dB(A)K=3 dB(A)(PH1420E) | ||
| 86 dB(A)K=3 dB(A)(PHX1600) | ||
| Garantovan nivo jačine zvuka L_WIA (izmereno prema 2000/14/EC) | 96 dB(A) | |
| Procena vibracije a_h | Prednja pomoćna drška | 4,2 m/ s^2 K=1,5 m/ s^2 (PH1400E) |
| 2,23 m/ s^2 K=1,5 m/ s^2 (PH1420E) | ||
| 4,85 m/ s^2 K=1,5 m/ s^2 (PHX1600) | ||
| Zadnja drška | 2,7 m/ s^2 K=1,5 m/ s^2 (PH1400E) | |
| 2,03 m/ s^2 K=1,5 m/ s^2 (PH1420E) | ||
| 2,67 m/ s^2 K=1,5 m/ s^2 (PHX1600) | ||
■ Gornji parametri su testirani i izmereni sa pogonskom glavom PH1400E/PH1420E/PHX1600.
■ Deklarisana ukupna vrednost vibracije je izmerena u skladu sa standardnim metodom testiranja i može se koristiti za upoređivanje jednog alata sa drugim;
■ Deklarisana ukupna vrednost vibracije može se koristiti, u preliminarnoj proceni izlaganja.
OSTALA SIGURNOSNA UPOZORENJA
- Izbjegavajte opasna okruženja. – Uređaje nemojte upotrebljavati na vlažnim ili mokrim nagibima.
• عن meters as important alla.
(1) ( C ) (2) ( D ) (3) ( E ) (4) ( F ) (5) ( G ) (6) ( H ) (7) ( I ) (8) ( J ) (9) ( K ) (10) ( L ) (11) ( M ) (12) ( N ) (13) ( O ) (14) ( P ) (15) ( Q ) (16) ( R ) (17) ( S ) (18) ( T ) (19) ( U ) (20) ( V ) (21) ( W ) (22) ( X ) (23) ( Y ) (24) ( Z ) (25) ( AA ) (26) ( AB ) (27) ( AC ) (28) ( AD ) (29) ( AE ) (30) ( AF ) (31) ( AG ) (32) ( AH ) (33) ( AI ) (34) ( AJ ) (35) ( AK ) (36) ( AL ) (37) ( AM ) (38) ( AN ) (39) ( AO ) (40) ( AP ) (41) ( AQ ) (42) ( AR ) (43) ( AS ) (44) ( AT ) (45) ( AU ) (46) ( AV ) (47) ( AW ) (48) ( AX ) (49) ( AY ) (50) ( AZ ) (51) ( BA ) (52) ( BB ) (53) ( BC ) (54) ( BD ) (55) ( BE ) (56) ( BF ) (57) ( BG ) (58) ( BH ) (59) ( BI ) (60) ( BJ ) (61) ( BK ) (62) ( BL ) (63) ( BM ) (64) ( BN ) (65) ( BO ) (66) ( BP ) (67) ( BOY ) (68) ( BPY ) (69) ( BPZ ) (70) ( D-1 C = 0.00000000000000000000000000000000000000000000000000000000000000000000000000000000000000000000000000
natural_image
Line drawing of a manual lever mechanism with a cylindrical base and fulcrum (no text or symbols)STA1500
OHIN OHIN OHIN HE


- STA1500
- LINE TRIMMER
- ATTACHMENT
- READ ALL INSTRUCTIONS!
- READ OPERATOR'S MANUAL
- SAFETY SYMBOLS
- SYMBOL MEANING
- SAFETY INSTRUCTIONS
- EN
- GENERAL MACHINE SAFETY WARNINGS
- SAVE ALL WARNINGS AND INSTRUCTIONS FOR FUTURE REFERENCE.
- WORK AREA SAFETY
- ELECTRICAL SAFETY
- PERSONAL SAFETY
- MACHINE USE AND CARE
- BATTERY MACHINE USE AND CARE
- TRAINING
- PREPARATION
- OPERATION
- MAINTENACE AND STORAGE
- OTHER SAFETY WARNINGS
- DESCRIPTION
- KNOW YOUR LINE TRIMMER ATTACHMENT (Fig. A)
- ASSEMBLY
- CONNECTING THE LINE TRIMMER ATTACHMENT TO THE POWER HEAD
- APPLICATIONS
- Before each use check for damaged/worn parts
- USING THE LINE TRIMMER WITH POWER HEAD
- After each use, clean the trimmer
- TO START/STOP THE TOOL
- ADJUSTING CUTTING LINE LENGTH
- LINE REPLACEMENT
- MAINTENANCE
- GENERAL MAINTENANCE
- CLEAN THE UNIT
- STORING THE UNIT
- Protecting the environment
- WARRANTY
- EGO WARRANTY POLICY
- ANDERE VEILIGHEIDSWAARSCHUWINGEN
- DE BESCHERMING MONTEREN
- HET APPARAAT SCHOONMAKEN
- HET APPARAAT OPBERGEN
- RENG∅RING AF APPARATET
- OPBEVARING AF APPARATET
- SIKKERHET PÅ ARBEIDSOMRÅDET
- VEDLIKEHOLD OG LAGRING
- GENERELT VEDLIKEHOLD
- BEZPIECZEŃSTWO W MIEJSCU PRACY
- POLITYKA GWARANCYJNA EGO
- CITIȚI MANUALUL DE INSTRUCTIUNI
- UPORABA IN NEGA STROJA
- ÜLDISED MASINA OHUTUSHOIATUSED
- OSTALA SIGURNOSNA UPOZORENJA
Brand : EGO
Model : STA1500
Category : Multitools