KM 120250 R Bp Classic - Sweeper Kärcher - Free user manual and instructions
Find the device manual for free KM 120250 R Bp Classic Kärcher in PDF.
| Product type | Industrial ride-on sweeper |
| Model | KM 120/250 R Bp Classic |
| Brand | Kärcher |
| Dimensions (L × W × H) | 2082 × 1250 × 1450 mm |
| Empty weight (without batteries) | 750 kg |
| Total weight with load | 1620 kg |
| Power supply | Battery 36 V / 360 Ah (450 kg pack) |
| Runtime (full battery) | 3.5 hours |
| Sweeping capacity (without side brush) | 5400 m²/h |
| Sweeping capacity (with 1 side brush) | 7200 m²/h |
| Sweeping width (without side brush) | 900 mm |
| Sweeping width (with side brush) | 1200 mm |
| Dust bin volume | 250 L |
| Max. dumping height | 1400 mm |
| Main brush (diameter × width) | 300 × 900 mm |
| Brush rotation speed | 325 rpm |
| Side brush (diameter) | 600 mm |
| Travel speed (forward/reverse) | 6 / 3 km/h |
| Max. climbable gradient | 14 % |
| Dust filter | Pocket filter, area 6.0 m² |
| Sound pressure level (LpA) | 70 dB(A) |
| Guaranteed sound power level | 90 dB(A) |
| Tire type | Solid rubber, dimensions 15-4.5 × 8 |
| Country of origin | Germany |
Frequently Asked Questions - KM 120250 R Bp Classic Kärcher
User questions about KM 120250 R Bp Classic Kärcher
0 question about this device. Answer the ones you know or ask your own.
Ask a new question about this device
Download the instructions for your Sweeper in PDF format for free! Find your manual KM 120250 R Bp Classic - Kärcher and take your electronic device back in hand. On this page are published all the documents necessary for the use of your device. KM 120250 R Bp Classic by Kärcher.
USER MANUAL KM 120250 R Bp Classic Kärcher
natural_image
Exterior view of a Karcher-branded cleaning robot with visible brush and control panel (no text or symbols on the device itself)Deutsch 3
English 15
Français 27
Italiano 39
Nederlands 51
Español 63
Português 75
Dansk 87
Norsk 99
Svenska 111
Suomi 123
Ελληνικά 135
Türkçe 147
Русский 159
Magyar 173
Čeština 185
Slovenščina 197
Polski 209
Românește 221
Slovenčina 233
Hrvatski 245
Srpski 257
Български 269
Eesti 282
Latviešu 294
Lietuviškai 306
Українська 318
中文 331
العربية 351
Register and win! www.kaercher.com/register-and-win


59683060 01/19
natural_image
Close-up of a car seatbelt with a yellow and white key inserted, showing no text or symbols.

natural_image
Exterior view of a black industrial machine with wheels and ventilation slots (no text or symbols visible)natural_image
Interior view of an electronic device showing a grid-like panel with components and wiring (no visible text or symbols)1 Batteriepole - in Fahrtrichtung links
2 Querstrebe
natural_image
Interior view of a mechanical device with labeled components (no readable text or symbols)1 Hydrauliköltank
2 Schauglas
natural_image
Close-up of a vehicle's side panel with visible tire and bolted components, no text or symbols present1 Schlüssel
2 Seitenverkleidung
natural_image
Interior view of a laboratory or industrial facility with glass panels and wiring, no visible text or symbols1 Haltebügel
2 Flügelmutter
natural_image
Abstract geometric pattern with layered triangular shapes and a blue upward arrow (no text or symbols)natural_image
Close-up of a mechanical device with labeled parts (③ and ⑫), showing internal components like a handle, cable, and bracket (no readable text or symbols)natural_image
Technical diagram of a mechanical housing component with labeled parts (1 and 2), showing internal components and an arrow indicating rotation or movement (no text or symbols beyond labels)natural_image
Exterior view of a mechanical ventilation grille with two labeled components (1 and 2), no text or symbols present.
Chairman of the Board of Management

S. Reiser
Director Regulatory Affairs & Certification
71364 Winnenden (Germany)
Tel.: +49 7195 14-0
Fax: +49 7195 14-2212
Winnenden, 2018/10/01
Hilfe bei Störungen
General notes ..... EN 1
Environmental protection EN 1
Warranty ..... EN 1
Accessories and Spare Parts....EN 1
Symbols in the operating instructions ..... EN 1
Symbols on the machine EN 1
Proper use.....EN 2
Foreseeable misuse....EN 2
Suitable surfaces ..... EN 2
Safety instructions ..... EN 2
Safety instructions concerning the operation ..... EN 2
Safety information concerning the driving operation. EN 2
Safety instructions for bat- tery-operated devices .. EN 3
Appliances with high emptying system ....EN 3
Devices with overhead guard....EN 3
Safety information concerning the transport of the appliance ..... EN 3
Safety information concern- ing maintenance and care EN 3
Function.....EN 3
Unloading tips ..... EN 3
Operating and Functional Ele-
ments.....EN 4
Illustration of sweeper .. EN 4
Operating field ..... EN 4
Before Startup ..... EN 5
Lock/ release parking brake EN 5
Start up....EN 5
General notes ..... EN 5
Inspection and maintenance work....EN 5
Safety notes regarding the batteries....EN 5
Charge the batteries ... EN 5
Operation.....EN 5
Adjusting driver's seat .. EN 5
Starting the machine ... EN 6
Drive the machine ..... EN 6
Sweeping mode ..... EN 6
Emptying waste container EN 6
Turn off the appliance .. EN 7
Transport......EN 7
Storage/decommissioning .... EN 7
Care and maintenance ..... EN 7
General notes ..... EN 7
Cleaning.....EN 7
Maintenance intervals .. EN 7
Maintenance Works .... EN 7
EU Declaration of Conformity. EN 10
Troubleshooting..... EN 11
Technical specifications.....EN 11
Please read and comply with these original instructions prior
to the initial operation of your appliance and store them for later use or subsequent owners.
General notes
Your sales outlet should be informed about any transit damage noted when unpacking the product.
- Warning and information plates on the machine provide important directions for safe operation.
– In addition to the information contained in the operating instructions, all statutory safety and accident prevention regulations must be observed.
Environmental protection
| The packaging material can be recycled. Please do not throw the packaging material into household waste; please send it for recycling. | |
| Old appliances contain valuable materials that can be recycled. Please arrange for the proper recycling of old appliances. Please dispose your old appliances using appropriate collection systems. |
Batteries, oil, fuels and similar substances must not be released into the environment. Please dispose of these substances via suitable collection systems.
Notes about the ingredients (REACH)
You will find current information about the ingredients at:
www.kaercher.com/REACH
Warranty
The warranty terms published by the relevant sales company are applicable in each country. We will repair potential failures of your appliance within the warranty period free of charge, provided that such failure is caused by faulty material or defects in manufacturing. In the event of a warranty claim please contact your dealer or the nearest authorized Customer Service centre. Please submit the proof of purchase.
Accessories and Spare Parts
DANGER
To avoid risks, all repairs and replacement of spare parts may only be carried out by authorized customer service personnel.
- Only use accessories and spare parts which have been approved by the manufacturer. The exclusive use of original accessories and original spare parts ensures that the appliance can be operated safely and trouble free.
- For additional information about spare parts, please go to the Service section at www.kaercher.com.
Symbols in the operating instructions
△DANGER
Warns about immediate danger which can lead to severe injuries or death.
⚠ WARNING
Warns about possible danger which could lead to severe injuries or death.
△CAUTION
Points out a possibly dangerous situation which can lead to light injuries or property damage.
ATTENTION
Pointer to a possibly dangerous situation, which can lead to property damage.
Symbols on the machine
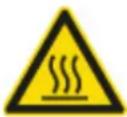 | Risk of burns on account of hot surfaces! Allow the exhaust to cool down sufficiently before starting work on the machine. |
 | Always use appropriate gloves while working on the device. |
 | Risk of getting squeezed on account of getting jammed between vehicle parts. |
 | Risk of injury on account of moving parts. Do not reach in. |
 | Risk of fire. Do not vacuum up any burning or glowing objects. |
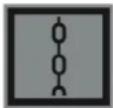 | Chain pick-up / crane point |
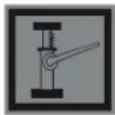 | Intake points for the jack |
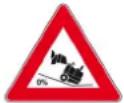 | Maximum decline of ground when driving with the waste container raised. |
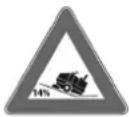 | The gradient in the direction of travel should not exceed 14%. |
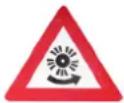 | Caution! Rotating brush (watch for rotation direction). |
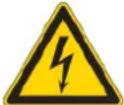 | Beware of dangerous electrical current! |
 | Pay attention to the instruction. |
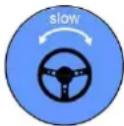 | Steer slowly! |
 | Please read the operating instructions and act accordingly! |
 | Risk of damage!Do not rinse out the dust filter. |
Proper use
The sweeper is intended for cleaning floor surfaces for commercial use and e.g. for the following fields of application:
Car parks
■ Production facilities
■ Logistics areas
Hotel
■ Retail industry
■ Storage areas
■ Walkways
- This sweeper has been designed to sweep dirt and debris from indoor as well as outdoor surfaces.
- The machine with working equipment must be checked to ensure that it is in proper working order and is operating safely prior to use. Otherwise, the appliance must not be used.
- Use this sweeper only as directed in these operating instructions.
– The machine may not be modified. - The machine is only suitable for use on the types of surfaces specified in the operating instructions.
– The machine may only be operated on the surfaces approved by the company or its authorised representatives. - The following applies in general: Keep highly-flammable substances away from the appliance (danger of explosion/fire).
Foreseeable misuse
→ Never vacuum up explosive liquids, combustible gases or undiluted acids and solvents. This includes petrol, paint thinner or heating oil which can generate explosive fumes or mixtures upon contact with the suction air. Acetone, undiluted acids and solvents must also be avoided as they can harm the materials on the machine.
→ Never sweep/vacuum up reactive metal dusts (e.g. aluminium, magnesium, zinc), as they form explosive gases when they come in contact with highly alkaline or acidic detergents.
→ Do not sweep/vacuum up any burning or glowing objects.
→ The appliance is not suitable for sweeping off hazardous substances.
→ The machine may not be used or stored in hazardous areas. It is not allowed to use the appliance in hazardous locations.
→ It is strictly prohibited to take co-passengers.
→ Pushing/pulling or transporting objects by means of this appliance is prohibited.
Suitable surfaces
- Asphalt
- Industrial floor
- Screed
- Concrete
- Paving stones
Safety instructions
Safety instructions concerning the operation
→ In order to maintain clearance and creepage distances, the device may not be operated over 2000 metres above sea level.
→ (Applicable for Finland only) The device may not be used at low ambient temperatures (below 0°C) if it is equipped with a PVC hose line. Contact Kärcher if should have questions regarding your device.
→ The machine with working equipment must be checked to ensure that it is in proper working order and is operating safely prior to use. Otherwise, the appliance must not be used.
→ If the appliance is used in hazardous areas (e.g. filling stations) the corresponding safety provisions must be observed. It is not allowed to use the appliance in hazardous locations.
△DANGER
Risk of injury!
→ Do not use the appliance without an overhead guard in areas where the operator might get hit by falling objects.
→ The operator must use the appliance properly. The person must consider the local conditions and must pay attention to third parties, in particular children, when working with the appliance.
→ It is important to follow all safety instructions, rules and regulations applicable for driving motor vehicles.
→ Prior to starting work, the operator must ensure that all protective devices are properly installed and function correctly.
→ The operator of the appliance is liable for accidents with other individuals or their property.
→ Ensure that the operator wears tight-fitting clothes. Wear sturdy shoes and avoid wearing loose-fitting clothes.
→ Check the immediate vicinity prior to starting (e.g. children). Ensure sufficient visibility!
→ Never leave the machine unattended so long as the engine is running. The operator may leave the appliance only when the engine has come to a standstill, the appliance has been protected against accidental movement, and the key has been removed.
→ Please remove the key, when not in use, to avoid unauthorised use of the appliance.
The appliance may only be used by persons who have been instructed in handling the appliance or have proven qualification and expertise in operating the appliance or have been explicitly assigned the task of handling the appliance.
→ This appliance is not intended for use by persons (including children) with limited physical, sensoric or mental capacities or lack of experience and/or skills, unless such persons are accompanied and supervised by a person in charge of their safety or if they received precise instructions on the use of this appliance.
→ Children should be supervised to prevent them from playing with the appliance.
CAUTION
Risk of damage! Do not sweep up straps, strings or wires as these may wrap around the brush roller.
Safety information concerning the driving operation
DANGER
Risk of injury! Verify the stability of the ground prior to driving on it.
△DANGER
Risk of accident, risk of injury!
Danger of tipping if gradient is too high.
- The gradient in the direction of travel should not exceed 14 %.
Danger of tipping over when taking bends at high speed (particularly left-hand bends). - Drive slowly when cornering.
Danger of tipping on unstable ground. - Only use the machine on sound surfaces.
Danger of tipping with excessive sideways tilt. - The gradient perpendicular to the direction of travel should not exceed 10% .
Safety instructions for battery-operated devices
Note: Warranty claims will be entertained only if you use batteries and chargers recommended by Kärcher.
- Always follow the instructions of the battery manufacturer and the charger manufacturer. Please follow the statutory requirements for handling and disposing batteries.
– Never leave the batteries in a discharged state; recharge them as soon as possible. - Always keep the batteries clean and dry to avoid creep currents. Protect the batteries and avoid contact with impurities such as metal dust.
- Do not place tools or similar items on the battery. Risk of short-circuit and explosion.
- Do not work with open flames, generate sparks or smoke in the vicinity of a battery or a battery charging room. Danger of explosion.
- Do not touch hot parts of the machine such as the drive motor (risk of burns).
- Be careful while handling battery acid. Follow the respective safety instructions!
– Used batteries are to be disposed according to the EC guideline 91/157 EWG in an environment-friendly manner.
Appliances with high emptying system
△DANGER
Risk of injury!
→ When working on the high emptying system, completely lift and secure the waste container.
→ Perform the safeguarding only from outside the hazard zone.
Devices with overhead guard
NOTICE
The overhead guard (optional) protects the driver against larger falling objects. However, it does not provide rollover protection!
→ Check the overhead guard for damage daily.
→ If the overhead guard, as well as individual elements, should be damaged, replace the entire overhead guard.
→ Any modification of the overhead guard and installation of elements, components and assemblies other than those approved by Kärcher is not permitted and may limit the function of the overhead guard.
Safety information concerning the transport of the appliance
→ Observe the net weight (transport weight) of the device during transport on trailers or vehicles.
To transport the device, unplug the battery plug and securely fasten the device.
Safety information concerning maintenance and care
→ First switch off the appliance and remove the key before performing any cleaning or maintenance tasks on the appliance, replacing parts or switching over to another function.
→ When performing any service and maintenance work on devices with a traction battery, the battery must be disconnected from the electrical system of the device via the battery isolation point (battery plug).
→ Always disconnect the battery when working on the electrics.
To do this, first disconnect the negative terminal and then the positive terminal. Reconnection is performed in reverse sequence. Connect the positive terminal first, then connect the negative terminal.
→ Do not clean the appliance with a water hose or high-pressure water jet (danger of short circuits or other damage).
→ Maintenance work may only be carried out by approved customer service outlets or experts in this field who are familiar with the respective safety regulations.
→ Please observe the local safety regulations regarding portable commercially used appliances.
→ Always use appropriate gloves while working on the device.
Function
The sweeper operates using the sweep-shovel principle.
- The rotating roller brush moves the dirt directly into the waste container.
- The side brush cleans the corners and edges of the surface and moves dirt and debris into the path of the roller brush.
- The fine dust is sucked in via the dust filter through the suction blower.
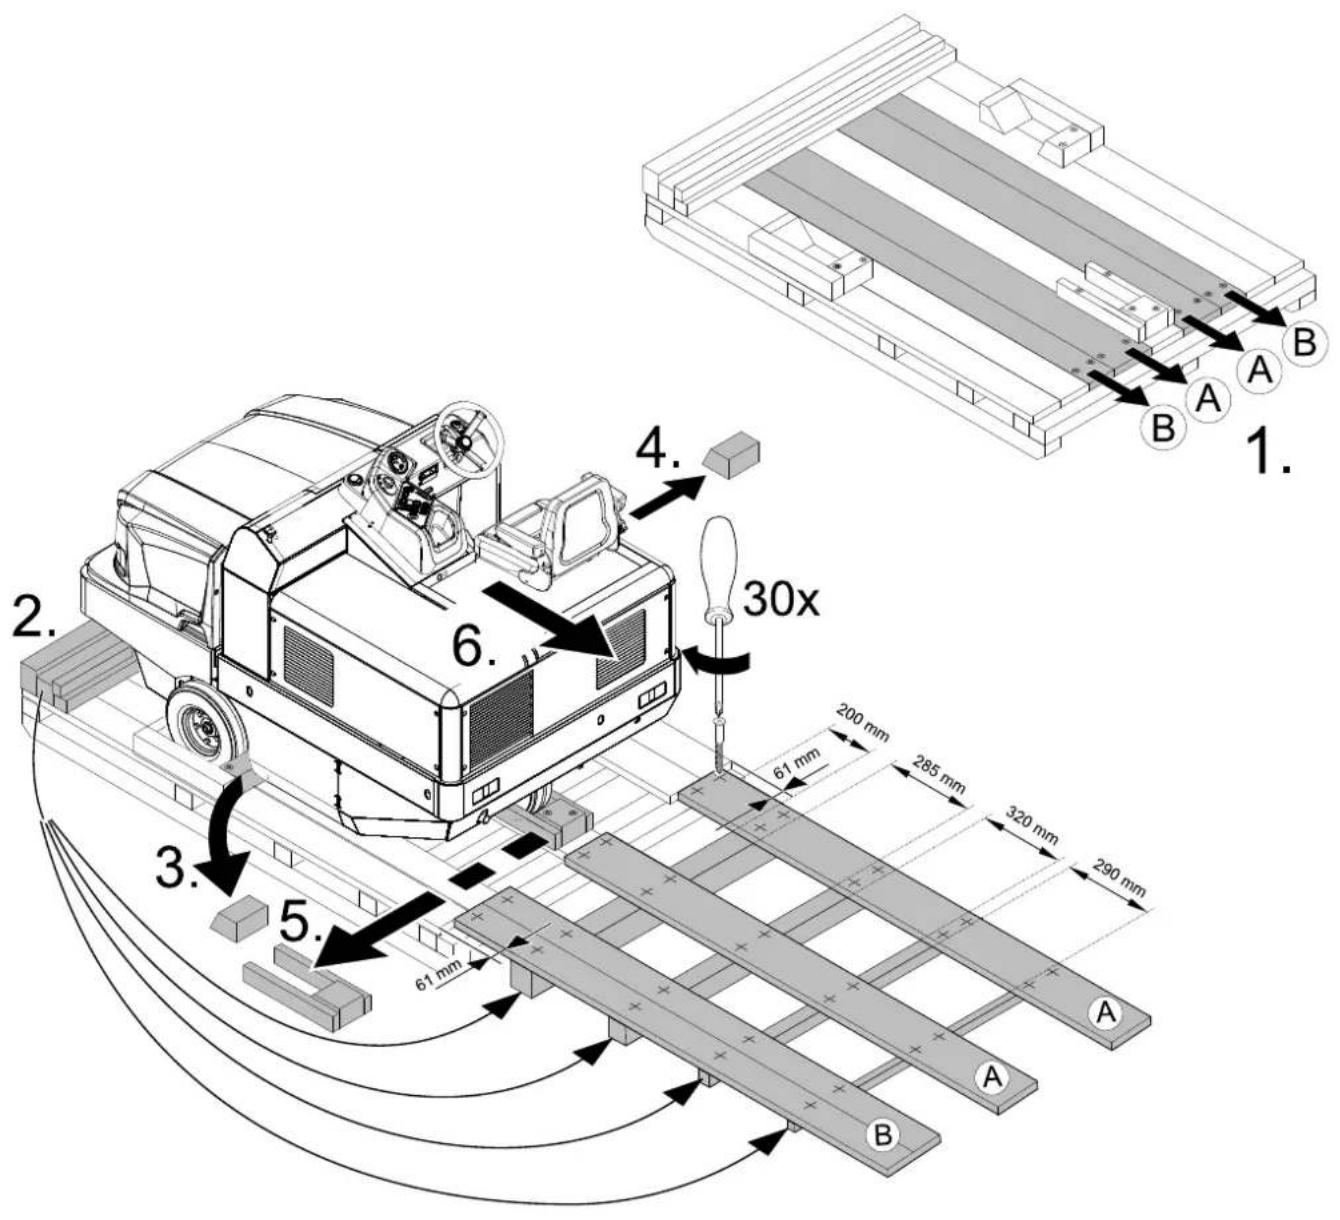
Unloading tips
⚠️Danger
Risk of injury, risk of damage! Observe the weight of the appliance when you load it!
| Weight (without batteries) 750 kg* | |
| Weight (with batteries) 1200 kg* | |
| * If upgrade kits are installed, the weight is respectively higher. | |
→ Do not use a forklift.
→ Use a suitable ramp or a crane to load the appliance!
→ Observe when using a ramp: Ground clearance 70 mm.
→ If the machine is delivered on a pallet, you must create an unloading ramp using the boards provided. You will find the instructions for this procedure on page 2 (inside of cover). Important instruction: every board must be attached with at least 2 screws.
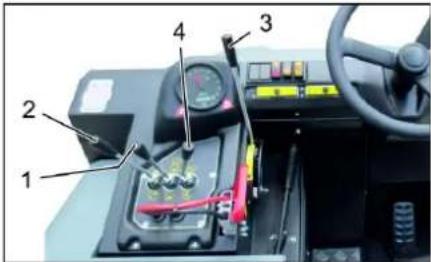
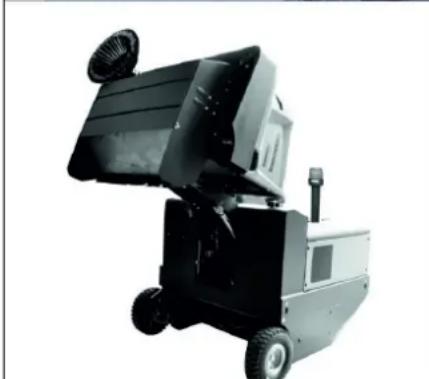
Operating and Functional Elements
natural_image
Close-up of a car seatbelt with a yellow key inserted, showing no text or symbols on the main subject.

Illustration of sweeper Operating field
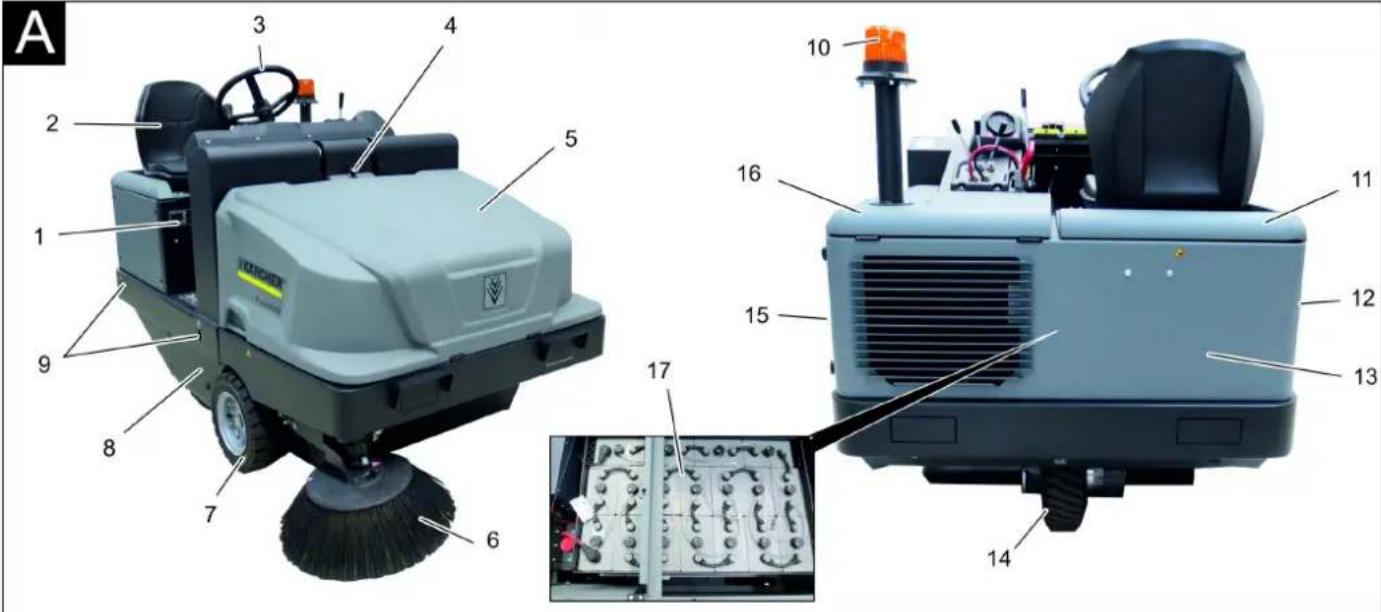
Illustration A
1 Nameplate
2 Seat (with seat contact switch)
3 Steering wheel
4 Lock of appliance hood
5 Cover
6 Side brush, right
7 Front wheel
8 Roller brush access
9 Lashing point
10 Beacon lamp
11 Appliance cover right side
12 Cover, right
13 Tail panel
14 Drive wheel
15 Cover, left
16 Bonnet left side (engine bonnet)
17 Battery set
(only included with the scope of delivery for the KM 120/250 R Bp Pack)
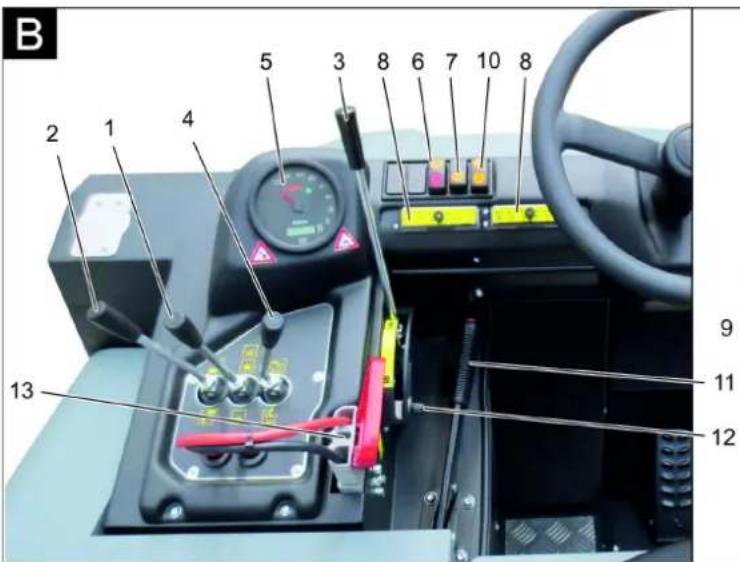
Illustration B
1 Roller brush and side brush control lever
Lever forwards: Switches the roller brush on and lowers and switches the side brushes on.
Lever backwards: Switches the roller brush on
2 Control lever waste container Raise/lower waste container
3 Roller brush control lever Raises and lowers the roller brush
4 Control lever container flap Open/close container lid
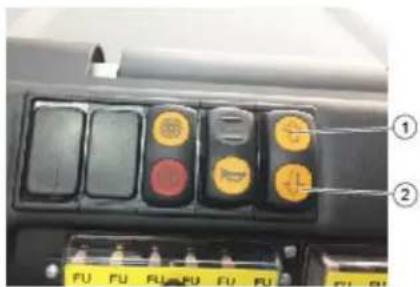
5 Indicator lamps and display
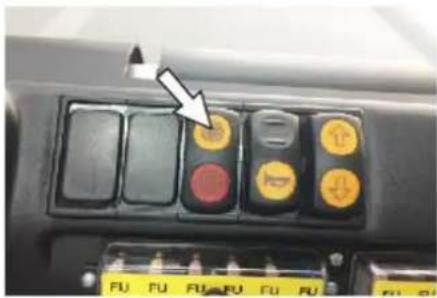
6 Switch blower and filter cleaning Position centred: Filter cleaning and blower off
Rear position: Blower on Front position: Filter cleaning on
7 Horn switch
8 Fuses
9 Ignition lock
Position 0: Switch off engine
Position 1: Ignition on
Position 2: Start the engine
10 Selector for the direction of travel
11 Parking brake
12 Roller brush wear adjustment / sweeping area setting
13 Battery socket
Pedals
Illustration ©
1 Brake pedal
2 Drive pedal
Indicator lamps and display
Illustration D
1 Battery capacity
2 Battery control lamp
3 Control lamp operating state
4 Indicator lamp for position lights
5 Indicator lamp (not connected)
6 Indicator lamp for dipper
7 Indicator lamp (not connected)
8 Indicator lamp - forward driving direction
9 Indicator lamp - reverse driving direction
10 Operating hour counter
Before Startup
Lock/ release parking brake
→ Loosen parking brake; press brake pedal at the same time.
→ Activate the parking brake; press brake pedal at the same time.
Start up
General notes
→ Park the sweeper on an even surface.
→ Remove ignition key.
→ Lock parking brake.
Inspection and maintenance work
Daily before starting operations
→ Check battery charging status; charge batteries it if required (see Chapter "Charging the batteries").
→ Check the sweeping roller and the side brush for wear and wrapped belts.
→ Check the wheels for tied up belts.
→ Check function of all operator control elements.
→ Check appliance for damages.
→ Clean the dust filter with the filter cleaning button.
Note: For description, see section on Care and maintenance.
Safety notes regarding the batteries
Please observe the following warning notes when handling batteries:
| Observe the directions on the battery, in the instructions for use and in the vehicle operating instructions! | |
| Wear an eye shield! | |
| Keep away children from acid and batteries! | |
| Risk of explosion! | |
| Fire, sparks, open light, and smoking not allowed! | |
| Danger of causticization! | |
| First aid! | |
| Warning note! |
| Disposal! | |
| Do not throw the battery in the dustbin! | |
| Beware of dangerous electrical current! |
⚠Danger
Risk of explosion! Do not put tools or similar on the battery, i.e. on the terminal poles and cell connectors.
⚠Danger
Risk of injury! Ensure that wounds never come into contact with lead. Always clean your hands after having worked with batteries.
⚠ Danger
Risk of fire and explosion!
- Smoking and naked flames are strictly prohibited.
- Rooms where batteries are charged must have good ventilation because highly explosive gas is emitted during charging.
⚠️Danger
Danger of causticization!
- Rinse thoroughly with lots of clear water if acid gets into the eye or comes in contact with the skin.
- Then consult a doctor immediately.
- Wash off the acid If it comes in contact with the clothes.
Charge the batteries
CAUTION
Charge the batteries before commissioning the machine.
△DANGER
Risk of injury! Comply with safety regulations on the handling of batteries. Observe the directions provided by the manufacturer of the charger.
Please read and follow the included operating instructions by the battery manufacturer and follow them.
Charge the battery only with an appropriate charger.
⚠Danger
Danger of chemical burns. Adding water to the battery in its discharged state can cause the acid to leak! Use safety glasses while handling battery acid and follow the safety instructions to avoid personal injury or damage to clothes. Should the acid spray on to the skin or clothes, rinse immediately with lots of water.
CAUTION
Risk of damage. Use only distilled or desalinated water (VDE 0510) for filling the battery. Do not add any substances (so-called performance improving agents), else warranty claims will not be entertained.
Recommended batteries, chargers
| Order number | |
| Battery pack 36 V, 360 Ah, (in the trough, low maintenance) * | 6.654-282.0 |
| Charger 36 V, 50 A 6.654-283.0 | |
| * Appliance requires 1 battery pack | |
The use of other batteries and chargers is not recommended and should be discussed with Kärcher customer service.
→ Pull the battery plug from the machine and connect it to the plug of the charger.
→ Connect the plug of the charger to a proper socket of 16 A, the charger will charge automatically.
→ Always keep both motor covers open during the charging process.
→ Note: When the batteries are charged, first remove the charger from the mains and then disconnect it from the batteries.
Check fluid level in the battery and adjust if required
CAUTION
Be sure to observe the battery manufacturer's instructions and then act accordingly.
Check charging status of battery
– Display of the battery capacity in the green range:
Battery is charged.
– Display of the battery capacity in the yellow range:
Battery is halfway discharged.
- Display of the battery capacity in the red range:
Battery is almost discharged. The sweeping mode will be shortly switched off automatically.
- Indicator lamp glows red
Battery is discharged. The sweeping mode will be terminated automatically (the sweeping aggregates cannot be taken into operation until the battery is charged).
→ Drive the machine directly to the charging station; avoid any steep gradients in the process.
→ Charge battery.
Operation
Adjusting driver's seat
1 Lever for seat adjustment
2 Driver seat
→ Pull seat adjustment lever outwards.
→ Slide seat, release lever and lock in place.
→ Check that the seat is properly locked in position by attempting to move it backwards and forwards.
Starting the machine
Note: The machine is equipped with a seat contact switch If the driver's seat is vacated, the machine is switched off.
→ Sit on the driver's seat.
→ Bring the direction selector switch into the middle position.
→ Lock parking brake.
→ Insert the ignition key into the ignition switch.
→ Turn the ignition key to position "I". The appliance is now ready for operation.
→ Turn the ignition key to position "II". The appliance can now be driven. Note: The display of the battery capacity will show the actual charge status after about 10 seconds.
Drive the machine
→ Press brake pedal and keep it depressed.
→ Release parking brake.
1 Forward travel direction
2 Direction of travel reverse
Drive forward
→ Set the travel direction switch to "forward".
→ Press accelerator pedal down slowly.
Reverse drive
⚠Danger
Risk of injury! While reversing, ensure that there is nobody in the way, ask them to move if somebody is around.
CAUTION
Risk of damage! Only use the direction switch when the machine is standing still.
→ Set the travel direction switch to "backwards".
→ Press accelerator pedal down slowly.
Driving method
- The accelerator pedal can be used to vary the driving speed infinitely.
- Avoid pressing the pedal suddenly as this may damage the hydraulic system.
Brakes
→ Release the accelerator pedal, the machine brakes automatically and stops.
Note: The braking effect can be supported by pressing the brake pedal.
Driving over obstacles
Driving over fixed obstacles which are 70 mm high or less:
→ Drive forwards slowly and carefully.
Driving over fixed obstacles which are more than 70 mm high:
→ Only drive over these obstacles using a suitable ramp.
Sweeping mode
ATTENTION
Do not sweep up packing strips, wire or similar objects as this may damage the sweeping mechanism.
Note: To achieve an optimum cleaning result, the driving speed should be adjusted to take specific situations into account.
Note: During operation, the dust filter should be shaken off and cleaned at regular intervals.
Note: When frequently working in areas with fine dust, the filter must be cleaned more often.
Control lever
1 Roller brush and side brush control lever
2 Control lever waste container
3 Roller brush control lever
4 Control lever container flap
Roller brush and side brush control lever
→ Control lever (1) forwards: Switches the roller brush on and lowers and switches the side brushes on.
→ Control lever (1) backwards: Switches the roller brush on.
Control lever waste container
→ Control lever waste container (2) to the front: Waste container is lowered.
→ Control lever waste container (2) to the back: Waste container is raised.
Control lever roller brush
→ Roller brush control lever (3) forwards: Raises the roller brush.
→ Roller brush control lever (3) backwards: Lowers the roller brush.
Control lever container flap
→ Control lever container flap (4) to the front: The container flap of the waste container opens.
→ Control lever container flap (4) to the back: The container flap of the waste container closes.
Sweeping dry floors
→ Switch on the blower.
→ With surface cleaning:
Roller brush and side brush control lever (1) backwards: Switches the roller brush on.
Roller brush control lever (3) backwards: Lowers the roller brush.
→ Control lever container flap (4) to the front: Container flap opens.
→ With cleaning of side edges:
Roller brush and side brush control lever (1) forwards: Switches the roller brush on, switches the side brushes on and lowers them.
Roller brush control lever (3) backwards: Lowers the roller brush.
Sweeping damp or wet floors
→ Switch off the blower.
→ With surface cleaning:
Roller brush and side brush control lever (1) backwards: Switches the roller brush on.
Roller brush control lever (3) backwards: Lowers the roller brush.
→ Control lever container flap (4) to the front: Container flap opens.
→ With cleaning of side edges:
Roller brush and side brush control lever (1) forwards: Switches the roller brush on, switches the side brushes on and lowers them.
Roller brush control lever (3) backwards: Lowers the roller brush.
Emptying waste container
△DANGER
Risk of injury!
→ During the emptying process, persons and animals must not stay within the swivelling range of the waste container. Danger of tipping!
→ Place the device on an even surface during the emptying process.
△WARNING
Risk of crushing!
→ Never reach into the rod assembly for the drainage mechanism. Do not stay under the raised container.
ATTENTION
Risk of personal injury or damage!
→ Material of the rotating roller brush may be catapulted off during the emptying process. Keep an appropriate distance.

natural_image
Exterior view of a black industrial machine with wheels and a mounted fan (no visible text or symbols)→ Raise the roller brush and side brushes using the control levers: Control lever 1 to middle position and control lever 3 forwards.
→ Close the container flap, in order to do so, move the control lever (4) to the back:
→ Raise the container flap, in order to do so, move the waste container control lever (2) to the back:
→ Slowly drive towards the collection container.
→ Lock parking brake.
→ Open the container flap, in order to do so, push the container flap operating lever (4) to the front and empty the waste container.
→ Close the container flap, in order to do so, push the container flap operating lever (4) to the back until it is tipped inwards in the end position.
→ Release parking brake.
→ Drive away the collection container slowly.
→ Lower the waste container into the end position, in order to do so, move the waste container control lever (2) to the front
Turn off the appliance
→ Press brake pedal and keep it depressed.
→ Lock parking brake.
→ Turn ignition key to "0" and remove it.
Transport
△DANGER
Transport damage!
→ Observe the net weight (transport weight) of the device during transport on trailers or vehicles.
→ When transporting in vehicles, secure the appliance according to the guidelines from slipping and tipping over.
→ Turn ignition key to "0" and remove it.
→ Lock parking brake.
→ Secure the appliance at the lashing points (4x) using tension belts, ropes or chains.
→ Secure the wheels of the machine with wheel chocks.
→ Disconnect the battery of the sweeper during transport.
Storage/decommissioning
△DANGER
Risk of injury and damage! Note the weight of the appliance in case of storage.
→ Park the sweeper on a level surface in a dry, frost protected area. Protect it against dust by means of covering material.
→ Raise the roller brush and the side-brushes to prevent the bristles from being damaged.
→ Close the container flap.
→ Turn ignition key to "0" and remove it.
→ Lock parking brake.
→ Lock the sweeper to ensure that it does not roll off.
Additionally observe the following points if the sweeper is not used over a longer period of time:
→ Clean the inside and outside of the sweeper.
→ Remove the battery plug from machine.
→ Charge battery and recharge it approx. every 2 months.
Care and maintenance
General notes
ATTENTION
Risk of damage!
→ Do not rinse out the dust filter.
→ Maintenance work may only be carried out by approved customer service outlets or experts in this field who are familiar with the respective safety regulations.
→ Mobile appliances used for commercial purposes are subject to safety inspections according to VDE 0701.
→ Park the sweeper on an even surface.
→ Turn ignition key to "0" and remove it.
→ Lock parking brake.
Cleaning
CAUTION
Risk of damage!
Do not clean the appliance with a water hose or high-pressure water jet (danger of short circuits or other damage).
Cleaning the inside of the machine
△DANGER
Risk of injury!
→ Wear dust mask and protective goggles.
→ Clean machine with a cloth.
→ Blow through machine with compressed air.
External cleaning of the appliance
→ Clean the machine with a damp cloth which has been soaked in mild detergent.
Note: Do not use aggressive cleaning agents.
Maintenance intervals
Note: The elapsed-time counter shows the timing of the maintenance intervals.
Maintenance by the customer
Note: Where maintenance is carried out by the customer, all service and maintenance work must be undertaken by a qualified specialist. If required, a specialised Kärcher dealer may be contacted at any time.
Daily maintenance:
→ Check the sweeping roller and the side brush for wear and wrapped belts.
→ Check function of all operator control elements.
→ Check appliance for damages.
Weekly maintenance:
→ Check hydraulic unit.
→ Check the hydraulic oil level.
→ Check brake fluid status.
→ Check the pad for wear, replace if required.
→ Check the container lid and lubricate it.
Maintenance following wear:
→ Replace sealing strips.
→ Readjust the side seals or replace them.
→ Replace roller brush.
→ Replace side brush.
Note: For description, see section on Maintenance work.
Maintenance by Customer Service
Maintenance to be carried out after 50 operating hours:
→ Have the first inspection done according to the service manual.
Maintenance to be carried out after 250 operating hours:
→ Have the inspection done according to the service manual.
Note: In order to safeguard warranty claims, all service and maintenance work during the warranty period must be carried out by the authorised Kärcher Customer Service in accordance with the maintenance booklet.
Maintenance Works
Preparation:
→ Park the sweeper on an even surface.
→ Turn ignition key to "0" and remove it.
→ Lock parking brake.
General notes on safety
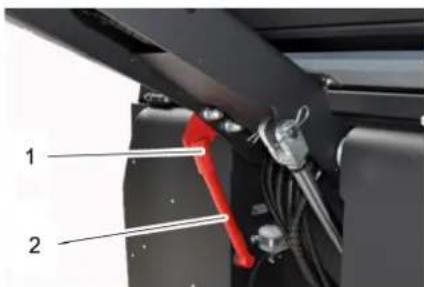
△DANGER
Risk of injury! Always apply the safety bar when the waste container is raised.
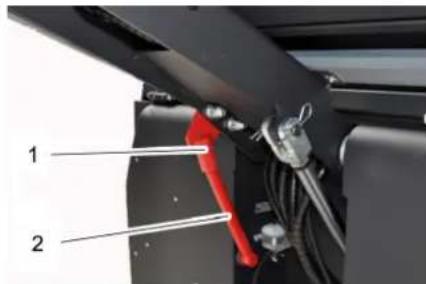
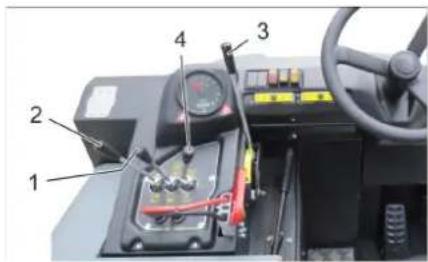
1 Holder of safety rod
2 Safety rod
→ Fold the safety rod for the high emptying up and insert it into the holder (secured).
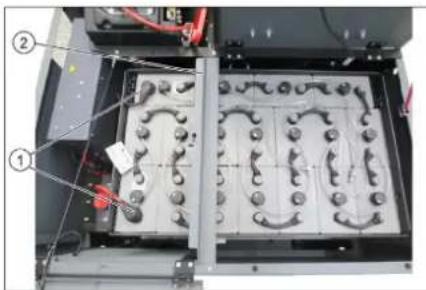
Replace batteries
ATTENTION
Observe the orientation of the battery terminals when installing the batteries. Battery terminals are installed on the left in the direction of travel.
The batteries can only be exchanged as a set. The exchange has to be performed by trained personnel.
→ Due to the heavy weight (450 kg), the batteries must be exchanged using a crane.
Note: The cross strut must be un-screwed prior to replacing the battery.
natural_image
Interior view of an electronic device showing a grid of circular components with labeled parts (no readable text or symbols)1 Battery terminals - travel direction left 2 Cross strut
→ When removing the battery, disconnect the negative terminal wire first.
→ Fasten the crane chains in the four eyelets of the battery set and carefully lift out the batteries.
Checking the brake fluid level and topping up brake fluid
△DANGER
Risk of injury!
→ Always apply the safety rod when the waste container is raised.
→ Perform the safeguarding only from outside the hazard zone.
1 Holder of safety rod
2 Brake fluid container
3 Closing head
→ Move up the waste container and secure it by means of the safety rod, see Chapter "Emptying the waste container"
→ Check if the there is enough brake fluid in the brake fluid reservoir.
Note
The filling level has to be between Min. and Max.
→ If necessary, refill DOT brake fluid currently commercially available.
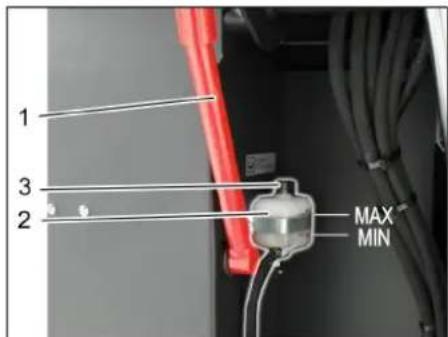
Check hydraulic oil level and refill hydraulic oil
NOTICE
The waste container must not be raised.
→ Open engine cover.
natural_image
Interior view of a vehicle battery pack with labeled components (no text or symbols visible)1 Hydraulic oil tank
2 Looking glass
3 Screw cap, oil fill opening
→ Check hydraulic oil level in the looking glass.
- The oil level must lie between "MIN" and "MAX" marking.
- Add hydraulic oil if the oil level is below the "MIN" marking.
→ Loosen the closing cap of the oil filling opening.
→ Clean the filling area.
→ Refill hydraulic oil.
Oil grade: see Technical Data
→ Replace and tighten the closing cap of the oil filling opening.
Check hydraulic unit
→ Lock parking brake.
→ Start the motor.
Only Kärcher Customer Service is authorised to carry out maintenance tasks on the hydraulic unit.
→ Check all hydraulic hoses and connections and ensure that they are leak-proof.
Checking roller brush
→ Sit on the driver's seat.
→ Bring the direction selector switch into the middle position.
→ Turn the ignition key to position "I".
→ Raise the waste container up to the end-position.
→ Turn ignition key to "0" and remove it.
→ Lock parking brake.
→ Use the safety bar for emptying from a height.
→ Remove belts or cords from roller brush.
→ Remove the safety bar.
→ Insert the ignition key into the ignition switch.
→ Turn the ignition key to position "I".
→ Lower the waste container up to the end-position.
→ Turn ignition key to "0" and remove it.
Replacing roller brush
natural_image
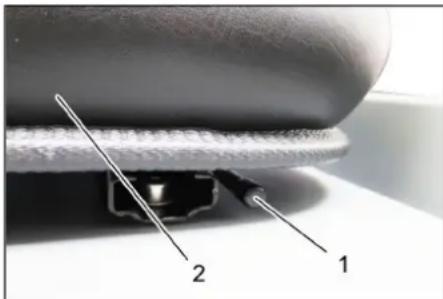
Close-up of a dark vehicle's side panel with visible bolts and a tire, no text or symbols present1 Key
2 Side panels
→ Drive the waste container up and support it with the safety rod.
→ Open the side covers using a key.
natural_image
Interior view of a laboratory or industrial facility with three numbered components (1, 2, 3) showing internal structures and connections (no visible text or symbols)1 Holding bow
2 Wing nut
3 Side seal
→ Unscrew the wing nuts.
→ Remove the retaining clamp.
→ Flip the side seal out.
→ Uncscrew the retaining screw of the roller brush intake, and swing the intake to the outside.
→ Pull out roller brush.
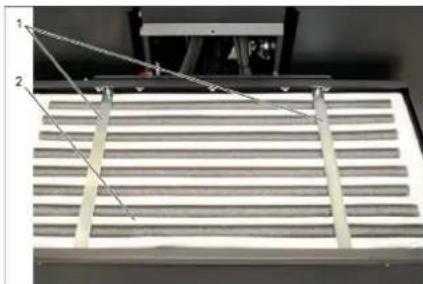
natural_image
Abstract geometric pattern with diagonal stripes and a blue upward arrow (no text or symbols)Installation position of roller brush in direction of travel (top view)
Note: When installing the new roller brush, ensure correct positioning of the bristle assembly.
→ Install new roller brush. The nuts of the roller brush must be inserted on the notches of the opposite crank.
Note: Once the new roller brush has been installed, the sweeping track must readjusted.
Check and adjust roller brush sweeping track
Note: The sweeping track is factory-set to 80 mm; it is steplessly adjustable if the brush roller wears down.
→ Check tyre pressure.
→ Switch off suction blower.
→ Drive sweeper on to a smooth, even surface covered with a visible layer of dust or chalk.
→ Roller brush and side brush control lever (1) backwards: Switches the roller brush on. Roller brush control lever (3) backwards: Lowers the roller brush.
→ Allow the roller brush to run for approx. 10 seconds.
→ Roller brush and side brush control lever (1) to middle position. Roller brush control lever (3) forwards: Raises the roller brush.
→ Raise waste container.
→ Drive machine backwards.
→ Check sweeping mirror.

The sweeping track should have an even rectangular shape which is 80-85 mm wide.
natural_image
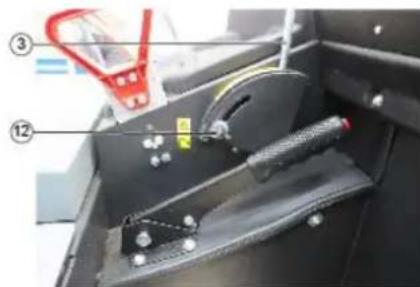
Close-up of a mechanical device with labeled parts (③ and ⑫), showing a handle, spring, and part of a black housing (no readable text or symbols)→ Undo and adjust the stop screw for wear adjustment (12).
Stop screw at the top: narrow sweeping area.
Stop screw at the bottom: broad sweeping area.
→ Tighten the stop screw again.
→ Check the sweeping area of the roller brush again as described.
Check and adjust sweeping track of the side-brush
→ The side-brushes lift up.
→ Drive sweeper on to a smooth, even surface covered with a visible layer of dust or chalk.
→ Lower the side brushes using the control lever and allow them to run for approx. 10 seconds.
→ The side-brushes lift up.
→ Drive machine backwards.
→ Check sweeping mirror.
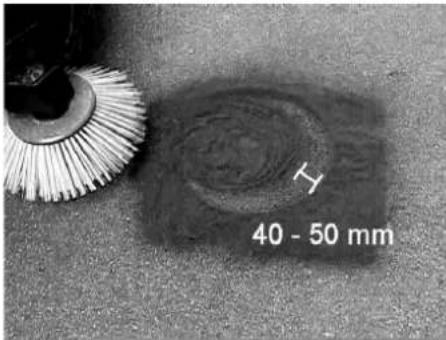
The width of the sweeping track should lie between 40-50 mm.
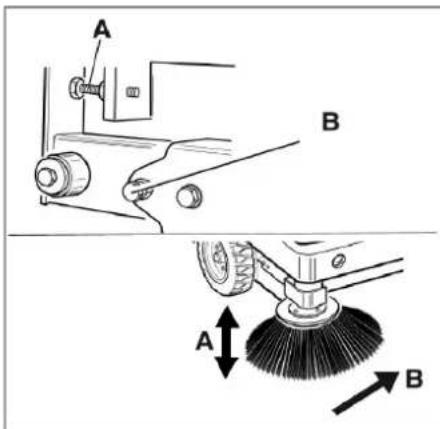
→ Set the sweeping track using the two adjusting screws.
→ Check sweeping mirror.
Adjust the side seals
△DANGER
Risk of injury! Always apply the safety bar when the waste container is raised.
→ Drive the waste container up and secure it with the safety rod.
→ Fold the safety rod for the high emptying up and insert it into the holder (secured).
1 Holder of safety rod
2 Safety rod
→ Open the side cover as described in Chapter "Replace brush roller".
→ Release the 6 wing nuts on the side holding plate.
→ Loosen 3 nuts (SW 13) on the front holding plate.
→ Press the side seal down (elongated hole) until it is about 1 to 3 mm to the floor.
→ Screw in the holding plates.
→ Repeat the procedure on the other side of the appliance.
Manually clean the dust filter
→ Switch on manual filter shake off.
Check/replace dust filter
⚠ WARNING
Risk of injury!
→ Wear a dust mask when working around the dust filter. Observe safety regulations on the handling of fine particles.
→ Clean the dust filter with the filter cleaning button.
→ Empty waste container.
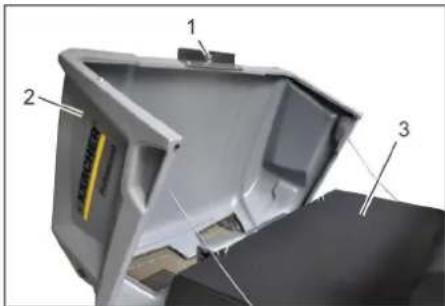
1 Lock of appliance hood
2 Cover
3 Filter cover
→ Open the lock, remove the star grip screw to do this.
→ Fold cover forwards.
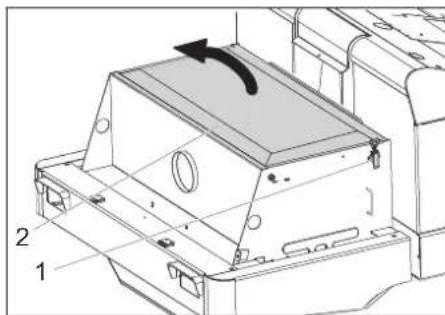
natural_image
Technical line drawing of a mechanical housing component with labeled parts (1 and 2), showing internal components and an arrow indicating rotation or movement (no text or symbols beyond labels)1 Lock, filter cover (2x)
2 Filter cover
→ Open the lock.
→ Open filter cap.
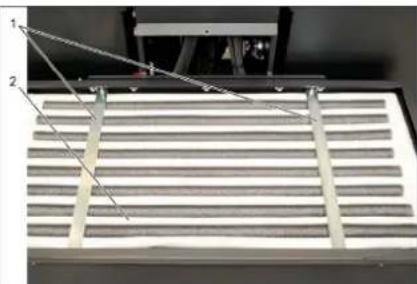
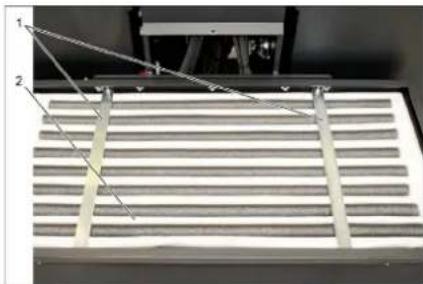
natural_image
Close-up of a metallic grate with two labeled components (1 and 2) and connecting wires, no visible text or symbols.1 Cross struts
2 Dust filter
→ Check the dust filter, clean or replace if necessary.
Note
The dust filter may only be replaced by Kärcher Customer Service.
→ Insert and lock the filter cover.
Changing the headlight bulb (option)
→ Unscrew the head lamps.
→ Take out the head lamps and pull out the plug.
Note: Note the positions of the plugs.
→ Dismantle the head lamps.
→ Dismantle the head lamp casing and hold it horizontally because the lamp unit is not fastened.
→ Unlock the bracked and take out the bulb.
→ Insert new bulb.
→ Reinstall in reverse sequence.
Changing the blinker bulb (option)
Note: Remove the glass of the direction-indicator lamp from its casing to replace the bulb.
Replacing fuses
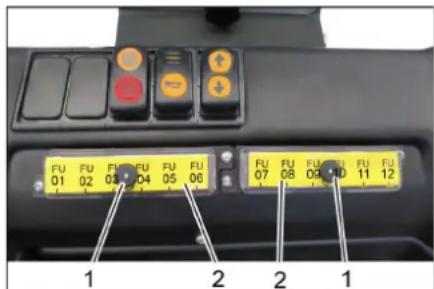
1 Lock nut
2 Cover fuse box
→ Unscrew the knurled nut.
→ Open the cover on the fuse box.
→ Check the fuses.
→ Replace defective fuses.
Note: Only use fuses with identical safety ratings.
| FU01 Safety relayDrive pedal | 3 A | |
| FU02 Multifunction display 5 A | ||
| FU03 Battery shut-off 3 A | ||
| FU04 Driving direction switch | 3 A | |
| FU05 Drive control 3 A | ||
| FU06 Vibrator system 15 A | ||
| FU07 Suction system control 3 A | ||
| FU08 Beacon lamp 7.5 A | ||
| FU09 Horn 7.5 A | ||
| FU10 Lights 15 A | ||
| FU11 Wiper | 3 A | |
| FU12 Driver cabin (optional) 10 A | ||
| FU 13* | Drive motor | 125 A |
| FU 14* | Electro motor | 100 A |
| FU 15* | Suction blower | 20 A |
* These fuses may only be changed by Customer Service, as it is necessary to check the device for potential faults.
EU Declaration of Conformity
We hereby declare that the machine described below complies with the relevant basic safety and health requirements of the EU Directives, both in its basic design and construction as well as in the version put into circulation by us. This declaration shall cease to be valid if the machine is modified without our prior approval.
Product: Ride-on vacuum sweeper
Type: KM 120/250 R Bp
1.186-002.0
Applied harmonized standards
EN 60335-1
EN 60335-2-72
EN 55012: 2007 + A1: 2009
EN 61000-6-2: 2005
EN 62233: 2008
Applied conformity evaluation method
2000/14/EC: Appendix V
Sound power level dB(A)
Measured: 88
Guaranteed: 90
The signatories act on behalf of and with the authority of the company management.

Chairman of the Board of Management

S. Reiser
Director Regulatory Affairs & Certification
Documentation supervisor:
S. Reiser
Alfred Kärcher SE & Co. KG
71364 Winnenden (Germany)
Tel.: +49 7195 14-0
Fax: +49 7195 14-2212
Winnenden, 2018/10/01
Troubleshooting
| Fault Remedy | |
| Device does not drive or drives only slowly | Sit on the driver seat, the seat contact switch gets activated. |
| Have the drive motor fuse, FU 13, checked by Customer Service | |
| Charging or replacing battery | |
| Release parking brake | |
| Check for trapped ribbons and strings. | |
| Inform Kärcher Customer Service. | |
| Whistling sound in the hydraulic system | Refill hydraulic fluid |
| Inform Kärcher Customer Service. | |
| Brushes are rotating slowly or not at all | Check for trapped ribbons and strings. |
| Inform Kärcher Customer Service. | |
| Too little or no suction power in the brush area | Clean filter |
| Inform Kärcher Customer Service. | |
| Dust gathers in the machine Adjust | the side seals |
| Switch on blower | |
| Clean dust filter | |
| Replace filter washers | |
| Inform Kärcher Customer Service. | |
| Sweeping unit does not pick up waste | Empty waste container |
| Clean dust filter | |
| Replacing roller brush | |
| Adjust sweeping track | |
| Replace sealing strips of the waste container | |
| Remove the blocking of the brush roller | |
| Inform Kärcher Customer Service. | |
| Waste container does not raise or lower | Check the fuses. |
| Remove the locking support from the waste container | |
| Inform Kärcher Customer Service. | |
| Waste container is rotating slowly or not at all | Inform Kärcher Customer Service. |
| Operation problems with hydraulic movement parts | Inform Kärcher Customer Service. |
Technical specifications
| KM 120/250 R Bp KM 120/250 R Bp Pack | |||
| Machine data | |||
| Drive speed, forward km/h 6 6 | |||
| Drive speed, reverse km/h 3 3 | |||
| Climbing capability (max.) -- 14% 14% | |||
| Surface cleaning performance without side brushes m | ^2/h 5400 5400 | ||
| Surface cleaning performance with 1 side brushes m | ^2/h 7200 7200 | ||
| Working width without side brushes mm 900 | 900 | ||
| Working width with 1 side brushes | mm | 1200 1200 | |
| Protection type, drip-proof | -- IPX 3 | IPX 3 | |
| Usage duration with battery fully charged | h | -- | 3.5 |
| Electrical system | |||
| Battery capacity | V, Ah | -- | 36, 360 |
| Battery set | kg | -- | 450 |
| Hydraulic system | |||
| Oil quantity in the entire hydraulic system | I | 25 | 25 |
| Oil quantity in hydraulic tank | I | 20.5 | 20.5 |
| Hydraulic oil type | -- HV 46 | HV 46 | |
| Waste container | |||
| Max. unloading height | mm | 1400 1400 | |
| Volume of waste container | 250 250 | |||
| Roller brush | |||
| Roller brush diameter mm 300 300 | |||
| Roller brush width mm 900 900 | |||
| Speed 1/min 325 325 | |||
| Sweeping track mm 80 80 | |||
| Side brushes | |||
| Side brush diameter mm 600 600 | |||
| Speed (continuous) 1/min 61 61 | |||
| Solid rubber tyres | |||
| Size, front -- 15-4.5 x 8 15-4.5 x 8 | |||
| Size, rear | -- 15-4.5 x 8 | 15-4.5 x 8 | |
| Brake | |||
| Front wheels | -- mechanical | mechanical | |
| Rear wheel | -- Electrical | Electrical | |
| Filter and vacuum system | |||
| Type | -- Pocket filter | Pocket filter | |
| Speed 1/min 2800 | 2800 | ||
| Filter surface area, fine dust filter | m2 | 6.0 | 6.0 |
| Nominal vacuum, suction system | mbar | 15.5 | 15.5 |
| Nominal volume flow, suction system | m3/h | 800 800 | |
| Vibrator system | -- Electric motor | Electric motor | |
| Working conditions | |||
| Temperature | °C | -5 and +40 | -5 and +40 |
| Air humidity, non-condensing | % | 0 - 90 | 0 - 90 |
| Values determined as per EN 60335-2-72 | |||
| Noise emission | |||
| Sound pressure level LpA | dB(A) | 70 70 | |
| Uncertainty KpA | dB(A) | 3 | 3 |
| Sound power level LWA + Uncertainty KWA | dB(A) | 90 90 | |
| Machine vibrations | |||
| Hand-arm vibration value | m/s2 | 0.7 | 0.7 |
| Seat | m/s2 | 0.5 | 0.5 |
| Uncertainty K | m/s2 | 0.1 | 0.1 |
| Dimensions and weights | |||
| Length x width x height | mm | 2082x1250x1450 | 2082x1250x1450 |
| Right turning radius mm 1350 | 1350 | ||
| Left turning radius mm 1350 | 1350 | ||
| Unladen weight (with/ without battery) | kg | 750/1200 | 750/1200 |
| Permissible overall weight | kg | 1620 | 1620 |
| Permissible front axle load | kg | 797 797 | |
| Permissible rear axle load | kg | 823 823 | |
| Subject to technical modifications! | |||
natural_image
Close-up of a car seatbelt with a yellow key inserted, showing no text or symbols on the main subject.


natural_image
Exterior view of a black industrial machine with open lid and wheels (no visible text or symbols)natural_image
Interior view of an electronic device showing a grid of components with numbered annotations (no readable text or symbols)natural_image
Interior view of a vehicle battery pack with labeled components (no text or symbols visible)natural_image
Close-up of a dark vehicle's side panel with two numbered components and a tire, no visible text or symbols.1 Clé
natural_image
Interior view of a mechanical or industrial enclosure with visible structural lines and components (no text or symbols)natural_image
Abstract geometric pattern with layered chevron shapes and a blue upward arrow (no text or symbols)natural_image
Close-up of a mechanical device with labeled parts (③ and ⑫), no readable text or symbols beyond labelsnatural_image
Close-up of a car's front panel with black buttons and a red indicator button, no visible text or symbolsnatural_image
Technical diagram of a mechanical housing component with labeled parts (1 and 2), showing internal structure and rotation arrow (no text or symbols beyond labels)natural_image
Close-up of a metallic grate with two numbered measurement lines (1 and 2) pointing to the structure, no text or symbols present.71364 Winnenden (Germany)
Tel.: +49 7195 14-0
Fax: +49 7195 14-2212
Winnenden, 2018/10/01
www.kaercher.com/REACH
Garanzia
natural_image
Close-up of a car seatbelt with a yellow key inserted into the lock (no visible text or symbols)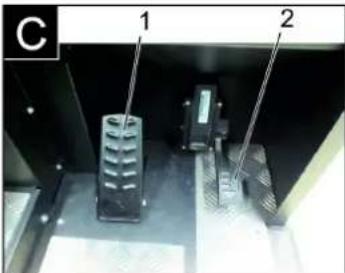

natural_image
Close-up of a car's front panel with buttons and a white arrow pointing to a red button (no readable text or symbols)
natural_image
Black and white photo of a small industrial machine with open lid and wheels (no visible text or symbols)natural_image
Interior view of an industrial battery pack with labeled components (no readable text or symbols)natural_image
Interior view of a vehicle battery pack with labeled components (no text or symbols visible)natural_image
Close-up of a dark metal vehicle's side panel with two labeled components (1 and 2), showing no visible text or symbols.natural_image
Interior view of a laboratory or industrial chamber with numbered components (1, 2, 3) and no visible text or symbols.natural_image
Close-up of a mechanical component with two labeled parts (1 and 2) and diagonal lines indicating alignment or connection points (no text or symbols present)2006/42/CE (+2009/127/CE)
2014/30/UE
2000/14/CE

Chairman of the Board of Management
S. Reiser
Director Regulatory Affairs & Certifi
71364 Winnenden (Germany)
Tel.: +49 7195 14-0
Fax: +49 7195 14-2212
Winnenden, 2018/10/01
www.kaercher.com/REACH
Garantie
natural_image
Close-up of a car seatbelt with a yellow and white key inserted, showing no text or symbols.

natural_image
Close-up of a car's front panel with buttons and a white arrow pointing to a red button (no text or symbols visible)
natural_image
Black and white photo of a small industrial machine with wheels and a mounted fan (no visible text or symbols)natural_image
Interior view of an electronic device showing a grid-like panel with labeled components (no readable text or symbols)1 Batterijpolen - in rijrichting links
2 Dwarsbalk
natural_image
Interior view of a mechanical or electronic device with labeled components (no readable text or symbols)natural_image
Close-up of a car's side panel with a tire and a small mechanical component, no visible text or symbolsnatural_image
Interior view of a mechanical or industrial enclosure with numbered components (1, 2, 3) and visible structural lines, no text or symbols present.natural_image
Diagram of a folded structure with a blue upward arrow at the base (no text or symbols)natural_image
Interior view of a mechanical device with labeled parts (③ and ⑫), showing a lever mechanism and handle (no readable text or symbols)natural_image
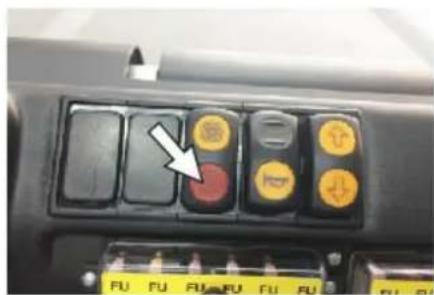
Close-up of a car's front panel with black buttons and yellow/red buttons, no visible text or symbols→ Handmatige filterreiniging inschakelen.
Stoffilter controleren / vervangen ⚠ WAARSCHUWING
Verwondingsgevaar!
1 Vergrendeling apparaatkap
2 Apparaatkap
3 Filterafdekking
natural_image
Technical line drawing of a mechanical component with labeled parts (1 and 2), no readable text or symbols beyond labels1 Sluiting, filterafdekking (2x)
2 Filterafdekking
→ Sluiting openen.
→ Filterafdekking openen.
natural_image
Close-up of a metallic grate with two labeled components (1 and 2), no visible text or symbols on the grate itself.1 Dwarsbalk
2 Stoffilter
→ Controleer de stoffilter, reinig of vervang hem indien nodig.
Tip

Chairman of the Board of Management
Director Regulatory Affairs & Certification
71364 Winnenden (Germany)
Tel.: +49 7195 14-0
Fax: +49 7195 14-2212
Winnenden, 2018/10/01
Hulp bij storingen
www.kaercher.com/REACH
Garantía
natural_image
Close-up of a car seatbelt with a yellow and white key inserted, showing no text or symbols.

→ Conectar el ventilador.
→ Si se limpian superficies:
natural_image
Exterior view of a black industrial machine with open lid and wheels (no visible text or symbols)natural_image
Interior view of a mechanical or electronic device with numbered components, no visible text or symbolsnatural_image
Interior view of a vehicle battery assembly with labeled components (no text or symbols visible)natural_image
Close-up of a dark vehicle's side panel with a tire and a small object on the wheel (no visible text or symbols)1 | | a v e
natural_image
Interior view of a server room with connected cables and ventilation ducts (no visible text or symbols)natural_image
Abstract geometric pattern with layered triangular shapes and a blue upward arrow (no text or symbols)natural_image
Interior view of a mechanical device with labeled parts (③ and ⑫), showing a tool handle and component layout (no readable text or symbols)natural_image
Close-up of a car's front panel with buttons and a red indicator light (no readable text or symbols)natural_image
Technical diagram of a mechanical housing component with labeled parts (1 and 2), showing internal structure and rotation arrow (no text or symbols beyond labels)natural_image
Technical diagram of a mechanical component with labeled parts (1 and 2), showing internal structure and alignment lines (no text or symbols beyond labels)1 Travesaños
2 Filtro de polvo
2006/42/CE (+2009/127/CE)
2014/30/UE
2000/14/CE
71364 Winnenden (Germany)
Tel.: +49 7195 14-0
Fax: +49 7195 14-2212
Winnenden, 2018/10/01
Carregar as baterias ... PT 5
www.kaercher.com/REACH
Garantia
natural_image
Close-up of a car seatbelt with a yellow key inserted, showing no text or symbols on the main subject.

Figura da máquina de varrer Painel de comando
Figura A
1 Alavanca de ajuste do assento
2 Banco do condutor
1 Sentido de marcha em frente
2 Sentido de marcha, marcha-atrás
Marcha para a frente
1 Alavanca de comando da escova cilíndrica de varredura e vassoura lateral
2 Alavanca de comando do colector do lixo varrido
3 Alavanca de comando da escova cilíndrica de varredura
natural_image
Close-up of a vehicle's front panel with buttons and a white arrow pointing to a red button (no readable text or symbols)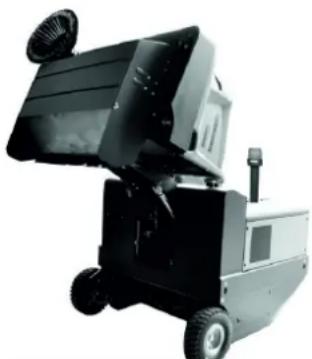
natural_image
Exterior view of a black industrial machine with wheels and ventilation ducts (no visible text or symbols)natural_image
Interior view of an electronic device showing a grid-like panel with numbered components (no readable text or symbols)natural_image
Interior view of a vehicle's internal components, showing battery, motors, and wiring (no text or symbols visible)natural_image
Close-up of a dark metal vehicle's side panel with a tire and two numbered components (no visible text or symbols)1 Chaves
2 Revestimento lateral
natural_image
Interior view of a mechanical or industrial enclosure with wire meshing and structural components (no visible text or symbols)natural_image
Abstract geometric pattern with layered chevron shapes and a blue upward arrow (no text or symbols)natural_image
Close-up of a mechanical device with labeled parts (③ and ⑫), showing internal components like a handle, cable, and spring mechanism (no readable text or symbols)natural_image
Close-up of a vehicle's control panel with buttons and a red indicator light (no readable text or symbols)→ Ligar a limpeza do filtro manual.
natural_image
Technical diagram of a mechanical housing or enclosure with labeled components and an arrow indicating rotation (no text or symbols present)natural_image
Close-up of a mechanical component with two labeled parts (1 and 2) and a diagonal line, showing parallel grooves or slats (no text or symbols beyond labels)2006/42/CE (+2009/127/CE)
2014/30/UE
2000/14/CE
H. Jenner
Chairman of the Board of Management
S. Reiser
Director Regulatory Affairs & Certification
71364 Winnenden (Germany)
Tel.: +49 7195 14-0
Fax: +49 7195 14-2212
Winnenden, 2018/10/01
www.kaercher.com/REACH
Garanti
natural_image
Close-up of a car seatbelt with a yellow key inserted, showing no text or symbols on the main subject.

Figur fejemaskine Betjeningsfelt
Figur A
1 Typeskilt
natural_image
Close-up of a vehicle's front panel with buttons and a white arrow pointing to a red button (no text or symbols visible)
natural_image
Exterior view of a black industrial machine with wheels and ventilation slots (no visible text or symbols)natural_image
Interior view of an electronic device showing a grid of battery cells with labeled components (no readable text or symbols)1 Holder sikringsstang
natural_image
Interior view of a vehicle's internal components with numbered labels (1, 2, 3), showing no readable text or symbols beyond labels.1 Hydraulikolietank
2 Skueglas
natural_image
Close-up of a dark metal vehicle's side panel with two numbered annotations pointing to the wheel (no visible text or symbols)1 N ø g l e
2 S i d e s k æ r m e
natural_image
Interior view of a laboratory or industrial facility with glass panels and metal structures, no visible text or symbols1 Holdebøjle
2 Vingemøtrik
3 Tætning i siden
natural_image
Diagram of a layered structure with a blue upward arrow, no text or symbols presentnatural_image
Interior view of a vehicle's internal compartment showing a black plastic tray, cable, and a red-handled tool (no visible text or symbols)→ Løsn og indstil stopskruen til slitagejusteringen (12). Skub fremad: smallere fejebane. Skub bagud: bredere fejebane.
natural_image
Close-up of a vehicle's front panel with buttons and a white arrow pointing to a red circular button (no readable text or symbols)natural_image
Technical line drawing of a mechanical housing component with labeled parts (1 and 2), showing internal components and an arrow indicating rotation or movement (no text or symbols beyond labels)natural_image
Close-up of a metallic rack with two metal supports and a connecting rod, no visible text or symbols1 Tværdragere
2 Støvfilter
2006/42/EF (+2009/127/EF)
2014/30/EU
2000/14/EF

Chairman of the Board of Management

S. Reiser
Director Regulatory Affairs & Certification
71364 Winnenden (Germany)
Tel.: +49 7195 14-0
Fax: +49 7195 14-2212
Winnenden, 2018/10/01
Hjælp ved fejl
Feilretting....NO 11
Tekniske data ..... NO 11
www.kaercher.com/REACH
Garanti
natural_image
Close-up of a car seatbelt with a yellow key inserted, showing no text or symbols on the main subject.

1 Hendel setejustering
2 F ø r e r s e t e
→ Slå på viften.

natural_image
Exterior view of a black industrial machine with wheels and a mounted fan (no visible text or symbols)natural_image
Interior view of an electronic device showing a grid of battery cells with labeled components (no readable text or symbols)1 Holder sikringsstang
natural_image
Interior view of a vehicle's internal components, showing battery, motors, and wiring (no visible text or symbols)1 Hydraulikkoljetank
2 Seglass
natural_image
Close-up of a dark vehicle's side panel with visible bolts and a tire, no text or symbols presentnatural_image
Interior view of a laboratory or industrial chamber with numbered components and light paths (no visible text or symbols)natural_image
Abstract geometric pattern with diagonal stripes and a blue upward arrow (no text or symbols)natural_image
Close-up of a mechanical device with labeled parts (③ and ⑫), showing internal components like a handle, spring, and lever mechanism (no readable text or symbols)1 Holder sikringsstang 2 Sikringsstang
natural_image
Technical line drawing of a mechanical housing component with labeled parts (1 and 2), showing internal components and an arrow indicating rotation or movement (no text or symbols beyond labels)1 Lås, filterdeksel (2x)
2 Filterdeksel
→ Åpne lås.
→ Åpne filterdeksel.
natural_image
Close-up of a metallic rack with slatted metal bands and two numbered measurement points (no text or symbols visible)2006/42/EF (+2009/127/EF)
2014/30/EU
2000/14/EF
2000/14/EF: Vedlegg V
Lydeffektnivå dB(A)
Målt: 88
Garantert: 90

Chairman of the Board of Management

Director Regulatory Affairs & Certification
71364 Winnenden (Germany)
Tel.: +49 7195 14-0
Fax: +49 7195 14-2212
Winnenden, 2018/10/01
Feilretting
www.kaercher.com/REACH
Garanti
natural_image
Close-up of a car seatbelt with a yellow key inserted, showing no text or symbols on the main subject.

natural_image
Close-up of a vehicle's control panel with buttons and a white arrow pointing to a red button (no readable text or symbols)
natural_image
Exterior view of a black industrial machine with wheels and a mounted panel (no visible text or symbols)natural_image
Interior view of an electronic device showing a grid of battery cells with labeled components (no readable text or symbols)natural_image
Interior view of a vehicle battery pack with labeled components (no text or symbols visible)1 Hydrauloljetank
natural_image
Close-up of a dark metal vehicle's side panel with bolt holes and a tire, no visible text or symbolsnatural_image
Interior view of a vehicle showing structural components and airflow lines (no text or symbols)1 Hållarbygel
2 Vingmutter
3 Tätning på sidan
natural_image
Abstract geometric pattern with diagonal stripes and a blue upward arrow (no text or symbols)natural_image
Interior view of a mechanical device with labeled parts (③ and ⑫), showing a tool handle and component layout (no readable text or symbols)natural_image
Close-up of a vehicle's front panel with black buttons and a red button, no visible text or symbols→ Välj manuell filterrengöring.
Kontrollera/byta dammfilter ⚠️VARNING
Risk för skada!
natural_image
Technical line drawing of a mechanical housing component with labeled parts (1 and 2), showing internal components and an arrow indicating rotation or movement (no text or symbols beyond labels)natural_image
Close-up of a mechanical component with two labeled parts (1 and 2) and diagonal lines, no visible text or symbols.1 Tvärsträva
2 Dammfilter

Chairman of the Board of Management

S. Reiser
Director Regulatory Affairs & Certification
71364 Winnenden (Germany)
Tel.: +49 7195 14-0
Fax: +49 7195 14-2212
Winnenden, 2018/10/01
www.kaercher.com/REACH
Takuu
natural_image
Close-up of a car seatbelt with a yellow and white key inserted, showing no text or symbols.

natural_image
Close-up of a vehicle's front panel with black buttons and a red indicator light, no visible text or symbols
natural_image
Exterior view of a black industrial machine with wheels and a mounted fan (no visible text or symbols)1 Varmistustangon pidike
2 Varmistustanko
natural_image
Interior view of an electronic device showing a grid-like panel with labeled components (no readable text or symbols)natural_image
Interior view of a mechanical or electronic device with labeled components (no readable text or symbols)natural_image
Close-up of a dark metal vehicle's side panel with two labeled components (1 and 2), showing bolt holes and a tire (no text or symbols beyond labels)1 A v a i n
2 Sivuverhous
natural_image
Interior view of a laboratory or industrial facility with metal beams and structural supports (no visible text or symbols)1 Kiinnityssanka
2 Siipimutteri
3 Sivutiiviste
natural_image
Diagram of a folded or layered structure with a blue upward arrow at the bottom (no text or symbols)natural_image
Close-up of a mechanical device with labeled parts (③ and ⑫), showing internal components like a handle and cable (no readable text or symbols)1 Varmistustangon pidike
2 Varmistustanko
1 Laitekannen lukitus
2 Pölysuoja
3 Suodattimen kansi
1 Lukitus, suodatinpeite (2x)
2 Suodattimen kansi
→ Avaa lukitus.
natural_image
Close-up of a metallic grate with two labeled components (1 and 2), no visible text or symbols on the grate itself.1 Poikittaistuet
2 Pölysuodatin

H. Jennifer
Chairman of the Board of Management

S. Reiser
Director Regulatory Affairs & Certification
71364 Winnenden (Germany)
Tel.: +49 7195 14-0
Fax: +49 7195 14-2212
Winnenden, 2018/10/01
Häiriöapu
www.kaercher.com/REACH
Εγγύηση
natural_image
Close-up of a car seatbelt with a yellow key inserted, showing no text or symbols on the main subject.


natural_image
Black and white photo of a small industrial machine with open lid and wheels (no visible text or symbols)natural_image
Interior view of an electronic device showing a grid-like panel with buttons and connectors, labeled with numbers ① and ② (no readable text or symbols beyond labels)natural_image
Interior view of a vehicle's internal components, showing battery, motors, and wiring (no visible text or symbols)natural_image
Close-up of a dark metal vehicle's side panel with visible bolts and a tire, no text or symbols present.natural_image
Interior view of a mechanical or industrial enclosure with visible structural lines and components (no text or symbols)natural_image
Close-up of a car's front panel with black buttons and a red indicator button, no visible text or symbolsnatural_image
Technical diagram of a mechanical housing or enclosure with labeled components and an arrow indicating rotation (no text or symbols present)natural_image
Technical diagram of a mechanical component with two labeled parts (1 and 2), showing internal structure and alignment lines (no text or symbols beyond labels)1 Εγκάρσιο στιλίδιο
2 Φίλτρο σκόνης
www.kaercher.com/REACH
Garanti
natural_image
Close-up of a car seatbelt with a yellow key inserted, showing no text or symbols on the main subject.

1 İleri sürüş yönü
2 Geri sürüş yönü
İleri sürme

natural_image
Exterior view of a black industrial machine with wheels and a mounted fan (no visible text or symbols)natural_image
Interior view of an electronic device showing a grid of battery cells with labeled components (no readable text or symbols)natural_image
Interior view of a vehicle battery pack with labeled components (no text or symbols visible)natural_image
Close-up of a dark vehicle's side panel with two labeled components (1 and 2), showing no visible text or symbols.natural_image
Interior view of a laboratory or industrial facility with three numbered components and diagonal white lines indicating measurement or flow (no visible text or symbols)1 Tut m a k o l u
2 Kanatlı somun
3 Yan conta
natural_image
Abstract geometric pattern with diagonal stripes and a blue upward arrow (no text or symbols)natural_image
Interior view of a mechanical device with labeled parts (③ and ⑫), showing internal components like a tool holder and lever mechanism (no readable text or symbols)natural_image
Technical line drawing of a mechanical housing component with labeled parts (1 and 2), showing internal components and an arrow indicating rotation or movement (no text or symbols beyond labels)natural_image
Close-up of a metallic grate with two labeled components (1 and 2), no visible text or symbols on the grate itself.
Chairman of the Board of Management
S. Reiser
Director Regulatory Affairs & Certification
71364 Winnenden (Germany)
Tel.: +49 7195 14-0
Fax: +49 7195 14-2212
Winnenden, 2018/10/01
Arizalarda yardım
www.kaercher.com/REACH
Гарантия
natural_image
Close-up of a car seatbelt with a yellow and white key inserted, showing no text or symbols.

natural_image
Close-up of a car dashboard with black buttons and yellow/red buttons, no visible text or symbols
natural_image
Black and white photo of a small industrial machine with wheels and a mounted panel (no visible text or symbols)natural_image
Interior view of an electronic device showing a grid-like panel with connectors and wiring (no visible text or symbols)natural_image
Interior view of a mechanical or electronic device with labeled components (no readable text or symbols)natural_image
Close-up of a dark metal vehicle's side panel with a circular tire and a small object on the wheel (no visible text or symbols)1 Ключ
2 Боковая обшивка
natural_image
Interior view of a stainless steel enclosure with visible ductwork and insulation (no text or symbols)1 С к о б а
2 Барашковая гайка
natural_image
Abstract geometric pattern with layered gray lines and a blue upward arrow at the bottom (no text or symbols)natural_image
Close-up of a mechanical device with labeled parts (③ and ⑫), showing internal components like a handle, spring, and lever mechanism (no readable text or symbols)natural_image
Interior view of a mechanical or electrical component with two labeled parts (1 and 2), showing parallel slats and metal supports (no text or symbols visible)
H. Jenner
Chairman of the Board of Management
S. Reiser
Director Regulatory Affairs & Certification
71364 Winnenden (Germany)
Tel.: +49 7195 14-0
Fax: +49 7195 14-2212
Winnenden, 2018/10/01
www.kaercher.com/REACH
Garancia
natural_image
Close-up of a car seatbelt with a yellow key inserted, showing no text or symbols on the main subject.

natural_image
Close-up of a car's front panel with black buttons and yellow/red buttons, no visible text or symbols
natural_image
Exterior view of a black industrial machine with wheels and ventilation slots (no visible text or symbols)natural_image
Interior view of an electronic device showing a grid of battery cells with labeled components (no readable text or symbols)natural_image
Interior view of a vehicle battery pack with labeled components (no text or symbols visible)1 Hidraulikaolaj tartály
2 Kémlelőüveg
natural_image
Close-up of a dark metal vehicle's side panel with a tire and a small attached component, no visible text or symbols.1 Kulcs-
2 Oldalburkolat
natural_image
Interior view of a laboratory or industrial facility with metal structures and wiring, no visible text or symbols1 Tartókengyel
2 Szárnyas anya
3 Oldalsó tömítés
natural_image
Abstract geometric pattern with diagonal stripes and a blue upward arrow (no text or symbols)natural_image
Interior view of a mechanical device with labeled parts (③ and ⑫), showing a black component and tool handle (no readable text or symbols)natural_image
Close-up of a vehicle's front panel with buttons and a white arrow pointing to a red button (no readable text or symbols)natural_image
Technical line drawing of a mechanical housing component with labeled parts (1 and 2), no readable text or symbols beyond labelsnatural_image
Technical diagram of a mechanical component with labeled parts (1, 2), showing internal structure and alignment lines (no readable text or symbols)
H. Jenner
Chairman of the Board of Management

S. Reiser
Director Regulatory Affairs & Certification
71364 Winnenden (Germany)
Tel.: +49 7195 14-0
Fax: +49 7195 14-2212
Winnenden, 2018/10/01
www.kaercher.com/REACH
Záruka
natural_image
Close-up of a car seatbelt with a yellow key inserted, showing no text or symbols on the main subject.

natural_image
Close-up of a vehicle's front panel with buttons and a white arrow pointing to a red button (no text or symbols visible)
natural_image
Exterior view of a black industrial machine with wheels and a mounted fan (no visible text or symbols)natural_image
Interior view of an industrial battery pack with labeled components (no readable text or symbols)natural_image
Interior view of a mechanical or electronic device with labeled components (no readable text or symbols)natural_image
Close-up of a dark vehicle's side panel with a tire and a small object, no visible text or symbols1 K I i č
2 Boční obložení
natural_image
Interior view of a mechanical or industrial enclosure with visible structural lines and components (no text or symbols)natural_image
Abstract geometric pattern with layered chevron shapes and a blue upward arrow (no text or symbols)natural_image
Interior view of a mechanical device with labeled parts (③ and ⑫), showing a tool handle and component layout (no readable text or symbols)natural_image
Close-up of a metallic grate with two labeled measurement points (1 and 2) and diagonal lines, no visible text or symbols.2006/42/ES (+2009/127/ES)
2014/30/EU
2000/14/ES

Chairman of the Board of Management

Director Regulatory Affairs & Certification
71364 Winnenden (Germany)
Tel.: +49 7195 14-0
Fax: +49 7195 14-2212
Winnenden, 2018/10/01
Pomoc při poruchách
www.kaercher.com/REACH
Garancija
natural_image
Close-up of a car seatbelt with a yellow and white key inserted, showing no text or symbols.
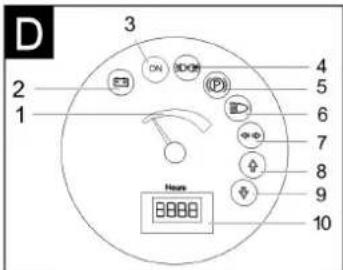
natural_image
Close-up of a car's front panel with buttons and a white arrow pointing to a red button (no text or symbols visible)
natural_image
Exterior view of a black industrial machine with wheels and a mounted fan (no visible text or symbols)natural_image
Interior view of an electronic device showing a grid of battery cells with labeled components (no readable text or symbols)1 Pola akumulatorja – na levi strani v smeri vožnje
2 Prečna opora
→ Pri demontiranju baterije je treba paziti na to, da se najprej odklopi vodnik minus pola.
→ Žico žerjava pritrdite na 4 rinke kompleta baterij in previdno dvignite baterije.
Preverite nivo zavorne tekočine in dolijte zavorno tekočino
ΔNEVARNOST
Nevarnost poškodb!
natural_image
Interior view of a vehicle battery pack with labeled components (no text or symbols visible)natural_image
Close-up of a dark vehicle's side panel with visible bolts and a tire, no text or symbols present1 Ključ
2 Stranska obloga
natural_image
Interior view of a laboratory or industrial chamber with visible structural lines and components (no text or symbols)1 Držalna palica
2 Krilata matica
3 Stransko tesnilo
→ Odvijte krilate matice.
→ Snemite držalno palico.
→ Stransko tesnilo sklopite navzven.
→ Izvijte pritrditveni vijak nosilca pometal-nega valja in nosilec zasukajte nav-zven.
→ Izvlecite pometalni valj.

natural_image
Abstract geometric pattern with diagonal stripes and a blue upward arrow (no text or symbols)Vgradni položaj pometalnega valja v smeri vožnje (tloris)
Opozorilo: Pri vgradnji novega pometalne-ga valja pazite na položaj krtačnega na-stavka.
→ Vstavite nov pometalni valj. Zareze po-metalnega valja morajo biti nataknjene na utore nasproti ležeče nihalke.
Opozorilo: Po vgradnji novega pometalne-ga valja je potrebno površino pometanja na novo nastaviti.
Preverjanje in nastavljanje površine pometanja pometalnega valja
Opozorilo: Pometalna površina je tovarniško nastavljena na 80 mm, ob obrabi po-metalnih valjev jo je mogoče brezstopenjsko nastaviti.
→ Preverite pritisk v gumah.
→ Izklopite sesalni ventilator.
→ Stroj za pometanje zapeljite na ravno in gladko površino, kjer zazna prah ali kre-do.
natural_image
Close-up of a mechanical device with labeled parts (③ and ⑫), showing a handle, clip, and part of a container (no readable text or symbols)1 Zapora pokrova naprave
2 Pokrov naprave
3 Pokrov filtra
natural_image
Technical diagram of a mechanical housing component with labeled parts (1 and 2), showing internal components and an arrow indicating rotation or movement (no text or symbols beyond labels)1 Zapiralo, pokrov filtra (2x)
2 Pokrov filtra
→ Odprite zapiralo.
→ Odprite pokrov filtra.
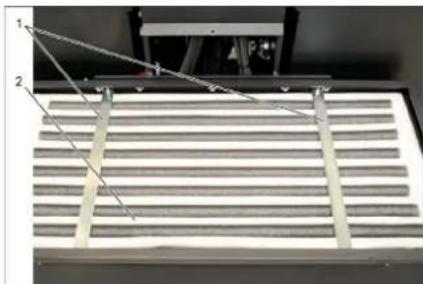
natural_image
Close-up of a metallic grate with two labeled components (1 and 2), no visible text or symbols on the grate itself.1 Prečne opore
2 Filter za prah
→ Preverite filter za prah, po potrebi ga očistite ali zamenjajte.
Napotek
2006/42/ES (+2009/127/ES)
2014/30/EU
2000/14/ES

Chairman of the Board of Management

S. Reiser
Director Regulatory Affairs & Certification
71364 Winnenden (Germany)
Tel.: +49 7195 14-0
Fax: +49 7195 14-2212
Winnenden, 2018/10/01
Pomoč pri motnjah
www.kaercher.com/REACH
Gwarancja
natural_image
Close-up of a car seatbelt with a yellow and white key inserted, showing no text or symbols.

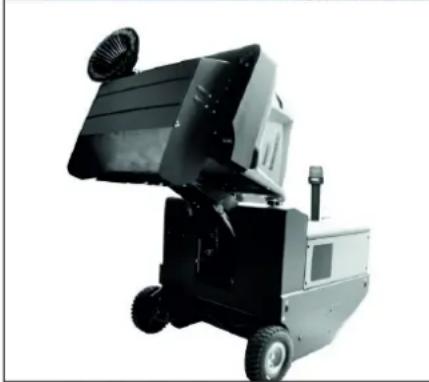
natural_image
Black and white photo of a small industrial machine with open lid and wheels (no visible text or symbols)natural_image
Interior view of an electronic device showing a grid panel with buttons and wiring (no visible text or symbols)natural_image
Interior view of a vehicle's internal components, showing battery, motors, and wiring (no text or symbols visible)natural_image
Close-up of a dark metal vehicle's side panel with a tire and a small mechanical component, no visible text or symbols.1 K l u c z
2 Obudowa boczna
natural_image
Interior view of a mechanical or industrial enclosure with visible structural lines and numbered components (no text or symbols)1 Strzemiączko
natural_image
Diagram of a folded structure with a blue upward arrow, no text or symbols presentnatural_image
Close-up of a mechanical device with labeled parts (③ and ⑫), showing internal components like a handle, spring, and tool (no readable text or symbols)natural_image
Technical diagram of a mechanical device with labeled components and an arrow indicating rotation (no text or symbols present)natural_image
Close-up of a mechanical component with two labeled parts (1 and 2) and diagonal lines indicating alignment or measurement, no readable text or symbols present.1 Poprzecznica
2 Filtr pyłu
2006/42/WE (+2009/127/WE)
2014/30/UE
2000/14/WE
Chairman of the Board of Management
S. Reiser
Director Regulatory Affairs & Certification
71364 Winnenden (Germany)
Tel.: +49 7195 14-0
Fax: +49 7195 14-2212
Winnenden, 2018/10/01
Usuwanie usterek
www.kaercher.com/REACH
Garantie
natural_image
Close-up of a car seatbelt with a yellow and white key inserted, showing no text or symbols.

natural_image
Close-up of a car dashboard with black buttons and a red indicator light, no visible text or symbols
natural_image
Black and white photo of a small industrial machine with open lid and wheels (no visible text or symbols)natural_image
Interior view of an electronic device showing a grid-like panel with labeled components (no readable text or symbols)natural_image
Interior view of a vehicle battery pack with labeled components (no text or symbols visible)natural_image
Close-up of a dark metal vehicle's side panel with a tire and attached cable, no visible text or symbols1 C h e i e
2 İnveliş lateral
natural_image
Interior view of a stainless steel industrial chamber with visible structural lines and internal components (no text or symbols)natural_image
Diagram of a layered structure with an upward arrow, no text or symbols presentnatural_image
Close-up of a mechanical device with labeled parts (③ and ⑫), no readable text or symbols beyond labelsnatural_image
Close-up of a vehicle's control panel with buttons and a red indicator light (no readable text or symbols)natural_image
Technical diagram of a mechanical device with labeled components and an arrow indicating rotation (no text or symbols present)natural_image
Close-up of a metallic rack with slatted metal frame and two numbered measurement lines (no text or symbols)1 Bare de încărcare
2 Filtru de praf
Directive UE respectate:
2006/42/CE (+2009/127/CE)
2014/30/UE
2000/14/CE
Norme armonizate utilize:
EN 60335-1
EN 60335-2-72
EN 55012: 2007 + A1: 2009
EN 61000-6-2: 2005
EN 62233: 2008
71364 Winnenden (Germany)
Tel.: +49 7195 14-0
Fax: +49 7195 14-2212
Winnenden, 2018/10/01
natural_image
Close-up of a car seatbelt with a yellow key inserted, showing no text or symbols on the main subject.

1 Páka prestavenia sedadla
2 Sedadlo vodiča
→ Páku prestavenia sedadla vytiahnite smerom von.
→ Posuňte sedadlo, uvoľnite páku a ne-
chajte ju zapadnút na svoje miesto.
natural_image
Close-up of a car's front panel with buttons and a white arrow pointing to a red button (no text or symbols visible)→ Zapnút dúchadlá.

natural_image
Exterior view of a black industrial machine with wheels and a mounted top component (no visible text or symbols)→ Nadvihnutie zametacieho valca a bočnej metly ovládacími pákami: Ovládacia páka 1 do stredu a ovládacia páka 3 dopredu.
→ Uzavrite klapku nádoby, k tomu obslužnú páku (4) dozadu.
Zdvihnite nádobu na smeti, k tomu obslužnú páku nádoby na smeti (2) doza-du.
→ Pomaly sa presuňte ku zbernej nádobe.
→ Zatiahnite ručnú parkovaciu brzdu.
→ Otvorte klapu nádoby, k tomu zatlačte obslužnú páku klapky nádoby (4) dopredu a vyprázdnite nádobu na smeti.
→ Uzavrite klapku nádoby, k tomu t'ahajte obslužnú páku klapky nádoby (4) doza- du, kým sa nezablokuje v koncovej po- lohe.
→ Povol'te parkovaciu brzdu.
→ Pomaly sa vzdial'te od zbernej nádoby.
→ Spustite nádobu na smeti do koncovej polohy, k tomu obslužnú páku nádoby na smeti (2) dopredu.
Vypnutie prístroja
natural_image
Interior view of an electronic device showing a grid of battery cells with labeled components (no readable text or symbols)1 Póly batérie - v smere jazdy vlavo
2 Priečka
natural_image
Interior view of a vehicle battery pack with labeled components (no text or symbols visible)natural_image
Close-up of a dark vehicle's side panel with visible bolts and a tire, no text or symbols present1 K I ú č
2 Bočný plášť
natural_image
Interior view of a stainless steel enclosure with visible structural lines and ventilation ducts (no text or symbols)natural_image
Diagram of a layered structure with a blue upward arrow, no text or symbols presentnatural_image
Interior view of a mechanical device with labeled parts (③ and ⑫), showing internal components like a handle, clip, and bracket (no readable text or symbols)1 Uzáver krytu zariadenia
2 Kryt pristroja
3 Kryt filtra
natural_image
Technical diagram of a mechanical housing component with labeled parts (1 and 2), showing internal components and an arrow indicating rotation or movement (no text or symbols beyond labels)1 Uzáver, kryt filtra (2x)
2 Kryt filtra
→ Otvorte uzáver.
→ Otvorte kryt filtra.
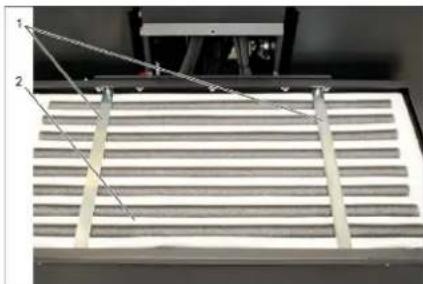
natural_image
Close-up of a metallic panel with slatted structure and two labeled points (1 and 2), no visible text or symbols.2006/42/ES (+2009/127/ES)
2014/30/EÚ
2000/14/ES
Uplatňované harmonizované normy:
EN 60335-1
EN 60335-2-72
EN 55012: 2007 + A1: 2009
EN 61000-6-2: 2005
EN 62233: 2008

Chairman of the Board of Management

Director Regulatory Affairs & Certification
71364 Winnenden (Germany)
Tel.: +49 7195 14-0
Fax: +49 7195 14-2212
Winnenden, 2018/10/01
Pomoc pri poruchách
www.kaercher.com/REACH
Jamstvo
natural_image
Close-up of a car seatbelt with a yellow and white key inserted, showing no text or symbols.

Slika stroja za metenje Komandno polje
Slika A
1 Natpisna pločica
2 Sjedalo (s kontaktnim prekidačem)
3 Upravljač
17 Akumulatorski set
(samo kod KM 120/250 R Bp Pack u opsegu isporuke)
Slika B
natural_image
Close-up of a vehicle's front panel with buttons and a white arrow pointing to a red button (no readable text or symbols)
natural_image
Exterior view of a black industrial machine with wheels and a mounted top component (no visible text or symbols)→ Podignite valjak za metenje i bočnu metlu upravljačkim polugama: Upravljačka poluga 1 u sredinu i upravljačka poluga 3 prema naprijed.
→ Zatvorite poklopac spremnika pomicanjem upravljačke poluge (4) unatrag.
→ Podignite spremnik nakupljene prljavštine pomicanjem upravljačke poluge (2) unatrag.
→ Polako dovezite uređaj do sabirne posude.
→ Zakočite pozicijsku kočnicu.
→ Otvorite poklopac spremnika tako što ćete upravljačku polugu (4) pritisnuti unaprijed i ispraznite spremnik nakupljene prljavštine.
→ Zatvorite poklopac spremnika tako što ćete upravljačku polugu (4) povući unatrag tako da se zakrene u krajnji položaj.
→ Otpustite pozicijsku kočnicu.
→ Polako udaljite uređaj od sabirne posu-
de.
→ Spustite spremnik nakupljene prljavšti ne u krajnji položaj pomicanjem upravljačke poluge (2) unaprijed.
natural_image
Interior view of an electronic device showing a grid of connected components and wiring (no visible text or symbols)natural_image
Interior view of a vehicle battery assembly with numbered components (no visible text or symbols)1 Spremnik za hidrauličko ulje
2 Kontrolno okno
3 Poklopac otvora za ulijevanje ulja
→ Na kontrolnom oknu provjerite razinu hidrauličkog ulja.
– Razina ulja se mora nalaziti između oznaka "MIN" i "MAX".
– Dopunite hidrauličko ulje, ako njegova razina padne ispod oznake "MIN".
→ Odvijte poklopac otvora za ulijevanje ulja.
→ Očistite prostor za punjenje.
→ Dopunite hidrauličko ulje.
Za vrstu ulja pogledajte tehničke podat- ke
natural_image
Close-up of a dark vehicle's side panel with two labeled parts (1 and 2), showing bolted components and a tire (no readable text or symbols)1 Ključ
2 Bočna oplata
→ Podignite spremnik za prljavštinu i osigurajte ga sigurnosnom polugom.
→ Otvorite bočnu oplatu ključem.
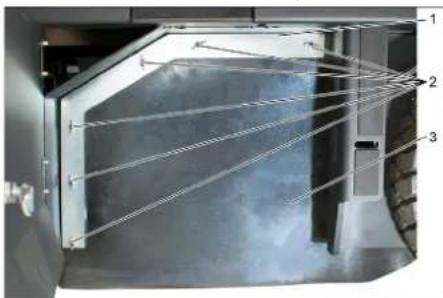
natural_image
Interior view of a stainless steel enclosure with visible ductwork and internal structure (no text or symbols)1 Pričvrsni luk
2 Leptir matica
3 Bočna brtva
→ Odvijte leptir matice.
→ Skinite pričvrsni luk.
→ Bočnu brtvu preklopite prema van.
→ Odvijte pričvrsni vijak prihvatnika valjka za metenje pa zakrenite prihvatnik prema van.
→ Izvadite valjak za metenje.

natural_image
Diagram of a layered structure with an upward arrow, no text or symbols presentnatural_image
Close-up of a mechanical device with labeled parts (③ and ⑫), no readable text or symbols beyond labels→ Odvrnite vijak graničnika za naknadno namještanje istrošenosti (12) i namje-stite ga.
natural_image
Technical diagram of a mechanical assembly with labeled components and an arrow indicating rotation (no text or symbols present)1 Zatvarač, poklopac filtra (2x)
2 Poklopac filtra
→ Otvorite zatvarač.
→ Otvorite poklopac filtra.
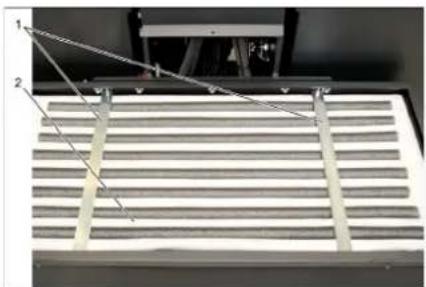
natural_image
Close-up of a mechanical component with three labeled parts (1, 2, 3) and diagonal lines, no visible text or symbols.1 Poprečni držač
2 Filtar za prašinu
→ Provjerite filtar za prašinu, po potrebi ga očistite ili zamijenite.
Napomena
Filtar za prašinu smije mijenjati samo servisna služba poduzeća Kärcher.
→ Postavite i pričvrstite poklopac filtra.
Zamjena žarulja prednjeg svjetla (opcija)
2006/42/EZ (+2009/127/EZ)
2014/30/EU
2000/14/EZ
Primijenjene uskladene norme:
EN 60335-1
EN 60335-2-72
EN 55012: 2007 + A1: 2009
EN 61000-6-2:2005
EN 62233: 2008
Director Regulatory Affairs & Certification
Opunomoćeni za izradu dokumentacije: S. Reiser
Alfred Kärcher SE & Co. KG
71364 Winnenden (Germany)
Tel.: +49 7195 14-0
Fax: +49 7195 14-2212
Winnenden, 2018/10/01
Otklanjanje smetnji
www.kaercher.com/REACH
Garancija
U svakoj zemlji važe garantni uslovi koje je izdala naša nadležna distributivna organizacija. Eventualne smetnje na uređaju za vreme trajanja garancije uklanjamo besplatno, ukoliko je uzrok greška u materijalu ili proizvodnji. U slučaju koji podleže garanciji obratite se sa potvrdom o kupovini Vašem prodavcu ili najbližoj ovlašćenoj servisnoj službi.
Pribor i rezervni delovi
⚠ OPASNOST
U cilju sprečavanja opasnosti, popravke i ugradnju rezervnih delova sme izvoditi samo ovlašćena servisna služba.
natural_image
Close-up of a car seatbelt with a yellow and white key inserted, showing no text or symbols.
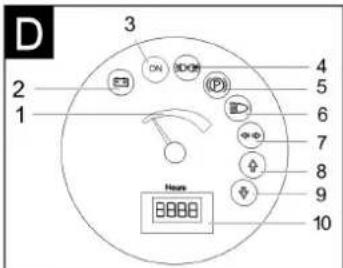
Slika uređaja za metenje Komandno polje
Slika A
1 Natpisna pločica
17 Akumulatorski set
(samo kod KM 120/250 R Bp pakovanje u obimu isporuke)
Slika B
1 Poluga za rukovanje valjkom za metenje i bočnom metlom
Poluga prema napred: valjak za metenje uključen i bočna metla se spušta i uključena.
Poluga prema nazad: valjak za metenje uključen
2 Upravljačka poluga posude za nakupljenu prljavštinu Podizanje i spuštanje posude za prljavštinu
3 Poluga za rukovanje valjkom za metenje
Podizanje i spuštanje valjka za metenje
4 Upravljačka poluga poklopca posude
Otvaranje i zatvaranje poklopca posude
5 Indikatori i ekran
6 Prekidač ventilatora i dela za čišćenje filtera
Položaj u sredini: Deo za čišćenje filtera i ventilator su isključeni
Položaj pozadi: Ventilator je uključen
Položaj napred: Deo za čišćenje filtera je uključen
7 Prekidač sirene
8 Osigurači
9 Kontaktna brava
Položaj 0: Isključivanje motora
Položaj 1: Paljenje
Položaj 2: Pokretanje motora
10 Poluga za izbor smera vožnje
11 Poziciona (ručna) kočnica
12 Naknadno podešavanje habanja/ podešavanje profila metenja valjka za metenje
13 Akumulatorski utikač
Pedala
Slika C
1 Kočna pedala
2 Vozna pedala
Indikatori i ekran
Slika D
1 Kapacitet akumulatora
2 Indikator punjenja akumulatora
3 Indikator radnog stanja
4 Indikator parking svetla
5 Indikator (nije priključen)
6 Indikator spuštenih farova
7 Indikator (nije priključen)
8 Indikator vožnje unapred
9 Indikator vožnje unazad
1 Poluga za rukovanje valjkom za metenje i bočnom metlom
natural_image
Close-up of a vehicle's front panel with switches and buttons, no visible text or symbols→ Uključite ventilatore.
Prilikom površinskog čišćenja: Poluga za rukovanje valjkom za metenje i bočnom metlom (1) prema nazad: valjak za metenje uključen. Poluga za rukovanje valjkom za metenje (3) prema nazad: valjak za metenje se spušta.
→ Upravljačka poluga poklopca posude (4) unapred: Poklopac posude se otvara.
→ Prilikom čišćenja bočnih ivica: Poluga za rukovanje valjkom za metenje i bočnom metlom (1) prema napred: valjak za metenje uključen, bočna metla uključena i spušta se. Poluga za rukovanje valjkom za metenje (3) prema nazad: valjak za metenje se spušta.
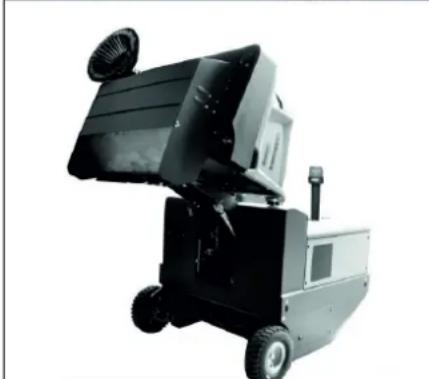
natural_image
Black industrial machine with open lid and wheels, no visible text or symbols→ Podignuti valjak za metenje i bočnu metlu pomoću poluga za rukovanje: Poluga za rukovanje 1 na sredinu, a poluga za rukovanje 3 prema napred.
→ Da zatvorite poklopac posude upravljačku polugu (4) pomerite unazad.
→ Da podignete posudu za nakupljenu prljavštinu upravljačku polugu (2) pomerite unazad.
→ Polako navezite uređaj do sabirne posude.
→ Zakočite pozicionu kočnicu.
→ Otvorite poklopac posude tako što ćete upravljačku polugu (4) pritisnuti unapred i isprazniti posudu za nakupljenu prljavštinu.
→ Da zatvorite poklopac posude upravljačku polugu (4) povucite unazad tako da se zakrene u krajnji položaj.
→ Otkočite pozicionu kočnicu.
→ Polako udaljite uređaj od sabirne posude.
→ Spustite posudu za nakupljenu prljavštinu u krajnji položaj tako što ćete upravljačku polugu (2) pomeriti unapred.
natural_image
Interior view of an electronic device showing a grid of battery modules with labeled components (no readable text or symbols)1 Polovi baterije - sa leve strane u smeru vožnje
2 Poprečni držač
→ Prilikom demontiranja akumulatora pazite na to da se prvo odvoji kabl sa minus pola.
→ Uže krana pričvrstite na 4 ušice kompletnog akumulatorskog seta pa pažljivo izvadite akumulatore.
Provera nivoa kočne tečnosti i dopuna
△OPASNOST
Opasnost od povreda!
→ Uvek postavite sigurnosnu polugu kada je posuda za nakupljenu prljavštinu podignuta.
→ Osiguranje izvedite samo izvan oblasti opasnosti.
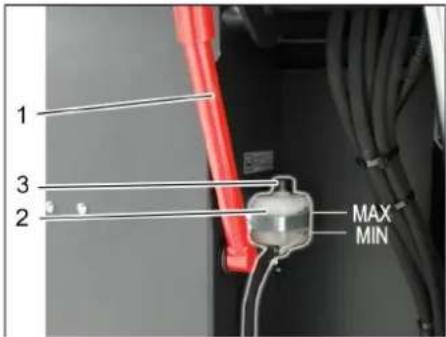
1 Držač sigurnosne poluge
natural_image
Interior view of a vehicle's internal components, showing battery, motors, and wiring (no text or symbols visible)natural_image
Close-up of a dark vehicle's side panel with two labeled parts (1 and 2), showing no visible text or symbols.1 Ključ
2 Bočna oplata
→ Podignite posudu za nakupljenu prljavštinu i poduprite je sigurnosnom polugom.
→ Ključem otvorite bočnu oplatu.
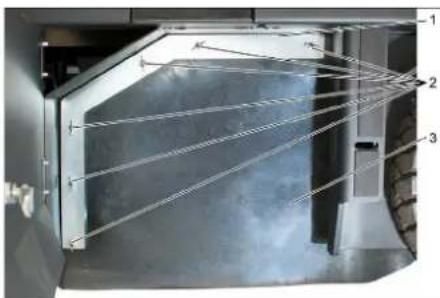
natural_image
Interior view of a vehicle showing structural components and airflow lines (no text or symbols)natural_image
Diagram of a layered structure with an upward arrow, no text or symbols presentPoložaj ugradnje valjka za metenje u smeru vožnje (pogled odozgo)
Napomena: Pri ugradnji novog valjka za metenje pazite na položaj garniture čekinja.
→ Ugradite novi valjak za metenje. Žlebovi valjaka za metenje moraju biti nataknuti na ispuste naspramnih držača.
Napomena: Nakon ugradnje novog valjka za metenje mora se iznova podesiti profil metenja.
Provera i podešavanje profila metenja valjka za metenje
Napomena: Profil metenja je fabrički podešen na 80 mm, a u slučaju istrošenosti valjka za metenje se može kontinualno podesiti.
→ Proverite pritisak vazduha u gumama.
→ Isključite usisni ventilator.
→ Uređaj za metenje odvezite na ravnu i glatku površinu koja je vidljivo prekrivena prašinom ili izmrvljenom kredom.
→ Poluga za rukovanje valjkom za metenje i bočnom metlom (1) prema nazad: valjak za metenje uključen. Poluga za rukovanje valjkom za metenje (3) prema nazad: valjak za metenje se spušta.
→ Valjak za metenje ostaviti da radi na oko 10 sekundi.
→ Poluga za rukovanje valjkom za metenje i bočnom metlom (1) na sredini.
Poluga za rukovanje valjkom za metenje (3) prema napred: valjak za metenje se podiže.
→ Odignite posudu za nakupljenu prljavštinu.
→ Pomerite uređaj vozeći ga unazad.
→ Proverite profil metenja.
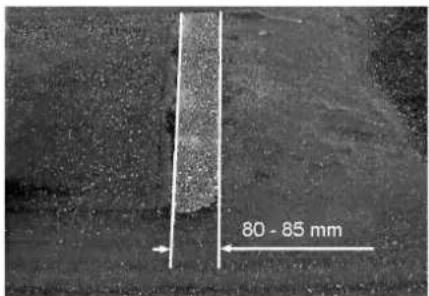
Pometena površina treba da ima oblik pravilnog pravougaonika širine između 80 i 85 mm.
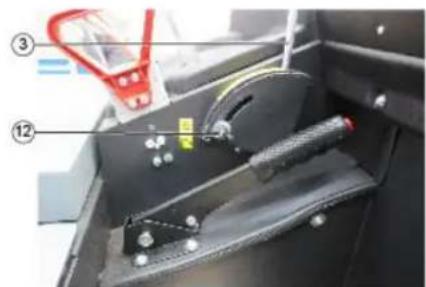
natural_image
Close-up of a mechanical device with labeled parts (③ and ⑫), showing internal components and no readable text or symbols.→ Otvoriti i podesiti granični zavrtanj naknadnog podešavanja habanja (12). Graničnik prema gore: uži profil metenja.
Graničnik prema dole: širi profil metenja.
→ Ponovo čvrsto pritegnuti granični zavrtanj.
→ Ponovo proveriti profil metenja valjka za metenje kao što je već opisano.
Provera i podešavanje profila metenja bočne metle
→ Podignite bočnu metlu.
→ Uređaj za metenje odvezite na ravnu i glatku površinu koja je vidljivo prekrivena prašinom ili izmrvljenom kredom.
→ Bočnu metlu sa polugom za rukovanje spustiti i ostaviti da radi oko 10 sekundi.
→ Podignite bočnu metlu.
→ Pomerite uređaj vozeći ga unazad.
→ Proverite profil metenja.
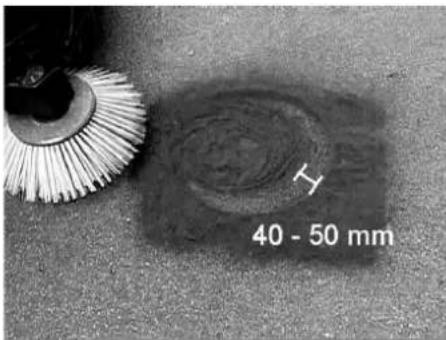
1 Blokada poklopca uređaja
2 Poklopac uređaja
3 Poklopac filtera
1 Zatvarač, poklopac filtera (2x)
2 Poklopac filtera
→ Otvorite zatvarač.
→ Otvorite poklopac filtera.
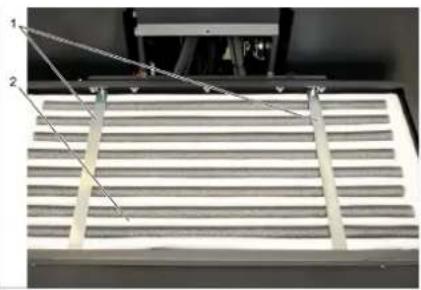
natural_image
Close-up of a metallic rack with two labeled components (1 and 2), no visible text or symbols on the rack itself.1 Poprečni držač
2 Filter za prašinu
→ Proverite filter za prašinu, po potrebi ga očistite ili zamenite.
Napomena
Filter za prašinu sme da menja samo servisna služba kompanije Kärcher.
→ Postavite i pričvrstite poklopac filtera.
Zamena sijalice prednjeg fara (opcija)
→ Odvijte prednji far.
→ Izvadite far i izvucite utikače.
Napomena: Pazite na položaje utikača.
→ Rastavite prednji far.
→ Razvucite i izvadite kućište prednjeg fara držeći ga pritom vodoravno, budući da lampa nije pričvršćena.
→ Otkačite blokirnu kuku i izvadite sijalicu.
→ Stavite novu sijalicu.
→ Sastavite uređaj obrnutim redosledom.
Zamena sijalice migavca (opcija)
Napomena: Da biste zamenili sijalicu migavca, skinite staklo migavca s kućišta.
Zamena osigurača
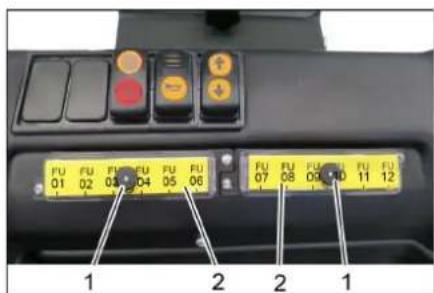
2006/42/EZ (+2009/127/EZ)
2014/30/EU
2000/14/EZ
Primenjene uskladene norme:
EN 60335-1
EN 60335-2-72
EN 55012: 2007 + A1: 2009
EN 61000-6-2: 2005
EN 62233: 2008
71364 Winnenden (Germany)
Tel.: +49 7195 14-0
Fax: +49 7195 14-2212
Winnenden, 2018/10/01
Otklanjanje smetnji
| Smetnja Otklanjanje | |
| Uređaj se ne kreće ili vozi sasvim polako. | Sedite na sedište vozača, kontaktni prekidača sedišta vozača se aktivira. |
| Osigurač voznog motora FU 13 treba da proveri servisna služba | |
| Punjenje ili zamena akumulatora | |
| Otkočite pozicionu kočnicu | |
| Proverite da nema upletenih traka ili petlji. | |
| Obavestite Kärcher servisnu službu. | |
| Pišteći zvuk u hidraulici Sipajte hidrauličku tečnost | |
| Četke se vrte polako ili se uopšte ne vrte | Proverite da nema upletenih traka ili petlji. |
| Obavestite Kärcher servisnu službu. | |
| U prostoru četki je usisna snaga mala ili je uopšte nema | Čišćenje filtera |
| Obavestite Kärcher servisnu službu. | |
| Uređaj diže prašinu Podešavanje bočnih zaptivki | |
| Jedinica za čišćenje ostavlja prljavštinu da leži | Ispraznite posudu za nakupljenu prljavštinu |
| Očistite filter za prašinu | |
| Zamenite filterske zaptivke | |
| Obavestite Kärcher servisnu službu. | |
| Posuda za prljavštinu ne može da se podigne ili spusti | Proverite osigurače. |
| Ukloniti saigurnosni podupirač sa posude za nakupljenu prljavštinu | |
| Obavestite Kärcher servisnu službu. | |
| Posuda za prljavštinu se vrti presporo ili se uopšte ne vrti | Obavestite Kärcher servisnu službu. |
| Smetnje u radu s hidrauličkim pokretnim delovima | Obavestite Kärcher servisnu službu. |
Tehnički podaci
| KM 120/250 R Bp KM 120/250 R Bp Pack | |||
| Podaci uređaja | |||
| Brzina vožnje prema napred km/h 6 6 | |||
| Brzina vožnje unazad km/h 3 3 | |||
| Savladavanje uspona (maks.) -- 14% 14% | |||
| Površinski učinak bez bočnih metli m | ^2/h 5400 5400 | ||
| Površinski učinak sa 1 bočnom metlom | m^2/h 7200 7200 | ||
| Radna širina bez bočne metle | mm | 900 | 900 |
| Radna širina sa 1 bočnom metlom | mm | 1200 1200 | |
| Stepen zaštite, zaštićeno od kapajuće vode | -- | IPX 3 | IPX 3 |
| Trajanje primene pri napunjenom akumulatoru h | -- 3,5 | ||
| Električne komponente | |||
| Kapacitet akumulatora | V, Ah | -- 36, 360 | |
| Akumulatorski set | kg | -- 450 | |
| Hidrauličke komponente | |||
| Količina ulja u kompletnom hidrauličkom sklopu | I | 25 | 25 |
| Količina ulja u hidrauličkom rezervoaru | I | 20,5 | 20,5 |
| Tip hidrauličkog ulja | -- HV 46 | HV 46 | |
| Posuda za nakupljenu prljavštinu | |||
| Maksimalna visina pražnjenja mm 1400 1400 | |||
| Zapremina posude za prljavštinu l 250 250 | |||
| Valjak za metenje | |||
| Prečnik valjka za metenje mm 300 300 | |||
| Širina valjka za metenje mm 900 900 | |||
| Broj obrtaja 1/min 325 325 | |||
| Profil metenja mm 80 80 | |||
| Bočna metla | |||
| Prečnik bočnih metli mm 600 600 | |||
| Broj obrtaja (kontinualno) 1/min 61 61 | |||
| Pneumatici od pune gume | |||
| Veličina napred -- 15-4,5 x 8 15-4,5 x 8 | |||
| Veličina pozadi | -- 15-4,5 x 8 | 15-4,5 x 8 | |
| Kočnica | |||
| Prednji točkovi | -- mehanička | mehanička | |
| Zadnji točak | -- Električno | Električno | |
| Filterski i usisni sistem | |||
| Tip | -- Vrećasti filter | Vrećasti filter | |
| Broj obrtaja 1/min 2800 | 2800 | ||
| Površina filtera za finu prašinu | m^2 | 6,0 | 6,0 |
| Nominalni podpritisak usisnog sistema | mbar | 15,5 | 15,5 |
| Nominalni zapreminski protok usisnog sistema | m^3/h | 800 800 | |
| Vibracioni sistem | -- Elektromotor | Elektromotor | |
| Okolni uslovi | |||
| Temperatura | °C | -5 do +40 | -5 do +40 |
| Vlažnost vazduha, bez stvaranja kondenzata | % | 0 - 90 | 0 - 90 |
| Izračunate vrednosti prema EN 60335-2-72 | |||
| Emisija buke | |||
| Nivo zvučnog pritiska L_pA | dB(A) | 70 70 | |
| Nepouzdanost K_pA | dB(A) | 3 | 3 |
| Nivo zvučne snage L_wA + nepouzdanost K_wA | dB(A) | 90 90 | |
| Vibracije uređaja | |||
| Vrednost vibracije na ruci | m/s^2 | 0,7 | 0,7 |
| Sedište | m/s^2 | 0,5 | 0,5 |
| Nepouzdanost K | m/s^2 | 0,1 | 0,1 |
| Dimenzije i težine | |||
| Dužina x širina x visina | mm | 2082x1250x1450 | 2082x1250x1450 |
| Poluprečnik okretanja udesno | mm 1350 | 1350 | |
| Poluprečnik okretanja ulevo | mm 1350 | 1350 | |
| Prazna težina (bez/sa akumulatorom) | kg | 750/1200 | 750/1200 |
| Dozvoljena ukupna težina | kg | 1620 | 1620 |
| Dozvoljeno opterećenje prednje osovine | kg | 797 797 | |
| Dozvoljeno opterećenje zadnje osovine | kg | 823 | 823 |
| Zadržavamo pravo na tehničke promene! | |||
| Общи указания. . . . . . . . . . . . . . . . . . . . . . . . . . . . . . . . . . . . . . . . . . . . . . . . . . . . . . . . . . . . . . . . . . . . . . . . . . . . . . . . . . . . . . . . . . . . . . . . . . . . . |
| Опазване на околната средаBG 1 |
| Гаранция. . . . . . . . . . . . . . . . . . . . . . . . . . . . . . . . . . . . . . . . . . . . . . . . . . . . . . . . . . . . . . . . . . . . . . . . . . . . . . . . . . . . . . . . . . . . . . . . . . . |
| Употреба по предназначение BG 2 |
| Предвидима грешна употреба. . . . . . . . . . . . . . . . . . . . . . . . . . . . . . . . . . . . . . . . . . . . . . . . . . . . . . . . . . . . . . . . . . . . . . . . . . . . . . . . . . . . . . . . . . . . . . . . . . . . . |
| Подходящи настилки . . . BG 2 |
www.kaercher.com/REACH
Гаранция
natural_image
Close-up of a car's key inserted into a yellow-lit lock on a black interior (no text or symbols visible)

natural_image
Close-up of a car's front panel with buttons and a white arrow pointing to one (no readable text or symbols)
natural_image
Exterior view of a black and silver industrial machine with wheels and a fan (no visible text or symbols)natural_image
Interior view of an electronic device showing a grid-like panel with labeled components (no readable text or symbols)natural_image
Interior view of a mechanical or electronic device with labeled components (no readable text or symbols)natural_image
Close-up of a dark vehicle's side panel with visible bolts and a tire, no text or symbols present1 Ключ
natural_image
Interior view of a stainless steel enclosure with visible structural lines and ventilation duct (no text or symbols)natural_image
Abstract geometric pattern with layered chevron shapes and a blue upward arrow (no text or symbols)natural_image
Close-up of a mechanical device with labeled parts (③ and ⑫), showing internal components like a handle, spring, and lever mechanism (no readable text or symbols)natural_image
Close-up of a vehicle's control panel with buttons and a red indicator light, no visible text or symbols1 Блокировка на капака на уреда
2 Капак на уреда
3 Капак на филтъра
natural_image
Technical diagram of a mechanical housing or enclosure with labeled components and an arrow indicating rotation (no text or symbols present)natural_image
Close-up of a metallic rack with slats and metal supports, no visible text or symbols71364 Winnenden (Germany)
Tel.: +49 7195 14-0
Fax: +49 7195 14-2212
Winnenden, 2018/10/01
www.kaercher.com/REACH
Garantii
natural_image
Close-up of a car seatbelt with a yellow and white key inserted, showing no text or symbols.

1 Istme reguleerimishoob
2 Juhiiste
natural_image
Close-up of a vehicle's front panel with black buttons and a red indicator light, no visible text or symbols→ Lülitage ventilaator sisse.
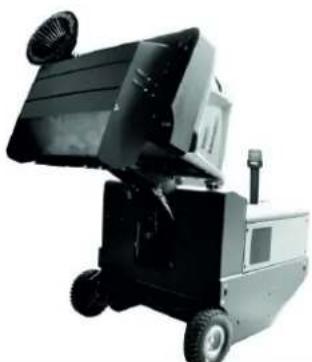
natural_image
Exterior view of a black industrial machine with wheels and a mounted top component (no visible text or symbols)natural_image
Interior view of an electronic device showing a grid of battery cells with labeled components (no readable text or symbols)1 Kinnituslati hoidik 2 Pidurivedeliku mahuti 3 Lukustatav kaas
natural_image
Interior view of a vehicle battery pack with labeled components (no text or symbols visible)natural_image
Close-up of a dark vehicle's side panel with bolt holes and a tire, no visible text or symbolsnatural_image
Interior view of a room with glass walls and ceiling-mounted equipment, no visible text or symbolsnatural_image
Abstract geometric pattern with layered chevron shapes and a blue upward arrow (no text or symbols)natural_image
Interior view of a vehicle chassis with labeled parts (③ and ⑫), showing mechanical components and wiring (no readable text or symbols)1 Kinnituslati hoidik 2 Kinnituslatt
1 Seadme katte lukk
2 Seadme kate
3 Fil tri k a te
→ Avage lukk. Selleks keerake tähtkruvi välia.
→ Keerake seadme kate ette.
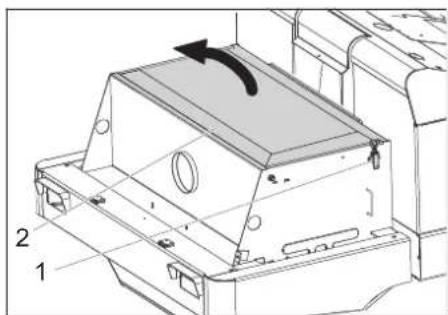
natural_image
Technical line drawing of a mechanical housing component with labeled parts (1 and 2), showing internal components and an arrow indicating rotation or movement (no text or symbols beyond labels)1 Lukk, filtrikate (2x)
2 Fil tri k a te
→ Avage lukk.
→ Avage filtrikate.
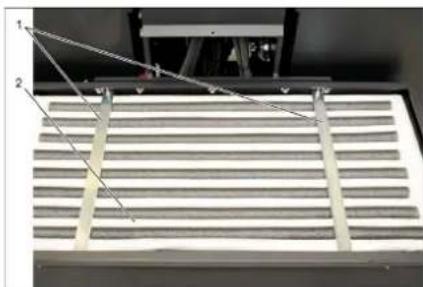
natural_image
Interior view of a server rack with two labeled components (1 and 2), showing no visible text or symbols.1 Risttoed
2 Tolmufilter
Toode: Imur-pühkija istmega

Chairman of the Board of Management

Director Regulatory Affairs & Certification
71364 Winnenden (Germany)
Tel.: +49 7195 14-0
Fax: +49 7195 14-2212
Winnenden, 2018/10/01
Abi häirete korral
www.kaercher.com/REACH
Garantija
natural_image
Close-up of a car seatbelt with a yellow key inserted, showing no text or symbols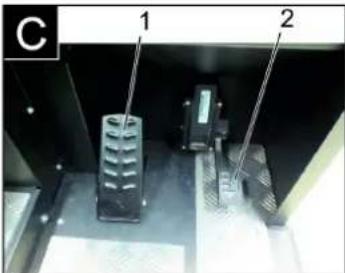


natural_image
Exterior view of a black industrial machine with wheels and a mounted sensor (no visible text or symbols)natural_image
Interior view of an electronic device showing a grid of battery cells with labeled components (no readable text or symbols)natural_image
Interior view of a vehicle battery assembly with labeled components (no text or symbols visible)natural_image
Close-up of a dark metal vehicle's side panel with a tire and a small object on the wheel (no visible text or symbols)1 Atslēga
2 Sānu apšuvums
natural_image
Interior view of a mechanical or industrial enclosure with visible structural lines and components (no text or symbols)natural_image
Abstract geometric pattern with diagonal stripes and a blue upward arrow (no text or symbols)natural_image
Interior view of a mechanical device with labeled parts (③ and ⑫), showing a lever mechanism and handle (no readable text or symbols)natural_image
Close-up of a vehicle's front panel with buttons and a red indicator light, no visible text or symbolsnatural_image
Technical line drawing of a mechanical housing component with labeled parts (1 and 2), showing internal components and an arrow indicating rotation or movement (no text or symbols beyond labels)natural_image
Close-up of a metallic grate with slatted top and two labeled points (1 and 2) pointing to the edge, no text or symbols present.1 Škērsspraišli
2 Puteklu filtrs

Chairman of the Board of Management

S. Reiser
Director Regulatory Affairs & Certification
71364 Winnenden (Germany)
Tel.: +49 7195 14-0
Fax: +49 7195 14-2212
Winnenden, 2018/10/01
www.kaercher.com/REACH
Garantija
natural_image
Close-up of a car seatbelt with a yellow and white key inserted, showing no text or symbols.

→ ljunkite orpūte.
→ Valant plotus:

natural_image
Black and white photo of a small industrial machine with wheels and a mounted fan (no visible text or symbols)natural_image
Interior view of an industrial battery pack with labeled components (no readable text or symbols)natural_image
Interior view of a mechanical or electronic device with labeled components (no readable text or symbols)natural_image
Close-up of a dark metal vehicle's side panel with a tire and a small object, no visible text or symbols1 R a k t a s
2 Šoninė uždanga
natural_image
Interior view of a laboratory or industrial facility with numbered components and connecting lines (no visible text or symbols)1 Kronšteinas
natural_image
Abstract geometric pattern with layered triangular shapes and a blue upward arrow (no text or symbols)natural_image
Interior view of a mechanical device with labeled parts (③ and ⑫), showing a handle, cable, and housing (no readable text or symbols)1 Prietaiso gaubto fiksatorius
2 Prietaiso gaubtas
3 Filtro dangtelis
natural_image
Technical line drawing of a mechanical component with labeled parts and an arrow indicating rotation (no text or symbols present)1 Filtro dangtelio fiksatorius (2x)
2 Filtro dangtelis
→ Atidarykite fiksatorius.
→ Atidarykite filtro dangtelj.
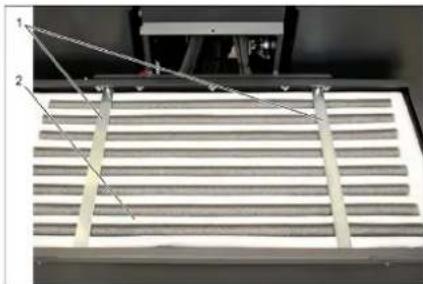
natural_image
Close-up of a slatted metal grate with two labeled measurement points (1 and 2) and diagonal lines indicating measurement direction (no text or symbols on the grate itself)1 Jstrižinė traukė
2 Dulkių filtras

Chairman of the Board of Management
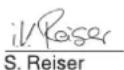
Director Regulatory Affairs & Certification
71364 Winnenden (Germany)
Tel.: +49 7195 14-0
Fax: +49 7195 14-2212
Winnenden, 2018/10/01
www.kaercher.com/REACH
Гарантія
natural_image
Close-up of a car seatbelt with a yellow key inserted, showing no text or symbols on the main subject.

natural_image
Close-up of a car's front panel with buttons and indicators (no readable text or symbols)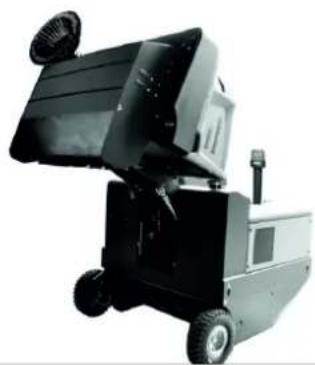
natural_image
Black and white industrial machine with wheels and a handle (no visible text or symbols)natural_image
Interior view of an electronic device showing a grid of battery cells with labeled components (no readable text or symbols)natural_image
Interior view of a vehicle battery pack with labeled components (no text or symbols visible)natural_image
Close-up of a dark metal panel with bolt holes and a circular object on the side (no visible text or symbols)natural_image
Interior view of a laboratory or industrial facility with metal beams and structural supports (no visible text or symbols)natural_image
Diagram of a layered structure with an upward-pointing arrow, no text or symbols presentnatural_image
Close-up of a mechanical device with labeled parts (③ and ⑫), no readable text or symbols beyond labelsnatural_image
Technical diagram of a mechanical component with two labeled parts (1 and 2), showing internal structure and alignment lines (no text or symbols beyond labels)
Chairman of the Board of Management

71364 Winnenden (Germany)
Tel.: +49 7195 14-0
Fax: +49 7195 14-2212
Winnenden, 2018/10/01
www.kaercher.com/REACH
质量保证
natural_image
Close-up of a car seatbelt with a yellow and white key inserted, showing no text or symbols.

清扫机图片 操作区
图A
1 铭牌
2 座位(带座位接触开关)
3 方向盘
4 设备外罩锁定装置
5 设备罩
6 右部侧刷
7 前轮
8 消扫辊入口
9 固定拖拉点
10 旋转警示灯
11 右侧护盖
12 右侧保护盖
13 尾板
14 驱动轮
15 左侧保护盖
16 左侧护盖 (发动机盖)
17 电池组
1 座位调整杆
2 驾驶员座位
1 行驶方向向前
2 向后的行驶方向
前行
1 扫辊和侧刷操作杆
2 清扫垃圾箱操作杆
3 扫辊操作杆
4 垃圾箱盖操作杆
扫辊和侧刷操作杆
natural_image
Close-up of a vehicle's front panel with buttons and a white arrow pointing to a red button (no text or symbols visible)→ 开启鼓风机。
→ 清扫平面时:
扫辊和侧刷操作杆(1)向后:扫辊启动。
扫辊操作杆(3)向后:扫辊降下。
natural_image
Exterior view of a black industrial machine with open lid and wheels (no visible text or symbols)natural_image
Interior view of an electronic device showing a grid-like panel with labeled components (no readable text or symbols)1 电池电极 - 沿左侧行驶方向
2 横杆
1 保险杠支架
2 刹车液容器
3 封盖
natural_image
Interior view of a mechanical or electronic device with labeled components (no readable text or symbols)1 液压油箱
2 观察视窗
3 封盖、加油口
→ 在观察视窗中检查液压油位。
natural_image
Close-up of a dark vehicle's side panel with a tire and a small mechanical component, no visible text or symbols1 钥匙
2 侧板
natural_image
Interior view of a mechanical or industrial enclosure with visible structural lines and internal components (no text or symbols)1 固定架
2 蝶形螺母
3 侧面密封板
→ 旋开固定架螺母。
→ 取下固定架。
→ 向外翻开侧面密封板。
natural_image
Abstract geometric pattern with diagonal stripes and a blue upward arrow (no text or symbols)natural_image
Close-up of a mechanical device with labeled parts (③ and ⑫), no readable text or symbols beyond labelsnatural_image
Close-up of a car dashboard with black buttons and a red indicator light, no visible text or symbols→ 开启手动过滤器清洁。
检查 / 更换灰尘过滤器
警告
受伤危险
1 设备外罩锁定装置
2 设备罩
3 过滤器盖
natural_image
Technical line drawing of a mechanical component with labeled parts (1, 2) and an arrow indicating rotation or movement (no text or symbols beyond labels)1 栓,过滤器盖(2x)
2 过滤器盖
→ 打开搭扣。
→ 打开过滤器盖。
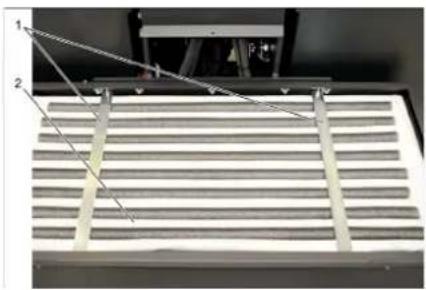
natural_image
Close-up of a metallic grate with two numbered components and connecting wires (no visible text or symbols)1 横架
2 灰尘过滤器

H. Jenner
Chairman of the Board of Management
S. Reiser
Director Regulatory Affairs & Certification
文档全权代表:
S. Reiser
Alfred Kärcher SE & Co. KG
71364 Winnenden (Germany)
Tel.: +49 7195 14-0
Fax: +49 7195 14-2212
Winnenden, 2018/10/01
故障排除
natural_image
Technical diagram of a mechanical housing or enclosure with labeled components and an arrow indicating rotation (no text or symbols present)natural_image
Close-up of a car's front panel with black buttons and a red button, no visible text or symbolsnatural_image
Close-up of a car's side panel with visible bolts and a tire, no text or symbols present1 المفتاح
2 كسوة جانية
natural_image
Close-up of a mechanical device with labeled parts (③ and ⑫), no readable text or symbols beyond labelsnatural_image
Interior view of a stainless steel industrial chamber with visible structural beams and metal components (no text or symbols)1 دعامة الشييت
natural_image
Diagram of a structural element with diagonal hatching and a blue upward arrow (no text or symbols)natural_image
Interior view of a mechanical or electronic device with visible components and wiring (no text or symbols)③
①
دروليكي 1
الزجاجية 2
الزيت ع
← بكي من
- مة الحد
The Ground Truth image displays a single, solid horizontal line. According to Rule 2 (UNDERSCORE & LINE RULES), this is a stylistic or background line, not a placeholder underscore. Therefore, the OCR result must ignore it. The provided OCR content is "____", which consists of four underscores. This is an incorrect interpretation of the line as a placeholder, violating the rule that stylistic lines must be ignored. The OCR has hallucinated underscores where none should exist based on the GT's visual context. Hence, the OCR result is inconsistent with the Ground Truth.
←
←
10
←
←
←
←
←النهاني;
←
←
natural_image
Interior view of an electronic device showing a grid-like panel with labeled components (no readable text or symbols)m = 311
نقل الجهاز
خطر ⚠
m = 311
التخزين/الإيقاف
خطر ⚠
natural_image
Two views of a vehicle's control panel and its corresponding industrial robotic device (no visible text or symbols)
natural_image
Close-up of a car's front panel with black buttons and yellow/red buttons, no visible text or symbols


←
←
←
←
←
←
←
←
←
←
←
←
←
←
←
←
←
←
←
←
1 ذراع ضبط المqedد
2 مqed Satisfaction
natural_image
Black silhouette of a hand giving a thumbs-up gesture (no text or symbols)THANK YOU!
MERCI! DANKE! iGRACIAS!
Registrieren Sie Ihr Produkt und profitieren Sie von vielen Vorteilen. Register your product and benefit from many advantages. Enregistrez votre produit et bénéficier de nombreux avantages. Registre su producto y aproveche de muchas ventajas.
www.kaercher.com/welcome

Bewerten Sie Ihr Produkt und sagen Sie uns Ihre Meinung. Rate your product and tell us your opinion. Évaluer votre produit et dites-nous votre opinion. Reseñe su producto y díganos su opinión.

natural_image
Icon showing a gear and wrench inside a square frame (no text or symbols)www.kaercher.com/dealersearch
Alfred Kärcher SE & Co. KG
Alfred-Kärcher-Str. 28-40
71364 Winnenden (Germany)
Tel.: +49 7195 14-0
Fax: +49 7195 14-2212