Max Power RY36CSX30B - Electric saw RYOBI - Free user manual and instructions
Find the device manual for free Max Power RY36CSX30B RYOBI in PDF.
User questions about Max Power RY36CSX30B RYOBI
0 question about this device. Answer the ones you know or ask your own.
Ask a new question about this device
Download the instructions for your Electric saw in PDF format for free! Find your manual Max Power RY36CSX30B - RYOBI and take your electronic device back in hand. On this page are published all the documents necessary for the use of your device. Max Power RY36CSX30B by RYOBI.
USER MANUAL Max Power RY36CSX30B RYOBI
Important! It is essential that you read the instructions in this manual before assembling, maintaining and operating the product.
Safety, performance, and dependability have been given top priority in the design of your cordless chainsaw.
INTENDED USE
The cordless chainsaw is intended for outdoor use only. For safety reasons, the product must be adequately controlled by using a two-handed operation at all times.
The product is designed for cutting branches, trunks, logs, and beams of a diameter determined by the cutting length of the guide bar. It is designed to cut wood only.
The product is to be used in domestic applications only by adults who have received adequate training on the hazards and preventative measures to be taken while using the product. It should not be used for professional tree services.
Do not use the product for any other purpose.
GENERAL POWER TOOL SAFETY WARNINGS
WARNING! Read all safety warnings, instructions, illustrations and specifications provided with this power tool. Failure to follow all instructions listed below may result in electric shock, fire, and/or serious injury.
Save all warnings and instructions for future reference. The term "power tool" in the warnings refers to your mains-operated (cored) power tool or battery-operated (cordless) power tool.
WORK AREA SAFETY
- Keep work area clean and well lit. Cluttered or dark areas invite accidents.
- Do not operate power tools in explosive atmospheres, such as in the presence of flammable liquids, gases or dust. Power tools create sparks which may ignite the dust or fumes.
- Keep children and bystanders away while operating a power tool. Distractions can cause you to lose control.
ELECTRICAL SAFETY
Power tool plugs must match the outlet. Never modify the plug in any way. Do not use any adapter plugs with earthed (grounded) power tools. Unmodified plugs and matching outlets will reduce risk of electric shock.
- Avoid body contact with earthed or grounded surfaces, such as pipes, radiators, ranges and refrigerators. There is an increased risk of electric shock if your body is earthed or grounded.
- Do not expose power tools to rain or wet conditions. Water entering a power tool will increase the risk of electric shock.
- Do not abuse the cord. Never use the cord for carrying, pulling or unplugging the power tool. Keep cord away from heat, oil, sharp edges or moving parts. Damaged or entangled cords increase the risk of electric shock.
- When operating a power tool outdoors, use an extension cord suitable for outdoor use. Use of a cord suitable for outdoor use reduces the risk of electric shock.
If operating a power tool in a damp location is unavoidable, use a residual current device (RCD) protected supply. Use of an RCD reduces the risk of electric shock.
PERSONAL SAFETY
- Stay alert, watch what you are doing and use common sense when operating a power tool. Do not use a power tool while you are tired or under the influence of drugs, alcohol or medication. A moment of inattention while operating power tools may result in serious personal injury.
Use personal protective equipment. Always wear eye protection. Protective equipment such as a dust mask, non-skid safety shoes, hard hat or hearing protection used for appropriate conditions will reduce personal injuries.
Prevent unintentional starting. Ensure the switch is in the off-position before connecting to power source and/or battery pack, picking up or carrying the tool. Carrying power tools with your finger on the switch or energising power tools that have the switch on invites accidents. - Remove any adjusting key or wrench before turning the power tool on. A wrench or a key left attached to a rotating part of the power tool may result in personal injury.
- Do not overreach. Keep proper footing and balance at all times. This enables better control of the power tool in unexpected situations.
- Dress properly. Do not wear loose clothing or jewellery. Keep your hair and clothing away from moving parts. Loose clothes, jewellery or long hair can be caught in moving parts.
If devices are provided for the connection of dust extraction and collection facilities, ensure these are connected and properly used. Use of dust collection can reduce dust-related hazards. - Do not let familiarity gained from frequent use of tools allow you to become complacent and ignore tool safety principles. A careless action can cause severe injury within a fraction of a second.
POWER TOOL USE AND CARE
- Do not force the power tool. Use the correct power tool for your application. The correct power tool will do the job better and safer at the rate for which it was designed.
- Do not use the power tool if the switch does not turn it on and off. Any power tool that cannot be controlled with switch is dangerous and must be repaired.
- Disconnect the plug from the power source and/ or remove the battery pack, if detachable, from the power tool before making any adjustments, changing accessories, or storing power tools. Such preventive safety measures reduce the risk of starting the power tool accidentally.
- Store idle power tools out of the reach of children and do not allow persons unfamiliar with the power tool or these instructions to operate the power tool. Power tools are dangerous in the hands of untrained users.
-
Maintain power tools and accessories. Check for misalignment or binding of moving parts, breakage of parts and any other condition that may affect the power tool's operation. If damaged, have the power tool repaired before use. Many accidents are caused by poorly maintained power tools.
-
Keep cutting tools sharp and clean. Properly maintained cutting tools with sharp cutting edges are less likely to bind and are easier to control.
Use the power tool, accessories and tool bits etc. in accordance with these instructions, taking into account the working conditions and the work to be performed. Use of the power tool for operations different from those intended could result in a hazardous situation. - Keep handles and grasping surfaces dry, clean and free from oil and grease. Slippery handles and grasping surfaces do not allow for safe handling and control of the tool in unexpected situations.
BATTERY TOOL USE AND CARE
- Recharge only with the charger specified by the manufacturer. A charger that is suitable for one type of battery pack may create a risk of fire when used with another battery pack.
Use power tools only with specifically designated battery packs. Use of any other battery packs may create a risk of injury and fire. - When battery pack is not in use, keep it away from other metal objects, like paper clips, coins, keys, nails, screws or other small metal objects, that can make a connection from one terminal to another. Shorting the battery terminals together may cause burns or a fire.
Under abusive conditions, liquid may be ejected from the battery; avoid contact. If contact accidentally occurs, flush with water. If liquid contacts eyes, additionally seek medical help. Liquid ejected from the battery may cause irritation or burns. - Do not use a battery pack or tool that is damaged or modified. Damaged or modified batteries may exhibit unpredictable behaviour resulting in fire, explosion or risk of injury.
- Do not expose a battery pack or tool to fire or excessive temperature. Exposure to fire or temperature above 130^ may cause explosion.
- Follow all charging instructions and do not charge the battery pack or tool outside the temperature range specified in the instructions. Charging improperly or at temperatures outside the specified range may damage the battery and increase the risk of fire.
SERVICE
Have your power tool serviced by a qualified repair person using only identical replacement parts. This will ensure that the safety of the power tool is maintained.
- Never service damaged battery packs. Service of battery packs should only be performed by the manufacturer or authorized service providers.
GENERAL CHAINSAW SAFETY WARNING
- Keep all parts of the body away from the saw chain when the chainsaw is operating. Before you start the chainsaw, make sure the saw chain is not contacting anything. A moment of inattention while operating chainsaws may cause entanglement of your clothing or body with the saw chain.
Always hold the chainsaw with your right hand on the rear handle and your left hand on the front handle. Holding the chainsaw with a reversed hand configuration increases the risk of personal injury and should never be done.
Hold the chainsaw by insulated gripping surfaces only, because the saw chain may contact hidden wiring. Saw chains contacting a "live" wire may make exposed metal parts of the chainsaw "live" and could give the operator an electric shock.
Wear eye protection. Further protective equipment for hearing, head, hands, legs and feet is recommended. Adequate protective equipment will reduce personal injury by flying debris or accidental contact with the saw chain.
- Do not operate a chainsaw in a tree, on a ladder, from a rooftop, or any unstable support. Operation of a chainsaw in this manner could result in serious personal injury.
Always keep proper footing and operate the chainsaw only when standing on fixed, secure and level surface. Slippery or unstable surfaces may cause a loss of balance or control of the chainsaw.
- When cutting a limb that is under tension, be alert for spring back. When the tension in the wood fibres is released, the spring loaded limb may strike the operator and/or throw the chainsaw out of control.
Use extreme caution when cutting brush and saplings. The slender material may catch the saw chain and be whipped toward you or pull you off balance.
- Carry the chainsaw by the front handle with the chainsaw switched off and away from your body. When transporting or storing the chainsaw, always fit the guide bar cover. Proper handling of the chainsaw will reduce the likelihood of accidental contact with the moving saw chain.
- Follow instructions for lubricating, chain tensioning and changing the bar and chain. Improperly tensioned or lubricated chain may either break or increase the chance for kickback.
Cut wood only. Do not use chainsaw for purposes not intended. For example: do not use chainsaw for cutting metal, plastic, masonry or non-wood building materials. Use of the chainsaw for operations different than intended could result in a hazardous situation.
- Do not attempt to fell a tree until you have an understanding of the risks and how to avoid them. Serious injury could occur to the operator or bystanders while felling a tree.
- Follow all instructions when clearing jammed material, storing or servicing the chainsaw. Make sure the switch is off and the battery pack is removed. Unexpected actuation of the chainsaw while clearing jammed material or servicing may result in serious personal injury.
CAUSES AND OPERATOR PREVENTION OF KICKBACK:
Kickback may occur when the nose or tip of the guide bar touches an object, or when the wood closes in and pinches the saw chain in the cut.
4 | English
Tip contact in some cases may cause a sudden reverse reaction, kicking the guide bar up and back towards the operator.
Pinching the saw chain along the top of the guide bar may push the guide bar rapidly back towards the operator.
Either of these reactions may cause you to lose control of the saw which could result in serious personal injury. Do not rely exclusively upon the safety devices built into your saw. As a chainsaw user, you should take several steps to keep your cutting jobs free from accident or injury.
Kickback is the result of tool misuse and/or incorrect operating procedures or conditions and can be avoided by taking proper precautions as given below:
- Maintain a firm grip, with thumbs and fingers encircling the chainsaw handles, with both hands on the saw and position your body and arm to allow you to resist kickback forces. Kickback forces can be controlled by the operator, if proper precautions are taken. Do not let go of the chainsaw.
- Do not overreach and do not cut above shoulder height. This helps prevent unintended tip contact and enables better control of the chainsaw in unexpected situations.
Only use replacement guide bars and saw chains specified by the manufacturer. Incorrect replacement guide bars and saw chains may cause chain breakage and/or kickback. - Follow the manufacturer's sharpening and maintenance instructions for the saw chain. Decreasing the depth gauge height can lead to increased kickback.
ADDITIONAL SAFETY WARNINGS
- Attend a professionally organised course on the use and maintenance of chainsaws, preventative actions, and first aid. Keep these instructions safe for later use.
- Chainsaws are potentially dangerous tools. Accidents involving the use of chainsaws often result in loss of limbs or death. Falling branches, toppling trees, rolling logs can all kill. Diseased or rotting timber poses additional hazards. Assess your capability of completing the task safely. If there is any doubt, leave it to a professional tree surgeon.
- Do not cut vines or small undergrowth (less than 75mm in diameter).
It is recommended to practise cutting logs on a sawhorse or cradle when operating the product for the first time.
The size of the work area depends on the job being performed and the size of the tree or workpiece involved. For example, felling a tree requires a larger work area than making other cuts, such as bucking cuts. The operator needs to be aware and in control of everything happening in the work area. - Do not cut with your body in line with the guide bar and chain. If you experience kickback, this position helps prevent the chain from coming into contact with your head or body.
- Do not use a back-and-forward sawing motion. Let the chain do the work. Keep the chain sharp, and do not try to push the chain through the cut.
- Do not put pressure on the saw at the end of the cut.
Be ready to take on the weight of the saw as it cuts free from the wood. Failure to do so could result in possible serious personal injury.
-
Do not stop the saw in the middle of a cutting operation. Keep the saw running until it is already removed from the cut.
To reduce the risk of injury associated with contacting moving parts, always turn off the motor, apply the chain brake, remove the battery pack, and make sure that all moving parts have come to a complete stop: -
before cleaning or clearing a blockage
-
before leaving the product unattended
-
before installing or removing attachments
- before checking, conducting maintenance, or working on the product
Injuries may be caused, or aggravated, by prolonged use of the product. When using the product for prolonged periods, ensure to take regular breaks.
If the product is dropped, suffers heavy impact, or begins to vibrate abnormally, immediately stop the product and inspect for damage or identify the cause of the vibration. Any damage should be properly repaired or replaced by an authorised service centre.
- Operate the product only in temperatures between 0^ and 40^ .
Store the product in a location where the ambient temperature is between -10^ and 50^ .
PERSONAL PROTECTIVE EQUIPMENT
Good quality personal protective equipment, as used by professionals, helps reduce the risk of injury to the operator. The following items should be used when operating the product:
Safety helmet
-should comply with EN 397 and be CE marked
Hearing protection
-should comply with EN 352-1 and be CE marked
Eye and face protection
-should be CE marked and comply with EN 166 (for safety glasses) or EN 1731 (for mesh visors)
Gloves
-should comply with EN381-7 and be CE marked
Leg protection (chaps)
-should comply with EN381-5, be CE marked and provide all-round protection
Chainsaw safety boots
-should comply with EN ISO 20345:2004 and be marked with a shield depicting a chainsaw to show compliance with EN 381-3. (Occasional users may use steel toe-cap safety boots with protective gaiters, which conform to EN 381-9 if the ground is even and there is little risk of tripping or catching on undergrowth)
Chainsaw jackets for upper body protection
-should comply with EN 381-11 and be CE marked
ADDITIONAL BATTERY SAFETY WARNINGS
To reduce the risk of fire, personal injury, and product damage due to short circuit, never immerse the tool, battery pack, or charger in fluid or allow fluid to flow inside them. Corrosive or conductive fluids, such as seawater, certain industrial chemicals, and bleach or bleach-containing products, etc., can cause a short circuit.
Charge the battery pack in a location where the ambient temperature is between 10^ and 38^ .
Store the battery pack in a location where the ambient temperature is between 0^ and 20^ .
INSTRUCTIONS CONCERNING THE PROPER TECHNIQUES FOR BASIC FELLING, LIMBING, AND CROSS-CUTTING
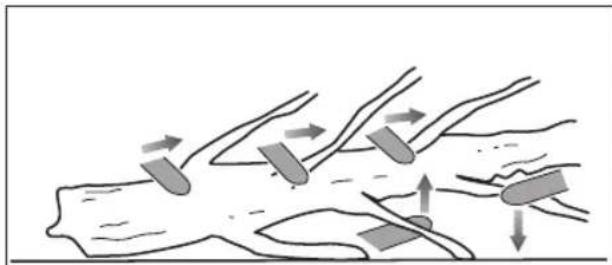
UNDERSTANDING THE FORCES WITHIN THE WOOD
When you understand the directional pressures and stresses inside the wood, you can reduce the pinches or at least expect them during your cutting. Tension in the wood means the fibres are being pulled apart, and if you cut in this area, the kerf or cut tends to open as the saw goes through. If a log is being supported on a saw-horse and the end is hanging unsupported over the end, tension is created on the upper surface due to the weight of the overhanging log stretching the fi bres. Likewise, the underside of the log is compressed and the fi bres are being pushed together. If a cut is made in this area, the kerf tends to close up during the cut. This cut would pinch the blade.
PUSH AND PULL
The reaction force is always opposite to the direction the chain is moving. The operator must be ready to control the tendency for the product to pull away and push backwards. The product pulls away (forward motion) when cutting on the bottom edge of the bar. The product pushes backwards (towards the operator) when cutting along the top edge.
SAW JAMMED IN THE CUT
Turn off the product, and remove the battery pack. Do not try to force the chain and bar out of the cut as this is likely to break the chain, which may swing back and strike the operator. This situation normally occurs because the wood is incorrectly supported, which forces the cut to close under compression, thereby pinching the blade. If adjusting the support does not release the bar and chain, use wooden wedges or a lever to open the cut and release the saw. Never try to start the chainsaw when the guide bar is already in a cut or kerf.
SKATING/BOUNCING
When the chainsaw fails to dig in during a cut, the guide bar can begin hopping or dangerously skidding along the surface of the log or branch, possibly resulting in the loss of control of the chainsaw. To prevent or reduce skating or bouncing, always use the saw with both hands. Make sure that the saw chain establishes a groove for cutting.
Never cut small, fl exible branches or brushes with your chainsaw. Their size and fl exibility can easily cause the saw to bounce towards you or bind up with enough force to cause a kickback. The best tool for that kind of work is a hand saw, an axe, pruning shears, or other hand tools.
FELLING A TREE
When bucking and felling operations are being performed by two or more persons at the same time, the felling operations should be separated from the bucking operation by a distance of at least twice the height of the tree being felled. Trees should not be felled in a manner that would endanger any person, strike any utility line, or cause any property damage. If the tree does make contact with any utility line, the company should be notified immediately.
The chainsaw operator should keep on the uphill side of the terrain as the tree is likely to roll or slide downhill after it is felled.
An escape path should be planned and cleared as necessary before cuts are started. The escape path should extend back and diagonally to the rear of the expected line of fall.

Before felling starts, consider the natural lean of the tree, the location of larger branches, and the wind direction to judge which way the tree will fall.
Remove dirt, stones, loose bark, nails, staples, and wire from the tree.
Do not attempt to fell trees which are rotten or have been damaged by wind, fire, lightning, etc. This is extremely dangerous and should only be completed by professional tree surgeons.
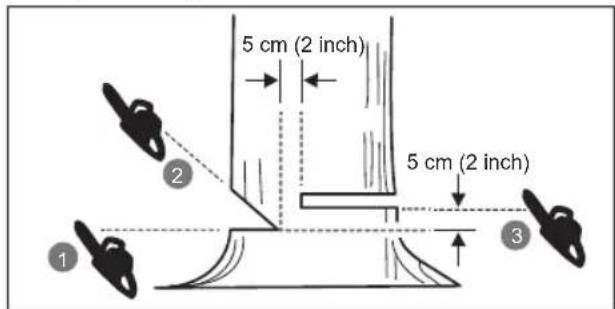
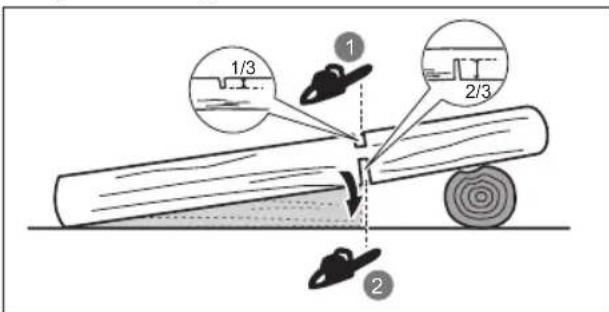
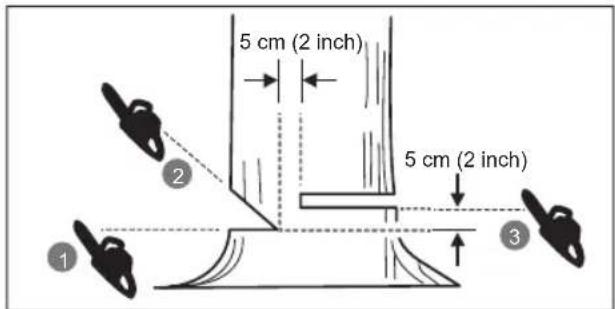
1. Notching undercut
Make the notch 1/3 the diameter of the tree, perpendicular to the direction of the fall. Make the lower horizontal notching cut first. This will help to avoid pinching either the saw chain or the guide bar when the second notch is being made.
2. Felling-back cut
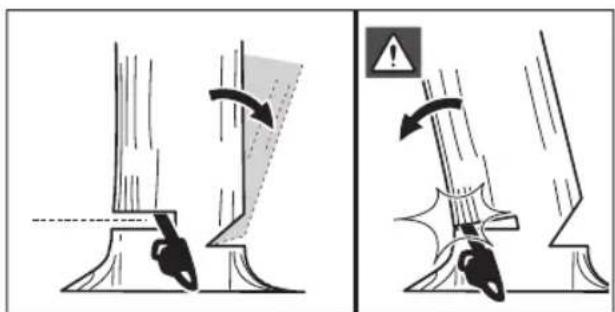
Make the felling-back cut at least 50~mm (2 in.) higher than the horizontal notching cut. Keep the felling-back cut parallel to the horizontal notching cut. Make the felling back cut so enough wood is left to act as a hinge. The hinge wood keeps the tree from twisting and falling in the wrong direction. Do not cut through the hinge.
As the felling gets close to the hinge, the tree should begin to fall. If there is any chance that the tree may not fall in the desired direction or it may rock back and bind the saw chain, stop cutting before the felling-back cut is complete and use wedges of wood, plastic or aluminium to open the cut and drop the tree along the desired line of fall.
When the tree begins to fall, remove the chainsaw from the cut, stop the motor, put the chainsaw down, and use the retreat path planned. Be alert for falling overhead limbs and watch your footing.

REMOVING BUTTRESS ROOTS
A buttress root is a large root extending from the trunk of the tree above the ground. Remove large buttress roots before felling. Make the horizontal cut into the buttress first, followed by the vertical cut. Remove the resulting loose section from the work area. Follow the correct tree felling procedure after removing the large buttress roots.
BUCKING A LOG
Bucking is cutting a log into lengths. It is important to make sure your footing is firm and your weight is evenly distributed on both feet. When possible, the log should be raised and supported by the use of limbs, logs or chocks. Follow the simple directions for easy cutting. When the log is supported along its entire length, it is cut from the top (overbuck).
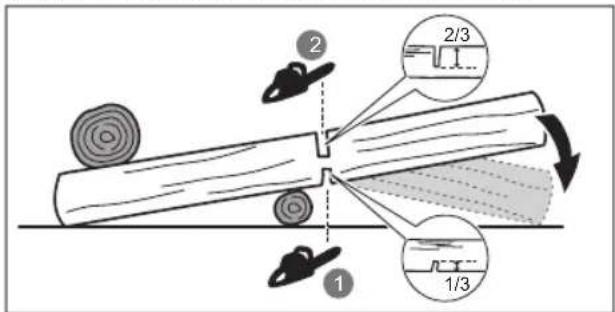
When the log is supported on one end, cut 1/3 the diameter from the underside (underbuck). Then make the finished cut by overbucking to meet the first cut.
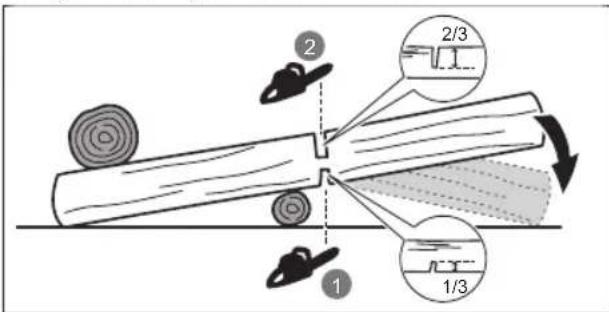
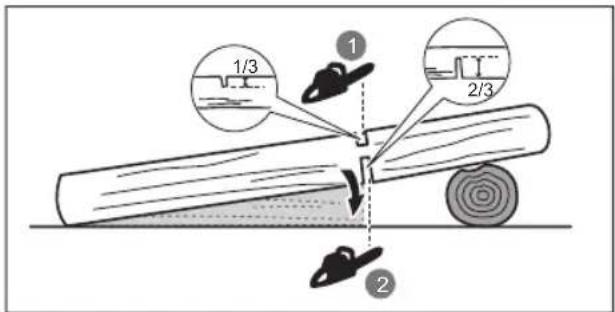
When the log is supported on both ends, cut 1/3 the diameter from the top (overbuck). Then make the finished cut by underbucking the lower 2/3 to meet the first cut.
When bucking on a slope always stand on the uphill side of the log. To maintain control when "cutting through", release the cutting pressure near the end of the cut without relaxing your grip on the chainsaw handles. Don't let the chain
contact the ground. After completing the cut, wait for the saw chain to stop before you move the chainsaw. Always stop the motor before moving from tree to tree.
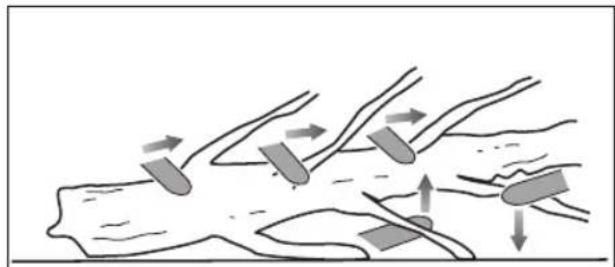
LIMBING A TREE
Limbing is removing the branches from a fallen tree. When limbs, leave larger lower limbs to support the log off the ground. Remove the small limbs in one cut. Branches under tension should be cut from the bottom up to avoid binding the chainsaw.
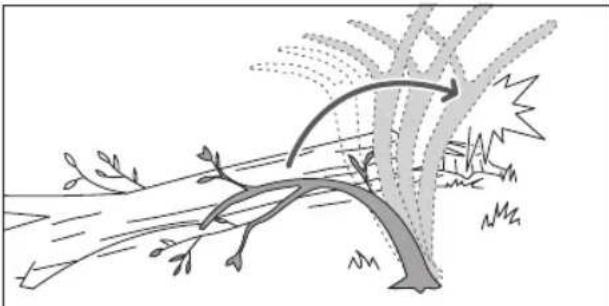
SPRINGPOLES
A springpole is any log, branch, rooted stump, or sapling that is bent under tension by other wood so that it springs back if the wood holding it is cut or removed.
On a fallen tree, a rooted stump has a high potential of springing back to the upright position during the bucking cut to separate the log from the stump. Watch out for springpoles—they are dangerous. Do not attempt to cut bent branches or stumps that are under tension unless you are professionally trained and competent to do so.

WARNING! Springpoles are dangerous and could strike the operator, causing the operator to lose control of the chainsaw. This could result in a severe or fatal injury to the operator. Cutting spring poles should be done by trained users.
TRANSPORTATION AND STORAGE
Turn off the product, remove the battery pack, and allow the product to cool down before storing or transporting.
- Remove all foreign materials from the product. Store the product in a cool, dry, and well-ventilated place that is inaccessible to children. Keep the product away from corrosive agents, such as garden chemicals and deicing salts. Do not store the product outdoors.
Fit the guide bar cover before storing the product or during transportation.
For transportation, secure the product against movement or falling to prevent injury to persons or damage to the product.
TRANSPORTING LITHIUM BATTERIES
Transport the battery in accordance with local and national provisions and regulations.
Follow all special requirements on packaging and labelling when transporting batteries by a third party. Ensure that no batteries can come in contact with other batteries or conductive materials while in transport by protecting exposed connectors with insulating, non-conductive caps or tape. Do not transport batteries that are cracked or leaking. Check with the forwarding company for further advice.
MAINTENANCE
Use only original manufacturer's replacement parts, accessories, and attachments. Failure to do so can cause possible injury, can contribute to poor performance, and may void your warranty.
Servicing requires extreme care and knowledge and should be performed only by a qualified service technician. Have the product serviced by an authorised service centre only.
You may make adjustments or repairs described in this manual. For other repairs, have the product serviced by an authorised service centre only.
Consequences of improper maintenance, removal, or modification of safety devices may cause the product to not function correctly, increasing the potential for serious injury. Keep the product professionally maintained.
- Sharpening the chain safely is a difficult precision task that should be performed only by experienced skilled professionals. Therefore, the manufacturer strongly recommends that a worn or dull chain is replaced with a new one, available at your authorised service centre. The part number is available in the product specification table in this manual.
- Follow the instructions for lubricating and chain tension checking and adjustment.
After each use, clean the plastic parts with a soft, dry cloth.
- Check all nuts, bolts, and screws at frequent intervals for security to ensure that the product is in safe working condition. Any part that is damaged should be properly repaired or replaced by an authorised service centre.
Maintenance schedule
Daily check
Bar lubrication Before each use
Chain tension Before each use and
frequently
Chain sharpness Before each use
(visual check)
For damaged parts Before each use
For loose fasteners Before each use
Chain brake function Before each use
Inspect and clean
Bar Before each use
Complete saw After each use
Chain brake Every 5 hours of operation
KNOW YOUR PRODUCT
See page 227.
- Saw chain
- Guide bar
- Front hand guard/Chain brake
- Front handle
- Rear handle
- Combination wrench
- Oil cap
- Chain catcher
- Guide bar cover
- Chain tensioning screw
- Sprocket cover
- Switch trigger
- Trigger release
- Lubricant flow screw
- Spiked bumper
SAFETY DEVICES
Chain brake
Chain brakes are designed to quickly stop the chain from rotating. When the chain brake lever/hand guard is pushed towards the bar, the chain should stop immediately. A chain brake does not prevent kickback. It only lowers the risk of injury should the chain bar contact the operator's body during a kickback event. The chain brake should be tested before each use for correct operation in both the run and brake positions.
WARNING! If the chain brake does not stop the chain immediately, or if the chain brake does not stay in the run position without assistance, take the product to an authorised service centre for repair before use.
Chain catcher
The chain catcher prevents the saw chain from being thrown back towards the operator if the saw chain comes loose or breaks.
Guide bars
Generally, guide bars with small radius tips have a somewhat lower potential for kickback. Use a guide bar and matching chain that is just long enough for the job. Longer bars increase the risk of loss of control during sawing. Regularly check the chain tension. When cutting smaller branches (less than the full length of the guide bar) the chain is more likely to be thrown off if the tension is not correct.
Low-kickback saw chain
The low-kickback saw chain helps to reduce the possibility of a kickback event.
The rakers (depth gauges) ahead of each cutter can minimise the force of a kickback reaction by preventing the cutters from digging in too deeply. Use only replacement guide bar and chain combinations that are recommended by the manufacturer.
As saw chains are sharpened, they lose some of the low-kickback qualities, and extra caution is required. For your safety, replace saw chains when cutting performance decreases.
Spiked bumper
The integral bumper spike may be used as a pivot when making a cut. It helps to keep the body of the chainsaw steady while cutting. When cutting, push the product forward until the spikes dig into the edge of the wood, then move the rear handle up or down in the direction of the cutting line to help ease the physical strain of cutting.
OVER-TEMPERATURE PROTECTION
The battery pack has over-temperature protection, which is designed to protect the battery cells from damage in the event of high temperatures. This feature may cause the battery to stop powering the product until the battery cells cool down. If the battery pack is warm to touch, allow it to cool down before resuming operation. If the product still does not work, connect the battery pack to the charger, which can also indicate over-temperature protection. When the battery cells cool down, the charger begins to charge the battery.
NOTE: High ambient temperatures above 30^ and high-power tools, such as chainsaws, can cause the battery cells to heat up faster. Monitor the battery pack regularly, and if it is warm to touch, change the battery or allow the battery to cool down.
NOTE: The battery pack LED indicator stops working if the battery protection feature has caused the battery pack to stop powering the product.
SYMBOLS ON THE PRODUCT


Safety alert
Read and understand all instructions before operating the product. Follow all warnings and safety instructions.
Wear eye, ear, and head protection.
Wear non-slip safety footwear when using the product.
Wear non-slip, heavy-duty gloves.
Beware of chain saw kickback and avoid contact with bar tip.
Do not expose the product to rain or damp conditions.
Hold and operate the saw properly with both hands.
Do not operate the saw using only one hand.
Set the chain brake to the RUN position.
Set the chain brake to the BRAKE position.


Conforms to all regulatory standards in the country in the EU where the product is purchased.
EurAsian Conformity Mark
Ukrainian mark of conformity
Waste electrical products should not be disposed of with household waste. Please recycle where facilities exist. Check with your local authority or retailer for recycling advice.
Guaranteed sound power level
Bar and chain lubricant
Turn to adjust lubricant flow + Increase the flow
- = Decrease the flow
Rotate to adjust chain tension + Tighten the chain
- = Loosen the chain
Moving direction of the chain. (Marked under the sprocket cover)
SYMBOLS IN THIS MANUAL

Parts or accessories sold separately

Note

Warning

Wear eye and face protection.

Wear upper body protection.

Wear leg protection.

Stop the product.
GETTING STARTED
See page 228.
- Wear Personal Protective Equipment (PPE).
Wear full eye protection, ear protection, non-slip heavy-duty gloves, substantial footwear, and protective clothing at all times while operating the product. Do not operate the product when barefoot or wearing open sandals.
- Remove the parts from the packaging. Assemble the product.
WARNING! If any parts are damaged or missing, do not operate the product until the parts are replaced. Failure to heed this warning could result in serious personal injury.
Place the chain drive links into the bar groove. Position the chain so that there is a loop at the back of the bar. The saw chain should face in the direction of chain rotation. If the chain faces backwards, turn the loop over.
- Loosen the bar mounting nuts. Remove the nuts and sprocket cover.
Hold the chain in position on the bar, and place the loop around the drive sprocket. Lower the bar so that the bolts go through the slot in the bar.
-
Reinstall the sprocket cover. Install and hand-tighten the bar mounting nuts. The guide bar must be free to move for chain tension adjustment.
-
Adjust the chain tension. Turn the chain tensioning screw using the combination wrench. Frequently check the chain tension while adjusting.
-To increase the chain tension, turn the chain tensioning screw clockwise.
-To reduce the chain tension, turn the chain tensioning screw counterclockwise.
NOTE: The chain tension is correct when the gap between the cutter in the chain and the bar is between 4 and 5mm for the RY36CSX30B and between 5 and 6mm for RY36CSX40B. Pull the chain in the middle of the lower side of the bar downwards (away from the bar), and measure the distance between the bar and the chain cutters.
NOTE: The temperature of the chain increases during normal operation, causing the chain to stretch. Check the chain tension frequently and adjust as required. A chain that is tensioned while warm may be too tight upon cooling. Make sure that the chain tension is correctly adjusted as specified in these instructions.
-
Hold up the tip of the guide bar, and securely tighten the bar mounting nuts.
-
Add chain lubricating oil.
Use only RYOBI chainsaw lubricating oil from an authorised service centre.
Clear the surface around the oil cap to prevent contamination. Remove the cap from the oil tank. Pour the oil into the oil tank, and monitor the oil level gauge. Ensure that no dirt enters the oil tank while filling. Close the oil tank, and tighten the cap. Wipe off any spillage.
WARNING! Never work without chain lubricant. If the saw chain is running without lubricant, the guide bar and the saw chain can be damaged. Before and while using the chainsaw, check the oil level in the oil level gauge.
-
Ensure that the lubricant flow screw is set to open for the chain and bar oil to be released.
-
Turn the screw counterclockwise to open and increase the oil flow to the chain and bar.
-Turn the screw clockwise to decrease the oil flow to the chain and bar.
A properly functioning chain and bar lubricating system normally discharges oil from the chain during use. To check the functionality of the chain and bar lubricating system, point the tip of the chain at a light-coloured surface, such as a newspaper. A distinct line of oil splatter should be observed after a short time.
- Install the battery pack.
Align the raised ribs on the battery pack with the grooves in the product's battery port. Insert the battery pack into the product. Make sure that the latch of the battery pack snaps in place and that the battery pack is fully seated and securely attached before beginning operation.
WARNING! Always hold the product with the right hand on the rear handle and the left hand on the front handle.
WARNING! Grip both handles with the thumbs and fingers encircling the handles. Ensure that the left hand is holding the front handle so that the thumb is underneath.
- Start the product.
Set the chain brake into the run position by grasping the top of the chain brake lever and pulling towards the front handle until you hear a click. Pull the trigger release. Press the switch trigger.
NOTE: To stop the product, engage the chain brake by rotating the left hand around the front handle. Allow the back of the hand to push the chain brake lever towards the bar while the chain is rotating rapidly. Release the switch trigger and the trigger release.
MACHEN SIE SICH MIT IHREM PRODUKT VERTRAUT
SieheSeite227.
SYMBOLE AUF DEM PRODUKT

Sicherheitswannung

ALGEMENE VEILIGHEIDSWAARSCHUWINGEN MET BETREKKING TOT KETTINGZAGEN
SAV HAR SAT SIG FAST I SAVERILLEN.
SYMBOLER PAPRODUKTET

Sikkerheds Varsel

Roteres for at justere
kaedespaendingen
- = Stram kæden
- = Løsn kaeden
TRANSPORT OCH FÖRVARING
ARBEIDSOMRADETS SIKKERHET
BRUK OG VEDLIKEHOLD AV ELEKTKOVERKTØY
KJENN PRODUKTET DITT
Se side 227.
SYMBOLER PÅ PRODUKTET


Sikkerhetsalarm
B OCHOB KoHCTpyKuIN BaIeN 6ecnpoBOHOH CEHNOI INbI IeXaT npHHcIIbI 6e3OnacHOCTn, npOdyKTNBHOCTn I NaDeXHOCTn.
HA3HAUHHE
BecnpoBODHnA ZENHn npedHa3NaeHa DnNcNoIb3OBAHnToNbKO BHe NOMEueHn.13 coo6paXeHn6e0nacHOCTn Bcerda Heo6xOaHMo 3KcnnyatnpoBaTbNHCTpymEt,ynpabJnIM DBym pyKaMn.
DaHHb HNCTpyMeHT npedHa3HaueH dIpaacnna BetOK, CTBOIOB, 6peBEN 6pyca, DnAmEtP KOtOpbIX onpeDeneTcR dINHO pe3AHn nnBHO uHbI. PpeHa3HaueHo TOnbKO dPa pacnna DepeBa.
I3JeIne IOnJLeKNT IcNoJIb3OBAHnIO TOJIbKO B 6bITOBBX ueJx COBepWeHHoNEHMN, IpOWeJIMM IOCTaTOHyIOIgROBky B OTHoWeHmN yrpo3 N IpOpJNAkTNuecknx Mep npN 3KnIpyaTunn n3denn. OH He npEJaHa3NaueH dIy INoJIb3OBAHnN IpOpeccnHOJIbHbIMN cnyK6amN O3eHeHnI.
He nCnoJIb3yIe yCTpoIcTBo dIra KaKnx-III6o INhIx cIeNei.
OBUHE YKA3AHNIO TEXHNIKEBE3OJACHOCTN IPII PABOTE C3JEKTPOHHCTPYMEHTOM
OCTOPOXHO! IpoTHTe BCE yka3aHnna, HNCTpyKcHn, NJIIOCTpaCn n CneuΦnKacHn, NOCTaBnREMbI C 3TNM 3NEKTPoHNCTpyMeHtOM. HecobJIoJeHHe HNKeyka3aHHbIX INCTpyKcHm MOKeT CTaTb npuHnOH nopaeHnE 3NeKTPnHeckm TOKOM, NoKapa n/ nnCEpBe3HO TpaBMbl.
CoxpaHnTe Bce npedynpexdeHn n HnctpyKu nn DaIbHeIeero NcNoJIb3OBAHn. TepMH "3neKTpOHnCTpyMeHT" B npedynpexdeHnx O3Haayet INCTpyMeHT, pa6oTaIOU OT 3NeKTpyuecko CETN (npOBODHO) nIu akkyMylTopa (6ecnpoBOHO).
BE30IACHOCTb HA PABOYEM MECTE
Paobouy yactok doJxhen 6bItb CBOOdbHIM Xopo0o OCBeueHHbIM. 3arpomoxKeHne INI INIOXoeOCBeeHne paOoy 3OHbl MOKET pINBecTn K HecuACTbIM CNyqam.
He nCnoB3yIe 3NeKtpoHnCTpyMeHTbl BO B3pbIBOONaCHO Cpe, HApPmep, npn HAnuHn NERKOBCnNaMeHHOxxCg KNDKocTe, ra3OB nn nbIn. B 3NeKtpuYeCKnx yCTpOiCTbax MoryT o6pa30BBiBaTcBcNckPbI, YTO MOXe TnpNBecTn K BOCnNaMeHEnIO nbIn nJIN ra3a.
He donyckaIte npncytCTBna DeTeu nocToPOHHnx nuc npn pa6ote c 3neKtpOnHcTpyMeHTOM. OTbIeHHe Ha noCtOpOHHX nuc MoKet npNBecTn K nOtepe KOHTpON B0 Bpem3KcnJyataun arperata.
3NEKTP0E3ONACHOCTb
■ BnIkn Ka6eJn NtAHn HNCTpyMeH Ta DOnJXhB COOTBeTCTBOBaTb NCNoJIb3yeMoN PO3eTKe. He NoDBepraTe BNky Ka6eJn KAKM-JIN6O n3MeHeHnM. He NCNoJIb3yIte KAKne-JIN6o nepeXODnKc C 3NeKTponHCTpyMeHTaMn C 3a3EmNoUoHm IPOBOOM. NcNoJIb3OBaHne OPINHaJIbHbIX UTenCeJIbHbIX BNIOK m COOTBeTCTByIOUX P03eTOK npedOTBpaAaET OnaCHOCTb NOPaXeHn 3NEKTpuYeCKM TOKOM.
He donyckaTe KOHTaKa Ta Cacte TeJa c NOBepxHOCTaM 3a3eMJIeHHbIX npeMeTOB, HAnpIMep Tpy6,paHaNtOpOB OTOnJIeHnK KyXOHbIX NNIT, XOJIOINbHKOB. PnCOPNKOCHOHm YcAteT e Ta HeNoBeka C 3a3eMJIeHHbIMU yAcTkAMN Bo3pactaET ONaCHOCTb NopaxEHn 3JIeKTPNueCKIM TOKOM.
He octabJnTe 3neKtpOnHCTpyMeHTbI NOddoXdEmnnB yCIOBnIX NOBblIeHHoB BJaXHOCTN. IonabWaa BHyTpB 3JeKtpOnHCTpyMeHTa BOda yBeINuBaet ONaCHOCTb NopaxEHNr 3JeKtpUeCKIM TOKOM.
He donyckaIte HenpabInbHoro 6paueHn c Ka6eIem. He nCnoJb3yIte Ka6eJIb dnn nepeHoCKn, nepemeueHn IIN OTKnIOUeyHn HNCTpyMeHTa OT cETn NITAHn. He packNaIbIBaIte Ka6eJIb B6NI3n ICTOuHnKOB TENNA, MaCna, OCTpbIX npEpmetOB IIN NOBnKHBIX 3IeMeHToB. NobpeXJeHHbIe IIN 3anyTaHHbIe npOBoDa NOBbIaOT OAnchocTb NopaxEHn 3NEKTPnuECKM TOKOM.
Pn pa6ote c 3NeKTPoHnCTpyMeHtOM BHe nOMEueHn NOb3yntecb yJINHHTeNbHbIM Ka6eIeM, npedHa3HaueHHbIM dJa HapyXHOrO npimHeHna. NcnoJb3OBAHne Ka6eJIa, npedHa3HaueHHoro dJa HapyXHOrO npimHeHna. CHIXKaEt ONaCHOCTb nopaxHeHra 3NEKTPuYeCKIM TOKOM.
Ecn Het BO3MOXHOCTn N36ExKaTb pa60Tb I By ycNOBnIX NOBbIeHHoB BnaxHOCTn, NOKlnOuAte 3NEKTPoHnHCTpymEtYepe3 ycTpoiCtBO 3aunTHOrO OTKnIOUeHn. Pnp nCNoJIb3OBaHN yCTpoiCTBa 3aUNTHORO OTKnIOUeHn CHNkaeTcR ONaCHOCb NOPaKeHn3NeKTPuueCKm TOKOM.
JIINHAR B3ONACHOCTb
Bybte BHNMaTeJbHbI npn pa6oTe c yctpoiCTBOM n pyKOBOCTByuTEcb 3paBBIM CmblcnoM. He nCNoJIb3yIe arperat B cnlyae yctanoCTn nn Nocne npnHHTN HApKOTKNOB, ANKOrOa NN MeuunHcknx npenapaTOB. Maneuwa HEBHImaTeJbHocT bn p6oTe C 3NEKTPOINHCTpymeHTOM MOKeT npNBecTu K cepbe3HO TpaBMe.
NcnoJb3OBA Tb CpeDCTBa HnHnBnDyAaBHo 3aunTb. Bcerda HaeBaTe 3aunThbIe OyKn. TaKne CpeDCTBa 3aunTb, KAK npOTNBOnBJeBaMacka, HeCKoJIb3aJaaOByB, JecTKn TOnOBHO y6Op n CpeDCTBa 3aunTb opraHOB cnyxa, pRn NcNoJb3OBAHN B COOTBeTCTByIOUX YCIOBnX N03BOJr TCH3NTb PnCK NOlyEHn TpaMbI.
He donyckaIte HnpeHaMepeHHoro 3anycca. Pepe IIOKIIHcHEm INHCTpyMeHTa K NCTOCHky nHTAHN, 3ameHOJ aKKMyJrTOpHOro 6Loka, NOHNTHe INPeHocKo INHCTpyMeHTa npOBepbTe, YTObI nepeKIOUoyateJB HaxODINCB B NIOXeHHN «BbIKIOUeHO». Pn peHocKe 3NEKTPoIHCTpyMeHTOB C NaJIbEe H napeKIOUaTeNe IIN NODaYe NITaHry K INHCTpyMeHTam Pn peKIIIOUaTeNe B NIOXeHHN «BKn.» BO3MOXhbl HechacThbIe Cnyau.
IpepeBKNIOHHeM3JKeKTPoHnHCTpymeHTa y6epnte BCE perynpoBOuHbIE nraeyHbIE KIOH.NaeHHbIe IIN peynpoBOUHbIE KIOH, OCTaBnEHbIe Ha BpaauOxxCqActX 3JKeKTPoHnHCTpymeHTa, MOryt npNBecTN K TeNECHOMY NOBpeKdEHHIO.
He npknlaabIbai Te ype3MepHbIX ycHJI. CtapaTecb coxpaHrTa yCTOuHBOcTb N oDbickBaIte TBepdyo onOpy. 3TO o6eCneHBAET Lyuuyu ynpaBIAREMocTb 3NEKTPoHCTpyMeHTOM B HepeDbIeHHbIX CnTyauNX.
OeBaITeCb COOTBeTCTBHyUcHm 06pa3OM. He HadeBaIte OeXky Cbo6oHOrO NOKpOrykpaWeHn. He donyckaIte nonaHaHn BONOC n OeKDbIB noDBNkHbIe Detann. Cbo6oHnA OeKDa, ykpaWeHn I DInHHbIe BONocbIMORYNTNONACTB B DInKyUneCyaCTN.
Pn HnHnHnOBpyoBaHnIy CoeHHeHn IbIeyNoBHTeN nIbIeOTdIHTeN oBeCneYbTe erO HApEkaaee NOkKnOChE N 3KcNlyatauIO. IbIeyNaBnBaHnEO MOKET CHN3ITb yrPo3bl, C8ra3AHhIE c O6pa3OBaHnEM IIbIIN.
He Hapywaite npabnla Texnkn 6e3onachoctn, daxe Hecmotpy Ha dInnteIbHbI ONbl pa6oTbI c nHCTpymentam. HepexHbe DeinCTBnMoryt 3a DOIO CEkyHdbI pINBEcTN K cepbe3HO TpaBME.
3KCNYATALUN 3NEKTPOHCHTPMHTA UXOD 3AHIM
He yBeJIHnUHbAte ckOpocb pa60tbl HnCtpymeHa. IpaBnIbHo nO6bpauTe nHCTpymeHT dJa BbINOJHHeHna Heo6xOaMOn pa60tbl. IpaBnIbHO nOdo6paHHbIn nHCTpymeHT lyuue n 6e3onachee BbINOJHReT CBOIO pa60ty.
He noIb3yItecb 3NEKTPoHcTpyMeHTOM, ecn BblKIOUaTeJIb HE BKIOUaETcra NHe BblKIOUaETcra. IIO60I 3NEKTPoHcTpyMeHT, He ynpabJIeMbI BblKIOUaTeJIem, ppeCTabJIeT ONaCHOCTb I DOJIXeH 6bITb OTpEMOHtPOBaH.
Ipeed perynpoBko, 3ameHoi npHaadneKHOte H NOMeHHeNEM 3NEKTPOHNCTpyMeHTa Ha xpaHHeHne OTcoEHHITE BUNky OT NCTOUYHka NITAHNA IIN N3BLeKNTe AKKyMylTOpHBn 6NOK (ecIn 3TO BO3MOXHO). TaKHe MEPbI ppeoctopoxHoCTn CHNXaOT PNC CnyauHoro Nycka INCHTpymeHTa.
XpaHInTe HeHCNoB3yEmbIe 3JIeKTPoHnHCTpyMeHTbl B MecTe, HeIOcTynHom DnIa DeTei, a TaKKe He DonyckaIte K NcNoJb3OBAHN OaHHORo HnCTpyMeNTa Niu, He 3HaKOMbIX C erO pa60ToH IIu He 03HaKOMNeHHbIX C DaHHBMn DaHHBMn NnCTpyKUnMn. NcNoJb3OBAHne 3JIeKTPoHnHCTpyMeHTOB IINUcAMN, HE NOdROTOBHeHHbIX K pa60Te C NoIO6bIMN 3JIeKTPoHnHCTpyMeHTAmN, MoKET CTaTb PpUNHO CO3DAHNA ONaCHbIX CNTyaCNI.
3NeKtpoHnHCTpyMeHTbl n npHaJNExKHOCTn Heo6xOdmIOo6cIyKnBaTb.IpOBepbTe HnCTpyMeHT Ha npEpmET HaIuYn IpeKocA nn 3aKnHNBaHnIB DnKyUHXc TaTei, DepeKTOB KOMNOHeTOB nn HaIuYn HbIX ycNoBn, KOtOpBle MOyT oTpazntbcnHaero paBoTe. Pnp NoBpeKdeHn N3DeJIne IpeEero DaIbHeINM nCNoB3OBAHnEM CJeDyET BbINONHTb TexHnueckoe 06cLyXnBaHne. BolbOoe kOnIYeCTBO HeChAcTHbIX cNyaeB npOnCXoIIT n3-3a HeHaJnEkaUeTo TexHnueckoro 06cLyXnBaHnI n3DeJIIn.
I Ondepxnbatepexyuue HNCTpyMeHbIB 3aTOUeHHOM uHCTOM BnDE.Pexyue HNCTpyMeHTbl B HaJIeXaUeM COCTOARHM, C OCTpbIMN KpOMKaMm MeHee NOBepKeHbI 3acTpeBaHIO I 6oJee ynpabJIembl.
IcnoJb3yIte HNCTpyMeHT, npHnAdJIeXHOCTn, HakoHeuHKn N Dp. B COOTBeTCTBn C DaHHbIMn IHCTpyKUaMn, yuHTbIBaY cNoBm n xapaKTe pa6oTbI. IcnoJb3ObaHne daHoro 3JIeKTPoINHCTpyMeHTa He no Ha3HaueHInIO MoKet Co3daTb onachHyIO cnTyauNIO.
I OndepKnBaTte 3axBaTHbIe NOBepXHOCTN B cyxom, YnCTOM BnDE, 6e3 MaCna n Cma3Kn. CkOJIb3Kne pyKOaTIu 3axBaTHbIe NOBepXHOCTN He DaHOT BO3MOXHOCTN KOHTPOJINPOBaTb INHCTpyMeHT B HEiTaTHbIX CNTyaUnx.
3KCNJYATAUH N OBCNJXUBAHNE AKKYMYJATOPHO IHCTPYMEHTA
3apjxabakkymnyTopbIMoXHOToJIbKO3apJHbIM yCTpOINCTBOM,pa3peeHHbIM npOn3BOIDNTenEM nHCTpyMeHTa.3apJnHOe yCTPOINCTBO,NOxDoxuiee TOJIbKO DnOHNOTNA 6bTapei,MOKET CO3dTa b ONaCHOCTb NOXAPA pN INCNOBJ3OBAHIN DnIg 3apJDKI 6bTapei INHO TINA.
B 3neKtpoHnCTpyMeHTbI cNe dyetyet yctaHaBnBaTa b aKKMyJrTOpHbIe 6LOKN, HmEouuhe NpOxDyUyO MapKnipOBky. Ppi NcNoIb30BaHN n Dpynx aKKMyJrTOpHbIX 6NOKOB BO3paCTaET pNCK NOkapa n NOlyeHn TpaBMbl.
Korda 6atapeH He nCnoJb3yIOTc, DePKeNTe Hx BdaHn OT MeTaNlHuECKNX npEdmETOB, TaKHX KAK 3aXHMbl, MOHeTbI, KJIIOUY, TBO3dN, BHTbI INHbIE He6OJbUWe MeTAJINHuECKNe npEdmTebl, KOToPbI MOrYT CO3DaTb KOHTAKT MExdy NOnHocam. KopoTKoe 3aMbIkaHne Ha KOHTaKTax aKKMyJrTopa MoKet CTaTb npuHHoN NOkapa.
■ Pn He6NaorPnraTbIX ycNoBnx n3 AkkymyIaTopa MoKe T BblTeYb XnIDKocTb; n36eAaTe KOtKaTc c TaKoJ XnIDKocTbIO. Pn CnyauHOM KOtAKTe npomOte MeCTO Bo3deNCTBna BOdo. Pn nonadAHnn XnIDKocTN B rJa3a npomOte nx BOdo n 0bpaNTecb K BpaCy. AkkymyIaTOPHaay XnIDKocTb MOKe TBbl3BaTb pa3dpaxKeHne KOKn i CnIN3NCTbIX 060noeK nn OXoRn.
IcnoJb3ObaHne NOBpeKdEHHoro NIM MoNΦnUPOBaHHoro AkkymJrTOpHO 6noka n HnCTpyMeHTa He DonyckaetC.NOBpeKdEHHbe NIM MoNΦnUPOBaHHbe AkkymJrTOpbl MOryt paBoTaTB HePpeDcKa3yeMo I CTaTb PnUnHoN IOxapa, B3pbIBa NN TpaBMbl.
3anpeaaetcnoDBepraTbakkMyIaTOPhBn6nOK n HnCTpyMeHT Bo3deNCTBnO ORH N BblCOKoT TemnepaTypb.Bo3eNCTBnO rHr nn TemnepaTypb Bblue 130^ MoKeT npNBecTN K B3pBly.
3apjkaTe aKKymIaTOpHbIe 6JIOKn HNCTpyMeHT B COOTBcETBmC INHCTpyKUne, He NODBeprAaNX pRn 3tOM BO3DeIcTBnIO TEMpeaTp BHe Dnana3OHa, yKa3aHHoro B INHCTpyKUnc. 3apjka 6e3 cO6JIouDeHnI INHCTpyKUnc IIN npu BO3deIcTBnIMempeaTp BHe PpeDyCMOTpeHHORo DnaNa3OHa MOKeT pINBeCTN K NOBpeXJeHnIO aKKymIaTOpa I NOBicNTb pNCK BO3rOpAHnI.
OBCJYKUBAHNE
TexHueeKoe 06cIyXnBaHne n peMOHT 3JIeKTPoHnHCTpyMeHTa DOJIxHe BblIOJNHaTb TOIbKO KBaIINΦuIUPoBaHHbI CneuaJIaNCT C HcIOJIb3OBAHEm B3aIMo3aMeHReMbI 3aNaChbIX Yacte. 3To 06ecneHIT HopMaJIbHoe TEXHueeKoe COCTOAHNE yCTPOIcTBa.
O6cIyKbAHnE aKKMyJrTOpHbIX 6JOKOB c np3HaKaMn NOBpeXdHnE He DOnyCKaETc. O6cIyKbAHnE aKKMyJrTOpHbIX 6JOKOB dONXHO BblONHtbcn PpOIN3BOJNTeHem NIN ABTOIN3OBaHHbIM cepBnCHbIM ueHTpOM.
OBUHE INPABUNA TEXHUKI BE3ONACHOCTN INCNOJIb3OBAHNI CEHNHOIIbl
He np6nkaTe pexuyuToeB K Teyy Bo BpeMa pa60tbl nIbI. Peepd 3anyckom cenho nnbl yOcTOBepbTecb, YTO nINbHaa cenb HN K YeMy He npKacaetc. MInHyTHa HEBHMAtEnbHOCTb PnPa6oTe C cENHO nnIO MoKET npVBECTN K TOMy, YTO nnlbHaa cenb 3auenIT BAwU Odekdy Nn TENo.
Bcerda nepknte nny npaBoi pyko3a 3adHIOpykoTky, a neBoi pyko-3a nepeDHOpyKoAry. Pa6ota cenHoi nIIOc o6paTHbIM nOJoxHeHem pyK noBbIwaet onacHocTb TeNEChbIX NOBpeXdEHN Hn B KOEM cnYae He donyckaetcra.
UdepKNaTe cenHyo nny TOnbko 3a H30InpOBAHHbIe 3axBaTHbIe NOBepXHOCTN, NockoJbKy BHyTpNiNbHoN cenn MOryT HaxOuNTbcr Ckpblte npOBoDa. KacaHne npOBoDa, HaxOJaIeROcnoHnPaJKeHHeM, peKyuSei cenbIO MOKeT Bb3BaTb IpoteKaHne 3NeKTpueckoro TOka Upee3 MeTaJINuYeCKne Yactn 3NeKTPOHCTpyMeHTa IN PnPBeCTN K IopaxeHNo OepaTopa 3NeKTpueckm TOkOM.
IcnoNb3yIne CpeDCTBa 3aunHbI opraHOB 3peHnPeKoMeHdyETcNcNoB3OBaTb DOnOJIHNTeJbHbIe CpeDCTBa 3aunHbI cnyxA, rONOBbl, pyK, Hor n CTon. Ncnonb3OBaHHe HndJeKaUx CpeDCTBa 3aunHbI CHNXaeT pNCK NOnyEHn TpaMbI OT BbIeTaIOuXu YactNU INN cNyauHoro KOHTAKTa C NINbHOI cENbIO.
3anpeaaetcpa6oTaB c cenHoi nIO, haxOaCb Ha depeBe, H Na IecTHnue, H Ka KpbIe N IIObo HeyctOnuBOI NOBepxHOCTN. TaKoe NCnONb3OBaHne CEHNHOIMMOXET PpNBecTNI C cepbe3HO TpaBME.
Bcerda HmeTe Hndnexkauyo onopy n 3Kcnnyatnpyute cenhyu nnny TOnbko npn Haxoxdhen Ha HeNoDnXHo, 6e3onacHO npBOHNOBepxHocTN.Pa6ota Ha CKOJIb3kNx n HeyctOnuHBix NOBepxHOCTx MOKeT pINBEcTN K notepe 6ana hca nn KOHTpONHa d cenHO nnIO.
Pn nneHn corHyto HnpanxenHoBetBn ocTepeaTecb ee pacnpMaHn. Korda HataKeHne B DpeBeChbIX BOJOKhAX BbICBO6OkaETcA,TO HanpXeHHa BetBb MoKet yApntb OepaTopa N/nn HapyuHTb ynpabJIeMOCTb cENHO nnbl.
Bybte KpaHe ocTopoKhbI npn HnneHn Kyctapnka MOnOdbIX DepeBbeB.ToHkn IecomatepnaJMOKeT 6bTb 3axBaueH nJIbHOu cenbIO, XNecTHyTB BAC NIN BBBeCTNu 3 paBHOBecnra.
IpehenocHTe cenHyIO nny 3a nepeDnHO pyky, B BBIKHIOueHHOM COCToHNN, He npNXmam K TeNY. Pn TpaHCnpOTnpOBKe nn XpaHeHHN cENHO Nnbl BcerDa HadeBaTe Ha NnIbHyO sHNY 3aunTHoe npncnocobHeNe. Hadnexkauee obaaehne C cENHO nnoi CNHXKaet onaCHOctb cnuyaHoro KOHTaTc DnKxUeienCnnbHO cEnbIO.
CneDyIte HNCTpyKUHm no Cma3Ke, HATXeHHIO cenn, 3aMeHe uHHbI u cenn. HenpaBnIbHO HaTAYta NcMaaHHaue NcEB MoKET NOpBaTbcN yBeJIuHTb ONaCHOCTb OTCKOKa.
LcHnHa nHa npedHa3HaueHa TOnbKO nIeHnA DpeBecnHbI. NcNoJb3yIte cenHyIO nIy ToIbKO no npamomy Ha3HaueHIO. Hanpimep: 3anpeaaetc HcNOJb3OBaTb cENHyIO nIy dIpyeKmEaJIa, INaCTNka, KamHry IN dpYrX CTPONTeJbHbIX MaTePnaIOB, KpOME DepeBa. Bo n36exKaHne onachocn co6JIoJaTe yKa3aHHoe dIra cenHO nnbl npedHa3HaueHne.
He nbitaTecb cnHnHTb DepeBO 6e3 yeTKoro NOHMaHn pyCKOB n npoPnJakTnecknx MEP. B npouceCE CNINBaHn DEpeBa cyuectByET ONaCHOCTb NOUYehn cepbe3HOI TpaMbbl OepaTopom NNI NOCTOPOHMN JNuCaMn.
Pn H3BLeueHn 3acTpaBwero MaTePnaJana, pa3MeueHn Ha XpaHeHne Nn npoBeDeHn TexHnueckoro 06cnyKmbaHn cenHoN nJIbI co6JIOdaIe BCE nHCTpyKuHn. BbIKIOUHTe H3dEne I n3BLeKeNTe aKKyMylrTopHbI 6nok. HenpeHaMepeHHoe Cpa6aTBiBaHne cENHOI nIIbI B npOecce N3BLeueHn 3acTpaBwero MaTePnaJana INn npn npoBeDeHn TexHnueckoro 06cnyKmbaHn MOkET npNBecTN K cepbe3HOI TpaBME.
PNUHb OTCKOKOB I MEPbI 3AUHTbI ONEPATOPAOT HIX
EcnHOCOK uINbHaToKHeTcHa npenrTCTBne nn nIbHa cNb 3aXMeTcB DpeBe BO Bpempa0tbl, 6eH3oIINa MoKeT OTCKOHtB.
KoHTaKT C BepuHHOB H EKOTOpbIX Cnyuayx MOKeT Bbi3BaTb BHe3aHHy OToDAy, KOTopA OTo6paCbIbae TINlbHyO UHHy BBepx Ha3aD B HAnpabJIeHNn OepaTopa.
3aKlnHbAHne 9eHn HINBIB B BepxHe yactn HapBaJIooIe MoKeT npNBeCTN KOTCKOKy B HapBaJIeHN onepaTopa.
N B nepBOM N BO BTOPOM Cnyae MOXHO NOTepaTb KOHTponb 3a 6eH30nIOI NONyUHTb TKeJIbIe TpaBMbl. He HadeTeCB TOJbKO HA cpeCTBa 6e3ONaCHOCTn CAMoB 6eH30nINbl. Bo n36exKaHHe HeCuaCThBIX CnyaeB IN TpaBM, Heo6xOIMOn IpnHIMAtb pa3NIuHbIe Mepbl PpeOCTOpOXHOCTn.
OTCKOK RAJIETCA pe3yIbTAtom HnnpabINbHoro NCNOJb3OBAHn INHCTpyMeHTa N/nnn HapyuHn npabn nn yCIOBn erO kCNnyataun. 3TOrO cneNyET n36eRaTb, COBJIOdA yKa3aHHbe HNKe MEPBI npedocTOPOXHOCTN.
I OndepxNBaTe HaexHb3axBaT Tak, yTo6bI 60nbUne naBcBi (C ONDHO CTOPBOH) N OCTaJIbHbIe naBcBi (C dpyroN CTOpOH) KpenKO OXBaTBiBAHn pyKoRTKn cENHO nNbl, dePKeNTe nNny oBeHMn pyKaMn, pacNoJaraTe TeNo nPyKn TaKMn 6pa3OM, YTO6bI npOTNUOCTOHTy cYNNIIO OTCKOKA. Oepatop MoKeT cnpABuTbcra C yCNIIeM OTCKOKA, ecNI npedpInHrTaHdNExKaUne MepbI npedeocTopoxHOCTN. He BbInyckaTe nNny n3pyk.
He nepehanpraarTecb Hn nnnte Bblwe ypoBna nnev.3To nomoxet n6exkaTb HnpeDnHaMepeHHoro KacAHnI nnbln I No3BOJNT Lyuwe ynpabnTb cenHOnn nnONBnHnEHHbx CNTyaunx.
IcnoJb3yTe TOJbKO peKOMHeOBAHHbIe npOn3BOAnTeJIeCMHeHbI uNHBi N NJIbHbIe cenn. HeKoppeKTHa YcTaHOBka CMeHHbIX uIN H n NIIbHbIX NOJIoTeH MoXET CTaTb PnUHoi IIOOMKn N/nn OToPacsbHaHna cenn.
PnO6cnyKBAHnn 3aToyKe NJIbHOJ cenn co6IoudaTe HNCTpykun n3ROTOBUNTEJy. YMeHbWeHne BbICOTbI OpaHUnTeJr NOaHr MOKET npNBecTN KYBeJIuYeHIO OTaHn.
IOnOJIHnTEJIbHbIE YKA3AHnI NO BE3ONACHOCTN
IpoiDnte npoceccnoHaBbHbI kypcbI no 3KcNpyatauIM nO6CnykBaHHIO nJIbHbIX ceene, npocnnaKTtueckm Mepam I nepBOI NOMOUI. CoxpaHTe daHHbIe INCTpyKUIN dnn noCneJeUooero NCNOJB3OBAHNA.
LcHbIe NblbIyBnIOTcNtEHNaJIbHOOnaChbIMNHCTpyMeHTAMn. HecyactHbIe Cnyaun, CBraHHbIE CNCIOJIb3OBAHHeMZeINbIXNII,ObUYHNO pInBOJKT NOBpeKdEnHmKoneHocTeNJeTaNbHOMY NCxOy.PadaIOUne BetBn,CBAINBaIOUneCEApeBBya,YKaTbIBaIOUneEC6 BpeBHa MOryt y6ntbYeNoBeka.NOBpeXDeHHaNN crHNBwaJpeBecHa npedctabnIETDOnOIHNITeBHyO ONaCHOCTb.BblDOJXHBIOUeHNTCBOIO CNOCo6HOCTb BblONIHrTa NoCTabJIeHHbIe 3aDaunBe30NaCHO.EcInyBacEcTb COMHeHn,DOBepbTe 3Ty paBoTy npoPeCCHOHbHOMCneuaNCTy no pe3Ke DepeBa.
He donyckaetcnnneHne BbOuxxCpaCTeHHn n/nnmIoIOrO noIpecka (DnaMetpom Mehee 75 MM).
Pn nepbom nCnoJIb3ObaHm n3dEIny peKOMeHnyeTc npoTeCTnpOBaTb erO nyTem pacnna 6peBHe H a NIIbHbIX KO3Jax.
Pa3Mepb pa6oey 30Hb 3aBnCt OT BnDa pa6oT npa3MepobpeBa.Hanpimep, Bala Ka depeBa Tpe6yet 60nbwe pa6oey 30Hb, Yem DpyrVe BnDbI nIneHn -packpaxkEBKa n.T.D. OnpaTop DoJKeH 3HaTb N KOHTPOJIuPoBaTb BCE, YTO npOxCxOJNT B 3ToI pa6oey 30He.
He pacnonarai Te Baale TeNo Ha OndHoi NnHn C nHbHoi shiHoi n cenbjo. OuyTMaJ oTdaH a NOMOKeT 36exatb cOnpIKoCHOBeHn qenC rONBOI nn Tynobuizem.
B npouecce pacnna He BblonHnIte BO3bpaTHoNocTynateNbHbIe DnHexn. Pacnn ocyuieCTBnEeTc3a cET xOda cenn. POndepKnBaIte cenb 3aTOueHHOM COCTOHNn Hne NbITaIeTcB npotaanKBaTbe ee CKBO3b OTpe3.
He Haxmaite Ha 6eH30nny B KOHcpe pacnnIOBKn. BybTe rTOBbl npnHrTb BEc NJIbI, KOrda nInneHne B dpeBecnHe 3aKOHHTCn. HeBbINOJHeHne daHHoro Tpe6oBaHnMoKeT npNBecTN K NoIyueHIO cepBe3HOI TpaBMbl.
He octaHaBnBaIe nIy B npOceCe nIeHna. He BbIKNoaTe nIy, noka OHa He BbIJeT nI npOnla.
TtO6bI CHN3NTb pNCK NONYueHn TpaBmbl npi KOHTaKTe C NOdBnKhbIMN DeTaJIaMn, Bcerda BbIKIOuayaTe DBNrAteNb, AKTNBupyIe CEINHOI TOPMO3, IN3BNeKaIte aKKMyJlTOp I DOXnDaITeCb OCTAHOBKn BCex NOdBnKhbIX DeTaJe:
YdaIte CpeBa pr3b, KaMHN,OTCTabWyO Kopy, rBO3n, CKo6bl npOBda.
He npo3bo1ne Bany rHnIbIX DepeBbeB, DepeBbeB, NOBpeKdEHHbIX BeTpOM, ORhem, MOJHne N T.n. TaKaar pa60ta Ype3BbUaHaOna Cha N DOJXHa BblONHrTbcr CneuAnlntom no 6pe3Ke DepeBbeB.
1. Banochny nponnn
CdeNaTe Bbpe3 1/3 DnAmetpa DepeBa nepneHnkyIaPHO HanpabNeHHIO naeHH. Chayana CedeNaTe HNKnr ropn3OHTaJIbHbIO bpaTHbIO npOnIN. 3TO NOMOXET PepoTbPaTb 3aUeMHeHne NnblHo UEN IN INHbI pN BbINONHeHHBTOPOrnpOnna.
2. Banochny nponn
CdeNaTe BaOnHb npOnn BblIe rOp3oHTaBbHOO6paTHOrnpOnnMaMHmymHa 50 MM. IopdepKnaBte BaOnHb npOnn npapAnenbHbIMrOp3oTaNbHomy o6paTHOMy npOnnJy.CdeNaTeBaIOuHb npOnn TaKm O6pa3om, YTO6bIOCTaIOcbDocTaTOH DpeBecnHb dInernepeMbUck.NpeMbUkaHa DepeBe NpeDToBpaaet BpaueHne DepeBa nOBecneuBaET naDeHHe B HxHOM HanpaBneHN.He nepeNnBaTe nepeMbUky.
Kak ToIbko BaIooHbI npOnnI DoIeT Do nepembykN, DepeBO DoJnxHO Haatb Naatb. Ecnn CyuaceCTByET BO3MOxHocTb TORO, yTO DepeBO He ynaTeB HuyKHOM HanpaBHeHm Nn OTKNoHHTc Haaad N 3axMeT NnblHyU cenb, npeKpATte NnHeHne Do 3aBepWeHn BAloCHOro npOnnla N nCNOJIb3yIte DepeBAAHbIe, PnactIKOBbIe Nn aIIOHMHeBBe KInHbY, yTo6bI pa3KaTb npOnnI n HAKNoHtB DepeBO B HyXHyO CTOpOHy naDeHnR.
Korda DepeBo HauHetaB, BbHbTe cenHyIO NnIy n3 npOnnla, OCTaHOBNTe DBrAteJIb, OTNOXHTe cENHyIO NnIy, a 3aTEM BOCNtB3yTEcB NOIROTOBJeHHbIM NyTEM OTXOJa. OcteperaTecb NaedHnBaETBeBcBepxu n CneDnTe 3a CBOeonopoi.
OBPE3AHNE HECUINX KOPHEN
Hecyune Kopn -3TO KpynhBie Kopn,OTxOJaune OCTBona K 3emne.Obpeaute 3TN Kopn nepeB BaJkoI DepeBa.CdenaTte Chayana ropn3oHTaJIbHbI pa3pe3 (A) B KopHe, 3aTeM BePTNkaJIbHbI (B).YdaJIte Bbyipe3aHHyU qactb (C) n3 pa6oey 30hbl. YdaJIINb Hecyune Kopn, npictynaiTe K BaJIke DepeBa.
PACKPRAKEBKA BPEBEH
PacpKBeKa - 3to pacnInOBka 6peBa no dInHe. HeoXoIMO oecneuYb yToUHByIO onOpy n paBHomepHoe pacnpedeJeHne Beca Ha o6e Horn. No BO3MOxHOCTN, 6peBHO HxHNO NOHrTb N NOdpeTB C NOMOsbTO BETBEN, 6peBEN IIN DEpeBcHHbIX Uypok. CoBIOdaIte npocstble npabnna dIra ObnerueHn nnEHHa. Ecn 6peBHO noDnepto NO Bcei dInHe, OHO nnNTcBcEpx (HaDnnl).
Ecn 6peBHO NOdnePo C OndHOro KOHua, npOnnnte 1/3 dnaMeTp a ChN3y (noDnn). 3aTeM 3abepuIne nIeHne, cDenab HADNN DO BCTpeuC nepBbIM npOnnIOM.
EcIn 6peBHO NOdEepKINBaetc C Obox KOnUOB, nponnnte 1/3 dnaMeTpa CBepxy (HaDnI). 3aTeM 3aBepnnte nIeHne, cdeJab noDnI Ha 2/3 Chn3y do BCTpeHc nepBbIM npoNlOM.
EcnnpackpckxkeBka BbINOHNRETCHa CkIOHe, cneNyET Bcerda HaxoINbCnHa BepxHnNo CKNHOCTOpOHe 6peBnHa. Dnna ObecneueHn KOHTpona BO Bpemra "nponinBaHn" 6bnXe K 3abepseHnO ocnaBte HaKm, He ocnaBnaXBat pykoTneu eHNO nIbl. He donyckaTe KOtakTa cenn C 3emNe. Nocne 3abepseHn nneneHn NOdoXdnte, noka cenb nIbl octahOBnTC, npexde Yem nepemeaaTb cENHyO nIny. Bcerda octaHabnBaJte DBnIateNb, npexde yem nepeynOT DepeBa K DepeBy.
CUYKOBAHNE DEPEBA
CykoBHaHne - 3TO ydaJeHHe cybeB C NOBaJeHHoro DepeBa. PnC cykoBAHm, He O6pe3aTe NepBbIMKpyNHbIe HxKnHHe BtBN, YTObI OHN NOdEpxNBaHn DepeBO HAD 3emJNe. Cpe3aTe He6oJbWne BetKN 3a OINHpoxO. HanpXeHHBe BtBN cNeDyET NnNTb CHN3Y BBepx, BO n36exKaHHe 3akInuHBaHn CEHN0 nnbl.
IpyxHJUNE DEPEBbJ
XlbCT (A) -3TO BtKa, BbIKOpYeBaHHbI KOpeH bN KcyT, HATryTbI NOd DaBHeHem DpyHM DepeBOM. XbICT MOKeT pe3KO BbIPrMnTbcR, ecNt OTpe3aTb DEpJkauee erO depeBO.
IeH NOBaJIeHHoro DepeBa yacto BO3BpaUaETcB BBePTnKaJIbHOe NIOJoxKeHne, KOrJa CTBOJ OTpe3aHT OT Hero Do KOHua. BydTe OCTOpOxHb! XlbICTb ONaChb. He nbITaNTecb Cpe3aTb N30rHyTbe BETKn NIN NHN, KOTopbIE HaxOJaTcra NOD HAnpJKeHNem, ecIn Bbl He IMeete npocceCOnHaJIbHOH NODrTOBKN HaBBKOB.
OCTOPOXHO! Xbictb Moryt yapntb pa6oero N BbIEcTn 6eH30nIy n3-nod erO KOHTPON. YTO BeTe TRAKEnbIM n daXe CMEptenbHbIM TpaBMam. PaCnnM MOIObIX DepeBBeB DOJXeH OcyueCTBnTbC ONbTHbIMN NOb3OBaTeJIaMn.
TPAHCNOPTIPOBKA IN XPAHEHNE
Ipepepa3MeueHnem Ha XpahEnHe NIT TaPcHcnpTIpOBKO BbIKJIOpHTe N3DeNne, N3BNeKtTe aKKMyJrTopHbI 6JOK I DOxKdNTecb OCTbIBaHnN 3DeJInr.
YdaHnTe Bce noCTOpOHnme MaTePnAnbI C n3dEnn. XpaHnTe ero B npoxnAdHom, cyXOM, xopoO npOBeTpBaEMOM HEDocTyNHOM dNr DeTcMecTe. O6eperaTe OT BeueCTB, Bbl3bBAIOxK Kopp03nIO, HanpImep, caDobx ydo6peHn nn CoIN dNraYdaNEHn IbDa. 3anpeucaTcXpaHnTB n3deNne Ha yInCe.
Ipeed XpaHeHnEM ININ TpaHCnOpTnPOBkoN HAdeHbTe Ha NInbHyIO WnHy KpbIuKy.
ДлгТранспортуровиЗakpeniteиЗденитak,уTOбI OHO He MOrIIO nepemeucaTbCSnNynyactBo BO n36exahne TpaBMnpoBaHnepcoHaJa nINNOBpeKdEHnN3dEJIa.
NEPEBO3KA JINTNEBbIX BATAPEI
TpaHcnpOpBky 6aTapen OcyuueCTbIyTe B COOTBeTCTBm MeCThIMn HaCIOHaJIbHbIMn HOpMaMn INOLOXeHnMn.
CneDyIe BCEM OcOsbIM Tpe6OBaHnM K ynaKOBKe n MapKnOpBKe npTpaHCnopTupOBKe 6batae B CTOpOHnHe opraHn3aun. IpoBepbTe, YTO6bl 6batae He cnpnkacanacb C dpyHMn 6bataeMn HIN TOKONpOBOJUUM MaTePnAJaMn BO BpeMn TpaHCnopTupOBKn, 3aunTNB OTkpblte KOHTaKTbl C NOMOuIbIO uOJIaUN, HENpOBOJUxKoJINaKOB UIN nnEHN. He TpaHCnopTpynte NOBpeXJeHHbIe UIN npoteKaIOuNIE 6batae. 3a KOHcyNbTaunE o6paauTecb B TpaHCnopTHO-3KcneDiuOnHOHy KOMnAHIO.
O6CJyKUBAHNE
IcnoB3yTe TObKO opnHaJIbHbIe 3aNpactN, akceccyapbl Hacadk NT pOn3BODNTeJr. HebnonHeHMe 3TOro Tpe6OBaHm MoKET npNBecTN K TpaBME, K CHINKeHHIO pOn3BODNTeJIbHOCTN I K aHHynpoBaHHIO rapaHTnn.
06cnyxnbHne Tpe6yET ype3BbIaHoh 3a6Otbl 3HaHHn I DOJIHXo 6bITb BbINOHeHO TOJbKO KBaJIINΦIuPObAHbIM TEXHNKOM 06cnyXNBaHHa. O6paTntecb BAOTOpN3OBaHHbI CEPBNCbI ueHTp.
Bb MoKTe BblONHb pa60Tb no perynnpOBKe n 06cIyXnBaHHo, KOtOpbIE onncAHb B DaHHOM pyKOBOCTBE. PemOHThbE pa60Tb DOnxHbIO cyueCTBJIbTBcA TOJbKO B ABTOPu3OBaHHOM cepBnCHOM ueHTpe.
CnEeCTBnEM HeHaIeJekaue EKcnnyatauH,CHaTna 3aunTHbIX npncnocobHeHn uIN BheceHn H3MeHHeHn B INX KOHCtpyKUIO MOKeT YBnTbCn HEkoppeKTHaR paBoTa n3dEInn,a TaKke yBeNnHuHne pNCa cepBe3HO TpaBMbl. ObecneBte CBOeBpemHHO npocceCNOHaJIbHOe OcIyKnBaHne n3dEInn.
3aTOUka cENI YBnEETc CNOXHOI pPeUN3IOHHO 3aDAeH, KOTOPARoONXHaBbINONHrTBcNCKHOnTEbHO ONbTHbIMn IPOpeCCNOHaJAMn. Be3ONaChA rOToUka cENI - 3aDAuA, Tpe6yIOUa HABbIka. B cTpyae N3HOCA nn paCTxKeHna cENI IPOUN3BOAnTeNb HAcTOrTeJIbHO peKOMeHdyET BbINONHrTB ee 3aMeHy Ha HOByoB 6bnkaiwem ABTopIN3OBaHNOM cepBnCHOM ueHTpe. Homep Detanl DoCTyEn Ta6nue cneunfKnacn n3DeJIraB pyKOBOCTBE.
CobnOdaTe HNCTpyKun no Cma3Ke, npOBepKe HataJKeHn CEEN n peryInpOBKe.
Iocne kaoDoro nCNoB3OBAHn npoTnpaTe nnactIKOBbIE Detan cyxOn TKaHbIO.
IpoBepntb BCE 60NTbl,3aDbNkNN,N BnHTbl,yepe3 KOpOTKne INTEPBAJIb,Ha HAnLnxKaUyIO NIOTHOCTb, YTObbl y6eINTbcra,TOOBopyDOBaHne HaxOJNTcB B 6e3OnachOM,paboyem COCToAHIN.B Cnyae NOBpeXDeHNA KAKOI-NIODeTALN Heo6xOIMO 6paTtbcRA B ABOTn3OBaHHBI CEPBNCBI UHTp DnB BBINOHeHNA HAnLnxKaUero pEMOHTaNJ 3ameHbl.
Cnncok 06cnyxuBaHn
3HaEbpAaNCKoO CoOTBcTbN
YkpanHckm 3nak CTaHdpTn3aun
Otpa6oTaHHa 3neKtpoxHueckar npodykua donjxha yHnUToXkaTbcB BmecTe C6bIToBbIMM OTXdAMn. YtINu3npyIte,ecnN IMeETc CneuaJIbHOe TExHueCKoe O6OpYIOBaHne. IIO Bonpocam YtINu3aUN pOKOHcyJbTnpuyITecb C MeCTHBIM OprAHOM Bnactn NIN PpeDnPnTMe p03HnHOr TOPROBN.
TapaHTpyembI yPOBEHb 3BYKOBO MOUHOCTN

Cma3ka pIJIbHOJ uINbI u cENI

BpaaTe perynpoBn noaMacna
- = YBENINITb NOaY
=ymeHbunTbnoauy

IopBHeNte dnypeyInpObKn HataKeHnue
-
= 3aTAHNTe ueNb
-
= Ocna6bte ueb

HapabneHne nepemuehena cenn. (Otmeyeho nD cenHn oecTepHei)
YCIOBHbIE OBO3HAUeHnB DAHHOM PYKOBOOCTBE

TeTANINPnHnAdNEXHOCTN, npNoBpeTaembIe OTdEbnHo

Приимеанно

Octopokho

HaedeBaTe cpeCTBa 3aunTb Ipa3 nIuca.

HaedeBaIte 3aunTHyIO OeKdy DnBepxHeu Yactn Teia.

HaedeBaTe 3aunTHyO 06yBb.

OctahOBIne yCTPOINCTBO.
IPEED HAYAIONPABOTbl
CM. ctp. 228.
1.ПиMuMeHЯTe cpeIcTBA INHINBnDyajbHOJ 3aUNtBI (CN3).
Bo Bpempa0bIc n3dennm Bcerda nCnObn3ynte NnHOueHHy0 3aunTy opraHOB 3peHna, Cnyxa, NnOThHe HEckoJIb3aIne nepuAtKn, HAdExHyIO OByBn 3aunTHyIO OJExKy. He pa0TaIte C nHCTpyMeHTOM 6ocNKOM mIN B OTKpbITbIX CaHaIaIInx.
- 13BnKeKTe DeTann n3 ynaKOBKn. Co6epnte n3dJIne.
OCTOPOXHO! EcIn IIO6bIe YacTn NOBpeKdEhl, ININ OTCYTCByOT He NcNIOb3OBaTB 3TO N3DeJIne, NOKa YacTHn He 3aMeHeHb.IpeHe6peXeHne DaHHbIM PpeDynpexKeHnEM MOKET PpNBecTn K TReKKOMY TeLeChOMy NOBpeKdEHIo.
IomeCTHe 3BHeHpa npNbOa ceHn B na3 uHHbl. Haenthe BCIO cHb Ha shHy.
NnBnaeBdoJXHa6bIbObaaHeBaHapabNeHHBpaaehnrae. EcnB HapabHeBa ObpaTHyIOcToPOHy, nepeBepHnte netnIO.
- OTKpyTnte raKn KpEnneHnur WnHbI. N3BNeKeNTe raKn n CHMNTe KpbUkky cENHOJ WeCTepHn.
Depknte cenb B noIooKeHn Ha nHe n 3aueNte neTne BOKpyr BeNyUeero 3y6HaTorO 6apa6aHa. Onycnte WnHy, TTO6bl npoTe b 60NTbl CKBO3b OTBepCTne.
4.YcTaHOBInTe KpbIuKy 贝HNoi WeCTepHN Ha MeCTO.3aKpyTInTe u 3aTaNHTe raIKn KpeNJIeHn IINbI.HanpaBIAIOUaIa UINHa DOJXHa CBO6oHn NepEmuAcbI MHeYb HATxKeHne cENII. - PerynipoBka HataKeHna CenH. HataKHO BnHT peYnpyeTcnopeCTBOM KOMbHNipOBaHHORO KIOUa. B npoccepe perynipoBkn Bpem O T BpemeH npoBepaTe HaTKeHne cENN.
HataKka cenn ocuueCTBnEeTc BpaueHnEM HataKHoro BNHTa NO YacBOO CTpeJIke.
Ocna6JIeHHe cENn OcyuEcTBJrEeTcBpaUeHNEM HATRAKHOBO BNTa npOTNB YacOBONCTpeKN.
INPMMEAHNE:HaTKeHne CEHN BJIaETcnpabnIbHbIM,ecn3aOp MeKdype3akOMBHyTpncEHN uHHoCoCTab7OT 4do5MM (RY36CSX30B) nOT 5do7MM (RY36CSX40B).BbITAHNTe cenb BHn3B cepeHHe HxKHe CTopoHb UHHb OT uHHb) Nm3MepbTe pacCToHHe MExdy uHHoN 3y6bMaM cEN.
PIMMEAHNE: TemnepaTypa cenn Bo3pactaet npn HopmaNbHOB pa6ote, Bbl3bIBa pactxKeHne cenn. Perynnpno npOBepraTe HataXKeHne cenn n perynpyte no Mepe Heo6xoDmOCTn. Ecn n cenb HataHyTa ropaye, OHa MoKet 3axaTbC8 OCTbHYB. HataXKeHne cenn perynpyte B COOTBeTCTBn C daHHbIMN yka3aHnMaM.
- Пидаржваяносokшинь, крелкоЗатянite ee raIGN.
- 06pa6oTaIe cenb cma3KoN
Cma3oHoe MacNo DnA ZenHbIX NIN npImeHnTe ToIbKO MapKn RYOBI. Ero MoXHo npNo6peCTN B ABTOPn3OBaHHOM cepBnCHOM cHTpe.
PpOtpnTe NOBepxHOCTb OKoJIO MaCJHOrO KoJINaUka BO n36eKaHHe 3aRpa3HeHH. CmIMTe KpbIuKy MacJHOrO baka. 3aJeIte MacNo B MacJHbIb 6ak N pOBopeBte yKa3aTeNb yPoBH MaCna. Ppr 3aJIbVe MacJa He dOnyckaiTe IonoJaHnra rpa3N B MacJHbIb 6ak. 3aKpOte MaCJHbIb 6ak N 3aTaNHTe KpbIuKy. BbITpntE BCE NOdTKeN.
OCTOPOXHO! HkOrda He pa6oTaTe 6e3 CMA3Kn cenn. Ppi nCnONb3OBaHnn cenn nNbl 6e3 CMA3Kn NlNbHa WnHa N cenb Nnbl MOrY T NOnyTuTb NOBpeKdEHH. Do n BO Bpem 3KcNpyataunu cENHOI Nnbl npOBepaTe ypOBeh Ma cneuaNBHom DaTnuKe.
-
86eHNTecb B TOM, YTO BHT NODaun Macna yCTaHOBJIe H BOTKpbITOM NIOXKeHHI DJI R CMA3KN IHNbI UcENI.
-
YtO6bI OTKpbITb I yBeJIyHITb NODaCy MaCNa HaIeNB I WInHy, NOBepHNTE BnHT IpOTNB YacOBoN CTpeKN.
YTo6bI yMeHbWntb NDoaHy MaCna Ha cenb H uHHy, NOBepHnTe BnHT No YacOBo CTpeNke.
Pn HopMaIbHOM cyHKUHOHIOBaHN cENI INNbHoI WnHbI ObIyHO npOxCoJNT HaHeCHeM MacNa Ha cenb CNTEmo CMA3Kn BO Bpemr 3KcNpyatauN 3dJIIn.
YTo6bI npOBepntb pa60Ty CnCTeMbI Cm3Kn 9en n nnJbHOH uHbHbI HappaBte KOHcK 9en Ha CBETnyo NOBepxHOCTb, HApPIMep, Ha ra3ety. BCKope DoJXHa NOBHTBCa 3amETHa LINHNA Bb16pb3rNBaEMOrO Macna.
- YctahOBIne akKymIyTOpHbIe 6atapen.
Bctabte BbCTyauOuYO KOHTAKTHYIO KOJIOky aKKMyIaTOPHO 6IoKa B rHe3do 6aTapeHORo OTceKa yCTpOcTBa. YcTaHObITE aKKMyJIaTOPbH b6NOK BHyTpB n3dEINn. Npeed Hauanom pa6oTbI y6eNTecb B TOM, yTO KpOChK Ha 6I0ke aKKMyJnTopa 3aUeKNHynCn n aKKMyJIaTOPbH b6I0K HaeXHo 3aФNKCuPOBaH.
OCTOPOKHO! Bcerda depxknte nny npaBoy pyko3a 3aHIO pyKoTky, a neBOy pyKO - 3a nepeDHOIOpyKoTky.
OCTOPOKHO! O6xbATNE o6e pyKoTKn, nCNoJb3yB 60nbWOn nocTaNbHbIe naNbCuI pyK. BOnbwo naneJneBoi pyKn, yDexnBaUoSei nepeDnIO pKoTky,doJIKeH paONJaRaTbcr CHN3y.
- 3aynctte n3dene.
YTO6bI nepeBecTn CEHNOI TopMOBpa6Ooee NOIOXKeHHe, BO3bMNTEcB 3a pbUar CEHHO TOpMO3a NOTAHHTe erO B CTOPHYnePeDHepyKoTnDoJeLHa. IOTAHHTe 3a KHNky BbICBO6OxDeHnCnyCKOBORKpOuKa.HaKmTe Ha KypKOBbI nepeKnUoyatEnb.
INPMEYAHNE: Yo6bIOCTaHOBtB INHCTpyMeHT:BkIIOHTe TOpMO3 NIIbHOI cENI, BpaUaJI neByIO pyKy BOKpyrpeJeHneI pyKoTKn. BoBpEMBaICTporo BpaUeHnIcENI HaxMITE Ha pbIur cENHOrO TOpMO3a TblNHOI CTopoHOH KInCTN. BbICBO6OJTe KypKObI NepeKIOUaTeNb I KHOJky BbICBO6OxDeHnI KypKa.
TpaHcNtOpTnOBKa:
Kateropnueckn He donyckaetc naeHne n IIObIe MexaHueckne BO3dienCTBna Ha ynakOBky npn TpaHCnpTnpOBke.
Ppi pa3rpy3ke/norpy3ke He donyccaetc nCnObn30BaHne IIO6o BnDa TexHnKn, pa5oTaIoSeI no npHHuNy 3aXnMa ynaKOBKn.
XpaHeHne:
Heo6xOIMO xpaHHTb B cyXOM MeCTe.
Heo6xOIMO XpaHnTb BdaJIOn ICTOCHNKOB NOBblJeHHbx TEMpepaTy n BO3DeIeCTBnA COJIHeuHbIX Jnye.
Ppi xpaHeHn Heo6xOdImo n36eRaTb pe3KOro nepenada Temnepatyp.
XpaHHeHe 6e3 ynaKOBKn He dOnyckaetc.
Cpok cnkyk6bln3dennr:
Cpok cnjxkbni3dennncoCTabJrE 5 net.
He pekomehnyetc K 3KcnIyataunn no nCTeuehen 5 let XpaHEnn C DaTbI N3rOToBneHn 6e3 npedBaPnteHbHO npOBepKn.
Data n3rotoblenen (KoD DaTbI) OTuTaMnOBaH H aNOBepxHOCTN KOpnyca N3denn.
Pnmupe:
W17 Y2015, rIe Y2015 - roI n3roTOBJIeHn
W17-HeJeI IN3rOToBJIeHnI
OnpeJntb Mecu H3ROTOBHeHMOXHO cOrlaCHO npBeHHo Hxke Ta6nue,Ha npImepe 2015 roda.
06paTne BHMaHHe! KOJIuYeCTBO HeJeB B MeCaIepa3NuaeTcA OT rOda B rOd.
USUNIECIE KORZENI BOCZNYCH
DOBORAREA UNUI COPAC.
Atunci cand sunt indeplinite operatiuni de taiere sau doborare a copacilor simultan de catre doua sau mai multe persone, operatiunea de doborare trebuie sa fie separata de cea de taiere la o distanla de cel putin doua ori inaltimea copacului ce vine doborat. Copaci trebuie doborati in asa fel incat sa nu puna in pericol nico persona, sa nu loveasca nicio linie de serviciu public sa cauzeze orice restrugere a proprietatii. In cazul in care copacul face contact cu o linie de serviciu public, compania trebuie sa fie notificata imediat.
TAIENDAVAD OHUTUSJUHISED
SIGURNOST RADNOG PROSTORA
Neka vaša radna povrsina bude Čiesta i dobro osvijetljena. Zatrpani i neosvijetljeni radni prostori izazivaju nezgode.
■ Elektricne alate nemojte upotrebljavati u eksplozivnoj okolini, primjerice u blizini zapaljivih tekucina, plina ili prasine. Iskre koje izlaze iz elektrichnih alata mogu in zapaliti ili izazvati eksploziju.
Djecu, posjetitelje i domace zivotinje drzite dalje od mjesta na kojem upotrebljavate elektricni alat. Mogli bi vas omesti te biste zbog toga mogli izgubiti nadzor nad alatom.
ELEKTRICNA SIGURNOST
- Utikač elektrícnog alata uvijek mora biti prilagoden utićnici. Nikada ne mistranjte utikač. Nikada nemojte upotrebljavati prilagodnik s elektrícnim alatom s uzemljenjem. Tako cete izbije opasnost od strujnog udara.
Izbjegavaje svaki kontaktu uzemljenim povrsinamapoput cijevi, radijatora, kuhala, hladnjaka itd. Opasnost od strujnog udara povecava se ako je diovaseg tijela u dodiru s uzemljenim povrsinama.
Elektricni at nat nemojte izlagati kisi ili vlazi. Opasnost od strujnog udara povecava se aku elektricni atat ude voda.
Pazite da kabel za napajanbe bude u dobrom stanju. Alat nikad nemojte drzati za kabel za napajanbe, a kabel nemojte vuci ni prilikom isključivanja iz struje. Kabel za napajanbe drzite dalje od izvora topline, ulja, oštrih predmeta iPokretnih dijelova. Opasnost od strujnog udara povecava se ako je kabel oštecen ili zapetljan.
Ako radite na otvorenom, upotrebljavaje samo produzne kabele koji su namijenjeni uporabi na otvorenom. Tako cete izbije opasnost od strujnog udara.
Ako alat morate rabiti u vlažnoj okolini, uredaj prikljucite na elektricnu uticnicu zašićenu uredajem za rezidualnu struju. Uporaba uredaja za rezidualnu struju smanjue opasnost od strujnog udara.
OSOBNA SIGURNOST
DODATNA VARNOSTNA OPOZORILA
He ro n3non3BaIte 3a HnKaKbN dpyrIeJI.
OCHOBHN IPEdUYPeXJDEHn3A BE3ONACHOCT IPN PABOTAC EJEKTPNueECK NHCHTPYMEHTN
PNEyPPEKDEHNE! PpoyeTe BCNUKINpeDynpexkdeHn 3a 6e3oNaChOCT NHCPTpyKuN INIOCTpaUN INCeuNcKaun, PpeOCTaBeH C TO3NEJETPNueckn INCHTPymENT. Hecna3BaHeTo Ha BCNUKNHCTpyKuN, NOCouEH N0-DOJY, MOKe Da DOBeDe DoTOKOB yap, NOxap N/IN CNepno3HO HapaHBAHe.
CbXpaHraBaTe BCnUKN npedynpeKdEHN HnHCTpykun 3a 6bdeu cnpaBKn.
TepMHbT ,eJekTpueckn HcTpymeHT B npedynpexkdeHnraTa ce OTHacr 3a Baunn HcTpymeHT - Cbc 3axpaHbaHe ot eJekTpueckata Mpeka (C Ka6en) nHa 6aTepehr (6e3xuHcH).
SE3ONACHOCT HA PABOTHATA 3OHA
IpoIbPkaTe pa6oTHOTo npocTpaHCTBO uHcTo ndope ocBeTeHO. Be3npaBkBT mN TbMHnHaTa B pa6oTHOTo npocTpaHCTBO ca npednoctabKa 3a 3JNOJnyK.
He n3noJ3BaIte eJekTpueckn HNCTpyMeHTB EKcNIO3NBH CpeDn, HApnpME B npncbCTBneTo Ha 3anaNTeHN TeHOCt, Ra3OBe Nn npax. No BpeMe Ha pa6ota eJekTpuecknte HNCTpyMeHTn npoN3BexkDaT NCKPn, KONTO MORa Da Bb3PiameHr npax nn napn.
ДрьхтЕ Deца n CtpaHnUHnTe HabIOnaTeNn Daneue,doKATO bopabnte c eJekTpueckn HhCTpymENT.AKO BHIMaHnETo BN 6bJe OTKNoHeHO, MOKe Da 3ary6nTe KOHTpOHa HAD eJekTpueckn HhCTpymENT.
ENEKTPNUECKA BE3ONACHOCT
UeNcBt Ha eNeKtpueckn HNCTpymEt Tp6Ba dae CbBMeCTnM c KOHTa. B HNKaKB CnyaH He BHacrTe N3MeHENB KONCTpykunraHa UeNceJa. Korato pa6OTte Cbc 3aHyneH eNEKTPueckn HNCTpymEt, He N3NoJ3BaIte aDAnTepn 3a UeNceJa. N3NoJ3BaHTo Ha OpuINHaJIHnTe UeNceNi N KOHTAKn HAmJRA pNCKa OT TOKOB ydap.
H36raBaTe Doonp Cbc 3a3eMeHN NOBbpxHOCTN, KaTO Tpb6n,paNaTOpH,neKu XJaAnJHnCn. Korato TaINoTo Bn e 3a3eMeHO, pCKbT OT Bb3HnKBaHe Ha ToKOB yDap e No-ronm.
He n3laarTe npOyKta Ha IbXd HnBnBnKHy cNoBna. IpOHNKBaHTo Ha B0da B eneKtpnueckn HnCTpyMeHT NOBnBaBA onaCHOCTTa OT TOKOB yap.
He HacnBaIte 3axpaHbAunna Ka6en. HnKora He HocTe, He N3KJIIOUyBaIte n He DbPnaiTe eNektpuueckn HNCTpymEnT 3a Ka6eJa. PpeNa3BaIte Ka6eJa OT HarpBaHe, OmacnBaHe, Donnp Do OCTpn p6oBe nn Do NOdBxKn 3BeHa Ha Maunnn. NobpeDeHnTe nn ycyKaHN Ka6eN yBENuABat PNCKaO TOKOB ynap.
Korato pa6oTte c eIeKtpnueckn HNCTpyMeHT Ha OTkpTO, n3non3BaTe cAmO ydbJnxTeHn Ka6eHn, npedHa3NaueHn 3a pa6oTa HA OTkpTO. mnon3BaHTo Ha ydbJnxTe, npedHa3NaueHn 3a pa6oTa Ha OTkpTO, hAmJIraBa pUCKa TOKOB ydap.
Ako He Moxete Da 36erHete H3NON3BaHTo Ha eJektpueeCKn HhCTpyMeHT Ha BnaXHO MRCTO, H3NON3BaTe RCD (PpeKbCBaC bC 3aunTHo H3KNIOuBaHe). H3NON3BaHTo Ha RCD HamaJIba OnachOCTTa OT eJektpueeCKn ydap.
JIIMUHA BE3ONACHOCT
BbTe 6DnteHN, BnMaBaIte KaKBO npaBnte n npoBraBte 6naropa3ymne, KORato 6opabnte c eEektpueeckn HNCTpyMeH. He n3noJ3BaIte eEektpueeckn HNCTpyMeH, KORATO CTE yMopeHn nn NOBnHHnTo Ha HApKOTuHn BeuecTba, ankoxon nn NekapCTBa. Mnr HeBHnMaHne, DOKaTO 6opabTe c eEektpueeckn HNCTpyMeH, e DOCTaTbueH 3a noyuaBaHeTo Ha cepNo3Hn HapaHbAHH.
H3noJ3BaTe JnUHa 3aunTHa eknnnpOBKa. BnHarn Hocete 3aunTHN OUYJa. 3aunTHaTa eKunnpOBKa, KATO MaCKa npOTNB npax, npriOdeHN npOTNB nIb3raHe 3aunTHN OByBKn, TBbpda WAnKa nn aHTnfoHn, N3noJ3BaHn 3a NOxOJaUte ycNoBna, ue HaAMn ONaCHOCTTA OT qn3nueckn HapaHbaHn.
He donyckaTe HexeJanaHO CTaptnpaHe. Ppei Da BnIgate HIN HOcHte IHCTpymeHTa NpeDn Da ro BKIOUBAte BeJIeKTPnuCeKaTaMPEXaH/INb6AtePnBnHar npOBepBaTe daHn pBeBKIOUBAteJeT e Ha No3uN OFF (n3Kn).HocHeTo HA INCTpyMeHTa C nPbCT BbpxY pBeBKNIOUBATeN INN BKIOUBAHeTO My KbM eNEKTPnuCeTBOTO, DOKaTO pBeBKIOUBATeJIrT My e Ha BkIOUyeH, e pEINOCTaBka 3a 3JNOJyKn.
Maxhe BCnKr RaeyHn Hn FpeHck KIOHOBe 3a HactpoKa npEn Da BKnOHTe NcHCTpyMeHa. IOMoSeH nHcTpyMeH, 3a6paBEN Ha BBpTaI CE eIeMeH, MoKe Da DOBeE Do fN3uYeCKn HapaHbAHna.
He ce npotraTe, 3a da pa6oTne Ha Tpydno DOCTNXMMECTa. BnHa n CTbNBAHTe Cta6nHNO NO BpeMe ha pa6oTa n na3e TaPBHOBeCne. TOBa DaBa Bb3MOXHOCT 3a No-Do6bp KOHTpO HAD eNEKTPuYeCKn INHCTpyMeHT B HeOHaKaBAn CNTyaUIN.
06nuaite ce ueecb6pa3no. He hocete wnpokn dpexn nn ykpaehnna. Dpbxte kocata n dpexnte cn daJeue ot dBnxuente ce qactn. uipoknte dpexn, ykpaehnra, nbjnte KOCN MORAT da 6bdaT 3axbaHATN yBneeyo OT DBNXeU N CE ENEMHTN.
Ako yctpoiCTBaTa ca obopyDbAHn cbc cbojxKeHne 3a n3dpbnBaHe n Cb6npaHe Ha npax, yBepTe ce, ye e To CbBp3aHO n fYHKUOHNpa npabnHno. H3non3BaHeto Ha yctpoiCTBa 3a Cb6npaHe Ha npax ige Hamajn pncOBete, CbBp3aHn c pa6ota B npaunu ycNOBn.
He no3B0nBaIe ONIta Bn C YecTo n3noI3BaHe Ha HNCTpyMeHTn Da BN HAnpaBn NpeKaJIeHO camOyBepenH I da BN HApapa Da NRhopnPate npHHuINTE 3a 6e3onacHocT. EJHo He6peXHO DeiCTBVE MOKe Da IOBeE Do cepNo3HO HapAHBaHe B pAMKInTe CaMo HA CEkyHda.
N3IOJI3BAHE NO5CJYXBAHE HAEJEKTPUeCKnHHTPYMEHT
He HacnBaIte npOdykta. N3noJ3BaIte eKeKtpueckn nHcTpymENT, cbo6pa3HO HerOBTO ppeHa3HaYeHne. IpaBunHo NO6paHnT eKeKtpueckn nHcTpymENT ige CBpwn pa6oTaT no- do6pe nNo-6e3oNacHO B 3aJaDeHnO T npOn3BODInTeN dHaana3OH Ha HATOBapBaHe.
He n3non3BaTe eNeKtpnueckn HNCTpyMeHTn, NnTO NyCKOB ppeKbCBAe NOBpeH. EKeKtpnueckn INCHTPyMeHT, KOTo He MoXe da 6bDe KOHTpOJIupaH nocpeDCTBOM ppeBKJIOUbaTeI, e OnaceH Tp8Ba Da 6bDe peMOHTnpaH.
N3KnIOUeTe ⅢeCenaHa en. 3axpaHbHeTo n/nnn 3BaTe AeKymLaTopHaTa 6aTePna, ako MoKe Da ce N3BaXka,OT eJekTpueckn INHCTpyMeHT, npEn Da N3BpWbATE KaKBnTo n Da e DeIcTBnNo perynnpaHe, CMHa Ha npHaNDHexHOCTnTe nn CbxpaHbBAHe Ha eJekTpueckn INHCTpyMeHT. Ta3n MpaKa npemaxBa OnaCHOCTTA OT 3aJeIcTbaHe Ha eJekTpueckn INHCTpyMeHT NO HeBHMaHHe.
CbxpaHbAte He3aETHeNEKtpueckn HhCTpyMeHTHa HeIOCTbHN 3a Dea MeCTa H He N03BOJBAeTa HaNtua, He3aNo3HaTc HhCTpyMeTA nn C Te3n Yka3AH, Da 6opabrt c Hero. Korato ca B pBcTe Ha HeONHTn Notpe6nteN, eNEKtpueckn HhCTpyMeTHM Morat da 6bDat n3KNIOHTENHO ONACHN.
I POnDbPkaHte B Do6po CbCTOaHne eNeKtpueecknTe HNCTpyMeHTu N TexHnte npHaDnHexHOCTn. IPOBepraBaTe 3a HeN3npabHocTn NN 3aKnINHbaHe B NoDBNXHnTe eNeMeHTn, 3a CuyeneH Yactn NN Dpyr O6CToRteJCTBa, KOTo MOrat Da BNoWAT paOta T ha eNeKtpueeckn INHCTpyMeHT. IpeDi da N3NON3BaTe eNeKtpueeckn INHCTpyMeHT, ce NorpuxKeTe NOBpeNTe Da 6bDaT OTcTaPaHeH. MHoro ot TpyDoBnte 3IonoNyKc CeNbXkT ha HeIo6pe NODbPkaHN eNeKtpueeCKn INHCTpyMeHTn.
I OndbpxaTe pexeunTe HcTpymEnTH BnHaN Do6pe 3aToueHn UcTn. HcTpymEnTH, 3a KOnTo e NoJaraHa npabuHa rpnka n ca c Do6pe HaToeHn pexeun enEmHTn, ce ynpabJIbBAT no-JeCHO IN BepoarTHocTTa da 3aJaTa e No-MaIIKa.
■ N3noJ3BaIte eNEKtpnuecknte nHCTpymentn, npHaJnEJXHOCTne n peKeUHTe n dp. Yactn Cbo6pa3HO Te3N yKa3AHNA, KATO CE cBo6pa3RABate c pa6oTHnte ycNoBnI n c pa6oTata, KOaTO ue H3BbPWBate. N3noJ3BaHTo Ha eNEKtpnueckn INHCTpyMeHTn 3a pa3NIuHN OT npEdBuJeHNTe OT npON3BOJNTeI npINIOxHeH NOBuWaba ONaCHOCTTA OT Bb3HKnBAHe Ha TpyOBN 3IOnOlyKN.
I DpBkTe pBkoXBaTKnTe N NOBbpxHOCTNe 3a 3axBaAaHe cyxN, uCTn N NO TAn dHa HMa MacNo n Cma3Ka. Xlb3raBnTe pBkoXBaTKn N NOBbpxHOCTN 3a 3axBaAaHe He DaBAT Bb3MOXHOCT 3a 6e3OnaCHO 6opabHe N ynpabJeHne Ha INHCTpyMeHTa PnB b3HNKBAHe Ha HEoayKaBAHN CNTyaUIN.
N3NOJ3BAHE N OBCNJYXBAHE HA NHCTPYMEHTAC BATEPNA
Ipe3apekdaIte eHnCTBeHO cbc 3apdHOTO yctpoictBO, nocoyeHO OT npOn3BODntJI. 3apdHO ycpoiCTBO, noXoJauo 3a 3apeKdaHe Ha eINH Bn6aTePNMOke Da npEIN3BnKa pNCK OT noxap, aKO bJe n3no3BaHO 3a Dpyn6aTePN.
■ N3noJ3BaIte eJIeKtpnueckn HNCTpyMeHTn C 6aTePmEINHCTBHeO CbC CneuaHNO npedHa3NaYeHInTe 3a TEx 6aTePm. N3noJ3BaHTo Ha BCaKaBn DpyrN 6aTePm MoKe Da Cb3daPe pNCK OT HapaHraBaHe nNokap.
Korato 6aTePnraTa He ce n3NoJ3Ba,cbxpaHbAaTe TaJeU OT dpyrMeTaNH NObekTu, KaTO HApnPmep KnaMepu, MoHeTu, KlnOyOBe, rBO3Den, RaKN nn dpyrMaNk MAnH NObekTu, KOnTO Morat Da HappABr BPb3Ka MeXdy KneMnte. KbCOTc CbeDInHeHne OT KNeMNTe MOKe Da DoBede Do N3rapnna NIN NOxap.
■Pn HnpaBnHO n3NoJ3BaHe 6aTepyra MoKe Da OTDeJI N TeYHOCr; n36RaBte KOHTA. Ako CnyauHNO HAcTbNn KOHTAKr, IpomHne C BODa. AKO TeuHocCTTa BNe3e B KOHTaKrC OOnTE, NOIbpcTe DonbHNITeHNO MeDnUHcKa NOMOUI. OTdeneHaTa OT 6aTepyra TeHOCr MOKe Da npuHHn BB3pAnHe Hnn n3rapHn.
He n3no3BaIte akymlyaTopha 6aTepeHn HnHCTpyMeHT, KOITo Ca NOBpeDeHN Nn IpomeHeHn NO HkaKbB HaHH. NopeHnte Nn IpomeHeHn 6aTePN Morat Da pa6OTr NO Henpeck3yEm HaHH, KOeTo Da DoBeDe IIOXkap, B3pNB Nn OnaCHOCT OT HapaHBAHn.
He n3naraTe akmyIaTOPHata 6aTepeHn nn HNCTpyMeHT Ha OYbH Nn INpeKaJIeHO BnCOka TemnepaTypa. N3naRaHTo Ha OYbH Nn Ha TemnepaTypa Na 130°C MoKe da npuHHB3pNB.
CneDbaiTe BcNKn HnctpyKun 3a 3apeXdaHe n He 3apeXdaIte aKymyIaNtOpHaTa 6atePn nn HnHCTpyMeHTa N3BbH TempePaTyPn nnAna3OH, NOcoyen B HnCTpyKUnTe. HenpabuHNOto 3apeXdaHe nn 3apeXdaHETo npn TempePaTypN 3BbH NoCOeHn nnAna3OH MoKe Da nOBpeDn 6atePnraTn da yBeJInuN pNCKa OT noXkap.
CEPBn3HOOBCLYKBAHE
PemontbHa eNeKtpnuecknte HNCTpyMeHTn Tp86Ba da ce n3BbpwBa cAmo OT KBaHnΦnupaHn CneuHaNCTn N cAmo C n3NON3BaHeTo Ha opunHaHN pe3epBHN qactn. IIO To3n HaunCe rapaTnpaNoDpbXpaHTo Ha 6e30nacHOCT npn pa6Ota C eNeKtpnueckn HNCTpyMeHT.
Hnkora He obcnykBaIte NOBpeHn akymyIaTOPHn 6aTePnn.ObcnykBaHeTo Ha akymyIaTOPHnTe 6aTePnn Tp8Ba Da ce n3BbPwBa cAmO OT npOn3BOJntenr nn OTOpN3nPaHn DoCTaBnCn Ha ycLyrNo 06cnykBaHe.
OBsI INPEyINPEKJDEHn3A BE3ONACHOCT INP PABOTAC BEPNXHHN TPNOH
Ipn pa6oteu BepnKe Htpno DpBkTe peKeaTa Bepura daJeU OT BCnKu qactn Ha TAnTo cn. Ipei Da cTaptnpate BepnxHn TpnoH, ce yBepete, Ye Bepurata He Donnpa HnkDe. EINMH MInr HeBHMnHaHe npu pa6ota C BepnxHn TpnoH MoKe Da 3abNehe qactn Ha O6JIeKnO To Nn TaJIoTO BN BB Bepurata.
BnHarn dpbXTe BepNXHn Tpnoh C daChata pKa 3a 3aHaT a pbKoXBaTKa n C JBaTa pKa 3a npEdHata pKoXBaTKa. 3axBaUaHEto Ha BepNXHn TpnoH c o6paTHn 3axBat yBeNvAba OnaCHOCTTA OT HapaHraBaHe n e 3a6paHeHo.
ДрьжтЕ Ворнхня Трон Camo 3a ИЗОпанite
ПОВьрхнoctи 3a XBaшанe, 3aоTO pexeшаТа
Вериг може Да Bпeзe B KOHTaKT CbC CkpTN
Каби. Ако Воригда Bпeзe B KOHTaKT C OTKpTN
Жиц, може Да npOTeH TO KNo MTeAHnITE qactN Ha
ЕNEКТчueckн ИСТpymEHT, B CNeДCTBne HA Koeto
ОпетаTOрБТ може Да npETbPn TOKOB ydap.
Hocete 3aunTHn CpeCTBa 3a Ouy NpepOpbTuNTHo e da n3noJ3BaT DonbJInHTeHH npedna3HN cpeCTBa 3a cnYxa, rnaBata, pueTe, kpaKaTa u XoDnla. IooXoJaTIne PpeNa3HN CpeCTBa ue HaMaJIr PtCKa ot fN3uEcko HapaHraBe OT NeTAAOTNaDbUc INI HeymnHeh KOHTAKC Bepurata Ha TPOHa.
He pa6oTeTe C BepnKnnr Tpnoh Bbpyx DbPBO,doKaTo ce HamnPate Ha CTbI6a, NOKPNB NIN HeCTa6nHa noDnopa. IV3No13BaHTo HA TpNOHa No TO3N HauHH MOKe Da IOBeDe Do cepNo3HO pN3Nuecko HapaHBAhe.
CTbNbaIte BnHarn Cta6nHc DBaTa Kpaka N3NoJ3BaIte BepnxHn TpnoH cAmO aKO CTe CTbNIIHa 3dpaBA, CNpyhA npBHa NOBbpxHOCT. Xb3raBIne nn HectabnHn NOBbpxHOCTM MoKe da npuHnT 3ary6a Ha paBHOBecn nN KOHTpoN Bbpxy BepxHn TpnoH.
Korato pexete KIOH, KOHTO e 06TERHat NOd HAnpeXeHHe, 6bTe B rTOBHOCT TOn Da OTCKOH B onpeJeHa nocoka. Korato 06TERHATnTE NOd HAnpeXeHHe BnakHa Ha DpbTO ce OCBO6oJrT, KNOhBT MOKe Da yDapu OepaTopa NIN Da IpeN3BnKa 3ary6a Ha KOHTpON HA BepNXHn TpnoH.
BbTe Oco6eHO BHMaTeHn npn p3aHe Ha xpactn mnn mna ndbpBeTa. Kpxkrt dpbbeH MaTePnAn MoKe Da ce 3axBaHe 3a peXeUaTa BePnra N da BN yapn nn da BN n3kapa oT paBHOBeCHO IIOJKeHne.
Hocete BepnKnra TpnoH, KaTo ro DbpxKe 3a npedHaT a pbkOxBaTKa, C n3KJIOueh MOTOp n daJeY OT TaIOTo BN. Pnp TpaHCNOptnpaHe Nn npn CbxpaHnBaHe Ha BepnKnra TpnoH BnHarn NOCTABYe IpeNa3HnKaNak Ha BOeauata hnHa. BHmATEJIHTO 6opabeHe C BepnKnra TpnoH HamaJIra Ba BepoTHOCCTTa OT CnyuaeH DoINP Do DBNXeAATA ce Bepira.
CneBaeHnCTpyKunHe 3a Cma3BaHe,HaTraHa He Beprata HCMHa Ha uHHaTa N Bepurata. HenpaBnHO oTeHaTata nn HeoctaBvHo Cma3aHaTa Bepura MoKe da ce ChyIn Nn da NobuNn 3HaHTeHNo ONaCHOCTTA OT OKaT.
Pexkete camo DbpbH MaTepnaJ. He n3noJI3BaJte BepxKnra TpOoH 3a DeHocTH, 3a KOtO ToH e npedHa3NaueH. HanpImep: He n3noJI3BaIe BepxKnra TpOoH 3a P3aHe Ha MetaI, INaCTMaCA, 3ndapn nn CTponTeHN MaTepnaH, KOtO He ca OT DbPBO. N3noJI3BaHTo H BepeXKnra TpOoH 3a DeHocTH, 3a KOtO He e npedHa3HaueH, MOKe da DOBeDe Do pNCKOBn CNTyaUIn.
He onntBaHte Da nobajare DbPBO,doKaTO He CTe pa36paHn KaKBN Ca PnCKOBete N KaK Da Tn 36raBate. NobaJIrHTo Ha DbPBO MoKe Da npuHHn cepno3HO HapaHBAHe Ha onepaTopa nn CTpaHnHTe Ha6nOdaTeN.
CnazBaTe BCnUKN HNCTpyKun 3a OTCTpaHnBaHe Ha 3aceDHaNN MaTePnAHH, CbXpaHHeNe NnO6cnyXBaHe Ha BepNXnra TpnoH. YBepTe ce, Ye npeBKnIOuBaTeIe e N3KnIOueH N batePnTa e npemaxhata. HeoayKaBaHO 3aDbNkBaHe Ha BepNXnra TpnoH NO Bpeme Ha NoYnCTBaHe Ha 3aceDHaN MaTePnAn nn O6cnyXBaHe MoKe Da DOBeDe Do cepNo3HO fN3Nuecko HapaHnBaHe.
INPUHNI 3A Bb3HNKBAHE HA OTKAT N HAYHNI 3A IN3BRAHETO MY:
MoKe Da Ce NOnyUn OTKaT, Ako KpaT Ha 5uHata BnE3e B KOHTAKT C DaDeH NpeDMET UIN AKO pexeUaT Bepra 6bJe 3aTNCHTA T N 3axBaHATA BDbPBO TO NO BpMe Ha P3aHe.
IOnKaora Donnp Do npEmet C Bbpxa Ha BoeaaTa IHHa MoKe Da npEni3Bnka HeoayakBaHa ObpaTHa peakua, npN KOrTO Boeauata IHHa OTCKaHa Harope N Ha3ad No nocoka Ha onepatopa.
3aKnHbHeTo Ha Bepnata OT rOpHaTa CtpaHa Ha mHaTAt MOKe P3KO Da OTXBpNn 1nHaTa No NocOKa Ha onepaTopa.
B TaKnBa Cnyan e Bb3MoXHo Da 3ary6nTe KOHTpon NaI TpnoHa I da NOnyUHTE cepNo3HO HapaHBAHe. He pa3uHTaIe cAmo Ha npEpa3HITe MexAHm3Mn, KOnTO mMa TpNObT. Bne cbso Tp86Ba da npEepnpeMeTe pa3NuHm MepKn, 3a Da n3BeHHepe PnckAOT 3nONOlyKn HapaHBAHnA.
OkaTbTe cneDCTBHe Ha HnpaBnH0 n3non3BaHe Ha eNeKtpnueckn IHCTpyMeHT. ToM MoKe Da 6bJe npedOTBpateHc PpeDnPmeMaHe Ha NOxDxOJaN ppeDna3HmepKn, KOnTO ca ONuCaHn No-DoJy:
IpBxTe BepnKnHr Tpnoh 3dpaBO C DBeTe pLcE, KATO O6XBauate xy6abo PbKOxBaTKnte My c NaIuNTe N NOKa3aJUNTe. 3aemaTne NO3nua Ha TAnOTO n PbueTe, npN KOARTO Ue MoKeTe Da IPOTHBOCTOHTe Ha eBEHTyaHNO Bb3HNKHaHn OTKaTHN CNII. Ako Ce B3emAT NoDxOJaUN PpeNa3HN MepKn, npN B3HNKBAHe Ha OTkA ONepaTopbT MOKe Da OBlaJeBb3HNKBAUte OTKaTHN CNIN. B HnKaKbB CnyaH He NyckaTte BepnKnHr TpnoH.
He ce npotrae npekomepno c nHctpymenta He pekeTe HAD BnCOUHa HAD pamehe Tc. Taka npedotbpaTBAte HeKeJahOTo DOKOCBaHe Ha npedMeTN C Bbpxa Ha BOdeuata uHa N Ue IMaTe NO-Do6bp KOHTpO NaBepKHHr TpNOH PnBHe3anHO Bb3HNKBaHe Ha HEoayKaBHn CNTyaun.
H3noJ3BaIe cAmo pe3epBHN HnpaBnaBaun HnHn n pexeun Bepn, npenopbuaHn OT npon3BOInTeJ. HenpabuHn pe3epBn HnpaBnaBaun HnHn n pexeun Bepn Moar da npuHHT CKbcBAHe Ha Bepurata N/INOTkAT.
CnazBaTe HNCTpyKuNTe Ha npOn3BoDnteT npn 3aToUBaHe nNoDpBxKa Ha Bepurata. TbbpDe HNCKnte OrpaHcyNTeHa Dbl6OChHata yBeInuHaBat ONaCHOCTTA OT Bb3HNKBaHe HA OTKaT.
DONJIHNHTENHIN PEPDYNPEXKDEHNA 3A BE3OJNACHOCT
Iocetete npopecnoHaen Kypc 3a n3n03BaHeTo n IODpBxKkata Ha BepnKHN TpNOH, 3a npeBaHTNBH NcCTBnN OKa3BaHe Ha nbpBa NOMOu. CbXpaHBAnte PbKOBOCTBOTO 3a ekCnIOaTaN HA cNpyHO MRCTO, 3a da MOKeTe Da ro nON3BATE IN NO-KbCHO.
BepnKHNTe TpnoHn ca NotEHuaHNO onaCHn HNCTpyMeHTN. HUuJeHTnte, Cbbp3aHN C n3NON3BaHETo Ha BepnKH NTPOHO, YecTO 3abbpWbAT CbC 3aY6ba HA KpaHnUu NIN cmbpt. NaaunTe KIOH, NOBAHeHNTe DpbBETA N TbpKaJNAIte Ce DbHepn CbIo MOrat Da y6NBaT. He3dpabnTn INrHneU DpbBeH MaTePnAn Cb3dAba DonbLnHtENn ONaCHOtn. Tpr6Ba BHIMATEJHO DA IpeueHbATE Bb3MOXHOCTNE tC 3a 6e3OnacHO cnpabRe He CbCcbOTBeTHata DeHOCt. Ako IMate HkaKBcMbHeHnOCTabe Ta p6oTaHa npopecnoHaJIeNCOBbD.
He pexeTe acMn n/nn MaJKn xpactanaun (c DnaMeTbp no7 5 MM).
Korato pa6oTnTe c npOdykTa 3a nbpBn nBt, npenopbUHTeHoe e da pexKeTe Tpyn Bbpxy Marape nnIIOJa.
I IIOUta Ha pa6oTHn yuacTBk 3aBnCn ot pa6oTaT, KOrTO Ue Ce n3BbPwBa, KaKTo N OT Ha DbPBO To NIM OT CTBOnA, KOIT Oe Ce o6pa6oTb. HanpImep NOBaanHeTo Ha DbPBO N3NCKBa No-roJMa pa6oTha 3OHa OT dpyrN BnOBe p3aHe, KATO HApImep 6uYeHe Ha Tpynn np. OnepaTopbT Tp8Ba Da BHIMaba N da KOHTPOJInpa BCnHko, Koeto Ce cnYBa B pa6oTHata 3OHa.
Iokato pexkete, Tnoto Bn He Tp6Ba da 6bde Ha eHa JINHn C BOeaaT a WnHa n Bepurata. Ako cna3BaTe TOBA, npEbeHTyaneH OTKat BEprata Hma Da BnE3B KOHTAKC BAaata maba nn TnO.
Pp n p3aHe He 3n013BaTe DnBKeHne HnpeHa3a. Octabete Beprata Da Cbbpwn pa6oTaT. PdIbpxKaTe Beprata HaToeHa n He ce OnITBaTe Da a 6yTaTe CbC cnJa npE3 npope3a.
He ynpaxhnaBaiTe HaTnck Bbpxy TpnoHa B KpaH p3aHTo. BdTe roTOBn Da IpoMeTe TeXeCTTa Ha BepxKnH TaIOH, Korato ToI npopexe P3aHOT O bPBO n Ce ocbo6oOn. HecbO6pa3raBaHTo C TOBa npedynpeXeDeHne MoKe Da DoBeede Do cepNo3HN KOHTy3nn.
He cnnpaIte TpnoHa no cpeIata Ha p3aHTo. OctabeTe TpnoHa da pa6OTn,doKaTO He ce ocboDo n ot npope3a.
3a Da HamaJIIne pIcKa OT HapaHbAHn, npuHHeHn OT KOHTaKT C DBNKeU nCe YAcTn, BINHaR N3KJIIOyBaHTe DBNrAteJr, 3aDeiCTBaIte CnnpaYkata Ha Beprata, MaxHete 6ateprrTa nCe yBepTe, Ye BCNUK DNbXeU nCe YAcTn Ca CnpEn HAnbJIHo:
-преди поочьBaHe Ии OTстpaняBaH 3anyuBaHЯ
-празнocтавянHa n3deleneto 6e3 NaДЗр
-прази моHTиран eHДeMoHTиран HaДОПьЛНИТЕЛНИ рИСТаВКИ
- ppei npoBepka, noDpBxKka nn pa6ota no npoDyKta
IpoJbJIKNTeHOTOn3nON3BaHeHaNCHTpymeHTaMOKe Da DOBeDe Do HapaHbAHn NIN BNoWbaHe.Ipn 13nON3BaHe Ha INcTpymeHTa 3a IpoJbJIKNTeHNIpePNOi OT Bpeme npabete YecTn NOHBKn.
Ako npodykTBt 6bIe n3nychaT, npetbpn CnneH yap nn 3anoue He Bnbpnpa HeecTeCTBHeO, He3abABHO n3KIOUte npdykTA u npOBepete 3a NOBpeu nn ce ONTaTE da NdeHTnФmUpate npuHaTa 3a BnbpnpaHeTo. NOnpaBKnTE u 3aMeHnTE Ha YacTN npN NOBpeDa Tp8Ba Da ce N3BbpWBat OT OTOPN3npaC cepBn3EH cEHTbp.
C npodykta Tp6Ba da ce pa60n cmo npi TempepaTpym Mekdy 0^ n 40^
CbxaHraBaIte npOyKta npn OkoHa TemnepaTypa MeKdy-10°C n 50°C.
JIYUHNIPEDA3HNCPEDCTBA
BucokokayecTBeHnI NmHn npedna3HN cpeCTBa, n3non3BaHOn OT npocepnoHaHnTe pa6oTHnU, HamaJBAt onaChocTTo HapaHbaHe Ha onepaTopa. CneHnTe 3aunTHn CpeCTBa Tp6Ba Da ce n3non3BAT npn pa6ota C BepNXHn TpOH:
IpeDn3Ha Kaca
- Tp6Ba Da e B cbOTBeTcTBnE c EN 397 n da nMa CE MapKnipOBka
AHTnfoHn
Tp6Ba da e B cbOTBeTCTBne c EN 352-1 n da nma CE MapKnpoBka
IpeDn3Hn CpeCTBa 3a OHTe N IInTeTo
- Tp6Ba Da NMAT CE MapKnpOBka N da ca B CbOTBETCTBnE C EN 166 (3a 3aunTHn Ounna) nIn C EN 1731 (3a MPexeun BN3bOpn)
PbKaBnCn
- Tp6Ba da e B cbOTBeTCTBne c EN381-7 n da nma CE mapknpoBka
3aunTHn cpeCTBa 3a kpaKaTa (ramaun)
- Tp6Ba Da ca B cbOTbETCTBne c EN381-5, da mAt CE MapKnpoBka n Da npedocTbTcJIOCTHa 3auNTa.
IpeJnA3Hn 60Tuu 3a pa6oTa C BepKHN TpOHO
Tp6Ba da ca B cbOTBeTCTBne c EN ISO 20345:2004
n da ca MapKnpaHn C uT, n3o6pa3raBaU BepnKeH
TpnoH, KoTo e 3NaK 3a cbOTBeTCTBne c EN 381-
3. (Notpe6bntenite, KonTo prAnko pa6OToTc ypeDa,
MOrat Da n3NoN3BaT PpeDna3HN BoTyuN Cbc
CTOMaHeHa 06WbKa Ha npbCTIne N CbC 3aUnTHN
MaHsOnn. Te3n 6OtTuN Ca B CbOTBeTCTBne
c EN 381-9 n MoRat Da 6bDat n3NoJ3BaHn,
ako pa6oTHata 30Ha e paBHa n CbUeCTByBa
MNHMaJIeH pICK OT CnBaHe Nn 3aJIHTaHe B
Ha3EmHata pacTeJIHoCT)
JaKeta 3a 3auNTa Ha roHaTa YacT Ha TAnTo npn pa6oTa C BepNKH TpNOH
- Tp6Ba da e B cBoTBeTcTBnE c EN 381-11 n da nma CE mapknpoBka
DONJIHHTENHI NPEADYIPKDEHEN3A BE3ONACHOCT 3A BATEPNYTA
3a da n36erHete onachocTta OT noXap, npedn3BnkaHa OT Kbco CbeDInHeHne, KaKTo HapaHbAHnra T NOBpeDInTe Ha npOdykTa, He Notanrte INCTpyMeHTA, CmehReMaTa akymyIaTOPHa 6atePn rnn 3apJdHOTo yCTPOcTBO B TeUHOCTn N CE NOrpNKeTe BypeInte n akymyIaTOPHnte 6atePn Da He nonaDat TeuHOCTn. TeUHOCTne, npEdn3BnKBaun KOp03n nn POBexJaun eJeKTprueCtBO, KaTO CoJena H BOda, ONpeDeEnH XIMKaN, n36BeNBauN BeuecTBA nn npOdykTN, CbDbpKaUnn 36EBNaUN BeuecTBA, MORAT Da npedn3BnKAT Kbco CbeDInHeHne.
3apekdaIteakymyIaTOPHATA6atepnaHaMrcTo,Ha KOeTO OKoJIHATA TEMnepaTpye MeKdy 10^ n 38°C.
CbxaHraBaIteakymyIaTOpHaTa6aTePnHaMaCTo,Ha KOeTo OkJHaTa TempePaTypa e MeKdy 0^ n 20^
MHCTPYKUN OTHOCHO OCHOBHNTEXHNI 3A IOBAJRAHE HA JBPBETA, KACTPEHE HANPEUHO PR3AHE
PA3BnPAHE HA CNJInTE N IPOUCNTE, IPOTNAAU B DbPBENRA MATEPNAJ
Korato pa36epeTe nocoknte Ha OKa3BaHe Ha o6TgAio
HappeKeHne I npTnCKaUc HATNCK B dbpBeHna MATEpNaI,
MOKeTe Da HAMnITE ,npuunBbHnTaHa TPOHO HA NIO
NoHe da 3Haete Kora Da rO uOakBaTe B npoueca Ha p3aHe.
Korato DpbBEHnT MaEPnAe e O6TerHnat ND HAPpeKeHne,
BnAKHATA B DpbBOTO ce pa3daneyabat IN npn py3aHe BA3N 30Ha ,CENHATnHata" INN npope3bT ce pa3wnPraBAt
CNEI npemHHaHe HA TPOHO.AKO INoJ3BaTe ,Marape" 3a NOnpa npn PRAHa Hd bHep, HO eINHnT KpaH Ha DbHepa BNC 6e3 NoDnpa, Ue ce cb3dae O6TgAuo
HappeKeHne B RopHata Yact Ha DpbEHHa MATEpNaI,
3aTO terlTo Ho BnCzUaT aact Ha DbHepa Ue
OBTER He BnAKHata.CBOTBTHo B DOnHata Yact Ha DbHepa Ue ce cb3dane npTnCKaHt HATNCK, 3aTO To BnAKHata Ue
6bDat npTnCHaN eDHO B dpyro. Ako HApnbTe npope3 B Ta3N 30Ha, CEHaTHnHa Tae Ce ONITA da Ce CTech N da ce 3aTBOpn NO Bpeme Ha p3aHeTo. TOBa Ue npeeuine ocTpneTo.
HATNUCK N TE TJIENEHE
IpoTnBOeHCTBaUaTa CnHa BnHar e c NocKa, ObaPaTHa Ha BbPTHeTo Ha Beprata. OnepaTopbT Tp8Ba Da NOIROTBEN 3a Bb3MOXHOCTTA npOdyKTbT Da OTCKOni Da npaBn OTkAT. PpOdyKTbT OTcKaa (DbNKeHne Hanpei) npn p3aHe No DoHNy Pb6 Ha uHnHa. YpeBt MoKe da OTCKOni Ha3ad (KbM ONepaTopa) No Bpeme Ha p3aHe no DblKnHaTa Ha rOpHn Kpa.
3ACRAHE HA TPNOHA B IPOPE3A
N3KJIUOyTe N3BaJTe AkyMylaTOpHaTa 6aTePnIe. He ce ONITBaIte Da OCBO6oJTe CbC cnJa Beprata N SinHATA OT npope3a, 3aIoTO TOBa BepoTHO ige Cyynn Bepnrata, KOrTo MoKe Da OTXBPbKHe I da ydapn OnepaTopa. Ta3n CNTyaUmaOBKnHOBcB3HnKBA, 3aIoTO p3aHOTo DbpBO He e NOCTabeHo Ha npabunHa Onopa n npop3aHaTa Yact PnuiuNbA ocptneTo. Ako perynpaheto Ha onopata He OCBO6oJIMnHATA N Beprata, INON3BaIte DbpBeHH KInHOBe ININ NoCT, 3a Da pa3wnpTe npope3a N da OCBO6oJTe TpnoHa. Hnkora He ONITBaIte Da CTApTpnpate
BepnKnI TpnoH, KOraTo BOeJcTa WnHa BeYe e 3aceHnA B npope3 nIn cenHaTHHa.
ПЛБ3ГАЕ/OTСКАЧАЕ
KoratoBepnKnHrTpnoHHeycnee Da3aNb6aeNoBpeMe Ha p3aHe, HacooyBaUata WnHa MoKe Da 3anOuHe da NODcKaa UINOnACHO Da CE PnINb3Ba NOOBpbXHOCTTa Ha DbHepa INN KNOHa,a TOBa EBeHTyaIHO MOKe Da DOBeDe Do 3ary6a Ha KOHTPOJ HA BepnKnHr TpnoH. 3a Da npedOTbPaNTe INN HAMAnTE PnTB3raHETo INN OTCKaHaTe,BINARIN3NON3BaInTe TpnoHa C DBe PbCe. YBepete Ce,Ye Bepurata Ha TpnoHa npabn XJIe6 3a p3aHe.
Hnkora He pexkete MaKn, rBKBaBn KIOHn HInxpactn C Bepnxnra TpnoH. Pa3MepbT n rBKBaOCTTa NM MOrat Necho Da DOBeDat Do OTCKaUaHe Ha TpNoHa KbM Bac UIN Do TOBa ToI da Ce 3akNeuDocTaBHyo CnHIO, Ye da ce PpeiN3BnKa OTKaT. Han-dOpnte IHCTpyMeHTn 3a To3N BnD pa6Ota ca pbueh TpNOH, rpaDnHapcKn HOKUn, 6paDaBa INI DpyrN PbUH INCTpyMeHTn.
NOBAJHHE HADbPBO
Ako Dbama nIIN NOBHe YOBeka eNHOBpeMeHNO 6uYat Tpynn I NOBaJIAT DbpBO, MEXy MxCTOTO Ha 6uYe H N DpBOTO 3a NOBJIaHE Tp8Ba Da IMa pa3CTOaHne, KOeTO e NOHe DBA NbTN No-ROJMAO OT BnCOUHaT A Na NOBJIaHOTo DpBOTO. PnIOBANHe Ha DpBETa Tp8Ba Da CE BHNMaBA Da He 6bDat 3actpaJeHn Dpyr INuca, ENEKTPponPOBoD, BOONPOBOi, Ra3ONPOBOi IN Dpyr NIObEHN CbOpBXeHn, KaKTo I Da He 6bDat HaneCehn MaTePnaHn UeTn. AKO NOBaJIeHOTo DbpBO 3acerHe CbOpBXeHne Ha INΦpactpykTypaTa, He3a6abHO TpyBa Da 6bDe yBeDoMeHa CbOTBeTHaT OprAHn3aun, CTOnaHNCBaUa CbOpBXeHneTO.
Ako pa6oTnte no HAKNoHeH yAcTBK, BnHaH n CToIte HaBnCOKO, 3aUTo OcBSeCTByBa ONaCHOCT npN OTCuHaTeO cn DpbBOTo Da ce N3TbPKaJIa NN NnB3He HAdOny No HAKIOHa.
Ipei Da ce 3anoyHe c nobajnHTo, Tp6Ba da 6bJe HabeJIa3aH npa3uHCTeH nbT 3a 6e3oNaCHO OTterJnHe OT pa60THata NIOUaJaKa. TbTAT 3a OTTERJaHE Tp6Ba Da BOIN KOCO Ha3ad CnpMo OuaKbaHaTa JInnHa NaDaHe HA DbPBOTo.
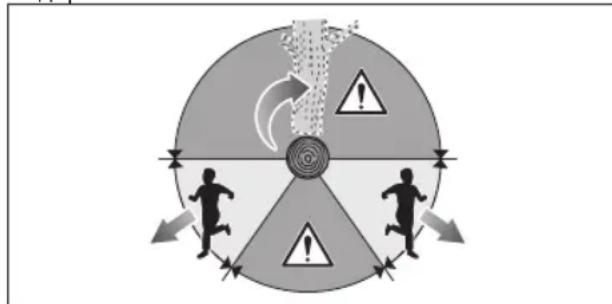
Ipeu noBaJIaHTo Tp6Ba Da 6bDat OTYeHTN ECTECTBHeHr HAKIOH Ha DbpBOTo, NO3nTtHa NoTOJEMNTe KNOH N NOCOKaTa Ha Brtbpa, 3a Da 6bDe IpeueHeHa B3MOxHO Ha-TOH OINHrTa Ha NaDaHe Ha DbpBOTo.
DbPBOTo Tp6Ba Da ce NouchTn OT 60Knyu, KambH, OKpbTbaa Ce Kopa, NPOH, CkObN TeI.
He onntbaIte da nobaiTe nbpBeTa, KOnTo ca n3HnInn nn ca noBpeDeHN OT BAtbp, OByh, MbJHnNn np. Toba e
N3KIOUHTeJIHO ONaCHO I TpRABa Da ce N3BbPbBa cAmO OT npOpeCNOHaHn ap6OpIcTn.
1. HanpaBlaBauc npope3
Hanpabete pa3pe3a Ha 1/3 ot dnaameTbpa Ha Dbpboto, nepneHdNkUyIrpHo Ha nocokata Ha nadahe. TbpBO Hanpabete DOHNr XOpn3oHTaEN Cpe3 Ha Haprabnaun npope3. Taka ue n36erheTe 3auINBaHeTo HA BepKHHr TpnoH NnHa BOeUaTa uHa pRn Hapabata Ha BTOpN Cpe3 Ha npope3a.
2. Nobanra 3aDen Cpe3
Nobanrnt 3aHEn cpe3 Tpr6Ba da ce HnpaBn nohe 50 MM (2 Hua) NO-BnCOKO OT xOpn3oHTaHnna Cpe3 Ha HnpaBnBaun npope3. Nobanrnt cpe3 Tpr6Ba da e ycnpoeDen Ha xOpn3oHTaHnna Cpe3 Ha npope3a. Hanpabete nobanraun cpe3 Taka, ye da octane n3BeCTHa Henpep3aHa qact, KOTo DeiCTBA KAto wapHnp. WapHnpbT npedotbpaTBA 3aBbptaHeTO n naHaTo Ha DpbTO B HnpaBnHa NocKa. He npepraBaTe wapHnpa.
Korato NOBANJUcIcpe3 Do6nJxuWapHnpa, 6n Tpr6BaNO DbPBOTo cAmO Da 3anoHe da nJa. Ako BnDInTe, Ye IMa Bb3MOXHOCT DbPBOTo Da He NaHe B XeJHaHaT a NocOKa nn Da ce HAKIOH N da 6bOKnPa BepNXHr TaHOH, PekbcHE Pa3p3BaHTo n 3nON3BaYte KINHOBE OT DbPBO, PnactMaca nn anyMnH 3a pa3TBapRHe Ha Cpe3a HAKNAHHe Ha DbPBO To B XeJHaHaT a NocOKa.
Korato Dbpboto 3anoHne da naDa, n3BaTe BepnKnHn Tpnoh OT cpe3a, n3KnUoHte ro, ocTaBeTe ro Ha 3emra HanyChete paobThata nNouzaJa Ka no npedBapnteJHo HabEny3aHnna Nt 3a OTternHe. BnImabaTe 3a Naaun KNOH, KaTTo n Da He Ce npenbHeTe.
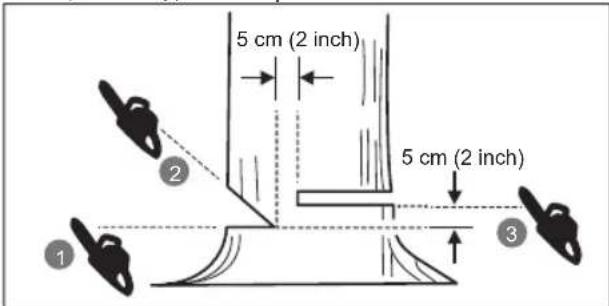
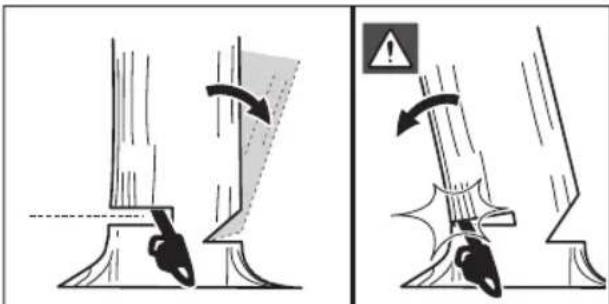
I3PRA3BAHE HA DEBENKOPEHN
Toba ca MHORO rONEMN KOpEHN, KOINTO n3NJ3aT OT CTBONA
HAD NOBbpxHOCTTA. PpeDN da OTceHete DbPBOTO, OTCpaHete De6eNTe KOpEHN. PbPBO HAnpaBeTe XOpN30HTaJIEN Ipope3 B KOpEHa, CNeI TOBa N BePTnKaJIeH. MaxHete N3pR3aHATA qACT OT pa6OTTHy yAcTbK. CNeI KaTO n3BaJNTe De6eNTe KOpEHN, pnpCTbIeTe KbM
OTPra3BaHe Ha DbPBOTo.
BNUHEHADbHEPA
BnuheHTo npedctabnBa Hap3BaHe Ha DbHepa no DbljInHa Ha Tpynn. BaxHo e da CtbNbaTe ctabnHOn I TeXeCTTA Bn Da e pa3npedeJeHa paBHomepHO Mekdy Dbata Kpaka. Ako e Heo6xOIMo, DbHepbT Tpr6Ba Da 6bDe NoDnprH C KIOHN, rpei nn KlnHOBe. 3a da pa3pr3BaTe JeKO, cna3BaIte Te3n IpocTn yka3aHn. Korato DbHepbT eNoDnprH NO UJlATA My DbljKInHa, Tpr6Ba Da ce pexe ot RopHATA MY CTpaHa (RopHO bnuhe).
Korato dbhepbt e noDnprH cAmO ot eHaTMy ctpaHa, HanpaBete pa3pe3 OT dOnHaTcTpaHa Ha dbhepa C dbIoouHa 1/3 OT dNaMeTbpa My (dONHO6uHe).CneTOBa Hapabete fHaHaHnca pce3 ype3 rOpHo 6uHe, KaTO cCBpxkTe C nbPBnra pa3pe3.

Korato DbHepbTe e noDnpnH n OT Dbete My cTpaHn, HAnpabete pa3pe3 OT rOpHata cTpaHa Ha DbHepa C dbl6ouHnA 1/3 OT dNAmetbpa My (rOpho 6uheHe). CneTOBa HAnpabete cHnHaJIHHa Cpe3 Ue3 DOJHO 6uHeHe, 3a Da CpexkTe OCTaHaJIte 2/3 OT dNAmetbpa, KaTo ro CbBpKeTe C nbPBnA pa3pe3.

Korato 6nHTe Tpyn Ha cKnOH, BnHar n CTouTe OT rOpHaTa CtpaHa Ha DbHepa. 3a Da NODbPkATE KOHTpO npn "p3aHe", HamaIe He HtNcKa KbM KpaH Ha p3aHTo, 6e3 Da OTnyckate 3axBata cn Bbpxy PbKOxBaTKnte Ha BepnKHH TpnoH. He No3BOJRABaTe Ha Bepurata Da DOKOCBa 3emrA. Cnei npNKIOUbaHe Ha npope3a N3yakaIte Bepurata Da cnpe, npdI da npMeCTnte BepnKHH TpnoH. BnHar n3KIOUBAte MoTopa, npdI da npemHHe TkM CneDbaUto DbPBO.
KACTPEHE HA IbPBO
Kactpeheto npedctabnba npemaxbahe Ha KnoHOn OT nobaneHO dbpBO. Korato kactpnte dbpBO, octabeTe rolemnte KIOHOn OT DOHaT My cTpaHa, 3a daTo noDnnpaT. Optr3BaTe MaJKe Tne KIOHn C eEOHO pexeO DnXKeHne. KIOHNe, KOIno CaOBterHATn NOd HAnPExeHne, Tpr6Ba Da 6bDat OTPzBAHN OTdoNy Harope, 3a da Ce npedOTBpaTn 3akneuBAHeTO HA BepNXHn TpNOH.

NpyxHHHnPbTN
OrbHaTne KIOHMOKe Da Ca KIOH, N3KOpHeHn TbHOBe Hnn PdAnKn, KOTo ca OrbHaTn OT DpyrO DbpBO, Taka Ye pR3KO Ue Ce N3npABrT, KOraTO rN OTpExKeTe Nm MaxHete DbpBOTO, KoTo rN DbpXn.
CbueCTByBa cepno3eH pNCK N3KOpeneHnT nbHa OTceyeHOTO DbpBO Da ce OCBo6Onn Da 3actaHe BbB BepTKaJIHO NOLOXKeHne npn Pra3aHe, 3a Da ce OTdEHNOT CTBona. BHIMABaIte -OrbHaTIte KIOHn Ca onaChn. He ONITBaIte Da peKeTe ORbHaTI KIOHn INJIN DbHEpN, KOITO ca nO HApExeHne, OCBen AKO He CTE npOpeCNOHaHNo OByehn N KOMNeTeHTHn 3a Ta3n DeHocT.
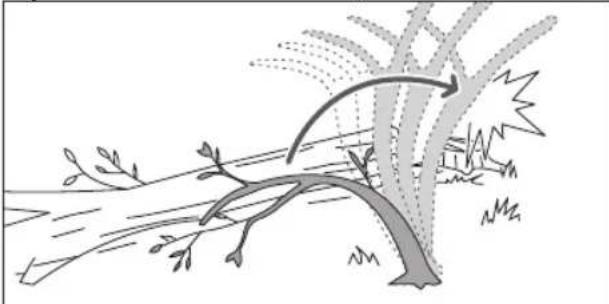
PNEUYPEXDEHNE!OrbHaTnte KIOHn ca onachn, 3aOTo MOrat Da BN yDaprN Da 3ary6nte KOHTpOJ HA TPOHO. Pn KoETo Da NOLyUHTe TeKKn NIN CMBPTOHCHN TEneChn NOBpei. P3aHeTO Ha npyKinHH CTbI6oBt P8Ba Da ce N3BbpwBa OT o6yHeH NTpeBnteHn.
TPAHCNOPTUPAHE N CbXPAHEHNE
13KIOUeTe npOdykTa, 3BaIeTe akyMyNaTOpHaTa 6atePn r no 3uakaTe da ce oxlaDn, ppeDn da ro npnbepete 3a cbxpaHHeNe nJn da ro TpaHCnoptnPate.
OTctpaHete BcNk N yKm MaTePnAIn OT npOyKta. CbXpaHraBaIe Ha XnaIHO, cyxo n Do6pe npOBetpRaHo MrcTo, KoETo e HeIOCTbNHO 3a Deua. DpbXte npOyKta DaJIeue Ot pa3JKaun BeUeCTBa, Kato HapnPmep rpaDnHckn XmMknAn pa3Mpa3BaUn coN. He cbXpaHraBaIte npOyKta Ha OTkpntO.
IocTABaTe Kanaka Ha BOeUata Ta HnHa, KOraTo npBnpate 3a CbXpaHeHne nn TpaHcnpTpapTe npodykTa.
Korato TpaHcnpntpate npdykta, ro o6e3onaceTe TaKa, Ye da He MoKe Da ce DnKn Nn Da nAHe, 3aTOToBa MoKe Da DOBeNe Do eBHTyAnHn HapaHbAHn Ha Xopa nn NobpeN no npdykTa.
TPAHCNOPTNPAHE HA JINTNEBMBATEPNI
TpaHcnpOpTuPaIte 6aTepeNITe BCbOTBcTCTBnE C MeCTHnTe HauHOHaJIH NoCTaHOBJIeHn npa3nopeDn.
CnauBae BcNKn CneuaJIH N3NCKBaHna 3a NaKeTnpaHne EtnKetnpaHne, Korato TpaHCnopTpate 6aTePnn Upe3 TpeTo Iuue. YBepeTe ce, Ye 6aTePnnte He BnI3aT B KOHTAKT C npTu 6aTePnn Nn npoBOUMM MaTePnAII N O BpMe Ha TpaHCnopTpapHe, KaTO npEJa3NTe OTkPnTtNE KOHEKTOp n H3OJaun, HEnPoBOUMM Kanaeta NN JENTa. He TpaHCnopTpai Te 6aTePnn, KOnTO ca cnYkaHn INI TEkat. CbByPxete Ce cbc CneJHata KOMNaHna 3a DOnbHnITenEH CbBET.
IOPDAPBXKKA
I3non3BaIte cmo opnHaJIHn pe3epBHN qactn, akcecoapn npctabKn OT npon3bOndTeN. B npotnbEN CnyaM MoKe Da Ce BNoOn pa6oTaHa HnHCTpyMeHTA Nn Da NOnyHTe TeKKn KOHTy3n, a rapaHcTgTA Bn ute CtaHe HeBaNnHa.
CepBn3HOTO 06cnyKbaHe N3NCKBa N3KNIOHTeHOBHHMaHHe n CneuΦuHn PO3HaHn N CIEaBa Da6bJe N3BbPswBaHO cMo OT KBaJIuΦuHpaH TexHKn.1pOdykTbT Tp86Ba Da 6bJe peMOHTnpaH cMo ByyblHOMoUeH cepBn3.
MoKTe Da npaBnTe cAmo TaKnBa HAcTpoKn N nonpaBKn, KOnto Ca ONnCaHn B HAcTOruTo pBkoBOcTBo. OctaHaJIte BnOBe peMOHTN DeHocTN Tpr6Ba Da ce n3BbPWBat cAmo B yIbJHOMOueh cepBn3eH ueHTbp.
IocneDCTBnra OHT He npabnHa NoDpBjka, OTcpanBaHe mmoNMOHkauHa npeDnAsnHTe yctpoCTBa MORa Da DOBeaT Do HnpabnHO fHKUHnPaH e npdykTa Koeto YBeuHbAbePOrTHOCTTAOT cepno3Hn HapaHbAHm. PpOyKTbT Tpa6Ba da ce noJara Ha npopecnoHaHa npoPnakTka.
Be30nachoto nOIOCTPRAHe Ha Bepratae TpydHa nIpeu3Ha 3a4a, KOTo Tp8Ba da Ce N3BbPwBa cAmO OT ONHTHn UMeiPiPOecHOHaJIcTn. Be30nachOTO 3aTOUBAHe HA Bepratae e DeIHocT, KOTo N3NCKBa CbotBETHIne UMeHn. 3aTOBa PON3BOJNTenrT CNlHO npenOpBvBa Da NOmEHnte N3HOceHATA u 3aTbNeHa BeprA C HOBA, KOTo MOKeTe Da HAMEPTE BB BAUnyYbNJHomOSeH cepBn3eH cHTbp. KaTIAoXKnHrT HOMep e NOMECTeH B TabNiCuTa Cbc CneuKauCInTe Ha IPOdykTA B HACTOUIOT PbKOBOIDCTBO.
CneBaTe INCTpyKuInTe 3a Cma3BaHe Ha Bepurata, KaKTo n 3a npOBepRaHe n perynnpaHe Ha HeHaTa o6TerHaTOcT.
CneB C8ka ynoTpe6a noHCTBaIte nIacTMacoBHTe actn C MeKa I cyXa Kbpna.
I IepnoDnHNO npOBepBaTe daN BCnKn raKn, 6oTObe n BuHTObe ca npaBnHO 3aterHaTn, 3a Da CTe cnrypHn, ye obOpyDbaHTo e B n3npaBHOCT. BcKa IOBpeHa qact Tp6Ba da 6bDe nonpaBeHa nn 3aMeHeHa OT yNbJHOMOueH cepBn3EH ueHTbp.
PraΦnK 3a noDpBxKa
EkeDHeBHa npOBepka
Cma3BaHe Ha shHaTa
Ipeu BCya ynoTe6a
OnbHaBepnraTa
Peobno npedn BcKa ynotpe6a
OcTpoTa Ha Bepurata
IpeNBCaKa ynoTepe6a, Bn3yaJHa npOBepka
3a noBpeHEn qacTn
PpeDn BcKa ynoTpe6a
3a pa3xJna6eHn Bpb3kn
PpeiBcKa ynoTpe6a
Функцин Ha cnpaquKaTa Ha Bepurata
PpeiBcya ynoTpe6a
Поберкa И постван.
UHa Ppei BcKa ynoTpe6a
LJIINrTpOH CneB BcKa yNtpe6a
CnnpaKaHaBepurata
HaBceke5yaca
ekcnnoataun
ONO3HAITEBAUNIPODyKT
Bx. cTpaHnca 227.
- Pexeua Bepura
2.巾nHa - PpeHn pepna3nten/cnpaueka Ha Bepurata
4.Ппедна рькхватka - 3aHa pBkoXBaTka
- KomboHnpaHraeHcKJIIOU
- Kanayka
- OrpaHnUHTeJ Ha BepnraTa
- Kanak Ha Bodeaata uHa
- BnHT 3a peryInpaHe Ha HataReHa To Ha Beprata
- Kanak Ha 3b6HTo KOJIeNo
- Cnycbk
- Byton 3a 6nokpahe Ha nycOBna loCT
14.BnHT3a CMA3OHHN IOTOK
15.Буференшн
YCTPOIcTBA3AEB3ONACHOCT
Cnnpaulyka Ha Bepurata
CnnpaTkata Ha Beprata e pa3pa6oTeHa c qeI da cnnpa 6b30BbPTAca Ta ce Bepra. Beprata Tp86Ba He3a6abHo Da Cnp, Korato HATNCHE ToocTa Ha CnpaKaTAPnpeNa3nten Ha nped. CnpaKaTAt Ha Beprata He orpanuYaba efeKta OT OKATA. Ta camo HamaJIbRa PnCKa OT HapAHBaHn, Bcnyai Ye BepNXHata UInHa Ce DOnpe Do TlOTO Ha ONepaTopa PnBb3HNkBaHe Ha OTKaT. N3npaBHOCTTA Ha BepNXHata CnpaKa Tp86Ba Da 6bJTeCTBaHa npeDn BCsKO IN3No13BaHe Ha npOdyKt - KaKTo B paBoTeUa, Taka N B CnpHa No3uNHa Beprata.
PENyPExEHE! Ako BepnKHaTa CnpaKa He CNpa MOMeHTaHOBepurata HINHe MOKe Da CTOn B pa6oTHa No3uNja 6e3 Hameca, 3aHecete npdykTa BYbJHOMOueh cepBn3eH ueHTbp 3a nonpaBka, ppei da ro N3NO3BaTe.
OrpHnHTeHaBepraTa
PpeNaTe 3a Beprata He No3BOJBA Ha Beprata Ha TpnoHa da bDe OTXBbPNeHa KbM OepaTopa, aKO ce pa3xna6n nn cynn.
山nha
O6nKHOBHeo 3nON3BaHTo Ha BOeUu 5HHN C NoMaIbK paIync npu Bbpxa HAMAnra Ba BepoTHocTt O Tb3HnKBAHe Ha OTKaT. Tp6Ba Da n3nON3BaTe BOeua WInHa N NOxOJaUa BepURA, KOnTO Da ca C TOHaTa
IbJNInHa 3a I3BbPbBaHe Ha KOHKpeTHaTa DeHocT.
No-DbJIrnte UHHyBeHnUaBat PnCKa OT 3ary6a Ha
KoHTpOJa no Bpeme Ha pR3aHe.PedOBHO npOBepraBte
ObTERHaTOCTTa Ha Bepurata.Korato pexTe MaKN KIOHN
(No-KbcnOT NbJIHATA DblJINHa HA BODeuata WnHa),
IMa No-rolma BepoAHTOCT Bepurata Da naHHe INN
OTXBPbKHe, AOK TRe He e O6TerHaTa KaKTo TpRABa.
Bepura c Hncka CKNoHooCT KbM OTkAT
HnckooTkaTHnTe pexKeuBepnHaMaJIaBaT BepoAHTOCTTa OT Bb3HnKBaHe Ha OTKaT.
OrpaHnHTeNTHeBaBnCOHNaTAp3nNoJKeHN B npedHaTayactHaBceK3b6,MOrTaHaHamajTeepKaTo OT OKata,KaTO ce npedOTbpatn HABN3aHETo BdbIbOuHa B 3oHaTHaOTkata.N3nON3BaIte cAmO KOMbHaun OT pe3epBn BOeUHn INpeXeUIN BepRn, NocOeHn OT npOn3BOIDNTeJI.
Бьдete Дбоино NO-BHIMATEJIHn CneI 3aTOUbaHe Ha Bepurata Ha TpnoHa, TbI KaTO TORaba Bepurata CTaba NO- nOdaTINBa Ha OTKaT. 3a BaWa 6e3OnaNCHOT NOmEnrTe Bepurata BnHar N Korato HeHATA CNOCOBHcT 3a P3aHe HAMJRABa.
Bypepen nn
HeDennMna 6ypepeH uN MoKe Da ce n3noN3Ba KaTo onOpHa Touka npu pR3aHe. ToBa nomara 3a noCTabnHto 6opabe He CBepKHNr TpNO H BpeMe Ha P3aHe. Pnpra3aHe n3bYtaTe NHCtpymeHa Hanpei, DOKATO WInOBete Ce 3aBnT B p6a Ha IbPBOTo, a CneD TOBa Ype3 IpemecTBaHe Ha 3aHaTa PkoXBtKa Harope nn HADONY NO NOCOKA Ha NPOpe3HaTA JINHm MOKeTe Da HamaNITE PhN3ueckOTO HATOBapBaHe, CbnpoBOXdaIo npOeca Ha pR3aHe.
3AUHTA OT INPEKOMEPHA TEMNEPATPA
AkyMnyatopHata 6aTePnHa 3aUHTa ot npekomepHa Temnepatya, KOrTo e npedHa3NaueHa 3aUHTa Ha KneTKnte Ha 6aTePnTa OT NOBpeHa npn BnCoka Temnepatya. Ta3n fynKcua MoKe Da npekpatn 3axpaHbaHeto Ha npoDyKta OT 6aTePnTa, Dokato KneTKnte ce OxnaJAT. HInHete akymyNatopa; ako e Mhoro ropeu, OCTabe Tg Da n3CTnHe npdeBb3OboHBraBaHe Ha paBoTata. Ako npoDyKtBT BCE OSe He paBoTn, BkNIOte AkymyNatopHata 6aTePnB 3apdHOTo yCTpoiCTBO, KoETO cbIoo MoKe Da nocOu, Ye e BKnHOeHa 3aUHTaTata OT npekomepHa Temnepatya. Korato KneTKnte Ha 6aTePnTa ce OxnaJAT, 3apdHOTo yCTpoiCTBO 3anOvBa da 3apeKda 6aTePnTa.
3ABEJIEXKA: Bucokata OKonHa TemnepaTypa, Hnd 30^ C n BucOKOObOpOTHnTe eJekTpUeCKn INHCTpyMeHTn, HAnp. BepNXeH TpNOH, MOKe Da DOBeJaT Do no-6bp3N 3aRpaBaHe Ha KneTKnTe Ha 6aTepeYra. IpoBepRaBte akymnatopHata 6aTePna peoBHO n Ako e ToIla npn DOnIP, r CmeHeTe NIn N3uKaAte Da ce OxJaDi.
3A6EJIEXK4: CBeToOnIOHNrT HnDnKaTOp Ha 6aTepeyra T Hma da pa6oTn, aKO 3aunTHata yHKunr Ha 6aTepeyra e DoBeJa DO cnpaHTo Ha 3axpaHbHeTo Ha nHcTpymeHa ot 6aTepeyra.
CNMBOJIH H NPODyKTA

PpeynpeKHeNE OTHOCHO
6e3oNaChOCTTa


001


IpooyeteHpa36epeTe BcNCHnHnCTpyKuIN, npEi Da n3nON3BaTe npOykTA.CJeDbaTc BcNCHnnpEynpExKeHn HnHCTpyKuIN 3a 6e30NaCHOCT.
Hocete 3aunTHn cpeCTBa 3a OHTe, cnlya nraBata.
Hocete Henb3p3aIuIe 3aIuTHN 06yBKN, KORATo I3nON3BaTe npOdykTa.
Hocete 3npaBn npedna3Hn pbkabu, npirodeHn npOTNB nIb3rahe.
BHHMABaTe 3a OTKaT Ha BepnKnHr TpnoH nN36BaTe KOHTaKT C BbPxaHa WnHaTa.
He n3naarate Ha dBxkN HA BnaxHn ycnoBna.
IpbkTe npabotete c TpnoHa C DBeTe cn pue.
He pa6oTe TpnoHa, KaTo ro DbpxKeTa cMo C eHa pKa.
IocTaBeTe CnnpaKaTHa BeprataB n03nra RUN.
IocTabete cnnpaKaTHa HBePnraTa B no3nna BRAKE.
Ta3MaHIna e B cBoTBeTCTBne C HOpMaTHBHaTa ype6a Ha NbPkaBaTa ot EC, KbTeTo e 6nna 3akynepHa.
EurAsian 3nak 3a CboTBetCTBne
YkpanHckn 3HaK 3a CbOTBETCTBNE
EneKtpnuecknte ypeHne Tpra6Ba da ce n3xBpbnT 3aeDHO C 6bTOBNTe OTnabu. PeuknupaTe, KbJeTo mMa Bb3MOxHoc. O6bpHete ce 3a cbbet no peuknupaHTo KbM MeCTHnte Bnactn nn pa3npocTaPAnTeNte.
TapaHTnpaHO HnBO Ha shyM
Bepnno Macno
3aBbptete,3a dapeynpate CMA3OuHnI NOTOK
-
= YBENHuaBaHe Ha NOTOKa
-
= HamaJraBaHe Ha noTOKa

3aBbptete, 3a da perynnpate onbHa Ha Bepurata
- = O6TeHHe T BepnraTa
- = Otxna6e oTeHatoctTaHaBepnata

Nocoka Ha DnBxKeHne Ha Bepnrata. (MapKnpaHO noD kanaKa Ha 3b6HoTc KOEnO)
CNMBOJIIN B HACTOJTOPOBOKOCTBO

Yactnte INI pnpHaIeKHOCTne Ce npdaBaT OTeHNO

3a6e9ka

PpeDynpexkdeHne

Hocete 3aunTHn CpeCTBa 3a OHTe nIuTeTo.

Hocete 3aunTHn cpeCTBa 3a rohpata Yact Ha TAnTO.

Hocete 3aunTHn CpeCDtBa 3a KpaKaTa.

Cnpete npoodykta.
PbPbNCTbnKn
Bx. cTpaHnua 228.
- Hocete JIuHn npedna3Hn cpeCTBa.
Korato pa60nte c npodykta, BnHaHn Hocete npedna3n CpeCTBa 3a YIIOCTHa 3aunTa Ha OHTe n Cnyxa, Hexb3rauni ce, 3dpabn pbKaBUN, 3dpabN o6yBKN n npedna3HO o6neKnO. He n3non3baTne NHCtpymEnTa, aKO CTe 6oCn INHOCNTe OTBOpEHn CaHdAn.
2.ИЗbaTe YeacHTe OT onakOBkata.CrNoBeTe npOyKta.
PENDyPEXKDEHNE! Ako Ima NnncBaun nnIOBpeDeHN Yactn, He n3no3BaTe To3n npOdyKT, PpeN Te Da 6bDat 3ameHeH. HecbOpa3raBaHTo CTOBA ppeDyPexkDeHne MoKe Da DOBeDe Do cepNo3HnФnueckn HapaHaBaHna.
Hamectete Boideuite 3BeHa Ha Bepurata B KaHaHa HsHnHata. Pa3noXeTe Bepurata Taka, Ye da o6pa3yBa npMka B 3aHaTata Yact Ha sHnHata.
Pexeata Bepira Tp8bda da e Hacoueha no nocokata Ha HeHOTo BbptHe. Ako Bepirata e o6bphata Ha3a, 06bphte yxoto.
- Pa3xJa6Te MOHTaXHn rAaKn Ha ⅢHaTc. CBaJIeTe raKNTe N KAnaka Ha 3b6Hoto KOJIeNo.
3aDpBxTe Bepurata HEnoDbNkHo Bbpxy uHnHaTu npemTHe T CBO6OHaTa Yact OKJIO 3b6HOTo KOJIeNo.
CbaNete uHnata, taKa ye 6oJTOBete da npemHaT npe3 OTbOpHTe HHe.
- NocTabete 06patHO Kanak Ha 3b6hOTo KOneNo. NocTabete H 3aterHete Ha pbKa MOHTaXnHte raKn Ha WInHata. HanpaBnaBaUata WInHa Tpr6Ba Da ce DnKn Cbo6oH0 3a perynipaHe Ha HATraHeto HA Beprata.
- PerynnpaTe o6TetHaTOCTTa Ha Bepurata. 3aBbpte TBHTa 3a 06TgAHe Ha Bepurata C NOMOuTa Ha KOM6Hnpan Rauehen KInouy. YecTo npOBepraBaTe ONbHa Ha Bepurata, Korato ro perynpate.
3a Da yBEnuHte HATraHTo Ha Beprata, 3abptTe BnHTa 3a perynipaHe Ha HATraHTo Ha Beprata No Nocoka Ha YacOBHNKOBATA CTpenka.
3a Da HamaIte HaTaraHeTo Ha Bepurata, 3abptTe BNHTa 3a perynaphe Ha HataraHeTo Ha Bepurata No nocoka, obaTHa Ha YacOBHnKobata CTpeJIka.
3AEJEKKA: O6TgAHeTo Ha Bepratae epaBnHNO, KOrato OTCTOReHneTo MeJdy pe3aKaTa BbB Bepratau mHHatae MeJdy 4 n 5 mm 3a RY36CSX30B n MeJdy 5 n 6 mm 3a RY36CSX40B. Hau-dO6pe e da dpbnHeTe Beprata B cpeDaTa Ha mHHata OTKbM HeHnra DOnen Kpaia (OT uHaTa HaBbH) n Da n3MePnte pa3CToRHeTo MeJdy mHHatau pe3zUte Ha Beprata.
3ABEJIEXKA: Bepurata nobuwaaba cBOyTa TemnepaTypa no BpeMe Ha HOpMaHa pa6oTa C npOdykTA, KOETO BOIN Do HeHOTo pa3TjaHe. IpoBepraBaiTe onbHa peDObHO n pRn Heo6xOUMocT obTgaiTe Bepurata. Korato 3aTgaiTe Bepurata, DOKATO e TOnJa, KORATO CE OXNaDN, MOKe Da CE OKaKe npEkanEO oBTerhata. YBepeTe ce, Ye 0bTaRaHTo Ha Bepurata e npabUNHO perynpAHO cnopei ONIcaHOTo B HactounTE IHCTpyKUn.
6.ДрьжTe края Ha WInHaTa N 3ДпаВО 3aTeHHeTe HHTOBeTe Ha WInHaTа.
7. HaheceTe Cma3O4H0 MacNo Ha Bepurata.
I3noJI3BaIte Cma3OuHO MacNo 3a BepnKHN TpNOH RYOBIOytynlHOMoUeH cepBn3eH eHTbp.
Noctete NOBpXHOCCTA OKJIO KanaKATA Ha MacIOTo,3a Inpa3HTe MacNTO OT 3aMbpcBaHe. MaxHeTe KanaKATA Ha pe3epBoapa 3a MacNo. HanbHete MacNo B pe3epBoapa, KaTo CBOEpeMeHHO cIeTe Mapkepa 3a paBnUeTo Ha MacNTo. YBepeTe ce,Ye DOKATO HAIIBATE MacNO, He BIn3AT HNKAKBm MpbCOnu B pe3epBoapa. 3aTBopTe pe3epBoapa 3a MacNo n 3aterHete KanaKATA. 3abpweTe, aKO Imapa3JIrTO MacNo.
PENDYNPEKDEHNE! HNKORA He pa6oTe 6e3 CMA3OHO MacNo 3a Bepurata. Ako Bepurata pa60TN 6e3 CMA3OHO MacNo, HeHNITE pe3UN Tc CaMaTa MORAT Da 6bDat NOBpeDeHN. PpeuN I NO Bpeme Ha n3NOI3BaHe Ha BepUKHn TpOH NPOBepRAaTE HNBOT HA MACNOTO C NOMOuTHa CbOTBEHn INDnKaTOP.
- YBepTe Ce, Ye BInhTbT 3a CMA3OHHN NOToKe OTBopeH, 3a Da Ce NODaBA MaCNo KbM BepuTa N uHaHaTa.
3aBbptete BnHTa 6paTHo Ha yacOBHKOBaTcTpeNka,3a da ro OTBOpNTe N da yBENHTE NOTOKaHa MacNo KbM Bepurata N uHNHata.
3aBbPteTe BnHTa No Nocoka Ha yacOBHkoBaTa CTpeJka, 3a Da HamaNITe NOTOKa Ha MacNo KbM BEpIraTn WInHaTa.
Ako CnCTemata 3a Cma3BaHe Ha Bepurata n HnHata pa6To nO6pe, o6nKHOeNo npu ynoTpe6a ue mAmacnNoBepurata.3a da npoBepnte fYHKUHOHaJIHOCTTa Ha CnCTemata 3a Cma3BaHe Ha Bepurata n HnHaTa, HacoHTe Bbpxa Ha Bepurata KbM npEomet cbc CBetna NOBbPxHocT, HAnpIMep BeCTHk. CneI kpaTKO BpeMe 6n Tpr6BaJIo da 3a6eKeKNTe TbHKa npbCKa MacNO.
- IocTabete akymyntopnata 6aTepeia.
IopabheTne NOBnHATnTe p6oBe Ha 6atepyTa cXnE6obete B OTbopa 3a 6atepyHa npOdykTa. IocTabete akymylatopHa 6atepyBa npOdykTa.Ipei Da 3anoyHete pa60ta, ce yBepete, ye fNKcatOpbTa Ha akymylatopHata 6atepyuPakBa Ha MRCTO n 6atepyra e HanbJIno NoCTabeHa n 3actOnopeHa B npOdykTa.
PNEyPExEHNe!BnHaN dpbXTe BepxHnTPOHcIaPbKa3a3aHaTa pkoXBtKa nCJIbaTaPbKa 3a npedHaTa pkoXBtKa.
PNEyPEXKDEHNE! O6XbaaIte do6pe pbkOxBaTKite, KATO CKJIOUbATE NaIcHTe N octHaJIInTe cn pbcn nIbTHo OKOJO TIX. JIbata pka Tp6Ba da o6Xbaa npedHaTa pbkOxBaTKa Taka, ye naeT Ta e OTdony.
- StaptnaTne npodykTa.
IocTabete cnpaVkata Ha Bepnata B aKTHBHa
no3u, KaTO XBaHete rOpHna KpaH Na IocTa H
cnpaVkata n ro DpbHnHe T KbM npedHaTp bKOXBaTKa,
DOKato uPakHe. DpbHnHe T fNkCaTopa Ha cnycbKa.
Hatnche TcnycbKa Ha npebKnOuBaTeJr.
3A6EJIEXKA: 3a da cnpeTe n3deJIneTo: 3a da n3noI3BaTe BepKHaTc CNpaUka, 3aBbptTe JnBaTa cN pbKa OKOIO npedHaTc pbKoXBaTKa. HaTnCKaTe NoCTa Ha CNpaUkata KbM UaHrata C BbHnHaTc TpaHa Ha pbKaTa cN, DOKATO Bepurata Ce BbptN 6bp30. Ocbobode TcNycbKa Ha npEBKnIOuBaTe r N fikCaTopa My.
TOnOBHmM MIPkyBaHHMa Npi pO3po6ci iiei 6e3dpotoboi nAnuTOBOI nnKn 6ynn 6e3neka, epeKTHBHCt b Ta HadiHnicb.
IPEDEBAUYBAHOMY BNKOPUCTAHHI
Be3dpoToBa NaHcHoroBa NnKa npn3HaueHa DnBnKOpncTahn TaIbKn Ha CBIXOMy NOBITpi. 3 MipkyBaHb6e3neKn PPOdyKT NOBInHeH HAnExKHUM YINHOM KOHTpO1OBaTNC3a DOONOMORO DBOX pyK.
IpoodykT npn3HaueHnn Dnna 06pi3kn rInok, cTob6bypib, DepeBHH i 6baJOK 3 diaMetpom, oByMOBneHm DOBXNHOIO pixyOHTaCTHNI WTAHN. TINbKn npn3HaueHo dJa pi3aHHA depeBHH.
Pnpctpi npn3NaeHo TiIbKn BnKOpNCtHaY DOMaunhOmy roCnoapCTBi dopocnMn,kI OTpImaII BiDnOBiHy nIdroTOBky 3 npNBOy He6e3neK Ta npoPinaKTuHnx 3axoIB /di,ki Heo6xIDHO BkNTn iD vac BnKOpNCtaHH npncTpo. He NOBHHO BnKOpNCtOByBaTnca Dnna npopeciHorO cnIIOBAHH depeB.
He BnKOpncTObyIe dIg 6yIb-kaNx iHnx cJne.
TOLOBHI NONEPEIXEHH3 E3NEKNEJEKTPOHCTPYMEHTY
PONEPJXEHHJI PPOUHTaTe BcI npaBnla 6e3neKn, IHCTpyKuii, iINOCTPaCi i CNEUΦiKaui, 3 eJEKTPOIHCTpyMeHOM. HeoTpMaHH HaBeDeEHNX HHXHe BkazIBOK MOKe np3BecTI Do ypaKHeH NJIeKTPnuHm CTpyMOM, NOXeki Ta / a60 cepNo3HN TpaBM.
36epexitb Bci iHCTpykuii i Bka3iBkn dnn MaibyTHboro BNKOpncTaHH.
TepmiH "eJektpoiHcTpymeHT" B nonepaKeHHx BiHocntbca do BaWoro MepeXeBoro (3 Ka6eJIem) eJektpoiHcTpymeHTy abo 3 baTapeHnM KINBHeHHAM (6e3npoTOBO) eJektpoiHcTpymeHTy.
BE3NEKA POBOOTO MICU
Utpmyte po6oey micue B chctoti i do6pe oCBitJeHm. Be3nad Ha p6ohomy micui a6o TemHi MICu cnpuHHaTb abapii
He BnKOpNCToBnyTe eNeKTpOInHCTpyMeHTN y Bn6yXoHe6e3neuHi aTmocfepi, HApNKnAd, y npncTyHOctI Nerko3aMnCtux piDnH, ra3IB a60 nny. ENeKTpnHi iHCTpyMeHTN CTBOPHOITb ickpi, 10 MoKyTb 3anaNTn nn a6o napn.
Tpmaite dite Ta ctopoHHix oic6 noani niz cac po60tn enektpoinhctpymeHtOM. BiDboniKaHHy ybarn MOKe np3BecTN Do BTPaTN KOHTPOJIO.
ENEKTPOBE3NEKA
BnIka XnBHeHneKtpoiHcTpymeHTy NOBnHa BiNobiDatn po3etci. HikOnn He 3miHIOte BnIKy. He BnKOpNCToBynte HiKi BNkN-NEpexiDnKn 3 3a3emJeHNm (3amKHyTmHn Ha 3emNIO) eKeTpoHcTpymeHTamn. He 3miHepi BNkN Ta BiNobiDiHi po3ETKn 3MeHwYIOb pN3NK ypaXeHHn eKeTpnuHm CTPyMOM.
YHnKaTe KOHTaKTy Tina 3 a3emneHmN NOBepxHm, TaHm Nk Tpy6n, paiaTOpN, nNTu TaXoNoDnJIbHnKn. IChy ePiBnueHn pniK npaxeHHr eNEKTPnuHm CTPyMOM, RaIOBaTe TIO 3a3EMHe.
He nidaabaTe eNekTpoiHcTpymEnbBnBy douy a6o BONornx yMOB.Boga, no notpanna B eNekTpoiHcTpymENT 36inbUye pnsk ypaKeHHa eNekTPnHmCtpymOM.
He 3noBkyIe wHyp. HikOn He BnKOpncToBynte WHyp KINBLeHHN DJI NEpeHeceHH, NepemieHHa abo BNnyeHH BnIKN 3 po3ETKn. TpMaIte wHyp nOanl BiD Tennla, Macna, roCTpnx KpOMOK a60 pyXomnx YactNH. NowkOJKeHi abo 3aIpyTahi wHypn 36ilbWyIOb p3Nk ypaKeHHN eNEKtpuHNM CTpyMOM.
■Pnpo60ti3 eNekTpoiHcTpymeHtOM Ha Bynui, BnKOpNCTOByTe NODOBKyBaU, BiDnOBiDnHm DnBnKOpNCaHHHa BiDkPNTomy NobITpi. BnKOpNCaHHKa6eHIO, npDnTHOrO nIy BnKOpNCaHHHa BiDkPNTomy NobITpi, 3HnKye pN3NK ypaKeHHa eNekTPnuHm cTpymom.
Ppno p60ti 3 eJekTpoiHCTpyMeHtOM y BOIoromy cepeoBnui BHKOpNCTOBynte 3aINuKOBn noToUHn npncptpi (3Pi) 3axuHeHO rKnBJeHH. BukopncTaHH 3Pi 3HNKye pn3NK ypaKeHHr eJekTpnuHm ctpymom.
OCOBNUCTA B3NEKA
Bybte yBaxhhi, dNbiTbcra, 0o BN po6nte, i BnKOpNCTOByTe 3dOpOBn rJy3np npo60ti 3 eNeKTponpnuJaamn. He BnKOpNCToByTe eNeKTpoHCTpyMeHr, kkuo BuBTOMnIncna 6o nepe6yBaTe niBnNBom HApKOTkIB, anKorOnIO a6o nikB. HaMeHwa HeoBepeXHicTB npu p60ti 3 eNeKTPOiHCTpyMeHTOM MoKe npn3BecTN do cepno3HNx TpaBM.
BukopncToByte nepcoHaJIbHe 3axnche 06laHaHHra.3aBXKn HaIraTaTe 3axNCHI OKyIpaHn. 3axnche yCTaTKyBaHH, HapnKnaI, pecnipatop, B3yTHa HekOB3Hi NiIOoWi, 3axNCn IOnOM a60 3acob 3axNcTy OpraHIB Cnyx, BukopncTOByBaHi B HaJIeKHX yMOBaX, 3MeHwaTb Pn3IK OTPMaHH TpaBMn.
3anobiraute BnnaKOBoro 3anycky. NpekoHaeTcra, zo BnMkaay 3haxoDHTbcry y BnMKHeHomy noLoXeHHi nepei ndoueHHm Do dKepeJaa KNBHeHHa Ta / afo akMyIaTOPHOI 6ataei, niHimaHHa a6o nepemieHHa IHcTpymenty.He nepenocbte eNeKTpoIHcTpyment 3 naIbceMa HBaMNkaay a6o nDaueo XNBHeHHa Ha IHcTpyment, knn Ma e nepemikau, u6o 3anobirn HeuacHO BnnaKy.
Ipeed BKNIOUeHHaEneKTPoIHCTpyMeHTy 3HimaiTe peYnIOBaIbHN aOraIKOBu KIOU. RaIKOBu KIOUa oOpeYIOBAJIbH N KIOU,3aNIueHn Ha o6epTaemui YacTHi eNEKTPoIHCTpyMeHTy,MOKe npN3BecTN Do TpaBMN.
He TarrhItbc. 36epiraTe npabunbHy cTiky i 6aIahc Becb Yac. Lc Do3BOJnE KpaUe KOHTPOJIIBaTN IHCTpyMeNT B HecNoDIBaHN CXITyauiX.
OdaRaTea npabnIbHo.He Hocitb BInbHn OaIg a6o npKpacn. TpMaIte BOLOcc i OaIg noaI BiD pyXOMnx qactnH.BinbHn OaIg, npKpacn a6o DOBRE BOLOCC MoKyTB NOTpanNTu BYPXXiCACTHN.
KuO e npctpoI dnn iiknHcHn 360py nny, nepekoHaTecra, 0o BOH nID'edhHi i BHKOpncTOByOTbcr npabnlbHO. BnkOpncTaHH
Hnno36ipnka 3nKye He6e3neky, noB'3aHy 3 3anneHicTIO.
HeyxnbH DoTpmyTecb npabnl Texhki 6e3neKn HabItb npn BnKOpncTaHHi HcTpymEny BnpoDobK Tpmbanoro yacy. Heo6epexHa iMy MoKe npotarom NiueHnx cekyHn npn3Bectn dO cepno3Hx TpaBM.
BVKOPNCTAHH TAOJIA 3A ENEKTPOIHCTPYMEHTOM
He nepeBaHTaxyIte eJekTpoHCTpyMeNT. BnKOpuctobyTe BiNobiHm DnB aWoi noTppeBn eJekTpoHCTpyMeNT. EneKtpoHCTpyMeNT BnKoHae po60ty kpaue i 6e3neHiie npn WbNkocti, dnn RaKoi Bin 6yb Po3pO6JIeHNI.
He BnKOpNCToBMyTe eNekTPOiHCTpymeHT, kkuo nepemkkay He BKIOuAc Ta BmNKac Noro. Bydb- kIn eNekTPOiHCTpymeHT, kIn He MoKe ynpabJrtncra 3a donOMorOIO nepemkkaya, c He6e3neuHm i Ma6 byt BIDpeMOHTOBaHH.
Ipepe npoBeHnM 6yB-RAKnx HalaTuBaHb, 3amino akcecyapib a60 npn 36epirAHni eNEkTpoiHcTpymeHT cyid BiD'ChHaTH BuNKy BID DxKepeJXNBHeHH i /a60 BnHrTn 3 eNEkTpoHcTpymeHT 6aTaPeIO, kAIO BOHA 3HIMHa. Taki npocipinaKTuHi 3axOdi 6e3neK 3MeHsuOTb pN3NK BnnaKOBORo BKIOUeHH eNEkTpoIHcTpymeHTa.
36epiraTe HnpaQIOOy eNkTponpnaIy HeoCTynHomy dIeMicui I He Do3BOJnTe Oc06am, kHe 3HaHOMi 3 IHcTpkyiAmn EektpuHoro npnada a6o 3 daHmIn HCtpykciAaMn, npaObATn 3 eNkTponpnaIaAMn. EekTpoHcTpymEnr He6e3neHi B pykax HeoCbiDyeHnx KopncTyBaivB.
O6cnyroByBaHH eneKtpoiHCTpyMeHTI Ta akcecyapib. Nepebipte po3peryIbObaHi a6o 3B'3aHI pyxomi yactnH, noIOMahi qactnH i 6ydb-aki iHsi yMOBN, kki MOxyTB BnInHyTH Ha p060ty eKeKtpoiHCTpyMeHTy. RaIO NOsKOJXeHN, BiDpemOnTyTe eKeKtpoiHCTpyMeHTN pePeB NkOpNCtAHHM. Barato HeuacnHex BnJaIKB Hacniikom noraHOr dOrnA dy 3a eKeKtpoiHCTpyMeHTOM.
TpmaTe pixyHn iHCTpyMeHT roCTpmI uHCTNM. DObpe dOrJIaHyTm pixyHn iHCTpyMeHT 3 roCTpIMn pixyHmKpaIkamPiDwe 3B'3yETbcra I nere KOHTPOJIIOEeBCr.
BukopncToByte eNekTpoHCTpymEn, akcecyapn Ta Hacaikn BiINOBiHO Do UxN IHcTpkyu, 6epyu NDo yBaHn yMOBNpO6OTi pO6OTy, 0o NOBHNa 6yTN BHKoHaHa. BukopncTaHHe neKtpnuHoro IHcTpymEnTy DnA onepaui, kBi BiPi3HNOtbcr BiD npu3HaueHnx, MOKe npu3BeCtn Do He6e3neHoo CNTyauii.
PyuKa Ta NOBepXHi DnA 3aXbAty IHCTpyMeHTy 3aBXKnIOBHHi6yTu CyXHM, YNCTHM i BJIbHMM BiOJNBn MaCTnJa. CnI3bKi pyuK Ta NOBepxHi DnA 3axBaTy MOKyTb NepeUKOJkATN Be3NeHOMy IOBOJKeHHIO I KOHTPOJIO IHCTpyMeHTa Y HeCNOJIBaHIN CNTyauqix.
BKNKOPNCTAHH I DOJIY IHCTPYMEHTY HA BATAPEIKAX
IpeepaJxatnTilbKn3aDOnOMoTO3apHOrOpnpctpo,3aHaueHoroBpu6hNkOM.3apdHni
npncptpi,po nixoDntb DnA OndHOrToTnny akymynTopib, MOKe CTBOpNTn PN3NK 3aRopHHN npn BnKOpuctaHHi 3 IHsIM akymyJIaTOpHM 6JOKOM.
BukopncToByTe eNeKtpoiHcTpymEnTn TInbKn 3 npn3HaueHmN dny Hx akymyIaTopamN. BukopncTaHH6yDb-ayknx iHux axymyIaTopiB, MoKe CTBOpNTn pnsIK OTpMaHH TaPBMn iNoxekxi.
KoNn akymyIaTOP He BnKOpNCTOBycTbCra, TpMaIte Ioro nOanl BiD metaJeBnx npEdMeTIB, TaNX kCpkInKn, MoHETN, KNoUci, ZBaxN, Wypyn, a60 iHsi dp6Hi metaneBi npEdMeTn, Aki MoKyTb NiKlnouHTn OOnn KOtAKT Do IHwOr. KopOTke 3AMKahHH KOtAKTIB akymyIaTopa MoKe npu3BeCTn Do onikib ao noKeXi.
Y Baxknx yMOBax ekCnnyataui, piHa moKe 6ytu Bnnyueta 3 6aTaapei; yHnKaIte KOtakTy. Ppi BnnaKOBomy KOtakTi 3mNte BOHO. Kaio piHa notpanna B oOi, 3BepHiTbcr 3a MeDnUHO ODonomoroIO. PiHa 3 akymyITopa MoKe BnKnikatn po3dpatyBaHHa aO onIKn.
He BnKOpNCTOByTe NOxKOJXeHn a6o MoNcIKOBaHN aKymyIaTOp a6o IHcTpymeHT. NtOkoJXeHI a6o MoNcIKOBaHI aKymyIaTOpHi batapei MOKyTB MaTH HeNepeIbHaYBaHy NOBeiHKy, 10 MoKe np3BecTN Do BnHnKHeHH NoKexi, Bb6yX i p3uKy OTPMaHH TpaBMn.
He niDaaBaiTe akymyIaTOPn a6o IHCTpyMeHT BnNBy HAdmipHOI Tempepatypn a6o BorHIO. BnNIB BOrHIO a6o Tempepatypn Bnue 130° C MoKe npu3BeCTn Do Bu6yXy.
I DToPmMyTeCb ycix nonepeJxHb Ta He 3apJaKeT aKymyTOpHy 6aTaPeo a60 IHcTpymENT npn Temnepatypax, kki BuxOpaTb 3a Mexi 3a3HaueHnx y IHcTpkyu.3apKa HeHaJeKHM uHOM a6o npn Temnepatypax no3a 3a3HaHeHoro diana3OHy moKe npNBecTu Do nouKOjXeHHa 6aTaapei Ta 36ilbUye pnsK BUNKHeHHa NoKxi.
CEPBIC
I O3BOJnTe 06cnyroByBaTu Baw eNEKtpoHCTpyMeHT TINbKn KBaIiPikOBaHOMy nepcoHaNy, BNKOpNCTOBvOuN TINbKn iDeHTNuHi 3anachi YactHH. Lte 6ye rapaHTyBaTn 6e3neue He 06cnyroByBaHH eNEKtpoiHCTpyMeHTy.
Hikon He 06cnyroByte noxkoJxhi akymyIaTOPn. O6cnyROBaHHa kymyIaTOPHX 6aTapei NOBHHO pnoBOuNTncr TINbKn Bnpo6HKOM afo yNOBHObaxHeM cepBICHm ceHTpom.
3AΓAJIbHI IIOPEPeJXEHHJ 3 BE3IeKN BUKOPNCCTAHH J EHH3OIIJKN
TpmaTe Bci qactnHn TiNa nodani Bid NaHcyBnnaKky KOJI NaHcIorOBA Nnla npaHoe. NepHix 3anyCTHTn NaHcIORoby Nnny, nepeKoHaTecy, 0o NaHcIg NnN He KONTAKTyE 3 Ymocb. MoMeHT HeybaxHoCTi npn pOboti 3 NaHcIOTOMM NnIaMm MOKe BKNkKaTN 3aNNyTuBaHHBaUoro Odary aOby aOTo nAHaICr.
3aBxDn TpMaTe NaHIOROBy nHy npABO pyKOHO Ha 3aHi pyKoTci i NIOO pyKOHO napeDiHpyKoTci. YTpMaHHaNIOROBOI nNIN i 3BOPOTHMIO KOHirpaJIMy pK 36IbWye pn3NK TpaBM i HIKON He NOBHHO BKNOHyBaTNCra.
TpmaTe 6eH30nIky TlkbN 3a I3OJIbOaHI NOBepxHi, TOMy 1o NaHcIg NIIK MoKe KOHTaKTyBaTH i3 npNXOBaHO pPOBOKO. NaHcIg NII, 1o KOHTaKTyE 3 npOBoDM "iD HApYrO" MoKe 3poBtM MetaneBi YactHn EneKtpoiHCTpyMeHTy "iD HApYrO" i MOKe BdapuTIOn epeatopa.
OdaTte 3axnchi OkyIpy CIId BnKOpncTOByBaTHdoaTKoBe 3axnche 0bnaHaHHn IyBx, roIOBN, pyk, hir, cton. HaneXHe 3axnche 0bnaHaHHn 3MeHHTb MOxJIbICTh TpaBMyBaHHn BiD UMaTKIB DepeBHH, 00 BiDcKaKyIOb, a60 BiD naHcIora nINJ.
He npaiothe 3 nIkoHa depebi,dpobnHi, Ha daxy, aOHa iHsi HectaibnHi onopi. Bo TAKe BUKOpNCtAHHBeH30nIKMOKe cnpuHHTn cepo3HI TpaBMn.
3aBXd 36epiraTe pIBHObary i ynpabnne TaHcIorOBy nny, TInbKn cTOny Ha HepyXomi, 6e3neHi i pBHi nobepxHi. Cn3bKi a6o HectabInbHi NOBEXHi MoKyTB npnbecn Do BtpaPi pIBHOarTa BTPaTH KOHTPOH NoH 6EH3ONIKHO.
Ipn pi3aHHi cykiv, kri 3haxoJTBc nID Hanpyro6ydbTe HANOROTBI, o06 OTPMATn BiDauy. KOnn HAnpyra y BOLOKHX BIDnyckae HanpyxHHeHn napocTOK MOKe BdapITN onepatopTa / afo Bn6ntn 6EH3OJIy 3-ii KOHTPOIIIO.
BybTe rpaHnHo o6epeXHi npi pi3aHHi Xm3a i napocTkIB. ToHKn MATEpian MoKe 3IOBHTN JaHcIg nn, BApTN a6o notarHyTn Bac, nopyuINBn BAuy pibHOBary.
Ipehenocbte naHcIOrOby nny 3a nepeDnO pykoTky BmKHeHO i noJaI BiD BaWoRo Tina. Ppn 36epirahHi nn TpaHCnOpTyBaHHi NaHcIOrOBoi Nnn 3aBXn BCTaHOBNIouTe KoxyHa HAnpABNIOU cy TaHry. PpaBnIbHe NOBdoXeHHra 3 NaHcIOrBOIO nIOIO 3HN3NTb IMOBipHicTb BnnaDKOBoro KOHTaKTo 3 pyxOMM nIIJIbHM IaHcIOrOM.
I DToPmMyTeCb IHcTpyKui 3MaueHnHaTAY NaHOra Ta 3AmHN Ta NaHOra. HnpaBnBHO HataRHyTu a6o 3MaueHn NaHOrMOKe a6o 3JAMATnC, a6o 36iNbHTn WaHCn HaBiDnayy.
PixTe TINbKn DepeBo. He BnKOpncTOBynte NaHcIorOBy nIny dInr He npn3NaueHx cinei. HanpNknaI: He BnKOpncTOByTe 6eH3OnnNy dInr piaHHa MetaneBnx, PnactNKOBHX, KaM'HNX abo He DepeB'HNX 6yDIBenbHnx MATEpiAnib. BnKOpncTaanr NaHcIorOBoi nInr dInr onepaui, BiDMiHHx BiD npn3NaueHHnx MoKe npn3BeCTn Do He6e3neuHOi CNTyaui.
He HamaraiTeC3BaHHTn DepeBO DOKN Bn He 3pozymiyn yci pn3nk Ta Jk IX MoKHa yHKnHytn. Iid qac naHHa DepeBa MoKyb 6ytn cnPunHeni cepno3Hi ykoJKeHHn Oepatopy Ta JIOdAm, 3haxoJaTbc npuy.
Dotpmyntecb Bcix IHctpykui niq cac BndaenHMaTepiaiiB, 0o 3actprtn, Ta Bka3iBOK 0do36epirahna Ta 06cnyroByaHHa 6eH30nKn. IpekoHaTecb, 0o 6eH30nNkA BmKHeHa TaakymyIaTOP BndaJeHH. HeouikyBaHe BkIIOueHHa 6eH30nJKNPi qac OunuEHH aO bOcnyroByaHHMOKe npn3BeCTn Do cepno3HOI TpaBMn.
I IPOΦIJIAKTNUKA ONEPATOPOM BIDAAU:
Bidiapa MoKe BHHKHyTn KOJI HiC a6o KIHN HAnpaBnaHoyoi IUnH NDoTOPKHeTBcra Do 06'ekTy, a6o KOJI DepeBO 3MnKaeTbca Ta 3axmae NnblHn NaHcHr.
KoHTaKT 3 KIHyNKOM B DeEaKNX BnNAkKax MOKe BnKnKaTpaNTOBy 3BOpOTHy peAkJIO, StOBxHbU HAnPaBIAHOyStaTHry BROPY I Ha3aD Do Opeapota.
3aTnCHENHnIyIbHO rHaHOra y BepxHi yactnHi HAnpaBnHooi IHH MoKe nIDTuOBxHyTN HAnpaBnHoyu IHHy IwNkO y HAnpMky onepatopa.
Byd-ka 3 qux peakui MoKe npn3BecTn DO BtpaTH KOHTPOH NaI INKOHO, 10 Mo KcpeN3BecTn DO cepNo3HX TpaBM. He NOKlaadaiTeCBA NKJIIOUHO Ha 3anO6iXHi npCTpoi, Bbyoabi H NiJI. Ra KopnctyBaH naHIOROBOI nIN, BN NOBHNI 3pObNTu KInbKa KpOKIB, 106 36epertn CBOI pOboCi MiCy IraPi3AHR BiNbHMn BiD HeUacCHO BnnaKy a6o TpaBMn.
BiDnaya e pe3yIbTaTOM HnpabINbHoro BkOpNCTAHnIHCTpyMeHTy i / a6o HnpabINbHnx DiOnepaTopa Ta yMOB BkOpNCTAHn, UBOrO MoXHa yHnKHyTN 3a DOnOMORHO 3anobixHNx 3axoJiB, 303aHaueHo HxKHe:
MiHOp TpMaIte, 0xONNBn nabzamnyuyn6eHN3oBIMpykMnHa nuii i 3 NOnOKeHHmTinaipyK, 0o Do3BOJc BamnpOTnCToTn BiDauCi.Cuna BIDaui MoKe KepyBaTnc3a DonomoroOn onepatopa, kUO BuKOHATn BiNObiHi3anobixhhi 3axOdi. He BiNyckaIte naHcIoroby nniy.
He nepeBnuyte Ta he pixTe Bnue ypoBn nnuee. Lc Je donomarae 3anobirtn HehABMNCHOMy KOHTaKty HakoHeuHnka i D03BOJnE Kpaue KOHTpONIOBaTn IaHIOROBy Nny y HeoOkyBaHN CXITyaIzx.
BukopncToByte 3aMiHn TINbKn HanpMaHITa NaHcOrn DnN NIKK, kki peKOMeHDoBaHO Bnpo6HnKoM. 3aMiHa HAnpMaMHnx Ta NaHcIorIB NJIKN Ha HeHaJeXHi MoKe CnpuHHInT NoLOMKy JaHcIora a6o BiJaayy.
Dotpmytecb IHcpykui i3 3aTouyBaHHiaTexHOrO 06CnyROyBaHH Bnpo6nka dnnIbHoro NaHOra. 3MeHWeHHr IIN6HHBACOTOMIPA MOKe npu3BecTn Do 3iNbweHHBiiDaHi.
IQATKOBI 3AraJIbHI IONEPEJXEHHJ IOIO BESNEKNI
Bn NOBHHi 6yTn npCyTHiMn Ha npOpeciHOr opraHIOBaHnx Kypcax 3 BNIKOpNCaHH Ta 06cnyroByBaHH 6eH3oNl, npOphiAKTNHnx 3axoJax Ta HadaHH nepwoI donomorn. Byb naCkA, 3epeXitb IHCTpyKuii 3 6e3neKn dno ndaBworo BIKOpNCaHH.
JaHIOROBa Hnna NoteHuiHo He63neuHn IHcTpyMeHT. HeaChi BnnaKn, Nob'3aHi 3 BNKOpNCTaHHM JaHIOROBx Nnq Yacto npn3BOyra Tdo BtpaTn KInCIBOK a6o Cmepti. NaadoHriRkn, nobaneHdepeBa, KOJOn, 0KTAYCB MoKyTB BCI B6NTu. Xbopa a6o rHIOUa DepeBnHa CTBOPIOE DoDAtKOBI pn3KN. Bu noBNHI OuiHn Taai MoKJINBOCTI 6e3neHoro 3ABepHHe 3abDaHH. KaO e cyMHIB, 3aNNTe ue B npoceciHomy dpebopy6y.
Hikojn He pixTe lo3y i / a6o HebeJukn niDnicok (MeHue 75 MM B diametpi).
Ipeed nepwIM BIKOPnCTaHHm npnctpo, peKOMeHDoBaHO nonpaKTkyBaTncra p3aTN KOJOnHa K03Jax dIg nnHnA 60 onopi.
P03mippo6ooyo6bnacti 3anekntbBidpo6oTn,0u BnKohyeTbcra,a TAKOX BiD po3mipy DepeBa a6o 3arotobkn,uo 6epyt b yactb.Hanpknlaad,Bnpy6ka DepeBa BImarae 6inbuy po6oy 3OHy,HIX npHnHTT IHNx po3piib,To6To, noPi6HeHH. OepaTop NOHNen 6yTN B Kypci,IKOHPTPOJIIBaTN BCE,uo BI6yBaCTbcraBpo6ohni 3OHi.
Hikon He nIyIe, KOJI BaIe TiIO Ha NIiH3axnchoro KOKyxa a6o IaHJOrA. JIko Bn BiDyBaTe BiJaCy, ce DonomOKe 3anO6irn NaHcIg BiD BCtyny B KOHTAKT 3 BaIoO rOJBOIO a6o TIJOM.
He BnKOpncToBnyTe pyxu Ha3aJ i Bnpeep npi po3nnIOBaHHi; HexaI NaHcIg po6Nt b CBOIO pO6Oty. TpMaIte IaHcIg roCTpIM, i He np6oyTe nIDTuBXHyTn NaHcIg Yepe3 po3pi3.
He TnchItb Ha Nnky B KInci pi3aHH. Bydtbe roTobi B3rTu Ha Ce6e Bary NnN, KOIN BOHa po3piKe DepeBHy. HeBnKoHaHH NcEi Bka3iBKN MoKe npBecTu Do cepno3HOI TpaBMn a60 NoWKoDHTn pncTpii.
He 3yinnHnIte nNkY ha cepeDeHi onepaui pi3aHHa. 36epiraiTe nNkY npauiouOIO, noKn He 6ynde BuaaneHa 3 po3pi3y.
1063Hn3HTn pnsIK OTpImaHH TpaBM, NOB'ra3aHOi 3 KOHTAKTOM 3pyXOMMn YactNHAMn, 3aBXn 3yINHnTe DBNrH, 3ACTOCOBYte ralbMa NaHcOra, 3HIMITb akymnyTop i nepeKoHaTEc8, 0C BcI pyXOMi YactHN npinJnn 3ynHHncneped:
- nepeД YUHHeHHa m a6o nepeД yCyHeHHaM 3a6nBaHHa
DO TORO,AK 3aJINuTn npOdyKT 6e3 HarnyDy - Npeed BCTAHOBHHeHm a60 3HrTTM npuTAdn
- nepei nepeBipkoIO, npoBeeHHaM texHiHoro 06cnyrobyBaHHa, a6o p6oToi 3 npOdyKToM
Tpmbane BnKOpncTaHHH iHcTpymeHTy MoKe np3BecTu Do TpaBMyBaHHa 6o 3arocTpHHi ChyOoTo TpaBMn. Pnp BnKOpncTaHHi npnaDy npotraom Tpmbaloro nepiody yacy, qacti nepepbn.
KpO npOyKT BnAB, noctpaXdab BiBaxkOro BnNBy a0 nouHnAe Bi6pyBaTn, heraiHo 3ynHInb o6laDnHaHH Ta nepeBipTe Ha HnAraBnCtB noWKoDkeHb a6o BN3HaHTe npuHnHy Bi6paQii. Byb-Ke neWKoDkeHHMa e 6ytn npaBnIbHO BiDpemOnTObaHO a6o 3amHeHO ABTOPIN3OBaHOMy cepBICHOMy ceHTpi.
EkncnnyatyBatn Bnip6do3BOJraTbcn npu TemnepaTypi BiD 0^ do 40^
36epiraTe Bpi6 y Micci, De HABKOJIuHЯ Tempepatypa TpmaeTbcB Mexkax -10-50°C.
3ACOBN INHINBIBYALNBHO 3AXNCTY
Xopo0oio koocti, 3acobn iHdNbiyaIbHoro 3axncty, Rki BnKOpNCOTByIOBc npocecioHaIamn Donomoxytb 3HN3NTn PN3NK OTpMaHnrr TpaBMn OepaTopOM. Hactynhi nyHKTN NOBHHi 6yTu BnKOpNCtahi npn po60ti 3 npOdykTOM:
-
10Jom6e3neKn
-
NOBHHI BiDNOBiDaTn EN 397 i MaTn MapKyBaHHa CE
3axnct opraHb cnyx
- NOBUNHI BiINOBiDaTn EN 352-1 i MaTn MapKyBaHHa CE
3acobn 3axncTy opraHb cnyxy
3axnCT 06nUy Ta OeyNoBHHi MaTN MapkyBaHnCe i BiINObIaHOb CTaHdApTy EN 166 (Dnna 3axnCHnx OkyJpIB) a6o EN +1731 (Dnra ciTuactnxKo3npkB)
PykaBvUKN
- NOBHHI BiINOBiDaTN EN 381-7 i MaTN MapkyBaHHY CE
3axnCT HIR (WkipraHn WtAHn)
- NOBHHI BiIDNoiDaTn EN381-5, MaTn MapkyBaHHa CE i 3a6e3neuHTn BCEiHn 3axnCT.
3axnchi yobotn dny po60nt 3 naHIOROBOIO nIIOIO
- noBHHi BiDnOBiDaTn EN ISO 20345:2004 i Bi3NaHATNCI MTOM i3 3O6paKeHHM NaHcHOrBOoIT NIN, 106 NOKa3aTN BiNobiHicTh Do EN 381-3. (IHODI KOpNCyBaCi MOkyTB BkOpNCtOByBaTN YepeBnK 3i CTaNbHM HOCKOM 3 3axNCHMn RetpAMN, kki BiDnOBiDaHTb EN 381-9, kKIO e HeBENIKn pN3NK naDiHHa 60 3aNNyTyBaHH y NiDnicOK)
KypTKaIJIaIaNzIorOBoI NIIIN IJN 3axnCTy BepxHboI YactHHn Tina
- NOBHHI BiINOBiTaN EN 381-11 i MaTn MapKyBaHHa CE
IODATKOBI NONEPEIXEHH3 TEXHIKINBE3NEKNIOOBOVKOPNCAHNAKUMYJATOPIB
Дя 3anobirahн Hebe3neci noxeki B pe3yltatikopoTKoro 3amkaHHra, TpaBMam i NOWKoJKeHHOBnpo6IB He 3aHypoiTe IHCTpymeHT, 3mHHnakymyIaTOp a60 3apdHn npctpiy y piDHy i He donyckaIte NotpanJHn pIDHN BCEpeDHy npctpoIB a60 akymyIaTOpB. Kop03iHi i cTpymonpoBidiHpiDHN, Taki JK coLOnHn po3Un, NEbHI xIMiKaTu, Bn6IIOBaJIbHi 3ac06n a60 npOdyKTH, loix MICTaTB, MOKyTB npN3BeCtN Do KopoTKoro 3amkaHHra.
3apnKaTe aKymyTOp y Mici 3 TempePaTypoB iD 10^ do 38^
36epiraTe akyMnyIaTOp yMiCi,Je HABKOJIuHr TemnepaTypa TpMaEcTBcR B Mekax 0-20°C.
IHCTPYKUII,IO CTOCYOTbCRA IPABNJIbHNX METOIDIB DnO OCHOBHOI PYBKN,OBPI3KN CYKIB,IPO3NIJIIOBAHHA
PO3yMHHcN B DEPEBHHI
KoNn Bn po3ymiTe cnpraMOBaHm Tnck i HanpyKeHb H depeBnHi, MoXHo 3MeHUnTn "uinKn" a60, npHaunMHi, oukyBaTu ix niD yac pi3aHH. Hanpyr B po3pii o3Haue, uO BOLOkHa po3TarytbcR, i KOnn pi3aTu B C6omy Micci "nponIn" bye, k npabIno BiKpNbAtnc, KOnn nna npoxoInb ckpi3b. JaKIO KOLOda NiTpumyETcb Ha Ko3ni DnA nnJHnH i KHeCb 3BnCaE HeniDtpUmAHm, ue CTBOpHe Hanyr Ha BepxHi qactnHi yepe3 HabncaUoy Bary i po3TaryBaHH BOLOKOH. DepeBnH. Ahanorichn M HINOM, HnKHN qactnHa DepeBnHb Byde po3piHa a BOLOkHa 3iHTOBxHyTi pa3OM.
KaHpaip3 po3piy nponny 6yde Matn TeHdenuo 36ilbuyBaTncr nic piaHH. Lc moke 3aTnchTyne0.
HATNCHITb I NOTARHITb
Cnla peakui 3abxnn npotnneKha HnpanMky pyxy IaHua. Oepatop mae 6ytn roTOBn BiDCTOPOHNTncra, Uo6 KOHTPOIIOBATn HAnpRMOk pyxy npunctpoTo Ta NotarHytn Noro Ha3ad. Pid Yac pi3aHHHa HnXHi Kpomui naheni pnicptpi BIDCTOPOHIOeTbC pyxOM Bpeed. IpOykt MoKe 6ytN BnTuOBxHytn Ha3ad (y HApRMky Do onepaTopa) npi pi3aHHI B3doBk BepxHbOrO Kpaio.
IIJIA 3ACTPRA B PO3PI3I.
BmKHiTa Ta BiD'EdHaIte AkmyJrToPHy 6aTapeHo. He HamaaraiTeCe npMuyBAtn NaHucor i WtAnHy rpe3 po3pi3, ce MoKe po3ipBatn NaHcUor, kN moKe BiXHTHyTncra Ha3ad i BApntn onepatopa. Lc cnTyauia 3a3bnuay BHNkAc Chee3 HnnpabunbHy nIDTPmKy DepeBHHi npMuyWeHHi 3akpTTra po3pi3 np CTncHeHHi, Tm CamMM 3aTnckaOuHne. Pn perynBoaHHi NiIDTPmKn He 3BilbHnTe wTaHry i NaHcUor, BnKOpNCTOBy Te DepeB'hi KInHn abo Baxinb, oob BiKpNTn po3pi3 i 3BInbHnTu Nnky. HikOnn He HamaaraiTeCe 3anyCTnTn NaHcIOBOy Nnly, Konn HanpMaHa WtAnRa Bxve Bpo3pi3 abo npOnni.
KOB3AHH/ΠIDCTPNBVAHH
KoH NaHOrOBA NIIka Bi6pye NiI yac piaHHa, HapmHa 7tAHra MoKe NoaTu NiIDCTPNbYbATn a60 KOB3aTN NO nobepxHi KOJOni a60 rIKN, 10 MoKe np3BecTn DO BtpaTI KepyBaHHa NIIko. 106 3anobirn a60 3HN3NTN KOB3aHHa a60 CTp6Kn, 3ABXn TpMaIte NINy Oboma pykAm. IpekeHOaTeC, 10 NaHcIg NINn BCTaHOBHeHo y na3 dnn piaHHa.
Hikon He o6p3aIte MaIeHbKi, rHyKr iRKn qu XmN 3a donOMorO 6EH30nJIn. Ix po3Mip i rHyKicTb MoKyTB JERKO np3BecTN Do TORO, 1o NnA BiDcTpNbE y Bau 6iK abo DOCTaTHra CnA MoKe BnKlnkata BIDaay. HaiKpaunm IHcTpymentom dIra TAKORo BNDy po6OTn e pyHa nNka, cekatop, coknpa a6o iHwi pyHi IHcTpymentn.
BAJIKA DEPEBA
KoHn ONEpaJIi PO3KpIyBAHN I Bnpy6Kn BnKOHyOTbc3a
DOnOMorO IOBox a60 6IbIe OcIb OndOchAcHOpeaJIi
Bnpy6Kn NobHHI 6By T BiDOKpeMJIeHi BiD ONEpaJIi
NoDPi6HeHHHa BIdCTaHI pINHaIMHI B DBA pa3N BnCOTn
Bnpy6Emo DepeBa. DepeBa He NobHHI 6ByT 3py6aHI,
IO6 NoCTaBHNI 3ARPO3y 6yIb-ky OC6y, NOsKOHTN
KOMyHAnbHI NiHII a60 HAnEChT 6yDb-aki 3bNTKn. JkIo
DepeBO Po6tB KOHTAKT 3 6yDb-koYO fYHKUHOHbHOO
JIHIEO, KOMNaHIA NOBHHA 6ByTH HeraiHo NOBIDOMJIeHa.
Onepatopy naHurorBoI nn nCnI TpMaTncHa ropi, 6o DepeBO, WBNiWe 3a BCE 3KOTnCnA 60 3KOB3He BHN3 no cxny niCn Joro nadiHH.
XbIbCTyn NOBHeH PnAHyBaTnci OuNtncnepn,HIX NoHNATn NJIaHH. Jx BxOy NOBHeN NOINIOBAeNC Ha3a i no diaroHani Do 3aHbOJ YactHnOiyKyBaHOI NiHII naIHn.
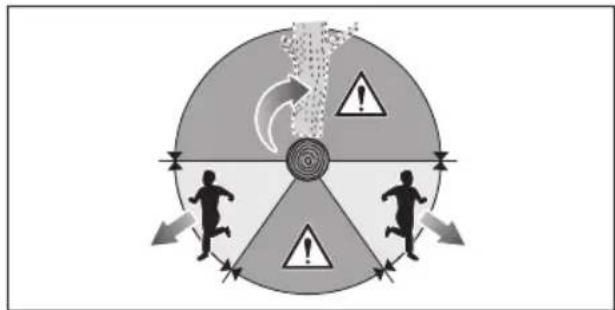
Ipeep noaTkom py6kn, po3rJnHbTe npnpOHN HaxnI DepeBa,po3TaWyBaHHB eNknx rIOK i Hanpam Bitpy, 0o6 cydntu, kIMM WnXOM depeBO 6ye naDAtn.
Budanitb 6py, kamehi, kopy, uBXn, ckobn Ta npotn 3 depeba.
3a6b0pOHeHO nHnTn DepeBa, 10 TpyXnBi, nobaneHi BITpOM, NsKoDxKeHI B Hacniok Noxekxi abo ydApy 6bnckabKn Ta iHwe. Lc dYxhe He6e3neuHo Ta Moke 6ytN BnKoHaHO nIWe npoceciHmM caiBnKaMn.
1. Happi3 mitkn
3p06itb BIMky 1/3 diametpa Depeba, nepneHnkyIrpHo HAnpMy naHH.3p06t b HxNHO rOpnsHTaBHy HAcIy B nepu yepry. Lc Donomoxe yHKnHyTu 3aueMmHeHH, afo nnraHoro NaHcOra abo HanpaBIAHOi WtaHr, konn dpyra Hacicka poobntbcra.
2. HaciuKa dna 3aHbO r o naIHn
3p06iB 3aHnB Bpy6Ky npHaMHI 50 MM / 2 Bnue rOpH3OHTaHbHoro po3piy Haciu. 3p06iB 3aHIO HaciuKy, BnpiaHoi npaIeNbHO rOpH3OHTaHbHOMy Pi3aHHIO. 3p06iB 3aHIO 3ap6Ky DOCTaTHBOHO, 106 3aIIuNTB R kocTI iDbickN. iDbickA depeBa 36epirae depeBO BiD cKpyUyBaHH I naIHIN B HenpaBnHOMy Hanpymky . He npopiaTe niDbicky.
KoJI naIHnHa6JIkaeTbCdo nIDBICKN,DepeBO noBNHNOuATn NaDTa. JaKIO e JKnIc b 7aHC, 0o DepeBO HeMOKe Bnactn B nOtpi6Homy HAnpMky, a6o BOHO MOKe NOxHTHyTnca Ha3a i 38'3aTN IIJILbHn NauHqr, 3ynHITb NIIHHa DO 3aHbOI HAcIck I BkOpNCTOByTe KInH 3 DepeBa, nactNY 6o AnOMHHIO, 0oB BiKpnTPO3pi i DepeBO Bnano y3DobX baxKaHOI niHII naINHn.
KoNN DEpeBO NOUHae NaDAtn BNDaNITb NaHcIyOBy Nnny 3 p03pi3, 3ynHHT dBnHy, noCTaBTE NaHcIyOBy Nnny Bn3, Ta BNkOpNCtaIte IJnx 3aIIaHOBaHO BIDctTy. BybTe NnblHi CTOCOBHO naIHnB BnCOkX npocTe i NnblHyTe CBOIO onopy.
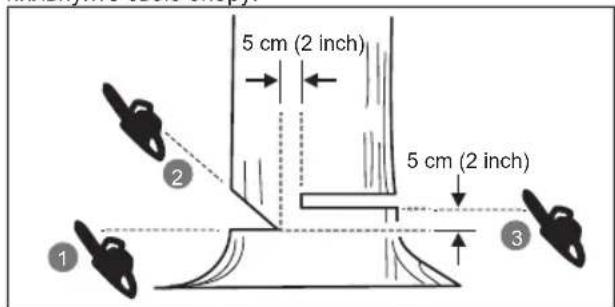
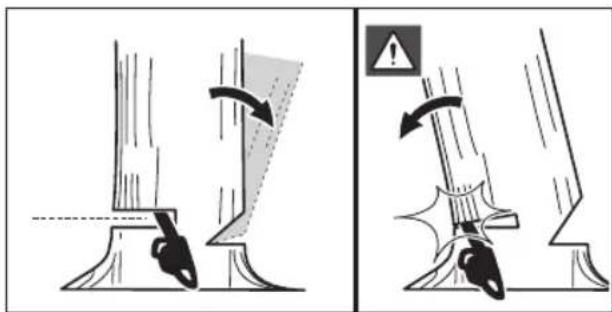
BNDANITb ONOPHE KOPIHHA
OnopnKopiNb, ce BeJnkn KopiNb, 10 npocTgAetbca BiD cTob6ypa DepeBa Hnd 3emJeu. BnuDanitb BeNki onopHi KopinHdo py6Kn. 3pObitb rOpntaHbnHn po3pi3 3nepy B onopHn Kopihb, a notim no Beptnkani piaHHa. Y6epitb OTPMaHn BiNbHn po3dIn 3 p6ooyo3ohn. DToPmYteCb npabInbHoI npoueDpyn Bnpy6Kn depeB nicJa BnuaneHHa BEJNKoro OONPHORO KOpHHa.
ПДТРИМКAKOJOДN
HaciuKa po3piAc KOJOny Ha notpi6Hy DOBXINHy. Baxnbo nepeKoHaTncs, 0o Ba7a onopa TBepda i Ba7a Bara pIBHomipHo po3noJInrEbCra Ha 06nDi Horn. KOnIe MoXnBO, KOJOna NOBHeHHa 6ytN nIDHraTa i NITprMByBaTncs 3a DOnOMorOc cykIB, KOJOn a6o UpyOK. DoTPmYTeCb npocTx IHCTpykui dny 3pyHoro PO3nnHOBAHHa. KOnI KOJOna NiITprMByEcbc no Bci II DOBXNIi, II po3piAIOTB 3Bepxu (Had Ko3nAmn).
KoNi KonoJa NiItpMpyTbc 3 OJHOrO KInu, CnNITb 1/3 diametpa 3 Hn3y (NiD Ko3Jamn). NOTIM 3p06Itb OCTaToHn po3piHaKD Ko3Jamn, uo5 3yctpirn nepwn po3pi3.
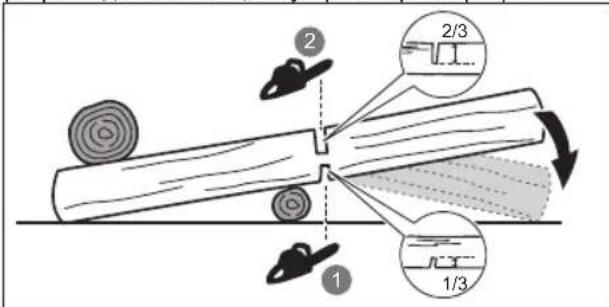
KoN KOnda NiItpmMyEeBc3 06ox KInuB, po3nni1b 1/3 diametpa 3Bepxy (HaD Ko3nAm). Notim 3pO6itb octatoUHn po3pi3 NiI KO3nAMn Hnxhboi 2/3, 0o6 3ycTpItn nepun po3pi3.
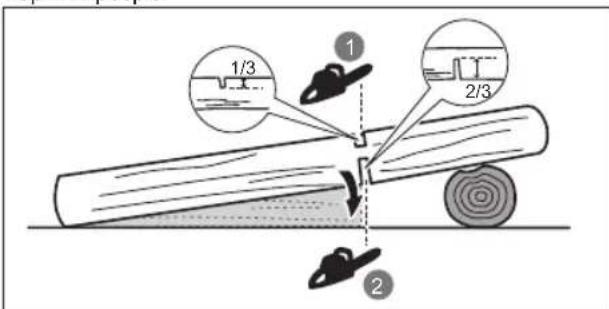
Ppno po3nnHbAHnHa cxNJ 3aXKn CTiTe Ha BepxHbomy6oCiKoJOnu. 5o6 36epeTn KOHTponi nd Yac "npop3aHH" nepeD 3akIHcEHnM piaHHn CnID 3HN3NTn
TnCK, MiUHO TpIMaIOHpyKn nnKn. He Do3BOJnTe NaHcIyO KoHTakTyBaTn 3emJeIO. Picna 3aBepWeHH po3nnIOBAHH, NOeKaIte NOK nAHIOTnNIN3yNNHtbcS, nepu HIX pyXaTH naHcIyOBy nNly. Nepu HIX nepeITn BID DepeBa DO DepeBa, 3aBXKn 3yINHnTe DnHyN.
OBPI3AHHcYKIB DEPEBA
O6pi3aHHc yukib ce BndaJIeHr rINOK 3 DepeBa, 10o BnaJIO. PnO o6p3aHHi cyuKIB, 3aIIMTe 6InbWi HNkHI KINUkBKn DnA niIDTPMKN KOLOND HaD 3emJeO. 3pi3aIte Dpi6HI rIKN 3a OOnH npoxi. FIKNI iD HanpyroIO NOBHNi 6yTN 3pi3aHI 3HN3Y BROPY, Uo6 YNHkHTN 3B'3yBAHNN NaHcIOROBOI nnn.
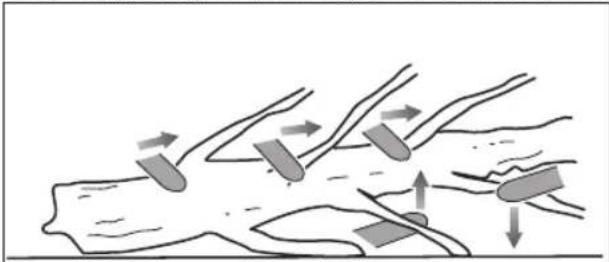
NPYKHI WHTAH
IpykHryOIO KOJIOHO MOKe 6yTN 6yNb-ka KONoDa, rIka, KopeHNCTn nehB, a6o caJKAHeu, kI HaxNJINLNCrN iN HApYROIO IHwO RO DepeBa, TAK 00 BOH CNpyKInHbHa3aAD, Ako 3p3ATn a6o BuaJIHTn TPmaUoy DepeBNHy. Y BnAbWOrO DepeBa, KopeHCTn nehMaE BnCOKNI NOTeHcIaI cPxyKNHTn Ha3aD B BePTNKaJIbHe NOnOKeHHN iN Daoc po3KpKByBaHN, 0o6 BiIDOKPeMNTn CTOBbyp BID nH. CTeXte 3a npKHNMy MNOJAMN -BOH He6e3neHi. He HamaraIteca 3piAtn 3irHyTI rIKN a6o nHI, Rki iN HApYROIO, Ako Bu NE IpoQeciHo NiIroTOBNeHi i KOMnTeHTHi B p6oTi.
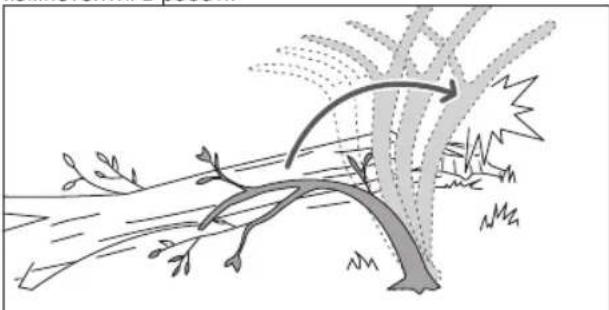
NonepeXeHH! PpyxHryi KOJOn He63neHi i MoKyTB BdApITn onepaTopa, B pe3yIbTaTI qRo onepapTop BtpaTNTKoHTPONb HAD NIKKOHO. Lc MOKe npN3BecTN Do cepNo3Hnx TpaBM aO do CmeTI onepatoa. PiaHHra IIOK, 10 3HaXoAraTbc NiD HATrOM, MaE 3diNCHOBaTncb DOCBIeHMM KOpNCyBaayAM.
TPAHCIOPTYBAHHRA 36EPITAHHH
Ipeep36epirahHm a6o YnueHHM BUMKHTb npucptpi, BIMtB akymyTAP Ta daTe npncTpOxOJOHyTN.
Ipn6epitb BcI cTOpOHn MaTePiaJn BiD npCtpoU. 36epiraTe npOdyKT B npoxoNoHOMy, cyXomy i do6pe npoBITpOBaHOMy Micu, HeoCTyHOMy dIteN. 36epiratn noaJI BiD arpecunBnHex areHTIB, Taknx k caoBI ximikatn i coJe npOt oBJeHeHHa. He 36epiraTe npCtpiHa BiDKpntomy nobITpi.
3aBxKn KpnuKa HnnpabNraHooi ShmH NoTpi6Ha 6ytn BCTaHOBeHa nepe3eepirAHm npodykTy, aO npd Yac TpaHCnOpTyBaHH.
Ipyx a6o naHnH, 063anobirn TpaBMn IIOe a6o NOKdoKeHH MaHH.
NEPEBE3EHHJITIEBHX BATAPEI
3dHIOIe TpaHCnOpTyBaHHa kMyJrTOpHOi 6aTapei BiNObIDHO Do MlueBnx Ta 3araIbHoJepeKxABHnx Hopm i npabn.
DToPmMyTeB CcneuaJIbHI BIMOrn Do yNaKOBKn i MapkyBaHH np TpaHcnOpTyBaHHi 6atapeiTpeTboHO CTopoHO. IpekoHaTeC, 10 NiJ cac TpaHcnOpTyBaHHa AkymyIaTOP He BCTynae B KOHTAK3 IHWMN akymyIaTOPHMn 6batapeMn a6o CTpyMOnpOBIHNM mATEpiAnam Ta 3axNCTtB BiKpnTi p03'Emi 3OlaHMM HEPoBIHNM KpnUkAMn a6o CTpiKoIO. YHe nepeHoCbTe akymyIaTOPn, TPichYti a6o 6iry. 3B'raTncr 3 Ham n dny OTPmaHH NoaJIbX PeKOMeHdaui.
TEXHIUHE OBCNYROBYAHHH
BnKOpncToByntiNbKn opriHaNbHi 3anachi qactHn, akcecyapn Ta obnaHaHHa BID Bnpo6Hnka. HeBnKoHaHH niei BmOrn MoKe npNBecTu DO MOKJIBOI TpaBMn, norAHOI npOdyKTnBHOCTi Ta MoKe npN3BeCTn Do BTPaTn rapaHTII.
O6cnyroBvBaHHB Bmarae KpaHb0oi 06peXHoCTi i 3HaHHI IOBNHHo 6yTN BNKHOaHe TJIbKn KBaIqikOBaHM qaxiBcM. 3BeptaIteCra TJIbKn Do ABTOpN3OBaHOrO cepBichORU cHTpy.
Bn moxete 3po6bntn peryIIOBaHHra Ta peMOHT, onncahi B cboMy nocibHky KopncTyBaay.Дя obcnyroByBaHHa abo peMOHTy, 3BepTaIteCra TINbKn Do ABTOpN3OBAHOrc cepBicHorO ueHTpy.
HehaIexHcTexHcHcO6cLyroBvBaHHbUdJIeHHa60 MoNΦiKaJ3aNo6iKHXnPnCTPOIBMOKyTbPn3BeCTn Do HeKopeKTHoIpo6tnpnCTPOIO,36IbSyuOu np3NKOTpIMaHHcePio3HxTpaBM.3a6e3neHyTe npopeciHe 6cLyroBvBaHHnPnCTPOIO.
3aTOyBaHHraIaHcHoraeCKlaJHOIO npOeHypo, i BnKOHyBaTNI MaEOCBiUeHn CneUianCT. 3aTOyeHHra IaHcHora6e3NeHOr e KBAJIicIKOBaHO 3aJaHeo. TomyBnPObHnK HAcTIHo peKOMeHNyE 3amInHTN 3HOWeHnIaHcHrHa HOBn, 10 MoXHa 3pObTu y ABTopu3OBAHOMy cepBichOMy ceHTpi.Homep 3aunactHH DoCTynHn B TaBnui CneUPhiKaui npOdykTy B KeipBHuNTBI.
I OToPmMyTeScb IHCTpyKciN NO 3MaUeHHIO I nepeBipCi HATrIy NaHcIora i KopeKTyBaHHIO.
■IicnaKoXHOrO BnKOpNCtAHHH, OunuYTe nJaCTNKOBi YactHHM'koHO CyXHO TKAHNHO.
I IpeBipTe Bci raikn, 6oTn i rBHTn nicra KopoTKoro npomixka yacy Ha npaBnIbHy repMeTuHicTB, uO6 3a6e3neuNTn npOyKT y 6e3neHOMy pOboOMy cTaHi. Byb-ka noWKoJKeHa Detanb, MaC 6ytN npaBnIbHO BiDpemontObaHa afo 3amHeBa ABTOPn3OBaHOMy cepBichOMy ceHTpi.
Tpaqik po6it no 0cbnyrobyaHHIO
He niDaaBaiTe BnNBy douy a6o BOIOnx yMOB.
TpmaTe i BnKOpNCbOyIe nny npaBnblho o6oma pykam.
He BnKOpNCToBnyTe nIky, BnKOpNCToBnyOuN TInbKn Ondy pyKy.
Pomictb raIbMIBHn IaHpor y no3nIO RUN.
Pomictb ranbmiBn nAur y no3nIO BRAKE.
Biinobiidae Bcim HopmatbHnM cTaNapTaB KpaIHax EC, De Bnpi6 6yno npudhao.
Cbpa3iibcbka 3nak BiNobiDnOHTi.
UkpaIhcbKm 3HaB KbIINOBiHocTi
He BnKnDaTn BiDnpaCbObaHi eNektpuHni npuaDi pa3om i3 no6yTOBmBiXoDammy Tyni3yBaTu y cneiaIbHo npzHaueHnx 3aknaIax.3a KOHCytbaTaeIO no ytni3aui npuaIay 3BepHITbcrdoopraHy MicceBoI BnAdn a60 dInepy
TapaHTOBaHm pIBeHb 3ByKOBoI nOTyKHOCTi.
MaTnlo 7TaHn Ta JAnuIora
PobepHtB,06bBiDpeyIIOBAtn NOaMy MaTnla
-
= 36iNbseHHn noaui
-
= 3MeHsEHHn noaui

Iobephitb,io6 BiiperynIOBaTH HaTg IanaIora
- = 3aTЯнТи NaHúŋor
- =Послабитланцior

Hanpmaokpyxynaniora.
(BiDmiyeNo nKpNkoIO JAnHIOROBOKoNEca)
CIMBOJN BcBOMY NOCIISHKU

3aunactuHnTa akcecyapn, 10 npdaotbc8 OkpemO

IPMMITKA

PonepeJxKHeHHa

HociTb 3axnCT Oey Ta oBnny.

Hocitb 3axnt Bepxhboi YactnHtina.

HocItb 3axnCT Hr.

3ynnHka npodykTa
IPEEDIOYATKOMBVKOPUCTAHN
DnBiTbCr CTOpHky 228.
- Hanaeata3acobinHdbiayalbHoro 3axncty (3I3).
Пд ус роботи 3 пистоим слд завкд Надяту новни зхист дя очей, Byx, pykaBHyK, zu Злбогiraють кOB3aHHIO, macNBHe B3yTTЯ, ta 3axnchni ODяг. He ekcnnyaTyIe MaunHy bocohix abo y ВIDkpTnx caHdJIAX.
- BnIMtIeTajI 3ynakyBaHHa. MoNTyBaHH npCTpoIO.
NonepexeHH!KuOBOH-He6ydb3amHeHi a60 NOWKoJxHeHi, He BnKOpNCTOByTE daHN Bnpi6, NOK BOH 3de6inbWOrO He 6ydyTB 3aMHeHi. HeBnKOHaHH Yiei BkA3IBKn MoKe npNBcTn Do cepNo3HOI TpaBMn a60 noWKoDHTn pncTpi.
NomictiB naHKn npNbOy naHcOra B KaHaBKn WtAHn. NomictiB naHcIgTak 6yNa netna No3aDy wTaHn.
Пияьнл Ланцor NOBHHEN 6yTN 3BepHEnB HanpMy o6eTpAnHЯ NaHOra. JIkuO JauHOr B noJoxKeHHI 3BopOTbOr O6eTpAnHЯ, neperOpHITb netTIO.
- Ocna6Te raKn KpInnEnHn taHaHn. 3HiMItb raKn Ta Kpnkny naHOrOBOr KOneca.
TpmaTe NaHcOr B noJoxeHHi Ha Wtah3i i nomictb neTIO HABKOLO NaHcIgOBoro KOleca npBODy. Onycntb wTaHry TAK, 606n 60NTn npoiu nn Kpi3b npopis y wTaH3i.
-
BctaHObIb KpNkU KaHcHOrOBO KOeCa Ha Micue. BCTaHObITb I BpyHy 3aTgHiB raKn KpinNeHHa TtAHn. HanpMa HsTaHa NOBHHa MaN MoXKnBicTh BiJbHO nepemuaTncA dIpeYIOBaHHHaTAY NaHcHora.
-
BidperyIIOHe HATr IaHcIora. IOBepTaTe rBnHT perynIOBaHHraHaHcIora, BIKOPNCOTbOHyKOMNKeKTHn raIKOBn KIOU. NocTIHo nepeBipTe HAnpyr IaHcIora, KOIN peryIOcTe HATr.
Дя 36iNbweHnHaTary NaHcIOra NOBepHITb rNHT HaTary NaHcIOra 3a roDHHNKOBHO CTpiKIO.
- 3MeHHTn HATr NaHOra, NOBepHtB rHHT HATrIy NaHcTOra npOTn rOuHHNkoBOi CTPIKN.
INPMITKA: Pn npabHbHOMy HataKHHi 3a3op MxHoxkem y naHcOry Ta wTaHROo CTaHOBntb 4-5 MM dImaMoJI RY36CSX30B Ta 5-6 MM dIra RY36CSX40B. NotarHt b IanHqor B cepeunHi HxhHboi Yacttnu WtaHn BHn3 (BiD wTaHn) i Bmipayte BiCTaHb Mx wTaHroio i pi3zam n laHcIora.
INPMITKA: TemnepaTypa JAnHcHora 36IbSyEbCp np HOpMaJIbHiPi pO60ti I BnKLIkae Po3TgHeHHaHcHra. IpeBepTe HaTg JAnHcHora cacto I npn Heo6xHocTi BiDperyHIOue. JAnHcIr HATaHyTa,KON TENm MoKe 6yTu 3aHaTTo KOpCTKIM npn OxOnOdKeHHI. IpeKeHOaTEcra, 10 HATaR JAnHcHora npabNtBHO BiDperyNbOBAHn, k3a3HaueHo B ciin HctpyKlii.
- Ytpmyu HakoheHnK HanpMaHOI WtahrBropy, HadiHo 3aTgHiTB raKn KpinneHn WtAHn.
7.ДоаиTe MaCTIno dIЯ NaHcIora.
BukopncObyTe TINbKn MaCTnIO RYOBI nna 6eH30nnIOK 3 aTOpN3oBaHoro cepBichoro ceHTpy.
OuHCTIb NOBepxHIO HABKOJIo MacJHOI KPNJKN, 063anobiITn 3a6pydHeHHIO. 3HIMITb KOBnaQOK 3 MacJHoro 6aka.HaIIte MacNo B MacJHNI pe3epByap i KOHTPOJIIOITE DaTNUK pIBN MaCNa. IpekeohaiTeca, 06bpyd He NotpanIe B MacJHNI 6ak NiD qac 3aONOBHeHHr. 3aunHtB MaCJHNI 6ak, 3aTARHITb KOBnaQOK.BNTPIb BCE po3nIte.
NonepdkeHH! HikOnn He npaioTe 6e3 3MaueHHnaHOra. KaIO naHOr nNkN npaioe 6e3 3MaueHH, HanpaBnKHa wTaHa i NaHOr nNkMOkyb 6yTu noKoJKeHi. Npeed Ta nD ac BVKOpNCtAHH 6EH3OuNK, KOHTpONIOte pBeHb MaCTNa Ha MaHOMeTpi.
- IpekeohaiTecra, 100 TBnHT, knn peyIIOe notik MaCTINa, BCTAHOBHeHm TaKIM YNHOM, 106 BIIH BiKpNBABcDnpeyIOBAAHHaHcOraTa WtAHn.
IobepHb rBnHT npOTn rOaHHNKoBOc CTPIKN, 06 BiKpTN a6o perynOBaTH nOTIK MaCTUNa Do naHqora a6o wTaHn.
IobepHbTbNHT3aRouHHNKOBOcCTpiIKKIO,06 3MeHNHTnNoaCyMaCTnlaDoNaHcUraTaTaTHrN.
Haarodkeha cnctema MaCTuna laHcIora Ta uTaHn, Ra npabJIO, BnKOpNCTOBc MaCTUNo 3 naHcIora nIac BnKOpNCtAHn. Uo6 nepebipuNf yHKcIooHaNbHiCtB MaCTUNbHnx CnCTem NaHcIpy i uTaHn, HanpaBte Kpaeyok naHcIora Ha cBiTly nobepxHIO, Taky, Ja ra3eta. Pi3Hi 6pn3kn MaCTuna nobHHi DOrJIaTncn icnna KopOTkoR Oacy.
- BctaHObITb akymyIaTOp.
3ictabte niinraTpe6pa Ha akymyIaTOPHn 6aTaapei 3 naamn B npTy 6aTaapei JAnuTOROBOI nnKn. Bctabe akymyIaTOp do npncToIO. Npeed noayatkom pobotn
nepekoHaTeCra, 0o fikcaTopn Ha akymyIaTOpi KlaucHyn Ta akymyIaTOp npnkpinHeNo do npnJa.
NonepexeHn! 3aBxntpMaTe naHOrOBy nny npabOy pykoHa 3aDHi pykOaTci i niBOO pyKOHa nepeDiHpyKoA Tci.
NonepexHn! Bi3bmitbcra 3a obndbi pykni 3 naibcmao 6xonnbmmpykn. NepekoahTeec, oBaasa Iiba pyka Tpmae nepeHHO pyky TaKIM YHOM, OOb BEJNKn naneCb 3haxODNBc 3Hn3y.
- 3anycitb npnla.
BctaHObit baHIOROBE raIbMo y noIOKeHHRA RUN, CXONNBWCb 3a BepxHIO acTHHy BaXeNraIbMa Ta notarHtB BnepeI nepeHIO pyKy nOKn He noUyeTe KlaaHn. Po3bOkyTe TpRrePhn nepemKaau. HatncHtB TpRrep nepemKaHH.
PnIMtKA:IyynHKn npnaJy:YbIMKHiTb naHcIorObe raBMO, NOBepTaQun JIBy pyky HABKOJnepeHbOit pykortkn. KOni zinok Wbnko oBeptAeTBcra, TINbHM 60kOM DonoH BiTnCHItb BaxInb rAnbMyBaHHa ZInka y 6ik 7taHn. Po3bNoKyTe TpirepHn nepemHKa i 3ano6ixHMK.
Kablosuz testerenin tasariminda guvenlik, performans veguvenilirige en yuksek oncelik verilmistir.
KULLANIM AMACI
The declared vibration total values and the declared noise emission values given in this instruction manual have been measured in accordance with a standardised test and may be used to compare one tool with another. They may be used for a preliminary assessment of exposure.
The declared vibration and noise emission values represent the main applications of the tool. However, if the tool is used for different applications, used with different accessories, or poorly maintained, the vibration and noise emission may differ. These conditions may significantly increase the exposure levels over the total working period. An estimation of the level of exposure to vibration and noise should take into account the times when the tool is turned off or when it is running idle. These conditions may significantly reduce the exposure level over the total working period.
Identify additional safety measures to protect the operator from the effects of vibration and noise, such as maintaining the tool and the accessories, keeping the hands warm (in case of vibration), and organising work patterns.

AVENTISSEMENT
In addition to any statutory rights resulting from the purchase, this product is covered by a warranty as stated below.
-
The warranty period is 24 months for consumers and commences on the date the product was purchased. This date has to be documented by an invoice or other proof of purchase. The product is designed and dedicated to consumer and private use only. So there is no warranty provided in case of professional or commercial use. This warranty applies only on new products.
-
There is a possibility to extend for a part of the range of power tools (AC/DC) the warranty period over the period described above using the registration on the www.ryobitools.eu website. The eligibility of products for extended warranty is clearly displayed in stores and / or on packaging and is contained within the product documentation. The end user is required to register his/her newly-acquired products online within 30 days from the date of purchase. The end user may register for the extended warranty in his/her country of residence if listed on the online registration form where this option is valid. Furthermore, end users must give their consent to the storage of their personal data that is required to be entered online. They must also accept the terms and conditions. The registration confirmation receipt, which is sent out by e-mail, and the original invoice showing the date of purchase will serve as proof of the extended warranty.
-
The warranty covers all defects of the product during the warranty period due to faults in workmanship or material at the purchase date. The warranty is limited to repair and/or replacement and does not include any other obligations including but not limited to incidental or consequential damages. The warranty is not valid if the product has been misused, used contrary to the instruction manual, or has been incorrectly connected to a power supply. This warranty does not apply to:
-
any damage to the product that is the result of improper or lack of maintenance
-
any product that has been altered or modified
-
any product where original identification (trade mark, serial number) markings have been defaced, altered or removed
-
any damage caused by non-observation of the instruction manual
-
any product not displaying the CE approval mark on the rating plate
-
any product that has been attempted to be repaired by a non-authorised warranty service centre or without prior authorisation by Techronic Industries
-
any product connected to improper power supply (amps, voltage, frequency)
-
any damage caused by external influences (water, chemical, physical, shocks) or foreign substances
normal wear and tear spare parts
inappropriate use, overloading of the tool -use of non-approved accessories or parts
-
Power tool accessories provided with the tool or purchased separately, including but not limited to screw driver bits, drill bits, abrasive discs, sand paper and blades, lateral guide, etc.
-
Components (parts and accessories) subject to natural wear and tear, including but not limited to service & maintenance kits, carbon brushes, bearings, chuck, SDS drill bit attachment or reception, power cord, auxiliary handle, transport carry case, sanding plate, dust bag, dust exhaust tube, felt washers, impact wrench pins & springs, etc.
-
For servicing, the product must be sent or presented to a RYOBI authorised service station listed for each country in the following list of service station addresses. In some countries your local RYOBI dealer undertakes to send the product to the RYOBI service organisation. When sending a product to a RYOBI service station, the product should be safely packed without any dangerous contents such as petrol, marked with sender's address and accompanied by a short description of the fault.
-
A repair / replacement under this warranty is free of charge. It does not constitute an extension or a new start of the warranty period. Exchanged parts or products become our property. In some countries delivery charges or postage will have to be paid by the sender. Your statutory rights arising from the purchase of the product remain unaffected
-
This warranty is valid in the European Community, Switzerland, Iceland, Norway, Liechtenstein, Turkey and Russia. Outside these areas, please contact your authorised RYOBI dealer to determine if another warranty applies.
AUTHORISED SERVICE CENTRE
Any request or issue with the product can be addressed to your local authorised service centres (visit www.ryobitools.eu) or directly to: Techronic Industries GmbH, Max Eyth Straße 10, 71364 Winnenden, Germany. Please state the serial number and product type printed on the label.

RYOBI CONDITIONS D'APPLICATION DE LA GARANTIE
UCIOBNA 3A BANIDHOCT HA FAPAHUNRAHA RYOBI
B DonbHHeHne KbM 3aKHOyCTAHOBENHe rPnBa, npOHTNAuIeNt o NKpykATA, TOnI npDcykE o6BXbaAT oRAPaJIaK, KaTKe o EINNOXEHo NO-dONJy.
- 拉普拉夫斯基克24 měteca 3a kliněneцу ná zánočha da TE OE Tědě HA 3a kýnuvahe na hpojkyta. Tažn dàta trpába da CE dokáke c fácktypa nɪn dpyro dokáaténtchö 3a nokynka. Pójkybt t e mpa60těn H pěndhánačeu hámco 3a noptéběvniču i núva hyoúpèsta. Cnébobaténo He ce dàba rapaúhuá B cnyau na hánónzābe Na opojechovámačn tīn c Tpbocra k Že.
- CbuectByBa Bb3MoxHoc3a yDblKabAbe Ha rapaHnOHHn Cpok 3a qact ot dnnanhaHa raapAHuaTa Ha eNktpmeckn HcTpyMeHTn (AC/DC) cnei nHTNAHETo HA onCNAAH Tuk Ype3 perCTpaunHa yhe6caTnwwyR0bitools. eu.B maraHNITE uHNu HA onakOBkATA uINBtpe BdoKymeTAuaqra HA npOyTKa E noK3aHO RCHAO daNNI HcNTpyMeHTb OTOBPA HA yCNOBMArta 3a TaKoBA yDblXKBaAbe HA rapaHnOHHn Cpok.KpainHnot pTeBnTepn TpRbBA da pErntPnpa CBOnTE HOBNpWDoBnHmCTpyMeHTn OHnA H pAMKnte HA 30 nnOT DA tATATA HA NOKYnka.KpainHnot pTeBnTKe MOnE da ce pErntPnpa 3a yDblKHea rapaHn B DpKabAte cna H napeBnBaBae,ako e nocOeHa BbBΦopMylrpa 3a OHnA HpnCTPaUN Kato MToKTO, KbTeTo Ta3n ONUe H bAnDA.OCBeH ToBA KpainHNT oNpEbnte TpBBA da Daadat cbfNaCto n 3a CbXpanHe H a daHNITE, KOInTo c3aDblKnTeHN 3a nonBnBaHe OHnA, INPBA da PnemAt ObuMHSe UcNObIA. TOnyHeoTOTNBpXdENHe 3a pERNTpaun, h3nPateHo NO eNkTPOHn Iooia, H opRTHaHnata fKaTpy, NOK3BaUa datata HA noKynka, ue cnykat kato dokKaaTeNCTBO 3a yDblKHehata rapaHn.
- FapauuHraTn NOKPbRA BCHNKe DepeKTH Na npOdyKTa NO bpeMe HpaapauuHnHnna CPOK, KOINTe DbNkTa HA npObeHmN Bnpa6oTKa Tnn MATEpauHnTe KMB MOMENTHa NOpKynkata. TaepauHnTA e OrpauHnEa DO pMeONr HnINZAMRaH n HE BKNIOBVA DpyTu 3aDyIbXeKeHn, BKNIOHHTeNHO, HO He cMO, CNYaHn INN KOCBEHN IETN. TaepauHnTA e HeBaNIMDA, AKO npOdyKTb E n3NO3BAH HnepauHnHO INN BnpOtnBOpeNeC pBkoBDCTBO CnHCTpyKUN, KaKTo N aKO eCBp3hN HnepauHnHO. Taan npauHnE h BexKa 3a:
-üeTn no npodykTa B pe3yntaHa HennpaBnHa npoФnnaKTka
- npOdykTN, KOINTo Ca 6HIN H3MeHeHN HIM MOHnHUPaH
- npoDyKT, pny KOTI opriHAnHITNE MapKIOBKR 3a IeHTnHmKauia (Tb.POBCKA mapka, cepneHHomeP) ca H3PTNt, npomEHEH nIN npemEXMAT
-
NOBpe7, npriHnHEAOT HcNA3BaHE Na pIbKOBOCTBOTO C INHCTpyKlIMI -PNOyDk6E3 CE MAPKOBPOKA
-
pOyDKT, 3a KOIOY e HapnABe OHNT 3a peMOHOT on HEKBANmIpaHnAP CNEUANJNT INN 6E3 npedabapntENHO paepSEHeNe o TchEtronic Industries.
-
nPOdYKT, CbBp3Aн KbM HENoDxOAnIaO eNekTKpo3AxpaHBaNe (amNepaK, BONTak, YecOTota)
-
UTeTIN, PnHmEHN OT BbHJH BNJHIN (XMMuHn, Fm3uHIn, ydApn) INIyKJbn BeueCTBa
-HopMaHNO H3HOCAHe Ha pe3epBHN YACT
-HeNoDxOJa7a YnOTope6a, NpeTOBapBaHe Ha HnHCTpyMeHTa
-3n0JI3BaHe Ha HeoO6peHn akcecoap nIu Yactn
-AKccoapnte 3e enktpnueckn HNCTpymeht ca npedocabEH nHCHtpmeHTa mCe Kynbyat OTeJHe. Te3n N3KnUeyehn BKNHOBAT, Ho He cAmo, HakpaHmua 3a OTBeTpKa, CbpeJa, abp3aNBHN DnCKObE, Wkypka N octPeta, CTPAHnHbEOy
KOMNOHENTI (chaTI n akCEcoaPI), NOJNOXeHI HA eCTeBHe I NHO BCAHE, BKIOHTENHO, HO He cAmO, KOMNIeTIN 3a 0bCnYkBAHe N noDpIbKka, KAP6BOHNO YETK, NARePi, NaTPOHNK, PNtCTABKa CbC CpeDnSDS INN PnIMEHMO YcTOIcTBO, 3axpaHBaU Ka6eN, CNoMaTeJIHa PbKOxBaTKa, KyTna 3a TpAHCNOPTnPAHe, UINΦOBuHa NnactIna, TOp6a 3a npax, Tp6ba 3a OTBeXdAnHe H a npax, PhIIIOBUn WaiBn, UINΦTOBe INpyKHHN 3a BNTOBePTN IN Dp.
4.3a c6cnykahe npdykTbTp6ba da ce n3paTu HnH 3aHece ha otopnHp an cepBn HA RYOBI, noocHoA 3 bCeka bDpKaba BcneHn Cn6bck C apecn HA cepBnB, H NKoH DpKabn MeCHTH TpBoeU HA RYOBI noMa OTROBOPHOCTT da hNpATn npOkyTA do cepBn3e HcTbp HA RYOBI. Pnp n3paauha He npOzyKTdo cepBn3 Ha RYOBI toh Tp6Ba da e onakoban 6eOnaccho 6e3 onacho CbDpKaHne, Hap. 6e3HH, da e MapKnpan cApcea Ha noDatane H npDpyKeH o KpTKo ONcAnae HA nobPeada.
5.PemohbT/3amHATA NO cinnata HA ta3n rapaHcna Ca 6e3nnattn. Te He BoJr do yIbJxBaHBe INn POHOBBaBe HA rapaHIOOHmna CPOK.CMEHeHATE qACTn INn HcPTymEt CTabAT hAaCobCTbeHOt. BHKOn DpbKaBn TaCkTe 3a DoCTBaKn INn NpTaPauHa TPrBa 6Da nCe INaTt OToNateIN. 3aKoHOCTaHOBeHIn INnpaba, npO3TNauHn O TzAKynyBaHeto HA HcTpyMeHa, OCTabAT He3aceHnat
6. Ta3n rapaunna e baindha B Ebponeckata oobhoct, Ibeauapria, Ncaanin Hopaeiru, Jntxtehuain, Typuiu n Pyciu. I3bH Te3n o5naactn ce cb5pkeet c yIbIHOMOUeHIN TBproeHa RYOBI, 3a da ce ycTaHOBn daIIe npINOXIMA dpyra rapaunua.
YINHOMOUEH CEPBn3EH LENTbP
BcNKN 3aBKn INI npObnEMn, CbpaHn C npOkyKa, Morat da 6bDat OTnpabHH KMb MeCHNTe YbNbHOMOuEH cepB3Hn CEHTPOBE (nocetete www.rybitools. eu) INI DpeKTHo DO: Techronic Industries GmbH, Max Eyth StraBe 10, 71364 Winnenden, Germany. Nocoche Tceepin Homep nTna Ha npOkyKa, otNeuataHn Bbpy EtNKeta.
UK
TAPAHIHIYMOBNIYROBOI
Okpim 3aranom UCTAHOBENHIX 3AKOHOM PAB, 0U CTOCYIOBc NOKYNKIN, CII INPcTnD NKPOBAETbC RApaHTIEO, 0U 3aHa3aHEHO HNtHcE.
- FapantHHH nepio dnn cnoxmbaivcknae 24 Mciui i noHnHaetcb 3 MoemHTy npD6HHB OTO pnpCTPOO. Lda nobuHHA 6ytN 3aoKmENTOBAH y raptHHHOMHY TanoH o6e Kye. Lte npctpi 6yB p0p6neH I np3HauHn TIIbKn DnO CNOKbHO TApNBAHOTBO NIKOPCTAHN. Y pasi npopeciHoro afo KomePliHHORO BIKOPCTAHN bTO pncCTPOO, BIn BTpaue rapaHTIO.
- Ichyec moKnBicbTb noOBkntn rapaHTHm nepio dna cactHn nHHN eneKtpIOHCTpyMeHTB (nepeMHHORo/NoCTHIORo CTpyM), NoHA peND oONcaHn Bnue 3aONMOrO peeeCTpaui Ha caiTi www.rybitools.eu. PnCtpo, kki MaOTb npAO ha NODobXeHHra rapaHTHOro nepOy, MaOTb qTI KNOHaKn 10do 10Bo r MArasInhax i / a6o Ha yNAkOBu / Ta DOkyMeTHauIg Do pINCTPO. KInBeBc KOPICETyBAu NOHNBE 3apeCTpyBATcN DnO NOOxEHHRA pAPAHITHO rnoepdy B CBOK xPAnH NoCTIHoro nepeCByAHN, kAIO BO C doCTYHO y BIDNOBDHn ONU OHnAH FpOM PeCECTpaui. KPM TORO, KINeBI KOpCtByA HOBTO DA TcBOO 3roDy HA 36epirAHAN, kki HO6xIDH naBDEEOH NtAH, a TAKOK BOH NobHHPi npHHTn npABIna Tu YMBO. OTPMaHHN iNTBepKeHHepeCTpaui, kki BiNPABJIeTBcH A adpecy eekTOHO IOWTH, Ta opMHIN rapAHTHHO taHOI 33aHaHeHO daToIO NOyKN bde CnyBAtn DOa3OM noDOBKeHO rapaHTII.
-
Fapantit noiipnoctbca H bci dekektn npnctpo npotrom rapahtinhoro TepmiH yhoD hOToPMMAH CTanaptB BnPO6hMHTBa 0do Matepiian H daTy pniD6haHH. Fapantit ombMeKyEeBCP eMOHTa/abo zamHoIO, Ta He BKHOuea B c6e 6dy-braHX iHxN 3o6oB'3aaH, B TOM yuCNi, ane heOBMeKeHa ypaia BNIAKOIBNX TA NOJabXIN NOIkoKJeHb. Fapantit He die, Ra knpntprn BIKOPCTBOYBAcBc HenaHEKHM YHOM, BCynepev IHcTpyKl3 ekcnnyataJIi abo 6yb HENPABNIHIO NIDKNIOHUY D mopeKj.Dana raptahIT nooiHPOCTbHa:
-
pπrctρο, ξι Μυγίνι Μουκόχει ένηρεύλβτα ένηρεμας ένηρεμας ένηρεμας ένηρεμας ένηρεμας ένηρεμας ένηρεμας ένηρεμας ένηρεμας ένηρεμας ένηρεμας ένηρεμας
-npncptoi, 606ynnBnD0aMHeHia6oMoNΦikOBaH;
- nPcTPO, oPIrHbIhhe IeDHTNfKaiJIHe (TOBAPHI 3Nak, cepiHNI HOMEP) MapkyBAHHJkIX 6yNoI NOUKOKeJzE, 3MHeNE a6bDUaHEO:
-Булб-КИМОДКУМ 迪ANOJIJIH HeDOTPIMAHMN IHCTPYKII 3 ekCnIYaTAtUJI -npiCtpo, loHeMaOTb MAPKYBaHN CE;
- npnctpo, 0u 6b7i BndemHOHTBOHAI HEKBAIIDIKOBAHM qaxIBUEm a6o 3a BIDcYTOCTi nonepeHboro DOBcOBy BD Tchronic Industries;
I NPTCPOI,IIKNIIOHcI O HeBIDNOIBHO DKepePAn KJBINENHn (CINA TOKY, HANPYKENHn, YACTOT);
-6yJb-Jki NOIJKDGKHEHN CnPNHNIHIE 0BNIHIM BNINBOM (XiMHHM,ΦI3HIVHK,CTPNKBAM HANPYR) a6O CTOPHOHHMPEOBOHAMAM;
-HOPMnBHy aMOPNTHaIzQI 3aFACNHX TACTIN; -HEBIIONBIE BMKOPCTAHNN, NEPEBAATBXEHNN PNPCTPOO;
-BNKOpNCTaHHH HeniTBePdxKeHX 3anachnx yactnH a6o akcecyapib;
- npnnaa da enektpoiHcptpyMeHTy, 10 NoctaHaetbca pa3om 3 npncTpoEM
4a KnyHcybck OpeMo. Taki BnHrAeKn bPaxOBybTa aHe He o6MekHeHHMn
4a KaHOeHmK BnPKyToK, cBepdE, abp3uBHnx DnCKiB, HkDaHOro
4a nanepy Ta ne3, 6HHX HanpHmX
-KOMHOEHHT(NACTHNI Ta pnpnAa) 3 ypaxyBAHHN HOPMaIbHORO 3HOUBAHH, BpAXOBYQUN, ane 6e3 oBMeKHeH HA KOMIIeKTHN npOipiNaKTIKu TAE XTKHOrO 6cNtoryBaHHN, ByrInh btiHN, NiDunnnHKn, NATPOHN, KpinENHn A50 npHOM SDS cpeDen, Ka6eni XmBHeHH, DoatKoBI pyKoRTKN, YOxIN DRA TPAHCNOPTyBAHH, UfIPyBaBHPi nactHn, MIIKN dJNA 360py nny, Ty6kBn BuXnony, fetpoBki Knb, Wntpi i npyKHHn raKOBepTy iT.
4.ДЯ obcnyrobyaHn, npicpti mae 6ytb iDnpabneHm a6o noDAHn do OdoHOrO 3 ATOPTM0BaNHX cepBICHX ueHTPi RYOBJI, kai nepeniiHeni JnKoKHoi KpaHH y HAcTyHNOy nepeNIOAececPBCHHx eHTPiR.YdEKNX kpaHax MicieBnI dune RYOBJI 3oob83yeTbc BIDpabNTn npicpti do cepBICHO ueTpy RYOBJI. Ppi BiDnpabNeHni npCTPO DO cepBICHO ueHTpy RYOBJI, npicpti Ma 6ytb HADIIy oynakobHNI 6e3 6ydb-IAKO rHe63neHoro BMICTy, HanpIKnad 6e3HNH, 3No3HaueHO AOpeCOO BiDnpABHnKa Ta CynpoBDKYBATNC KOPOTHM ONOM HeCCNPABHOCTI.
5eMeOH/3aMHaBiaNIOaIHO do qic rapaHTi 3aJHIOCTb6EkoTobHO.
Le He c OCHOBO dnnoNOBKeHHA 60 noVATy HOBO rapAHITnHO
neipOdy, 3aMIHOH aACTHHo 60 npnADn nepeXoJrTO bO nlaCHOCTi KOMnHI.
Y deKHX kpaIHax BAPtCT doCTABKn 60 aoNToBI BNpTaN NOBHnHi 6yTN
cnnaeHI bINpRaBHnKOM. 3araIbHO BCTaHOBHePi npBa NOKynA Ha npcTpI
3aIIHbOTcB He3MIHHMM
6. La rapantir dic B Capponebckomy Co03i, Wbeuapii, Icnahii, Hopberi, JixTeHHTeRHI, TypeyunHHaT Pocii. 3a MeKAMH uX 30n, 6ybJ nacka, 3apeHtcbdo ophiHoro dInepa RYOBI, uoB bNHaHTn, uH 3acTOcoBybrc Hua rapantir.
ABTOPN3OBAHICEPBICHIUEHTPN
3 6yIb-RAHIX NITAHb a0o npOBeNEM, NOB'ra3AHX 3 npnCTPOeM, BN MOKeTe 3BepHTmBc do MICIEBHX ABTOPM3OBAHx cepBICHX CEHTPB (BIBIDAIITE Ww. ryobitools.eu) a0o HanpMy do: Techtronic Industries GmbH, Max Eyth StraBe 10,71364 Winnenden, Germany. Byb nacka, Bkaxltb cepiHn Homep Ta Tn npodykTy, Bka3ahi Ha etnkeTci.
TR
RYOBI® GARANTI UYGULAMA KOSULLARI
EN DECLARATION OF CONFORMITY
Cordless Chainsaw
Brand: RYOBI
We declare under our sole responsibility that the product mentioned below fulfills all the relevant provisions of the following European Directives, European Regulations and harmonised standards2
The notified body involved3
Measured sound power level. 102.6 dB(A)
Guaranteed sound power level. 105 dB(A)
Conformity assessment method to Annex V Directive 2000/14/EC amended by 2005/88/EC.
FR DÉCLARATION DE CONFORMITÉ
Tronconneuse sans fil
Marque: RYOBI
SV KONFORMITETSDEKLARATION
Sladdlos motorsag
Marke: RYOBI
TapaHTnpyembI ypoBeHb 3ByKOBO MOUHOCTn ....105 dB(A)
CnOco6 OLeHKn COBTeCTCBN, PnIIOKeTNBE V K DupeKToNE 2000/14/EC c
mHeMeENHIMN 2005/88/EC.
PL DEKLARACJZGODNOSCI
CS PROHLASENI O SHODE
1RY36CSX30B,RY36CSX40B
RY36CSX30B:47540301000001-47540301999999
RY36CSX40B:47540701000001-47540701999999
2 2006/42/EC, 2014/30/EU, 2000/14/EC, 2005/88/EC, 2011/65/EU, EN 60745-1:2009+A11:2010, EN 60745-2-13:2009+A1:2010, EN 55014-1:2017, EN 55014-2:2015, EN IEC 63000:2018
3 0197 TÜV Rheinland LGA Products GmbH; Tillystraße 2 D -90431 Numberg, Germany has carried out EC type approval, and the certificate number is : BM 50473808 0001
Jamcena razine zyuene snage 105 dB(A)
Metoda procjene usklenadosti prema Dodatku V Directive 2000/14/EC navedenco u 2005/88/EC.

IZJAVA O SKLADNOSTI
Deknapame Ha CBOA NnHa OTROBOPHOCT, He npOyKbT, NOcOH No-dony,
OTROBAPn HA BCNUKn CbOTBeTHn pa3nopeDn Ha DnpeKtNBte n perrnaMeHTnTe Ha
Ebroneckn 30 xapmoHn3npaHMe CTahdpTu no-dony
OTROBOpEN HOTnOuNpuAUPaUOPraH
NImpeHO HNO HA WYM 102.6 dB(A)
TapaHTnpaHO HmBO Ha Wym 105 dB(A)
Meto3a ouehBaHe Ha cBoTBeCTBnETo C npInoxKeHne V DnpeKtnBa 2000/14/
EC, N3MeHeHa oT 2005/88/EC

ENAPALIINPOBIIOBIDHCTb
Bepotoba nauoroba nna
Mapka: RYOBI
MnBIDNOIBaIbHO3aBnREMO,IOOINCAHIMHHNcpe npCtpi BIDNOIBaIe BCIM HHMM NOIOXeHHM DnpeKTHB EC, Cbponehcknx HOPm Ta rapMOHIOBAHX CTAHdaptB
BnOBHOBaKeHn OprAH, 0o npnIMab yHaCTb y ouHOBaHHi BIDNOBIDHOCT
BmipraHn pibeHb 3bykoBoi notyXhoCTi.102.6 dB(A)
IapaANTOBaHm pIBeH 3ByKOBoI NOTyKHOCTi.105 dB(A)
MeToD ouJINB iIIOBIOHocCTI Annexio 2000/14/EC 3 nonpaKAM, BHECEMIM 2005/88/IEC.

UYGUNLUK BEYANI
Sr. Director, Regulatory & Safety
Winnenden, Sept. 15, 2020
Authorised to compile the technical file:
Alexander Krug, Managing Director
Techtronic Industries GmbH
Max-Eyth-Straße 10, 71364 Winnenden, Germany

EN RYOBI is a trade mark of Ryobi Limited, and is used under license.
71364 Winnenden, Germany