True Presence KNX - Motion detector STEINEL - Free user manual and instructions
Find the device manual for free True Presence KNX STEINEL in PDF.

User questions about True Presence KNX STEINEL
0 question about this device. Answer the ones you know or ask your own.
Ask a new question about this device
Download the instructions for your Motion detector in PDF format for free! Find your manual True Presence KNX - STEINEL and take your electronic device back in hand. On this page are published all the documents necessary for the use of your device. True Presence KNX by STEINEL.
USER MANUAL True Presence KNX STEINEL
GB....12 Follow written instructions!
BG...150 Co6IIOdaTb TeKCTOByIO IHCTpyKUIO!
IpoueTeE nHCTpykunTE!
CN...156 遵守文字说明要求!
3.1
3.2
3.3
3.4
5.1
3.5
4.1
5.2
5.4

5.3
5.5
5.7
5.6
DE
- Please read carefully and keep in a safe place.
-Undercopyright.
Reproduction either in whole or in part only with our consent.
- Subject to change in the interest of technical progress.
Symbols

Hazard warning!

Reference to other information in the document.
2. General safety precautions

Disconnect the power supply before attempting any work on the sensor.
- This product may only be installed by a qualified electrician in accordance with national wiring regulations as defined in VDE 08 29 (DIN EN 5000 90).
- Fitted improperly, low-voltage installations can cause extremely serious personal injury or damage to property.
- This product must never be connected to a 230 V AC power supply as it is intended for connection to an extra-low voltage power supply.
- Only use genuine replacement parts.
- Repairs may only be made by specialist workshops.
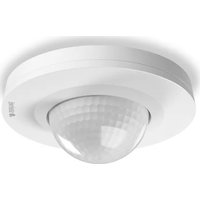
3. True Presence® KNX
Proper use
- Sensor for indoor ceiling mounting for connecting to the KNX bus system
The True Presence KNX is the "eyes and ears" in modern, intelligent buildings. Presence of persons, brightness, room temperature and humidity are captured as sensor variables.
The True Presence KNX is also equipped with "True Presence" technology which detects the presence of persons. Thus, true presence and absence is recognisable. The detection zone of the sensor can be precisely limited via the range setting.
This makes it ideal for use in offices and schools
For specific applications, such as cruise ships or hotels, please contact us directly so we can work together on defining the best way to integrate the sensors.
All function settings are made via the Engineering Tool Software (ETS) from version ETS4.0 and higher. The Smart Remote app displays the sensor variables and enables activation of the programming mode.
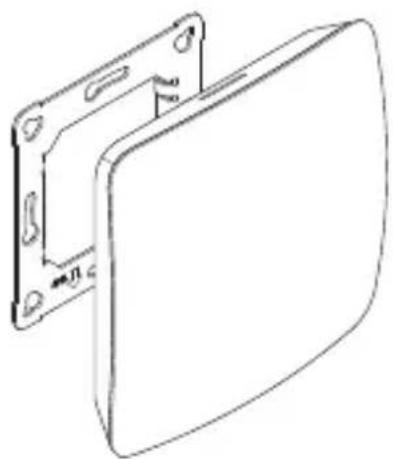
Product components concealed installation (Fig. 3.1)
- Sensor
- Surround
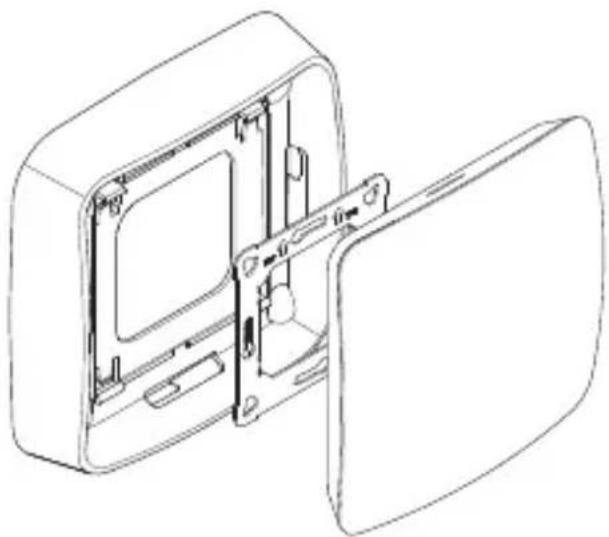
Product components surface-mounted installation (Fig. 3.2)
- Sensor
- Surround
- Surface-mounting adapter
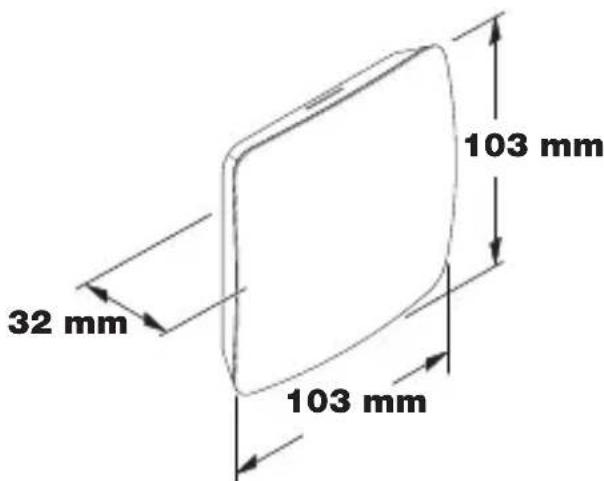
Product dimensions, concealed installation (Fig. 3.3)
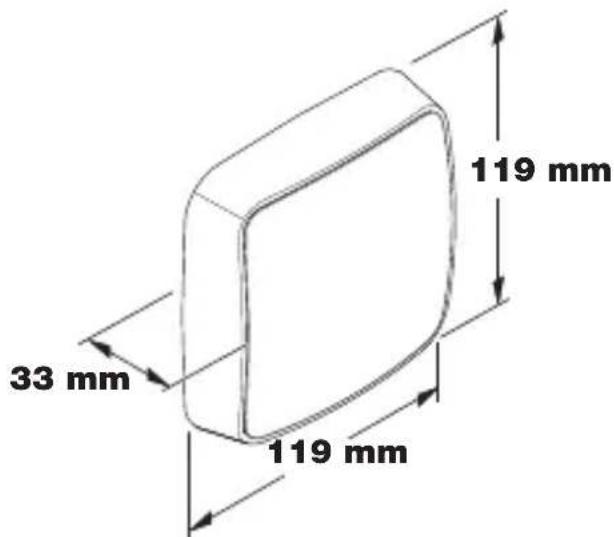
Product dimensions, surface-mounted installation (Fig. 3.4)
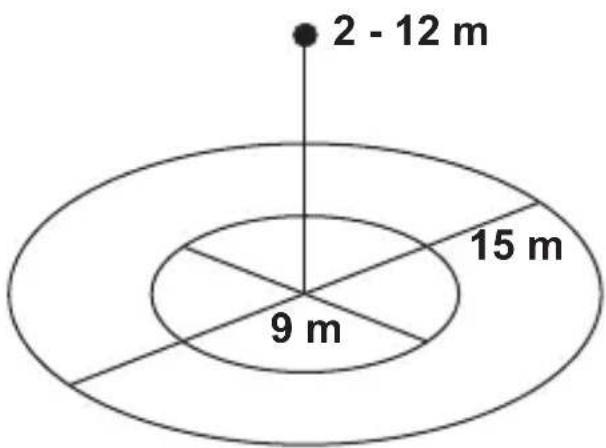
Detection zone (Fig. 3.5)
4. Installation
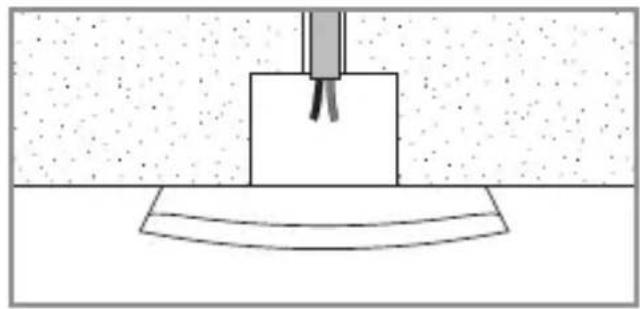
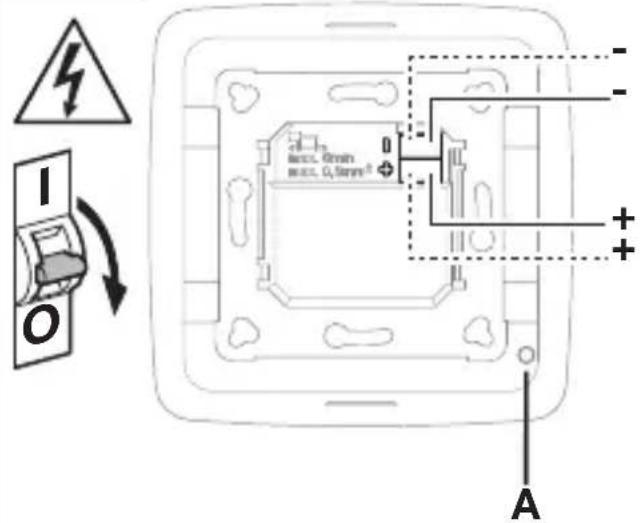
Wiring diagram (Fig. 4.1)
5. Mounting
- Check all components for damage.
- Do not use the product if it is damaged.
- Select an appropriate mounting location, taking the reach and presence detection into consideration.
- Switch OFF power supply (Fig. 4.1)
Mounting procedure, concealed installation
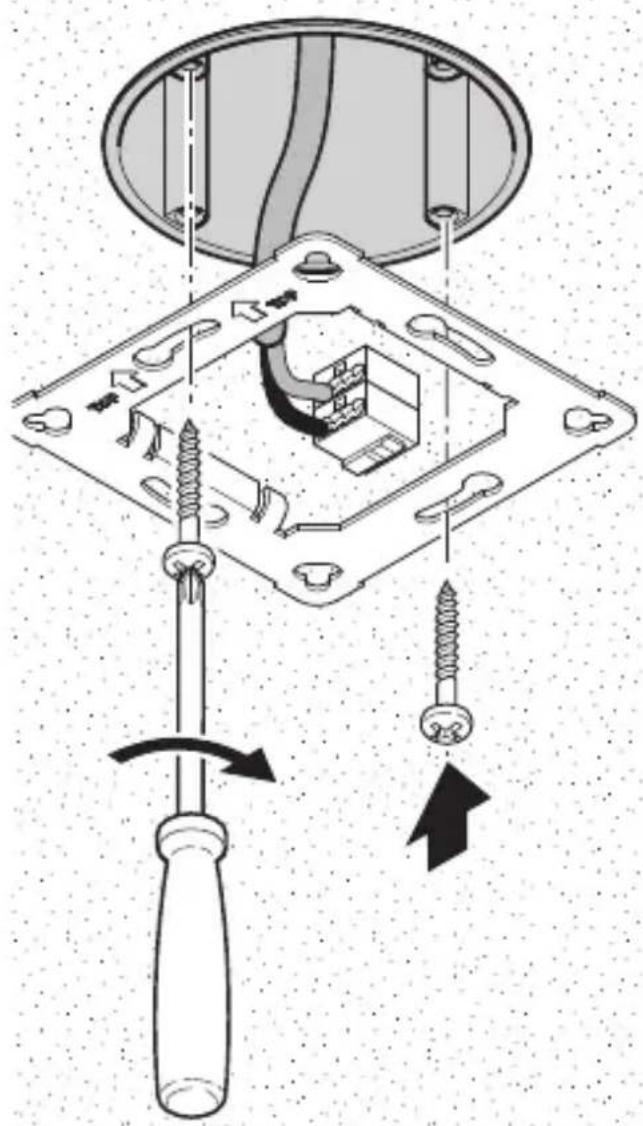
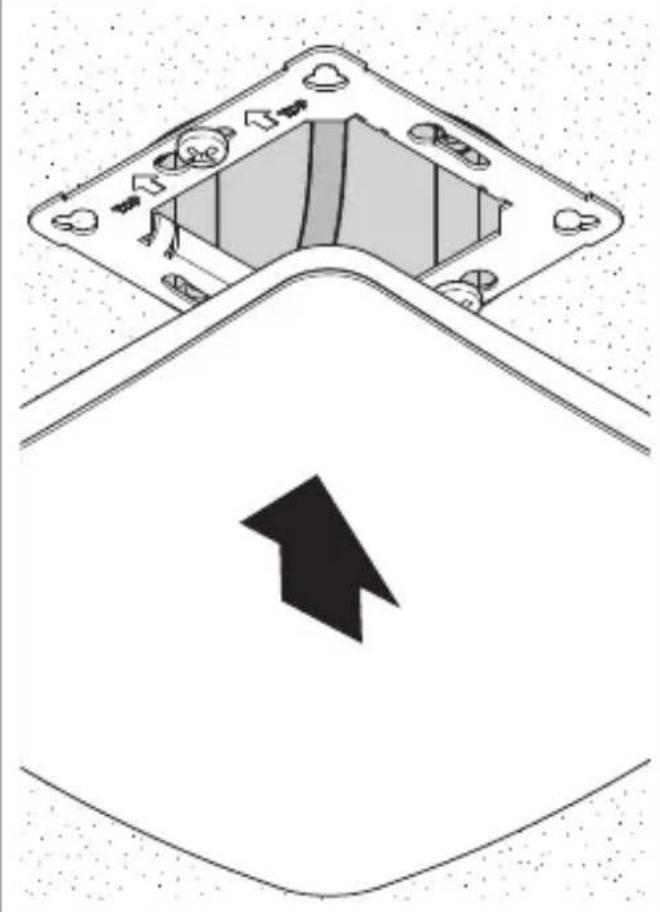
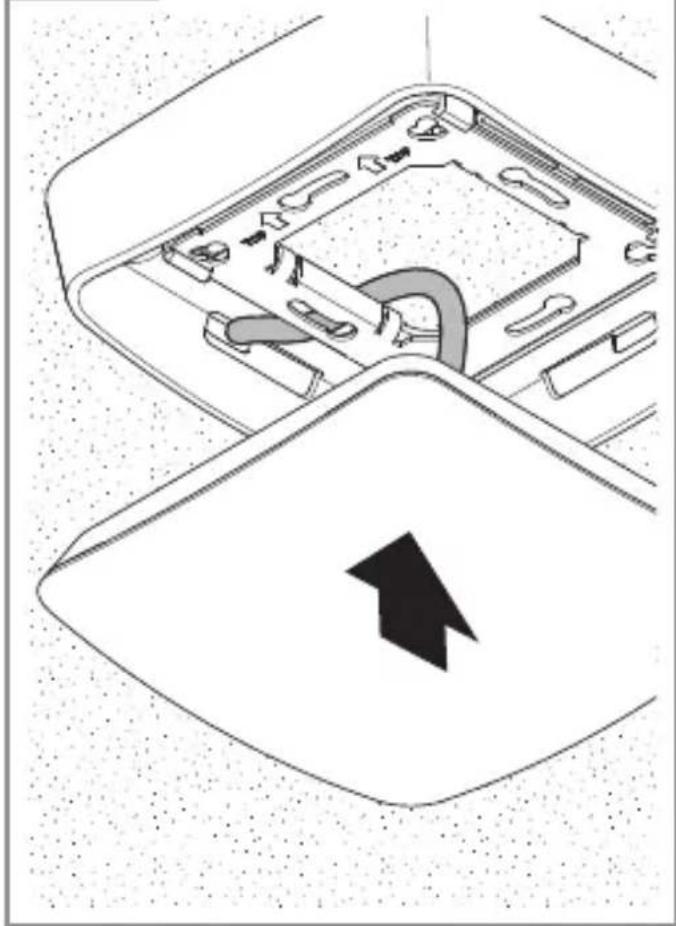
- Firmly screw the surround onto the mounting box (Fig 5.1)
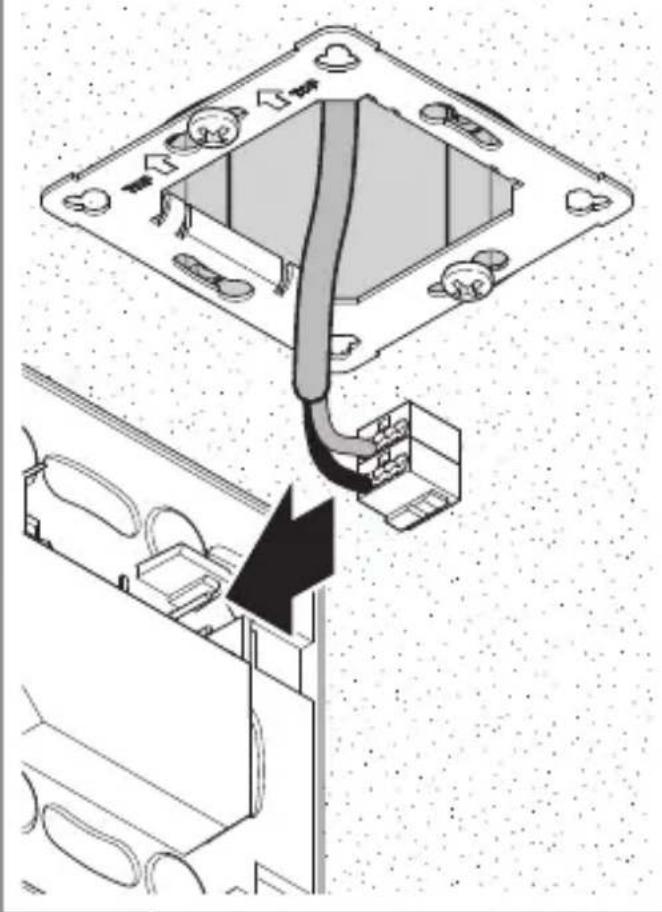
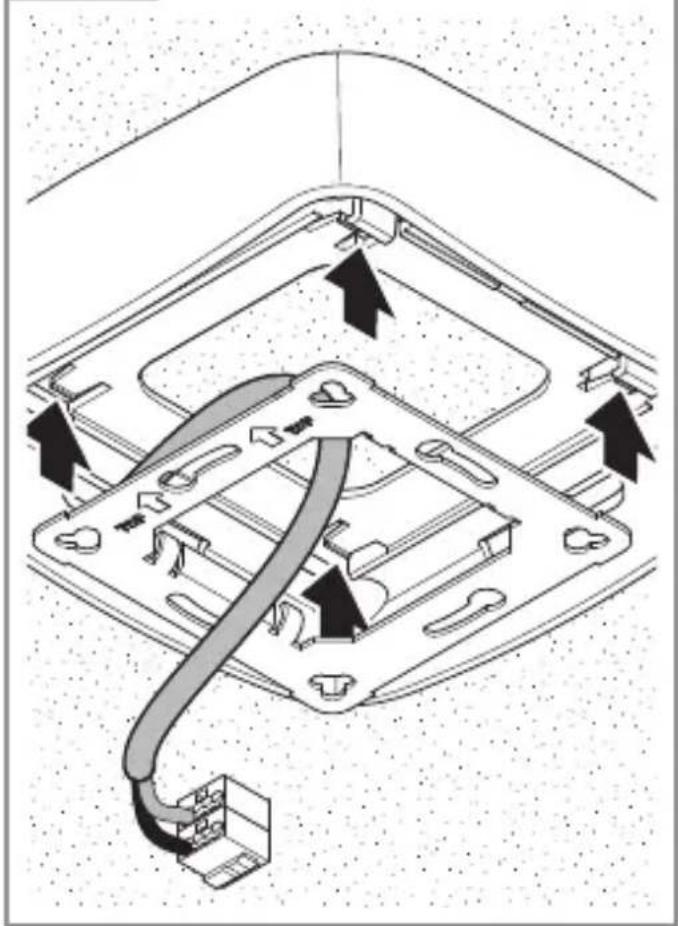
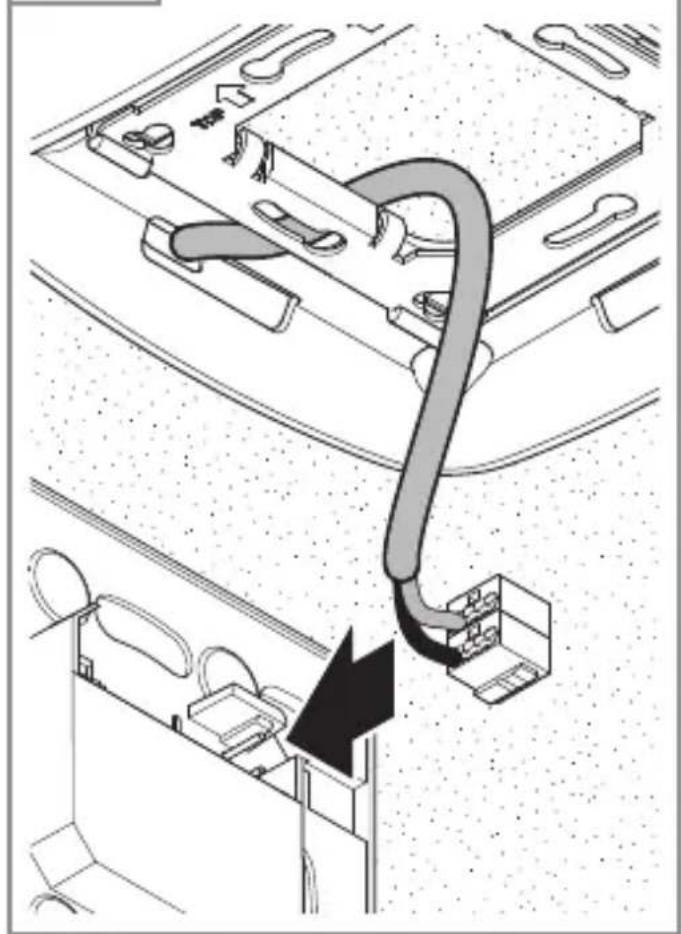
- Make plug connection (Fig. 5.2)
-
Position sensor on the surround (Fig. 5.3)
-
The sensor is held on the surround by magnetic force.
Mounting procedure, surface-mounted installation
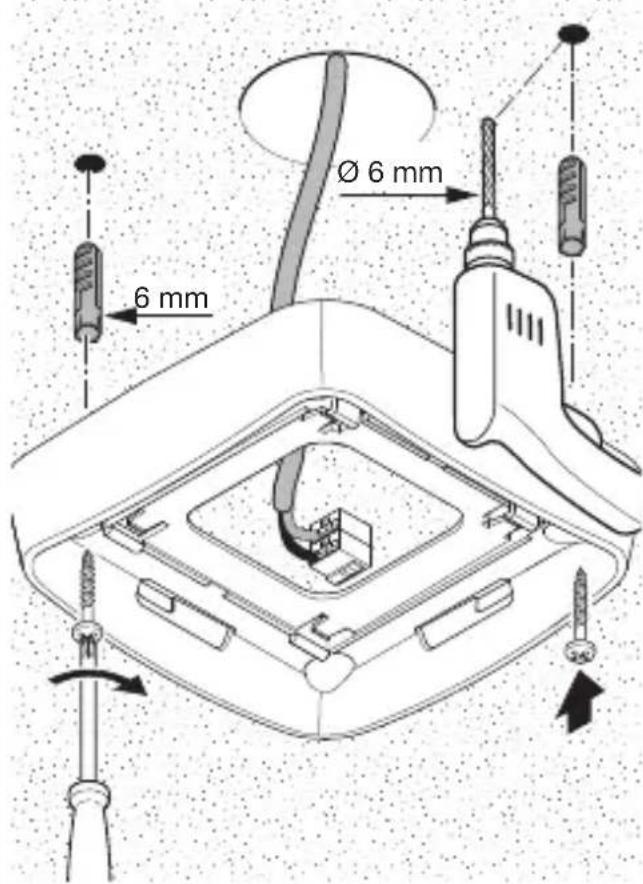
- Drill holes and screw on surface-mounting adapter (Fig. 5.4)
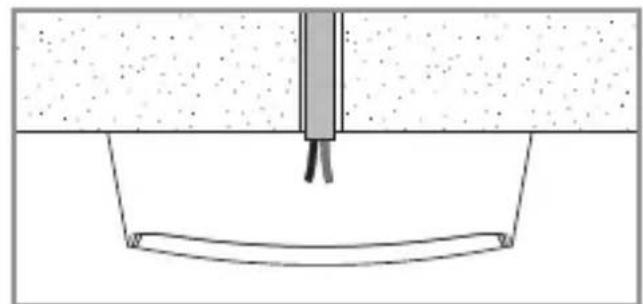
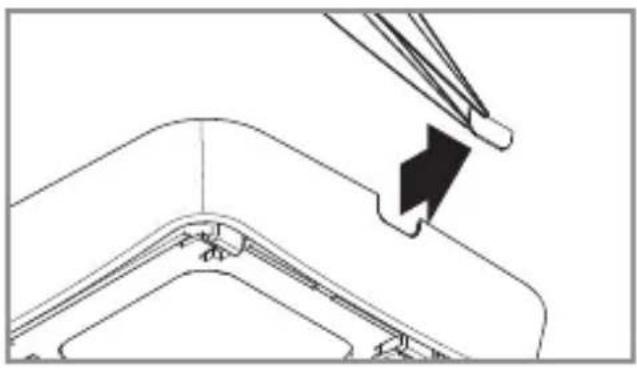
- When mounting with exposed cable, break out the mounting tab (Fig. 5.4)
- Firmly screw the surround onto the surface-mounting adapter (Fig 5.5)
- Make plug connection (Fig. 5.6)
-
Position sensor on the surround (Fig. 5.7)
-
The sensor is held on the surround by magnetic force.
Note:
When setting the reach, the mounting height needs to be specified via the ETS
Note:
Surface-mounted installation has influences on the sensor variables measured. For this reason, correction factors are implemented in the software which take effect by activating the "surface mounting" type of installation in the ETS.
6. Function and settings
Factory settings
- See KNX application description
Startup
During initial commissioning, the presence detector creates a room image. The room must be free of movement for 2 to 2.5 minutes for this.
Note:
An image of the room is also created if reach or mounting height is changed. The sensitivity of the True Presence sensor can be adjusted from 1 (= low) to 9 (= high) via the ETS.
The functions to be used (activated) are set in the "General Settings" parameter window using the ETS.
Note:
You will find an application description at knx.steinel.de.
- Issue physical address and generate application program in the ETS.
- Load the physical address and application program into the True Presence sensor. When you are prompted, press the programming button A (Fig. 4.1).
Smart Remote app
To read off and activate the programming mode of the True Presence sensor via smartphone or tablet, you must download the STEINEL Smart Remote app from your app store. You will need a Bluetooth-capable smartphone or tablet.

Android

iOS
LED function
Initialisation: LED lights up white
Normal mode: LED OFF
Bluetooth connection active: LED lights up blue
Error: LED lights up red
Programming mode: LED lights up green Application not configured or wrong: LED lights up orange
7. Accessories
Surface-mounting adapter (EAN: 4007841 063887)
8. Maintenance / care
The product requires no maintenance. The sensor can be cleaned with a damp cloth (without detergents) if dirty.
9. Disposal
Electrical and electronic equipment, accessories and packaging must be recycled in an environmentally compatible manner.
Do not dispose of electrical and electronic equipment as domestic waste.
EU countries only:
Under the current European Directive on Waste Electrical and Electronic Equipment and its implementation in national law, electrical and electronic equipment no longer suitable for use must be collected separately and recycled in an environmentally compatible manner.
10. Conformity
Hereby, STEINEL Vertrieb GmbH declares that the radio equipment type TRUE PRESENCE KNX is in compliance with Directive 2014/53/EU. The full text of the EU declaration of conformity is available at the following internet address: www.steinel.de
11. Manufacturer's Warranty
As purchaser, you are entitled to your statutory rights against the vendor. If these rights exist in your country, they are neither curtailed nor restricted by our Warranty Declaration. We guarantee that your STEINEL Professional sensor product will remain in perfect condition and proper working order for a period of 5 years. We guarantee that this product is free from material-, manufacturing- and design flaws. In addition, we guarantee that all electronic components and cables function in the proper manner and that all materials used and their surfaces are without defects.
Making Claims
If you wish to make a claim, please send your product complete and carriage paid with the original receipt of purchase, which must show the date of purchase and product designation, either to your retailer or contact us at STEINEL (UK) Limited, 25 Manasty Road, Axis Park, Orton Southgate, Peterborough, PE2 6UP, for a returns number. For this reason, we recommend that you keep your receipt of purchase in a safe place until the warranty period expires. STEINEL shall assume no liability for the costs or risks involved in returning a product.
For information on making claims under the terms of the warranty, please go to www.steinel-professional.de/garantie
If you have a warranty claim or would like to ask any question regarding your product, you are welcome to call us at any time on our Service Hotline 01733 366700.
5 YEAR MANUFACTURER'S WARRANTY
| 12. Technical specifications | |
| Dimensions | Concealed: 103 × 103 × 32 |
| (W × H × D in mm) | Surface-mounted: 119 × 119 × 33 |
| Current consumption 30 mA | |
| Power supply KNX bus voltage, 21-30 V | |
| Mounting height 2-12 m | |
| Detection zone 360° | |
| Reach Ø 9 m True Presence (mounted up to a height of 4 m) | |
| Ø 15 m presence | |
| Ø 15 m movement | |
| (can be set to within one centimetre) | |
| Sensor values True Presence | |
| Light measurement | |
| Temperature: 0-40°C | |
| Relative humidity: 0-100% | |
| Outputs 4× light output (ON/OFF, dimming level, scene) | |
| Dimming level with effect light | |
| 2× constant-lighting control with basic light level | |
| HVAC, presence, temperature, relative humidity, dew point, logic gate, comfort, anti-purchase | |
| Time setting 30 seconds to 18:12:15 hours (hh:mm:ss), IQ mode | |
| Twilight setting 2-1000 lux | |
| Temperature range 0°C to +40°C | |
| IP rating IP20 | |
| True Presence frequency | 7.2 GHz (responds to micro-movements resulting from the vital functions) |
| UWB transmitter power | ≤ -41dBm/MHz |
| Bluetooth frequency | 2.4-2.48 GHz |
| Bluetooth transmitter power | 5 dBm/3 mW |
13. Troubleshooting
| Malfunction Cause Remedy | ||
| Light does not switch ON | ■ No supply voltageSwitching threshold light level set too lowNo movement being detected | ■ Check supply voltageSlowly increase switching threshold light level until light switches ON■ Ensure unobstructed sensor visionCheck detection zone |
| Light does not switch OFF | ■ Switching threshold light level too high | ■ Reduce switching threshold light level |
| Sensor switches OFF despite persons being present | ■ Wrong scenario selectedReach set too lowSwitching threshold light level too low | ■ Select scenario with True Presence■ Change reach■ Change switching threshold light level |
| Sensor does not switch OFF quickly enough | ■ Stay-ON time too long | ■ Reduce stay-ON time |
| Sensor does not switch ON when persons are present despite it being dark | ■ Switching threshold light level set too low■ Semi-automaticmode activated | ■ Increase switching threshold light level■ Activate fully automatic mode or switch light ON at button |
| Sensor switches ON despite no persons being present | ■ Movement within adjacent rooms and floor levels | ■ Change reach■ Select scenario with lower sensitivity |
| Wrong temperature indicated | ■ Different layers of air | ■ Enter correction factor into the ETS |
FR
3. True Presence® KNX
Utilisation conforme aux prescriptions
Application Smart Remote
Initialiseren: led brandt wit
Storing: led brandt rood
Programmeermodus: led brandt groen
Initialising: LED lyser vitt
Initialising: LED lyser hvitt
5 ANI GARANTIA PRODUCTORULUI
Ipeed Naayanom IIO6bIX pa6oT, npOBODMbIX Ha ceHcope, cJeNyET OTKJIIOHTb HanpJxKeHne!
- MoNTaX pa3peWaeTcBbINOJIHrToJIbKO CneUmaJIncTy C CO6IIOJeHnEmyKa3aHn, DeIcTByIOuX B CTpaHeNCIoJIb3OBAHn I3dJIIn, VDE 08 29 (DIN EN 5000 90).
B OkpyxeHn C Hn3KOBOJbTHbIMn N3dJIyMn OUn6OuHoe NOKJIoueHne MOxET Bbl3BaTb TJaKeIeIuN yUep6 3DOpOBbIO NJI MaTePnaJIbHbI yUep6.
3anpeuaeTcnoKIOUaTb 3OT np6op K Hn3KOMy Hapjxehno (230 B AC), nockoIbky OH npedHa3NaueH dIy noKIOUeHnK KOHTypam MaIoro Haipjxehn. -
Исторы ТолбКо Оригиналы. 3апachны част.
-
Pemont pa3peuaeTcBbINOJIHrToJIbKO B CneuaIIN3nPOBaHHbIXMaCTepCKNX.
3. TruePresence KNX
PpIMeHHeNoHa3HaueHnIO
- CeHcOp IJI NOTOJIOUHO MOHTaXa BHyTpN IOMeUeHNI, IJI NODKJIIOUeHNI K UHHoN CnCTeMe KNX.
True Presence KNX obecneuBaet «ПаЗи yши»В COBpeMeHHbIX,«YMHbIX» 3ДанИяx. ПрсутCTBVE, ИNTeHcNtBHOCTb CBeta OKpyжЕнЯ, TempepaTypa B ПOMeUeHnI N ВлajxHoCTb BO3dUxa peRnCTpnpPyOTcKak ceHCOPHbIe BeJIuHbI.
True Presence KNX ochaueh TexhoJornei, True Presence", kotopar onpeJeIyET npCytCTBne IIOdei. TaK MOxHOPacno3HaTb paKTnueckoe npCytCTBneNIIOTCYTCTBne. 3OHy peRnCTpaUIMoXHOTouHO orpaHnHTb NocpeDCTBOMYCTAHOBKn DaJIbHOCTN DeIcTBnJ.
IOnToMv OH IealbHO IOXoINT JnI NCNoJIb3OBaHnB OΦncax N IkoJax.
Дя спесиаьных с lyuaeВ npimHeHnA, TAKnx KaK Kpyn3HbIe cydaNII OTeJI, NOxKaIyIcTa, CBxN-TEcB C HAmHHaPryMyo, YTO6blCOBMecCTHO peaIIN3OBaTb ONTIMaJIbHyIO INHTerpaIIO ceHCOPOB.
Bce cyHKUHOHaJIbHbIe HAcTpoKn MOKHO BblONHITb C NOMOuH IO Engineering Tool Software (ETS), Naunna C BepcuN ETS4.0.
Прилwxье Smart Remote noka3bIbaet ceHCOPHbIe BeJIuHbI IN NO3BOJAreT aKTI-BnpoBaTb peXIM npOrpaMMIpOBaHnI.
Pa3MepbI n3eJnIy IJIa MOHTaJa OTKpbI-TOI npOBoDKoI (pnc. 3.4)
3oHa pernctpaun (pnc. 3.5)
4. MoHTax
Ecn MeHReTc TaIbHOCTb DeIcTBn IJI MOHTaXHa BbICota, TaKKe COCTaBnEeTc KaPTiHa NOMEuEHHa.
UyBCTBNTeJIbHOCtbcHcopa True Presence MoXHo OTpeYJnPoBaTb NocpeIcTBOM ETS ot 1 (= Hn3Ka)do 9 (= BbICOKa).
KaKHe cyHKUIN DOJXHbI NCNoJIb3OBaTb- C8 (6bITb aKTINBnPOBaHbI), yCTaHaBInBaETcB OKHe npametpoB ,O6uHe HAcTPOiKN" C NOMoUbIO npOrpaMMHOrO oBeCneueHnE ETS.
Yka3aHne:
True Presence KNX npedctablaBa "OuN yu" B MOdepHnte, INHTeINrEHTN crpaN. Cen3OpbT OTuNTa npncbCTBne, OCBteHOCT, Tempeatypa Ha NOMEueHNeto N BlaXHOCT Ha Bb3dYxa.
True Presence KNX e cna6dencTexHoiTgna, True Presence", kOaTO3acnHa npncbCTBneTo Ha xopa. NTo3n HauHH Ce pa3no3HaBa peaJIHO npncbCTBne nIi OTcbCTBne. OblaactTaHa 3acnHaHe Ha ceH3Opa MoKe MHOToTOUHO da 6bJe oRpaHnueHa C hAcTPOKITE Ha 0xbata.
IToTO3nHaunH HantbJlHO NOxOJa3a yNtpe6a B Oocn N yuJnUa.
B cneuHaHn clyua, KaTo Ha np. Kopa6n IIn XOTeI, CbpxKeTe ce MoJc Hac, 3a da peaHn3npame 3aeHNO ONTmAlHa INHTerpaun Ha ceH3Opnte.
Bcunkn yHKnOHaJIHn HacTroKn MOrat Da 6bDaT npOMeHN C NOMoTa ha ETS (Engineering Tool Software) Bepn ETS4.0 npJIoXeHa.
Прилобеньeto Smart Remote noka3Ba CTоинocHTe Ha ceH3opa И дaВа Вьз-MOжноCT 3a akTиВиразе Ha pexиma 3a npoportamipahe.
IperJIeIHa ypeIa MoHTaX NOI Ma3NlKa (pnc. 3.1)
- CeH3Op
- Pamka
IperJIeHnHa ypeHa OTKpIT MoNTaJX
(pnc.3.2)
- CeH3Op
-
Pamka
-
AdaanTep Bbpxy Ma3nIka
Pa3mepnHa npOdykTa,MOHTaK NOI Ma3nJa (pnc.3.3)
Pa3Mepn Ha npOdykTa, OTKpNT MOHTaX (Pnc. 3.4)
Диапазон Ha OTчпане (pnc. 3.5)
4. MoHTax
Диагама 3a CBbp3BaHe (pnc.4.1)
5. MoHTax
3a HacTroPoiKa Ha OxbBaTa e Heo6XoIMMo BbBexJaHTo Ha BnCOuHa Ha MOHTaX npe3 ETS.
CBeHeHne:
MOHTaKbT C OTKpNT N Ka6JI N BIIJRe Ha 3aceHHe Tce H3OpHn NapaMeTpN. 3aToBa B codTyepa ca BrpaIeHn KopnIrpauu PhaKTOpN, KOnTO Ce aKTINBpuAT C n36Op Ha BIV MoHTaK ,OTKpNT " B ETS.
6.ФункциЯинactrpoиkn
3aBoDcN HacTpoiKu
- BnK KNX yntbTbaHe
IyckaHe B ekCnloataaia
Pn PpBOHaJHOTo NyCKaHe B EKC- PLoataCnCeH3OpbT Cb3JaBa KaPTNa Ha NOMEeHNeTo. Pn TOBa B NOMEeHNeTo He Tp6Ba Da Ima DvXKeHne 3a 2 Do 2,5 MInHyTN.
CbeHne:
Ipn npomHa Ha IbJxHnHaTa Ha 0xbat NJIHa BnCOuHnHa Ta Ha MOHTaK Ce Cb3- DaBa HOBa KaPTHa Ha NOMEeHneTo. CyBCTBnTeJHoCTTa Ha True PresenceceH3Opa MoKe Da 6bJe HacTpoEHa B ETS ot 1 (= HnCKa) do 9 (= BnCoka).
KoI ΦyHKUIN Da ce n3nOJ3BaT (aKTNBiPaT), ce HacTpoBbC nOMoUta Ha ETS, npe3 npo3opeuca c npaMeTpN „ObuHacTPOIKN".
CbeHne:
OncanHe Ha npiloxKeHneTo ige Hamepnte Ha aDpec knx.steinel.de