
XLED PRO ONE S - Lamp STEINEL - Free user manual and instructions
Find the device manual for free XLED PRO ONE S STEINEL in PDF.
Download the instructions for your Lamp in PDF format for free! Find your manual XLED PRO ONE S - STEINEL and take your electronic device back in hand. On this page are published all the documents necessary for the use of your device. XLED PRO ONE S by STEINEL.
USER MANUAL XLED PRO ONE S STEINEL
- Abmessungen (H × B× T):
XLED PRO ONE S: 230 × 229 × 182 mm
XLED PRO ONE PLUS S / Max S: 250 × 259 × 202 mm
XLED PRO ONE: 206 × 229 × 182 mm
XLED PRO ONE PLUS / Max: 226 × 259 × 202 mm
- About this document 41
- General safety precautions 41
- System description 42
- Electrical connection 50
- Installation 52
- Function 62
- Remote control accessory 67
- Cleaning and maintenance 70
- Disposal 71
- Manufacturer's warranty 71
- Technical specifications 74
- Troubleshooting 76
1. About this document
- Under copyright. Reproduction either in whole or in part only with our consent.
- Subject to change in the interest of technical progress.

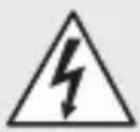
Hazard warning!
Warning of hazards from electricity!
Warning of hazards from water!
2. General safety precautions

Failure to observe these operating instructions presents hazards!
These instructions contain important information on the safe use of this product. Particular attention is drawn to potential hazards. Failure to observe this information may lead to death or serious injuries.
- Read instructions carefully.
- Follow safety advice.
-
Keep instructions within easy reach.
-
Working with electrical current may produce hazardous situations. Touching live parts can result in electrical shock, burns or death.
- Work on mains voltage must only be performed by qualified, skilled personnel.
- National wiring regulations and electrical operating conditions must be observed (e.g. DE: VDE 0100, AT: ÖVE-ÖNORM E8001-1, CH: SEV 1000).
- Only use genuine replacement parts.
- Repairs must only be carried out by companies qualified to do so.
3. System description
Proper use
XLED PRO ONE S / Plus S / Max S
- LED floodlight with infrared motion sensor.
- For indoor and outdoor wall mounting
- Not suitable for connecting to a dimmer.
Operating principle
- The integrated infrared sensor detects the heat radiated from moving objects (e.g. people, animals). The heat detected in this way is converted electronically into a signal that switches the LED floodlight ON automatically.
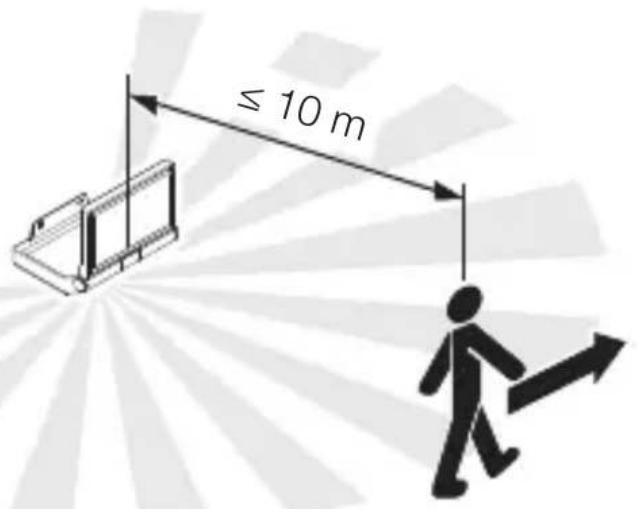
- The most reliable way of detecting motion is to install the unit with the sensor aimed across the direction in which a person would walk.
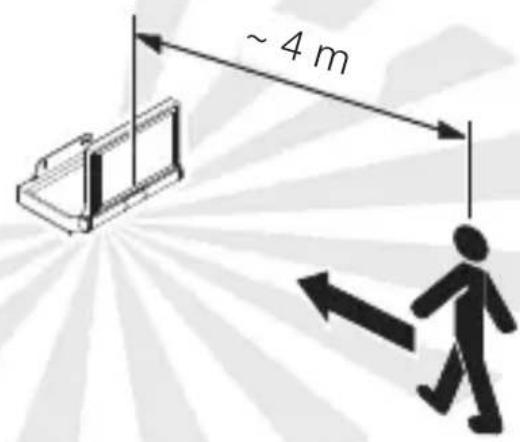
- Motion detection reach is restricted when the unit is approached head on.
- Obstacles (such as trees, walls or panes of glass) may restrict or prevent the detection of movement.
- Sudden fluctuations in temperature as a result of changes in weather are not distinguished from sources of heat.
Proper use
XLED PRO ONE / Plus / Max
- LED floodlight.
- For indoor and outdoor wall mounting
- Not suitable for connecting to a dimmer.
Non-intended use
- The LED floodlight cannot be dimmed.

Not dimmable
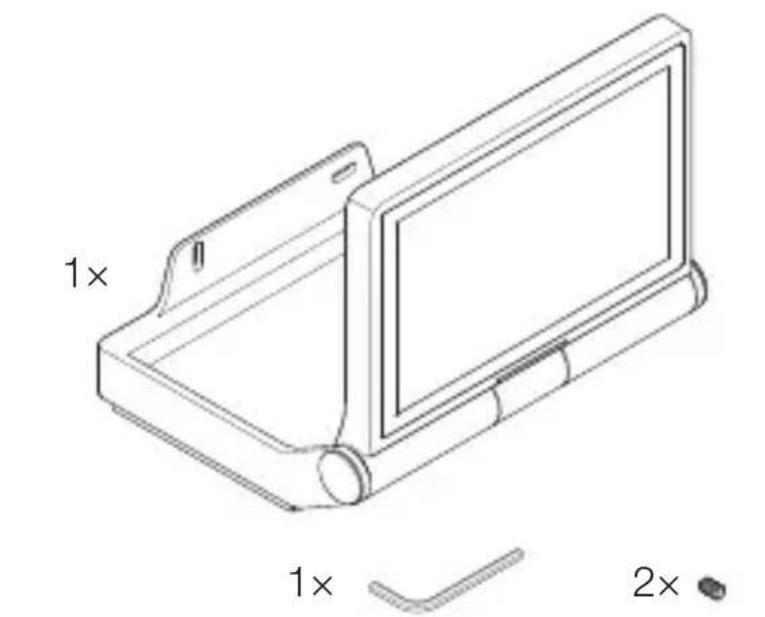
Package contents
- XLED PRO ONE S
- XLED PRO ONE Plus S
- XLED PRO ONE Max S
GB
3.1
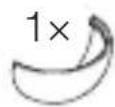


1x
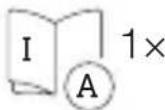
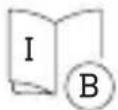
2x

- 1 LED floodlight with infrared motion sensor
- 1 Allen key
- 1 shroud
- 2 screws
- 2 wall plugs
- 2 washers
- 2 grub screws
- 1 remote control RC 12
- 1 safety data sheet
- 1 quick-start guide
Package contents
-XLED PRO ONE
- XLED PRO ONE Plus
- XLED PRO ONE Max
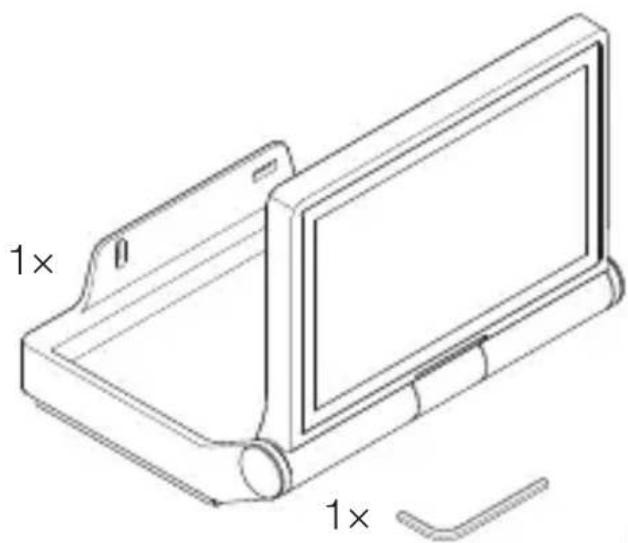
3.2

- 1 LED floodlight
-1 Allen key - 2 grub screws
- 2 screws
- 2 wall plugs
- 2 washers
- 1 safety data sheet
- 1 quick-start guide
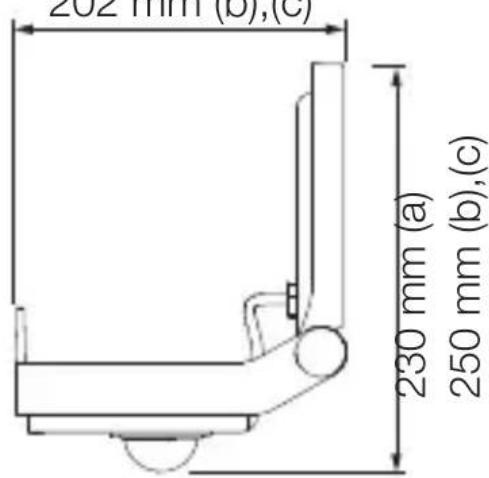
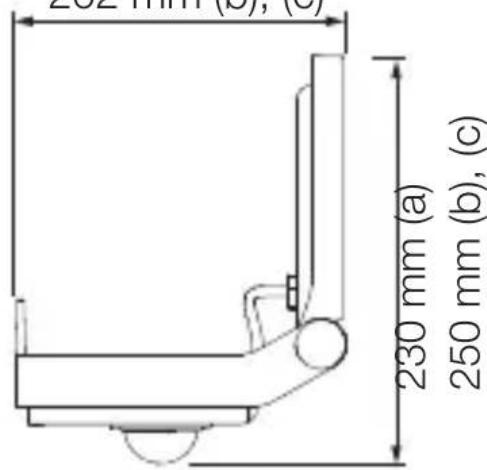
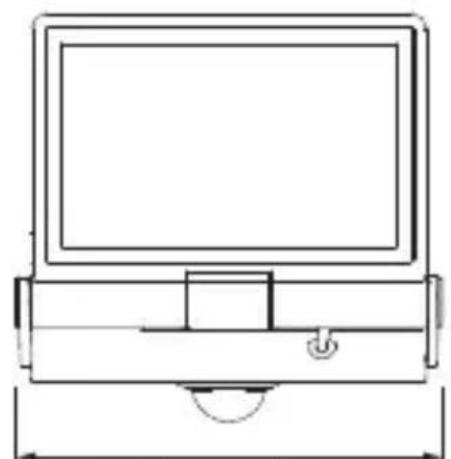
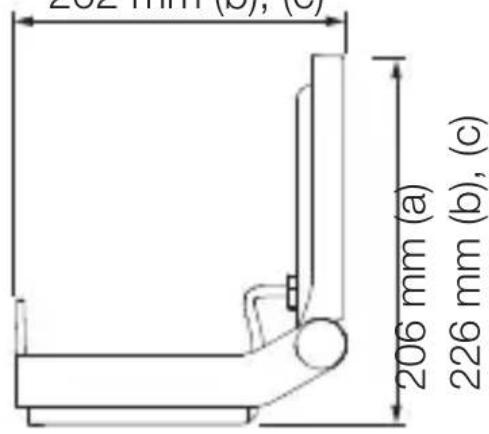
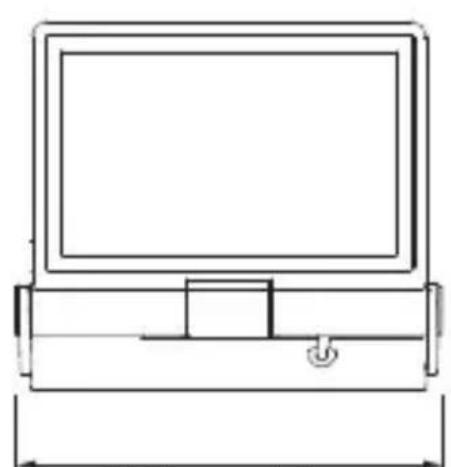
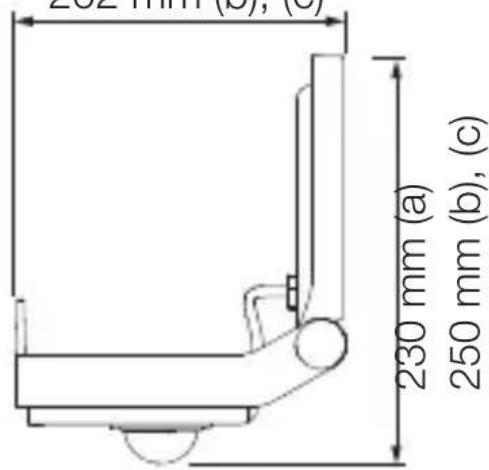
XLED PRO ONE S product dimensions
- XLED PRO ONE S (a)
- XLED PRO ONE Plus S (b)
- XLED PRO ONE Max S (c)
GB
3.3

229 mm (a)
259 mm (b),(c)
182 mm (a)
202 mm (b),(c)
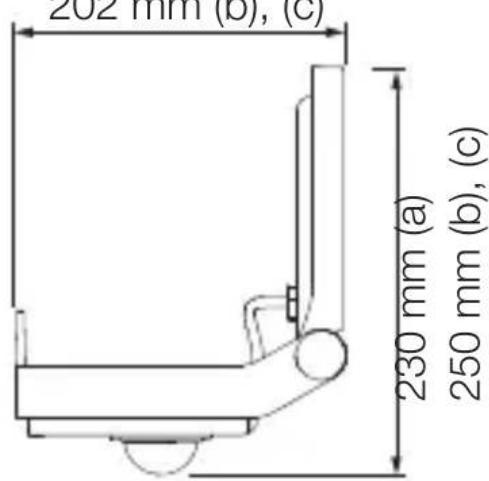
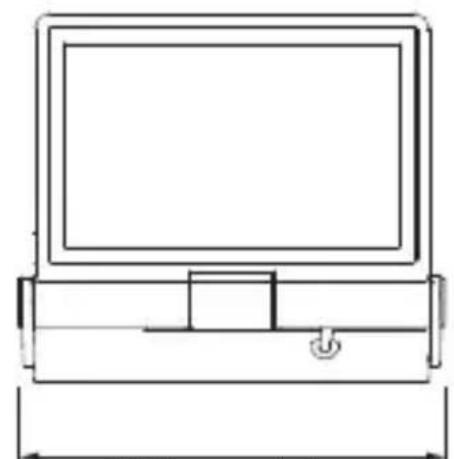
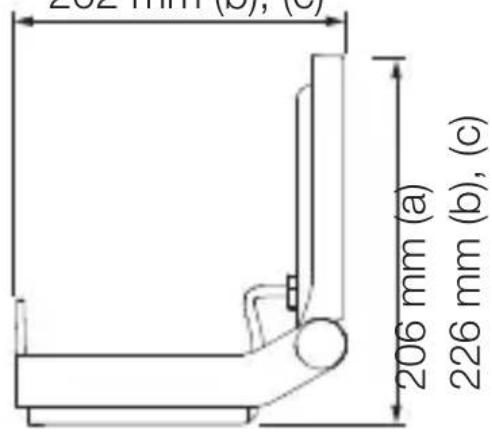
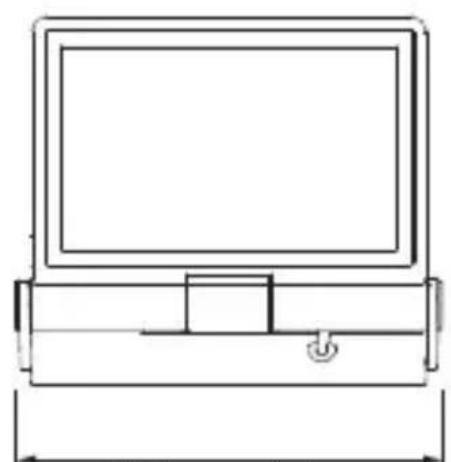
XLED PRO ONE product dimensions
- XLED PRO ONE (a)
- XLED PRO ONE Plus (b)
- XLED PRO ONE Max (c)
3.4
229 mm (a)
259 mm (b),(c)
182 mm (a)
202 mm (b),(c)

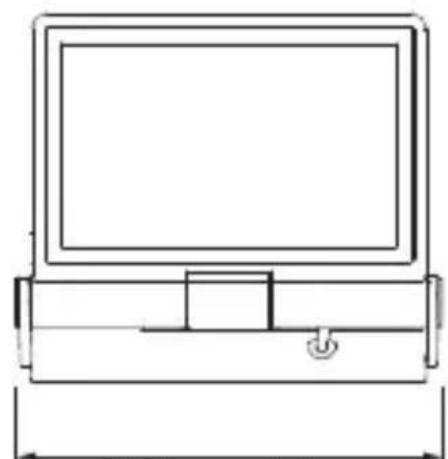
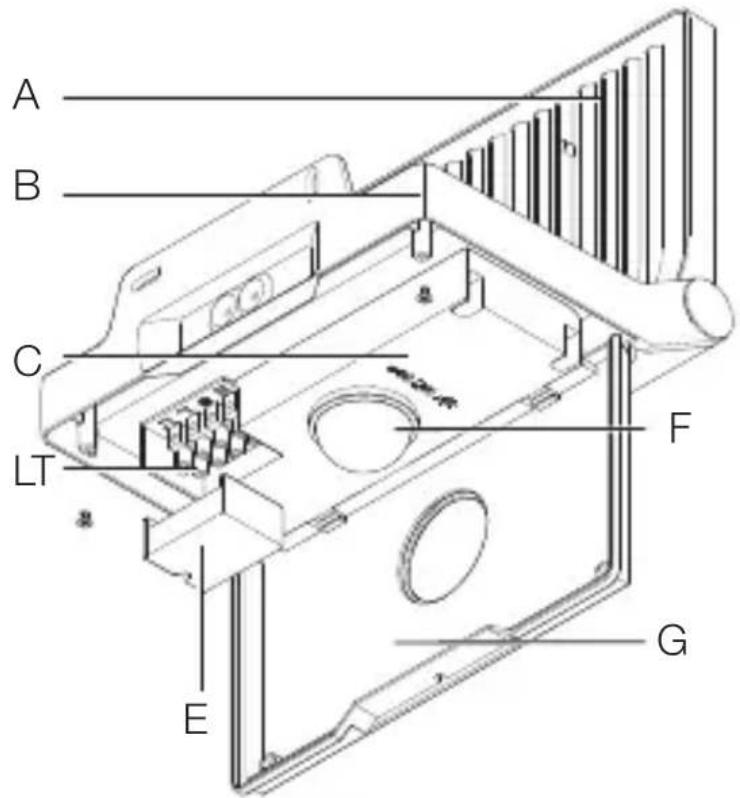
XLED PRO ONE S / Plus S / Max S product components
GB
3.5

A LED floodlight head
B Mounting bracket
C Control dial
D Connecting terminal
E Terminal cover
F Sensor unit
G Cover
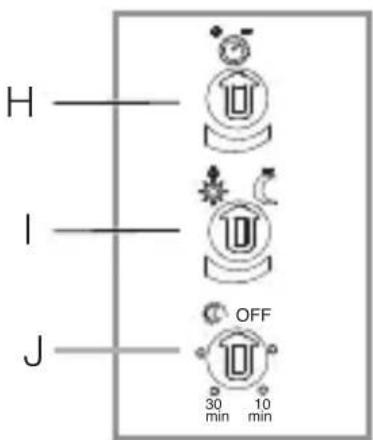
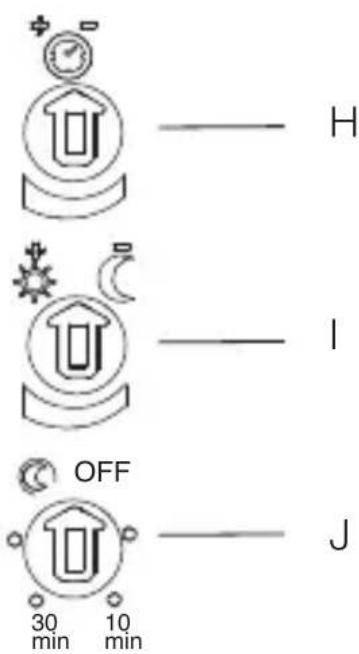
3.6
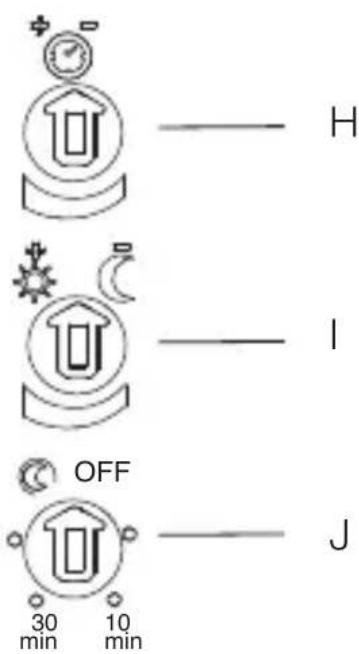
H Time setting
Twilight setting
J Basic light level
3.7
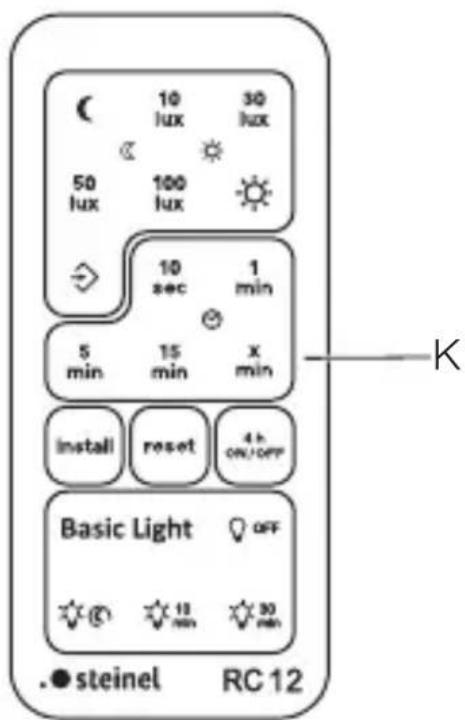
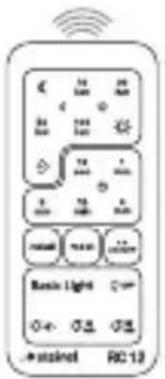
K Remote control RC 12
3.8
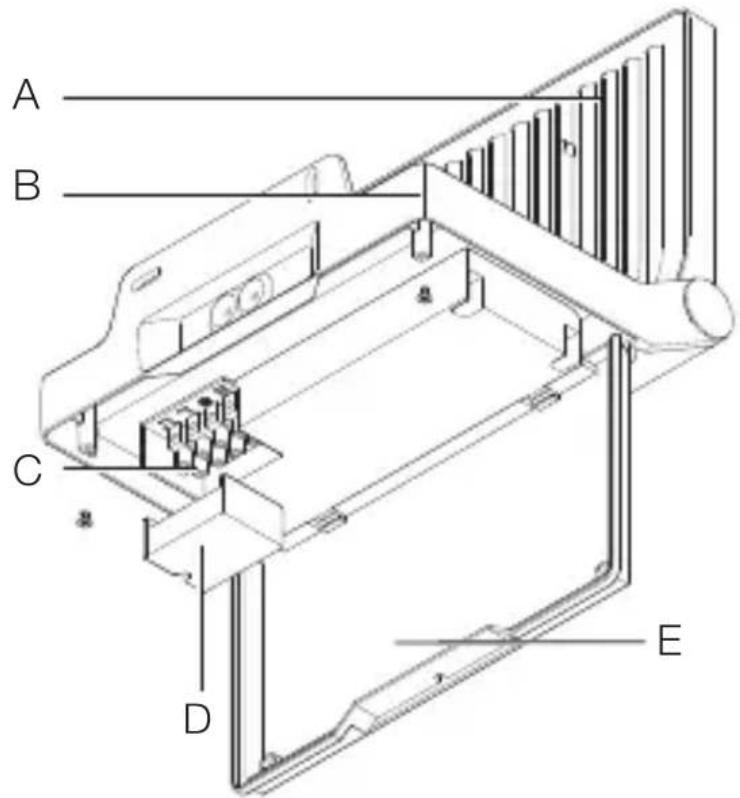
A LED floodlight head
B Mounting bracket
C Connecting terminal
D Terminal cover
E Cover
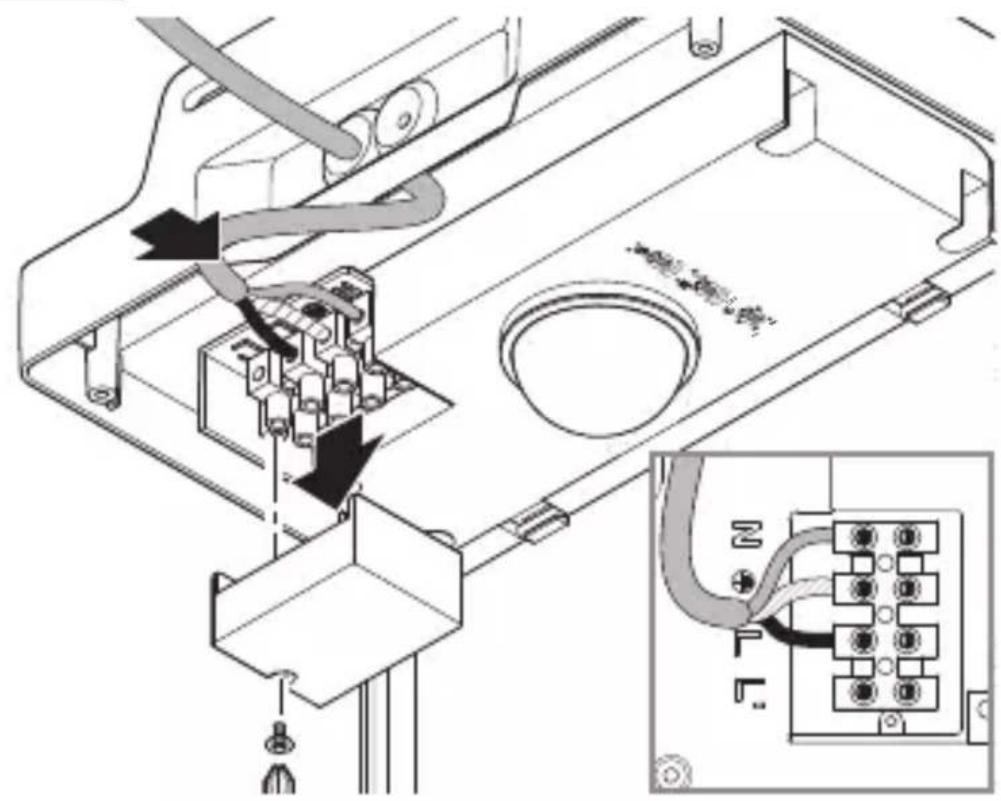
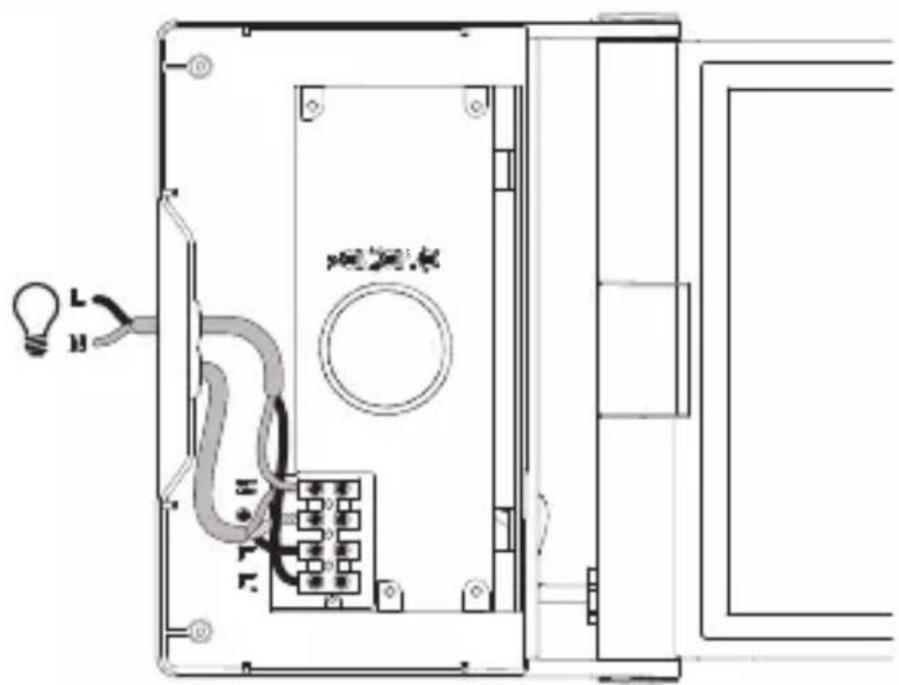
4. Electrical connection
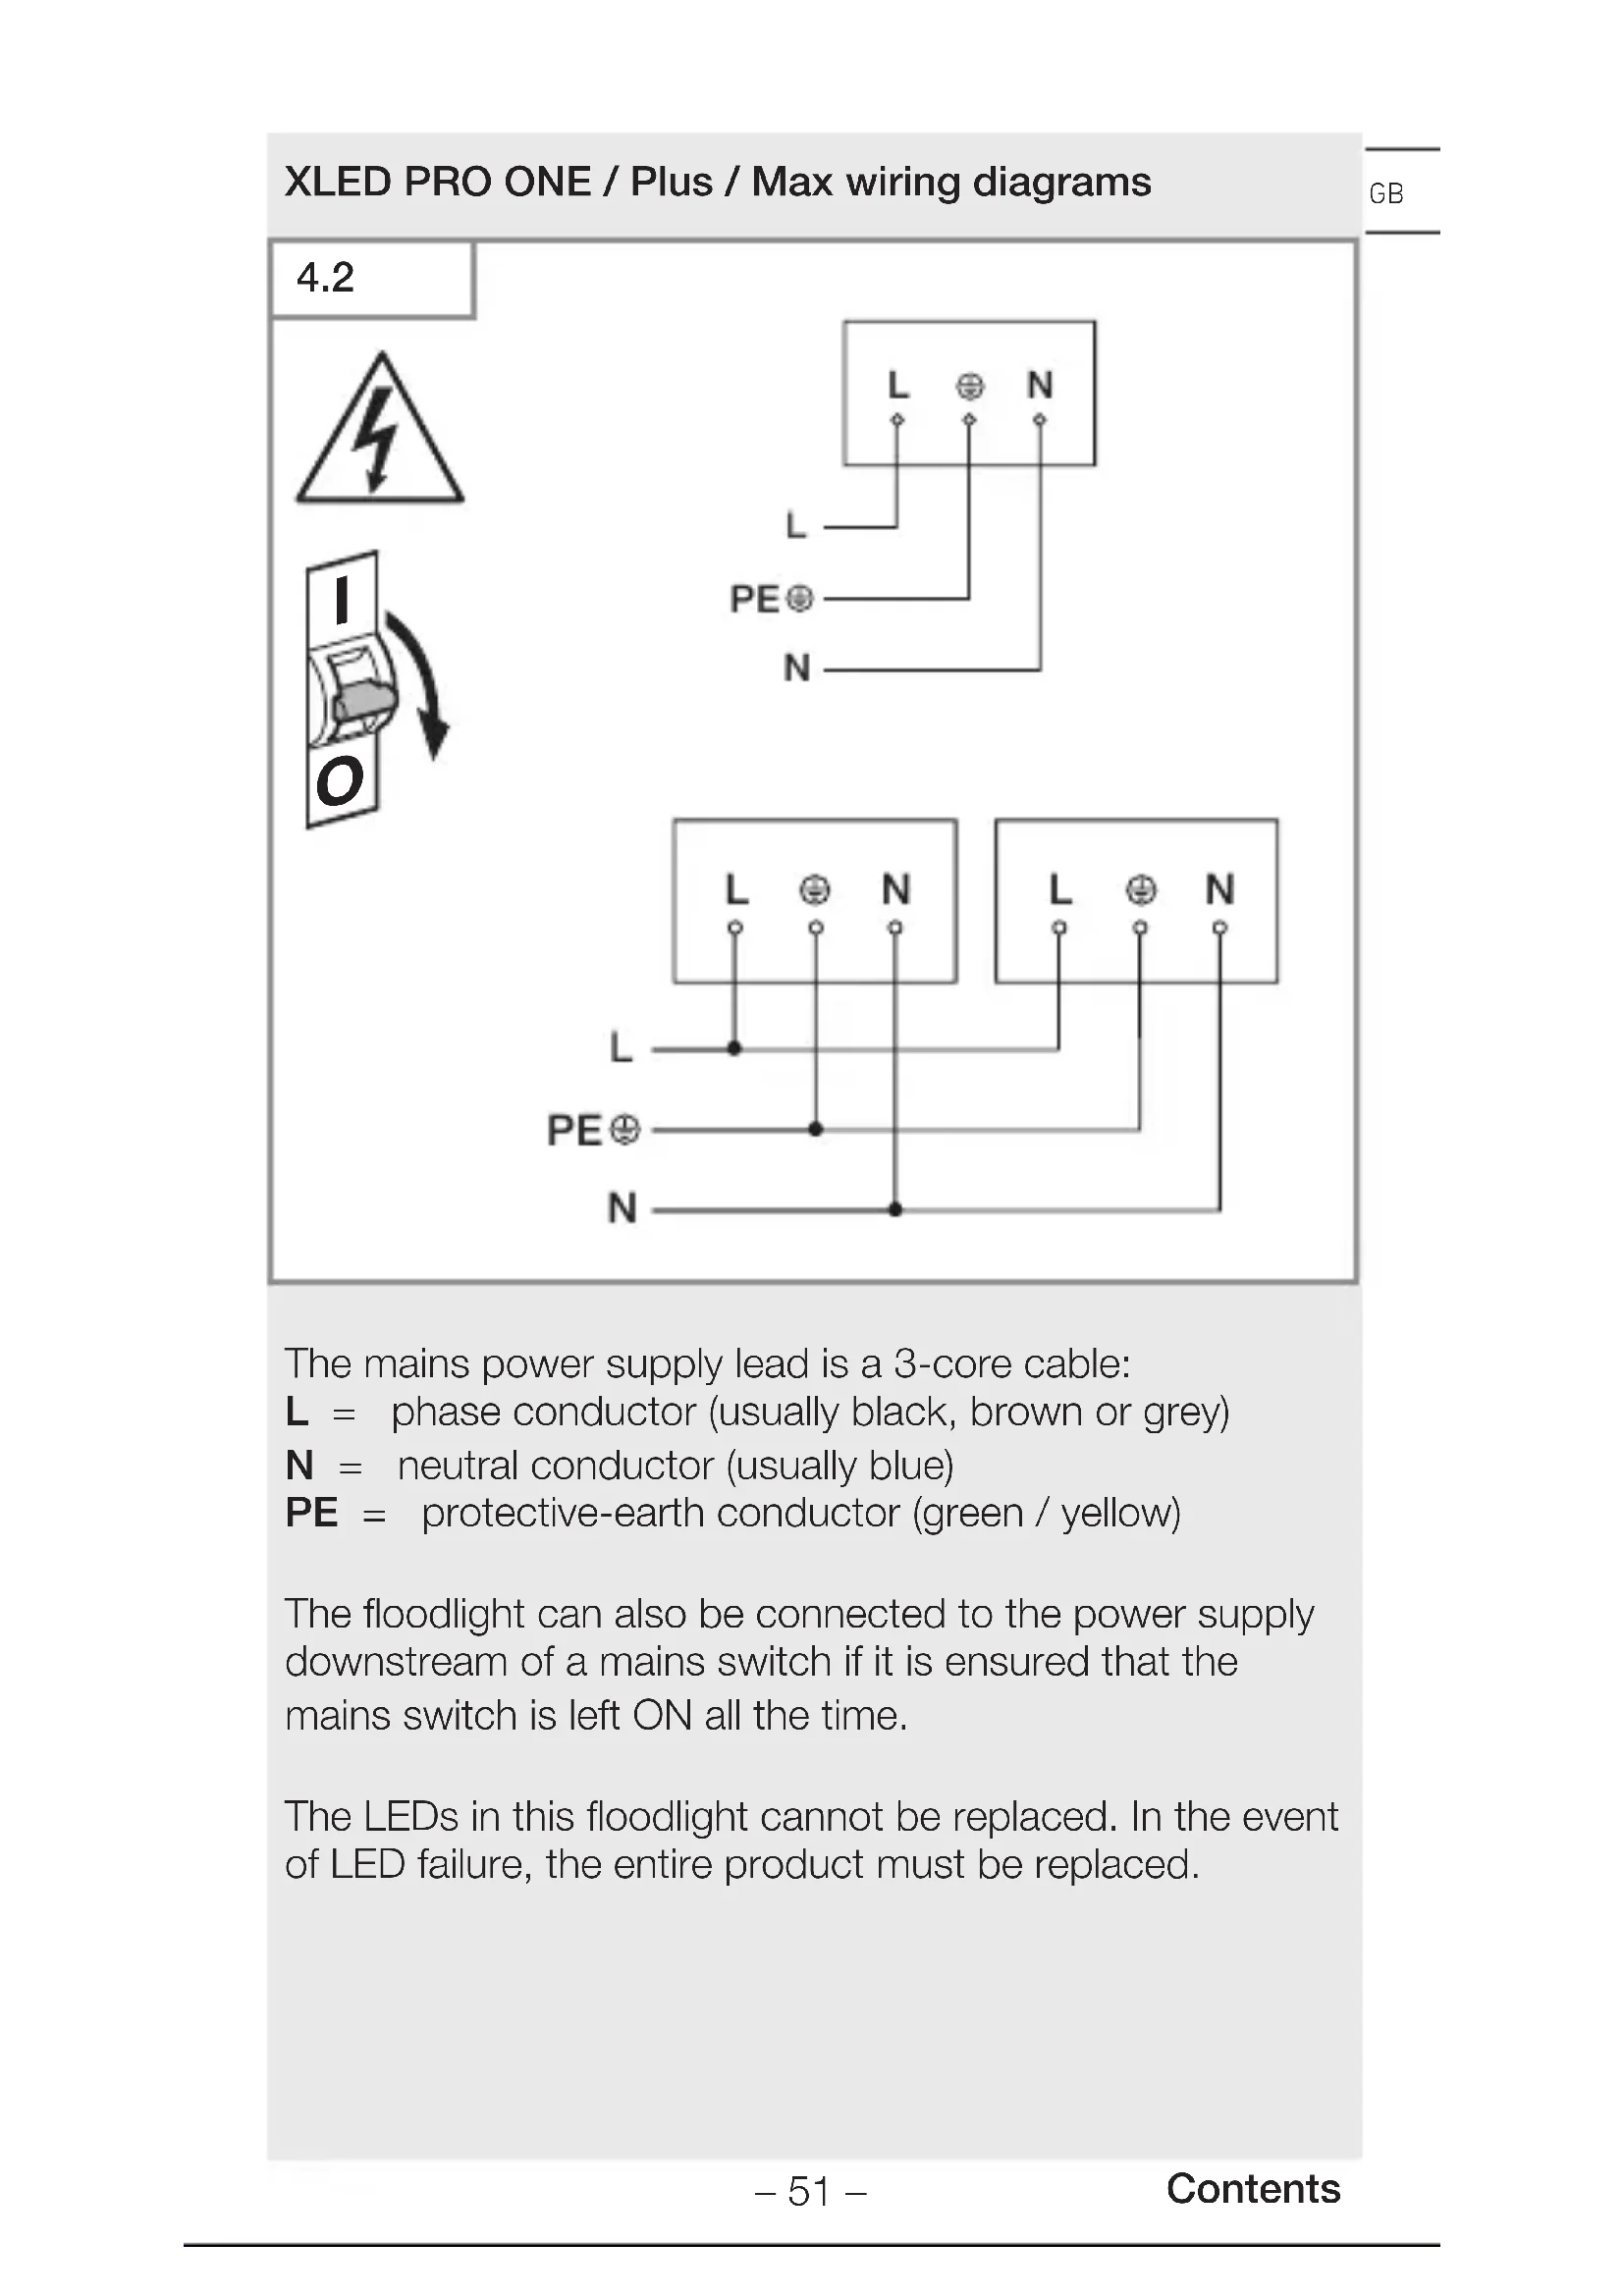
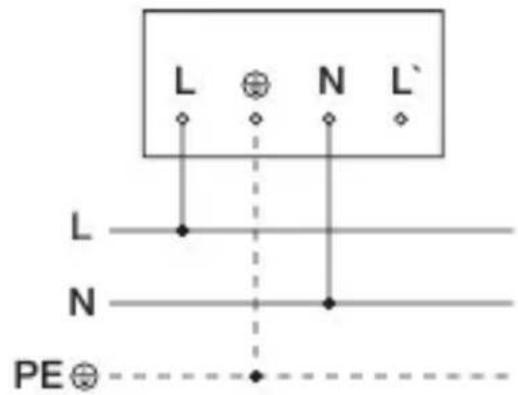
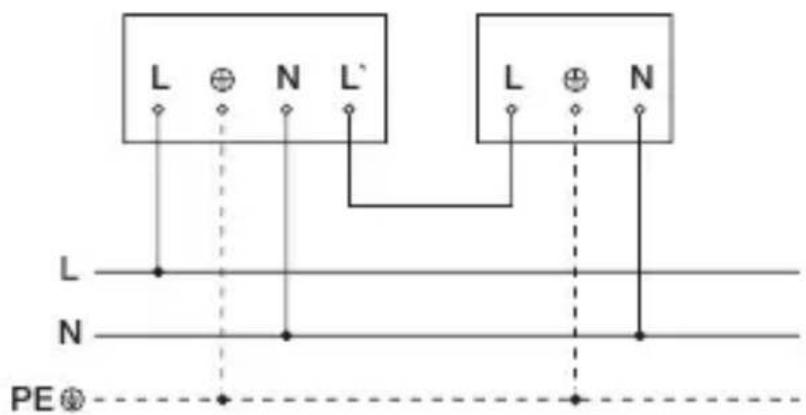
XLED PRO ONE S / Plus S / Max S wiring diagrams
4.1
4.2
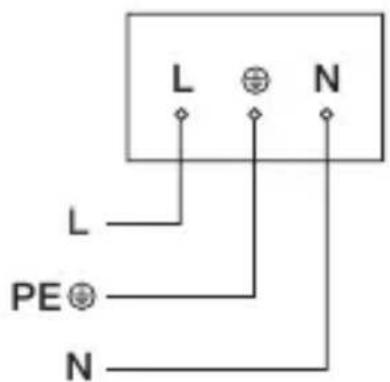
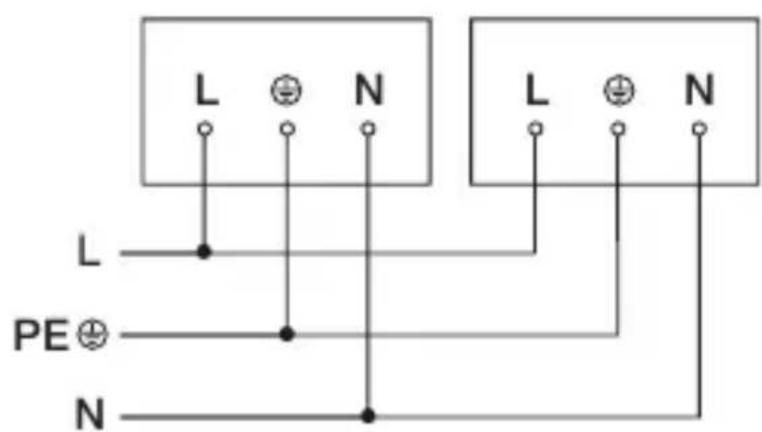
The mains power supply lead is a 3-core cable:
L = phase conductor (usually black, brown or grey)
N = neutral conductor (usually blue)
PE = protective-earth conductor (green / yellow)
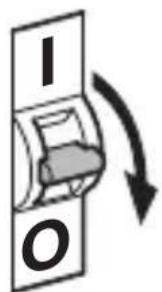
The floodlight can also be connected to the power supply downstream of a mains switch if it is ensured that the mains switch is left ON all the time.
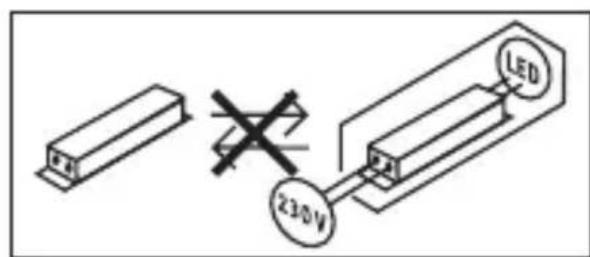
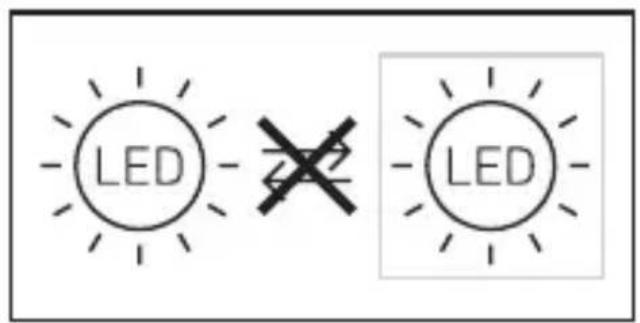
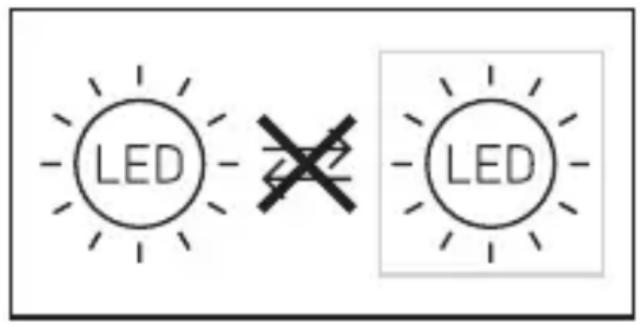
The LEDs in this floodlight cannot be replaced. In the event of LED failure, the entire product must be replaced.
The light source of this light cannot be replaced. If the light source needs to be replaced (e.g. at the end of its service life), the complete light must be replaced.

5. Installation
Hazard from electrical power!
Touching live parts can result in electrical shock, burns or death.
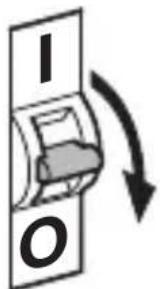
- Switch OFF power and interrupt power supply.
- Using a voltage tester, check to make sure that the power supply is disconnected.
- Make sure power supply remains interrupted.
Risk of damage to property!
Mixing up connection leads may produce a short circuit.
- Identify connection leads.
- Connect the leads correctly.
Preparing for installation
- Check all components for damage. Do not use the floodlight if it is damaged.
- Select an appropriate site to install the product.
-Take reach into consideration.
- Take reach and motion detection into consideration.
-Vibration-free.
- No obstacles in detection zone.
-Not in explosive atmospheres.
-Not on normally flammable surfaces.
-Do not look into the light source from a short distance (< 30 cm).
- Spaced at a distance of at least 50 cm from other LED floodlights.
XLED PRO ONE S / Plus S / Max S reach
5.1
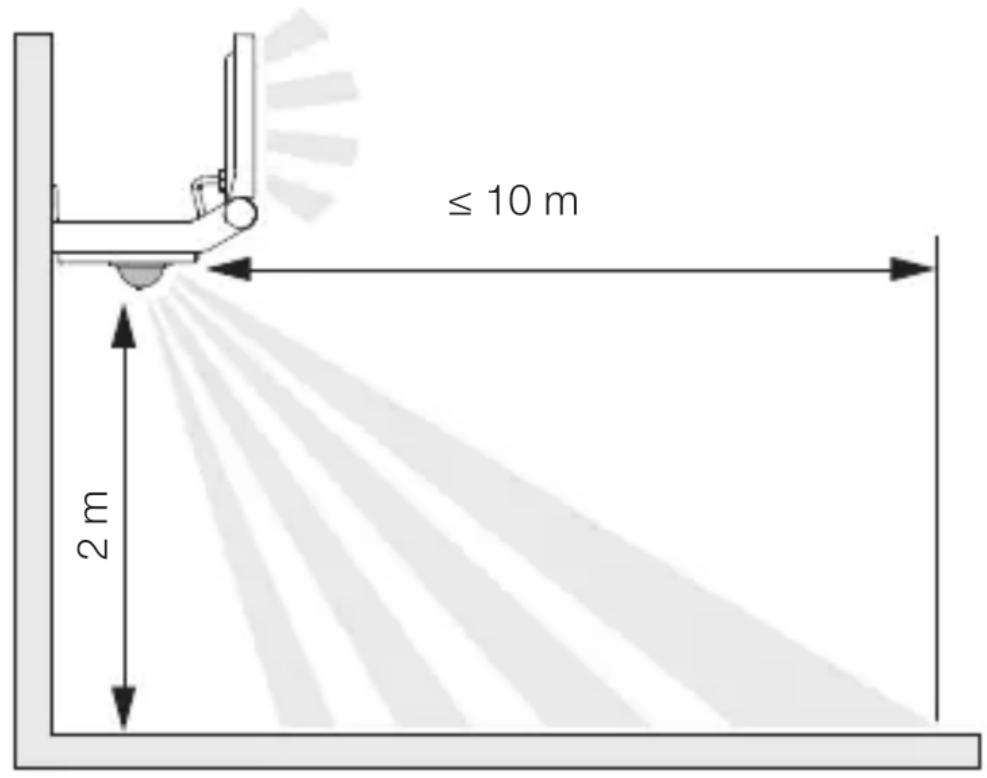
Detecting motion across the direction in which a person walks.
XLED PRO ONE S / Plus S / Max S
5.2
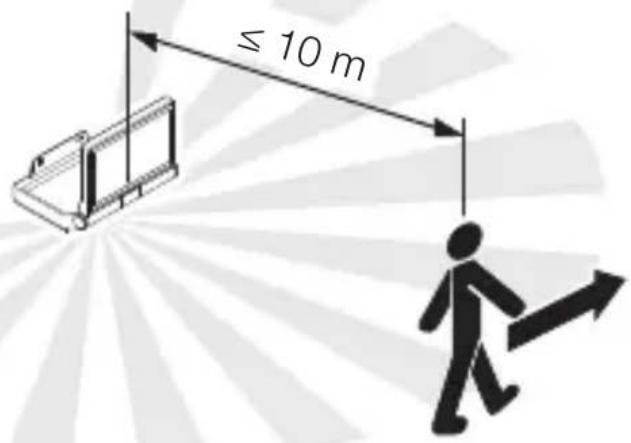
Detecting motion in the direction in which a person walks.
XLED PRO ONE S / Plus S / Max S
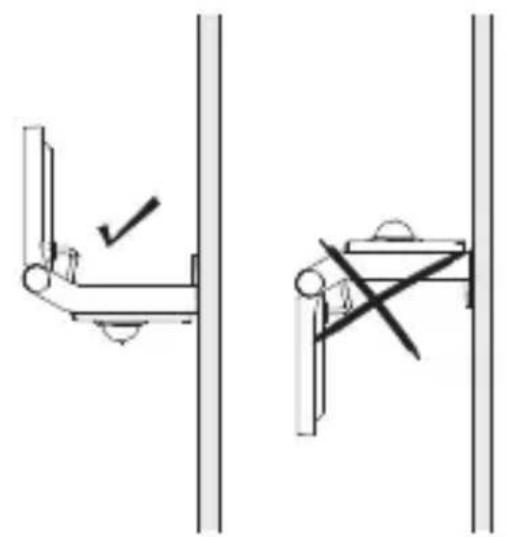
5.3

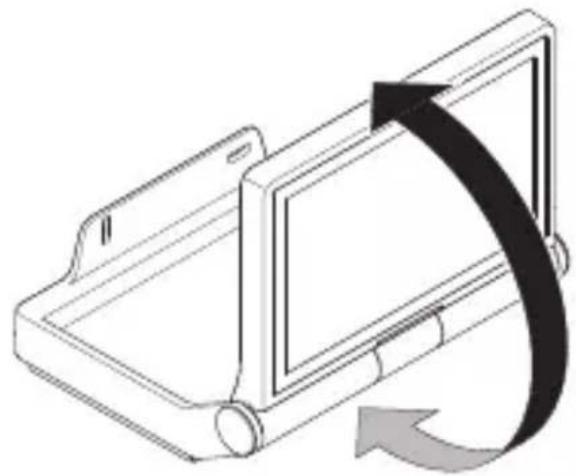
Aiming the floodlight
GB
5.4

- Correctly aim floodlight.
Mounting procedure
5.5
- Check to make sure the power supply is switched OFF.
Mark drill holes.
5.6
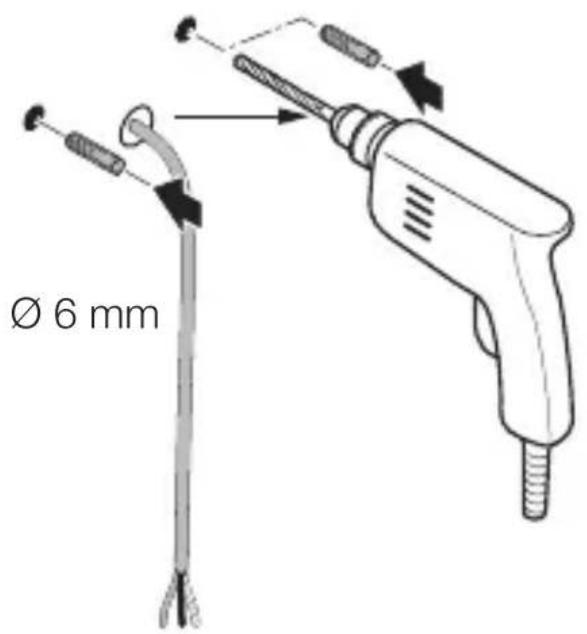
- Drill holes (Ø 6 mm) and fit wall plugs.
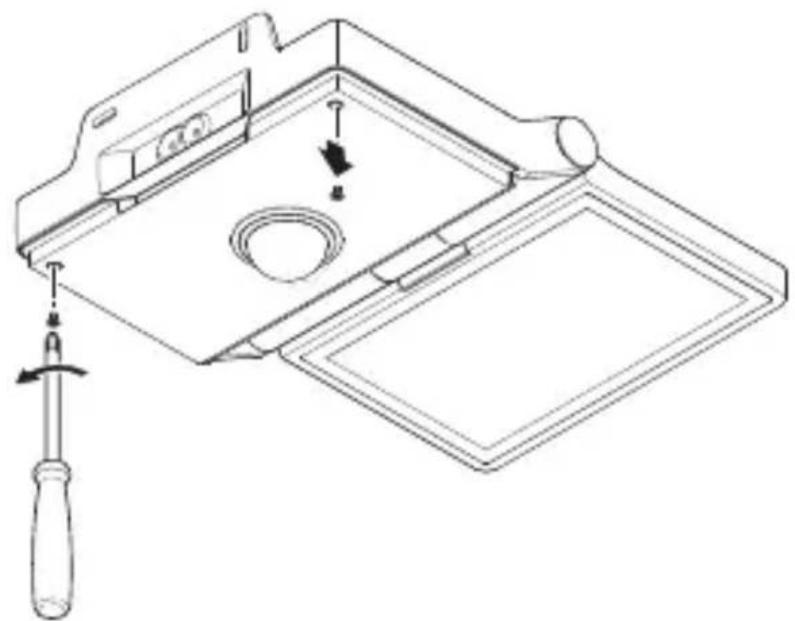
5.7
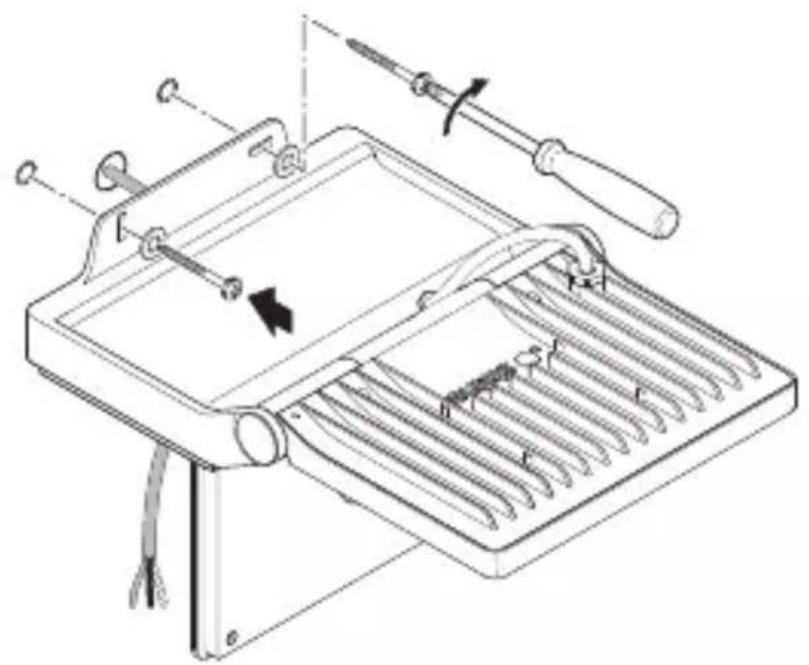
Unscrew cover.
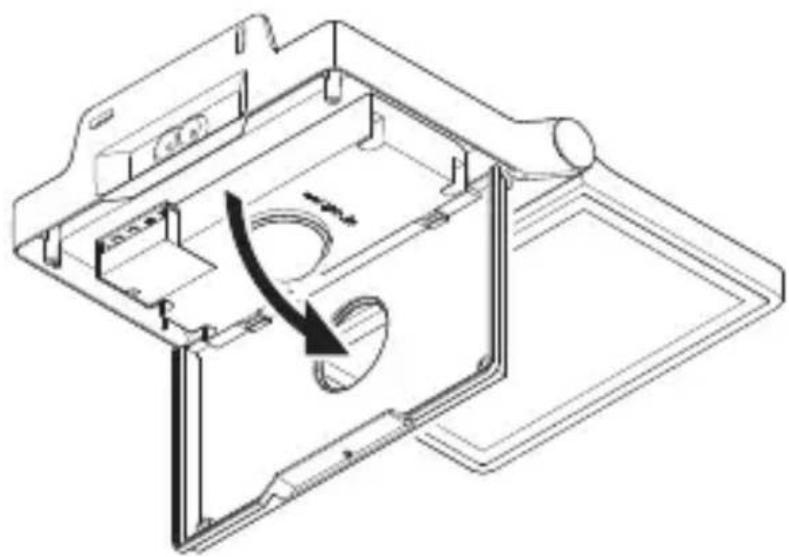
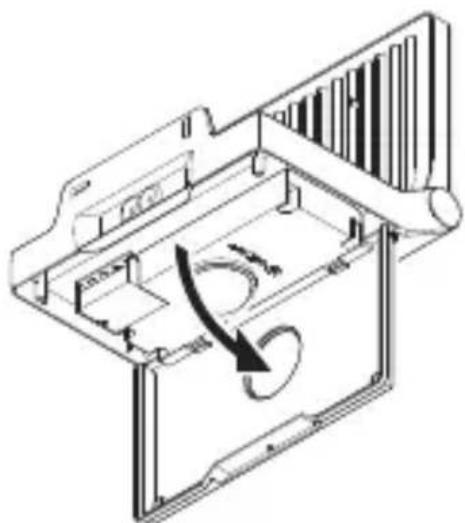
5.8
- Open cover.
GB
5.9
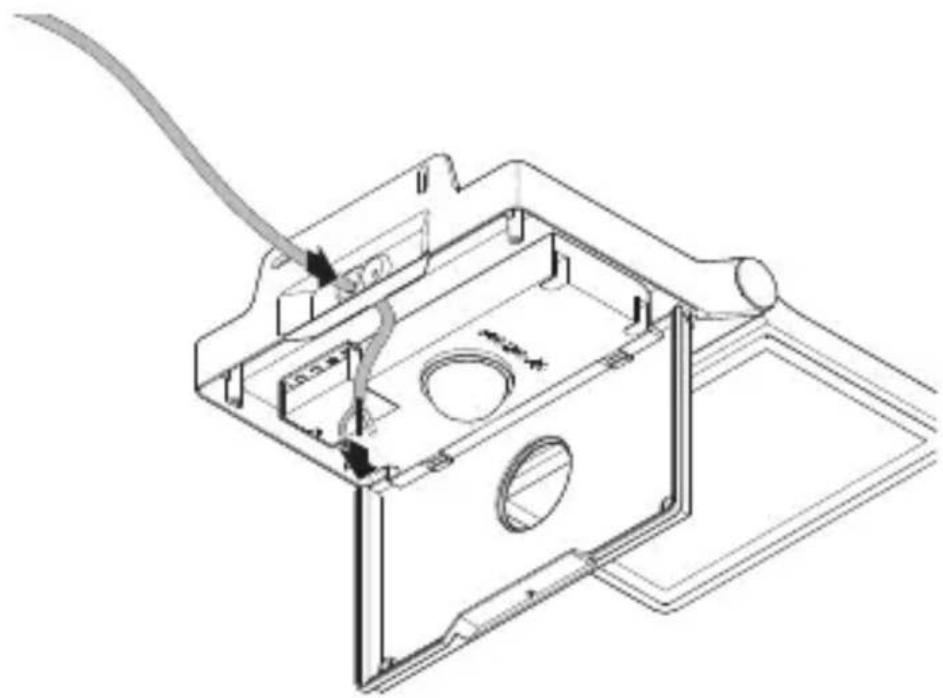
- Pull cable through opening.
5.10
- Screw bracket to mounting surface.
5.11
GB
- Unscrew terminal cover.
- Connect mains power supply lead as shown in the wiring diagram.
"4. Electrical connection"
5.12
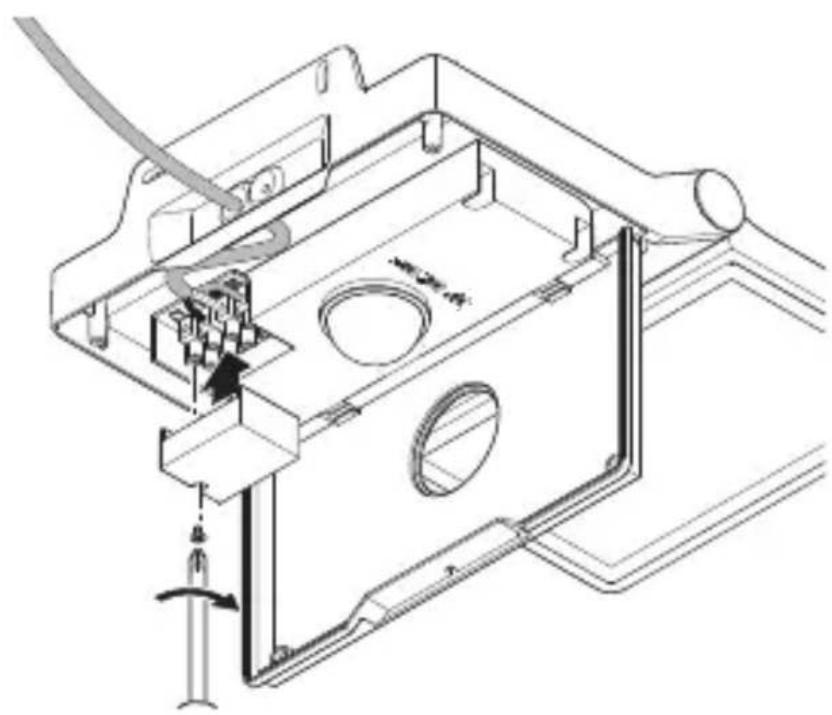
- Screw terminal cover in place.
5.13
- Close cover.
- Screw in retaining screws.
5.14
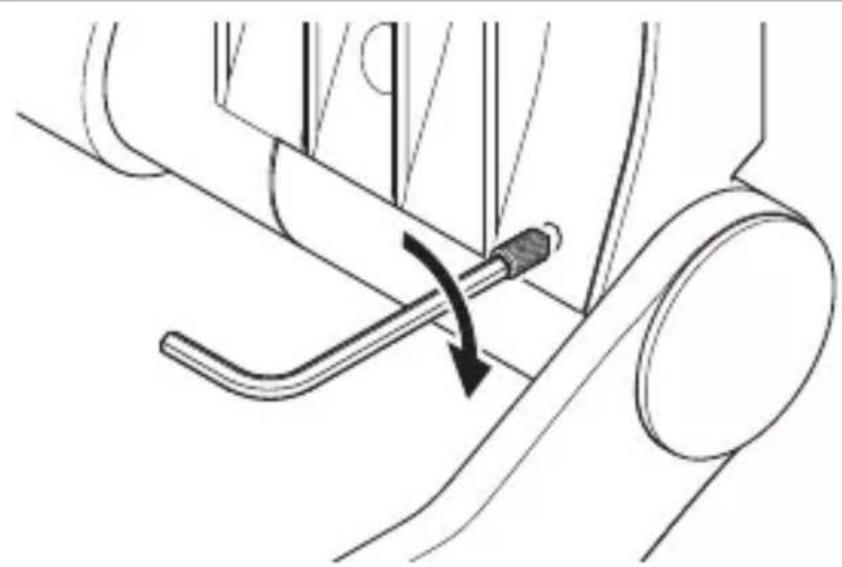
- Aim floodlight head and fix in place with grab screws.
5.15
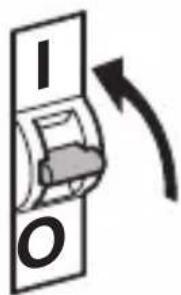
- Switch ON power supply.
- Setting functions. "6. Function"
GB
6. Function
XLED PRO ONE S / Plus S/Max S
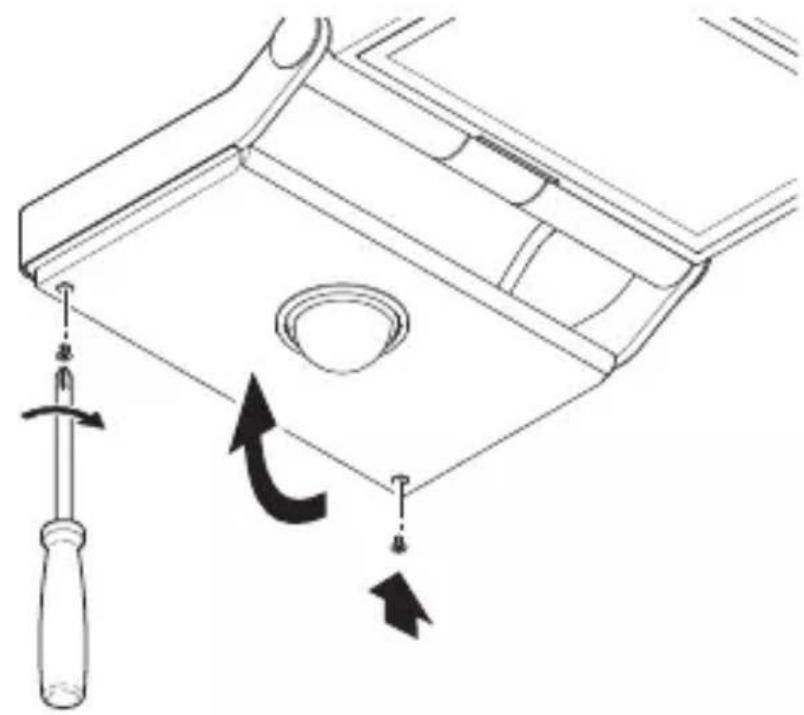
6.1
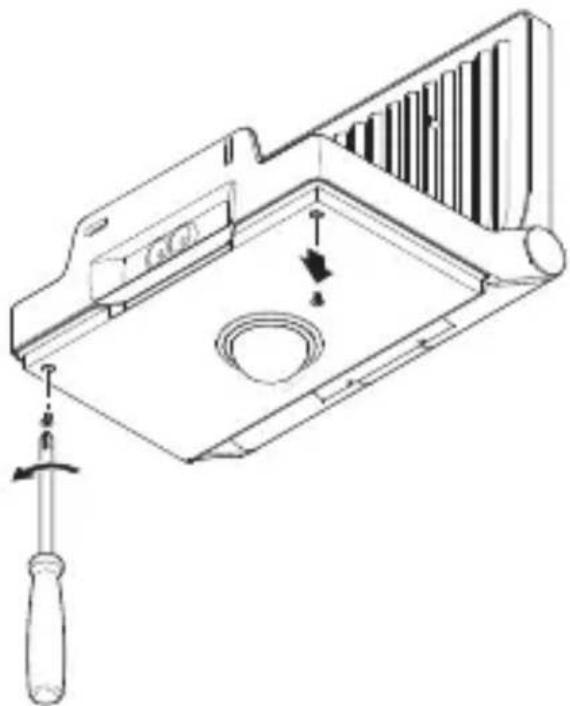
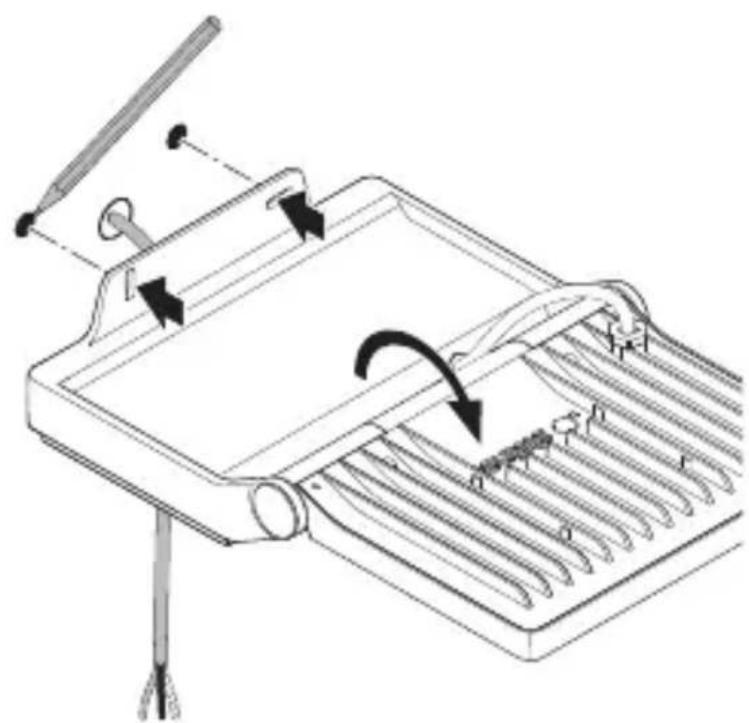
- Remove screws to open cover.
Make settings.
Factory settings
- Time setting: 8 seconds
- Twilight setting: Daylight mode 1,000 lux
- Basic light level: OFF
Time setting (H)
The stay-ON time can be set to any period from approx. 8 seconds to a maximum of 35 minutes. Every movement detected re-activates the light.
Note: After the LED floodlight switches OFF, it takes approx. 1 second before it is able to start detecting movement again. The LED floodlight can then switch ON again in response to movement.
The shortest time setting is recommended when adjusting the detection zone and performing the functional test.
Twilight setting (I)
The response threshold (twilight) can be infinitely varied from approx. 2 to 2,000 lux.

daylight mode (depending on ambient light level)

night-time operation (approx. 2 lux)
The control dial must be turned to when adjusting the detection zone and performing the functional test in daylight.
Basic light level (J)
The basic level of lighting from basic light LEDs provides a low level of illumination.
The main light is only switched ON for the preset time in response to movement within the detection zone. The light then switches to the selected basic brightness.
- OFF = no basic light
- 10 min = basic light for 10 minutes upon expiry of the stay-ON time selected.
-
30 min = basic light for 30 minutes upon expiry of the stay-ON time selected.
-
C = basic light all night. Basic lighting comes back on again as soon as ambient light level falls below the selected response threshold.
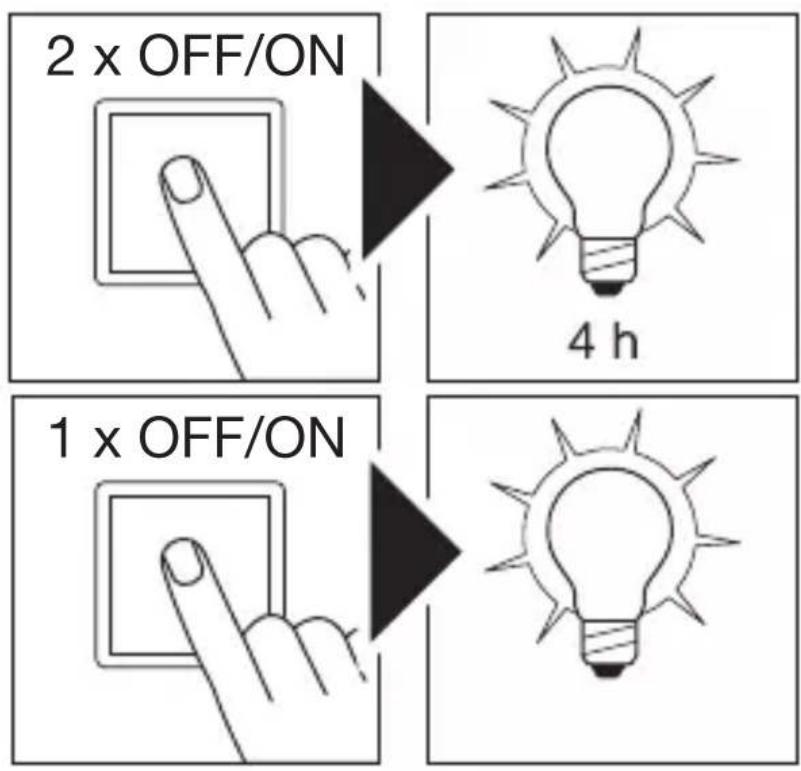
6.2
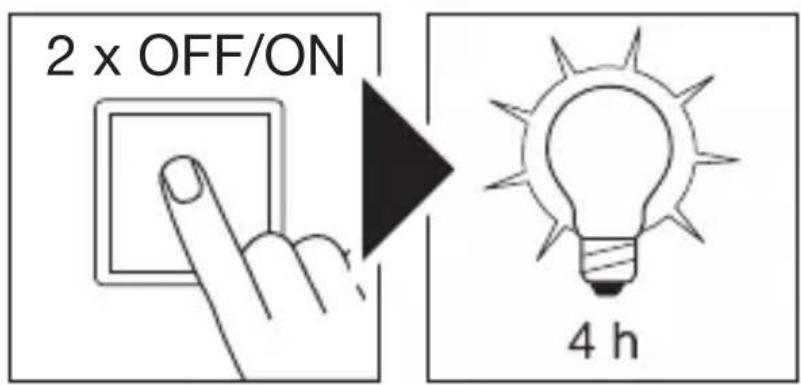
1) Activate manual override:
- Switch OFF and ON twice.
The LED floodlight is set to manual override for 4 hours.
Then it returns automatically to sensor mode.
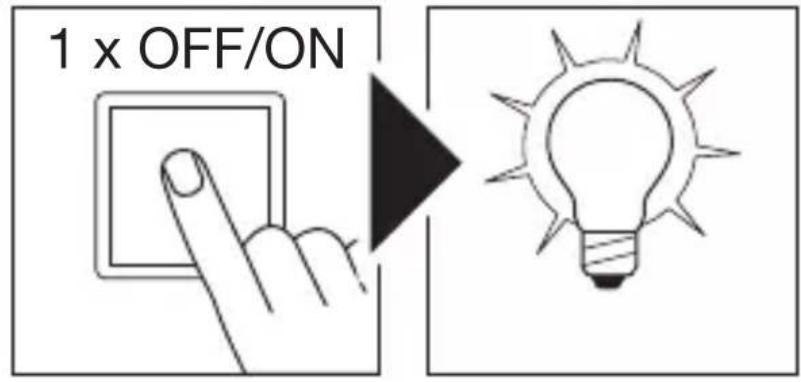
2) Deactivate manual override:
- Switch OFF and ON once.
Light goes out or switches to sensor operation.
Important:
Switching must take place within 0.2 to 1 second.
Adjusting the detection zone
To rule out inadvertent triggering or to target specific areas, the detection zone can be limited or adjusted with the shroud.
6.3
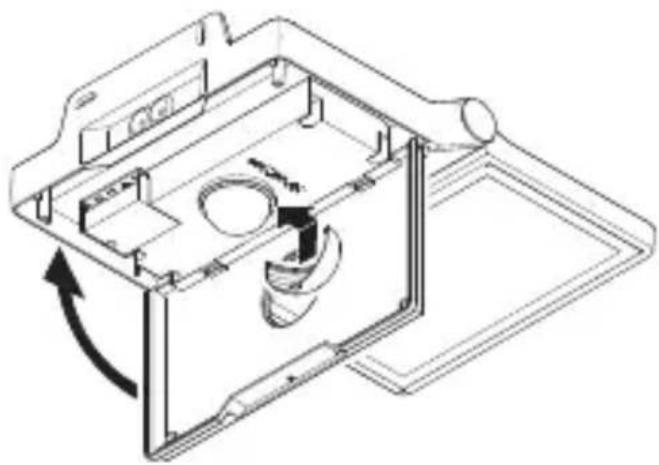
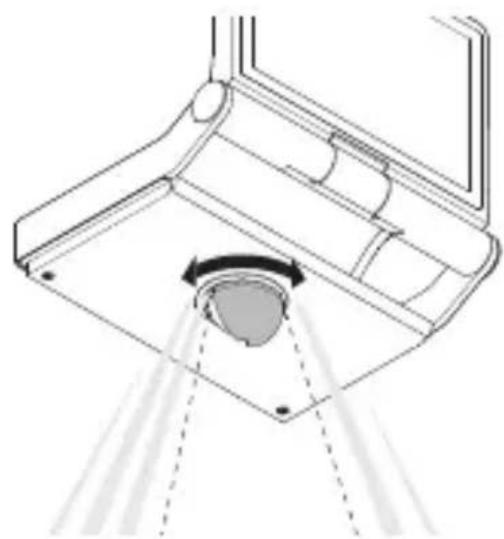
- Fit the shroud on the sensor.
Fix the shroud in place by closing the cover.
7. Remote control accessory
Remote control RC 12
(EAN 4007841079000)
7.1
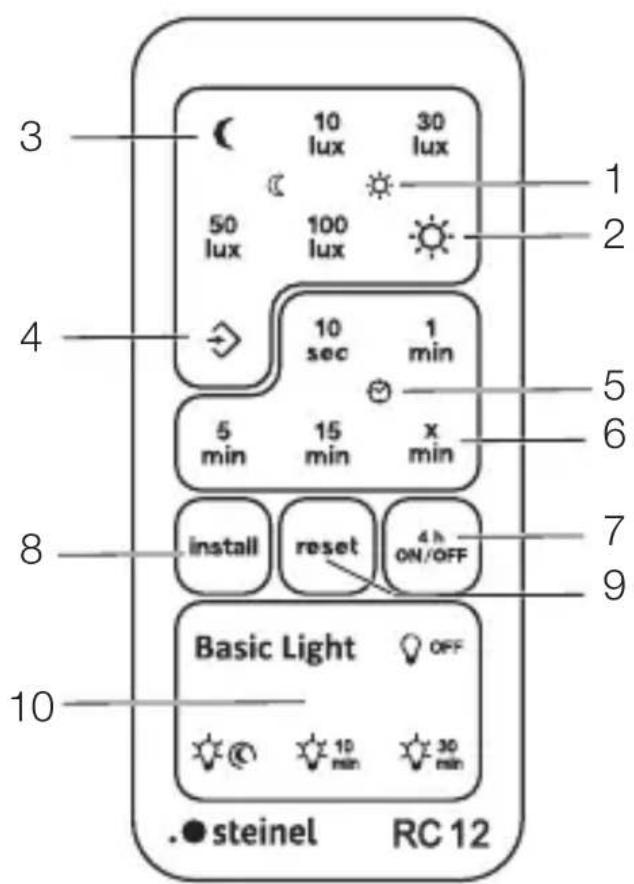
- Makes it easier to install larger-scale lighting systems. The LED floodlights can be set in any chosen way once they have been installed.
- Any number of LED floodlights can be controlled via the remote control unit.
- A status LED acknowledges each valid press of a button on the remote control unit.
The RC 12 remote control uses a CR2032-type battery.
The RC 12 remote control can be used for selecting and setting the following XLED PRO ONE S / Plus S / Max S functions:
1 Twilightsetting: The chosen response threshold can be set from approx. 2 to 2,000 lux.
→“Twilight setting (l)”
2 Daylightmode (depending on ambient light level)
3 Nightmode(2 lux)
4 Light-level setting via the memory button / teach mode (2-2,000 lux). At the levels of light at which you want the sensor to respond to movement from now on: press button. The current value is stored.
5 Timesetting:The period of time you want the light to stay ON for after the last detected movement can be set to 10 s, 1 min, 5 min, 15 min by pressing these buttons.
"Time setting (H)"
6 Chosen ON time: Sets the light to stay ON for a time of your own choice. Each press of the button increments the current time setting by 1 min (up to 15 min).
7 Manualoverride:
Pressing this button in sensor mode switches the LED floodlight ON for 4 h (status LED lights up permanently). Pressing this button in 4 h-ON mode switches the floodlight OFF for 4 h (status LED lights up permanently). The 4 h mode is terminated after the time elapses, by pressing the reset button or, in the 4 h OFF mode, by pressing the 4 h button.
→“Manual override”
8 Install mode (test mode): Install mode has the purpose of checking for proper working order as well for testing the detection zone. Irrespective of light level, the floodlight switches ON for 10 s in response to movement. Movement is signalised by the status LED. Install mode has priority over all other settings. Install mode ends automatically after 10 min. Install mode ends immediately after pressing reset. Note: Teach mode and Install mode cannot be used at the same time.
9 Reset: Resets all settings to the values manually selected on the floodlight or to the factory settings.
10 Basic light level: The basic level of lighting from basic light LEDs provides a low level of illumination. The main light is only switched ON for the preset time in response to movement within the detection zone. The light then switches to the selected basic brightness. "Basic light level (J)"
Intelligent remote control (optional)
(EAN 4007841009151)
- Control via smartphone or tablet.
- Replaces the remote control.
- Load appropriate app and connect via Bluetooth.
8. Cleaning and maintenance
The tool requires no maintenance.
Hazard from electrical power!
Contact between water and live parts can result in electrical shock, burns or death.
- Only clean tool in a dry state.
Risk of damage to property!
Using the wrong cleaning product can damage the light.
- Clean tool with a moist cloth without detergent.
Important note: The control gear cannot be replaced.
9. Disposal
Electrical and electronic equipment, batteries, accessories and packaging must be recycled in an environmentally compatible manner.
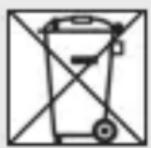
Do not dispose of batteries or electrical and electronic equipment as domestic waste!
The remote control contains a battery of type CR 2032 (lithium manganese dioxide / organic electrolyte).
EU countries only:
Under the current European Directive on Waste Electrical and Electronic Equipment and its implementation in national law, batteries and electrical and electronic equipment no longer suitable for use must be collected separately and recycled in an environmentally compatible manner.
10. Manufacturer's warranty
Manufacturer's warranty of STEINEL GmbH,
Diesel strasse 80-84, DE-33442 Herzebrock-Clarholz, Germany
All STEINEL products meet the highest quality standards.
For this reason, we, the manufacturer, are pleased to provide you, the customer, with a warranty under the following terms and conditions:
The warranty covers the absence of deficiencies which are proven to be the result of a material defect or fault in manufacturing and which are reported to us immediately after detection and within the warranty period. The warranty shall cover all STEINEL Professional products sold and used in Germany.
Our warranty cover for consumers
The provisions below apply to consumers. A consumer is any natural person who, on entering into the purchase transaction, neither acts in exercising their commercial nor their self-employed activity.
You can opt for warranty cover in the form of repair or replacement which will be provided free of charge (if applicable, in the form of a successor model of the same or higher quality) or in the form of a credit note.
In the case of sensors, floodlights, outdoor and indoor lights, the warranty period for the STEINEL Professional product you have purchased is 5 years in each case from the date on which the product was purchased.
We shall bear the shipping costs but not the transport risks involved in return shipment.
Our warranty cover for entrepreneurs
The provisions below apply to entrepreneurs. Entrepreneur is a natural or legal person or partnership with legal personality who or which, on entering into the purchase transaction, acts in exercising their or its commercial or self-employed activity.
We have the option of providing warranty cover by rectifying deficiencies free of charge, replacing a product free of charge (if applicable, in the form of a successor model of the same or higher quality) or by issuing a credit note.
In the case of sensors, floodlights, outdoor and indoor lights, the warranty period for the STEINEL Professional product you have purchased is 5 years in each case from the date on which the product was purchased.
Within the scope of warranty cover, we shall not bear your expenses accruing from subsequent fulfillment nor shall we bear your expenses for removing the defective product and installing a replacement product.
Statutory rights accruing from defects, gratuitousness
The warranty cover described here shall be applicable in addition to the statutory rights of warranty – including
special consumer protection provisions – and shall not restrict or replace them. Exercising your statutory rights in the event of defects is gratuitous.
Exemptions from the warranty
All replaceable lamps are expressly excluded from this warranty.
- In addition to this, the warranty shall not cover:
- any wear resulting from use or any other natural wear of product parts or any deficiencies in the STEINEL Professional product that are attributable to wear caused by use or other natural wear,
- any improper or non-intended use of the product or any failure to observe the operating instructions,
- any unauthorised additions, alterations or other modifications to the product or any deficiencies attributable to the use of accessory,
- supplementary or replacement parts which are not genuine STEINEL parts,
- any maintenance or care of products that is not carried out in accordance with the operating instructions,
- any attachment or installation that is not in accordance with STEINEL's installation instructions,
- any damage or loss occurring in transit.
Application of German law
The warranty shall be governed by German law excluding the United Nations Convention concerning the International Sale of Goods (CISG).
Making claims
If you wish to make a warranty claim, please send your product complete and carriage paid with the original receipt of purchase, which must show the date of purchase and product designation, either to your retailer or directly to us at STEINEL (UK) Ltd. – 25 Manasty Road, Axis Park, Orton Southgate, GB- Peterborough Cambs PE2 6UP United King-
dom. For this reason, we recommend that you keep your receipt of purchase in a safe place until the warranty period expires.
5 YEAR MANUFACTURER'S WARRANTY
11. Technical specifications
- Luminous flux / brightness:
XLED PRO ONE Max S: 50.1 W
XLED PRO ONE: 17.7 W
- Projected floodlight area:
XLED PRO ONE S: 180 cm²
XLED PRO ONE PLUS S / Max S: 254 cm²
XLED PRO ONE: 180 cm²
XLED PRO ONE PLUS / Max 254 cm²
- Weight:
XLED PRO ONE S: 1.45 kg
XLED PRO ONE PLUS S: 1.7 kg
XLED PRO ONE Max S: 1.72 kg
XLED PRO ONE: 1.4 kg
- IP protection rating: IP44 / I
Additional switching capacity
XLED PRO ONE S / PLUS S / Max S:
- Incandescent / halogen lamp load: 1,500 W
- Fluorescent lamps, electronic ballasts: 430 W
- Fluorescent lamps, uncorrected: 500 VA
- Fluorescent lamps, series-corrected: 900 VA
- Fluorescent lamps, parallel-corrected: 500 VA
- Low-voltage halogen lamps: 1,500 VA
- LED lamps < 2W : 16W
- 2 W < LED lamps < 8 W: 64 W
- LED lamps > 8 W: 64 W
- Capacitive load: 88 F
12. Troubleshooting
Unit without power.
- Fuse not switched ON or faulty.
- Switch ON fuse.
- Change faulty fuse.
- Break in wiring.
- Check wiring with voltage tester.
- Short circuit in mains power supply lead.
- Check connections.
- Any mains switch OFF
- Switch ON mains switch.
Unit does not switch ON.
-
Wrong twilight setting selected.
-
Reset twilight setting.
- Mains switch OFF.
-
Turn on mains switch.
-
Fuse not switched ON or faulty.
-
Switch ON fuse.
-
Change faulty fuse.
-
Rapid movements being suppressed to minimise malfunctioning, or detection zone too small or incorrectly defined.
- Check and adjust detection zone.
- Light source faulty.
- The light source cannot be changed. Completely replace unit.
Unit does not switch OFF.
-
Continued movement within the detection zone.
-
Check detection zone.
- If necessary, limit or change detection zone.
Unit switches ON when it should not.
- Floodlight not mounted for detecting movement reliably.
- Securely mount floodlight.
- Movement occurred but not identified by the observer (movement behind wall, small object moving in immediate proximity of lamp etc.).
- Check detection zone.
- If necessary, limit or change detection zone.
FR
Sommaire
- Dimensioni (A x L x P):
XLED PRO ONE S: 230 × 229 × 182 mm
XLED PRO ONE PLUS S / Max S: 250 × 259 × 202 mm
XLED PRO ONE: 206 × 229 × 182 mm
XLED PRO ONE PLUS / Max: 226 × 259 × 202 mm

229 mm (a)
259 mm (b), (c)
182 mm (a)
202 mm (b), (c)
(250 mm (b), (c)

229 mm (a)
259 mm (b), (c)

182 mm (a)
202 mm (b), (c)
229 mm (a)
259 mm (b), (c)
182 mm (a)
202 mm (b), (c)
229 mm (a)
259 mm (b), (c)
182 mm (a)
202 mm (b), (c)
$$ R _ {a} \geq 8 0 $$
- Sensorik:
XLED PRO ONE S / PLUS S / Max S: Passiv infraröd
Räckvidd:
XLED PRO ONE S / PLUS S / Max S: Max. 10 m
- Bevakningsvinkel:
XLED PRO ONE S / PLUS S / Max S: 240°
- Efterlystid:
XLED PRO ONE S / PLUS S / Max S: 8 sek-35 min
N = nulled (oftest blä)
PE = jordledning (grøn / gul)
Enheden kan och tilsluttes elektrisk after en netafbrdyder, hvis det er sikret, at netafbrdyden altid er taendt.
- Méretek (Ma × Sz× Mé):
XLED PRO ONE S: 230 × 229 × 182 mm
XLED PRO ONE PLUS S / Max S: 250 × 259 × 202 mm
XLED PRO ONE: 206 × 229 × 182 mm
XLED PRO ONE PLUS / Max: 226 × 259 × 202 mm
- Trida ochrany IP: IP44 / I
Doseg XLED PRO ONE S / Plus S / Max S
5.1

Zajetje premikanja na strani glede na smer premikanja XLED PRO ONE S / Plus S / Max S
5.2
Zajetje premikanja v smeri premikanjaXLED PRO ONE S / Plus S / Max S
5.3
SI
Usmeritev naprave.
5.4

229 mm (a)
259 mm (b), (c)
182 mm (a)
202 mm (b), (c)

Toote mōōdud XLED PRO ONE
- XLED PRO ONE (a)
- XLED PRO ONE Plus (b)
- XLED PRO ONE Max (c)
3.4
229 mm (a)
259 mm (b), (c)
182 mm (a)
202 mm (b), (c)

229 mm (a)
259 mm (b), (c)
182 mm (a)
202 mm (b), (c)
LT
Gaminio matmenys XLED PRO ONE
- XLED PRO ONE (a)
- XLED PRO ONE Plus (b)
- XLED PRO ONE Max (c)
3.4
229 mm (a)
259 mm (b), (c)
182 mm (a)
202 mm (b), (c)

Irenginio apžvalga XLED PRO ONE S / Plus S / Max S
3.5
A LED prozektoriaus galvuté
B Montavimo apkaba
C Nustatymo regulatorius
D Gnybtai
E Gnybtu dangtelis
F Sensorius
G Dangtelis
LT
3.6
L = φa3a (obukHOBeHo YepeH, KaΦyB nIi CNB)
N = Huya (O6nKHOBeHO CnH)
PE 3a3eMaBaU npOBoHnK (3eJIeH / XbIIT)
UpeiBcIIO MoKe Da 6bIe eJIeKTpIueCKn CBbp3aH CJIeI pKeKbcBauch, aKO Ce rapaHTnpa, ye IpeKbcBauchT uE BkJIIOUeH NOCTOAHNO.
LED ha to3n ypei He moke da 6bde 3aMeHn. Ako e Heo6xOIMo, Tp6Ba da 6bde 3aMeHn ceJIypei.
CBeTINHHNt N3TOUHnK Ha Ta3n LaMna e He3aMeHReM; aKO ce HANOJN 3aMHaTa My (HaNP. CJIeI KpaI Ha XKNBOTa My), ZJIaTa IaMNa Tp8Ba Da Ce 3aMeHN.
5. MoHTaЖ
Onachoct ot eJektpnueckn TOK!
Доирьт до части, повекдаши TOK, може за довetedо до eл ektrпческіshok, n3rapяняллсmbpt.
ToKbT da ce n3KJIouH n HnpeXeHneTo da ce npeKbSche.
- Да се повери с урета Измерване на Нашижени.To.
- Да ce ocinrgynпpeкьсbaHeTo Ha HanpexeHneTo.
Onachoct ot utn!
Pa3MaHa Ha NOJIocIte MOKe Da IOBeJe DO KbCo CbeHnHeHne.
Hactpoika Ha CBetlooyBCTBNTeJIHOCTTa (I)
OcbeteHocCTTa Ha 3aJeIcTbaHe (MpaK) MoKe Da ce peYJInpa 6e3cteHenHO OT OKoLo 2-2.000 lykca.
- =Дневен ржим (He3aBnCmO OT OCBeTeHocTTa)
- = pejkm npn HacTbNbaa TaMnHa (OKOJ0 2 nyka)
Ipn HacTroPka Ha 0xbaTa n npn npOBepKa Ha yHKunTe Ha dHeBHa cBeTInHa peYJatOpbT Tp6Ba da e Ha
Базовocветлени (J)
OCHOBHOTO OCBETJIeHne c 6a30Bn LED OCNrypRABa Hncko HnBO Ha OCBETeHOCT.
ГлавнасВETЛина се ВКЛючВа 3a ИЗбраHOTО Врemecamо ппсьOTВЕТно ДВИЖЕнe B OБXBаТ. След КоETO CBETЛинаТа OTHOBО прЕМинава Ha OCHOВHO OCBETЛeHne.
- OFF = 6e3 6a30BO OCBetlenHe
- 10 mIn = 6a3OBO oCBeTJIeHne 3a 10 mInHyTn cJeI n3TuHaHe Ha n36paHOTo BpeMe.
- 30 MmH = 6a3OBO OCBeTJIeHne 3a 30 MmHyTn CJIeN N3TuHaHe Ha N36paHOTo BpeMe.
- 6a30BO OCBeTJIeHne UIa HOUI. Ba30BO OCBeTJIeHne KOraTO OKoJHaTa CBETJIiHa CpaIHe IOD N36paHOTO HnBO Ha OCBeTeHOCT.
NoctoHHa CBetJnHa
6.2
1)Вклюванe:
KJIIOybT Da Ce N3KJIIOUH IN BKJIIOUH DBA IbTN.
LED-прожектор octaba c постонна CBetлна 3a 4 уа. След това abTomатино пеминава OTHOBO B ceH3open peхим.
2)ИЗКЛЮУВаHe:
KJIIOyT Da Ce N3KJIIOUH IN BKJIIOUH BeHNbX.
IHTeJIrREHTHO dNCTaHcNoHHO ynpabJeHne (OOny)
(EAN 4007841009151)
- YnpaBJIeHne cbc cMapTfoH nIITa6JTeT.
- 3aměну дистанционно упразnéне.
- CbajeTe cBoTBeTHOTo npIIOXKeHne n Ce CBbpXKeTe npE3 Bluetooth.
- Pa3mepn (B × LIIxД):
XLED PRO ONE S: 230 × 229 × 182 MM
XLED PRO ONE PLUS S / Max S: 250 × 259 × 202 MM
XLED PRO ONE: 206 × 229 × 182 MM
XLED PRO ONE PLUS / Max: 226 × 259 × 202 MM
-
HanpexeHne: 220-240 V, 50/60 Hz
-
MoIHHoCT / eΦeKTHBHOCT:
XLED PRO ONE S: 120 lm/W
XLED PRO ONE PLUS S: 129 lm/W
XLED PRO ONE Max S: 122 lm/W
XLED PRO ONE: 126 lm/W
YpeBt He Ce n3KJIIOUvBa.
-
Прдьлжаваю движени в обхва.
-
O6xbatbT da ce npOBepn.
- Прн Heo6xOДIMOCCT 6xBaTbT Да ce orpaHnU nIIN3MeHn.
YpeBcBKJIIOUBA npON3BOJHO.
-
YpeIbT He e MOHTnpaH cTa6nJIHo.
-
YpeIbT Da ce MOHTnpa cTa6nJIHo.
-ДВИЖЕНЕТО e OCTaHaNo cKpITo 3a Ha6JIIOJaTeJIA (ДВИЖЕНe 3aI CTeHа,ДВИЖЕHne Ha MaJIbK OBeKT B HENOCpeIcTBeHa 6JIIN3OCTdo JAmNaTaи T.H.).
- Да се повери обхвata.
- Прп Heобходимоct obxBaTbT da ce orpaHnU nIin ɪЗмehɪ.
CN
内容
XLED PRO ONE Max S: 50.1 W
XLED PRO ONE: 17.7 W
CeteBOI npOBOD COCTOITn3 3 KINJ:
N =HyJIeBOI npOBoD (uaIe BCero CInnI)
PE = npoBOD 3a3eMJIeHnIy (3eJIeHbI / JKeJIrTbI)
I3dJIe TAKKe MoKet 6bITb NOdkJIOUeHO 3JIeKTpUpeCKN NocJe CTeBOrO BbIKJIOUaTeJIa, eCIN OBeCneUeHO NocToRyHHOE BKJIOUeHHe CTeBOrO BbIKJIOUaTeJIa.
CBeToIIOJ 3TOI O3dJIeJIa He IIOJIeKHT 3aMeHe. EcII HEO6XODIMO, CJIeIyET 3aMeHNTb BCE I3dJIeJIe.
IcToHnK CBeta 3TOrO npoxKeTopa He nOpJleKIT 3aMeHe.
Pn Heo6xOIMOCtN 3aMeHbI NcToHnKa CBeta (HaipnMep, B KOHcE erO cPoKa ClyXkb), Heo6xOIMo 3aMeHnTB BeCb IpoxKeTOp.
5. MoHTaЖ
Опасноctь ИЗ-3a удара за leктуескIM TOKOM!
BhimaHne:peKIM oOyuEHHN I peKIM yCTaHOBKn OndHOBpeMeHHO nCpOJIb3OBaTbcr He MOrYt.
BkIIOHTb ceTeBOB BblKJIIOUaTeIb.
I3dJIeNe He BkJIouaetcra.
-
HenpaBnIbHo Bbl6paHa yCTaHOBKa cymepeHOrO BKJIIOUeHnI.
-
3aHOBO OTppeYIpOBAbYcTaHOBky CyMepeHOrOBKJIIOUeHnIy.
-
CeteBoB BblKJIouaTeIb BblKJI.
-
Hactpontb cTeBOB BblKJIIOuataTeIb.
-
Празхапелов Влочен Или HeicpaBEN.
-
Bключпь пpeохсангь.
3aMeHnTb HeNCpBbI INpeOxpaHnteIb.
-ДлЯ MнHMn3aUH NOMEX 6bICTpbIe DBNXeHNA ITHOPnpyOTc IJIYUCTaHOBJIeHa CIIuKOM MaJIA 3OHaOBHApUxKeHNA IJIY UCTaHOBJIeHa He KOppeKTHO.
-
Праверпь зону обаружения и OTpeгунюваъ.
-
IcToUHnK CBeta HeNCppaBeH.
-
Источник CBeta He полескота amehe. 3amehntbИЗделпЕ ПОЛноctыю.
I3dJIe He BbIKJIOUaETcra.
- I3dJIe yCTaHOBJIeHO He NOLHOCTbIO CTAUHOAPHO.