
DTI 335 - Thermometer ZEISS - Free user manual and instructions
Find the device manual for free DTI 335 ZEISS in PDF.
| Product type | Thermal camera |
| Brand | ZEISS |
| Model | DTI 335 (DTI 3/35) |
| Category | Thermometer (thermal camera) |
| Dimensions (L × W × H) | 193 × 60 × 65 mm (7.6 × 2.4 × 2.5 inches) |
| Weight | 420 g (14.8 oz) |
| Battery type | Integrated lithium-ion, non-removable |
| Battery life | Up to 10 hours |
| Sensor resolution | 384 × 288 pixels, 17 µm pixel pitch |
| Frame rate | 50 Hz |
| Optical magnification | 2.5x |
| Digital zoom | 1.0x to 4.0x in 0.5x steps |
| Display resolution | 1,280 × 960 pixels (LCOS) |
| Field of view (H × V) | 11° × 8° |
| Detection range (1.8 m object) | 1,235 m (1,350 yd) |
| Color modes | White Hot, Black Hot, Red Hot, Rainbow |
| Connections | WLAN (2.4 GHz, IEEE 802.11b/g/n), USB (charging and data transfer) |
| Internal memory | 15 GB |
| Protection rating | IP66 (protected against heavy rain) |
| Operating temperature range | -10 °C to +40 °C (+14 °F to +104 °F) |
| Tripod thread | Standard 1/4 inch |
| Package contents | Camera, neoprene carrying strap, case with shoulder strap, USB cable, optical cleaning cloth, power supply (depending on version) |
| Maintenance | Clean the lenses with a special optical cloth after blowing off dust |
| Safety | Do not point the lens at intense heat sources (sun, laser); keep out of reach of young children; avoid shocks |
| Manufacturer warranty | 2 years, extendable by one year after product registration |
Frequently Asked Questions - DTI 335 ZEISS
User questions about DTI 335 ZEISS
0 question about this device. Answer the ones you know or ask your own.
Ask a new question about this device
Download the instructions for your Thermometer in PDF format for free! Find your manual DTI 335 - ZEISS and take your electronic device back in hand. On this page are published all the documents necessary for the use of your device. DTI 335 by ZEISS.
USER MANUAL DTI 335 ZEISS
For United States patents which may cover this product see our website.
Patents: www.zeiss.com/cop/patents
DE EN FR ES IT NL CZ DK EE FI HR HU
LT LV PL PT RO SE SK SL BG GR RU JP CN 09.2021

GEBRAUCHSANLEITUNG
Building 1, the 5th plant, Jiayi Industrial Park
Daping Community, Guilan Street Longhua District
Shenzhen P.R. China
www.zeiss.com/nature
www.zeiss.com/hunting
ZEISS DTI
3/25 | 3/35
Instructions for use
For United States patents which may cover this product see our website.
Patents: www.zeiss.com/cop/patents
DE EN FR ES IT NL CZ DK EE FI HR HU
LT LV PL PT RO SE SK SL BG GR RU JP CN 09.2021

Instructions for use
ZEISS products are famous for outstanding optical performance, precision engineering and a long service life.
Please observe the following instructions for use in order to obtain the best from your thermal imaging camera and to ensure that it remains your constant companion for many years to come.
IMPORTANT SAFETY INFORMATION
Environmental influences
Note: Never point the lens of the device directly at intense heat sources such as the sun or laser equipment. The objective lens and eyepiece can function as a burning glass and damage the interior components.
Caution: Avoid touching the metal surface (cooling fins) after exposure to sunlight or cold.
Caution: Protection class IP66 is only achieved when all rubber covers are firmly closed.
Ergonomics note
Caution: Take breaks after longer periods of use to avoid wrist pain.
Risk of swallowing
Caution: Do not place this device in the hands of small children. Incorrect handling can cause small parts to come loose which may be swallowed.
Safety instructions for battery
- Handle the device with care: Rough handling can damage the internal battery.
Do not expose the device to fire or high temperatures above 60^ . - Do not disassemble the device to access the battery. The battery is not meant to be replaced by the end user.
Only use the battery charger included in the delivery package.
Only charge the device at temperatures ranging between 10^ and 40^ .
The battery capacity decreases when operated in a cold ambient temperature. This is not a fault and occurs for technical reasons. - Do not store the device for long periods at temperatures below 0^ or above 35^ . This permanently reduces the capacity of the battery.
If the device has been damaged or the battery is defective, send the device to our after-sales service for repair.
Safety instructions for the power supply unit
Check your power supply unit and cable for visible damage before use.
- Do not use any defective parts.
Do not use your power supply unit in wet or humid environments.
Only use the original cable provided with an approved power supply unit.
- Do not make any technical modifications.
For further information and safety instructions, please refer to the QuickGuide provided. This is also available on our website in the download center: www.zeiss.com/hunting/downloads
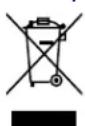
Disposal of batteries

In the European Union, this symbol indicates that the battery used in this product may not be disposed of in domestic waste and must be collected for disposal separately. When returning used batteries, please use a collection system that may exist in your country. The materials and substances in the batteries may have a detrimental impact on health and the environment.
By depositing empty batteries at a recycling facility, you are contributing to the protection, maintenance and improvement of the quality of our
environment.
Please only return discharged batteries.
The battery used does not contain mercury, cadmium or lead in quantities exceeding the limits defined in Directive 2006/66/EG.
User information on the disposal of electrical and electronic devices (private households)

The WEEE symbol on products and/or accompanying documents indicates that used electrical and electronic products must not be mixed with ordinary household waste. For proper treatment, recovery and recycling, take these products to the appropriate collection points where they will be accepted without charge. In some countries, it may also be possible to return these products to your local retailer when you purchase
a corresponding new product. The proper disposal of this product serves to protect the environment and prevents possible harmful effects on human beings and their surroundings, which may arise as a result of incorrect handling of waste.
More detailed information on your nearest collection point is available from your local authority. In accordance with state legislation, penalties may be imposed for the improper disposal of this type of waste.
For business customers within the European Union
Please contact your dealer or supplier regarding the disposal of electrical and electronic devices. He will provide you with further information.
Information on disposal in other countries outside of the European Union
This symbol is only applicable in the European Union. Please contact your local authority or dealer if you wish to dispose of this product and ask for a disposal option.
Intended use
The device is intended for displaying heat signatures during nature observation, remote hunting observations and for civil use. This device is not a toy for children. Use the system only as described in this instruction manual. The manufacturer and the dealer accept no liability for damages which arise due to non-intended or incorrect use.
Function test
Before use, please ensure that your thermal imaging camera has no visible damage. Test to see if the thermal imaging camera displays a clear, undisturbed image.
- Check that the settings for the thermal imaging camera are correct. See the notes in the section Observation mode.
Package check list
| Product | Order no. | Lieferumfang |
| DTI 3/25 52 70 | 11 | Thermal imaging cameraNeoprene strapCarrying case incl. shoulder strapUSB cableOptics cleaning cloth |
| DTI 3/35 52 70 | 10 | Thermal imaging cameraNeoprene strapCarrying case incl. shoulder strapPower supply unit incl. USB cableOptics cleaning cloth |
Installing/removing the battery
The ZEISS thermal imaging camera DTI 3 is equipped with a battery. It cannot be removed.
Observation with and without glasses
Thanks to the flexible eyecup, the thermal imaging camera can be used with or without glasses. It offers a full field of view in both cases.
TECHNICAL DATA 3/25 3/35
| Optics | |||
| Focal length 25 mm/F1.0 35 mm/F1.0 | |||
| Lens type Germanium | |||
| Detection range (object size 1.8 m × 0.6 m; 2 yd × 0.7 yd) | m (yd) 880 (960) 1,235 (1,350) | ||
| Subjective angle of view° | 30 (diagonal) | ||
| Field of view at 100m (at 100 yards) m (ft) 26 (78) 19 (57) | |||
| Field of view | ° horizontal x vertical | 15 x 11 | 11 x 8 |
| Optical magnification | 1.8 | 2.5 | |
| Maximum digital zoom | 4 x | ||
| Zoom increments | in 0.5x increments | 1.0 x - 4.0 x | |
| Sensor | |||
| Sensor resolution | px | 384 x 288 | |
| Sensor pixel pitch | μm | 17 | |
| Frame rate | Hz | 50 | |
| Display | |||
| Display resolution | px | 1,280 x 960 | |
| Display type | LCOS | ||
| Electronics | |||
| Interfaces | USB: charging + data transfer WLAN: data transfer | ||
| Battery | Lithium-ion | ||
| Battery life | up to 10 hrs. | ||
| External power supply | 5V / 2A (USB) | ||
| Internal memory | GB | 15 | |
| Video/image/live-streaming feature | ✓ | ✓ | |
| WLAN frequency | GHz | 2.4 | |
| WLAN standard | IEEE 802.11a/b/g/n | ||
| Connection with other devices | ZEISS Hunting app, USB | ||
| General | |||
| Ingress protection rating | IP66 (protected from heavy rain) | ||
| Operating temperature range | °C (°F) | -10 / +40 (+14 / +104) | |
| Length x width x height mm (inch) | 187 x 60 x 65 | 193 x 60 x 65 | |
| (7.4 x 2.4 x 2.5) | (7.6 x 2.4 x 2.5) | ||
| Weight | g (oz) | 410 (14.5) | 420 (14.8) |
Subject to changes in design and scope of supply due to technical improvements.
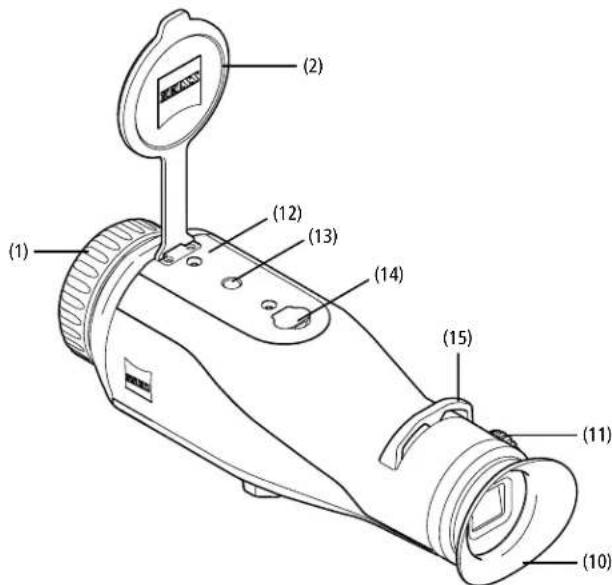
Attaching the carrying strap

Power on/off
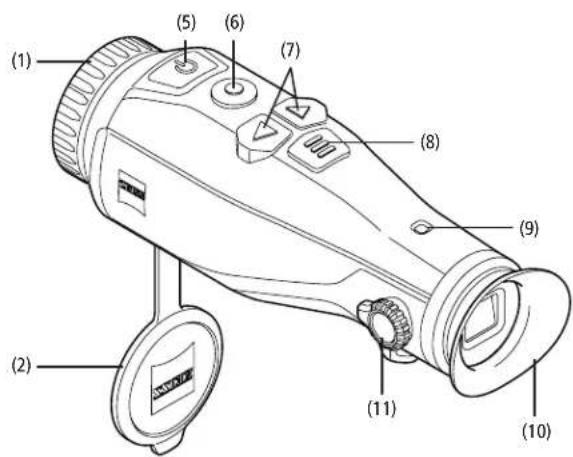
Press the on/off button (5) for a longer time to switch on the device. The LED (9) is green. The LED (9) lights up red when the charge level is low.
Press the on/off button (5) for a longer time to switch off the device again. The LED is off. When switched on, the LED (9) lights up red when the charge level is low.
Note: The on/off button (5) must be pressed until the OFF symbol appears on the display. Only then can the on/off button (5) be released and the device switches off. If the on/off button (5) is released before the OFF symbol is displayed, the device does not switch off but switches to standby mode.

Standby mode
Briefly press the on/off button (5) to switch the device to standby mode. The LED (9) blinks
green. Briefly press the on/off button (5) again to switch the device back to observation mode. The LED (9) is permanently green.
In standby mode, the LED (9) flashes red when the charge level is low.
Calibration
The device enables you to perform automatic (Auto Calibration = On) or manual calibrations (Auto Calibration = Off).
In automatic mode, the device automatically performs a calibration by closing and opening an internal shutter when necessary. A gentle click should be heard. In this mode, you also have the option of performing the calibration manually by pressing the Shutter button (6) and the Menu button (8) simultaneously.
There is a further option for performing a manual, silent calibration. Go to the device menu and set the "Auto Calibration" option to "Off". Then return to the observation mode. Close the lens cap manually. Now press the Shutter button (6) and the Menu button (8) simultaneously. The device is now calibrated again.
Note: Always cover the lens when performing a manual calibration. Otherwise the sensor cannot calibrate correctly and the image will deteriorate, e.g. ghost images. If you forget to cover the lens during a manual calibration, repeat the calibration procedure with the lens covered.
Observation mode
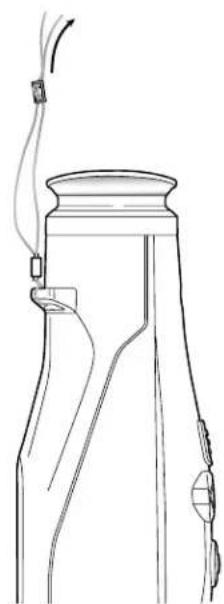
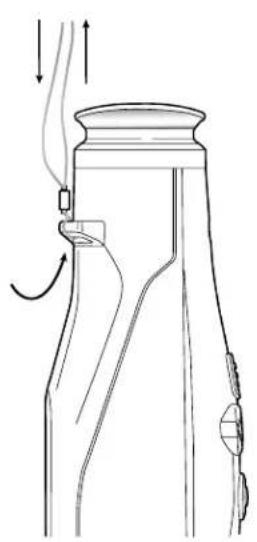
Look through the viewfinder (10) to observe the scene. Turn the diopter adjustment (11) on the side to focus the screen.
Turn the focus ring (1) on the lens to focus on the scene.
Zoom
In observation mode, the arrow keys (7) can be used to zoom in (right arrow key) and zoom out (left arrow key) the scene. Zoom in increments of 0.5 between 1.0x and 4.0x .
The zoom function is circular, i.e. if you press the right arrow key (7) again after a 4.0x zoom, you will return to 1.0x.
The currently set digital magnification is shown on the display.

Color modes
The scene can be displayed in four different color modes. Briefly press the menu button (8) to change the observation mode.
When changed, the selected mode is shown on the display as text for about 2 seconds. The following color modes can be selected:
White Hot: Cold areas are displayed here in black and warm areas in white.
Black Hot: Cold areas are displayed here in white and warm areas in black
- Red Hot: Cold areas are displayed here in black and warm areas in white. In addition, the warmest areas are shown in yellow to red.
Rainbow: a varied color palette displays cold areas in black to blue and warm areas in yellow to white.
LED-Off
To switch off the LED on your ZEISS DTI 3, press the right arrow button (7) for 5 seconds. The LED then switches off. Repeat this procedure to switch on the LED again.
Auto-Off
The ZEISS DTI 3 switches off automatically after 60 minutes of inactivity in order to save battery power.
Shooting mode
You have the possibility to take photos and videos. Press and hold the Shutter button (6) to switch between the two shooting modes. The symbol at the top left of the display changes to indicate the selected mode.
Briefly press the Shutter button (6) once to capture a photo or record a video. Briefly press the Shutter button (6) again to stop a video recording in progress.
Note: Longer video recordings are automatically split into several smaller files of 10 minutes each when saved.
Photo mode Video mode


Menu
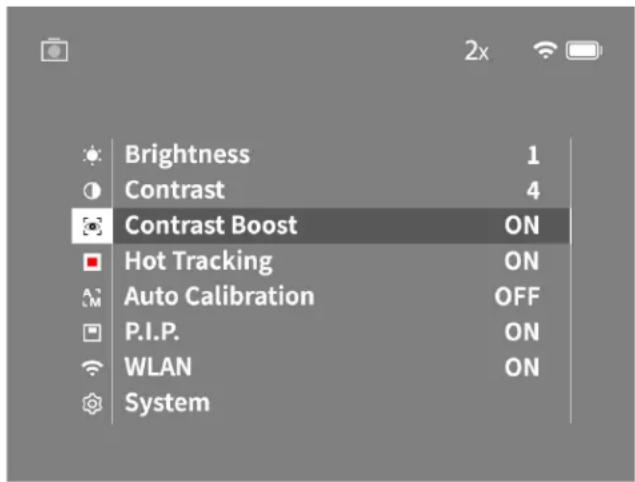
Press and hold the menu button (8) to show the main menu on the display. Look through the viewfinder (10). The main menu offers the following options:
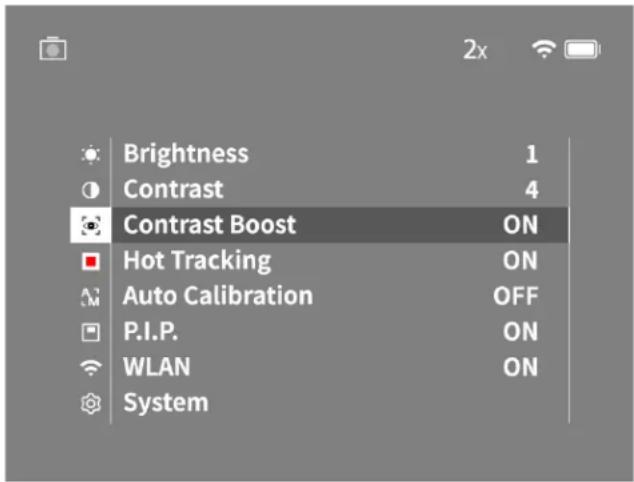
- Brightness: Set the brightness of the display here. There are four brightness levels to choose from. The brightness is lowest at level 1. The brightness is highest at level 4.
Contrast: Adjust the contrast of the scene here. There are four contrast levels to choose from. The contrast is lowest at level 1. The contrast is highest at level 4.
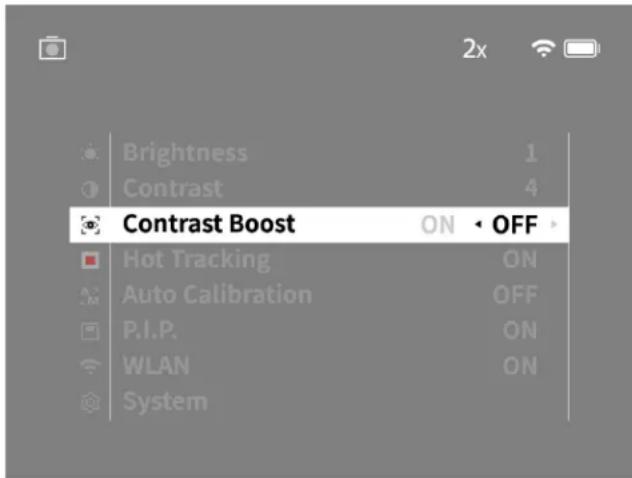
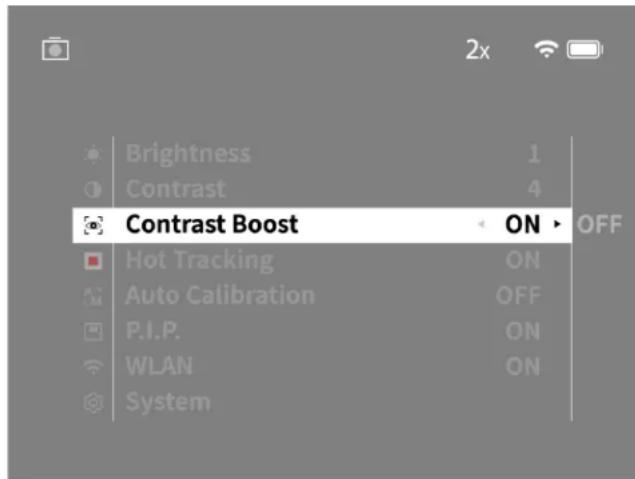
Contrast Boost: Activate this mode for better visibility in high humidity or fog.
Hot Tracking: In observation mode, select "Hot Tracking" to highlight the warmest point in the scene with a small red square. - Auto Calibration: Set manual (Auto Calibration = Off) or automatic calibration (Auto Calibration = On) here.
P.I.P. (Picture in Picture): a central section of the image is enlarged by a factor of 2 and shown in a small magnification window on the display. - WLAN: Switch WLAN on/off. When WLAN is switched on, the device creates a hotspot that allows another device (e.g., smartphone) to make a connection.
System: Make all system-relevant settings here, including language, time and factory settings.
The arrow buttons (7) and the menu button (8) are used to navigate in the main menu. Press the right arrow button (7) to scroll down. Press the left arrow button (7) to scroll up.
Briefly press the menu button (8) to select a menu item. This opens the submenu. Make your settings using the arrow buttons (7).
Briefly press the menu button (8) to confirm your selection and return to the main menu. Press the menu button (8) for a longer time to exit the main menu and return to observation mode.
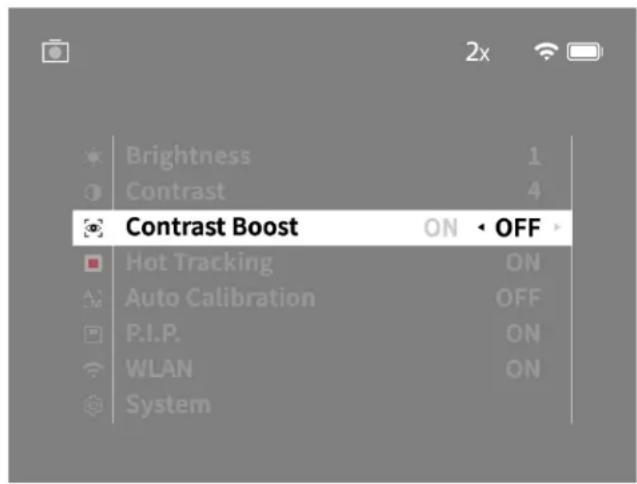
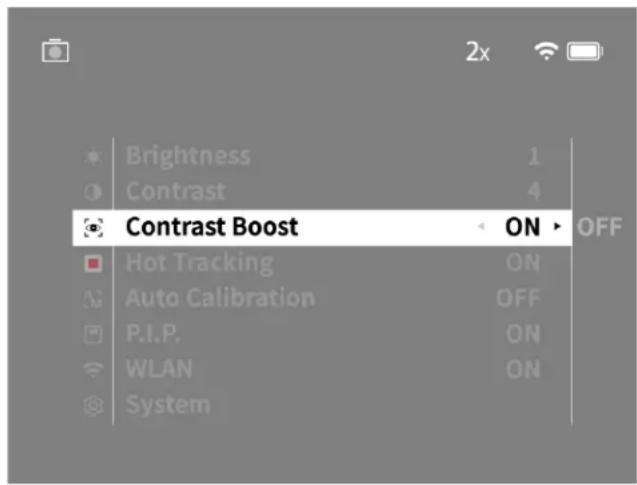
Contrast Boost
The contrast boost makes it possible for you to display the image in an improved way in high humidity or fog. This highlights edges so that structures can be recognized better.
To activate the contrast boost on your device, select "Contrast Boost" in the main menu. Then select "On" or "Off". Briefly press the menu button (8) to confirm the selection.
Note: It is recommended to use this mode only in the above-mentioned conditions and to disable this mode in normal conditions.
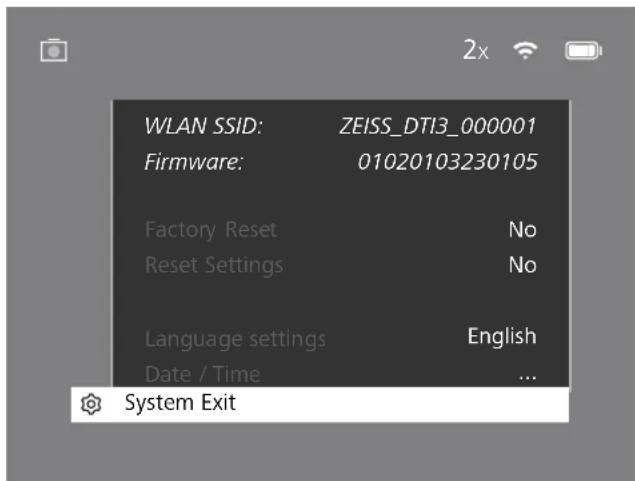
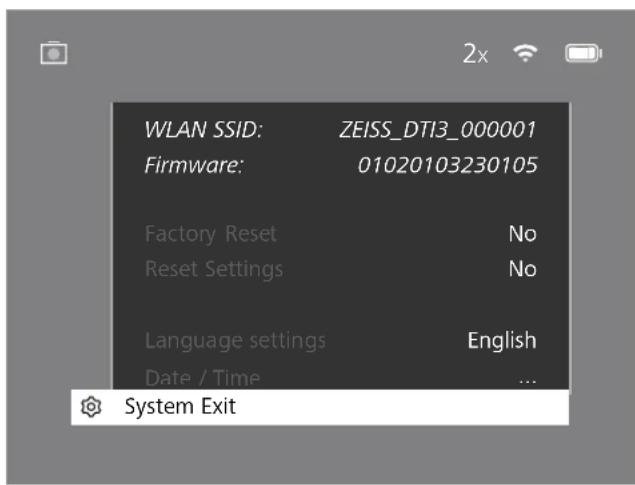
System
The "System" submenu has the following options:
Factory Reset: Select "Factory Reset" to reset the device to the factory settings. This also deletes all data saved on the device, including images and videos.
- Reset Settings: Select "Reset Settings" to reset all settings to the default values for the device.
Language settings: Select a menu language here.
Date / Time: Set the date and time of the device here.
You can also view the following information:
WLAN SSID: The name of the WLAN hotspot is displayed here.
Firmware Version: The current firmware version is displayed here.
Factory reset
To perform a factory reset, select "System" in the main menu. Then navigate to "Factory Reset". Select "Yes" and confirm your selection. A second security prompt follows, which must also be confirmed with "Yes".
Reset settings
To reset the settings, select "System" in the main menu. Then navigate to "Reset Settings". Select "Yes" and confirm your selection.
Note: The device must be restarted for the reset of the settings to be completed successfully.
Personal data when you dispose of or pass on your ZEISS device
Remember that there may be personal photos and videos on the internal device memory. Before passing on the device to a third party, please perform the factory reset to delete this data and verify it has been deleted. By doing so, you help maintain your privacy and data security.
Cooperation on device safety
Please take an active role in protecting the IT security of your device by using the ZEISS Hunting App and installing new firmware updates as soon as they become available.
Date and time
Select "System" in the main menu to set the date and time. Then navigate to "Date / Time". You can now set the year, month, day, hour and minute individually. The "Time Format" setting allows you to choose between 24-hour and 12-hour display. Be sure to set the current date and time, as your photos and videos will be time stamped.

Note: If the battery is completely discharged, the device loses the set date and time. Reset the date and time so that your images and videos get a correct timestamp.
Firmware update
A firmware update can be carried out using the ZEISS Hunting App. Follow the instructions for this in the ZEISS Hunting App.
Note: Make sure that the device is fully charged before updating the firmware. Do not switch off the device during the update, otherwise it may be damaged.
Note: If you initiate an update via the ZEISS Hunting App, you must confirm this again on the device for security reasons.
LED status
Operating status Charge state LED color LED status
| Power-up -- | |||
| Normal operating condition | Does not charge Green Constant | ||
| Does not charge (low charge level) | Red Flashing | ||
| Charging Red Constant | |||
| Charging (fully charged) | Green | Constant | |
| Standby | Does not charge | Green | Flashing |
| Does not charge (low charge level) | Red Flashing | ||
| Charging Red Constant | |||
| Charging (fully charged) | Green | Constant | |
| Off | Does not charge -- | ||
| Charging Red Constant | |||
| Charging (fully charged) | Green | Constant | |
Note: To avoid fading in the dark, the brightness of the LED is kept low. The LED may therefore sometimes be only barely visible in daylight.
Troubleshooting
Fault Possible reasons Solution
| Will not bool. Battery is empty. Charge the device. | ||
| The device is not charging. | The USB cable is defective. Replace the USB cable. | |
| External power supply is not sufficient. Check if the external power supply is fine. | ||
| The USB cable is not properly connected to the device. | Unplug the USB cable and check that the connector and port are undamaged and free from dirt. | |
| The image is unclear.The image has streaks.The background is not uniform. | The device must be recalibrated. | Follow the instructions when performing the calibration procedure. |
| The image is too dark. The screen brightness is set too low. Adjust the screen brightness. | ||
| The image on the display is flat. The contrast is set too low. Adjust the contrast. | ||
| The computer does not recognize the device (internal memory). | The device is not switched on.The USB cable is not connected properly.The required software has not been installed. Please read the notes in the section "USB interface". | |
| The time information on the images is incorrect. | The time information (time/date) in the device is not yet set. Poor weather conditions may have adverse effects (e.g. heavy snowfall, rain, fog, etc.) | |
| Image quality is poor.The detection range is too short. | ||
| The image is blurred. | The contrast boost is activated despite normal conditions. | Deactivate the contrast boost. |
| The smartphone does not connect to my DTI 3. | The WLAN password is incorrect.There are too many WLAN networks in the immediate vicinity of the device. There may be adverse effects. | Enter the correct password. Move the device to a location with few or no direct WLAN networks. |
| The WLAN signal is repeatedly lost or interrupted. | The ZEISS DTI 3 is too far away or there are too many other WLAN networks nearby.There is an obstruction between the device and the receiver. | Change the location of the device so that a WLAN signal is detected directly. |
WLAN
This device is equipped with a WLAN function. Go to the menu and switch on the WLAN function. When activated, WLAN is indicated by a WLAN symbol in the upper right corner of the display. You can now connect your smartphone to the device via WLAN.
Note: When first used, the preset password for the WLAN connection to the device needs to be changed to prevent unauthorized access by third parties.
The ZEISS Hunting App is required to change the password.
Default password: 12345678
To increase user comfort, the ZEISS Hunting App synchronizes your password on all logged-in devices.
To increase the security of the connection, we recommend that you change your password.
To extend battery life, we recommend that you only switch on the WLAN function in the device when the device needs to establish a data connection to the ZEISS Hunting App.
ZEISS Hunting App
Install the ZEISS Hunting App on your smartphone and open the app. Follow the steps shown there to connect to the ZEISS DTI 3.
The ZEISS Hunting App allows you to transfer images and videos to your smartphone, view the live image, make settings and use other functions. A more detailed description can be found in the help function of the app.
Note: To use the ZEISS Hunting App and its functions, ensure that your smartphone is connected to the ZEISS DTI 3 WLAN network.
Note: Every time you connect to the ZEISS Hunting App, the current date and time are automatically transferred from your smartphone to the device.
Note: Please note that you are not connected via the normal WLAN if you have established a WLAN connection to your ZEISS DTI 3. To return to the normal WLAN, disconnect your ZEISS DTI 3 from your smartphone.
USB port
Use the USB interface (14) on the bottom to charge your device or to transfer data (photos and videos) to your PC.
The ZEISS DTIB connects as an MTP device using the USB interface. The device is automatically recognized and can be used immediately on computers with Microsoft Windows 10 operating system software. For computers with Apple Mac OS operating system software, you need to install additional third-party software to access the data stored on the device, such as "Android™ File Transfer". ZEISS assumes no responsibility or guarantee for third-party software.
Microsoft and Windows are either registered trademarks or trademarks of Microsoft Corp. in the United States and/or other countries.
Apple and Mac OS are registered trademarks of Apple Inc. in the USA and other countries.
Android is a trademark of Google LLC.
Tripod thread
A 1/4-inch standard thread (13) for standard tripods is located on the bottom of the device. Screw the device onto a tripod for more steady shooting.
Charging the device
Charge the device via the USB port (14) when the battery is empty
The battery charge level of the device is shown in the upper right corner of the display.
When the charge level is low, the display changes to red. When the device is being charged, the LED (9) lights up red when the device is switched on and off. When
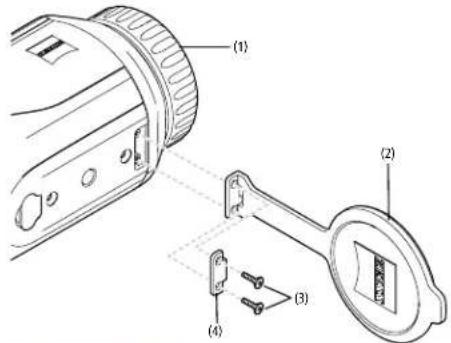
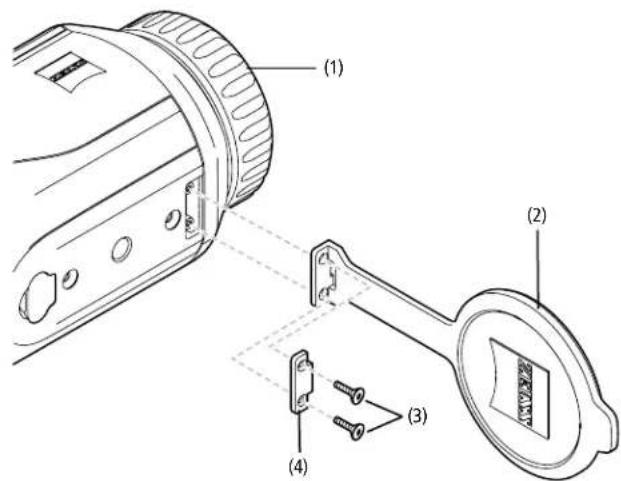
Replacing the lens cap
To replace the lens cap (2), unscrew the screws (3) using a screwdriver. Remove the retaining plate (4) and the defective lens cap (2). Fit the new lens cap (2) and retaining plate (4). Tighten the screws (3) using a screwdriver.
Care and maintenance of the device
Do not rub coarse particles (e.g. sand) from the lenses. Blow them off, or use a soft brush! Over time, fingerprints can corrode the lens surface. Breathing on the lens and polishing it with a clean optical cleansing cloth is the easiest method of cleaning the lens surface.
Dry storage and keeping the outer lens surfaces well ventilated, especially in the tropics, helps to prevent a possible mold film forming on the optics. Your ZEISS DTI 3 requires no further special care.
Care and maintenance of the battery
Follow these steps to extend the battery life:
Avoid storing the device at high temperatures.
Avoid storing the device with a fully charged battery.
Avoid complete discharging of the device.
Software updates
Within the scope of the statutory warranty (2 years from the transfer of risk of the goods - according to German law), we will provide appropriate updates to remedy defects. Generally, updates are used for security-related aspects or to eliminate functional impairments and do not include new functions of the software. Insofar as the provision of new functions is necessary to remedy security aspects, this shall not in principle constitute a claim to new functions as such.
After the legal warranty period has expired, we will of course endeavor to provide you with appropriate further updates. However, there is no entitlement to this.
Spare parts
Should you require spare parts for your device, e.g. the lens cap, please contact your specialist retailer, your local distributor or our after-sales service.
For Customer Service inquiries we are happy to take your calls from Monday to Friday from 8:00 a.m. to 4:30 p.m. (CET).
Tel.: +49 (0) 800 934 77 33
Fax. +49 (0) 64 41-4 83 69
service.sportsoptics@zeiss.com
ZEISS is a byword for reliability and a high level of quality. Therefore, quite independently of the seller's warranty obligations to the customer, we the manufacturer offer a two year warranty on this ZEISS product, which can be extended for a further year upon registration of the product if registration is made within four weeks of purchase.
The scope of the warranty can be seen by accessing the following link: www.zeiss.com/cop/warranty
Register your product at: www.zeiss.com/cop/register
Manufacturer's address
Carl Zeiss AG
Carl-Zeiss-Strasse 22
D-73447 Oberkochen
www.zeiss.com/nature and www.zeiss.com/hunting
Subject to changes in design and scope of supply due to technical improvements. No liability for mistakes and printing errors.
Data protection notice
Personal data is processed when using the DTI 3.
Our information on data protection and the processing of personal data can be found in our download center: www. zeiss.com/hunting/manuals
Legal and regulatory information
Wireless transmitter module frequency range: WLAN: 2,412-2,462 MHz
Wireless transmitter module power: 100 mW

Carl Zeiss AG thus declares that the thermal imaging camera DTI 3 complies with the directives 2014/53/EU and 2011/65/EU. The full text of the EU declaration of conformity as well as additional information are available at: www.zeiss.com/dti-335/conformity.
Some certification marks for standards supported by the ZEISS DTI 3 can be displayed on the screen of the ZEISS DTI 3. Select "System" in the main menu. Then navigate to "Regulatory Information".
Regulatory Information USA and Canada
USA:
FCC-ID:2AMSPDT1335
Kanada:
IC-1D:22938-DTI335
CANICES-3(B)/NMB-3(B)
- This device complies with Part 15 of the FCC Rules. Operation is subject to the following two conditions: (1) This device may not cause harmful interference, and (2) this device must accept any interference received, including interference that may cause undesired operation.
- Changes or modifications not expressly approved by the party responsible for compliance could void the user's authority to operate the equipment.
NOTE: The manufacturer is not responsible for any radio or TV interference caused by unauthorized modifications to this equipment. Such modifications could void the user's authority to operate the equipment.
NOTE: This equipment has been tested and found to comply with the limits for a Class B digital device, pursuant to part 15 of the FCC Rules. These limits are designed to provide reasonable protection against harmful interference in a residential installation. This equipment generates uses and can radiate radio frequency energy and, if not installed and used in accordance with the instructions, may cause harmful interference to radio communications. However, there is no guarantee that interference will not occur in a particular installation. If this equipment does cause harmful interference to radio or television reception, which can be determined by turning the equipment off and on, the use is encouraged to try to correct the interference by one or more of the following measures:
Reorient or relocate the receiving antenna.
Increase the separation between the equipment and receiver.
- Connect the equipment into an outlet on a circuit different from that to which the receiver is connected.
Consult the dealer or an experienced radio/TV technician for help.
This equipment complies with FCC RF radiation exposure limits set forth for an uncontrolled environment.
Name of Responsible Party
Carl Zeiss SBE, LLC / Consumer Products CO., INC.
ZEISS Group
One North Broadway, Suite 1501
White Plains, NY, 10601, USA
Phone+18008586745
We, Carl Zeiss Inc. hereby declare that this product was tested conforming to the applicable FCC rules under the most accurate measurement standards possible, and that all the necessary steps have been taken and are in force to assure that production units of the same equipment will continue to comply with the Commissions requirements.

Regulatory Information California
The BC mark indicates that this product is in compliance with the California Energy Commissions regulations on battery chargers.
This product is licensed under the AVC Patent Portfolio License for personal and non-commercial use by a consumer to (i) encode video in compliance with the AVC standard ("AVCVIDEO") and/or (ii) decode AVC video encoded by a consumer for personal purposes and/or video provided by a licensed video distributor. No license, implied or otherwise, is granted for any other use. Further information is available from MPEG LA, L.L.C., see http://www.MPEGLA.com.
Power supply unit manufacturer
Shenzhen Simsukian Electronic Technology Co., Ltd.
Building 1, the 5th plant, Jiayi Industrial Park
Daping Community, Guilan Street Longhua District
Shenzhen P.R. China
Model identifier: SK22G-0500200Z
TECHNICAL DATA ON POWER SUPPLY UNIT
Electronics
| Input voltage VAC 100 - 240 | ||
| Input frequency Hz 50 / 60 | ||
| Output voltage VDC 5 | ||
| Output current A 2 | ||
| Power output W | 10 | |
| Average operating efficiency | % | 82.98 |
| Power consumption at zero load | W 0.068 | |
Ambient conditions
| Operating temperature | °C (°F) | -0/+40 (-32/+104) |
| Relative humidity | RH | 25% - 90% |
| Storage temperatures | °C (°F) | -30/+60 (-22/+140) |
| Protection type | IP 20 |
Carl Zeiss AG
www.zeiss.com/nature
www.zeiss.com/hunting
ZEISS DTI
3/25 | 3/35
Mode d'emploi
For United States patents which may cover this product see our website.
Patents: www.zeiss.com/cop/patents
DE EN FR ES IT NL CZ DK EE FI HR HU
LT LV PL PT RO SE SK SL BG GR RU JP CN 09.2021

MODE D'EMPLOI
Mode photo Mode video


Menu
Amplification contrast
www.zeiss.com/hunting
www.zeiss.com/nature et www.zeiss.com/hunting
Building 1, the 5th plant, Jiayi Industrial Park
Daping Community, Guilan Street Longhua District
Shenzhen P.R. China
Code du modele:SK22G-0500200Z
CARACTERISTIQUES TECHNIQUES DU BLOC D'ALIMENTATION
www.zeiss.com/nature
www.zeiss.com/hunting
ZEISS DTI
3/25 | 3/35
For United States patents which may cover this product see our website.
Patents: www.zeiss.com/cop/patents
DE EN FR ES IT NL CZ DK EE FI HR HU
LT LV PL PT RO SE SK SL BG GR RU JP CN 09.2021

INSTRUCCIONES DE USO
www.zeiss.com/nature y www.zeiss.com/hunting
de Internet: www.zeiss.com/dti-335/conformity.
Building 1, the 5th plant, Jiayi Industrial Park
Daping Community, Guanlan Street Longhua District
Shenzhen P.R. China
Referencia de modelo: SK22G-0500200Z
www.zeiss.com/nature
www.zeiss.com/hunting
ZEISS DTI
3/25 | 3/35
For United States patents which may cover this product see our website.
Patents: www.zeiss.com/cop/patents
DE EN FR ES IT NL CZ DK EE FI HR HU
LT LV PL PT RO SE SK SL BG GR RU JP CN 09.2021

ISTRUZIONI PER L'USO
Building 1, the 5th plant, Jiayi Industrial Park
Daping Community, Guanlan Street Longhua District
Shenzhen P.R. China
Identificativo del modello: SK22G-05002007
DATI TECHNICI ALIMENTATORE
Parte elettronica
www.zeiss.com/nature
www.zeiss.com/hunting
ZEISS DTI
3/25 | 3/35
Gebruiksaanwijzing
For United States patents which may cover this product see our website.
Patents: www.zeiss.com/cop/patents
DE EN FR ES IT NL CZ DK EE FI HR HU
LT LV PL PT RO SE SK SL BG GR RU JP CN 09.2021

Gebruiksaanwijzig
www.zeiss.com/hunting/manuals
Building 1, the 5th plant, Jiayi Industrial Park
Daping Community, Guilan Street Longhua District
Shenzhen P.R. China
Modelidentification:SK22G-05002002
www.zeiss.com/nature
www.zeiss.com/hunting
ZEISS DTI
3/25 | 3/35
Návod k použití
For United States patents which may cover this product see our website.
Patents: www.zeiss.com/cop/patents
DE EN FR ES IT NL CZ DK EE FI HR HU
LT LV PL PT RO SE SK SL BG GR RU JP CN 09.2021

NÁVOD K POUZITI
S pfistrojem mate moznost provadet automaticke (Auto Calibration = On) nebo ručni kalibrace (Auto Calibration = Off).
V automatickem rezimu proveede pristroj zavfenim a otevrenim vinitmi uzawerky samocinne kalibraci, pckud je potfebnia. Pitom se oze tich klinuti. V toto rezimu mate navic moznost provest kalibraci rucne tak, ze soucasne stisknete tlaikiko nahravani (6) a tlaikico menu (8).
www.zeiss.com/nature a www.zeiss.com/hunting
Zmemy v provedeni a roszahu dodavky v dusledku technickho vyvoje vhyrazeny. Nerucime za omly, ani za tiskovc chby.
Building 1, the 5th plant, Jiayi Industrial Park
Daping Community, Guilan Street Longhua District
Shenzhen P.R. China
Označeni modelu: SK22G-05002002
TECHNICKÉ UDAJE SITOVEHO ZDROJE
www.zeiss.com/nature
www.zeiss.com/hunting
ZEISS DTI
3/25 | 3/35
Brugsanvisning
For United States patents which may cover this product see our website.
Patents: www.zeiss.com/cop/patents
DE EN FR ES IT NL CZ DK EE FI HR HU
LT LV PL PT RO SE SK SL BG GR RU JP CN 09.2021

BRUGSANVISNING
Shenzhen Simsukian Electronic Technology Co., Ltd. Building 1, the 5th plant, Jiayi Industrial Park Daping Community, Guanlan Street Longhua District
Shenzhen P.R. China
Modelka: SK22G-050200Z
TEKNISKE DATA STRÖMFORSYNING
www.zeiss.com/nature www.zeiss.com/hunting
ZEISS DTI
3/25 | 3/35
Kasutusjuhend
For United States patents which may cover this product see our website.
Patents: www.zeiss.com/cop/patents
DE EN FR ES IT NL CZ DK EE FI HR HU
LT LV PL PT RO SE SK SL BG GR RU JP CN 09.2021

KASUTUSJUHEND
Shenzhen Simsukian Electronic Technology Co., Ltd. Building 1, the 5th plant, Jiayi Industrial Park Daping Community, Guilan Street Longhua District Shenzhen P.R. China (Hina Rehvacabariq)
Mudeli tāhis: SK22G-05002007
TOITEPLOKI TEHNILISED ANDMED
www.zeiss.com/nature
www.zeiss.com/hunting
ZEISS DTI
3/25 | 3/35
Käyttoohje
For United States patents which may cover this product see our website.
Patents: www.zeiss.com/cop/patents
DE EN FR ES IT NL CZ DK EE FI HR HU
LT LV PL PT RO SE SK SL BG GR RU JP CN 09.2021

KAYTTOOHJE
TEKNISET TIEDOT 3/25 3/35
Building 1, the 5th plant, Jiayi Industrial Park
Daping Community, Guilan Street Longhua District
Shenzhen P.R. China
Mallitunniste: SK22G-05002002
VERKKOLAITTEEN TEKNISET TIEDOT
www.zeiss.com/nature
www.zeiss.com/hunting
ZEISS DTI
3/25 | 3/35
Upute za uporabu
For United States patents which may cover this product see our website.
Patents: www.zeiss.com/cop/patents
DE EN FR ES IT NL CZ DK EE FI HR HU
LT LV PL PT RO SE SK SL BG GR RU JP CN 09.2021

UPUTE ZA UPORABU
www.zeiss.com/nature i www.zeiss.com/hunting
Shenzhen Simsukian Electronic Technology Co., Ltd. Building 1, the 5th plant, Jiayi Industrial Park Daping Community, Guanlan Street Longhua District Shenzhen NR Kina
Oznaka modela: SK22G-05002002
TEHNICKI PODACIMREZNOG DIJELA
| Elektronika | ||
| Ulazni napon VAC 100 - 240 | ||
| Ulazna frekvencjna Hz 50 / 60 | ||
| Izlazni napon VDC 5 | ||
| Izlazna struja A 2 | ||
| Izlazna snaga W 10 | ||
| Prosjecna učinkovitost u radu | % | 82,98 |
| Potrošnja struje bez opterećenja | W | 0,068 |
| Okolni uvjeti | ||
| Radna temperatura | °C (°F) | -0/+40 (-32/+104) |
| Relativna vlažnost zraka | rH | 25 % - 90 % |
| Temperatura skladistjenja | °C (°F) | -30/+60 (-22/+140) |
| Vrsta zašite | IP 20 | |
Carl Zeiss AG
Carl-Zeiss-Strasse 22
73447 Oberkochen
Njemačka
www.zeiss.com/nature
www.zeiss.com/hunting
ZEISS DTI
3/25 | 3/35
Használati utasítás
For United States patents which may cover this product see our website.
Patents: www.zeiss.com/cop/patents
DE EN FR ES IT NL CZ DK EE FI HR HU
LT LV PL PT RO SE SK SL BG GR RU JP CN 09.2021

HASZNÁLATI UTASITÁS
Shenzhen Simsukian Electronic Technology Co., Ltd. Building 1, the 5th plant, Jiayi Industrial Park Daping Community, Guilan Street Longhua District Shenzhen, Kinai Nepkoztarsasag
Modellazonosito:SK22G-0500200Z
www.zeiss.com/nature
www.zeiss.com/hunting
ZEISS DTI
3/25 | 3/35
Naudiojimo instrukcija
For United States patents which may cover this product see our website.
Patents: www.zeiss.com/cop/patents
DE EN FR ES IT NL CZ DK EE FI HR HU
LT LV PL PT RO SE SK SL BG GR RU JP CN 09.2021

NAUDIOJIMO INSTRUKCIJA
"ZEISS Hunting" programme
www.zeiss.com/nature ir www.zeiss.com/hunting
Building 1, the 5th plant, Jiayi Industrial Park
Dapingo savivald., Guanlan gatte, Longhua rajonas
Shenzhen, Kinjios Liaudies Respublika
Modelio zymuo:SK22G-05002002
MAITINIMO SALTINIO TECHNINIAL DUOMENYS
| Elektronika | ||
| Ivado jtampa VAC 100 - 240 | ||
| Iejimo dažnis Hz 50 / 60 | ||
| Isvado lampa VDC 5 | ||
| Ijéjimo srove A 2 | ||
| Isvado gallia W 10 | ||
| Vidutinis darbinis efektyvumas % 82,98 | ||
| Imamoji gallia be apkrovos | W | 0,068 |
| Aplinkos salygos | ||
| Darbiné temperatura | °C (°F) | -0/+40 (-32/+104) |
| Santykine oro dregme | rH | 25% - 90% |
| Laikymo (sandéliavimo) temperatura | °C (°F) | -30/+60 (-22/+140) |
| Apsaugos tipas | IP 20 | |
"Carl Zeiss AG"
Carl-Zeiss-Strasse 22
73447 Oberkochen
Vokietija
www.zeiss.com/nature
www.zeiss.com/med
ZEISS DTI
3/25 | 3/35
Lietošanas instrukcija
For United States patents which may cover this product see our website.
Patents: www.zeiss.com/cop/patents
DE EN FR ES IT NL CZ DK EE FI HR HU
LT LV PL PT RO SE SK SL BG GR RU JP CN 09.2021

Lietosanas instrukcija
ZEISS zimola izstradajumi garanté izcilu optsko sniegumu, precizu apstradi un igu kalpoşanas laiku.
Lai varetu optimali izmantot termoattelveidosanas kameru un ta uzticami darbotos daudzus gadus, ludzam ieverot turpmak smegtos lietoanas noradijumus.
INFORMACIJA JUSUDROSIBAI
Vides ietekme
- Noradijums: nekad nevresiet ierics objektiv tiesi uz intensva slituma avotu, piemeram, saul vi lazera iekartam. Objektiv un okukars var izraisit azdegsanos Idzigi ka paleilinarmais stikis un pnilba sobajobi erices eksejas dasj.
levibai: nepieskarieties metaira virsmai (dzesans rezgis) pec saules iespiedesanas vai akstuma.
leveribai: aizsardzibas kase IP66 tiek nodrosinata tikai tad, kad visi gumijas parsegumi ir ciési azverti.
www.zeiss.com/nature un www.zeiss.com/hunting
Paturetas tiesibas veikt izmainas modeli un piegades komplektija atbilosto technologiskajai attistubai. Neuzemamies atbilidibu par nepareizibam un drukas kjdam.
Building 1, the 5th plant, Jiayi Industrial Park
Daping Community, Guilan Street Longhua District
Shenzhen P.R. China
Modela markejums:SK22G-0500200Z
BAROŠANAS BLOKA TEHNISKIE DATI
| Elektronika | ||
| Iejas spiregums VAC 100 - 240 | ||
| Iejas frekvence Hz 50 / 60 | ||
| Iejas spiregums VDC 5 | ||
| Iejas străva A 2 | ||
| Iejas energia W 10 | ||
| Videjá elektríteå daribías laikā % 82,98 | ||
| Energijas paterínès bez slodzes | W | 0,068 |
| Vides apstaklj | ||
| Darba temperatura | °C (°F) -0/+40 (-32/+104) | |
| Relativíais gaisa mitrums | rH | 25% - 90% |
| Glabǎsanas temperatura | °C (°F) | -30/+60 (-22/+140) |
| Aizardzības klase | IP 20 | |
Carl Zeiss AG
Carl-Zeiss-Strasse 22
73447 Oberkochen
Vacija
www.zeiss.com/nature
www.zeiss.com/hunting
ZEISS DTI
3/25 | 3/35
Instrukcja obslugi
For United States patents which may cover this product see our website.
Patents: www.zeiss.com/cop/patents
DE EN FR ES IT NL CZ DK EE FI HR HU
LT LV PL PT RO SE SK SL BG GR RU JP CN 09.2021

INSTRUKCJA OBSLUGI
Building 1, the 5th plant, Jiayi Industrial Park
Daping Community, Guanlan Street Longhua District
Shenzhen, Chiny
www.zeiss.com/nature
www.zeiss.com/hunting
ZEISS DTI
3/25 | 3/35
For United States patents which may cover this product see our website.
Patents: www.zeiss.com/cop/patents
DE EN FR ES IT NL CZ DK EE FI HR HU
LT LV PL PT RO SE SK SL BG GR RU JP CN 09.2021

INSTRUÇÉS DE UTILIZAZão
A camaré permite realizar calibrações automatías (Auto Calibration = On) oumanuals (Auto Calibration = Off).
AENA OMOO OMOO OMOO OMOO OMOO OMOO OMOO OMOO OMOO OMOO OMOO OMOO OMOO OMOO OMOO OMOO OMOO OMOO OMOO OMOO OMOO OMOO OMOO OMOO OMOO OMOO OMOO OMOO OMOO OMOO OMOO OMOO OMOO OMOO
www.zeiss.com/nature e www.zeiss.com/hunting
Building 1, the 5th plant, Jiayi Industrial Park
Daping Community, Guanlan Street Longhua District Shenzhen R.P.China
www.zeiss.com/nature
www.zeiss.com/hunting
ZEISS DTI
3/25 | 3/35
Manual de utilizes
For United States patents which may cover this product see our website.
Patents: www.zeiss.com/cop/patents
DE EN FR ES IT NL CZ DK EE FI HR HU
LT LV PL PT RO SE SK SL BG GR RU JP CN 09.2021

MANUAL DE UTILIZARE
Produsele marsi ZEISS sunt caracterizate de performante optice exceptionale, de o realizare precizà si o durà mare de viata.
INFORMATII PENTRU SIGURANTA DVS.
Building 1, the 5th plant, Jiayi Industrial Park
Daping Community, Guilan Street Longhua District Shenzhen P.R. China
Cod model: SK22G-0500200Z
DATE TEHNICE BLOC DE ALIMENTARE
| Sistem electronic | ||
| Tensiune de intrare V c.a. 100 - 240 | ||
| Frecventa de intrare Hz 50 / 60 | ||
| Tensiune de ieire V c.c. 5 | ||
| Current de ieire A 2 | ||
| Performanta de ieire W 10 | ||
| Randamente mediu in modul activ % 82,98 | ||
| Puterea consumatà fãrà sarcina | W | 0,068 |
| Condiţii de mediu | ||
| Temperatura de fonctionare | °C (°F) | -0/+40 (-32/+104) |
| Umiditatea relativă a aerului | rH | 25% - 90% |
| Temperatura de depositare | °C (°F) | -30/+60 (-22/+140) |
| Gradul de protectie | IP 20 | |
Carl Zeiss AG
Carl-Zeiss-Strasse 22
73447 Oberkochen
Germany
www.zeiss.com/nature
www.zeiss.com/hunting
ZEISS DTI
3/25 | 3/35
Bruksanvisning
For United States patents which may cover this product see our website.
Patents: www.zeiss.com/cop/patents
DE EN FR ES IT NL CZ DK EE FI HR HU
LT LV PL PT RO SE SK SL BG GR RU JP CN 09.2021

BRUKSANVISNING
Firmware-upppatering
www.zeiss.com/dti-335/conformity
Building 1, the 5th plant, Jiayi Industrial Park
Daping Community, Guilan Street Longhua District
Shenzhen P.R. China
Modellnummer: SK22G-05002002
NATAGGREGATETS TEKNISKA DATA
| Elektronik | ||
| Ingängsspänning VAC 100-240 | ||
| Ingängsfrekvens Hz 50/60 | ||
| Utpänning VDC 5 | ||
| Utgäende ström A 2 | ||
| Uteffekt W 10 | ||
| Genomsnittlig verkningsgrad under drift | % 82,98 | |
| Effektforbrukning utan belastning W 0,068 | ||
| Omgivningsvillkor | ||
| Driftstermperatur | °C (°F) | -0/+40 (-32/+104) |
| Relativ luftfuktigkeit | rH | 25 %-90 % |
| Förvaringstermperatur | °C (°F) | -30/+60 (-22/+140) |
| Kapslingsklass | IP20 | |
Carl Zeiss AG
Carl-Zeiss-Strasse 22
73447 Oberkochen
Tyskland
www.zeiss.com/nature
www.zeiss.com/hunting
ZEISS DTI
3/25 | 3/35
Návod na použitie
For United States patents which may cover this product see our website.
Patents: www.zeiss.com/cop/patents
DE EN FR ES IT NL CZ DK EE FI HR HU
LT LV PL PT RO SE SK SL BG GR RU JP CN 09.2021

NÁVOD NA POUZITIE
Produktznačky ZEISS sa vyznacujovnikajucim optickym vykonom, precižnym spracovanim a dihou zivotnostou.
Dodžiavaje nasledujúcePokyny na použivanie,aby ste dokázali svju termoviznu kameru optimáne použivat a stala sa tak vasm społahlivym spoolčnikom po mnohé roky.
INFORMACIE PRE VASUBEZPECNOST
Environmental vplyvy
Upozornenie: Objektiv pristroja nikdy nemierte priamo na intenzivne zdroje tepla, aka slnko alebo laserové zariadenia. Objektiv a okocular mozu posobit aksošovka a zridć konstrukné prkvy, kotre sa nachadžaúvo vnútr.
- Upozornenie: Nedotykaje sa kovového povrchu (chiadiac hiamel) po vystaveni slnecnemu ziareniu alebo chladu.
- Upozornenie: Stupeč ochrany IP66 sa dosiahne len vtedy, ked su pevnu uzavreté věsétky gumové kryty.
www.zeiss.com/nature a www.zeiss.com/hunting
Building 1, the 5th plant, Jiayi Industrial Park
Daping Community, Guilan Street Longhua District
Shenzhen P.R. China
Identifikación modelu: SK22G-0500200Z
TECHNICKE UDAJE NAPAJACIEHO ZDROJA
| Elektronika | |
| Vystupné napátie VAC 100 - 240 | |
| Vystupné frekvência Hz 50 / 60 | |
| Vystupné napátie VDC 5 | |
| Vystupné prúd A 2 | |
| Vystupné vykon W 10 | |
| Priemerná učínnost v aktivnám režime | % 82,98 |
| Prikon pri nulovom zalaženi | W 0,068 |
| Podmiency prostredia | |
| Preváczková teplota | °C (°F) -0/+40 (-32/+104) |
| Relativna vlhkest vzduchu | rH 25%-90% |
| Teplota pri skladovani | °C (°F)-30/+60 (-22/+140) |
| Stupeř ochrany krytom | IP 20 |
Carl Zeiss AG
Carl-Zeiss-Strasse 22
73447 Oberkochen
Germany
www.zeiss.com/nature
www.zeiss.com/hunting
ZEISS DTI
3/25 | 3/35
Navodila za uporabo
For United States patents which may cover this product see our website.
Patents: www.zeiss.com/cop/patents
DE EN FR ES IT NL CZ DK EE FI HR HU
LT LV PL PT RO SE SK SL BG GR RU JP CN 09.2021

NAVODILA ZA UPORABO
Izdekli blagovne znamke ZEISS se ponaaso z odlicno optiko, precizno obdelavo in dogo ziviljensko dobo.
www.zeiss.com/hunting/downloads
Odstranjevante baterij

Znaprovo Iahto izvedetde samodejo (Auto Calibration = On) all rocn oumerjanie (Auto Calibration = Off).
www.zeiss.com/nature in www.zeiss.com/hunting
Pridzujemo spravico do sprememb v izvedbi in obsegubodave zaradi tehnicega razvoja. Ne prevzemamo odgovomosti za pomote in tiskarske napake.
Navodila za varstvo podatkov
Building 1, the 5th plant, Jiayi Industrial Park
Daping Community, Guilan Street Longhua District
Shenzhen P.R. Kitajtska
Oznaka modela: SK22G-0500200Z
TEHNICNI PODATKI NAPAJALNIKA
www.zeiss.com/nature
www.zeiss.com/hunting
ZEISS DTI
3/25 | 3/35
PbKOBOcTBo 3a ynoTe6a
For United States patents which may cover this product see our website.
Patents: www.zeiss.com/cop/patents
DE EN FR ES IT NL CZ DK EE FI HR HU
LT LV PL PT RO SE SK SL BG GR RU JP CN 09.2021

PbKOBOCTBO 3a YIOTPE6A
PjOyKNTTEcMapkataZEISScOTINHABTcBENIKONENAHOTNKA.ToHOCT HaaOb6oKOTaHnIbJIYKJAOB.
MOna, cnaBaTHe HactoIaTa HnCTpyKun 3a yNToPpeBa, 3a da MoKe Bauata TepMoRpaΦcka KaMepa Da Ba Cnykno HaHnDobpnr HAuHn IN pOndJkeHne AH MHOrO ToHIN.
HHOPMALUN3a BALIATA BE3ONACHOCT
Bb3dEeCTBnHa OKoJIHaTa CpeDa
■Yka3aHne: HIKORA He HacooyaIte OeKtINBa HA ypeDa KbM IVHTEHBHNTOHCHUHA TOIINHSA, KATO HAnIMep KbM CbHJETO NIN KMB JIAEPHYNCTOB. OeKtINBbNIOyynpB MOrA da NOeDCTBAKTaKOyNA daNOPEpT DaTHMnA HAMPAeCE BbB TBePILHOCTTA HA ypeDA.
BHHMaHHe: 368aBaTe KOHTaK TcMetaHaTa NObpxHOCT (OxJaKaUnte pc6pa) cIed B3dEeCTane Ha CbHcEB NbHnNn CTyD.
BHHMae: cTeHn Ha 3aunrTa IP66 ce noctyr caMo aKo BCNUK rymen Kanau ca do Bbne 3aTbOPHe.
Yka3aHHe 3a eproHOOMnHOCCT
BunHane: npipnoDjxRjntEnHOIOJ3BaHe npabete nay3a da He ce noIyat 60bnK bCTABTE Ha pueTe.
OnachocT O3aDaBHe
BnMaHHe: HkOra He daaTe To3n ypeB p6te He MaKn Da. Pn HnpaaHbO bopaehe Morat da ce otDenr MaKn Hactn, KOTo da 6bDat r7bTHATN.
Yka3aHHa 3a 6e3oNaCHOCT OTHOCHO 6aTePnRA
OTHACIe CE cyepe BHNMeTeHIO: pN HEBHNMeTeHIO OTHIOJIHeH NAMPiAitataCE bE BOsAtePMA MoKe A do CnePBDEi.
He nlaaraiyepeHa OyBn Hm BcOKN Tempepatyn Ha 60°C.
He demontpaiyeypea3da CTNRHTe do 6atepna. Batepna He e npdebuene ha 3a cma HTKpaHn KInENT.
N3noJ3BaIe BkIOHEnO B KOMnIEKTA 3apAHO yCTpoICTBO.
3apekdaTe ypeda caMo np TEmnepaTynp Mekdy 10 ^ C do 40^
KanaTETbHaBatepaHamaIbBa npaBoTa npHnckaOKoHnHa TemepaTypa.TObeTeXnueckOnOBycnoBeHOHe eDekeT.
He CxpaHaaBnye pema IbIIO BpeMe HA temepaTy poN 0°C NIN HAp 35°C ToBa BOIN Do TpauHO HAMAHAABE H Na KaJIaTeta H a6ePrria.
Ako ypeBt nHtePepaTeCe nopeBpaTe ypeBa 3e pemOH B hauHn LeChTbp 3a 06CnYKBHe H KaNkHTb.
Yka3aHn 3a6e3onachOCT OTHOCHOxpaHbUOTO yCTPOIcTBO
Pnepy nyoTpe6a npoepeTe BaHTo 3axpaHauo yctpoCTBO Ka6eNa 3a BnuNm noBpeDy.
He n3non3BaIte depeKTHn qACTH.
He n3non3baTe BaWeto 3axpaHbauTo yCTPOIcTBO B MOKpa INN BnAa HpeJa.
MnI30JIaTe CaMO BKOIMJIeNcHbA KOMJIeNcHTa opINrHaJIen Ka6eJI 3aeJIO C OdoBpEHO XaepHABOU yCTOPICTBO.
He npaBete HnKaBn TexHueCKn 3MChEHN.
IopblnntHaHfOpMaunuHnHctyKmua 3a 6e0naCHoCT ue HamePte Bnpnoxehn Quick Guide. Quick Guide moke da 6bne nterneon
Download Center Ha Hauata ye6ctpaHua: www.zeiss.com/hunting/downloads
N3xbpnaHe Ha 6aTepeHn

B EAponeck Cb03 Ta03 CNBOM NOKA3BA, He 3N03N3BAHATA B TO3n ypeD 6Bepn TpBaBaa Da Ce cb6pa Pa3eNo H da He ce 3XbBpIa 3aEoC 6 BToaBte OtnaBdu. 3a npcdaabaHto HAytOpTeBaAHn 6Bepm eEHtayAoHO Ce b3noTBAaIte O tCbseCTBaBaTa aBB BaAta cTaPA hCCTMeA 3a CB6paHe.
HaUNHTe B 6BepmTe MaTePAAu IN BeueCTBa MOrTa dMa HMT PBeHNO BBJ3eACTBe BVpby 3npABeto NKoNtHa CpeA.
PepdaBauKnIpa3HNTe 6aTepeRnIO HaJIeNKeHHYpeR 3aPeLcIKnIpaHe, DOpPINHACrE 3a3uHTa, ONa3BaHETo NNoOobpaHETo HA KeCTBOTO Ha HAIaTa OKJHa CpeDa.
PpeaabaTe caMo pa3peHn 6aTePN.
H3nonBaHaTb6aTepeHcBbpxKa HTO XVBaK, KaMn,HTO ONoBO
B KOINHecTBO, KOEt Da Ha HAdBnUba DeCPhHpaHte B DpyeKTHBa 2006/66/EO
rpaHmHnCTOHOCTA.
HnΦopMaZna 3a nOTpe6nteNTe OTHOcHO N3XBbPJIHeTo Ha eNekTpueckn H eNekTPOHH (DOMAKHNCK) ypeDi
TOni CmBON BbPy npOyKNTNE ININn pNpDpyXaBAWNTe DOKyMCHN O3HaHAb, He nEeKTPMeKNTe INeKTPOnHnpOyTKHe TpR6Ba Da Ce mCeA cOBKnHOBeHTe 6bTOBnOTaNbU. 3AHeCet eTeN pOoYkTN 3a HaJdHexHa 06pa6To4, Bb3TaHOBnBaHe UINpeuKnIpaHE BcOtBHTne CBvPATEhN HgKHTOb, KbJeTo Ue 5bDat Bte 8e3 TaKcn. B HApK dBxpaBn TeN npOyDKT MoRat Da 6bDat PpeaDeHn B MAr3aHHa pN 3akynyBaHc HcBoTBETH HOB npOyDKT. HauNEXHOTO
X3BbPnHE Ha To3H PNOyKx CNYKn 3a Ona3BaHe HA OKoNHa TcpeJa
I npOeObPbTaRa B3bMOxHN BPeDN Hb3DeiCTBmB BbPxy OWKeKa IN pnpOdaT,
KoTO Hx B3bNHKnHnnPi NpHnEPnBnHnTOpeTnPaHsA OHnDaUe.
Ito-KoHKeTHa HOpMaun 3a Ha-6n3KIne PyHKToBe 3a CbUpaHe Ha OTnabuU
ue noyHTe OT oBunHata. CbOpa3HO HaIOHOJHOTo 3aKoHOdATECTBO
3a HnpabnloNn 13X8bPnIHe Ha To3n PoD OTnabuM Morat Da BbDat HanoKeHH
rnoB.
3a 6n3Hec KInMeHTB EBpOeNcKna cb03
MOna, CbpxeTe Ce Baunn DaCtphByToop NIN DoCTABNk, Ako XeJaTe da 3XbBpInte eNeKtpueckn NIN eNeKtpoHNH ypeiN. ToP aanarac donblntenHa nΦOoMaia 3a Bac.
HOpmaa3a CbupaneTo Ha OTnabBn BdbpKABN 3BBH
EbponecknBcIO3
To3A CHMOE BANIDEN CAMO B EBOIENKCHBc03. MoJI, CBpKeTe Ce c O6UHnATA mC BoN DCTnPbYTop, AOKO KENBaTe Da 3xBbPmTe To3n PpOyKT, IN nonNTaHTe 3a B3MxOHOCTNe 3a N3XbPnHETO My.
Ynotpe6a no npedHa3HaueHne
YpeDb t peDnHa3aHcH 3a TepMNHO NIO6paKeHMe Ha oBektn npHa bIoDneHMe H npVpOdaT, NoBN DNTAHUONHN HbNIODeHMe 3a 3uINBnHO N03BaHe. YpeDb He e IprpaKa 3a Deua. HAnon3BaIte ypeDa cMo KaKTo e OAnCaHo B HactoTo pBkoBOdCTBO 3a YnOtpeBa. Pno3AcDmTeHn TbProBeBt He HOcat OTOBOPHOCT 3a 5eTn, npHInHEn OyIOTpeBa He nnpEHa3aHa-He Me Wn HenpabInHa yOnTOpeBa.
Функионанla npOBepka
Pnpduynotpe6a ce yebepte, ne no Bauata Tepmorpapcka kamepa HnMa BuaIMM uTt.
PpOeppe TaIaTepMOrpaΦckKaTa KaMepa nOKa3a RaCen O6pa3 Be3 cmUeHn.
IpoBepete daHnactpOKnHe Ta He TepMOrpaCkata KAMepa ca npAunHn 3a cTeTa BnkTe yKa3aHnnta B TnaBATA OTHcOe peKmMa 3a HbKnDeHne.
OKOMNIJEKTOBka
TEXHNUECKN DAHHN 3/25 3/35
| Оптокa | |||
| Фокусно разстони 25 mm / F1.0 35 mm / F1.0 | |||
| Оьektiv{TП} Германи | |||
| Овьат на детекциа(Големина на obekta 1,8 m × 0,6 m; 2 yd × 0,7 yd) | m (yd) 880 (960) 1 235 (1 350) | ||
| Субъевен зретенъл.° | 30(дuarогално) | ||
| Зретенко лопу на 100 m (нa 100 yards) m (ft) 26 (78) 19 (57) | |||
| Зретенко лопe | °хорозонтailing x Вернкално | 15 × 11 11 × 8 | |
| Опточно увейненье | 1,8 | ||
| Масимално сизforth машабиранe | 4 x | ||
| Сълkin на машабиранe | нa CTынки no 0,5 | 1,0 x - 4,0 x | |
| Сенир | |||
| Разделтелна способrost на сенира | px | 384 × 288 | |
| ПисSELно разстони на сенира | μm | 17 | |
| Чеб耗费 на кадура | Hz | 50 | |
| Ереан | |||
| Рazделтелна способrost на ekрANA | px | 1 280 × 960 | |
| Ереан ТП | LCOS | ||
| Еnétrочникa | |||
| Иntерфейсни връки | USB: зарожданe + пehoc на данни WLAN: пehoc на данни | ||
| Багэрия | Лиговийни | ||
| Вреве на равoting на връгия | do 10 u. | ||
| Вышно сл. зхраванe | 5V / 2A (USB) | ||
| Выtrightва памет | GB | 15 | |
| Виdeo / гадушина / лайфстрим Фуншaria | ✓ | ✓ | |
| WLAN чебота | GHz | 2,4 | |
| WLAN.stanдapt | IEEE 802.11b/g/n | ||
| Връка с дугу устroyства | ZEISS Hunting App, USB | ||
| Овши данни | |||
| Вид на зашиTRA | IP66(сpeцу сileн дъжд) | ||
| Овхbat на равOT纳atura Temпература | °C (°F) | -10/+40 (+14/+104) | |
| Дълхина × Шерпina × ВисочINA | mm (inch) | 187 × 60 × 65 (7,4 × 2,4 × 2,5) | |
| Тегло | g (oz) | 410 (14,5) | |
3ana3Ba Ce npabOTo Ha npomHn B 3nBnHEHnra Ta n Oxbata Ha doctabKa npaDy TexHnuecko YcbAepHeCTBaHe.
NocTaBHe Ha KaIkwKaTa 3a HocHe

BKnIOuBaHe/3KJIIOUBaHe
YpeBbTc BkIOHbC nPpIbKmTeHNO HtNcKaHe HA KOnTHe 3a BKnIOHBHe/ NkIOuBaHe (5)LED NHnKATOpBt (9) CBeTBa B 3eNeHO. Pn HnCKo HnBO Ha 3apeKdAHE LEO HnIrkAtoptB (9) CBeTa B CepHeNo.
YpeBt ce nKIOHb OTHOBc npOdbNXHTHO HATNCKAHC HA KONCTO 3a BKNIOHBAe/NKIOHBAe (5).LEDnIKKATOptBeHe CEBTN. Korato e BKNIOH, npn HnCKo HnBO Ha 3apeXdahe LED nIKADKATOpt (9)CBTBA BuepeHo.
Yka3aHHe: KOHTHO 3a BKNIOHbHe/
N3KIOHbAHe (5) TPOBa Da ce 3aDpOxn
HaTHcHTo,doKATO Ha ekpaHae He cNOkaxe CmBOnTb 3a N3KJ. EaDa Toraba KONeTO
3a BKNIOHbAHe/N3KIOHbAe (5) MoKe Da bJe
IyCHato N ypeDbTe cN3KIOHba.AKO KONeTO
3a BKNIOHbAe/N3KIOHbAe (5) Bde NcHato
npEn Da ce NcKoKe CmBOnTb 3a N3KJ.,yePa
He CE N3KIOHba.A pEmHHabB B Pekmm Hto FO

PekmHa roTOBHOCT
C Kpatko HATvckaHa HA KonHTo 3a BKNIOVAHeN3KIOVAHe (5) ypeBt npemHHaa B pexkHa roTOBHOCT. LED INHdkATOpBt (9) npmmraBa B zeneHo. C oJe eHDo Kpatko HATnCKaHa Ha KOHTo 3a BKnIOVAHeN3KIOVAHe (5) ypeBt OTHOBO PneEOKOBA B pekm 3a HbNODeHHe. LED INHdkAtOpBt (9) CBTe HENpeKbCHato B 3eJIeHO.
PnHnKo HnBc Ha 3aepKaDa Cb pexkHa roTOBHOCT LD INnDnKATOpBT (9) Mmra B VpeBEO.
Kan6pnpahe
CypeaIMATEB3MOXHOCTda npaHTe abTomTHIO(AutoCalibration=On)wn pHNO kAIb6pnpae(AutoCalibration=Off).
B A B T O M A T H E N P E K I M Y P E D T C A M N 3 B B p U B A K A N I N B P I P A H E, A K O E H E O B X O D I M O, Y P E 3 A T B A P H E N O T B A P H E N A E E N H B T P E L E W H A T B O P. I P N T O B A C E Y B A T X O K I N K B A H. B TO S N P E K I M D O N B H I N T E H O I M A T E B 3 M O X H O C T 3A P B H O K A N I N B P I P A H E, K A O H A T H C H E E D H O B P E M E H H O K O N I E T O 3A C H M A H E (6) N K O N T E T 3A M E H O T O (8).
Dpyra onupe puyho, 63euymHO kaihbpnpaHc.3a cetaT aOnTe B MeHOTo Ha ypeHa nocabete onpura "Auto Califoration" Ha Off". CnE ToBa ce bvpHete b pexkma 3a haoJeHne. 3aBopope pHyO 3aunTH KaanKaHa oBeKTHBa. Cera HATCHe eHNOBpeMeHHO KONHe 3a CHMaHE (6) INONHTO 3a MEHOTO (8) ETO yepeDb tOHBO e KaHbPpHAp.
Yka3aHHe: npn pBHyK aNb6bpAne BnHar nokpmbaTe o6eKTHBa. HHaHe cEH3OpBHe MeOx e KaNb6pAp npabHHo KApTHHaTae CE bNOu, T.e. He daBA DBOHO h6bpAkeHMe. Ako 3aBpaTe d NaKpTe Te o6eKTHBa No BpeMe Ha pHo KaNb6pAne, NOBtOpTe KaNb6pAheTo npn NOKPnOte6eKTHB.
Pekm 3a Ha6JIOeHne
3aHa5nOHe HAOBcT NOrnEHDTe Npe3 BnBopa10).3aBpTeTe DOnontPNHHH 1 peryanTop (1)OTCPAHN,3aHaHCTPOMe PCHOTATA HaOBpa3A HaekPAH. 3aHactpoKa HAChOTATA HaOBpa3a 3aBbPteTe NpbcTeHa 3a DOKycnPae1 (1) HAOBcTKBA.
Maansa6npahe
C 60ytHHe Cb cTpeKIN (7) B pexm 3a HsIoNIOHeHn IMa 63MxOHOc3 a 3yEbnBaBae (ACh CtePKeHa) yMaIBARe (Jha CtePKeHa) hAoPba3.
MaasabpaarHe Ma cTbKn IIO 0,5 MeKdy 1,0x 4,0x.
yHKpTa3a MaasabpaHe cIAPKyjPnHa,
TOeCT AOKI cIeMaasabpaHae 4,0X HATNCHTe
deChm6 ByToH CbC CTpeKHa (7) Oue BENhK,
ie Ce BpHete Ha 1,0x.
Ha ekpaHa ce noka3a HAcTPOeHOTo B MometHa
unfooo yEneHne.

UBetOBnpeKmm
O6pa3b MoKeJa 6bJe NOKa3H B Hcypn pa3NJHn UEBOTB pEXMHa. 3a Da CMCHNE pEXKMA 3a HaNOJcHHe, HATNCHE KpATKO KONHTO 3a MCHOTO (8) Pn npomra H6paHIT pEXM Ce NOKaBA HA eKpaH a KTO TKT 3a OKIO 2 cekHm. MoKeJa ce H6npa MEkNy CnHNTe UEBOTB pEXMM:
White Hot: Tyk CTyDHeHTE 30Hc ce 306pa3aBaT a cepHo, a TOnnIte - B 6Ano
Black Hot: Tyk CTypeHnTe 30Hn Ce n3o6pa3a8BaT B 6BnO, a TOnnIte - B cepHo.
Red Hot: TYK CTYDENHTE 30HN CE NIO6P3A8ATB C HEPHO, A TOHNITE - B 67NO. OCBEN TOBA HAI TONINE 30HN CE IIO6P3ABATB K XJNTO DO HEPBOHc.
Rainbow: IpeB nIcbTa IbeBaTbA NaIITPa CTyEneHte 3OHNc CE HIO6paRBA B CHePO Do cHbO, a ToJIIne -B JxblTo Do bIK.
CBeToaNoI N3KJI.
3a da nKIOHnTe CBETOpNOda Ha Baaata TepMOrpaDcKa KAMepa ZEISS DTI 3, HATckAIte DECHIN BYTOH C5C CTPEKNA (7) a npOdbJIkeHne HA 5 cekyHn. CnED TOBA CBETOpNObTc BeNkIOHbA. NOBTCpeTe OTHBO To3n PpOec, 3a da BKNIOHnTe OTHBO CBETOpNOda.
ABTOMaTHUHO N3KJIIOUyBaHe
Cuen necteHa bateepnra, ZEISS DTI 3 ce mknouba aBtOMaTHO CneD 60 MmHTu Be3neCTBme.
PexKm3a CHMaHe
IMATEBb3MOXHOCTaPpABITE CHMKNIa 3aNVCBATE BIDcOKJINOBE.3a Da ppeakIOHTMEKmkyDyBaTAPeKIMHa CHMMAH,3aDbjKTe HATNCato KONHTO 3a CHMHe6 (6) aNo-Bo apeme.CmBOBtROpe BnBOHa ekpAha ce PnpemHa cnped,13bpaHepxiam.
3a Da HAPABITE CHIMKA INI DA 3aNIUWE BIDCKINN, HATNCHE KpAKO BENbX KOHTHO 3a CHAMHe (6).3a Da CIPTE TKyUNB BIDcO3ANIC, HATNCHE KOHTo 3a CHAMHe (6) OIO BE DbIXbX.
YkaaHHe: NO-DbTnTe BUNEOaAMCn npN CbXpaHbAHeTO ce pa3dneAT ABtOMaTHHO Ha MaNKn faIIOae No 10 MHyTN.

ΦTopeKm BnDeopeKm

MeHIO
C. JbIto HATKACA HA KONHTO 3A MEHOTO (B) HA EkpHa CE NOKA3Ba IaHbHOTo MEHO.IIOJHeHETe TARabe P9E B3bOba(10).B IaHbHOTo MeHO IMATE Ha paoNOnOKHeCnDHTHe B3MOKHOCTn 3A b6Op:
■ Brightness: HachpoTe JxehaTaApKocT Ha eXpaHa. IMATE B53MOXHOCT Da Hs6BaPeMaTe Mekjy TcHnHa CTeHN Ha CTeEN 1 ApKocTtA e HainCbHa. Ha CTeEN 4 ApKocTtE hainCtHa.
- Contrast: TUK HCTPOIYE KOHPTA RA Ho6p3a. IMATE B3MOKHOCTdA N6bipate Mekdy TcENHI HA KOHPTA. HA CTENEH 1 KOHPTaBt E ha cnae Ha CTENEH 4 KOHPTaBt e Hau-cnEH.
Contrast Boost:KtTbHnPaeTTO3epeXm3aNo-Jo6paBVDIMOCPTPNBWCCKA BfKaHOCT HBaB3DyXaIINbMb/Tna
Hot Tracking: B pexMM 3a Ha5JIOHeM He6peTe, Hot Tracking", 3a da OTKponte HAI-TOrnata ToHcA OTo6pa3a C MaJIbK, HepeH KBaDpT.
Auto Calibration: Tyk HacptpoTe psho (Auto Calibration = Off) mna abTOMaTHHNO (Auto Calibration = On) kaHbmpane.
P.I.P. (Picture in Picture): ueHpaJIeH cpaImeHT onIOobpaKeHHeTo CE yBEniHaBa C KOecnUeHET 2 IN CE NOKaBA B MaJIbK yBEniHITeH NpO3OpEu HA ekpaHa.
WILN: BKNHOeAaKNOeT WNL. Pnp BKNHOH WNL ypeBt OcMpyBa XOTCNOT 3a CbpB3aeC npyepd (Harp, cmpTPOh).
System: Tyk IDaBATE BCNKNCACTEMHN HACTPOIN HAIP.3a e3NK,TOHO Bpemc n pa6pnHn HAcTPOIN.
HaBHTaHETO B RnABHOTo MEHO ce N3BpUBA ue3 6yTOHtE CcCTPENK (7)
N KONHTO 3A MCHOTO (8). 3A cPOBAne HADOny HATNCHE DECNH BYoTH Cbc CTPNK4 (7). 3A cKPOBAne Harope HATNCHE NEBN BYoTH CcCTPNK4 (7).
C KpatoHOTKAe HA KONHTO 3a MEHOTO (8) CE N3BOpa TOK4 OT MeHOTO.
Taka BnMaTe B NoMeHTo. HanpaBete HAcTpoKIne C 6yToHIne cCtpeKn (7). C KpaTKo HaNTckAnHe HA KonHeTo 3a MeHTo (8) N0TBpKdAabe NTbOpaN OTHOBc ce BpTaTe A TnaHbTO MeHIO.
CdbIHO HATCKAHe HA KONHTO 3a MCHOTO (8) HanyCKATE TnABHOTOMCHIO N OTHOBOCe BpBpTaE B PEXKIM 3a HaBKOJeHne.
YCNIBaHe Ha KOHTpaCTa
YcNBAHETO HA KOHTPACTA Bv Daba Bb3MOXHOCT 3a No-DObo H3OpaKHeMe Ha KAPTHATA npn BVICOKA BNAKHOCT HA Bb3Dyxa HJIN MblrA. PO To3n HAHIN CE 3ACnBAT OeHTAHNTA, TAKA He CTpykTyPnte Da ce pAn03HaTaeNo DOpe.
3a da akTbPate ycIbHaHTo Ka HOtpacta Ha BaIIu YpeJ,OT TnABHOTo MEHO 3bepete "Contrast Boost".Cne ToBa 3bepeteOn"UIN "C KpATKO HATKCAHe HA KOHTe 3A MeHtO (8) ue NTbDpIte 3bOpba.
Yka3aHHe: npenopbnyeJIHO eTo3n pexyIM da bJeI N3noJ3BaH cAmo npin rOpenoCooHEnTe ycNoBmN da ce JeakTbVnpa Ipn HOpMaHa o6ctaHOBKa.
System
B noDmeHIO „System" IMATE Ha pa3noLoXeHne CnEHNTE Bb3MOxHOCTN 3a N36Op
Factory Reset: nB6epete,Factory Reset", 3a Da BvPHTe daphmHHTe HactpoKn Ha ypeA. PnT OBa CE h3TpVbAT N BCN KKn CbXpaHen AypeA daHN, BKN. CHMKN IN BIDea.
- Reset Settings:ɪsəbepete „Reset Settings", 3a ṅa bəpHene BcHKN HæctPɔkNn
Hæypeŋa ḌaɪdʌpHrtniət ChtoHostN.
Language settings: Tyk M36peTe c3NK 3a MeHIOTo.
Date / Time: Tук Насторе Датая Уда са Нусяа.
OCBEH TOBA MOXeTe Da BnDnTE CneHATA INHOpMaIaI:
WLAN SSID: TYK CE noka3Ba HmETo Ha WLAN xOTcNOTa.
Firmware Version: TyK ce nokaa Tekyaata Bepcnna Ha pfbpmyepa.
Fa6pnueH pecet
3a npoBexkda He haphbpyen peceT n36pepe System" B rIaBHO To MeHO. CnEe TOAOTNEHe "Factory Reset".N36peTe,Yes" nnotbpcTe 36bopa. NoBBAe ce noTTOHPO 3aNTBaHE 3a no-foRMA cUrypHOCT, KOETc bIo Tp8Ba Da bDe NOBtbpDECo,Yes".
Bpbuahe Ha HacTpouKnTe
3aBpBuaHe Ha HAcTpoKIne N36pepe "System" B IaBHOTo MeHIO. CneI ToBaO tNDeHa ,Reset Settings".N36pepe "Yes" nOTbPdTe N36opa.
YkaaHHe: 3a Da MoXe BpBuaHTo Ha HAcTpOaNte Da 3aBbPm YcneuHo, ypeDbT Tpa6Ba Da ce pectapTnpa.
JIuHnI daHHN pRi npEdaBaHe na BaUHn ypeD ZEISS 3a oTnaBtu nHn Ha dpyro liue
He 3abpaBnIe, He BbB bTpeHata NAMET Ha ypeMa DOXe Da IMA NIMHN CHIMKIN BnDna. Ptei Da pTeaIede YpeHa H TpeTO Ima, IVNbTHene CYHKnITA "AfpBnH peCecet, 3a Da nTpTENE TEa DHH, INpoBepete IVTpBaHIO. No To3n HAHIN Uc 3aunHtne IMHOHO CnPOCTPAHCTBO INHFOOPMAONHO CHyPHOT.
CbdeIcTBn3a CnryphocTHa ypeDa
Cbckctbae ktnno 3a nI 3auinrata Ha Baaia ype, Kato nIanl3abe nploKenHneto ZEISS Hunting App n HcTaanipate HOBn bpypeHn AXTyAIN3aun, LOMbDat HanmH.
Data/4ac
3a Hacptpka Ha datata n caca n3bepete „System" B rnaBHO MCHIO. CnD toba OHtde He "Date / Time". TYK MOXETe da HacptpoTe nooTaeNo 10raHnA, Meceu, DeH, YAC mNHYta.C HacptpKaTa ,Time Format"MOXETe Da N3bupate Mekdy 24-112-Hacob fopmat. BHIMAAaee npn HacptpkaHa daTata n caca, 3auTOI ue IINMa HA BaWHTe CHMKN INBuaea.

Yka3aHHe: ako 6ateprrata ce papei HantbHIO, HactpoKIne Ha ypea 3a data
Hacse 1343at. HactpoTe daTATA Naca OTHOBO, 3da 6bDat BepnHa BAaHTe CHMKN BVDEA.
AkyaI3auHaΦbmyepa
AkyaI3aIHa bpymyepa MoKe da sbde HapnabeHa nocpeCTBOM ZIESS Hunting App. 3a ceta cneBaiTe NcHcykUIne BZEISS Hunting App.
YkaaHHe: npDn aKtyaIHa3aIgna H aFbPmEpa Ce yBepTe, Ye ypeDbTe HaNbIHO 3apeHc. He3kIOBaHTe ypeDa no BpeMe Ha aKtyaIHa3aIgTa, 3auOTo InaHe MoKe Da ce nOpeRd.
Yka3aHHe: ako cpeuHeneakTuaynnaaunB npnnnoKeHneto ZEISS Hunting App, 3a no-cnpyho Tpr6Ba da na3aJeCTbATE Oue BENbK nHa ypena.
LED cTaTyc
CMHa Ha 3aunTHata KaayKa Ha 06eKtmba
3a CMHa Ha 3aunTHATA KanaHc Ha o6eKTHBa (2) paBnTe BnTOBeTe (3) C nOMOHTA HbOTePK. CaNEte nactHHKATA (4) N DEeKHeT3aUNTHA KanaKa Ha o6eKTHBA (2).NocTabe HeoTa BAUnTHa KanaKa Ha o6eKTHBa (2) U nlaCTNHKA (4). 3aBnTE BnTOBeTe (3) c nOMOHTA Ha oTBeTKA.
NoCTBaHe n noDpBxKa Ha ypeDa
pyb3ampcbaauchn(Hnp.1pck)no neuHTe He TpaBaa Ce 3abpcBaT, a cMoC e naBxATN da ce OTCPAHBAc TcKAL C BpeMeTO NO NOBpxHOCTa Ha NeuTAt MOrTa Da ce NoARbOTneuATbUOn OTpctHa. HauNekHmT HauHn 3aNoCTBAHe Ha NoBpXHOCTa Ha NeuTe Ea DxbHETe H da TNtPmTe C HcTA Kbpoa 3a NoHKTBAHe HA ONTVKA.
3a npdoTbpaTbHa He Oba3yBaHeTo Ha MyXbI NO OTNtKaTa-OCo6eHO BTOPNIHTE -OHNKbTbT PnBa Da Ce CxpHaRaH Cyxo MCToCNOCTORHa BEHINHHe BA BBHNIHTe NOBbpXHOCTHa IeLdA.
Baata Kaempe ZEISS DTI 3 He ce Hxkda ot HnKkBA npyra cneuaHnna noDpBka.
NoCTBaHe n noDpBxKa Ha 6aTepyTa
3a no-DbIbT JKBOT Ha 6atepnra TcneBaNTe CnCnHNTe TOHK:
I368BaTe da CbxaHbAte ypea npn BcOKn TEMpepatyp.
I368raBte da cbxpaHbATE ypea c HnblHo 3apeHe bateepn.
H36BbTeHaTbHOpa3peXnHeHa ypera
CoΦTyepHnakTyanu3aun
B pAMKNTe H3aKOHOBHrRAPaHIOHOHcPCK (2 rOHNn OT npExbpyHrHa Pnck Bboxy CTOKATA -no REpMAHCKO TnpBO) HNe Iue npdeocBaRME CBoTBHTNtke AkyTAAU3A 3aOTCPaHBAHe HHeoCTaBtu. NpapBnAo kTyJNA3AUuNTe 3aCrtat BAXHH 3a CnYPCHCTA aCNEKTHNn OTOCTPAHBAH He HApWJCNH Ha FyHKUINTE H He BkIOUYBat HOB FyHKUNn Ha cOpTyepa. DokonKOTO 3aOTCPaHBAHe H BAckHH 3a CnYPCHCTTA aCNEKTHn E HeoBXODm POpeoCTABHTo HA HOH FyHKUN, To No nPiHnIe H MoKe Da 6bDe oChOBAHne 3a npBO Ha npEODCTABHHe HHOH FyHKUN.
CnE 3NTHUHHe H3AKOHOBn rapaHvOHCH cpoK ue ce noctapacm da Bn npedoctaaMe DOnbHTHEnIhA kTaynauBn. BnypeK ToBA He MokTe da npedBaBATE pnetehum 38 TOBA.
Pe3epBnH qactn
Aka c Bn Heo60dmmpeepbHnacta 3a Baun ype, kato Hap. 3aunTHa KanaaHa oBekTbMa, ceobpHeTeKb MaBn cmeiunpaHan MaraHH, Baun dNctp6yTopn Ha MTOKn HauuHaunIeHTbp 3a ocbnyKaBaHn KaHneHt
3a 3aMTBAHn no TepeoHa HauHT LOK e Ha Baue paanoloxHne ot nHeDenHk do nBk or 08:00 do 16:30 q. (CET).
Te.: +49 (0) 800 934 77 33
Oakc:+49 (0) 64 41-4 83 69
service.sportsoptics@zeiss.com
Mapkata ZEISS e cHIOHM 3a HApckHOCT uBcOKO KaucctBO. 3aTOBa Hne KaTo npov3BDQHTEN, He3A3CIMNO OT rapaHIOHNITc 3aBbIXKHN HA npOdaBAA KbM kynBya, 3a ToTn npOkyt C mapKa ZEISS DaBaMe DByrOtnHa rapaHIN, KOto npP erNtCPaun HA npOkyTA B cOpOT cYtpn CeDMn Cncl 3aKyIyBaHETo My, M0ke da bde yblkKeH a cUe eDHa roHnHa.
C rapaHIOHHOTIy cILOBIA MOKETe Da ce 3aIOHOaTe Ha CIEHNHIA JINHK: www.zeiss.com/cop/warranty
Perictpaate Baun npoykt Ha: www.zeiss.com/cop/register
Ampn3BouTe
Carl Zeiss AG
Carl-Zeiss-Strasse 22
D-73447 Oberkochen
www.zeiss.com/nature u www.zeiss.com/hunting
3ana3a Ce npaboto Ha npomehn B nntbneHnra N oxbata H daocbaN npadn texHHeCKO ycbbpoeHcTBAHe. He HOCM OTTOBOPHOCT 3a HETHOCTN n eHaTHI ROEUKU.
Yka3aHHe 3a 3auNTataHa daHHN
Pn nnnnbae Ha DTT 3 ce o6pa6oBt aJHHn daHHn.
HaHTe ykaaHna 3aunrata Ha daHHn o6pa6OKaTa Ha JHHN
daHHn uie HamapeYb HAaunu eHTb 3a N3TrrHe Ha DOyMeHTN:
www.zeiss.com/hunting/manuals
PpabHa n perynaTOpHa HhOpMaun
YecToEH 06xBaHnpaIOnpeIaBateHmMoyn:WLAN:2.412-2.462MHz MoHocHa paIOnpeIaBateHmMoyn:100 mW

C HAcTbOuTo DmPma Carl Zeiss AG DeKnapura, Ye TepMOrpaFckata KAmpea DT 3OTTOAorHa DInpeKTuBa 2014/53/ EC N DInpeKTuBa 2011/65/EC. TbHnHT TeKT Ha DEKnapaurta 3a CbToBcTBNe HA EC, KaKTo N DoTbHnHTenHa HnFOpMaun, Ca Ha paoNIOKeHne Ha CcIeHN AApDC B VHTepHET. www.Zeiss.com/dti-335/conformity.
HKnO 3Nau 3a KaeeCTBO, NOIbDpaXAHN OT ZEISS DT 3, MOrat da Ce NOKAKAT Ha ekpHa ZEISS DT 3. B rnaBHO ToMeH NoSbepeTe „System". CnED TOBa OTUdTe Ha „Regulatory Information".
To3 npOdykT e NmUeH3npaB bPAMKHTe H nIuEe3A AVC PATENT PORTFOLIO 3a IINH a HcOpMepHaN yOntpeBa oT cTpaH a HnOpeBteMa 3 (i) KOnpaH a BnDBe a CbOTBeTCTBE C AVC CTaHdaprA (AVCVIDEO") WIn (ii) DEpOpaHa H AVC Bndea, KOnpHaH oNtpeBteMa 3a NmHn Ene, mNn Bndea, npenoCTaBHe O T nIuEh3npaH BVDeopAsnPoCTPAHTe. He ce npedocBaBnue Hs, Bnlo To mNnIuLipaH, 3a pyra yOntpeBa. Pnooe HnOpmaunie ne noynte ot MPEG LA, L.L.C., Bx. http://www.MPEGLA.com
Pon3BODntenHa3axpaHbauoTo ycTPOINCTBO
Shenzhen Simsukian Electronic Technology Co., Ltd. Building 1, the 5th plant, Jiayi Industrial Park Daping Community, Guilan Street Longhua District Shenzhen P.R. China
KoHaMoega:SK22G-0500200Z
TEXHNUECKN DAHHN HA 3AXPAHBAUOTO YCTPOICTBO
| Еlektronika | |
| Вхodus Настесене VAC 100 - 240 | |
| Вхodus четota Hz 50 / 60 | |
| Изodus Настесене VDC 5 | |
| Изodus ток A 2 | |
| Изodus мошноct W 10 | |
| Сразда сώटовост颇ни равORA | % 82,98 |
| Консуцяп На мошноct颇ни hyнегов Товар | W 0,068 |
| Усώвяп Н оковскатуca crêda | |
| РавOTHA Tempepatура | °C (°F) -0/+40 (-32/+104) |
| О:tнocitETнь Влжноct на Вьздуна | rH 25% - 90% |
| Tempepatура на Сыханения | °C (°F) -30/+60 (-22/+140) |
| Стени На зашита | IP 20 |
Carl Zeiss AG
Carl-Zeiss-Strasse 22
73447 Oberkochen
FcpMaH
www.zeiss.com/nature
www.zeiss.com/hunting
ZEISS DTI
3/25 | 3/35
Oδηγίες χρήσης
For United States patents which may cover this product see our website.
Patents: www.zeiss.com/cop/patents
DE EN FR ES IT NL CZ DK EE FI HR HU
LT LV PL PT RO SE SK SL BG GR RU JP CN 09.2021

O△HIEE XPHSE
Ta npioivta mApKac ZEISS xapaktnjovtai ano Eaipetkec, ontukc, emdoec, andaoka akpiB nteegyoadia kai meyAyn diapkeia cwnic. Aabete unuTn Tnapakatuwntoeieic xprponpokoeiouva eate 0ean va agtoianae Tneepukkajepa meTov kautepe duvato npno Ka va oocouwOeue aonoiya y noAxApoVA.
IIAHPOΦOPIE ΠIA TH ΔIKH ΣAΣ AΣA/EA
PepiBaAovtkeEipdpaeic
YnOBeIeN: Mny Otpepete note tov avtkeevikpokng oukeun aneueiac ninyec Evovnc Bepountac, ouc, n, x, oovn ao e ouotmuata aecep. Oavitkeivkoc kai npaoopbaioq pokoc mnpovva laerouyauw wc paokol avapalecn kai va katoaTpewuow eoprtipua.
Pnooxn: Anopoeuyte Tny enapn me netaaAikn Einkpaveia (ntepuia yoc) metao andekthetaon oe naakkctwoBolai n oyooc.
Ppoooxo:Obaouc npoataiaCIP66Eaopaaiketai movov otav evaiepueta klaotad a ta laatvEvia kaUmuata.
YnodEtEn epyovouia
Poox: Kavete diaeipaata oepnnwae npatetapevov xepiaou eot wote va anopuyte tvn emuowwn katanovnon tw appwoeuw twy xepiw.
Kivovoc katantoon
Nooyn: Mny aqyve autn ouakeun oe kpa naia. zne pinnwn oepauevou xieaoo u npovu va anonctaoov ukpoeapntmuou nupopov v kaTATOuyu.
YnodEic aopaaiaac yia to ouoowpuit
XeipieEeTn ouakeun pnpooox;O anotopoc xepioooc npopei va npokaeen Cnue ooueepiko ouowpeun.
Mnyeketene t ouokeun oqwni n uynl cepouokpaoic dwo w60C.
Mny anouuapaooyane T ouakeur yia va atoknnae npaaon 0to ouowpeun. O ouawpeutc dev npoepetai yia avikataaon an toy teAke
XpnoaipooieAIOKAEiAtkto OvOeutko poptn.
OpTe n oukeun ovo oe eepokpacia ano 10°C ews 40°C.
Kata Tn xan ane xan aneepkoopaia nepaiaovoc uoabqctan n yupntikotra tou ouooopeutn. Autoeivai texwic avaykaio kai dev anoteAei eAttwa.
Mny aonkne Tn oukeun y naqatetauevxovko 6dntma ae
epoxkpaia kat wu 0 n avw tuv 35 C. Auto b exi wk anotelaeqa Tn
lown eattwn tnc xupanokntac tou ouapoueun.
Eavexi uortoei nueie, n ouakeun i eivai aattuaatok o ouoowpeutnic, enotpape t in ouakeun yia etiokeun oto tunja Euvinptonnc teatovtnc etaipidac juc.
YnobdiEic aoapaleia tpoosotkoou
Pw anto t xpon, eeyte to popobotko kai to kalwio yia epapaveic nuiie.
Mny xpoqnoieEeAattwataKa Eaaptjata.
Mny xnpnoiote to tropoobotiku oovtheta c ypaia c oe uvo np
Xpnpoioite mvo to npexoevoo uoevtko kaawio paiz eva eyekpivotpopoositko.
Mny npoBaivee oE texwke,pononnoepic.
Tia piaaoaotepe nAnpopopiee kai unofoiEic aapaaiaoc avatpeTe otic auovntkec obnyie ouuvoeovou to npoiov. ieviaioiauek cai otoiotono mac oco Kevtpo anpupv:ew. 10e e Htunng/duowlads
Aieeon ouoowpeutuw
TnV EuouoaiKaEvua, auto to ouBoAo EiianuAveiOn 0 xonaioiouieueoc oto oukyekoevo npoiov ouauowpeutic npetei va ouaayevta Eeewpiota kai va uyndiouetauqi ta oikia anoppjmuata. Tia tvr etipopn xonaiouioivuv ououwpeutuy oxaiouanote eva oatma aauoyncnou Evexouevuc unapxei atn Xwpa ooc.
Ta uikai kai ouaie nou unapxov ouoc aodawpeutec, mopov va exov emaia yia tvu vyeia kai to neiabalov dpao.
Ota npapaiiefe efavlanueovuaaouaeutevi avakukwauuupuva me npi npoiaypakc, auaialate otnynpoataia, otni biipnna kai ot baliwn ngnoiotaac tau nepiaalvocto.
NapabiEte movo ekpoptouevou ouoopeutec.
O xpnaiionoiouveoc ouoowpeuric dev nepieexu npupco kaiduo oue olufo 0ne nootnauou tepbaevic opokoevc otyn odyia 2006/66/EK opiake tsic.
Ia npopopiec yia tov xpnotn ia tvn atoppuyn nAektpikw K a Iaektpovikw oukeuv (18iWTEC)
AutO to auBdoAo e npovOVA ny/kai uovbSeTuK Epyapao onuAvei, 6t Bv th pene i va aueyUeVE xpnouonuva nAekpka knyAekpovkia npovOVA te auvnO hikak o anoppipata. Ta n Awatni
enEepoiaia kai avukkawon, napabide auta ta npovOVA ata oxetika
onjuia ouAloxyn, onu npapaauubovoyta xupic xpeowon. Se opaevec
xwoc evexetai va unapxei nduvatotina va npadoeote auta ta
npovOVA otavtorioac emopo liavikic me tvnv apov ec avitotoxuy
kavoupou npoiovtoc. H awot anoppipn autou tou npovotoc xpanjueei otvy
npoataia Tou nepiaalovoc kai amotpene iMbevc emiae emttwoc otov
avpwnk ao tto peipalov, o ioiec evexetai va npokupov an tov akatalanx
xepioio anoppipauutv.
Tia IeTnopeic nAnopopoeic ayetka me To naiaatepo anueio auXoyri
aneuUoEvite otn Boiknon Tou dHou oac. Eupnuva me Tn vuo0eia Tc ka0e
xupac evexetai va enbAovaa xonnatika npooiuya via nv katoAan anoppipn
autou tol eiouc anoppipauw.
Tia enayyelaaties evtos Eupwnaiknc Evwong
Etikovwnote me tov eunopo npouonthetaac,otav eela va aopopiee nAekpkiKc kai nAektpovikce ouokuec. Oa oak napexi nepioooepc npanpoopiec
Pnpoopopiec yia th diaeon ae aalecs xwpe cktoc ts Eupwaiknc Evwns
Auto to aujbaioiauuei movo evtoc ncc Eupmaikncc Evuaon. Etnkoovnote me tni diaknon tou denou aou taev npaoa oav thelene va anppipetae auto to npoiokai kpatnpte via ic suvatoine antappnoy.
PpOβλεπóμενη xργση
H oukeun npoepetai ytn npoBn Eepkiv Eokov kata nnpaipnng nqounc, atolauuovwn kyvetik npapatpnnn kai noitikec xpoieic. H oukeun 6ev iai naikko naivdi. Xpoiaonoei t oukeun oovot epeypkapet otig npouoe cobyiec xprionc. O kataokeuaatn no eumopoc devaalauve kajia eubvni ia qiee nov npokalovvat an o n m npoBleinoev n epaueyn xpno
EeYoxc aeitoupyia
Pniv an to xhon Bepauveote on n thepukk kapea dev npouiae ie paveic
EeYxete av n cepuk kape npoalai eonv oovn ia eokwn eikova waoi napoeBolc.
Eeeyetn oot npouon Tc BepuKnc Kepaac, 0xetka tC ono6eiEKC TO Kepaaiou Aeioupvy napatnpns.
EvpyoioiAn/AevepyoioiOn
H oukeun evyoantai pe nataetaevo natma tou koumou evpyoinan/ aneveyoinanc (5) H wtoiodoc (9) aabeje npadaovxuva. zkataaon xanlnc poption, qn wtoiodoc (9) aabej e KKKVXPua. H oukeun atevoyoantai kai nae napeiaeaovnatma tou koumou
evpyooinanc/aneeyooinc5.Hpawtoiaoc6evavaei nEv. Otav evai eevyonainvyn, npwtoiaoc9 avaei ie
KOKIVO XOAJDAOTAVEVAQANJN KATAOaON apoTIONC.
YnodcEi: To koupi eevyopoino/ aneeyepoino (5) npne va natoe iexpia va npao3Anef to auofoanevyeopoino onrty oovn. Movov toe pnoepite va aeueuepoae To koupi eevyopoino/aneeypoiocn (5) ka n ouakeyn tibetai ektoa letoupyiac. Dtav aneauepoeaote to koupi neyepoino/

anepeyonoiong (5) npn an Tnpoan Tou auboau anepeyoionnc, n oukeur dev tetai ekicak eoupyiaac aia tietai ony katataon ovayovr.
Kataotaaan avapovic
Me ouvtoo natau tou koumou evyovoinan/anevepyonoinc (5) n oukeun tiotai katatoa anayovic. H poutoboc (9) aovbaodrive i npao xpuja. H ouakeun tietai kalai oekataoan napatipionnc me vdo ouvtuo taou koumou evyovoinan/anevepyonoinc (5).H oioobosc (9) avaei ouevxuc ie npaovo xpuja.
Shenzhen Simsukian Electronic Technology Co., Ltd. Building 1, the 5th plant, Jiayi Industrial Park
Daping Community, Guilan Street Longhua District Shenzhen P.R. China
www.zeiss.com/nature
www.zeiss.com/hunting
ZEISS DTI
3/25 | 3/35
HctpyKznaNo npimHeHIO
For United States patents which may cover this product see our website.
Patents: www.zeiss.com/cop/patents
DE EN FR ES IT NL CZ DK EE FI HR HU
LT LV PL PT RO SE SK SL BG GR RU JP CN 09.2021

HHTPYKUNIIO NIPMMEHEHIO
I3DnM MapK ZEISS OTNMAOTCA BENIKOENHO ONTKO, TONHO6pa60TKn DaHbIX NoTINM CPOKOM Cryk6bl.
CobnDaiTe npBedeHbIe Hnke yKa3AHNIO ONTmAlbHOMy npMHeHIO TnelOBnHOHH KAmepb, I OHa CTaHEh HndexHbIM CNYTHMKo HA DOnlne rObl.
INHΦOPMALIJIY DIAI BAUJ E3O1NACHOCTI
Bo3dienCTBnOOKpykaIOuecpebl
- PnmeaHne. Hkorda He Hanpablan Te oBekTb npbopa HenocpeCTBeHHo HA TAKNE HHTENCHMBHE NCTOHNN TERRA, KAK COJIHHe NIN Na3epHHe yCTPOCTBa. B 3OM CTyueae oBekTb NOKyIpaMOT paOtaT b KaCobpaIOUaJI INH3a, pa3pyuHa BHTpeHNHe KOMHOEHTb.
OctopoxH0!N36eraTe KOHTaKTOB C MeTaIINueeCKHM NOBepxHOCTAM (pe6paMn OXnaJaeHn) NocJIe BO3dEChTBA COJIHeHOrO CBeta IMXoJIOa.
OctopoxHO! CTeHeb 3aunTbIP65 rapaHTnpoBaHa TToBko B Tom Cnyae, cEm BCE 3aunTbIe pe3nOBBe npncocObeHnnoTHo 3akpbl.
PpmeaHne no 3proHOMKe
OctopoxHo!PnINIITeHbOMNIOJIb30BaHmIPpeyCMOTpTe Na3bI BO 136exAHHe 60nB Jnye3aIANTHom Cytabe.
Onachoctb nporlaTbBAHH
OctopoxHl He no3BnIe MaHbKm DetM 6pTa yCTPOIcBO B pyk. Pn HnpaBnHOM o6paee Mory OTXKPENITBCa MEKNIE dTAL, KOtOpbcpebeHO KMOET CNYAHI NOPIOTHTb.
Yka3aHnno TeXnke 6e3oNaChocT npn o6paueHHn cakkymyIATopom
ObpaaItecbcycTPOACTBOMAkkypatHO:npnHe6pexHOMO6paueHNO83MOXHOIOBpeKJeHMe HAXoJrEoCBAHTPNAKyMylTotaP.
He noaepraite yctpoictBO Bo3eCTBnIO nAmEH NIN BbICOKX Tempeatyp BbIe 60°C.
Heza6bIpaTeYcTOpOCTbO,TObSbIOCTaTbAkkMyIyrTOp.3MaHaAkkMyIyrTOpa IIOIIOBATETEMIEHpeIPODcMOTPcHa.
Icnojb3yTeToJIbKOOpTnHAnbHOe3apdHoeyctpoCTBO,BXOJHueB KOMNIKETIOCTABKN.
3aPdIKyVCTPOBCTBAONyCKAeTCAOcYUeCTBnHTbTONkoPnTEmNepaTpyTe 10 no 40^
3KcIyataaPnTemepatypHxke yka3AHORO 3HaehnBeDET K CHIXeHHIO EMOCTK kyyMjTOpA. To06yCnoJIeHO TEXHNecKMM Oo6eHHOTMn H He ABJRCTe DEEKCOTM.
CnyetnaBefaTbDnntenbHoro xpaHEHNy yctPoivCTBa npN Temnepatype Hnke O C,a TaKcE BtBe 35 C.3To MoXeT cTaB npNHHo Heo6paTMORO CHXKeHNr EMKoCTN AKKMyrTOpA.
B Cilya neoBpeXJedHn yCtpoiCTBa IIN BxOda akkMyrATopa n3 CTPOE He0bXoIMIO OTnpaBnTb Taeoe yCtpoiCTAO B cepBnChIeHTP dI npoBeHn pemOHTA.
Yka3aHnno TExHKe 6e3oNaCHOCTn npn o6paueHH n 6JOKOM IHTAHN
IpeHdHaHOM IcNIOJIbOaHnI pnoBepBe 6IOK nIaTHAnI Ha KaEbe Ha OTCYCTBVE BIDIMINIXoRopekDeHN.
3anpeaaetcncnolb08aTnoapeXeHHbteactn.
3AnpeIaETcNcNOb3OBaTb 6bOK NtuaHnA B yCNoBnx ChpOCTn A aJAAxHOI cpeDb.
HcnoIb3yIteTolbKOcPmHaHbHbKab6JIb,BXOaIuB B KOMrJKeTIOCTABKa pa3peHnHO 6Noka nHTAHV.
BHeceHKe KaKnx-Jn60 TexHnuecknx N3MeHeHn 3aIpeJeHo.
IpoipobHnHpOPMaNy uKa3AHHNo ToxEHNIe 6201aCHOTIn npdeTcAneHbB nprlaioeMCA kpatKOM pykoBDCTBe (QuickGuide).Ero TAKe MOKHO cKaHTaBa CnaCte KOMHaBn B paoepz aarpzyoK: www.zeis.com/hunting/downloads
Ytlnn3aun aKkymnyTopoB
B EApOENKCM COO3E 3OT CMMBOI yKa3BBAET Ha TO, 4TO AKKMyTATOP, HNOb3cMb B DAHOM YCTPOCTBC, NOKeKNT XPAHEnIO OTdJIbHO O T DpyN XTOAOB IN ME KOET 6BtB yTuINM3APOBAH BMECTC 6 BtTOBIM MycopoM. IaY TuINM3aUM NCOJb3OBAHNbHX AKKMyTATOPoB BOCnOJBayTeBC yCnyrma PpeDpNVAHIN NO yTuINM3aUNI OTxOoB, DECTByuux B BAeIN CTpaNE. MATEPNAH IN BaeCTBA, BXOJaNE CoCTAB AKKMyTATOPoB, MOYr CTaB INPNHHON BPeDHO BO3PeTCTBNA Ha 3DopOBBe IIOeN IN OKpykaMOUcpey.
3a60TcB O HAdnHexauey Tnnnnn BnHbUeDnNx N3 cTPOA KkyMnTropoB, Bbl BHOCITcCBN BKnAd B 3aunty, CoXpAHHeNe n yIyHuWeNe KaYeCTBa OKpyKaIOe CpeDe.
OtnpabnIte Ha yTmIIaIIO ToIbKO pa3PExeHHIbe akKMyIaTOPbI.
CopepKaHne pTyTH, KaMnN CbHua BcNcNoBMyeMOM AKKyMnyTOpoe He npaeBbAe3aueHnYcTaHOaHeHHbIX DnpeKtBuO 2006/66/EC.
HΦopmaaIgIIOb3ObaTeIgNo yTINHa3aIgN 3NEKTPnHecko n3NEKTPoHHo annapaTypb (DOMOX3AICTBA)
3TOT CMMBOH HA ⅢDAJNEXA, A TACKE B PnIINRAEMO K HIM DOKyMeHTALIM, O3HAAET, YTO INONbYMbE M3KTPnVcckne N ENEKPOHHe yCTPOiACTB He IpeHnHa3HuYeH bIy dYTHaJIaMBA MBeCTe C6bITOBBIMN OTXoDMN. IyHdNExaIe nepepaB0TK, peReHepauin NpeKJKNHbIa THXCTPOvCTB OTHECnTE IH B COOTBTCTBYIOUe TYHKbI CBOPa, TDE OHN pINHHMAIOCTcB3O3M3DHO. H KekotopbIX CTpAHx CYUECTByE TO3MOXHOCTCB TaTb TAKeOEIAJIe HA TNIH3AUO npn NOKyIke HOBOrO aHAnOruHTo TOBAPA B PO3HNHOH cTeI. HAdNExaIa JYTHmIAIaIa TAKO rYCTPOiACTBa CNYKIT IIN 3AUNTHI OKpyXauOIe Cpebl N pPeIOIBPbAaET BPeDHO B3QeHIE BA HE HcEBoKA H OkpyXauOIO cypeD, BO3MOXHOe PN HEPaBnHbOM oBaAsChn COTXoAMn. BOnoe NoDPo6Hy INHpOpMaIIIO O bIKKaIeM NyKTE c60pa Bbl NOyHYte B AIMNHCTPAluM MyHInlNTaTIeTA. B COOTBTCTBI M MeCHbIM 3AKoHOATEIbCTOM 3a HEPaBnHbHy yTINHAUO 3TO TRO BINA OTOXoOB MOKET BVMATCB Wtapf.
ДяКЛиЕТOBEBPONEYCKOMCOIO3e
CBKNTTEcC bAAMD NApemOM NnN NOCTaBUNKOM FO BOPoCm yTNIN3AUIN 3JIeKTPnuecknx INI 3JIeKTOHbHx pNIOpOB. OH npeOCTaBt BAM DNOJONHIETbHyIOHOFOpMAUIO.
HnFopmaaO6 oyTmI3aunB dpynx cTpaHax 3a npedeNAMb Ebponeckoro coo3a
DHHB CMBON DECTBNTENEH TOLKOB DNE EBPONCCKO COO3a.
Pn HEOXMOIOCTN yTNIMNPOBATs 3TO H3DEJNE CBKNTECb CAMINHCTPAACB
BaIeero MyHNIPIAITETA IN BAIMM DNIEPOM IN PCPOCITE O B0MOXHOCTN
yTVNIAU
PnmuHeHne no Ha3HaueHHIO
YcTPOICTBO npedhaHaHEnO DnOBaHyXeHN TEnIObBx CnHTAypnp
HaIOHOEN 3a NpOdoN, NOCKE DNHN NcNOIbOABHBN B rpaKaDCHKHX CEJAX.
YcTPOICTBO nepeDnaHaeHo DnTOrO, YTObBdt ENrPraJn C HNM. INoNbEyIe
yCTPOICTBO TOIbKO TaK, KAK ONCaHO B HAcToAeu HInCTpyKuHN IO pImMeHENIO.
PiOn3AOINTeB N dIeep He Hecyt OTaETCTBeHHOCHTa No POBPeKDeHN.
OByCIOBNEHbte pIMHeHEm He No HAHaehHIO Nn HApUeHEm nPaBVn
kCNPLyatauN.
PpOBepKa nCnpaBHOCTn
PepnIIOJIbOABHMeM y6eNTeB, YTO TEnIOBNIHOHHa KAMPe Hc IMET BINIMXb NOBeEJHIN
Y6eIntecb,HTO KAMepa co3daet Ha IINCRnee YETKOE IV3OBpaXHeMe 6e3 KaNX
Y6eDNTcB B PnabINH HnCTPOKe TENNOBmHOH KAMepb; CM. Yka3HAHBA Bp3EJIePexMn HnOHeHn
KOMNJIeKT NOCTaBKn
TEXHUYECKNEXAPAKTEPNKU 3/25 3/35
BbIKJIIOUeHHe CBeToaNoDa
TbBbKIOHTCBeTOIOH,HAZEISSDT3,HAXMNTIyUepxNBAITIE5cEYHO npaoy KOHNky COTENKO (7).TOCNE 3TOCBOIOIOB,BkIKHOITC. TObb CHOBAOKNIOHTCBeTOIOH,NOOTOIOI TYDQDPY.
ABTomaTnueckoeOTKJIbOueHne
YTO6bI AKKMyTnTOP pa60an DOnbue, ZEISS DT1 ABtOMaueckn ABkHouaETcpe3 60 MmHT Be3dEeCTBnR.
Pekm 3aIncn
IOCTYINHA BO3MOXHOCTb FOTO-N BUNEOBcEMKN. DnIepeKIOOCHNMAEXNy 3TNIMD yBMMAPEKHMAMHaXMMTEH yDEPKNBAITE HAxATOH KONKY CNYCKA 3aTBOPA (6) CMMBON B BEPXHEJ EBOH qACTN DNCLPNER NMEHNTCB COOTBECTBNC C BILOPAHBHIM pEXMMOM.
3aynCTb foTO- HIN BuaeOcBEmky MOxHO OJHOKoAThbIM KOpOTKM HAKAtEMN KOHN 3aONC (6). Eue pa3 HaxMnTe KOnKny Cytcka 3aTbopa (6), TTO6bl OCTaOHOBt BuDeocBEmKY.
PnnpoJnKHTBHO BIDeOcEBMke 3aHbB AOTMaTneck paAaeTcN COxpaTeTcB BnDEOTDeBHXΦaIIOB HeOBJLIOPO pAmepa npDQKNTBHeBOCTbO 10MAHYKKaBd.
Pekm foTOcEMKn Pekm BIDeOcBEmKn


MeHIO
JINHAKATAEMKHOKNMEOH8OTXpblBaETCRIbABHeMEOHNOHaIINCJIe.
ITPnTOMCMOTNTBVAUONCKaTeJIb(10).BITABHOMMEOHIMEOTCRCLDyIOUme
BapnaHtBuBOpA:
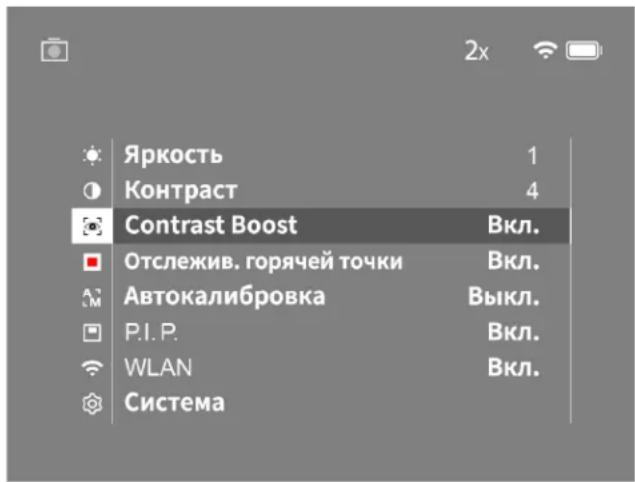
Rpkoctb:c nOMOIOBIO 3TOI cyHKUIM BBI MOKeTe HAcTPOINb Rpkoctb dKcNJIe. JINB BbOpa DOCTYHb Yteblpe CTENEHN RPKOCTn. CTENEHb 1 npedcaanBcOoMmHMAbHyIO Rpkoctb. PpB bIope CTENEHN 4 Rpkoctb BydET MAKCMABJHO.
Kohtpact:CnMOOJIbO3ToIyHKUINBblMOXeTeOTpyYnnpOBaTB KoHTpACT 103o6paKeHMe. DnBa BbIOA DOCTyNBI YETbpe CTeneHH KOHTpAcTHOCTN. CTeNEb1 O3aHaayu MmHIMMaJIbHyO KoHTpAcTHOCTb IO3o6paKeHMe. PnBbIOpe CTeneHH 4 KOHTpACT6yDetMAkCMMaJIbHM.
Contrast Boost: aKTHINpyTE 3T0 pEXM M yIyHHeHRA BIDMOCT IN PBNBICOKO BJAXHOCTN BO3DxaVIMaHC.
OcIeKbHae TOpuey ToKn: npn BbIbope 3oT oHyKuN cMbteBIO b6EET KApChbM KBaDpTOM.
A BTOKAK6P0Ba:BA TOM peXIMEMO XHO BbIIOHNHt pyHyO (aBTKaJI6P0Ka=BkN.) INB ATOMaTIYeCKyO KaI6P0Bky (aBTKaJI6P0Ba=BkN.)
P.I.P. (Picture in Picture): YeHtpaBHa oNbactb NcOpaXeHHa YBeHHaBaTeB 2 p3a n OTOpaXaETC B DIOHOHTeBHOM MAIEhBkOM OKoLIKe Ha DCNCUE.
WLAN:pyHKUBAKIOHNEB/BukIOHNEHWLAN.PnBkIOHNEHWLANycPoIcBOPipeOCTABRETOCKyIOCTyNCAETN203MOKHOCTNOKIOHOOHJKpOryoYcPoTcTB(HaPmEPE,CMAPTOPOH)
CnCTema:3e6cbcoepjkatcpa3HmHbIe CnCTEMHbIe HAcTpoIK,HaipMep 3blk,BpemN 3aB0ckne HAcTpoIK.
ДЯн HabirauHm NO rAusbHOMy MeHO CNYKAT KONKn co CTpeKoN (7) N KONKa MeHIO (8). HaxMTe npayu KONKny co CTpeKoN (7) nI npokpyTK BHH. HaxMTe neayu KHONky CO CTpeKoN (7) nI npokpyTK BBePc.
KopOTHM HaxATMeH KONKIA MEHO (8) BbEpyte NHyKT MeHO. BblOnHETe
nepeXOaB NoDMEHIO. BblONHTe HaCTpoKn KONKAMn CO CTpeKoN (7). HaxMTe XHONKy MeHO (8) DnI NoTBePckJdeHn BbOpa. BblOnHETc B03pA
B rAIBHOe MeHO.
DorIM HxAtvCM KONKMI MeHO (8) BblONHTe BbxOd IV TlABHOrO MeHO
IN BePHTecB PexHM Ha5IooHeH.
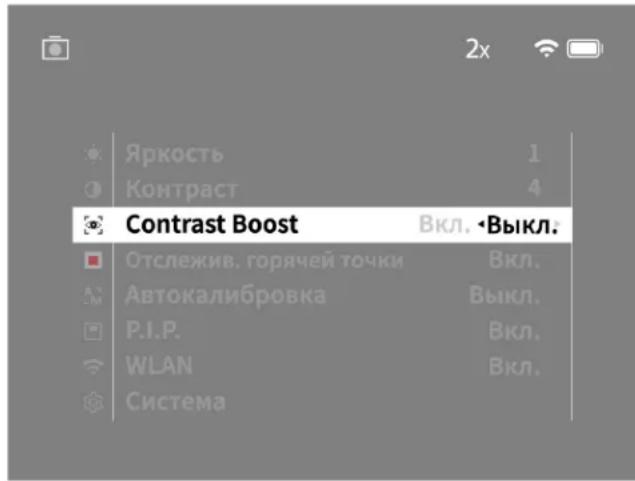
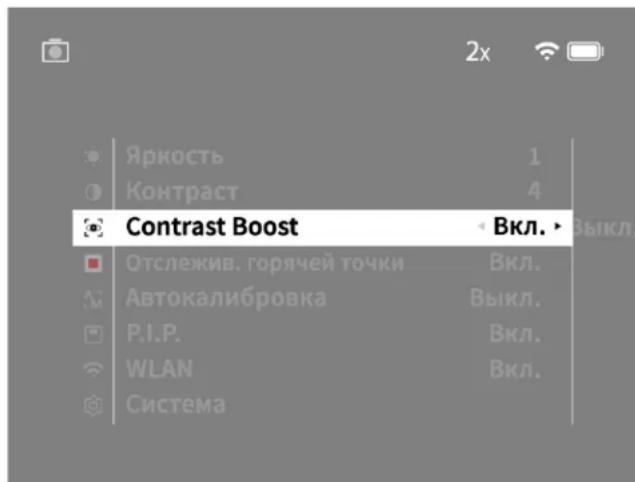
YcJIeHHe KOHTpaCTa
YcHHeNKeKoHTPaTaIaTaeB03MOXHOCTbONyHHTbOoneKAECTBEHHoe 13649eHnPmBvBCOKoBAXHOCTBO3DyMaIn TYMaHe.Tak BbEINOTCR KpOMk,TO NO3BOJIeT JyHHe paCnO3AABtB CTpyKTIpyI.
YtOb6IaKtBuOpBaBycuHHeN KOHTpaHa BAuEeM yCTPOJcTBe, BbIepePte B IaBHOM MeHOo contrast Boosts).3aTeM bIepePte E KJI. NIM BbIKJI.KOPOTKIM HAKaTHEM KHOKNM MeHO (8) nOITBCPdNTe Bb6Op
PnmeHHe: pekomeHyTeCnIOB30BaTpeKHM TOIbKO B OINCAHHbIX Bblue yCNOBHX NdeAKTNBPoBaTB er npOcbHou pa6ote.
CnCTema
IIOMeHIO «CnCTema» coepKHT cIeNyUoWc BapNaHTb Bb6opa:
C6pocdo3a0b0cknHAcTpoek:BaBepntc «C6pocdo3a0b0cknHaTcpoek》,YTObblBnIOHNbTB0BpaT K 3a0bOcKIM HAcTpoiKaM yCTooiCTBA.PnI TOM BCE coXpAeHHHe DaHHBe, BKNIOVA N3oBpaKeHHN BmDEo3aNNCi,BdyTuJDAneHbI.
C6poc HAcTpoek: npn Bb6ope pdyHKmN «C6poc HAcTpoek» BCE HAcTpoKyCTPOCTBa bdyT c6poWeHbI Do CTaHdAPThbX 3HaHeHIn.
HactpoKn 3decb bbl MOxTe BbOpaTb 3bIK MeIO.
Data/BpeM:3DecbMOXHOHaCTPONTB DaTy IN BpeM.
Kpome TOrO, DnA O3HaKOMnEHH DoCTynHcNeDyUoJAR NHOOPMaJRA:
WLANSSID:300CBOTOP60XACTCRIMTOKNOCTyNA WLAN
BCTpoeHHe PO:3decb0tobpaKaetcInHfOpMaunO TeKyuueBepCn BCTpoeHHOro nporpamMHO o6ecneHn.
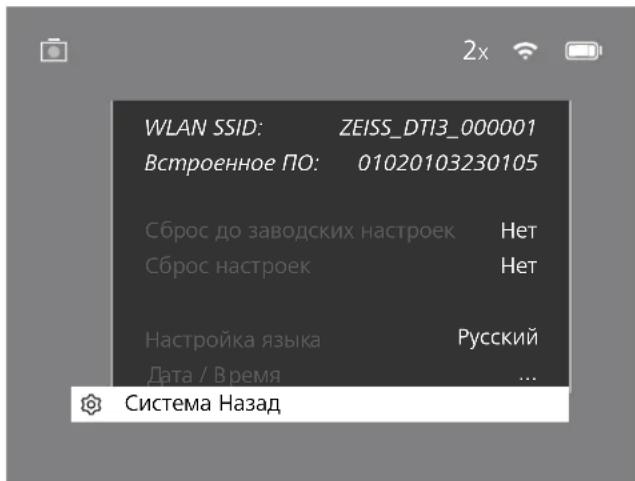
C6poc do 3aBODCKHX HAcTpoek
Дясбресдддддддддддддддддддддддддддддддддддддддддддддддддддддддддддддддддддддддддддддддддддддддддддддддддддд徳псьгсгсгсгсгсгсгсгсгсгсгсgсgсgсgсgсgсgсgсgсgсgсgсgсgсgc gc gc gc gc gc gc gc gc gc gc gc gc gc gc gc gc gc gc gc gc gc gc gc gc gc gc gc gc gc gc gc gc gc gc gc gc gc gc gc gc gc gc gc gc gc gc gc gc gc gc
C6poc HacTpoek
ДдсбрcaHасроeнпердув�ддгССТЕмПЯБНОМEH.3aTeM BbIbePteNYHK《CbPocHaCtpoeK》.BbIbePteBaPnAHT《Дa》NIOITBpeDnTe CBWbIbOp
PnmeaHne. IyceuHoro 3abepeHnCbpoca Hacptpoek Heo6xOIMMa nepe3arpy3ka yctpoiCTBA.
IpecoaHbIe daHbIe npy tUIN3aunn nnpepeaue BaWero yCTpoiCTBa ZEISS
TOMHHTO TOM,TOB BHTPENHE NAMATN YCTPOXCTBA MORYT XPAHNTbCA
NEPCOHABHLBE pOTo-N BIADEOMATEpAIBL. PPKeJe CEM NPERaBt yCTPOCTBO
TPTbIM NLIcAM, BINOLNHTE PHyKIOC 《C6poc Do 3ABODCKHX HAcTPOEK》,TTObI
CTepETB TnDAHNNy 8NeD1ECb, TO OHN BUNYdAneHb. 3TO TOMOXET BAM
3aUITNTB CBOIO HACTHYIO KJTH3N B603NAOACHOCT DAHNbIX.
CoeBCTBME 630nacHocTn yctpoiCTBa
AKTNBHO YACTBYTE B OSECNUEHIN 3AUNIbTHIOHPOMAUONHHO E60ANACOTHO Baillero yCtpoiCTBa C IOMOJIbTHIOPOKHeNZAIDDJNOXHTb NOCpECDTBM YCTAOHNBOHbIXO BHOBHNIPOHMBNK, KAK TOJIBKO OHONCTAHOTDCTOYTHBI.
Data/Bpemr
IINHACTPOKNI DtBn I BPEMCHNEPDEITBE PaaedcI CHTTEMRAI HHO 3ATEM BbpeiyeNHYKT Data/Bpemr. Tenepe MoXHO BInOnHNTb HAcTPOKy, YkAa3B ROD, MecIL, CuNLO, BpEMR B Vacax INMHytAX.C NMOUIOHbACTOPIKHe (FOpMaT BpEmeHn) Bbl MOxete Bb6pa24-1nn 12-HacBOWf pOpmAT OTo6paxEHn BpEmeHn.He 3abYbTe HAcPTOBt EkyuO DaTy n BpEmr. cToBb Awnm OdtorpaFm n BnBeDAn3NcBn ChabEkehN HInOpPAumoe O datn BpEmeHn CEmKn.
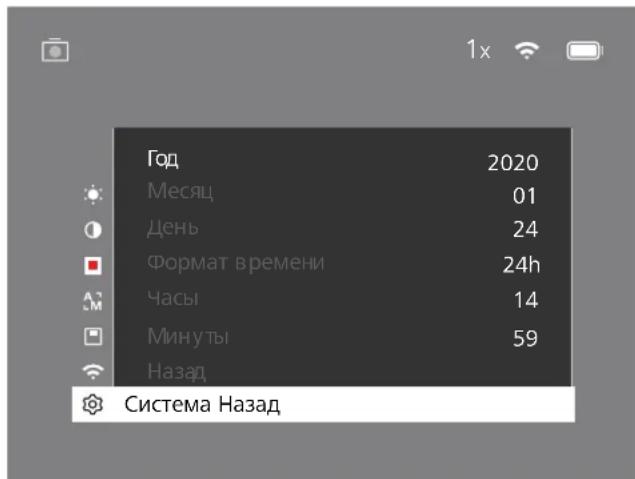
IpneMaHHe. Ipn NoJIHnO p3aRJaKx AkyMylrToPA hAeTOyN DaTb N BpeMeHN Ha yctPOCTBe c6paCbBaHToC. CHOba HAcPTOpTe dAty n BPEMy, Tc0b6 K foTOrPaFmN m BInDeo3AaNCIM DoBablanbc KopkeTHbTe DAnhBte DaTb N BpeMeHN CbMeKN.
06HOBJIeHHe BCTpoEHHorO IIO
IporpamHMOeObeCneHMeoKet 6bTBbOHOBHeoC NMOUBoIO npIOJOEHNn IoxTHNKOB ZIESS. Ia oboHOBHeNcIeHyIe HCTpyKuIM, COepKaAUMmC BnpIOXHOENI IAOxOHOKNZIESS.
PnmeaHne. Peped Hauanom OboaJIeHNBCTPOEHHO Iy6eIATEcb, 10Y cTPOIEbTO NIOHcTO 3APKeHe HO BkNIOAHTe YcPOETBO A pOueCE C06OBHeH, TAK KKT 30MOKETPNBECTK NOBPEXDEHM.
PnmuueHme. Ecm Bbl 3anykaeTe 6bnoBHeNe Ueep3 npnoxHeNe ZEISS nOxOtB, Bbl DoJIXHb CHOBa NpDtBepdntb 3TO dNBAbeOnaCHOCTHa yctpoTBe.
CBeToNDnHa HnDnKaua
| Pabochue coctoHnue | CocToHnue 3apJxu | Lbet HndKATopa | CoCTOHe HndKATopa |
| Ipyck -- | |||
| HopMaJIbHbI peKIM paBoTbI | 3apJxu He BblIOJIHcTeTc 3eJIeHbI TogPIT | ||
| 3apJxu He BblIOJIHcTeTc (HmIKy I yPOBeHb 3apJxu) | KpaCHbI MItaET | ||
| BblIOJIHcTeTc 3apJxu KpaCHbI TogPIT | |||
| BblIOJIHcTeTc 3apJxu (ycTroJYCTBO pOLIOCTbI 3apJxuHo) | 3eJIeHbI TogPIT | ||
| PeKIM OxIIaDAnIA | 3apJxu He BblIOJIHcTeTc 3eJIeHbI MItaET | ||
| 3apJxu He BblIOJIHcTeTc (HmIKy I yPOBeHb 3apJxu) | KpaCHbI MItaET | ||
| BblIOJIHcTeTc 3apJxu KpaCHbI TogPIT | |||
| BblIOJIHcTeTc 3apJxu | 3eJIeHbI TogPIT | ||
| (ycTroJYCTBO pOLIOCTbI 3apJxuHo) | |||
| Aus 3apJxu He BblIOJIHcTeTc -- | |||
| BblIOJIHcTeTc 3apJxu KpaCHbI TogPIT | |||
| BblIOJIHcTeTc 3apJxu (ycTroJYCTBO pOLIOCTbI 3apJxuHo) | 3eJIeHbI TogPIT | ||
PnmeHaeH. 10b636ckatb cncnneHn B TcHMeOTe, nCnONs3yTea CBeTOaHOD MmHaBHO npKoCTn. PO3OMY a CBETIOE BpEMy CYTOH INDKAUNCA BcEOIIOA MoXet 6bTb IINOxo BnIHua
UcTaPaHHe HEnCnPaBHOCTe
HeinpabHocb Bo3MOxHbI npuHbPeWHe
| YctpoiCTBO He BkJIOnaETCRA. | AkkymIyIaTOp pa3paJxHc. | ZapnIte yCTPOICTBO. |
| YctpoiCTBO He 3aPaxJaETCA. | IobpexJeH USB-Ka6eB. 3aMeHite USB-Ka6eB. | |
| HedocTaToHoe HApPaxHe Me CetN. IpoBepbTe BHeuHm NtOChNk 3neptoCHa6XeHn. | ||
| USB-Ka6eB HEnpabInbH OYCTHO AaHaeH B pa3bEm yCTpoiCTBa. | IpaBnHbNo PoiKlOHTe USB-Ka6eB n YbElnTeCeB BOTCYCTB MIOpExeHn N aRpyHHeH NtEKePa N pa3bEma. | |
| HeueKoe I3o6paxHHe. | HeobxOyoMo 3aHObO OTKaIIb6PoBaTb 3KpaH. | BbINOHHe T KeIb6pOBy A COOTBeTBCM C INCTpyKUHMI. |
| Ha I3o6paxHHe NpOBAHOTCA NIOCSb. | ||
| HeoHOpOINHOCTb foHa. | ||
| I3o6paxHHe CInLbKom TemHoe. | B HAcTpoKax Bb6paHa CInLbKom Hb3Ka JApKoCTb DicnIeR. | HAcTpoIe JApKoCTb DicnIeR. |
| I3o6paxHHe Ha DInCnIe HeKoTHpactHoe. | B HAcTpoKax Bb6paHa CInLbKom Hb3Ka CTeHb KOHTpacta. | HAcTpoIe KOHTpactHocTb. |
| KOMlbOTep He paClIo3HaEt YCTPOICTBO (BHyTPenHNaPMyb). | YCTPOICTBO He BcKIOHcHo. | BbINOHHe NpePdAny I3o6paxHn NocLe BcKIOHcHn |
| HEnpabInbH OIOKIOUeH USB-Ka6eB. | yCTpoIcTBA. | |
| He yCTaHOBHeH NoE6bOIMoe PO. O3HakOMbTeCb C INCTpyKUHMI B p4aIeNe «USB-nopTb. | ||
| Ha I3o6paxHHe XyKa3Ha HeBepHn DaTa n Bvem. | Ha yCTPOICTBE He BbIOJIHeHa HAcTpoKia BpeMeHn (BpeMn/DaTa). | BbINOHHe HAcTpoKy BpeMeHn B COOTBeTBCM C INCTpyKUHMI. |
| PiLoXe KauCtBO I3o6paxHHe. | PiLoXe NpOIOHb YEcoBn MOrTy CTaB pPruHnO Hb3KOrO KaCtBb I3o6paxHn (HaPImep, CInbHb CHERoIaD, DOXb, TyMaH n Ip.). | |
| HeoCTatoHb DInaIa3O HDeTEKzHn. | ||
| HeCyTko I3o6paxHHe. | YcIeHHe NcKTOpACTa AkTbHpOBaHO, HecMOTpHa HOpMaIIbHb YeCLIOBIV. | IdeAaTbHpyTe YcIeHHeNc KOHTpacta. |
| CMapTfoH He MoKet IodKIOHHTbce K DTI 3. | HeprabInbHn napOlb WLAN. BeEdite nprabInbHn napOlb. | |
| B 3OHe IcNOIb3OBAHn YcTOpCTBa DoCTyHn CInLbKom Mhoro cTeB WLAN. 3To MoKet bBy pPruHnO ImeIOUxck OIOBok pRi NIOKIOUeHn. | IpeMeecTIte yCTpoIcTBO B 3OHy C He6OJIbUH M KOINHECTBOM IIN IOJIbH M OTcyTCTBm Eot WLAN. | |
| CInHnA WLAN NoCToHn IprOaDaet IINI npebbBaETcra. | YcTPOICTBO ZEISS DTI 3 HaxOITcR CInLbKom DanoEko, IInbO B 3OHe erO IcNOIb3OBAHn DoCTyHn CInLbKom BoIbUoe HcN0 IprOuHc cTeB WLAN. | IpeMeeuIe yCTpoIcTBo DoTex nop, noka He Bydet obHapyekn yCTOuHbN CInHnWLAN. |
| MeXdu yCTpoIcTBMn I PrAeMHNKOM HaxOITcR npelrTCTBcIe. |
WLAN
YcypctbOa Ch6KHeO fHyKHeM WNL. PpeIeHte B MEOH bKnHHTe yHxNHO WNL.Pm kIyTaBauM WNL BepxHne pBaOB qCTn DmCnEe NOBBAETe 3HaYOK WNL.Teneb K YcypctbBy MoXHO NpOkKnHbCB OCMaPTpOH No WNL.
PnmuueHne. PnpBpntenHo HacTpoeHHb npoB n coeHHn WLAN CytPOCTBOm HeOxDmIMoMHeHT pRn EPBoPnPMHeHH BO 366XnHHeCAHKUHOAPoBAHOro DoCTyNa TpeTBnx MmEHnB npoB MoXHO B PnIOEHNMnOxOTNHKO ZESS. PpcYcTaHOBnHHn npoB:12345678
Длг NOBILWEHн KMФОТа NOIb3OBAHn npINoxHeHn OXOTNHKOB ZEISS CINHXPOHN3NpyBaII NaPOnBa Hcex BApE WCTpnpOBAHHBx yCTpoCTBAx.
INOBIIeHnB63oNaCHOCn CoeHNHeHpeKOMeHcyTeaN3MeHHTb napOJIb.
DnTTOQTOBAtkMyTATOPCkMxHKOaKMOHOaBUE,peKOMeHyTeCTA BIOHOTAHdyHKUWLANBYCPOITCBTeTJbKOaIINPepeaHdHaHHbIXN CBBN CnpOJIeXHEcEMZEISSDNAOXTHNKo.
PpIIOXKeHne IAn OXOTHMKOB ZEISS
YCTAHOBHeHa CMAPTOH PnIOXeKHeHn DnOxOTHKnOB ZEISS.OTKPOHTe
PnIOXeKHeHn CnDyTe COepeKaAUMC B HEM NcHCTpykUIMR DnYCTAHOBeHHN CB3M YcPTPOCTBOM ZEISSDTI3
PnIOXeKHeHn DnOxOTHKnOB ZEISS NOBHOJET NpOpaBaTb N3o6paXehHN
N BDeEO3AnHC HA CmPTPOH, PocmoTAtBOaBb N3o6paXehHN B pexMIpeAaBHO
BPEMeHn, BblIOJIHTaHb HAcTPOKn HIOJIb3OaBbCR PpO4HM FyHKUIMN.
PpOboHoe OONCAHb 3NX BO3MOXHOCTCM.C BpNAKe PpNOXeHHN.
PnmeHaeH.HTO6bI McNoB3oBaTb PmIOKHeMe DIA OXOTHKOB ZEISS N erO cyHKu, y6eMaTeCb, HTO BAI CMAPTOH NOKNOeH K cTeN WNL YCTPOJCTBa ZEISS DT13.
PnIeHaeHne. PnI KAXDOM NOKJHOCHN K PpINOKCHNO DIA OXTHIOKOB ZEISS INFOOPMAO Tckuue Date N BpEmHa aBtOMaHeckn nepeaetcno CMOAPTOHa HA yCTPOCTBO.
PnmeyHae.Obpatne BHHaHMe Ha To, QTo bB HeNIOKHeHb Hpe3 o6bhyo WNL,ecn bbl yctahOBuHN WLCoedHHeMe C BaWIM yCTpoIcTBOM ZEISS DT 3, T0b6b Berpytck C kObHMnCetra WNL,OTocOeHNHTZEISS DT 3 OTcMPTpHa.
USB-nopt
NcnoB3yTE USB-npT (14), paonoloxeHHb C HxHHe CTOpBOy yctpoCTBa, nI 3apnK n nepeaau daHHbx (oToTporpaM u BnDeo3AneC) Ha KOMNbTeP.
ZEISS DTI NOKIIKAHCTC HEPES USB-NPT KAK MTP-ycptpctBO.Ha KOMNbIOTepax COC Microsoft Windows 10 yctpoCTBAPcnoH3AeT BAtMAHTeCKn Hcpaay roTOBO KIOKNIbOBAHNO.Ha KOMNbIOTepax c Apple macOS IINoCTyNA KDAHHM, XPAHILIMCM HA yCTPOCTBHe, NOTpeyETCAYTHOBA.KDIOHNITeBHOROpnpaMMHOO oBeCEeHEN CTOPOHHNX OCTaBUNKO, HanPIMe APAndroid File Transfer. ZEIS HE Hecet OTBETBCHHOH He npdoctABHReRapAHm HA cnONbOBAHneopnpaMMHOO oBeCEeHEN CTOPOHHNX OCTaBUNKO.
Microsoft Windows 3apmtpnoBHHMn 3aknn M Mapknn
Microsoft Corp. Ha Tepptopm CllA uMn npynx cTpaH.
Apple m macOS 3apmtpnoBHHMn 3aknn Apple Inc Ha Tepptopm CllA n npohx cTpaH.
Android raanrTa TopoBn MapKoGooGe LLC.
WtataBHOe rHe3do
B HINKHEI CTNCTPOCTBA pACNOONOHE TNE3O CO tCAHDAOTN3OBAHHO peB6bof 1/4 (13) nTcYANTOBKn HA cTaNAPTHbUHTaNTb. IaI NOUYEHNA tCBAJHbTO N3OBPAKENH YCTAOHATE yCTPOCTBO HA NTaNTb.
3apnKa yCtpoNCTBa
Ecn kkyMnTOp 3ap3aKeH, 3ap4nte yctpOCTBO, noJIb3yUC USBpa3cEMOM (14). YpoBeHe 3apda kkyMnTAtop OTO6paKaTeC a BepxHne IpaBnactn HcIe HcyTPOCTBa. Pnp HkKOM ypoBe 3ap4za JEBt INHdkatopa HA NcIIe MeHETCB HA KpaChb. BO BpeMa 3ap4zKn CBeToND (9) CBeTATCR KpaCHbIM HA BKNIOEHOM n BbIKHOHOM yctpOCTBe. Pnp NoHm 3ap4ke AkyMnTAtop 3BET INHdkatopa (9) IMMeHETcH BA HeNbH.
3aMeHa 3aIHTHOK PblIKN 06BeKTINBa
ДяЗAMHHTOKNKbIHKO6bEeTKBa(2)BbKpyTNEBVHTB(3)cNOMOuBTOBETeKTHCIMNTeKpEeKHyIOCTAHNY(4)NOBpeKDeHHy3aunTHyKpBlyKUo6bEeTKBA(2)YCTAOHBeHOYAEa3UHYYKbPbEyKo6bEeTKBa(2)NkpenExHHyoNactHry(4)HaMeTO.CNOMOJIbTOOBETKn3akpyTNEBVHTB(3)
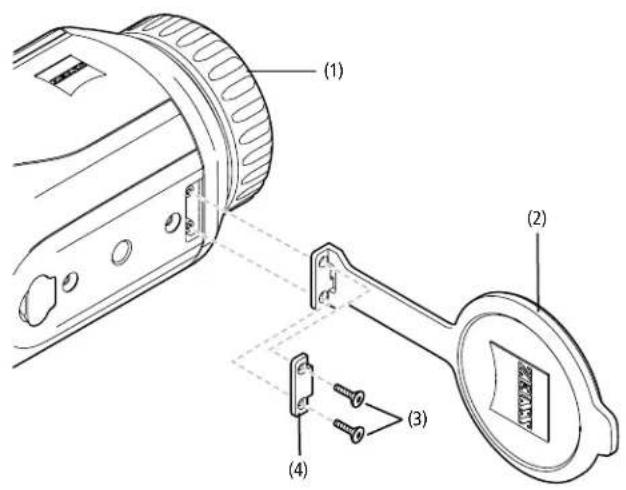
Yxoi n o6cnykubahne yctpoiCTBa
KpyHbIe 3aepnHHeHn (Ha npmepnecnn) Ha nH3ax cneyET He CTpaTb, a Cbyn ydaNt BONOSOH KCTOOK. Cnbl O nAubce Moryr cep3 HekTOPOE Bpem Aok3ab HeratBHOB BOE DCNECTBE Ha NOBepxHOCTn NIN3. PIOCTOCH TcO60 OHCTKN HIN3: NOyTB HA IN3y IOPTEPbTe ee HACTbIM nATKOM I3 NOXoJUero MaTePnHa.
IINI 3AUNHOTO6P3OBANHTRPNKOBORHOHAONKE,OCB6EHHO BTOPTNCKXYNCNOBNX,CNEyETXPANHTIPNBOpCAxOMMeCTeCXPOUENB BEHNHNIIBOPXHECTEJNUH
YcTpoAeZEISSDT3HeTpe6yETKakoro-nMoDononHentbHorOyxoda
YxOINo6CJyKuBaHneaKKymyTota
BbnoHnHrTe cndyUouye ykaaHa, HTo6bl npOuNTb cPcK cyxkb6k kkymnyrTopa:
H36eAaTe xpaHeHH yCToPcIbTa B yCIOBmX BbICOKnx TemnepaTyO.
He peKoMeHdyETcXpaHbTbYCTPOCTBO C NOCTOARHO NOIHOCTbO 3apAKeHHbIM AKKyMnTOpOM.
He donyckaTe noHHo pa3paKn yCTpoKCTBa.
06HOBHeHH nporpaMMHoro 06eNeHn
B pamkax 3aKOHnrapaHTm (2 roda c MmEHa TepexoDa PnCKOB
TOBAPBA-B COOTBECTBNA 3aKOHDAeTbCTBOM TepaHNNMbI PnEOCTABMn
COOTBECTBYOUNe OBHNCHNn DyYCPaHNE HEOCTATKB. KaNPaBNO,
OBHOENHn KACAOCTCR AcreKTOB Be3ONaCHOCTIN NcYCPaTHe FyHKMOHALbHBx
HOyUHeHn H E OXBtBAJOT KAKXnNIO HOBIX FyHKnn IporpAMMHoro
06cneueHH. B ToI Mepe, B KOtPOJ nI pReHsEH BonPocO B3ONaCHOCTn
HEoBXdmo npoeDcTaJIHe HOBIX FyHKnn, 3To B pNHUNHe HApBETCA
OCHOBHEm dI pTeHnHa HOBIE FyHKnn KAK TOBkoE.
No ICTeHENH yctAHOBtEHORO 3aHOHOBtEBCTOM RAPHTMHORO cPcKaMbI, be3ycIOHO, pniJIaERm ACE ycNIA, TTObI pTeOCTABnTbAM COOTBeTcBYoUHe daJIbEHNHue O6bONHHeHr. Ho npabo Tpe60BaTHx npTeOCTABnHr OTcYCTByET.
3anachbte yactn
J3A3A KAKXH N60 3anaCHbX cacteI dR BAUero yctpoIACTBA, HAPIMep, 3aHTHO BKNKIIIO DnOBkTbIg, ObaPTcBcN LINPEy, MeCTHOMY DnCTPbBTOpy 3anaCHbX cacteI NIK B HAW cepBChbI CEHTp.
Mokho o6paTbCRA K CnueaHnCTAM Hauei KIneHTCK no LyxKbI no TeneoHy
cnoheBnKka no nTnHiu, c08:00 do 16:30 (uehtpaBHOEBPoneckoe Bpey).
Te.: +49 (0) 800 934 77 33
Oakc:+49 (0) 64 41-4 83 69
service.sportsoptics@zeiss.com
MIMZIESSIANRETCNHOHMMHADEXKHOCTN BILCOKOROKAeCTBa.No3OTMY MBI-HE3AHCNOOOTAPAHNTBHXOB8BETBCHPDBABNZIOHTOHUEHNO KOKYPTAEIO-NPEOPCTABNEMHAADHOENIEZIESSRAPaHTNCOcPOKOM DeICTBINDArOa,KOPTOPANB CUYAEPERNTPAUNNEDENMOKETbIPbNDnEH eue HApHINrO,ECNIPEHCTPAUNNPON3UWNA BTEUEHNEETbEPHEHbCO DnH NOKYNK.CYCNOBMRPAHATMNMOXHO03HAKOMITBCNoCNEyHOUeCCBKe: www.zeiss.com/cop/warranty
Perictpaunn 3ndenr: www.zeiss.com/cop/register
Adepnc npo3Bodntela
Carl Zeiss AG
Carl-Zeiss-Strasse 22
D-73447 Oberkochen
www.zeiss.com/nature u www.zeiss.com/hunting
BO3MOXHbI HEMHOHBA NCOHNOHNNN KAMNIOKTAUN, KOPTOpBc npO3BOaTcA CLeHbTexHHeCKoCoBepHeCHTBoAHn Pnpbopa.Mb He BepeM Ha c6Ba OTBeCTBEHHOCTNa 30 OuINKn IOneAtKn.
PnmueyaHne no 3aunTe daHHbIX
PnHcTb30aHHn D11/35 npocxOoHT nOcbapOka nepcoHaBbX daHbIX, Yka3aHHno 3aunTe daHHNo 6opabOke nepcoHaBbX daHHbx MOHXHO HnB PA pande3 saryck:/www.zeiss.com/hunting/manuals
HopMaTHBHO-tpaBOBaHΦOpMaun
Hana3OH HACTOT paHONPMHOROMyIa
WLAN:2.412-2.462M
MoUHocTpaDnOpiemHOroModyr:100MBT

Hactoam Carl Zeiss AG 3aBnReT, TTO TcnoBnHOHHa Kemaepa D13 cootbetCTbyeT DupeKTeBe 2014/53/Eu uDupeKTeBe 2011/65/EU. IOnHbI TeKc Deknapaum cooTbeCTBN EC nBoone noPpOHy HhOpmauM CM Ha Hauem cae B INHTephe; www.zeiss.com/dti-335/conformity.
HeKOTOpBle 3nAKnTexHmckoro KOHTpOJIyI nOJepExnBaemx ZEISS DTI 3 CTAnDAPoT BMOYrTOOpaXaTHcHa HxpeHae yCtpoACTBa ZEISS DTI 3. NpePdnte BpaasIe CInTeMa rIbHOrMeHO.3aTeM HauNTe IyHKT HOpMaTHBO-HpaOBBaHnΦopMaunr.
3T0npdykTnuehHOBaB B pAMKx nueeHUMAVC Patent Portfolio dnnuHoro HekOMMpeckoro IcNIOb3BOAHO Co CTOpHbI NpOeBteTne I (I) KOIOPOBAHIN BInEOMAPEPAHO B COOTBETCBHH CO tAHdApTOvACV (AVC VIDFOs) mII (I) DEKOIOPOBAHIN BInEOMAPEPAHO AVC, 3AOIOPOBAHIX NpOeBteTneIMI DmI INHbIX CEJIEN W/INN BInEOMAPEPAHO, PpEOCTABNEHHX INeHcHvPobAAHBM INCTPb6bOTOPoM BInEOMAPEPAHO. IIN INHbIX BApOaTHOB NcONIOB3BOAHN HE npEOCTABNErTOH NkAKAJI NueeH3HA, DaxE NOpPa3yMeBaemA. DOnONHIENTbHyIO INHOFOPMAIO MOKHO NnOYtB B MPEG LA,LL.C.,cm.http://www.MPEGLA.com
PpOu3BODHTeJIb 6NoKa NHTaHn
Shenzhen Simsukian Electronic Technology Co., Ltd. Building 1, the 5th plant, Jiayi Industrial Park Daping Community, Guilan Street Longhua District Shenzhen P.R. China
IeHTnFkAToP H3eHn: SK22G-0500200Z
TEXHUYECKNE XAPAKTEPNCTUKN BLOKA NITAHNA
www.zeiss.com/nature
www.zeiss.com/hunting
ZEISS DTI
3/25 | 3/35
取掇說明書
For United States patents which may cover this product see our website.
Patents: www.zeiss.com/cop/patents
DE EN FR ES IT NL CZ DK EE FI HR HU
LT LV PL PT RO SE SK SL BG GR RU JP CN 09.2021

取極説明書
www.zeiss.com/cop/warranty
www.zeiss.com/nature www.zeiss.com/hunting
Building 1, The 5th plant, Jiayi Industrial Park
卡尔卡:SK22G-0500200Z
電源二卜T二力儿一夕
雪子系统
www.zeiss.com/nature
www.zeiss.com/hunting
ZEISS DTI 3/25 | 3/35
使用说明书
For United States patents which may cover this product see our website.
Patents: www.zeiss.com/cop/patents
DE EN FR ES IT NL CZ DK EE FI HR HU
LT LV PL PT RO SE SK SL BG GR RU JP CN 09.2021

使用说明书
www.zeiss.com/cop/warranty
请在此注册您的产品:www.zeiss.com/cop/register
制造商地址
Carl Zeiss AG
Carl-Zeiss-Strasse 22
D-73447 Oberkochen
www.zeiss.com/nature和www.zeiss.com/hunting
www.zeiss.com/nature
www.zeiss.com/hunting


- GEBRAUCHSANLEITUNG
- Instructions for use
- IMPORTANT SAFETY INFORMATION
- Environmental influences
- Ergonomics note
- Risk of swallowing
- Safety instructions for battery
- Safety instructions for the power supply unit
- Disposal of batteries
- User information on the disposal of electrical and electronic devices (private households)
- For business customers within the European Union
- Information on disposal in other countries outside of the European Union
- Intended use
- Function test
- Installing/removing the battery
- Observation with and without glasses
- Power on/off
- Standby mode
- Calibration
- Observation mode
- Zoom
- Color modes
- LED-Off
- Auto-Off
- Shooting mode
- Menu
- Contrast Boost
- System
- Factory reset
- Reset settings
- Personal data when you dispose of or pass on your ZEISS device
- Cooperation on device safety
- Date and time
- Firmware update
- LED status
- Troubleshooting
- WLAN
- ZEISS Hunting App
- USB port
- Tripod thread
- Charging the device
- Replacing the lens cap
- Care and maintenance of the device
- Care and maintenance of the battery
- Software updates
- Spare parts
- Manufacturer's address
- Data protection notice
- Legal and regulatory information
- Regulatory Information USA and Canada
- Kanada:
- Regulatory Information California
- Power supply unit manufacturer
- TECHNICAL DATA ON POWER SUPPLY UNIT
- Carl Zeiss AG
- MODE D'EMPLOI
- Amplification contrast
- INSTRUCCIONES DE USO
- ISTRUZIONI PER L'USO
- DATI TECHNICI ALIMENTATORE
- Gebruiksaanwijzig
- NÁVOD K POUZITI
- BRUGSANVISNING
- KASUTUSJUHEND
- KAYTTOOHJE
- UPUTE ZA UPORABU
- HASZNÁLATI UTASITÁS
- NAUDIOJIMO INSTRUKCIJA
- "ZEISS Hunting" programme
- Lietosanas instrukcija
- INFORMACIJA JUSUDROSIBAI
- Vides ietekme
- INSTRUKCJA OBSLUGI
- INSTRUÇÉS DE UTILIZAZão
- MANUAL DE UTILIZARE
- INFORMATII PENTRU SIGURANTA DVS.
- BRUKSANVISNING
- Firmware-upppatering
- NÁVOD NA POUZITIE
- INFORMACIE PRE VASUBEZPECNOST
- Environmental vplyvy
- NAVODILA ZA UPORABO
- Odstranjevante baterij
- Navodila za varstvo podatkov
- PbKOBOCTBO 3a YIOTPE6A
- HHOPMALUN3a BALIATA BE3ONACHOCT
- Bb3dEeCTBnHa OKoJIHaTa CpeDa
- Yka3aHHe 3a eproHOOMnHOCCT
- OnachocT O3aDaBHe
- Yka3aHHa 3a 6e3oNaCHOCT OTHOCHO 6aTePnRA
- Yka3aHn 3a6e3onachOCT OTHOCHOxpaHbUOTO yCTPOIcTBO
- N3xbpnaHe Ha 6aTepeHn
- HnΦopMaZna 3a nOTpe6nteNTe OTHOcHO N3XBbPJIHeTo Ha eNekTpueckn H eNekTPOHH (DOMAKHNCK) ypeDi
- 3a 6n3Hec KInMeHTB EBpOeNcKna cb03
- HOpmaa3a CbupaneTo Ha OTnabBn BdbpKABN 3BBH
- EbponecknBcIO3
- Ynotpe6a no npedHa3HaueHne
- Функионанla npOBepka
- BKnIOuBaHe/3KJIIOUBaHe
- PekmHa roTOBHOCT
- Kan6pnpahe
- Pekm 3a Ha6JIOeHne
- Maansa6npahe
- UBetOBnpeKmm
- CBeToaNoI N3KJI.
- ABTOMaTHUHO N3KJIIOUyBaHe
- PexKm3a CHMaHe
- MeHIO
- YCNIBaHe Ha KOHTpaCTa
- Fa6pnueH pecet
- Bpbuahe Ha HacTpouKnTe
- JIuHnI daHHN pRi npEdaBaHe na BaUHn ypeD ZEISS 3a oTnaBtu nHn Ha dpyro liue
- CbdeIcTBn3a CnryphocTHa ypeDa
- Data/4ac
- AkyaI3auHaΦbmyepa
- CMHa Ha 3aunTHata KaayKa Ha 06eKtmba
- NoCTBaHe n noDpBxKa Ha ypeDa
- NoCTBaHe n noDpBxKa Ha 6aTepyTa
- CoΦTyepHnakTyanu3aun
- Pe3epBnH qactn
- Ampn3BouTe
- Yka3aHHe 3a 3auNTataHa daHHN
- PpabHa n perynaTOpHa HhOpMaun
- Pon3BODntenHa3axpaHbauoTo ycTPOINCTBO
- O△HIEE XPHSE
- IIAHPOΦOPIE ΠIA TH ΔIKH ΣAΣ AΣA/EA
- PepiBaAovtkeEipdpaeic
- YnodEtEn epyovouia
- Kivovoc katantoon
- YnodEic aopaaiaac yia to ouoowpuit
- YnobdiEic aoapaleia tpoosotkoou
- Aieeon ouoowpeutuw
- Ia npopopiec yia tov xpnotn ia tvn atoppuyn nAektpikw K a Iaektpovikw oukeuv (18iWTEC)
- Tia enayyelaaties evtos Eupwnaiknc Evwong
- Pnpoopopiec yia th diaeon ae aalecs xwpe cktoc ts Eupwaiknc Evwns
- PpOβλεπóμενη xργση
- EeYoxc aeitoupyia
- EvpyoioiAn/AevepyoioiOn
- Kataotaaan avapovic
- HHTPYKUNIIO NIPMMEHEHIO
- INHΦOPMALIJIY DIAI BAUJ E3O1NACHOCTI
- Bo3dienCTBnOOKpykaIOuecpebl
- PpmeaHne no 3proHOMKe
- Onachoctb nporlaTbBAHH
- Yka3aHnno TeXnke 6e3oNaChocT npn o6paueHHn cakkymyIATopom
- Yka3aHnno TExHKe 6e3oNaCHOCTn npn o6paueHH n 6JOKOM IHTAHN
- Ytlnn3aun aKkymnyTopoB
- HΦopmaaIgIIOb3ObaTeIgNo yTINHa3aIgN 3NEKTPnHecko n3NEKTPoHHo annapaTypb (DOMOX3AICTBA)
- ДяКЛиЕТOBEBPONEYCKOMCOIO3e
- HnFopmaaO6 oyTmI3aunB dpynx cTpaHax 3a npedeNAMb Ebponeckoro coo3a
- PnmuHeHne no Ha3HaueHHIO
- PpOBepKa nCnpaBHOCTn
- BbIKJIIOUeHHe CBeToaNoDa
- ABTomaTnueckoeOTKJIbOueHne
- Pekm 3aIncn
- YcJIeHHe KOHTpaCTa
- CnCTema
- C6poc do 3aBODCKHX HAcTpoek
- C6poc HacTpoek
- IpecoaHbIe daHbIe npy tUIN3aunn nnpepeaue BaWero yCTpoiCTBa ZEISS
- CoeBCTBME 630nacHocTn yctpoiCTBa
- Data/Bpemr
- 06HOBJIeHHe BCTpoEHHorO IIO
- PpIIOXKeHne IAn OXOTHMKOB ZEISS
- USB-nopt
- WtataBHOe rHe3do
- 3apnKa yCtpoNCTBa
- 3aMeHa 3aIHTHOK PblIKN 06BeKTINBa
- Yxoi n o6cnykubahne yctpoiCTBa
- YxOINo6CJyKuBaHneaKKymyTota
- 06HOBHeHH nporpaMMHoro 06eNeHn
- 3anachbte yactn
- Adepnc npo3Bodntela
- PnmueyaHne no 3aunTe daHHbIX
- HopMaTHBHO-tpaBOBaHΦOpMaun
- PpOu3BODHTeJIb 6NoKa NHTaHn
- 取極説明書
- 使用说明书
- 制造商地址
Brand : ZEISS
Model : DTI 335
Category : Thermometer