
T* SLR ZS - Lens ZEISS - Free user manual and instructions
Find the device manual for free T* SLR ZS ZEISS in PDF.


| Product Type | Lens |
| Brand | Zeiss |
| Model | T* SLR ZS |
| Mount | ZS (Bayonet) |
| Focal Length | Varies by model (e.g., 35mm, 50mm, 85mm) |
| Aperture Range | f/1.4 - f/16 (typical) |
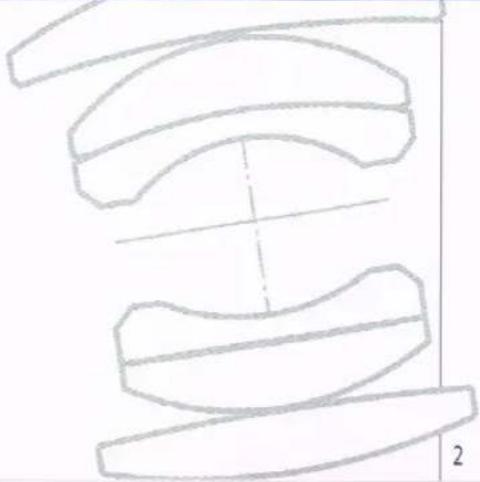
| Optical Construction | 6 elements in 5 groups (Planar design) |
| Coating | Zeiss T* multi-coating |
| Filter Thread | 55mm |
| Minimum Focus Distance | 0.45m |
| Dimensions (D x L) | 65mm x 45mm |
| Weight | 310g |
| Diaphragm | Manual, 6 blades |
| Focus Type | Manual |
| Compatibility | SLR cameras with ZS mount |
| Included Accessories | Front cap, rear cap |
| Maintenance | Clean with soft cloth, avoid touching glass |
| Storage | Keep in dry place, protect from dust |
| Safety | Avoid direct sunlight, do not disassemble |
| Repairability | Authorized service centers, spare parts may be available |
| General | High-quality manual focus lens, renowned for sharpness and contrast |
Frequently Asked Questions - T* SLR ZS ZEISS
User questions about T* SLR ZS ZEISS
0 question about this device. Answer the ones you know or ask your own.
Ask a new question about this device
Download the instructions for your Lens in PDF format for free! Find your manual T* SLR ZS - ZEISS and take your electronic device back in hand. On this page are published all the documents necessary for the use of your device. T* SLR ZS by ZEISS.
USER MANUAL T* SLR ZS ZEISS
Carl Zeiss T* SLR-Lenses ZE, ZF.2, ZF, ZK, ZS
Gebrauchsanweisung Instruction Manual Instructions d'emploi Manual de instrucciones Manuale d'Istruzioni

We make it visible.
| 4 | Deutsch | D |
| 14 | English | GB |
| 24 | Français | F |
| 34 | Español | E |
| 44 | Italiano | I |
 | ||
Camera Lens Division
73446 Oberkochen
Germany
www.zeiss.com/photo
DE_10_070_129IV DEJEN?
FRÉSUIT DIV 08/2009
Subject to change
Carl Zeiss T\* SLR-lenses – for Superior Images
Thank you and congratulations for purchasing this Carl Zeiss T\* lens. We are confident that you will enjoy exceptional photographic success with your new lens.
Outstanding lenses are designed and manufactured in an intricate process involving science, technology — and passion. Carl Zeiss's capability for extreme precision, allied with cutting-edge technological mastery, is evident in the optics we make for micro-chip fabrication. We set the world standard and we are the world's leading maker in this field. In the field of cinematography lenses, where images are often enlarged 1000 times, and color uniformity is critical, Carl Zeiss is also the world leader. Here, our passion for creating the ultimate imaging tool plays an important role in guiding the science and technology we apply to the design and manufacture of our lenses. Technologically inspired passion, based on the extensive experience and know-how we have gained since 1886, is the formula we are now incorporating into the high-performance Carl Zeiss SLR-lenses. Never before has this unique combination been available to such a broad spectrum of passionate still photographers. The result is a unique range of high-performance lenses for analog and digital SLR cameras.
Carl Zeiss SLR lenses are currently available in five different models.
The technical specifications indicate which bayonet mount is available for each specific lens.
■ Carl Zeiss ZE lenses are designed for use on Canon SLR cameras with an EF bayonet mount (EOS models).
■ ZF lenses are designed for use on SLR cameras with a Nikon F (AI-S) bayonet mount.
■ ZF.2 lenses are also designed for use on SLR cameras with a Nikon F bayonet mount and have an additional electronic interface (CPU) for extended functions.
■ The ZK lenses from Carl Zeiss are designed for use on SLR cameras with a K-bayonet from Pentax.
■ ZS lenses were designed for use on cameras with the classic M42 thread mount. Thanks to the universally available "M42 adapter", they also fit many modern high-performance SLR cameras.
All the lenses come with a lens shade as standard.
Highlights of the SLR-lens family:
■ excellent optical performance
■ manual focusing with the smooth feeling of high precision and durable mechanics
■ perfectly adapted for film and digital photography
■ highly advanced flare control for crisp and brilliant images
■ geometric distortion very well corrected
■ color-matched lenses for superior consistent color reproduction, as featured in professional motion picture lenses
■ beautiful out-of-focus zones (bokeh') due to optical design and 9-blade iris with near circular shape
■ aesthetically pleasing rendition of highlights in out-of-focus areas (bokeh ^1 ) thanks to the unique optics design
Lens components
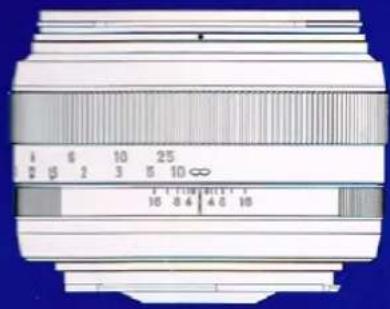
① Aperture scale (ZF, ZF.2, ZK, ZS)
② Aperture index/Center index (ZF, ZF.2, ZK, ZS)
③ Focusing ring
④ Distance scale
⑤ Depth of field scale
⑥ Infrared index
⑦ Shade index
⑧ Locking lever for shutter priority (ZF.2, ZK)
⑨ Lever for manual or automatic aperture operation (ZS)
⑩ The largest f-stop (orange) for automatic functions on cameras with an electronic interface (ZF.2)
Fitting Instructions
Front cap
The lens cap is removed and attached by pressing the two buttons on the rim of the cap inwards. When a lens hood is attached, the cap can be removed by gripping into the finger slot of the cap, which is accessible from the front.
Attaching the lens
First, hold the lens at the grooves of the depth-of-field ring. Align the index mark in the middle of the depth-of-field scale with the marking on the camera body (with ZE lenses, align the red mark on the lens ring with the red marking on the camera's bayonet mount) and insert the lens in the camera's bayonet mount. Turn the lens clockwise until you hear and feel it click into place. For Nikon models, turn the lens counterclockwise until it clicks into place. ZS lenses should be screwed clockwise onto the lens mount of the camera body until secure. The index mark on the scale should then be at the top.
Removing the lens
To remove the lens, hold it at the grooves of the depth-of-field ring. Hold down the lens release knob on the camera while turning the lens counterclockwise (or clockwise in the case of ZF and ZF.2 lenses) and remove the lens from the camera's bayonet mount. To remove the ZS lens, hold it by the grooves of the depth-of-field ring. Unscrew the lens from the body by turning it counterclockwise.
Attaching and removing filters, lens shade
Standard threaded filters can be attached to the front of the lens. If you use more than one filter at a time mechanical vignetting may occur.
To attach the shade in operation mode, align the white dot on the shade with the shade index on the lens. Turn the shade clockwise until it clicks into its locked position. To remove the lens shade, push the lens shade towards the lens and turn it counterclockwise. The shade can also be attached in reverse mode for transportation and storage.
Modes
ZE lenses support all key EOS camera modes (e.g. aperture priority, shutter priority, programmed exposure or manual exposure settings). Some operating modes and special functions of a number of EOS models, which are only intended for use with AF lenses (e.g. depth-of-field automatic exposure or eye control) are not supported. The optical and acoustic confirmation that that the camera body is correctly focused is supported by the ZE lens.
ZF.2 lenses support all key modes (e.g. aperture priority, shutter priority, programmed exposure or manual exposure settings) on camera models equipped with an electronic interface (e.g. current Nikon DSLR cameras). To do so, simply lock the aperture ring in the largest f-stop (e.g. 16) shown in orange. On camera models with an electronic interface, the aperture is manually set on the lens aperture ring. With some camera models, it is possible to set in the menu whether the lens should be selected using the setting dial on the camera or the aperture ring on the lens. Please note that, for technical reasons, there is no halfway notch between the largest (e.g. 16) and second-largest (e.g. 11) f-stop.
In the case of ZK lenses, the f-stop can either be set manually using the lens aperture ring or, alternatively, using the camera body (by locking the lens aperture ring to position "A"); this depends on the required mode (aperture priority, shutter priority, programmed exposure or manual exposure setting) and the features of the camera body in each case. For more information on available modes with manual lenses (Pentax KA standard), please consult your camera's operating instructions.
Depending on the features of the camera body, the ZS lens can be used either with full aperture metering or stop-down metering. For full aperture metering, select the desired f-stop using the aperture ring and switch the selector lever on the lens to position "A". When using a ZS lens on a camera body without aperture transfer or with an adapter, lock the lens aperture to the preselected value by switching the lever to position "M". With many cameras, it is then possible to carry out automatic exposure with aperture priority.
Refer to www.zeiss.com/photo for further information on compatibility.
Tips for lens care
To avoid any imperfections and humidity on the front lens surface, and for general protection, it is recommended to use the lens cap as much as possible when the lens is not in use. Dust, smudges and fingerprints on the lens surface can be gently removed with a very soft brush and then with a dry, clean, soft cotton cloth.
The ZEISS lens cleaning kit will give superior results and is highly recommended for this purpose.
Customer Service
The website www.zeiss.com/photo will guide you to your nearest dealer.
Carl Zeiss AG reserves the right to make changes to the published specifications without prior notice.
All rights reserved. No part of this material may be reproduced, stored in retrieval systems, or transmitted, in any form or by any means, electronic, mechanical, photocopy, recording, or otherwise without the prior written consent of Carl Zeiss. Copyright 2009, Carl Zeiss AG

- Carl Zeiss T\* SLR-lenses – for Superior Images
- Thank you and congratulations for purchasing this Carl Zeiss T\* lens. We are confident that you will enjoy exceptional photographic success with your new lens.
- Highlights of the SLR-lens family:
- Lens components
- Fitting Instructions
- Front cap
- Attaching the lens
- Removing the lens
- Attaching and removing filters, lens shade
- Modes
- Tips for lens care
- Customer Service
- Carl Zeiss AG reserves the right to make changes to the published specifications without prior notice.
Brand : ZEISS
Model : T* SLR ZS
Category : Lens