
KSK 2001 - Other household appliances MIELE - Free user manual and instructions
Find the device manual for free KSK 2001 MIELE in PDF.
| Product type | Side-by-side mounting kit for refrigeration appliances |
| Brand | Miele |
| Model | KSK 2001 |
| Compatibility | K 26xx Vi, K 28xx Vi, K 29xx Vi, F 241x Vi, F 28xx Vi, F 29xx Vi, F24xxVi, F26xxVi, KF 28xx Vi, KF 29xx Vi, KWT 26xx Vi, KWT 26xx ViS |
| Number of included parts | Kit including hinges, fixing brackets, lateral heater, cable covers, metal clips, anti-tip brackets |
| Materials | Steel, plastic, rubber |
| Kit dimensions (packaged) | Approximately 50 x 30 x 10 cm |
| Kit weight | Approximately 2.5 kg |
| Lateral heater power supply | Electrical connection 230 V, increases energy consumption |
| Main function | Mechanical and electrical fixing of two refrigeration appliances side by side, with anti-condensation heating |
| Tools needed for assembly | Torx T20 screwdriver, electric screwdriver, hammer, multigrip pliers, adhesive tape |
| Installation type | Fitting into a niche (mandatory before recessing) |
| Possible configuration | With or without partition wall (minimum thickness 16 mm) |
| Anti-tip protection | Fixing brackets included in the mounting kit of refrigeration appliances |
| Recommended number of people for assembly | Two people (due to the weight and size of the appliances) |
| Maintenance | No specific maintenance; check electrical connections during installation |
| Warranty | In accordance with Miele general terms and conditions |
Frequently Asked Questions - KSK 2001 MIELE
User questions about KSK 2001 MIELE
0 question about this device. Answer the ones you know or ask your own.
Ask a new question about this device
Download the instructions for your Other household appliances in PDF format for free! Find your manual KSK 2001 - MIELE and take your electronic device back in hand. On this page are published all the documents necessary for the use of your device. KSK 2001 by MIELE.
USER MANUAL KSK 2001 MIELE
Side-by-side Kit KSK 2001
de Montageanweisung
bg IHcTpkyKzna 3a MOHTaJx
cs Montázní námod
da Monteringsanvisning
el O8nyiEcToTnoOeTnOnc
en Installation instructions
Side-by-side Montage
He otctpaHЯBaIte dNCTaHcNoHHIte eIeMeHTN OT BbTpEShHITe CTPaHn Ha ypeIHTe.
ДемоHTираиTe bглOBиTe ПlaнкИ OT CTpaHInTe Ha ДрьЖКИTe Ha ДВaTа Xладиннka.

3aterheTe BkIIOUeHHTe B IOCTaBKaTa IIOOBHH Ha NaHTITE Ha Dbata Xla- dINHnka.
3aBnHTeTe 3aKpePbAunTe XaJIKN Ha Dbata XnaIINHka. IpoBepTe nobTOpHO nOJoxKeHneTo Ha Dbata XJa- DnIHnKa.
MOHTAX Ha OTONJIeHneTo Ha CTpaHnUHaT a CTeHa
OTONJIeHHeTo Ha cTpaHnUHaTa CTeHa Tp6Ba Da ce 3aKpeN KbM DcHAta CTpaHa Ha pa3NoJoxEHHa OTJBAo XJa- dnnHnK (rIeDaHO OTnped).
IocTaBeTe UnTOBte B npEeBHeHnte 3a CEJIta OTBOPN B OTOJIeHneTo Ha cTpaHnUHaTa CTeHa 1.).
I3TerIeTe 3aunTHaTa JeHTa Ha 3aJenBaUaTaJeHTa 2.).
ДрьхтЕ OTОПЛЕнгЕТО Ha CTpaHnUHa-Ta CTeHa ДALEЧ OT XlaДИNHLHka B DOJHaTa YaCT N NOCTaBete UΦTOBete B ROPHaTa YaCT B OTBOpNTe 3.).
HaTnCHete OToJIeHneTo Ha CToPAHnHuHaTa CTeHa OT Rope HAnOly KbM XJa- DnIHnKa I BKapaIte UuΦTOBete B DoJIHaTa Yact B OTBOpnte 4.).
bg - 3aKenBaHe Ha side-by-side kom6nHaizna

Pa3BnHTeTe BnHTa Ha KaNaKa Ha 5.).
CbaIeKaIaHaIeIcEla6.).
Cbpxkete ka6ena 7.).
OTHOBO NOCTaBeTe KaNaKa Ha UeNce- La 8.).
3aTeHHeTe BnHTa Ha KaNaKa Ha 9.).

Pa3BnHTeTe JIeKO BnHTOBeTe OT 3aHaTa CtpaHa Ha XnaIInHnka 10.).
BkapaTe BKNIOUeHnB DOCTaBkaTa KaapanKa6eNaB npope3nte Ha OTOpJIeHnETo Ha CTpaHnUHaTcTeHa.
3aKaYeTe KaNaKa Ha KaBeJa KbM BInTOBete OT 3aHaTa CToPaHa Ha XlaAnHnka 11.).
3aterheTe BnHTOBete 12.).
Cbbp3BaHe Ha xJaIINHnTe eINH KbM dpyr
I O6nHexTe XnaHInHnUte B 3aHaTa N M Yact, DOKaTO NOJOBnHtE Ha NaHTaTbBIA3aTe eHa B dpyra.

IocTabeTe uHToBte OTrope B noJIOBHHTE Ha NaHTITE.
bg - 3aKenBaHe Ha side-by-side kom6nHaця
PnTnCHTe XlaIINHnIte B npedHaTa IM qact Bb3MOxHO Ha-6JIn3o eINH Do dpyr.
3aTeHHeTe DbTa XlaIINHnKa DoIbIHNTEJHO B IpeHaT a Yact C NOMOHTa Ha BOIOPOBOeH KJIou.
BkapaTe NO-ДьIraTa OT DBete MeTaNHcKOBn, BKNIOUeHN B DOCTaBAKa-Ta, OTNpeD B DoJIHaTa 3aKpeNBaua xaJka. Ako e Heo6xOdmo, n3NoJ3-BaIte yK.

Pa3BnHTeTe Dbata BnHTa OT rOpHnTe CTpaHn Ha ypeDnTe.
I3noJ3BaIte pa3BnHTeHITe npedn TOBa BnHTOBe 3a 3aKpePbAHe Ha BKJIIOUeHnB DIOCTaBkata bTNOB eJeMeHr 3a3aUHTa OT ppeOpbUaHe.
ДВаТа bглови сlementа 3a 3aцИТа OT ppeo6рьшане можete Д a OTКрпeTe B MOHTаЖнЯ KOMПЛeKT 3a Вгражданe Ha XlaДИHnIuTe.

PnTNCHeTe DbTa bIIOBn eIeMeHtA 3a 3aHTa OT npeO6pbUaHe dONblNHTeJIHO C NOMOuTa Ha BOOnpOBoDcH KJIouc.
IocTaBeTe No-KbCaTa MeTaNHa CKO-6a, BKJIouHeHa B DoCTaBKaTa, OTrope B 3aKpePbAunTe XaJKn. Ako e Heo6-XOIMO, N3NoJ3BaIte YyK 3a Ta3n ZeI.
CleTobpa3BHTeTe OTHOBuHTOBete OT rOpHaTa cTpaHa Ha ypeiTe N DEMOHTnpaIte DbTa bTIOBn eIemEHTa 3a 3aunTa OT ppeo6pbuaHe.
IbrnoBte eIemEn 3a 3aunTa OT npeo6pbzane He ue ca Bn Heo6xOdImn IIO-KbCHO 3a 3aKpePbAHe Ha HnShaTa 3a BrpaXdaHe.

CneT OBa 3aBHTeTe OTHOBuHTOBETe OT ROPHTe CTpaHn Ha ypeDNTe.
CbBet: Cera npoIbIxTe BrpaKdAneto Ha XlaIaIIHnIuTe. 3a ceIta cIeIBaIte npIIOXeHInTe IHCTpyKUIN 3aEKCIIoAtaIuN MoHTaX Ha CbOTBeT-HnTe XlaIaIIHnIuN.

IocTaBete NOKpNBHaTa IaIcTHa B MeKdHAta MeKdy XJaIINHnIte, C TOBa BrpaXdaHTo Ha Side-by-side KOMbHaCnIyTa e HaNbJIHO 3aBbpseHo.
Montáž side-by-side
Side-by-side-montering
Denne side-by-side-monteringsanvis- ning er gaelende for folgende modeller:
- K 26xx Vi, K 28xx Vi, K 29xx Vi
-F241xVi,F28xxVi,F29xxVi
-F24xxVi,F26xxVi - KF 28xx Vi, KF 29xx Vi
- KWT 26xx Vi, KWT 26xx ViS
Side-by-side installation
These side-by-side merging kit installation instructions apply to the following models:
- K 26xx Vi, K 28xx Vi, K 29xx Vi
-F241xVi,F28xxVi,F29xxVi
-F24xxVi,F26xxVi - KF 28xx Vi, KF 29xx Vi
- KWT 26xx Vi, KWT 26xx ViS
It is essential to read these installation instructions as well as the operating and installation instructions for your refrigeration appliances before setup, installation and use.
Danger of injury due to electric shock.
The supply voltage is applied to the appliance even if it is switched off.
Unplug both appliances from the mains power supply prior to commencing side-by-side installation.
The refrigeration appliances must be installed side by side before installing them in the niche.
Danger of damage and injury due to appliances tipping over.
The refrigeration appliances are very heavy and can tip forwards when the doors are open.
Keep the doors shut until the appliances have been built in and secured in their housings in accordance with the operating and installation instructions.
Due to their weight and size, the refrigeration appliances must be installed by two people.
The following tools are required for side-by-side installation:
- Torx T20 screwdriver
- Cordless screwdriver
- Hammer
- Pipe wrench
In addition
- Material to place under the appliances to protect the floor
- Adhesive tape
... with partition wall
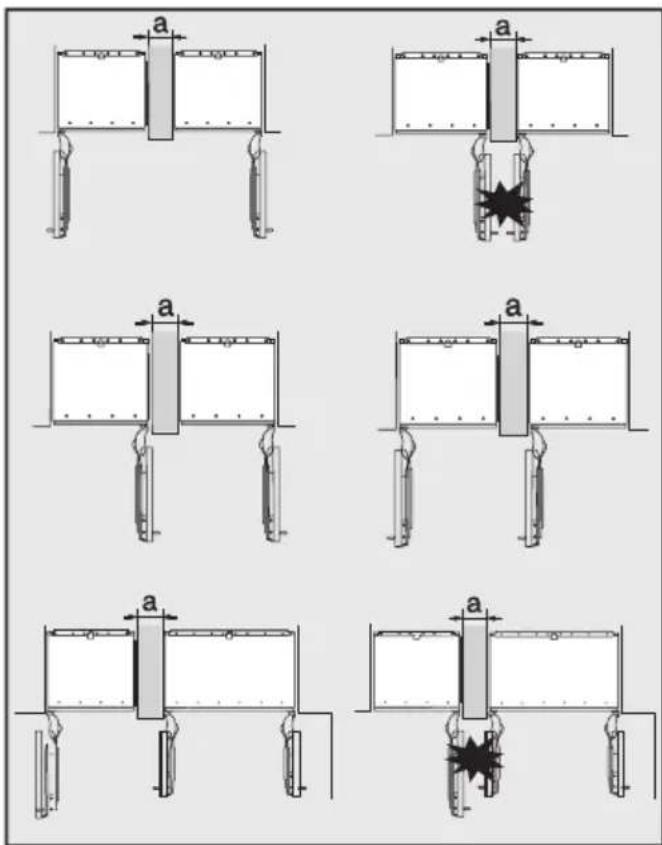
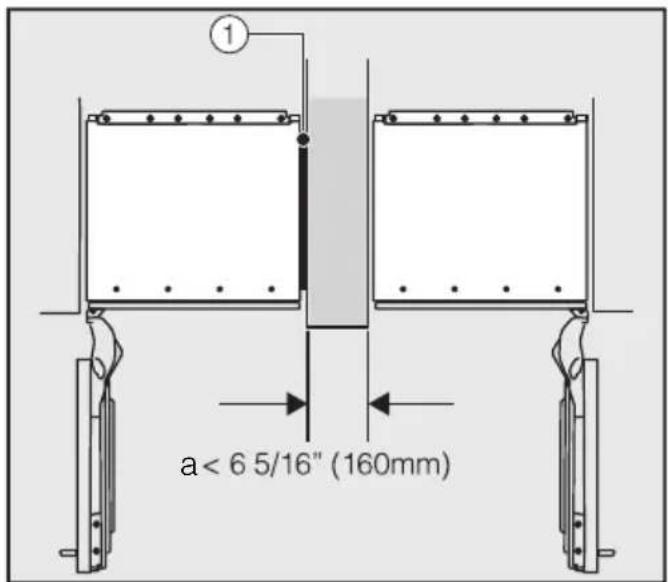
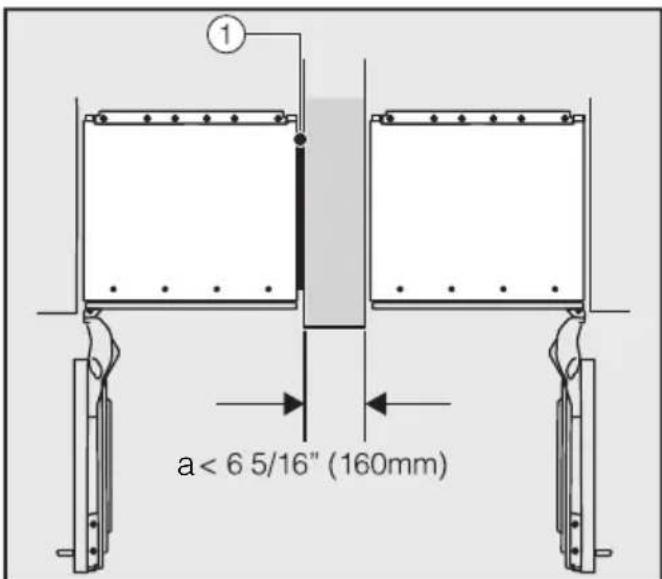
The wall a between the side-by-side appliances must be at least 16 mm thick.
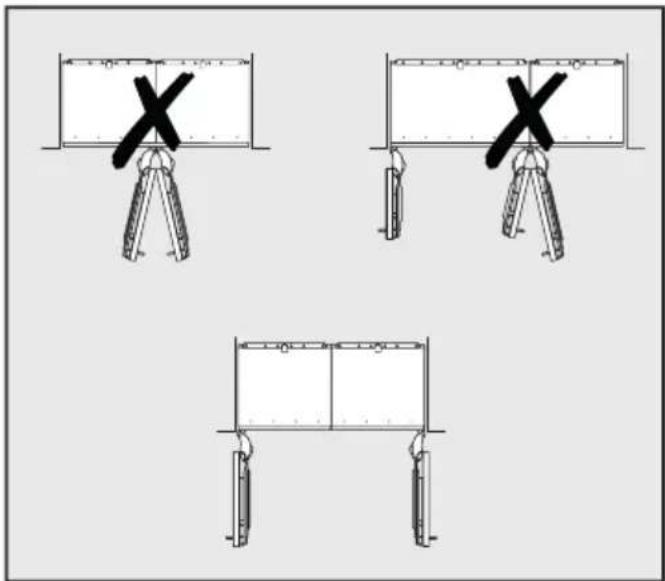
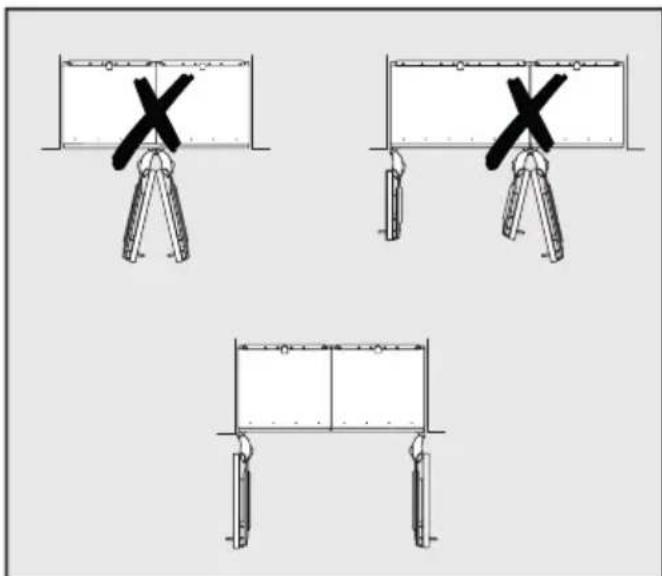
If the door hinges of the appliances are next to each other, you must take into account the thickness of the cabinet fronts and door handles so that the appliance doors do not collide and become damaged if they are opened at the same time.

If the partition wall a is narrower than 160mm you will need the side panel heater 1 from the side-by-side merging kit to prevent condensation from forming and any resulting damage (see section "Installing the side panel heater").
The side panel heater ① is attached to the right side of the appliance that is on the left (when seen from the front).
When planning niches, please note that the niche into which the appliance with the side panel heater ① is installed must be 3 - 5mm wider.
Connecting the side panel heater leads to higher energy consumption.
en - Securing a side-by-side combination
The appliances are then secured individually in their niche using the supplied installation material (follow the instructions in the enclosed operating and installation instructions).
... without partition wall
If the appliances are to be installed next to each other without a partition wall between them, they will need to be joined together with the side-by-side merging kit. In addition, you must install the side panel heater to prevent condensation from forming and any resulting damage (see from section "Preparing the refrigeration appliances").
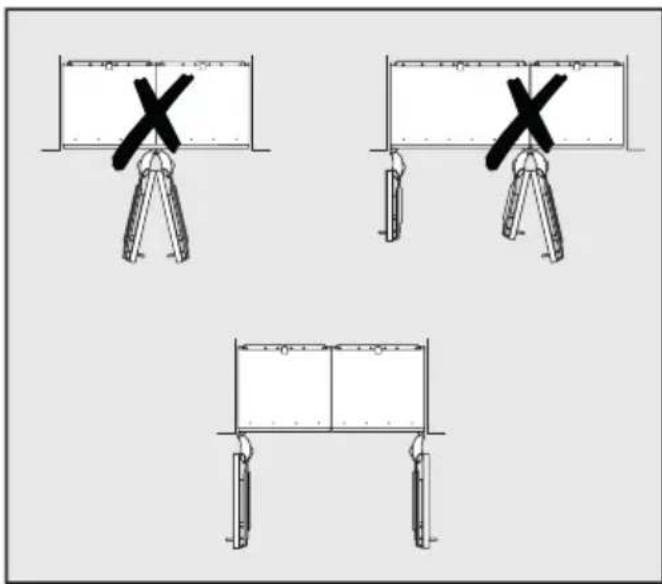
The door hinges of the appliances must not be located next to each other, otherwise the appliance doors will collide and become damaged if they are opened at the same time.
Connecting the side panel heater leads to higher energy consumption.
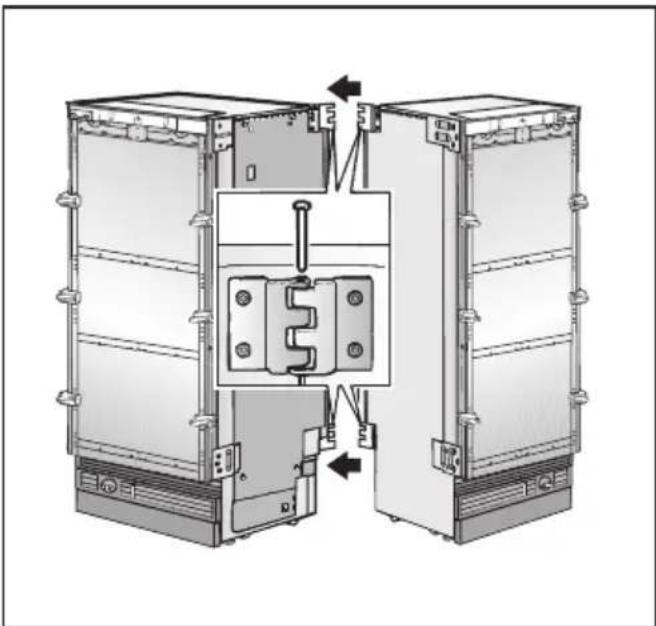
Preparing the refrigeration appliances
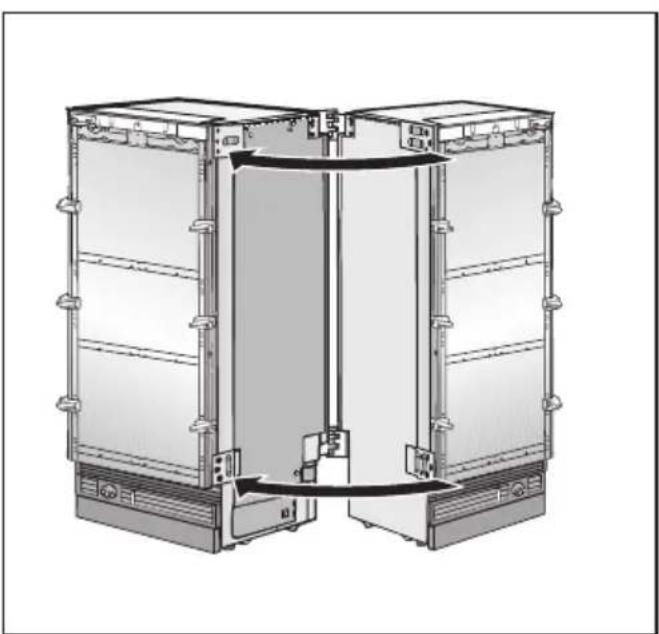
Place both refrigeration appliances side by side in the required positions, leaving a small gap between them.
Do not remove the spacers from the insides of the appliances.
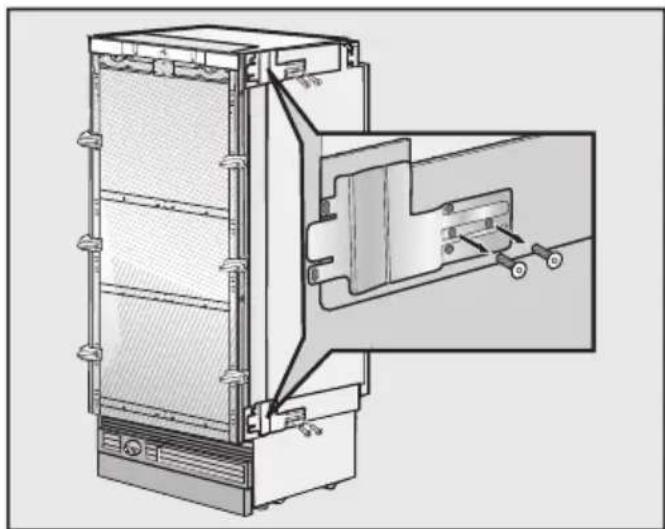
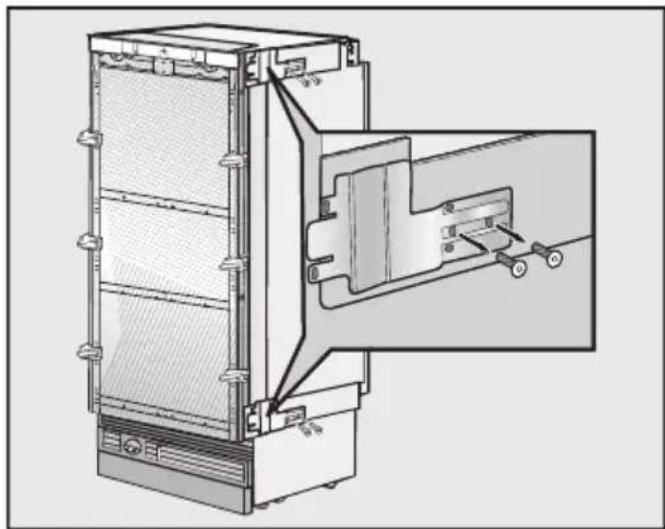
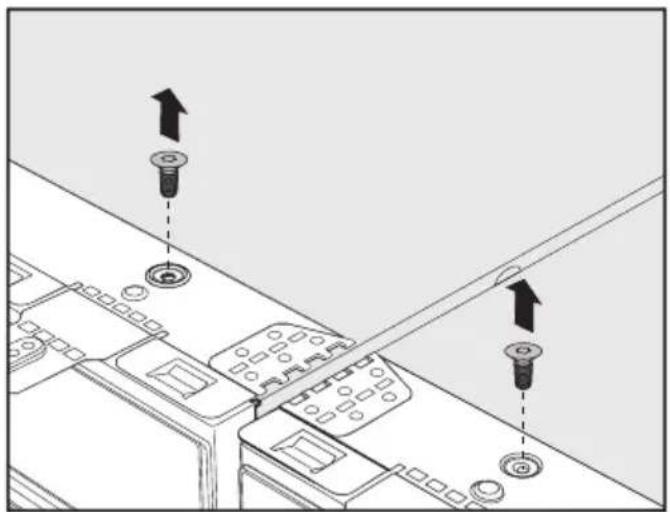
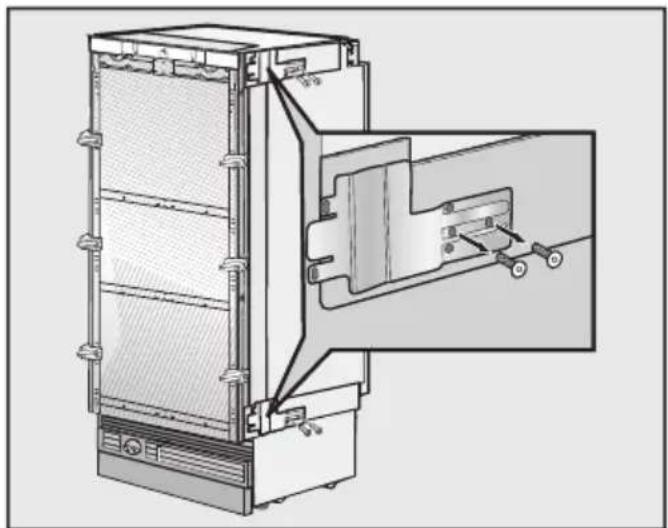
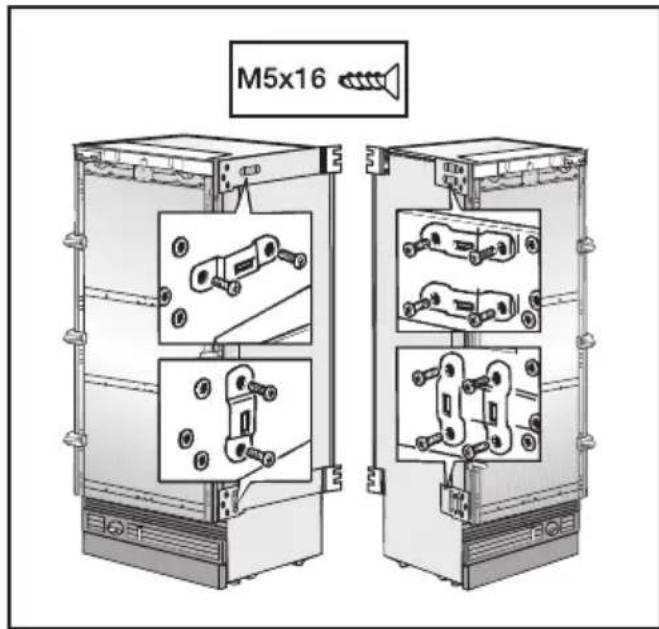
Remove the bracket plates from the handle sides on both appliances.
- Secure the supplied hinge halves onto both appliances.
- Secure the fixing lugs onto both appliances. Check the position of both appliances again.
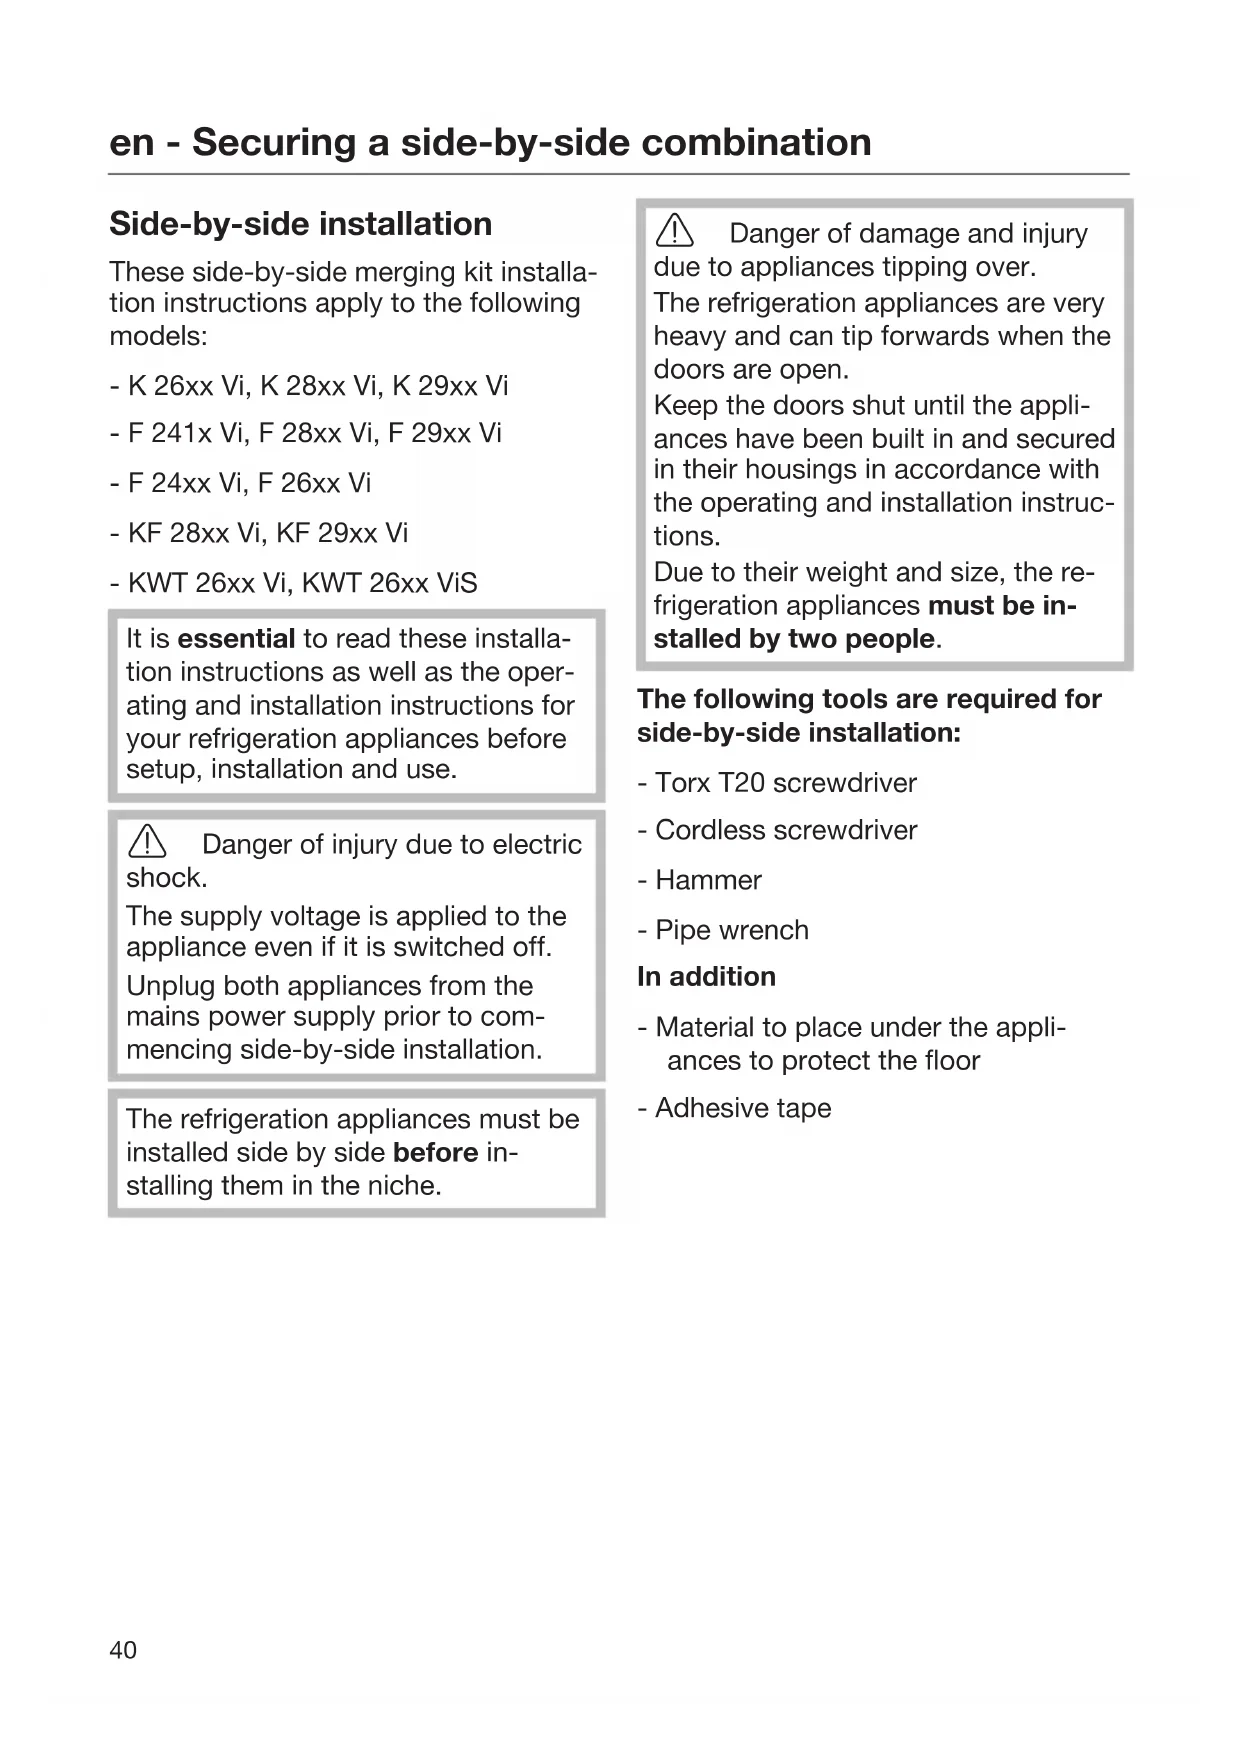
Installing the side panel heater
The side panel heater must be attached to the right side of the appliance that is on the left (when seen from the front).

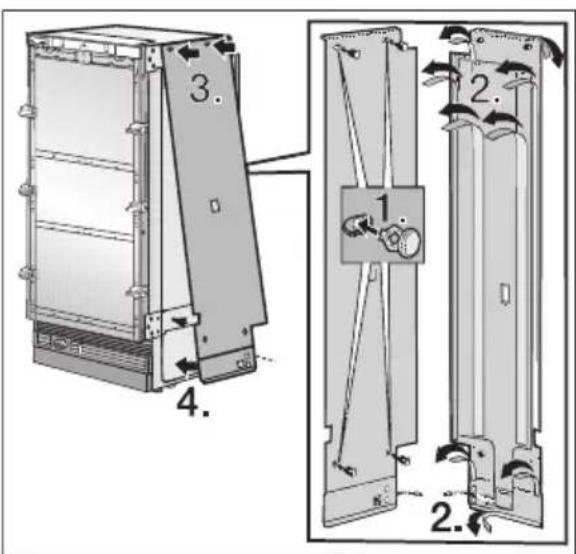
Insert the pins into their respective holes in the side panel heater 1.).
Remove the protective strip from the adhesive tape 2.).
- Maintain a gap between the bottom of the side panel heater and the bottom of the appliance, and insert the pins into the holes at the top 3.).
Push the side panel heater onto the appliance from top to bottom and insert the pins into the bottom holes 4.).
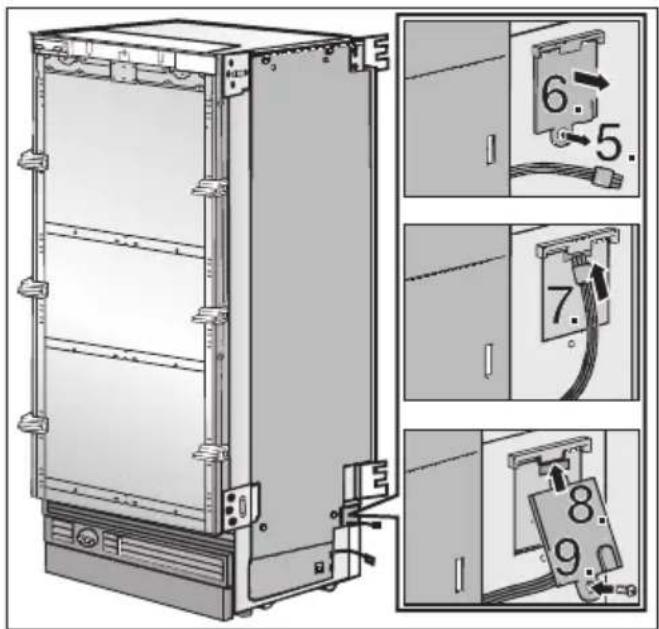
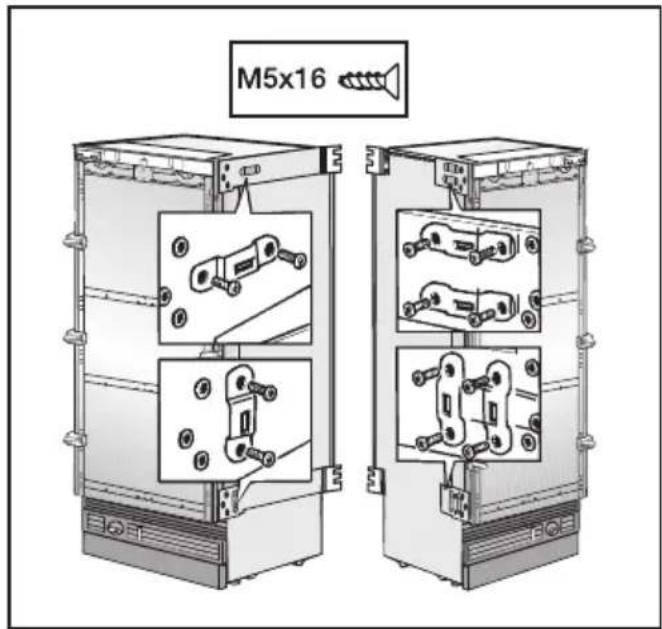
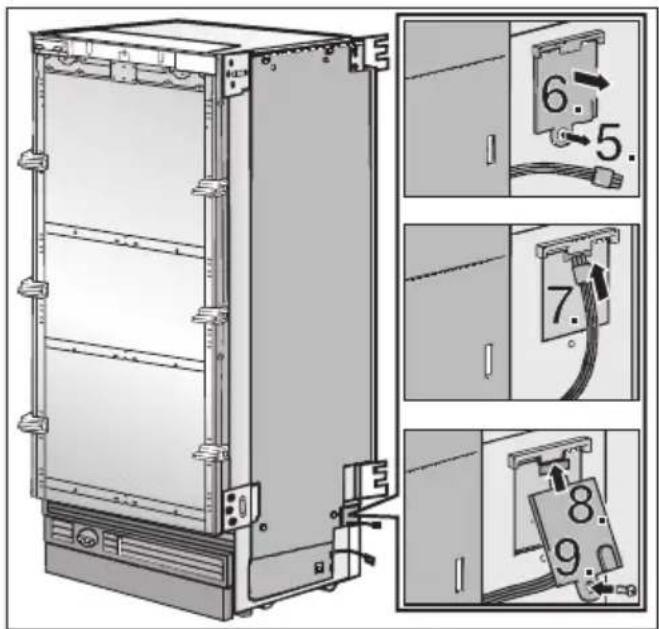
Loosen the screw on the plug cover 5.).
Remove the plug cover 6.).
Connect the cable 7.).
Reinstall the plug cover 8.).
- Tighten the screw on the plug cover 9.).
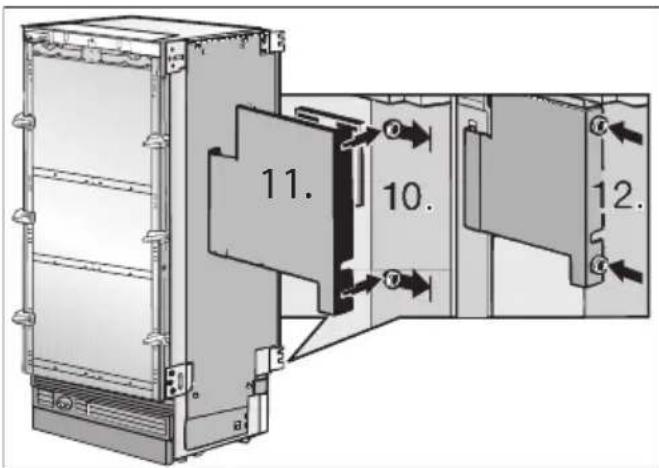
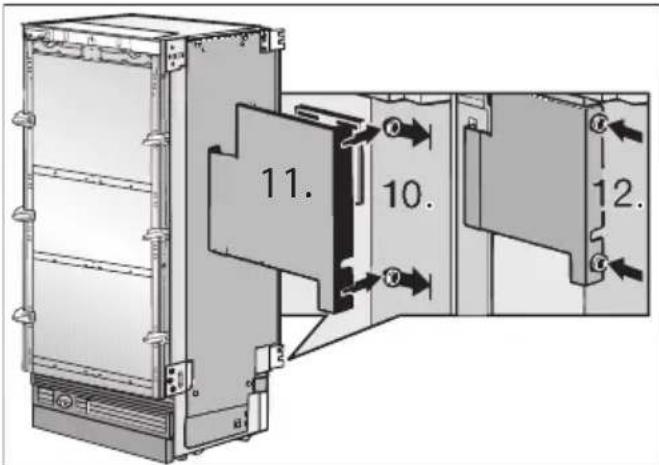
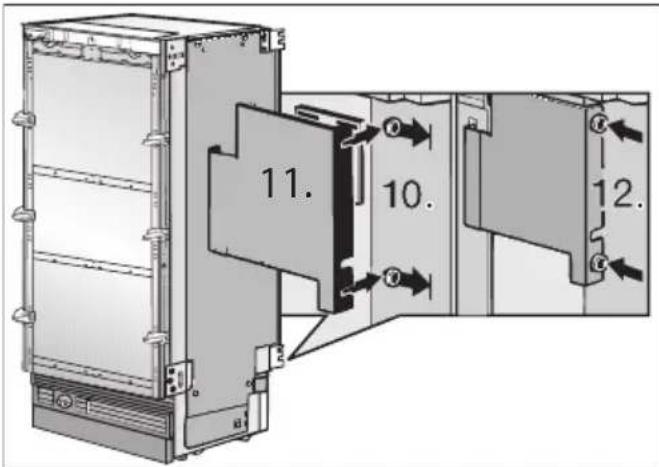
Slightly loosen the screws on the back of the appliance 10.).
Push the cable cover supplied into the slots on the side panel heater.
Hook the cable cover onto the screws on the back of the appliance 11.).
Now tighten the screws 12.).
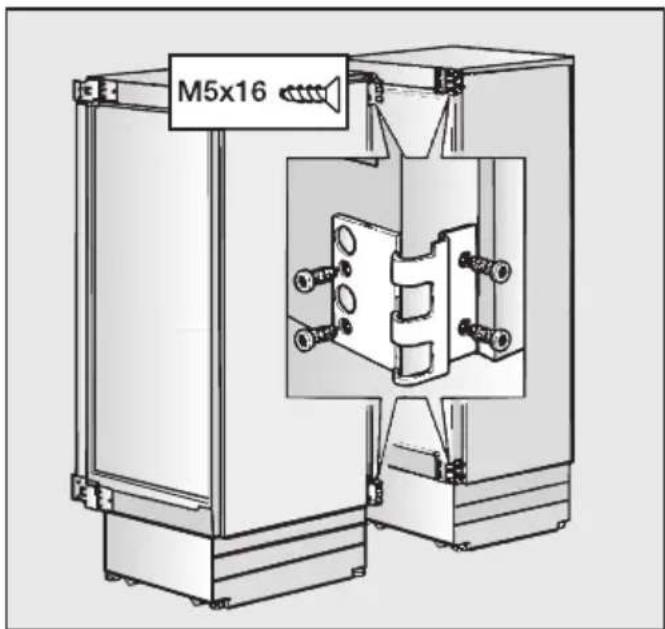
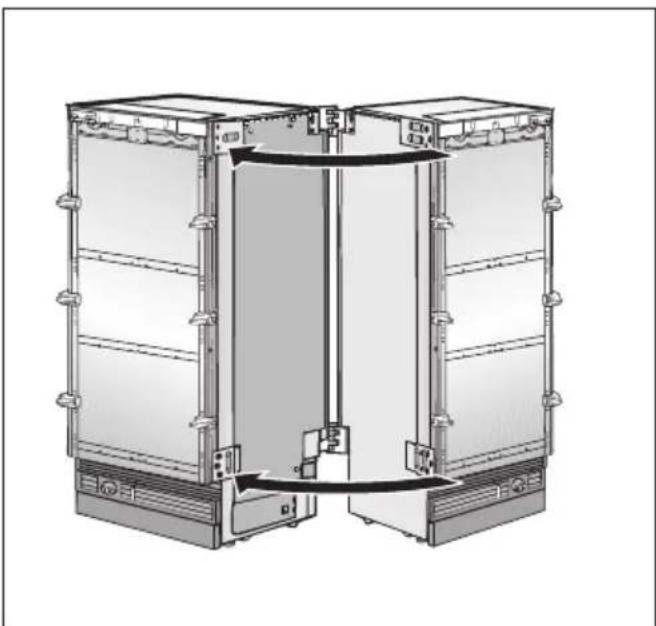
Connecting the refrigeration appliances
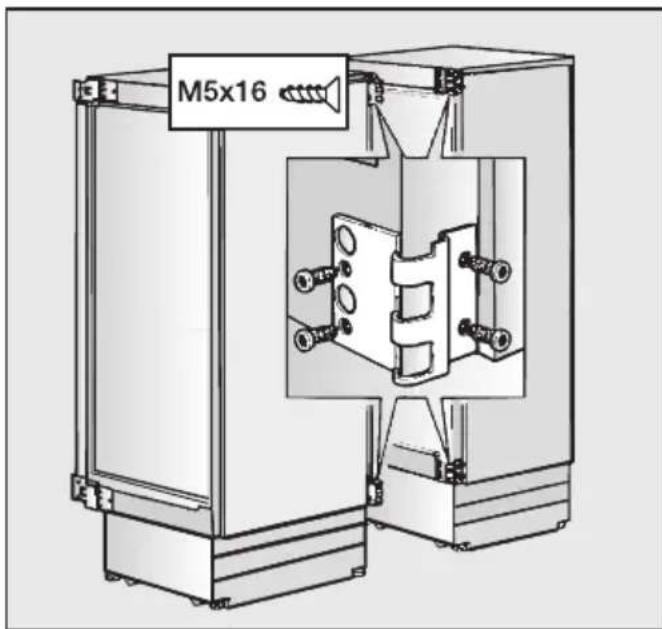
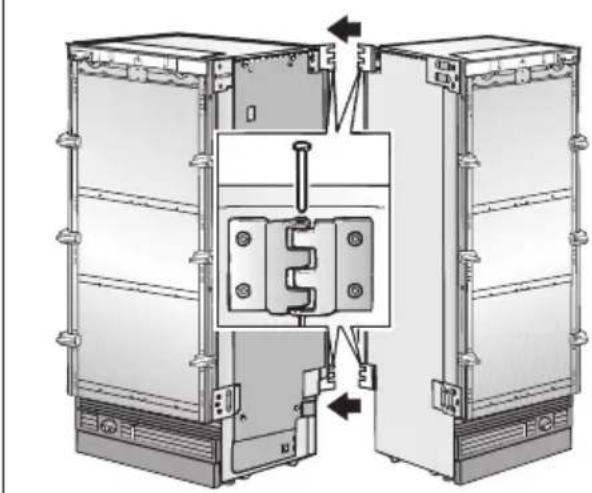
Push the appliances together at the back until the hinge halves engage.
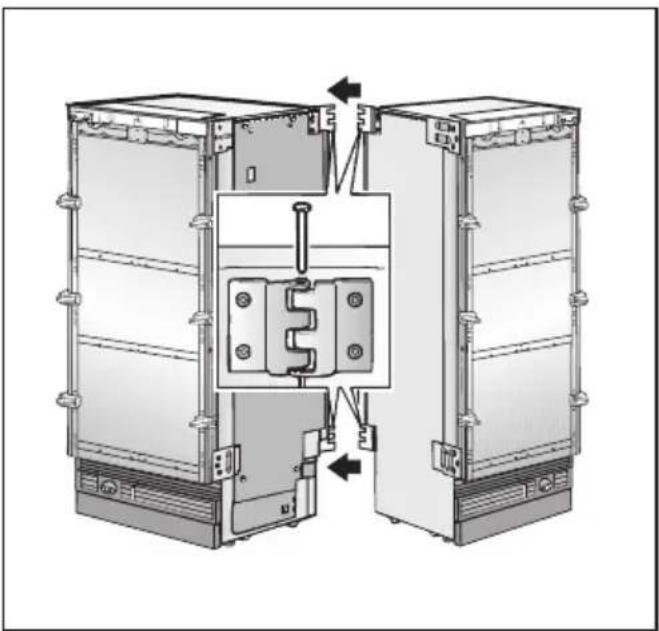
Insert the pins into the hinge halves from the top.

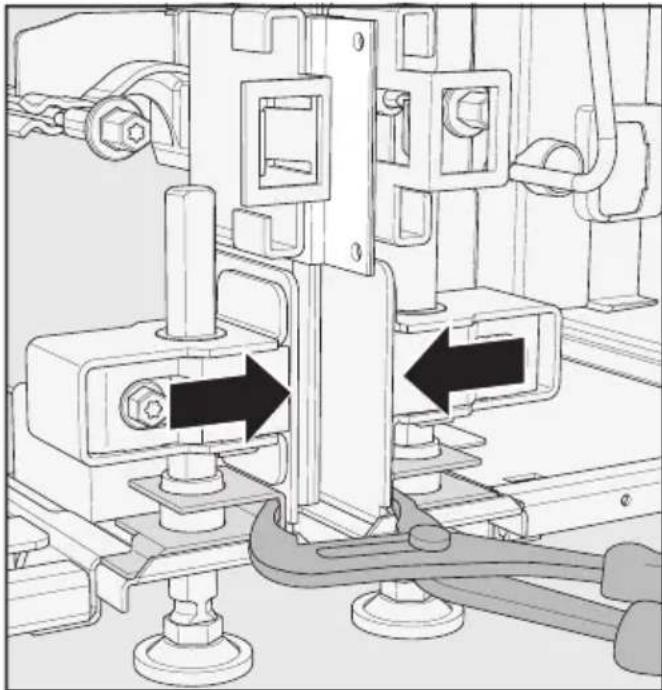
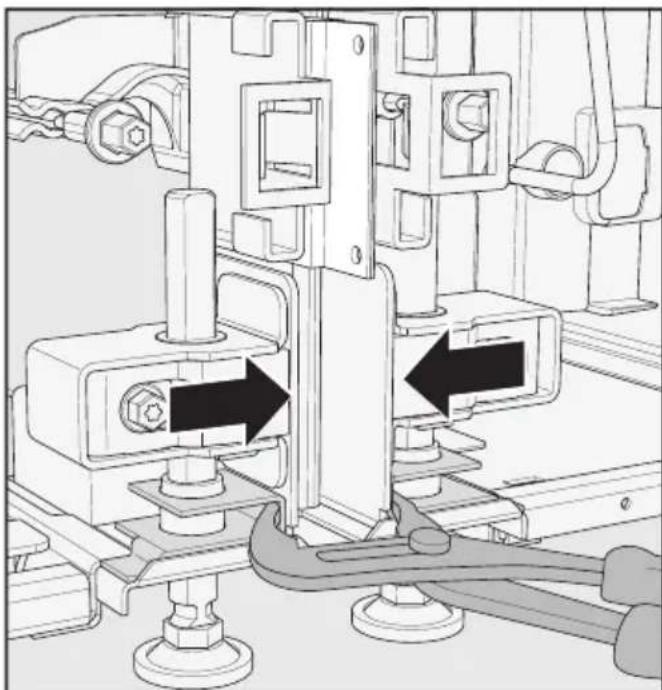
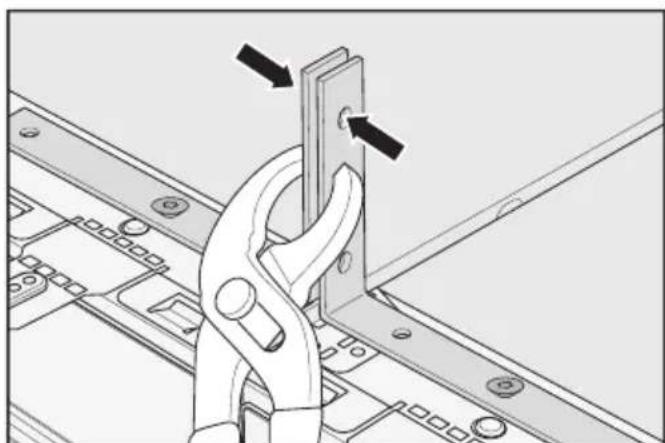
Push the appliances as close together as possible at the front.

In addition, pull both appliances together at the front with a pipe wrench.
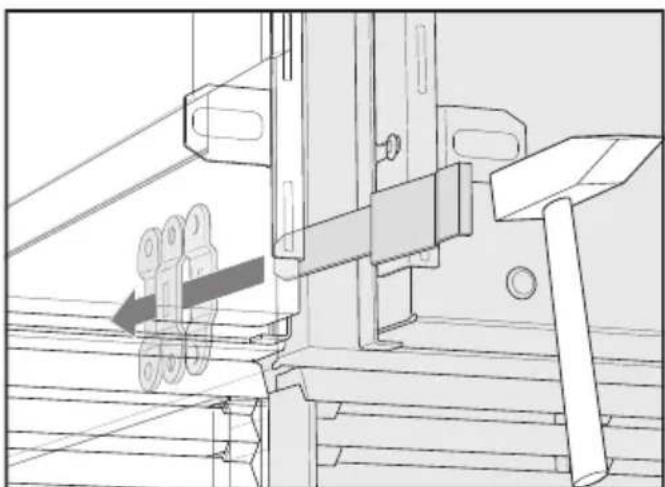
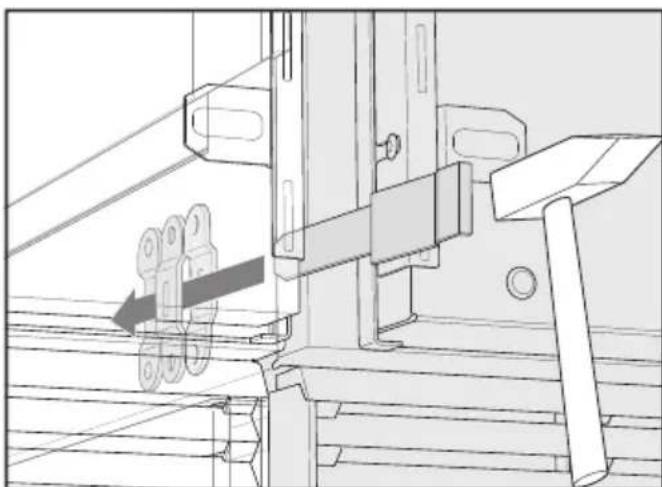
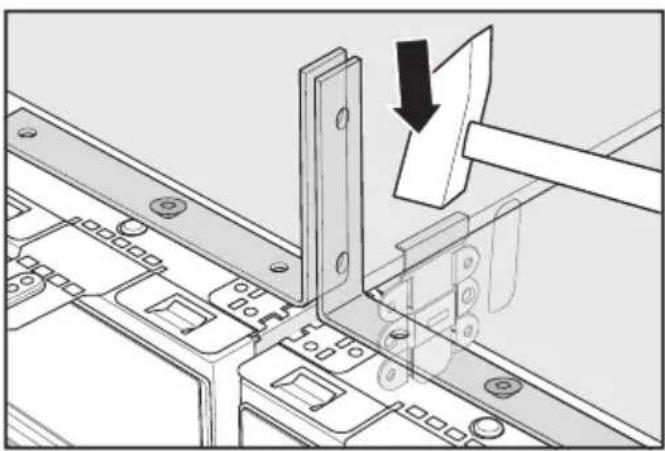
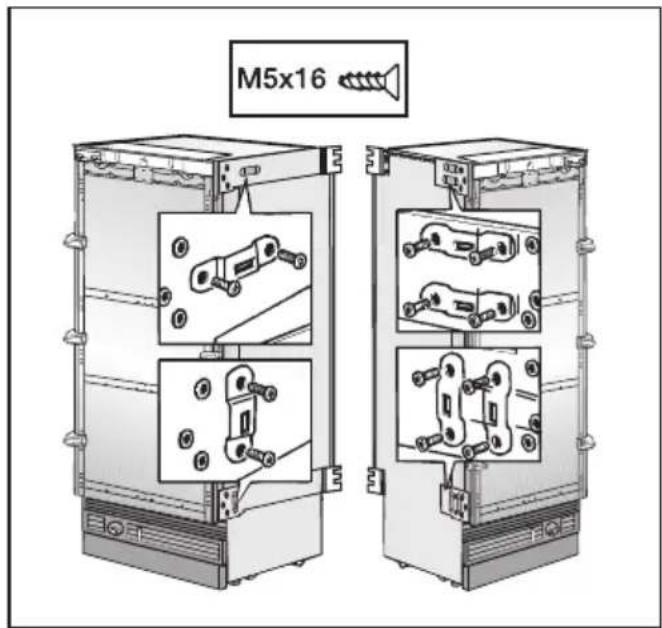
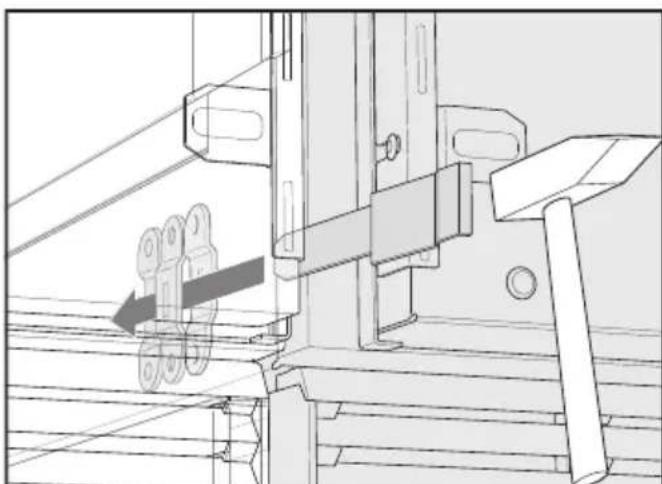
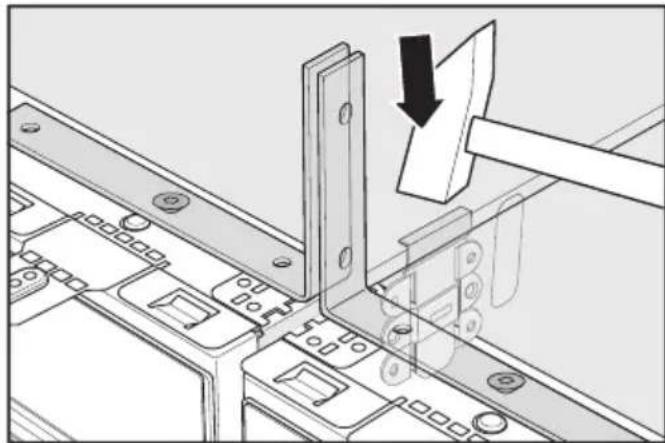
From the front, push the longer metal clip of the two supplied into the bottom fixing lug. If required, use a hammer.
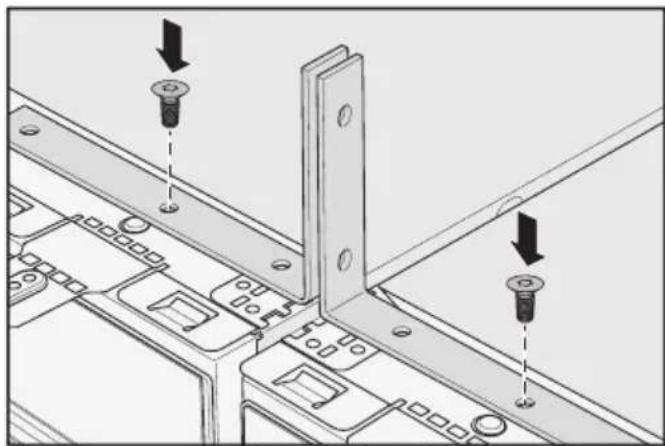
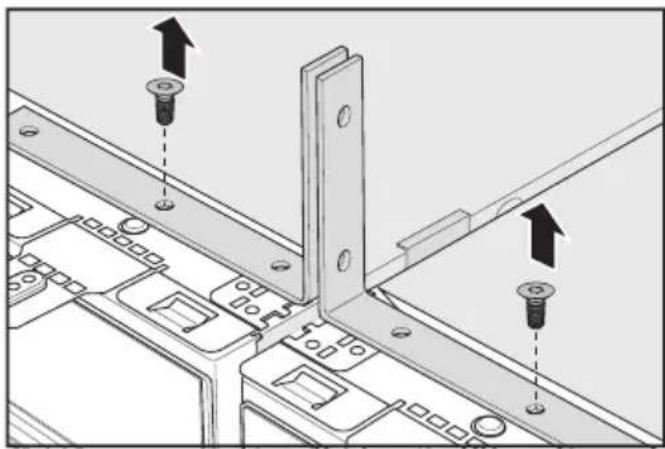
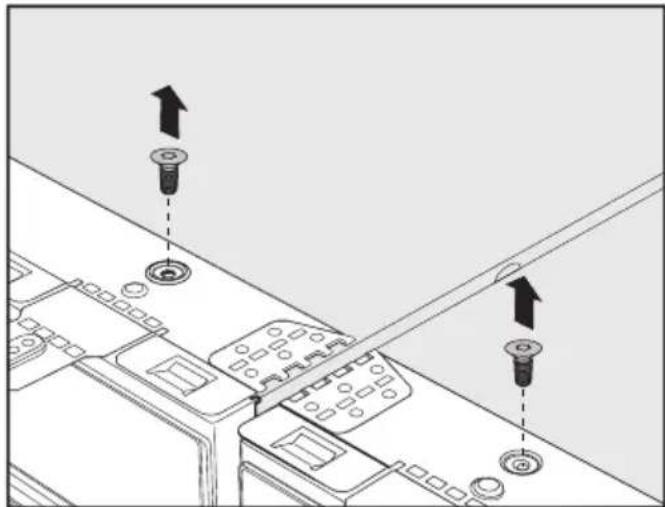
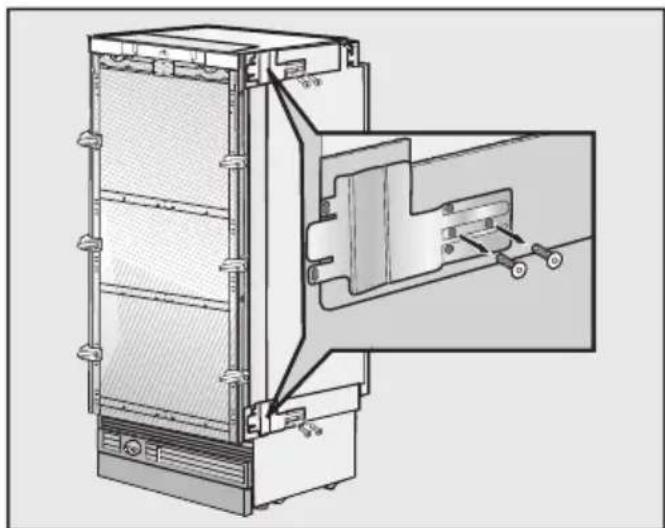
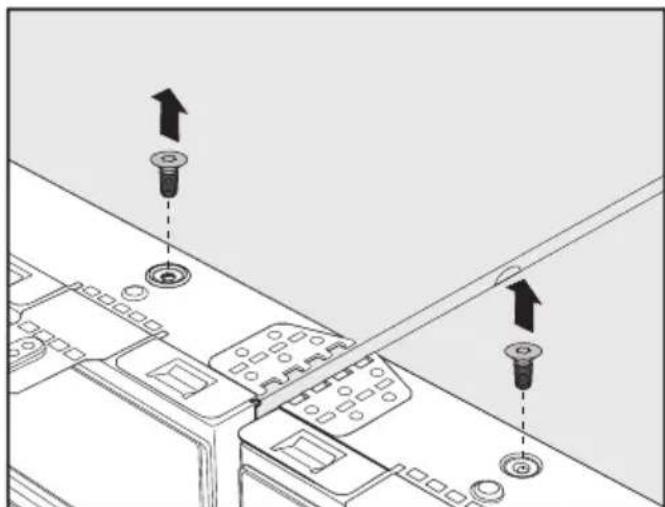
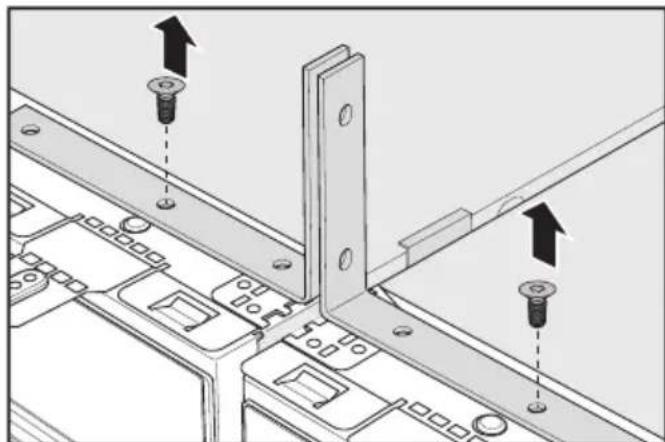
Remove the two screws from the tops of the appliances.
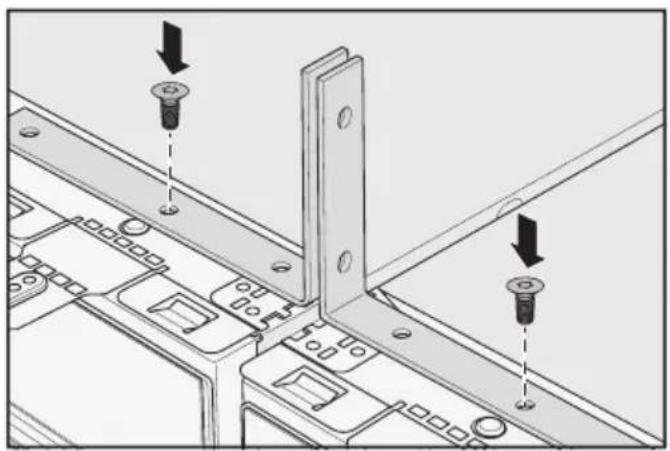
Use these screws to secure the supplied anti-tip brackets.
Both anti-tip brackets can be found in the refrigeration appliance installation kit.
en - Securing a side-by-side combination
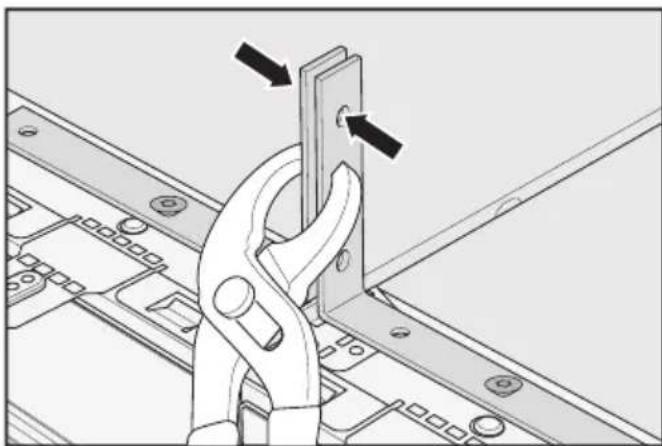
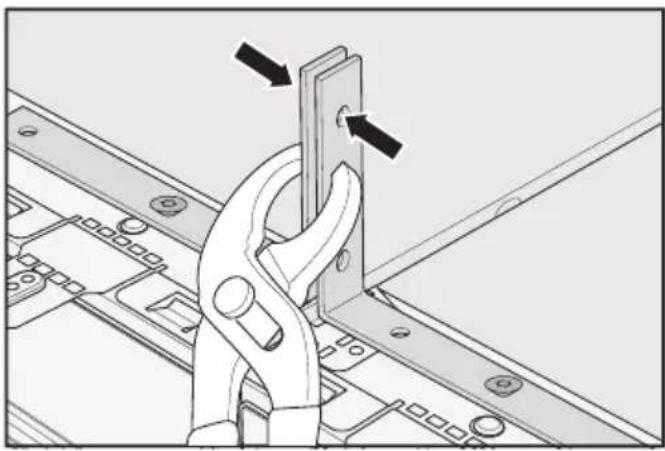
In addition, press both anti-tip brackets together with a pipe wrench.
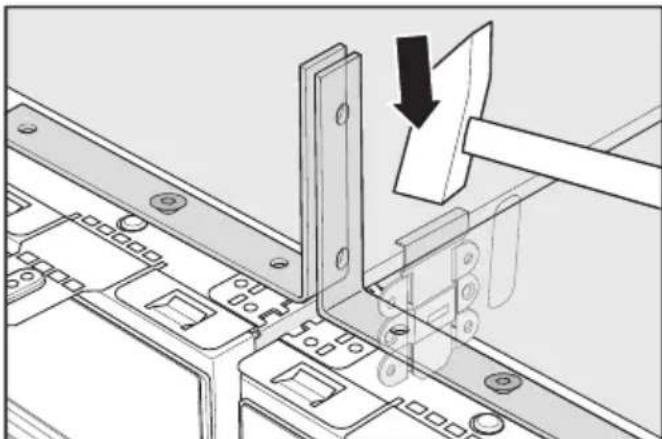
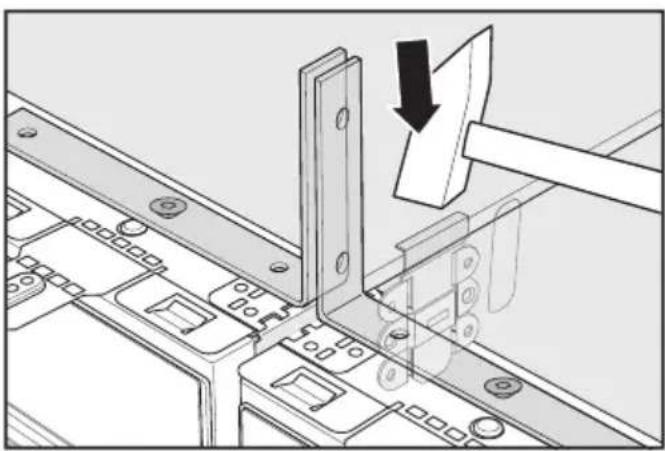
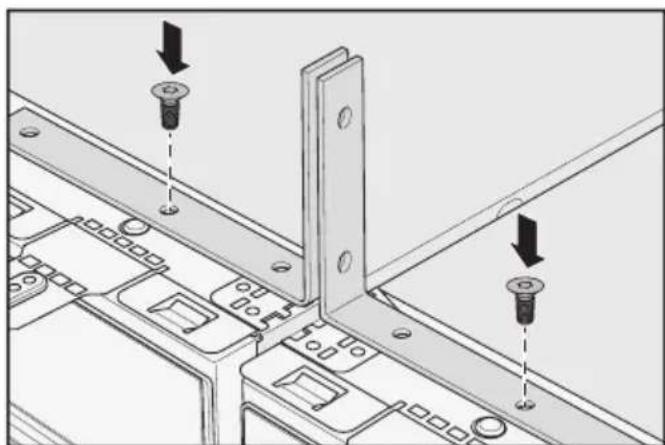
From the top, insert the shorter of the supplied metal clips into the fixing lugs. If required, use a hammer.
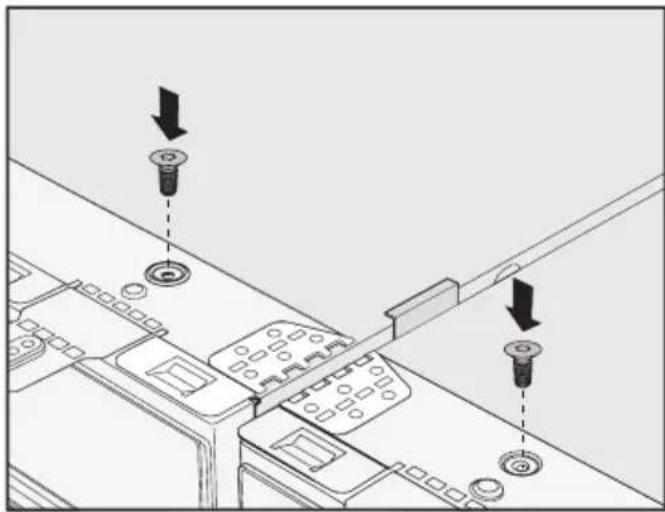
Now loosen the screws on the tops of the appliances again and remove both anti-tip brackets.
You will need the anti-tip brackets to secure the niche.
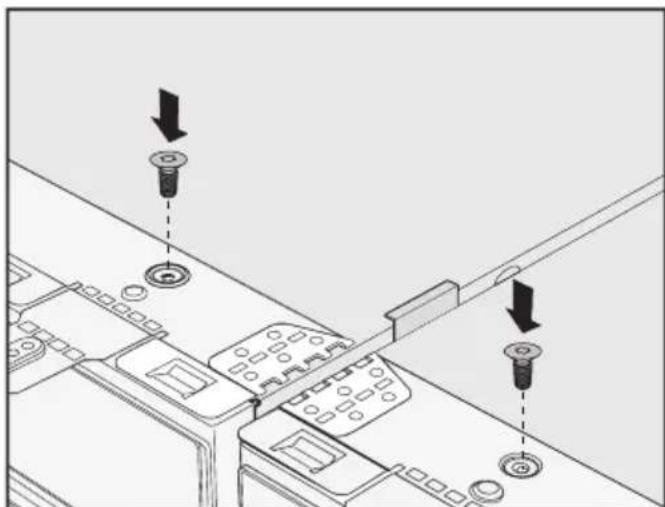
Then reinstall the screws on the tops of the appliances.
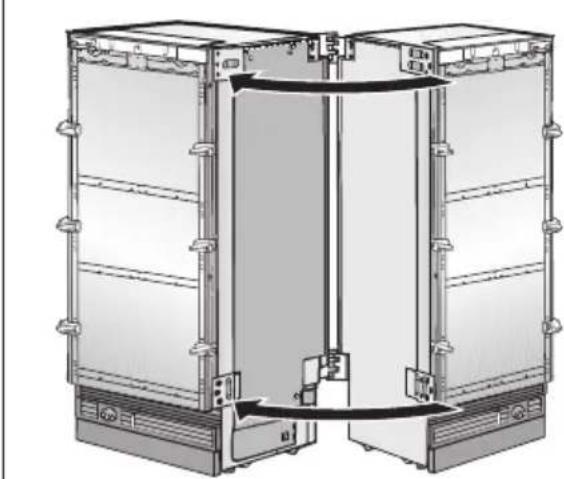
Tip: Now you can continue installing the appliances. For this purpose, observe the operating and installation instructions supplied with each of the appliances.
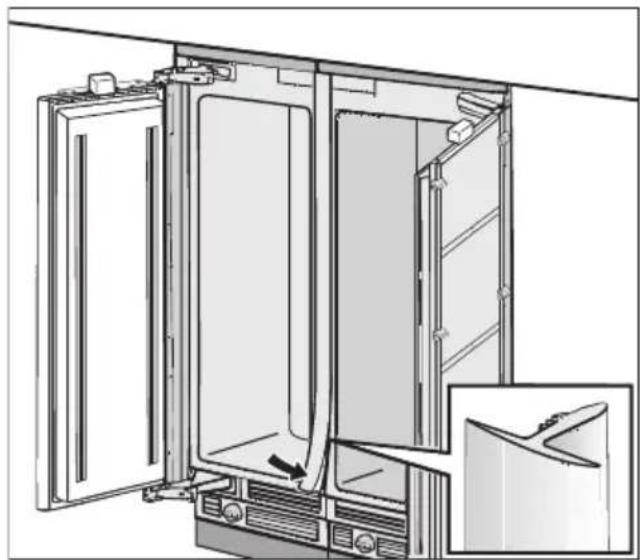
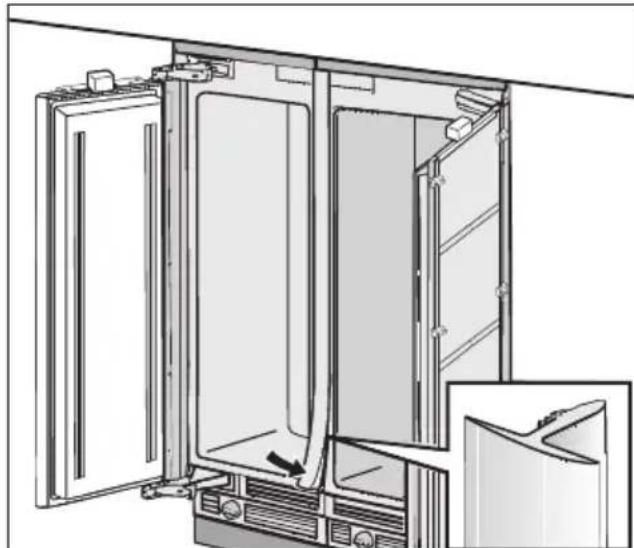
Insert the cover strip into the gap between the refrigeration appliances. You have now finished installing the side-by-side combination.
Montaje Side-by-side
Side-by-side montage
Side-by-side-montering
Denne side-by-side monteringsanvisningen gjelder for falgende modeller:
- K 26xx Vi, K 28xx Vi, K 29xx Vi
-F241xVi,F28xxVi,F29xxVi - F 24xx Vi, F 26xx Vi
- KF 28xx Vi, KF 29xx Vi
- KWT 26xx Vi, KWT 26xx ViS
-en Torx-skrutrekker T20,
-en drill,
-enhammer,
-en vannpumpetang.
Dessuten
MOnTaX Side-by-side npnbopdoJxHcOcyueCTBnTbCnpeD BCTpaunBaHnem npnbopOB HnUy.
OnachocTb TpaBM n NOBpeK-DeHn npoPOKnbBaHn npbo-poB.
Pn6opbI OueHb TjXkJIbIe N npN OTKpbITOn DBepcE MOrT ONpOKnHyTb-Ca Bnepd.
He otKpbBaIte DBepu npnbopa do Tex nop, noka OH He 6ydet BCTpoeh B HnSy COrJaCHO peKOMeHdaCnM B INHCTpyKcNn PO 3KcPnyaTaCnN MOHTaxy.
No npuHHe TjKeCTn npa3Mepa np6opa Heo6xOdmo npoBODtbo MOHTax BMeCTe C NOMOuHNKOM.
Дя мontаха Side-by-side Bam noTpe6yIOTcЯ сеюшпеши ИнстpyMeH-Tbl:
-OTBepTKa TORX T 20;
- wypynobepT;
-MOJOTOK;
-pa3BOdHOKJIIOU.
Kpome toro:
- MaTePnAJI, KOtOpBIM MOxHOb 6bIIO 6bl IOdIoXHTb IOd npN6OpbI, YTO6bI He NOBpeDITb IOL;
- KJIeIKAЯ JIeNTa.
...c npomexkytoHOn CTeHKoN
CTeHka a MeJdy yCTaHOBJIeHHbIMn pIOM dpyr c dpyrom npu6opamn DOJXHa 6bITb TOJUHON He MeHee 16 MM.
EcIn DBePbI ynpbl np6OpOB
pacnoIarAOTc PAnOM dpYr C dpY
rom,Bbl DOJIxHbI OpaTITb BHMa
Hne Ha ToJIuINHy Me6JIbHbIX
fpoHTOB IN DBepHbIXpyeK, YTO6bl
pN OJHOBpeMeHHOM OTKpbIBaHN
DBepzbl np6OpOB He cTaIKBaJIncb
dpyr C dpyrom Hne NOBpeXdaJI
dpyr dpyra.
B clyuae ecn npomexkytohna CTehka a He 60nee 160 MM, Bam notpe6yetc yCTaHOBtB HArpeBaTeIbHbIM Mat 6oKOBbIX CTeHOK 13 MOHTaXHOrO KOMJIeKta Side-by-side, UTo6bl N36eJxTb 6pa3OBAHnKOnHeHcata n, COOTBETCTBeHNO, NOBpeXdHn Ipn6opa (cm. pa3dEIN «MoHTaX HarpeBaTeIbHo- ro MaTa 6OKOBbIX CTeHOK').
HarpeBaTeIbHbI MaT ①doJxHeMOnTHnPoBaTbcra (BnD cpeepu) Ha npaBoi CTeHKe np60pa, cToaIero CJIeBa.
При пларовани Нш дяВстpanваня образпгЕ Внмане наTO,чTO HИSHA ДЯВстpanваня,КудаMOHTINPyETС рпборс HarpeBaTeЛьнblIM MaTOM ①,ДОЛЖHA 6bITb Ha3-5 MM shipe.
IodKIOUeHHe HArpeBaTeJIbHOrO MaTa 6OKOBbIX CTeHOK BeEET K NOBbIuEHHOp pacXoJa 3JIeKTPo3Heprnn.
B 3aKJIuOHeHne KaJdbI npi6Op Kpe-NTcR C NOMOUsbIO BXODAUX B KOMJIeKT NOCTaBKn MaTePnaIob DnI MOHTaKa B HnIe DnI BCTpaINBaHn (DnI 3TOrO CLeNyIte YKa3aHnM B COOTBeTCTByUoX INHCTpyKUnx IOn 3KcNJIyatauN n MOHTaKy).
...6e3 npomexkytoHOn CTeHKn
EcIn MeKdy np6opamn, pacnoJoxeHbIMn PAnOM, Het IpomexkyToOHNoCTeKN,TO np6Opbl MOyT 6bITb npKpeJIeHbI Dpyr K DpyrCy C NOMOuHO MoNTaXHoro KOMnIeKta Side-by-side. Kpome TOrO, Heo6xOdImO yCTaHOBtB HarpeBaTeJbHbM aT, UTO6bl N36ExKaTb O6pa3OBaHnRA KOHDeHCata n, COOTBeTCTBeHHO, NOBpeJxHn Ipn6opa (CM. NaHHa c pa3deJa «IodroTOBka np6Opob').
He ydaIaIte npocTaBkn Ha BHyTpehnHex cTOpOHax np6OpOB.
YdaJIte yroJKN co cTOpOHBI pyeK o6oNX np6opOB.
PnKpyTte BxOJaune B KOMnIeKT nOIOBnHbI 7apHnpOB Ha oBa np60pa.

■ПиктутTe KpenExKbIe ПlaCTINHbI Ha o6a np6opa.Εuple pa3 npOBepbTe noloxHeNe 6oux np6opOB.
MOHTAX HarpeBaTeIbHOro MaTa 6OKOBbIX CTeHOK
HarpeBaTeIbHbIM MaT 6OKOBbIX CTeHOK DoJIKeH MOHTnPOBaTbcS (BnD CnepeN) Ha npaBoi CTeHKe pInbopa, CToIeero CNeBa.

BCTaBbTe WtntbI B npedyCMOTpeHbIe IJIg 3TOrO OTBepCTnB HaPebaTeNbHOM MaTe 6OKOBbIX CTeHOK 1.).
CHIMITE 3aUNTHbIe NOLOCKN KJIeINKOJJeHTbl 2.).
YdepxnBaTe HargeBaTeIbHbIM MaT 6OKOBbIX CTeHOK B HNXHei YactN npnbopa N BCTaBbTe UNTOpTbIB OT-BepCTnHaBepx3.).
■ПиЖМTe HArpeBaTeJIbHbI MaT 60-KOBbIX CTeHOK CBepxY Bn3 K npi6Opy N BCTaBbTe WtNΦTbI B OTBepCTna Bn3y 4.).
Ocna6bTe BnHT Ha KpbIwKe WTekepa 5.).
CHIMITE KpbIkwky wTekepa 6.).
I OndcoeHnHte Ka6eJIb K 7.).
CHOBA HaneHbTe KpbIuKy UTeKepa Ha 8.).
■Пикрутinte вHT Ha Крblшke wTe-kepa 9.).
Hemhoro ocna6bTe BnHTbHa o6paTHOH CTOpOHe np6opa 10.).
BCTaBbTe BXOJaUo B KOMnJIeKT 3a- uI TY Ka6eJr B Na3 HarpeBaTeJbHOro MaTa 6OKOBbIX CTeHOK.
■Повесьтешашиту кабеля Ha BnHTax Ha obpaTHoN CTOpOHe npnbopa 11.).
Tyro 3aTaNHe BnHTb1 12.).
CoeiHHeHne np6opOB pyr c dpyrom
CdBnHbTe npnbopbl 3aHmN cTeHN KaMn dpyr K dpyry, Noka NOOBnbl WapHnpoB He BCTaBraTcR dpyr B dpyra.
BCTaBbTe WITnΦTbI B NOJOBuHKn Iap-HnpOB CBepxY.
ru - Крелене komби国有资产 side-by-side
CdbnHbTe npnbOpbl nepedHmN cTo- pOHaMn KaK MoXHo 6JnxKe dpyr K dpuy.

Kpome toro, cBnthe oba npnbopa dpyr K dpuyc NOMOuKneuei.

BcTaBbTe 60Jee IINHHyIO n3 BXOJa-ux B KOMnJIeKT MeTaNIIueCKNX cKo6 cpeI IN HIXHIO KpeIeK-HyIO nlaCTnHy. B Cnyae Heo6xOnMocTn NcNoJIb3yIte MoIOTOK.
BbIbePHTe 6a BnHTa n3 BepxHeJ qactn npnbopa.

IcnoIb3yIte paHee BbIBepHyTble BNHTbl IJRA KpeJIeHnBxOJaux B KOMJIeKT KpeJExHbIX yroJkoB OT ONpOKnDbHaHn.
O6a KpenEeKbIX yroIka OT ONpOKn-DbIBaHnBbHaNdTe B KOMPJIeKTe npHaJNeXHOCTeДЯ MOHTaXa np6OpOB.
I OonoHnTeIbHo npnxMnte o6a KpenExKnbIX yroIka OT onpOKnDbIbA-Hnra dpyr K dpyrCy c NOMou bIO Kne- uen.
YcTaHOBInTe 6oJee KOpOTkyIO n3 BXOJaIux B KOMJIeKT MeTJIINueCKNX CkO6 CBepxv B KpeJExKHyIO pIaCTnHy. B Cnyuae Heo6XoIMocTn IcNoJB-3yIte MoJOTOK.

BbIbepHInTe BnHTbIC BepxHei Yactn npnbopa n yctaHOBnTe o6a KpeJexK HbIX yroJka OT ONpOKnDbBaHna.
Kpenexhbie yrolkn OT onpoknDbibaHna nTpe6yOTcBam dJa KpeIeHnHn nn BCTpanBaHn.
CHOBA BKpyTITe BnHTbIBB BepXHIOU qactb np6opa.
Cobet: PpOdoJXKeMoHTaK np6oPob. Ppi 3TOM yUHTbIaIe Yka3aHnB INHCTpyKcNn NO 3KcJIyatauN N MoHTaxky o6oNX np6oPob.
BCTaBbTe 3aunTHyO nlaHky B npope3b Mekdy npnbopamn, K 3TOMyBpeMeHN BcTpaNBaHne KOM6HaCmNSide-by-side doJxHo 6bItb noHocTbHO 3aBepseHo.
Side-by-Side montáž
Montera side-by-side
Denna anvisning for side-by-side-monitoring gäller foljande modeller:
- K 26xx Vi, K 28xx Vi, K 29xx Vi
-F241xVi,F28xxVi,F29xxVi
-F24xxVi,F26xxVi - KF 28xx Vi, KF 29xx Vi
- KWT 26xx Vi, KWT 26xx ViS
BcTaHOBJIeHHa BnpyJ (side-by-side)
LЯ Inctrpykuzia 3 MoNTaJy BnprTuJ (side-by-side) nIXoDntb ДЯ TaKnx Mo- deJe:
- K 26xx Vi, K 28xx Vi, K 29xx Vi
- F 241x Vi, F 28xx Vi, F 29xx Vi
- F 24xx Vi, F 26xx Vi
- KF 28xx Vi, KF 29xx Vi
- KWT 26xx Vi, KWT 26xx ViS
Ipeed yctaHOBkoIO, nIDKIOUeHHaM Ta BBeDeHnM npuAky B eKcNlyaTa- zuo 06OB'3KOBO npouHTaIe zuo IHCTpyKciO 3 MOHTaxy, a taKoX IHCTpyKciO 3 ekCnLyataui Ta BCTaHOBJIeHna BaWoOro xoJOnNbHnka.
He6e3neKa TpaBMyBaHnYepe3 ypaXeHHaCTpyMOM.
HaBItb KOJI XOJIOJIbHnK BmKHeHn, y MepeXi HaBHa Hapyra.
Iepsh Hix BCTaHOBIOBaTN BnPNTyI (side-by-side), BITrHiTb UTeNceJIbHI pO3eTKn 06ox XoJOnJIbHnKiB.
MoHTaK BnPITyI (side-by-side) xoJIoAnJIbHnIKIB HeO6XiIDHO 3dIiCHIOBA-TN nepeiX BCTaHOBJIeHHaM y HiSy.
He6e3neKa TpaBMyBaHHa Ta NOsKOJxHnBHaCJIIOK NpeKeiDaHn npuJaNy.
XoIOnIbHnKn DyKe BaXKi MoKytb HaxnJIaTncBnepei ndac BiDHNHeHHaDbepi.
TpmaTe DBePraTa npilaNy 3aKpnTmN,doKn BIn He 6ynde B6yDoBaHn i 3aKpInIeHn BiINoBiIDHO Do IHCTpyKuii 3 ekCnLyataqii Ta MOHTaKy.
3BaXaUOuHa Bary Ta po3Mip npiJaNy Ioro MOHTax Heo6xIDHO 06OB'3KOBO 3dIInCHIOBAtn 3a DOnOMoRoTO Oe OndieOC6N.
Дя Встановленья Впритул (side-by-side) Bam 3надоблъся тaki робочi iHcTpymeHTN:
- 3ipKoIoi6Ha BnKpyTka T20,
- WypynOBepT,
-MOJOTOK, - PO3CyBnKJIou.
A TaKoX:
...i3 npomixHO CTiHKO

TOBUNHa CTiHKn a MIX NOPyI yCTaHOBJIeHIMN XOJODINbHNKamM MaE CTAHOBNTn PpHnAHMHi 16 MM.
Якwo Девернишарнipхолоиь-нИКIB 3нaxОДТбСпоруч,обOB'яЗ-KOBО ВраховиTe TOBиHyпeredHixЧастIN МбЛВ i Девернх руOK,цo6ПIDчac OndHocHOrO BiDUnHEnHЯДеверпристpoIB yHnKHyTN IX 3iT-KHeHHa Ta NOшКODЖeHHЯ.
KIO npomixHa cIHka a ToHsa HIX 160 MM, Bam 3HaOobTbc8 6OKOBa OAnIOBaIbHa nAHeIb ① i3 KOMnJIeKTy MOHTaXy BnpITy (side-by-side), 0o6 3aNoBITn yTBOpEHNO KOHeHCaty Ta BInHKHeHHIO NOIKODXeHb (INB. NiDpo3dI IN «BCTaHOBJIeHHra OAnIOBaJIb-HOI nAHeJI>).
Бokoba onaHOBaIbHa nHaJIeIb ① KpInITbcra (aKIO DNIBTncb Cpepey) i3 npaBoi CTOpOHN XoJOnIbHnKa, aKn I CToITb 3JIbA.
IiD qac pnaHyBaHHn HiW BpaXOBuY-Te, 10 HiHa, y kky 6yde BoyObaHO XoJOnJIbHnK 3 ONaIOBaIbHO IO NaHeJIIO ① ,MaE 6yTu Ha 3-5 MM IINP-
Y BnnaKy nID'eHaHnO npaIbAJIbHOI naHeJI 36IbIbIyIOTbcra BnTpAn eHep- rII.
uk - 3aKpInJIeHЯ KOM6iHaцii BCTaHOBJIeHnX BnPnTуЛ (side-by-side) xoJIoIbHnKiB
IOTIM XOJIOINbHnKn NO ODNOMy 3aKpi- nIOIOBcR B HiSi 3a DOnOMoRO MOHTaXHOrO MaTePiany, kN BxOInTb Y KOMnJIeKT NocTaHaHH (DOTPIMyIteCb Pn ZbOMy Bka3iBOK, HabeJeHX B IHCTpyKci 3 ekCnLyataqii Ta MOHTaXy).
...6e3 npomixhoi CTiHKn
Y BnnaKy kIoo mIx nopA yCTaHOBLeHIMN XOJOnJIbHNkAmn IpomixHa CTIHKa BiCyTHra, PnIIaIHy Heo6xIDHO 6e3- nOcepeHbO 3'EdHATM MIX CO6OIO 3a DOnOMOrO MOHTaXHORO KOMJIeKTy side-by-side. Kpim zboRo, Heo6XiHo BCTaHOBNTu 6OKOBy ONAJIHOBaJIbHy naHeIb, 0o6 3aNo6iTn yTBOpEHNO KOHN deHCaty Ta BnHKHeHHIO NOsKOJKeHb (DNVB. NiDpo3dIg «PiIdrotOBKa XOJOnJIbHNKIB»).
ДвернишарнихолдьнкIB He MaIOТь 3нанODNTNCb NOPU, OCKIЛБКIIпIDчac OndHocHOrO BiDHHHeHnI DBepi npicntpoIB MOxKyTB 3ITKHyTNCb i NOsKOДNTNCb.
Y BnpaKy NiD'EnHaHNa OpaIbAJIbHOI naHei 36IbIbIyIOTbcra BnTpAteN eHeprii.
PiIroTOBka XoIoAnJIbHnKiB
IocTaBTe ObndBa XOJOnnJIbHnKn B Heo6xIDHe nOJoxeHHa BaIIOBiDHi BIdCTaHI ODNH BiO ODHoro.
He demontyute po3nipkn ha BnyTpiunix ctopohax npnctroo.
3Himitb KpiinnbHi KyTHnKn 3 60ky pyOOK o6ox XOJOnBnIKiB.
uk - 3aKpInJIeHЯ KOM6iHaцii BCTaHOBJIeHnx BnPNTyI (side-by-side) xoJIoJbHnKiB

Miucno 3akpytItb HanibmyΦtn shapHipiB, kki BXoJrTb y KOMnJIeKT nocTa-uaHHa, Ha o6ox XOJIoNbHnKax.
Miucno 3akpytItb KpiinlblHi haKnaIkn Ha o6ox xoJOniNbHnKax. Lcpe pa3 nepeBipTe nOJKeHHa o6ox XoJOniNb-HNKIB.
BcTaHOBJIeHnO npaIIOBaJIbHOI naHeJI
Bokoby onaIobalbHy naHeJIb Heo6xID-HO 3aKpInNTn (aKIO DNIBTNCb Cpepey) i3 npaboi CTOpOH XoJOnJBHnKa, kNCTOITb 3JIba.
BCTaTe wTnΦTu B nepe6aueHi dIy HIX OTbOpHa onaIIOBaIbHi nAHeJI 1.).
3HIMITb 3axnChi cMyr n i3 KneiKoi CTpiKn 2.).
TpmaTe 6OKOBy onaIIOBaIbHy naHeJIb HIXKYe XoJIoNJIbHnKa Ta BCTaBTe 3BepxU TnΦTn B OTBOpn 3.).
PnTnCHiB 6OKOBy onaJIbAlbHy naHeIb 3BepxD OHN3y Do XOJODINbHnka Ta BCTaBTe 3HN3y WTNΦTN B OTBOpn 4.).
uk - 3aKpInJIeHЯ KOM6iHaцii BCTaHOBJIeHnX BnPnTуЛ (side-by-side) xoJIoIbHnKiB

Iocna6Te rBnHTn Ha Kpnsu i Tekepa 5.).
3Himitb KpNkky WTekepa 6.).
■Пд'энайтecaбел7).
3HOBy BCTaHOBIb KpNiUKy WTeKepa 8.).
Miucno 3akpyTiB rBNHTn Ha Kpnuiz uTekepa 9.).
Tpoxn nocna6Te rBnHTn Ha 3aHi n CTInCi xOJOnIbHnka 10.).
Ipnoknaitb 3axnct ka6eHIO, kIn BxOHTb y KOMnJIeKT nOCTaHaHHy, y na3n B 6OKoBIM onaJIIOBaIbHi nAHeI.
HaBicbTe 3axnCT Ka6eHn Ha rBnHTn Ha 3aHn CTInCu XoJOnJIbHnka 11.).
Miucno 3akpyitb rBnHTn 12.).
3'εdHaHHe XoJIoMnIbHnKiB
3cybaTe XOJOnIbHnKn No3aNy,do-Kn HAniBMyΦTu WapHipiB He 3aue-nnrTaCra.
BcTaBTe 3Bepxv B HaniBMyΦTn wapHipiB.
IiCyHbTe XoJIoNJIbHNKn YKOMORA 6JnxJy OOnH Do OOnHO Cpepy.
uk - 3aKpInJIeHЯ KOM6iHaцii BCTaHOBJIeHnX BnPHTyI (side-by-side) xoJIoJbHnKiB
Kpim cboRo,ДЯ 3CyBaHnXOJOnIb-HNKIB CpepeDy BnKOpNCTObYuTe po-3BIDHNI KJIOnU.
Cnepey BCTaBTe B HnXHIO KpiINb-Hy HaKlaIky IOBsy MeTaNBy cKO6y i3 DBOX, kI BXOJrTy Y KOMNJIeKT NOcTaUHaHH. 3a Notpe6u BnKOpNCTo-ByIte MoIOTOK.
BukpyiTb 6nDbBa rBnHTn 3 BepXhboi CTOPOHn npNCtpoo.
BnKOpNCToByIte nonepeHbO BnKpyuHi rBnHTn dJa 3aKpInJIeHHa KyTHNa dJa 3axNcTy BiD npeKeNuHaHHa.
OsbIbKa KyTHnKn IJIa 3axNcTy BiI nepeKnDaHHBxOJaTbY MOHTaXHnKO-MmJIeKT IJI BCTaHOBHeHH XoJIoINb-HnKa.
uk - 3aKpɪnJIeHЯ KOM6ɪHaцüB BCTaHOBJIeHIX Bπpɪtúŋ (side-by-side) xoJIoДиЛьнкiB
I OdaTkoBO npITnCHiTB oBnDb a KytHnKn dJa 3axncty BiD nepeKndaHHa 3a DOnOMOrO p03BiDnHO KIOHa.
BCTaBTe KOpOTwi MeTaneBi cKo6n, rKi BXOJaTB y KOMnJIeKT NOCTaUaHHra, 3Bepxv y KpInnIbHi NaKlaIKn. 3a noTpe6N BnKOpNCToByTe dIy cboIOMJOTOK.
Telep 3HOBy nocla6Te rBnHTn 3Bepxy npnctpoTo Ta 3HimItb 6nDbKa KytHNKn dIy 3axNCTy BiD nepeKnDaHn.
KytHnKn dIy 3axNCTy BiI nepeKeiHaH H3HaO6JIbTbcI NOTIM Iy KpinJeH HxOJOnBnIKiB y Hiwi.
Notim 3HOBy 3aKpyTiB rBNHTn 3Bep-xy npuctpo.
IobidomJIeHn: TeNep MoXHa npoOBKHTN B6yIDOBaHHx XOJOnIbHNkIB yHiSy. Pn cBOMy dOpmyITeCb IHcTpyKci3 ekCnIyatauTa MoHTaKy BiINOBiDHorO XOJOnIbHNka.
BCTaTe 3axnchny nlaHky B uinHy mixx xoJOnIbHnKam. Tenep BcTaHOBJIeHHaCi II BnpTuI (side-by-side) 3aBepseHo.
Miele
Miele & Cie. KG