2827056 - Multi-cooker RUSSELL HOBBS - Free user manual and instructions
Find the device manual for free 2827056 RUSSELL HOBBS in PDF.
| Product Type | Multi-cooker |
| Brand | Russell Hobbs |
| Model | 2827056 |
| Capacity | Approximately 4.5 litres |
| Power | 1200 W (estimated) |
| Supply Voltage | 220-240 V ~ 50/60 Hz |
| Cooking Functions | Sear, Roast, Sous vide, Low and high slow cook, Steam, Rice, Boil, Keep warm |
| Temperature Range | 38 °C to 215 °C depending on modes |
| Timer | Up to 20 hours |
| Bowl Material | Dishwasher safe stainless steel |
| Included Accessories | Steaming rack, roasting rack, glass lid |
| Control Panel | Removable, do not immerse |
| Care | Bowl and glass lid dishwasher safe; panel wiped with a damp cloth |
| Safety | Auto shut-off after 4 hours of keep warm, hot surfaces, overheat protection |
| Use | Household use only |
Frequently Asked Questions - 2827056 RUSSELL HOBBS
User questions about 2827056 RUSSELL HOBBS
0 question about this device. Answer the ones you know or ask your own.
Ask a new question about this device
Download the instructions for your Multi-cooker in PDF format for free! Find your manual 2827056 - RUSSELL HOBBS and take your electronic device back in hand. On this page are published all the documents necessary for the use of your device. 2827056 by RUSSELL HOBBS.
USER MANUAL 2827056 RUSSELL HOBBS
Follow basic safety precautions, including:
This appliance can be used by children aged from 8 years and above and persons with reduced physical, sensory or mental capabilities or lack of experience and knowledge if they have been supervised/instructed and understand the hazards involved. Children shall not play with the appliance. Cleaning and user maintenance shall not be done by children unless they are older than 8 and supervised. Keep the appliance and cable out of reach of children under 8 years.
If the cable is damaged, it must be replaced by the manufacturer, its service agent, or someone similarly qualified, to avoid hazard.
Don't immerse the appliance in liquid.
The surfaces of the appliance will get hot.
The control panel must be removed before washing the cooking pot. Dry the cooking pot thoroughly before using the appliance again.
Do not use this appliance near bathtubs, showers, basins or other vessels containing water.
- Leave a space of at least 50mm all round the appliance.
- Use extreme caution when moving the appliance when it contains hot food or hot liquids.
- Use oven gloves or similar protection when removing the lid. Beware of escaping steam when removing the lid.
- Do not use this appliance outdoors.
- Don't cover the appliance or put anything on top of it.
- Unplug the appliance when not in use, before moving and before cleaning.
- Don't use accessories or attachments other than those we supply.
- Don't use the appliance for any purpose other than those described in these instructions.
- Don't operate the appliance if it's damaged or malfunctions.
- Don't place the cooking pot on any surface affected by heat. Always place the pot onto a trivet or heat-proof mat.
The base of the cooking pot has a rough surface and can leave scratches or other marks on delicate or polished surfaces. Always place protective padding under the cooking pot to protect these types of surface.
HOUSEHOLD USE ONLY
PARTS
-
Glass lid
-
Handles
-
Steaming rack
-
Cooking pot
-
Control panel
-
Roasting rack
BEFORE USING FOR THE FIRST TIME
Remove any packaging material and labels. Wash the removable parts in warm soapy water, rinse well, drain, and air dry.
CONTROLS
The following table give a brief description of the control panel functions.
| m | Keep Warm Selects the keep warm mode. Roast Selects the roast mode. | ||
| Steam Selects the steamer mode. | Sous Vide Selects the sous vide mode. | ||
| Rice Selects the rice cooking mode. | Temperature Used to select temperature values for adjustment. | ||
| Boil Selects the boil mode. | Time Used to select time values for adjustment. | ||
| Sear Selects the sear mode. | ▲▼ | Used to increase/decrease temperature or time values. | |
| Slow Cook High Used to select the slow cooker high setting mode. | I/O Used to start or stop the appliance. | ||
| Slow Cook Low Used to select the slow cooker low setting mode. | |||
C
Place the bag onto a flat surface and, using your hand, carefully push out as much of the air from the bag as you can. Be careful not to squash or damage the ingredients when you do this. Then, close the seal on the bag.
- Water Immersion Method (fig.E)
Fill a container big enough to hold the zip bag and ingredients with cold water. Put the ingredients into the bag and close the seal almost all of the way just leaving a small opening at one corner. Slowly push the bag into the water leaving the unsealed corner sticking up out of the water. When you do this, make sure than no water accidentally enters the bag. As you immerse the bag, the water will push almost all of the remaining air out. Finally, seal the corner and remove the bag from the container.
For Silicon bags:
Follow the instructions provided by the manufacturer of the bag.
For Vacuum pack machines:
A purpose made vacuum sealer suitable for food use is perfect for sous vide cooking. Use the correct bags as recommended by the manufacturer, and follow the instructions that come with the machine.
USING THE SOUS VIDE MODE
- Add hot water and fill the cooking pot to approximately half way. Use water from the hot water tap (not boiling). Try and get the temperature of the water as close as you can to the temperature you are cooking at as this will cut down any unnecessary waiting time. Use a mixture of hot and cold water as required. If the water that you put in the cooker is at a temperature that is very different from the temperature you will be cooking at, the appliance will take a lot longer to either heat the water up or cool it down to the selected temperature.
- Plug in the appliance. The main control display will flash "----". This indicates that the heat is off and the appliance is ready to be programmed.
- Put the bagged food into the cooking pot ensuring that it is fully submerged. Add additional water if needed.
- Cover with the glass lid.
- Press the Sous Vide button.
- The default cooking temperature is set at 57^ . To change the temperature, use the and buttons. The range is approx. 38 to 96^ .
- Next, press the Time button. The default cooking time is 1 hour. To adjust the cooking time, use the and buttons. The maximum cooking time is 20 hours.
- Press the I/O button. The display will stop flashing and the cooking pot will start to heat up.
- At this point the water will start heating up to the target temperature. The amount of time that takes varies. The bagged food can stay in the water during the heating up time as long as the set temperature is 55^ or above. The cooking cycle timer will only begin to count down once the water has reached the target temperature.
- When the cooking time has ended, the unit will beep three times and automatically switch to the keep warm setting. The display will flash and start counting up from zero (00:00) to 4 hours (04:00).
After the keep warm setting has been on for 4 hours, the unit will stop heating and return to the default display: "----".
Note: Do not keep foods on the keep warm setting for more than 4 hours. - Unplug the appliance when not in use and always allow it to completely cool before cleaning and storing.
Finishing Steps
Some foods can be eaten straight after cooking. For steaks and other meats, searing after cooking is essential for the best flavour and texture.
Use your multicooker's Sear function to sear the edges and sides of the meat to your preference (up to 2 minutes per side).
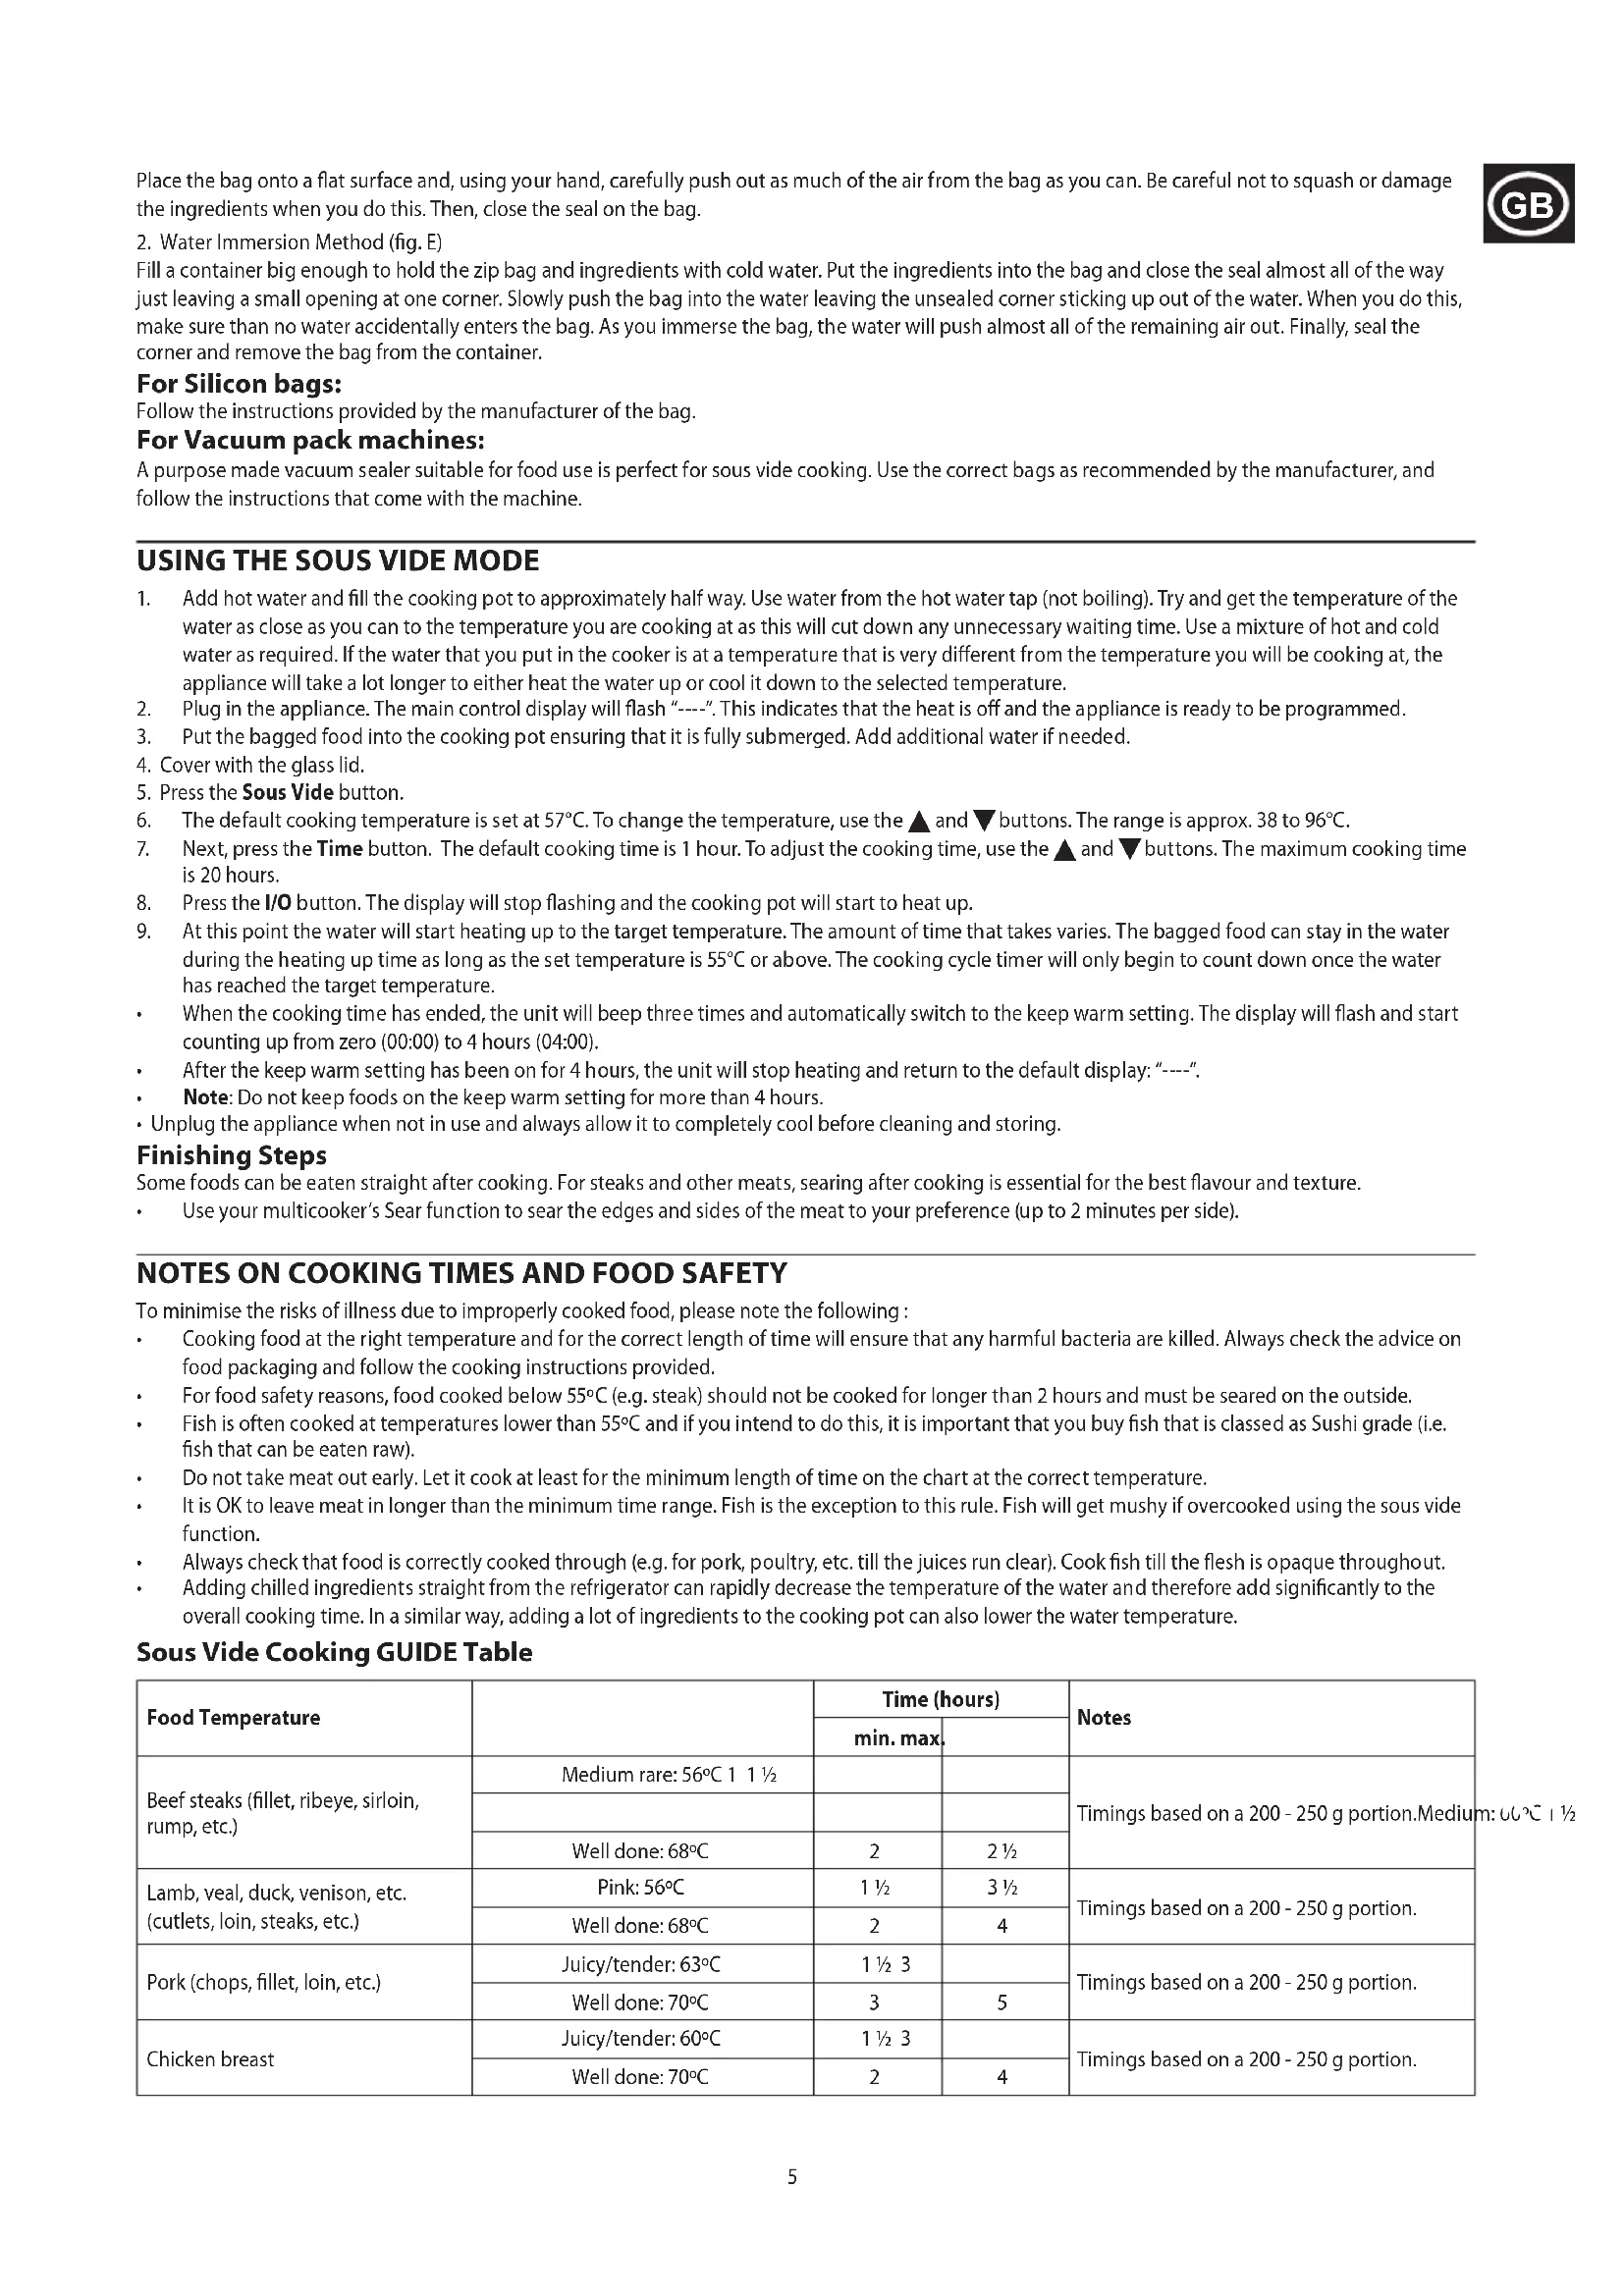
NOTES ON COOKING TIMES AND FOOD SAFETY
To minimise the risks of illness due to improperly cooked food, please note the following :
Cooking food at the right temperature and for the correct length of time will ensure that any harmful bacteria are killed. Always check the advice on food packaging and follow the cooking instructions provided.
For food safety reasons, food cooked below 55^ (e.g. steak) should not be cooked for longer than 2 hours and must be seared on the outside.
Fish is often cooked at temperatures lower than 55^ and if you intend to do this, it is important that you buy fish that is classed as Sushi grade (i.e. fish that can be eaten raw).
Do not take meat out early. Let it cook at least for the minimum length of time on the chart at the correct temperature.
It is OK to leave meat in longer than the minimum time range. Fish is the exception to this rule. Fish will get mushy if overcooked using the sous vide function.
Always check that food is correctly cooked through (e.g. for pork, poultry, etc. till the juices run clear). Cook fish till the flesh is opaque throughout.
- Adding chilled ingredients straight from the refrigerator can rapidly decrease the temperature of the water and therefore add significantly to the overall cooking time. In a similar way, adding a lot of ingredients to the cooking pot can also lower the water temperature.
Sous Vide Cooking GUIDE Table
| Food Temperature | Time (hours) | Notes | ||
| min. max. | ||||
| Beef steaks (fillet, ribeye, sirloin, rump, etc.) | Medium rare: 56°C 1 1 1/2 | Timings based on a 200 - 250 g portion.Medium | ||
| Well done: 68°C | 2 | 2 1/2 | ||
| Lamb, veal, duck, venison, etc. (cutlets, loin, steaks, etc.) | Pink: 56°C | 1 1/2 | 3 1/2 | Timings based on a 200 - 250 g portion. |
| Well done: 68°C | 2 | 4 | ||
| Pork (chops, fillet, loin, etc.) | Juicy/tender: 63°C | 1 1/2 3 | Timings based on a 200 - 250 g portion. | |
| Well done: 70°C | 3 | 5 | ||
| Chicken breast | Juicy/tender: 60°C | 1 1/2 3 | Timings based on a 200 - 250 g portion. | |
| Well done: 70°C | 2 | 4 | ||
| Chicken leg, wing, thigh | Juicy/tender: 63°C 3 1/2 5 1/2 | |||
| Well done: 72°C 4 1/2 6 1/2 | ||||
| Fish, (salmon, cod, etc.) | Soft, flaky 55°C 1 2 | Timings based on a 150 - 200 g portion. | ||
| Firm, well cooked 65°C 1 1/2 2 1/2 | ||||
| Root vegetables (carrots, swede, celeriac, etc.) | 80°C 4 6 Cut into even | sized pieces, | 15-20 mm in size. | |
SLOW COOKING
THE BENEFITS OF SLOW COOKING
Health: The gentle cooking action reduces damage to vitamins and retains more of the nutrients and flavours.
Economy: Long, slow cooking can tenderise the cheaper, tougher cuts of meat, and uses about a quarter of the power of the small ring on the average hob.
- Convenience: Prepare the ingredients the night before, put them in the slow cooker before you leave, and have a delicious meal waiting for you when you get home.
USING THE SLOW COOKING MODE
- Add the ingredients to the cooking pot and cover with the glass lid.
- Plug in the appliance. The main control display will flash "----". This indicates that the heat is off and the appliance is ready to be programmed.
- Press the Slow Cook High or Slow Cook Low button as desired.
- The display will show a flashing default time. For the low setting, the default cooking time is 8 hours and for the high setting the default time is 4 hours. To adjust the cooking time, use the and buttons. The maximum cooking time is 20 hours.
- Press the I/O button to begin cooking. The display will stop flashing and the "::" between the numbers will flash, indicating the unit is cooking.
- When the cooking time has ended, the unit will beep three times and automatically switch to the keep warm setting. The display will flash and start counting up from zero (00:00) to 4 hours (04:00).
After the keep warm setting has been on for 4 hours, the unit will stop heating and return to the default display:"----".
Note: Do not keep foods on the keep warm setting for more than 4 hours.
Unplug the appliance when not in use and always allow it to completely cool before cleaning and storing.
Making Adjustments During Cooking
You may adjust the time during the cooking cycle by pressing the and buttons. After 3 seconds of no buttons being pressed, the numbers will stop flashing and the new time for cooking will begin.
GENERAL TIPS
- Keep in mind that ingredients used straight from the fridge can increase the cooking time.
Try not to open the lid unnecessarily during cooking. A lot of heat can escape when you do this and it can take your multi cooker a long time to recover. - When testing a dish to see if it's cooked, don't forget that root vegetables usually take longer to cook.
Thaw frozen food completely before adding it to the cooking pot.
Pre-browning meat beforehand is not strictly necessary but can help seal in the moisture and add depth to the flavour. Use your multi cooker's sear function to brown meat. - Store ingredients prepared beforehand (e.g. the night before) in containers in the fridge. Don't put the multi cooker or the cooking pot into the fridge.
- When cooking with rice, use at least 150ml ( 1/4 pt) of cooking liquid for each 100g (4 oz) of rice.
- Pasta isn't suitable for slow cooking, it becomes too soft. If your recipe requires pasta, it should be pre-cooked and then stirred in 30-40 minutes before the end of the cooking time.
After all the ingredients are put into the cooking pot, it shouldn't be more than about three quarters full. If you overfill, it may spit hot liquid or overflow during use.
If the finished dish is too liquid, it can be thickened using a little cornflour, arrowroot, etc. For each 250 - 300ml of liquid, mix together 2 tbsp of cornflour with enough water to form a thin paste. Add the paste to the dish approx. 30-45 minutes before the end of cooking. Alternatively, stir in ready-made gravy granules following the manufacturer's instructions.
COOKING GUIDELINES
Vegetables
Slow cooking is ideal for vegetables. There's little evaporation, so all the juices and flavours are retained.
Root vegetables like potato, carrot, turnip, and swede, need more slow cooking than meat. Cut them into bite-size pieces and immerse in the cooking liquid. Place the vegetables as close to the bottom of the pot as possible.
Quickly cooked vegetables, like peas and sweetcorn, should be added half an hour before the end of cooking.
Pulses (Beans, Peas and Lentils)
Some dried pulses (lentils, peas, etc.) may need soaking before use. Always check any recommendations on the packaging before using.
WARNING dried beans (e.g. red kidney beans, cannellini, etc.) should be soaked for a minimum of 8 hours and boiled for at least 10 minutes before adding to the slow cooker. They're poisonous if eaten raw or undercooked.
Meat and Poultry
Slow cooking tenderises cheaper cuts, and reduces shrinkage and evaporation, retaining flavour and nutritional value. The leanest cuts of meat are best for slow cooking.
- Trim excess fat from the meat because this can add to the liquid during cooking in the form of fat.
- Where possible, use chicken without skin.
- Cut the meat into evenly sized cubes (approx. 2.5cm ) for casseroles and stews.
CONVERTING RECIPES FROM A TRADITIONAL OVEN
These times are approximate and can vary depending on the ingredients and quantities. Always check that the food is thoroughly cooked before serving.
| Oven cooking time (minutes) | Time on low (hours) | Time on high (hours) |
| 15-30 4-6 1-2 | ||
| 30-60 6-8 2-4 | ||
| 60-180 8-12 4-7 |
STEAM
- Fill the cooking pot with water to a depth of approx. 2 - 2.5cm . This will give you approx. 30 minutes of steaming. Don't add too much water otherwise the ingredients will be submerged.
- Place the steaming rack into the cooking pot (fig. C). Add ingredients such as fresh vegetables cut to a uniform size to the cooking pot and cover with glass lid.
- Plug in the appliance. The main control display will flash "----". This indicates that the heat is off and the appliance is ready to be programmed.
- Press the Steam button.
- The display will flash and show a default time of 30 minutes. To adjust the cooking time, use the and buttons. The maximum cooking time is 2 hours.
- Press the I/O button. The display will stop flashing and the cooking pot will start to heat up.
- When the temperature of the unit reaches 100^ the time will begin to count down.
- When the cooking time has ended, the unit will stop heating and return to the default display: "----".
Tip
- Keep an eye on fresh vegetables and don't overcook. Aim for brightly colored and slightly softened but not limp. Refer to your recipe for precise times.
Suggested Steaming Times
These foods are best cooked using your steamer from cold.
| Food (fresh) Notes | Time (minutes) | |
| Broccoli | Cut into 1-2 cm florets/pieces | 13-15 |
| Green Beans | Lay flat on the steaming rack | 13-15 |
| Carrots | Sliced approx. 1 cm thick | 17-19 |
| Cabbage (savoy) | Shred or cut into pieces | 11-13 |
| Asparagus | Lay flat on the steaming rack | 11-13 |
| Courgettes | Sliced approx. 1 cm thick | 9-11 |
| Sprouts | Whole (approx. 2 cm in diameter) | 13-15 |
| Cauliflower | Cut into 1-2 cm florets/pieces | 15-17 |
| Sweetcorn | Whole, on the cob | 17-21 |
| Potatoes | New potatoes or potatoes cut into 1-2 cm pieces | 21-23 |
| Boiled egg | Soft / Medium / Hard / Well done | 5-6/7-8/9-10/11-12 |
| Poached egg | Place in a ramekin or small dish | 5-6 |
| Chicken breast | Butterfly or dice into 1-2cm pieces | 12-14 |
| Salmon/round fish | Cod, Haddock, etc. | 7-9 |
| Flat white fish | Plaice, Sole, Basa, etc. | 3-4 |
| Steak fish | Tuna, Swordfish, etc. | 7-9 |
| Kale/cavolo nero | Cut into pieces | 9-11 |
| King prawns | Remove shells. Steam for 2-3 minutes or until the prawns have cooked all the way through. Stir half way through cooking. | |
RICE
- Plug in the appliance. The main control display will flash "----". This indicates that the heat is off and the appliance is ready to be programmed.
- Add the rice according to the table and fit the glass lid.
- Press the Rice button. The display will show "----".
- Press the I/O button. The unit will beep once. The display will cycle through dashes. (, , , , , , ) . This will continue to run through the entire cooking cycle. Keep the lid closed throughout the cooking cycle to ensure that the rices is cooked correctly.
- The rice is cooked when the temperature reaches approx. 105^ , the liquid in the pot has been absorbed by the rice, and the excess has boiled off.
When cooking has ended, the unit will automatically switch to the keep warm setting. The display will flash and start counting up from zero (00:00) to 4 hours (04:00).
After the keep warm setting has been on for 4 hours, the unit will stop heating and return to the default display: "----".
Note: Do not keep foods on the keep warm setting for more than 4 hours. - Unplug the appliance when not in use and always allow it to completely cool before cleaning and storing.
- When finished, press the I/O button.
- Unplug the appliance when not in use and always allow it to completely cool before cleaning and storing.
Tip
- Allow rice to rest on the keep warm settings for at least 15 minutes before serving.
Rice Cooking Chart
| Rice (grams) Water (ml) Approx. number of servings | ||
| FOR WHITE RICE | ||
| 100 240 1-2 | ||
| 200 480 2-4 | ||
| 300 720 | 3-5 | |
| FOR BROWN RICE | ||
| 100 320 | 1-2 | |
| 200 640 2-4 | ||
| 300 960 3-5 | ||
- For other types of rice not listed in the cooking chart or when in doubt, follow the package directions.
BOIL
- Add water and ingredients and fit the glass lid.
- Plug in the appliance. The main control display will flash "----". This indicates that the heat is off and the appliance is ready to be programmed.
- Press the Boil button.
- The default cooking time is 30 minutes. To adjust the cooking time, use the and buttons. The maximum cooking time is 2 hours.
- Press the I/O button. The display will stop flashing and the cooking pot will start to heat up.
- When the temperature of the unit reaches 100^ , it will beep twice and the time will begin to count down.
- When the cooking time has ended, the unit will stop heating and return to the default display: "----".
IMPORTANT: If you are making pasta, make sure that the water is boiling before adding the pasta.
KEEP WARM
- IMPORTANT: Do not use the Keep Warm setting to cook. Only use it to keep warm cooked food that is already hot.
- Start with already cooked and hot ingredients in the cooking pot, covered with the glass lid.
- Press the Keep Warm button.
- Press the I/O button.
The display will start counting up from zero (00:00) to 4 hours (04:00).
After the keep warm setting has been on for 4 hours, the unit will stop heating and return to the default display: "----".
Note: Do not keep foods on the keep warm setting for more than 4 hours. - Unplug the appliance when not in use and always allow it to completely cool before cleaning and storing.
SERVING FOOD
Once the food is cooked, you can serve it directly from the cooking pot.
-
Switch off (I/O) and unplug your multicooker.
-
Slide out the control panel from the cooking pot.
-
Use the handles to carry the cooking pot and its contents to the table and serve.
Take great care when carrying the cooking pot as it, and the ingredients will be HOT! Always use the carrying handles and oven gloves if necessary.
Make sure that the surface on which you place the cooking pot will not be damaged by heat. Prepare the serving area by putting down a heat resistant pad or suitable trivet before you place the cooking pot down.
CARE AND MAINTENANCE
- Unplug the appliance and let it cool down before cleaning or storing away.
- Remove the control panel and wipe it with a damp cloth. DO NOT immerse the control panel in water or any other liquid.
- The cooking pot and glass lid can be cleaned in the dishwasher, or handwashed in warm soapy water.
- Allow to dry thoroughly before storing or using again.
- Don't use harsh or abrasive cleaners, solvents, scourers, wire wool, or soap pads.
RECYCLING
To avoid environmental and health problems due to hazardous substances, appliances and rechargeable and non-rechargeable batteries marked with one of these symbols must not be disposed of with unsorted municipal waste. Always dispose of electrical and electronic products and, where applicable, rechargeable and non-rechargeable batteries, at an appropriate official recycling/collecting point.
These times are approximate and can vary depending on the ingredients and quantities. Always check that the food is thoroughly cooked before serving.
APENAS PARA USO DOMÉSTICO
PEÇAS
-
Tampa de vidro
-
Pegas
-
Grelha para assar
-
Recipiente de cozedura
-
Painel de controlo
-
Grelha para cozedura a vapor
ANTES DE UTILIZAR PELA PRIMEIRA Vez
LANGTIDSTILBEREDNING
FORDELENE VED LANGTIDSKOGNING
ATT OMVANDLA TRADITIONELLA UGNNSRECEPT
FORDELENE MED LANGSOM KOKING
PLEIE OG VEDLIKEHOLD
Nap: npirotoBneHn Ha napy oOoey, pbl6bI nPc NOMOsbU BXOaJe B KOMnKeT peeTeKN dJa npiroToBHeHa napy.
Puc:abTOMaTnueckaIeAaBHaB BApKa pica.
Knayehne: nCnoB3yIe TdN Knayehn HHRpeJeHToB, npiroTOBHeHcyoB, MaKapOHbIX N3deHnn I T. d
TOpdepKaHHe TemnepaTpby: nO3B0JraET COXpaHrT pIPIOTOBJIeHHyIO NIIu TYeTIPOI nepe IOnaueHa CTON.
OBXAPKA
- PnKIOUHTe np60 K 3eKTPocetu. Ha oCHOBHO naneH ynpaBHeHg 6ydt MraTb HAnncb «----> . 3TO O3Haayet, YTO HarpE BbIKIooH, a np60 roTOB K nporpaMMPOBaHIO.
- HaxmTe KOnKy 06kapka.
3.Диспнг haHET MmraTb, n Ha HEM OTo6pa3ntc BpEmrNo yMOnuHaHnIO 30 MNHT. - 406blmehntbBpem npirotoBHeHn,ncnoj3yTe KhoKnA N. MakcmaJIbHOe Bpem npiroTOBHeHn coCTabIaTet 1 aac.
- Haxmte KhoNky I/O. DnCnIe nepeCaTe MntaTb, a KaCTpIOJHaHHeT HaPeBaTbcra.
- KOrda Tempepatya yctpoCTBa DOCTnHTet nPIMeRHO 220 ^ C , HauHETcObpaTHbO TcTcEBpeMeHN.
- 06abBte cInbOuHoe nnn paCTnteINbHOe MaCIO n npOue INrpeMeNTb B KAcTPhIO N uCnOJIb3yIte ee TaK Je, KaK o6bHyIO cKOBOpOky.
8.3aKoHnB rOToBnTb,HaKMnTe KOnKy I/O. - Ecn np6op He nCnOJb3yETc, oTKIOUaHTe ero ot cTeBOI po3eKn. O6aTeBHO DoXnJaTecb, Noka yCTPOINCTBO ONHOCTBIO OCTbHET, npexJe CEM YNCTNTb ero nnpeHocNTB MeCTO XpaHEHn.
- He monb3yItecb KpbIkwO npri nCnIob3OBaHm FyHKcM O6kapka.
KAPKA
1.ПложкiteхаоунpoшетуьКастюиДоббыteИнгpeidneHtby(pnc.B).
2. PoiKIOUHTe np6op K 3JIeKTPocetn. Ha oCHOBHOI naHenn ynpabHeHH 6ydt MrraTb HAdncb «----». 3To O3HaayeT, YTO HArpeB BblKlIOueH, a np6op roTOB K nporpaMMnpoBaHIO.
3. HaxMMTe KhoNk Ky Kapka.
4. Ha dinncnlee oTo6pa3ntcT empepatypa no ymoIuahmIO 204°C. UTo6bI n3MeHnTb Tempepatpy, nCOnJIb3yTe KhoNKn ▲ N. DuaNa3OH Tempepatpyb coCTablaer npIMepHO ot 65 do 215°C.
5. 3aTeMaHxMnTe KhONkY BpEm. BpEm npiroTOBHeHn NO yMonuHaHIO COCTABnIeT 1 ac 30 MmHT. TTo6bl m3MeHnTB BpEm npiroTOBHeHn, nCNoJIb3yIte KhoNkN A N. MakcImaJIbHOe BpEm npiroTOBHeHn COCTABnIeT 20 YacOB.
6. YcTaHOBnB TempeaTyP N BpEm, HaxMnte KOnkny I/O. DInCnnei nepeCTaHET MmraTb, n HaHHeTc npuroToBHeHne edbl.
IIO 3aBepuHn BpemH npiroTOBHeH yCTPOCTBO TpIXdbI NOACT 3bYkoBo CnHn ABOMATUeCKN PeeknOHTcB Pexm NoepKaHn TempeaTpyb.Incnn6 Byet Mngt N HauHET OTCET OT Hyn0 (00:00) do 4acob (04:00).
Iocne 4 yacob B pexime noiepxahnra TempepaTby uctpoicTBo npekpatnt cbo opa6Ty, aHa iucnnee 6ydet Choba oTo6paxatbca naPiNcB noymouhaHIO: «----».
PnmeaHne. He depKnte 6IIOA BHytpn npnbopa B pexkme noDpejkaHn TEmnpaTpyb Cbbie 4acob.
Ecnn np6bOp He nCnObn3yETc, oTKIOUaHTe ero ot cTeBO pO3eKn. O6a3aTeNbHO DoXnJaTecb, Noka ycTPOIcTBo NOnHocTbIO ocTbHeT, PpeJde qem YnCTNTb erO nnnepeHOCuTb B MeTO xpaHEHn.
CObETbl
- Makcimalbnaemkoctb dny jkapkn coctabnre npimepeho 1,8-2,2 kkyprtnhbl n1n 1,3-1,8 kma dnj xkaporo.
EcnBb npednoHTae 6olee HacblueHHB BKyc nOxkapenHoro Mca, nCnolb3yTe nepeJ xapKo fynKcIO o6xapka, TTO6bl npDpyMaHITb Mco.
O6a3aTeNbHo JapbTe c 3akpblToK pblkOJ. OTKpbBaTKe KpbIky KaK MoXHO MeHbIe, YTObI oBecneHTb paBHOMepHoe npnroTOBHe H He DaTb TENNy BbITN.
IcnoB3OBAHHe TepMometpa Ira Mca MoKet 3aHHTeNbHO yUyHNTb KOHeHbI pe3yIbTaI cDenaTb ero 6OJIe ToHbIM.

FOTOBKA B BAKyyME
IJIraTobBn B BakaYMe NoHao6bnc TaKet Nnn Meooek, B KOTOpBn KnaTyCn HrpeJeHtbl. Pocne 3TOrO n3 Hero CNeJyET BbInyCTntb KaK MoXHO 6oNbSe Bo3Dxa, a 3aTeM repMeTuHc 3aKpbTb.
IIOIROTOBKA
IIOJXNTe INHpeDneHTb B Bb6paHHb nnakETnn MeoOey. NcnoB3yTe no ONDHY naKety Ha nopUHO. CtapaiTecb, YTO6bl npCn 6bln np6bn3ntelbHO odHaKOBbE. BbInCTte n3 NaKeta KaK MoXHO 60JIwe BO3dyxa n repMeTuH 3aKpOte erO.
Дя nakeTOB c3aTeKko-MoHnei:
1. Puchon cnocob (Pnc.D)
IIOXKITNe NaKT Ha IIOCKYIO NOBepxHocTb N OHOH pyKO OCTopoKHO BbInyCTnTe IN3 NaKEtA CTOnbKO BO3Dyxa, CKOBKO CMOKeTe. Pn ETOm CTapaNTecb He pa3dABNTb Hne IOBpeiHTb INrPeJeHneHTbl 6JIoua. 3aTe mepMeTuHO 3akpoTe NaKT.
2.CnocobcnporpykeHHEMBBOy(pnc.E)
3aONHnTe xoJOnH BODO EMKocTb, Bmuaoyu NaKT C 3actekon-MOHne H INHpeJeHTb 6IIOJa. NomeCTNe INHpeJeHTb B NaKT n 3akpoTe ero noTN noHOCbTO, OCTABNB He6oBLoe OTBepCTne c Ondoro n3 yrno. MeNHeHNO NOOXITE naKT B BODY TaK, YTO6b I OKpBTb I yROLOK BBcTypan I 3BObl. Pn BVInONHeHN 3TOE DeCTBn CNEIte 3a Tem, YTO6b BOda CnyauHo He nonana B naKT. IIO Mepe ONyckaHnna NaKet a BoDA BbITOKHET NOHTN BeCb octabunca BO3dyx Hapky. Tenepb 3akpoTe naKT NoJIHOCTbo n DOCTahBe erO n3 EMKOCTn.
ДЯСИANKOHOBbIX naKeTOB:
BbINHnIte HNCTpyKuIN PON3BODInTeJ DaHHOr NaKeTa.
Maunn BaKyyMHorO ynaKOBbBaHn:
IaTTOBKN B Bakyyme Ieaealbno nOoJeT CneuaIbnaB aBkyyM-3aKaToHnA MaunHa, COBMeCTmMa CnIeBbIMN IpOdyKtAm. NcNoJIb3yTe HaIeXaIe NaKeTbI, peKOMeHIOBaHbIe IPOIN3BOJNTeIe, IN BbINOJIHrTe IHCTpyKUIN NO 3KcIIyatauONnCAHHo MaunHbI.
NCIOJIb3OBAHNE PEXKIMA TOTOBKN BBAKyyME
- 3aeneTepuyo BDO np6nntelbHO Do cepeHb KaCTpOHN. Heo6xmoIO nCnoB3OBaBo BDOy HcKpaHr OpeuH BoDy (He KINrTOK). KeNaTeBHO, YTO6bI Tempeatypa BOdI b6bI MaKcImaIbHO 6N3Ka K Tempeatype RotOBKn. 3To I36abNT BAC OT NnHrero BpeMeHOn OXnHaHn. PnH eO6xOIMOCTN nCIOJIb3yUte Tropuyo BOy, pa36abNEHHyO XONODHc. EcnT Tempeatypa BOdI B KaCTpIONe 6yET 3auHTeBHO OTnuaTbcraOT TempeatypbI rOtOBKn, np60py NOHaOobtbcra 3auHTeBHO BpeMa IJnHarpeBa/OxlanJeHn BOdI DO BBpaHNO Tempeatypbl.
- PnKIOUHTe np6op K 3eKtpocetn. Ha oCHOBHOI naHenn ynpabneHn 6ydt MrraTb HADNcB (<---). 3To O3Naayet, 4TO HarpB BIKIOueH, a np6op rOToB K pOrpamMnPOBaHHo.
- IIOLOXHTe 3aIakOBAHbHe INHrpEnHeTb B KAcTpHIO TaK, YTO6bI NaKET OKa3aCnR NOnHOCTbIO NO BOIO. Pn HEO6xOIMoCTn DoneITE BOBt. Ecnn Tpe6yEtca npiroTOBnTB HeckONbKO nOpzni 3a pa3, NOMecTne NaKetbIO TDeJIbHO NO OTceKaM pNOBOJNoHO NoCTabKN (BXoITB KOMPJIeKT).
4.3aKpoTeKaCTPioIO CTeKJIaHHoN KpbIkoN. - HaxMMTe KONKy IOTOBKa B BakyyMe.
- TemnepaTpa npirotoBHeHn no yMOnuHaHIO coCTabNtET 57 C. TTo6bI n3MeHHTb TemnepaTpy, nCNoJIb3yTe KHOJKN ▲ N. DuaNa3OH TemnepaTpyb coCTabNtET npImepHo OT 38 do 96 C.
- 3aTeM HaxMNTE KONKy Bpem. Bpem npiroTOBHeHn no yMOJuaHHIO COCTABJIeT 1 ac. YTo6bI n3MeHHTb Bpem npiroTOBHeHn, nCIOJIb3yIe KONKn u▼. MakcunMaJIbHOe Bpem npiroTOBHeHn coCTABJIeT 20 cAcob.
- Haxmnte KhoNky I/O. DnCnne nepectaHET MMRt, a KaCTpIONHaHHT HaPeBaTbca.
- B 3OT MOMENT BOda NaHHT HArpeBaTcBd OTo uebo TEmpeaTpbyI. Heo6xoJnMoE dna 3TOBO Bpem MoKet pa3nuaTcBc. 3aNaKOBaHHbIe INHrpEnHeTbMOrY OCTaBaTbc B BOe BO Bpema HArpeBa, cIny ycTaHOBJeHa TempeaTppa55 ^ C nIN BBiJe. TaMep zIKla npiroToBHeHn HaHTO6paTHbIOCTcTobko NocLe TOR, Ka BOda DOctIrHET uebo TEmpeaTpbl.
IIO 3aBepseHn BpeMeHn npiroToBneHn yCtpoCTBO TpIXdbI NOAcT 3ByKOBo CnHaN aBToMaTuYeCKn NepeKlOHTcB PexIM NoDepXaHn TempepaTybl. DcncnE6ydt MrrTa n HauHET OTCyET OT Hyla (00:00) do 4 cacob (04:00).
Iocne 4 yacob B pexime noidepkaHnra TempepaTyb ycTpoiCTBO npekpatnt CBOIO pa6Oy, a Ha dncnlee 6ydet ChOBa oTO6paKaTbc Hndnncb noymoluaHIO: «----».
PnmeaHne. He depKnte 6IIOda BHTpnpnbopa BpeKmpeoepKaHnTeMnepaTpybCbbie4acob.
Ecn np6op He nCnObn3yETc, oKTHouaTe erO ot cTeBOH po3eTKN. Oba3aTebHO doXnDaItecb, noka yCTpoiCTBO nONHOCTbIO OCTbHE, ppeJe qem YnCTNTb erO nn nepeHocuTB MeCTo XpaHeHn.
3ABEPUHEHNEOBPABOTKN
HeKoTOpBle 6IIOda MoXHO yNtpe6IbTc p3ay nocne nprirotOBnHn. IJRA 6uΦwTeKcoB uDpyrnx MrcbIX 6IIOd 6xOApKa nocne nprirotOBnHn Heo6xoIIMa, YTO6bl NOnyUHTb HauLyuWn Bkyc n TeKCTypy.
Vcnobn3ynte yhkuuio 6xkapa MyIbTnBapKn Ira o6xkapkn Kpaeb n CTOPOH Mca n cBOemy BKcy (D0 2 MNHyT Ha cTOPOHy).
ПРИМЕЧАНИ NO NOBOДУ BPEMEH N PIPROTOВLEHNY IBE3ONACHOCTN NIIUEBBIX IPOДYKTOB
Bo n36ekahme pncka 3a6oJIeBaHnra n3-3a HEnpaBnIbHO npiroTOBHeHHoi Niuoi o6paTne BHIMaHne Ha nepeHNCJIeHHbe HIXe MOMeHTbl.
HaIeJaaaTemaepaTpaHn npabunbHO noOp6pahno Bpem npiroTOBneHnO bcpeuBAOT yCTpaHHe BCEX bpeoHOcbix 6akTePm. O3aTbHo uTaIte HOpMaUHO aYnAOKBe npOyKToB N BInONHnTE COOTBcTByIOUme INCTpyKUN.
IIO npuHnAm, CBAaHHbIM C 6e3oNaCHocTbIO NIIeBbIX IpOyKTOB, Te 6NIOda, KOtOpbIe rOToBATc PnI TempeType Hxke 55^ C (HaPpMep, cTeKN), He cTouT o6pa6aBtBaT bOJIbIe 2 lacOB. IVx cIeNyET nOJXapuBaTchApyKn.
Pb6y HepeKo roTobr npri TemnepaType Hnke 55° C. B 3OM cnuyae cneyeet nokynatb pb6y, klaaccnphiunpoBaHHy KaK npiroHyIO nn npiroTOBHeHry cyu (To eCTb pb6y, KOtopyIO MOXHO eCTb cbipoi).
He doTaBaTe MaChBte 6IIOda I3 yctpoiCTBa CnIKKOM paHO. OHn DoJIxHbI rOToBHTcB A TeueHne MHNMaJIbHO peKOMeHdyemoro BpeMeHN, ykaaHHoro T a6JInce, npn noDxOJaIeT empeatype.
- Donyckaetca 60pa6oTka MraCb TEeyHHe DoONHnTeJbHOr BpeMeHn, PpeBbIaIOeO MNHMmaJIbHoe. Pb6a - NCKIIOyeHne n3 TOrO npaBnla.
PpeBbIeHne BpemHn 6pa60Kn pbl6Horo 6nloDa c nmoouho yHKun rOToBkn B Bakyyme npuBeTe K TOMy, tTO KOHeHbN npOdyKT 6ydet IMetb cnKOM MRAKkyo KOHCnCTeHIO.
- 063aTeBHO CneIte 3a TEM, yTO6bI Baae 6HNO 6bINO rOToBO BHyTpN (HapnMep, cOK n3 CBHHHbI, nTnUcI b T. n. dOnJxH 6bITb npO3paHbIM).
TToOBtpepb6ydoTexnop,NAKMAKOtcbTaHETHeNoP3paHoi.
PYKOBODCTBO NO PNIROTOBJIENIO BJIUD BBAKYUME
POKNY NA PRIPRAVU JEDLA
Zelenina
PIN ANO THN INPQTH XPHSE
Apaipote ta uikoukeuaiac kai tic etikete, Nuvete ta apapoumu np eanovoeo, enuote ka kai apnote ta va oeyvooov otov aepa.
XEPII∑THPIA
Tov napakatw nivaka napouaicetai ma ouvtounpiipyapn twv leitoupuyuov tou nivaka eelyxou.
- Keep an eye on fresh vegetables and don't overcook. Aim for brightly colored and slightly softened but not limp. Refer to your recipe for precise times.
Uviotwmevoi xpovoiayeipepaatoc oToV aTuo
Autc oI tpoqec maeyipeuovtai kautepa me Kpuo vepo otov atmuayepa.
A LASSU FOZES ELONYEI
He BNKOpNCToByTe uei npnaIaN IO6n3y BaHH,dyoBHX Ka6H,ymBaJIbHKiB Ta iHUNX NocuINH,IO MICTaB Yoody.
3aHnTe npHaMHi Ha 50 MM BinbHorO Micra HABKOIO npnAay.
Bynde Dyke o6epexhi, nepecybaoyn npuaad, konin biH micntb rapay ixy afo rapay piiny.
-Длгягггкршквнькогистову te kkyoHni pykabuynki abo ananorighi 3acobn 3axicty.прнзгткршкngoctepiraytecВNKnynapn.
He knaditb Ha npnila i He po3miuye HiOro Ha noBepxhi.
Bmukai Te npnaad bi Mepeki, KOHe BnKOpictobyte no, peep nepeheceHHM abo OunueHHM.
- PpnaH He Moke npaucobTu BID 30BhiuHbOra TaMepa a6o DuctauHIO CNTem ynpablinHH.
He BnKOpncToBnyTe npnaIaJ, kauo Bin NowkoJxehn a6o npaioe 3 nepe6oamM.
He cTabe KaCTpyIHO Ha NOBepxHIO, IKA MOKe NOnKoOHTuCBAIDII TENNa. O6OB'3KOBO CTabe KaCTpyIIO Ha niCDTabKy-TPHOry a6o TepMoCTiIKy nIDCTaBky.
ПИЗHAUCEHOBKJIIOUHOДЛДOMAUSHbOFO BKNOPUCTAHH
JIIOCTPALI
- CklaHa KpIsha
-
Ka'tpyra
-
Puykn
4.ПаньуnpablinHH -
Peiwitka dans npnroTybaHna napi
- Peiitka dna cmaKeHHa
NEPEI NEPIIM BUKOPUCTAHHAM
3HIMtB 3 npntpo Bc i nkyBaIbHI matepiAa Ta etuketKn. IpomnTe Bci 3HIMHi Detani TeNIO MInbHOIO BOIO, k cnid npomnte, 3HITe Body i BucyItB Detani Ha Nobitpi.
ELEMENTKEPYBAHH
Yta6nuiHnxue HabeDenKopoTKn OOnc yHKnn nanei npabInna.
Puc:abTOMaTuHne npiroToyBaHHiaJeanbHoro pncy.
Kn'atHH: BnKOpNCTOByTe DnA KIn'ATHH IHRpeiEHTIB, pnproTyBaHHa Cynib, MaKaPOHHX BnPo6IB ToIO.
IiTpumka TeMnepaTyPn: 03B0JrE 36epiraTu TEnIOO roTOby iKy neped nOdaHHa Ha cTin.
ПACEPYBAHHЯ
1.ПИКЛЮчITьnpICTPIДоМерекиЖИВЕннЯ.Ha roJIOBHomY duCnnei ynpabInHn6yde 6IIMaTn «----».LcO O3Haaye,Io HarpIbAHN BUMKHeH npICTpi rotOBuDo nporpamYBaHH.
2. HATNCHTb KHOHONY 06cMaxyBaHHa
3. DnCnIeNoHc6nMaTnHa HbOMy BiO6pa3ntb8auc 3a 3aMOBvBaHHM 30 xBNHn.
4. Ⅱo63mHnTn ac npuroTyBaHn, KopucTeYtecb KhoNkamTa ▲MakcunmaBnHn ac npuroTyBaHn cKnadae 1 roDnHy.
5. Hatncihb KhoNky I/O. DnCne npnnHb 6nMaTn, iKactpyra noHe niirpibaTncb.
6. Koni TemnepaTypa npucTropo cRHe npu6n3Ho 220 ^ C , nouHetbc 3BOpOtHNI BIDNik yacy.
7. DdaTe MaCNO, OIIO TOO B KAcTpynIO BnKOpNCTOByTE II TAK CaMO, IY 3BnuAHy NaTeNbHO.
8. 3aKiHbBnIroTyBaTn,HaTNCiTb KOnKy I/O.
9. BiD'cndHyTe npicTpiB iD MepeXi XnBHeH, KOIN BIn HE BnKOpNCToByeTbcra, Ta 6OB'3KOBO daBaIte IOMy IOBHICTIO OxOnOHTu nepeO uNueHHm i 36epirAHHM.
He KopnctyIe TcA KpIuKoIO, KOJI BnKOpNtOByTe FoYHKUHO nacepyBaHHa.
CMAXKEHH
- Pokla汀pewiTky dna CmaKeHHB KactpyIO u doaIte iHrejeiHTn (pnc.B).
2.ПИКЛЮчITьnpICTPIДоМерекиЖИВЕннЯ.Ha rOJOBHOMY dIcPnEi ynpabInHH6yde 6JIIMaTIN «----».Lc O3Haac,Io HarpIbAHN BUMKHeH npICTPII rOTOBn Do nporpaMByaHH. - HatnchItb KhoNkCy CmaXeHHa.
- Ha dinpnei BiDoppa3ntbca TEmnepaTpya 3a 3amOBuyBaHHaM204°C. Iio6 3miHHTn TemnepaTpy, KopncTyTecA KHOIKAmTa ▲ Ta ▼. JiaNa3OH Temnepatypu cKnadae np6bn3HoB 65 do 215°C.
- Ntim HATnCHiB KHONkyac. Yac npiroToyBaHHa 3a 3amOBvBaHHm cKaJa e 1 roDnHy 30 xBnHn. Ioo6 3miHnTn ac npiroToyBaHH, Kopnctyntecb KhoKAMN ▲ Ta ▼. MakcunMaBnHn ac npiroToyBaHH cKaJa e 20 roDnH.
- YctahOBuBm Tempeatpy uac,HaTncHtB KhoNky I/O.Ducnne npunHHTb 6nMaTn, iNoHETbc npuroTyBaHHA.
KoHn qac nprirotybAHnckHHCTCB, npiCtpi noaCTb Tpr 3BkyOBHX CnHann ABTomatuHNO nepeMKHeBCa B pexm niTpumkN TemnepaTpy. Dcnnne 6yde 6nmatn nohe BiDnik BiD Hny (00:00) do 4 roDn (04:00).
PiIcraToroAkrpeKIMnNITPmMKNTemnepaTyprn6ydeBBIMKHeHn npotrOAm 4 roHN,npCTpi npnnHtB niirpibHHn NOBepHebCdo BIDo6paKeHHHa DNcNPe3a 3aMOBvBaHHAM: 一 - 一 - Ppimitka. He Tpmaite ixky B pexkmi niTpumkn Tempepatypn DOBwe 4 roHN.
Iopadn
MakcmaBnO6EMdIgCMaKeHHKcJaAcPiN6m3Ho1,8-2,2Kr KypaTmHnA6o1,3-1,8Kr neeHi.
Ykso Bn xOyTe OTPmAtu 6inbH HacnueHH CMAK NiCMAKeHOro M'ra,CKOpNCaTae Tce npeD CMAKeHHM FyhKciIO nacepyBaHH,io6 niDPymHHTM M'co.
O6OB'3K0BO 3aunHnIe Kpnkny nIac cmaKeHHa. BiKpNBaiTe Kpnkky kOMoHa MeHwe, 06 3abe3neuHTn pIBHomiphe npiroTbAHn He daTN TeNBy BnTu.
BnKOpncTaanHr TepMometpa Ira M'ra MoKe 3NaHNO NOKpaunTu KInueBn pe3yNbTaI 3po6ntu NoToHniHIM.

CY-BIД
Ira roTyaHnB B aKyyMi 3HaIo6uMbCnaKeT a6o Miueyok, B kyn KnaDyTB iHrpEiEHTN. Nicra uboro 3 Hboro cnid BuNyctTu NKOMora 6inbwe nobitpr, a notim repMeTuH0 3aKpTuN.
IⅡΓOTOBKA
Pokladitb ihreepentn B o6paHm naket a6o miueoyk. BnKOpNCTOByIte no ODHOMy nakety Ha npucio. HamaraTeCra, 06 nopui 6yn np6n3HO odHaKOBi. BnnycttB 3 naKeTa kOMORA 6ilbe NOBITpI rrepMeTuH 3aKpnIte MOrO.
3MiHa HanaWtYBaHb niD yac npuroTyBaHHa
Bn mojete 3miHtuaac npotraom uKny npuroTyBaHHa,HaTNCbUHN KOnKn Ta V. Hepe 3 cekyHni nicna octaHbOHaTnckaHn KHOPOK nIpnpnHrTa 6JImaTu noHcTbca HOBn aac npuroTyBaHH.
3AΓAJIbHI NOPAДN
- Pam'raTae, 10 doaabaHHI hprpeiHtIB npmo 3 XoJIoNbHbNka MoKe 36jlbHnTu cac npntOyBaHHA.
HaMaraiTeCb He BiKpBAtn KpiuKy 6e3 notpe6n iIac npuroTyBaHna. Kaio BiKpTuN KpiuKy, MoKe BInTu 6aRaTo TepNa, iMybTnBapuc 3HaOobTuCB TaPuaHm Yac dA BInHOBneHHra. - PpO6yOuCyTpaBHy a roTOBnHcTb, na'raTae, 10 KOpeHEnIOa 3a3Bvaua nOtpe6yOTo 6JbIe yAcy dI pynroTuBaHH.
PobHicTIO po3MOpOxyuTe 3amOpOxeni npOdyKTN, nepu HIXdoJadabATIN x y KAcTpynio.
PonepeHne 6cbmKyaBaHHa RaHe aE abcoIIOTH Heo6xIHnM, aJe MoKe dONOMOTBTPMaTn y M'acI BOrOy I OTPMaTn 6bH hAcuHcHcMak. BnkopncTOByte fHKUIO 6cbmKyaBaHHa MytBnBapKn dna 6cbmKyaBaHHa M'ca.
36epiraTe iHrpeiEHTN, npiroToBaHi 3a3dalerIb (HaPnKlaad, HanepeoDi BBeuepi), y KOHTeHepax y XoOnDInbHnky. He cTaBte MyIbTnBapKy a60 KAcTpynB xOIOuNbHNK.

ToTyouCh CTpaBn 3 pucom, BnKOpncTobyTe npHauMHI 150 mI (%NIH) BapNbHOi piJHn Ha KoxHi 100 r (4 yHcii) pncy.
MaKapOHHi BnO6H He npiaatni nobIbHoro npiroTyBaHHaBOH cTAtOB HaITo MaKIMM. AkiO do BaIoro peeHTy BXoJrMb MaKApOnH, iX cnId npiroTyBaTH 3a3anerid i doatny CTpaby 30-40 xBnInn do KINcA hcy npiroTyBaHH.
Iicra doabahna Bcix inrpeiHtB y kactpynIO BOHa MaE 6ytN 3anOBHeHa He 6inbue HIX HA Tpu VBeptI. Raio nepenobHTN KActpynIO, i3 HeIMoKe 6pn3kATn rapaay aipHa abo BOHa MOKe nepeintnc npac BkOpunctaHH.
RIO roToBa cTpaBa HaTPO pikKa, II MOKHa 3aYcTHTN, DoaBUn TPOXn KUkyPd3HOrO 6oPoSHA, apopyTu Toio. Ha KoxHi 250-300 mPiHN 3MiAsIe 2 CTOJIOBI JIOKKN KUkyPyD3HOrO 6oPoSHA NDOCTAHIO KINbICtB BOIN, IO6 3pO6NTn P1Ke TICTo. DOnaiTe CE TICTo DO CTpABN Pn6n3HO 3a 30-45 XBNHn DO KINz PnproToyBaHH. A6o JK DoaAte roToBI COUC-rpaHyn BIDNOBIDHO do IHCTpyKuIN BIVo6Hnka.
IHCTPYK3I3PNIFOTYBAHHA
Oboqi
Pobinhe npirotoybaHH iaeanbHO nixoDntB Ira OOvib. PidHa MaJke He BnnapoBycTa TOMy Bci cok Ta apomat 36epiraioTbcra.
Kopehennoi, taki kaptonla, mopkba, pina ta 6pykba, notpe6yotb nobilhioro npnroTybaHHaix M'aco. Po3piXe ix Ha HeBENKi 1MaToQki 3aHypTe y BapunbHy piinhy. Knaitb oOoi akomora 6nnKye do dHa KaCTpyni.
Oboui,aki wbnko rotyoubcra,taki ak ropoix ukykpoBa kykypd3,cni ddoabaTn 3a nbroHn do kiHpu npirotoybaHHA.
Bó6OBI (KBacon, ropoix couebnuca)
Ieaki cyuhei 6ooboi (coeeuia, ropox too) noTpi6HO 3amoyubTu nepei BnKOpncTaHHa. Oob'3KOBo nepeBipTe pekomeHa ynaKOBi nepei BnKOpncTaHHa.
TIOPEJXEHH: cyuHcyuH KBaconIO (HaupnKnaI, uepBoHy KBaconIO, 6Iy KBaconIO ToO) cnI3aMoUyBaTu npHaumHi 8 roHN i BapNTn npHaMHi 10 xBnHH, nepH Hxix Doabatn B nobInbHObApKy. kIo icN ix CnpmAm a6o HeOpaeHMM, BOH oTpHi.
M'acota nTnua
Nobinhe npirotoybaHH NOM'kUe DeueBisi BIDpy6u Ta 3MeHUe yBAPIOBAHH N BuNPoBOyBaHH, 36epiraOCH cMak i noKMBHy ciHHicTB. Hainkpaie nixxoJrB dIra Nobihoro npirotoybaHH BiPy6n M'ca 3 HaMeHWOIO KIBKCtIO Xnpy.
- 06pixTe Haanuok Jnpy 3 M'ra, ockinbkn BIn Moke 6yt DoaHn do p iDn H ni dac npiroToyBaHH y fOpmi Jnpy.
3a moKmNBOcTi roTyTe KpyTnHy 6e ukpI.
-ДязапіканК 3ОвачмИТушковано м'ясаНаріжтМ'ясо КУБИКAMN OДнakOBOrо розмір (прибпнЗHo2,5cm).
ADANTALIPELENTIBJ3BNUAHHOI DYXOBKN
Yka3aHI 3HaueHHH aucy c npu6n3HmM MoKytb 3MiHOBATNCra 3aIexKHO BID iHRpeiEHTIB Ta ixHbo'i KInbKOcTI. 3abKn nepeBiprTe nepd noaHHM, 00 Ika NOBHCTIOROTOBA.
| Час rotуваимь в духовци (хвлини) | Час за НИЗБКОТУЕВАННИ (rogenи) | Час за ВИСOKОТУЕВАнНИ (rogenи) |
| 15-30 4-6 1-2 | ||
| 30-60 6-8 2-4 | ||
| 60-180 8-12 4-7 |
IAPA
- 3aONBHTb KAcTpynIO BDOIO Do rIIN6HnnpN6H3HO 2-2,5 cm.Le 3a6e3neuTb np6H3HO 30 XBNH npiroToyBaHHa napi.He doabaiTe 3a6arato BOIN, iHaKwe iHrpeiEHTn 6dyTb 3aHypeni.
- PoknaIbIpeWITky Iny npiroTyBaHHa Ha napi B kactpynIO (pnc.C). DogaTe iHrpeDiEHTn, Taki AK CBiK OBOUi, Hap3aHI Ha UMATKN ODAKOBOPO3MIPy, y KACTPynIO N 3akpnTE II CKLHNOO KPNsKOIO.
- PIIKIOHTb npictpi do Mepexix KINBENHnHa rONOBHOMy dncnnei ynpabnHH 6yde 6nmatn «----».Lc o3Naac, 0o HarpibaHn BUMKHe n npictpi roTOBn Do nporpaMyBaHH.
4. HataChHtB Khonky Napa.
- Dicnne nohe 6lmatn Ha Hbomy BiO6pa3ntbcraac 3a 3amOBvBaHHm 30 XBnHn. Uo6 3miHnTn ac npriToyBaHH, KopcTsyTEcb KONKAMN TaV. MakcmaJIbHn Yac npiroToyBaHH cKnadae 2 rOHN.
- YctahOBuBwI TemnepaTy pHa, HATNCHTb KHOKy I/O. DcNneI npnnHHTb 6mMaTn, i NoHTeBC npiroTOyBaHHA.
- Koln TemnepaTypa npnctpoO cRHe 100 ^ , noHcTbC 3BOpOTn BIDNIK acy.
- Nicra 3akinueHHa cay npuroTyBaHn npncpti npunHnTb ndirpiBaHH na nobepHebcra do biOcbpaKeHH Ha nucnne 3a 3amOByBaHHM: «-»
Iopada
- CTeXeTc 3a CbIXKIMN OBOUAMn He nepeBaHIOte ix. HamaraIteCra, 0o6 BOHN MAn N RCKpaBn KOnip i 6yn M'AKIMN, aIe He 3aHaJTO. ToHn qac npuroToyBaHHBAkaAHn y peuNTi.
PekomeHdoBaHn qac npuroTyBaHHa napi
Li npdyktn Haikpaae roTyBaTN b npOBapci, noHnauOn 3 xoJNOHO rO CTany.
Pssll sasaae aee eae aee ae aee aee aee aee aee aee aee aee aee aee aee aee aee aee aee aee aee aee aee aee aee aee aee aee aee aee aee aee aee aee aee aee aee aee aee aee aee aee aee aee aee aee aee aee aee aee aee aee aee aee
jplablll lglll jll jlll lal 100000000000000000000000000000000000000000
aallll lgljg jgslll galsall galsall 120
jaiill jaiill jaiil 1y g aai ygai ygi bai:
jzjjz
11111111111111111111111 1
aaii iie 1
J
"---" 1
1
aal aal aal aal aal aal aal aal aal aal aal aal aal aal aal aal aal aal aal aal aal aal aal aal aal aal aal aal aal aal aal aal aal aal aal aal aal aal aal aal aal aal aal aal aal aal aal aal
y 1
0
"Jiai jiai" 10
(DJss) 1
aill llll 1111111111111111111111111111111
S_ OBC = 12 · CO · BC = 12 × CD × 5
(EJSS) 2
a 1
j 1
J 1
在 Rt ABD 中:
:ssalln 4g gail
aai aai ai
15 15
g 1
AaSL
1g 1
cllll jyj yj (gllll gaiy) jalll lll gaiy i jaii aill gaiy i jaii aill
a aal aal alal aal aal gaaal gaaal gaaal gaaal gaaal gaaal
j 1
aal aal alal
"..." 2
jai jil jil jil selal gai jai jai yae jai slal gai gai gai gai gai gai gai gai
aal aal alal aal alal alal alal alal alal alal alal alal alal alal alal alal alal alal alal alal alal alal alal alal alal alal alal alal alal alal alal alal alal alal alal alal alal
aeg
J 1
(04:00) 4 (00:00)
a a a a a a a a a a a a a a a a a a a a
aall
aill aal lal aln j klll lal bll y
a
Jiaaii liuie aui jiuui yuyuui uuiyui
aabll aabll
1
"---" aalalalal alalal alalal alalal alalal alalal alalal alalal alalal alalal alalal
AaJn Jnnnnnnnnnnnnnnnnnnnnnnnnnnnnnnnnnnnnnnnnnnnnnnnnnnnnnnnnnnnnnnnnnnnnnnnnnnnnnnnnnnnnnnnnnnnnnnnnnnnnnnnnnnnnnnnnnnnn
14
20 1
5
alall 1e blll l!
.04:00) 4 (00:00)
aaiy aaiy aaiy aaiy aaiy aaiy aaiy aaiy aaiy aaiy
()
a 1
10 8 8 8
y
1515g2
J 1
1
Jg 1
10 1000
(204 2.5)
1
aal 1 aal 1 aal 1 aal 1 aal 1 aal 1 aal 1 aal
Jally jalll gall gall plabll glblll baaasai .gall aessil gdlalld
gai jil baili slbin gail jbi aialy ai yjao ci jiy 1
.2
1/0 3
.04:00) 4 (00:00) j
y jaiill yjaiill 12 aai 24 yg 24 g 24 g 24 g 24 g 24 g 24 g 24 g 24 g
pabj pabi
eolj 0 jaiy aayi dkiay gab
1
2
Aagaaalall aillgaoaalal 3