
Satisfry Snappi 27290-56 - Multi-cooker RUSSELL HOBBS - Free user manual and instructions
Find the device manual for free Satisfry Snappi 27290-56 RUSSELL HOBBS in PDF.

| Product Type | Multi-cooking appliance (hot air fryer) |
| Brand | Russell Hobbs |
| Model | Satisfry Snappi 27290-56 |
| Usage | Household use only |
| Main Functions | Hot air cooking, presets, synchronized cooking, shake function |
| Controls | Touch panel with digital display |
| Basket Configuration | Can be used with 1 large basket or 2 separate baskets |
| Capacity | Generous-sized baskets (not specified in liters) |
| Coating | Non-stick on crisper plates and baskets |
| Adjustable Temperature | Yes, via up/down buttons |
| Adjustable Timer | Yes, via up/down buttons |
| Preheating | Yes, adjustable to minimum 3 minutes |
| Shake Function | Yes, programmable for mid-cooking reminder |
| Synchronized Cooking | Yes, allows finishing two dishes at the same time |
| Included Accessories | 2 baskets, 2 crisper plates, 2 basket dividers, 1 U-shaped connector |
| Basket Care | Hand wash or dishwasher safe |
| Plate & Divider Care | Hand wash or dishwasher safe |
| Exterior Cleaning | Damp cloth or sponge, dry thoroughly |
| Safety | Do not immerse, do not use external timer, hot surfaces, keep out of reach of children under 8 years |
| Recommended Use | Non-metal utensils (heat-resistant plastic or silicone) |
Frequently Asked Questions - Satisfry Snappi 27290-56 RUSSELL HOBBS
User questions about Satisfry Snappi 27290-56 RUSSELL HOBBS
0 question about this device. Answer the ones you know or ask your own.
Ask a new question about this device
Download the instructions for your Multi-cooker in PDF format for free! Find your manual Satisfry Snappi 27290-56 - RUSSELL HOBBS and take your electronic device back in hand. On this page are published all the documents necessary for the use of your device. Satisfry Snappi 27290-56 by RUSSELL HOBBS.
USER MANUAL Satisfry Snappi 27290-56 RUSSELL HOBBS

Russell Hobbs
A BRITISH ICON SINCE 1952

natural_image
Technical line drawings of a grid-patterned device with numbered annotations (no text or symbols on the diagram itself)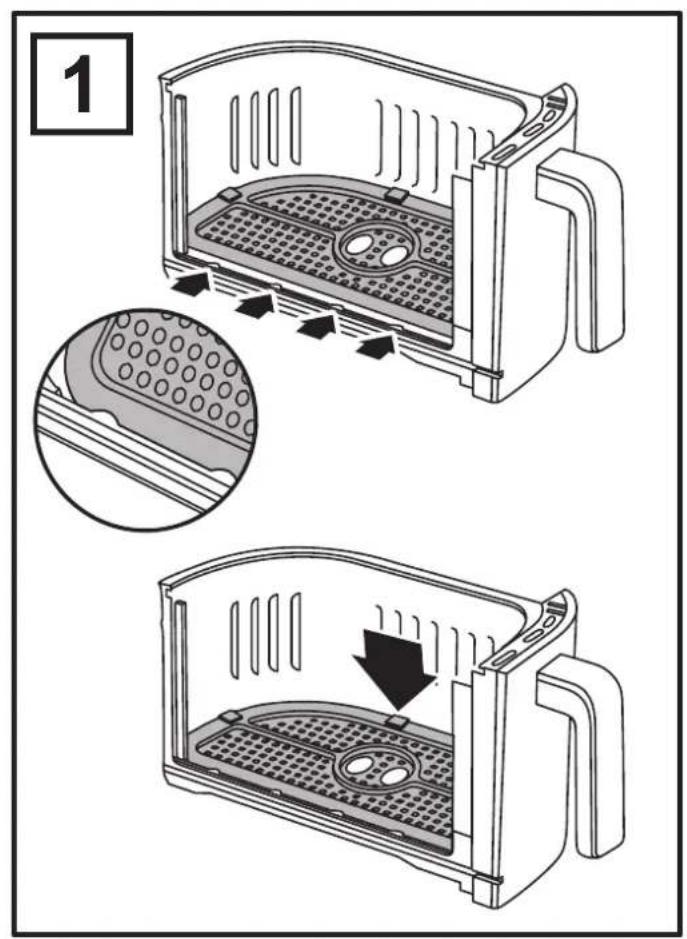
natural_image
Illustration showing two steps of an air fryer being opened into a plastic basket, with no text or symbols present.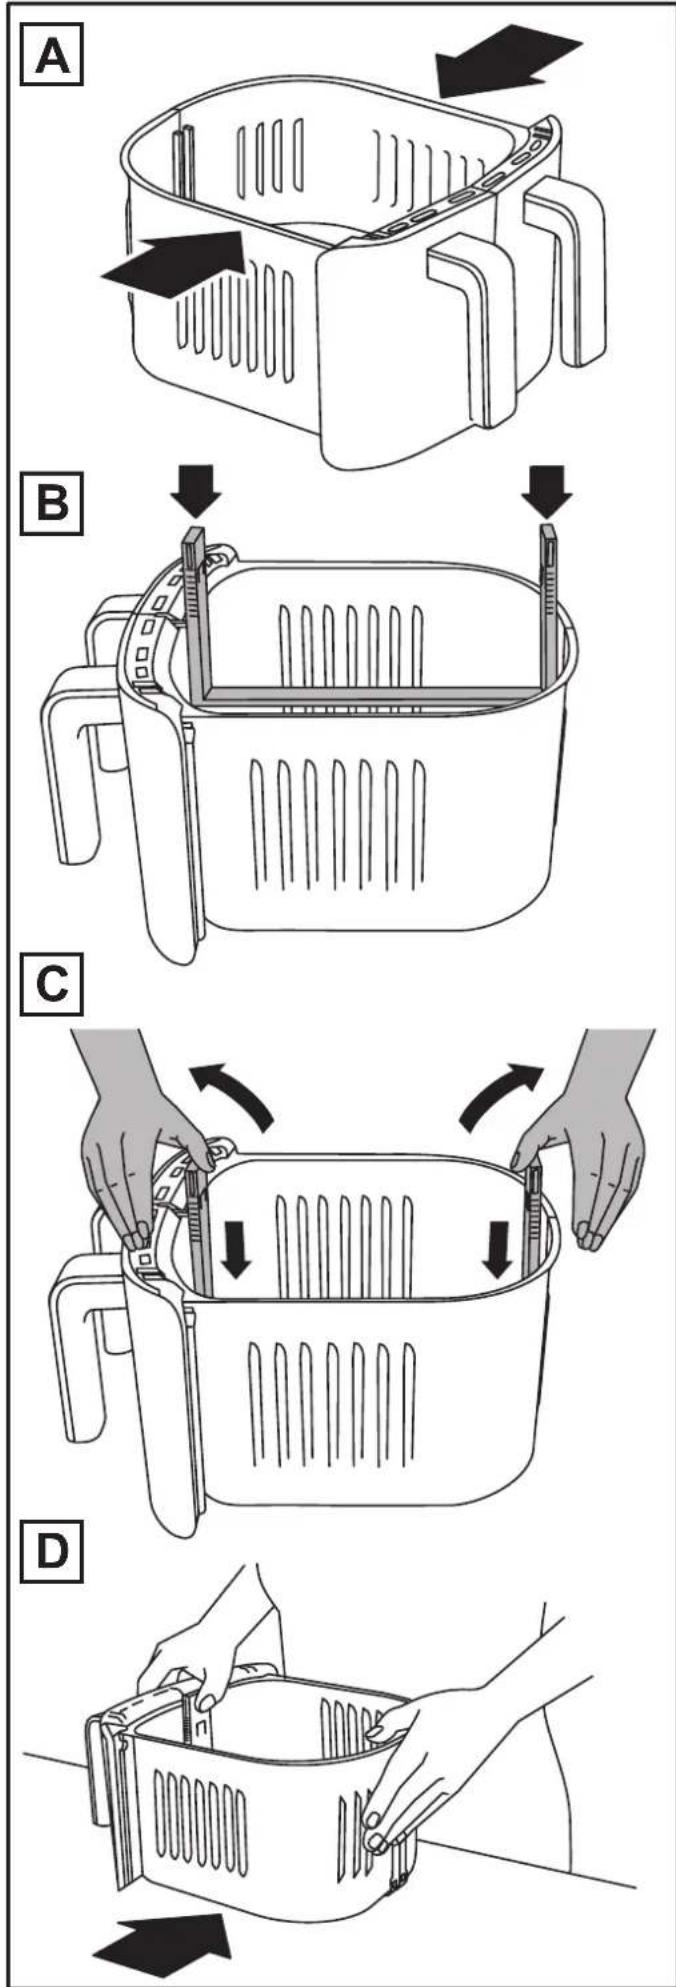
IMPORTANT SAFEGUARDS
Follow basic safety precautions, including:
This appliance can be used by children aged from 8 years and above and persons with reduced physical, sensory or mental capabilities or lack of experience and knowledge if they have been supervised/instructed and understand the hazards involved. Children must not play with the appliance. Cleaning and user maintenance must not be done by children unless they are older than 8 and supervised. Keep the appliance and cable out of reach of children under 8 years.
Don't connect the appliance via a timer or remote control system.
Don't use the appliance near or below combustible materials (e.g. curtains).
The surfaces of the appliance will get hot.
Do not immerse in any liquid.
If the cable is damaged, return the appliance, to avoid hazard.
- Don't use accessories or attachments other than those we supply.
- Don't use the appliance for any purpose other than those described in these instructions.
- Don't operate the appliance if it's damaged or malfunctions.
- Don't use anything metal or sharp, you'll damage the non-stick surfaces.
- Keep clear of the vent at the rear of the appliance hot air will come from it.
HOUSEHOLD USE ONLY
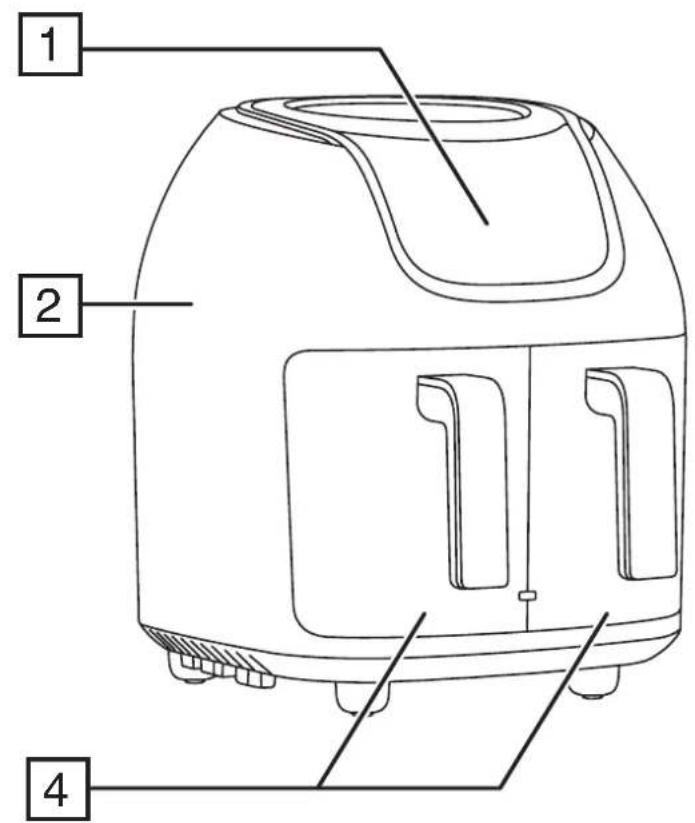
PARTS
- Touch controls and display
- Body
-
Crisping plates
-
Baskets
- Basket dividers
- U-channel connector
BEFORE USING FOR THE FIRST TIME
- Handwash the removable parts, rinse, and dry.
- When using your air fryer for the first time, you may notice smoke or a slight odour for the first few minutes of cooking. This is normal. Ensure the room is well ventilated.
- Place the crisping plates into the baskets. Slide the baskets into the body.
PREPARATION
- Sit the appliance on a stable, level, heat-resistant surface.
- Leave a space of at least 50mm all-round the appliance.
- Have oven gloves (or a tea towel) on hand, use heat resistant plastic tongs and a heat-resistant mat or dinner plate to rest the basket on.
- Note: Do not use metal tongs as it may scratch the coating. We recommend using only heat resistant plastic or silicon coated tongs.
CRISPING TRAYS
Fit the crisping trays into the bottom of each basket before fitting the basket dividers or joining the baskets together. Insert the front edge of the crisping tray under the curved projections that are along the inside edge of the basket as shown (Fig. 1). Press the back edge down to seat the crisping tray into the basket. Make sure that the trays are fitted correctly so that they don't fall out if the basket is tipped.
ASSEMBLING THE BASKETS
To use one large basket
- Remove the baskets from the body.
- If present, slide the basket dividers out of each basket.
- If they are not already fitted, fit a crisping plate into each basket.
-
Place the baskets side by side so that they are touching and aligned with each other (A).
-
Align the U-channel connector with the grooves on both sides of the baskets simultaneously and slide it partway into the basket (B).
-
Apply gentle outward pressure with your thumbs onto the top of the connector (C). Slide the connector downwards while maintaining the outward pressure. This will keep the connector aligned with the grooves on the inside of the basket.
-
Continue until the connector clicks into place.
-
If the connector binds up or jams when it is near to its final position, use your fingers to gently pull the bottoms of the baskets against your body (D). This will help to keep them aligned.
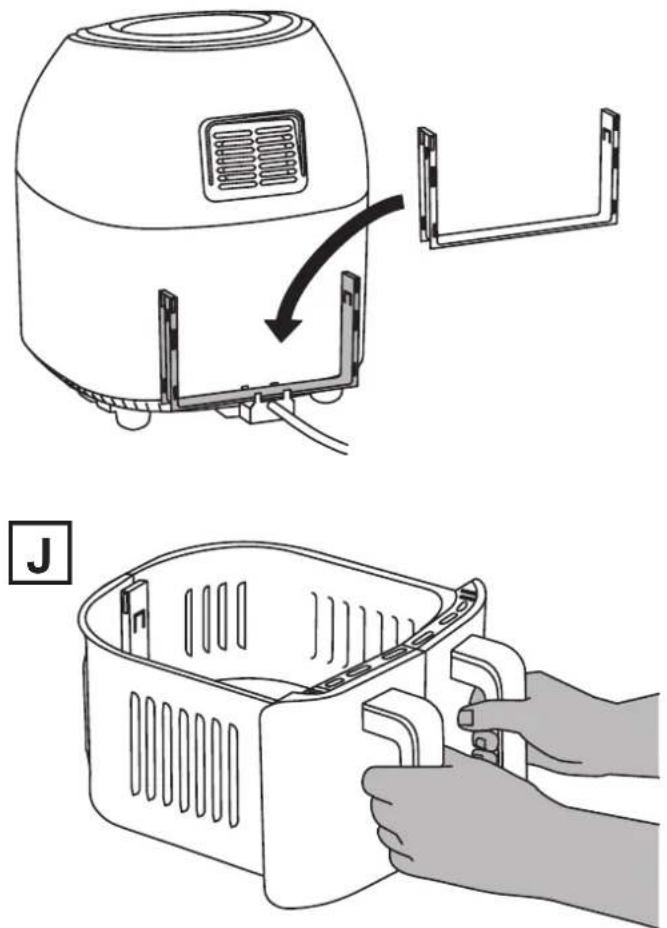
- IMPORTANT When the baskets are connected together, use BOTH handles to remove, replace or otherwise move the baskets (J). Failure to do so may result in damage to the U-channel connector.
- Don't force anything. It should only require gentle/moderate pressure to install the basket connector,. Forcing it to fit might cause damage. If it doesn't fit correctly, remove it and then check that the baskets are still in contact and aligned with each other, then try again.
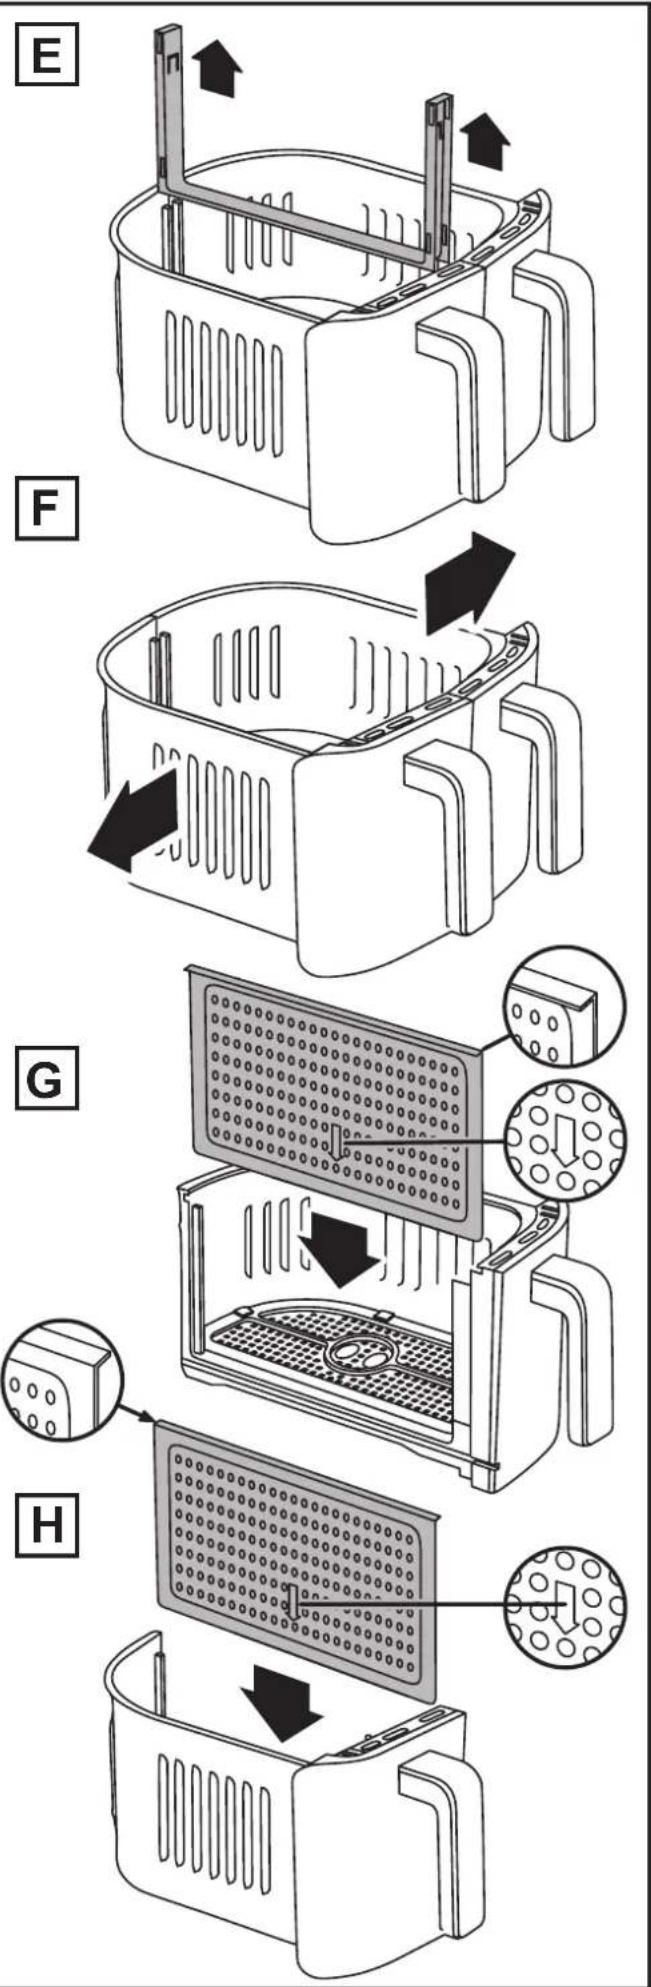
To use two separate baskets
- Remove the baskets from the body.
- If present, remove the basket connector (E).
- Separate the baskets (F).
- Insert the crisping plates if you are using them.
- Orient each basket divider so that:
- the arrow on the divider is pointing downwards.
- The folded-over part on the top edge of each divider is facing outwards (see figures G and H).
-
Slide the divider into the basket slot.
-
Repeat for the other basket.
Note: If you don't orient the basket dividers correctly (step 5) before fitting, they will fall out when the baskets are inverted.

Scan this QR code for a video showing how to assemble the baskets.
PREHEATING
If you want to preheat the appliance before cooking:
- Use the temperature control up/down buttons ( ♩ ∨ ∨) to increase or decrease the temperature.
- Use the time up/down buttons (☐ ∧ ∨) to set the preheat time to 3 minutes.
- Press the start/pause button (▶/II) to begin preheating.
- Assemble the large basket as previously described.
- Plug the appliance in. Press the power button (⏻) to turn the appliance on.
- Press the menu selection button (M) to scroll through the cooking presets and select a preset time and temperature, or use the time up/down buttons ( Ⓞ ∨ ∨) and the temperature control up/down buttons ( ♩ ∨ ∨) to manually set a time and temperature.
- Optional shake feature: Press the shake button (SHAKE) to activate the shake feature for the selected basket.
- Carefully pull the basket out of the appliance, place the ingredients inside, and push the basket all the way back into the appliance. DO NOT touch the basket directly; only hold the basket by the handles.
- Press the start/pause button (▶/II) to start the cooking cycle.
- When the buzzer sounds, the set cooking time has elapsed. Carefully remove the basket from the appliance and place it on a heat-resistant surface.
- If the food is fully cooked, use tongs to remove it. The appliance is instantly ready for preparing another batch.
- If the food is not fully cooked, simply slide the basket back into the appliance and cook for a few more minutes.
- Your fryer can be operated with a single small basket. Simply fit the basket dividers and cripsing trays and fill only one basket with food.
Shake feature
Press the shake button (SHAKE) during programming to activate the shake feature. The "SHAKE" icon below the left hand time display will come on. If active, the icon will blink five times when the cooking time is halfway through. When this occurs, carefully remove the basket and shake or turn the ingredients over. Replace the basket and cooking will restart.
- Assemble the two baskets as previously described.
- Plug the appliance in. Press the power button (⏻) to turn the appliance on.
- Press the menu selection button (M) to scroll through the cooking presets and select a preset time and temperature, or use the time up/down buttons (☐ ∧ ∨) and the temperature control up/down buttons (☐ ∧ ∨) to manually set a time and temperature.
- Press the basket 2 button (2). Then, use the time up/down buttons to manually set a different cooking time for basket 2.
- Optional shake feature: Press either the basket 1 (1) or basket 2 (2) button, then press the shake button (SHAKE) to activate the shake feature for the selected basket.
- Carefully pull the baskets out of the appliance, place the ingredients inside, and push the baskets all the way back into the appliance. DO NOT touch the baskets directly; only hold the baskets by the handles.
- Press the start/pause button (▶/II) to start the cooking cycle.
- When the buzzer sounds, the set cooking time has elapsed. Grasp BOTH handles (J) and carefully remove the joined baskets from the appliance and place them on a heat-resistant surface.
- If the food is fully cooked, use tongs to remove it. The appliance is instantly ready for preparing another batch.
- If the food is not fully cooked, simply slide the basket back into the appliance and cook for a few more minutes. Remember to use BOTH handles when removing or replacing the baskets.
NOTES:
- For best performance, always fit the crisping trays into the basket(s).
- CAUTION: Do not turn the baskets upside down. Any excess oil that has collected on the bottom of the basket will leak onto the ingredients and may splash onto you and your surroundings.
SYNCHRONISED COOKING
You can operate your air fryer so that foods with different cooking times will finish cooking together.
- Assemble the two baskets as previously described.
- Plug the appliance in. Press the power button (⏻) to turn the appliance on.
- Press the basket 1 button (1) to select basket 1.
- Press the menu selection button (M) to scroll through the cooking presets and select a preset time and temperature, or use the time up/down buttons (☐ ∧ ∨) and the temperature control up/down buttons (☐ ∧ ∨) to manually set a time and temperature.
- Press the basket 2 button (2) to select basket 2.
- Next, program the cooking time for basket 2 (the temperature will be the same for both baskets).
- Optional: Press either the basket 1 (1) or basket 2 (2) button, then press the shake button (SHAKE) to activate the shake feature for the selected basket.
-
Select the basket programmed with the LONGEST cooking time ONLY. Carefully pull the basket out of the appliance, place the ingredients inside, and push the basket all the way back into the appliance.
-
Press the synchronise button (SYNC) to synchronise the cooking timers.
-
Press the start/pause button (▶/∥) to start the cooking cycle.
-
When the audible alarm sounds, the cooking timers have synchronised and cooking will pause.
-
Carefully remove the empty basket, fill with food, and push the basket back into the appliance to resume cooking.
-
When the audible alarm sounds again, the set cooking time has elapsed. Carefully remove the baskets from the appliance and place them on a heat-resistant surface.
TIPS
- Foods that are smaller in size usually require a slightly shorter cooking time than larger ones.
- Misting a bit of vegetable oil on fresh potatoes is suggested for a crispier result. When adding oil, add only a little just before cooking.
- Snacks normally cooked in an oven can also be cooked in the appliance.
- Place fragile or filled foods in a baking tin or oven dish in the appliance. A baking tin or oven dish is also suggested when baking a cake or quiche.
- You can use the appliance to reheat foods. Simply set the temperature and time to however warm you want your food.
- Wear oven gloves to protect against accidental contact with the heated surfaces and escaping hot air and steam from opening the appliance.
- To prevent scratching the nonstick coating, use only non-metallic utensils. Do not lift or cut food in the appliance using sharp utensils, such as forks and knives, which can scratch the cooking surface.
COOKING TIMES AND FOOD SAFETY
• To be used purely as a guide
- Check food is cooked through before serving. If in doubt, cook it a bit more.
- Cook meat, poultry, and any derivatives (mince, burgers, etc.) till the juices run clear.
- Cook fish till the flesh is opaque throughout.
- When cooking pre-packed foods, follow any guidelines on the package or label.
| Food Temperature | °C | Time (min) | Remarks |
| Chips 200 25 Rinse, dry, | toss in salt, pepper, and oil | ||
| Potato wedges | 200 | 15-20 | Rinse, dry, toss in salt, pepper, and oil |
| Sweet potato wedges | 200 | 15-20 | Rinse, dry, toss in salt, pepper, and oil |
| Jacket potato | 180 | 30-40 | For a crispy jacket, brush with oil |
| Roast potatoes 180 | 25-35 | Rinse, dry, toss in salt, pepper, crushed rosemary (optional) and oil | |
| Mixed Mediterranean vegetables | 180 | 6-10 | All cut to similar sizes, approx. 1-2cm pieces, toss in oil and season |
| Chicken Breast | 180 | 15-20 | |
| Chicken Thighs | 180 | 25-30 | Cooking time depends on size. Brush with oil, season |
| Chicken wings | 180 | 23-28 | Cooking time depends on size. brush with oil, season |
| Burgers | 180 | 8-12 | Cooking time depends on size. brush with oil, season |
| Sausages | 180 | 8-12 | |
| Pork chop | 180 | 22 | Brush with oil, season |
| Salmon fillet | 180 | 8-12 | Brush with oil, season |
| White fish fillet | 180 | 8-12 | Brush with oil, season |
| Sausage Roll | 200 | 13-15 | Brush with oil, season |
| Spring Roll | 200 | 8-10 | |
| Muffins | 180 | 15-18 | |
| Frozen Food | Temperature °C | Time (min) | Remarks |
| Chips 200 25 | |||
| Potato wedges 200 15-20 | |||
| French fries | 200 | 12-20 | |
| Chicken Nuggets | 200 | 6-10 | |
| Fish fillets | 200 | 10-12 | |
| Fish Fingers | 180 | 6-10 | |
| Onion Rings | 180 | 10-15 | |
| Scampi | 180 | 15 | |
NOTE: High fat foods (e.g. pork) may create smoke. This is normal as oil residue is cooked at a high temperature. Reducing temperature may decrease the effect of smoke.
CARE AND MAINTENANCE
- Unplug the appliance.
- Leave everything to cool down.
Baskets, basket dividers and crisping plates
- Once the air-fryer has cooled, remove the baskets from the air-fryer body for cleaning.
- Remove the dividers from the baskets.
- Remove the crisping plates from the baskets.
-
Wipe the interior of the body to remove any crumb or residue, but DO NOT wipe the heating elements located at the top.
-
Dispose of food residue and oils, and wipe the baskets, basket dividers and crippling plates with a damp cloth before hand washing them in warm to hot soapy water. Dry thoroughly before using them again, or refitting them into your fryer.
- The baskets, basket dividers and crisping trays can also be washed in a dishwasher.
Exterior Surfaces
- Clean the exterior with a damp cloth or sponge. Dry thoroughly.
RECYCLING
To avoid environmental and health problems due to hazardous substances, appliances and rechargeable and non-rechargeable batteries marked with one of these symbols must not be disposed of with unsorted municipal waste. Always dispose of electrical and electronic products and, where applicable, rechargeable and non-rechargeable batteries, at an appropriate official recycling/collection point.
APENAS PARA USO DOMÉSTICO
COMPONENTES
STEKEPLATER FOR SPR∅STEKING
BEHANDLING OG VEDLIKEHOLD
UPORABA Z DVEMA KOŠARAMA

- Russell Hobbs
- IMPORTANT SAFEGUARDS
- HOUSEHOLD USE ONLY
- PARTS
- BEFORE USING FOR THE FIRST TIME
- PREPARATION
- CRISPING TRAYS
- ASSEMBLING THE BASKETS
- To use one large basket
- To use two separate baskets
- PREHEATING
- Shake feature
- NOTES:
- SYNCHRONISED COOKING
- TIPS
- COOKING TIMES AND FOOD SAFETY
- CARE AND MAINTENANCE
- Baskets, basket dividers and crisping plates
- Exterior Surfaces
- RECYCLING
- APENAS PARA USO DOMÉSTICO
- COMPONENTES
- STEKEPLATER FOR SPR∅STEKING
- BEHANDLING OG VEDLIKEHOLD
- UPORABA Z DVEMA KOŠARAMA
Brand : RUSSELL HOBBS
Model : Satisfry Snappi 27290-56
Category : Multi-cooker