Satisfry Air & Grill 26520-56 - Multi-cooker RUSSELL HOBBS - Free user manual and instructions
Find the device manual for free Satisfry Air & Grill 26520-56 RUSSELL HOBBS in PDF.
| Brand | Russell Hobbs |
| Model | Satisfry Air & Grill 26520-56 |
| Product type | Multi-cooking appliance (air fryer, grill, roast, sear, bake, slow cook, keep warm) |
| Power supply | Electric, mains powered |
| Main functions | Air fry, Grill, Roast, Sear, Bake, Slow cook (high and low), Keep warm |
| Maximum temperature | 260 °C (Grill and Roast mode) |
| Minimum temperature | 65 °C (Bake, Roast mode) |
| Timer | From 1 to 1440 minutes depending on mode |
| Preheat | Available in Grill and Bake modes |
| Display | Digital screen with 8-LED light ring |
| Temperature units | °C or °F (switchable) |
| Auto standby mode | After 5 minutes of inactivity |
| Materials | Removable cooking pot and grill plate, non-stick coating |
| Care and cleaning | Pot and grill plate dishwasher safe or wash with warm soapy water; exterior surfaces wiped with a damp cloth |
| Safety | Do not immerse, leave 50 mm free space, use oven mitts, unplug after use |
| Use | Household use only |
| Country of origin | Not specified |
Frequently Asked Questions - Satisfry Air & Grill 26520-56 RUSSELL HOBBS
User questions about Satisfry Air & Grill 26520-56 RUSSELL HOBBS
0 question about this device. Answer the ones you know or ask your own.
Ask a new question about this device
Download the instructions for your Multi-cooker in PDF format for free! Find your manual Satisfry Air & Grill 26520-56 - RUSSELL HOBBS and take your electronic device back in hand. On this page are published all the documents necessary for the use of your device. Satisfry Air & Grill 26520-56 by RUSSELL HOBBS.
USER MANUAL Satisfry Air & Grill 26520-56 RUSSELL HOBBS
natural_image
Black Russell Hobbs air fryer with digital display and control buttons (no visible text or symbols on device body)26520-56
IMPORTANT SAFEGUARDS
Follow basic safety precautions, including:
This appliance can be used by children aged from 8 years and above and persons with reduced physical, sensory or mental capabilities or lack of experience and knowledge if they have been supervised/instructed and understand the hazards involved. Children shall not play with the appliance. Cleaning and user maintenance shall not be done by children unless they are older than 8 and supervised. Keep the appliance and cable out of reach of children under 8 years.
If the cable is damaged, it must be replaced by the manufacturer, its service agent, or someone similarly qualified, to avoid hazard.
The surfaces of the appliance will get hot.
Do not immerse in any liquid.
Don't connect the appliance via a timer or remote control system.
- Remove the cooking pot from the unit before washing it separately.
- Leave a space of at least 50mm all round the appliance.
- Use extreme caution when moving the appliance when it contains hot food or hot liquids.
- Use oven gloves or similar protection when opening the lid. Beware of escaping steam when opening the lid.
- Do not use this appliance outdoors.
- Don't cover the appliance or put anything on top of it.
- Unplug the appliance when not in use, before moving and before cleaning.
- Don't use accessories or attachments other than those we supply.
- Don't use the appliance for any purpose other than those described in these instructions.
- Don't operate the appliance if it's damaged or malfunctions.
- Don't place the cooking pot on any surface affected by heat. Always place the pot onto a trivet or heat-proof mat.
- The base of the cooking pot has a rough surface and can leave scratches or other marks on delicate or polished surfaces. Always place protective padding under the cooking pot to protect these types of surface.
HOUSEHOLD USE ONLY
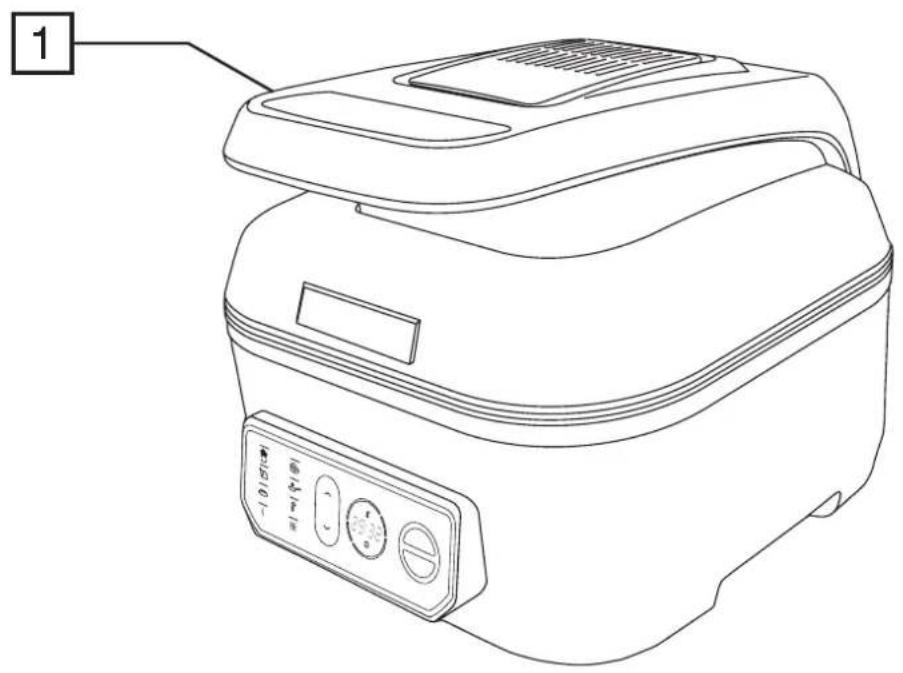
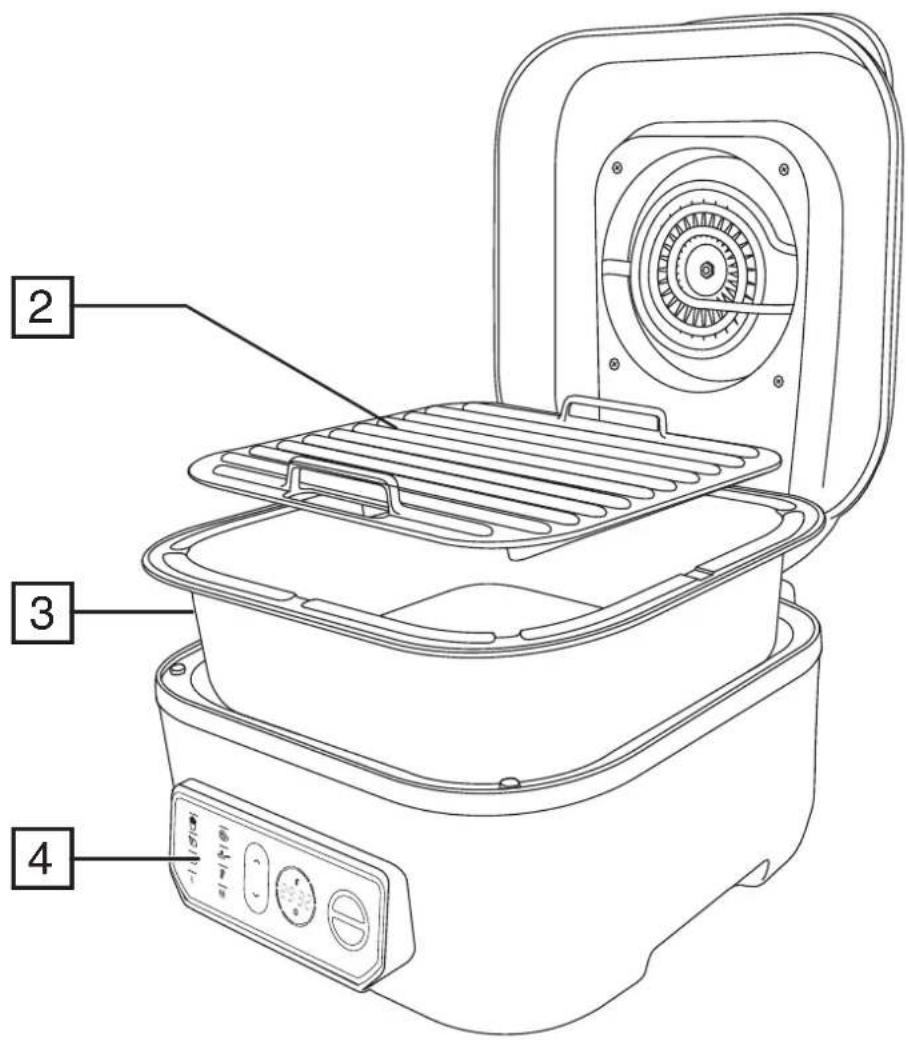
PARTS
-
Handle
-
Grill plate
-
Cooking pot
-
Control panel
BEFORE USING FOR THE FIRST TIME
Remove any packaging material and labels. Wash the removable parts in warm soapy water, rinse well, drain, and air dry.
CONTROLS AND LIGHTS
 | Air Fry Light Air Fry mode selected | Keep Warm Light Keep Warm mode selected | |
 | Grill Light Grill mode selected | Slow Cook High Light Slow cooker high setting mode selected | |
 | Roast Light Roast mode selected | Slow Cook Low Light Slow cooker low setting mode selected | |
 | Sear Light Sear mode selected | Used to select cooking modes and increase/decrease temperature or time values. | |
 | Bake Light Bake mode selected | I/O | Used to start or stop the appliance. |
TEMPERATURE UNITS
To switch back and forth between °F and °C press and hold the O button for 3 seconds.
COOKING FUNCTIONS
Air Fry: Use your multi cooker for healthier air frying with top and bottom heat, and a fan for even browning.
Grill: Use to grill food. The preheat cycle can be used to heat the grill plate to add sear/grill marks.
Roast: Use to cook whole pieces of meat, fish, or vegetables.
Sear: Use your multi cooker to sauté and sear.
Bake: Use your multi cooker for baking.
Slow Cook: Perfect for casseroles, soups, stews, and combinations of meats and vegetables.
Keep Warm: Allows you to keep cooked food warm before serving.
Cooking Temperatures and Times
| Mode | Heat Temperature (°C) Time (minutes) | Preheat | |||||
| Top | Bottom | Default | Range | Default | Range | ||
| Air Fry | ● | ● | 215 80 - 230 | 20 1 - 59 NO | |||
| Grill | ● | ● | 230 80 - 260 | 20 1 - 59 YES | |||
| Roast | ● | ● | 190 65 - 260 | 30 1 - 120 NO | |||
| Sear | - | ● | 230 | 230 - 260 | 10 | 1 - 120 | NO |
| Bake | ● | ● | 175 65 - 230 | 30 1 - 120 YES | |||
| Slow Cook High | - | ● | - | - | 240 | 1 - 1440 | NO |
| Slow Cook Low - | ● | - | - | 480 | 1 - 1440 | NO | |
| Keep Warm | - | ● | - | - | 240 | - | NO |
FEATURES COMMON TO ALL COOKING MODES
Changing the time or temperature during cooking
Once cooking has started you can change the time or temperature as follows:
-
To adjust the time, use the ∧ and ∨ buttons. The display will flash while you are changing it.
-
To change the temperature, press the I button while the unit is cooking. The currently selected temperature will start to flash. Use the and buttons to make any desired changes.
Opening the lid during cooking
The lid can be opened during cooking to add or to stir ingredients. Cooking and the timer will be paused when the lid is opened and continue once the lid is closed again.
Auto Sleep Mode
If no buttons are pressed within 5 minutes, your multi cooker will go into sleep mode to save power. To wake it, press any button.
Light Ring Display
The 8 leds which surround the temperature and time display do various things during use but are mainly are used to show the following:
• During cooking, they all light up and go out one by one as cooking progresses.
• If cooking is cancelled for any reason, they will all flash briefly before going out.
• During the preheating cycle (Grill and Bake modes), the will flash until the set temperature is reached.
Hints and Tips
- Once the cooking cycle has finished you can remove the food and transfer to a serving plate. You can also fully remove the cooking pot. Take great care and use appropriate protection such as oven gloves.
• To speed up the cooling down process, leave the lid open after removing your food.
- If you are batch cooking, empty the oil from the removable cooking pot after every 2 batches. This will help prevent grease from burning and causing smoke.
AIR FRY
• For best results, leave enough space around the ingredients to allow hot air to circulate.
- Place the ingredients into the cooking pot and close the lid.
-
Plug in the appliance. Your multi cooker will beep and display will go through its start up sequence. After a few moments the display will go out with just the Air Fry 📋 light flashing.
-
With the Air Fry light flashing, press the I button. The display will show the default temperature.
-
Change the temperature as required using the ∧ and ∨ buttons. Press the I button to confirm the selected temperature.
-
The default cooking time will be displayed. Change the cooking time as required using the ∧ and ∨ buttons. Each press will increase or decrease the time by 1 minute. Press and hold the button to rapidly increase or decrease the temperature.
-
Press the I button to confirm the selected time.
-
To begin cooking, press the I button. Cooking will start and the display will start to count down.
-
When the timer reaches 00:00, your multi cooker will beep twice and the heater will be turned off. The display will show "End". The fan will continue to run for a short time.
• To cancel cooking at any time, press the O button.
COOKING TIMES AND FOOD SAFETY
• To be used purely as a guide
- Check food is cooked through before serving. If in doubt, cook it a bit more.
• Cook meat, poultry, and any derivatives (mince, burgers, etc.) till the juices run clear.
• Cook fish till the flesh is opaque throughout.
- When cooking pre-packed foods, follow any guidelines on the package or label.
| Food Temperature °C Time (minutes) Remarks | |||
| Chips 200 25 Rinse, dry, toss in salt, pepper, and oil | |||
| Potato wedges | 200 | 15-20 | Rinse, dry, toss in salt, pepper, and oil |
| Sweet potato wedges | 200 | 15-20 | Rinse, dry, toss in salt, pepper, and oil |
| Jacket potato | 180 | 30-40 | For a crispy jacket, brush with oil |
| Roast potatoes | 180 | 25-35 | Rinse, dry, toss in salt, pepper, crushed rosemary (optional) and oil |
| Mixed Mediterranean vegetables | 180 | 6-10 | All cut to similar sizes, approx. 1-2cm pieces, toss in oil and season |
| Chicken Breast | 180 | 15-20 | |
| Chicken Thighs | 180 | 25-30 | Cooking time depends on size. Brush with oil, season |
| Chicken wings | 180 | 23-28 | Cooking time depends on size. brush with oil, season |
| Burgers | 180 | 8-12 | Cooking time depends on size. brush with oil, season |
| Sausages | 180 | 8-12 | |
| Pork chop | 180 | 22 | Brush with oil, season |
| Salmon fillet | 180 | 8-12 | Brush with oil, season |
| White fish fillet | 180 | 8-12 | Brush with oil, season |
| Sausage Roll | 200 | 13-15 | Brush with oil, season |
| Spring Roll | 200 | 8-10 | |
| Muffins | 180 | 15-18 | |
| Frozen Food | Temperature °C | Time (min) | Remarks |
| Chips 200 25 | |||
| Potato wedges 200 15-20 | |||
| French fries | 200 12-20 | ||
| Chicken Nuggets | 200 | 6-10 | |
| Fish fillets | 200 | 10-12 | |
| Fish Fingers | 180 | 6-10 | |
| Onion Rings | 180 | 10-15 | |
| Scampi | 180 | 15 | |
Note: High fat foods (e.g. pork) may create smoke. This is normal as oil residue is cooked at a high temperature. Reducing temperature may decrease the effect of smoke.
GRILLING
- For best results, leave enough space around the ingredients to allow hot air to circulate.
- Place the cooking pot in the unit and insert the grill plate.
- Plug in the appliance. Your multi cooker will beep and display will go through its start up sequence. After a few moments the display will go out with just the Air Fry 📋 light flashing.
- Use the ∧ and ∨ buttons to select Grill 🔒.
- With the Grill light flashing, press the I button. The display will show the default temperature.
- Change the temperature as required using the ∧ and ∨ buttons. Press the I button to confirm the selected temperature.
- The default cooking time will be displayed. Change the cooking time as required using the ∧ and ∨ buttons. Each press will increase or decrease the time by 1 minute. Press and hold the button to rapidly increase or decrease the temperature.
- Press the I button to confirm the selected time.
- Press the I button to start the preheat cycle. Your multi cooker will beep and preheating will begin. While preheating, the display will read "PrE" until the unit reaches the selected temperature and then beep. Add food ingredients after the unit is preheated.
- When the timer reaches 00:00, your multi cooker will beep twice and the heater will be turned off. The display will show "End". The fan will continue to run for a short time.
- To cancel cooking at any time, press the O button.
COOKING TIMES AND FOOD SAFETY
• To be used purely as a guide
- Check food is cooked through before serving. If in doubt, cook it a bit more.
• Cook meat, poultry, and any derivatives (mince, burgers, etc.) till the juices run clear.
• Cook fish till the flesh is opaque throughout.
- When cooking pre-packed foods, follow any guidelines on the package or label.
| Food Temperature °C Time | (minutes) Remarks | ||
| Burgers 230 8-12 120-160g | |||
| Sausages 230 8-12 | |||
| Chicken breast 230 15-20 200-250g | |||
| Salmon | 230 | 5-8 | 120-140g |
| Steak | 230 | Rare 4 | 200-250g |
| Medium rare 5 | |||
| Medium 6 | |||
| Well done 7-8 | |||
| Bacon | 230 | 3-7 | Time depends on desired crispness |
| Pork chop | 230 | 10-14 | 220-260g |
| Lamb leg steak | 230 | 3-6 | 150-200g |
| Mediterranean vegetables | 230 | 6-8 | All cut to similar sizes (1-2cm). Toss in oil and season. |
ROASTING
- For best results, leave enough space around the ingredients to allow hot air to circulate.
-
Place the ingredients into the cooking pot and close the lid.
-
Plug in the appliance. Your multi cooker will beep and display will go through its start up sequence. After a few moments the display will go out with just the Air Fry 📋 light flashing.
-
Use the and buttons to select Roast ☐.
- With the Roast light flashing, press the I button. The display will show the default temperature.
- Change the temperature as required using the ∧ and ∨ buttons. Press the I button to confirm the selected temperature.
- The default cooking time will be displayed. Change the cooking time as required using the and buttons. Each press will increase or decrease the time by 1 minute. Press and hold the button to rapidly increase or decrease the temperature.
- Press the I button to confirm the selected time.
- To begin cooking, press the I button. Cooking will start and the display will start to count down.
- When the timer reaches 00:00, your multi cooker will beep twice and the heater will be turned off. The display will show "End". The fan will continue to run for a short time.
- To cancel cooking at any time, press the O button.
Tips
- The approximate maximum capacity for roasting is a 1.3–2.0 kg. chicken or a 1.3–1.8 kg. roast.
- If you desire the deeper flavour of browned meat use the sear function before roasting to brown the meat.
• Using a meat thermometer can help significantly improve and give a more accurate end result.
SEARING
- Place the ingredients into the cooking pot and close the lid.
-
For best results, leave enough space around the ingredients to allow hot air to circulate.
-
Plug in the appliance. Your multi cooker will beep and display will go through its start up sequence. After a few moments the display will go out with just the Air Fry 📋 light flashing.
- Use the ∧ and ∨ buttons to select Sear ∼.
- With the Sear light flashing, press the I button. The display will show the default temperature.
- Change the temperature as required using the ∧ and ∨ buttons. Press the I button to confirm the selected temperature.
- The default cooking time will be displayed. Change the cooking time as required using the and buttons. Each press will increase or decrease the time by 1 minute. Press and hold the button to rapidly increase or decrease the temperature.
- Press the I button to confirm the selected time.
- To begin cooking, press the I button. Cooking will start and the display will start to count down.
- When the timer reaches 00:00, your multi cooker will beep twice and the heater will be turned off. The display will show "End". The fan will continue to run for a short time.
- To cancel cooking at any time, press the O button.
BAKING
• The ingredients for cakes and similar items should be placed into a suitable cooking container (cake tin, etc.) which will fit into the cooking pot. Once your multicooker has finished its preheat cycle, open the lid and carefully place the prepared ingredients into the cooking pot and close the lid.
- If you don't want to use the preheat cycle, or your recipe doesn't call for it, then place the ingredients into the cooking pot at the beginning of the cooking cycle.
1. Plug in the appliance. Your multi cooker will beep and display will go through its start up sequence. After a few moments the display will go out with just the Air Fry 📋 light flashing.
2. Use the ∧ and ∨ buttons to select Bake 📄.
3. With the Bake light flashing, press the I button. The display will show the default temperature.
4. Change the temperature as required using the ∧ and ∨ buttons. Press the I button to confirm the selected temperature.
5. The default cooking time will be displayed. Change the cooking time as required using the and buttons. Each press will increase or decrease the time by 1 minute. Press and hold the button to rapidly increase or decrease the temperature.
6. Press the I button to confirm the selected time.
7. Press the I button to start the preheat cycle. Your multi cooker will beep and preheating will begin. While preheating, the display will read "PrE" until the unit reaches the selected temperature and then beep.
8. Open the lid and place the ingredients into the cooking pot then close the lid.
9. When the timer reaches 00:00, your multi cooker will beep twice and the heater will be turned off. The display will show "End". The fan will continue to run for a short time.
- To cancel cooking at any time, press the O button.
SLOW COOKING
THE BENEFITS OF SLOW COOKING
• Health: The gentle cooking action reduces damage to vitamins and retains more of the nutrients and flavours.
- Economy: Long, slow cooking can tenderise the cheaper, tougher cuts of meat, and uses about a quarter of the power of the small ring on the average hob.
- Convenience: Prepare the ingredients the night before, put them in the slow cooker before you leave, and have a delicious meal waiting for you when you get home.
USING THE SLOW COOKING MODE
- Note: The temperature cannot be set or adjusted in the slow cooking function.
- Place the ingredients into the cooking pot and close the lid.
- Plug in the appliance. Your multi cooker will beep and display will go through its start up sequence. After a few moments the display will go out with just the Air Fry light flashing.
- Use the ∧ and ∨ buttons to select either Slow Cook High or Slow Cook Low.
- With the desired slow cook mode light flashing, press the I button. The display will show the default cooking time.
- Change the cooking time as required using the and buttons. Each press will increase or decrease the time by 1 minute. Press and hold the button to rapidly increase or decrease the temperature.
- Press the I button to confirm the selected time.
- To begin cooking, press the I button. Cooking will start and the display will start to count down.
- When the timer reaches 00:00, your multi cooker will beep twice and the heater will be turned off. The display will show "End". The fan will continue to run for a short time.
- To cancel cooking at any time, press the 0 button.
GENERAL TIPS
- Keep in mind that ingredients used straight from the fridge can increase the cooking time.
- Try not to open the lid unnecessarily during cooking. A lot of heat can escape when you do this and it can take your multi cooker a long time to recover.
- When testing a dish to see if it's cooked, don't forget that root vegetables usually take longer to cook.
- Thaw frozen food completely before adding it to the cooking pot.
- Pre-browning meat beforehand is not strictly necessary but can help seal in the moisture and add depth to the flavour. Use your multi cooker's sear function to brown meat.
- Store ingredients prepared beforehand (e.g. the night before) in containers in the fridge. Don't put the multi cooker or the cooking pot into the fridge.
- When cooking with rice, use at least 150ml (¼ pt) of cooking liquid for each 100g (4 oz) of rice.
- Pasta isn't suitable for slow cooking, it becomes too soft. If your recipe requires pasta, it should be pre-cooked and then stirred in 30-40 minutes before the end of the cooking time.
- After all the ingredients are put into the cooking pot, it shouldn't be more than about three quarters full. If you overfill, it may spit hot liquid or overflow during use.
- If the finished dish is too liquid, it can be thickened using a little cornflour, arrowroot, etc. For each 250-300 ml of liquid, mix together 2 tbsp of cornflour with enough water to form a thin paste. Add the paste to the dish approx. 30-45 minutes before the end of cooking. Alternatively, stir in ready-made gravy granules following the manufacturer's instructions.
COOKING GUIDELINES
Vegetables
Slow cooking is ideal for vegetables. There's little evaporation, so all the juices and flavours are retained.
Root vegetables like potato, carrot, turnip, and swede, need more slow cooking than meat. Cut them into bite-size pieces and immerse in the cooking liquid. Place the vegetables as close to the bottom of the pot as possible.
Quickly cooked vegetables, like peas and sweet corn, should be added half an hour before the end of cooking.
Pulses (Beans, Peas and Lentils)
Some dried pulses (lentils, peas, etc.) may need soaking before use. Always check any recommendations on the packaging before using.
WARNING dried beans (e.g. red kidney beans, cannellini, etc.) should be soaked for a minimum of 8 hours and boiled for at least 10 minutes before adding to the slow cooker. They're poisonous if eaten raw or undercooked.
Meat and Poultry
- Slow cooking tenderises cheaper cuts, and reduces shrinkage and evaporation, retaining flavour and nutritional value. The leanest cuts of meat are best for slow cooking.
- Trim excess fat from the meat because this can add to the liquid during cooking in the form of fat.
- Where possible, use chicken without skin.
- Cut the meat into evenly sized cubes (approx. 2.5 cm) for casseroles and stews.
Suitable cuts include:
Beef - Brisket, shin, silverside, topside, stewing steak, braising steak, chuck
Pork - Leg, shoulder, belly, cheek, chump
Lamb - Shanks, leg, shoulder, neck
CONVERTING RECIPES FROM A TRADITIONAL OVEN
These times are approximate and can vary depending on the ingredients and quantities. Always check that the food is thoroughly cooked before serving.
| Oven cooking time Time on low (hours) Time on high (hours) | |
| 15-30 minutes 4-6 1-2 | |
| 30-60 minutes 6-8 2-4 | |
| 1-3 hours 8-12 4-7 |
KEEP WARM
• IMPORTANT: Do not use the Keep Warm setting to cook. Only use it to keep warm cooked food that is already hot.
1. Start with already cooked and hot ingredients in the cooking pot.
2. Plug in the appliance. Your multi cooker will beep and display will go through its start up sequence. After a few moments the display will go out with just the Air Fry light flashing.
3. Use the and buttons to select either Keep Warm ☐.
- The display will start counting down from 4 hours (04:00) to zero (00:00).
• After the keep warm setting has been on for 4 hours, the unit will stop heating.
• Note: Do not keep foods on the keep warm setting for more than 4 hours.
CARE AND MAINTENANCE
- Unplug the appliance and let it cool down before cleaning or storing away.
- Clean the exterior surfaces with a slightly damp cloth and then dry them thoroughly.
- The cooking pot and grill plate can be cleaned in the dishwasher, or hand washed in warm soapy water.
- Allow to dry thoroughly before storing or using again.
- Don't use harsh or abrasive cleaners, solvents, scourers, wire wool, or soap pads..
RECYCLING
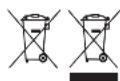
To avoid environmental and health problems due to hazardous substances, appliances and rechargeable and non-rechargeable batteries marked with one of these symbols must not be disposed of with unsorted municipal waste. Always dispose of electrical and electronic products and, where applicable, rechargeable and non-rechargeable batteries, at an appropriate official recycling/collection point.
These times are approximate and can vary depending on the ingredients and quantities. Always check that the food is thoroughly cooked before serving.
APENAS PARA USO DOMÉSTICO
PEÇAS
- Pega
-
Placa de grill
-
Recipiente de cozedura
-
Painel de controlo
ANTES DE UTILIZAR PELA PRIMEIRA VEZ
LANGTIDSTILBEREDNING
FORDELENE VED LANGTIDSKOGNING
ATT OMVANDLA TRADITIONELLA UGNSRECEPT
FORDELENE MED LANGSOM KOKING
PLEIE OG VEDLIKEHOLD
• To be used purely as a guide
- Check food is cooked through before serving. If in doubt, cook it a bit more.
- Cook meat, poultry, and any derivatives (mince, burgers, etc.) till the juices run clear.
• Cook fish till the flesh is opaque throughout.
- When cooking pre-packed foods, follow any guidelines on the package or label.