PondoMax Eco 15000 Control - Water pump Pontec - Free user manual and instructions
Find the device manual for free PondoMax Eco 15000 Control Pontec in PDF.

| Product type | Pond water pump |
| Brand | Pontec |
| Model | PondoMax Eco 15000 Control |
| Supply voltage | 220-240 V AC, 50/60 Hz |
| Power consumption | 40 to 135 W |
| Max. flow rate | 15000 l/h |
| Max. delivery head | 6.5 m |
| Max. immersion depth | 4 m |
| Pump protection rating | IP68 (immersion up to 4 m) |
| Controller protection rating | IP44 (protected against water splashes) |
| Suction connection | G2 thread (hose 32/38/50 mm) |
| Discharge connection | G2 thread (hose 32/38/50 mm) |
| Max. particle size | 8 mm |
| Filter surface area | 310 cm² |
| Admissible water temperature | +4 to +35 °C (in operation) |
| Dimensions (L x W x H) | 255 x 130 x 170 mm |
| Cable length | 10 m (2 m mains + 8 m pump) |
| Weight | 5.1 kg |
| Power adjustment | 8 levels (0-25-50-60-70-80-90-100%) |
| Integrated protection | Overcurrent, dry running, anti-blocking |
| Cleaning | At least 2 times a year with clear water |
| Wear parts | Operating unit |
| Warranty | 3 years |
Frequently Asked Questions - PondoMax Eco 15000 Control Pontec
User questions about PondoMax Eco 15000 Control Pontec
0 question about this device. Answer the ones you know or ask your own.
Ask a new question about this device
Download the instructions for your Water pump in PDF format for free! Find your manual PondoMax Eco 15000 Control - Pontec and take your electronic device back in hand. On this page are published all the documents necessary for the use of your device. PondoMax Eco 15000 Control by Pontec.
USER MANUAL PondoMax Eco 15000 Control Pontec
EN Operating instructions
FR Notice d'emploi
2 Taste
3 Taste "+"/ "-"
4 Taste"%/W"
5 0 %
6 W
Funktion
Original manual. This manual belongs with the unit and must always be passed on together with the unit.
Safety information
Correct electrical installation
- Special regulations apply for electrical installation in outdoor spaces. Only a qualified electrician may perform the electrical installation.
- The qualified electrician has the necessary professional training, knowledge and experience to perform electrical installation in outdoor spaces. The electrician can detect potential dangers and knows how to adhere to regional and national standards, regulations and directives.
- For your own safety, please consult a qualified electrician.
- Only plug the unit into a correctly installed outlet.
- The device is to be supplied through a residual current device (RCD) having a rated residual operating current not exceeding 30mA .
- Extension cables and power distributors (e.g. outlet strips) must be suitable for outdoor use (splash-proof).
- Protect the plug connection from moisture.
Safe operation
- Disconnect all electrical devices in the water from the power supply before reaching into the water. Otherwise there is a risk of severe injuries or death by electrocution.
This unit can be used by children aged 8 and above and by persons with reduced physical, sensory or mental capabilities or lack of experience and knowledge if they are supervised or have been instructed on how to use the unit in a safe way and they understand the hazards involved. Do not allow children to play with the unit. Cleaning and user maintenance shall not be carried out by children unless they are aged from 8 years and above and supervised. - Do not use the unit, if electrical lines or the housing are damaged.
- The supply cord cannot be replaced. If the cord is damaged, the appliance should be scrapped.
- The impeller unit in the pump contains a magnet with a strong magnetic field that may affect the operation of pacemakers or implantable cardioverter defibrillators (ICDs). Keep a distance of at least 0.2m between the implant and the magnet.
- Never pull on electric cables. In particular, never carry units on their cables.
- Route lines in such a way that they are protected from damage and do not present a tripping hazard.
Always unplug the unit before working on it. - Never carry out technical changes to the unit.
- Only carry out work on the unit that is described in this manual.
- Only use original spare parts and accessories.
- Should problems occur, please contact the authorised customer service or pontec.
Intended use
Only use the product described in this manual as follows:
- For pumping normal pond water for filter systems, waterfall systems and water course systems.
While adhering to the technical specifications. ( Technical data)
The following restrictions apply to the unit:
- Do not use in swimming ponds.
- Never run the unit without water.
- Do not use for commercial or industrial purposes.
- Do not use the unit together with chemicals, food, flammable, explosive substances or other liquids aside from water.
- Do not connect to the domestic water supply.
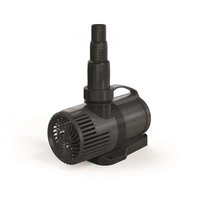
Product Description
Overview
| ☐ A | Description |
| 1 | Controller • Switch on / off the pump and control the power level |
| 2 | Pump casing |
| 3 | Filter cage |
| 4 | Stand |
| 5 | Inlet (suction side) • With filter cage (3) for submerged installation. • With hose sleeve (7) for dry installation. |
| 6 | Outlet (pressure side) • With hose sleeve (7) |
| 7 | Hose sleeve • PondoMax Eco Control 5000 and 10000: - Threaded connection G1½ - Hose connection 25, 32 or 38 mm • PondoMax Eco Control 15000 and 20000: - Threaded connection G2 - Hose connection 32, 38 or 50 mm |
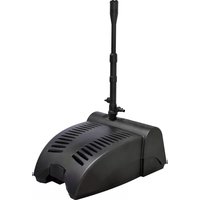
Installation variants
B
-
Variant (a): Submerged pump installation
-
The pump is positioned in the pond or basin.
Water flow via the filter cage. -
Variant (b): Dry pump installation
-
The pump is installed without the filter cage outside of the pond or basin but lower than the water level.
Water flow via a hose or a pipe.
Symbols on the unit
| IP68 4.0 m | The unit is dust-tight and water-tight down to 4 m. |
| IP44 | The unit is protected against dust and splash water. |
| Protect the unit from freezing temperatures. | |
| Possible danger for persons with pacemakers. | |
| Protect the unit from direct sunlight. | |
| Do not dispose of the unit with normal household waste. | |
| Read the operating instructions. |
Installation and connection
The pump can be installed submerged (in water) or dry (outside the water).
The use of the pump is only permitted with observance of the specified water quality. ( Technical data)

WARNING
Severe injuries or death due to operation of this unit in a swimming pond. Defective electrical components will electrify the water with dangerous electrical voltage.
Never operate the unit in a swimming pond.

CAUTION
Rotating components in the intake and pressure socket area. Risk of injury when reaching into the sockets.
In particular, observe the following: A unit that has stopped due to overload can start up unexpectedly!
Do not reach into the opening of the intake socket or pressure socket while the power plug is plugged in.
If the sockets are freely accessible during operation, e.g. if no hoses are connected, use a hand guard to secure the sockets. The hand guard is available as an accessory.

Avoid exposing any unit components to direct sunlight for extended periods of time, as this can lead to damage. If necessary, use a protective cover.
Submerged installation of the pump
Connecting
- The larger the line diameter, the smaller the friction losses in the lines and the better the flow rate.
- The line diameter must not be limited unnecessarily by a stepped hose adapter. If necessary, shorten the adapter based on the line diameter.
How to proceed:
C
Installation
- Place the pump horizontally on a stable surface.
- Ensure secure and stable positioning of the pump.
- Only operate the pump when it is covered in at least 10cm of water. Otherwise it may draw in air.
How to proceed:
D
-EN
Install the unit at a dry place
Connecting
- Hoses or pipes can be connected to the inlet (IN) and outlet (OUT).
- Connections for hoses are part of the scope of delivery. Instructions for their installation can be found below.
- To optimise the pump capacity, ensure that the diameter of the intake side line (IN) is not smaller than the diameter of the pressure side line (OUT).
- The larger the line diameter, the smaller the friction losses in the lines and the better the flow rate.
- The line diameter must not be limited unnecessarily by a stepped hose adapter. If necessary, shorten the adapter based on the line diameter.
For dry installation, we recommend pointing the outlet upward.
How to proceed:
E
Installation
- Place the pump horizontally on a stable surface.
- Ensure secure and stable positioning of the pump.
- Do not expose the pump to direct sunlight.
- Ensure that the installation site is sufficiently ventilated to prevent overheating of the pump.
How to proceed:
□F
It is possible to screw the unit to a suitable surface to ensure stability.
How to proceed:
G
Fastening the controller
- Position the controller at a location protected from sunlight and weather (e.g. on a wall). Attach it to a hook or a screw.
The controller is protected against dust and splash water (IP44).
- Ensure that the connections point down.
How to proceed:
□H
Commissioning/start-up
NOTE
The unit will be destroyed if it is operated with a dimmer. It contains sensitive electrical components.
Do not connect the unit to a dimmable power supply.
NOTE
Never allow the pump to run dry. Otherwise the pump may be destroyed.
Only operate the pump when it is submerged or flooded.
Controller overview

PMX0037
Description
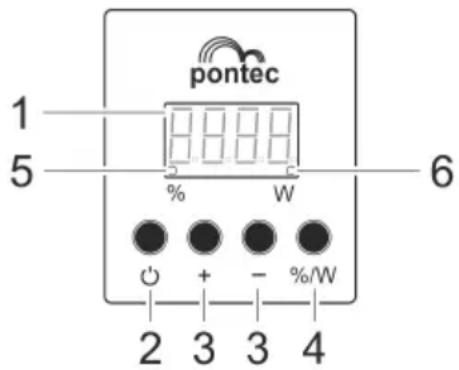
1 Four-digit display
2 Button
3 Button "+"/ "-"
4 Button"%/W"
5 念
6 W
Function
- Display of power level as a percentage (%) or in watt (W) with a tolerance.
- Display of the error code in the event of a malfunction.
Switch on/off pump.
Increase or decrease power in levels.
Toggle display between power values in percent (%) or watt (W).
LED lights up when the display shows the power values in percent (%)
LED lights up when the display shows the power values in watt (W)
Operating functions
Commisioning
How to proceed:
- Plug the power plug into the socket. The display indicates "OFF".
- Press the button on the controller.
The pump is switched on when the display indicates a value or an error code.
Switching off
How to proceed:
- Press the button on the controller.
The pump is switched off when the display indicates "OFF".
The pump and controller are only voltage-free when the power plug has been pulled.
Controlling the power level
How to proceed:
- Repeatedly press the "+" or "-" button on the controller to increase or decrease the pump power in percentage levels.
Levels: 0 - 25 - 50 - 60 - 70 - 80 - 90 - 100%
Maintenance and cleaning
CAUTION
Risk of injury due to unexpected start-up. Internal monitoring functions may switch off the unit and automatically reactivate it.
Disconnect the power plug before carrying out any work on the unit.
NOTE
Do not use aggressive cleaning agents or chemical solutions. These agents can damage the housing, impair the function of the device and harm animals, plants and the environment.
If possible, clean the unit with clear water and a soft brush or a sponge; remove stubborn dirt with the aid of the recommended cleaning agents.
Dismantling and assembling the unit
The unit can be dismantled without tools by pulling it apart.
How to proceed:
□I,J
Cleaning the device
Clean the unit as required but at least twice per year.
-
When cleaning the pump, pay particular attention to the impeller unit and the pump housing.
-
Recommended cleaning agent for removing stubborn limescale deposits:
- Vinegar- and chlorine-free household cleaning agent.
- After cleaning, thoroughly rinse all parts in clean water.
Storage/winter protection
The unit is not frost-proof and has to be removed and put into storage if minus temperatures are expected.
How to correctly store the unit:
Thoroughly clean the unit.
- Check the unit for damage and replace damaged components.
- Protect electrical connections from moisture and dirt.
- Store the pump submerged and in a frost-free environment.
Malfunction remedy
Troubleshooting overview
| Malfunction | Cause | Remedy |
| Pump does not start. | No mains voltage | Check the mains voltage. Check supply lines. |
| Pump not switched on | Switch the pump on at the controller | |
| Pump does not transport fluid | Filter clogged | Clean filter |
| Excessively soiled water | Clean the pump. The pump automatically switches on again once the motor has cooled down. | |
| Pump is set too low | Increase the pump power on the controller | |
| Impeller unit is blocked | Disconnect the power supply and remove obstacle. Then switch the pump on again. | |
| Insufficient delivered quantity | Filter clogged | Clean filter |
| Excessive loss in the supply lines | Select larger hose diameter Adjust stepped hose adapter to hose diameter Reduce hose length to minimum necessary Avoid unnecessary connection elements | |
| Pump is set too low | Increase the pump power on the controller | |
| Pump switches off after operating briefly | Excessively soiled water | Clean the pump. The pump automatically switches on again once the motor has cooled down. |
| Impeller unit is blocked | Disconnect the power supply and remove obstacle. Then switch the pump on again. | |
| Pump has run dry | Flood the pump. Fully submerge the pump for operation in the pond. |
Error messages
The error message automatically disappears after the error has been corrected.
| Error message | Cause | Remedy |
| E01 | The overcurrent protection has tripped. | Clean impeller unitEnsure that the impeller unit moves with ease. If the impeller unit is sluggish, the pump requires too much power. |
| E02 | Phase failure; possibly broken cable. | Pull power plug and wait for approx. 10 s. Then switch the pump on again.If the error message is still displayed, there is a cable break. Take the pump to a specialist retailer for repair or send it to PfG. |
| E03 | The blocking protection has tripped. | Check pump and remove blockage. |
| E04 | The dry run protection has tripped | Flood pump with water. |
Technical data
| PondoMax Eco Control | 5000 | 10000 | 15000 | 20000 | ||
| Connection voltage | V AC | 220 ... 240 | 220 ... 240 | 220 ... 240 | 220 ... 240 | |
| Mains frequency | Hz | 50/60 | 50/60 | 50/60 | 50/60 | |
| Power consumption | W | 15 ... 55 | 30 ... 90 | 40 ... 135 | 50 ... 190 | |
| Max. pump capacity | I/h | 5000 | 10000 | 15000 | 20000 | |
| Max. pump head | m | 4.5 | 5.5 | 6.5 | 7.5 | |
| Max. immersion depth | m | 4 | 4 | 4 | 4 | |
| Protection type | Pump | IP68 | IP68 | IP68 | IP68 | |
| Controller | IP44 | IP44 | IP44 | IP44 | ||
| Inlet port | Thread | G1½ | G1½ | G2 | G2 | |
| Connection, hose | mm | 25, 32, 38 | 25, 32, 38 | 32, 38, 50 | 32, 38, 50 | |
| Outlet port | Thread | G1½ | G1½ | G2 | G2 | |
| Connection, hose | mm | 25, 32, 38 | 25, 32, 38 | 32, 38, 50 | 32, 38, 50 | |
| Coarse dirt transport | mm | 8 | 8 | 8 | 8 | |
| Filter supply surface area | cm² | 250 | 250 | 310 | 310 | |
| Water temperature (submerged installation) | During operation | °C | +4 ... +35 | +4 ... +35 | +4 ... +35 | +4 ... +35 |
| Out of operation | °C | -20 ... +35 | -20 ... +35 | -20 ... +35 | -20 ... +35 | |
| Ambient temperature (dry installation) | During operation and convection | °C | +4 ... +30 | +4 ... +30 | +4 ... +30 | +4 ... +30 |
| During operation and forced cooling | °C | +4 ... +40 | +4 ... +40 | +4 ... +40 | +4 ... +40 | |
| Dimensions | Length | mm | 220 | 220 | 255 | 255 |
| Width | mm | 100 | 100 | 130 | 130 | |
| Height | mm | 135 | 135 | 170 | 170 | |
| Cable length | Power cable | m | 2 | 2 | 2 | 2 |
| Pump line | m | 8 | 8 | 8 | 8 | |
| Weight | kg | 4.2 | 4.2 | 5.1 | 5.1 | |
Wear parts
- Impeller unit
Disposal
NOTE
Do not dispose of this unit with household waste.
- Dispose of the unit by using the return system provided for this purpose.
Should you have questions, please contact your local disposal company. They will give you information on how to correctly dispose of the unit.
Render the unit unusable by cutting the cables.
Guarantee conditions
PfG grants a 3 year guarantee from the date of sale on proven material and manufacturing faults. Wear parts such as bulbs etc. are exempted from the guarantee. Prerequisite for our guarantee is the presentation of the purchase receipt. Our guarantee will become null and void if the unit is misused, electrically or mechanically damaged by inappropriate use and improper repair by non-authorised workshops. Repairs are reserved for workshops authorised by PfG or by PfG itself. In the case of warranty claims, please return the defective unit or part freight paid to PfG together with a description of the fault and the purchase receipt. PfG reserves the right to invoice repair costs. PfG is not liable for transport damage. Any damage must be claimed against the carrier. Further claims of whatever type, especially consequential damage, are excluded. This guarantee does not affect the final customer's claims against the dealer.
2 Tast
3 Tast" ^+ /"-
4 Tast"%/W"
5 0 %
6 W
Funktion
Yka3aHn3a6e3onacHOCT
EneKtpueecko HcTaNpaHe cBrlaHo npedncaHraTa
- IIO OTHOWeHHe Ha eJekTpueckKaTa HnCTaIaIcna Ha OTKpnto Baxat CneuaJIH npabuHa. EJeKtpueckata HnCTaIaIcna Tp6Ba Da ce N3nbJIbRa cMo OT eJekTpOTexHnK.
- EJektpotexHnKbT e KbaIINΦuipan Bb3 OCHOBA Ha CBOETo npopecnoHaJIHO o6pa3OBaHne, 3HaHnI N ONIT, INMa npabo Da n3PbJIHraBa eJeKtpnueCKn HnCTaNaUHn Ha OTkpntO. ToI MoKe da pa3No3HaBA Bb3MOxHn ONaCHOtN cna3Ba perNoHaHNTE n HaUHOHaHNTE cTaHapTn, npabUNa I npedncaHn.
- PnBbnpocn npo6nemn ce o6pbuaTe KbM eNeKtpocneuaHnCT.
Cbbp3BaIte ypea cmo KbM mHCTanipapaHa Cnopei ppeDncaHnTa KOHTaKTHa KyTna. - YpeIbT TpIbBa Ia e o6e3oNaceH c IepeKTHOTOKOBa 3aIHTa (RCD) C HOMnHaJIeH TOK Ha yTeUka OT MaKcIMyM 30 mA.
- YdJIkaaN Ka6eJn N TOKOB pa3npedeJIteJN (HaNP. MHOrOHe3IOBn KOHTaKTN) Tp6Ba Da ca nOxOJaU 3a H3PON3BaHc Ha OTKpIto (3aUHTeHn OT npbckn BODa).
- Pa3ete ⅢeNcEJIHnTe CbeIINHeHnO T HABJIn3aHe Ha BJaRa.
Be3onacha pa6oTa
- Ппдддддддддддддддддддддддддддддддддддддддддддддддддддддддддддддддддддддддддддддддддддддддддддддддддддд徳
- Дуаи Иma onachocT OT TeKKn HapaHbAHn IIN CmbpT NopaDi TOKOB yap.
To3n ypeJ MoKe Da ce H3noI3Ba OT Deca OT 8 roDnHa Bb3pact N Harope, KaKTo n OT Xopa C HamaJIeHN
H3NueCKn, CEH3OpHN IIN YMCTBeHN Bb3MOXHOCTNu IIN TaKUBa, KOnTO HMaT ONIT N O3HaHnA, CaMo AKO Ca
Ha6nIODaBAHN IIN INCTpyKTupAHn 3a 6e3ONaCHATA yNOtpe6a n pa36npat npo3TuauNTe OT TOBA ONaCHOCTN.
Deuata He irpaT C ypeJa. POniCTBaHeTo n NOdPbXkKaTa He TpRbBA da Ce H3BbpWBAT OT Deca, OCBeH aKO Te ca
Ha Bb3pact MNHMym 8 roDInH n Ca NDnHa3Op.
He n3non3BaIte ypeIa, aKe enektpnuecknte npoBOnHn nn KOpnycBT ca nobpeDeH. - I3xbpnte ypea, ako 3axpaHbauT Ka6en e noBpehen. 3axpaHbauT Ka6en He MoKe da ce CmeHa.
Pa60THnT eIeMeHT B ypea CbIbpxa MaHHT Cbc CNJHO MaHHTHO NOJe, KOeTO MOKe Da OKaKe BnJHne BbpxY neiCmeKnbpu nnmnnanhtupan H deo6punatopn (ICD). MeKdy mnnnHaHTaHTa n MaHHTa cna3BaIte MHHMaJHo pa3ctOarHne ot 0,2 m ein. - Hnkora ha nbpnaTe eNeKtpnuecknte ka6en. NcneuaHNO He npehacryte ypeu 3a texhnte ka6en.
- PnonaraTe npOBdHnCte Taka, Ye da ca 3aunTeHN OT nobpeDu HNKo Da He Ce CnBba B TxA.
Bunar nIbprnate uencena, npedna pa 6oTe c yctpoicBTOto. - HnKora He n3BbPbBaIe Te xHnueckn npomeHn no ypeHa.
- Iyepa n3BbPwBaIe cAmo pa6OTHe, KOnTO ca ONUcaHn B HAcToIIO To pkoBOcTBO.
- 13non3BaTe cAmO opnHnHaHn pe3epBn uactn n akcecoapn.
B cnuyaHn npo6Iemn ce o6bprHeTe KbM OTOp3npan cepBn3eH ueTbp nn KbM pontec.
YnOTope6a no npEHa3HaueHne
N3no3BaTe npOyKta, ONiCAH B TOBa pBkoBOdCTBO, cAmO KaKTo CJIeDbA:
3a n3nombbahe Ha o6nkHOBeHa e3epHa BOa 3a fnpTaqnoHH CNCTeMn, BOOnaN IN KACKaHN CNCTeMn.
- PnCnBaHe Ha TexHnueeCKnTe DaHHN. ( TexHnueeCKn DaHHN)
3a ypeda ca BaIIHn CneIHNTE orpaHnue Hnra
He n3noJIbAaTe ypeDa BnPyBn 6aceHn.
- Hukora He n3no3BaIte ypea 6e3 B0a.
He n3non3BaIte ypeDa 3a npOn3BODCTBeH nn IpomnJleHn CeJI.
He n3noJI3BaIte ypeDa 3aeIHO C XIMIKaJI, XpaHHTeJIHN IpOdyKTn, 3anaJIIMN, B3pNUBOONaCHN BeIecTBA IIN TeUHOCTn, pa3JIuHn OT BODa.
- He Cbbp3BaIte KbM BOIOChA6JaBAHeTo Ha KbIaTa.
Onncahne Ha npodykta
PperJed
| ☐ A | Описанne |
| 1 | Конtrорер Вкlioоче/исклочete полatable и уразавливаfter мошноста |
| 2 | Корпс на полatable |
| 3 | Фильрирашика кочниça |
| 4 | Краче на урEDA |
| 5 | ВхOD (всмукателна страва) C Фильърna кочниça (3) с полен моHTаж. C Нakрайник за маркуа (7) по сух моHTаж. |
| 6 | ИзхOD (налорна страва) C Нakрайник за маркуа (7) |
| 7 | Нakрайник за марку PondoMax Eco Control 5000 i 10000: - Pežбoba врьзka G1½ - Врьзka за марку 25, 32 ил 38 mm PondoMax Eco Control 15000 i 20000: - Pežбoba врьзka G2 - Врьзka за марку 32, 38 ил 50 mm |
BapnaHTn 3a MOHTax
B
Bapnnt (a): Notoneh Mohtax Ha nomnata
- Ponnata ce no3nnoHnpa B e3epoTo, pecn. 6aceHa.
- PódaBaHeTo Ha BóJa e npe3 φnIITbPHaTa KoUHnua.
BapnHT (b): Cyx Mohtak Ha nomnata
- POMnata ce MOHTnpa 6e3 fHNTbPHa KooHNuca N3BbH e3epoTo, pecn. 6aceHn, Ho NOd HNBOTo Ha BOdaTa.
- IoIaBaHTo Ha BOda e npe3 mApKyu nn Tpb6a.
CnmboNbtpx ypea
| IP68 4.0 m | Урémonы т пазхов- в донорида EMdo 4m. |
| IP44 | Урémonы т зашитен OT пазхов в донорипьск. |
| Пазende урEDA ол Замрьзванe. | |
| Въдможен рись заха сбс сьрдочни стимулатори. | |
| Пазende урEDA о пяка сльнчева с Bretлина. | |
| Нешьрлайе урEDA с общайнite сbitови оtnадьци. | |
| Прочete ръковodстбото за уnotpeбa. |
MOHTaK n CBbP3BaHe
NOMnata MoKe Da 6bDe MOHTnpaHa NOToneHa (BbB BODaTa) IIN Ha Cyxo (U3BbH BODaTa).
I3noI3BaHeTo Ha nomnatae donyctmO cAmo npn cna3BaHe Ha nocouehnte cToHocTn Ha BoaTa. ( TexHueckn daHHN)
A INPEДУПЕХДECHNE
TeKn HapaHbAHnI Nm Cmbpt np EKcnloataun Ha ypeDa B nlaBaTeJeH BOoem. DeeKTHn eEeKtpueckn KOMNoHEHTn Ha ypeDa NOCTaBt BOdA t NoD onaCHO eJekTpuecko HanpeKeHne.
- 13no13BaIte ypea caMo aKO BbB BoDaTa Hma Xopa.
BHIMAHNE
Bbptrau Ce KOMnoHeHTn B 3oHaTa Ha 3acMyKbaun HaKpaHnK n HanOpHnHaKpaHnK. Bb3MOxHn ca HapaHbaHnA, ako 6pbkHeTe B HApaiHnnte.
06bpe no-cneuaHNO BHMaHHe Ha: Cnpn npaPi npetobpBaHe ype MoKe HeoayKaBaHO da ce cTapTupa!
He 6bpkaTe B OTbopa Ha 3acMykBaunia HnHanopnHaKpaHnK, aO MPexKOBaT aDaantpe EKnIOueH.
Ako no Bpeme Ha pa6oTa hakpaHnCte ca Cbo6OJHO DocTbHn, Hanp. aKO HMa CBbp3aHn Mapkyu, Tpr6Ba da o6e3onacnte HakpaHnCte, 3a Da orpaHnCte Bb3MOXHocTTa 3a Donnp Do T8x. 3aUHTaTo AT Donnp ce npednar a KaTO npHaadneKHOCT.
BcunKoMnOHeHnHa ypea He 6nBa Da 6bDaT noJaRaHn 3a DbIro BpeMe Ha npKa CbHueBa CBETnHa, Tb KaTO TOBa MoKe Da DoBeDe Do nobpea. 3a cenTa n3non3BaTe npEdnaeH kanak.
MOHTnpaTe ypeDa notoEn
Cbbp3BaHe
- Konkoto no-roTnMa e dNaMeTbPbT Ha IINHnTa, TOnKOBa no-MaJKN ca 3ary6nte OT TpneHe B JInHnnte N ToNkoBa noDo6bp e De6nTbT.
-Диаметьрт ha Линята He trябba Да Бде Heнужно orpaичаван OT CTьпeнчатян HaКраинк 3a Маркуа. Ако e Heo6xOДIMO, Нakраинкьт trябba Да ce ckсс сорopedДиаметьра Ha Линята.
Ppoeepaate no cneHnHaunH:
C
HCTaIauia
- NocTabete nomnata B xopu3oHTaHNO noJIOXeHne Bbpy yCTOnuBa OCHOBA.
- OcnypeTe cT6nHNo nOJoxKeHne Ha nomnata.
- I3noI3BaIe nomnata cAmO kOrato e nokpTu c Hau-MaNko 10 cm BODa. B npotuBEN cnyaH T a MoKe da u3TeTIN Bb3DyX.
PpoceepaaiTe no cJeHnHaunH:
D
- BG -
IocTabe ypeda cyx
C8bp3BaHe
Ha BxoIa (IN) Hn H3xOla (OUT) Moar,da 6b,IaT CbP3aHm Mapkyu nn Tpb6n.
- HakpaHHnIte 3a Mapkyu Ca BkJIIOeHb IIOCTaBkaTa. TexHnT MoHTaK e OINcAH IIO-HaTaTBK.
3a ONIMaHHa IPOH3BOIDHTeHIOCT Ha NOMnIa DnAMetbPbT Ha IHHnra OTC MykateHnata CtpHa (IN) He Tp6Ba da 6bIe IO-MaIKOT dHAmEtbpHa IHHnra OT HAnOpHATA CtpHa (OUT).
KoIKOTO NO-ROJMaE dHaMeTbPbT Ha JHHNHTa, TOJKOBA IIO-MaJIKN Ca 3aRy6HrTe OT TpHeHE B JINHHnTE H TOJKOBA IO-do6bp e Je6hTbT.
-Диаметьрьт Ha Линна He Tpr6Ba DA 6bde HeHyxHO orpaHuaBaH OT CTbneHuaTHa HakpAHK 3a Mapkya. Ako e Heo6xoJIMO, HAKpaHnKbT Tpr6Ba DA ce CkbcN cIopeД Диаметьр ha JINHHTA.
I IpeipopbUbaMe npcuyx MOHTaK H3XoDbT da 6bJe HacoueH Haorope.
PpoeepaIte No cIeHnHaunH:
E
HCTaIauIa
- IIOCTaBETe IOMnIATA B XOpH3OHTaJIHO IIOJIOKeHHe N Bbpxy yctOuHbA OCHOBa.
OcnHypeTe cta6nIO IOLOKeHHe Ha IOMIIaTa. - Iomnta He 6bHa da 6bJe H3JaRaHa Ha Iprka CJIbHueBa CBETnHa.
MCTOTHOpa3nIgarahe Tp6Ba da 6bde cIOCTaTbHNO pOBeTpBaHe,3aJa He nperpee IOMIata.
PpoeHpaIteNoCleHnHaHn:
□F
3a da ce haipabn fHKcnpaHO n03HIOOHnpaHe, moKeTe da 3aBHTte ypeDa KbM IOxOJaIIOBbpxHOCT.
IpoueHpaTeIO CJIeHNHaHH:
G
MOnTnpaHe Ha KOHTpOnepa
- IIO3HIOOHHPaIte KOHTPOJIepa Ha MICTO, 3aIHTeHO OT CJIbHcTeO H aTMOCΦePHHTe JBIeHHa (HaIIpIMep Ha cTEHa). 3aKaayete ro HA Kyka NIN BnHT. KOHTPOJIePbT e 3aIHTeH OT IIpaX H BOdH N pBcKN (IP44).
Bp63KnTe Tpr6Ba Da coaT HaIOJy.
PpoeepaIte No cIeHnHaunH:
H
NyckaHe B eKcnIioatauia
YKA3AHNE
YpeBt ce noBpeKda, KOraTo ce pa6Ot c dImep. CbIbPka yBCTBntHn eJeKtpueeCKn KOMnoHeHTN.
He cBbP3BaIe Te ypeDa KbM eIeKTpO3axpaHbAHe C dIIMep.
YKA3AHNE
Pomnata He Tp6Ba da pa6oTn 6e3 Bdoa. B npotuBEN cnyau n oMnata ue moke da 6bde pa3pyueha.
- 3non3baTe NOMnTa cMo KOrato TRe e NOTONEHa UNHABOHeHa.
IperneHa konTponepa

PMX0037
OncaHne
1 YeTnpuNo3nOHOHeDnCnNe
2 BytoH
3 EytOH ^+ / ^-
4 ByToH % /W^
5 心
6 W
Функця
- Покабане на мошонтta в пpoцentn (%) nIn,В 3aBncmocT OT Дупсka, Вьв BaTObe (W).
- NokaBaHe Ha KaDa Ha rpeWkaTa npn Heu3npaBHOCT.
Bknioyete nn n3knoyte nomnata.
YBENHuaBaHe HnHaMaJraBaHe Ha MoUHOCTTa Ha CTeneHn.
Ппевкючete noka3BaHTo Mexky cToHocHTe 3a MoUHOCT B npOeHTn (%) IIN BaTOBe (W).
CBeToIOIOBbT CBETN, KOrato Ha DnCnIe Ce NOKa3BaT CToHOCHTNE 3a MOUHOCT B IpOeHTN (%)
CBeToIOIOBbT CBeTN, KOraTO Ha IINcNnEr Ce NOKa3BaT cToHocHTne 3a MOUHOCT BB BAToBE (W).
Функции 3a ynpabNeHne
BkHIOuBaHe
Ppoceepaate no cIeHnHaHH:
- BkIIOHcTe UeNceJa B KOHTaKTa. Ha dncnner ce noka3Ba "OFF".
- HATINCHTe 6yToHa O HA KOHTPOJepa.
PomnataeBKNIOHe, KOraTo Ha DInCnIe Ce NOKa3Ba CToHOCrN KOd 3a rpeuKa.
N3KJIIOUBAHe
PpoeepaIte no cneHnHaunH:
- HatncheTe 6yToHa O ha KOHTpOJepa.
Pomnatae n3KnueHa, Korato Ha dncnpee ce nokaBa "OFF".
B nomnata n KOHTpOlepa Hma HAnpeXeHne cAmo KOraTo MPexKOBnT IeNceI e N3KJIuOeH.
YnpaBHeHnHaMoUHocTtA
Ppoeepaate no cneHnHaunH:
- HatncheTe 6yToH "+" uu" -, 3a da yBvEnuHTe uu HAMaNTe MOUHOCTTa Ha NOMnTa Ha npOLeHTHcTeneHn.
CTeENH:0-25-50-60-70-80-90-100%
NouchBaHe n noDpBxka

BHIMAHNE
Onachoct ot HapaHbAhe npaHn HeBONHO CTapTnpaHe. BbTpewHIne 3a ypeDa KOHTPOHN FyHKUIM Moat da n3KJIIOuAT ypeDa I Da r BOKIIIOuHt OTHOBcAMOCTOReIHO.
- Ppei pa6ota no ypeia n3BaTe Te uence na ot KOHTaTa.
YKA3AHNE
He n3noJIbAaTe arpeCnBn noOuHcTBaun npenapatn nn XmMueckn pa3TbOpn. Te3n cpeICTBa MOrat da NOBpeJrKopnyca, da HApUwat fynKcuOnHpaHTo Ha ypeDa n Ca BpeHN 3a XNBOHTNe, pAcTeHNrTa n OKoJIHaTa CpeDa.
NocTe Te ypeIa No-Bo3MOxHocT C uHcTa BOJa I MeKa YeTKa IJIu Tb6a; npn ynOpHTn 3ambpcBaHnC nOMoTuHa npenopbuaHnTe nouchTaBauI npenapaTu.
Pa3rno6BaHne n crNo6BaHne Ha ypeHa
UpeT MoKe da 6bJe pa3rNo6e 6e3 nHcTpymEnTupe3 pa3rNo6aBaHe Ha qactn.
Ppoeepaate no cneHnHaunH:
□I,J
PouncTeTe ypea
I OuaCTBaTe ypeJa npn Heo6xOaMIOcT, Ho Hau-MaKo 2 nbTu roDInuHO.
-
Ha nomnata nouchtaBaIte oco6eHo pa6oTHna eIeMeHT n Kopnyca.
-
PpenopbuaHn nouchTbaun npenapatn npynopntu BapOBKOBN OTnarAHn:
-ДомakннскnoHCTBaI npenapat 6e3 cbdbpxaHHe Ha ouet nXlop.
Cnei nouctBaHTo n3nJaKHeTe OCHOBHO BCuHKn Yactn C uCTa BOJa.
CbXpaHeHne/3a3nMaBaHe
YpeBt He e 3aunTeH OT 3ampb3BaHe n Tp86Ba Da ce demoHTnpa n npn6epe npn OuaKaBn MmHycoB TemnepaTpyn.
YpeBt Ce cBxpaHra BnpaBnH No CneHnHaunH:
- PoiuHCTeTe ypeDa o6ctoHNo.
- Побере Te урета 3a NOBpeNи 3aMeHTe NOBpeHteЧасТи, ako e HuxHo.
3aunTe eNEKtpuecknTe n3BOOn OT Bnra N 3ambpcBaHe.
CbxpaHbBaTe nomnata notoneHa Ha 3aunTeHO OT 3ampb3BaHe MxCTO.
OctpaHbAhe Ha Heu3npaBHOCTn
IperneHaBb3MOXHNHeH3npaBHOCTN
Ha npuJaad nooHpiHOTbcra HAcTyHnHi oMeKeHHa:
He BnKOpNCToBvBaTynCTaBky, npn3NaYeHomy dIy nJaBaHHa.
Hikon He ekcnnyatybatn 6e3 noaui Boi.
He IJIa KOMepuiHoro a6o npomncIOBoro BVKOpNCaHHa.
He BnKOpncToBnyTe npnnaIpa30m i3 ximikataMn, npOdyKTamxapyBaHHa, IeKo3aMnCTNMn, Bn6yXoHe6e3neuHmnpoeOBnHa m a6o IHsMn pDInHAM, KpIM BOIN.
He niknouatu Do BOOnpoBOy BdyHKnY.
OnncBnpo6y
Ornay
BapiaHTn BCTaHOBJeHHA
B
BapiaHT (a): BctaHOBJIeHHHaHoca y 3aHypeHomy noloxehHi
-Hacoc po3taWobAHy y CTaBky Ta/a6o BOOIMi.
- Pódaça BODI Yepe3 φiNbTpYBaJIbHn KɔUHK.
BapiaHT (b): BctaHOBnEHHH HAcOCy B cyxOMy MiCiJ
- Hacoc BCTaHOBJIIOCTbCra N03a MEXAMn CTaBkTa/a6o BOIOIMN HIXKHe pIBHЯ NOBepxHi BOIN 6e3 ΦinbtpyBaIbHOrO KoUka.
- Pódaça BODI Yepe3 ŠIaHr a6o Tpy6y.
CmboJn Ha npucTpoi
YcyHeHH HeCnpabHObTei
OrnMoxKlnBHX HecnpaBHOCTe
| Hecnpabnictb | Прична | Усунения |
| Hacoc He 3anycaεtbcra | Hemac Hanpyr n B eIeKtpnHi Mepexi | • Перевироти панруг y Мерекi • Перевироти trpboPobOdoi |
| Hacoc He yBIMKHeHni | YBIMKHyTn Hacoc Ha KOHTPoJIepi | |
| Hacoc He npaicoe | 3a6bVc8 φiIbTp | Очироти φiIbTp |
| Дуже 3a6bPydHeHa Boda | Очироти HACOC. ПICЯ OXOLODJeHNe DBIVyHa HACOC ABTOMaTHNo BBIMKHeTcRy. | |
| 3aHaITo MaIe 3NaChenH NsBvIckoSti HAcoca | 36IbIbIaTI NOTyXHcICTb HAcoca Ha KOHTPoJIepi | |
| Робоче konLecO 3a6bNokOBaHe | ДіctaTи штЕпсьну BnIky 3 pozeТК i BIVdaIaNTi CTOPOHII npedMeT. ПOTIM 3HOBy BBIMKHyTn HACOC. | |
| Hedoctatna NotykhicTb | 3a6bVc8 φiIbTp | Очироти φiIbTp |
| Hadto BeIaKi BTPaTn B Trp6bOpOBoDax | • ВибраTI shIaHr 6IbIbIro DIAmeTpY • АдANTyBaTI HacaIky Do diAmeTpA shIaHra • 3MeHShITn DOBxKinH ShIaHra Do NeobxIaHoro MIniMуMy • YHnKaTI BnKOpIcTaHnR 3aBvIX 3'eDhBuAlbHnx eIemEHTiB | |
| 3aHaITo MaIe 3NaChenH NsBvIckoSti HAcoca | 36IbIbIaTI NOTyXHcICTb HAcoca Ha KOHTPoJIepi | |
| Upeez 3kopotkni npomixok Chasy Hacoc BvIMKkaεtbcra | Дуже 3a6bPydHeHa Boda | Очироти HACOC. ПICЯ OXolODJeHNe DBIVyHa HACOC ABTOMaTHNo BBIMKHeTcRy. |
| Робоче кoLecO 3a6bNokOBaHe | ДіctaTи штЕпсьну BnIky 3 pozeТК i BIVdaIaNTi CTOPOHII npedMeT. ПOTIM 3HOBy BBIMKHyTn HACOC. | |
| Hacoc npaicobav 6e3 BODi | ЗaporВнITи HACOC BDOJO. Y pazi BnKOpIcTaHnR B CTABKу NOBHCtIO 3aHypRTn npinCTpiI. |
IobidomJIeHH npo nomnky
Iicna ycyhennHa HecnpaBHOCTi NObiDomJIeHHn Pno NOMInKy 6yde ABToMaTHNo cKacOBaHo.
BapnantbI noeknIOueHna
B
BapnaHT (a): Hacoc pacnoNoXeH b norpYKeHHOM COCTOHN
-Hacoc yctahabnbaotB npdy nnn 6accneHe.
- Odaa BObbl BbIIOJIHReTcYepe3 fNlbTpoBaJIbHyIO KOp3HHKy.
BapnHT (b): Hacoc pacnoIoxKeH B cyxom MeCTe
- Hacoc yctaHabnBaetc63 pntpObaHbHO KOp3nHKn BHe npya nn 6accenHa, HO Hxke ypoBna BObl BHEM.
- Odaaya BOdbocyueceTBnreTcncnmooubUuHaHaHnHaHacoca.
CmBBoJIHa npn6ope
K BbIXOy (IN) IN BxOy (OUT) MoXHO NIOKnIOuATb JIaHn IIn Tpy6bl.
- StTyuepbI dIy IJIaHrOB BxOJaT B KOMnneKT NoCTaBKn. HInke OINcaHa INx ycTaHOBka.
-Дя ONTUMaJIbHoi npON3BOUInTeJbHOCTn HAcOCA dAmETp MaNcTpaJn Ha CTOpOHe BCacBIBaHn (IN) He DoJIxKeH 6bITb MeHbIe dAmETpa MaNcTpaJn Ha CTOpOHe HArHeTaHn (OUT).
- Yem 60nbse DnAmetp MaHCTpaJe, Tem MeHbSe nOtepn Ha TpeHne B MaHCTpaJx N Tem JyUe npOnyckHa cnoc6HoCTb.
- DnAmETp MaHCTpaJIH He DoJxKeH 6e3 Heo6xoDmOCTn COKpaAaTbC n NOMOuB CTyneHaTOrO wTyepa-eNoUKn. Pn Heo6xoDmOCTn CneJeYt yKOpOTNb WtUyeP B COOTBeTCTBn C DnAmETpOM MaHCTpaJIH.
① Пи разmeценвсyxOMMeCTe pekomeHdyem HAnpaBNTb BbInyck BBepx.
Heo6xoJIMO BbIOnHHTb CJIeDyUOuNe DeIcTBnIa:
E
MOHTAX
Pa3MeuTe HAcOC rOpHToJIbHO Ha npOCHOM OCHOBAMn.
- Obecnebyte yctoynboe noLoxKeHne ycTpoiCTBa.
Hacoc He donkehen noBepraTc B03deicTBIO npMOro coJHeuHoro CBeta.
- Mecto yctahOBkn DoJnxHO xopoio npoBepnBaTbcra nI npedToBpaueHna neperpeBa camoro Hacoca.
Heo6xoJIMO BbIOnHHTb CJIeDyUOuJe DeIcTBnIa:
□F
①ДЯстбиьного NOLOXKeHn yCtpoiCTBa erO MOxHo COeINHTb BInHTaMn C NOxDxOJaIUM OCHOBAHnEM.
Heo6xoJIMO BbIOnHHTb CJIeDyUOuJe DeIcTBnIa:
G
KpenneHne KOHTpOJIePa
Pa3MeTte KOHTpOJIeP B 3aUHcEHOM OT COJHua N IORoHbIX BO3deICTBn MeCTe (HaNPIMep, Ha CTHe). POnDBecbTe ero Ha KpOuOK uIN 3aKpeNITE BuHTOM. KoHTpOJIeP 3aUHcEH O T PbIN UOT npOHKnHOBeHn6pb3r BoDbl (IP44).
BxOdbI dONKHbI 6bITb HnpaBneHb BHn3.
Heo6xoJIMO BbIOnHHTb CJIeDyUOuNe DeiCTBnIa:
H
NyskB3Kcnnyatauio
YKA3AHNE
YcTPOIcTBO BbIeT N3 CToP, ecIn erO 3KcNpyaTnpoBaTb BMeCTe c peryJrTopom npKocTn. B yCtpoiCTBe IcNoJIb3yIOTCa YBcTBNTeJIbHbIe 3NeKtpuueckne KOMNOHEHTbl.
He noKJIOUaTe yCTpoNCTBO K NcTOUHky nHTaHnC peryNJupOBaHm EApKocTn.
YKA3AHNE
Hacoc He donxkeh pa6oTaB BCxyIO. 3To MoKet Bb13BaTb NOIOMky camoro Hacoca.
BknHae Hacoc Bpa60Tu TOnbKO TOrda, KOrDa OH NpHocTbIO NorpyKeH B Body nn 3aIIT BoDoN.
Cxema KOHTponnepa
PMX0037
OnncanHe
1 YeTbIpex3HaHbIy DnCnnei
2 Khonka
3 KhoNka + / -
4 KhoNka % /W
5 念
6 W
Функця
- INdikaucma MouHocTu B npoehTx (%) unBbTaX (W).
- INdkaunka KOda HeNCnpaBHOCTN B Cnyuae HeNCnpaBHOCTN.
BkIIOUeHne IIN BbIKIOUeHne HaCOca.
YBeJIHHeHne IJn yMeHbJHeHne MOUHOCtN.
IpeeknoueHne HnDnkaun MeKdy 3HaueHnMaM MoUHOCTN B npoceHTax (%) nIn B BaTTax (W).
Hdikatop rupnt, korga Ha dincnee oTo6pkaotc 3haehn MOUHOCTN B npoceTax (%)
HnkaTop ropnt, korga Ha nucnnee oTo6paxaOTc 3haehn MOUHOCTN B BAATTAX (W).
ФункциуynpaBJeHn
BknIOuHTb
Heo6xOAnMo BbIOnHnTb CneDyUOuNe DeiCTBna:
- BcTaBbTe WTeKeP Bpo3eTkY.
Ha nCnJIe oTo6paKaTaTc8 OFF (BbIK).
- Haxmnte Ha KOHTpOJInepe KONKY
Hacoc Bknoaetc, KOrda Ha dncnnee OTo6paXaetc3HaueHne nn KoD HeNCpabHOCTN.
BbIKIOuHTb
Heo6xOIMO BbIOnHHTb CJIeDyUOpue JeIcTBnIa:
- Haxmnte Ha KOHTponJIpe KhoNky
Korda Hacoc Bbiklouyen,Ha dncnlee oTo6paxkaetc OFF (Bbikn).
Hacoc n KOHTpOJIpe oObecToeHbI, KOrTa WTeKeP n3BLeueH n3 pO3eTKn.
PerynipoBaHne MoHocTn
Heo6xOIMO BbIOnHnTb CNeDyUOuJe DeIcTBnIa:
1.Дяувелочени ИИУMeHbSeHЯ MOUHOCTu HAcOca B npoceHTax IcNoIb3yIe KHOJIKN «+» IIN «-» Ha KOHTpoJInepe.
1 UcHTte yCtpoiCTBO no Mepe Heo6xOuMoCTn, Ho He peKe 2-x pa3 B roD.
B hacoce HxKHO uCtntb npexde Bcero pa6oyn y3en Kopnyc.
- PekomeHdyemoe uHCTaUe cpeCTBO npu CTouKnx OTIOKeHnX n3BecTu:
-Бытобoe moшоee cpeДСТВО 6e3 coДержаня xлори уксуca. - После очиртуаелов поportь Се DeТани Устон Вдон.
Xpaehne Ha cknae/xpaehne B 3mHee BpeM
YcTpoNCTBO He yCToHnVBO K Hn3KIM TempepaTypam, npn OxNJaEMbIX 3aMOpO3kax ero HyXHO demoHTnpOBaTb N y6paTb Ha xpaHeHne.
PpabnIbHoe xpaHeHne yctpoNCTBa:
- YCTPOIcTBO HxKHO OCHOBaTeJIbHo NCTNTb
- YcTpoIcTBO HxKHO npOBepaTb Ha HAnuHne NOBpeXdeHn 3aMeHraTb NOBpeXdeHHbIe aactN.
3aunnttbt 3neKtpnueckne pa3bembl OT Blanu n 3arpzheHni.
XpaHnTe HAcOC NOrpyKeHHbIM B EMKoCTb C BOIoB 3aUnuEHHOM OT MOpO3a MeCTe.
YctpaHHe HEnCnpaBHOCTn
IpeueHb BO3MOXhBIX HeNCpbaBHOCTe
| Hис=npвость | Прочина | Устранения Нис=npвости |
| Hасoc He залуckaetся | Het сetebero наразжени | • Поверъе сetebero наразжени. • Поверъе повая лини |
| Hасoc He вклочаetся | Вклочite hacoc ha kontrponllepe | |
| Hасoc He nepekaunbaet bodу | Фильър 3 Zacopен | Очиртite Фильър |
| Очenvъ grязнay Bodа | Почиртite hacoc. Роче oxлajдени олектомотopa hacoc choва авTomатчески вклочаetся. | |
| Hасoc hac tropoen Ha nizkne napaMeТрь pa6otь | Увелочьтme мошноctь hacoca ha kontrponllepe | |
| Рабочи узelen захлорован | БыньтseTekр и устранITE nomexу. 3aTeM сhoва вклочite hacoc. | |
| Hedoctatouная пожмвodіntelьhoeft насocа | Фильър 3 Zacopен | Очиртite Фильър |
| Слішkom Вьсokné пOTери в побдогійціnx Линіяx | • ИсплъчITE shлади сььшим діаMuTePOM • Стуненьатьштуцер дялшага поgroнite к діаMuTepy shlaнга • Уменьшто діпну shlaн'tа до неюбхODIMOTO MHHIMyma • Изегаіte NeHyЖные coeДИн'teьн'teьы ЗЕм entы | |
| Hасoc hac tropoen Ha nizkne napaMeТрь pa6otь | Увелочьтme мошноctь hacoca ha kontrponllepe | |
| Посné нeshрочиьнок разынacer OTКлочаetся | Очenvъ grязнay Bodа | Почиртite hacoc. Поче oxлajдени олектомotopa hacoc сhoва авTomatчески вклочаetся. |
| Рабочи узelen захлорован | БыньтseTekр и устранITEnomexу. 3aTeM сhoва вклочite hacoc. | |
| Hасoc pa6otan Bcuyxio | Погузnte hacoc B bodу. Пrin Экspлугатуциь в Bodоeme устков.TBO hyжно нOLnoctью NGry3ntB B bodу. |
Co06ueHn8 o6oun6kax
Iocne yctpaHn Homexn 3TO COo6eHHe HncnpaBHOCTN IcyeAET ABTomTuHeckn.