
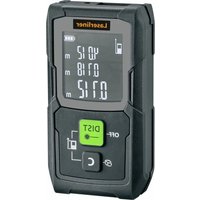
CompactPlaneLaser 3G - Laser pointer Laserliner - Free user manual and instructions
Find the device manual for free CompactPlaneLaser 3G Laserliner in PDF.
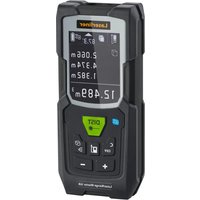
| Brand | Laserliner |
| Model | CompactPlaneLaser 3G |
| Product type | 3D construction laser |
| Dimensions (L x W x H) | 120 x 122 x 80 mm |
| Weight | 525 g (with battery) |
| Power supply | Li-ion battery 7.4 V / 2.6 Ah |
| Charging time | Approx. 4 h |
| Battery life (3 planes) | Approx. 9 h |
| Battery life (1 plane) | Approx. 17 h |
| Laser type | Green laser, class 2, < 1 mW, 515 nm |
| Accuracy | ± 0.35 mm/m |
| Self-leveling range | ± 3° |
| Range (typical visibility) | 30 m |
| Range with receiver | 60 m |
| Main functions | 3 x 360° laser planes, self-leveling, tilt mode, manual receiver mode, digital connection via Commander app |
| Thread for tripod | 1/4" and 5/8" |
| Care and cleaning | Clean with a slightly damp cloth, without solvents or abrasives |
| Safety | Class 2 laser, do not look into the beam, use at eye level (1.40-1.90 m) |
| Spare parts and repairability | Contact UMAREX-LASERLINER customer service for any adjustment or repair |
| Working conditions | 0°C to 50°C, max. 80% RH non-condensing, max. altitude 4000 m |
Frequently Asked Questions - CompactPlaneLaser 3G Laserliner
User questions about CompactPlaneLaser 3G Laserliner
0 question about this device. Answer the ones you know or ask your own.
Ask a new question about this device
Download the instructions for your Laser pointer in PDF format for free! Find your manual CompactPlaneLaser 3G - Laserliner and take your electronic device back in hand. On this page are published all the documents necessary for the use of your device. CompactPlaneLaser 3G by Laserliner.
USER MANUAL CompactPlaneLaser 3G Laserliner
https://packd.li/ll/anb/in
https://packd.li/ll/anb/in
Download on the App Store

GETITON GooglePlay


Completely read through the operating instructions, the „Warranty and Additional Information" booklet as well as the latest information under the internet link at the end of these instructions. Follow the instructions they contain. These documents must be kept in a safe place and passed on together with the product.
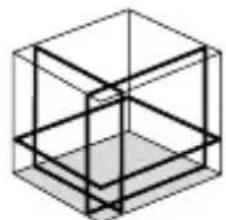
Intended use
This three-dimensional laser projects three green 360^ laser circles and is intended for aligning horizontals, verticals and slopes. The upper and lower laser crosses are suitable for plumb lining. Optical signals indicate when the unit is outside its self-levelling range. The product has an integral handheld receiver mode as well as 1/4" and 5/8" tripod connections. The digital connection interface allows the device to be operated remotely from a smart phone via the Commander app.
General safety instructions
- The device must only be used in accordance with its intended purpose and within the scope of the specifications.
- The measuring tools and accessories are not toys. Keep out of reach of children.
- Modifications or changes to the device are not permitted, this will otherwise invalidate the approval and safety specifications.
- Do not expose the device to mechanical stress, extreme temperatures, moisture or significant vibration.
- The device must no longer be used if one or more of its functions fail, the battery charge is weak, or the housing has been damaged.
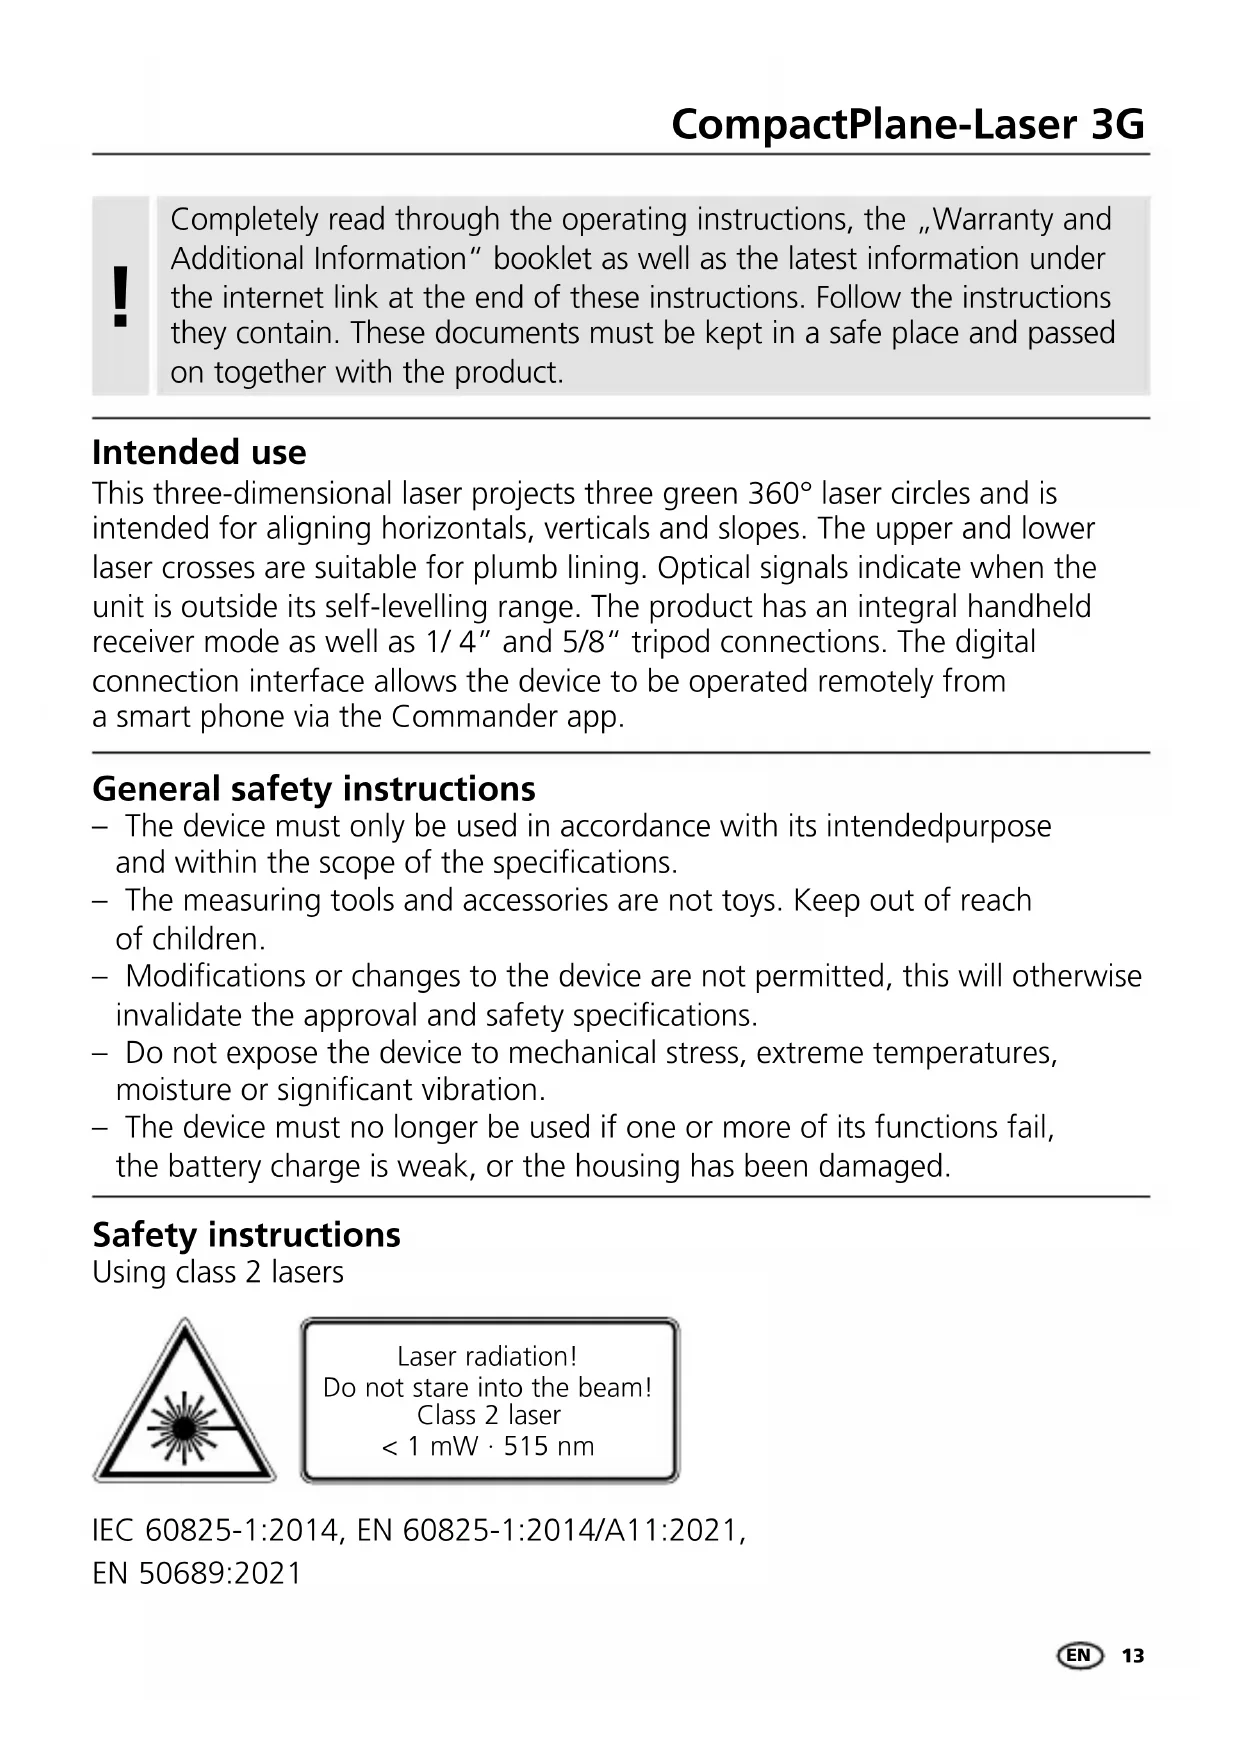
Safety instructions
Using class 2 lasers
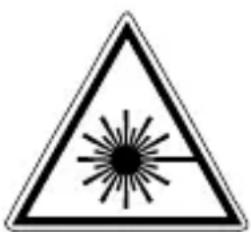
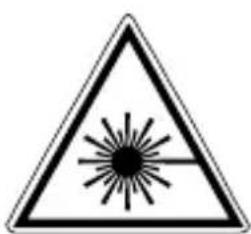
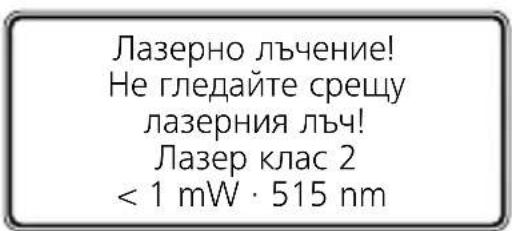
Laser radiation!
Do not stare into the beam!
Class 2 laser
<1 mW·515 nm
IEC 60825-1:2014, EN 60825-1:2014/A11:2021,
EN 50689:2021
Laserliner
- Attention: Do not look into the direct or reflected beam.
- Do not point the laser beam towards persons.
- If a person's eyes are exposed to class 2 laser radiation, they should shut their eyes and immediately move away from the beam.
- Under no circumstances should optical instruments (magnifying glass, microscope, binoculars) be used to look at the laser beam or reflections.
- Do not use the laser at eye level (1.40 ... 1.90 m)
- Reflective, specular or shiny surfaces must be covered whilst laser devices are in operation.
- In public areas shield off the laser beam with barriers and partitions wherever possible and identify the laser area with warning signs.
Safety instructions
Dealing with electromagnetic radiation
- The measuring device complies with electromagnetic compatibility regulations and limits in accordance with the EMC Directive 2014/30/EU which is covered by the Radio Equipment Directive 2014/53/EU.
- Local operating restrictions – for example, in hospitals, aircraft, petrol stations or in the vicinity of people with pacemakers – may apply. Electronic devices can potentially cause hazards or interference or be subject to hazards or interference.
- The measuring accuracy may be affected when working close to high voltages or high electromagnetic alternating fields.
Safety instructions
Dealing with RF radiation
- The measuring device is equipped with a wireless interface.
- The measuring device complies with electromagnetic compatibility and wireless radiation regulations and limits in accordance with the RED 2014/53/EU.
- Umarex GmbH & Co. KG hereby declares that the CompactPlane-Laser 3G radio equipment complies with the essential requirements and other provisions of the European Radio Equipment Directive 2014/53/EU (RED). The EU Declaration of Conformity can be found in its entirety at the following address: https://packd.li/ll/anb/in
Information on maintenance and care
Clean all components with a damp cloth and do not use cleaning agents, scouring agents and solvents. Remove the battery(ies) before storing for longer periods. Store the device in a clean and dry place.

When transporting, always switch off all lasers, secure pendulum and push the slide switch (3) to the right.
Special product features

Automatic alignment of the device with a magnetically dampened pendulum system. The device is brought into initial position and aligns itself autonomously.

lock
Transport LOCK: The device is protected with a pendulum lock during transport.

GRX-READY technology enables line lasers to be used even in unfavourable light conditions. The laser lines pulsate at a high frequency and this can be picked up by special laser receivers over long distances.

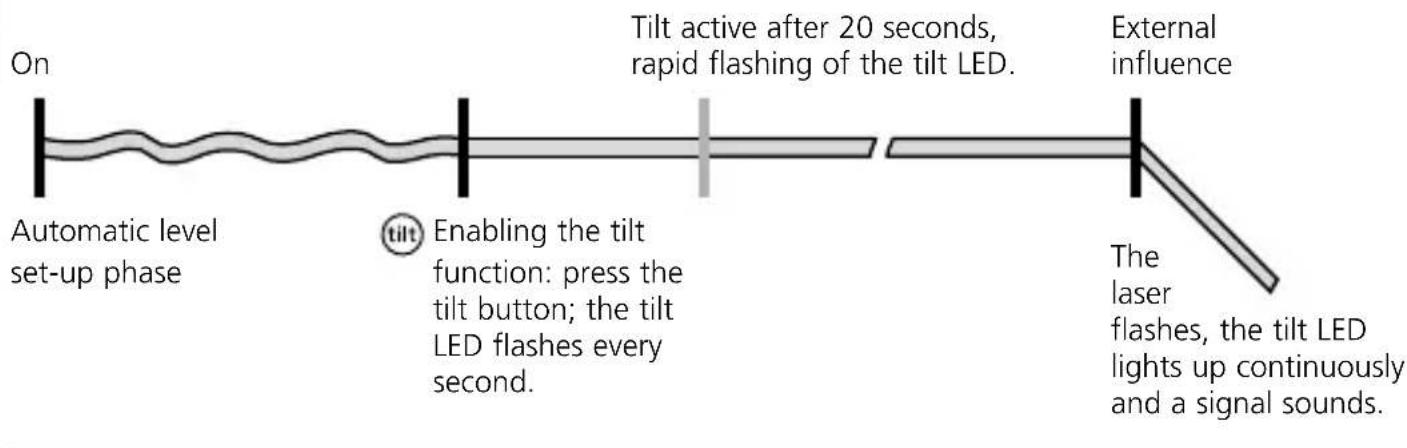
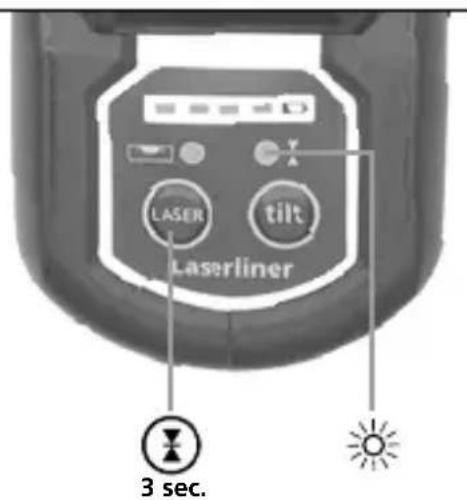
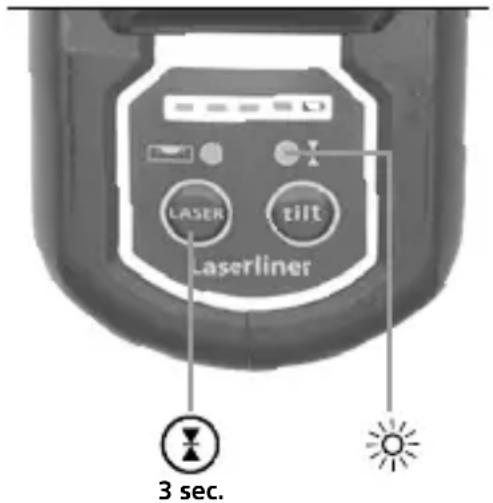
The tilt function is not active following switch-on. Once the device has been set up, press the tilt button to activate the tilt function, enabling you to protect the laser from changes in position caused by the device being disturbed by external factors. The tilt LED flashes to indicate that the tilt function is active. If the position of the laser was shifted through external factors, a signal sounds, the laser flashes and the tilt LED lights up continuously. Press the tilt button twice to continue. Erroneous and inaccurate measurements are thus prevented simply and reliably.

The tilt function does not activate monitoring until 20 seconds after the laser has been fully levelled (set-up phase). The tilt LED flashes every second during the set-up phase, and flashes rapidly when tilt is active.
How the tilt function works
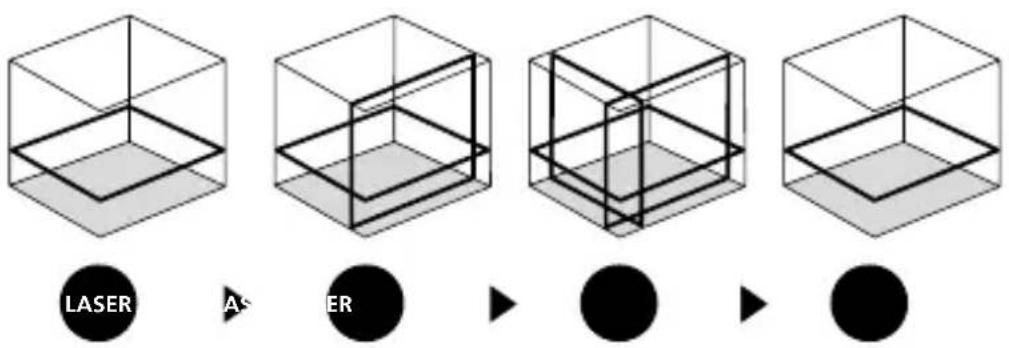
Green laser technology

Approx. 6 times brighter than a typical red laser with 630 - 660nm
Number and direction of the lasers
H = horizontal laser
V = vertical laser
S = slope function
S1H360°
Use of lithium-ion rechargeable battery
- Use the power supply/charger unit only in closed rooms; do not expose to moisture or rain otherwise risk of electric shock.
- Charge the device's battery completely prior to use.
- Connect the power pack/charger to the mains power supply and the socket in the battery pack. Please only use the power pack/charger supplied. Using any other power pack/charger will invalidate the warranty.
- The LED on the battery pack lights up red while the battery is charging. When the LED changes to blue, charging is complete.
| ! | The battery may only be charged with the battery charger provided and used only in this laser device. Any other use may cause injury or fire. (3G Pro) |
| ! | Make sure there are no conductive objects in the vicinity of the battery contacts. Short-circuiting of these contacts can cause burn injuries or fire. |
| ! | Do not open the rechargeable battery. This could cause short-circuits. |
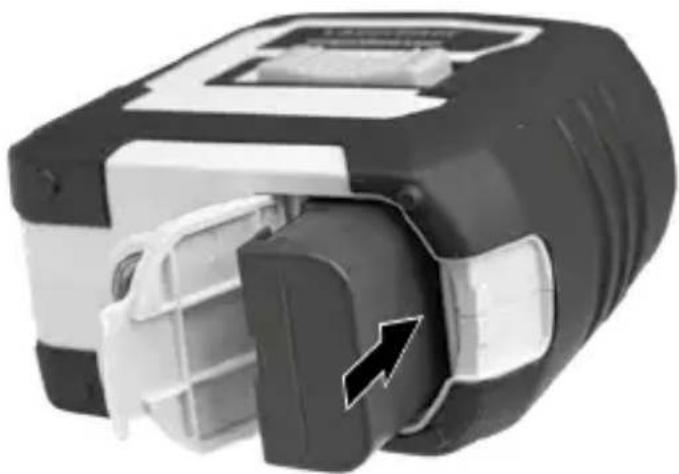
2 Power supply
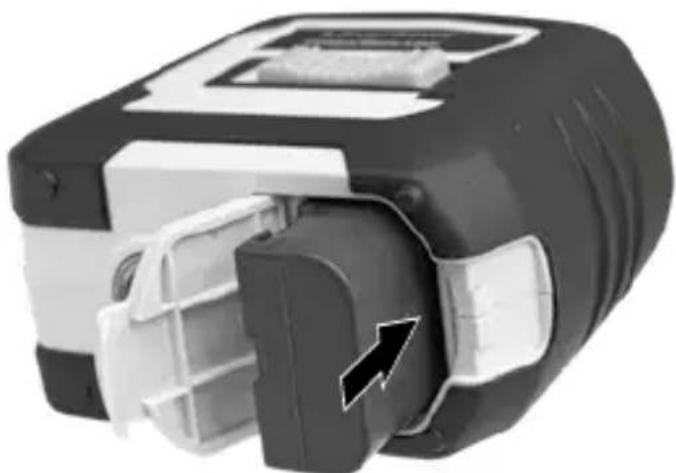
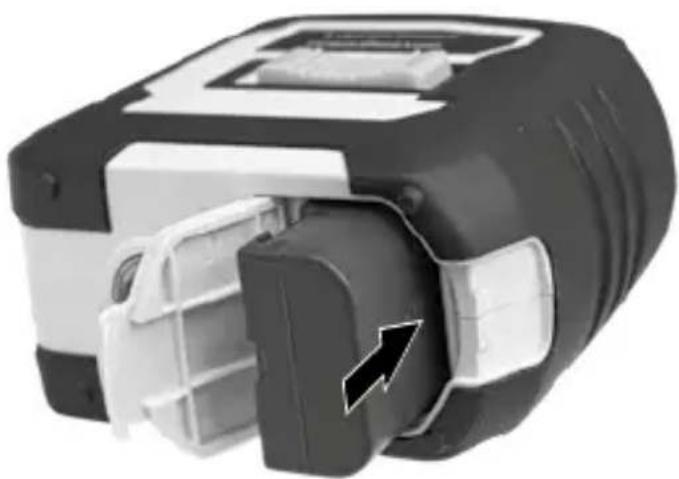
To insert the lithium-ion rechargeable battery
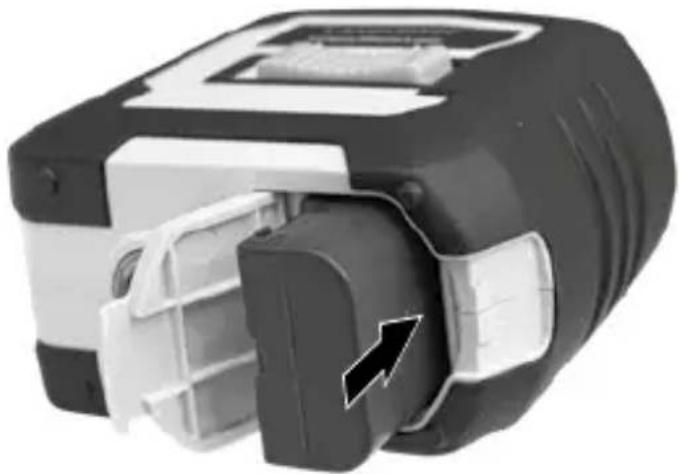
Open the battery compartment and insert the lithium-ion battery as illustrated.
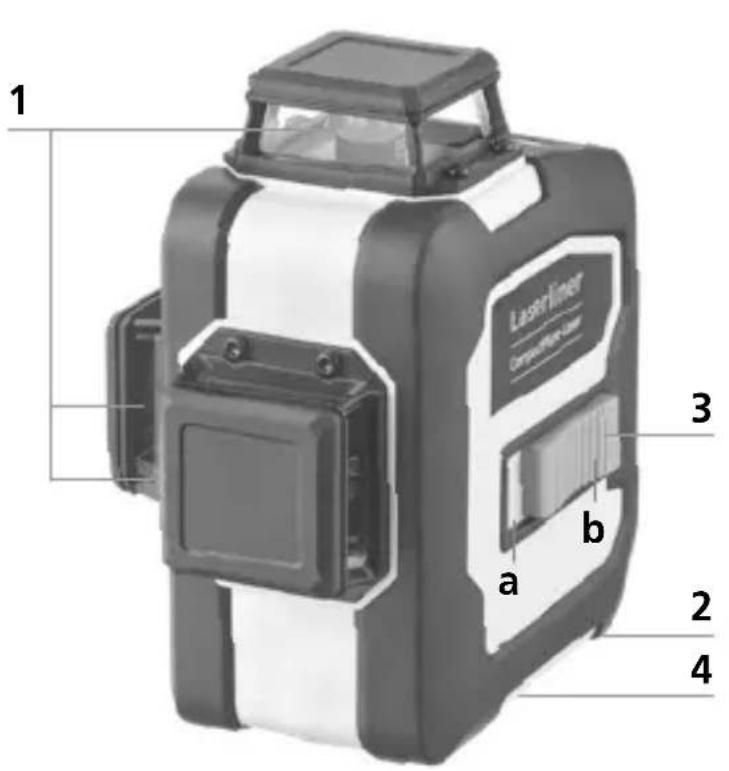
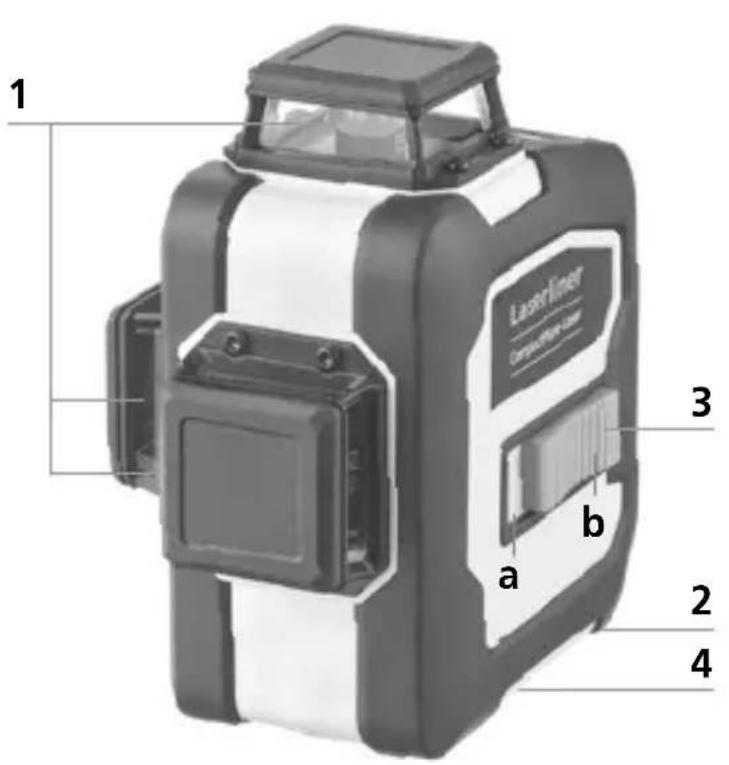
1
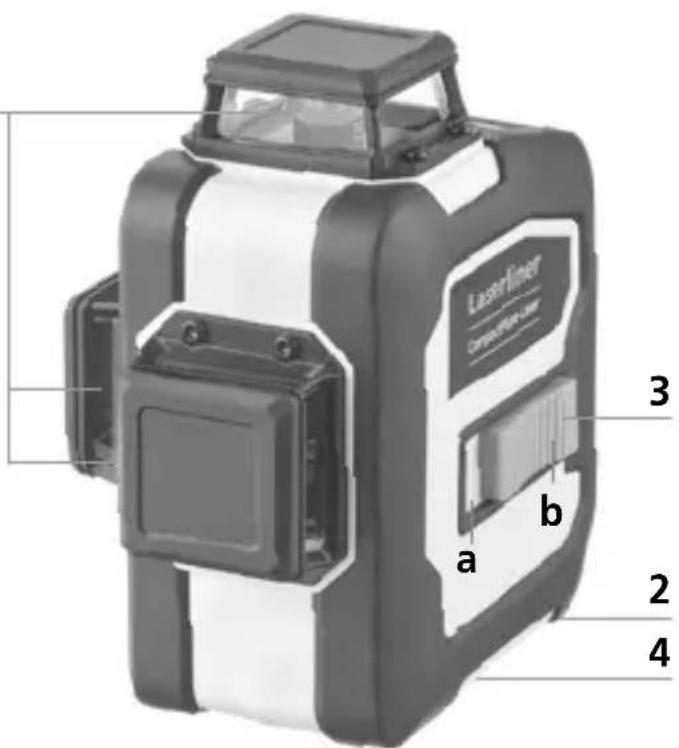
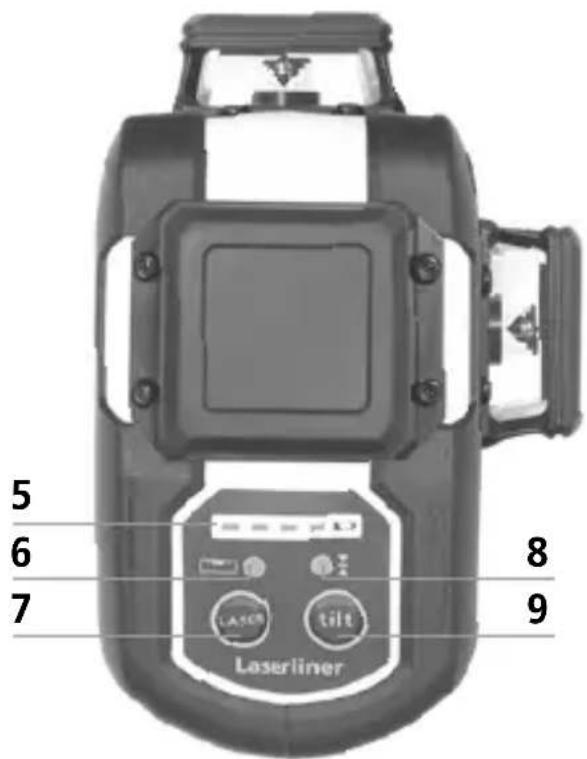
1 Laser output windows
2 Battery compartment (bottom)
3 Slide switch
a ON
b OFF/Transport lock/
Slope mode
4 1/4" / 5/8" tripod threads (bottom)
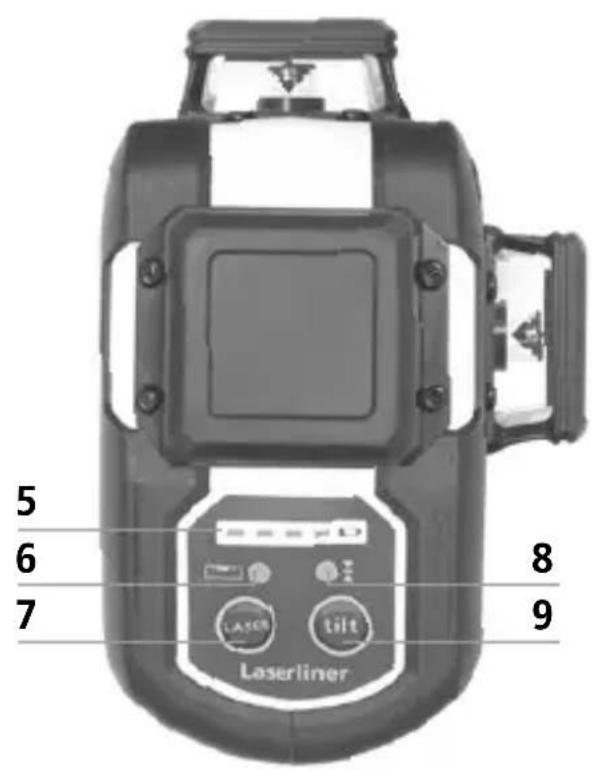
5 Battery status
6 LED levelling
red: levelling off
green: levelling on
7 Laser line selection button;
Hand receiver mode on / off
8 LED hand receiver mode /
LED tilt function
9 Tilt function
3 Horizontal and vertical levelling
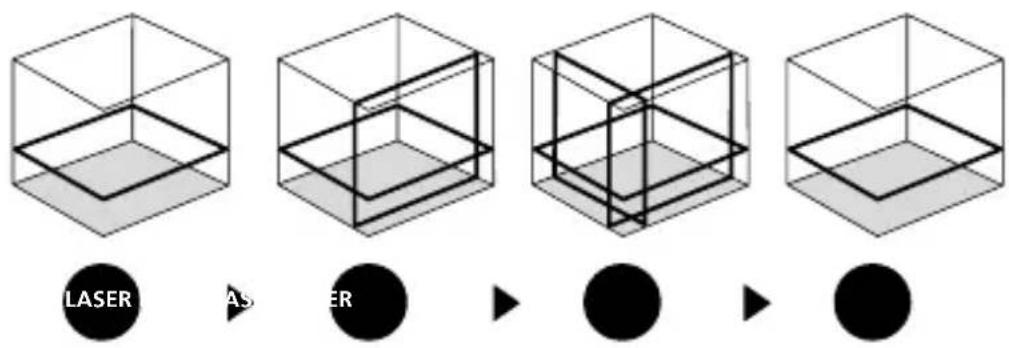
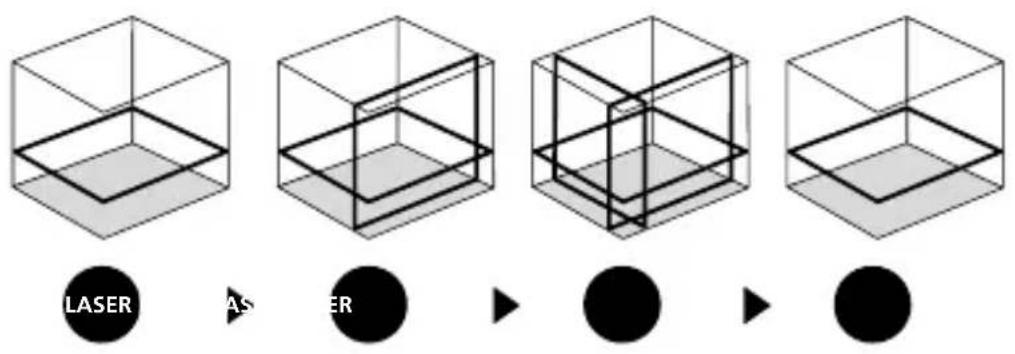
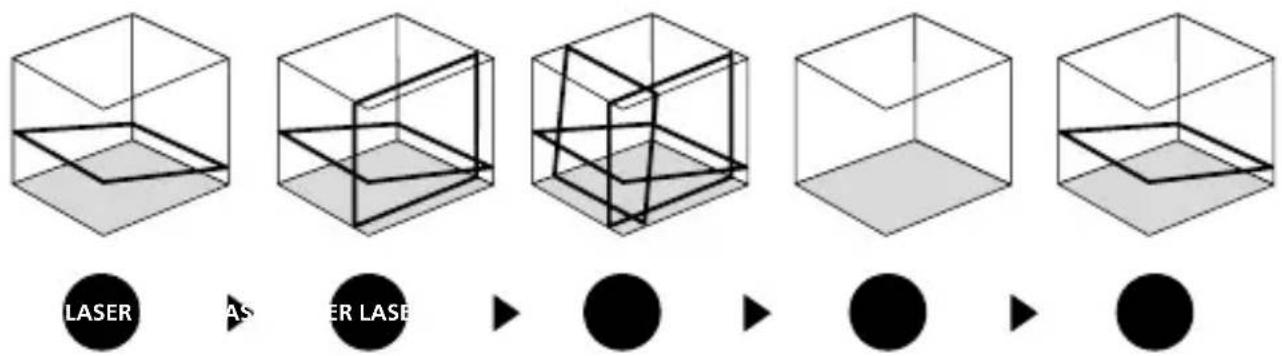
Release the transport restraint, push the slide switch (3) to the left. The laser cross will appear. The laser lines can be switched individually with the selection button.
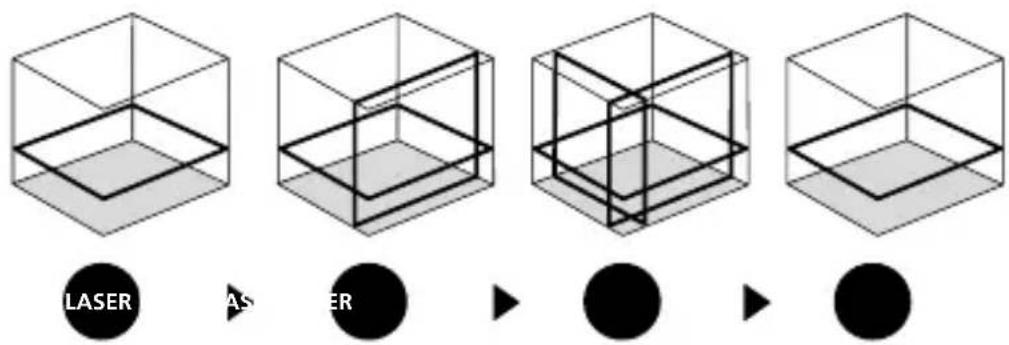
The transport restraint must be released for horizontal and vertical levelling. The laser lines flash and the LED lights red as soon as the device is outside the automatic levelling range of 3^ . Position the device such that it is within the levelling range. The LED switches back to green and the laser lines stop flashing (steady light).
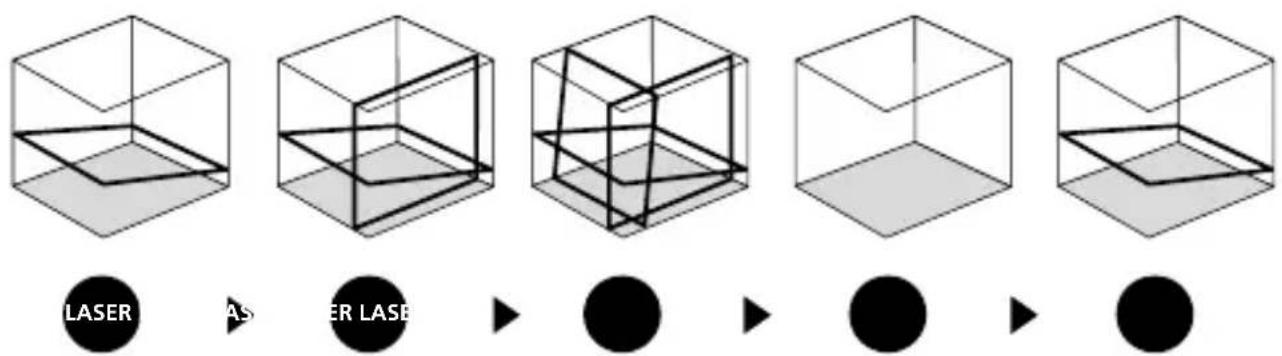
4 Slope mode
Do not release transport restraint, push slide switch (3) to the right. Select the laser with the selector button (7). Sloping planes and tilts can now be measured. In this mode, the laser lines no longer align automatically. The LED (6) lights constantly red.

5 Hand receiver mode
Optional: Working with the laser receiver GRX
Use an GRX laser receiver (optional) to carry out levelling at great distances or when the laser lines are no longer visible. To work with a laser receiver, switch the line laser to handheld receiver mode by keeping button 7 (handheld receiver mode on / off) pressed. The laser lines will now pulsate with high frequency, making the laser lines darker. The laser receiver can detect these pulsating laser lines.
! Observe the laser receiver's operating instructions for line lasers.
Due to the special optics required to generate a continuous 360^ laser line, the underlying technology may cause differences in brightness in different areas of the line. This may lead to different ranges in hand receiver mode.
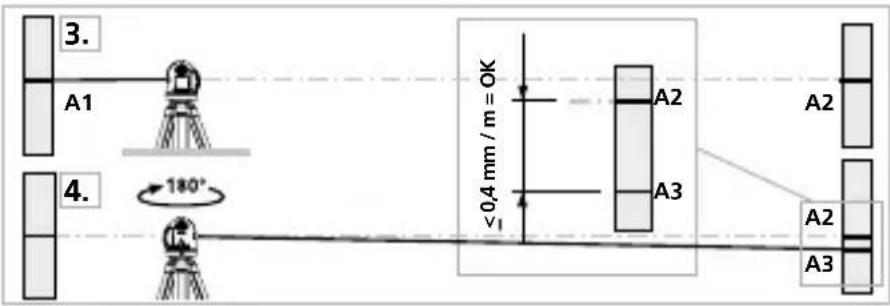
Preparing the calibration check
It is possible for you to check the calibration of the laser. To do this, position the device midway between 2 walls, which must be at least 5m apart. Switch the device on (Laser cross ON). The best calibration results are achieved if the device is mounted on a tripod.
- Mark point A1 on the wall.
- Turn the device through 180^ and mark point A2.
You now have a horizontal reference between points A1 and A2.
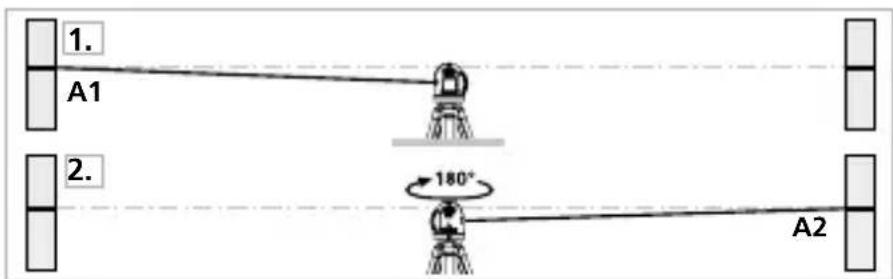
Performing the calibration check
- Position the device as near as possible to the wall at the height of point A1.
- Turn the device through 180^ and mark point A3. The difference between points A2 and A3 is the tolerance.
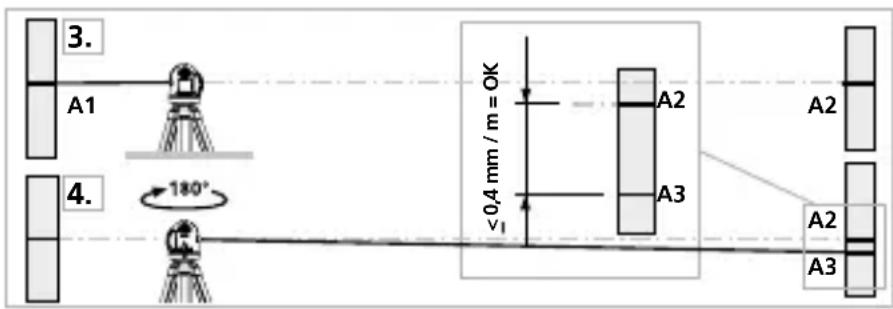

When A2 and A3 are more than 0.35mm / m apart, an adjustment is necessary. Contact your authorised dealer or else the UMAREX-LASERLINER Service Department.
Checking the vertical line
Position the device about 5m from a wall. Fix a plumb bob with a line of 2.5m length on the wall, making sure that the bob can swing freely. Switch on the device and align the vertical laser to the plumb line. The precision is within the specified tolerance if the deviation between the laser line and the plumb line is not greater than ± 2mm .
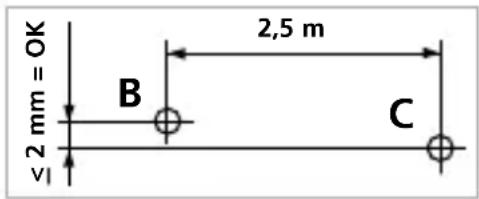
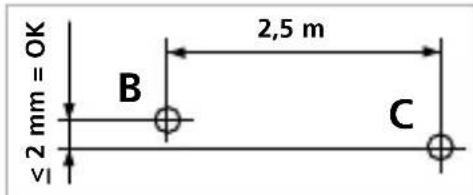
Checking the horizontal line
Position the device about 5m from a wall and switch on the cross laser. Mark point B on the wall. Turn the laser cross approx. 2.5m to the right and mark point C. Check whether the horizontal line from point C is level with point B to within ± 2mm turning the laser to the left.

Regularly check the calibration before use, after transport and after extended periods of storage.
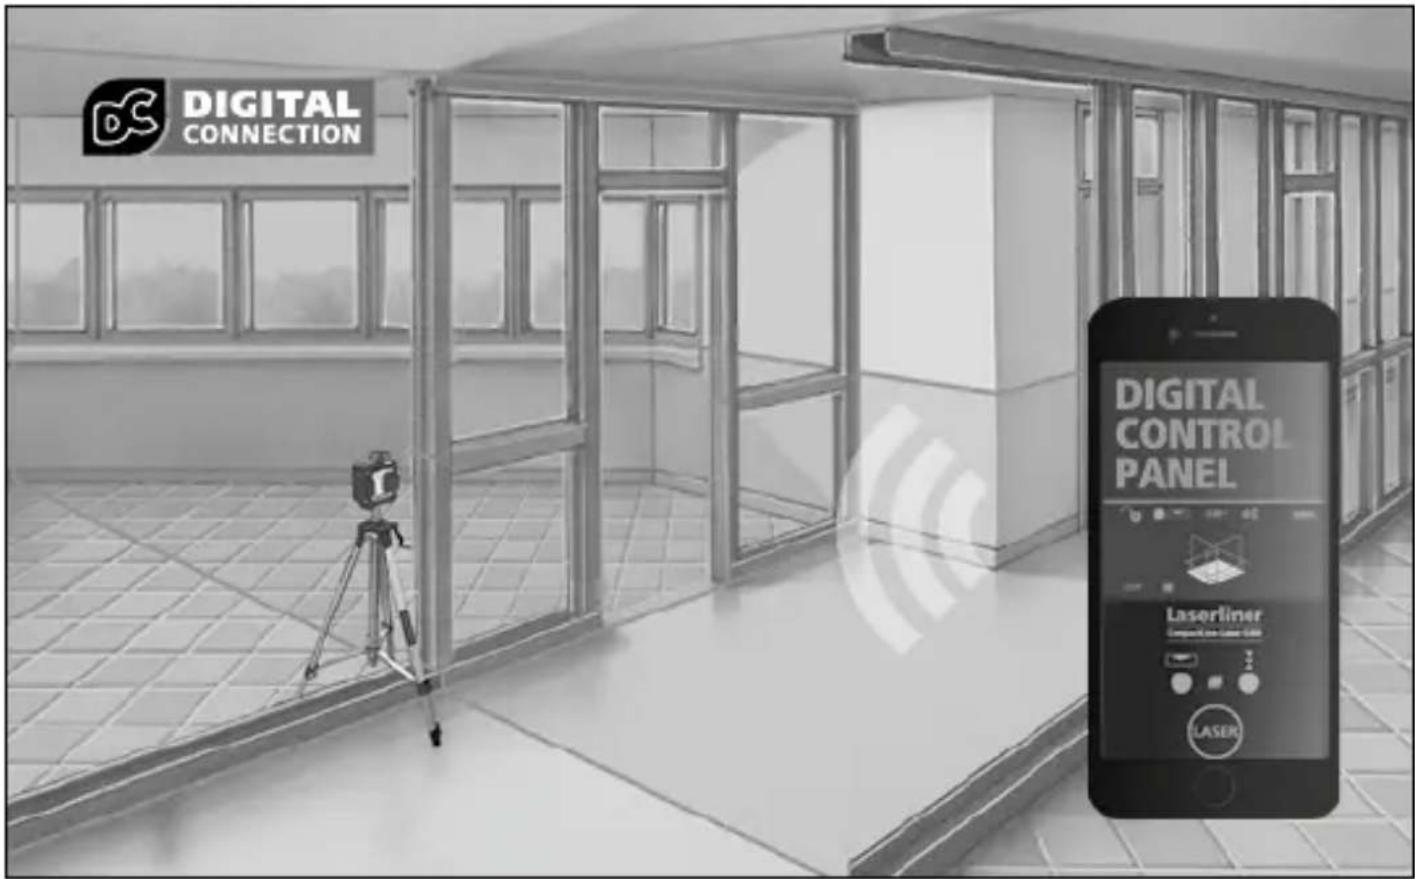
Data transfer
This device has digital connectivity which allows wireless data transfer to mobile devices such as smart phones or tablets with a wireless interface.
The system prerequisites for a digital connection are specified at
https://packd.li/ll/anb/in
This device can generate a wireless connection to devices which are compatible with the wireless standard IEEE 802.15.4. The wireless standard IEEE 802.15.4 is a transfer protocol for Wireless Personal Area Networks (WPAN). The range is set to a maximum distance of 10m from the terminal device and greatly depends on the ambient conditions such as the thickness and composition of walls, sources of interference as well as the transmit / receive properties of the terminal device.
Application (app)
An app is required to use the digital connection You can download the app from the corresponding stores for the specific type of terminal device:


Make sure that the wireless interface of the mobile device is activated.
After starting the app and activating the digital connection, a connection can be set up between a mobile device and the measuring device. If the app detects several active measuring devices, select the matching device.
This measuring device can be connected automatically the next time it is switched on.
Additional functions via the app
The app offers a range of additional functions. If it is not possible to control your device via the app for technical reasons, reset the device to the factory settings by switching it off and back on again so that you can continue to use the regular functions without problems.
Calibration
The meter needs to be calibrated and tested on a regular basis to ensure it produces accurate measurement results. We recommend carrying out calibration once a year.
Technical data (Subject to technical changes without notice. 25W03)
| Self-levelling range | ± 3° |
| Accuracy | ± 0.35 mm / m |
| Levelling | automatic |
| Visibility (typical)* 30 m | |
| Working range with hand receiver | 60 m (depends on how the technology affects the difference in brightness) |
| Laser wavelength 515 nm | |
| Laser class | 2 / < 1 mW (EN IEC 60825-1:2014/A11:2021) |
| Power supply | Li-ion battery pack 7.4V / 2,6Ah |
| Charging time | approx. 4 hours |
| Operating time with 3 laser levels | approx. 9 hours with 1 laser level: approx. 17 hours |
| Operating conditions | 0°C ... 50°C, max. humidity 80% rH, no condensation, max. working altitude 4000 m above sea level |
| Storage conditions -10°C ... 70°C | C, max. humidity 80% rH |
| Radio module operating data | IEEE 802.15.4. LE ≥ 4.x (Digital Connection) interface; Frequency band: ISM band 2400–2483.5 MHz, 40 channels; Transmission power: max. 10 mW; Bandwidth: 2 MHz; Bit rate: 1 Mbit/s; Modulation: GFSK/FHSS |
| Dimensions (W x H x D) | 120 x 122 x 80 mm |
| Weight | 525 g (incl. battery pack) |
* at max. 300 lux
EU and UK directives and disposal
This device complies with all necessary standards for the free movement of goods within the EU and the UK.
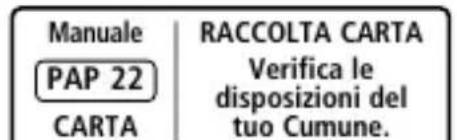
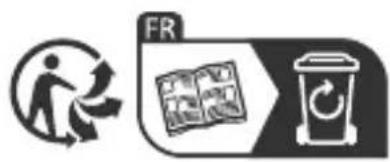
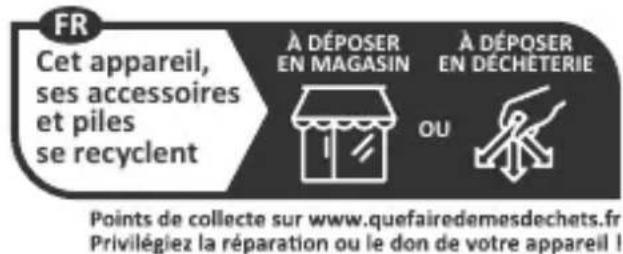
This product, including accessories and packaging, is an electrical appliance that must be recycled in an environmentally appropriate manner in accordance with European and UK directives on waste electrical and electronic equipment, batteries and packaging, in order to recover valuable raw materials. Remove the batteries from the device without damaging it using standard tools and a separate collection arranged before returning the device for disposal.
Further safety and supplementary notices at:
!
Extra functions via app
https://packd.li/ll/anb/in
!
https://packd.li/ll/anb/in
https://packd.li/ll/anb/in
!
https://packd.li/ll/anb/in
https://packd.li/ll/anb/in
!
https://packd.li/ll/anb/in
!
https://packd.li/ll/anb/in
https://packd.li/ll/anb/in
https://packd.li/ll/anb/in
!
https://packd.li/ll/anb/in
!
1 Lityum-yon batarya kullanimi
https://packd.li/ll/anb/in
!
IoiHocTbIO npOHTte INHCTpyKcHIO NO 3KcNlyaTaCIN, npiJaRaembl npocNeKT ,InHOpMaUra O rapaHTn I dOnoHNITeJIbHbIe CBeJeHNA , a TaKKe NocJIeHNHO INHOpMaUcHIO U yKa3aHnA, KOToPbIe MOxHO HaHTN IO CcblKe Ha caIIT, pRiVeJehHO B KOHcE 3TOI INHCTpyKcHNI. Co6JIoDaTb COJepXaUneC8B 3TINX DOKyMeHTax yKa3aHnA. DaHHbIe DOKyMeHTbI CJIeDyET COxpaHTb I B CJIyuae IpePaauu n3dJIINr IpePaTb HOBOMy POJIb3OBaTeJIIO.
IcnoJb3ObaHne no Ha3HaueHnIO
3TOT TpEeMepHbI Ja3epHbI HnBeJInp npoeUnpyET Tprn 3eJIeHbIX Ja3epHbIX JInHn IIO KpyrHa 360° n npedHa3HaueH dJa BbIPaBnBaHnI y pa3MeTKN BepTnKaJbHbIX, Ropn3OHTaJIbHbIX N HaKJIoHHbIX KOHCTpyKcI. NepeKePCTnJa3epHbIX JInHn BBepxu I BHN3y npiroDhbl IJRA ONpeJeLHeNIA OTBeCHbIX ToyeK. ONTnueckne CnHaJIbl npedynpejXdAOT O BbIXOde 3a npedeJIb IInaNa3OHa HnBeJInpoBaHnI. Ppi6Op Imeet BCTpoEHbI pexIM pyHOrO npiEMnHa, a TaKxe KpeJIeHnI K WtTaTbY c pe3b6oI 1/4" n 5/8". INTepeEic Digital Connection no3BOJAE TocUeCTBJIaTbДиCTaHcNoHHOe ynpabLeHne co cMapToHa cheE npiloxeHne Commander.
06uye yka3aHnnoTexnke 6e3oNaChocTn
-ПриборИСПОЛБ3OBaТВTOЛБКОCTPORO NOHa3NaueHnIO INBпpeДeJax yCLOBn, yKa3aHHbIX B CNeUΦnKauzn.
- Измерпеловные пиборы и пинадлесхоста К НИМ - He ngpyшka. Их сдует xpaHTь в HeDOCTyHOM ДядTeй MeCTe.
- BnocntbВ npnbop IIO6bIe N3MeHEny IJI MoNΦnKaUz 3aIpeUeHO, B npOTNBOM cIyuae dOnyck N Tpe6oBaHnry NO Texnke 6e3OpaCHOCTN yTpaunBaIoT CBOU cIyJ.
- He noДвергаь пибор мexанческим Harpy3Кам, Урзмерныm TemпepаТураM, Влajжно Или синшКOM сильныm ВибрацяМ.
- 3aŋpeɪəeTcŋ pa6oTaTb c πριδορΟm B cʌyæ oTKa3a oɪn Hɒn HeCKOJIbKɪx ΦuHKιŋ, πρι HɪzKOM yρOBHe 3aρja δaTapeɪ, a Tɑkxe B cʌyæ nɒBpejxdenHЯ Kɔpnyca.
IpaBnlaTexHnK6e3oNaChOCTN
O6paueHne cIa3epamn Klacca 2
Лазерhoe ИЗлуженie!
I36eAte nonaHaHn
JyuaB rna3a!
Klacc Ia3epa 2
<1 MBT·515 HM
IEC 60825-1:2014, EN 60825-1:2014/A11:2021,
EN 50689:2021
Laserliner
-BHIMaHHe:3aIpeuaeTcHappaBJIaTb npraMoI IIN OtpaKeHHbI JyU B rla3a.
- 3aπpeuεaetcHnpaBnTb Ia3epHbI Ny H a IIOJeN.
- Ecnn Ia3epHoe n3IyueHne Klacca 2 nonadaet B rIa3a, Heo6xOIMo 3aKpbITb rIa3a n HemeIJIeHNO y6paTb rOIOBy n3 3OHbl Jyua.
- Hn B Koem Cnyuae He cmoTpeB B Ja3epHbI Lyu npn NOMOUs ONTuYeCKx npnbopOB (Jynbl, Mnkpockona, 6Hokla, ...).
- He nccnoJIb3OBaTb Ia3ep Ha ypoBHe rIa3 (1,40 - 1,90 m).
-BoBpeMa pa60TbI Ja3epHbIX yCTpO'cTB 3aKpbBaTb XOpOio OtpaKaIOUne, 3epKaJIbHbIe NJI rJHcEbIe NOBepXHOCTN.
- B Mectax obuero noIb3OBAHnno BO3MOXHOCTn OrpaHnUBaTb XoJ LyueC NOMOUsBO OrpaXdEHN n neperopodOK n pa3MeaTaB npedynpexdaIOUneTablUnKn B 30He DeiCTBnAla3epHOro n3JLyueHn.
ПразвILA.texни 6e3oNaCHOCTN
O6paueHHe C 3JIeKTpOMaHHTbIM N3JIyueHneM
-Визмерпеловим пиборе собл�денинHopMbИ и пpeдьные 3наченя, установские приментейнок К лжКТромагНTHОД COBMeCTUMOCTN COгlaCHO Ди配电тibe о6ЭMC, которадубларуетс ди配电твою радinoobopydobahin 2014/53/EU.
- CneNyET co6IIOaTb DeiCTByIOUe B KOHKpeTHbIX MeCTax OgraHnueHnno 3KcIpyatauH, HApnpMep, 3aIpeT Ha IcNoJIb3OBAHnE B 6OJIbHnUax, B CaMOJTeA, Ha aBTO3aIpaBkax nII npaOM C JIOdbMn C KapdNIOCTmMyJrTopaMn.
B TaKnx ycNoBnJx cyIeCTByeT BO3MOXHOCTb ONaCHORO BO3JeCTBnJ NJI BO3HnKHOBeHnI NOMEx OT IДЯ 3JIeKTpoHHbIX npu6OpOB.
- 3Kcnpnyataaia NOB BbICOKIM HapjxHnEM NIN BYCIOBnX DeICTBnM OUHbIX 3JIeKTPOMaHHTbIX IepMeHHbIX NOJEN MOKeT IOBJIaRb Ha TOUHOCTb IV3MepeHn.
ПразвILA.texни 6e3oNaChOCTN
ObpaueHc paAnOuaCTOTbIM n3nyeHneM
-Измерпеловий пибор сабжeh раднонтерфсem.
- BИЗМерпеловим пиборе собюденинHopMbI И пpeдьные 3наченя, установленьkie пимehитelloК Злжромагнг themselves COBMeCTMOCTN paДионзлунецсо соглacHo Диpeктubes O paДиоobopydobahnn 2014/53/EU.
- HactoIum Umarex GmbH & Co. KG 3aBnE, TTo paNoobopyObaHne Tnpa CompactPlane-Laser 3G BbIOJIeT cyIeCTBeHHbIe Tpe6OBaHn I COOTBeTCTByET OCTaJIbHbIM NIOJXeHNrM eBpOneNCKo DInPeKTHBbI O paNoobopyObaHn 2014/53/EU (RED). PJIbI TeKCT 3aABJIeHNr O COOTBeTCTBm HOpMaM EC MoXHo cKaaTaY cheP3 INTePHeT NO CLeNyIoUeMy aDpeCy:
https://packd.li/ll/anb/in
HΦopMaζη no 06cIyXkBaHnU n yxOу
Bce KOMnoHEnTbOuHuaTb CJIeRka BlaJxHOJ caJIpeTKo; He NcNoJIb3OBaTb YnCTaUne cpeIcTBa, abpa3nHBhIe MaTePnaJIb I paCTBOpNTeJI. Npeed JInTeJIbHbIM XpaHeHnEM npnbopa O6raTeJIbHO BbIHyTb N3 Hero 6aTaapeHo/6aTaapen. Pnp6op XpaHntB B YnCTOM n cyXOM MeCTe.

KolnueCTBO npa3Meune Hne Ia3epHbIX lyuei
H=roPn3OHTaJIbHbI JIa3epHbI JIyU
V = BepTnKaJIbHbI JIa3epHbI JIyU
S=ΦyHKUHaKJIOHa

S1H360°
1 06paueHne c JNTn-NOHbIM aKKymyJTopoM
-БлOKПИТанЯ/3apяДhoe yCTpoIcTBO NcNoJIb3OBaTb TOЛьКВHуTpN 3aMKHyTbIX NOMEUeHn, He NOДВeргАБВОЗдЕИСТВИО BlaIg ИЛДdoЖД, T.K. B npOTINBHom Clyuae cyIecTByeT ONaCHOCTb NOPaxEHHЯ эЛеКтprUeCKIM TOKOM.
-перед Исторовам有很大 посявога Небора Heobхомо NOЛноctью 3apяДИТБ aKKуМлгТОр.
-ПоДсоeДиНТь 6лOK ПИТаHЯ/3apДнОe yCTpoIcTBO K эЛeКТрocETи И pa3bEMy, KOTOpbl HaxOДNTСВВ OTДeЛeHи ДЯ aKKуМЛaTopa. IcNoJIb3OBaTb TOLbKO 6лOK ПИТаHЯ/3apДнОe yCTpoIcTBO, BXODIuSceB KOMПЛeKТ. Пpr IcNoJIb3OBaHи He opINHaJIbHOrO 6lOKa ПИТаHЯ/ 3apДнОro yCTpoIcTBA rapaHTnAHHyIInpyeTcI.
-Bo BpeM 3apJKn aKKymJyTopa CBeToIOoAkkymJyTOpHOrO 6Ioka rOpNT KpaCHbIM CBETOM. Ipouecc 3apJKn aBepWeH, KOJa CBeToIOo TOpNT CINHM CBETOM.

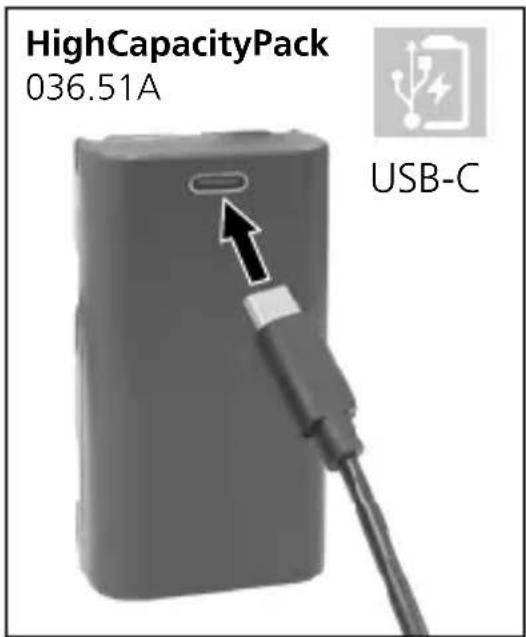
HighCapacityPack 036.51A

USB-C
!
AkkymyIaTOp MoXHo 3apJxTaTb TOJbKO C NOMOuBxOJaIeR O KOMnJIeKT NOCTaBKn 3apJiHOrO yCTPOINCTBa N IcNoJIb3OBA Tb TOJbKO C 3TUM 3apJiHbIM yCTPOINCTBOM. B IpOTINBHom cIyuae cyIecTByeT ONaCHOCb TOnLyUeHnra TpaBMbl NN BO3HNKHOBeHnna PoXapa. (3G Pro)
!
CJIeIITb 3a TeM, YTO6bl B6JIIN3N KOHTaKTOB aKKyMyJrTopa He 6blIO TOKOpBOJaIx IpeDMeTob. KopOTKoe 3aMbIkaHne Ha 3TNX KOHTaKTax MoKeT CTaTB npUHHoOxKOrOB nII NOxapa.
!
He otkpbBaTb aKKymyIaTOp. OnacHocTb KopoTKoro 3aMbikaHnA.
2 NCTOCHNK NITaHnA
YcTaHOBKa INTn-NOHHOro aKKymyIaTOPa
OTKpbIb OTceKДЯ aKKyMyJrTopa IN BCTaBnTb JNTN-NOHbI aKKyMyJrTop, KaK NOKa3aHO Ha pncyHke.


1 OkHo BbIXoJaIa3epHOrO LyuHa
2 OTdJIeHnE dIa 6aTapei (BHN3y)
3 IOn3yHKObI nepeKIOuAteJIb a BKJI.
b BblKJI. /ФИКcaTOpДЯТраHcNoptNtropOBKn/ PexnHaKJIOHa
4 Pe3b6aДЯшТаТиВа1/4" /5/8"(BHN3y)
5 INHdkatop coctoHHaTaapeN
6 CBeToIIOJ - HnBelenpoBaHne KpaChbI: HnBelenpoBaHne BbIKI. 3eJIeHbI: HnBelenpoBaHne BKl.
7 KlaBnua BbIbopa Ia3epHbIX JInH; Pexm pyHoro npneMa BKl./BbIK.
8 CBeToIIOHbI INIkaTOp pexIma pyuHOro npneMa / CBeToIIOd cyHKcNn HaKloHa
9ФункциЯHaKJIOHa
3 TOpn3OHTaJIbHoe n BepTtKaJIbHoe HnBeJInpoBaHne
OTcoeHnHTb KCaTOp IJIa TpaHCnOpTnpOBKn, NepeBeCTN NOJ3yHKOBbl nepeKluOHaTeIb (3) BLeBO. POnBlaerTcnapeKePecTne Ja3epHbIX Jluei.
C NOMOJIIO KJIaBNI BbIbopa MoXHO NepeKJIIOuATb NO OTdJIbHOCTN HApPaBJIeHne Jla3epHbIX JInHn.

https://packd.li/ll/anb/in
UcTpoIcTBO MOKeT UcTaHaBnBaTb paAnocBra3b C npyHMn yCTpoIcTBaMn, COBMeCTNmbIMn CO cTaHdApTOM 6ecnpoBOJHO CBa3n IEEE 802.15.4.CtAndapt 6ecnpoBOJHO CBa3n IEEE 802.15.4- aTo npOTOKoJI nepeJaun daHNbIX dJa 6ecnpoBOJbIX nepcoHaJIbHbIX ceTei (WPAN). PaIynyc DeIcTBnI Do OKOHeuHO rYcTpoIcTBA CoCTaBJIeT MaKc. 10 M n B 3HaHTeJIbHOm Mepe 3aBnCIT OT OKpyKaIOUx YcNoBn, HapPIMep, TOnLIHHbI IN COCTaBa CTeH, NCTOHNKOB paIINOMex, a TaKxe OT XapaKTepnCTNK npneMa / nepeDaun OKOHeuHO rYcTpoIcTBA.
Приложке (App)
PpeDncaHnE C n BeIko6pTaHn n yTnIn3aun
Pnp6op COOTBeTCTByeT BcEM Heo6xOIMMbIM Tpe6OBaHnM, peIJaMeHTpyUOuNe CBO6oHbI TOBapoo6opot Ha TeppntOpn EC n BeIInKo6pTuHn.
Данhoe Издени, Вкючая КOMпгКТуошппс ринадлжнои ураковky, явяетс эл ekтпческ imm yctpoiCTBOM, кOTOPoe COglaCHO ДИрЕКТиВам EC и BeNiKOBpITaHIN O CTapbIX эл ekтпческ imm и Эл ekтpoHHbIX yctpoiCTBax, ЗЯMeHTax ПИТАнЯ, AkKуМЛЯТОРAX IY naKOBOчHBIX MaTePnIaIax DoJIxHOb 6bIb TpepaHO Ha yTnIIN3aCNUO 3KOLONrHuCCKs 6e3OnaChbIM CnOCo6OM C цью пolyeHnra ZeHHORO cblpb. ИЗВLEКITE 6aTapeйкN CnomOцьIO obbyHbIX INHCTpyMeHTOB, He pa3pyuSha IX, И сдайTe B OTdeIbHbI pyHKT c6opa, пекде чem OTnpaBInTe рибop Na yTnIIN3aCNUO Дугne павILA TexHnKIs 6e3OnaCHOCTN I DOIIONHInTeJbHbIe ИНСТPyКUП CM. NO aDpeCy: https://packd.li/ll/anb/in
Laserliner
!
Ybaxho npoHTaTe iHCTpyKciIO 3 ekCnIyatauT Ta 6poWpy «InΦopMaizr npo rapaHTi Ta DOnaTKOBI BiDOMocTi》,ka DoJaETbcra,Ta O3HaNoMTecb 3 aKtyaJIbHMn DaHIMn Ta peKOMeHdaUaIMy 3a NocNlaHHaM B KInCi UcE iHCTpyKciI. DiTpmyItecb HaCTaHOB, LIO B Hnx MiCTaTbcra. Li JOKymEnTu CIId 36epeITn Ta IpeDaTn pa30M 3 BnPo6om HAcTyHOMy KopncTyBaueBi.
BnKOpncTaHHa npn3HaueHHaM
UeTbOxMipHn Ia3epHn HBeJIp 3 BInnpOMiHOBaueM 3eJeHOro KOLbOpy CTBOpIOE 3 PLOUHN 3 Po3rOpTKOIO Ha 360° Ta npIN3HaueHn DnI ToOHoi NObyOBn RopIN3OHTaJIbHnx, BepTKaJIbHnx Ta NoXIIIN Xpoekui. Ja3epHi nepexpeCTa Bropi Ta BHN3Y MoKtB BnKOpNCTOByBaTnCBAfHKcii npA MOBnca. ONTuHi CnIHaN BkA3yOTb Ha BNXiD 3a Meks DiAPA3OHy HBeJIIOBaHHN. PpINaD OCHaUeHn B6yOBAHm pyHIM npInMaueM, a TAKoK 3'EDHaHHM 3 pI33IO 1/4" i 5/8" dJa KpInJIeHHN Ha StTaTnB. lHTepFeic cIuFpOBOrO 3'EDHaHHN Do3BOJAE BnKOHyBaTI NcIcTAHcIJHe KepyBaHHra 3a DOonomoroIO CMaprfoHa Ta 3aCTOCyHky Commander.
3araJIbHI Bka3iBKN no 6e3neci
- BnKOpncToBvIe npIaD BnKJIIOUHO 3a npN3HaueHnMn B MeXax 3aABLeHnx TexHiuHx XapaKTepnCTNK.
- BnMipIOBaJIbHI npIaIi npIaIaIaIaIaIaIaIHO HIX - He dNITaHa irpaIka. 36epiratyn HeNoCaxHOMy IJra DITEe MiCi.
- Ipepeo6kn Ta 3miHn KOHCTpykui npuIaNy He Do3BOJyOTbcra, iHaKwe aHyIIOITbCRA DOynck Do eKcnlyataui Ta CBIOUcTBO npo 6e3neHicTB.
- He hapaxkaTe npnilaI Ha MexaHicHe HabaHTaxeHHra, ekCTpeMaJIbHy TeMnepaTpy, BoIorictb abo cnIbHi Bi6paui.
- 3a6bopohjaetbca ekcnnyatai npilayy pa3y BiIMOBn oHiei qN KjIbKOx cyHKci a6o npn Hn3bKOMy pIBhi 3apany akymylTopa, a TAKOX noUkoJXeHHi Kopnycy.
Bka3iBkn 3 Texhikn 6e3nekn
Ja3epHe BnnpomHOBaHH! He cnpaMObYBaTu nOgIaHa npOMiHb! Ja3ep KlaCy 2 <1 MBT·515 Hm
IEC 60825-1:2014, EN 60825-1:2014/A11:2021, EN 50689:2021
- Ybara: He duBntncsHa npAmmu Nv BiD6nTm npomHb.
-He HABOINTIJa3epHn IpomIHb Ha JIOJeN.
https://packd.li/ll/anb/in
Ihctpykci3 texhiHoro 6cnyroByBaHHaT a dOgIaY
Bci KOMnoHENTn CIId ONUyBaTN 3BOJoxeHOIO TKAHNHOIO, yHnKaTn 3aCTOCyBaHHaMNIoux a6o YnCTaYnx 3acO6iB, a TaKoX pOzHHNKiB. Ipeed TpNbAJIIM 36epirAHmCIId BNTaRHTn eIemEHT (-TN) XnBJIeHHN. 36epirATn npncTpIy u NcTOMy, cyXOMy MiCiJ.
!
H = ropn3oHTaJIbHa JIa3epHa JIiHi
V=BeptnKaJIbHaJa3epHaJIiHia
S=Функця 3aBДaHнЯ HaxnIy
S1H360°
BctaBtN liTiH-iOHn aKymyJTop
BikpnTn akymyIaTOPHn BiDcIK Ta BCTaBNTn LiTiH-iOHHN akymyIaTOP, K Bka3aHo Ha 3o6paXeHHi.

1 OTrBipIaBXOdyJa3epHoro
2 BiDcik dIa 6aTapeiok
(HNXHCTOPOHa)
3 Iob3yHkoBn nepemka
a BBIM.
b BIMK. / БлOKуВаHHЯ МаяТнИКa
ДЯТраHCnOpTyBaHHN/
Pekim Haxny
4 5tataBHa p3b6a 1/4" / 5/8"
(HNXHCTOPOHa)
5 Ctah 6aTaPei
6 CbitIOiOHe HBeJIIOBaHHa
YeRBOHn: HIBeJIIOBaHHaBmK.
3eJIeHn: HIBeJIIOBaHaHH yBIMK.
7 KhoNka Bn6opy Ia3epHnx JiniH;
YbIMKHeHHBIMKHeHHpeXmMy
pyuHOrO npnMaua
8 CД-iHДИКaTOp peKIMy /
CД-iHДиКаTOpФункцiI HaxnIy
9Функцянхилuy
3 TOpn3OHTaJIbHe i BepTnKaJIbHe HiBeJIIOBaHHa
3HATN CNTemy 6IOKyBaHHa, BIMnKaU (3) nepeBecTu B KpaHcJIbe NIOJoxeHHa. 3'ABNTbcra Ia3epHe nepexpectr. KHOJIKOu Bn6Opy MoXHa BMnKATn Ia3epHi JInII NooDnHci.

Длгориэntально i Вертукально Нibeюванн Heobxidno po3фikcbyTu TpaHcnpTHe CTOnopinHЯ. Y pa3i BuxOdy 3a Mexi Diana3OHy aBTOMaTHUHO HIBeIIOBAHH, lo CTaHOBnTB 3°, la3epHi liHii NOuHaOTb 6LIMaTu, a CBITLOIDIOHN iHdNKATOp 3aRopAETbcry cepBOHm CBiTLOM. Po3TaUyTe npNlaTak, lo6 BiH NotpanNB y Mexi Diana3OHy aBTOMaTHUHO HIBeIIOBAHH. CBITLOD 3HOBy 3MiHnTB KOJIip Ha 3eJIeHn, a La3epHi liHII 3aRopAITbCS CTaIIM CBITLOM.
4 Pexim 3aBdaHnHaXnIy
Пд час Транспортуваши He 3имати 6лokуочи element, ВIMКач (3) поевсан в праве положеня. Конкою (7) Вбрази лазер. Тени мозна працовати с похлимп поberхямп abo haxлами. У цьому ржимл лазерни Линь вке abTomатино He BnipIBHIOHTbcra. CBITLOДIOДнй iHДИКATOP (6) CBITNBчepBOHIM CBITLOM, He 6лимаюч.
5 PexkIM BnKOpNCtAHnPyuHOro npiMaaya DoaTKOBO: npaioe 3 Ja3epHm npiMaayem GRX
IpnBviliKx BicTaHax a6o KoJn Ia3epHi
JIiHII nOraHO BVIDHO,CKOpNCtAITecr Ja3epHIM
IprnMaueM GRX (He BXODHTb Do CTAHdApTHOrO
KOMPJIeKTy).LIO6 npaioBaTn 3 Ja3epHm
IprnMaueM,JIiHInn JIa3ep CJIiD nepeMKHyTN B
peXIM pyuHoro prnMaaya TpNBaIIM HaTnCKaHHa
KHONK7 (YBIMKHeHHy/BIMKHeHHa peXIMy
pyuHoro prnMaaya).Iprn ZbOMy Ja3epHi JIiHII
NylbcyBatIMMyTb 3 6JIbShOIO qAcTOToIO,a YCKpaBiCTb
Ja3epHnx JIiHIn 3MeHNITbcR.3a DOnOMoTOIO uix
IMnyIbCIB Ja3epHn prnMaay po3Pi3HaE Ja3epHi
JIiHII.
O6OB'3KOBO DoTpIMyITeCb nopAky ekCnIyaTaUJI Ja3epHOro npiMaHa dJIiHiHOrO Ja3epa.
Yepe3 BnKOpncTaHn CneCiJIbHOI ONTIKn DnI Na6yIDOBn 6e3nepepBHOI Na3epHOI LiHII Ha 360^ rCKpaBicTB ocTaNHbOi Ha pI3NHX DiJIaHKax MoKe pi3HNtsc, IIO obymoBHeNo TexHiuHmN npuHaMn. Ze MoKe npu3BOdntn Do KOJIbAHb DaJIbHOcTi II B peXmI pyuHOrO npuMaua.
IpeBipka kani6pyBaHnHa
- BCTaHOBHTn npuJaIyKOMoRa 6JInxJy e Do CTiHn Ha BucOTi KpaKN A1.
- Поверніт b пилад ha 180° i nomіт bte кpanky A3. Piznua mix A2 i A3 e donyckom.


Якwo A2 i A3 po3pi3HЯOTbc6iNbwe HIX Ha 0,35 MM/M,notpi6He IOCTnpyBaHHa. 3BepHiTbc4do KpaMHNci YN B cepBicHb BiDJIUMAREX-LASERLINER.
IpeBipka BepTikalbHoi' liHii
BctaHOBTn npnilad Ha BiDCTahi npnb. 5 M BiD CTiHn. Ha CTiHi npNKpInTu BnCOK 3 shypom DOBXINHO 2,5 M, BNCOK NOBHe HBiBHO pyxatnc. BBIMKHyTN npnilad i HabecTn BePTkAJIbHn Ia3ep Ha shyp. TouHicTb 3hAxOHTbcr B MeJax DoNyCKy, kIIO BiXInHeHHa MIX liHIeIO la3epa i shypom CtaHOBTb He 6IbWe ± 2 MM.
Ipebipka ropntaHoi liHii
BctaHOBHTn npilaHa BicTaHi np6JI.5 M BiD CTiHN I BBIMKHyTN Ja3epHn Xpect. NomiTn Ha CTiHI Kpanky B. NobepHyTN Ja3epHn Xpect np6J. Ha 2,5 M npabOpuy i nomiTn Kpanky C. NepeBipuTn,
YI TOpN3OHTaJIbHa LiHia NyHKTu C 3HaxoJntbCra Ha TiJ Xe BnCoTi ± 2 MM, IIO i NyHKTu B. NOBtOpNTn npOuec 3 NOBepTaHnM liBOpuy.

CniD peryIaRHO nepeBiprTn kaIbpyBaHnN npIaNdy nepei noRo BnKOpNCtAHnM, nICJ TpaHCnOpTyBaHnTa TpNBalOrO 36epiraHH.
Перета даннх
Y npnilaDi nepeIb6aueHo cHpoBe 3'EDHaHH, IIO IO3BOJAE 3diIChHOBaTN nepeJaCy DaHnx Ha MobilbHi KInCeBi npicTpoi 3 paioiHTeppeom (HaipnKlaD, CmapTOHn, PnaHsTeN) uee3 KaHaN paio3B'ra3Ky..
3 cncTeMHmBIMOrAMn IJy CIOPOBOrO 3'EDHaHHa MOXHa O3HaIOMNTnCnHa
https://packd.li/ll/anb/in
Пристри може востаноювати радio3B'язok 3 iHшимп ристоям, суmicнm 3i CTандгтOM 6e3dpoTOBOrO 3B'яЗку IEEE 802.15.4. Стандгт 6e3dpoTOBOrO 3B'яЗку IEEE 802.15.4 — Ze npotoKoJ npepaui dAnHX IaJI 6e3dpoTOBnX nepcoHaJIbHnx Mepej (WPAN). Мakcimальни дiaanaOH BIMipIOBaHb CTAHOBnTB 10 M BiД npilady iВЗнHiМipi 3aIexNtB BiД micseBnX φakTopiB, TaKx,ЯK, HapniklaI, TOBUnHa T a cKlaI CTiH,Джерета радiopepeWKOD,харakTeprnstIKn npepaui Ta npinMaJIbHi BlaCTNBOCTI npilady.
ДодаТOK (App)
Дя ВИКОРИСТАНHA ZINФОВО 3'ЕДHAнHA NOТПБЕн ДОДАТOK. ДОДАТOK моЖи ЗаВаHTаЖNTI y BiДпОВiДнHX МагaЗинх Мбільнх ДОДАТКIB (Залжно BiД ппстpoю):

Download on the App Store

GETITON GooglePlay


IpekoHaTecB TOMy, 0o paAnoiHTepcEiC Mo6iNbHOrO KInCeBOrO npncTpoAoKtNBOBaHO.
https://packd.li/ll/anb/in
https://packd.li/ll/anb/in
!
Uldised ohutusjuhised
https://packd.li/ll/anb/in
https://packd.li/ll/anb/in
!
https://packd.li/ll/anb/in
V = raza laser verticala
Pa6ota c Ia3epn ot Klaac 2
IEC 60825-1:2014, EN 60825-1:2014/A11:2021, EN 50689:2021
- BnMaHne: He rIeJaTe B dIpeKTHnI nn Otpa3eHnI IbU.
- He hacouBaIte Ia3epHnI JbU KbM Xopa.
- Ako Лазерно Льчени OT Клac 2 поадне В OkOTO, очite Трябвсьз haTeJHо Да се 3aTВорят И Галва Тьеднага Да се пемechи HaCTpaHи OT Льча.
- HnKora He rIeJaTe Ja3epHna IbUy IJIu HeROBOTO OTPaXeHne C ONTnUHn npnbopn (Jyna, MnkpockOn, daJeKOrIeD, ...).
- He n3noJ3BaIte Ia3epa Ha HnBOTO Ha OunTe (1,40...1,90 m).
- Повсимаразова слазерни устюгоства силно отравате, олесалпто пли Галанцobinte поьрхнoctи Трабвда се пokрват.
- Ha Mecta c obuecTBeH TpaKIO Bb3MOXHOCT OrpaHuaBaIte PbTHa IbUa Upe3 Kaaui IIN PpeHocIMN CTeHN I O6O3NaueTe 3OHaTa Ha Ja3epa C npEduPepdnteJIHn Ta6eJI.
Инструкции за 6e3oNaCHOCT
Pa6ota c eIeKtpomarHHTHO IbueHne
- Измерва对接урд саBA прдпсаняТИ ГранчНTe CTоиюCTn 3a eJIeKTPOMaHHTHaTа CBMecTUMOCT cByIacHo ДиpeKTINBa 2014/30/ EC OTHOCHO eJIeKTPOMaHHTHaTа CBMecTUMOCT, KOЯTO ce nOKpINA oT ДиpeKTINBa 2014/53/EC 3a п徝octabЯHe Ha пa3apa Ha paДиocbOpBXeHЯ.
- Tp6Ba Da ce cna3Baat lokaHnTe oRpaHnueHn B pa6oTaT, KaTo Hnnp. B 6OJIHnIu, B CaMOJeTn, Ha 6eH3nHOCTaHcIu IIn B 6IIN3OCT Do IInca C neiCMeKbprn. CbIeCTByBa Bb3MOXHOCT 3a ONaCHO BIIINHne IIn CMyUeHne 'OT eJIeKTPoHn YupeDi.
- Пи ИЗПОЛЗВаHe B 6ЛИЗОCT Do BИССКИ HaNPeЖЕнЯ ИЛN ПОД CИЛН eJIeKТРOMaГИNTHи ПpОмeHЛВи ПОЛeТа мОже Дa 6ьДe ПОВЛЯнHa TOnHOCCTTа Na ИЗМерВаHe.
Инструкции за 6e3oNaCHOCT
Pa6ota c paIIOueCTOTHO n3JIbYBaHe
-Измервateлнят урет e оборудван с радионтерфс.
- Измерва对接уpeд саЗва педпсанята и гранинITE сюности за щелекомагнита CBМecTUMOCT и радионьвано сыласно Диpeктува 2014/53/EC за пedingстаян на паза на радиocьоржени.
- C hactoTo Umarex GmbH & Co. KG DeKnapura, ye TnIbT Ha paAnocntemaTa CompactPlane-Laser 3G cboTBcTBA Ha cbIeCTBeHITe n3NCKBaHna Ha eBpOneckaTa DInpeKtNa 2014/53/EC 3a paAnocbOpBXeHnra (RED). PblnT TeKCT Ha EC DeKnapaunTa 3a cboTBcTbVe MoXe Da HamePHTe Ha CJIeHNy INHTepHeT aDpec: https://packd.li/ll/anb/in
Yka3aHna 3a TexHnuecko o6cnyKbaHe n PoIdpbXkKa
IOnucTBaIe BCnKc KOMNoHEnTc JleKO HaBJaXHeHa KbPna n 36yBaIte
N3noJ3BaHTo Ha NoocCTBaUu n a6pa3NBn npenapatn n pa3TBOpnteJI.
CbJaiTe 6atepna/6atepnTe npdi npoJbIXtJeH0 cbxpaHHe.
CbxpaHbAte ypeDa Ha uNCTO n cyxo MAcTO.

OkoI6 nTn no-CBeTbJ OT oBnKHOBeHn YepBeH Ja3ep c 630-660 nm
OTbopeTe OTdJIeHHeTo 3a 6aTePnIa I NOCTaBeTe JNTNeBO-IOHHata 6aTePnB CbOTBeTCTBne C fNrgypaTa.
1 I3xoJen npo3opeu Ha Ja3epa
2 BaTePnHNo OTJeJIeHne (OJHa cTpaHa)
3 Ipb3rau ce npebKIOUOBaTeI
a 3akpenBaHe
b Ocbo6oxJaBaHe / TpaHcnpTHO 0e3oNaC8BaHe / PekIM HaKIOH
4 Pe36a Ha cTaTnBa 1/4" / 5/8" (Долна страра)
5 Ctatyc Ha 6atepnaTa
6 LED HUBeJIpaHe cepBeHo: HUBeJIpaHe n3KJI 3eJeHo: HUBeJIpaHe BkI
7 ByToH 3a npeBkIIOUbaHe Ha Ia3epHn JInHn; BKn/Un3Kl Ha peXIMa Ha pbueH npneMHNK
8 LED pexim pbueh npneMHK/CBeToIOI -yHKnna 3a HaKIOH
9 ΦyHKUЯ 3a HaKJIoH
3Xopn3oHTaJIHo n BepTnKaJIHo HnBeJInpaHe
Ocbo6oTe TpaHcnpTHOTyKpeINBaHe, NOCTaBeTe Nlb3raunI ppeBKnUoyBaTeJ (3) B JIABO noloxene. IopBbA ce Ja3epnT KpbCT. Ype3 6yToHa 3a IpeBKnUoyBaHe MoKe Da Ce BKIOuBaT NoOTdJIHo Ja3epHNTe JInHnN.

3a xopn3oHTaJIHo n BepTnKaJIHo HnBeJInpaHe Tp8Ba Da ce OCBO6OJn TpaHcNOpTHOTO obe30NaC8BaHe. LcOM ypeIbT Ce hAmipa N3BbH 3OHaTa Ha aBTOMaTNUHO HnBeJInpaHe 3^ , Ja3epHnte JInHm MmRaT n LED cBeTba B YerBeHo. POniOnHpaIte ypeDa TaKa, Ye da Ce hAmipa BbTpE B 3OHaTa Ha HnBeJInpaHe. LED oTHOBn IpeBkIIOUvBa Ha 3eJeHO n Ja3epHnte JInHm CBeTart NOCTOJHHO.
4 Pekim HaKloH
He ocbo6oxJaBaIte TpaHcnpTHaTa 6JoknpoBka, npemecTe nJb3raa (3) HaJxHO.
I36epTe Ia3epa c 6byToHa 3a I36op (7). Cera Moxe da ce cb3daat HaKIOHeHn
paBHnHn, CbOTB. HAKIoHn. B To3n peXIM Ja3epHnTe JInHn He ce NOpapBnBaT
aBTOMATuHNo. LED (6) CBETn NOCTOAnHBO UePBeHo.
5 Pekim Pbyen PrneMnK
IoproToBka 3a npOBepKa Ha KaII6pOBkata
Mожete Да коHTpoJInpaTe KaIибрOBKaTa Ha ЛаЗepa. ИЗпраВе Te урета В cpeДаТ МeЖду ДБе CTeHи, KОПTO са На pa3СToHnE Hau-МaЛko 5 MnomeЖdу сN. BKЛюЧe Te ypeДа, 3a ZeNTa OCBOБODeTe obe3OиacЯBaHETO pri TpaHcNoPT (la3epeH KpbCT BkJIHOueH). 3a ONTIMaJIHa ПpoBepka, MoJЯ, ИЗпОЛЗBaIte CTaTINB.
- Марк inpайт e T. A1 ha cteHaTa.
- 3aBbPTeTe ypeHa Ha 180^ n MapKnpaTte T. A2. Mekdy A1 u A2 imate cera xopn3OHTaJHa pepepeHcIy.

Поберka на калбрвкata
- NocTabete ypeia KOJIKOTo e Bb3MOxHNo-6JIn3Ko Do CteHaTa Ha BnCOUnHaTHa MapKnpaHaTa T.A1.
- 3aBbptTe ypeHa Ha 180^ n MapknpaTte T. A3. Pa3nKaTa MeJy A2 n A3 e dOnyckbT.

Korato A2 n A3 ce hamipat Ha nobuee ot 0,35 mm / m, e Heo6xodmo KaIbnpaHe. BJe3Te BvB Bpb3Ka c BaIIp nn Ce o6bpHeTe KbM cepBn3HnA OTdEHa UMAREX-LASERLINER.
https://packd.li/ll/anb/in
UpeiBTo MoKe Ia yCTaHOBRA paIIOBp3Ka CbC CbBMecTUMN CbC CTaHApTa 3a 6e3KuHa Bp3Ka IEEE 802.15.4 ycTpoiCTBa.CtAndapTbT 3a 6e3KuHa Bp3Ka IEEE 802.15.4 e npoTOKoJ 3a npeHoc 3a nepcoHaJIHn 6e3KuHn MpeXn (WPAN). PaIynCbT Ha DeiCTBHe e npoeKTipan 3a MaKc. 10 m pa3CTOJHne OT KpaIHOTo ycTPOICTBO n CnIHNo 3aBnCn OT ycIOBnTA Ha OKOIHaTa CpeJa, KaTO HApPIMep De6eJIInHaTa n CbCTaBA Ha CTeHN, IN3TOUHnCi Ha paIIOCMUSeHnA, KaKTo IOT pPiemHo / PpeDaBaTeJIHnTE CBOICTBa Ha KpaIHOTo ycTPOICTBO.
Приложке (App)
3a da ce n3noJ3Ba cnpoBaTa Bpb3ka, e Heo6xOIMO npnloXeHne. To MoKe da 6bJe n3TeJleHO B CbOTBeTHnte MaRa3HH N B 3aBNCMOCT OT KpaHOTO yCTpOICTBO:

Download on the App Store

GETITON GooglePlay


IopnkeTe ce da 6bJe akTINBipaH 6e3xNCHnT INTEppec Ha KpaHOTOMo6nHOr yCTpoiCTBO.
Cleid cIapTnpaHTo Ha npInloXeHneTo n aKTHBnpaHTo Ha cnΦpOBATa Bpb3Ka MoXe da ce Cb3daTe Bpb3Ka MeJy KpaIHO MObIHo yCTpoIcTBo N 3MePBATeJIHHa Ypei. Ako npInloXeHneTo OTKpIe HAKOJIKO aKTHBn I3MePBATeJIHH upeJa, I36epeTe IOxOJIHHu N3MePBATeJIEN Upei.
Pn cIeBauJyapT To3n I3MepBaTeJen ypeJ moKe da 6bJe Cbbp3aH aBTOMaTuHNo.
DopbHnTeHN H yHKcnn Ype3 npNoJKeHneTo
Upe3 npiloxeHneTo nMaTe DoCTbI Do IOnbHnTeJHn fynKcun. Ako no TexHnueckn npuHH He MoKeTe Da ynpaBnBaTe ypeDa OT npiloxeHneTo, Bb3ctaHOBeTe fa6pnHnte My NaCtpoiKn Upe3 n3KJIIOUvBaHe n BKJIIOUvBaHe.
I0To3nHaunH MoXeTe Da n3POn3BaTe oBnuaHnTe cyHKcnn 6e3 orpaHnueHne.
Kannibpupahe
I3MepBaTeHnT ypei Tp8Ba peoBHO da ce KaJIb6Pnpa n 3nITBa, 3a da ce rapaHTnpa ToUHocTTa Ha pe3yJtATnTe OT I3MepBaHeTo. PpeOpbYBaMe nHTepBaJ ha KaJIb6PnpaHe eHa roDnHa.
https://packd.li/ll/anb/in
!
i a o p o o k t i k a i c o b n y i e c x p o n c, t o o v n v o u x o c "Eyyunon kai npo0tec uno8eiEic" kaWc kai tic rpexouoeC PAnpofoepie Ckai uno8eiEic otov ouv8eOmo diakrtuou oTo teLoC autwv twv obnyiow. Tnpite tic avaepoEvEc obnyiec.Autata eyypapa a npen va pfuaosovtai kai va npapadisovtai mazi e to npoiov oTov enoEvo xpnoTn.
Evδεδειγμένη χρήση
https://packd.li/ll/anb/in
O8nyiec oxetiká με tn ouvtnpnon kal φpovtida
https://packd.li/ll/anb/in
!
V celoti preberite navodila za uporabo, priloženo knjižico „Garancijski in dodatni napotki" ter aktualne informacije in napotke na splletni povezavi na koncu teh navodil. Upostevajte vsebovana navodila. Ovu dokumentaciju potrebno je sačuvati i u slučaju prosljedivanja proizvoda prosljediti je zajedno s njime.
Pravilna uporaba
https://packd.li/ll/anb/in
https://packd.li/ll/anb/in
https://packd.li/ll/anb/in
!
https://packd.li/ll/anb/in
V = fuggoleges lézer
https://packd.li/ll/anb/in
!
https://packd.li/ll/anb/in
!
https://packd.li/ll/anb/in
Informacije o cisćenju i održavanju
https://packd.li/ll/anb/in
Urežaj može uspostaviti radijsku vezu s urežajima kompatibilnima s tehnickim standardom IEEE 802.15.4. Tehnički standard IEEE 802.15.4 je protokol za prijenos za bežične osobne područne mreže (Wireless Personal Area Networks – WPAN). Raspon je postavljen na maksimalnu udaljenost od 10 m od priključnog urežaja i uvelike ovisi o ambijentalnim uvjetima kao što su debljina i sastav zidova, izvore smetnji kao i svojstva prijenosa / prijema priključnog urežaja.
Aplikacija (app)
Za korištenje digitalne veze potrebna je aplikacija. Ona se moze preuzeti u odgovarajućim prodavaonicama ovisno o terminalnom urežaju.


Vodite računa o tome da je aktivirano radijsko sučelje mobilog terminalnog urežaja.
NakonPokretanjaaplikacije i aktiviranja digitalne veze moze se uspostaviti veza izmedu mobilog terminalog ureda i mjernog ureda.
https://packd.li/ll/anb/in

Rev25W03
Umarex GmbH & Co. KG
- Laserliner -
Gut Nierhof 2
59757 Arnsberg, Germany
- https://packd.li/ll/anb/in
- Download on the App Store
- GETITON GooglePlay
- Intended use
- General safety instructions
- Safety instructions
- Laserliner
- Information on maintenance and care
- Special product features
- How the tilt function works
- Green laser technology
- Number and direction of the lasers
- Use of lithium-ion rechargeable battery
- Power supply
- To insert the lithium-ion rechargeable battery
- Horizontal and vertical levelling
- Slope mode
- Hand receiver mode
- Optional: Working with the laser receiver GRX
- Preparing the calibration check
- Performing the calibration check
- Checking the vertical line
- Checking the horizontal line
- Data transfer
- Application (app)
- Additional functions via the app
- Calibration
- EU and UK directives and disposal
- Extra functions via app
- Lityum-yon batarya kullanimi
- IcnoJb3ObaHne no Ha3HaueHnIO
- 06uye yka3aHnnoTexnke 6e3oNaChocTn
- IpaBnlaTexHnK6e3oNaChOCTN
- ПразвILA.texни 6e3oNaCHOCTN
- HΦopMaζη no 06cIyXkBaHnU n yxOу
- KolnueCTBO npa3Meune Hne Ia3epHbIX lyuei
- 06paueHne c JNTn-NOHbIM aKKymyJTopoM
- NCTOCHNK NITaHnA
- YcTaHOBKa INTn-NOHHOro aKKymyIaTOPa
- TOpn3OHTaJIbHoe n BepTtKaJIbHoe HnBeJInpoBaHne
- Приложке (App)
- PpeDncaHnE C n BeIko6pTaHn n yTnIn3aun
- BnKOpncTaHHa npn3HaueHHaM
- 3araJIbHI Bka3iBKN no 6e3neci
- Bka3iBkn 3 Texhikn 6e3nekn
- Ihctpykci3 texhiHoro 6cnyroByBaHHaT a dOgIaY
- BctaBtN liTiH-iOHn aKymyJTop
- TOpn3OHTaJIbHe i BepTnKaJIbHe HiBeJIIOBaHHa
- Pexim 3aBdaHnHaXnIy
- PexkIM BnKOpNCtAHnPyuHOro npiMaaya DoaTKOBO: npaioe 3 Ja3epHm npiMaayem GRX
- IpeBipka kani6pyBaHnHa
- IpeBipka BepTikalbHoi' liHii
- Ipebipka ropntaHoi liHii
- Перета даннх
- ДодаТOK (App)
- Uldised ohutusjuhised
- Инструкции за 6e3oNaCHOCT
- Yka3aHna 3a TexHnuecko o6cnyKbaHe n PoIdpbXkKa
- 3Xopn3oHTaJIHo n BepTnKaJIHo HnBeJInpaHe
- Pekim HaKloH
- Pekim Pbyen PrneMnK
- IoproToBka 3a npOBepKa Ha KaII6pOBkata
- Поберka на калбрвкata
- DopbHnTeHN H yHKcnn Ype3 npNoJKeHneTo
- Kannibpupahe
- Evδεδειγμένη χρήση
- O8nyiec oxetiká με tn ouvtnpnon kal φpovtida
- Pravilna uporaba
- Informacije o cisćenju i održavanju
- Aplikacija (app)
Brand : Laserliner
Model : CompactPlaneLaser 3G
Category : Laser pointer