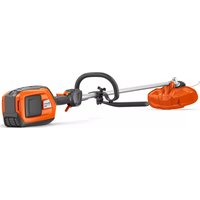
129RJ - Brush cutter HUSQVARNA - Free user manual and instructions
Find the device manual for free 129RJ HUSQVARNA in PDF.
| Product type | Brushcutter |
| Brand | Husqvarna |
| Model | 129RJ |
| Weight (without fuel or equipment) | 5,21 kg |
| Displacement | 28 cm³ |
| Maximum power (ISO 7293) | 0,8 kW |
| Idle speed | 2 800 - 3 200 tr/min |
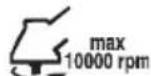
| Max. output shaft speed | 11 000 tr/min |
| Fuel tank capacity | 343 cm³ |
| Fuel type | Unleaded gasoline / 2-stroke oil mixture (50:1) |
| Spark plug | NGK BPMR6A, gap 0,6 mm |
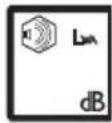
| Measured acoustic power level | 106 dB(A) |
| Guaranteed sound power level | 114 dB(A) |
| Vibrations left/right handle (grass blade) | 4,21 / 4,23 m/s² |
| Vibrations left/right handle (trimmer head) | 5,89 / 4,61 m/s² |
| Main functions | Weeding, brush cutting, clearing |
| Compatible cutting attachments | Grass blade Ø 250 mm (4 teeth), trimmer head T25 (line 2,4-2,7 mm) |
| Safety | Throttle lock, stop button, debris guard, quick-release harness |
| Routine maintenance | Air filter cleaning (every 25 h), spark plug check (monthly), bevel gear lubrication |
Frequently Asked Questions - 129RJ HUSQVARNA
User questions about 129RJ HUSQVARNA
0 question about this device. Answer the ones you know or ask your own.
Ask a new question about this device
Download the instructions for your Brush cutter in PDF format for free! Find your manual 129RJ - HUSQVARNA and take your electronic device back in hand. On this page are published all the documents necessary for the use of your device. 129RJ by HUSQVARNA.
USER MANUAL 129RJ HUSQVARNA
GB Operator's manual 2-25
SE Bruksanvisning 26-47
DK Brugsanvisning 48-70
NO Bruksanvising 71-92
WARNING: The engine exhaust from this product contains chemicals known to the State of California to cause cancer, birth defects or other reproductive harm.
Note the following before starting:
Please read the operator's manual carefully.

WARNING: Under no circumstances may the design of the machine be modified without the permission of the manufacturer. Always use genuine accessories. Non-authorized modifications and/or accessories can result in serious personal injury or the death of the operator or others.

WARNING: A clearing saw, brushcutter or trimmer can be dangerous if used incorrectly or carelessly, and can cause serious or fatal injury to the operator or others. It is extremely important that you read and understand the contents of this operator's manual.

WARNING: Long-term exposure to noise can result in permanent hearing impairment. So always use approved hearing protection.
We have a policy of continuous product development and therefore reserve the right to modify the design and appearance of products without prior notice.
Symbols

WARNING: Clearing saws, brushcutters and trimmers can be dangerous.
Careless or incorrect use can result in serious or fatal injury to the operator or others.
Please read the operator's manual carefully and make sure you understand the instructions before using the machine.


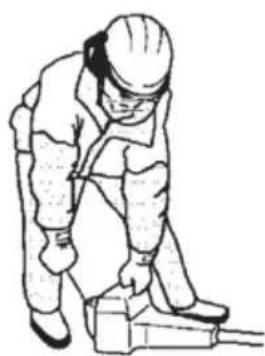
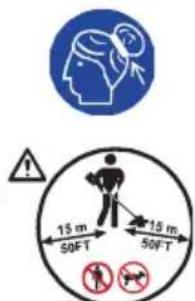
Always use steel-toed safety footwear with non-slip soles; snug-fitting clothing; heavy, long pants, and long sleeves; heavy-duty, non-slip gloves; eye protection such as non-fogging, vented goggles or face screen; an approved safety helmet; and sound barriers (ear plugs or mufflers) to protect your hearing.


Persons with long hair should (for personal safety) put their hair up.

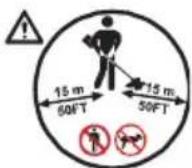
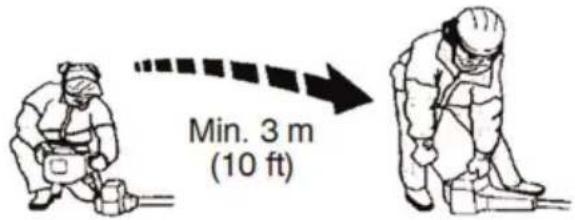
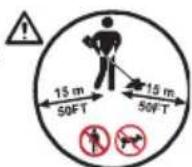
The operator of the machine shall ensure, while working, that no persons or animals come closer than 15 meters (50 feet).
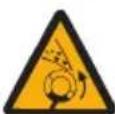
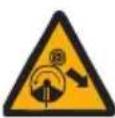
Beware of thrown objects and ricochets.
Max speed of output axle, rpm
Machines fitted with grass blades can be thrown violently to the side when the blade comes into contact with a fixed object. The blade is capable of amputating an arm or leg. Always keep people and animals at least 15 meters (50 feet) from the machine.
Arrows which show limits for handle mounting.

Sound pressure level at 7,5 meters (25 feet) per Australian regulation.

Noise emission to the environment according to the European Community's Directive. The machine's emission is specified in the Technical data section and on label.
This product is in accordance with applicable EC directives.

This product is in accordance with applicable EAC directives.

This product is in accordance with the Australian electromagnetic compatibility (EMC) regulations.

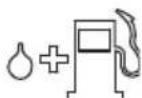
Use unleaded gasoline and two-stroke oil mixed at a ratio of 2% (50:1).
Other symbols/decals on the machine refer to special certification requirements for certain markets.
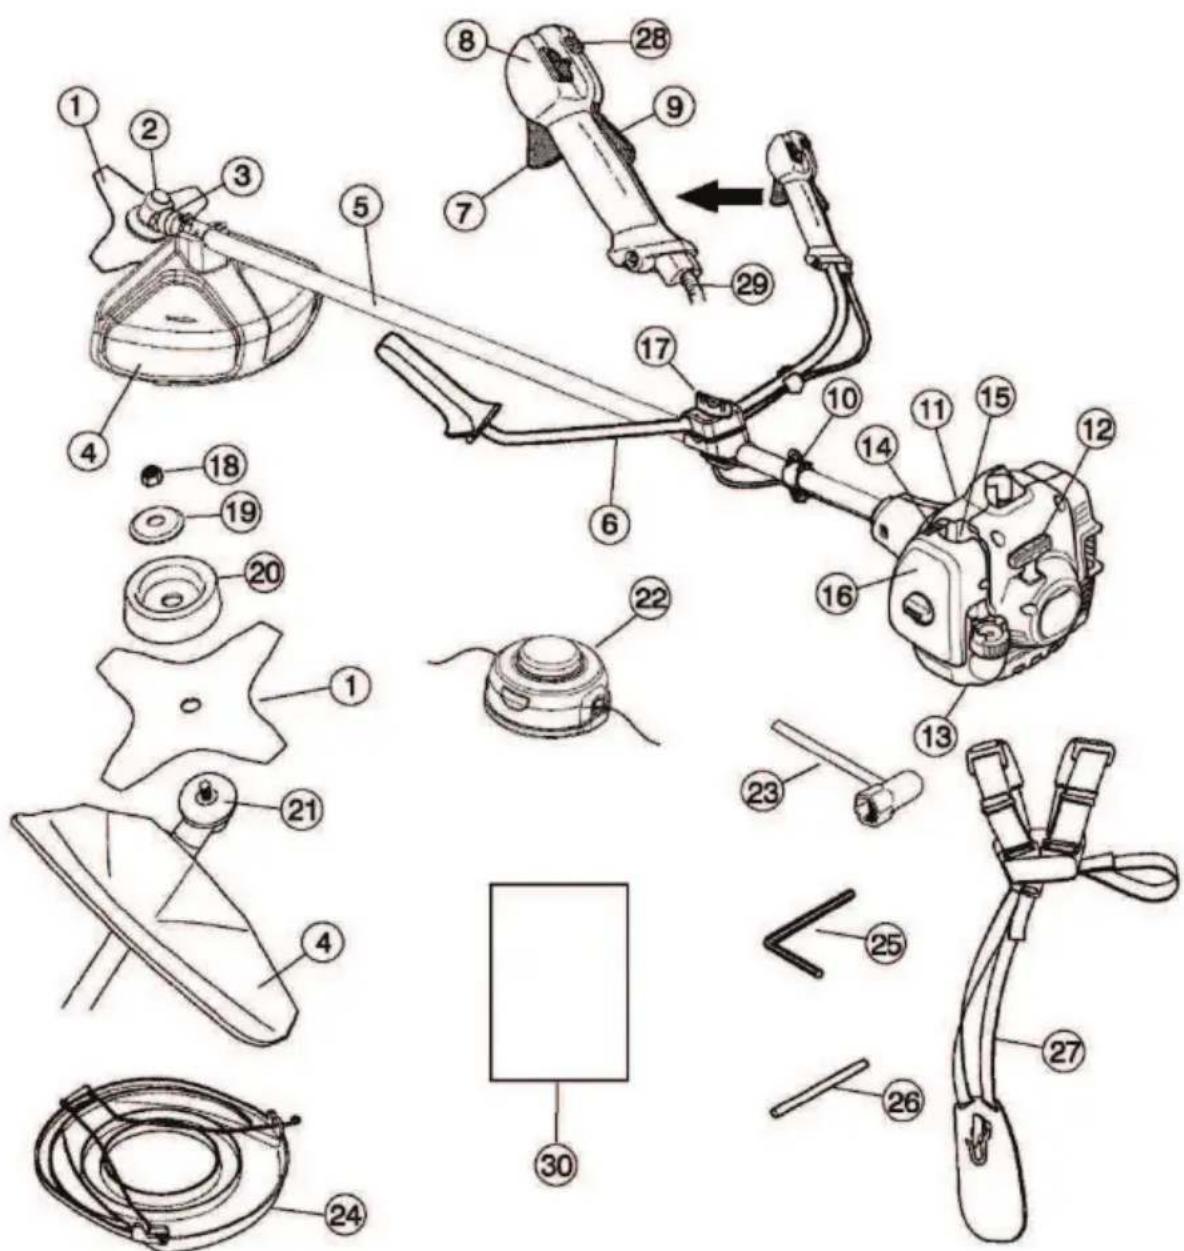
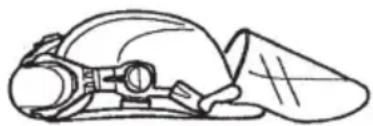
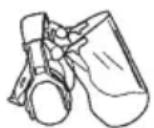
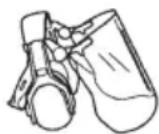
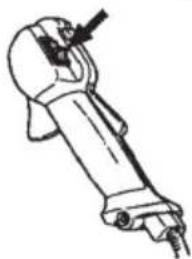
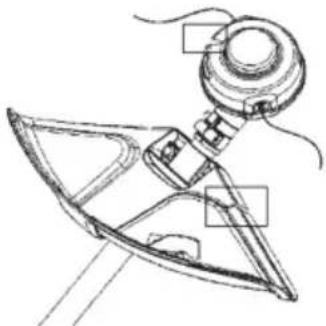
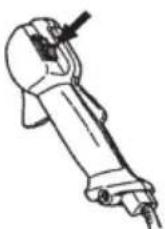
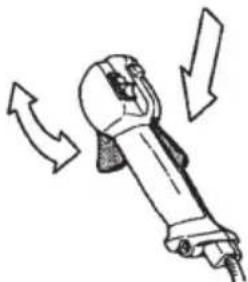
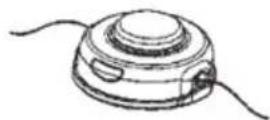
What is what?
- Blade
- Grease filler cap
- Bevel gear
- Cutting attachment guard
- Shaft
- Handlebar
- Throttle control
- Stop switch
- Throttle lock-out
- Harness clamp
- Cylinder cover
- Starter handle
- Fuel tank
- Choke control
- Primer bulb
- Air filter cover
- Handle adjustment
- Locking nut
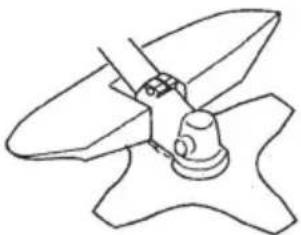
- Support flange
-
Support cup
-
Drive disc
- Trimmer head
- Socket wrench
- Transport guard
- Hex wrench
- Locking pin
- Harness
- Start throttle button
- Adjusting the throttle wire
- Operator's manual
Important
- A clearing saw, brushcutter or trimmer can be dangerous if used incorrectly or carelessly, and can cause serious or fatal injury to the operator or others. It is extremely important that you read and understand the contents of this operator's manual.
- The machine is only designed for trimming grass, grass clearing and/or forestry clearing.
- The only accessories you can operate with this engine unit are the cutting attachments we recommend in the "TECHNICAL DATA" section.
- Never use the machine if you are tired, if you have consumed alcohol, or if you are taking medication that could affect your vision, your judgment or your coordination.
- Never use the machine in extreme weather conditions such as severe cold, very hot and/or humid climates.
- Wear personal protective equipment. See instructions under the heading "Personal protective equipment".
- Never use a machine that has been modified in any way from its original specification.
- Never use a machine that is faulty. Carry out the checks, maintenance and service instructions described in this manual. Some maintenance and service measures must be carried out by trained and qualified specialists. See instructions under the "MAINTENANCE" section.
- All covers and guards must be fitted before starting. Make sure the spark plug cap and lead are not damaged. Otherwise you could get an electric shock.
- The machine operator must ensure that no people or animals come closer than 15 meters (50 feet) while working. When several operators are working in the same area, the safety distance should be at least 15 meters (50 feet).

WARNING: This machine produces an electromagnetic field during operation. Under some circumstances, this field may interfere with active or passive medical implants. To reduce the risk of serious or fatal injury, we recommend persons with medical implants to consult their physician and the medical implant manufacturer before operating this machine.

WARNING: Using an incorrect cutting attachment or an incorrectly filed blade can increase the risk of accidents.

WARNING: Never allow children to use or be in the vicinity of the machine. As the machine is equipped with a spring-loaded stop switch and can be started by low speed and force on the starter handle, even small children under some circumstances can produce the force necessary to start the machine. This can mean a risk of serious personal injury. Therefore remove the spark plug cap when the machine is not under close supervision.
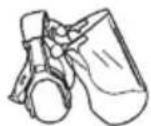
Personal protective equipment

WARNING: You must use approved personal protective equipment whenever you use the machine. Personal protective equipment cannot eliminate the risk of injury but it will reduce the degree of injury if an accident does happen. Ask your dealer for help in choosing the right equipment.

WARNING: Listen out for warning signals or shouts when you are wearing hearing protection. Always remove your hearing protection as soon as the engine stops.
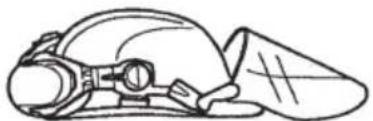
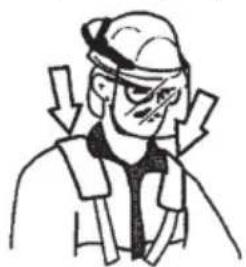
■ Helmet
A helmet should be worn if the brush being cleared is taller than 2 meters (6 feet).
Hearing Protection
Wear hearing protection that provides adequate noise reduction.
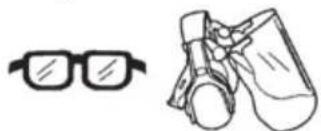
Eye Protection
Always wear approved eye protection. If you use a visor then you must also wear approved protective goggles. Approved protective goggles must comply with EN 166 in Europe, ANSI Z87 in the United States, and CSA Z94 in Canada.

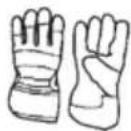
Gloves
Gloves should be worn when necessary, e.g., when fitting cutting attachments.
GENERAL SAFETY PRECAUTIONS

Boots
Wear anti-slip and stable boots.
Clothing
Wear clothes made of a strong fabric and avoid loose clothing that can catch on shrubs and branches. Always wear heavy, long pants. Do not wear jewelry, shorts sandals or go barefoot. Secure hair so it is above shoulder level.
First Aid Kit
A first aid kit should be carried by operators of clearing saws, brushcutters or trimmers.
Machine's safety equipment
This section describes the machine's safety equipment, its purpose, and how checks and maintenance should be carried out to ensure that it operates correctly. See the "WHAT IS WHAT" section to locate where this equipment is positioned on your machine.
The life span of the machine can be reduced and the risk of accidents can increase if machine maintenance is not carried out correctly and if service and/or repairs are not carried out professionally. If you need further information please contact your nearest service workshop.
IMPORTANT! All servicing and repair work on the machine requires special training. This is especially true of the machine's safety equipment. If your machine fails any of the checks described below you must contact your service agent. When you buy any of our products we guarantee the availability of professional repairs and service. If the retailer who sells your machine is not a servicing dealer, ask him for the address of your nearest service agent.

WARNING: Never use a machine that has faulty safety equipment.
Follow the control, maintenance and service instructions described in this section. If your machine fails any of these checks contact your service agent to get it repaired.
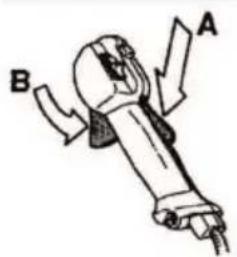
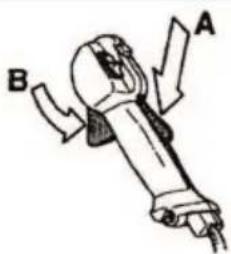
Throttle lock-out
The throttle lock-out is designed to prevent accidental operation of the throttle control. When you press the lock-out (A) (i.e. when you grasp the handle) it releases the throttle control (B). When you release the handle, the throttle control and the throttle lock-out both move back to their original positions. This movement is controlled by two independent return springs. This arrangement means that the throttle control is automatically locked at the idle setting.
Make sure the throttle control is locked at the idle setting when the throttle lock-out is released.
Press the throttle lock-out and make sure it returns to its original position when you release it.
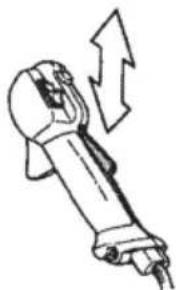
Check that the throttle control and throttle lock-out move freely and that the return springs work properly.

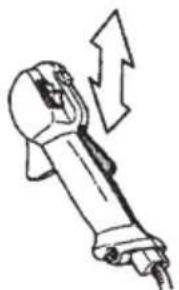
See instructions under the heading "Start". Start the machine and apply full throttle. Release the throttle and check that the cutting attachment stops and remains at a standstill. If the cutting attachment rotates with the throttle in the idle
GENERAL SAFETY PRECAUTIONS
position then the carburetor idle setting must be checked. See instructions under the "MAINTENANCE" section.

Stop switch
Make sure the engine stops when you push and release the stop switch.
Cutting attachment guard
This guard is intended to prevent loose objects from being thrown towards the operator. The guard also protects the operator from accidental contact with the cutting attachment.
Check that the guard is undamaged and not cracked. Replace the guard if it has been exposed to impact or is cracked.
Always use the recommended guard for the cutting attachment you are using. See the "TECHNICAL DATA" section.

WARNING: Never use a cutting attachment without an approved guard. See the "TECHNICAL DATA" section. If an incorrect or faulty guard is fitted this can cause serious personal injury.
Use of incorrectly wound trimmer line or an incorrect cutting attachment increases the level of vibration.

WARNING: Overexposure to vibration can lead to circulatory damage or nerve damage in people who have impaired circulation. Contact your doctor if you experience symptoms of overexposure to vibration. Such symptoms include numbness, loss of feeling, tingling, pricking, pain, loss of strength, changes in skin color or condition. These symptoms normally appear in the fingers, hands or wrists. The risk increases at low temperatures.
Harness quick release
There is an easily accessible, harness quick release fitted at the front in case of an emergency that requires you to free yourself from the machine and harness.
See instructions under the heading "Adjusting the harness".
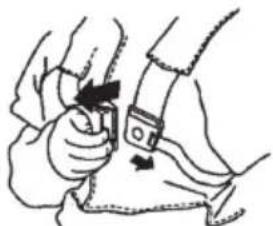
Check that the harness straps are correctly positioned. Once the harness and machine have been adjusted, check that the harness quick release works correctly.
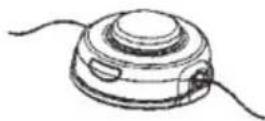
Muffler
The muffler is designed to reduce the noise level and to direct the exhaust gases away from the operator.
CAUTION! Muffler is fitted with a catalytic converter designed to reduce harmful exhaust gases.
In countries that have a warm and dry climate there is a significant risk of fire. We therefore fit certain mufflers with a spark arrestor mesh. Check whether the muffler on your machine is fitted with this kind of mesh.
GENERAL SAFETY PRECAUTIONS
For mufflers, it is very important that you follow the instructions on checking, maintaining, and servicing your machine. Never use a machine that has a faulty muffler.
Regularly check that the muffler is securely attached to the machine.

WARNING: Mufflers fitted with catalytic converters get very hot during use and remain so for some time after stopping. This also applies at idle speed. Contact can result in burns to the skin. Remember the risk of fire.

WARNING: The inside of the muffler contain chemicals that may be carcinogenic. Avoid contact with these elements in the event of a damaged muffler.

WARNING: Engine exhaust fumes contain carbon monoxide, which can cause carbon monoxide poisoning. Do not start or run the machine indoors, or anywhere that is poorly ventilated.

WARNING: The exhaust fumes from the engine are hot and may contain sparks which can start a fire. Never start the machine indoors or near combustible material.
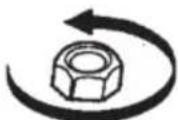
Locking nut
A locking nut is used to secure some types of cutting attachment.
When fitting, tighten the nut in the opposite direction to the direction of rotation of the cutting attachment. To remove it, undo the nut in the same direction as the cutting attachment rotates. (The nut has a left-hand thread.) Tighten the nut using the socket wrench.

The nylon lining inside the locking nut must not be so worn that you can turn it by hand. The lining should offer a resistance of at least 1.5Nm (1,1 ft lb). The nut should be replaced after it has been put on approximately 10 times.
Cutting equipment
This section describes how to choose and maintain your cutting equipment in order to:
- Reduce the risk of blade thrust.
- Obtain maximum cutting performance.
- Extend the life of cutting equipment.
IMPORTANT:
- Only use cutting attachments with the guards we recommend. See the "TECHNICAL DATA" section.
Refer to the instructions for the cutting attachment to check the correct way to load the trimmer line and the correct line diameter. - Keep the teeth of the blade correctly sharpened. Follow our recommendations. Also refer to the instructions on the blade packaging.
- Maintain the correct blade setting. Follow our instructions and use the recommended file gauge.

WARNING: Stop the engine before doing any work on the cutting attachment. Ensure the cutting attachment has stopped rotating completely. Disconnect the lead from the spark plug.

WARNING: Using an incorrect cutting attachment or an incorrectly sharpened blade increases the risk of kickback.
Cutting equipment
Grass blades and grass cutters are intended for cutting coarse grass.

A trimmer head is intended for trimming grass.
GENERAL SAFETY PRECAUTIONS
General rules
Only use cutting attachments with the guards we recommend. See the "TECHNICAL DATA" section.
Keep the teeth of the blade correctly sharpened. Follow our instructions and use the recommended file gauge. An incorrectly sharpened or damaged blade increases the risk of accidents.

Check the cutting attachment for damage or cracks. A damaged cutting attachment should always be replaced.

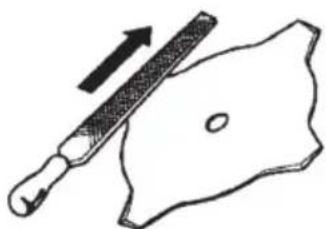
Sharpening grass cutters and grass blades
See the cutting attachment packaging for correct sharpening instructions. Sharpen blades and cutters using a single-cut flat file.
- Sharpen all edges equally to maintain the balance of the blade.


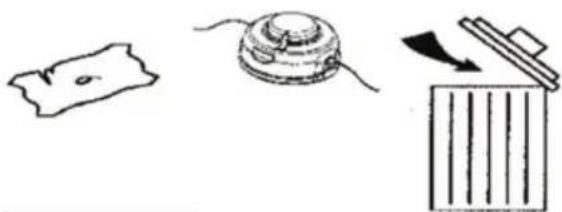
WARNING: Always discard a blade that is bent, twisted, cracked, broken or damaged in any other way. Never attempt to straighten a twisted blade so that it can be reused. Only use original blades of the specified type.
Trimmer head
IMPORTANT: Always ensure the trimmer line is wound tightly and evenly around the drum; otherwise the machine may generate vibration which could be harmful.
Only use the recommended cutting attachments. See the "TECHNICAL DATA" section.
- Smaller machines generally require small trimmer heads and vice versa. This is because when clearing using trimmer line the engine must throw out the trimmer line radially from the trimmer head and overcome the resistance of the grass being cleared.
- The length of the trimmer line is also important. A longer trimmer line requires greater engine power than a shorter trimmer line of the same diameter.
- Make sure that the cutter on the trimmer guard is intact. This is used to cut the trimmer line to the correct length.
To increase the life of the trimmer line it can be soaked in water for a couple of days. This will make the line tougher so that it lasts longer.
ASSEMBLY
NOTE: Make sure unit is assembled correctly as shown in this manual.
Fitting the handlebar
- Remove the screw at the rear of the throttle handle.
- Slide the throttle handle onto the right side of the handlebar (see illustration).
- Align the screw hole in the throttle handle with the hole in the handlebar.
- Refit the screw in the hole in the rear of the throttle handle.
- Screw the screw through the handle and handlebar. Tighten the screw.
- Fit the mounting components as shown.
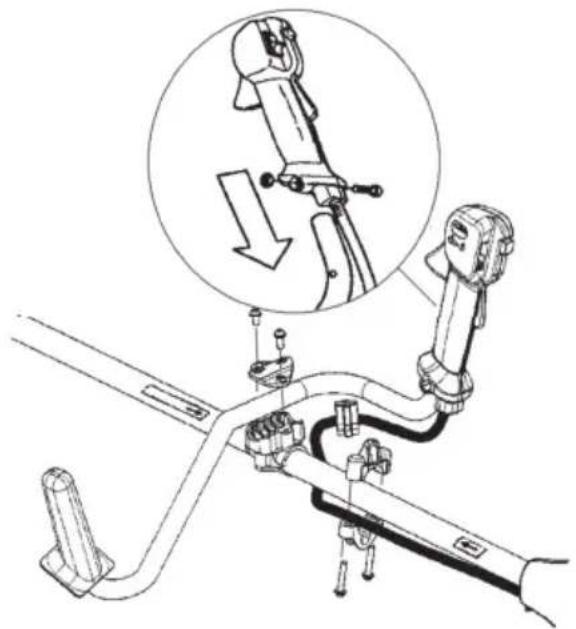

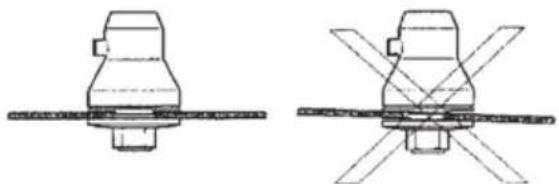
WARNING: The handlebar mounting parts must be fitted between the arrows on the shaft to maintain a safe operating position.
- Tighten the screws with a hex wrench.
Fitting the harness

WARNING: When using a brushcutter, it must always be hooked securely to the harness. Otherwise, you will be unable to control the brushcutter safely. This can result in injury to yourself or others. Never use a harness with a defective quick release.
Proper harness and handlebar adjustments must be made with the engine completely stopped before using unit.
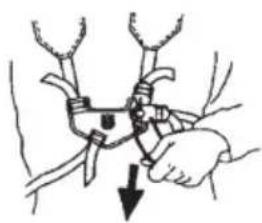
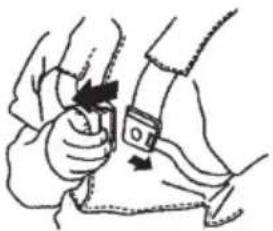
Fitting the harness clamp
- Place the upper harness clamp over the shaft and position the lower harness clamp under the shaft. Align the upper and lower clamp screw
holes. Clamp must be fitted above the arrow on the shaft (see illustration).
NOTE: Fit throttle wire in groove of lower harness clamp before tightening screws.
- Insert two screws into the screw holes.
- Secure harness clamp by tightening screws with a hex wrench.
Adjusting the harness
At the front of the harness is an easily accessible quick release. Use the quick release in any emergency situation that requires you to free yourself from the machine and harness.
Spreading the load on your shoulders
A well-adjusted harness and machine makes work much easier.
Put on the harness. Adjust the harness for the best working position. Tension the side straps so that the weight is evenly distributed across both shoulders.
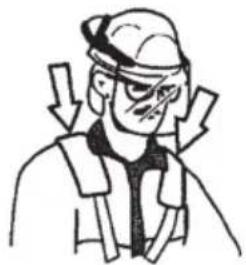
NOTE: It may be necessary to relocate the harness clamp on the shaft for proper balancing of unit.
Correct height
Adjust the harness so that the cutting attachment is parallel to the ground.
Correct balance
Let the cutting attachment rest lightly on the ground. If you use a grass blade, it should balance about 10 centimeters (4 inches) above the ground to prevent contact with stones and the like. Adjust the position of the harness clamp to balance the unit correctly.
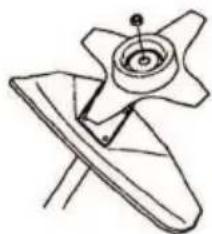
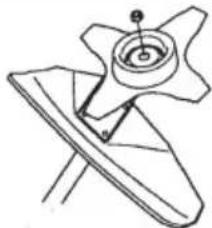
Fitting blades and trimmer heads
- When fitting the cutting attachment it is extremely important that the raised section on the drive disc/support flange engages correctly in the center hole of the cutting attachment. If the cutting attachment is fitted incorrectly it can result in serious and/or fatal personal injury.

WARNING: Never use a cutting attachment without an approved guard. See the "TECHNICAL DATA" section. If an incorrect or faulty guard is fitted this can cause serious personal injury.
IMPORTANT: If a grass blade is to be used, the machine must be equipped with the correct handlebar, blade guard and harness.
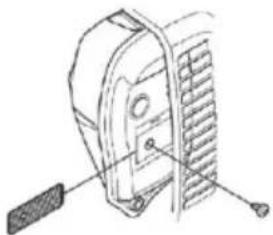
Fitting a blade guard, grass blade and grass cutter

- Hook the blade guard/combination guard (A) onto the fitting on the shaft and secure with the bolt.
CAUTION! Use the recommended blade guard. See the Technical data section.
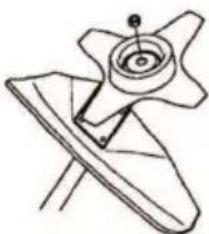
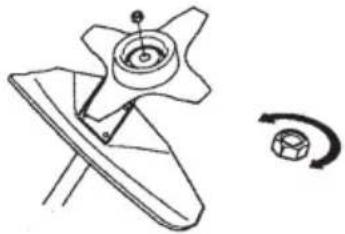
- Fit the drive disc (B) on the output shaft.
- Turn the blade shaft until one of the holes in the drive disc aligns with the corresponding hole in the gear housing.
- Insert the locking pin (C) in the hole to lock the shaft.
- Place the blade (D), support cup (E) and support flange (F) on the output shaft.
- Fit the nut (G). The nut must be tightened to a torque of 35-50 Nm (3.5-5 kpm). Use the socket wrench in the tool kit. Hold the shaft of the wrench as close to the blade guard as possible. To tighten the nut, turn the wrench in the opposite direction to the direction of rotation (NOTE: left-hand thread).
Fitting the trimmer guard and trimmer head
- Fit the correct trimmer guard (A) for use with the trimmer head. Hook the trimmer guard/combination guard onto the fitting on the shaft and secure with the bolt (L).
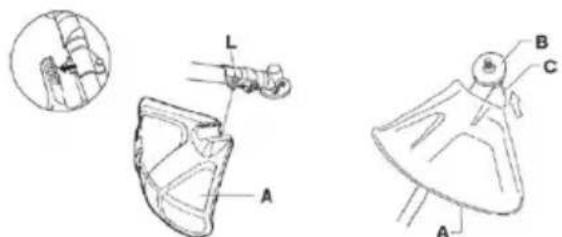
- Fit the drive disc (B) on the output shaft.
- Turn the shaft until one of the holes in the drive disc aligns with the corresponding hole in the gear housing.
ASSEMBLY
- Insert the locking pin (C) in the hole to lock the shaft.
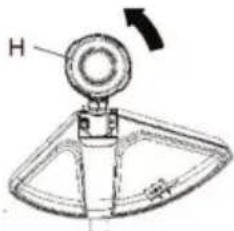
- Screw on the trimmer head (H) in the opposite direction to the direction of rotation.
- To dismantle, follow the instructions in the reverse order.
FUEL HANDLING
Fuel safety
Never start the machine:
- If you have spilled fuel on it. Wipe off the spillage and allow remaining fuel to evaporate.
- If you have spilled fuel on yourself or your clothes, change your clothes. Wash any part of your body that has come in contact with fuel. Use soap and water.
- If the machine is leaking fuel. Check regularly for leaks from the fuel cap and fuel lines.
Transport and storage
- Store and transport the machine and fuel so that there is no risk of any leakage or fumes coming into contact with sparks or naked flames, for example, from electrical machinery, electric motors, electrical relays/switches or boilers.
- When storing and transporting fuel always use approved containers intended for this purpose.
- When storing the machine for long periods the fuel tank must be emptied. Contact your local gasoline station to find out where to dispose of excess fuel.
- Ensure the machine is cleaned and that a complete service is carried out before long-term storage.
- The transport guard must always be fitted to the cutting attachment when the machine is being transported or in storage.
- In order to prevent unintentional starting of the engine, the spark plug cap must always be removed during long-term storage, if the machine is not under close supervision and when performing all service measures.
- Secure the machine during transport.
WARNING: Take care when handling fuel. Bear in mind the risk of fire, explosion and inhaling fumes.
Fuel
CAUTION: The machine is equipped with a two-stroke engine and must always be run using a mixture of gasoline and two-stroke engine oil. It is important to accurately measure the amount of oil to be mixed to ensure that the correct mixture is obtained. When mixing small amounts of fuel, even small inaccuracies can drastically affect the ratio of the mixture.
WARNING: Fuel and fuel fumes are highly inflammable and can cause serious injury when inhaled or allowed to come in contact with the skin. For this reason observe caution when handling fuel and make sure there is adequate ventilation.
Gasoline
CAUTION: Always use a good quality gasoline/oil mixture (at least 90 octane). Use low-emission gasoline, also known as alkylate gasoline, if it is available.
- The lowest octane recommended is 90. If you run the engine on a lower octane than 90, it can result in knocking. This gives rise to a high engine temperature, which can result in serious engine damage.
- When working at continuous high revs, a higher octane rating is recommended.
Two-stroke oil
To ensure best performance and engine durability, Husqvarna XP oil is preferred as it is specially formulated for our air-cooled two stroke-engines. Only use high quality full synthetic two-stroke oil when mixing fuel.
- Never use two-stroke oil intended for water-cooled engines, sometimes referred to as outboard oil or marine oil (rated TCW).
- Never use oil intended for four-stroke engines.
Mixing
- Mixture is 50:1.
Always mix the gasoline and oil in a clean container intended for fuel. - Always start by filling half the amount of the gasoline to be used. Then add the entire amount of oil. Mix (shake) the fuel mixture. Add the remaining amount of gasoline.
- Mix (shake) the fuel mixture thoroughly before filling the machine's fuel tank.
Gasoline, liter (gal) Two-stroke oil, ml (oz)
4 (1) 77 (2,6)
8(2) 154(5,2)
-
Do not mix more than one month's supply of fuel at a time.
-
If the machine is not used for some time, the fuel tank should be emptied and cleaned.

WARNING: The catalytic converter muffler gets very hot during and after use. This also applies during idling. Be aware of the fire hazard, especially when working near flammable substances and/or vapors.
Fueling

WARNING: Taking the following precautions will lessen the risk of fire:
- Do not smoke or place hot objects near fuel.
Always shut off the engine before refueling. - Always stop the engine and let it cool for a few minutes before refueling.
- When refueling, open the fuel cap slowly so that any excess pressure is released gently.
-
Tighten the fuel cap carefully after refueling.
Always move the machine away from the refueling area before starting. -
Clean the area around the fuel cap. Contamination in the tank can cause operating problems.
- Ensure that the fuel is well mixed by shaking the container before filling the tank.
STARTING AND STOPPING
Check before starting
- Check the blade to ensure that no cracks have formed at the bottom of the teeth or by the center hole. The most common reason why cracks are formed is that sharp corners have been formed at the bottom of the teeth while sharpening or that the blade has been used with dull teeth. Discard a blade if cracks are found.
- Check that the support flange is not cracked due to fatigue or due to being tightened too much. Discard the support flange if it is cracked.
- Ensure the locking nut has not lost its captive force. The nut lock should have a locking force of at least 1.5Nm (1,1 ft lb). The tightening torque of the locking nut should be 35 - 50Nm (26-36 ft lb).
- Check that the trimmer head and trimmer guard are not damaged or cracked. Replace the trimmer head or trimmer guard if they have been exposed to impact or are cracked.
- Never use the machine without a guard nor with a defective guard.
- All covers must be correctly fitted and undamaged before you start the machine.
Starting and stopping

WARNING: The complete clutch, clutch cover, and shaft must be fitted before the machine is started, otherwise parts could come loose and cause personal injury. Always move the machine away from the refueling area before starting. Place the machine on a flat surface. Ensure the cutting attachment cannot come into contact with any object. Make sure no unauthorized persons are in the working area, otherwise there is a risk of serious personal injury. The safety distance is 15 meters (50 feet).
Cold engine
- Primer bulb: Press the air purge diaphragm repeatedly until fuel begins to fill the diaphragm (about 10 times). The diaphragm need not be completely filled.
- Choke: Set the choke control in the choke position.

WARNING: When the engine is started with the choke in choke position the cutting attachment will start to rotate immediately.
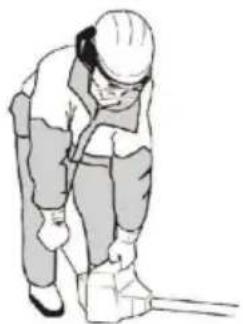
- Hold the body of the machine on the ground using your left hand (CAUTION! Not with your foot.). Grip the starter handle, slowly pull out the cord with your right hand until you feel some resistance (the starter pawls grip), then quickly and powerfully pull the cord. Never twist the starter cord around your hand.
NOTE! Do not squeeze the throttle control while attempting to start the engine.
NOTE! Do not pull the starter cord all the way out and do not let go of the starter handle when the cord is fully extended. This can damage the machine. Repeat pulling the cord
STARTING AND STOPPING
until engine attempts to start (or maximum 3 pulls).
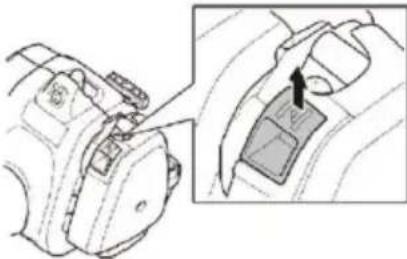
- If the engine starts or attempts to start, push the choke lever down to the run position.
- Keep on pulling the cord powerfully until the engine starts.
- Once the engine starts, allow the engine to warm up for 30 seconds before applying full throttle.
Warm engine
For throttle handles with a start throttle lock-out:
- Primer bulb: Press the air purge diaphragm repeatedly until fuel begins to fill the diaphragm (about 10 times). The diaphragm need not be completely filled.
- Repeat pulling the cord until engine attempts to start (or maximum 3 pulls).
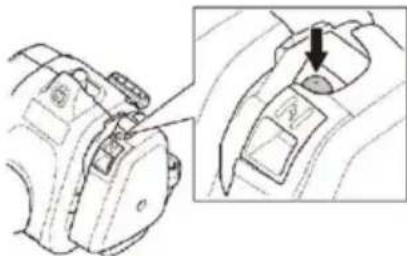
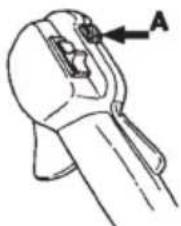
Set the throttle to the start position by first pressing the throttle lock-out and the throttle trigger, then pressing the start throttle button (A). Then release the throttle lock-out and the throttle trigger, followed by the start throttle button. The throttle function is now activated. To return the engine to idle, press the throttle lock-out and throttle trigger again.
Stopping
Stop the engine by pushing and releasing the stop switch.
CAUTION! The stop switch automatically returns to the start position. In order to prevent unintentional starting, the spark plug cap must
be removed from the spark plug when assembling, checking and/or performing maintenance.

WARNING: When the engine is started with the choke in the closed position the cutting attachment will start to rotate immediately.
IMPORTANT!
This section describes the basic safety precautions for working with trimmers. If you encounter a situation where you are uncertain how to proceed you should ask an expert. Contact your servicing dealer.
Avoid all usage which you consider to be beyond your capability.
You must understand the difference between forestry clearing, grass clearing and grass trimming before use.
Basic safety rules
- Look around you:
To ensure that people, animals or other things cannot affect your control of the machine.
To ensure that people, animals, etc., do not come into contact with the cutting attachment or loose objects that are thrown out by the cutting attachment.
CAUTION! Do not use the machine unless you are able to call for help in the event of an accident.
- Do not use the machine in bad weather, such as dense fog, heavy rain, strong wind, intense cold, etc. Working in bad weather is tiring and often brings added risks, such as icy ground, unpredictable felling direction, etc.
- Make sure you can move and stand safely. Check the area around you for possible obstacles (roots, rocks, branches, ditches, etc.) in case you have to move suddenly. Take great care when working on sloping ground.
- Switch off the engine before moving to another area. Fit the transport guard before carrying or transporting the equipment any distance.
- Never put the machine down with the engine running or while the cutting attachment is rotating.
The basics of clearing
Always use the correct equipment.
Make sure the equipment is well adjusted.
- Follow the safety precautions.
- Organize your work carefully.
Always use full throttle when starting to cut with the blade.
Always use sharp blades.
- Avoid stones.
- Always slow the engine to idle speed after each working operation. Long periods at full throttle without any load on the engine can lead to serious engine damage.
WARNING: Neither the operator of the machine nor anyone else may attempt to remove the cut material while the engine is running or the cutting equipment is rotating, as this can result in serious injury. Stop the engine and cutting equipment and disconnect the lead from the spark plug before you remove material that has wound around the blade shaft as otherwise there is a risk of injury. The bevel gear can get hot during use and may remain so for a while afterwards. Allow time to cool. You could get burned if you touch it.
WARNING: Watch out for thrown objects. Always wear approved eye protection. Never lean over the cutting attachment guard. Stones, rubbish, etc. can be thrown up into the eyes causing blindness or serious injury. Keep unauthorized persons at a distance. Children, animals, onlookers and helpers should be kept outside the safety zone of 15 meters (50 feet). Stop the machine immediately if anyone approaches. Never swing the machine around without first checking behind you to make sure no one is within the safety zone.
WARNING: Sometimes branches or grass get caught between the guard and cutting attachment. Always stop the engine before cleaning.
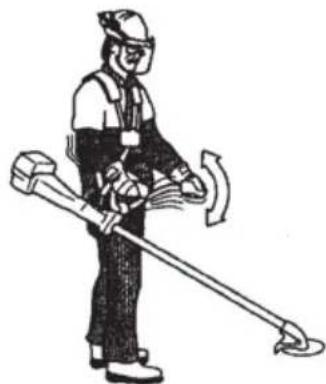
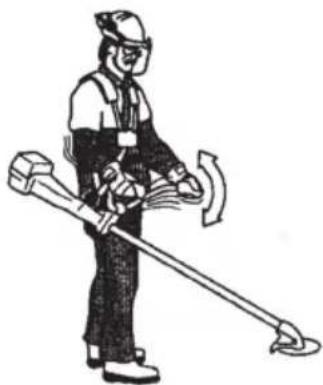
Grass clearing using a grass blade
- Grass blades and grass cutters must not be used on woody stems.
- A grass blade is used for all types of tall or coarse grass.
- The grass is cut down with a sideways, swinging movement, where the movement from right-to-left is the clearing stroke and the movement from left-to-right is the return stroke. Let the left-hand side of the blade (between 8 and 12 o'clock) do the cutting.

WORKING TECHNIQUES
- If the blade is angled to the left when clearing grass, the grass will collect in a line, which makes it easier to collect, e.g. by raking.
- Try to work rhythmically. Stand firmly with your feet apart. Move forward after the return stroke and stand firmly again.
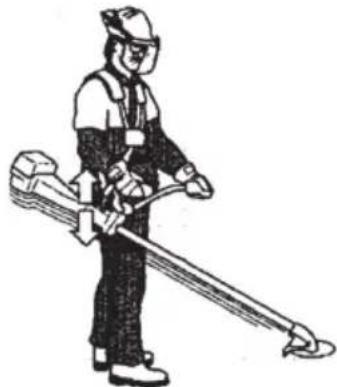
- Let the support cup rest lightly against the ground. It is used to protect the blade from hitting the ground.
- Reduce the risk of material wrapping around the blade by following these instructions:
Always work at full throttle.
- Avoid the previously cut material during the return stroke.
- Stop the engine, unclip the harness and place the machine on the ground before you start to collect the cut material.
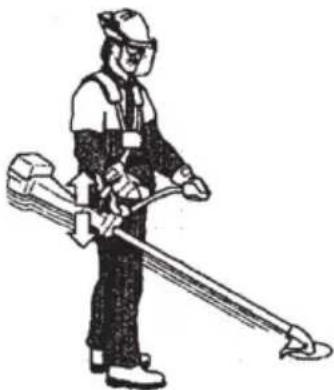
Grass trimming with a trimmer head
■ Trimming
- Hold the trimmer head just above the ground at an angle. It is the end of the trimmer line that does the work. Let the trimmer line work at its own pace. Never press the trimmer line into the area to be cut.

- The trimmer line can easily remove grass and weeds up against walls, fences, trees and borders; however it can also damage sensitive bark on trees and bushes, and damage fence posts.
- Reduce the risk of damaging plants by shortening the trimmer line to 10-12 cm (4-4,75 in) and reducing the engine speed.
- When trimming you should use less than full throttle so that the trimmer line lasts longer and to reduce the wear on the trimmer head.
Clearing
- The clearing technique removes all unwanted vegetation. Keep the trimmer head just above the ground and tilt it. Let the end of the trimmer line strike the ground around trees, posts, statues and the like. IMPORTANT! This technique increases the wear on the trimmer line.
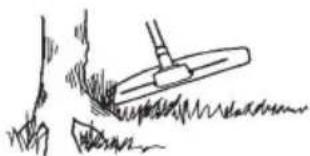
- The trimmer line wears quicker and must be fed forward more often when working against stones, brick, concrete, metal fences, etc., than
when coming into contact with trees and wooden fences.
Cutting
- The trimmer is ideal for cutting grass that is difficult to reach using a normal lawn mower. Keep the trimmer line parallel to the ground when cutting. Avoid pressing the trimmer head against the ground as this can ruin the lawn and damage the tool.

- Do not allow the trimmer head to constantly come into contact with the ground during normal cutting. Constant contact of this type can cause damage and wear to the trimmer head.
Sweeping
- The fan effect of the rotating line can be used for quick and easy clearing up. Hold the trimmer line parallel to and above the area to be swept and move the tool back and forth.

- When cutting and sweeping you should use full throttle to obtain the best results.

WARNING: Neither the operator of the machine nor anyone else may attempt to remove the cut material while the engine is running or the trimmer line is rotating, as this can result in serious injury. Stop the engine and trimmer head and disconnect lead from spark plug before you remove material that has wound around the drive shaft as otherwise there is a risk of injury. The bevel gear can get hot during use and may remain so for a while afterwards. Allow time to cool. You could get burned if you touch it.

WARNING: Watch out for thrown objects. Always wear eye protection. Never lean over the cutting attachment guard. Stones, rubbish, etc. can be thrown up into the eyes causing blindness or serious injury.

Keep unauthorized persons at a distance. Children, animals, onlookers and helpers should be kept outside the safety zone of 15 meters (50 feet). Stop the machine immediately if anyone approaches.
MAINTENANCE
The life span of the machine can be reduced and the risk of accidents can increase if machine maintenance is not carried out correctly and if service and/or repairs are not carried out professionally. If you need further information, please contact your nearest authorized service dealer.
Unit/Maintenance Safety
Disconnect the spark plug before performing maintenance, except carburetor adjustments.

WARNING: The complete clutch, clutch cover, and shaft must be fitted before the machine is started, otherwise parts could come loose and cause personal injury.
Carburetor
Function
The carburetor governs the engine's speed via the throttle control. Air and fuel are mixed in the carburetor.
The T-screw regulates the throttle setting at idle speed. If the T-screw is turned clockwise this gives a higher idle speed; turning it counterclockwise gives a lower idle speed.
Basic setting
The basic carburetor settings are adjusted during testing at the factory. Fine adjustment should be carried out by a trained technician.

WARNING: The cutting attachment may be spinning during carburetor adjustments. Wear your protective equipment and observe all safety instructions. Be sure the cutting attachment stops turning when the engine idles. When the unit is turned off, make sure the cutting attachment has stopped before the unit is set down.
CAUTION! If the cutting attachment rotates when the engine is idling the idle adjustment screw T should be turned counterclockwise until the cutting attachment stops.
Recommended idle speed:
See "Technical data" section.
Recommended max. speed:
See "Technical data" section.
Fine adjustment of the idle speed-T
Adjust the idle speed using the idle adjustment screw-T if it is necessary to readjust. First, turn the idle adjustment screw-T clockwise until the cutting attachment starts to rotate. Then, turn the screw counterclockwise until the cutting attachment stops. The idle speed is correctly adjusted when the engine will run smoothly in every position. The
idle speed should also be well below the speed at which the cutting attachment starts to rotate.
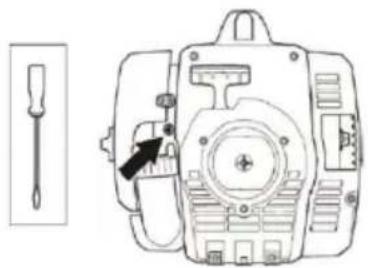
Adjusting the start throttle speed
The correct start throttle speed is set by means of an adjuster on the rear of the handle next to the cable. Use this screw (4 mm Allen screw) to increase or decrease the start throttle speed.
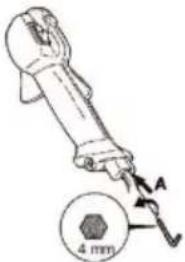
Proceed as follows:
- Run the machine at idle.
- Press the start throttle lock as described under the heading Starting and stopping.
- If the start throttle speed is too low (below 4000 rpm), turn adjuster screw (A) clockwise until the cutting attachment starts to rotate. Then turn adjuster screw (A) clockwise an additional 1/2 turn.
- If the start throttle speed is too high, turn adjuster screw (A) counterclockwise until the cutting attachment stops. Then turn adjuster screw (A) clockwise an additional 1/2 turn.

WARNING: If the idle speed cannot be adjusted so that the cutting attachment stops, contact your servicing dealer. Do not use the machine until it has been correctly adjusted or repaired.
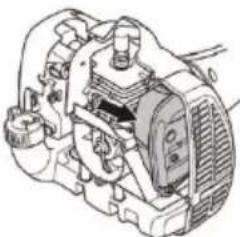
Muffler
CAUTION! Muffler is fitted with a catalytic converter designed to reduce harmful exhaust gases.
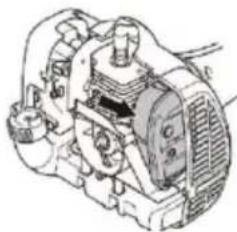
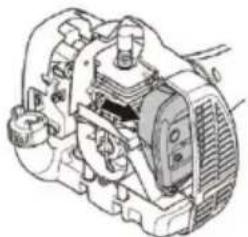
(Starter housing removed for clarity)
The muffler is designed to reduce the noise level and to direct the exhaust gases away from the operator. The exhaust gases are hot and can contain sparks, which may cause fire if directed against dry and combustible material.
Mufflers are equipped with a special spark arrestor mesh. The mesh should be checked and, if necessary, cleaned by a servicing dealer. If the mesh is damaged, it should be replaced.
If the mesh is frequently blocked, this can be a sign that the performance of the catalytic converter is impaired. Contact your servicing dealer to inspect the muffler. A blocked mesh will cause the machine to overheat and result in damage to the cylinder and piston.
CAUTION: Never use a machine that has a faulty or loose muffler. Ensure the muffler bolts are tight.

WARNING: Mufflers fitted with catalytic converters get very hot during use and remain so for some time after stopping. This also applies at idle speed. Contact can result in burns to the skin. Remember the risk of fire!

WARNING: The inside of the muffler contain chemicals that may be carcinogenic. Avoid contact with these elements in the event of a damaged muffler.

WARNING: Engine exhaust fumes contain carbon monoxide, which can cause carbon monoxide poisoning. Do not start or run the machine indoors, or anywhere that is poorly ventilated. The exhaust fumes from the engine are hot and may contain sparks which can start a fire. Never start the machine indoors or near combustible material!
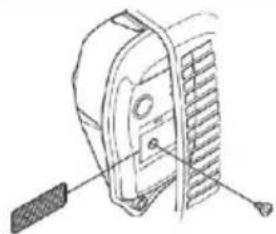
Spark plug
The spark plug condition is influenced by:
- incorrect carburetor adjustment.
- an incorrect fuel mixture (too much or incorrect type of oil).
- a dirty air filter.
These factors cause deposits on the spark plug electrodes, which may result in operating problems and starting difficulties.
If the machine is low on power, difficult to start or runs poorly at idle speed always check the spark plug first before taking any further action.
If the spark plug is dirty, clean it and check that the electrode gap is 0.024 inch (0.6mm) .The spark plug should be replaced after about a month in operation or earlier if necessary.
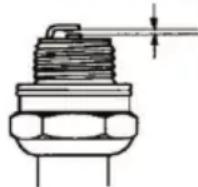
0.024 inch (0.6 mm)
CAUTION: Always use the recommended spark plug type. Use of the wrong spark plug can damage the piston/cylinder.
Air filter
The air filter must be regularly cleaned to remove dust and dirt in order to avoid:
carburetor malfunctions
- starting problems
- loss of engine power
- unnecessary wear to engine parts
excessive fuel consumption
Clean the filter every 25 hours, or more regularly if conditions are exceptionally dusty.
Cleaning the air filter
Remove the air filter cover and take out the filter. Wash it clean in warm, soapy water. Rinse thoroughly. Ensure that the filter is dry before refitting it.
An air filter that has been in use for a long time cannot be cleaned completely. The filter must therefore be replaced with a new one at regular intervals. A damaged air filter must always be replaced.
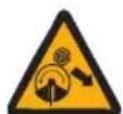
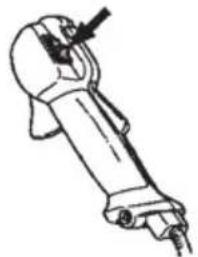
Bevel gear
The bevel gear is filled with the right quantity of grease at the factory. However, before using the machine you should check that the bevel gear is filled three-quarters full with grease. Use special grease. The grease in the bevel gear does not normally need to be changed except if repairs are carried out.
MAINTENANCE
Sharpening grass cutters and grass blades

WARNING: Always stop the engine before doing any work on the cutting attachment. This continues to rotate even after the throttle has been released. Ensure that the cutting attachment has stopped completely and disconnect the lead from the spark plug before you start to work on it.
- See the cutting attachment packaging for correct sharpening instructions.
- Sharpen blades and cutters using a single-cut flat file.
- Sharpen all edges equally to maintain the balance of the blade.

WARNING: Always discard a blade that is bent, twisted, cracked, broken or damaged in any other way. Never attempt to straighten a twisted blade so that it can be reused. Only use original blades of the specified type.
Maintenance schedule
The following is a list of the maintenance that must be performed on the machine. Most of the items are described in the Maintenance section. The user must only carry out the maintenance and service work described in this Operator's Manual. More extensive work must be carried out by an authorized service workshop.
Weekly Maintenance:
- Clean the outside of the machine.
- Make sure the throttle trigger lock and the throttle function correctly from a safety point of view.
- Check that the stop switch works correctly.
- Check that the cutting attachment does not rotate at idle.
- Clean the air filter. Replace if necessary.
- Check that the cutting attachment guard is undamaged and not cracked. Replace the cutting attachment guard if it has been exposed to impact or is cracked.
- Check that the trimmer head is undamaged and not cracked. Replace the trimmer head if necessary.
- Check that the locking nut of the cutting equipment is tightened correctly.
- Check that nuts and screws are tight.
- Check that there are no fuel leaks from the engine, tank or fuel lines.
Monthly Maintenance:
- Check the starter and starter cord.
Annual Maintenance:
- Clean the outside of the spark plug. Remove it and check the electrode gap. Adjust the gap to 0,6mm (1/32 inch) or replace the spark plug. Check that the spark plug is fitted with a suppressor.
- Clean the outside of the carburetor and the space around it.
- Check that the bevel gear is filled three-quarters full with lubricant. Fill if necessary using special grease.
- Check the fuel filter from contamination and the fuel hose from cracks or other defects. Replace if necessary.
- Check all cables and connections.
- Check the clutch, clutch springs and the clutch drum for wear. Replace if necessary by an authorized service workshop.
- Replace the spark plug. Check that the spark plug is fitted with a suppressor.
- Clean or replace the spark arrester mesh on the muffler.
TECHNICAL DATA
Engine
Cylinder displacement, cm^3 28
Cylinder bore, mm 35
Stroke, mm 28,7
Idle speed, rpm 2800-3200
Recommended max. fast idle speed, rpm 11000
Speed of output shaft, rpm 8000
Max. engine output, acc. to ISO 7293, kW 0,8
Catalytic converter muffler Yes
Speed-regulated ignition system Yes
Ignition system
Spark plug NGK BPMR6A
Electrode gap, mm 0,6
Fuel and lubrication system
Fuel tank capacity, cm³ 343
Weight
Weight without fuel, cutting attachment and guard, kg 5,21
Noise emissions (see Note 1)
Sound power level, measured dB(A) 106
Sound power level, guaranteed L_WA dB(A) 114
Noise levels (see Note 2)
Equivalent sound pressure level at the operator's ear, measured according to
EN/ISO 11806 and ISO 22868, dB(A)
Equipped with grass blade (original) 94
Equipped with trimmer head (original) 95
Vibration levels (see Note 3)
Equivalent vibration levels (a_HV,eq) at handles, measured according to EN ISO
11806 and ISO 22867, m/s2
Equipped with grass blade (original), left/right 4,21 / 4,23
Equipped with trimmer head (original), left/right 5,89 / 4,61
Note 1: Noise emissions in the environment measured as sound power (I_WA) in conformity with EC directive 2000/14/EC. Reported sound power level for the machine has been measured with the original cutting attachment that gives the highest level. The difference between guaranteed and measured sound power is that the guaranteed sound power also includes dispersion in the measurement result and the variations between different machines of the same model according to Directive 2000/14/EC.
Note 2: Reported data for equivalent sound pressure level for the machine has a typical statistical dispersion (standard deviation) of 1 dB(A).
Note 3: Reported data for equivalent vibration level has a typical statistical dispersion (standard deviation) of 1m / s^2
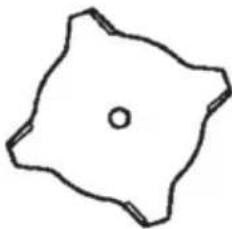
Model 129R (M10 LH arbor shaft thread) - center hole in blades/cutters, 25,4 mm
| Approved accessories | Type | Cutting attachment / guard, part. no. |
| Grass blade/grass cutter | Grass 255-4 1 inch (Ø 250 4-teeth) | 504001303 / 580446606 |
| Trimmer head | T25 (Ø 2,4 - 2,7 mm line) | 537338306 / 580446606 |
DECLARATION OF CONFORMITY
Issuer's name: Husqvarna AB, SE-561 82 Huskvarna, Sweden, tel: +46-36-146500.
Husqvarna AB claims sole responsibility for the object of this declaration: Trimmer and/or Brushcutter, platform(s) A05328CBHV representing model 129R from 2014 serial numbers and onwards.
The platform number and Model number are clearly stated in plain text on the type plate along with the year with subsequent serial numbers.
The object of the declaration described above is in conformity with the requirements of the Council's Directives:
2006/42/EC "relating to machinery" 17 May 2006.
2004/108/EC "relating to electromagnetic compatibility" 15 Dec 2004
2000/14/EC "relating to noise emissions in the environment" 08 May 2000
In accordance with Annex V, the declared sound values are stated in the technical data sheet of the operator's manual.
The following standards have been applied:
EN ISO 12100:2010, EN ISO 11806-1:2011, ISO 14982:1998, CISPR 12:2007
TUV Rheinland N.A. has carried out a voluntary examination on behalf of Husqvarna AB, providing AM72140165 - Certificate of conformity to EC Council directive 2006/42/EC for machinery. This certificate is applicable to all manufacturing locations and Countries of Origin, as stated on the product. The supplied grass trimmer and/or brushcutter conforms to the example that underwent examination.
Signed on behalf of: Husqvarna AB, Huskvarna, Sweden, 2013-12-27.
距离
Ronnie E. Goldman, Director of Engineering. (Authorized representative for Husqvarna AB and responsible for technical documentation.)
U.S. EPA / CALIFORNIA / ENVIRONMENT CANADA EMISSION CONTROL WARRANTY STATEMENT
IMPORTANT: This product is compliant with U.S. EPA Phase 3 regulations for exhaust and evaporative emissions. To ensure EPA Phase 3 compliance, we recommend using only genuine replacement parts. Use of non-compliant replacement parts is a violation of federal law.
YOUR WARRANTY RIGHTS AND OBLIGATIONS: The U.S. Environmental Protection Agency, California Air Resources Board, Environment Canada and Husqvarna Consumer Outdoor Products N.A., Inc. (HCOP) are pleased to explain the emissions control system warranty on your year 2014 and later off-road engine. In California, all small off-road engines must be designed, built, and equipped to meet the State's stringent anti-smog standards. HCOP must warrant the emission control system on your small off-road engine for the periods of time listed below provided there has been no abuse, neglect, or improper maintenance of your small off-road engine. Your emission control system includes parts such as the carburetor, the ignition system and the fuel tank, line, and cap. Where a warrantable condition exists, HCOP will repair your small off-road engine at no cost to you. Expenses covered under warranty include diagnosis, parts and labor.
MANUFACTURER'S WARRANTY COVERAGE: If any emissions related part on your engine (as listed under Emissions Control Warranty Parts List) is defective or a defect in the materials or workmanship of the engine causes the failure of such an emission related part, the part will be repaired or replaced by HCOP.
OWNER'S WARRANTY RESPONSIBILITIES: As the small off-road engine owner, you are responsible for the performance of the required maintenance listed in your instruction manual. HCOP recommends that you retain all receipts covering maintenance on your small off-road engine, but HCOP cannot deny warranty solely for the lack of receipts or for your failure to ensure the performance of all scheduled maintenance. As the small off-road engine owner, you should be aware that HCOP may deny you warranty coverage if your small off-road engine or a part of it has failed due to abuse, neglect, improper maintenance, unapproved modifications, or the use of parts not made or approved by the original equipment manufacturer. You are responsible for presenting your small off-road engine to a HCOP authorized repair center as soon as a problem exists. Warranty repairs should be completed in a reasonable amount of time, not to exceed 30 days. If you have any questions regarding your warranty rights and responsibilities, you should contact your nearest authorized service center.
Please call HCOP at 1-800-487-5951 (USA) or 1-800-805-5523 (Canada) or send e-mail correspondence to emission.warranty@us.hvwan.net.
WARRANTY COMMENCEMENT DATE: The warranty period begins on the date the small off-road engine is purchased.
LENGTH OF COVERAGE: This warranty shall be for a period of two years from the initial date of purchase, or until the end of the product warranty (whichever is longer).
WHAT IS COVERED: REPAIR OR REPLACEMENT OF PARTS. Repair or replacement of any warranted part will be performed at no charge to the owner at an approved HCOP servicing center. If you have any questions regarding your warranty rights and responsibilities, you should contact your nearest authorized service center. Please call HCOP at 1-800-487-5951 (USA) or 1-800-805-5523 (Canada) or send e-mail correspondence to emission.warranty@us.hvwan.net.
WARRANTY PERIOD: Any warranted part which is not scheduled for replacement as required maintenance, or which is scheduled only for regular inspection to the effect of "repair or replace as necessary" shall be warranted for 2 years. Any warranted part which is scheduled for replacement as required maintenance shall be warranted for the period of time up to the first scheduled replacement point for that part.
DIAGNOSIS: The owner shall not be charged for diagnostic labor which leads to the determination that a warranted part is defective if the diagnostic work is performed at an approved HCOP servicing center. CONSEQUENTIAL DAMAGES: HCOP may be liable for damages to other engine components caused by the failure of a warranted part still under warranty.
WHAT IS NOT COVERED: All failures caused by abuse, neglect, or improper maintenance are not covered. ADD-ON OR MODIFIED PARTS: The use of add-on or modified parts can be grounds for disallowing a warranty claim. HCOP is not liable to cover failures of warranted parts caused by the use of add-on or modified parts.
HOW TO FILE A CLAIM: If you have any questions regarding your warranty rights and responsibilities, you should contact your nearest authorized HCOP service center.
Please call HCOP at 1-800-487-5951 (USA) or 1-800-805-5523 (Canada) or send e-mail correspondence to emission.warranty@us.hvwan.net.
WHERE TO GET WARRANTY SERVICE: Warranty services or repairs shall be provided at all HCOP service centers. Please call HCOP at 1-800-487-5951 (USA) or 1-800-805-5523 (Canada) or send e-mail correspondence to emission.warranty@us.hwwan.net.
MAINTENANCE, REPLACEMENT AND R EPAIR OF EMISSION RELATED PARTS: Any HCOP approved replacement part used in the performance of any warranty maintenance or repair on emission related parts will be provided without charge to the owner if the part is under warranty.
EMI s t i t t t t t t t t t t t t t t t t t t t t t t t t t t t t t t t t t t t t t t t t t t t t t t t t t t 0
MAINTENANCE STATEMENT: The owner is responsible for the performance of all required maintenance as defined in the instruction manual.

Ronnie E. Goldman, Director of Engineering. (Bemyndigad representant for Husqvarna AB somt anvariig for teknikt underlag.)

Tennplugg NGK BPMR6A
Elektrodeavstand, mm 0,6
Brennstoff/smoresystem
Brennstofftankens kapasitet, cm 343
Vekt
Aprikots ar zales asmeni (originals)
Aprikots ar trimera galvu (originals)
Vibraciju limeni (skatiet 3. piezimi)
Ekvivalenti vibraciju limeni (aiv,eq) pie rokturiem, meriti atbilsto standartam
EN ISO 11806 un ISO 22867, m/s²
Aprikots ar zales asmeni (originals), pa kreisi/pa labi
Aprikots ar trimera galvu (originals), pa kreisi/pa labi
94
95
4,21/4,23
5,89/4,61
Silindir capi, mm 35
Strok, mm 28,7
Rolanti, dev/dak 2800-3200
IpeH hauanom pa6oTbIC MaunHOB HnMaTeNbHO npOHTte IHCTpyKuH N y6eINTecb, YTO BAM BCE NOHrTHO.

Bcerda noJIb3yIteCb hAdexHoi npOuHoi OByBbIO CO CTaJIbHOJ OKAHTOBKO CpePeDN HeCKoJIb3KoN pODoWBO; NIOTHO npINeRAOUsE ODeXdo, DInHHbIMn IPOUHbIMN 6pOKAMN ODeXdoC dINHHbIM pyKaBOM; IPOUHbIMN, HECKoJIb3aUMM NepUaTKaMn; CpeDCTBaMn 3aUNTbl rna3, HApPmep, He3aONOTeBAOUsIMMn 3aUHTbIMN OChAMN C OTBepCTnA M nBcHTnJaUN INN 3aUHTbIM NtKOM nJnua; cepTnΦnUropBaHHO 3aUHTHO KACKoN cpeDCTBaMn 3aUNTbICnyxa (HaNPmep, bepuamn).

JIIOJAM C DNIHHbIMN BOJOCAMN CNeJyET (JINX JNUHON 6e3oNaCHOCTn) NODBra3bIBaTb BOJOCbl.
OnepaTop MaunHbI DOJXeH CneiNb 3a Tem, YTObI BO BpeM paobToB b paanyce Mehee 15 M (50 cyTOB) OT Hee He 6bln IIOJe N XNBOThbIX.
OcTepeaTecb OToPoWeHHbIX oBeKToB n pIKoWeta.

MaKc. ckopocTb BpaueHnBbIXoHDoro BaNa, 06/MnH

MaunHbI, OchaueHHbI
nope3yKAMN INN Jne3BnMn I
KOweHn TpaBbI, MoXeT pe3ko
6pocatb B CTOpOHy, KOrdaJe3BnB
BXoJrT B KOHTaKT C
3aONKcnpOBaHHbIM ObEKTOM. B
pe3yJIbTaTe KOHTaTc Ne3BnEM
MOxHO NToepaTb pyKy INN HORY.
Bcerda cpeinte 3a TeM, YTO6bl
IIODNI XINBOTbIE HAXOINNCb Ha
pacCToAHn He MeHee 15 M (50
fYTOB)OT MaunHbI.
CTpeKamn 0603haueHbI rpaHnCbl
dЯ pa3MeUeHnKpeJIeHn
pyKn.

YpOBeHb 3ByKOBOr DaBHeHnHa 7,5M (25 cyTOB) corlaCHO 3aKoHOdaTeJIbCTBy ABCTpaJIN.

YpOBeHbUyMa, n3JyuaemoroB OKpyKaIOuIcpeDy COOTBeTCTByeT dIneKtNBam EC. BeNnUnHa n3JyueHnA yMa npIBeDeHa B pa3dJe "TexHnueckne DaHHbe", a TaKke yKa3aHa Ha Ta6JInuKe.

3Ta npOdyKuN OTBeUaET Tpe6oBaHnM COOTBeTCTByIOxHOpMaTINBOB EC.

3Ta npOdyKzna OTBeuayet Tpe6oBaHnM COOTBETCTBYIOxN HOpMaTINBOB EAC.

3Ta npOdyKUry OTBeyaET Tpe6oBaHnM COOTBeTCTByIOUX HOpMaTHOB ABCTpaNNI NO 3JIeKTpOMaHRHTHO COBMECTNMOCTN.
NcnoJb3yIte He3TNIpOBAHHbI 6eH3nH n MacIO IJIa DByXTaKTHBIX DBnraTeNei, CMeuahHoe B nponopun 2% (50:1).
Dpyrhe cHMBOJIb/HaKJNeiKaHa MaunHe OTHOCaTc K CneuaNbHbIM Tpe6oBaHnM ceptnoKaun Ha onpeDeeHHbIX pbIHkax.

4To ectb 4To?
- Je3Bne
2.ПобkaOTBepCTnIЯЗanpaBKn KOHCNCTeHTHOcMa3KIN
3.YrnoBa 3y6aTaNpeDau
4.ПИТOKржуцeroобордованя - Ban
- pykoTka
- Pучka Дрocселя
- BbIKJHoyaTeJIb
9.Блokровka рукн дрoc塞尔
10.ФИКСАТОСHACTKIN
11.KpbiukaunHpa - Puyka cTapTepa
- TOnnBbIb6aK
14.3acnoHka - pyuwa
16.Kpbuika Bo3duHoro fNbTpa - BnHT perynipobkn pykoraTOK
-
KOnTpraKa
-
OnopHbI ΦJIaHeU
- OnopHyk konnak
- BényünniDnck
- TOnOBKa TpIMMepa
- TopoBoi KJIIOU
- TpaHcnpTnpoBOuHyI uNTOK
- ⅢeCTnIrpHbI KJIIOU
- CToOpHbI WtntΦT
- Ochactka
- Khonka CTapTOBOro noJoxeHnra3a
- PerynipoBka Tpoca ra3a
- RykoBoDCTBO no 3KcNpyaTun
Baxhna HOpMaun
- Ioppe3uK, KcTope3 uN Tpmmep, KOToPbIMn NOJb3yOTcH He6peXHO uNn HEnpaBnIbHO, MOYr OKa3aTbcr ONaChbIM INCTpyMeHtOM, CNOcO6hBIM HaHeCTn cepBe3HyO uNn CMEpteJIbHyTO TaBMy onepatOpU uNn OkpyKaIOUm. KpaHne BaXHo, YTObbl IpOouNTaHn HAcToauee pyKOBoDCTBO nO paOTe n NoHraIe ero coJePkaHne.
MaunHa npedHa3HaueHa Tolbko Inra TpmmepHO CTpnKKn, KoWeHnra TpaBbI n/nn paacnCTkn Ieca.
-EdnHCTBeHHbIMnpncnoc6JIeHNyAMN, KOToPbIE MOrTy NcNoIb30BaTbcRA BMeCTe C DBnraTeJIeM, AByIaOTcKOMnOHeNTbl peKyuIero 6obOpYdOBaHnA, peKOMeHDoBAHHbIe HAMN B rIabe "TexHnueckne daHhble".
3anpeaaetcnoIb30BaTcMaunHO,ecnBbl yCTaII,6oJIbHbI,HaxOHTecb NOB03dEICTBnEM CnnpTHORO ININIEKapCTBeHHbIX npenapaTOB,KOTOpbieBnIaOT Ha BaSe 3peHne,paccyOK INIKOOPDInHaCNUO.
3anpeaaetcnojb30BaTcMaunHn npn He6IaropnraTHbIX NOrOHBIX yCJNOBHX, TaKNX KAK CNJIbHbIM XoIOD, Jkapa IIN BIAaXHOCTb.
-ПользунтессpeдстБаминДиВиДуАлбНо 3aцntbl.Cm.yka3аньВ pa3deNe "ИнДиВиДуАльНыe cpeдстВа 3aцntbl". - HnKoIa He pa6oTaTe C MaunHoi, KOTopar 6bIa MoDnΦnUnpoBaHa.
HnKoIa He 3KnIyataNpyte HeNCpabHyu MaunHy. IpOBOUITE peYIpaHbIE OCMOTpbI, yXoI n 06CnykBaHne B COOTBeTCTBUN C daHHbIM pyKOBoDCTBOM. HeKOtOpbie onepaunIO yXoMy n 06CnykBaHnIO DOJHXbIBbINONHrTBcR TOJIbKO KBaIIHnPHUPOBaHHbIM CNEUaNCTAMN. CM. yka3aHnB pa3dene "TEXHNUECKOE OBCJYKBAHNE". - Ipeed 3anyckom MaunHb BCE uNTKn n OrpaxdeHn DaJxHb6bITb yCTaHOBHeHb Ha CBOI MeCTa. Y6eINTecb B OTCyTCTBn NOBpeXdEHN CBeu 3axnraHn N BbICOKOBoTHOro npObOda. HNaYe Bac MOKeT yDapNTb TOKOM.
- OnepaTop DoJxKeH CJIeINb, YTO6bI BO BpeMpa60TbIB paAnyce 15 MeTpOB He 6blIOIHOe HnN JxNBOThbIX. Korda Ha ODHOM N TOMXe yUactke OndHOBpeMeHHO pa60TaIHTHeCKoJbKO ONEpAToPob, 6e3OnacHoepacCToRHe MExdy HmN DoJxHo 6bITb HeMeHee 15 MeTpOB (50 cyTob).
I PPENYPEXKDEHNE: MaunHa Bo BpeMa pa60tbl co3daet 3neKtpomarHHTHOe none. B HeKOTOpbIX o6cTOrTeBbCTBax 3To none MoKET BMeuNbAtbcs B pa60Ty AKTNBbIX uIN naCCNBbIX MeuCnHcknx MMnAHTaTOB. YTO6bl n36ExKaTb pncKa cepBe3HOJ TpaBMbl INI CMEpTN, JInCaM C MeuNCHKIMN MMnAHTaTM N peKOMeHNdyETc npOKOHcyJIbTInpOBaTBcR C BpaQOM N n3ROTOBNTeJIem MMnAHTaTa, IpnXDe YEm npCTyNaTb K 3KcNlyaTaCuN 3TOJ MaunHbl.
I PPEyIeHHe: PnmeHne HnnpaBnIbHO pexuero 6OpuyoBaHnI nn He npaBnIbHO 3aToyeHoro HOxa NOblaaet OnaCHOCTb HaHeceHnCepBe3HOI nIcMeptelHO TpaBMbl.
I PPEyIIPEXJEHNE: HkOrda He I03BOJnTe DeTAM NOJIb3OBA TbCn HnHaxoIITbcra PpIOM C MaunHO. TaK KaMauHnA OCHaSeHa KOHTaKTOM OCTaHOBKn C npUxHHbIM BO3BpaTOM N MoXeT 6bITb 3anyueHa C Hn3KOcKOpocTbIOu ycHInem Ha CTapTOBnpyKe, To DaXeMaJIeHbKne DeTH B ONpeDeJeHHbIX 06CToRtBeTBax Mory T Co3DaTb yCnNHe, Heo6xOdImoe dIra 3anYcKa MaunHbI. 3To CO3daet pNCK cepBe3HbIX TpaBM. IOTOMy Bcerda ChnMaIte KOnNaQOK Co CBeHu, ecnOctabJIeTe MaunHy 6e3 npncMOtpa.
CpeiCTBa HINIBNDAJbHOn 3aunTbl
I PPEdYIpEKeJDEHHe:BoBpeMa pa6oTbIC MaunHOcJeDyET NcNoJIb3OBAtB cneuHaNbHbIe Odo6peHHbIe CpeICTBa 3aunTbI. HndnBnDaJbHbIe CpeIcTBa 3auntbI He MOrTy NpIoHOCbIO NCKJIIOHTb PNCK NpUyeHn TpaBMbl, HO npN HeCuaCTHom Cnyae OHn ChnXaIOT TJaXeCTb TpaBMbl. ObpaauTeCb 3a NOMouH K dInlepy npn BblOpe o6OpyDoBaHn.
I PPEdUYPEXKDEHNE: Bcerda cJeDnte 3a npedeynpejkaIOoUMN CnHanaMn Hnn KpHKAMN, KOrda NoJIb3yeTecb 3aunTHbIMN HayuHNkAMN. ChmMaTe HayuHNKn cpa3y NocJe OCTaHOBKn DBnRaTeJn.
3aunTHa Kaca
3aunTHyIO kACKy cneJeT HaedeBaT npn 06pe3Ke KycTOB Ha BbICote 6oJee 2 MetPOB (6 cyTOB).
OBsNE PPeDnCAnHNo Bc3OpAChOCTN
CpeDCTBO 3aunTbI cnyxa
CneNyET NOnb30BaTbCra 3aunTHbIMn HayuHnKamN CdoTaToHbIM 3aIyUaOUsm 3ΦΦeKToM.
3aunthbte OUKN
Bcerda noIb3yntecb Oo6peHHbIMn 3aunTHbIMn Oukamn. Ppr nCIOJIb3OBAHmN 3aunTHoM Mackn CneJyET NOIb3OBaTbCSr TaKKe Oo6peHHbIMn 3aunTHbIMn OUKAMN. Oo6peHHbIE 3aunTHbIE OUKN DOJXHbCI COOTBeTCTBOBaTb Tpe6OBAHmCTaHApTa EN 166 B Ebpone, ANSI Z87 B CoeINHeHHbx IITatax n CSA Z94 B KaHaJe.
■ NepuataKn
B cnyuae Heo6xOdmocTn, Hapnpmep, nJyctaHObKn peKyuIero 06OpdyOBaHn, cNe dyET HaDeBaTb nepuAtKn.
06yBb
HaedeBaIte ycTouNByU 06yBb C HeckoJb3KoN noDOWBOI.
Pa6oay oJekna
HaedeBaTe OeJy, n3ROTOBJIeHHyU n3 pIIOTHoH TkaHn, n36beraTe CBO6OHOH OeKdbl, KOtOpa MoKeT 3aCenITbcra 3a KycTbI u BcTKn. Bcerda HaedeBaTe dINHHbIe, npouHbIe bpoKn. He HocTe yKpaWeHnA, WOpTbI nnCaHdAInu, He XoNTe 6OCIKOM. DmHHbIe BOLOCbI He DOJXHbI CBNCaTb HNKe PNeY.
AnTeuKa nepBoN nOmoU
OnepaTopbI NOpe3KOB, KcTope3OB NIN TPIMMepoB Bcerda DOJXhbl IMetb C COboi anTeUky DnA OKa3AHN NEpBOH NOMOUI.
3aunthbIe npncnocobJeHMaunhbl
B daHOM pa3deIe paccMaTpnuBaOTcpa3nUHbIE 3aunTHbIe npucnocO6neHnMaunHbI, IN pa6oTa, n npBeHebl OCHOBHbI npuHcunbl N npabUNa, KOtOpIe Heo6xOdmo Co6JIOdaTb dJa obecneueHn npabNbHO pa6ObI. Jn onpeDeHn paCNOJoxEHNrTO Hn HnHO o6opydoBaHn Ha MaunHe cm. pa3den "HTO ECTb YTO".
CpOK CnyK6bl MaunHb MoXeT 6blb ykopOueH, a
PnCK HeCuaCThBx CnyaEB yBeInuH, ecnn
06cnykubHne MaunHb He BbINOJIHReTC
HaJIeKaUIM Opa3OM n ECnn cepBNC n/NI
peMOHT He 6bln BbIOJHEHb IpoQeCCNoHaNbHO.
Ecnn Bam Tpe6yETc DOONHNTelbna
INΦopMaucn, 6paTntecb B 6bnkaMuyo
MaCTepckyIO NO 6cnykubHnIO.
BAKHO!ДЯOBcIyXHbAHnIpeMOHTa MaunHbI Tpe6yeTcA CneuAnbHaN NOIROTOBka. 3To OOC6eHNO OTHOCNTcK 3aUHTbIM npncnocO6JIeHNMaunHb.I.Ecn y MaunHbIObHApYkATcJIO6bIe N3 ONcaHHbIX HNXe HenCnpabHocTe,HeMeJeHNo CBxKITecb CO cNeuaJIncTOM NO OBCnyXHBaHHo.Pp nOKynke IIO6oRi N3 HauxN 3DeHm Mbl rapaHTnpyEm npOpeCCnoHaJIbHbI peMOHT IN 06cIyXHbAHnE.EcIn NoCTaBUnK, npOdaUoHn Bam MaunHy, He JBLJeTcA DnIepom no OBcIyXHbAHnIO,CnpocnteY hero aDpec 6nnKaJWe CneuaHn3nPoBaHHo MaCTepckOn.

PPEyIPEXJEHNE: HnKOrda He NOb3yItecB MaunHOc NOBpeXDeHHbIMN 3aUNTHbIMN npncnoc6JIeHNrMn.
CneyuTe HNCTpyKUmaM no npOBepKe, Texo6cnyKuBaHnIO u peMOHTy, npNBedeHHbIM B daHHom pa3dene. Ecnn B pe3yIbTaTe 3Tnx npOBepOK o6hApXeHb I HeNCnpaBHOCTn, HEmeJleHHO Bbl3OBtE CneuaJIInCTa dIpa npOBeEHnpeMOHTa.
BnokpOBka pyKn npocceJia
БлOKИРОВКа рукн дроссел слжNTДп праздррашени слчайно ВКПЮЧЕНЯ рук дроссел. Ппн нахатин Ha рьчarблOKИРОВК (A) (T.e. KOrda Bbl CxIMaTe pyKoRTy) OH OTnyckaet руку дроссел (B). KOrda Bbl OCBO6OxJaTe pyKoRTy, рьчarблOKИРОВКИ pyka дроссел перemeшадяв перBOHAчальhoe поожене. 3TO перemeшени OCUSECTBnRETCЯ DBYMa He3aBnCmMbIM BO3BpATHbIMn ppyKinHamN. Тakoe yctpoiCTBO обecneuBaet abTomatueckyIO 6lOKIPIOBKY pyrkn dроссел Ha xOLOCTOM XOdy.
Y6eIITecb B TOM,уTo pyUka IpOcCenB MOMENT BO3BpaueHnry pbUyara 6JIOKIpOBKn B INCXoHoe NOJOKHe 6JIOKpyETca Ha XOIOCTOM XOy.

HaXmTe pbyar 6IoknpoBkn pyKn dpocce n y6eHntecb, yTO OH BO3BpaaaetcB nePBOHauaHbHOe noIOxKeHne npn OTnyckaHnn.
Y6eHNTecb, yTO pyUka IpocceIy npUar 6IOKINPOBKNIpeMeuAOTc CBO6OJHO,a BO3BpaTHbIE npKHNbI pa6OtaOT COOTBeTCTByUoUIM o6pa3OM.
Cm.yka3aHnB pa3dene "3anyck". 3anyctnte MaunHy n PONHOCTbIO OTKPOIte dpocceIb. OTnycTne pbyar dPocceJIy y6eINTEcB, YTO peKyuuee obopyoBaHne ocTaHABnBaETcN oCTaETcR HeNoDBrXhBIM.Ecn NoCne ycTAHOBKn dPocceJI B noLoXeHNe xOJOCTORO XoJa peKyuuee obopyoBaHne npOdoJXAeT BpaAaTbcr, CneDuYET npOBepuTB perynipOBky xOJOCTORO XoJa kap6iopatopa.Cm.yka3aHnB pa3dene "TEXHNUECKOE OBCJYKNBAHNE".


BbIKHoyateIb
Y6eNTecbBTOM,TOI BnIraTeJIb OCTaHaBnBaETcPn HaxaTmN ydepXnBaHn KHOIIK BbIKJIOUaTeJIa.
LITOK pexyueo o6opydoBaHnA
Даньи UntOK npedHa3HaeHдпnpedOTbpaueHЯ OTbpaCbBaHЯ npedMeTOB HanpabHeHn onepaTopa. Kpome TOrO, UntOK npedHa3HaeH ДЯ 3aUntbI onepaTopa OT cnYuahHOro cOnpNKOCHOBeHЯ CpeJyUIM ObopydoBaHem.
Y6eIntecb, yTO uNTOK He NOBpeKJEN HHe IMeET TpeuH. 3aMeHInTe uNTOK, ecn OH bbl NoDBepKeH yDapy nn IMeET TpeunHbl.
Bcerda noJb3yItecb peKoMeHdyEmo 3aunToi JnKaKdoTtna peKyuOero o6OpyDoBaHna. Cm. pa3den "TEXHnueCKNE XAPAKTEPNCNTUKN".

PPEyIeKJHHe: KaterOpueckn 3aIpeuaetcnaCnoIb3ObaTbpeKyUee 6opuyoBaHne 6e3 peKOMeHyE moi 3aunbl.Cm.pa3dE"TEXHUECKNE XAPAKTEPNCTIKN".YcTaHOBka HnpaBnblHoN nHn NOBpeXJeHHoH 3aunblMOxET npNBecTN K cepBe3HO TpaBMe.
OBsNE PPeDnCAnHNo Bc3OpAChOCTN
Pp nppaote c HnnpabNbHo HaMoTaHHo pexyuue Jlecko nn HeNCpnaBbIMpexyuum o6opydoBaHnem ypoBeH bOpaun IOBbIaetcra.

IPEyIPEKDEHNE:JInTeNbHoe BO3dEiCTBnE Bn6paun MoXeT npNBecTN K HApUweHHo KpOoo6paueHn Hn paccToPcTBam HepBHO nCtEmbl y IHOe C HApUweHHbIM KpOoo6paueHnem.B cnyae noRbHeHn CMNTOMOB neperpy3Kn OT Bn6paun CNe dyET o6paHTbcra K BpaY. TaKmN CMNTOMAMM MOrTy 6bItb OHemeHne, NOTepa YyBCTBntbHoCTn, "ueKOTKa", "KOJOTBe", 60nb, Notepa CNbI Nn Cna6ObTb, N3MeHHeN e CBeta n COCTOHN KoxN. O6bIuHO nOdo6hble CMNTOMbl npo8BnAOTcHa NaJIbuax, pykax Nn 3aIaCTbAx. Pnp Hn3KoI TeMnepaType pNCK yBeINuBaETc.
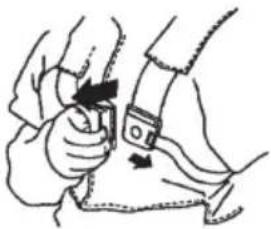
YcTpoIcTBo 6bIcTporo pacuenHeHna OCHaCTKn
B npeedne uactn nmeetc JERKOIOCTyINHOe yctpoicTBo 6bICTPOrO paCzepJIeHnO cHAcTKn, ecn B cnyae Upe3BbUaHNo CNTyaCIn Tpe6yeTc OCB06OdntbscOT MaUNHBI N OCHAcTKn.
CM.yka3aHnBpa3dJepe"PeryIpOBKa OCHACTKIN


Y6eIInTeCb, YTO JAMKNO OChACTKn npaBnJbHO pacnoNoKeHb. Iocne perynipOBKn OChactKn mAsHHb IpOBepe pa6oTy yCTpOcTBA 6bICTporo pacenJIeHnO OChACTKn.
InywnTeIb
InyuHTeB CNYKNT DnA CHNXEHN yPOBHa Wyma nOTBOda BbIXNONHbIX Ra3OB OTonepaTopa.
BHIMAHHE!InyuHTeJIbOcHaueH KaTaN3aTOPOM,IpeHa3HaYeHHbIMДЯ yMeHbWeHnCOpEpaHnBpeHbIXBeUeCTB B BBIXONHbIXra3ax.
B ctpaHax C xkapKIM n cyxim KnIMaTOM 3HaHTeIbHa BepoTHocTb BO3HKnHOBeHnnoXapOB. N03tOMy Mbl o6Opdyem HeKOtOpbIe
TnyuHTeTI T.H.NCKpoyIaBnBaIOUeI ceTKoI. IpOBepeHaJIuYne TaKoi CeTKn Ha TnyuHTeIe BaWei MaunHbI.
Pn HnHnnr rnyuHTe TaKOro Tnna OyeHb BaxHo CToPO Co6JIouDaTb IHCTpyKcHn No npOBepKe, yXOy n 06CnyxHBaHnIO. HNKOrda He NcNoB3yUHe MaunHy C HeNCpabHbIM rnyuHTeNeM.
PepnoDnueckn npoBepnTe HaedxHocTb KpennneHn rnyuNTeN K KopnyCy MaunHbl.

PPEyPPEXDEHNE: TnyuHTenb KaTaN3aTopa CnIbHO HArpeBaETcB npouecce pa60tbN nocJe pa60tbI HeKOTOpoe Bpemr octaetcRTO pONxCoANT N BPexkme XONOCTORO XOA. CoPnKOCHOBeHne MoKeT Bbl3BaTb OXor Koxn. POMHNTe 6 onaCHOCTn NOxapa.

IPEyPEXKDEHNE: B rnyuHTene ecTb XMMKaTbI, KOtOpbIe MOrY T Bbl3bIBaTb paKOBbIe 3a6oJIeBaHH. N36eraIte KOHTaTc C 3TNM 3JIeMeHTAMN B CnUyae NOBpeXdEHn rnyuHTenJ.

IPEyIPEXJEHNE: BbIXlonHbIe ra3bl
DBrraTeNa CoepKaT MOOHCKnD
yrIepoJa, KOTOpBIM MoKET BbI3BaTb
OTpaBHeHne yrapHbIM ra3om. He
3anyckaIte N He 3KcIIpyntyIte
MaunHy B NOMeueHm N BdpYnx nIOxO
npOBetPbAebix MecTax.

PPEyPExEHE: BbIXNONHbIe ra3blBnraTeI rOpYne n MOryt CoepXaTbNCKpbI, KOTOpbIE MOryt CtABy npuHHoNHOxapa. NToTomy MaunHy HNKOrDa HeCJeMyET 3anyckatb BHyTpN NOMeHnHmPi PAnOM C JERKO BOCnJaMeHReMbIMMaTePnaJOM.
KoHTpraKa
Ha HeKOTopbIX BnDax pexyUero o6OpyOBAHn Ia KpePHeHn IcNoB3yeTcKoHTprAka.
OBsNE PPeDnCAHnI NO Bc3OpAChOCTN
Pn c6opke cneyet 3aTnBaTb raKy npOTNB HnpaBHeHn BpaUeHn peKyuIeroOBopyoBaan. Pn pa3Opke Heo6xOIMO NOBOPaHbTaB rAky B HnPaBHeHn BpaUeHn peKyuIero OBopyoBaan. (raKa nMeET neBOcTOPOHHIO pe3b6y.) 3aTaNTe raKy TOPueBBIM RaeyHBIM KJIIOHOM.
HeJIOHOBA npOKnAka KOHTprAaKn He DoJXHa 6bIb N3HOWeHa HAcTOnbKO, YTObI ee MoXHo 6blNo NobopaunBaT BpyHyO. IpoknAdKa 10JXHa BbIePknBaT MInHmAlbHoe ycJIne 1,5 HM (1,1 cyTo-cyHTOB). Fainky CneJyET 3aMeHnTb nocNe ee nCNOJb3ObaHna npN6n3ntelbHo 10 pa3.
Pexyuiee o6opyobaHne
B hactoem pa3dene onncaho To, kak 6laorapnpaBnHomy o6cnykBaHIO n cnoIb3OBAHIO npaBnIbHoro pexyueo 06opydoBaHna:
CHN3NTb pNC OTdauMaunHbl.
- OoctuMaKcMaJIbHOrO 3ΦΦeKtApn pe3Ke.
- PpOaIITb cPOK cnJxkbI pexyueo 06OpYIOBaHn.
BAKHO:
Пользунтусь рекушим оборуданем.Toлько с pekomeндованhoи 3aunToI.Сm.pa3den "TEXHUNECKNEXAPAKTEPNCTUKN".
- POnb3yInTeCb yKa3aHnMaM INHCTpyKuIN dJa peKyuIero o6OpyIOBaHnA dJa npabUNbHOJ yCTaHOBKn peKyuIe JneKn I BbIOpa npabUNbHOro dNaMeTp a JeCKN.
Pexyune 3y6bja ne3BnJa DOnJNHi 6bItb npabnIbHO 3aToueHb.CneDyIte pekomeHdaunm. PpaBna 3aTaunBaHn npuBeHeh TaKHe Ha ynakOBKe ne3BnA.
- PdepxNBaTe npabnIbHyIO pa3BOdky. BbnoHnYe yka3aHn INCTpyKcIn n noJb3yTEcB peKoMeHDoBaHHbIM WabHOHom dJIpa3BOdkN.
I PPEyIpyKJENHE: Bcerda BbIKNoaHte DnRaTeB nepeTem, KaK npNCTynrB K JIOboi pa6Ote c pexuIm OobopyoBaHnEM. Y6eINTecb, YTO peKyuSce o6OpUoBaHne NOHOCtBuO OCTaHOblHe. OTcoEHNHTe npBOd CBeyn 3axnraHH.
I PENEYNPEXKDEHNE: NcnoNb3ObaHne HnnpaBnIbHoro pexyuzero 606pydoBaHnI nHn HnpaBnIbHo 3aToeHHbIX Ne3Bn yBeJIuHNaBaET pnck OTdaun.
Pexyuueo6opydoBaHne
Je3Bne HOK dIa TpaBb IpeHa3HaueHbI dJIa BbKaunBaHnra rpy6oTpaBbl.
TOnOBKa TpMMepa npedHa3HaueHa dIra TpMMepHO CTpNXKn.
06upe npaBnna
Ponb3yntecbpekyuim o60pyoBaHnem TOpIbko C peKOMeHNIOBAHHo3aunTo. cm. pa3dJI "TEXHnueCKNE XAPAKTEPUCTNU".
PexyuIe 3y6bI ne3BnI DOJXHbI 6bITb npaBnIbHO 3aToueHb.I BblOnHnIte yka3aHnI INCTpykCm I NOJIb3yIteCb peKOMeHDoBaHHbIM WabIOHOm Ipn pa3BOdkn. HnppaBnIbHO 3aToueHHOe nIN IOBpeXdEHHO ne3BnE yBeNnUBAeT PnCK HeCuaCThBiX CnyuAeB.
IpoBepbTepeKyuueoobpyObaHneHaHaJIuHne NOBpeKdEnn nn Tpeunn. NobpeKdEHoe peKyuueoobpyObaHne cJeDuET o8a3aTeJbHo 3aMeHHTb.
3atauBaHne HOKa NJe3BnTpaBbl
Ha ynaKOBKe pexyUero o6OpyOBAHn OINCAHO, Ka npaBnIbHO npOn3BOuNTb 3atauBaHne. Je3Bne Hox 3aTaunBaOTcA
ПLOСКИМ HANJIБНКOM C OДHOCTOPOHHIM y30POM.
-Дя coхpaHHeHЯ 6aJIaHcHpOBKn BCE yIbIdoJXHbI 6bITb 3aToUeHbI OdHaKOBO.


PNEyPEXKDEHNE: Bcerda yTuN3npyTe norHytoe, nepekoWeHHoe, TpechYBwee, pa3OpBaHHoe nIN NOBpeXdEHHoe INbIM o6pa3OM Je3Bne. He nbItaTaeCb BbInpMaMTb nepekoWeHHoe Je3BNe dJa NOBTOPHOrO nCNoIb3OBAHn. NOnb3yIteCb ToJIbKO nCnpaBHBIM Je3BnAMn PpeDncaHHoro Tnna.
TOnOBKa TpMMMepa
BAxHO: O6a3aTeIbHo y6eIITecb B TOM, YTO pexyua Jncka IIOTHo npABHOMepHo HAOTaHa Ha 6apa6aH, NockoJbky B IpOTNBHom Cnyae BO3MOXHbI BpeHbIe BN6paun.
-Пользунтусь только pekomehнобаHHbIMpekyшим obopydobAHneM.Сm. pa3дeN"TEXHnueCKNE XAPAKTEPNCTIKN".
O6bIyHO IJIa MeHbIeMaIINHbITpe6yOTc H60JIbIe rONOBK TpIMMepa N HaO6OpOT. 3TO C8ra3aHO C TeM, YTO pN K0UeHN C NCIOJIb3OBAHnEM JeCKN DBrIaTeJIb DOJIKeH OT6paCbIBaTb NeCKy B paIaNbHOM HAnpaBHeHN OT rONOBK TpIMMepa, BCtpeay aPn 3TOM COIpOTuBJIeHne Co CTOpOHbI cKaIINBaEMoT TaBbl.
Kpome TOrO, BaxHa dInHa pexKyuee neckn. Boonee dInHHa necka Tpe6yET 0onee MOUHoro DBrIaTeJ, Yem KopoTKa necka TaKoro Xe DNaMeTpA.
- Y6eIITecb, cTO HOK, pa3MeUeHHbI Ha IuNTKe TpMMepa, He NOBpeJdeH. OH INcNoJIb3yETcI dIg O6pe3Kn JneCKn Do HEO6XODIMoI dINHbl.
- IyBENUeHnCpOKa CnyKbI neckn ee MOxHO B TeueHne HeCKoJIbKnX DHei BBIMaUNBaTb B BoTe. 3To CdeJaET ee NNOThee, n OHa npocnyknt DoJbWe.
CEOPKA
ПРИМЕЧАНЕ:У6eДиТecь,чTo Maшна co6paHa TaK,ΚaK NOKa3aHo B HAcTOraTeM pyKOBoOdCTBe.
YcTaHOBka pyKoTkn
- CHIMITE BINTB 3aHHeuactn pyKIN dpocceIy.
- Hadehhe pyky dpoceenHa pykoTky c npaBOI CTopoHbI (CM.pucyHOK).
- CoBmectTe BnHTOBoE OTBepCTne B pyuKe ra3a C OTBepCTnEM pyKoRTKn.
4.YCTAHOBNTBEINTBOTBepCTneC3aHHeI CTOPOHbIpyKoRTKn. - 3aBepHnTe BnHT uepe3 pyky n pykoTky. 3aTnHte BnHT.
- YcTaHOBnTe DeTaIeKpeNJIeHn, KaK NOKa3aHo Ha pncyHke.


PPEyIPEXJEHNE: Kpenexhble deTaIIpyKoTKn DOJXHbI 6bItb yCTaHOBHeblMeKdy CTePKamn Ha BaNy dIPOBecneueHna 6e3onachoro pa6oerynoIOnOKeHH.
- 3aTnHtE BnHTbI WeCTnRpaHHbIM KInOyOM.
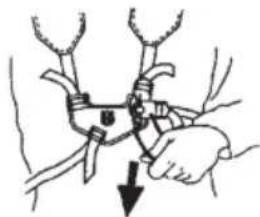
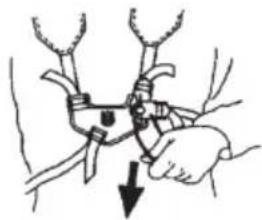
KpenJIeHne ochactkn

IPEyIPEKDEHNE: Pn pa6ote c KcTOpe3OM OH Bcerda DOJXeH 6bITb HAdExHO NOBWeHn Ha OChAcTke. B npOTNBHom Cnyae Bbl He CMOxete oEscneHTb 6eONacHocTB ynpaBHeHn KcTOpe3OM. 3To MOxET npHBecTN K TpaBMe OepaTopa Nnn Dpyrnx NnU. HnkOrda He NoJIb3yIteCb OChACTKO Co CLOMaHHbIM 6bICTpo OTCTeRNaIOUmMcra 3aMKoM.
Heo6xoIIMbIepeRyIINPOBKnpyKoRTKnIOChAcTKn DJIKNHbI 6bITb BbIOnHeHbI nepe HaayanOM
pa60tbI npn nonHOCTbIO OCTaHOBJEHOM DBNrataTeNe.
KpenneHne qnkcaTopa ochactkn
1.YctaHOBtTe BepxHnΦKcTOp OChactKn HaJ WtAHrO, a HxKHN — NOd WtAHrO.
COBMECTNE BINTOBBLE OTBepCTNBEpxHrO HnXHrOΦNKCATopoBCOOTBETCTBYUOMN OTBepCTNAM Ha WtAHRe.ΦNKCaTOp DOJxKeH HaxOHTbCBAIe N306paXeHHoHa WtAHRe CTpeJIKN (CM.pncyHOK).
ПРИМЕЧАНЕ: Песяд захков ВиHTOB BCTaBBTe TpOc ДрОСсELЯВ Na3 HIXHHERO Фнкcatopa.
- BCTaBbTe DBA BnHTa B BNHTOBbIe OTBepcTna.
- 3akpenite qnkcaTop ochactkn, 3aTaryB BnHTbI WeCTnrrpaHHbIM raeYhbIM KJIIOyOM.
PerynnpOBka oChactkn
C npeAHe CTOPOHbO OCHACTKn HAXoNTcR
JIeKoOCTyHnHOe yCTpOuCTBO 6bICTPoro
pacuenenHn. IcnoNb3yIne yCTpOuCTBO
6bICTPoro pacuENHn npn IIObO aBapuHOn
CITyaun, B KOTOpO Bam NOTpe6yeTcR
OCBOODtBCr OT MaUNHbI OCHACTKn.
PaBHomepeHoe pacnpedeJeHne Harpy3Kn Ha nIeHu
PpabnIbHO OtperynipoBaHHa Ochactka mMaunHa 3NaHTeJIbHO ynpoaaOT pa60Ty.
HaedeHbTe OChactKy. OTperynpuIte OChactKy IJIa ONTmAlbHO rpo bOoeryrno nOnoxeHHa. HATAHITE 6OKOBBe JAMKn TAKM Opa3OM, YTO6bI Bec paBHomepHo pacpeJeJrnc Ha IIneu.
PIMMEUHNE:IyuWero ypaBHOBeuBaHHaKcTope3a MoXeT nOte6oBaTbCn3MeHeHne MeCTa erO KpenHeHnK uTaHre.
PpaBnIbHa BbICota
HactpoTe nOToXeHne OChactKn TaKIM o6pa3OM, UTo6blpeKyUee o6OpyDObaHne HaxOJNIOcb npapannelbHo 3emJe.
PpaBnIbHbI 6aJHaC
Pexyueo6obpyoBaHne DOnKHO CnerKa kacaTbca 3emn. B cnyuae nCnoJb3ObaHna DNCKa dJa KooeHn TpaBbl OH DoJKeH HaxOHTbcn Ha pacctoHnn Okono 10 cm (4DIOHMOB) Na3emne dI npedOTBpaSeHH KOHTAKTa C KamHmN np. OtperynpyTe noNoxHeNe OCHAcTKn dJa npabInbHoro 6anaHca yCTpoiCTBa.
YcTaHOBka Je3Bn I rOJOBOK TpMMepa
- Pn yctaHOBKe peKyuIero o6OpyIOBaHnK kpaIHe BaxHO, YTObI IoHraTae TAcTb BeDyIeO DnCKa/OnOpHOro FNaHua HaxOuINacB No CEHTpy OTBepCTnapeKyuIero o6OpyIOBaHn. HenpaBnJIbHO yCTaHOBJeHHoe peKyuIee o6OpyIOBaHne MoKet CTaTb npUHHo cepBe3HO n/In CMePeTbHO TpaBMbl.

I PPEdYPPEKDEHNE: Kateropueckn 3a npeuaetcnaonb3oBaTb pexyuiee 606pydoBaHne 6e3 pekomeHyemOn 3auntb. CM. pa3deN "TEXHNUECKNE XAPAKTEPNCTNK". YctaHOBka HnnpaBnblHoN mnn nobpeXdeHHoN 3auntbMOxET npNBecTN K cepbe3HOJ TpaBme.
BAKHO:Дя pa6oTbI c DnCKOMДЯ KOWeHn TpaBbMaunHa DoJnxHa 6bITb OChaSeHa pyKoYTKoN ppaBnIbHOrO Tnna, UNTKOMДЯ JIe3BnN OCHACTKO.
YcTaHOBka uNTKaIJIe3BnJ, DnCKa IJKoWeHnTpaBbl n pe3uKa TpaBbl
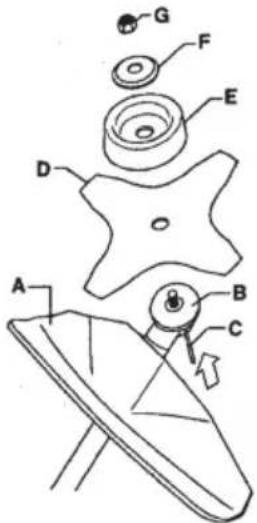
- HadehTe ⅢnTOK Ie3BnA/KOM6HnHnpOBaHHbI ⅢnTOK (A) Ha KpenJIeHne ⅦTaHrN n 3aФнкCpyuTe 6oTTom.
BHIMAHHE! NcnoB3yIte pekomeHdoBaHHbI ΚιTOKДЯЛe3Bn. CM. pa3dEe "TexHueckne xapaKTepeNCTnK".
- HadeHbTe Ha BbIXoHoi BaI BeDyun DnCK (B).
3.ПоворачиBaTe BaIДИСКАdoТeХnop,пOKa OДНОИЗOTВЕРСТИВБЕДУСЕМДИСKEHe COBMECTITcCOTBΕPCTNEMB KOPNYCE peDyKTopa.
4.BCTaBBTe CTOnOpHbI WTHnPT (C) B OTBepCTne, YTO6bl 3aΦNKcnpoBaT bBIXOHOB BaJ.
5.YctahOBTe ne3Bne (D),onopHyu yaiky(E) onopHbIΦnaHeu(F)Ha BbIXoHoi Ban. - 3aKpeNTe raKy (G). MomeHT 3aTJxKn raKn paBEN 35-50 Hm (3.5-5 KRM). NcNoJIb3yInTe TOPIObI KIOU O3 HaOpa INHCTpyMeHTOB. DePKeTIpe pyuKy KIOUa Ka MOXHO 6INKe K IUNTKy Ne3BnA. RaKa 3aTARNBaeTc npn BpaUeHN TopueBOrO KIOUa IpOTNB HAnpABLeHnBpaUeHn TpIMMepa (BHIMAHNE! neBOcTOPOHHra pe3b6a).
YcTaHOBka ⅢNTKa I rOJIOBKn TpMMepa
- YctaHOBtTe UHTOK TpMMepa (A) Jnpa6oTbI C rOIOBKOITpMMepa.HaJeHbTe UHTOK Je3Bra/KOMbHNHPoBaHHbI UHTOK Ha KpePJIeHne UTaHn 3aKpeNITe BoNTOM (L).
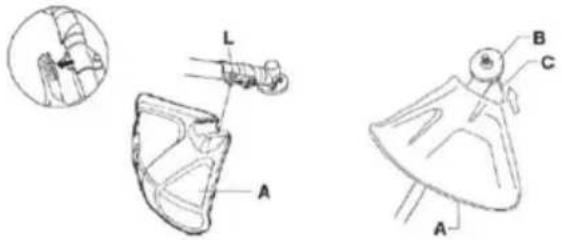
- HadeHbTe Ha BbIXoHoi BaI BeDyuN nnCK (B).
3.ПоворачиBaTe BAnДИСКа DoТexnop,пoka OДно ИЗ OTВЕРСТМВ ВБЕДУСЕ МДИСКЕ He COBMECTNTСС OTBΕPCTNEMВ KОРПУСЕ peДуКТopa.
4.BCTaBbTe cTOnOpHbI WTHnΦT (C) B OTBepcTne, yTO6bI 3aФNKCuPObaTb BBXoHOBan.
5.ПоворачиBaTe roIOBky TrpIMMepa (H) B HappaBHeH, npOTnBONoJoxKHom HappaBHeHIO BpaueHna.
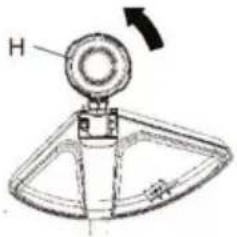
6.ДЯСТЯ NOBTOpe BCE ONEpaUN B O6paTHOM NOPrKe.
Ppabnla 6e3oNaChOCTn npn 3anpaBKe
HnkOrda He BkIouaTe MaunHy:
Ecnn Bbl npoJnTOnnBO Ha Hee. Ipotpnte 6pb13n n daTe OCTaTKam TOnJInBa NCnapntbca.
- Ecnn Bbl npoln TOnnBO Ha ce6n nCBOO oexky, Cmehnte Odekny. IpomoyTe Te yactn TeJa, KOtOpBie 6blN B KOHTaKTe C TOnnBOM. POnb3yTEcB MbIOM N BOoI.
- Ecni Ha MaunHe HabJIOdaetcYteKa TOnJIbBa.PeryIaRHO npOBepnTe KpbIbKy TOnJIbBHorO 6aka N UHaHnHa HauNue yTeeK.
TpaHcnpToPbKa n XpaHeHne
CneJeT XpaHnTB N TpaHCnOpTnpoBaTb MaunHy n TOJIINBO TAKIM O6pa3OM, YTO6bl He 6blno pNcKa KOHTaKTA NOTeKOB UIN NAPOB C NCKpAMN UIN OTKpbITbIM ORHEM, HAnpIMep, y 3NEKTPOMaUNH, 3NEKTPoDBuRAteNei, 3NEKTPnuecknx IN CNIOBbIX NepeKJIouCaTeNei/HarpeBaTeNei N KOTJIOB.
- TOnnIBo Bcerda CneIyET xpaHntb IN TpaHCnOpTnpOBaTB B CneuaJIbHbIX EMKOCTX, NpeHa3HaueHHbIX DJIa 3ToI CEJI.
- Ipepe TEm, KaK HApBaNTb yCTpOcTBO Ha DInTeBHOe xpaHeHne, CNeyEt ONOpOXHTb TOINHBHbI 6aK. BByChnTe Ha MeCTHO 6eH3o3anpaBOuHOH CTaHcUN, KyaD Bbl MoXeTe CJNtB OTPa60TabWee TOJINBO.
Cneinte 3a Tem, yTo6bl MaunHa 6bIa XopoWo ouHHeHa n YTo6bl neped ee npoJOnKInTeJbHbIM xpaHHeM 6blIO BbINOJIHeHO nOJIHoe 06cJyKINBaHne.
- Pn TpaHcnpTnpOBKe nIIN XpAHeHH MaunHbHa HeB Bcerda DOJXHa 6bITb yCTaHOBJeHa TpaHCnpTHa 3aUHTa dJIpejxUeO6OpydoBaHna.
- UTo6bI He npOn3oUJIo HEnpOn3BOJbHOrO 3aNycka DnIraTeJIa, KOIIpaOK CBeuN CneJyET CHIMaTb PnДЛNTeJIbHom XpaHeHIn, ecJIM MaUnHa 6ydt OCTaBJIeHa 6e3 npncMOTpa IN pRn IIO6om 06cIyXuBaHN.
3akpennTe MaunHy BO BpeMra TpaHCnopTnpOBKn.

PPEyPExEHHe: Co6JHOaTe octopoxKHOCTb npn o6paueHn C TOJIINBOM. IOMHnte 06 onacHOCTn IOXapa, B3pbIBOB IN BdbIXAHNA napOB.
Tonnbo
BHIMAHHE! Maunha OchaueHa DByXTaKTHbIM
DBnraTeJem N DOJXHa Bcerda pa6oTaB Ha
CMecn 6eH3nHa M Macna dJa DByXTaKTHbIX
DBnraTeJe. DnI NOlyeHn IpaBnBHO
COCTBa TOnNHBHO CMecn CJIeDyET AKKypaTHO
OTMeprTb KOJNUcEeTBO BXODJUero B COCTAB
Macna. Pnp npiroTOBneHn He6oBsworo
KOJNUcEeTBA TOONHBHO CMecn DaXe MaJra
HEToOHocTb MOKeT CINbHO IOBnAryt b Ha
KaueCTBO TOnNHBHO CMecn.

IPEyPEXDEHNE:ToNNBO n
NcnapenraTOnnBa KpaHne
NoXapoonacbIMoRyt npNBecTN K
Cepbe3HbIM TpaBMam Pn BdbIXaHH N
KoHTaKe C Koxe. I03Tomy 6yDbTe
OCTOpOXHbIPn ObaPeHH C TONNBOM
N ObecneYbTe XopoWyo BEHTINrAIO.
■BeH3nH
BHIMAHHE! Bcerda nonb3yntecb cmecbu Macna n ouhueHHoro 6eH3nHa (c MHHMaJIbHbIM OKTaHOBBIM YNCLOM 90).No BO3MOXHOCTN NOJb3yNTecb 3KOJOrnueckm, T.H. aIKnlaTHbIM 6eH3nHom.
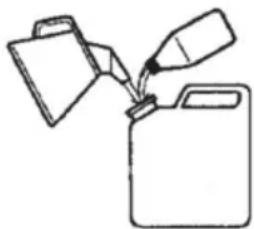
- Camoe Hn3Koe pekomeHnyemoe OKtaHOBOe Yncno - 90. Ecnn DnBnraTeNb 6yJeT pa6oTaTb npn 6OJee Hn3KOM OKTaHOBOm Yncne Yem 90, OH MOxet Haatb "CTyAtb". 3To npNBoNT K yBeJIuYeHIO TEMnepaTpybl DnRatEny, YTO B CBOIO OuepeIb MOxET PnNBecTN K eRO cepbe3HbIM HeNCnpabHocTAM.
- Пи дinteьнй pa6оTe Ha BbICOKx 6obopTaX peKOMeHnyETcNIOJIb3OBAtB 6eH3nC 60Jee BBICOKIM OKTaHOBBIM YUcIOM.
MacnoДЯДByXTaKTHbIXDbVaTeJen
Macno Husqvarna XP yBnIeTcnpednoHTtehHbIM dIyObeCneeyHNOITMaNbHO npOn3BOAnTeHbHOCTN IDIOROBeHuOCTN DBuRatJI, NOCKoJIbKyo OHO CNeuaNbHO pa3pa6oTaHO dIyHaUHX DBYXTaKTbIX DBuRatJeC BO3dyHbIM OxNaXdEHNEM. Ppi CMeWnBaHm TOpNBAHCNoJb3yIte TOnbKO BbICOKKaueCTBeHHbIE CNHTeTnueckme Macna dIyDBYXTaKTbIX DBuRatJe.
HnkOrda He noJb3yTecb MacnOM, npedHa3HaueHHbIM DJIa DByXTaKTHbIX DBNfTeJeC BHeuHM BOJHbIM OxnaKeHHeM, T.H. "outboard oil" nIi CyDObbIM MacnOM (HaMeHOBaHne TCW).
- HnKoIa He npImeHnTe MacNo IJy eTbIpexTakTHbIX DnBraTeNei.
CmeunBaHne
- Поронориясмеси — 50:1.
BcerIa CmeunBaIte 6eH3nC MacnOB YnCTOn EMKoCTn, PpeHa3HaueHHOJ DJIa XpaHeHn TOJINBa. - Chayaja Bcerda HaJINBaIte NOJOBHy Heo6xoJIMoro KOJInueCTBa 6eH3nHa. 3aTeM do6abBte NoJHOe Tpe6yEmoe KOJInueCTBO
ПРавиJA OБразецня C TOПЛВOM
macna.CmeaainTe(B36oJTaIe)noJyehHyO cmecb,doabBteocTabuioCyaCTb 6eH3nHa.
TtateJIbHO CMeaIte (B36oJItaIe) TOJIINBHyO Cmecb nepe3aJIbAHnEM B TOJIINBHyI 6ak MaJINHbl.
ПРИМЕЧАHЕ! He BbIHMaIte shHyp NonHOCTbIO He BbINyCKaIte pyuKу CTapTepa npi NOnHOCTbIO BbITryTom shHype. 3To MOxET npNBecTи K NOBpeXdEHNO MaunHbl. IpoDOnKaIte TReHYt bShHyp Do To Tex nop, NOka DbURatelb He NonbITaETcra 3anycTNTbcra (NIM MakCmym 3 pa3a).
- Пи залуcke пл nonblte 3anycka DBurataTeЯ onyctnte pbuar 3acnoHKn B pa6ooye noJoxKeHne.
5.C CnNoB BbTgBaNte UHyp, NOKa DBNrTaTeNb He 3anyCTNTc. - KaTToNbKO DnBraTeJIb 3aNyCTnIcR, daTe emy nporpeTBC B TeueHne 30 cekyHd, npexKe cheM daBaTb NOJIhBi Ira3.

TeNbI DnBraTeJIb
BHIMAHHE! Hnkorda He noIb3yntecb MaunHO B CnTyauu, npKOTopoB bI He cMOKeTe No3BaTb Ha NOMOuB npN HeCyaCTHom cnyuae.
He pa6oTaIe C MaunHOB NIOxN IoroHbIX yCIOBnX, TaKNX KAK rYCTOJ TymAH, CNNbHbI JOXDb, pe3Kn BTeP, CNlbHbI XOLOD, nT.D. Pa6oTa B NIOxyo NorOy CuNbHO YtOMJrET IN BB3bIBaET DOnOJIHNTEbHbI pNCK, HApPIMep, OT CKONb3KOrO rpyHTa INN HepeDcKa3yEmOro HAnpabNeHnaPeHn DaEHHa DepeBa nT.D.
- Y6eIITecb, yTO BBIMOKeTe DBNrAaBcra N CToTb 6e30nacHO. IpoBepbTe, HET JIN BOKpyr Bac BO3MOxHbIX NOMEX N IpePnTCTBn (KOpHei, KamHei, BeToK,Яm n T.D.), ecn Bam Bdpyr 6yDet HxKHO 6bICTpO nepemecTITbcr. BydbTe OcO6eHNo BHImaTeJIbHbI npn pa6ote Ha cKnloHaX.
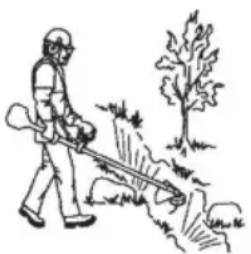
- Ppei nepeHOCOM OTKJIIOHTe DBNrataTeIb. Ppei nepeHOCOM Ha 6oJIbwoe pacCTOHaHe I TpaHCnOpTnPOBko CNeDyET NcNoIb30BaTb TpaHCnOpTHyIO 3aunTy.
He cneyet onyckaTb MaunHy Ha 3emnIO npnpaobotaousem Dbratene nIN Bpaauoouemcpejyuem obopydOBAHNI.
OchOBHa paCnCTka
Bcerda noJb3yItecbc COOTBeTcTBYIOUM o6opydoBaHnem.
Bcerda noIb3yItecXopoOo oTperynipoBaHHbIM 6opuyoBaHneM.
CobJIOaIte MepbI 6e3ONaCHocTn.
TuaTeNbHO oprAH3yIe cBOIO pa6Oty.
- PeKbTe JIe3BnEM Bcerda Ha NoINbIX O6OpOtax DBURAteJ.
Bcerda noIb3yIeTc b xopoio 3aToueHHbIMN Je3BnMn.
- I36eAaTe KaMHei.
Iocne kaxdo npaboye onepaunnc6paacbainTe yactOty bpaueHnBnraTeJndo xoNocToxoJa.PaboTaBteueHneDInTeNbHO BpemH npnNoHOM OTKpbITnNdpocceHbHO 3acnoHKn 6e3 kaKo-JinboHaRpy3Kn Ha DBnraTeJIb MoKeT npNBecTN Kcepbe3HOMy NOBpeXdeHNIO dBnraTeJn.

IPEyIpeXJEHNE: Hn onepaTop Maunhbl, Hn dpyrne Jnca He doJnxHbI nbItaTbc y6hpatb B cToPOHy cpe3aHHbIM MaTePnA np naPabotaOoem DBrnte InnBpaauoouemcpexuem O6opydOBAHN, TAK KaK 3TO MOKeT npNBecTN K cepBe3HbIM TpaBMam. PepeTem KaK y6hpatb MaTePnA, Hamotabwnsc BOKpyr BaNA dnCKa, OCTaHOBNTe DBnraTeNb n pexuee O6opydOBAHne, TaK KaB N pOToNBHom Cnyae mMeetc PnCK NOyHTb TpaBMy. 3y6vataa nepeDaya MoKet HarpETbc BO BpEm pa60tbi n octaBaTbc rOpaye HeKOTOpoe BpeM. DaNe eN OCTbITb. Bbl MOxETe NOyHTb OXOR np INPKOCHOBEHN C Hei.

NPEUYPEXJEHNE:OCTeperaITeCb OT6paCbIbaembIX npedMeTOB.Bcerda NOIb3yITeCb peKOMeHOBaHHbIMN 3aunTHbIMn OqkAmn. HNKOrDa He HAKNoHJTEcB NaNTKOMpeKyuIero 06OpUdoBaHn. Kamn, Mycop n np. MOryt NOnaTb B rna3a n npNBecTN K CIneote INN K cepbe3HbIM TpaBMam. DepxHTe NoctopOHnX IuC Ha pacCToAHn. Detn, XINBOThIe, NOCTOPOHnE IN NOMOUnHKN DOJXHbI HaxoINTbcra B 6e3ONacHO 3OHe 3a npedeIamnpaHyca B 15 MetpoB (50 cyTOB).Ecnn KTO-H6yDb n3 HxN noDoIet 6Jnxke, HeMeDJIeHNO OCTaHOBtme MaunHy. HNKOrDa He NOBopaUNBaIteCb c MaunHoH, He NOCMOTpeB BVauane Ha3ad, n He y6eINBUnCb B TOM, YTO B 3OHe PNCKa HNKORo Het.

IPEyPExEHEN: HOrda B npoctpaHCTBe MeKdy uNTkOM n peKyuM o6OpyOBAHnEM 3actpeBaHT BcKn HnTpaB. Ipeed OChtKo octahOBHTe DBuratelb.
Nope3Ka TpaBbI Ne3BHeM dIa TpaBbI
-Ne3BnHNOHNJaTpaBbIHeOJXHbI NCNoJb3OBaTbCnJa Cpe3aHnCTBOJIOB.
- Je3BnE dIy TpaBbl npedHa3HaueHO dIy BCex BnO8 BbICOKo IIN rpy60 TpaBbl.
ПОНЗВОДNTE KOWEΗΝΕ MaRTHΝΚΟΒΥΜ
ДВΙΝΥΗΝΕ ΜΙЗ CTΟΡΗΤΑΒ CTΟΡΗΥ, ДВΙΝΥΗΝΕ
СпраВаΗΑΝΕВΟ 6уДТ раБΟΥΜ ДВΙΝΥΗΝΕ, a
ДВΙΝΥΗΝΕ СеВΑΗΝΡΑВΟ — BO3ВpaTHБΙΜ.
ЛeзВиЕdoЛЖИСо Cpe3aТ ТраВу CBOUM ЛeБВΙΜ
КраЕМ (МexДу 8и 12 yapamn).

- Ecnn HauKnoHHTb Ne3BVe HeCKoNbKO BNeBO npn noDpe3Ke, To cpe3aHHa TpaBa 6yDeT yKnaDbIbA TbCBpOBBbIMn PraaMn, YTO o6JeTHT ee crpe6aHHe.
CTapaNTecb pa6oTaB B ODHOM pHTMe. CToIte yCTOINBO, NOCTaNB CTONBI HOR Ha HEKOTOPM pacCTOHN Dpyr OT dpyra. Pocne BO3BpaTHORO DBHXEHN NpeDBrHbTEcB BnpeiN ONTb BCTAHbTe B yCTOINBOM nIOJXeHN. -
OnopHajuWka DOnjXHa CnErKa KacaTbCJ 3emnn. OHa npedoxpaHaret ne3Bne ot KOHTaTcA 3emne.
-
Ymehbinte pnc 3akpyuBaHn MaTePnAnaBOKpyr Je3Bn, BblOnHra CneDyUOuNe yka3aHn:
-
Pa6oTaIe BceIa Ha noJIhIbIX o6OpOtax ra3a.
CTapaaTeCb He npoxoDnTb no yke cpe3aHHoTpaBe npu BO3BpaTHOM DBHXeHIn. -
Парад Tem, кak Naачаь сбираь cpe3aHHyTo TpaBy, octaHOBNTe DBURAteJb N CHIMnTe OCHAcTky.
Tpmmepnag ctpnxka ra3oHOB TpmmepnoTJIOBkoI
Tpmmepha ctpnka
- Depxnte rnoOBky TpMMepa yTy bblwe 3emn noi yIOM. Pa6Ota BbINOJIHReTc KOHcOM neckn. DaIte necke BO3MOXHOCTb pa6OtaTb c co6CTBHeHHo CKOpocTbIO. He npxImaTe necky K BbikaUNBaEMomy yuaCTky.
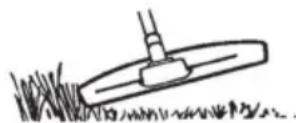
- Jecka mokej nerko ckaunbaT bpaby n copnky y CTeh, 3a6opa, depeBbeB n 6opdopoB, oHaKO OHa MOKe T aKKe IOBpeNTb YyBCTBHTeJbHyO KOpy Ha DepeBbax n KcyctapHnKax N NOBpeNTb CToIb3a6opOB.
Puck noBpeKdEHH paCTeHm yMeHbShaetc 3a cHT yKOpauNbAHn neKn do 10-12 cm (4-4,75 dIouMa) uymeHbSeHH o6OpOTOB DBratJIa. - Pn TpMMepHO CTpIXe N OoNCTKe CneNyET He NOJIHOCTbIO OTKpbIBaTB DPOCCEnb, YTO6blnpOJNTb CpOK CnyX6bI JeCKN UymeHbWHTb H3HOC rOJIOBKn TpMMepa.
Pacvnctka
- Ppi paacnCTke npoCXoNT ydaJIeHne BceI HeKeIaTeNbHO paCTnteNbHOCTN. DepeKInTe roIOBky TpIMMepa HEnocpeDCTBeHHO Ha3 3emNe B HAKIOHOM NIOXeHNI. NycTb KOHeC JNEcK N KacaETc3 EMN BOKpydpeBBeB, CTOn6OB, CTAtuN t.d. BAXHO! TaKaJ texHnka ycINnBaET n3HOC neckn.

- NcKa n3HaunBaetc 6bICTpee n doJxHa BbIBBraTbcyaue np paOte cpeu KAMHei, Knpua, bToHa, metaJIInnecknx 3abOpOB u T.D. NO cpaBHeHIO C paOToI cpeu DepeBBeB IN DepeBraHHbIX 3abOpOB.
Pe3ka
TpMMep ndeaIbHO NOxOHT dIg CTPNKKn TpaBb I MeCTax, TpyHNOCTyINhIx dIg 06bIuHoi ra3oHokocnKn. B npoucece pe3kn DePKeTne necky napaiJIeNbHO 3emNe. N36eraIte npKIMMaHraTOnOBKn TPMMepa K 3emNe, NocOKlbKy 3TO MOKeT HcNOPTuTB ra3OH nIOBpeDntb INCTpymENT.

He donyckaTe noCToHHoro COpnKOCHOBEHn rOIOBKn TpIMMepa C 3emne B npoccepe pe3kn. IocToHHoe COpnKOCHOBEHne MOKeT pINBecTn K NOBpeXdEHnU nN3HOcy rOIOBKn TpIMMepa.
y60ka
- Θффekt BeHTnIaTopa Bpaauouecra NeckmoKET NcNoB3OBaTbCra IJIa 6bICTpOro INpoCToro NOmTaHna yAcTka. Depxnte JeCKy npaJIeNbHO NaI NoDMTaembIM yactkom IN BOJNTe TpIMMepOM IN3 CTOpOHbIB CTOPOHy.
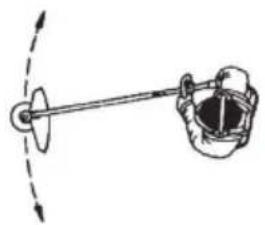
Ipnpe3ke nIOMaTeHn dJa noJyehn ONTMaJIbHbIX pe3yJIbTaTOB ApocceJIb DoJIxKeH 6blb OTkpblt NOJIHOCTbIO.

IPEyIeKJHHe: Hn onepaTop Maunhbl, Hn dpyrne Iuca He doJnxHbI nbItaTcB y6HpTaB B CTOpOHy cpe3aHHbIMatepnA np na pa6oTaOnueM DBrataTeJe Hn BpaauoUeNc TpMMePHO pe3Ke, TAK KAc 3TO MOKeT npNBecTu K cepBe3HbIM TpaBMam. Npeed Tem KaK y6HpTaB MaepnA, Hamotabwnsc BOKpyr BeDyUero BAana, OCTaHOBNTe DBnraTeJIb n pexyUee o6OpyDoBaHne, TAK KaK B IpOTnBHom Cnyae NMeETcR pNCK nonyHTb TpaBMy. 3y6uataa nepeDaYa MoKeT HarpeTbcra BO BpeMa pa60tBI n OCTaBaTbcra ropayeH neKOTOpoe BpeMa. DaIte en ocTbITb. Bbl MOKeTe NoIyHTb OXOR npn PnPKoCHOBENC HEn.

PPEyPExDEHNE:OcTepeaTeceb OT6paBbAembIX npedMeTob. Bcerda Hocnte 3aunTHbIe ouKn. HkOrDa He HaKNoHraTEcb NaNTKOM pexyUero 06OpdyoBaHna. Kamn, Mycop n np. Moryt nonactb Brna3a n npuBeCTN K CJneote Nn K cepbe3hblm TpaBMam.

Iepknte noctopohnX nHc Ha pacCTOHH. TeH, XHBOTbIe, NOCTOPOHHe N NOMOuHNK D0JXHbI HaxoDHTbcB B 6e30aChOH 3OHe 3a npedeJAMn paHyca B 15 MetpoB (50 cyTOB). Ecnn KTO-H6yDb n3 Hnx NOoJdET 6nHexe, HeMeJeHHO OCTaHOBNTe MaunHy.
Cpok Cnyk6bl MaunHb MoKeT 6bl Tykopoeh, a
PnCK Heecacthbx Cnyaeb YBeJIuueH, ecnn
O6CnyKINBaHne MaunHb He BbINOHNReTcN
HaJIeKaUIM O6pa3OM N ECNI cepBNC n/nn
peMOHT He 6blu BInONHeHb IpOpeCCNOHaNbHO.
DOnoINHeJIbHyIO INΦOpMaUIO MOxHO NOyUHTb
y 6IINKaJWero ABTopn3OBaHHoro DInepa.
IpaBnla TexHnKn 6e3oNaChOCTn npI TexHnueckOM 06cJyXnBaHmMaunHbI
OTcoeHnHTe CBeUy 3aXnIraHnI nepei BbIOJNHeHnEM pa60T no TexHnueckomy 6cIyXnBaHnIO 3a NCKIIOUeHnEM pa60T no perynipOBKe Kap6oPaTopa.

IPEyPExEHNc:KpbuKa cuenneHn, cuenneHne n BaI DOJXHBi 6bITb yCTaHOBHeH I nepe3anyckom MaunHbI, Hnue HeKOTOpbIe DeTaN MOryt 6bITb Ocna6JeHbI n CTaTb npuHOn TpaBMbl onepataopa.
Kap6HopaTop
Функции
Kap6upatop ynpabnaretobopoTAMN DBurateIe
yepe3 pyky dpocceI. B kap6upatope
CmeunBaIOCTBO3dyx N TOONBO.
BnHT T perylnpyet obopotbixoNocToro xOda. NOBOPOT BnHTa T no yacoboi cTpeIke yBeJIuHBAeT obopotbIXoIOCToro xOda, NOBOPOT npOTNB YACOBI CTpeIKN yMeHbwaET OOBOpOtbl XOIOCToro xOda.
OchOBHnpeRynpoBka
OchOBHnpeRynpoBkaKap6oPaTopa BbINOHNReTcHa3aBODe BO BpeM NcblTaHn. PerynpoBka Kap6oPaTopa DOnJxHa OcyueCTBJIaTbcOByeHHbIM CneuaJIInCTOM.

IPEUYPEXJEHNE: Pexyuee
obopyoBaHne MoKet BpaatbCra BO
BpempeynpOBKn Kap6OpaTopa.
HaJeHbTe Bce 3aunTHbIe
npncnoc6JIeHn n co6JIoDaIte MepbI
6e3OnacHOCTn. Y6eINTecb, yTO pexyuee
obopyoBaHne OCTaHOBHeO BO BpEm
xOIOcTOro XoJa. NpeD onyckaHnem
ycTroponCTBa y6eINTecb, yTO pexyuee
obopyoBaHne OCTaHOBNeHo.
BHIMAHHE! Ecnn pexyuee oobopyoBaHne Bpaaetc npn pa6ote Ha xONoCTbIX o6opotax, BnHT T cneJeT nobepHytbpOTNB YacOBoi CTpeKN Do Tex nop, noka pexyuee o6OpuyoBaHne He octaHOBNTc.
PekomeHdoBaHHbIe o6oPoTbIXONoCToro xOJa:
CM. pa3JeI "TexHueckne xapaKTepeNtIKn".
MaKc. peKomeHDoBaHHbIe o6oPoTbIXONoCToro
XoJa:
Cm. pa3dien "TexHnueckne xapaKTePncTnKn".
Toyna perynipobka xoloctoro xoda
OTperpynpyteXOIOCToXoB BuHTOM XOIOCTOxoTaT,ecnn3TO Heo6xOIMo.Bhauane NOBepHnTe BnHT T no YacBOO CTpeNKe Do tex Nop, noka peKyuue 0bOpyOBaHne He NaHET BpaataBcra.3aTEM nobopaunBaIte BnHT npOTNB acBOO CTpeKN, noka peKyuue 0bOpyOBaHne He octaHOBnTCra.IpaBnblHoN cHITaeTcra perynipOBka, pnp KOTopoN DBnIaTeNb POBHO pa6otaet BJIIO6om NIOJoxHeH.No Hauana BpaueHnpeKyuero 0bOpyOBaHnDOnKeH OCTaBaTbCn DOCTaTOUHyn CBO6OHDhXoD.
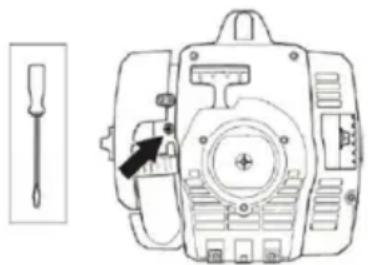
PerynpoBka 60poTOB cTapTOBOra3a
UTo6bI Do6ntbcra npaBnIbHbIX O6oPOTOB CTapTOBOrO ra3a, B 3aHei qactn pyKn IpocceJI, BO3JIe Ka6eJIe, ppeDyCMOTpeH peYJrTOp. 3TmBnHTOM (WecTHrpaHHbI 4 MM) MOxHO YBeJIuNTb HII N yMeHbUHTb KOJIuYeCTBO O6oPOTOB CTapTOBO r3a.
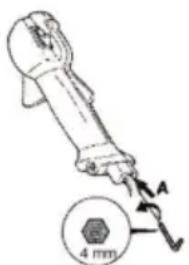
BbInOpHnTe cneJeUouee:
1.ДаиTe MaunHe nopa6oTaTb Ha xOIOCTbIX o6opotax.
2.ПикмITEФнсаТОДрOCCEЯ CORNACHO ONICAHNO INHCTpyKUNI NOД 3aROJOBKOM "3aNYCKI OCTaHOBKa".
3. Ecni KoJIInueCTBO O6OpOTOB CTapTOBOrO ra3a Ype3MepHO Hn3KOE (HnKe 4000 06/MnH), perynipoBOuHbI BnHT (A) cneDyET NOBOPaUBaTb No YacBOB CTpeJIke, noka peKyUe ee O6OpYDoBAHne He NaHcET BpaTaBcra. 3aTeM NOBepHnte perynipoBOuHbI BnHT (A) Ha 1/2 o6Opota no YacBOB CTpeJIke.
4. Ecn KOnIueCTBO OboOpOTOB CTapTOBOrO ra3a Ype3MepHO BbICOKOE, peryInpoBOUHbIN BnHT (A) cneJyET NOBOPaUNBaT npOTNB YacobO BCTpeIKN, noka peKyuuee obopyoBaHne He octaHOBNTcra. 3aTeM NOBepHnte perynipOBOuHbIN BuHT (A) Ha 1/2 obopota no YacobO CTpeJIke.
TEXHnueCKOE OBCJyXINBAHNE

PNEyPExEHNHe:EcnnO6oPoTbIXoNocTOXoJa HeBO3MOxHOOTpeYnpoBaTb TaKIM O6pa3OM, YTo6blpeKyUee o6OpyDoBaHne OCTAHOBnIOcB,6paTntecb K dInepy.He noJb3yntecMaunHo, noka He 6yDeT BbINOnHeHaTochApeYnpoBKa Hn peMOHT.
TnyuHTeB
BHIMAHHE!InyuHTeNb ochaueh KaTaN3aTOPOM,IpeHa3HaYeHHbIM dny MeHbWeHncoOpKaHn BpeHbIX BeueCTB B BBIXONHbIX ra3ax.
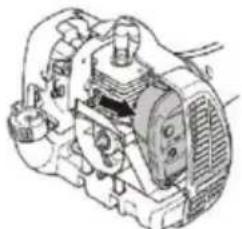
(Kopnyc cmapmepa chm nHaanHocmu)
InyuHTJIb CnyKNT IJIa CHNXHnY yPOBnIyMa n OTBOJa BbIXNONHbIX Ra3OB OT ONepaTopa.
BbIXIOHbIe ra3bI ouEnb rOpayne mMoryT coDEpKaTb NCKpbI, YTO MOKeT npNBecTN K NOXApy npnPpAMOM nonaHaHn Ha cyxOn BOCNNaMeHIOUnciMaTePnAn.
InyuHTeN O6OpyOBAHbI CneuaNBHO
nCKpoynabNbaIOUe CEtKo. 3Ty CEtKy CNeEyET
PpOBepaTb, n Pn Heo6XoIMOCTN YcCTNTB B
cepBnCHO MaCTepCKo. Pn BO3HKnHOBeHHN
NoBPexKeHH Na CETke ee CNeJeYet 3aMeHNTb.
Ecni cetka yacto 6bibaet 3acopeha, fyHKcna KaTann3aTopa yxudweHa. Obpatntecb K dInepy InpoBepkn rnyuHnteJr. 3acopeHne cetKn Bbl3OBET neperpB dBuraTeJr N nobpeXdeHne UINHHpa n nopshn.
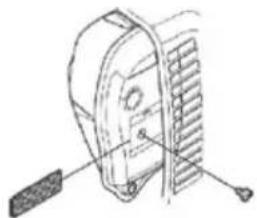
BHUMAHNE! 3anpeaaetcnoB30BaTbcMaunho,ecn rnyuHTen nobpexden nnnnloxo 3akpenne.Hyedntecb,TO6oNTblrnyuHTe 3aTarytbl.

IPEyIPEXJEHNE: InyuHTeJIb KaTaN3aTopa CnIbHO HArpeBaETcB INpoUecce pa6OtBI N OocJIe pa6OtBI HeKOTOpOE BpEMr OCTaETcR TOpAUM.3To npONxCoJNT N B pEXNMe XOJOCTOro XoJa. CoPnKOCHOBeHne MOKET Bbl3BaTb OxOr KoxN. POMHnte 6b OnaCHocTN noxapa!

IPEyIPEXDEHNE: B rnyuHTeJe ecTb XMMKaTbI, KOtOpbIe MOryt Bbl3bIBaTb paKOBbIe 3a6OJIeBAHn. N36eraTe KOHTaTc C 3TNM 3JIeMeHTAmN B cJyuae NOBpeXdEHn rnyuHTeJI.

IPEyIPEXJEHNE: BbIXlonHbIE ra3blBnraTeNa CoepKAT MOOHCKNDyIePDA, KOToPbIM MoKET BbI3BaTbOTpaBHeHne yrapHbIM ra3OM. He3anyckaIte N He 3KcNpyaHTpyuTEMaunHy B NOMeUeHN N B dpYrNX pNOXOpOBETpNBaEMbIX MecTx.BixlonHbIE ra3bl DnRaTeNA MeEOTBbICOKyIO Tempeatpy N MOrytCoepKaTb NcKpbI, KOTopBIE BCBOO OpepeMbrynpBeCTN KBOcnPaMeHEnIO. Po3Tomy MaunHy HNKOrda He CJIeDyET 3AnycKaTb BHyTpNOMeSeHHN NIN PRAOMC JERKOBCnPaMeHReMbIM MaTePnaJOM.
CBeya 3axnraHna
Ha pa60ty cBeu 3axnraHnBnIOT CneDyIOUne
- HenpaBnIbHa perynipOBKa Kap6IopaTopa.
- HeNoDxOJaTgONnBHaCMeCb (CmNtKOM MHOrMaMnHecOoTBcTCTByIOuee MacNo).
- rpa3HbI B03dUHbI ΦnJIbTp.
3TNФakTopbI BnIaIOT Ha 6pa3OBAHne HaraHa 3JIeKToDax CBeuN MOrY TpInBecTn K C6oM B pa60Te N TpydHocTm npn 3anycke.
Ecnn Dnuratelb He Habnpaet MouHocTb, nnoxo 3aBODNTcnnn pao pa6oTaet Ha XOJOCtbIX o6opotax, npexde BCero npOBepbTe Cbeuy 3axnraHH.
Ecni Cbea 3aqr3HeHa, npOuNCTnTe ee n npOBepbTe, yTO6bl 3a3Op MeKdY 3JIeKTPoJaMn coCTabnn 0,024 IIOIma (0,6 MM). CBeuy HxHNO MeHrTb Ype3 MeCz pa60tBu IIN pRn Heo6xoDmOcTn Yaue.
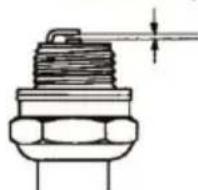
0.024 inch (0.6 mm)
BHIMAHNE: Bcerda nCnoB3yIe TOnbko yka3aHHbI Tn CBeuN. NcNoB3ObaHne HeBepHO MoJEN MOKeT npNBecTN K cepbe3HbIM NOBpeXdeHNm NOPHRA/UNINHpa.
Bo3duyhbiHnIbTp
Bo3dyhbln fnnbtp cneyeet perynapno uuctntb ot nbIIN npr3n dnn npedeotbpaueHnCneDyUOxN NOBpeKdHn:
- HenpaBnIbHna pa6To ka6IpaTopa
TpydHOCTb 3anycka - NaDEHNE MOUHOCTN DBNrTaTeJRA
- N3NHHH N3HOC DeTaNe DnBraTeJRA
- Upe3MepHbI paCXoT ToJINBa
Bo3dyuHbI ΦnJbTp cneJeT ouNtAbKaxDbIe 25 yacob nnn qaue,ecnn MeCTo pa60tbl CnNUKOM 3anblNeHO.
OuNcTkBa03DyUHoroΦnIbTp
CHIMTE BO3dyHbI ΦnIbTp, CHB KpbIuKy BO3dyHoro ΦnIbTpa. PpOMOte B uNcToi, TENNOMbIHBOe. TuaTeJIbHO npOnoLoCHnte. Ipeed c6opKo y6eINTeCb, UTO FnIbTp cyXoI.
Bo3dyuHbI ΦnIbTp nocne 3KcnIpyataunB TeueHne HeKOToPOr BpEmHn HeBO3MOxHO NOHOCTBIO BvUChNTb. I03TOMy erO Heo6XoIMo nepNoDnueckn 3aMeHrTb HObIM. NOBpeKdEHHbI BO3dyuHbI FnIbTp Heo6XoIMo 3aMeHtB.
YrnoBa 3y6aTaI nepeDaHa
Yrnobyu 3y6aTyu nepedauy 3anoNHaOT DOCTaTOUHBIM KOINueCTBOM KOHCnCTeHTHO Cma3Kn Ha 3aBODe-n3rOToBnteJe. Ondako, npexde yem noIb3oBaTbcra MaunHO, cneDyeT y6eInTbcra, YTO 3ta nepedaua Ha 3/4 3anoJIHeHa Cma3Ko. IcNoIb3yIte CneuJbHyO Cma3Ky. O6bIuHo KOHCnCTeHTNa Cma3Ka He HxJaetCBA 3aMeHe, 3a NCKIIOUeHEm CnyaEB peMOHTa nepedaun.
3atauBaHne HOxa IJe3Bn TpaBbl

PPEyPExEHN: Bcerda BbIKIouaHTe DBHrataJIb nepeTcM, KaK npctyntB K paOte HaJ KaKoI-NIOO qactbpo pexyUero o6OpdyOBaHn. OHO npOdoJXaET BpaAaTbc JaKe npO tnyueHHOM dpocceJe. Y6eINTecb, YTO pexuyne o6OpdyOBaHne OCTaHOBNIOCb NONOCTbIO, NOTcoEINHTe PpOBd OT CBeu3axHraHHN, PpeKde Yem npCTyntB K pa6ote c Hm.
Ha ynaKOBKe peKyUeRo o6OpyIOBaHnO nncAHO, KaK npaBnIbHO npOn3BOdntb 3atauBaHne.
- Ie3Bne HOK 3aTaHNBaHOTc PIOCKHM HAnNJbHNKOM C OJHOCTOpOHNM y3OPOM.
-Дя coхpaHHeH6BaJIaHcnpOBKn BCE yIbIdoJXHbI 6bITb 3aTOUeHbI OINHaKOBO.

PPEyPPEKDEHNE: Bcerda yTnIIN3npuYTe NorHytoe, nepekoWeHoe, TpechyBwee, pa3OpBaHHoe nI IN NOBpeXDeHHe NHBIM O6pa3OM Je3Bne. He nbitaTEcB BbInpMaITb nepekoWeHoeJe3Bne dIra NOBTOPHOr IcNoJIb3OBaHHa. IOnb3yTEcB TOJbKO IcnpaBHBIM Je3BnAMN ppeDncaHHoro Ttna.
TpaФн TextHnueckoro O6cJyXnBaHnA
Hnke npBedeH nepeYeHb TexHueckoro
06cnykBAHnA, KOToPOe Heo6XoIMo BblNOJHrTa
Ha MaunHe. BoIbWHCTBO nyHKTOB ONuCAHb I
pa3dene "TexHueckoe 06cnykBAHne".
POnb3OBaTeJIb MoKet BblONHrTaTb TOnbKO TaKe
pa60tI NO 06cnykBAHnIO n cepBucy, KOTOpbIE
onuCAhBI DaHHOM pyKOBoDCTBe no pa6Ote.
O6cnykBAHne 60nbWero 06beMa dOnxHo
BblONHrTbcra ABTopu3OBaHHoN cepBnCHO
MaCTepckoi.
ExeHeJeIbHoeTexHnueckOe 06cnyKuBaHne:
OuNTe MaunHy ChapyKn.
- Y6eIntecb, yTo 6noknapoTpor peryJrTopa ra3a n pyka dpoceJIra COOTBeTCTByIOT Tpe6oBaHnM 6e30nacHOCTn.
- Поберп Te pa60Tu BbIKnHouaTeJia.
- Y6eIntecb, cyTo peKyuuee 06OpydoBaHne He BpauaetcHa XOJocTbIX 06OpOTax.
- IpoounCTne Bo3dyuHbI ΦnIbTp. 3aMeHnTe B cnyuae Heo6xOAnMocTN.
- Y6eIntecb, yTO IuTOK peKyuIero o6OpyIOBaHnHa He NMeet IOBpeXdEHN H TpeUHH. 3aMeHInTe IuTOK peKyuIero o6OpyIOBaHnA, ecN OH 6bl nOdBepKeH yApPy IIN NMeET TpeUnHbI.
- Y6eIInTeCb, yTO rONOBKa TpMMepa He NOBpeKdEHa n He NMeET TpeuH. Ppn Heo6xOIMOCn 3aMeHnTe rONOBky TpMMepa.
- Y6eIntecb, yTO KOHTprAka peKyuIero. 06OpyIOBaHnI npabUNbHO 3aTHyTa.
- Поверпгдзатякгаеки внтуов.
- PpOBepbTe OTCyTcBne yTeKn TOnnBa n3 DnIraTeJI, baka nn IJNaHROB.
ExeMeecyHoe texHueeckoe o6cnyKbaHne:
- Поберпсстартей сeroшур.
ExeroDHOeTexHnueckoe 06cnyKuBaHne:
OuHCTnTe HApxHyIO NobepxHOCTb CBeu3aXnraHn. Chmnte n npOBepbTe 3a3OpMekdy 3JeKtpoamn. OTperynpyte ero do0,5 MM (1/32 dIouMa) nn 3aMeHnTe CBeuy.CneHnTe 3a Tem, TTo6bl CBea 6blaOchauhe HaN3OJIaue paDInonomex.
-ПочNTe HapyKHyIO NOBepxHOCtB Kap6IopaTopa I npJIeraIoUne K HeMy NOBepxHocTn. - Y6eIntecb, yTO yrnoBa 3y6uataa npeDaaya Ha 3/4 3aNoJIHeHa Cma3koJ. 3aNoJIHnTe ee B Cnyuae Heo6xOIMoCTn, NcNoJIb3yra CneUaJIbHyIO Cma3ky.
- Y6eIInTeCb, yTO TOnJIINBHyI ΦnJIbTp He 3aIrp3HeH, a HA TOnJIINBHom IJNaHRe HET TpeuHH INI npYrNx DeΦeKToB. 3aMeHIne B Cnyuae Heo6XoDnMOCTn.
- OcmotpuTe BCE npoBoa n CoeHHeHnA.
- PpOBePbTe CcENnHHe, npyKuHb CcENnHnN 6apabah CcENnHnHa n3Hoc. Ppi
Heo6xoDMOCTn 3aMeHHTe INX B aBTOpN3OBaHHoM aCTepCKoN.
3aMeHnte cBey 3axnraHna. CJIeInte 3a TeM, yTo6blcBeea 6bIIa OChaupeHa n30JIaue ne paAnonomex.
OuHCTnTe Hnn 3aMeHnTe NCKPOyNAbNBAIOU cyo CeTky Ha rnyuHTeJe.
Bnuratenb
Obemunnnpa,cm 28
DnametpunHpa,MM 35
Динhaха,MM28,7
Oboptb xjoctoro xoda, 06/MnH 2800-3200
PekomeHIOBaHHbIe MaKc. BbICOKne 60opOToXoNocToro XoJa, 06/MnH 11000
YacToTa BpaueHnBbXoHOro BaHa, 06/MnH 8000
MaKc. BbIXoHna MoUHocTb DnRaTeNa corNacho ISO 7293, KBT 0,8
TnyuHTeB cKaTaJIIN3aTopoM Da
CnCTema 3axirarHn C peryInpOBKo YacToTb I BpaueHna Da
CnCTema 3aXnraHna
Cbeua 3axnraHna NGK BPMR6A
3a30p MeKdy 3NeKTPoDaM, MM 0,6
TOnnBHa CNTema N CNTema Cma3Kn
EMKoCTb TOnJIINBHorO 6aka, cm³ 343
Bec
Bec, 6e3 ToIINBa, pexyUero o6OpdyObaHn n uNTka, Kr 5,21
3Mnccn ywma (cm. Pnpmeuane 1)
YPOBEHb MOUHOCTn 3Byka, n3MepeHHbI, d5(A) 106
YPOBEHb MOUHOCTn 3Byka, rapaHTnpoBaHHbI, LwA D6(A) 114
YpOBHn Wyma (cm. PnpMeuHne 2)
YpOBeHb yMBoRo daBJeHnHa yPobHe yxa onepaTopa, n3MepeH corlaCHO
EN/ISO 11806 n ISO 22868, dB(A)
CJe3BnEMIaTpaBbI (OpuHHaNbHbIM) 94
C roJIOBkoI TpIMMepa (opuHaJIbHO) 95
YpOBn Bn6paun (cm. PnpmeaHne 3
3KbBbaIeHT ypObHenn Bn6paunn (aHy,eq) nI pyueK, n3MepeH cornacho EN ISO 11806 n ISO 22867, m/c2
CJe3BnEMIaTpaBbl (opuHHaJIbHbIM), CJIeBa/Cnpaba 4,21/4,23
C roIobkoT prIMMepa (opuHaJIbHO), cneBa/cnpaba 5,89/4,61
PnmuueHne 1: Mmccna Wyma B OKpykaioyU cpeNy n3MepreTc KaK WymoBoi 3ΦΦeKT (wA)
corlaacHO DnpeKtBc EC 2000/14/EC. Yka3aHHbI ypoBeH bIyMa IJMaIHHbI n3MepeH c opunHaJIbHbIM peKyuIIM o6OpYIOBaHNeM, daOUIIM HauBbICHI ypoBeHb. Pa3Hua MeJdy
rapaHTnpOBaHHoN u3MepeHHoN 3ByKOBoM OuHocTbO 3aKnIOuaeTcB TOM, yTO rapaHTnpOBaHHaR 3ByKOBa MOnHocTb TaKKe BkIIOUaE p36poc pe3yNbTaTOB u3MepeHn N INx OTKNOHeHne dJRA MaUNH oHDn I ToJ Ke MoJIeN, corNaCHO DnapeKTNBe 2000/14/EC.
IpmeHne 2: Ka3aHHbIe daHHbIe o6 3KBuBaJIeHTHom yPOBHe WymOBOrO daJIeHnA JnMaunHbIMeOT TnHbI cTaNTcNueckn pa3bPoc (CTaHdapTHoe OTKIOHeHne) 1 d5(A).
IpmeHne 3: Ka3aHHbIe daHHbIe o6 ypoBHe Bn6paun IMeOT TnIMuHbI CTaTNCtUeCKn pa36poc (CTaHdapTHoe OTKIOHEHe) 1 M/c.
MoIeJIb 129R (KoHnK BaJa c neBocToPOHHe pe3b60M10) - eHTpaJIbHOe OTBepCTne BJe3Bnax/Hoxkax, 25,4 MM
PpimHeHOTc CneDyUOuIe CTaHdApTbI:
EN ISO 12100:2010, EN ISO 11806-1:2011, ISO 14982:1998, CISPR 12:2007
Opranu3aue TUV Rheinland N.A. 6bI npoBeHd o6pOBohBk KOHTpoJIb OT ImEHn Husqvarna AB, B pe3yIbTaTe KoTOporo 6bl BbIaH AM72140165 - CepTuΦnKAT COOTBeCTBnA DnpeKTnBE EC 2006/42/EC O MexAHueckOM obOpydoBaHH. DaHbI cepTuΦnKaT DeiCTBnTeJH IJI BAePnpraTn I CTpaH npOn3BOInTeJI, KaK yka3aHO Ha N3deJIH. PocTabIaEmbI TpIMMep H/IIIN KycTOpe3 COOTBeTCTByET 3TaHOy, npOseDuWeMy KOHTpoJIb.
Iopnncb ot mEnH: Husqvarna AB, Huskvarna, UBeun, 2013-12-27.
距离
POnHH E. TOndMaH, TexHnueckn DnpeKTop. (yNoJHomOeHHbI npeCTaBtTeIb Husqvarna AB, OTBETCTBeHHbI 3a TexHnueCKyIO DOkymeHTaCNUO).

YBAGA! Buxnon DBNyHa cboRo Bnpo6y MICTb ximiuH peoBuHN, aki 3a daHMM Wtaty KaIipOpHia BKNlkaOTb paK, BPOJKeHi depeKTn a60 iHsi 3axBOPOBAHn pePpOdykTnBHOi CNCTeMn.
DeaKi npaDi nepeTm, JaK noaTn:
YbaxHo npouHTaTe noci6HnK KopnCTyBaHa.

YBAI! 3a KODHx O6CTaBnH He 3MIHOHTe KOHCTpyKuii IHCTpymEnTy 6e3do3BOy Bnpo6Hnka.3aBXKn KOpNCTyTecr OpnirHaJIbHnMn 3aunactnHAM Ta npnnaDjam. 3AcTOcyBaHHr Heo3BOJeHnx MoiΦikaui Ta/a6o npnnaDra MoKe npn3BeCTn Do cepNo3HoI YC CMeptelbHOITpaBMn KOpNCTyBaHa qn IHnx oci6.

YBAI! Kyoip3n, Kocapkn Ta TpImepn MoKyTb 6yTu He6e3neuHMMn, RaIO HMM KOpNCTyBaTncr HEnpaBnIbHo a6o He6aNo, I MOKyTb npN3BeCTn Do cepno3HOi Yc CMeptelbHOiT PaBM N KOpNCTyBaVa qn IHnx oc6! DyXe BaxKnBO npOHTaN Ta 3po3ymtN 3Mict Noci6Hnka KOpNCTyBaHa.

YBAGA! HaTo IOBra po6oTa npn cnIbHomy wymi moKe cnpuHHHTn noripweHn Cnyx. Otke, 3aBXdN KopncTyHTEcR BiIDNOBIDHMn 3axNCHMn HabyuHnKaMn.
Hawa komnaHia DOTpMycbCn noJITKn, 10 nepe6aue nocTInHe BDOCKOHaJIeHHn npdykii, TOMy MN 3aIIuMaECMO 3a CO6oN npabo 3mIHOBaTN dN3aHn I 3OBHIHNBURJnBnpo6iB 6e3 nonepdHbOrO cnObiueHHn.
P03NaYeHn

YBAI! Ounchi nIIKn, Kyuopi3n Ta TpImepn MoKyTb 6yTu He6e3neuHmN! He6aN nn Hn npabNJIbHe BnKOpNCtAHn MOKe CnpuHHnCepNo3He a CMeptIbHe nopAHeHHKopnCTyBaay n iHux oc6.

IpepeKopncTyBaHHMaunHoUyBaXHO npouHTaTe NocioHnK KopncTyBaay Ta nepekoHaTecra, 0u Bn 3pOzymiBc Bka3ibKn.
3aBXKn BnKOpNCToByTe 3axnche
B3yTT3i CTaJIeBmH NcKaMn Ha
HeCnN3bKi NiOuBi,
npnacOBaHn OJr, DObri 7TaHn
3MiUHOI TkaHHn Ta copOuykY 3
IOBnMMpyKabAMM, MiHi
HeCnN3bKi pyKabuZi, 3acO6n
3axnCTy OueN, Taki JK 3axnCHi
OKyJApN, Uo He 3anOTiBaOtB Ta
MaOtB BeHTnAciHi OTBopN, a60
UHTOK 3BapHnKa, CXBaJIeHNI
3axnCHNI WOnOM Ta Wymo3axnCi
3acO6N (ByuHI 3aTnUKN a60
WymoRnyuHnKn) dJIra 3axnCTy
cIyxy.
Oco6n 3 IOBm BOJOCCM NOBHHI (IЯ BnaCHOI 6e3neKn) BNCOKO IX 3aKoJIOTN.
Iiacpo6oBnBpaiyci 15MeTpiB(50ΦyTIB)BiKOpNCTyBaHaHeNoBHHI 3HAXOHTNCJIOHNYTBapHH.
OcTepiraTecra 6oEKTIB, kIMoKyTB BnIITaTN 3-niIDIHCTpyMeHTy I BiDcKaYBaTN BiHABKOnuHix PpeDMeTIB.
MaKcMaJbHa WbUdKiCTb 06epTaHH BxHIOi Oci, 06./XB.


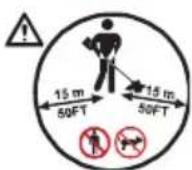
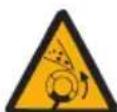

IHCtpymeHT,Ha kOMy BCTaHOBHeHO HOxI dIa TpaBN, MOKe p3KO BiKInHyTN B6IK, KaHoi HIX HaTpanNTb HA Hepyxomn npEmT. Ie30 NIIKn 3aTHe BiITaN pykYu HOry. JIOHN Ta TBapHH 3aBXKn IOBnHi 3hAxOHTncB Bd IHcTpymeHTy Ha BiCTaHI He MeHs Hix 15 MeTpIB (50 cyTIB).
CTpiK, 10 noka3yHb MeKi dna BCTaHOBHeHH pyKoTOK.
Pibehb 3BykoBOro TnCKy Ha BiDCTaHi 7,5 MeTpIB (25 cyTIB) BiNobIdae HOpMaM, BCTaHOBJIeHIM B ABCTpaIIi.
PBeHb BnnpomHOBaHHaUMy B HABKOINHc cepeOBNUce BiNobiAc DnpeKtNBi CC.PibeHb BNpOMIHBOAHHaUMy MaunHOBkA3AHn y po3dini "TexHniDaHI", a TAKoX Ha eTNKeTJI.
Ley Bnpio Biinobiidae BmorgcC
Ley BnipB Biinobiae BmoraEAC.
LcBnpiBdnoBiae BmOram HOpM eNekTpomarHITHOcymichocti (EMC) ABctpanii.
BukopncToByTe HeeTnOBaHm 6eH3nH i MacNo DJa DBOTaKTHX DBNrHyHb y cymiwi 2 % (50:1).
Ihwi no3haeHHHa IHctpymenti BiNobidaotb BmOram CneiaIbHx ceptnphiKatIB dny neBHX pHKIB.


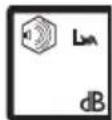


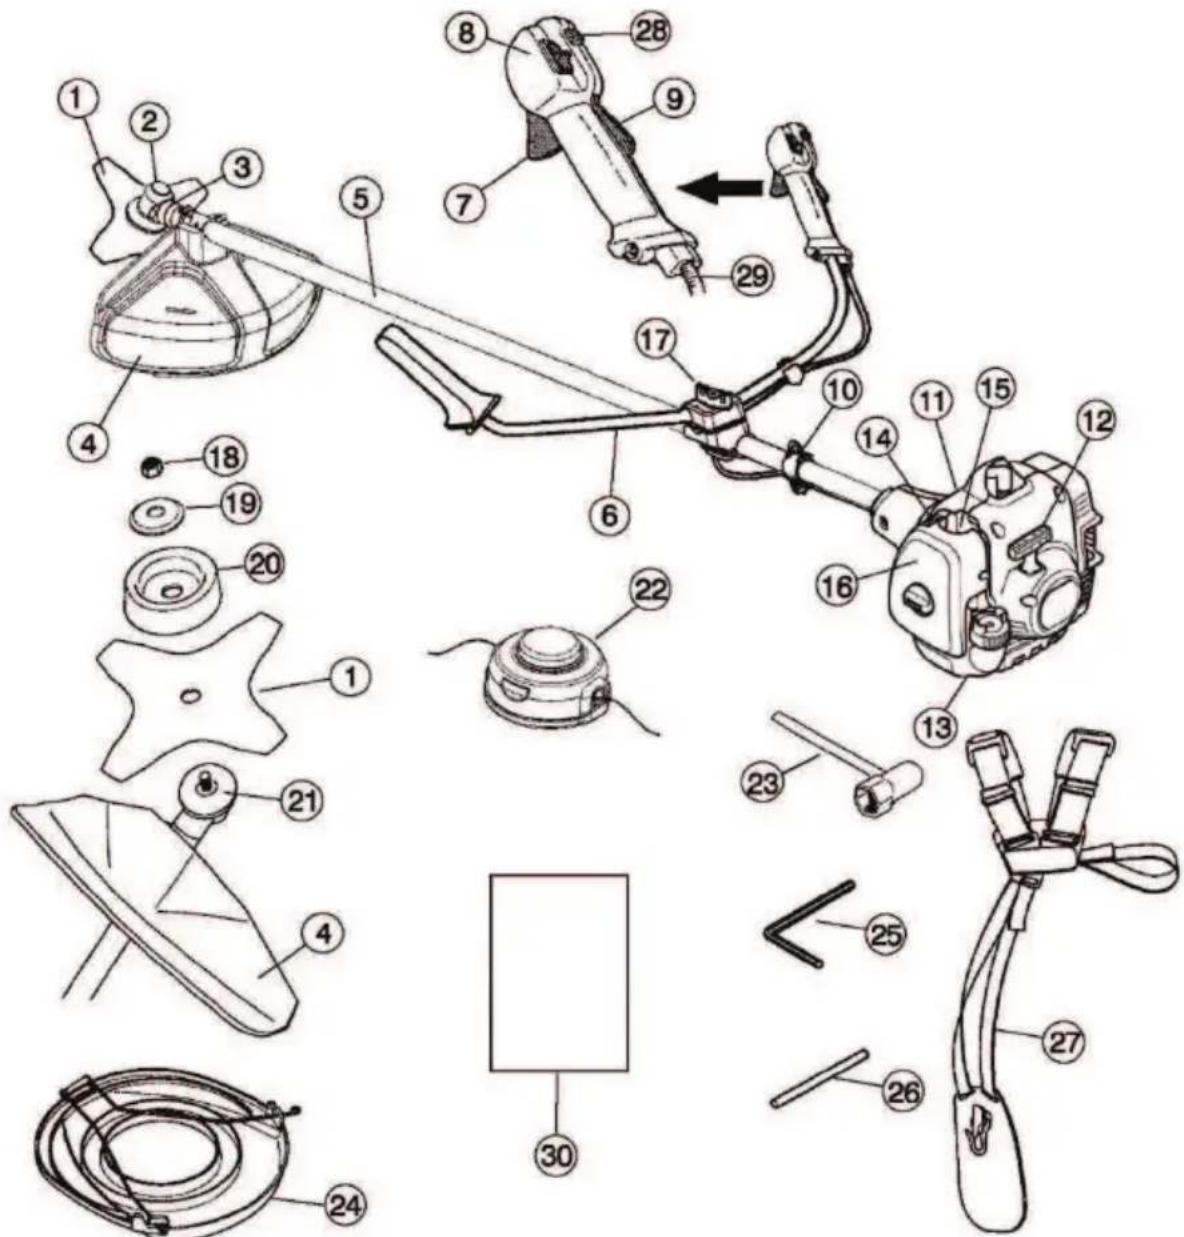
Uo e uo
- JIe30
- Kpnska MaCTnIbHOro pInbTpTa
- 3y6uacta nepeadaa
- 3axnchnn koxypikyoHaacdkn
- UtaHra
- Rykortka
- KepyBaHHaDpoceJIem
- BIMnkau
9.Блokуванядрocеля - KpinJIeHHnpeMeHn
- KpnuKa CnInHpa
- RykoarKa cTapTepa
- NaBnBn 6ak
- KepyBaHHa 3acJIiHKoH
- Kyra 3anaIbHnka
16.Kpwnka noBITPraHOro pInbTpa - PerylkuBaHHpyKoTkn
- Kontrprainka
-
OnopnHn FNaHeu
-
Onopha MaHkeTa
21.Пивовни дисс - TOnOBka TpImepa
- TopceBn raiKOBn KJIIOU
- YoxonДлЯТранспортуbaHHA
- Raikobin KJIIOU
- CToonopHn WtntΦT
- Nacoba niDvicka
- Khonka zanycky dpoceena
- Peryniobanna npoBdy dpocen
- NocibHK KopncTyBaay
BaxKnBO
KuOpizn, Kocapkn Ta TpImepn MoKytb 6yTu He6e3neUHMN, JaKo HUMN KOpNCTyBaTncr HenpaBnIbHO a6o He6aNo, iMOKytbpn3BeCTn Do cepno3HOi Yn CMepeJIbHOITpaBMN KopNCTyBaVa qn IHux Oc6! DyKe BaxINBO npOHTaTI Ta 3pO3ymTi 3MiC Toc6Hnka KOpNCTyBaHa.
- Lcien iHCTpymEnT npn3HaueHn BnKIOUHO nIy BnpiBnHOBaHHa 60 BNKOswyBaHHa TpaBN, a TAKOK dIy po3uCTKn Icy.
PikyuH hacaKn, nepeJIueHi B po3diJI "TEXHIH DAHI", - ue cInHe npuJa,Ke Do3BOJRAeTBcB NkOpNCToByBaTu npi po60ti 3 LIM IHCTpyMeHToM.
HikoJn He KopncTyItecI hCTpyMeHTOM, kUO BN BTOMJIeHI, BKNBJIIN CnIPTHI HANOI YN npIMaTe IIKN, 10 MOKytB BnInHyTu Ha 3ip, CBIDOMICTb YN KOOPDnHaIIO pyxIB.
HikonHe BnKOpncToByTe IHCTpyMeHT 3a HecnpnATJINBnx IOROHNX yMOB, TAKNX RA CInbHn XoIOd, y dyke JkapkOMy Ta/a60 BOJOrOMy KImati.
BukopncToByte 3acobn iHdbiyaIbHoro 3axNCTy. NIBITbcra iHcTpyKuii nD 3aRIOBkOM "3acobn iHdbiyaIbHoro 3axNCTy".
Hikon He Kopnctyntecra hCTpymehTom, y KOHCTpyKuo koro 6yJIu BHeceHi 6yIb-aki 3MiHN.
3abopohraetbcK KopncTyBaTnca HecnpaBHm npnctpoem. Dotpmytec iHCTpykui 3nepebipkn, dorgny Ta o6cnyroByBaHH, 0n Habedehi y nociHnky. Deaki 3axoN 3dorJyTa o6cnyroByBaHH NOBHHI 3diChKBaTnC CneuaJIbHO NiIroTOBHeHMn axibqM. Deki onepauii TexHIORO 6cnyroByBaHH MaOTb BIKOHyBaTu NIIwe KbaIiΦikobahi xfaxbi. DnBiTbc po3dn "TEXHlUHE O5CJYrOByBAHH".
- Ipeed noaTkom pobotn notpi6ho BCTaHOBtN Ha MicCe BcKpnUkni 3axuChi Koxyn. IpekoHaNTecB Tomy, 0o KOBnak CBiUKn 3anaIIOBaHH i KaBeNb He NoWkoJKeHi. IHaKHe icHyE pn3NK ypaXeHHeJIeKTpHNM CTpyMOM.
Piucpo6oBnBpaDiYci15MeTpib (50yTIB)BIDKOpNCTyBaUaHeNoBHHi 3HaxOHTNCIIOHNuTBapHNI.KoIN DeKInbKa KopNCTyBaUIBpauHOITbBOHOMY Micui,6e3neHa BIDCTaHbMIXHMMaE6yTN npHaMH15MeTpib(50yTIB).
YBAI!PiJ uac po6Otn, c9i iHCTpymeHT CTBOpIOE eJIeKTPOMaHITHe NOJe. Y deAKnX BnnaKaX Ie N0Je MOKe BnNBAuHa Po6Oty AKTNBHX a6o NaCUBHX MeuHNX IMNaHtATIB. Jnra 3MeHwENHpaN3ky cepNo3Hnx a6o CMEpTeJIbHnx TpaBM nepeD NoaTkom po6Otn 3 IHCTpymeHTOM MPeKOMeHNyEMO OcO6am 3 MeuHIMM IMNaHtTaAMn IpOKOHcybTyBaTncr i3 CBOIM Nikapem Ta Bnpo6HkOM MeuHOro IMNaHtAty.

YBAGA! BnKOpNCaHHH HnPaBnIbHoI pIXyOHaCAdKn Yn HnPaBnIbHO 3arocTeHoro HOxA 36IbWye He6e3neKy BHNKHeHH HeaChNX BnJaKIB.

YBAGA! HikOnn He Do3BoJnTe dITaM BnKOpNCTOByBaTn IHCTpymeHT u 3NaXoDHTNc6IJa HbOrO.OckIbKn IHCTpymeHT o6JaHaHn nepemKaUem i3 npyKHoIO I MoKe 6TyN 3anyuHeHn Ha Hn3bKi WbNkOcTi I 3 MaNoIO CnNOIO 3a DonOMoroIO CTApTEpa, To HabITb MaNeHki DiTu 3a DeaKnx O6CTaBH NMOxyTB Matn CNly, Heo6xIDHy dJa Ioro 3anycky. Lc MoKe O3HaCuTn Pn3NK cepNo3HOI TpaBMn. TOMy BuDaJIbTb NatPOH CBiUKN 3anaJeHH, KOJI nIHCTpymeHT He 3NaXoDHTbcra Ni d CyBOpHM HarJaDM.
3ac06n iHnBiDyajbHoro 3axncty

YBA!KoXHOrO pa3y npu po6Ot i 3
IHCTpyMeHTOM Heo6xIDHO KOpNCTyBaTnCRA BIDNOBIDHMN 3ac06amn
IHINBIyAaBHorO 3axNCTy.OCo6nCTe
3axNCHe CnpAaXeHHr He MoKe NOBHiCTIO
NIkBiDyBaTH He6e3NeKy TpaBMyBaHHr,
ane npn HeuaChOMy BnnaKy BOHO
3HN3NTb CTyniHB BaxKoCTI TpaBMn.
3BepHtbcrdo npoDaBraNo DOnomory y
Bn6opi npabNbHoro CnpAaXeHHr.

YBA! Ppaouyn y 3axnchnx Habyshnkax, npncnyautecdo nonepdxyBaIbHnx cnHanib Ta OKnkiB. BmKHyBwn DnRyn IHcTpyMeHa, Heraio 3Himitb 3axnchi Habyshnkn.
山JOM
KuO Kyu, KI Bn 3pi3aTe, BuCi 3a 2 MeTpN (6 cyTIB), NotpiioHO OJraTn WoJOM.
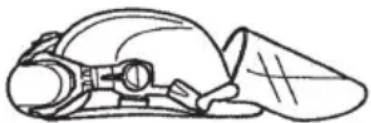
3ac06n 3axncTy cnlyx
BukopncTOByNe 3axnchi HabyuHnKn, kki 3axnCTaTB BiD 3aIBBOO wMy.
3AΓΑЛbHI ΠРABиla БE3ПЕКИ
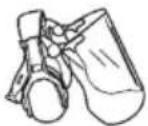
3axnchi okynpn
3aBKn KOpNCTyTecra 3acobamn 3axncTy ouen 3aTBepdxKeHOro 3pa3ka. JKIO Bu Bn BnKOpNCTOByTe npO3Opn uNTOK,doaTKOBO nOTpiHO BdIraTN 3axuChi OkyJnprn 3aTBepdxKeHOro 3pa3ka. 3aTBepdxHe 3axuChi OkyJnprn NobHHi BiINOBiDaTn BmOram cTAndaptIB EN 166 B Ebponi,ANSI Z87 B CUSA i CSA Z94 B KaHaji.

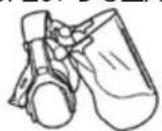
PykaBnci
y pa3i BnKOpncTaHH pixyuoi HacaKn Heo6xidHO OJraTu pykabuui.
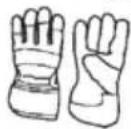
UpeBukn
Heo6xio OJraTu Hecn3bKi, MiChi YepeBnK.
OdA
BdraTe Ondr, BiroToBJeHn 3MiUHOI TKaHHN; yHkaTe HaTTO npocToPO OJry, kN MoKe 3aueNTncs 3a Kyu a6o rIKn. 3aBXn DjaTaTe Uynki Ta Dobri wTaHn. He OdaTe Ha vac poBoTu Woptn, cAndi, doporouHHocTi, a TakoK He XoDi b6oCoHIX. 3anHITb BOLOCCr TaK, uOb BOHO 6yNo BVne pNeuei.
3acobnHaandaHnepwoi MeuHoiI donomorn
KopncTyBauch Ounchoi NnIKN, KyuOpiaa a60 TpImepa NOBHeH MaN npn cObi Ha6ip 3acO6iB IJa HadaHHa nepoI MeDnuHOJ DOnOMOrn.
YcTaKyBaHHaJa 6e3neuHoi pOboTn npncToIO
U yIbOmy po3diIOnncyEc7bc 3axnche
obnaHaHHa, kIMCnpoJXeHIn HCtpymENT,
Ioro npn3HaueHHa, a TaKoK Jk Heo6XiHo
BnKOhyBaTu nepeBipKy Ta npoBOUnTI 3axoDi
TexHOrO 06cnyroByBaHHa, 06 3abe3neuHTn
Ioro npabNlbypo6Ot. 3BeptaTecra do po3diny "LIO E LIO?", 06 noBaHTn, de Came Ha
IHCTpymEtI 3hAxOUnTBcA ce CnpaJxHeHHa.
Ctpok cnjxkbn IHCTpymehTa MoKe 3MeHwINTncb, apnIK BUNHKHeHH HeuacnX BNpaKIB 36InbWNTncb, kUo TexHiue O6cnyroByBaHH
IHCTpyMeHTa BIKOHyEcTbC HENpaBnIbHO a6o AkuO 06cnyROByBaHHra/a6o pemOH TBNKOHyEcTbC HEnpopeciHIO KUo BN Notpe6yTe DoaTKOBoI IHOpMaui,3BepHtbc,6yNb NaKa,do Han6nXqOro UeHTpy O6cnyROByBaHH.
BAKJIINBO! Ⅲo6 npoBOuNTn 06cnyROByBaHHa Ta po6OTn 3 pemOnTy, notpi6HO matu CneuiabHy nIiroTOBky. Lc Oco6bNO CTocyTbc3axncHoro 06naHahHH. RaKuo IHCTpyMeHT He BiIDNoBidae npHaHaMHi OndH i3 BnMOr nepeBipKn, 0o HabeDeHi HxKye, 3BepHITbc DO npaizIBNka ueHTpy 06cnyROByBaHH. KyNyUOu 6yDb-RAKN Ha Wnpi6, BN OTPmUyTe rapaHTIO Ha npopeciHm peMOHT Ta 06cnyROByBaHHa. Rkso npoDaBeueb, y JAKoro Bu KynyTe IHCTpyMeHT, He Hadae nocnyr 3 06cnyROByBaHH, dI3HaHTecB Hboro, De 3hAxoDHTbc4 Ha6nXkYn CEHTp 06cnyROByBaHH.

YBAGA! Hikon He BnKOpncToBynte IHcTpyment i3 HecnpaBnM 3axnchm cnopdxKeHHam!
IotpmytecIHCpykui 3 nepeBipKn, DOrny Ta o6cnyroByBaHH; Deki 3axoyn 3 DoJny Ta o6cnyroByBaHH, 0u HabeHb B Cbomy po3di, NOBHNI BIKOHyBaTcN CneuaJIcTAM. KIO IHCTpyMeHT He BiINOBiJaC XOa 6 OOnH i3 BmOR nepeBipKn, 3BepHITbcra DO cHTpy 06cnyroByBaHH dIpeMOHTy.
BnokyBaHHApocen
БлOKУВаннДрОсЕЯ CTBОпЕ ДЛЯЗANOBIRANHЯ BUNaIKOBOMy CnpaIQUBAHHHO peryJITOPaDpOcEЯ.КоЛиBNHaTnCKaTeФIKCaTOp(A) (TO6To, KOЛи BN TpIMaTe B pyKaxpyKoRtKy), BIN 3BilbHc BaxKinb(B).KoJIи BN BnUnyCKaTe 3pyKpyKoRtKy,ToiΦikCaTOp,iBaxKinb NOBepTaIOTBcA DoNoVATKOBOrNOJOnOKeHHN.ПOBepHeHHY 3dInCHIOCTbC3aDonOMOrIO DBOX He3aJIeXHnx BiBDiHNx npyKHH.Le O3Hauae, lo BaxKinb DpOcEЯ ABTomTuHHO CTaE B N03uIIO XONOCTOXOdy.
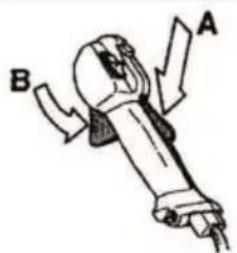
IpepeipTe, uΦiccyctbca BaXiNb y noNoxKeHHI dnn XoNoctOoi pOToN, KOIN Bn BiDnyckaTe φikcatop.
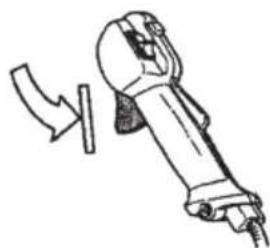
3AΓΑJIbHI ΠРABUNA E3NEKIN
HaTnCHiB Ha MexaHi3M 3BiNbHeHHI DpoCeJI Ta nepeKoHaIteC,IO BIn NOBePTaCTbCBA nonepeHc NonoXeHHa, KOJI BN Ioro BiDnyckaTe.
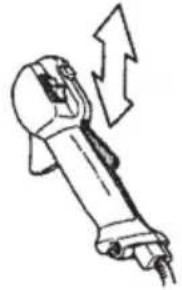
Ipekeohntecb, 0p pernyTop imexahi3M 3BilbHeHHaDpoceJI pyxaoTbcBilbHO,a 3BOPOTHa npyKnHa npaHoe HaidiHMM YNHOM.
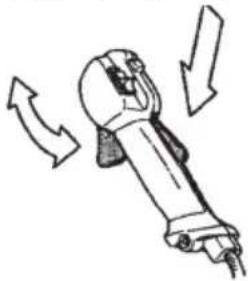
ДиВITbCSI INCTpyKcII Ni3 3aRONSOBKOM «ПуСК». YBIMKHITb IHCPTyMeHT Ta NOBHICTO HATNCHITb BaxJIb. BiDnyCTiTB BaxINb Ta nepekoHaTecS, lo pIXyua HacaIka 3ynHnlaC9 I He KpyTtbc8. JaKIO BaxJIb 3HaxoNDtbc8 B NOJoxEHHI DJIЯ XOLOCTORO XOyU, a pIXyua HacaIka npOdoBxkye KpyTtuc8, nepebiTe HanauTyBaHHX OJOCTORO XOdy Kap6kpopatopa. NInBITcP0zdiIN "TEXHlUHE OBCJLYFOBYAHHRA".
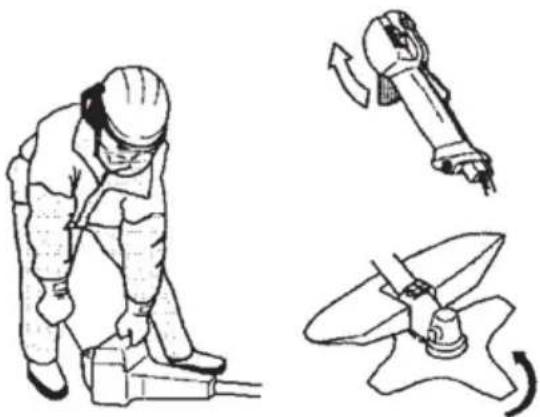
Bumkaay
IpekeKaHTeCBA TOMy,IO KOJIN Bn HaTnCKaTe i BiDnyckaTe Nepemkaqu,DbNpyH BmNKaTbcra.
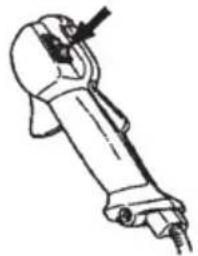
3axnchnn koxkx pixyoi Hacaikn
Ley Koxyx npn3haeHnn DJIra TORO, 0o6 He daTNI 06'KCTAM, kI BUNITATAOTb 3-niD npnady, nonactu B Kopnctybaa. Koxyx TAKOX 3axnuaC KOPNCTyBaA BiD BNnADKOBOrO KOHTaKTy i3 pIKyUHM eJemeHtOM.
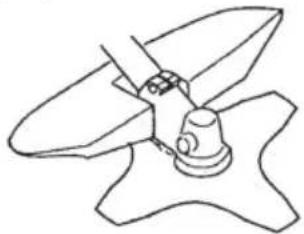
IpekeKaHTeCra, 10 KoKyx Tpumepa HENoWKoJxehn i He po3KOJOTn. 3amHiTb KoxyX, RaIO BIn 3a3HaB ydApy abo MaC TpiunHy.
3aBXdKOpNCTyIeTcKoKyxOM, zo peKOMEHDOBaHn IJRA BCTaHOBJIeHnx Ha daHn MOMeHT pIXyHx HacaDOK. DnbITbcr po3di n "TEXHIuHI DAHI".

YBA! Hikon He KopnctyTecr pixyuHn HacaKamn 6e3 BiNobiDHoro 3axncHoro Koxyxa. DnBItbcr po3dIn "TEXHIyI DAHI". BnkOpncTaHH HecnpaBHoro Yn He BiNOBiDHorO Koxyxa MoKe CnpuHNHTcepNo3Hi nopAHeHHa.
BukopncTaanHn HnpabunbHo shhpya Tpimepa nn HnpabunbHOi pkiyoo i hacaKn nDwnye pibehb Bi6paui.

YBAI! Y IIOe, kI MaHOb NoripHeH N KPOO6Ir, HAdMipHa Bi6paizr MoKe yUkoDHTn HEPBOy CnCTEmy a6o CnCTEmy KPOO6Ir. KaO y BAc npOBnIOTbcr CmNTOMn BpaxeHHa Bi6paicIO, 3BepHITcRdo NiKapra. Do TaNX CmNTOMiB HanexKaTb: Do TaNX CmNTOMiB HanexKaTb: OHIMIHn, Btpata QytNtBOcTi, NOuNpyBaHH, NOKOIBoHH, Btpata CNH, 3MiHN KOJIbOpy a6o CTany uKipn. Ra npabHno, ci CmNTOMn npOBnIOTbcr y NaIbux, pykax ta 3an'AcTkax. Hebe3neka ypaxeHH nIDBuNyEcTbcr npn Hn3bKnx TEMnpatypax.
YkopnCTyBaHHI rnyuHnKOM dyke BaXnIBO
DOTpmyBaTnCBAa3iBOK 0oO nepeBipKn,
DOrJy Ta o6cnyroByBaHHI INCTpyMeHTy. HikoN
He KopnCTyTeCe IHCTpyMeHToM i3 HecnpaBHm
rnyuHnKOM.
Perynapno nepebipraTe, qn rnyuHnK HaDiHo npnkpinneHn do IHCTpyMeHTy.

YBAGA!IpyuHnK,OBnaHaHn KaataJIitNCHM donaHOBayem ra3iB,dyKe CnIbHO HarpIBaEcTBcNiJ vac po6OTi I DeAKn Yac 3aNNaAcTbCra rapyHM nicr 3ynHKn. Ce TaKoCTocyeTbCra po6OTn Ha XONOCtOMy xOy.Ipn DToPky MoXHa OTPMaTHOn iIKn Wkipn.Pam'raTaIe npo He6e3neKy 3aropHHn.

YBAI! BcepeHNI rnyuHNka MicTbCn xIMiHi eNEmHTN, 0o MoKyTB 6yTN KaHcpePoreHHmN. RaKIO rnyuHNK NOxKOxKeHO, yHnKaIte KOHTaKTy i3 cHmN eJEMeHTAMN.

YBAGA! Ra3n BiD BuxJony DnRyHa MICTaTb MOHOKcNd ByrIeHo, AKN MoKe BnKlnKaTH OTPcHHa. Ha 3anyckaTe i He KOpNCtTyntecraHCTpyMeHToM y npMIueHHI a6o 6yDb-RAKOmy Micci 3 HeDOCTaTHbOIO BEHTNJuaicio.

YBAGA! BnXlonHi ra3n MaOTb BnCOky TemnepaTy i MoKyTb MicHTn Ickpn, BiJ knx MoKJIne 3arOpHnHa. HikoN He BMkaTe IHcTpMeHt y npMiuSeHHi nn 6iJa Ierko3aUmNCTnx MATEpIaIIB.
KoHTpraIka
Длгфikcaui DeRkNxBnBipKyuHacadok BnKOpNCTOBycKa KOHTpraiKa.
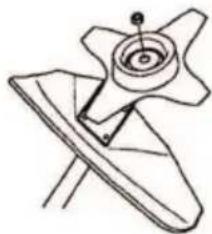
BctaHOBJIOUO npixyH hacky,3aTAYte raKy B6ik, npoTNLEKHN HnPamky o6epTaHHa HacaKn. Lio6 3HAn Hacky, BiKpyuYte raKy B6ik o6epTaHHraKa MaE NIO6iHy Hapizky. 3aTARHITb raiKy, BNkOpNCTOByOuN TopueBn raiKOBI KJIQUH.
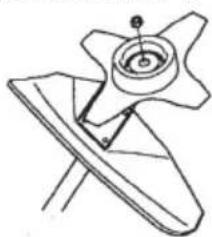

HeJIOHOBA npOKnAdKa BCEpeHNI raKn He NOBHHa 6yTN HAcTIbKn 3HOweHOU, 0o6 II MOxHa 6yIIO NOBepHyTu pyKO. IpoknAdKa NOBHHa 3a6e3neuYBaTu 3cunIIra, 0o DOpIBHIOe npHaUMHi 1,5HM (1,1fynTo-fyT).rAky cni3amHHTn, kIoo 6yIIO BnKOpNCtAo HO 6nn3bKO 10 pasIB.
3AΓΑJIbHI ΠРABUNA E3NEKIN
Pikyu cnpaJxKeHH
Ucbomy po3diin noareHo, kBn6paTu Ta DOrJraTn 3a pikyum CnpjKeHHM, 06:
3MeHHTn pN3NK BiDauH OXka;
- OTPMAtu MaKcMaJIbHy npOdykTnBHiCTb pi3aHH;
- NOOBKHTN TepMin BnKOpNCtAHHpaipkyoHaCaADKn.
BAJKINBO!
KopncTyIeTcpiKyHmHaCakamnIiWe i3 peKoMeHDoBaHmM KOxyXaMn. DnBiTbcra po3dn "TEXHIUHI DAHI".
KopncTyIeec Bka3iBkamn Ina pikyux HacaDOK dIra TORO, 0o6 nepeBipuTN npabNbHICTb BCTaHOBneHHn SHypa Ta BiNDOBHICTb NOro diamepy.
3y6j HOxN NOBHHI 6yTN npaBnJbHO 3arOCTpeHI! DToPmMyTEcra Haux Bka3iBOK. PpOHTaTe IHCTpykui Ha ynakOBci HOxA.
-Правлбно 3агостюпгохи.Дотримутеся
НашхВьадьОТа ВИКОPGИСТОВУпЕ НANЛOK
pekomeнdoваного розмір.

YBAGA! 3yynHnTe DnHyn nepei 6ydIaKIMN ONEpaIaMn 3 pixyOIO HacaIkoHO. PepeKoHaIteC, 0o pixyau HacaIka NobHicTIO npnnHnna o6epTaHHa. Bi'cHaHTe Ka6eIb BID CBiUKN 3anaIOBaHHa.

YBAGA! BnKOpNCTaHHH HnPaBnIbHOi pixyoi HacaKn Yn HnPaBnIbHo 3arocTpeHoro HOxa 36IbWyc He6e3neKy BiDau.
Pikyu cnpaXeHH
Hoxi pi3ci dIpy TpaBn npn3HaueHi IJI KocHHrpy60I TpaBn.
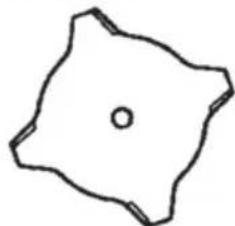
TolOBKa TprImepa npn3HaueHa nnI ndpuraHH.
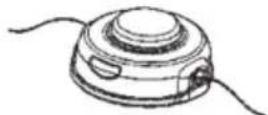
3araJIbHI npaBnla
KopntyTeCp kxyHm HacaKaMn Jnwe i3 peKomeHDoBaHmN KOxyXaMn. NnBiTbcra po3dIn "TEXHIYI DAHI".
3y6j HOXA NOBHHI 6yTN npaBnHbHO 3arOCTpeHI! DToPmMyTEcra Hauxx BkAsIBOK Ta BnKOpNCTOByTe HAnIOK peKOMeHDoBAHOro po3Mipy. HenpaBnHbHO HarOCTpeHn qH
noKoJKeHn HIX 36IbWyc He6e3neky Heuaacnx BnpaikB.

IpepeipTe pikyH hacaKy Ha HaraBHicTb NowkoDkeHb Ta TpiuH. NowkoDkeHy pikyH hacaKy oob'raKOBO NOTpioHO 3amHHTN.
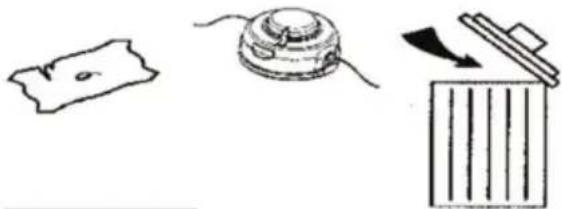
3aroctpenHpi3i i Hoxa nTpaBn
IHCtpyku,IK npabunbHO Harocptpu pikyu HacaKn, DnBiTcRa Ha ix ynaKobu. Ira roCTpiHHa pi3iB Ta HOxIB CnID KOpNCtYBaTnCn Pnackm Tepnyrom i3 OJHOCTOPOHHIM Bi3epyHKOM.
HarocptpiB kpaTakm YHOM, 0o6 nIITpIMyBatN 6aHaHC HOka.
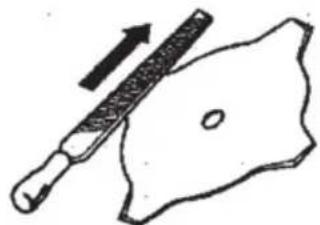

YBAGA! 3aBXd n BnKDaaiTe 3irHyTi, BnKpNBHeHi,HaDtpichyTi,3naMaHi YN NOxKOxKeH IaMOCb IHuM uHOM HOXi. B XoDHomy pa3i He HamaraHTecB HpiBHrTu BnKpNBHeH HIX 3 MeTOHO NOro NobTOpHOro BnKOpNCtAHH. KopNCTyTEcra NlWe opnrHaJIbHMn HOxAm 3a3HaueHOro TnIy.
TOnOBKa TpIMepa
BAJKJINBO! 3aBXn nepeBipraTe, uo6 shHyp Tprimepa 6yB MiHO HaTARHyTu HA 6apa6aH; iHaKSe IHCTpyMeHT MOKe CTBOPOBaTH He6e3neuHy Biopaio.
KopncTyIeTcA liuwe pekomeHIOBaHIMPiXyHMn Hacaikam. NbiTBca po3di"TEXHIH DAHI".
Дя iHCTpyMeHTy MeHoro po3mipy,Я npabnIO,notpi6i MeHsi TpImepHI roNOBKn i HabnakNI. Lc noRCHIOCTbCra Tm,IoN ia cKocIHHa 3 BnKOpNCtAHHm WHpy,DbrHy NOBnHeB BiDknDaTn Ioro B paiaIbHomy Hanpami BiD TpImepHOI roNOBKn,doNaOu npnCbOMy onip TpaBN.
-ObKHa Hhpy TaKoK Mae 3HaueHn. OobuW uHyp Tpumepa Bumarae NotyKHIwO rBnryHa, HIX KOpOTuW uHyp Takoro X diametpy.
- IpekeohaTeC8, 10 HIX Ha Koxyci Tpumepa B nopAky. BIn CnyKntb DnToro, 106 oBpi3atuHyp Do nOtpi6HOI DOBXHH.
- 36ilbunTuacpoBtuHypaTrpmepa, Ioro MoXHa BIMoUHTu BOi npOTarom DeKlboKox DnIB. Lc3pObntb uHypMiHiuM i BIn npocnykntb DOBwe.
3БИPAHHЯ
PIMITKA. Npebipte, 06 npna6yB 3i6paHn y BiIDNOIbHocti do ciCi IHcTpkyuii.
HactpoIOBaHHpyKOrTkn
- BiikpyTitb rBnHT 3 TnIbHOrO 6oky dpoceIbHOI pykoTkn
- BucyHbTe DpocelbHy pyKoTky Ha npabn 6ik pyKoTKn NJIKN (INB. MaJHOHOK)
- 06'edhaTe rBnHTOBn OTbip Ha dpocelbHpykoTci 3 OTbOPOM Ha pykoTci nnkn
- IpepecTaBTe TBnHT Do OTbOpy 3 TnJIbHOrO 60ky npocenbHOI pyKoTKn
- Bkpytib rBnHT kpi3b pykoTky Ta pykoTky nJIKN 3aTgHITb rBnHT
- 36epiMbMOHTaXHi By3n, KaHaMaJIIOHky


YBA!ДЯdoCgRHeHNe6e3neHOro noLoXeHHNid Yac po6OTM oHTaxHi yactHHpyKoRTN NoTpi6HO BCTaHOBTn MIX cTpinKaMn Ha Bany.
- 3aTARHITb TBnHTN WecTKyTHM raKOBUM KJIIOYEM
HactpoKobHaHHpemeHiB

YBAGA! Pnppo6oti 3 KUoopi3om Noro 3aBXn cIiN HAdiHNO KpInHTNo nacBOoi niBicKn. B iHwOMy BnnaDky icHyc He6e3neKa TORO, 00 BN He 3MOXTe 6e3neuHO KepyBatn KUoopi3om. Lc MoKe np3BeCTn DO TORO, 00 BN TpaBMyTEcra cami a6o TpaBMyTe iHux HikOnn He KopnctyntecpeMeHmN 3 HecnpabHOIO CNCTeMOHO WBNkOro 3BiNbHeHHr.
Yci Heo6xidi HacTpoiKn peMeHIB Ta pyKoRTKn NIIKN BIKOHyOTbcra Do NOyAtKY BIKOpNCtAHNr npnady Ta 3 NobHicTHO 3ynHeHM dBnyHom.
HactpoIOBaHHKpinneHHpeMeHIB
- Po3TaWyIe BepXHe KpInnEHHpeMeH 3BepxpyuKn, HIXKHe KpInnEHHa - 3HN3y pyuKn. 3po6Itb TaK, uOb BepXHi Ta HNXHi TBnHToBi OTBOp CNiBnaDAn. KpInnEHH Mae 6yTu BCTaHOJIeHO Ha CTrPiKOHO Ha BaNy (INB.MaIOHOK).
PIMITKA. Npeed 3aTgHHeHHrBnHTiB BCTaHOBIT dpocelbHm dpiY npopi3 HxHBoro KpInJeHHra pemeHa
- BCTABTE DBA TBNHTN DO TBHTOBUX OTBOPIB
- 3akpinitb kpiinHnpeMeH 3aTnHeHHr m TBnHTiB WECTNkTyTHm rAkoBm KJIOyem.
PerylIOBaHHn nacoBoi niBickN
Y nepeHni qactnHi nacoBoi niBickn e JERKO DOCTyNHm MexaHI3M WBNDKORo PO3MNKAHHa KopNCTyIeTcE MEXaHI3MOM WBNDKORo PO3MNKAHHa B6yIb-RAIK HeBIkJaADHI CNTyaJI, RaK BUMarae BiD Bac WBNDKO BBNJIbHITNCB IId MaUNHn Ta peMeHIB
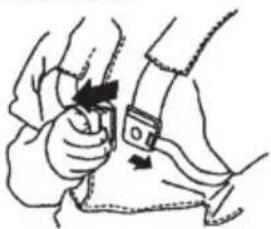
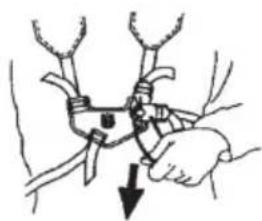
IpeheceHHHaBaHTaxKeHHHa nneui
KoII nacOba NiBicka i MaunHa Do6pe BiDperyIbOBAhi, npaIOBaTu Habarato Nerwe HAdrHITb pemInb. RaKaHkPaaSe npnAcnyTe peMeHi dIpaPoBoTn. Po3npaBte 6iHi peMeHi TAKIM YINOM, 0o6 Bara pIBHomipHo IraJala Ha DBA IIeua.
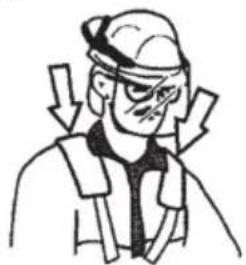
PIMITKA. Moxe BnHnKHyTu Heo6xHnicTb nepeMICHTTu KpinneHHa PemeHa BaJ dJa HanexKHorO 6anaHcyBaHH npnaNy.
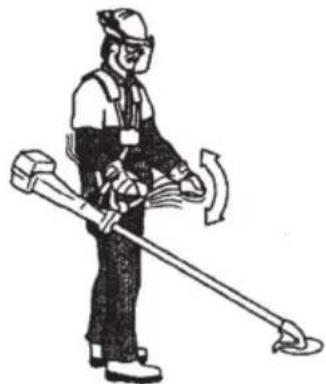
PpaBnIbHa BnCota
BiDperyIIOHe nacoby niBbICKy TaKIM YHOM, 0o6 pIXyHa HacaIka 6yIa po3TaWObaHa npapJeIbHo 3emni.
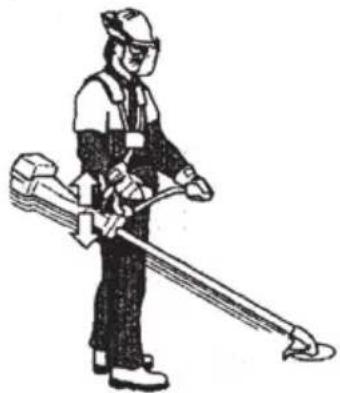
PpaBnIbHn 6aIaHc
D03BOJbTe pixyui Hacadci 3nerka npnIaTn Ha 3eMnIO. JaIO Bn BVKOpNCOTBycTe HIX dJIraTpabN, TO BIn NOBHeH 3hAxoJNTncr Pnp6Jln3HO Ha 10 cm Bnue NOBepxHi 3emJI, Uo6 3anO6iratN KOHTaKTy 3 KAMINTOIo. BiDperyIIOte noLOXeHHKpIIeHHpeMeHry TAKIM YHOM, Uo6 bloK 3hAXODNBcY npabNJbHOMy noLOXeHHI.
BcTaHOBJIeHHa HOXa i rOJOBKn TpImepa
- PnBCTaHOBHeHHi pIKyOi HacaKn BaXJInBO, 06 NiHaTAtuactNa npNBOHOro DICKy/ONOpHoro fnaHc npaBnIbHo yBiUHa B CEHTpaJIbHm OTBip pIKyOi HacaKn. JaKIo pIKyHy HacaKy 3akPInJeH He npaBnIbHo, ce MoKe npN3BeCTn Do cepNo3Hoi i/a6o CMePeTbHO TpaBMn.
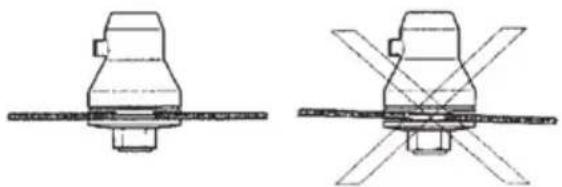

YBAGA! Hikon He KopncTyIeCpaKyuHn HacaKaMn 6e3 BiIDNoBIdHO3axNCHoro Koxyxa. DnBiTbcr po3dIn"TEXHIyI DAHI". BnkOpncTaHHHecnpabHoro Yn He BiIDNoBIdHOro KoxyxaMOKe CnpuHNHTcepno3Hi nopAHennr.
BAKJIIBO! RaKo Bu 36npaTeC8 KOpNCTyBaTnC HoxeM DnTpaBn, IHcTpymeH Ma6 ByTu OChaueHn BiNobiDHOpyKOaTKOIO, KOxYXOM DnHOxTa NaCOBOIO niDbicKOIO.
BcTaHOBJIeHHKoKxyaIJIHoxKa HOxA IIN TpaBN Ta piz
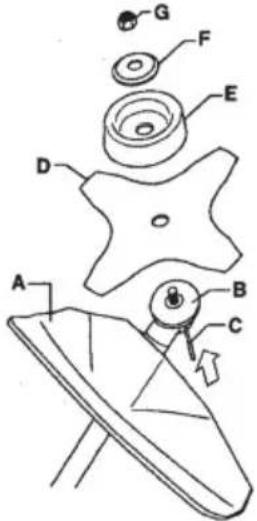
- 3akpiTe KOxH OKa/YcTaHOBiTb KOMiHOBaHm KOxH (A) IaBany i 3akpinIb Horo BoJToM.
YBAI! BnKOpNCToByTe peKOMeHDoBaHn Koxy dIa HOxa. NbItbcpa03di "TexHiHi daHI".
- BCTaHOBiTb npINBOHm DNCK (B) Ha BnXiDHM BAn.
3.ОБета Te BaI HOka,IOKN OdIH i3 OTBOpIB npINBOHOrO dNcKy He cnIBNaJe 3 BiINOBiHMM OTBOPOM y Kopnyci peDyKTopa.
4.BCTABTE cTOnOpHn WTNPT (C) B OTBip, 0o6 3aΦikCyBaTu BA. - YcTaHOBt b HIX (D), onOpHy MaHKeTy (E) i onOpHn FpnaHeu (F) Ha BuxiHN Bn.
- 3akpinnte raKy (G). 3ycnnnna 3atarybaHHraKn NOBHHO DOpIBHOBaTH 35-50 Hm(3,5-5 Km). CkopncTaeTcR TopceBnMraNKOBIM BOPOTkom i3 Ha6opy IHCTpyMeHTiB. TpmaTe pyky TopeBOr RaIKOBORo KIOUa kOMora 6JnxKye do 3axnCHoro KOxya. Uo6 3atrayn rAky, nobepTaNe KIOUy HAnpMaKy, npOTnEcxHOMy Do HanpMaKy o6epTaHHy (YBAFA! NibobiuHa Hapi3ka).
YcTaHOBka Koxyxa TpIMepa N roJOBKn TpIMepa
- Ppi po6oti 3 roJOBKO TpIMepa BCTaHObitb BiIOBIDHm 3axnCHN KOxyn DnA TpIMepa (A). 3akpnTe KoxyXOM TpIMepa/yCTaHObitb KOMiHOBaHm KOxyn DnA Bany i 3akpinIb Noro 6oTtOM (L).

- BCTaHOBiTb npINBOHn DNCK (B) Ha BNXiDHN BAn.
3БИPAHHЯ
- 06eptaTe BaI,doKo OdnH 3 OTbOpIB npBODHO DnCKy He cnBnaJe 3 BiINOBiHNM OTbOpOM y Kopnyci peDyKTopa.
- BCTABTE CTONOPHNI WTNΦT (C) B OTBIP, οO6 3aΦIKCyBATN BAN.
- 3arBnHTnbTb rONOBky TpMepa (H) B HAnpymky, npOTnEChOMy Do HAnpymky oBeptAHHa.
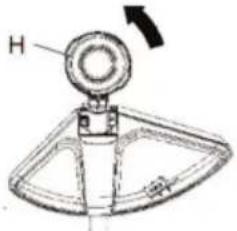
6.Плдчас demoHTaxy BnKohyTe Bci KpOKn y 3BOPOTHOMYnopAky.
3axoyn 6e3nekn npn 3anpaBci naJnBa
Hikon He 3anyckaTe npuJa y HactynHX BnnaKax.
JaHbO npoINocb naINBO. BntpiTb IHCTpymeHT Ta noeKaITe, nOKn naINBa 3aJIuKINBnAPyOTbcr.
- IpeoOaRHiTbcra, RaIO Bu PO3JIuNn nAunBO Ha cebe yu Cbi OJyR. Bumnte YacTHNu Tina, Ha rki noTpanuNo naUNBO. Dna Ubo CKOpNCaTae MUNOM Ta BOIOU.
JaKuo y npunaDi BnToK naInBa. PeryIaRHO nepeBipraTe, cn KpuNka 6aky Ta Tpy6Kn naINBHOI CNCTeMn He nponyckaHb NaInBa.
TpaHcnpOpTyBaHHaTa 36epiraHHa
36epiraTe Ta TpaHcnpTyIte IHCTpymeHT i naINBO TAKIM YINOM, UOb HABiTb y BNnADKy BNTOKy a6o BNnapOByBaHHra NaINBA BOHO He NOTpanJnlo B KOHTaKT i3 BiDkPntIM BORhem Ta ICKpAMN BiD eNEKTPnHnx MaunH, DBUNHyHIB, eNEKTPnHnx peNe/pepeMnKaUH cBOnnePiB.
ДяЗбериганнчипевезнг naиba kopисуITEcB BiNobIHm Nocydom, npusnaueHIM IЯ takx zuJe.
- JIIO IHCTPymeHT 6yde 36epiraTnca npotrrom doBrorO yacy, cnopoxHITb naINBnHn 6ak. Iio6 diHaTncra, k Kpaue 3nNTn HaJInWok nAinBa, 3BepHITbcra Ha MicceBy 6eH3o3anpaBky.
- YKIO IHCTpymeHT 6yJe 36epiratncn npotrorm DOBrorO yacy, nepekoHaIteCra, 0o BIn NOUHHeHNI 6yNn npOBeHc I BCI BiINOBiHi PO6OTn 3 NOrO OScnyroByBaHHa.
- Ppi 36epiraHHi Yn TpaHCnpTyBaHHi IHCTpyMeHTy Ha pIXky HacaKy Heo6xidHO OJraTn YoXOJI DJIra TpaHCnpTyBaHHa.
Дязлбоганг HeHbMnchOrO 3anycky DnHyHa, npTtpBaIOMy 36epirAHHi KOBnak CBiKu 3anaJIeHH NOBHeH 6ytN 3aBXJIN 3HrTn, kUIO IHCTpyMeHT He Nepe6yBaC nID cyBOpIM HaJIaIOM, a TAKoX npn BnKOHaHHI BCIX npOceDyp 3 Noro OBCnyROByBaHH.
HaIiHo 3aqiKcYne npncTpiJ dJa TpaHCnopTyBaHHJ.

YBAI! Bybte o6epexHi, npaquooun 3 naHbOM. PAm'raTae npo He6e3neky 3aoropHHB, Bn6yX Ta BdxxAHHBnapipB.
Panbo
3ACTEPEKHEH: IHCpymeT O6JNaHaHO DBOTAKTHM DBNrHyOM, TOMy dIry NOro PO6OTn CnID 3aBXdN BnKOpNCToBvBaTu Cmiiu 6eH3nHy Ta MOTOPHORO Mactnla dIy DBOTAKTHX DBNrHyHIB. Uo6 OTpMaTu Cmiiu y npabunbHi nponopuii, Baxnbo ToUHO BiDmiprtu KjkbKiCTb OnII. Ppi 3MiuyBaHI He3HaHuOI KjkbKOcTi naINBa HABiTb He3HaChI HeTOUHOcTI MOKyTB CNbHo BNInHyTu Ha nponopciO cymiwi.

YBAGA! NaINBO Ta NORO BUNAPN NERKO 3aMaHObCRA i MOKytb 3aBdATN cepNo3HOI WKOAn npn BAnxAHHi Ta NotpanHHi Ha Wkipy. Tomy 6yDbTe o6epeXHi npn po6oti
3 naHbOM i nepeKoHaItec, 0 npMiuEHHaOCTaTHbO npOBITpOCTbCra.
■BeH3nH
3ACTEPEXEHH: 3aBxDn BkOpncToByTe kichy cymiu 6eH3nHy Ta MaCTnJa
(3 OKtaHOBm YNCJOM He HnKy90. RaKuo
cMOXJIHbCTb,BNKOpNCToByTe 6eH3HH
3 Hn3bKmP iBHeM BKnDIB, BiOMn, AK
6eH3nH-aJknIaT.
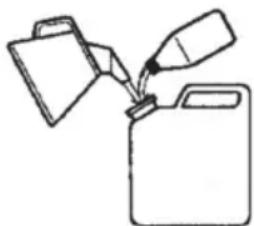
- PeKOMeHdUcTBcBnKOpNCToByBaTn 6eH3nH 3 OKTaHOBm YncnOM He HxKyE 90. JaKIO dBNryH npaOc Ha 6eH3nHi 3 HxKyIM OKTaHOBm YncnOM, HIX 90, Ie MoKe BnKlNaTn CTyKiT. LPe np3BeDe Do 36IbWeHHr TempepaTyPi DnRyHa, IIO MoKe npu3BeCTn Do cepNo3HOro NOrO yuKOdXeHHra.
JaKIO DBUYH NOCTIINHO npaue Ho HbCOKiWNBnDKOcTi, peKOMeHdyEcTbc 3aCTOCOByBaTH6EH3NH i3 6iNbB WBCOKIM OKTaHOBM YNCLOM.
Motozuknetha OJnBa
- 3a6e3neuHnHa6iNbuy eefekTubHicTb i DOBROBHyHa,6axaHO BnKOpNCTOByBaTu MaCTNuHO Husqvarna XP, OCKINBOHO CNEuaJIbHo PO3pO6JeHO DnBOTaTKHX DBuYHIB i3 NOBITPraHM OxONoXeHHM. DnA CTBopeHHa CymiWi BnKOpNCTOByTe TiNbKn BucOKoRkICHe NOBHiCTIO CNHTETUHE MaCTNuO DnBOTaTKHX DBuYHIB.
HikoJHe BnKOpNCToBnyTe MaCTuNo,Ke np3HaYeHO IJIa DBOTaKTHX DBNrHyHB 3 BOJAHM OXOIOJXeHHa,Ke IHKOJn Ha3NBaOTb 3OBHIWHIM MaCTNJOM a6o BaXKM KepocnHom (MapkyBaHHra TCW).
HikoJn He BnKOpNCToBvIe MaCTnIO, npu3HaueHe dJa YoTnpBoXtakTHnx DBNrHyHb.
3miuBaHH
- Cknaicymiwi50:1.
3MiUyBaTn 6eH3nH 3 MaCTnIOM Heo6xioHO B UcTNI Tapi, npn3HaueHiJ dJIa 6eH3Hy
3aBXn cnoaTy BInBaIte noIOBHy KINbKOcTi 6EH3NHy, kyn 6yde BkOpncTaHO. TOni DoaTe BCIO kINbKiCTb OII. Nepemiaute (ctpyuOu) naINbHy cymi. DOnaTe peWtY 6EH3NHy.
3miwaTe (360BtaTe) nainbHy cymiw, nepu HIX 3aINBaTN II B naINBHN 6ak.
| Бeнзinh, літр (rangон) | Масло дая Двotingх Двигунов, мь (унцій) |
| 4 (1) | 77 (2,6) |
| 8 (2) | 154 (5,2) |
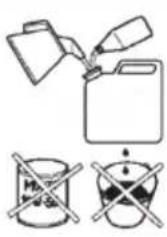
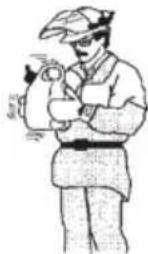
He roTyuTe cymiwi 6iNbwe, HIX Ha OOnH MicraUpo60Tu.
- RaKIO IHCTpymeHT He BnKOpNCToBbATmMeTbcra neBHn Yac, naNBO nOtpi6HO 3JNTu, a naJIINBHN 6aK NoUcHtNTu.

YBAGA!IpyuHnK i3 KaTaNITnHnCnAIOBaUeM BNXONHnx ra3iB CNbHO Harpiaecbc niJ vac Ta nicJy po6Otn. CeCTOCyEcBcI p60TN Ha XoNocToMy xOdy.Pam'raTe npo pn3NK BuHnKHeHHnoXekxi,OC6nBO KOnn npaucTe no6n3y JERKO3aMnCTnx piHNi BNnapIB.
3anpaBka naIbHnM

YBAGA!DToPmMaHHBk3aHx 3axoib 6e3neKn 3MeHnTb He6e3neKy 3aropAHH:
He naiitb uirapkn Ta He cTaBte rapy i npedmetn no6Jn3y naHnBa.
3aBxDn BmKaiTe DBrHy Npei 3anpaBkoIO.
- Pepe3anpaBkoIO naIbHmO6OB'3KOBO BUMKHITb DBnHyH i daIte NOMy OXoJHOHT npOTrrom DeKInbKOx XBnHH.
Пид уac 3anpaBkn NOBInbHo BiKpyuYte KpIshky NaINHBHO 6aKy dЯ TOrO, 7o6 TnCK 3MeHsuBaBCr NoCTynOBO.
- 5e3 3aBnX 3ycnIb 3aTgHITb KpnKky naNBHO 6aky nicJra3anpaBKn.
- Pered 3anyckom o6oB'3KOBO BiidinItb BiD Micu3a npabneHH.
BntpiB kpnukny naINBHoro 6aky Ta nobepxHO 6iIra ropIOBHH. 3a6pydHeHH B 6aky MoKe cnpuHHTn npo6JIemn y po60ti.
- PódBaiTe npo Te, uOb nAInBO 6yNo peTEnbHO nepemiiwane,ДЯ YOrO eHepriHo 36OBaIte KOHTeHep, Nepu HIX 3aNBAtu NaINBO B 6ak.
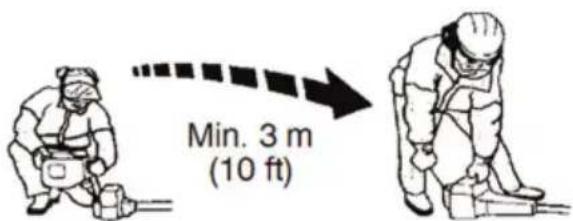
3ANyCKI 3yINHeHHPOBOTN
IpeBipka nepeD nyckom
Ipebeipte HoK, 6e nepekoHaTncs, 0 B HxHn yactnHi 3y6uB a6o 6iN zentpaHbHO OTbOpY HeMaC TpiuH. Jk npabnO, TpiuHn BnHKaHTb, kUo npn HaroCTpeHi B OCHOBi 3y6uB yTBOpNBc DyXe roctpn Kyt, a6o npn po60ti 3 He HaroCTpeHm HOxem. B pa3i BnBBNeHHr TpiuH 3amHtB HIX.
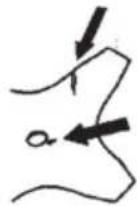
- Ipebeipte, n He noWkoJxHn onOpHn PhaHeCbYepe3 BTomy MaTepiany a6o 3aHaTcO cnIbHe HATryBaHH. B pa3i BnaBvBneHHa TpiuH 3amHtB onOpHn PhaHeCb.
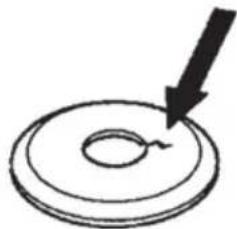
- IpekeohaiTeca, 10 KOHTprAka He BTPaTnna fikcyuoyi CnH. fikcyuoya Cnna raKn noBHnHa CTaHOBnTn npHaMHi 1,5 Hm (1,1 cyHTo-oyr). RaKy cnid 3aTARHyTN 3 cnIOIO 35-50 Hm (26-36 cyHTO-oytib).
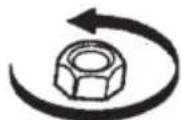
- Ipekeohntec, 10 roonbka i koxyx Tpimepa He Maotb TpiuH i He nookxgeHi. 3amHtB roNobky Tpimepa Ta 3axnH Koxyx, kUO BOHN 3a3HaJn yapy a6o Maotb TpiuHy.
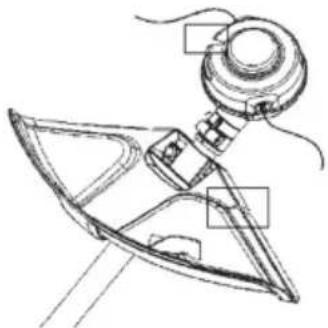
Hikon He KopnctyTecra IHCTpyMeHTOM 6e3 Koxyxa a0o 3 noKoDKeHM KOxYXOM.
- Ipeed 3anyckom DBNyHa Bci KPNuKN NOBHHI 6ytn npabNtBHO BCTaHOBNeHi i Ha Hnx He MaC 6ytn HiKnx ykoJKeHb.
3anycki 3yynHeHHpO60Tu

YBAG! Npeed noaTkom po60tn
notpi6Ho BCTaHOBHTN 3eennnHn, KpnKy
3eennnHn i Ban, OckInbKn iHaKwe Detani
3eennnHn MOxTyb BiD'cHaTncra i
3aBdATn TpaBMn.
Ipeed 3anyckom o6oB'3KOBO Biiiniditb BiDmicra 3anpaBneHn. Noknaidt b IHCTpymEnHa pIBHy nobepxHIO. IpeekohaiTeC, 0o pixyua hacaKa Hi do Qoro He DotyJrEcbc.
BneBHITbcra, 0Ha npo6Omy Micci HemaC cTOpOHHIX IIOdei, OckINbKn B iHOMy BnnaIky icHyc He6e3neka OTpMaTH cepno3Hi TpaBMn. Be3neuHa BiDCTaHb cTaHOBHTb 15 MeTpIB (50 cyTIB).
XoJIOaHnDbNryH
- KhoNka Hacoca: DekiNbka pa3iB HaTnCKaIte iaqpaMy npOdyBkn NOBITpy, NOK nAnBO He noUHe 3anOBHOBaTN Mem6paHy (Pn6JIn3HO 10 pa3iB). Mem6paHa He nobHHa 6yTu cJIKOM 3anOBHeHa.
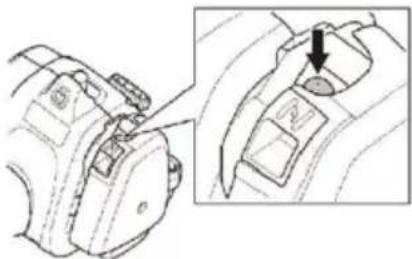
- UToPka: YcTaHOBItb opraH KepyBaHHn CnCTeMOIO 3anyCKy XOJIOHORO DBNrHyBa B IIOJoxKeHHa 3acNIHNK.
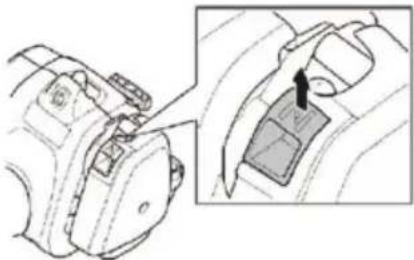

YBAGA! Pnp BBIMKHei DnBuryHa pixyua HacaKa noUHe Ondpa3y X o6epTaTnc i3 3acNIHKO, 0o 3haxOuNTbcr y nNoXeHHI BBIMKHeHr dpoCen.
- JIbOIO pyKOIO npTnCHiTb KOpNc IHCTpyMeHTa Do 3emni (YBAFA! He po6iB UBOHO Horo). Bi3bMitb pyKy cTapTepa i NobInbHO NotarHITb Whyp npaBOIO pyKOIO, nOKn HE BiDyEte CnpOTNB (CnpaBoBye 3uenenHHra 3y6IB), NOTIM NotARHITb Whyp p3ko i CNJbHO. HikoJIr He HamOTyIte wHyp cTapTepa Ha pyKy.
3BEPHITb yBAr! He ctnckaTe peryIaTOp KepyBaHHra3OM, HAmaraIOUcNc 3aNyCTnTn DBrHyN.
3BEPHITb YBAr! He BntaRyIte uHyp cTapTepa nobHicTIO I He BiDnycKaIte pyKn cTapTepa, kUo wHyp nobHicTIO BNTaRHeHO. Ue MoKe nowKOdHTn IHCTpyMeHt. NotarHITb Whyp dekilbka pa3IB nepei 3anyckOM DBNryHa (MaKcMym 3 pa3n).
- 阿图 3anycKaTbC a60 HamaTbC3anyctntnc, HATNCHb Ha Baxinb 3acnIHKnBHN3 y po6oye nooKeHH.
- 3po6itb Deeknbka cnpo6, nokn DBNrHyH He 3aBeDeTbcra.
6.ПиСЯТOrOЯДВИRGY3aNcTnTbCra,ДaIteHOMy nporpiTnCRA 30ceKHy,napH HIXNOBHCITIO BIDKpNBaTN DpoCeJIbHy 3acNIHcy.
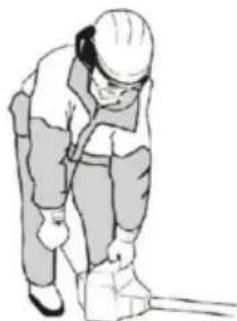
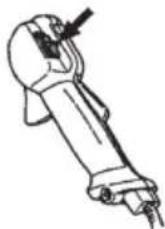
YBAI! Nepemkaay ABTomauHNOBepTaCTbCBy NOJoxHeHHy 3anyCTHTN).ДЯ 3anobirHH HeHaBMnCHoro 3anycky DBnryHa, naTPOH CBiUKN 3anaJIeHHa NOBHeH6yTN 3aBXKn 3HATNI npuTPBaIOMy36epiraHHI, kkuO IHcTpymeHT He 3haxoDHTbcNid cyBOpHM Harnldom, a TAKOX npu BCixnpouedypax i3 noro o6cnyroByBaHH.

YBAGA! Pnp yBIMKHei DnBryHa i3 3acJIInKOHO Y Hau6JnxKuH no3nui, pIXyua HacaKa Opa3y NoHc o6eptaTnc.
IporpiTn DBNrHy
-
Khonka Hacoca:Деклбк pa3ib HaTnCKaIte iaФparmy npOdyBkn NOBITpy, nOKn pAnIBo He noUHe 3anOBHIOBaTN Mem6paHy (pnpBn3HO 10 pa3iB). Mem6paHa He nobHHa 6yTu Zilkom 3anOBHeHa.
-
NotarytB uHyp deKibka pa3iB nepeid 3anyckom DnHyHa (MaKcMym 3 pa3u).
BukopncTaHHaMexahi3My 3BiNbHeHHaDpocen
IocTabTe npocenb y cTapTOBe noNoXeHHn, cnepuy HaTncHyBnHa φikcaTop dpocelbHOi 3acniHKn Ta dpoceBnHn peryaTOp, a notim HATNCHyBnHa KHONky NcKy (A).PiCnZbOro BiNyCTITb φikcaTOp dpocelbHOi 3acniHKn Ta dpoceBnHn peryaTOp, a notim KNONky NcKy FyhKciJr DpoceNra Tenep AKTNBOBaHa.ДЯппemEkKaHHa DBuRyHa Ha XoNoCTm Xid HaTncHiTb φikcaTOp i Tpurep dpoceNra 3HOBy.
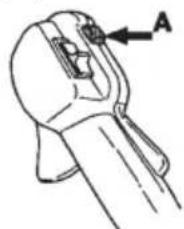
3ynnHka dBnryHa
BmKHTb DnHyH, HATNCHyBUn i BiNyCTNBUN BmNKaU.
BAJKINBOI
y zuomy po3di n onncahi ochoBhi 3anobixnhi 3axoHn iD yac BnkopncTahn TpImepa. Kaio BHHKHe He3HaNOMa cTyaucia, cnId CnITatn nopadny y faxibur. 3BepHitbcra do cepbicoro dInpepa.
HamaraTeCHePo6nTuO,0o,HaBaWy dMyKBy,BN3po6nTu HeB 3Mo3i.
CniDpo3ymiPi3HnIO mIX 3pi3aHHm DepeB, KocHHMa Ta niIDcTpnaHHM TpaBn.
OchOBHI npaBnla 6e3neKn
-ПОДИВNTьСЯ HabkoJOI.
- NepekoHaTeCra, IIOIou, TBapHn Yu 6ydb-io IHwe He nepeWKOJaTmE BaM nID qac KopncTyBaHHI HCTpyMeHTOM.
- IpekeKaHTeC, 10 pixyHa HacaIka a6o npedMeTn, kI MoKytB BiDCKOHTn npu po6oti, He NotpanJaTb y JIOe YI TBapnH.
YBAI! He KopncTyntecn IHcTpymENTOM, kKo y pa3i Heuachoro BnnaKy Hemae MoKlnBOCTi NOKnKaTH Na DonomOry.
He KopncTyItecIHCtpymeHToM y norany norOdy, HApnKnaD CnIbHm TymaH, DoU, cnIbHm BITEp, Hn3bky TemnepaTpy i T.I. Po6ota B Norany norOdy Buchaxye i qacto Ma cdoatkobipn3nKn, taik Ra 3aMeP3na 3emnJe, Heneped6auyBaHm Hanpam naiHHra I T.I.
- PepekoHaITeC, 10 Bu MoKeTe 6e3neHc HcTOni pyxatnc. IpeBipTe, u HABKOHeHMa c MOKInBux nepeWkoD (KopiHHa, KaMHnR, rIKn, poBN Ta iH.) y BUnaDKy, kUTo Tpe6a bYepe p3Ko nepemicHTncs. BybTe dYke yBaXHi, npauOuH na CXnJax.
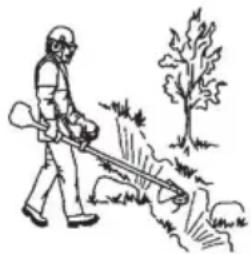
- Ipeep TMM JAK NpeeHTN B IHWE MicCe, BUMKHiTb DBNrH. IpeepocraH INCTpyMeH TpAHcNOPTyOuH NoHO b6yDb-ryk BiCTaHb, BCTaHOBNIOTe Ha HbOro 3axnCHM yoxoJ.
HikonHe KnaiItb IInCTpyMeHT, RaIO npaioe Dnryh a6o o6epTaetbc pixyha HacaKa.
OchOBH npaBnla po60Tu
3aBxKn KOpNCTyTecB iINoBIHm 06NaHaHHM.
- IpekeKaHTeCra, 0o 6nlaHaHHa npabunbHo HanaTobHe.
BukohyTe 3anobixhi 3axoHn.
- PeTeIbHo opraHizyTe cBOIO po6Oty.
KoHn nouHaCTe po6Oy HOxKEM,3aBKn npauHouTe Ha NOBHi WbNkOcTi.
3aBxKn KOpNCTyIeTcra RoCTpIMN HOXAMN.
- HamaraatTEcYHnKaTn KaMiHHa.
3aBxDn nepeBooHTb DBNyH y xOIOCTn xiD nicJ KoxHOi po6ooi onepaui. Tpnbani nepioDn p60tHa NOBHy notyXHICTb 6e3 6yDb-RAKOHO HabaHTaxeHHra Ha DBNryH MOxYtB npu3BOoHTn Do NOro cepNo3HO rUkoJKeHHA.

YBAGA! Hi KopncTyBaCy, Hi 6yDb-KOMy iHwomy He Do3BOJAEbCz 3HIMaTH 3pi3aHH MATEpIaN, NOKn npaucOc DBHyH a6o o6epTaEc hacaKa, OckJIbKn ce MOKe CnpuHHNT CepNo3Hy TpaBMy. Uo6 yHnKHyTN TpaBM, nepeD qHneHHa Bana HOka BiD HAMOTAHx Ha HbOrO 3aHnWKIB PocHN BmHKaIe TBHyH, YekaiTe NOBHORO 3ynHHeHH pIXyOi Hacadkn i BiD'EDHaIte WHP BiD CBiQKn 3anAnIOBaHH. 3y6vacta nepeDaHa MoKe HarPITcN i 3aHnWATNC rapyOIO npTgrom DeKoro Yacy. DaIte ix Yac OxOnOHyTN. Jkso TopKHyTncr Hei, MoXHa 06NeKtncra.

YBA7A! OcTepiraTecra npedMeTIB, 0o BiDcKaKyoTb. 3aBxKn KopncTyntecra 3acO6amn 3axnCTy oue 3atBepdxKeHoro 3pa3ka. HikOn He haxnIaTecra yepe3 3axnChn Koxyx pixyoi HacaKn. KamHHr, CmTT Ta iH. MoKe BiDcKoHTn i notpanNTu Ooyi, cnpuHNBUn cnInoty nn cepno3Hy TpaMy. TpMaHTe CTOpOHHX IHOeHa 6e3neuHi BicCTaHI. DiTu, TBapHH, cnoctepiraTa nOMiHNKn NOBHHI nepe6yBaTu 3a MEXAMN 30HN 6e3neKn, 0o ctaHOBtB 15 MeTpIB (50 cyTIB). HeraHo BmKHITb IHcTpymENT, rKUo XTOCB NiDiJe. HikOn He NOBepTaIte IHcTpymENT, He nepeBipNBUn, qH He cTOiTb XTOCb 3a CnHHO.

YBAFA! IHKONMIX KOxOxOM Ta uHHO NnKn noTppannIOTb rIKN i TpaBa. NepeT Mm k BndaJIaTN Ix, O6OB'3KOBO 3ynHHtB DnHyH.
BnKOpncTaHHH HoXa nTpaBN
Hoxamn Ta pi3zma NJIra TpaBn He MoxHa 3pi3yBaTN CTOB6ypn DepeB.
HIXIITpaBn BkOpncOBycTcIaKocHHBaCix BnIDIB BNCOKOI Ta rpyoI TpaBn.
Tpaby KocTb MaTHNKOBUM pyxamn 3 60ky B 6ik -pyx cnpaba HaniBo 6yde poboum, a 3niba Hanpabo -3BOPOTHM. Hix nobHeH KocTn TpaBy NiBIM Kpaem (uo Ha cnpep6nati
roHHnKa BiNoBiae npomixkMy mix 8 Ta 12 roHIOU).
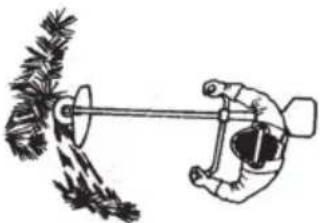
- KIIO CKOswUOHTpaby HaxuNTn HIX TPOXN BJIBO,TO TpaBA 6yde CknaDaTnCBA OOnH PAd, 10 nonerWntb II 3bnpaHH, HanpnKnaD rpaJMyn.
- HamaraTecn npauOBaTH pNTMiuHO. CtiTe BneBHeNo, po3CTabNBuHorn. Picna 3BOpOTHOpyx npoiDiB vpeepi 3HOBy 3aIMtB CTiKe nIOXeHHN.
- OnopHa MaHkeTa nobuHa 3Jerka npJIaTn Ha 3emIIO.BoHa 3ano6irac ydApy HoJa o6 3emIIO.
3HN3NTn PN3NK O6MOTyBaHHMaTepeiaJIB HABKOJIO HOKa MOXHa BIKOHyOuH HaCTynHi IHCTpyKii:
3aBxI npaHIOte npn nobHicTb BIDkpTiin dpocelhHi 3acniHui.
-Пд уac 3ВОрТHorO pyxH He npOBoBte HOXkEM NO Bxke 3piaHIM TpaI.
Ipeed TMMK NOATN 36upatn 3pi3aHy TpaBy, BUMKHITb DBNrHy, 3HIMITb peMeHi Ta NOKlaIDITb IHCTpyMeHT Ha 3eMIO.
Пдстригань Трави 3а ДОПOMORОЮ ROЛOBКИ Тримерс
PiictpnraHH
TpmaTe TpMepHy rONoBky HaD cAmoTo 3emneIO. PndtpnraHH BnKOHyEcTbcCa me KIncem shhpy. HexaunHyp npauoc 3 BlaCHOU WbNdkicTIO. HikoJIH He npntncKaTe UHyp TpImepa Do dIinHKn, Ha kii npauoTe.

LHyp Ierko MoKe BnKoUyBaTu TpaBy Ta MOnOi PocInHb 6iHa CTIn, OropoKi, DepeB Ta 6OpDIOpIB, XOa BIn MOKe NooKOuTn CTOBn OropoKi Ta UyTInBc Kopy Ha DepeBax i KyuaX.
3HN3HTN pIN3NK NOIKODXeHHr POcINH MOxHaCKOPOTNBUN shypr TpIMepa do 10-12 cm(4-4,75IOHMIB)i 3HN3NBUN qACTOTy o6eptAHn DBNryHa.
- Ppi niDcTpraHHi Ta BnKoWbAHHi TpaBn CnId npaObaTn Ha MeHsi WBNkOci, 0o6 npoDBXHTu c HOpMaNbHOi pOBoTn Whpy TpImepa Ta 3MeHUnTI 3HOeHHr TpUmepHOI rONOBKn.
■ Nobhe BuaaJIeHHa poCInH
Texhika ouHHeHH DO3BOJc BuaNTu Bci He6axahi pocnHn. TpmaTe TpImepHy rOIObky HAD cAmOIO 3emJeIO Ta HaxNJITb II. KHeueB shHypa TopkaTbcra 3emni, NobHicTIO BuaIauOu npocnnH 6iJa DepeB, CTOBnIB, Nam'rTHNKIB Ta iN. BAXJIINBO! TaKn cnocio po60TN npuWBudwE 3HOWeHHra Whhypy Tprimepa.

KoNn Bn npaioTe Ha iINrHkax 3 KAMHHM, UerIIO, betoHOM, MetaJIeBmN oropoxAmTa IH., WHyP 3HOwYcBcra WbUdwe i NOrO cnId BucyBatn Yactiue, HIX npu poBoTI 6Inr DepeB Ta DepeB'HNx orOpox.
KocinH
TpMep e iedealbHM IHCTpymeHOM JnKocHH TaPbN TaM, De Baxko 3po6HTn ce 3a DonomoroTO ra3OHokocapKn. KOnI KocTe, TpMaTte uHyp TpImepa napaneBHO 3emni. HamaraTecr He npNTnckATn TpImepHy roNoBky do 3emNi, 6o ue MOKe NOsKOHTn Ra IHCTpymeH, Tak I ra3OH.

Iiud yac po60Tu He daBaIte roIOBci noCTiHOTopkATnC3emJI. TaKni nOCTiHNI KOHTaKTroIOBKn 33eMNEo MOKe npNBecTn Do IINOsKOJKeHHra Ta 3HOWeHHra.
3aMitahHH
- EpeKT BeHTnIaTopa, kIn CTBOpOe 06epTaHHa Hhpy, MoKe 6yTu BnKOpNCTaHm dIa IWBnKoro i IerKoro 3aMiTaHHa TepuToPi. TpMaTe shyp npapaneJbHo Do dIinHKn, kky np6npaTe, Ta BoDITb IHcTpymeHTOM 3 6OKy B 6ik.
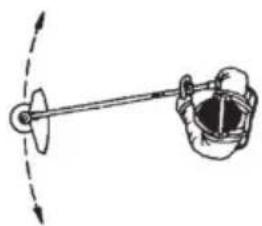
- Lio6 otprmaTn haikpauzi pe3yIbTaTn niD qac KocHHra Ta NiIMiTaHH,Notpi6HO npaIOBaTu Ha MaKcImaJIbHi IWBnIDKOCTi.

YBAGA! Hi KopncTyBaCy, Hi 6yDb-KOMy iHwOMy He DO3BOJnAcTbCz 3HIMaTn 3p3aHH MATEpiAn, NOKn npauoE DBNHyh a6o pyXacTbcg Whyp TpImepa, OckIbKn Ce MoKe CnpuHHn CepNo3Hy TpaBMy. Uo6 yHnKHytn TpaBM, nepeD qHneHHam npBODHO Bany BiD HamOtAHnx Ha HbOrO 3aNNKIB PocnnH, BmKHiTB DBNyH, DoyeKaItec3yUnHKn TOnOBKn TpImepa i BiD'EdHaTe whyp BiD CBiQKn 3aNaIOBaan. 3y6vacta nepeDaay MoKe HarpITnc i 3aNNsATncr rapyOTo npOTARom Deekoro Yacy. DaTe ix Yac OxONohyTN. Jkso TopKHyTncr Hei, MOxHa o6NeKTncr.

YBAGA! OcepiraItec npedMeTIB, 0o BiDcKaIyOtB. O6OB'3KOBO Heo6XiIHO KOpNCTyBaTHc3acO6amn 3axNCTy dIpy ouen. HikoJI He haxnIaTeC ype3 3axNCHn KOxyx pixyooi HacaIK. KamHHra, CmTTa tH. MoKe BiDcKoHTn i notpAnNTn B ooyi, cnpuHHBun cInOnTy cn cepno3Hy TpaBMy.

TpmaTe cToPOHHIX IIOeH Na 6e3neuHi BIdCTaHI. DITN, TBapHH, cnocTepiraYi Ta NOMiUHNK NoBHHI nepe6yBaTu 3a MekAMn 3oH N6e3neKN, 10 CTahOBHTb 15 MeTpiB (50 cyTIB). HeraHNO BMKKHITb IHCTpyMeHT, kXO XTOCb nidiJe.
TEXHICHE OBCJYROBYAHH
CtpOK cnjxkbn IHCTpymeHTa MOKe 3MeHunTncb, a pN3NK BUNHKHeHHa HeuaChNX BUNaKIB 36iNbWNTncb, kUo TEXHcHpe OBCnyROByBaHHA IHCTpymeHTa BNKOHycTBcHr HENpaBUNbHO a60 RaKIO 06CNyROByBaHH Ta/a60 peMOHT BNKOHycTBcHr HEnpopeciHo DnI OTPMaHHa DOaTKOBoI IHOpMaui 3BepTaNTecb Do Ha6NJXqHor cepBichoro DNepa.
Texhika 6e3nekn npn po6oTi / Texhichomy o6cnyroBybaHHi npnlaNy
IiD yac TexHIOHO6CJyROByBaHHBnMaHTe CBiKy 3anaHOBaHH,OKPIM BnnaKIB,KoIN noTpi6Ho BiDperynBObTu KAp6KopatOp.

YBAI! Npeq noqatkom pobotn notpi6HO BCTaHOBHTN 3eennenH, KPNKy 3eennenHn I BaN, OCKINbKN iHaKwe Detani 3eennenHn Moke BiD'cHATnci 3aBdTu TpaBMn.
Kap6iopaTop
Ekcnnyatauia
Kap6opatop BnInBaHa Ha WbNkictb po60tn DnHyHa uepe3 peryIaTOp dpocen. Y Kap6opatopi nobITpr 3miUyETbcra 3 naBHM.
Tperynoe oeptn npn po6oHa xOIOCTOMy XOdy. RaKIO T NOBEPHyTN 3a roHHNKOB0O CTpiIKOIO,TO WBNDKICb PO6OTn Ha xOIOCTOMy XOdy 36iINbUnTBc; a KIO NOBEPHyTN npOTn rOHNHHKOBOI CTpiIKN, BOHa 3MeHUnTBcR.
Nonepednc perynIOBaHHa
PonepeHc peryIIOBaHHa KAp6Opatopa BIKOHyOTb npn BNpO6yBaHHi IHCTpyMeHTy Ha 3aBODi. TouHe peryIOBaHHa KAp6Opatopa NOHNHe BIKOHATn faxIBEcb.

YBAR! Pixyha HacaKa Moke
0eptatncn iid yac perynIOBaHHa
kap6opatopa. BdrrHtB 3axnche
cnopdKeHH Ta doTpmyTecb ycix
npabnl Texhki 6e3neKn. NepekoHaTeC,
Oo pixyha HacaKa npnnnHc
0eptatncn iid yac xonocToro xOdy.
Piicna BmKHeHH hCTpyMeHTy, nepu HIX
NOKnactn NOro Ha 3emJIHO,
pekoHaTeC, oo pixyha HacaKa
3ynHHJaac.
YBAI! JaKIO HIX OeepTaCTbCRA, KOIN DBNHyH npaHc Ha XOIOCTOMy XOy, cnID NOBepTaTN RBnHT peryIHOBaHH T IpOTn rOHNHKOBOiT CTPIKN, NOK HIX He 3ynHHTbcra.
PekomeHIOBaHa WbUdkictb XoIocToro XOy:
ДиВ. роздл "Texhiндаи".
PekomeHIOBaHa MaKcMaJbHa WbNdkiCtB:
YBAI!IpyHnK,06naHaHn KaTaNITuHnM DonaHOBaHem ra3IB,TaKoX 3MeHwyc BKNiDn WkiDnBnx peObH.

EMHICTb nainBHO 6aka, cm343
Bara
Bara 6e3 naJInBa, pi3aJIbHoro yCTaTKyBaHHn i 3anobixKnka, kr 5,21
BunpomHHOBaHHy wMy (dVB. Ppumitky 1)
Pibeh 3BykoBoi nOToxKHOCTI, BmipIOBaHn y deu6eJax (A) 106
Pibehb 3BykoBoi noTyXhOCTi, rapaHTOBaHn LwA dB (A) 114
Pibhi wmy (dNb. PpMmItKy 2)
EkBbAeHTn pBeHb yMBoO rcky y Byci onepaTopa, BmipraHn y
BIDIOBIDHOCTI Do CTaHApTIB EN ISO 11806 i ISO 22868, B(A)
OblaHaHo Hoxem nI TaBn (opurHaJIbHa deTalb) 94
OblaHaHo roJIbKOIO TpIMepa (opurHaNbHa deTaNb). 95
Bi6paia (nB. PpMItKy 3)
EkbbaIeHT pIBHb Biopaui (aiv,eq) y pykoarKax, BmipraHn BiIOBIOHO
CTaHdaptIB EN ISO 11806 Ta ISO 22867, M/c2
O6naHaHo HOxem Inra TpaBn (opurHaIbHa deTaIb), npaBn/niBn 4,21 / 4,23
OblaHaHo roJIbKOTo TpIMepa (opriHaJIbHa deTaJIb), npaba/laBa 5,89 /4,61
IpnmiTka 1: BnpomHOBaHH yMByB cepedobuie, Bmiphe k 3ByKoA notyXhicb (Lw), BiNobiae dpeKtBi EC 2000/14/EC. 3aBneHn pBeH 3ByKOBoI notyXhocTi daHOi MaunHn 6yo 3amipraHo niD qac po60tn opriHaJIbHOI uHN nnIKN, 0o dae Hau6blwn pBeHb wMy. Pi3Hnuc mixr rapaHTOBAHIM Ta BmipraHm pIBHE M 3ByKOBOI NOTyXhOCTI NOJRAc B TOMy, 0o rapaHTOBaHn pBeH 3ByKOBOI NOTyXhOCtI TAKOX BrpaxOBye pO3KnU y pe3yNbTaTAX BmipIOBaHH Ta BiDMHn mix p3HMn MaunHAMn OndHiCi Tici Jx MoJeI 3riINO 3 DnpeKTHBOO 2000/14/EC.
PpIMtKa 2: PpeCTaBHeI daHI IJIe EKBiBaNEHTHO pIBHr 3ByKOBO rTcCKy IJIra MaUNHn MaOTb TINOBY CTATNCTHHy DncNepcio (CTAHdAPthe BiXIneHH) B 1 d5(A).
PnIMtKa 3: PpeCTaBHeHi daHI npo ekBbAeHTHni pBeHb Bi6paqii MaOTb TnOBy cTaTnCTnHy dncNepcio (ctaHdapThe BiXnIeHHra) B 1 M/c.
Modenb 129R (M10 LH winiHdeJb 3 pi3b6JIeHHaM) - diametp ueHTpaIbHoro OTBOPY B HOKax/pi3ux 25,4 MM
MaKcImaJIHa CkOpocT Ha n3XoJHaTaOc, 06/MnH
MaunHnTe,obopydBaHn C HOKOBe 3a TpeBa,MoraT da ce npMeCtT HAcTpaHn,KORATo HOKbTBnE3BcBnpNKOCHOBeHne C HrKO HeNoDnKeH OBeKT. HOKbTe BcCToRHe Na amnyTnpaPbue nIi Kpaka. BuHarn na3eTe xopata u XNBOTHTe Ha Hau-MaIKo 15 MeTp a (50 feet) ot MaunHata.
CTpeKn, KOINTO NOKa3BaT rpaHnCHTe 3a MOHTnpaHe Ha dpbXkata.
HnBO Ha 3BykoBO HnraHe npn 7,5 MeTpa (25 feet) cbrnacho aBCTpAaNCKTe pa3npoe6b.
UWMOBN emncn KbM OKoJHaTa Cpea B CbOTBETCTBNE C DnpeKTnBaT a Ha EbponeeCKata 06uHcT. UWMOBNTe emncn OT MaunHATA ca NOCOeyn B pa3dena 3a cneuKauNTe n Ha TaBeNKata.
To3n npOdyKT E BCbOTBcTCTBne C npINOxKIMTe DnpeKtNB Ha EO.
To3n npOdyKe B CbOTBeTCTBne C npINOxIMTe DnpeKtNBn Ha ENO.
To3n npOdyKT e B cBoTBeCTBne C AbcTpaNnCKnte pa3nope6n 3a eNeKtpOMaHHTHa cBBMeCTUMoCT (EMC).
N3no3BaTe 6e3oNoBcH3nH MaCNo 3a DByTaKToB DBrIaTeJ, CMeCeH B CbOTHOseHne 2% (50:1).
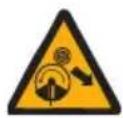


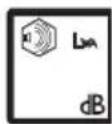


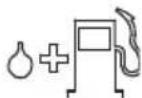
OctaHaJIHTe CnMBOJIH/CTNKePn CbC CnMBOJIH NO MaunHata ce OTHacrT DO CneuΦnHn M3NCKBaHHa NO OTHoWeHHe Ha cepTNΦnKaTH 3a onpeDeJIeHN na3apn.
KOE KAKBO E?
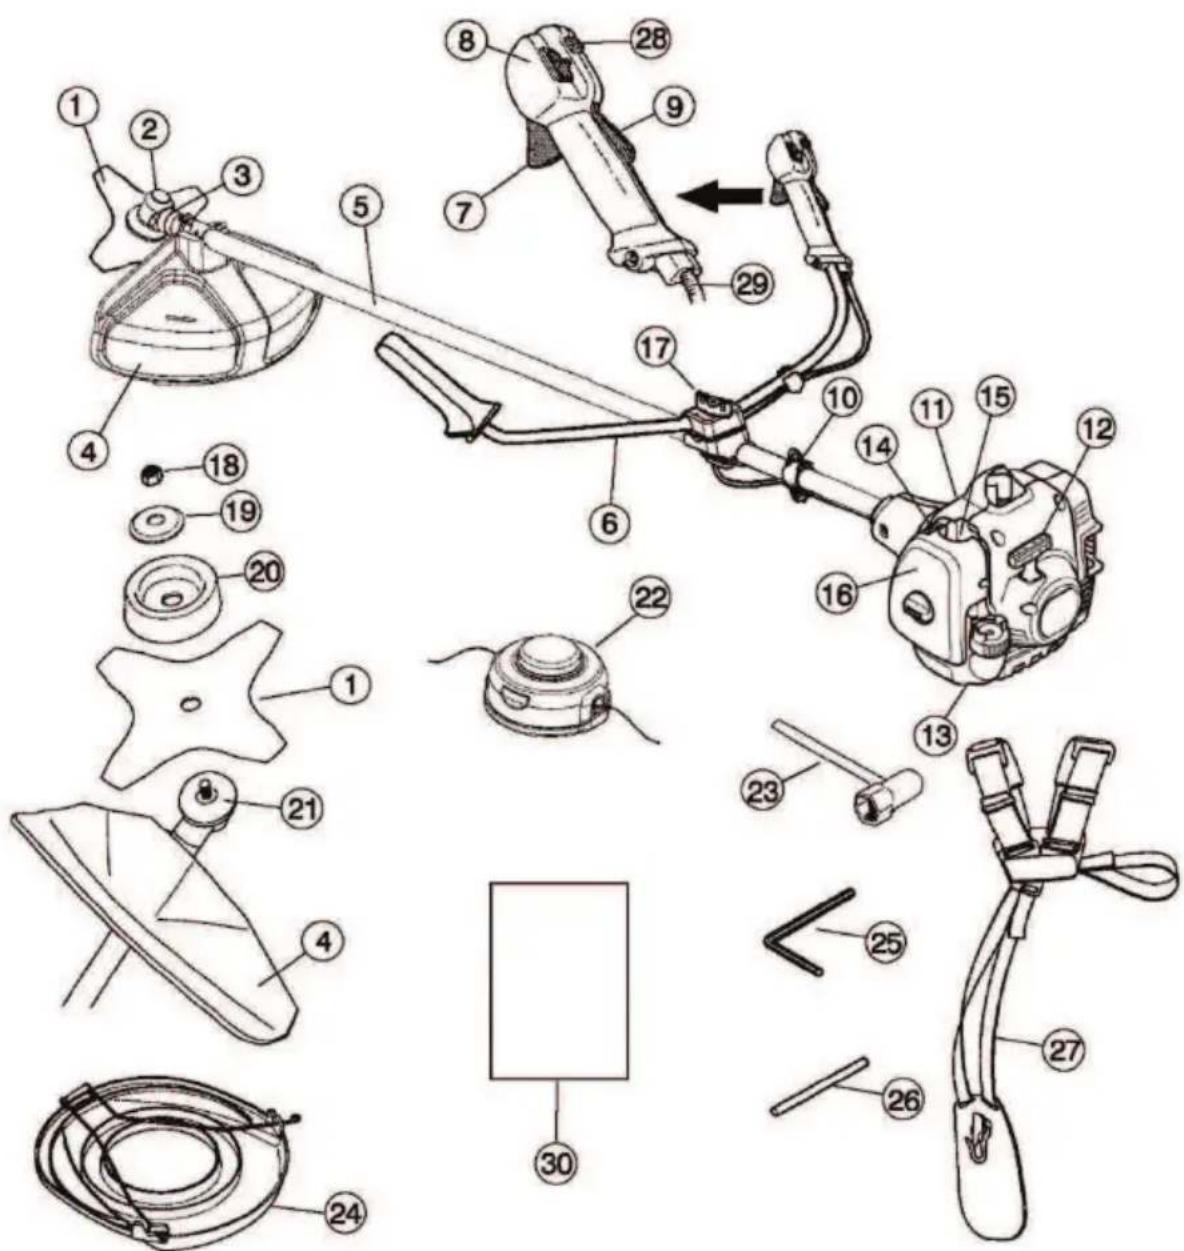
Koe kaKaBoe?
- Hox
- Kanayka 3a nbHehe c rpec
- brrnoBa 3b6Ha npedAka
- Праздаител на писносьмену за рязан.
- Bān
- YdblnxnteHa npbkk
- YnpabHeHne Ha r3Ta
8.Ппевкнчытael 3a cTOn
9.БлokирвkaHa ra3Ta - Cko6a 3a camap
- Kanak Ha cnHbpa
12.ДрьжkaHaВькetoHaCTapTepa - Pe3epBoap 3a ropuBO
14.Cmykau - Kapbypatop c ropBHa nomna
- Kanak Ha Bb3dywHnA fnnTbp
- Perynpahe Ha dpbkkata
- KoHTparaIka
-
OnopenerФланец
-
CopepnuHa onopa
21.3aBnKBaUdNCK - TpimepHa rnaBa
- Tnyx raeuen kJIOU
24.прдпаителза Трансортуранe - WecTeCteHeN KJIIOU
26.卍nnt - Camap
- BytoH Na CTapTObA T MoUHOCT
- PerynnpaHe Ha Ka6ena 3a perynpaHTo Ha MOUHOCTTa
30.Инстукцуа 3a ekcnлоataць
BaxHo
- TpnoHbT 3a nouchtBaHe, xpaCTope3bT nIN TpImePbT ca ONaCHN INHCTpyMeHTN, KOITOMoRat Da npedn3BnKaT cepNo3Ha nIN paTaIHa TpaBMa Ha onepaTopa nIN 3aO6nKaJIaIuTe ro, aKO C TEx ce pa60Tu HemapInBO nIN HeNPabUNHO. OT n3KlIOHTeHLBaBXHOCT e da npOyeTe nPa36epeTe cbDbpxKaHneTo Ha Ta3n INHCTpyKcIg 3a EKCnIooataqy.
MaunHaTa e KOHCTpyupaHa n3KnIOuHTeIHO 3a DOOΦopMraHe Ha TpeBa, KocHe Ha TpeBa H/INn NOUcTbaHe Ha ROpCKy UAcTbL. - EДинCTBHeHNTe npncnOc6JIeHnЯ, KOnTO MoKeTe Da n3NoI3BaTe C To3N dBnraTeJ, Ca peXeUHTe obOpyDbHnЯ, npenOpbHaHO OT Hac B rnaBaTa „TEXHnueCKN XAPAKTEPNCTIKN".
- HnKora He n3noJ3BaIte MaunHaT, aKO cTe yMopeHn, yNOTpeBnIaIKOXoN nn npHeMaTe JekapCTBa, KOTo MoarTa da NOBnraT Bbpx 3peHneTO, ppeHKaTa NN KoOpDnHaCnTa BN.
Hnkora He n3noJ3BaTe MaunHaTa npn ekCTpemHn aTMocpepn ycNoBna, HapnpMeMHOO CTydeH, MHORo 1opeu N/INN BJIaXeH KImMaT.
Hocete NnH npepa3n CpeCTBa.BnxTe HnCTpyKuNTe NOI 3aRnaBneTo ,NnuHn npedna3Hn CpeCTBa". - HnKora He n3noJ3BaIe MaunHa c n3MeHeHn BOpuHnHaJIHaTa KOHCTpyKUy.
Hnkora He n3noJ3BaIte MaunHa, KOrTo e Henn3npaBHa. N3BbPwBaIte OINcaHnte B TOBa pKOBODCTBO 3a ekCnloatauia peDobHn npoBepKn, noDpBkKa n cepBn3. OnpeJeHn Oepaunn NO noDpBkKaTn cepBn3a Ce N3BbPWBat EDNHCTBeHO OT KBaIINcHpaHN CneuaHnCTn. BxKTe INHCTpyKUnTe B pa3dEn ,NOIDPbKKA". - BcnuKn Kanaun npedna3nten Tpr6Ba da ca nocTaBeH npedn CTapTnpaHe. YbepTe ce, ye JyNata Ha 3anaNTeHaTa CBeu N npoBODnKbT He ca NOBpeDeH. B npOTnBEH cIyau MoKe Da ce CTnHrE Do eJNEKTpUYeCKn ydap.
-ОпаTopbТ ha MaunHaTa Tp6Ba da rapaHTnpa, Ye no BpeMe Ha pa60Ta B paDnyc ot 15 MeTp a (50 feet) Okono Hero He ce HAMpat Xopa n XNBOTHn. Korato HraKoJIko OpeaTopu pa60T B eDNH N CbU yAcTbK, Tp6Ba da ce cna3Ba 6e3OanCho pa3CTOarHne ot noHe 15 MeTp a (50 feet).

PPEyPEXDEHNE: Ta3n MaunHa
cB3daBa eNeKtpomarHHTHO NOE NO
BpeMe Ha pa6ota. Pn HAKo
O6ctoTeJICTBa TOBA NOE MOKe Da
Ppeu3BnKBa CMUeHnHa AKTNBn NLI
NaCnBn MeDnHCKn NmNJaHTn. 3a Da
HaMaJInTe PNCKa OT CepNo3Ho Nn
ΦaTaNHO HapaHbAHe, Hne
PpeOpbYBaMe INuCaTa C MeDnCnCKn
HMnHaNTaHTn Da ce KOHCytnpaT C
JeKapr cN n Ppon3BOJnteJn Ha
MeDnCnHckn NmNJaHTaHT, PpeDn Da
3anOvHa d a pa6otr c Ta3n MaunHa.

IPEyIPEXDEHNE: HenpaBnHnT n36op Ha pexeio o6opydBahe nn HnpaBnHOTo 3aTOUbaHe Ha HOxAMorat Da yBeNHTpCKa OT 3JNONOyKn.

IPEyIPEXJEHNE: Hnkora He NO3B0JBAaTe Ha deuata Da n3noJ3BaT MaunHaTa Nn Da 6bDat B 6nn3oCT Do He. TbKato MaunHaTa e O6OpyDbHa C npxHHe N3KnOuBATEN MoKe da 6bDe 3anaheha Ype3 npnnaRaHe Ha HnCKa CKopocT nCnA BbPxy CTapTepa, DOpN MAnKte Deua npn HAKON o6ctOraTeNCTBa MORa Da ca cNoC6Hn Da 3anJaT MaunHaTa. ToBa O3NaUaBa PnCK OT cepNo3HO TeleCHO HapaHbaHe. CneDoBaTeHNO OTcPaHraBaTe KanaQkata Ha CBeuTa KOraTO MaunHaTa He e NOD npKOTO Bn Ha6JIOdeHne.
Лична 3ацNTha eКИПИрOBka

IPEyPExEHE: np pa6ota c MaunHaT Tp6Ba BnHar Da non3BaTe JnUHa 3aunTHa eknnnpOBKa Oo6peHa OT CboTBeHTo BeOMCTBO. NnHaTa 3aunTHa eknnnpOBKa He n3KnOuBa PNCK OT TpaBMn, Ho HamaJIbBa cepNo3HOCTTA Ha TpaBMata npn 3lononyka. NomoneTe CB0r dncTp6yTop 3a nomou npn n36opa Ha noXoJa aeknnnpOBka.

PPEyPPEXDEHNE:БbTe BnHaBn BHMaTeHN 3a npEynpeDnteHN CNHaN NIN NOBnKBaHNA, KOrATO n3NoJ3BaTe aHTnfoHN. BuHAr cBaJaIte aHTnfoHnTe He3a6abHo cIeD cnpaHe Ha DBuratela.
Kacka
Hocete kacka, KORATO npOuNCTBaHaTa pactnteHooCT e No-BuCoka ot 2 MeTpa (6 feet).
OBUHCTPYKUN 3A B3OJACHAPABOTA

AHTNΦOHN
Hocete aHTnfoHN,OCNpypBaunIOCTaTbueH 3arnywaBauepeKT.

3aunTa 3a ouHTe n yuHTe
BnHaHn HocTe OoOpeHa OT CbOTBeTHnte OpraHn 3aunTHa eknnnpOBKa 3a ouHTe. Ako n3noJ3BaTe MaCKa, cneDbA da n3noJ3BaTe n Odo6peHn 3aunTHn oUHa. Odo6peHnte 3aunTHn ouJa Tp6Ba Da CbOTBeTcBAt Ha EN 166 B Ebpona, ANSI Z87 B CbeDnHeHnte uatn n CSA Z94 B KaHada.
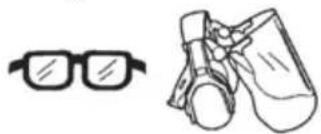
PbKabuun
PbKaBnU Tp6Ba Da ce HocrT, Korato e Heo6xOaHMo, HanpImep npu crIIO6BaHe Ha peKeuTo OobpyDaHe.

BotyuH
Hocete Hexb3raun n Ctaunn60Tuyn.
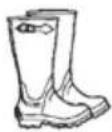
#
Hocete dpexn OT 3dpaba TBkaH nN36raBaHTe WnpOKn dpexn, KOINTo MOraT da ce 3akaayat OT xpactn KNOHN. N3noJ3BaTe BnHaRn DblrnaHTaONHOTdPAB PnAT. He Hocete bKyTa, KbCN NaHTaNoHn, cAndaJIH n He paBoTe 6OcN. Kocata Bn He 6bNA Da BVNCn NOp pamHeTe.
KomnneKT 3a nbpba nomou
KomnneKT 3a nbpba nomo, Tpr6Ba da ce Hocn ot onepaTopnte Ha TpuOHn 3a NouCTBaHe, xpaTope3n nn TpImepn.
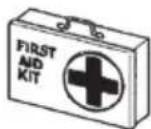
PpeIpa3Ho 06OpyDbAHe Ha MaunHaTa
BTo3n pa3dJeI ce onncBa npedna3HOTO
obopydBaHe Ha MaunHaT, HerOBOTo
npedHa3HaueHne I KAK Tp8Ba Da ce N3BbPWBaT
npOBepKn I TexHnuecko O6cnyKBaHe, 3a da ce
rapaHTnpa npabnHaTa My pa6ota. BxKTe pa3dJe
"KOE KAKBO E", 3a Da yCTaHOBtKe KbDe ce
Hamipa ToBa obopydBaHe Ha BaWata MaunHa.
CpokbHa eKcnnoaataHa MaunHaTa MoKe da ceCKbcn, a PNCKbT OT 3IOnOlyKn Da Ce NOBUN, aKO He CE n3BbPwBa PpaBnHTo TexHuecko o6cnykbaHe n cepBn3bT n/nnpeMOHTte He CE n3BbPWBat npopecnoHaIIHO. Ako mATE Hxka OTO OSe INΦopMaqna, MOJ, O6bpHeTe Ce KbM Ha- 6n3kn cepBN3.
BAKHO! BcraKO n3BbPwBaHe Ha cepBn3 n peMOHT Ha MaunHaTa N3NCKBa CneuHaNO 6pa3OBaHne. ToBa ce OTHacr Oco6eHO Do npedna3HOTo 6obpyDbaHe Ha MaunHaTa. O6bPheTe KbM cepBn3a cn, aKO MaunHaTa He otRObApHa N36pOeHnTe NO-dOny npOBepKn. Pn NOKynkata Ha Hau npOdyKT Hne rapaHTnpame npedocTABnHETo Ha KBaINΦnUpaHHpeMOHTnY cnyrN n cepBn3. Ako MCTOTO, OT KoETO cTe 3akynnn MaunHaTa, He e Hau cNeuaNaH3npaH dNCTpn6ByTop, 3aHTaYe 3a Hau-6n3KaTa cepBn3Ha pa60tnnHnca.

IPEyPExEHE: Hnkora He n3no3BaTe MaunHa c DepeKTHo npedna3HO 6OpdyBaHe.
CneBaiTe HnctpyKunTe 3a ynpabHeHne, TexHuecko 06cnykBaHe n cepBn3, onncAHn B To3n pa3deJ. Ako BaWata MaunHa He npemHe ycneHNO HKO8 OT pOBepKIne, Tp6Ba Da ce 06bphTe KbM cepBn3a 3a peMOHT.
BnokpOBka Ha ra3Ta
BLOKPOBkata Ha ra3Ta e npedHa3HayeHa 3a
npedOTbpaTBAhe Ha HeBOJHOTo 3aDeiCTBaHe Ha
peryaTopa Ha ra3Ta. Pn npitncKaHe Ha
6LOKPOBkata (A) (T.e. KOrato CTncHete
pbkoxbkata) ce ocbo6oxdaba ynpabJeHneTo Ha
ra3Ta (B). Korato OTyncheTe pbKOxBatkata,
ynpabEnHeTo Ha ra3Ta n 6LOKPOBkata Ha ra3Ta
ce Bpbaat B n3XoHOTo cn noIOxHeHne. Toba ce
OCbueCTBBA C NOMOHTa Ha DBe He3aBNCmM
eHa O Tpyra Bb3BpaTHn npyKinHn. B TOBa
noIOxHe HpeYrAToPbT Ha ra3Ta 3acta
ABTomATuHO B peKIM Ha pa60Ta Ha npa3EH xOJ.

OBUHCTPYKUN 3A B3OJACHAPABOTA
YBepete ce,Ye peryIaTOpbT Ha ra3Ta e B NOLOXHeHa npa3eH XoD, KOrato 6JOKnPOBkata Ha ra3Ta Ce HAMnpa B INxOdHOTo Cn NIOLOXHe.
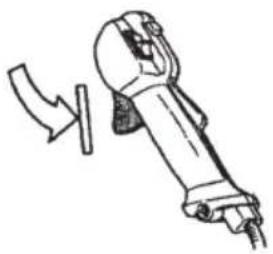
HaTnchete 6Ioknpobkata Ha ra3Ta n ce yBepeTe, Ye Ta Ce Bpbuca B uXoHOTo Cn NOJoxKeHne, KOrato r OTnycheTe.
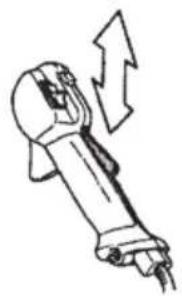
YBepete ce,yeynpabneneHToHa ra3Ta n 6bNOKIpOBkata Ha ra3Ta ce DnKat CBO6oHNo N Bb3BpaTHHTe npyKinHn Ca B n3npaBHOCT.
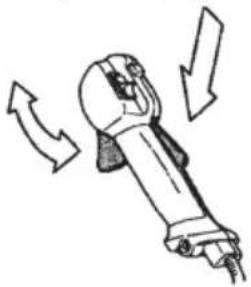
BnKTe nHCTpyKuNTe no3aTnabNeTo "CtaptnpaHe". CtaptnpaIte MaunHaTa n noaIte nbInha ra3. OTnycHete perynatopa Ha ra3Ta n ce yBepeTe, ye peXeUTo o6OpyDbaHe cnPa n ocTaba HeNoDbNkHo.Ako cneI pexeIoTO o6OpyDbaHe npOdbJnxBa Da ce Bbptn CneI NOCTABAHeto Ha ra3Ta B pexm Ha pa60Ta Ha npa3EH XoD, Tp6Ba Da ce npOBepn HacTpoKaTa 3a npa3eH XoD Ha Kap6bypaTopa. BnKTe nHCTpyKuNTe B pa3deI ,NOДРbKKA"
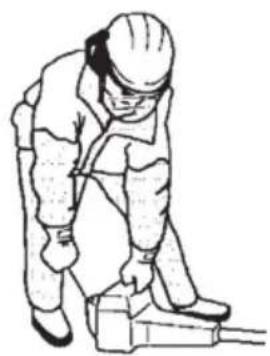
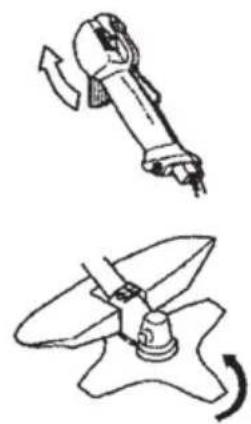
PpeBknIOyBaTeI 3a cTOn
YBepete ce, Ye DnurateJrT cnipa, KoraTo HATUCHETe n 3aIbpxKInTe npEKBIOuBaTeJIa 3a CTOn.
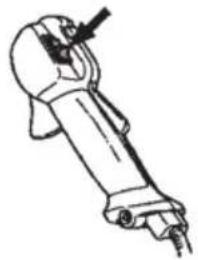
IpeDnataTeHa npucnoc6JeHneTo 3a p3aHe
To3n npedna3nte npehdha3haueh 3a 3aunta ot OTCKauehe Ha npedmetn KbM onepatopa.
PpeNa3nteIAT OCBEN TOBa 3aunTaba onepatopa OT HeBOJEN KOHTAKT C peKeuOTo o6OpyDbAHe.
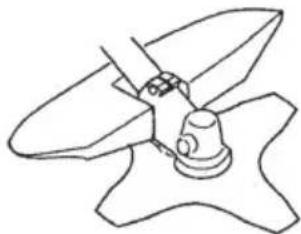
YBepete ce,Ye npedna3nteJrT He e nobpehen HnHanykAn. CmeHeTe npedna3nteJrAko e 6nn n3IOxEN Ha ydApn nn Ce e HanykAn.
I3noJI3BaIte BnHaI npenOpbuaHn npedna3nte 3a KOHKpeTHOTo peKeIoo o6OpyDbaHe. BuxTe pa3deI ,TEXHNUECKN XAPAKTEPNCNTUKN".

IPEyPExEHE: Pn HnKaBn
06ToTeJCTBa He 6nBa Da ce N3NoJ3Ba
peXeUTo 6OpUpBaHe, 6e3 Da e
MOHTnpaHa Oo6peHata 3aunTa. BxKTe
pa3dEn,TEXHNueCKN
XAPAKTEPNCTNK." N3noJ3BaHeTo Ha
norpeuHO Hn Hn3npaBHO 3aunTHO
6OpUpBaHe MoKe Da DoBeDe Do
cepNo3Ha TeleCha NobpeDa.
OBUHCTPYKUN 3A B3OJACHAPABOTA
N3noJ3BaHeTo Ha HenpaBnH0 HaMoTaHa Kopda 3a TpImep NInn HEnpaBnH0 pexeIoo o6OpyDaHe BODn DO NOBnWabaHe Ha HNBOTo Ha Bn6paunTe.

IPEyIPEXJEHNE: IpeKomepeHo
n3Iarae Ha Bn6paun MoKe da doBeDe
do npaxeHn Bbpx Ky KpbBOHOCHN
cBDOBE n HepBHaTcNCTema Ha Xopa Cbc
CMyueHn B KpbBOO6pauneHHeTo.
NotpcTe Jekapcka nomou, ako ce
noBAT CNMTOMn, KOTo MORaT da ca
pe3yntat OT Bn6paun. TaKNBa
CNMTOMn Ca HanpImep N3TpbnBaHe,
3ary6a Ha YvBCTBNTeHNoCT, nnPnukn" 6oDexn"7, BoJkn, Pn3nuecka
OTnyCnatoc, npomraHa Ha CBeta Hnn
cBCToRHeTO Ha KOkata. Te3n CNMTOMn
ce NOBBAt O6nKHOBeHo Ha npbCTnte,
pbute n KNTKnte. PnCKbT MOKe da ce
yBeHHn npn Hnckn Temnepatypn.
Bbpl30 ocbo6oxdaBaHe Ha camapa
CbueCTByBa IeCHOIOCTbHNO,6bp30 OCBO6oxdAbaHe Ha camaPa,HAMnpaO Ce OT npedHaTcTpaHa,KoETO CE N3NoJ3Ba CB abapuHn CHTyaUHN, pN KOnTO CE N3NCKBa Da Ce OCBO6oDNTe OT MaunHaTa n camaPa.
BnKTe HnCTpyKunTe NoI 3aRJaBneTo ,PeryJnpaHe Ha camapa".
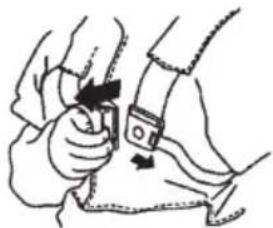
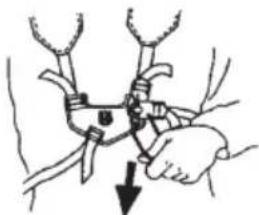
YBepete ce, ye pembute Ha cama pa ca pa3noIoxeH npabunHO. CnepeRynpaHe Ha camapa n MaunHaTa npoBepTe daH 6bp30To OCbo6OkaBaHe Ha camapa e Bn3npaBHOCT.
Aycnyx
AycnybTe npedHa3HaueH 3a NOHNKabaHe Ha HnB0To Ha Wyma N 3a OTBeXdaHe Ha Otpa6oTeHnte Ra3OBe B Nocoka, o6paTHa Ha onepaTopa.
BHIMAHHE! AycnyxbTe o6OpyDbHc KaTaN3aTop, npEHa3NaYeH 3a HamaJIbBaHe Ha BpeHNTE Otpa6OTeH ra3OBe.
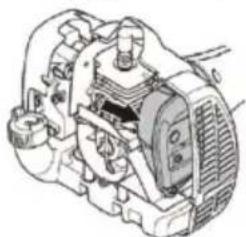
B ctpaHn C ropeu n cyx KInMaT BepoTHocTTa OT b3HNKBaHe Ha noXapn e rOJMa. ETo 3aUo Hne
ChabBame HAKO aynCn C NCKporacntHa Mpeka. PpOBepTe daJn aynxbt B e ChabdeH c Takaba MPeka.

No OTHoWeHne Ha aycnyx e n3KIOUHTeJHO BaxHo Da ce cna3BaT INcTpyKuInTe 3a npereJed, TexHuecko o6cnyXbaHe n cepBn3. Hnkora He N3PON3BaIte MaunHa, KOrTo e C nobpeDeH aycnyx.
PpOBepBaTe peoBHO daayn aycnyxbTe HAdEeJHO MOHTnpaH KbMaunHaTa.

PPEyPExEHEAycnucTe,
obopydBaHc KaTaN3aTop ce HarpBaT
CnHb B npoceHa pa6ota n 3BeCTHO
BpeMe cIeT OBa. ToBa BaXn npn
npa3eH XoJ. DOnnpT MoKe Da
npeDn3BnKa n3rapHnHa KOxTa.
ImaTe ppeBnD pNcKa OT noXap.

PPEyPPEXDEHNE: BbTpewHocTtHa aycnyxa cIbpxka xMmKan, KOnto MoKe da ca kaHcpeoreHH. B cnyaay e aycnyxbTe nobpehen, n36raBaIte donnp C Te3n enementn.

IPEyPExEHE: Otpa6oTnnte ra3OBe OT MOTopa CbDpKaat BbrpeoDeH OKnD, KOITOMOKe Da Ipeu3BnKa OTPaBHe C BbrpeoDeH OKnD. He CTapTnpaTe N He H3NON3BaHTe MaunHaTa Ha 3akpTo mN Ha MeCTa C HeDo6pa BeHTnnaqra.

IPEyIPEXDEHNE: Otpa6oteHnte ra3OBe OT dBnraTeNa ca ropeuN MOrat Da cBdPkaT Nckpn, KOnTO da npEi3BnKAT Noxap. Hnkora He CTaptnpaIte MaunHaTa Ha 3akpnto Hnn B 6bn30CT Do 3anaJIMMaTePnaJI.
KoHTparaKa
3a 3akpenBaHTo Ha HnKoBn BnOBe peKeuO6OpyDbaHe ce n3NoJ3Ba KOHTpaarKa.
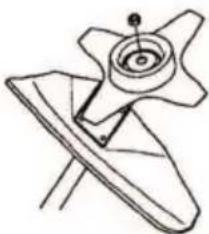
OBUHCTPYKUN 3A B3OJACHAPABOT
PnMOHTaKa 3aTeHHe TaKaTa B NocOKaTa,
ObaTHa Ha NocOKaTa Ha BbPeTeHa peXeTo
obOpyDbAHe. Pn DeMOHTnpaHe raKaTa CneDbA
da Ce OTBnHTBa No NocOKa Ha BbPeHTo Ha
peXeUTo O6OpyDbAHe. (TaNkAta mMa JnaBa
pe36a.) 3aTeHHeTe raKaTa c rIpyxna Rauehen KInu.
PPEyPPEKDEHNE: 3nOJ3BaHeTo Ha HEnpaBnIHO pExeio o6OpyDbaHe nHn HEnpaBnIHO 3aTOyeH HOx yBeJINuAbaT PnCKa OTOTKaT.
Pexkeo o6opyDbane
HoxoBeTe 3a TpeBa n pe3uTe 3a TpeBa ca npedHa3HaueHn 3a DnpeKTHo KocHe Ha TpeBa.
HaJIOHOBATA NOKPITNE OT BbTpewHATA CtpaHa Ha KOHTparaiKaTHe Tp8Ba Da e N3HOceHo Do CTeEN, No3BOJIyBaUa Ta Da ce 3aBbPtAc pKa. POKPITNeTO Tp8Ba Da OcNpyraBa CbnpOTnBJeHne Hain-MaMKo 1,5 Nm (1,1 ft Ib). RaKata Tp8Ba Da ce CMeH, CneD KaTo e 3aBNHTBaHa OKONo 10 nTn.
Pexeio oobpyBahe
To3n pa3dEonncBaKaK Da n36peTe n noDbpxate BaWeTo pexeO o6OpyDbaHe, 3a Da:
- Hamalinite pücka ot OtkaT Ha Hoxa.
- POnyUHTe MaKcImaHa eΦeKTnBHOCT Ha pR3aHe.
- YdIbJNKeTe JnBOTa Ha peKeUTo O6OpyDbaHe.
BAXHO:
- I3noI3BaIte peKeIoo o6OpyDbaHe caMo c npenopbuaHTo OT Hac npeIpa3Ho o6OpyDbaHe. BuxTe pa3JeI ,TEXHnueCKN XAPAKTEPNCNU".
BnKTe nHcTpykUInTe 3a peKeuTo O6OpyDbaHe 3a npaBnHTo HAMoTaBaHe Ha KopdaTa Ha TpImepa Nn3bopa Ha npaBnEn DnAmEtbp Ha KopdaTa. - IopdIbpxkaTe pekeuNTe 3b6n Ha HOKa npabNJHO 3aTOUeHN. PnpIbpxkaTe ce KbM npenOpbknte HN. BxKte nHCTpykunTe Bbpxy ONAKOkBATA Ha HOxa.
- PoiDbPkaTe npaBnHnTe HAcTPOkN Ha HOxa.Cna3BaTe nHCTpyKunTe Hn N 3noJ3BaTe npenOpbuaHn Ia6IOH 3a 3aTOUBAHe.
PPEyPExEHE: CnpaTe BuHaRn
DInrataTn npEn H3BbPWBaHe Ha pa6ota
No HkOa Yact OT pexeTo OobpyDbAhe.
YBepeTe ce, ye pexeToO obOpyDbAhe e
CnpraNo Da ce BbTpHn HnBnHO.
Pa3eHNHe Te Ka6ena ot 3anaNTenHata
CBeU.
TpimepHaTa rnaBa e npedHa3HaueHa 3a DooΦopMnHe Ha TpeBata.
O6u npabna
I3noJ3BaIte pexeio o6OpyDbaHe cAmO C npenopbuaHTo OT hAc npeJa3Ho o6OpyDbaHe. BuxTe pa3Je "TEXHnueCKN XAPAKTEPNCTKN".
IodlbpkaTepexeuTe 3b6nHa HOxapabnHO 3aToUeHN.Cna3BaTe nHCTpyKuNTe Hn N3noJI3BaTe npenopbuaHn 7a6IOH 3a3aTOUbaHe. HenpaBnHo HaToUeHnte nnIOBpeDeHO HOXOBe yBeNnUaBA pNcKa OT 3JNOJyKn.
PpOBepaTepeKeIToobOpyBaHe3a NobpeHn nnnyKHaTnH.NobpeDeHTopeKeIoo 60bOpyBaHe Tp6Ba Da BnHarNa Ce noDMehra.
3aToUbaHe Ha pe34n 3a TpeBa HoxKObe 3a TpeBa
BukTe onakOBkataHa pexeToO 6OpyDbAHe 3a HnCTpyKcnn 3a npabuHNo 3aTOUbaHe. Pe3eCbT n HOxBT ce 3aTOUBat C NOMoTa Ha nnOcka nnJa.
3aTOUeTe BCNUK p6OBe paBHOmePHo, 3a Da NOdIbPkaTe 6aHaHcHa HOxa.
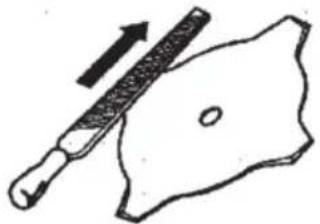

PPEyPExEHE:OrbHcIce, ycykAn, HanykAn ce, CkbCan nnn NOBpeDen no HyaKaBb Dpyr HauHH pe3eU Tp8Ba HnpeMeHNo da 6bJe OTCTpaHeH. Hnkora He ce ONNTBaTe Da n3npaBte ycYkAn pe3euc 3a NOBtOpHo m3noJ3BaHe. Pa6oTe cAmO c opuHaJIHn pe3uOT npenopbuaHn Tn.
Tpimepha rnaBa
BAKHO:BnHn npOBepBaHTe daHN KOpdaTa Ha TpHmepa e HABNTa CTERHATO n paBHOMepHO OKONO 6apabaha, B npOTHBEN cnyaMauHHata MOKe Da reHepnpa Bv6paunN, KOINTO MORAT da Ca BpeHN.
- 13no3BaIte cAmo npenopbuaHTo OT Hacpekeo o6OpyDbaHe. BnKe pepaTe n"TEXHnueCKN XAPAKTEPNCTUKN".
B O6uHn Cnya, NO-MaKHe MaHHn 3NCKBaT MaKN TpIMepHrIaBn Io6paTHO. ToBa e Cbbp3aHo C o6CToTeJCTBOTo, Ye npu npOuNCtBaHe C KOpda DBrTaTeJrT Tpr6Ba Da n3XbPJI KOpdAra B PaDnaHa NocOka OT TpIMepHaTcRaBA H CbUeBpeMeHHO da npEoDoJIyBa CbnpOTNbAra Ha TpeBaTa, KoTo Ce npOuNCtBa.
-ДьЖинata Ha KOpdaTHa TpImepa cbIo e BaxHa. IIO-DbIraT a Kopda n3NcKBa NO-roJMa MOUHOCr Ha DBnRaTeJI r OTKoNkOTo KbCaTa KOpda CbC cbuЯ dnaMeTpBp. - YBepete ce, ye pe3eT ha npedna3nten Ha Tpimepa He e nobpehen. Toi ce n3noJ3Ba, 3a Da OTPra3Ba KopdaTa Do Heo6xOumata DbJIKNHa.
3a da ydbjxnte xHBota Ha KOpdaTa, TMOKe Da ce NotOnn BbB BoDa 3a HraKOJIko dHn. KopdaTa CTaba No-3dpbXJnBa n Tpae NO-dblno BpeMe.
MOHTAX
3A6ELEKKA: YBepTe ce, ye ypeIbTe moHTnpaH npaBnHIO, KaTTo e NOKa3aHO B TOBa pBkoBOdCTBO.
NoctabrHe Ha yIbJxnteHa npkoXBaTkata
- ⅢBaIeTe BnHTa Ha IbpaHa IdpkKaTa Ha Ra3Ta.
2.ПьзHeTeДрБЖКATAHa ra3Ta BbpyДЯСHaTcTpaHa Ha yIbJxKITeJIa (BnXTeNIOCTpAUNrTa).
3.LeHTpnpaTe OTBopa Ha BnHTa B npkKaTa Ha r3Ta C OTBopa BVbNKeTJe. - NocTabete 6bpaTHo BNHTa Ha rbp6a Ha DpKaTa Ha ra3Ta.
- 3aBHTeTe BnHTa npesdpbkkata n VbNknten. 3aterHETe BnHTa.
- NocTabete MOHTaXHNTe KOMnOHeHTN, KaKTo e NOKa3aHO.


IPEyIPEXDEHNE: MoHTaxHNTe eJeMeHTn Ha yDbJnxTEnJa Ha dpBxKaTa Tp6Ba Da ce NoCTaBt MExdy CTeJIKNTe Ha Bana, 3a Da ce NOpDbPka 6e3OnacHo pa6ToHO NOLOKeHne.
- 3aterhe BnHTOBETe C wectoCTeHEN KIOU.
Noctabraye Ha camapa

IPEyIPEXJEHNE: Pnp pa6oTa c xpaCTope3 ToT Tp8Ba BnHaRn Da 6bJe OKaueH cnIpyHOBcamapa.B npOTnBeH clyuah Hma da MoKeTe Da ynpabnBaTe xpactope3a 6e30nacHo.ToBa MoKe Da IOBede DO HapAHBaHe 3a Bac Nn Dpyr Xopa.He n3non3BaTe HNKora camap C NOBpeDeHO 6bP3O OTKOnuBaHe.
PpabnHTo perynpaHe Ha cama np ydbJnxTeIHa dpbKkata Tp6Ba Da ce npabrt
cAmO npHnBbHcnpH DvraTeJ, ppei n3No3BaHe Ha ypea.
IocTabraHe Ha cko6aTa Ha camapa
- NocTaBete roPHaTa CkO6a Ha camapa Bbpy BaJa, a DOnHata CkO6a Ha camapa -noD BaJa. LcHTpnpaTe OTBOpnte 3a BNHTObe Ha roPHaTa n DoJHaTcCKo6a.CkO6a Ta Tpr6Ba da ce NoCTaBN HAd CTpeJIkaTAt Bbpy BaJa (BnKTe nnIOCTpaunra).
3A6ELEKKA: NocTaBete Ka6eJa 3a Ra3Ta B KaHaJa Ha DoHnHaTa CkO6a Ha cAmapa, nped Ja 3aterhe TBuHTOBete.
- BkapaTe DbTa BnHTa B OTBOpNTe.
- 3akpenete ckoobaTHa camaapa ype3 3aTrahe Ha BnHTOBeTe C WecTOCTHeH KJIIOU.
PerynnapaHa cama pa
OTnped Ha camapa ce Hamnpa lechooocbneH 6bytoh 3a 6bp30 ocbooxkdaBaHe Ha camapa.
N3no13BaIte 6byToHa 3a 6bp30 ocbooxkdaBaHe npn abapnHa cHTyaun, npn KOrTo e
Heo6xOIMO da ce ocbooDnte ot MaunHaTa n peMbka.
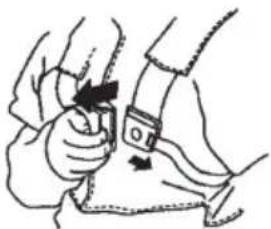

Pa3npeJeIHe Ha TOBapa Bbpxy paMeHTe BN
Dópe perynpaHnte camap mMaHHa ynechBaT paOtaT.
IocTaBeTe camapa. Harnacete camapa 3a HanDobpo pa6oTHO noLoXeHne. 3aterHeTe cTpaHnUHnTE peMbucn Taka, ye Terlnto da ce pa3npedeJn paBHomepHo Bbpxy DBeTe pameHa.
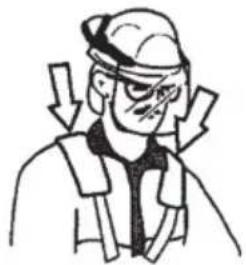
3A6EJIEXKA: Moxe da ce haNoxu da npemecntte cko6ata Ha camapa Bbpxy Bana c ue npabnno 6baanhcnpahe Ha ypeda.
MOHTAK

PpaBnHa BnC0uHa
PerynnpaTe camapa Taka, ye pexeToO o6opyDbAne da e ycnpoEdHO Ha 3emrTa.
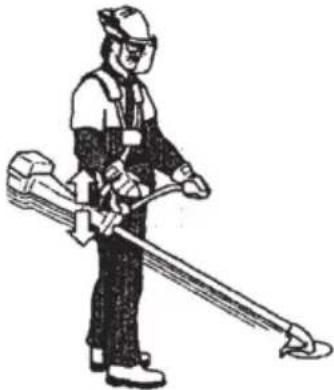
IpaBnEn 6aJaHc
OCTaBeTe pexeIooTo o6OpyDbaHe Jeko noInpraHo Ha 3emTa.AKO n3noI3BaTe HOK 3a TpeBa,TOI Tp8Ba Da e 6aIahCupan Ha OKo10 caHTmEtpa (4 inches) Hd 3emTa, 3a da ce npedOTbpaTN KOHTc KAmbHn NIOobHn npedMeTn. PeryuipaTe No3uYraHa cKo6ata Ha camapa, 3a Da 6aIahCnpate YpeDa npabUNHO.
IocTaBHe Ha HOXOBe I TpIMepHn rnaBu
IpnMOHTaHa pexeOo o6OpyDbaHe ot 3KIOHTeHb BaxHOCT e NOBINrHaTata YaCT Ha 3aDBXBAuNnA DnCK/ONOPHnA OJNaHEd a nonaHne npABINHO B CEHTpaHnA OTbOp Ha pexeToO o6OpyDbaHe. IOrpeuHo MOHTpApHO pexeToO o6OpyDbaHe MoKe Da DOBeDe Do cepNo3HN n/nn OnaChn TeJeCHn NobpeDi.
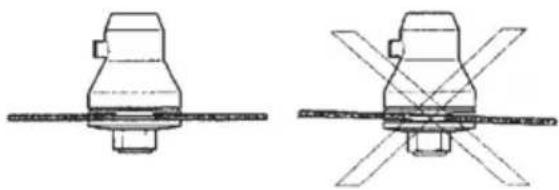
I PPEyIpyKDEHNE: Pn HnKaBn 06CTOyTeJCTBa He 6uBa Da ce n3NoJ3Ba peXeJIoTO o6OpyDBeHe, 6e3 da e MOHTnpaHa Oo6peHaTa 3aunTa. BnxTe pa3dEn ,TEXHnueCKN XAPAKTEPNUCTIKN". N3noJ3BaHeTo Ha NorpeuHO Hn HnE3npaBHO 3aunTHO o6OpyDBeHe MoKe Da DoBeDe Do cepNo3Ha TeJeCha NobpeDa.
BAxHO:3a Da n3noJ3BaTe HOx 3a TpeBa, MaunHaTa Tp6Ba Da e o6OpyDbaHa C npabnHn yIbJnxTeJ Ha dpBxxKaT, npedna3eH uNT Ha HOxa n camap.
Mohtax Ha npedna3eH uHT Ha HOXa HOX 3a TpeBa n pe3eU 3a TpeBa

- 3akayete npedna3nHa HHOka/KOMbHnpaHn npedna3ntA(A)BbpxyHakpaHHka Ha n ro 3akpenete c bonta.
BHIMAHHE! 3non3BaTe npenopbuaHn npedna3eH uHT Ha HOxa. BuxTe pa3deJa 3a texHnueckx xapakTepcntKn.
- NocTabete 3aDbXkBaunn Dnck (B) Bbpxy n3xOHNBAJ.
- 3aBbptete BaHa HOxA,doKaTo eHnOT OTBOpNTe B 3aDbNkBaunr DaCK Ce NOppaBHn Cbc CbOTBeTHnO TBOp B Kopnyca Ha CKOPoCTHaTa KYtnr.
- NocTabete WnHHTa (C) B OTbopa, 3a da ce nnKcnpa octa.
- IocTabete Hoxa (D), onophata yauka (E) onopnna FJIaneu (F) Ha n3XoHnB BAJ.
- NocTabete raKaTa (G). RaKaTa Tp86Ba da e 3aTeHata DO MOMeHT Ha 3aTgAhe 35-50 Nm (3,5-5 kpm). IN3non3BaIte rnyxna raeueh KIOUOT KOMnNEkTA IHCTpyMeHTN. XBaHete dpBbKaTa HA KIOUc KaKoIKOTO e Bb3MOxHO NO6JIN3O Do npedNa3HnA uNT Ha HOXa. 3a da 3aTERHeTe RaKaTa, 3aBbPTETe KIOUca B npOTNBONOxHATA NOcOKa Ha NOcOKaTa Ha BbPTeHe (3ABEJIEXKA: JnBa pe36a).
MOnTax Ha npedna3nteHa TpImepa n TpImepHaTa rnaBa
- NocTaBeTe npaBnHnI npedna3HTeI Ha TpImepa (A) 3a n3noJ3BaHe C TpImepHaT a IaBa. 3aKaayTe npedna3HTeI Ha TpImepa/Ko6bHnpaHaTa 3aUNTa KbM HakpaunHka Ha Bala n fukcupaTe 6oJTA (L).

- IocTabeTe 3aDbXkBaunr Dnck (B) Bbpxy n3XoDHnBAJ.
- 3aBbptete BaIa,doKaTo eHn OT OTBOpnte B 3aDbNkBaunr DnCK Ce NpapBn Cbc CbOTBETHn OTBOP B Kopnyca Ha CKOpocTHaTa KYTNJ.
- NocTaBete WnJIInHa (C) B OTBopa, 3a Da ce fHKcnpa OCTa.
- 3aBHTeTe TpMepHaTa rnaBa (H) B nocoka, o6paTHa Ha nocOKaTa Ha BbPteHe.
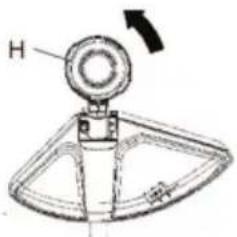
- 3a da pa3rno6nte, cneBaTe nHCTpyKunTe B o6paTeH pei.
БezonaHocT npn pa6ota c ropnoB
Hnkora He cTaptnpaTe MaunHaTa:
Ako cte pa3nennr opuBO Bbpxy Hej. 136bpuwepe pa3JnIto Ce rOpuBO nnn Macno n ocTabeTe ocTaTbUnte Da ce n3napaT.
Ako cte pa3neI npuBO Bbpxy ce6e cn nI npexnte CN,ce ppeo6neyeTe. N3mnTe Te3n Yactn Ha TAnOTo CN, KOtTO ca 6nINB KOHTAKT C ropuBOTo.N3non3BaTe canyn BOa.
- Ako OT MaunHaTae Teue rOpuBO. PpOBepaBte peoBHO 3a TeObe ot KaNaUkata N MapKyuHTE 3a RopNBOTO.
TpaHcnpOptnpaHe n cxbxpaHene
CbxaHraBaTe n TpaHcNoptnpaTne MaunHaTa n TOpNBOTaKa, Ye da Hma OnaCHOCT eBeHTyaJIeH TeU Nn N3napeHna Da Bn3aT B KOHTaKT C NCKPn Nn OTKpNT NlaMbK, HApnPmepOT eNEkTpueckn MaUNHn, eNEkTpOdBnRaTeNn, eNEkTpueeckn peNeTa/npEbkIouBaTeNn Nn 6oJlepN.
- TOpNBOTO TpRA6Ba Da ce CbXpaHraBa n TpaHCnOpTnpa B CneUmaHNO PpeHa3HaueHn N Odo6peHn 3a Ta3n UeJ KOHTeHepn.
Korato cxbpaHbATE MaunHaTa 3a Dbln nepnoi, pe3epBoapbT 3a rOpNBO Tp6Ba Da ce n3Pp3HN.ObbPHeTe Ce KbM MeCTHaTa 6eH3HHocTaHcIyTa 3a INΦopMauЯ KbDe da n3JIeTe OCTaHaJIoTO rOpNBO.
- YBepTeCe, Ye MaunHaTa e NouchTeHa N Ye
-празсьханeTo Ha MaunHaTa 3a ДblrN
-периOn e n3BbPseHo ПblnHO cepBn3Ho
-обсclуЖВаHe.
3aunTa npu TpaHcnpOpTnpahe 3a peKeoTo o6OpyDbAne Tp8Ba Da e BnHaN NoCTaBeHa No BpeMe Ha TpaHCnOpT NIn CbXpaHeHne Ha MaunHaTata.
3aДапгдOTьрNTe HeymuIHeO CTapTnpaH e HdBnTaTeJI,ЛyNATA Ha 3anaITeHHaTc CBeU Tp6Ba BnHaN Da ce CBaJIpy npi CbXpaHЯBaH e MaunHaT a 3aДBJIN NepNOi,akOMaunHaTHe e NOJ Prk HAD3Op,KaKTo I npN 3BbPbWbAHe Ha cepBn3HO O6CnyKBaH e Ha MaunHaT a.
- Obé3onacete MaunHaTa npu TpaHcnpTupahe.

PPEyPEXEHE: PpOraBaTe npedna3nBOcT npn pa6ota c rOpNBOTo. NomHeTe, Ye mHa onaCHOCT OT noXap, B3PNBOBe n BdNWBaHe Ha napn.
TopuBHa Cmec
BHIMAHHE: MaunHaTa e o6OpyDbHa c DBytaKTOB DnraTeN n Tp8Ba BnHaRn da pa8OTcC Mec OT 6eH3n H MacNo 3a DBytaKTOB DnraTeN. 3a Da ce noJyuH Heo6XODMOTO CbOTHOWeHne Ha CmecTa, KOInueCTBOTo HA MacNoTo Tp8Ba Da ce OTmepBa ToUHo. Pn CmecBaHe Ha MaIKN KOInueCTBa RopNBO, DOpn He3NaHTenHH
OTKIOHOHNOKTOKINHECTBOTOMACNOMORATDa BNOwATPRA3KO CbOTHOHeHNEToHaCmecTa.

IPEyPExEHE: TOpNBOTOn OTnAdHnTe npOdyKTH OTo RopNBOTo ca IeCHO Bb3PiAmEHmN MoT Da npuHrT CepNo3HO HapaHBAHe npBdNWBaHe Nn KOraTO Bn3at B KOHTaKT C KoxTa. Iopadn Ta3n npuHa 6bDeTe BHMaTeHN, KORato 6opabNTe c rOpBO, HnHnpeMeHH npOBepBaHTe daJIH e HaNlue aDeKBaTHa BeHTnlaucn.
■BeH3nH
BHIMAHHE: BnHaH n3noJ3BaIte BnCOKOKaueCTBeHa Cmec OT rOpNBO/MacNo (MnHmym 90 OKtHa). N3noJ3BaIte 6eH3nH C HnCKO HnBO Ha emCnn, N3BecTeH OSe KaTO aKNlAteH 6eH3nH, aKO TaKbB e HaJIuYeH.
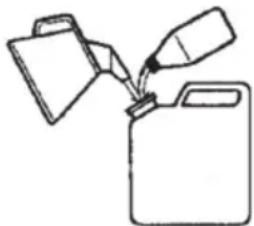
- Han-HNCKOTO npenopbUbaHO OKTaHOBO YNCIO e 90. Ako n3PON3BaTe DnurataTc C NO-HNCKO OKTaHOBO YNCIO OT 90, TOBa Ue DOBeDe Do DeToHaUN. ToBA npuHnRA NobuShaBaHe Ha TemnepaTypaHa DNBraTeJI, KOEt MOKe Do DoBeDe Do cepNo3Ha NOBpeJa.
Korato pa60nte HnpekbcHaTo npn BnCOKn o6opOn, ce npenopbYBa NO-BnCOKO OKTaHOBO uNcNo.
ByTaKtOBo MacNo
3a da ocirpynte ha-no6pata npon3bOHTeHIOCT n DblrEKCnnoaTaUHOHe nepnoHa DBIRAten, 3a npednoHTane e n3non3BaHeTo Ha MacNo Husqvarna XP, Tb KaTO To E Cbc Cneunna H opMyna 3a HaWnte DByTAKTOBn DBIRAtEN C Bb3dyuHo OXJaXDaHe. N3non3BaIte camo BucOKokaeCTBeHO, HanbInHO CnHTeTuH0 MacNo 3a DByTAkTOB DBIRAten, KORATO pnpOTBtE rOpNBHata CMEc.
- HNKORA He n3noJ3BaIte MacNo 3a DByTaKTOB DBnRaTeI, npedHa3HaueHO 3a DBnRaTeIi C BOJHO OXJaXdAHe, NOHkORA o6o3HaayabaHO KaTo MACNo 3a N3BbH6OpDObN DnRaTeJIu IIM MacNo 3a PnJaBaTeJIHcBDoBe (c Mapka TCW).
- HnKora He n3noJ3BaIte MaCIO, npEHa3NaYeHO 3a YETnPurTaTobN DNBraTeH.
PnuroTbHe Ha roOpBHaTa Cmec
CbOTHOUeHHeTo Ha cMEcBaHe e 50:1.
BUNHcmeBaTe 6eH3nH n MacNo B uNCT KOHTeHep, npedHa3HaueH 3a rOpuBO.
BnHa 3aOnuBaIte c HaNbAHe Ha NOIOBnHaTa OT ppeBnKdAnHra 3a N3NoJ3BaHe O6em Ha
PAEOTA C TOPNBOTO
6eH3nHa.CneT0BaTOb6aBeTeUJIoTO KOJIueCTBO MacNo.CmecTe (pa3KnTaTe) RopNBHata CMEc. DOnJeIte OCTaHaJIOTO KOJIueCTBO 6eH3nH.
- CmecTe (pa3kNaTe) roPUBHaTa Cmec Do6pe, Ipei Da 3apeiTe pe3epBOapa 3a TOpuBO Ha MaunHaTa.
| Бeнзин, Лигра (gal) | Масло за Дытуковский Двигател, ml (oz) |
| 4 (1) 77 (2,6) | |
| 8 (2) 154 (5,2) |
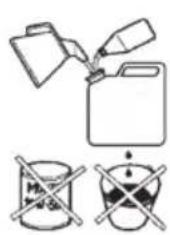

He cmecBaIte HabeHbX NOBue TropBO OT HyKHO TO BN 3a eINH Mceu.
Ako MaunHaTa He Ce n3nOJ3Ba n3BecTHOBpeMe,ropuBnIr pe3epBoap Tp8bDa da 6bJeN3npa3HeH nOuNCTeH.

PNEyPExEHHc AycnyxbTc KaTn3aTop ce HarpBa CnHOB npoeca Ha pa60Ta n 3BeCTHO BpeMe cIeT OBa. TOb a BaNIO n 3a pa60Ta Ha npa3EH xOJ. Cb6pa3raBaiTe ce c onachocTTa OT noXap,OC6eHO npi pa60Ta B 6n30CT Do NecHOaJIIMN BeueCTBa n/nnn 3npaepnna.
3apekdaHe

PPEyIPEKDEHNE: Cna3BaHeTo Ha cJeHNte PpeNa3Hm MepKn HamaJraBa onaCHOCTTa OT NOxap:
He nywete He cxbxpanhaite ropeu npedmetn B 6Jn30ct do ropnboto.
BnHaHn n3KnHouBaHTe DBNrAteTJ, npEn da 3apeXdaTe c rOpNBO.
BnHaN n3KnHouBaHTe DnHrAteTn I ro octaBnTe Da Ce OxnaIg 3a HrkOknOMnHyTN, npEIN da 3apexkate C rOpNoB.
- Pn3 zapexkdahe c ropnBO OTBOpTe BHNMaTeJH0 KanaqKaT a Ha rOpNBnpe3epBoaP, 3a da ce ocBO6OuTe HJIraHeTO BHMaTeJH0.
3aTgAte KaNaUkata Ha TOpNBHpe3epBoap BHNMaTeJHo CneJ 3apeKdaHe.
-ПпсдСтатианБИнагпремecТыМашинота Далоч OT мястOTо Ha зapекдаНа Горьо.
IOnuHCTeTe OKOIO KanaUkata Ha rOpNBnpe3epBoap. 3aMbpcBaHNrTa B rOpNBnpe3epBoap BOJr Do HApUSeHnHa pExmHa pa6oTata.
YBepTeCe,Ye rOpNBOTo e Do6pe CmecHo, KaTO pa3KnATnTe KOHTeHepa npEi 3apeKdaHe Ha pe3epBoapa.
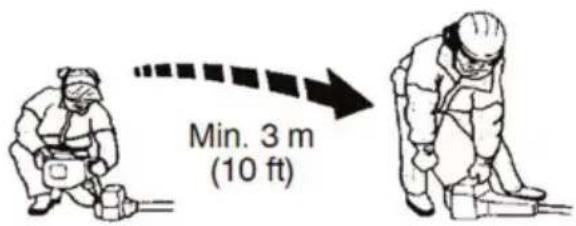
CTAPTIPAHE IN N3KJIIOUBAHE
KoHTpO npeDi cTapTnpaHe
- PpOBepTe HOka, 3a Da ce yBepnTe, ye B DOJHaT aact Ha 3b6nte nnn OkOIO CEHTpaHnra OTBop He ca Ce φOpMnpaNn pyKHaTHn. Han-yeCTo NOBaTa Ha nyKHaTn e BCJeCDTBnE Ha 06pa3yBaAnCe ocTpN brrn NO DOJHaT aact Ha 3b6nte pRn n3nINBaHe nIN BCJeCDTBnE Ha n3NoJ3BaHe Ha HOxCa n3TbNeHn 3b6uN. IOnMeHete HOxKa, aKO OTKpneTe NyKHATnH.
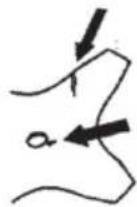
- IpoBepaTe peoBHO onOpHnaΦnane 3a NORBnIe CE NyKHATnH BCJeDCTBne Ha N3HOCBaHe NIN PpeKaJIeHO 3aTgAHe. IOnMeHete onOpHnaΦnane, aKO OTKpNeTe NYKHATnH.
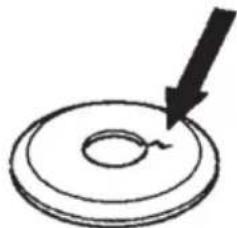
- YBepete ce, ye KOHTparaikkata He e n3rybuna 3ateraTeHHata cn cun. Raikata Tp6Ba da npntexkaba 3ateraTeHnca nna Hau-Manko 1,5 Nm (1,1 ft Ib). BbpTsiNt MOMENT Ha 3atrahe Ha raikata Tp6Ba da e Ha 35-50 Nm (26-36 ft Ib).
YBepTe Ce,Ye TpIMepHaTa rnaBa n 3aunTaHa TpIMepa He ca NOBpeHn nn HanykaHn. IOnMeHe Te TpIMepHaTa rnaBa n 3aunTata Ha TpIMepa, aKO Te ca 6nnn NODIOKeHn Ha ydapn nn No TEx Ca ce NOABnNnyKHATnHn.
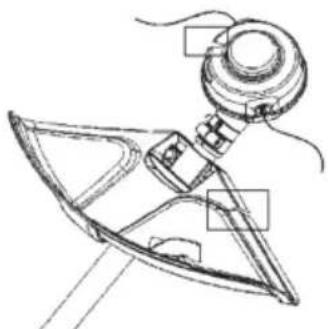
Hnkora He n3noI3BaIe MaunHaTa 6e3 npedna3nten nn c nobpehen npedna3nten.
BcunKn KanaCn CneDbA da ca npaBnHO MOHTnpaH N B n3npaBHOCT npeDn CTapTnpaHe Ha MaunHaTa.
CTapTnpaHe n N3KnIOUcBaHe
I PNEUYPEXKDEHNE: Ppeu cTaptnpaHe Ha MaunHaTa KOMnKeTbT Ha CbeHNHTeJIa, KaNAkT Ha CbeHNHTeJIa N BaJIbT TpI6Ba Da ca NoCTaBeHn, 3aOTo B nPoTNBEH clyuaa YacTHte MOKe Da ce pa3XJa6rT Na ppeu3BnKaT TeLECHN NOBpeH. Ipeu cTaptnpaHe BnAHn IpemeCTBaIte MaunHATA DaJIeY OT MAcTOTO Ha 3apeXdaHe Ha rOpINBO. NoCTaBeTe MaunHATA Bbpxy 3dpaBA OCHOBA. YBepTe Ce, Ye peXeIoTO obOpuyDaVe He MoKe Da ce Donpe Do dpyrN ppeMTei. YBepTe Ce, Ye B 3oHaTa Ha pa6ota Hma Niua, Ha KOnto TOBa He e pa3peSeHo, 3aOTo B nPoTNBeH cIyuaa HMa pNCK OT cepNo3Hn TEleChn NOBpeH. Be3onachTo pa3ctOarHne e 15 MeTpA (50 feet).
CTyDnBnrateN
- TOpuBHa NOMHa:HaTnCHeTe Mem6paHaTa Ha TOpuBHaTa NOMHa HeKoNkOKpaTHO, DOKaTO TOpuBTo 3AnOChe Da n3nblBa Mem6paHaTa (okono 10 nbTu). He e Hno6xoJMo dnaΦparMaTa Da ce HanbHn N3cINo.
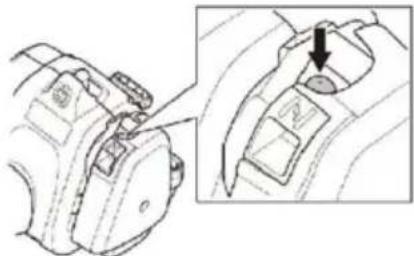
2.Cmyka:YcTaHOBeTe CmykaaB NOIOKeHne 3aJeIcTBaH Cmyka".
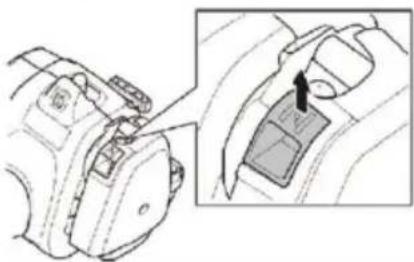
I PENEYNPEXKDEHNE: PnCSTaptnpaHe Ha DBNrataJIe CbC CMyKaU, NoCTaBeH B NIOJoxHne ,3aJeNCTBaH CMyKaU", peXeIoTO 6OpyDbAHe ige 3aNoUHe da ce Bbptn He3a6aBHo.
- 3aipbKTe Kopnyca Ha MaunHaTa Ha 3emrTa c IyBaTa cn pbKa (BHIMAHNE! He npabete ToBa C Kpa!. XbaHete dpbkkata Ha CTapTepa
n n3TeTne 6aBHO uHypa c dAchata cn pKa, DOkato yceTne N3BeCTHO cbnpOTNBHeHne (3b6uNTe Ha cTApTepa 3aueNBat), Cnei KoETO n3DbpnaIte WHpya C 6bP30 n CnHNO dBHXeHne. Hkora He HabNBAITE uHypa Ha cTApTepa OKoNo pKaTa CN.
3A5EJIEXKKA! He cTnckaIte perynaTopa Ha ra3Ta,doKaTo npaBnTe ONNT 3a CTapTnpaHe Ha DBnRaTeJ.
3A6EJIEXKKA! He 6nBa Da ce n3dIbPnBa
n3aJNO CTapTOBOTO BbXe N da Ce OTnycKa
dpkKaTHa CTapTePa npn HAnbJHo
n3TerJeHO NOJIOKeHHe. TOBa MoKe Da
NoBpeN MaunHata. N3dIpNaIte Whypa
MHOROKpaTHO, DOKATO DBnraTeJrT ce ONNTa Da
CTapTnpa (nnMaKcmym 3 n3DbPnBaHH).
- Ako DnurataTeTCTapTnpa HnN Ce ONNTBa Da CTapTnpa, HaTNCHeTe NocTa Ha CmyKaaya HADONY B pa6OTHO NOLOXKeHne.
- PpOdbJIkaBaiTe da dbPnate CnHno shHypa, DOKaTO dBVaTeJrT 3anaIi.
- CneI kaTo DnRaTeJrT CTapTnpa, ocTaBeTe ro da 3arpee 3a 30 cekyHn, npeN da noJaTe nebJIHa ra3.

TOnbI nDbIraTeI
- TOpuBHa NOMa:HaTnCHeTe Mem6paHaTa Ha TOpuBHaTa NOMa HeKoIKNOKpaTHO, DOKaTO TOpuBOTo 3aOnUHe Da n3bJbMa Mem6paHaTa (okono 10 nbTu). He e Heo6xOdmo dnaΦparMaTa Da ce HAnbHn N3cINo.
2.ИЗдьрnaиTe Uнура MHorOKpaTHO,ДOKаTO DBNrAteJIaTc ce ONTa da CTapTnpa (UIN MaKcIMyM 3 ИЗдьрванЯ).
3a pIbKOXBaTKn Ha ra3Ta c 6IoknpoBka Ha ra3Ta npn cTapTnpaHe:
BknOyete ra3Ta Ha CTapTOBO NOLOXeHne, KATO
IbPBO HATNCHEte 6nOKnPOBkata Ha ra3Ta n
perynaTopa 3a ra3Ta, a Nocne HA TnCSHeTe
CTapTePHN6 byoH Ha ra3Ta (A). CneT OBa
OTnycHeTe 6nOKnPOBkata Ha ra3Ta n peryaTopa
3a ra3Ta, cJeDBAHn OT CTapTEPHN6 byToH Ha
ra3Ta. C TOBa CTe 3aDeiCtBAHn CTAPTOBaTa ra3.
3a da BbpHeTe DBrrAteJna Ha npa3EH XOD,
HaTnCSHeTe 6nOKnPOBkata Ha ra3Ta n peryaTopa
3a ra3Ta OTHOB.
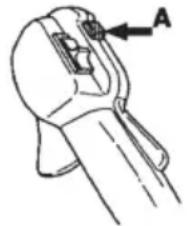
CnnpaHe
Cnpete DnBraTeIype3HaTnCKaHe N OTnyckaHe Ha npEeBKnOuBaTeJI 3a cnIPAhe.
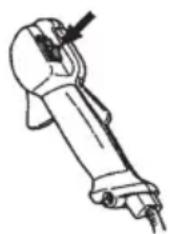
BHIMAHHE! N3KJIIOUbATEJAT ABTOMaTHNo Ce Bpbua B nbpBOHaunHOTc NnnoXeHne.3a Da ce npedOTBpaTN HenpeDnHaMepeHO nyckaHe, Nynata Ha 3anaNTenHATA CBeu Tp6Ba Da ce CBaan OT CBeuTa PnCrNo6BaHe, npOBepKa H/nnN 3BbPbVAHe Ha TexHuecko O6cnykBAHe.

PPEyPExEHEHe: PnCtApTnpaH He nDbuTeIe CbC CmKaay, NoCTaBeH B3aTBopeHO NOJoxEHe, pexeOTo 6OpuyBaH e 3anOHe da Ce Bbptn He3a6abHo.
BAKHOI
BTo3n pa3dcl ce OnncBaT OCHOBHnTe Mepkn 3a6e3onacnoct npn pa6oTa C TpImepn.Ako ce OKaxete B CNTyaun, B KOrTO CTE HeyBepeHN KaK Da NocTBnTe, Ce NocBbETBaIte Cbc CneuaJnCT.ObbPHeTe Ce KbM Baunr cepBn3eh DnCTpN6yTop.
N36yBaTe BcKa yNoTppe6a, 3a KoYTo Ce CByBCTBaTe HeOCTaTbUHO KBaHnΦnUpaHn.
Ppei Da npeTbHnTe KbMa pa6Ota, Tp86Ba da npaBHTe pa3nHa Mexy npoUncTbaHe Ha rOpNCt yAcTbK, KOceH Ndo00ΦopMnHe Ha TpeBHN PLOuN.
OchOBHn npaBnla 3a 6e3OnaCHOCT
OrneauTece:
3a da ce yBepnte, ye xopa, KINBOTHN INN dpyHn Heua He Morat Da NOBInraT Ha Baunr KOHTpObl Bbpxy MaunHaTa.
3a da ce ybepnte, ye Hma onacnoct xopa, KNBOTHn nn npedMeTn da Bnra3at BdoNnp CpeKeTo OobpyDbaHe nn ne Hma npedMeTn, KOnto da OTCKOuat OT peKeTo OobopyDbaHe.
BHIMAHHE! He pa6oTeHe NKora c MaunHaTa, KOraTo HMaTe Bb3MOxHOCT Da NOBnKaTe NOMOu BcnyaH Ha 3JNONOlyka.
He pa6oTe Te npn lou anmocfepn ycNoBna KaTo HApnpMep npn PbTHa MbINa, CIneH DxKd, CIneH BAtbp, CIneH CTyD nT.H. Pa6oTaT B Noo BpeMe e n3MopntHa m MoKe Da DoBeDe Do ONachn CHTyaCn, KaTo HApnpMep 3aJeBaHe Ha 3eMaTa, HenpeDbNIMma Nocoka Ha naDaHe Ha DbPBOTo n T.H.
- YBepete ce, Ye MoKeTe Da XoJnte N da CTOnTe 6e3onacHo. IpoBepete 3a eBeHTyaHn npenTCTBn (KopeHn, KaMbHn, Xpactn, KaHaBKn n T.H.), B Cnyaay Ce HAnOxN da ce npemecTne BHe3anHO. BbTe MHoro npedna3JnBn npu pa6Ota no HaKNoHeH TepeH.

-ИЗклочete DBIgATEJIЯ,прдЯ ce npemecHTe Ha pyro MrcTo.ПocTaBeTe 3auntata npi TpaHcnpTnpaHe,прдЯ da npehecTe nII TpaHcnpTnpaTe obopydBaHetoHa pa3CTOraHne.
Hnkora He octabrTe MaunHaTa C BkIIOyEn DBrarTeJ ININ DOkaTo pexeUTo 06OpyDbAHe Ce DnXn.
OchOBn Ha npoUncBaHeTo
Bunarnn3noJ3BaIte npabunHOTO 06OpyDbaHe.
- YBepete ce, ye obopydBaHeto e npabnHO HacTpoeHO.
CneBaeIte HNCTpyKunTe NO TEXHnKa 3a 6e30nachocT.
- OpraHn3npaIte pa6oTaTc n BHMaTeJIHo.
BnHaHn n3noJ3BaIte nbJHa ra3 npn CTapTnpaHe Ha pra3aHTo C HOxa.
BnHaHn n3noJ3BaIte oCtpn HoxOBe.
- N36raBte KaMbHnTe.
BHHarH noHNKabAte ckopocTtHa DnBraTeJrdoCKopocT Ha npa3eH XoD CJIeD BCja pa60tha onepaun. IpoIbJxNKeTIHaTa pa6ota Ha IIbIInn O6OpOTn, 6e3 DnBraTeJrTa da e HATOBapeH, MoKe Da npedn3BnKa cepno3Ha nobpeDa Ha DnBraTeJr.

I PENEYPENEXDEHNE: HnTO onepaTopbT Ha MaunHaTa, HnTO HnKOJ Dpyr Tp86Ba Da ce ONNTBaT da OTcPaHnBaT Hapra3aHnMaTePnAJI DOkATO DBnRaTeJIaT pa60TN nIN DOkATO pe3eUbT ce DnXn, TbN KATO TOBA MOKe Da DOBeDe Do cepno3HO HapaHnBaHe. N3KnIOuYeTe DBnRaTeJIa n PexeJoTO o6OpyDbaHe n pa3eHNHeTe npOBoHNKa OT 3anaHTeJIHATA CBeU, NpeDN da OTCTpaHnTE MaTePnAJa, KOITO Ce e HABNI OKOLO BAJa HA HOXA, TbN KATO B IPOTNBEH Clyuayn CbIeCTBvBa PNCK OT HapaHnBaHe. No BpeMe Ha pa60Ta n HEnocpeDCTBeHO CJeD TOBa, BfIOBaTa IpeDaBka MOKe Da e HaropeSeHa. OTabete BpeMe 3a OxnaXdaHe. Ppi DOKOCBaHeto M MoKe Da ce N3ropnte.

I PENEYPENKDEHNE: Onachoct ot Xbpyaun npedmetn. Bnharn hocete Odopeha OT cbOTBeHTne opraHN 3aunTHa eknnnpOBka 3a ouhte. Hnkora He ce HaBexdauTe OTbD 3aunTaHa pe3eua. B ouhte BN MORAT da nonaHaT KAmbH N OTnaDbuN, KOtO MORAT da DOBeDat DO cIenota Hn Cepno3Hn HapaHyaHn. DpbXte HeOTOpn3npAHNTe Jnca Ha pa3CToRHe. Deua, XNBOTH, CTpaHnHn Ha6NoDaTeJn NOMOHNu Tp6Ba Da CToT N3BbN 3OHATA Ha 6e3onacnoct ot 15 metpa (50 feet). Cnpete He3a6abHo MaunHaT, aKO HrkOn ce np6nKn. Hnkora He ce o6puaTe C MaunHaT, 6e3 npEn ToBa Da npOBepnte DaII 3aB Bac He Ce Hamnpa HkON B 3OHATA 3a 6e3onacnoct.

PPEyPExEHEe:NoHrkora ce 3aApbCTBaT KIOHn Hn TpeBa MeKdy 3aunTa n pexeOTo o6OpyDBeHe. BInHaN n3KnUoyBaIte DBrATeIg Ppei nouchBaHe.
Kocene Ha TpeBa C NOMOHTa Ha HOX 3a TpeBa
HoxOBete 3a TpeBa n pe3uTe 3a TpeBa He Tp6Ba Da ce n3noJ3BaT 3a CTb6Na Ha DbpBETA.
3a BCNUBIOBE BUCOKA NIN TBCTa TpeBa ce H3NOJ3BA HOK 3a TpeBa.
TpeBaTa ce KOCn C MaxaIOBnHO CTpaHnUHO DvIXeHne, KaTO pRn DvIXeHne OT JrCHO HaJIbBO Ce KOCn, a DvIXeHneTO OT JIbBO HaJrCHO e BpIaAio DvIXeHne. 3a KoCeHe ce N3PON3Ba JIbBaTa CTpaHa Ha HOxHa (B O6XbAta ot 8do 12 Yaca).
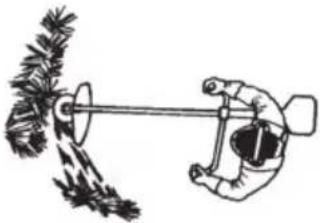
- Pn HAKNOH Ha HOKa HAJIABO, KOraTO KOCNTe TpeBa, Ta Ce Cb6upa B NInHna, KoETo yIecHraBa np6upaHeTo n, HanpImep c rpe6No.
OntaTe da pa6oTne pNTMnHc.3actaHeTe CTaBnHOB Nek pa3Kpa. PpNDbNKBaHTo HAnpeD ce n3BbPwBa CneB Bp7aUTo DnHexHne, KaTO CNEd TOBa 3aCTaBaTe OTHOBO CTaBnHc. - Onopnata yawka ce donnpa neko do 3emrTa. Ta cnykn 3a npedna3BaHe Ha HOxa OT ydpraHe B 3emrTa.
- Hamane pncka ot yBnBaHe Ha MaTePnaI OKoJIO HOKa Ype3 CneDbaHe Ha Te3N INHCTpyKcIM:
BnHa npabotete Ha nblna ra3.
- N36yBaIe ToKy IIO OKoCeHaTa TpeBa, npB BpbuaOTo DnHexHne.
Cnpete Dnuratela,OTkaTe cama npocTabeMaunHaTa Ha 3emrta,pei Da 3anOuyhe Ta Cbupate OTPaHm MaepnaI.
DooOpMaHe Ha TpeBa C TpImepHa rnaBa
DooopmHaHe
ДрькTe TpIMepHATA rIaBA HeNOCpeiCTBeHo HAD 3emra n noD bbl. Pa6oTata ce n3BbPwBa OT kpa Ha KopdaTa Ha TpIMepa. Octabete KopdaTa da pa6oTN c6c co6CTbeHn cn pntbM. He npTuNCaTe HNKora KopdaTa KbM yUacTBK, KOITO KOCITE.
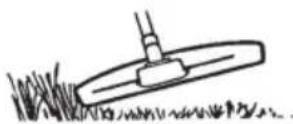
KopdaTHa TpImepa MoKe IecHO da npemaxHe TpeBaTa N PJIeBeJInTe OKOIO CTeHn, OpradN, DpbBETA N 6OpIOpN, HO MOKe Da NOBpeDN YyBCTBHTENHaTc Kopa Ha DpbBETaTaN XpactNTe N Da NOBpeDN CTbJIoBe Ha orpaDInTe.
- HamaIepe nCKa OT NOBpeHa pAcTeHnra Tpe3 CkbcBaHe Ha KopdaTdo 10-12 cm (4- 4,75 in) INoHNKabHe Ha CKOpocTTa Ha DnRaTeJI.
Korato dooopmTe, Tp6Ba da He paobnte Ha nJHa ra3, 3aOTo TaKa KopdaTa IMa noDblr XNBOT n Ce HamaJra N3HOCBaHeTo Ha TpImepHaT rnaBa.
IpoountBaHe
TexHkata Ha npouncBaHe npemaxBa qJlata HeHyxHa pactnteHocT. DpbXte TpImepHaTa rnaBa HENOCpeDCTBeHO Ha 3emrTa. OctabeTe Kpa Ha KopdaTa Da ce yprB 3emrTa OKoI ObPBeTa, CTbNoBe, CtaTyu n dpyrN. BAXHO! Ta3n TexHkA NOBnAba n3HOCBAHeTo Ha KopdaTa Ha TpImepa.

KopdaHa Tpimepa Ce n3HocBa no-6bp30 u Tpr6Ba Da ce n3BaXda Hnpei No-yeCTO, KOrato Ce paBOTN OKOIO kAmbHI, TyxIIN, 6eTOH, MetaJIHN OPGAnu N Dp., B CpABHeHne C KOHTAKC DbPBeta N DbPBeHn OPGAn.
KoceHe
TpmepeT e ndeaen 3a Koche Ha TpeBa, KOTo e TpydHa 3a DoCTnraHe npu H3noJ3BaHe Ha HopmaJHa Kocayka. DpbXte KopdaTa Ha TpImepa ycnpeHa Ha 3emrTa npu KocHe. N36RaBte npntckaHTo Ha TpImepHaTa rnaBa DO 3emrTa, Tb' KaTO MoKeTe Da HapaHtE TpeBHata PNOU i da NOBpeDInTe ypeDa.

He no3BOJBAIte TpIMepHaTa rnaBa Da Bn3a NOCTOHHo B KOHTaKT C TepeHa No BpeMe Ha HOpMaJIHO KOCeHe. IocToHNNrT KOHTaKT OT TO3N TIN MOKe Da npEdu3Bnka NOBpeu IN BOUN DO n3HOCBaHe Ha TpIMepHaTa rnaBa.
Поунстванe
- BeHTnlaTOpHnT efeKTH Ha BbptaTa ce Kopda MoXe Da ce n3noI3Ba 3a 6bp3o n IecHo noUcTBaHe. DpbXTe KOpDATA yCnpopeHn HaJyAcTbKa, KOITOnNoUcNTBaTe, KaTO dBVxNtE ypeDa HAnpei Ha3aI.
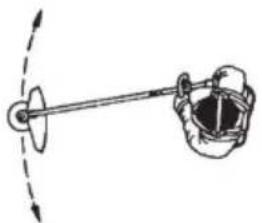
Korato pexete n nouctBaTe, Tpa6ba da pa60nte Ha nbnHa ra3, 3a da nocTnHHe TaHdo6pn pe3yntatn.

IPEUYPEXJEHNE: HnTo onepaTopbT Ha MaunHaTa, HnTO HkOu Dpyr Tp8Ba Da ce ONHTBa Da OTCTpaHn OTP3aHnMaTePhaI, DOkATO DBnraTeJrPa6Ot Hn KOpDaTa Ha TpImepa Ce DBnXn, 3aUOT TOBA MOxE Da DOBeDe Do cepNo3HO HapaHbAHe. N3KnIOyHe TBrAteJI N TpImepHata rnaBa n pa3eDInHete npOBoHNka OT 3aNaNTeJIHATA CBeU, PpeDN da OTCTpaHnTE MaTePhaIa, KOITc Ce e HaBNI OKOLO 3aDbNxBaun BAn, TbN KaTO B npOTNBEN Clyuay CbueCTByBa pCK OT HapaHbAHe. No Bpeme Ha pa6ota n HeNoCpeDCTBeHo CneT ToBa, BrNoBaTa npedabKa MoxE Da e HaropeeHa. Octabete Bpeme 3a OxJaXdaHe. Pn DOKOCBaHeto MOnKe Da ce N3ropnte.

PPEyPExEHNc:OnaCHocT OT Xbpyaun npedmetn.BuHarn Hocete 3aunTHn cpeCTBa 3a ouHTe. Hkora He ce HaBexdaIte OTbJd 3aunTaHa pe3eua.B OuyTe BN MoarTa da nonaHaT KaMbHn OTnaDbu, KONTO Morat Da DOBeDat Do CJIeNota Hnn cepNo3Hn HapaHyaBaHHa.

Дрьхte HeOTOp3npuHnte Jnca Ha pa3ctOraHne.Дeцa,ЖИВОТн,СТpaHnUHn H6JIbOdaTeN N NOMOuHnCt Tp6Ba Da CTOrT N3BbH 3OHaTa Ha 6e3OnaCHOCT OT 15 MeTp a (50 feet). Cnpete He3a6abHo MaunHata,ako HЯко ce np6Jnxn.
TEXHnuecko OBCJIyXBAHE
CpokbHa eKcnnoataaHa MaunHaTa MoKe Da ceCKbcn, a PnCKbT OT 3IonoNyKn Da ce NobuHn, aKO He Ce n3BbPwBa npabUNHO TexHuecko
06cnykBaHe n cepBn3bT n/nn peMOHTnte He ce
n3BBpWBat npopecnoHaJIHo. Ako BN e
Heo6xOIMMa DOnbHnTeJHa INΦopMaua,
06bpHete Ce Ha-6n3Kna OToPn3npaH cepBn3eH
dNCTpNoByTop.
БezonaachocT ha ypeDa/TEXHnueckOTO 06cnykBaHe
Pa3eINHЯBaIe BpB3KaTa KbM CBeuTa npeiN TexHnuecko 06cnyXbaHe, OCBeh npn HAcTpoBaHe Ha KapbypaTopa.

IPEyPExEHE: Ipei cTapTnpaHe Ha MaunHaT a KOMnKeTbT Ha CbeHHTe, KaNaKbT Ha CbeHNHTeN BaBbT Tp6Ba Da ca NoCTaBeH, 3aOTo B IpOTuBEh Cnyaay Yactte MoKe Da ce pa3Xna6T N da IpeHn3BnKaT TeJeCHN NOBpei.
Kap6ypaTop
Функця
Kap6ypaTopbT perynipa obopoNTe Ha dBnraTeJype3 ynpabneHneTo Ha ra3Ta. Bb3dyxbT nropnbOTc Ce cmeCBat Kap6ypaTopa.
T-06pa3HnT BnHT peryInpa HacToPiKaTa 3a ra3Ta npn npa3eH xoJ. Ako T-06pa3HnT BnHT ce Bbptn NO NocOka Ha YacOBnKOBaTa CTpeNka, TOBa BOuN DO NOBnUbaHe Ha OobOpTne Ha npa3HnXoJ, a BbptHeTo B nocOka, ObaTHa Ha YacOBnKOBaTa CTpeNka, BOuN DO HaMaJIbaHe OobOpTne npn npa3Hen XoJ.
OchOBHa HacTpoKa
OchOBhata Hactpoika Ha Kap6ypaTopa ce OcbIeCTBraBa IPN N3NITBAHnraTb 3aBOda. FInHaTa Hactpoika Tp86Ba Da Ce N3Bbpnn OT npocecnoHaHnCT.

IPEyIPEXDEHNE: PexeToO
obopyBaHe MoKe Da Ce BbptN No BpeMe
Ha HacTpoBbHe Ha Kap6ypaTopa. Hocete
BaWnte 3aunTHn CpeDCTBa N
CbJIOdaBaIte BCnUKN HnCTpyKcN 3a
6e3onacHocT. YBepeTe ce, Ye pekeIoTO
obopyDaHe cnnpa Da ce BbptN, KOrato
DbnraTeJIr pa60Tu Ha npa3eH XoJ.
Korato MaunHata Ce n3KnIOuN, Ce
yBepeTe, ye pexeIoTO obopyDaHe e
cnpNo, PpeiMaunHaTa Da ce OCTaBN
Ha 3emrTa.
BHIMAHHE! Ako pexeetao o6opyDbahe ce Bbptn. KoraTo DnraTeIaT pa60Tu Ha npa3eh XoI, T-6pa3HnT BnHT Tp6Ba Da ce 3aBbptn 6paTHo Ha yacOBnKOBaTa CTpeNka, DOkato pexeetao o6opyDbaHe cnpe da Ce Bbptn.
IpenopbHTeHaCKOpocHa npa3EH XoJ: BxTe pa3deJ „TexHueckn XapaKtepncTnKn". IpenopbHTeHa MaKcMaJIHa CkOpcT: BxTe pa3deJ „TexHueckn XapaKtepncTnKn".
■Фина Habtpoиka Ha T-06pa3HnBnHT 3a ckopoCt Ha npa3eH xOД
Ako e Heo6xOIMO, perynpaTte cKopocTtHa npa3eH xOc nOMOuTa Ha T-0bpa3HnBnHT 3a NaCTpOJa Ha cKOpocTtHa npa3eH xOd. 3aBbptete NbpBO T-0bpa3HnBnHT 3a perynpaHe Ha cKopocTtHa npa3eH xOd no Nocoka Ha YacOBnKOBaTa CTpeNka, DOKaTO peXeIoTO o6OpyDbAHe 3anOvHe da Ce BbPTn. Cnei TOBa 3abptete BnHTa o6pAtno Ha acOBnKOBaTa CTpeNka, DOKaTO pexEIoTO o6OpyDbAHe cnpe. IpaBnHPO perynpaHn O6OpOTn Ha npa3Hn XoD ce NOlyuBaT toraba, KOrato DBnraTeTn paBTo nIABHO BB BCsKO nIOJKeHne. CkOpocTtHa npa3eH xOd Tpr6Ba da e DOCTaTBUHO No-HnCKa OT cKOpocTt, pnKoT0 peXeIoTO o6OpyDbAHe 3anoYBa Da ce BbPTn.
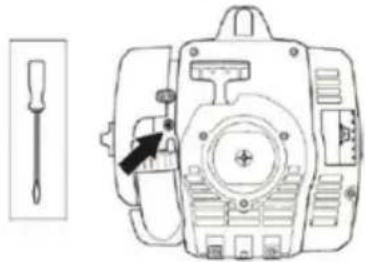
PerynnpaHe Ha ckopoCTTHa HauaHHaTa ra3
IpaBnHataCKoOCTHaHaayanHata ra3 ce 3aDabat NocpeiCTBOM peryNaTOp, pa3noNoXeH B 3aHata YacT Ha pbkoXBaTkata Do Ka6ena. I3noJ3BaIte To3N BuHT (4 mm C wecToCTeHHa rnaBa), 3a Da yBeInuYte Nnn HamaJIte CKoOCTTa Ha HaayanHata ra3.
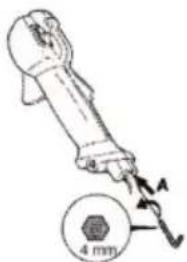
Ioctbnete no cneHnHaunH:
- Octabete MaunHata da pa60Tu Ha ckopoCT npn npa3eH xoJ.
- HaTnCHeTe 6IoknpoBkata 3a HauJIHaTa ra3, KaKTo e OINCAHO NOJ 3aRnaBneTo ,IyckaHe n cnIPAhe".
- Ako ckopocTHa Ha hauaHnHaTa ra3 e npeKaJeHo Hncka (no 4000 06/MnH), 3anOuHete da Bbptnte BnHTa 3a peryInpaHe (A) no nocoka Ha yacOBHNKOBaTa CTpeNkA, OkaTo pexeIoTO 6obpydBaHe 3anoHne Da ce Bbptn. Cnej ToBa
TEXHnuecko OecJyXBAHE
3aBbPTeTE BnHTa 3a peryInpHaHe (A) no nocoka Ha yacOBHnKOBaTa CTpeJka c oue 1/2 obopot.
4.Ako ckopocTtHa Ha hauaHnHata ra3 e npekaJeHo BnCoka, 3aNooyHeTe Da Bbptnte BnHTa 3a perynipane (A) B noCoka, o6paTHa Ha yacOBHKOBaTa cTpeJka, DOKaTO peKeToO obOpyDbAhe cnpe. CneT TOBa 3abPteTe BnHTa 3a perynipane (A) no nocoka Ha yacOBHKOBaTa cTpeJka c Oue 1/2 obopoT.

PPEyIPEXJEHNE: Ako ckopocTtHa Ha npa3eH XoJ He MoKe Da ce perynpa Taka, Ye pexeOTo 06OpyDbaHe da cnpe, ce 06bphTe KbM Baunr cepBn3e Hnctp6yTop. He pa6oTe c MaunHaTa, npdN Ta Da e npabUNHO perynpaHa nn peMOHTnpaHa.
Ayncyx
BHIMAHHE! AycnyxbTe o6OpyDbH c KaTaN3aTop, npeHa3NaueH 3a HamaJBAHe Ha BpeHNTE Otpa6OteH ra3OBe.
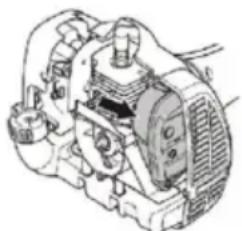
(Kopnycblm Ha cmapmepa e npemaxham c uen Ychoma)
AycnyxbTe npedHa3HaueH 3a noHxkaBaHe Ha HNBOTO Ha Wyma N 3a OTBexdahe Ha OTPabOTeHTe ra3OBe B NOcKa, OpaTHa Ha onepaTopa. OTPabOTeHTe ra3OBe ca HarpeTu MOrat Da CbIbPxKAT NCKPn, KOnTO Da npEiN3BnKAT NoXap, KOraTo nonaHaT Bbpx CyX Inecho3aapanM MaTePnaI.
Aycnyte ca obopydbanh cbc cneuaHa nckporacntenHa mpeka.Mpekata Tp6ba da ce npobepn i, ako e Heo6xoDIMO, nouCTN OT cepBn3e Hnctpn6byTop. B cnuyaYe mpekata e nobpedeHa, Ta Tpr6Ba Da ce IoDMEHN.
AkoMpexkatace3anyuBaYeCTO,TOBA MoKe Da e npn3HaK,ye epeKTNBHOCTTa Ha KaTaN3aTopa e Bb3npenrTcTaHa.ObpHete ce KbMaBnna cepBn3eH dncTp6yTop 3a npOBepKa Ha aycnyxa. 3anyWeHATA Mpexa MoKe Da npedn3Bnka npperpaHe Ha MaunHata,KoTo Da DOBeDe Do nobpeDa Ha cUINHDbpaN6yTaNoTo.

BHIMAHHE: Hnkora He n3noJ3BaIte MaunHa, KOrTo e c nobpeDen nn pa3xna6eH aycnyx. YBepeTe ce, ye 6oJTOBete Ha aycnyxa ca 3dpaBO 3aterHaTn.

IPEyIPEXJEHNE: Aycnucnte, 60bOpYBaHc c KaTaN3aTOp ce HarpRbAT CnHb B npoueca Ha pa6Ota N3BeCTHO BpeMe cNeToBa. ToBa BaKn n npn npa3eH xoJ. DOnnpbT MoKe da npedN3BnKa n3rapHnHa Koxata. BHmAbaTe 3a onachoc T ONoxap!

I PEPYUNPEXDEHNE: BbTpewHocTtHa na aycnyxa cBdbpka xMMkauN, KOnTO MOKe da ca kaHcpeoreHH. B cnyaay e aycnyxbTe nOBpehen, n36raBaTe dOnnp C Te3n enEmENTn.

IPEyPExEHENE: Otpa6oTnInTe ra3OBe OT MOTopa CbDpKaat BblpeOpdeH OKnD, KOITOMOKe Da npeu3BnKa OTPaBHe C BblpeOpdeH OKnD. He CTapTnpaHTe H He N3NON3BaHTe MaunHaTa Ha 3akpTO nn Ha MeCTa C HeNo6pa BeHTnlaqna. OTPa6oTeHnTe ra3OBe OT DnRaTeJc RaopeuN MoRat Da CbDpbXkAT Nckpn, KOITOn DA npeu3BnKAT Noxap. He CTapTnpaHTe Hnkora MaunHaTa B NomeueHne NN 6nn30 Do TropNBn MaTePnAn!
3anaIteHa cBee
CbctoHHeTo Ha 3anaJInteHHaTa CBeU MoKe da ce NOBnIRe OT:
- HénpaBnHa NaCTpOJa Ha KapbypaTopa.
- HenpabnHa rOpBHa CMEC (TBbpDe MHOrO nHn HnnpaBnEn TnN MaCNo).
3aMbpcEH Bb3dUyWeH qnITbP.
Te3nФakTopnMOraTda npedn3BnKAT OTnaraHnBbpxy eNeKtpoDnte Ha CBeuTa, KOtO daIOBedaTdo npobemn B pa6oTa n Tpydnoctn npn CTapTupaHe.
Ako MaunHaTa HMa NOnHKeHa MoUHocT, TpydHo ce Ctapnpa nn pa60Tu HepaBHomepHo Ha npa3Hn obopOt, BnHa n npOBepraBaTe CBeuTa, npeDn da npednpneMeTe DOnbHnTeJIHO DeiCTBne.
Ako CbeuTa e 3aMbpeHa,Я NOUCTe N npOBepTe DaIpa3CToHneTo MeKdy eNeKTpoDnTe e0,024 nHua (0,6 mm). 3anaNTeJIHata CBeu Tp8Ba da ce noDMehr cNeI OKOIO eDNH Mceu IIN DOpN No-YecTO, aKO TOBa Ce HaJara.
0.024 inch (0.6 mm)
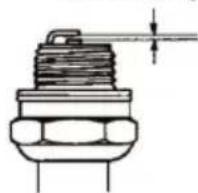
BHIMAHHE: N3non3BaTe BnHarn 3aNaHNTeHNHe CBeuN OT npenOpbuaHn BnD. N3noJ3BaHeto Ha norpeweH Tn CBeuN MoKe Da npedn3BnKa cepno3Hn NobpeDu Ha 6yTaNoTO/UnnnHDbpa.
Bb3dyweH qnIeTp
Bb3duhnytФnntbpTpra6Ba da ce nouuctba peoBHO, 3a da ce OTCpaHn npaxa n 3ambpcaBAHnTa, 3a da ce npdeotbpaT:
- NOBpeiHa Kap6ypaTopa
- npo6nemnpn cTaptnpahe
3ary6aHaMOHOCHTHaDBuratela
HeHyXHO 3HOCBaHe Ha YaCTNTe Ha DBNrTaTeJIa - PnekomepHa KOHCmaqna Ha ropuBO
IounCTBaIte ФИNTbpa Ha BCEkn 25 yaca nIn no-uecTo, aKO yCIOBnraTa ca N3BbHpeDHo 3a npaWeH.
NouchBaHe Ha Bb3dUHHnФnTbp
CbaTeKaNakaHaB3dyuHnAeHnTbp n 13BaTeePnTbpa.N3MnIte ro BnCTa,TOnna canyHehaBoDa.N3nJaKHeTe oBnHo.IpeDn crIO6BaHTo ce yBeJeTe,yeΦnTbpTe cCyx.
Bb3dyuH e HnTbp, KoTo e n3noJ3BaH dJnro BpeMe, He MoKe Da ce n3yncTn HanbNo. ETo 3aio Ha onpeJeHn INTEpBaHn OT BpeMe To Tp8Ba Da Ce NODMeH C HOB. NObpeH Bb3dyuH e HnTbp Tp8Ba Da 6bDe HnpeMeHHo CMeHeH.
brnoBa 3b6Ha npedabka
brnoBata 3b6Ha npedAka e HanbIHeHa c Heo6xOIMOTO KOINueCTBO rpec B 3aBoJa. Ho npedn da Ce Bb3NoJ3BaTe OT MaunHaTa, Tp6Ba Da ce y6eHnte, ye 3b6HaTa npedAka e 3aBJIHeHa Ha 3/4 C rpec. N3non3BaIte CneuHa rpec. O6nKHOBeHo He e Heo6xOIMo rpeCTa B brrnOBaTa 3b6Ha npedAka da ce CMeHna, OCBeH aKO He CE n3BbpUba peMOHT.
3aToUbaHe Ha pe3u 3a TpeBa Hoxobe 3a TpeBa

PPEyPPEKDEHNE: CnnpaTe BnHaBn DBrTaTEn PpeDn Da 3anOuHete Da pa60nte C HAKON YACT OT pexeTo O6OpUDbAHe. To npoBtJkAba Da ce BbptN DOpN, KORATO cTe NcHaN peryIaTopa Ha ra3Ta. Y6eDete Ce, ye pexeToO6OpUdbAHe e cnpraNo HanbIHO n pa3eDInHete Ka6ena ot 3anaJIteHNata CBeu, PpeDN da 3anoHete Da pa60nte C Hero.
BnKTe onakOBkataHa pexeToO6OpyDbaHe 3a HnCTpyKm3a npabNJHO 3aTOUbaHe.
- Pe3eUbT IN HOXbT Ce 3aTOuBaT C NOMOuTa Ha IIIOCKA NIIJa.
3aToYe BCnKn p6OBe paBHomepHo, 3a da noDbpxKe 6aJHaHcHa HOka.

IPEyPExEHE:OrbHaI ce,ycKaH, HanykaI ce,CKbcAHnnIOBpeDeH NO HkaKbB dpyr Haun pe3eTupa He npemehno da 6bde otctpanen. Hkora He ce onntBaTe Da n3npaBte ycyKaH pe3eU 3a NOBTOHO 3nON3BaHe. Pa6oTe cAmO c opuHaJIHn pe3zN OT npenopbuaHn Tn.
Texnuecko o6cnykBahe
CneBb Cnncbk C onepaunnte no Texnuecko 06cnykBaHe, KOTo Tp8Ba Da ce n3nbHnRaBt No MaunHaT. NObeHTo OT no3uNTe Ca onncaHn B pa3deNa PoDp8kKa. Notpe6ntenr Tp8Ba Da n3BbPwBa cAmo pa6oTaT NO npDp8kKaTa n 06cnykBaHeTO, ONnCAHN B TO3n HapbYnK Ha onepaTopa. No-3NaHTeHNHte pemOnTHn Tp8Ba Da ce n3NbHnRaBt OT OToPi3nPaH cepBN3.
CeMnHNo o6cnyXBaHe:
-Почирете MaшиннаТОТьн.
- PpOBepete daHn 6IOKIpOBkata Ha ra3Ta nФyHKUraTa 3a NoDABaHe Ha ra3ФyHKUHOHPaT npabNJHO OT rJeHa TOUka Ha 6e3OnacHOCTTa.
- YBepete ce, ye n3KnHouBaTeJrT pa60tn npabNJHO.
- YBepTe ce, ue pexeTo 06OpyDbAHe He ce Bbptn npu paOTo Ha npa3eH xoJ.
- POnuCTe Bb3dyuHnIyPnITbp. POnMeHete roBcnyaHa Heo6xOUMoCT.
- YBepTe ce, ye npEa3nTeJrHa peKeIooTo obOpyDbAHe He e NobpeDeH He e HaNyKaH. CmeHeTe npEa3nTeJrHa pEkeIoTO obOpyDbAHe, aKo e 6nI n3NoXeH Ha ydApn nnCe e HanykaJ.
- YBepete Ce, Ye TpIMepHaTa rIaBa He e NOBpeDeHa n He e HanykaHa. Ppi Heo6xOUMocT Tpr6Ba TpIMepHaTa rIaBa Da 6bJe CMeHeHa.
- YBepTeCe, Ye KOHTparaiKaTa Ha peKeITo O6OpyDbAhe e npaBnJHo 3aterHaT.
- YBepete ce, Ye raiKITE N BnHTOBeTe 3a 3aTeHaTn.
- YBepete ce, ye He ca HauuTe TeOBe Ha rOpINBO OT DnurataTeJ, pe3epBoapa nnr TropBONpOBOdnte.
MeceHObcIyXBaHe:
DnameTbp Ha cHnHbpa, mm 35
XoA, mm 28,7
OboptnHa npa3eH xoD,06/MmN 2800-3200
IpenopbnteHHMaKc.6bp3n 06opOTHa npa3Hna 11000
CkopoCT Ha n3XoDnna BaJ, 06/MnH 8000
MaKc. MoUHocT Ha Dnuratela CbI. ISO 7293, kW 0,8
3aŋyuŋnten Ha KaTajn3atopa Da
3anaHntHa cHcTeMa c peryuipaHa ckopocT Da
3anaJIteHa CnCTema
3anaIteHa CBeu NGK BPMR6A
Pa3cToHHe MeKdy eJekTpOuTe, mm 0,6
CnCTema Ha 3axpaHbHe/cMa3BaHe
BmeCTHMOCT Ha pe3epBOapa 3a ropuBO, cm³ 343
Terno
Terno 6e3 ropnBOTo, pexeIooTo o6OpyBaHe n npedna3nteJg 5,21
UymoBn emncnn (BnxTe 3a6eJekka 1)
HnBO Ha 3BykoBaTa MoUHOCT, n3MepeHa dB(A) 106
HnBO Ha 3BykoBaTa MoUHocT, rapaHTnpaHa LwA dB(A) 114
UyMoBn HnBa (BuxTe 3a6eNexKa 2)
EknBaIeHTHO HNO Ha 3ByKOBOTo HAnraHe Bbpxy yxOTo Ha onepaTopa,
n3mepeno cbrnacho EN/ISO 11806 n ISO 22868, dB(A)
O6opyDbaH c Hox 3a KocHe (opuHaJeH) 94
O6opudBc TpMepHa rna (opnHaHa) 95
HnBa Ha Bn6paunu (BnxTe 3a6eJekka 3)
EKBnBaIeHTHn HnBa Ha BnOpaunTe (aHV,eq) Ha pbkoXBaTKnte, n3MepeHN
cbrnacho EN ISO 11806 n ISO 22867, m/s2
O6opydBaH c Hox 3a KocHe (opnHaHEn), JABo/JeCHO 4,21 / 4,23
ObopydBaH c TpImepHa rIaBa (opnInHaJIHa), IyBO/JeCHO 5,89 / 4,61
3a6eKka 1: WymOBn emCnn B OKJHaTc CpeDa, N3MepeHn KaTO 3ByKOb MaUHOCT (W) B CbOTBeTCTBne c dIpeKTnBa Ha EO 2000/14/EO. OTYeTeHnTe HnBa Ha WyMa 3a MaunHaTa ca N3MepeHn c opINHnHTo pexeio obOpYBaHe, KoTo daBa Hau-BnCOKOTO HnBO. Pa3Nkata MeXdy rapaHTnpaHTo n N3MepeHTo HnBO Ha WyMa E B TOBa, Ye rapaHTnpaHTo HnBO Ha WyMa BKIOuYBa CbIo N DnCnepCnTa B Pe3yNTaTtNe OT N3MepBaHeTo, KaTO u BapNaCmTE MExDy pa3NnuHnTe MaUNHn OT eDIn N CbUIM MoDen B CbOTBeTCTBne c dIpeKTnBa 2000/14/EO.
3a6eIekka 2: OTuTeHnTE daHHN 3a eKBBaIeHTHO To HbO Ha 3ByKOBoTo HaJIraHe 3a MaunHaTa IMaT TnUuHa cTaNTnuecka dncnepcna (CTaHdApTHo OTKnloHeHne)OT1dB(A).
3a6eEckka 3: OTuTeHnTe DaHHN 3a EKBuBaIeHTHO To HNo HA Bu6paunTe mAt TnMnHa CTaTnCTnuecka DnCnepcn (CTaHdApTHO OTKnOHeHne)OT1m/s.
Moe1 129R (M10 c JIbA pe36a Ha Bana) - eHTpaJen OTBOp B HoxoBeTe/pe3uTe, 25,4 mm
| Одобreno prиспособлия | Тир | Рекеши оборudвае / сиит, apt. № |
| Нож за трева/разец за трева | Трева 255-4 1 Инч (Ø 250 4 зьба) | 504001303 / 580446606 |
| Тримерна палва | T25 (Ø 2,4 - 2,7 mm пал综合体) | 537338306 / 580446606 |
ImeHa n3daTeJIa: Husqvarna AB, SE-561 82 Huskvarna, UBeuJra, TeJ.: +46-36-146500.
Husqvarna AB Hocn cyaIATA OTROBOPHOCT 3a npedMeTa Ha Ta3n DeKnapaunr: Tpimep n/nnx xapctope3, nlaTOpMa(n) A05328CBHV, npedCTabIbAua(a)(m) Moen 129R cbc cepuHn Homepa ot 2014 r. n HataTbK.
HomepbT Ha nIaTΦopMaTa n HomepbT Ha MoJeJa Ca rCHO NOCOeHN KaTO TEKCT Bbpy TInOBaTa TaBeNka 3aeDnO C rOuHAta, CneDbHa HOTcepuHnTe Homepa.
IpeMeTbHa deknapaunra, onncaH no-rope, e B cboTBcTBnC n3NCKBaHnTa Ha DnpeKtNBte Ha Cbbeta:
2006/42/EO,OTHOCHO MaunHnTe" 17MaJ 2006r.
2004/108/EO ,oTHOCHO eJKeKtpomarHHTa cBbMecTmocT 15 dKeEMbpn 2004 r.
2000/14/EO,OTHOCHO WUMOBITE EMUCN B OKOJHaTa CpeDa" 8 Ma# 2000 r.
B cboTBeTcBne C npnloKeHne V, o6BaBeHnte 3ByKOBn CTOnHOCTn Ca nOcoeHN B cneuΦnKaunrTa Ha TEXNHueCKNTe XapaKTePncTnB INHCTpyKUraTa 3a eKcnIooataua.
N3noJ3BaHn ca CneDHNTe CTaHApTn:
EN ISO 12100:2010, EN ISO 11806-1:2011, ISO 14982:1998, CISPR 12:2007
TUV Rheinland N.A. ɪЗBsршо дбровлно контpoл оtmeto Ha Husqvarna AB и n3rotbN CeptnФИКAT 3a cBoTBeTCTBnE AM72140165сДиpeKТиBa Ha CБВeTa 2006/42/EO OTHOCHO MaunHInTe.To3n cepTФИКа t epnIoXIM 3a BCnUKN pOIN3BODCTBeH INILOUdKn IN CTpaHn Ha npOn3XoD, KaKTo e yPOMeHaTO BbpynpOdykTA.ДocTaBeHnTe TpImep 3a TpeBa N/IIIN XpactOpe3 CboTBeTCTBaT Ha obpa3eCa, noIIOJKeH Na KONtPoI.
IopnncanO t mTo Ha: Husqvarna AB, Huskvarna, 7Beunr, 27.12.2013 r.
距离
Ronnie E. Goldman, Дирейков посторе. (Одneyнограда на Нusrуарною).

NPOEIAOIOIHHEH: H Egatmuon KIVnnpa aTo auto To Tpoiov TepieXeI XnmuKcS ouoe c01 OTIOEc eivai Vwot Otnv NlaTeia tnc Kaipopvia oTt POKaouv Kapkivo, YEETIKc Avwmaiec n aaee c avattapaywyikc Baaes.
ExTe UToyn Ta TnapaKAtw PIV AnTo Tn
Theon oAeIitoupyia:
Ekkivnon kai biakottn
IPOEIAOIOIHsH: OloKAnpo To
ouyKpOTnma OuumTAEktn, KaUmuatoC
oumTAEktn KAI aEsova TpETe i Va ExeI
TOnTOBETNOEi TPIV TNY EKKIVNOn TOU
UnxavmuTo. DiAPOpETiKa, Ta
EgApTmuata MTOpei va XaALapWosouv KAI
VA TPOKANEOI TPOOWTIKOc
TPauMAtIOoC.
AToUaKpUVETe NAVTA TO uNxavnua atro
TNV TEPIOXn AVEPODIAOu PTV TO
TheSETE OE AEIToupyia. TOnTOBETnATE TO
Unxavnua OE ETINTEbN ETIPAveia.
AioQpaAlIOte OTI TO TAPeAKoEv OKTING
DeV mTOpei va EPOE1 OE ETTaPn ME KATTOIO AVTIKEIevo.
BebaIWtheite OTI OTO xwpo EpyaiaC dev
UTAPXOUV n ESOUIODOTNeva atoua,
DiAPOpETiKA UTIAPxEIKVUVOC OoBapou
TPooWNIKO TPAUPATIOoH H ANOATAO
aQpaAeiac eivai 15 MeTpa.
Kpuoc kivntnpac
1.ФoOka Tlnpwns;Piote To diapayma TnC XeipokivntncavTiaac kauoiou eTavaIaumeva mExpiTo KauiMo va apxiei va yeiizi To diapayma (Teepitou 10 opec).To diapayma xpeiicetai va ymuoei eVTalewsc.
Iaeppo kulivopou, mm 35
Aipoun Emuolou, mm 28,7
Original instructions
Original instruktioner