
SH 2.5 E - Plane ALPINA - Free user manual and instructions
Find the device manual for free SH 2.5 E ALPINA in PDF.
| Product type | Shredder |
| Brand | Alpina |
| Model | SH 2.5 E |
| Supply voltage | 230-240 V |
| Frequency | 50 Hz |
| Rated power (S6 - 40%) | 2500 W |
| Rated power (S1) | 2000 W |
| No-load speed | 44 rpm |
| Max cutting diameter | 40 mm |
| Weight | 27.8 kg |
| Sound pressure level | 85 dB(A) |
| Sound power level | 94.6 dB(A) |
| Intended use | Shredding branches and shrubs up to 40 mm in diameter |
| Main functions | On/Off, reverse rotation for clearing jams |
| Maintenance and cleaning | Clean after each use, apply spray oil on the roller, do not clean with water jet |
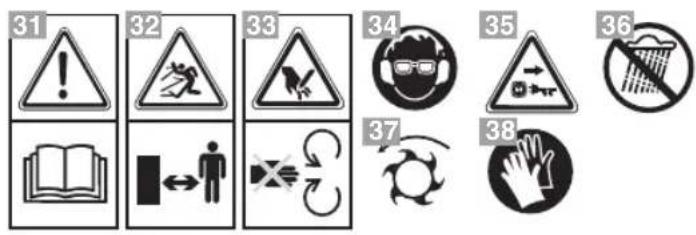
| Safety | Pictograms: read manual, keep people away, rotating blade, hearing/eye/respiratory protection, disconnect before maintenance, do not expose to rain, wait for moving parts to stop, wear gloves |
| Spare parts and repairability | Replace worn parts at a specialized center, repairs by a professional |
| General information | Removable collection bin, safety handle, wheels for mobility |
| Motor type | Electric (single-phase) |
| Protective device | Use a residual current device (RCD) 30 mA |
| Recommended power cable | Type H07RN-F, minimum cross-section 5 mm², max length 25 m |
Frequently Asked Questions - SH 2.5 E ALPINA
User questions about SH 2.5 E ALPINA
0 question about this device. Answer the ones you know or ask your own.
Ask a new question about this device
Download the instructions for your Plane in PDF format for free! Find your manual SH 2.5 E - ALPINA and take your electronic device back in hand. On this page are published all the documents necessary for the use of your device. SH 2.5 E by ALPINA.
USER MANUAL SH 2.5 E ALPINA
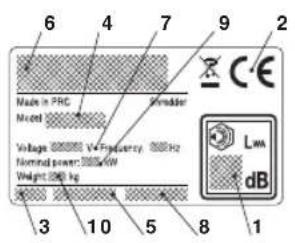
- Acoustic power level according to directive 2000/14/EC
- Conformity marking in accordance with Directive 2006/42/EC
- Year of manufacture
- Type of machine
- Serial number
- Name and address of manufacturer
- Power supply frequency and voltage
- Article code
- Motor power
- Weight in kg
Immediately after purchasing the machine, write the identification numbers
4-5) in the spaces on the last page of the manual.
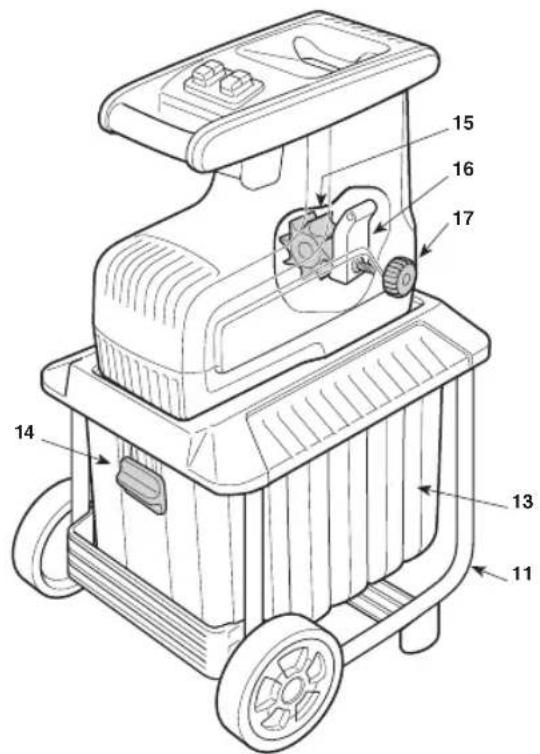
- Support frame 12. Feeding hopper 13. Collection box 14. Box safety function 15. Shredding roller 16. Collection box 17. Pressure adjuster
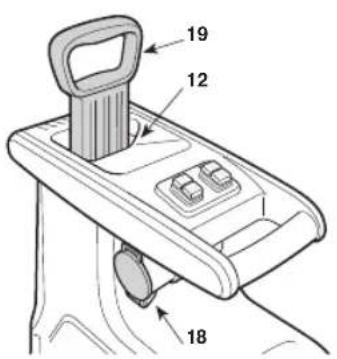
- Power plug 19. Plunger

electronic equipment and its implementation in accordance with na
tional regulations, electric equipment that has reached the end of its pro
must be collected separately and recycled in an ecologically compatible
electrical equipment is disposed of in dumps or in landfills, hazardous sub
stances can leak into the groundwater and get into the food chain, dam
your health and well-being. For further information on the disposal of this
uct, contact a domestic waste collection authority or your dealer.
DESCRIPTION OF SYMBOLS ON CONTROLS
- Stop (Red) 22. Run (Green)
- Reversal of rotation direction 24. Operating rotation direction
SAFETY REQUIREMENTS - Your machine must be used carefully. Symbols
have therefore been placed on various parts of the machine to remind
main precautions to be taken. Their meaning is explained below.You are
asked to carefully read the safety regulations in the specific chapter of
ual. Replace damaged or illegible labels.
- Warning: Read the instruction manual before using the machine.
- Warning: Keep bystanders away.
- Warning: Rotating blade. Keep hands and feet away from openings when the motor is operating.
- Warning: Use ear protectors, safety goggles and dust masks.
- Warning: Disconnect the plug from the mains before commencing maintenance work or if the power lead is damaged.
- Warning: Do not expose the machine to rain (or humidity).
- Warning: Wait for moving parts to stop before doing any work on the machine.
- Warning: wear safety gloves during use.
Power supply voltage and frequency V/Hz 230-240/50
Radial power (S6-40%)* 2500
Rated power (S1) W 2000
Idle speed n/1' 44
Maximumcutting speed mm 40
Maximum noise and vibration levels
(according to directive 2000/14/EC, 2005/88/EC) db(A) 94.6
DE
Meyote ts eopou kai dovnoewv
Zha 3a ycornaceHOCT co NpeKTHBata 2006/42 Ha EY
Te-OrnHa Ha npOn3BOcTBO
4eTuHaMaWnHa
drlaCepnch6poj
Gzahme n apeca Ha npOn3BODHTeNOT
e7.ePntaHa n BnH HanojyBaHe
aybipgi npo3BO
a9.SMHOHOCHT HA MOTOPOT H PEXHM
- TeKHa BO KR.
Beda no hababka ha maunhata, 3aennte r6poebnte 3a ndeHTnФнauja (
-5) BO COODBETHO TO MECTO Ha NocleHnata CTpaHnca ODA BnATCTBO.
11.Pamka 3a notnopa 12.HKKa 3a noJIHeBe 13.KOpna 3a cObIpaHBe 14.
Be36eHocen6nok 3a Kopnata 15.Baljan 3a ceykahe 16. IIOua 3a npntncKahe 17.
PerynaTOp Ha npHTncOKOT 18. EneKtpnueH npHKnyoK 19. NotckyBaay
latmaHe e pnaTe ro eneKTPHHOT anapat 3aedho co domaueh otna.Bo
caIbcoNacHOCT co dpeHnBata HA EY 2002/96/CE, OTnADOT wto ce coctOn c
tav- eJekTPHHu H eJekTPoHCHn anapatne B aala OndROBOPcH T BO corlaachO
haUOHANHTe ODpeDn, eJekTPHHte anapatna 3a oPpAbe Tpeba ce dpnat
3ace6HO 3a da MoKe NOoOHa NOBTOPO Da ce ynoTpeBa H eKO-HOMnATnBHeH
haunAko eJekTPHHTE anapatn Ce odIOHAt Ha ry6pHwte HnHa 3emJa, WTeT
COCToJH MOnE Ja CTanat BO KOHTAe CO eJeMehNTBe BO NocBATA na HabJIe3
ZHHUPOT Ha HCpaHa, co wTO Ke CE hapyWAT BAeTo 3dpabe J 6narococToj
NoDTaHn INHOFOpMaHn OKOly ePnaBeTo H OBOJ PNOsBDo, KOHTAIPaje Co
KOMMeTeHTHN HCHNTUYm 3a oPpAbe DOMaueH otna nco 3actAnHHOT.
ONHC HA DADEHNTE CHMBOJN HA ROMAHNTE
21.3actaHyBaHe (UpBeHo) 22.Pa60Ta (3eJeHO)
23. O6paTeH npabeu ha potaunja 24. PaboteH npabeu ha potaunja
BE36EHOCHM MEPH - Maunhata Tpe6a da ce KOpCTN BHMMATEHNO.3a Taa Ha Maunhata ce NoctabeHH NlyctpaHH HAMEHTn Da Be NOTcYBaat 3a rAbaBH 6e36eHOCHM MEPH npn yNoTpe6a.HNBHO tO 3aHaeHe e oJbacheto nOdy. 3ato
npenopaaybame BHNMaTeJHO da r npouHTate 6e36eHOnCHte MepKn wTo ce daekniske data
BO 3ace6HO norlaBJe Ha Oba yNaTcTBo. 3ameHete rN OWTeHTeHTE NIN HeHTINBITE
ETUKETN.
- BHMMHHe: IpoHTajTe ro ynatCTBTo 3a ynotpe6a nped da ja kOpHCTNTe MaHHHaTa.
- BHIMAHNE: OndaneyeTe rN IucaTa BO HENOCpeHa OKOIHa.
- BhmnaHe: PotnpaunCeHbA. DpKeTe r paTe n cTOnaIata noJaIeKy OTBOpHTe DoEHa paBoTH MToPOT.
- BhimaHne: He kauybaJte ce Bp3 Kopnata 3a co6upahe.
- BHMMHHe: Nooekajte da ce cmpat CNTe DeIOBn wTO ce DBNKaT nped HappaBHe KaBa bIoN INTEpeBENJHa MaunHata.
- BhimmaHne: He n3noxyBajte ja MaunHaTa Ha doKd (nHa Bnara).
- Bhimha: HopCTeTe akyctnHa 3aHTTa, 3aHTTHn OuHa n MacKa 3a o npauHa.
- BHIMAHHE: HOCETe 3aHTTNpaKaBmU BO TEKOT Ha pa6oTaT.
TexHHNn noaToCu
BolTaxa HnD hanojyBahe V/Hz 230-240/50
HOMHaHa MOKHOCT (S6-40%)* W 2500
HomHaHa MoHocT (S1) W 2000
EpaHa Ha npa3Ho n/1' 44
MaKcImaJIeH dIJaMeTap 3a ceYeHe mm 40
TeHHHa 27,8
*PpOHH Ha paBota 3a 4 MNHyTH co ONTOBAPyBaHe n 6 MMHyTH Ha npa3HO. D03BOJeha e KOHTINHynpaHa paBota npn npakTuHa ynoTpe6a.
MaKcHmAlHn BpeDnocTH 3a 6yUaB HnBbpaun
HnBTo Ha akCTuHe npntcoK Bp3 yuTe Ha onepaTopoT ... db(A) 85
- Otstankni npn Mepehe db(A) 3,0
H3mpeHo HnBO Ha aKcTnuHa MOkHOCT
HeToHocTb H3MepeHH 3,0
H3mepeHHbI ypoBeHb aKycTnueckO MoUHOCTN
(Ha OCHOBAHm DnpeKTHBbl 2000/14/EC, 2005/88/EC) ...E(A) 94,6
HR
IDENTIFIKACIJSKA ETIKETA I KOMPONENTE STROJA
- Razina zvučne snage prema direktivi 2000/14/EZ
- Oznaka sukladnosti prema direktivi 2006/42/EZ
- Godina proizvodnje
- Vrsta stroja
- Serijski broj
- Naziv i adresa proizvodača
- Napon i frekvencija napajanja
- Sifra articla
- Snaga i rezim motora
- Težina u kg
- Godina proizvodnej
- Vrsta stroja
- Serijski broj
- Naziv i adresa proizvodača
- Napon i frekvencija napajanja
- Sifra articla
- Snaga i rezim motora
- Težina u kg
SL
IDENTIFIKACJSKA NALEPKA IN SESTAVNI DELI STROJA
- Nivo akusticne moci v skladu z Direktivo 2000/14/ES
- Oznaka o ustreznosti v skladu z Direktivo 2006/42/ES
- Datum izdelave
4AMHt stroja - Referencna stevilka
- Ime in naslov izdelovalca
- Napetost in frekvenca elektricnega napajanja
- Sifra articla
- Moč in stevilo obratov motorja
- Teza v kg
Takoj po nakupu stroja prepišite identifikacijski stevilke (3 - 4 - 5) v ok zadnjki strani priročnika.
Nesiguranta in masurare db(A) 3,0
(3Nivel de putere acustica masurat
(conform directivei 2000/14/CE, 2005/88/CE) db(A) 94,6

HOMHaHaMOuHOCT (S1) W 2000
Ckopoct Ha npa3en xo.. n/1' 44
MaKcMaJIeH dIaMeTbP Ha pR3aHe MM 40
Tero 27,8
- Pa60TeH npoФиI OT 4 MHyTn C HAtOBaPbAHe I 6 MHyTH Ha npa3e XoI.
B npaktnkata ce donyca HnpeKbchato yHKuOHnpaHe.
MaKcHmAlHn CToHocTH Ha Wym Hb6paun
-
Uzmanibu: Izmantoşanas laika valkajiet aizsargcimdus.
-
Uzmanibu: Nepaklaujiet masinu lietus (vai mitruma) iedarbibai.
-
Uzmanibu: Izmantojiet dzirdes organu aizsardzibas lidzeklus un pretpdmbHO Ha 3bYkoBO HalaIHaHe, 3MpeHo Ha yxoTo Ha oneparop db(A) 85
teklu maskas. -Измервateларршka db(A) 3,0
H3MepeHO HnBO Ha aKycTnUHa MOuHOCT
(Bb3 OCHOBA Ha dIpeHTnBa2000/14/EO, 2005/88/EO) db(A) 94,6

ET
MARKERKLEEBIS JA MASINA KOMPONENDID
ENPORT ET DEPLACEMENT
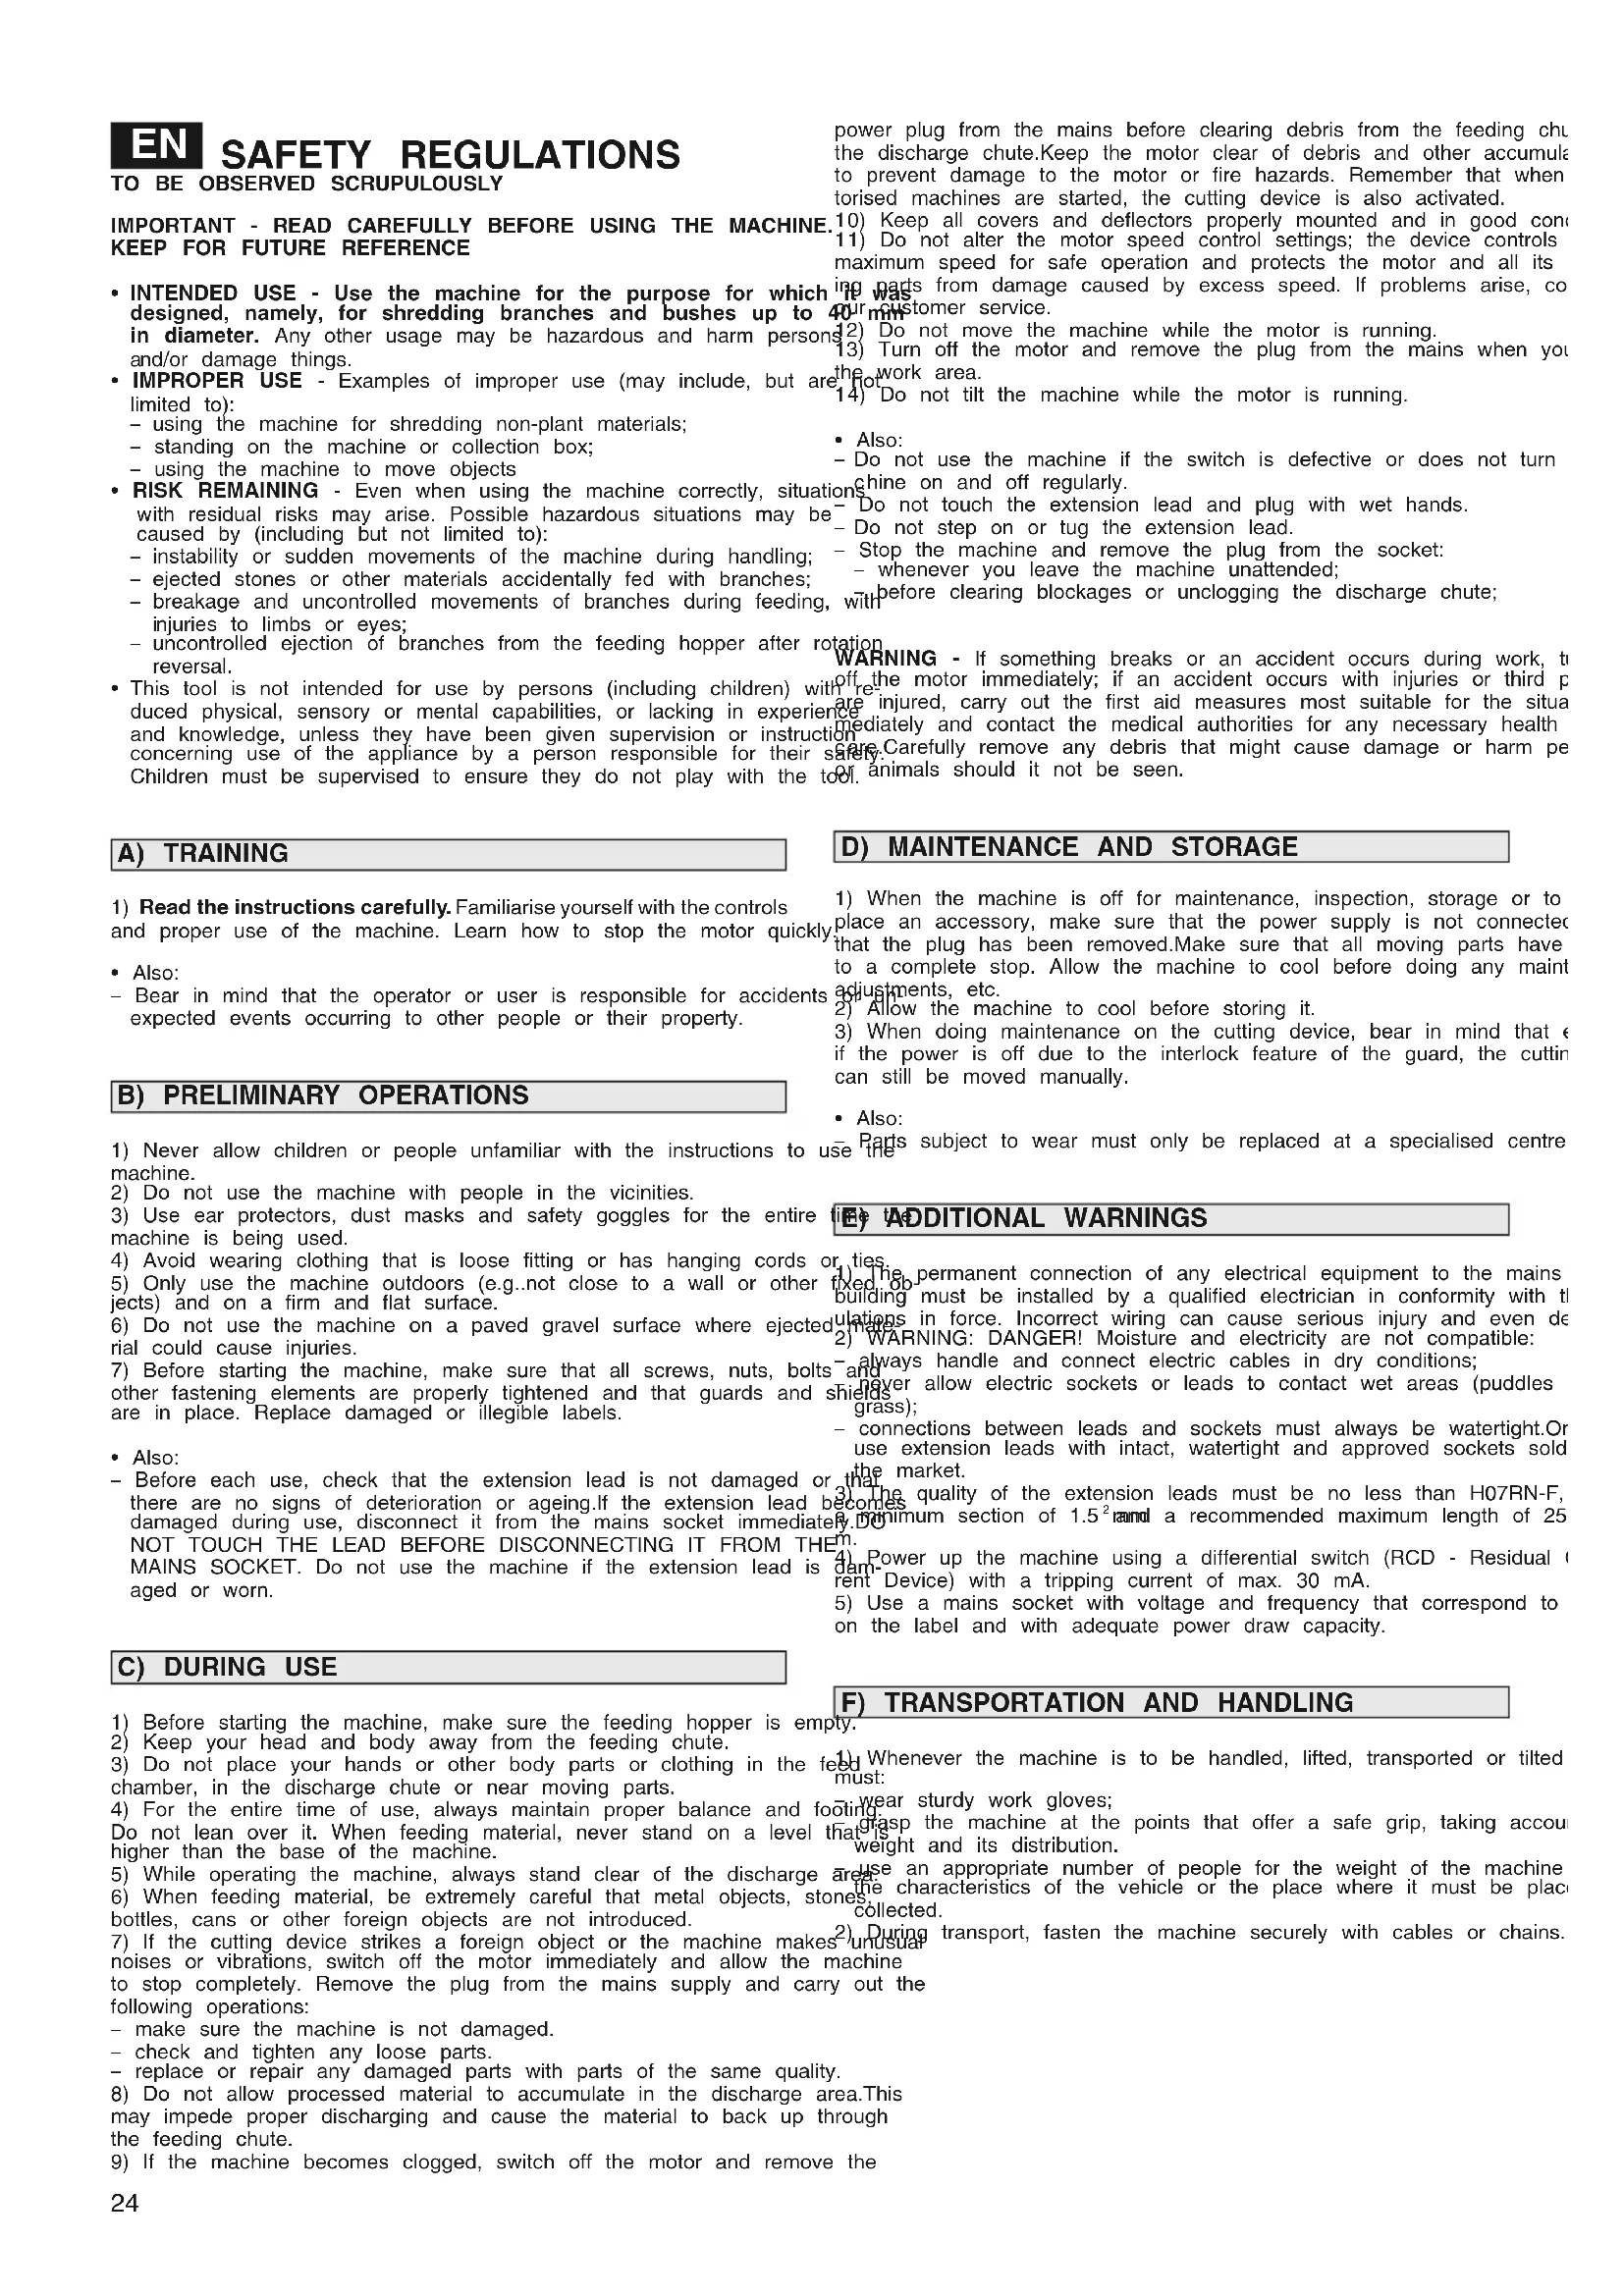
IMPORTANT - READ CAREFULLY BEFORE USING THE MACHINE. KEEP FOR FUTURE REFERENCE
power plug from the mains before clearing debris from the feeding chut the discharge chute.Keep the motor clear of debris and other accumulato prevent damage to the motor or fire hazards. Remember that whentorised machines are started, the cutting device is also activated.
(110) Keep all covers and deflectors properly mounted and in good condition (111) Do not alter the motor speed control settings; the device controls a maximum speed for safe operation and protects the motor and all its
ing parts from damage caused by excess speed. If problems arise, co 40ir customer service.
2) Do not move the machine while the motor is running.
(13) Turn off the motor and remove the plug from the mains when you the work area.
14) Do not tilt the machine while the motor is running.
Also:
- Do not use the machine if the switch is defective or does not turn on.
Machine on and off regularly.
Do not touch the extension lead and plug with wet hands.
-
Do not step on or tug the extension lead.
-
Stop the machine and remove the plug from the socket:
-
whenever you leave the machine unattended;
with before clearing blockages or unclogging the discharge chute;
W
atation
WARNING - If something breaks or an accident occurs during work, the
The motor immediately; if an accident occurs with injuries or third p
are injured, carry out the first aid measures most suitable for the situation
practice; mediate and contact the medical authorities for any necessary health care
Carefully remove any debris that might cause damage or harm per
all animals should it not be seen.
- INTENDED USE - Use the machine for the purpose for which designed, namely, for shredding branches and bushes up to
in diameter. Any other usage may be hazardous and harm person and/or damage things.
- IMPROPER USE - Examples of improper use (may include, but are
limited to):
-
using the machine for shredding non-plant materials;
-
standing on the machine or collection box:
-
using the machine to move objects
-
RISK REMAINING - Even when using the machine correctly, situations with residual risks may arise. Possible hazardous situations may be caused by (including but not limited to):
instability or sudden movements of the machine during handling;
-
ejected stones or other materials accidentally fed with branches;
-
breakage and uncontrolled movements of branches during feeding, injuries to limbs or eyes;
-
uncontrolled ejection of branches from the feeding hopper after rotation
reversal.
- This tool is not intended for use by persons (including children) with
duced physical, sensory or mental capabilities, or lacking in experier
and knowledge, unless they have been given supervision or instruct
concerning use of the appliance by a person responsible for their s
Children must be supervised to ensure they do not play with the ta
1) When the machine is off for maintenance, inspection, storage or to place an accessory, make sure that the power supply is not connected that the plug has been removed. Make sure that all moving parts have to a complete stop. Allow the machine to cool before doing any maint adjustments, etc.
2) Allow the machine to cool before storing it.
3) When doing maintenance on the cutting device, bear in mind that e
if the power is off due to the interlock feature of the guard, the cuttir
can still be moved manually.
Also:
Parts subject to wear must only be replaced at a specialised centre
A) TRAINING
1) Read the instructions carefully. Familiarise yourself with the controls
and proper use of the machine. Learn how to stop the motor quickly
Also:
- Bear in mind that the operator or user is responsible for accidents
expected events occurring to other people or their property.
B) PRELIMINARY OPERATIONS
1) Never allow children or people unfamiliar with the instructions to machine.
2) Do not use the machine with people in the vicinities.
3) Use ear protectors, dust masks and safety goggles for the entire
machine is being used.
4) Avoid wearing clothing that is loose fitting or has hanging cords or ties
(5) Only use the machine outdoors (e.g..not close to a wall or other
jects) and on a firm and flat surface.
(6) Do not use the machine on a paved gravel surface where ejects
rial could cause injuries.
7) Before starting the machine, make sure that all screws, nuts, bolt
other fastening elements are properly tightened and that guards and
are in place. Replace damaged or illegible labels.
Also:
- Before each use, check that the extension lead is not damaged or
there are no signs of deterioration or ageing.If the extension lead
damaged during use, disconnect it from the mains socket immediatET NOT TOUCH THE LEAD BEFORE DISCONNECTING IT FROM THE
- MAINS SOCKET. Do not use the machine if the extension leads is
aged or worn.
E) ADDITIONAL WARNINGS
[O] The permanent connection of any electrical equipment to the mains.
Building must be installed by a qualified electrician in conformity with the
construction must be installed by a qualified electricalian in conformity with the regulations in force . Incorrect wiring can cause serious injury and even de
-
WARNING: DANGEREL Moisture and electricity are not compatible;
-
always handle and connect electric cables in dry conditions:
and lays with and connects electronic cables in dry conditions,
shields allow electric sockets or leads to contact wet areas (puddles,
grass);
- connections between leads and sockets must always be watertight. Or
use extension leads with intact, watertight and approved sockets sold
the ma
31The quality of the extension leads must be no less than H07RN-F.
becomes a minimum section of 1.5^2 recommended maximum length of 25
m.
(4) Power up the machine using a differential switch (BCD - Residual unit
dant- (rrent Device) with a tripping current of max. 30mA
5) Use a mains socket with voltage and frequency that correspond to
on the label and with adequate power draw capacity.
C) DURING USE
F) TRANSPORTATION AND HANDLING
1) Before starting the machine, make sure the feeding hopper
2) Keep your head and body away from the feeding chute.
3) Do not place your hands or other body parts or clothing in the
chamber, in the discharge chute or near moving parts.
4) For the entire time of use, always maintain proper balance and
Do not lean over it. When feeding material, never stand on a level
higher than the base of the machine.
5) While operating the machine, always stand clear of the discharge
6) When feeding material, be extremely careful that metal objects, s
bottles, cans or other foreign objects are not introduced.
7) If the cutting device strikes a foreign object or the machine makes
noises or vibrations, switch off the motor immediately and allow the machine
to stop completely. Remove the plug from the mains supply and carry out the
following operations:
- make sure the machine is not damaged.
- check and tighten any loose parts.
- replace or repair any damaged parts with parts of the same quality.
8) Do not allow processed material to accumulate in the discharge area. This
may impede proper discharging and cause the material to back up through
the feeding chute.
9) If the machine becomes clogged, switch off the motor and remove the
NOTE - The number which precedes each paragraph important:
the references in the text to the respective illustrations (listed on page 2 and following pages).
Use the machine on firm level ground, keeping at the same level as the wheels.
- When starting the machine there can be momentary drops in voltage. Make sure that its impedance is lo than 0.42 ohm to prevent disturbances to other equipment connected to the mains supply.
If the motor stops because it is overheated while working, you must wait about 5 minutes before restarting.
1. COMPLETING ASSEMBLY
3.1 Machine set-up
NOTE - The machine can be supplied with some pre-assembled parts.
WARNING - Unpacking and completing the assembly the collection box (1) in the space beneath the m should be done on a flat and stable surface, with pull the safety handle (2) up to lock it and enable enough space for handling the machine and its pator to be started. aging, always using suitable equipment. If the handle is not positioned properly, the motor will Disposal of the packaging should be done in acstart. dance with the local regulations in force.
1.1 Machine assembly
3.2 Machine connections
Properly insert the extension lead socket (11) to the n
Grasp the working head (1) as indicated and positionline plug (12) as indicated, then insert the extension over the frame (2), taking care to insert the protruding plug in the mains socket (13).
part (3) in its slot (4). Fully tighten the four knobs (5).
Assemble the wheels (6), using the pins (7), washers (8) and split pins (9) in the indicated sequence.
Apply the wheel covers (10) inserting the tabs (11) in their slots (12).
IMPORTANT - When assembly is completed, the shredder's feed opening (2). If necessary, use the provided between the pressure plate and the shredding roller blunger (3) to help push material through. Be adjusted as indicated at point 4.1.
3.3 Motor start-up and operating modes
Press the green button (1-1) to start the motor. Always the material to be shredded from the right side through the paper's feed opening (2). If necessary, use the provided (3) to help push material through.
2. CONTROL DESCRIPTION
Advice for shredding
2.1 Motor control
The motor is controlled by two buttons:
- Green button (1-I) = Run
- Red button (2-O) = Stop
- Avoid shredding wet material.
- Strip branches with too many ramifications and remo the side shoots.
- Do not shred branches with a diameter exceeding 4 cm; it may be necessary to reduce the maximum diameter of branches to be shredded according to wood
The tool will switch off in the event of a power shortage and freshness.
Press the green button (1) again to restart the motor.
2.2 Rotation direction switch
- Always feed small quantities of material in order to clog the feeding hopper.
The motor rotation direction is controlled by two buttons. Avoid blocking the discharge chute to prevent shred material from backing up through the feeding hopper. Black button (3 - ) = Operating rotation direction, f Shred garden waste only in small quantities, particular vouring material feeding. when humid or wet;alternate it with branches to prevent free jammed material; a led (5) lights up to indicate that rotation do not shred kitchen waste or other material with a solid consistency.
Important recommendations
When the motor is started, the operating rotation direction not shed excessively long branches to prevent is automatically set which favours material feeding. juries from branches that may lash out uncontrollably
3.4 Emptying the box
4.1 Distance adjustment
Make sure the shredded material in the collection box The distance between the pressure plate (2) and shredd doesn't reach too high a level; if this happens, the shredder (3) must be adjusted before using the macded material could clog the discharge chute, causing fora-the first time. Afterwards, it is necessary only wheterial to back up through the feed opening. shredding proves to be imperfect.
To remove or empty the box, turn off the motor, lower the
safety handle (1) and take out the box (2).
In order to set the plate (2) in an optimal position with regard to the roller (3), you must:
- start up the motor to activate the shredding roller (
- turn the handwheel (1) slowly clockwise to bring the plate (2) closer to the roller until you hear a scrapi
3.5 Clogging of material
If material to be shredded becomes clogged, you can the shredding roller by reversing the rotation direction the motor. Therefore:
fend between the two parts, demonstrated by small of metal shavings falling from the discharge chute.
- reverse the rotation direction by pushing the black Aubid excessive contact in order to preventunnecessa ton (4 - ) , taking care that material does not back wear to the plate.
from the feeding chute;
- a led (5) lights up to indicate that rotation is in the opposite direction.
- when you have unblocked the material, press the black
button (3-▼) to restore the operating rotation direction: ENVIRONMENTAL PROTECTION
Stop the motor and disconnect from the mains supplyEnvironmental protection should be a priority of consid you must unclog the chute and the material dischargeable importance when using the machine, for the bene chute. of both society and the environment in which we live.
3.6 End of work
- Avoid causing any disturbance to the surrounding air
When you have finished work, stop the motor by pressposal of waste materials after working.
- Scrupulously comply with local regulations for the di
ing the red button (2-0). - Scrupulously comply with local regulati
Disconnect the extension lead (11) BEFORE the generposal of packaging, deteriorated parts or any element mains socket (13) THEN from the machine plug (12). With a strong environmental impact; this waste must move and empty the container. be disposed of as normal waste, but must be sepa
4. STORAGE AND MAINTENANCE
- When decommissioning, do not abandon the machine in the environment, but hand it over to a disposal centre, in accordance with the local regulations in force.
IMPORTANT - Routine and accurate maintenance is essential in maintaining original machine safety and performance levels.
Store the machine in a dry place.
Disconnect the machine from the mains supply before starting any cleaning, inspection or maintenance activities.
1) Wear sturdy work gloves before cleaning, maintaining or adjusting the machine.
2) After each use, remove the collection box and clean the remaining debris in the discharge chute.
3) After each use, spray a light layer of biodegradable oil on the shredding roller to protect the metal from corrosion.
4) Always make sure the air vents are free of debris.
5) Do not spray water onto and avoid wetting the motor and electrical components. Do not use harsh liquids to clean plastic parts.
6) Do not attempt to carry out demanding repairs without the necessary means and technical knowledge. All work on the machine that is poorly executed autorat- any doubts or problems, please do not hesitate to ically voids theWarranty, releasing the Manufacturercocontact your nearest Customer Service Centre or Your all liability. Dealer.
5. BESCHERMING VAN DE OMGEVING
de
3.5 Obstrucao do material
m = 311 ;
yakun
e yakiri
E) EK UYARILAR
HOCTIaPDEH3BnKaIOBpeHn 3aNnIIN PDEMeTH.
HECOODBETA YNOTPE6A - Ce otPpnaat npn HnpabmHa ynotpe6a
POMMEDHOHECEORPAHUYBAHA CNEHOTO
- ynoTpe6a Ha MaunHaTa 3a CEHaBe MaTeDnJaH KOuTo He Ce OD B
TUBHOIOTEKIO.
-
KaCyBaHBe Bp3 MaUHHaTa HIN KOpNaTa,
-
ynoTpe6a Ha MaunHaTa 3a npnDbNkYBaBe npdMeTH.
MOHEH PN3NH -Дурн И КORA ja KOPINTE MaUNHaTa Ha npaBnJIeH
MOKe Da ce noiBaT pH3nHH CHTVaaHN.MoHHnte onaCHN CHTVaaHN MOH
PpeH3BnKaat Co (Kako Ha PnMep, Ho He Ce ORpaHcyBa Ha CneHOTc -
HectaBnHocT Hn HnpeBnHeH DnKHeHa Ha MaunHaTa Kora ja np
CTYBATE, - nCΦpnaHé Ha KaMeHa Hn Dpyr MaTepnjAn KOn 6nJe CTaBeHN BHa
yajno 3aeHNO co rpaHKeTe. - PteKHH HeKOHTpOJIpaHO DnXHeHa rpaHKeTe DoEka TCTaB
Tpe Co HamepHn NOBpeHn NIOBpeHn Ha OHTe, - HeKoHTpOJInpaHO nCΦpIaHe Ha rpaHKeTe wTo ce CEyKaat NocIe npOM
potauijata.
Oboj ypeH e hameHET da ro KopncTaT mua (BknyntenHO n deca)
JIENH HN3NCHK, CETNIHN NIM MEHTaHIN CNOCOBHOCTN, NIN aKO HEMAAT NCKYCTBa npa3HeBe,
HIN N03HaBaHe, OCBHe AKO He Ce NOI Ha3Op Ha ODROBOPHO Iue 3a
pa60ta nIa nK npTeXoJHO He 6nle o6yueHn 3a npabunHa ynoTpe6a.
Tpe6a da ce HaIgIeYBaAaT 3a da ce oBe36eN da He cn irpaat co y
A)OByHA
1) BHIMATEJHO npoHTajTe ryn ynatCTBaT. 3ano3HajTe ce co KOMaHNTe
PpabHIOTO KOpCTeHe Ha MaunHaT. Hayte 6p3o da ro 3anipate MOTOPOT.
- NoHaTamy:
-ИмаiteHaуMДeKaKOPINCHIKOTeODROBOpEH3a He3roDHTeHnOnaCHOCTAIO
DpyrN Nlca HIN HNBHNOHT NMOT.
B) BOBEHN ONEPAUIN
1) He do3Bonybaje HMKorau deua da ja ynoTpe6ybaaT MaunHaTa nn dI Iinaa wTO He ce 3ano3Haehn co OCHOBHIne ynaTcBAta.
2) HekopncTeTe ja MaunHaTa aKO mMa lyre Bo HenocpeHa 6n3Ha.
3) Hocete akyCTHHa 3aHTTa, MaCKa 3a 3aHTTa oD npaHHa n 3aHTT
eNo BpeMe DoEka ja KOpHCTnTe MaunHaTa.
4) 36erhybajTe da HocHTe o6IeKa co DeIOBn wTO ce BNopaT nn HMa
JIeHTN.
5) KopuTeTe ja MaunHaTc camo Ha OTBOeHO (OHOCHO, HNKORAH BO 6n
SND NIN DVPY UBPCT PpeDMET) n cAmo Ha UBPCTa n pAMHa NOBPIHnA.
6) He KOPNCTeTe ja MaunHata Ha nonNoyeHa 3amp3Ha TNOBpHnHa Ka
3, HOPPOJIOJ 1000000000000000000000000000000000000000000000000000000000000000000
7) PpOBepTe DaJIH CHTe UpaFOBn HABPTN, KaKo N CHTe CTErN N Dpyrnte Ha
Pnabn 3aФнсрангс coonBETHO 3aterHATN n daNN 3auNTATA m bpa
HbA1c, CROSTO, MECTO, PDE, Na, BPKVHMT, MAJUMHATA, 3AMHATA, F4, OUTETEH
Ha CBOE MoCIOIpe Da Ja BclyWHe MaHInaTae. Samehere Tn Ocltern
Heunmbte
-
NoHaTaMy:
-
Ppei cekoja ynoTpe6a, npOBepTe npoDJIKNHNOt Ka6e Ima 3Haun Ha
BAHe Hn 3Haun Ha nCTPOUeHOCT n 3aCTapeHOCT, BeHau ncknyte
KNYOHOT ON UTEKED AKO PPOJONHHNOT KABEN CE OUTETN BO TEHOT HA
HE JONUPA-TE TO KABELOT PEPI DA TO NCHIVHTE OJ I3BO
NOJYBAHFE He Kopnctete ja maimhata ako npodjHMOT Haben e ou
1007242: He kipnro 1a maunata are npdenmne naeon e 0
OLOKCEHETO,HTO,MOJE,Na,IPEN3BKAaT,NEFHT,IMN,POBPEN,Ha,NIIUA,KI
BOTHNI AKO OCTAHAI HEBABEJEHAO BO MAUKHATA
Worth are coral an hesacnemtio 30 maaernta.
spot.
D) VEDLIKEHOLD OG OPPBEVARING
4. OPPBEVARING OG VEDLIKEHOLD
3.5 Fastnat material
are DODATECNA OPATRENI
srouby
10345672e zapojeni jakehokoli elektrickho zaizeni do elektrickho Rozvo
Tedy musi byt zrealizovano kvalifikovanym elektrikarem v souladus nymi predpisny.Nespravne prodevené zapojeni muze zpusobit važnă ubli na zdravi včetné smrti.
2) UPOZORNENI: NEBEZPECI! Vlkhost a elektrina nejsou slučitelné. A
proto:
- Manipulace s elektrickymi kabely a juicesh zapoieni se musi provadeti
chem prostreidi;
Tnikdy neumoznete styk zasuvky elektrickego rozvodu nebo kabelu s
Krou zónou (kaluží nebo vlhkou travou);
Zu spojeni mezi kabela a zasuvkami musi byt vodotesne.Pouzivejte pro
Zovaci kabely s vestavenymi vodotensnymi a homologovanymi zasuv
kami, dostupnymi v bezném prodeji.
3) Napajeci kabely nesmi byt nizski kvality nez typu H07RN-F s minin
prurezem 1,5 mHa maximalin dopurocenou delkou 25 m.
4) Zajistete napajeni zafrizeni prostrednictvim proudovho chraniie (RCD
- Residual Current Device) s vypinacim prudem max. 30 mA.
PNEPEBO3KA INIPEPEMUEHNE
INPMEYAHNE-CootBETCTBnE CcblIOK,coepKaunxCra TeKCTe,N COOTBETCTByUOuNX pncyHKOB (pacnoJIOKeHHbIX CTpaHuaX 2-3 n NocJeDyUoNX) onpeJeTcra UΦpoi, WecTByUoSe Ha3BaHnIO KaKnDoI rnaBbl.
1.3ABEPUHEHNE MOHTAHA
IPIMUEAHNE - MaunHa MoKHeT 6bItb NoCTaBLeHa c HOTOpbIMN HOMNoHEHTAMn, yHe yCTaHOBLeHHbIMn Ha
BHIMAHHE - PacnaKOBHa 3aBepWeHne MoNTaHa DoJIHHb I BbIOnJIHTbcra Ha TBePDoN IOBHO NOBepXHOCTn,
rnde doctatoyHO MeCTa nIe npemeeHnMaunHbI ynaKOBHN, Bcerda NOIb3yrcb COOTBETCTByIOUMN HCTpyMeHTAMN.
YTHIN3aun ynaOBHN DOJINHn IPOH3BONDtBCB B COOT-BETCTBn C DeIcTByIOUHMN MecThbIMN HOpMaMn.
BBAHHO:
Ha·Pa6oTaB Ha MaWHe Ha POBHOI TBepDoN NOBepxH npECTn, HOrn OnepaTopa DOJHHbI HAXOHTbcr Ha ODHOM yPOBHe C HOlecamn.
-
Pn 3anycke Maunhbl Moryt npon3oHTn BpeMeHHbIe naHnHaPraKeHHa.Bo n36eKaHne Bo3MOxHbIX NOMex dIpyrOro obopydOBaHH, noKIOUChEHHORo K cETN NITAHN, ydoCTOBepbTecb, yTo ee conpoTnBJIeHne Hnke O,42 OM.
-
Ecnn DnBnraTeIb OCTaHaBnBaETCn 13-3a nepepeBa BO
He-Bpempa60tbl,Heo6xOIMO NOOJdaTb npH6IIN3HTeJIbHO 5 He.MnHyT nepei NOBTOPbIM 3anyCKOM.
68.1 NpOroTOBka MaunHbI
PacnoJIOHnTb npHemHbI 6yHKeep (1) noD MaunHO n notAH BBePx npedoxpahnteHyO pyKoRTHy (2), YTO6bl 3a6NoHPOBaTb erO n DaTb pa3peWeHne Ha 3anyck DBNrataJIa.
Ecn He yctAHOBHTb pyKoTky B HndJeKaUee NOLOKeHHe, DBnraTeIb He 3anyCTNTc.
1.1 MoHTaK MaunHbI
B3rB roIobHyIO yAcTb (1), KaK nOKa3aHO, H yCTaHOBNtB ee Ha paMy (2), YTO6bl BbICTyn (3) BOweB CneuHaJIbHOe THe3do 34
3aTaNyTb do ynpa YeTbipe pyKn (5).
YctaHOBnBt b KoIeCa (6), nCnoJIb3y r CTepeHHN (7), 7aI6bI (8) (12) MaunHb, KaH NOKa3aHO, a 3aTEM NOcOeHNHT BILKy ydInHNTeJr K po3eTke 3JeKTPoINHTAHn (13).
YCTaHOBNb KOJIINaKN (10), BCTaBnB J3bIyKn (11) B COOTBetCTByIOUne rHe3da (12).
BAHHO - Nocne 3aBepeHn MOHTaHa Heo6xOIMO Otpen3.3 3anyck DnRaTeJn peXHMbl pa60TbI
JIHPOBaTb paccToHHe MeJHy HnpaBnaIooJe nlaCTnHO I JIra TOro YTO6bl 3aNyCTnTB DBNrTaTeJB, HaKaTb Ha 3eJIeHyIC N3MeJIbuaIOUm POJIHKOM, KaK yka3aHO B nyHKe 4.1. KHOJIky (1- I).
2. ONICAHNE OPRAHOB YNPABJEHNA
2.1 PnBOD Dnuratela
BnRaTeIb ynpabJIeTcA DByMa KHOHKnKaMn:
-3eIeHa KhoHa (1-1) = XoI
- Kpacna KhoNka (2-O) = OctaHOB
Pn OTCyTCTBn TOKa yCtpoiCTBO BbIKIOuHaETc. Ia TOrO 106bl CHOba BkHouHTb DnraTeIb, Heo6xOIMo eue pa3 Ha 3eJeHyKHOhKy (1).
2.2перклioчateьи3MeHeHЯнравLEHЯВраш�HЯ
HapabLeHne BpaueHn ynpaBraTeY
- YepnKa KhoNka (3-▼) = Pa6oOee HappaBHeHne BpaSeHna. 3aRpy3Kn MaTePnAJa.
- Yepnay KhoNka (4-▲) = PeBepcNBHoe BpaueHne, cnoc6CTByIOoee BbICBO6OJKeHNO 3a-CTpRAWero MaTePnaJa; Ha peKHMpeBepcNBHO BpaueHn yKa3bl-BBaET BKJIoueHne CBeToIHOda (5).
Pn 3anycke DbHraTeJIa aBtOMaTHueChn yCTaHaBnBaETc8oOee HnpaBLeHne BpaUeHn IJN 3aRpy3Kn MaTepnaJa.
NoJIe3HbIe peKoMeHdaaun no n3MeJIbUeHHIO
- N36eRaTb N3MeIbYeHn MOKpOro MaTePnAna.
- 06pe3aTb 6OKOBbie BETKN, ecn HX CJIHKOM MHORO, n JNTb 6OKOBbie OTPOCTKN.
He H3MeIbYaTb BETHN, DnAmETp KOTopbIX npeBbIaet 4 aHa3aBnCHMOCTN OT TINa N CTeNEHN CbIpOCTn dpeBecHbIMoH BO3HnKHyTB Heo6XODMOCt b yMeHbWHTb MaKcImaJIbHbI DnAmETp H3MeIbYaEmbIX BeTOK.
- Bcerda 3arpykaTb MaTePnA1 MaIeHbKIMN napTnA M,HTo6 He 3acopntb 3arpy3OHyBn 6yHKepe.
- 1368aTb 3acopeHnPa3rpy3oHOrO OTBepCTn, TaK KaK MoHcT npHBecTn K BO3BpaTy H3MeJIbYeHHOro MaTePnAna B3arpy3oHbI 6yHKeP.
- N3MeIbUaTb CaIOBbl OTOXObl TOJIbKO MaJIeHbKIMN nopMn,OC6eHHo ECIN OHN CbIPbIE Nm MOKpbie;YepeoBaTb Hx C BETKaHn BO N36eKaHne 3acopa.
He n3MeIbHaT b KxyoHbIe OTxOdbI IN pyrO MaTePnA1, IMeIO- ⅢHETBepdyIO KOHCNCCTEHUIO.
BaxHbIe peHOMeHaaUN
He 3arpykaite cIIMKOM dINHHbIe BETN nIa H3MeJIbpeHn, nockoJbKy nx HeKOHTPOIpHyemoe DnHexHe MeKet npNBecTn K TpaBMam.
3.4 OnopohHeHne npHemHoro 6yHkepa
4.1 PerylnopOBka paccToHHN
N3MeJIbUeHHbIMaTePnAIBpHMeHMo6yHKepeHeDOLHeHEo6xOIMOOTpeYIuPoBaTpaCToHneMeJHyHaPa-IOCTHrA TbCLINKOMBbICOKOrOypOBnB30HeBbIbPOCa,IIaJIHOeIIaCTHnO(2)H3MeJIbuaOuIMpoJIHKOM(3)NECKOJIbKyB3OMcLyuaeYKe H3MeJIbUeHHbIMaTePnAIBzIMcNOJIb3OBAHmMaUNHb.IBocLeIcTBmMOKeTnpa3rpy3OuHbIKaHJI,INMaTePnAIHaHTBbIXoHtBYepe3Tpa6oBaTbCCHObaeroOTpeYIuPoBaT,ecInpe3yJIbTaNTRpy3OuHoeOTBepCTHe.MelJIbUeHHraJIraETcReKaueCTBeHHbIM.
TTOOyTo6bI CHaTb H ONOpOHHTb npHmHb 6yHKeB, Bbl- KIOUHTe DnIRaTeJIb, yCTaHOBTb B HINKHe IIOJOKeHHe IpeJIToro YTO6bI yCTaHOBTb INaCTHy (2) B ONTMaJIbHOe DoXpaHInTeJIbHyIO pyKoHTy (1) n N3BLeuB 6yHKeP (2). IOJOHeHne OTHOcHTeJIbHO polNka (3), Heo6xOIMMo:
- BKNIOHTb DBNrAteIb, YTO6bl BKNIOHINcN H3MeJIbHaOuN pIK (3);
3.5 3acTpeBaHnne MaTePnaJa
B cnyae 3actpebaHn H3MeIbHaemoro MaTePnAna, H3MeHeHne HAnpaBLeHn BpaUeHn DBnraTeIg N03BOJrE T BbcBo6Odntb H3MeIbHuOu npNk. DnA 3TOrO cJeDyET:
- N3MeHHTb HappaBJIeHne BpaIeHHa, HaKaB Ha YepHyKHOHky (4-▲), yHTbIBaR, yTO MaTePnaI HaHHeT BbIXOHTbYepe3 3arpy3oHoe OTBepCTne;
- Nocle yctpaheHn 3actpeBaHn HaKaTb Ha YepHyo KHOImeBeraite CInuKOM TeCHOro KOHTaTa, TTO6bl 6ecnoJe3HO (3-▼), YTO6bl BOCCTaHOBtB paOohn HApPaBHeHne BpaUeHne NODBepratb PIACTnHy n3Hocy. Hnra.
BbIKIOUHTb DBIRATeJIb I OTKIOUHTb 3JIeKTPoNITaHHe, ecNI
Heo6xOIMO ycTpaHnTb 3acopeHne pa3rpy3oHOro OTBepCTn5. OXPAHA ORPyRAIOUeN CPEDbI n KaHaJa.
OxpaHa OKpyKaIOSe CpeBdI DOJHHa YBJIbTcB CyUeCTBeHnBIM N nepBooOepeDHBIM ACNEKTOM PnN OJb3OBAHN MaSHnHO, BO 6laRo YEJOBeueCkOrO OObEcTBA N OKpyKaIOSe CpeBdI, B KOToPoM Mbl HnBEm.
3.6 3aBepseHne pa6oTbI
Iocne 3aBepWeHnpa60Tb BbIKIOHTb DBIRaTeJIb KpacHOH KhoNko (2-O).
OTcoeHNHtB yDlnHnTeIb (11) CHAHAJA OT 6uEi po3eTHn Ctporo CO6JIoDaTb DeIcTBYIOUHe Ha MeCTHOM yPOBHe np (13), a 3ATEM OT BnIK MaunHbl (12). ChrTb n OnpOxHHnMa Ia NO BBIBOy OTXODOB.
PnpHmHbI 6yHKepe.
- Ctporo co6IHOaTb MeCTHbIE HOpMbI NO yTHIN3aun yNAKOBn, NOBpeJxDeHHbIX YAcTei NIn IIO6bIX 3JeMeHTOB CO3HaHTeJIbHbIM BInrHHeM Ha OKpyKaIOyU CpeDy; 3TNOTXoDbI He DOJIHbI Bbl6paCbIBaTbCBA MycOpHbI KOHTeHApOJIHbI 6bITb OTdJIeHbI IN PepeDaHbI B CNEuaJIbHbIe TpbI c6op a OTXoDOB, 3aHimaIOuueCeHX Nepepa60TKoN.
4.XPAHEHNE IN TEXOBCLYKHBAHNE
BAHHO - Perylphoe n TuatelbHoe Texnuechoe 06cny HnBaHne Heo6xOndmo dna noDepkaHn ypOBn 6e30-nachocTN opunHaJIbHbIX 3KcnIyatauONHHbIX xapaKTePnCTNK MaunHbl.
XpaHnTb MaunHy B cyxom MecTe. OTKIIOuTaB MaunHy OT 3JIeKtpocetN nepeB BbINoJHeHHem ee ouHCTKN, PpOBepHN nn 06cnyHHBaHHa.
-1ocne 3aBepenHcpoKa cnyK6bMaunHbHe Bbl6paCbBaTe ee, a o6paTnTEcb B ceHTp c6opa OTXoOB B COOCTBHN C DeICTBYUOM MecTHbIM 3aKOHoDaTeJIbCTBOM.
1)ПльзоватбяnpчыIM pa60чIMперчтамвВрм BCexОпаци NO OCHTE,TEXHuechOMy 6cIyHnBaHIO nIN peYlnpOBKe MaunHbl.
2) KaJdbi pa3 nocle pa60tbi cHMaTb npHemHb 6yHKe p ydaJIaTb OTXoDb, OCTaBUnHeCBA pa3rpy3OuHOM OTBepCTHN.
3) KaHdbi pa3 nocle pa60tbi paCbIaTb Ha 13MeJIbUaIOuIPOIIK TOHN K CLOI 6Nopa3Jaaraemoro Macla, YTO6bl 3a-HTb MetaII OT Koppo3NI.
4) Bcerda npoBepTb, qTo BeHTnlaUHOHbIe OTBepCTnHe 3a-6ntbl rpr3bIO.
5) He nCnoB3OBaTb CTpyn BOdbi N 36eRaTb nonaHaHn BnraTeIb N 3JeKTPnueckne y3JI. He nCnoB3OBaTb arpeccNBbIe HnIKOCTN DnO ONUCTKN INaCTMaCCOBbIX Ya-CTeN.
6) HnKorda He nbItaTeCb BbIOnHnTb CIOJHbI peMOHT, ecn y Bac Het Heo6XoHmblx CpeCTB nnn 3HaHn. JIO6o nnOxo BbIOnHeHHbI peMOHT npINBOHIT K HEmeJHHomy npe- EcIn y Bac Bo3HNKHyT comHeHn IIN npOBeMbl, 6e3 npo KpaueHnIO DeiCTBnI rapaHTn IN C n3rOTOBtela ChImaMeJHnCBAHXTECb C 6JIHKaIM CepBNCbIM cHTpOM n etcra BCaHAR OTBeTCTBEHHOCtB. c BaHIM dInlePOM.
HR SIGURNOSNA PRAVILA KOJIH SE TREBA SAVJESNO PRIDRZAVATI
VAZNO - PAZLJIVO PROCITAJTE PRIJE POCTKA UPORABE JA. CUVAJTE ZA BUDUCPE POTREBE
1.1 MoHTIpaHe Ha MaunHaTa
XbaHete pa60HaTa rIaBa (1), KaKTo e yKa3aHo, pa3nOIOKe Cbbp3BaHe Ha MaunHaTa
HaHpaMkata (2) Hato BHHMaBaTe Da CNOHNTE 3daJeHbPHeTe npaBnHO ueKepa Ha yIbJIHnTeJHnHa Ka6e (11) 7act (3) B HapouHoto rHe3do (4). KbM uencela (12) Ha MaunHata. KaKTo e YKa3aHo, NocJe
3aterheTe DOKpaYeHTnpTe pbyu (5).
MOnTppaTe KoIeIaTa (6), H3NoI3BaIKn IuΦTOBte (7),
6nTe (8) nIiNoHKnTe (9) B yKa3aHaTa NocJeObaTeHOCT.
CnokeTe tacobete Ha konelata (10) kato noctabnte e3nue
TaTa (11) B CbOTBeTHnTe rHe3a (12).
BAHHO - Lom npKIOUHTe MOHTaHa, Tp6Ba Da HAnpapeylaun Ha pa3cTOrHHeTo MeKdy PLOOATA 3a HAIraHeBala pa3dpo6bTeI, KaKTo e yKa3aHo B ToHa 4.1.
3.3 BhInouBaHe Ha MOTopa n HauHHn Ha ynotpe6a
3a BHIOUbaHe Ha MOTopa HATINCHete 3eIeHn 6yToH (1- I)TabrTe MaTePnAla 3a pa3dpo6BaHe BnHaH OT dChAn OpaHa npe3 OTbopa 3a nbJIHe He Ha fynra (2).
Pn Heo6xOIMOC, HAnpeBaHTo Ha MaTepHaJa MoKe Da 6bJe yIeChEHO Upe3 yNtpe6aTa Ha CneuHaHaTa npeca (3
2.ОПИСАНЕHAKOMAHДNTE
2.1 HOMAнда MOTOP
MotopbT ce KOMaHDb a O T Dba 6yToHa:
-3eH6yToH(1-I)=XoA
- YepBEN 6yToH (2-O) = CToN
Pn Jnnca Ha ToK ypeBt Cnnpa.3a Da BKnHouHte naK Tp6Ba Da HATNCHE Te OTHOBO 3eJIeHn6yTOH (1).
Pone3n yka3aHna 3a pa3dpo6BaHaTeO
- N368BaTe Da pa3dpo6BaTe MOKbp MaTePnA.
- OkactpeTe KIOHnte c MHoro pa3KIOHeHn I OTcPaHete CTpaHNUHTe N3dBHN.
He pa3dpo6BaIe KIOHn C dHaMeTbp NO-ROJAM OT 4 cm 3aBNCIMOCT OT Bua N CBExKeCTTa Ha DbPBeCNHaTa MOKe ce HAIoHN Da Ce HaMaJI MaKcImaJIHn I DaHaMeTbp Ha OOTBaHIne KIOHn. - NocTabaIe BnHaM MaKn KOJIueCTBa MaTePnaI, 3a Da 3anyuHtE cyHnTa 3a 3apeKdaHe.
- N36rBaIte 3aNyUbaHeTo Ha n3XoHaTa IIO3a, 3a Da He YHHnte N3KaUbaHe Ha pa3ApObeHn MaTePnA BbB FyHnA
2.2 HomyTaTOp Ha nocohata Ha BbptHe
Nocokata Ha Bbptene Ha MOTopa ce KOMaHDb a O T Da b 6yTa3apeJdahe.
- Yepen 6ytoh (3-▼) = OnepatnBHa nocoHa Ha BbptHe, -63dpo6BaIte rpaHnckHte OTnaDbu CaMo Ha MaJHKn HrO npraTCTBaUa NaCTabRHeTO Ha MATE- IInueCTBa, Oco6eHO aKO ca BlaJHH NIN MoKpn;peDyBaIte pnaJa. C KIOHN, 3a Da n36erHete 3anyWBaHn.
- Yepen 6ytoh (4-▲) = Bbptene B o6paTHa nocKa, 3a Ha He pa3dpo6BaIte KxHcN OToaBun Hn npyrn MaTe OCBO6oN 3aceHaJIra MaTePnaJI; Cbc- pHaJIc H He TBbpda KOHCNCTeHcN. ToHHeTO Ha o6paTHO Bbptene Ce OHa- rJeJaBA CbC CBETBaHcTo Ha JeI-DIOd (5). BaXHH npenopbKn
Ipn 3aedcTbaHe Ha MoTopa, ATOMaTHUHO ce 3aDaBa onoPeHne npEhAbaTe C bJIHHaTa Ha pa3dpO6BaHnTe KIOH TNBHaT a Nocoka Ha BbPteHe, KOrTo 6laRanpnaTCTBa NoCTaBraHb KaTo, KlaTeHN Ce HeKOHTrpOInpyEmo, Morat Da npN HETo Ha MaTePnAna. HAT HapaHBAHnJ.
3.4 N3npa3BaHe Ha KOHTeHepa
Pa3dpobenrMaTePnA1B KOHTeHepa 3a Cb6npaHe HcTp8Ba Da DOCTnra PpeKaIeHO BnCOKO HnBO B 30HaTa 3XbPnHe; aKo TOBa Ce Cnyu, BeYe pa3dpobenrMaTe 3anyuBa n3xOdHn RaHaI N Ppe3 OTbopa 3a PblHe O MaTePnA1.
3a oTKaHaHe nI3npa3BaHe Ha KOHTeHepa cnpTe MoTOpa da ce DoKapa IIOyata (2) B ONTHMaJIHa No3nCnPcR CmBkHeTe HAnOly pBvKaTa 3a 6e3oNaChocT (1) n N3BaTeBaJa (3), TpRbA:
KoHTeHepa (2).
4.1 PerylaunHa pa3ToHHeTo
PerylaunraHa pa3ctoHneTo MeKdy nIOyata 3a HAnraHe
Hbala pa3dpobntel (3) Tp6Ba da 6bJe N3BbPseHa npE
HbI3BaTe MaHNHata 3a nbpBn nbl. Pocne ce Hanara camk
rpa3dpo6RaHeto He e ndealHo.
a da ce dokapa nloyata (2) B onTnmaHa no3nna Cnpra 8ana (3), Tp6ba:
- da ce BKNIOH MToopa, 3a da 3aJeNCTBa Bala pa3dp06 (3);
- da ce Bbptn 6abHo KOpMnIoto (1) no nocoka Ha yacoB BaTa cTpeHa, 3a da npnbnnn nnoyata (2) KbMa BaJa H KaTO ce yye wym OT dOnnp MeHdy DBeTe YacTHn, DOka3
3.5 3aKlHbAHe Ha MaTePnHa
B cnuya Ha 3aklnHbaHe Ha pa3dp06raBaHH MaTePnaI, 6b- IIN3aHTo Ha MaJKN MeTaJIH NCTpyKKn OT IN3XODHaT AIO3 pBuaHeTo Ha NocOKaTa Ha BbpTeHe Ha MOTopa No3BOJRA Da
ce ocbo6oBn Bala pa3dp06nte. 3a Ta3n cen: N36raBte npkeaneHO cnJeH KOHT, 3a da He noDnaT -obpheTe nocokata Ha BbptHe KaTo HATNCHEte UepnHa HHeHyKHO n3HOCBaHe.
TOH (4-▲), BHMabaKn 3a n3KaYBaHe Ha MaTePnaJa OT BXoHOTO OTBepCTne;
- ⅢOM onpaBnTe 3aKJIINHBAHeTo, HATNCHEte YepHn8 6yTOH
(3-▼), 3a Да Вьзостановite onepaTHBHaTЯ NOcOKa HaTeHe.
5-ONA3BAHE HA OHOJIHATA CPEDA
Ona3BaHTo Ha OKoJIHaTa CpeDa Tp86Ba Da 6bIe npHopHTe
Cnpete MoTopa n 3KluOeTe eJeKtpnuecKTo 3axpaHbAbe BaKeH acNeKT npynoTebaHa MaunHaTa, B noI3a Ha aHO e Heo6XoDIMO da OTnyWBate OTBepCTHeTo n HxOdHpaHaDaHcKTo 0buctBO Ha CpeDaTa, B KOrTO JINBeEM. Han.
- N36raBae da npTEchBaTe cbcene.
- CneBaIe CTpIKTHO MeCTHHe HOpMn OTHOCHO3XBbPJIa HeTo Ha OTNaIbHn MaTePnaJIu.
- CneBbIe CTpIKTHo MeCTHHe HOpMn 3a N3XbPJIrHETo
3.6 3aBbPwBaHe Ha pa6oTata
B KpaHa pa6oTaTa cnpTe MoTopa KaTo HaTnCHe T cep 6yTOH (2-0).
N3KluOte Te yIbIHNHTeIa (11) PbPBO ot r.
n NOCLE ot uenceIa Ha MaunHata (12).
OCTpaHete n 3npa3HeTe KOHTeHepa
BeknHOBNH, H3HOCEHN YACTN NIN KaHbATO N da e yact, C 3aMbpCRABaUa OKoJHaTa Cpea;Te3N OTnaDbuH He Tp6Ba (13) n3XbBpIaT B 60hnyka, a Tp6Ba Da ce Cb6npaT pa3, N da Ce npedabat B CneuaJIHnte pyHKTObe 3a Cb6npaH DeTo Ue ce norpnHata 3a peunKInpaHe Ha MATEpnaJIte.
B MOMeHTa Ha 3BaKdaHe OYnoTpe6a, He 3axBbPnI MaunHata B OKoJHaTa Cpea, a ce 0bphete KbM c6n TeJeH nyHKT, CnopeD JeNCTBaUInTe MeCTHN pa3npoe6n.
4.CbXPAHEHNEIPOAPBbHHA
BAHXO-PedOBHATAI rpnKlnBa nodpBkHa e He3aMeHHMa 3a noDbPkaHe nbpBOHaayanHnte XapaHTepnCTHN HnBO Ha 6e3oNaChoc HA MaunHa. CbXpaHaaTe MaunHaTa Ha cyxo Macto. N3KnUoyete MaunHaTa OT eJeKTPnuechata MPeHa npdN da 3anoHte BCaKaBa HaMeca no NouchBaHe, KOHTPOI HnNo pdpBkHa.
1) CiaraiTe de6eHn pa60TH npKaBnCn npEi BcRHO no- YnCTBaHe, NOIbPkaHe Hn peryaun Ha MaunHaTa.
2) CneB BcKa yNtpe6a OTCTpaHbAte KOHTeHepa 3a cb-6npaHe n NOuHCTBaITe OTNaDbUHTe, OCTaHaJI N 3XoDHaTa DIO3a.
3) CneBcKa ynoTpe6a cnaarTe Ha BaIa pa3Dpo6nte TbHbK nlaCT cnpE 6nopa3rpaKa dao ce MacNo, 3a Da npedNa3HTe MetaJ ot Kopo3nJ.
4) BnHaHn npOBepraBaIte daIIb3dyXo3a6OpHnIte ca CBO- 6oDHNOT OTnAdbuN.
5) He n3noJI3BaIte cTpyn BOda n n36aIBAIte da MOKpIte MoToPa n eJeKtpnueckHte KOMNoHeTHn.. He n3noJI3BaIte arpeCINBn TeuHOCTNa NoNUCTBaHe Ha pIACTMaCOBIne YaactN.
6) Hnkora He ce onntBaIte da n3BbPwBaTe cepno3Hn non- paBkn 6e3 da hMaTe Heo6xOdImnte TexHueckn CpeDCTba n 3HaHna. BcraHa loSo n3BbPseHa Hameca BoiNo do aBTO- matuHO OTnadaHe Ha TapaHunrTa H OTROBOPHOCTHe HcnyaH Na CbMHeHne nn npo6lem, CBbPKeTe ce 6e3 H Ipon3BODInTeJI. 6aHne c Hau-6bn3Kn r cepBn3 nn C baAny dNCTprbyTop.
ET OHUTUSNOUDED RANGELT JARGIDA
TAHTIS - LUGEDA HOOLIKALT ENNE MASINA KASUTAMIST TADA IGAKS EDASPIDISEKS KASUTUSEKS
1.1 Masina monteerimine

- DESCRIPTION OF SYMBOLS ON CONTROLS
- Maximum noise and vibration levels
- DE
- Meyote ts eopou kai dovnoewv
- ONHC HA DADEHNTE CHMBOJN HA ROMAHNTE
- TexHHNn noaToCu
- MaKcHmAlHn BpeDnocTH 3a 6yUaB HnBbpaun
- HR
- IDENTIFIKACIJSKA ETIKETA I KOMPONENTE STROJA
- SL
- IDENTIFIKACJSKA NALEPKA IN SESTAVNI DELI STROJA
- MaKcHmAlHn CToHocTH Ha Wym Hb6paun
- ET
- MARKERKLEEBIS JA MASINA KOMPONENDID
- ENPORT ET DEPLACEMENT
- IMPORTANT - READ CAREFULLY BEFORE USING THE MACHINE. KEEP FOR FUTURE REFERENCE
- A) TRAINING
- B) PRELIMINARY OPERATIONS
- E) ADDITIONAL WARNINGS
- C) DURING USE
- F) TRANSPORTATION AND HANDLING
- COMPLETING ASSEMBLY
- CONTROL DESCRIPTION
- Advice for shredding
- Important recommendations
- Emptying the box
- Distance adjustment
- Clogging of material
- End of work
- STORAGE AND MAINTENANCE
- BESCHERMING VAN DE OMGEVING
- Obstrucao do material
- E) EK UYARILAR
- A)OByHA
- B) BOBEHN ONEPAUIN
- D) VEDLIKEHOLD OG OPPBEVARING
- OPPBEVARING OG VEDLIKEHOLD
- Fastnat material
- are DODATECNA OPATRENI
- PNEPEBO3KA INIPEPEMUEHNE
- 1.3ABEPUHEHNE MOHTAHA
- ONICAHNE OPRAHOB YNPABJEHNA
- NoJIe3HbIe peKoMeHdaaun no n3MeJIbUeHHIO
- BaxHbIe peHOMeHaaUN
- OnopohHeHne npHemHoro 6yHkepa
- PerylnopOBka paccToHHN
- 3acTpeBaHnne MaTePnaJa
- 3aBepseHne pa6oTbI
- 4.XPAHEHNE IN TEXOBCLYKHBAHNE
- HR SIGURNOSNA PRAVILA KOJIH SE TREBA SAVJESNO PRIDRZAVATI
- VAZNO - PAZLJIVO PROCITAJTE PRIJE POCTKA UPORABE JA. CUVAJTE ZA BUDUCPE POTREBE
- 2.ОПИСАНЕHAKOMAHДNTE
- Pone3n yka3aHna 3a pa3dpo6BaHaTeO
- N3npa3BaHe Ha KOHTeHepa
- PerylaunHa pa3ToHHeTo
- 3aKlHbAHe Ha MaTePnHa
- 5-ONA3BAHE HA OHOJIHATA CPEDA
- 3aBbPwBaHe Ha pa6oTata
- 4.CbXPAHEHNEIPOAPBbHHA
- ET OHUTUSNOUDED RANGELT JARGIDA
- TAHTIS - LUGEDA HOOLIKALT ENNE MASINA KASUTAMIST TADA IGAKS EDASPIDISEKS KASUTUSEKS
Brand : ALPINA
Model : SH 2.5 E
Category : Plane