PW 240 - Pressure washer HUSQVARNA - Free user manual and instructions
Find the device manual for free PW 240 HUSQVARNA in PDF.
| Technical Specifications | Maximum pressure: 140 bars, Flow rate: 440 l/h, Power: 1.8 kW, Weight: 12 kg |
|---|---|
| Usage | Ideal for cleaning outdoor surfaces, including terraces, driveways, and vehicles. |
| Maintenance and Repair | Regularly check filters, clean nozzles, and store protected from frost. |
| Safety | Wear protective goggles, avoid directing the jet at people or animals. |
| General Information | 2-year warranty, compatible accessories available, user manual included. |
Frequently Asked Questions - PW 240 HUSQVARNA
User questions about PW 240 HUSQVARNA
0 question about this device. Answer the ones you know or ask your own.
Ask a new question about this device
Download the instructions for your Pressure washer in PDF format for free! Find your manual PW 240 - HUSQVARNA and take your electronic device back in hand. On this page are published all the documents necessary for the use of your device. PW 240 by HUSQVARNA.
USER MANUAL PW 240 HUSQVARNA
EN Operator's manual 8-25
BG PboBODCTBO 3a ekCnnoTaunr 26-45
CS Navod k použiti 46-62
DA Brugsanvisning 63-79
UK NocibNK KopncTyBaay
189-205
224-241
242-258
259-275
276-293
294-309
310-328
347-364
365-384
385-402
403-418
419-435
436-452
453-469
470-488


16
18
19
20
21
22
32

33
34
36
37

38

48

50
52
54
Contents
Introduction. 8
Safety. 9
Assembly. 15
Operation. 15
Maintenance. 18
Troubleshooting 20
Transportation, storage and disposal. 21
Technical data. 21
Accessories 22
Declaration of Conformity 24
Introduction
Product description
The product is an electrical high-pressure washer. The product can be operated with different levels of water pressure and different cleaning agents.
Intended use
Use the product for domestic cleaning only. Do not use the product for other tasks. Use the product in an upright position only.
Note: National regulations can set limit to the operation of the product.
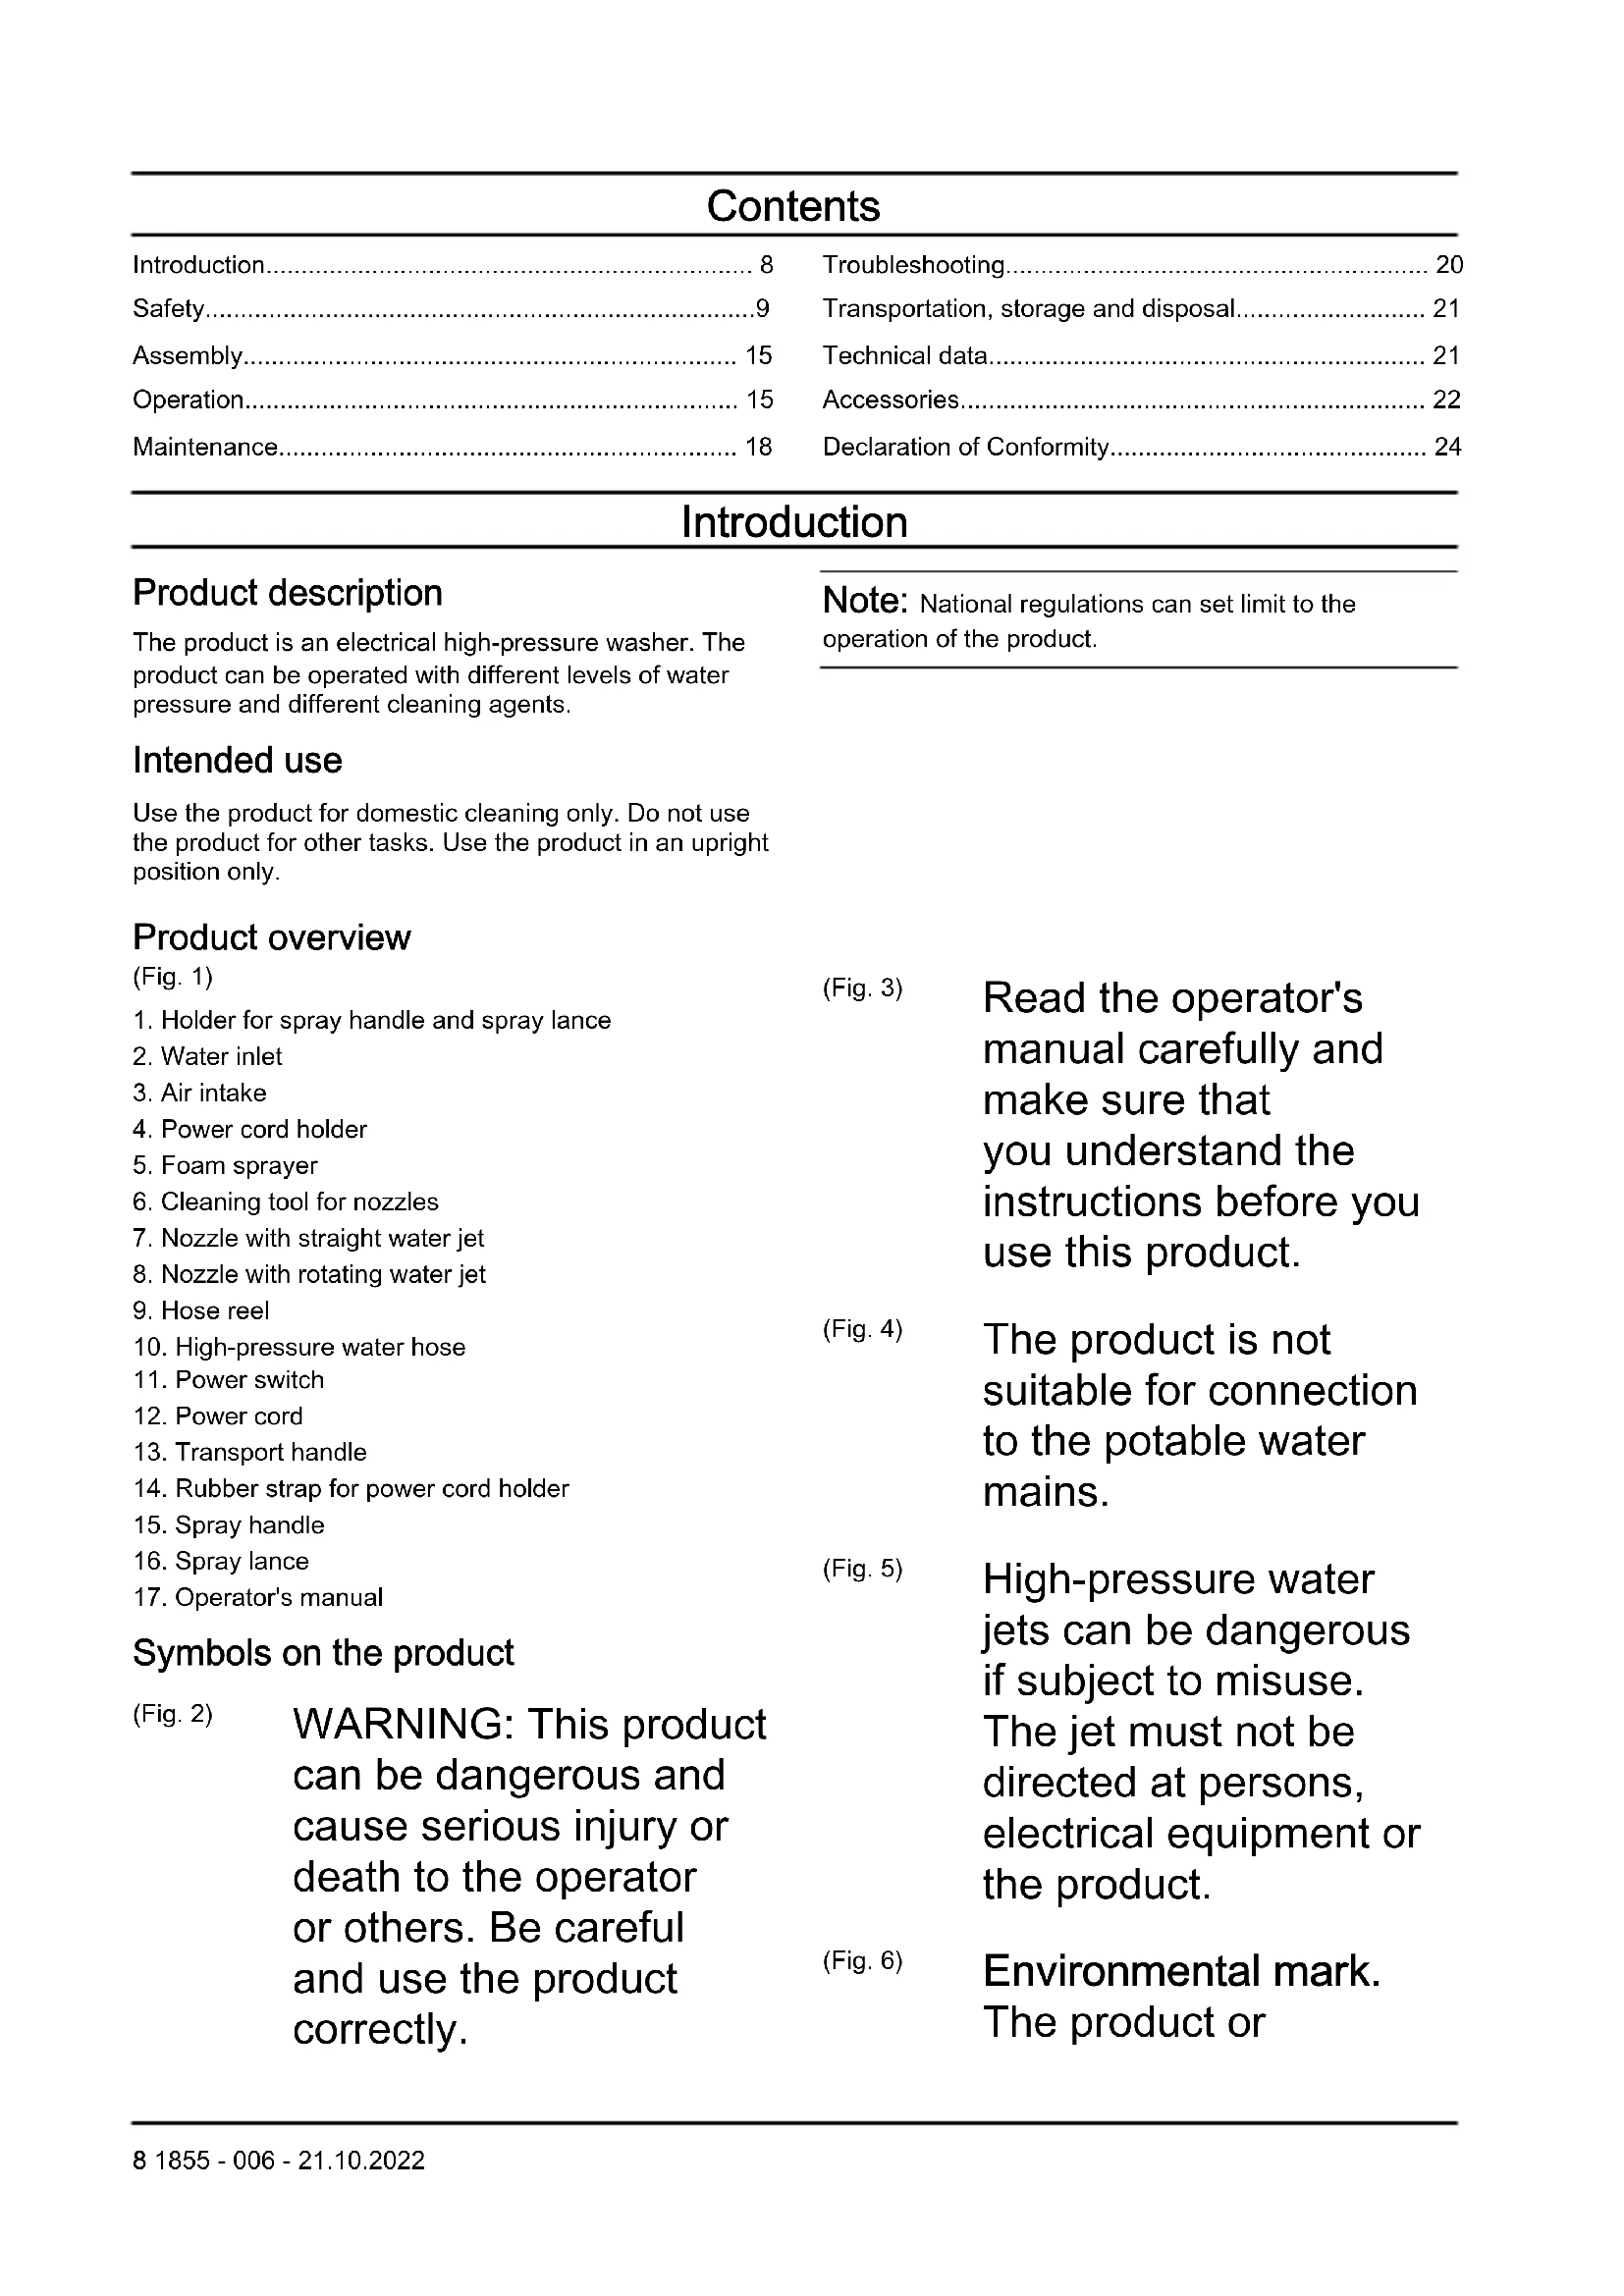
Product overview
(Fig. 1)
1. Holder for spray handle and spray lance
2. Water inlet
3. Air intake
4. Power cord holder
5. Foam sprayer
6. Cleaning tool for nozzles
7. Nozzle with straight water jet
8. Nozzle with rotating water jet
9. Hose reel
10. High-pressure water hose
11. Power switch
12. Power cord
13. Transport handle
14. Rubber strap for power cord holder
15. Spray handle
16. Spray lance
17. Operator's manual
(Fig. 3)
Read the operator's manual carefully and make sure that you understand the instructions before you use this product.
(Fig. 4)
The product is not suitable for connection to the potable water mains.
(Fig. 5)
High-pressure water jets can be dangerous if subject to misuse. The jet must not be directed at persons, electrical equipment or the product.
(Fig. 6)
Environmental mark. The product or
| (Fig. 7) | package of the product is not domestic waste. Recycle it at an approved disposal location for electrical and electronic equipment. | (Fig. 13) | legislation "Protection of the Environment Operations (Noise Control) Regulations 2017". The guaranteed sound power level of the product is specified in Technical data on page 21 and on the label. |
| Class II tool. | |||
| (Fig. 8) | The product agrees with applicable EC directives. | Protected against low pressure water stream from any angle. | |
| (Fig. 9) | The product agrees with applicable Eurasian Customs Union directives. | (Fig. 14) | Keep away from frost. |
| (Fig. 15) | This product conforms to the applicable UK regulations. | ||
| (Fig. 10) | The product agrees with applicable UkrSEPRO directives. | ||
| (Fig. 11) | The product agrees with applicable RCM directives. Applies to AU/NZ only. | Note: Other symbols/decals on the product refer to certification requirements for some markets. | |
| Product liability | |||
| As referred to in the product liability laws, we are not liable for damages that our product causes if: | |||
| • the product is incorrectly repaired. | |||
| • the product is repaired with parts that are not from the manufacturer or not approved by the manufacturer. | |||
| (Fig. 12) | Noise emission to the environment label as per EU and UK directives and regulations, and New South Wales | • the product has an accessory that is not from the manufacturer or not approved by the manufacturer. | |
| • the product is not repaired at an approved service center or by an approved authority. | |||
Safety
Safety definitions
Warnings, cautions and notes are used to point out specially important parts of the manual.
WARNING: Used if there is a risk of injury or death for the operator or bystanders
if the instructions in the manual are not obeyed.

CAUTION: Used if there is a risk of damage to the product, other materials or the adjacent area if the instructions in the manual are not obeyed.
Note: Used to give more information that is necessary in a given situation.
General safety instructions

WARNING: Read the warning instructions that follow before you use the product.
- This product is dangerous if used incorrectly or if you are not careful. Injury or death can occur if you do not obey the safety instructions.
- Always be careful and use your common sense. If you are not sure how to operate the product in a special situation, stop and speak to your Husqvarna service agent before you continue.
- Keep in mind that the operator will be held responsible for
accidents that involve other persons or their property.
- Keep the product clean. Make sure that you can clearly read signs and decals.
- Never allow children or people unfamiliar with these instructions to use the appliance. Local regulations may restrict the age of the operator.
- This product can be operated by persons with reduced physical, sensory, or mental capabilities if they are supervised or given the instructions for how to operate the product safely and understand the hazards involved.
- This product can be operated by persons who do not have the necessary experience or knowledge if they are supervised or given the instructions for how to operate the product safely and understand the hazards involved.
-
Do not use the product if you are tired, ill, or under the influence of alcohol, drugs or medicine. This has a negative effect on your vision, alertness, coordination and judgement.
-
Do not use the product if it is defective.
- Do not change this product or use it if it is possible that it has been changed by others.
Safety instructions for operation

WARNING: Read the warning instructions that follow before you use the product.
- Do not use the product if the power cord, high-pressure hose, trigger lockout or spray handle is damaged.
- Do a check for damage before you operate the product. Do not use the product if parts are damaged or missing.
- Hold the spray handle tightly with both hands. A kickback force occurs when you pull the power trigger.
- Be careful when you operate the product. The high pressure supplied by the product is dangerous and can cause injury.
- Do not point the jet in the direction of you, other persons or animals.
-
Do not point the jet in the direction of yourself or others to clean footwear.
-
Do not point the jet in the direction of electrical equipment or the product itself.
- Use personal protective equipment when you operate the product. Refer to Personal protective equipment on page 13.
- Do not operate the product near persons unless they wear protective equipment.
- If you use a cleaning agent, follow the safety instructions for the cleaning agent.
- Use Husqvarna cleaning agents only.
- Use correct water pressure and cleaning agents, and use the product only for the tasks given in this manual. If you use incorrect water pressure, cleaning agent, or use the product for other tasks than the tasks given in this manual, it can cause damage to the product, surfaces, materials or other devices. Husqvarna does not accept liability for damage that is caused by incorrect use.
- It is not recommended that you connect the product to potable water mains. If you must connect the product to potable water mains, obey local and national regulations.
Use a backflow preventer (not included) if it is necessary. Water that has flowed through a backflow preventer is considered to be non-potable.
- Do not spray flammable liquids. Risk of explosion.
- Do not let children operate the product.
- Do not let children play with the product.
- Do not let persons operate the product without training.
- Use only accessories and spare parts that are approved by Husqvarna.
- Make sure that the electric connection is made by an approved electrician and that it complies with IEC 60364-1.
- Use a residual-current device that stops the electricity if the leakage current is more than 30mA for 30ms . If you do not have a residual-current device, use a device that will prove earth circuit.
- Use motor start/delayed fuses with characteristic C or D according to IEC 898-1 or IEC947-2, or corresponding standards outside IEC.
-
No actions are needed for adjusting products marked with dual voltage and frequency.
-
If it is necessary to use an extension cable, make sure that it is applicable for operation outdoors. Make sure that the socket is at a minimum distance of 60 mm from the ground. The connection must always be kept dry.
- Put the power switch in the off (0) position, disconnect the power plug, and engage the power trigger lockout before you go away from the product.
- Put the power switch in the off (0) position and disconnect the power plug before you change accessory.
- Put the power switch in the off (0) position and disconnect the power plug before you clean or do maintenance on the product.
- Do not operate the product in environments where the ambient temperature is less than 0^ .
- Do not start a frozen product.
- Do not operate the product indoors.
- Do not put objects on the product when it is in operation.
-
Do not drink water that has been used with the product.
-
Do not operate the product near open windows.
- Watch out for thrown objects. Stones and loose objects can be thrown up into the eyes causing blindness or serious injury.
- If the product does not operate correctly, refer to Troubleshooting schedule on page 20.
Personal protective equipment

WARNING: Read the warning instructions that follow before you use the product.
- Personal protective equipment cannot fully prevent injury but it decreases the degree of injury if an accident does occur. Let your dealer help you select the right equipment.
- Use heavy-duty, slip-resistant, boots or shoes. Do not use open shoes or go with bare feet.
- Use protective clothes.
- Use approved hearing protection.
- Use protective goggles.
- Use breathing protection with class FFP2 or equivalent if you operate the product in environments where
dangerous aerosols can be formed.
Safety devices on the product

WARNING: Read the warning instructions that follow before you use the product.
- Do not use a product with defective safety devices.
- Do not remove or do modifications to safety devices.
- Do a check of the safety devices regularly. If the safety devices are defective, speak to your Husqvarna service agent.
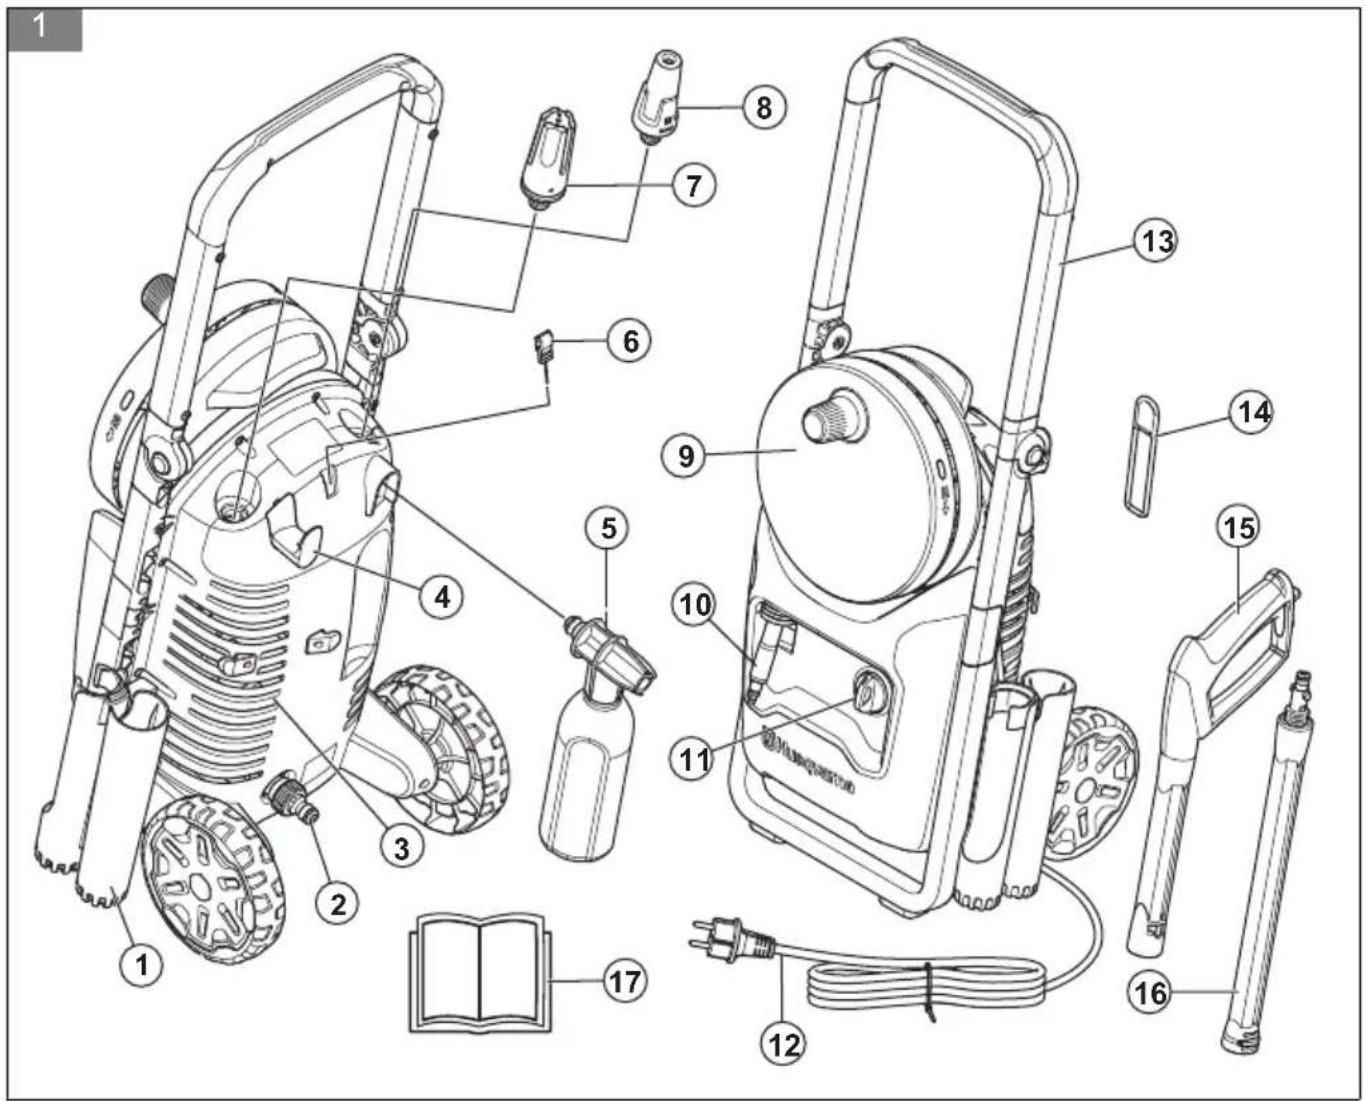
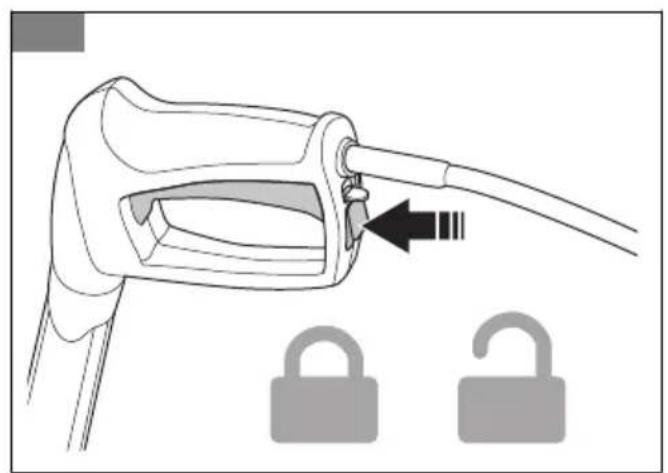
Power trigger lockout
The power trigger lockout (A) prevents accidental operation of the power trigger (B). When the power trigger lockout is in the locked position, the power trigger cannot be pushed in.
(Fig. 16)
Power trigger
The product starts when the power trigger is pushed in. The product stops when the power trigger is released.
Thermal protector
The product has an automatic thermal protector. If the product becomes too hot, the thermal protector will stop the power supply to the product. If the thermal protector has stopped the power, wait until the product is cool. The thermal protector will reset automatically when the product is sufficiently cool.
Hydraulic relief valve
The product has an integrated hydraulic relief valve that prevents too high pressure in the system.
Safety instructions for maintenance

WARNING: Read the warning instructions that follow before you do maintenance on the product.

CAUTION: Always do maintenance before you start the product after a long time in storage.
- Put the power switch in the off (0) position and disconnect the power plug from the power source before you do maintenance on the product.
- Disconnect the product from the water source and make sure that all parts are dry before you do maintenance on the product.
- Do the maintenance work written in this operator's manual only.
- Use only spare parts recommended by Husqvarna. High pressure water hoses, fittings and couplings are important for the safety when you operate the product. Use only hoses, fittings and couplings that are recommended by the manufacturer.
- Do not repair the product. Speak to your Husqvarna service agent.
- Speak to your Husqvarna service agent if the power plug or power cord is damaged.
- Do not let children clean or do maintenance on the product.
Assembly
Introduction

WARNING: Read and understand the safety chapter before you assemble the product.
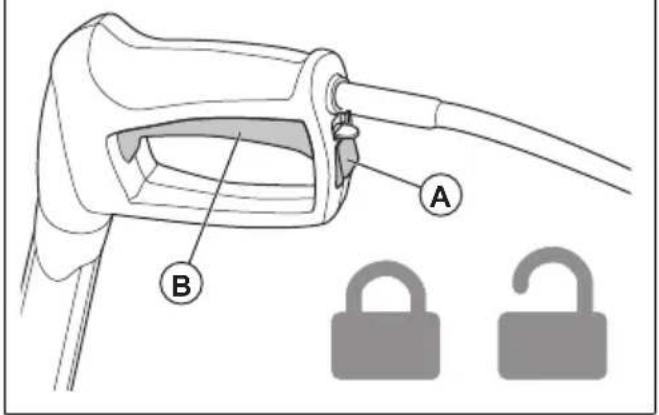
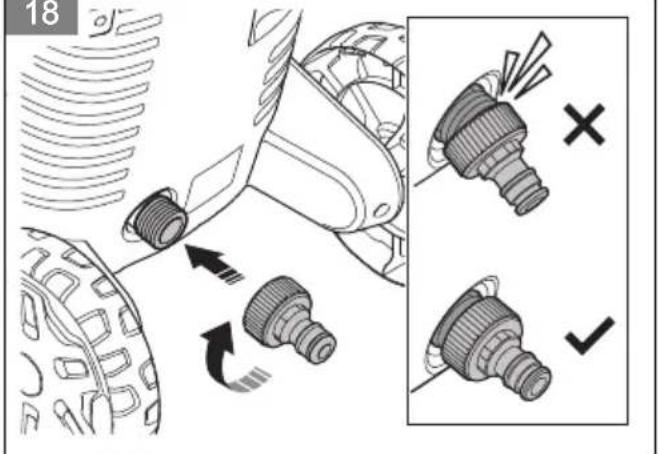
To install the garden hose adapter
- Remove the transport cover from the water inlet and discard it. (Fig. 17)
- Install the garden hose adapter on the water inlet. (Fig. 18)

CAUTION: Make sure that you install the garden hose adapter straight on the water inlet. If the garden hose adapter is not installed straight, it can cause damage to the threads and leakage can occur.
- Tighten the garden hose adapter fully.
- Remove the garden hose adapter in the opposite sequence.
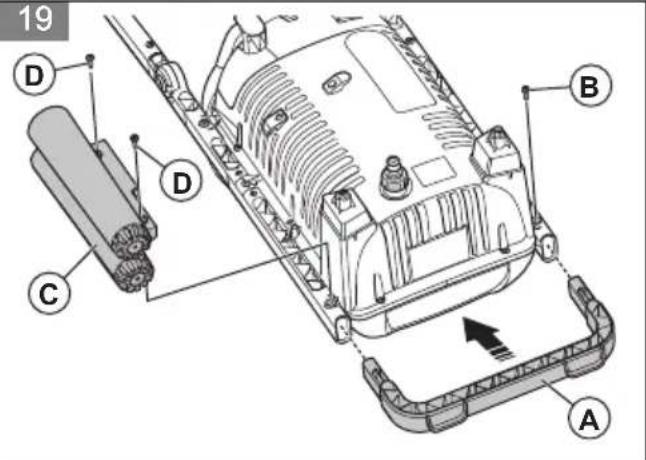
To install the footrest and the holder for the spray handle and the spray lance
- Put the footrest (A) in position and install the screw (B). (Fig. 19)
- Put the holder (C) in position and install the 2 screws (D).
Note: The lower screw on the holder also holds the footrest. Make sure that you align the hole in the footrest with the lower screw.
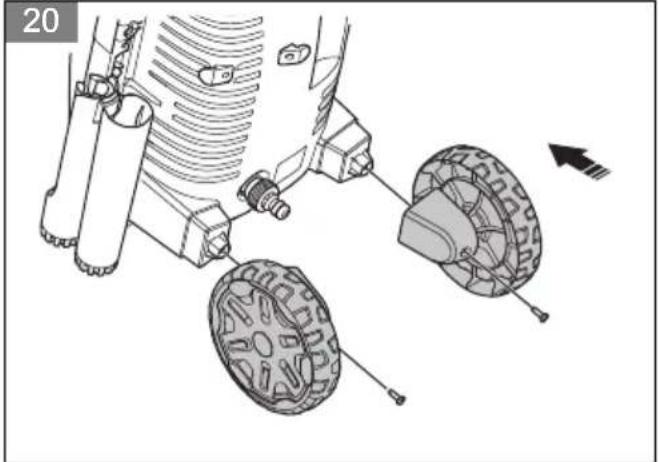
To install the wheels
Note: Before you do this procedure, make sure that the footrest and the holder for the spray handle and spray lance are installed. Refer to To install the footrest and the holder for the spray handle and the spray lance on page 15.
- Put the wheel assemblies in position and install the 2 screws. (Fig. 20)
Operation
Introduction

WARNING: Read and understand the safety chapter before you use the product.
Husqvarna Connect
Husqvarna Connect is a free app for your mobile device. The Husqvarna Connect app gives extended functions for your Husqvarna product:
- Extended product information.
Information about, and help with, product parts and servicing.
To start to use Husqvarna Connect
- Download the Husqvarna Connect app on your mobile device.
- Register in the Husqvarna Connect app.
- Follow the instruction steps in the Husqvarna Connect app to connect and register the product.
Note: Husqvarna Connect app is not available for download in all markets. Speak to your servicing dealer for more information.
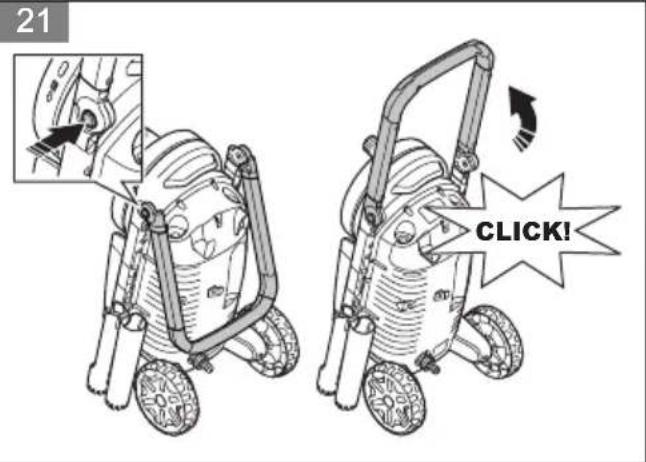
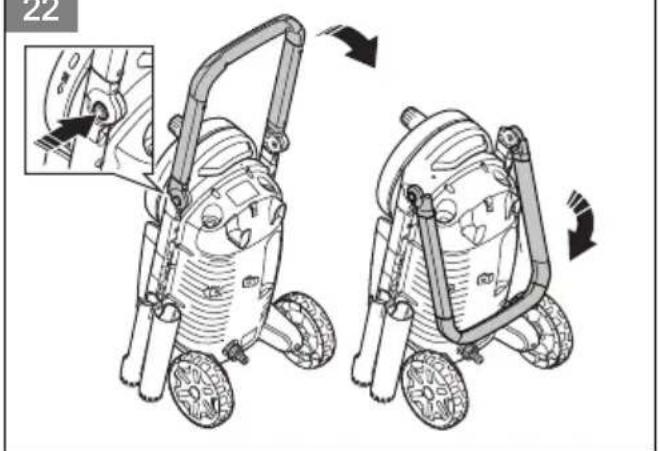
To unfold and fold the transport handle
- To unfold the transport handle, push the buttons on the left and right side and pull up the transport handle. (Fig. 21)
- To fold the transport handle, push the buttons on the left and right side and push down the transport handle. (Fig. 22)
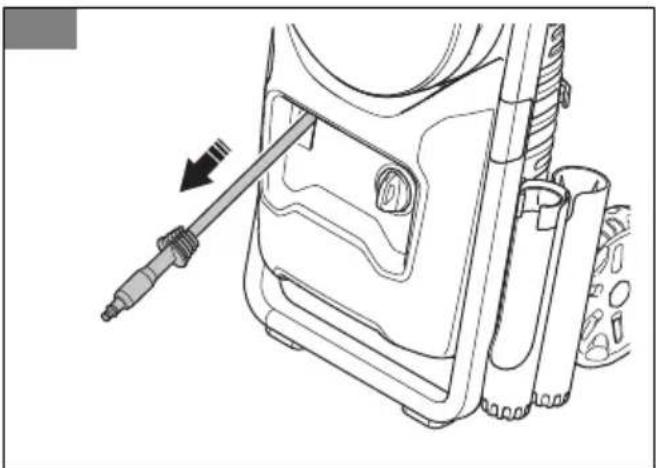
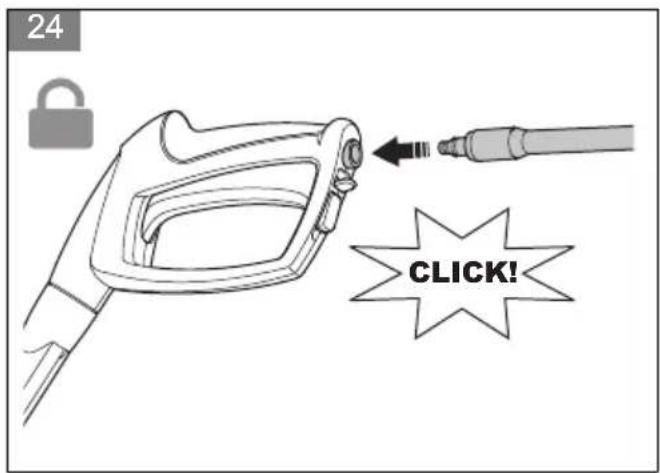
To install the spray handle
- Pull out the high-pressure water hose. (Fig. 23)
- Hold the spray handle tightly with one hand and push the high-pressure water hose into the quick connection on the spray handle. (Fig. 24)
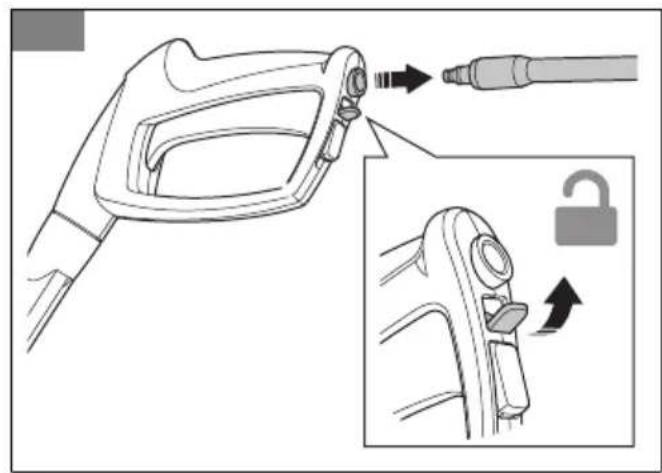
To remove the spray handle
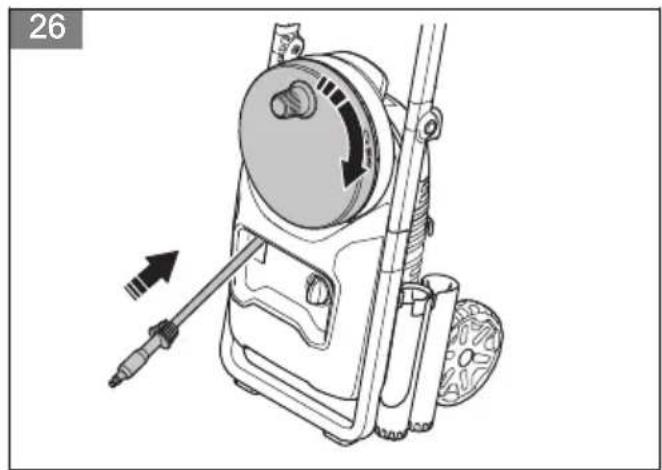
- Push the tab in the direction of the quick connection on the spray handle and pull out the high-pressure water hose. (Fig. 25)
- Turn the hose reel clockwise until the high-pressure water hose is fully wound. (Fig. 26)
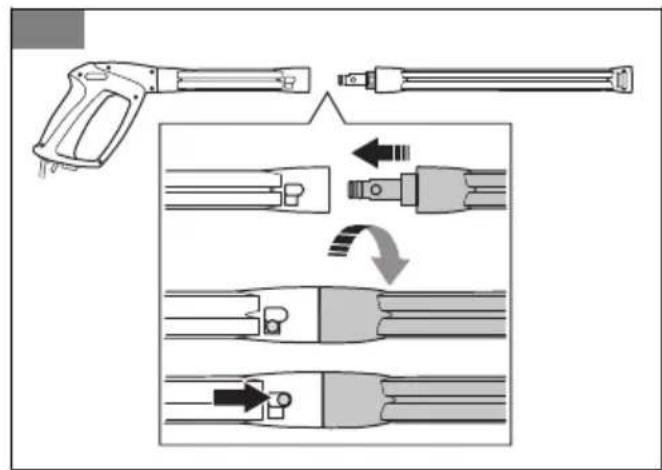
To install the spray lance
- Hold the spray handle with one hand and push the coupling on the spray lance into the spray handle. (Fig. 27)
- Turn the spray lance clockwise and release the spray lance. The spray lance locks in position.
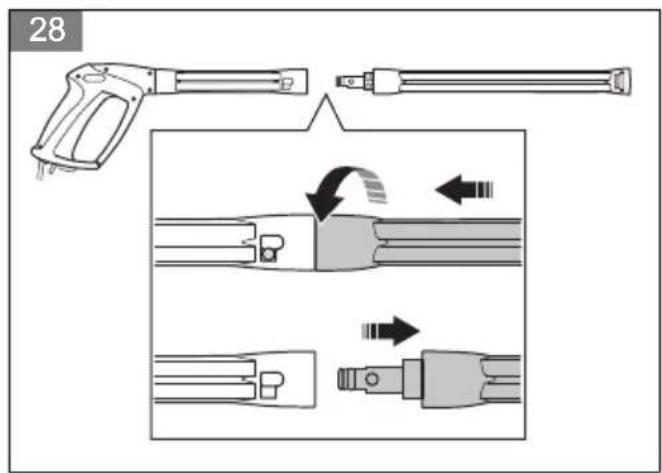
To remove the spray lance
- Push in the spray lance and turn it counterclockwise. (Fig. 28)
- Pull out the spray lance from the spray handle.
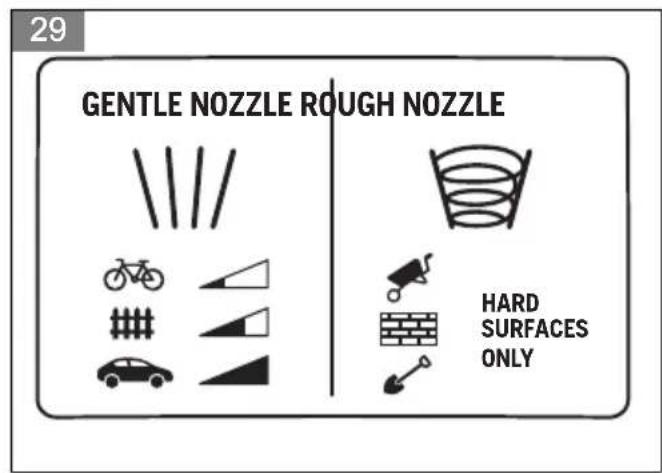
To install and remove a nozzle
The product is supplied with 2 nozzles: 1 nozzle with a straight water jet (identified with "gentle nozzle") and 1 rough nozzle with a rotating water jet (identified with "rough nozzle". The nozzle with a straight water jet can be used to clean sensitive surfaces, for example vehicles. The nozzle can be used to clean surfaces that are not sensitive, for example driveways.
(Fig. 29)

CAUTION: Do not use the nozzle with a rotating water jet on sensitive surfaces, for example painted surfaces on a vehicle. The rotating water jet can cause damage to the surface.
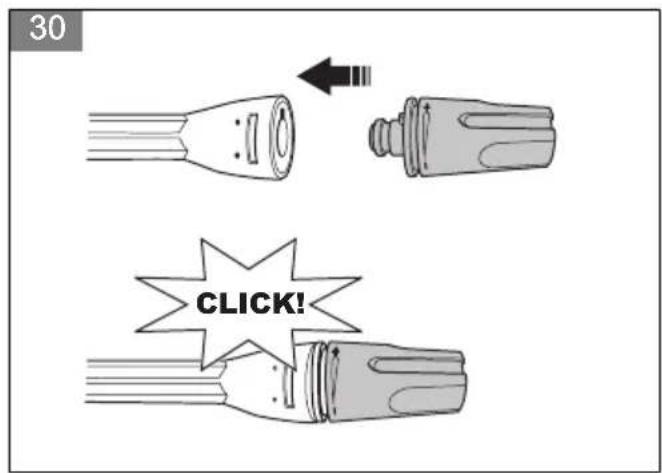
- To install a nozzle, hold the spray lance with one hand and push in the nozzle until it locks in position. (Fig. 30)
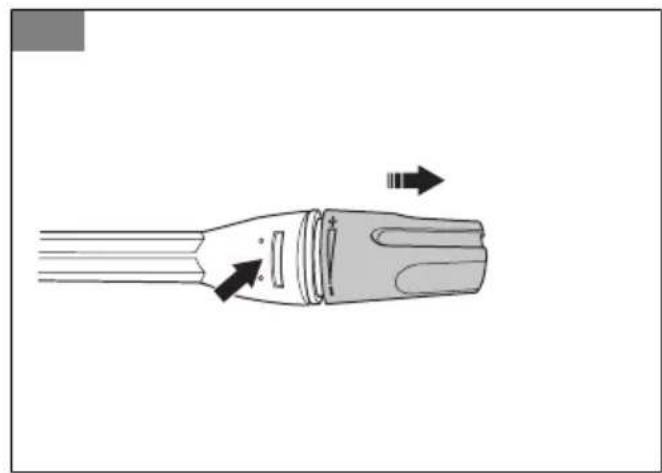
- To remove a nozzle, push in the tab on the spray lance and pull out the nozzle from the spray lance. (Fig. 31)
To adjust the pressure of the water jet
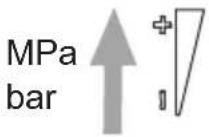
The nozzle with a straight water jet has adjustable pressure.
To increase the pressure of the water jet, turn the nozzle clockwise. (Fig. 32)
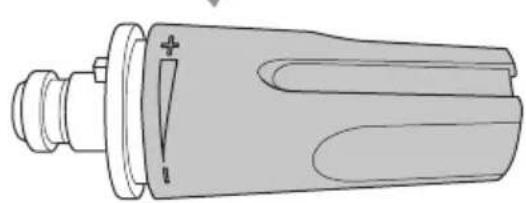
- To decrease the pressure of the water jet, turn the nozzle counterclockwise. (Fig. 33)
To operate the product
- Connect the product to a water source. Refer to To connect the product to a water source on page 16.
- Bleed the system. Refer to To bleed the system on page 17.
- Start the product. Refer to To start the product on page 17.
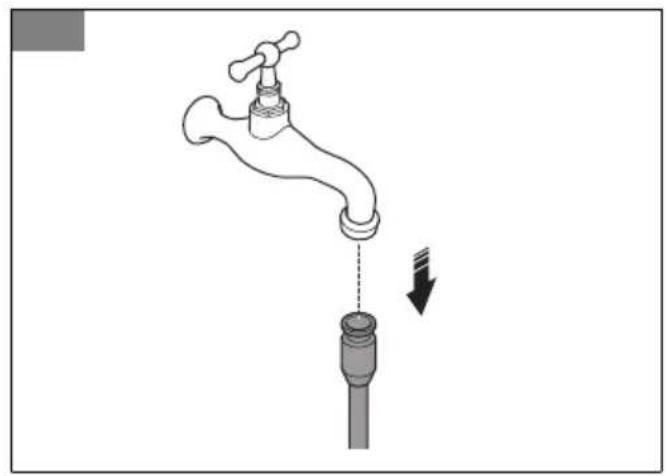
To connect the product to a water source
The product can be used with water from the water mains or water from an open water source, for example a lake or a water barrel.
- To connect the product to the water mains, refer to To connect the product to the water mains on page 16.
- To connect the product to an open water source, refer to To connect the product to an open water source on page 16.
To connect the product to the water mains
- Install the garden hose adapter to the water inlet on the product. Refer to To install the garden hose adapter on page 15.
- Connect the garden hose to the water mains. Use a 12 in. garden hose that is 10-25 m long. (Fig. 34)

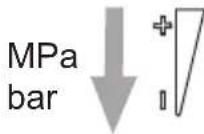
CAUTION: The water pressure in the water mains must not be more than 1 MPa (10 bar).

CAUTION: The water temperature in the water mains must not be more than 40^ .
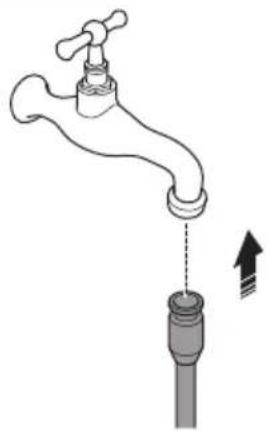
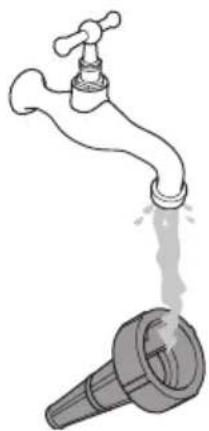
- Open the valve on the water mains and make sure that water can flow freely from the garden hose. (Fig. 35)
- Close the valve on the water mains.
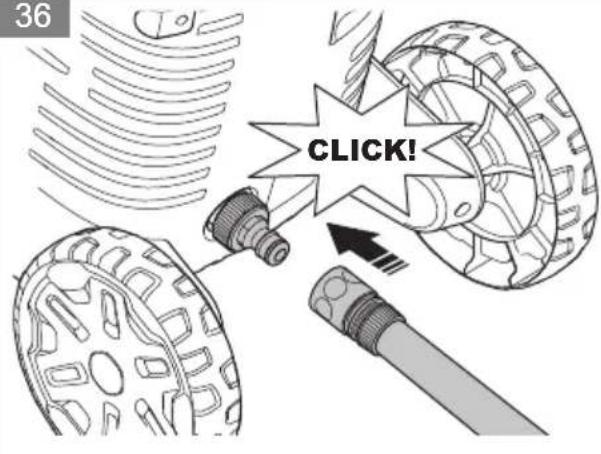
- Connect the garden hose to the water inlet on the product. (Fig. 36)
- Connect the power plug to the power source.
- Open the valve on the water mains.
- Bleed the system before you operate the product. Refer to To bleed the system on page 17.
To connect the product to an open water source
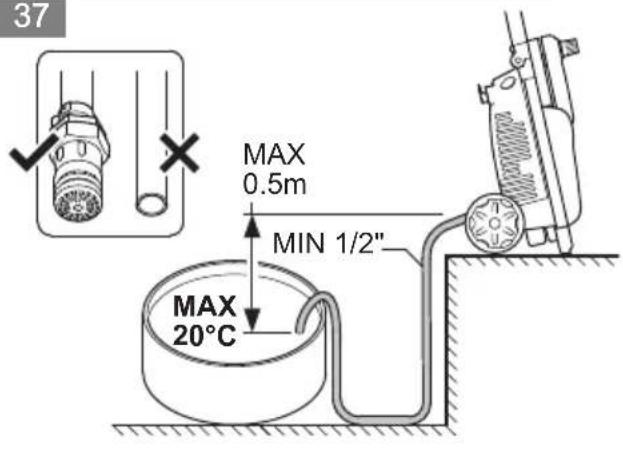
The product can be used with water from an open water source, for example a lake or a water barrel. Use a 12 in suction hose (not included) that is maximum 3 m long. (Fig. 37)

CAUTION: The water temperature in the water source must not be more than 20^ .

CAUTION: The product must not be more than 0.5m above the water source.
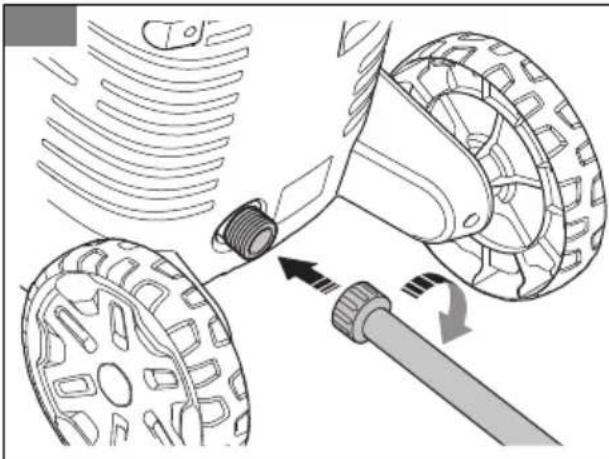
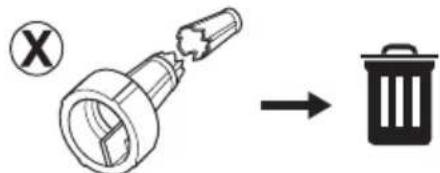
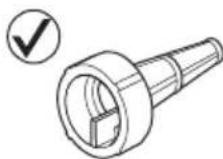
- If the garden hose adapter is installed, remove it from the water inlet on the product. (Fig. 38)

CAUTION: Do not remove the water filter in the water inlet.
- Connect a suction hose (not included) to the water inlet on the product. (Fig. 39)
- Put the suction hose in the water source and make sure that the filter is fully submerged.

CAUTION: Do not use a suction hose without a filter.
- Push the tab in the direction of the quick connection on the spray handle and pull out the high-pressure water hose. (Fig. 25)
- Connect the power plug to a power source.
- Turn the power switch to the on (I) position and let the product operate for 2 minutes.
- Turn the power switch to the off (0) position.
- Hold the spray handle tightly with one hand and push the high-pressure hose into the quick coupling on the spray handle. (Fig. 24)
- Bleed the system before you operate the product. Refer to To bleed the system on page 17.
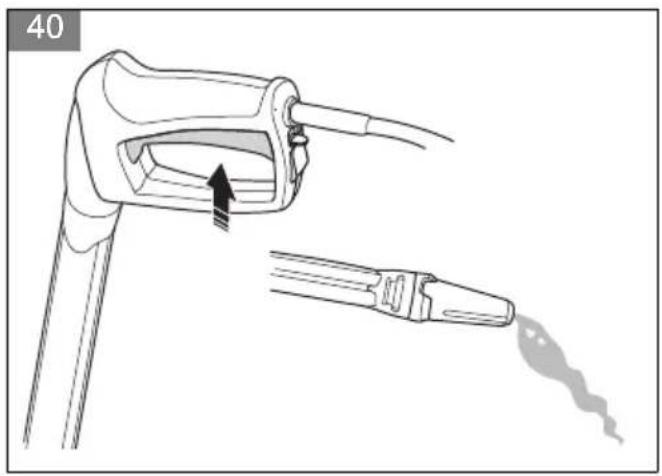
To bleed the system

CAUTION: Make sure that the power switch is in the off (0) position before you bleed the system.
- Connect the product to a water source. Refer to To connect the product to a water source on page 16.
- Install the spray lance on the spray gun. Refer to To install the spray lance on page 15.
- Disengage the power trigger lockout. Refer to To engage and disengage the power trigger lockout on page 17.
- Push the power trigger and keep it pushed in until water comes out of the nozzle on the spray lance. (Fig. 40)
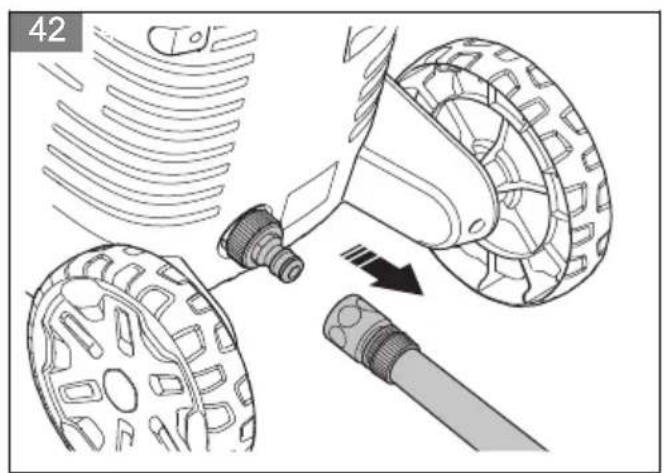
To disconnect the product from the water source
- Turn the power switch to the off (0) position.
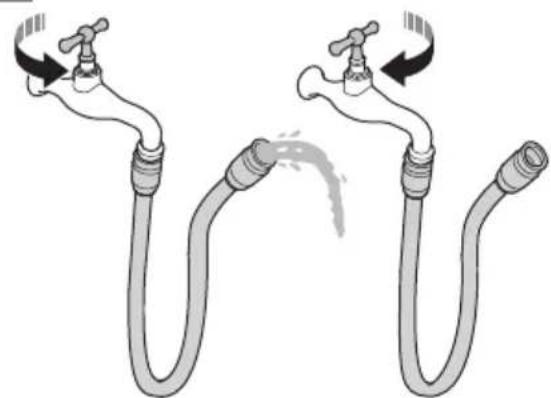
- If the product is connected to the water mains, close the valve on the water mains.
- If the product is connected to the water mains, disconnect the garden hose from the water mains. (Fig. 41)
- If the product is connected to an open water source, remove the suction hose from the water source.
- Push the power trigger and keep it pushed in until no water comes out of the nozzle.
- Disconnect the garden hose from the water inlet on the product. (Fig. 42)
Note: If the product is connected to an open water source, disconnect the suction hose.
-
Push the tab in the direction of the quick connection on the spray handle and pull out the high-pressure water hose. (Fig. 25)
-
Turn the power switch to the on (I) position. Let the product operate until no water comes out of the high-pressure hose.
- Turn the power switch to the off (0) position.
- Let the spray handle, the spray lance, and the nozzles become dry before you put the product in storage.
To engage and disengage the power trigger lockout
To engage the power trigger lockout, push the button to the locked position. (Fig. 43)
- To disengage the power trigger lockout, push the button to the unlocked position.
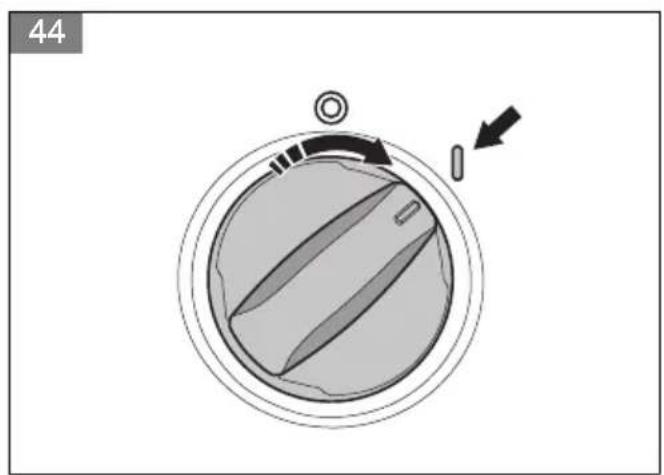
To start the product
- Connect the product to a water source. Refer to To connect the product to a water source on page 16.
- Connect the power plug to a power source.
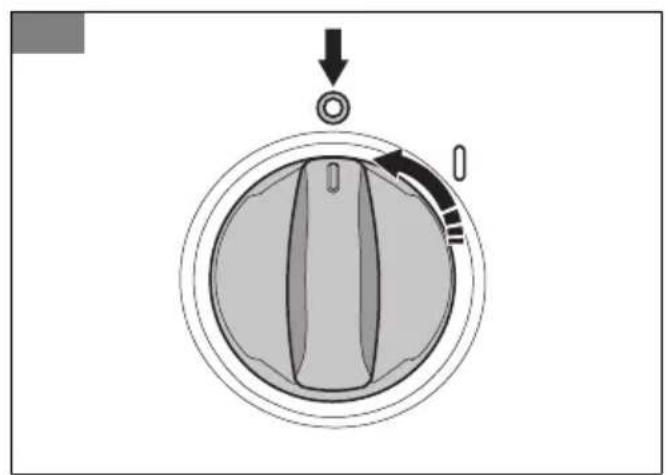
- Turn the power switch to the on (I) position. (Fig. 44)
- Disengage the power trigger lockout. Refer to To engage and disengage the power trigger lockout on page 17.
- Push the power trigger on the spray handle.
Note: The product stops automatically when you release the power trigger.
To stop the product
Note: The product stops automatically when you release the power trigger.
- Release the power trigger on the spray handle.
- Engage the power trigger lockout. Refer to To engage and disengage the power trigger lockout on page 17.
- Turn the power switch to the off (0) position. (Fig. 45)
- Disconnect the power plug from the power source.
- Disconnect the product from the water source. Refer to To disconnect the product from the water source on page 17.
Note: Always disconnect the product from the water source if you go away from the product for more than 5 minutes.
To use the foam sprayer
- Remove the foam sprayer from its holder. (Fig. 46)
- Fill the container on the foam sprayer with cleaning agent.

CAUTION: Use only cleaning agents that are recommended by Husqvarna.
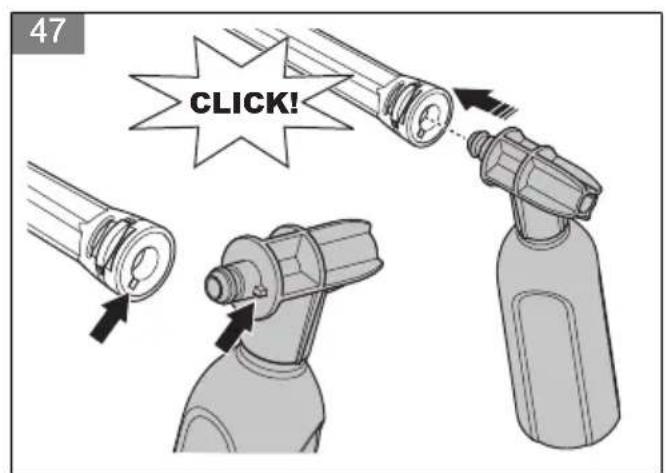
- Push the quick connection on the foam sprayer into the quick connection on the spray lance until it locks in position. (Fig. 47)
Note: The flange on the foam sprayer must align with the groove in the spray lance.
- Connect the product to a water source. Refer to To connect the product to a water source on page 16.
- Start the product. Refer to To start the product on page 17.
Maintenance
Introduction

WARNING: Before you do maintenance, you must read and understand the safety chapter.
For all servicing and repair work on the product, special training is necessary. We guarantee the availability of
professional repairs and servicing. If your dealer is not a service agent, speak to them for information about the nearest service agent.
For more detailed information, refer to www.husqvarna.com.
Maintenance schedule
| Maintenance Before use After use | ||
| Do a general inspection. Refer to To do a general inspection on page 18. | X | |
| Clean the product. Refer to To clean the product on page 18. | X | |
| Clean the spray lance and the nozzles. Refer to To clean the spray lance and the nozzles on page 19. | X | |
| Clean the water filter. Replace the water filter if it is damaged. Refer to To clean the water filter on page 19. | X | |
| Lubricate the O-rings on the couplings. Refer to To lubricate the O-rings on the couplings on page 19. | X |
To do a general inspection

WARNING: Put the power switch in the off (0) position and disconnect the power plug from the power source before you do maintenance on the product.

CAUTION: Disconnect the product from the water source and make sure that all parts are dry before you do maintenance on the product.
- Make sure that the nuts and the screws on the product are tightened.
- Make sure that the cables on the product are not in a position where they can be damaged.
- Examine the high-pressure hose for wear and damage.

WARNING: Do not operate the product if the high-pressure hose is worn or damaged.
To clean the product

WARNING: Put the power switch in the off (0) position and disconnect the power plug from the power source before you do maintenance on the product.

CAUTION: Disconnect the product from the water source and make sure that all parts are dry before you do maintenance on the product.
- Clean all external parts with a dry cloth.
- Do not use a high-pressure washer to clean the product.
- Keep the air inlets clean to make sure that the product always has sufficiently cool temperature.
To clean the spray lance and the nozzles

WARNING: Put the power switch in the off (0) position and disconnect the power plug from the power source before you do maintenance on the product.

CAUTION: Disconnect the product from the water source and make sure that all parts are dry before you do maintenance on the product.
- If a nozzle is installed on the spray lance, remove it from the spray lance. Refer to To install and remove a nozzle on page 16.
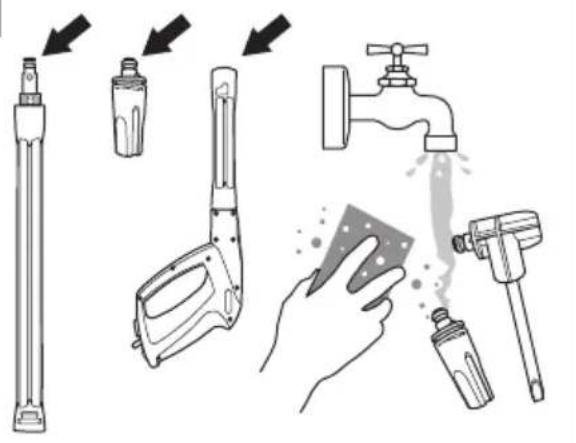
- Clean the nozzles, the coupling on the spray lance, and the coupling on the spray handle with soap and water. (Fig. 48)
- If there is blockage in the nozzles, remove it with the cleaning tool. (Fig. 49)
To clean the water filter

WARNING: Put the power switch in the off (0) position and disconnect the power plug from the power source before you do maintenance on the product.

CAUTION: Disconnect the product from the water source and make sure that all parts are dry before you do maintenance on the product.
- If the garden hose adapter is installed, remove it from the water inlet on the product. (Fig. 38)
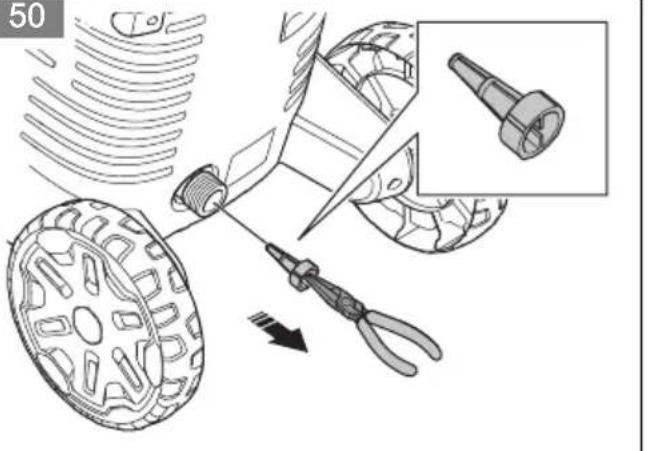
- Pull out the water filter. Use a pair of pliers. (Fig. 50)
- Do a check for damage on the water filter. Replace the water filter if it is damaged. (Fig. 51)
- Flush the water filter with clean water. (Fig. 52)
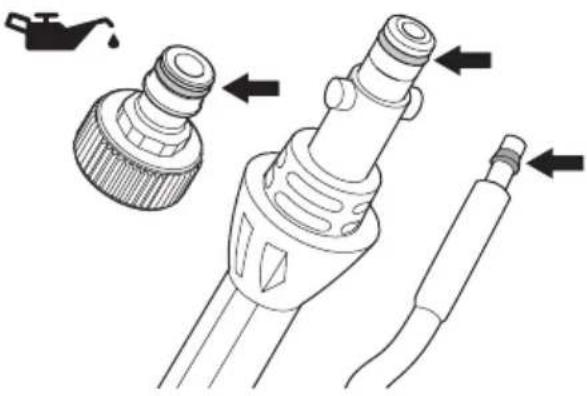
To lubricate the O-rings on the couplings

WARNING: Put the power switch in the off (0) position and disconnect the power plug from the power source before you do maintenance on the product.

CAUTION: Disconnect the product from the water source and make sure that all parts are dry before you do maintenance on the product.
- Remove the spray lance from the spray handle and the spray handle from the high-pressure hose. Refer to To install the spray lance on page 15 and To install the spray handle on page 15.
- Lubricate the O-rings on the garden hose adapter, the spray lance, and the high-pressure hose with grease. Refer to Technical data on page 21 for the correct type of grease. (Fig. 53)
To remove and install the hose reel cover

WARNING: Put the power switch in the off (0) position and disconnect the power plug from the power source before you do maintenance on the product.

CAUTION: Disconnect the product from the water source and make sure that all parts are dry before you do maintenance on the product.
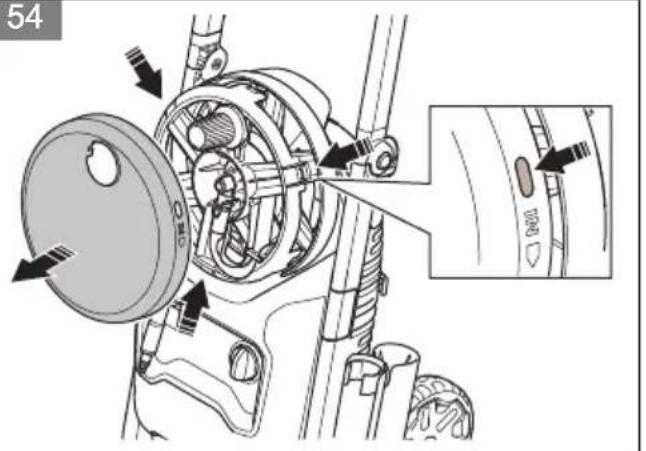
The hose reel cover is attached with 3 snap locks.
- Push in the 3 snap locks and carefully remove the hose reel cover. (Fig. 54)
- To install the hose reel cover, carefully push it until the snap locks locks it in position.
Troubleshooting
Troubleshooting schedule
| Problem Possible cause Solution | ||
| The product does not start. The power | plug is not connected to a power source. | Connect the power plug to a power source |
| The power switch is in the off (0) position. | Turn the power switch to the on (I) position. | |
| There is no electricity in the power source. | Speak to an approved electrician. | |
| The power cord is damaged or defective. | Speak to an approved service agent. | |
| The thermal protector has stopped the power. | Wait until the product becomes cool before you operate the product again. | |
| An incorrect type of extension cable is used. | Make sure that the extension cable is unwound fully and that the voltage supply agrees with the voltage of the product. | |
| The fuse blows during start or operation. | An incorrect type of fuse is used. Make sure that you use a slow-blow fuse that has class "C" or "K". | |
| The product does not stop. The product is defective. Disconnect the power plug and speak to an approved service agent. | ||
| The product becomes too hot. The air flow is not sufficient. Clean the air intakes. | ||
| The product does not operate smoothly. | There is air in the system. Bleed the system. | |
| The water pressure is unsatisfactory. | The hose is bent. Make sure that there are no bends on the hoses. | |
| The power switch is in the off (0) position. | Turn the power switch to the on (I) position. | |
| The water flow is not sufficient. Make sure that the product is con- nected to the water source correctly. Make sure that the water flow is suffi- cient. | ||
| The water filter is clogged. Clean the water filter. | ||
| There is air in the system. Bleed the system. | ||
| The accessory is not correct. Make sure that you use the correct accessory. | ||
| The high-pressure water hose is not possible to pull out. | The hose reel is blocked. Remove the hose reel cover and re- move the blockage. Clean the hose reel. | |
Transportation, storage and disposal
Transportation
- Disconnect the power plug from the power source before transportation of the product.
- Disconnect the product from the water source before transportation of the product.
- Put the product horizontally during transportation.
- Attach the product to prevent movement during transportation.
Storage
- Drain all water from the product, the high-pressure water hose, and the accessories before you put the product in storage.
- Prepare the product for storage. Refer to To prepare the product for storage on page 21.
- Keep the product in a dry and frost-free environment.
To prepare the product for storage
- Stop the product and disconnect the power plug from the power source.
-
Disconnect the product from the water source. Refer to To disconnect the product from the water source on page 17.
-
Make sure that all accessories are dry.
- Put the spray handle, the spray lance, and the nozzles in their holders.
- Disconnect the high-pressure water hose from the spray handle and wind the high-pressure water hose on the hose reel. (Fig. 26)
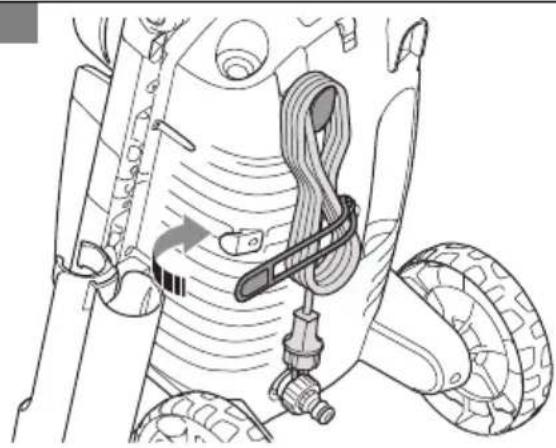
- Put the power cord on its holder and attach the strap. (Fig. 55)
- Fold the transport handle. Refer to To unfold and fold the transport handle on page 15.
Disposal
Husqvarna products are not domestic waste and must only be discarded as given in this manual.
- Obey the local disposal requirements and applicable regulations.
Recycle the product and package at an applicable disposal location. - Speak to your local Husqvarna dealer for more information on how to recycle and discard the product.
Technical data
| PW 240 | |
| Motor and pump | |
| Type Series AC Motor | |
| Power, W 1800 | |
| Voltage range, V 220-240 | |
| Frequency, Hz 50 | |
| Rated current, A 7 | |
| Max. water flow, l/min 7.7 | |
| Max. water output pressure, bar/MPa 140/14 | |
| Max. water inlet pressure, bar/MPa 10/1 | |
| Max. water inlet temperature, °C/°F 40/104 | |
| Max. water inlet temperature (in suction mode), °C/°F 20/68 | |
| IP rating IPX5 | |
| Safety class Class II | |
| Lubrication | |
| Type of grease for lubrication of O-rings Unisilkon L250 / Gardena silicone | grease / Dow corning® M 55 O-ring lubricant |
| Weight | |
| Weight, kg 9.5 | |
| Noise emissions1 | |
| Sound power level, measured dB(A) 89 | |
| Sound power level, guaranteed LWA dB(A) 92 | |
| Sound levels2 | |
| Equivalent sound pressure level at the operator's ear, dB(A) 76 | |
| Vibration levels3 | |
| Hand/arm (with standard nozzle) m/s2 | 2.5 |
| Equivalent vibration levels4 | |
| Hand/arm (with standard nozzle) m/s2 | 0.9 |
Accessories
Approved accessories
| Approved accessories | Art. no. |
| Surface cleaner SC 300 590 65 79-01 | |
| Foam sprayer FS 300 590 66 04-01 | |
| Pipe cleaning hose, 15 m 590 66 10-01 | |
| Water filter 590 65 93-01 | |
| Backflow preventer 590 65 95-01 | |
| Suction hose 590 65 97-01 | |
| Vehicle kit 590 66 07-01 | |
| Approved accessories Art. no. | |
| Rotating brush kit 590 66 06-01 | |
| Angled spray lance 590 66 11-01 | |
| Water suction nozzle 590 66 05-01 | |
| Extension hose, 8 m 590 66 08-01 |
Declaration of Conformity
EU Declaration of Conformity
We, Husqvarna AB, SE-561 82 Huskvarna, Sweden, tel: +46-36-146500, declare on our sole responsibility that the product:
| Description Pressure washer | |
| Brand Husqvarna | |
| Type / Model PW 240 | |
| Identification Serial numbers | dating from 2022 and onwards |
complies fully with the following EU directives and regulations:
| Regulation Description | |
| 2006/42/EC "relating to machinery" | |
| 2014/30/EU "relating to electromagnetic compatibility" | |
| 2000/14/EC "relating to noise emissions in the environment" | |
| 2011/65/EU | "On the restriction of the use of certain hazardous substances in electrical and electronic equipment" |
and that the following standards and/or technical specifications are applied: EN 60335-1:2012/A11:2014/A13:2017/A1:2019/A14:2019/A2:2019/A15:2021, EN 60335-2-79:2012, EN 62233:2008, EN 55014-1:2021, EN 55014-2:2021, EN IEC 61000-3-2:2019/A1:2021, EN 61000-3-3:2013/A2:2021, EN 61000-3-3:2013/A2:2021, EN IEC 63000:2018.
For information relating to noise emissions, refer to Technical data on page 21.
Huskvarna, 2022-12-12

Claes Losdal, Development Manager/Garden Products, Husqvarna AB
Responsible for technical documentation

UK Declaration of Conformity
We, Husqvarna AB, SE-561 82 Huskvarna, Sweden, tel:
+46-36-146500, declare on our sole responsibility that
the product:
| Description Pressure washer | |
| Brand Husqvarna | |
| Type / Model PW 240 | |
| Identification Serial numbers | dating from 2022 and onwards |
complies fully with the following UK regulations:
| Description |
| The Supply of Machinery (Safety) Regulations 2008 |
| Electromagnetic Compatibility Regulations 2016 |
| The Noise Emission in the Environment by Equipment for use Outdoors Regulations 2001, schedule 8 |
| The Restriction of the Use of Certain Hazardous Substances in Electrical and Electronic Equipment Regulations 2012 |
and that the following standards and/or technical
specifications are applied: EN 60335-1:2012/A11:2014/
A13:2017/A1:2019/A14:2019/A2:2019/A15:2021, EN
60335-2-79:2012, EN 62233:2008, EN 55014-1:2021
EN 55014-2:2021, EN IEC 61000-3-2:2019/A1:2021, EN
61000-3-3:2013/A2:2021, EN 61000-3-3:2013/A2:2021
ENIEC 63000:2018.
For information relating to noise emissions, refer to
Technical data on page 21.
Huskvarna, 2022-12-12

Claes Losdal, Development Manager/Garden Products, Husqvarna AB
Responsible for technical documentation

UK Importer:
Husqvarna UK Ltd
Preston Road, Co. Durham
DL5 6UP
CbDbpxaHne
BbWeJeHne. 26
Bezonachoct. 28
MoHTaK 34
Onepa. 35
Pondpbckka. 38
OToTpaHraBaHe Ha npo6JIeMn. 41
TpaHcnpOpTnpaHe,cbxpaHene n3xbpIaHe. 42
Texnuecknx xapaKtepcntkn 42
PpinaIeKHOCTN. 43
Deknapa3a cboTBcTbue. 45
BbVeDeHne
OncanHe Ha npodykTa
PpOdykTbTe eENEKTPnuecka BOIOcTpynKa. PpOdykTbT MoKe da pa6OTn c pa3JInuHn HnBa Ha BOHO HAnraHe n C pa3JInuHn NoUcTbaU npenapaTu.
3a6eIeKka:HaHIOHaIIHnTe perNaMeHTm MoRat da nocTABrT orpaHnueHnna 3a pa6oTaTc c npOdykTa.
PpeHa3NaueHne
I3non3BaTe npOdykTa cAmo 3a 6nTOBO NOHCTBaHe.
He n3non3BaIte npOdykTa 3a dpyru 3aDaun.
N3noJ3BaIte npOdykTa cAmo B n3npaBeHo noJIOKeHne.
ObuntnerneHa npodykta
(ФИ.1)
1.ДьрkaчзapbkoXBaTKaHa npbckaKa n ydblxKeH pa3npbckBauch
2.BxoDHeNOTBOp3aBoDa
3.CmykateJeHb3dyxOnpOBOd
4.Дьржанha3axpaHbauишHyp
5.Пьсkaчka 3a пяна
6.ИHcTpymEn3aNouHCTBaHeHaIHO3nTe (Фиг.3)
7.ДIO3a c npaba BOHa CTpya
8.ДIO3a C BbptTua ce BoDHa cTpyr
9. Makapa 3a Mapkyu
10. Mapkyu 3a BOda nOd BVCOKo HaJIraHe
11.прекьсвay
12.3axpaHbauu hHyp
13. TpaHcnpTHa pbkoXBatka
14. Г汞нemрькздржанзaxpaHbau,shHyp
15. P'koXbaTka Ha npbckaKa
16. YdIbIKeH pa3npBcKBaU
17. PbkoBoDCTBO 3a onepatopa
(Φn.r.3)
(ΦnΓ.4)
CnmboN Bbpxy npodykta
(Фи.2) PPEДУПЕЖДЕΗΝΕ:
TO3I pOdyKT MOKe
da 6bde onaceH
I da npuHnH
cepno3Ho HapaHyaHe
NIN CMBpT Ha
OnepaTopa IJI N DpyuXopa.BHmMaBaITe IN3NoJ3BaITe pOdyKTa npaBnIHO.
PpoyeTe BHNMaTeJHOpBkoBOdCTBOTO 3aOepaTopa n ceybepeTe, ye pa3bnpateHHCTpyKuNTe, npediJa H3NoJ3BaTe TO3nPpOdyKT.
PpOdyKTBHe
e nOxOJa3a
CBbp3BaHe KbM
BODONPOBOHaTaMpexa
3aПNTeHnBODa.
(Фиг.5) BoHnTe cTpyn noD
BINGOKO HANJRAHe MORaT
da6bdat onacn
Pn3eTe OT 3aMpb3BaHe.
(ФИг.15)
To3n npOdyKT CbOTBETCTBa Ha npINOxIMnte peIamEnTn Ha O6eINHeHTo KpaIcTBO.
3a6eKka: OcTaHaJIte CmBOLn/CTNKePn Ha npOdykta ce OTHacrT Do N3NCKBaHnNo OTOHOse H a cePTnΦNKaTu 3a onpeDeIeHn na3apu.
OTROBOPHOCT 3a npoodykta
KaTo e nocOyeHO B 3aKOHnTe 3a OTROBOPHocT 3a BpeN, npuHHeHN OT CTOKN, Hne He HOCIM OTROBOPHOCT 3a UETN, npuHHeHN OT Haunr npoDyKT, aKO:
- npoDyKTbTe HnnpaBnHOpemOnTnpaH.
- npodykTbTepeMOHTnpaH C yactn, KOINTo He ca OT npOn3BOUnteJIy NIIH He ca Odo6peHn OT npOn3BOUNTeJIy.
- PpOdyKTbT mMa pPnHaIeNkHOCT, KOrTO He e OT PpON3BOOnTeJIa HHe oO6peHa OT PpON3BOOnTeJIa.
- npOdyKtBt He e pemOnTupaH B Odo6peH cepBn3eH ueHTbp nIIN OT Odo6peH opraH.
Бe3onaCHOCT
DeΦnHnζm 3a 6e3oNaCHOCT
IpeDynpexKdEHHa3a BHNMaHne N6eJIeXKn Ce n3POn3BaT 3a yKa3BaHe Ha OCObEno BaJHn YacTn Ha INHCTpyKcIyTa.
He ce cna3BaT HnHCTpyKuNTe B pBkoBOdCTBOTO.

PPEyPExKDEHNE:
I3noJ3Ba ce, ako
nMa ONaCHOCT OT
HapaHЯBaHe nJIncMbpt
3a ONePaTopa nJInc 3a
OKoJIHnTe, aKO He Ce
cPna3BaT INHcTpPyKcNITe B
pBkoBOdCTBOTO.

BHIMAHNE:Използва
ce, ako nMa onaCHocOT NOBpeKdAne HaMaunHaTa, dpyrMaTePnAIn nnCbCeDnTa 3OHa, aKO
3a6eJexka: I3noJ3Ba ce 3a
IpeIoCTaBraHe Ha NObueye
HΦopMaζη, KOrTo e
Heo6xOДmAb DaJeHa
CITyaζη.
O6uHnHCTpyKcnn 3a 6e3oNaChocT

PPEyPExEHN: PpOyeTe cIeDbaunTe PpeynpeintenHn HnCTpyKcN, PpeN da n3NoJ3BaTe npOdykTa.
To3n npOdyKT e onaceH, aKO ce n3POn3Ba HEnpaBnHOn nn aKO He cTe
BHMaTeJIHn. Hecna3BaHeTo Ha INHCTpyKcNITE 3a 6e3OpacHOCT MOKe Da IOBeDe Do HapaHЯBaHe IIN CMBpT.
BnHaIbTe BnMaTeJHn I IOxOJaTe pa3yMHo. Ako He cTe cnpyHn KaK Da pa6OTte C npOyKta npi CpeuHa cnTyaun, CnpTe N ce o6bpHeTe KbM Baunr cepBn3 Ha Husqvarna, npeni Da npoDbJXHTe.
- Имайтейпразди,
Че операторьт Ноч
OTROBOPHOCT 3a 3ллолук,
ВКЛЮчВаши другп Лица пл;
ТяХНОТ ИМУЦЕСТВО.
- ПовьраиTe npodykta упст. Yверете ce, ye pa3uTateяCHO 3Haцnte n CTnKepeITE.
- HnKora He nO3BoJBaIte Ha Deca nIi Ha Xopa, He3aNo3HaTn C Te3n INHCTpyKcN, Da n3NoJ3BaT ypeDa. MeCTHnte peIamEnTm MOKe Da NOCTaBt Bb3paCTOBn OrpaHnueHn 3a onepaTopa.
To3n npOyKT moKe da ce n3noJ3Ba OT IuCa C HamaJIeHn 0n3nueCKn, CetNBn Nn yMCTBeHn CnOCo6HoCTn, aKO ca POn Ha6JIHOdeHne nn Ca NM DaJeHn HHCTpyKcNn KaK da pa6OTaT 6e3OpacHo c npOyKTa n
pa3bnpaT CBbp3aHnte C TOBa ONaCHOCTN.
To3n npOdyKT moKe da ce H3noJ3Ba OT JnUca, KOnTO HЯMaT Heo6xOdImna ONIT NJIH NO3HaHnA, aKO ca NOD HaD3Op NJIH Ca Nm DaJeHn INCTpyKcN KAK Da pa60TAT 6e3OpaCHO C npOdykTa n pa3bnpaT CBbp3aHnTe C TOBa ONaCHOCTn.
He n3noJ3BaITe npOdyKTa, aKO cTe yMOpEnH, 6oJHn IJI N IOB Vb3JeICTBneTo Ha aJkoXoJ, HApKOTuN iJI NLekapCTBa. ToBa OKa3Ba OTPucaTeJHo Bb3DeiCTBne Bbpxy BaSeTO 3peHne, 6dnteJHocT, KoOpDInHaZnI npeueHka.
He n3noJ3BaIte npOdyKta, ako e deoKeTeH.
He npomehyTe To3n npoDyKT n He rO n3noJ3BaIte, aKO nMa BepoTHOCT ToJ da e 6nil npomehen OT dpyrN Jnca.
IHCtpyKuN 3a 6e3oNaChOcT 3a pa6ota

PPEyPExEHNHe: PpOyete cIeBaunTe PpeynpeiTeHn HnCTpyKcN, PpeN da n3NoJ3BaTe npOdyKta.
He n3noJ3BaIte npOdykTa, aKO 3aXpaHbAunrT shHyp, MapKyuT NOB BnCOKo HaNraHe, bOknpOBKaTa Ha cnYcbKa IIN pBkoXBaTKaTa Ha npbckaUkata e NOBpeHa.
- Извъше Te поверка 3a NOBpeДa,прди Да pa6OTnte C npOdyKta. He n3noJ3BaIte npOdyKta, aKO nMa NOBpeDeneH nJIIn JINNCBaUuЧаCTN.
XBaHete 3dpaBO pkoXBaTKaTa Ha npckaKata C DBe pBce. OToCKaHaHe Bb3HNKBA, KOraTO dpbHHeTe 3axpaHBaunia cnycbk.
-БыдeteВнIMaTeJIHn,KOraTo pa6OTnte c npOdykTa. BnCOKOTOHaIraHe, npeIOCTaBeHO OT npOdykTa, e OnaCHO mOKe da npuHHn HapaHЯBaHe.
He haoBaTe ctpyTa no nocoka KbM Bac, dpyrI Iuca nn JKBOTn.
He haoBaIe ctpyTa no nocoka KbM Bac nnn KbM dpyrn Iuca 3a nouchTbaHe Ha obvKn.
He haoBaTe ctpyTa no Nocoka KbM eJeKtpuYecko oBOpUdBaHe nIi KbM camna npOdyKT.
- При работа с пroduкты
нзползваши.
празда за и средства.
Нанравete справka с пουни.
празда за и средства настара за 32.
He pa6oTeTe c npOdykTa 6IIN30 Do IInca, OcBeH aKO He HocT 3aUHTHO o6OpyDbaHe. - Ако Изпольвату поочстваши пpenapat, сдаимутей Инструкциnte 3a 6e3oonaСНОТ 3a поочстваши пpenapat.
- Изполизвайта само поочстваши пpenapatни Husqvarna.
- Изпольайтей равилно
ВODно налягане и
Почистваши пpenapatи
Изпольайтей пюдукта
само 3a пооченite
В TOBA ръководстBO
Задачи. Ако Изполь�件
Грешино ВODно наляганe,
Почистваши пpenapat и
Яко Изполь�件 пюдукта 3a
Друн 3адачи OT пооченite
В TOBA ръководстBO, TOBA
Може дa причини повера
На пюдукта, повьрхостпт.
Mateрnaл�件 ил на дуг-
устroduястBA. Husqvarna He
Поема OTROBOPHOCT 3a
Пов徕а, причине на OT
Нелраз车联网но Изпольванe.
He ce npenopbuya da CBbp3BaTe npOdyKta KbM
BODONPOBOHa Mpeka 3a
HNTeHa Boda. Ako ce
HaIarA Da CBbPjKeTe
IPoDyKTa KbM BOOOnPOBOHa
Mpeka 3a NITeHa Boda,
CnA3BaIte MeCTHnte I
HaCuHOHaJIHnte peIamEHTN.
I3NoJ3BaIte eHNOpbTeH
Klapan (He e BkIIOUeH),
aKO e Heo6xOdIMO.
BoDaT, npemHaJa npe3
edHONOCuEH KlaPaH, Ce
cHTa 3a HerOHa 3a PneHe.
He npbckaTe 3aapanm TeuHOCTn. PnCK OT ekCpI03nJ.
He no3B0JBAIte Ha deca da pa6OTa C npOdykTa.
He no3B0JIbAitte Ha deca da cn nIgpaT C npOdyKta.
He nO3BOJRAIte Ha IInca da pa6oTc npOdyKta 6e3 o6yueHne.
- Използваіte само приноалдіжноctи и peЗервни часи, конто са оdoбрени OT Husqvarna.
- YBepTe ce, ye
eJIekTpUyeckaTаВрь3ka e
n3BbPseHa OT Odo6peH
eJIekTpOTexHnK I e B
cBoTBeTCTBne c IEC 60364-1.
- ИзползBAйTe
дeф ekTHOTOKOBa 3aцNTa,
КОЯTO спира
eЛeКТрИчEcTBOTO, aKO TOKВТ
Ha yTeЧKaTae NOBEue
ot 30 mA 3a 30 ms.
Ako He pa3noIarate c
deΦeKTHOTOKOBA 3aUNTa,
H3PON3BaIte yCTpO'cTBO,
KOeTO Ie OCNrpyn Bepnra 3a
3a3EmYBaHe.
- Изполизваite педпаител
3aстарпане на двигател/
3abавянecхарakтерстika
C ун D сьласно IEC
898-1 ун IEC947-2, ун
сьOTВETHNTe CTahdapTN
ИЗВьн IEC.
He ca Heo6xOdImn DeiCTBna 3a peryInpaHe Ha npOdyKtn, KOnTO ca MapKnpaHn C DBOHNO HAnpeJXeHne n YecToTa.
Ako ce haIara da n3noJ3BaTe yIbJXHTeJIeH Ka6eI ce yBepTe, ye e noJxOJaU 3a pa6oTa Ha OTKpITo. YBepTe ce, ye KOHTaKTbTe Ha MInHMaJIHo pa3CToRnHe ot 60 mm ot 3emrTa.Bpb3KaTa Tpr6Ba BInHaI Da 6bDe cyxa. - Пocтавete пркьсвача визкючedoноожене (0), pa3kaуte 3axpaHbaцяшеньл и ВКючete 6лokировkaраз на 3axpaHbaця спуньк, п徳дада ce OTdaJIeЧITE ot npodukta.
- Пocтавete п配电ьсвача визклочен поожени (0)и ра3качete зхсанвашя
IeNcEi, IpeDn Da CMeHnte npHaJleJxHocCTTa.
- Пocтавete п配电ьсвача в
иЗКЛЮЧЕно положения (0)
и разкачete зхранвашия
шеньет, педи дa поочтente
илд a ИЗВьршinte
Тexнческо обслужваце на
пpoodyкта.
He pa6oTeTe c npOdykTa B CpeiN, KbJeTo OKoJHaTa TempepaTypa e NO-HnCKa OT 0^
He cTapTnpaIte 3aMpa3eH npOdyKT.
He pa6oTeTe c npOdyKta Ha 3aKpITo.
He nocTaBraIte npeDMeTn Bbpxy npOdyKta, KOrato pa60tn.
He nIte BOda, KOaTo e 6nla n3NoJ3BaHa C npOdyKta.
He pa6oTeTe c npOdykTa B 6JIn3OcT Do OTBOpEn npO3Opu.
BnImaBaIte 3a XbpyaI npedMeTn. B OunTe Bn Morat Da IOnaHaT KaMbYeTa N IN3XBpIeHn PpeDMeTn, KONTOMorat Da npuHrT cJeNoTa INIcepNo3HO HapaHЯBaHe. - Ako npodukTB He pa60Tu npabuHNO, HnpaBete cnpaBka c Pa3ncaHne 3a TbpceHe IV OTcPahBaHe Ha Hen3npaBHOCTNu Ha CTPaHnua 41.
IyuHn npedna3Hn cpeDCTBa

PPEyPExEHNHe: PpOyeTe cIeDbaunTe PpeynpeiTeHn HNcTpyKu, PpeDu a N3NoJ3BaTe npOdykTa.
- Лучны педпа3нсрдства
He ИЗКЛЮЧВаТ ИЗцяло
pИСka OT НараяВаHe,
Но НамалЯВaT CTepeNTa
Ha НараяВaHetoПри
ВьзнКВаHe Ha 3ПОпolyka.
Heka Baшят ДИльр Ви
nomorHe за ИЗберete
норхODЯшOTO оборудваHe.
Hocete 60Tu7n nIu o6yBKn 3a TeKbK peKIM Ha pa6Ota, KOnTO ca yCToINuBn Ha XJIb3raHe. He Hocete OTBOpEHn o6yBKn n He XoJeTe 6ocn. - I3noJ3BaIte 3aIHTHO o6JIeKIO.
- I3noI3BaIte oIo6peHa 3aIHTa Ha clyxa.
- Използваite педпа3ни очILA.
- Изполизвашиства за 3а 3ашита на динахлессема с клас FFP2 пи ekвьалентен, akо работente с подуктавсрди, Кбдeto moratда образуbat onасни腋розл.
3a peryunipaHe Ha HanaRaHTo Ha BODHaTa Ctpy
IIO3ata C npaba BODHa ctpya mAp epynnpyEmo Hana rane.
3a da yBENHHTe HANrAHeTo Ha BOHaTa Ctpy, 3abbpTeTe IIO3aTn No YacOBHNKOBaTa CTpeNka. (ФИг.32)
3a Da HamaNITE HaIraHeTo Ha BOHaTa cTpy, 3aBbPTeTe IIO3aTa O6paTHo Ha YacOBHnKOBaTa cTpeNka. (ΦIr. 33)
OdopeHn npHaJneKHOCTN
| Одобrenoи п riноалесьости | № на(apгкура) |
| Почиствац прениат за повьрхости SC 300 590 65 79-01 | |
| Пръckaчka за пяна FS 300 590 66 04-01 | |
| Маркуз почистваце на трава, 15 m 590 66 10-01 | |
| Вожен phіntьр 590 65 93-01 | |
| Едòngьтень клалан 590 65 95-01 | |
| Одобrenoи п riнадлесност Nа на arтikuна | |
| СмужATElenе Марку 590 65 97-01 | |
| Комплен 3а певозно средстvo 590 66 07-01 | |
| Комплен 3a върта се четka 590 66 06-01 | |
| ИзвIT удьлжен разningsсвач 590 66 11-01 | |
| СмужATEнна дюза 3a вoga 590 66 05-01 | |
| УдьлжITElenе Марку, 8 m 590 66 08-01 |
Декларачnia 3a CbOTBETCTBNE
Ieknapaun 3a cboTBeTCTBne Ha EC
Hne, Husqvarna AB, SE-561 82 Huskvarna, UBeuia, Tei.: +46-36-146500, DeKnapnpame Ha cBor co6cTbeHa OTROBOPHOCT, Ye npOdyKTBt:
| Описане Вodoctrpvиka | |
| Mapka Husqvarna | |
| Тир/модел PW 240 | |
| Идентноюкая Серийниhomera ot 2022 и наразьк |
OTROBAPnHaNbHnHO Ha CneHnTe DnpeKtNBn I perJameHTn Ha EC:
| Perlament Onicanhe | |
| 2006/42/EO "OTHOCHO Maichi" | НITE" |
| 2014/30/EC "OTHOCHO eIeKT" | СOMaRGHTHaTа сьВмeCTИМоCT" |
| 2000/14/EO "OTHOCHO shуMo" | БИТе EMICHI B OKOLHaTа срEDA" |
| 2011/65/EC | "ПО OTHошени на ограшиениTo 3a ИЗПОЛЗВане на опраздени onасни BeшecТва в eIeKtrpческо и eIeKtrpoHnO оборudbaHe" |
UYeCJIeIHNITcTaNapTIN
n/nn TeXnueckn cneuФkaun ca npinloKeH:EN60335-1:2012/A11:2014/A13:2017/ A1:2019/A14:2019/A2:2019/A15:2021,EN 60335-2-79:2012,EN62233:2008,EN55014-1:2021 EN55014-2:2021,ENIEC61000-3-2:2019/A1:2021,EN 61000-3-3:2013/A2:2021, EN61000-3-3:2013/A2:2021, ENIEC63000:2018.
3a HOpMaqIa OTHOCHO WymOBn EMUCN HaPaBaTe CnpBaKa C TexHueckn XapaKTePNCn Ha CTpaHnua 42.
Huskvarna, 2022-12-12

Claes Losdal, MeHnIxKbP "Pa3pa60Tkn npa3Bntne/ rpaAnHcKn npOyKtN", Husqvarna AB
Otrobopen 3a Texnueckata DOKymeHa

Obsah
Uvod. 46
Bezpečnost 48
Montáž 53
Provoz. 53
Udrzba. 56
Odstrańovani problemu 58
Preeprava, skladovani a likvidace. 59
Technické udaje. 59
Prisluesenstvi 60
A2:2021, EN 61000-3-3:2013/A2:2021, EN IEC
63000:2018.
AvtijetwTion TpoBaaTawv. 115
Meapopa, aTo0nKeuon kai aTopppiu. 116
TeXviKa 0ToiXeia. 116
Aεσouαρ. 117
119
Eioaywyn
περιγραφή προίόντος
To pioiov eivai ia nAekpiKn ouokeuun IAUngs uynan
Tiean. To pioiov mIopei va aeitoupynoe iE diaqopetikk
ETITDEa TIEANCS Vepou kai diaqopetikka KApiaotik
muo.
PpOβλεπóμενn xρησ
XpəiμoTIOeTe TPOiOv Móvo yia oikaiok Kaθapiμo.
Mny xnpoiopoieit o Tpoiov ia aAaEs epyaoieC.
XpnoToinoTo Tpoiov mOe oPtheta
NepiexoEva Mtopei va 1oxouv eovikoi kavovioi Ttou touv opia stn xpnoi tou pioiovtoc.
Eπιακόπηση προίντος
(EK.1)
Opiouoi yia tny aospaalεia
TnV EINIaON eIDIKWv
OmaVTIKwv Tmuatwv Tou
EYxepiDiou XpnoiopoIOuVTai
TPOeIoTOINoEIG, OUToAeIC
TPOOxNc KAI ONEIWoEIG.
aTOKkEoiTikn lacuovn ot to pioiov:
Tehnilised andmed. 150
Lisavarustus. 152
Claes Losdal, Development Manager/Garden Products,
Husqvarna AB
- Extended product information.
- Information about, and help with, product parts and servicing.
HHCTpyKcni pyKOBOdCTBa
MOKET pINBECTN
K TpaBmam IJIH
Cmeptn onepatopa nnn
HaxoJxXcPraOM
NOCTOPOHnX JnC.

BHIMAHNE:
Icnojb3yetcya
HCTpyKcnn NO TexHnKe
6e3oNaChocTn, npexKe Yem npicTynaTb K 3Kcnpnyatau nn3deJna.
- Пи He6peXHOM nIh HnPaBnIbHOM o6paIeHn I3dJIne MoKET pPeIcTAbIaTb co6oJ onaChOCTb. Hec6blIODeHne IHcTpyKcni no TexNke 6e3OpacHOCTn MoKET npNBecTn K TpaBMam IIN cMePTn.
Bcerda co6lnoaTe OCTOPoJxHocTb n pukOBODCTByITEcB 3dpaBbIM cMbICnOM. EcII Bbl He yBepeHbI, KaK npabNlbHO 3KcPlyaTnpOBaTb n3deJIne B ONpeJeHNo CNTyaCIN, PpeKpATnte pa6Otu n npOKOHcyIbTnpyITecb CO cNeuAInCTom cepBnCHoro ueHTpa Husqvarna, npexKe chem npoDoljkaTb. - ПомнITE: OTBETCTBEHHOCTb 3a HechacThbIe CJIyuaN, yrpoJauOuIe dpyrIM JIOdAm ININ INMuyIecTBy, Hecet Opepatop n3deJIIny.
Copejnte n3dJIne B uNCTOTE.CJeINTe 3a TeM, UTO6bl 3HaKNn HaKJIeKN 6bln JERKO YHTaEMbIMN.
HnB Koem cnyae He n03BOJyTe NcNoJIb3OBaTb o6OpydoBaHne DeTAM IIN
JIucaM,He O3HaKOMNBUIMMCa C DaHHbIMN INHCTpykCnA MNI. DOnyCTmbl B03pact NOb3OBaTeJMAoKeT 6bITb OrpaHnueH MeCTHbIM 3aKOHOaTeJIbCTBOM.
Boa, npoWeJa qepe3 yCTpoIcTBO 3aunTbI OT o6paTHoro Toka, HnnpirodHa dIy nITbI.
He pacnbijte IerkoBocnJaMaHЯUoIneCzNdkOCTN. ONaCHOCTb B3pbIBa.
He n03B0JaTe DeTm IcNoIb3OBaTb N3dJIne.
He nO3BOJyTe dETaM INrpaTb Cn3dJIeHem.
He n03BOJnTe JIOdAm 6e3 HaJIeJaUeI NOIrTOBKn IcNoJIb3OBaTb N3DeJIne.
- Исторьштейп Толбков
- Ринадлесхоста и заразсные части, одобре给他们
- Husqvarna.
- Y6eIntecb, yTO
элкгческoe
coeINHeHne BblIOJIHeHO
KBaIINΦnцIpOBaHHbIM
элкгчКOM I COOTBeTCTByET
cTaHdapTy IEC 60364-1.
- Исторуte усторостvo 3auntoro OTKluoyehnay, KOTOPoe ppekpaaaet noauy nHTaHnay, ecn TOK yTeuKN IpeBbIaet 30 mA B TeueHne 30 mc. Pn OTCyTCTBn ySTPOiCTBa 3aunTHoro OTKluoyehnay NcnoJb3yIte yCTPOiCTBO, KOTOPoe budet BblONHЯr Tb Функцю 3a3eMJIIOUsei ZeHN.
- Исторьштей
- Росторьштей
- Данный
- Данный
- Дaria
- Дaria
- Дaria
- Дaria
- Дaria
- Дaria
- Дaria
- Дaria
- Дaria
- Дaria
- Дaria
- Дaria
- Дaria
- Дaria
- Дaria
- Дaria
- Дaria
- Дaria
- Дaria
- Дaria
- Дaria
- Дaria
- Дaria
- Дaria
- Дaria
- Дarias
- Дarias
- Дarias
- Дarias
- Дarias
- Дarias
- Дarias
- Дarias
- Дarias
- Дarias
- Дarias
- Дarias
- Дarias
- Дarias
- Дarias
- Дarias
- Дarias
- Дarias
- Дarias
- Дarias
- Дarias
- Дarias
- Дarias
- Дarias
- Дarias
- ДIAS
- ДIAS
- ДIAS
- ДIAS
- ДIAS
- ДIAS
- ДIAS
- ДIAS
- ДIAS
- ДIAS
- ДIAS
- ДIAS
- ДIAS
- ДIAS
- ДIAS
- ДIAS
- ДIAS
- ДIAS
- ДIAS
- ДIAS
- ДIAS
- ДIAS
- ДIAS
- ДIAS
- ДIAS
- Дias
- ДIAS
- ДIAS
- ДIAS
- ДIAS
- ДIAS
- ДIAS
- ДIAS
- ДIAS
- ДIAS
- ДIAS
- ДIAS
- ДIAS
- ДIAS
- ДIAS
- ДIAS
- ДIAS
- ДIAS
- ДIAS
- ДIAS
- ДIAS
- ДIAS
- ДIAS
- Дя рergулрови n3deлс ДBOHbIMN 3HaueHnMaHанряжени nЧaCTOTblHnKaKnx DeiCTBn HeTpe6yeTe.
- EcII Tpe6yeTcra ИСПОЛьЗOBaТь УДПИНTEЛьнБИй Ka6eJIb, У6eДиTeCь,ЧTO OH празнэЗнayeh ДЯ ЭКСПЛуацIN BHe ПOMeшен. Po3etka ДОЛЖHa HaxODITbСЯ hapcSTOrHnI He MeHee 60 MM OT 3eMЛ. CoeДиЕнe ВCErДa DoJxHo 6bITb cyxIM.
- Перацем кад отоиму OT ИЗдени пераевадпглавны Выкночateь В поожене ВыКЛ (0), ИЗВлЕКИТЕ ВИКУ ИЗ розтуи 3аблOKирейперахсанть курka.
-
Перацмени празнадлесхости пераевide тгалвьі ВыКЛЮчateь В положен БыIKЛ (0) и n3ВлЕкnte влжу n3 рoЗтк.
-
Перед оочников ини роведения облuyхваняи здени перевадпесь
- Ралынь ВыКючать В поожене ВыКЛ (0) и ИЗВлекитЕ ВИКУ ИЗ рОзЕТКИ.
He nCnoJb3yIte n3dEJIne npn TeMpepaType okpykaIOUeN cpeIbI HnKe 0 ^ C
He 3anyskaTe 3amep3wee n3dennie.
3aPpeuaeTcNcNoIb3OBaTb n3dJIeB NOMeUeHn.
He klaadte Ha n3dene NoctopOHne npedMeTb BO BpeMa erpa60tbl.
He neiTe BOdy, KOTopa IcNoIb3OBaIaIcB IV3dEJIIN.
3aPpeuaeTcNcNoIb3OBaTb N3dJIePraDOM COTKpbITbIMN OKHAMN.
OcteperaItecb O76paCbIBaEmbIX npeIMTeOB. KamHn Hne3akpeIeHHbIe npeIMtBi MOryT nonactb B rla3a N npINBeCTN K CJIeNoTe IIN TJXeJIbIM TpaBMam. - Ecni n3dene He pa6oTaet NaIeJkaIIM O6pa3OM, CM. pa3JeT Ta6nua npOceIpy IIO NOnCKy U yCTpaHEnHIO HeNCpPaBHOCTeH Ha cTp. 380.
CpeIcTbA INHINBnDyaJIbHOJ 3aIITbl

IPEdUYPExKDEHNE:B 06aTeBHom nopAKe npouHTe cJeDyOuNe HnCTpyKcNn PO TexHKe 6e3OpacHoCTn, pexKe yem npnstynatb K 3KcPnyataunn n3deJIny.
CpeiCTBa INDINBnIyajbHoi 3aIITbI He MOryt NOnHOCTbIO NCKJIouHTb PnCK NOnyuYeHn TpaBMbl, HO pRn HeCuaCTHom Cnyae OHI CHIXaOT TjXeCTb TpaBMbl. 3a NOMOuBo IOn npabNlbHomy BbIbOpy CN3 o6paauTeCb K dInlepy.
HaideBaIte 3aIHTbIe 6OTnHKn C HeCKOJIb3KoI nOIOuBoi. 3aInpEuaETcra HaideBaTb OTKpbItyU O6yBb IIN pa60TaTb 6OcNkOM.
HaDeBaITe 3aIHTHyIO OdEJy.
- Исторы TeODobpeHHbIe cpeIcTb3aIITbI opraHOB cnlya.
- Исторьштейдзашистные очк.
- Исторуte средства
3аuntы opraHOB дыханя
Класca FFP2 пи
aHaIOrnHybIe, ecIn Bbl
pa6OtaTe c n3deJIneM
B yCIOBnJx, rIe MOryT 6pa30BbIBaTbcra OnaChbIe napbl.
3auntbIe yctpoiCTBa Ha arperate

- YctaHOBnTE NOHOKky (A) Ha MeCTO n 3aBepHnTe BnHT (B). (Pnc. 19)
- YctaHOBNTe DepeKaTeJIb (C) Ha MeCTo N 3aBePHTe 2 BnHTa (D).
PnmuMeaHne: HxHbN BnHT Ha depKaTeJe TaIOKe RbIaeTcKpeNExHBIM 3JIeMeHTOM NOpHOKKN. Y6eINTEcb, yTO OTBepCTne B NOHOKKe BbIPOBHeHO IOd HxHKn BnHT.
YCTaHOBka KONEC
IpnmeaHne:peepBbINOHNHeHnem3Toi npoceDpybIy6eDInTecb,yTOyCTaHOBnEHaNoDHoxKa n depKataNbIy NcTOneta-pacNbInTeNn u WtAnrnpacNbInTeNn.Cm.paDnYCTaHOBkNaOHOKKn I depKataNdIy NcTOneta-pacNbInTeNn u WtAnrnpacNbInTeNnHa cTp.374
- YctaHOBnTe KOleCa B c6ope Ha MeCTO n 3aBePHnTe 2 BNHTa. (Pnc. 20)
3Kcnpnyatauia
BVeJeHne

IPEyPExEHENE:Pepe3KcnpnyatauieN3dennBHNMaTeNbHO n3yUte pa3denTexnKn 6e3oNaChocTn.
Husqvarna Connect
Husqvarna Connect npecdtabnaret c6oB 6ecnlaTHoe npINOxKeHne dI MObNbHO yCTpoiCTBa.
PpIIOxKeHne Husqvarna Connect no3BOJraT nOlb3OBaTbCpaCUnpeHHbIMn cyHKUmaMn BaWero u3denn Husqvarna:
-Дононтьнаяинформачаяобиздл.
CBeHeHnO DeTaNJx N NOMOuB B TexHnueckOM 06cnyKnBaHH.
Haujao pa6oTbI c Husqvarna Connect
- 3arpy3nte npnloKeHne Husqvarna Connect Ha CBOe MO6nIbHoe yCTpoiCTBO.
- 3apernctpnyTecb B npnloKeHHn Husqvarna Connect.
- BbnoJHnTe noWaorOBbie nHcTpkyuBn B npNJIOxKeHn Husqvarna Connect dIra noDKNIOUeHn npereCTpaun arperata.
IpnmeaHne: npnloKeHne Husqvarna Connect doctyno dny 3arpy3Kn He ha Bcex pbHKax. Dny noJyehna 6oonee noDpo6Ho nHΦopMaun o6paTntecb CBOn cepBncbY ueHtp.
PaKnaIbIbAHne I cKJaIbIbAHne pyKoIaTKn IJra TpaHCnOpTnpOBKn
- UTo6bl pa3NoXHTb pyKoTky dIra TpaHcNopTnpOBKn, HaxMMTe KHOJKN Ha IeBOI n npaBOI cTOpOHAX n NotAHnTe pyKoTky dIra TpaHCnOpTnpOBKn BBepx. (Pnc. 21)
- To6bl cIoxkntb pyKoTky dIra TpaHcnOpTnpOBKn, HaxMMTe KHOKN Ha IeBOI n npaBOI cTopoHax n OynCTnTE pyKoTky dIra TpaHCnOpTnpOBKn. (Pnc. 22)
YcTaHOBKa NnCTOJIeTa-pacNbIInTeJia
- BbITaHHTe BOdHaHOI WJNaHr BbICOKOr DaBJIeHNr. (Pnc. 23)
- Kpenko ydepknaBaa nctoneT-pacnbnteIb oHou pyKo, BCTaBBte UHaH BbICOKO rAbneHnB 6bICTpopa3beMHOe coeINHeHne Ha nctonetePacnbnteIe. (Pnc. 24)
Chytna nuctoneta-pacnbinteJia
1.ПиЖМЛТЕ ВьICTун NO HANpaBJIeHIO K 6bICTpopa3bemHOMy COeINHeHIO Ha NcTOnJTe- paCnblNTeJIe N BbITAHNTe BOdAHOI WIIaHR BbICOKORO daBJIeHry.(Pnc.25)
2.BpaaainTe kAtyuky dIra shnaHra no yacoboi CTpeJIke, YTO6bl NOnHOCTbIO HAMOTaTB BOJHOI WnAHI BbICOKO DaBJeHn. (Pnc. 26)
YctaHObKa ⅢTaHn-pacnbIInTeJIa
- Ydepknbary nctolet-pacbblnteIb oHoi pykoB, BCTaBBte MyfTy Ha wTaHre-pacbblnteB nctolet-pacbblnteIb. (Pnc. 27)
- NobepHnTe wTaHry-pacnbIInTeNb no yacOBOnCTpeNke n OTNyctnte ee. Wtahra-pacnbIInTeNbФNKcnpyetcaHa MeCTe.
ChrTne wTaHn-pacNbIInTeJIa
- HanaBHTe Ha 7aTnHy-pacbIInTeIb n nobepHnTe ee npOTNB YacOBoN CTpeJIKn. (Pnc. 28)
- OToeHNHTe 1TaHry-pacbIInTeIb OT nIcToJeTapacblInTeJIa.
YCTaHOBka IN CHaTne φOpCyHKn
B KOMNNEKT NOCTABKN 3dEINNA BXOJAT 2 fOpcyHK:1 fOpcyHka "Ppmaa cTpy" (ob03hauaetcKa kAc "gentle nozzle"(fOpcyHka C yMepeHHbIM HAnopom)) n 1 fOpcyHka "PoTop" (ob03hauaetcKa kAc "rough nozzle" (fOpcyHka C cnIbHbIM HAnopom)). fOpcyHka "Ppmaa cTpy" NODXoINT dNn OUNCKu YBCTBNTeJIbHbIX NobepxHOCTe, HApnpMeap ABTomOBnne. DaHnyo fOpcyHKy TaKKe MOxHO NCNOJb3OBaTb DnN OUNCTK MeHee CyBCTBNTeJIbHbIX NOBepxHOCTe, HApnpMepeNDbE3DHbIX DOPOKEK.
(Pnc. 29)

BHIMAHHE: He nCnoJIb3yIte ΦopCyHky "PoTOp" Ha yUbCTBnTeIbHbIX NoBepxHOCTaX, HApPImeR Ha OkpaWeHHbIX NoBepxHOCTaX aBtOMoBnJa. BpaAioUaJcA CTpy BAodbl MoKet NOBpeDnTb NoBepxHOCTb.
- UTo6bI yCTaHOBnTb φOpCyHky, OJHOI pyKoi yEpeKINBaIte IITaHry-pacblIInTeIb, a BTOPOI BCtABbTe φOpcyHky Do ΦHKcaUu. (Pnc. 30)
- TTo6bI CHaTb fOpCyHky, HaxMnTe Ha BbIcTyn Ha WtTaHRe-pacnblnteJe n 3BJIeKeNte fOpcyHky. (Pnc. 31)
PerynpoBka Hapopa BoDbI
ΦopcyHka "Ppmaa cTpy" no3BOJareT peryInpoBaTb daBHeHne noDaun BObl.
- UTo6bI yBEnuHTb HanOp, NOBepHnTe fOpcyHky no YacobO B CTpeKe. (Puc. 32)
- UTo6bI yMeHbUHTb HAnOp, NOBepHInTe φOpcyHky npOTnB YacOBn CTpeKN. (Pnc. 33)
3Kcnpnyataua n3delen
1.ПоДСоЕДИНHTEи3ДeЛпЕКИCTOУнkyBOДы.CM. pa3ДeI ПОДСоЕДИНЕи3ДeЛпЯKИCTOУнkyBOДы Ha cTp.376.
2.CtpaBnTe BO3dyx n3 CnCTeMbI. Cm. pa3deN CtpaBnBaHHe BO3dyxa n3 CnCTeMbI Ha Ctp. 377.
3. 3aynctte n3eJne. Cm. pa3dien 3aynck n3deJnna Ha ctp. 377.
IopcoeHHeHne n3dJIy K NcTOUHNKy BObl
I3dene MoKet pa6oTaB OT BOOnpOBOHcTn IIN 3a6npaTb BDOy n3 aJIbTePHaTINBbIX NCTOCHNKOB, HAnpImep, n3 O3epa nn6ouKn.
Инстукции NO NOДСоЕДИЕНИО N3ДELI K BOДОПВОДHON CETN CM. B pa3dene ПОДСоЕДИЕНIE N3ДELI N K BOДОПВОДHON CETN HcTp.376.
- HCTpykunno nO nCNOJb3OBaHnIO n3deJIINc aJIbTePhATNBbIMN NCTOUYHKAMN BObl CM. B pa3dene UcNoJb3OBaHne N3dEJIINc aJIbTePhATNBbIMN NCTOUYHKAMN BObl Ha cTp. 376.
IopcoeHHeHne H3deJIy K BoOpnpoBODHOcETN
- YctaHOBnTE nepexoHNK caOBOrO uHa Ha BnyckHOI wTuep dIra BObI Ha n3denn. Cm. pa3deJ YcTaHOBka nepexoHNKa caOBOrO uHa HrHa cTp. 374.
2.ПодсоeДинTe caOвьй Wланг KВОДОпрОВдИСЕТи.ИспЛьзУte caOвьй Wланг ДИАмETPOM ½" nДПИНоH 10-25 M.(Pиc.34)

BHIMAHNE: He n3BnekaTe ΦnIbTp dIy BObl N3 BnyCKHOrO WTyuepa dIy BObl.
2.ПоДсоЕнHITe BCaCbIBAUOuN WJIaHr (He BXoJNT B KOMnJIeK) K BnYcKHomy WTuCyepy IЯ BOdBi Ha n3deJnn. (Pnc. 39)
3. NomeCTnTe BCaCbIBaIOuN WJIaHr B INCTOCHNK BODbI n y6eIInTEcB, YTO φnIbTp NOnHOCTbIO NOrpyKeH B BOy.

BHIMAHNE: He nCnoJb3yIte BCacBIAOuN mIaHr 6e3 qnIbTpa.
4.Пижмп Te BbIcTyn no HanpaBHeHIO K 6bICTpopa3bEmHomy coeINHeHIO Ha NtCToJTe- paCnblInTeJIe N BbITaHNTe BOdHaOH WlaHr BbICOKOr O daBJIeHnA. (Pnc.25)
5.ПодклочиТЕ ВИЛКУ ПИТАнЯ К розтke.
6. NpebeDnte rnaBHy BbIKNoaTeNb B NOIOKeHne BKI (I) n daTte u3dennu npa6oTaB b TeueHne 2 MNHT.
7. NpebeDnte BbIKNoaTeIb b noLoXKeHne BbIKn (0).
8. Kpenko ydepknbara nctolet-pacnbnte b oHou pyKoB, BCTaBBTe 7nHaR BBICOKO rABJeHnB 6bictpopa3beMHOe coeINHeHne Ha nctoTepacnbntene. (Pnc.24)
9.Перед НаимОЗкпунатуги Издени Стравпев
ВОЗдух ИЗ сИСТЕМБI.СM.раздел СтравлNBaHne
ВОЗдухИЗСИСТЕМБI Ha CтР.377.
CtpaBnBaHne Bo3dyxa n3 cnCTembl

PpmeHne: Ecnu3dene nCnoJb3oBaIocb C aIbTepeHaTnBbIM NCTOChNKOM BODbl, OTCoeDInHITe BCacbIBaIOUoi IJNaHR.
7.ПижмTe BbICTyn NO HanpaBHeHIO K 6bICTpopa3bemHomy coeINHeHIO Ha NcTOneTe- paCnblNTeNe I BbITAHHTe BOJHOI WJNaHr BBICOKOro daBHeHry.(Pnc.25)
8.перевене Галовы ВькючateNBи NOLOженe BKI(I).Даiteи3дению поботаьdo tex nop, nokaи3шанra BbICOKOTo DAВЛeня He nepectaNETnTn BOda.
9. NpeBBeIDTe BvIKNoUaTeJIb NIOJIOKeHne BvIKJI (0).
10. Pered nomeueHnem n3dennHa xpaHeHne npocyuTe nctOnet-pacnbInTeJb, wTaHrypacnbInTeJb nOpcyKn.
OdopeHHbI npHaJdxKHOCTN
TEXHUIHE OBCNYROBYBAHHRA 482
UcyhennHa HecnpaBHOcteI. 484
TpaHcnopTyBaHHa,36epirAHnHa yTuiniauia 485
TexhiHixapaKTepeNCTnKi. 486
Akkecsyapn 487
Ieknapaia BiinobiHocti 488
Bctyn
Oncs Bnpo6y
Bnpi6 e eneKtpnHIO MnKOHO BnCOKOro TnCKy. Pid Yac KopncTyBaHHa Bnpob MoXHa HanaTbOByBatn pi3Hi pIBHI TnCKy BOIN Ta 3aCtOCOByBatn pi3Hi MnHi 3ac06n.
PpN3HaueHn
BnKOpNCTOByTe Bnpi6 IInne Ipn6npaHn BDoMa. 3a6bopohReTbcBnKOpNCTOByBatn Bnpi6IInHux
3aBdAnb.ПiДчacKOpNCTyBaHnB BIpO6om BiH Mae 6yTINIWe y BeptNKaIbHOMy NOJoxEHHI.
3BepHb yBary: Hopm BHytpiHbOro 3aKoHOdaBCTBa MoKyTb HaknadaTn OmbexHHa BaNKOpNCTAHNcBoO Bnpo6y.
OrnayBnpo6y
(Man. 1)
- Tpimau dny pyknpo3nIIObaya ta uTaHn npo3nIIObaya
2.BnyckBoDn
3.YcMOKtByBaH noBItpr - Tpimay shypa kINBneHHA
- Po3nnIIOBaU nIHn
- IHCTpymENT dIy OUYeHHa HacaDOK
7.Hacaika3 npramm ctpymembOBDI
8.Hacaikα3i cTpyMeHem BOuN, 10 o6epTaetbcra - Kotyka Дялшанга
10.BoaHmIuHaH BucOKoTnCKy - Bumikaay KInBneHHA
- Hpy KnBHeHH
- Pучka Дялг Траснортуваньня
- TymoBa CtrpUka DnIa TpIMaUa WhHpa KINBHeHHA
- Pучka po3nIIOBaUa
- UtaHa ra po3nnIIOBaHa
- Noci6HnK KopncTyBaHa
CnmboHnHaBnp6i
(Man.2) YBAI! Lcey Bnpi6 moKe 6yTu He6e3neuHm i 3aTHN cnpuHHTu TjXkI TpaBMn a6o Cmeptb OepaTopa ChCTOPOHIX oci6.
Bupi6 He npn3nauehen I nIePiEHaHnro Do Jxepel NHTHOI BODN.
(MaI. 5)
Y pa3i He npabnIbHoro BnKOpNCtAHNc Tpymehi BOAnPiBnCOKIM TnCKOM MOxTyb CTaHOBHTN He6e3neKy. 3a6opOHeHo
Ha npabJIaTI cTpymiHb HaJIoJe, eIeKtpOo6JaHaHHa6o cam Bnpi6.
(MaJ. 12)
(Man.6) EkoIorichne MapkyBaHnHa. Zei Bnpi6 i Noro NaKyBaHHa He MoxHa yTnI3yBaTu pa30m i3 no6yTOBmN BiXoDAMn. YtNiI3aCiIO Bnpo6y Heo6XiIDHO nPoBOdHTn Ha cepTnOikOBaHOMy NiIprnEMCTBi 3 nepepo6Kn BiXoDiB eJeKtpuHOro I eJeKtpoHOrO O6JaHaHnHa.
(Man.7) IHCtpymeHT Knacy II.
(Man.8) Bnpi6 BiDIOBiae BnMOram 3aCTOCOBHnx DnpeKtNB EC.
(Man.9) Bnpi6 BiDnoBiae BnMOram 3aCTOCOBHx DnpeKtNB MHTHOro coH03y CAEC.
(MaI.10) Bnpi6 BiDIOBiJae BImOram BiDIOBiIDHnx IInpeKTHB YKpCEPPO.
(MaI.11) Bnpi6 BiDnoBidae BImOram 3aCTOCOBHx DnpeKtNB RCM. 3aCTOCOByEbCra TilbKn
YHnKaITe BnJIbBy Hn3bKnx Tempeatyp.
(MaI. 15)
Cey Bnpi6 BiDnoBidae BmOram 3aCTOCOBHx Hopm CnoJyehoro KopoiBCTBa.
3BepHb yBary: HwI no3NaueHHa BaBpu6i BiNobiaotb BmOram cepTnΦikaui dny neBHX pIHKB.
BidnoiidaIbHictb 3a kictb npodykci
3riINO i3 3aKOHOM npo BiNObiDaIbHicTb 3a kictb npOdykuii Mn He HecEMo BiNObiDaIbHoCTi 3a 6yDb-aki NOsKOJxehn, cnpuHHeHi po60ToH Haunx Bnpo6iB, RkUo:
Bupi6 6yno HenpaunbHo BiDpeMOHToBaHO;
Bupio6yIIO BiIpemOHToBaHO i3 BnKOpNCtAHHm DeTanei, BnroTOBneHnx He Bnpo6HnKom a60 He 3aTBepdxKeHx Hm;
Bupi6obnaHaHo akceCyapom,BVROTOBHeHm He Bnpo6HnKo a6o He 3aTBePdxKeHm Hm;
Bnpi6 6yNo BiDpeMOHTOBAHO B HeaBTOpN3OBAHOMCy cepBicHomy ceHTpi a6o HeaBTOpN3OBAHOKOMnaHieHIO;
Бeзnéкa
Bn3HaueHnI 0oO 6e3neKn
IonepeJxHn, 3aTepeJxHn
n npimitkn cnykaTb dna
HaROJIoWeHn Ha OcO6JIuBO
BaxJIiBux NpOJxEHnx
Noci6Hnka.

ПОЕРЕДЖЕHHЯ:
Bka3ye Ha Te, 0o B pa3i nopuyweHnI iNCTpyKci, HabeJeHnx y cboMy noci6nky, icHyE He6e3neKa nopahenHa abo cmepti onepaTopa Ch iHux oci6, 0o 3NaXoJTBcra nopuy.

YBAΓA:Вka3yeHa Te, ⅢOВ pa3i nopuyseHnI INCTpyKciI,HaVeJeHnx y cIbOMy noci6HnKy, icHyE He6e3neKa NOWKOJxKeHHaBPO6y, iHNx MaTepiJIb a6o HABKOJIshHix o6'ekTIB.
3BepHItb yBary: BnKOpNCTOBYeTbcra dIaHaDaHHaOdaTKOBOi IHopMaui IooIO neBHO CHTyaui.
3araJIbHi npaBnlaTexHikn 6e3neKn

YcTaHOBJIeHHIpiHIXKn, TpIMaHa pyuKn po3nnIOBaHa Ta 1tAHN p03nnIOBaHa
- Po3TaWyIe NiDHiKky (A) Ha CBOeMy Micci Ta BCTaHOBiTB rBnHT (B). (MaI. 19)
- Po3a7yIte TpIMaU (C) Ha CBOeMy Micu Ta BCTaHOBITb 2 rBnHTn (D).
3BepHiTb yBary: HxHki I BnHT Ha TpMaqi TaKoK TpMae NiDiHixKy. IpekeOHaITeCra, 0o OTbip y NiDiHixu po3TaioBaHn HanpoTu HxHbOrO rBNHTa.
YctaHOJIeHHKoJIC
3Bephiy ybary: Nepei BIKOHaHHM iie npoueDpyn nepekoHaTeC8, 10 BCTaHOBneHo nIDHXKky, TpIMauch pUKNPO3NIIOBAuTa 1tAHrnpO3NIIOBAuA. NIBITbca po3dIn YCTaHOBNEHn nIDHXKK, TpIMauch pUKN PO3NIIOBAuTa 1tAHrnpO3NIIOBAuHa cTOpIHci 479.
- Po3a7yIe By3n KOnic Ha CBOEmy Micu Ta BCTaHOBITb 2 rBnHTn. (MaJ. 20)
Ekcnnyataciia
Bctyn

PONEPENXEHH:peepBnKOpNCtAHNm Bnpo6y yBaJHo npouHTaTe po3dIn npo npabnla TeXhIKN 6e3neKn.
Husqvarna Connect
Husqvarna Connect 6e3koTobHOIO nporpamOIO
dma MoibHoro npictpoIO. Y nporpami Husqvarna
Connect DocTyHa zina Hn3ka po3wnpeHnx fynkui dny
kopncTyBaHHa Husqvarna:
- po3uipena iHopmaiznpo Bnpi6;
BIDOMOCTI npo DeTani I o6cnyroByBaHHaBPO6y, a TAKOX DObIKOBa IHOpMaui.
Iio6 noatn KopncTyBaTncs Husqvarna Connect
- 3aBAHTaXTe nporpaMy Husqvarna Connect ha cbi Mo6iJIbHn npncTpi.
- 3apeecpyntecB nporpamHusqvarna Connect.
- BukaHaTe Bka3iBkn 3 iNkIIOUeHnra Ta peecTpaJIi Bnpo6y, HabeJeH b nporpami Husqvarna Connect.
3BepHb yBar: Y DeaKnx KpaIhax nporpama Husqvarna Connect MoKe 6yTu HeoctynHOIO dnn 3aBaHTaXeHHra. IooDaTkoBy iHOpMaio 3BepTaiTeCn Do CBOr cEpBicHoro DnEpa.
Po3KnaaHnTa cKaaHaHH pyuKn dJa TpaHCnOpTyBaHH
YcTaHOBJIeHHpyUKNpO3NIIIOBaUa
- BntaHITb BOJAHn ⅢNaHR BucOKOro Tncky. (MaI. 23)
- Miцно Вторунуку розиювача odhiю pykoIO, BCTaBTe BOДншпанг BnCOKOrO TnCKy Bpo3'em WbNdkoro Ni'd'EDHaHnHa ryuci po3nIIOvBaay. (MaJ. 24)
3MaUyBaHHy uIbHOBaIbHnx KJIeCuHa MyΦTax

NONEPEDXKEHHY:YcTaHOBiTB BUMKau XNBHeHHB NOIOXeHHBUMKHeHH (0) Ta Bi'edHaTe BuNKy
BID DkepeNa XnBHeHna nepeTd TexHiHm 06cnyroByBaHHM Bnp6y.

YBAGA: BiD'cHnTe Bnpi6 BiD dKepeNa noaBoN Ta nepeKoHaTecra, 0o Bci Ioro qactnHu cyxi, nepu HIX BkOHyBaTH texHicHe ocbnyroByBaHHa Bnpoby.
- BiD'edhaite wTaHry po3nnIObaya BiD pyKIN po3nnIObaya, a pyKy po3nnIObaya - BiD uHaRa BnCOkOro TnCKy. DnBiTbcr po3dIn YcTAHOBNeHHa WtAHn po3nnIObaya Ha cToPiu479i YcTAHOBHeHHra pyKn po3nnIObaya Ha cToPiu479.
- 3maCTiB yuINbHOBaIbHI KINbIgHa aadantepi dIra caIOBO rO uHaHra, UtaH3i po3nNIOBauTa IuaHry BnCOKOro TnCKy. NbiTbcr po3dIn TexHiCyI xaPakTepncTNHa CTOpIHcI 486dJIb BN3HaueHHn npabINbHorO Tnny MaTnna. (Man. 53)
3HЯТТЯ yCTaHOBJIeHHЯ KpIshKn Ha KOTyShKy dIЯ ShJaHra

NONEPEDXKEHHY:YcTaHOBITb
BIMNKaJXMBHeHHB NOIOKeHHBIMKHeHH (0) Ta BiD'cHaNTE BUNKyBiD JKepeJa XNBHeHH NpeEd TexHiHMMO6CnYROByBaHHM BINO6y.

YBAGA: BiD'EDHaIe Bnpi6 BiD Jxepena noaio BOn Ta nepeKoHaItecra, 0o Bci Ioro qactHn cyxi, nepu HIX BnKOHyBaTH texhiue OcbnyroByaHHa Bnpoby.
Kpnuka Ha KOTyUkny Dnla ShnaHra npneDHyEbCra 3a DonomorOIO Tpbox 3auunnHex pfKcaTopiB.
- Hatncihb Ha Tpr 3aunnHex fikcaTopu n o6epexHo 3HIMtB KpUkky 3 KOTyUKN dJa UHaHa.(Man.54)
2.卍06 yctaHOBHTN KpUHKy Ha KOtyuKy DnlaHra, oBepeXHO HATNCHTb Ha HeI Do φikcaqii 3auunHHx φikcatopIB Ha Micui.
UcyHeHHa HeCnpaBHOCTeH
Tabnca nowky HecnpaBHOCTe
| Hecnpabnictb Moxlnba prunina Bnpi | iuzhenry | |
| Bnpi6 He 3anyskaetbcy. ShtenceIbny | BnIky He niz'ednaHo do dkepeNa JxNBHeHry. | Piz'd'ednaIte stenceIbHy BnIky do dkepeNa JxNBHeHry |
| BmNkau XnVBLeHry BCTaHOBLeHry B noLoXeHry BmKHeHry (0). | IpebeDeIb BmNkau XnVBLeHry B noLoXeHry BBimKHeHry (l). | |
| U dxepeNi XnVBLeHry BIdCyTHni cTpyM. | 3BepHITbcrydo KBaJIiΦiKOBaHOrO eJeKtpnka. | |
| UHyp XnVBLeHry noShKOJXeHry a6o HeCnpaBnri. | 3BepHITbcry B aBTOpN3OBAHri ΚeHTp obSclyroBvBAnHry. | |
| XnVBLeHry BImKHeHry BHaClNiDOK cnpaCbOBvBaHry ΦyHKciT TeNIOBOrO 3axIncty. | 3aueKaIte,doKn Bnpi6 oxolone, nepu Hix npODOBKHTn po6OTy 3 NIM. | |
| BnKopnICTobVeytbcra noDobKByauch He- npaBnIbHorO TnIpy. | IpekoHaITeScra, zuo noDobKByauch no- BnICTU pOzMOTaHO Ta zuo NaPpyra XnVBLeHry BIdNoBlae Happy3i Bnpo-6y. | |
| Hecnpabhnicb Moxlnba npuynha Bnpi | шени | |
| Пд час поату роботу перегорацanobixnik. | Викорисовец залобіжник неправильно туни. | Переконайся, сцвокорисьоусься залобіжник nobільносрочьовдану класу «С»abo«К». |
| Вириб не зушияетсь. Вириб песчарын. | Вид'энайе Штесельны вилку та | Зberнitsьсь в副市长овань сcentroююуровань. |
| Вириб перег�ваший. Нedingстатни ротik поитray. Почисты всмokтувачи поитray. | ||
| Вириб пацюе не палов. У сисемпresусун. | псисуне поитray. Видалиь поитray iizcstemi. | |
| Тиск вodи незадовын. Шанг песчун. | псисуне поитray, сцвамангax не-macпераимов. | |
| Виимьков чьнелень встановлень В поожени виимкинney (0). | Переведы вимьков чьнелень в поожени в вимкинney (I). | |
| Нedingстатни ротik вodи. Переконайся, сцвамбпд'эн-a-ho до джерега вдогоностачannahа паловы. Переконайся, сцо по-tik вodи досстатни. | ||
| Засmicуно вodяни Финчт. Chишени | Воряноуфофпаг. | |
| У сисемп рисуне поитray. Видалиь | повитray iizcstemi. | |
| Еналжный akcesуap. Переконайся, сцвокорисьоусьсь. | ||
| Hemoxлво витаян'tи вodянишалг високого тиску. | Кotушka дьшална заабл Okobага. 3симы Кршку 3 кotушки дьшална усуне рисуну блку високу дьшална. |
TpaHcnpTyBaHHa, 36epirahnny uyni3aui
TpaHcnpTyBaHHa
- Ppei TpaHcnpTyBaHHaM BpuO6y BiD'EnHaIte WTeNCenbHy BuNkY BiD JxKepeNa XuBNeHnA.
- IpeTe TpaHcnpTyBaHHaM BiD'EdHaNte Bupi6 BiD DkepeNa BOOnocTaayHHa.
ПлдчасТранспортуваши розашовуITEВирб ropns0HTaNbHO.
HaIIInHO 3akpinIIOte Bnpi6,0o6 3ano6irTno Iero nepemiuueHHIO nID qac TpaHcnpOpTyBaHH.
36epiraHH
3nnte Bc0 Boody 3 Bnp6y, nlaHra BucOKoro Tncky Ta akcecyapib, nepw Hix KnaCTu Bnpi6 y Micue dny 36epirahnn.
-Плдотуге Вибiodо 36ерiraнь.ДиВитсяроздп Плдотовка Виpo6уdo 36ерiraнь Ha CTopIHci 485.
36epiraTe Bnpi6 y cyxomy Micci, 3axuueHomy BiBnNBy MOpO3y.
IiDrTOBka Bnpo6y Do 36epirAHnH
- 3ynnHtB BniP6 i BiD'edHaTe WTeNceJbHy BuNKy BiD JxKepeNa XINBneHHa.
- BiD'EDHaIe Bnpi6 BiD DxKepeNa BOOnocTauHn. NbiBtbcr po3dn BiD'EDHaHHBnpo6y BiD DxKepeNa BOOnocTauHn Ha CToPiu 481.
3.ПepekoHaITeCЯ,лоВсIakceCyapn cyxi. - Nomicitb pyky po3nnHOBa, uTaHry po3nnHOBaHa Ta HacaKn y BiNobiHi TpImaHi.
- BiD'EDHaIe BoaHn WJNaHr BNCOKOro TnCKy BiD pyuKn po3nnIOBaYa Ta HAMoTaIe BOJHn WJNaHr BNCOKOro TnCKy Ha KOTyUkY dJa WJNaHra. (Man. 26)
- Po3tauYte uHyp XnBHeHH Ha BiNobiHOMy TpImaqui Ta npKpinItb cTpiKy. (MaI. 55)
- CknaTb pyky dny TpaHcnpTybaHH. NnBtbcR po3in PoKnaDaHHra cKaJaHHaPyHKn dny TpaHcnpTybaHH Ha CTopHci 479.
Ytulizia
Bnpo6n Husqvarna He haneXaTb do no6yTOBux BiXoDIB i MaOTb yTuNl3yBaTncr3iDNo 3 BmOramn, HabeDeHMMB cMbmy noci6hNky.
-
DToPmMyTeCn MiueBnx BnMOr i 3aCtOCOBHx HOpMa Ta npabun yOdo yTuNi3aui.
-
Ytniiazio Bnpo6y uyakOBK cnid 3diHOBaTH Ha BiIDNOBIDHomy niDnpiEMCTBi 3 nepepo6kn BiXoIb.
-ДоаТКОВу iHΦOPMaIIO ΜΟΝΟ nepeροБкИ yTnIi3aIiBnOb6y MoKHa OTPMAtu BiD MiceBOrO dInepa Husqvarna.
Texhichi xapaKtepncTKn
Original instructions
OpunHaHn HcTpyKm
Puvodni poukyny