
Li58T - Grass trimmer MCCULLOCH - Free user manual and instructions
Find the device manual for free Li58T MCCULLOCH in PDF.
| Product Type | Cordless Grass Trimmer |
| Brand | McCulloch |
| Model | Li58T |
| Rated Voltage | 58 V DC |
| Motor Power | 750 W |
| Motor Type | Brushless |
| Battery | Lithium-ion 58 V, 2.6 Ah (ref. Li 582.6A) |
| Charger | 58 V, 2.5 A (ref. Li 58V 2.5CGR) |
| Weight (without battery) | 3.5 kg |
| Cutting Width | 38 cm |
| Guaranteed Sound Power Level | 96 dB(A) |
| Sound Pressure Level at Ear | 80 dB(A) |
| Vibrations Front Handle | 1.93 m/s² |
| Vibrations Rear Handle | 1.71 m/s² |
| Telescopic Shaft | Yes (adjustable) |
| Pivoting Head for Edging | Yes (180°) |
| Power Modes | Standard and Boost |
| Cutting Equipment Guard | Included |
| Cutting Line Diameter | 2.4 mm |
| Approved Accessories | Guard, weed cutting head, line (ref. 591 37 79-21) |
| Daily Maintenance | Cleaning, check fasteners, trigger, battery |
| Safety | Eye, hearing protection, shoes, gloves; distance 15 m |
| Spare Parts and Repairability | Only use approved parts; repair by authorized center |
| General Information | Compliant with EC directives (2006/42/EC, 2014/30/EU, 2011/65/EU) |
Frequently Asked Questions - Li58T MCCULLOCH
User questions about Li58T MCCULLOCH
0 question about this device. Answer the ones you know or ask your own.
Ask a new question about this device
Download the instructions for your Grass trimmer in PDF format for free! Find your manual Li58T - MCCULLOCH and take your electronic device back in hand. On this page are published all the documents necessary for the use of your device. Li58T by MCCULLOCH.
USER MANUAL Li58T MCCULLOCH
EN Operator's manual 5-14
BG PboBcTBo 3a ekCnloatauia 15-26
BS Korisnicki prisucnik 27-37
The initial language of this operator's manual is English. Operator's manuals in other languages are translations from English.
Overview
(Fig. 1)
- Battery pack
- Battery charger
- Battery state of charge LED
- Battery status button
- Twist and edge button
- Cutting attachment guard
- Direction of rotation
- Trimmer head
- Cutter
- Lower shaft
- Telescoping latch
- Loop handle
- Digital control center
- Power meter
- Battery state of charge LED
- Power boost button
- Power button
- Top trigger
- Handle
- Battery release button
- Foot
- Electrical powerhead
- Bottom trigger
- Operator's manual
Symbols on the product
(Fig. 2) Warning
(Fig. 3) Read this manual
(Fig. 4) Use approved head protection
(Fig. 5) Use approved hearing protection
(Fig. 6) Use approved eye protection
(Fig. 7) Wear a dust mask
(Fig. 8) Use approved protective boots and gloves.
(Fig. 9) Wear long sleeves and trousers.
Make sure that long hair is put up above
(Fig. 10) your shoulders.
The product can cause objects to eject,
(Fig. 11) which can cause damage to the eyes.
(Fig. 12) Look out for thrown objects and ricochets.
(Fig. 13) Max. speed of the output shaft
(Fig. 14) Electrical shock
Only use an approved trimmer head, spool and recommended trimmer line. Do not use
(Fig. 15) blades.
(Fig. 16) Keep bystanders away
(Fig. 17) Guaranteed sound power level
The product or packaging cannot be handled as domestic waste. The product and packaging must be submitted to an appropriate recycling station for the recovery
(Fig. 18) of electrical and electronic equipment.
Do not leave, store or use in the rain or in
(Fig. 19) wet conditions.
(Fig. 20) Recycle
Note: Other symbols/decals on the product refer to certification requirements for other commercial areas.
Product liability
As referred to in the product liability laws, we are not liable for damages that our product causes if:
- the product is incorrectly repaired.
-
the product is repaired with parts that are not from the manufacturer or not approved by the manufacturer.
-
the product has an accessory that is not from the manufacturer or not approved by the manufacturer.
- the product is not repaired at an approved service center or by an approved authority.
SAFETY
Safety definitions
The definitions below give the level of severity for each signal word.

WARNING: Injury to persons.

CAUTION: Damage to the product.
Note: This information makes the product easier to use.
General power tool safety warnings

WARNING: Read all safety warnings and all instructions. Failure to follow the warnings and instructions may result in electric shock, fire and/or serious injury.
Save all warnings and instructions for future reference.
The term "power tool" in the warnings refers to your mains-operated (corded) power tool or battery-operated (cordless) power tool.
Work area safety
- Keep work area clean and well lit. Cluttered or dark areas invite accidents.
- Do not operate power tools in explosive atmospheres, such as in the presence of flammable liquids, gases or dust. Power tools create sparks which may ignite the dust or fumes.
- Keep children and bystanders away while operating a power tool. Distractions can cause you to lose control.
Electrical safety
- Power tool plugs must match the outlet. Never modify the plug in any way. Do not use any adapter plugs with earthed (grounded) power tools. Unmodified plugs and matching outlets will reduce risk of electric shock.
- Avoid body contact with earthed or grounded surfaces, such as pipes, radiators, ranges and
refrigerators. There is an increased risk of electric shock if your body is earthed or grounded.
- Do not expose power tools to rain or wet conditions. Water entering a power tool will increase the risk of electric shock.
- Do not abuse the cord. Never use the cord for carrying, pulling or unplugging the power tool. Keep cord away from heat, oil, sharp edges or moving parts. Damaged or entangled cords increase the risk of electric shock.
- When operating a power tool outdoors, use an extension cord suitable for outdoor use. Use of a cord suitable for outdoor use reduces the risk of electric shock.
- If operating a power tool in a damp location is unavoidable, use a ground fault circuit interrupter (GFCI) protected supply. Use of a GFCI reduces the risk of electric shock.
Personal safety
- Stay alert, watch what you are doing and use common sense when operating a power tool. Do not use a power tool while you are tired or under the influence of drugs, alcohol or medication. A moment of inattention while operating power tools may result in serious personal injury.
- Use personal protective equipment. Always wear eye protection. Protective equipment such as dust mask, non-skid safety shoes, hard hat, or hearing protection used for appropriate conditions will reduce personal injuries.
- Prevent unintentional starting. Ensure the switch is in the off-position before connecting to power source and/or battery pack, picking up or carrying the tool. Carrying power tools with your finger on the switch or energising power tools that have the switch on invites accidents.
- Remove any adjusting key or wrench before turning the power tool on. A wrench or a key left attached to a rotating part of the power tool may result in personal injury.
- Do not overreach. Keep proper footing and balance at all times. This enables better control of the power tool in unexpected situations.
-
Dress properly. Do not wear loose clothing or jewellery. Keep your hair, clothing and gloves away from moving parts. Loose clothes, jewellery or long hair can be caught in moving parts.
-
If devices are provided for the connection of dust extraction and collection facilities, ensure these are connected and properly used. Use of dust collection can reduce dust-related hazards.
Power tool use and care
- Do not force the power tool. Use the correct power tool for your application. The correct power tool will do the job better and safer at the rate for which it was designed.
- Do not use the power tool if the switch does not turn it on and off. Any power tool that cannot be controlled with the switch is dangerous and must be repaired.
- Disconnect the plug from the power source and/or the battery pack from the power tool before making any adjustments, changing accessories, or storing power tools. Such preventive safety measures reduce the risk of starting the power tool accidentally.
- Store idle power tools out of the reach of children and do not allow persons unfamiliar with the power tool or these instructions to operate the power tool. Power tools are dangerous in the hands of untrained users.
- Maintain power tools. Check for misalignment or binding of moving parts, breakage of parts and any other condition that may affect the power tool's operation. If damaged, have the power tool repaired before use. Many accidents are caused by poorly maintained power tools.
- Keep cutting tools sharp and clean. Properly maintained cutting tools with sharp cutting edges are less likely to bind and are easier to control.
- Use the power tool, accessories and tool bits etc. in accordance with these instructions, taking into account the working conditions and the work to be performed. Use of the power tool for operations different from those intended could result in a hazardous situation.
Battery tool use and care
- Recharge only with the charger specified by the manufacturer. A charger that is suitable for one type of battery pack may create a risk of fire when used with another battery pack.
- Use power tools only with specifically designated battery packs. Use of any other battery packs may create a risk of injury and fire.
- When battery pack is not in use, keep it away from other metal objects, like paper clips, coins, keys, nails, screws or other small metal objects, that can make a connection from one terminal to another. Shorting the battery terminals together may cause burns or a fire.
- Under abusive conditions, liquid may be ejected from the battery; avoid contact. If contact accidentally occurs, flush with water. If liquid contacts eyes, additionally seek medical help. Liquid ejected from the battery may cause irritation or burns.
Service
- Have your power tool serviced by a qualified repair person using only identical replacement parts. This will ensure that the safety of the power tool is maintained.
Grass trimmer safety warnings
Training
- Read the instructions carefully. Be familiar with the controls and the correct use of the machine.
- Never allow children or people unfamiliar with these instructions to use the machine. Local regulations can restrict the age of the operator.
- Keep in mind that the operator or user is responsible for accidents or hazards occurring to other people or their property.
Preparation
Before use, always visually inspect the machine for damaged, missing or misplaced guards or shields.
- Never operate the machine while people, especially children, or pets are nearby.
Operation
- Wear eye protection and stout shoes at all times while operating the machine.
- Avoid using the machine in bad weather conditions, especially when there is a risk of lightning.
- Use the machine only in daylight or good artificial light.
- Never operate the machine with damaged guards or shields or without guards or shields in place.
- Switch on the motor only when the hands and feet are away from the cutting means.
Always remove the battery:
- whenever the machine is left unattended;
- before clearing a blockage;
- before checking, cleaning or working on the machine;
- after striking a foreign object;
-
whenever the machine starts vibrating abnormally.
-
Take care against injury to feet and hands from the cutting means.
- Always ensure that the ventilation openings are kept clear of debris.
Maintenance and storage
- Remove the battery before carrying out maintenance or cleaning work.
- Use only the manufacturer's recommended replacement parts and accessories.
- Inspect and maintain the machine regularly. Have the machine repaired only by an authorized repairer.
- When not in use, store the machine out of the reach of children.
General safety instructions
- Use the product correctly. Injury or death is a possible result of incorrect use. Only use the product for the tasks found in this manual. Do not use the product for other tasks.
- Obey the instructions in this manual. Obey the safety symbols and the safety instructions. If the operator does not obey the instructions and the symbols, injury, damage or death is a possible result.
- Do not discard this manual. Use the instructions to assemble, to operate and to keep your product in good condition. Use the instructions for correct installation of attachments and accessories. Only use approved attachments and accessories.
- Do not use a damaged product. Obey the maintenance schedule. Only do the maintenance work that you find an instruction about in this manual. An approved service center must do all other maintenance work.
- This manual cannot include all situations that can occur when you use the product. Be careful and use your common sense. Do not operate the product or do maintenance to the product if you are not sure about of the situation. Speak to a product expert, your dealer, service agent or approved service center for information.
- Remove the battery pack before you assemble the product, put the product into storage or do maintenance.
- Do not use the product if it is changed from its initial specification. Do not change a part of the product without approval from the manufacturer. Only use parts that are approved by the manufacturer. Injury or death is a possible result of incorrect maintenance.
- This product makes an electromagnetic field. The electromagnetic field can cause damage to medical implants. Speak to your physician and medical implant manufacturer before you operate the product.
- Do not let a child operate the product. Do not let a person, without knowledge of the instructions operate the product.
- Make sure that you always monitor a person, with decreased physical capacity or mental capacity, that uses the product. A responsible adult must be there at all times.
- Lock the product in an area that children and not approved persons cannot access.
- The product can eject objects and cause injuries. Obey the safety instructions to decrease the risk of injury or death.
- Do not go away from the product when the motor is on. Stop the motor and make sure that the cutting attachment does not turn.
- The operator of the product is responsible if an accident occurs.
- Make sure that parts are not damaged before you use the product.
Make sure that you are at a minimum 15 m (50 ft) away from other persons or animals before you use the product. Make sure that a person in adjacent area knows that you will use the product.
- Refer to national or local laws. They can prevent or decrease the operation of the product in some conditions.
Safety instructions for operation
Make sure the product is fully assembled before you use it.
- The product can cause objects to eject, which can cause damage to the eyes. Always use an approved eye protection when you operate the product.
- Be careful, a child can come near the product without your knowledge during operation.
- Do not operate the product if there are persons in the work area. Stop the product if a person goes into the work area.
- Make sure that you are always in control of the product.
- Do not use the product if you cannot receive aid if an accident occurs. Always make sure others know when you use the product before you start operation.
- Do not turn with the product before you make sure that no persons or animals are in the safety area.
- Remove all unwanted materials from the work area before you start. If the cutting attachment hits an object, the object can eject and cause injury or damage. Unwanted material can wind around the cutting attachment and cause damage.
- Do not use the product in bad weather, such as fog, rain, strong winds, risk of lightning or other conditions. Dangerous conditions, such as slippery surfaces, can occur because of bad weather.
- Make sure that you can move freely and work in a stable position.
- Make sure that you cannot fall when you use the product. Do not tilt when you operate the product.
- Always hold the product with your two hands. Hold the product on the right side of your body.
- Operate the product with the cutting attachment below your waist.
- Stop the motor before you move the product.
- Do not put down the product with the motor on.
- Before you remove the unwanted materials from the product, stop the motor and wait until the cutting attachment stops. Let the cutting attachment stop before you or an aide remove the cut material.
Personal protective equipment
- Always use correct personal protective equipment when you operate the product. The personal protective equipment does not erase the risk of injury. The personal protective equipment decreases the grade of injury if an accident occurs.
-
Always use an approved eye protection while you operate the product.
-
Do not operate the product with bare feet or with open shoes. Always use heavy-duty slip-resistant boots.
- Use heavy, long pants.
- If it is necessary, use approved protective gloves.
Use a helmet if it is possible that objects fall on your head. - Always use approved ear protection while you operate the product. Noise for a long period can cause noise-induced hearing loss.
- Make sure that you have a first aid kit near.
Protective devices on the product
-
Make sure that you regularly do the maintenance to the product.
-
The life of the product increases.
- The risk of accidents decreases.
Let an approved dealer or an approved service center regularly examine the product to do adjustments or repairs.
- Do not use a product with damaged protective equipment. If the product is damaged, speak to an approved service center.
Cutting attachment guard
The cutting attachment guard prevents a loose object to eject in the direction of the operator.
Examine the cutting attachment guard for damage and replace if it is damaged. Only use the approved guard for the cutting attachment.
Cutting attachment
- Do the regular maintenance. Let an approved service center regularly examine the cutting attachment to do adjustments or repairs.
The performance of the cutting attachment increases.
- The life of the cutting attachment increases.
- The risk of accidents decreases.
- Only use an approved cutting attachment guard. For more information, see #.
- Do not use a damaged cutting attachment.
Grass trimmer head
Make sure that you wind the grass trimmer line tightly and equally around the drum to decrease the vibration.
- Use only the approved grass trimmer heads and grass trimmer lines. See #.
- Use a correct length of the grass trimmer line. A long grass trimmer line uses more motor power than a short grass trimmer line.
- Make sure that the cutter on the cutting attachment guard is not damaged.
- Soak the grass trimmer line in water for 2 days before you attach the grass trimmer line to the
product. This increases the life of the grass trimmer line.
Battery safety
Only use battery packs from the manufacturer and only charge them in a battery charger from the manufacturer.
The rechargeable battery packs are only used as a power supply for related cordless products. To prevent injury, the battery pack must not be used as a power source for other devices.
- Do not disassemble, open or shred battery pack.
- Do not keep battery packs in open sunlight or heat. Keep battery packs away from fire.
- Regularly examine the battery pack charger and the battery pack for damage. Damaged or changed battery packs can cause a fire, explosion or risk of injury. Do not repair or open damaged battery packs.
- Do not use a battery pack or product that is defective, changed or damaged.
- Do not change or repair products or the battery pack. Only let your approved dealer do repairs.
- Do not short circuit a cell or battery pack. Do not save battery packs in a box or drawer where they can be short circuited by other metal objects.
- Do not remove a battery pack from its initial package until necessary for operation.
- Do not mechanically shock battery packs.
- If there is a battery leak, do not let the liquid touch the skin or eyes. If you have touched the liquid, clean the area with a large quantity of water and get medical aid.
- Do not use a battery charger other than what is specified for operation with the battery pack.
- Look at the plus (+) and minus (-) marks on the battery pack and product to make sure of correct operation.
- Do not use a battery pack not made for operation with the product.
- Do not mix battery packs of a different voltage or manufacturer in a device.
- Keep battery packs away from children.
- Always purchase the correct battery packs for the product.
- Keep batteries clean and dry.
- Clean the battery pack terminals with a clean dry cloth if they become dirty.
- Secondary battery packs must be charged before use. Always use the correct battery charger and refer to the manual for correct charging instructions.
- Do not keep a battery pack on continuous charge when not in operation.
- Save the manual to refer to it in the future.
- Only use the battery pack for its necessary operation.
- Remove the battery pack from the product when not in operation.
ASSEMBLY

WARNING: Read the safety chapter before you assemble the product.
To change the position of the loop handle
(Fig. 21)
- Release the latch.
- Move the loop handle to the correct work position.
- Close the latch.
- Make sure the screws on the latch are tightened.
To change the length of the shaft
The telescoping shaft of the product lets you change the shaft to the correct length.
- Release the latch.
- Move the lower shaft to extend it or to make it short.
- Close the latch.
- Make sure the screws on the latch are tightened.
To attach the cutting attachment guard and the trimmer head (straight shaft)
- Attach the cutting attachment guard (A) to the shaft with the bolts (L). Make sure to use the correct cutting attachment guard and the correct trimmer head. (Fig. 22)
- Turn the trimmer head (H) counterclockwise to tighten the trimmer head to the gearbox (Left hand threads). (Fig. 23)
OPERATION

WARNING: Read and understand the safety chapter before you operate the product.
Before you start the product
- Keep persons and animals away from the work area.
- Do daily maintenance. See Daily maintenance on page 11.
To install the battery pack
- Align the ribs of the battery pack with the slots in the battery compartment. Push the battery pack into the battery compartment until you hear a click.
- To remove the battery pack, push and hold the battery release button and pull out the battery pack.
To start the motor
- Install the battery pack. See To install the battery pack on page 10.
- Push the power button until the light is on.
- Hold the assist handle with your left hand.
- Press and hold the top trigger with your right hand.
-
While you hold the top trigger, squeeze and hold the bottom trigger. Continue to squeeze the bottom trigger to operate the product.
-
Squeeze the bottom trigger lightly for lower speed.
-
Squeeze the bottom trigger more for higher speed.
- Use the product.
To stop the motor
- Release the triggers.
- Push the power button until the light is off.
To change the power mode
The power mode of the product can be changed while the product is in operation. There are 2 power modes:
- Standard mode - Saves energy and maximizes run time. Standard mode is applicable for most tasks.
Note: The product is set to Standard mode when started. - Boost mode - The product operates at high speed in Boost mode. Boost mode runs at maximum power for tasks that are not easy. To start Boost mode, push the Boost mode button until the light is on. To stop Boost mode, push the Boost mode button until the light is off.
Note: If the trigger is released during operation, the product starts in the last mode. If the product automatically stops, or if the operator pushes the power button, the last used mode is erased from memory. The product is set to Standard mode again when started.
Power meter
The power meter shows how much power the product uses during operation.
- LED lights 4 and 5 show the best performance and best battery efficiency.
- LED light 6 on the right side shows maximum power and the minimum battery efficiency.
Battery state of charge LED
The status of the battery pack is shown until you pull the trigger. When you release the trigger, the status of the battery pack is shown again.
The number of LEDs that are on show the current charge level of the battery pack.
| LED lights Battery | status |
| All Green LEDs come on | Fully Charged (100% - 76%) |
| LED 1, 2 and 3 come on | The battery pack is 75% - 51% charged. |
| LED 1 and 2 come on | The battery pack is 50% - 26% charged. |
| LED 1 comes on | The battery pack is 25% - 6% charged. |
| LED 1 flashes The | battery pack is 5% - 0% charged. |
Note: If the motor stops and the power LED stays on, push the button on the battery pack. For possible solutions, see TROUBLESHOOTING on page 12.
Note: When the battery pack is fully discharged, the motor stops immediately.
Note: The motor automatically stops if the battery pack or motor controller is too hot during heavy operation. Let the motor and battery pack cool. The product then resets.
To operate the grass trimmer
- Clean the cover of the trimmer head when you attach a new trimmer line to prevent vibrations.
- Examine other parts of the trimmer head and clean if it is necessary.
To trim the grass
- Hold the trimmer head immediately above the ground at an angle. (Fig. 24)
- Do not push the grass trimmer line into the grass.
To cut the grass
- Make sure that the grass trimmer line is parallel to the ground when you cut. (Fig. 25)
- Do not push the trimmer head to the ground. The ground and the product can be damaged.
- Do not let the trimmer head touch the ground continuously, it can cause damage to the trimmer head.
- Use full throttle when you move the product from side to side to cut grass. Make sure that the grass trimmer line is parallel to the ground. (Fig. 26)
To edge the grass
- Make sure that the grass trimmer line is vertical to the ground when you edge. Walk slowly along the area to be cut.
- Do not push the trimmer head to the ground. The ground and the product can be damaged.
- Do not let the trimmer head touch the ground continuously because it can cause damage to the trimmer head.
- Use full throttle.
- Make sure that the trimmer line ejects the cut material into an area that was cut before.
To use the twist and edge button
The twist and edge button of the product lets the operator turn the trimmer head. This makes it easier to edge along walks or driveways.
(Fig. 27)
- Push and hold the button while you turn the motor housing 180 degrees.
- Release the button to lock the motor housing in edge mode

CAUTION: Always stop the product and make sure the trimmer head does not move before you change the mode of cut.
MAINTENANCE

WARNING: Read and understand the safety chapter before you clean, repair or do maintenance on the product.
Daily maintenance
- Remove the battery pack. Refer to the operating instructions of the battery pack for correct maintenance.
- Examine the nuts, screws and bolts.
- Examine the trigger for correct operation.
-
Examine the power button for correct operation.
-
Remove external unwanted material from the product with a soft brush or dry cloth. Do not clean with water, cleaning fluids, or solvents.
- Use a soft brush to remove unwanted material from the air vents.
- Examine the product for missing, damaged, loose or worn parts.
- Examine the product to make sure the moving parts align and are safe for operation.
- If the product is damaged, speak to an approved service center. Do not use a damaged product.
To replace the trimmer line
1.(Fig.28)
2. (Fig. 29)
3. (Fig. 30)
4. (Fig. 31)
5.(Fig.32)
6.(Fig.33)
TROUBLESHOOTING
| Problem Possible | cause Possible solution | |
| The product does not start | The power is off. Start the power | See To start the motor on page 10. |
| No electrical contact between the product and battery pack. | Install the battery pack correctly. See To install the battery pack on page 10. | |
| The battery pack is not charged. | Charge the battery pack. See the operator's manual for the battery pack. | |
| The battery pack or product are too hot. | Let the battery pack and product cool down before you start the product. | |
| The battery pack or product are too cold. | Let the battery pack and product become warm before you start the product. | |
| Motor controller is too hot. Let the | battery pack and product cool down for a minimum of 1 hour before you start the product. |
Error codes
The error codes help you do troubleshooting on the battery pack and/or the battery charger while it charges.
(Fig. 34)
Note: Look at the battery state of charge LED with the ribs of the battery pointed up to see the correct orientation of the LED lights.
| LED screen Possible faults Possible steps | ||
| LED 1 is red and LED 4 is green, battery pack does not charge or operate correctly in product | Internal fuse is blown Speak to an approved service center. | |
| LED 1 is red Irregular cell voltage Speak to an approved service center. | ||
| LED 4 is green Battery pack is over-charged | Remove the battery pack from the battery charger and install in the product. Operate the product. Battery charger may be defective. Speak to an approved service center. | |
| LED 1 is red and LED 2 is green, battery pack does not charge or operate correctly in product | Battery pack failure Remove battery pack from the product. Do not charge. Battery pack is damaged and must be replaced. Speak to an approved service center. | |
| RED LED comes on, LED 2 is green and flashes during charging or when the battery pack is in the battery charger | Internal battery temperature is too low or too high for charging | Move the battery charger and battery pack to a location where the internal temperature of the battery pack can be between 5°C (41°F) and 45°C (113°F). |
| RED LED flashes and LED 2 flashes green when the battery pack is installed. | Internal battery temperature is too low or too high | The internal temperature in the battery must be between -15°C (5°F) and 70°C (158°F). The environment temperature in the battery pack is too low or too high. ·If the battery pack is too cold from the ambient environment, move the battery pack and battery charger to a warm environment. ·If the battery pack is too hot, especially after operation, move the battery pack and battery charger away from the hot environment. |
TECHNICAL DATA
| unit Li 58T (BLT58VPR) | ||
| Motor specifications | ||
| Motor type Brushless | ||
| Motor voltage V (DC) 58 | ||
| Motor power W 750 | ||
| Battery and charger specifications | ||
| Default battery pack type Li 582.6A | ||
| Battery charger type Li 58V 2.5CGR | ||
| Noise and vibration data | ||
| Equivalent vibration level (ahv, eq) front handle.See Note 1. | m/s2 | 1.930 |
| Equivalent vibration level (ahv, eq) rear handle.See Note 1. | m/s2 | 1.707 |
| Sound power level, guaranteed (LWA). See Note 2. | dB(A) 96 | |
| Sound power level, measured. See Note 2. dB(A) 91 | ||
| Sound pressure level at operator's ear. See Note 3. | dB(A) 80 | |
| Product dimensions | ||
| Weight kg (lb) 3.5 (7.5) | ||
| Cutting width cm (in) 38 (15) | ||
Note 1: Reported data for equivalent vibration level has a typical statistical dispersion (standard deviation) of 1.5 m/s².
Note 2: Noise emissions in the environment measured as sound power (LWA) in conformity with EC directive 2000/14/ EC. Reported sound power level for the
machine has been measured with the original cutting attachment that gives the highest level. The difference between guaranteed and measured sound power is that the guaranteed sound power also includes dispersion in the measurement result and the variations between different machines of the same model according to Directive 2000/14/EC.
Note 3: Reported data for equivalent sound pressure level for the machine has a typical statistical dispersion (standard deviation) of 3 dB (A).
ACCESSIONS
| Approved accessories Type Cutting attachment guard | |
| Threaded shaft (M10L) | |
| Trimmer head Trimmer line Ø 2.4 mm (.095 in) 591 37 79-21 |
CONTENTS OF THE EC DECLARATION OF CONFORMITY
We, Husqvarna AB, SE 561 82 Huskvarna, SWEDEN, declare under our sole responsibility that the represented product:
| Description Grass Trimmer | |
| Brand McCulloch | |
| Platform / Type / Model Platform BLT58VPR, repr- resenting model Li 58T | |
| Batch Serial number dating | 2017 and onwards |
complies fully with the following EU directives and regulations:
| Directive/Regulation Description | |
| 2006/42/EC “relating to machinery” | |
| 2014/30/EU “relating to electromagnetic compatibility” | |
| 2000/14/EC “relating to outdoor noise” | |
| 2011/65/EU “relating to hazardous substances” |
Harmonized standards and/or technical specifications applied are as follows: EN ISO 12100, EN 60335-1, EN 50636-2-91, EN 62233, EN 55014-1, EN 55014-2
In accordance with directive 2000/14/EC, Annex VI, the declared sound values are stated in the technical data section of this manual and in the signed EC Declaration of Conformity.
TUV Rheinland has carried out a voluntary examination on behalf of Husqvarna AB, providing a Certificate of
conformity to EC Council directive 2006/42/EC for machinery.
The certificate, as provided on the signed EC Declaration of Conformity, is applicable to all manufacturing locations and Countries of Origin, as stated on the product.
The supplied grass trimmer conforms to the example that underwent examination.
On behalf of Husqvarna AB, SE 561 82 Huskvarna, SWEDEN, 2017-12-04
John Thompson, Product and Marketing Director Responsible for technical documentation
Copepknne
BbBEHNE 15
BE30NACHOCT. 16
MOHTAK 21
PA6OTA. 21
TEXHINCHECKO OBCJYKBAHE. 23
OTCTPAHRAHE HA HEN3INPABHOCTN. 24
TEXHUNECKN XAPAKTEPNUCTNIKIN 25
AKCECOAPN 26
CbDbPXAHNE HA DEKJIAPALIYTA 3A
CbotBetCTBNE HA EC 26
BbBEDEHNE
IHCtpyKzna 3a ekCnloatazaia
OpHnHaHaTa BepnHa Ha HactoMaTa INHcTpKu3a ekPnoatae e Ha anrnnckn esnk. HcTpKuNTe 3a
Pperne
(ФИ.1)
1. KomIIneK7 6aTePm
2.3apnHo yctpOCTBO 3a 6atepyTa
3. CBeToIIOI 3a CbCTOHa Hn To Ha 3apeHocT Ha 6aTePnraTa
4. Ebytoh 3a cTaTyHa Ha 6aTepeyra
5. Bytoh 3a 3abptTaHe n oΦopmHaHe
6. Празапел на ржецю обудане
7. Nocoka Ha BbptHe
8. TpimepHa rnaBa
9. Pe3e4
10.ДоленДысекионовВал
11. Teneckonuchope3e
12.Примкова рьковытka
13. LufpoB KOHTpoJen ceHbP
14.Инданаху МошноctTa
15. CBeToIOnoI 3a CbCToHnETo Ha 3apeJeHoCT Ha 6aTepeyra
16. BytoTH 3a peKIM 3a MaKcImMaHHa MOUHOCT
17. Byton 3a BklnouBaHe
18.БлokирвkaHa cnycbKa Ha ra3Ta
19. PbKoxBaTaKa
20.Бутон за освобождаване на батугеля.
21.OCHOBa
22. EneKtpnuecka cnloBa rnaBa
23. CnycbKa rata3a
24.Инстукцяза ekcnnoataця
CnmboN Bbpxy MaunHaTa
(Фиг.2)Прдупждени.
(Фиг.3)ПpoуетeteTOBa pБКOBОДТВО
(Фиг.4)ИЗнOL3BaIte ODo6peHa 3aUHTa 3a rIaBa
(Фи.5)ИЗнOL3ВaÎТе OДОБрEHn aHTNФОHn
eKcNlloatauHaIpynE3uCa npBeDeHnOT aHJInCKn.
13noJI3BaITe oOo6peHn 3aunTHn cpeCTBa (ФИг.6) 3a OuHTe
(Фиг.7) HocTe peCnnpaTopHa macka
I3noJ3BaIte oOo6peHn 3aunTHn 6OTuun n (Φnrg.8) pBkabuun.
(Фиг.9)HocTeДьлгпрькави nIaHTaJIOnH.
YBepete ce, Ye IbIraTa Koca e np6paHa (ФИг.10) Hd paMeHete.
Bb3MOxH0 e n3xBpUaHe Ha npEpmEtO TnpOdyKTa, KOETO MOXe Da DOBeDe Do
(Фиг.11) yBpeKdAnHe Ha OChTe.
Ia3eTe ce ot OTCKaHaun npedMeTNn (Φnrg.12) pikoWetn.
(ФИ.13)MaKcImaJIHnO6OpOTnHaI3XoJHnBaI
(ФИ.14)Енктуескудар
I3noJ3BaIte cmo Odo6peHa TpImepHa rna, MaKapa I npenOpbUHTeJIHa KOpda 3a
(ФИ.15)Тример. He n3IOJI3BaIte ocTpeTa.
(Фиг.16)Бezonacho pa3ctoHne
(Фиг.17)НивоHa силаТаHa 3Byka
IpoodykTbT n ONAKOBA tA He Tp86Ba Da ce TpeInpat KATO 6ntOB OTnAbk. IpoodyKbT n ONAKOBA tP86Ba Da 6bDat DoCTaBeH N B NOxOJa, NyHKT 3a peuNKJlnpaHe Ha
(Фиг.18) eNeKtpnuecko n eNeKtpoHNo o6OpyDbAhe.
He octabraIte, He cbxpaHraBaIte n He n3noJ3BaIte B yCIOBnHa dJxD nJIn
(Фиг.19) Bnara.
(Фиг.20)Рeцкпранe
3a6eIekka: OctaHaHNTe CMBONN/CTnKePN Ha npOdykTa ce OTHacrT Do N3NCKBaHnNo OTHoWeHne Ha cePTnOHKaTN 3a DpyrT TbPROBcN 3OHN.
OTROBOPHOCT 3a Bpei, npuHHeHn OT CTOKN
KaKTo e nocOyeHO B 3aKOHnTe 3a OTROBOPHOC T 3a BpeN, PpUHHEnH OT CTOKN, Hne He HOCM OTROBOPHOCT 3a UeTN, PpUHHEnH OT Haunr npOdyKT, aKO:
- npOdykTBt e HenpaBnHOp emOHtuPAH.
- npOdykTbTepeMOHTnpaH C qactn, KOnTO He ca OT npOn3BODInTeIe IIN He ca Odo6peHn OT npOn3BODInTeIe.
- npOdykTbT mMa npHnAdnEeKHOCT, KOaTO He e OT npOn3BOoNTeTNe IuN He e ODoBpeHa OT npOn3BOoNTeTNe.
IpoDyKbT He e peMoHTnpaH B Odo6peH cepBn3eH UeHTbp uNt Odo6peH opraH.
BE3OPIACHOCT
IeHnHn3a6e3oNaCHOCT
IeHnHcHNTe No-dony npedocTabr HNBOTo Ha cepno3HOCT 3a BcKa eHa npedynpeHntHa dMa.

ПЕДУПЕХДECHNE:Наразнayaн haJицa.

BHIMAHHE: Nobpea Ha npodykTa.
3a6eEka: Ta3n INΦopMaζη npaBn npoDyKta noJIecEH 3a n3noJ3BaHe.
O6u npedynpexdHna 3a 6e3OpacHOCT 3a cnIOBn IHcTpymEnTn

IPEyIPEXKDEHNE: IpooyTeTe BHNMaTeHNO BCnUKN IpeDyIpexKeHn 3a 6e3OanachocTt a nHCTpykun. Hecna3BaHeTo Ha nHCTpyKcunTe n Ha IpeDyIpexKeHnTa 3a 6e3OanachocT MoKe Da DOBeDe Do eNekTpueeckn ydap, noXap n/nn Cepno3Hn HapaHbAHn.
3anaTe BCnUKN npedynpeKdEHN N HcTpyKuN 3a 6bdeu cnpaBKn.
TepmHbT "eNeKtpueckn INHCTpyMeHT" B npEdupeKdEHHaTe ce OTHac3a eNeKtpueckn ynpabJIbAAHnna (ka6eene) eNeKtpueckn INHCTpyMeHT nIN TaKB Ha 6aTeepn (6e3KneH).
Бezonachoct Ha pa6oTHata o6nact
- PóndbpxkaTe pa60THaTa 0bactncta n do6pe oCBeTeHa. MpbCHnte N TBMHnte 0bactn ca no-npèpda3nonaraùn KbM INHcndeHTN.
He pa6oTe c eIeKtpueckn INHCTpyMeHTN B EKcNIO3NBHa Cpea, KaTO HApnpMep B npncbCTBneTo Ha 3anaJInteJIHn TeUHOCTn, Ra3OBe nn npax. EIeKtpueckte INHCTpyMeHTN cb3daBaT NCKpn, KOnTO MOKe Da Bb3PNaMeHrT npaxa nn dIma.
-Дрьхтdeцataи HabIoDAteIeIaJIeU,DOKaTO pa60NTe c eIeKtpnueckn INHcTpymeHT. Pa3ceuBaHeTo MoKe Da IOBeDe Do 3aY6a Ha KOHTpOJ.
Ynotpe6a n rpnka 3a nHctpyMeHTa Ha 6aTepey
-П配电кдуtecamocb3apdnoyctpoiCTBO, onpepelehoOT npou3BODHTeJ.3apdno yctpoiCTBO,KoTo e noDxOJaIoo 3a edNH BUD 6aTePnMoKeJa c3daJeOnacHOCrOT 3NoONyka, Korato ce n3NoI3Ba cdpura 6aTePn.
-Изпалые eнктуческгу Инстументсамoc cbc cneцанно onpeдениte komпкги batepin.Изрлзванeto Na dpyru batepin можда CB3daDe onachoct ot habанbahe и пожар.
Korato 6aTeepnTa He e B ynoTpe6a,dpxTe JaIeue OT dpYm MeTANH PpeMeTu, KaTO KnaMepu, MOHeTu, KNIOUObE, NpOHN, BNHTObe nIN dpyrN, KOnto MoarT Da CBbpXkT eHATA KneMa C dpyrata. OkcbraBe Ha n3BOJNe Ha 6aTeepnTa MOnKe da npEi3Bvka n3rapAHHn IIN noXap.
-Пиуnotpe6aOT6atepyta moKe da 6bde n3XbbpNeHa TeuHocT -n36raBaTe DoNp. B cnyaHa cnyaeh KOHTaKT n3PnakHeTe C Boda.Ako TeuHocTTa nonaHb BOHTe, noTbpcTe DOIbJIHITJIHa MeDUnHcKa NOMO. TeuHocTTa, n3XBbpNeHa OT 6aTepeYTa, MoKe Da npuHH pa3dpa3HeHnI INI IN3rapHnI.
06cnykBaHe
- TexHnueCKoTo 06cIyKBaHe Ha BaIaIeNekTpueckn INHCTpyMeHT Tp8Ba Da ce N3BbPwBA OT KBAJIINuIpuHa IInCe, KaTO Ce N3NOn3BaT Camo INDeHTNuHN pe3epBN qactN. ToBa Ue rapaHTnpa 6e3ONaChocTTa Ha eJKeTpnueckn INHCTpyMeHT.
IpeDynpexKeHn 3a 6e3oNaChocT npn pa6Ota C TpImepn 3a TpeBa
06yueHne
-ПочеТЕВИМATEЛноИнСТPyкциTe.3aNo3HaNte ceобсToHcOprAnHTe3aУрвАленHe n npabnHATA ynotpe6aHaMaunHata.
Hikora He no3BONBAIte Ha deca nnHa xopa, He3ano3HaTu C Te3n INHCTpyKuIN, Da n3noJ3BaT MaunHata. MeCTHnte pa3npoe6b MoKe da noctabrt Bb3pactOBn orpaHueHra 3a onepatopa.
-ImaTe npedBnD,Ye onepaTopbT nIN noTpbeBnteJIr HOCN OTROBOPHOCT 3a HeuactHn Cnyau INI INOACHOCTn 3a dpyrX xopa INI IN TxHOTOMyueCTBO.
IoproToBka
- Ppeynynoptpe6a BnHaH npOBepBaTe Bn3yaHNO MaunHata 3a NobpeDeHN, NnCBAuN nn HnpabNJHO NoCTaBeHN ppeNa3nteIN nIIN uNTOBe.
- Hnkora He pa6oTe c MaunHata, KOraTo Ha6JIn30 nma xopa, oO6eHo Deca, INI DomauHN JKNBOTHN.
EkTnloataua
Hocete 3aunTHn OuJna n coUndn ObyKn npe3 yIIO TO Bpeme, DOKATO pa6OTnte C MaunHaT.
He n3noJI3BaIte MaunHaTa B loUIm MeTeOpOJOrnHn ycNoBna Oco6eHO KOraTO mAm ONaCHOCT OTMbJIINr.
- 3nnon3BaIte ypeIa cAmo Ha IHeBHa CBeTJIHb IIN Ha Do6po n3KcyCTBeHO OCBeTJeHne.
Hikora He pa6oTe c MaunHaTa, ako ca noBpeDeHN ppeDn3nteJIte uIN npucnoc6JeHnaTa uNn aKO Te He ca nocTaBeHn Ha MactO.
Bknoute Dnuratae Icmo KOrato pueTe n KpaKaTa ca daNeu OT peKeunTe cpeDCTBa.
BunHnO TcPAnBaIe 6aTepeyra:
Korato MaunHaTa e octaBeHa 6e3 Ha30p;
-преши поочиствае на зашивае;
-преши поверка, поочьвае ялpaбота noMaшин haTa;
- cneyadByyxdnpeidmet;
Korato MaunHaTa 3anOHe da Bn6pnpa HeHopMaHNo.
-ПпeдOTьраTeHараняВанЯHaКpaKaTaNpbцeTe OTpekeuITE cpeДCTBa.
BnHaH npOBepBaTe daJIb BENTnlaOnHHnTe OTbOpn He ca 3anyeHNOT OTnaDbuN.
PonpBkka n cbxpanHeHne
- N3BaTe 6aTepeTn npEiN n3BbPswBaHe Ha DeHocTn NO NOdpbXkata NIN NOuNCtBaHeTO.
- INON3BaIe cMo npenopbuaHnTe OT npOn3BOUInTeJpe3epBHN Yactn n akcecoapn.
-ПоверяBaIteиИЗБьршBaIteТexHnuecka ЮДпьЖkaHaMaшинAtepeДOBHo.ИЗБьршBaIte серВи3HOTOобсчУжВаHeHaMaшинAtecamо пи OTOPИран серВи3.
Korato He n3no3BaTe,cbxpaHraBaTe MaunHaTa Ha MRCTo,HeIOCTbNHO 3a Deca.
O6uHnHCTpyKuIN 3a 6e3oNaCHOCT
- I3noJ3BaIte npabnHNo npOyKta. HenpabunHaTa ynoTpe6a moKe da doBeDe do HapaHraBaHe nIN cMbpt. I3noJ3BaIte npOyKta camo 3a 3aDaHTe, ONiCaHN B HactoJSeTo pBkoBOcTBo. He I3noJ3BaIte npOyKta 3a dpyrN 3aJaHn.
Cn3BaIte HNCTpyKuNTe B Ta3n INHCTpyKU7a 6eknloataua. Cna3BaIte CNMBOJNTe 3a 6e3oNaCHOCT N INHCTpyKUNTe 3a 6e3oNaCHOCT.AKO onepaTOpt He Cn3Ba INHCTpyKUNTe IN CNMBOJNTe, pe3yTTaTbT MOKe Da e HapaHaBe, NOBpeDa UIN CMbPT.
He n3xbpnaTe TOBa pkoBOcTBo.CneBaTe HnCTpyKunTe 3a MOHTnpaHe, n3noN3BaHe n noDpBkaHa npOyKaTbdo6po CbCToHne. CneBaTe NCHtpkUnTe 3a npabJIeH MONTaH npncnoc6JeHraTa n npHaJNeXHoCTte. I3noJ3BaIe cAmO ODo6peH npncnoc6JeHra n npHaJnEKnOCTn.
He n3no3BaIte noBpeDeH npOdykT. Cna3BaIte rpaФИka 3a TexHnuecko O6CnyKBAhe. N3BbPwBaIte cAmO DeHOCHTe NO TexHnuecko O6CnyKBAhe, 3a KOnTO Μe HamePiTe NHCTpyKcIIra B TOBa pBkoBOdCTBO. BcNqKn DpyrN DeHocTn NO TexHnueCKOTO O6CnyKBAhe Tp8Ba Da 6bDaT N3BbPseH NT OdopeH cepBn3eH ueHTbp.
ToBa pBKOBOCTBO He MoKe Da BKJIIOUBA BCNUKN CNTyaUN, KOINTO 6Nxa MOrIN Da BB3HNKHAT npn n3PON3BaHe Ha npOdykTa. BbTe Te BHIMATEJHn I DeIcTBaIte pa3ymHO. He pa6oTe c npOdykTa Hn3BbPbBaIte TexHnuecko O6CnyKBaHe, aKO He CTe cnrypHn OTHOCHO CNTyaUNra. 3a Da nonyUnTe HHOpMaun, ROBopeTe c ekCnept N0 npOdykTa, BaunI dIcTp6byTop, cepBn3 nnn c oIo6peh cepBn3eH ueHTbp. - OTePHeKOMnKeTa 6aTeepn npEi crNo6BaHe, cKnAupaHe NIn TexHuecko 06cnykBaHe Ha npOdykTa.
He n3no3BaIte npOdykTa, aKe e npomeHcnpaMo npbpBOHaayAHnTe My cneuΦnKaun. He cMeHnTe HkoJAcT Ha npOdykTa 6e3 Oo6peHne OT npOn3BODnteJ. N3no3BaIte camo qactN, KOtO ca Oo6peHn OT npOn3BODnteJ. HenpaBUNHO To TexHNuecko 06CnyKBaHe e Bb3MOxHo da DoBeDe do HapaHBAHe NN CMbPT.
To3n npOdyKT cb3daaba eJNEKTPOMarHHTHO NOIe. ENeKTPomarHHTHO TONE MOKe Da npEiN3BnKa noBpeHa Ha MeDnIHCKn MMnAHT. TOBopeTe C Baunr Nekap nn C npOn3BOIDnten Ha MeDnIHCKN MMnAHT, npEiN da 3aNoCHHeTa pa6ota c npOdykTa. - He no3B0JBAaIte Ha deca da pa6oTc npOdyKTA. He no3B0JBAaIte Ha nue, KoETo He e 3aNo3HaTO c HnCTpyKUnTe, da pa6oTu c npOdyKTA.
- YBepTe ce, Ye BnHaHn Ha6IIOdaBaTe JNuca C HamaJen Hm3UeCKn Nm yMCTBeH KanaUNTET, KOITOn 3N0n3Bat npOdykTa. Ipe3 cIanoTO Bpeme Tp86Ba Da npncbCTBa OTROBOpEH Bb3paCTeH.
CbxaHbAitpe npOyKaTnOJKnHcHaMCTo, HeoctbHNO3a Deua n HeynbHOMOeHNIuca.
Bb3MOxH0 e OT npOyKTA da n3XbBypaT npEmdTe i da npuHHr HapaHraBaHna. Cna3BaHTnHCTpykUnnte 3a 6e3oNaCHOCT, 3a da HamaNTe onaCHOCTTa OT HapaHraBaHe nn CMbpT.
He ce otdaeneabaTe ot npdykTa, koraTo dBiratenaTpa6oTu.CnpeTe DbrarTeN I ce ybepeTe, ye pexeIoo o6OpyDbaHe He ce BbptN.
- OnepaTopbT Ha npoDyKta e OTROBopeH npu Bb3HNKBaHETo HA INUdEHT.
- YBepTe ce, ye actuTE He ca noBpeHn, npEi Da n3non3BaTe npOdykTa.
- YBepete ce, ye cTe Ha pa3CTOHHne OT Hai-Manko 15 m (50 ft) ot dpyrN Iuca Nnn KINBOTHN, npeDn da u3noJ3BaTe npOdykTa. YBepete ce, ye nIeTO B 6n3ocT do Bac e HaeCHO, ye ue n3noJ3BaTe npOdykTa.
- HanpaBete cnpaBka c HauNoHaJHnTe nIIM MeCTHnTe 3aKoHn. Te 6nxMa MoTn Da npEDoTbPaTt rnn OrpaHnUaT pa6OtaTa Ha npOdykTa pNpOnpeDeneHn ycIOBnA.
Инструкции за 6e3oNaCHOCT NO BpeMe Ha pa6Ota
- YBepete ce, Ye npOdykTbTe HAnbJIno crIIO6e, PpeDn da ro n3NO3BaTe.
Bb3MOKHO e 3XBpUaHe Ha npEdmEtN ot npOyKTa, KOeTo MOKe Da DOBeDe Do yBpeKdaHe Ha oHTe. BnHaru n3non3BaTe Oo6peHn 3aunTHn cpeCTBa 3a OHTe, KOrato pa60Tnte C npOyKTa.
-Бьдete BHHMaTeHn -6e3 Da 3HaTe, Hяко DeTe MoKe Da ce Do6nKn Do npOdykTa,doKaTo ToI pa60tN. - He pa6oTeTe c npOyKta, ako nMa xopa B pa6oTHaTa 30Ha. CnpTe npOyKta, aKO B pa6oTHaTa 30Ha BJIe3e YOBek.
- YBepTe ce, Ye BnHaRn mMaTe KOHTpOHaI npOdykTa.
- He n3noJ3BaIte npOyKta, aKO He moKeTe da nOlyuHTe NOMOUI pRn Bb3HKnBAHeTo Ha INCuIeHT. BuHaRI ce yBepraBaiTe, ye npEi Da 3aNoUHeTe pa6oTa c npOyKta, dpyrnte ca IHΦopMnpaHn 3a TOBa.
He ce 6pbuatae,doKaTo DbpxKe npOdykTa, npEi Da ce yBepTe,ye B 6e3oNaChaTa 30Ha HMa dpyrn Xopa nn JKNBOTHn. - OTepahe TBCnHKeJHaH MaTePnaHOT pa6oTHaTa 30Ha, npEi Da 3anOuHeTpepa6oTa.Ako pExeToOobOpyDbAHe ce ydapn B npEmdet, ToJ MoKe da 6bIe nXbBpIeH I da DOBeDe IHOpaHЯBaHe nn NobPeDa. HexeNaHTe MaTePnaHm Morat Da ce yBnT OKoIPOpeXeToOobOpyDbAHe n Da IOBeDat Do nobPeDa.
He n3noJI3BaIte npOyKta npn loo BpeMe, HapnpMep npn TbCTaMbIJa,DbXd,CINHn BeTPOBe, ONaCHOCT OT CBETKaBUNu INN dpYr MeTeOpOJOnUHN yCIOBna. PpN ILOo BpeMe MoKe
Ia Bb3HKnHaT Onacn YcNoBna OT pOda Ha Xlb3raBNOBbpXHOCTn.
- YBepTe ce, Ye MOKeTe Da ce DnKHTe CBO6OJHO n da pa6OTHe B cTa6uHa No3uJna.
- YBepTe ce, Ye HMa Da naHHeTe, KOraTo n3noJ3BaTe npOdykTa. He ce haknaHnTe npu pa6ota c npOdykTa.
Bunr npbxtpe npodykta cDbete cn pue. DpbkTe npodykta OTdACHO Ha TnIOTo cn.
Pa6oTe c npOyKta c pexeOTo o6OpyDbaHe noHNBOTO Ha KpbCTa.
Cnpete dBvraTeIa MeCTnTe npOdyKta.
He octabraye npodykta Ha 3emrta, KoraTo Dbraratejrt pa60tn.
-ПредиOTCTpaHЯBaHe Ha HeKeJaanIпрdmEtN OT npOdykTa cnpTe DBnRaTeJn N3yakaJIte,doKaTo peKeJIoTO obOpUdBaHe cnpe.ИЗчakaiTe peKeJIoTO obOpUdBaHe da cnpe,пр徳Виe nIIi BaW nomOuHNk Da OTCTpaHInTe n3Pra3aHn MaTepnaI.
I\PuHn npeDna3Hn cpeDCTBa
BnHaHn n3noJ3BaIte npaBnHInTe JnUHN ppeJa3Hn CpeDCTBa, KOrato pa6oTHe c npOdyKta. JnUHNte npeJa3Hn CpeDCTBa He eJIMMHnP aT ONaCHOCTTa OT HapaHbAHe. JnUHNte npEJa3Hn CpeDCTBa HamaJIaBAt CTeneHTa Ha HapaHbAHe npi Bb3NkBAHeTo Ha INuJeHT.
BnHaHn n3noJ3BaIte Odo6peHn 3aunTHn cpeCTBa 3aOHTe, kORato pa6oTnte C npOdykTA.
- He pa6oTeTe c npOyKTA c roIIN Kpaka nn C OTBOpEHN 06yBKn. BnHaHn 3nON3BaIte yCTOnuNBn Ha nIb3raHe 6oTyUn 3a TeKbK peKIM Ha pa6oTa.
- 3nnon3BaIte DJIIN nHaTJIOHn OT 3dpab nnat.
Ako Heo6xOIMO, n3PON3BaIe oO6peHn 3aUNTHn pKabu.
-ИзползВаиTe kacka,akO e ВьзмoxHo,3a da ce npedna3nte OT napaun Ha rnaBaTa npedMeTu.
BnHaru n3no3BaIte oO6peHn aHTnFOH, KORATOpa6oTnte c npOyKta. PpOdbJnxTeHNrT yMMOxKe da doBeDe Do 3ary6a Ha cnLyxa, pnpUHeHa OT LWM.
- YBepTe Ce, Ye 6JIn3o Do Bac NmA KOMnIeKr 3a nbpBa NOMOu.
UcTpoIcTbA 3a 6e30nacHOCT Ha npOdyKTa
- YBepTe ce, ye peIIOBHO n3BbPWBaTe TexHnuecko 06cnykBaHe Ha npOdyKta.
CpokbHaeknnoataaHa npodykTa ce yBeneuaba.
- PuckbT OT 3ПОПУКа НамлЯBa.
I03BOnTe Ha Oo6peH dNtbp nnn Oo6peh cepBn3eH cHTbp da n3BbPwBa peOOBHa npOBepka Ha npOdykTA 3a KopeKun nn peMOHTn DeHOCTH.
He n3noJ3BaIte npOdykT cNoBpeHn npEJa3Hn CpeIcTBa. Ako npOdyKbTe nOBpeH, ce KOHCyIITnpaIte C oOObpeH cepBn3EH eHTbp.
Ipea3nTeHa pexeso obopydBaHe
PpeIpa3nteIaT Ha pexeIoTo o6OpyDbaHe
PpeIOBpTaBa NxVBpJnHe Ha CBO6oHn PpeMTeN No
nocoka Ha onepaTopa.
IpoBepTe npedna3nteHa pexeToO obOpyDbAhe 3a noBpeDa n ro cmeHeTe, ako e nobpeDen. I3noJ3BaIte camo oOobpeH npedna3nteJ 3a pexeIoTO obOpyDbAhe.
Pexeio o6opyDbaHe
- N3BbPwBaIte peoOBHOTe texHnuecko o6cnyXbaHe. P03BOnTe Ha Odo6peh cepBn3eH ueHTbp da N3BbPwBa peoOBHa npOBepKa Ha pexKeIoTO obOpyDbAbe 3a KopeKuIN IIN peMOHTN DeiHOCTN.
-ПОНЗВОДИТЕЛНOCТаHa peжецOTOobopydBaHe ce NOBnwaBa.
CpokbHa eKcnIIOaTaun Ha peKeuToO o6OpyDbAHe ce nobuwaBa.
- PnckbT OT 3JIOJNYka HamaJЯBa.
- INoI3BaIe cAmO OIO6peH npeIa3IteJ HapeXeIo 6OpUdBaHe. 3a noBeYe IHΦopMaunBnKTe #
- He n3non3baIte noBpeJeHO peKeIoo o6OpyDbaHe.
TpimepHa rnaBa 3a TpeBa
- He 3a6paBraIte Da HABnTe KOpData Ha TprImepa 3a TpeBa 3dpaBO n paBHomepHo OKoJIo 6apa6aHa, 3a Da HAMAJInTe Bn6paCunTe.
- I3noI3BaIe cAmo Odo6peHn TpImepHn IJIaBn 3a TpeBa n KopDn Ha TpImep 3a TpeBa. BIXTe #.
- IN3noI3BaIte KOpda Ha TpIMep 3a TpeBa C npabINHa DbJnxHa. Dblrata KOpda Ha TpIMep 3a TpeBa IN3noI3Ba NOBcHcMoUHcT Ha DnIraTeJI B cpaBHeHc C KbCaTa KOpda Ha TpIMep 3a TpeBa.
- YBepete ce,Ye pe3eucbT Ha nppeJa3nteJHa pexKeuTo 6obpydBaHe He e NOBpeJeH.
-ПOTONETe KOpДaTa Ha TpIMepa 3a TpeBa BbB BOda B npOdbIpxEHNe Ha 2 DnH, npEi Da 3akpenite KOpДaTa Ha TpIMepa 3a TpeBa KbM npOdyKtA. ToBa NOBnIbAba CpOKa Ha EKCnIooatauHa KOpДaTa Ha TpIMepa 3a TpeBa.
БezonaCHOCT Ha 6aTepeyTa
I3no3BaTe cMo KOMnKeTn 6aTePnn OTo npOn3BODnteN I n 3apEkdAte cMo B 3apdHO yCTpOJCTBO OT npOn3BODnteN.
KOMnJIeKTInTe 6aTePmN Ce n3NoJ3BaT eINHCTBeHO 3a 3axpaHbaHe Ha cBoTBeTHInTe 6e3xuHn IpoIyKTn. C
Cen I36raBaHe Ha HapaHbAHnKOMJIeKtBt 6aTePmN
He Tp8Ba Da ce n3NoJ3Ba 3a 3axpaHbaHe Ha npYrN
ycTroPoIcTa.
-
He pa3rIIO6BaIte, OTbApIe Te nppeKeTe KOMnJIeKTInTe 6aTePun.
He dpbXTe KOMnJIeKNTte 6aTePN Ha npKa CblHcyeBa CBETJInHa nn TOnJInHa. DpBXTe KOMnJIeKNTte 6aTePN daJepe OT orbH. -
PeIOBHO npOBepaIte 3apAHDTo yCTpoiCTBO n KOMnJIeKTA 6aTePnN 3a nobpeDi. NOBpeHnte u nn npOMEHeH N KOMnJIeKTH 6aTePnM MoT da npuHnT noXkap, B3pNB uNN onachOCT OT hapaHbAhe. He peMOHTnpaIte N He OTbapRnTE NOBpeHnte KOMnJIeKTH 6aTePnN.
He n3noJ3BaIte KOMnJEKT 6aTePmN nn npOdyKT, KOITo e depeKeTEn, IpomHeH nn nobpeDeH.
He npomehnyTe n He pemOnHTnpaTne npOdyKTne n KOMnJIeKTA 6atePnn. PemOnHTne TpI6Ba da ce n3BbPwBAT cAmO OT Odo6peH TbproBcN npedCTabNTeJ.
He cBbP3BaIte HaKbCO NOJIIOCTe Ha KJIeTKa IIN KOMIIeKTA 6aTeepnn. He cbXpaHraBaIte KOMIIeKNTe 6aTeepn B KyTna YekMeJxke, KbdeTo Te MoarTa a 6bDaT CbP3aHn HaKbCO OT dpyrMaTALn NpeDmEtN.
He n3BaKaJaTe KOMnJIeKTo 6aTepeHn OToOpnHaJHaTa OnaKOBka Do MOMeHTa, B KOITo eHeo6xOdIma 3a ekCnIooTaCuN. - He ydpraTe mexaHnHo KOMnJIeKNTte 6aTePn.
Ako mHa n3TuHa He 6aTepeH, He octabrTe TeuHOCTTa Da Bn3a B KOHTaKT C KOKaTa N OChTe. Ako DOKOCHeTe TeyHOCTTa, N3MmTE McTOTO C ObIInHO KOnUeCTBO BOda N NOTbpCte MeDnCnHCKa NOMOUs.
He n3no3BaIte 3apAHO yCTpoiCTBO 3a 6aTePnra,pa3nUHO OT onpeJeHOTo 3a yNoTpe6a c KomnKeTa 6aTepn.
BnKTe 3Haunite nHoc (+) mNHyc (-) Bbpxy KOMnIeKta 6aTePNn npOdyKTA, 3a Da cTe cnrypHn, ye ynotpe6ata e npabuHa.
He n3noJ3BaIte KOMJIeK76aTePN, KOITo He e npedHa3HaueH 3a pa6ota c npOdyKaT.
He nocTaBnTe KOMnneKtn 6aTeepnC pa3NnHOn HappeXeHne NIN OT pa3NnueH npOu3BOoNTeJ B eDHO yCTpOietBO.
-ДрьжтКOMПнгТteбATEPNДаNEueOTdeua.
Bunr npbYBaIe npabUNHITe KOMnJIeKTH 6aTePN3a npOdyKa.
-Подьркай Te 6atepuNTe uCTn cyxN.
-Почистовп Te KJIeMnte Ha KOMPNeKTe 6aTepeHn C YIcTa n cyxa Kbprna, aKO ce 3aMbpcrT.
Btopnte komnlekn6aTepnTp6Ba da ce 3apeJr npedynynotpe6a.3noJ3BaIte BNHaN noDxOJa3apJHO yCtpoiCTBO 3a 6aTePnraT a Cna3BaIte HhCTpyKUnnte 3a 3apeXdaHE BpbKOBoIDCTBOTO.
He octabraye KOMnJIeKta 6aTeepnn da ce 3apeKda npoDbJxNteJIHO, KOraTO He ce n3NoJ3Ba. - 3ana3eTe pkoBOdCTBOTO 3a 6bDeu cnpaBkn.
- 3no3BaTe KOMnneKta 6aTepuN caMo no npedHa3HaueHne.
- I3BaIeTe KOMJIeKta 6aTePnO T npOyKTA, KOraTO ToH He Ce N3NoI3Ba.
Korato pa6oTu, na3eTe 6aTepyTa daNeu ot xapTneHnte cko6n,KnOyOBe, npOnH, BnHTObe nn npDpyrMaKm MeTanHn npEmdTe. NTo To3n HauHH MoKe Da ce HAnpaBn Bpb3ka MExd Ky KInemTe.
MOHTAX

PNEyPPEKDEHNE: PpOeTeTe rnaBaTa 3a6e3oNaChocT ppeN crNo6BaHe Ha npOdykTa.
3a npomHa Ha no3nua Ta Ha npIMKOBaTa pbKOXBaTKa
(Фиг.21)
- Pa3xna6eTe pe3eTo.
- Ппемесе Te npIMKOBaTa pBkoXBaTkA B npabUNHOTO noloxHe Ha pa6ota.
- 3aTBopeTe pe3eTo.
- YBepete ce, ye BnHTOBeTe Ha qKcaTopa ca 3aTeHaTu.
3a npomHa Ha IbIxHHaTa Ha DByCEKUNOHnBaJ
TeNeckOnnHnT BByceKUHOHeB BaJI Ha npOdykTa BnNo3BOJIABa Da CMeHIne BaJIa Ha npabNJHaTa DbJIxHa.
- Pa3xna6epe3eTo.
2.Премстete ДОЛнЯ ДВуCEкционов BaN,3a DA ro ydJIKNTE NIN Da RO CkbcNTe. - 3aTBopeTe pe3eTo.
- YBepete ce, Ye BnHTOBeTe Ha qNKcatopa ca 3aTeHaTu.
3a 3akpenBaHe Ha npedna3nteHa pejeseTo o6OpyDbAHe n TpImepHaTa rIaba (npab DByceKuHOHe BaJ)
- 3akpenete npedna3nteHa pexeioTo obopydBaHe (A) KbM DByceKUHnB Ban C nOmoTa Ha 6oTobTe (L). He 3a6paBnTe da n3no3BaTe npabnHnI npedna3nte 3a pekeo obopydBaHe n npabnHaTa TpImepHa rnaBa. (Fnr. 22)
- 3aBbptTe TpImepHaTa rnaBa (H) O6paTHo Ha yacOBHNKOBaTa CtpeNka, 3a DaЯ 3aTeHHeTe KbM ckOpocTHaTa KyTna (JraBa pe36a). (ΦnR. 23 )
PABOTA

PNEyPEXEHNIE: PpoyeTe npa36epepepaedacnctpykun 3a 6e30nacnoct npednpa6oTa c npoDyKta.
Ppei da cTaptnpate npodykta
B30HaTaHa pa6Ota He 6nBa Da nMa JInuca N XINBOTHN.
- 3BbPwBaIe BCEKnDHeBHO TexHuecko 06cnyKBaHe. BxKTe BCEKnDHeBHO 6cnyKBaHe Ha cTpaHua 23
3a HnctaInpaHe Ha KOMnJIeKTa 6aTeepu
- PódpabHete pe6pata Ha KOMPJIeKt 6aTePNi C OTBOpNTe B OTDeJIeHNHeTo 3a 6aTePNi. NocTabeTe 6aTePNiTa B OTDeJIeHNHeTo 3a 6aTePNiTe, DOKaTO yyeTe UpaKaBaHe.
3a n3BaAnTe 6aTeepnTa, HATNCHe n 3aApkTe 6yToHa 3a OCBO6OxJaBaH e Ha 6aTeepnTa n 3dBpNaTe KOMnEeKaT6aTeepn.
3a cTapTupaHe Ha dBnraTeJIa
CBeToOnOInTe 4 n 5 noka3BaT Ha-Do6pnte pa6oTHn xapaKTeepncTnKn Hn-Do6paTa eΦeKTnBHOCT Ha 6aTepeyTA.
CBeToIIOJa 6 OT JIChHa CTpaHa NOKa3Ba MaKcImaJIHa MoUHOCr IMHIMaJIHa eΦeKTINBHOCT Ha 6atePnra.
CBeToIIO3a CbCToHHeTO Ha 3apeDeHOCT Ha 6aTePnTa
CbctoHneto Ha 6aTePnraCe noka3Ba,doKaTo He n3DbpnaTe cnycbka.Korato npChete cnycbka,OTHOBO ce noka3Ba cbCToHneto Ha 6aTePnraTa.
BpoT Ha CBToDIONDTe, KOINTO Ca BKNIOUeHn, NOKa3Ba TeKyuIOTo HnBO Ha 3apeXdaHe Ha 6atepnaTa.
| Сbvетоюдни лампи | Статус на батерияа |
| Вс neuropи зелени Сbvетоюдни Сbvетят | Налъно зараздана (100% - 76%) |
| Сbveti Сbvетоюд 1, 2 и 3 | Басторияа e зараздана на 75% - 51%. |
| Сbveti Сbvетоюд 1 и 2 | Басторияа e зараздана на 50% - 26%. |
| Сbveti Сbvетоюд 1 | Басторияа e зараздана на 25% - 6%. |
| Сbvетоюд 1 мига | Басторияа e зараздана на 5% - 0%. |
3a6eIekKa: Ako DnBraTeIaT CnpE n CBeToIONbT 3a 3axpaHbAHe OCTaHe BKnIOueH, HATNCHEte 6yTOHa Ha KOMIIeKtA 6aTePm. 3a Bb3MOXn peSeHn BIXTe OTCTPAHRAHE HA HEV3INPABHOCTU ha cTpaHnua 24
3a6eJekka: Korato 6aTePnTa e HanbNo n3ToUeHa, DBnraTeIaTcnpa He3a6abHO.
3a6eIeKka: MoToPbT cInpa aBtOMaTuHNo, aKO
6aTepeIra TnI nperyNaToPbT ha DnuIaTeIa ca
IpeKaJIeHO ropeuN IO BpeMe Ha TeKka pa6Ota.
OCTaBeTe DnuIaTeIa N 6aTepeIra Ta da ce OxJaT.
CleD ToBa IpoDyKTBt Ce Hynipa.
3a pa6oTa c TpImepa 3a TpeBa
-Почисте Кала К Тримерна Глаба, KOrTo MOHTИраTe HOBA KОрда Ha Tример, 3a Да npedotвразпгЕ Вбраци.
-Поберете дугнite ча'tи на Тримерна тлави ng почстete,akoe Heo6xodmo.
KactpeneHa TpeBa
-ДрькTe TrpIMepHata rnaBa HENOCpeICTBeHoHaJ3emrTaNoIbI.(ΦnIg.24)
- He haTnUckaIte KOpIaTa Ha TpImepa 3a TpeBa B TpeBaTa.
PraaHe Ha TpeBa
- YBepTeCe, Ye KOpJaTa Ha TpImEpa 3a TpeBa e ycnpoeHa Ha 3emrTa, KOraTo pexKeTe. (ΦnR. 25)
- He haTnCKaIte TpIMepHaTa IlaBa KbMa 3emrTa. MoKeTe Da nobpeDIne 3emrTa n npOdykTa.
3.He no3BONBaIte Ha TpIMepHaTa rnaBa HnpeKbCHaTo Da DOKOCBa 3emrTa,TOBa MoKe da DOBeDe Do NOBpeDa Ha TpIMepHaTa rnaBa.
4.ИЗнОЗВай TeNBlaHa ra3, KOraTo MeCtIte npOdyKTa NaHCTpaHn 3a pr3aHe Ha TpeBa.YBepeTe ce, Ye KOpДaTHa HApMepa 3a TpeBa e yCnpopeHa Ha 3emra.T.(Фиr.26)
3a nouchBaHe Ha TpeBa
- YBepete ce, ye KOpdaTa Ha TpImepa 3a TpeBa e BepTKaJIHO NOCTaBeHa CnPRAMo 3eMraTa, KOraTO pexKeTe. BpbBeTe 6abHo No NIOuTa, KOrTo Ue 6bDe nOndpa3Ha.
- He haTnCKaIte TpIMepHaTa rIaBa KbMa 3emrTa. MoKeTe Da nobpeDIne 3emrTa n npOdykTa.
3.He no3BolraIte Ha TpIMepHaTa rIaBa HeIpeKbChato Da DOKOCBa 3eMaTa,3aIoTO TOBa MOKe Da DOBeDe Do NOBpeHa Ha TpIMepHaTa rIaBa.
4.Даительногra3. - YBepete ce, ye KOpdaTa Ha TpImepa n3XbPnI N3Pra3aHnMaTePnJI B 30Ha, KoTo e 6nJa pr3aHa npdeN.
I3non3BaHe Ha 6yToHa 3a 3aBbPtaHe n OΦopMnHe
BytOBt 3a 3abbpTaHe n OopMnHe No3BOJyBa Ha onepaTopa da 3abbpTa TpImepHaTa rnaBa. NTo3n HauHH ce yIeChra BA OOpMaHTo NO npOdbJxKeHne Ha nbTEKn nnPiTuHa.
(Фиг.27)
- Hatnchete n 3aPbXTe 6yToHa, DOKaTO 3aBbptnte Kanaka Ha DnBaTeTn Ha 180 rpaDyca.
2.Ocb6oTe 6yToHa,3a Da 3akInuHte Kanaka Ha dBiratena B pexmHa oopmhe

BHIMAHHE: IpeDn Da npomeHnte peKIma Ha p3aHe, BnHaRn CnpaIte npOdykTa n ce yBepTe, Ye TpIMepHaT a rnaBa He ce DBNKn.
TEXHnuecko O6CJyXBAHE

PNEyPEXEHN: PpOeTeTepa36peTe pa3deLa c HcTpyKuN 3a630nacHocT npEdn NOUcTBaHe,peMOHTupaHe nI IN TexHnuecko O6CnyXBaHeHa npOdyKa.
BceKnIaHbO 06cnyKbaHe
-3BaTe KOMnIeKta 6aTePn. 3a npaBnHa
noDpBkKa HAnpaBeTe CnpABA C nHCTpyKunTe 3a
pa6Ota Ha KOMnIeKta 6aTePn.
-Поверете raикite,ВиHTOBeTe n 6oNTOBete.
- Поверете ренистора на ra3ta 3a павина pa6ota.
- Поверете 6уToHa 3a BkIIOUVAHe 3a npaBnHa pa6oTa.
- OTePaHeTe BbHnH HeKeJaHn IpeDMeTn OT npOdyKta C MeKa YetKa NIn cyXa Kbpna. He NOuchTbaIe Tc Boda, NoOHCTBaUu TeUHOCTN IN pa3TBOpNTeJI.
- Изпаловытмeca чета, за щримaxlete
нжелане пedingу OT BeHTnlaционнite OTBOPN.
- PpOBepeTe npOdyKTo 3a JInncBaUu, nobpeDeHn, pa3XJa6eHn NJN n3HOceHn YacTn.
-Поберете npodyкta,за да стсурн,ч e noDnKHNe TaCTN ca nOpaBHeHn ca 6e3OnaCHn 3a pa6ota.
Ako npoodykTBt e nobpeDeH, KOHCyIITnpaIte ce c oOobpeH cepBn3eH ueHTbp. He n3non3BaIte nobpeDeH npoodyKT.
3a cMaHa Ha KOpdaTa Ha TpImepa
TEXHINUeCKN XAPAKTEPNUCTNIKNI
| e diminish Li 58T (BLT58VPR) | ||
| Спесифизддигателя | ||
| Тул двигател Без чета | ||
| Нароженин на двигател V (DC) 58 | ||
| Моцноct на двигател W 750 | ||
| Спесифизддигател Ддигатела и заюно устюстvo | ||
| Тул komплен 6д electри по подаимане Li 582.6A | ||
| Тул на заюно устюстvo Li 58V 2.5CGR | ||
| Данни зашии вибрац di | ||
| Еквиьалentно НИВО на ВИбрациite (ahv, eq),Preden Дръжka. Вижte забileжka 1. | m/s2 | 1,930 |
| Еквиьалentно НИВО на ВИбрациite (ahv, eq),Заден Дръжka. Вижte забileжka 1. | m/s2 | 1,707 |
| НИВО на 3БУКOBaTa моцност, rapантурано(LWA). Вижte забileжka 2. | dB(A) 96 | |
| НИВО на 3БУKOBaTa моцност, Измерешо. Вижte забileжka 2. | dB(A) 91 | |
| НИВО на 3БУКOBOTO налаягане рpr ухото наосяраза. Вижte забileжka 3. | dB(A) 80 | |
| Размeperи на п探测укta | ||
| Тerglo kg (lb) 3,5 (7,5) | ||
| eдиница Li 58T (BLT58VPR) | ||
| РабOTнаширунca rm (in) 38 (15) | ||
3a6eEckka 1:OTyTeHnTe daHHn 3a eKBBaIeHTHOTo HNBO Ha Bn6paunte Nmat TnNUnHa cTaNTcTneCkA nCnepcn (CTaHdapTHO OTKIOHeHne) ot 1,5 m/s2.
3a6eIeKka 2: UyMOB emCnB OKoJIHaTa CpeDa, I3MepeH Kato 3ByKOB eFKeT (LWA) cIraNacHO DInpeKTbBa 2000/14/EO Ha EO. OTYeTeHNte HNBa Ha UyMa 3a MaUnHaTa ca N3MepeHc OPuRnHaJHOTOppeJeO o6OpUdBaHe, KoETo DaBa Hau-BvCOKOTO HNBO. Pa3NIkKaTa MekDy rapaHTnpaHOTOn I3MepeHOTOn HNBO
Ha 乌Ma e B ToBa, Ye rapaHTnpaHOTn HnBO Ha 乌Ma BKJIIOUyBa CbIoo I nDCNepCnraTb Pe3yJITaTnTe OT n3MepBaHETo, KaKTo I BapnaunTe Mekdy pa3NJuHNTe MaunHOT eEINH N CbIu MoJeB CbOTBeTCTBHe C DInpeKTnBa 2000/14/EO.
3a6eEckka 3:OTcTeHnTe daHHn 3a eKBBaIeHTHO TnBO Ha 3ByKOBOTO HAnraHe 3a MaunHaTa IMat TnNnHa CTaTnCTnuecka dncnepcn (ctaHapTHO OTKIOHeHne) ot 3 dB (A).
AKCECOAPN
Сыдьрахане HA ДЕКЛAPALИЯТA 3A СьOTBETCTBNE HA EC
- (Fig. 28)
2.(Fig.29)
3.(Fig.30)
4.(Fig.31)
5.(Fig.32)
6.(Fig.33)
FEJLFINDING
Na xpooiomoiite EykeepiEv a
(Eik.4) TPOOATaETUkαKEpaaNc
Na xpooiopoioite EYKekpiéva
(EIK.5) TPOOATEUtikαkoNc
Na xpoaiopoiieTe yekepiueva eoa
(EIK.6) TpoataoiaCtwuaiwv
(Eik.7) Na φopate TTPOOTATEUTIKI μασka avattvoiŋS
Na xpoimuoiEeTEyEKPIEVEc μTóTeC
TEKNISET TIEDOT. 112
ASENNUS 109
LISAVARUSTEET. 113
KAYTTO 109
EU:N VAATIMUSTENMUKAISUUSVAKUUTUS.113
KUNNOSSAPITO. 110
JOHDANTO
Käytöohjekirja
RICERCA DEI GUASTI. 154
SICUREZZA. 147
DATI TECHNICI 155
MONTAGGIO 151
ACCESSORI. 156
FUNZIONAMENTO 152
PROBLEMU NOVER'SANA 175
TEHNISKIE DATI. 176
PIEDERUMI. 177
ES ATBILSTIBAS DEKLARACIJAS SATURS.177
IEVADS
1.(Fig.28)
2.(Fig.29)
3.(Fig.30)
4. (Fig. 31)
5.(Fig.32)
PROBLEMEN OPLOSSEN
Sorg for at langt hare settes opp over
(Fig. 10) skuldrene.
TILBEHØR
INNHOLDET I EF-SAMSVARSERKLÄERINGEN
TEXHINCHECKNE DAHHbIE 243
PPIHADJIEXKHOCTN. 244
CODEPKAHNE DEKJIAPALUNIO
COOTBETCTBNI EC. 244
BBEDEHNE
PykoBODCTBO NO 3KcPnyatauIN
IcxOdbHb TeKCT daHHoro pyKOBOdCTBa no pa6oTe coCTaBJeH ha aHrnniCKOM 3bIke. PyKOBOdCTBa no
0630p
(Pnc.1)
1.БлokakkymyIaTOpOB
2.3apdHoe yctpoiCTBO
3.CBToIONoHbI INDnKaTOp COCTOHN3aPJa aKKyMylrTopa
4. KhoNka coCToHnna aKKymyIaTopa
5. Khonka peximma o6pa6oTK KpOMOK
6. ΜιΤΟΚ pεχύητο σόβρυδοῦνη
7. HanpaBJIeHne BpaUeHnA
8. Головka Триммера
9.Hox
10. HxHry 7tHaHa
11. Teneckonuuecka 3auejka
12.петеловая руковая.
13. Lünpobov zuHtp ynpablenn
14.ИЗмерптуль моцноctи
15. CBeToDnOndb HnDnKaTOp COCToHn 3apJa aKKyMylTopa
16. Khonka yBelenuhenra Mochoctn
17. KhoNka BkTIOueHn
18. Ctonop pbiyara dpocceia
19. Rykoytka
20. Khonka n3BneHnnaKkymyIaTopa
21.OCHOBAHHe
22. Θεκτρινεcksας ευλοῦγ τολοῦκα
23. Pbyar dpoceena
24. RykoBoDCTBO no 3KcIpyatauN
YcNoBhIe 06o3HaueHnHa n3dJIHH
(Pnc.2)PpeDynpexKdEHHe
PpoHTte daHHoe pykoBOcTBO no
(Pnc.3) 3Kcnpnyataun
IOnb3yInTeCb npOBepeHHbIM 3aUNTHbIM
(Pnc.4) WlneMOM
pa6ote Ha npyInx I3bIKax IaBIAHOTc IpebeOdaMn C aHJIINCKORO.
IcnoJb3yIte Odo6peHbIe cpeICTBa
(Pnc.5) 3aunTbIoprAHOBcnyxa
IcnoJb3yIte Odo6peHbIe cpeICTBa
(Pnc.6) 3auntbI rna3
(Pnc.7)HaedeBaIte nbIe3aunTHyMQKy
IcnoB3yTe OIO6peHHbIe 3aUNTHbIe
(Pnc.8) 60tHKn n nepaTkn.
HaedeBaTe OeJdy CdINHHbIM pyKaBOM n
(PnC.9) 6pIouKn.
(Pnc.10)ДиHHbIe BOJocbI y6upaIte HaBepx.
I3dennmoketOT6paBbTa
HaxoJzneCHa 3eMJe PpeMeTbI, YTO
(Pnc.11) MoKeT npuHnHTb BpeI rna3aM.
Bepertecb otckaKBAIOux npedMeTOB n
(Pnc.12) pikoWTeOB.
MaKcImaJIbHa YacToTa BpaueHn
(Pnc.13) BbIXoHoro BaNa
(PnC.14)Ydap TOKOM
IcnoB3yTeToBkoOo6peHHyoTOnOBky
TpIMMepa, KaTyUkY n peKOMeHdyEmyO
(Pnc.15) necky.He nCnoJb3yIe Hoxn.
(Pnc.16) Be3oNaChaJnCTaHcna
(Pnc.17) YpOBeHb MoUHocTn 3Byka
DahHoe n3dJIeNn nn yIaKOBky HeIb3J
yTNIN3nPOBaT B KaueCTBe 6bITOBbIX
OTXoIOB.ИЗДeЛи nунakOBky Heo6xOДIMO
peepaB B COOTBeTCTByOuNyHKT DnA
pepepaotkn 3JIeKtpnueckoro n
(Pnc.18)3neKtpoHHoro o6opydoBaHna.
He octabnIte, He xpaHnTe n He nCnoJIb3yIte DaHHOe I3JeIe nOd DOJKeM (Pnc.19) nn BO BnaXhblx ycNoBnx.
(Puc. 20) Перетаста
PnmeaHHe:OctaIbHbIe CmBOnJIb/3TNKeTKn Ha n3JeIN OTBeHaOT Tpe6oBaHNM, IpeDbraBnEeMbIM K ceptnΦnKaUIN BdpYnx KOMMepeCkNx 3OHax.
OTBETCTBEHHOCTb N3ROTOBNTEJIa
B COOTBETCTBUN C 3aKOHAMN O6 OTBETCTBEHHOCTN 13ROTOBNTEJI Mbl He Hecem OTBETCTBEHHOCTN 3a
yuep6, Bb3BaHHbI 3KcPnyatauNei HaWero n3dennBpe3yblTaTe:
- HeHaIeXaIeRo pEmoHTa n3dJIINIA;
- nCNoJIb3OBAHnI dIpeMoHTa I3dEInIe HeOpINHaIbHbIX DeTaneIe IINI DeTaneIe, HeoOObpeHHbIX pOnI3BODITeNem;
- IcnoIb3OBAHnHa HeOpunHaJIbHbIX DoONHInTeJIbHbIX npuHaJnEJXHOCTe Nn HEOdo6peHHbIX npoN3BOOnTeJIem;
- pEmoHTa N3dEJIINB HeaABTOpN3OBAHHOM cepBnCHOM CeHTpe INI HekBaIIuΦuIupOBaHHbIM CneuaJIInCTOM.
MEPbI BE3OПACHOCTN
YCTaHOBka 6JIOka aKKymyIaTOPOB
- COBmecntTe BbICTynbI Ha 6nOKe aKKymJrTOPOB C n3aMn B aKKymJrTOpHOM OTcEke. BCTabTe 6nok aKKymJrTOPOB B aKKymJrTOpHbI OTCeK Do ⅢeNtka.
- UTo6bI n3BNeueb 6JIOK aKKyMylrTOPOB, HAKMTe uYdepXnBaIte KHOKNy I3BJIeueHnra aKKyMylrTOPA N BbITaunTe 6JIOK aKKyMylrTOPOB.
3anyck DvraTeJIa
- YctahOBHTe 6nOK aKKymyIaTOPOB.Cm.pa3den YcTahOBKa 6nOKa aKKymyIaTOPOB Ha cTp.240.
- Haxmnte KhoNky BkJIooheHn, noka He 3aropntcnyHdkaTOp.
3.ДерхиTe BCNOMOraTeNbHyO pyKoRrKy JIeBOI pyKOJ. - Правов руков Нар KMITE и уdeckимаite Верхниpbuhar.
-
YdepxnbA BepxHn pbIar, HaxMITE Ha HxHn pbIur n He OTnyckaIte erO. IpoDOnJkaIte ydepXNBaTb HxHnPBiur dJIy NcNoJb3OBAHNn 13JeJIy.
-
Haxmajte Ha HxHn pyuar C He6oJbIWM ycIIeM dna pa60tbi Ha H3Ko ckopocTn.
- Haxmaite Ha HxHn pbyar CunbHee, YTo6bI pa6oTaTb Ha 6OJee BBICOKO CKOPoCTn.
6.Издени roTOBO K ekcnnyaTaUIN.
OctahOBka DvBraTeJra
- Otnyctnte pbuar.
- Haxmnte KhoNky BKnHueHn, noka He noracHe HndKaTOp.
I3MeHeHne pexIma 3HEproNoTpe6JIeHnA
PexIM 3HeprnonoTpe6JIeHnI N3JIeIN M0XHO N3MeHHTb HEnocpeIcTeBENHO BO BpEma pa6Otbl. CyIecTByet 2 peXIMa 3HeprnonoTpe6JIeHnI:
1.CTaHApTHbIpeKIM-3KOHOOMn 3HeprnoTpe6JIeHnIyBEnuYeHne BpeMeHn pa60tbl.CTaHApTHbIpeKIMNCNoJb3yeTCr dnn 6oJbUnHCTBa3aDaU.
IpmeaHne: CtaHapTHbI peKIM BKnHoyaeTc npn 3anycke n3dJIy.
- YcNHeHHbIpeKIMpa6oTa c 60Jee BbICOKOckopocTbIO.BycnHeHHompeKIme n3dEne pa6oTaET Ha MaKcImaJIbHOH MoUHOCTn dJaBbINOJIHeHnCLOXHbIX 3aJaU. JIy BKIOUChEny ycIneHHOrOppeKIMHaXMMTe KHOJky YBeJIuueHmmoHOCn, Noka He 3aRopITcraHdkaTop. UTo6bl BbIKIQUHTb YcNHeHHbIpeKIM, HaxMMTe KHOJky YBeJIuueHmMoUHOCTn, Noka INHdkaTop He IORachET.
PpmeaHne: Ecnn pbyar 6bl OTnyueH BO BpeM pa60tbl,TO npn 3anyce N3denn8 6ydet BKIOUeH nocneHn nCnoIb3OBAuWmcapeKIM.Bcnyae ABToMaTHnuecko OCTaHOBKn N3dJIINu INn HaxKaTnA KHONKn BKNIOUeHn OepaTOPOM, NOcneHn MCNoIb3OBAuWmcapeKIM ydaJnEeTcN 3n Namr. Pp 3anycke N3denn CHOBa BKNIOUaETc TcAnDapTHbI peKIM.
I3mepntb MOHOCn
N3Mepntb MOUHOCTN NOKa3bIBAeT, CKOBKO 3HeprnNOTpe6JrE NTdJIe BO Bpempa60Tbl.
CBeToIOHbIe HINKAtOpb4 5 06o3HaohOT ONTImaJIbHyIO IPOU3BOIDTeJIbHOCTb N3deJIny IN 3ΦΦEKNBHOCTb paXOJa 3Heprn aKKMyJrTopa.
CBeToIOHbI INHnKaTOp 6 cnpaba 06o3Haayet MaKcMaJIbHyIO MOUHOCTb N3DeJINr IMHImaJIbHyIO 3ΦΦeKTuBHOCTb aKKyMylTopa.
CBeToIIOHbI INHnKaTOP COCTOHN3apJa aKKyMyJrTopa
HnDnKaTOpb coCToHn6Joka aKKymyIaTOPOB CBETrC, noka onepaTOp He notHaTe pUar. Iocne TORO KaK pbuAr OTNuJeH, INDnKaTOpb COCToHn6Joka aKKymyIaTOPOB HaunHaOT CHOBA CBETNbCra.
KoNueCTBO CBETaUNxCnHdNkAToPOB yKa3bIbAeT Ha TeKuynypoBeHb 3apJa 6NoKa aKKymJrTOPOB.
| Сbvetoiodнble инданаюы | Состаянue akкymларону батару |
| 3aropaIoTcR Bce Зелени Сbvetoiodы | Посноctью заразоже (100% - 76%) |
| 3aropaIoTcR Сbvetoiodы 1, 2 и 3 | Зард 6лoka akкymларонов — 75- 51%. |
| 3aropaIoTcR Сbvetoiodы 1 и 2 | Зард 6лoka akкymларонов — 50- 26%. |
| 3aropaetся Сbvetoiod 1 | Зард 6лoka akкymларонов — 25- 6%. |
| Сbvetoiod 1 Miraаet | Зард 6лoka akкymларонов — 5- 0%. |
PnmeaHne: EcnBnraTeNb octaHOBNnc, a CBToNDnDhI INDkaTOp nHTaHna IPOdONkAeT CBETNbCn, HxMnTe KhoNky Ha 6Noke AkKymIaTOpOB. Bo3MOxHbIe BapNaHTbI peSeHnI npOBeMbI cM. B pa3deNe IONCK N YCTPAHEHNE HEICnPABHOCTEHa cTp.242.
PpmeHne:KorJa6NOKaKKMyJrTOPOBNONHOCTbpoa3paXKeH,DBnraTeJIbMTHOBeHHO OCTaHaBBnBaETc.
PnmeaHne: ABraTeJIb aBToMaTueeCKN OCTaHaBJIbBaetc npn nepepeBe 6loka aKkyMylTopoB uN KHTpOJIepea DBrAteJIb BO BpEmr
BbINOHNHeHn CNOXhBIX Oepaun. DaIte DBNrAteNIO u 6NoKy aKKymyTOpOB oCTbITb. Pocne 3TorO n3dJIne BO3BpaaetcB pa6ooye coCtOJHnE.
3Kcnpnyataunr TpmmMepa Jra TpaBbl
OunuTe KpbIuKy rOIOBKn TpIMMepa npu yCTaHOBKe HOBOH pExyUeJ NcKn dJa npedOTbpaueHn Bn6paun.
- PpOBeBpTe dpyrHe DeTAnI rOJIOBKn TpIMMepa N OChCTnTe IN npH Heo6xOuMoocTn.
CtpnKKa TpaBbl
-ДерхитЕ roLOBky trPIMMepa uYb BblIe 3eMЛn NOd yrnom.(Pnc.24)
- He npnKmMaTe pejkyuI necky K TpaBe.
KoWeHne TpaBbI
1.Пи Кошенп Травь Дерхит eржую NeckуТриммера napаллельно зemle.(Pnc.25)
2. He npKImaTe roNObky TpMMepa K 3emJe. 3To MoKeT npUBeCTn K NOBpeXdEHNIO N3DeJInr IpyHTa.
3. He no3BoJrIe TOrOBKe TpIMMepa nocToHnO cOnpKacTbCc 3eMJe, 3TO MoKeT NOBpeDnTb roJIOBky TpIMMepa.
4.ДЯСКAWBANI TpabI nepemeaIte N3dJIeNIE N3 CTOPOHBI B CTOPHY pRn NOJHOCTbIO OTKpbITOM dpocceJe.Y6eINTEcB, YTO peKyuJaI necka pacnoJIOXKeHa npaJIJIeJIbHo 3emNe.(Pnc.26)
06pa6oTk KaKpOMOKra3OHa
1.ПиОБрабоТKEКРOMOKДерЖИТЕржуHЛeckyТгIMМераВерТИКАЛьНООТHOSEHINK3eMJIe.
MeIeHNO nepemuaTecb BDoNb 6pa6aTaBaemO o6NaCTN.
- He npixkmaTe roNoBky TpIMMepa K 3eMJe. 3To MoKeT npuBeCTN K NOBpeKdEHIO N3DeJIINr IpyHTa.
- He no3B0JnTe rONOBKe TpIMMepa NOCTOHHO cOpNkacaTbC 3eMnei, NocKoNbKy 3TO MOKeT NOBpeDntb rONOBky TpIMMepa.
- Pa6oTaIe Ha noHNo MOUHocTn.
5.Y6eNTecb,TOpejxuaJneckaOT6paCbIbAet Cpe3aHHyIO TpabyBpaHee NOCTpnKeHHyIO 30Hy.
IcnoIb3OBAHne KhoIkppeKIMa 6pb60TKn KpOMOK KhoIka peKIMa 6pb60TKn KpOMOK nO3BOJraT eOnepaTopy NOBOPaUHBaTB rOJOBkY TpIMMepa.3To ynpouaet 6pb60TKy KpOMOK ra3OHa BdoJIb TpoTyapOB I npDbE3HbIX DOpOKeK.
(Puc.27)
- Haxmnte u ydepknBaTe KhoNky, TTo6bl NOBepHytb Kopnyc Dniratela Ha 180 rpaDycob.
- OTnyctnte KhoNky, YTO6bl 3aФнкupoBaTb KOpnyc DBnIraTeJI B peKmE o6pa6OTKn KpOMOK

BHUMAHNE: PpeKJe Qem N3MeHnTb peKIM CTpnKKN, O6ra3aTeJbHO BbIKIIOHTe n3dJIne N y6eINTEcB, YTO R0JOBKa TpIMMepa He BpaJaeTcR.
TEXHINQUECKOE OBCJYKINBAHNE

IPEyIPEXJEHNE:peepOChTko, peMOHTOM ININTEXHnueCKIM 06cnyxnbAHnEM N3dJIINBHNMaTeJbHo n3yUHe pa3deN TexHnKn 6e3OpacHOCTn.
EkeHHeBHOe 06cnyKbAHne
- INBNEKNTe 6JOK aKKyMylTOpOB. HHΦopMaζIHO NaIeXaIeM TexHnueCKOM 6cNyKbAHm C.M. B INHCTpyKuIx N0 3KcNlNyataζIIN 6JIOKa aKKyMylTOpOB.
-Поверп Te 3aTЯку raeK, BnHTOB n 6oNToB. - PpOBepeIncnpaBHOCTb pa60Tb pbHara.
-
PpOBepbTe nCnPaBHOcTb pa6Otbl KHOJIKN BKNIOUeHINr.
Mrkoi tckoi nI cyxoi BetoobO ouhnte NOBepxHocTBn3deJnOy Mycopa.He nCnoJIb3yIte Ira OuHCTKn BOy, YNCTaUne CpeDCTBa IIN pactBOpHTeII.
MrkouIeTKoI npOuHCTnTe BeHTNJIAUHOHHbIE OTBepCTnJ. -
PpOBepbTe n3dene Ha haJIuHne Bcex DeTanei n OTCyTCTBnE NOBpeXJdeHHbIX,OCna6NeHHbIX nn N3HOWeHHbIX DeTanei.
- OcmotpuTe n3dennne u y6eDnTecb, yTO noDbNkHbIyactn COBMeUaTcra 6e3OnacHbI dnyNCNOJIb3OBAHnA.
- Pn noBpeJdeHnn n3dJeHna o6paauTecb B aBTopn3ObaHHb cepBnchb uHTp. He nCNoJIb3yIte NOBpeJdeHHOe n3dJeHne.
3aMeHa peKyuIeJIeCKn
RIESENIE PROBLEMOV 254
TECHNICKÉ UDAJE 255
PRISLUSENSTVO. 256
OBSAH VYHLASENIA O ZHODE ES. 256
UVOD
Návod na obsluhu
John Thompson, Product and Marketing director
Ansvarig for teknik dokumentation
Içindekiler
GIRIS. 288
SORUN GIDERME 295
EMNIYET 289
TEKNIK VERILER 296
MONTAJ. 293
AKSESUARLAR. 297
KULLANIM. 293
AT UYUMLULUK BILDIRIMIN INICERIGI 297
BAKIM 294
GIRIS
Kullanim kilavuzu
UCYHEHHHHECINPABHOCTE 306
B3NEKA. 299
TEXHIUHXAPAKTEPUCTUKI 307
36IPAHHJ 304
AKCECYAPU. 308
EKCPIIYATAJIIA 304
3MICT DEKJIAPALI BIDIOBIDHOCTI EC. 308
TEXHUYOBCJNYTOBYAHHH 306
BCTYI
Посibик Корисьача
OpriHaJIbHa MoBa noci6Hnka KopncTyBaça - aHrliIcbKa. Noci6HnKo KOpncTyBaça iHsIMMoBaMn e nepeKeIaamn aHrliIcbkOrO opriHaIy.
Orla
(Man.1)
1.AkymyIaTOpHn6nok
2.3apdHn npncptpi akymyIaTopa
3.CbITIOIDHn iHdkaTOp pIBHa 3apAkyMylTopa
4. Khonka cTaHy akymyTopa
5. Khonka noBepTaHn rONoBKn
6. 3axnchnn koxypikyoHaacKn
7. Hanpamok o6epTaHHa
8. TOnOBKa TpUmepa
9. Pizepb
10. HnKHa TtHaHra
11. Po3cyBnH φikCaTOp
12.ПeTeNbHnTpMau
13.БлokцфровoroКеруваня
14. BmipioBaH noTyXHoCTi
15. CbITNoIOJIOHN iHdNkATOp pIBHa 3apAkyakymyIToPA
16. Khonka nIDBnueHH noTyXHOCTi
17. KhoNka XnBneHHa
18. EneMeHT 6IOKyBaHHK Kypka
19. Puyka
20. KhoIIka dIy BnMaHHa akymJIaTOpHOi 6aTaapei
21.Ochoba
22. EneKtpnHn po6oHn 6Iok
23. Kypok
24.ПосібніК Користувача
CnmboHnHaBnp6i
(Man.2)Попeджения
(MaI.3)ПpoUHTaIte uei noci6HnK
BnKOpncToByTe BiiNObiHi 3acO6n 3axncty
(MaI.4) roJIOBn
BukopncToByTe BiIIObiHi 3ac6b3axncty
(Man.5) cnyxy
BukopncToByTe BiDnObiDiHi 3acO6n 3axncty
(MaJI.6) ouei
(Man.7) HadsraTe pecnipatop
BnKOpncTObyIte BiDnOBiHe 3axnche B3yTTa
(Man.8) nykaBnzi.
HaJaTaIe OJgI3 DoBmPyKaBaMn
(MaJI.9) 乌TaHn.
Heo6xio ckikybatn, 06 dobre Bonooc
(MaI. 10) 6yIIO 3aKoJIoTe BnIe pe iBHa nJIeueH.
3-niB Bnpo6y MoKyb BnKDaTncr npedMeTu, 10 MoKe npu3BecTu DC
(MaI.11) noxkoJKeHHn oyei
OcTepiraunTeT sy o6'ekTIB,aki
(Ma1. 12) MoKyTb BuNItaTu 3-niB Bpu6y.
(Ma1.13) MaKcImaIbHa WbUdKicTb BuxiDHoro BaNa
(Ma1. 14) YpaKeHH eneKtpnHm Ctpymom
BukopncToByte JIme cepTnphiKobahi roJOBKn TpImepa, KOTyUKN HHTKy. He
(MaI.15) BnKOpucToBvIte ne3a.
(Man. 16) Be3neuHa BiDcTaHb
(Ma1. 17) PibeHb 3BykoBoi nOtYxHocti
Bnpi i ynapokky He moKHa ytni3ybaTn kno6ytoBiDxOaN. Ytni3aio Bnp6y niynapokk cnid 3diChIOBaTN Ha cneuiian3OBaHomy nipnpemCTBI 3 nepepo6kn BiXoDiEneKTpHoro
(MaJI.18) eNeKtpoHHoro o6naHaHHra.
He 3aIuuaTe, He 36epiraTe n He BnKOpncTOByte Bnpi6 niD doUeM i y
(Man. 19) Boloromy cepeobuizi.
(Man. 20) Ytunizui
3BepHt b yBary: Ihni no3haeHHHa Bnpo6i BiINOBiJaIOb BnMOram CneiaJIbHnx cepTnΦikatIB dIa IHx TOProBnX 30H.
BidnoiidaIbHictb 3a kictb npodykci
BiinbHIO 3aKOHIB npo BiNobiaIbHicTB 3a kictb npdykuii MHe Hecemo BiNobiaIbHocTi 3a 6ydb-aki
NoukoJKeHH, cnpuHHeHi po6ToIO Haunx Bnpo6iB,
Bnpi6 6yB HnepaBnIbHO BiDpemHOHToBaHn;
Bnpi6 6yB BiDpemOnTOBaHn i3 BNKOpNCTaHHM DeTaeN, BnroTOBHeHX He Bnpo6HnKOM a60 He 3aTBepdxKeHX Hm;
Bupio6bnaHaHn akcecyapOM, BuroTOBHeHM He Bnpo6HnKOM a60 He 3aTBePdxKeHm Hm;
Bnpi6 6yB BiDpeMOHTOBaHn y HeaBTOpN3ObaHomy cepBichOMy ceHTpi a6o HeaBTOpN3ObaHOKOMnaiHeIO;
BE3NEKA
He BnKOpNCToBnyTe Bnpi6 3 noWKoDxKeHIM 3axnCHm CnpAxDxKeHHM. Y pa3i noWKoDxKeHH
Bnpo6y, 3BepHITbcra Do aBtOpn3oBaHoro cepBicHoro ueHTpy.
3axnchn Koxyxp iKyuOHa caKn
KoJy x pIkyoH hacAn 3axuae BiB BnKndaHH npedmeti y Hapymky onepaTopa.
IpeBipraTe Koxyxpixyoyi HacadKn Ha npEmdet
NoKoJKeHb Ta B pazi Heo6xjHocTi 3amHIOte Noro.
BnKOpNCToByte Nnue ceptuikobaHi Koxyn dny
piKyuNX HacaDOK.
Pikyuha hacaika
- Пювовытpeperуяргелхичheобслг罗вань. PerynarHn ornaI,perynIOBaHnHa 6o peMOHT pixkyoi HacaDNKn NOBUNHEN PPOBOUITNcA ABTOPIN3OBaHNM cepBICHm ueHTpOM.
-ПодуктИВист b piKyuoi HacaДkn 36iЛьшуETbcra.
- Ctpok cnjxbi jkyoH hacaKn 36iNbWyETbcra.
-He6e3neKa BnHnKHeHH HeaChNX BnnaKIB 3MeHwycbCra.
BnKOpncToByTe JnIe ceptnphiKOBaHn 3axnCHn KoxypxiKyuOHaCaKn. Doklaadhiwe nVB.#
- He BnKOpncToBvIte NoIkoJKeHpy pIXkyu HacaIky.
TOnOBka TpIMepa
-Дязменинь Bi6paци nepekohaitecra, lo HNTka Tpimepa hamotaHa ha 6apa6ah zuIbHo ta pIBHOMipHO.
BVKOpNCToByTe Jnue ceptuΦikOBaHi rOJOBKn Ta HHTKN KocapKn. NIB. #
CniDkyIte 3a npabunbHOIO DOBXNHOIO HHTKIN KocapKn.ДЯpo6OTn 3 BeNkoHO DOBXNHOIO HNTKN BNIKOpNCTOByeTbcra 6Inbwe NOTyXHOCti DBNrHa, HIX i3 ManoHO.
- PepekoHaIteCra, 0o HIX Ha Koxyci pixkyoH hacaKHe noIKoJKeHn.
- PpeB BCTaHOBnEHn HnTK Ha Bpi6, Heo6xIDHO BmOHTn ii y BoDi npTgrom DBOX dHIB. Lc36iNbHTb CtpOK cnYk6n HnTKn.
3axoNi 6e3neKn iD qac po6OTn 3 akymyIaTopamN
BukopncToByuTe Nnue akymyraTOpHi 6nOKn BiD Bpuo6Hnka u3apdXkaaTe ix Nnue B 3aprAnHomy npucptoBiBnuo6Hnka.
AkymynTOpHi 6nOKn, kI MoXHa nepe3apKkATn, BnKOpNCTOBYIObCRA K DxKepeNo XnBLeHnra TInbKn dJa BIDNOiDHHx akMyJrTOpHnx npCTpoIB. Uo6 yHnKHytn TpaBMyBaHHa, 3a60pOHeNo BnKOpNCTOByBaTHn aKMyJrTOpHn 6nOK kDxKepeNo XnBLeHHra dJa IHnX npCTPOIB.
3a6opohnaetbpc03bnpatn,Bjdkpnbatny po3piatahakymyntophi6Jokn.
- He TpmaTe akmyIaTOpHi 6nokn iI nprammM coHryHMM npomeHMy nI biJ dxKepeI TeNla. TpmaTe ix noJaJI BiD BorHIO.
Pereynapno nepeBipnTe 3apndn npicpti Ta akyMnyTopHn 6nok Ha hAraBHicTb noIKoJKeHb. NooKoJKeHi a60 3mHeHi akyMnyTopHi 6nKn MoKyTB npn3BeCTn Do nOxEki, Bnu6yXu TpaBMvBaHHra IIOeH. He pemOnTyIe Ta He BiDkPnBaIte noKoJKeHi akyMnyTopHi 6nKn.
He BnKOpNCToByTe DeΦeKTHN, 3mHeHn Qn NowKOdKeHn aKymJrTOpHn 6bO bpi6.
He 3miHouTe Ta He peMOHTyIe Bnpo6n I akymyIaTOpHi 6IoKn. PeMOHT MaE BuKoHyBaTu JInuJe ABTOPN3OBaHN dUneP.
He 3amkaite KOHTaKTn eIemehTa JxNBHeHHa6o akymyIaTOpHoro 6Joka. He 36epiraTe akymyIaTOpHi 6JOKN B KOPo6ci Yn Raunky, de ix MOxyTb 3AMKHyTN iHwi MeTaeBi IpeDMeTu.
BnMaTe akyMylTOpHn 6NoK 3 opurHaJIbHOyynakOBKn JInue 6e3nocepEHNbO nepeBNKOpNCtAHHM.
- He donyckaTe MexaHiHnx ydapiB no akymyIaTOpHnx 6JIOkax.
Y pa3i BntikahHn piINH 3 akymyIaTopa cnIknyTe, 06 BOHa He notpanHnHa hskipy uB oui. Kaio pIHHa notpanHnHa hskipy, npomnTe BpaKeHy iJRAHKy BENIKO KINbKICTHO BODn Ta 3BepHiTbcra 3a MeINuHO DOnOMoROU.
BukopncToByntaepnnpctpiJnue3a npn3HaueHHm.
- 3a6e3neuHT npabnIbHy po60ty, BCTaHOBJIIOte akyMylTOpHNI 6Iok BiINOBiIDHO IO3HaQK «IIIOc» (+) i «MiHyc» (-) Ha akyMylTOpHOMy 6Iouci Bnpo6i.
BukopucobyTe Jnue akymyTOpHn 6Jok, npn3HaueHn DJIa KOHKpeTHOro BnpOby.
- He 3acctocobyTe B OndHompynpctpoi akymnyTophi 6IOKPi3HOHnpyrN uBIDpi3Hnx BpuO6HnKIB.
- TpmaTe akymyIaTOpHi 6bNoKn noJaI bI dItei.
3aBXn KynyTe niDxOJaui akymyIaTOpHi 6nOKn DnBnpo6y.
CπiDkyTe, ξo6 akymyIaTOpn 6ynu nuctmny cyxumn.
- KaHIO.
- Y pa3i 3amHn HOBI akymyIaTOpHi 6Iokn CnId 3apAHTn Ipeep BnKOpNCTaHHaM. 3aBxJn BnKOpNCTOBYte npaBnJIbHn 3apAHN npucTpi; nVB. BiIOBIDHy IHCTpyKciHO 0IoO 3apAJaHHaB Noci6HNY KOpNCTyBaHa.
He donyckaTe 6e3nepepbHOro 3apJxKaHHaKMyJIaTOPHO 6Joka, kN He BnKOpNCbByTbcra.
36epexitb noci6nK, 0o6 3BepTaTncrdo HbOrO 3roDOM.
BukopocToByte akyMnyTopHn 6nok nIuwe ToDi, KOHN BIN notpi6eH.
BnMaTe aKymJrTopHn 6nok i3 Bnpo6y, KOnn BiH He BnKOpNCTOByETbcra.
Пд ус ecknnyataцi Трmaite akymyrtopnH 6JOK noDani BiD ckpinok, KJIIOvIIB, CBxIB, rBnHTIB
3БИРАннЯ

IONPEJKEHH: Ipeep 36npaHnM Bnpo6y npouetae po3dn npo npabuna texhki 6e3neK.
3MiHa nOLOXeHHn neTeIbHOro TpIMaYa
(Man. 21)
- Biinycitib fikcatop.
- IpebeBcIb neTeIbHn TpImaU y Heo6xIDhe po6oJe noJIOXKeHHa.
- 3akpnIte fikcaTop.
- NepekoHaTeCra, 10 rBnHTn Ha fikCaTopi 3aTHyTi.
3MiHa IOBxHnBaJa
Teneckoniyn BAN BINO6y Do3BONe HAJauToBvBaTu Ioro Ha Heo6xIDHy DOBXINHy.
- BiDnyctitb fikcatop.
2.Перемиун Te HxHnBan, 36inbUnTn 3MeHUnTn NOro DoBxNHy. - 3akpnte qikcatop.
4.ПepekoHaiTeec,zo rBnHTn Ha φikcatopi 3aTyrHyTi.
MoNTaK 3axnchoro kOxUxa pIXyOoi HacaIKN Ta rOIOBKn TpIMepa (npAmm BaI)
1.Пд'бнaite 3axnchno KoxypiKyoHaacAn(A)doBaNa 3a Donomoro6oNTiB(L).IpekeOnaTeCya,IO Bn BnKOpncTOByTe npabInbHn 3axnchnoKoxyx Ta roNoBky TpImepa.(Man.22)
2.Повернштюлбу Тримета (H) npotruOHHNKOBoi CtrpIKN, u63akpinTu RoLOBky 3Kopo6koI nepeaay (niBo6iHa Hapi3ka). (Man. 23 )
EKCПЛYATAЦИ

NONEPEDKEHH: Npeed BnKOpNCtAHNM Bnpo6y yBaxHo npOHTaTe po3dIn npo npabuNa texHikn 6e3neKn.
Ipeed noaTkom po6OTn 3 BInpo6om
- CtopoHHi oco6n TbapHHn nobHHn nepe6yBaTu Ha 6e3neuHi BiDCTaHI BiD po6oOoi 30Hn.
3iHIOHe IOeHHN TeXHiHn OrJy. NIB. 10eHHe texHiHne o6cnyroByBaHHHa cToPiu 306.
YCTaHOBJIeHHaKymyIaTOpHOro 6Joka
3piBnItepe6paakymyIaTOPHOro 6noka 3 npopizamn akymyIaTOPHO BicciKy. BCTABTe akymyIaTOPHn 6nok y BiDcik i HaTnciHbHa Hboro do KnacaHHra.
- 3Hn akymyIaTOPn6nK, HATNCiTb n ytpmnyTe KHONky DnB BnMaHHa kymyIaTOPHOI 6ataei, nicJyOBOBtHiB noRo.
3anyck dBnryHa
- BctaHObitb akymyIaTOPHn 6JOK. NIB. YCTaHOBHeHHa kymyIaTOPHO 6Noka Ha CTOPIH4i 304.
- Hatncihtb KhoNky XNBHeHHy N doyeKaTeCey, DOKN BBIMKHeTcra IHnKaTop.
-
Bi3bmitbcra 3a donomixky pyky IIBIO pykoio.
-
HatnchiTb Ha BepxHni Kypok npaBOIO pyKOIO Ta yTpmyTe moro.
5.He BiDnyckaOuN BepXHiK KypOK,HaTnCHiTb Ha HnKHi KypOK uTPmYuTe noro.ДЯ po6oTu 3 BInpo6oM npOdoBkUyTe yTPmYBaTu HnKHi KypOK.
-ДЯ MeHoiOI WbNIOKoCTi po6OTn HaTnCKaITe Ha HnXhHi KypOK cna6iWe.
-Дябиошьнкoctipo6otnHaTnckaTeHa HxHki KypOK CnblHiIe.
- Bupi6 roTobu do po6oTu.
3yHHeHHa
- BiDnyctiB kypok.
- Hatncihb Ha KhoNky JnBHeHHa N OoKeaTeec, DOKu IHdNKaTOp BmKHeTbcr.
3MiHeHHpeKmMy nOtyxHocTi
PexnM nOtJxHocti BnO6y MoXHa 3MiHTn NiД Yac NOro BnKOpNCtAHn. IChye 2 peXmN po6OTn.
- CtaHdapTHn peKIM - 3a6e3neuey 36epeKeHH eHepTt Ta IIOOBKyE Yac po60TN. CtaHdapTHn peKIM MoXHa 3actOCOByBaTN dIg 6IbWoocTi 3aDaU.
3BepHt b yBary:PiJ uac 3anycky Bupi6 BCTaHOBJIeHn y cTaNdapTHn peKmM. - Pekim iDnueHH noTyXHocTi - y peKm3iNbueHH noTyXHocTi Bpi6 npaHc Ha BnuxOeptax DnryHa. Pekim iDnueHH noTyXHocTi
BKNOPNCTOBy MAKCIMMaJbHO DoCTyHNo NOTyXHicTb DnBnKoHaHH CknaDnHex 3aDauch. IInr 3anycky peKmMy NiDbuIeHH NoTyXHocTi HATnCHiB KhoNky NiDbuIeHH NoTyXHocTi NDoUeKaIteCBAIMKHeHH iNDnKaTopa. IInr BImKHeHHpeKmMy NiDbuIeHH NOTyXHocTi HATnCHiB KhoNky NiDbuIeHH NoTyXHocTi NDoUeKaIteCBAIMKHeHH iNDnKaTop.
3BepHt b yBary: Y pa3i BiDnyckaHH KypKa nIac BnKOpNCTaHH Bnpi6 noHne npaioBaTn B oCTaHHbOMy BBIMKHeHOMy pexm. RaKIO Bnpi6 3ynHraTbcr ABTomatuHO a6o onepaTOp HATnCKaE KHONKY XMBLeHH, OCTaHHi BBIMKHeHNI pexm BndaJIeTbcS 3 na'MTI npcTpo. Iid vac 3anycky Bnp6 3HOBy nepexOHTb y cTaHapTHn peXIM.
BmipioBaH noTyXhOcTi
BmipOBaay notyKHOCTi BiO6paXye notyXHicTb, 00 BnKOpNCTOBy Bnpi6 niD yac po6oTu.
CbitIOiOHi iHnKaTOpn 4 n 5 03HaHoTB HauKpaUy npOdyKTHBHCtB po6Ot Ta epeKTHBHCtB BnKOpNCtAHnA kymyJrTopa.
CbitIOioHN iHnKaTOp 6 3 npaBoi cTopoHn O3Haac MaKcMaIbHy nOlyXHiCTb i MiHImaIbHy eFeKTnBHiCTb BnKOpNCaHHa kMyJlTaTopa.
CbitIOiOHN iHnKaTOp pIBn3apAkyakymyIToPa
CTah akymyIaTOPHOro 6noka BiOobpaKyeTbc,doKN Bn He HATnCHete Kypok. KOnn BN BiDnyctnte Kypok, cTaH akymyIaTOPHO 6noka 6yde BiOobpaKeHn ue pa3.
KilbkiCTb BBIMKHeHn CBITIOJIOHNIX iHnKaTopiB noka3ye nOTOHHn pIBeHb 3apAy akyMyIaTOpHOro 6noka.
| СbvITLOIODHINIHДКATOPN | Стан akумлайора |
| Гороть уcizeleни СBVITLOIODN | Заряжени поBNICTHO (76-100 %) |
| ГоротьсBVITLOIODN 1, 2 ta 3 | Актулайорний 6лOK заряжени на 75-51 %. |
| ГоротьСBVITLOIODN 1 i 2 | Актулайорний 6лOK заряжени на 50-26 %. |
| ГоротьСBVITLOIOD 1 | Актулайорний 6лOK заряжени на 25-6 %. |
| БлимаСBVITLOIOD 1 | Актулайорний 6лOK заряжени на 5-0 %. |
3BepHb yBary: RaO dBuryn 3ynnHaetbcra, a CBITIOIDHn iHnKaTOp 3aIIuAeTbCBA BIMKHeHM, HATNCHTb KONkHa akymyIaTOpHOMy 6Noi. IHopMaio OoO MoKnBuX pIWeHb MoXHa 3HaHTN B YCYHEHHA HECNPABHOCTEHa cToPi306.
3BepHt b yBary: kkuO akyMylarTopnH 6Iok 6yde NOBHCTIO PO3pAxDKeHNI, DBNrHy H eraiHO 3ynHHTbcra.
3BepHb yBary: JaKIO nIac IHTeHCNBHOeKcNpyauii AkymyTOpHn 6JOK qN DBNrH cTaHyTB 3aHaTO rapAHH, DBNrH 3ynHtBCa ABTomATuHo. DaIte DBNrHy n AkymyTOpHomy 6JOK oxONoHyTu. Picna uboro Bnpi6 cnJa e HanaWtBuHHa.
Eknyatau Tpimepa
-ya3i BCTaHOBnEHn HOBOHHTKn HEO6xIDHO ONUCTNTN KPNUKy rOJIIBKN TpIMepa, 0o6 yHnKHyTN NOdaJIbIuX Bi6paui.
OrnhaTe iHni Detani rojibKn TpImepa Ta 3a Heo6xidHOCTi OCHITb ix.
Пдстригнг Трави
TpmaTe roIOBky TpImepa nIyKytOM 6e3nocepHbO Ha3emJeo.(Man.24)
- He BДаБЛIOИТЕ HINTKY TpIMepaВ TpaBy.
3pi3HH TpaBn
1.Пд усЗрзэнгТравиНтмера Мб 6унnapальна зemni.(MaJ.25)
2. He BdabJIOIte rOJIbky TpIMepa B 3emNI. IChye pN3NK N0WKoDKeHnHa 3emNi Ta BInpo6y.
3. He dozbojnyte rojibci trpimepa noctiHOTopkaTnca 3emni, aJke ue moKe npu3BecTu do IInoWKoDKeHHN.
4.Пдчac nepemiiueHHBup6y 3i CTopoHn BCTopoHy dЯ 3pi3aHH TaPbN BkOpncTOByTe NOBHy notyXhictb.пepekoHaItec,ио HHTka TpImepa 3HaxoDHTbcnnapaJIeNbHO 3emni.(Man.26)
Пдстригань Трави
1.ПдчacпдсрганнлариНHTКаТримераMae nepe6yBaTN BepTnKaJbHo BiHocHO 3emNi.ПobIbHo nepemiuTeCraB3doBxДЯнHKn,Ha kI npaioTe.
2. He BdaBIOIte rOIIbky TpIMepa B 3emNI. IcHye pN3NK N0UKOJKeHnHa 3emNi Ta Bnpo6y.
3. He dozbojnye ronoBci Tpimepa noctiHo TopkaTncr 3emni, aJxke ue MOxpe npn3BecTu Do II NOWKoDKeHHN.
4. NOBHICTHO HATNCiTb Kypok ra3y.
5. NepekoHaTecra, 30 3piaHa TpImepom TpaBa BIDKndaeTbca Ha BKe CkOWeHy DInrHky.
BukopncTaHHK HonKn NOBepTaHHr TOnOBKn
KhoNka noBepTaHHraTOnOBKn Do3BOJnE onepatopy noBepTaTN rOIOBky TpImepa. Lc neIonerWyec niDcTpuraHn TaPbN B3DoBk npoxoJb Yn TpoTyapib.
(Man.27)
- HatnciB ytpmyTe KHONky, Ondohacno nobeptaOuH KOpNc MOTopa Ha 180 rpaDycib.
- BiDnyctItb KhoNky, 063aΦikCyBaTn Kopnyc MOTopa B peKmPi ndTpuraHn
TEXHlUHE OBCJyROByBAHHa

NONEPEDKEHH: Npeo ouHnHm, peMOHTyBaHHM YI TexHiuHm 06cnyroBvBaHHm yBaXHO npOHTaIte po3dIn npO npabunA texhIK6e3neKn.
TeXHicHe 06cnyroByBaHHa
BnMIb akymyIaTOPHn 6JIOK. IHOpMaIio 1oHO HJIeXHOrO TexHiUHOrO 06CJyROByBaHHra MOxHa 3HaHTN B IHCTpyKci 3 ekCnnyatauia akymyIaTOPHOrO 6JIOka.
- PenebipTe rain, rBnHT Ta 6oJTN.
-Перевірітіnpавиьнісігі робіті Күрka.
- NpebipTe npabnblhictb po60tn KhoNkn XNBJIeHHa.
-ПибираиTe 30BhiHi 3a6pydHeHn 3a DonomorOIO M'koI uTkn Yu cyxoI TkaHnH. 3a6opohЯeTbcR BnKOpNCTOByBaTu BOy, pIDHn IJr OuHSeHHN P03UnHHKn.
-ПибираиTe 3a6pydHHeHHBAENTnJIaIiHnx OTBopIB 3a DonOMorO M'koI JITKN.
- IpeBipTe Bnpi6 Ha npEaMeT BiDcyTHix, noWkoJKeHnx, po3xuTaHnx a6o 3HoWeHnx DeTanei.
- IpebeipTe Bpi6 i nepekoHaTecra, 0p yxomi DeTaIi BCTaHOBneHi pIBHO iHCTpyMeHT MoXHa 6e3neuHO BBIMKHyTu.
- Y paazi NOUKOJXeHHaBPO6y, 3BepHiTbcra Do aBTOPn3ObaHoro cepBicHO cHTpy. He KOpNCTyItecnoUKOJXeHHM BINO6om.
3amHa HHTKn TpImepa
UCYHEHHH HECPABHOCTEN
| HecnpaBnictb MochniBa pruChna MoxKInBe pIeHЯ | ||
| Вириб He 3anyskaεTbcra | Живления BiDcTyHc. ПОдайTe JИВпения. ДИВ. З苹усдВигуна насторци 304. | |
| Еlektpruchny koNTaKT mIXK Виробм и akymylantopHm 6blokom BiDcTyHni. | УстановiTb правильно akymуларони 6blok. ДИВ. UstahOBlenHry akymylnarTopHoro 6bloka насторци 304. | |
| Актуларони 6blok He 3aprДжeHni. | ЗaporдITь akymуларони 6blok. ДИВ. InctrpukciIO 3 ekspлnyataцii Akymулароно 6bloka. | |
| Актуларони 6blok Ch Wri Bpi6 3aHaJTo rapiy.i. | Пereşd 3苹ycsKom дaiTe akymуларонomy 6blokу виробу oxolohyTu. | |
| Актуларони 6blok Ch Wri Bpi6 3aHaJTo xOJodnHi. | Пereşd 3苹ycsKom daiTe akymуларонomy 6blokу виробу погрітис. | |
| PerugЯл对接 ДВиГунa 3aHaJTo rapiyni. | Пereşd 3苹ycsKom daiTe akymуларонomy 6blokу виробу oxolohyTu npotragOM zuHaJMeHne 1 rodiHni. | |
KoДn nomInok
KoNi nomnok donomaraIb 3haxodntu nyCybaTu HecnpabHocTi akymyIaTOpHoro 6Ioka N/a6o 3apJdHorO npictpoN iD yac 3apJdxKaHH.
(MaI.34)
3BepHt b yary: 06 cbTIOJIOHi iNikKaTopn pIBn 3apAkyakymIaTopa 6yIn HAnpaBneHi B npabunbHn 6iK, DnBiTbcra Ha Hx TaK, 6o6 pe6pa akymIaTopa 6yIn HAnpaBneHi Bropy.
| СвитлODиОний ekран Можлиы | нecspabHocTi Можлиы | пособу усунения |
| СвитлODиОний indikatop 1 rogNTb cheRBOHIM, a свитлODиОний indikatop 4 rogNTb 3eJIeHIM, akymylarotopnii 6lOK He Зapяджаэtsя abo ФункцioHye He nprabVilbHo | Внуtriшni зanobixнik перогів | Зberнітбсь в abTOpn3OBaHni cepbicnii ceHTp. |
| СвитлODиОний indikatop 1 rogNTb cheRBOHIM | Неравильна habpyra elenentaЖИВлЕнry | Зberнітбсь в abTOpn3OBaHni cepbicnii ceHTp. |
| СвитлODиОний indikatop 4 rogNTb 3eJIeHIM | Акymуларotnii 6lOK пeepezapdIXeHIN | Вииміть akymуларotnii 6lOK i3 zaradnoro princstpoу та Встановіт bуorOу вириБ. Почиіт bpoбту 3 вирбом. Зaporд尼 princstpri може 6утп He cncpabHIM. 3berhітьсь В abTOpn3OBaHni cepbicnii ceHTp. |
| СвитлODиОний indikatop 1 rogNTb cheRBOHIM, a свитлODиОний indikatop 2 rogNTb 3eJIeHIM, akymylarotopnii 6lOK He Зapяджаэtsя abo ФункцioHye He nprabVilbHo | HesnpabHictB зарднoro писстpoу | Вииміть akymуларotnii 6lOK i3 zaroby. He zaradжайte и�о. Akymуларotnii 6lOK пошкodжeHIN i notpe6ye Зами. 3berhітьсь в abTOpn3OBaHni cepbicnii ceHTp. |
| Вмікіаftсь чЕРBOHIM свитлODиОний indikatop, свитлODиОний indikatop 2 rogNTb 3eJIeHIM i 6lIma€ пiod уac 3apяджанny abo Коли akymуларotnii 6lOK Встанов立面 В зapяднii писстri | Внуtriшna tempepatура akymуларota 3aHn3bka abo 3abncoKa дя Зapяджанry | Перенесіть зарднii princstpri ta akymуларotnii 6lOK у міс汞, De möжна 3a6e3neuHTN bHytrpiшю Tempepatура akymуларotnoro 6lOK в diana3oHи bID 5 do 45 °C. |
| Коли akymуларotnii 6lOK Встанов立面, 6lImae ЧЕРBOHIM CBITLOДODHni indikatop, a cbTlODiOHDnii indikatop 2 6lImae ЗелENIM. | Внуtriшna tempepatура akymуларota 3aHn3bka abo 3abncoKа | Внуtriшna Tempepatура akymуларota мae StahOBtN bID -15 do 70 °C. Tempepatура cepeodovsua B akymуларotnomy 6lOci 3aHn3bka abo 3abncoKa. •Якшо akymуларotnii 6lOK занадTo xolodnii чepe навкови Di y mOBu, NeobxidNo nepemicrttu NorOу n Зaperд尼 princstpriу y tenne cepeodovsue. •Якшо akymуларotnii 6lOK занадTo rapayu, ocobLINO bICnEуatauü, priobepiTy NorOу n Зaperд尼 princstpriу podani bID tenno rocepeodovsua. |
TEXHIUHIXAPAKTEPNUCTUKN
Type Approved
Safety
Regular Production
Surveillance
www.tuv.com ID 1419052531
Original instructions
OprunnaHn HNCTpyKuOn
Originala uputsta
PuvodniPokyny
Originale instruktioner
Originalanweisungen
Apxikc oyniec
Instrucciones originales
Originaaljuhend
Alkuperaisetohjeet
Instructions d'origine
Originalne upute
Eredeti utmutatas
Istruzioni originali
Originalios instrukcijos Lietosanas pamaciba Originele instructies Originale instruksjoner Oryginalne instrukcje Instruções originais Instructiuni initiale OpiHnHaNbHbIe INCTpyKuP Povodné Pokyny Izvirna navodila Originalna uputstva Bruksanvisning i original Original talimatlar OpiHnAbHni INCTpyKu

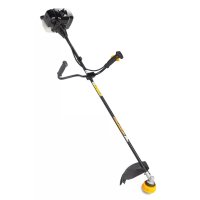
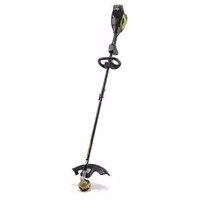
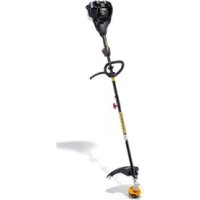
- Overview
- (Fig. 1)
- Symbols on the product
- Product liability
- SAFETY
- Safety definitions
- General power tool safety warnings
- Personal safety
- Power tool use and care
- Battery tool use and care
- Service
- Grass trimmer safety warnings
- Training
- Preparation
- Operation
- Maintenance and storage
- General safety instructions
- Safety instructions for operation
- Personal protective equipment
- Protective devices on the product
- Cutting attachment guard
- Cutting attachment
- Grass trimmer head
- Battery safety
- ASSEMBLY
- To change the position of the loop handle
- To change the length of the shaft
- To attach the cutting attachment guard and the trimmer head (straight shaft)
- Before you start the product
- To install the battery pack
- To start the motor
- To stop the motor
- To change the power mode
- Power meter
- Battery state of charge LED
- To operate the grass trimmer
- To trim the grass
- To cut the grass
- To edge the grass
- To use the twist and edge button
- MAINTENANCE
- Daily maintenance
- To replace the trimmer line
- TROUBLESHOOTING
- Error codes
- CONTENTS OF THE EC DECLARATION OF CONFORMITY
- Copepknne
- BbBEDEHNE
- IHCtpyKzna 3a ekCnloatazaia
- Pperne
- CnmboN Bbpxy MaunHaTa
- OTROBOPHOCT 3a Bpei, npuHHeHn OT CTOKN
- BE3OPIACHOCT
- IeHnHn3a6e3oNaCHOCT
- O6u npedynpexdHna 3a 6e3OpacHOCT 3a cnIOBn IHcTpymEnTn
- Ynotpe6a n rpnka 3a nHctpyMeHTa Ha 6aTepey
- 06cnykBaHe
- IpeDynpexKeHn 3a 6e3oNaChocT npn pa6Ota C TpImepn 3a TpeBa
- IoproToBka
- EkTnloataua
- PonpBkka n cbxpanHeHne
- O6uHnHCTpyKuIN 3a 6e3oNaCHOCT
- Инструкции за 6e3oNaCHOCT NO BpeMe Ha pa6Ota
- I\PuHn npeDna3Hn cpeDCTBa
- UcTpoIcTbA 3a 6e30nacHOCT Ha npOdyKTa
- Ipea3nTeHa pexeso obopydBaHe
- Pexeio o6opyDbaHe
- TpimepHa rnaBa 3a TpeBa
- БezonaCHOCT Ha 6aTepeyTa
- MOHTAX
- 3a npomHa Ha no3nua Ta Ha npIMKOBaTa pbKOXBaTKa
- 3a npomHa Ha IbIxHHaTa Ha DByCEKUNOHnBaJ
- 3a 3akpenBaHe Ha npedna3nteHa pejeseTo o6OpyDbAHe n TpImepHaTa rIaba (npab DByceKuHOHe BaJ)
- PABOTA
- Ppei da cTaptnpate npodykta
- 3a HnctaInpaHe Ha KOMnJIeKTa 6aTeepu
- 3a cTapTupaHe Ha dBnraTeJIa
- CBeToIIO3a CbCToHHeTO Ha 3apeDeHOCT Ha 6aTePnTa
- 3a pa6oTa c TpImepa 3a TpeBa
- KactpeneHa TpeBa
- PraaHe Ha TpeBa
- 3a nouchBaHe Ha TpeBa
- TEXHnuecko O6CJyXBAHE
- BceKnIaHbO 06cnyKbaHe
- 3a cMaHa Ha KOpdaTa Ha TpImepa
- FEJLFINDING
- JOHDANTO
- Käytöohjekirja
- IEVADS
- PROBLEMEN OPLOSSEN
- BBEDEHNE
- PykoBODCTBO NO 3KcPnyatauIN
- 0630p
- YcNoBhIe 06o3HaueHnHa n3dJIHH
- OTBETCTBEHHOCTb N3ROTOBNTEJIa
- MEPbI BE3OПACHOCTN
- YCTaHOBka 6JIOka aKKymyIaTOPOB
- 3anyck DvraTeJIa
- OctahOBka DvBraTeJra
- I3MeHeHne pexIma 3HEproNoTpe6JIeHnA
- I3mepntb MOHOCn
- CBeToIIOHbI INHnKaTOP COCTOHN3apJa aKKyMyJrTopa
- 3Kcnpnyataunr TpmmMepa Jra TpaBbl
- CtpnKKa TpaBbl
- KoWeHne TpaBbI
- 06pa6oTk KaKpOMOKra3OHa
- (Puc.27)
- TEXHINQUECKOE OBCJYKINBAHNE
- EkeHHeBHOe 06cnyKbAHne
- 3aMeHa peKyuIeJIeCKn
- UVOD
- Návod na obsluhu
- Içindekiler
- GIRIS
- Kullanim kilavuzu
- BCTYI
- Посibик Корисьача
- Orla
- (Man.1)
- CnmboHnHaBnp6i
- BidnoiidaIbHictb 3a kictb npodykci
- BE3NEKA
- 3axnchn Koxyxp iKyuOHa caKn
- Pikyuha hacaika
- TOnOBka TpIMepa
- 3axoNi 6e3neKn iD qac po6OTn 3 akymyIaTopamN
- 3БИРАннЯ
- 3MiHa nOLOXeHHn neTeIbHOro TpIMaYa
- 3MiHa IOBxHnBaJa
- MoNTaK 3axnchoro kOxUxa pIXyOoi HacaIKN Ta rOIOBKn TpIMepa (npAmm BaI)
- EKCПЛYATAЦИ
- Ipeed noaTkom po6OTn 3 BInpo6om
- YCTaHOBJIeHHaKymyIaTOpHOro 6Joka
- 3anyck dBnryHa
- 3yHHeHHa
- 3MiHeHHpeKmMy nOtyxHocTi
- BmipioBaH noTyXhOcTi
- CbitIOiOHN iHnKaTOp pIBn3apAkyakymyIToPa
- Eknyatau Tpimepa
- Пдстригнг Трави
- 3pi3HH TpaBn
- Пдстригань Трави
- BukopncTaHHK HonKn NOBepTaHHr TOnOBKn
- (Man.27)
- TEXHlUHE OBCJyROByBAHHa
- TeXHicHe 06cnyroByBaHHa
- 3amHa HHTKn TpImepa
- UCYHEHHH HECPABHOCTEN
- KoДn nomInok
Brand : MCCULLOCH
Model : Li58T
Category : Grass trimmer