Li 40T - Grass trimmer MCCULLOCH - Free user manual and instructions
Find the device manual for free Li 40T MCCULLOCH in PDF.
| Product type | Cordless grass trimmer |
| Brand | McCulloch |
| Model | Li 40T |
| Rated voltage | 40 V |
| No-load speed | 4500 / 5500 (±10%) min⁻¹ |
| Cutting head type | Bump feed (tap and go) |
| Cutting line diameter | 2 mm |
| Cutting width | 35.6 cm / 40.6 cm |
| Battery | Lithium-ion rechargeable 2 Ah 40 V (model Li 402A) |
| Charger | 40 V (model Li 40CGR) |
| Weight (without battery) | 4.9 kg |
| Weight (with battery) | 6.3 kg |
| Sound pressure level (LPA) | 75.63 dB(A) (K=2.71) |
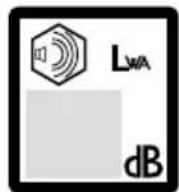
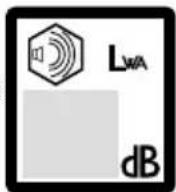
| Sound power level (LWA) | 92.73 dB(A) |
| Vibrations | < 2.5 m/s² (K=1.5) |
| Cutting protection | Protective guard with cutting blade |
| Front handle | Height adjustable |
| Safety device | Safety lock + automatic shutdown after inactivity |
| Power supply | Removable Li-ion 40 V battery |
| Routine maintenance | Cleaning after use, line/spool replacement, visual inspection |
| Main functions | Cutting grass, weeds and undergrowth |
| Usage | Outdoor, lawn surfaces |
| Repairability | Original parts recommended, repair by authorized service |
Frequently Asked Questions - Li 40T MCCULLOCH
User questions about Li 40T MCCULLOCH
0 question about this device. Answer the ones you know or ask your own.
Ask a new question about this device
Download the instructions for your Grass trimmer in PDF format for free! Find your manual Li 40T - MCCULLOCH and take your electronic device back in hand. On this page are published all the documents necessary for the use of your device. Li 40T by MCCULLOCH.
USER MANUAL Li 40T MCCULLOCH
GBOperator's manual 2-21
SE Bruksanvising 22-41
DK Brugsanvising 42-61
NO Bruksanvising 62-81
WARNING! A clearing saw, brushcutter or trimmer can be dangerous if used incorrectly or carelessly, and can cause serious or fatal injury to the operator or others. It is extremely important that you read and understand the contents of this operator's manual.
Please read the operator's manual carefully and make sure you understand the instructions before using the machine.
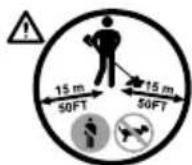
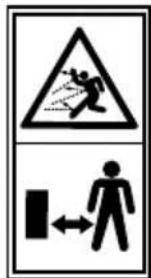
Wear eye protection.
Wear hearing protection.
Do not expose to rain or in damp condition.
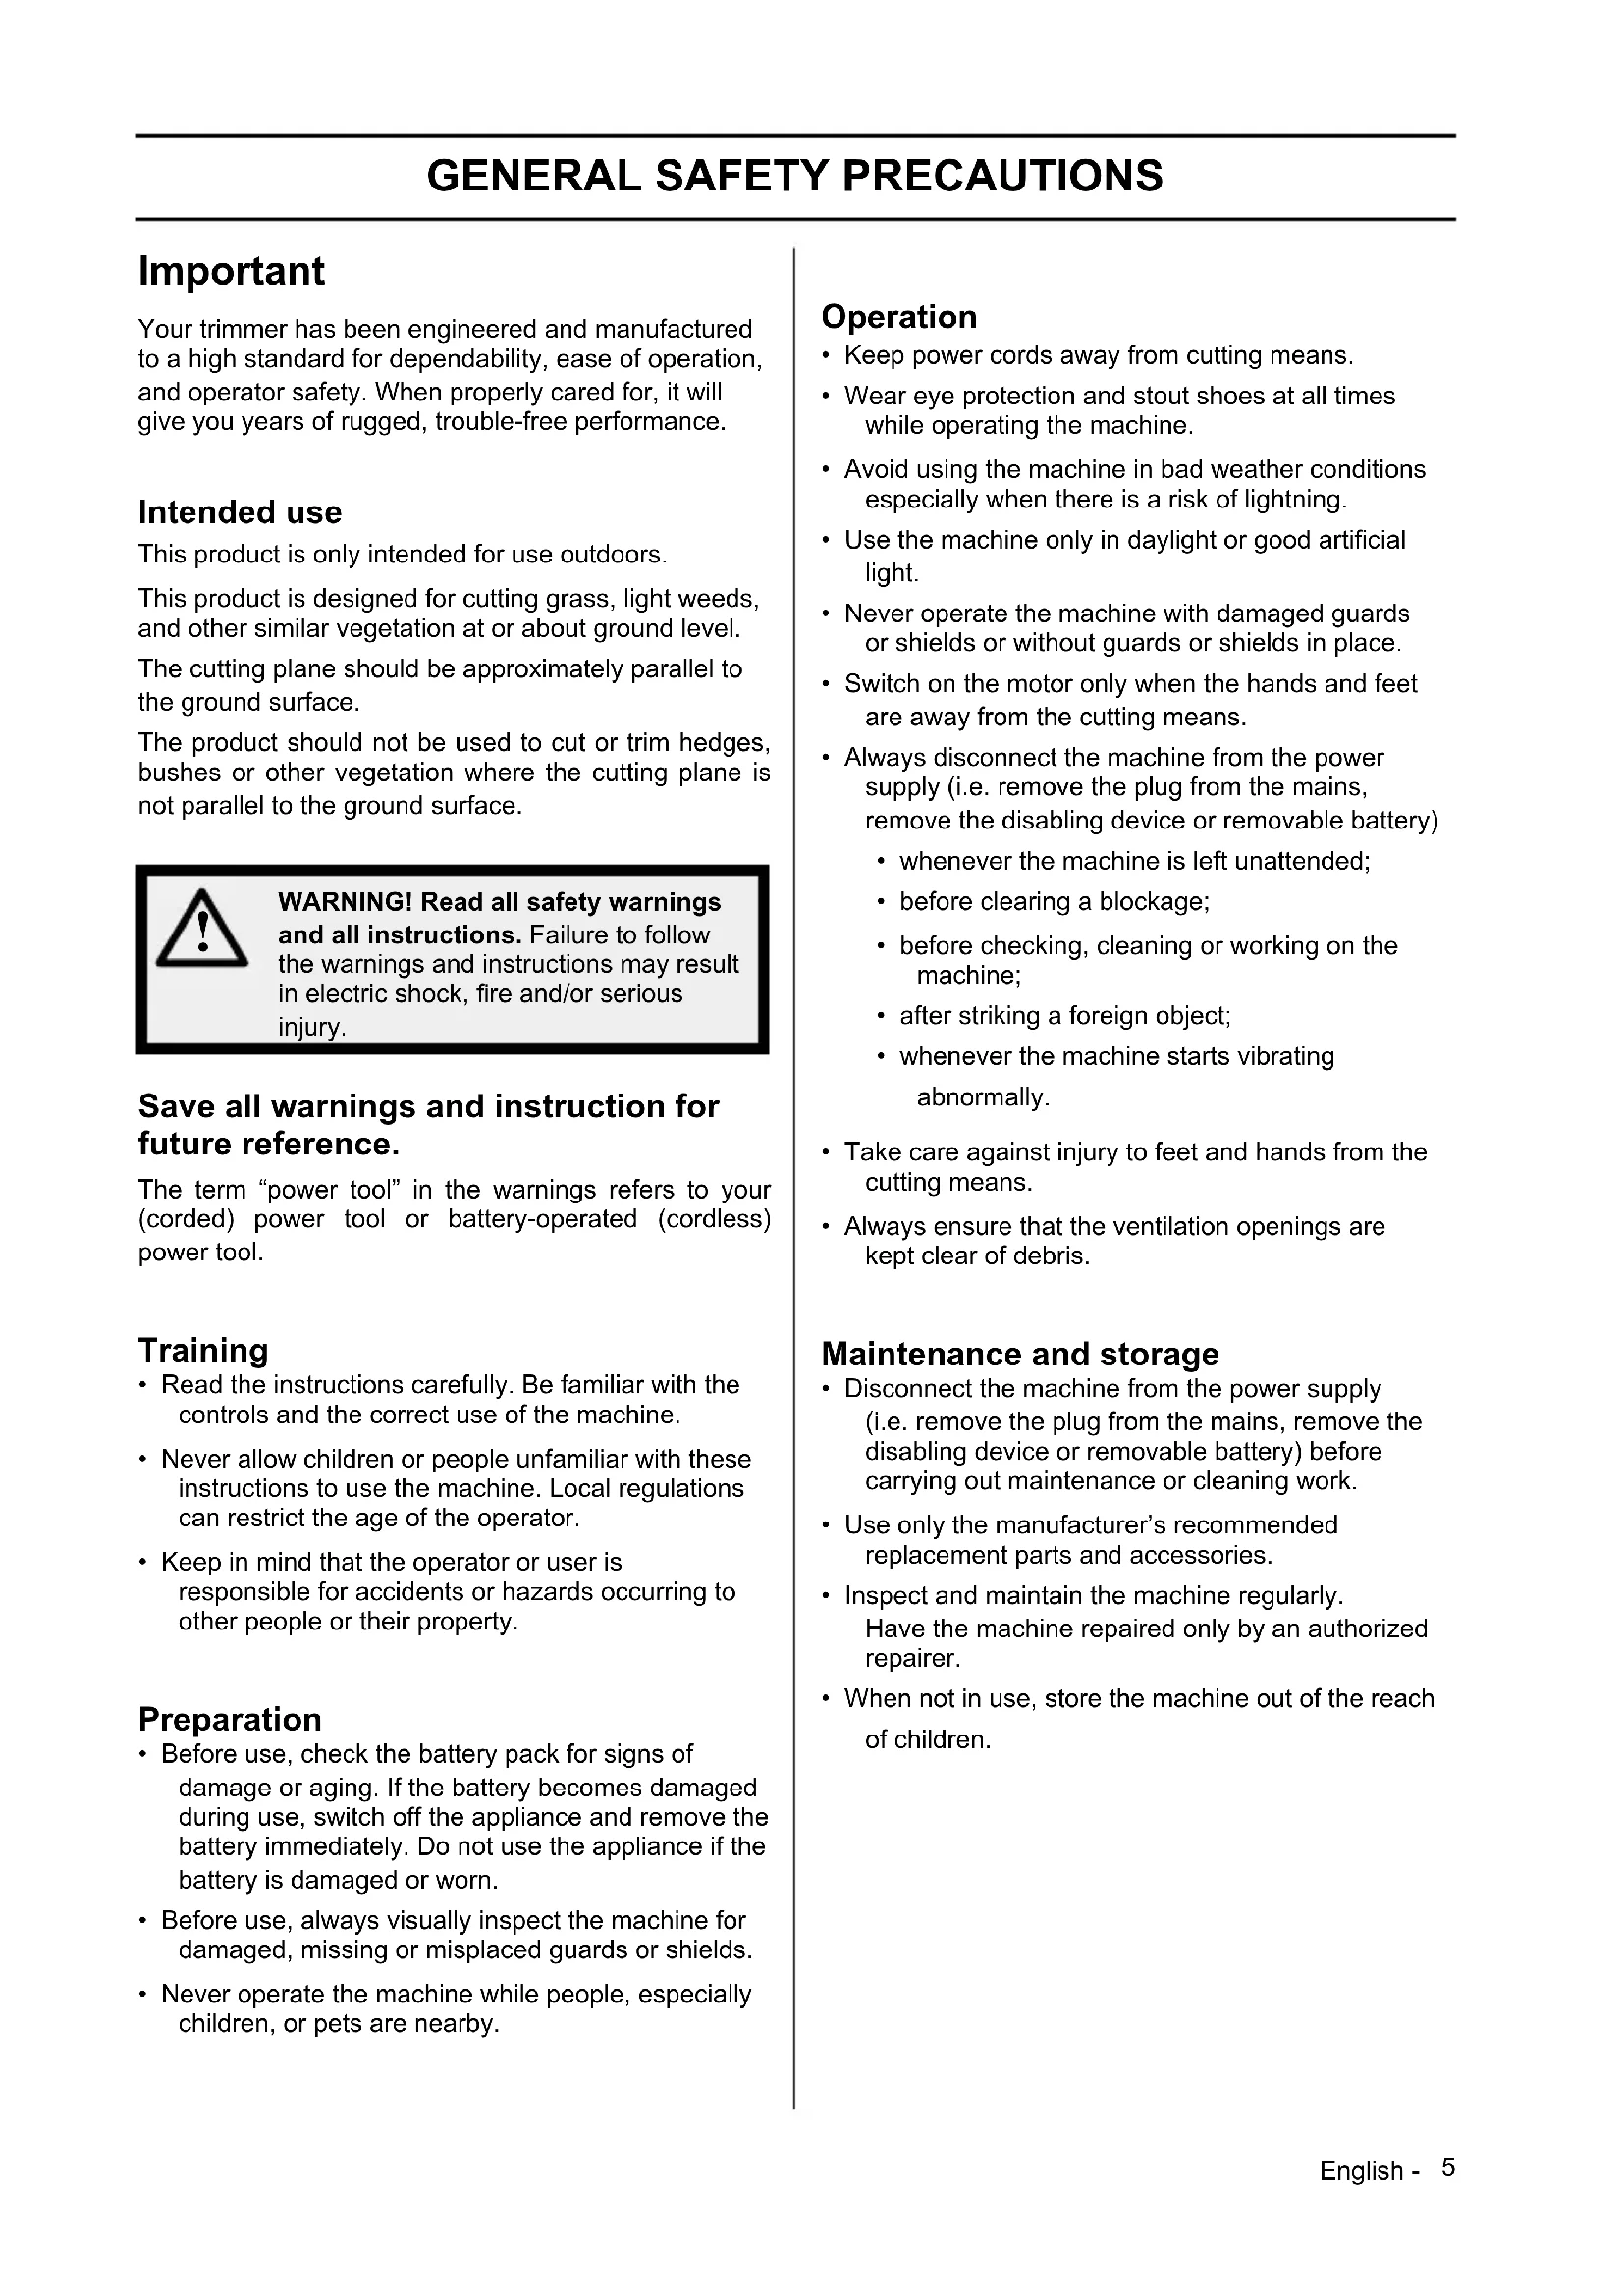
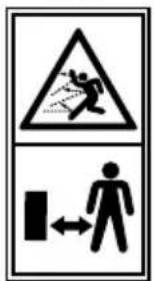
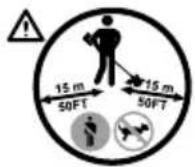
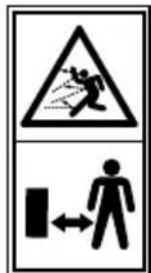
Beware of thrown or flying objects. Keep all bystanders, especially children and pets, at least 15m away from the operating area.
Keep bystanders a safe distance away from the machine.
This product is in accordance with applicable EC directives.
Make sure your hair does not hang below shoulder level.


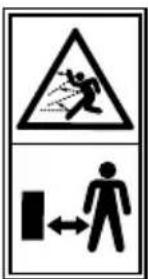


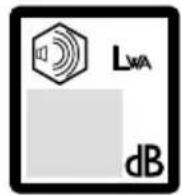
Noise emission to the environment according to the European Community's Directive. The machine's emission is specified in chapter technical data and on label.
Arrows which show limits for handle positioning
Only use non-metallic, flexible cutting attachments, i.e. trimmer heads with trimmer cord.
Watch out for thrown objects and ricochets.
The operator of the machine must ensure, while working, that no persons or animals come closer than 15 meters.
Separate collection. This product must not be disposed of with normal household waste. Should you find one day that your product needs replacement, or if it is no further use to you, do not dispose of it with household waste. Make this product available for separate collection.
Separate collection of used products and packaging allows materials to be recycled and used again. Re-use of recycled materials helps prevent environmental pollution and reduces the demand for raw materials.
At the end of their useful life, discard batteries with due care for our environment. The battery contains material which is hazardous to you and the environment. It must be removed and disposed of separately at a facility that accepts lithium-ion batteries.


Batteries

Li-ion
CONTENTS
Contents
KEY TO SYMBOLS
Symbols 2
CONTENTS
Contents. 3
Note the following before starting: 3
WHAT IS WHAT?
What is what on the string trimmer? 4
GENERAL SAFETY PRECAUTIONS
Important 5
Grass trimmer safety warnings 6
ASSEMBLY
Unpacking 7
Packing list 7
7
Shaft assembly 8
Attaching the front handle 9
STARTING AND STOPPING
To install battery pack 10
To remove battery pack 10
Starting/Stopping the trimmer 10
WORKING TECHNIQUES
Operating the trimmer 11
Advancing line 11
Cutting tips 11
Line cut-off blade 11
MAINTENANCE
General maintenance 12
Spool replacement 12
Cutting line replacement 13
Storing the trimmer 14
Environmental protection 14
TROUBLESHOOTING
Troubleshooting 15
TECHNICAL DATA
Technical data 16
EC-declaration of conformity 16
Note the following before starting:
Please read the operator's manual carefully.

WARNING! Long-term exposure to noise can result in permanent hearing impairment. So always use approved hearing protection.

WARNING! Under no circumstances may the design of the machine be modified without the permission of the manufacturer. Always use original accessories. Non-authorized modifications and/or accessories can result in serious personal injury or the death of the operator or others.

WARNING! A clearing saw, brushcutter or trimmer can be dangerous if used incorrectly or carelessly, and can cause serious or fatal injury to the operator or others. It is extremely important that you read and understand the contents of this operator's manual.
WHAT IS WHAT?
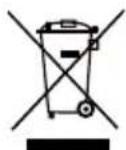
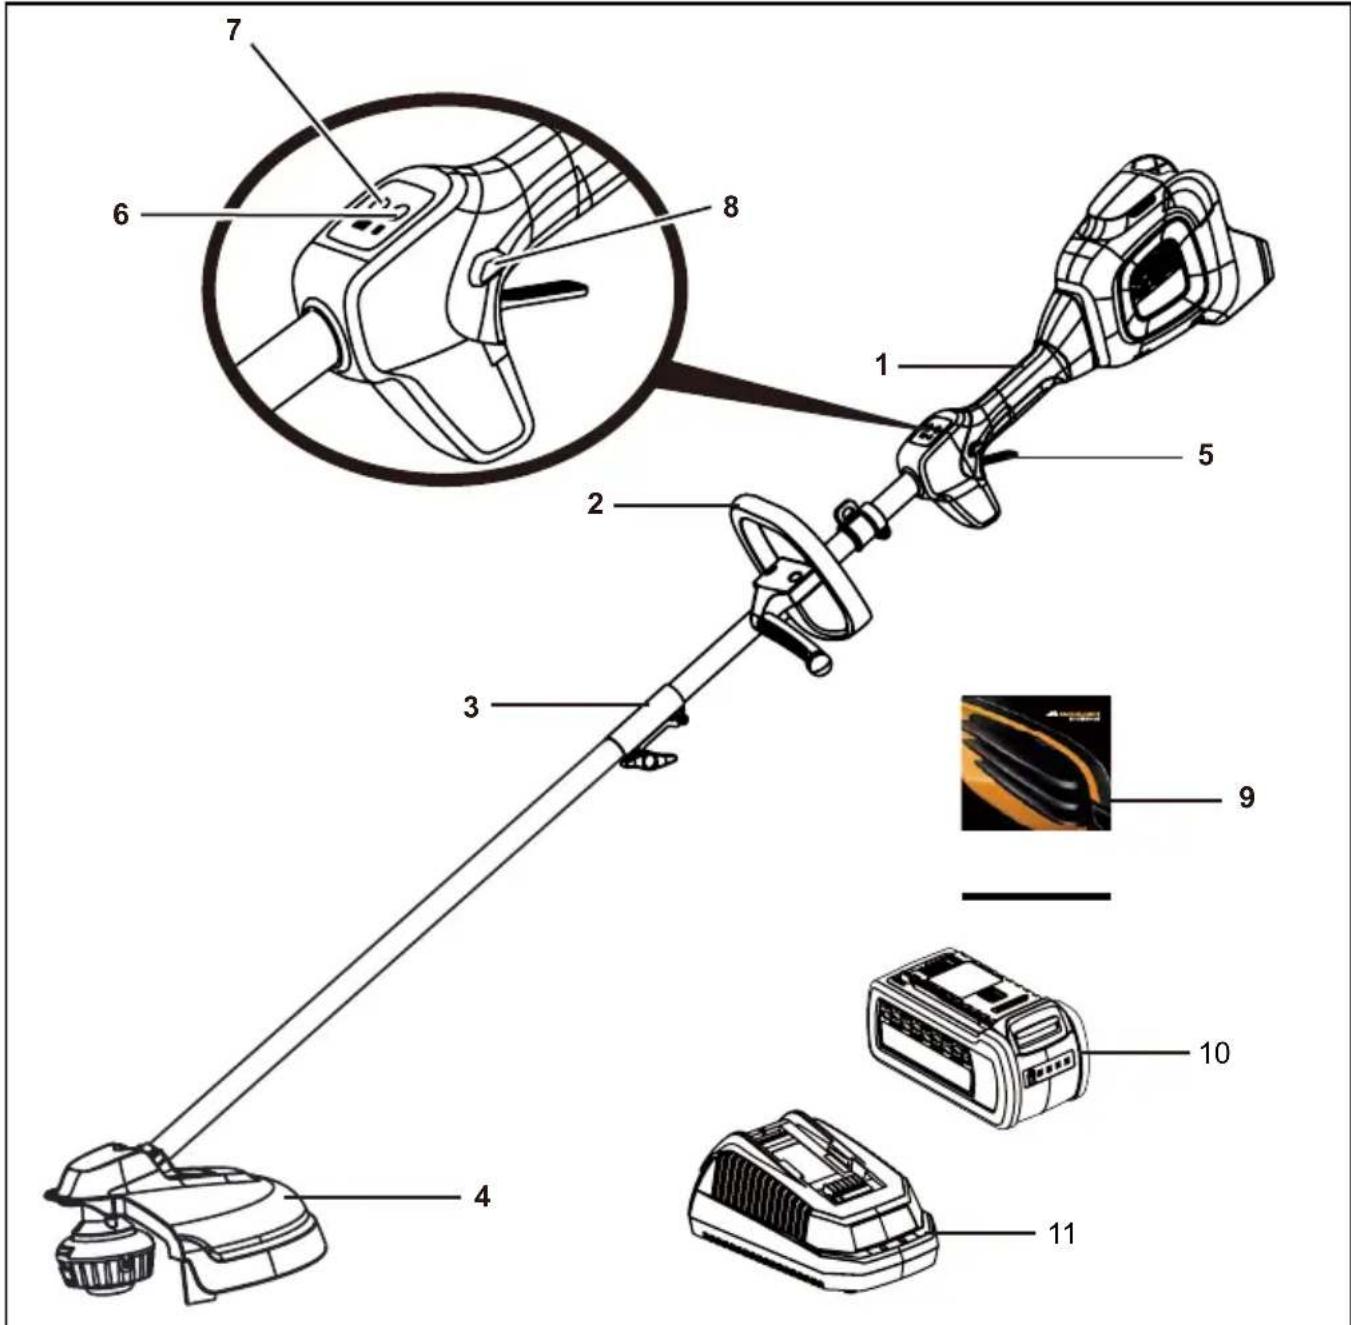
What is what on the string trimmer?
- Rear handle
- Front handle
- Coupler
- Guard
- Variable speed trigger
-
On/off button
-
High/low speed button
- Safety lock button
- Operator's manual
- 40V 2Ah rechargeable li-ion battery (Li 402A)
- 40V battery charger (Li 40CGR)
Important
Your trimmer has been engineered and manufactured to a high standard for dependability, ease of operation, and operator safety. When properly cared for, it will give you years of rugged, trouble-free performance.
Intended use
This product is only intended for use outdoors.
This product is designed for cutting grass, light weeds, and other similar vegetation at or about ground level.
The cutting plane should be approximately parallel to the ground surface.
The product should not be used to cut or trim hedges, bushes or other vegetation where the cutting plane is not parallel to the ground surface.

WARNING! Read all safety warnings and all instructions. Failure to follow the warnings and instructions may result in electric shock, fire and/or serious injury.
Save all warnings and instruction for future reference.
The term "power tool" in the warnings refers to your (corded) power tool or battery-operated (cordless) power tool.
Training
- Read the instructions carefully. Be familiar with the controls and the correct use of the machine.
- Never allow children or people unfamiliar with these instructions to use the machine. Local regulations can restrict the age of the operator.
- Keep in mind that the operator or user is responsible for accidents or hazards occurring to other people or their property.
Preparation
- Before use, check the battery pack for signs of damage or aging. If the battery becomes damaged during use, switch off the appliance and remove the battery immediately. Do not use the appliance if the battery is damaged or worn.
- Before use, always visually inspect the machine for damaged, missing or misplaced guards or shields.
- Never operate the machine while people, especially children, or pets are nearby.
Operation
- Keep power cords away from cutting means.
- Wear eye protection and stout shoes at all times while operating the machine.
- Avoid using the machine in bad weather conditions especially when there is a risk of lightning.
- Use the machine only in daylight or good artificial light.
- Never operate the machine with damaged guards or shields or without guards or shields in place.
- Switch on the motor only when the hands and feet are away from the cutting means.
- Always disconnect the machine from the power supply (i.e. remove the plug from the mains, remove the disabling device or removable battery)
whenever the machine is left unattended;
- before clearing a blockage;
- before checking, cleaning or working on the machine;
- after striking a foreign object;
- whenever the machine starts vibrating abnormally.
Take care against injury to feet and hands from the cutting means.
- Always ensure that the ventilation openings are kept clear of debris.
Maintenance and storage
- Disconnect the machine from the power supply (i.e. remove the plug from the mains, remove the disabling device or removable battery) before carrying out maintenance or cleaning work.
- Use only the manufacturer's recommended replacement parts and accessories.
- Inspect and maintain the machine regularly. Have the machine repaired only by an authorized repairer.
- When not in use, store the machine out of the reach of children.
GENERAL SAFETY PRECAUTIONS
Grass trimmer safety warnings
- This appliance can be used by children aged from 8 years and above and persons with reduced physical, sensory or mental capabilities or lack of experience and knowledge if they have been given supervision or instruction concerning use of the appliance in a safe way and understand the hazards involved.
Children shall not play with the appliance. - Cleaning and user maintenance shall not be made by children without supervision.
- The battery must be removed from the appliance before it is scrapped.
- The appliance must be disconnected from the supply mains when removing the battery.
- The battery is to be disposed of safely.
- Do not overreach. Keep proper footing and balance at all times. This enables better control of the power tool in unexpected situations.
- Dress properly. Do not wear loose clothing or jewellery. Keep your hair, clothing and gloves away from moving parts. Loose clothes, jewellery or long hair can be caught in moving parts.
- This appliance is not intended for use by persons (including children) with reduced understanding, or lack of experience and knowledge, unless they have been given supervision or instruction concerning use of the appliance by a person responsible for their safety.
- Children should be supervised to ensure that they do not play with the appliance.
ASSEMBLY
Unpacking
This product requires assembly.
- Carefully remove the product and any accessories from the box. Make sure that all items listed in the packing list are included.

WARNING! Do not use this product if any parts on the Packing List are already assembled to your product when you unpack it. Parts on this list are not assembled to the product by the manufacturer and require customer installation. Use of a product that may have been improperly assembled could result in serious personal injury.
- Inspect the product carefully to make sure no breakage or damage occurred during shipping.
- Do not discard the packing material until you have carefully inspected and satisfactorily operated the product.
Packing list
| Part Name Figure Qty | ||
| String trimmer | 1 | |
| Auxiliary handle | 1 | |
| Guard | 1 | |
| Operator's manual | 1 | |

WARNING! If any parts are damaged or missing, do not operate this product until the parts are replaced. Use of this product with damaged or missing parts could result in serious personal injury.

WARNING! Do not attempt to modify this product or create accessories not recommended for use with this string trimmer. Any such alteration or modification is misuse and could result in a hazardous condition leading to possible serious personal injury.

WARNING! To prevent accidental starting that could cause serious personal injury, always remove the battery pack from the product when assembling parts.
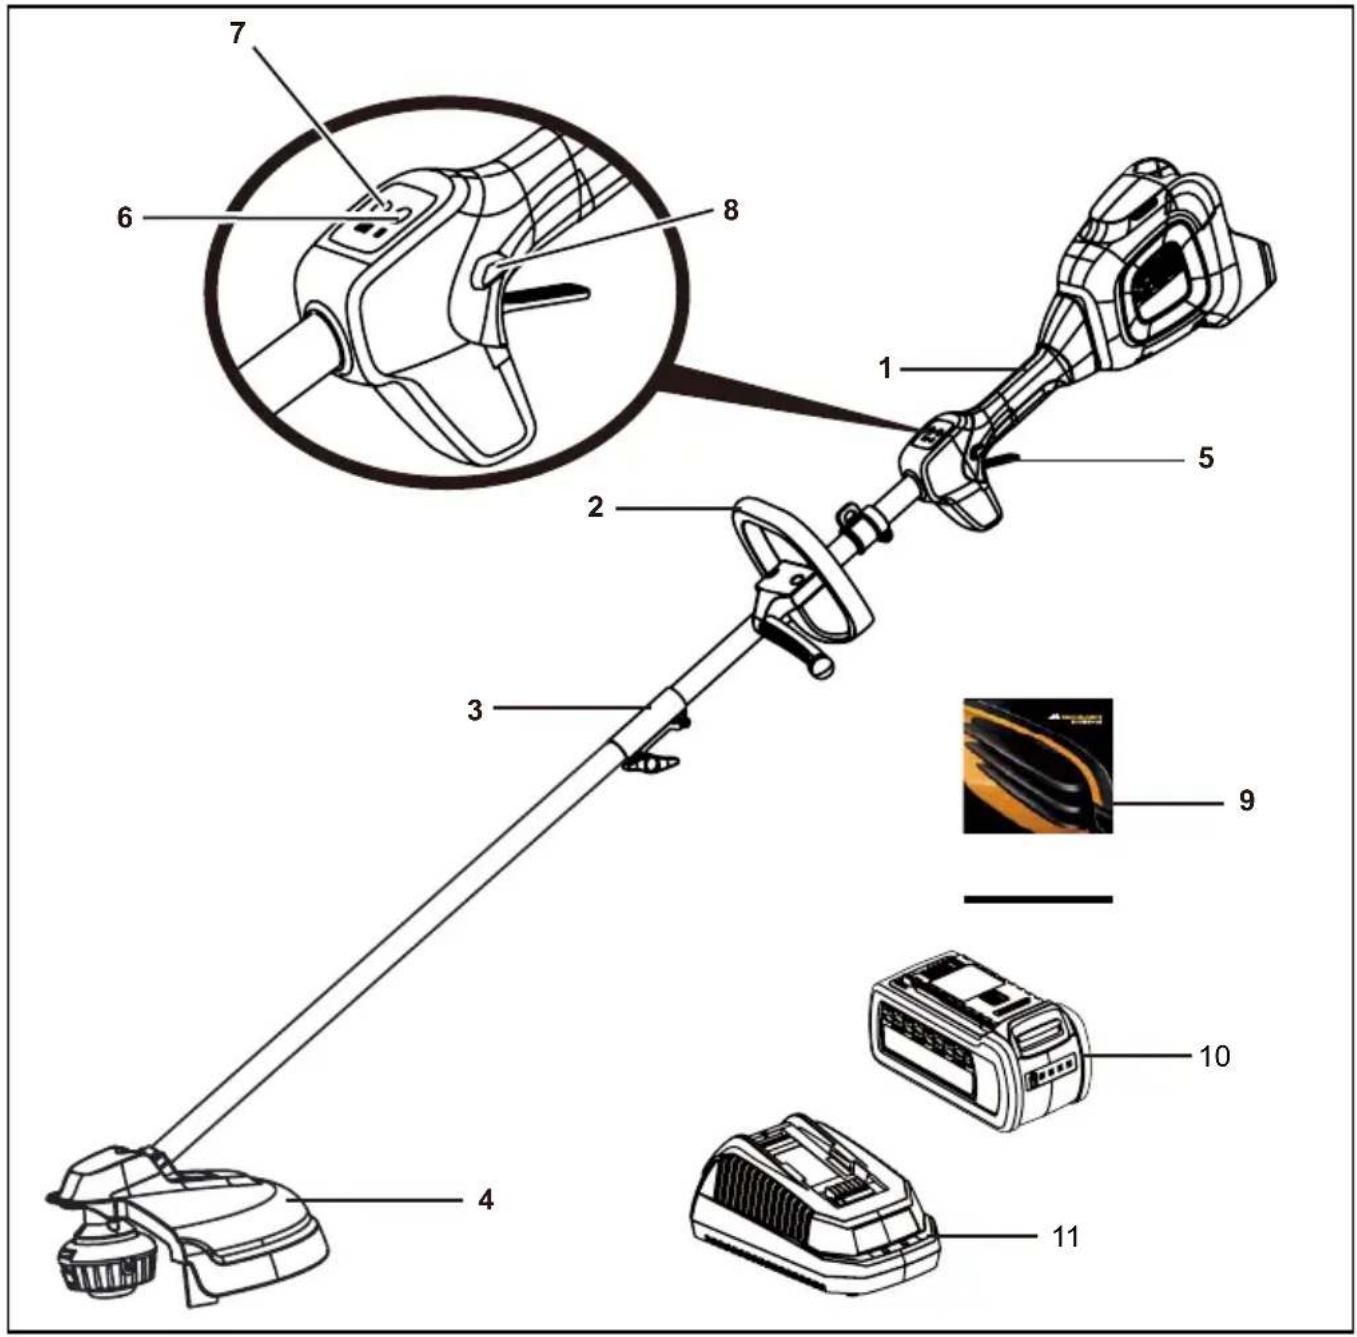
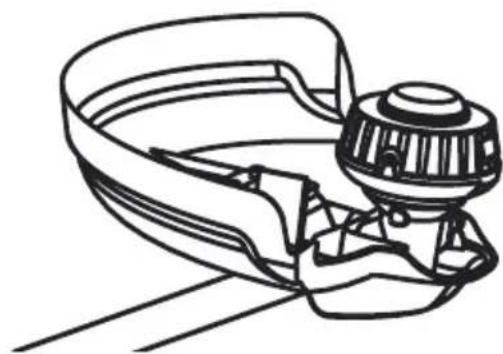
Attaching grass deflector

WARNING! The line cut-off blade on the grass deflector is sharp. Avoid contact with the blade. Failure to avoid contact can result in serious personal injury.
- Invert the string trimmer to access the trimmer head.
- Using a Phillips head screwdriver, remove the preinstalled screws (a) from the trimmer head.
- Place the guard (b) onto the trimmer head and slide the guard onto the head by following the track on the head.
- Align the screw holes on the guard with the screw holes on the trimmer head.
- Insert the screws into the trimmer head, fastening the guard in place.
- Place the guard cap (c) on to the guard and slide the guard cap onto the guard.
- Align the screw holes on the guard cap with the screw holes on the guard.
ASSEMBLY
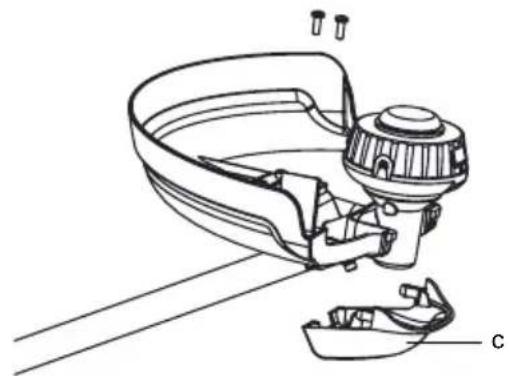
- Insert the screws into the guard, fastening the the guard cap in place.
NOTE: The torque of screws is 1.0-1.6 Nm.
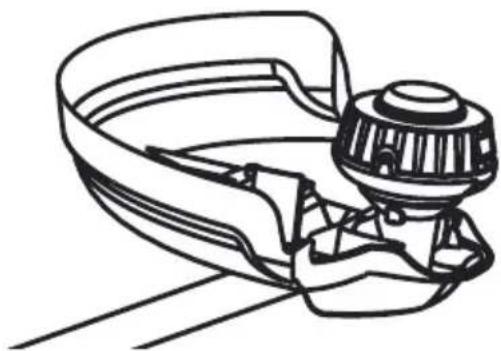
Shaft assembly
The attachment connects to the power head by means of a coupler device.
- Set the unit on a flat, level surface.
- Loosen the knob (a) on the coupler (b).
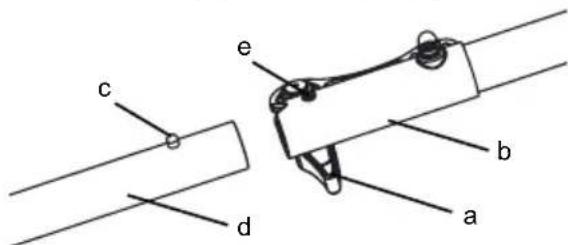
- Push in the release button (c) located on the lower shaft (d). Align the release button with the positioning hole and slide the two shafts together. Rotate the lower shaft until the button (c) locks into the positioning hole.

- Tighten the knob securely.
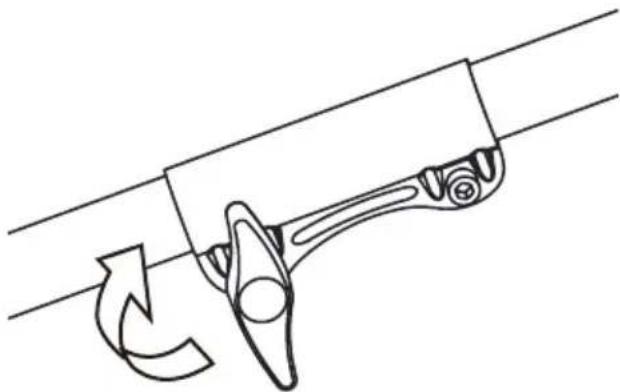
NOTE: If the button does not release completely in the positioning hole, the shafts are not locked into place. Slightly rotate from side to side until the button is locked into place.
ASSEMBLY
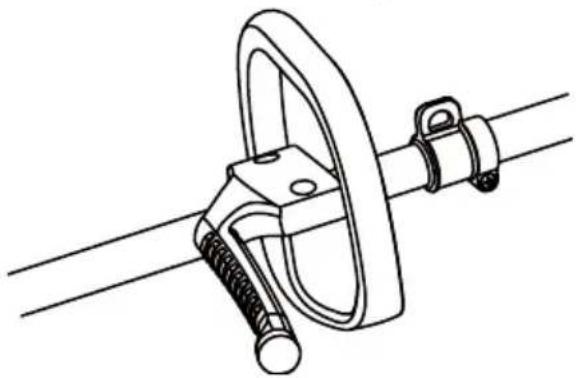
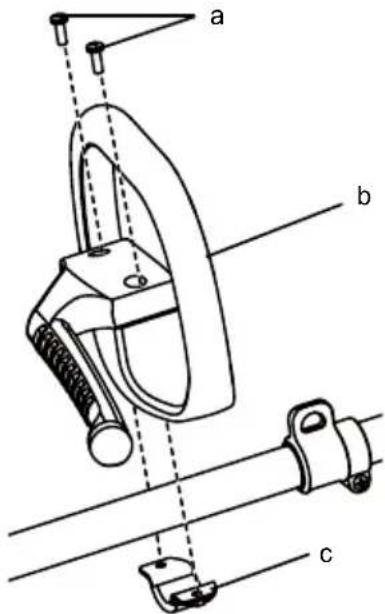
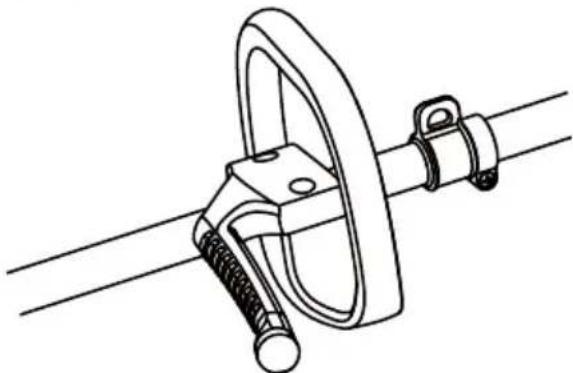
Attaching the front handle
- Loosen the two screws (a) in the handle with a philips screwdriver (not included) and remove the screws from the handle.
- Attach the front handle (b) and lower clamp (c) on the shaft.
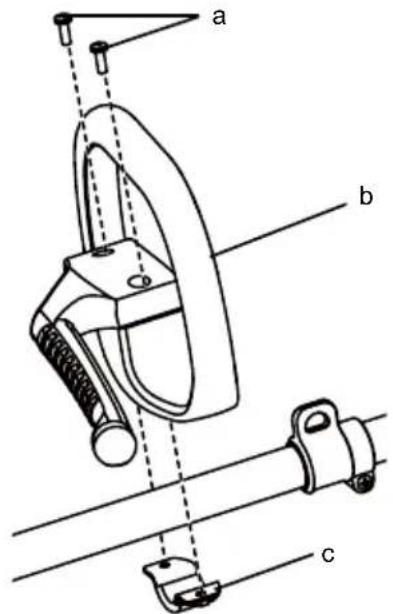
- Adjust handle up or down, if necessary, to desired operating position.
- Tighten the two screws so that the handle cannot be rotated on the shaft. The torque is 1.0-1.6 Nm.
STARTING AND STOPPING

WARNING! Do not allow familiarity with products to make you careless. Remember that a careless fraction of a second is sufficient to inflict serious injury.

WARNING! Always wear eye protection. Failure to do so could result in objects being thrown into your eyes resulting in possible serious injury.

WARNING! Never use blades, flailing devices, wire, or rope on this product. Do not use any attachments or accessories not recommended by the manufacturer of this product. The use of attachments or accessories not recommended can result in serious personal injury.
For complete charging instructions, refer to the Operator's Manuals for your battery pack and charger models.
NOTE: To avoid serious personal injury, always remove the battery pack and keep hands clear of the lock-out button when carrying or transporting the tool.
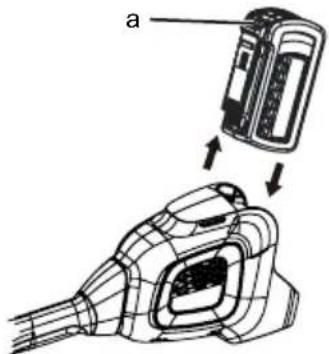
To install battery pack
- Align raised ribs on battery pack with grooves in the trimmer's battery port and slide battery into position as shown.
- Make sure the latch on the back of the battery pack clicks into place and that battery pack is fully seated and secure in the trimmer before beginning operation.
To remove battery pack
- Release the switch trigger and lock-out trigger to stop the trimmer.
- Press the power button to turn off the trimmer.
- Press and hold the battery latch button (a) on the back of the battery pack.
- While holding the battery latch place one hand on the trimmer handle and remove battery pack.
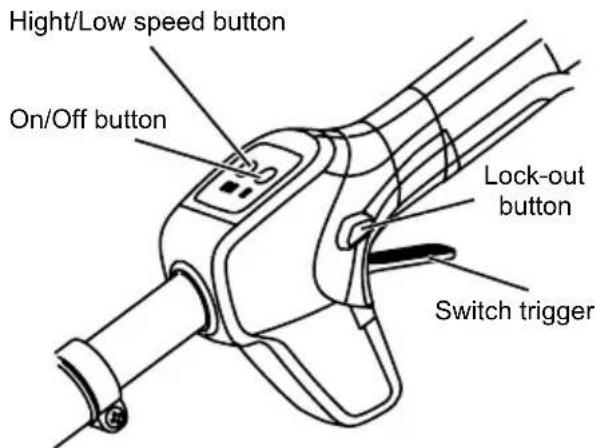
Starting/Stopping the trimmer
To start:
- Press the on/off power button.
- Depress the lock-out button and squeeze the switch trigger.
- Press high speed button to increase speed depending upon grass condition. Two LED's will illuminate above the high speed button indicating that the trimmer is in the high speed setting.
To stop:
- Release the switch trigger.
- Press the power button again to turn the unit off.
NOTE: The unit will power itself down after being idle for 1 minute.
Operating the trimmer
Follow these tips when using the trimmer:
- Hold the trimmer with your right hand on the rear handle and your left hand on the front handle.
- Keep a firm grip with both hands while in operation.
- Trimmer should be held at a comfortable position with the rear handle about hip height.
- Cut tall grass from the top down. This will prevent grass from wrapping around the shaft housing and string head which may cause damage from overheating.
If grass becomes wrapped around the string head:
- Remove the battery pack from the trimmer.
- Remove the grass.


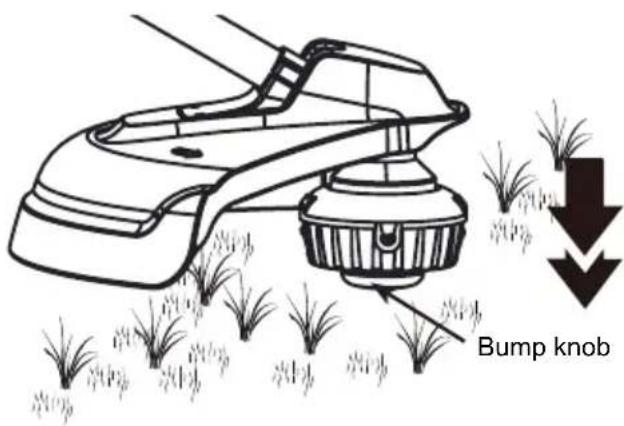
Advancing line
While the string trimmer is operating, the cutting line gets worn down and becomes shorter. This trimmer is equipped with bump feed line advancement, which advances additional line once the head is bumped on the ground while rotating. The cutting blade will cut the line to keep an accurate cutting swath.
Cutting tips
- Keep the trimmer tilted toward the area being cut; this is the best cutting area.
- The trimmer will cut better when moved from left to right across the area to be cut; it is less effective when moved from right to left.
- Use the tip of the cutting line to do the cutting; do not force cutting head into uncut grass.
- Wire and picket fences cause extra cutting line wear, even breakage. Stone and brick walls, curbs, and wood may wear cutting line rapidly.
- Avoid trees and shrubs. Tree bark, wood moldings, siding, and fence posts can easily be damaged by the cutting line.
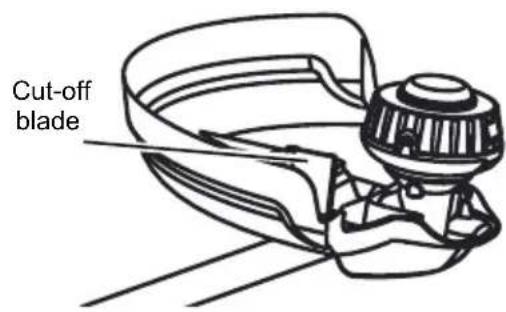
Line cut-off blade
This trimmer is equipped with a line cut-off blade on the grass deflector. For best cutting, advance line until it is trimmed to length by the line cut-off blade. Advance line whenever you hear the engine running faster than normal, or when trimming efficiency diminishes. This will maintain best performance and keep line long enough to advance properly.
MAINTENANCE
General maintenance

WARNING! When servicing, use only identical replacement parts. Use of any other parts may create a hazard or cause product damage.

WARNING! To avoid serious personal injury, always remove the battery pack from the tool when cleaning or performing any maintenance.
Before each use, inspect the entire product for damaged, missing, or loose parts such as screws, nuts, bolts, caps, etc. Securely tighten all fasteners and caps and do not operate this product until all missing or damaged parts are replaced.
Avoid using solvents when cleaning plastic parts. Most plastics are susceptible to damage from various types of commercial solvents and may be damaged by their use. Use clean cloths to remove dirt, dust, oil, grease, etc..

WARNING! Do not at any time let brake fluids, gasoline, petroleum-based products, penetrating oils, etc., come in contact with plastic parts. Chemicals can damage, weaken or destroy plastic which may result in serious personal injury.
Only the parts shown on the parts list are intended to be repaired or replaced by the customer. All other parts should be replaced at an Authorised Service Centre.
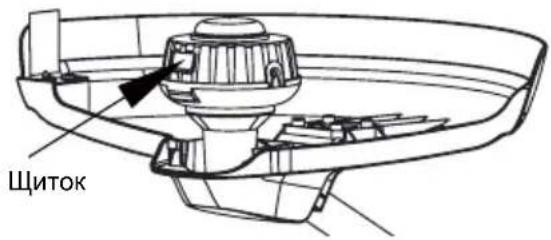
Spool replacement
Use original manufacturer's replacement cutting line for best performance.
- Remove the battery pack.
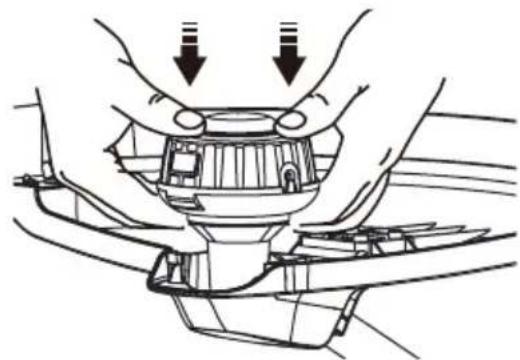
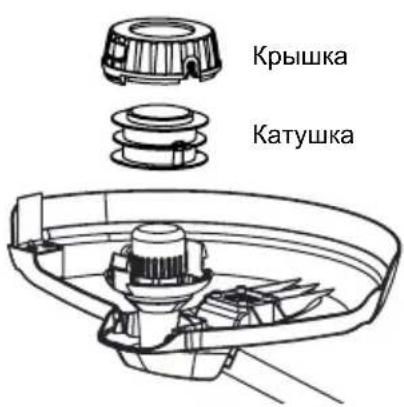
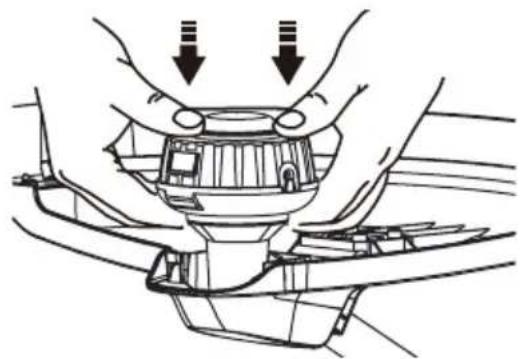
- Push in tabs on sides of spool cover.
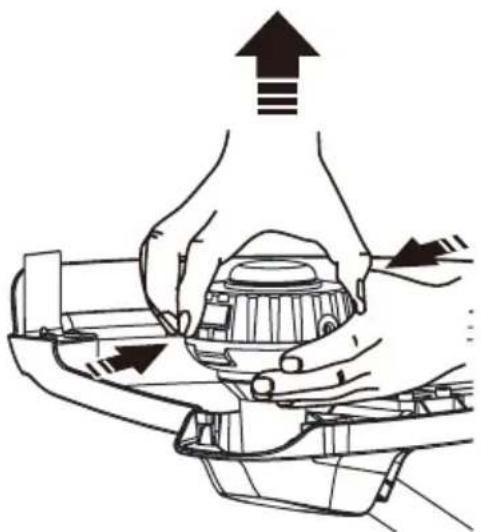

- Pull spool cover up to remove.
- Remove the old spool.
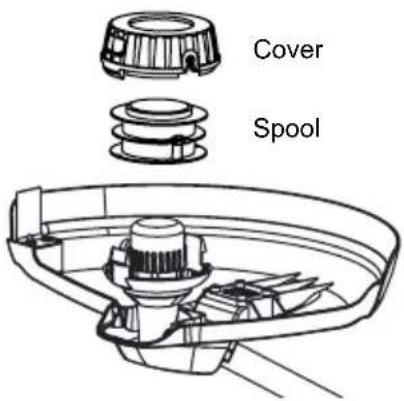
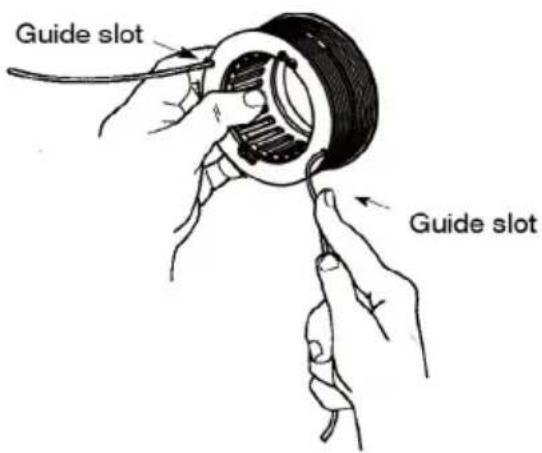
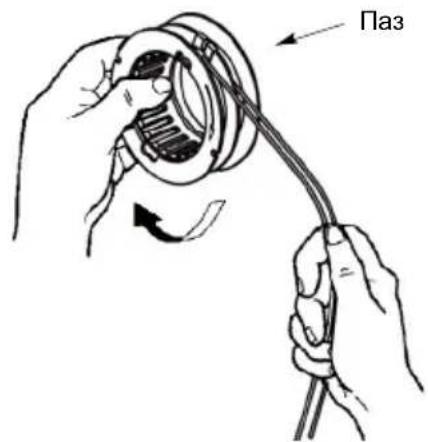
- To install the new spool, make sure the cutting line is captured in the slot on the new spool. Make sure the end of the cutting line is extended approximately 15cm beyond the slot.
MAINTENANCE
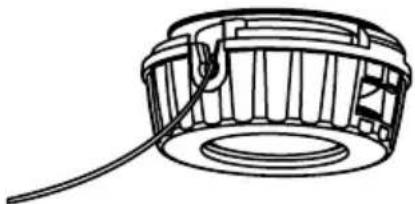
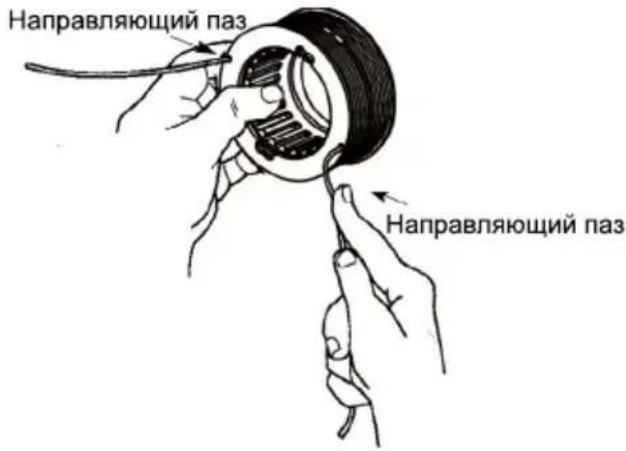
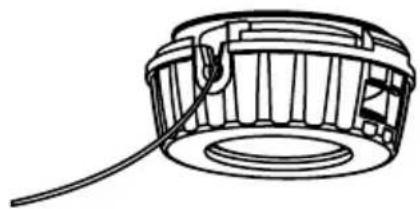
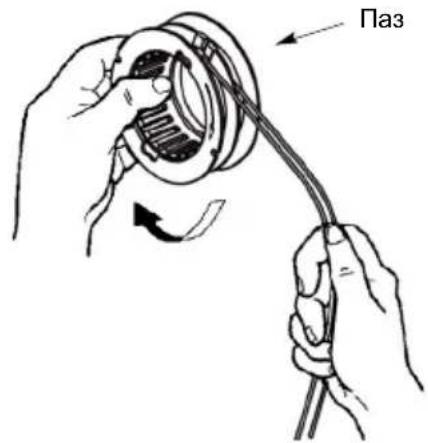
- Install the new spool so that the cutting line and slot align with the eyelet in the sides of the cover. Thread the cutting line into the eyelet.
- Pull the cutting line extending from the cover so the cutting line releases from the slot in the spool.
- Reinstall the spool cover by depressing tabs into slots and pushing down until spool cover clicks into place.
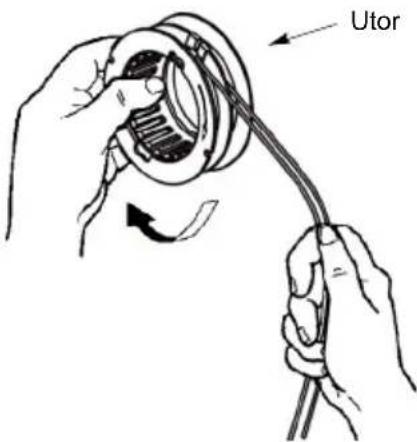
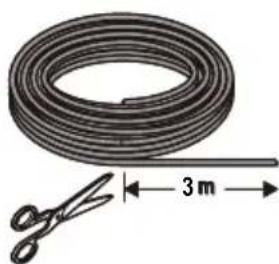
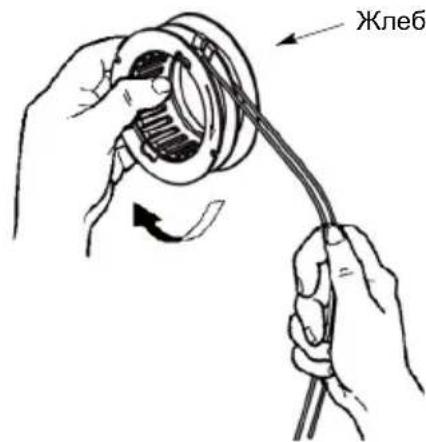
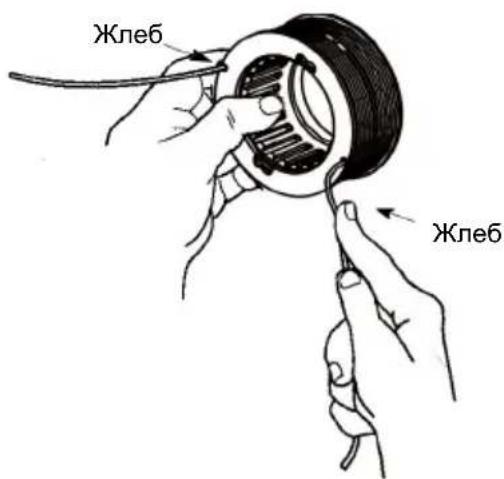
Cutting line replacement
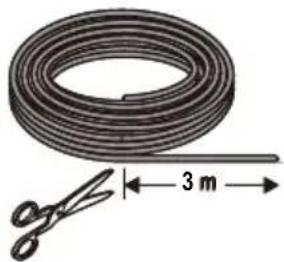
- Remove the battery pack.
- Remove the spool from the cutting head.
NOTE: Remove any old cutting line remaining on the spool.
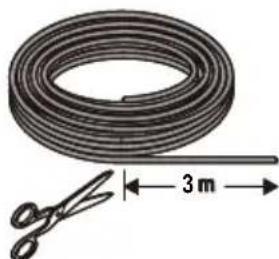
- Cut a piece of cutting line approximately 3m long.
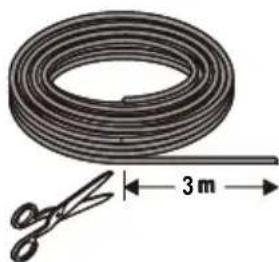
- Bend the line at the midpoint and hook the loop into the slot in the center rim of the spool. Ensure line snaps into position in the slot.
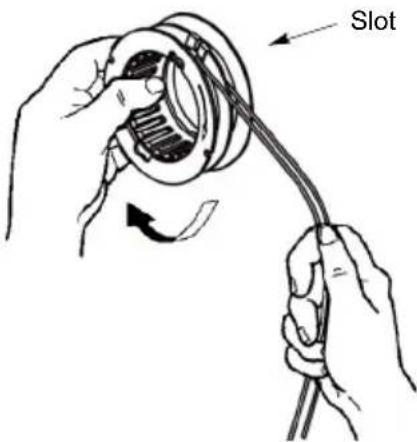
- Wind the line evenly and firmly in a clockwise direction. Once completed, put the line in the slot so it does not unwind.
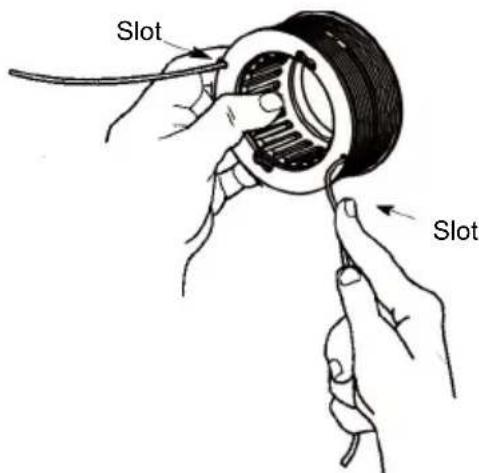
- Do not wind the line beyond the edge of the spool.
MAINTENANCE
Storing the trimmer
- Remove the battery pack from the trimmer before storing.
- Clean all foreign material from the trimmer.
- Store it in a place that is inaccessible to children.
- Keep away from corrosive agents such as garden chemicals and de-icing salts.
- Store and charge your batteries in a cool area. Temperatures above or below normal room temperature will shorten battery pack life.
- Never store batteries in a discharged condition. Wait for battery pack to cool and fully charge immediately.
- Store the battery pack where the temperature is below 27^ and away from moisture.
- All batteries gradually lose their charge. The higher the temperature, the quicker they lose their charge. If you store your unit for long periods of time without using it, recharge the batteries every month or two. This practice will prolong battery pack life.
Environmental protection
- Environmental protection should be a priority of considerable importance when using the machine, for the benefit of both social coexistence and the environment in which we live. Try not to cause any disturbance to the surrounding area.
- Carefully comply with local regulations for the disposal of packaging, deteriorated parts or any elements with a strong environmental impact; this waste must not be disposed of as normal waste, it must be separated and taken to specified waste disposal centres where the material will be recycled.
- Carefully comply with local regulations for the disposal of waste materials after mowing.
- At the time of decommissioning, do not pollute the environment with the machine, but hand it over to a disposal centre, in accordance with the local laws in force.
TROUBLESHOOTING
TROUBLESHOOTING
| PROBLEM POSSIBLE CAUSE | SOLUTION | |
| String will not advance when using the bump-feed head. | String is welded to itself. Replace | string. |
| Not enough string on spool. | Install more string. Refer to string replacement earlier in this manual. | |
| String is worn too short. Pull string | while pressing line release button. | |
| String is tangled on spool. | Remove string from spool and rewind. Refer to string replacement earlier in this manual. | |
| Grass wraps around shaft housing and string head. | Cutting tall grass at ground level | Cut tall grass from the top down to prevent wrapping. |
| Motor fails to start when switch trigger is depressed. | Battery is not secure. | To secure the battery pack, make sure the latch on bottom of the battery pack snaps into place. |
| Battery is not charged. | Charge the battery pack according to the instructions included with your model. | |
| Shaft not connected completely | Make sure lower shaft is fully seated in shaft coupler on upper shaft and secure shaft coupler. |
TECHNICAL DATA
Technical data
| Technical data Li 40T | |
| Voltage 40 volts | |
| No load speed 4500 / 5500 (±10%) RPM | |
| Cutting head Bump feed | |
| Cutting Line Diameter 2 mm | |
| Cutting Path Diameter 35.6 cm / 40.6 cm | |
| Battery pack Li 402A | |
| Charger Li 40CGR | |
| Weight (without battery pack) 4.9 kg | |
| Weight (with battery pack) 6.3 kg | |
| Measured sound pressure level L | PA=75.63 dB(A), KPA=2.71 |
| Measured sound power level L | WA=92.73 dB(A) |
| Vibration < 2.5m/s2, K=1.5 m/s2 |
EC DECLARATION OF CONFORMITY FOR MACHINERY
Manufacturer: Changzhou Globe Co., Ltd.
Address: No.65 Xinggang Road Zhonglou Zone Changzhou, Jiangsu 213000, P.R.China
Name and address of the person authorised to compile the technical file:
Name: Gary Gao Naixin (Director of Outdoor Power Equipment)
Address: Greenworks Tools Europe GmbH
Wankelstrasse 40.
50996 Kln
Germany
Herewith we declare that the product
Category STRING TRIMMER
Model.. Li 40T
Serial number . See product rating label
Year of Construction . See product rating label
-
is in conformity with the relevant provisions of the Machinery Directive (2006/42/EC)
-
is in conformity with the provisions of the following other EC-Directive
2014/30/EU (EMC-Directive), and
2000/14/EC (Noise-Directive) incl. modifications (2005/88/EC)
And furthermore, we declare that
- the following (parts/clauses of) European harmonised standards have been used
EN60335-1, EN 50636-2-91, EN ISO 3744, ISO 11094, EN 55014-1, EN 55014-2
A V Technology Ltd AVTECH House, Arkle Avenue, Stanley Green Trading, Estate, Handforth, Cheshire, SK9 3RW
Measured sound power level 92.73 dB(A)
Guaranteed sound power level 96 dB(A)
Conformity assessment method to Annex VI/ Directive 2000/14/EC
Place, date: Changzhou, 22/07/2016
Signature: Gary Gao Naixin (BEng, CEng,
MIET) Vice president of Engineering

SYMBOLFÖRKLARINGAR
Symboler
Allmant underhall 27
Byte av spole 27
Byta trad 28
Forvara trimmern 29
Namn: Gary Gao Naixin (Chef for Outdoor Power Equipment)
Adress: Greenworks Tools Europe GmbH
Wankelstrasse 40.
50996 Koln
Germany
A V Technology Ltd AVTECH House, Arkle Avenue, Stanley Green Trading, Estate, Handforth, Cheshire, SK9 3RW
Uppmatt ljudeffekt 92.73 dB(A)
Garanterad ljudeffekt 96 dB(A)
Chef for Engineering
Underskrift: Gary Gao Naixin (BEng, CEng, MIET)

SYMBOLFORKLARING
Symboler
A V Technology Ltd AVTECH House, Arkle Avenue, Stanley Green Trading, Estate, Handforth, Cheshire, SK9 3RW
Målt lydeffektniveau 92.73 dB(A)
Garanteret lydeffektniveau 96 dB(A)
Overensstemmelsesvurderingsmetode iht. Tillaeg VI / Direktiv 2000/14/EØF
Sted, data: Changzhou, 22/07/2016
Underskrift: Gary Gao Naixin (BEng, CEng, MIET)
Vicedirektor for maskinteknik

NØKKEL TIL SYMBOLENE
Symboler
NOKKEL TIL SYMBOLENE
Symboler 47
INNNHOLD
Innhold. 48
Herewith we declare that the product
Kabellos GRESSTRIMMER
Modell.. Li 40T
A V Technology Ltd AVTECH House, Arkle Avenue, Stanley Green Trading, Estate, Handforth, Cheshire, SK9 3RW
Målt lydeffektnivá 92.73 dB(A)
Garantert lydeffektniva 96 dB(A)
Samsvarsvurdering til Tillegg VI/Direktiv 2000/14/EC
Sted, data: Changzhou, 22/07/2016
Signatur: Gary Gao Naixin (BEng, CEng, MIET)
GENERAL SAFETY PRECAUTIONS
Tärkeäa 65
A V Technology Ltd AVTECH House, Arkle Avenue, Stanley Green Trading, Estate, Handforth, Cheshire, SK9 3RW
Mitattu aenenteho 92.73 dB(A)
A V Technology Ltd AVTECH House, Arkle Avenue, Stanley Green Trading, Estate, Handforth, Cheshire, SK9 3RW
Attention: projections et ricochets.
2000/14/CE (Directive Emissions Sonores) y-compris modifications (2005/88/CE)
A V Technology Ltd AVTECH House, Arkle Avenue, Stanley Green Trading, Estate, Handforth, Cheshire, SK9 3RW
Lieu, date: Changzhou, 22/07/2016
ALGEMENE VEILIGHEIDSWAARSCHUWINGEN
Belangrijk 110
ALGEMENE VEILIGHEIDSWAARSCHUWINGEN
Belangrijk
ALGEMENE VEILIGHEIDSWAARSCHUWINGEN
Naam: Gary Gao Naixin (Director of Outdoor Power Equipment)
Adres: Greenworks Tools Europe GmbH
Wankelstrasse 40.
50996 Koln
Germany
A V Technology Ltd AVTECH House, Arkle Avenue, Stanley Green Trading, Estate, Handforth, Cheshire, SK9 3RW
Gemeten geluidsdruk niveau 92.73 dB(A)
Vice president of Engineering
Handtekening: Gary Gao Naixin (BEng, CEng, MIET)

TECLA A SIMBOLOS
Símbolos
A V Technology Ltd AVTECH House, Arkle Avenue, Stanley Green Trading, Estate, Handforth, Cheshire, SK9 3RW
Manutencao geral 147
Substituicao bobina 147
Endereço: No.65 Xinggang Road Zhonglou Zone Changzhou, Jiangsu 213000, P.R.China
Nome: Gary Gao Naixin (Director of Outdoor Power Equipment)
Endereço: Greenworks Tools Europe GmbH
Wankelstrasse 40.
50996 Kolin
Germany
Pelo presente declaramos que o produits
Categoria CORTADOR DE SEBES SEM FIO
Modelo.. Li 40T
A V Technology Ltd AVTECH House, Arkle Avenue, Stanley Green Trading, Estate, Handforth, Cheshire, SK9 3RW
Noise Emission Directive (2000/14/EC amended by 2005/88/EC)
A V Technology Ltd AVTECH House, Arkle Avenue, Stanley Green Trading, Estate, Handforth, Cheshire, SK9 3RW
A V Technology Ltd AVTECH House, Arkle Avenue, Stanley Green Trading, Estate, Handforth, Cheshire, SK9 3RW
Adrese: No.65 Xinggang Road Zhonglou Zone Changzhou, Jiangsu 213000, P.R.China
Personas, kas pilnvarota sastadit tehnisko dokumentaciju, vards, uzvards un adrese:
Vards, uzvards: Gary Gao Naixin (Director of Outdoor Power Equipment)
Adrese: Greenworks Tools Europe GmbH
Wankelstrasse 40.
50996 Koln
Germany
Ar so mēs pazinojam, ka prece
Kategorija BEZVADU LINIJAS TRIMMERIS
Modelis.. Li 40T
Serihas numurs. Skatit preces specifikaciju etiketii
A V Technology Ltd AVTECH House, Arkle Avenue, Stanley Green Trading, Estate, Handforth, Cheshire, SK9 3RW
Izmertiatis skanas jaudas timenis 92.73 dB(A)
A V Technology Ltd AVTECH House, Arkle Avenue, Stanley Green Trading, Estate, Handforth, Cheshire, SK9 3RW
A V Technology Ltd AVTECH House, Arkle Avenue, Stanley Green Trading, Estate, Handforth, Cheshire, SK9 3RW
A V Technology Ltd AVTECH House, Arkle Avenue, Stanley Green Trading, Estate, Handforth, Cheshire, SK9 3RW
Namerana uroven hluku 92.73 dB(A)
Garantovana uroven hluku 96 dB(A)
Metóda zhodnotenia zhyd k Dodatku VI/Smernice 2000/14/EC
Miesto, datum: Changzhou, 22/07/2016
Podpis: Gary Gao Naixin (BEng, CEng, MIET)
Vicepresident pre strojárstvo

SZIMBÓLUMOK MAGYARÁZATA
Szimbólumok
A V Technology Ltd AVTECH House, Arkle Avenue, Stanley Green Trading, Estate, Handforth, Cheshire, SK9 3RW
DEKLARACJA ZGODNOSCI WE DLA MASZYN
Producent: Changzhou Globe Co., Ltd.
Adres: No.65 Xinggang Road Zhonglou Zone Changzhou, Jiangsu 213000, P.R.China
Nazwisko: Gary Gao Naixin (Director of Outdoor Power Equipment)
Adres: Greenworks Tools Europe GmbH
Wankelstrasse 40.
50996 Kohn
Germany
A V Technology Ltd AVTECH House, Arkle Avenue, Stanley Green Trading, Estate, Handforth, Cheshire, SK9 3RW
Nivelul māsurat al puteri acustice: 92.73 dB(A)
NOTE: Remove any old cutting line remaining on the spool.
NAPOMENA: Uklonite svaki stari flaks koji je preostao na kalemu
- O drežite komad flaksa duljine priblizno 3m.
- Savijte flaks na srednjoj tocki i zakačite u utor u sredini kotača kalema. Osigurajte da flaks uskovi na mjesto u utoru.
A V Technology Ltd AVTECH House, Arkle Avenue, Stanley Green Trading, Estate, Handforth, Cheshire, SK9 3RW
HCTpyMeHTOM, KOTOpbI
MOHeT HaHeCTN CepBe3HyO NIN CMePeTeJIbHyTOpaBMy NOIb3OBAJIeJIIO NIN OKpyHaIOUIM.
Upe3BbUaHNo BaHHo, UTo6bI Bbl npouHTaJI NaHacToJuee PyKOBocTBO nnoHJI erO coepHaHHe.
PpeJe Yem npncTynntb K pa6oTe C MaunHO BHMATEJIbHo npouHTaTe HcTpyKUIO y6eNTecb, yTO Bam BCE noHrTHo.
Hocnte cneuaNbHbIe yctpoNCTBa dna 3aunTbI rna3.
Hocnte yctpoiCTBa 3aunTbI cnyxa.
He onyckaIte nonaHaHna BlaHn Ha yctpoictBO.
POMHHTe 60nachOCTn CO CTOpOHbI 6poWeHHbIX INN JETaXIN ppeDMTOB.
He donyckaIte npnbnxkeHnnoCTOPoHHNX IuOocbeHNO DetEnI DOMaunHX XNBOThbIX K pa6oyen30He 6nHexe Yem Ha 15 M.
Ha yactke BbINOJIHeHnpa60tI He DOJXHO 6bITbNOCTOPOHNX JNU.
H3denncooTBeTCTByET Tpe6oBaHNm dIpuKtNB EC.
IIHHbI BOIOcBi He OJIHHbICBnCaTb HHe ne.


YpOBeHb Wyma COOTBETCTByeT
DInpeKTHBe EBpOneNcKOro COo6uecTBA.
YpOBeHb Wyma yKa3aH B rIabe
《TexHnueckne xapakTepcntKN》Ha
HaKJIeKe.
CTpeIkanM 06o3HaueHbI rpaHnUb IJra pa3MeueHnKpenneHn pyuKn.
NoIb3yIeTcB ToJIbKO HeMeTaJIInuYeCKM, rN6KIM peKyuIm o6OpYIOBaHHeM, TaKIM KaK rOIOBka TpIMMepa co CtpyHOI TpIMMepa.
BepenTecbOTcKaKNBaIOxnpedMeTOB INPKOWeTOB.
NoJIb3OBATeJIb MaUHOnI
doJIHeH y6eHTbcraB TOM, UTO
BpaNHyce 15 M BO BpeMra
pa60TbI HeT JIOJe NJI
HNBOThbIX.
Pa3dJIbHbI c6Op Mycopa. 3To n3dJIeHne He DOJIxHO yTNIN3nPOBaTbcra BMeCTe C dpyHMn 6bITOBbIMN OTXoAMn. Nocne OKOHuaHn Cpoka CnyKbI n3dJIeHn Greenworks He BB6paCbBaIte erO BMeCTe C 6bITOBbIMN OTXoAMn.
IoproToBbTe erpa3dienbHoro c6opa Mycopa.
Pa3deIbHbI c6Op oTpa6OtaHHbIX u3dJIIN nNCIOB3OBaHHbIX ynaKOBOCHbIX
MaTePnAIOB N03BOJRE INNpepepaTaBbATb N IOBTOPOHNCIOJIb3OBaTb.
NcnoIb3OBAHnne nepepa6oTaHHbIX MaTePnAIOB NOMoAe TpeDOTBpaTNTb 3aRpy3HeHNe OKpykaIoUe CpeDbI n CHnKaet Cnpoc Ha cbIpbe.
B KOHcpe cpoKa cnyk6bl 6batape yTuIN3npyuTe INx CHaIeXaUe3 3a6To0i 6OkpykaUoSe i cpe.
BaTape coepxnt BeuecTa, KOToPbI Li-ion ABJHOCT OAnChbIMn DnB Bac N OkpykaIOSe Cpebl. Ee cNeDyET ChrMbN OtnpabNTb DnYyTNIN3aUN B nyHKT npHema OTPa6OtaHHbIX JNTN- NOHHbIX 6BaTapei.


Batteries
Li-ion
CODEPXXAHNE
CopepkHne
OBBRCHEHNE YCJIOBHbIX OBO3HAUEHNI
YcnoBhpie o6o3haueHn 287
CODEPKAHNE
Copepkane 288
Ipeed 3aynckom npocneinte 3a cneyuouim 288
KOMPNEKTALU
KomnneKtaun pyuHoro Tpmmepa 289
OBUNE YKA3AHNIA NO BE3ONACHOCTN
BaxnHa INΦopMaun 290
PpeoctepexeHnO tHocnteIbHo 6e3onachoro nCnoIb3OBaHHra3OHHO TpumMepa 291
C6OPKA
PacnaKOBka 292
Oncb komnkeKta noctabkn 292
C6opka deefneKTopa TpaBbl 292
C6opka Bana 293
PpikpeJIeHne nepeIeHne pyKoTkn 294
3ANYCKIOCTAHOBKA
UcTaHOBKa aKKyMnyTopa 295
ChTne akKymyIaTOPHO6aTapeu 295
3anyck/OctaHOBKa TpIMMepa 295
METOdbiPABOTbi
Pa6ota c nope3yikom 296
ABTomatueckn 3anyck pexyuei HHTN 296
PeKOMeHdaUIN NO BbIOnHeHIO pe3Kn 296
PexyHn HOK HHTN 296
TEXHNUECKOE OBCNJUXBAHNE
06uee texHnueckoe o6cnykBaHne 297
3am eHa KaTuWKn 297
3aMeHa cTpyHbI 298
XpaenHe Tpmmepa 299
OxpaHa okpykaiouei cpebl 299
ПОИСК И YYSTРАЕНUE HENСПAPВHOCTEД
Ponck nyctpaHHe HeucnpaBHOCTe 300
TEXHNUECKNEXAPAKTEPNCNTIKN
TexHHueckne xapaKTepeNCTnKn 301
3aBHeHcOoTBeCTBn Tpe6BaHm EC 301
Ipeed 3anyckom npocJIeNTe 3a cJeDyUoM:
BHHMaTeIbHo npOuecTb HnHCTpyKUHO no 3Kcnnyatau.

PENDyNPEKJDEHNE!
IpoOJIHnTeJIbHoe BO3eJcTBne Wyma daet Hen3JeHmOe yxUdWeHne cLyxa. Bcerda noJIb3yItecB, no3Tomy, cneUHaJIbHbIMN HayuHnKaMn.

PENYPNPEKDEHNE! Hn npKaKnx 06TOATEbCTBax He DonyckaetcBHeceHne N3MeHEn B
nepBoHaaybHyO KOHcTpkyKuIO MaunHb 6e3 pa3peweHn I3rTOBNTeJI. IoJIb3yIteCb ToJIbKO opnHaJIbHbIMN 3anYacTAMN. BHeceHne Hepa3peWeHHbx N3MeHEnn /nJn NcNoJIb3OBAHne Hepa3peWeHHbx npCnocO6JeHm MoKeT npVBecTu K cepBe3HO TpaBME nJn DaHe K CMePeTbHOMy NcxOdy dJa onepaTopa nn Dpynx Niu.

IPEJYIPENJEHNE!PnHe6peHHOM IIN HEnpaBnIbHom 06paueHm TPMMeM MoHET OKa3aTbcra OnacHbIM INCTpyMeHToM, CnOc6bHM HaHeCTN cepBe3HyIO NnCmeptTeJIbHyIO TpaBMy NOJIb30BaTeJIIO NIOOKpyKaIOUIM. Upe3BbuaHHO BAHHo, YTO6bl Bbl npouHTaII NaCTOJaee pyKOBODCTBO no pa6ote nnoHaJI erO coedePkaHne.
KOMPJIeKTAUЯ
Komnlektaun pyHoro Tpmmepa
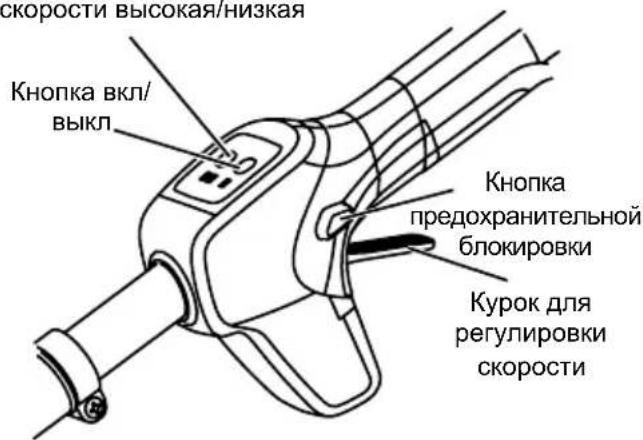
- 3aɪnɪy pɪkɔrɪtka
2.Переднaya pykorytka - CoeHHHeJbHa MyΦTa
4.3aunTHbI KOxUx - Kypok dnia perynipOBKn ckopocTn
-
KhONka BKN/BbIKN
-
Khonka nepeklnoueHnCKOpocTN BbICOKa/Hn3Ka
8.Khonka npedeoxpaHnteHbH 6noknpOBKn - PykoBoCTBO no 3Kcnnyataun
- Papezapkaemajnntn-noHna6atapea 40B,2 Au (Li 402A)
11.3apraHoe yctpoiCtBO 40 B (Li 40CGR)
ОБICIЕ YKA3AHЯ NO БE3ONACHOCTN
BaxnHa nHΦopMaζη
Данньу Триммер соксгтураовани ИЗТОВпЕН B COOTBECTBUN C BbICOKIMN CTaHdApTAMN B OTHошени Наджхости, пocToTBI 6e3OЯСHOCTN 3KcPnyatauIN. Пп павильом yxoDE BAwe yCtpoICTBO 6yET 6e3OTka3Ho pa6OtaTB TteHHe MHorix JET.
Copepa npmHeHn
I3eIne npedHa3HaueHo TOJIbKO IINr INcNoB3OBaHn Ha OTKpbITOM BO3dyXe.
I3eJIne npedHa3HaYeHO nA CkAsnBaHn TpaBbl, He6oBshux copHraKOB nDpyro nOdoHoJ pactntteIbHocTn Ha ypoBHe 3emn nn Okono Hero.
IIOCKOCTb CkauINBaHn IOnJXHa 6bITb npu6JIn3nteNbHO npaJIneBHoN NOBepxHOCTn 3emn.
I3dJIeHHe IOnKHO NcONb3OBaTbCЯI
6pe3AHn HnN NOpe3Kn KINbIX N3rOPOe, KCYTOB
Hpyro pactnteNBocTN, rNe PNOCKOCb pe3Kn
HenapannehHa nobepxHOCTn 3emNI.

OCTOPOXHO! BHIMaTeIbHo
H3yHTe BCE yKa3aHnN n HnCTpyKcHn
No TexHnke 6e3oNaCHOCTn.
HecobnOeHne daHHbIX yka3aHn n HNCTpyKm MOxET npNBecTN K IopaxEHNO 3NEKTPnueckm TOKOM, BO3rOpAHNO pNCy NOJUyeHn cepbe3HO TpaBMbl.
CoxpaHnTe Bce yka3aHnI n HnCTpyKuIN IJRA mCNoJIb3OBAHnB 6yduem.
TepMHN «3JIeKTPoHCTpyMeHT» BdaHHbIX yKa3aHnX OTHOCNTcK BaWemy 3JIeKTPoHCTpyMeHTy, pa60TaIOUeMy OT cETN (ceTeBOMY) ININ pa60TaIOUeMy OT 6aTapeN (6ecnpoBOdHOMY).
06yuēnne
BHHMaTeIbHo npOHTaTne HNCTpyKUIN. O3HaKoMbTeCb c 3JeMeHTAmu ynpabJIeHnru npabNJbHbIM NcNOJb3ObaHnem yCTpOICTBa.
HnKOrJa He No3BOJMaTe DeTAMnnIIOJAM, He3HaKOMbIM C 3TNIM INCHtpkUmaM, INCNoJIb3ObaTb DaHHoe yCTpoiCTBO. MeCTHOe 3aKoHOdaTeJIbCTBO MOxET OrpaHnUBA Tb Bo3pact OnepaTopa.
- IMeIe B BVdy, YTO onepaTOp nIN noJIb3OBaTeJIb HecET OTBeTCTBEHHOCTb 3a HeCuaCTHbIe CnyauN INn yUepe6, HaHeceHHbI dpyrIM JIOdAm INn INx CO6CTBHeHHOCTn.
IodrotOBka
Ipeep nCnoB3OBaHnem yCTpoiCTBa npOBepbTe 6aTaapeHO Ha HAnuHne npn3HaKOB NOBpeXdEHHn nn CTapeHn. Ecn 6aTapeN NOBpeNTcNo BpEmn CNOB3OBaHn, BblIOUHTe yCTpoiCTBO n He nCnoB3yIne YCTPOICTBO, ecn 6aTapeN NOBpeXdEHa, nnn nCTek cPOK ee Cnyk6bl.
- Ipeed Haayalom NcnoIb3ObaHn yctpoNCTBa npOBepaTe ero Ha HAnuYe NOBpeKdEHN, 3aunTHbIX yCTpoNCTB nIN cNTKOB.
3anpeaetcpa6oTaBc yctpoiCTBOM,ecn B6JIn3n HaxOJaTcIIOJN,Oco6eHNO Detn ININ DOMaunHe XuBOTbIe.
3Kcnnyataun
-Держпгшнрь пntаня поадьше от ржуши detajel.
Bcerda Hocnte yctpoiCTBa dna 3aunTbI rna3 n npouHyIO obyBb BO Bpemr EKcnpIyaTauny ctpoictBa.
I36eRanTe nCNoB3OBaHn yCTpoNCTBa B IIOxN XIoroDnBix ycNoBnX,OCoBeHHO KOrDa cyueCTByET PnCK NOnaHaHn MOHNH.
-3KcnnyatnpyTe yCTpOINTOJbKO npn DHeBHom CBETe INXopoWEM NCKYCCTBEHHOM OCBeUeHNN.
3anpeaetc3Kcnnyatauny yctpoiCTBa CHeNCnpaBBbIMNnHNeYcTaHOBJIeHHbIMN 3aHTbIMN yCTpoiCTBAMn nIINtKamN.
3anyckaTe DBrarTeIbToIbKO NocNe TOrO, KaK y6eIntecb, YTO peKyuIue Yactn HaxoJrTcH a 6e3onachom pacctOraHnn OT pyK n Hor.
Bcerda otKlnuayte yctpoCTBO OT cetn 3JIeKTPoNTaHnT (T. e. BbIHMaIte BNkky n3 3JIeKTPnuecko po3ETKn, n3BNeKaIte 6JIOKIpOBOUHoe npncnocO6JeHne nIN 6aTapeIO) BCJeDyUOxCnyaX:
BCaKpa3,KoTda yCTpOcTBO ocTaETc86e npCMOTpa;
- nepeod ouncTkO 3acopeHnra;
- npei npoBepko, uCTKoN I Texo6cnykBaHnEm yCtpoIcTba;
- Nocne ydapa o NoctoponHn npedMeT;
BCaKpa3,KoTda yCTpoCTBO HaunHaET CnUHKOM CNJbHO B6pnpoBaTb.
CneIte 3a TeM, TTo6bIpeKyuIe npncnOco6HeH He OKa3bIbAJIcB 6JN3KO KHoram m pykam.
- NoctoHHO cneHte 3a Tem, UTo6bI OTBepCTnI dnn OxnaJdaHooero Bo3dyxa 6bln OTKpbITbIMN.
Texo6cnyxmbaHne n xpaHeHne
Bcerda otKJIIOUaHTe yCTpOINCTBO OT cETn 3NEKTPoPNTaHnra (T. e. BbIHMaITe BUNKy n3 3NEKTPnueCKo p03eTKn, n3BJeKaIte 6NoKIpOBoUHoe npCnOCo6LnHe nnn 6aTapeO) nepeD BbINOJIHeHnem O6cLyKNaHn rNn YnCTKn.
- IcnoIb3yIte ToJIbKO peKOMeHdyeMbIe npOn3BOdnteJIeM 3aNaChbIe YacTn u Akceccyapbl.
- Perylnarpo npoBepaTe yCTpoNCTBO n BbINONHnTe erO texO6cIyKnBaHne. Pemont yCTpoNCTBa DOJXeH BbINOJIHrTbC4 TOIbKO B aBTOpN3OBaHHOM cepBnCHOM ueHTpe.
- HencnoJb3yemoe yctpoiCTBO DOJIHXO xpaHHTbcB HeIOCTyHOM IINI DETeMecTe.
IpeodocTepexeHn OTHOCHTeJIbHO 6e3ONaCHOro NcNoJIb3OBaHnra3OHNOrTOprMMepa
- 3TO yCTPOIcTBO MOKeT NcONb3OBaTbCra DeTBMN B BO3pacte 8 JeT n CTapWe, a TaKKe JnUaMn C ORpaHnueHHbIMn Qn3NuYeCKMn, CEHCOPbIMn ININ YMCTBeHHbIMn CNOC6HOCTaMn INN C HeIOCTaTKOM ONbTa n 3HaHn, ecn OHn HAnEJaUm O6pa3OM npOnHCTpyKTIpOBaHbI NO BONpocAm 6e3OnaCHOr OcNoJIb3OBaHnY cTPOIcTBa, IOHMaOT OnaCHOCTb IN HaxoJrTcR NO KHTPOlEM.
- DeTЯm 3aIpeuεaetcH irpaTb c yctpOJCTBOM.
HeOnyckaetcBbINOJIHeHneOuNCtKnIO6CJyXkBaHnJeTbMn 6e3Ha6JIoDeHnB3pocIbIX.
BaTapeIO Heo6xOJIMo I3BneYb I3 yCTpoIcTBA nepeI ee yTNII3auei. - UcTpoIcTBO Heo6xOdmo OTKJIIOHTb OT 3JeKTpocTeNpeed ee N3BNeueHHeM 6aTapeu.
Batapeo Heo6xOIMO yTNJIN3npOBaTb C co6JIIODeHnEM Mep 6e3OnacHOCTN.
He nepenapraTecb. CoxpanyTe yctOnuBoe noJIOXKeHne. 3TO N03BOJNT LyUWe ynpaBnTb 3JIeKTPoINHCTpyMeHTOM B HepeDnDeHHbIX CNTyaunx. - PabotaTe B cneuaJIbHOJ ODEXJe. He HadeBaIte 6oTAtOuSyUc8 ODEXy N yKpaUeHn. He donyckaIte IonoaHaHn BOLOC, ODEXDbI N nepCuATOK B DBNkUxueCe JETaII. BoTAtOuJaCra ODEXDa, yKpaUeHn I Hey6paHHbIE BOLOcbI MOrYT 6bITb 3aTAYtI DBNkUxumMCr DeTaJIaMn.
Данhoe yctpoicBO He npedHa3NaheNoI INCIOJIb3OBAHnI JIOdbMn (BKJIIOUaJ DeTei) C OrpaHnueHHbIMnФИЗИeCKnIMn IINуMCTBeHHbIMn CIOOC6HOCTaMn IIN JIODbMn C HeIOCTaTOUHbIM ONbITOM N 3HaHnAIMN. NcKIIIOUeHNEmЯBnErc TcIyuaI, KOrda OHI pa6oTaOT NOd Ha6JIIOHeHem, IINI KOrDa OHI 6blnn O6yHeHbI NOJIb3OBAHnIO yCTPOIcTBOM JIncOM OTBETCTBEHHbIM 3a INX 6e30nacHOCTb. - DeTN, nCnoJIb3yIOUe ne DaHHOe yCTPOIcTBO, OJXHBi HaxoINtbcra IOd HABJIIODeHneM.
PacnaKOBka
Данhoe yctpoCTBO Tpe6yET BbINOHNHeNc6OpKn.
OCTOPOXHO 3BNEKTe yCtpoNCTBO IN BCE npncnoc6bHeHnI 3 Kopo6Kn. PpOBepTe HAnuHc BcEx DeTale, npeueNCJIeHHbIX B CnIcKe KOMnEkTyIOxN.

He noIb3yItec b yCTPOINCTBOM,ecnn npn eropacnaKOBKe 6hApYkNTcra, 4TO KaKne-1n6o DeTann n3 CnNCKa KOMNNEKTyOuXx Uyke YCTAHOBnEHB Ha yCTPOINCTBe. DeTann n3 DaHHORO CNNCKa He MOHTnpyOTcRa Ha yCTPOINCTBe n3ROTOBnTeJEM,ONn DOJIKNHb IyCTaHaBnBaTbcn POKynatEnem.NcNoIb3OBaHne HENpaBnIbHo Co6paHnHO yCTPOINCTBa MoKeT pNBECTn K cepbe3HOI TpaBme.
BHHMaTeIbHO OCMOTPnTE yCTpOJCTBO Ha IpeMET HAnuHr JeFKeTOB NIn IOBpeXdEHN, BO3HKnux npu TpaHCnOpTnpOBKe.
- He BbIbpaCbIbAte MaTePnAJI yNaKOBKn, noka He BblIOJIHnTE TuaTeNbHbI OCMOTp I He y6eIITecB HOpMaIbHbOu pa6oTe yCTpoIcTba.
Onncb KOMnJIeKt a NoCTaBKn
BCTaBbTe BnHTbI B 3aUHTHO npncnoc6JIeHne, TTO6bI 3akpeNTb KpbIuKy 3aUHTHO npncnoc6JIeHna.
KhoNka nepeKIOUeHnCKOPOCTN BbICOKa/Hn3Ka
Pa6ota c nope3vnkom
Pn noIb3OBaHN TpMMepOM BbIOJHrTe CneDyUe peKOMeHaun:
Bo3bMnte noDpe3nK npaBOy pyKO 3a 3aHIOpyKoRTky, a neBOy pyKO-3a nepeHIO pyKoRTky.
- Ppi pa6ote kpenko depknte ero o6eHm pykamn.
Ioppe3nK cneDyET depKaTb Byo6Hom noNoxHm 3a 3aHIO pyKOrTy Ha Bbcote 6epa.
O6pe3aIe BbICOKyIO TpaBcBepxBy BnH3.3To npedOTbpaTHT HabopauuBAHne TpaBbHa KOKyX BaNa n rONOBky CTpyHb, YTO MOKeT pNBeCTN K IONOMKe n3-3a nepepeBa.
Ecn TpaBa HaMOTanacb Ha rONOBky CTpyHbI:
BbInbTe akkymyTOpHyio 6aTapeIO n3 Tpmmpepa.
- YdaInte TpaBv.

OCTOPOXHO! CnyaHbI KOHTcpeKyuIeI ROJOBKOI TpIMMepa MOxETnpINBecTNI K TReKeJIbIM TeJIeCHbIMNOBpeXDeHnA.M.

ABTOMATNueckn 3anyckpejxueHHTN
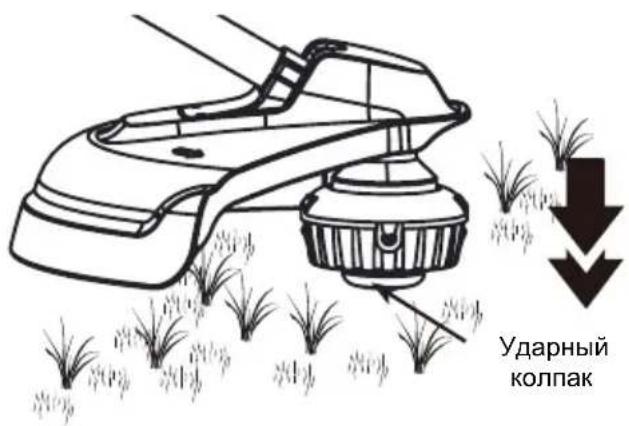
BOB Bpempa6oTbCTpyHHoro Tpmmpepa,pexuayctpyHa n3HaunBaetcN CTaHOBTcK OPOue.
TOT Tpmmep OCHaueH CnCTeMoB BbIDBxKeHnCTpyhbl,6laOdaap KOTOpoC TpyHa BbIDBvraeTcKOrda RoNobKa yadpaetcO 3emnI npn BpauneHN.
CneuajbHbHoxo6pe3aet ctpHy do HxKHOI nnHbl.
PekomeHdaunnoBbINOJIHeHIO pe3Kn
-ДерхиTe TpIMMep NOI HAKIOHOM K NIOCKOCTN CTpIXKNI,3TO NOIOXeHne YBJIeTc ONTMaJIbHbIM.
BbIOCTURHete NyuNX pe3yNBtATOB B pa6oTe, ecnn 6yndeTe DBNrAtb TpMMep CneBa HnpaBO; cTpIXKa 6ydeT MeHee 3ΦΦeKTHBHO npn DBNKeHN TPMMepa CnpBa HaneBO.
- NcnoB3yInTe DnIe CtpnKKn KpaJ peKyuEn HHTN; He BBODNTe peKyuIIOBky rny60O B TpaY.
- PnHaTajKnBaHn Ha KOJIIOUyI npOBOJOKy I OraDbI yCKopReTcN3HOC peKyuEe HHTN, BNIOtB Do ee pa3pbIbA. KamH, Knpu, DepeBO npNBODrK 6bICTpOMy n3HOcy HHTN.
- 36raTe KOHTaKTA C DepeBbMaN KycTaMn. Pexyua Hntb MoXeT HaHeCTn NOBpeXdEHNr KoPe DepeBBeB, DepeBHHbIM CTpOnTeNbHbIM DeTaJAm, Yactm NaHeIbHOJ OShuVBKn N I3rOpOJaM N3 WtaketHnka.
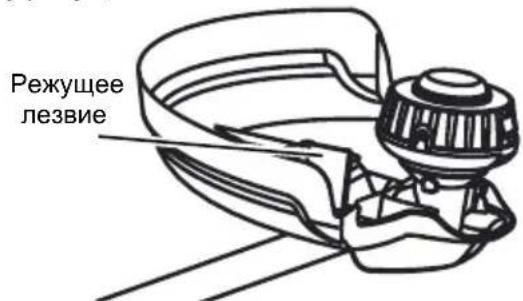
Pexyuni HOX HNTN
YcTpoiCTBO OCHaSeHOp pe3QOM DnI HHTN,
yCTaHOBJIeHHbIM Ha DeΦneKTope TpaBbI.ДЯ
ONTImaJIbHOro BblONHeHnpe3a pa3MOTaTb HHTb
Ha HyxHyIO DnIHy. BblONHtB pa3MOTky pexyuei
HNT,ecNI DBrAteJIb HauINHaET BpaUaTbcra CO
CKOPOCTbIO, npeBbIshaOuSeH HopMaJIbHyIO, INI
ecNI 3aMeYeHO NOHIXKeHNe Ipon3BOIDTeJIbHOCTN
CTPnKKn. 3TO N03BOJNT NOdEprXNBaTb ONTImaJIbHyIO
IpOn3BOIDTeJIbHOCTb yCTpOJCTBa I npabInlbHyIO
DnIHypeKUseHHTN.
TEXHnueCKOE OBCJnyxINBAHNE
Obüee texnueckoe obcnykBaHne

OCTOPOXHO!Bcnyae3aMeHbI
NCN0JIb3OBA Tb NCKJIIOHTeINbHO cnmpMeHHbe 3aNaCHBe Yaactn.
NcnoB3OBAHne DpynX KOMNOHeHTOB MOKeT npEaCTabJIb ONaCHOCTb INI NocnyKNTb npuHNoH NOBpeXdEHn yCTpOInCTBa.

OCTOPOXHO!Bo n36eKaHne pncka noJyehnT JxKeJIbIX NOBpeKdHn CJeDyET 08a3TeJIbHO n3BNeKaTb
aKMyITop n3 yCtpoIcTba BO BpeM erO YnCTKN I npu BBIOJIHeHNI IO6bIX paB0r NO TexHnueckomy OcbnykBaHIO.
IpeepKaKdbim NcNoB3OBAHnEM CneDyET npOKoHTpOJIPOBaTb yCTpoNCTBO DnO6hApYKeHnIOBpeXdEHH,OTcyTCTByUOuNX INN Ocna6JeHHbIX qAcTeKAK,HaPnIMep,BnHTbl,raKN,3aXmbl nT.D.HaJNeXaUIM o6pa3OM 3aTaNHTe BCE KpenexHbIe DeTaUN H He npINBOUte yCTpoNCTBO B DeiCtBnE Do Tex NOp, NOKA He BydyT 3aMeHeHb BCE OTCyTCTByUOuNE INN NOBpeXdEHHbIe YacTN.
He nCnoJb3ObaTb pactBopnteHdIy ChCTKn pIaCTNKOBbIX qacte. BoIb7a YacTb INaCTNKOBbIX MaTePnAnOB MoKet 6bITb NOBpeXKeHa IMeIOUIMNCB B npOdaKe pactBopnteJIaMn. NcNoJIb3ObaTb YIcTyO BeToSb dIy ydaJeHra rpa3N, nbIIN, Macna, rycToi Cma3Kn n T.d.

OCTOPOXHO! He donyckaTb
HONaHa Ha NpactKOBbIe qACTn TopMo3HOJ KIOcTn, 6eH3nHa, HeTeXmUeCKNX npOdyKTOB,
npOHKaIOUxMaceNt.n.Takne
XMMueCKNE pOdyKtB MOryT NOBpeNTb,
ocna6ntbnn pa3pyuHTb PnactKy,TO
MOKeT npNBcTn K NnHbIM TpaBMam
PeMOHTy nn 3aMeHe nOJIb3oBaTeJem
NOIIeXaT TOIbKO KOMIOHeHTbl,
BXODaUIe B CNICOK 3aNaChbIX qAcTei.
Bce dpyrNe qActn DOJnxHbI 3aMeHrTaCB
ABTOPIN3OBaHHbIM CepBNCbHM CEHTPOM.
Дл ремоHTа n 3aMeHb MOxHo NcNoIb3OBaTb TOnbKO DeTaN, yKa3aHHbIe B CnUcKe DeTaNe. 3aMeHa BCex dpyrNx DeTaNe DoJIXHa npOn3BODNTbcR B aBTopu3OBAHHOM cepBnCHOM ueHTpe.
3am eHa KaTuShKn
IcnoB3yTe 3aMeHy nHHn pe3a opuHaJIbHoro npOn3BODNTeJn LyUwei npOn3BODNTeJIbHOCTn.
- BbHyTb akkymyIaTOP.
HaxKaTb BHyTpB KpbIbIbIaKn, HaxOJaIuecra No 6OKam KpbIaKn KaTyuKn.
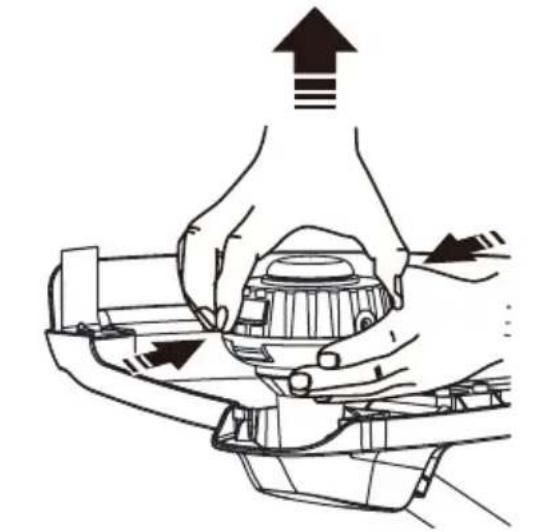
-ДяСЧТЯКрБИKKaTуШКNotэнБeEВБepX.
BbHbTb cTapyIO kaTyUKy.
- Ipeed yctaHOBkoHOBo KaTyuKn y6eINTbcra, YTO HHTb BCTaBJeHa B Na3 Ha HOBOI KATyUKe. Y6eINTbcra, YTO KOHeu peKyuSei HNTN BbIXOJNT n3 na3a Ha OKoNo 15 cm.
TEXHnueCKOE OBCJnyXINBAHNE
- UctaHOBtH HOByo KaTyuKy TaK, YTo6bI peJxUaH HtB n Na3 6bln BblpOBHeHb No npoyuHne B pexyuEe roNoBKe. IpOnyCTHTb HtB b npoyuHy.
IOTaHyTb 3a HHTb, BbIXoDjaUyIO n3 pexyuei roJIOBKn, TaK, YTO6bI OHa npOuJa Upe3 na3 B KaTyUKe.
HaTeB KpbIuKy Ha KaTyuKy, BCTaBnB 3bIuKn B Na3bI HaxmMa Ha HxN Do NOnHoi fNKcaun KpbIuKn.
3ameHa ctpyHbl
N3BnKeKte aKKMyJrTopHyIO 6aTapeIO.
BbIhBTe KaTyUkU n3 rOIOBKn CTpyHbl.
PIMMEYAHNE CHMNTe c KaTyuKN OCTaTKN CTapoN CTpyHbI.
- OTPeKyCOKCTpyHbI dNHHoH npMepHO 9 cyTOB.
CorHnTe CtpHy B cepeDInHe n 3aKpeNte nTeTIOB UeINu B CEHTpaIbHom O6OJe uynIbKn. Y6eINTecb, UTO CtpyHa 3akpenIeHa B uen.
- Hakpytute ctpny paBHomepno n noTHo no yacoboi ctpelke. Iocne 3abepuHn yctaHObnte ctpny uen, T06bl OHa He packpytnacb.

He hakpyuNbaiTe ctpyHa 3a KpaunynbKn.
TEXHnueCKOE OBCJnyxINBAHNE
XpaHeHne TpIMMepa
- Пелегхраненьынб te aKKMyIЯTopHyIO 6atapeu n3 trpIMMepa.
OuHCTHTe TpHMMeP OT BCEx NOCTOPOHHNX BEUectB.
XpaHnTb yCTpoiCTBO B MeCTe, HeIOCTyIHHOM InnIeTei. - OБерегаиTe OT BeuEcTB, Bbl3bIbAIOxKoppo3nIO, HapnpMep, caOBoBix yDObpeHn nIi CoNДЯ ydaJIeHn IbDa.
XpaHnTe n 3apKaaTe aKKMyJrTOp B npoxlaHOM MeTe. TempepaTypb BblIe HnKe KOMHaTHoI cOKpaauOT cPcK ClyK6bl AKKMyJrTOpa. - Hikorda He xpaHnte pa3pXeHHbIe aKKyMJIaTOpbl. Pocne nCnOJb3OBAHnJaTe aKKyMJIaTOpY OCTbITb n Cpa3y 3apAInTe erO.
XpaHnTe aKKymyTOpHyo 6aTapeIOn npi TemnepaType Hxke 27^ B MeCTax 6e3 NOBbUeHHOJ BJaXHOCTN. - co BpemeHem akKymyIaTOP aTePHT cNny 3apJKn. Yem BbIwe TemnepaTypa, Tem 6bICTpee akKymyIaTOp TepaET cNny 3apJKn. Ppi npOIOJIKNTeBHom npocToe KcTOpe3a, 3apJKaIte akKymyIaTOp KaKdIbe MeCau nIu dBa. 3TO npoDnIT cPok erO cNyK6bl.
Oxpana okpykaioe cpebl
OxpaHa OkpyKaIOUeI cpeIbI OJXHa RaJIbTcR cyueCTBeHHbIM I nepBOoUepeHbIM acNeKTOM npI NOJIb3OBaHm MaunHO, BO 6Iano YeJIOBeYeCKOrO 6IeCTBa I OKpyKaIOUeI cpeIbI, B KOTOpOI Mbl XINBem. CtapaiTeCb He 6ecnOKoNTb OkpyKaIOUxN.
Ctporo co6nOaTe MeCTHbIe HOpMbI NO yTnIn3aun yNaKOBKn, MaCeI, 6eH3nHa, fNtBtpoB, NOBpeXJDeHHbIX YAcTe Nnn JIO6bIX 3JeMeHTOB CO 3HaHTeINbHbIM BnIaHHe M Ha OKpyKaIOuYO Cpey; 3TN OTXoDbI He DOJIaKbI BbIbpaCbBaTbcra C 6bITOBbIMMycopom, a Co6npaTcR OTeJIbHO IN nepeDaBaTcB CneuaJIbHbIe CEHTpbI c6opa OTXoOB, BblONHauOuine IN nepepa60TKy.
- Ctporo co6IIOdaIte DeIeCTBlyOuIne Ha MeCTHOM ypOBHe npabNla No BbIBO3y OTXoIOB pa60Tbl.
- Pocne 3aBepseHnCpoka Cnyk6bl MaunHbI He Bbl6paCbBaIe ee, a o6paTntEcB UcHTp c6opa OTXoOB B COOTBETCTBnC DeIcTBYIOUM MecTHbIM 3aKOHODaTeJIbCTBOM.
NONCK UYCTPAHEHNE HENCINPABHOCTEIN
ПОИСК И YYSTPAHEHNE HENCSРABHOCTEД
| HEMCNР ABHOC T b BO3MOJ | Ны IE ПИЧИнbl MÉTOD UCTР | АHENHЯ |
| При Исторьану меловки саватческог поочем STруна He BvInyckaetca. | Ны StКлЕплась. 3amEuHa Sttrpyнbl. | |
| Ha KaTuшke HeDocStaToCHNo HHTn.См. rIaBy "3amEuHa pexUşeH HHTn | См. rIaBy "3amEuHa pexUşeH HHTn" дaHOro pyKOBODCTBa. | |
| Ны StПшkom KOpOTkaH. | ПOTянТь 3a HHTb, уděрЖиВа НжаToH KHOДКу pa3MOTkn. | |
| Ны 3aIyTalacb Ha KaTuške. | СнЯТь HHTb c KaTuškn i ChOba HAmOTaTb.См. rIaBy "3amEuHa pexUşeH HHTn" dAnHOro pyKOBODCTBa. | |
| Вokтуг креления валу ngolobkn C kaTuško HHTn HAMatbɪBaETcrg Trpaba. | Стржka Trpавы прозвodится StПшkom 6bl3ko K 3eMJIe | Д��PreдурпекдиENHЯ HakapЛиВанЯ Trpавы прозвodITb STprjckу CBepxu BHN3. |
| Устю CTBO He 3aIpyckaetca. | He 3akpeПлен akKymJulyTop. | Д�� Надlexашero 3akpeПленENHЯ akKymJulyTopa ДобиТься 3aSceMЛeENHЯ r3bYчka, paCnoJIoXeHHORO B erO HIXKneJЧAstn, B COOTBETCTBvUOSeM Pa3y. |
| AkkymJulyTop pasprajxeH. | ЗардNTь akKymJulyTop B COOTBETCTBnC ИнструКцИМи. | |
| He noIlnocTbU BCTablenera StTaHra. | УбетдNTь с, чTO HIXKЯ StTaHra npabINьно BCTablenera B StcEInHoe yCTproiCTBO Ha BepxHne I StTaHre I 3aTЯHtB StcEInHoe yCTproiCTBO. |
TEXHnueCKne XAPAKTEPNCN
TexHnueckne xapaKTepeNCTnKN
A V Technology Ltd AVTECH House, Arkle Avenue, Stanley Green Trading, Estate, Handforth, Cheshire, SK9 3RW
I3MepeHHb ypoBHeB 3ByKOBoM OuHocTn 92.73 dB(A)
IapaHTnpyembI yPOBeHb 3ByKOBoM OUsHOCTn 96 dB(A)
OueHka COOTBeTcBnI npOBedeHa corNaCHO npInoXeHHIO VI K DnpeKtNbE 2000/14/EC
MecTo, data: Changzhou, 22/07/2016
Bnue-npe3nEHT no pa3pa6oTkam
Poiinncb: Gary Gao Naixin (BEng, CEng, MIET)
OBRCHEHNE HA CUMBOJNTE
CHMBOJN
PENDUNPEKDEHNE!
MotopHaTa Koca,
xpacTope3aKaTaHIN
TpMepbT, c KOnTo ce pa6oTu HeMapJINBO NIN HEnpaBnJIHo, Ca onaChnHcTpMeHTN, KOtO MoTa Da npedn3BnKAT
cepno3Ha nIcMbpTOHocHa TpaBMa Ha onepaTopa IIN 3ao6nkaJNTe rO. MHO e BaHHo da npouTeTe TOBa pKoBOdCTBO 3a ekCnNoatauN I Da BHNKHeTe BCbDpHaHNeTo My.

Moi, npooyTepe bkoBODCTBOTo 3a onepaTopa BHMaTeJIHO n Ce yBepeTe, ye pa3bupate yka3aHnraT, ppei da n3non3BaTe MaunHaTa.
Hocete 3aunTHn cpeCTBa 3a ouN.

HoceteaHTnfoHN

He n3naraIte Ha dbxqI HA BnAekH yCIOBna.


BHHMaBaIte 3a n3XbPneHn Hn JETaU OBeKtn. DpbXTe BCuKN CtpaHnHn Ha6NIOaTeN (OCo6eHO Deua NDOMaUNH JIO6UMu) HA NOHe 15m pa3CTOaHHe OT pa6oTHata 30Ha.

BHMabaIte 3a n3XBbPneHn IJI NJIeTAAU OBeKTN KbM HAMnpaUNTe ce Ha6N3O JNuca. IpbXte HAMpaUN Ce Ha6NJN3O JNuca Ha 6e3OnaCHO pa3CToHHe OT MaunHaTa.

To3n npOdyKT E BCbOTBeTCTBne C npINOxKIMTe DnpeKtNB Ha EO.

YBepeTe ce, Ye Kocnte Bn He BnCrt KoraTo ce HabeKdaTe noi HNBOTo Ha paMTo cn.
HNBOTO Ha UyMOBNTe EMNCN B OKONHATA Cpea E B CbOTBeTCTBNE c DnpeKTNbata Ha EbPoneckata 06HOCr. HNBOTO Ha EMNCHTe Ha MaunHata e NocOyeHO B rJaBaTa OTHOCHO TexHueCKNTe DaHHN Ha ETUKETA.
MapKupaHnTe CTepeIKN nOKa3BaT
rpaHnUte 3a NoCTaBRe He Ha
dbpKaHa Ha pBkoXbATKaTa.
IpeBnEHO eHcTBeHo 3a HeMeTaJIHO, rBKBaBO peKeHoo6OpyDbaHe, KoEtO 03HaUaBa TpIMepHa IJaBa C TpIMepHa Kopda.
PaseTe ce ot otckaau npedMeTN pikoWeTN.
No Bpeme Ha pa6oTa, onepaTopbT Ha MaunHaTa Tpr6Ba Da BHIMaba Xopa Nn HINBOTHN Da He Ce np6JnKabat Ha No-MaIKo OT 15 M.
Pa3dennho cb6bnpaHe.To3n npoDyKT He Tp86Ba Da ce n3XbBpna 3aeHNO C octaHaNITE 6ntOBn OTnabu. Ako Baunr npOyKT Ha Greenworks Tools HMa HyJda OT NOpMHa HnH He B3hAmePBAte Da rN3NON3BaTe NOBue,He Tp86Ba Da rN3XbBpnaTE B 6ntOBnTE OTnAbu.OTJeIeTepoDyKTA 3a pa3dennho cb6bnpaHe.
Pa3dEINHOTo c6bnpaHe Ha n3nON3BaHn npOdyKTn ONAKOBKn NO3BOJnBa MaTePnaNITE Da 6bDat peuKnnpaHn n3nOJ3BaHn NOBTOpHO. NOBTO pO3nO3BaHe Ha peuKnnpaHn MaTePnaHn npDeOTbpaTBA 3aMbpcraBaHETo Ha OKoHNHaTa CpeDa HamaJIraBa NOTpe6HoCTTa OT CypOBHH.
B kpaHa ekcnIIOaTaUOHHn JXIBOT Ha 6aTeepnte Tpr6Ba Da rN n3XBbPnnte IIO eKoIOrOCbO6pa3eH HauH. AkymyIaTopHaTAt6aTepeNa CbDpKa MaTeepnA, KOnTO ca OAnCHn 3a Bac n OKoJHATA cpeA. Ta Tpr6Ba da ce N3BaAn OT ypeDa n Da CE n3XBbPn pa3DeJIHO B o6eKT, KoITo pnpema JNTneBO-ooHH 6aTeepn.


Batteries

Li-ion
CbAbypXaHne
OBRCHEHNE HA CIMBOJNTE
CIMBOI 302
CbDpXAHNE
CbIbpxkHne 303
IpeDi da 3anOuHHe, mMaITe npEdbnCneHTo: ... 303
KAKBO E TOBA?
Koe KaKBO npecTaBnBa Ha TpImepa C pexeio BnaK Ho? 304
OCHOBHNI MEPKN 3A BE3ONACHOCT
3aHOMHeTe 305
PpeynpeJeHn 3a 6e3oNaHa pa6ota c Tprimepa 3a TpeBa . 306
CTIO6BAHE
Pa30nakobane 307
Onnc Ha nakeTa 307
MONTAX Ha dephiékTopa 3a TpeBa. 307
Crlno6yBaHe Ha npTa. 308
MoHTIpaHe Ha npeHnata pbKoXbTaKa. 309
CTAPTIPAHE IN CINIPAHE
HCTaI npaHe Ha akymyla Topnla 6nok 310
N3BaXdaHe Ha 6aTePn 310
CtaptnpaH/cnnpaHa Ha Tpimepa 310
TEXHNIK 3A PABOTA
Pa6oTa c TpImepa 311
ABTomatuHNOIpaBaHeHa HnWkata 311
IpeNo pBkn 3a pR3a HeTo 311
NcK3a p3a He Ha HnKkata 311
PbKKA
O6ua noDpBkka 312
CmHa Ha 6o6nHaTa 312
TEXHNUECKX XAP AKTEPNUCTIKN
TexHnueckx np akTepeNtIKN 316
EcKeIapaua 3a cBcTBeTCTBnE Ha MaunHaTa..... 316
OCHOBHIMEPKIN3ABE3OPACHOCT
IopdpbkkncbxpaHne
BnHaHn N3KlIOuBaIte MaunHaTc OTe 3axpaHbAHeTo (T.e. N3KlIOUBaIte UeNCeNa OT eNEKtpueeCKn KOnTaKT, CBAJnTe 6NOKpAuOTo yCTpoiCTBO nInn AkymyIaTOpHaTa 6aTePn), npEn Da n3BbPbBaTe DeHOCrN NO NODpBXKa INN NOHCtBaHe.
- 3nOJI3BaIe caMo pe3epBHN qAcTn I npHAnJExKHOCTN, npenOpbuaHn OT npOn3BOJNTJIa.
- PeIOBHO HHCNEKTIpaIte MaHnHaTaN3BbPbBaIte DeHOCTN NO HeHATA NOIDpBXKa.MaHnHaTApra6Ba da ce pemOHtnpa cAmO OTOTOpN3UnPAhTexHK.
Korato He ce n3noJ3Ba,cbxpaHbAte MaunHaTa daJeve ot Docera Ha deca.
IpeydynpekdeHna 3a 6e3onacHa pa6ota c TpImepa 3a TpeBa
To3n ypeJ moKe da ce n3noJI3Ba ot deca HaI 8-roINuHa Bb3pact, KaKTO n OT IInuCA c HamaJeHn fN3nueckn, CETNBn INn yMCTBeHn CNOc6HOCTn INn 6e3 ONIT n PO3HaHnA, Ako CbUHTe Ca NOd HA3Op, NOnyUnn ca IHCTpyKUnn OTHOCHO n3NoJ3BaHeTo Ha ypeDa nO 6e3oNaCeH Naun H pa3bnpat eBentyaJHnTe onaCHOCTn.
- Deça He 6nBa Da Cn nIgparT Cypea.
-ПочнстанetoипдрьжкataOTNotpe6nteJH Tp86Ba Da ce N3BbPWBaT OT Deua 6e3 HaI3Op.
- AkymynaTopHata 6aTePnra Tp8Ba Da ce n3BaDi O typeDa, cnei KoTo Da ce npede 3a peuKlnpaHe.
- YpeBt Tpr6Ba Da e n3KnIoueH OT 3axpaHbAHeTo, KOrato N3BaJdATE aKymyNaTOpHaTa 6aTePn.
BaTepeYra Tp6Ba Da ce N3XBbPn no 6e3onaceH naHH.
He ce onntbaTte da doCTHHeTe TpyHNOctHXHM MeCTa.BnHa n CTbNBAite Cta6uHNO no BpeMe Ha pa6Ota n na3eTe paBHObecne. ToBa DaBa Bb3MOXHOCT 3a NO-dO6bp KOHTpON Ha eNEKTPnueckn INHCTpymENT B HeoayKaBHn CNTyaUIN.
Hocete noxoado o6neKno. He hocete u npokn dpexn nn ykpauehna. Dpbxte kocata, dpexnte n pbkabuunte cn ha 6e30ancho pa3ctoHne ot noBnHNTE enemeHTN. Unpoknte dpexn, ykpauehnaTn Nblnte KOCN MORaT da 6bdaT 3axBaHaTHN OT DnKxeune ce enemeHTN.
To3n ypeI He e npedHa3HaeH 3a ynoTppe6a OT Nua (BKNIOHTeJIHO Deua) C HamaJIeHN IO3HabATEJIN CNOCO6HocT INN Nua, KOITOn HAMAT Heo6XODIMTE ONIT IN 3HaHna, OCBEN aKO CbUNTe He ca Ha3npaBAHn INHCTpyKTIpaHn OTHO6e30NaCHOTuNIOJ3BaHe Ha ypeDaOT NInCe, OTROBOPHO 3a TxHaTa 6e30NaCHOCT.
- Deuata Tp86Ba Da 6bDat Hau3npaBaan, 3a da ce rapaHTnpa, ye He cn irpaT c ypea.
Pa30nakobaHe
To3n npoodykT n3nckBa crno6baHe.
BHIMATEJIHO H3BaTe Te npOyKTA n npHnAJIeXHOCTHTe KbM Hero OT kyTnRA. YBepTe ce, Ye ca HaIINuHN BCNcK eJeMeHTn, BKNIOHeH N B onncaHa NaKeTa.

He n3noJ3BaIte To3n npOdyKT, aKO npa pa3oNAKOBaHETo My HraKo YactN, BKIOUeHN B OINca Ha NaKeTa, Beue ca CrNo6EH. Yactnte, BKIOUeHN B TO3n ONc, He ca 4p6pHNO crNo6EH, a Tp86Ba KIneHTbT Cam Da rN CrNo6N. I3noJ3BaHTo Ha HenpaBUNHO crNo6EH npOdyKT MoKe Da DOBeDe Do cepNo3HN pN3uYeCKn HapaHRAHn.
OrnedaTe BHMaTeHNO npOyKta, 3a da ce yBepnte, Ye He ca Bb3HNKHann NOBpeDn nn CuyNbaHn no Bpeme Ha TpaHCnopTa.
Ornadae BHMaTeJHo npOdyKa n ce yBepTe, ye pa60Tu npaBnHNo, npEdu da n3xBpInTe onakOBbHHmaTePnaI.
Onnc Ha nakeTa
- OTeTpaHete 6aTepeNraTa.
- Remove the spool from the cutting head.
3A BENEKKA: PpeMaxHete OCTaHaIOTO B MaKaPaTaCTapo BnakHO.
- 3pejkeTe yact OT BnaKHOTo, C dJnxHa np6n3ntenH0 9 cyta.
CrbHete KOpDATA B CpeDHaTayact N NoCTaBete npIMKaTBA CNOTAB CEHTpaJHnYyIe Ha makapata.YBepTe Ce,ye KOpDATA e Do6pe nO3uOHiPapaBA CNOTA.
Pa3BnIte KopdaTa paBHomepHo n PnabH No nocoka Ha yacOBnKOBaTa cTpeNka. Cnei KaTo 3aBbPUnTe TOBa DeIcTBue, NocTaBeTe KopdaTa B CNoTa, Taka Ye Da He MoXe Da Ce HAMOTae o6paTHo.
- He pa3BvBaIe KOpIaTa OTbIa Pb6a Ha MaKapapaTa.
ПОДРьЖKA
CbXpaHHeHa TpImepa
- 3BaTe6aTePnraTaOT TpImepa, npEn Da ro npn6epeTe 3a cbxpaHene.
-Почирстгпмераот BCИЧКИ УЖДИ саCTиИ.
CbxaHraBaTe rHa MrcTo, KoETo e HeIOCTbHHO 3a deua.
-ДрьжTe ro daneUOT pa3Яжdauni BeuecTba, KaTo HapnpMep rpaDHckn XmMkaJIu n pa3Mpa3raBaun COJI. - IocTaeIte n 3apeKdaiTe akymyIaTOPHaTa 6aTePnHa XnAIDHO MxCTO. Tempepatyn Ha nnPi NOI HOpMaJIHATA Tempepatya Ha OKOIHaTa CpeDa BOJrT Do CbKpaUaBaHe Ha XNBota Ha akymyIaTOPHaTa 6aTePn.
Hikora He npnbpaate 6aTeepnra, ako e pa3peena. Cnei pa6ota n3yakaate 6aTeepnra da ce oxnaui H3a6abHO 3apepeTe.
CbxaHbBaTe aKymaTOpHn6Jok Ha MeCTa CTempepatypoD 27^ 6e3 Bnara.
C TeueHHe Ha BpeMeTo BCnKn AkymyIaTopHn 6aTePnN Ce n3TOUaBt. KOJIKOTo NO-BuCOKa e TEMnepaTpyTa, TOJkoBa NOBce Ce n3TOUaBa akymyIaTOPHaT6aTePnA. Ako ypeDbT He ce n3NoJ3Ba 3a DbIbT nepNOd OT BpeMe, 3apeXdaTe akymyIaTOPHaT6aTePnR BceKn Meecu NnHa BCEKN DBA Meceua. Ta3n Oepaunr YdbJnxaba XINBOTa Ha akymyIaTOPHaT6aTePnR.
TEXHnueCKXAPAKTEPNCNU
TexHnueckx hap aKTepeNCTnKN
CepneH Homep.. BnKTe eTnKeTa C HOMHaHInHe CTOnHOCTN
ToDHa Ha npOn3BOcTBo BnKTe eTuKeTa C HOMHaHHTe CTOHOC
-OTROBAPaHa CbOTBeTHnTe pa3nope6n Ha NpuKeTnBaTa OTHoCHO MaunHnTe 2006/42/EC
-OTROBAPHa pa3nope6nTe Ha cJeHnTe dpyn DnpeKtNB Ha EO
2014/30/EU (Директва 3a EMC) n
2000/14/EC (Изльчан sym OT машини CBopьхеня, коно pa6otТ Ha otkpnto)
BKNIOHTeHNO Ipomehne (2005/88/EC)
OcbEN TOBa JeKnapnpaMe, Ye
ca cna3eHN (aactn/klay3n ot) cneHnTe o6uHte ebponenckn CTahdaptn
EN60335-1, EN 50636-2-91, EN ISO 3744, ISO 11094, EN 55014-1, EN 55014-2
A V Technology Ltd AVTECH House, Arkle Avenue, Stanley Green Trading, Estate, Handforth, Cheshire, SK9 3RW
I3MepeHo HnBO Ha 92.73 dB(A)
TapaANTnpaHO HnBO Ha yM 96 dB(A)
MeToHa OueHbAHe Ha CboTBcTbHeTo Cbo6pa3Ho PnIIOKeHHe VIoT DnpeKtBa 2000/14/EC
MЯсто,data:Changzhou,22/07/2016
Gao Naixin (BEng, CEng, MIET)
Bnuepe3nEHT,MaHnHOCTpoeHe

CHEIE CÂTRE SIMBOLURI
Simboluri
A V Technology Ltd AVTECH House, Arkle Avenue, Stanley Green Trading, Estate, Handforth, Cheshire, SK9 3RW
Nivelul māsurat al puteri acustice 92.73 dB(A)
Nivel garantat al puterii acustice 96 dB(A)
Metoda de evaluare a conformitatei la Anexa VI / Direciva 2000/14/EC
Locul, data: Changzhou, 22/07/2016
Semnataura: Gary Gao Naixin (BEng, CEng, MIET)
Address: Greenworks Tools Europe GmbH
Wankelstrasse 40.
50996 Koln
Germany
Aia Tou TAPoVTOg OAnwoume oT To Tpoiov
Karnyopia A\$YPMATO KONTIKO FPAMMH
Movéla. Li 40T
Aip06 0eipac .BA Eiketaa BaoovoungnTpoiovto
EtoKataaKeu. BtiketaBaoovoungntpoitovtro
εival ouμφwvo με TIG oxETIKE δiataeic ts Oδnyiaç Mnxavnpatw 2006/42/EK
To npoiov eivai ouuwo v tnc npouitnoeoeic wv npakatw loiw Onyuw ts EK
2014/30/EE (Oδηγα EMC) και
2000/14/EK (Odyia OpuBou) oupiepiaaiaavovewtwvptottoioeWv (2005/88/EK)
Kai 1nnnov dnwoue o
A V Technology Ltd AVTECH House, Arkle Avenue, Stanley Green Trading, Estate, Handforth, Cheshire, SK9 3RW
Metpnevo eTtEo Evtaonn xou 92.73 dB(A)
Eyyunuevo einnieo evtaonn xou 96 dB(A)
Meoos aioyonsoumuoppwns npocnapaetaVi/Oynia 2000/14/EK
Tórnoç, ημερομηνία: Changzhou, 22/07/2016
Yyoypaq: Gary Gao Naixin (BEng, CEng, MIET)
AvTIp6Ebpocunxavoloayikou tmuatoc

KAJ POMENIJO SIMBOLI
Simboli
A V Technology Ltd AVTECH House, Arkle Avenue, Stanley Green Trading, Estate, Handforth, Cheshire, SK9 3RW
GENEL GÜVENLIK AÇİKLAMALARI
Önemli 365
CIM BICME MAKINESI ISLETIMI
A V Technology Ltd AVTECH House, Arkle Avenue, Stanley Green Trading, Estate, Handforth, Cheshire, SK9 3RW
Ölcülen ses Güncü seviyesi
92.73 dB(A)
Please read the operator's manual carefully and make sure you understand the instructions before using the machine.

BdHiTb 3axnChi OkyIpyn a6o macky dna 3axncty ouei.

BdHItb HabyuHnKn dIa 3axncty cnxy.

OsepiraTe BiD douTy Ta He BnKOpncToByyTe y BOJOrnx yMOBaX.

OcTepiraTecb npedMeTIB,IO BnKndaIOTbcra 6o BNITaHOb. He DO3BOJIaIte XODHIM CTOPOHIM OC6am,Oc6NBo DITAM Ta DOMaSHIM TBapuHaM,Ha6NIkxatncb IOhai6iNbwe 15 M do po6oyoi DiJHKn.
Utpmyte ctopoHHix oci6 Ha 6e3neuHi BicTaH BiD uboro npncTpoIO.

UeBnpi6 BiinnoiJaε HaeKHM DInpeKTnBaM CC.

IpekeKaHaTeCra, 0o BaWe BOnocR He DoCraRc pIBHnHue nJeey.

Pibehb wmy B cepedobnui 3riH0 3 DnpeKTHBOIO CBponeNcBKOi cnIbHOTn. Pibehb wmy uboro npucTPO BO BkazHni y po3di i 3TexHHMn daHMM Ta Ha ta6nui.
CTpiKN, 0n noKa3yIOb MeHi dna po3MiueHHpyKoTOK.

BnKOpncToByIe IInue HeMeTaJIeBI rHyKi HacaKn, Taki YK TpIMepHa roJIOBka i3 TpIMepHm shypom.

OcTepiraTecpaNkoWety Ta npedMetIb, 0o BiDcKaKyIOb.


Piacpo6oTnBpaDiYci 15 MeTpib BiKOpncTyBaUa He noBHHo 6yTuIIOeN TbapH.

Okpemi 36ipHi nyHKTu. 3a6bOpHReTbcr yTuIiyBaTu ue Bnpi6 Ha 3BnuaHnx nobyTOBHX CMITHKax. KaUo Ondoro dHra BN BnpiuHTe, 10 npniuob Yac 3amHHTu BaW Bnpi6, a6o KaUo Bin 6JIbWe Bam He notpi6eH, He BnKnJaTe NOrO y noByTOBi CMTHKN. BiDaaiTe ue Bnpi6 y NyHKt OKpemoro 36opy.

OkpeMn 36ip BnKOpNCtAHx Bnp6iB Ta nakyBaIbHnx MaTepiJIIB Do3BOJRe ix nepepo6ky Ta NOBTOpHe BnKOpNCtAHn. IIOBTOpHe BnKOpNCtAHn NEpepo6JeHx MaTepiJIIB Do3BOJRe yHNKHyTu 3a6pydHennHaBKOINHbOro cepeoBnUa Ta 3MeHsUe NOTpe6y BCnPux MaTepiAnax.

Iicna BnuepeHnpecypcy
akymnyTopiB yTuNi3yute ix HanexKHM
HHOM y 6e3neuHn dNra DOBkInn
cnoci6.B akymnyTopax MicTbC
peOBOHN, He6e3neuHi dNra Bac Ta
doBkInn.Ix cnid yTuNi3yBaTu B
cneiaJIbHnx NyHKTx, kI npMauOt b
niTi-IoHHi akymnyTopn.
Batteries

Li-ion
3MICT
3mict
NORCHEHHCIMBOJIB
CIMBOJI 377
3MICT
3MiCT. 378
IpeepoataKOMpo60nBkoHaTeHacTynHe:.....378
山 ~ o ~ 山 ~ o ~ ?
3 yoro cknaaetbcj nickoBa koca? 379
UCYHEHHH HECPABHOCTEN
UcyhenHH HecnpaBHOtei 390
TEXHIYHI XAPAKTEPNUCTIKN
TexhiHixapakTepncTuKu 391
Декларачи сдо BiIDNoBIDHOCI HOpMaTnBaM EC......
391
PnKpInIeHnpeHbOi pyKn
BukpyTb Dba TBNHTn (a) Ha pyuci 3a Donomoro BukpyTKn Phillips (He Dojaetbcra Ta BNIMt b ix i3 pyuK.
3aKpiiTb nepeHIO pyky (b) Ta HIXHIO IJaHky (c) Ha wTaH3i.
- RaKuO noTpi6Ho, HanaWtYyTe NoNoXeHHa pyKn Bropy a6o Bn3 Ha Heo6XiHy BucoTy.
3aTHiB DbA rBHTn TaKIM YHOM, 06 pyKa He KpyTnIacr Ha uTaH3i. KpyTHm MOMeHT cTaHOBtB 1,0-1,6 Hm.

NONEPEDKEHH! He cTabTecb Do UboI npICTpoI JeKOBaXHO Ta He BtpaayTe NInbHocTi, ppaioOuy 3 Hm. Pam'yaTe, uo HeoBepeXhicTb Ta BtpaTa NInbHocTi HabItb Ha DonIO CEkyHd, MoKe npn3BeCTn Do cepNo3HOrO TpaBMyBaHH.

NONEPENKEH! 3aBxDn BdraTe 3axnci okyIepn. HexTyBaHHzieH BmoroMOKe Ipn3BcTn Do cepNo3HO TpaBMvBaHH Oey BHacNiIDOK BNITAHNCTOPOHIX o6'ekTIB..

NONEPEDKEHH! Hikon He BnKOpNCTOByTe ne3a, cInoBi npncTpoi, dpit a6o uHyp Ha cBomy npncTpoi. He BnKOpNCTOByTe 6yDb-aki HacaKn a6o akceCyapn, He peKOMeHDoBaHi BnPo6hNKOM zuBOrO npncTpoIO. BnKOpNCtAHnHe peKOMeHDoBaHnx HacaOK a6o akceCyapIB MOKe pni3BeCTn Do cepno3HOrO ocobntoro TpaBMyBaHH.
Дя OTPIMaHH NOBHX IHCTpyKcI ΣODo 3apJXeHH
INB. Noci6HnK KopNCTyBaHa BAWoR o AkymyIaTopa Ta
Noci6HnK KopNCTyBaHa BAWoR 3apJHOro npucTroO.
IPMITKA: Uo6 yHnKHyTN cepNo3Horo Tinechoro
TpaBMyBaHH, 3aBXKn BmMaTe aKymyIaTOp Ta
He TpImaTe pyKn Ha KhoNci pO3bNoKyBaHH niD
Yac nepenecehnA abO TpaHCnOpTyBaHHr cboRo
IHCTpyMeHTy.
NOTE: Remove any old cutting line remaining on the spool.
NPMITKA: 3HIMiTB i3 KOtyuKN 3aNNuKN cTapoI pIKyOJ NICK.
BidpiKTe 1MaTOK pIkyoI NICKN DOBXHHO np6n3HO 3M.

3irHt b nicky nocepeHHi Ta BCTaBte 3rHOM y na3, 3haxoNDbcra B cHTpaBbHomy o6oDi KOTywn. IpekoHaTeCb, 0nicka NobHicTIO 3aIwna y na3.
HaKpyyIe NICKy pIBHomipHO Ta nID HaTAROM 3a roINHHKOBOIO CTPIIKOIO. Iicnla 3aBepueHHa NOMictiB NICKY y npopis, o6 BOHa He po3KpyyBaJACr.

He hakpyuynTe nicky Bnue Kpaib KoTuwn.
36epirahnkaos
-Пелерставеннам uei kocn Ha 36epirahn BIMITb i3 HbOro akMyJrTOp.
- Pocntb Kocy BiD 6yDb-8Knx CTOPOHHix MaTepiAniB.
36epiraTe noOу mciU, HeoctynHomy dna diTei.
- TpmaTe nOaJI BiD Kopo3iHnx areHTiB, TaNX Ra caoBi xIMiKaTu Ta aHTnO6MopoxyBaIbHi coJI.
36epiraTe Ta 3apJkaTe BaWi aKymyIaTopu y npoxoIoHomy Micui. TemnepaTypn Bnu i a60 HxKU BiD HopMaJIbHOi KIMHaTHOiT TemnepaTypn CKOpOuyIOb pecypc aKymyIaTopa.
Hikon He 36epiraTe akymyIaTOp np03pJxKeHMn. 3auekaTe, nOKn akymyIaTOp oxoIone, a ToDi oDpa3y J NOBHCIO 3apRdIb Ioro.
36epiraTe akymyIaTOp y cyxomy Micci 3 TemnepaTPOH He Bnue 27^
- Yci akymyIaTOPn NOCTynoBO po3prJxHaTbC8. YmBn7a TeMnepaTypa, TmM WBNdSe BOHn BTPaauHOcBcBn 3apRd. RaKuo BN 36epiraTe BaW npucTpiYnpoD0BX TpNBaIoro yacy Be3 BNKOpNCtAHNToDi 3apRJaTe aKymyIaTOPn KOKHOrO MICAa6o KOKHnx DBA MiCAzi. Taka npaKTnKa Do3BOINTB npoD0BxHTn pecypc akymyIaTopa.
3axnct doBknna
3axnCT doBkInn npn BnKOpncTahHi zboor npncTroIO nobHEn 6yTN oDHM i3 HaN6iNbux npioptetIB. He 3a6pydHIOte Ta He HAnocitb WKOdy HABKOINHbOMy cepeOBOuY.
- YBaJHNO dOtpmMyTecb ycix MicueBnx npnnciB 3HOWeHx a6o noKoJKeHx DeTaNe, a TakoX IHxN x eIemHeTIB, 0o MaIOb CnIbH N BnINb Ha DOBkInr; ci BiXoDi 3a6OpOHeO yTuNl3yBaTN Ha 3BnuAHHx No6yTOBnxCmitHKax, a NotpioHo BiOKpeMIOBAtu Ta BiIDHocHTu CneuaJIbHi cHTpn yTuNl3aui Ha nepepo6ky.
- YBaJHo DToPmMyTecb MicueBn npnnciB 0do yTuJI3auii MaTepiAniB nicra KocinHna.
KoHn HacTynnTb Yac yTuNl3auii buoro npncTpOIO, He 3a6pydHIOte Hm DOBkiJIa, aJe BiDaaTe NOrOy U cHTp i3 yTuNl3auii 3riIDHO 3 BIMORAM YHHORO 3aKOHODaBCTa.
UCYHEHHH HECPABHOCTEN
UCYHEHHH HECNPABHOCTE
A V Technology Ltd AVTECH House, Arkle Avenue, Stanley Green Trading, Estate, Handforth, Cheshire, SK9 3RW
BumipraHn piBeHb 3BykoBoi NotyKHOCTI 92.73 d(A)
IapaHTOBaHn pIBeHb 3ByKOBoi nOtYxHocTi 96 dB(A)
MetoOniHKn BiINOBiHocTi Do DonOBHeHHa VI / DnpeKTHbN 2000/14/EC
Miche, deta: Changzhou, 22/07/2016
Пдпс: Gary Gao Naixin (BEng, CEng, MIET)
MeheJkep i3 6e3neKu Ta BiNobiDnOcti ToBapib

WWW.MCULLOCH.COM
Original instructions Originalios instrukcijos
Bruksanvisning i original