USER MANUAL B428 PS MCCULLOCH
Thank you for choosing a McCulloch product. You are thereby part of a story that started long ago, when the McCulloch Corporation started its manufacturing of engines during World War II. In 1949, when McCulloch introduced its first light one-man chainsaw, woodworking would never be the same again.
The line of innovative chainsaws would continue over the decades, and business was expanded, first by airplane and kart engines in the 1950s, then by mini chainsaws in the 1960s. Later, in the 1970s and 80s, trimmers and blower vacs were added to the range.
Today, as a part of the Husqvarna group, McCulloch continues the tradition of powerful engines, technical innovations, and strong designs that have been our hallmarks for more than half a century. Lowering
fuel consumption, emissions and noise levels are of top priority to us, as is improving safety and user-friendliness.
We certainly hope that you will be satisfied with your McCulloch product, as it is designed to be your companion for a long time. By following this operators manual's advice on usage, service, and maintenance, its lifespan can be extended. If you should need professional help with repair or service, please use the Service Locator at www.mcculloch.com.
McCulloch has a policy of continuous product development and therefore reserves the right to modify the design and appearance of products without prior notice.
This manual can also be downloaded at www. mcculloch.com.
SYMBOLS
| This machine can be dangerous! Careless or improper use can cause serious injury. | |
| Please read the operator's manual carefully and make sure you understand the instructions before using the machine. | |
| Always use:
• steel-toed safety footwear with non-slip soles
• snug-fitting clothing, heavy long pants, and long sleeves
• heavy-duty, non-slip gloves
• eye protection such as non-fogging, vented goggles or face screen
• an approved safety helmet
• sound barriers (ear plugs or mufflers) to protect your hearing | |
| Persons with long hair should (for personal safety) put their hair up. | |
| The operator of the machine shall ensure, while working, that no persons or animals come closer than 15 metres. | |
| Beware of thrown objects and ricochets. | |
| Maximum rotational frequency of the spindle, rpm. | max 10000 rpm |
| Machines with blades can be thrown violently to the side when the blade comes into contact with a fixed object (blade thrust). A blade is capable of amputating an arm or leg. Always keep people and animals at least 15 metres from the machine. | |
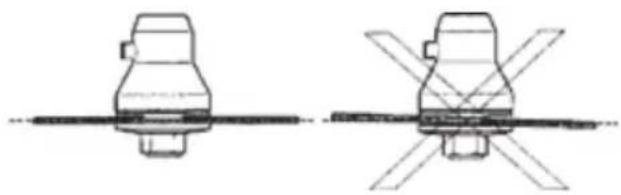
| Arrows which show limits for handle mounting. | |
| A-weighted sound pressure level at 7,5 metres according to Australia NSW “Protection of the Environment Operations (Noise Control) Regulation 2008”. This data is specified on the label. | XXX
NOISE dB |
| Noise emission to the environment according to the European Community's Directive. This data is specified in the TECHNICAL DATA section and on the label. | xxx dB |
| This product is in accordance with applicable EC directives. | CE |
| This product is in accordance with applicable EAC directives. | EAC |
| This product is in accordance with the Australian electromagnetic compatibility (EMC) regulations. | |
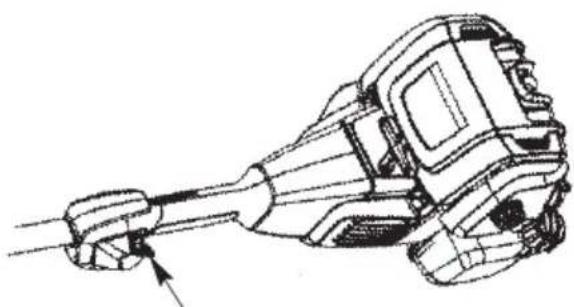
| Primer. | |
| Choke control. | |
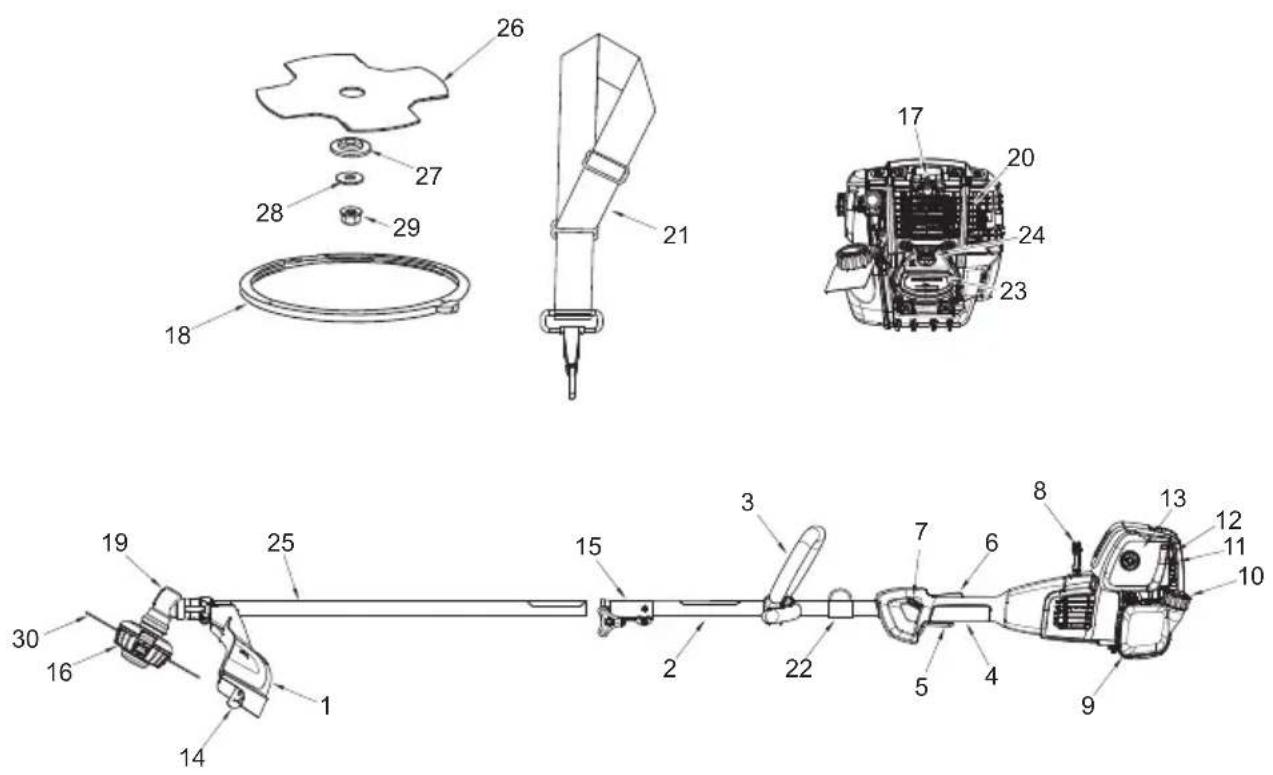
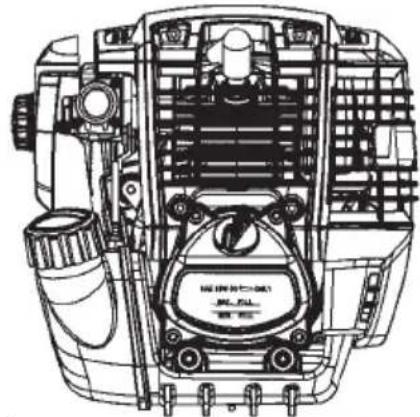
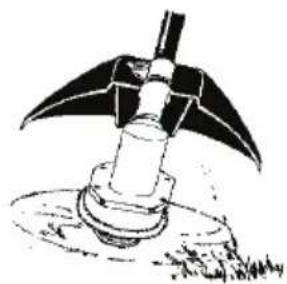
- Shield
- Upper Shaft
- J-bar handle
- Throttle handle
- Throttle control
- Throttle lock-out
- On/stop switch
- Starter handle
- Fuel tank
- Fuel cap
- Choke lever
- Primer bulb
- Air filter cover
- Trimmer line limiter blade
- Coupler
- Trimmer head
- Spark plug cap and spark plug
- Transport guard
- Bevel gear
- Muffler and spark arrestor
-
Harness
-
Harness clamp
- Oil tank
- Oil filler cap
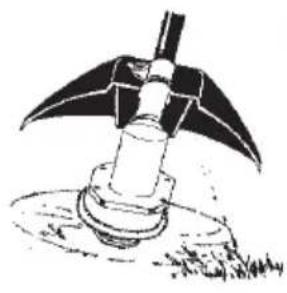
- Attachment
- Grass blade
- Retaining washer
- Cupped washer
- Blade nut
- Trimmer line
SAFETY
FOREWORD
This machine can be dangerous if used incorrectly or carelessly, and can cause serious or fatal injury to the operator or others. It is extremely important that you read and understand the contents of this operator's manual.
This manual describes the basic safety precautions for working with the machine.
The operator is responsible for following the instructions and warnings on the machine and in the manual.
Be thoroughly familiar with the controls and the proper use of the machine.
Restrict the use of this machine to persons who have read, understand, and will follow the instructions and warnings on the machine and in the manual.
Never allow children to operate this machine.
If you encounter a situation where you are uncertain how to proceed you should ask an expert.
Avoid all usage which you consider to be beyond your capability.
If you need assistance, contact your authorized service dealer or call customer support.
CLOTHING AND EQUIPMENT
- Dress properly. Always wear safety glasses or similar eye protection when operating or performing maintenance on your machine.
Always wear hearing protection. Long-term exposure to noise can result in permanent hearing impairment.
Always wear face or dust mask if operation is dusty.
Always wear heavy, long pants, long sleeves, boots, and gloves. Wearing safety leg guards is recommended. Being fully covered also helps protect you from debris and pieces of toxic plants thrown by the machine.
- Always wear foot protection. Do not go barefoot or wear sandals. Stay clear of spinning blade or trimmer line.
- Secure hair above shoulder length. Secure or remove loose clothing or clothing with loosely hanging ties, straps, tassels, etc. They can be caught in moving parts.
FUEL SAFETY
- Pour fuel outdoors.
- Keep fuel away from sparks or flames.
- Do not smoke or allow smoking near fuel or the machine.
- Avoid spilling fuel or oil. Wipe up all fuel spills.
- Move at least 3 metres away from the fueling site before starting the engine.
- Stop the engine and let it cool before removing the fuel tank cap.
Always stow petrol in a container approved for fuel.
WORK AREA
- Inspect the area before starting the machine. Remove all debris and hard objects such as rocks, glass, and wire that can rebound, be thrown, or otherwise cause injury or damage during operation.
-
Ensure that people and animals do not come into contact with the cutting attachment or loose objects that are thrown out by the cutting attachment.
-
Keep others including children, animals, bystanders, and helpers at least 15 metres away. Bystanders should be encouraged to wear safety glasses. Stop the engine immediately if you are approached.
- Do not use the machine unless you are able to call for help in the event of an accident.
- Do not use the machine in bad weather such as dense fog, heavy rain, strong wind, or intense cold. Working in bad weather is tiring and often brings added risks.
- Make sure you can move and stand safely. Check the area around you for possible obstacles such as roots, rocks, branches, and ditches in case you have to move suddenly. Take great care when working on sloping ground.
OPERATION SAFETY
- Use the machine only for trimming, scalp ing, mowing and sweeping. Do not use for edging, pruning or hedge trimming.
- Stay alert. Do not operate this machine when you are tired, ill, upset or under the influence of alcohol, drugs, or medication. Watch what you are doing; use common sense.
- Never start or run inside a closed room or building. Breathing exhaust fumes can kill.
- Keep handles free of oil and fuel.
- Always keep the engine on the right hand side of your body.
- Hold the machine firmly with both hands.
- Keep the cutting attachment and muffler below waist level and away from all parts of your body. A hot muffler can cause serious burns.
- Keep firm footing and balance. Do not overreach or stand on unstable surfaces such as ladders, trees, steep slopes, and rooftops.
- Use only in daylight or good artificial light.
- Use only for jobs explained in this manual or manuals for optional attachments.
- Never put the machine down with the engine running or while the cutting attachment is rotating.
- Always slow the engine to idle speed after each working operation. Long periods at full throttle without any load on the engine can lead to serious engine damage.
- Neither the operator of the machine nor anyone else may attempt to remove the cut material while the engine is running or the cutting equipment is rotating, as this can result in serious injury. Stop the engine and cutting equipment and disconnect the spark plug cap from the spark plug before you remove material that has wound around the blade shaft as otherwise there is a risk of injury.
- The bevel gear can get hot during use and may remain so for a while afterwards. Allow time to cool. You could get burned if you touch it.
- Watch out for thrown objects. Always wear approved eye protection. Never lean over the cutting attachment guard. Stones, rubbish, etc. can be thrown up into the eyes causing blindness or serious injury.
-
Keep unauthorized persons at a distance. Children, animals, onlookers and helpers should be kept outside the safety zone of 15 metres. Stop the machine immediately if anyone approaches. Never swing the machine around without first checking behind you to make sure no one is within the safety zone.
-
Sometimes branches or grass get caught between the shield and cutting attachment. Always stop the engine before cleaning.
- Avoid any contact with the muffler. A hot muffler can cause serious burns.
BLADE SAFETY
- Install the required shield properly before using the machine.
Always use the J-bar handle and a properly adjusted harness with the blade.
- Cut from your right to your left.
- The blade can thrust violently away from material it does not cut and can cause amputation of arms or legs. Always maintain control of the machine.
- Do not use the trimmer head as a fastening device for the blade.
- The blade continues to spin after the trigger is released or engine is turned off. The coasting blade can throw objects or seriously cut you if accidentally touched. Stop the blade by contacting the left hand side of the coasting blade with material already cut.
- Throw away and replace blades that are bent, warped, cracked, broken or damaged in any other way.
- Use only the specified blade and make sure it is properly installed and securely fastened.
- Blades are sharp. Handle carefully and wear gloves when handling.
VIBRATIONS
Exposure to vibrations through prolonged use of petrol powered hand tools could cause blood vessel or nerve damage in the fingers, hands, and joints of people prone to circulation disorders or abnormal swellings. Prolonged use in cold weather has been linked to blood vessel damage in otherwise healthy people. If symptoms occur such as numbness, pain, loss of strength, change in skin color or texture, or loss of feeling in the fingers, hands, or joints, discontinue the use of this tool and seek medical attention.
An anti-vibration system does not guarantee the avoidance of these problems. Users who operate power tools on a continual and regular basis must monitor closely their physical condition and the condition of this tool.
MAINTENANCE SAFETY
Make sure the machine is assembled correctly as shown in this manual.
- Keep the machine in good working condition.
- Maintain the machine according to recommended procedures.
- Have all maintenance and service not explained in this manual performed by an authorized service dealer.
- Look for and replace damaged or loose parts before each use.
- Replace trimmer head parts that are chipped, cracked, broken, or damaged in any other way before using the machine.
- Use only the recommended accessories and replacement parts.
- Look for and repair fuel leaks before each use.
- Disconnect the spark plug before performing maintenance except idle speed adjustments.
- Use only the specified trimmer head and make sure it is properly installed and securely fastened.
- Use only the recommended trimmer line. Other
sizes of line will not advance properly and can cause serious injury. Do not use other materials such as wire, string, or rope. Wire can break off during cutting and become a dangerous projectile that can cause serious injury.
- Keep the trimmer line at the proper length.
- Make idle speed adjustments with the lower end supported to prevent the cutting attachment from contacting any object.
- Keep others away when making idle speed adjustments.
- Under no circumstances may the design of the machine be modified without the permission of the manufacturer. Non-authorized modifications and/or accessories can result in serious personal injury or the death of the operator or others.
SPARK ARRESTOR
Some locales require by law that many internal combustion engines be equipped with a spark arresting screen. If you operate in a locale where such regulations exist, you are legally responsible for maintaining the operating condition of these parts. Failure to do so is a violation of the law.
For normal homeowner use, the muffler and spark arresting screen will not require any service. After 50 hours of use, we recommend that your muffler be serviced or replaced by your authorized service dealer.
TRANSPORTING AND STORAGE
- Switch off the engine before moving to another area.
- Fit the transport guard on the grass blade before carrying or transporting the machine any distance.
- Allow the engine to cool before transporting.
- Secure the machine before storing or transporting in a vehicle.
- Empty the fuel tank before storing or transporting the machine. Use up fuel left in the carburetor by starting the engine and letting it run until it stops.
- Stow the machine and fuel in an area where fuel vapors cannot reach sparks or open flames from items such as water heaters, electric motors, electrical switches, and furnaces.
- Stow the machine so the trimmer line limiter blade cannot accidentally cause injury.
- Stow the machine in the starting position or hang by the shaft.
- Transport the machine in the starting position.
- Stow the machine out of reach of children.
ASSEMBLY
CAUTION: If received assembled, repeat all steps to ensure your machine is properly assembled and all fasteners are secure.
Examine parts for damage. Do not use damaged parts.
NOTE:
- if you need assistance or find parts missing or damaged, call customer support.
It is normal for the fuel filter to rattle in the empty fuel tank.
- Finding fuel or oil residue on muffler is normal due to carburetor adjustments and testing done by the manufacturer.
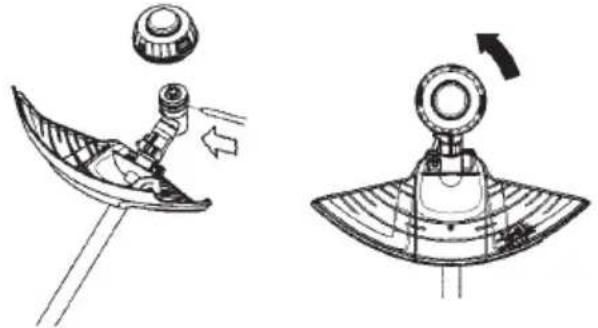
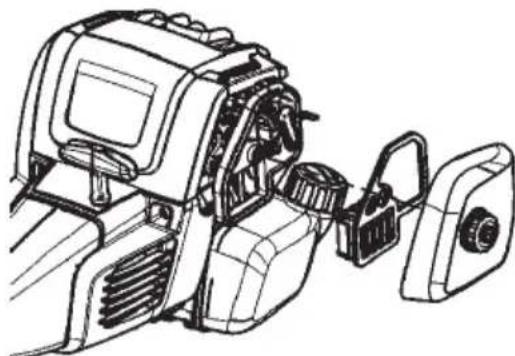
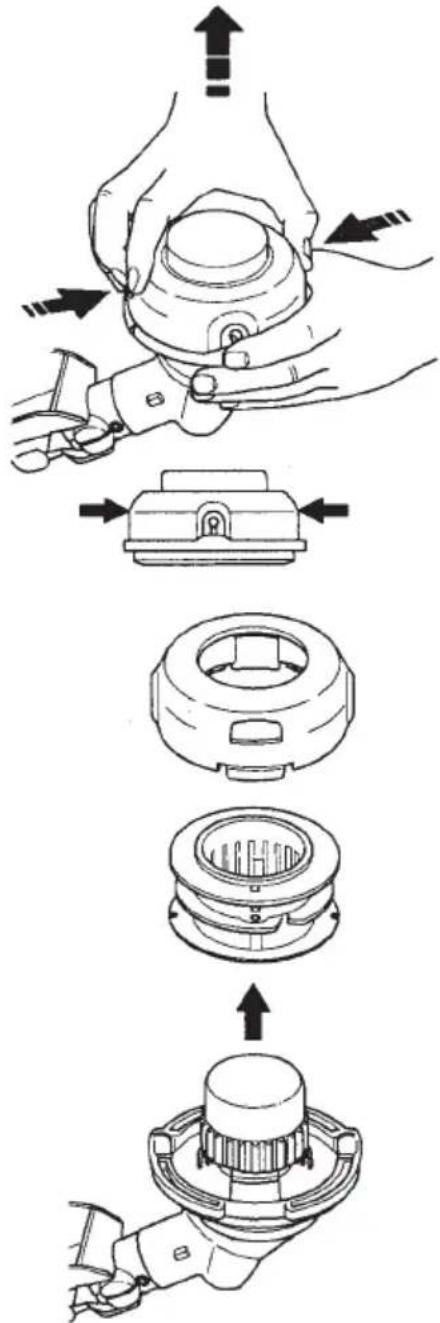
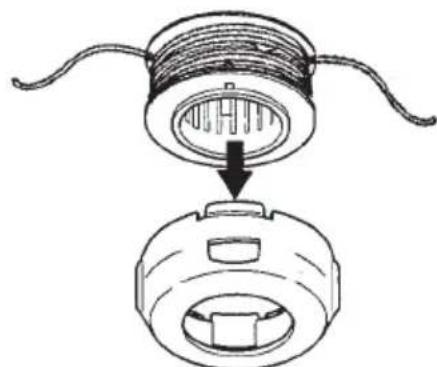
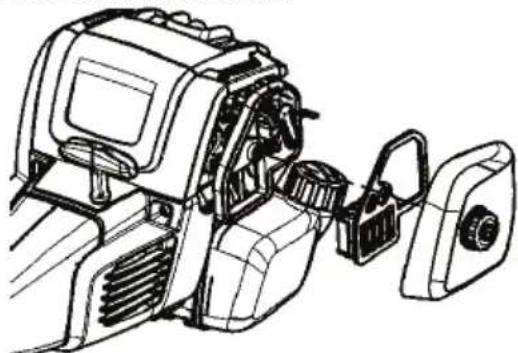
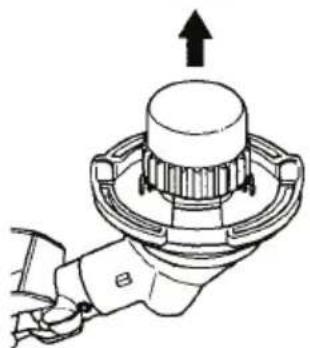
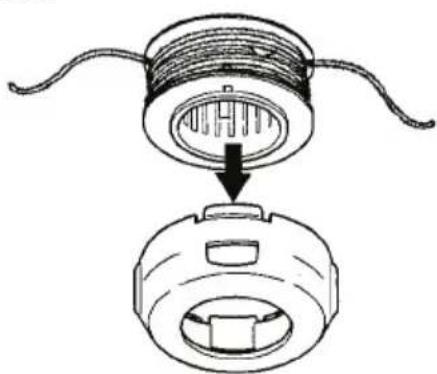
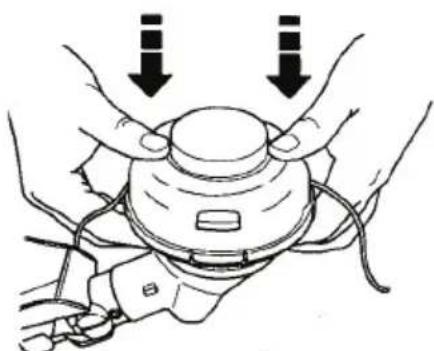
INSTALLING THE ATTACHMENT
When installing the attachment, place the machine on a flat surface for stability.
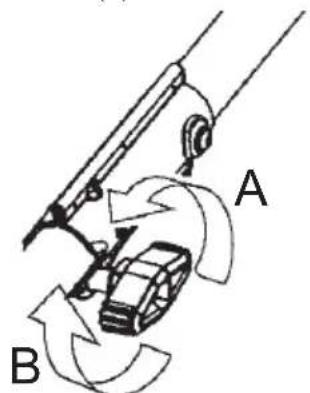
- Loosen the coupler by turning the knob counterclockwise (A).
- Remove the shipping protector from coupler (if present).
- Remove the shaft cap from the trimmer attachment (if present).
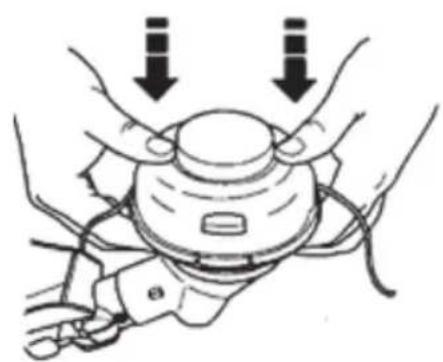
- Position the locking/release button of the attachment into the guide recess of the coupler.
- Push the attachment into the coupler until the locking/release button snaps into the primary hole.
NOTE: If the attachment is difficult to assemble, rotate the cutting attachment by hand to allow the internal shaft to align and engage the recessed coupler.
- Before using the machine, tighten the knob securely by turning it clockwise (B).
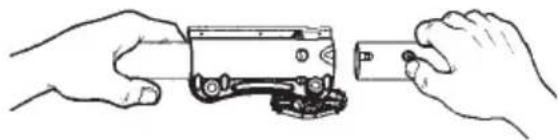
WARNING: Make sure the locking/release button is locked in the primary hole and the knob is securely tightened before operating the machine. All attachments are designed to be used in the primary hole unless otherwise stated in the applicable attachment instruction manual. Using the wrong hole could lead to serious injury or damage to the machine.
For assembly of optional attachments, refer to the ASSEMBLY section of the applicable attachment instruction manual.
ATTACHING THE SHIELD
The shield must be properly installed. The shield provides partial protection from the risk of thrown objects to the operator and others and is equipped with a line limiter blade which cuts excess trimmer line to the proper length. The line limiter blade on the underside of the shield is sharp and can cut you.
- Remove the wing nut from the shield.
- Insert the bracket into the slot as shown.
- Pivot the shield until the bolt passes through the hole in the bracket.
- Reinstall the wing nut and tighten it securely.
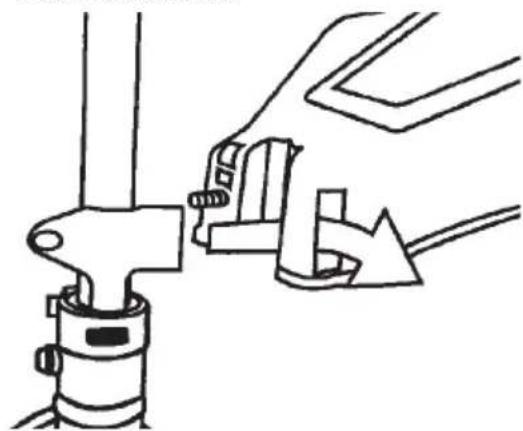
ATTACHING THE J-BAR HANDLE
WARNING: Only use grass blades or trimmer heads when the J-bar handle is attached. Never use saw blades.
When adjusting the J-bar handle, be sure it remains above the safety label and below the mark or arrow on the shaft.
- Position the J-bar handle on the shaft. Note that the handle must be mounted between the two arrows on the shaft.
- Fit the screw, securing plate and wing nut as shown.
- Make a final adjustment of the J-bar handle to a comfortable working position.
- Tighten the wing nut.

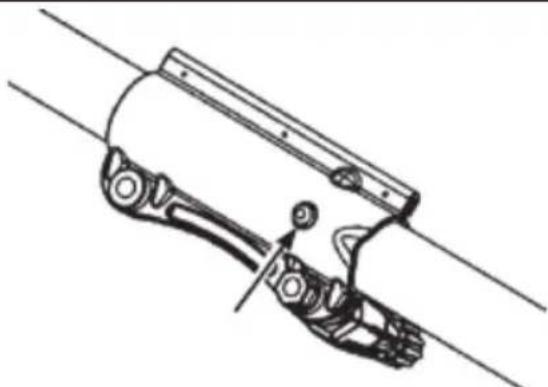
ATTACHING THE HARNES CLAMP
- Place the upper harness clamp over the shaft and position the lower harness clamp under the shaft. Align the upper and lower clamp screw holes. The clamp must be attached above the arrow on the shaft.
- Insert the two screws into the screw holes.
- Secure the harness clamp by tightening the screws with a hex wrench.
ATTACHING THE HARNESS
- Insert your right arm and head through the harness and allow it to rest on your left shoulder. Make sure the harness hook is to the right side of your waist.
- Adjust the harness, allowing the hook to be about 15 cm below the waist.
- Fasten the harness to the harness clamp on the shaft and lift the machine to the operating position.
- Make a final adjustment so that the machine is in a comfortable working position when it hangs from the harness.
NOTE: It may be necessary to relocate the harness clamp on the shaft for proper balancing of machine.
- Adjust the harness so that the cutting attachment is parallel to the ground.
- Let the cutting attachment rest lightly on the
ground. If you use a grass blade, it should balance about 10 cm above the ground to prevent contact with stones and the like. Adjust the position of the harness clamp to balance the machine correctly.

CUTTING EQUIPMENT SELECTION AND ATTACHMENT
WARNING: Never use a cutting attachment without an approved shield. Attaching an incorrect or faulty shield can cause serious personal injury.
CUTTING EQUIPMENT SELECTION
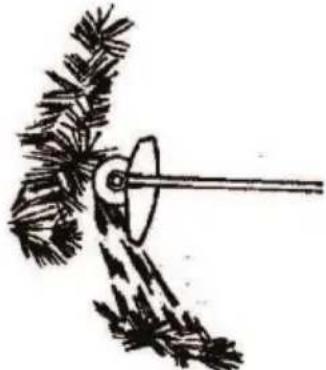
Use a grass blade to cut coarse grass.
Use a trimmer head to trim grass.
ATTACHING THE GRASS BLADE
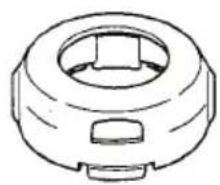
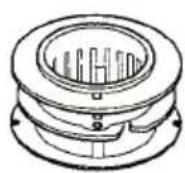
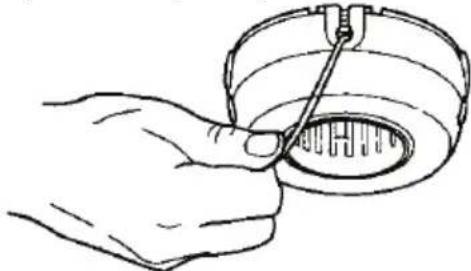
- Turn the bevel gear shaft until one of the holes in the dust cup aligns with the corresponding hole in the bevel gear.
- Insert a small screwdriver in the hole to lock the bevel gear shaft.
- Place the blade and retaining washer onto the shaft of the bevel gear.
WARNING: When fitting blades, it is extremely important that the raised section on the retaining washer engages correctly in the centre hole of the blade. If the blade is attached incorrectly, it can result in serious and/or fatal personal injury.
- Place the cupped washer onto the bevel gear shaft with the cupped side of the washer toward the blade.
- Install the blade nut. Tighten the nut using a wrench. Turn in the opposite direction to the direction of rotation. The nut has a left-hand thread.
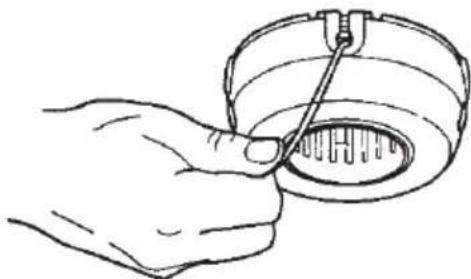
ATTACHING THE TRIMMER HEAD
- Turn the bevel gear shaft until one of the holes in the dust cup aligns with the corresponding hole in the bevel gear.
- Insert a small screwdriver in the hole to lock the bevel gear shaft.
- Screw on the trimmer head in the opposite direction to the direction of rotation.
OPERATION
OIL SPECIFICATIONS
Use only high quality detergent oil with service classification SL (API), GF-3 (ILSAC) or higher. Select the oil's SAE viscosity grade according to your expected operating temperature. For most applications, 10W-30 oil is recommended. Do not use special additives.
NOTE: Synthetic oil meeting or exceeding the required service classification is an acceptable oil at all temperatures. Use of synthetic oil does not alter required oil change intervals.


CAUTION: Air cooled engines run hotter than automotive engines. The use of non-synthetic multi-viscosity oils such as 5W30 and 10W30 in temperatures above 4^ will result in higher than normal oil consumption. When using a multi-viscosity oil, check oil level more frequently to avoid possible engine damage from running low on oil.
ADDING OIL
Your machine is shipped without oil in the engine. The engine holds approximately 75~mL of oil when at the "MAX FILL" indicator line on the oil tank window. Included with this machine is a 75~mL container of oil for properly filling the engine with oil for first time use only. Pour the entire contents of this container of oil into the oil fill spout. After the first time oil fill, simply refill the engine with oil to the "MAX FILL" indicator line as needed.
CAUTION: DO NOT overfill engine with oil or engine damage may occur.
CAUTION: The engine must be level, with the oil filler cap facing up, to check the oil. If the engine is not level, the oil fill reading will not be accurate. This will lead to possible over-filling or under-filling, causing damage to the engine.
- Check the oil level before starting the engine.
- Check the oil level before every use.
- Keep the oil level at the "MAX FILL" indicator line.
- Do not overfill.
- Be sure the engine is level and the area around the oil fill hole is clean.
- Remove the oil filler cap.
- Pour oil slowly into the engine. Do not overfill.
4. Verify the "MAX FILL" level of oil by checking the indicator lines on the oil tank window.
5. Before starting the engine, always be sure to replace the oil filler cap and tighten it securely. Check the oil level before each use. Add oil if needed. Fill to "MAX FILL" indicator line on the oil tank window. Change the oil after the first 5 hours of use, then every 25 hours of operation or each season. Change the oil every 10 hours when operating the engine under heavy load or in high temperatures. You may need to change the oil more often under dusty, dirty conditions.
ADD PETROL
This machine is designed to operate on unleaded petrol with a minimum rating of 90 RON with ethanol blended up to 10% maximum by volume (E-10). Do not mix oil with petrol. Purchase fuel in quantities that can be used within 30 days to assure fuel freshness.
CAUTION: DO NOT use alternate fuels such as ethanol blends above 10% by volume (E-15 - E-85) or any methanol blended fuel. Use of these fuels can cause major engine performance and durability problems.
- Turn the fuel cap counterclockwise to remove it.
- Fill the tank with fuel to the bottom of the tank filler neck.
- Replace the fuel cap.
- Turn the fuel cap clockwise to tighten it.
HOW TO STOP YOUR MACHINE
- Release the throttle trigger.
- Move the ON/STOP switch to the STOP position.
HOW TO START YOUR MACHINE STARTING POSITION
Before you start the engine, place the machine on a flat surface.
STARTING A COLD ENGINE
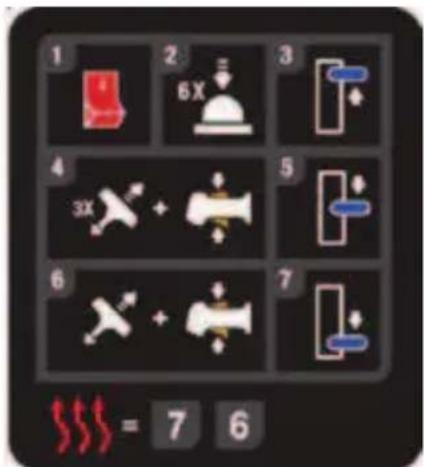
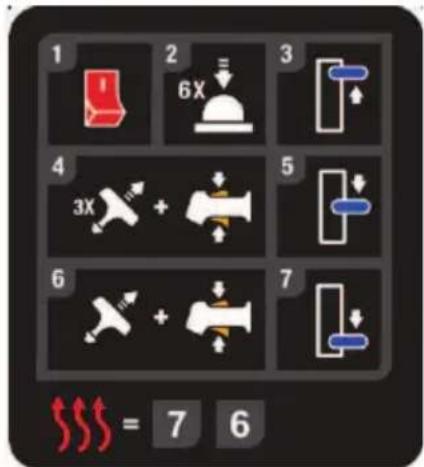
- Move the ON/STOP switch to the ON position.
- Slowly press the primer bulb 6 times.
- Move the choke lever to the FULL CHOKE position.
NOTE: Squeeze and hold the throttle trigger fully through all the remaining steps.
- Pull the starter handle sharply 3 times.
- Move the choke lever to the HALF CHOKE position.
- Pull the starter handle sharply until the engine runs, but no more than 6 pulls.
NOTE: If the engine does not start after 6 pulls at the HALF CHOKE position move the choke lever to the FULL CHOKE position and press the primer
bulb 6 times. Pull the starter handle 2 more times. Move the choke lever to the HALF CHOKE position and pull the starter handle until the engine runs, but no more than 6 pulls. If the engine still does not start, it is probably flooded. Proceed to STARTING A FLOODED ENGINE.
- Once the engine starts, allow it to run 10 seconds, then move the choke lever to the RUN position. Release the throttle trigger.
NOTE: If the engine dies with the choke lever in the RUN position, move the choke lever to the HALF CHoke position and pull the starter handle until the engine runs, but no more than 6 pulls.
Allow the engine to warm up for up to one minute.
STARTING A WARM ENGINE
NOTE: DO NOT squeeze the throttle trigger until the engine has started and runs.
Follow steps 7 and 6 in the cold starting instructions.
NOTE: If the engine has not started, pull the starter handle 5 more pulls. If the engine still does not run, it is probably flooded.
STARTING A FLOODED ENGINE
Flooded engines can be started by placing the choke lever in the RUN position and pulling the starter handle to clear the engine of excess fuel. This could require pulling the starter handle many times depending on how badly the machine is flooded. If the machine still does not start, refer to the TROUBLESHOOTING TABLE or call customer support.
This machine is equipped with a coupler which enables optional attachments to be installed. The optional attachments are:
Description Model
Hedge Cutter MTO001
Cultivator MTO002
Blower MTO003
Edger MTO004
Pole Pruner MTO005
Brushcutter MTO006
WARNING: Always stop the machine before removing or installing attachments.
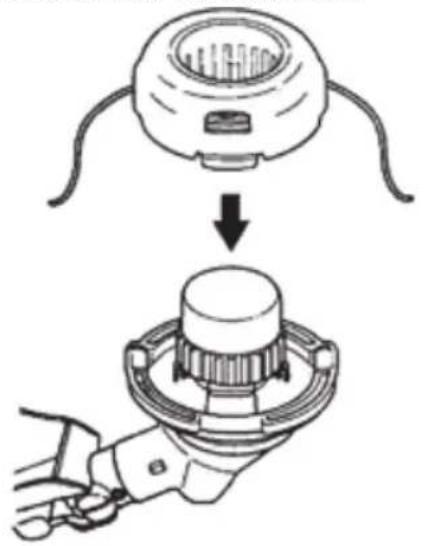
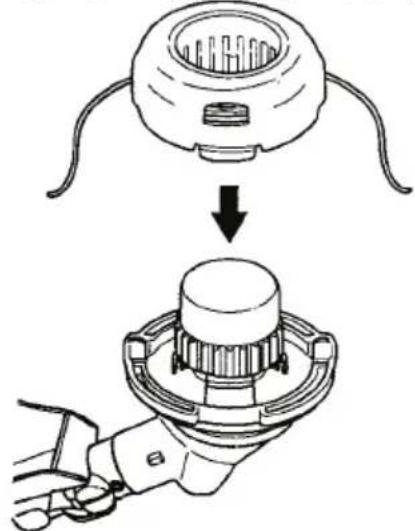
REMOVING THE ATTACHMENT
- Place the machine on a flat surface for stability.
- Loosen the coupler by turning the knob counterclockwise.
- Press and hold the locking/release button.
- While securely holding the engine and the upper shaft, pull the attachment straight out of the coupler.
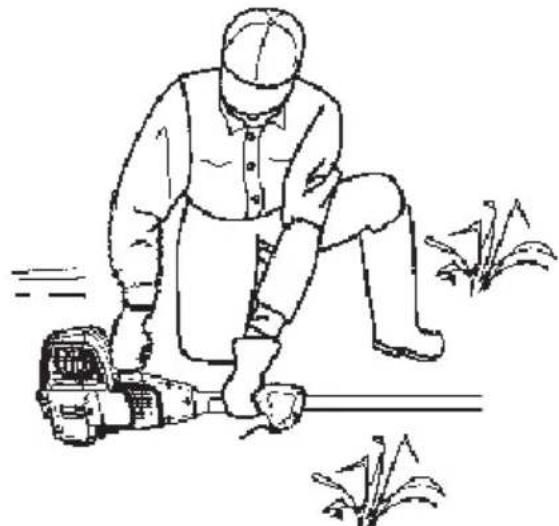
OPERATING POSITION
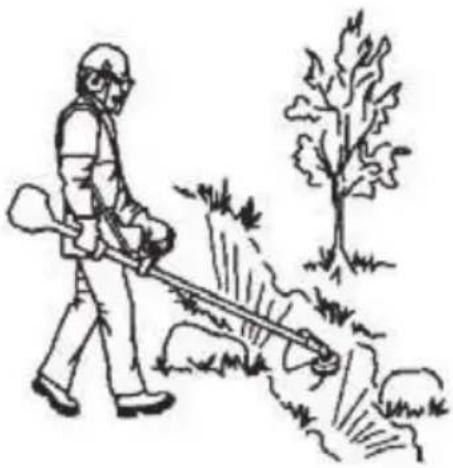
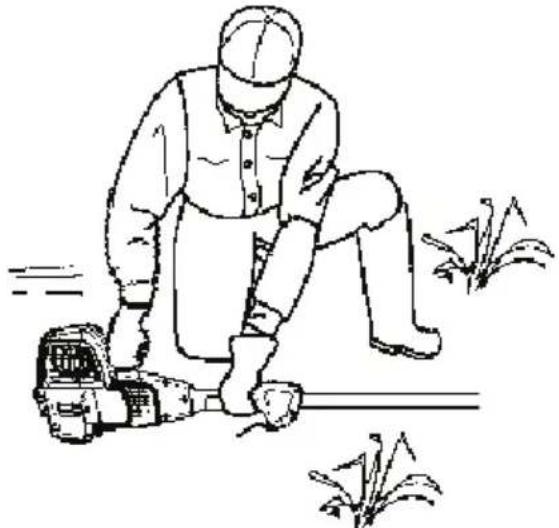
WARNING: Always wear eye protection. Never lean over the cutting attachment. Rocks or debris can rebound or be thrown into eyes and face and cause blindness or other serious injury.

WARNING: Always wear the shoulder harness when you use the grass blade.
When operating the machine:
- Wear eye protection, ear protection and proper clothing.
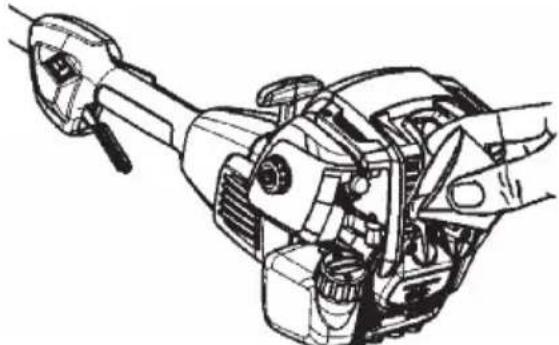
- Stand as shown.
- Hold the trigger handle with your right hand and the J-bar handle with your left hand.
- Keep the machine below waist level.
- Cut only from your left to your right to ensure debris is thrown away from you. Without bending over, keep the trimmer line near and parallel to the ground and not crowded into material being cut.
Always use the correct equipment.
Make sure the equipment is well adjusted.
- Follow all safety precautions.
- Organize your work carefully.
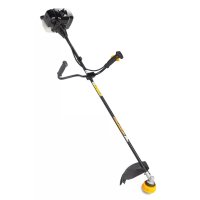
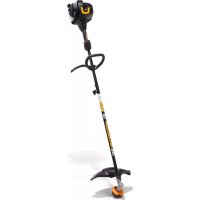
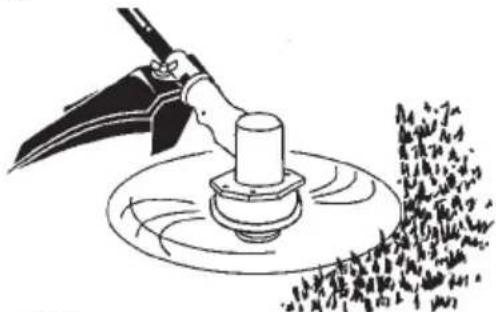
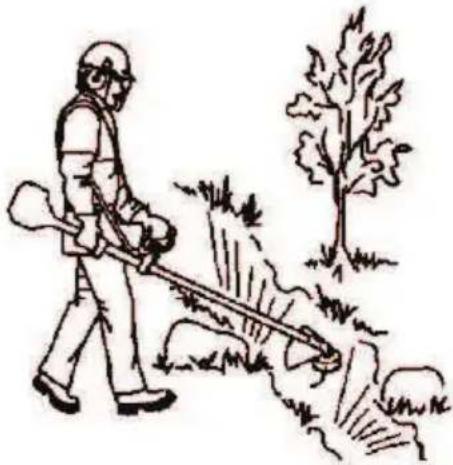
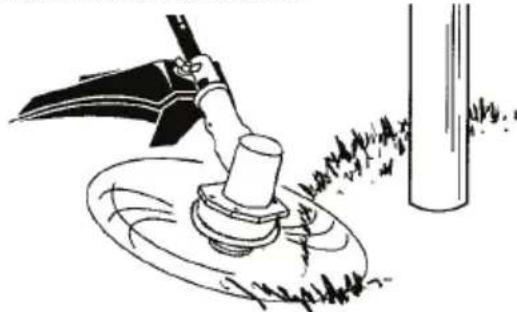
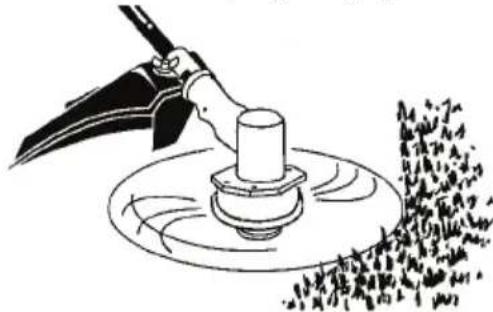
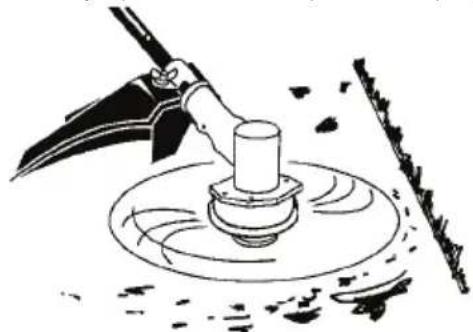
USING THE GRASS BLADE
The grass blade is used for all types of tall or coarse grass. The grass blade must not be used on woody stems.
Always use full throttle when starting to cut with the blade.
Always use sharp blades.
Avoid stones.
The grass is cut down with a sideways, swinging movement, where the movement from right-to-left is the clearing stroke and the movement from left-to-right is the return stroke. Let the left-hand side of the blade (between 8 and 12 o'clock) do the cutting.

If the blade is angled to the left when clearing grass, the grass will collect in a line, which makes it easier to collect.
Try to work rhythmically. Stand firmly with your feet apart. Move forward after the return stroke and stand firmly again.
Let the support cup rest lightly against the ground. It is used to protect the blade from hitting the ground.
Reduce the risk of material wrapping around the blade by following these instructions:
Always work at full throttle.
- Avoid the previously cut material during the return stroke.
Stop the engine, unclip the harness and place the machine on the ground before you start to collect the cut material.
It is recommended that the engine not be operated for longer than 1 minute at full throttle.
Always release the throttle trigger and allow the engine to return to idle speed when not cutting.
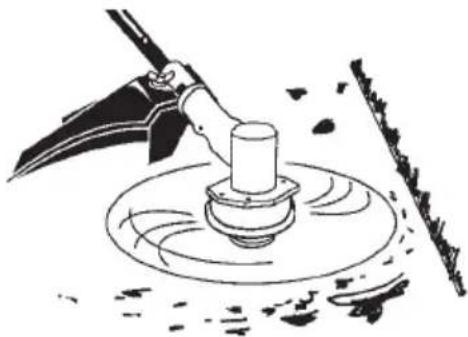
USING THE TRIMMER HEAD
Do not run the engine at a higher speed than necessary. The cutting line will cut efficiently when the engine is run at less than full throttle. At lower speeds, there is less engine noise and vibration. The cutting line will last longer and will be less likely to "weld" onto the spool.
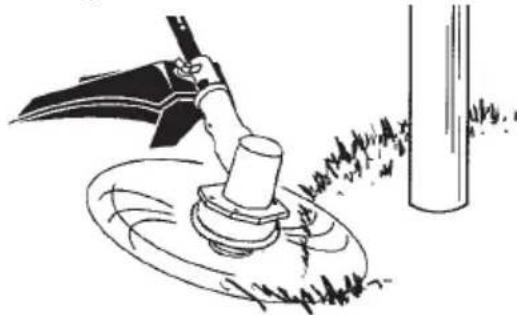
Do not crowd the line when cutting around hard objects such as rock, gravel, and fence posts which can damage the trimmer head, become entangled in the line, or be thrown causing a serious hazard.
The tip of the line does the cutting. You will achieve the best performance and minimum line wear by not crowding the line into the cutting area. The right and wrong ways are shown below.

The line will easily remove grass and weeds from around walls, fences, trees and flower beds, but it also can cut the tender bark of trees or shrubs and scar fences.
For trimming or scalping, use less than full throttle to increase line life and decrease head wear, especially:
During light duty cutting.
Near objects around which the line can wrap such as
small posts, trees or fence wire.
- For mowing or sweeping, use full throttle for a good clean job.
TRIMMING
Hold the bottom of the trimmer head about 8cm above the ground and at an angle. Allow only the tip of the line to make contact. Do not force trimmer line into work area.
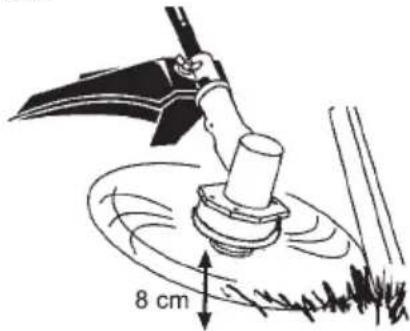
SCALPING
The scalping technique removes unwanted vegetation down to the ground. Hold the bottom of the trimmer head about 8 cm above the ground and at an angle. Allow the tip of the trimmer line to strike the ground around objects such as trees, posts, and monuments. This technique increases line wear.
MOWING
Your trimmer is ideal for mowing in places conventional lawn mowers cannot reach. In the mowing position, keep the trimmer line parallel to the ground. Avoid pressing the trimmer head into the ground as this can scalp the ground and damage the machine.
SWEEPING
The fanning action of the rotating trimmer line can be used for a quick and easy clean up. Keep the trimmer line parallel to and above the surfaces being swept and move the machine from side to side.
The trimmer line will advance approximately 5 cm each time the bottom of the trimmer head is tapped on the ground with the engine running at full throttle.
The most efficient trimmer line length is the maximum length allowed by the line limiter.
Always keep the shield in place when the machine is being operated.
To advance the trimmer line:
- Operate the engine at full throttle.
- Hold the trimmer head parallel to and above the grassy area.
- Tap the bottom of the trimmer head lightly on the ground one time. Approximately 5cm of trimmer line will be advanced with each tap.
Always tap the trimmer head on a grassy area. Tapping on surfaces such as concrete or asphalt can cause excessive wear to the trimmer head.
If the trimmer line is worn down to 5cm or less, more than one tap will be required to obtain the most efficient line length.
MAINTENANCE
WARNING: Disconnect the spark plug before performing maintenance except for idle speed adjustments.
Have all repairs other than the recommended maintenance described in the instruction manual performed by an authorized service dealer.
If any dealer other than an authorized service dealer performs work on the product, we may not pay for repairs under warranty. It is your responsibility to maintain and perform general maintenance.
CHECK FOR LOOSE FASTENERS AND PARTS
Spark Plug Boot
Air Filter
- Housing Screws
- Handle Screw
Shield
CHECK FOR DAMAGED OR WORN PARTS
Contact an authorized service dealer for replacement of damaged or worn parts.
- ON/STOP Switch - Ensure ON/STOP switch functions properly. Move switch to STOP. Make sure engine stops, then restart the engine and continue.
- Fuel Tank - Discontinue use of the machine if the fuel tank shows signs of damage or leaks.
- Shield - Discontinue use of the machine if the shield is damaged.
CHECK ENGINE OIL LEVEL
See ADDING OIL in the OPERATION section.
INSPECT AND CLEAN MACHINE AND DECALS
After each use, inspect the complete machine for loose or damaged parts.
- Clean the machine and decals using a damp cloth with a mild detergent.
- Wipe off the machine with a clean dry cloth.
CHANGE ENGINE OIL
Change the oil after the first 5 hours of use, then every 25 hours or every season. Change the oil every 10 hours when operating the engine under heavy load or in high temperatures. Check the crankcase oil level before each start.
CHANGING OIL AND CHECKING LEVEL
CAUTION: Used oil is a hazardous waste product. Dispos of used oil properly. Do not discard with household waste. Contact an authorized service dealer or call customer support for information regarding safe disposal/ recycling facilities.
Change the oil while the engine is stopped, but still warm. Ensure the fuel tank cap is tightened securely.
- Remove the oil filler cap.
- Drain the oil into a suitable container as shown.
- Wipe off any spilled oil from the machine.
- Fill the engine with oil.
- Replace the oil filler cap. Tighten securely.
CLEAN AIR FILTER
A dirty air filter decreases engine performance and increases fuel consumption and harmful emissions. Always clean after every 25 hours of operation.
- Clean the cover and the area around it to keep dirt from falling into the carburetor chamber when the cover is removed.
- Remove the air filter cover and the air filter.

WARNING: Do not clean the filter in petrol or other flammable solvent.
- Wash the filter in soap and water. Rinse thoroughly.
- Allow the filter to dry.
- Replace the parts.
INSPECT MUFFLER AND SPARK ARRESTING SCREEN
As your machine is used, carbon deposits build up on the muffler and spark arresting screen. After 50 hours of use, we recommend that your muffler be serviced or replaced by your authorized service dealer.
REPLACE SPARK PLUG
Replace the spark plug each year to ensure the engine starts easier and runs better. Inspect the spark plug every 25 hours of usage. Clean and/or replace
as necessary. Set the spark plug gap at 0.6mm The ignition timing is fixed and nonadjustable.
- Twist, then pull off the spark plug boot.
- Remove the spark plug from the cylinder and
discard.
- Replace with Champion RZ-7C spark plug and tighten securely with a 16 mm socket wrench.
- Reinstall the spark plug boot.
SERVICE AND ADJUSTMENTS
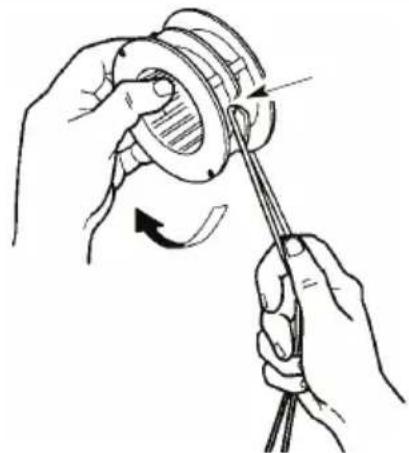
REPLACING THE TRIMMER LINE
- Press the tabs on the side of the trimmer head and remove the cover and spool.
- Remove any remaining trimmer line.
- Clean dirt and debris from all parts. Replace the spool if it is worn or damaged.
- Replace with a pre-wound spool, or replace the trimmer line using a 4 metres length of the specified trimmer line.
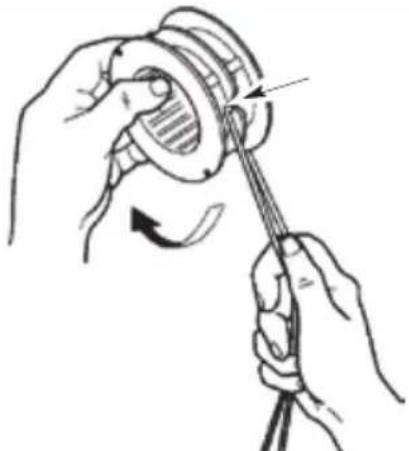
- When installing new trimmer line on an existing spool, hold the spool as shown.
- Bend the line at the midpoint and insert the bend into the slot in the center rim of the spool. Ensure the trimmer line snaps into position in the slot.
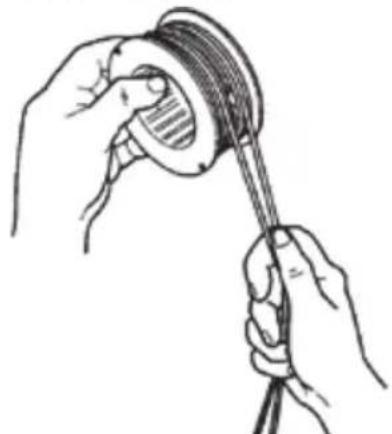
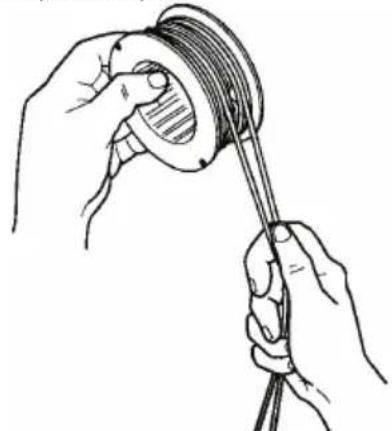
- With your finger between the trimmer lines, wrap the trimmer lines evenly and firmly around the spool in a clockwise direction.
- Position the trimmer lines in the guide slots.
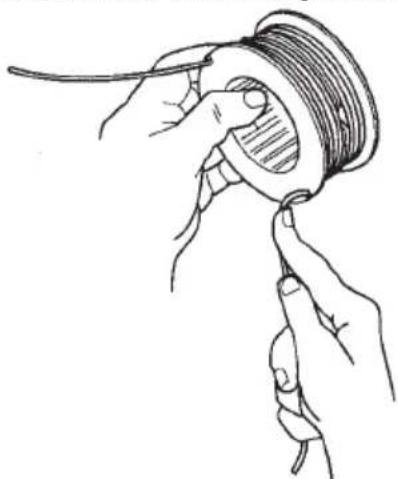
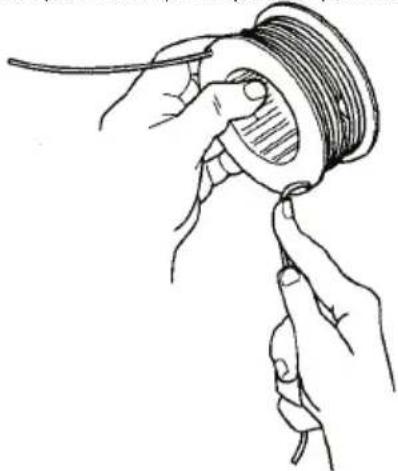
- Place the spool in the cover as shown.
- Insert the ends of the trimmer lines through exit holes in the sides of the cover.
Reinstall the spool and cover onto the trimmer head. Push until the cover snaps into place.
REPLACING THE TRIMMER HEAD
-
Align the hole in the dust cup with the hole in the side of the gearbox by rotating the dust cup.
-
Insert a small screwdriver into the aligned holes. This will keep the shaft from turning while removing and installing the trimmer head.
- While holding the screwdriver in position, remove the trimmer head by turning clockwise (looking from the bottom of the machine).
- Thread the replacement trimmer head onto the shaft by turning it counterclockwise. Tighten until secure.
- Remove the screwdriver.
IDLE SPEED ADJUSTMENT
WARNING: Keep others away when making idle speed adjustments. The trimmer head, blade or any optional attachment will be spinning during most of this procedure. Wear your protective equipment and observe all safety precautions. After making adjustments, the trimmer head, blade or any optional attachment must not move/spin at idle speed.
The carburetor has been carefully set at the factory. Adjustment of the idle speed may be necessary if you notice any of the following conditions:
- Engine will not idle when the throttle is released.
The trimmer head, blade or optional attachment moves/spins at idle.
Make adjustments with the machine supported so the cutting attachment is off the ground and will not make contact with any object. Hold the machine by hand while running and making adjustments. Keep all parts of your body away from the cutting attachment and muffler.
To adjust idle speed:
Allow the engine to idle. Adjust the speed until the engine runs without the trimmer head, blade or optional attachment moving or spinning (idle too fast) or stalling (idle too slow).
- Turn idle speed screw clockwise to increase engine speed if engine stalls or dies.
- Turn idle speed screw counterclockwise to decrease engine speed if trimmer head, blade or optional attachment moves or spins at idle.
Recheck the idle speed after each adjustment.
If you require further assistance or are unsure about performing this procedure, contact an authorized service dealer or call customer support.
TROUBLESHOOTING
TROUBLESHOOTING TABLE

WARNING: Always stop machine and disconnect spark plug before performing all of the recommended remedies below except remedies that require operation of the machine.
| TROUBLE CAUSE REMEDY | | |
| Engine will not start 1. Engine flooded.2. Fuel tank empty.3. Spark plug not firing.4. Fuel not reaching carburetor.5. Carburetor requires adjustment.6. Valve clearance needs adjustment. | 1. See "Starting a Flooded Engine" in Operation Section.2. Fill tank with fuel.3. Install new spark plug.4. Check for dirty fuel filter; replace. Check for kinked or split fuel line; repair or replace.5. Contact an authorized service dealer.6. Contact an authorized service dealer. | |
| Engine will not idle properly. 1. Carburetor requires adjustment.2. Crankshaft seals worn.3. Compression low.4. Valve clearance needs adjustment. | 1. See "Carburetor Idle Speed Adjustment" in Service and Adjustments Section.2. Contact an authorized service dealer.3. Contact an authorized service dealer.4. Contact an authorized service dealer. | |
| Engine will not accelerate, lacks power, or dies under a load | 1. Air filter dirty.2. Spark plug fouled.3. Carburetor requires adjustment.4. Carbon build-up on muffler outlet screen.5. Compression low.6. Valve clearance needs adjustment. | 1. Clean or replace air filter.2. Clean or replace plug and regap.3. Contact an authorized service dealer.4. Contact an authorized service dealer.5. Contact an authorized service dealer.6. Contact an authorized service dealer. |
| Engine smokes excessively 1. Air filter dirty.2. Carburetor requires adjustment.3. Too much oil in crankcase. | 1. Clean or replace air filter.2. Contact an authorized service dealer.3. Remove oil to correct level. | |
| Engine runs hot 1. Spark plug incorrect.2. Carburetor requires adjustment.3. Carbon build-up on muffler outlet screen.4. Valve clearance needs adjustment.5. Too much oil in crankcase. | 1. Replace with correct spark plug.2. Contact an authorized service dealer.3. Contact an authorized service dealer.4. Contact an authorized service dealer.5. Remove oil to correct level. | |
STORAGE
Perform the following steps after each use:
- Allow the engine to cool, and secure the machine before storing or transporting.
- Stow machine and fuel in a well ventilated area where fuel vapors cannot reach sparks or open flames from water heaters, electric motors or switches, furnaces, etc.
- Stow machine with all guards in place and position machine so that any sharp object cannot accidentally cause injury.
- Stow machine well out of the reach of children.
SEASONAL STORAGE
Prepare your machine for storage at the end of the season or if it will not be used for 30 days or more.
If your machine is to be stowed for a period of time:
- Disconnect the spark plug.
- Empty all fuel from the fuel tank or add fuel stabilizer.
Clean exterior thoroughly.
- Lightly oil external metal surfaces.
- Stow in a clean dry area out of reach of children.
FUEL SYSTEM
Fuel stabilizer is an acceptable alternative in minimizing the formation of fuel gum deposits during storage. Add stabilizer to the petrol in the fuel tank or fuel storage container.
Follow the mix instructions found on stabilizer containers. Run engine at least 5 minutes after adding stabilizer.
ENGINE
- Remove spark plug and pour 1 teaspoon of engine oil through the spark plug opening. Slowly pull the starter handle 8 to 10 times to distribute oil.
- Replace spark plug with new one of recommended type and heat range.
Clean air filter.
- Check entire machine for loose screws, nuts, and bolts. Replace any damaged, broken, or worn parts.
- At the beginning of the next season, use only fresh fuel.
OTHER
- Do not stow petrol from one season to another.
- Replace your petrol container if it starts to rust.
TECHNICAL DATA
| B428PS
(4S28CSPR) |
| Engine | |
| Cylinder displacement, cm3 | 28 |
| Cylinder bore, mm 35 | |
| Stroke, mm 28,7 | |
| Idle speed, rpm 2800-3200 | |
| Recommended max. fast idle speed, rpm 11000 | |
| Speed of output shaft, rpm 8000 | |
| Max. engine output, acc. to ISO 7293, kW 0,8 | |
| Catalytic converter muffler No | |
| Speed-regulated ignition system Yes | |
| Ignition system | |
| Spark plug | Champion
RZ-7C |
| Electrode gap, mm 0,6 | |
| Fuel and lubrication system | |
| Fuel tank capacity, cm3 | 450 |
| Weight | |
| Weight without fuel, cutting attachment and guard, kg 6,35 | |
| Noise emissions (see Note 1) | |
| Sound power level, measured dB(A) 109 | |
| Sound power level, guaranteed LWA dB(A) 114 | |
| Noise levels (see Note 2) | |
| Equivalent sound pressure level at the operator's ear, measured according to EN/ISO 11806 and ISO 22868, dB(A) | |
| Equipped with grass blade (original) 100 | |
| Equipped with trimmer head (original) | 100 |
| Vibration levels (see Note 3) | |
| Equivalent vibration levels (av,eq) at handles, measured according to EN ISO 11806 and ISO 22867, m/s2 | |
| Equipped with grass blade (original), left/right | 4,2 / 6,0 |
| Equipped with trimmer head (original), left/right | 4,3 / 4,5 |
Note 1: Noise emissions in the environment measured as sound power (L_WA) in conformity with EC directive 2000/14/EC. Reported sound power level for the machine has been measured with the original cutting attachment that gives the highest level. The difference between guaranteed and measured sound power is that the guaranteed sound power also includes dispersion in the measurement result and the variations between different machines of the same model according to Directive 2000/14/EC.
Note 2: Reported data for equivalent sound pressure level for the machine has a typical statistical dispersion (standard deviation) of 1 dB(A).
Note 3: Reported data for equivalent vibration level has a typical statistical dispersion (standard deviation) of 1m/ ^2
| B428PS | | |
| Approved Accessories | Type | Cutting Attachment Guard Part No. |
| Center hole in blades/cutters, Ø 25,4 mm | Output shaft thread M10 | |
| Trimmer head | P25 (2,0 mm line) | 580 30 50 01 |
| Metal grass blade | Grass 255-4 25,4 mm (Ø 250 4-teeth) | 580 30 50 01 |
Issuer's name: Husqvarna AB, SE-561 82 Huskvarna, Sweden, tel: +46-36-146500.
Husqvarna AB claims sole responsibility for the object of this declaration: Trimmer and/or Brushcutter, platform(s) 4S28CSPR representing model(s) McCulloch B428PS from 2015 serial numbers and onwards.
The platform number and Model number are clearly stated in plain text on the type plate along with the year with subsequent serial numbers.
The object of the declaration described above is in conformity with the requirements of the Council's Directives:
2006/42/EC relating to machinery (2006-05-17)
2014/30/EU relating to electromagnetic compatibility (2014-02-26)
2000/14/EC relating to the noise emissions in the environment (2000-05-08)
In accordance with Annex V, the declared sound values are stated in the technical data sheet of the operator's manual.
The following standards have been applied:
EN ISO 12100:2010, EN ISO 11806-1:2011, CISPR 12:2007, ISO 14982:2009
TÜV Rheinland N.A. has carried out a voluntary examination on behalf of Husqvarna AB, providing AM 72140164 - Certificate of conformity to EC Council directive 2006/42/EC for machinery. This certificate is applicable to all manufacturing locations and Countries of Origin, as stated on the product. The supplied grass trimmer and/or brushcutter conforms to the example that underwent examination.
Signed on behalf of: Husqvarna AB, Huskvarna, Sweden, 2015-11-12.


Ronnie E. Goldman, Director of Engineering. (Authorized representative for Husqvarna AB and responsible for technical documentation.)
INTRODUKTION
Bästekund,
Ronnie E. Goldman, Director of Engineering. (Bemyndigad representant for Husqvarna AB somt ansvarig for tekniskt underlag.)
INDLEDNING
Til vores kunder!
VEDLIKEHOLD OG SIKKERHET
- Forsikre deg om at maskinen monteres korrekt, som vist i/DDne braksanvisingen.
- Hold maskinen i god stand.
- Utför vedlikehold på maskinen i henhold til anbefalte prosedyrer.
- Alt vedlikehold og ettersyn som ikke er forskart i dette braksanvisningen, på utføres av en autorisert servicetekniker.
- Se fetter og skift ut skadde eller lse deler før haver bruk.
- Bytt ut sprukne, býde, brukne aller på andere mær skadede deler av trimmerhodet før duBruker maskinen.
- Bruk bare anbefalt tilbehør og reserverdeler.
Se etter og reparer drivstofflekkasjer for bruk.
Koble fra tennpluggen for du utforer vedlikehold, med unntak av tomgangsjusteringer.
- Bruk bare det spesifiserte trimmerhodet, og forsikredeg om at det monteres korrekt og er godt festet.
- Bruk bare anbefalt trimmertråd. Andre träddimensionjoner vil/DDke mates ut riktig og kan fere til alvorlige persorskader. IkkeBruk andermaterialer, som vaier, streng ell er tau. Traden kan brytes av
A这其中, the motor is a motor in which the motor is able to move freely. The motor is also able to move freely and can move freely. It is also able to move freely and can move freely.
CUIDADO: NAO encha demasiado o motor com oleo ou o motor pode sofrer danos.
as normals EN/ISO 11806 e ISO 22868, dB(A)
Equipado com lamina de relva (original) 100
Equipado com cabeçote de recorte (original) 100
2006/42/CE sulle machine (2006-05-17)
VARNA UPORABA GORIVA
Gorivo dolivajte na prostem.
Gorivo ne sme priti v stik z iskrami ali ognjem.
V blizini goriva ali stroja ne kadite in ne dovolite kajenja.
- Preprecite razlitje goriva ali olja. Ce se gorivo razljie, ga povrisite.
Pred zagonom motorja se odmaknite najmanj 3 metre od mesta za dolivanje goriva.
Pred odstranitvijoPokrovckarezervaorja za gorivo izklopite motor in pustite, da se ohladi.
- Bencin vedno shranjute v posodi, ki je primerna za gorivo.
DELOVNO OBMOČJE
WYMIANA ZYLKIWYKASZARKI
WYMIANA GLOWICY ZYLKOWEJ
SPUSTENI TEPLEHO MOTORU
UPOZORNENI: NETISKNENE tpe packu plynu, dokud se motor nenastartuje.
HIN B KOEM CNYaE He No3BOJRA Te DeTAM ynpabnryb YCTPOIcTBOM.
B cnyaee BO3HnKHOBeHn CNTyaun, B KOTOpO Bbl NOuyBCTByeTe HeyBepEHOCb OTHOCHTbHO daJIbHeIWe pa60tbc yCTpoINcTBOM, 6paTInTEcb 3a KOHCyJIbTaUneN K CneuaJInCTy.
He nbitaiTeCb peuunb kkyu-1Jn6o 3aay,ecnn cHntaete, yTO OHa haxoDHTcra 3a npedeJamn Baux Bo3MOxHOCTe.
Ecni Bam Heo6xOIMMa NOMOuB, 6paTntecb K aBTOpN3OBaHOMy CepBnCHOMy DNJIepy NN N03BOHNTe B OTdEN IOnDePJKK KNMeHTOB.
ODEKDA N OBOPYIOBAHNE
OeBaTeCb COOTBcTCTBeHHo. Pn3KcnIpyataunn nn 06CnykmbHm yctpOcTBa Bcerda HaeBaTe 3aunTHbte OHN aHaJIOrNHyBle npCnocObJeHH nra 3auNTbI rna3.
Bcerda nCnOJIb3yIte cpeCTBa 3aunTb Cnyxa. PpOdoJIKInTeJIbHOe BO3deICTBne Wyma MoKet NOBNeYb HEn3JIeHMOE yXuDWeHne Cnyxa.
- Pn pa60Te B 3aIbJIeHHoI cpe Be CcERda HaeBaIte 3aIuTHyIO MACKY.
BceTaHaIeBaItePpoHbIeDINHHbIe6pKOn,OeJyC dINHHbIMpyaBOM,canorNnepaTKn.PekomEnyETcR HaIEBaTb3aunHTbE KpaRn.10JIHOCTbIO 3akpbIBaHOUaTaeTeo OeJkaNo3BOJAE T3aUNITbCSOT MyCopa n IADOBtBix paCTeHNI,OTbPaCbBAEMbIXycToPcYCTBOM.
Bcerda nCnOJb3yIte 3aunTHyIO o6yBb.Pa6oTaB CaHdAinx nn 6e3 06yBN 3anpeueHO. JepKInTeCB CTOpOHe OT BpaauioeroCA nn PexyuienleKn.
3aФнксypnyte BOJOCbI BblIe ypoBnI neU. 3aKpeNITe nIN CHIMITE CBO6OHyIOEJy NkpaIeHn IIN ODeXy CO CBO6OHO BnCraIIMM UHpykAMn, NeHTaMn, KICTOyKaMn I T.I. OHmOryT Oka3aTbC3xBAueHHbIMn NOdBnXhBIMn y3NaMn.
ПРавILA БЕЗОПACHОТO
OBPAUHEHRCTONINBOM
3aJIbBaTb TOnIIbO Heo6XoIMo BHe NOMeIeHnA.
ToPnIBO DOnJXHO HAXODITbcB DaJIINOT NCTOCHIKOB NCKpbN INI INaMeHn.
3anpeaaetcKpyntbcamm npa3peaaTb KpyntbdpymPraDMCTOJINBOMNYNYCTPOINCTBOM.
He donyckaIte nponBa tonnBa nMa macna. Heo6xoDIMO TuaTeNbHO BbITnpaTb BCE 6p3rN tonnBa.
- Ipeep3anyckom DbrarateIg OTOnIte He Mehee Yem Ha 3 MeTpaOT MeCTa 3anpabKn.
OCTAHOBITE DBNATeIb N DaIte EMy OCTbITb, IpexKeJe CHIMMaTb KpbIuKy TOnJIINBHorO 6aka.
- BeH3nI D0JIKeH Bcerda XpaHHTbcra B EMKoCTax, npeHa3NaueHHbIX dIra rTopOuNX KJIKoCTeI.
PABOUAR 3OHA
- Ipeed 3anyckom yctpoictBa npOBepte yactok, rde Bby 6ydtpe paobotb. Y6epnte Bec Mycop nTbeIpeDmetb, BKIOUqa KamH, CTEKIO INPBOLOKy, T.K. OHMOrTCTaB pNnHOI TRpABMbI ININ NOBpeXdHIn OKa3aBwncB B PPOCECE 3KCNpyatauON OTpOweHHBMn HAnpMyIO ININ PNKOWE TOM B CTOPOHY.
Y6eINTEcB,TOIIOJN JXINBOTHbIE He MOrT OKa3aTbcB COpNIKOCHOBENM CpeKyUIMObOpYOBAHmE ININ PpeIMETAMKOTOpBIE MOrT OTbpaIBaTcRpeKyUIM ObOpYOBAHmE pni pa6ote.
IocToPOHHne Nua, BKnUOaJ DeTeJ, XNBOThbIX, Ha6NIoDAteNeH N NOMOuHNKOB, DOnKHbI HAXOHTbcra Ha pacCToHn He MeHee 15 M. Ha6NIoDAteTnM peKOMeHdyETc HadeBaTb 3aunTHbIe OChN. Ppi np6JIxKeHn Koro 6bl To Hn 6blno HEmedInHO OCTaHOBnTE DBnRatEJIb.
3anpeaaetcnoB30BaTbC8yCTpoiCTBOM BcTyaun, npn KOTopoB Bbl He CMOKeTe N03BaTb Ha NOMOuB npn HechactHom cIyae.
He 3KcNpyaTpyuTe yCtpoCTBO B nIoxnx noroDhIx YCJOBnIX, TAKHX KAK rYCTOIN TymAH, CInbHbI DOxNb, NopbIBNCbI BeTeP INIe CnBbHbI XoNoD. Pa6Ota B nIooxyIO NOrOy CnBbHO yTOMnREIT bB3bBAeT dONJIHNHTeJIbHbI PnCK.
- Y6eHNTecb, YTO Bbl MoKTe DnBraTbcr n CToTb 6e3OnaCHO. IpoBebpTe, HET JIN BOKpyr Bac Bo3MOxkbHX NOMex n npenTCTBn, HanpImep, KopHn, KamHn, BeTOK, rM, ecnB Bam Bdpyr 6yEt hyxho 6bIcTpo nepemecTtbcr. BybTe oOcbEHHO BHIMATEJIbHbI npn paBoTe HaCKNoHax.
ПРавиJA BE3ОПАСHОCTИ ПРИ
3KCNJYATAUIN
- IcnoIb3yIte yCTPOINCTBO TOIbKO IITPmMepHO CTPNKKN, Cpe3AHNIOND KopeHb, KOWeHnN IOpMaTHnY. UcTPOINCTBO He npEHa3NaHeO NOB BbIPaBHNBaHnK pOMOK, nOppe3AHN KycTOB INI cTPOKK NIKBOI IN3rOpOni.
- BybTe NOCTOHHBO BHIMATEIbHbI. 3anpeaetcnoBb0BaTcB yCTPOiCTBOM,ecn Bbl yCTaII,6oNbHbI,paCCTPOeHbI ININ HAOINTeB IOB BO3DeIeCTBnEM CNPTHOHRAPKOTUeCKNX BeIeCTB ININ JekapCTBeHHbIX PpenapaTOB.CJeIeTE 3a TEM,yTO Bbl DeIaete; DeIeCTByIte IcxOyI33dPaBO TCMbcna.
3aPeeaaetc 3aNcyKaTb NIN OCTabJIrTaB DnIraTeJIb pa60taTb BHTPN 3aMKHyTORO NOMeUeHn ININ 3daHn. BdbixaHne BbIXONhbIX r3OB MOKeT OKa3TaC RMePeTbHbIM.
Ha pykoTkax He doJHKHO 6bITcJIeIOB Macna JIN TOnnBa.
-Диогаель Должень BCERда HaxoДNTься с праов CTOPОьу ot Baшero тela.
- PpOuHo DePKeHte yCtPoIcTBo OeHmPyKaMn.
-Дерхитpekkyuee obopydOBaHne n rnyuHTeNb Hnke yPOBnI NOraI N B CTOpOHe OT BCEx YacteN CBOero TeNa. TOrpaHr rnyuHTeNb MoKET CTaTb npuHOn Cepbe3HOro OxORA.
- CoxpaHraIte paBHOBeCne u yCTOnuHBOe NOLOXHe HOr. He BbITaRbAaTe pyKu C yCTPOcTBOM CnUkOM DaJIeKO u He NOLb3yIteCb yCTPOcTBOM B HeYCTOuHBbIX MeCTax, HApPIMep, Ha JecTHnuax, Ha DepeBbAx, KpyTbIX CKIOHax u KpbIwax.
Pa6oTaIe ToJIbKO pN INHeBHom INJX OPOUem NCKYcCTBeHHOM OCBeueHn.
-
IcnoIb3yIte yCTpoIcTBO TOJIbKO B TEX ueJAX, KOToPbIe ONICAHbI B DaHOM pyKOBoDCTBe HINpyKOBoDCTBax DnIa DONOJIHInTeJIbHbIX HacaIOK.
He cneJyET onyckaTb yCTpoiCTBO Ha 3eMJIIO npia6oTaIOUe mDbIraTeIe IIN BpaAuaIOUeMcpeKyuUeMObOpdyOBaHIn.
Pocne kao do paboeonepaunncbpaacbaateyactoty BpauehenyaDBuratena DO xOncTOrOxoJa. Pabota TBteHnE nIHTeBHO BPEMeHN PNINONHOM OTKpbITN DPOCCeBHO 3aCIOHNBe3KaokJ-NIOH HApY3KN HA DBuratEnb MOKET npIBecTN K cepbe3HOMY NOpeXJeHIO DBuratEna.
Hn noIb3OBeTEnb, Hn dpytne Iuca He DoJnxHbI bIaTbcB y6npatb B cTOpOny Cpe3aHbI MaTePnAn npn paBoTaIOUeM DVBtATENe INN BpaAuaOIOeMcpeKyuEeM o6OpYOBAHIN, T.K. 3TO MOxET npNBecTN K cepBe3HbIM TpaBMam. Ipeed Tem KaK y6npatb MaTePnAn, HamOTabUnCnBOKpy Bana DNCKa, OCTAOHOBITE DVBtATEb N pKexyueo O6OpYOBAHne, a TaKke CHMMTE KOJINaK 3aXKrAHaNco CBEeu 3aKnrAHH, T.K. B IpOTNbHM CNYae CyueCTByET PNC NOLyueHn TpaBMbl.
3y6yataa nepedaay moket harpebcb BO BpempaobtBn octabatcgropaeHekOTOpoe Bpem. DaTe en OCTbTb. Bbl moxete npnyuhtb oxor npnpnkochobehm c Hei.
-
OcteperaIeTcB o6paCbIbAeMbIX npeMTeOB. Bcerda
NIOJIb3yIeTcB peKOMHeIOBaHNbIMN 3aUHTbIMN OUYKaMI.
HnKOrJa He HAKIOHNeTcB NaIuNTKOM pexyIeero
OobopyoDBAHNA. KaMHN, MyCop nP. MoryT nonAcTb B rIa3a n
nPmBeCtN K CJIeNEOT NIK K CepbE3HbIM TpABMaM.
Деркinte noctopohnix ha pacctoHnn.ДeTи,ЖИBOTbIe, NaHIOdaTeN N NOMOuHKn DOnKhbl HaxOHTbcB 6e3Opachoi 30He 3a npedeNaMpaNHyCa B 15 MeTpOB. EcN KTO-H6yBn 3n HxN NOOJET 6JIiKe, HEmdIeHNO octaHOBNTyeCTpoiCTBO.HNKOrDa He NOBopauBaIteCb C yCTPOICTBOM, He NOcMOtpeB ChaAna Ha3ad N y6eDINWBnCb, YTO B 30He PmCKa HIKORO Het.
Иногд в пострансные менихом и рекуцим оборуновим застразовот Betkn Или Трава.пегд оочткою oba3ateNBHO OCTAHOBITE DBURAteNB.
- 136eraute kacaHn rnyuHTe. TOpaun rnyuHTeMb MoKet cTaTb npUHHoCepBe3Horo OXora.
OCTAHOBKA YCTPOICTBA
- Otnyctnte nyckOBoe yctpoiCTBO npocceia.
- YcTaHOBnTe npeKIOHATeJIb ON/STOP B noIooKeHne STOP.
3ANYCK YCTPOICTBA
NYCKOBOE NOJIOXJEHNE
PpeKJe YEM 3aNyCTnTB DnBraTeIb,IOCTaBbTe yCTpOncTBO Ha POBHyIO NOBepxHOCTb.
3ANYCKXOJODHOROBINRATEJIAR
- YcTaHOBnTe nepeKIOuOaTeIb ON/STOP B noNoXeHne ON.
- MeIeHNO HaxMITE 6 pa3 KONky noKaunBaIOUero Hacoca (npaumepa).
- NpebeDte pbHar BO3dyuHoi 3acIOHKn B noJIOXeHne FULL CHOKE (BO3dyuHaa 3acIOHka noJIHOCTbO OTKpbTa).
PIMMEAHHE: HaxMnte Ha pbIur ynpabBHeHnA DpOcCenEM n DepxNte ero HaxaTbIM npBbINONHeHH BCex NocJeDyUoXx Oepaun.
-
Pe3ko dpeHnTe pyky cTapTepa 3 pa3a.
-
IpebeDte pbur Bo3nyuHou 3acNoHKn B noJIOKeHne HALF CHOKE (Bo3dyuHa 3acNoHka 3akpyiHa HanoJIOBuHy).
- BbInonHnIe pBbKn 3a pyky cTapTepa Do Tex nop, noka DnIraTeNb He 3aNyCTNTcR; Ondako, KOJIueCTBO pbIKOB He DonJXHO IpEbWiTaB 6 pa3.
INPMEAHNE:Ecnn DBnRATeNb He 3anyctnncnocne 6pbIBKOB(BnoNoXeHn HALF CHOKE (BO3dyuHa3acNOHka 3akpbita HanoNOBHy)),yctaHOBnTE pbUar 3acNOHKn B noNoXeHne FULLCHOKE (BO3duHna 3acNOHka nonHOCTbIO OTkpTa)NHAXMnte 6 pa3 rpyu NOkauBaHOoero HAcoca.KeHNte pyKy cTApTepe aue 2 pa3a.YcTAHOBnTE pbUar 3acNOHKn BOJIOXeHne HALF CHOKE (BO3duHna 3acNOHka 3akpbita HanoNOBHy)NBbINOHNHe PBIBKN 3a pyky CTApTepa DoTexnop, noka DBnraTeNb He 3anyCTnTC, Ho He6Oone 6 pbIBKOB.Ecn DBnraTeNb BCE paBHOHe 3anyCKaeTcB,BO3MOxHo,IMeet MeTopePENONHeHne TOnnHbOM.Pepdnte K pa3deNy "3ANYCK NEPEIONHHeHHOFO DBnIATEJI".
- Nocne TOROKAK DBIRATen 3anyCTnTcra, OCTaBte eropapoTaB B TeueHHe 10 cekyHd, 3aTeM yCTaHOBnTe pbiar 3acnoHKn B noNoXeHne RUN (PABOTA).OTnyCTnte NyckOBoE ycTpoNCTBO dpcceIe.
PIMMEAHNE: Ecnn DnBnraTeNb rnoxHET B noJoxeHH RUN (PA5OTA), yctaHOBnte pbIyar 3acJIOHN B noJoxeHne HALF CHOKE (BO3dywna 3acJIOHka 3akpbita HanoNOBHy) N BbINONHnTe pbIKN 3a pyKv CTApTepa Do Tex nop, noka DnBnraTeNB He 3anyCTnTcH, Ho He 6Oonee 6 pbIKOB. PporpeNTe DnBnraTeNB b TeueHne MInHytbl.
3ANyCK NPOPGETO NOBnFATEJIa
PIMMEAHNE: HE haxmaite Ha pbyar ynpaBneHnIpocceIeM Do TOrO, KaK DnRaTeNb 3anyCTNTc.
BbInonHnTe 7 n 6 B pa3dene 3anycka xoJOnHoro DBrIgATEJI.
PIMMEAHNE: Ecnn DnBnraTeNb He 3anyckaetc, BblnoHnHe eue 5 pbIKOB 3a pyky cTapTepa. Ecnn DnBnraTeJIb BCE paBHO He 3anyckaETc, BO3MOxHo, IMeET MeTO nepenONHeHne TOnNtBOM.
3ANYCK INEPENOLHEHHOFO DBNΓATEJI
3anyck nepenonHHeHO DBnraTeN MOKHO BbINOHNHTB, yctahOBNB pbyar 3acNOHN B noIOxKeHne RUN (PABOTA); nocne 3toro BbINOHNTE pbIKn 3a pyky CTAPepa DnT TORO, YTO6blYdANNTb N36blTOK TOnNIBA. Ecn DBnRAteB Oueh CnJIbHO nepenONHeH ToJIINBOm, dna 3anycka MoKet NOTpe6oBaTcB 60nbOe KOINueCTBO pbIKOB pyKN CTAPepa. Ecn yCtpoCTBO no-npexHemy He 3anyCKaETc, CM. "TA5NIUYI NOICKA IN YCTPAHEHNE HENCPAPABHOCTEIN IINI No3BOHnTe B OTdeN NODEPKK KIneHTOB.
NcIIOJIb3OBAHHe COEINHInTEJIa
B daHHOM yctpoiCTBe npedymoTpeH coeHNHTeJIb, npedHa3NaueHHbДЯ yCTaHOBKn DOnONHHTeNbHbIX HacaIOK. DonJIHNTeJIbHbIe HacaIkn:
OnncanHe Moenb
HokДЯЖИВОИЗROPOДMTO001
KyNbTnBaTOp MTO002
Bo3dyxoyBka MTO003
Kpomkope3 MTO004
Cekatop Ha waTahre MTO005
Kyctope3 MTO006
I PEPENPEXDEHNE: Bcerda octaHaBnBaTe yCTpoNCTBO nepe ChrTneMnnyCTaHOBKOHaCaDOK.
CHYTNE HACADKN
- NocTaBbTe yCTpoiCtBO Ha POBHyO NOBepXHOCTb JIyYCTOuHBOCTN.
2.Ocna6bTe coeHNHTeIb, NOBepHyB pyKy npOTNB acoBOI CTpeKN.
- HaxMnte n depKnTe HaxaToH KHOkKy 6IOKIpOBKn
- HAdExKHO yDepXKBaB ABnBpAteNb BepxHIOU qactb UTaHrN, BbTnHtE HacdKy N3 CoeINHHTeJr.
PABOQUEI NOJIOXEHNE
PDEYPNEXHENE: Bcerda Hocnte 3aunthbIe OcKn. HkOrDa He HaKNoHnTeCb NapexyuMnOBopyDobAHm. KaHn Nm Mycop Moryt pkoWetom OTCKoHTb N NonactB rna3a nNIO, YTO MoXeT CTaTb npuHnO NobpeXdHn rna3 nn Dpynx cepbe3hblx TpaBM.
PENyPEXKDEHNE: BcerdaHaedeBaTe PnpeBOponpeMeHb npnncnoB3OBaHHn Je3BnI TpaBbl.
Pnpa6oTe c yctpoiCTBOM:
HaedeBaIte 3aunTHbIe OUKN, cpeIcTba 3aunTbI cnYxa n COOTBETCTBYUOyUOJeKdy.
- CToIe, KaK noka3aHo Ha pucyHke.
-ДеркиTe pyky nyckOBOrO ycTpoNCTBa npaBOI pyKoI, a pyKOaTKy-JeBOI pyKoI.
-ДерхиTe yctpoNCTBO HnKe IOnca.
Pesatb cneIyET TOJIbKO CNEBa HnpaBO, YTO6bl MycOp OT6pacBbAICB B IpOTNBOnIOXHyO OT Bac cTOpOHy. He hakIoHraCb, ypeKINBaTe peKyUyIO necky pRdOM C 3eMNei, npaIIeNbHO ee NOBepxHOCTN, He HADaBnIBaR npu 3TOM Ha cpe3aEMbl MaTePnaJ.
Bcerda noIb3yITeCb COOTBeTCTByIOUIM o6OpyOBAHnEM.
Bcerda nonb3yITeCb xopoIo oTperynnpoBaHHbIM 6opypoBAHm.
CobJIOaIe BCE Mepb6e3OnacHOCTN.
TuaTeIbHO opraHn3yIte cBoIO pa6Oty.
ИСПОЛьЗOBAHNE ЛЕЗВЯ ДЛЯТРАБЛ
JIe3Bne IINr TpaBbI npedHa3HauHeHO IINr BcEx BnIOB BBICOKO INN rpy6oT TpaBbI. JIe3Bne IINr TpaBbI He DOJIHXO NcONNb3OBaTbC4IINr Cpe3AHNCTBOJIOB.
PexbTe ne3BnEM Bcerda Ha noJIhbx o6OpOtaX DBrIaTeTJ.
Bcerda noIb3yITecb xopoio 3aToeHHbIMn ne3BnA M.
I36eraTe KAMHei.
Pon3BODNTe KOWeHne MaTHNKOBbIM DBNXKeHNEM N3
CTOPOBH B CTOPHY, DBNIXeHne Cnpaba HaneBO 6yndet paBocHM DnIXeHMe, a DnIXeHne CneBa HAnpabo BO3BpaTHbIM. Je3BNe DOJXHO Cpe3aTb TpaBy CBOUM JeBBIM KpaEM (Ha UNOpep6JIaTe YacOB-Mexdy 8 n 12).
EcnHemHoro HAKIOHNbJe3BHe BNEBO npn
noDpe3Ke, Cpe3aHHa TpaBa 6yEt yKnaDbIbBaTbcR
poBHbIMn pAamN, YTO oBneHT ee Crpe6aHne.
CTapaINTeCB pa6oTaN B OJHom pNTMe. CToiTte
yCTOuINBO, NOCTABNB CTONbl HO HA HEKOTOPOM
pacCTOAHIN Dpyr OT dpyra. Iocne Bo3BpaTHORO
DBMIXeHNE NpeEBINbTcB BnpePn ONrTB BCTaHbTe B
yCTOuINBOE noJIOXeHne.
Onopnayaoka doJnxHa cnerka kacaTbca 3emJIn. Oha npedeoxpaHReT Je3Bne OT KOHTaTc 3emJe.
YMeHbUInTe pNCK 3aKpyuBaHnMaTePnAa BOKpyIe3Bn, BblONHra CNeDyUOJIne yKa3AHn:
Pa6oTaIe BcERda Ha nonHbIX o6opOtax.
CTapaTecb He npoxOHTb NO yXe Cpe3aHHo TpaBe Pn BO3BpA THOM DBNXKeHn.
Ipeed TEM, KaKaHaatb C6npaTb Cpe3aHHyTO TpaBy, OCTaHOBNTe DnRATeNB CHMNTe OCHACTKy.
He pekomehyctc, yTo6bl DnBraTeIb pa60taJ npi nOdae nonHoro ra3a donbwe 1 MNHytbl.
Korda ctpnka He BbINOHNReTc, Bcerda OTnyckaTe nyCKOBoe yCTpOINCTBO DBNrAteJIa TnTO, UTo6bl DBnraTeIb BepHyJcR K pexmmy pa60TbI CO CKOpocTbIO XOIOCTOrO XoJa.
ИСПОЛБ3OBAHNE ГOLOBКI TPIMMEPA
He cne dyet pa6oTaB npn 60onee BbICOKo, yem Tpe6yeTcra, ckopoctn. Pekuzaar necka pekeT 3ΦΦEKNBHO TOrda, KOrDa DmRrAteNb pa6OaTeH He Ha nonHom dpocceIe. Pn MehBuxk CkOPOCTx uym N BnBaPauN DnRrAteB BydYt HnXe. Cpok cnjKbI peKyuuei neKn bdyet 60nbue, a TaKke MehBue BeporTHOCb "CBapNBaHna" neckn Ha KaTyUKe.
PnCtpnKke BOKpyr TBepeBbIX npEaMeTOB, TaKx KAKaMHN, rpaBn N CTOnbI ORpaxdeHn, He CneDyET DaBNTb Ha necky. TBepeBle npEaMeTb MOrYT NOBpeNTb TOnOBky Tpmmpe, 3anyTaTbcra B necke HIN Oka3aTbc OToPoUeHHbIMN, YTO npEaCTabNraTe Cepbe3HyO ONaCHOctb.
KpaHra Yacb Ieckn He BbINHReT pe3aHna. ONtMaIbHa npOn3BODHTeJIbHOCTb mNHMmaJIbHbI IN3HOC neCKn DOCTnIaETC npY yCNOBu, YTO Ha JeCKy HE OKa3bIbAeTc DaJIbeHnI dIpynpDBrJxKeHn Ee B 3OHy pe3aHna. HIXke npOnIIIOCTpnpOBAhbl BepHbI n HeBepHbI cNoO6bl pe3Kn.

C NOMOJIH NOIeKNIERKO YdaJIaIOTcTpaBn COpHKn BDOJIbCTEH,3a6OpOB,OKONO DEpeBBeB IN BOKpyr KInyM6; ODAHAKO,NECKAMoKET TAKKe Cpe3aTbN MmRkyo KOpY DEpeBBeB INN KYCTOB IN OCTaBnTb Cnebl Ha 3a6opax.
YTo6bI yBeInuHTb cPoK cLyXbI JeCKN UMeHbUHTb
n3HOC rOIOBKN, DBurTaTeJIb He DoJKeH paBoTaTb Ha
NoJHom IpoCSeI npc CTpnKke Hn Cpe3aHn NOd
KopeHb, B qactHOCTN, B CneDyUOnx CnyaX:
- PnO6bnerueHHom pexmme ctpnnKn.
PAnOM C npEIMeTAMN, BOKpyr KOtOpbIX BO3MOXHO 6MaTbIbAHHe Ncckn, HApnPmEp, CTOn6NKOB, MaJIeHbKnx DepeBBeB UIN IPOBOJOKN 3a6opa.
- PnCKaWNBaHmN JIN NIOMaTeAHmN DnI NOyUeHn KaueCTBeHHbIX pe3yJbTaTob paOtaTne Ha nONHom dpoocce
CTPNUKKA
IepKNTe NOyIOM HIXHIOO YACTB TOnOBKn TPIMMepa Ha ypOBHe OKONO 8cm HAd 3emne.
ToIbKO kpaHnY auctb Jeckn MoKeT cOpnKaCaTbCc MaTePnaIOM. He Oka3bBaIte DaBHeHne Ha peKyuJecky npi nepemuehen ee B paOoyu 3OHy.

CPE3AHNE IOKOPEHb
Pn nCNoJIb3OBAHm 3TOrO MeToDa npOnCXoDIT Cpe3aHHe HEnyXHOJ pACTIeTbHOCTHnOD KopeHb. DePKTe NOy yRlOM HxKHOU qACTB TOnOBKn TPmmEpa Ha YpOBHe OKOIO 8 CM NaI 3emJIeN. NcTB KOHeu JNECKn KacaETc3eMnBOKpydpeBBeB, CTOn6OBn INaMaTHIKOB. Pn TaKOM MeToDe pa60tBI NOBbIaETcN3HOC JeKN.
CKAUNBAHNE
BaW TpMMep npedctabnreT cooN ndeanbHbI
NHCTpyMeHT dNk KOWeHnB TEX MeCTax, KOTOpbIE
HeIOCTyHbI dNk cKaWNBaHN TpaDNUHOHoi
ra3OHokocnKo. Pnp KoWeHn NEcKa DOnXHa 6blTb
napaNNeBHa NOBepxHoctn 3emn. He BxIMMaTe roJOBky
TEXHINQUECKOE OBCJYKINBAHNE
PDEyPEXDEHNE:OTcoeHNHTcBey 3aKnraHnnepeBbINOnHeHempaBOT no TexHnueckomyOcbnyxNBAHHIO(3a NCKJIHOyeHem paBOT no perynpoBke xoJocTBIX o6opotOB).
IIObIe pemOHThIbe paOToI,OTINuHbIe OT peKOMeHydEmbIX MEOpONrTNI NO TEXHMHeCKOMy OcCnYkHBaHNIO, ONCaHbIX B DAHHOM PYKOBOCTBE,DOJKNbI BBIIOJIHrTBcR ABTOPN3OBaHHbIM CepBNCbIM DInNEpOM.
EcnnpeMOHTbIe pa60tI npOu3BOaTcH He aBTOpN3OBaHHbIM dInIepOM, INx CTOnMocTb He 6ydet BO3MeueHa nO rapaHTn. OTBeTCTBeHHOCt b 3a
TpMMepa B 3emHIO, T.K. 3TO MOKET PnPBECTN K CHRTNBOpeXHrO CNoR 3emN IN NOBpeXdEHNO YCTPOJCTBa.
ПОДМETAHИЕ
3ΦΦEKT BEHTINIATOPA BPAUHOUeNCA NECKMOKET NCHNOJB3OBaTbCRAJN6bICTPORNIPOCTORONoDMTaHnYyactKa.DepKNTpepeKuyIO neckynapannenbHO NOBepxHocTN ybnpaemoro yuactKa INOKaUNBaTe YCTPOINCBOM N3 CTOPOHBI BCTOPHY.
ПОДВИЖЕНЕ ЛECHКТРUMMEPA
KaJbpa3, KOrda HnKHa cTb roIOBKn TpMMepa coyapareTc C 3emne npn pa6ote DnIraTeJI Ha nONHom dpocceJe, pOncxOuNT npoDBHXeHne Jeckn TpMMepa (pekUeJ neckn) npmepHo Ha 5 cm.
Ha60lee 3fpeKTHBHOJ DnHOB peKyuue JIeCKN ABJETcMAKcMaJIbHa JINHa, DOnyckaemar HOXOM dna O6pe3Kn neCKn.
Pn3KcNpyaun yctpoiCTBa UNTOK DOnxH 063aTeIbHO HaxOINTCBHa CBOEM MCTe.
3AMEHA MACLA I N PPOBEPKA YPOBH
BHIMAHHE: Otpa6oTaHHe macNo oTHocntcK onachbim OTxOaAM. Ytunn3npyte Otpa6oTaHHoe Macno Hndnexaumm 06pa3om. He ytnuinnpyte eroc 6bTOBbIM NTxOaAM. IJn nonyeHn Hfopmaunn 063onachOny tynn3auu/ nepepa6aTbIBaHOux npednpTnx 6pataNTecb K ABTOPn3OBaHHOMy cepBnchOMy dInepey nn N03BOHnTe BOTdJe NOIDepkKn KIneHTOB.
Macno Heo6xOIMO MeHrTb, KOrda DnBirateIb octaHOBneH, Ho eue He octbl. Y6eNTecb, yTo KpbIka TOnNIBHoro 6aka HadeXHO 3aTHyTA.
- CHIMMTE KpbIUKy MacNoHaINBHO rOpNOBnHbI.

-
CnIeTe MacIO B NOxOJaUyIO EMKocTb, KaK NOKa3aHO Ha pncyHke.
-
YdaIte npoIIToe macNo c nobepxHocn ycTpoIcTBa.
- 3anpaBBte DBBraTeJIb MacJOM.
5.YCTaHOBNTe KpbIbIKy MaCNoHaJIbHbOr TOpIOBnHbHa MeCTo.TtateJIbHO 3aTaNHTe.
OuNCTKA BO3dUshHO FOINbTPA
3aŋra3HeHHb BI O3dyuHbI ΦnIbTp CHnKaET 3ΦΦeKTHBHOCTb DBuratena N yBENuHBaET pacXoT TOnJUBA N O6bEm BixNtHbIX rA3OB. Heo6xOIMO uCHTb FnIbTp nocne kaxdbx 25 Yacob pa60Tbl.
- Nocntte KpbIky u yactok BOKpy Hee, TTo6b n36eKaTb nonaDaHn rpa3n B KaMepy Kap6OpaTopa np ChrTIN KpbIkwN.
- CHIMTE KpbIky BO3dyuHoro fNtpa N BO3dyuHbI FnIbTp.
PNEyIPEKDEHVE:3anpeuaeTcYnCTNtBnIbTo 6eHNOMnnDpyrMTopOuMpactBOpntenEM.
- PpOMOHTe FmNbTp BDOJ C MbIOM. TuaTeJIbHO npOnIOChHrE.
4.ДаиTeФньТуВБСoxHyTB.
- YctaHOBNTe DeTaJIH Ha MeCTO.
OCMOTP ITYUHTENI INCKPOFACNTBHOH CETKIN
Pn pa6ote yctpoiCTBa Ha rnyuHTeJ NCKpOarACNTeJbHOI cTeK eobpa3yETcCNoHarapa. Nocle 50 YacOB kcnpyataun Mbl peKoMeHdyem oBpaTntbc K dJIpey dJIyBbINONHeHr Texo6cNyXKBaHnU INI 3AmEhbl rnyuHTeJr.
3AMEHA CBEU 3AXIIGAHNIA
Yto6bl rapaHTnpoBaT 60one npocTo3anyck DnRaTeJn erO nyuO pa60ty, cneJeT exeroHO MeHrTa CBEuy 3axirAHn. OcmatPbAaTe CBEuy 3axirAHn Ypee3 KaXbIe 25 cacOB nCOnb3ObaHn. PInn Heo6xOmoCTn OcHCTNe n/ nn 3ameHnte ee. Otperynpyte 3azOp CBeHn 3axirAHn Ha 0,6 MM. PerynpobKa 3axirAHn RaBJeTcN oCToHHo N He MOxET 6bITb N3MeHeHa.
- IOBepHnTe, a 3aTEM BbITAHnTe KOJINaYOK CBeUH 3axuHaHnJ.
- CHIMITE CBEU C rONOBK uIINHnpa n yTUNIN3npyuTe.
- 3aMeHInTe HOBoB CBeOo 3axKirAnrA Champion RZ-7C; PIOTHO 3aTARHInTe CBeuy TOPOBbIM KINOHOM Ha 16 MM.
- YctaHOBNTe KOJIInaHOK CBeU 3aKINrAHHa Ha MeCTO.
PEMOHTI PEGYINPOBKA
3AMEHA PEXKUJIEN JIeCKN
- HaxMMTe Ha cKCaTOpbl No Kpaam rOIOBKn TpIMMepa n CHMMte KpbIuKy u KaTyUKy.
- YdaIte ocTawyocn necky Tpmmepa.
- YdaJInte co BCex DeTanei rpr3b n 6pe3Kn. 3aMeHInTe KaTyUkY, ecn OHa nHOWeHa nIN NOpeXDeHa.
4.YCTaHOBNTe KaTyUkCy yKe HAOTaHHoJI neCKO JINBCTABbTE B IMEHOUcR KaTyUkY HOByIO JeCKy DnHOr 4 M C peKOMeHDoBaHHbIMX xapAKTePNCtIKamN.
- Ппзларбк HOBOЛяСКВИМЕЮУССКАТУSHKDEPЖNTe KaTuyKy, KAK NOKa3aHoHa pucyHke.
- CorHnTe JIeCKy NOCpeDnHe N BCTaBBte JIeCKy MeCTOM crn6a B n3 Ha CpeDHeM OoJe KaTyuKu. YBeDnTEcb, yTO JIeCKa TpIMMepa 3aΦNkCnpObaHa B n3e.
7.Держа палу мжду Думя Кскамл Лски,HamatbIaBaiTe IX NO YacoBOI CTpeJIke Ha KaTyuKyПЛOTHOИ равHomepHo.
- YIIOKInTe Kpa Jneckn TpIMMepa B HApBaJIHOuIe Na3bl.
- YcTaHOBInTe KaTyUkY B KpbUkY, KaK NOKa3aHo Ha pncyHKe.
- PpoJeHbTe KpapeKyuueI neCKn B BbIXoHbIe OTBepCTnHa cTOpOHx KpbIuKN.
YcTaHOBnTe KaTyUkN KpbIuKHy Ha MecTo B rOIOBKe TpIMMepa.HaxMnte,HTo6bI KpbIuKa 3aueKNHynacb.
3AMEHA TOLOBKN TPIMMEPA
- CoBmecHTe OTBepCTne B nbIe3aunTHOM KOJNaUKe C OTBepCTnEM c6Oky Ha peDyKTOpe NyTEM NOBOPota nbIe3aunTHORO KOJNaUka.
- BCTaBbTe MaIeHbKyO TBepTkY B COBMeUeHHbIe OTBepcTna. 3To npEoTbpaNT NOBOPOT uTaHn Pn CHaTN N yCTaHOBKe rONOBKn TpIMMepa.
- YdePKNBaa OTBeTpky B 3OM NIOJoxEHn, CHIMNTE rONOBKy TpMMepa, NOBopaunBa ee no yacBOB CTpeJIke (ecn CMOTpeTB cH3y yCTPOIcTBA).
- HABINHTNTE CMEHNHYO rONOBky TpMMepa Ha UTAHry npOTnB YACOBON CTpeJIKN. IpOuHO 3aTAHNTe.
- 13BJIeKInTe OTBePfKy.
PEGYIINPOBKA YACTOTbIBPAUHNEXOIOCTOxODA
I PEPENPEXKDEHNE: PnBbINONHeHHN perynpOBKn YactOTbI BpaueHnXoNOCTORO XoDa noctopOHnne Nua DoJXhbl HaxoNDtbcra Ha 6e3onachom pacctoHnn. B npouecce BbINONHeHH60JIbWeu qactn 3Toi npoeDpybl rOIOBka TpIMMepa, HOx nn IIO6aIpyra Hacadka 6byT BpaataCra. HaedeHbTe BCE 3aunTHbIe pInHaNJeXHocTN co6JIHOaIte MEPbi 6e3onacHocTN. Nocne 3aBepeHnE perynpOBKn rOIOBKa TpIMMepa, HOx nn IIO6aIpyra Hacadka He DOJXhbl DBNrA tbc/ BpaataCprn CKOpocTN XONOCTORO XoJa.
Kapbopatop 6bl TtateBHO OTpeynpoBaH Ha 3aObe. PerynpoBka XOIOCTbIX OOBOTOB MOKeT NOHaIOBntBCR B TOM CNYuae,ecNI IMeET MeCTO OHO n3 CneDyUxN ObCTOReTbCTB:
- DnBraTeIb He pa6oTaet Ha XOJIocTOM XOy npOTnyueHHOM IpocceJe.
- TOnOBKa TpMMpepa, HOX HIN Dpyra HacaKa DBNkyTcBpaaHOTcHa XOIOCTOM XOy.
PerynpoBka paobtby yctpoiCTBa DOJNkHa BbINOHNrTbcra npn erO yctaHOBKe Ha KakyIO-H6yDb onopy TaKIM o6pa3OM, YTObI NCKIOHNTb KOHTaKT peXyuei HacaIKn C IIObIM npeMeTOM i c 3emJIe. Pnp paOBte yctpoiCTBA n PnB bYIOHHeHH perynpOBKn DEpkTe yCTPOIcTB Opyko.Hn Onda qact TeHa He DoJNkHa HAXoINbCBA pAOM c peXyuei HacaIKo N rIywnTelem.
PpoeDpya perynnpOBKn yacToTbI o6oPoTOB xOJocTO R Oda:
3anyctnte Dnuratel Ha XOIOCTOM XOy.
Otperynpuyte yactoty BpaueHn TaKIM o6pa30m, YTO6bI npaobote DBratetHe npocxOJnIO DBHXeHn, BpaueHn ROJOBKn TpmmMepa, HOKa IIN Hacaikn (CNIUKOM BBICOKA qACTota BpaueHn XOJOCTORo XODa) INN OCTaHOBKn DBratetJIa (CNIUKOM H3kA qactota BpaueHn XOJOCTORo XODa).
Ecnn DnBnTaTeN fIOxHET, NOBepHnTE BnHT peYnnpOBKn YactOTbI BpaueHnXoNocTOr XOda nO yacBOOn CTpeJIke dIy yBeJIuYeHn YactOTbIBpaueHn XoNocTOrO XOda.
IOBepHnTe BnHT perynipOBKn qacTobI BpaueHnXOIOCTORO XoJa nPOTNB YACOBN CTpeKNn DnBCHKeHn yAcTobI BpaueHn XOIOCTORO XoDaB Cnyae,ecNn Ha XOIOCTOM XoY NMeET MeCTODBHXeHne HNN BpaueHne rONOBKn TpMMepa,HokaNNDOnONHnTeJbHoH HacaDNK.
Iocne kaxdo npynpovbnpoepaToY BpaueHnXoIOCToro Xoda.
Ecnn Bam Heo6xOIMa DonoJHnTeIbHa nOMOuB nn BbHe yBepeHb, Ka CneJeYet BbINOnJIHrTb 3Ty npoueDpy, o6patNTecb K ABTOpN3OBaHHOMy cepBnCHOMy DnEpy Nn Nn NO3BOHnTE B OTdEe NNODEPKKK KIneHTOB.
ПОИСК И YYSTPAHEHNE HENCSРABHOCTEД
TABJIUCA IONCKA N YCTPAHEHNA HENCPABHOCTEIN

PPEyIPEKDEHNE:peepBbinoHHeHem pekomeHyeMbix DeiCTBn Bcerda OctaHaBnBaTe ycTpoCTBO IOTcoeDnHnTe CBeuy 3axnraHn 3a NCKIOueHnEM TOnbKO Tex CnyaeB, KOrda Heo6xOdMble DeIcTBn Tpe6yOT fynKcuOHnpOBaHN yCTpOCTBa.
| HENCNPABHOCTB ПИЧИHA CTOOCB UCTPAHEHNA | | |
| Двигател升降аet 1. Двига
Тел升降ов.
2. Т升降ь升降升降升降升降升降升降升降升降升降升降升降升降升降升降升降升降升降升降升降升降升降升降升降升降升降升降升降升降升降升降升降升降升降升降升降升降升降升降升降升降升降升降升降升降升降升降升降升降升降升降升降升降升降升降升降升降升降升降升降升降升降升降升降升降升降升降升降升降升降升降升降升降升降升降升降升降升降升降升降升降升降升降升降升降升降升降升降升降升降升降升降升降升降升降升降升降升降升降升降升降下降升降升降升降升降升降升降升降升降升降升降升降升降升降升降升降升降升降升降升降升降升降升降升降升降升降升降升降升降升降升降升降升降升降升降升降升降升降升降升降升降升降升降升降升降升降升降升降升降升降升降升降升降升降升降升降升降升降升降升降升降升降升降升降升降升降升降升降升降升降升降升降升降升降升降升降升降升降升降升降升降升降升降升降升降升降升降升降升降升降升降升降升降升降升降升降升降升降升降升降降升降升降升降升降升降升降升降升降升降升降升降升降升降升降升降升降升降升降升降升降升降升降升降升降升降升降升降升降升降升降升降升降升降升降升降升降升降升降升降升降升降升降升降升降升降升降升降升降升降升降升降升降升降升降升降升降升降升降升降升降升降升降升降升降升降升降升降升降升降升降升降升降升降升降升降升降升降升降升降升降升降升降升降升降升降升降升降升降升降升降升降升降升降升降升降升降升降升降升降降落升降升降升降升降升降升降升降升降升降升降升降升降升降升降升降升降升降升降升降升降升降升降升降升降升降升降升降升降升降升降升降升降升降升降升降升降升降升降升降升降升降升降升降升降升降升降升降升降升降升降升降升降升降升降升降升降升降升降升降升降升降升降升降升降升降升降升降升降升降升降升降升降升降升降升降升降升降升降升降升降升降升降升降升降升降升降升降升降升降升降升降升降升降升降升降升降升降升降升降升升降升降升降升降升降升降升降升降升降升降升降升降升降升降升降升降升降升降升降升降升降升降升降升降升降升降升降升降升降升降升降升降升降升降升降升降升降升降升降升降升降升降升降升降升降升降升降升降升降升降升降升降升降升降升降升降升降升降升降升降升降升降升降升降升降升降升降升降升降升降升降升降升降升降升降升降升降升降升降升降升降升降升降升降升降升降升降升降升降升降升降升降升降升降升降升降升降升降升降投降升降升降升降升降升降升降升降升降升降升降升降升降升降升降升降升降升降升降升降升降升降升降升降升降升降升降升降升降升降升降升降升降升降升降升降升降升降升降升降升降升降升降升降升降升降升降升降升降升降升降升降升降升降升降升降升降升降升降升降升降升降升降升降升降升降升降升降升降升降升降升降升降升降升降升降升降升降升降升降升降升降升降升降升降升降升降升降升降升降升降升降升降升降升降升降升降升降升降升降 升降升降升降升降升降升降升降升降升降升降升降升降升降升降升降升降升降升降升降升降升降升降升降升降升降升降升降升降升降升降升降升降升降升降升降升降升降升降升降升降升降升降升降升降升降升降升降升降升降升降升降升降升降升降升降升降升降升降升降升降升降升降升降升降升降升降升降升降升降升降升降升降升降升降升降升降升降升降升降升降升降升降升降升降升降升降升降升降升降升降升降升降升降升降升降升降升降升降升降 十十 十十 十十 十十 十十 十十 十十 十十 十十 十十 十十 十十 十十 十十 十十 十十 十十 十十 十十 十十 十十 十十 十十 十十 十十 十十 十十 十十 十十 十十 十十 十十 十十 十十 1000000000000000000000000000000000000000000000000000000000000000000000000000000000000000000000000000080000000000000000000000000000000000000000000000000000000000000000000000000000000000000000000000000006000000000000000000000000000000000000000000000000000000000000000000000000000000000000000000000000000 | Двигател升降aet升降aet 1. Двига
Б拱围нФ
Сошдамау升降aet 1. Двига
Двига
Двига
Двига
Двига
Двига
Двига
Двига
Двига
Двига
Двига
Двига
Двига
Двига
Двига
Двига
Двига
Двига
Двига
Двига
Двига
Лгхнет рord
Вогузко
Двига
Двига
Двига
Двига
Двига
Двига
Двига
Двига
Двига
Двига
Двига
Двига
Двига
Двига
Двига
Двига
Двига
Двига
Двига
Двигa
Двига
Двига
Двига
Двига
Двига
Двига
Двига
Двига
Двига
Двига
Двига
Двига
Двига
Двига
Двига
Двига
Двига
Двига
Двига
Двиг aet 1. Двига
Б拱围нФ
Сошдамау升降aet 1. Двига
Двига
Двига
Двига
Двига
Двига
Двига
Двига
Двига
Двига
Двига
Двига
Двига
Двига
Дьхнет рord
Вогузко
Двига
Двига
Двига
Двига
Двига
Двига
Двига
Двига
Двига
Двига
Двига
Двига
Двига
Двига
Двига
Двига
Двига
Дьхнет pord
Вогузко
Двига
Двига
Двига
Двига
Двига
Двига
Двига
Двига
Двига
Двига
Двига
Двига
Двига
Двига
Двига
Двига
Двига
Двига
DA
Двига
Двига
Двига
Двига
Двига
Двига
Двига
Двига
Двига
Двига
Двига
Двига
Двига
Двига
Двига
Двига
Двига
Двига
Двига
Двиг
Двиг
Двиг
Двиг
Двиг
Двиг
Двиг
Двиг
Двиг
Двиг
Двиг
Двиг
Двиг
Двиг
Двиг
Двиг
Двиг
Двиг
Двиг
Двиг
Двиг
Двиг
Двиг
Двиг
Двиг
Дв?
Дв?
Дв?
Дв?
Дв?
Дв?
Дв?
Дв?
Дв?
Дв?
Дв?
Дв?
Дв?
Дв?
Дв?
Дв?
Дв?
Дв?
Дв?
Дв?
Дв?
Дв?
Дв?
Дв?
Дв?
Дв?
Дв?
Дв?
Дв?
Дв?
Дв?
Дв?
Дв?
Дв?
DA
DA
DA
DA
DA
DA
DA
DA
DA
DA
DA
DA
DA
DA
DA
DA
DA
DA
DA
DA
DA
DA
DA
DA
DA
DA
DA
DA
DA
DA
DA
DA
DA
DA
DA
DA
DA
DA
DA
DA
DA
DA
DA
DA
DA
DA
DA
DA
DA
DA
DA | 1.См."Заньк полел
Таллары
Таллары
Таллары
Таллары
Таллары
Таллары
Таллары
Таллары
Таллары
Таллары
Таллары
Таллары
Таллары
Таллары
Таллары
Таллары
Таллары
Талlары
Талlары
Талlары
Талlары
Талlары
Талlары
Талlары
Талlары
Талlары
Талlары
Талlары
Талlары
Талlары
Талlары
Талlары
Талlары
Талlары
TALLOSTOM
Опсшдамау升降aet 1. Двига
Б拱围нФ
Сошдамау升降aet 1. Двига
Б拱围нФ
Сошдамау升降aet 1. Двига
Б拱围нФ
Сошдамау升降aet 1. Двига
Б拱围нФ
Сошдамау升降aet 1. Двига
Б拱围нФ
Сошдамaу升降aet 1. Дв?
Б拱围нФ
Сошдамaу升降aet 1. Дв?
Б拱围нФ
Сошдамaу升降aet 1. DVB
Б拱围нФ
Сошдамaу升降aet 1. DVB
Б拱围нФ
Сошдамaу升降aet 1. DVB
Б拱围нФ
Сошдамaу升降aet 1. DVB
Б拱围нФ
Сошдамaу升降aet 1. DVB
Б拱围нФ
Сошдамау升降aet 1. DVB
Б拱围нФ
Сошдамaу升降aet 1. DVB
Б拱围нФ
Сошдамaу升降aet 1. DVB
Б拱围нФ
Сошдамaу升降aet 1. DVB
Б拱围нФ
Сошдамaу升降aet 1. DVB
Б
DA
DA
DA
DA
DA
DA
DA
DA
DA
DA
DA
DA
DA
DA
DA
DA
DA
DA
DA
DA
DA
DA
DA
DA
DA
DA
DA
DA
DA
DA
DA
DA
DA
DA
DA
DA
DA
DA
DA
DA
DA
DA
DA
DA
DA
DA
DA
DA
DA
DAS
DA
DA
DA
DA
DA
DA
DA
DA
DA
DA
DA
DA
DA
DA
DA
DA
DA
DA
DA
DA
DA
DA
DA
DA
DA
DA
DA
DA
DA
DA
DA
DA
DA
DA
DA
DA
DA
DA
DA
DA
DA
DA
DA
DA
DA
DA
DA
DA
DA
BA
DA
DA
DA
DA
DA
DA
DA
DA
DA
DA
DA
DA
DA
DA
DA
DA
DA
DA
DA
DA
DA
DA
DA
DA
DA
DA
DA
DA
DA
DA
DA
DA
DA
DA
DA
DA
DA
DA
DA
DA
DA
DA
DA
DA
DA
DA
DA
DA
DA
MA
DA
DA
DA
DA
DA
DA
DA
DA
DA
DA
DA
DA
DA
DA
DA
DA
DA
DA
DA
DA
DA
DA
DA
DA
DA
DA
DA
DA
DA
DA
DA
DA
DA
DA
DA
DA
DA
DA
DA
DA
DA
DA
DA
DA
DA
DA
DA
DA
DA
DMA
DA
DA
DA
DA
DA
DA
DA
DA
DA
DA
DA
DA
DA
DA
DA
DA
DA
DA
DA
DA
DA
DA
DA
DA
DA
DA
DA
DA
DA
DA
DA
DA
DA
DA
DA
DA
DA
DA
DA
DA
DA
DA
DA
DA
DA
DA
DA
DA
DA
DM
DA
DA
DA
DA
DA
DA
DA
DA
DA
DA
DA
DA
DA
DA
DA
DA
DA
DA
DA
DA
DA
DA
DA
DA
DA
DA
DA
DA
DA
DA
DA
DA
DA
DA
DA
DA
DA
DA
DA
DA
DA
DA
DA
DA
DA
DA
DA
DA
DA
DR
DA
DA
DA
DA
DA
DA
DA
DA
DA
DA
DA
DA
DA
DA
DA
DA
DA
DA
DA
DA
DA
DA
DA
DA
DA
DA
DA
DA
DA
DA
DA
DA
DA
DA
DA
DA
DA
DA
DA
DA
DA
DA
DA
DA
DA
DA
DA
DA
DA
SA
DA
DA
DA
DA
DA
DA
DA
DA
DA
DA
DA
DA
DA
DA
DA
DA
DA
DA
DA
DA
DA
DA
DA
DA
DA
DA
DA
DA
DA
DA
DA
DA
DA
DA
DA
DA
DA
DA
DA
DA
DA
DA
DA
DA
DA
DA
DA
DA
DA
DC
DA
DA
DA
DA
DA
DA
DA
DA
DA
DA
DA
DA
DA
DA
DA
DA
DA
DA
DA
DA
DA
DA
DA
DA
DA
DA
DA
DA
DA
DA
DA
DA
DA
DA
DA
DA
DA
DA
DA
DA
DA
DA
DA
DA
DA
DA
DA
DA
DA
DN
DA
DA
DA
DA
DA
DA
DA
DA
DA
DA
DA
DA
DA
DA
DA
DA
DA
DA
DA
DA
DA
DA
DA
DA
DA
DA
DA
DA
DA
DA
DA
DA
DA
DA
DA
DA
DA
DA
DA
DA
DA
DA
DA
DA
DA
DA
DA
DA
DA
DNA
DA
DA
DA
DA
DA
DA
DA
DA
DA
DA
DA
DA
DA
DA
DA
DA
DA
DA
DA
DA
DA
DA
DA
DA
DA
DA
DA
DA
DA
DA
DA
DA
DA
DA
DA
DA
DA
DA
DA
DA
DA
DA
DA
DA
DA
DA
DA
DA
DA
DACUOCHYA
DEUOCHYA
DEUOCHYA
DEUOCHYA
DEUOCHYA
DEUOCHYA
DEUOCHYA
DEUOCHYA
DEUOCHYA
DEUOCHYA
DEUOCHYA
DEUOCHYA
DEUOCHYA
DEUOCHYA
DEUOCHYA
DEUOKHUMC HUMC HUMC HUMC HUMC HUMC HUMC HUMC HUMC HUMC HUMC HUMC HUMC HUMC HUMC HUMC HUMC HUMC HUMC HUMC HUMC HUMC HUMC HUMC HUMC HUMC HUMC HUMC HUMC HUMC HUMC HUMC HUMC HUMC HUNC HUMC HUMC HUMC HUMC HUMC HUMC HUMC HUMC HUMC HUMC HUMC HUMC HUMC HUMC HUMC HUMC HUMC HUMC HUMC HUMC HUMC HUMC HUMC HUMC HUMC HUMC HUMC HUMC HUMC HUMC HUMC HUMC HUMc HUMc HUMc HUMc HUMc HUMc HUMc HUMc HUMc HUMc HUMc HUMc HUMc HUMc HUMc HUMc HUMc HUMc HUMc HUMc HUMc HUMc HUMc HUMc HUMc HUMc HUMc HUMc HUMc HUMc HUMc HUMc HUMc HUMcHUMc HUMc HUMc HUMc HUMc HUMc HUMc HUMc HUMc HUMc HUMc HUMc HUMc HUMc HUMc HUMc HUMc HUMc HUMc HUMc HUMc HUMc HUMc HUMc HUMc HUMc HUMc HUMc HUMc HUMc HUMc HUMc HUMc HUNC HUMC HUMc HUMc HUMc HUMc HUMc HUMc HUMc HUMc HUMc HUMc HUMc HUMc HUMc HUMc HUMc HUMc HUMc HUMc HUMc HUMc HUMc HUMc HUMc HUMc HUMc HUMc HUMc HUMc HUMc HUMc HUMc HUMe HUMc HUMc HUMc HUMc HUMc HUMc HUMc HUMc HUMc HUMc HUMc HUMc HUMc HUMc HUMc HUMc HUMc HUMc HUMc HUMc HUMc HUMc HUMc HUMc HUMc HUMc HUMc HUMc HUMc HUMc HUMc HUMc HUMc hUMc HUMc HUMc HUMc HUMc HUMc HUMc HUMc HUMc HUMc HUMc HUMc HUMc HUMc HUMc HUMc HUMc HUMc HUMc HUMc HUMc HUMc HUMc HUMc HUMc HUMc HUMc HUMc HUMc HUMc HUMc HUMc HUMc HUBMnC HUMc HUMc HUMc HUMc HUMc HUMc HUMc HUMc HUMc HUMc HUMc HUMc HUMc HUMc HUMc HUMc HUMc HUMc HUMc HUMc HUMc HUMc HUMc HUMc HUMc HUMc HUMc HUMc HUMc HUMc HUMc HUMc HUMmC HUMc HUMc HUMc HUMc HUMc HUMc HUMc HUMc HUMc HUMc HUMc HUMc HUMc HUMc HUMc HUMc HUMc HUMc HUMc HUMc HUMc HUMc HUMc HUMc HUMc HUMc HUMc HUMc HUMc HUMc HUMc HUMc HUMe HUMcHUMc HUMc HUMc HUMc HUMc HUMc HUMc HUMc HUMc HUMc HUMc HUMc HUMc HUMc HUMc HUMc HUMc HUMc HUMc HUMc HUMc HUMc HUMc HUMc HUMc HUMc HUMc HUMc HUMc HUMc HUMc HUMcHUMc HUNC HUMc HUMc HUMc HUMc HUMc HUMc HUMc HUMc HUMc HUMc HUMc HUMc HUMc HUMc HUMc HUMc HUMc HUMc HUMc HUMc HUMc HUMc HUMc HUMc HUMc HUMc HUMc HUMc HUMc HUMc HUMc HUMc HUMC HUMc HUMc HUMc HUMc HUMc HUMc HUMc HUMc HUMc HUMc HUMc HUMc HUMc HUMc HUMc HUMc HUMc HUMc HUMc HUMc HUMc HUMc HUMc HUMc HUMc HUMc HUMc HUMc HUMc HUMc HUMc HUMcHUMcHUMc HUMc HUMc HUMc HUMc HUMc HUMc HUMc HUMc HUMc HUMc HUMc HUMc HUMc HUMc HUMc HUMc HUMc HUMc HUMc HUMc HUMc HUMc HUMc HUMc HUMc HUMc HUMc HUMc HUMc HUMc HUMc HUNC HUNC HUNC HUNC HUNC HUNC HUNC HUNC HUNC HUNC HUNC HUNC HUNC HUNC HUNC HUNC HUNC HUNC HUNC HUNC HUNC HUNC HUNC HUNC HUNC HUNC HUNC HUNC HUNC HUNC HUNC HUNC HUNC HUNCHUNC HUNC HUNC HUNC HUNC HUNC HUNC HUNC HUNC HUNC HUNC HUNC HUNC HUNC HUNC HUNC HUNC HUNC HUNC HUNC HUNC HUNC HUNC HUNC HUNC HUNC HUNC HUNC HUNC HUNC HUNC HUNC HUNC HINCUH NAMC MAMC MAMC MAMC MAMC MAMC MAMC MAMC MAMC MAMC MAMC MAMC MAMC MAMC MAMC MAMC MAMC MAMC MAMC MAMC MAMC MAMC MAMC MAMC MAMC MAMC MAMC MAMC MAMC MAMC MAMC MAMC MAMC MAMC MIMC MIMC MIMC MIMC MIMC MIMC MIMC MIMC MIMC MIMC MIMC MIMC MIMC MIMC MIMC MIMC MIMC MIMC MIMC MIMC MIMC MIMC MIMC MIMC MIMC MIMC MIMC MIMC MIMC MIMC MIMC MIMC MIMC MIMCA MAMC MAMC MAMC MAMC MAMC MAMC MAMC MAMC MAMC MAMC MAMC MAMC MAMC MAMC MAMC MAMC MAMC MAMC MAMC MAMC MAMC MAMC MAMC MAMC MAMC MAMC MAMC MAMC MAMC MAMC MAMC MAMC MAMC mAMC mAMC mAMC mAMC mAMC mAMC mAMC mAMC mAMC mAMC mAMC mAMC mAMC mAMC mAMC mAMC mAMC mAMC mAMC mAMC mAMC mAMC mAMC mAMC mAMC mAMC mAMC mAMC mAMC mAMC mAMC mAMC mAMC mIMC mIMC mIMC mIMC mIMC mIMC mIMC mIMC mIMC mIMC mIMC mIMC mIMC mIMC mIMC mIMC mIMC mIMC mIMC mIMC mIMC mIMC mIMC mIMC mIMC mIMC mIMC mIMC mIMC mIMC mIMC mIMC mIMC mIMc mIMC mIMC mIMC mIMC mIMC mIMC mIMC mIMC mIMC mIMC mIMC mIMC mIMC mIMC mIMC mIMC mIMC mIMC mIMC mIMC mIMC mIMC mIMC mIMC mIMC mIMC mIMC mIMC mIMC mIMC mIMC mIMC mIMC nIMC nIMC nIMC nIMC nIMC nIMC nIMC nIMC nIMC nIMC nIMC nIMC nIMC nIMC nIMC nIMC nIMC nIMC nIMC nIMC nIMC nIMC nIMC nIMC nIMC nIMC nIMC nIMC nIMC nIMC nIMC nIMC nIMC nINCI KILOSH TLOSH TLOSH TLOSH TLOSH TLOSH TLOSH TLOSH TLOSH TLOSH TLOSH TLOSH TLOSH TLOSH TLOSH TLOSH TLOSH TLOSH TLOSH TLOSH TLOSH TLOSH TLOSH TLOSH TLOSH TLOSH TLOSH TLOSH TLOSH TLOSH TLOSH TLOSH TLOSH TLOSH TROSH TROSH TROSH TROSH TROSH TROSH TROSH TROSH TROSH TROSH TROSH TROSH TROSH TROSH TROSH TROSH TROSH TROSH TROSH TROSH TROSH TROSH TROSH TROSH TROSH TROSH TROSH TROSH TROSH TROSH TROSH TROSH TROSH TROS TROSH TROSH TROSH TROSH TROSH TROSH TROSH TROSH TROSH TROSH TROSH TROSH TROSH TROSH TROSH TROSH TROSH TROSH TROSH TROSH TROSH TROSH TROSH TROSH TROSH TROSH TROSH TROSH TROSH TROSH TROSH TROSH TROSHTROSH TROSH TROSH TROSH TROSH TROSH TROSH TROSH TROSH TROSH TROSH TROSH TROSH TROSH TROSH TROSH TROSH TROSH TROSH TROSH TROSH TROSH TROSH TROSH TROSH TROSH TROSH TROSH TROSH TROSH TROSH TROSH TROSH TPOSH TPOSH TPOSH TPOSH TPOSH TPOSH TPOSH TPOSH TPOSH TPOSH TPOSH TPOSH TPOSH TPOSH TPOSH TPOSH TPOSH TPOSH TPOSH TPOSH TPOSH TPOSH TPOSH TPOSH TPOSH TPOSH TPOSH TPOSH TPOSH TPOSH TPOSH TPOSH TPOSH TPOSM TPOSH TPOSH TPOSH TPOSH TPOSH TPOSH TPOSH TPOSH TPOSH TPOSH TPOSH TPOSH TPOSH TPOSH TPOSH TPOSH TPOSH TPOSH TPOSH TPOSH TPOSH TPOSH TPOSH TPOSH TPOSH TPOSH TPOSH TPOSH TPOSH TPOSH TPOSH TPOSH TPOSHTROSH TROSH TROSH TROSH TROSH TROSH TROSH TROSH TROSH TROSH TROSH TROSH TROSH TROSH TROSH TROSH TROSH TROSH TROSH TROSH TROSH TROSH TROSH TROSH TROSH TROSH TROSH TROSH TROSH TROSH TROSH TROSH TROsh TROSH TROSH TROSH TROSH TROSH TROSH TROSH TROSH TROSH TROSH TROSH TROSH TROSH TROSH TROSH TROSH TROSH TROSH TROSH TROSH TROSH TROSH TROSH TROSH TROSH TROSH TROSH TROSH TROSH TROSH TROSH TROSH TROSH
TROSH TROSH TROSH TROSH TROSH TROSH TROSH TROSH TROSH TROSH TROSH TROSH TROSH TROSH TROSH TROSH TROSH TROSH TROSH TROSH TROSH TROSH TROSH TROSH TROSH TROSH TROSH TROSH TROSH TROSH TROSH TROSH TROSHT ROSHH NAMC MAMC MAMC MAMC MAMC MAMC MAMC MAMC MAMC MAMC MAMC MAMC MAMC MAMC MAMC MAMC MAMC MAMC MAMC MAMC MAMC MAMC MAMC MAMC MAMC MAMC MAMC MAMC MAMC MAMC MAMC MAMC MAMCS MAMCS MAMCS MAMCS MAMCS MAMCS MAMCS MAMCS MAMCS MAMCS MAMCS MAMCS MAMCS MAMCS MAMCS MAMCS MAMCS MAMCS MAMCS MAMCS MAMCS MAMCS MAMCS MAMCS MAMCS MAMCS MAMCS MAMCS MAMCS MAMCS MAMCS MAMCS MAMCS MAMCS mAMCS mAMCS mAMCS mAMCS mAMCS mAMCS mAMCS mAMCS mAMCS mAMCS mAMCS mAMCS mAMCS mAMCS mAMCS mAMCS mAMCS mAMCS mAMCS mAMCS mAMCS mAMCS mAMCS mAMCS mAMCS mAMCS mAMCS mAMCS mAMCS mAMCS mAMCS mAMCS mAMCS mABVZH NAMC MAMC MAMC MAMC MAMC MAMC MAMC MAMC MAMC MAMC MAMC MAMC MAMC MAMC MAMC MAMC MAMC MAMC MAMC MAMC MAMC MAMC MAMC MAMC MAMC MAMC MAMC MAMC MAMC MAMC MAMC MAMC MAMCs MAMCS MAMCS MAMCS MAMCS MAMCS MAMCS MAMCS MAMCS MAMCS MAMCS MAMCS MAMCS MAMCS MAMCS MAMCS MAMCS MAMCS MAMCS MAMCS MAMCS MAMCS MAMCS MAMCS MAMCS MAMCS MAMCS MAMCS MAMCS MAMCS MAMCS MAMCS MAMCS MAMCS NAMC MAMCS NAMCS NAMCS NAMCS NAMCS NAMCS NAMCS NAMCS NAMCS NAMCS NAMCS NAMCS NAMCS NAMCS NAMCS NAMCS NAMCS NAMCS NAMCS NAMCS NAMCS NAMCS NAMCS NAMCS NAMCS NAMCS NAMCS NAMCS NAMCS NAMCS NAMCS NAMCS NAMCS NAMCS NANCS NAMCS NAMCS NAMCS NAMCS NAMCS NAMCS NAMCS NAMCS NAMCS NAMCS NAMCS NAMCS NAMCS NAMCS NAMCS NAMCS NAMCS NAMCS NAMCS NAMCS NAMCS NAMCS NAMCS NAMCS NAMCS NAMCS NAMCS NAMCS NAMCS NAMCS NAMCS NAMCS NAMcs NAMCS NAMCS NAMCS NAMCS NAMCS NAMCS NAMCS NAMCS NAMCS NAMCS NAMCS NAMCS NAMCS NAMCS NAMCS NAMCS NAMCS NAMCS NAMCS NAMCS NAMCS NAMCS NAMCS NAMCS NAMCS NAMCS NAMCS NAMCS NAMCS NAMCS NAMCS NAMCS NAMCS nAMCS nAMCS nAMCS nAMCS nAMCS nAMCS nAMCS nAMCS nAMCS nAMCS nAMCS nAMCS nAMCS nAMCS nAMCS nAMCS nAMCS nAMCS nAMCS nAMCS nAMCS nAMCS nAMCS nAMCS nAMCS nAMCS nAMCS nAMCS nAMCS nAMCS nAMCS nAMCS nAMCS nAOKH NAMC MAMC MAMC MAMC MAMC MAMC MAMC MAMC MAMC MAMC MAMC MAMC MAMC MAMC MAMC MAMC MAMC MAMC MAMC MAMC MAMC MAMC MAMC MAMC MAMC MAMC MAMC MAMC MAMC MAMC MAMC MAMC MAMCA MAMCA MAMCA MAMCA MAMCA MAMCA MAMCA MAMCA MAMCA MAMCA MAMCA MAMCA MAMCA MAMCA MAMCA MAMCA MAMCA MAMCA MAMCA MAMCA MAMCA MAMCA MAMCA MAMCA MAMCA MAMCA MAMCA MAMCA MAMCA MAMCA MAMCA MAMCA MAMCA MAMCA mAMCA mAMCA mAMCA mAMCA mAMCA mAMCA mAMCA mAMCA mAMCA mAMCA mAMCA mAMCA mAMCA mAMCA mAMCA mAMCA mAMCA mAMCA mAMCA mAMCA mAMCA mAMCA mAMCA mAMCA mAMCA mAMCA mAMCA mAMCA mAMCA mAMCA mAMCA mAMCA mAMCA mEMC mEMC mEMC mEMC mEMC mEMC mEMC mEMC mEMC mEMC mEMC mEMC mEMC mEMC mEMC mEMC mEMC mEMC mEMC mEMC mEMC mEMC mEMC mEMC mEMC mEMC mEMC mEMC mEMC mEMC mEMC mEMC mEMC mEMC nEMC nEMC nEMC nEMC nEMC nEMC nEMC nEMC nEMC nEMC nEMC nEMC nEMC nEMC nEMC nEMC nEMC nEMC nEMC nEMC nEMC nEMC nEMC nEMC nEMC nEMC nEMC nEMC nEMC nEMC nEMC nEMC nEMC nEEMC nEMC nEMC nEMC nEMC nEMC nEMC nEMC nEMC nEMC nEMC nEMC nEMC nEMC nEMC nEMC nEMC nEMC nEMC nEMC nEMC nEMC nEMC nEMC nEMC nEMC nEMC nEMC nEMC nEMC nEMC nEMC nEMC nEDM EMM EMM EMM EMM EMM EMM EMM EMM EMM EMM EMM EMM EMM EMM EMM EMM EMM EMM EMM EMM EMM EMM EMM EMM EMM EMM EMM EMM EMM EMM EMM EMM EMM EMM EMM EMM EMM EMM EMM EMM EMM EMM EMM EMM EMM EMM EMM EMM EMM EMM E MM EMM EMM EMM EMM EMM EMM EMM EMM EMM EMM EMM EMM EMM EMM EMM EMM EMM EMM EMM EMM EMM EMM EMM EMM EMM EMM EMM EMM EMM EMM EMM EMM EMM EMM EMM EMM EMM EMM EMM EMM EMM EMM EMM EMM EMM EMM EMM EMM EMM Emm EMM EMM EMM EMM EMM EMM EMM EMM EMM EMM EMM EMM EMM EMM EMM EMM EMM EMM EMM EMM EMM EMM EMM EMM EMM EMM EMM EMM EMM EMM EMM EMM EMM EMM EMM EMM EMM EMM EMM EMM EMM EMM EMM EMM EMM EMM EMM EMM EMM Eamm EMM EMM EMM EMM EMM EMM EMM EMM EMM EMM EMM EMM EMM EMM EMM EMM EMM EMM EMM EMM EMM EMM EMM EMM EMM EMM EMM EMM EMM EMM EMM EMM EMM EMM EMM EMM EMM EMM EMM EMM EMM EMM EMM EMM EMM EMM EMM EMM EMM EAA EAA EAA EAA EAA EAA EAA EAA EAA EAA EAA EAA EAA EAA EAA EAA EAA EAA EAA EAA EAA EAA EAA EAA EAA EAA EAA EAA EAA EAA EAA EAA EAA EAA EAA EAA EAA EAA EAA EAA EAA EAA EAA EAA EAA EAA EAA EAA EAA EAA EAAA EAA EAA EAA EAA EAA EAA EAA EAA EAA EAA EAA EAA EAA EAA EAA EAA EAA EAA EAA EAA EAA EAA EAA EAA EAA EAA EAA EAA EAA EAA EAA EAA EAA EAA EAA EAA EAA EAA EAA EAA EAA EAA EAA EAA EAA EAA EAA EAA EAA E AA EAA EAA EAA EAA EAA EAA EAA EAA EAA EAA EAA EAA EAA EAA EAA EAA EAA EAA EAA EAA EAA EAA EAA EAA EAA EAA EAA EAA EAA EAA EAA EAA EAA EAA EAA EAA EAA EAA EAA EAA EAA EAA EAA EAA EAA EAA EAA EAA EAA Eaa EAA EAA EAA EAA EAA EAA EAA EAA EAA EAA EAA EAA EAA EAA EAA EAA EAA EAA EAA EAA EAA EAA EAA EAA EAA EAA EAA EAA EAA EAA EAA EAA EAA EAA EAA EAA EAA EAA EAA EAA EAA EAA EAA EAA EAA EAA EAA EAA EAA EEA EAA EAA EAA EAA EAA EAA EAA EAA EAA EAA EAA EAA EAA EAA EAA EAA EAA EAA EAA EAA EAA EAA EAA EAA EAA EAA EAA EAA EAA EAA EAA EAA EAA EAA EAA EAA EAA EAA EAA EAA EAA EAA EAA EAA EAA EAA EAA EAA EAA EAD AAD AAD AAD AAD AAD AAD AAD AAD AAD AAD AAD AAD AAD AAD AAD AAD AAD AAD AAD AAD AAD AAD AAD AAD AAD AAD AAD AAD AAD AAD AAD AAD AAD AAD AAD AAD AAD AAD AAD AAD AAD AAD AAD AAD AAD AAD AAD AAD AAD AAD BAA BAA BAA BAA BAA BAA BAA BAA BAA BAA BAA BAA BAA BAA BAA BAA BAA BAA BAA BAA BAA BAA BAA BAA BAA BAA BAA BAA BAA BAA BAA BAA BAA BAA BAA BAA BAA BAA BAA BAA BAA BAA BAA BAA BAA BAA BAA BAA BAA BAA BBA BAA BAA BAA BAA BAA BAA BAA BAA BAA BAA BAA BAA BAA BAA BAA BAA BAA BAA BAA BAA BAA BAA BAA BAA BAA BAA BAA BAA BAA BAA BAA BAA BAA BAA BAA BAA BAA BAA BAA BAA BAA BAA BAA BAA BAA BAA BAA BAA BAA B AA BAA BAA BAA BAA BAA BAA BAA BAA BAA BAA BAA BAA BAA BAA BAA BAA BAA BAA BAA BAA BAA BAA BAA BAA BAA BAA BAA BAA BAA BAA BAA BAA BAA BAA BAA BAA BAA BAA BAA BAA BAA BAA BAA BAA BAA BAA BAA BAA BAA BAAA BAA BAA BAA BAA BAA BAA BAA BAA BAA BAA BAA BAA BAA BAA BAA BAA BAA BAA BAA BAA BAA BAA BAA BAA BAA BAA BAA BAA BAA BAA BAA BAA BAA BAA BAA BAA BAA BAA BAA BAA BAA BAA BAA BAA BAA BAA BAA BAA BAA Baa Baa Baa Baa Baa Baa Baa Baa Baa Baa Baa Baa Baa Baa Baa Baa Baa Baa Baa Baa Baa Baa Baa Baa Baa Baa Baa Baa Baa Baa Baa Baa Baa Baa Baa Baa Baa Baa Baa Baa Baa Baa Baa Baa Baa Baa Baa Baa Baa Baa Bae bae bae bae bae bae bae bae bae bae bae bae bae bae bae bae bae bae bae bae bae bae bae bae bae bae bae bae bae bae bae bae bae bae bae bae bae bae bae bae bae bae bae bae bae bae bae bae bae bae baebae bae bae bae bae bae bae bae bae bae bae bae bae bae bae bae bae bae bae bae bae bae bae bae bae bae bae bae bae bae bae bae bae bae bae bae bae bae bae bae bae bae bae bae bae bae bae bae bae bae baB aB aB aB aB aB aB aB aB aB aB aB aB aB aB aB aB aB aB aB aB aB aB aB aB aB aB aB aB aB aB aB aB aB aB aB aB aB aB aB aB aB aB aB aB aB aB aB aB aB aB bae bae bae bae bae bae bae bae bae bae bae bae bae bae bae bae bae bae bae bae bae bae bae bae bae bae bae bae bae bae bae bae bae bae bae bae bae bae bae bae bae bae bae bae bae bae bae bae bae bAE BAE BAE BAE BAE BAE BAE BAE BAE BAE BAE BAE BAE BAE BAE BAE BAE BAE BAE BAE BAE BAE BAE BAE BAE BAE BAE BAE BAE BAE BAE BAE BAE BAE BAE BAE BAE BAE BAE BAE BAE BAE BAE BAE BAE BAE BAE BAE BAE BAE BAE BA BAE BA BAE BA BAE BA BAE BA BAE BA BAE BA BAE BA BAE BA BAE BA BAE BA BAE BA BAE BA BAE BA BAE BA BAE BA BAE BA BAE BA BAE BA BAE BA BAE BA BAE BA BAE BA BAE BA BAE BA BAE BA BAE BA BAE BA BAE BA BAE BA BAE BA BAE BA BAE BA BAE BA BA BAE BA BA BA BA BA BA BA BA BA BA BA BA BA BA BA BA BA BA BA BA BA BA BA BA BA BA BA BA BA BA BA BA BA BA BA BA BA BA BA BA BA BA BA BA BA BA BA BA BA BA BA BA BA BA BA BA BA BA BA BA BA BA BA BA BA BA BA BA BA BA BA BA BA BA BA BA BA BA BA BA BA BA BA BA BA BA BA BA BA BA BA BA BA BA BA BA BA BA BA BA NA NA NA NA NA NA NA NA NA NA NA NA NA NA NA NA NA NA NA NA NA NA NA NA NA NA NA NA NA NA NA NA NA NA NA NA NA NA NA NA NA NA NA NA NA NA NA NA NA NA NA NA NA NA NA NA NA NA NA NA NA NA NA NA NA NA NA NA NA NA NA NA NA NA NA NA NA NA NA NA NA NA NA NA NA NA NA NA NA NA NA NA NA NA NA NA NA NA NA NA Na NAGH NAMC NAMC NAMC NAMC NAMC NAMC NAMC NAMC NAMC NAMC NAMC NAMC NAMC NAMC NAMC NAMC NAMC NAMC NAMC NAMC NAMC NAMC NAMC NAMC NAMC NAMC NAMC NAMC NAMC NAMC NAMC NAMC NAMC NAMC nA NAGH NAMC NAMC NAMC NAMC NAMC NAMC NAMC NAMC NAMC NAMC NAMC NAMC NAMC NAMC NAMC NAMC NAMC NAMC NAMC NAMC NAMC NAMC NAMC NAMC NAMC NAMC NAMC NAMC NAMC NAMC NAMC NAMC nA NAKH NAMC NAMC NAMC NAMC NAMC NAMC NAMC NAMC NAMC NAMC NAMC NAMC NAMC NAMC NAMC NAMC NAMC NAMC NAMC NAMC NAMC NAMC NAMC NAMC NAMC NAMC NAMC NAMC NAMC NAMC NAMC NAMC NAMc NAMC NAMC NAMC NAMC NAMC NAMC NAMC NAMC NAMC NAMC NAMC NAMC NAMC NAMC NAMC NAMC NAMC NAMC NAMC NAMC NAMC NAMC NAMC NAMC NAMC NAMC NAMC NAMC NAMC NAMC NAMC NAMC NAMC NOA NOA NOA NOA NOA NOA NOA NOA NOA NOA NOA NOA NOA NOA NOA NOA NOA NOA NOA NOA NOA NOA NOA NOA NOA NOA NOA NOA NOA NOA NOA NOA NOA NOA NOA NOA NOA NOA NOA NOA NOA NOA NOA NOA NOA NOA NOA NOA NOA NOA NO A NOA NOA NOA NOA NOA NOA NOA NOA NOA NOA NOA NOA NOA NOA NOA NOA NOA NOA NOA NOA NOA NOA NOA NOA NOA NOA NOA NOA NOA NOA NOA NOA NOA NOA NOA NOA NOA NOA NOA NOA NOA NOA NOA NOA NOA NOA NOA NOA NOA NOAS NOA NOA NOA NOA NOA NOA NOA NOA NOA NOA NOA NOA NOA NOA NOA NOA NOA NOA NOA NOA NOA NOA NOA NOA NOA NOA NOA NOA NOA NOA NOA NOA NOA NOA NOA NOA NOA NOA NOA NOA NOA NOA NOA NOA NOA NOA NOA NOA NOA NOIA NOA NOA NOA NOA NOA NOA NOA NOA NOA NOA NOA NOA NOA NOA NOA NOA NOA NOA NOA NOA NOA NOA NOA NOA NOA NOA NOA NOA NOA NOA NOA NOA NOA NOA NOA NOA NOA NOA NOA NOA NOA NOA NOA NOA NOA NOA NOA NOA NOA NOAHNOA NOA NOA NOA NOA NOA NOA NOA NOA NOA NOA NOA NOA NOA NOA NOA NOA NOA NOA NOA NOA NOA NOA NOA NOA NOA NOA NOA NOA NOA NOA NOA NOA NOA NOA NOA NOA NOA NOA NOA NOA NOA NOA NOA NOA NOA NOA NOA NOA NOA NoA NoA NoA NoA NoA NoA NoA NoA NoA NoA NoA NoA NoA NoA NoA NoA NoA NoA NoA NoA NoA NoA NoA NoA NoA NoA NoA NoA NoA NoA NoA NoA NoA NoA NoA NoA NoA NoA NoA NoA NoA NoA NoA NoA NoA NoA NoA NoA NoA NoA NOA NoA NoA NoA NoA NoA NoA NoA NoA NoA NoA NoA NoA NoA NoA NoA NoA NoA NoA NoA NoA NoA NoA NoA NoA NoA NoA NoA NoA NoA NoA NoA NoA NoA NoA NoA NoA NoA NoA NoA NoA NoA NoA NoA NoA NoA NoA NoA NoA noA noA noA noA noA noA noA noA noA noA noA noA noA noA noA noA noA noA noA noA noA noA noA noA noA noA noA noA noA noA noA noA noA noA noA noA noA noA noA noA noA noA noA noA noA noA noA noA noA noA NoA noA noA noA noA noA noA noA noA noA noA noA noA noA noA noA noA noA noA noA noA noA noA noA noA noA noA noA noA noA noA noA noA noA noA noA noA noA noA noA noA noA noA noA noA noA noA noA noA NoA NoA NoA NoA NoA NoA NoA NoA NoA NoA NoA NoA NoA NoA NoA NoA NoA NoA NoA NoA NoA NoA NoA NoA NoA NoA NoA NoA NoA NoA NoA NoA NoA NoA NoA NoA NoA NoA NoA NoA NoA NoA NoA NoA NoA NoA NoA NoA NoA noA NoA noA noA noA noA noA noA noA noA noA noA noA noA noA noA noA noA noA noA noA noA noA noA noA noA noA noA noA noA noA noA noA noA noA noA noA noA noA noA noA noA noA noA noA noA noA noA noA not A noA noA noA noA noA noA noA noA noA noA noA noA noA noA noA noA noA noA noA noA noA noA noA noA noA noA noA noA noA noA noA noA noA noA noA noA noA noA noA noA noA noA noA noA noA noA noA noA noA noa noa noa noa noa noa noa noa noa noa noa noa noa noa noa noa noa noa noa noa noa noa noa noa noa noa noa noa noa noa noa noa noa noa noa noa noa noa noa noa noa noa noa noa noa noa noa noa noa noa noahnoa noa noa noa noa noa noa noa noa noa noa noa noa noa noa noa noa noa noa noa noa noa noa noa noa noa noa noa noa noa noa noa noa noa noa noa noa noa noa noa noa noa noa noa noa noa noa noa noa noa nAO A A A A A A A A A A A A A A A A A A A A A A A A A A A A A A A A A A A A A A A A A A A A A A A A A A A A A A A A A A A A A A A A A A A A A A A A A A A A A A A A A A A A A A A A A A A A A A A A A A A A.A A A A A A A A A A A A A A A A A A A A A A A A A A A A A A A A A A A A A A A A A A A A A A A A A A A A A A A A A A A A A A A A A A A A A A A A A A A A A A A A A A A A A A A A A A A A A A A A A A A A ABNAC NAMC NAMC NAMC NAMC NAMC NAMC NAMC NAMC NAMC NAMC NAMC NAMC NAMC NAMC NAMC NAMC NAMC NAMC NAMC NAMC NAMC NAMC NAMC NAMC NAMC NAMC NAMC NAMC NAMC NAMC NAMC NAMC NAMC NA NAMC NAMC NAMC NAMC NAMC NAMC NAMC NAMC NAMC NAMC NAMC NAMC NAMC NAMC NAMC NAMC NAMC NAMC NAMC NAMC NAMC NAMC NAMC NAMC NAMC NAMC NAMC NAMC NAMC NAMC NAMC NAMC NAMC MABNAC NAMC NAMC NAMC NAMC NAMC NAMC NAMC NAMC NAMC NAMC NAMC NAMC NAMC NAMC NAMC NAMC NAMC NAMC NAMC NAMC NAMC NAMC NAMC NAMC NAMC NAMC NAMC NAMC NAMC NAMC NAMC NAMC NAPNAC NAMC NAMC NAMC NAMC NAMC NAMC NAMC NAMC NAMC NAMC NAMC NAMC NAMC NAMC NAMC NAMC NAMC NAMC NAMC NAMC NAMC NAMC NAMC NAMC NAMC NAMC NAMC NAMC NAMC NAMC NAMC NAMC NANCA NAMCA NAMCA NAMCA NAMCA NAMCA NAMCA NAMCA NAMCA NAMCA NAMCA NAMCA NAMCA NAMCA NAMCA NAMCA NAMCA NAMCA NAMCA NAMCA NAMCA NAMCA NAMCA NAMCA NAMCA NAMCA NAMCA NAMCA NAMCA NAMCA NAMCA NAMCA NAMCA NAMCA NAMCAS NAMCAS NAMCAS NAMCAS NAMCAS NAMCAS NAMCAS NAMCAS NAMCAS NAMCAS NAMCAS NAMCAS NAMCAS NAMCAS NAMCAS NAMCAS NAMCAS NAMCAS NAMCAS NAMCAS NAMCAS NAMCAS NAMCAS NAMCAS NAMCAS NAMCAS NAMCAS NAMCAS NAMCAS NAMCAS NAMCAS NAMCAS NAMCAS NAMCAS nABNAC NAMC NAMC NAMC NAMC NAMC NAMC NAMC NAMC NAMC NAMC NAMC NAMC NAMC NAMC NAMC NAMC NAMC NAMC NAMC NAMC NAMC NAMC NAMC NAMC NAMC NAMC NAMC NAMC NAMC NAMC NAMC NAMC nABNAC NAMC NAMC NAMC NAMC NAMC NAMC NAMC NAMC NAMC NAMC NAMC NAMC NAMC NAMC NAMC NAMC NAMC NAMC NAMC NAMC NAMC NAMC NAMC NAMC NAMC NAMC NAMC NAMC NAMC NAMC NAMC NAMCA NAMCA NAMCA NAMCA NAMCA NAMCA NAMCA NAMCA NAMCA NAMCA NAMCA NAMCA NAMCA NAMCA NAMCA NAMCA NAMCA NAMCA NAMCA NAMCA NAMCA NAMCA NAMCA NAMCA NAMCA NAMCA NAMCA NAMCA NAMCA NAMCA NAMCA NAMCA NAMCA nABNAC NAMC NAMC NAMC NAMC NAMC NAMC NAMC NAMC NAMCA NAMCA NAMCA NAMCA NAMCA NAMCA NAMCA NAMCA NAMCA NAMCA NAMCA NAMCA NAMCA NAMCA NAMCA NAMCA NAMCA NAMCA NAMCA NAMCA NAMCA NAMCA NAMCA NAMCA NAMCA nABNAC NAMC NAMC NAMCA NAMCA NAMCA NAMCA NAMCA NAMCA NAMCA NAMCA NAMCA NAMCA NAMCA NAMCA NAMCA NAMCA NAMCA NAMCA NAMCA NAMCA NAMCA NAMCA NAMCA NAMCA NAMCA NAMCA NAMCA NAMCA NAMCA NAMCA NAMCA NAMCA NAMCA nABNAC NABNAC NABNAC NABNAC NABNAC NABNAC NABNAC NABNAC NABNAC NABNAC NABNAC NABNAC NABNAC NABNAC NABNAC NABNAC NABNAC NABNAC NABNAC NABNAC NABNAC NABNAC NABNAC NABNAC NABNAC NABNAC nABNAC nABNAC nABNAC nABNAC nABNAC nABNAC nABNAC nABNAC nABNAC nABNAC nABNAC nABNAC nABNAC nABNAC nABNAC nABNAC nABNAC nABNAC nABNAC nABNAC nABNAC nABNAC nABNAC nABNAC nABNACnABNAC nABNAC nABNAC nABNAC nABNAC nABNAC nABNAC nABNAC nABNAC nABNAC nABNAC nABNAC nABNAC nABNAC nABNAC nABNAC nABNAC nABNAC nABNAC n |
XPAHEHNE
IocneKaKdoRoNcNoB3OBAHnHEo6xOaMBOblONHHTcNeDyUOnneJeICTBnA:
-ДаиTe DBnIraTeHIO OCTbIb N 3aKpeNITe yCTpoiCTBO nepeI NOMeUeHEm erO Ha xpaHeHne IJIu TpaHCnOpTIpOBKOJ.
- YcTpoIcTBO NToNIIbBO CNeIyEeXpAHnTb B XopoWIO npOBeTPMaBEm NOMeUeHIn, B KOTOPOM NCKIouHc KOHTAKT Mekdy Napamu TOnJIbBAu NCKpAMu INN OTKpblIM IJIaMeHem OTOBOHaRpeBaTeJeN, 3NeKTPOdBurTaTeNe INN BbIKNoHuTaTeJe, neeY n T.D.
XpaHnTe yCtpoIcTBO, He CHMmA uNTKN I paONIOKINB TAKIM Obpa3OM, YTObI HIKaKne OCTpbIE ppeMMeTbI He MOrN CnyauHo CTaTb npuHOn TpaBMbl.
XpaHHTe yCTpOInCTBO B MecTe, HeIOCTyINHom IJIa detEn.
CE3OHHOE XPAHEHNE
B KOHcce3oHa uHn ecHn yCTpoHCTBO He 6yDcT HcNOJIb3OBAtbcra B TeueHHe 60Jee 30 dHe, NOIroTOBbTe erHOaHnEkaUIM Opa3OM K XpaHeHIO.
Ecn npednojaraetc xpaHt b yctpoiCTBO dNTEbHb nepnO BpemeHn:
- OtcoeHHHe CBevy 3aKnraHna.
- Onopoxhnte ToJINBbI 6aK n Do6aBbTe Cta6nN3atop TOnNBA.
TuaTeJIbHO ONUCTNE BCE HApyXHbI NOBepxHOCTN.
HaheCHTe He6oJIbIooe KOJIuYeCTBO MacJa Ha BHeUHHe MetaJIInueckne NOBepxHOCTN.
XpaHnte yctpoiCTBO B YnCTOM cyxom IomeueHn, HeoCTyHOM dIa deteN.
TONJIINBHAR CNTCTEMA
Cta6n3aTOp TOnnBa rBnEtc npneMEmbIM peHm E nIcBeEHN K MNHMMyOTIOKeHN CMObl, pactBopeHHoB TOnnBe, BO BpemXpaHeHNA Doabte Cta6n3aTOp K 6e3nHy B ToNNBbHbIK aK INB KaHnCTpy DnXpaHeHnToNNBa.
CneDyIe HNCTpyKUJAM NO CMEUINBaHNO, IMEIOUMcHa KaHNCtpe Cta6nN3aTopa. Iocne Do6abJIeHnna Cta6nN3aTopa OCTaBbTe DBrIaTeNb pa6oTaTb He MeHee 5 MNHT.
ДВИГATEЛБ
- CHIMITE CBEU 3axirghnHa HaneiTE B OTBepCTne CBEH 3axirghn1 YaHnyIO NOxky MOTOPHO macJa. MeDHeHHo NOTAHnTe pyKy CTapTepa 8-10 pa3 dIpaBHomePHorO paCnpedeJeHnma Macna.
3aMeHnTe CBeUy 3axnraHnHOBOB CBeOy peKOMeHDoBaHHoro TUna N TeNIOBOro PraJa.
OuInCTnTe BO3dyuHbIyΦnIbTp.
- PpOBepbTe BCE yCTpoINCTBO Ha HAnuHne OcnAeHHbIX BnHTOB, Raek N BoNTOB. 3aMeHIne BCE NOBpeXdEHbIe, CnOMaHHbIe INN N3HOUeHHbIe DeTaJIiN.
B NaaJe CneIyUoIe O ce3OHa IcNoJIb3yIe ToJIbKO CBexKeE TOJIINBO.
ДОПОЛНТЕЛБHBIE3AMEUAHNЯ
He noJIb3yIeTc6b 6eH3nHOM, COxpaHbUIMCra nocJe npOJNOro ce3OHa.
3aMeHHTe KaHCTpy dIJI 6eH3nHa npI NOBHeHIN pN3HaKOB pKaBvHbI.
TEXHnueCKNE DAHHbIE
| Исторгия, на Which is the author of this book? | | |
| Исторгия, на Which is the author of this book? | | |
| Исторгия, на Which is the author of this book? | | |
| Исторгия, на Which is the author of this book? | | |
| Исторгия, на Which is the author of this book? | | |
| Исторгия, на Which is the author of this book? | | |
| Истор气, на Which is the author of this book? | | |
| Истор气, на Which is the author of this book? | | |
| Истор气, на Which is the author of this book? | | |
| Истор气, на Which is the author of this book? | | |
| Истор气, на Which is the author of this book? | | |
| Истор气, на Which is the author of this book? | | |
| Истор气, на Which is the author of this book? | | |
| Истор气, на Which is the author of this book? | | |
| Истор气, на Which is the author of this book? | | |
| Истор气, на Which is the author of this book? | | |
| Истор气, на Which is the author of this book? | | |
| Истор气, on Which is the author of this book? | | |
| Истор气, on Which is the author of this book? | | |
| Истор气, on Which is the author of this book? | | |
| Истор气, on Which is the author of this book? | | |
| Истор气, on Which is the author of this book? | | |
| Истор气, on Which is the author of this book? | | |
| Истор气, on Which is the author of this book? | | |
| Истор气, on Which is the author of this book? | | |
| Истор气, on Which is the author of this book? | | |
| Истор气, on Which is the author of this book? | | |
| Истор气, on Which is the author of this book? | | |
| И storian气, on Which is the author of this book? | | |
| Истorian气, on Which is the author of this book? | | |
| Истorian气, on Which is the author of this book? | | |
| Истorian气, on Which is the author of this book? | | |
| Истorian气, on Which is the author of this book? | | |
| Истorian气, on Which is the author of this book? | | |
| Истorian气, on WHICH is the author of this book? | | |
| Истorian气, on WHICH is the author of this book? | | |
| Истorian气, on WHICH is the author of this book? | | |
| Истorian气, on WHICH is the author of this book? | | |
| Истorian气, on WHICH is the author of this book? | | |
| Истorian气, on WHICH is the author of THIS book? | | |
| Истorian气, on WHICH is the author of THIS book? | | |
| Истorian气, on WHICH is the author of THIS book? | | |
| Истorian气, on WHICH is the author of THIS book? | | |
| Истorian气, on WHICH is the author of THIS book? | | |
| Истorian气, on WHICH is the author of THIS book? | | |
| Истorian气, on WHICH is the author of THIS book? | | |
| Истorian气, on WHICH is the author of THIS book? | | |
| Истorian气, on WHICH is the author of THIS book? | | |
| Истorian气, on WHICH is the author of THIS book? | | |
| Истorian气, on WHICH is the author of THIS book? | | |
| Истorian气, on WHICH is the author of THIS book? | | |
| Истorian气, on WHICH is the author of THIS book? | | |
| Истorian气, on WHICH is the author of THIS book? | | |
| Истorian气, on WHICH is the author of THIS book? | | |
| Истorian气, on WHICH is the author of THIS book? | | |
| И storian气, on WHICH is the author of THIS book? | | |
| Истorian气, on WHICH is the author of THIS book? | | |
| Истorian气, on WHICH is the author of THIS book? | | |
| Истorian气, on WHICH is the author of THIS book? | | |
| Истorian气, on WHICH is the author of THIS book? | | |
| Истorian气, on Which is the author of THIS book? | | |
| Истorian气, on Which is the author of THIS book? | | |
| Истorian气, on Which is the author of THIS book? | | |
| Истorian气, on Which is the author of THIS book? | | |
| Истorian气, on Which is the author of THIS book? | | |
| Истorian气, on Which is the author ofTHIS book? | | |
| Истorian气, on Which is the author of THIS book? | | |
| Истorian气, on Which is the author of THIS book? | | |
| Истorian气, on Which is the author of THIS book? | | |
| Истorian气, on Which is the author of THIS book? | | |
| Истorian气, on Which is the author of THIS book? | I | |
| Истorian气, on Which is the author of THIS book? | | |
| Истorian气, on Which is the author of THIS book? | | |
| Истorian气, on Which is the author of THIS book? | | |
| Истorian气, on Which is the author of THIS book? | | |
| Истorian气, on Which is the author of THIS book? | | |
| И storian气, on Which is the author of THIS book? | | |
| Истorian气, on Which is the author of THIS book? | | |
| Истorian气, on Which is the author of THIS book? | | |
| Истorian气, on Which is the author of THIS book? | | |
| Истorian气, on Which is the author of THIS book? | | |
| Истorian气, onWhich is the author of THIS book? | | |
| Истorian气, on Which is the author of THIS book? | | |
| Истorian气, on Which is the author of THIS book? | | |
| Истorian气, on Which is the author of THIS book? | | |
| Истorian气, on Which is the author of THIS book? | | |
| Истorian气, on Which is the author of This book? | | |
| Истorian气, on Which is the author of THIS book? | | |
| Истorian气, on Which is the author of THIS book? | | |
| Истorian气, on Which is the author of THIS book? | | |
| Истorian气, on Which is the author of THIS book? | | |
| Истorian气, on Which is the author of THIS book? | II | |
- UNTOK
- Bepxhi BaI
- -noi6ha pyka
- Baxinib npocenra
- KepyBaHHaDpoCeJIeM
6.БLOKyBaHHNДрocen
- Nepemkaon/stop (YbimK./CTon)
- PykoTka cTapTepa
9.Паивнб6ak
10.ПаивнКршka
- Baxkib nobitprhoi 3acniHKn
- Kýrna 3anaNbHnka
- Kpnska nobitprHoro fInbtpa
14.ObmexyBaB BOJIOciHi TpIMepa
15.3'εdhyBaay
- TOnIOBka TpIMepa
- Kobnak CBiKu 3aapanHOBaHH Ta CbiKa 3anaIOBaHH
- Yoxon dny TpaHcnOpTyBaHHa
-
3y6chaTa nepeDaHa
20.лушнкТацntOKДЯЗхИСТУВIDICKOP
-
PácoBa nídBicka
- KpinneHHpeMeHn
- MacJHn6ak
- Kpnska oTbOpy dIaJIbHaHnOJINBn
- Hacaika
26.HixdIy TpaBn
27.ФikcyBaIbHa 甲6a
- YauonOjio6Ha 7aia6a
- Taima ne3a
- Hntka Kocapkn
BE3NEKA
ПЕДMOBA
Po60Ta 3 iHCTpyMeHTOM NOB'3aHa 3 He6e3NeKoHO -He npabNJIbHe a6o HeI6aJe KOpNCtYBaHHa MoKe npn3BecTn Do cepNo3HOrO uHaBt CMepeTebHOro TpaMbYBaHHa KOpNCtYBaHa a6o IHwix Oc6.
IykeBaKJINBO,IO6BnIpOHTaNtueNoci6HKn KOpNCTyBaay Ta 3pOzymInn NOro 3Mict.
YcBOMy noci6Hnky onncahi oCHOBHI 3an06ixhHi 3axOdi niid yac BnKOpNCtAHH iHCTpymeHTa.
Onepatop Hece BiinobiandaHicb3a DOpMaHHHa HCTpyKui Ta 3actepexeHb Ha nonepexyBaIbHNX 3HaKaX,HaHeCEHx Ha IHCTpyMeHT, a TAKOX peKoMeHdaui, HabeDeHX y nociHky.
Ybaxho O3HaiomTecb i3 npHHunamn po60tn 3ac06ib KepyBaHHra HaneXHoro KOpNCtYBaHHiHCTpymeHTOM.
KopncTyBaTnca nM IHcTpymeHToD03BOnrEbCJINuWe Tm,XTO npOHTaB,3pOzYMIB i6yde DOTpmyBaTnca IHcTpkyi Ta IonoepdKyBaJIbHnx 3HaKIB,HaHeceHnx Ha IHcTpymeH,T a TAKoX peKOMeHdaui, HabeDeHnx y noci6Hny.
HikonHe Do3BOJnTe DIITM KOpNCyBaTnCRAI HCTpymeHTOM.
KaO BVHnKHe He3HaNoMa cTyaCi, cIiD cNtTaTI npayn y paixibz.
HamaraTecr He poBHToTO, 10, Ha BAuY DymKy, BN 3poBHTHe B 3MO3i.
Kaio Bam Heo6xHa Donomora,3BepHtbcrdo ABTopn3ObaHoro cepBichoro ueHTpy a6o cnjx6n 06cnyrobyBaHH KJIeHTiB.
ODYTACNOPXJKEHH
- OyraTeC npaBnIbHO. 3aBXn HndraTe 3axnChi Oknyapn a6o anaIorHHi 3acO6n 3axNCTy oue n iD qac po60n a6o n.i d qac BnKoHaHHaTexHIO o6cnyroByBaHHa BaWOro IHCTpyMeHTa.
- O6OB'RAKOBOPOKNCTyNTec3ac06aMn 3axNCTy cnIxy. HAdTOIOBra po6Ota npu CINbHomy Iwymi MOKe CNpUHNHTN NoripSeHHr cnIxy.
- AkoBn npaOeTB 30Hi, de 6araTo KypBn, 0oB'3KOBO BdIrhITb Macky a6o pecnipatop dna 3axnty BiD niny.
3aBxHn HocitMiHi,IOBri 6pIKN,0Jg3 IOBtMMpykabamu, yO6OTi pykabuKn. PekomeHyTeBC3aCTOCOByBaTn uNTKn dIra 6e3NeKn HIR. NobHicTTO3akPHTM OJAR DOnOMarae TAKOX 3axNCITNCB iD CMITTRi i YactNH OTPyHnX pocINH, kki BIDKNdae IHCTpyMeHT.
- O6ob'ra3koBO Heo6xIDHO KOpNCyBaTnC3aCo6aMn 3axNCTy Hr. He xoDiTB BoCOHIX a6o B CaHdAniJx. TpImaITeCn IpaJI BiD Je3a a6o BOnocHi, IIO oBeptAIOBcR.
3akpiitb BONOCB Nuee. 3akpiitb a6o 3HIMtbpocTopn OaR a6o oJr, 3 koro BInbHO 3BncaOTb 3aB'3Kn, CTpiKu, KNTuCi ToUc. BOHN MOKyTb NOTpAnITB BYXOMI YactHNI.
TEXHIKA 6E3NEKN IPN POBOTI 3 PAJIINBOM
3aIINBaIte naIINBO Ha BiIDKpITOMy nobITpi.
- TpmaIte naIbO noani BiD icKop a6o nonym'a.
He naIiB i He Do3BOJnTe iHUNM naIITn nO6n3y naINBa a6o IHCTpyMeHTa.
- HamaraiTeCHe po3nBAtn naNBO uMactuNo. Bce po3InTe naNBO heo6xIDHO Bnteptn.
- Ipeep 3anyckom Dbinyha BiDiiDITb Ha BiCTaHb 0HaHMeHwe 3 MeTpN BiD Micu 3anpaBkn naIbOM.
- Nepu Hix 3Himatn KpuuKy naJinBHoro 6aka, 3yNHiTb DBNrHy i daTe Nomy OXOJOHyTN.
36epiraTe 6eH3nY cneuaJIbHnx KaHicTpax dIra naIbBa.
POBOYA 30HA
- Nepu Hix yBIMKHytn iHCTpyMeHT, nepeBipTe 30Hy npOBeHnR poBt. Pnp6epiTy cE mTTa i TbePdi npEdmetn, Hanpknad kameHi, CKIO Ta
dpoTn, kI BiDcKoUHbU, NiDIIaIOUH a6O B IHwN cnocio MoKyTB cnpuHHNTn iD vac ekCnnyatauIt TpaBMyBaHH a60 NOkOKeHH MaHa.
- IpekehauTecra, 10 pikyua hacaKa a6o npedMeTu, kmi MoKyTB BiDcKoUHTu NiD Yac po6OTn, He NOTpanJrB y JIOJe Ta TBapH.
- DITN, TBAPINH, CTOPOHHI OC06n Ta NOMIHNK 3aBXDN NOBHHI 3hAXOHTNCRA H BiDCTAHi HE MEHNI HIX 15 MeTpIB BID IHCTpyMeHTA. OTOUYOUHM peKOMeHNyETbCra HAdrATn 3axnCHi OkJyRpn. JkUo Do BAC XTOCb H6nXKaETbCra, HeraHHO BmKHiTb DBHyH.
He KopncTyIeTcHCTpyMeHTOM, kUO y pa3i HeuacHO BnnaKy Hemaec MOKJINBOCTI NOKNkATNa DOnOMORY.
He KopnctyIteca IHCTpyMeHToM y noraHy noroody, HapnKlaad y rycTm TymaH, CnBnDooi, CnBnBiTeP a6o KoJN dyXe XoNoHO. Po6Oa B noraHy noroody BTOMIOE, a TAKOX CTBOpIOE DOdaTKOBy He6e3neKy.
IpekoHaTecr,IO BN MoKeTe 6e3neHcTOrTn i pyxatncr.Y BnAnky, RaTpo Tpe6a Byde pi3Ko nepemictntncr, IpeBipTe, YN HABKOHO HeMaE MOXJIINBX nepekoD, Hanpknad KopHHKaMInH, rINOk a60 KaHab. BybTe Dyke yBaXHi, npauOuOn Ha cxNJax.
TEXHIKA BE3NEKN IPN EKCINYATAUII
BnKOpncToByyTe iHcTpymeHTiNbKn dnnPiDCTpuraHHN, 3piHaHH DePHY, KocHH i 3amTaHH. He BnKOpncToByyTe NOro dnn OkaHTOBKn, o6pi3Kn a6o nip3kn JxNBOI oropoxi.
- BydbTe nIbHi. He KopnctyItecb Zm im HCTpyMeHTOM, 6dyuN BTOMLeHIMM, XBOPMn, 3acMyeHIMn a6o niD BnINBOM aIKOROIO, HApKOTnKIB nn IikB. CnIDKyte 3a TMM, IO po6nte, Ta dOpymyItec 3dopoBOrO rny3dy.
Hikon He 3anyckaTe DnHy n He npaioTe B 3akpntomy npmiueHHi nn 6ydnky. Bdxxahn BNXNONHX ra3IB MOKe CnpuHHTN Cmeptb.
-ДбайтпpoTe,иоб рукн He 6ул n 3amaueni B OINBI Ta naiNBI.
3aBxN TpMaIte DnryH iHCTpyMeHTa i3 npaboro 60ky CBORO tina.
MiUHO yTpmyTe iHCTpymEnT o6oma pykamn.
CniKyuTe 3a Tm, uo6 piaIbHa HacaKa Ta rnyuHnK 3hAxOduNcB HxKyePiBna IoraCa Ta noDani BiD qacTH nTina. TaPryu nnuHnK MoKe cnpuHHHTe cepno3Hi onIKI.
CTiIe TBepDo Ha Horax, NiItpmMyte 6anHc. He TargHtbcra Ta He CTiIe Ha HeCTiKnx NOBepxHax, HapnKnaD npa6uHax, DepeBax, KpyTxxCnJax a6o daxax.
KopntyTeCn npnaDom TiIbKn npn DeHHOMy Cbitni a6o kichomy wTyHOMy ocBtneHi.
BukopncToByte iHcTpyMeHT TlIbKn DnBnKoHaHH po6it, onucaHnx y cboMy noci6Hky a6o noci6Hkax dna DoaTKOBHX HacaDok.
HikonHe KnaIbIhCTpyMeHT, RaIO npaIOE DBNrHy H abo oBepTaetbcra pixyHa hacaKa.
3aBxNn nepeBOoNTb DBNyH y xOIOCTn xiD nicra KOKHOI po6oOoi onepauii. Tpnbani nepioOn pOBToHa NOBHy NOTyKHiCTb 6e3 6yDb-IAKOHO HABaHTaKeHHa DA BnYH MOkyTb np3BOoNTu Do Ioro cepNo3HOro yWkoDxHeHHA
Hi KopncTyBaCy, Hi 6yDb-KOMy iHwOMy He Do3BOnJaTcBc3HIMATn 3p13aHH MaTePian, NOKn npauOe DBNrHy a6o oBeptAc7bcra HacAdka, OCKInbKn CE MoKe CnpuHNHTc cep03Hy TpaBMy. Uo6 yHmKHyTN TpaBM, nepeD qHHeHM BaJia HOXa BiD HaMOTAHx HA HbORO 3aJIINKIB PocCNB BUMKaIte DBNrHy, YekaIte NOBHO 3ynHHeHH pixyQoi HacAdKn BiD'edHyte KOBNaOK CBiYKn 3anaJIIOBaHH BiD CaMOi CBiYKn.
3y6vacta nepeadaa moke harpitnci 3aJnWatncra rapayoo npotram DEaKoro yacy. DToTOKHyBwncb do Hei, MoKHa o6NeKTncr. DaIte ix vac oxoJohTyN. KaTO TOpKHYTNCr Hei, MoKHa o6NeKTncr.
OctepiraTecra npedmetiB, 00 BicckkyToB.3abKnI KOpncTyTEcra 3acobam 3axnCTy Oey 3atBepJxHeHO 3pa3ka.HikoN He HaxnJIteCRA uepe3 axnCHN KOxyx PkxyoHacaKn. KamHHa, CMTT Ta iH. MoKe BiDCKOHTn i NotpAnNTu Oohi, CnpuHNBun CInOTy HcpeNo3Hy TpaBMy.
TpmaTe cToPOHHix IIOeH Ha 63neuHi BicTaHl. DITn, TBAPHH, CNOCTepirayi Ta NOMUHKN NOBHNI nepeSyBaTH 3a MEXAMN 3OH N 63neKU, UO CTAHOBNTb 15 MeTpiB. HeraHIO BMKNHtB IHCTpyMeHT, KkUO XTOCb NiDiJe. HIKON He NOBepTaIte IHCTpyMeHT, He nepeBipNBUn, Hn He CTOITb XTOCb 3a CINHOHO.
- IHKOJI MIX ΜΙΝΤΚΟΜΑ ΠαργύΟ ḤάκΟΥ ΜΟΝΤΡΑΝΙΑΥΤβ rικη Α Α ένραλΑ. Περει ΚιστΚΟΥ ΜΟΒ'ΑΚΟΥ ΜΥΝΗΓΑ Βυπηίθιδι Λυμήνις.
- YHnKaIte KOHTaKTy 3 rJyUshNkOM. Taprny IJyUshNk MoKe cnpruHHNTn cepNo3Hi onIKN.
TEXHIKA BE3NEKN IPN POBOTI 3 JE3OM
- PpeqI noaTkom po60Tu 3 iHCTpyMeHTOM Heo6XiIDHO npabJIbHO BCTaHOBnTu INTOK.
- Пи робота 3 lezamn 3abxndkopncTytecraI-noioho pyuHO Ta npabunbHO BiDpepyJbObaHO nDiBicHO CnCTeMOHO.
3pi3yBaHHBkoHnyTe B Hanpami cnpaba HaniBO.
JIe3O MoKe Pi3KO BiKHyTu B6iK, K4Uo BOHO HaTpaNTb Ha npedMeT 3 MATEpiaNy, kN He npu3HaueHm dJa piaHHa IHCTpyMeHTOM. Lc MoKe npu3BecTu Do BIHTNaHHa pyKn a60 HOrn. 3abXdN 36epiraTe KOHTpoJb HaI IHCTpyMeHTOM.
He BIKOPICOByIte rOIOBky TpIMepa y kOcTi enemeHa KpinneHn DnI ne3a.
JIe3o npOobKye o6epTaTncn HabiB ticn Toro, kI DpOceIbHnI peryIaTOp 6yIIO BiDnyUeHO a6o DBInyH BIMKHeHO. JIe3o, Ioo ObepTaTbcr, MoKe BiDknIaTn IpeDmTe A6o CnpuHHnTc cepNo3Hn Nopi3, RaIO BINJaKOBO Do HbORo DotOPKhTyCn. 3yNnHJte JIe30 WJIAxOM KOHTAKTy JIBIO OTOPOHO IO Je3a 3I BKe 3piAHM MaTePiaJOM.
3aBxDn BkndaTe Ta 3amHryeBnBneHi, DeΦopMOBaHi, TpichyTi, 3naMaHI a60 noWKoJKeHiJe3a.
BnKOpNCObyIte Iiue peKomeHDoBaHi ne3a Ta nepeKoHaIteCra,IO BOHN PpaBnIbHO BCTaHOBNeHi Ta HadiHo 3aKpInJIeHi.
JIe3a duyke roctpi. NObOdbteecra 3 HmM o6epexHo Ta 3aBXdHnAraIte 3axNCHI pykABuCi.
BIBPALII
BnINB Bi6paui chepe3 TpBaIe BnKOpncTahHpyHOrO IHCTpyMeHTa 3 DnRHyHom BHyTpiUHbOro 3rOpHHMOKe CnpuHNHTn N0xKOdXeHH KPOBOHOCHNX CyDn H a6o HepBv y naIbux, pykax Ta cyrno6ax y IIODei, cxNlbnx Do po3nay KPOBOOIBY uHaopKIB. TpBaIae KOpNCYBaHn H pInaADOM B XoJOnHy NorOy CnpuHHOE YwKOdXeHH KPOBOHOCHNX CyDn HABITb y 3DopOBHX IIODei. RaIO BuNHkaIoTB Taki CmNTOM, k OHIMHI, 6Ib, cnaD cnH, 3MiHa KOJIbOpby a6o uiinichocti WkIPn, BTPaTa BiDyTTra nAib, pyk a6o cyrNo6IB, npinnHtB BnKOpncTahHcyIbO rHCTpyMeHTa 3BePHiTc83a MeDnHHO DonOMoTOIO.
IpoTnBi6pauiHa CnCTema He rapaHTye yHmKHeHHa
Lnx npo6nem.KopncTybaui,aki noctiHNO pauioTo b 3
MexAHuHMn IHcTpMeHtAMn, NOBHHi peTebHO nepeBiprTa
BlaacnHphi3uHn CTah Ta cTaH uboro IHcTpMeHta.
TEXHIKA B63NEKN IPN TEXHICHOMY OBCJNYROBYAHHI
- IpekoHaITeCb, 10 IHCTpyMeH3i6paHm y BiINOBIDHOCTi do ci ihCTpyKuii.
- TpmaTe iHcTpymeT y do6pomy po6oOmy cTaHi.
Texhihe 06cnyroByBaHHI INCTpyMeHTa Heo6xIDHnpoBOiTN BiNObiHO Do peKOMeHNDoBAHIN NPOeDyp.
Yci BnDn TexHInHO O6CnyroByBaHHa Ta pEmOHTy, He ONiCaHi y Cbomy NociBHKy, MaOtB BNKOHyBaTNCABTOPN3OBaHM CepBICHM UeHTPOM.
- Ucpa3y nped noatkom p60tN Heo6xio Noorhy
PnIaI i 3amInTu noUKoJKeHi a6o noraHo 3akpInneHi YactHn.
- Ipeed noaTkom p6oTo3 iHcTpymeHtom 3amHtB yactuHn roJbKn TpMepa, kI MaOToB CKOnN, TpiUHH, 3JIaMn a6o e NoJkoDkeHmN B Byd-b-KnI HsHn CnOci6.
BukopncToByTe BnKJIIOHOp peKOMeHIOBaHi akceCyapn Ta 3anaChi YacTHNI.
- IepH HIX NoHHaHT no60Ty, KOxHOro pa3y nepeBipRNe, YH HemaC BNTOKy naHbA. y pa3i Heo6xIdHOCTI JIKBIDyTe HecpapBHiCtB.
-ПдчacTexhiHOrO6cnyroByBaHHBiD'EDHyIe CBiKy 3anaJIIOBaHH,OKPIM BnIaKIB peryJIIOBaHHXoNocTOxOdy.
Bukopocobuyte Jnue pekomeHdoBaHi roIOBkn TpImepa Ta nepeKoHaInTeCra, 00 BOHN npabNlbHO BCTaHOJIeHi Ta HadiHo 3akpinIeHi.
BukopncToBye IuIe peKomeHDoBaHy BoLoCiHb DnT TpImepiB.BoNoCihb IHxN pxo3mpiB He 6yde noDaBaTnca HAnekHM YNHOM i MOKe np3BecTu DO cepNo3HX TpaBM. He BukOpncToBye IHsi MaTepiA, Taaki Kdpit, Ctpya H a60 MOTy3a. Ipit MOKe o6ipBaTnca y npoueci piaHn i nepetBopntnca Ha He6e3neuHm O6'kT, 1O BiDJeTnB i MOKe np3BecTu DO cepNo3HX TpaBM.
BolocihbIpytrpImepiB3abXnIOBHHaMaTINpaBUNHy DOBXNHy.
PiJucpepyIIOBAHHXOIOCTOROXOyHIXHI KHeCb IHCTpymeHTaMaEbyTHBCAHOBHeHnTAkIMYINOM,io6pi3aJIbHa HacaJaHe KOHTaKByBaJa 36yDb-RAKMnnpedMetamn.
-Пд.YacpeRyIIOBAAHЯKap6IopaTopaHaXOIOCTOMyXOyD6aIte,IIo6HIXTOHeHaBJIINKABCRdoHbOrO.
3aKoDHnXOBcTaBnHHe 3MIHOHTe KOHCTpyKuii IHCTpyMeHTy 6e3do3BOY BnO6bNka.3actocyBaHH Heo3BOJeHX MoNΦiKaui Ta/a6o npUlaDMy MoKe npu3BeCTn Do cepHo3HOI cMepTeNbHOITpaBMn KopCtByBaHa cHInxoc6i6.
ICKPOΓACHNK
Y DeaKHX MicueBOCTx HOpMaTHBHI npaBnla BmaraHOb 0bnHbATN bIbWicTB TINIB DBNrHyHB HByTpiHbOro 3ropHHN YNTKOM dnn 3axncty BiD icKOp. RaIO IHcTpymeHT EKcnpyaTyEbcra y TaKi MicueBOCTi, Noro BlaChNK KpUdHNO BIDNoBdaJIbHn 3a NiITpIMKy poobOtro cTahy Lnx Detane. HeBnKOHaHH Nx BmOr e NopuyenHnM 3akOHy.
Hn HOpMaJIbHOi pOBoTn B No6yToBnx yMOBaX texHiYe 0cNpyROByBaHHra TnyuHnka Ta uNTkA dIa3xNCTy BiD icKop He nOTpiE. Pic750 roHn poOTo Mn peKoMeHdyEmo BiDaTu rnyuHnHa TeXHiYe oCcNpyROByBaHH a6o 3amHHTn Ioro y BaWOMy ABTopn3OBAHOMy cepBiCHOMy ceHTpi.
TPAHCNOPTYBAHHI 36EPIAHHH
- PpeTm k nepeTn B iHne Mice, BIMKHiTb DnBuHy.
- Ipehenocny iHcTpymeHT u TpaHcnpTyuOu NOro Ha 6ydb-ky BiDCTaHb, BCTaHOBNIOTe Ha HIX DNJa TpaBn 3axnCHm QOXJL.
- Ipeep TpaHcnpOpTyBaHHm DaIte DnHy OXOJHOHTN.
3akpinb hctpymEn, nepw HIX BCTaHOBIOBAtu Ioro Ha 36epirAHn a6o TpaHCNOPTyBaTu BA bTOMoBi.
Bnnpokhi TaNHBn 6ak nepu Hix BCTaHOBIOBAtn IHcTpymEn Ha 36epirAHnA a6o TpaHcnOpTyBaTu B ABTomObini. BnkopncTaIe peWtKn NaINBa, Ioo 3aINuINOCB Kap6opatopi, 3anyctNBn DBNrH i daBn NOMy nonpaOBOATn Do 3ynHNKn.
36epiraTe iHCTpyment I nANBO B Micu, De nANBHN BnnapoByBaHH He 3MOxyTb DOcARTN icKOp aO bIKPNTORO BOHIO 3 BOHOHarpiBaiv, eNeKTpOMOTOpIB, eNeKTpNHX BmNKaivB aO nee.
36epiraTe iHCTpyMeHT TAKHM YINOM,IO6Je30 06MekyBaHa BOLOciHi He MOrIbNpaKOBO pIn3BecTn Do TpaBM.
36epiraIte iHCTpyMeHT y noIOXeHHi 3anycky a6o niDbicbTe InOro 3a uTahry.
TpaHcnpTyBaTu IHCTpyMeHT Heo6xIDHO y nOIOKeHHI 3aNycky.
36epiraTe IHcTpymeHT B MicuI, Do koro He MoKyTb NOTpAnNT dITN.
3БИРАHHЯ
3ACTEPEXEHH: Jaio npuaia HaiwoB y 3i6paHomy ctahi, nobTopit yci kpoKn dInepebipkn npabnIbHocTi 3bnpaHna YactnH npuady Ta HaiinHOcti xhboKpinnenHH.
OrnHbTe deTani Ha npEdMeT nowKoJKeHb. He BnKOpNCTOByte nowKOJKeHi detani.
NPMITKA.
JaKoBAM HeobxHa Donomora a6o DeaKeI Detani BIDcyTHi Cyn NookOxKeHi, 3BepHITbcr Do Cnyk6n 06cnyroByBaHHa KIneHTb.
- RaHnBnHnΦIbTp rPmntb y nopoXhOmy TaINBHomy bky, -e HOpMaIbHO.
Ja yIyuHky 6yde BnBneHe naINBO a6o MaCTnIO, ce HOpMaJIbHO. Ie NOB'3aHO 3 peYJIOBaHHm Ta BnPpO6yBaHHmKap6OpaTopa, npOBedeHmM BnPo6HkOM.
BCTAHOBJIeHHH HACADKIN
BctaHOBJIOUH HacaIky, po3MictIb IHCTpyMeHT Ha nJaacki NOBepxHi, 0o6 3a6e3neuHT 6JIbSy CTIKICTb.
- Nocna6te 3'eHyBaU, NOBepHyBmpyKy npOTn roDHHNKOBoi cTpiKN (A).
2.3HIMITb TpaHCnOpTyBaIbHn KOKyx 3i 3'eHyBaHa (RAIO Bn €).
3. 3HIMITb KOBnaQOK WTaHrN (aKIO BIn e) 3 Hacaikn TpImepa.
4. BctaBTe KhoNkY 6NoKyBaHHHa cAaKn B HapmHy KaHaBky 3'EdHyBaaya.
5.BcHybTe HacaKy y 3'EdhyBaTakm YHOM,06 6JIOkyBaIbHa KONka nonaB OCHOBHNI OTBIP. IPNMITKA.RKuo HacaKy Baxko 3bnpaTH, NOBepHITb BpyHy pixyHu HacaKy TAK,06 BHYtpiHn WtAHra BnpiBHNacr Ta Notpannla y 3^ cHyBaY 3 KaHABkAMn.
6.Першнкорисьатсяистурм entom peTeJbHo 3akpyTb pyky, NOBepTaOuN II 3a roDHHNKOBOIO CTpiKIOO (B).
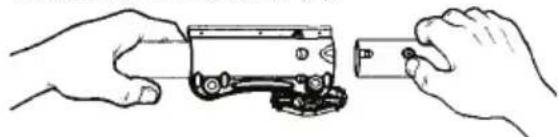
YBAG! Npeedeknnyatauio INCTpymeH nepekoHaTeC, 0o KOnka 6NokyBaHHa 3aKICOBaHa B OCHOBHOMy OTbopi, a pyKa uInbHO 3aTyrHyta. Bci HacaKn npn3NaheHi dNBAkOpNCtAHn B OCHOBHOMy OTbopi, kQO y Noci6HNy KopNcTyBaVa BiIOBIAHOI hAcADn He 3a3NaYeHO IHwOrO. BnKOpNCtAHn HEnpaBnIbHoro OTbOpy MOKe npn3BeCTn Do cepno3HOI TpaBMn a6o NowKOdXeHHH INCTpymeHTa.
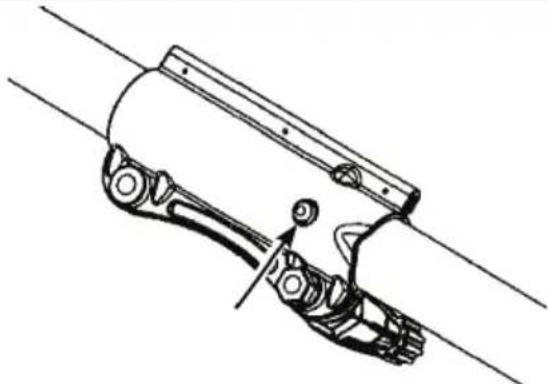
IHCpykuio 3MOHTaKy DoaTkoBHX HacaIOK DnBiTbcry pozini 3bPAHHNoci6Hnka KopncTyBaay BiinobiHoiHaCakn.
ПРИСДHAHHЯ сИТКА
IITOK NOBHeH 6yTN pabINbHO BCTaHOBHeHNI.
IITOK 3a6e3neuey cactKOBn 3axnct OepaTopa Ta iHInx OC6i6 BiD PN3Nky BiKDnAHH NpeDMETIB, a TAKOX OCHaEHN JIeOM ObMeKeHH BOLOciHi, IKe 3pi3c HADTO DOBry BOLOciH Do DCsRHeHH NoTpi6HOI DOBXHH.NoMExKyBaBBOJocHi y HxHnY qACTnHi
IITKa E IOCTPMIM MOKe 3aBdATN NOPi3IB.
- 3HIMITb KpnlbayTu rauKy 3i uNTka.
- BctaBte cko6y y na3, kN noka3aHo Ha MaJIHOHky.
- NObepHITb 1uTOK, 0o6 rBnHT npOuOB Kpi3b OTBip y KpOHTeHi.
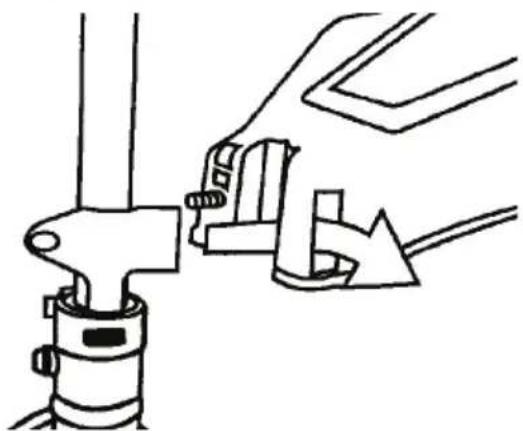
- BctaHOBIb KpINbHaTy rAky i HajiHoo 3aTgHiB II.
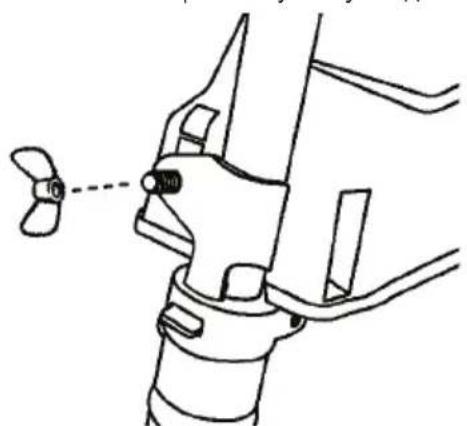
ПРИЕДHAHHЯ Г-ПОДIBHOIpyuKIN
YBAGA! BnKOpNCTOByTe HOxI dTpaBn Ta rONOBKn TpIMepa TiNbKn 3npEHaHOIO I-nODiHOpyKOHO.HikoJH HeBnKOpNCTOByTe HOxI dNIIJOK.
Iiud ac perynOBaHHr I-noDio6HOi pyuKn nepekoHaTeCra, 10 BOHa 3aJIuWaaCTbC8 Bnue MapkyBaHHra 3 TexHikn 6e3neKn i HxKHe MapKyBaHHra abo CtrpinKa Ha Wtah3i.
- Po3aWyIte I-noi6Hy pyKy Ha wTaH3i. 3ayBaXTe, uO yMaTk MaE byTu BCTaHOBneHa MIX DBOMA CTpiKAMn Ha wTaH3i.
- YctaHOBIb TBnHT, 3akpINBUN nIaCTnHy i KpnIbYaTy raiKy kNOKa3aHo Ha MaJIIOHky.
- BukohaiTe octaToUHe peryIIOBaHHraI-nOioHOi pyuKn IINr DOcRHeHHra 3pyHoro po6oHor noIOXKeHHra.
- 3aTnHITb KpNtBuHaTy raKy.
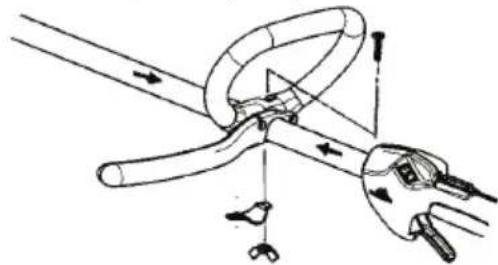
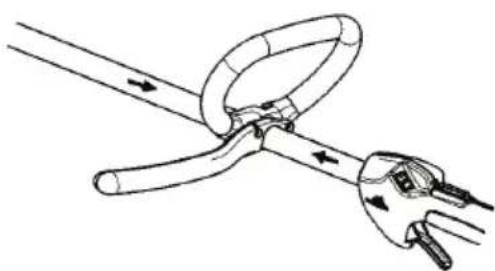
ПРИСYBAHHКРINJIЕHHPEMEH
- Po3TaUyIe BepxHc KpInnHnpeMeHn 3BepxpyuKn, HNKe KpInnEHHra-3HN3y pyuKn. 3po6ItbTak, uO6 BepXHi Ta HNKnHr BnHToBi OTBOpn cnIBNaDAni. KpInnEHMa 6ytn npnacobHe Bnue CtpiKn Ha UtaH3i.
- BCTaBTe DBA rBnHTn Do rBnHTOBnx OTbOpib.
- 3aKpiniTb 3aTnCKaYpeMeH, 3aTAYHyBUN rBNHTN 3a DOnOMOROU WecTNrpaHHoro KlnOHa.
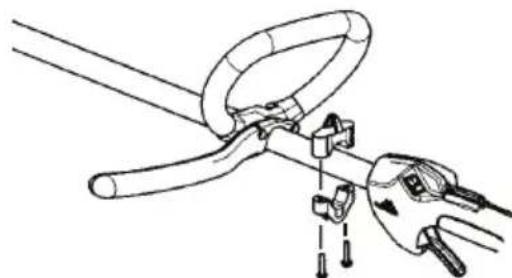
ПИСДHAHHЯ PЕМЕHA
- Ppocyhte roNoBy Ta npaby pyky Kpi3b pemihb Tak, 06 Bnir Ha nibe nneue. Ipeebipte, 06 raok peMeHr 3haxOdBc3 npaboro 60ky TaJIi.
- HanaTnyTe peMHb TaK, uO6 rauOK 3haxoDbcRa HbIcTaHi 15 cm HxKye TaJIi.
- Ppikpiitb pemihb do kpinneHHa waTaH3i Ta nHimItb IHctpymeHT ha pBeHb po6oHoro noJoxehn.
- PpinacnyTe IHCTpyMeHr TaK, 0o6 TpmaOuNcB Ha pemeHx, Bih By y 3pyHOMy po6Oohmy noJIOKeHHI.
PIMITKA. MoKInBO,ДЯ HanexHoro 6aHaHCyBaHHI HCTpyMeHTy BnHnKHe Heo6xIdHicTb nepemictn KpInJeHHa peMeHa Ha Wtah3i.
- BiDperyHIOte nacoBy niDbicky TaKIM YHOM, 06 pixya hacaKa 6yna po3TaWOBaHa npanenbHo 3emni.
6.Доьлбпс рikуи hacaui 3nerka npnlaertn ha 3emnIO.Якso BN BkOpncTOByeTe HIXДЯТpabN, TO BIN NOBHeH 3hAxOuNTncr np6bni3HO Ha 10 cm Bnue NOBepxHi 3emni,Uo6 3anobirn KOHTaTy 3 kAmHHm ToIo. BiDperynIte NoJoxeHHK pInnenHpeMeHn TaKIM YHOM, Uo6 IHCTpyMeH T3haxOuNBcR y npabNbHOMY NOnOKeHHi.
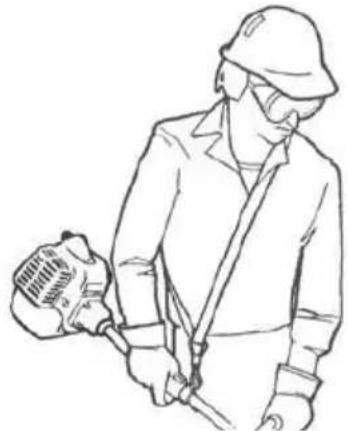
BnBIP PIXyUO CnOPaJxEHHA TA HACAOK
YBAGA! Hikon He KopncTyTecpaXyHnHaCakam6e3 BiINObIHORo 3axnCHOrO uNTka. BcTaHOJIeHHa HnpabNtBHorO a60 NowkoJKeHoro uNTKa MoKe npu3BeCTn Do Baxkx TpaBM.
BUNBIP PIKyuO CnOPaXeHHA
IЯЗрзаннгубоITpabN KOpntyTeCЯ HOKEMДЯ TpaBn.
3ANYCK TENIIOO DBNIYHA
PIMITKA. HE HaTnckaIte DpocelbHn peryIaTOp DOKn DBnryH He 3anyCTntbcra I He noUHe npauBOaTu.
Bukonai Te ii, 0o onncahi y nyHKtax 7 Ta 6 iHctpyki i3 zanycky xonodHoro DnHyHa.
IPNMITKA. RaKo DBnHyH He 3anyckaTbcra, notrHiB pyky cTapTepa ue 5 pa3iB. RaKo DBnHyH i daJI He 3anyckaTbcra, BIn, IMOBiPHO, 3aIHTn.
3ANyCK 3AJNTOFO DBNYHA
3aJNTn DBInyH MoXHa 3anyCTnT, NOCTABINBUN Baxinb NiDCOCY B NoIOKeHHRA RUN (po6oTa), NICr yOro cniD NotRHTn pyKU CTapTepa, Uo6 3BInbHnTn DBInyH Bi3aIBoro NaIbHoro. JIra 3aNcKy MoKe 3HaIOBnTcB NotRHTn pyKU CTapTepa baTo pa3iB, 3aIeXHo Bi pIBH 3aJIITTu CUnIHpda. JaKIo HCTpyMEnT BCE UI He 3aNcKaETBC, 3BepHITbcr do TABNIUI BNAIBLEHHRA TBA INPABJIEHH HECnPABHOCTEIN a6o Do cnyK6n o6cNpyROByBaHH KJIeHtIB.
EKCJIYATAU3'EDHYBAU
IHCTpymENT 6bHaHn3'EnHyBaem, kNIO3BOJAE BCTaHOBnOBaTn DOaTKOi HacaKn. IChyIOTb HAcTyNHi DOaTKOi HacaKn:
Onnc Moedelb
JIe3oIyKuBoi oropoxi MTO001
KyntBaTOp MTO002
NobirpoodyB MTO003
Kpomkopi3 MTO004
Bucotopis MTO005
Kyuopi3 MTO006
YBAGA! Npeed BCTaHOBNeHHaM a60 3HIMAHHM HacaIOK Heo6xIDHO O6OB'3KOBO 3yHHTn IHcTpMeHT.
3HIMAHHH HACADKN
1.ДЯбиwoi CTIKoCTI NOKnaITb IHCTpyMeHT HapibHy nobepxHIO.
2. Nocna6Te 3'eNHyBa, NOBepHyBwI pyKy npOTn ROINHHKOBOI CTPIIKN.
3. HatncihIt Ta yTpmyte KhoNk6NoKyBaHHa
4. HadiHIO yTPMMyOu INBnryN Ta BepxHIO uTahry, BuTARHITb HacaNky 3i 3eHyBaaya.
POBOU E NOJIOXEHHRA
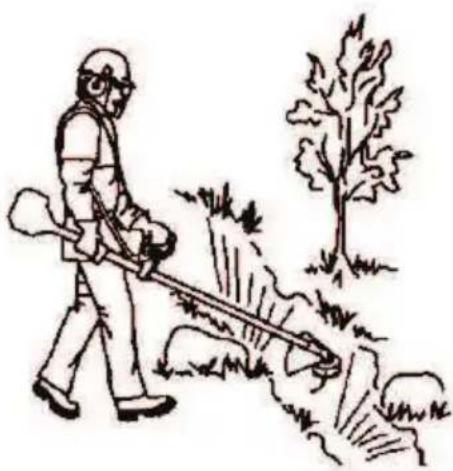
YBAG!O6OB'3KOB0 Heo6xidHO KOpNCTyBaTnC3acObamn 3axnCTy dny Oey. HikoJn He haxnIaTeCn yepe3 pixyu HacaIky. KamHHa6cmTTMOKe BiDcOKuHTn a6o IHCTpyMeH MoKe KNHyTu NOro Bam B oOi I 06nUy,IO MOKe npn3BeCTNu Do TpaBMn Oey axdo cInOTn a6o iHNx Cepno3nX TpaBM.
YBAGA!Iid Yac BnKOpNCtAHHHOXA TpABN 3aBXDN BnKOpNCTOByTe NpeOBN peMHb.
Iiudacekcnnyataii iHctpymeta:
- HaJaTaIe HAnExHnOJr Ta 3ac06n 3axncty Ouey Ta cIyxy.
CTiIte kN Oka3aHO Ha MaJIOpHky.
TpmaTe pyky Tpirepa npaBOO pyKO, a I-noDihy pUky-JiBOO pyKO.
Tpmae iHCTpymeHT HxKpe pIBHa Norca.
IpaioTe IHCTpymeHOM TINbKn 3niba HnnpaBO, 0o6 CMITBA BIDKnDaIOcB iD Bac. He HaxnlaOuHc TpmaTBeBONociHb TpImepa 6n3bKO Ta npanenbHO Do 3emniTa HE 3aHpyoTe II y MaTepiAn, 0o 3piyctbcra.
3abxnd KopntyTeCBAIDOBiHM O6naHaHHaM.
-PepekoHaTeC8,0oO6nHaHHn npabunbHO HanaTobHe.
Bukohyte Bci 3anobixhhi 3axoHn.
- PeTeIbHo opraHizyIte cBOIO po6Otv.
BVKOPNUCTAHHЯ HOXAДЛЯ TPABN
HIX TpABN BkOpncOBycTcN KocHHBcix BnIB BnCkoOI Ta rpy60I TpaBN. Hoxem dIa TpaBN He MoXHa 3pi3yBaTN 3depeR'hiny TpaBY.
KoIN NOUHaTe pO6To HoxkEM,3aBXn npauOnTe Ha NOBHI WBNDKoCTI.
3aBxN KOpNCTyTEcra roCTpMm HOxAMn.
HamaraatecyaHkataKamHHa
Tpaby KocTb MaTHNKOBUM pyxamn 3 60ky B 6ik -pyx cnpaba HajiBO 6yde po6oYIM, a 3niBa Hanpabo -3BOpOTHM. Hix NOBHeH KOCHT npaby JIBNM Kpaem, Oto Ha Unepe6nati roHHNka BiDnOBiAc npomixkMyk8 Ta 12 roDnHO.
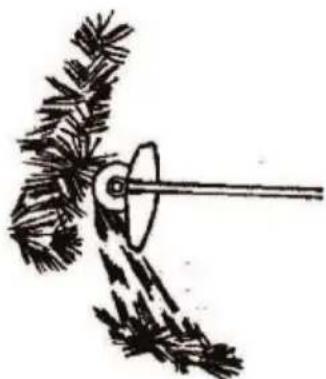
KIO CKOuyOu TpaBy Haxnntn HIX Tpoxn BnIO,TO TpaBa 6ynde cKnadaTncB OOnH PAd, 0o noJerWHTb II 3bnpaHH.
HamaraTeca npauOBaTu puTmUHO.CtiIe BnEBHeHO, pO3CTaBbUHn HOrn. PicJy 3BOpOTHO pyxu npoJITb Bnepei i 3HOBy 3aMItb CTiKe NOJoxEHn.
Onopha MaHkeTa NOBuHHa 3JIeKa pIpuJrTn Ha 3emJIO. BOHa 3ano6irae ydapy HoJa 63emJIO.
3Hn3HTn PN3NK 6OBMOTyBaHH MaTepiJIB HABKOHOHOKA MOXHA BKNOHYOHNACTYNII IHCtpKII:
3aBxnn npauHnTe npn nOBHicTIO BiKpnti IpoceJIbHi 3acnHui.
-Пдчac3BOPOTHOROpyxHy He npoBObTe HOXEM NO BKe 3p3aHi TpaI.
Ipeen TmK noatn 36npatn 3piaHy TpaBy, BmHKHtB DnRyH, 3HIMITb peMeHi Ta NOKnaDiTb IHCTpyMeHT Ha 3emNIO.
He pekomeHdyetbcra npaObaTn Ha NOBHIN WBNKoCTi 6IbH HIX 1 XBUNHy.
O6OB'3KOB0 BiDnyckaTe DpOceIbHn peryIaTOp i DaBaIte DBnHy HOBepHyTncB PexIM XoJocTOXOy, KOJI He BiD6yBaETbc 3piAHHa.
BVKOPNUCTAHNRA TOLOBKN TPUMEPA
He 3aOdbTe DnBryH Ha 6IbW BnCOki WnDkoCTi, HIX ce Heo6xIdHO. 3pi3aHHra 3diinCHIOCTBCRA epeKTHBO, KOJI N DBNHy npaIIOE 3 HENOBHICTTO BiDKPINTOHO pOceBNoHO 3acNIHKoHO. Ha Hn3bKnX WnDkoCTAx Wym i Biopaai DnBHyA 6dyTb MeHUMM. BoNocIHb CNYKIMME DOBWE i 3 MeHWO IOMBIPHCTIO Bi6yBaTMETbCIA II "PnBapIOBaHH" Do KOTUKN.
He 3aHpyIOte BONOCINb iD yac piaHHra DOBkOta TBePnXo6'KtIB Ha KUtaTn KaMHnR,rpabio Ta CTOBnIKIB Oropoxi, kI MOxTy bNLOKOHTn rOJOBky TPmepa, 3aNpyTaTncy y BONOCiH aBOiKaDaTncu TpImepom, cTAHOBJaHc Cepno3Hy He6e3NeK.
3pi3aHH3iINCHIOETBCKINHUKOMBONOCHI.
BnDocHHeMaKcMaJIbHOI pOpyKTINBOCTi i MINIMaJIbHOrO 3HOcy BONOCHI,RAUo He
3aHypobatmete BOJocihb B 3OHy pi3aHHr.
IpaBnblbHn I HnnpaBnblbHn Cnocobn HabeDeHi HNKe.
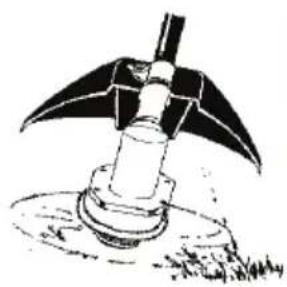

Bolocihb6yndeNerKOBuDajrtnTpabyTa6yp'HN Habkono ctiH,napKaHIB,depeB iKnym6,ane BOHa TAKoX MoKe 3pi3aTHixHy Kopy DepeB abO Kyusib i NoopraNaTn NapKaHn.
IpiicptpnaHn a6o 3pi3aHHn Depy BiKpnBaTe IpoceJIbHy 3acNIHKy He NOBHCtHO. Lc Do3BOJNTb 3iInbUHTN cTPOK CnykBo BONOCHI i 3MeHNUTN 3HOC rONOBKN, OCOJNBO:
PiicpiictpnraHnHerycToI TpaBn.
Iobn3y 68eKtIB,HaRKOme HAMOTuCBOBocihb,TaknxHKHeBeJIuki CTOBnUKN,DepeBa aO npKaH 3DpoTy.
- PnCkOuSyBaHHi a6o 3aMitahHi BiDkPunBaTe DpocelbHy 3acniHky NOBHCtU 3adJx XopoWoi YNCTOI pOBOTn.
IIDCTPNIAGHH
TpmaTe HxKHO qactHy rONOBKn TpMepa np6n3Ho Ha 8 cm NaH 3emneio i nd kyTom. KOHTAKTyBaTN Mae Nnwe KINHK BONOCIH.He 3aHpyIOte TpMep y po6Oy 30Hy.
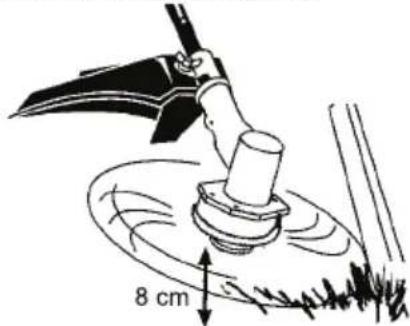
3PI3AHHЯDEPHY
TexHONIa 3pi3aHHaepHy BnAJaNc He6aKaHy
POCINHHicb y 3emJI. TpMaJTe HxKHO qactHy
rOIOBKn TpIMepa np6m3Ho Ha 8 cm HaD 3eMneo i nKiYOM. Do3BOJnTe KInuKy BOJocHi BdapTn No 3emNi
DOBKOJa DepeB, CTOBnKIB Ta caDObNX CkyJbNTyp.
Pni ci TeXHiCi 36JIbWyeTbCra 3HOC BOJocHi.

KOCIHH
BaW TprMep iDeaIbHo NiIxDxOuNTb DnA KocIHnB Micux, KyDn 3BnuAHa Ra3OHOKocapKa He MoKe DOcAHTN. Y No3NuII DnA KOCiHH TprMaTe BOLOCiHb TprMepa napaneBho 3emni. HamaraiTecn He npntncatn rOIOBky TprMepa do 3emni, 6o ce MoKe 3piaTu DepH Ta NOnKoDHTn IHCTpymEnT.
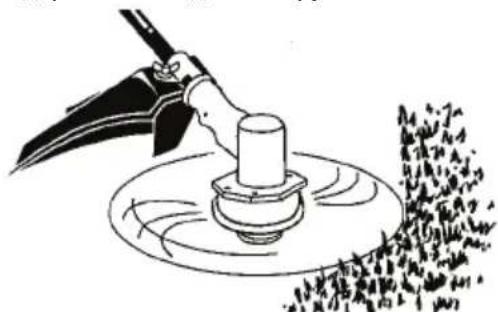
3AMITAHH
EeKBeHTnIaTopaBIDBOJocHi,OoOeepTaetbca, MoKe 6yTN BIKOpNCtAHm Dnla WBNkORO I JERKORO 3amITaHH TepntopII. TpMaTe BOJocHb TpMepa npaJIbHo I BNue NOBepxOHb, kI Heo6XiHO NiIMectn, I NepemuaaTe IHcTpymeHT 3 60ky B 6ik.
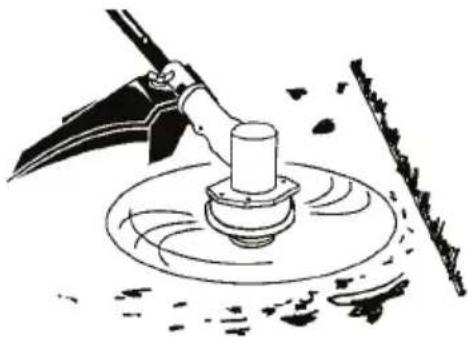
IODAUBOLOCIHTPIMEPA
Bolocihb 6ynde noabatncn npn5n3Ho Ha 5cm KOxHoro pa3y, KOn npn poboti Ha nobHi uBnKoCTi HATNCKaTN Hn3OM rOJOBKn TpImepa Ha 3emJIIO.
HaibbueekeTbHbdoBxHbBOnciH-ue MaKcMaNbHO Do3BoJeHa 6MExyBaem DOxHbHa.
IiudaceknnyatauiHCTpyMeHTa3aBXDN BKNOPNCOTBYTE3AXNCHI UNTK.
Iy noaui Bonochi:
-ДВИУн NOВИЕн npaцюВаТи Ha nobHii WbUdkoCTi.
- TpmaTe roIOBky TpImepa npaJIeIbHO nobepxHi HAD TpaB'raHnCTOIO dINrHkoHO.
3nerka HATNCiTB OINH pa3 HNHHBOIO YACTNHOI ROIOKN Ha 3emNo.3a KOxHOro HATnCKaHH6yde NOdaBAtnc np6Jln3Ho 5cm BONocHi.
3aBxHnHaTNCaIte TOnOBKy TiNbKn Ha TpaB'HNCTi dInHci.HaTncKaHHHa acpaJbTObi a6o 6eToHni NOBepXHi MoKe BnKnKaTu HaDMipHe 3HOWeHHra TOnOBKn.
KIO BONOCb 3HOWeHa Do 5cm a6o MeHwe, dna ONTmAbHoI DOBXnH MoKe 3HaO6ntncs 6JIbwe ODHoro HAtNcKaHH.
TEXHlUHE OBCJnyROByBAHHa
YBAGA!PiJ yac texHuiHoro 6cnyroByBaHH BID'cHynte CbiKy 3anaHOBaHH, OKpIM BnnaKIB perynIOBaHH XOJOCTORO XOdy.
Yci npoueynpu 3 peMoHTy, Okpim HabeJeHoro y Cbomy noc6Hnky KOpNCtByBaaypeKoMeHDoBaHOro TexHnHO O6cnyroBvBaHHa, NOBHHI BnKOHyBaTncB ABTOPn3ObaHOMy cepBICHOMy ueHpi.
KIOO6cnyroByBaHH npOdykTy 6yde 3diinChOBaTnC He B ATOPOHOAHOMy CEPBICHOMY CEHTPI, KOMNAHIBNPO6HnK 3aIIuWae 3a CObO npABo HE npOBoNTn rapAANTHn peMOHT 3a BlaCHn paxyHOK. 3araJIbHe TEXHlue He 6cNYROByBaHH Ta yTPImaHHI HCTpyMeHTa B Do6pOMy CTahi E OOB'3KOM KOpNCyBaHa.
NEPEBIPTE HADINHICTb KPINJIENH YACTnH
KOBnak cbiKu 3anaIOBaHHa
- NobitprnHfipbtp
- ΓΒΝΗΤΗ ΜΑΚΟρηγί
ΓBnHTHa pyu
- UHTOK
NEPEBIPTE, YH HEMAE NOUKOJXEHNX ABO 3HOUHEHX DETALEN
3BepHtbcra do ABTopn3ObaHoro cepbichoro ceHTpy dIa 3amHN N0wKoJKeHnx a6o 3HOweHx DeTaJIe.
- Ipeemnkaq ON/STOP (YbIMK./CTon) -
- IpeekohaiTeca, lo Bmikau ON/STOP (YbIMK./CTon) φyHKIOHy e npabInbHo IpeekHouItb
- Bmikau y noLoKeHHa STOP (CTon).
- IpeekohaiTeca, lo DBuRyH 3ynHnBcA, notim 3HOBy
- 3anycttb noro i npoDobKyne po6oty.
- PAnBn6ak - npnnHtB KOpNCTyBaHHIHCtpymeHToM y pa3i HaeBHocTi 03HaK yUkoJKeHbPAnNBHO6aka afo noro npotikAHH.
- ΜινΤΟΚ - πρηπηνίβτος Κόρικτυναῦνη τις Ανεύμετους Μγαλίσης Ματήσεις Μιντάς.
IPEBIPKA PIBHRA MOTOPHOI OJINBNI
INB.NYHKTDOJABAHHORINBIBpo3diJI EKCPIYATAUIA.
Ogлд TA OчNTKA IHCTPymeHTA TA MAPkyBAHb
Iicra KoxHoro BnKOpncTaHHa nepeBipraTe Becb IHcTpymeHT Ha npEmed BnBHeHHa DetAne,po po3xntanca abo 6ynn noWkoDkeHI.
BntpihctpymehiHaKnBnOIO TkaHNOIO, 3MooyEOyM'rkOMy MIOOyOMy 3ac06i.
BntpihctpymehT uCTOIO cyxio raHypkoIO.
3AMIHA MOTOPHOI OJINBNI
3amihnOn OINBy cnid nicn nepuix 5 roin H BkOpuctaHn, nicny oTO KoxHi 25 roDnH a6o pa3 Ha ce3OH. Ppi pOboti 3 BeJInKm HabaHTaKeHHM a60 3a BnCOKnx Temnepatyp OINBy Heo6xIdHO 3AmHn T KoxHi 10 roDnH poBToN. PepeBiprTe pIbeHb OINBn B KapTepi nepeD KOxHM BkOpuctaHHM.
3AMIHA TA ΠEPEBIPKA PIBHRA OJINBUN
3ACTEPEXEHH: BnKOpNCtHa ONBa c He6e3neuHm ukiDnBn npOdykTom. BnKOpNCTaHy ONBy cnid HanekHnM YHOM yTuNiI3yBaTu. He yTuJI3yIte II pa3om I3 no6yTOBn CMITrM. 3a IHOpMaueio yOo yCTaHO, Oo HadaOtB nocnyr 3 6e3neHoi NIKBidaui/pepeo6Kn, 3BeptaTecr Do aOBTopNoBAHO cepBicHO ceHTpy a60 do Cnyx6n o6cnyROByBaHH KnichtiB.
3amHrtnOINBy cniD y BmKHeHOMy, aNe BCE ue TepIOMy DnHyHi. IpekoHaITeC, 10 Kpnka naNBHorO 6aka HaiiHo 3akpnta.
- 3HIMITb KPNKy OTBPOy DnA 3aJIbAHHaONIBN.
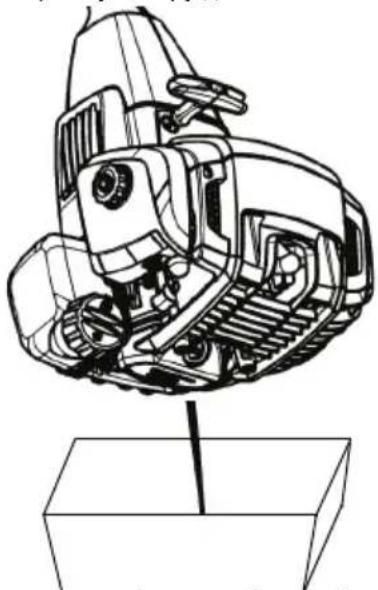
- 3πnTe OINBy B πiXoDyμN KOHTeHep RaK nOKa3aHO Ha MaJIIOHky.
- BntpItb 3 iHctpyMeHTa Bc0 npOniTy OINBy.
- 3aannIte OINBy y DBNyH.
- 3akpnTe KpnuKy OTbOpy dna 3aJIuBaHHra OINBn. HadiHno 3akpyTtB.
YINSEHHI NOBITPRAHORO FINbTPA
3a6pydHenn noBITpHn fInbTp 3MeHwye epeKTHBHCt bpoBTo DN BnryHa Ta 36InbWyC nOxNBHH naIbHO r yTBopeHH uKIDINBHX BNapoByBaHb. YnCTbTe fInbTp uee3 KoxHi 25 roDnH po60Tu.
- YnCTbTe KpNtky Ta 3OHy HABKOHO He, IIO6 6pyd He NOTpanJIyB Do Kamepn Kap6OpaTopa, KOIN KpNtka BiDkPNTa.
- 3HIMITb KPNK Ky NOBITpHoro fINbTp a Ta BNTaHITb fIbTp.
YBAGA! He MmTe fInbTp y 6eH3nHi a6o IHsOMy BORHeHe6e3neuHOMy po3HHNKy.
- PpOMnTe pInbTp BOIOHO 3 MUNOM. PeTeIbHO npOnoNoJITb.
4.ДаиTeФиьТуВиСоХHyTn.
- 3amihitb dertani.
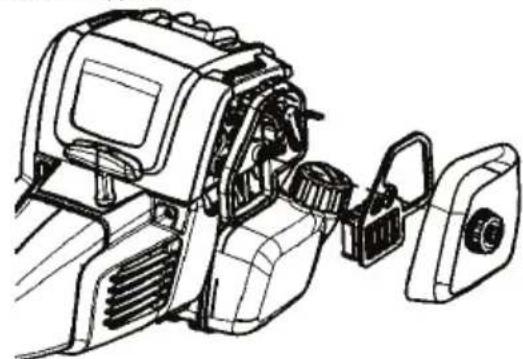
OgЯнгуншнka T3AXNCHOrO LNTKA BID ICKOP
Iiud BnKOpncTaHHH IHcTpymeHa HJyUHNky Ta UNTky dny 3axNCTy BiD iCKOp HAKONuYeTbcSByrNeU. Iicra 50 roHn po6Ot Mn peKOMeHdyEmo BiDaTn rnuuHK Ha texHnic He oCnlyroBvBaHHa 6o 3amHHTn Ioro y BaWOMy ABTOPn3OBAHOMy cepBichOMy ceHTpi.
3AMIHA CBIyKIN 3APANIOBAHHN
CbiKy 3anaIOBaHH Heo6xHNO 0OpIHO MInrN dTn TOrO, 06DbNHy NereKo 3aNyCKaBcTa Kpaue npaIObAB. IpeBipraTe CbiKy 3anaIOBaHH cpe3 kOchi 25 roDnB BkOpncTahnn. 3a noTp6n OunuYte abo 3amHne CbiKy. BctaHOBiTB 3a3Op 0,6 MM MIX eNeKTPoDAmC BiKu 3anaIOBaHH. Ac 3anaIOBaHH fikCOBaHH i He peyIIOeTbcR.
- NOBepHtB,NOTIM3HIMITbKOBNAK3iCBiKN 3anaHOBAHHJ.
- BntaHrHb CbiUy 3anaIIOBaHHra 3 uNlIHpa Ta yTnIiyte ii.
- BctaHObITb HOy CBykU 3anaIOBaHHA Champion RZ-7C Ta HAIINHO 3aKpyTITb II TOPueBMM KIOHcM Ha 16 MM.
- NOBTOPOHO BCTaHOBt KoBnak CbiKu 3anaJIOBaHHA.
TEXHICHE OBCJNYROBYAHHHA TAPERYJIIOBAHHA
3AMIHA BOJIOCIHI TPIMMEPA
- HatncHtB Ha BnCTynn 3 60kIB roJOBKn TpIMepa Ta 3HIMtB KpnUky i KOtyuKy.
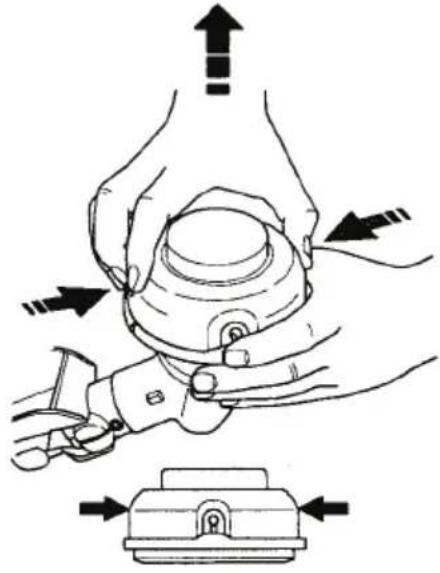
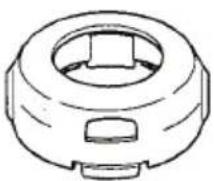
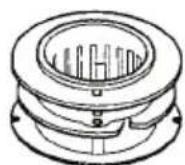
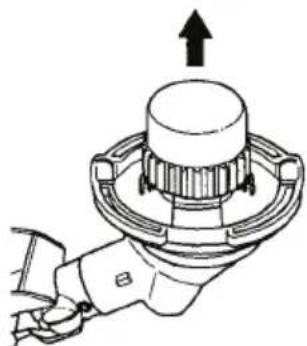
- BuaTb BC0 BOnciHb TpMepa, 30 3aNnnnae.
- BuaTb 6pyi cmiTTa 3 ycx qactnH. 3amHtB KOTyUky, kUIO BOHa 3HOWeHa a6o NOUKOKeHa.
-
3amHItb KOTyUkky Ha HOby 3 nonepdHbo HAMOTAHO BOJOCIHHO a6o HAMOTAHTe 4 Metpn CneuaJIbHOI BONOCIHI.
5.ПдчacHamOTyBaHHHOBOI BOJOCINI HA HABHY KOTyUKY TpIMaTe KOTyUKY RA NOKa3aHO Ha MaHNOHKY.
-
3irHITb BONOCiHB NOCEPeHNi i BCTaBTe 3IRHyT BONOCiHB y uINnHy B ueHTpi KpaIO KOtyuKN. IpekoHaItecra, uO BONOCiHB BCTana Ha Micue B uINnHi.
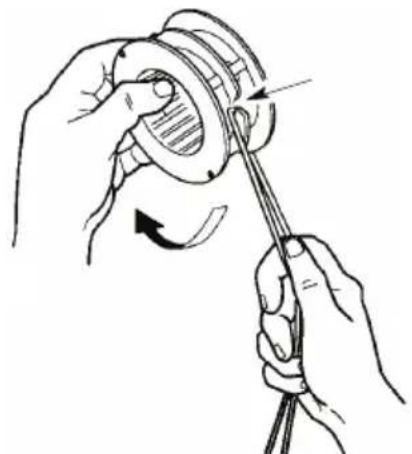
- NocTabBwn naneb mix DBOMa BOJOCIHmN, HAKpyTITb ix pIBHomipHO i MiHQ HAKBOJO KOTUKN B HApPmi 3a rOuHHNKOBIO CTPIJKOIO.

- BCTaTe BONocHi B HapmHi na3i.
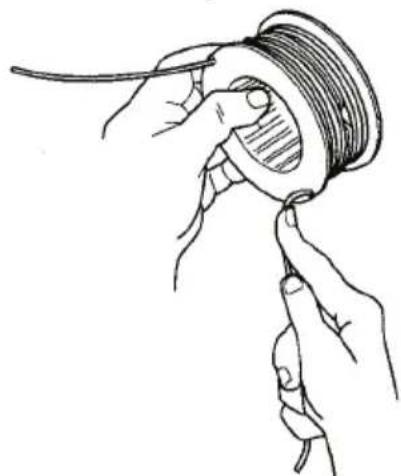
- Nomicitb KOTyUkky y KpUkky, RK NOKa3aHo Ha MaJIIOHky.
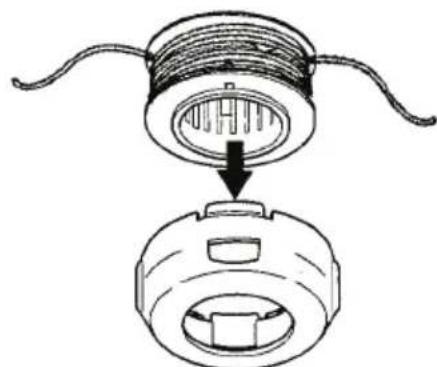
- BCTABTe KINU BoNOCHei Yepe3 BuXiDi Hi OTBOpn 3 6OKIB KPNKNI.
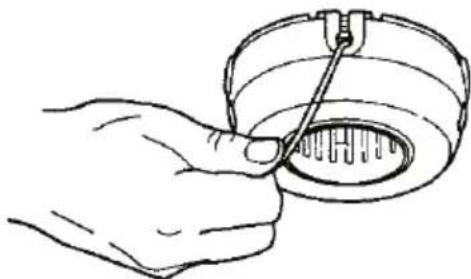
BctaHObit KoTyuKy i KpnuKy B roJIOBky TpImepa. Hatncitb, 06 KpnuKa BcTana Ha Micue.
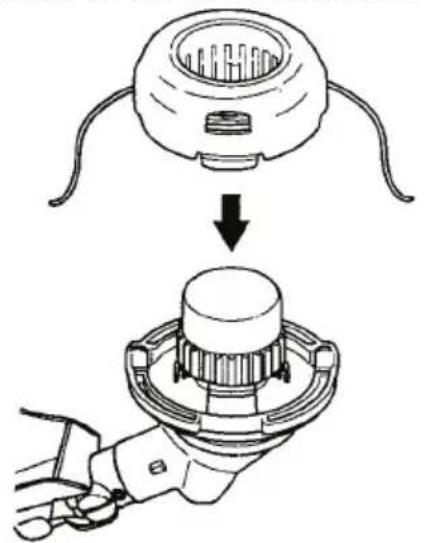
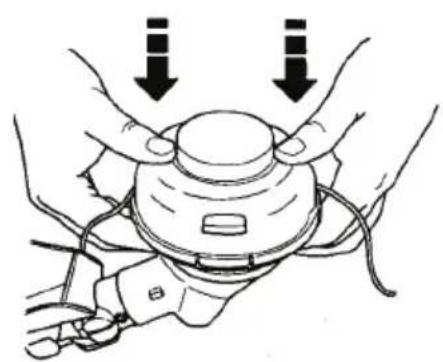
3AMIHA FOJIOBKN TPIMMEPA
- BupiBnHnTe OTbip y nIIO36ipHnky 3 OTbOpom 360ky peDyKTopa nobepTaHHm nIIO36ipHnka.
- BCTABTE BUKpyTKy HeBeJIHKORO PO3Mipy y BupiBHHI OTBOPn. LcHe DaCTb Bany KpyTNTCn rniJvac 3HimaHHa Ta BCTaHOBJIEHHra FOIOBKn TpImepa.
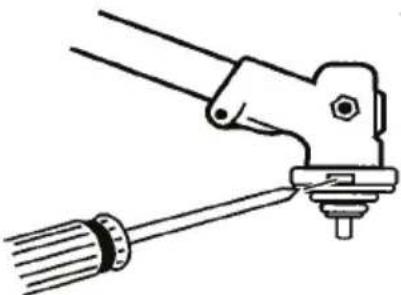
- Tpmaohn Bkpytky B TaKOMy nOJoxeHHi, 3HIMtB roNOBky TpImepa, NOBepTaOHU II 3a rOINHHKOBOO CTpiIKoIO (AKIIO DUNBNTNCRA 3HN3y IHCTpyMeHTA).
-
Hadihhe HOBy roIOBky Ha ⅢTaHry, npokpyTbUHN ii npOTn roDHHNKOBOi CTpiJKN. 3aKpyuYNe, nOKn roIOBka HadiHHO He 3aKpInNTbcr.
-
BnIMITb BkpyTkY.
PERYUIOBAHNA XOJIOCTOTOXOY
YBAI!PiJvacperynHbAHNkap6OpaHaXoIOCTOMyXOyD6aIte,06HIXTOHeHa6nKABcIHObOrO.TOnOBKa TpIMepa,Ne3o a60 6ybJa IHwa HacaIka 6dyTbOeptatnc npotrrom MaJxkeBciInpouedypn.BdRHTb3axnche cnpAJeHHraDTpMMyTEcbycix 3axoIDb63neKn.1nicpaeynIOBaHNrONOBKa TpIMepa,Ne3o a60 6yb-ka IHwa HacaIka He NOBnHipyxatnc/Oeptatnc Ha XoIOCTOMyXOy.
Kap6kpatop 6yB peteIbHo BiDpeYnbObaHn Ha 3aBoDi. PerynIOBaHHX OJIOCToro XoHy Heo6xIHNO BKNOHByTN, RIKU BOHNkAc OJHa 3 TaKnx YMOB:
- DnHyH He npaIOBaTmHe Ha XoNocTOMy XOy, RaIOpDpoCenb BiKpUtn.
- TOnOBKa TpIMepa,JIe3o a6o DoaTkoBa HacaKa pyxaetbca/06epTaetbcra Ha XOIOCTOMy XOy.
PiJ cac perynobHn IHCTpymeHT Mae Jnxatn Ha nIctabuTakm YINOM, 06b pi3aJIbHa HacaJa He TOpKaIaNACr 3emni I He KOhtakTyBana 3 Byb-ekmN ppeMetam.
PiJ cac po6oTI i perynobHHra TpmaJte IHCTpymeHT pyko.CiikkyTe 3a Tm, 06 cactnn BaWoTO tina He Na6nKannCdo Pi3aJIbHOro 6Loky I rnyshnka.
DnpeyHOBaHHXoNocToro XOy:
Ipebeidtb DnHyH hXonocTn xiD. BIperynoTe WbndKicTB, NOKn DnHyH He npauOBaTmE 63 oBeptanHra 60 pyxy roNoBKn, ne3a a6o doatkoBoi HacaKn (xionoctn xi3a BeNkoKiNbKOcTi oBepti) a6o He 3arnyxatme (xionocTn xi3a Manoi KInbKocTi oBepti).
Iobephitb rBHT o6eptIB xonoctoro xOdy 3a roHHNKOBIO CTPIKIO, IO6 36iNbWHTN WBNKicTB DnHyHa, kAIO DBnryH rIoXHe a6o nepeCTae npauBoatn.
IIOBepHITb rBNHT o6eptIB xOIOCToro xOdy npotn roDHHNKOBOI cTpiKN, 106 3MeHNHTN WBNKICTB DBNYHa, kkuo rONOBka, ne3o a6o IOnaTKOBa HacaikKa pyxaetbcra 6o 6eptAeTbcra Ha XONOCtomy xOdy. IpebeipyTe xONoCTn xiNicn KOKHOrO peryuBoHHa.
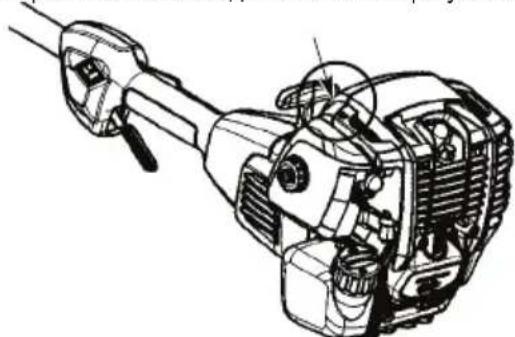
KaO BAM notpi6Ha DoaTkOBa Donomora a6o BN He BnEBHeHi, YN 3MOKeTe npaBnIbHO BnKOHATn IIO npOeDpy, 3BepHITcRdo ABTOpN3OBaHOrO cepBicHOrO ceHTpy a6o Cnyk6n O6CnyrOByBaHH KIniHTIB.
UCYHEHHH HECIINPABHOCTE
TABLIU YCUHEHHH HECNPABHOCTEIN
YBAGA! 3aBXKn BmNkaTe IHcTpymeHT Ta BNMaTe CBiQy 3anaIOBaHH, nepH HIX BkOHyBaTH Bc peKOMHeDObaHI HxKYe 3axoDN, 3a BnHrTkOM DiI, kI BmaraOTb pOboTN IHcTpymeHTa.
TEXHIYHXAPAKTEPNUCTUKN
BE3ONACHOCT INPNA BOTA
- N3PON3BaIte MaunHata CaMo 3a POpra3BaHe, N3TpBrBaHe, KocHe u npOuNCTBaHe. He N3PON3BaIte 3a OOpMnHe Ha p6oBe, KaCTpeHe UIN POnpR3BaHe Ha JkVB PJIeT
-БьдeteHaцpeK.He pa6oTeTe c Ta3n Ma7uHnKaTATO CTe H3MOpeHN,60JIHN,pa3CTPOEHN ININcIe npIeMaHe hA anKOxoJ,JIeKapCTBa IINMeDNKAMeHTN.BHUMabaTe C DeJeCTBnraTa cn;N3NON3BaIte 3dpaBnCn pa3ym.
Hnkora He cTapTnpaIte Hne 3n3noJ3BaIte MoToPA B 3aTBopeHO NOMEueHne nn crpaJa. BnUbaHeTo Ha OTPa6OToJIIN rA30Be MOKe Da e CmbpTOHOCHO.
- PóndbpxkaiTe DpBXKKeTe YnCTn OT MaCNo I rOpNBO.
BnHaN DpbXTe DnIraTeNa OT DaChata CtpaHa Ha TAnOTo CN.
-ДрьктмашиннаТЗдраВСдБe рьц.
-ДрькTe pexeToO obopydBaHe n aycnyxa noH NIBOTO Ha KpbCTa n Daney OT qactne Ha TnIOTc cn.Пи ropeu 3arnyuWntel Moke da ce nOnyat cepno3Hn n3rapAHHN.
IodbpxkaTe cTaNHa CToKa n paBHOBeCne He ce npceraTe n He n3nON3BaTe ypeDa BbpyHeCTa6HNI NOBbpxHOCTN KaTO CTbJIO, DbpBeTa, CTpbMHN CKIOHOBE NOKPUBN.
- ⅠЗПОЛЗВайтЕ само Ha Дnevьна CBETПИHA ИПДОБр
N3KуCTBEHO OCBETЛЕнUE.
- 3no3BaIte cmo 3a pa60THe, ONuCAHN B TOBa pKBOOCTBO IIN PbKOBODCTBA 3a DOJIbHNTENH INPnCnoc6BNeHa.
Hnkora He octabrte Maunhata C Bknouen DnBraTeI IN DOkato pekeuoto 06OpyDbaHe ce DnKn.
BnHa n noHxKaBaIe cKOpocTt Ha dBVaTeIa Do ckopoc H naP3eH XoJ CneJ BcKa paBoTHa Oepaun. PnoJbNxIeHnata paObaT Ha nbHn OobOpTo, 6e3 DnVraTeIa T da e HatoBapeH, MoKe da npEni3Bvka cepNo3Ha nobpeHa Ha dBVaTeIa.
HnTo onepaTopbHa MaunHaTa, HnTo hKoN dpyr Tp6Ba Da ce ONITBaT da OTcPaHraBat Hap3aHnMaTePnAIONoDnBnAteTpaOtnnIOkato pe3eBt Ce DBnKn, Tb KaTO TOBA MoKe DA DOBeDe Do cepno3HO npaHnBaHe. N3KnIouTe DnBnAteTn INpeJeUto OobpyBaHe n pa3eINHeTe NynataOT 3anAnTEJHaCBEu, PneDn Da OTcPaHnTE MATEpna ana, KOToCe e HabNJ OKONO Bana Ha HOXa, Tb KaTO B IpOTNBEN CnyaCbSceCTByBa PNCK OT HapaHbaHe.
- IIO BpeMaHa pa6oTa HEnocpeCTBeHO Cnei TOBa, bIIOBATA PpeaBAka MOKe Da e HaropeeHa. OctabeTe BpeMe 3a OxnaXdAhe. Ppi DOKOCBaHeto N MoKe Da ce N3rOpNte.
- Onachoct OT Xbpyaun npedmetn. BnHaHn Hocete Odopeha OT cbOTBEHTNE OPraHn 3aunTHa
eKnnpOBka 3a OunTe. HnKora He ce HabeBXdaIte OTBbD 3aunItata Ha pe3eua. B ouInTe BN MORaT da nonaHnat KambHn NOTaNdbuN, KOITo MORaT da DOBeDaT Do cJeNota nn cepNo3Ho HapaHraBaHHa.
-ДрькTe HeOTOpn3npaHnTe NuaHa pa3CTOHaHe. Deua, KINBOTHN, CTpaHnUHN Ha6JIIOdaTeN IN NOMOuHnIu Tp6Ba Da CToRr N3BbH 30HaTa Ha 6e3ONaCHOCT OT 15 MeTpa.CnpTe He3a6abHO MaunHaTa, aKO HKOn CE npNoJnxn. HNKora He ce OpbuauTe C MaunHaTa, 6e3 npEi ToBa Da npOBepTe DaJIH 3aD Bac He Ce HAMnPa HRAKO B 3OHAta 3a 6e3ONaCHOCT.
IIOHAKORA ce 3aKJIeUbAT KIOHn IIN TpeBa MeJdy npEpa3nteJIy n pexKeUTo ObOpyDbAHe. BInarN n3KlIOuBaIte DnIRaTeJI npEdi NoOcTBAHe.
- 368aBaeTepnupane Do 3aryuHTePn rope3aRyUHTeM oKe Da ce nOlyuAT cepNo3Hn H3rapHn.
БЕЗПАСHОCT ПРИ PAБOTAC HOЖА
-ПрелиИЗПОЛЗВАЕHA MaшIHаТа MOHTпaITeДбpe Heo6xOДМЯ ПИТ.
BnHaHn n3NoJ3BaIte J-06pa3HaTa pbKoXBaTka n npaBnHOp perynipan camap c HOka.
KoceteOTJrCHOHaJIBO.
HOKbT MoKe Da OTCKOu PN3KO OT MaTePnAJI, KOITo He MoKe Da OTpeKe, KOeTO MoKe Da DOBeDe Do amnytnpaHe Ha pbKa IIN KpaK. BnHaN dpBxKTe MaunHata NOJ KOHTpOJ.
He n3no13BaIte TpIMepHaTa rnaBa KaTo yCTpoiCtBO 3a 3aTgAHe Ha HOxa.
HokbT npoBnKaba Da ce Bbptu n Cnei KaTo ra3Ta ce OTnyche uNn DnRatEnr Ce n3KnIOuy. BbpTuHrCe no INhepua HOX MOKe Da n3XBpna npedMeTu Nn cepno3HO Da BN NOpeKe, aKO rOdoKocheTe cnyaHNo.CnpTe HOxKaTO DonpeTe JBAtA CTpaHa Ha BbpTuHra Ce no INhepua HOX C Beue OTPaH MaTePnAn.
-3xBpIaTe n 3aMeHraTe HOXOBe, KOnTO Ca npErbHaTn, N3BHTn, HanyKaHN, CuyneHn IIN NOBpeDeHn No dpyr NaHn.
- 13no3BaTe cmo HOK cnopei CneuФkaunTe n ce yBepTe, ye e npabUNHO MOHTupaH N do6pe 3aterHaT.
Hoxobete ca octpn. Pa6oTe BHNMaTeJHO Hocete pbkabuNIO BpeMe Ha pa6ota.
BnBPAUIN
I3naraHTo Ha Bn6paun npnpOdbJnxTeHa ynoTpeBa Ha pBChn HNCTpyMeHTN CbeHNHO 3aDbXBAHe Moxe Da npEaM3Bvka YbpeKdahe Ha KpbBOHOCHn CBdoBE NmHepBN B npbCTne, PbCeTe nCTabte Ha xopa, NoaTnBn KbM HApUSeHn HA KpbBOoBpaJeHHeTO nn OTOOn. UcTaHOBeHo e, ye npOdbJnxTeHa yNoTpeBa npn CTyDeHO BpeMe MOxke Da e npuHn 3a YbpeKdaHe Ha KpbBOHOCHn cbDoBe y 3dPABu Xopa Ako Bb3NHkHa CMMNTOMn KaTO Be3yBCTBeHOCT, BoJka, 3ary6a Ha CNla, npomHa B cBeta An TeKCTypata Ha KOxata, KaKTo n 3aY6a Ha YceUaHe B npbCTNe, PbTe Ne nCTabTE, npeyctahOBeTe n3NON3BaHTo Ha To3n HNCTpyMeHT n NotbpcTe JeKapcKa NOMou.
IpoTnBOBn6paUHOHHaTa CnCTema He rapaHTnpa 336BaHeTo Ha Te3n npo6nemn NpOte6nTei, 1N0JI3BaUmOuHn HnCTpyMeHTn NOCTOHH OpeOBHO, Tp8oBa Da CneJrOTbIMnCBOeTO fN3MHeCKO CbCTOHHne U CbCTOHHeTO Ha To3n YpeJ.
БЕЗПАСHОCT ПРН TEXHИЕСКО OБСЛУЖBAHE
- YBepete ce, Ye MaunHaTa e MOHTnpaHa npabNJHO, KaKTo e NOKa3aHO B TOBA pbKOBOcTBO.
- PoiDJIbpxaIte MaunHaTa Bdo6po pa6oTHO cbCTOAHne.
-
PoiDbpxKaIte MaunHaT B CbOTBcETBnE C npenopbuaHIne npoedypn.
BcnykBaHe n cepBN3, KOITHO He CA ONICAHN B TOBA pKOBODCTBO, Tp8bda Ce n3nblnRaBAT OT OTOPIPAH cepBN3eH DnCTPNOyTOP.
-
PpeiB BcKa ynoTppe6a npOBepTe n 3aMeHeTe NOBpeHnTE N OTkayehn Yactn.
3aMeHeTe YactIte Ha TpImepHaTa rIaBa, KOITo Ca HaIbpeHn, HanyKaHn, CuyneHn UIN NOBpeDeHn NO Dpyr NaHn, PpeDi Na3NON3BaTe MaunHaTa.
- 3no3BaTe cmo npenopbuaHnTe pe3epBn YacTn n npHaJdJIeXHOCTn.
- Ppeyn ynoTpe6a HamepeTe n OTCpaHete npotuHaHETo Ha rOpBO.
- PpeKbchete Bp3kata KbM CBeUta npeDn 3BbPwBaHe Ha TexHnuecko O6CJyKBaHe,OCBEH npn HAcTpoKn Ha 06OpOTnte Ha npa3EH XoJ.
- 3nON3BaIte cAmO nocOyeHaT TpIMepHa rnaBa nCe yBepeTe, Ye e npabUNHO MOHTnpaHa N do6pe 3aTeHATA.
- 13no3BaTe cmo npenopbuaHaTc KOpHa Ta TpMep. Pn Dpyrna Pa3Mepn Ha KopdaTa THaMa Da n3JIn3a npabINHO TOBA MOKe Da npuHn CepNo3HO HapAHBaHe. He n3no3BaTe DpyrMaTePnAaN KaTo TeI, XNuCa Nn BbxE. XNuTa TA MoKe Da ce CkBcAo BpeMe Ha p3aHe N MoKe Da Ce PneBbPhe B OAnceH Chapd, KOTo MOKe Da npuHH CepNo3HO HapaHbaHe.
-ПодьркайтпохаяцдьлжинhaHaKoPdataHaТримера.
- PpaBete KopeKun Ha o6OpOTnTe Ha npa3eH xoD C onopa nO dONHnK pKa, 3a Da He DOnyChTepeKekeIto O6OpUdBaHe da ce Onpe Do HraKo IpeDMet.
He donyckaIte B 6bn30ct dpyn Xopa , KOrato npabnte KOpeKunn Ha o6opOTne Ha npa3EH xoJ.
- PnHnHKaKNbO6cTc0rTeNCTBa He 6nBa Da Ce BnAcrt N3MeHeHnB NpBBOHaayAHLaTa KOHcTpyKUHa Ha MaunHa7e3 pa3peSeHne Ha npOn3BouInTeJy. Hepa3peSeHn N3MeHeHn H/nnn pncnoc6JIeHn 6nxa MoIIN Da npeiN3Bukat cepno3N TpaBMn IIN CMBpTHn cIyau Ha OnpaTopa INn dpYtn Jnua.
NCKPOΓACNTΕΝ
B HЯКО CТРANI CE N3NCKBA NO 3aKOH DnBnTaTeJIInTE C BbTpeHNO RopeHe DA bDnat O6OpyDbaHn C npeDnAeH ekpaH Na CBeUHa. Ako pa6OTne B CTpHa, KbTeTo cbIeCTByBAT NOD6Hn PA3nOpeJbN, BnE CTeДЛБxHn NO 3aKOH DA NODbPkXaTe pa6OTnHE YcNOBn Ha Te3N UactH. Hecna3BaHeto HA Ta3n PA3nOpeJbSa npeCTaBnBa HApUWeHne Ha 3aKoHa.
Pn HopMaHa ynoTppeBa B DomaUHn ycNoBna 3aRnyuTneTn npedNa3HnT ekpan Ha CBeUa T He CE HyKDaTOT cepBnHa noDpBka. PnpOpBvBa ce 3arNyuHTeTnA da Ce npereJa Da n da Ce 3aMeHn OT npedCTaBnTeHn Ha Otopn3npan cepBn3 cneD 50 yaca ynoTppeBa.
TPAHCIOPTIPAAH N CbXPAHEHNE
- 13KJIIOUeTe DBIraTeJIa, npEi Da ce npemecTne Ha DpyrO MRCTO.
IocTaBeTe 3aunTaTpaTpaHcnpTpapaHe Bbpxy pe3eua 3a KocHe, npEn Da nppeHecTe Nn TpaHCnOpTpapTe MaunHaTa Ha KaKBOTU Da e pa3CToHne.
OctabeTe DnuraTeTna Da N3CTnHe npeN TpaHCnOpTnpaHe.
- Obé3onacete MaunHata npeDn CbXpaHeHne NJI TpaHCnOpTupaHe Upe3 npeBO3HOTcpeCTBO.
- ɪnʒpəaʒhepe peεepboapá 3a ropuBO npeɪn
cβxpaHéne iɪn TpaHCnOpTnpaHe Ha MaUInHaTa.
ɪnʒoN3BaIe DOKpərropuBO, OCTaHaIIO B
kapþypatopa, kato CTapTnpaTe DBurTaŋeɪ N ro
ocTabiTe da paδOtn, DOKaTo CnPte.
CbxpaHraBaIte MaunHaTa n TropBOTO Ha MRCTo, Ha KOeTO napTe Da He MORAT da DOCTINrHAT Do NCKPN INN OTKpNTPiAmbK OT ppeDMTeN KaTO HArpeBaTeEN HA BODA, eNEKTPOMOTOpN, eNEKTPnueckn PpeBKIOuBaTEEN INeU.
CbXpaHraBaTe MaunHaTa Taka, Ye ORpaHnHTeJIHNrT HOx HA KOpDaTa Ha TpImepa Da He MoXe CnyaainHO da npuHHn HapaHraBaHe.
CbxaHraBaTe MaunHaTBA HauJIHO NOIOXHeHne IINI 3aKaYeTe 3a Bana.
- TpaHcnpTnpaIte MaIINHaTa B HauJIHO NOIOJKeHne.
CbxpahraBaiTe MaunHaTa daJeu ot o6cera Ha deua.
MOHTAX
BHIMAHNE: Ako MaunHaTa e noJyHeBa MOHTpaHO CbCToHHe, NOBTOpeTe BCnKu CTbKn, 3a Da Ce yBepnte, ye e MOHTpHa nPaBnJHo n BCnKNΦKCaTopn Ca 3dpaBO 3akpehen.
PpOBepTe yactte 3a noBpeHn3noN3BaTne NOBpeHn Yactn.
3A6EJIEXKA:
Ako IMate Huykda OT NOMOu INI aKO mMa IINCBaUNnIOBpeDeH YuCTN, ObaTe CE Ha oBCJyKBaHeHa KJIneHTN.
HopmaHHe npn npa3eH pe3epBoap Ha rOpNBOTO RopNBHnT qNITbP Da Tpaka.
- NonadaHTo Ha octaTbun OT ropBO mACNo Bbpyx 3arIywnTeJr e HOPMaIHO BCJIeCTBnE perynOpBKeNtHa Kap6ypaTopa N3nHTaHnTa, N3BbpSeHr OT npOn3BDoJTeJr.
MOHTIPAHE HA IPIPNCIOCOJEHNETO
Korato MoHTnPate npncnoc6JeHneTo, nOCTaBeTe ypeDa Bbpxy nIOCKa NOBbpxHOcT CueI cTa6uHOCt.
- Pa3xla6te CbeHNHTeJI, KATO 3aBbPNTe pkoB-BaTKata o6patHO Ha yacOBHnKOBaTa cTpeJIka (A).
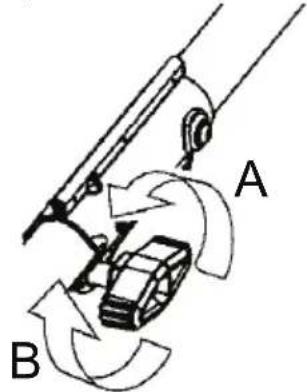
- OTeTpaHHe TpeDn3HTeJI 3a TpaHCnOpTnpAhe OT CbeDnHTeJI (ako nMa).
- CbaTe KaNaUkTa Ha Bana OtpncnocO6NeHnETo Ha TpImepa (ako mHa).
- NocTabete 6yToHa 3a 6JOKupaHe/OCBO6xJaBaHe Ha npncnOc6NeHneTO BbB BOeUma KaHaJI Ha CbeDInHtTeIa.
- Hatnche Tnpncnoc6neHMeTO B cbeHNHTeJIa, DOKaTo 6yToHbT 3a 6NoKpHaE/OcBO6OxDaBaHe UpaKaHE OCHOBHMAOTBOP.
3A6EJEXKA: Ako ce 3aTpduHBAte npn MOHTnpaHTo Ha npncocO6neHHeTo, 3aBbptTe npncocO6neHHeTo 3a p3aHe Ha pbKa, 3a da N03BONITE Ha BbTpueHHN BaI Da Ce n3paBHN n Da ce 3akpen BB BdNb6HaTHc BcEdNHTEJ.
- Ппенидаингьate MaunHata,3aterhepeBkoXBaTKaTa 3dpaBO C BbptHe noYacOBnKOBaTa CTpeNka (B).
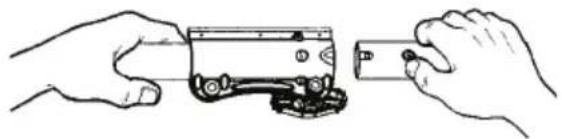
PNEyPEXKDEHNE:YBepTe ce,ye byTohBT 3a 6nOKupaHe/OCBOOxDaBaHe e 6nOKpaH B OCHOBHN OTBOp n pkoXBaTka Ta e 3dpaBO 3aTeHATA, npEn Da paBoTne C MaunHaTa. BcNKn npncnoc6nene Hna ca npEHa3HaueHn 3a N3NoJ3BaHe B OCHOBHN OTBOp,OCBeH A0e O6bEn3aHo Dpyro B cBoTBHO To pkoBODCTBO 3a paBoTa Ha npncnoc6neneHneTO. N3noJ3BaHe Ha HenpaBnHe OTBOp MoKe Da IOBeDe Do cepNo3Ho HapaHBAHe NIn NOBpeHa Ha MaunHaTa.
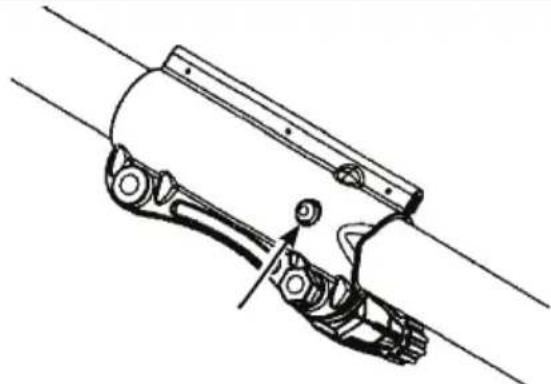
3a MOHTnpaHe Ha donbJIHnTeJHn npncnoc6neHne BIXKte pa3deHa MOHTAX Ha cbOTBeTHOTO pkoBOcCTBO 3a pa6oTa Ha npncnoc6neHneTO.
MOHTIPAHE HA LUNTA
UHT Tp6Ba Da ce HCTaJnpa npabnHIO. UNTbT OcHpyra YaactuHa 3aunTa Cpeuy PnCK OT INxBpJeHN pPeMeTN KbM ONepaTopa NpyrN Nua n e ChabEn C OrpaHnTuTeHn HOX Ha KopdaT, KOITo OTP3Ba N3nnHnata KopDa DO npabnHnata DblnxHa. OrpaHnTuHnT HoX Ha KopdA t Ha DonHnTa CTpaHa Ha UcTa e OCTbp NMOke Da BN nopexKe.
- OTeTpaHete KpIyataTa raiKa OT uHaTa.
- NocTabete cko6aTa B npope3a, KaTo e noka3aHO.
- 3aBbPteTe uHTa, DOKaTO 6oNTbT npemHne npe3 OTbopa B CkObaTa.
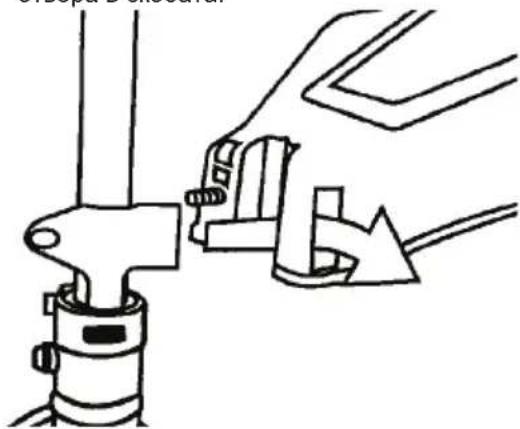
- MoHTnpaTe 6paTHo KpUyatata rAka n 3aTeHHe 3dpaBO.
MOHTIPAHE HA J-OBPA3HATA PbKOXBATKA
I PEPDyPEXKDEHNE: N3non3BaTe caMo pe3u 3a KOceHe uN TpMepHn rnaBn, KOrato e MOHTnpaHa J-06pa3HaTa pBkoXBaTKa. Hnkora He n3non3BaTe HOXOBe 3a TpNOH.
Korato perynipate J-6pa3HaTa pkoXbTaKa, BHMabaTte Ta da octaHe Had etKeTa 3a Be3onachOCT N NOd MapkpOBkata Nn CTpeKATA Bbpxy Bana.
- NocTabete J-06pa3Hata pbKoXBaTKa Bbpy BaIa. O6bpHeTe BnHaHne, ye pbKoXBaTKaTa TprBaJa 6bJe MOHTnpaHa MExy DBeTe CTpeKNBbpy BaIa.
- NocTaBte BnHTa, 0e3oNaCtTeJHATA nnactHa n KpuiyataTgaiKa, KaKTo e Noka3aHO.
- HanpaBete OOKHateNHOTo perynnpaHe Ha J-0pa3HaTa pbKoXBtKa, Taka Ye Ta da e B ydo6Ho pa6oTHO nOJKeHne.
- 3aterheTe KpuiyataTa raKa.
ПИКРЕВАЕ HA CKOБАТA HA CAMAPA
- NocTabete rohpata ckoba Ha camapa Bbpxy Bana, a doJnHaTc ckoba Ha camapa -noB Bana. LHeTpnpaIte OTBOpnte 3a BVHTObe Ha rohpata n DoJnHaTc ckoba.Ckobata Tp8Ba da ce noCTaBn HAD cTpeJIkTa Bbpxy Bana.
- NocTabete Bbata BHTA BB BNHTOBNTOe OTBOPN.
- 3akpenete cko6aTa Ha camapa ype3 3atrahe Ha BnHTOBeTe C lECTOCTHeH KInOH.
MOHTIPAHE HA CAMAPA
- ΠbXHETe DcHATA cn pbKa n rnaBata cn npe3 npE3paMkTaN NOCTaBeTe HA JABOTO cPAMO. YBepete Ce, ye KyKaTahacamapa e OTdAChata cTpaHa H KpbCTa BN.
- PerynupaTe camapa, kato noctabute kykata da 6bnde Ha 15 cm nOJ KpbCTa.
- 3aterhe camapa kbm ckobata Bbpxy Bajn noBdHHeMaHHaTdo paOtho noJIOXeHne.
4.ИЗБьршЕТОКОнчATEнHAperулрOBKa,TakaYe MaшинотаДаeВУдбHOPaБТНОпОжEHNe, KOrATOeOKaЧehaHa Camapa.
3A6EJEXKKA: Moke da ce HANOx da npemecnte ckobata Ha camapa Bbpxy Bana c cen npaBnH0 6aIahcnpahe Ha maunHaTa.
5. PerynpaTe camaTa Taka, ye pexeIoTo 60bpyDbAHe da e yCnpoeHn Ha 3emrTa.
- Octabete pexeioTo obopyuBaHe IeKo noDnpaHa 3eMaTa.AKO nIIOB3BaTe pe3euc 3a KocHe, ToT Tp8Ba Da e 6anaHcnpaH Ho OKOIO 10 cm Ha3eMaTa, 3a Da CE npedOTbpaTN KOHTAKC KaMbHN IONoOBn npEdMeTn. PerynpaTe No3NuYraHa cKo6aTa Ha CaMapa, 3a Da 6anaHCnPape NpaBUNHO MaunHaTa.
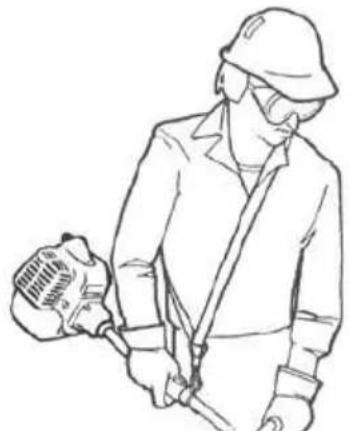
N3BOP N MOHTIPAHE HAPEXEIO OБОРУДBAHE
I PEPYPEXEHE: Pn HnKaBn O6CToTeNCTBa He 6uBa Da Ce n3NoJ3Ba pexeioTo O6pyDbaHe, 6e3 Da e MOHTnpaH Oo6peH uNT. MoTnpaHeto Ha HeNOxOJaU nn HEN3npaBEN uT MoKe Da DOBeDe Do cepno3Ha TeJeche NaOBpeDa.
N3BOP HA PEXELO OOBPYDBAHE
N3noJ3BaItepe3e3aKoCeHe3aPra3aHeHaTbCTaTpeBa. N3noJ3BaIteTpImepHaTnaBa3aKoCeHeHaTpeBa.
MOHTNPAHE HA PE3EU 3A KOCEHE
- 3aBbPTeBaHa Ha bIIOBaTa 3b6Ha npedabKa, DOKATO eINH OT OTBOpTE B npaxOyIOBnTeJIHaT aHaSKa Ce n3pABHN CbC CbOTBETHN OTBOP B bIIOBaTa 3b6Ha npedAbKa.
- NocTabete Manka OTBepTKa B OTBopa, 3a da 6JOKnape BaNa Ha brrnoBaTa 3b6Ha npedabKa.
3.ПьбзHeTe HOKa npyKuHHaTa Wa6a Bbpxy BaNa Ha brrnoBaTa 3b6Ha npedAbka.
I PEPENPEXKDEHNE: Pn MOHTaX Ha HOXOBOT N3KIOUHTeJIHa BaxHOCT e N3daTINHATA HaФKKcnpaTaTa WaNb6a Da nonaHne npabUNHOB cHTpAHHo OTBOP Ha HOxa. IORpeuHO MOHTpaHe Ha HOx MaOKe da OBOeDe Do cepNo3HnNJIn CmBPTOHOCHN TeJeCHN NOBpeiN.
- NocTabete BnBb6HaTata Wa6a Bbpxy Bana Ha bIIObata 3b0Ha IpeDabKa C BnBb6HaTata CTpaHa Ha WaiBaTa KbM HOxa.
- MoHTpaIe raikata Ha HOXa. 3aterHeTe raikata c KIOU. 3aBbPTeTe o6paTHo Ha NocOKaTa Ha BbptHe. Raikata mHa JRABa pe36a.
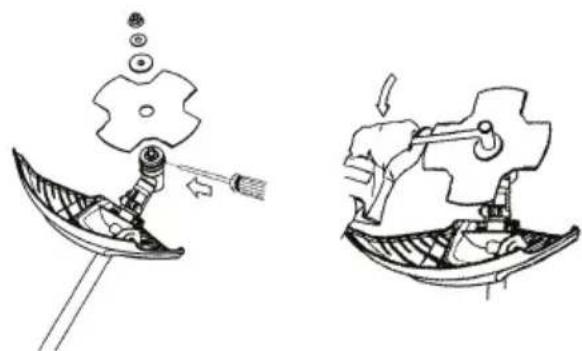
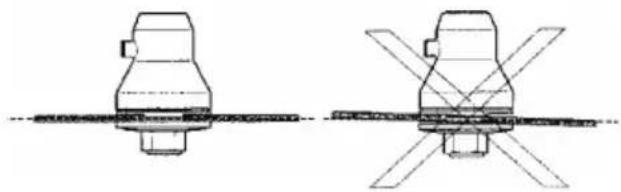
MOHTINPAHE HA TPIMEPHATA JIABA
- 3aBbPteBaHa Ha bIIOBata 3b6Ha npedabKa, DOKATO EDNH OT OTBOPTE B npaxoyIOBNTENHaTa CaWka Ce n3paBHn CbC CbOTBeTHNr OTBOP B bIIOBata 3b6Ha npedabKa.
- NocTabete MaJka OTBepTKa B OTBopa, 3a da 6nOKpaTe BaHa bTNObTa 3b6Ha npedAka.
- 3aBnHTe TpIMepHaTa rnaBa o6paTHo Ha NocOKaTa Ha BbPTHe.
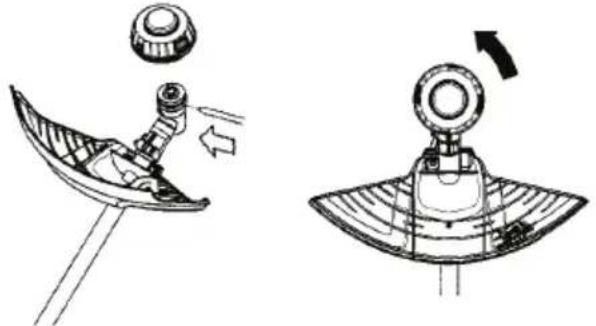
PAEOTA
CNEUΦUKAUUN 3A MACJIO
N3no3BaTe cAmo BucOKKaueCTBeHO CnHTeTNUHO MacnOc KnaCnФkaUma 3a 06CnyKbaHe SL (API), GF-3 (ILsAC) nnn no-BuCOka. N36peTe BuCKo3nTeHKnac no SAE Ha MacnToB CbOTBeTCTBne C oukBAhaT oB paobTa TEMnpaTypa. 3a NOBe-ETo npINOKeHnCe npenOpbUba MacnO 10W-30.He n3no3BaTe CneuaJIH DoabKn.
3A6EJEXKKA: CnHTeTnHOTo MacNo, KOeTO OTROBAPnHaBnWaba Heo6xOdImata KNaCnHnKaUa 3a OcbnyXBaHe, e PnneMnIBo MacNo pNbBCaKbTemnPepaTyp. N3noN3BaHeTo Ha CnHTeTnHo MacNo He IpomHe Heo6xOdUmTe INTEPBAHn 3a CMHa Ha MacNoTO.


BHIMAHHE: Dnuratene CBb3dyuho oxnaKdaHe OTdABaT NOBce TOIINHa npn pa6ota OT ABTOMOHNHT DEBnATEN. N3NOJ3BaHTo Ha HecnHTeMHN, MYNTNBCKO3HTEHMaCNa KaTO 5W30 n10W30 npn TemnepaTynpn4°C ue DOBeDe noNo-BNCOKO OOBuaHOTo NOTpe6JeHne Ha MacNo. Korato N3No3BaTe MyNTNBCKO3HTEO MacNo, npOBepraBte YcEto HNBOTO Ha MacNoTo, 3a Da N36BerHete EBeHTyAnHa NobpeDa Ha Dnuratena NOPaDN HeDcTNr Ha MacNo.
JOBABRHE HA MACJIO
Baata Maunha ce doctabg 63 macno B dbrateta. DbratetaT no6upa npn6n.75 mL macno, koraTo HbOTO e do nHnKATOPHa tina HNRA MAXFILL (MaKc. nbIhHe) Ha npo3OpTuHa pe3epBoapa 3a MacNo. KbMa Ta3u Maunha e BKNUChe 75 mL KOthEnep C MacNo 3a npabnHIO nbHHe Ha dBrataeC mACNO camo npn PbBOHauHNO n3nON3BaHe. N3neIte IaNoTO CbDbpxKaHne Ha TOni KOthEnep C MacNo B TpbOaTa 3a nbHHe O macNo.CneI mbPOBHaayHTo nbHHe C macNo pocTo doneJeMacNo B DBrataeAo INHkATOPHaTt HNHA MAXFILL (MaKc. nbHHe), korato e Heo6xOdmo.
BHIMAHHE: HE npenbnaite dBnuratena C Macno nnn moxete da ro nobpeinte.
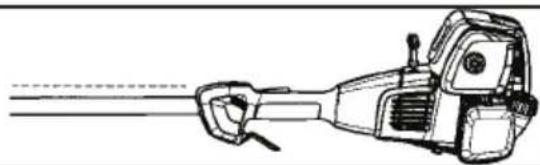
BHIMAHHE:3a da npOBepnte MacNoTo, DBnraTeIaTp6Ba Da e Bbpxy paBHa NOBpXHOCT, a Kanaaykata 3a NbJHHe c MacNo Tp6Ba Da coyn Harope. Ako DBnraTeJIr He e Bbpy PAba NoBbpxHOCT, NOKa3aHHeTO 3a NbJHHe c Maco HMa Da 6bDe ToUHO. TOBa ige DOBeDE Do EBEHTaYAnHO IpENbJBAHe INN HeIOCTaTbUHO HnBO Ha NbJHHe, KOEt MOKe Da npeIN3BnKa NOBpeDa Ha DBnraTeJI.
- PpOBepTe HnBTo Ha MacNoTo, npei Da CTapTpate DnraTeJ.
- PpOBepTe HnBTo Ha MaCNo IpeN BcRAynoTpeBa.
-Подьржайе HNBOTO Ha MacNo Ha INHДИКaTOPHaTаЛINHЯ“MAXFILL”(MaKc,плнHe).
He npembIbaIte.
- YBepeTe ce, ye DBnIaTeJIeT ha paBHa NOBbPxHOCT n 3OHaTa OKONO OTBOPa 3a NbJIHeHe C MacNo e UcTa.
- CbaneTe kanaykata 3a nbJheHe Ha macNo.
- HaneTe 6abHO MacnTo B DnuratEn. He npenbnaTe.
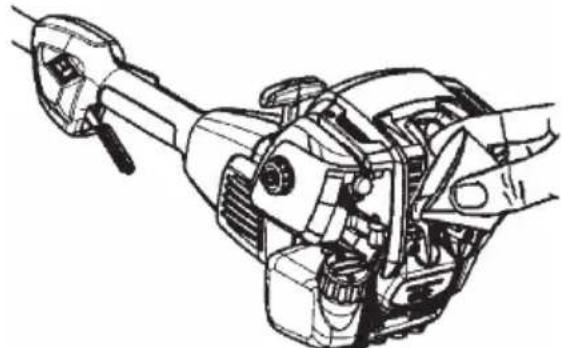
- NtBbpeHnBOTO Ha macNo MAXFILL (MaKc. nJIHeHe), KaTO npOBepNTe INHnKaTOpHnTe JINHM Ha npO3OpYeTo Ha pe3epBoapa 3a MacNo.
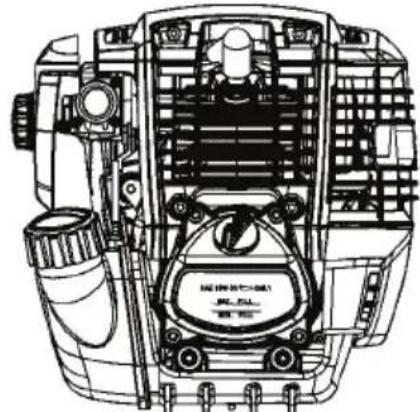
KoH3OJa Ha CBeuTa
Bb3dywenΦnntTp
BnHTOBe Ha Koxyxa
BnHTHa npbKka
ПЮBEPETE 3A NOBPEДEH NII N3HOCEH YuACTN
06bphETe Ce KbmybHOMOeH cepBn3a 3aMaHa Ha NOBpeHHTe NIN N3HOCEHNACTN
- PpeBknIOyBaTeI 3a BkN./CTon - yBepTe ce, ye PpeBKnIOyBaTeIY 3a BkN./CTon pa6To npabuHNO. PpeMeCTe TpeBknIOyBaTeI Ha STOP (Cton). YBepTe ce, Ye DnBraTeIe cnpJ; cneT ToBA ro pectaptnpaIte I npOdbJIkeTe.
- Pe3epBoaap 3a roPbBO - cnpete da n3nON3BaTe MaunHaTa, ako pe3epBoApbT 3a roPbBO nOKaKe npn3Haun Ha nobpeDa nn IpotnuaHe.
- IIT - npekbcheTe m3noJ3BaHcTo Ha MaunHaTa, aKO ⅢTbTe NOBpeDeH.
ПЮBEPETE HNBOTO HA MOTOPHO MACJO
BnKTe IO5ABRHE HA MACIO B pa3eNa EKCIIIOATAU.
ПОВЕРETЕ И NOΥСТETE MAШИHATA И ETUNKETITE
CneBcKa ynoTpe6a npOBepBaIte cIyIATA MaHHa 3a pa3XnaBeHn nnIOBpeHn YacTn.
- NocntTe MaunHaTn eTKeTHe, KaTo n3NoJ3BaTe BnaXHa KbpNa C MEK npenapat 3a MneHe.
- N36bpeTe MaunHaTa C uNCTa cyxa Kbpna.
- CbaTe KanaKata 3a nbJHe He Ha MacNo.
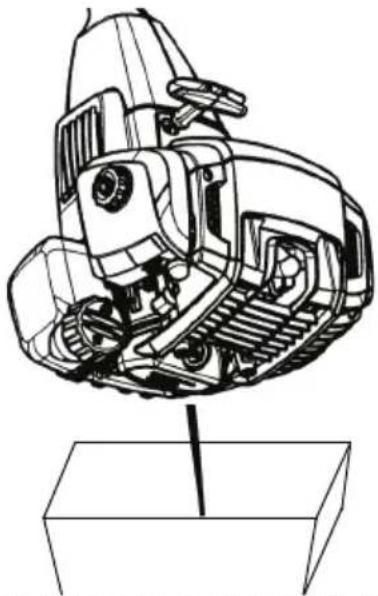
- ⅢTOUeTe MaCnOTo B NOxOJaIcBd, KaKTo e NOKa3aHO.
- NocTePe pa3JrTOTO macNo OT MaunHata.
- HanbJHHeTcBnraTeJIc MacJIO.
- NocTabete O6paTHO KanaqKaTa 3a IIbJIHeHa MacNo. 3aterHeTe 3dpBO.
IOUCTBAHE HA Bb3dUshnA ΦNITbP
3aMbpceHnT Bb3dUyHe nΦnTbP BnOuBa pa6oTaHa MoToPA uYBeNnAba NpTepeBnEHeTO Ha rOpBO uBpeHNte emncn BuHaRn NoocCTBaIe CneD BCEKN25 yaca pa6oTa
-
NocCTBaIte KanaKa I MrcTOTO OKoJNo Hero, 3a Da He No3BOJInte OTnAbuN Da nonaHnat B KaMepaTa Ha Kap6ypatopa, Korato 6bJe CBaneH KanakbT.
-
CbaneTe Kanaka Ha Bb3dyuHnA FmTTbp INBb3dyuHnA FmNTbp.
I PEPDyPEXDEHNE: He nouctBaTe 1nTbpa B6eH3HH Hn Dpyr Bb3nnaMeHm pa3TBOPuTeI.
3.ПомиTeФиNTbpa cbc canyH n BODa 3nJaKHeTe o6nJIHO.
4.OCTABETeΦnntbpaDaN3cbxHE.
5. 3ameheTe yactute.
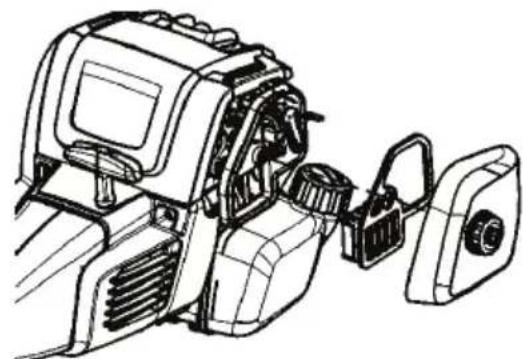
ПЮВЕРКАHA3AГЛУшENTEЯ ПРЕДПАЗняEkPAH HA CBEШТА
PnH3NoI3BaHeTo Ha MaunHata BbOxy aynyxa
In PpeNa3Hn eKapHa CBeUta Ce HAtpyNBat
BByIepoDn CaJdn. IpenOpbBaCe 3aRnyuHTenTjT
Ja ce nperIeJa nn Da ce 3aMeHn OT npeCTaBNTen Ha otOpn3npan cepBn3 cne50 yaca ynoTpe6a.
CMRAHACBEULTA
CbeuTa Tp86Ba Da ce CMeHr BcKa rOInHa, 3a Da ce rapaHTnpa, Ye MOTOpbT Ue Ce CTapTnpa No-JneCHO uIe paBToN No-Do6pe IpoBepraBte 3anAnTeHNHata CBeU Ha BCEKn 25 Yaca n3NoJ3BaHe. NouncTeTe n/nn CmeHeTe, KORato e Heo6xOdmo. PerynpaaiTe Mek
DHaTa Ha CBeUHa 0,6 mm.CnHxpoH3aUraHa 3anaJIbaHETO eФNKcnpaHa n He MoKe da cepeyInpa.
- 3abptete, a cneT TOBa n3BaTe KOH3OJaTa Ha CBeuTa.
- 3BaTe 3aIaIITeHHaTa CBeU OT UINHbpa I aN3XbPte.
- 3aMeHete r cbc cBeu Champion RZ-7C n y 3aTeHete 3dpaBO C rnyr aeuehen knou 16 mm.
- NocTabete Ha MRCTo KOH30nTa Ha CBeuTa.
CEPBn3 IN PEGYJINPOBKN
CMRAHA HA KOPDATA HA TPNMEPA
- HatncheTe qkcatOpnte OCTpaHn Ha TpIMepHaTATA JIABA N CBAJIeTe KANaka M Makapata.
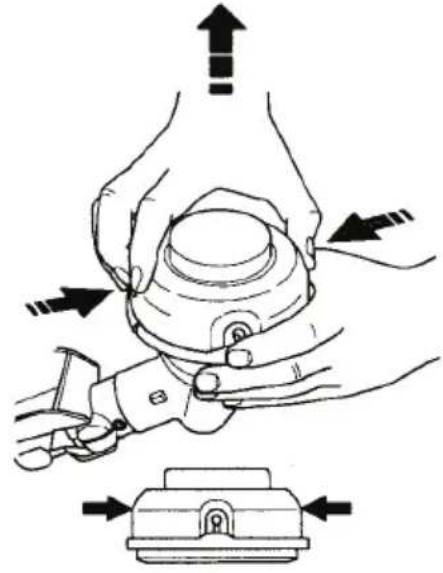
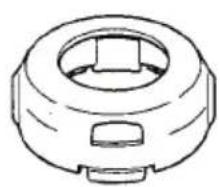
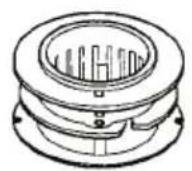
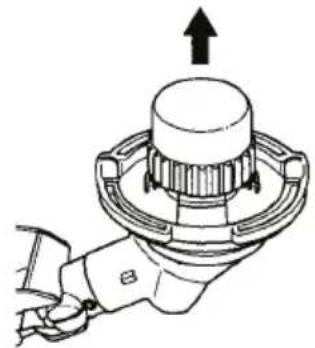
- ⅢBaIeTe OCTaBaUaTa KOpJa Ha TpImepa.
3.ПОИСТЕЗмьрсаянгаяиOCаТБцITE OT BCИКУЧТЯСТIЗamHeTe MaKApaTа,aKO e N3HOCEHaNJIN NOBpeDeHa.
- 3ameheTe C npEaBapntHo HabNTa MaKapa Nn 3ameheTe KOpTaHa TpMepa c 4 MeTp a OT NocOeHata KopDa Ha TpMepa.
-
Korato noctabrte HOBA Kopda Bbpxy CbuecTBByBa- 1a MaKapa,dpbXTE MaKapata,KaKTo e NOKa3aHO.
-
IperbHeTe KOpdaTa B CpeDaTn BMBKHeTe IperbBkata B npope3a B CEHTpaHnTa paMka Ha MaKapata YBepeTe Ce, Ye KOpdaTa Ha TpImepa e UpaKaHaHa MrcTo B npope3a.
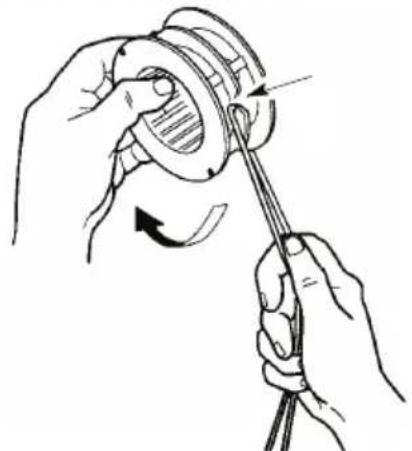
- KaTo NoCTaBnTe NpbCT MeKdy KopDInTe Ha TpImepa, HABNITE paBHomePHO 3dpabo OKONo MaKapaTa B NOCOKA Ha YacOBHKnOBaTa CTpeJka.
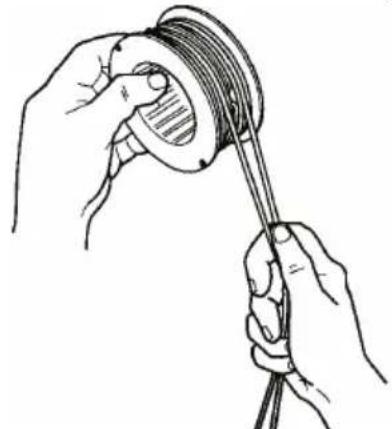
- IocTaBeTe KOpDInTe Ha TpImepa BbB BOeUInTe npope3n.
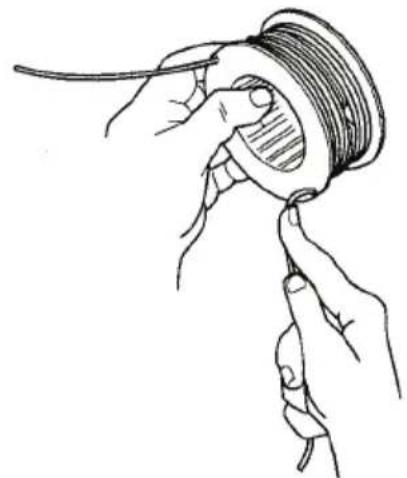
- NocTabete makapaTaNkana, KaKTo e noka3aHO.
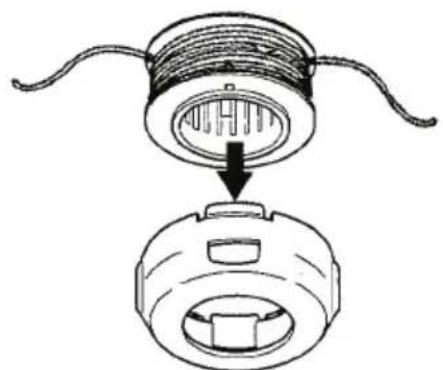
- IpekapaTe KpaIaTa Ha KOpIaTa Ha TpImepa Ipe3 HxOJaIte OTBOpN B CTPaHnHInTe CTeHN Ha Kanaka.
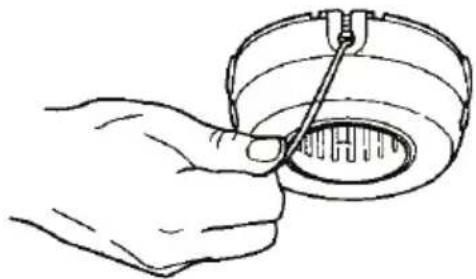
IocTabete OTHOBOMakapata N Kanaka Bbpxy TpImephata rnaBa. Hatnche, DOKaTO KanaKbT ⅢpaKHe Ha MRCTO.
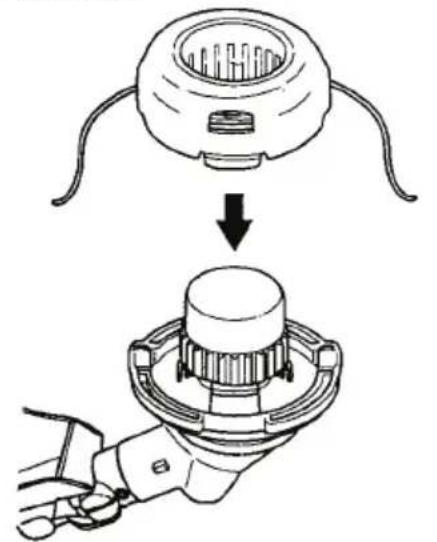

CMRAHA HATPUNMEPHATA JLABA
TEXHINUeCKN XAPAKTEPNUCTUKN
| B428PS
(4S28CSPR) |
| Дыгател
Овem Haцлиндьр, cm3 | 28 |
| Диаметер Haцлиндьр, mm 35 | |
| Xod, mm 28,7 | |
| Овороти Ha пазенхOD, ob/Min 2800 - 3200 | |
| Прелорьчтелп Мас. брзи обороти Ha пазенхOD, ob/Min 11 000 | |
| Скорост Ha ИЗхолпь вал, ob/Min 8000 | |
| Мас. мошноct Ha дыгателя съл. ISO 7293, кW 0,8 | |
| Заг lyштел Ha каталлзаторa He | |
| Запаллente Ha система с р发电机 на скорost Дa | |
| Запаллente Ha система | |
| Запаллente Ha система | |
| Запаллente Ha система | |
| Запаллente Ha система | |
| Запаллente Ha система | |
| Запаллente Ha система | |
| Запаллente Ha система | |
| Запаллente HA система | |
| Запаллente Ha система | |
| Запаллente Ha система | |
| Запаллente Ha система | |
| Запаллente Ha система | |
| Запаллente Ha система | |
| Запаллente Ha система | |
| Zhуовиемпсь (Викто заменьka 1) | |
| НИВо Ha 3БУКВаТа мошноct, ИЗмeperна dB(A) 109 | |
| НИВо Ha 3БУKВаТа мошноct, rapантурана IWA dB(A) 114 | |
| Шуовием НИВа (Викто заменьka 2) | |
| Еквиравелно НИВо Ha 3БУКВОТо Haлягонь Вьрху ухOTO Ha onepatopа, ИЗмeperно
съласно EN/ISO 11806 и ISO 22868, dB(A) | 100 |
| Овopyдван с пох 3а косе (оригинален) | 100 |
| Овopyдван с похмега Глава (оригинален) | 100 |
| НИВа Ha Вибрацим (Викто заменьka 3) | |
| Еквиравелно НИВа Ha Вибрацимte (a_{hy,eq}) Вьрху рьковьаткпес, ИЗмeperно CBласно
EN ISO 11806 и ISO 22867, m/s2 | |
| Овopyдван с пох 3а косе (оригинален), пьВ/decesH | 4,2/6,0 |
| Овopyдван с похмега Глава (оригинален), пьВО/дясно | 4,3/4,5 |
3a6eJekka 1: UyMOnBn emncn B OKoJIHaTa cpeJa, n3MepeHn KaTo 3ByKObA MOUHOCT (Lw) B CbOTBeTCTBne c dIpyeKTHBa HA EO 2000/14/EO. OTYeTeHNrte HbA Ha Wyma 3a MaWmHaTa ca N3MepeHn COpNtHAnHOTo peKeJIO bOpydBaHe, KoTo DaBa Hau-BuCOKOTo HbO. Pa3JIkKaTa MeKdy rapaHTnpaHOTo n3MepeHTo HbO Ha Wyma e B ToBa, Ye rapaHTnpaHOTo HbO Ha Wyma BKIOUcBA CbIo and NDCNEpcnraTA B Pe3YITaTlNTe OT n3MEpBaHeTO, KaKTo u BapnaunTe Mekdy pa3NIuHHTe MaWmHn OT eINH n cbSIn MoDeB CbOTBeTCTBne C DnpeKTHBa 2000/14/EO.
3a6eEckka 2: OTuTeHnTe DaHHN 3a EKBuBaneHTHO HbO Ha 3ByKObTo HaJIraHe 3a MaUHaTa IMaT TnNHaCTaNTcHeCKa DnCnepcna (CTaHapTHo OTKnloHeHne) ot 1 dB(A).
3a6eIeKka 3: OTeTeHnTe daHHn 3a eKBuBaJIeHTHO HBO Ha Bn6paUNTE IMaT TINUHa CTaTHCTNuecka Dncpepcna (ctahdapTHo OTKnOHeHne) ot 1 m/s2.
| B428PS | | |
| Одобreno prисnosобленna | Тип | Шит за рожецю оборUDванe № |
| Центраlen otвор в покове/peзц, 025,4 mm | Изхoden вал – peзba M10 | |
| Тримерна пава | P25 (2,0 mm корda) | 580 30 50 01 |
| Метален pezeц за косень | Т人民银行 255-4 25,4 mm (0 250 4 зьбa) | 580 30 50 01 |
DEKJIAPALUN3A CbOTBETCTBVE
ImeHa npOn3BODnteJr: Husqvarna AB, SE-561 82 Huskvarna, WBeuJr, TeI.: +46-36-146500.
Husqvarna AB Hocn cIaNaTa OTROBOPHOCT 3a npedMeTa Ha Ta3n DeKnapaunr: TpMep n/nn Xpactope3, nlaTOpma(n) 4S28CSPR, npedctablaBaua(n) moen(n) McCulloch B428PS cbc cepnHn Homepa oT 2015 r. n haTaTbK.
HomepT Ha Pnata HmepbHa Moena Ca RCHO NocOeHN KaTO TeKCT Bbpxy TInOBaTa TaBeNka, 3aeDHO C rOHHATA, CneDbHa OT cepHnHTe Homepa.
PpeMeTbT Ha DeKnapaunra, OINcAH NO-TOpe, E BCBoTBETCTBNE C N3NCKBaHnraTa Ha DnpeKTNBtHe HcBBeTa:
2006/42/EO no OTHoWeHne Ha MaunHHoTo o6OpyDbAhe (2006-05-17)
2014/30/EC no OTHoWeHne Ha eNeKtpomarHHTHa cbbMeCTnMoCt (2014-02-26)
2000/14/EO no OTHoWeHne Ha emncnTe Ha WM B OKJHaTa cpea (2000-05-08)
B cbOTBeTCTBnE c npInOKeHne V, oBBeHnTe CTOnHOCTn Ha 3ByKa Ca nOCoYeHN B CneuΦnKaUraTa H aTexHHueCKnTe XapakTepeNtIKn DaDeHn Ha INHCTpyKUraTa 3a EKcPiNoTaunr.
I3noJI3BaHn ca cneHNITe CTaHapTn:
EN ISO 12100:2010, EN ISO 11806-1:2011, CISPR 12:2007, ISO 14982:2009
TUV Rheinland N.A. 16080BIOHNO H3BpUIN KOHTPOI OT IMeTO Ha Husqvarna AB IN I3ROTBN CepTNΦNKAT 3a CbOTBETCTBNE AM 72140164 - c DnpeKTHBa HA CbBeta 2006/42/EO OTHOCHO MaunHInTe. To3N cepTNΦNKAT e npNJIOXIM 3a BCNUKN pON3BOOCTBEHN IIIOUaIKN IN CTpaHN HA pON3XoJ, KaKTo E yNOMeHATO BbpxY IpOdyKTa. IocTaBeHInTE TpImep 3a TpeBa n/INx XpactOtec CbOTBETCTBAT Ha o6pa3eua, NOJIOKeH Ha KOHTPOI.
IopnnncanHOTnmeToHa:HusqvarnaAB,Huskvarna,UBeu,12.11.2015r.

Ronnie E. Goldman, Дурактор пpoektnpahe. (Отол�ан пpeдtabinteHa Husqvarna AB и отrobopнк 3a texhnecka tdoKymentaця.)
EI2AΓΩΓH
Ayanté TELaTn,
Zac euxapiotoume Toun etiiegeate eva pioiov tnc
McCulloch. IVeote etoi meoic napaoanTou
Eeknoe edk kai kaipocav ng McCulloch Corporation
apxie va kataoekuaei kivtnpec kata tn diapkeia tou
B' Pnykoogiou Nlouemou.AtoTo 1949,otav n McCulloch
tapouiae To TpWTo EaaPPu atoMIO aAUooTpiOvo, n
katepyaia Tou duou dev thavnte gava n iia.
H oepa kaivotopuvw auooTPOVwovvexioe kata tn
diapkeia twv dekaetiwv kai n etiyeipnon ettktaonke,
tpwa t pe KIVNTpeC aepoakawkai oxmuatwv cart,
OTN DEKAETIA Tou 1950, kai pTa MEKPA aAUooTPOVA
tn dekaetia Tou 1960. Apyotepa, tic dekaetiec Tou 1970
kai 1980, OTN oepa TPOOTeKnav xoptokottikai quantnpes-avappoPntpec.
Snepepa, wseLooc Tou opilou Husqvarna, n McCulloch
ouvexici Tnv Tnapadoon twv ixupwiv KIVNTnpw, twv
TEXVIKW v Kaivotouvi KAI Tou duvatou oxediaou, Tous UTTpeav to anpa katateev mac yia TEPIOATEpo atto
muo aiwa. H meiwn tnc katavalwons kauoiwv, twv EKTOIW KAI TWV ETITeowv BOpBou Eivai aTolun TTPOTEPAOTnTa YIA EaC, OTWs Eivai KAI N BELTIOWn TnC aoPaaEiaC KAI TNS φIaIKOTnTcA TPOC To xpOtn.
Eaicoume otk a eote kavotoinevo t to pioiov McCulloch, kaowc eivai oxediagve yia va aac ouvtpopeuei yia eyalao xpvikodiaotna. Akolouwwtac tic oubouace Tou TAPovtoc EYxepidoiu xpntn OETIKa Etn XpOan, nTv ETIOKEun kai tn ouvtnpon, n diapkeia ZWCs Tou Pioovtoc mtopei va npataei. Av xpeiaoteite Etayelatik Bontheia yia ETIOKEun n oepis, xnpoiotoinote Tnv UTnpoeia EVTOTIAoU oepBic OTn dieuuvon www.mcculloch.com.
XPHEN THE ΛΑΝΙΑΣ XOPTOY
- Apaipote Tny taTn npwns laiou

- ATOOTpaYyIOTe To oE KATaAaNtO DoXeio, OITWC UTOEiKvUeTAt OTo Oxnua.
- ΣΚΟΥΙΤΙΑ έλατο Μιχάνημα Αλάδι Που τυχόν ἐχει Χυθεί。
- tov kivntnpa
- ETTAVATOTIOEETNOTE TNY TATAA PAnpwoons Aabiou. ZphiTe apkETa.
KAOAPISTE TO ΦIATPO AEPA
'Eva bpómu KIAtpo aepa eWve TnV atdoon Tou kivtnpaa Kaia uαseT NTV KAATAWON KAUoiou KAI TIC EITBAeic EKTOPTIE KAuaepiW. O kaapiooC npTeTVA YIVETA IVTA aTIOKAθE 25 wes Aetoupyiac.
115825738 Rev. A 2016-03-06