
SEV 2416 Q - Saw STIGA - Free user manual and instructions
Find the device manual for free SEV 2416 Q STIGA in PDF.
| Product type | Electric chainsaw |
| Brand | Stiga |
| Model | SEV 2416 Q |
| Supply voltage | 230 V~ / 50 Hz |
| Motor power | 2400 W |
| Guide bar length | 405 mm (16 inches) |
| Chain speed | 13.5 m/s |
| Oil tank capacity | 230 ml |
| Weight | 5.3 kg |
| Sound pressure level | 84.92 dB(A) |
| Sound power level | 104.92 dB(A) |
| Vibration level | 3.838 m/s² |
| Insulation | Double insulation (class II) |
| Chain brake | Yes, with double braking system |
| Overload protection | Resettable overload circuit breaker |
| Intended use | Wood cutting, felling, limbing, bucking |
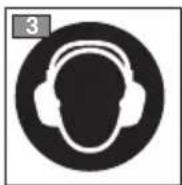
| Recommended safety | Wear PPE: goggles, gloves, helmet, hearing protection |
| Recommended oil | Biodegradable specific chain oil |
| Regular maintenance | Chain sharpening, groove cleaning, tension check |
| Common spare parts | Guide bar, chain, drive sprocket, chain catcher |
| Storage | In a dry place, protected from weather, with the guide bar guard |
Frequently Asked Questions - SEV 2416 Q STIGA
User questions about SEV 2416 Q STIGA
0 question about this device. Answer the ones you know or ask your own.
Ask a new question about this device
Download the instructions for your Saw in PDF format for free! Find your manual SEV 2416 Q - STIGA and take your electronic device back in hand. On this page are published all the documents necessary for the use of your device. SEV 2416 Q by STIGA.
USER MANUAL SEV 2416 Q STIGA
EN Electric Chain-saw - OPERATOR'S MANUAL WARNING: read thoroughly the instruction booklet before using this machine.
BQ Ferăstrau electric - MANUAL DE INSTRUCTIONUNI
ATENTIE: inainte de a utilizesmaina, citi ci atentie manualul de fata.
BG Elektprucecka pe3auka - YnTBAHE 3A yNOTPE6A
BHHMAHNE: npedn da n3noJ3BaTe MaunHaTa npoyeTe
BHnMaTeJIHo HactoIaTa KHHK.
ET Elektrisaag - KASUTUSJUHEND
ETTEVAATUST: enne masina kasutamist lugeda tahelepanelikult kaesolevat kasutusjuhendit.
ITALIANO - Istruzioni Originali IT
ENGLISH - Translation of the original instructions (Istruzioni Originali) ....
FRANÇAIS - Traduction de la notice originale (Istruzioni Originali)
DEUTSCH - Übersetzung der Originalbetriebsanleitung (Istruzioni Originali) DE
ESPANOL - Traducción del Manual Original (Istruzioni Originali) ES
NEDERLANDS -Vertaling van de oorspronkelijke gebruiksaanwijzing (Instruzioni Originali)NL
PORTUGUES - Traducao do manual original (Instruzioni Originali) PT
EANHNIKA - Mετάφραση του πρωτότιου των σθηγίων χρήσς (Istruzioni Originali) EL
TURKÇE - Original Talimatlarin Tercümesi (Istruzioni Originali) TR
POLSKI - Tlumaczenie instrukcji oryginalnej (Instruzioni Originali) PL
SLOVENsCINA - Prevod izvirnih navodil (Instruzioni Originali)
PYCCHN - IpeBOD opnHaJIbHbIX nHcTpkyCn (Istruzioni Originali) ....RU
HRVATSKI - Prijevod originalnih uputa (Istruzioni Originali)
SVENSKA - Oversättning av bruksanvisning i original (Istruzioni Originali)SV
SUOMI - Alkuperäisten ohjeiden käannös (Instruzioni Originali) FI
DANSK - Oversættelse af den originale brugsanvisning (Istruzioni Originali)DA
NORSK - Oversettelse av original bruksanvisning (Istruzioni Originali) ....NO
ČESKY - Překlad původního námodu k používání (Istruzioni Originali) ....CS
MAGYAR - Eredeti hasznalatiutasitas forditasa (Istruzioni Originali) ......HU
MAKEHOHCHN - IpeBOD Ha opnHaJIHnte yNaTcTba (Istruzioni Originali)MK
LIETUVISKAI - Originaliug instrukciju vertimas (Instruzioni Originali) LT
LATVIEŠU - Instrukciju tulkojums no originalvalodas (Instruzioni Originali) L
ROMÁN - Traducerea manualului fabricantului (Istruzioni Originali) RO
БылгAPСИ - Иструкши за[eхллоатаця (Istruzioni Originali) BG
EESTI - Algupärase kasutusjuhendi tõlge (Istruzioni Originali) ET


Gentile Cliente,
thank you for choosing one of our products. We hope that you will be completely satisfied with this and that it fully meets your expectations. This manual has been compiled in order to provide you with the information you need to get acquainted with the machine and use it safely and efficiently. Don't for that it is an integral part of the machine, so keep it handy so that it can be consulted when necesss pass it on to a further user if you resell or loan the machine.
Your new machine has been designed and manufactured in pursuance with current regulations, and is and reliable if used in compliance with the instructions provided in this manual (proper use). Using the chine in any other way, or non-compliance with the safety specifications relative to use, maintenance a repair is considered "improper use" which will invalidate the warranty, relieve the manufacturer from all abilities, and the user will consequently be liable for all and any damage or injury to himself or others
Since we regular improve our products, you may find slight differences between your machine and the scriptions contained in this manual. Modifications can be made to the machine without notice and with the obligation to update the manual, although the essential safety and function characteristics will remain unaltered. In case of any doubts, please contact your dealer. And now enjoy your work!
TABLE OF CONTENTS
- Identification of the main components 2
- Symbols 3
- Safety warnings 4
- Machine assembly 6
5.Preparing to work 6 - How to start - Stop the engine 8
- Using the machine 8
- Maintenance and storage 13
- Troubleshooting 14
- Accessories 14
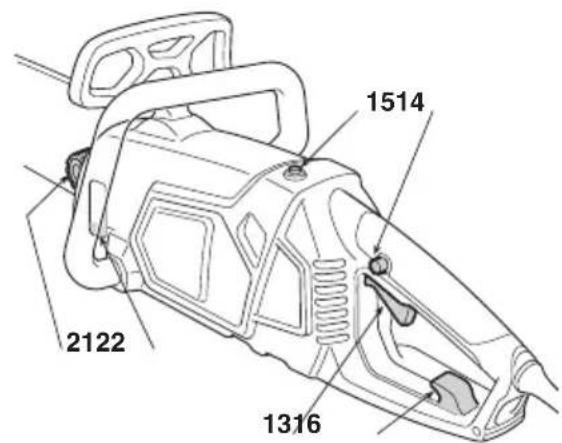
1. IDENTIFICATION OF MAIN COMPONENTS
MAIN COMPONENTS
- Power unit
- Spiked bumper
- Front hand guard
- Front handgrip
- Rear handgrip
- Chain catcher
- Bar
- Chain
- Bar cover
- Identification plate
- Power cable
- Extension lead (not supplied)
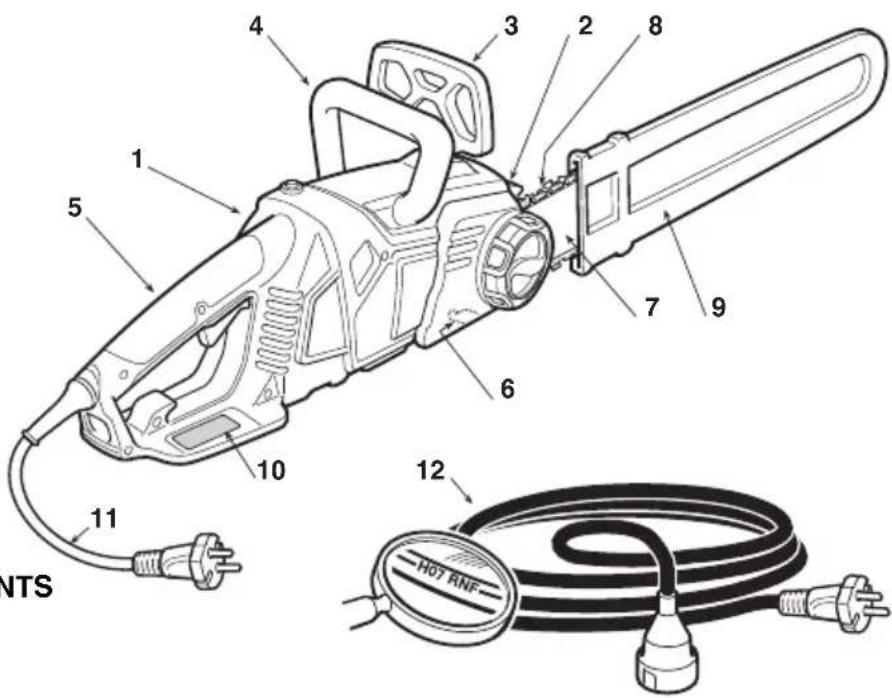
CONTROLS AND FILLING POINTS
- Trigger switch
- Safety button
- Reset button
- Extension lead connection
- Chain oil tank cap
- Chain oil gauge
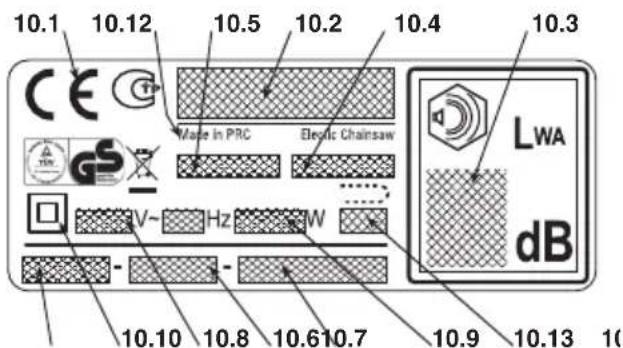
IDENTIFICATION PLATE
10.1) Conformity marking in accordance with Directive 2006/42/EC
10.2) Name and address of the manufacturer
10.3) Acoustic output level LWA in accordance with directive 2000/14/EC
10.4) Manufacturer's model of reference
10.5) Machine model
10.6) Serial number
10.7) Year of manufacture
10.8) Power supply frequency and voltage
10.9) Engine power
10.10) Dual insulation
10.11) Article Code
10.12) Manufacturing country
10.13) Maximum permitted length of the bar. Do not use longer bars.

Do not dispose of electrical equipment together with household waste material. In observance of European Directive 2002/96/EC on waste electrical and electronic equipment and its implementation in accordance with national law, electric equipment that have reached the end of their life must be collected separately and returned to an environmentally compatible
recycling facility. If electrical appliances are disposed of in landfills or dumps, hazardous substances can leak into the groundwater and get into the foodchain, damaging your health and well-being. For further information on the disposal of this product, contact your dealer or a domestic waste collection Service.
| Maximum noise and vibration levels [1] | ||
| Operator ear noise pressure level (EN ISO 22868) | dB(A) | 84,92 |
| - Measurement uncertainty (2006/42/EC - EN 27574) dB(A) 3 | ||
| Measured acoustic output level (EN ISO 22868) dB(A) 104,92 | ||
| - Measurement uncertainty (2006/42/EC - EN 27574) | dB(A) | 3 |
| Vibration level (ISO 22867) m/sec | 2 | 3.838 |
| - Measurement uncertainty (2006/42/EC - EN 12096) | m/sec2 | 1.5 |
| TECHNICAL SPECIFICATIONS | ||
| Voltage V~ 230 | ||
| Power frequency Hz 50 | ||
| Motor power W 2400 | ||
| Bar length mm / " 405 mm 16" | ||
| Chain speed | m/sec | 13.5 |
| Weight | kg | 5.3 |
| Oil | ml | 230 |
[1]
Notice:
The vibration value indicated was determined with a standardized tool and can be used to make comparisons with other electric equipment as well as temporary estimates of the load through the vibrations.
WARNING!
The vibration value may vary according to the usage of the machine and its fitted equipment, and be higher than the one indicated. Safety measures must be established to protect the user and must be based on the load estimate generated by the vibrations in real usage conditions. In this regard, all the operational cycle phases must be taken into consideration, such as switching off or idle running.
2. SYMBOLS
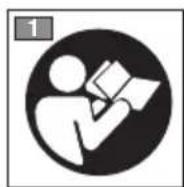


1) Read the instruction manual before using the machine.
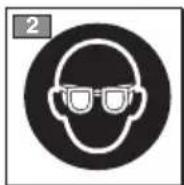
2) 3) If you are using the machine every day in normal conditions, you can be exposed to a level of 85dB (A) or higher. Wear safety gla and hearing protection.
4) Do not leave the machine in the rain (or in damp conditions).
5) Unplug the chain-saw immediately if the cable (or extension lead) is cut or damaged.
6) Maximum permitted length of the bar. Do not use longer bars.
EXPLANATORY SYMBOLS ON THE MACHINE (if present)
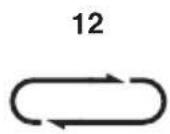
11) Direction in which the chain is mounted
12) Direction in which the chain runs
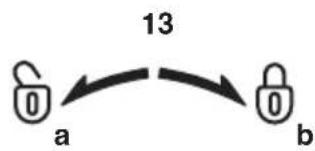
13) Rotation direction to loosen (a) or tighten (b) the bar
3. SAFETY WARNINGS
HOW TO READ THE MANUAL
Certain paragraphs in the manual contain particularly significant p information and are marked with various levels of highlighting with the following meaning: 3)
NOTE
or
IMPORTANT
These give details or further informa
tion on what has already been said, in the aim to prevent damage to the machine.

WARNING!
Non-observance will result in the
risk of injury to oneself or others.

DANGER!
Non-observance will result in the
risk of serious injury or death to oneself or others.
GENERAL POWER TOOL SAFETY WARNINGS

WARNING!
Read all safety warnings and all
instructions. Failure to follow the warnings and instructions may result in electric shock, fire and/or serious injury.
Save all warnings and instructions for future reference. The term "power tool" in the warnings refers to your mains-operated (cored) power tool.
1) Work area safety
a) Keep work area clean and well lit. Dirty or cluttered areas invite accidents.
b) Do not operate power tools in explosive atmospheres, such as in the presence of flammable liquids, gases or dust. Power tools create sparks which may ignite the dust fumes.
c) Keep children and bystanders away while operating a power tool. Distractions can cause you to lose control.
2) Electrical safety
a) Power tool plugs must match the outlet. Never modify the plug in any way. Do not use any adapter plugs with earthed (grounded) power tools. Unmodified plugs and matching outlets will reduce risk of electric shock.
b) Avoid body contact with earthed or grounded surfaces, such as pipes, radiators, ranges and refrigerators. There is an increased risk of electric shock if your body is earthed or grounded.
c) Do not expose power tools to rain or wet conditions. Water entering a power tool will increase the risk of electric shock.
d) Do not abuse the cord. Never use the cord for carrying, pulling or unplugging the power tool. Keep cord away from heat, oil, sharp edges or moving parts. Damaged or entangled cords increase the risk of electric shock.
e) When operating a power tool outdoors, use an extension cord suitable for outdoor use. Use of a cord suitable for outdoor use reduces the risk of electric shock.
f) If operating a power tool in a damp location is unavoidable, use a residual current device (RCD) protected supply. Use of an RCD reduces the risk of electric shock.
3) Personal safety
a) Stay alert, watch what you are doing and use common sense when operating a power tool. Do not use a power tool while you are tired or under the influence of drugs, alcohol or medication. A moment of inattention while operating power tools may result in serious personal injury.
b) Wear protective clothing. Always wear protective goggles. Using personal protective equipment such as dust mask, non-skid safety shoes, safety helmets or hearing protectors will reduce personal injuries.
c) Prevent unintentional starting. Ensure the switch is in the "off"-position before connecting to power source, picking up or carrying the tool. Carrying power tools with your finger on the switch or energising power tools that have the switch "ON" invites accidents.
d) Remove any adjusting key or wrench before turning the power tool on. A wrench or a key left attached to a rotating part of the power tool may result in personal injury.
e) Do not overreach. Keep proper footing and balance at all times. This enables better control of the power tool in unexpected situations.
f) Dress properly. Do not wear loose clothing or jewellery.
d) Keep your hair, clothing and gloves away from moving parts. Loose clothes, jewellery or long hair can be caught in moving parts.
g) If devices are provided for the connection of dust extraction and collection facilities, ensure these are connected and properly used. Use of dust collection can reduce dust-related hazards.
4) Power tool use and care
(a) Do not force the power tool. Use the correct power tool for your application. The correct power tool will do the job better and safer at the rate for which it was designed.
b) Do not use the power tool if the switch does not turn it on and off. Any power tool that cannot be controlled with the switch is dangerous and must be repaired.
c) Disconnect the plug from the power source before making any adjustments, changing accessories, or storing power tools. Such preventive safety measures reduce the risk of starting the power tool accidentally.
d) Store idle power tools out of the reach of children and do not allow persons unfamiliar with the power tool or these instructions to operate the power tool. Power tools are dangerous in the hands of untrained users.
e) Maintain power tools. Check for misalignment or binding of moving parts, breakage of parts and any other condition that may affect the power tool's operation. If damaged, have the power tool repaired before use. Many accidents are caused by poorly maintained power tools.
f) Keep cutting tools sharp and clean. Properly maintained cutting tools with sharp cutting edges are less likely to bind and are easier to control.
g) Use the power tool, accessories and tool bits etc. in accordance with these instructions, taking into account
the working conditions and the work to be performed.
Use of the power tool for operations different from those tended could result in a hazardous situation.
Tip contact in some cases may cause a sudden reverse reaction, n-kicking the guide bar up and back towards the operator.
Pinching the saw chain along the top of the guide bar may push the guide bar rapidly back towards the operator.
5) Service
a) Have your power tool serviced by a qualified repair person using only identical replacement parts. This will ensure that the safety of the power tool is maintained.
Either of these reactions may cause you to loose control of the saw which could result in serious personal injury. Do not rely exclusively upon the safety devices built into your saw.
As a chain saw user, you should take several steps to keep your cutting jobs free from accident or injury.
CHAIN SAW SAFETY WARNINGS:
- Keep all parts of the body away from the saw chain when the chain saw is operating. Before you start the chain saw, make sure the saw chain is not contacting anything. A moment of inattention while operating chain saws cause entanglement of your clothing or body with the saw chain.
Always hold the chain saw with your right hand on the rear handle and your left hand on the front handle. Holding the chain saw with a reversed hand configuration increase the risk of personal injury and should never be done. - Wear safety glasses and hearing protection. Further protective equipment for head, hands, legs and feet is recommended. Adequate protective clothing will reduce personal injury by flying debris or accidental contact with the chain.
- Do not operate a chain saw in a tree. Operation of a chain saw while up in a tree may result in personal injury.
- Always keep proper footing and operate the chain saw only when standing on fixed, secure and level surface. Slippery or unstable surfaces such as ladders may cause loss of balance or control of the chain saw.
- When cutting a limb that is under tension be alert for spring back. When the tension in the wood fibres is release the spring loaded limb may strike the operator and/or throw chain saw out of control.
- Use extreme caution when cutting brush and saplings. bra The slender material may catch the saw chain and be whipped toward you or pull you off balance.
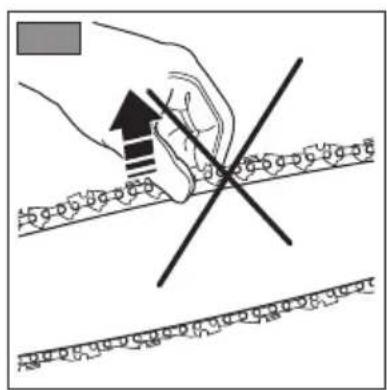
- Carry the chain saw by the front handle with the chain saw switched off and away from your body. When transporting or storing the chain saw always fit the guide bar cover. Proper handling of the chain saw will reduce the likelihood of accidental contact with the moving saw chain.
- Follow instructions for lubricating, chain tensioning and changing accessories. Improperly tensioned or lubricated chain may either break or increase the chance for kickback
- Keep handles dry, clean, and free from oil and grease. Greasy, oily handles are slippery causing loss of control.
- Cut wood only. Do not use chain saw for purposes not intended. For example: do not use chain saw for cutting plastic, masonry or non-wood building materials. Use of the chain saw for operations different than intended could suit in a hazardous situation.
Kickback is the result of tool misuse and/or incorrect operating procedures or conditions and can be avoided by taking proper precautions as given below:
- Maintain a firm grip, with thumbs and fingers encircling may the chain saw handles, with both hands on the saw and position your body and arm to allow you to resist kickback forces. Kickback forces can be controlled by the operator, if proper precautions are taken. Do not let go of the chain saw.
asesDo not overreach and do not cut above shoulder height. This helps prevent unintended tip contact and enables better control of the chain saw in unexpected situations. - Only use replacement bars and chains specified by the manufacturer. Incorrect replacement bars and chains may cause chain breakage and/or kickback.
- Follow the manufacturer's sharpening and maintenance instructions for the saw chain. Decreasing the depth gauge height can lead to increased kickback.
- Techniques for using the electric chain-saw
Always observe the safety regulations and use the most suitable sawing techniques (see chapter 7 for instructions and examples). the
Arrange the power cable so that it does not get tangled in branches or other obstacles.
- Safe carrying of the saw
Whenever the machine is to be handled or transported you must:
- turn off the engine, wait for the chain to stop and unplug the machine from the mains;
- mount the bar cover;
- only hold the machine using the handgrips and position the bar in the opposite direction to that used during operation.
When using a vehicle to transport the machine, position it so that it can cause no danger to persons and fasten it firmly.
e- Recommendation for the first-time users
CAUSES AND OPERATOR PREVENTION OF KICKBACK:
Kickback may occur when the nose or tip of the guide bar touches an object, or when the wood closes in and pinches saw chain in the cut.
Before felling or deliming for the first time, make sure:
- you have been specifically trained to use this type of equipment;
- you have carefully read the safety regulations and user instructions contained in this manual;
- you practise first on logs on the ground or attached to trestles, the in order to get familiar with the machine and the most suitable cutting techniques.
4. MACHINE ASSEMBLY
1. PACKAGING CONTENTS
The packaging contains:
-powerunit,
- bar,
chain,
bar cover,
bag containing documents.
IMPORTANT
The machine is supplied with
the bar and chain dismantled and the oil tank empty.
WARNING!
Unpacking and complet
ing the assembly should be done on a flat and stable surface, with enough space for machine handling and its packaging, always making use of suitable equipment.
Disposal of the packaging should be done in accordance with the local regulations in force.
2. BAR AND CHAIN MOUNTING
WARNING!
Always wear heavy-duty
gloves when handling the bar and chain.
Mount the bar and chain very carefully so as not to impair the safety and efficiency of the machine. If in doubt, contact your dealer.
Before fitting the bar, make sure the chain brake is not engaged; this is done by pulling the front hand guard right back towards the body of the machine.
WARNING!
Make sure the machine is
not plugged into the mains socket.
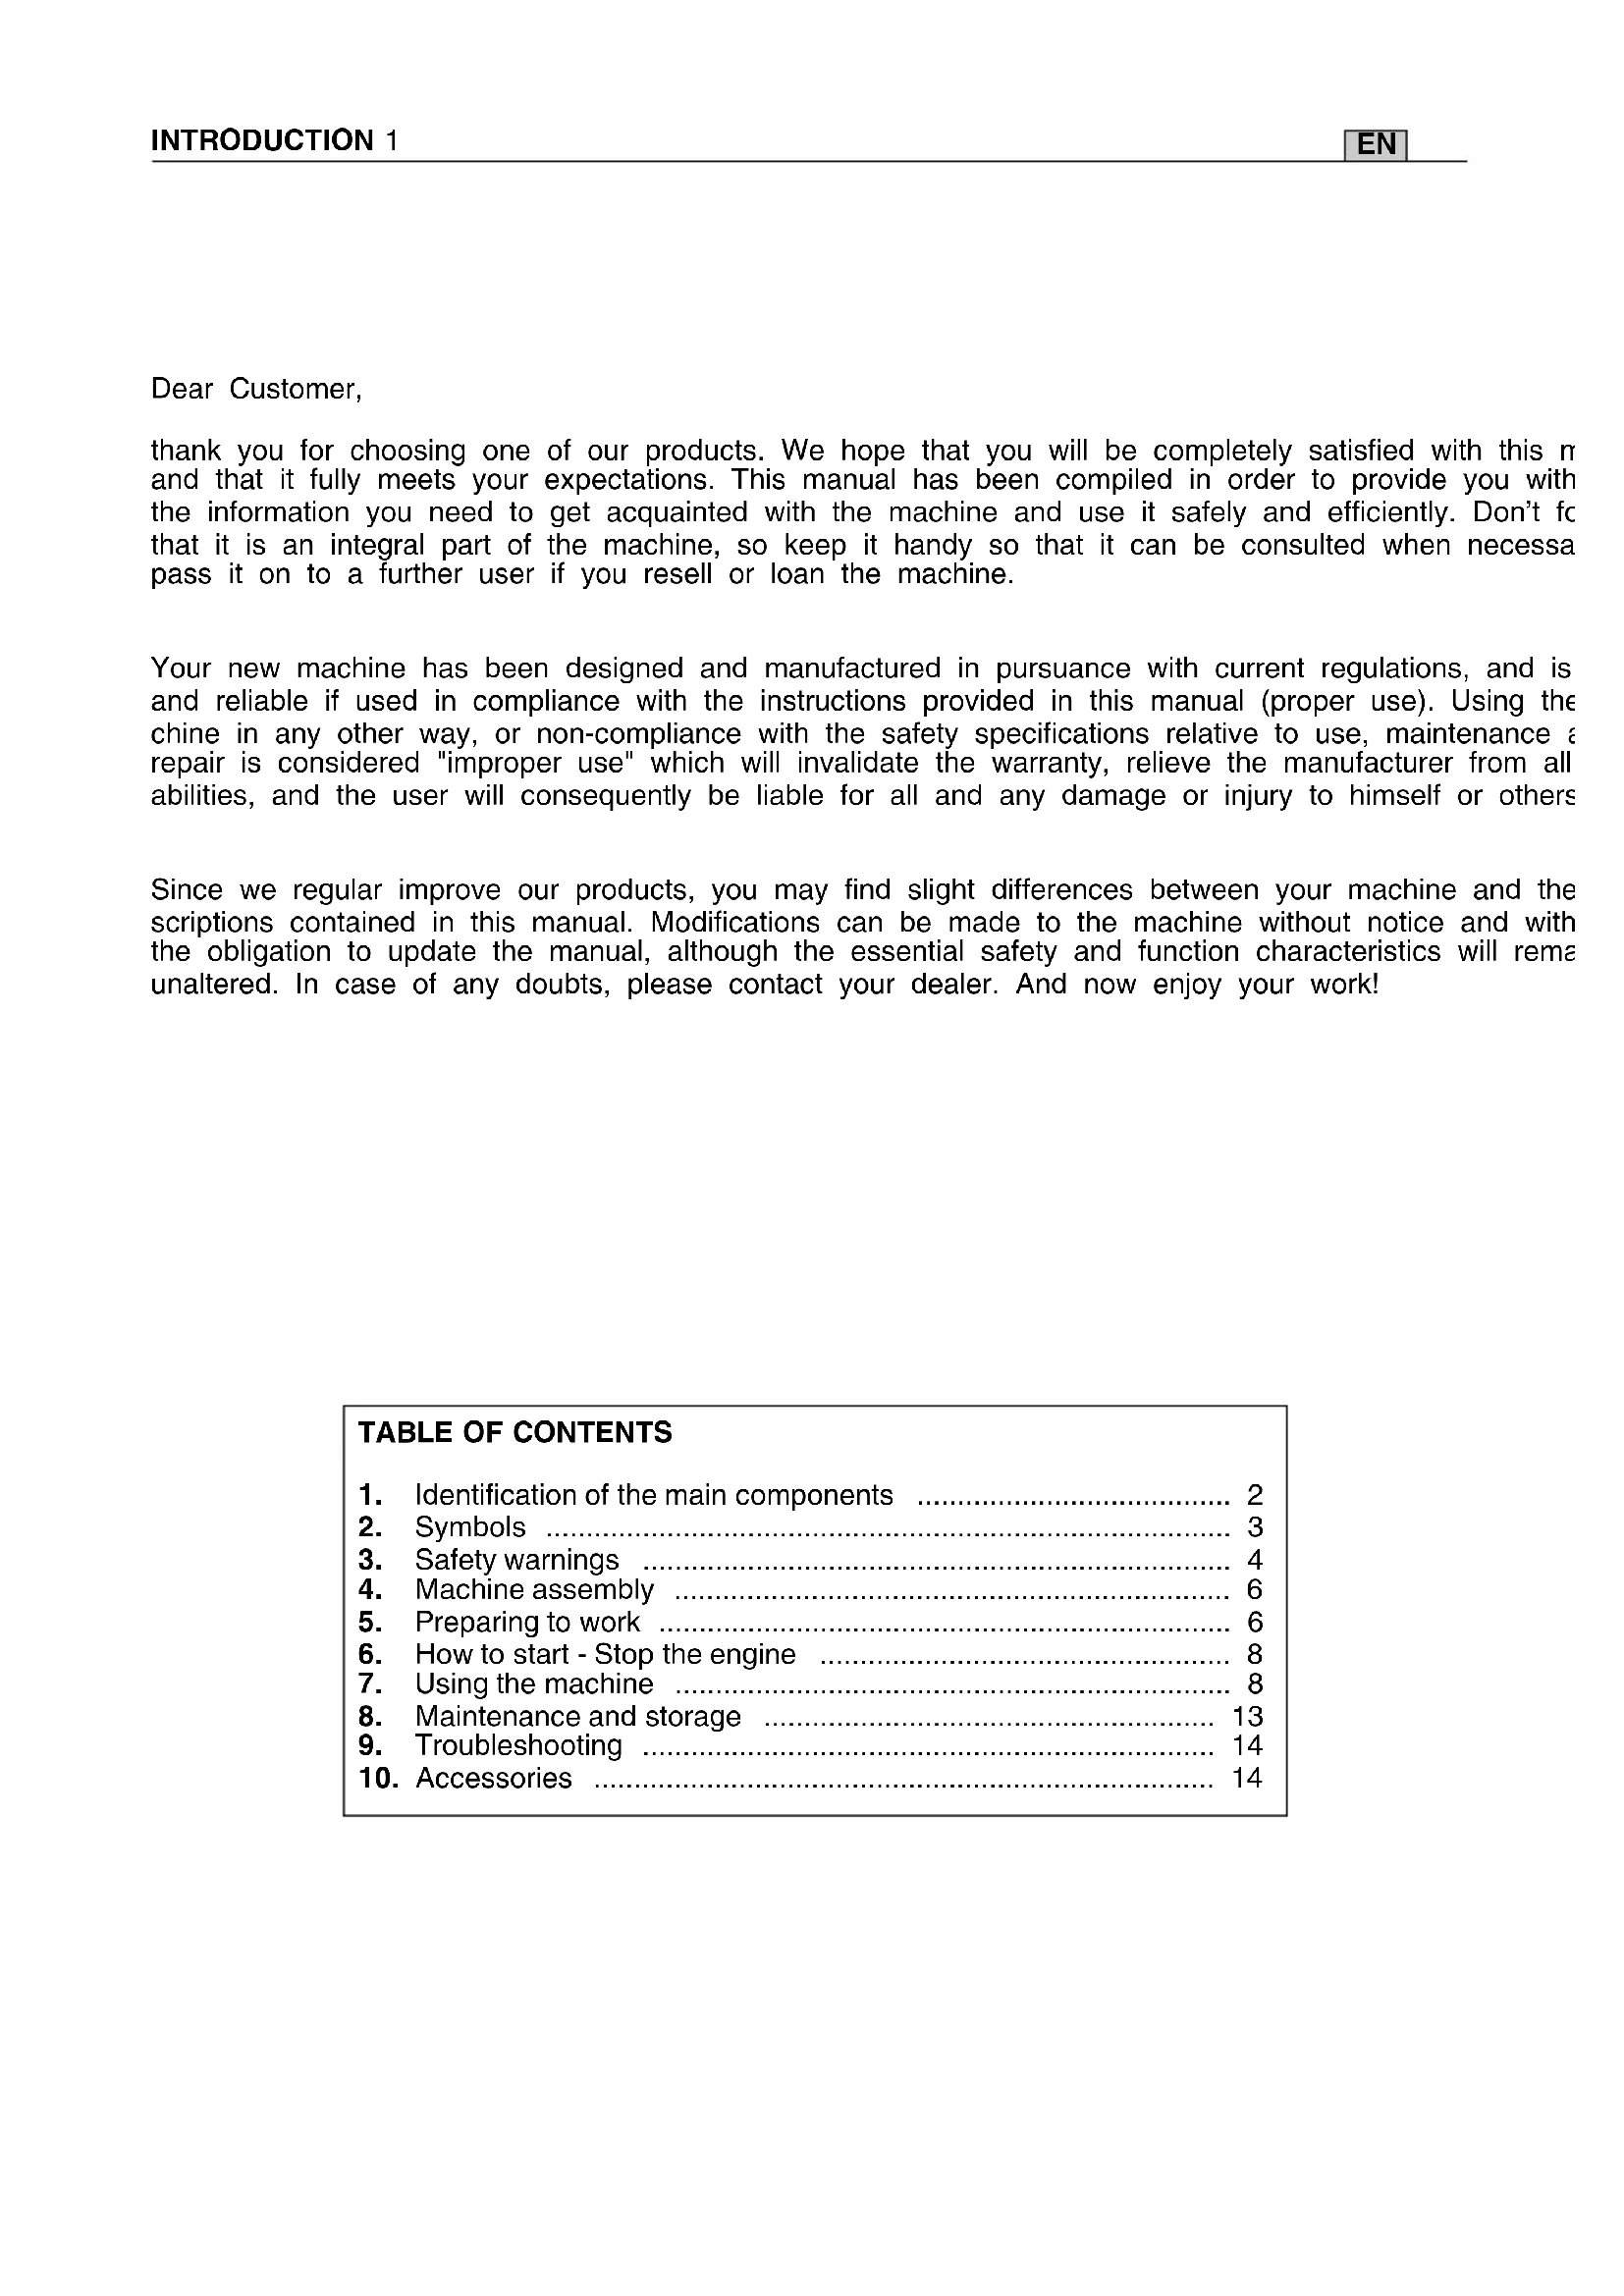
- Unscrew the handle (1) and remove the guard to get to the drive sprocket and the point where the bar is fitted (Fig. 1).
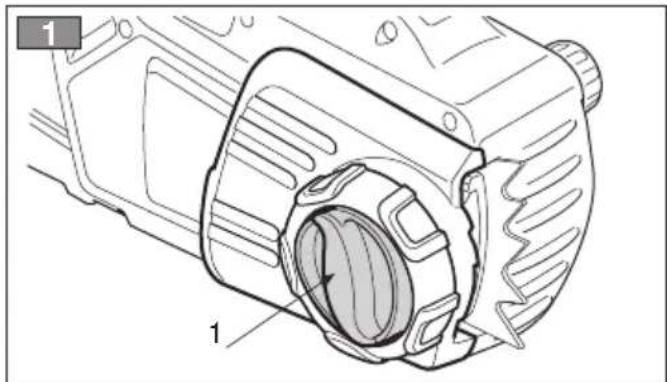
- Mount the chain in the right direction on the bar. If the tip of the bar has a nose sprocket, make sure the drive links are correctly inserted in the sprocket rims (Fig. 2).
- Mount the bar (2) inserting the stud bolt in the bar's slot using the tension adjuster (2a); move the bar towards the back of the machine body (Fig. 3).
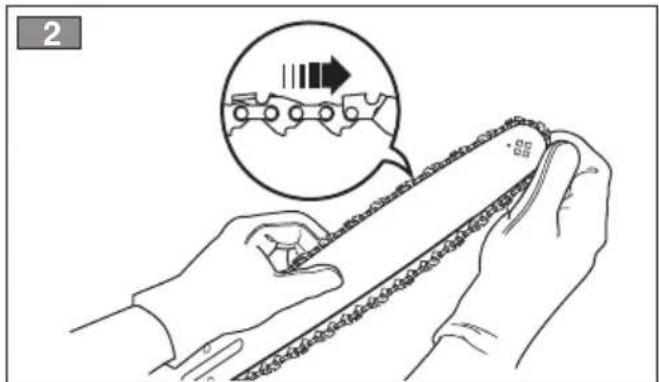
- Wind the chain around the drive sprocket (Fig. 4) and push the bar forward to achieve an initial tensioning of the chain.
- Fit the guard back on, screwing on the knob (1) without tightening it.
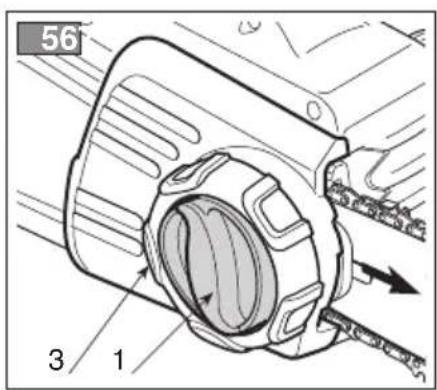
- Turn the ring (3) clockwise until you find the right chain tension (Fig. 5).
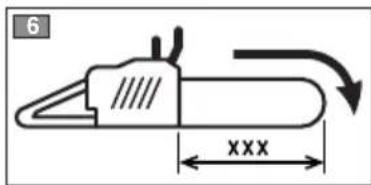
- Raise the bar and tighten the knob (1) securely (Fig. 6).
5. PREPARING TO WORK
1. CHECKING THE MACHINE
WARNING!
Make sure the machine is
not plugged into the mains socket.
Before starting work please:
- check that handgrips and protection devices are clean and dry, correctly mounted and well fastened to the machine;
- check that the chain brake is working efficiently;
- check that the trigger switch and the safety button should move freely without forcing and return automatically and rapidly back to their neutral position;
-
check that the trigger switch must remain locked until the safety button is pressed;
-
check that the mains frequency and voltage is - make sure the cooling air vents are not clogged the same as the rating data on the "identification up with sawdust or debris;
plate" (see chap. 1 - 10.8);
- ccheck that all the screws on the machine and the bar are tightly fastened;
- check that the power cable and extension leads are not damaged;
- check that the chain's oil level is not below the
- check that the chain is tensioned correctly, sharp «MIN» level mark and top up to 1 cm from the rim and there are no signs of any damage; of the filler if necessary.
2. CHECKING THE CHAIN TENSION
WARNING! Make sure the machine is not plugged into the mains socket.
- Loosen the handle (1). (Fig. 5).
- Turn the ring-nut (3) to obtain the desired chain tension level (Fig. 5).
- Raise the bar and tighten the handle (1) secure (Fig. 6).
WARNING! Do not use the machine if the chain brake does not function correctly and have it inspected by your dealer.
4. CHAIN LUBRICANT
IMPORTANT Only use chain-saw oil or adhesive oil for chain-saws. Do not use oil containing impurities, to avoid clogging the tank filter and permanently damaging the oiler.
The tension is correct when the drive links do not slip out of the chain guides if you hold the chain in the middle of the bar (Fig. 7).
Loosen the brake by pressing both the switch and the safety button. Using a screwdriver, run the chain along the guides to check that it moves smoothly.
IMPORTANT The chain lubricating oil is bio-degradable. The use of mineral oil or engine oil can have a serious impact on the environment.
It is essential that you use good quality oil to lubricate the cutting parts effectively.
This machine is equipped with a double braking system that intervenes in two situations:
Used or poor quality oil does not guarantee good lubrication and reduces the duration of the chain and bar.
a) When the switch lever is released, a brake is automatically activated that slows and stops chain movement, in order to prevent the risk of injury should the chain continue to turn after it has been switched off.
IMPORTANT Before each machine use, the oil level should be checked and topped up to 1 cm from the rim of the filler. The oil level must not drop below the «MIN» level mark.
b) In the event of a kickback while working, following an irregular contact of the tip of the bar, with a brusque upward movement that causes the hand to strike the front guard. In case, the brake blocks chain movement and must be released manually in order to disengage it.
NOTE To top up with oil, it is recommended to lie the machine on its right side, so that the filler spout is in a vertical position.
This brake can be operated manually by pushing the front guard forward. To release the brake, put the front guard towards the handgrip until you he a click.
5. ELECTRICAL CONNECTIONS
DANGER! Electricity and moisture are not compatible.
- Always handle and connect electric cables in dry conditions.
- Keep electric sockets or cables away from wet and damp areas (e.g. puddles or wet ground).
To check that the brake works efficiently, proceed as follows:
- Start the engine by holding the front handgrip and push the front hand guard forwards with your thumb (towards the bar).
- When the brake is engaged, release the trigger switch.
The quality of the extension leads must be no less than H07RN-F or H07VV-F, with a minimum section of 1.5 mm and a recommended maximum length of 30 m.
The chain must stop as soon as the brake is en-To avoid overheating, do not keep the extension gaged. lead rolled up during use.
DANGER!
The permanent connec
tion of any electrical equipment to the mains of a building must be installed by a qualified electrician in conformity with the regulations in force. Incorrect wiring can cause serious injury and even death.
DANGER!
Supply power to the ma
chine using a differential switch (RCD - Residual Current Device) with a tripping current of max. 30mA .
IMPORTANT
To prevent power supply
outages:
make sure that the electric system's overall capacity is adequate;
connect the machine to a mains socket with sufficient amperage;
- avoid simultaneous use of other electrical appliances with high power consumption.
6. HOW TO START - STOP THE ENGINE
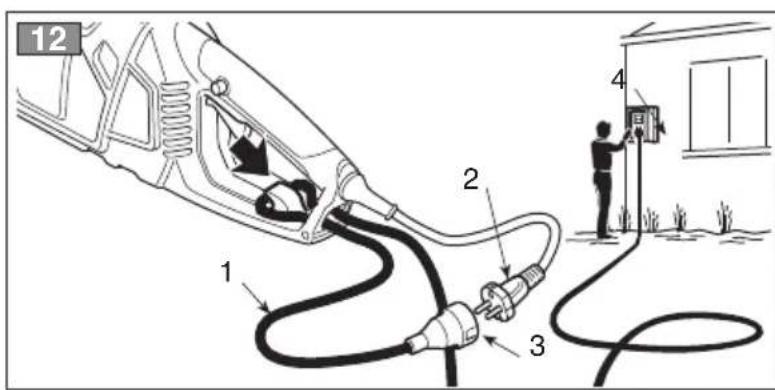
STARTING THE ENGINE (Fig. 12)
Before starting the engine:
NOTE
When you release the
switch, the safety button is also released and the engine stops.
- Fasten the extension lead (1) to the cable clamp on the rear handgrip.
- FIRST connect the power cable plug (2) to the extension lead (3) and THEN plug the extension lead into the mains socket (4).
- Take off the bar cover.
- Make sure the bar is not touching the ground any other object
WARNING!
The chain may take one
second to come to a stop after the engine is switched off.
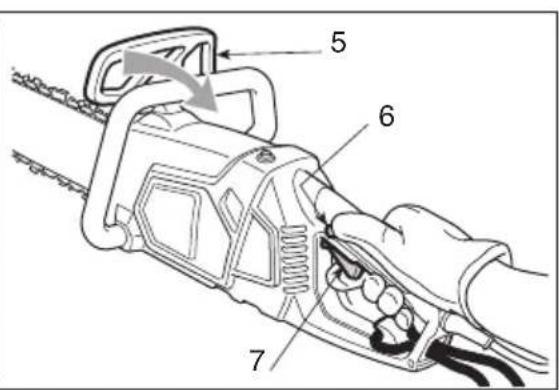
To start the engine (Fig. 12):
OR STOPPING THE ENGINE
To stop the engine:
- Disengage the chain brake (5) by pulling the front hand guard towards the front handgrip.
- Hold the chain-saw firmly with both hands.
-
Press the safety button (6) and then the switch (7).
-
Release the switch (7).
- FIRST unplug the extension lead (3) from the mains socket (4) and THEN disconnect the power cable (2) of the machine from the extension lead (3).
7. USING THE MACHINE
WARNING!
For personal safety and
that of others:
1) Do not use the machine without reading the instructions carefully. Become acquainted with the controls and the proper use of the machine. Learn how to stop the engine quickly.
2) Only use the machine for the purpose for which it was designed, that is for "felling, bucking and delimbing trees with dimensions suitable for the length of the bar" or wooden objects with the same characteristics. Any other use, such as using accessories not specified in this manual, may be haz-
ardous and also damage the machine. Examples of improper use may include, but are not limited to:
- trimming hedges;
- intaglio carving;
- sectioning pallets, crates and various packing materials;
- sectioning furniture or other materials with nails, screws or other metal components;
- butchering meat;
- using the machine to lift, move or split objects;
- using the machine while fastened to fixed supports.
3) Keep in mind that the operator or user is responsible for accidents or hazards occurring to other people or their property.
4) Always wear suitable clothing when using the machine. Your dealer can provide you with all the information on the most suitable accident-prevention devices to guarantee your safety. Wear anti-vibration gloves. All the above-mentioned precautions do not however guarantee the prevention of certain risks - i.e. Raynaud's phenomenon or Carpal tunnel syndrome. For operators who use this machine for prolonged periods, it is therefore recommended to have periodic check-ups on the hands and fingers. If any of the above mentioned symptoms should appear, please contact a physician immediately.
5) This machine's electrical system generates an average sized electromagnetic field, but it is not however possible to exclude the possibility of interference on any active or passive medical devices that operators may be wearing; this could be risky for their health conditions. All those using medical devices should always consult their GP, or the device manufacturer, before using this machine.
6) Mow only in daylight or good artificial light.
7) Take utmost care when working near metal fences
8) Keep the chain away from the electric cable. Use the cable clamp to prevent the extension lead from disconnecting accidentally. Make sure it is connected to the socket without being forced. Never touch a live electric cable if it is poorly insulated. If the extension lead gets damaged during use, do not touch the cable and unplug the extension lead immediately.
9) Take care not to hit the bar hard against foreign objects or flying debris caused by the movement of the chain.
10) Stop the engine and unplug the machine from the mains:
- whenever you leave the machine unattended;
- before cleaning, checking or servicing the machine;
- after striking a foreign object. Inspect the machine for any damage and make repairs before restarting it again;
- if the machine begins to abnormally vibrate (Immediate look for the cause of the vibrations and take for necessary controls at a Specialised Centre).
- when the machine is not in use.
IMPORTANT Always remember that an incorrectly used electric chain-saw may disturb others and have a serious impact on the environment.
To respect people and the environment:
- Avoid using the machine in environments or at times of the day when it may disturb others.
- Scrupulously comply with local regulations and provisions for the disposal of waste materials after sawing.
- Scrupulously comply with local regulations and provisions for the disposal of oils, damaged parts or any elements which have a strong impact on the environment.
- A certain amount of chain lubricating oil is released into the environment when the machine is running, so only use biodegradable oils made specifically for this use.
- To avoid the risk of fire, do not leave the machine with the engine hot on leaves or dry grass.

WARNING!
It takes specific training
to use the machine for felling and delimbing.
1. CHECKS DURING WORK
- Checking the chain tension
The chain tends to stretch gradually as you work, so you need to check its tension frequently.

IMPORTANT
During the first period of use
(or after replacing the chain), it must be checked more frequently due to settling of the chain.

WARNING!
Never work with the chain
loose, as it can be hazardous if the chain slips out of its guides.
To adjust the chain tension, follow the instructions in Chapter 5.2.
- Cut-off during work
Your machine is designed with an overload protection with circuit breaker. If the chain saw is clogged (e.g. blocking of the cutting means, chain
teeth jammed, overload cutting) during the cutting operation, the overload circuit breaker will cut the mains power supply automatically to protect your chain saw.
IMPORTANT
The circuit breaker will be ac
tivated when the cutting current is over 35-35A, and it can be reset manually by pressing the reset button (15) 30 seconds after it has cooled completely.
- Checking the oil delivery
IMPORTANT
Never use the machine with
out lubrication! You can check the oil level in the tank through the transparent gauge. Make sure you fill up the oil tank every time you use the machine.
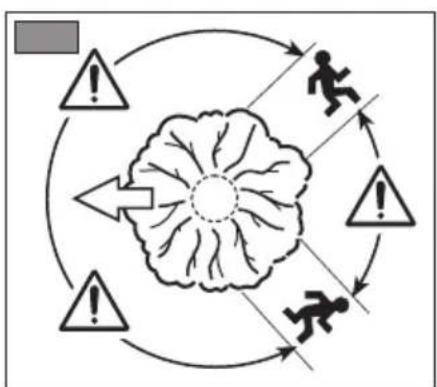
from the bucking operation by a distance of at least twice the height of the tree being felled. Trees should not be felled in a manner that would endanger any person, strike any utility line or cause any property damage. If the tree does make contact with any utility line, the company should be notified immediately.
- The chain saw operator should keep on the uphill side of the terrain as the tree is likely to roll off slide downhill after it is felled.
- An escape path should be planned and cleared as necessary before cuts are started. The escape path should extend back and diagonally to the rear of the expected line of fall as illustrated in Figure 15.
- Before felling is started, consider the natural lean of the tree, the location of larger branches and the wind direction to judge which way the tree will fall.
- Remove dirt, stones, loose bark, nails, staples and wire from the tree.
WARNING!
Make sure the bar and the
chain are in place when you check the oil delivery.
- Notching undercut
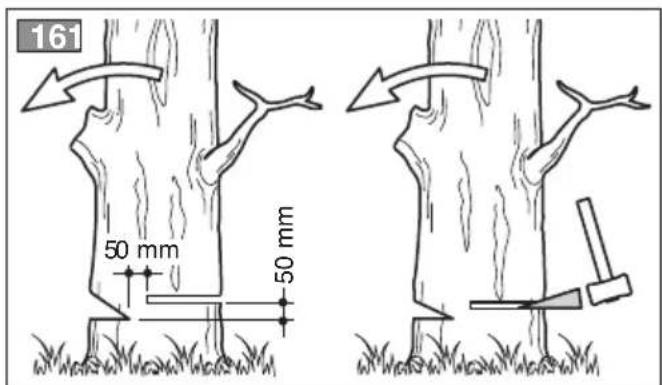
Make the notch 1/3 the diameter of the tree, perpendicular to the direction of falls as illustrated in Figure 16.
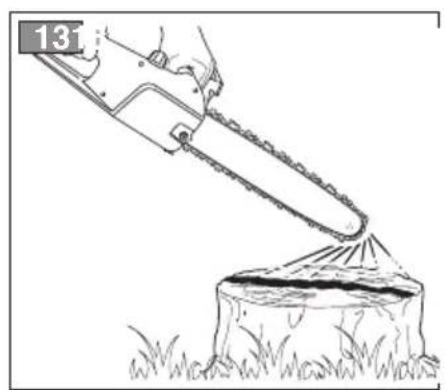
Start the engine and check if the chain oil is deliMake the lower horizontal notching cut first. Vered as shown in the figure (Fig. 13).
his will help to avoid pinching either the saw chain or the guide bar when the second notch is being made.
2. DIRECTIONS FOR USE AND CUTTING TECHNIQUES
Before felling or delimbing for the first time, practising back cut sawing logs on the ground or on wrestles, so that
you can get familiar with the machine and the mestMake the felling back cut at least 50~mm higher suitable sawing techniques. than the horizontal notching cut as illustrated in
WARNING!
Always hold the machine
with both hands when sawing.
WARNING!
Stop the engine immedia
tely if the chain stops during sawing. Beware of kickback, which can occur if the bar contacts an obstacle.
- Felling a tree
- When bucking and felling operations are being performed by two or more persons at the same time, the felling operations should be separated
Figure 16. Keep the felling back cut parallel to the horizontal notching cut. Make the felling back cut so enough wood is left to act as a hinge. The hinge wood keeps the tree from twisting and falling in the wrong direction. Do not cut through the hinge.
- As the felling gets close to the hinge, the tree should begin to fall. If there is any chance that the tree may not fall in desired direction or it may rock back and bind the saw chain, stop cutting before the felling back cut is complete and use wedges of wood, plastic or aluminium to open the cut and drop the tree along the desired line of fall.
- When the tree begins to fall remove the chain saw from the cut, stop the motor, put the chain saw down, then use the retreat path planned. Be the alert for overhead limbs falling and watch your feet and footing.
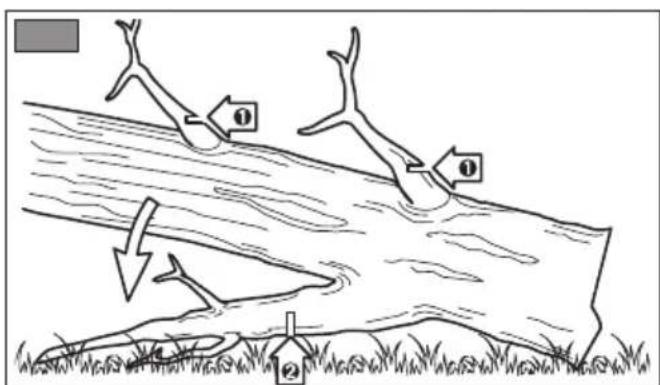
- Limbing a tree
3. END OF OPERATIONS
Limbing is removing the branches from a fallen tree. When limbing leave larger lower limbs to port the log off the ground. Remove the small in one cut as illustrated in Figure 17. Branches der tension should be cut from the bottom up avoid binding the chain saw.
WARNING!
Make sure the machine is
not plugged into the mains socket.
WARNING!
Be careful of where the
branches are lying on the ground, the risk of them being under tension, the direction the branch may go during cutting and the risk of the tree being unstable after the branch has been cut.
-
Switch off the engine as indicated above (Chap. 6).
-
Wait for the chain to stop and allow the machine to cool.
-
Remove any traces of sawdust or oil deposits from the chain.
-
If there is excessive dirt or resin build-up, disassemble the chain and place it in a container with a specific cleanser. Then rinse it with clean water and treat it with a suitable anticorrosive spray,
- Bucking a log
Bucking is cutting a log into lengths. It is important before reassembling on the machine. to make sure your footing is firm and your weight is
evenly distributed on both feet. When possible, - Fit the bar cover before reassembling the ma-
the log should be raised and supported by the use chine.
of limbs, logs or chocks. Follow the simple direc
tions for easy cutting.
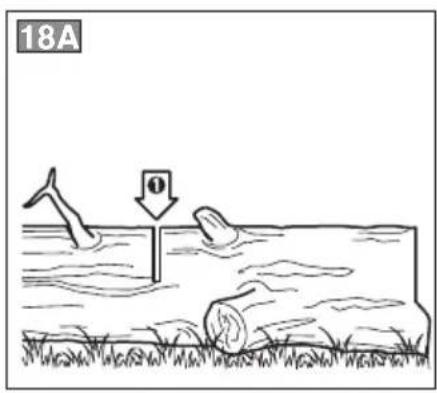
- When the log is supported along its entire length, Warning! Allow the engine to cool as illustrated in Figure 18A, it is cut from the top fore storing in any enclosure. (overbuck). To reduce fire hazards, clean the machine thor
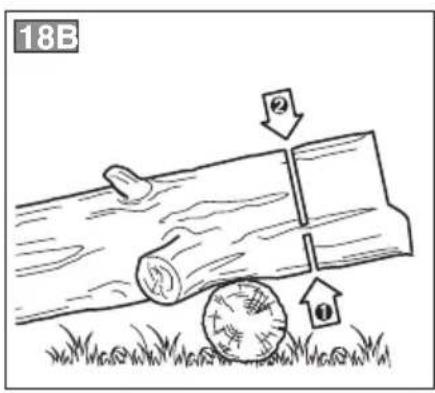
- When the log is supported on one end, as illusoughly to get rid of any sawdust, branches, trated in Figure 18B, cut 1/3 the diameter from leaves or excess grease, never leave containthe underside (underbuck). Then make the fin- ers with the cut debris inside the storage ished cut by overbucking to meet the first cut. area.
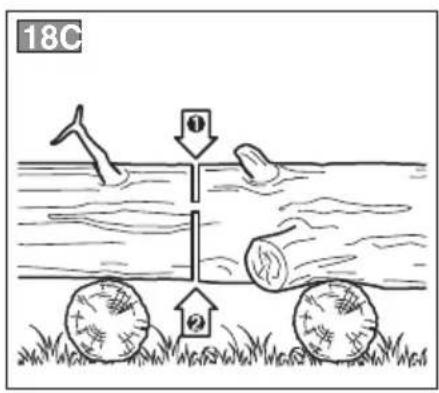
- When the log is supported on both ends, as illustrated in Figure 18C, cut 1/3 the diameter from the top (overbuck). Then make the finished cut by underbucking the lower 2/3 to meet the first cut.
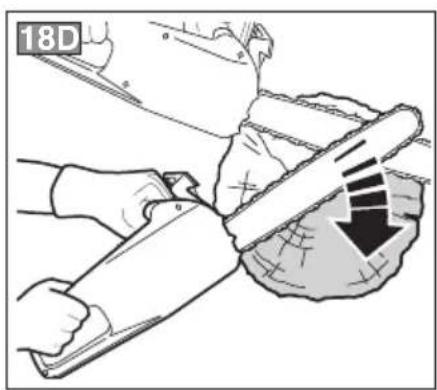
-
It is easier to saw a log using the spiked bumper (Figure 18D).
-
Dig the spiked bumper into the log and use it as a pivot. Cut with an arched motion to make the bar penetrate the wood.
-
Repeat several times if necessary, changing the point where you plant the spiked bumper.
-
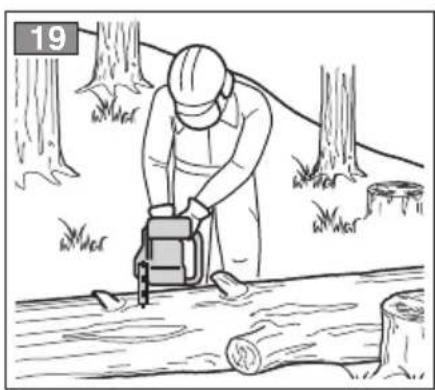
When bucking on a slope always stand on the uphill side of the log, as illustrated in Figure 19. When "cutting through", to maintain complete control release the cutting pressure near the end of the cut without relaxing your grip on the chain saw handles. Don't let the chain contact the ground.
After completing the cut, wait for the saw chain to stop before you move the chain saw. Always stop the motor before moving from tree to tree.
8. MAINTENANCE AND STORAGE
WARNING!
For your safety and that
of others:
- Correct maintenance is essential to maintain the original efficiency and safety of the machine over time.
- Keep all nuts, bolts and screws tight to be sure the equipment is in safe working condition.
- Never use the machine with worn or damaged parts. Damaged parts are to be replaced and never repaired.
- Only use original spare parts. Parts that are not of the same quality can seriously damage the equipment and compromise safety.
WARNING!
During maintenance oper
ations:
- Unplug the machine from the mains.
- Use protective gloves when handling the bar and chain.
- Keep the bar protection devices on, except when intervening directly on the bar or the chain.
- Never dispose of oils or other polluting materials in unauthorised places.
Regularly check the condition of the chain catcher and replace it if it gets damaged.
5. NUTS AND SCREWS
Periodically check that all the nuts and screws are securely tightened and the handgrips are tightly fastened.
6. SHARPENING THE CHAIN
WARNING!
To ensure that the chain
saw works safely and efficiently, it is essential that the cutting components are well-sharpened. Any work on the chain and bar requires specific skills and special tools in order to do the work properly. For safety purposes, we recommend you contact your Dealer.
Sharpening is necessary when:
- The sawdust looks like dust.
- Cutting becomes more difficult.
The cut is not straight. - Vibrations increase.
A specialized centre will sharpen the chain using the right tools to ensure minimum removal of material and even sharpness on all the cutting edges.
1. ENGINE COOLING
To avoid overheating and damage to the engine, Replace the chain whenever:
ways keep the cooling air vents clean and free of
sawdust and debris.
2. CHAIN BRAKE
Regularly check the efficiency of the chain brake.
3. CHAIN SPROCKET (Fig. 20)
Regularly check the condition of the sprocket and The use of some types of organic oil may cause de replace it when wear exceeds 0.5mm 1 posits or fouling after a certain period of use.
Do not mount a new chain with a worn sprocket Ibrthis happens, before leaving the machine un-vice-versa. used for a long period of time:
7. EMPTYING AND FLUSHING
THE OIL TANK
(Only if organic oil is used for the chain)
disassemble the chain and the bar;
- empty the oil tank;
4. CHAIN CATCHER
This is an important safety device that restrains the chain if it breaks or degrooves.
-
pour a specific liquid cleanser in the tank, to about half the maximum level;
-
close the tank cap and operate the machine un- tions provided by the manufacturer), then tighten til all the cleanser runs out. the screw as far as possible (1);
Remember to fill with oil, before using the machine replace the bar, the chain and the casing, following the instructions provided in chap. 4.2.
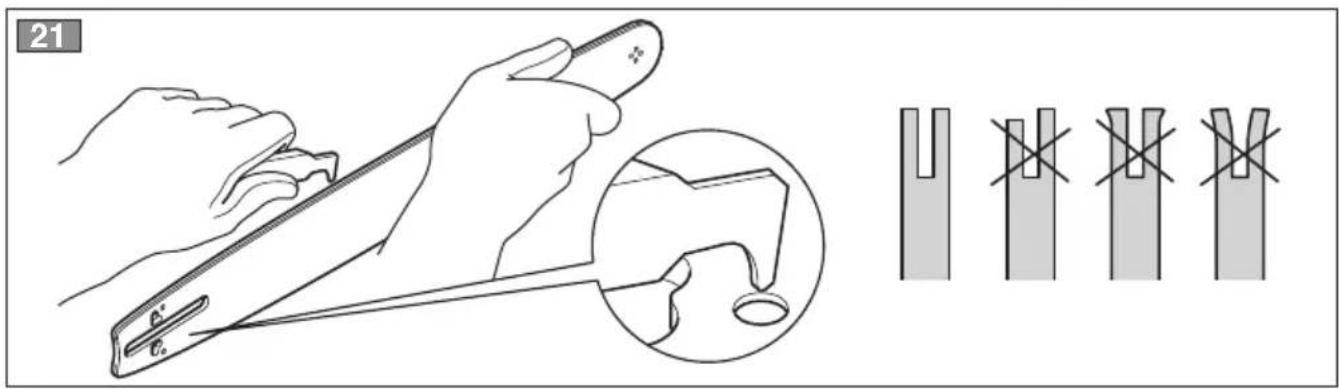
8. BAR MAINTENANCE
To avoid asymmetrical wear on the bar, make sure it is turned over periodically.
9. ELECTRIC CABLES
WARNING! Check the condition of the electric cables regularly and replace them if they are worn or their insulation looks dam
To keep the bar in perfect working order, proceedaged. as follows (Fig. 21):
- Grease the bearings on the nose sprocket (if present) with the syringe.
- Clean the bar groove with the scraper.
- Clean the lubrication holes.
- With a flat file, remove burr from the edges and level off the guides. 10
If the machine's power cable is damaged, it can only be replaced with an original spare part by your dealer or an authorised service centre.
Replace the bar whenever (Fig. 21):
10. EXTRAORDINARY MAINTENANCE
All maintenance operations not foreseen in this manual must be performed exclusively by your
- the groove is not as deep as the height of the dealer. drive links (which must never touch the bottom);
All and any operations performed in unauthorised the inside of the guide is worn enough to make centres or by unqualified persons will totally invalid the chain lean to one side. idate the warranty.
To avoid asymmetrical wear on the bar, make sure it is turned over periodically.
11. STORAGE
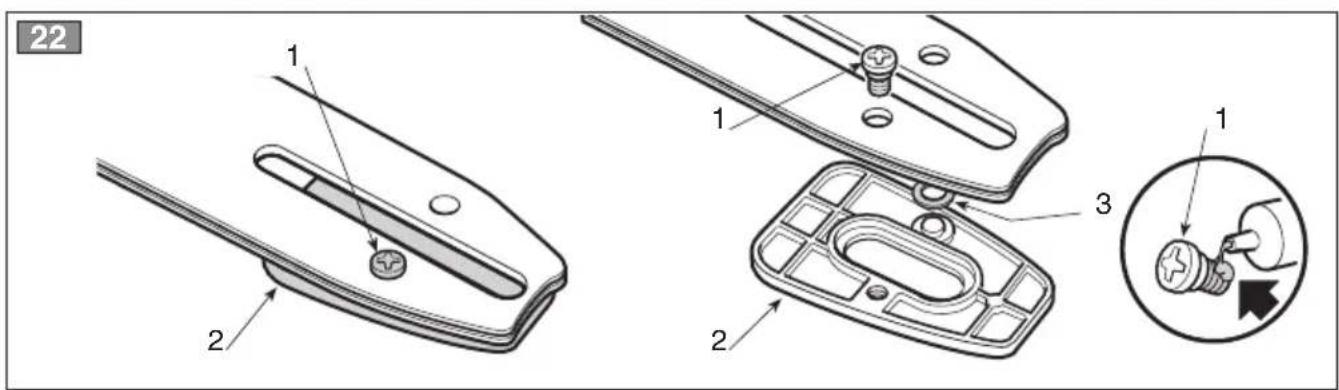
If it should be necessary to turn the bar over or replace it, follow the instructions below (Fig. 22): The
The machine must be stored in a dry place away from the elements and with the bar cover correctly
- remove the casing, the chain and the bar, carefitted. fully following the instructions provided in Chap. 4.2;
- remove the screw (1) using a cross-head screwdriver and remove the tension adjuster (2), taking care not to misplace the sealing ring (3);
IMPORTANT
When initially assembled, a
"threadlocker" was inserted on the screw thread to prevent it from accidentally working loose, this means that a certain amount of force will be needed to remove the screw; use a clamp to block the bar in place and always use a suitable sized screwdriver.
- reassemble the tension adjuster (2) on the other side of the overturned bar, or on the new bar, making sure the rubber seal is inserted correctly (3);
- apply a small amount of "threadlocker" on two or three screw threads (1) (following the instruc
9. TROUBLESHOOTING
IMPORTANT
Carefully reading the infor
mation in this Manual provides good machine notions and the guide allows you to identify and face the most common operating situations. For any other difficulty or problem, please contact an Authorised Service Centre.
- The chain does not turn:
- make sure that the front guard is positioned facing backwards.
- The machine does not start:
The oil does not flow:
-
make sure there is oil in the tank and flush it if necessary (8.7).
-
make sure there is current in the socket;
- check that the power cable and extension lead are intact;
- check that the switch works correctly; if this is not the case, contact your Dealer for a replacement.
Sparks form:
Poor performance
-
contact your Dealer for an inspection of the motor and brushes.
-
check the direction in which the chain is mounted,
- check that the chain is correctly sharpened and/or for any worn or damaged parts (contact your Dealer concerning the most suitable intervention).
10. ACCESSORIES
The table contains a list of all possible combinations between bar and chain, indicating those which may be used on each machine, marked with the symbol
chain are actions made solely by the user, the latter assumes responsibility for damages of any kind due to such actions. When in doubt or if lacking knowledge of the specificity of each bar or chain, contact your retailer or specialised gardening centre.

WARNING!
In consideration that the
selection, application and usage of bar and
Bar and chain combinations
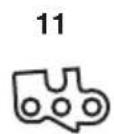
| Pitch BAR CHAIN | ||||
| Inches | Length Inches / cm | Groove width Inches / mm | Code Code | |
| 3/8" | 16" / 40 cm | 0,050" / 1,3 mm | 123900368/0 | 4113765 |
Cher Client,
Durante as operacoes de ma
Salter, salma akimi 30-35
YCTPOICTBA YIPABJIENH N 3APPABKN
- Pbyar BbIKIOUaTeJIa
- PpedoxpaHnteIbHaN KhoHa
- KhoNka BO306HOBJIeHn pa6oTbI
- KpOK dIaIe 3aueIeHn yIINHITeJIa
3. MEPbI IPEdoCTOPOXHOCTN dJa OBecneueHnBa3OnaCHOCTN
KAK CJIeIyET YHTATb 3TO PYKOBOCTBO
B TeKCTePyKOBOcTBaHEKOTOpbIea63aIbI, B KOToPbIX 3NIOJKeHa Oc06BaJHnA HΦOpMaIaI, NOMEeHbI pa3JIuHbIM 06pa3OM, IMEIoUIM CJeDyIOoee 3HaueHHe:
ПРИМЕЧАНЕ
WIM
BAHHO
CopeHHyTOUHeHnI IIN DpyryIO pa-
He ynomnytyu uHOpmaCIO C qelbIO H36eHaHna IOnOMKMaunHbI a nn HaheceHryuep6a.

BHHMAHNE!
B cnyuae heco6IIOeHHn HMeetcA
OnachocTb NOJyueHn TeneChbIX NOBpeHHdeHn ONepaTopom HIN TpeBmN NHuaMn.

ONACHOCTb!
B cnyuae Heco6nOeHn HmeTc
Onachocb NOJyehn TAnHHX TeNechblx NOBpeHDeHN C JetaNbHbIM HcxOdom OepaTopom Hn TpeTbHMn HuaAMN.
OBsNE INPABNIA TEXHNK B3OINACHOCTNIPIPA6OTE C 3JEKTPOOBOPYIOBAHHEM

BHIMAHNE!
Ipoptyte Bce npabHna texHHN
6e3oNaChocTH H Bce yka3aHn. HecobJIOJeHne MeP npedocTopoKHOCTN H peHOMeHaaM MoHe T pNBecTH H 3JIeHTpHuEcHM Ydapam, noHApam N/nn HaHeCEHNO cepbe3Horo yuepe6a.
XpaHnTe Bce OncaHmep npedoctoPOKHOCTn uka3aHmI nCNoIb3ObaHnB 6dyuem. TepMH «3eKTPnueckoe o6OpydoBaHne》,BCTpeyaUoHmCB OINcaHm Mep npedocTOPOKHOCTn,OTHOcHTcR K BaWemy yCTPOMCTBy,NTaIOUeMycr OT 3eKTPocEtN.
1) Be3onachoctb pa6ooy 30HbI
a) Pa6o7a 30Ha DOnKHa 6bITb YHCTO H XopoOo OCBeueH Ho. Ha yuaTkax, rge cepnt rpr3b N 6ecnpraDOK, noBbIwa-ETcR PNCK HeCuaCThBIX ClyaEB.
b) He nCnoJb3yIte 3JIeKtpoo6OpOyOBaHne BO B3pBBOONaCHOcpe, NO6JN3OCTn OT TROPUHX HNDHOCTe, Ra3a HINpbIN. 3JIeKtpoo6OpOyOBaHne rHeepuPyET NCKPbI, KOToPbIE MOrTy npNBecTn K Bo3rOpaHNIO pbIN ININ napOB.
c)Bo Bpempa60tb3JeHtpoobopyoBaHnna Detn H noctopohnne nua daJHHbI haoDntbcra daKeO ot Hero. EcnBblOTBleTeEcB.To MOKeTe NoTepaTb HOHTpoNb HaOobopyoBaHnEM.
2)3eHTpuuechKa 6e3oNaChocTb
a) BnIka 3JIeKtpoO6OpyOBAHnHa DOJIHnHa 6bITb COBMeCTnMo c po3EtHO. HNOrda He BHOCHe MOHnHnHaunB KOHcTpyuHIO BnIHn. He nCNoJIb3yIte aADTepbI c 3a3eMJeHbIM 3JIeKtpoO6OpyOBAHnEM. HmOJnHnCuPBOaHHbE BnIKn, COBMeCTnMbIe C po3EtHO, CHINHAIOT PNC 3JIeKTPuYeCKORO yda pa.
b) N36eraTe COpHKoCHOBHeHr TeJa C TaHHM 3a3eMJIeHHbIMN IOBepxHOCTaHM, KaH Tpy6bl, paHaTopbl, HXYOHHbIe IINTbl, XOLOHJbHHn. Pnck 3JeHTpuechoro ydaP aOBbIaaeTc npi COpHKoCHOBHeHr TeJa C 3a3eMJIeHHm.
c) He octablne 3ehtpo6bpyoBaHne noDdoHem HnB MOhpO cpe.Boa, npOHHaoua BHytpb 3ehtpoo6bpy- doBaHna, NOBbIaet pNCK 3eHTpruechoro yapa.
d) He nCnoIb3yIte Ka6eIb HHeaIeHaIzM 06pa3om. He nCnOJIb3yIte Ka6eIb IJIpeMeIeHINr 3JIeHTpOo6OpyDOBAHN, He TAnIte erO 3a Ka6eIb, B TOM YIcIe IJrTO, YTO6bl N3BLeHy BNHy N3 po3EtHN. Ka6eIb DOnJIeH HaxoDITbc DaJIeHO OT hCTOuHHOB TeIIa, MaCna, OCTpbIX YrIOB INoDBNNHbIX y3IOB. NObpeKeHbI nn 3anyTaHHbI Ka6eIb NOBbIaET pICH 3JIeKTHpUeCHOrO yUpa.
e)BoBpemHcNoIb3OBaHH3JIeKTPoO6OpyDobAHn BHe nOmeueHHNcNoIb3yIte npOBo-UYINHHTeNb,NOxOJaun dHa HcNoIb3OBaHH Ha yInu. HcNoIb3OBaHHne npOBoDa-ydInn-HHTeJI, NOxDoxoJrero dHa NcNoIb3OBaHH Ha yInu, CHnKaET
Pnck 3JIeHTpUHeCko yapa.
f) EcHn HeIb3a H36eHaTb HcNoIb3oBaHnra 3JeHTpoO6OpyOBAHn BO BlaJHoN CpeDe, HcNoIb3yIte Po3eTHy C npedoxpaHnteJIbHbIM dHΦepeHuaJIbHbIM BbIHIOuAteMeR (RCD-Residual Current Device). NcNoIb3oBaHnE YcTPOCTBa 3a-NTHO OTKIQUeHnRA RCD cHnKaet pNCK 3JeKTPnueckoro yda-pa.
3)Jiunha6e3oNachoctb
BybTe BHIMATElbHbI, CLEdTe 3a CBOHMn DeiCTBnAMn I BeNTe Ce6ra pa3ymHO BO Bpemr NcNoJIb3OBAHn3NeHTPOo6OpyOBAHn. He cNoIb3yute 3neHTPOo6OpyOBAHme, eCIn Bbl yctaan HnHaxoOnIEc Nob O3DeNCTBnEM HApKOTNoeeCHN BeueCTB, AnHOROJIa HnIeHApCTB. DaJHe He-BoMbwaH HeBNIMATElbHOCTb BO Bpemr NcNoJIb3OBAHn3NeKTPOo6OpyOBAHn MOKeT pInBeCTN K cepbe3hIM TpaBMam
b) NcnoIb3yIte 3auNTHyO oEHy. Bcerda HaneBaIte 3a- uHTbIe OuKn. IcnoIb3oBaHne TaKHX CpeCTB INHdINByaJIb-HOH 3auNTbl, Ka KnbIe3aunTbIe MaCKN, 3auNTHaJ ObyBc HeCKoJIb3raJe IIOUBoH, KACKN JnH HayuHNKn dJa 3auNTbl CJyXa, CHHKaET PnCK TpaBM.
c) N36eraaTe camonpon3BolbHoro 3anycha. Udoctobepb-TEcb, yTO BblIOUateJIb HaxOHTCBA NOLOHEHNN «OFF» («BblKJI»), npEneJe CEM BCTABNTB BNky B PO3ETHy, 06XBaTNTb IIIN NEPEMeCTNTB 3NEKTPOO6OpyOBaHHe. IpeMeueHHe 3JEKTPOO6OpyOBaHn, pN IN KOTOPOM NaIEc HaxOHTCn HA BblIOUateJIe, a TAOKe ERO NOkIIIOUeHHe K PO3eThe, KOrda BblIOUateJIb HaxOHTCBA NOLOHEHNN «ON» («BKJI»), nobbiuaet PNCK HeCHaCTHOrO ClyuA.
d) Ipeep 3anycHOM 3neHTpo06OpOBOaHn y6epnte BCE HIOU n peryI npoBOHbIe IHCTpyMeHTbl. KIOU nn HNCTpyMeHT nPn COpNIKOCHOBeHHn C BpaauIOuIMcY 3JLOM MOKeT BbI3BaTb TDaBMbl.
e) CoxpanHnTe paBHOBeCne. Bcerda npOuHo onnpaTecb Ha onOpHyIO nobepxHocb n coxpanHnTe HADJeHaaee paBHO BeCne. 3TO NO3BOJNT LyUHe KOHTpOINPOBaTb 3NeKTPo06OpydoBaHnE B HenpeDnDEHHbIX CNTyaunX.
f) OeBaItecb HAdIeKaUIM 6pa3OM. He HadeBaIte Wnpokyo OdeHdy n DparoueHHocTN. BOLocbl, OeHda n NepuATn He DOJIHHbI HAXOHTbcn NO6JN3OCTN OT NOBUNHbIX y3IOB. IINPOKAR OeKdA, DparoueHHocTn INI DIIHHbIE BOLOcbl MOrY 3a-CTPb TB NOBUNHbIX y3Jax.
g)PnHaHnHn yctpoiCTB, KOtOpbIe DoJIHHbI 6blTb NODHIOHeH K YcTaHOBHAM UdaJIeHHN I C6opa PbIIN, yDOCTOBepbTEcb, YTO OHN NOHIOHJeHbI IN cNoIb3ayOTc HADHeHuaumO6paOm. PpIMHeHHe 3THX yCTpoiCTB MOKET CHN3HTbPNCHN, CB83aHHbIe C nbIbIbO.
4) 3Kcnnyataunn H aunna TneHTpoobopyoBaHH
a) He neperpykaTe 3JeKtpoobOpyObaHne. NcNoIb3yIte 3JeKtpoobOpyObaHne, npedHa3NaeHHe dIaHHO pa60TbI. IpaBvIbHO BbIbpaHHe O6OpYBaHne BblIOJIHT pa60Ty JyUHe I 60Jee 6e3OnaHo, co ChOpocTbI, dJI KOTopo OHO 6blno pa4pa60TaHO.
b) He nCnoJIb3yIte 3JeHTpoo6OpdyObaHne, ecIn BbIKIOuOaTeIb HE B COCTOHHN IpaBnIbHO BHKIOUHTb HIN BbIKIOUHTb ERO. 3JeHTpoo6OpdyObaHne, KOTope HeJIb3aIynCTHTb pN NOMO- mN BbIKIOUHaTeJIaBJIeTcra ONaChbIM HHyJdaeTcR B peMOHTe.
c) OToeHNHTe Bnky OT po3ETH, npeKJe YEM BbINOnHtB pe- rgyInpO8kY Hn CmEHy npncnoc6JIeHn, a TAnKe IpeKJe Yem NomeCTHb 3JeKtpoo6OpdyoBaHne Ha XpaHeHne. 3TH npEdBapHTeNbHbIe MePbI npedocTopoKHOCTN CHHKaOT PCK camonpon3BOhBOHorO 3anyCA 3JekTPOo6OpdyoBaHn.
d) XpaHnTe HEnCnOlb3yEmoe 3JeHtpoobOpdyobAHne BHe OcraeMocTn DeTeH N He No3BOLJIte HcNoIb3OBA Tb erO IIOJAM, HOTOpBie He O3HaKOMnHc b pa6OtOH o6OpdyobAHn H C HAcToaUMN YHa3aHnMn. PnH HeyMeIOM HcNoIb3OBAHN 3JeHtpoobOpdyobAHne OnaCHO.
e) IpoBODIte TexHueChoe 06cLyHHBaHne 3JIeKTPoO6OpyDobAHn. IpoBepRHe CooCHocTb pacNoIOnHeHn NOBHHbIX y3IOB IN CBO6OHy IN nepemeueHn, a TaHHe OTCyTCTBHe NOLOMOK H dpyrNx ycNOHN, KOToPbIE MOrTy nO
BnHb Ha pa60Ty 3JeHTpOo6OpyOBaHn. Pn Hauynn noBpeKdHn Heo6xOIMO OTePMOTpOBaT bJeKTHPOo6OpyOBaHne, npEHe YEM nCNoB3OBaT erO. MHOHEcCThIe ClyuAn BblN Bbl3BaHbI HeIOCTaTOHbIM OcClyHbAHnEM.
f) PexyuiepeopnbldoHNHb6bItb3aToeHbIuNCTb.HaJIeKaUee 0cCnyHbAHne pexyuix opraHOB,XOPOJAA3aTOUYapeKpOMOK npedOTBpaAHTnx 3aeJaHne IOSeIHaOT KOHTPOlb HAD HMM.
9) NcnoIb3yIte 3JeHtpoo6OpdyobAHne n COOTBeTCTBHyIOuHne DOIOJIHHTeIbHbIe npHCnOCo6JeHHa B COOTBeTCTBHN C ppeOCTABJIeHHbIMN yHa3aHnHM, YUHTbIBA YCOBnH N TIN BIIPOJHMeo pa60TbI, HcNoJIb3OBaHHe 3JeHTpoo6OpdyobAHn, PpeDaHa3aHrHoro IaIeNeI, OTNIHbIX OT ppeYCMOTpeHHoM, MOXET pNBECTn K ONAOH CNTyaUM.
5)Texnueckanomoo
a) Pemont 3JeHTpOo6OpUOBaHHa DOJIKeH BbIIOHNrB KBaA HnHnucPobAHbI NepcoHaJI, Heo6XODHMo HCNOJb3OBA Tb NcJIIOHTeJIbHO OpiRHaJIbHbIe 3anaChIe DeTaN. 3TO NO3BOJAE CoXpaHITb yPoBeH 6e3OnaCHOCTN 3JeKToPoo6OpU DOBaHHa.
PEKOMEHDAUINIIOBE3OANACHOCTNIPN PABOTE C 3JIEKTPONIIO
He np6nnae Tc 3y6aToI cENH, HOrda 3JIeKTPoNIIa pa- 60taeT. NpeD 3anyckOM 3JIeKTPoNIIbI yOCTOBepbTeCb, 7TO 3y6aTaA TcB Hn C Yem He CoPnHacaeTcM.MaJIeHbKa HEBHMATEJIbHOCTb PnPa 6oTe C 3JIeKTPoNIO MoKet PnBecTn K TOMy, UTO OJExJa IIN HaCTn TeIa 3actpHyt B 3y6aToI cENH.
- Ppabay pyka DOLKHa Bcerda IeKaTb Ha 3aHHe pyKOHThe, a LeBa PyHa Ha nepeDney pyKoHTHe. HIKOrda HeIb3a MeHrTa pyKn MecTAmn pIn yDePknBAHm 3NeKTPoNlbl, NOCKOJIbky B 3Tom Cnyae BO3pactET PNCK HeCuaCTHO CnyaJ.
NoIb3yIeTcB 3aunTHbIMn OChAMn H 3aunToJ dnn Cnyxa. PeKOMHeHdyTeC NOJIb3OBAtBCN DpyHMn CpeCTBaMn DnA 3aHTbI TOnOBbl, pyN HOr. 3aunTHa N OeJka CHINr PnCK TpaBM, BblBaHHbIX JETAAIMN UeHNkAMn, N CnyauHbIM COpNIKOCHOHeHem C 3neKTponlnoi.
He nCnoNb3yIte 3eKtpoNnly, CnIa Ha DepeBE. HcNoNbSOBaHHe 3JeKTPoNnIbI, CnIa Ha DepeBE, MoHET npHBecTn K TpaB-MAM.
Y HOrn Bcerda DOJHHa 6bItb HAdEHHa TOnKa OOnpbl,3JeKTPoHny MOHNO BKIOUcTb NmB cTOr Ha IPOuHO,6e3-ONACHOH pOBHO NOBepxHO. Pa6OHa HA CKoJIb3KOI INI WATKO NOBepxHOCTN, HAnPIMep, Ha IecTHNIe, MOKeT npVBecTN K NoTepe paBHOBecn HIN KOHTpOJIaHd 3JeKTPoHNoI.
- Pn 6pe3ne BtBn, HaxoAauecB HataHHeHH, Heo6xOIMO yUHTbIbTaPCH 6paTHoN OTaH. KOrJa HATRHeHne DpeBEChbIX BOLOKOH CHINHaetC, CNIIeHHaBETKa NOD 3ΦΦeHTOM OTdauMOTyApntb OepaTopa NIN NT6pocTb 3JIeHTponNy C NoCNEyUoSe Notepe KOHTpOJe.
IpoBnTe octopOHocb nppe3He HcytapHHOB O no-6erob MaHbKO raMepa. HeoBwne MaTePnAbMoYr No- NaCTb B peHyuO cenb u yapntb Bac nnn BbiBt Bac n3 paBHOBeCn.
- Pn nepemeeHnn depKHTe BbIKIOueHHyIO 3neKTPoNNy 3a nepedHOpykoTHy, pacnoJARaa Nny Ha paCtOHNOT Tena. Pn nepeHoce Hnn XpaHeHHN 3neKTPoNNbl Bcerda HCNoIb3ynte 4exNbl dA nnHbI. PpaBnblHa 3KnNyataun 3neKTPoNNbl CHN3NT pCK CnyauHoro cOpNIHOCHOHeHc nllbHo IeBbO B DBNKHeHN.
CneyuTe yka3aHnAm OTHoCTeJIbHO Cma3bIBAHn, HATJHeHHNIIbHOI cENI I 3anachbIX dTeaIe. HeHaTHyTaI INHEcMa3aHHa YenbMOKeT NopBaTbc IIN yBeJIuHTb PnCK oBpaTHOH OTdauH.
IopdpHnBaTe pyKoTHN B cyXOM, HCTOM COCTOHH, 6e3 cIeOB Macna HIN CMA3Kn. PyKoTHa, NcNaYKaHHa MaCJLOM IN CMA3KOH, CTAHOBITCR CKoJIb3KOH MoKET PIPBECTN K NOTepe KOHTpOJa.
IcnoIb3yTe nny hcnHIOHTeBHO npe3HN DepeBa.He cnNoIb3yTe 3NEHTPONNy DnA pRHyN HHyD.IpHMep:He NC- NOIb3yTe 3NEKTPONNy DnA pe3HN NtAcTMaccbl,CTPONTEbHBx IN dpyRnx HeDEPBecbIX MaTePAHOB. PImMeHHe 3NEKTPONNbl IaI dpyRnx OonoPAHMOKET 6bITb ONaCHbIM.
INPHHbIOBSPATHOHTDAUH INMEPbI PEPDOCTOPOXHOCTN JIA ONEPATOPA
OTdyaMOHET BO3HNKHyTB,ecn HOC WINbI CONPKACAeTcC NO-MEXOHN ECnDEpeBO CklaDbIaBaeTc,3AmbKaPeKyUIO NLO-KoCTbNbHOu CENI.
CopnKoCHOBHeHHe HocA HINbI C NOMEXO MoKeT B HeKOTOpBix Clyuax Bb3BaTb 6bpaTHyIO OTaHy, PnI KOtOpO SiHa OToPacbIbAeTc BBePx H3aD, B HApabLeHHN OpeTaTopa.
3aKaTHeHbHOH cENB B BepxHeY qACTn WnHbI MoXeT Bb3BaTb6bICTpbI OTCKO HbHOH cENK ONepatopy.
3TN ABHeHnMoRyT npNBecTN K NOTepe KOHTpOJaH 3NeKTPoNIOI N K NocLeDyUOUM TpaBMAM. HeB3r HaJeAeTbC ToIbHO Ha npeDoXpAHnTEhBbIye UcTPOJCTBa 3NeKTPoNIIb. POnB3OBaTeB 3NeKTPoNIIb DOJIKeH pINHArMb MePb I Jn PneOpETBaPaeH HecCACTbIX CUYaEB IN TpaBM BO BPeM paObToI. ObpaTHa OTaHa YBnErcTpe3yIbTAOM HENPaBnIBHOro N0JIb3ObaHN HcHTpyMeHToM W/NIH He npaBnHBx IpOceUpy HnN YCIOBn paObToI. Ero MOxHo H36KaTb, pInHHB cIeDyUOuNE MePb IpeOCTOPOKHOCTN:
- Pn pe3he depkhtne nny hpenho 6eHm pyhamn, oxBaTbIaB o6e pykoTH 3JeHTponbl b6oIbHM nIabem INpyHMn nIbuaamPykn.PacnoNOKHTe CBOE TEO n pyKn TAHM O6pa3OM, yTO6bBl BbMORn CoXpAHrBo HKTPOJb HAD NIOB B cnuyae 6bPAthOn OTdau. OnepaTop MOKeT npOTINBOeYCTBOBaTc CNIE 6bPAth ONdau pNycOBHN, YTO 6blN pINHrbl HADJIeHaUme MpeB npedocToPckHOCTn. He donyckaTe 6eKHOPTOJbHOrO nepemeueHHA 3JeHTponblbl.
He npotraHbAte pykCnHsKOM daJeKO n He pexbTe Bblwe ypOBHcBcOero PJIeHa.3To no3BOHt H36EHaTb Cny- HaHbIX COpNIKOCHOBeHm NIIbI C KOHeuHOCTaMn NOMoKET LyU- Ie KOHTPOJINPOBaT 3JIeKTPoNHy B HenpeBUNDeHHbIX OcbTOr- TeJIbCTBAX. - Pn 3aMeHe HcNoIb3yIte ToIbH0 WInHbI n peHyuIe cenH, yKa3aHHbIe npOn3BODnteIem. HenoJxOJaUe WInHbI n peJyUne cENM OMyT npINBeCTN K pa3pblBy cENN NnnK O6paTHoN OTDAue.
CLeNyTe HnCTpyKzNAM npOn3BODnteI NO 3aToueH TeXo6cLyKHBaHHIO 3NeHTpONHbI.CNHKeHHe rYbHbI npOnHJa MOHET pINBECTN K yuaSeHHIO o6paTHO OTdaH.
- MeToDnKa HcNoB3OBAHnA 3JeNtPonHbI
Bcerda co6IIOdaTe npabnla 6e3oNaChOCTn n pImeHnTe MeToDbI pe3Kn, HAn6OJIee NoXoDAJUne Ia TnPa BbINOHaREMoP pa60TbIB COOTBeCTBnC yKa3aHnMn IN PpIMepAMn, N3LOKeHHbIMN B pyKOBODCTbe NO 3KcIIpyatau (cm. r.l. 7).
PacnoJIOHnTe npoBOng nHTaHn TaHm 6pa3OM, YTObI OH He cenllnc3a BcTHN dpyne npenrTCTBn.
- PeneMeueHne 3JIeHTpONJIbI By cIOBnax 6e3ONaCHOCTN
KaKdbpa3, KOrda Tpe6yeTcraepeBnHyTB NnnepeBe3Tu MaunHy, cIeMyET:
- BbHIOHTe DBrAteIb, DOxHITecb OCTaHOBa CEIN N OTCOeHNHTe MaunHy OT 3JIeKTPocETn;
-yCTaHOBnTb 3aunTHbIy cEXoL uHHbI;
B3aTb MaunHy, HcNoIb3yra ToIbko pyKoarKn, HnHaPbaNtBuHny B HaPaBHeHH, IpOTNbONIOxHOM HaPaBHeHHO DmKeHH.
PnnepeB03e MaunHbHa ABTOpaHCnpTe Heo6xoImo paCIOJHOHTb ee TaHIM o6pa3OM, YTO6bI OHa Hn Dn KOrO He npedCTaBnaOnaCHOCTN, n pOuHNo 3a6bKnOpOBaTb ee.
- PeHOMeHdauuIN dIa HauHnHaUOux
IpeKdE, cHbBnepBbIe npCTyNTb K BANKe IeCa HIN O6pe3Ke BetBcN, peKOMEHdyETc:
- npoTn cneuaJIbHbI Kypc obyuHn paOte Ha oBOpyIOBaHHN 3TOrTO TnA;
-BHIMATEJIbHO O3HaKOMITbCnPapBILAMn 6e3oNaCHOCTn yKa3aHmMn PO 3KcNJIyatauHn, H3IOXeHHbIMn B HAcTOrIeM pyKOBOCTBE;
NoynpaHHTbCnHa NnHx, pactyuNX n3 3emnn Hn npnKpeHnHbIX K NOCTabKe, YTOb6 O3HaXOMNTbCn paBToM MaunHbI HaH6OJIe NoXODaHIMM MeTodAm.
4. CBOPKA MAUHHbl
1. CODEPHIMOE YNAKOBKN
ByaKOBKe MaunHbI MHeOTcR:
- cnloboarperaT,
-UNHa,
-uenb,
-3aunTHbIyueXoJuHHbl,
-KOHBepT C DOKymeHTaunne.
PpeKHe, Yem yCTaHOBHTb WnHy, yIOCTOBePBTEcB, TTO TopMO3 cENH He BkIIOUeH; PnN 3TOM fpoNTaJIbHOe 3a- uHTHOe yCTpOINCTBO dIy pyKn IOnIHOCTBIO OTTRHyTO Ha3aI, K KopnyCy MaunHbl.
BAHHO
MOHTIPOBaHHbIMN UINHO N cENbIO N IyCTbIM BaKOM DnMaCna.

BHHMAHNE!
MaunHa nocTabJraTcRc c De
MOHTaHa DOLHHbI BblINHrTbCn Ha TBepDoN I POBHOI NOBepxHocTH, C pacCToHNHeM, DoCTaTOy- HbIM JnpeMeueHn MaunHbI N ee yNaKOBn, Bcerda NoJb3yAcB COOTBeTCTByIOuHMn HHCTpyMeHTAMn.
O6pa6oTHa B OTXoDbI yNaHOBn DoJHHa npOn3BODHTbCBA COOTBeTcTBn C DeHCTByIOUIMM MeCTHbIMN HOpMaMn.
2. MOHTAX WINHbI N CE\PN

BHHMAHNE!
Ipn o6paueHH c uHHoH n
eBaHTe TOJIcTBie pa6OHe nep
co6oe BHNMaHne MOHTaHy
5bl He CHN3HTb yPoBeHb 6e3-
XHTNBHOCTn MauHHbl; ecHN y B
CenbIO Bcerda HadeBaHTe TOnCTbIe pa6OHe nep- qatHN. YdEJaIte Oco6oe BHMaHne MOtAHy - Hnbl n cEN, yTObI He CHN3NTb yPoBeHb 6e3- ONaCHOCTn N 3ΦΦeHTNBHOCTn MaunHbl; eCnn y Bac BO3HHHY COMHeHn, ObaaauTecb B Mara3HN.
-OTBnHTnte pyky (11) n CHmnte KapTe, yTo6bl noJyHtB DOCTyn K BeDyuee 3Be3doUKe N K rHe3dy ShnHbI (Pnc. 1a).
- YCTaHOBnTb cenb Ha WnHy, CO6JIoDAH HAnpaBHeHne DnHexHn; ECIN HA KOHCOJN WnHb IMeETcB BeDoMa 3Be3D0UKa, CLeITe, YTO6bl 3BeHb IeEN npabNtBHO BCTaBJIInCb BO BnAINHb 3Be3DOuKN (Pnc.2).
- YctaHOBHTb 5HHy (2), BCTaBnB 5HINlbKy B OTBepCTne 5HHbI Yepe3 HaTAAKHTeIb (2a) I npToIKNHyTB 5HHy K 3aDHeY aactn Kopnyca MaHHbI (Pnc. 3).
-ObepHyb cenb BOKpyr BeDyuee 3Be3doouKn (Pnc. 4) n npotoKHytb uHHy BnpePe dIry o6ecneueHn npBoro npedBaHPtehBOHO HATJKeHn cenn
-BHObB yCTaHOBnTb KapTeP, 3aBnHTnB 3aBnHnBaHO- uioC pyuKy (1), Ho He 3aTnBa eE.
-Повернть заимhoe кльculo (3) no yacoboi CTpeIke ДЯ полученя правильною натужени (Pnc.5).
- YdeprKnBaI uHHy B npHNOJrTOM nOLOKeHH, 3aTHeTe Do yNopa 3aBnHuaIOuOyOc pyKy (1) aC (Pnc.6).
ydoctOBepbTecb, yTO Ma
HnHa He noKnIOueHa K po3EThe 3JeKtpoNTaHn.
IpeaHaJOMpaObTcLJeDyeT:
- npOBepntb, yTo HAprrKeHHe n YacToTa 3JeKtpocettn COOTBeTCTByOT 3HaueHnM, yKa3aHHbIM Ha «Ta6JIuYKe c DaHHbIMN» (CM. rnaBy 1 - 10.8).
-yoCTOBepntbCRA,TOHaMaWHeHHa WnHe He Ocna6JIeHbI BNHTbl;
- npOBepntb, YTO cENb npaBnIbHO HaTaNyTa, 3aTOHeHa 6e3 cJeDob IOBpeKdEHH;
- npOBepntb, yTO pyKoRTN n 3aunTHbIe npncnocO6JIeHnMaunHbI cHTbIe n cyXHe, yTO OHn yCTaHOBJIeHbI npabINbHO n npOuHO npNKpeJIeHbIK MaunHe;
- npOBepntb DeHCTBeHHOCtB TopMO3a cenni;
- npOBeRbTb, yTO pBHyar BbIKIOUaTeIaH INpeOxpaHHTeJIbHaJ KHOJka CBO6oJHO nepMeuAioTc8 6e3 FOpcnpoBKn, u TTO npN OTnyCKaHm OHN aBTOMaTH. Yeckn H bIcTpo BO3BpaUaOTc8 B HeITpaJIbHOe nIoXKeHHe;
- pOBoBepntb, YTO pbIHaR BByIKIIIOHateJIa DOJINKeH OCTaBaTbCra 3a6IOnKInPOBaHHbIM Do TEX NOP, NOKa He 6yDet HaKaTa IpeDOxpaHHTeJIbHaN KHONKa;
- npOBeepntb, YTO KaHaJIb I npOxoJa BO3dYxa JIyoxlaJKeHnHe 3acOpEnbI OINIKaMn NIn O6lOMKAMN;
- npOBepntb, yTO Ka6eIb PNTaHnY uDInHInTeJIb He NOBpeXdEhbl;
- npOBepntb, yTO ypOBeHb Macla ceHn He HnHe OT-MetKn «MIN» n, ecIn Heo6xOaMnO, DoJIHTb MaCNo, YTObI OHO Ha 1 cm He DOxOaNIO Do 3aJIINBHorO OT-BepCTnI.
2. NPOBEPKA HATAXHEHNAIEN
BHIMAHHE!
ydoctOBepbTecb,TO Maunn K po3ETHe 3JeHTponNTaHn.
- Ocna6bTe pyKy (1) (Pnc. 5).
-Bo3dIeCTByTe HaJIeHaUIM O6pa3OM Ha 3aHIMHOE KOJIb4O peryIaTopa HaTJKeHINa cENn (3)ДЯnoJyEHIN Tpe6yEMoro HATJKeHINu cENn (Pnc.5). - YdepnBaa HnHy B npnoDnTOM nOLOKeHn, 3aTnHe Do ynpa pyky (1) (Pnc.6).
HaTaeHHe RaBJeTc npaBnIbHbIM KOrDa, npu 3axBaTe ceHn Ha cepeDInHe uHbI, 3BeHb He BbIXoJr N3 Ha- npablaIOse (Pnc.7).
DepKaTb HaKaTbIM BbIKIIOuATEIb N IpeOxpaHHTeJIbHyIO KHOHNy, YTO6bl OcIa6nTB TOPMO3, 3aTeM, PnI PO-MoUg OTBepTKN, PpOrHaTb cENb BDOJIb HApBaJIHO-UX, YTO6bl yOcOCTOBepNTbcR, YTO OHa DBrHexTCs 6e3 PnpIoJKeHrNry Upe3MePbIX ycINl.
3. ПОBEРКА TOPMO3A LECIN
3Ta MaunHa OChaSeHa DBOHOn CnCTEmoT TopMoKeHHa, KOtopa Cpa6aTbIbAeT B DByx CnyaX.
a) Pn OTnyckAHn pbIyara BbIKIOUaTeJI ATOMatHuecNn BkIIOuaeTc TOpMO3, KOTOpB 3a-MeJnREt N OCTaHaBnBaet DbIXeHne cENi, YTO6bl N36EkaTb TpaBM, PNCH KOTOpBX 6bl 6bl BbcOK, ecNI 6bl I NOcJIe BbIKIOUeHn cENb IpOdoJIHkaJa dBIXeHne.
b) B clyae OTcKoHa BO BpeM pa60TbI, Bbl3BaHHO aHOMaJIbHbIM KOHTaHtOM C KOHCOJIbIO uHHbI, B pe3yJIbTaTe yeFo MaUHa pe3KO nOcKa-KnBaet BBepx I pyKa yApAreTc O nepeDHIo 3a-nty. B 3ToI cnTuayuIN TopMO3 OCTaHaBnBaET DnHexHe ueN HEO6XoDMo pa3bLOHIpOBaTb ERO BpyHyU, YTO6blOTKlHouHTb.
3TOT TOPMO3 MOHNO BHKIOHTb TaKHe BpyHyO, NOBHNyB BnpeI d pOHTaIbHyIO 3aunTy. IINr OCBO60JDeHHa TOpMO3a NepMeCTNTe PpOHTaIbHyIO 3aunTy BCTOPOHY pyKoTKn Do UeNkHa.
Toro, TObI npOBepntb HcnpaBHOCTb pa60tI TopMo3a, Heo6xOIMO:
-3aynctntb DnBraTeIb, B3aMaunHy 3a nepeHIOpyKoTky, nToJkHyTb 6OJIbShm NaJIbCem BnepeDfpoHTaJIbHyU 3aunTy dJa pyKn B HappaBHeHHuHbl.
-KordaTopMo3BKNIOaEeTc,OTNycNTbpbHAr BblKIOHaTeJI.
CenbdoJHKHaOCTaHOBNTbcHHe3aMeIHTeJIbHO,KaTOJBKO BKNIOHTcT TOPMO3.
BHIMAHHE!
He nCnoNb3yIte MaunHy,
ecn Topmo3 eenn pa6oTaET HencnpaBHO, n 6paTHTecb B Mara3HH dIy npOBeHn HEO6xOIMbIX npOBepoK.
4.CMA3KAJIAUENI
BAHHO
HcnoB3yInTe nCHIOHTeIbHO
CneuajbHoe Macno DnB 6eH30nn nn aDre3nOHHy Cma3ky dny 6eH30nn. He nCnoJb3yIte Macno, COdepkauee npmech, yTo6bHe 3acopntb fNtbp 6aka H He HaheCTN MaCIAHOMy HAcOcy Heo6paTHMbIe NOBpeKdEHH.
BAHHO
CneuaJIbHoeMacIOI
CMA3H NcEN YBJIETCA Bnopa3IOKHMbIM. NcNOJb30BaHne MNHepaIbHORO INMOTOPHO MAcJa HaHOCNT cepBe3HbI yuepe6 OkpyKaIOUe CpeJe.
BaHHO hCNOJb3OBaTb MaCIO BbICOKoro KaueCTBa, YTO6bl Xopo0o Cma3aTb DeTaJI NIIbHOro annapata; 6bIBweB HcNoJIb3OBaHmMaCIO NIN MaCIO IIOXORO KaueCTBa CHNJaOT 3ΦΦeKTHBHOCTb CMA3HN COHpaaIQT cPOK ClyK6bl UeIN N IINHbl.
BAHHO
KaHbI pa3 nepeHcnoJb30
BaHnem Maunhbl peKOMeHnyeTc npOBepaTy yPOBeHb NdoNtBaT MacNo, Yo6bl OHO Ha 1 CM He DoXoAnIO DO 3aJINBHorO OTBepCTHa. YPOBeHb MacJa He DoJIKeH ONyChAcbr HnHe OTMeTHN «MIN»
PIMMEUAHNE
IIa3aIINBkMaCna peHomeH
DyETcN NOLOKHTb MaunHy Ha npabBn BOK, TTO6bl HAJIINBHAR ropIOBnHa 6bIa pacNOJKeHa BEPTNKaJIbHO.
5. 3JIeKTPnueCKNE COEINHEHNA
ONACHOCTb!
BlaHHocb H 3JIeHTpHue
CTBO HECOBMECTHMbl.
- Pa6ota c 3neKtpnueChmH Na6eJMaH n nx noCoeHNHeHne DOJIHHbI BblNOJHrTbcB C cyHXYcIOBnX.
-Po3eTHa 3JIeHTponHTAHnHa Hn Ka6eNb HnKOrda He DOJIHHbI COpHnHaCatbC C BlaHHOu 3OHo (LyKeH nn BlaHHoN 3emJe).
KaueCTBO Ka6eNe yDInHnTeIa DOJIHHo 6bITb He HnHex Tnna H07RN-F Hn H07VV-F npu MmHmAbHo nlo- uadn ceHeHn1,5 MMn MaKcHmAbHo peKOMeHdyem Mo dInHe 30M.
Bo Bpempa60bI Ka6eJIy yDInHnTeJI He DoJKeH 6bITb 3amToAH BO n36eKaHne neperpeBa.
ONACHOCTb!
NoctoHHoe noCoeHHeHne
JIIO6Oro 3JENTPNuechoro annapata H 3JENTPOcTeH 3a-HN RAONHO 6bITb BbINOLHeHO KBAHNPHUPOBaHHbIM 3JENTPHOM, B COOTBETCTBnC DeIeCTBYUHmH HopMAMn. HenpaBnIbHO BbINOLHeHHe CoedNHHeH MeKHT HaHeCTn cepbe3HbYuep6, B TOM YHCJIe Bbl3BaTb CMeptb.
ONACHOCTb!
IITAHNE npnbopa doJHHO ocytoo nnDnΦepeHua (RCD - Reco 3NaueHneM nΦepeHuaNbHe 60nee 30 mA.
BAKHO
Bo n36eKaHne nepe6oEB noJaue
3NEKTPoNTaHnA:
-yIOCTOBEPHTbC,TOO6aHarpy3Ka 3JIeKTPo06OpyOBAHn COOTBETCTByET Tpe0BaHnM;
- NOJHIOHTb MaunHy K po3eTHe, paccHTaHHoH Ha DOCTATOHbI TOK;
-36eRaTb OJHOBpeMeHHoro NcNoIb3OBAHnA pyrOrO 3NeK Tpoo6OpyDobAHn, Notpe6nIooero MHorO 3NeKtpo3Hep rnn.
6. 3ANYCK - OCTAHOB ДВИГATEЛЯ
3ANyCK DBNIGATEJIa (Pnc. 12)
Ipeed 3aynckom Dbngateia:
-3aKpeNITe Ka6eJIb yIINHITeJIa (1) Ha depKaTeJIe, paCNoLOJKeHHOM Ha 3aDHeI pyKoRTke.
-ПодсоeннTe CHAчАЛВилky ka6eЯ nHTaHnR (2) K ydlnHnTeJIIO (3), a 3ATEM ydlnHnTeJIb K po-3eTke 3JIeKTPoPnTaHnR (4).
-CHaTb 3aunTHbI yexoI uHHbl.
- Y6eIntecb, yTO uHa He Kacaetc3eMn nn Dpynn X npedMeTOB.
YTo6bI 3aynctntb DnBnTaTeJIb (Pnc.12):
- BbIKIOUHTe TOPMO3 ueHn (5) (pepeHra 3aunTa pyKn IepemeueHa K pepeHnepyKoTHe).
2.Kpenko BO3bMnte MaunHy o6eMN pyKaMa. - HaHMMTe npedoxpaHnTeJbHyIO KhoNky (6) IN BHKIOUHTe BBKIOUHaTeJb (7).
ПРИМЕЧАНЕ
Pn OTnyckAHN BbIKIOyateTEn
PpeOxpaHnteJbHaN KHOJa pa36nOKnpyETcN n DnIraTeJIb OCTaHOBNTcR.

BHIMAHHE!
OctaHOB cenn MoKeT npo
H30HTN Chepe3 OndHy CeHydny Nocne BbIHIOUeHnA DBnraTeJI.
OCTAHOBKA DBNIGATEJI
YTo6bIOCTaHOBHT BnIraTeJIb:
-OTnyctntb BbIKIOuHaTeIb (7).
-OTcoeHNHTe CHAAYAIA ydInHnTeIb (3) OT po3eTHN 3JeKtpoNTaHnra (4), a 3ATEM ka6eIb nHTaHnra (2) MaINHbI OT ydInHnTeIa (3).
7. ПОльб3OBAHNE MAшINHОД
BHIMAHHE!
An oecneueHHBaWei 6e3CHOCTN OKpyHauOxH:
1) He nCnoB3yIte MaunHy, BHMaTeIbHo He O3HaKOMNBWHcB C yKa3aHnAIMN. O3HaKoMbTecb C opraHAMN ynpabJIeHHN HnadneKaUHM NcNoIb3O-BaHHem MaunHbl. HayHTecb 6bICTpo OCTaHaBJIHBaTb ABnRaTeIb.
2) HcnoJb3yIte MaunHy dJIa CEHN, dJIa KOTopoOn OHa npedHa3NaYeHa, T.E. JnA «BaJIHn, pa3JeJIHn I O6pe3Kn BETBe C DepeBbEB, pa3MebpI KOTOpbIX COOT-BETCTBYOT DInHe WInHbI» HIN DepeBAAHHbIX npedMetOB C TaHmN He XapAHTePncTHKAMn. JIO6oe DpyOe HCNoJb3OBaHHe MOHer 6blb OnachbIM N IOBpeHtB MaunHy, 3TO OTHCHTCA H H NCNoJIb- 3OBaHNO DOONHHTeJIbHbIX npNCNoC6JIeHH, He yONMHaEMbIX B HactoJsem pyHOBOdCTBE. BxOHT B NOHrTne HeHaJIeHaJcero NoJIb3OBaHHa
(нан пимер, HO He TOnbHo):
- BbipabHnBaHne HnBOHn3rOpO;
- pe3HbIe pa60TbI;
- pa3deneHne Ha qactn noaHOB, uHKOB u npaHOBOK B 06eM;
- npn pa3deneHn Ha yactn Me6eB MoKet COdePHaTb rBO3n, BnHTbI nn MetaAnuYeCKHe HOMNOHEHTbl;
- BbINOJIHeHHe pa60r no 6pa6oThe Mrca;
- HcnoIb3OBAHHe MaunHbI KaH pbIyara Ira NODHATN, nepemeueHHa nn pa3JaMbIBAHn npedMETOB;
- NOIb3OBAtbcMaunHou, 3a6NoHnpoBaHHoHa HenoDBnHHbIX Cynnoptax.
3) NOMHHTe, yTo onepaTop Hn NoIb3OBeTb MaunHbI HeCet OTBETCTBEHHOCt 3a HeCuaCTHbI CnyuAn Hn BO3HNKHOBeHne HenpeBnDEHHbIX CHTyaqN, B pe3yIbTate KOTOpbIX MOrY T NOcTpadaTb
TpEtbn Hnua Hnn Hx HmYueCTBO.
4) Bo Bpempa60tBu HmEtBa Ce6e COOTBETCTBYO uyO OeHdy. Baw npoabeu MoHet npedocTaBnB Bam CbeHnA O Han6oEe NOxOaunxCpeCTbax 3aHTbI, rapaHTpyUoUnx 6e3onacHOCTb BO Bpempa60tBu. HadeHbTe aHTNB6pa- cNoHHbIe NepaTHN. Bce yHa3aHHbIe Bblwe MepblnpoctopOHooCTn He rapaHTpyOT 3auHTy OT B6pO6OE3HN IIN KHeTBEORO TYHEnbHorO CNHApOMa. No3ToMy, peKomeHdyem Tem, HTO dONrIO nJb3yETc DaHHbIM H3dJIHEm, NepnoDnueChn npOBepaTb COCToAHne 3dOpOBbBy pyK n NaIbueB. Pn BO3HHHOBeHHn HeHOTOpbIX n3 yHa3aHHbIX Bblwe CHMNTOMOB HEmdJeHHO O6paHTTEcb K BpaCy.
5) 3NeKtpponpoBODka daHHoMaunHbI co3daeT cna- 6oe 3NeKtpomarHHTHOe nOle, HOTOpoe OHaHo He HCKIOyaeT BO3dEYCTBn Ha aKTHBhIE Nn NaC- CNBHbIe MeduCHne yCTpOcTBa, MMNaHTP oBaHHbIe B OpraHn3M OepaTopa, YTO MoHe T No BeprHyt b erO 3DopOBBe cepbe3Homy pncHy. ITo npuHHe nepeH NCNoJb3OBaHNem MaunHbI JIOH, HOTOpbIM 6bln HMnAHTPOBaHbI MeduCHne npncnoc6nEHn, DOJIHHbI npOHc cyJbTHpOBAtbcra C BpaVOM Hn C npOn3BOUnteMe MeDuHCHOrO npncnoc6nEHn.
6) Pa6oTaIe ToIbHIO dHem Hnn npn XopoWem nCHyCCTBeHHOM OCBeUeHNN.
7) Bydte ouehb BHHMaTeIbnHbI npu pa6ote B6n3n MetaJIHueChnx orpaKeHH.
8) Cenb He doJIHHa cOnpHKacatbca C 3JeHTpucecknmp Habeinem. NcNoIb3ObaTb DePHaTeNb HabeN BO n3-6eHahne clyuayHoro OTHpeHnEHHa Ka6eY yHn-Hnte, a TaHHe IJRA ObecNeueHHa npABnIbHO 1. YCTAHOBHN B po3ETHy 6e3 fOpCnPOBHN. HnHorda He npHKacaTeCb K 3JeHTpucechOMy HabeHIO NOd HapRHeHHem C IIOXoH N3OJIuHne. EcH N yDInHNTeNb IOBpeHnCA BO BPeMn NCNoIb30-BaHHa, He npHKacauTeCb K Ha6eHIO H He3aMeD-Bo JHTeNbHO OTHIOUHTeY dINHHTeNB OT 3JeHTpoCeTnO
9) O6paaHte BnHaHne, YTObI uHa He CnIbHO ydaPnaLacb O NOCTOpOHnE npeMTebl, H Ha BO3 MOHHoe OT6paCbIbAHne MaTepHaJa, BCJeDCTBHe DBNHHeHn eHn.
10) OctaHOBNTe ABHrataJIb n OTcoeHNHTe MaunHy 3JIeKTPocETn:
BAHHO
Bcerda nomnHTe, YTO Hnpa-
BnIbHO NcNoIb3yEma 3NeKTpOnnla MoKeT HApUWHTb IOKoIIODeN HaHeCTn yuep6 OkpyKaiouien CpeJe.
Toro,TO6bHe npuHHTb 6ecnokoCTBa dpyHM IIOJIM H He HaHocTb BpeD OkpykaUoJe Cpee:
- N36eraIte HcNoJIb3OBA Tb MaUHHy B TaHx YcNOBHX B TaHOe BpeM, KOrDa OHa MOKeT HApUHTb NOKoI OKpyKaIOuX.
- Ctporo co6IIOdaTb DeIcTByIOuHne Ha MeCTHom ypoBHe npaBnla no BbIBO3y OTXoOB pe3Kn.
- Ctporo co6nIaTb DeNCTByOuHne Ha MeCTHOM ypOBHe npabnla nO BbIBO3y Ha CBaNy MaCeI, N3HOeHHbIX YactEn nn NIObIX 3JEMeHTOB, HAnOCaNX e yuepe6 OkpyKaIoUe cpeJe.
-BoBpempa60bI BOKpyHauOyU cpey nonadaet HeKOTOpoe KOJnueCTBO Macna, Heo6xOIMORO nA CMA3bIBaHnA qen; NO 3TOI pnuHne NcNoIb3ynte TOIbKO bNopa3IOHmMbIe Macna, PpeHa3HaueHHbIE CNEuNaIbHO dI TaKOrO NcNoIb3OBaHnA.
-Bo n36eKaHHe noKapHoN onaCHOCTn, He OCTaBJaIte MaunHy C rOpHm DburaTeMe CpeNm JInCTbeB Hn CyXoTpaBbl.

BHIMAHHE!
Hnbl JIy BaJIH N O6pe3HN BcTBeH Heo6xOJMo
PpOHTn CneuaJIbHbI Hypc OboyuHn.
- PPOBEPKN, BbINOJIHAEMbIE BO BPEMPA5OTbl
-Поберрканатяжени.
BoBpempa6oTbIeHbNoCTeHnHO pactraHbaeTcR, HOTOMy Tpe6yeTcHaCTO npOBepaTb ee HaTaeHne.

BAKHO
B nepBoe BpeMn nn noCne 3a
MeHbI cENn) Heo6xOaHMo npOBoNDtB npOBepKn yaue 96bIHorO n3-3a peryInpOBKn cENn.

BHUMAHNE!
He pa6oTaIe c ocJa6neH
HON cenbIO, 4TO6bI 3TO He npHBeIO K onaCHOn CHTyaun, ecn cenb BblndT n3 HappaBnaOuHX.
TTO,TO6bIOTpepyuipoBaTbHaTJKeHHe cenn, pKOBODCTByTEcB yKa3aHnA MIn,N3IOKeHHbIMN B TJI. 5.2.
OCTAHOB BO BpeMa pa60TbI
3Ta MaunHa OchaueHa 3aunToIOT nepepy3OK C BblKlouatelem. EcnI cenb 3actpHET (HanpHMeP, BCneJd
CTBHe 3aCtpeBaHnpeKyuIeO y3la, 3aRpa3HeHn 3y6- zuoB ueHn nepeRpy3Kn npu pa6Ote), npedoxpahnteHbHbBbIKHIOaTeB aBTOMaTNUeCKN OTcKaET eKeKTPOpNTaHne, YTo6bl He dOpYCTHTb NOBpeJDeHn 3JIeKTPoPNIbl.
BAKHO
BbIKIOHateIb cpaBaTbIbAeT,
ecn TOK OTKIOUeHnI pReBbIaet 30-35 A,ero MOKHO BpyHyTO BepHyTB HcXoJHOe NIOJOKeHne HaKaTNEM CneuaJIbHOH KHOKN (1-5) yepe3 30 cekynd IocJe IONHO OCTbIBAHn.
YdEnHte BHHMaHHe ToyHam
ONOpbl BETBn Ha 3emIe, BO3MOHHOCTN npncytCTBn HAnpAHeHn, HAnpaBHeHIO, HOtOpoe MoHcT npHHaTb DepeBO npn pe3Ke n BO3MOHHoYCTOuHBOCTn DepeBa NocJe 6pe3HN BETBn.
Pa3dJIHa CTBOla
"Pa3deIaTb"CTBOJ O3HaayeT pa3pe3aTb erO NO Bcei erO dInHe. BaHIO yOcTOBepNTbcra, YTO Bbl cToNTe Ha HeIOBHNHO ONope n YTO BaW Bec paBHOMepHO pa- npedeHn HA OBe HOr. EcIN BO3MOHNO, peKOMeHdyETc npINOHTb CTBOJ, YTO6BI OH ONpAICr HA BetBN, 6peBHa nn Uyprn. DJI TORO, YTO6BI ynpocTtB npo- ceCC pa3deHN, He DeJaTe CLOHHbIX pa3pe3OB.
- Ecnn CTBOJ OINpaeTcH Ha ToKn OnOpbI NO Bcei DInHe, KaN POKa3aHo Ha Pnc. 18A, erO pa3deJa HauHaeTcB B BepxHe yactn (BepxHra pa3dElnka).
- EcHn TOnbKO ODNH KOHeC CTBOLA ONIPAeTcH Na ToCHN OONOpbl, KaK NOKa3aHO Ha Pnc. 18B, Heo6XoDIMO BbIIOHNHTb pa3pe3, OXBaTBBaIOUoiN 1/3 DnaMeTpA B HIXHHeY qACTN (HHHNA pa3deJIka). 3aTeM HApO BbIIOHNHTb 3aBepsaIOUoi pa3pe3, YTO6bl BepxHra pa3dEJIka coeDINHlnacb C nepBbIM pa3pe3OM.
-
EcHn Oba KOHua CTBOJa ONIPAOTcHa ONOpbl, KaK noka3aHo Ha Pnc. 18C, Heo6xOJMo BbINOJHHTb pa3pe3, OXBtBbIAOuIeI 1/3 dIaMeTpa B BepXHeJ cactN (BepXHra pa3deJIka). 3aTeM HAdo BbINOJHHTb 3a-Bep7aIOUeI pa3pe3, CdEJIab CHN3y pa3pe3, OXBtBbIAOuIeI 2/3 dIaMeTpa, KOTOpBI JdoJIKeH coeINHTbcr c nepBbIM pa3pe3OM.
-Благогаря Испльбованю Крюка,раздениства вллелнгетсь солeeуdoбн(Pnc.18D). -
YCTaHOBnTe KpIcK Ha CTBOJe N C eRo NOMOuHIO DaIte MaunHe COBepuHTb DyroO6pa3Hoe DBNHeHne, B pe3yIbTaTe KOtOpO WUnHa BOJdET B DepeBO.
OBTOPUTe 3To DeINCTBHe HeCKoJIbKO pa3,ecnH HeO6XoIMo,MeHra ToKry OOnOpby KpIka. -
Pn pa3dJIke CTBoJa Ha cKIOHe Heo6xOJMo BceIgHaXoHTbCBAIe Hero, KaK NOKa3aHO Ha Pnc. 19. Bo BPemr Onpaun, npn 3aBepweHnn pa3pe3a, YTO6bl He notePrtb KOHTpOJIb, Heo6xOJMo yMeHbShITb DaBJeHne pe3HN, He OTnyckar pyKOraTOK 3JeKTpOINbl. Heo6xOJMo n36eRaTb KOHTaHTa 3JeKTpOINblc 3eMJIe.
IIO OKOHuaHn pe3Kn NODOxDHTe, noka nnla octaHOBNTcra, n ToIbKO 3aTeM nepehocnte ee. Pnp nepeHoce NNbl OT OJHOrO DepeBa K DpyrOy Bcerda BbIKIOuYaTne DBNAteIb.
3. OKOHUAHNE PABOTbl
BHIMAHHE!
YdoctOBepbTecb,4TO MaHa K po3ETHe 3JeHTponHtAHn.
HnHa He noKnIOueHa K po3eThe 3JeHTponrTaHn.
HeKaOHHHBa6OToY:
- OctaHOBnTb DnBraTeIb, KaK yKa3aHo paNbwe (ΓI. 6).
-NoDoxdaTb, KOrDa cenb OCTaHOBNTcR, N DaTb Ma-
-Поуностпь сени OTОПИКи MacJa. - Ecnr np3b yctoynbaa nno OHa npebpatnlaacb B CMOJy, CHrTb cenb n Ha HeCHOJIbHO YAcOB IORpy3NTb ee B eMKocTb CO CneuaJIbHbIM YNCTraUM CpeD CTBOM. 3aTEM CNOLOCHyTb ee NCTOIN BOIOI HAHeCTN CNpeEM NOxODaUH aHTNHOpp03uHbI COCTAB, a 3aTEM BHOBb YCTaHOBnTB ee Ha MaunHy.
- YCTaHOBtB 3aIHTbI yEXoI IINHbI nepeTeM, KaK NOMEcTITb MaIHy Ha xpaHeHne.
BHIMAHHE!
AaTe OCTbITb ABHrataIIO
pepepepeeHem Maunhbl B IIOboe NOMEeHne. Ia CHnHeHHa NOHaPOn OH NaCHocN OChCTte MaunHy OT ONNoH, OCTaTHOB BetOH, JNCTbeB Hn H36bIHTa Cma3HN; He OCTaBJaTe KOHTeHepbC OTXoJamPe3HN B NOMEeHnn.
8. TEXOБСЛУЖИBAHNE И XPAHEHNE
BHIMAHVE! Дя обесенья Baшен 6e3oNaChocTN n 6e3oNaChocTN OkpyHaIoUxN:
-Правиьhoe texo6cnyнване АВЯETС OCHOBONOLARAIOUM ДЯ COXPAHEHЯ ПЕВОHA-ЧАлььбIX 3КСПЛУATAUQUHbIX XapAHTepNCTH N HаджнocTHnp pa6ote MaunHbl.
- CneiTe 3a Tem, yTo6bI raHn n BnHTbI 6bln 3aTAYtB, IyBaVepeHHoCTN B TOM, yTO Maun H Bcerda 6eOnacha npn pa6ote.
- Hn B Hoem Cnyae He NcNoIb3OBaTb MaunHy H3HOCHBUNMCAHnn NOBpeHdEHHbIMN qACTHM. NobpeHdEHHbIe DeTaHn CneJeYer Bcerda 3aMeHATb, Hx HNKOrDa He peMOHTpyOT.
- NcnoB3yIe ToIbHO opnHnHaIbHbIe 3aIyactN. 3aIyactn He paBHOceHHoro HauEcTba MOryt npNBecTH K NOBpeHdEHHO MaHnHbI N K BO3-HNKHOBeHHO ONaChbIX CNTyaqH.
BHIMAHNE! Bo Bpem anepaun texo6-cnykBaHn:
- OtcoeHHHe MaunHy ot 3JeKtpocTe.
- Ppn o6paueHn c uHHo HcENbIO HaedeBaHTe 3auHThIe nepaTHN.
- HadeBaTb 3aunuty Ha uHHy, 3a NcKloueHneM pa60r c camou uHHoH uHn c ceNbI.
-He pa3nBaTb B OKpyHaIOUe CpeDe MacNo n npOue 3arpa3HIOUe BeIecTba.
1. OXIAJIHKeHHe IDBIgATEJIa
Bo n36eKaHne nepepeBa n nobpeKdEHHaBnraTeJIa BO3dyXo3a6OpHbIe peWetKn IIN OXlaKdEHHaDJIHKbI BCerda coepKaTbCn B YnCTOte, Ha Hnx He DOJIHKHO 6bITb ONIOH n OTXoDOb.
2. TOPMO3 ζΕΝΑ
YacTo npOBepaTe 3ΦΦeKTHBHOCTb pa60Tb1 TOPMO3a ceH.
3. 3BE3DOUKA LEN (Pnc. 20)
Yacto npOBepaTe COCTOHNHe 3Be3IOUKN cENN 3aMeHHTe ee, KOrDa n3HOC ppeBbICNT 0,5 MM.
He ycTaHaBnBaIte HOByIO ueNb C n3HOWeHHoN 3Be3- DooKoHJn HAO6OpOT.
4. CTEPHEHb OCTAHOBA LENI
3TOT CTepeKHeB BaKeH dIy o6ecneueHn 6e30nacHOCTN, NocKoJIbKy OH npeDToBpaaAet HeKOHTpOInpyeMoe DmHKeHnE cEN B Clyuae pa3pbBa nn OcIa6leHHn.
Yacto npOBepnTe coCTOaHHe cTepHHn 3aMeHnte ero,ecn OH NOBpeHdEh.
5. FISKPENJIEHNIA
IepnoDnueckn npOBepaTe pIoTHoCTb 3aTJHKN BCEx HHTOB nraek, a TaKKe npOuHOCTb 3aKpeJIeHn pyKOrTOK.
6.3ATOUKA LENH
BHIMAHNE! IIO coo6paHHeHnM 6e3onac-HocTH n 3ΦΦeHTNBHOCTn pa6Otbl, OeyH BaHHO, YTO6bl peKyuIe opraHbI 6blI XopoO 3aToyeHbI. DnI npAunlbHoro BblONHeHn Bcex Oepaun C cenbIO n uHHo Tpe6yETcN OC6aH KomTeHcHn, a TAKHe CneuHaBHy INHCTpyMeH; n3 COo6pa- Hn H630nACHOCTn peKomeHdyETcN O6pa- uTaBcH K Bawemy dInepy.
Heo6xOIMO BbInOnHrTb 3aTochky, KOrda:
BnD onnok HanomHaet nbJb.
-ДЯпнеленгтpe6уетс npnIOKHTb 6OJIbIyU cNly.
-ПиеленHeHenpmaOe.
- YBENHINBAE TCR Bn6paIy.
EcnBbINOHeHne 3aTOcKN IOpyuaeTcNcEuaJIIN3nIPOBaHHOMy ceHTpy, OHO 6yDenBbINOJIHeHO Ha cNeuJAlbHOM ObOpYIOBAHIn, ObecNEUBAJOUeM MInHMaJIbHb Cpe3 MaTePnaIa N paBHOMepHyIO 3aTOcKBy BCExpeKyuix KpOMoK.
Heo6xOIMO 3aMeHHTb cenb, KOrda:
-Дина peKHyuei KpOMHn CHNJaETcI Do 5 MM NJI MeHee;
-3a3Op 3BeHbeB Ha 3aKJIeNkax CInIiHOM BeINH.
7. ONOPOXHEHNE IN POMbIBKA MACJIHORO BAHKA (ToIbKO B clyuae nCnoJb3OBaHHB 6nolornuechoro macna dIy uei)
Приимеони HeKOTOpbIX TINOB 6HIOLOrHuYeCKOrO MaCJa CO BpeMeHem MOKeT Bbl3BaTb O6pa3OBaHne OTIOKeHnI HapocToB.
B 3TOM clyuae, nepei NOMEeHnEM MaunHbI Ha IInTeJIbHOe XpaHeHne:
-CHrTbIeBnIuHNy;
- onopoHHnTB 6aK OT MacJa;
-3aINTb B 6aK CneuHaBHyIO YnCTAryIO XnIKOCTb DO NOIOBHHb MaKcMaJIbHOrO yPOBHr;
-3aKynopntb 6aH N BkIIOHTb MaunHy, YTO6bI OHa paB6oTaJa Do Tex nop, NOKa BCE MOIOUee CpeDCTBO He BbITEHeT.
He 3a6ydbTe 3anpaBntb MaunHy macnom nepei cIe- dyUOIM NcNoJIb3OBaHneM.
8. TEXOBCJLYKHBAHNE UHHbl (Pnc. 21)
Bo n36eKaHHe acnMMeTpNHO n3HoCA uHbI He- o6xOaMo nepNoDnueckn nepeBopaunBaTb ee.
9. HENCINPABHOCTN IN CNOCObI INX YCTPAHEHNA
BAHHO
TuaTeIbHoe 03HaKOMJIeHHe Co
CBeHeHnMn, n3LoKeHHbIMn B HAcToaIeM pyKOBoDCTBe, n03BoJrT Bam xopoWIO NOHrTa pa6Otu MaunHbI, a CoepKaUneCeB pyKOBoDCTBe yka3aHnI NOMOryT Bam pacNo3HaTb n peWntb BCE Bonpocbl, CBraaHbIe C OCHOBHbIMn peKHMamn pa6Otbl. Ecln Bo3NkHyT dpYrHe HencnpabHOCTn IIN np6JIembl, ObaaauTeCb B OΦuNaJIbHbI cepBnCHbI ueHTp.
- Maшина He 3anychaetca:
-ydOCTOBepntbCBAHAnuHnHa npJKeHnBpo3eTke:
- npOBepntb, YTO Ka6eIb NITaHnY yDInHHTeJIb He NOBpeKDeHbl.
- npOBepntb nCnpaBnOCTb BbIKIOUaTeJIa N, ecJIH He- 06xOJIMo, o6paTHTbcra K dIInepy dJa 3aMeHbI BblKIOUaTeJIa.
Pa60Ta Hn3KOro KaueCTBa
- npOBepntb HnpaBJIeHne MOHTaJa cenn,
-
npOBeRnTb 3aToUky ceNn n/nnn H3HOC Je3Bn (o6paTntbcr K dIJIepy IJIa BblOJIHeHnA Heo6xoJIMorOpemOnTa).
-
Lcenb He Bpaaaetca:
-yoCTOBepntbC,TO npeDnra 3aunTa OTHHyTa Ha3a.
Maclo He BbitekaeT:
-yoCTOBepntbCBAHJIuINMaCnaB6aKeI,ecnHe- 06xOIMO,npomblteero(.7).
-ИckpeHne:
-OBpaTnTbCRA K DnJIepy DJIa npOBepKn DBrIraTeJIY n 1eTOK.
10.ДОПОЛНТЕЛьнtie ПРИСПОСOBLEHЯ
B Ta6nue yka3an nepeyeHb BCEx DOnoNHTeIbHbIX KOM6HaCmMeHdy WInHO HcENbIO C NometKo, Ha KaKoMaHHe IX MOxHO pPIMeHrTb-OHN OTMeYeHbICMBOJOM
Topbie NOIb3OBaTeJIb BblIOJIHHeT CaMOCTOaTeJIbHO, OH He Hecet N BCIO OTBeTcBeHHoCTb 3a yuepe6, n3 3TOrO BblTeHaIoUm. B clyuae comHeHNn Hnne3HaHn XapaHTepNtN KaHdoN uHHbI n cenn, ObaaauTeCb B Mara3HH nN B CpeuaHn-3npoBaHbI ueTp no caOBOdCTBy.

BHIMAHHE!
Nochony Bb6op, MoTHaX
H 3KcnIyataunu WnHbI H cenn, -3TO dEeCTBn, KO-
Coyetahna uHHbI u cenH
3. AFLSUTNING AF ARBEJDET
ADVARSEL!
2. KONTROLL MED KJEDETS SPENNING
8. VEDLIKEHOLD OG LAGRING
ADVARSEL! het:
8. VEDLIKEHOLD AV SVERDET
For a unnga usymmetrisk slitasje pa sverdet, er en fordel a snu det med jevne mellomrom.
1. KONTROLY, KTERÉ JE TřEBA PROVADET BEHEM PRACOVNI CINNOSTI
- Kontrola napnuti retézu
9. PROBLEM A JEJICH RESENI
DULEZITA INF.
Pozorno precten informaci
1. A CSOMAG TARTALMA
Maun KaHO To e npeTxOAnHO HabeJeHO, co ueI da He ce OwTeH MaunHaTn Da He Ce npedn3BnKa WTeTa.

BHIMAHHE!
MokHOCT 3a IuHn NobpeHn Hua Bo Cnyuj Ha HeBHMaHHe.
noBpeHn Ha dpyrn lHua Bo clyuaj Ha HeBHMaHHe.

ONACHOCT!
Mokhoct 3a TeuKn JnUHN nobpeu
HIN NOBpeHN Ha dpyrH Iuca, Na dypn N Cmpt, BO cnyaj BHMAHne.
TEHEPAJIHN B63BEOHCHN IPEyIpyBAHbA 3A EJEKTPNUHNTE DEJIOBN

BHIMAHHE!
IpoHTajre rn zenoTo npedynpey
Bahe BO ODHoc Ha 6e36eHocTa n CEIOCHOTyNATCTBO. npdpjxhybahe KOH npedynpeybahata N KOH ynatCTBOTO MOHe da npedn3BuHaat eJeKtpueH ydap, n3ropeHnU pno3HN nobpeH.
Coyybajte rnpedynpeyBaHata 3aEDHO co ynaTCTBOTO 3a HnHa KOHCyIaunja.TepMHOT eEeKtpnueH anapat" HabeDen BO npedynpdyBaHeto ce OndecyBa Ha anapatOT CO BkIyHeHTE Do- daTOU KOn paObTaH cTpyja.
1) 06e36eYBaHe Ha pa6oTHaTa cpeHHa
a) OdpKhybajte ja pa6oTHata cpeHna YnCTa n Do6po oCBET-HeHa. HeuNCTn nn HecpeDeHN CpeHH MoKe Ja DOBeaT DO HnUdENTn.
6) He Hopnctete r n eEhtpnHnte anapatn BO cpeHa Kaede NoctOn p3nk Od EHCIIIO3nJa, BO npncyctBO Ha 3anaJIbHMatepn, racOBn Hn HcNCTOTnJa. EeKTPnuHnte DeIOBn PpeH3BnkyBaat NcPn WTO MoKe Da r n 3aIaNAT HeHcTOTnTe nnN NCnapyBaHaTa.
B) Deuata n Dpyrnte kon wto ce BO 6n3na Tpe6a da ce daJeayat hora ce hopnctat eentpnuHnte anapatn. ODbLeKyBaHe BnMaHne MoKe da npEi3BnKa ryebeKe KOHTpoJa.
2) 06e36eYBaHe Ha eIeHTpHHTe DeIOBn
a) PnHKJyOHOt 3a eJENKTPNCHNE DEJIOBn Tpe6a da 6Hne HOM- NaTHbIeH CO eJENKTPNCHNO DOBOd. HNKORAw He npenpaBAjTe ro pNKHJyOHOt. He KopNCteTe aAnTepn 3a eJek- 6 TPnHHTe DeIOBNI TO HMaat 3a3emjyBaHe. PnHKJyOHOt WTO He NpeTpNeI IN3MeHa ININ He e aAnTIpanH rO HAMAYBa pN3IKOT OD eJENKTPnHEn yap.
6) N36erHybajTe KOHTaHT Ha TeJOTO CO NOBpHnHa CO Maca Hn Co 3emJa, HANO CEbKn, paDnaTOpN, KjHCn Anapatn, PpnHnepn. PnHnOT oEneKtpuYnap ce nOTTtHcyBa aKO TeJOTO Ce HajDe Ha Maca Hn 3emJa.
B) He n3IOnyBaJte rH eIeHTpUHHe DeIOBn Ha DoXd Hn BlaKHN cpeHHN.BoJaTa wTo moKe da HabJIe3e Bo eIeKTPuHHOT dIeTg 3rOJIeMyBa pnsIKoT od eIeKTpUeH ydap.
r) He Kopnctete ro Ha6eIOT HecooDBetHO. He Kopnctete ro Ha6eIOT 3a TpaHcnpOpTHpaHe, BLeueHe nn paCHIOyBaHe Ha npHJyOHT. CyBajTe ro Ka6eIOT nOdaJIeHy oD n3BOPn Ha TOJIINHa, MacNo, orAn nn ppeMeTH BO DbNHeBe. OwTeHen nn Ipceeyen Ka6eIro 3rOJIeMyBa pn3IKOT oD eJIeKTPn- PueH ydap.
I) Hora eIeHTpHnHOT deI ce HOpHCTn Ha OTBopeHo, KopHCTe npoDolJhen Ka6en wTo e aanTnpaH 3a yNotpe6a Ha OTBopeHo. YnoTpe6a Ha eIeHTpHnHKe Ka6en wTo e aanTnpaH 3a
KOpHCTeHe Ha OTBopeHo rHaMaIyBa pN3IKOT oEJIeKTpUeH yap.
r) Aho He MoHe Da ce n36erHe da ro KOpHCTHe eHeKTPnHOTypeBBO BlaHHYcNoBH, KopHCTepePnHKlyuOH 3a ctpyaItoe HMa PneHJlonHH 3a Han3MeHnHu ctpya (RCD- ype3a Han3MeHnHu ctpya). Ynotpe6a Ha RCD ro HamaLyBa pu-3NKOT od eJeKTPnuH yap.
3)JInuHa 6e36eHnOCT
a) BnTe BnHMaTeJHH, KOHTpOJIpaJte WTo ce CnyuBa n Co UeNoCHO BnHMaHHe CnyHeTe Ce CO eJeHTpUHnTe anapatn. He KopncTeTe rN eEKeTpUHnTe anapatn Kora cTe yMOpHn Hn NOD BInJaHne Ha JeKOBn, aHoxoN Hn np Dorpa. Pnp paTpoehocT, He KopncTeTe ro eKeTpUHnOt anapat 6ndejKn MoKe da NpeDn3BnKa TeuKn TeLeCHn OwTeTyBaHa.
6) Hopnctete 3aWTHHa 06NeHa. Cekoraw CTabajte 3aWTHH OuHa. HocHe Ha onpema 3a JIHy 3aWTtA KaHO TO CE AJ MacHerpoTINPap, 6e36eHCHOnCHyEBN IpOTNB JIN3raHe, 3a- WHTEN HJEM N 3aWHTTA 3a yHr HO HamanyBaAT Pn3IKOT OD TeJeCNH NOBpei.
B) N36erHybajTe HectaHapdN3npaHn npHHyOu. IpopoBepeTe DaJIIN PpeKHHyBaOT ce HAOfa BO No3nJJa *OFF" (HCnlyeHo) nped da ro BnLnyHTe npHHnyOKOT, ro 3aΦaHaTe nn TpaHCnpTnape eEeKTPnHnOT anapaT. TpaHCnpTu
He-paBe Ha eNeKtpnHnO t anapat co npctOT Ha npeKInHyBaOT nI IN Kora npeKInHyBaOH e BO nO3nUja «ON» BkIyueHo) co IecHOTnJa ce- DOBEdyBa Do nHUnDeHTN.
r) OTeTpaHete r n CHTe KnyeBn Hn aIaTHN 3a perynaJna nped da ro BknyuHte eJeKtpnHNOt anapat. Ako HeJo Knyu Hn aIaTka oCTaHaT BO KOHTaKT CO HeJo potpauKn DeI MoKe Da nped3BnKa TeWKn TEleCHN OWTeYBaHa.
d) He ry6e TaamHOTeka.Cekoraw HmajTe Cnrypha notnpa cooDBetHa pAMhoteka. Ha ToJ HauHH HajiOboPe Ke To KOHTpoI npate eEkeTpuHHOT anapaat BO HenpeDbndeneH CNTyaun.
r) O6NeYeTe ce cooBcHo. He Hocete uPOnn anuTuHaHn HauHT. Hocata, 6NeHata n paHabuNTe Tpe6a da ce dpHAT NaCTpaHa OD DeNoBHT wTo ce DnHnat. UnpOHa o6JeHa, HaKHT NIOJRA Koca MoKe Da ce 3aKaHaT 3a DeNoBHT Bo DnHKeHe.
e) Ako Hmate ypei 3a NOBp3yBaHe Ha anapatn 3a n3dBojYBaBe N CObnpaBe Ha HeHCTOTn, npOBepTe daHc ce NoBp3aHn Cc Kopnctat Ha npabHJen HauHH. YnoTpe6ata Ha OBHe anapatn MoKe Da Tn HamaJIIN Pn3NHTe WTO Ce NOBp3aHH CO HeHCTOTnHTe.
OD
4) Ynortpe6a n 6e36eHocHo paKyBaBe co eJeKtpnHnot anapat
a) He npe3arpeBajte ro eIeKtpnHnot anapat. KopHcTeTe ro eIeKtpnHnot anapat npJlarOen Ha pa6oTHnte ycNOBm. IpaBnJIHO KOpNCtHe Ha anapatOT o6e6eDyBa Hajdo6pa HajCnrypHa pa60ta, cnopeMOKHocTa 3a Koja e co3daJeH.
6) He Hopnctete ro eIeKtpuHnot anapat aHO npEHNHyBaOT He e npaBnIO HO NOCTaBE BO N03njuA 3a BHLyUyBaBe HIN NcKlyUyBaHe. AKO eJIeKTPuHNOt anapat He MOKe Da ce BkLyuN CO npeKNHyBaHT, ToJ e ONaCeH 3a yNoTpe6a N Tpe6a da ce nonpaBN.
B)Иснлучete ro npHnIyohOT od DOBOd Ha eJIeHTpUHa eHepRnja nped KaHb6NIO peryaunja nn MeHyBaBe DeOBn nn nped cHnaInpaBe Ha anapatot.Obne 6e36eHocn MEpkn rO haMaJyBaat pN3IKOT od ClyuajHO BkIyUbaHe Ha eJIeKTPuHNot anapaT.
r) OndnoKte ro eIeHTPNHnot anapat Hora He ro HOPnCTHe NOdaJIeHy OdoΦaT Ha Deua N He DabajTe anapatOT Da ro HOPnCTaT IMaTa WTo He ce 3ano3HaNe co HCTNt N He ro npCm YHTAne Oba yNatCTBO. EJeETPNHNTe anapatn Ce onacn BO
IpeOBHO H3BpUyBajTe npOBepHa Ha eJeHTpHnHOT ana- pat.IpoBepete daHn NOdBHHNTE DeIOBn ce HameCTeH npaBnIHo n CLObODHN 3a DnHeBe, DeKa He ce OwTeEHn Ha eINMHnHpaJte ja cHoja dpyra MoHnOCT wTo moKe da noBnJaebp3 FynHcNoHaHnOCTa Ha OBOj anapat.Bo cnuyaj Ha
ouTeyBaHa, eEnKtpnHnot anapat Tpe6a da ce nonpaBn nped noBtopHa ynotpe6a. MHORY HnUeHTn ce nped3BnKaHH 3apaAn HeBHMaTeIHO KOpIcTeHe.
r) OdpKyBaJte ro anapatot HaoctpeH n HcHCTeH oD octaTOU np CEHeBTo. ADeKBaTHO ODPkyBaHBe OD OCTaTOU npceHeBTo, CO HAOCTpeHn CeHbA HOCh NOMaHcy CnyaH Ha 3aTlabyBaHe n NOleCHO e 3a KOHTpOJIpaHbe.
e) Hopnctete rne eneHTPNHnot anapat n daTOaHTte Bo c rJlachOCT co OBA yNaTCTBO, HmajKn rN ceHoraaw BO npep YcIOBNTe 3a pa6ota N BNDOT pa6ota wTo Tpe6a Da ce BPun. YnoTpe6ata Ha Oojo eNeKTPnuen anapat 3a pa3HN onepaun WTo He ce PneDbUdEHN MOKe Ja PpeIN3BnKa onaChn CO- ctoj6n.
5) Nomou
a) EeHTpHnHOT anapat Tpe6a da ro nonpaba HbAnfkyBaHO IInue co npimeHa Ha cAmO opHHaHn pe3epBnIOBN. Ha ToJ HauHc ce OdpHyBa 6e36eHocTa Ha eEeHTpHnHOT anapat.
INH3A KOHTPAJAP N 3AWTNTA 3A ONEPATOPOT
MOnHe Da DoJde Do KOHTpaydap KOra KpajHaTa TOka Ha NoCTOT 3a BODeHBe Ke yDprn BO pIpeMet NIM KOra DpBTo NMa Kopa WTO rO cnpeyBa Haza6eHNOT LaHeu BO pOnecOT Ha CeHeBe. KOHTaTc Co KpaJHnTe DeIOBN MoHe Bo DaJeHn Cnyan Da npEn3-BiKa HeHaJeJHa NobPaTHa peakunja BpTejKn rO LooCTOT 3a HabeDuBaHe Harope NIM HHaHa3ad KOH OpeaTopoT.
3naterHyBaHbTo HaHa3a6eHnOT LaHeu 3a rOpHnOt DeHnHaIOCTo3a
3HaBeDyBaHbe MoKe Da npeu3BnHa HArNo DnKHe Be HaHa3aHa Ha Ha
3a6eHnOT LaHeu HAcOey KOH OepaTOpOT.
Koja 6nIO OJ OBHe peakun MoKe Da npEn3BnKa rSybe He KOHTpOJa Bp3 nIaTc oTo Ce npEn3BnKyBaAT TeuKn NobpeN NO IuaTa. Hema Notpe6a Da ce ynoTpe6yBaAT cAmO ypeNITe 3a 6e36EHOCT WTO Ce codPkaHb BO nIaTa.
OnepaTopoHa nIaTa co IaHeu, MoKe Da npEeMe pa3nHm HepKn 3a eIIMnHnpaHe Ha pn3nHcN CNTyaCn Nn TceChn NopeDn BO TEkOt Ha ceYeBeTo. KoHTpaydApOe pe3yTat Ha He npabInHa yNotpeBaHa MaunHataN /nn NOCTaNkA nn ycNoBn Ha pa60ta WTO He Ce npabInHn MOnKe da Ce n36erHAT COeJeHe Ha COODBeTHnTe, NocOeEHm Mepkn 3a 3aHTnTa:
IPEyIpyEyBAHa 3A B636HOCT HA HOHEBNTE HA JAIHELOT
OdpHcybajre Hn CHTe DeIOBN Ha TELOT NOdaJeHy OHa3a6EHNOI JaHeu D0EKe CaYNBOTO Ha Janaeou pABOT. PpeJa ja BnlyHTe NnIata Co IaHeu, npOBepete DaHn Ha3a6EHNOI JaHeu He e BO KONTAHT CO HnWTO. EEN MOMENT Ha HEBHMaHne DoEKe paBOT NnIATA Co IaHeu MoKe da IOBeDe DO3aKaUyBaHe Ha ObLeKATA NN TELOTO 3a Ha3a6EHNOI JaHeu.
- Dechata paka Mopa cekoraw da ja dpnna 3aHaTpa paHa, nebata papa npedhata paHa. HnkoraH He cMee da ce cmehat paTe 3a dpxheBa Ha nnata co Ianae 6ndejKn DoBedyBa Do PN3NK OJ INCnDEHTN 3a daHeHOTo Nue.
Hocete 3aunTHn OUYHa n AkyctnHa 3aunTHa. Ce npeno-paulyba Hoche Hpyra 3auHTHa Ha rnaBata, paute H cta-nanata. HocheTo COoDBeTHa 3auTHTHa oBeKa HamaLyBa NOpeIte Ha TeLoTo wTo ce Pneu3BkAnn OD INBepKHe wTO ce pa3JeTyBaat npn Cnyaen KOtAaTc Co Ha3a6eHaTa nnla.
He Kopnctete ja nIaTa co JaHeu KauEn Ha npBo. Pa6oTa co nIaTa co JaHeu doKeHa CTe KaueHn Ha npBO MoKe Da npEIN3- BnKa TeLeChn NobpeiN.
OdpHcybajte cehoraw npabnHa toka Ha notnpora Ha Ho3eKoraiw cdeTe rnpedoyBaHata 3a Ba7a 636dHocT n npin Bknybajte ja nnlata co nahec camo aHO CTOnTE Ha CHeHyBajTe rN TexHKInTe 3a ceYe hTo Hajdo6po OrodBapaat Ha 6nHa, cnrypha n pamHa nobpHHa. IIN3raBHTe INI HecTa- 6nHH NoBPHH, KaIO wTO CE cKaJIte, MOKe Da npEi3BnKaat py6be He paAMHOTeKaTA Nn r6Be He KOHTPOA BP3 nnlata co NaHeu. NoCTABETe Ro Ka6eJOT 3a HanojyBaHe Ha HauHH da He ce 3
- Kora ce ceve rpaHka wto ce Haora noJn HNBOTo, Tpe6a da oBpHe BHHMaHHe Ha p3NHOt OD KOHTpaydAp. Kora OTnpoHa cTpyKTypaTa Ha dpBoTo Ke ce paJna6abn, rpaHKata WTO ce cee moKe Da ro NobpeDiOnepaTopoI / nIu da CE n3ry6n KOHTponata Bp3 nnata co IaHe.
Kopncte ja co Ncknyntno BHMaHne Kora ce ceat rpmuHN mnaqyectaun MeKeIte MaTePnjaM oMe Da Ce 3arlaBat BO Ha3a6eHnot NaHeu da Ce nCpPaT Bo Bau npabeu /nn da npedn3Bkaaat ry6be Ha paMHOTeKaTa.
TpaHcnpTpajte ja nlaata co laheu 3a npednata paHa Ka e ncknyeHa, dphejkn ja noJaIeHy od TeIoto. KOr TpaHCnpTpia Hn ce oJIOHyBa, nlaata Tpe6a cekorau Ce CTaba CO 3aHTHa 3a loCTOT 3a BOHe. IpaBnHO pa BaHe co nlaata co naHeu ja HaMaLyBa MOKHOCTa 3a ClyuAeH KOHTaKT CO H3a6EHNO TlaHeu BO DmKHe.
- PnpdpnHybajte ce do cooDBETHNte ynatCTBa 3a noDmaHyBaBe, 3a 3aterhyBaBe Ha naheocT n 3a pe3epBnTe DeIOBN. NaHeu Nte 3aterhyBaBe n noMaHyBaBe He ce npabINH MoKe da ce cKHe wTO npDOHEcyBa Do p3NK oKHTpaydap.
OdpKByaje paKHe cyBn, qCTn H 6e3 Tparn Od Mac nMactn. 3aMaCTeHIne nn MPChn paKHe CE JIN3raBn I npedN3BnkyBaat ryebeHa KOHTpOJaTa.
- Ceyete eHNCTBeHO npBO. He KopnCTeTe ja nHlata co naHeuDa HmATE COoDBeTHa OByka 3a KopnCTeHe Ha OBOJ BnD anapATN; 3a ynoTpe6n wTo He ce npedBnDEHN. Ha npimep: He Kopn- Da cTe rnpHTaJIe 6e36bHcHNTe npEOyBaHa n ynatCTBOTO CTe je nnlata 3a CEHebe PnactuHn Matepnjann, MatePnJaH 3a rpa6ba HnM Matepnjann wTo He HnPaBeHN oD - Da cTe BEK6aJe HA mAnr rpyMxKn Ha 3emJa NnN FkCpuHn Ha dpBO. KopnCTeHo To Ha NaHeOOT 3a Dpyr npabotn wTo He ce COoDBeTHn NOTnOpn Ha HauHn WTo Ke DoBede Do HeONXoHATA 3a npedBnDEHMOKe da DObeDe Do ONACHn CInTuAun. NO3Haehoc Tc MaunHata N Co HajheCTte TEXHKn 3a CeueHe.
He dpkeTe rpaete MHory daleky H He ceye Heh BnHata Ha pameHnnte. TaKa ce 36berHybaaT HeKoHTpOJIpaHn KOHTAKTN CO EKCTpeMHTeNTe H Ce OBO3MOHyBa Hajdo6pa KONTpoJa BP3 NIIATA BO PpeBUNDeHTE CNTyaUIM.
Hopnctete rno BODHHNE Ha noCTOT n IaHeoT cmo 3a pa60THI TO rno NOCOHN pON3BOHTeNt. PeepBHTeJeIOBN 3a loCTOT n 3a IaHeoT wTO He CE COOBETHM OMe Da IpeDN3-BKaaT pacHyBaHe Ha IaHeoT N / NIN KOHTpayap.
PnpdpHyBaJte ce do ynatCTbata Ha npOn3BODHTeIOT BO ODHOC Ha OCTpeHbETO n ODPHyBaHbeto Ha Nnata Co NaHeu. HamaNyBaHe Ha HNBOTo Ha TEmEJIHOCTa MOHe Da DOBeDe Do 3rOJeMyBaHe Ha KOHTpaydApOT.
TexHHnHa HopncTeHe Ha eHHTpuHata nHa
Koraw CneTe rnpooyBaHata 3a BaAa 6e6bHocn npHyBajTe rN TEXHNKe 3a CeYeHe wTO Hajdo6p OOrOBapaat Ha paOtaTBo cornaCHOCT Co HnHKaUNHe N CO pNkKaHAnTe Pmepn n ynatCTBa (BnDETe NorlaBe 7).
IocTabete ro Habeot 3a HanojyBahe Ha HauH da He Ce 3a-
-ДБИнгеьеHa eIeHTpHnHaTа nIIa Bo 6e36eHochu yCIOBn
Cekoraw Kora e notpe6eH npehoc nn TpaHcnpT Ha MaunHaTa no- Tpe6Ho e:
- da ce nCHnlyuMOTOpT, da ce cmnpi JaHeuOT n da ce nCHnyMaunHaTa OD DOBOd Ha en. eHeprna;
-Да ce Hamectn 3aWHTaTa Ha loCTOT;
cea ce aTH MaunHaTa cAmo 3a dpKaHHTe N da CE HAcOu IocToT a BO npabeuCnptOBEN O npabeOT Ha DBNKeHe.
Hora MaunHaTc Ce TpaHcnpTnpa Co Bo3nlo, Tpe6a Da ce nocTaBn Ha HauH da He npetctaByBa onacHocT 3a Hkoj u da Ce 6LoKnpa CBpTo.
- Ppenopapn 3a nooyTHn
pei da 3aOnHHeTe CO ceHBe H KacTpeHBe 3a npBnat, HeonxOJHO e:
eHa HMaTe CooBtHa OByKa 3a KopncTeHe Ha OBOJ BnD anapatN;
- da CTE FN PpOHTane 6e36eHOnCHte PpeOyBaHa n yNaTCTBOTo 3a KopncTeHe wTO ce COCTaBeH den HA OBOJ npnPauHHK;
- da CTE BeK6aJe Ha MaJIn rPmUkHn Ha 3emJa NIN fNkCupAHn H COOdBETHN NOTNOPn Ha NaHHN WTO Ke DOBepe Do HeONXoHaTa 3a- NO3HaEOCT CO MaUNHATA n CO HajHeCTte TEXHKn 3a CeHeBe.
-Држete ja nHnIATA zuBpcto co dbete paue, co naIcHTe npCTNTE OKOly paHNTe Ha nHnIATA co NaHeu n CTabajkn ro TeIOTO n paTe BO no3nJia Koja BN Do3BOJyBa da rH n3dpHNTE ydapnte Ha npOTbYdApOT. CnIaTHa npOTbYdApOT MOKe Da rN KOHTPOJInpa OepaTOpOT aKOncu NCKnyUHTeHOBHMaHne Ha cnTyauJnata. He ocTabajte ja nHnIATA co NaHeu.
4. COCTABYBAHbE HA MAUNHATA
1. COДРЖИHA HA NAKYBAHbETO
NaKeTOn Ha MaunHaTa coOpHn:
-MOTOPHa eINHnua,
-IOCT,
-naheu,
-3aWHTnTa 3a loCTOT;
-ПИК COДOKуMeHTN..
BAKHO
MaunHaTa Ce DoCTaByBa Co
OJBOEHN Ioc T n JaHeu n Co npa3eH pe3epBoap 3a MacNo.

BHHMAHNE!
NotnpaheTo n ceJata MoH
Taka Tpe6a Da Ce N3BpwaT Ha CbpCTa H pamHaBaTe, BHIMAbaje NOeTOKOT Ha BLeueHbTo 3a JaBpHHa Co DOBOJHO npocToP 3a NOMecTyBaHe HaeOeTa Da ce BMETHE PpaBnIHo BO Ipa3HNHTe Ha 3aMaunHata Na H aMbajHata KopncTejHn Cehoraw nIuTe (cI.2).
COOdBETHn aJatN.
ΦpnaheTo Ha am6aHaKaTa Tpe6a Da ce n3BeJ BO CORNaCHOCT CO BaHeyKHTe JOKaJIHn 3aHOH.
2. MOHTHPAHE HA JIOCTOT IJIAHELOT

BHHMAHNE!
CekoraW HocTe MacHBH
paKaBnI 3a paBoTa Hora paHyBaTe co loCTOT -BpaeTe ro npcteHOT (3) BO npabeUOT Ha CTpeJIHTe NaHeuOT. O6pHete MaHCmMaIIHO BHNMaHHe npH CoHa YacOBHHKOT DoJeKa He NOCTIHETe npabUNHa 3a-CTaByBaHe Ha NoCTOT N NaHeuOT 3a Da He Ce HFAHATOCT Ha NaHeuOT (cI.5).
pywat 6e36ednocta H eHnHaCHocTa Ha MaunHataPjKeJn rO loCTOT nOnnHaT, 3aupapete ro DOKpaj BO Cnyaj Ha HecnryphocT, KOHTaHTnpajte co dN-perylatopot (1) (cI. 6).
ctpn6yTepoT.
PpeI da ro cHlonnte loCTOT, npOBepTe daIIe eoCTaBeHa KoUHncaTa Ha laHeoT; Oba ce noCTnHyBa Kora npedHaTa 3aHTHa 3a paTe Ce nobLeKyBa nTNOJHo Hana3aAd HacnpOT TeIoTO Ha MaunHaTa.

BHIMAHHE!
06e36edeTe mawHHata da
He 6nnde npnKnyueHa Bo wTeKepe.
- OtpafoTe ro paKofoTOT (1) n 3BaTeTo KApTePOT 3a da npCTannte do 3aunTe 3a BneueHe ndo OCHOBATA Ha loCTOT (cI. 1).
- IocTaBeTe Ro IaHeUOT Bp3 IocTOT, O6PhyBajKn BHNMaHHe N IOHTyBajKn FO npabeUOT Ha DnBHebe; aKO KpaJOT Ha IocTOT e ONpeMeH CO 3anu 3a ODIOKHy
HaBae, BHIMaBJte NOeTOKOT Ha BLeueHbTeO 3a JaHaHeUOT da ce BMETHE npaBnHOb BO npa3HHHTe Ha 3aHnPntE (cI.2).
-MoHTnpajTe ro loCTOT (2) BMETHyBajKn ja KoHnucata yBaBO OTBOPOT Ha loCTOT nIN BO ypeD0T 3aTeRHyBaHe (2a) n 3aKocTe Ro loCTOT KOH 3aDHNOt DeI Ha MaunHaT (cI.3).
-ObBnTkajTe ro loCTOT OKOly 3aIuTe 3a BLeueHe (cI.4) n npTnChTe ro loCTOT HAppe 3a da ce noCTnHne npBnHTo 3aTeRHyBaHe Ha IaHeoT.
- IocTaBete ro NOBTOpHO KapTePoT HApTpYBaJKn ro peryIaTopoT (1) 6e3 3aTeRHyBaHbe.
5. ПОДГOTOBК 3A PAБOTA
1. ПОВЕРKA HA MAШИHATA

BHIMAHHE!
06e36edeTe MaunHata Da
He 6nnde npnKnyueHa Bo wTeKepe.
Ipea 3anoHeTe co pa6oTa, Tpe6a:
-Да поверпге ддддддддддддддддддддддддддддддддддддддддддддддддддддддддддддддддддддддддддддддддддддддддддддддддддддд徳нгяя coOdBETCTByBa CO OHaA WTo e NocOeHa Ha rTlaBHaTa etNkeTa" (BnTe TnorIabJe 1-10.8).
-Да npOBepnte Да He ce CnyuajHo Ola6aBeHn UpaΦOBHTe Ha MaunHaTa HJI Ha loCTOT;
-Да поверпгддллалецт e пицьрстн Ha-octpeн павилно И Нем 3haци 3a owTeHoCT;
-Да поверпге ДдИnpeнHyBaчOTи 3aштntaHaMaшиннасе чИсти и сУВи,правлно поставени n
3aUBCTeHN 3a MaUNHaTa;
- da ja npOBepnTe eΦHKacHocTa Ha KoUHncaTa 3a JaHeuOT;
-Да поверпге дал paката 3а палыи 6e36eHIOCHOTOKOчe ce ocnofoehn prn DBNKeHbe 6e3npimeha Ha cnila n DeKa aBtOMaTCHN 6p30 ce BpaKaat BO HeyTpalHa no3uJa npn OTnyWtaHbe;
-Да поверпгддл рачкага за палеье eблонпана за ду He Гу пинсhe 6e3eEDHOCHTO KONue;
-Да поверпге Далу OTВОВпге 3а пpoTOK Ha BO3dYx 3a Ладье ce nonpeueHи OД OCTaTOUи OД ceueHbeto Nдpyн OTnadou;
-Да поверпгдддддддддддддддддддддддддддддддддддддддддддддддддддддддддддддддддддддддддддддддддддддддддддддддддддд徳н; - npOBepyBajTe HnBOTo Ha MacNoTo 3a JaHaeOTo Da He ONa'ra NOD 3HaKOT 3a MNHmMyM «MIN» n HaOnoJIHeTe aKO e HeONXoHO Do 1 cM oD pa60T Ha rpoTo.
2. NPOBEPHA HA 3ATERHATOCTA HA JIAHELOT
BHIMAHNE! 06e36eTe MaunHaTa Da He 6nnde npnHnyeHa Bo wTeHep.
- Pa3na6aBeTe paKoΦaTOT (1) (cI. 5).
-ИлзаВртувajte ja aLkata(3) ce doNeKa He do6nete npabunHa 3aTeHAToCT Ha NaHeuOT (cI,5).
-Држеки ГлостOT ПОдигнат,Зашрафete Г дokpaj paKoФaTOT (1) (cI.6).
3aTeHaTOcTa e npabnHa Kora, dpxejiKrTo JaHeuOT Ha CpeiHaT a Ha loCTOT, HocauHte Ha npeHOCOT He 3- IeryBaAT oJLeHNHTeTo (Cn.7).
IpxeTe r npTnCHaTH KOChETo 3a nanebe n 6e36edHocHO KOnue 3a ja ocNo6oNDte KOuHncaTa n TOraaw CoNOMOu Ha upaΦuRep IIn3raJte ro JaHeQTdoJbK BoDnJIKeTe 3a da npOBepnte daII DvNKeHbeto ce ODbVA 6e3 npekymepHa cnla.
3. ПОВЕРHA HA HOУнцATA 3A ЛаHELOT
Obaa MaunHa e onpemeHa Co DBOeH CnCTem 3a KoueHe ITO ce aKTHBnpa BO DBe CNTyaun.
a) Hora Ke ce nyuHTn paKaTa 3a npeHHyBaOT, ABTOMaTcHn Ce BkLyCyBa KoUHncaTa KoJa rO 3a6a-ByBa n 3aCTaHyBa DmKHeBeto Ha NaHeoT 3a Da CE cnpeHn OnaCHOCT OJ NOBpeDa KOn 6n MoKeJe Da HactHaT aKO NaHeoT pOdoJKN Da paBoTHn IO NcKlNyBaHbeto.
6) Bo clyuj ha nobpaTeH yap 3a BpeMe Ha 60tata, KaHO pe3yIaT Ha HeHOpMaJIeH KOHTaKT Ha BPOT Ha loCTOT co HacnIHo DBNKeHbe Harope WTo ja Hocn paKaTa Da ce ydpn BO npedHaTa 3a- uTnta.Bo ToJ clyuj, BKnyBaHeTo Ha KoCHNuTa ra 6loKnpa DnBHeTo Ha NaHeOu T e HeONXoHOp paHNO De6loKnpaHBe 3a NcKlyuYBaHe.
Obaa KoCHNuca MoKe Da ce NocTaBn paHNo 6yTkajKn ja Hanapei npedHaTa 3aHTNa. 3a da ja OTnyuTnTe KOUHnCaTa, NOBLeeTe FO npEDHnot 3aWTnTHNK KOH paKaTa Ce ODoEHa He ce CnyUHe 3ByK Ha OTCKOKHyBaHe.
3a da ja npOBepnTe eФИKacHocTa Ha KoUHncaTa, Tpe6a:
-Да Г ВКЛУЧИТЕ MOTОР, Држевский ja Maшинна за за пedingда раоча и сб Рпебе наhanpeсd co habile�а пedingда заштета за рацete BO павец на loctot.
- Kora Ke ce Hamectn KoHncaTa, oclo6oTe ja paKaTa 3a naJeHe.
Jaheot Tpe6a Da 3actaHe BeHaaw WtOM Ke Ce BMeTHe KOyHncaTa.
BHIMAHNE! He HopncTe je MaunHata aHO KoHnCATA 3a NaHeoT He pa6OT npabHnHO HOHTaHTnpajTe CO 3actaHHoT 3a HeonxOHa npoBepHa.
4. NOДмУнБАБЕ HA JIАHECUOT
BAHHO Kopnctete ncknyuBO cmo Macno HameHTo 3a MOTOpH NnN nn MacNo CO aINTHBn 3a MOTOpH nn. He Kopnctete MacNo To coDPKn HeNCCTOTn 3a Da He ro 3anynte fHTepOT BO pe3epBoapot n TpajHO da ja Owtette nymnata 3a MacNo.
BAHHO MacnoTo HameHTo 3a noMaHyBaHe Ha IaHeoT e 6nopa3rpaIINBO. YnOte-6bata Ha MInHepaJIHo MaCIO NIMOTOPHO MacNo npeN3BnkyBa TeuKu WTeTu Ha OKoJInHaTa.
KopncTebe MacNo Od BpBeH KBaJIHTe T e BaJhen IpeIycIOB 3a ODPKByBaHe eFInKaChHa NOMaUHaHOCT Ha CnTe DeIOBn 3a CeYeHe; KopncTebe MacNo CO JIoI KBaJIHTet FO CnpeyBa NOMaUKyBaHbeto I Go HamaJIyBa BpeMeTpaeHbeto Ha JaHeQT N Ha loCTOT.
BAHHO Ipei npBoto KopncTeHe Ha MaunHaTa,ceKorae e notpe6Ho Da ce npOBepn HNBOTo H da Ce HADONOJIH Do npNbHHo 1 cm. od pa60r Ha rpoTo.HNBOTO Ha macIoTo He cMee Da naDne noId 3HaKOT 3a MNHMym «MIN»
3A6EJIeHKA 3a HApOnOpJHyBaHe MaCNo, HeONXoJHO e da ja IerHete MaunHaTa Ha DeChaTcTpaHa n Ha Toj HauHr rPloTo Ke BnDe BO BeptuKaIHa no3njuJa.
5. ELEKTPNHYO PPNKJUYYBAHbE
ONACHOCT! BnaHocTa n en. ctpya He ce komnatahnn.
- PaHyBaHbeto n NOBp3yBaHbeto Ha eJelKtpnHnte Ka6nn Mopa da ce n3BEdyBa Ha cyBO MeCTo. Hnkoraaw He cnojyBaJte n3BOp Ha eJelKtpnHa eHeprnja nn Ka6e Bo MOkpa 3OHa (6apa nn BlanKeH Tepen).
Ka6nTe Ha npoDJIHKnOT Ka6eTpe6a da ce co KBaJntet He nOan O TINOT H07RN-F nn H07VV-F coMnHmHa cekuJa o1.5 MMn co npenopaHa MaKcMaHa DoJIHnHa oD 30 M.
PpOdoJIHHNt Ka6eI He Tpe6a Ce 3aIeTHyBa BO TEKOT Ha pa6oTaTa 3a Da N36erHete npeKymepHo 3arpeBaHe.
ONACHOCT! TpajHOTo NOBp3yBaHe Ha HoJ BAHHO 3a da ce n36erHaT peknHn Bo
H da 6nlo eIeHTpnueH anapat BO en. MpeHa HIOjYBaHbeto Co eIeKTPnHu eHeprJa:
0bjcTpe6a da ro peaun3npa KBAUNPHUYBaH
eIeHTpnuap cneJeHn rH HajcTporo COODBeTHNTE - npOBepTe dAn BHyHNOT o6em Ha eIeKTPnuHOT
HOpMaTHBn. HeKOpENTHO IOBp3yBaHbe MoHe da CnCTEm e aDeKBaTeH;
IpeH3BnHa cepNo3Hn NobpeH, BHnyUbaJIn N - NoBp3eTe ja MaunHaTa 3a n3BOp Ha en. eHeprJa co
CMPT. 3aDOBOJIHTeH ePoJ amPepn;
ONACHOCT! Hanojybaje ro anapatoe alektpnHn anapatn co rolemnoTPOWBAUka. npeny dnepepenzjai (RCD - Yped 3a npetbpyBaBe Ha ctpyjata) co TpaHcpep Ha ctpyja He no- rolem od 30 mA.
6. BKJyBAHbE - 3ACTAHYBAHbE HA MOTOPOT
BKHJUYBAHbE HA MOTOPOT (cI. 12)
PpeI da ro 3anaJIte MOTopoT:
-ПиклuyеTe ro npoДонгИNot Ka6eI (1) 3a noctojHnot wTo ce Haora Kaj 3aHaTpaqka.
- Iobp3eTo IPRBO npnKnyOoH Ta nocToJHnOT Ka6en 3a HanojyBaHe (2) BO npoDoJHHoT npnKnyOH (3) nIOTOA npdoJHHoT Bo wTeKeP (4).
-Ⅰ3baTeTe 0aHTTHNKOT Ha JIOCTOT.
- PpOBepeTe DaJIH JIOCTOT rO Donnpa TepeHOT nIIN DpyrN npEdmETn.
PanaheHaMOTopoT(cI.12):
- OTKaYeTe ja KoUHnIaTa Ha IaHeOt (5) (npeHaTa 3aHTIa 3a paueTe e TprHaT a KOH npEHaTa paKa).
- 3aΦaTeTe ja cBpCTo MaunHata co DbTe paue.
- Ппншете Го 6e36eДнсно КОче (5) И ВКлчЕТу КОчETо 3a пале (7).
3A6EJIeUHA
3a napehe, 6e36eHocHOTo KOnYe Ce 6loKnpa N MOTOPOT 3aCTaHyBa.

BHHMAHNE!
3actaHyBaHBeTo Ha NaHeuOT
MOHe Da Ce Cnyu No KpaTHo BpeMe OJ NCHNyUy BaHe Ha MOTOpOT.
3ANHPAHe HA MOTOPOT
3a da ro 3acTaHete MOTOPOT:
- Ocno6oTeTo KOnUeTo 3a naneHe (7).
- Ncknyte ro NPBO npoJnKHNOT (3) od uTekep (4) n ITOA noctojHnot Ka6eI (2) Ha MaunHaTa oD npoJnKHNOT (3).
7. KOPNCTEHe HA MALINHATA
- KoHTpOJa Ha CTeneHOT Ha MacJo
BAKHO
He KopuCTeTe ja MaunHaTa aKO
Hema NpMaHyBaHe! HbTo Ha MacIoTO BO pe3epBOapOT e BnIbBO Ha TpaHCnapeHTNOT INdHaTOp. CekoraH aDOnoNHyBajTe ro pe3epBOapOT co MaNo npn ceKoe KopncTeHe Ha MaunHaTa.
TepnjaJIHnI WTeTn. Bo clyuj Kora dpBoTo Ke donpe Ha daJIHOBOd, ce npenopayBa BeDAu Da ce noBnKa KompaHjata To e HADJeKHa 3a DnCTpN6yUJa Ha eI. eHeprnja.
- Ce npenopayba onepaTopoT ha nlaTa co IaHeu da ce DnHn CnpOTnBHO od Hacokata Ha TepeHot KaDe dpBOTo HajBepojaTHO Ke ce cTpKaIa nnKe naHne no ceyeheTo.
Hajodpo e da ce opraHn3npa nat 3a n36erHyBaHe 3a da ce oopnn OTCpaHyBaBeTo nped da ce npoDolnn co ceuehe. Ce npenopayba naTOT 3a n3-6erHyBaHe da ce npotera HABHaTpe NjiaRoHaIHO 3ad npedBnEHaTa LInnja Ha Na'ae, KaKo uTO e npinkacKaHo Ha cn. 15. - PpeI da ce npoOJIHK co CEeHbETo, nOTpe6Ho e da Ce 3eme BO npeBnD npnpoHOT 3aKocyBaHe Ha dpBOTo, OD cTpaHaTa Ha KOJ rpaHNte Ce MHOry RoIemN, KaO N npabeQT Ha BETPO, Taka WTO Ke ce npoUeHN NaHHOT Ha KOJ Ke naA DPOTO.
-NCnCTeTe ro dpBOTO OD HeuNcTOnH,napHbKaopa,KINHcNmMeTaJIHn NapHbA nKnCn.

BHHMAHNE!
PpOBepete daH noctot n
JaHeuot ce do6po No3nHOpaHn Kora ce Bpuuehe Bo OCHOBa KOHTpOHa CTeneHot Ha MacNo.
Bknyte ro motopot n npobepeTe daHn HcTpeHOT MacNo 3a IaHeoT COOdBETCTByBa Co npKa30T Ha CInKaTa (cI.13).
2. HauHH HA KOpHCTeHBe N TEXHNH HA CEueHbE
Ipei 3a 3anoyheTe 3a npBnat Da pa6oTHe Ha CeyeHe i KacTpeHBe Tpe6a Da ce Bex6a Ha HnCKn rpmuKn Ha 3emJaTa NII 3aKaueHn Ha KpaHObN, 3a Da ce CTekHe HeONXoHaHa 3aNo3HaeHOCT Co MaunHaTn CO TexHN- KInTe 3a KOHKpETHO CeYeHe.

BHIMAHHE!
Bo tehot ha pa6otata, Ma-
Hnata cehoraw Mopa da ce npnn Ubpcto co dbete paue.

BHHMAHNE!
3actahe ro BeHaM MOTO
pot aHO IaHeuOT ce 6NoKnpa BO TeKOT Ha pa6 Tata. Cenoraw BHHMabajte Ha eBentyaIeH NOBpaTeH yap (KOHTpaydap) wTO MOHe da Ce cnyuN loCTOT HAnde Ha npenpeKa.
- Cechene npBO
- Kora DBe HIN NOBEKe IINa HCtOBpeMeHO N3BeDyBaAT pa6OTn 3a CeueHbe N cENKaHbe, TaKBrTe ONEpaun Tpe6a Da CE N3BeDyBaat BO 3ace6HN 30HN Ha eHaKBA Ha DbaNAtn OD BNCnHaT Ha NceHToOdpBO. Ce npenopayBa Da He ce Cevat dpBa Ha NaHnHa KOJ Ke rN CTaba IINaTa BO pN3NK, AKO NMa daHIOBOD INI aKO Ce PpeIN3BnkyBaAT KaHbN 6nIO Ma
N3BpWTe ro ceyeheTo do 1/3 od nnjameTapoT ha dpBTO, BepTKaHIO BO npabeOTo Ha naHaBeTo, KaHO wTo e nocoueHo Ha cn. 16.
3aceyeHa npBoto MeCTO 3a ceyehe XOpN3oHTaIHO Odo3doJa.
Taka ce OBO3MOKyBa da ce n36erHe 3aTeRHyBaHBe Ha H3a6eHNOT IaHeu NnHa loCTOT 3a BOeHbe Kora ce CnpOBeDyBa BTOPO TO CeHeIe.
- 3aHObceHebe3aco6OpyBaHe
- CnpoBeTe 3aHcOceHe 3a co6OpyBaHe Ha roHBOHa npn6nKHO 50 MM od xopn3oHTaHOTo 3aceKyBaHe KaIO uTo e npnKaHaHO Ha cInka 16. OdpKByajTe ro 3aHoto ceHe 3a co6OpbyAbe npaJIHo CO xopn3oHTaHOTo ceHee. N3BpWeTe ro 3aHOTO ceHe 3a co6OpyBaHe Ha NaHn Da ce ocNo6ODoBOJHO dpBHa Maca 3a HabaLyBaHe. DpBHata Maca 3a HabaLyBaHe cnpeyBa DnHexeCo TpneHe Ha dpBTo n HerOBo Na'arHe BO norpeWeH npabeU. He ceHe Ta HacnpoTu HabaLyBaHeTo.
60fora co6bOpBaHbTo e Bo 6n3nHa Ha HbAlyBa- a- hBeTO,dpBOTO noHyBa da na'a. Ako nocTo KaKOB
H pN3NK dpBOTO da naHe BO HecaKaH npabeU nn aKO n3rHyb pamHOTeKa HaHa3aJn rO npEBNTHa
ha3a6eHNOT IaHeU, ppeTaHete CO ceYebe nped 3aBp7yBaHbe Ha 3aHTo CeYeBe 3a co6bOpBaHbe n yTOpe6Te DpBEHN, PnaCTnHn HIn aLyMNHyMCKn
KlnHOBn 3a Da rO OTBOpHTe 3aceKyBaHbTo n 3a da
PaHne DpBOTO DOJIck CaKaHaTa LInHJa 3a Na'ae.
Kora npBotoKe noUHe da naFara, Tpe6a Da ce n3Bneye nnlaTa co IaHeOTo OD 3aceKyBaHbETo, Da ce 3acTaHe MOTOPOT, Da ce OCTaBN Ha 3emJa N NotoA Da ce 3aMnHE BO npeDbNdeHnTatn3Ie3. Tpe6a Da BHIMaBAte Ha naHaTe OHa rpaHKnTe OD BnCnHa N Da BHIMaBAte KaDe CTanHyBaTe.
- Kactpehe Ha rpaHHnTe Ha dpBOTO
Kactpebe 3NaHcyeHe Ha rpaHKeTe OD nAdHaTOT dpBO. Kora ce kactpn, Tpe6a da ce ocTabat 3aHnTe norolemnte rpaHKn, 3a da ro noDpHyBaat Cte6loto Ha noCbata. Ncehe Te mMaHtete rpaHKn co eDen Noter KaKo wTo e nocOeHO h cInka 17. Hajdo6po e da ce ceayrpaHKeTe ND OTNOPOT Ida ce 3anoue He Od DHO To KOH Harope 3a da ce n36eHHe ppeBHTKyBaHe Ha nnlaTa CO NaHeQT.

BHIMAHNE!
06phe TBHMaHne 3a TOU
KHTe Ha Notnopa 3a rpaHHte Ha TepeHOT, aHO e MOxHo Da HMa OTnop BO npabeOTo wTO MoHe rpaHHata Da ro 3a3eme npn ceyeheTo n 3a Mo
HaTa HeCTaBnHOCr Ha DpBOTo No CeueHe Ha KHTe.
- CeuKaHe Ha cTe6JIoTO
CeKaHbEtO 3NaU CeYeHe Ha CTe6IOTo NO DOJIKNHa.
BaxHo e Da ce ObE36eN IOTnOpata NOD CTanAJaTa Da
6nnde UBPCTa H TeKHNaTa Da 6nDe paCnopepeHa eD
HaKBO Ha DBeTe HO3e.AHO e MOxHo, Ce npenopayBa
IOINrHyBaHBe H ODpKByBaHe Ha CTe6IOTo Ha NOJIOBnHa BcUNHa HA rPaHKnTe, CTe6IATA NaCTapKnTe.
CJIeTe rH eHocTaBHnTe npaBun 3a OJeCHyBaHe Ha CEHeBeTo.
-Kora cTe6NoTo e noLoKeHo No ueJa TcBoJa DoJIHHa KaHO wTO e npKaHaHO Ha cn. 18A, ce 3anoHyBa co CeYeHe ODo3Ropa (ropho ceKaHbe).
Kora cTe6Ito ce notnnpa Ha KPOuHaTa, KaKo 7To e npKaHao Ha cn.18B, Tpe6a Da ce ceye 1/3 Bo DNJaMeTap Ha CTPaHaTa wTO e HAOra DOly (3aHNo ceuKaHe).PocLeIOBaTeJHo Tpe6a Ce N3BpUn FIn-HaHHTO ceYeHe, 3aONyHyBajKn Co CEuaHe oDrope 3a Da ce DoJe co nPBOTo ceYeHe.
Kora cTe6Ito ce notnnpa MeFy KpoHaTa, KaHo 130 To e npkaKaHo Ha cn. 18C, Tpe6a da ce ceye 1/3 BO dJaMeTap Ha cTpaHata 170 To e Haora rope (ropho cekaHe). 3a da ce npdoJHK co fHaJIHO ceKaHe, cekaJn O3aDn 2/3 3a da ce dojde do npBOTO ceYeHe.
- CeueheTo Ha cTe6Ito Ce oIeChyBa co KOpNCteHe Ha xapnyhot (cI. 18D).
3a6oTe Ro xapnyHot BO cTe6Ioto n Od CTpaHata Ha xapnyHot n3BeTe 3aKpNBHeO DnNKeHcCO MaunHaTa KOe WTo Ke Do3BOJyBa IocTOT DaHabJe3e BO dPBoTO.
- NOBTOpeTe ja onepaunjata HeKoJHy nAtn aKO Toa e NOTpe6Ho npemecTyBajKn ja TOnkata Ha 3a60- dyBaHe Ha xapnyHOT.
Kora ce ceuKa cTe6No Ha 3aKocen Tepen, Tpe6a da ce cTOn Ondrope KaKO e npKaHaHO Ha cn.19.Bo TeKOT Ha pa6oTaTa, Kora CeueHbTo e 3abPseHo, 3a Da ce ODpHN KOHTPOJaTa, pNITUCOKOT Ha CEueHbTo Tpe6a Da ce HAMAI6e3 Da ce ocIobOIN pNITUCOKOT BP3 pa4KnTe Ha NnlaTa. Tpe6a Da ce cnpeu NnlaTa Da DoJNe BO KOHTAKT CO NOVBata.
Kora ceyeheTo Ke 3aBpHn, npOBepTe daHn nnlaTa n IaHeoT ce 3actaHaTHn PpeD da ja oCTaBHTe. FaceTe ro cekoraw MOTOPOT Kora ja OCTaBaTe nnlaTa notnpena Ha dpBO.
3. 3ABPUYBAHc CO PABOTA

BHIMAHHE!
06e36edeMaunHata da
He 6nnde npnKnyueHa Bo wTeKepe.
MaaBpUyBaHeco pa6ota:
TcHETe TMOtOpT KaHO uTo e npTeXoAnHO nocyeHo (norlaabe 6).
-NouekajTe Da Ce CMnPN IaHeuOT N OCTaBeTe Da Ce H3JaDN MaunHaTa.
-OTCTpaHeteIOnJaHeoT CHTe TpaHn Od CeYeBeTo nn TaIO3N Od MaCNo.
-Bo cIyaj Ha roJIeMn HeNCTOTn nn 3aMaCTeHOCT, H3BaTeTe Ro IaHeuot n OCTaBeTe Ro Da NoCTOn BO CaD CO OpeDen DeTepreHr HEKOLHy YacOBn. NToa, HcpeTe Ro BO YnCTa BODa HcnpchajTe Ro Co COoDBeTeH CNpej npOTNB KOpO3nJa PpeDa Ro NoCTaBHTe Ha MaunHaTa.
- NocTaBeTe ja 3aWtntata nped da ja cHlaIpaTe MaHHata.

BHIMAHHE!
Octabete MOTOPOT da ce n3-
JaHn nped da ce octabn Maunhata Bo Hoja 6nI npoctopna. 3a Da ro HamaNte pn3HHot od orAh nChuCTe ja Maunhata od octatoOn npn Ceye- hBeTo, rpaHnuHa, JnctOBn nn TpeBa; He octabajHoKpHn co npoH3BODn Ha ceueheTo BO 3aTbopeH npocstop.
8. OДРЖУBAHБЕ И KOH3EPBAциJA
BHNMAHNE! 3a Bawa cnpyhocn 3a 6eHETe ro kora ke ce oHTN.
- PpaBnHIO OpHyBaHbe e OCHOHO 3a 06e36eY- OHCHNPAHOCT BaHbe eHnHaCHO TemNo n 6e36eHOCHT Ha opHHnHaJIHNTe DeIOBn Ha MaunHata.
- CHTe 3aBPTHn, HABPTHn IIOCTOBn OoPHyBaJTE HABPTHn 3aBPTHn, KaKo N DaJIpaKHTe ce DeKa Kocayhata e 6e36eHa 3a paBoTa.
- HnKoraw He KopncTe te ja MaunHata co KopnCTeHN nn OwteteHn DeIOBn. OwteteHnte 6. N3OCTPEHOCT HA JAAHEUOT IOBN Ce 3aMeHyBaat, HnKoraw He ce nonpaBaaT.
- Hopnctete camo opnunhaJIHn pe3epBHN JeIOB1
IeIOBn CO HeCOoBBeTeH HBaJIHTeT MoHaT da OWTetat MaunHata n da ja 3arpo3aT 6e36ed CTA.
BHIMAHNE! Od 6e36eHochn npuHHn HopaH eHKachocr Bo pa6oTata, Mhory e BaHHO
eIemEnTe 3a ceYeBe da 6nDat o6po HaOCTpeH. Cnte Onpaun WTo ce odHecyBaat HaJaHeoT H Na IocTo ce pa60Tu 6apaar cneUΦuHa KOMTeHTHOCT co aHraHnpahe coODBeTHa Onpema 3a da MoHe pa60Ta Ta da ce H3
Bepe npabnHoo; od 6e36eHocn npnuHH, HcHTaKTHpajTe co npodaBauyot.
BHHMAHNE! Pn onepaun Ha odpnyBaHe:
- NcHnyeTe ja MaunHaTa Od DoBOD Ha en. eBte npabnHO, 04 oes HHTaHTnpajTe co npoda rna.
- Hopnctete 3aWHTHpaHbNp np onepaunOCTpeHe e HeonxOAnHO Kora: wTO ce odHecybaat Ha loCTOT n Ha Ianaeot.
- CekoraH HeHa ce NoCTaBeHn 3aHTTHNHTe 3a CTpyrotINHTe IuHaT Ha npaunHa, IOCTOT, dypn H npn HHTepBHeHcHja Ha Camnot CeyeHbeto Ce OdBnBa Co MHOry cHla, IOCT H HA CAMNOT LaHeU. CEYehTo He E LInHeapHO
He 0pIajTe HaOHony Macno n npyHn HauBn Bnpaunnte ce 3roJeMeHH. MaTepnjann.
1. JIADHe HAMOTOPOT
3a da ce n36erHe npperpeBaHbe N OwTeTyBaHbe Ha MToTOpOT, peWetKInTe 3a npOTOK Ha BO3dUx 3a NaDeHBe Tpe6a cekoraw Da ce ODpXyBaA TnCTn N OcIbOeHNoD octatoOn pRn NiJIeHBe N DpyrO.
2. KOUHnua HA JIAHEUOT
KoHTpOIpaJTe ja eFInKaChOcTa Ha KoUHnIaTa Ha IaHeuOT peDoBHO.
3. KONHE 3A JIAHELOT (Cn. 20)
PeIOBHO KOHTPOINpajTe ja COCTOj6aTa Ha KOnHeTo n 3aMeHete ro Kora HcTpoWeHocTa Ke HaDMnHe 0.5 MM.
He mONTipajTe HOB IaHec CO cTapo KOnYe I o6paTHo.
4. HONU 3A BLOHHPaHbE HA JIAHEUOT
Oba konye e BaKeH eIemEn BO Ondoc Ha 6e36eHocTa 6ndejKn cnpeyBa HeKOHTpOlnpaHn DBNKeHa Na IaHeoT npn Cnyaj Ha KNHeBe Nn pa3BneKyBaBe.
OcTeBHe BO CneJauH3npaH ueHTap ce OCTbapyBa COOOBETHN anapATN KOI OBe36eYBaAT MNHMaHPO paCnPCKyBaHBe Ha MaTePNI N OCTpeHe KOHCTaHTHO 3a CNTe BNDOBn CeYeHa.
Jaheot Tpe6a da ce Cmehn Kora:
-ДОЛЖИнHa Ha ceHbata Ke ce HamaJI 3a HajMaJIky 5 MM;
-KORA DBNKHeBcTo Ha OKIIOOT Bp3 HAcOBaJIHa e TEUKO.
7. INPA3HEHbE N YNCTEHe HA PE3EPBOAPOT 3A MACI0 (cAmO aHO HOpNCHTe 6NoJIoWHO MacIoo 3a JAnu)
YnoTpe6aTa Ha HeKoJky BnOBoN 6nOLOuKO MaCIO MoKe Da npEiIN3BnKa CO3DaBaHc TaIOr N KaIunΦnKaunja Po Ondepen HepNoD Ha ynoTpe6a.
Bo Toj cIyuj, nped da ja oJIOKHTe MaunHaTa Ha noDoJIr nepno Ha HeynoTpe6a:
- n3BaTeTn JanaHeuOT NIOCTOT,
- nCnpa3HeTe ro pe3epBOapOT 3a MacIIO,
-CTABETBOpe3epBOapOT COOBETeHTeTeHTeTepREHTdo CpeHHaTa Ha MaKcImaJIHOTo HNBO,
-3aTBopeTe ro KanaeTo Ha pe3epBoapOT IN BknyeTe ja MaunHaTdoKeHa He ro NcPpN CNOT DeTePREHT.
He 3a6opabajTe HaHanoHnte MaCNo nped NOBTOPOKOpCTeHbHa MaunHaTa.
8. ODPKHYBAHbE HA JIOCTOT (cI. 21)
3a da ce n36eHHe acnMeTpnuHc KOpNCTeHb He Ha loCTOT, Notpe6Ho e Toj nepnoDnHc Da ce npOBepyBa.
3a eФикасоОджУваье Ha loctOT Tpe6a:
- da ce noMaCyBaat nepHnUHbata 3a OJIOKByBaHe Ha 3aIpaHnKOT co npInIOxHeHHOT Wnpu (aKO nMa);
-Да ce YIcTat JJIe6OBeNTe Ha loCTOT CO COODBeTHa rpe6aIIka;
-Да се чист OTBOPITE 3a NOIMaUKyBaHbE; - co eHa paMaHa TypnJa, Da ce N3BaAdT CTpaHnHnTe HaTaIOKByBaHa n Da ce NopamHaT EBEHTyaHnTe pa3NIKN BO BnCnHaTa Me'y BoDnJIknte.
IocToT Tpe6a Da ce CmEH Hora:
-Длабочинatable Ha 3aunite Ke 6nde noHnCKa OJ BnCnHaT a Ha nOyETHaT a ToHka Ha npEHOCHIKOT (KoH NkOraI He cMee Da DOnpat Do DOnHaTa CTpaHa);
-BHATpeuHHNt SNHa BOINKaTa e NCHOpNCTeH Do TOHk Ha DOnnpaHe Bp3 NaHeoT.
3a da ce n36eHHe acnMeTpnuHc KopncTeHbe Ha loCTOT, noTpe6Ho e Toj nepnoDnHc Da ce npOBepyBa.
Ako e HeonxoDHO da ce 3aBPTN nIN 3aMeHN loCTOT, noCTaneTe KaKo wTo cNeDN (cI.22):
- n3BaTeTo HapTePOT n 3BaTeTo n IaHeoT n loCTOT cIeJeKn rNo o6paTeH peOcNeD NOCTaKNITE NocouEH BO norlaJbeto 4.2;
- co Kpctact wpaФuHep OTwpaΦeTe rHaBPHTKHTe (1) n 3BaTeTo ypeDTo 3a 3aTeHyBaBe (2) BnMaBajKn Da He ro N3ry6nte TymHeNOT npCTeH (3);
BAKHO
Habptkata e npBnHNo nocTa
Bena da n3dpnn "cpeen OTnp" 3a da ce cnpneu cnlya jno pa3na6abaBe. 3aToa, BaedebeTo Ha HabptnTe bapa odpeHa cna HajdoBo e da ce cnpoBe de co 7paqunrep CO COOBETN dImeH3n 3aepHyBajKn ro JIOCTOT BO 6lokaTopoT.
- nocTaBeTe ro ypeIoT 3a 3aTeHyBaHe (2) Bp3 npyraTa CtpaHa Ha CBPTeHnOT HIn HOBnOT loCT BHMaBajKn Da ro nocTabHe N rymeHnOT npCteH (3);
-CTaBete MaIa KOJIuYHnA OJ npOu3BOoT 3a ,CpeHnOT OTnOP" Ha HeKoIky 3aBOH Ha HApTkata (1) (CJeJeKn rN yNaTcTaBaTbHa npOu3BOuNTeIoT), nToa 3aTeRHeTe rN DOkpaj HApTknTe (1); - n3BaTe Tn loCTOT IaHeuOT N KApTePoT CneDejKn Tn NOCTaKNTE NoCOUeHN BO NorIabjeTo 4.2.
9. ELEKTPNUH N KABJIN
BHHMAHNE! NOBpemeHo npobepybajte ja coctoj6ata Ha eJeHTPNuHnte KaBn H 3aMeHeTe rKora Ke nOKaHaT 3Nau Ha CTapeeBe Nn Kora nOlaqjata NM e OwTeTeHa.
Ako Ka6eIOT 3a eIeKtpnH0 HanojyBaHe Ha MaunHaTa e OoTeTeH, Tpe6a Da ce 3aMeHN cAmO Co opnHahJe pe3epBeH DeI Od CTpaHa Ha 3acTaHnKOT NIn Ha KBaJIuΦnKUbaHO IInce.
10. BOHPEHN INHTEPBEHCUIN
Cekoja onepaunja Ha odprkyBaHe ITo He e BknyeHa BO OBA yNaTCTBO Tpe6a Da ce N3BeDe NCKlyuHBO Kaj BaWnOT 3actaHnK.
Cnte Oepaunu To ce n3BedeHn Ha HecooDbeteh Ha- yHH N OD HeKbaJInΦNkyBaHn JIua npNoHeCyBaat Da ce 3ry6bnc ekoja foopMa ha rapaHcuija.
11. KOH3EPBALUNJA
MaunHaTape6a da ce KOH3epBnpa Ha cyBO MeCTO, 3aCOJHaTO oD HAIBoPeuHNTe BpeMeHcKn PpNIkN Co npAINHO NOCTaBeHa 3aWTtHa Ha loCTOT.
9. ПОНДЕМИ ПELSEHENJA
BAHHO
ΦopMaunTe wTo ce codpHaT BO Oba YnataCTBO BODaT KOH Do6pa Cocto6a Ha MaunHaTa, a CneHNte HABOnBn OBO3MOxkyBaat Da rN NdeHTnФnKyBaTe n peWnte BOObuAehnte pa60THn CoCTo6b. CeKojnat Kora Ke HanDeTe Ha np6IeM, KOtAtkTnpajTe co Obnacten ceHTap 3a NOMOW.
BHHMaTeHNO YHTaBe Ha H
- LaheζοT He ce BpTN:
npoBepTe dani npedHaTa 3aHTnTa e nocTaBeHa HABHaTpe.
MaunHaTa He ce naH:
- npOBepTe ro HanojyBaHbeTo co eI. eHeprnja,
- npOBepTe daiN Ka6eIOT 3a HanojyBaHbe nIIN npOdoJIHHnOT Ka6eI CE nCnpaBn.
- npOBepeTe dajn npEKNHyBaOT pa60TN npaBnHOn nIIN eBeHTyaJIHO o6e36eTe 3ameHa kaj 3acTaHnKOT.
MacJIoTo He npOteKyBa:
- npOBepeTe dAIN mMa MacNo BO pe3epBOapOT, n aKo e Ntpe6Ho NCuHCTeTe ro (7).
- Nojaba Ha HcKpn:
-KoHTaHTnpajTe CO 3aCTaHnHOT 3a Da ce npOBepaT MOTOPOT N YeTHNTE.
- He3aOboJnteJHa pa6oTa
- npOBepeTe ro npabeuOT Ha nOCTaBeHOCt Ha IaHeuOT,
- npOBepeTe ja n3OcTpeHocTa ha NaHeuOT n / nn CoCToJbata Ha NCKOpNCTeHOCCT Ha pa6OBnTe 3a ceYeBe (KoHTaHTnpajTe CO 3actanHHKOT 3a da rN CNpOBeDeTe COODBETHnTE INHTepBeHnU).
Ipn HeCnna3BaHe HMa Bb3MOxHOCr 3a
HaHacnHe Ha IuHn TeIeCHN yBpeKdaHn, Hn yBpeKdaHn Ha TpeH IuHa.

ONACHOCT!
Pn Hecna3BaHe NMa Bb3MOxHOCt 3a
HaHacHe Ha cepno3HN LNCHN TeneChn yBpeHdaHn, Hn yBpeHdaHn Ha TpeTH Nua c OnaCHOCT OT Cmbpt.
OBsUyTBAHn3ABE3ONACHOCTIPN H3NOJ3BAHE HA EJEKTPUeCKN YPeDn

BHIMAHHE!
Ipooyetete BCnKynynbTbaHna 3a
6e3onacnoct H BCnHn HnCTpyKnH. HecnaaBaHeto Ha ynbTaBnHaTn HnCTpyKnHTe MoHe Da IOBeDe o eEnTpueChn YdaPn, noKapn Hnn Cepno3Hn HapaRaBaan.
3ana3e TBCNHybTBaHn HnHCTpyuHm 3a 6bDea cnpabHa.TepMHbT "eNEKtpueckn ypeD, uHTnpaH BynbTaHo, ce OT-Hac3a BaunypeD cbc 3axpaHbaHe ot eNEKtpueckata MPeka.
1) Be3onachocht ha pa6oTHata 30Ha
a) NpIbPkaHte YnCTa n do6pe oCBeteHa pa6OthaTa 30Ha. MpbCHN n pa3XbPJIHN 30Hn DOpnPnHacrT 3a Bb3HnKBaHe Ha nH-
6) He n3noJ3BaIte eJeKtpnueckn ypeB CpeDa c pnck OT ekCnnO3H, TAM KbDeTO HMa 3aNaJIHMN TeYHOCTH, Ra3OBe HIN npax.EeKtpnuecknTe ypeDnCb3dABaT NCKPN, KOINTo MOKe Da noJnaJIr TpAX HIN H3npaHEnH.
B)ApbHexe daJeue deaeta H npncbcCTBaunte, KORATO n3no3BaTe eEnEhtpueckn ype. Pa3ceBaHTo MoKe Da npuHH 3ary6a Ha KOHTpOJ.
2) EeHTpuHcKa 6e3oNaChOCT
a) ⅢeNcEJIbT Ha eIeKtpnueChn ype Tpr6Ba da e cBbMeCTHM C eIeKtpnueChn KOHT. HnHora He npomeHae Te qencela. He n3noJ3BaTe aadantOpn C eIeKtpnueChn ypeH, CHa6eHN Cbc 3a3emBAHe. UenCeJIte, KOHTo He ca npomeHEn H npncocobHn 3a KOHTaTa, HamaJIbaT pIcKa oT eIeKtpnueChn ydap.
6) N368RaBHe KOHTaHa HApOpyCa CbC 3a3eMeHN NOBbpxHocTH, r) Kato Tpb6h, padNaTOpN, KxHEnCHN NeuHN, XlaadnHnCu. PncKbT OT eEKeTpnuCeKn yDap ce yBeNeuHaBa aHO KopnyCbT ce 3a3eMN.
B) He n3naraiTe eIeKtpnuecknte ypeiHa dbHd Hn Ha MOKpa cpea. IpoHKBaua B eIeKtpnuecknna ypei BOda, yBeJIuYaba pCKa ot eIeKtpnueckn ydap.
r)N3noI3BaIte Ha6eIcamao no npedHa3HaueHHe. He 3nON-3aIte Ha6eIa, 3a Da TpaHCnOpTpate ypeIa, da ro IbPnaTe Hn da Ro 3HIOUbATE OT HOHTAHTa.DpbHTe Ka6eIa DaJeYOT hTOuHnHa tonIIHn, MaCNo, octp n Pb6Obe Hn DBHeuE c qAtn. NOBpeH nn ONJIeTeH Ka6eI nobua pncKa OT eJENKnecky Uap.
I) Korato non3BaTe eJenTpuechn ypeH aOTkpTO, n3non3BaTe yDblHnTeH Ka6eN, noXoJa 3a ynoTpe6a Ha OTkpTO. YnoTpe6aTa H yDblHnTeH, noXoJa 3a n3no13BaHe Ha OTHpTO, hAmalraBa pncA ot eJeHTpuechn yap.
e) AHO He MoHKe Da Ce N36erHe yN0Tpe6aTa Ha eEeHTpueChn YpeB BbB BlaKaHb CpeDa, H3NoI3BaIte eEeHTpueChn UenCeI, npeNa3eH OT dHepEnuHaIe NpeKcbaR (RCD-Resi-dual Current Device). YnoTpe6aTa Ha RCD HamaJIraBa pIcKa ot eEeKTpueeCKn ydap.
3)JIuHa 6e3onacHocT
a)БbTe BnHarn BHMaTeJIHn,HOHTpOInHpAaTe TOBa,HOTo Ce BbpHn MmCJeTe pa3ymHo,KORAto H3NoI3BaTe eJEnTpPueckypeEd.He H3NoI3BaTe eJEnTpPueckn ypeD KOrAto Cte 2y- yMopeHn Hn NOD DeIeCTBHeTO Ha HapOTnU,AnKoxoN Hn JeHapCTBa.MoMeHT HeBHMaHHe,DOKaTO CE H3NoI3Ba eJekTPueckn ypeD,MOKe Da pNUnHn cepNO3H JInHn HapaHBaHn.
6) H3noI3BaIte 3aunTH npexn. CnaarTe BnHarn 3aunTH ouHna. YnOtnpeBaTa Ha IInHH npeDnA3HN cpeCTBa, KaTO npOTNBonpaHn MaChn, npeDnA3HN OByBn IpOTNB NOxJb3BaHe, 3aunTH KACKN Nn HayuHnCu 3a CnyxA, HamaJIra BaIyHnTE HapaHbaHnI.
B)ИЗБАВаTe CnyaHOTOBKIOUBAHe.Y6eTeCe,уpeKbCBaYbTe BNo3nUg“OFF”("N3KJI)npEyn Da BnIOuHTe ⅢECEla HIN DA TpaHCnOpTnPaTe eNeHTpnueckn ypeD. TpaHCnOpTnPaHTo HA eJEnKTpUeCKn ypeD c npbCT Bbpxy npeKbCBaHaI CNBbP3BaHETo My KbMMpeKaTa C npEkbCBaH B NO3nUg “ON”("BKJI)yIeCHRa HUNDEHTte.
r) OTeCTpaHete BCnHKn KJIIOObe Nnn ypeN 3a HAcTPOHa Ka nped da BnIOHTe eEnKtpueChn ypeD. KIOU nn ypeD,ocTaBaB B KOHTAHT C HAKoR DAHNKeUca Ce Yact,MOKe Da DOBeDe Do JINHn HapaHbAHn.
d) He ry6eTe paBHOBeCne. 3ana3BaIte BnHaH nnoDxOJaun onopa n paBHOBeCne. Toba n03BOJRA b a mAte n-TOJAM KOHTpOJI HAD eNEKTPnueckn ypeB d HEOyAKBaH CNrTaUaUN.
e) O6JnuaTe ce noxOaHoo. He 6JnuaTe uPpOKn dpexn nn 6Nky. Dpbhte Ha pa3CToAHne OT dBnHexuTe ce aactn Kochte cn, dpexnte n pbkabuNTe. UnpOKn dpexn, yKpaWeHna nn Dbl- rN KOCh MoKe Da ce ONIeTaT B dBNHeuNTe ce aactn.
g) AHO ca HAIHn YcTPOICTBA, KOHTo TpR6Ba Da 6bDaT CbBp3AHn HA CNCTEM 3a H3BNIuAne H cb6HpAne Ha npax, yBepete Ce, ye Te Ca CbBp3AHn H3NOJ3BaHn NO NOxOJaHauHH. I3- NOJ3BaHETo Ha Te3n YcTPOICTBA MOKe Da HAmAJn PnCKa CBbp3Ah C HAIHNeTO Ha npax.
4) ynoTepe6a n cbxpaHenne Ha eIeHTpHueChnna ype
a) He npetobapBaIe eIeKtpueckn ypeN.3nON3BaIte noDxoAun 3a pa6oTata eIeKtpuechN ypeN. IOnxOAnuEeKtpueckn ypeN 3BbPmHn-Do6pe Hn-Ha-Be3onacHo pa6oTata, Ha cKOpocTta, 3a KOrTo e npoeKtnpaH.
6) He n3noI3BaIte eIeIeTpueckn ypeI aIO npEkbCauBT He B CbCToRHe Da ro BnIOUH Nn Da ro CnpTe HOpMaIHO. EJeKtpueckn ypeI, KOITo He MOKe Da 6bDe BnIOUeH OT npEkbCbaa, e ONaCeH I Tp6Ba Da 6bDe nonpaBeH.
B) N3HIOUOHTe ⅢeNcEa OTeIeHTpueckn HOHTAKT npedn da H3- BbPwBATE HABaTo N Da e HAcTpoHa NN CMHa Ha pInH aHeHocn, nn npde n da npnbepete eIeHTpueckn ype. Te3n pBeBAHTNBHN MepKn 3a 6e3oNaCHOCT HamaJIbaT pNcKa OT CnyauHHO 3aADBnKbaHe H eIeKTpueckn ypeD.
r) NocTabnTe HeH3nO3BaHnTe eEeKtpueckn ypeDn H3BbN 06 cera Ha Dea n He No3BOJBAuTe H3NO3BaHeTo Ha eEeK TpueeKn ypeD ot Xopa, KOHTo He ca 3ano3HaTH CbC Camn ypeD n C Te3n HnCTpyKn. EeKtpuecknTe ypeDn ca onachn B pBcTe Ha He3anO3HaTH nOTpe6nteHn.
I)PnHexe ce 3a NODpBHHaTa Ha eEnTpHueChnTe ypeH. Y6e-Te CE, Ye NODBnHHte TaCTn Ca NODpeEHn n CBObOHN B DBNHeHHeTO, Ye HMA CyNeH YaCTn HJN Dpyro ycNoBHe, HoTo MoHe Da Bb3JeCTBa Ha pa6oTata Ha eEnKtpHueChnrypeD. B cnyaHa Na nobPeH, eEnTpHueChnrypeD Tpr6Ba da 6bDe I nonpaBen npEHN3No13BaHeto My. MHOrO INuDEHTNa CpEN3BnHAHOn OT loWa NoDPbHHKa.
e) NpOdbpHaHte HatoyeHn YnCTn peHeuHte qAcTH. POnxoDJaTa nOdpbXKa Ha peKeJeHTe qAcTH, Cdope HatoyeHn OC-TPneta, rN npaBn NO-MaIHO NOaTINBn Ha 6NoKnpaHne n No-JeCHN 3a KOHTPOIpAne.
g) N3no3BaIte eIeKtpHueckn HNCTpyMeHT n CbOTBeTHNTe npH
HADJIeHHOCTH CbIraLACHO ppeIOCTaBeHNTE HNCTpyKuHN, KATO IMATE ppeBnD yCLOBnaTHa pa6Ota N TnHa H3BtpBaHATA pa6Ota. H3NoJ3BaHeto Ha eJeHTpueChnH NCHtpymeHT 3a Opeaun, pa3NUnHOn OT Te3n ppeBnDEHnTe, MOKe da npedn3BnKa onaChn cnTuayn.
5)CepBn3
a) DaaBte eNektpnuechna ype3 a nonpaBb caMo Ha HbAnHnepnapn nepcoHa, Hato n3non3BaTe cMo opnHnHaHn pe3epBn qactn. Toba no3boJbRa da ce noDlbpHa 6eOonacHocT Ta Ha eNektpnuechka ype.
PNEyIPEHJENH3ABE3OJACHOCTPNPA6OTA C BEPHKEN TPHOH
IodbpxhAte BCHKn Yactn Ha TAnoTo DaJeY OTe 3b6HaTa BEPnra,doHato pa60THBepHHNn TPhOH.IIpeN da BKNIOHTe BEpHHNn TPhOH,ce yBepeTe,ue 3b6HaTabePnra He BN3a CBnpnHOChOBHe C HnKaHb IIpeMeT.EHO MOMEHTO pa3CeBaHe,doHato pa6OTBepHHNtE TPOHNMOKe Da DOBeDe Do 3aJIInTaHe Ha Dpexn Nn HA TAnoTO B 3b6HaTa BePnra.
AChata pBHa Tp6Ba BnHarn Da DbpHn 3aHata dpBnHa, a JBAta pKa, npedHata dpBnHa. Hkora He Tp6Ba da ce pa3-MeHrptbete PnpDbpHnHaETo Ha BepHHnTpnoH, Tb KaTOce YBeJIuHaba PNCKA OT 3JIONoYKn Ha paOteunna.
Hocete 3aunTHn OuHa n 3auHTa npOTNB yM. PpenOpbvat ce,dpyrn 3auHTNH YcTPOINCTBa 3a rJabata, pTeTe HpaKaTa.Hoceho HnoXoJIO 3auHTHO 6NeHIO,ue HaMaJIi Ha- paHABHnI NO TAnOTO, pNHNHeHn OT IeTn TpeKn, a CTO TaKa n CInyuaen KOHTAKT CbC 3b6TuTmTPOOH.
-Да He ce H3no3Ba BepHHHn TpOH Bbpy DbpyBO.3aEnCTBaHeTO Ha BepHHHn TpOH,doKaTO Ce HampaTe Ha DbpyBO,MOKe Da npuHHn HapaHbaHe Ha TAnOTO.
IodbpaHnTE BnHa nPaBnHa ToyHa H NoJaraHe Ha KpaKa Bn 3aJeCTBaTe BepHHn TpNOH, EHNCTBEHO, KOrTOce HamnPate BpXy HenOdBnKHa, CHyPha n paBHa NOBbpxHOCT. Xb3raBnTE Nn HeCTaBnHn NOBbpxHOCT, KaTO HanPmEP cAHI, MORAT Da npEdnBnKaT 3aRyHa paBHOBeCe Nn 3aRy6a Ha KOH-TPoJa Bbpy BepNKn TpNOH.
Korato ce pehe KIOH, KOHTO e NOHANPEHeHne, e HEO6XoDMo Da ce BnMABA, Tb HATo CbIeCTByBa PnCH OT OTHaueHane (06- paTHydpn). Korato 06TfAHOTo HbNAKHATA Ha DpbBecIHATA ce OTNcHc, HtOBapeHOTo pAmO Ce BpTaHaHa3Ad NMOKe Da yDapn ONepaTopa HJINJa npuHHN H3JI3aHe H3BbH KOHTPOJHa BEpHKHM TpOH.
BHHMaBaTe MHorO, Horato peHete Xpactn mIaJn XpactoBnHN pacteHna. TbHKnte MaTePhaHm MORat Da ce 3anpeyat B 3b6HaTBePurHa n Da H3JeTAT B NOcHa, KbTeTo Ce HAmpn Bne nn da npedin3BnKAT 3ary6a Ha paBHOBecne.
TpahncnpTpaHte BepHHnH TpnoH,Horato e n3HIOueH, Hato ro dbpHnTe daJeu ot BaWeto TnNo. Korato BepHHnH Tp OH ce TpAHcnpTnpaHne Hce np6epe 3a cbxpanHeH, e He06XoHNMo BNHaH Da ce noHpBa BOeGaTA uHa. IpaBnHOTOC 06CnyKaBe Ha BepHHNTHpOoh, ue HaMaJIbB3MOHXHOCTTA O CnyYaeH KOHTaKT C NOdBnKHaTa 3b6Ha BePira.
- PnHbPnaHTe Ce HbM HNCTpyHcHNTe OTHaHcN Ce Do Cma3BaHETo,OBTRAHeTO Ha Beprata N pe3epBnTe PnHaJEnHOCTn.Bepra,NeTo OBTRAHe n CMA3BaHc He ca N3BbPseHn npaBnHO,MOKe Da CE ChbCa INI Da YBeJIuHn PnCKa OTOTckaHaHe (OpaTeH yap).
PpHnpe cyu, n 6e3 cneiOT macno Hrpec. Omacehnte puekni Te3n, no KOnTO hMa rpc ca Xlb3raBn I MORAT da npedn3BnKAT 3ary6a Ha ynpabHeHHeTo HA TpnoHa.
PeKeTe eUHCTBeHO IbpeBecHa. He H3NoI3BaIte BepHHn TPhOH 3a He npEpeBnDEHN n3NoI3BaHn. HanpIMeP: da He ce H3NoI3Ba BepHHn TPhOH 3a P3aHe Ha INaCTMacOBn MaTePbAHn, MaTePbAHn H3NoI3BaHn B CtponteJIcTBOTo HnHEbPbeHN MaTePbAHn. H3NoI3BaHeTO Ha BepHHN TPhOH 3a Opepaun,pa3HHN OT Te3n npEpeBnDEHnTE,MOHe Da npEepIN3BnKa onacHN CITyauuN.
PIMUHHN 3A OTCKAUAHE (OBPATHN YdAPN) H 3AUNTA HA ONEPATOPA
MoKeJaHMaOTChauaHe (O6paTHN yIapn), KOraTo BbPxa NII KpaHa HAnpaBJIbRaUaTAtuHa DOKOCHe PpeMeT NII, KOraTo DbpBeCInHaTa
ce 3aTbOpn B ce6e cn, 3aTgAkn 3b6HaTa Bepna B yAcTbHa Ha pR-3aHe.
To3n KOHTaHa KaHa HaHapBaIbAaTa a HnHa c PpeMeT MoKe, B HAKOn CnyaH, da npEIN3BnKa BHe3aHNO ObaPaTHa peaku, n3-6yTBaHn HapBaIbAaTa a HnHa Harope N Ha3aD, KbM OepaTopa. 3aTgAneto Ha 3b6Hata BepHa Bbpxy ropHata qact Ha HapBaIbBaaTa a HnHa, MoKe Da n3bYa Ta 3b6Hata BepHa 6bp3o Ha3aD KbM OepaTopa.
EHa Hn Dpyra OT nocoyeHnte peaKun, MoKe da npuHH 3ary6a Ha ynpablenHeTo Ha TpnoHa N da npedn3BnKa no To3n Haun HTeKN 3IIOJyKn C IInceto. He e Heo6xOmo Da ce DOBepBaTe eINHCTBeHO Ha BrpaDeHnte B TpnoHa npedna3Hn ycTpoiCTBa.
YmecTHo e nOTpe6nTeJIaH Ha BepnKnnr TpnoH da pnpIpnme Pa3- Hn PpeNa3Hm MepKn 3a OTcTpaHraBaHe ha PnCKOBte OT 3JNOyKn Hn HapaRaBa He NoBpeMe Ha pa60Ta. OTrCaHaTe (OpaTHn ydapn) e pe3yIaT o HnPabNlHO n3NoI3BaHe Ha INCTpyMeHa n/nn HnPabNlHn PPOeDpyn Hn HenoXoJaun YCIOBna Ha pa60Ta n To MOKe Da ce N36BerHe, Kato Ce B3MaT NOxOJaun PpePa3HN MepKn, NocOHeH Ny IIO-Dny:
-Дрьнгte trpoHa HeNoDBHHHc C DBeTe pBcE, c NaIuN n npbCTH OKOLO dpbHKnTE Ha BepHHHr TpOHn H ce No3NuHOHNpaHTe C BaWETo TIAO N pBue B No3Nua, KOrTO Bn No3BOJRA bA yCTOnTE Ha CNITE Ha OTChauHero (OBPAHTHE ydaPn).CNITE Ha OTChauHero (OBPAHTHE ydApn),MORaT da 6b-DaT KOHTPOIpaHn OT OpeaTopa, aKo Ca B3ETn NOxOJaU 3aClyua JpeJa3Hm MepH. He No3BOJIraBHe BepHHHr TpOHn Dace 3aJeCTBa.
He oTaraTe pBcTe MHO r daJeH He peKeTe Ha BnCOuHa HAD BnCOUHaTa Ha pamOTO. Toba dOnpHacr 3a N36rBaHe Ha HeBOJHn KOHTaKTn C KpaHuaTn N03BOJBA No-Do6po KOHTPOINPAHe HA BepNKHHr TpOH npH HenpeDbndEHn CtTuAun.
H3noJIbAiteeMHCTBeHO HnPaBnBaaata WnHa n Beprnte, nocoueho NT pOn3BOJNTeH. HeNoDxOJaIu pe3epBn BOaH N BepnM, MoT a Da npEIN3BnKAT CkbcBaHe Ha BepnraTa HmN OTCKaHaHe (OpaTHydpn).
- PnIbPnHaTe ce KbM HnCTpyKuHHe Ha nOTpe6HeJI, OTHACaUc Ce do HAToOVAHETo NODbPpHkATA Ha BepHHNTRPOH. ENo HamaJBaHe Ha Dbl6OuHATA, MOKe Da DOBeDe DO yBENHAbHe Ha OTCKaHaHEo.
- TexHnHa Ha n3noJ3BaHe Ha eJeKtpueckn TpnoH
BnHarn Cn3BaIte yka3aHnIa 3a 6e3oNaChOCT n H3noIbAaTe Ha-nOxOJaTa TEXHnKa 3a pr3aHe BbB BaIra Clyuay, cNopey Ka3aHnIa I npImepInTe, nOmeTeHN B INCTpyKunTe 3a yNOTpe6a (BnK rI.7).
Tcnohe 3axpaHbau HA6e TaHa, He DaHe Ce 3aNTa B HIOHN IINB Dpyn npenrTCTBn.
H-mpemectbahe Ha eEeKtpnueckn TpnoH npn PbJHa 6e3oNa-HOCT
BceHnIbT, KOrato TpR6Ba Da npemecTBaTe HIn TpaHCnpTpapate Ma- uHaTa, e Heo6xOdmo:
-ДаИЗгСHTEДВИГATEЛЯ,ДaИЗЧАКЕТСПИРЕТОHAВЕРIGRTAиДaИЗHIQUHITeMaSHINHATAOTELEKTPNUECHKAtAМpeKa;
- noctabete npedna3nKaIbΦ Bbpxu HHaTa;
-XBaAaIeMaHnHaTaEINHCTBeHO3ApbXKnTe HAcOyTe IHHaTaB NocOKa 6paTHa Ha npDvNkBaHeto.
Korato TpaHcnpntpate MaunHaTa C npEBo3HO cpeCTBO, Tpr6Ba da ra paoNIOKeT TaKa, Ye Da He npEcdTablaBa ONaCHOCT 3a HIKORO n 3dpabo Da Ra 3akpenite.
-Пренин за начимаши
Ppei Da npncTbnte 3a NpBn NT KbM paOta, CbBp3aHa COTcHuaHe Ha DpbBETA INN OTpR3BaHe Ha KIOH, 6N BNO do6pe:
- da Cte nocseaaBn CneuaHepKypc Ha oOyuEHe 3a H3no13BaHe Ha TaKbB BnD INCTpyMeHT;
-Да cTe npOeHn BHIMATEHNO ppeDynpEHEHnRA Ta 3a 6e3oNaCHOCT N INCHTpYKuNTe 3a nIIN3BaH, NOMeCTEH B HAcTOUeTO pBKOBOIDCTBO; - da cTe ce ynpaHnBaHn Bbpxy DbHepn NoCTaBeHN Ha 3emTa Nn DbHepn 3akpeHEn Ha NoCTaBKn, C cEJ da Ce 3anO3HaTe C MaunHaTn Hau-NoDxOJaUte TexHKn Ha p3aHe.
4. MOHTAK HA MALIHATA
1. CbДьРЖAHNE HA ONAKOBKATA
Onakobkata Ha MaunHaTa cBdpka:
-6JOKMOTOP,
- uHaTa,
- Bepura,
-3aunTaHKaIbΦHa shHa,
-ПИКСпрлОжениДOKуМЕТИ..
BAKHO
MOHTIpaHn Bbpy Hea uHa n Bepura, H npa3eH pe-3epBoap 3a MacNo.
BHIMAHHE!
MaunHaTa e Cha6eHa c He
HETO HA MOHTAHa Tp6Ba Da 6bDaT N3BbpweHn Ha paBHO n CTa6HnHO MAcTO, C DOCTaTBuHO MAcTO 3a npemeCTBaHe Ha MaunHata N OAnHOBnA, Kato BnHarn CN CnyHnte C NOxOJaUnte NHcTpymEnTH. N3XBpJrHTo Ha OAnHOBnTe Tp6Ba Da ce Ocb-ueCTBABa Cnopei DeIcTBaUnte MeCTHN pa3nppe6n.
2. MOHTIPAHE HA IINHATA IN BEPHATA
BHIMAHHE!
H3noJ3BaIte BnHaI nnBTHN
pa60THn pbkabu npn H3BbPwBaHe Ha onepaunn Bbpx uHa n Bepurata. 5bTe He 3KnUoyTeHNO BHMaTeHNn npn MOHTnpaHe Ha uHaTa n Bepurata, 3a Da He 3actpaWnte 6ezonacHocTt n eHnHachOCTTA Ha pa6oTa C He; B clyuaH Ha cbMHeHne, 06bpHete Ce KbM Baun npodabay.
Ipei Da MOHTnpaTe uHaTa, yBepTe ce, ye He e noCTabeHa cnpaKaTa Ha BepnTa; TOBa CTaba KaTo npedHaTa 3aunTa 3a pbKaTa CE n3TeJIM MaKcHMaJIHO Ha3aD KbM TAnOTo Ha MaUnHaTa.
BHIMAHHE!
Y6eTeCe, Ye MaunHata He
e Cbbp3aHa C eIeHTpNueChnHOHTaHT.
-OTBnIte p6kata (1) nOTMeCTeTe KapTepa, 3a da DOCTnHHeTe BlaueuNnINHbOH NsHaTAt (ΦnR.1).
-MoHTnpaIte BepnraTa Bbpxy ShHaTa, KaTO BHMaBaTe 3a NocOHaTa Ha DnHexHne; aKO Bbpxa Ha SHHaTa e Cna6DeH C Bb3BpaTeH PnHbOH, BHMaBaTe PnTb3rAunTe 3BeHa Ha BepnraTa Da ce HAnOxat PpaBnHO B npa3HNTE pOcTpaHCTBa Ha PnHbOHa (ΦnR. 2).
-MoHTnpaIte uHnHaTa (2) Hato noCTaBInTe uHnHaTa B OTbopa Ha uHnHaTa Upe3 yCTPOINCTBOTo 3a HATraHe (2a) H3TERLeTe uHnHaTa KbM 3aAnHaTa YAcT Ha Kopnyca Ha MauHnHaTa (ΦIr. 3).
- HABNITe BepnraTa OKOIO NIIb3raunnINHbOH (ΦNR. 4) nI36yTae WInHaTa HAnpe, 3a Da NoCTnIRHeTe pBpBOHaayAo6TgAre Ha BepnraTa.
-MoHTnpaIte OTHObO KapTepa, 3aBnHTBaHKn pBcKaTa (1)6e3 da J 3aTgRaTe.
-3abptete KpbIata raHa (3) no nocKa Ha yacOBHNKOBaTa CTeJa KaTO NOCTHHe TpaBnHOTO 6TgAre Ha Beprata (Fnr.5).
- 3aterheTe DOKpaB pBcHata (1), KaTo DbPHeTe uHaTa NOBnHata (Φnr.6).
5. NOДГOTOBKA 3A PABOTA
1. KOHTPOJINPAHE N3NPABHOCTTA HA MAUNHATA
BHIMAHHE!
y6eTe ce, ye Maunnata
He cBbP3aHa C eJeHTpHueckn KONTaHT.
Ipei Da 3aOnuHHe Ta6Ota, e Heo6xOJMo Da npOBepiTe:
- npOBepeTe DaJIH HAnpeKeHHeTo N UecToTaHa Ha eJIeHTpUeChKaTAt MpeJa OTROBaprT Ha nOKa3aHnTe Ha "EtIKET CepneH HOMep" (BnK rI. 1-10.8).
- npOBepeTe daJIIMma pa3Xla6eHN BnHTObe Bbpxy MaunHaTa N mHaTa;
- npOBepete daIIN BepnraTa e onbHaTa npaBnIHO, HatoyeHa n 6e npu3Haun 3a noBpeDa;
- npoBepTe DaIIN dpbHKnTe n 3aunTHnTe ycTpoNCTBa Ha MaunHaTa ca NouNCteHn, cyxN n3dpabo 3a
KpeenHn 3a MaunHaTa;
- npoBepeTe eKacHocTtHa cnnpaKaTa Ha BepnraTa;
- npOBepeTe dAnI NocTbT npeKbCbaH 6yToHbT 3a 6e3oNaChoc Tce DnKHaT CBO6OJHo, 6e3 Da e Heo6XoJIMo ynpaKaHraBe Ha HATNcK BbPxy TIX; npn OTnyckaHe Tp6Ba Da c Be BbPHaT aBTOMaTHUHO 6bP30 B HeyTpalHa No3uZn;
- npoBepeTe daJIH loCTbT ppeKbCBAU ocTaba 6IOKn paH aHO He ce HATNCHe 6yToHa 3a 6e3OnaCHOCT;
- npoBepTe daJn npoxOHTe 3a oxJaXdauny Bb3dyX Da He ca 3anyWeHOn OT cTbpOTnHn JIn OTnaDbu;
- npOBepeTe DaJIH He ca NOBpeDeHn 3axpaHbauJrT Ka6eI n yDblKHTeJIrT;
- npOBepBaIte HnBTo Ha MaCIOTo Ha BepnraTa Da He CIn3a NOD 3HaKa «MIN» n DOJINBaIte, aKe e He-6xOdmo, Do OKo1o 1 cm ot p6a Ha CbeDnHeHneTo.
2. IPOBEPKA HA OBTRAHAHETO HA BEPNFATA
BHIMAHHE! y6eTe ce, ye MaunHata He e Cbbp3aHa c eIeHTpueechnHOHTAHT.
- OtnycheTe pTuKhata (1) (Φn.r. 5).
-Bb3deICTbaIte no NOxOJaHauHHa npbcTeHOBnHaTa raKa (3),do NoCTnHaHe Ha npabNlHo 6TgAre Ha Bepurata (ΦIr.5).
-3aterheTe pkaTa (1), KaTo DbpKHe Tse HnHaTa NOBdHnHaT (ΦnR.6).
Bepnata e npabnilho onbHaTa, aKo npnstraaKn Y B cpeata Ha uHata, nIb3rauNTe 3BeHa He n3JIIN3aT OT BODaHTe (ФИr.7).
Дрьжte HaTINCHa npeKbcBaua n 6byToHa 3a 6e3oNaC HOCt, 3a d a OTnycHete CnnpaKaTa, NocIe C NOMOuTa Ha OTBepTKa PnDnKHe TepnraTa NO DbJIHKnHaTa Ha BOdaHTe, 3a Da ce y6eHnTe, Ye DBnKeHHeTO ce Ocb- UcECTBRABa 6e3 npeKaJIeHO ycInne.
3. IPOBEPKA HA CINPAUKATA HA BEPNIGATA
Ta3n MaunHa e Cha6deHa C DBoiHa CnpaHa CnCTema, KOrTO Ce HameCbA B DBe CHTyaUN.
a) Horato OTnycheTe NoCTa Ha npekbcbaa, aBToMaTHuHO Bn3a B DeiCTBHe CnpauchKaTa, KOrTO 3a-6abn H CNIPA DnKHeHneTo Ha BepraTa, C cEe Da npedOTbpaTH OnachOCTTA OT HapaHraBaHe, KOrTO MoKe Da Bb3HnKHe AKO BepRaTa npoDbNkDa Ce DBnKn CLeD N3HIOUHbAHeTo.
6) B clyaHa oTcauaHe no BpeMe Ha pa6oTa BCJeDCTBHe Ha aHOMalen Donnp Ha BbpxHa 1uHa, C p3KO nCNIHO n3MeCTBaHe HArope, TaKa Ye pbkata Da ce ydapn B npednna3nte. B TO3N clyaH DeIcTBHeTo Ha cnnpaKATA bloKupa DA BVKeHHeTo Ha BEpuraTn Tpr6Ba Da 6bDe p6yHo OT6LOKHPaHO, 3a Da Ce n3KIOUH.
CnnpaKaTAt MoKe Da 6bJe aKTHBnPaHa n pBuHNo, KaTo ce HATNCHe npedHaTa 3aunTa. 3a Da OCBO6OHTe CnnpaKaTAt, N3TeIeTe npedHaTa 3aunTa KbM dPbHKaTAt, DOKaTO ycETNTe UpaKaHe.
3a da npoBepnTe eKacHocTtHa cnpaKaTa e He-06XoIMo:
-Да Внluчete MOTopa, KaTO XBaHete MaWuHaTa 3a npedHaTa DpbKka N36yTaTe HappeC naleca npedHaTa 3auNTa Ha pKaT, NO nocOKa Ha WnHaTa.
-Korato cnpaKaTa ce BkIouN, ocbo6oTe loCTa Ha npekbCbau.
Bepnata Tp86Ba Da cnpe He3a6abHO uom cnnpaKaTa Ce BkIIOH.
BHIMAHNE! He n3noJ3BaIte MaunHata, aKo cnpaHaTHa Ha Bepurata He yHKnOHNpa npabHNO.ObbPhe Ce hM BaWn npOdaBAY 3a OcbSectBraBe Ha Heo6xOdHMn KOHTpON BbpXy MaunHata.
4.CMA3OHO MACJIO 3A BEPHATA
BAHHO 30uHO MacNo, npedHa3HaeHo 3a pe3aKn nn npnIeBaio Macno 3a pe3aKn. He n3no3BaIte Macno, CbDpKaIo npimecN, 3a Da He 3anyuTe fHtbpa Bpe3epBoapa n 3a Da He nobpeiTe OKOHaTeHNO Nmata Ha MaclOTO.
BAHHO Iopxoadpo Macno 3a Bepn-ratae6nopa3rpaKdaoTOce.Ynotpe6ataHaMHepaHm MacnaNNMACNO3aDnraTeNnPpeIN3BnBa cepno3H ekONOruHn 电
H3noJ3BaHeTo Ha KaueCTBeHO MacIooTeJIHO 3HaueHne 3a Do6pTO Cma3BaHe Ha peKeIuTe 3BeHa; H3noJ3BaHO HnH NCKOKaueCTBeHO MacIO BOJrT DO Heo6po Cma3BaHe n ChbCraBt JHBota Ha Bepurata n uHHata.
BAHHO IpeHn BcRHO H3PON3BaHe Ha MaunHaTa, BuHar n e do6pe da npOBepaTe HbOTO n Da DOJIbATE Do OKoNo 1 CM OT pb6a Ha CbeUHeHHeTo. HbOTO Ha MacIoto He Tp6Ba Da CIn3a NOD 3HaKa «MIN»
BEJENKHA 3a da HaneTe MaCNo e He-OBxOIMo Da IocTabeMaHHaTa Da IeHN Ha DcHata CN CtpaHa, TaKa Ye TbpIOBnHaTa 3a IIbIHe He da CeHAMnpa BvB BePTNKaHNO NIOJOKeHne.
5. EJEKTPNUECKN BPb3KN
ONACHOCT! BnaHHocTTa n eJeHTpue-CTBOTO ca HecbBmectHMn.
- MaHnIyIlnpaHTo n Cbbp3BaHTo Ha eIeHTpnYeCHnte HabeJN Tp86Ba Da ce N3BbpWBaHa cyxo.
- HnKora He donychaTe DoNp MeHdy eEnktpnueckn KOHTaHT nn Ka6eI C MOhpa 3OHa (JohBa nn BlaKeH TepeH).
YdbnHHTeHHTe Ka6eIa Tpr6Ba da 6bdaT cKaueCTBO He NO-HNCHOOT H07RN-F nn H07VV-F C MmHMaJIHO ceueHHe 1,5 KB.MM. n MaKcMaHa npenOpbHa dblnKaHa 30 M.
He npbKte HABNT ka6eHa Ha ydbNknteIa No BpeMe Ha pa6oTa, 3a Da He nperpee.

ONACHOCT!
NoctoHHoto Cbbp3BaHe Ha
HoiTo n da e eIeHTpueechn ypeed hBm eIeHTpn-yechata MpeHa Ha cgradaTatra6Ba da 6bde n3-BbpweHO OT KBaIIHΦnucnPah eIeHTpoTeXHH, Cb-06pa3Ho DeiCTBaunte pa3npoep6n. HenpaBnHoto CBbp3BaHe MoKe da npuHH cepno3HN uetn, BHIOHTeJHO n Cmbpt.

ONACHOCT!
3axpaHbAte ypea noc
peCTbOM nHepenua (RCD - Residual Current Device) c ToH Ha H3N10uBaHe He HauBnAbaa 30 mA.
BAKHO
3a da n36erHete npekcbAHn
B NoidaBaHeTo Ha eIeKtpnuecka eHeprna:
- npOBepTe daHn obuHa kanaTet Ha eNeKtpueckaTa HCTaIaue e NOxOra;
- CbbpHeMaunHaTa c eNeKtpnuecKn KOHTaKT C DOCTaTbyeH ampepaH;
- n36yBaIte eHOBpeMeHHaTa yNtpe6a Ha Ipyn eKeTpueckn anapatn C BncoKa abcop6uia.
6. BKJIIOUyBAHE - N3KJIIOUyBAHE HA MOTOPA
BKJIIOUBAHE HA MOTOPA (ФИ. 12)
Ppei Da BkIIOHTe MoTopa:
-3aKaayete yIbJnKHTeJIHnKa6eI (1) KbM oBtAAKaTa B 3aHaTa dpbKa.
-ПБРО cBbPKeTe ueencela Ha 3axpaHbaunna Ka6eI (2) cydblnHTeIa (3) n CJIED TOBA -yDblnnTeIa KbM eJelKTpueeChnKoHTaKT (4).
-OTcTaPaHeTe 3aUHTnHa KaIbΦ Ha SiHaTa.
- YBepete ce, Ye uHata He ce onnpa B TepeHa nn Do Dpyr npedmetn.
3a BKNIOUbaHe Ha MoTOpa e Heo6xOdmo (ΦnIg. 12):
1.Да ce n3KIOUc cnpaKaTa Ha BepnRaTa (5) (PpeHa 3aunTa Ha pKaTa N3DbpnaHa KbM PpeHata DpbKka).
2. XbaheTe MaunHaTa 3dpaBO C DBe pue.
3. HatncheTe 6yToHa 3a 6e3oNaChocT (6) n BkIIOUte npekbcBaay (7).
BENEJHKA
Kato ocbobodte npekcbcaba,
6byToHbT 3a 6e3oNaCHOCT ce pa36nOKnpa n DvraTeIaT cnnpa.

BHIMAHHE!
7)Obbphete MaKcHMaJIHO BHMaHHe Ha OnpaUN H3BbPweHN B 6n3OCT Do MetaJIHOrpaI.
8)ИЗБЯВАЕ КОТАТа Ha BepHrata C eLEKTPNueChnHa H6eI.ИЗПОЛЗВАte OБТЯннATA 3aHa6eNa,3aДa ИЗБERHete CnyaHOTO OTHauAHe Ha ydblHHTeHa,HaTO CbUeBpeMeHNO raPANTpATE npABHnHOTo NOCTABHne,6e3 cHla,B KONTAKTA.HNKORA He nIIaIte eLEKTPnueChnHa6eI NOHAPeHHe AHO e INoWIO H3OlnpaH.AHO ydblHNTeJIrTc e NobpeHn IO BpeMe Ha pa-6ota,He IINaIte Ha6eHa N BeHara H3HIOUyeteYdblHNTeI rT eLEHTPNueChATA MpeHa.
9) Na3eTe uHHata OT cHHeu yIap B UyHn TeHa, TbH Hato CE yBENHuBa BEporTHOCTTa OT OXBbPcAun MaTePhaHn Pn DUNKeHne Ha BePurata.
10) Cnpete ABnrateIe I n3HIOyTe MaunHaT aTo eJeHTpueckata MpeKa:
- BCEKN TbT, HORATO MaunHaTa He e NOD BaW Ha43Op;
- npedu da ce n3Bbpuwa KOHTPO, NOuHCTBaHe nn da ce pa60TH no MaunHaT;
- cIeH hato e ydapeHo yHdo TAno. IpOBepete eBentyaHn UeTn H3BbPwTe Heo6xoDUMHTe NnonpaBHN PpeN da H3NoJ3BaTe OTHOBO MaunHaTa;
- ako Maunnata 3anoyhe da Bn6pnpa no HeHopmaen HauHH (NtbpceTe He3abHNo npuynnata 3a Bn6paunnte n 3aHeceTe Hocayka
Ta B CneuHaHn3npaH ceHTbp 3a ocBuecTBBAHe Ha Heo6xOumnte npOBepKn); -Pn HEn3NoJ3BaHe Ha MaunHata.
BAXHO
He 3a6paBnTe HnKora, ye
eIektpueeckn TpnoH n3nO13BaH He npabNlHO, MoKe da Cmyuaba dpynte Xopa n Da OKaHe CNJHo Bb3dEInCTBne Bbpxy OkOIHaTa Cpea.
YBaKaBaIte DpyrIte n OKJIHaTa CpeJa:
- N36BBAIte Da n3nOJI3BaTe MaunHaTa B CpeDa n B YacOBe, B KOHTO MOKe Da CMUaBaTe OKOHInTe.
- CnEaBHe CTpNkTHO MeCTHHe HOpMn OTHOCHO OTJaHETo Ha OTnaDbuHm MaTePnAIn CNeI pr3aHe.
- CneBaIte cTpIKTHo MeCTHHe HOpMn OTHOCHO 3XbPJIaHETo Ha Macla, BeH3HH, N3Xa6eHN YaCTN U BcKaKBN dpyrH eIemEHTN, OKa3BaUH CNJHO BInRHe BbpxO OkJHaTa Cpea.
- IIO Bpeme Ha pa6ota, B OKoHnHa ta Cpea ce pa3ceiBa ONpeJeIeHO KOJIueCTBO MaCIO, Heo6XoJMo 3a Cma3BaHe Ha Bepurata; nopadn Ta3n npuHa, n3- POn3BaIte camo bnopa3rpaKaJdaun Ce Macla, CneuΦuHn 3a TOBa n3NoJ3BaHe.
-3a da n36erHete pncA OT noKap, He octabnTe MaunHata c TOnbI MOTOP cpeJnCTa nn Cyxa TpeBa.
BHIMAHNE!
He pa6oTeTe c MaunHata,
aHO Bepurata e OTnychata, 3a da He ce cb3daat CHTyaun Ha onachocT, aHO Bepurata H3ne3e OT BoDaunTe.
3a da ce perynnpa oobraheTo Ha BepnraTa, DeiCTbaTe KaKTo e nocOyeHO rI. 5.2.
- Cton no Bpeme Ha pa6ota
Ta3n MaunHa e Cha6deHa c npedna3nteI OT npetoBapBaHn Ype3 npekbcbay. Ako Bepnrata 6loKupa
(Hanp. npaH 6IoknpaHe Ha peKeu HNCTpyMeHT, npaH 3AmbpcBaHe Ha 3b6uTe Ha BepnraTa HIn npeTOBapBaHe npn pR3aHe), npeKbCBAuT 3a npetOBapBaHe ABToMaTHUHO npekCbCA 3axpaHbHeTO C TOK, 3a da npedNa3n eEeKtpnueckaTa pe3a4ka.
BAKHO
IpeKbcBaaybT ce HameCba KO
rato ToKbT Ha n3KnOuBaHe HnBnH 30-35 A m MoKe Da 6bIe Bb3ctaHOBe pBuHO, HATNcKaHKn CneuaHnH 6yToH (1.15) 30 ceHyHn Cnei QAnoCTHOTo OxnaHdAhe.
-ПобернаHa npHTOKa Ha MacNo
BAKHO
He n3noJI3BaIte MaIINHaTa B
Cnya, ye IINCBa CMA3OuHO MaNo! HnBoto Ha MacIoToH NIOcKaTa Ha Brtbpa, 3a Da ce IpeueHn HaunHa, B pe3epBoapa Ce BNJa npes p03paun HndnHaTOp. NO KOHTo ige NaHe DpbOTO. OJINBaIte MaNo B pe3epBoapa npn BCaHO n3no3BaHeOTCTpAnHeTe OT DbPBOto 3ambpcaBaHn, KAmbHn, YacHa MaunHaTata. TN OT Kopata, INPOHn, MetaHn BbpXObe n Jxu.
BHIMAHHE!
Korato npoBepBaTe npnto
Ha Ha MacNo, yBepete ce daHn uHHata N Bepurata ca do6pe pa3noJOnKeHH.
BkIIOye MOTOPa I npOBepTe DaII MAcIoTO Ha Be-pnraTa ce pa3npbckBa npabNlHo, TaKa KaKTo e NOKa-3aHO Ha FInrpypTa (Fnr. 13).
2. HauHH HA H3IOJ3BAHE IN TEXHnKHA PRA3AHE
IpeiHa npncTbHnTe 3a IIpBn NbT KbMa6Ota, CBpb3aHa COTcUaHe Ha DbPBeTa HIn OTpa3BaHe Ha KIOHN, 6n 6nIO Do6pe Da ce ynpaHnTe Bbpxy NobaJIeHN DbHepu INI DbHepu, 3aKpeHn Bbpyx NOCTaBN 3a pr-3aHe, c 9eI Da npndO6nTe Heo6XoDmMg ONIT 3a pa60Ta C MaunHaTa n IOXdOJaNTe TEXNKn 3a p3aHe.
BHIMAHHE!
No Bpeme Ha pa6ota c ma-
HnHaTe Heo6xOaHMo Da a IbprHHTe BnHaH 3paBO C dBe pbue.
BHIMAHHE!
N3HIOyete He3a6abHO ABn-
rateH, B cnyaaye Bepnrata 6noknpa no BpeMe Ha pa6ota. BbTe BnHarn Haupeh 3a eBeHTyaJIen OTCHO, npn nonadahe Ha uHaTa Bbpxu HkaKaBa npeyka.
-OTcHuaHe Ha KIOHn OT bPBO
-KoratoIbHeHnNoBceJeNuaH3BbPwBaTeHOBpeMeHHo Pra3aHe HOTcHae,Te3nOepaun Tp86Ba Da 6bDat N3BbPweHN BOTDeJIHN 30HN,Ha pa3CTOJHne paBHNOHe2NbTN BnCOuHnHa HaOTceHTo DbPBO.UMecTHOe,da He ceOTcHnatDbPBeTa NOHaunn, IIO KOHTo Te He H3JIarat Ha ONaCHOCTXopata,He ce
ydpB E eIeKtpnuecka IINHn Hn He ce npdN3BnBa HnKaKBO yBpeJdahe Ha MaTePnAna. B clya n pni KOHTO, DbPBOTo BLe3E B CbnpNKOCHOBeHne C LInHnHa eIeKtpnueckaTa MpeKa, e yMeCTHO da YBeDomnte He3a6abHO fnpMaTa OTROBapra 3a eIeKtpnYeCKaTa MpeKa.
-UMecTHOe,ONepaTopbTHaBepnHHNtPnoHdaCeHaMnpaBtopHaTaYacTHaTepeHa,KbJeTOeBb3MOHHO TbpKaJIHe NII NaJaHe Ha DtpBOTO CJeDOTCNuHaHETo.
-Добpe e,да ce noДгТВи ПБТ 3a HanycKaHe, КоITOTpЯбВа Дa ce noДьрЖаЧИСТ,пpeДи Дa ce npИСТыПИКБМ ряЗанeto.УмecTHо e,пБТЯТ 3a HanycKaHeДace pa3npocTира OT3ad И NO Диагонал 3ad ЛинЯтAppeBnIeHa 3a NaDAнe, KaKTo e nocoуHo HaФИr.15.
-ПпсддспспсьннКьмOTСИЧАНTo,е HeO6XoDnMoДа ce Има ПпсБИД ecTeCtBeHЯ HabIOH Ha DbP-BOTO, cTpaHaTa, OTKbM KOrTO KIOHIne Ca NO-pa3BnOTOnи NOCOKaTa Ha BAtbPa, 3a Da ce ПпсeEHи HauHNa,NO KOnTO ue NaIHe DbPBoTO.
HeOTCTpaHETe OT dPBOTo 3aMbpcBaHЯ, KaMbH, YacTHNOT KOpATA, NiPoHn, MetaJIHN BbPxOBe n JxuN.
Pa3pe3 B ochoBbata
HanpaBete pa3pe3 ha 1/3 ot dnaMeTbpa Ha DpbBOTo, nepEnHnKylpHo Ha nocKaTa Ha naDaHe, KaHTo e noKa3aHo Ha qnr. 16.
Hapabete npbpoxopn3oHTaendoJe npa3pe3.
Toba no3B0JBA da ce n36erHe 3aTraHe Ha 3b6HaTa Bepnra nn Ha BOeAata WnHa, KOrato Ce n3BbPwBa BTOPNpa3pe3.
3aedn OTCnuaa pa3pe3
- HanpaBeTe 3aHEn OTCuau pa3pe3 Ha HNBO NOHe 50 MM NaXOpN3OHTaHnRA pa3pe3, KaHTo e NOKa3aHO Ha Phr.16. PoDbPkaHte 3aHnra OTCuau pa3pe3, naPaIeHen Ha XOpN3OHTaHnRA pa3pe3. HanpaBeTe 3aDeH OTCuau pa3pe3, Taka Ye da OCTaBnTE DOCTaTbUHO DbPBecHa, KOYTO CnyKn 3a NoRc. DpbBEHH NOC Bb3PpENrTCTBa N3BnBaHe Ha DpbBOTO IN HeroBOTo NaDAHe B NorpeuHa nocoka. He npabete pa3peHn HanpeHn Ha noRa.
-Korato OTCnUaHTo Ce npn6nnn Do nOra, DbPBOTo 3anOuBa Da naDa. Ako CbIeCTByBa OnaChocT, ye DbPBOTo HMa Da naDHe B JKeHaHaTa NocOka NIn, Ye MoHe Da 3aRy6n paBHOBeCne Ha3ad N da npEbHe 3b6- Hata Bepnfa, CnpTe Pn3aHTo IpeN Da 3aBbPn- Te 3aHnro OTCnHa, Pa3pe3 Nn3No3BaNte DbPBE, PnaCTMacOB Nn anymnHeB KInH, 3a Da OTBOpHTe pa3pe3a, 3a Da naDHe DbPBOTo NO npoTeJKeHHTo Ha JKeHaHaTa LInn Ha naDahe.
-Korato DbpbOTO 3anoHe da naDa, e Heo6xoJMo Da ce N3BaAn BepnKHHa TpnoH, da Ce cnpe MOTopa, da Ce noIoXn Ha 3emra BepnKHHa TpnoH n Da ce OTnpaBNTe KbM npedBnDEHn PbT 3a n3Iin3ane. Heo6xOIMO e Da ce BHIMaba 3a naDahe Ha KIOHN Ha DtbpbOTO OTROpe, KaHTO n Da ce BHIMaba KbDe CTbINBaTe.
- 06p3BaHe Ha KIOHn Ha IbPBO
O6p3BaHe O3HaUa BAOTCNHHe HA KIOHn OT NaHAno DbPBO.Korato Ce 6p3BaT KIOHnTe, e Heo6XoHMo Da ce OCTaBnT DOHNTE KIOHn, NO-ROLEMITE KIOHn, 3a Da ce NDoBpHa CTBoJa Bbpy NoBata. OtpeKeTe MaNKHe KIOHn Camo C eINH 3aMax (yDap), KaKTo e NocOyeHo HaΦr.17. Po-do6pe e da peKeTe KIOHnTe nOHaNpEKeHHe, KaTo 3aNoOHHe OTrope HADony, 3a Da ce N36BerHe PpeBbAHe Ha BepHHn TpNOH.
BHIMAHNE!
06bphete BHMaHHe B KOH
TOUKN KNOHbT Ce OINHpA B 3eMra, CbIeCTByBa JN H3BecTeH HaTnch, B KaHbA NocOHa MoHe Da ce OTKIOHN KIOHbT NO Bpeme Ha pR3aHe H npEiN3BnHBA JN CE HeCTa6uHHOCT Ha IbPBOTo CneI OTPr3BaHe HA KIOHa.
- Pa3p3BaHe Ha CTBOJ
Pa3p3BaHe 03Haayaba p3aHe Ha CTBOJa NO HcEROBaTa DbJHHa. BaKHO e Da CTe CNyPhN, Ye CToHr CeA6NJHO Ha KpaKaTa cn n, Ye BaWeto TerNo e pa3npeDeJeHo no paBn Yactn Bbpxy Dbata Bn KpaKa. Ako E Bb3MOxHo, UmeCTHO e da NOBdHrTe n NODbPkHrTe CTBOJa NocpeDCTBOM KIOHnTE, DbHepa nnPiHa. CLeDaIte IeCHN NOCOKn, 3a Da yleChnTe P3aHeTo.
-Korato CTB0la ce 6bIra no cIaTa cn dJIHHa, TaHa KaKTo e nocOeHO Ha Hr. 18A, ce pExe OTrope (noBbpxHocTHo pa3p3BaHe).
-Korato CTBOLA ce 06Ira cAmO Ha eDIN KpaI, KaKTo e nocOeHO HaΦIr.18B,e Heo6xOJMo Da ce OTeJke 1/3 OT dNaMeTbpa Ha CtpaHaTa, KOrTO ce HAMIPA oTdoJy (dONHO pa3PRA3BaHe).CneI KoETo e Heo6XoJMo Da N3BbPwTe NocJeHOTo pa3PRA3BaHe, KaTO HAnpABNTe TropHO pa3PRA3BaHe, 3a Da CpeUHe-Te PbPBnA pa3pe3.
-Korato cTbOla ce 6oBJa Bbpy DaBaTaHpa, TaKa KaTo e nocoyeHO HaΦn. 18C, e Heo6xOJMo Da ce pa3peKe 1/3 ot dnaMeTbpa 3aNoUbaHKn OT rOpHaTa cTpaHaTa (rOpHo pa3p3BaHe). CneI KoETo npOdbJHete C nocJeHnra pa3pe3, KaTo HnPaBnTe DOJHo pa3Pra3BaHe Ha 2/3, 3a Da cpeuHHe TpbNra pa3pe3.
- Pa3p3BaHeto Ha CTbOla ce yIeChra B npn n3non3BaHe Ha MeTaIe H npT (ФИг. 18D).
BmBkHeMeMaHnI npbT B CTBOJa, ynpaKnBaIte Cnla C Hero C cen 3aBbPtaHe, 3a Da ONiWemaunHaTa DbRa Bbpxy CTBOJa, KoETo Ie N03BOJN Da npOHKnE B DbpBOTo.
- NOBTOpeTe HAKOJIKO NbTn Ta3n Oepaunr N3-MecTbaKIN ONOPHaTa TOUka, aKO e Heo6xOdmo.
-Korato ce pa3pr3Ba CTBOI NO HaKIOHeHa NOBbpxHOCT (CKIOH), e Heo6xOIMO BnHaRn Da CE CTOB ROPHa- Ta YAcT, KaKTo e NOKa3aHo Ha Phr. 19. B Cnyuay Ha H3BbPwBaHe Ha Oepaun, Korato Ce 3aBbPwBa pa3pe3a, 3a Da ce 3ana3N KOHTpOla, HaNTsCHA Ha pr- 3aHe Tp6Ba Da CE HAman, 6e3 Da CE OTnyckat Dpbk- Knte Ha TpnoHa. Heo6xOIMO e Da CE nonpeuHa TpNoHa Da BJIe3E B CbnpNKoCHOBHeC NoVBata.
Pn 3aBbPwBaHe Ha pa3pe3a, n3yaKaIte 3b6HaTa pe3aHa Da cnpe, npedn da a npemeCTnTe. N3HIOuBaIte BnHaR MoToPA, KOraTO ce npemeCTBaTe OT eEDHO DbpBO Ha dpyro.
3. ПИКЛIOUBAHE HA PABOTA
BHIMAHHE!
y6eTe ce, ye MaunHata He
e Cbbp3aHa c eIeHTpnuechn KHOHT.
Korato cTe npnHIOUHn pa6oTa:
-ИЗКИЮЧЕТМOTOPA NO OПИСАНЯ ВЕЧЕ НAUHN (Глaba 6).
-ИЗуакайспиранetoHaВеригатиOCTaBeTeMa-шинота Da ce OxlaДи.
-OTCTpaHete OT Bepnata BCnKIOCTaTbO NTcBpTOTINH NIM MacNo.
-BcnyaHa cnilho 3ambpcBaHe nHa BTVBpIraBaHe Ha CMoJa, pa3rJIO6e TBePnRata n Ja NOCTabeTe 3a HrKoJIHO Yaca B CbD CbC CneuAen DeTepreH. NocJe n3PnAkhETe C NCTa BOda n Ja TpeTpnaTe C NOxDxAHTNkOPO3NOHe CNpei, PpeDi Da J MOHTnPate NaK Ha MaunHata.
-MoHTnpaIte npedna3nteI, nokpnbauu uHaTa, npedn da npnbepete MaunHata.
BHIMAHNE!
H3aKaIte MoToPbT Da H3-
CTNHe IpeDu Da Noctabute MaunHata B Koe da e NOMEeHne. 3a HamaIbAhe Ha pncHa ot noHap, OCBoOeTe MaunHata OT CTbprotHH, OCTaTbUH OT HIOHcTa, INCTa HIN IpEkanEHO MacNo; He OCTaBraTe CbDOBe C MaTePnAnOT P3aHTo BbTpE B NOMEeHne.
8. TEXOBCJUJHUBAHNE IN XPAHEHNE
BHIMAHHE! 3a BawaTa 6e3oNaChOCTn 3a 6e3oNaChocTtHa npynte:
- PpaBnHOTo NODbPkaHe Ha MaunHaTa e OT n3- KIOUHTeJIHO 3NaueHne 3a 3ana3BaHe Ha HeHata eΦeHTNBHOCT u6e3onachOCT npu pa6ota.
- PndbpaHae 3aterHa raHnTE u BNHTOBeTe, 3a da cTe cnryphu, ye MaunHata BnHar e B 6e3- onacho nolokHe He Ha pa6ota.
-HnKora He n3noJ3BaIte MaunHata C n3HOceHN nn NOpeHeH yactn. NOBpeHeHte yactnte Tp6Ba da 6bdaT 3aMeHeH, a He nonpaBeHN.
-3no3BaIte eHCTBeHO opHuaHnHu actn. 4actn c pa3nuHo kaueCTBO MOKe da nobpeaT maunHaTa n da 3actpaWat 6e0NaChocTt Bn.
BHIMAHVE! Pn ocbsectBraVeHa onepaunno npdpbka:
- N3KIOUeTe MaUNHata ot eIeHTpuYeChata MpeHa.
- N3noJ3BaIte 3aunTHn pbHabn npn pa6ota no shHaTaN Bepurata.
- Octabete MOHTHPaHn 3aunTHHe yCTpOcTbHa Ha UHHaTa,OCBeH B ClyuAHe,Horato pa6oTHe No CAMaTa UHHa HnBepHa.
- Na3ete OKoJHnHaTcpea OT n3JIHbAHe Ha Macna nn npytn 3ambpcBaun MaTePnAn.
1. OXIAHDAHE HA MOTOPA
3a da n36berHeTe nperepaBae H NOBpeHa MoTopa, e Heo6xoJIMO peWetHnTe 3a Bb3dUshO OxJaHdaHe Da ca BnHaRn Do6pe NouchTeHN N OCBO6ODeHN OT CTbproTINH IN DpyrN OTNaDbuN.
2.CNIPAUPKA HA BEPNFATA
PpOBepaBaiTe YecTo eHkacHocTtHa CnnpaKaTa Ha BepnraTa.
3. INHbOH HA BEPNrATA (Фиr. 20)
ПровераянTe YecTo CbCTOЯHHeTO Ha NINbOHa I TO 3aMeHete, ako n3HOceHaT yacT haXbPn 0,5 MM. He mONTpaIte HOBa Bepura c n3HOceH PnHbOH nIi O6-paTHOTO.
OcbseCTBeHOTOTCNEuHa3n3npaHceHTbpHaTOBaHe,ceN3BbPwBa C Heo6xOdMnTe HnCTpyMeHTN, KOnTO rapaHTnPaT MHHMaJIHO N3HOCBaHe Ha MaTePnaIte N TpaHNo HaToUbaHe Ha BCNUKn peKeuYactn.
KUIDAS KASUTUSJUHENDIT LUGEDA
Kasutusjuhendi tekstis on moned, eriti tahtsat infot sisal- tiv davad loigud, eriliselt esile toodud, nende tahendus on jargmine:
PANE TÄHELE
voi
TAHTIS


- Gentile Cliente,
- TABLE OF CONTENTS
- IDENTIFICATION OF MAIN COMPONENTS
- MAIN COMPONENTS
- CONTROLS AND FILLING POINTS
- IDENTIFICATION PLATE
- SYMBOLS
- EXPLANATORY SYMBOLS ON THE MACHINE (if present)
- SAFETY WARNINGS
- HOW TO READ THE MANUAL
- NOTE
- IMPORTANT
- WARNING!
- DANGER!
- GENERAL POWER TOOL SAFETY WARNINGS
- 1) Work area safety
- 2) Electrical safety
- 3) Personal safety
- 4) Power tool use and care
- 5) Service
- CHAIN SAW SAFETY WARNINGS:
- - Safe carrying of the saw
- e- Recommendation for the first-time users
- CAUSES AND OPERATOR PREVENTION OF KICKBACK:
- MACHINE ASSEMBLY
- PACKAGING CONTENTS
- BAR AND CHAIN MOUNTING
- PREPARING TO WORK
- CHECKING THE MACHINE
- CHECKING THE CHAIN TENSION
- WARNING! Make sure the machine is not plugged into the mains socket.
- WARNING! Do not use the machine if the chain brake does not function correctly and have it inspected by your dealer.
- CHAIN LUBRICANT
- ELECTRICAL CONNECTIONS
- DANGER! Electricity and moisture are not compatible.
- The permanent connec
- HOW TO START - STOP THE ENGINE
- STARTING THE ENGINE (Fig. 12)
- OR STOPPING THE ENGINE
- USING THE MACHINE
- For personal safety and
- CHECKS DURING WORK
- - Checking the chain tension
- - Cut-off during work
- - Checking the oil delivery
- - Notching undercut
- DIRECTIONS FOR USE AND CUTTING TECHNIQUES
- - Felling a tree
- - Limbing a tree
- END OF OPERATIONS
- - Bucking a log
- MAINTENANCE AND STORAGE
- NUTS AND SCREWS
- SHARPENING THE CHAIN
- ENGINE COOLING
- CHAIN BRAKE
- CHAIN SPROCKET (Fig. 20)
- EMPTYING AND FLUSHING
- THE OIL TANK
- CHAIN CATCHER
- BAR MAINTENANCE
- ELECTRIC CABLES
- EXTRAORDINARY MAINTENANCE
- STORAGE
- TROUBLESHOOTING
- - The machine does not start:
- Sparks form:
- Poor performance
- ACCESSORIES
- YCTPOICTBA YIPABJIENH N 3APPABKN
- MEPbI IPEdoCTOPOXHOCTN dJa OBecneueHnBa3OnaCHOCTN
- KAK CJIeIyET YHTATb 3TO PYKOBOCTBO
- ПРИМЕЧАНЕ
- BAHHO
- BHHMAHNE!
- ONACHOCTb!
- OBsNE INPABNIA TEXHNK B3OINACHOCTNIPIPA6OTE C 3JEKTPOOBOPYIOBAHHEM
- BHIMAHNE!
- PEKOMEHDAUINIIOBE3OANACHOCTNIPN PABOTE C 3JIEKTPONIIO
- INPHHbIOBSPATHOHTDAUH INMEPbI PEPDOCTOPOXHOCTN JIA ONEPATOPA
- - MeToDnKa HcNoB3OBAHnA 3JeNtPonHbI
- - PeneMeueHne 3JIeHTpONJIbI By cIOBnax 6e3ONaCHOCTN
- - PeHOMeHdauuIN dIa HauHnHaUOux
- CBOPKA MAUHHbl
- CODEPHIMOE YNAKOBKN
- MOHTAX WINHbI N CE\PN
- NPOBEPKA HATAXHEHNAIEN
- BHIMAHHE!
- ПОBEРКА TOPMO3A LECIN
- 4.CMA3KAJIAUENI
- PIMMEUAHNE
- 3JIeKTPnueCKNE COEINHEHNA
- BAKHO
- 3ANYCK - OCTAHOB ДВИГATEЛЯ
- 3ANyCK DBNIGATEJIa (Pnc. 12)
- OCTAHOBKA DBNIGATEJI
- ПОльб3OBAHNE MAшINHОД
- BHUMAHNE!
- Pa3dJIHa CTBOla
- OKOHUAHNE PABOTbl
- TEXOБСЛУЖИBAHNE И XPAHEHNE
- BHIMAHVE! Дя обесенья Baшен 6e3oNaChocTN n 6e3oNaChocTN OkpyHaIoUxN:
- BHIMAHNE! Bo Bpem anepaun texo6-cnykBaHn:
- OXIAJIHKeHHe IDBIgATEJIa
- TOPMO3 ζΕΝΑ
- 3BE3DOUKA LEN (Pnc. 20)
- CTEPHEHb OCTAHOBA LENI
- FISKPENJIEHNIA
- 6.3ATOUKA LENH
- ONOPOXHEHNE IN POMbIBKA MACJIHORO BAHKA (ToIbKO B clyuae nCnoJb3OBaHHB 6nolornuechoro macna dIy uei)
- TEXOBCJLYKHBAHNE UHHbl (Pnc. 21)
- HENCINPABHOCTN IN CNOCObI INX YCTPAHEHNA
- - Maшина He 3anychaetca:
- Pa60Ta Hn3KOro KaueCTBa
- 10.ДОПОЛНТЕЛьнtie ПРИСПОСOBLEHЯ
- AFLSUTNING AF ARBEJDET
- ADVARSEL!
- KONTROLL MED KJEDETS SPENNING
- VEDLIKEHOLD OG LAGRING
- ADVARSEL! het:
- VEDLIKEHOLD AV SVERDET
- KONTROLY, KTERÉ JE TřEBA PROVADET BEHEM PRACOVNI CINNOSTI
- - Kontrola napnuti retézu
- PROBLEM A JEJICH RESENI
- DULEZITA INF.
- A CSOMAG TARTALMA
- ONACHOCT!
- TEHEPAJIHN B63BEOHCHN IPEyIpyBAHbA 3A EJEKTPNUHNTE DEJIOBN
- INH3A KOHTPAJAP N 3AWTNTA 3A ONEPATOPOT
- IPEyIpyEyBAHa 3A B636HOCT HA HOHEBNTE HA JAIHELOT
- COCTABYBAHbE HA MAUNHATA
- COДРЖИHA HA NAKYBAHbETO
- MOHTHPAHE HA JIOCTOT IJIAHELOT
- ПОДГOTOBК 3A PAБOTA
- ПОВЕРKA HA MAШИHATA
- NPOBEPHA HA 3ATERHATOCTA HA JIAHELOT
- BHIMAHNE! 06e36eTe MaunHaTa Da He 6nnde npnHnyeHa Bo wTeHep.
- ПОВЕРHA HA HOУнцATA 3A ЛаHELOT
- NOДмУнБАБЕ HA JIАHECUOT
- ELEKTPNHYO PPNKJUYYBAHbE
- BKJyBAHbE - 3ACTAHYBAHbE HA MOTOPOT
- BKHJUYBAHbE HA MOTOPOT (cI. 12)
- 3A6EJIeUHA
- 3ANHPAHe HA MOTOPOT
- KOPNCTEHe HA MALINHATA
- HauHH HA KOpHCTeHBe N TEXHNH HA CEueHbE
- - Cechene npBO
- - 3aHObceHebe3aco6OpyBaHe
- - Kactpehe Ha rpaHHnTe Ha dpBOTO
- - CeuKaHe Ha cTe6JIoTO
- 3ABPUYBAHc CO PABOTA
- OДРЖУBAHБЕ И KOH3EPBAциJA
- JIADHe HAMOTOPOT
- KOUHnua HA JIAHEUOT
- KONHE 3A JIAHELOT (Cn. 20)
- HONU 3A BLOHHPaHbE HA JIAHEUOT
- INPA3HEHbE N YNCTEHe HA PE3EPBOAPOT 3A MACI0 (cAmO aHO HOpNCHTe 6NoJIoWHO MacIoo 3a JAnu)
- ODPKHYBAHbE HA JIOCTOT (cI. 21)
- ELEKTPNUH N KABJIN
- BOHPEHN INHTEPBEHCUIN
- KOH3EPBALUNJA
- ПОНДЕМИ ПELSEHENJA
- MaunHaTa He ce naH:
- - He3aOboJnteJHa pa6oTa
- OBsUyTBAHn3ABE3ONACHOCTIPN H3NOJ3BAHE HA EJEKTPUeCKN YPeDn
- 5)CepBn3
- PNEyIPEHJENH3ABE3OJACHOCTPNPA6OTA C BEPHKEN TPHOH
- PIMUHHN 3A OTCKAUAHE (OBPATHN YdAPN) H 3AUNTA HA ONEPATOPA
- -Пренин за начимаши
- MOHTAK HA MALIHATA
- CbДьРЖAHNE HA ONAKOBKATA
- MOHTIPAHE HA IINHATA IN BEPHATA
- NOДГOTOBKA 3A PABOTA
- KOHTPOJINPAHE N3NPABHOCTTA HA MAUNHATA
- IPOBEPKA HA OBTRAHAHETO HA BEPNFATA
- IPOBEPKA HA CINPAUKATA HA BEPNIGATA
- 4.CMA3OHO MACJIO 3A BEPHATA
- EJEKTPNUECKN BPb3KN
- BKJIIOUyBAHE - N3KJIIOUyBAHE HA MOTOPA
- BKJIIOUBAHE HA MOTOPA (ФИ. 12)
- BENEJHKA
- BAXHO
- HauHH HA H3IOJ3BAHE IN TEXHnKHA PRA3AHE
- - 06p3BaHe Ha KIOHn Ha IbPBO
- - Pa3p3BaHe Ha CTBOJ
- ПИКЛIOUBAHE HA PABOTA
- TEXOBCJUJHUBAHNE IN XPAHEHNE
- BHIMAHHE! 3a BawaTa 6e3oNaChOCTn 3a 6e3oNaChocTtHa npynte:
- BHIMAHVE! Pn ocbsectBraVeHa onepaunno npdpbka:
- OXIAHDAHE HA MOTOPA
- 2.CNIPAUPKA HA BEPNFATA
- INHbOH HA BEPNrATA (Фиr. 20)
- KUIDAS KASUTUSJUHENDIT LUGEDA
- PANE TÄHELE
- TAHTIS
Brand : STIGA
Model : SEV 2416 Q
Category : Saw