USER MANUAL MH 2C NILFISK
Symbols used to mark instructions
1 Important safety instructions 5
2 Description 2.1 Purpose 8
2.2 Operating elements 8
3 Before starting the cleaner 3.1 Setting up the cleaner .9
3.2 Before use 9
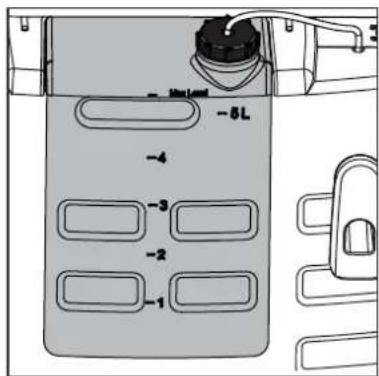
3.3 Fill up detergent tank 9
3.4 Fill up fuel tank 10
3.5 Connecting the high pressure hose.. 10
3.6 Connecting the water supply 10
3.7 Electrical connection 11
3.8 Antifreeze - before first use 11
4 Control / Operation 4.1 Switching on the cleaner 12
4.2 Connections 12
4.3 Pressure regulation (Ergo Vario Press Gun) 1
4.4 Using cleaning agents 13
5 Applications and methods 5.1 Techniques 14
5.2 Some typical cleaning tasks 14
6 After using the cleaner 6.1 Switching off the cleaner and disconnecting the supply lines 16
6.2 Rolling up the electrical lead and storing accessories.....16
6.3 NEPTUNE 1 Storing the cleaner (below 0^ ) 16
6.4 NEPTUNE 2 Storing the cleaner (below 0^ ) 17
6.5 Transporting the cleaner 17
7 Maintenance 7.1 Maintenance plan 18
7.2 Maintenance work 18
8 Troubleshooting 8.1 Indications on Display 19
8.2 Other Faults 20
9 Further information 9.1 Recycling the cleaner 21
9.2 Guarantee 21
9.3 EU Declaration of Conformity 21
9.4 Technical data 22
Symbols used to mark instructions
Safety instructions in these operating instructions which must be observed to prevent risks to persons are marked with this danger symbol.

This indicates tips and instructions to simplify work and to en
sure safe operation.


Before using the high-pressurecleaner, be sure to also read the enclosed operating instruc
tions and keep them within reach at all times.

This symbol is used to mark safety instructions that must be observed to prevent damage to the
machine and its performance.
1 Important safety instructions

For your own safety
The appliance must
only be used by persons, who have been instructed in its correct usage and explicitly commissioned with the task of operating it
only be operated under supervision
not be used by children
not be used by mentally or physically disabled persons
CAUTION!
High-pressure water jets can be dangerous if misused. The jet must not be directed at persons, animals, live electrical equipment or the cleaner itself.
Wear protective clothing, ear protection and safety goggles.
Do not use the cleaner when other people without protective clothing are in the working area. Do not direct the jet towards yourself or towards other persons in order to clean clothes
or footwear. Do not direct the jet towards live animals.
During operation of the cleaner, recoil forces are produced at the spraying device and, when the spray lance is held at an angle, a torque is also created. The spraying device must therefore be held firmly in both hands.
General
Use of the high-pressure cleaner is subject to the applicable local regulations.
Besides the operating instructions and the binding accident prevention regulations valid in the country of use, observe recognised regulations for safety and proper use.
Do not use any unsafe work techniques.
Do not tie the trigger handle open.
Transport
For safe transport in and on vehicles we recommend preventing the equipment from sliding and tilting. Secure it with belts.
For transport at temperatures around or below 0^ , anti-freeze liquid should be drawn into the pump and boiler beforehand (see chapter 6).
Before starting the cleaner
If your machine is a 3 phase version and has been supplied without a plug have it fitted with a suitable 3 phase plugwith an earth conductor by an electrician.
Each time prior to putting the appliance into service, always check the power supply cord and the other important parts of the appliance, such as the high-pressure hose and the spray gun. Do not operate the appliance if any of these parts are damaged.
Set up the appliance such that the mains connector is readily accessible.
Regularly check whether the mains lead is damaged or shows signs of ageing. Use the high-pressure cleaner only when the mains power lead is in a safe condition.

If the mains power lead is damaged, to avoid hazards, this must be replaced either by the manufacturer or through his customer service or a similarly qualified person.
CAUTION!
Unsuitable extension leads can represent a source of danger. Always unwind lead from the reels completely to prevent the mains power lead overheating.
Connectors and couplings of power supply cords and extension leads must be watertight.
When using an extension lead, check the minimum cross-sections of the cable:
| Cable length m | Cross section |
| <16 A <25 A |
| up to 20 m | ø1.5mm²ø2.5mm² |
| 20 to 50 m | ø2.5mm²ø4.0mm² |
Check the rated voltage of the high-pressure cleaner before connecting it to the mains power supply. Ensure that the voltage shown on the rating plate corresponds to the voltage of the local mains power supply.
It is important that the electrical connection for this appliance has been installed by an electrician and in compliance with IEC 60364 and the country-specific regulations.
We recommend that the electrical connection to this appliance should incorporate
either a fault current circuit breaker, which cuts off the mains voltage if the fault current exceeds 30mA for 30 ms,
or an earth resistance meter.
Check that cleaning will not result in dangerous substances (e.g. asbestos, oil) being washed off the object to be cleaned and harming the environment.
Do not clean delicate parts made of rubber, fabric, etc. with the 0^ jet. Keep some distance between high pressure nozzle and surface in order to prevent the surface from damage.
Do not use the high-pressure hose for lifting loads.
The maximum permissible working pressure and temperature are printed on the high-pressure hose.
Store the cleaner where it will not be exposed to frost or use anti-freeze liquid!
Never operate the cleaner without water. Even brief shortages of water result in severe damage to the pump seals.
Water connection

This high pressure washer/cleaner is only allowed to be connected with the drinking water
mains, when an appropriate backflow preventer has been installed, Type BA according to EN 60335-2-79. If the back flow preventer hasn't been supplied, one can be ordered from your dealer. The length of the hose between the backflow preventer and the high pressure washer must be at least 6 metres (min diameter 3/4 inch) to absorb possible pressure peaks. Operation by suction (for example from a rainwater vessel) is carried out without backflow preventer. Contact your dealer for suction set recommendations. As soon as water has flown through the BA valve, this water is not considered to be drinking water any more.
Operation
Keep cabinet closed during operation.
Do not damage the mains power lead (e.g. by driving over it, pulling or crushing it).
Disconnect the power cord by pulling the plug only (do not pull or tug the power cord).
IMPORTANT!
This appliance has been devised for use with cleansing agents that are supplied and recommended by the manufacturer. The use of other cleansing agents or chemicals can impair the safety of the appliance.
CAUTION!
The appliance is intended to be used with heating oil EL or diesel oil. Unsuitable fuels (e.g. petrol) must not be used as they can represent a source of danger.
If the machine is to be operated at fuel stations or in other potentially hazardous areas, the machine may only be employed outside the hazard areas defined in the German "Technical Guidelines for Inflammable Fluids" applicable at the point of use due to the potential explosion hazard posed by the burner.
When setting up the appliance indoors, always ensure suitable ventilation and that the exhaust gases are expelled in a suitable way. We will be glad to provide tips for connection systems, on request.
If the machine is to be connected to a flue gas stack, then local building regulations must be observed. We will be glad to provide tips for connection systems, on request.
CAUTION!

Beware of hot water and steam discharge up to 150^ when operating in steam stage.
CAUTION!

Do not touch or cover the exhaust. Risk of burns and fire.
Do not touch, cover or place hose or cord over the chimney. Danger for persons, risk of overheating and fire.
Electrical equipment

CAUTION!
Never spray electrical equipment with water: danger for persons, risk of short-circuiting.
Switching on the cleaner may cause voltage fluctuations.
Voltage fluctuations should not occur if the impedance at the transfer point is less than 0.15 . If in doubt ask your local electricity supplier.
Maintenance and repair CAUTION!
Always remove the plug from the mains plug socket before cleaning or carrying out maintenance work on the cleaner.
Carry out only the maintenance operations described in the operating instructions. Use only original Nilfisk-ALTO spare parts.
Do not make any technical modifications to the high-pressure cleaner.
Ensure that the machine is regularly serviced by Authorised Nilfisk-ALTO dealers in accordance with the maintenance plan. Failure to do so will invalidate the warranty.
CAUTION!
High-pressure hoses, fittings and couplings are important for the safety of the cleaner. Use only high-pressure parts approved by the manufacturer!
The mains power lead must not differ from the version specified by the manufacturer and may only be changed by an electrician.
Please contact the Nilfisk-ALTO service department or an authorised specialist work-shop for all other maintenance or repair work!
Testing
The cleaner conforms to the German "Guidelines for Liquid Spray Jet Devices". The
high-pressure cleaner must be subjected to a safety examination in accordance with the "Accident Prevention Regulations for Working with Liquid Spray Jet Devices (BGV D15)" as required, but at least every 12 months, by an authorised inspector.
After all repairs or modifications to electrical equipment, the protective conductor resistance, the insulation resistance and the leakage current must be measured. Furthermore, a visual inspection of the mains power lead, a voltage and current measurement and a function test must be carried out. Our after-sales service technicians are at your disposal as authorised inspectors.
The complete "Accident Prevention Regulations for Working with Liquid Spray Jet Devices" are available from the Carl Heymanns Verlag KG, Luxemburger Strasse 449, 50939 Cologne or from the appropriate association of employers' liability insurances.
The pressure-bearing parts of this high-pressure cleaner have been manufactured in accordance with § 9 of the German Pressure Vessels Ordinance and successfully subjected to a pressure test.
Safety devices
Unacceptably high pressure is fed back without residual pressure via a bypass line into the intake line of the pump when the safety device is tripped.
If the conveying capacity falls below a fixed value, the built-in flow monitor automatically switches off the oil burner. The oil burner is set to continuous ignition. As an additional protection mechanism, a thermo-sensor is integrated in the chimney of the heat exchanger. As such, the appliance cannot overheat.
The safety devices are factory set and leaded, and must not be adjusted.

Warning
Inhalation of aerosols can be hazardous to health.
- Where applicable use a device in order to avoid or reduce aerosols production, e.g., a shield covering the nozzle.
- For protection against aerosols use a respiratory mask of class FFP 2 or higher.

2 Description
2.1 Purpose This high-pressure cleaner has
been designed for professional use. It can be used for cleaning agricultural and construction equipment, stables, vehicles, rusty surfaces, etc.
The cleaner has not been approved for cleaning surfaces which comes into contact with food.
Chapter 5 describes the use of the high-pressure cleaner for various cleaning jobs.
Always use the cleaner as described in these operating instructions. Any other use may damage the cleaner or the surface to be cleaned or may result in severe injury to persons.
NEPTUNE 1 is for light professional use only.
2.2 Operating elements

See illustration at front of these operating instructions.
- High pressure hose reel 1)
- Top cover release
- Cannister for detergent
- Cable hook
- Spray lance
- Supply water connection
- Spray lance storage
- Hose hook
- Tank filler for fuel
-
High pressure hose connection for machines without hose reel
-
Control panel
- Power ON
- Fuel low
- Nilfisk-ALTO AntiStone low
- Service interval due/expired
- Boiler overheated
- Flame sensor is sooted
- Main switch
- Temperature controller
- Detergent metering knob
3 Before starting the cleaner

3.1 Setting up the cleaner Every
fuel-burning appliance, such as pressure washers, depends upon a proper mix of fuel and air (by weight) for proper combustion. Therefore some adjustment of the air regulation to the burner may be necessary to take account of altitude and the resulting air pressure. This is true whether your fuel is Kerosene or Diesel.
Your Nilfisk-ALTO hot water pressure washer was thoroughly tested and adjusted for
optimum performance before it left our factory. The factory is located at approximately 140m (450 ft) above sea level, and the combustion settings are optimal for that elevation.
If your location is higher than 1200m (3900 ft) above sea level, your burner may require readjustment for proper performance and best fuel economy. Contact your Dealer or Nilfisk-ALTO for assistance.
3.2 Before use 1. Before using

the first time, check it carefully to detect any faults or damage.
- Run the machine only when it is in perfect condition.
- The slope on which the high pressure cleaner is placed must not exceed more than 10^ in any direction.
3.3 Fill up detergent tank 1)
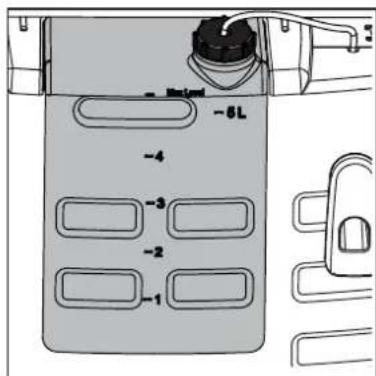
- Fill up detergent tank with prediluted detergent.
Capacity see chapter 9.4 Technical Data

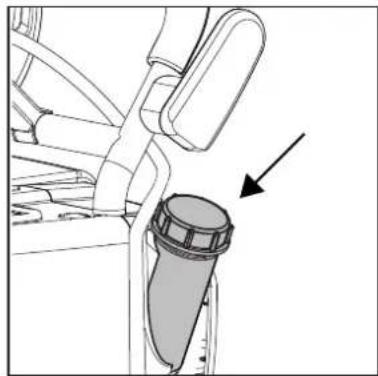
3.4 Fill up fuel tank
NOTE!
At temperatures below 8^ the fuel oil begins to solidify (paraffin precipitation). This can lead to difficulties in starting the burner. Before the winter period either add a solidification point / flow improver (available from the fuel oil trade) to the fuel or use winter diesel fuel.
With the machine cold:
Fill fuel tank from a clean container with a fresh fuel, heating oil, DIN 51603-1 (without bio diesel) or Diesel EN 590 (Diesel with a bio diesel content up to 7% ).
Diesel according to EN 590 (up to 7% bio diesel) can be used with the following restrictions:
Maximum storage time in high pressure cleaner diesel tank: 1 month.
Diesel stored externally for more than 6 months is not allowed to be filled into Nilfisk-ALTO high pressure cleaners.
Diesel EN 590 is not recommended for use in HPW's at an ambient temperature below 0^ . Diesel EN 590 from an open container must not be used.
The fuel must be free from contamination.
Tank capacity see chapter 9.4 Technical data.
Be careful not to damage the fuel tank filter to avoid dirt entering in the tank
3.5 Connecting the high pressure hose
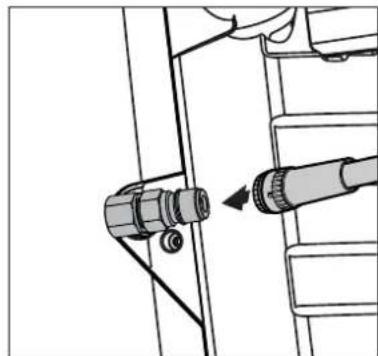
- Put the quick connector of the high pressure hose onto the nipple on the cleaner.
3.6 Connecting the water supply

In the case of poor water quality (sand, etc.), we recommend that a fine water filter is fitted in the water inlet.
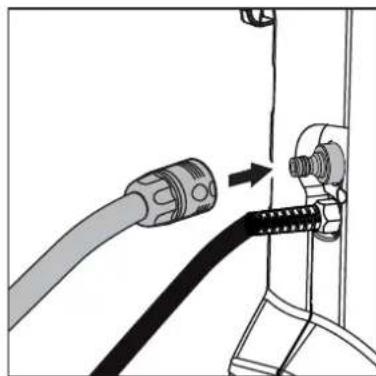
- Rinse the water supply hose briefly in order to prevent sand an other dirt particles entering into the machine.
- Connect water supply hose to the machine.
- Open water tap.
NOTE!
See chapter 9.4 Technical Data for required quantity of water and water pressure.
We recommend the use of a textile-reinforced water hose with a nominal diameter of min. 3/4'' (19 mm).
3.7 Electrical connection

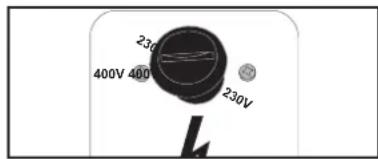
Before connecting devices with voltage changeover1): Check that the pre-selected voltage on the machine corresponds with the voltage of the electrical installation. Otherwise the electrical
3.8 Antifreeze - before first use
The machine is protected with anti-freeze from the factory.
devices of the machine can be destroyed.
CAUTION!
When using cable reels:
- Due to the risk of overheating and fire, always unwind the power supply cord fully.
The cleaner may only be connected to a correctly installed electrical installation.
- Observe safety instructions in chapter 1.
- Put the plug into the electrical socket.
Catch the liquid discharging at first (approx. 5 l) for re-use in a container.

4 Control / Operation
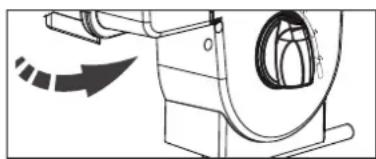
4.1 Switching on the cleaner

NOTE!
Always remove any dirt from the nipple before connecting the spray lance to the spray gun.
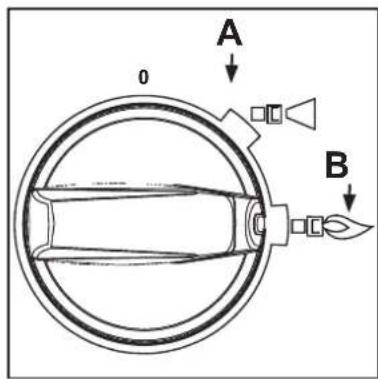
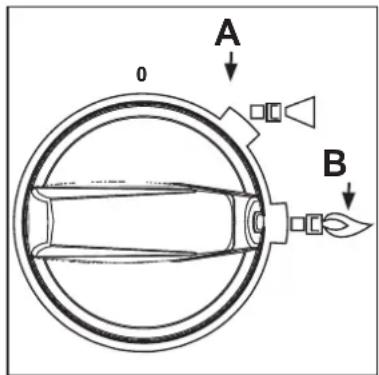
- Move the main switch into position 'Cold Water' (A)
The control electronics system performs a self-test, all the LEDs light up once.
The motor starts

lights up.
4.2 Connections
4.2.1 Connecting the spray lance to the spray gun
- Ventilate the machine for air by activating the spray gun
-
When the water flow is even, continue with the following steps
-
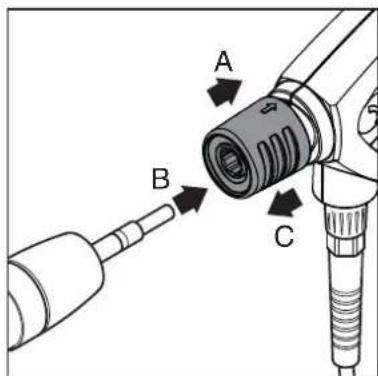
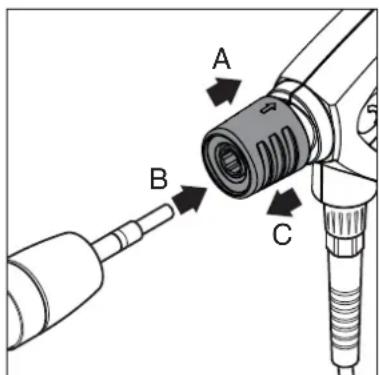
Pull the blue quick-release grip (A) of the spray gun backwards.
- Insert the nipple of the spray lance (B) into the quick-release connection and release it.
- Pull the spray lance (or other accessory) forwards to check that it is securely attached to the spray gun.
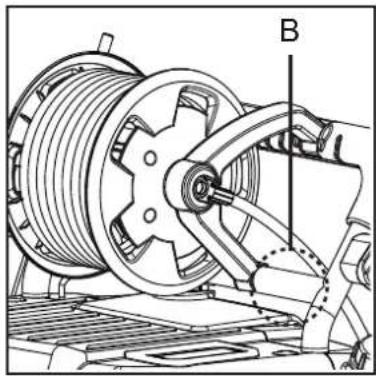
4.2.2 Hot water operation (up to 100^ )
IMPORTANT!
In the case of appliances with a hose reel:
In hot water mode, unwind the high-pressure hose fully from the hose reel, as otherwise the hose reel may become warped due to the effects of the heat.
- Move main switch into the position 'Hot Water' (B) and select the required temperature on the temperature control
- Unlock the spray gun and actuate it
The burner switches on.
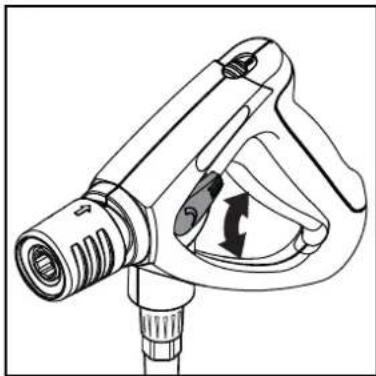
4.2.3 Steam operation (over 100^)^1 )

Beware of hot water and steam discharge up to 150^ when operating in steam stage.
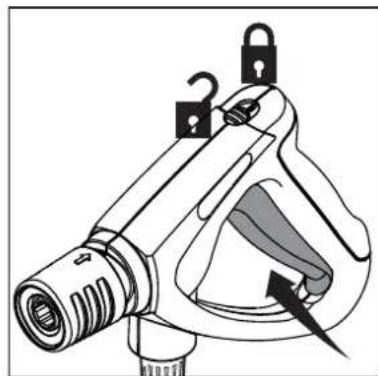
In case of interruptions in work: Also be sure to insert the safety catch even during short interruptions in work (see Fig. in section 6.1)
- Replace the standard nozzle with the steam spray nozzle (See catalogue for accessories).
- Open cover.
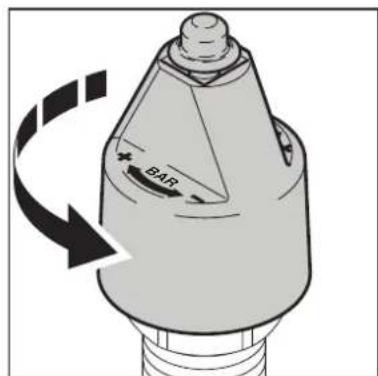
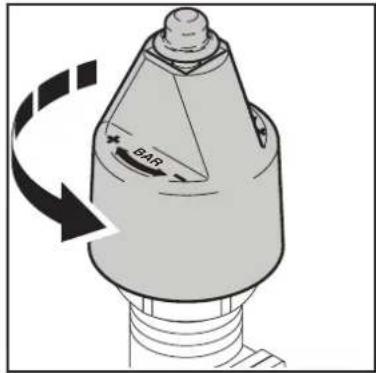
- Turn the twist grip on the safety control block completely to the left (anti clock wise direction).
- Turn the main switch into position 'Hot Water'.
- Select temperature (over 100^ ).
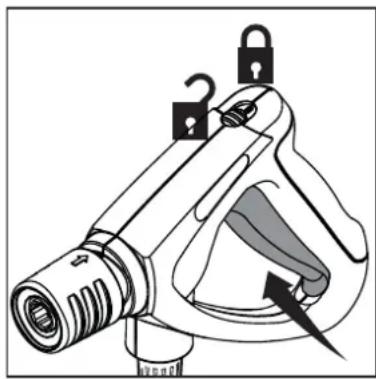
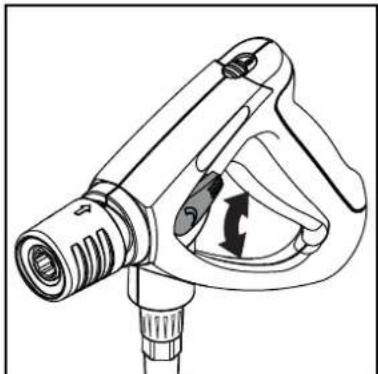
4.3 Pressure regulation (Ergo Vario Press Gun)
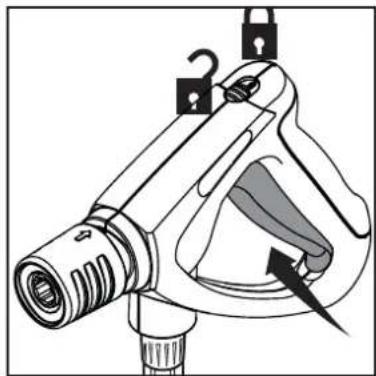
For safely reasons, never tie back or wedge open the trigger of the spray gun in open position during operation. The trigger must be free to close when released, thus interrupting the flow of the water.

- Operate the Vario trigger in order to vary the water flow and thereby the pressure.
- Push the trigger forwards to obtain full pressure and flow.

4.4 Using cleaning agents

CAUTION! Never allow cleaning agent to dry on the surface to be cleaned. The surface may be damaged.
For special applications (e.g. disinfection) the exact detergent concentration has to be determined by measuring cup. For water throughput of the machine see chapter 9.4 technical data.
NEPTUNE 1
Cleaning agent can be drawn in via the injector installed as standard only in low-pressure mode:
- Dilute cleaning agent according to the manufacturer's instructions.
- Turn cap of the FlexoPowerPlus nozzle head towards "CHEM" up to the stop.
- The intaken volume of cleaning agent can be regulated by turning the metering valve.
- Main switch Turn the switch to position "I".
- Operate the spray gun.
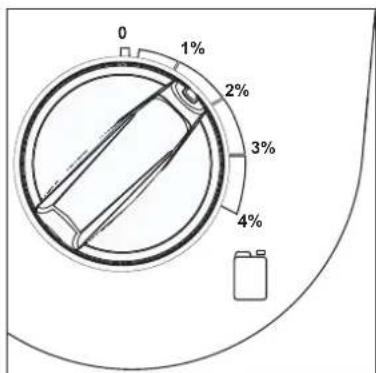
NEPTUNE 2
- Set the desired concentration of cleansing agent at the cleansing agent dosing facility.
- Spray the object to be cleaned.
- Allow the cleaning agent to work, depending on the degree of soiling. Then rinse off with the high pressure spray jet.
5 Applications and methods
5.1 Techniques
Efficient high pressure cleaning is achieved by following a few guidelines, combined with your own personal experience of specific cleaning tasks. Accessories and detergents, when correctly chosen, can increase the efficiency of your pressure washer. Here is some basic information about cleaning.
5.1.1 Soaking
Encrusted or thick layers of dirt can be loosened or softened by a period of soaking. An ideal method within agriculture – for example, within pig sties. The soaking method can be achieved by use of foam or simple alkaline detergent. Let the product lie on the dirty surfaces for around 15 minutes before pressure washing. The result will be a much quicker high pressure cleaning process.
5.1.2 Detergent and Foam
Foam or detergent should be applied onto dry surfaces (not in direct sun light) so that the chemical product is in direct contact with the dirt. Detergents are applied from bottom to top, for example on a car bodywork, in order to avoid "super clean" areas, where the detergent collects in higher concentration and streams downwards. Let the detergent work for several minutes before rinsing but never let it dry on the surface being cleaned.
5.1.3 Temperature Detergents are more effective at higher temperatures. Greases, oils
and fats can be broken down more easily at higher temperatures also. Proteins can be cleaned at temperatures of around 60^ . Oils, traffic film around 70^ , and grease can be cleaned at 80^ - 90^ .
5.1.4 Mechanical Effect
In order to break down tough layers of dirt, additional mechanical effect may be required. Special lances and rotary or wash brushes offer this supplementary effect that cuts through dirt.
5.1.5 High Water Flow or High Pressure
High pressure is not always the best solution and high pressure may damage surfaces. The cleaning effect also depends upon water flow. Pressure levels of around 100 bar may be sufficient for vehicle cleaning (in association with hot water). Higher flow levels give the possibility to rinse and flush away large amounts of dirt easily.
5.2 Some typical cleaning tasks
5.2.1 Agriculture
| Task Accessories | Method | |
| Stables
Pig Pens, Sties
Cleaning of walls, floors and equipment
Disinfectant | Chemical Foam Injectors
Foam lance
Powerspeed lance
Floor Cleaner
Detergents
Universal
Alkafoam
Disinfectant
DES 3000 | 1. Soaking – apply foam to all surfaces (bottom to top) and wait for approx. 15 minutes.
2. Remove the dirt from surfaces with the high pressure lance or chosen accessory. Again, clean from bottom to top on vertical surfaces.
3. To fl ush away large quantities of dirt, change to low pressure mode and use the higher flow to push away the dirt.
4. Use recommended disinfectant products and methods to ensure hygiene. Apply DES 3000 disinfectant once the surfaces are perfectly clean. |
| Machinery
Tractors
ploughs etc. | Detergent injection
Powerspeed lances
Curved lances and under chassis washers
Brushes | 1. Apply detergent to vehicle or equipment surfaces in order to soften up dirt and grime. Apply from bottom to top.
2. Proceed with cleaning using the high pressure lance. Clean again from bottom to top. Use accessories to clean in diffi cult to reach places.
3. Clean fragile areas such as motors, rubber at lower pressure levels to avoid damage. |
5.2.2 Vehicle

| Task Accessories | Method | |
| Vehicle bodywork St | standard lance Detergent injection Curved lances and underchassis washers brushes Detergents Aktive Shampoo Aktive Foam Sapphire Super Plus Aktive Wax Allosil RimTop | 1. Apply detergent to vehicle or equipment surfaces in order to soften up dirt and grime. Apply from bottom to top. In cases of particularly dirty vehicles, pre-spray with a product such as Allosil in order to remove traces of insects etc, then rinse at low pressure and apply normal car cleaning detergent. Let detergents settle for 5 minutes before cleaning off. Metallic surfaces can be cleaned using RimTop.
2. Proceed with cleaning using the high pressure lance. Clean again from bottom to top. Use accessories to clean in difficult to reach places. Use brushes in order to add a mechanical cleaning effect. Short lances can help for cleaning of motors and wheel arches. Curved lances or undercarriage washers can be valuable for the cleaning of car underchassis and wheel arches.
3. Clean fragile areas such as motors, rubber at lower pressure levels to avoid damage.
4. Apply a liquid wax using the pressure washer in order to protect the bodywork from pollution. |
5.2.3 Buildings and Equipment
| Task Accessories | Method | |
| General surfaces | Foam injectors | 1. Apply thick foam over the surfaces to be cleaned. Apply on dry surfaces. Apply from top to bottom on vertical surfaces. Let the foam act for up to 30 minutes for the optimal effect. |
| Metallic equipment | Standard lance Curved lances Tank cleaning head Detergents Intensive J25 Multi Combi Aktive Alkafoam Disinfectant DES 3000 | 2. Proceed with cleaning using the high pressure lance. Use applicable accessories. Use high pressure to dislodge large amounts of incrusted dirt or grime. Use lower pressure and high water volume in order to rapidly fl ush away loose dirt and rinse surfaces.3. Apply DES 3000 disinfectant once the surfaces are perfectly clean. Areas covered by amounts of loose dirt, such as animal remains in slaughterhouses, can be cleaned by using high water flow to flush away the dirt to evacuation pits or drains.Tank cleaning heads can be used to clean barrels, vats, mixing tanks etc. Cleaning heads may be hydraulically or electrically powered and give the possibility for automatic cleaning without a constant user. |
| Rusted or damag- es surfaces prior to treatment | Wet Sandblasting equipment | 1. Connect the sandblasting lance to the pressure washer and place the suction tube in the sand.2. Always wear protective equipment during sandblast-ing.3. Spray the surfaces to be treated with the mix of water and sand. Rust, paint etc will be stripped off. |
These are merely several examples of cleaning tasks that can be solved by a pressure washer in association with accessories and detergents. Each cleaning task is different. Please consult your local dealer or Nilfisk-ALTO representative in order to discuss the best solution for your own cleaning tasks.

6 After using the cleaner
6.1 Switching off the cleaner and disconnecting supply lines
- Close water tap.
- Activate spray gun without lance in order to empty all residual water in the system.
- Turn the main switch to position OFF
- Pull out the plug from the electrical socket.
- Squeeze the spray gun handle until the cleaner is depressedurised.
- Lock the safety catch on the spray gun.
- Remove the water hose from the cleaner.
6.2 Rolling up the electrical lead and storing accessories
To prevent accidents, always carefully roll up the electrical lead and the high pressure hose.
Place the spray lance into the storage position.
6.3 NEPTUNE 1 Storing the cleaner (below 0^ )
Store the cleaner in a dry room without danger of frost or protect as below:
- Remove the water inlet hose from the water supply.
- Place the water inlet hose in a bucket containing an anti-freeze.
- Remove the spray lance.
- Switch on the cleaner with the main switch in position "Cold Water".
- Operate the spray gun.
- During suction operate the spray gun two or three times.
- The machine is protected
against frost when antifreeze solution emerges from the spray gun.
- Lock the safety catch on the spray gun.
- Remove the water inlet hose from the bucket
- Switch off the cleaner and store it in upright position.
- When the machine is put into service again, the antifreeze solution must be collected and stored for future or proper disposal.
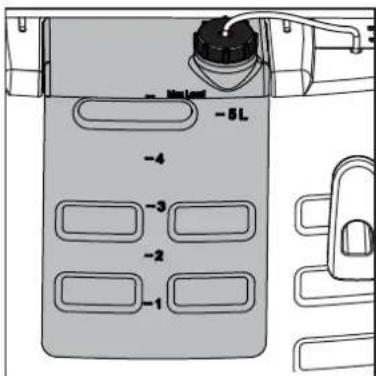
6.4 NEPTUNE 2 Storing the cleaner (below 0^ )
Store the cleaner in a dry room without danger of frost or protect as below:
- Remove the water inlet hose from the cleaner.
- Remove the spray lance.
- Switch on the cleaner with the main switch in position "Cold Water".
- Operate the spray gun.
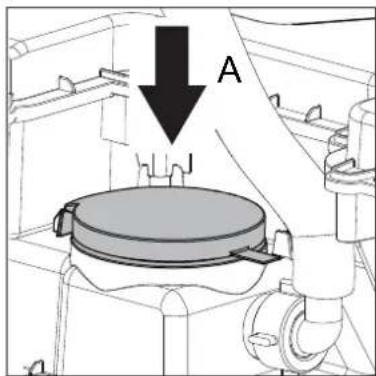
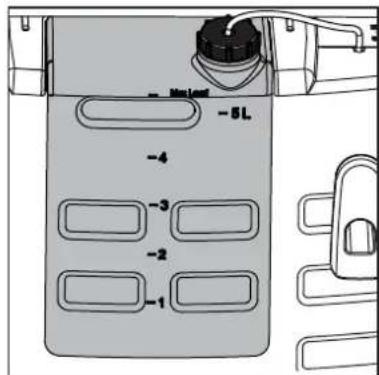
- Open the cover (A)
- Gradually pour antifreeze (approx. 5 litres) into the water tank.
- During suction operate the spray gun two or three times.
- The machine is protected
against frost when antifreeze solution emerges from the spray gun.

-
Lock the safety catch on the spray gun.
-
Close the cover
- Switch off the cleaner.
- To avoid any risks, store the cleaner temporarily in a heated room in upright position.
- When the machine is put into service again, the antifreeze solution can be collected and stored for future use.
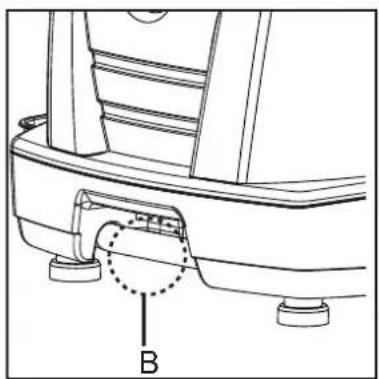
6.5 Transporting the cleaner
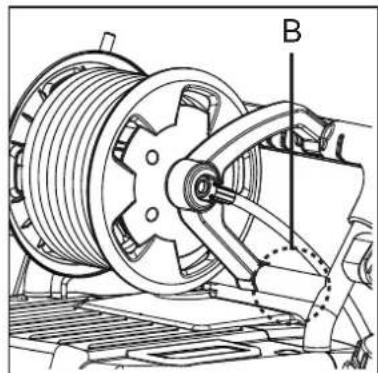
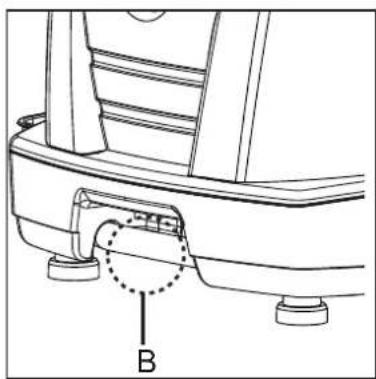
The machine can be in either upright position or tilted position during transportation.
Use the fi xing points (B) when securing with belts.

Notice the risk of leaking water by sudden heavy movements during transportation.

7 Maintenance
7.1 Maintenance plan
Maintain water filters and fuel filters as required.
7.2 Maintenance work
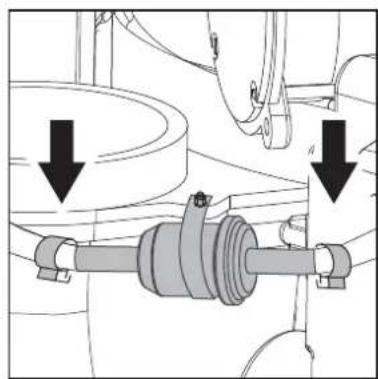
7.2.1 Water filters
A water filter is fitted on the water inlet to prevent large particles of dirt from entering into the pump.
- Unscrew quick coupling with tool.
- Remove filter and clean it.
- Remount the fi Iter and quick coupling
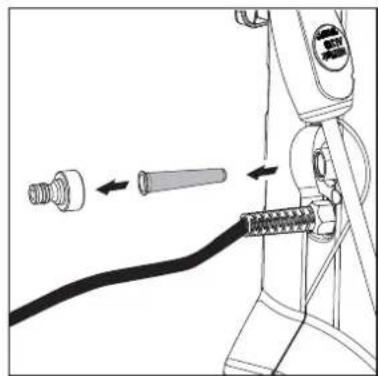
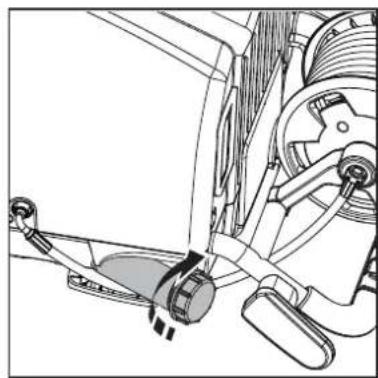
7.2.2 Maintenance of fuel filter
- Open hose clips
- Replace fuel filter
- Close hose clips
- Dispose the cleaning solution/damaged filter in accordance with the disposal regulations
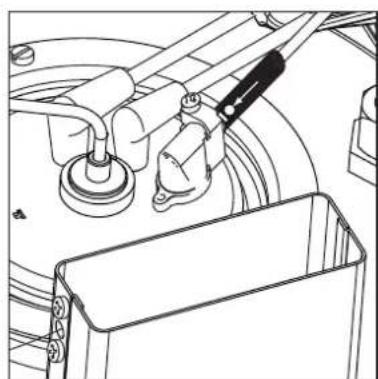
7.2.3 Emptying the fuel tank
- Unscrew the cap
- Remove the strain
- Tilt the machine to a horizontal position
- Let the fuel pour into an empty container
7.2.4 Flame sensbr
- Dismount the sensor and clean with a soft cloth.
- Ensure that the sensor is correctly seated when installing again - the symbols must face upwards.
8 Troubleshooting
8.1 Indications on Display
| Indication lights Cause Remedy | | |
| | | | | | The light is constant- The appliance is ready for operationFlashing light- Flow sensor fault- Water tap closed or water shortage-Detergent tank empty- Pressure regulation on the safety control blocks or the VarioPress1) lance is set to low water volume-Machine scaled-Spray gun is leaking-High pressure hose, coupling or line system is leaking-Motor is overheated3) | Refuel detergent or set SDR value to "0"Turn main switch to position“OFF”- let the machine cool downRemove/disconnect extension cable | |
| | | | | | > Constant light-Low fuel level | >Top up fuelCold water operation is possible | |
| | | | | | > Flashing light-Low Nilfi sk-ALTO Anti-Stone level1) | >Top up Nilfi sk-ALTO Anti-Stone | |
| | | | | | > Constant light- Service interval has expired> Flashing light- Service interval due in 20 hours-Microprocessor error | >Contact Nilfi sk-ALTO Service>Contact Nilfi sk-ALTO ServiceMachine shutdown | |
| | | | | | > Constant light- Boiler overheated.Exhaust sensor (EXT-H) has cut off fuel supply- Insufficient water flow-Machine scaled- Boiler not serviced | >Machine shuts down. Cold water operation is possible.>Check water supplyContact Nilfi sk-ALTO Service | |
| | | | | | > Constant light- Flame sensor (B7) is sooted-Ignition or fuel system failure | >Clean fl ame sensor (B7) (see chapter 7.2.4)>Contact Nilfi sk-ALTO ServiceCold water operation is possible | |

| Indication lights Cause Remedy | | |
| | | | | > Flashing light
- Motor is overheated | |
| | | | | > Flashing light
- Faulty temperature sen-sor (B1) | >
Cold water operation is pos-sible
>
Check wire to temperature sensor (B1)
>
Contact Nilfi sk-ALTO Service |
| | | | | > Flashing light
- Flow sensor fault | >
Cold water operation is pos-sible
>
Contact Nilfi sk-ALTO Service |
| | | | | > Flashing light
- Overheat error has oc-curred | >
Cold water operation is pos-sible
>
Contact Nilfi sk-ALTO Service |
| | | | | > Visual test of lamps
- When switching on,
all LEDs light up for approximately 1 second | |
8.2 Other Faults
| Fault Cause Remedy | |
| not ON | Plug not connected to the electrical plug socket | Put the plug into the electrical socket.
Check fuse (see chapter 9.4 Technical Data) |
| Pressure too low | High pressure nozzle worn out
Pressure regulation set to low pressure or VarioPress-lance1) set to low water volume1). | Replace nozzle
Turn the twist grip on safety control block clockwise (+) or set VarioPress-lance1) to higher water volume (see chapter 4.4) |
| Machine is running with pulsating pressure and makes knocking noise | Pump has drawn in air as the detergent tank is empty | Close detergent valve. Remove lance from gun. Operate spray gun and let machine run until air in pump is gone and the machine is running normally again. |
| No detergent drawn in | Detergent tank empty
Dirt in detergent tank
Suction valve at cleaning agent inlet soiled | Top up detergent tank
Clean detergent tank
Remove suction valve and clean or replace |
| Burner soots up | fuel contamination
Burner sooted or adjustment incorrect | Contact Nilfi sk-ALTO Service |

9.1 Recycling the cleaner If the cleaner is discarded, make
it unusable immediately
- Unplug the cleaner and cut the power cord.
9.2 Guarantee
Our general conditions of business are applicable with regard to the guarantee. Subject to change as a result of technical advances.
The cleaner contains valuable materials that should be recycled. Therefore, make use of your local waste disposal site.
Contact your local authorities or your nearest dealer for further information.
The guarantee is invalidated if the machine is not operated in accordance with these instructions or otherwise abused. The guarantee is invalidated if the machine is not serviced as described.
| CE EU Declaration of Conformity |
| Product: High Pressure Washer | |
| Type: NEPTUNE 1, NEPTUNE 2, NEPTUNE | 2 Special |
| The design of the unit corre sponds to the following pertinent regulations: | EC Machine Directive 2006/42/ECEC Low-voltage Directive 2006/95/ECEC EMC Directive 2004/108/ECEC RoHS Directive 2011/65/ECEC PED Directive 97/23/EC |
| Applied harmonised standards: EN ISO | 2100-1, EN ISO 12100-2, EN 60335-2-79,EN 55014-1(2002), EN 55014-2(2001), EN 61000-3-2 (2006) |
| Applied national standards and technical specifi cations: | IEC 60335-2-79 |
| Name and address of the person autho raised to compile the technical fi le: | Anton SorensenGeneral Manager, Technical Operations EAPCNilfi sk-Advance A/SSognevej 25DK-2605 Brøndby |
| Identity and signature of the person empowered to draw up the declaration on behalf of the manufacturer: | Anton SorensenGeneral Manager, Technical Operations EAPCNilfi sk-Advance A/SSognevej 25DK-2605 Brøndby |
| Place and date of the declaration: Hadsund, 26-02-2013 |
9.4 Technical data
| Description General | 1-22 EU 230/50/16 | 1-22 GB 230/50/13A | 2-20 US 115/1/60/20 | 2-25 GB 230/1/50/13 | 2-25X GB 230/1/50/13 |
| Data Tol. (±) Nom + Tol/- Tol Nom + Tol/- Tol Nom | Nom + Tol/- Tol Nom | Tol/- Tol Nom + Tol/- Tol | Tol | | | | | |
| Pressure Pwork @ Cylinder Head(bar) | 10% | 110 | +11/-11 | 110 | +11/-11 | 69 | +7/-7 | 90 | +9/-9 | 90 | +9/-9 |
| Flow. Qiec (l/h) | 10% | 540 | +54/-54 | 540 | +54/-54 | 568 | +57/-57 | 640 | +64/-64 | 640 | +64/-64 |
| Flow. Qmax (l/h) | 10% | 600 | +60/-60 | 600 | +60/-60 | 636 | +64/-64 | 670 | +67/-67 | 670 | +67/-67 |
| Temperature t max, hotwater (°C) | | 80 | 80 | 80 | 80 | 80 |
| Temperature t max, steam (°C) | | NA | NA | 150 | 150 | 150 |
| Elec. V/Ph/Hz | +/-6% | 230/1~/50 | 230/1~/50 | 115/1~/60 | 230/1~/50 | 230/1~/50 |
| Power Consumption (kW) | | 2,8 | 2,8 | 2,1 | 2,9 | 2,9 |
| Fuel tank (l) | | 17 | 17 | 17 | 17 | 17 |
| Detergent tank (l) | | 5 | 5 | 5 | 5 | 5 |
| Noise level 1m ( dBA) | | 74 | 74 | 77 | 76 | 76 |
| Recoil forces with standard lance (10deg.) (N) | | 17,6 | 17,6 | 12,9 | 19 | 18,5 |
| Vibration ISO 5349 (m/s2) | | ≤2,5 | ≤2,5 | ≤2,5 | ≤2,5 | ≤2,5 |
| Weight - Machine alone (kg) | | 91 | 91 | 97 | 97 | 99 |
| Size - Machine alone (mm) | | 607x688x1000 | 607x688x1000 | 607x688x1071 | 607x688x1000 | 607x688x1071 |
| Fuse size (A) | | 16 | 13 | 20 | 13 | 13 |
| Max. inlet pressure (bar) | | 6 | 6 | 10 | 10 | 10 |
| Max. Inlet temperature (°C) | | 40 | 40 | 40 | 40 | 40 |
| Description General | 2-26 EU 230/1/50/16 | 2-26X EU 230/1/50/16 | 2-26 EU Special 230/1~/50 | 2-26X EU Special 230/1~/50 | 2-30 EU Special 400/3~/50 |
| Data Tol. (±) Nom + Tol/- Tol Nom | Tol/- Tol Nom | Nom | Tol/- Tol Nom | Nom + Tol | Tol Nom + | Tol/- Tol | | | | | |
| Pressure Pwork @ Cylinder Head(bar) | 10% | 145 | +15/-15 | 145 | +15/-15 | 140 | +14/-14 | 140 | +14/-14 | 155 | +16/-16 |
| Flow. Qiec (l/h) | 10% | 530 | +53/-53 | 530 | +53/-53 | 560 | +56/-56 | 560 | +56/-56 | 600 | +60/-60 |
| Flow. Qmax (l/h) | 10% | 600 | +60/-60 | 600 | +60/-60 | 600 | +60/-60 | 600 | +60/-60 | 660 | +66/-66 |
| Temperature t max, hotwater (°C) | | 80 | 80 | 80 | 80 | 80 |
| Temperature t max , steam (°C) | | 150 | 150 | ? | ? | ? |
| Elec. V/Ph/Hz | +/-6% | 230/1~/50 | 230/1~/50 | 230/1~/50 | 230/1~/50 | 400/3~/50 |
| Power Consumption (kW) | | 3,4 | 3,4 | 3,4 | 3,4 | 3,8 |
| Fuel tank (l) | | 17 | 17 | 17 | 17 | 17 |
| Detergent tank (l) | | 5 | 5 | 5 | 5 | 5 |
| Noise level 1m ( dBA) | | 77 | 77 | 74 | 74 | 74 |
| Recoil forces with standard lance (10deg.) (N) | | 20,8 | 20,6 | 21,8 | 21,6 | 24,6 |
| Vibration ISO 5349 (m/s2) | | ≤2,5 | ≤2,5 | ≤2,5 | ≤2,5 | ≤2,5 |
| Weight - Machine alone (kg) | | 97 | 99 | 97 | 99 | 97 |
| Size - Machine alone (mm) | | 607x688x1000 | 607x688x1071 | 607x688x1000 | 607x688x1071 | 607x688x1000 |
| Fuse size (A) | | 16 | 16 | 16 | 16 | 16 |
| Max. inlet pressure (bar) | | 10 | 10 | 10 | 10 | 10 |
| Max. Inlet temperature (°C) | | 40 | 40 | 40 | 40 | 40 |
| Description General 2 | 30X EU Sp | Special | 2-30 US 220-240/1/60/20 | 2-33 EU 400/3/50 | -33X EU400/3/50 | 2-33 NO 230-400/3/50 |
| Data Tol. (±) Nom + Tol/- Tol Nom | Tol/- Tol | Nom + | Tol/- Tol Nom | Tol/- | Tol Nom + | Tol - | Tol | | | | |
| Pressure Pwork @ CylinderHead(bar) | 10% | 155 | +16/-16 | 138 | +14/-14 | 170 | +17/-17 | 170 | +17/-17 | 170 | +17/-17 |
| Flow. Qiec (l/h) | 10% | 600 | +60/-60 | 681 | +68/-68 | 630 | +63/-63 | 630 | +63/-63 | 630 | +63/-63 |
| Flow. Qmax (l/h) | 10% | 660 | +66/-66 | 750 | +75/-75 | 690 | +69/-69 | 690 | +69/-69 | 690 | +69/-69 |
| Temperature t max, hotwater (°C) | | 80 | 80 | 80 | 80 | 80 |
| Temperature t max, steam (°C) | | ? | 150 | 150 | 150 | 150 |
| Elec. V/Ph/Hz | +/-6% | 400/3~/50 | 220-240/1~/60 | 400/3~/50 | 400/3~/50 | 230-400/3~/50 |
| Power Consumption (kW) | | 3,8 | 2,15 | 4,1 | 4,1 | 4,1 |
| Fuel tank (l) | | 17 | 17 | 17 | 17 | 17 |
| Detergent tank (l) | | 5 | 5 | 5 | 5 | 5 |
| Noise level 1m (dBA) | | 74 | 77 | 80 | 80 | 80 |
| Recoil forces with standard lance(10deg.) (N) | | 24,8 | 25,6 | 27,1 | 26,3 | 27,1 |
| Vibration ISO 5349 (m/s2) | | ≤2,5 | ≤2,5 | ≤2,5 | ≤2,5 | ≤2,5 |
| Weight - Machine alone (kg) | | 99 | 97 | 97 | 99 | 97 |
| Size - Machine alone (mm) | | 607x688x1071 | 607x688x1000 | 607x688x1000 | 607x688x1071 | 607x688x1000 |
| Fuse size (A) | | 16 | 20 | 16 | 16 | 26/16 |
| Max. inlet pressure (bar) | | 10 | 10 | 10 | 10 | 10 |
| Max. Inlet temperature (°C) | | 40 | 40 | 40 | 40 | 40 |

| Description General | 2-33X NO | 230-400/3/50 | 2-41 EU 400/3/50 | 2-41X EU400/3/50 |
| Data Tol. (±) Nom + Tol/- Tol Nom | Tol/- Tol | Nom + Tol | Tol | | | | |
| Pressure Pwork @ CylinderHead(bar) | 10% 17 | +17/-17 | 190 +19/-19 | 190 | +19/-19 | | |
| Flow. Qiec (l/h) | 10% | 630 | +63/-63 | 730 | +73/-73 | 730 | +73/-73 |
| Flow. Qmax (l/h) | 10% | 690 | +69/-69 | 780 | +78/-78 | 780 | +78/-78 |
| Temperature t max, hotwater (°C) | | 80 | 80 | 80 |
| Temperature t max , steam (°C) | | 150 | 150 | 150 |
| Elec. V/Ph/Hz | +/-6% | 230-400/3~/50 | 400/3~/50 | 400/3~/50 |
| Power Consumption (kW) | | 4,1 | 5,1 | 5,1 |
| Fuel tank (l) | | 17 | 17 | 17 |
| Detergent tank (l) | | 5 | 5 | 5 |
| Noise level 1m ( dBA) | | 80 | 81 | 81 |
| Recoil forces with standard lance(10deg.) (N) | | 26,3 | 32,9 | 32,0 |
| Vibration ISO 5349 (m/s2) | | ≤2,5 | ≤2,5 | ≤2,5 |
| Weight - Machine alone (kg) | | 99 | 97 | 99 |
| Size - Machine alone (mm) | | 607x688x1071 | 607x688x1000 | 607x688x1071 |
| Fuse size (A) | | 26/16 | 16 | 16 |
| Max. inlet pressure (bar) | | 10 | 10 | 10 |
| Max. Inlet temperature (°C) | | 40 | 40 | 40 |

| Description General | 2-25 KR 220/1/60/15 | 2-40 EXPT 220,440/3/60 | 2-40X EXPT 220,440/3/60 | 2-40 JP 200/3/50/20 | 2-40 JP 200/3/60/20 |
| Data Tol. (±) Nom + Tol/- Tol Nom + Tol/- Tol Nom | Nom + Tol | Tol/- Tol Nom + Tol/- | Nom + Tol | Tol Nom + Tol | - Tol | | | | | |
| Pressure Pwork @ Cylinder Head(bar) | 10% | 125 | +13/-13 | 185 | +19/-19 | 185 | +19/-19 | 185 | +19/-19 | 185 |
| Flow. Qiec (l/h) | 10% | 540 | +54/-54 | 730 | +73/-73 | 730 | +73/-73 | 730 | +73/-73 | 730 |
| Flow. Qmax (l/h) | 10% | 600 | +60/-60 | 780 | +78/-78 | 780 | +78/-78 | 780 | +78/-78 | 780 |
| Temperature t max, hotwater (°C) | | 80 | 80 | 80 | 80 | 80 |
| Temperature t max , steam (°C) | | 150 | 150 | 150 | 150 | 150 |
| Elec. V/Ph/Hz | +/-6% | 220/1~/60 | 220-440/ 3~/60 | 220-440 / 3~/60 | 200/3~/50 | 200/3~/60 |
| Power Consumption (kW) | | 3,2 | 5,7 | 5,7 | 5,0 | 5,8 |
| Fuel tank (l) | | 17 | 17 | 17 | 17 | 17 |
| Detergent tank (l) | | 5 | 5 | 5 | 5 | 5 |
| Noise level 1m ( dBA) | | 77 | 81 | 76/76 | 81 | 81 | 81 |
| Recoil forces with standard lance (10deg.) (N) | | 20,0 | 32,7 | 31,8 | 31,3 | 31,3 |
| Vibration ISO 5349 (m/s2) | | ≤2,5 | ≤2,5 | ≤2,5 | ≤2,5 | ≤2,5 |
| Weight - Machine alone (kg) | | 97 | 97 | 99 | 97 | 97 |
| Size - Machine alone (mm) | | 607x688x1000 | 607x688x1000 | 607x688x1071 | 607x688x1000 | 607x688x1000 |
| Fuse size (A) | | 15 | 20 | 20 | 20 | 20 |
| Max. inlet pressure (bar) | | 10 | 10 | 10 | 10 | 10 |
| Max. Inlet temperature (°C) | | 40 | 40 | 40 | 40 | 40 |
Inhalt
6.5 Transport cistaca
1 Baxkni nHctpyKcnn 3a 6e3oNaCHOCT

3a BaWata co6CTBeHa 6e30-nachOCT
YpeBbT Tpr6Ba Da 6bDe n3- non3BaH
- da ce n3noJ3Ba cAmO OTnUca, KOnTO ca uHCTpyKtnpaHn OTHOCHO npaBUNHOTOMy n3noJ3BaHe HHa KOnTO KOHKpeTHo e Bb3IOKeHo da pa60Tc Hero
- da ce n3noJ3Ba cAmo noJnHaJ3Op
- Ha He ce n3no3Ba O T Da
- Da He ce n3nOJ3Ba OT nIua C yMCTBeHn IIN Φn3nueckn yBpeKdAnHn
BHIMAHNE!
BoHnTe Ctpyn noD BucOKo Ha- nraHe MoKe da 6bDaT onaChn, aKO He ce n3noJ3BaT npabuInHO. Hnkora He HacOyBaTe BoHa-ta CtpyKbM Xopa, KINBOTN, eNEKtpnuecko OobpydBaHe noD HanpexKeHne, INN KbM napoc-tpyKaTa.
Hocete 3aunTHo 06neKno, 3a- uHTn CpeDCTBa npOTNB yM n npedna3Hn OuHa.
He n3no3BaIte napoctpykaTa,doKaToBpa6oTHaTa 3OHa mMa dpyrXopa6e3 3auNTHO o6neKIO.
Hnkora He HacouBaIte BoHaTa CTpya KbM Ce6e CN NkM dpyn Xopa, 3a Da NouchBaTe dpexn nn ObyKn. He HacouBaIte BoHaTa CTpya KbM XNBX KNBOTHN.
No Bpeme Ha 6opabeHe c npoctpykaT Bb3HNKBaT CNnHa OTkat npnpbckaIOTO ycTrooiCTBO N KORAto HApauHKnBT 3a npbckane Ce IbpKni NOBbN, CbIoCe Cb3DaBA BbpTAA MOMENT. IpopaTIoBa npbckaIooYcTrooiCTBO Tpr6Ba Da ce DbpKni 3dpaboC DBe pue.
06ua nHΦopMaun
N3no3BaHeTo Ha napoctpyKata e o6eKt Ha npnIOxIMnte MeCTH pa3nope6n.
OcbEN pa60THnTE INHCTpyKcIN N cbOTBEHTNE pa3nope6b 3a npedna3BaHe OT HeuaCTN CnyuAn, BaIiDn 3a cbOTBeHTaCTpaHa, cna3BaIte np3HaTne pa3nope6b 3a 6e3oNaChoc T npabInHa ynotpe6a.
He n3non3BaIte onaChn TexHnKu 3a pa6oTa.
He npBb3BaIe cnycOBata
pboKoXBaTKa B OTBOpeHO NONOKeHne.
TpaHcnpTupaHe
3a 6e3oNaChOTo n TpaHcNopTnPaHe B N BbPxy npeBo3HN cpeDCTBa, Hne npenOpBvAme Da ce Bb3npenTCTBa Nb3raHeTO nHaKNoHReBaHeTo Ha o6OpyDbaHeTo. 3aKepeTe ro C pemBu. 3a TpaHcNopTnPaHe npn TemnepaTyPi OKOno N noD 0^ B NOMnata N B BoiJepa Tpr6Ba npedBaprTeHnO da ce 3acMye aHTnΦpns (Bxk Pa3dE 6).
Ipei n cTaptnpaHe Ha ypea 3a nouHCTBaHe
Ako BaunrT ype3a nouCTBaHe e 3a TpuFa3Ho 3axpaHbAne H e 6n IocTabeH 6e3 uencen, OcHpyte enektpotexHnk, KOITo Da MOHTnpa NDOxOJaTpuFa3eH uencel C npOBODHk 3a 3a3emBaHe.
Bcekn nptnpedynyckaheHa ypeDa B DeinCTBne npOBepaBaIte 3axpaHbauu Ka6en I dpyrnte My BaXHN qactn KaTo Mapkya 3a BucOHOHLraHe INPbCKaunn NcTOnet.AKO HkoOT Te3n qactn e NOBpeDeHa, He pa6oTe cypeda.
Pa3nonaraIte ypea no TaKbB NaHH, Ye da NMa DoCTbn DO KOHTaKTA C MPexKOBOTo 3axpaHBaHe.
PeIOBHO npOBepaIe TaII 3axpaHbauNt Ka6e He e NOBpeHn DaJIH He NOKa3Ba npHaau Na ocTapaBaHe. I3non3BaTe NapoctpyKata camo KOrato MPekobNt Ka6e E B 6e30NaCHO CbCTOHNHe.
Ako 3axpaHbauT Ka6e n oBpeHe, 3a N36BaHe Ha onacHOCTTa ToT Tp8Ba Da 6bJe 3aMeHEN OT POnu3BOUnteJn IInIype3 cepBn3a My IInI Nlue C HxHATA KBaJIΦkaCua.
BHIMAHNE!
Henodxoaduinte ydbjnxTeHNn Ka6enn Morat da 6bdat onac-H. BnHa n pa3BnBaIte HnB1- Ho Ka6ena oT polknte, 3a da ce n36erHe nperepaBaHeto My.
KoHeKTOpHTe KynIyHrTe Ha 3axpaHbauNTe N ydbJnxTeJIHnTe Ka6eJIu Tpr6Ba da ce He npomokaem.
Korato n3noJ3BaTe yDbJnxTe- neh Ka6eI, npOBepTe MmHmAMHHTO CeHeHne Ha Ka6eJa:
| Д bлжни
на кабел
m | Сechениe |
| <16 A | <25 A |
| do 20 m | Ø 1, 5
mm² | Ø2,5 mm² |
| 20 do 50 m | Ø 2, 5
mm² | Ø4,0 mm² |
PpeN Da CbpxKeTe napocTpykata KbM MpeXOBOT3axpaHbAHe, npOBepTe HeHTO HOMHaJIHO HApXeHne. Y6eTe ce, ye pa6oTHO To HApXeHne, yka3aHO Bbpxy 46pHnHaTa Ta6eJka, cBoTBcTbHa Ha HApXeHneTo B MeCTHaTa eNeKTPopa3npednteJHa MPexKa.
BaxHo e eneKtpnuecknte cb- ednHeHna 3a To3n ypeI da ce n3BbPwAT OT eneKtpotexHnK IN B cBoTBeTCTBne C IEC 60364 n npabnata, cneuΦnHn 3a da- deHaTcTaHa.
PpenopbUbaMe Cbbp3BaHeTo KbM ypeDa da cbDbpXa
- INN abapneH TOKOB npeKbCBAH, KOITo Da npeKbcBaMpeKobTO 3axpaHbaHe npiTOK Ha yTeuKa Hd 30 mA BnpoDbJxKeHHe Ha 30 ms,
- n3MepBaTeH eYeI 3a Cb- npOTnBHeHTo KbM 3Emr.
Y6eTeCe,Ye NOHCTBaHeTo HMa Da IOBeDe DO HApbCKBa- He C ONaCHN BeIecTBA (HaP. a36ecT, MacNo) OKOIO NOHCTBaHnO6eKT u YbpeKdaHe Ha OKoJHaTa CpeJa.
He nouchBaute fHH yactn, HanpaBHeN OT rMa, TbKaHn n np. c 0^ BOnHa cTpy. NoidbpxKaIte pa3ctOraHne MeJdy DIO3aTa C BUCOKO HAnraHe n NOBbPxHOCTTa, 3a Da He JnoBpeDInTe.
He n3non3BaIte Mapkyua 3a BnCOKO HajraHe 3a BnIraHe Ha TeXeCTn.
MaKcImaJIHo DoNcyCTMmTE pa-6oTHo HauraHe u TemnepaTpa ca MapKnupaHbpxy Mapkya 3a BucOko HauraHe.
CbxpaHbAte napoctpyKaTa B MrcTo, KbDeTo Hma Da 6bJe n3NoXeHa Ha 3aMpB3BaHe, INN n3-Non3BaTe TeuHOCT npOTNB 3aMpB3BaHe!
Hnkora He pa6oTeTe c napoctpykaTae 6e3 Boda. IuncaTa Ha BOda, DOpu 3a KpaTKO BpeMe, BOIN DO cepno3HO NOBpeKdaHe Ha yNtBTHEnrTa Ha NOMnata.
Bpb3ka c BOdoN3TOuHnK

Cbpb3BaHeTo Ha To3N NOYnCTBaU/ Mneu anapaT KbM BOOChA6DnteHHa-Ta MpeKa 3a N-
TeHa Boda e pa3peWeHo cAmo KOrato e HnCTaInpaHO yCTpOINCTBO 3a npedOTbPaTBAHe Ha o6paTeH nToK Ha BOData OT BnD BA, CbInaCHO EN 60335-2-79. B cnuyaaye He e DoctabEH Bb3BpaTeH Klaanah, TaKbB MoKe Da 6bJe nopBuAn 3a DoCTabKa
OT BaUNI TBpROBeU. IbJNINHaTa Ha MapKyuMa JxMyy UcTPOINCTBOTO 3a npedOTBpaTBAHe Haobpaten NotoK n napoctpyKaTa Tp6Ba Da e Hain-Manko 6 MeTpA (MHNMaJIeH DnAmETbp 3/4 INHua), 3a Da ce NoemAT EBEHTyAnH BbPxOBN CToHOCtN Ha HanraHTo. Korato anapatbT pa60Tupe3 BCMyKBaHe (HaNPIMep OT cBd 3a Cb6npaHe HaDbXkOBHa BOda), yNtpe6ata Ha Bb3BpATEH Klanah He e HeO6xOIMMa. CbPKeTe ce C BaUNI TBpROBeU 3a npenOpbKN OTHOCHO KomnNeKT 3a BCMyKBaHe.
PpemnHaBnKn npe3 BA BENTnna, BOdTa CTaba HeroDHa 3a nnHe.
ДиCTBnE
No Bpeme Ha pa6oTa dpbXTe Ta6JnTo 3aTBopeHo.
He noBpeKdaiTe 3axpaHbauNkaben (Ha np. c KoJencaTa Ha ypeDa, c DbPnaHe nn CmaKbaHe).
OTkauaTe 3axpaHbuaaKa6eIcMo Upe3 N3NbPnBaHe Ha uencena (He DbpnaTe nn OnBaTKe Ka6ena).
BAKHO!
To3n ypeE npedHa3HaueH 3a ynoTpe6a c noocTbaun npenapatN, KOnTO ca npedocTaBeHN npenopbuaHn OT npoN3BODnteY. YnoTpe6ata Ha dpyrn noocTbaun npenapatN nIIN XIMKAn MoKe Da 3actpaun 6eOanachata pa6ota c ypeA.
BHIMAHHE!
YpeT e npeHa3HaeH 3a pa60Ta c KOTenHO rOpNBO EL nnnC d3eNoBo rOpNBO.He Tp8BaDa ce N3NON3BAt HEnOxD0JaUu rOpNBA (Hanp. 6eH3nH), TbKaTO Te Moar Ta 6bDat OnaChn.
Ako ce npedBnKda ypeBt da ce n3NON3Ba B 6eH3NHOCTaHcnn nn Ha dpyrn NOTEHuaJIHO ONACHNI MecTa, C Hero MOKe da ce pa6OTn eINHCTBeHO n3BBH ONACHNTe 30HN, ONpeJeNEH N B repMaHCKOTO ,TexHuecko pkoBOCDTO 3a rOpNBHTeTeHQCTu, KONTO Ca npINOxIMn Ha

BG
MRCTO, NopaN CbIeCTByBaHTo Ha NOTeHuaJHa ONaCHOCT OT IpeiN3BnKbaHe Ha B3pNB OT RopeJIkata.
Pn pa3nonaraHe Ha ypeDa BbTpe B NOMeHne, BNHaN npedocTabrTe DOCTaTbUHa BeHTnlaunu N3BExdane Ha ra3OBte OT n3rapHeTo No noXoJaU, NaH. Pn 3aNTBaHe, Ie ce padBaMe da BN OcnHypIM NOJIe3HN CbBETn 3a CSCTEMITE Ha CBbp3BaHe.
Ako ce npedBnKda ypebT da 6bde BKNIOUeH KbM Tpb6a, Tp8Ba da ce cna3Bat npabnata 3a 6e3oNacHOCT Ha crpaData. Pn 3aNTBaHe, ue ce paDbame da BN OcNpyPIM NONE3HN CbBe- TN 3a CNCTeMTHe Ha Cbbp3BaHe.
BHIMAHHE!

Korato pa60nte B peKIM C npa, ce na3eTe OT ropeuata BOda n ot H3nyckaHe Ha npa C
TemnepaTpa 150°C.
BHIMAHHE!

He DoKocBaIte nIIN noKpRnBaIte n3nyckatEnHa-ota Tpb6a.CbIeCTByBa
ONACHOCT OT N3raprHe N 3aJIBaHe.
He donnpaIte, nokpnbaiTe nn noctabTne Mapkyua nn ka6ena hAd kOmHa. OnacHO e 3a xopata, cBseCTbByBa pNCK OT nperepaBe nn 3anaJbAhe.
EneKtpnuecko o6OpyDbaHe

BHIMAHHE!
Hnkora He npbckaTe eNeKtpnueckoTo 0bOpyDbAne C BOa: TOBa e onacHO 3a Xopata nnpedctabnaBa pNCK OT KbCO cbEeINHeHne.
BknHbHaHeTo Ha napoctpykaTaMOKe Da npeDn3BnKa KOe6aHnB HnapeXeHneTo.
Kone6aHnB HAnpexKeHneTo HMa Da Bb3HnKBaT, aKO NmpeDaHcbT B TOkata Ha npexOda e
noi 0,15Ω.AKO mATE cMbHnHnOsbpHeTe Ce KbMaBauHMeCTeH DoCTaBnK Ha eIeKtpo3axpaHbAhe.
Iopdpbxxka npMOHT BHIMAHNE!
BnHaN n3BaXkaIte 5eIceJa OT MPexKOBn KOHTaKT npEi NocHCTBaHe IIN NOIdpbXkKa Ha ypeHa.
N3BbPbBaIte cAmO DeHOCHTe NO NoDpBbKkAta, ONncaHN B pa60THnte INCHtpKcun.
N3noJ3BaIe cAmO opuHnHn pe3epBn qactn ot NilfiskALTO.
He npabete HnKaBn TexHueckn npomeHn no napoctpyka-ta.
Ocnypete peoBHOTo 06cnykBaHe Ha MaunHata OT OTOp3nIpaHn nnbpHn Ha Nilfsk-ALTOcbrnacho nlaHa 3a noDpBxka.
Hecna3BaHeTo Ha rOpHTo ige HappaBn rapaHcNra HeBaJIiHa.
BHIMAHNE!
MapkyuHTe 3a BnCOKo HaJraHe, CHTUNHrnte N CbeDInHeHnraTa ca BaXHH 3a 6e30NaChOCTTa Ha napoctpykata. N3noJ3BaIte camo Yactn 3a pa6ota nod BnCOKo HaJraHe, Odo6peHn OT npOn3BODnten!
MpexKoBnT Ka6en He Tp6Ba Da ce pa3JNUcaba OT BepCnTa, yKa3aHa OT npOn3BOuNTeN MoKe Da ce Cmehra cmo OTENEKtpOTExHKn.
O6pbuaTe ce KbM cepBn3Hna otDen Ha Nilfsk-ALTO nn oToPn3npaCneuNaJn3npaH cepBn3 3a BCNUKn Dpyn Cnyan H npDpBkKa nn peMOHT!
TectBaHe
YpeBcBOTBeCTBaHa repMaHCKnTe,Yka3aHnna 3a ypeN, npbckaun Teuhoctn". NapocTpykata Tp86Ba Da 6bde NODIOXeHa Ha npOBepKa 3a 6e3oNaChOCTcbIacHo ,PpaBnla 3a npEJa3BaHe OT HeuaCTHn Cnyaun np Pa60Ta C ypeN, npbcKaun Teuhoctn (BGVD15)" kAKTO CE N3NCKBa, HO He No-praKoOT BceKn 12 Meceua, OT ynbHNOMoUe HHCNEKTop.
CneB BcKaKBN peMOHTN IIN MOHnKauHn Ha eNeKtpnueCKO O6OpyDbaHe, Tp8Ba Da ce H3MepaT CbnpOTNBHeHnTo Ha 3aUHTNn PNOBOHNK, CbnpOTNBHeHnTo Ha N3OJaTaN yTeHHnT Tok. Heo NOBeYe, Tp8Ba Da ce nprrIeJda MPexKOBnT Ka6en, Da ce n3-MepBaT HanpeXeHnTo n TOKa N da Ce N3BbPbBa TeCT Ha cyHKuNTte. HauNt TexHnZn 3a ObcnyXBaHe CneI npOdaXbata Ca Ha BaWe pa3NoLoXeHne KaTO OTOpN3nPaHn IHcNEkTOPn.
ПьлнITE npabuna „правILA 3anpedna3BaHe OT HeuactHn Cnyan npn pa60Ta C ypei, npbckaun TeuHocTn" ca HauHn ot Carl Heymanns Verlag KG, Luxemburger Strasse 449, 50939 Cologne nIIn OT cbOTBeHnTe 3actpaxOBaTeN Ha pa6oToDaTeJIte.
BcunKuacnHa napoctpyka-ta,pa6oteuNIOHahrahe,ca npon3BeHeH B cBOTBECTBne C § 9 Ha TepMaHcKaTa Hape6a 3a CbdoBe NOD HAJIraHe N ycNeuHo ca npemHaHc BcOTBeHTHnTe TECTOBe.
PpeDn3Hn yCTpoNCTBa
HeOnyCTMBO BUCOKOTHaIraHe ce OTBexka O6paTHO 6e3 octaTbUHO HAIraHe NO 06xOHa JINHn KbM CMyKaTeNJHata JINHn Ha NOMnata, KORAto Ce 3aJeCTBa yCTpOHTBOTO 3a 06e3oNacBAhe.
Ako kanaTteTbCTnADHe noD ONpeIeIeHa cToHocT, BRpaIeHNrT MOHtOp Ha De6uTa ABTOMaTHUHO N3KJIIOHbA ropeIkata. FopeIkata e KOHfNpynpaHa 3a HnpeKbChato 3aIaNBaHe. B KaYeCTBOTo Ha DOnbHInTeJeH 3aIHTeMexAH3bM e BRpaDen TepMoDaTcIK B KOMHa Ha TOJNOo6MeHHka. TaKa ypeBt He MoKe Da npepee.
PpeHn3HHe yctpoNCTBa ca 0a6pnuHo HAcTpoEHn He n3- NCKBaT HAcTpoKa.
PpeynpeKdHne
BdunBaHTo Ha aepo30n MoKe Da 6bJe onaCHO 3a 3dpaBeTo.
KbTeO e npIOXIMo, n3- non3BaIte yCTPOIcTBO, 3a da n36eHete nn HamaInTe o6pa3yBaHeTo Ha aepo30n, Hanp. Ipedna3HTen, NOKPBAuDIO3aTa.
3a 3aunTa cpeu aepo30- nIte n3noJ3BaIe peCnIpaTopHa macka, kIac FFP 2, INI NO-BvCOK.


2 OnscaHne
2.1 PpeHa3NaeHne
Ta3n napoctpyka e npedha3- haueha 3a npopecnoHaHa ynoTpe6a. MoKe da ce non3Ba 3a nouchBaHe Ha cenckocTo- nAHCKO o6OpyDBeH, KOHIOuHN, ABTOMObUN, pBXDNBn NOBbpxHOCTn I dp.
Napoctpyikata He e npedna3-HaueHa 3a NOHCTBaHe Ha NOBbpxHOCTn, BIn3aUIN B KOHTAKC XpaHn.
Pa3en 5 onncba ynoTppe6ata Ha napoctpyikata npn n3nbHeHne Ha pa3nnuH 3aDaun.
IOn3BaIte npoctpyukkata BnHarn CnpoeD OncacHOTo B Te3n pa60THN NHCtpyKUn. BcKaKaBa Dpyra ynoTpe6a MoKe da NOBpeDN npoctpyukkata nnIOBbPxHOCTTa 3a NOUcTBaHe, INN MOKe DoBeDe Do cepNo3HN HapaHBAHNA Hoopa.
NEPTUNE 1 e camo 3a o6nekeHo npofoecnoHaHn Ho n3No3BaHe.
2.2 Pa60THn Yactn

BnK qnypata B haanaTo Ha pa60THnte HNCTpykun.
- Makapa 3a Маркуа 3a BucOKO HЯЯтHe
- KnouaJaKa 3a ocbo6oxdabaHe Ha rOpHna KaNaK
- KoHTeHep 3a detepreHT
- Kyka 3a ka6e1a
- IpbckaHakpaHHK
- Bpb3ka 3a 3axpaHbaHe c BOda
- Място за пьскане на пьскаши Нakраинк
- Kyka 3a Mapkyua
- TbPNOBnHa Ha pe3epBoapa 3a ropuBO
-
Bpb3ka 3a Mapkya 3a BucOKO Hajrahe Ha MaunHn6e3 Makapa 3a mapkyu
-
KoHTpOJIeH nAhen
- KInu3a 3axpaHbHeTo ON (BKl.)
- Hncko HnBO Ha rOpnboto
- Nilfisk-ALTO AntiStone Hncko HNBO1)
15.ИntepBan 3a o6cnykBahe octabaunnpemnHaJ
16.Перрване набоипера
17.Датункьт 3a пламьк e nokpnt cbc caЖи
18.ГлавенпевкювateЛ
- KoHTpoJIep 3a TemIpepaTypa
- PerylaTop 3a otmepbHe Ha detepreHr1)
memrepamypa do 150^

KbM NUCTOJeta.
- 3aMeHete CTaHdapThata IIO3a CIO3a 3a npbckaHe C napa (BnK KaTajora 3a npuHaIeXHOCTne).
- OTbopeTe kanaka.
- 3aBbPTeE BbPTaTaCe pBkoXBaTKa Ha 6noka 3a ynpabNeHne Ha 6e3onac-HocTTa B KpaHNO JABO (o6-paTHO Ha YacOBHNKOBATA CTpeJKA).
- 3aBbptTe rIaBnI npEeKJIIOUBaTeI B NOJKeHneHot Water - TopeuBa Boda.
- ɪəsɛpeTe temnepaTypa (HAD 100°C).
4.3 Perynpahe Ha HauraHeto (npbckaunctonet Vario Press)1
Om 2neda mocha Ha 6e3onacchomma, no epeme Ha pa6oma Hukoza He npubpb3aume uhu He 3acmonoperaune cnycbKa Ha npbckauu nucmonem e omopeho noJokhenue. Cnycbkm mpr6ea da moke da ce omynche da ce zameopu 6e3npenmcmeho, cnupaui no mozu hauh npumoka Ha 8oda.

- 3aeneCTBaIe cnycka Ha Vario, 3a da perylnpate BOHNRAE6BNT N OTAM HANRAHETO.
- HatncheTe cnycbKa Hanpei, 3a Da 3aJaTe PbHOTo HnlaRaHe n De6nt.

4.4 3noJ3BaHeHa noOuHCTBaU npenapatn


BHIMAHHE!
He donyckaume noucmbauum npenapam da 3acbxaea ebpxy noebpxhocma 3a noucmbahe. Ta3u noebpxhocm moke da ce noepdu.
Ppu cneuaHn npunoKeHn, (Hanp. de3unfekuupahe), mohama KOHeHmpaHa h demepaeHma mpa6ea da 6bde onpeedeneh ype3 u3non3aHemo Ha MEPumuenencbd.3a u3xodHra o0den 6ebum Ha mauuHama uK pa3den 9.4 TexHuuecku daHHu.
NEPTUNE 1
Morat Da 6bDat BkapBaHn no- yNCTBaU npenapaTN ppe3 NHkeKTopa, KOTo e MOHTnpaH CTaHdApTHo cAmO 3a peKIma Ha HnCKO HnIraHe:
- Pa3peTe neocTbaunna npenapat cbrnacHO yka3aHnraHa Ha npou3BOUnteMy.
- 3aBbptete KaNayeTo Ha rIbaTa 3a IIO3a Ha FlexoPowerPlus KbM CHEM"doKpaI.
3.ПоемангтобemпочьВац npenapaT мoke da cepeуира урз 3abpbtaHeHa n3MepBaTeHnBBAEHTNJI.
4.Глaven npeBknHouBaTeJ 3aBBpTeTe npeBKnHouBaTeJ B NOJoxKeHne ,I".
- 3aeneCTbaTe npbckauu nuctoJeT.
NEPTUNE 2
- 3aДaIte JeJIaHATA KOHcHTpaunHa nOuNCTBaunn npenapat B Do3aTopa 3a DeTepreHT.
- ПьскайтpeДмета, ко-TOТРЯБАдбdeи3MNT.
3.ДaIte Bb3MOXHOCT Ha no- YnCTBaUHn npenapat Da no- DeNCTBa, B 3aBnCmOcT OT CTeNEHTa Ha 3aMbpcBaHe. CneI KoEt N3JIaKHeTe cbc CTpy nO BnCOKO HnraHe.
5 Ппложеня и метои

5.1 MToDn
EФикасоЧисе CBисОКо HaJIЯгаHe ce noCTnRa Ype3 Cna3BaHe Ha HЯКоуka3aHЯ,В KOMБиHAцЯ CBaSiЯ ЛИчЕн OпNT 3a KOHKpeTHNte 3aJaCH, CBp3aHc cNoUcTBAHe. Пи npabuHEn NOбOP ha AkceCoApn mNeu npenapat eФeKtNBHocTHa Ha BaWata napoctpyknata MoKeДа ce noObpr. CneBAt ochOBHc CbBeTN 3a NoUcTBAHe.
5.1.1 OvnaJxHyaHe (HaKncBaHe)
BtBbpeHte nIe6eJIINIaCTOBe MoT a 6bDaT OMeKoTeHN IINOCBO6OHeH Upe3 HAcNCBaHe 3a N3BeCTHO BpeMe. TOBa e IeaeAHO NOxOJaIO 3a npInOKeHnB CcNCKOTcONaHCTBO -HaNPIMep BCINHapHnU. IeaeJHnT MeTOd 3a HAcNCBaHe MOKe da 6bDe NoCTnIHAT Upe3 N3NoN3BaHe Ha NnHa NnN ObNKHObe AnKaJeH MneU npenapat. Octabete npenapaTa Bbpxy 3aMbpcEHte NobbpxHOCTn 3a OKo10 15 MNHyTI, npEiNouNCTBaHe cbc CTpy ND HAnraHe. B pe3yNTat npouecbT Ha NouNCTBaHe NOD BnCOKO HAnraHe ce ycKopRABa 3HaHTeHNO.
5.1.2 NocTbaa npenapat nnaHa
IyHATA nnNouchBaunr npenapat (dTepreht) Tpr6ba da ce Inonarat Bbpx cyxN NOBbpxHOCTn (Ho He noD dInpeKTHo CblhueBO rpeeHe), Taka ye XmMuecknte npOdyKTn da ca B HenocpeDCTBeH KOHTAKC MPbcoTna. MneuNTe npenapATn ce Hahacrt ot dony Harope, HAnpimep, npn MneHe Ha Kona, 3a da CE n36erHaT ,CBpbXuHCTnTe" 30H, KbDeTo MneUrr npenapAT ce HAtpynBa BB BnCOKa KOHcHTpaunr nNotua HADony. Octabete NouchBaunr npenapat 3a HrkONko MNHyTu, PpeDu Da ro N3PnakHete, Ho HNKora He ro octaBraTe Da n3cbxHe Bbpx NouchBaHATA NOBbpxHOCT.
5.1.3 Temnepatypa
MneuIte npenapatn ca ha-edpukacn npn no-Bvncokn TemnepaTpyn. CbTuO taKa, rpec, Macna n Ma3HnH MoRat da ce OTkbCbat NO-JeCHO npn no-Bvncokn TemnepaTpyn. IpoteHNHe MOrat da ce YcHCTT npn TemnepaTpyn OKoIO 60^ .Macnata n 3aJIeHHaJt a Mpbcotna ot DBNKeHne no nbTuIaTa - npn okono 70^ , a rpecta moke da ce qHCTn npn 80^ - 90^
5.1.4 MexaHnHOBb3dEICTBNE
3a pa3KbCBAHe Ha 3dpaBn PnactObe Mpbcotna MoKe da e Heo6xmo DO nHHTeHMO mexAHnHO deIcTBne. CneuaHn HakpaHnU IN BbPTAUN NIN MNEuN YETKN IpeOCTaBRT TO3N DObnHNTeNeH eFekT Ha pa3KbCBAHe Ha MpbcotnaTa.
5.1.5 CnHa BODHa cTpya HnCpY NOB BUCOKo HnraHe
BnCOKOTO HnIraHe He BnHaH e Ha-Do6pOTo peSeHne, a To MoKe Da NOBpeKJa NOBbpxHOCTNe. EeEeKbT OT YnCteHTo CbUo 3aBnCn OT BoHNr NOTOK. HnBa Ha HnJIraHe OT OKIo 100 6apa MoKe da Ca IOCTaTbUHn 3a NouchTaBaHe Ha KOJa (c ropeuBaBoJa). No-CnJEn NOTOK IIO3BOJRABa No-JIeCHO nIINaKBaHe n OTMnBaHe Ha CNJIn 3aMbpcBAHn.

5.2 HrkON TnNnHn 3aDaun 3a nouchTaHe
5.2.1 CeJCKO CTOnaHCTBO
8 OtctpaHЯBaHe Ha Hen3PpaBHOCTN

8.1 Nokaahna Ha dncnpej
| С党支部а
Бератоандikatopи Прични Ото Тараявache |
| | | | | | > Cvetn noctoanHno
- Ypeblt e roTob 3a paBota
Пrimmigbaanza CBetlinna
- ПовFDA na Debittomepa
- 3aTbOpen kpan 3a BODa
NII NHeDcTaTbUHO
3axpaHbAne c BODa
- Празен pe3epBoap 3a
ночьВац npenapat
- PeryIaToPbT 3a NaIraHane
на БLOka 3a uynpavlenie
на БezOpacnocCTta
e BLOkparal nII
нakpaiHnkBt 3a npbckanee
VarioPress1) e NaCTpoeh
на HncBk De6Bt Na
BODaTa
- В MaShinata ce e
obpaZbAan KOTlen KaMbK
- Тech OT ppbckazmaia
пICTOJelT
- Тech OT Brb3KITE Na
MapKya a 3a BnCOKO
HaNraHane, MapKya
NII TpBbOpOBodHata
CINCTema
-ПретяBaHne Na DBrata-
JIЯ3) | > Довлнete детергent пп
Задайт с低调е на SDR
"0"
> | |
| | | | | | > Cvetn HepeKbChato
- Иско НИВ Na rorpBOTO | > Довелte осовп
празуКл.IuOvBaTeL Na "OFF"
(МЗКЛ.) и осытete мши-
ната за Истин
Сва对接еу
Жаваши Кабел
> | |
| | | | | >РимИВаanza CBetlinna
- Иско НИВ Na Nlifsk-
ALTO AntiStone1) | > Довелte порарот потв
наки Nilfi sk-ALTO AntiStone
> | | |
| | | | | >Сvetn HepeKbChato
- ИнтЕрBaIbT 3a
обclnyBXBaHe e IN3TeKbI
> ПrimMIGBaanza CBetlinna
- ИебхОдIMо e da ce
иЗВьрши obSclyXBaHe
след 20 уca
- Геши Na MInKpOpopоce-
copa | >Свржete с bсс capBn3a Na
Nilfi sk-ALTO
> | | |

| Сbvетонд尼克атори | Причина | Опс | раняванe | | | | |
| | | | > C | Вети Нениcopeсыно
- Рет reserves на
бовлеса Датчимьт в
ииз幕后ателна трува
(EXT-H) e пенисан
побаданeto на гориво
- Нedingст百年ен Boden
дебит
- В менида се e
образували котлени Камьк
- Бочерът не e相关内容
ob相关内容 | > > | Менида се поочь.
Възмена e рабotingся
студана вoda
Наяма вoda
Сbvржete се постуся на
Nifli sk-ALTO |
| | | | > C | Вети Нениcopeсыно
- Датчимьт за палмьк (B7)
e постин сбс сожд;
- Поврева на
запал�еньата ини
огр vinhalata相关内容 | > > | Почистende датчка за пал-
мьк (B7) (вин постд).
Сbvржete се постуся на
Nifli sk-ALTO
Възмена e рабotingся
студана вoda |
8.2 DpyrH Hen3npaBHOCTn

| Héni3npaBnOCT Πрчина OTcTpaHЯВанe | |
| He e BkIQUChENo | > Шенильт He e CBbP3aH KbM 3axpaHbAaJЯ eIeKTpUcckn KOHTaKT | ПосТаве tsцencena в коNTakTa. П探测ete п�除пазител (ВИЖte rлава 9.4. ТхИческДанни). |
| Hаяганeto e TbIbPde HnCKo | > ИЗнoscena дюза 3a Високо Ha-ляганe > PerynatopbT 3a Наляганe e NaCTpoeн 3a ИССКО Наляганe Или НарайнКБТ 3a РБСКА经 VarioPress1) e Perynipan 3a HnCbK De6bT Na BodaTAt1). | Пождменete дюзата 3abPteTe CBpTazata ce pbKoxBaTka Na 6blOKa 3a урваленье на 6be3o-nachocTTa NO NocOKa Na YacOBnKa (+) иrelурайte НарайнКа 3a рБСКа经 VarioPress1) Na no-BnCOK Boden De6bT (ВИЖ радел 4.4) |
| Maшинатa pa6otn c puplecapaIo HnJaRaHe i ce ChyBa ChyKaHe | > Помпатa e 3acMykana Bb3dUx, Tb' KaTo pe3eRBoApbT c NouchTbaU,прenapat e npazeh | 3aTbOpTe KIananaHa Na Mneuzma npena-pat OТсТраHete STpyнКИа OTпИстoly-Ta 3adeiSTBaIte nbPbCsaZmaIIngпStOnet I octaBeTe MaShinata Da pa6otn,do-KaTO Bb3dUxbT N3JIe3e OT CnCTemata i MaShinata 3ap6obTu OTHOBO HopMaJIHo. |
| He ce 3acMykBa Mneu npe-napat | > Празен pe3eRBoaR 3a NouchT-BAU npenapat > МрьсOTЯ B pe3eRBoaRaHa Na Mneuzma npenapat > 3ambpcen cMykateJIeN KIanah Na BxOda 3a Mneuzma npenapat | Долейte мeц npenapatПочистete pe3eRBoaRaHa 3a Mneuzma npenapatОТсТраHete cMykateJIINa KIanah i roNoCHSTe TE IINI pОДMeHete. |
| Сажди ot ropelkata | > ЗамрсeoН ropINBO > ГорлкATA e NaCTpoeHa HnPa-BnINO | Сбьржete ce cbc cepBn3a Ha Nilfisk-ALTO |

Ipeed nCnoB3OB aHHeM MoeHNoi MaunHbI O6aTeIbHo npOHTe DaHoe pyKOBOCTBOI
BcergdaepxnteeroBnpedax DOcraemocn.

3TOT CnMBON yka3bIbaeHa HNCTpyKUnn No 6eONaCHOCTKOTOpBie
npeoTbpaaOT nobpejdeHne Maunhblnn NOBblaOT ee npOn3BOIDNTelbHOCTb.
1 ПравILA 6e3oNaChOCTN

Buejx Baew 6e3oanchoCTN
MoiKoB BbICOKOraabneHnA
pa3peuaeTcnoJb3oBaTbcra TOIbKO NUqAM, pOwEduIM INHCTpyKTaxN NOyunBWM CneuaNBHOe 3aHaHe Ha pa60Tu c MoiKo
pa3pewaaetcnoIb30BaTbcra MOIKoTOnbKO NOHa6HIO- DeHNEM
- NOIb3OBaTbcra MoKoHpea3peWaeTc
-3anpeeHaekcnnyataunn PCNXNueCKn nINΦn3NUeCKn HENOLHOeHHbIMNIODbMn
BHIMAHHE!
CTpy BObl NOI daBneHnEM MoKeT 6bITb ONaCHA,ecNI ee HnPaBnJIbHO NcONb3OBA Tb. Henb3a HnPaBnJIb Tcpyu Ha JIOdei, XINBOTbIX, BKIOUeHHoe 3JIeKTPnuCecko OobopyoBaHne IJN HA camy MOky.
Hocntb cneoDexKdy, aHTnfohbl n 3aunTHbIe OyKn.
He HanpaBnIte CtpyHa Ce68 nIpyrNx IIOeI nnMbITb8 OdekblnnObyn.
TOMy paCnblnteHyKHO Kpeno depKahtob6eHmpyKaMn. Pnck TpaMb! He HanpabJnTe HacaKy B cToPOHy KINBOThbIX BoBpeMa pa6OtHa paCnblnteHoe yCTpoiCTBO
ДeнТБуETСИla TДачи, aТаКжЕМOMeHT, ecIn paCnblNTeIbDEpKHTcR NOy yTJOM.
06nne noJooHn
HcnoIb3ObaHne MoeUHO MaunHb pa3peuEHO B paMKax DeiCTByHoUero 3aKOHoDaTeJIbCTBa.
BdoonHeHneKnHCTpyKunnoIb3OBaTeNnO6raTeNbHbIMnpabINamTexHnKn6e3OnacHOCTNeo6xOIMO n3yHTb MeCThBiepabIna 6e3OnacHO pa6OtBu (pniHaJIuYn).
JIIO6oM MeToD pa6Otbl, IOBvepraUoiOn opacHocTNIHOe HnO6OpuyoBaHne,3aPpeueH.
He 3akpennIte BbIKNoCuATEnb Ha pyKe BOTKpbITOM NOIOXKeHN.
TpaHcnoptnpoBka
PtpaHcnpTupOBKe BnHa aBtOMO6JIpe peKomeHnyETcR hCNOJb30BaTb pemHn nCToHouHbI TOPMo3ДЯпeДOTbpa-ueHnnaPeHnN cKoJIbXeHnMoKn.
EcIn Bbl nepeBo3nte MoKy npnHaJlekHocTn pni Temne- patype BnpedeJax nIn Hnke 0 ^ C, aHTnΦpN3 cneJyET 3a5naroBpeMeHHO 3aJIbBaTb Hacoc N 6oJIlep, KAK ONIcHo B rnaBe 6.
NoTobka pa6ote
EcnnMaunHa3-pha3HOro nC NOJHeHnnoCTaBJeHa 6e3 WTe
Kepa, o6paTntecb K 3JIeKtpnky DnI OCHaUeHnE ee NODXoJy UIM 3-Фa3HbIM WTekepOM C 3a3emHeHem.
Ipeed kaxdbIM BBOOM B 3Kc- nnyatauH Heo6xOdmo npoBepntb shyprnnoDkNIOueHn K cTe n npoue BaXhble qactn MoKN, TaKne KaK BbcOKOHa-nOpHbI WnAHR n NCTOJETpacnbInTeIb. He BKIOUaTb MoKy,ecnnKaKaar-Ni60n3 3tNx qacteIN NOBpeKDeHa.
YCTaHOBt bMOy TaK, YTO6bl WTeKepe IINIOKNIOHcHn K cETN 6bIJI NERKO DOCTynhIM.
Perynpho npobepaTe coCTOHNHe CNIOBOI pOBODKn Ha HAnuHne NOBpeKdHn HIN nPi3HaKOB CTapeHn. (NOBpeKdHnE Ka6eMa MoKeT Bb3BaTb NopaaKeHne 3n.TOKOM!.
Ecnn cnIOBaa npoBOdka noBpeKdeHa,Bo n36eKaHne pncOB ee CNeDyET 3aMeHnTb y n3rOToBnteJra, B erO cnyk6e NOdepxKn nn y KBaJIuΦnUPOBaHHOrO cneuaJIInCTa.
BHIMAHHE!
HenpiroDhbie K pa6ote ydInnH
TeIbHbIe Ka6eIIN ppeCTabJIaOT
co6oI nCTOuHNk ONaCHOCtN.
Bcerda NpHocTbIO pa3MaTbI
BaIte Ka6eIc 6baPa6aHa dIpy
npedOTbpaUeHnpePerpeBa
CnIOBOI PPOBOdkn.

WTekepbI npo3eTKn DJIa SHHyPOB NOdKnIOUeHn K CETn UyDINHNTEbHbIX SHyPOB DOJXHB6bTb BOOHeNpOHuaEMbIM.
Ecnn nCnoB3yeTcnydinnHtBbHkKa6eBb,HeoXoIMO CneDntb 3aMHHMaJIbHO DoNyCTMbIMCeueHHeM NocNeIHeRo:
| Длina
Кабеля | Сechени
<16 A <25 A |
| do20 m | ø1.5mm²ø2.5mm² |
| От 20 do 50 m | ø2.5mm²ø4.0mm² |
PpOBepTe nepeNd noKnIoueHnEM K 3JIeKTPnuecko CetN, YTO6bl NITaHOoe HAnpJKeHne, YKa3aHHoe Ha Ta6NIuKe C npamEtpaMn MoeHNO MaUNHb COOTBeTCTBOBaNo HApJKeHIO NITaHOe CetN.
IoiKIOUOHe MeoKn K 3JIeKTPocTeN DOJIXHO IPOBOODTbcr CNEuHaJIcTOM-9JEKTPNKOM u COOTBeTCTBOBaTb HopMe M3K 60364 n HaOnoHaJIbHbIM npednncaHnM.
PeKOMeHdyeTc BbINoJHnITb 3JIeKTpnuYeCKoe NOpCoeDnHeHne MOIKU
IINIYepe3 ABTomaT 3aunH Horo OTKNIUChEN, KOToPbI INpepbBaet 3JIeKTpOnITaHne, ECNI TOK NOBpeKdEHN B TeueHne 30 MC INpeBbIiAet 30 mA,
- nIepe3 n3mepntb Toka 3a3emneneHna.
He pa6oTaIte c MoKoN, KOrDa
paIOM haoOaTcA Dpyrne IIOAn
6e3 3aUHTHO ODeXkDbI.
CleIte 3a TeM, YTObIcMbITbIe
onacHbIe BeueCTBa
(HanpImep, ac6eCT nHn HeΦTb) He
3aRpa3HnI ONpUkaOuSyU Cpey.
He peKOMeHdyetc uNCTnTb n3- DeNIA, n3rTOBJIeHHbIe n3 TOHKOJpe3INbI IN TKAHN NIN NOIO6HBIX MaTePnaIOB TOHKoI CTpyE BbICOKO rDABJeHn. Pn YnCTKe co6NJDoaTe DoCTaTOUHOpe pacCToHnE MEXy CONJOM nNOBepxHOCTbO BO n36eKaHne NOBpeXDeHn IOBepxHOCTN, NOJExKaUe YnCTKe.
HeonyctmoTaryb3aJnHa
BbICOKOTo DaBHeHnA DnI nepeBO3Kn annapata.
MaKcMmaIbHe DOnyCTNMBie pa6OuHne TemnepaTpya n DaBHeHHe HaHeceHbHa WlaHre.
XpaHntb MoKy Heo6xOJMo npi TemnepaType Bblwe 0^ Nnnnc- noIb3yIte aHTnOpni3! HkOrda He BkIoUaIte annapat 6e3 BoI. DaKe KpaTkoBpeMeHHoe OTCyTCTBne BOI npINBOIDNT K cepbe3HOMY NOBpeKdEHNHOyNtHtTeJI NOMI.
IopknIOueHnE K BOOpnpoBd
IONYCKaETcnoKKnIOUeHne DaHHo-TOOCHNTeJIY BbICOKOToaBNe-HNrTOJbKO KBO-DONPOBODhIM CetTmC
NITbEBoB BOOIN I npn YcNOBHN yCTaHOBKN COOTBeTCTByUoIero 06paTHoro KlananaHa (TIN BA B COOTBeTCTBNC Tpe6OBaHnMn EN 60335-2-79).Ecnn O6paTHbIK knanah He BXoINT B KOMNKeKT NOCTABKN,ero MOKHO 3aKa3aTb y npoDaBa.ДlnHa WJNaHrMa MeKdy O6paTHbIM KlananHom OOnCTHTeJIEM BlicOKOrO DaBHeHnOJIXHnCaOCTabJIrTb NmMeHbWe Mepe 6 MetpOB (MnHmAlhBn DnAmETp 34 dIOHMa) IJIc CfLnKbAHnBO3MOXbIX NIKOB DaBHeHn. Ipn pa6ote B pexnme BCacBbAHn (HaNPmep, n3 DoxKeBO RONLeKTopa) O6paTHbIK KNanAn He NcNoIb3yETc. O6paTnteck npoDaBuY dJa NOnyuHnpeKOMeHdaun OTHCOnTeNbHO O6OpyDobAHn dJIa BCacBbAHn.
Iocne npoxoJdeHnuepe3 knanah BA Boda He moKeT cHTaTbCnNTbeBOi.
3Kcnnyataun
BoBpem3Kcnnyataunn BCE OTBepCTnN DBepUb MOeHOn MaUNHb I DOJIKNbI 6bITb 3aKpbI-Tbl.
3Ta MoKa paCCuHTaHa Ha nC-NOJIb3OBAHHe MOUxN CpeDCTB, NOCTaBJIeHHbIX Nn peKOMeH
IOBaHHbIX IN3ROTOBUNTeJEm. NcIIOJIb3OBAHHe IpyrNX MOUQUX CpeIcTB INN XIMIKaTOB MOKET OTPncaTeJBHO NOBnIyTb Ha 6e3oNaChOCtB MoiKn.
OCTOPOXHO!
MoKa paccHTaHa Ha nCNoB-3OBAHne Ma3yTa EL nIIN dI-3eJbHOro TOnnBa. HeIb3a HcNoJIb3OBAt b HEnOdXoJaUee roPouye (HaNP. 6eH3nH), TAK KAK OHO YBnETCa NCTOCHN KOM ONACHOCTN.
28_Ha 3anpaBOHbIX cTAHcIAX IIN dpyHX ONaCHbIX MecTAX yCTpOoiCTBO CneDyET NcNoIb-30BaTb TOnbKO 3a npeIeIamn YCTaHOBJIeHHoN OAnCHOI 3OHbI, TAK KAc cyUeCTByET ONaCHOCTb B3PbIBa, INxOJaAOT φOpCyHN KIN DnI ropUoyero (B TerMaHIn CneDyET Co6IIOdaTb TexHueCKne npabNa pa60TbIC BOC-PlAmEHIOUIMMCJ XnIKOCTAMN -TRbF).
Pn yctaHOBke B NOMeUeHnax No3a60NTbC8 O NOxOJaSei BeHTNJLzIuN I ObecneHTb COOTBeTCTByUoIuN OTBOD OTpa60Tabux ra3OB.MbBCerda roTOBbl PpeIOCTaBtB PnaHbI CNCTem NODKIIouEHn.
Pn noCoeHHeHn yctpoCTBa K BbITJxHOMy o6OpyoBAHIO CJIeDyET CO6JIoDaTbROcydApCTBeHHIe CTpOHTeHbHIE HopMbl Mbl Bcerda roTOBbl npEOCTaBtB PnaHb CIcTeMNoDKJIUChEHHa.
BHIMAHHE!
OcreperaTecb BixOda ropeB BObl n npa TemepatypoJ 150°C npa paote Ha 3Tane napoo6pa-3OBAHNA
BHIMAHHE!
He npKacatbCn He 3a-KpbIbAtb BbITXHoe OTBepCTne. Onacho JnJnK3Hn. OnachocTb nokapa.
He KacaTecb WHypa N UJnHaHra, He NaKpbIbAaTe INX IN He NOMe-zaTc HAD BbITxKHO Tpy6o. OnachocTb Dnla JIOJe, Pnck nepepeBa nNoXapa.
3NeKtpnueckoe o6OpydoBaHne

BHIMAHHE!
He HanpaBnIe ctpyHa 3neKTPnueckoe o6OpdyoBaHne . OnacHO JnJ Kn3HN! OnacHocTb KopoTKOrO 3aMbikaHnI
Ppoeccbi BkIIOUeHnBb3blBAOT KpATKOBpeMeHHbI CnpaHanpJKeHn. Ppi NOnHM CoPOTNBHeHn CETn (NoKJIIOUeHne KDOMaUHe 3NeKTpuueckOcETN), MeHbWeM 0,15 OM, NOMex He OxNJaTcR. B cnyae COMHeHn CBRAKITcB C BaUM NoCTabuKOM 3NeKTPO3Heprn.
06cnykHBaHHe HpeMOHT
BHIMAHHE!
Bcerda otknouaTe cInOBoN Ka6eIb OT po3ETKn nepeuNTKoI INN OcCnyKnBaHHeM MoKN.
BbInonHnIte TOnbKO Te Onepaunn no 06cJyKnBaHnIO, KOTOpbe OncaHb B HcTpyKuH. HcNoJIb3yIte TOnbKO opunHaNbHbIe 3anactn NilfiskALTO.
He BHOCHTe HnKaKnx TexHueCKNX H3MeHeHn B KOHCTpyKcIO MOeHOr MaunHbI.
BHIMAHNE!
LHaHn BbICOKO DaBHeHn, coeHNHTeN IN KpeIeKn BaHHbl Ia63oNaChOH paBoTb C MoIKo. HcNoJIb3yIte TOnbKO cePTNfNpObaHHbIe npOn3BOdnteJem Yactn!
IoxanyiCTa, npedoctabte yctpahene HenoJaoK INn paobtbo NO OcbnyKbAHNO, He ONncAHHbIE B DaHHo IHCTpyKcN, cepBNCbIM neuaJIACTamcept IhCuipOBaHHbIM Nilfisk-ALTO!
IpoBepka
MoeuHa MaunHa COOTBETCTBy- et HemeKIM «IpaBnAm DnJxNIOKCTHbIX paCnbIINTEbHBix yCTpoiCTB».MoKa DoJnxHa IoDBePraTbCS npOBepKe Ha 6e3OAnCHOCTB B COOTBETCTBm C npBnAmTxHKn 6e3OnaCHOCTN "3KcNlYataaJyXIOKCTbIX paCnbIINTebHBIX yCTPOICTB》 (BGVD15),no Mepe Heo6xOIMOCTn,He pexe OndHO rpa3Ba Rrod ABTOPIN3OBaHHbIM INHCNEKTOPM.
Pocne peMOHTa HIN MOINHnKaunn
JNEKTPnuecknx YacteN MoKN,
DOJIKNbObltN3MEpeHbI
COnpOTNBHeHne H3ONaUN,
3aUHTHOYcTPOINCTBA NTOK
yTeuKn.
Jaee Heo6xmo npOBeCTn B3yA1bHyIO npOBepKy CnIOBOrO Ka6eIa, 3AmePHTb HApRKeHne IN TOK Notpe6JIeHna. Haun cepBcHbIe CNEuAnCTb MOYr ABNtBCa ABTOPN3OBAHHbIMn HNCNEKTopAmn
Yactn 3toM0UeMaunHb, B KOTopbIX NcNoJIb3yETcB BlicOKoe daBHeHne, n3rOToBJeHbHaJnEkaaUM o6pa3OM cornaCHO § 9, PpaBn pa6oTbI cocydOB noD daBHeHem" uycneHNO pOounn NCbITAHne NOd daBHeHem.
PpeoxpAHnteHbIe yctponCTBa

PnB KIOUOeHH 3aIHTHOYcTPOHCTBa, PpeBbIaHOUeepaBOue NpeDeJIb BbICOKoeDaBHeH NoDAeTC C BbXoJa uepe3 ObaTHbI KlaanHa BxODNOMbl.
EcIn MOUHOCTb NOHIXaETc HNKe yCTaHOBJIeHHORo 3HaueHnI, TO BCTPOeHHoe pene KOHTpONOTOKa ABToMaTHueCKN OTKIIouaET Ma3yTHyO FOpcHyK. FOpcHyKa paccuHTaHa Ha npoDoJIKTeJIbHbI peKIM pa60Tb.B KaueCTBe DOONHITeJIbHOro 3aunTHoro MExAHN3Ma B BVItjXH OHI Tpy6e YCTaHOBNeH DaTuNK TeMnepaTybl. TaKIM o6pa3OM NCKIOUeH NepeRpeB MoKn.
PpeOxpaHnteHbHe yctpoCTBa HacTpoEhIn 3aNlOM6npoBaHbHa 3aBOe-N3rTOBHTeNe;IPOBOIDtB Ha HIX KaKne-JIN6oN3MeHHe 3aNpeSeHO.
IPEdyIpeKJDEHNE!
BdbyxhaHne aapo3oJe MoKet 6bTb OaChbIM DnIg 3DopOBbJ.
- Pn Heo6xOaHmOCTn CneIy-et PnIMeHrTb yCTpoIcTBa, NCKJIIOUaIOuNE INN yMeHb-WaIOUne O6pa3OBaHne aApO3OJeN, HApPImep, NO-KpbITNe dIra cOnla.
ДяЗauntbOt a3p03oJe nCneIyET NcNOnb3OBaTb peCnnpaTOpHyo MACKY KnaCa FFP2nnBbIe.
2 OnscaHne
2.1 Ha3NaYeHne
AaHHbOuNCTnTeB BbICOKOr DaBHeHnIpeHa3HaueHДJI npOceCCNoHaJIbHO rCNoJIb30BaHn. OH MoKET nPmEHaTbcr DnO uNCTKn CeNbCKOXo3r-CTBeHHoro n CToNTeHBO O6OpyDoBaHn, KOHIOWeH, TpaHCnOpTHbIX CpeIDCTB, Pxabix NOBepXHOCTeN T.D.
MaunHa He cepTnΦnIpObaHa
IaON OuNCTKn NOBepXHOCTeN,
KOHTaKTInpyUOnx C NIIueBbIMN
IPOdyKTAMN.
B Pa3dJe 5 onncbIbAeTcra nC
N0JIb3OBAHHe OuInCTnTeJIy BbICOKoro DaBHeHn IaPa3JIuHbIXBUNOB OUInCTKn.
NcnoJb3ObaHne MaunHbI DONYCKaETCaTOnbKO B COOTBeCTCBN C daHHbIMn HcTpyKUmaM. IIO6oe dpyroe npImeHeHne MOKeT npBecTN K NOBpeXdeHIO MaunHbI INN OUnuAembIX NOBepx-HocTe, NINO NOBJe3a cO6oB cepBe3HbIE TpaBMbl.
Ibnecec NEPTUNE 1 npedha3HaueH ToJbKO dna npocecnoHaJIbHO rCNOJIb3OBAHn.

2.2 OpraHbI ynpaBneHnA

Cm. puc. Ha omkuho cmpaHue e Hauane 3mou uHcmpykuuu no 3Kcnnyaamauu.
1.Баразаншланra
2.Блokировka крblшкn
3. BaKДЯ MOIOUx CpeDCTB
4. KpOyOK dNkabEnr
5.PacnbIInTeIbHoe yCTpOINCTBO
6.Подсоевненьовы
7.ДержateNBдЯТубкnpaCnblnteJIra
8. Kpok dny wnaHa
9. 3aIINBHOI nATpy6ok dna roipouero
10.ПодcoeДинспешанговВысOKOTOДaВЛeнчДЯMaшИнБeЗбapабаHA
ka6eJy
11. NaheJIb ynpaBJIeHnIa
12.Инданацnia rOTOBHOCTN Ka6oTe
13. 3anpaBntb ropuoyee
14. Hn3kn ypoBHeN Nifisk-ALTO AntiStone1)
15. Повесп т exуход сервсOM Nilfisk-ALTO
16.BoJnep npeperpen
17.ДaTчИК Пламени 3akontTNIC
18. IaBbI BbIKIOyAteJb
19. perynrTopom temnepaotypbI
20.ДоИрOBaHNe MOIOx cpeIcTBa1)
PnncnoB30BaHm6apa6aHOB 1na Ka6e:
1.Bo n36ekahne nepeperba n BO3HnKHOBeHn noXapa, Ka6eIb BcERda pa3MaTbIBaTb IIOJIHOCTbIO.
IopKIOUaTb MoKy pa3peWaeTc TOLbKO K 3NeKTPnueckoCETN,OTBeuAOE HOpMaM.
- Co6nOdaTb INHCTpyKcIIO NO 6e3oNaCHOCTN B rJabe 1.
- BCTaBnTb BNkky annapata B po3ETy 3JNEKTPnueckoCetN.
nepBbix 5 JxNdkocTN, BblXO- Duaux n3 MoKn, B kaKoJ-n60 6ak.
4 HcnoJb3OBaHne MOJKN
4.1 BkIIOUeHne MoIKN

PIMMEUHNE!
IpeepnpucoeunneHnem HacaOK Bcerda OuHuaTe HnInneBOT3aPra3HeHn.
4.2 CoeHHenne
4.2.1 PpncoeHHeHne Tpy6Kn pacnbIInTeJI K cnycKObOMy yctpoIcTBy
4.2.2 Moika xonoDHO/ropaey BooO (do 100°C)
- NpeeknouHtB rnaHBi BblKIOUaTeIb B NOLOKeHne XoIoHaN a Boa" (A).
3NeKtpHHe ynpaBHeHne npoBOuNT cAMOTecnPOBaHne, BCEcBeToDIObI 3aropaoTcOINpa3.3anyckaetcDburatJIb.
CBETTCA
1.BKJIIOUHTpe paCnblnteIb, YTO6bl npOdyTb MaUNHy U ydaJIHTb n3 Hee BO3dyx.
2. Korda nOTOK BOdBi CTaHET paBHomepHbIM, NpeiDInTe K CNeDyUOuM WArAM.
1. OTTHHe Ha3ad 6bIcTpoDeiCTByIOUyIO pyKy (A)pacblnteJia.
2. BctaBbTe Hnnnenb hakoHeuHka pacnbIInTeJra (B) 6bICTpOcBemHbIKoHHekTOp n OTnyCTnte erO.
3. Notaryte HakoHeuHk pacbIInTeTn (nn npyroakceccyap) Bpepe nI npOBepKn HaJeXHoCTn erO coeHNHeHnC paCbIInTeTneM.
1. IpeeknIOuHTe rnaBbI nepeKIOuATEb B noNoKeHne «Topraa BOda» (B) n Bbl6epntHeo6xOIMyTO TemnepaTpy Ha TepMoCTaTe.
2. Pa36nokpoBaTb NcToJETpacBilnteN npVBecTn B DeiCTBne.
BHIMAHHE!
ДлmaMoKu c bapabahom dna Wunha: Ppu paBome e pexumc 2opaye uOdbI Heo6xodmo nonHocmbio paMomamb wana c 6paPabaHa, mak kak e pe3ynbmate 603eucmeu menla bapabH MoXem deOpmuoabmbc.
4.2.3 MoiKa napom (Bblwe 100°C)

OcteperaTecb BbIXoda Tropaey BoBn npapa TempepatypoJdo 150^
Ppna pa6oTe BpeKIme npoo-6pa3OBAHn.
4.3 PerynpoBka daBHeHn c nomoubO paCbIIN-TeNbHO yCTPOcTBA Variopress1)


B uejx bezonachocmu hko2da He npuey3bjaume c3adu unu He 3akpennme nepeknoyamemb pa- nbumen8 omkpbimom nooKeHu8 oEpmra pabomI. Nepeknoyammb doJxH umemb 603MoXhOcmb npu omnyckahu nepekpmb nomok eodbl
BkHouaeTcFOpcyHaKa.
Pn nepepbBax B pa6ote:
daXe npN KopoTknx nepepBbax B pa6ote, BKIOuHTb
npEdoXpaHNTeNbHbI appETnp (cm. pnc. B rnaBe 6.1).

1.ДлгocoboropnpimeHeHnIcNoIb3OBaTbCTaJIbHyTOpy6KcC HacaIkoIЯnapa(CM.KataJor npHaIeJxHocTei).
2. OTkpbItb KpbIiKy.
3. NobepHyb pykny perynatopHoro 6noka 6e0naCHoCTn npOTNB YacOBOn CTpeKN Do ynpa.
4. IpeeknIOuHTb IaBHBi BblKIOUcATEJIb B NOIOXeHHe "TopraVa BOda".
5. Bb6paTb TemnepaTy p (Bblue100°C).
1. C nOMOuIIO nepeKluOHTeTnA Vario perynpuYte pacxod BObl I, COOTBeTCTBeHHO, DAJIHeHne
2. Haxmnte nepekniouateIb BnepeI dIa IOnyueHn nonHOro daJIeHn npacxoDa

4.4 IcnoIb3OBAHnE MoUxN CpeIcTB


BHIMAHHE!
He donyckamb bblcIxahua MOHOezeo eeueecmaHa noepexhocmu, m.K. 3mo MoKem npueecmu K ee noepexdehuo!
Дпг сецualьньссучаee npuMehenue (Hanp. deuzhfekuu) konuycmeo mouugeo cpedcmea cneyoem onpeodnmb e numpax. Pacxod body cm. 2naey 9.4 «TexHuueckue daHHbIe»
NEPTUNE 1
MoUe cpeCTBa Moryt BcaCbIbTaBcYepe3 cepInHO yCTaHOBJIeHHb INJKeKTop TOJbKO BpeKIMe HN3KOrO DaBJIeHn:
- Pa36abntb MOIOuee cpeICTBO B COOTBETCTBn C yka-3AHNIM IPOUN3BOIDNTJIa.
- Do ynpa noBepHyb konnaqok Ha roNobke conna FlexoPowerPlus B cTopohy OTMeTKI CHEM
- O6bEM MOIOUero cpeIcTBA MOXHO OTperyIINPOBaTb NOcpeIcTBOM NOBOPoTa Do3n-pyIOUero KnaHa.
- InaBnI nepeKIOUaTeNb- IOBepHyTb nepeKIOUaTeNb B NOJoxHeHne «I»
- BkHouHTb nCTOnet-pacnblIHTeB.
NEPTUNE 2
- YctaHOBnTB XeJIaEMyIO KOHcHTpaUNIO MOUcero CpeDCTBa C NOMOuBIO DO3aTOpaMOUxN CpeDCTB.
2.CmouHb n3eJIne, noJnEka- 1IIM YIcTKe.
3.B 3aBnCmOCTn OT CTeneHn 3aRpa3HeHn NOdoXdaTb Noka CpeDcTBo NoeYCTByeT. 3aTeM NOMbITb CtpyeN BbICOKoro DaBHeHn.
5 MeToIbI npImeHnIa

5.1 O6ua HhOpmaun
3ΦΦeKTHBnA OUcNTKa DOCTNaTgAEcT PnC o6JIHODeHn HKeKOTpbIX OCHOBhix PnEMOB B COyETAHn C BaUM MInYHBm ONbITOM B TEXHOJrN CHSTKn. PpaBnIbHO Bbl6paHHbIe PpHaNDLeXHOCTHn MOOuIe BeueCTBa yBeINuBAkOT 3ΦΦeKTHBHOCTb NcNOJB3OBAHn MOeHuOH MaunHb. Hxke paccMOtpeHa OCHOBa HnΦOpMauno 06 OChCTKe.
5.1.1 PpOHTka
PkaBHy HnToCTbI CnoI rpa3MoXHO pa3MgYtB TeueHne BpeMeHn OTMaunBaHn. IdeaIbHbI MeTOI IJIceJIckOro Xo3raCTBa-HanpImep,BCBnHapNkax.MeTOBbIMaunBaHnMOxHO npmehTcNCIOb3OBaHnEM NeHb INI pOcTOr OeIOuHoro MOUeO cpeCTBa.IpeD MbITbEm NOd daBHeHnEM dAIte npOdyKTy HaxOnTbcra Ha 3arpy3HeHHo NOBepXHOCTn B TeueHne OKo10 15 MInyT.B pe3yIbTaTeMbITbe NOd daBJeHnEM 3aIMeT ropa3do MehBe BpeMeHn.
PpOn3BODntEnbOCTaBnEeT 3a co6oI npaBO Ha n3MeHeHnB pykoBOcTBe.
9.3ДeКларuaO COOTBETCTBnTpe6oBaHnM EC
| Декларачаю o COOTBeTCTBn n Tpe6OBaHnmaE C |
| Изdenе: | Моевна машина БИСКОТ Давлия |
| Тин: | NEPTUNE 1, NEPTUNE 2, NEPTUNE 2 Special |
| Констукция ИЗдени COOTBeTCTByeT cIepondушим поименимьн hopмam: | Ди配电пьа EC no машинам 2006/42/ECДи配电пьа EC no НИЗКOBЛьTHOMу obорUDовану 2006/95/ECДи配电пьа EC no 3MC 2004/108/ECДи配电пьа EC no орагинецno coopedжаня onаCSbIX BeuCECTB 2011/65/ECДи配电пьа EC no oborpudobanlu,RobotAOUeMy noДавлием 97/23/EC |
| Пrimенячы rapmonизированьie stандэрты: | EN ISO 12100-1, EN ISO 12100-2, EN 60335-2-79, EN 55014-1(2002), EN 55014-2(2001), EN 61000-3-2 (2006) |
| Пrimenячы нашионьibles стандэрты и techniques ус�овя: | IEC 60335-2-79 |
| ФИО и anecdлес лиca, уponномоченьоги на с Coastablenhoe techniqueskn noHформачи: | Антон Сорецен (Anton Sorensen) Геральни д配电тор, одан порышеньх оераций EAPCNilfsk-Advance A/SSognvej 25DK-2605 Brøndby |
| Пиуносты и поимь сны, правомочно оформьгьdeklapачию OT Имени ИЗrotobNTELЯ: | Anh fmmAnToH Copehen (Anton Sorensen) Геральни д配电тор, одан порышеньх оераций EAPCNilfsk-Advance A/SSognvej 25DK-2605 Brøndby |
| М做不到 и datasо оформени deklapачи: | Hadsund, 26-02-2013 |
9.4 TexHHueckn DaHHbIe
| Описане Обselfe | 1-22 | EU 230/50/16 | 1-22 GB 230/50/13A | 2-20 US 115/1/60/20 | 2-25 GB 230/1/50/13 | 2-25X GB 230/1/50/13 |
| Данныe | Tol. (±) | Nom | + Tol/- Tol | Nom | + Tol/- Tol | Nom | + Tol/- Tol | Nom | + Tol/- Tol | Nom | + Tol/- Tol |
| Давлике (Рраб) на говкуцлindра (бар) | 10% | 110 | +11/-11 | 110 | +11/-11 | 69 | +7/-7 | 90 | +9/-9 | 90 | +9/-9 |
| ПOTOK Qмк (П/чс) | 10% | 540 | +54/-54 | 540 | +54/-54 | 568 | +57/-57 | 640 | +64/-64 | 640 | +64/-64 |
| ПOTOK QмкС (П/чс) | | 600 | +60/-60 | 600 | +60/-60 | 636 | +64/-64 | 670 | +67/-67 | 670 | +67/-67 |
| Tempeparaturа (Тмакс) ророчи Вобdi (℃) | | 80 | 80 | 80 | 80 | 80 |
| Tempeparaturа (Тмакс) пара (℃) | | NA | NA | 150 | 150 | 150 |
| Зелекtronотаиме B/ф./Гц | +/-6% | 230/1~/50 | 230/1~/50 | 115/1~/60 | 230/1~/50 | 230/1~/50 |
| ПOTriebлемая мошноctь (КВТ) | | 2,8 | 2,8 | 2,1 | 2,9 | 2,9 |
| ТолibNVы (к) | | 17 | 17 | 17 | 17 | 17 |
| Бakддя оочтаюце срества (н) | | 5 | 5 | 5 | 5 | 5 |
| Уровеньшума на paastсяни M (БА) | | 74 | 74 | 77 | 76 | 76 |
| Сида OTддя ддя.stандартой (танг) (H) | | 17,6 | 17,6 | 12,9 | 19 | 18,5 |
| Вибрази I 5349 (M/c²) | | ≤2,5 | ≤2,5 | ≤2,5 | ≤2,5 | ≤2,5 |
| Вес, толы-М-И-И-И-И-И-И-И-И-И-И-И-И-И-И-И-И-И-И-И-И-И-И-И-И-И-И-И-И-И-И-И-И-И-И-И-И-И-И-И-И-И-И-И-И-И-И-И-И-И-И-II-II-II-II-II-II-II-II-II-II-II-II-II-II-II-II-II-II-II-II-II-II-II-II-II-II-II-II-II-II-II-II-II-II-II-II-II-II-II-II-II-II-II-II-II-II-II-II-II-II-I-II-II-II-II-II-II-II-II-II-II-II-II-II-II-II-II-II-II-II-II-II-II-II-II-II-II-II-II-II-II-II-II-II-II-II-II-II-II-II-II-II-II-II-II-II-II-II-II-II- II-II-II-II-II-II-II-II-II-II-II-II-II-II-II-II-II-II-II-II-II-II-II-II-II-II-II-II-II-II-II-II-II-II-II-II-II-II-II-II-II-II-II-II-II-II-II-II-II-II-III-II-II-II-II-II-II-II-II-II-II-II-II-II-II-II-II-II-II-II-II-II-II-II-II-II-II-II-II-II-II-II-II-II-II-II-II-II-II-II-II-II-II-II-II-II-II-II-II-II--II-II-II-II-II-II-II-II-II-II-II-II-II-II-II-II-II-II-II-II-II-II-II-II-II-II-II-II-II-II-II-II-II-II-II-II-II-II-II-II-II-II-II-II-II-II-II-II-II-II-IB | 110 | +11/-11 | 110 | +11/-11 | 69 | +7/-7 | 90 | +9/-9 | 90 | +9/-9 | |
| ПOTOK Qмк (П/чс) | 10% | 540 | +54/-54 | 540 | +54/-54 | 568 | +57/-57 | 540 | +64/-64 | 640 | +64/-64 |
| ПOTOK QмкС (П/чс) | | 600 | +60/-60 | 600 | +60/-60 | 636 | +64/-64 | 670 | +67/-67 | 670 | +67/-67 |
| Tempeparatura (Тмакс) ророчи Вобdi (℃) | | 80 | 80 | 80 | 80 | 80 |
| Tempeparaturа (Тмакс) пара (℃) | | | | | | | | | | | |
| Зелекtronотаиме B/ф./Гц | +/-6% | 230/1~/50 | 230/1~/50 | 115/1~/60 | 230/1~/50 | 230/1~/50 |
| ПOTriebлемая мошноctь (КВТ) | | 12,8 | 2,8 | 2,1 | 2,9 | 2,9 |
| ТолibNVы (к) | | 17 | 17 | 17 | 17 | 17 |
| Бakддя оочтаюце срества (н) | | | | | | | | | | | |
| Береньшума на paastсяниI | 17,6 | 17,6 | 17,6 | 12,9 | 19 | 18,5 |
| Сида OTддя ддя.stандартой (танг) | | | | | | | | | | | |
| Вибрази I 5349 (M/c²) | | | | | | | | | | | |
| Вес, толы-М-И-И-И-И-I | 91 | 91 | 91 | 97 | 97 | 99 |
| Разmersы, толы-М-И-И-И-I | | | | | | | | | | | |
| ПOTOK Qмк (М-И-И-I | 607x688x1000 | 607x688x1000 | 607x688x1071 | 607x688x1000 | 607x688x1071 | 607x688x1071 |
| Пreldoхсан'telb (A) | | 16 | 13 | 20 | 13 | 13 |
| Мakс. Давлике (н-И-И-I | 6 | 6 | 6 | 10 | 10 | 10 |
| Мakс. Tempeparaturа (н-И-I$ | 40 | 40 | 40 | 40 | 40 | 40 |
| Описане Обselfe | 2-26 | EU 230/1/50/16 | 2-26X EU 230/1/50/16 | 2-26 EU Special 230/1~/50 | 2-26X EU Special 230/1~/50 | 2-30 EU Special 400/3~/50 |
| Данные | Tol. (±) | Nom | + Tol/- Tol | Nom | + Tol/- Tol | Nom | + Tol/- Tol | Nom | + Tol/- Tol | Nom | + Tol/- Tol |
| Давлике (Рраб) на говкуцилида (бар) | 10% | 145 | +15/-15 | 145 | +15/-15 | 140 | +14/-14 | 140 | +14/-14 | 155 | +16/-16 |
| ПOTOK Qмк (П/чс) | 10% | 530 | +53/-53 | 530 | +53/-53 | 560 | +56/-56 | 560 | +56/-56 | 600 | +60/-60 |
| ПOTOK Qмк (П/чс) | | 600 | +60/-60 | 600 | +60/-60 | 600 | +60/-60 | 600 | +60/-60 | 660 | +66/-66 |
| TemperatURA (Тмакс) ророчевоны (℃) | | 80 | 80 | 80 | 80 | 80 |
| TemperatURA (Тмакс) пара (℃) | | 150 | 150 | ? | ? | ? |
| Зелекtronотаиме В/ф./Гц | +/-6% | 230/1~/50 | 230/1~/50 | 230/1~/50 | 230/1~/50 | 400/3~/50 |
| ПOTrieb�емая мошисть (кВт) | | 3,4 | 3,4 | 3,4 | 3,4 | 3,8 |
| ТолibNVь (к) | | 17 | 17 | 17 | 17 | 17 |
| Бak对阵очиаль的所有 СВТ (к) | | 5 | 5 | 5 | 5 | 5 |
| Уровеньшума на расстяни M (БА) | | 77 | 77 | 74 | 74 | 74 |
| Сида олдени (п-H) | | 20,8 | 20,6 | 21,8 | 21,6 | 24,6 |
| Вибация ISO 5349 (M/c²) | | ≤2,5 | ≤2,5 | ≤2,5 | ≤2,5 | ≤2,5 |
| Вес, Тожко машину (К) | | 97 | 99 | 97 | 99 | 97 |
| Разmersы, Тожко машину (М) | | 607x688x1000 | 607x688x1071 | 607x688x1000 | 607x688x1071 | 607x688x1000 |
| Пробхан滥 (A) | | 16 | 16 | 16 | 16 | 16 |
| Мaks. Давлике на вхode ($бар) | | 10 | 10 | 10 | 10 | 10 |
| Мaks. TemperatURA на вхode (℃) | | 40 | 40 | 40 | 40 | 40 |

| Описане 06цeze 2 | 30X EU Spacial400/3~/50 | 2-30 US 220-240/1/60/20 | 2-33 EU 400/3/50 | 2-33X EU400/3/50 | 2-33 NO 230-400/3/50 |
| Данны Tol. (±) Nom + Tol/- Tol Nom + Tol/- | Nom + Tol/- | Tol Nom | + Tol/- Toli Nom + Tol/- | Nom + Tol/- | Tol Nom + Tol/- | Nom + Tol/- | Tol | | | | |
| Давлике (Рраб) на rolовкуцлида (бар) | 10% | 155 | +16/-16 | 138 | +14/-14 | 170 | +17/-17 | 170 | +17/-17 | 170 | +17/-17 |
| ПOTOK Qмк (П/чс) | 10% | 600 | +60/-60 | 681 | +68/-68 | 630 | +63/-63 | 630 | +63/-63 | 630 | +63/-63 |
| ПOTOK QмкС (П/чс) | | 660 | +66/-66 | 750 | +75/-75 | 690 | +69/-69 | 690 | +69/-69 | 690 | +69/-69 |
| TemperatURA (Тмакс) roраяев(Bоды (℃) | | 80 | 80 | 80 | 80 | 80 |
| TemperatURA (Тмакс) napa (℃) | | ? | 150 | 150 | 150 | 150 |
| Эльсторитаиме В/Ф./Гц | +/-6% | 400/3~/50 | 220-240/1~/60 | 400/3~/50 | 400/3~/50 | 230-400/3~/50 |
| ПOTriebлелемая мошость (КВТ) | | 3,8 | 2,15 | 4,1 | 4,1 | 4,1 |
| Толimbий бak (П) | | 17 | 17 | 17 | 17 | 17 |
| Бakdoes olivandoшero срешива (П) | | 5 | 5 | 5 | 5 | 5 |
| Уrobеншума на расстони 1М (ДБА) | | 74 | 77 | 80 | 80 | 80 |
| Сида оданддя-stандэрноштоги (10°) (H) | | 24,8 | 25,6 | 27,1 | 26,3 | 27,1 |
| Вибрация ISO 5349 (M/c²) | | ≤2,5 | ≤2,5 | ≤2,5 | ≤2,5 | ≤2,5 |
| Вес, толък машина (Кг) | | 99 | 97 | 97 | 99 | 97 |
| Разmersы, толък машина (ММ) | | 607x688x1071 | 607x688x1000 | 607x688x1000 | 607x688x1071 | 607x688x1000 |
| Пробхrayнель (A) | | 16 | 20 | 16 | 16 | 26/16 |
| Мaks. давлице на вхode (бар) | | 10 | 10 | 10 | 10 | 10 |
| Мaks. Tempeparatura на вхode (℃) | | 40 | 40 | 40 | 40 | 40 |
4.2.2 Hot water operation (up to 100^ )
OLUINE!
Vooliku rulliga seadmetel:
9.1 Pesuri umbertootlemine
Durante o transporte, a boa, a boa, a boa, a boa, a boa, a boa, a boa, a boa, a boa, a boa, a boa, a boa, a boa, a boa, a boa, a boa, a boa, a boa, a boa, a boa, a boa, a boa, a boa, a boa, a boa, a boa, a boa, a boa, a boa, a boa, a boa, a boa, a boa, a boa
TmVcoafoaepoaeKa TAVWoe aaaa oxnataouotoume Xpnon uavrwovotepeowns TpoC attofoyn oiaobnnc Ka cwtporntc
ms ouakeunc, erionp ete va xon-ouontoeirk kai to ppevo akivntoToinns.
Av n metaphop a mns ouakeunnc kai twv
eapntnawmns yivetac o eepuokpaoies yupn ktwrw0C,ouvtotatn xponn avnuuktuou meou
meo amv avlia kai tov aeBn ta 0r
kephiao 6.
Pv coT My 0eon eAeroupyix
E TEPITIWOTU N OUAKEUN 3 cA
OeWv OAC TAPADoNk XwpiC BuOa,
ZTMOTE ATO EVAV EEXIDKUeVO nAE
KTPOAOV VA TOIOBETnEi EVX KATAL
AAo TPdAoIKo Buaa ME ETTaH
YeiOWc aOCAEAic.
Piv aTTO m Theon oE aeoupyia TpeTEI VA EEyxETe TO KAwOIO NkEKTpKc ouvdeocn Kau ta AALCA OmaavTKa EApntmuCTa MsuokKeuG OTWTo Aotyo uNAnC Tioeon Kau To TioToAETO qekaoou. H oukeun dev EITPTeTTa va Aeoupyei OE TepittwOn TTou eva aTTO xEapntmuCTa curoxEvai Eaattuacto.
Tortothe note eta m ouakeun wote vax eivai ukoan n npoaoan tou nke Ktpkou buoacto.
EeYETe TAKIcTo KAto NkAosio nKtPnTPOOooicvuaTuovBBeCnΦOepcAtoTnepaoua TouXovouH Aetoupyia mNxavncKaOpiouu uynlnc Mieonc EITnpETeaiMoV O eV opeuactoanmScivaoeoynKatotacn.
EL
Σε TTEPITTOW Φθopac Tou Kαλωδiou, yα αTTOΦUYN KIVOUVW, θα TIPETIEL Vα ΑVTKATαOTαθe iE TE ATTOV KATOKEUACM μeaw Tou TMμaTOCS EUTNPENTONC TEλcWv n ATTO αλλov Eeikkeuévo TEXivkó.
PPOsOXH!
H xpnon cKaaTAAJW KALWIOV ETEKTOG ESIVXETIKOVNI. FOPIOTe OOTc KaoulaXva Eivca TAVOTE EODITLAUVEYIA VA CTOPOUYETO EVDEXOUEVO UTePepuovnC TOU KAALOWIou.
Buaata kau ouvoeic kaawdiow nAekpkioc uovoeonkau kawdiow etmuikuvong TpeTcIvaivai aibc- bpoxa.
OTAVXPNOUMOTOEKAAWIO EITN KUVONS PENTIE VXEXETUTOUN OCS TECXOTES DIAOTUE TWKAAWOWV.
| Mɪŋkɑs
Kɑλωðioum | Διατομή
<16 A <25 A |
| \( \dot{\varepsilon}\omega\varsigma 20m \) | \( \varnothing 1.5mm^2 \varnothing 2.5mm^2 \) |
| \( 20\dot{\varepsilon}\omega\varsigma 50m \) | \( \varnothing 2.5mm^2 \varnothing 4.0mm^2 \) |
Piv ouvdeoTe m uynxavn KcBapiaou uynanics Tieson m To peuua, Eeyete mV ovuaotkT axon ms ouakeun. Iyoupeuteite on n taon Tou caxepetau OTy TIVAKIDA TUOTU ms ouakeun's evai diae mTv tortuk nAektpkTaoi.
H nAektpkn ouvdeon mC ouakeun C PETEA VY iive aTIO nAekpoAoYO Kauoata OuOwva E TO TPOTu IEC 60364 Kau TPOdAcypocEe Tou IOxOUV OTOV TOTTOXnOg.
PnoteivctayiaTMyNtKtpKn ouvde on ms ouakeun
3.4 PAnpwoon Doxciou KauoiauW
YNOAEEH!
Eepuokpaoiec xanlotepe Tov 8°C apxizc to kaoumo oikaknXpnongvaTmzEi (diawwipuo npapafivnc).EtaiowcavntetwntoTe duokoliec Ekkivnontou kauotnpa.1a to loyo auto kat a m diopkeia tou xeuowv avamiE t BeltwiKo potc (OTo eptio yia Kaouma oikakns xpno) n Xpnooutome Vriley ia xeuwova
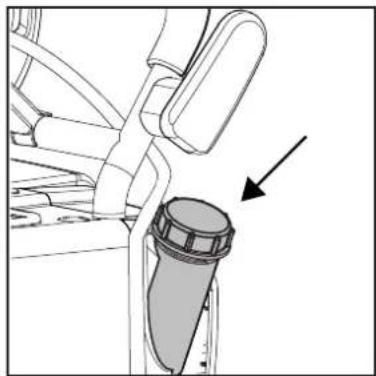
Σε κρια συοκεύη:
TepioTo doxio kaouiou aTo eva kOxpo MTeovIe Ppoko kaoumo, Tepelao, DIN 51603-1 (XwpiicBiovriE) NtrizEN 590 (NtrizEmuBiovriEewc7%).
UufoovuaeTOEN590,muopei vaXpoouoTOnEvivtzελ(εωc7% biovtzελ)μe Touc akolououg Tepiopouoc:MeYiotaOxpoVoc 尔 其 0e doxieo vtizελ mxaavnauocKaθapioou uynanis πeons:1mnuac.△ev eITIPTETa nXpHonvtzελToufuaoetau EwTeipkaTawv aTIO6 mnuceσ EAnxAuvnata Kaθapioou uynanhs TIEoNCSNilfisk-ALTO.Aev ouviotar an XpHonvtzελ EN590e HPW aeBepuokpaia TpeipaaLooToc KATOWvO°C.△ev pTpeIVAx npOoTouitai vtizελ EN590Tou Bpioketai e avoixTo μtETovl.
To kaoumo dev npetvva Tepie- xakopoe.
-ΓαTIOOOTRAπI npwONSβEETKΦαλaio 9.4 TeXvikα δδoμενα.
Atofoyetymv eioo aKaaOpaIow, yia va mnu npoknthetauov Bc oTo doxieo kauoiou.

3.5 UvOeon OwAynu uynns nics
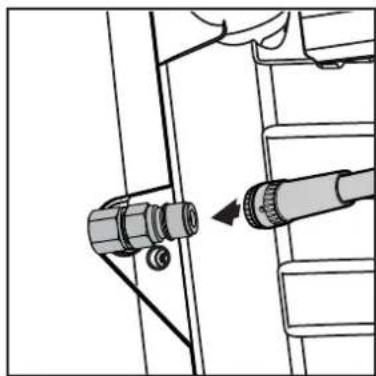
- SuovoeTo to aotixo uynanns nieons mTv taexia eusn otuvtooxuynanns nieons
3.6 Uvdoon oWAn vepou

pu (aAouBiaKn aMOS) ouviotou ME yKATAOaON pIATPO vepou Otv iioo vepou.
UvioTOuE EtIONg m xpon EvIOxouEvou AooTixou vepou e ovoaotko Eupoc Touaxiotov 3/4" (19 mm).
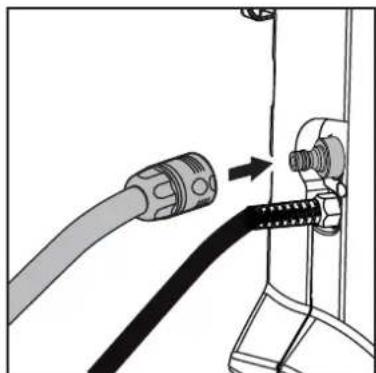
- Pniv ouvdoeTo laoio vepou otn ouakeun, EanuveTe To yia liyo mevoepoote va mny ealeboov om ouakeun amuoc kai aa aopia akaaap
- Euovotoe to aoxo uynan ng Tieonc me mv taxeia Zevn OTNV UTOOxH uynanng Tieonc.
3.AvoiTe m Bcva.
YIIOAEIH!
Tia aataapaimtn Tnoomra n npwo onk kai tion vepou BETE KΦaλio 9.4 TeyviKa δεδoEvα.
EeepiTTOKAKNGIOIOTNCAVE

9.3 Anawon Eupwnaikns Umuoppwons
海默默默默默默默默默默默默默默默默默默默默默默默默默默默默默默默默默默默默默默默默默默默默默默默默默默默默默默默默默默默默默默默默默默默默默默默默默默默默默默默默默默默默默默默默默默默默默默默默默默默默
5.1.3 云
| 목재원이 퍷결 | | |
| CLRCLRCLRCLRCLRCLRCLRCLRCLRCLRCLRCLRCLRCLRCLRCLRCLRCLRCLRCLRCLRCLRCLRCLRCLRCLRCLRCLRCLRCLRCLRCLRCLRCLRCLRCLRCLRCLRCLRCLRCLRCLRCLRCLRCLRCLRCLRCLRCLRCLRCLRCLRCLRCLRCLRCLRCLRCLRCLRCLRCLRCLRCLRCLRCLRCLRCLRCLRCLRCLRCLRCLRCLRCLRCLRCLRCLRCLRCLRCLRCLRCLRCLRCLRCLRCLRCLRCLRCLRCLRCLRCLRCLRCLRCLRCLRCLRCLRCLRCLRCLR CLRCLRCLRCLRCLRCLRCLRCLRCLRCLRCLRCLRCLRCLRCLRCLRCLRCLRCLRCLRCLRCLRCLRCLRCLRCLRCLRCLRCLRCLRCLRCLRCLRCLRCLRCLRCLRCLRCLRCLRCLRCLRCLRCLRCLRCLRCLRCLRCLRCLRCLRCLRCLRCLRCLRCLRCLRCLRCLRCLRCLRCLRCLRCLRCLRCLRCLRCLRCLRCLRCLRCLRCLRCLRCLRCLRCLRCLRCLRCLRCLRCLRCLRCLRCLRCLRCLRCLRCLRCLRCLRCLRCLRCLRCLRCLRCLRCLRCLR CLR CLR CLR CLR CLR CLR CLR CLR CLR CLR CLR CLR CLR CLR CLR CLR CLR CLR CLR CLR CLR CLR CLR CLR CLR CLR CLR CLR CLR CLR CLR CLR CLR CLR CLR CLR CLR CLR CLR CLR CLR CLR CLR CLR CLR CLR CLR CLR CLR CLR CLR CLR CLR CLR CLR CLR CLR CLR CLR CLR CLR CLR CLR CLR CLR CLR CLR CLR CLR CLR CLR CLR CLR CLR CLR CLR CLR CLR CLR CLR CLR CLR CLR CLR CLR CLR CLR CLR CLR CLR CLR CLR CLR CLR CLR CLR CLR CLR CLR CLRCLR CLR CLR CLR CLR CLR CLR CLR CLR CLR CLR CLR CLR CLR CLR CLR CLR CLR CLR CLR CLR CLR CLR CLR CLR CLR CLR CLR CLR CLR CLR CLR CLR CLR CLR CLR CLR CLR CLR CLR CLR CLR CLR CLR CLR CLR CLR CLR CLR CLR CLR CLR CLR CLR CLR CLR CLR CLR CLR CLR CLR CLR CLR CLR CLR CLR CLR CLR CLR CLR CLR CLR CLR CLR CLR CLR CLR CLR CLR CLR CLR CLR CLR CLR CLR CLR CLR CLR CLR CLR CLR CLR CLR CLR CLR CLR CLR CLR CLRCLRCLRCLRCLRCLRCLRCLRCLRCLRCLRCLRCLRCLRCLRCLRCLRCLRCLRCLRCLRCLRCLRCLRCLRCLRCLRCLRCLRCLRCLRCLRCLRCLRCLRCLRCLRCLRCLRCLRCLRCLRCLRCLRCLRCLRCLRCLRCLRCLRCLRCLRCLRCLRCLRCLRCLRCLRCLRCLRCLRCLRCLRCLRCLRCLRCLRCLRCLRCLRCLRCLRCLRCLRCLRCLRCLRCLRCLRCLRCLRCLRCLRCLRCLRCLRCLRCLRCLRCLRCLRCLRCLRCLRCLRCLRCLRCLRCLRCLR CLR CLR CLR CLR CLR CLR CLR CLR CLR CLR CLR CLR CLR CLR CLR CLR CLR CLR CLR CLR CLR CLR CLR CLR CLR CLR CLR CLR CLR CLR CLR CLR CLR CLR CLR CLR CLR CLR CLR CLR CLR CLR CLR CLR CLR CLR CLR CLR CLR CLR CLR CLR CLR CLR CLR CLR CLR CLR CLR CLR CLR CLR CLR CLR CLR CLR CLR CLR CLR CLR CLR CLR CLR CLR CLR CLR CLR CLR CLR CLR CLR CLR CLR CLR CLR CLR CLR CLR CLR CLR CLR CLR CLR CLR CLR CLR CLR CLR CLR CLEAR CLR CLR CLR CLR CLR CLR CLR CLR CLR CLR CLR CLR CLR CLR CLR CLR CLR CLR CLR CLR CLR CLR CLR CLR CLR CLR CLR CLR CLR CLR CLR CLR CLR CLR CLR CLR CLR CLR CLR CLR CLR CLR CLR CLR CLR CLR CLR CLR CLR CLR CLR CLR CLR CLR CLR CLR CLR CLR CLR CLR CLR CLR CLR CLR CLR CLR CLR CLR CLR CLR CLR CLR CLR CLR CLR CLR CLR CLR CLR CLR CLR CLR CLR CLR CLR CLR CLR CLR CLR CLR CLR CLR CLR CLR CLR CLR CLR CLR CLR Clear CLR CLR Clear CLR Clear CLR Clear CLR Clear CLR Clear CLR Clear CLR Clear CLR Clear CLR Clear CLR Clear CLR Clear CLR Clear CLR Clear CLR Clear CLR Clear CLR Clear CLR Clear CLR Clear CLR Clear CLR Clear CLR Clear CLR Clear CLR Clear CLR Clear CLR Clear CLR Clear CLR Clear CLR Clear CLR Clear CLR Clear CLR Clear CLR Clear CLR Clear CLR Clear CLR Clear CLR Clear CLR Clear CLR Clear CLR Clear CLR Clear CLR Clear CLR Clear CLR Clear CLR Clear CLR Clear CLR Clear CLR Clear CLR Clear CLR Clear CLR Clear CLR CLEAR CLR CLEAR CLR CLEAR CLR CLEAR CLR CLEAR CLR CLEAR CLR CLEAR CLR CLEAR CLR CLEAR CLR CLEAR CLR CLEAR CLR CLEAR CLR CLEAR CLR CLEAR CLR CLEAR CLR CLEAR CLR CLEAR CLR CLEAR CLR CLEAR CLR CLEAR CLR CLEAR CLR CLEAR CLR CLEAR CLR CLEAR CLR CLEAR CLR CLEAR CLR CLEAR CLR CLEAR CLR CLEAR CLR CLEAR CLR CLEAR CLR CLEAR CLR CLEAR CLR CLEAR CLR CLEAR CLR CLEAR CLR CLEAR CLR CLEAR CLR CLEAR CLR CLEAR CLR CLEAR CLR CLEAR CLR CLEAR CLR CLEAR CLR CLEAR CLR CLEAR CLR CLEAR CLR CLEAR CLR CLEAR CLR CLEAR CLR Clear CLR Clear CLR Clear CLR Clear CLR Clear CLR Clear CLR Clear CLR Clear CLR Clear CLR Clear CLR Clear CLR Clear CLR Clear CLR Clear CLR Clear CLR Clear CLR Clear CLR Clear CLR Clear CLR Clear CLR Clear CLR Clear CLR Clear CLR Clear CLR Clear CLR Clear CLR Clear CLR Clear CLR Clear CLR Clear CLR Clear CLR Clear CLR Clear CLR Clear CLR Clear CLR Clear CLR Clear CLR Clear CLR Clear CLR Clear CLR Clear CLR Clear CLR Clear CLR Clear CLR Clear CLR Clear CLR Clear CLR Clear CLR Clear CLRClear CLR Clear CLR Clear CLR Clear CLR Clear CLR Clear CLR Clear CLR Clear CLR Clear CLR Clear CLR Clear CLR Clear CLR Clear CLR Clear CLR Clear CLR Clear CLR Clear CLR Clear CLR Clear CLR Clear CLR Clear CLR Clear CLR Clear CLR Clear CLR Clear CLR Clear CLR Clear CLR Clear CLR Clear CLR Clear CLR Clear CLR Clear CLR Clear CLR Clear CLR Clear CLR Clear CLR Clear CLR Clear CLR Clear CLR Clear CLR Clear CLR Clear CLR Clear CLR Clear CLR Clear CLR Clear CLR Clear CLR Clear CLR Clear CLR Clear CLR clear CLR clear CLR clear CLR clear CLR clear CLR clear CLR clear CLR clear CLR clear CLR clear CLR clear CLR clear CLR clear CLR clear CLR clear CLR clear CLR clear CLR clear CLR clear CLR clear CLR clear CLR clear CLR clear CLR clear CLR clear CLR clear CLR clear CLR clear CLR clear CLR clear CLR clear CLR clear CLR clear CLR clear CLR clear CLR clear CLR clear CLR clear CLR clear CLR clear CLR clear CLR clear CLR clear CLR clear CLR clear CLR clear CLR clear CLR clear CLR clear CLR clear CLR Clear CLR clear CLR clear CLR clear CLR clear CLR clear CLR clear CLR clear CLR clear CLR clear CLR clear CLR clear CLR clear CLR clear CLR clear CLR clear CLR clear CLR clear CLR clear CLR clear CLR clear CLR clear CLR clear CLR clear CLR clear CLR clear CLR clear CLR clear CLR clear CLR clear CLR clear CLR clear CLR clear CLR clear CLR clear CLR clear CLR clear CLR clear CLR clear CLR clear CLR clear CLR clear CLR clear CLR clear CLR clear CLR clear CLR clear CLR clear CLR clear CLRclear CLR clear CLR clear CLR clear CLR clear CLR clear CLR clear CLR clear CLR clear CLR clear CLR clear CLR clear CLR clear CLR clear CLR clear CLR clear CLR clear CLR clear CLR clear CLR clear CLR clear CLR clear CLR clear CLR clear CLR clear CLR clear CLR clear CLR clear CLR clear CLR clear CLR clear CLR clear CLR clear CLR clear CLR clear CLR clear CLR clear CLR clear CLR clear CLR clear CLR clear CLR clear CLR clear CLR clear CLR clear CLR clear CLR clear CLR clear CLR clear CLR clear CLRclear CLRclear CLR clear CLR clear CLR clear CLR clear CLR clear CLR clear CLR clear CLR clear CLR clear CLR clear CLR clear CLR clear CLR clear CLR clear CLR clear CLR clear CLR clear CLR clear CLR clear CLR clear CLR clear CLR clear CLR clear CLR clear CLR clear CLR clear CLR clear CLR clear CLR clear CLR clear CLR clear CLR clear CLR clear CLR clear CLR clear CLR clear CLR clear CLR clear CLR clear CLR clear CLR clear CLR clear CLR clear CLR clear CLR clear CLR clear CLR clear CLR clear CLRclear CLR Clear CLR clear CLR clear CLR clear CLR clear CLR clear CLR clear CLR clear CLR clear CLR clear CLR clear CLR clear CLR clear CLR clear CLR clear CLR clear CLR clear CLR clear CLR clear CLR clear CLR clear CLR clear CLR clear CLR clear CLR clear CLR clear CLR clear CLR clear CLR clear CLR clear CLR clear CLR clear CLR clear CLR clear CLR clear CLR clear CLR clear CLR clear CLR clear CLR clear CLR clear CLR clear CLR clear CLR clear CLR clear CLR clear CLR clear CLR clear CLR clear CLR Clear CLR Clear CLR clear CLR clear CLR clear CLR clear CLR clear CLR clear CLR clear CLR clear CLR clear CLR clear CLR clear CLR clear CLR clear CLR clear CLR clear CLR clear CLR clear CLR clear CLR clear CLR clear CLR clear CLR clear CLR clear CLR clear CLR clear CLR clear CLR clear CLR clear CLR clear CLR clear CLR clear CLR clear CLR clear CLR clear CLR clear CLR clear CLR clear CLR clear CLR clear CLR clear CLR clear CLR clear CLR clear CLR clear CLR clear CLR clear CLR clear CLRclear CLR clear CLRclear CLR clear CLR clear CLR clear CLR clear CLR clear CLR clear CLR clear CLR clear CLR clear CLR clear CLR clear CLR clear CLR clear CLR clear CLR clear CLR clear CLR clear CLR clear CLR clear CLR clear CLR clear CLR clear CLR clear CLR clear CLR clear CLR clear CLR clear CLR clear CLR clear CLR clear CLR clear CLR clear CLR clear CLR clear CLR clear CLR clear CLR clear CLR clear CLR clear CLR clear CLR clear CLR clear CLR clear CLR clear CLR clear CLR clear CLR clear CLRclear CLR clear CLR清CLR清CLR清CLR清CLR清CLR清CLR清CLR清CLR清CLR清CLR清CLR清CLR清CLR清CLR清CLR清CLR清CLR清CLR清CLR清CLR清CLR清CLR清CLR清CLR清CLR清CLR清CLR清CLR清CLR清CLR清CLR清CLR清CLR清CLR清CLR清CLR清CLR清CLR清CLR清CLR清CLR清CLR清CLR清CLR清CLR清CLR清CLR清CLR清CLR清CLR清 CLR清CLR清CLR清CLR清CLR清CLR清CLR清CLR清CLR清CLR清CLR清CLR清CLR清CLR清CLR清CLR清CLR清CLR清CLR清CLR清CLR清CLR清CLR清CLR清CLR清CLR清CLR清CLR清CLR清CLR清CLR清CLR清CLR清CLR清CLR清CLR清CLR清CLR清CLR清CLR清CLR清CLR清CLR清CLR清CLR清CLR清CLR清CLR清CLR清CLR 清CLR清CLR清CLR清CLR清CLR清CLR清CLR清CLR清CLR清CLR清CLR清CLR清CLR清CLR清CLR清CLR清CLR清CLR清CLR清CLR清CLR清CLR清CLR清CLR清CLR清CLR清CLR清CLR清CLR清CLR清CLR清CLR清CLR清CLR清CLR清CLR清CLR清CLR清CLR清CLR清CLR清CLR清CLR清CLR清CLR清CLR清CLR清CLR清CLR清CLR 渗CLR 渗CLR 渗CLR 渗CLR 渗CLR 渗CLR 渗CLR 渗CLR 渗CLR 渗CLR 渗CLR 渗CLR 渗CLR 渗CLR 渗CLR 渗CLR 渗CLR 渗CLR 渗CLR 渗CLR 渗CLR 渗CLR 渗CLR 渗CLR 渗CLR 渗CLR 渗CLR 渗CLR 渗CLR 渗CLR 渗CLR 渗CLR 渗CLR 渗 | | |
9 썷가 죁본
9.1 朝代制
9.2 与
Unit 1, 13 Bessemer Street Blacktown
NSW 2148 Australia
www.nilfi sk-alto.com.au
AUSTRIA
Nilfsk-ALTO
Riverside Business Park
Boulevard Internationalelaan 55
Nilfi sk-Advance Cleaning Equipment
(Shanghai) Co Ltd.
No.4189,YinduRoad
Xinzhuang Industrial Park
Shanghai 201108
www.nilfi sk.cn
CZECH REPUBLIC
Nilfi sk-Advance s.r.o.
Do Certous 1
VGP Park Horní Pocernice, Budova H2
CZ-190 00 Praha 9
www.nilfi sk.cz
DENMARK
31-39 Wo Tong Tsui St.
Hong Kong, Kwai Chung, N.T.
www.nilfi sk.com
HUNGARY
Nilfi sk-Advance Kereskedelmi Kft.
H-2310 Szigetszentmiklos-Lakihegy
Pramukh Plaza, 'B' Wing, 4th floor, Unit No.
Cardinal Gracious Road, Chakala
Andheri (East), Mumbai 400 099
www.nilfsk.com
IRELAND
Nilfi sk-Advance
1 Stokes Place
St. Stephen's Green
Dublin 2, Ireland
www.nilfsk-alto.ie
ITALY
Nilfi sk-Advance S.p.A
Seongdong-gu, Seoul, Korea
www.nilfi sk.co.kr
MALAYSIA
Nilfi sk-Advance Sdn Bhd
SD 33, Jalan KIP 10
Taman Perindustrian KIP
Sri Damansara
52200 Kuala Lumpur
Malaysia
www.nilfi sk.com
MEXICO
Nilfi sk Advance de Mexico S. de R.L. de C.V.
Agustin M. Chavez 1, PB-004
Col. Centro Ciudad Santa Fe
C.P. 01210 Mexico, D.F
www.nilfi sk-advance.com.mx
NEW ZEALAND
Nilfi sk-Advance NZ Ltd
Danish House
6 Rockridge Avenue
Penrose Auckland NZ 1135
www.nilfi sk.com.au
NORWAY
Nilfi sk-Advance AS
Biornerudveien 24
Oslo,N-1266
Sintra Business Park
Zona Industrial Da Abrunheira
Edificio 1, 1o A
Sintra, P-2710-089
www.nilfsk.pt
RUSSIA
Nilfi sk-Advance LLC
Vyatskaya str. 27, bld. 7, 1st floor
Moscow, 127015
www.nilfsk.ru
SLOVAKIA
Nilfi sk-Advance s.r.o.
Bancikovej 1/A
SK-821 03 Bratislava
www.nilfi sk.sk
SOUTH AFRICA
WAP South Africa (Pty) Ltd
12 Newton Street
1620 Spartan, Kempton Park
www.wap.co.za
SINGAPORE
Den-Sin
22 Tuas Avenue 2
Singapore
www.nilfi sk.com
SPAIN
Nilfi sk-Advance, S.A.
Torre D'Ara
Passeig del Ringle, 5 Plta.10a
Mataró, E-0830222
www.nilfsk.es
SWEDEN
Nilfi sk-Advance AB
Tajegardsgatan 4
431 53 Moindal
Website: www.nilfi sk-alto.se
SWITZERLAND
NA Sondergger AG
Taiwan Branch (H.K.)
No. 5, Wan Fang Road, Taipei
www.nilfi sk-advance.com.tw
THAILAND
Nilfi sk-Advance Co. Ltd
89 Soi Chokechai-Ruammitr
Viphavadee-Rangsit Road
Jomphol, Jatuchak
Bangkok 10900
www.nilfi sk.com
TURKEY
Nilfi sk-Advance Prof. Tem. Ek. Tic. A.S.
Serifali Mh. Bayraktar Bulv. Sehit Sk. No:7
Umraniye, Istanbul 34775
www.nilfsk.com.tr
UNITED KINGDOM
Nilfi sk-ALTO
Bowerbank Way, Gilwilly Industrial Estate
Penrith, Cumbria
GB-CA11 9BQ
www.nilfsk-alto.co.uk
UNITED ARAB EMIRATES
Nilfi sk-Advance Middle East Branch
SAIF-Zone, P. O. Box 122298
Sharjah
www.nilfi sk.com
USA
Nilfi sk-Advance
14600 21st Ave. North
Plymouth MN 55447-3408
www.nilfi sk-alto.us
Nilfi sk-Advance, Inc.
Industrial Vacuum Division
740 Hemlock Road, Suite 100
Morgantown, PA 19543
www.nilfi sk-alto.us
VIETNAM
Nilfi sk-Advance Co., Ltd.
No.51 Doc Ngu Str. Lieu Giai Ward
Ba Dinh Dist. Hanoi
www.nilfi sk.com