
C&C Tornado - Pressure washer NILFISK - Free user manual and instructions
Find the device manual for free C&C Tornado NILFISK in PDF.
| Product type | High pressure washer accessory for roofs |
| Brand | Nilfisk |
| Model | C&C Tornado |
| Usage | Cleaning of roofs, walls, greenhouses, caravans (with optional brush) |
| Compatibility | Nilfisk/Nilfisk-ALTO/KEW high pressure washers with quick-connect |
| Telescopic lance length | Adjustable from 1.2 to 3 m (estimate) |
| Weight | Approximately 1.5 kg (estimate) |
| Included nozzles | Wide-angle foam nozzle and pencil jet foam nozzle |
| Optional accessory | Nilfisk Click & Clean brush for windows, caravans |
| Detergent type | Original Nilfisk roof detergent (dilution 1:10) |
| Feeding | By the water flow of the high pressure washer |
| Operating pressure | Depends on the high pressure washer used (up to 150 bar typical) |
| Maximum water temperature | 40 °C (standard recommendation) |
| Maintenance after use | Rinse with clear water by sucking clean water, then store frost-free |
| Safety | Wear goggles, gloves, protective clothing; do not direct the jet at people or electrical equipment |
| Warranty | 2 years for domestic use (defective parts, shipping not included) |
| Repairability | Nilfisk authorized service center; spare parts available (nozzles, seals, hose) |
| Warranty conditions | Use of original detergent, pure water, no rental or commercial use |
Frequently Asked Questions - C&C Tornado NILFISK
User questions about C&C Tornado NILFISK
0 question about this device. Answer the ones you know or ask your own.
Ask a new question about this device
Download the instructions for your Pressure washer in PDF format for free! Find your manual C&C Tornado - NILFISK and take your electronic device back in hand. On this page are published all the documents necessary for the use of your device. C&C Tornado by NILFISK.
USER MANUAL C&C Tornado NILFISK
Roof Cleaner Instructions for use
Roof Cleaner
English 2
Deutsch 10
Francais 18
Espanol. 26
Portugues 34
Nederlands 42
Italiano 50
Dansk 58
Norsk 66
Svenska 74
Suomi 82
Polski 90
1 Safety precautions and warnings 2
2 Description 3
3 Before you start using your Roof Cleaner 4
4 Roof Cleaning. 5
5 After using your Roof Cleaner 8
6Trouble shooting 8
7 Further information 9
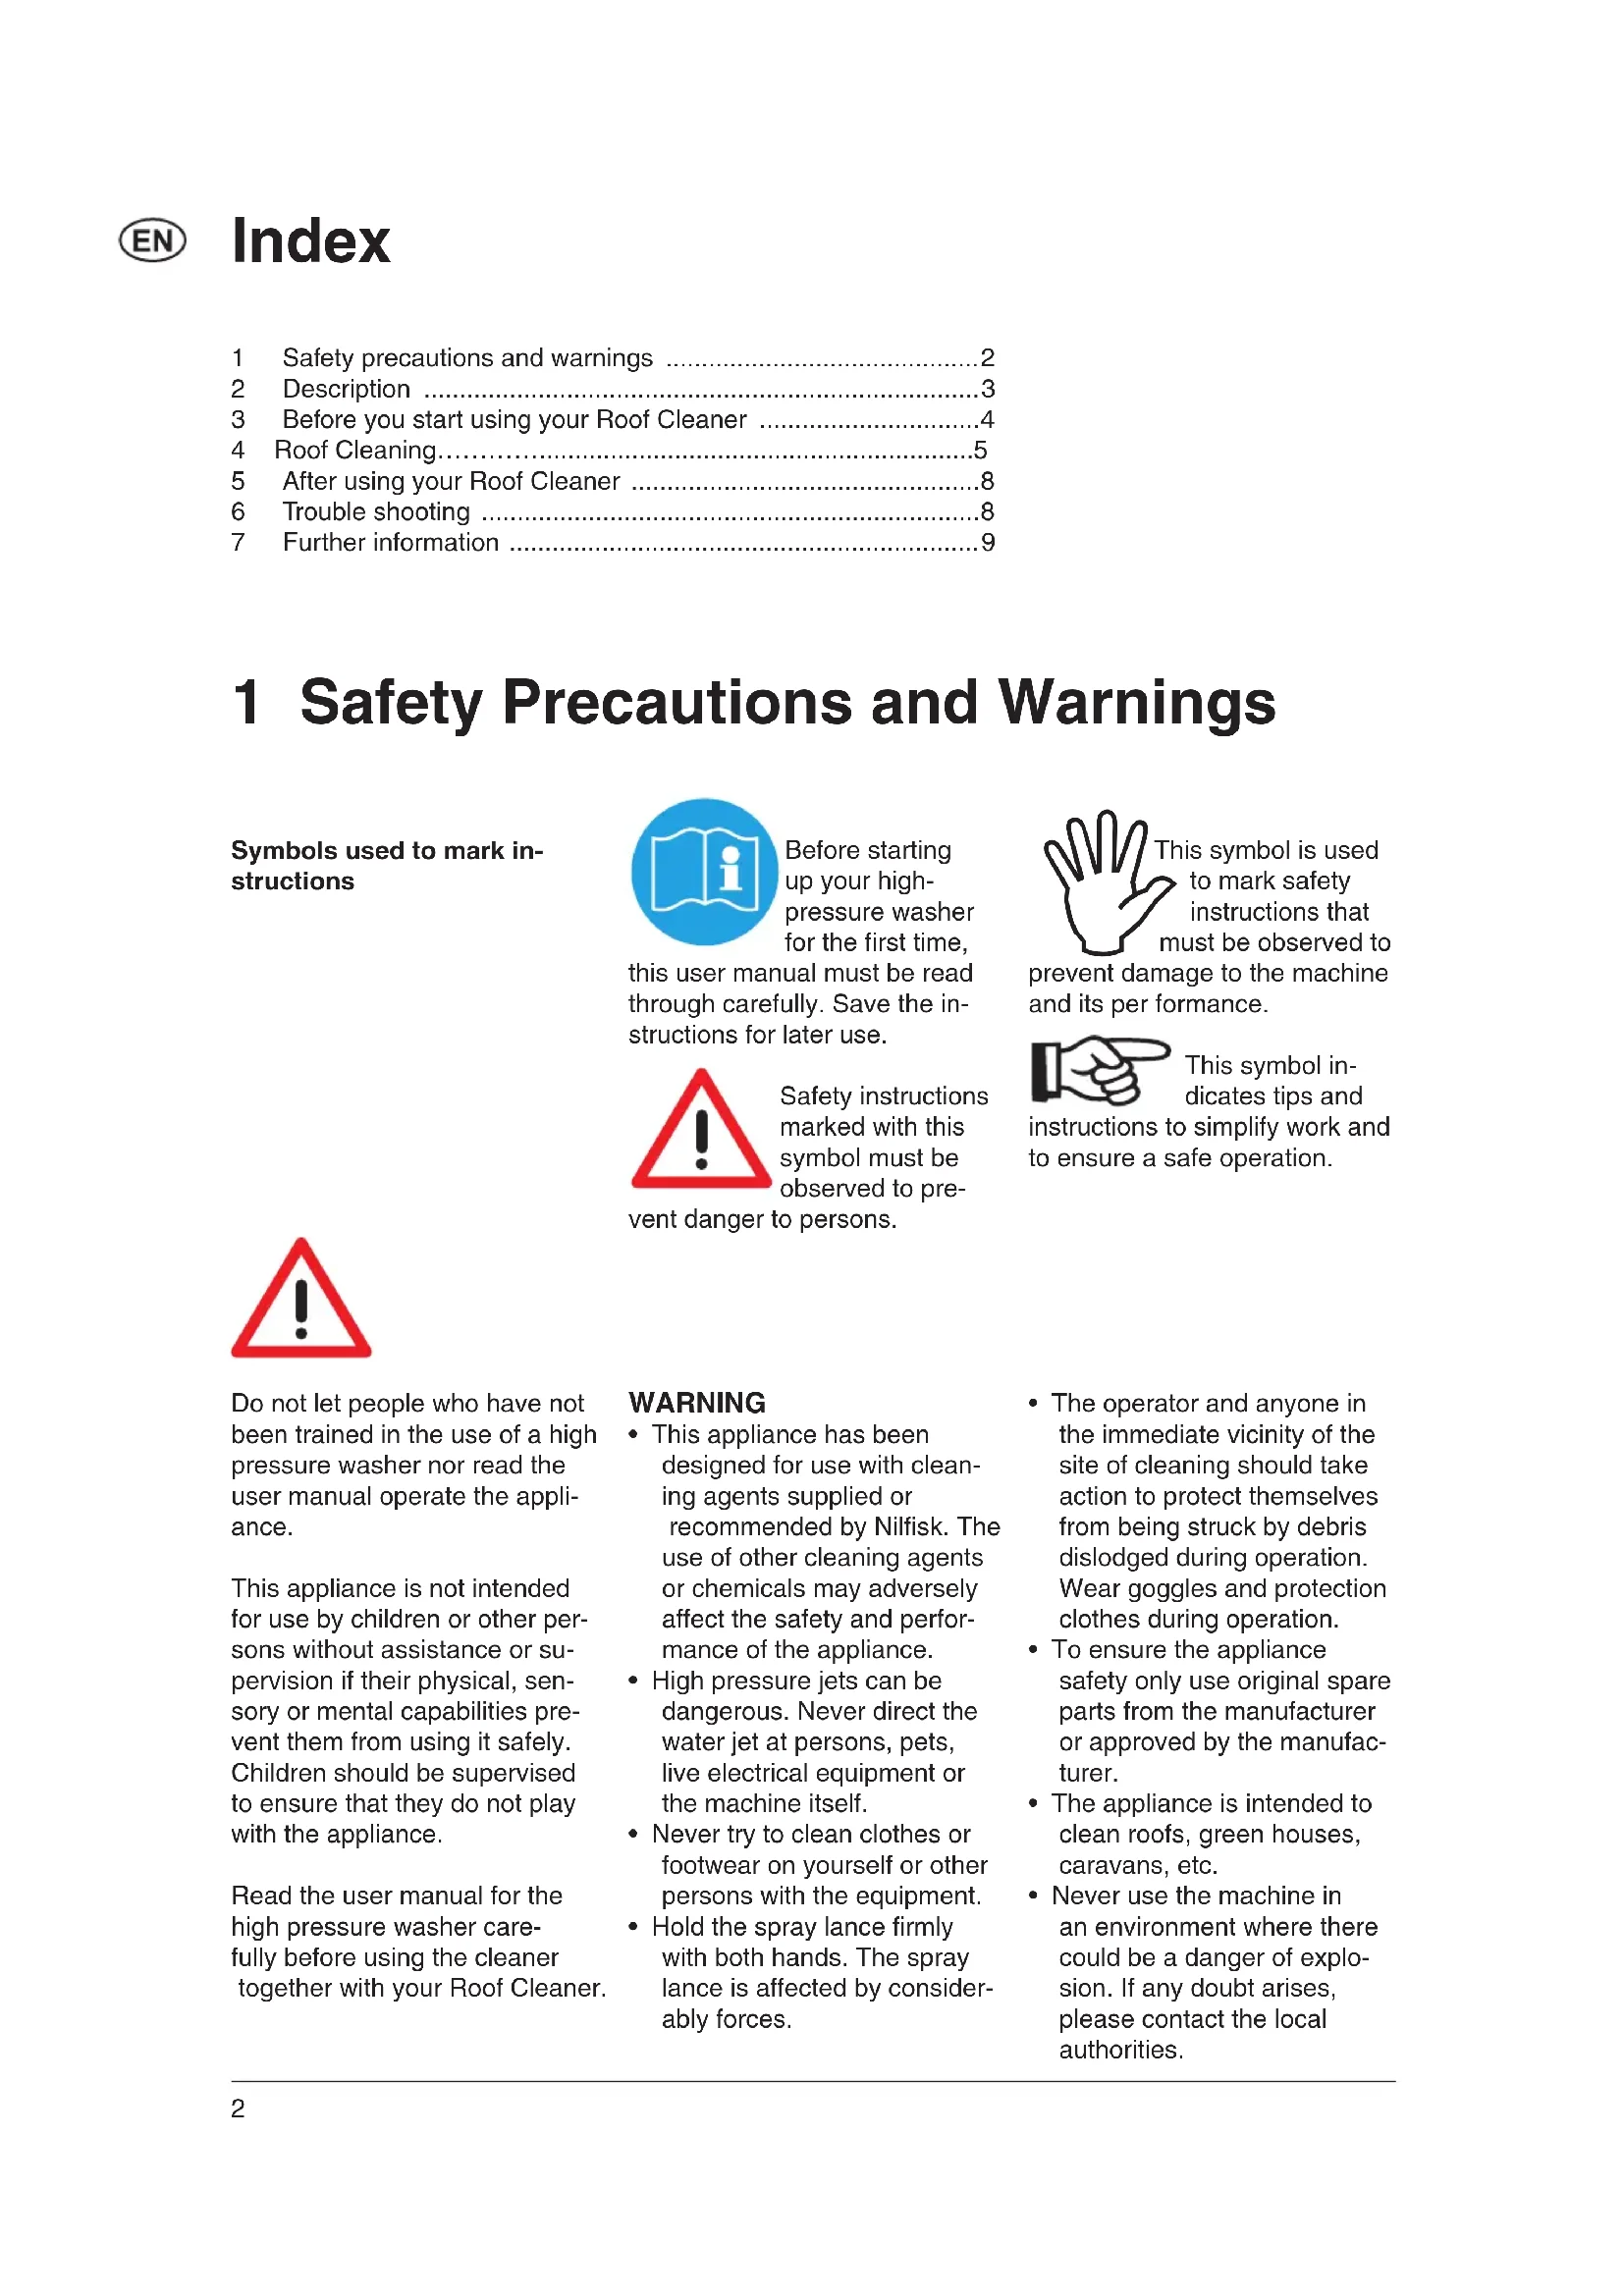
1 Safety Precautions andWarnings
Symbols used to mark instructions

Before starting up your high-pressure washer for the first time,
this user manual must be read through carefully. Save the instructions for later use.
Safety instructions marked with this symbol must be observed to pre
vent danger to persons.

This symbol is used to mark safety instructions that must be observed to
prevent damage to the machine and its per formance.
This symbol indicates tips and to simplify work and safe operation.
Do not let people who have not been trained in the use of a high pressure washer nor read the user manual operate the appliance.
This appliance is not intended for use by children or other persons without assistance or supervision if their physical, sensory or mental capabilities prevent them from using it safely. Children should be supervised to ensure that they do not play with the appliance.
Read the user manual for the high pressure washer carefully before using the cleaner together with your Roof Cleaner.
WARNING
- This appliance has been designed for use with cleaning agents supplied or recommended by Nilfisk. The use of other cleaning agents or chemicals may adversely affect the safety and performance of the appliance.
- High pressure jets can be dangerous. Never direct the water jet at persons, pets, live electrical equipment or the machine itself.
- Never try to clean clothes or footwear on yourself or other persons with the equipment.
-
Hold the spray lance firmly with both hands. The spray lance is affected by considerably forces.
-
The operator and anyone in the immediate vicinity of the site of cleaning should take action to protect themselves from being struck by debris dislodged during operation. Wear goggles and protection clothes during operation.
To ensure the appliance safety only use original spare parts from the manufacturer or approved by the manufacturer. - The appliance is intended to clean roofs, green houses, caravans, etc.
- Never use the machine in an environment where there could be a danger of explosion. If any doubt arises, please contact the local authorities.
2 Description
2.1 Application This appliance has been devel
oped for domestic fouling cleaning for:
Roofs, Walls, Green houses, etc With optional brush (see section 7.1) for cleaning of
- Caravans, Trailers, Windows, etc
Only use the appliance for purposes described in this manual. The safety precautions must be observed to prevent damage to the appliances, the surface to be cleaned or severe personal injuries.
2.2 Use The appliance is designed to
work together with a Nilfisk/ Nilfisk-ALTO/KEW high pressure washer equipped with a hose quick coupling system.
If your high pressure washer is not equipped with a hose quick coupling system a separate high pressure hose can be bought.
Always use original detergent from Nilfisk.
Always test the detergent on a small spot to ensure that there are no negative side-effects.
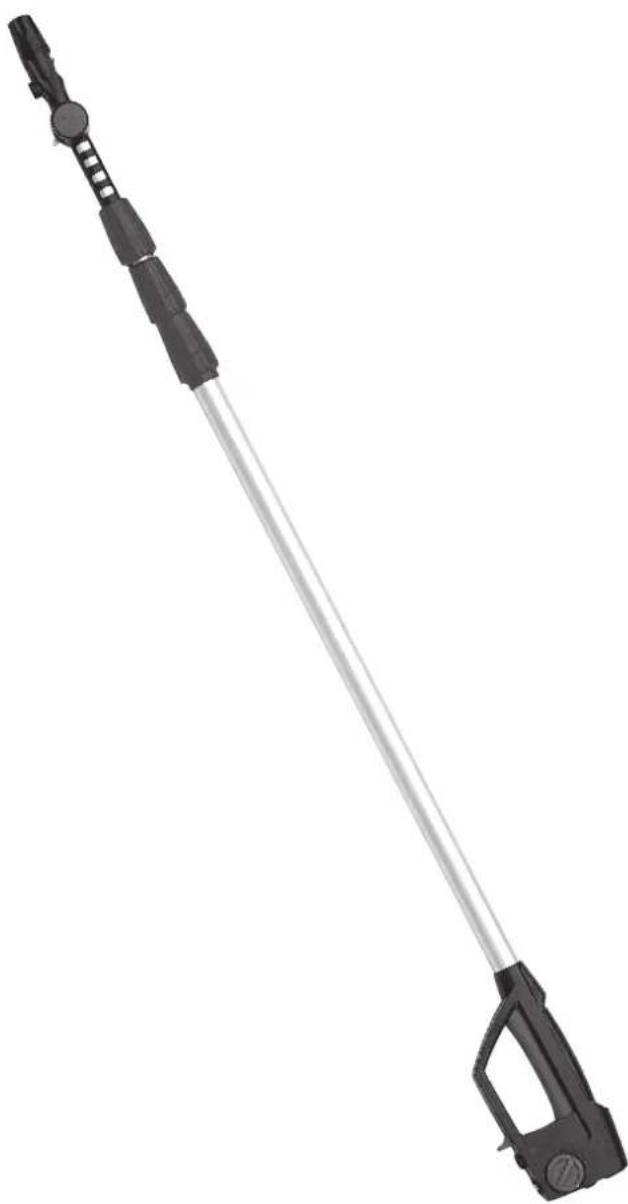
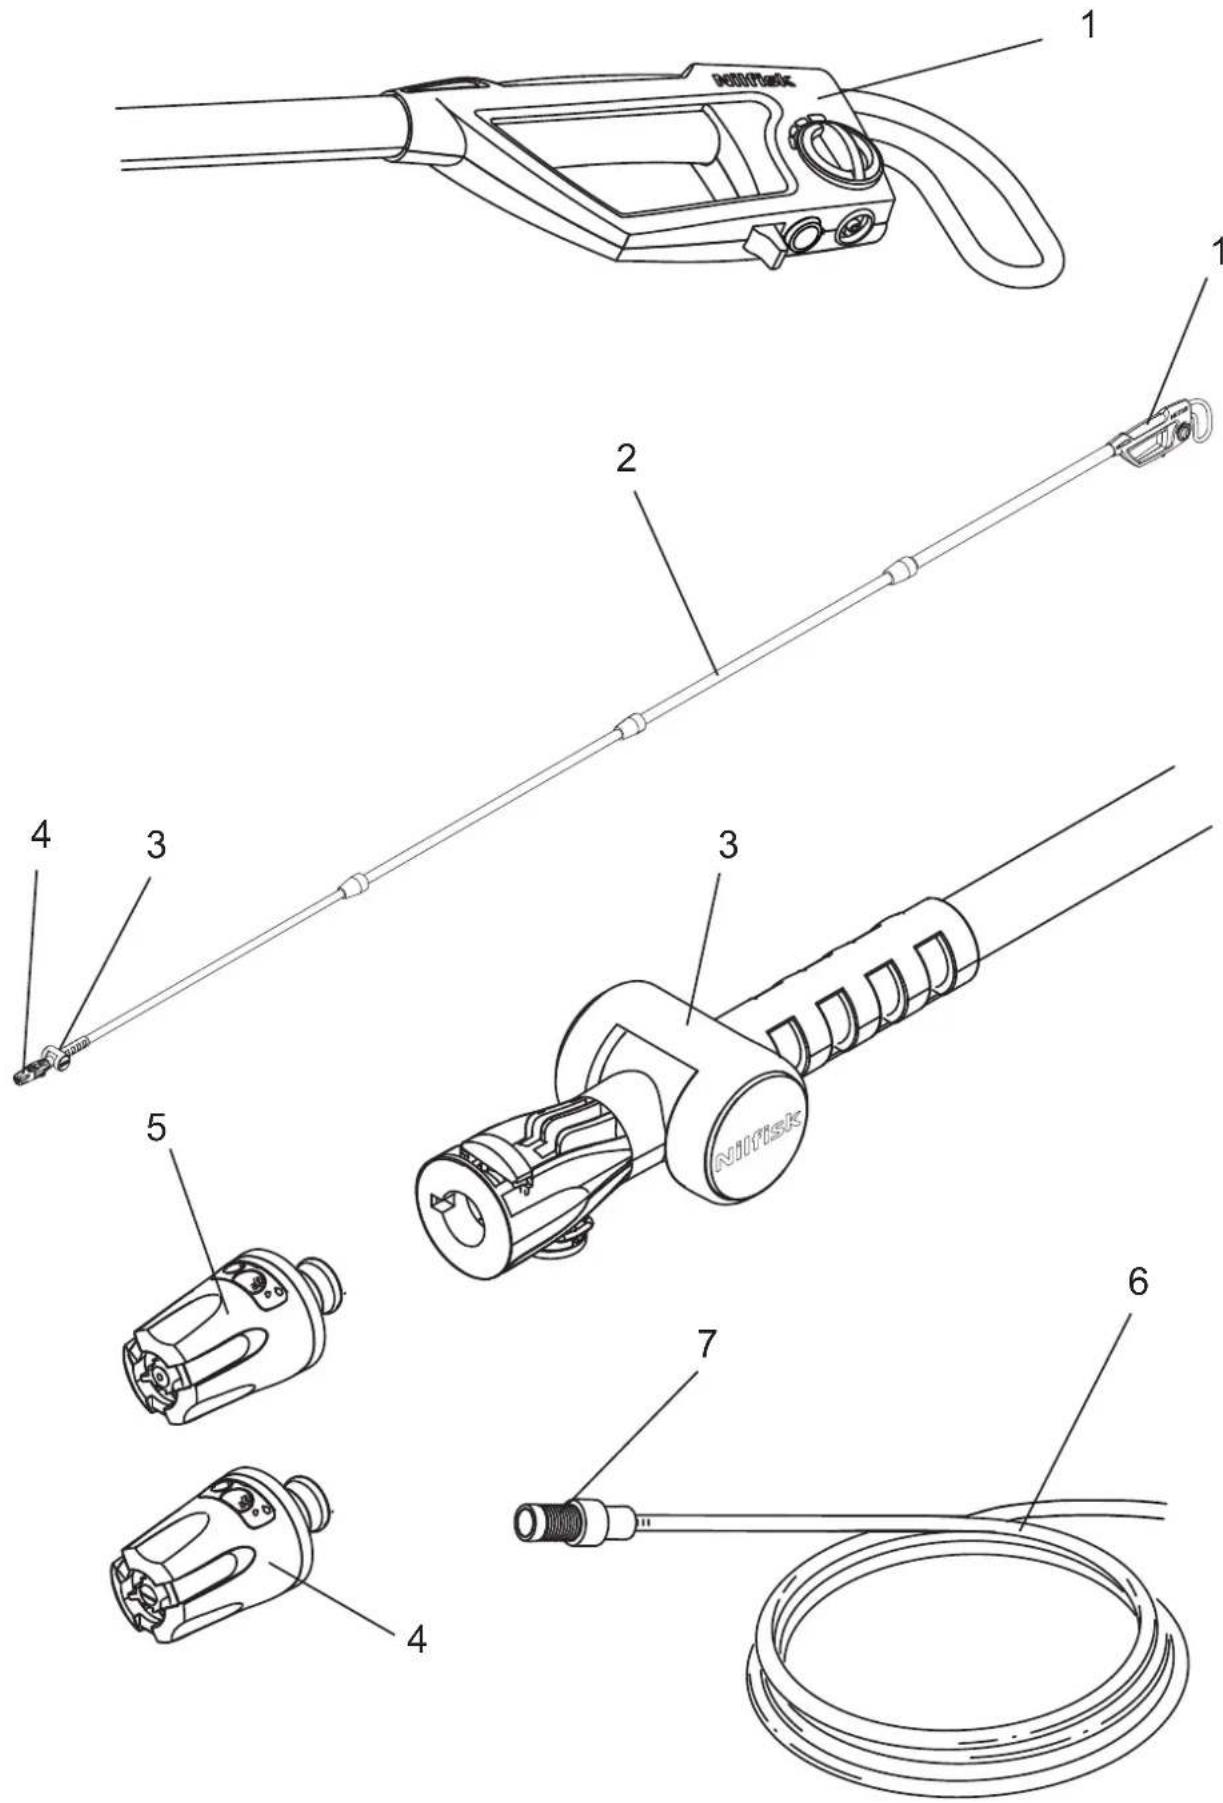
2.2 Operation elements See illustration at the end of this manual.
1 Spray handle
2 Telescopic lance
3 Angular coupling
4 Wide angle foam nozzle
5 Pencil jet foam nozzle
6 Detergent hose
7 Detergent strainer
3 Before you start using your Roof Cleaner
3.1 Mounting of telescopic lance
Assemble the telescopic lance (2) by putting the tubes into each other. Observe that the tube gives a click when inserted into the other tube. Once inserted the tubes cannot be removed again.
3.2 Mounting of detergent hose on spray handle
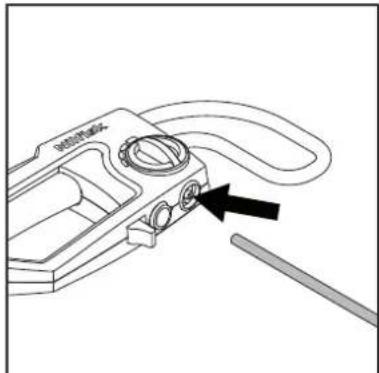
Attach the detergent hose (6) to the spray handle (1) by pushing it over the nipple. Detach the detergent hose by pulling it out.
3.3 Mounting of high pressure hose on spray handle
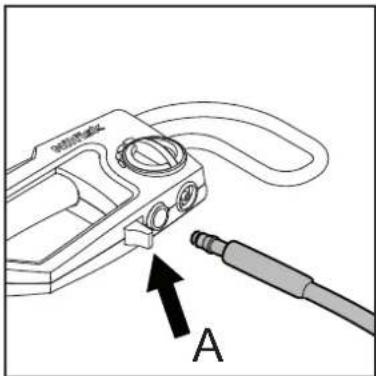
Attach the high pressure hose to the spray handle (1). Detach the high pressure hose by pressing the pawl (A).
3.4 Mounting of foam nozzle or brush
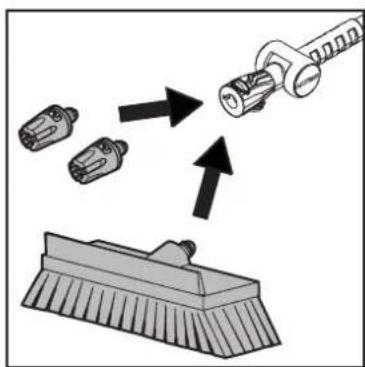
Attach the foam nozzle or the brush.
Warning: When attaching the foam nozzle, the pawl on the side of the angular coupling d come out again.
High pressure nozzles (i.e. Tornado, Power speed) cannot be attached to the Roof Cleaner!
3.5 Hose clip For better control of
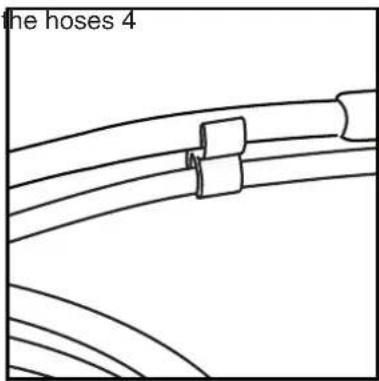
hose clips can be mounted.

4 Roof Cleaning
4.1 General information about roof cleaning

The best cleaning results are obtained in the evening in autumn/spring where fouling on the roof is in growth.
If the fouling is very dry it is necessary to apply pure water to the roof before cleaning and wait 0,5-1 hour before applying the detergent. This can be done by removing the detergent hose from the detergent canister. Adding water is to ensure that the pores open and the fouling can thus be affected by the detergent.
Depending on the degree of the fouling, it may be necessary with an additional treatment after 2-3 months.
The Nilfisk detergent causes only harm to plants when large amounts of detergent are applied.
Do not stand on the roof or on a latter when cleaning. The Roof Cleaner is
made for safe ground operation.
If the gutter of the house is connected to a rain water collection system, make sure that the detergent is not collected but disposed in the right way.
The detergent kills the fouling but does not remove it. This is done via rain, wind, etc that with time will flush the fouling into the gutter.
The result of the decomposition of the fouling can, depending on the conditions, be seen after 4-6 weeks. Full effect can be seen after 4-6 months.
When applying the detergent to the roof, please observe that the detergent is not directed under any roof tiles as this may cause damages to the house.
Wind will affect the direction and the length of the jet. Best result is obtained when cleaning is done on a day with no wind.

Wear goggles, protection gloves and clothes to ensure that your skin,
eyes, etc do not get in contact with the detergent.
4.2 Detergent Buy detergent for roof cleaning
from your local Nifisk dealer.
Only use original Nilfisk detergent. Observe the safety precautions on the detergent bottle.
4.3 Detergent suction Put the detergent hose (6) with
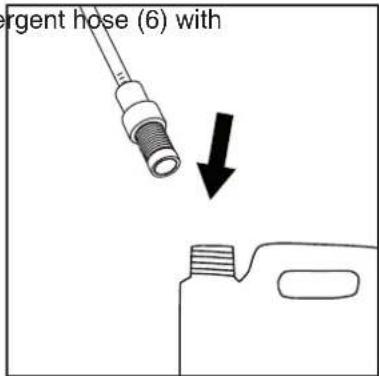
strainer (7) into the detergent canister. Observe that the strainer is not clogged and that the strainer is located at the bottom of the canister.
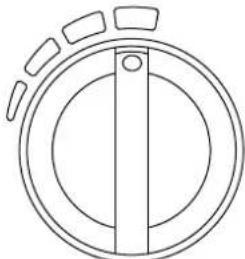
4.4 Adjusting the detergent suction
The Nilfisk detergent shall be mixed in a 10% ratio. The corresponding adjustment of the
detergent knob will depend on the machine and the degree of fouling.
$$ \approx 8 \% $$

$$ \approx 10 \% $$
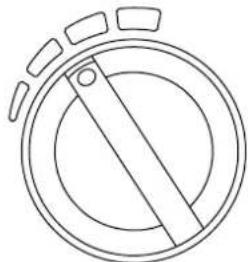
$$ \approx 16 \% $$
4.5 Adjustment of angular coupling
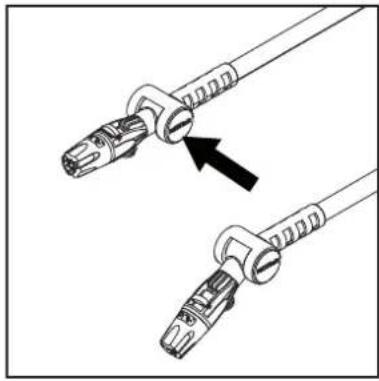
Adjust the angular coupling by pressing the button. When the right position has been found release the button and the coupling will lock. Ensure that it is safely locked.

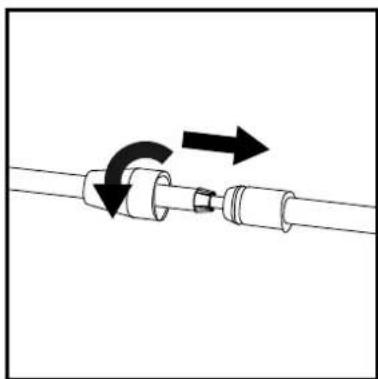
4.6 Adjustment of telescopic lance length

Adjust the telescopic lance to the desired length. Fix the tubes by rotating the connectors. Check that the tubes are properly fixed before start.
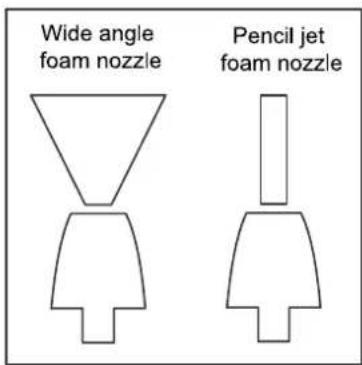
4.7 Choice of foam nozzle Pencil jet,foam nozzle:
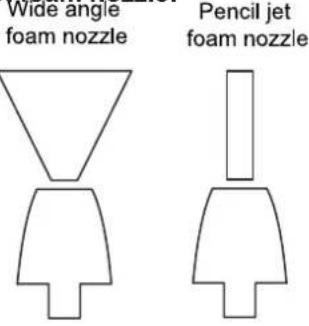
An extensive working area is achieved by using the pencil jet foam nozzle.
Wide angle foam nozzle: At shorter distance a wider area is achieved by using the wide angle foam nozzle.
4.8 Activating the Roof Cleaner
- Connect the high pressure washer (see machine user manual for further information).
- Connect the high pressure hose to the machine and the Roof Cleaner.
- Activate the trigger.
5 After using your Roof Cleaner
5.1 Cleaning Flush the cleaner with clean wa
ter by sucking from e.g. a water
bucket instead of the detergent bottle.
Flush until all detergent has
been removed from the system.
5.2 Storing Remove the detergent hose and
high pressure hose.
Reduce the length of the telescopic lance to a minimum
Store the Roof Cleaner in a frost-free room
6 Trouble shooting
To avoid unnecessary disappointments, you should check the following before contacting the Nilfisk service organization:
| Symptom Cause Recommended action | ||
| Water coming out underneath nozzle | Safety valve open | Wrong nozzle inserted |
| Nozzle blocked. | Check nozzle | |
| O-rings damaged | Contact your nearest Nilfisk Service Centre | |
| No detergent suction Detergent valve closed | Open detergent valve | |
| Suction strainer clogged | Clean strainer | |
| Detergent hose leaking | Check and replace hose | |
| No or smaller jet is coming out from the Roof Cleaner | Water supply not sufficient Check that the high pressure washer is turned on and the water supply to the machine is sufficient | |
7 Further Information
7.1 Brush The Roof Cleaner can also be
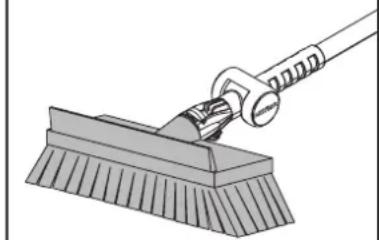
used together with the Nilfisk Click & Clean brush for long distance surface cleaning like windows, caravans, trailers, etc.
7.2 Warranty Nilfisk guarantees the Roof
Cleaner for domestic use for 2 years. If your Roof Cleaner is handed in for repair, a copy of the receipt must be enclosed. Guarantee repairs are being made on the following conditions:
- that defects are attributable to flaws or defects in materials or workmanship. (wear and tear as well as misuse are not covered by the guarantee).
that the directions of this user manual have been thoroughlyobserved.
that repair has not been carried out or attempted by other than Nilfisk-trained service staff. - that only original accessories have been applied.
-
that the product has not been exposed to abuse such as knocks, bumps or frost.
-
that only original Nilfisk detergent has been used
that only water without any impurities has been used. - that the Roof Cleaner has not been used for rental nor used commercially in any other way.
Repairs under this guarantee include replacement of defective parts, exclusive of packing and postage/carriage. Besides, we refer to your national law of sale. The machine should be forwarded to one of the service centres of the Nilfisk organisation with description/ specification of the fault.
Repairs not covered by the guarantee conditions will be invoiced. (I.e. malfunctions due to causes mentioned in section Troubleshooting Chart of the user manual).
6 Resolver problemas
Herrera 1855, 6th floor/604
Unit 1/13 Bessemer Street
Blacktown NSW 2148
Blackdown N072 48 Tel: (+61) 2 98348100
Website: www.consumer.nilfsk.com.au
AUSTRIA
Nilfisk GmbH
Metzgerstrasse 68
Website: www.nilfisk.at
BELGIUM
Nilfisk n.v-s.a
Riverside Business Park
Boulevard Internationalelaan 55
Nilfisk Canada Company
240 Superior Boulevard
Mississauga, Ontario L5T 2L2
Tel.: (+1) 800-668-8400
Website: www.nilfisk.ca
CHILE
Nilfisk S.A. (Comercial KCS Ltda)
Salar de Llamara 822
8320000 Santiago
Tel.:(+56)2684-5006
Website: www.nilfisk.cl
CHINA
Nilfisk
4189YinduRoad
Xinzhuang Industrial Park
201108 Shanghai
Tel.: (+86) 21 3323 2000
Website: www.nilfisk.cn
CZECH REPUBLIC
Nilfisk s.r.o.
VGP Park Horni Pocernice
Do Certous 1/2658
193 00 Praha 9
Tel.: (+420) 244 090 912
Website: www.consumer.nilfisk.cz
DENMARK
Nilfisk A/S
Kornmarksvej 1
2605 Broendl
Tel.: (+45) 4323 4050
Website: www.consumer.nilfisk.dk
FINLAND
Nilfisk Oy Ab
Koskelontie 23 E
02920 Espoo
Tel.: (+358) 207890600
Website: www.consumer.nilfisk.fi
FRANCE
Nilfisk SAS
31-39, Wo Tong Tsui St.
Kwai Chung, N.T
Tel.: (+852) 2427 5951
Website: www.nilfisk.com
HUNGARY
Nilfisk Kft.
Pramukh Plaza, B'Wing, 4th floor, Unit No. 403
Cardinal Gracious Road, Chakala
Andheri (East) Mumbai 400 099
Tel.: (+91) 22 6118 8188
Website: www.nilfsk.in
IRELAND
Nilfisk
- Stokes Place
St. Stephen's Green
Dublin 2
Tel.: (+35) 312943838
Website: www.nilfisk.ie
ITALY
Nilfisk SpA
Industrial W/Santiago
76120 Queretaro
Tel: (+52) (442) 427 77 00
Website: www.nilfisk.com
NEW ZEAL
Nilfisk Limited
Suite F, Building E
42 Tawa Drive
0632 Albany Auckland 71 214 111892
Tel.: (+64) 9 414 1996
Website: www.nilfisk.com
NORWAY
Nilfisk AS
Bjørmerudveien 24
1266 Oslo
Tel: (+47) 22 75 17 80
Website: www.consumer.nilfisk.no
PERU
Nilfisk S.A.C. 100-26703-1100
Calle Boulevard 162, Of. 703, Lima 33- Peru
Lima
Tel: (511) 435-6840
Millenium Logistic Park
ul. 3 Maja 8, Bud. B4
05-800 Pruszkow
Tel.: (+48) 22 738 3750
Website: www.consumer.nilfisk.pl
PORTUGAL
Nilfisk Lda
Sintra Business Park
Zona Industrial Da Abrunheira
Edificio 1, 1^ A
P2710-089 Sintra
Tel: (+351) 21911 2670
Website: www.nilfsk.pt
RUSSIA
Nilfisk LLC
Vatskaya str. 27, bld. 7/1st
127015 Moscow
Tel.:+74957839602
Website: www.consumer.nilfisk.ru
SINGAPORE
Den-Sin
22 Tuas Avenue 2
639453Singapore
Tel.: (+65) 6268 1006
Website: www.densin.com
SLOVAKIA
Nilfisk s.r.o.
Bancjkovej 1/A
SK-821 03 Bratislava
Tel.: (+421) 910 222 928
Website: www.consumer.nilfisk.sk
SOUTH AFRICA
Nilfisk (Pty) Ltd
Kimbult Office Park, 9 Zeiss Road
Laser Park, Honeydew
Johannesburg
Tel.: (+27) 118014600
Website: www.nilfisk.co.za
SOUTH KO
Nilfisk Korea
Nilfisk Middle East Branch
SAIF-Zone
P.O.Box 122298
Sharjah
Tel.: (+971) (0) 655-78813
Website: www.nilfisk.com
UNITED KINGDOM
Nilfisk Ltd
Nilfisk House, Bowerbank Way
Gilwilly Industrial Estate, Penrith
Cumbria CA11 9BC
Tel: (+44) (0) 1768 868995
Website: www.consumer.nilfisk.co.uk
UNITED STATES
Nilfisk Inc.
14600 21st Avenue North
Plymouth, MN-55447
Tel.: (+1) 800-989-2235
Website: www.nilfisk.com
VIETNAM
Nilfisk Vietnam
No.51 Doc Ngu Str.
P. Vinh Phuc, Q.Ba Dinh
Hanoi
Tel.: (+84) 761 5642
Website: www.nilfisk.com
- Roof Cleaner Instructions for use
- Roof Cleaner
- Safety Precautions andWarnings
- Symbols used to mark instructions
- WARNING
- Description
- Application This appliance has been devel
- Use The appliance is designed to
- Operation elements See illustration at the end of this manual.
- Before you start using your Roof Cleaner
- Mounting of telescopic lance
- Mounting of detergent hose on spray handle
- Mounting of high pressure hose on spray handle
- Mounting of foam nozzle or brush
- Roof Cleaning
- Detergent Buy detergent for roof cleaning
- Detergent suction Put the detergent hose (6) with
- Adjusting the detergent suction
- Adjustment of angular coupling
- Adjustment of telescopic lance length
- Choice of foam nozzle Pencil jet,foam nozzle:
- Activating the Roof Cleaner
- After using your Roof Cleaner
- Cleaning Flush the cleaner with clean wa
- Storing Remove the detergent hose and
- Trouble shooting
- Further Information
- Brush The Roof Cleaner can also be
- Warranty Nilfisk guarantees the Roof
- Resolver problemas
- AUSTRIA
- BELGIUM
- CHILE
- CHINA
- CZECH REPUBLIC
- DENMARK
- FINLAND
- FRANCE
- HUNGARY
- IRELAND
- ITALY
- NEW ZEAL
- NORWAY
- PERU
- PORTUGAL
- RUSSIA
- SINGAPORE
- SLOVAKIA
- SOUTH AFRICA
- SOUTH KO
- UNITED KINGDOM
- UNITED STATES
- VIETNAM
Brand : NILFISK
Model : C&C Tornado
Category : Pressure washer