D 2001024V - Compressor STANLEY - Free user manual and instructions
Find the device manual for free D 2001024V STANLEY in PDF.
Frequently Asked Questions - D 2001024V STANLEY
User questions about D 2001024V STANLEY
0 question about this device. Answer the ones you know or ask your own.
Ask a new question about this device
Download the instructions for your Compressor in PDF format for free! Find your manual D 2001024V - STANLEY and take your electronic device back in hand. On this page are published all the documents necessary for the use of your device. D 2001024V by STANLEY.
USER MANUAL D 2001024V STANLEY
GB Instruction manual for owner's use (Original instructions)
Manufactured under license by:
FINI NUAIR S.p.A. - via Einaudi 6, 10070 Robassomero (TO) Italy
Stanley® is a registered trademark of The Stanley Works or its affiliates and is used under license.
Attenzione! - Warning! - Attention! - Achtung! - Cuidado! - Atenço! - Waurschuwing! - Adversell!
- Varning! - Varoitus! - Пожохи! - Uwaga! - Pozor! - Pozor! - Figyelem! - Pozor! - Pozor! - Bнманe! -
Advarsel! - Uyar! - Atentie! - BnmaHne! - PaZna! - Demesio! - Tahelepanu! - Uzmanibul
Tutti dati identificativi, costruttore, modello, codice e numero di series, sono riportati sull'etichetta CE applicata sull'ultima pagina del manuale.
GB All identification data: manufacturer, model, code and serial number are printed on EC label stuck onto the last page of this manual.
FR Toutes les données d'identification : fabricant, modèle, reférence et numéro de série, sont indiquées sur l'étiquette CE appliquée sur la的最后一 page du manuel.
DE SAmtliche Geratedaten wie Hersteller, Modell, Artikel- und Seriennummer sind auf der CE-Plakette angefuhrt, die auf der letzten Seite des Handbuchs abgebildet ist.
ES Dos los datos identificativos: fabricante, Modelo, codelo y numero de series figuran en la etiqueta CE aplicada en la ultima pagina del manual.
PT Todos os dados de identificacao: fabricante, Modelo,�� e numero de série são impressos na etiqueta CE colada na ultima pagsa于此 manual.
NL Alle identificatiegegevens: fabrikant, model, code en serienummer zijn gedrukt op het EG-etiket dat is aangebracht op de LASTe pagina van\
deze handleiding.
DK Alle identifikationsoplysninger: Producent, model, kode og serienummer findes pa CE-maerkaten, der er anbragt pa sidste side i denne manual.
SE Alla identieringsdata, tilverkare, modell, kod och serienummer, aterges i CE-märkningen, som sitter pa sista sidan i manualen.
F Kaikki tunnistustiedot, kuten valmistaja, malli, koodi ja sarjanumero loytyvat oppaan viimeisell sivulla olevasta CE-merkinnast.
Ola ta oioieia tautotntac, kataokeuaotns, movteao, kwokoc, kai apiouc oipac, avapepovtai otny etiketa CE tou pioktai ony TEaetuaia oelida tou yeeipidoiu xpang.
PL Wszystkie dane identifikacyne: producent, model, kod i numer seryjny zostaly wskazane na oznaczeniu CE przyklejonym na ostatnej stronie niniejszej instrukcji.
HR Svi identifikacijski podaci: proizvodač, model, šifra i serijski broj su ispisani na CE etiketi koja se nalazi na posljednjoj stranici ovog prisćnika.
SI Vsi identifikacjski podatki, proizvajalec, model, koda in serijska stevilka, so navedeni na CE oznaki, ki se nahaja na zadnji strani prirocnika.
HU Az azonositashoz szukseges adatok, ugymint gyartó, modell, kód es sorozatszám, megtalalhatok a kézikonyv utolsó oldára ragasztott EK-cimkén.
Vsechny identifkauci udaje (vyrobce, model, kod a seriove cislo) jsou vtiisteny na stitku EK nalepenem na posledni strane teto pirucky.
SK Vsetky identifkne udaje (vyrobca, model, kod a seriove cislo) su vytlcnene na stitku EK nalepenom na poslednej strane tejo prirucky.
RU Bce IeHTnFkauHOHHbIe daHHbIe, H3BaHHe Ipon3BODNTeJIa, MOeJIb, HOMep n cepHbI HOMep yka3aHbI Ha 3TNKeTke CE, HAKLeEHOH Na noCneDHeI CTpaHnce pyKOBoDCTBA.
NO Alle identifikasjonsdata: Produsent, modell, kode og serialummer er trykt pa EU-merket som du finner pa den siste sider i denen bruksanvisningen.
TR Tum kimlik verileri: uretici, model, kod ve seri numarasi, bu klavuzun son sayfasina yapistrlmis olan AT etiketi uzerine basilmstir.
Toate datele de identificare, producatorul, modelul, codul sinumarul de series sunt redate pe eticheta CE aplicatae pe ultima pagina a manualului.
BG BcHn IeHTnIaONHOHN DaHHN - npo3BOJTeN, Moen, KOn n cepueH Hmep - ca OTneHaHn Bbpxy CE MapkpOBkata Ha noCneHaTa CTpaHnca Ha HactoTO pKoBOCTBO.
RS Svi identifikacjski podaci: proizvodac, model, sifra i serijski broj su ispisani na CE etiketi koja se nakazi na zadnjoj strani ovog priscnika.
Li Visi identifikaciniaiu duomenys: gamintojas, modelis, koras ir serijos numeris, yra iisspausdinti EB etiketete, prikljuotoje paskutiniame sio vadovo puslapye.
EE Koi identifseermisandmed, nagu tootja, mudel, kood ja serianumber, on trkitud toote tagakulj olevale EU margistusele.
LV Visi identifikacijas dati: ražotajs, modelis, kods un serijas numurs ir drukati uz EK etiketes, kas piellmeta sfs rokasgramatas pe dedja lapa.
Dichiarazione di conformità CE - Declaration of compliance EEC - Declaratio de conformità CE - EG Konformitätserklärung - Declaracion de conformidad CE - Declaracao de conformidade CE - Verklaring van overeenstemming EEG - CE-Overensstammelseserklaering - Forsakran om CE-Overensstammelse - CE Vaatimustemmukaisuusvakuutus - oumuopwoonc CE - Deklaracja zgodnosci WE - Izjava o sukladnosti direktivama EZ - Izjava o sukladnosti ES - EK Megfelelesi nyilatkozat - ES Prohlasei o shode - Prehlaseie ES o zhode - Dieknapaun o cootbetrcbn Hopmam EO - EF-overensstammelseserklaering - AT uygunluk beyani - Declaratie de conformitate CE - Dieknapaun 3a cboTBeTcBne no stanapt Ha EO - Izjava o sukladnosti propisima EZ - Deklaracija del EB reikalavimu vykdymu - Vastavusdekaratsoon EK - Pazinojums par atbilstibu EK prisibam
La seguente dichiarazione è allegata in copia originale al compressore.
The following declaration is attached to the compressor in original copy.
FR La déclaration suivante est jointe en copie originale au compresseur.
DE Die gegenüber Erklärung wird im Original dem Kompressor beigepackt.
ES La?siguientedeclaracionseadjuntaencopiaoriginalalcompresor.
A segunte declaração está anexada ao compressor na cópia original.
NL Een originele kopie van de onderhavige verklaring is bij de compressor gevoegd.
DK Denne erklaring vedlaegges kompressoren i forsteekemplar.
SE Folfande forsakran bifogas kompressorn i originalkopia.
F1 Seuraava vakuutus on liitetty kompressoriin alkuperäisenä kopiona.
GR AuEvtiKO avitutIO TnC TAPakatw 0wns TPOapTatai OTOV aupntieotn.
PL Oryginal niniejszej deklaraci jest dołaczny do spreżarki.
HR Uz kompresor je prilozena kopija originala sljedece izjave.
SI Ta izjava je v originalu prilozena kompresorju.
HU Az alabbi nyilatkozat eredeti peldanya a kompresszor mellekletet képezi.
Cz Nasledujici prohlasei je prilozeno ke kompresoru v originni kopii.
SK Nasledujuce vyhlasenie je prilozene ku kompresoru v originalnej kopii.
RU OpunnaJn deKJIapaun npunaraetc K Komnpeccy.
No Den falgende erklageringen er festet til kompressoren i original kopi.
TR Asagidaki beyan, original nusha olarak kompresore ilistirlmistir.
Urmatoarea declaratie this anexata in copie originala la compresor.
BGOpunHnHaJHo KOnHe Ha CneHaTa DeKnapauae npKpeNaeHa KbM KomPecopa.
RS Uz kompresor je prilozena kopija originala sledece izjave.
Toliau pateiktos deklaracijos originali kopija pritvirtinta prie kompresoriaus.
EE Selle availuse originaaleksemplar on kinnitatud kompressorile.
LV Sekojosas deklaracijas originala kopija ir pievienota kompresoram.
Il costruttore - The manufacturer - Le fabricant - der Hersteller - El fabricante - O fabricante - De fabrikant - Producent - Tillverkare - Valmistaja - O kataokeuaotn - Producent - Proizvodač - Proizvajalec - A gyátro - Vyrobce - Vyrobca - Ppou3bOduTeJ - Produsent - Üretici - Produçatorul - Ppou3bOduTeJ - Proizvodač - Gamintojas - Tootja - Razotájs
| IT | Dichiara sotto la sua esclusiva responsabilità, che il compressore d'aria qui di seguito descripto è conforme alle prescrizioni di sicurezza delle direttive applicabili. |
| GB | Declares under its sole responsibility that the air compressor described below complies with the safety requirements of applicable directives. |
| FR | Déclare sous son entière responsabilité que le comprisseur d'air décrit ci-après est conforme aux prescriptions de sécurité des directives applicables. |
| DE | Erklart unter ihrer alleinigen Verantwortung, dass der in Folge beschriebene Luftkompressor den Sicherheitsvorschriften der anwendbaren Richtlinien entspricht. |
| ES | Declara, bajo su exclusiva responsabilitad, que el compresor de aire describe a continuacion responde a las prescripcionedes seguidad de las directivas aplicables. |
| PT | Declara sob a sua exclusiva responsabilitadque o compresor de ar descriito a seguir está em conformidade com as prescricçõesde segurarca das directivas aplicaveis. |
| NL | Verklaart onder+zijn eigen verantwoordelijkheid dat de hieronder beschreiben persluchtcompressor in overeenstemming is met deveiligheidsvoorschriften die van toepassing+zijn. |
| DK | Erklaerer under eget ansvar, at luftkompressoren, der beskrives nedenfor, er i overensstemmelse med sikkerhedsforskrifterne i direktiverne. |
| SE | Forsakrar under eget ansvar att den luftkompressor som beskrivs nedan överensstämmer med de tillämpliga direktivenssakerhetsforeskrifter. |
| FI | Vakuuttaa omalla vastuullaan, ettā seuraavassa esitelly ilmakompressori vastaa sovellettavien direktivien turvallisuusvaatimuksaia. |
| GR | Δηλωνει με ατολείσική δική Ιευύνης Επιο συμπίεοτης ἀρος Που Περίράφεται Παρακάτων αντατοκρίνεται στι πρόδιαγραφέςασφαλείας τινο βόηιών Που οχύουν. |
| PL | Oswiadcza na swoja wylçćznà oppowiedzialność, ze opisana ponižej sprežarka spelnia wymagania w zakresie bezpiecieżstwa zawarte w obowiazujacych dyrektywach. |
| HR | Izjavljupe pod vlastitom odgovornócu da dolje opisani kompresor zraka udovoljava swim sigurnosnim zahtjevima važecih Direktiva. |
| SI | Izjavlja pod lastno odgovornostjo, da je v nadaljevanju opisan kompresor za zrak skladen z varnostimi dozadevnih direktiv. |
| HU | Sajat felelòssege tutatában kijelenti, hogy a lent megnevezett kompressor megfelel a vonatkoź irányelvek biztonságikövetelményinek. |
| CZ | Prohlasuje s plnou odpopědnosti, ze uvedený vzduchový kompresor vyhovuje bezpečnostím požadavkūm príslušných směncic. |
| SK | Vyhlasuje na vlastnú zodpovednost', ze uvedený vzduchový kompresor vyhovuje bezpečnostím požiadavkūm príslušníchsmernic. |
| RU | Заравлaret по сбююсяк nullуточныну ответстеность, чу воздунный kompaneccop, описандийниже, отberает BCEM tréбованям бezоноанocstи пrimениевых діректуг. |
| NO | Erklaerer under eget ansvar at luftkompressoren her beskrevet er i overensstammelse med sikkerhelsforskriftene i de gjeldende direktivene. |
| TR | Tek sorumluk kendisinde olmak üzere, aşağida acıkulanan hava kompresörünün, geleeri direktiflerin güvenlik gereklerine uygun olduguṇu beman eder. |
| RO | Declarāpe propria raspundené cã comptorul de aer describris in continuare este conform cu cerințele de siguranta ale directivelor aplicabile. |
| BG | Демарра на собстVENA OTROBOPHOC, чу описаний по-дочу вьзduшень kompaneccop в сьотоветстинец сизickванята на риможимпесу direkteцьи за Бероанocst. |
| RS | Izjavljupe pod ličnom odgovornócu da je dole opisan kompresor vizduha u skladu sa svim zahtevima bezbednosti koje propisuju važece Direktive. |
| LT | Su visa atsakomybe pareiskia, kadŽemiau aprasγtas oro kompresorius atitinka taikomü direktyvy saugos reikalavimus. |
| EE | Avaldabenda täieliku vastutusega, et järgnevalt kirjeldatud öhukompressor vastab kohaldatabate direktiviide ohutsnõuetele. |
| LV | Pilnibā apstiprina, ka tālāk minētais gaisa kompressors atbilst piemerojamo direktīvu drošības prisibām. |
LEGENDA SEGNALETICA DI SICUREZZA SUI PRODOTI
GB KEY TO PRODUCT SAFETY SIGNS
FR LEGENDE DES PICTOGRAMMES DE SECURITE FIGURANT SUR LES PRODUITS
DE ERKLARUNG DER SICHERHEITSKENNZEICHNUNG AN DEN PRODUKTHEN
ES INSCRIPCION DE LA SENALIZACION DE SEGURIDAD COLOCADA EN LOS PRODUCTOS
LEGENDA DA SINALETICA DE SEGURANCA NOS PRODutos
VERKLARING WAARSCHUWINGSSYMBOLEN OP PRODUCTEN
DK SIGNATURFORKLARING TIL PRODUKTERNES SIKKERHEDSSKILTNING
SE FÖRKLARING TILL SÄKERHETSSYMBOLER PAPRODUKTERNA
FUOTTEITA KOSKEVAT TURVAMERKIT
GR YNOMNHMA ZHMATON AZΦAIAEIA ΣTA IPOIONTA
PL LEGENDA ZNAKOW OSTRZEGAWCZYCH NA WYROBACH
HR ZNAKOVI ZA UPOZORENJE NA PROIZVODIMA
OPOZORILNI ZNAKI NA PROIZVODIH
HU A TERMÉKEKEN TALÁLHATO BIZTONSAGI JELZÉSEK LISTAJA
CZ BEZPECNOSTNI ZNAÇENI NA VYROBCICH
LEGENDA: BEZPECNOSTNE OZNACENIA NA VYROBKOCH
RU YCIOBHBIE PEPDYNIPDEITENBHE 3HAKINO BE3ONACHOCTN PABOTC N3DENNIM
NO SIKKERHETSTEGNFORKLARING PÄ PRODUKTENE
TR URUNLER HAKKINDA GUVENLIK TALIMATLARI LEJANDI
RO LEGENDA INDICATOARELOR DE SECURITATE APLICATE PE PRODUSE
BGJIIEHDAHA3HAUITE3ABE3OINACHOCTBbPxyN3DEINIyTA
UPOZORAVAJUCE NAZNAKE O BEZBEDNOSTI PROIZVODA
LT SUTARTINIAI JSPÉJAMIEJI ZENKLAI DEL DARBO SAUGUMO SU GAMINIAIS
EE OHUTUSNOUDED
LVPRODUKTUDOSIBASNORADIJUMAZIMJUSARAKSTS

IT Leggere attendamente il manuale d'istruzioni prima dell'uso
GB Before use, read the handbook carefully
FR Lire attentivement le Manuel Opérateur avant toute utilisation
DE Vor Inbetriebnahme Gebrauchsanleitung aufmerksam lesen
ES Leer atentamente el manual de instrucciones antes de usar el equipo
PT Ler com atenção o manual de instruções antes do uso
NL Lees voor gebruik aandachtig de handleiding door
DK Laes omhyggeligt instruktionsmanualen for brug
SE Lás bra克斯anvisingen noggrant fore användning
FI Lue käytöopas huolelliseti ennen käyttoa
GR Aiaaote TPOOeTKIaTo EYXeiio OOnyiwv TIPV aTTO Xpion
PL Przed uzyciem nalezy dokladnie zapoznać sie z instrukcjami obstugi
HR Prije upotrebe pažljivo pročitajte upute za upotrebo
SI Pred uporabo, pazljivo preberite navodila za uporabo
HU Hasznalat elott figyelmesen olvassa el a kezikonyvet
CZ Prid zahajenim prace si pozorné prectele piriucku pro pouzil.
SKPred pouzivanim vyrobkusipozome prectajte navod na jeho pouzitie
RU Ipeed TEM, kak npctyntb KaBoTe, BHMaTeIbHo IpOHTaTHe HCTpyKuIO No 3KcIIyatauIN
NO Les noye bruksanvisningen for bruk
TR Kullanimdan once kullanim kilavuzunu dikkatice okuyunuz
RO Cititi cu atenie manualul de instrueti inainte deutilizare!
BG BHIMaTeHNO npOeTepeBkoBOdCTBOTo NO eKcnnoatauynpeynotpe6a
RS Pre upotrebe pažljivo prociţajte piručnik s uputstvima
LT Pries imdamiesi darbo atidziai perskaitykite naudojimo vadoveli
EE Enne kasutamist lugege kasutamisjuhend tahelepanelikult labi
LV UzmanTgi izlasiet Izmantoanas instrukcijpirms produkta lietanas

IT Pericolo di scottature
GB Warning, hot surfaces
FR Risque de brûlures
DE Verbrennungsgefahr
ES Peligro de quemaduras
PT Perigo de queimaduras
NL Gevaar voor brandwonden
DK Risiko for skoldning
SE Risk for brannskador
FI Palovammavaara
GR Kivovoc Eykaupatw
PL Uwaga, grozi poparzeniem
HR Opasnost opekotina
SI Nevarnost opeklin
HU Figyelem, egetofeluletek
CZ Nebezpeci spalen!
SK Nebezpečenstvo popálenia!
RU Onachoctb oxkora
NO Fare for a brenne seg
TR Yanma tehlikesi
RO Pericol de arsuri
BG OnachocOT n3rapHn
RS Opasnost od opekotina
LT Nudegimo pavojus
EE Suttivuse oht
LV Piesargieties no apdedzināsana

IT Attenzione corrente elettrica
GB Dangerous voltage
FR Attention: presence de courant electrique
DE Achtung, elektrische Spannung
ES Atencion, corriente electrica
PT Atenção corrente eletrica
NL Attentie, elektrische stroom
DK Adversel elektrisk strøm
SE Varning - elektricitet
FI Huom. vaarallinen jannite
GR npooyn nAekptikp oeu
PL Uwaga, niebepezicznstwo porazenia pradem elektrycznym
HR Pažnja, elektrickni napon
SI Pozor, elektricna napetost
HU Figyelem, elektramos aram
CZ Pozor - elektrické napét!
SK Pozor - elektricky prud!
RU Puck 3neKtpueckoro HanpjaeHn
NO Forsiktig elektrisk strøm
TR Dikkat elektrik akimi
RO Atentie! Pericol electric
BG BHIMAHHe: eJKeTpUeKIn TOK
RS Pažnja elektricka struja
LT Elektros itampos rizika
EE Ettevaatust - elektrivool
LV Esiet uzmanigi - elektrifas plusma
IT Pericolo avviamento automatico
GB Danger - automatic control (closed loop)
FR Risque de démarrage automatique
DE Gefahr durch automatischen Anlauf
ES Peligro de arranque automatico
PT Perigo arranque automatico
NL Gevaar voor automatisch starten
DK Fare automatisk start
SE Risk for automatisk start
FI Automaattisen kaynnistymisen vaara
GR Kivouvoa autopatns Ekkivnans
PL Uwaga, niebezpieczenstwo automatyczneo uruchomienia sie
HR Opasnost kod automastkog uklapanja
SI Nevarnost pri avtomatskem zagonu
HU Automatikus beindulás veszélye
CZ Nebezpeci - automatické spoustén!
SK Nebezpečenstvo - automatické spustenie!
RU OnaHOCTb aBtOMaTHueCKTO BKNIOUeHIN
NO Fare for automatisk oppstart
TR Dikkat otomatik calisma tehlikesi
RO Pericol porne automata
BG OnachOCT OT aBtOMaTHo NyCKaHc B XoD
RS Opasnost od automatskogPokretanja
LT Automatinio [sijungimo pavojus
EE Ohtlik - automaatiline käivitus
LV Uzmanibu - automatiska iedarbinasanas


IT Protezione obbligatoria dell'udito, della vista e delle vie respiratoriie
GB Hearing, eye and respiratory protection must be worn
FR Port obligatoire de protections auditives, oculaires et des voies respiratoires
DE Gehorschutz, Augenschutz und Atemschutz sind obligatorisch vorgeschrieben
ES Proteccion obligatoria de los oidos, de la vista y de las vias respiratorias
PT Proteção obligatória do ouvido, da vista e das vias respiratórias
NL Verplichte bescherming van oren,ogen en luchtwegen
DK Obligatorisk beskyttelse af horelse, syn og luftveje
SE Horselskydd, skyddsglasogon och andningsmask obligatoriskt
FI Käytettäva kuulosuojaimia, suojalaseja ja hengityksensuojaimia
GR YTOxpeWtIKo TPOoTATEUTIKo aKoN, 6paonkai Tou avatveuotikouoTuHpaos
PL Obowiazkowo zabeziepieczyć sluch, wzrok i drogi oddechowe
HR Obavezna zaistita ociju, disnih puteva i sulha
SI Obvezna zaščita oči, dihal in sluha
HU A legutak, a latas es a hallas vedelme kotelez
CZ Povinnost chraniit sluch, oci a dychaci cesty.
SK Povinná ochrana sluchu, zraku a dychacich ciest!
RU 063aTeNbHa 3aunTa ywei, nua n DbixaTeNbHbix nyTei
NO Obligatorisk a t i bruk horselsver, vernebriller og pustemaske
TR Mecuri isitme, gorme ve solunum yollari korumasi
RO Echipament de protectie obligatoriu pentru urechi, ochi si cai respiratoriii
BG 3aBnKInHmpeDCTBa3a3aHTaHaCnyxa,3peHMetOnuNxATenHITENbTnua
RS Obavezna zaftita sluha, vida i disnih puteva
LT Privaloma ausu, veido ir kvépavimo taku apsauga
EE Kuulmis-, nagenis- ning hingamisteede kaitse on kohustuslik
LV Obligata dzirdes, redzes un elposanas celu aizsardziba
IT DATI TECHNICI: Fare riferimento all'etichetta applicata sull'ultima pagina del manuale
TECHNICAL DATA: Please, refer to the label stuck onto the last page of this manual
FR CHARACTERISTIQUES TECHNIQUES: Se référer à l'étiquette appliquée sur la的最后一 page du manuel
DE TECHNISCHE DATEN: Sie sind dem Etikett zu entnehmen, das an der letzten Seite des Handbuch's angebracht ist
ES DATOS TECNICOS: Consulte la etiqueta aplicada en la ultima pagina del manual
DADOS TECNICOS: Por favor, consulte o rotulo aplicado na ultima pagina deste manual
NL TECHNISCHE GEGEVENS: Raadpleeg het etiket dat is aangebracht op de LASTe pagina van deze handleiding
DK TEKNISKE DATA: Se mærkaten, der er sat pa sidste side af\
denne manual
SE TEKNISKA DATA: Se etiketten applicerad pa sista sidan ienna manual
TEKNISET TIEDOT: Tiedot loytyvat kayttoppaan vimeiselle sivulle kiinnitysta etiketistä
GR TEXNIKA STOIXEIA: AvatpeTe OTNV ETIKETA TOU Eivai Utrapxei OTNV TELEUTA OEAIBa TOU EYEXEPIDIou
PL DANE TECHNICZNE: Odnosi sie do etykietki znajdujacej sie na ostatnej strony instrukcj obslugi
HR TEHNICKI PODACI: Molimo vas pogledajte etiketu na posljednjoj stranici ovog prisučnika
SI TEHNIÇNI PODATKI: Poglej oznako, navedeno na zadnj strani priročnika
HU MUSZAKI ADATOK: Lásd a kezikonyv utolsó oldára ragasztott címkét
CZ TECHNICKÉ UDAJE: Informace naleznete na štifiku nalepeném na posledni straně manuálu
SK TECHNICKÉ UDAJE: Informácie najdete na stitku nalepenom na poslednej strane tejo prirúčy
RU TEXHNUECKE XAPAKTEPHCTKNU: CMOTPte 3TKETKY, npnPKenHHeHyHO Ha nocneHne CTpaHne pykoBODCTBA
NO TEKNISKE DATA: Det vises til etiketten festet til siste side i donne manualen
TEKNIK VERILER: Lüften bu kilavuzun son sayfasina yapistirilmis olan etikete bakiniz
RO DATE TEHNICE: Va rugam sa consultaeti eticheta lipita pe ultima paginà a acestui manual
BG TEXHMueCKN DAHHN: BnKTe eTNKeTa, 3aJIeHn Ha NocneHaTcPbHmua Ha HAcToIooTO pBkoBOOCTBO
RS TEHNICKI PODACI: Pogledajte etiketu zalepljenu na poslednjoj strani prisncika
TECHNINIAI DUOMENYS: Remtis etiketés, prikljuotos ant paskutinio instrukciju vadovo puslapio, duomenimis
TEHNILISED ANDMED: vt juhendi viimase lehekulje kuljes olevat siti
TEHNISKIE DATI: Skatiet uzlimi, kas piestiprinata pie rokasgramatasPEDejas lappuses
(IT) Facsimile targehta identificazione prodotto - (GB) Facsimile product identification plate - (FR) Fac-simile plaquette signaléique du produit -
(DE) Faksimile Produkttypenschild - (ES) Fac-similar plac identificacion del producto - (PT) Fac-similar da plac de identificacao do produto - (NL) Facsimile identificatieplaatje product - (DK) Ilustration af mearkeplade - (SE) Facsimile produkt typskylt -
(FI) Tuotteen arvokilven nakiskopio - (GR) IIOTo avrtypaoivavkiOc avyvwpians pioovto - (PL) Wzor tabliczki identfikujacej produit - (HR) Faksimil ploica s identifikacjskim podacima proizvoda - (SI) Vzorec identifikacjske ploche za izdelek - (HU) A termek azonosito tabajanak masolata - (CZ) Faksimile typohe stitku - (SK) Faksimile typoheho stitku - (RU) 06pa3e u dENTnKauHOn TabuNkHa npodyuKuo - (NO) Faksimile av skiltet som identifisierer produktet - (TR) Faks urun tanitm plakasi - (RO) Fax placuta de identificare a produsului -
(BG) Φακυπημε Μινηλας Σηθητιρούκαυηουην Αγακην Ανηρόγκτα - (RS) Faksimil tablica sa identifikacionim podacima proizvoda - (LT) Produktó identifikacinés lenteles faksimiè - (EE) Toote andmeplaadi koopia - (LV) Izstradājuma identifikacijas pläksnītes kopija
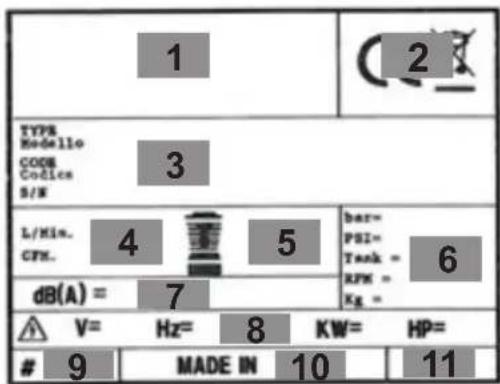
IT Legenda:
1 - Manufacturer's data
2 - CE mark and WEEE symbol
3 - Type / Code / Serial Number
4 - Air displacement expressed in (l/min) and (cfm)
5 - Air delivered by the compressor expressed in (l/min) and (cfm)
6 - Maximum operating pressure (bar and PSI), tank capacity (l), rotations per minute (RPM), weight (kg)
7 - Guaranteed sound power level in dB(A);
Measured sound power level in dB(A)
8 - Electric data: voltage (V), frequency (Hz), absorption (A), power in (kW) and (HP)
9 - Duty cycle
10 - Declaration of origin
11 - Year of production/manufacturing
FR Légende :
All users must read and fully understand all information contained in this owner's manual before assembling, operating, or maintaining this air compressor.
Carefully review the following rules for safe operation and fully understand all warnings.
An ACOUSTIC PRESSURE value of 4m corresponds to the ACOUSTIC POWER value stated on the yellow label located on the compressor, minus 20 dB.
THINGS TO DO
- The compressor must be used in a suitable environment (well ventilated with an ambient temperature of between +5^ and +40^ ) and never in places affected by dust, acids, vapours, explosive or flammable gases.
- Always maintain a safety distance of at least 4 meters between the compressor and the work area.
- Any coloring of the belt guards of the compressor during painting operations indicates that the distance is too short.
- Insert the plug of the electric cable in a socket of suitable shape, voltage and frequency complying with current regulations.
- Use extension cables with a maximum length of 5 meters and of suitable cross-section.
- The use of extension cables of different length and also of adapters and multiple sockets should be avoided.
Always use the I/O switch to switch off the compressor.
Always use the handle to move the compressor. - Always disconnect power cord and air hose from the air compressor before transporting.
- When operating, the compressor must be placed on stable, horizontal surface.
THINGS NOT TO DO
- Never direct the jet of air towards persons, animals or your body. (Always wear safety goggles to protect your against flying objects that may be lifted by the jet of air).
- Never direct the jet of liquids sprayed by tools connected to the compressor towards the compressor.
- Never use the appliance with bare feet or wet hands or feet.
- Never pull the power cable to disconnect the plug from the socket or to move the compressor.
- Never leave the appliance exposed to adverse weather conditions.
- Never transport the compressor with the receiver under pressure.
- Do not weld or machine the receiver. In the case of faults or rusting, replace the entire receiver.
- Never allow inexpert persons to use the compressor. Keep children and animals at a distance from the work area.
- This appliance is not intended for use by persons (including
children) with reduced physical, sensory or mental capabilities, or lack of experience and knowledge, unless they have been given supervision or instruction concerning the use of the appliance by a person responsible for their safety.
Children should be supervised to ensure that they do not play with the appliance.
- Do not position flammable or nylon/fabric objects closed to and/or on the compressor.
- Never clean the compressor with flammable liquids or solvents. Check that you have unplugged the compressor and clean with a damp cloth only.
- The compressor must be used only for air compression. Do not use the compressor for any other type of gas.
- The compressed air produced by the compressor cannot not be used for pharmaceutical, food or medical purposes except after particular treatments and cannot be used to fill the air bottles of scuba divers.
- To avoid serious burns, never touch the cylinder head parts or tubing during or immediately after operation.
THINGS YOU SHOULD KNOW
- To avoid overheating of the electric motor, this compressor is designed for intermittent operation (do not operate on more than a 25% duty cycle. If this air compressor pumps air more than 25% of one hour, then the compressor's capability is less than the air delivery required by the application. Always match the air volume requirements of the attachment or accessory with the air volume delivery of the compressor). In the case of overheating, the thermal cut-out of the motor trips, automatically cutting off the power when the temperature
^a is too high. The motor restarts automatically when normal temperature conditions are restored. - When the compressor is plugged into an electrical source and the I/O switch is in the "ON" position, this compressor will cycle automatically.
eyes- Never touch any moving parts.
- Keep all body parts, hair, clothing, and jewelry away from moving parts.
- Never operate the air compressor without all guards and shrouds in place.
-
Never stand on the compressor.
-
The compressor is fitted with a safety valve that is tripped in the case of malfunctioning of the pressure switch in order to assure machine safety.
- The red notch on the pressure gauge refers to the maximum operating pressure of the tank. It does not refer to the adjusted pressure.
- When fitting a tool, the flow of air in output must be switched off.
- When using compressed air, you must know and comply with the safety precautions to be adopted for each type of application (inflation, pneumatic tools, painting, washing
with water-based detergents only, etc.).
-
Never exceed the maximum allowable pressure recommended by the manufacturer of any attachment or accessory you use with this compressor.
-
Please check that the air consumption and the maximum working pressure of the pneumatic tool and connection pipes (with the compressor) to be used, are compatible with the pressure set on the pressure regulator and with the amount of air supplied by the compressor.
2. FEATURES (Pics. 1-2)
B. Handle for lifting/moving.
A. I/O Switch: The I/O switch is the activation mechanism that is used to start and stop the compressor. When the switch is "On", the motor and pump will compress air until tank pressure reaches the upper limit of the factory set operating pressure. When tank pressure falls below the factory set "cut in" pressure, the compressor will again automatically start to compress air.
C. Regulated Pressure Gauge: The regulated pressure gauge indicates the amount of pressure that is allowed into the discharge line according to the setting of the regulator.
D. Pressure Regulator Knob: The regulator knob is used to adjust the air pressure that is available at the discharge line. The discharge air pressure is increased by turning the knob clockwise and decreased by turning the knob counter clockwise.
E. Drain Valve: Ball style valve that drains moisture from the tank when opened.
F. Quick Coupler: The quick coupler is used to connect the airline to your tool.
G. Safety valve: The safety valve is set to avoid over-pressurization of the air tanks. This valve is factory pre-set at 10 bar (145 PSI) and will not function unless tank pressure reaches this pressure. Do not attempt to adjust or eliminate this safety device. Any adjustments to this valve could cause serious injury. If this device requires service or maintenance, see an Authorized Service Center.
3. SCOPE OF USE
The compressor is designed for generating compressed air for tools operated by compressed air.
Please note that our equipment has not been des for use in commercial, trade or industrial application Our warranty will be voided if the machine is used in commercial, trade or industrial businesses or for equivalent purposes.
The machine is to be used only for its prescribed purpose. Any other use is deemed to be a case of misuse. The user/ operator and not the manufacturer will be liable for any damage or injuries of any kind caused as a result of this.
4. ELECTRICAL GROUNDING INSTRUCTIONS
This product should be electrically grounded. In the event of an electrical short circuit, grounding reduces the risk of electrical shock by providing an escape wire for electrical current. This product is equipped with a cord having a grounding wire with an appropriate grounding plug. The plug must be plugged into an outlet that is properly installed and grounded in accordance with all local codes and ordinances.
4.1 Connection of the mains plug
Important!
The wires in the mains lead fitted to this product are coloured in accordance with the code shown in pic. 5.
The 3 pin plug must comply to BS1363/A.
- Fuse must comply to BS1362.
If for any reason the 13 amp plug fitted to this product requires replacement it must be wired in accordance with the following instruction:
Do not connect the brown (live) or blue (neutral) to the earth pin marked 'E' on the 3 pin plug.
Connect the Blue wire to the terminal marked Neutral (N). Connect the Brown wire to the terminal marked Live (L). Connect the Yellow & Green wire to the terminal marked Earth (E). Ensure that the outer insulation is gripped by the cord grip and that the wires are not trapped when replacing the plug cover. The mains lead on this product is fitted with a 13 amp (BS1363/A) plug. A 13 amp (BS1362) fuse must be fitted in the plug.
If in doubt consult a qualified electrician
There are no user serviceable parts inside this product except those referred to in the manual. Always refer servicing to qualified service personnel. Never remove any part of the casing unless qualified to do so; this unit contains dangerous voltages.
Warning!
For your protection if this product is to be used outdoors it should not be exposed to rain or used in damp locations. Do not place the product on damp surfaces, use a workbench if available. For added protection use a suitable residual current device (R.C.D.) at the socket outlet.
Note: If the mains cable requires replacing it must be replaced with an identical one and fitted by a qualified person.
5. PRE-START PROCEDURES
- Examine the machine for signs of transport damage. Report any damage immediately to the company which delivered the compressor.
- Verify that the tanks have been drained and are clear of any moisture or dirt.
- The compressor should be set up near the water consumer.
- Avoid long air lines and long supply lines (extensions).
Make sure the intake air is dry and dust-free. - Do not set up the compressor in damp or wet rooms.
- The compressor may only be used in suitable (with good ventilation and an ambient temperature from +5^ to +40^ ). There must be no dust, acids, vapours, explosive gases or inflammable gases in the room.
- The compressor is designed to be used in dry rooms. It is prohibited to use the compressor in areas where work is conducted with sprayed water.
6. OPERATION INSTRUCTIONS
6.1 Start-Up Procedures
- Verify that the On/Off switch is in the Off position.
- Verify that the tank air pressure is at 0 PSI.
- Attach the air hose to the discharge line.
- Plug the unit into a properly grounded outlet.
- Push the On/Off switch to On. The On/Off switch will light-up to indicate the compressor is on. Compressor will automatically cycle on and off to keep the tank pressure maintained.
- Adjust the pressure regulator to the proper pressure setting required for the air tool.
6.2 Shut-Off Procedures
- Push in the On/Off switch to the Off position.
7. CLEANING AND MAINTENANCE

Warning!
Pull the power plug before doing any cleaning and maintenance work on the appliance.

Warning!
Wait until the compressor has completely cooled down. Risk of burns!

Warning!
Always depressurize the tank before carrying out any cleaning and maintenance work.
7.1 Cleaning
- Keep the safety devices free of dirt and dust as possible. Wipe the equipment with a clean cloth or blow it with compressed air at low pressure.
We recommend that you clean the appliance immediately after you use it. - Clean the appliance regularly with a damp cloth
and some soft soap. Do not use cleaning agents or solvents; these may be aggressive to the plastic parts in the appliance. Ensure that no water can get into the interior of the appliance.
- You must disconnect the hose and any spraying tools from the compressor before cleaning. Do not clean the compressor with water, solvents or the like.
7.2 Draining tank
The condensation water must be drained off each day by opening the drain valve (ref. E) (on the bottom of the pressure vessel).
rodraining the tank (a correct use of the drain valve -pic.3):
- Verify that the compressor is turned Off.
- Holding the handle, tilt the compressor toward the drain valve so that it's set in a lower position.
- Open the drain valve.
- Keep the compressor tilted until all moisture has been removed.
- Close the drain valve.

Warning!
The condensation water from the pressure vessel will contain residual oil. Dispose of the condensation water in an environmentally compatible manner at the appropriate collection point.
7.3 Safety valve (ref. G)
The safety valve has been set for the highest permitted pressure of the pressure vessel. It is prohibited to adjust the safety valve or remove its seal. Actuate the safety valve from time to time to ensure that it works when required. Pull the ring with sufficient force (pic. 4) until you can hear the compressed air being released. Then release the ring again.
7.4 Storage

Warning!
Pull the mains plug out of the socket and ventilate the appliance and all connected pneumatic tools.
Switch off the compressor and make sure that it is secured in such a way that it cannot be started up again by any unauthorized person.

Warning!
Store the compressor only in a dry location which is not accessible to unauthorized persons.
Always store upright, never tilted!
8. DISPOSAL AND RECYCLING
The unit and its accessories are made of various types of material, such as metal and plastic.
Defective components must be disposed of as special waste. Ask your dealer or your local council.
9. TROUBLESHOOTING GUIDE
Note: Remove power source and drain tank pressure prior to making any repairs or adjustments.
| FAULT CAUSE REMEDY | ||
| Leakage of air from the valve of the pressure switch with the compressor off. | Check valve that, due to wear or dirt on the seal, does not perform its function correctly. | Unscrew the hexagonal head of the check valve, clean the valve seat and the special rubber disk (replace if worn). Reassemble and tighten carefully. |
| Reduction of performance. Frequent start-up. Low pressure values. | Excessive performance request, check for any leaks from the couplings and/or pipes. Intake filter may be clogged. | Replace the seals of the fitting, clean or replace the filter. |
| The compressor stops and restarts automatically after a few minutes. | Tripping of the thermal cutout due to overheating of the motor. | Clean the air ducts in the conveyor. Ventilate the work area. |
| After a few attempts to restart, the compressor stops. | Tripping of the thermal cutout due to overheating of the motor (removal of the plug with the compressor running, low power voltage). | Activate the on/off switch. Ventilate the work area. Wait a few minutes. The compressor will restart independently. |
| The compressor does not stop and the safety valve is tripped. | Irregular functioning of the compressor or breakage of the pressure switch. | Remove the plug and contact the Service Center. |
Any other type of operation must be carried out by authorized Service Centers, requesting original parts. Tampering with the machine may impair its safety and in any case make the warranty null and void.
1. MESURES DE SECURITÉ
3. DOMAINED'APPLICATION
1. VOORZORGSGMAATREGELEN
2. OMINALSUUDET (Kuv. 1-2)
TI INPENEI NA EEPETE
Tia va aTOPOeuyETaI TUXO UTEPepmuon Tou
nAEKTPIOU KIVNTpO, OouTIOTNC EXE OXEDIAOTei YIA
dIAKOITTOEV N LEITOUpyia (mTv TOV OTETE OE AELIOUPyia
YIA TEPIOOTePO aTo to 25% Tou kKlou AELIOUPyiac. Eav
o aepooauTIEOTc AVtai aepa TEPIOOTePO aTo to 25%
Piac Wpac, Tote n IKAVOTNa Tou OUsTIEOTn Eivai AiyOTepn
ATO TTV TApoxh aepa Tou aattieitai aTo Tnv eapuoyn.
Na avTIOxIGTe TAVTOTE Tc attaitneG Tou oykou aepa
aTou Tapekokevou n Tou Eapntmuatoc TnV Tnapoxn oykou aepa Tou ouuTieotn). Z TEPiTTwn UTEpEePavon, EVeyoioietai Oepikoc diakottnc Tou KInnpa, diakottovtac autouata Tny Tpofoobia otav n Eepokpia eivai ToLu uynl. O kInnpac tnavekkiveitai autouata otav
aTOKaIoiAtvai oKavovikcOuvHekcEepuokpaiaac.
- Otav o ouptieotns ouvdeetai e kantoia nAektpiKn Tnyn kai o biakottnc On/Off (evpyoToinan / anEvpeytooinan) evai otn Theon "ON" (evpyoToinan), oouptieotns 8a aeitoupynoei autouata.
Mny ayyicETIOTa KIVOUeva EApntmuata.
- Diatnpente o antioctaon npou wpatoc ootwca ta paaia, ta pouxka kai ta koogunataa tio ta kivoumuev a eapntmuata.
Mny xeiipceote note tov aeopoumuTheotn av dev Bpiakovtai otn theon touc ola ta Tpooatautikk aai ta kaIumuata.
Mny TATATE TO OUHTIEOTN.
O oumtieotns evai eotiaouevoc meia baibda aopaaiaag n otoia evepyoioietai oe pintwn duoioupyiac tou diaokottn tieng yia va egaopaaietai naopaaea i npxavmuos.
H Kokkivn ypaun oTov eTpnt nieoans avapepetar neiotn nieon aeitoupyia cTNC deqevnc. Ev avapepetai ot npuioeynieon.
Kata n ouvdean evoc TVEUATIKOU epyaaleiou eEv a OAnva eoou too otioou doxetueTai oumtiieauvoaepac an to Tov aeoouTIEOTn, TpETeI OTWODNTTE va biakotntai npon Tou aepa an to Tnv Esoo Tou oAnva autou.
H xpnoTou TETIEOeVOU aepa OTIC diafopeC TPOBtIOeVc xnoEic (pouokwua, PVEuMaTKA epyAAia, Bapn, KaopiooC ME dialutec mvo ME uativn BaoN, KATI. ) aataei T N VwON KAI TNY Tnpon TwV TPOBtIOeVWv Kavovioow yia Kaote TEPiTTwn 5exwpiota.
Mnu utepbaive Tne T neyioT n eTtpeuevn Tiean Tnou Tpoteiveo kataoekuaotc OTIOUOHTOTE TapeAkoEvou n Eapntmuatox npoiuttoite ME To uuptiotn.
- Napakaloume 1eYeTe 0ti n katavalw an aepa, n meyiotn tiean aeitoupyiac kai oI owAnveC ouDoean (mu to kouptpeep) TIO XpOoiopoiouvtai, eivai katalaae yia tnTnv tiEan TIO exoume opieoi tO pUthetaN egodou kai ia
OTN TIV TTOOOTNTa aepa TIOU TAPeXeT O KOpIpeoep.
2. XAPAKTHPIIKA (Eikovες 1-2)
2. FUNKCJE (Rys. 1-2)
2. ZNACAJKE (Slike 1-2)
A. On/Off (I/O) prekidač: Prekidač je aktivacijiski mehanizam koji se koristi zaPokretanje i zaustavljane kompresora. Kad je prekidač u položaju „On“, motor i pumpa ce komprimirati zrak sve dok tlak unutar spremnika ne dosegne gornju granicu tvornicki postavljenog radnog tlaka. Kad se tlak unutar spremnika spusti ispod tvornicki postavljene vrijednosti prekida rada, kompresor ce ponovno automatski započeti s komprimiranjem zraka.
B. Rucka za podizanje/pomicanje.
2. LASTNOSTI (Slike 1-2)
- Prepěte spínač ZAP/VYP (On/Off) do polohy VYP (Off).
7. CISTENIA UDRZBA

Pozor!

Pozor!
8.LIKVIDACE A RECYKLACE
- HnkOrda He cTOrb Ha KOMnpeccope.
Komnpceccop ochaue HpeoXpaHnteNbHbIM KlaanHom, cpaabaBiauUcIM B cnyae HeNCpabHOCTn peNe daBneHnB ceJnx rapaHTnn 6e3OnacHOCTn obOpydoBaHn.
Kpachna Metka Ha cnep6nate MaHometpa 03Naaet MaKcImaIbHoe pa6oee daBneHne pe3epByapa, a He perynpyeOe daBHeHne.
- IopcoeHnH J K 7JNaHry KOMnpecccopa HHeBMOHcTpymEnT, He 3a6bIbAaTe nepeKpbBaTb BO3dUHbI KpaH.
-Пи ИСЮЛБЗОВАИССАТОгBO3ДУХA(HAryBaHNe,pacblIeHneYepe3PHEBMONHCTpyMeHT,OKpacka,MOKa pactBOPAMHa BOHNoOCHOBnT.N.)Co6NIOJaTe BCE npabIna TBДЯΚKDoTO KOHKPeTHOrO CnyaJ.
HkoIa He npeBbIaTb MaKcImaIbHoe DoNyCTMoo DaBJIeHHe, peKOMeHNyEMoe N3rOToBnTeJem DOONHHTeJIbHOrO yCTPoNCTBa INI PnHaADNeXHOCTN, IcNoJIb3yEmbIX C KOMnPecccopom.
- Поберпь, чобь пасхов ВОЗдуха и мakсимальhoe
экллуataцнонhoe Давлиене Инебматиеско
Инструмени
Компессором) сыни COBМecTIMьС давлиен.
установеньham на рergyлароpe давлиен,在
КолиЧecтВOM ВОЗдуха, подааамого КOMпессором.
2. XAPAKTEPNUCTUKN (Pnc. 1-2)
A. IpeeknioateIb On/Off (I/O): IpeeknioateIb npedctabJraet c6oM mexaHm3M aKTNbauu, nCNoJIb3yEmbl dIg 3aNyCKa N OCTaHOBKn KOMnpccopa. Korda nepeknioateIb haxOHTcB NIOLOXeHN "On", DnIRaTeIb HacOC CxIMaOT BO3dYx NOKa daBJeHne 6aKa He DOCTNraeT BepxHero npedeJa pa6OYe rDaBNeHn, yCTaHOBHeHHOr Ha 3aBOe. Korda daBNeHne B 6ake Naadaet HIXe ycTaHOBHeHHOr Ha 3aBoDe "OTKIIUOaIOUe" DaBJeHn, KOMnpccop BHOBb HaUNHaet ABTomTuueckn CxIMaTb BO3dYx.
B. Pучka дя подема/nepemeehenia.
C. OtperynipoBaHHbMaHOMeTp: OTPerynpoBaHHbMaHOMeTp yKa3bIbaeT DaBHeHne, DOnyCTmOe Ha JINHM HArHeTaHnB COOTBeTCTBn C yCTaHOBOUHbIMN 3HaueHnA MPeryJrTopa.
D. PerynipoBoHna pyka: PerynpoBouHna pyka nCnoIb3yeTcra IЯpeynpOBKn DaBHeHn BO3dyxa Ha JInHn HArHeTaHn. DaBHeHne BO3dyxa HArHeTaHn yBeJIuNBAeTcra NytEm NOBOPaUBaHn pyKn IIO YacBOO CTpeJIke n
yMeHbIaETcNpyTeMIOBOpaHbAHn pyKINpOTNB YacOBOn CTpeKN.
E.CnBHOJ Klanah: WapOBoN Klanan, oBeCneuBaOUsn CnB BnaH n3 6aKa npn erO OTKpbITNI.
F.БыICTpoJeIcTByIOuaMyΦTa: BbICPoJaIcTByIOUaMyΦTa IcNoIb3yETcA ДЯ NOdCoEINHEnN INHeBMaTNUeCKO JINHN K INHCTpyMeHTy.
G. IpedoxpanHtBbI Knaan: IpeoxpanHeBbI Knaan yCTaHOBnEn dJa npdynpexJeHn Ype3MepHO r DaBneHn BO3dyuNbIX 6aKOB. Knaan OTperynipoBaH Ha 3aBoe Ha 10 6ap (145 cyHTOB Ha KB.DIOm) n He fynkuOHpyET Noka He 6ydet DOCTrHyTO daHHe DaBHeHne. He nbTaTecb perynpoBaTb nn CHMaTb daHHe npdoxpanHeBHOE yCTpOcTBo. IIObIe perynpOBKn DaHoro Knaana MoYrHaHeCTn cepBe3HbI yUep6. Ecnn DaHHoe yCTpOcTBo Tpe6ye TpeMOHTa nn TexO6CnyKbAHn, o6paTtEcB B aBTOpN3OBaHHbI cepBVCHbI ueHTP.

3. OBJACTb IcNoJIb3OBAHnIa
Komnpcecop npedHa3Hauhen Bbipapotkn Cxatoro BO3dyxa nI npINBOIDMOB DeiCTBNE CxATbIM BO3dyxom INCHtpymeHTa.
IoxaJyNCTa, npmTe BO BHMaHHe, yTO KOHCTpyKUHaIX yCtpoiCTB He npedHa3HaueHa dIg NcNoJIb3OBAHHn Ix B pOmblIeHHoCTn, peMeCne IINu INHycTpIM. Mbl He daem rapaHTnHbIX o6raTeNbCTB, ecNI yCtpoiCTBO 6yDet NcNoIb3OBAtbcr B IpomblIeHHoH, peMeCJIeHHoI INn INHycTpnaJIbHO, a TaKKe IIOOBHO JTeJIbHOCTn.
YCTPOINCTBO MOXHO NcONb3OBaTb TOIbKO B COOTBeTCTBn C erO npEHa3NaueHHeM.JIIO6oe dpyroe, BblXODJUe ee 3a 3TN paMKN NcONb3OBaHne, cHTaTeC H CeOTBeTCTByIOUIM PpeINuCAHNO. 3a BO3HNKU B pe3yNbTaTe 3TOrO yUeP6 IIN TpaBMbl JIO6oRo pOda HeCet OTBeTCTBeHHOCb IOJIb3OBaTeJIb IIN pa6OtaUHm C INCHTpymeHToM, a HE IN3ROTOBtJIb.
4. ПОДСОЕДИЗЕНЕ K ЗЛЕКТPOCETN
KOMnpeccop Imeet NITAHne OT cETN OCHaueH 4
HTekepom C 3aIHTbIM KOHTAKTom. Ero MOxHO
NOkIIOHaTb K 7TeNCelbHO pO3ETKE C 3aIHTbIM
KOHTAKTom 230 B\~50 Tc, IMeIOUe 3aIHTy 16
A.IpoBepbTe nepeB BBODOM B 3KcNlYatauio
COOTBETCTBHe HAnpJXeHn CETN HAnpJXeHnO,
yKa3aHHOMy Ha Ta6JIuChe C nACNOPTHbIM DaHHbIM
yCTPOiCTBa. JINHHbIe KaBeJI NITAHnA, a TAKKe
yDIIHNHTeJI, KaBeJIbHbIe 6apabahNI T.D.MOryT
Bbl3BaTb NaDeHnE HAnpJXeHn I TeM CambIM
3aTpYdHNTb NyCK DBrarateJI. Ppi TemnepaTypax HnKe
+5°C NyCK DBrarateJI 3aTpYdHn H3-3a TjXeNoTO
xoJa.
- IpeekIIOuHTb BbIKIOUaTeIb On/Off B noIooKeHne Off.
7. OYNCTKA IN TEXOBCJNYXUBAHNE
BhumaHue!
BbHMaTe n3 po3eTKn nepei BcEMn pa6oTAMn no OuchTE N TexHnueckOMy 06CnyXnBaHNu WTekep BVET 3NeKTPoNTaHn.
BhumaHue!
Xnte do Tex nop noka Komnpceccop octbHet npnHOctbo! OnacHoCTb nonyUntb oxorn!
BhumaHue!
Ipeed Bcemn pa6oTAMn no ouHCTke n texHnueckomy 06cnyKuBaHHO HxHO c6pocntb daBneHne B EMKoCTn.
7.1 Ouchstka
Copejnte 3aunTHbIe npncnoc6JIeHna KAKMOHO 60Jee CBO6OHNbIMN OT NblIN n rpa3N. Ipotpy UcTPOCTBO YnCTOn TpAnKO nn O6dyTe cKaTbIM BO3DyXOM NO HeBbICOKM DaBJIeHnEM.
- Mbl pekomehnyem ouhatab yctpoinCTBO cpa3y nocJIe NcNoJIb3OBAHnIa.
OuHuaTe peryIpaHOn yCTpoNCTBO BnaJxHOITpRnKoC He60JIbUIM KOJIueCTBOM XnDKOrOMbIa. He nCnoJIb3yIte CpeDcTBa DnA OuyCTKnPACTBOpHTeIN, OH NMOrT pa3BeCTb PIACTMaCCOBbieDeTaJIY yCTpoNCTBa.CJeIte 3a TEM, YTObI BHyTpB yCTpoNCTBa He nonaJa BOda.
- YdaHnTe nepei OunchKoI uHaH n BOy dIpa36pb13rNBaHn I3 KOMnpeccop. 3anpeueHO ouuatab KOMnpeccop BOdo, pactBopnteJem nnnoDobhIMn CpeCTBaMn.
7.2 CJIINBHOJ 6aK
KoHdEHCauNoHHa BODa DOJXHa CINBaTbCkKaXDbI DeHb NytEm OTkpBITn CINBHO KnaHnA (N03.E) (Ha DnHlue cocyda NOD daBJIeHmE).
Kak ocbo6oHTb pe3epByap OT KOHdeHcata (IpaBnIbHoe nCnoJIb3OBaHne npOdyBHorO KpaHa -pnc.3):
1.Y6eIITecbBTOM,HTOKOMnpccopBbIKIOueH.
2.Держа ergo 3a pykoTky,HaKIOHnTe KOMnpecccop B HAnpaBJIeHNI npOyBHOrO KpaHa TaKIM O6pa3OM, YTObI OH HaxOJINcB 6OJee HN3KOM NIOJOKeHN.
3. OtkpoTe npOdyBHOKpaH.
4.ДержITE KOMPpeccop BHaKIOH亥HOM NOLOXeHIN Do Tex nop, Korda BeCb KOHdEHCAT BbIeT 13 pe3epByapa.
5. 3akpoTe npoDyBHOKpaH.
BhumaHue!
KoHdEHCAT n3 eMKoCTN BBICOKO TaBJIeHn coDePKeHT oCtAtKn MaCna. CdaTe KOHdeHCaT,He 3acopra npnpody, B COOTBeTCTByUOnuNyHKT c6opa OTXoDOB.
7.3 PpeoXpaHntbHbI KnaH (TeT.G)
IpedoxpaHntbHbI KlnaHaHOtperynipoBaHa cAmoe BblcOKoe DOnyCTmOe DaBHeHne EMKoCTN BblcOKoro DaBHeHna. 3aPpeSeHo N3MeHrTpereynipOBky IpedoxpaHnteHbHO KlnaHa HJIN ydaJIrTb erO nnom6y. Jnra TOrO, YTObI IpeDOxpaHnteHbHbIKlnaH npn Heo6XoDMocTn Cpa6ToaI,ero HyxHO Bpemr OT BpemeHn PnivBOIDtB DeiCTBne.CnlbHO NotHNTE 3a KOJIb4O (CM.pnc.4), noka He cTaHET CbluHo KaK bSyTe BblNyUeH CkAteB IO3dUx. 3aTeM BHOBB OTnyCTNE KOJIb4O.
7.4Пошинковая onopa
BhumaHue!
BbInbTe wTekep 3NeKtpoNTaHnI N3 po3eTKu,BbInyCTnte BO3dyx N3 yCTpoNcTba H Bcex NOdkluoyehhblix NHCtpymeHTOB Ha CxatOM BO3dyxe. 3aunTnte KOMnpecccop OT HecaHKUHOHPoBAHHORO BKLIQUeHnI.
BhumaHue!
XpaHnte KOMnpeccop TOnbKO B cyxom H HeNoctynHom IJn Noctopohnx MecTe. He 4PnpOKnDbIBaTb, XpaHNTb TOnbKO B CTOyem NOLOXeHN!
8. YTNIN3AUIGNI NBTOPNUHAR INEPEPABOTKA
Komnpceccop n ero npnaadJeXHOCTn COCTOAT n3 pa3JIuHbIX MaTePnaIIOB, TaKnx KAK HApPImep MTeaJI IN pIacTMacc. YTuJIN3NpyUte DepeKTHbIe DetaJI N MeCTax c6opa oc6bIX OTxOIOB. IHΦOpMaUNIO 6 3TOM Bbl MoKeTe NOJyHTB CneuaN3NpOBAHHom Mara3InHe IIN B MeCThIx OpraHax npabNeHn!
9. BO3MOXHbIE HENOJAdkn IN CNOCObl INX UCTPAHEHnA
PpmeaHn: OKnIOHTb nCTOuHnK nTahnN I BblNyCTNTb daBHeHne cIINBHoro 6aka neped npOBedeHnem pEmoHTbIX pa60t nn perynnpOBok.
6.1 Start Prosedyrer
6.1 Proceduri de pre-pornire
2. SANDARA (Pav. 1-2)
- Paspauskite On/Off jungiklj ant Off.
7. VALYMAS IR PrieziURA

Demesio!
Pries atlikdami prieziuros ir valymo dark isjunkite visus prietaisus.

Demesio!