
SXAC2036121 - Compressor STANLEY - Free user manual and instructions
Find the device manual for free SXAC2036121 STANLEY in PDF.


| Product Type | Compressor |
| Brand | Stanley |
| Model | SXAC2036121 |
| Power Source | Electric, 230 V / 50 Hz |
| Motor Power | 1.5 HP (1100 W) |
| Max Pressure | 8 bar (116 psi) |
| Air Tank Capacity | 50 L |
| Air Flow | 200 L/min at 0 bar, 140 L/min at 8 bar |
| Dimensions (L x W x H) | 65 x 35 x 55 cm |
| Weight | 25 kg |
| Noise Level | 97 dB(A) |
| Main Functions | Inflating tires, operating pneumatic tools, spray painting, cleaning |
| Maintenance | Drain tank daily; check oil level (oil-lubricated models); replace air filter every 3 months |
| Cleaning | Wipe exterior with damp cloth; keep ventilation slots clear |
| Safety Features | Thermal overload protection, pressure relief valve, automatic shut-off |
| Spare Parts | Air filter, pressure switch, safety valve, check valve, piston rings |
| Reparability | Modular design; user-serviceable with common tools; spare parts available |
| General Information | Oil-lubricated belt-driven compressor; suitable for DIY and light professional use |
Frequently Asked Questions - SXAC2036121 STANLEY
User questions about SXAC2036121 STANLEY
0 question about this device. Answer the ones you know or ask your own.
Ask a new question about this device
Download the instructions for your Compressor in PDF format for free! Find your manual SXAC2036121 - STANLEY and take your electronic device back in hand. On this page are published all the documents necessary for the use of your device. SXAC2036121 by STANLEY.
USER MANUAL SXAC2036121 STANLEY
natural_image
Black-and-white photo of a Stanley air compressor with pressure gauges and a large cylindrical tank labeled 'STANLEY' (no additional text or symbols visible)MODEL NO. SXAC2036121
For service, spare parts or product information, please contact Smart Marketing Group Pty. Ltd.
AUST. 1300 660 457 N.Z. 0800 474 876
SUGGESTED APPLICATIONS
You may use some light duty air tools with this compressor. Some examples of light duty tools are:
- Ball Inflator
- Toy Inflator
- Tyre Inflator
- Mini Air Brush
- Touch Up Spray Can
- Stapler
- Combo Nailer
• C-Bradder
• T-Nailer
This light duty air compressor is NOT recommended for use with a spray gun. Always check the air requirement of the tool wishing to be used to ensure that it is within this air compressor's air output.
CONTENTS
| Section Page | |
| Contents 2 | |
| Suggested Applications 2 | |
| Introduction 3 | |
| Guarantee 3 – 4 | |
| General Safety Instructions 5 – 7 | |
| Electrical Information 8 | |
| Specific Safety Instructions 8 | |
| Components and Controls 9 | |
| Operating Instructions 10 – 15 | |
| Maintenance 16 | |
| Trouble Shooting 16 | |
| Parts Diagram 17 | |
| Technical Information 18 | |
| Contact Information | 18 |
Please take note of serial number and write here for ease of reference:
Serial Number:
Date of Purchase:
Place of Purchase:
Receipt Number: ____
INTRODUCTION
Dear Customer,
Thank you for purchasing this compressor which has passed through our extensive quality assurance processes. Every care has been taken to ensure that it reaches you in perfect condition. However, in the unlikely event that you should experience a problem, or if you require any assistance, please do not hesitate to contact us;

If you have a problem, call customer service do not return this compressor to the place of purchase.
CUSTOMER SERVICE
Australia: 1300 660 457
New Zealand: 0800 474 876
Operating times: Monday – Friday
8.00am - 5.00 pm
Australian Eastern Standard Time (AEST)
EXPRESS WARRANTY STATEMENT - COMPRESSOR
You are not required to do anything to register your compressor purchase. Please attach the purchase receipt to this manual and ensure both are kept safe. We hope you enjoy your new compressor, and if you have any problems call customer service on the above phone numbers. Do not return to place of purchase.
Smart Marketing Group Pty Ltd (SMG) warrants that this compressor will be free from manufacturing faults or defects for 24 months from the date of purchase, providing original purchase receipt is kept and shown when needed and is subject to the terms and conditions below.
If a warranty fault appears within the warranty period, SMG reserves the right to replace or repair the product. In the event that SMG chooses to replace the product, this original warranty will expire at the original date. If the product includes various accessories or components, only the defective accessory or component will be replaced or repaired.
SMG reserves the right to replace defective parts of the product with parts and components of similar quality, grade and composition where an identical part or component is not available.
Products presented for repair may be replaced by refurbished products of the same type rather than being repaired. Refurbished parts may be used to repair the products.
What is covered.
• Manufacturing fault or defect.
How to claim under this warranty.
- Call customer service.
- Ensure you have the following: Original purchase receipt, Model of compressor, Serial number of compressor.
- Discuss the issue.
- Customer service will advise which authorised service agent to take the compressor to provide the issue is a warranty one.
• Take compressor to authorised service agent for repair.
What is not covered.
• Commercial use of compressor.
- Use of compressor for hire
- Use of compressor in a commercial premises.
- Damage or deterioration due to transport.
- Damage caused by negligence, misuse, abuse or accident or incorrect voltage and wattage.
- Any corrosion or rusting.
- Damage caused by incorrect set up and start up.
- Replacement parts due to general wear and tear.
- Compressors with serial number defacement, modification or removal.
- Compressors which have been serviced by other than an authorised SMG service agent.
- Compressors with no original purchase receipt.
- Compressors which have been on sold, not original purchaser.
- Damage due non-servicing of compressor as is required by this manual.
- Blockages / damage caused by dust, dirt, spiders webs or insects.
- Damage caused by the incorrect fitting of accessories.
- Damage caused by overloading, overworking the compressor.
- Damage to attached equipment or third party accessories.
- Damage caused by attached equipment or third party accessories.
CONTACT DETAILS
Smart Marketing Group Pty Ltd
33-35 Lionel Road, Mt. Waverley
Victoria 3149, Australia.
Tel (+613) 9543 7266
Fax (+613) 9543 9839
service.group@sitro.com.au
COMPLETE WARRANTY STATEMENT – COMPRESSOR
As soon as you have purchased the compressor, we recommend that you check to make sure it is intact and that you read the operating instructions carefully before using it. The purchase receipt for this product is to be retained and must be presented if making a claim under the terms of the Smart Marketing Group (SMG) warranty. Bank account statements are not acceptable for proof of purchase.
This warranty does not cover compressors intended for hire or use in commercial applications or in commercial premises. The warranty will under no circumstances extend to reimbursement or payment of damages, whether direct, indirect or consequential. The warranty is void if there is evidence the compressor has been modified or tampered with in any way or used with unauthorised accessories without our consent.
SMG declines any responsibility or liability whatsoever arising from misuse or abuse, negligent handling of the compressor or if the product has not been installed or failure to comply with the relevant safety, operating, setting and maintenance instructions (see further in this manual).
The warranty does not extend to installation or disconnection costs.
Any item sent freight forward/collect for repair will be refused. Warranty repairs are free of charge, provided the appliance is delivered to our service department or authorised service agent. The compressor will need to be returned, adequately protected in a box. SMG will not be responsible for any in-transit loss or damage. Assistance under the warranty will only be made available if the request is made to our customer service team on the contact numbers listed below and proof of purchase is provided.
This is a repair only warranty you will need to take the compressor to the authorised service agent after contacting our customer service centre.
If the product includes various accessories or components, only the defective accessory or component will be replaced or repaired.
SMG reserves the right to replace defective parts of the product with parts and components of similar quality, grade and composition where an identical part or component is not available.
Products presented for repair may be replaced by refurbished products of the same type rather than being repaired. Refurbished parts may be used to repair the products.
Damage caused by third party accessories is not covered under this warranty.
Damage caused to attached equipment or third party accessories will not be covered under this warranty.
Rust and corrosion are not covered under this warranty.
If a warranty fault is found, the freight cost will be credited to the owner. If no fault is found, the product will be returned and any costs associated with the service will be charged to the owner.
Blockages caused by spider webs, insects, dirt or accumulated dust are not covered by warranty. SMG reserves the right to replace or repair the appliance within the warranty period. Parts found to be defective due to a manufacturing default will be replaced free of charge.
In the event of SMG choosing to replace the appliance, the warranty will expire at the original date of purchase. If no warranty fault is found the owner will be advised and the product will be returned and any costs associated with the service will be charged to the owner.
Our goods come with guarantees that cannot be excluded under the Australian Consumer Law. You are entitled to a replacement or refund for a major failure and for compensation for any other reasonably foreseeable loss or damage. You are also entitled to have the goods repaired or replaced if the goods fail to be of acceptable quality and the failure does not amount to a major failure. The benefits of this warranty are in addition to any rights and remedies imposed by Australian State and Federal legislation that cannot be excluded.
In New Zealand, this SMG warranty is in addition to the conditions and guarantees which are mandatory as implied by the New Zealand Consumer Guarantee Act 1993.
CONTACT DETAILS
Smart Marketing Group Pty Ltd
33-35 Lionel Road, Mt. Waverley
Victoria 3149, Australia.
Tel (+613) 9543 7266
Fax (+613) 9543 9839
service.group@sitro.com.au
LUBRICATION OF COMPRESSOR
This compressor is OIL FREE. Therefore there is NO oil used for lubrication.
ASSEMBLY
This compressor MUST be fully assembled by you prior to use. Failure to do so will result in the warranty being VOID. Failure to fully assemble this compressor may also result in personal injury.
SAFETY
Before attempting to operate this air compressor the following basic safety precautions should be taken to reduce the risk of fire, electric shock and personal injury. It is important to read the instruction manual and to understand applications, limitations and potential hazards associated with the air compressor. This air compressor is not intended for use by persons (including children) with reduced physical, sensory or mental capabilities, or lack of experience and knowledge, unless they have been given supervision or instruction concerning the use of the appliance by a person responsible for their safety.
BEWARE OF CHILDREN AND PETS
Children and pets should be kept out of the work area. Children should not be allowed to touch or operate the air compressor, tools or extension cords. This air compressor is not designed for use by young children or infirm persons without supervision. The air compressor and tools should be kept out of reach of children, preferably stored or locked in a secure cabinet or room when not in use.
WORK AREA
Work areas and benches should be kept tidy. Cluttered benches and work areas can cause accidents. Floors should be kept clean and free from rubbish. Special care should be taken when the floor is slippery due to sawdust or wax. Always leave sufficient distance, at least 5 metres between the air compressor and the work area, especially when using tools designed for sanding or spraying liquids. If needed, use a longer air hose to reach your work area.
WORK ENVIRONMENT
Do not expose your air compressor to rain or use in damp or wet conditions. Keep the work area well lit. Always ensure your compressor is level and stable. Using your compressor on unlevel or unstable ground may cause it to tip over, this damage will not be covered under warranty. Do not use your air compressor in the same area that you are spray painting or sanding. Always use your compressor in clean air. If needed use a longer air hose to reach your work area.
Avoid body contact with earthed or grounded surfaces (e.g. pipes and refrigerators).
DO NOT OVERLOAD AIR COMPRESSORS
The air compressor will do a better, safer job and give you much better service if it's used at the duty cycle for which it was designed. The duty cycle will only take effect after the initial (1st) tank fill for the day. This air compressor's duty cycle is 75%. Duty cycle is the proportion of time during which the air compressor is operated. This means after 45 seconds of operation, motor pumping, the air compressor must be left for 15 seconds resting, motor not pumping. When the motor is pumping the attached air tool can not be used. Only use the attached air tool while the compressor is not pumping. Stop using the attached tool as soon as the air compressor starts pumping.
USE THE RIGHT TOOL
Select the right tool for the job. Do not use a tool for a job for which it was not designed. Do not force a small air compressor to do the job of a heavy-duty air compressor. Do not use the air compressor for purposes not intended.
DO NOT ABUSE THE POWER CORD
Never yank or pull on the power cord to disconnect it from the mains supply socket. Never carry or pull your air compressor by its power cord. Keep the power cord away from heat, oil, solvents and sharp edges. If the power cord becomes damaged have it replaced by an authorised service facility.
EXTENSION CORDS AND REELS
This air compressor MUST be plugged directly into a 240V AC wall socket.
This air compressor is NOT designed to be run off an extension cord/lead. If you need extra distance do NOT use an extension cord, USE A LONGER AIR HOSE.
The use of extension cords may cause power voltage loss and will result in damage to the motor. This will NOT be covered under warranty.
SECURE THE WORK PIECE
Whenever possible secure the work piece using clamps or a vice. It is safer than using your hands or feet and leaves both hands free to control the tool.
HOT COMPONENTS
Beware many of the components will get hot during use. Never touch any of the metal pipes, pump or motor as these may burn.
MAINTAIN YOUR AIR COMPRESSOR WITH CARE
Follow the instructions for cleaning and changing accessories. Check the air compressor power cord periodically and if damaged have it replaced by an authorised service facility. Keep handles clean, dry and free from oil and grease. Ensure that ventilation slots are kept clean and free from dust at all times. Blocked ventilation slots can cause overheating and damage to the motor.
DISCONNECT AIR COMPRESSOR
Ensure that the air compressor is disconnected from the mains supply when not in use, before servicing, cleaning, making adjustments or when changing any accessories.
REMOVE ADJUSTING KEYS AND WRENCHES
Form the habit of always checking to see that any adjusting keys or wrenches have been removed from the air compressor before operating.
AVOID UNINTENTIONAL STARTING
Ensure that the switch is in the 'OFF' position before plugging the air compressor into the mains supply.
PROTECT FURNISHINGS
If using the air compressor inside your house, protect furnishings and floors with a suitable dust sheet.
FIRE PRECAUTIONS
When using the air compressor inside your house or workshop general fire precautions should be observed. As a precaution it is recommended that an expert is consulted on obtaining and using a suitable fire extinguisher.
CLEANING YOUR AIR COMPRESSOR
Always disconnect your air compressor from the mains power supply before you commence cleaning. Always ensure that your air compressor has cooled, about one (1) hour, before cleaning and storing. When cleaning your air compressor use only a damp soft cloth. NEVER use liquid or solvents of any type.
CHECK DAMAGED PARTS
Before using the air compressor it should be carefully checked to determine that it will operate properly and perform its intended function.
Check for the correct alignment of moving parts ensuring that they do not bind. Check for broken or missing parts and have them replaced or repaired at an authorised service facility. Check any other condition that may affect the operation of the air compressor. A guard or any other part of the air compressor that is damaged should be properly repaired or replaced by an authorised service facility unless otherwise indicated in this instruction manual.
Any switch that does not operate correctly must be replaced by an authorised service facility.
DO NOT use the air compressor if the 'ON / OFF' switch does not turn the air compressor 'ON' and 'OFF'.
DO NOT use the power point switch to operate the air compressor as this will cause damage and injury may occur. Any damage will not be covered under warranty.
PERSONAL SAFETY
Clothing
Do not wear loose clothing, jewellery or anything that could get caught in moving machinery.
Hair
Long hair should be tied back or contained in a protective covering.
Eye Protection
The use of safety goggles is highly recommended (normal glasses are not sufficient for eye protection) when using an air compressor. Prescription glasses do not have safety lenses.
Footwear
Where there is the risk of heavy objects or if there is a risk of slipping on wet or slippery floors, suitable non-slip safety footwear should be worn. Protect your feet from dropping accidents.
Ear Protection
The use of ear protection is highly recommended when using air compressors. The continual noise may damage your ears.
Respiratory Protection
When operating any machinery that creates dust or when spray painting, an approved dust / filter mask must be worn. When machining concrete, man made fibres, especially MDF (Medium Density Fibre board), the resin used in these materials can be hazardous to your health. Use an approved face mask with replaceable filter.
Do Not Over Reach
Do not over reach. Keep a proper footing and maintain your balance at all times. Avoid using abnormal stances and awkward body positions.
Stay Alert
Watch what you are doing, use common sense and never operate an air compressor when you are tired, drinking alcohol, taking drugs or if taking medication that causes drowsiness.

WARNING
Only use compressor when fully assembled
Do not attempt to modify the air compressor in any way; this will VOID your warranty.
The use of any attachment or accessory other than those recommended in this instruction manual could result in damage to the air compressor and could cause injuries to the operator.
This electric air compressor complies with Australian / New Zealand and International standards and safety requirements. Repairs should only be carried out by qualified persons using original spare parts. Failure to do so may result in considerable danger to the operator.
IMPORTANT
ELECTRICAL DATA
This air compressor is fitted with a sealed electrical connection plug that is compatible with the mains power supply for Australia / New Zealand and meets the requirements of international standards. This air compressor must be connected to a supply voltage that is equal to that stated on the rating label. If the mains power connection plug or power cord becomes damaged it must be replaced with a complete assembly that is identical to the original, and this must be replaced by an authorised service centre. Always follow the Australian / New Zealand requirements for connection to the mains supply. If in doubt always consult a qualified electrician.
SPECIFIC SAFETY INSTRUCTIONS
Warning! Do not use the air compressor in areas where there is a risk of explosion or fire from combustible materials. The sparks generated from certain tools attached to air compressor can ignite combustible materials as well as flammable liquids, paint, varnish, petrol, flammable gases and dust of an explosive nature. As a precaution it is recommended that you consult an expert on a suitable fire extinguisher and its use.
- Do not attempt to modify the air compressor, guards or the supplied accessories in any way.
- Domestic air compressors are designed for intermittent operation. Ideally a 75% duty cycle. (Meaning: 45 seconds ON motor pumping and 15 seconds OFF, motor not pumping). When the motor is pumping the attached air tool can not be used. Only use the attached air tool while the compressor is not pumping.
- Stop using the attached tool as soon as the air compressor starts pumping.
- Fully assemble compressor before use.
- Always ensure your compressor is level and stable. Using your compressor on unlevel or unstable ground may cause it to tip over, this damage will not be covered under warranty.
- Never run this compressor without the wheels and rubber stopper being correctly fitted.
- Never use an extension cord with this compressor always use a longer air hose.
- Never connect to a generator which does not produce sufficient power, at least 3000W and has pure sine wave power output.
- Domestic air compressors are not designed for industrial / commercial applications.
- Domestic air compressors are not designed for continuous running. Always follow duty cycle - 75%.
-
Avoid touching the pump area as it can become very hot and may burn.
-
Ensure that the air compressor is disconnected from the mains supply when not in use, before servicing, lubricating, making changes and when changing attachments such as air hoses / tools.
- Always use the correct type of tool for the operation to be carried out.
- Never use the air compressor if any part of the unit is damaged. Always have the air compressor serviced by an authorised service agent.
- Always wear safety eye, ear and respiratory protection when operating the air compressor.
- Allow the tank to completely fill before using the air compressor.
- If the air compressor makes an unfamiliar sound or vibrates excessively, switch the air compressor 'OFF' immediately and disconnect from the mains power supply. Investigate the possible cause or consult your authorised service facility.
- Always move the air compressor using the handle and wheels.
- Always use the air compressor on stable ground.
- This air compressor is designed to compress normal air. Never use to compress any other type (s) of gases.
- Never direct the jet of air or other liquids / gases towards your body, other persons or animals.
- Never direct the jet of air or other liquids / gases towards this air compressor.
- This air compressor is not suitable for pharmaceutical, food or sanitary purposes.
- This air compressor is not to be used to for filling scuba or oxygen air bottles or tanks.
- Always follow the instructions relating to the tools attached to this air compressor.

COMPONENTS AND CONTROLS
- Rear handle
- Tank
- Wheels
- Tank drain tap
- Rubber stopper
- Safety Valve (not shown)
- Tank pressure gauge
- Front handle
- Pressure switch
- On / Off button – red colour
- Outlet pressure gauge
- Air outlet - nitto style socket
- Outlet pressure regulator
- Water filter
- Air filter (not shown)
OPERATING INSTRUCTIONS
Unpacking
Carefully unpack your air compressor. This air compressor is bulky and heavy, two (2) person lift required. Dispose of all packing material in an environmentally responsible manner.
Assembly
Your air compressor requires minor assembly before initial operation. Check that you have all required components required for assembly and initial use.
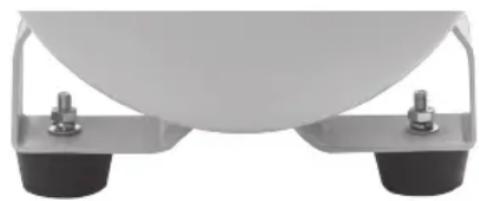
RUBBER STOPPER
To attach the rubber stopper to the bracket located on the bottom of the tank;
- Undo the nut and remove the washer.
- Push through the bracket and replace the washer.
- Tighten the nut, Pic. 1.
PIC. 1
natural_image
Close-up of a white satellite dish antenna with metallic base and two black connectors (no text or symbols visible)WHEELS
- Insert a bolt through the wheel.
- Push through the tank wheel bracket.
- Tighten the nut, Pic. 2.
PIC. 2

natural_image
Close-up of a mechanical component with a circular body and a side-mounted wheel, no visible text or symbols.WARNING

Do not attempt to operate this compressor until it is fully assembled.
Damage caused due to incomplete assembly will not be covered under warranty.
Ensure the air compressor is disconnected from the power supply before carrying out any assembly, maintenance or adjustments on the machine.
HANDLE
- Loosen bolts in tubes welded to the tank.
- Push handle into tubes welded on the tank.
- Tighten the bolts to hold handle in place, Pic. 3.
AIR FILTER
The supplied air filter must be used.
Failure to do so may result in irreparable damage and will void the warranty, Pic. 4.
To install;
- Carefully screw supplied air filter into the threaded hole on the top of the pump head. This only needs to be done up by hand. Do not use tools to tighten air filter.
NOTE: Do not OVER TIGHTEN as this may damage the air filter or cylinder head which will NOT be covered under warranty.
STARTING AND STOPPING YOUR AIR COMPRESSOR
Pic. 5
NOTE: Always ensure that you plug your air compressor into a standard 240V AC power point. Never use an extension cord as this can lead to a voltage drop which may cause power loss and over heating. Use a longer air hose if you need to get closer to your work area.
Always start and stop the compressor using the ON/OFF switch on the Pressure Switch (Pic. 1 Item 9 and 10 as well as Pic. 5). Damage caused by not using this switch will not be covered by warranty.
To turn your air compressor ON;
Lift up the red ON / OFF switch on top of the pressure switch.
To turn your air compressor OFF;
Push down the red ON / OFF switch on top of the pressure switch.


natural_image
Close-up of a mechanical component with a black knob and perforated base (no visible text or symbols)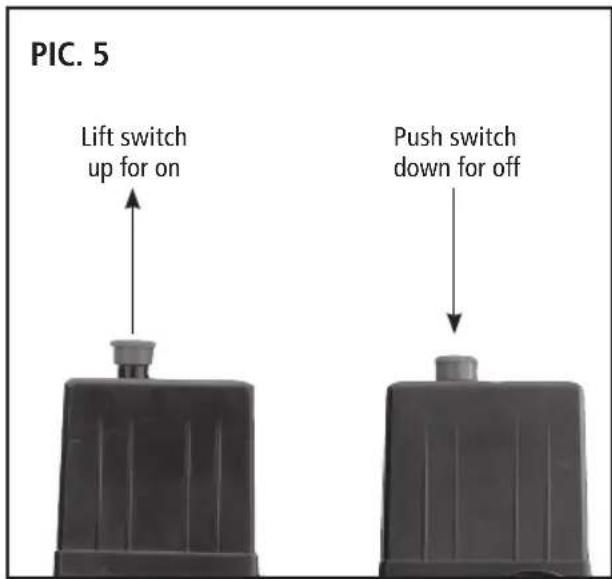
USING THE AIR COMPRESSOR
Your compressor does not require running in. Before use ensure you have read and understood these instructions. Before use ensure this compressor is fully assembled as per pages 10 and 11.
Before starting run through this simple list;
- Fully assembled.
- Drain tap – open and drain tank.
- Drain tap – close fully.
- Check power lead for any damage. If damaged have replaced by an authorised service centre.
- Plug compressor into a standard 240V 10Amp AC power point and turn ON.
- Lift the red button to turn ON, see page 11, Pic. 5.
- Allow the compressor to fill the air tank.
- Turn the compressor OFF.
- Turn the power point OFF and disconnect the power lead from the power point.
- Connect your air hose and air tools.
- Reconnect to the power lead to the power point and turn ON.
- Turn your compressor ON.
- Once turned on and you begin using the connected air tools the compressor will start and stop without warning. This is controlled by the pressure switch. These pressure settings are factory set and should not be changed.
FILTER REGULATOR
Pic. 6
This air compressor comes with a filter regulator, which will filter some water and other particulates from the air as it passes through the regulator.
To drain any fluid from the filer regulator;
- Gently pull the nipple down.
- Allow fluid to drain.
- Allow nipple to seal.
To clean bowl (no tools required);
- Unscrew the clear bowl.
- Rinse the bowl in clear water.
- Allow to air dry fully.
- Screw the clear bowl back into place.

IMPORTANT
Pumping starts at (minimum) 115PSI and stops at (maximum) 145PSI. Once the initial pump up stage has finished you can use the compressor.
This compressor has a maximum pressure of 10 bar. Always regulate the outlet air pressure to match your air tool.
Different air tools require different operating pressures. Always check with the air tool manufacturer if unsure.
PIC. 7

natural_image
Product photo of a Stanley air compressor with various pressure connectors and spray units (no visible text or symbols)Not supplied, purchased separately.
The configuration of tools and accessories can be varied to suit your particular requirements. A basic recommended set up is shown in Pic. 7.
When you have finished using your air compressor follow these simple steps;
- Turn your air compressor OFF, using the ON/OFF switch.
- Turn the power point OFF and disconnect the power lead.
- Disconnect your air tools and air hose.
- Clean your air hose and air tools.
- Store your air hose and air tools in a secure well ventilated cabinet.
- Slowly open the tank drain tap, see page 16. This allows excess air and moisture, water, to vent.
- Leave the tank drain tap open. This allows any moisture to drain while the air compressor is stored.
NOTE: Use of a water trap may be of benefit to ensure no water or moisture reaches your air tool.
IMPORTANT
Pumping starts at (minimum) 115PSI and stops at (maximum) 145PSI. Once the initial pump up stage has finished you can use the compressor.
This compressor has a maximum pressure of 10 bar.
Always regulate the outlet air pressure to match your air tool.
Different air tools require different operating pressures. Always check with the air tool manufacturer if unsure.
ADJUSTING THE PRESSURE
To adjust the outlet air pressure, use the red coloured regulator knob and check the pressure on the outlet pressure gauge, Pic. 8.
If the pressure needs to be lower, turn anti clockwise. If the pressure needs to be higher, turn clockwise.
Use the gauge to ensure you set the correct working pressure.
Note: Different air tools require different operating pressures. Always check with the tool manufacturer if unsure.

SAFETY VALVE
Pic. 9
NOTE: When checking the safety valve ALWAYS wear safety glasses.
To check the operation of the safety valve the air tank will need to be full. Gently pull the ring outwards. This should release air under pressure. Release the ring and this should stop the air out flow immediately.
If the safety valve does NOT work in this manner, STOP the air compressor immediately and have the air compressor checked / serviced by an authorised service centre.

IMPORTANT
This compressor has a maximum pressure of 145PSI (10 bar). Always regulate the outlet air pressure to match your air tool.
Different air tools require different operating pressures. Always check with the air tool manufacturer if unsure.
AIR FITTING
Pic. 10
This air compressor is fitted with a 'Nitto style' (female) socket.
- Push in the 'Nitto style' male plug (not included).
- Fully and completely push the 'Nitto style' male plug (not included) into the 'Nitto style' female socket until it clicks and the collar locates forward.
To remove
- Push collar down and remove male fitting, collar will stay retracted.
NOTE: For ease of connection and disconnection use regulator to reduce outlet pressure to 0PSI.
This compressor has a maximum pressure of 145PSI (10 bar).
Always regulate the outlet air pressure to match your air tool.
Different air tools require different operating pressures. Always check with the air tool manufacturer if unsure.

DRAIN TAP
Pic. 11
After use open the drain tap to drain excess air and any moisture. The excess air will also help purge the moisture. Leave the drain tap open when air compressor is not in use, so any moisture can continue to drain
To open the drain tap pull the lever down to vertical.
To seal the drain tap push the lever up to horizontal.
NOTE: Remember to seal the drain tap before starting the compressor.

MAINTENANCE
Daily: Before use
- Seal the tank drain tap, see page 15, Pic. 11.
- Check safety valve operation, see page 14, Pic. 9.
After Use
- Open the tank drain tap, see page 15, Pic. 11 and leave open to allow to drain.
- Wipe down the compressor.
- Store safely and securely.

TROUBLE SHOOTING
If your compressor does not start
- Check that you have plugged the power lead into a standard 240V 10Amp power point and turned the switch ON.
- Check that you have turned the air compressor ON/OFF switch ON.
- The air tank may be full. Use your air tool and the air compressor should start when the pressure decreases to 115PSI.
If these tips do not work please have your unit checked by an authorised service centre.
Call Smart Marketing Group for your closest centre, Australia. 1300 660 457 N.Z. 0800 474 876.
PARTS DIAGRAM

| Part Description Qty SMG Part No. | |
| 1 Air Filter 1 95 BRC95AF | |
| 3 Exhaust Elbow 1 95 BRC95EE | |
| 4 Exhaust Tube Set 1 95 STDDET | |
| 7 Wheel Set 2 95 STWH | |
| 8 One Way Valve 1 95 BRC95OWV | |
| 9 Drain Tap 1 95 BRC95DT | |
| 10 Cushion Foot Set 2 95 BRC95RS | |
| 11 Unloading Tube Set 1 95 STDDUT | |
| Part Description | Qty | SMG Part No. | |
| 14 | Filter Regulator | 1 | 95 STREGWT |
| 15 | Outlet Nitto Style Socket (Female) | 1 | 95 STNSF |
| 16 Safety Valve 1 | 95 ST10SPV | ||
| 17 | Pressure Switch (10 Bar) | 1 | 95 ST10PS |
| 18 | Handle | 1 | 95 STDDH |
| 19 | Pressure Gauge Outlet | 1 | 95 STOPG |
| 20 Pressure Gauge Tank | 95 STTPG | ||
TECHNICAL INFORMATION
Specifications
Inflator SXAC2036121
Voltage 240V AC \~ 50Hz
Motor Electric 2 HP
Wattage 1500W
No Load Speed 2850 RPM
Free Air Delivery (FAD) 105L per minute
Tank Size 36L
Duty Cycle 75%
Max. Tank Pressure 145PSI (10 Bar)
Outlet Pressure 1PSI - 145 PSI Adjustable
Minimum Generator Size Pure Sine Wave 3000W
Noise Rating 80dB@5m
Motor/Pump Kicks in 115PSI
Pressure Cycle
Stops 145PSI
Number of Outlets 1

For any queries or assistance call

Customer Service
AUST. 1300 660 457
NZ 0800 474 876
Hours of operation:
Monday to Friday 8.00am - 5.00pm AEST
Do not return to place of purchase.
Keep your purchase receipt, this will be required to make any claims under the 24 month warranty.
STANLEY.
STANLEY
STANLEY®, The STANLEY Logo, The Notched Rectangle and the Yellow and Black Diagonal Package
Design are all trademarks of the Stanley Black & Decker, Inc or an affiliate thereof and are used under
license. Product manufactured and distributed by Smart Marketing Group Pty Ltd
Manufactured in China.


- SUGGESTED APPLICATIONS
- INTRODUCTION
- CUSTOMER SERVICE
- EXPRESS WARRANTY STATEMENT - COMPRESSOR
- What is covered.
- How to claim under this warranty.
- What is not covered.
- CONTACT DETAILS
- COMPLETE WARRANTY STATEMENT – COMPRESSOR
- LUBRICATION OF COMPRESSOR
- ASSEMBLY
- SAFETY
- BEWARE OF CHILDREN AND PETS
- WORK AREA
- WORK ENVIRONMENT
- DO NOT OVERLOAD AIR COMPRESSORS
- USE THE RIGHT TOOL
- DO NOT ABUSE THE POWER CORD
- EXTENSION CORDS AND REELS
- SECURE THE WORK PIECE
- HOT COMPONENTS
- MAINTAIN YOUR AIR COMPRESSOR WITH CARE
- DISCONNECT AIR COMPRESSOR
- REMOVE ADJUSTING KEYS AND WRENCHES
- AVOID UNINTENTIONAL STARTING
- PROTECT FURNISHINGS
- FIRE PRECAUTIONS
- CLEANING YOUR AIR COMPRESSOR
- CHECK DAMAGED PARTS
- PERSONAL SAFETY
- Clothing
- Hair
- Eye Protection
- Footwear
- Ear Protection
- Respiratory Protection
- Do Not Over Reach
- Stay Alert
- WARNING
- IMPORTANT
- ELECTRICAL DATA
- SPECIFIC SAFETY INSTRUCTIONS
- COMPONENTS AND CONTROLS
- OPERATING INSTRUCTIONS
- Unpacking
- RUBBER STOPPER
- WHEELS
- HANDLE
- AIR FILTER
- To install;
- STARTING AND STOPPING YOUR AIR COMPRESSOR
- Pic. 5
- To turn your air compressor ON;
- To turn your air compressor OFF;
- USING THE AIR COMPRESSOR
- Before starting run through this simple list;
- FILTER REGULATOR
- Pic. 6
- To drain any fluid from the filer regulator;
- To clean bowl (no tools required);
- When you have finished using your air compressor follow these simple steps;
- ADJUSTING THE PRESSURE
- SAFETY VALVE
- Pic. 9
- AIR FITTING
- Pic. 10
- To remove
- DRAIN TAP
- Pic. 11
- MAINTENANCE
- Daily: Before use
- After Use
- TROUBLE SHOOTING
- If your compressor does not start
- PARTS DIAGRAM
- TECHNICAL INFORMATION
- For any queries or assistance call
- AUST. 1300 660 457
- NZ 0800 474 876
Brand : STANLEY
Model : SXAC2036121
Category : Compressor