
HomeRun 2000 Series XU2100 - Vacuum Cleaner PHILIPS - Free user manual and instructions
Find the device manual for free HomeRun 2000 Series XU2100 PHILIPS in PDF.
| Brand | Philips |
| Model | HomeRun 2000 Series XU2100 |
| Product type | Robot vacuum with mopping |
| Power supply | Rechargeable battery, charging station with auto-empty |
| Navigation | 360° laser navigation (LiDAR) |
| Main functions | Simultaneous vacuuming and mopping, map creation, no-go zones and dry zones, automatic session resume |
| Cleaning modes | Standard, Room, Zone, Silent, Intensive |
| Adjustable suction power | Low, Normal, Strong, Max |
| Adjustable water level | Low, Medium, High |
| Number of cleaning passes | 1, 2 or 5 passes |
| Mapping capacity | Up to 5 maps, 3 maps can be locked |
| Auto-empty station | Yes, with dust bag (anti-allergy S-bag) |
| Connectivity | Wi-Fi 2.4 GHz and 5 GHz, Philips HomeRun Robot app |
| Voice alerts | Multi-language, selectable in the app |
| Safety sensors | Anti-drop (x3), obstacle detection, IR sensor |
| Filter maintenance | Washable filter, clean monthly, replace every 3-6 months |
| Mop pad maintenance | Washable mop pad, clean after each use, replace every 3-6 months |
| Main brush maintenance | Clean monthly, replace every 6-12 months |
| Side brush maintenance | Clean monthly, replace every 6-12 months |
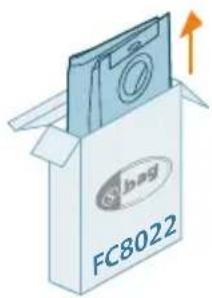
| Spare parts | Mop pads XV1430, maintenance kit XV1433, dust bags FC8022 |
| Operating temperature | 8 °C to 35 °C |
| Warranty | International warranty, support via www.philips.com/support |
Frequently Asked Questions - HomeRun 2000 Series XU2100 PHILIPS
User questions about HomeRun 2000 Series XU2100 PHILIPS
0 question about this device. Answer the ones you know or ask your own.
Ask a new question about this device
Download the instructions for your Vacuum Cleaner in PDF format for free! Find your manual HomeRun 2000 Series XU2100 - PHILIPS and take your electronic device back in hand. On this page are published all the documents necessary for the use of your device. HomeRun 2000 Series XU2100 by PHILIPS.
USER MANUAL HomeRun 2000 Series XU2100 PHILIPS
Charging the robot 8
Download the app, register, and connect to Wi-Fi 9
Audible signals 11
Set the language of the voice alerts 11
How your robot works 11
Create a map 11
Tell your robot where not to clean with restricted cleaning zones 12
How your robot cleans 13
Set cleaning preferences, advanced settings and cleaning order 14
Using your robot 15
- Preparing for a cleaning run 15
Start your first cleaning program via the app 16
Using the robot without the app 16
Your robot's cleaning pattern 17
Returning to the station 17
Auto recharge and resume 17
Cleaning and maintenance 18
When to do maintenance 18
How to clean the mop pad and the dust bin 18
Cleaning the water tank 21
Cleaning the main brush 22
Cleaning the side brush 24
Cleaning the main wheels and the front caster wheel 25
25
Replacing the dust bag 26
Long term storage 27
User interface signals and their meaning 27
Reset/restore the robot 28
Replacement 28
Ordering accessories 28
- Removing the rechargeable battery 29
Warranty and support 30
Disposal and recycling 30
Troubleshooting 31
Introduction
Congratulations on your purchase of a Philips HomeRun 2000 Series Robot vacuum cleaner! To get the most out of your robot and access all the advanced functions you can download and install the Philips HomeRun robot app. You can also find support videos and frequently asked questions in the app or visit www.philips.com/homerun2000.
Read the separate safety booklet carefully before you use the robot for the first time and save it for future reference.
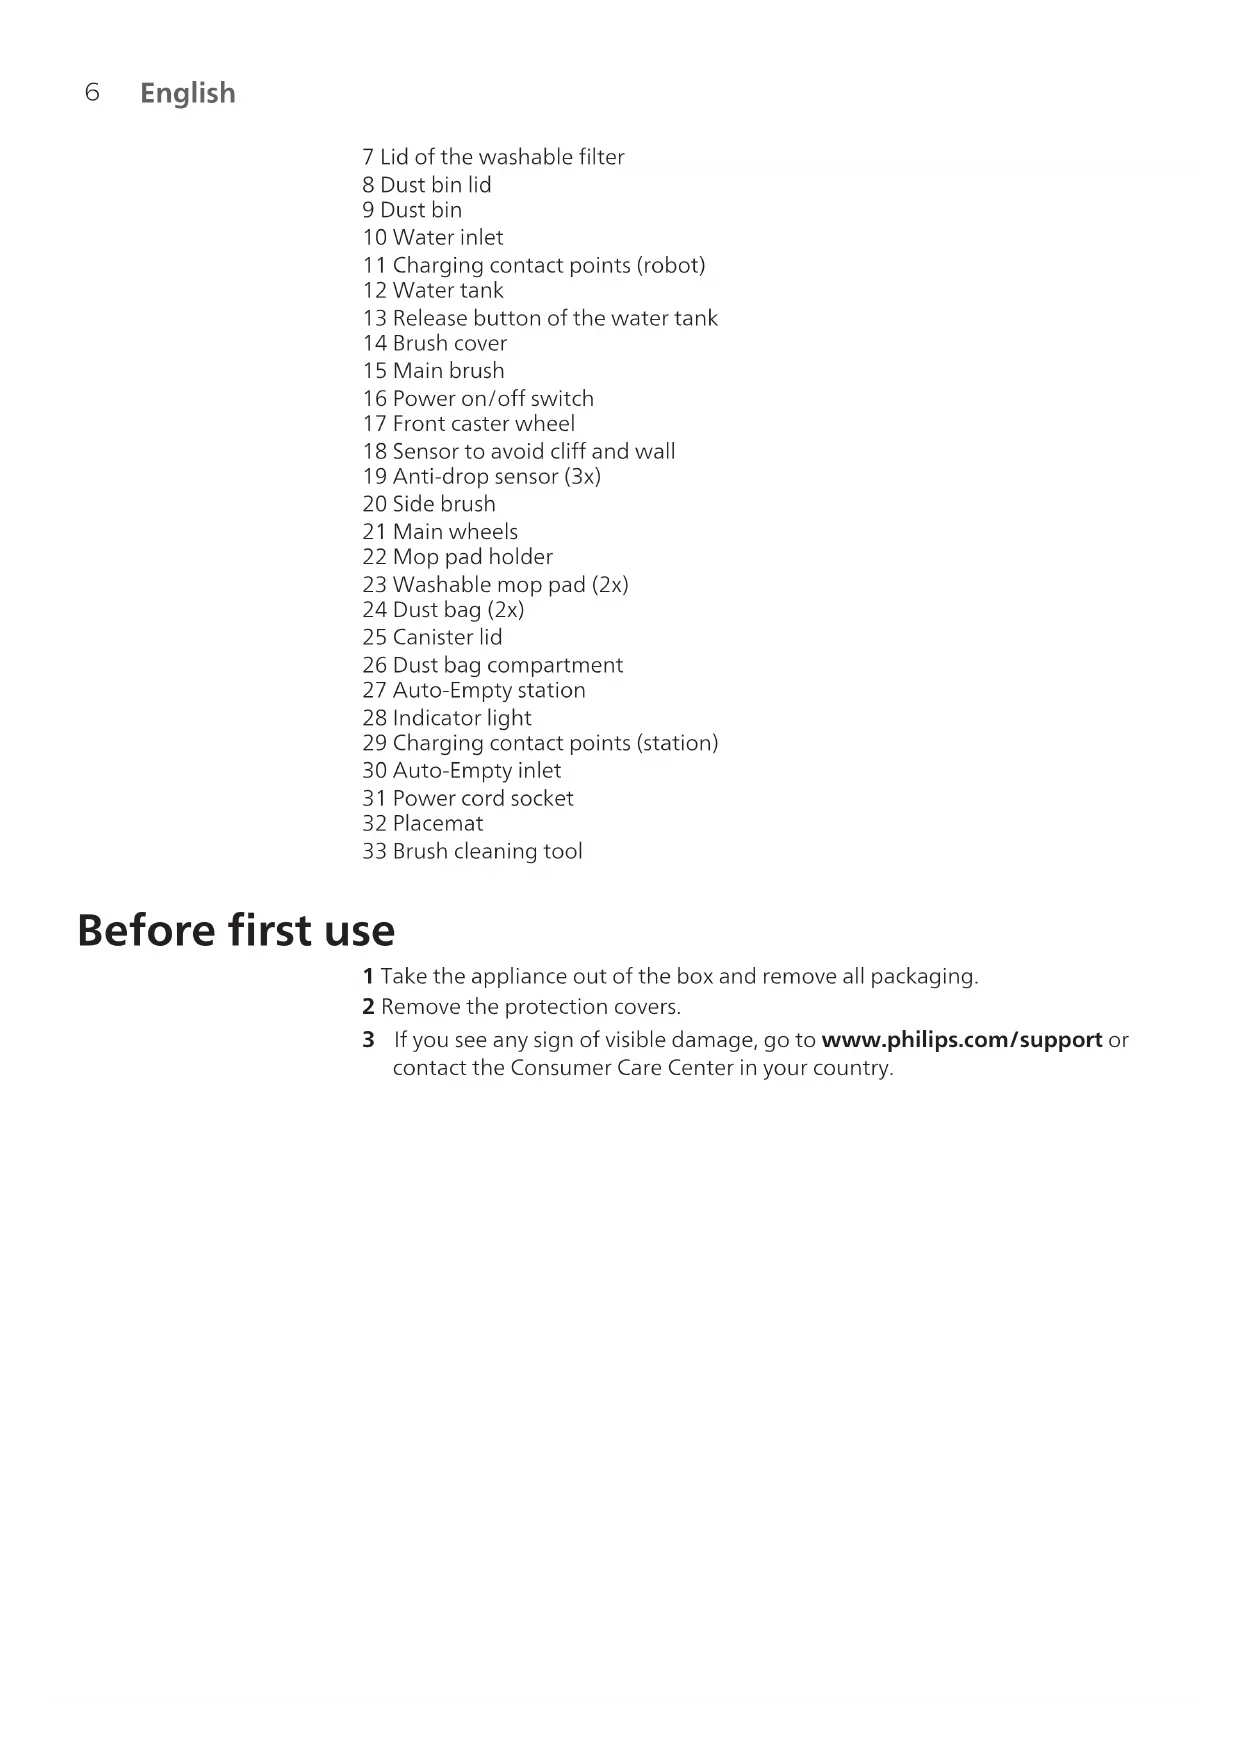
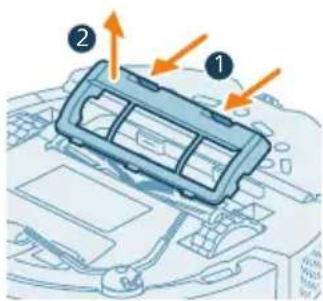
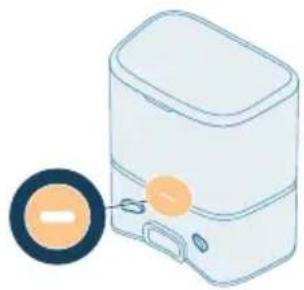
Product overview
1 Start/stop button
2 Home button
3 Top cover
4 360^ laser navigation (LiDAR)
5 Air outlet
6 Washable filter
7 Lid of the washable filter
8 Dust bin lid
9 Dust bin
10 Water inlet
11 Charging contact points (robot)
12 Water tank
13 Release button of the water tank
14 Brush cover
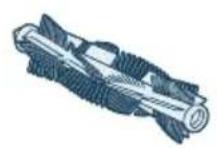
15 Main brush
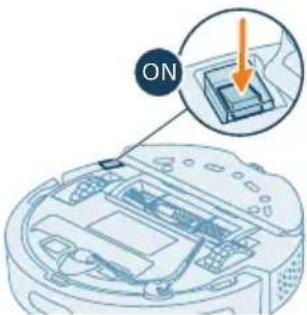
16 Power on/off switch
17 Front caster wheel
18 Sensor to avoid cliff and wall
19 Anti-drop sensor (3x)
20 Side brush
21 Main wheels
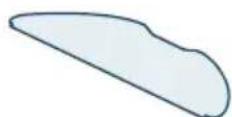
22 Mop pad holder
23 Washable mop pad (2x)
24 Dust bag (2x)
25 Canister lid
26 Dust bag compartment
27 Auto-Empty station
28 Indicator light
29 Charging contact points (station)
30 Auto-Empty inlet
31 Power cord socket
32 Placemat
33 Brush cleaning tool
Before first use
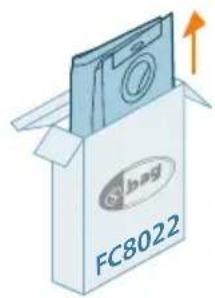
1 Take the appliance out of the box and remove all packaging.
2 Remove the protection covers.
3 If you see any sign of visible damage, go to www.philips.com/support or contact the Consumer Care Center in your country.
Preparing for use
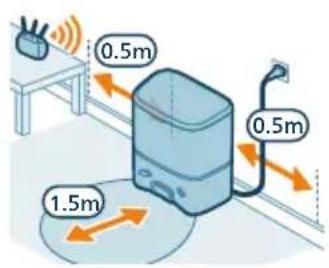
Tips for choosing the best location for installing the station:
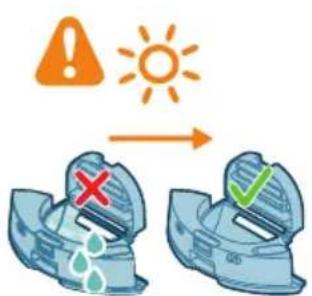
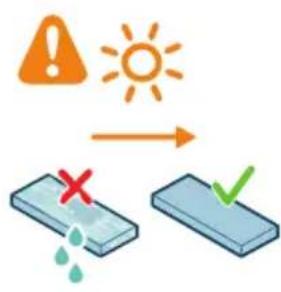
- Do not place the station in bright sunlight or under furniture. This will block the infrared signal that helps the robot find its way back to the station.
Install the station on a level surface against a wall.
Install the station on a hard floor. - Do not place the station near stairs or a heating source (radiator).
Install in a location with good WiFi coverage.
Install the station
1 Install the station within the correct dimensions for placement.
Note: Keep 0.5 meters of space on the sides of the station and 1.5 meters in front of the station.
2 Connect the station to the power supply.
3 Make sure that the remaining part of the power cable is well concealed behind the station so that the robot cannot drive over it.
4 Place the dust bag in the dust bag compartment of the station.
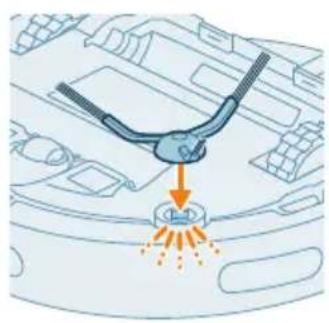
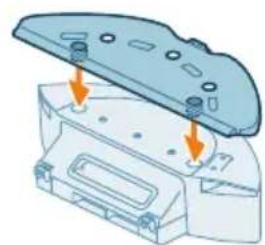
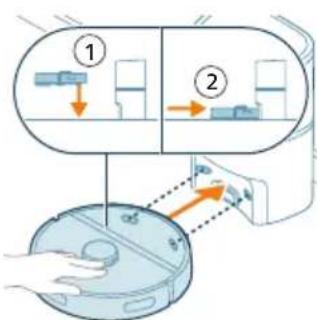
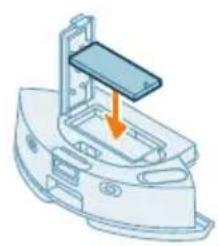
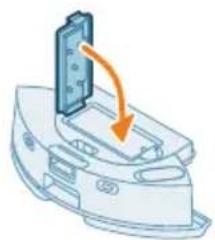
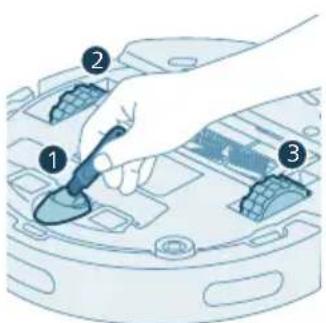
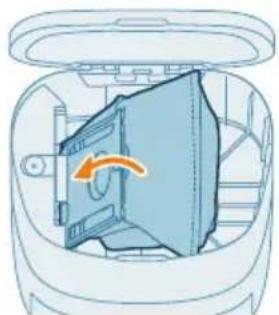
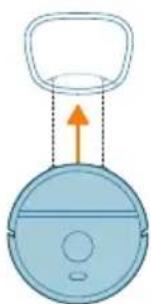
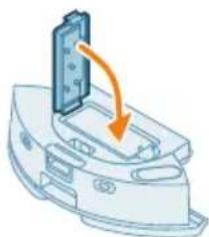
Install the mop pad holder, washable mop pad, and the side brush
1 Attach the side brush by clicking it into the correct position on the bottom of the robot.
2 Attach the mop pad holder to the bottom of the water tank of the robot.
3 Slide the straight side of the washable mop pad in the correct slot of the mop pad holder.
4 Attach the washable mop pad to the velcro material of the mop pad holder.
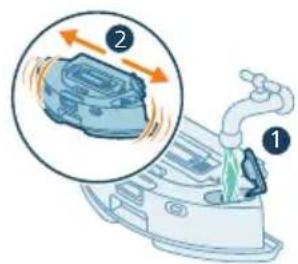
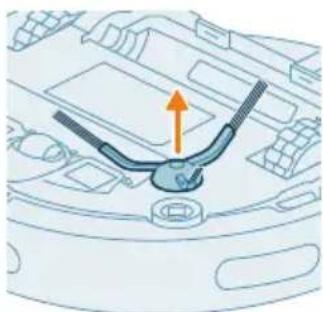
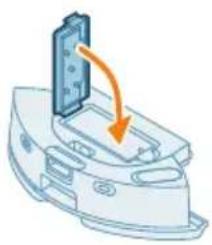
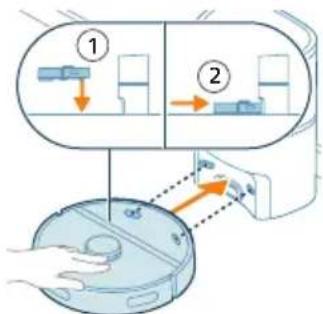
Charging the robot
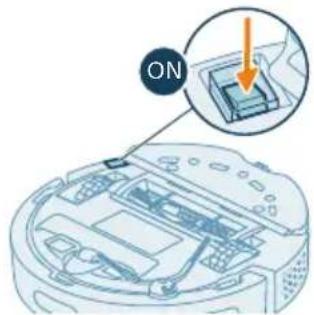
1 Press the on/off switch on the bottom of the robot to switch on the robot.
2 Turn the robot to its correct position and put the robot on the floor in front of the station.
3 Make sure that the station is connected to the wall socket.
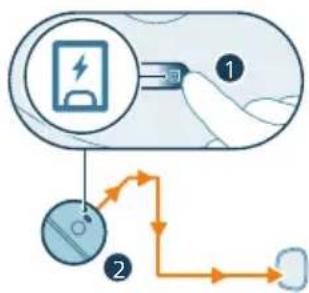
4 Press the home button. The robot drives to the correct position in the station.
5 Wait until the robot is fully charged.
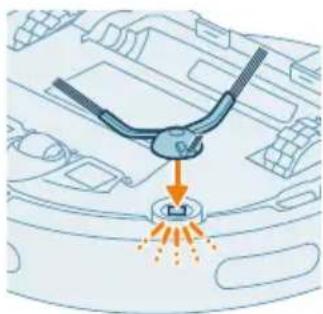
If the battery is empty, the robot will not drive itself to the correct position. In this case, follow the next steps:
1 Turn the robot to its correct position and put the robot on the floor in front of the station. The water tank should be facing the station.
2 Align the charging contact points on the water tank of the robot with the charging contact points on the station.
3 Push the robot against the station so that the charging contacts of the robot make contact with the charging contacts of the station.
Note: Make sure that the robot is in its correct position and starts to charge. The lights in the two buttons on top of the robot flash slowly. If the battery is empty, it may take a while before the robot indicates that it is charging.
1 Attention: Even if you charge the robot for the first time, the station will start vacuuming the robot empty. This is not an error, but is part of the normal charging procedure.
4 Wait until the robot is fully charged.
Note: Make sure the robot is fully charged before you use it for the first time.
Note: The white LED on the station also lights up to indicate that the robot is charging.
Download the app, register, and connect to Wi-Fi
App content
You can operate the robot with the Philips HomeRun robot app. The app allows you to manage your robot and offers help and support:
1 How-to-use videos.
2 Full user manual.
3 FAQs.
4 Contact Consumer Care.
5 Create a map of your home.
6 Select which rooms to clean.
7 Choose between different cleaning modes and settings for each room.
8 View the status of the cleaning run in real time and see the battery level.
9 Receive notifications and alerts.
10 Schedule a cleaning run.
11 See the maintenance status and find replacement parts.


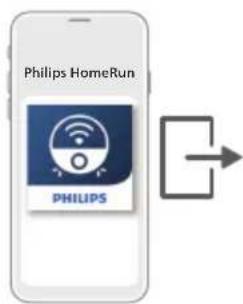
Downloading the app
1 Scan the QR code on the left or on the packaging of the robot to download the Philips HomeRun robot app.
Or:
Search for 'Philips HomeRun robot app' in the Apple App Store or one of the Android App Stores.
2 Download and install the app.
3 Follow the instructions in the app.
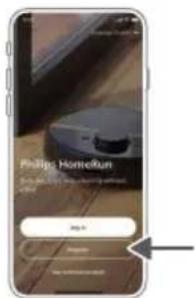
Registering a personal account
You can register a personal account and benefit from the following advantages:
- Control the robot from more than one device, e.g. a smart phone and tablet, or add multiple users in the household.
- Save back-up of important data like customized cleaning plans for your home.
i Note: If you change your phone and you don't have an account, then you'll lose all customized cleaning plans.
i Important: Philips values and respects your privacy. A link to our privacy notice can be found in the app before registering.
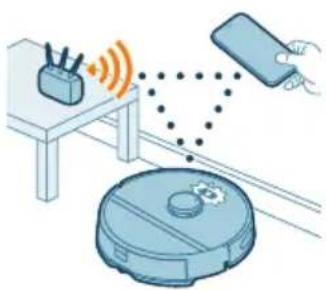
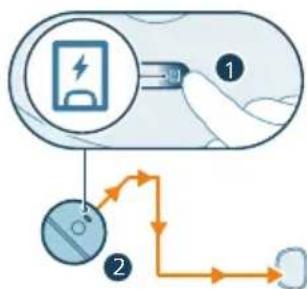
Setting up the Wi-Fi connection
Before you begin: make sure that the robot and your mobile device have good Wi-Fi coverage.
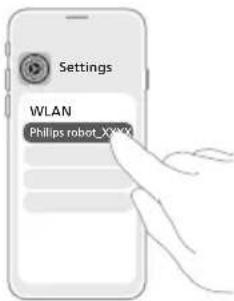
1 Press the 'Add robot' button in the app and follow the instructions.
2 Pair the robot with the WiFi in the app. Make sure that you have your WiFi password at hand.
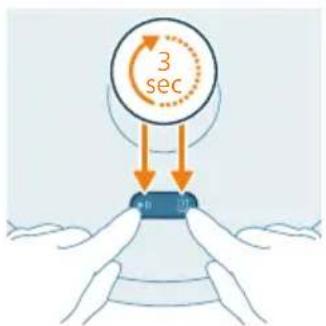
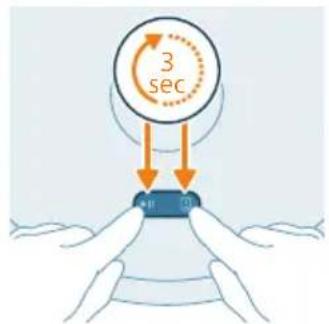
3 Press and hold the start/stop button and home button at the same time for three seconds. The lights in the buttons will flash orange to indicate that the robot is in Wi-Fi set-up mode.
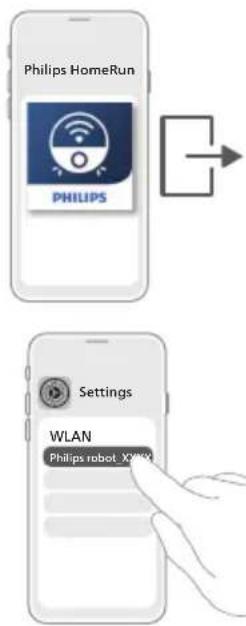
4 Click the join button if it's visible in the app to connect with the 'Philips robot' network.
i Note: If the join button is not visible in the app, leave the app and go to WiFi under 'Settings' on your mobile device. There you can select the Philips robot network and connect to it.
Note: Your robot can connect to both 2.4GHz and 5GHz frequency WiFi bands.
If the Wi-Fi pairing fails:
- Check your Wi-Fi connection.
- Check if you selected the correct model.
- Check if you entered the correct Wi-Fi password.
- Check if the robot is still in Wi-Fi set-up mode.
Note: You can recognize this if the lights in the two buttons on the robot are still flashing orange.
Note: If you are unable to solve the problem, visit www.philips.com/homerun2000 for support information and the contact details of Consumer Care.
Audible signals

- The voice alert language of the robot can be changed from English to your local language. To change the language, download the app and connect the robot with the Wi-Fi, so that it can download the new language.
- The app will give alerts and reminders if the robot needs attention. This way you'll be fully informed on the real-time status even if the robot cleans while you're away.
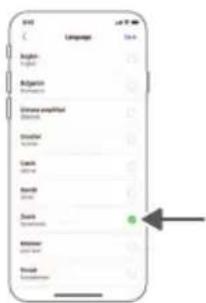
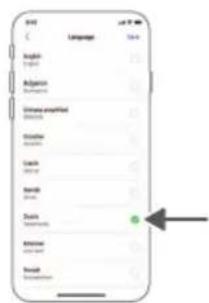
Set the language of the voice alerts
i You can set the language of the voice alerts immediately after you have connected the robot to Wi-Fi.
1 Make sure that the robot is connected with the app.
2 In two places in the app you can find the option to change the language of the voice alert.
- On the same app screen where you are asked to name the robot.
- Or by pressing the setting icon at the top right corner and then choosing the Robot settings tab.
3 Then choose the language of the voice alert there.

How your robot works
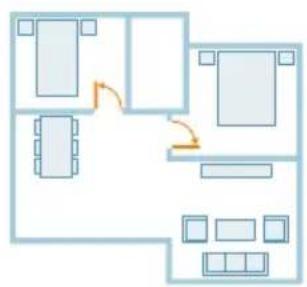
Create a map
How mapping works
The robot drives through the rooms and the laser navigation quickly scans the rooms to build a map of the floor.
Map Edit
In the app, you can use Map Edit to:
- Edit rooms (merge/divide rooms, name rooms) so you can customize the cleaning routine of the robot per room.
- Set up restricted areas to specify where the robot is allowed to clean and where it is not.
- Create a map for each floor of your home and store up to 5 maps. When you use the appliance, it generates a new map in a new environment. If you have maps that you use frequently and do not want to accidentally overwrite, you can lock up to 3 maps.
Preparing the room for mapping
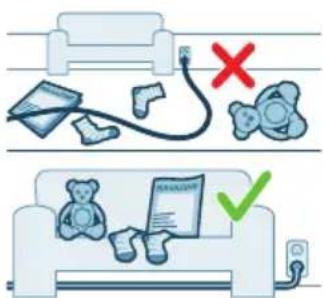
Before you start mapping, make sure to:
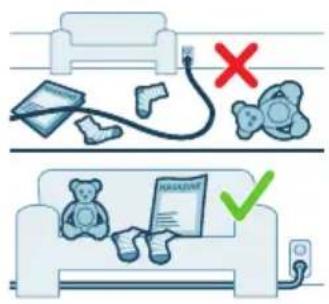
Tidy up the area.
Put furniture in the proper place.
Put away loose and small obstacles.
Note: This is important to avoid permanently storing the obstacles on the map.
- Open all in-house doors and close doors to the outside.
i Important: Make sure the robot cannot get blocked during use.
Create and edit a map
i Important: During mapping your robot will not clean.
1 To create a map, either click "Create map" in the home screen directly after pairing the robot with the app or when no map has previously been created. Or click the setting icon in the top right corner, select "My maps", and select the "+" icon in the top right corner. Then follow the instructions in the app.
2 To edit your map, either select the map icon in the home screen or click the setting icon in the top right corner, select "My maps", and select "Edit map" for the map that you would like to edit.
Tell your robot where not to clean with restricted cleaning zones
In the app you can set up restricted areas to indicate where the robot is allowed to clean and where it is not.
Virtual wall and No-Go zone
Create virtual walls and No-Go zones areas you do not want the robot to go. You can for example create virtual walls or No-Go zones to:
- Protect fragile objects. The robot cannot detect small obstacles like shoes, toys or cables, nor can it detect shiny, transparent (e.g. glass) or dark obstacles or surfaces.
- Prevent the robot from getting stuck while cleaning.
Note: The robot can get stuck on high pile carpets, carpets with fringes or or very light rugs like in the bathroom. Also the robot cannot detect cables on the floor.
- Protect the robot.
Note: The robot should be kept away from liquids and wet areas such as pet bowls and plant trays.
i Important: virtual walls and No-Go zones should not be used to protect against hazards.
i Important: virtual walls and No-Go zones should not prevent the robot from returning to the station.
No-Mop zone
Create No-Mop zones to prevent the robot from mopping carpets or rugs.
Note: The robot will avoid the No-Mop zones when the mop pad holder is attached. When the mop pad holder is not attached to the robot, the robot will vacuum the No-Mop zone.
How your robot cleans
In the app, the following cleaning routines can be selected:
Routine Description
| Regular Regular cleaning is intended for your normal daily cleaning routines. The robot cleans each room according to the settings you specified and saved in the cleaning plan. If the environment is not recognized, the robot maps the environment and cleans according to the last set mode. If it is a mode with mopping function but no mop is installed, the robot does not dispense water. After the cleaning is completed, the robot returns to the station. | |
| Room | - Room: the robot cleans one or more rooms in an order you specify. |
| Zone | - Zone: the robot cleans a zone in a room you specify. After selecting one of the above options, you can select a cleaning mode and fine-tune your cleaning preferences and advanced settings. |
Set cleaning preferences, advanced settings and cleaning order
In the app, you can select five different cleaning modes for each room. These are standard modes that can be used in most situations. You can customize your cleaning mode by fine-tuning cleaning preferences and advanced settings.
Cleaning modes
Mode Description
Vac & Mop The robot vacuums and mops the floor at the same time. This mode is intended for regular cleaning of hard floors.
IMPORTANT: For mopping sensitive hard floors, such as parquet floors, set the water level in the app to the lowest level.
Vacuum The robot only vacuums the floor. This mode can be used for areas that shouldn't be mopped.
Mop The robot only mops the floor.
Quiet The robot cleans with minimal noise. The suction power is lowered and the voice alerts are muted.
Intensive The robot vacuums and mops the floor at the same time and at full power. This mode is intended for thorough cleaning of small areas. Note that it is not recommended to clean large areas in this mode. The robot passes the area 5 times, so the cleaning time and battery usage will increase significantly.
Cleaning preferences
For each cleaning mode, you can fine-tune the following cleaning preferences:
Setting Description
Suction power Change the suction power:
- Low : f e ficient cleaning with low energy consumption and low noise level.
- Normal: f regular cleaning and effective removal of fine dust on hard floors with optimal balance between power and efficiency.
- Strong : for a thorough cleaning of large floors. Can clean more on a single charge than max mode.
- Max : ideal for removing large dirt like crumbs. The strong suction power removes fine dust particles hidden deep inside carpets and crevices.
Setting Description
| Mop Wetness Determine the flow rate that is pumped from the electric water tank onto the mop: | |
| IMPORTANT: Do not add hot water or cleaning detergents to the water tank. | |
| - Low: to mop a sensitive floor e.g. parquet. The combination of vacuuming and mopping removes more fine dust than vacuuming alone. | |
| - Medium: optimal for a regular wet & dry cleaning. The mop removes superficial dirt and bacteria to keep your home sanitized and healthy. | |
| - High: for a spotlessly clean home. It is recommended to combine this setting with 2 or 5 cleaning path repetitions for an intensive cleaning. | |
| Cleaning path repetition | Specify the number of repetitions. One pass is sufficient for normal cleaning. It is possible to program the robot to make 2 or 5 passes for intensive cleaning. It is recommended to select this option only for specific cleaning areas as it impacts cleaning duration. |
Advanced settings
You can set your own cleaning order in the app by clicking the setting icon in the top right corner and selecting "Cleaning order".
Using your robot
Preparing for a cleaning run
Before you start the robot on its cleaning run:
1 Attach the side brush by clicking it into the correct position on the bottom of the robot.
2 Attach the mop pad holder to the bottom of the water tank.

3 Slide the straight side of the washable mop pad in the correct slot of the mop pad holder.
4 Attach the washable mop pad to the velcro material of the mop pad holder.
IMPORTANT: The mop pad holder can be removed. But when using the robot with mop pad holder, the washable mop pad must always be attached to the mop pad holder, even if you use the robot without mopping. This is to prevent damage to the floor and the mop holder during use.
- Remove all cables, wires, cords and small objects such as shoes and toys from the floor to prevent the robot from getting entangled in them.
- Open all in-house doors.
- Pre-wet the mop for optimal results.
Start your first cleaning program via the app
Start
1 Open the app.
2 Select the cleaning program: Regular, Room, or Zone.
3 Press the 'start' icon.
Note: make sure that the power on/off switch on the robot is set to the "on" position ("I").
Note: If the battery level is too low, cleaning cannot start. Wait until the robot is sufficiently charged before you start a cleaning run.
Stop
1 Press the Pause icon in the app. The robot stops.
2 Press the Start icon again. The robot continues.
3 Press the Return icon. The robot goes back to the station.
Using the robot without the app
i Note: For an optimal experience, we recommend using the app.
Without the app, you can use the two buttons on the robot to operate it:
-
Start/pause button
-
Long press (3s) to turn the robot on and off.
-
Short press to start cleaning or to pause cleaning. Press again to resume cleaning.
-
Return-to-station button
-
Short press (when the robot is not cleaning): the robot will find the station and charge.
-
Short press while cleaning: the robot will stop cleaning. Short press again: the robot returns to the station to charge.
- Short press when the robot is driving back to the station: the robot will pause returning to the station. Press again to let it drive back to the station.
i Note: To deactivate the robot's WiFi function, press the bumper on the front side of the robot and return-to-station button for 10 seconds. You can still use basic functions without WiFi, but for full access to all features, we highly recommend pairing the robot with WiFi.
When operating the robot manually, it will vacuum and mop. However, if the water tank is empty or the mop pad holder is not attached, the robot won't mop.
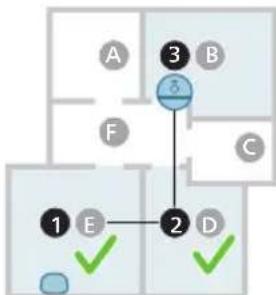
Your robot's cleaning pattern
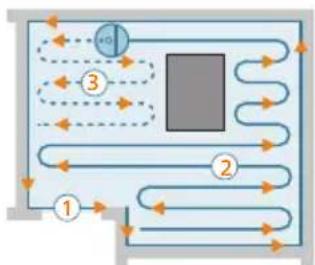
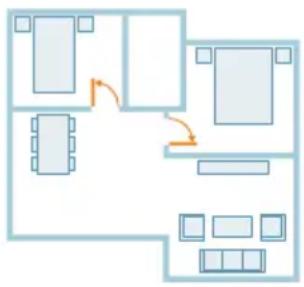
The robot cleans the home in a structured way. The robot cleans room by room and always starts by cleaning the edges of the room first before covering the remaining surface.
Returning to the station
After the robot has completed its cleaning run, the robot will automatically drive back to the station to recharge.
Auto recharge and resume
When the battery runs low (< 20%) while cleaning, the robot automatically returns to the station to recharge. After the battery has been charged, the robot continues where it has left off.
You can disable this function in the app by clicking the settings icon in the top right corner and then toggling the "resume clean" option on or off.
Cleaning and maintenance
When to do maintenance
Item Cleaning Replacement
| Washable mop pad After every use 3-6 months | |
| Main brush Monthly 6-12 months | |
| Washable filter Monthly 3-6 months | |
| Side brush Monthly 6-12 months | |
| Main wheels & Front caster wheel | Monthly - |
| 360° laser navigation (LiDAR) sensor | Monthly - |
| Sensors: | Monthly - |
| - Infrared signal sensors | |
| - Anti-drop sensor (3x) | |
| Charging contacts robot and station | Monthly - |
| Sensors to detect placement of dust bin and water tank | 6 months - |
| Dust bin Empty the dust bin after each use | |
How to clean the mop pad and the dust bin
Clean the washable mop pad
1 Pull the washable mop pad off the velcro material.
2 Slide the straight side of the washable mop pad out of the slot.
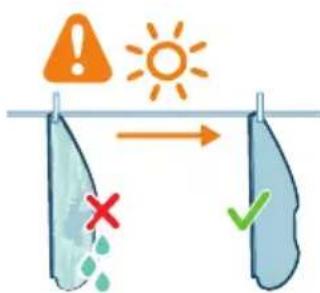

3 Rinse and clean the washable mop pad with water or wash it in the washing machine.
4 Air dry the washable mop pad.
Note: Do not use other ways to dry the washable mop pad.
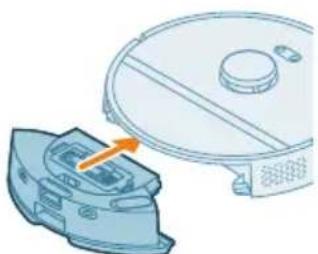
Clean the dust bin and washable filter
1 Pull out the water tank with dust bin.
3 Pour the dirt out of the dust bin.
4 Rinse the dust bin under the tap.
5 Air dry the dust bin.
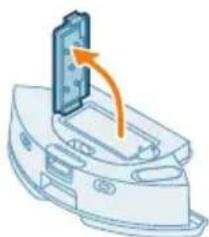
6 Open the lid of the washable filter.
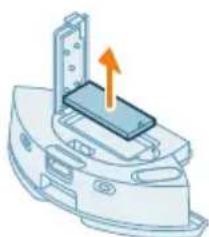
7 Pull the washable air filter out.
8 Rinse the washable filter with water and air dry the washable filter.
i Note: Do not use cleaning detergents.
Note: Do not use other ways to dry washable filter.
9 Make sure the washable filter is completely dry and then put it against the filter lock of the dust bin and push it in.
10 Push the washable filter down.
11 Close the lid of the washable filter.
12 Slide the dust bin back into the water tank.

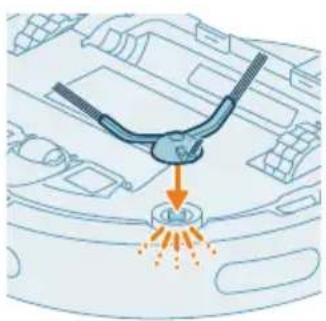
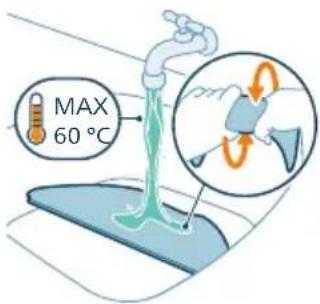
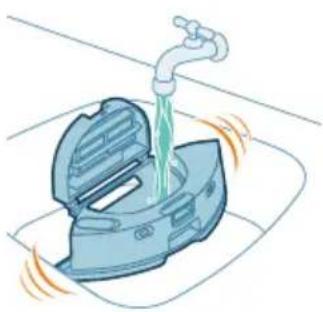
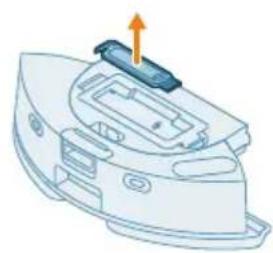
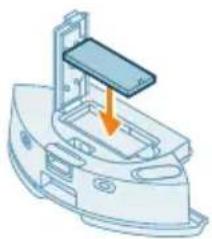
Cleaning the water tank
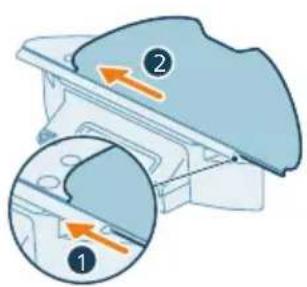
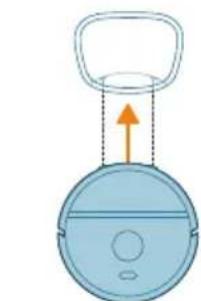
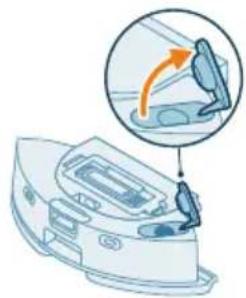
1 Push the water tank release button. and pull the water tank out of the robot.

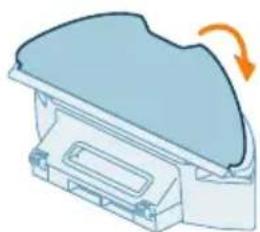
2 Open the lid of the water tank.
3 Fill the water tank with tap water and shake it over a sink.
4 Pour out any remaining water in the water tank.
5 Dry the outside of the water tank with a cloth.
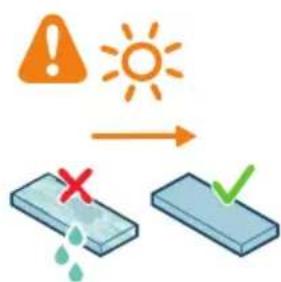
Note: Do not use cleaning detergents.
IMPORTANT:Do not wash water tank in the dishwasher.
6 Keep the sealing cap of the water tank open and allow the inside of the water tank to air dry.
Note: Do not use other ways to dry the water tank.
7 Insert the water tank in the robot.
Note: Make sure that the outside of the water tank is dry.
i Note: Do not use cleaning detergents.
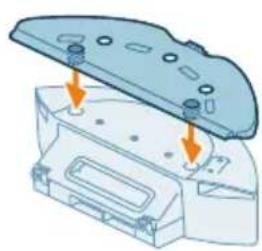
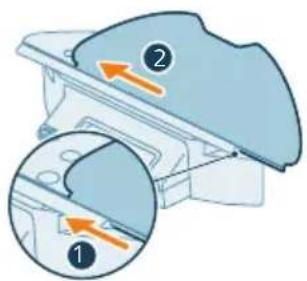
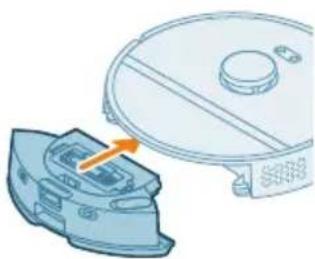
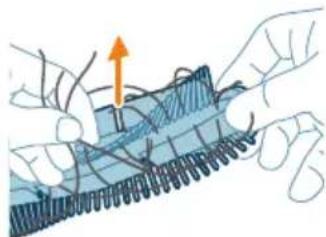
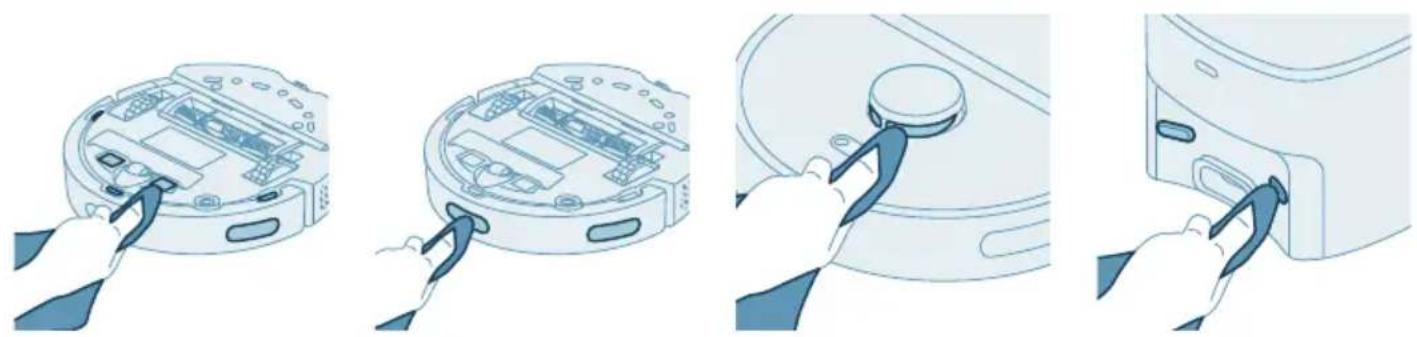
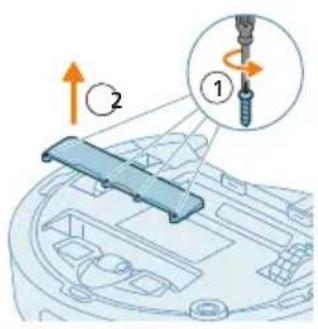
Cleaning the main brush
1 Put the robot upside down on a surface that is flat and stable.
2 Push the release buttons of the brush cover at the same time.
3 Lift and remove the brush cover.
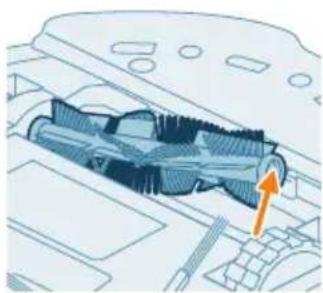
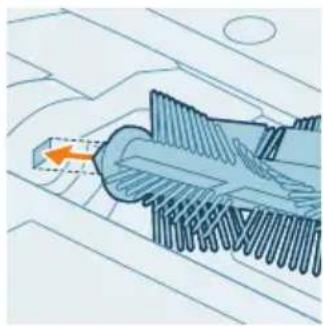
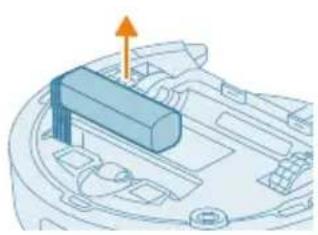
4 Pull the main brush out.
5 Detach the cleaning tool from the dust bin lid.
6 Use the cleaning tool to cut through the hairs.
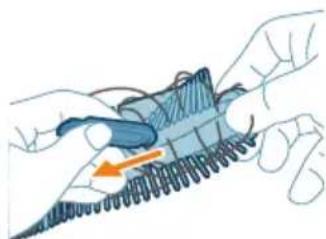
7 Remove the hairs and dirt from the main brush.
Tip: Use the brush end of the cleaning tool to remove the dirt on the main brush.
8 If you have removed the cap on the end of the main brush, place it back.
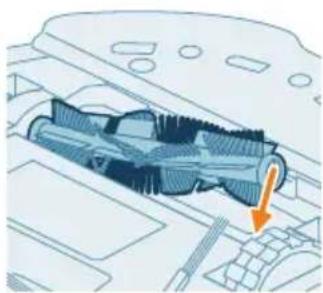
9 Install the main brush in the correct location. Match the square shaped peg with the square shape hole and insert the brush into position.
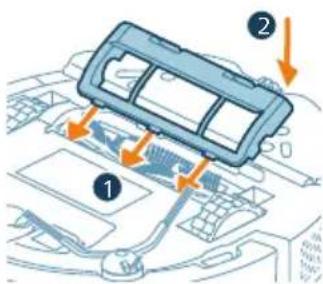
10 Put the lips of the brush cover in the correct cutouts.
11 Push the brush cover in.
Cleaning the side brush
1 Put the robot upside down on a surface that is flat and stable.
2 Remove the side brush.

3 Use a brush with soft bristles (e.g. a toothbrush) to remove dust or fluff from the side brush and the robot.
Tip: You can use the brush end of the cleaning tool to remove dust or fluff from the side brush and the robot.
4 Attach the side brush by clicking it into the correct position on the bottom of the robot.
Cleaning the main wheels and the front caster wheel
1 Put the robot upside down on a surface that is flat and stable.
2 Use a brush with soft bristles (e.g. a toothbrush) to remove dust or fluff from the front caster wheel and main wheels.
You can use the brush end of the cleaning tool to remove dust or fluff from the wheels.
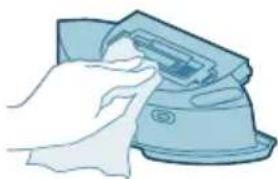
Cleaning the sensors, contact points and IR signal window
To maintain good cleaning performance, you have to clean sensor, contact points and IR signal window from time to time.
1 Unplug the station from the wall socket
2 Use a soft non-abrasive dry cloth.
3 Clean the components.
i Note: Do not use cleaning detergents.
4 Dry the components and surfaces with a dry cloth.
Note: Do not use other ways to dry the components.
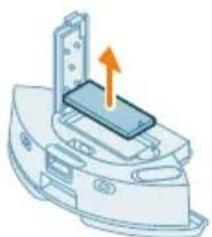
Replacing the dust bag
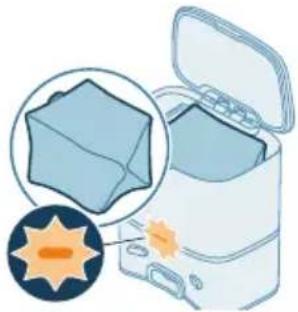
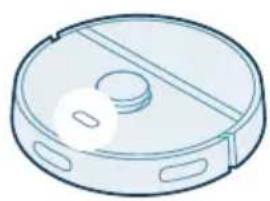
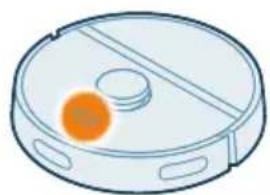
When the orange LED on the auto-empty station flashes indicating that de dust bag is full.
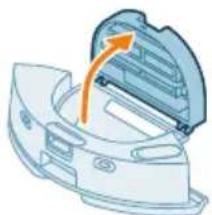
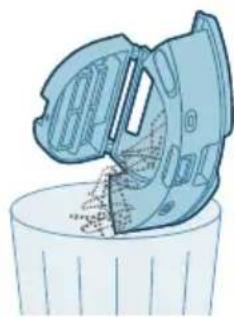
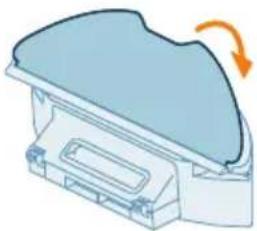
1 Open the lid of the Auto-Empty station.
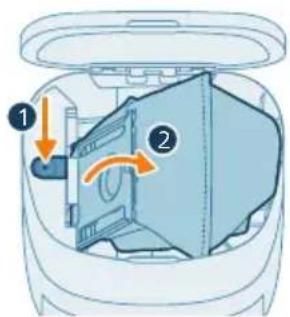
2 Press the release button and push the bag holder to the side.
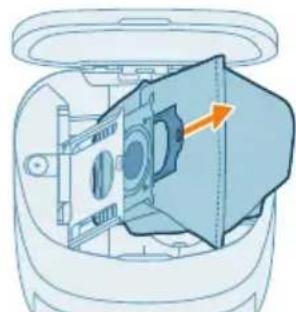
3 Remove and dispose the dust bag.
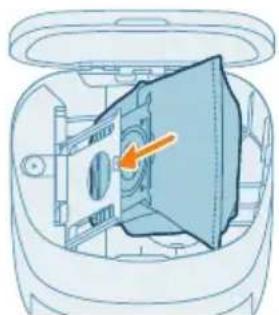
4 Slide the cardboard piece of the dust bag onto the bag holder.
5 Push the bag holder back to its standing position until you hear a clicking sound.
6 Close the lid of the Auto-Empty station.
i For information on where and how to order new dust bags, see the 'Replacement' section in the manual.
Long term storage
1 Charge the battery until it is full.
2 Store the robot within a temperature range of below +35^ and above 8^
User interface signals and their meaning
Signal Description of signal Meaning of signal
The indicator light on the robot lights up white.
The robot is powered on, or in a cleaning circle.
The indicator light on the robot is pulsing white and orange.
The robot is charging.
The indicator light on the robot is flashing in orange.
The robot runs into a problem or is in the pairing mode.
The indicator light on the station lights up white.
The station is plugged in.
Signal Description of signal Meaning of signal
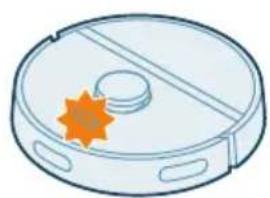
| The indicator light on the station flashes orange. | The station lid is not closed, the s-bag is not installed in the station, or the s-bag is full. If the indicator still lights up orange after you have checked the above, contact the consumer care center in your country. |
| The indicator light on the station is off. | The station is not plugged in. If the station is plugged in, the indicator light goes out if the appliance is left idle to save power. |
Reset/restore the robot
You can reset/restore the robot by pressing and holding both the home and on/off buttons on top of the robot for 15 seconds.
Note: After resetting/restoring the robot, the robot needs to reconnect the app, and the relevant settings in the app are removed.
Replacement
Ordering accessories
To buy accessories or spare parts, visit www.philips.com/homerun2000 or go to your Philips dealer. You can also contact the Philips Consumer Care Center in your country (see the international warranty leaflet for contact details).
Replacement parts:
XV1430 Replacement washable mops
XV1433 Maintenance kit with 2 filters, 1 main brush and 1 side brush.

FC8022 Dust bags (anti-allergy s-bags)
Removing the rechargeable battery
To remove the rechargeable battery, follow the instructions below. You can also take the robot to a Philips service center to have the rechargeable battery removed. Contact the Philips Consumer Care Center in your country for the address of a service center near you.
Take any necessary safety precautions when you handle tools to open the product and when you dispose of the rechargeable battery.
Warning: Before you remove the battery, make sure that the product is disconnected from the station and that the battery is completely empty.
1 Start the robot from a place somewhere in the room and not from the station station.
2 Let the robot run until the rechargeable battery is empty to make sure that the rechargeable battery is completely discharged before you remove it and dispose of it.
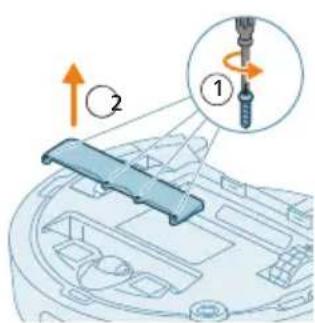
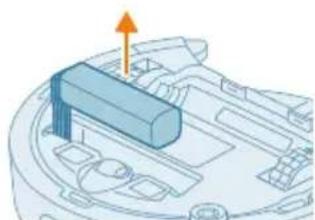
3 Undo the screws of the battery compartment lid and remove the lid.
4 Lift out the rechargeable battery and disconnect it by pressing the little clip on the battery connector to release the battery connector.
5 Take the robot and the rechargeable battery to a collection point for electrical and electronic waste.
Warranty and support
If you need information or support, please visit www.philips.com/support or read the international warranty leaflet.
Your robot vacuum cleaner has been designed and developed with the greatest possible care. In the unfortunate case that your robot needs repair, the Consumer Care Centre in your country will help you by arranging any necessary repairs in the shortest possible time and with maximum convenience. If there is no Consumer Care Centre in your country, go to your local Philips dealer.
Disposal and recycling
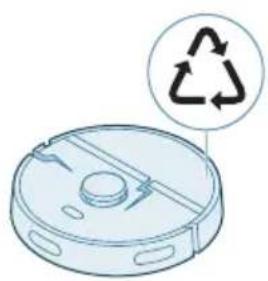
Do not dispose the robot in the regular trash. Make sure to bring it to your the recycling facility for electrical equipment.
Troubleshooting
This chapter summarizes the most common problems you could encounter with the appliance. If you are unable to solve the problem with the information below, go to the Philips HomeRun robot app or visit
www.philips.com/homerun2000, where can also find support videos and frequently asked questions. You can also contact the Consumer Care Center in your country.
Problem Possible cause Solution
| The robot doesn't switch on. The battery is low. Charge the robot on the station before use. | ||
| The ambient temperature is too low or too high. | Use the robot at a temperature between 8 °C and 35 °C. | |
| The robot is unable to pair with the app. | The robot is no longer in pairing mode. | Put the robot back in pairing mode by holding the home and on/off button at same time (lights will flash orange). |
| The Wi-Fi connection (signal) is not good. | Place the robot in an area with a good Wi-Fi signal. | |
| A wrong Wi-Fi network selected. | Make sure you select the correct Wi-Fi network. | |
| A wrong password used. Make sure you use the correct Wi-Fi password. | ||
| A wrong robot model is selected in the app. | Make sure you select the correct robot model. | |
| A wrong app is downloaded Always use the app that you have downloaded via the QR-code from the quick start guide. | ||
| The app and the robot lose connection. | The robot has gone out of reach of the Wi-Fi signal. | Wait for robot to drive back into area with a good Wi-Fi signal. |
| The robot has gone into sleep mode. | The robot will go into sleep mode if it has not returned to the station. Press the on/off button for 3 seconds or longer to awake the robot. Then send it to the station via the app or by pressing the return-to-station button. | |
| The Wi-Fi password has been changed. | When Wi-Fi details have changed: add the robot to the app again. | |
| The Wi-Fi network name has been changed. | When Wi-Fi details have changed: add the robot to the app again. | |
| The app account was changed. | When account details were changed, add robot to the app again. | |
| The email with the verification code has not been received. | The verification code email may take up to a minute to arrive. | Wait more than a minute for the email. |
Problem Possible cause Solution
| The email has not been sent. Click the "resend" button. | ||
| The email may have landed in 'spam' or 'junk' folder. | Check the 'spam' or 'junk' folders. (The sender e-mail address starts with: HomeRun_noreply@). | |
| A wrong email address is used. Check if you have used the correct email address. | ||
| The phone or computer doesn't have good internet connection to receive the email. | Make sure the phone or computer has a good internet connection. | |
| The robot can't find station. The station has been moved during a cleaning run. | Place the station back in the same place it was when the cleaning run started. | |
| The station is not connected to the power supply. | Connect the station to the power supply. | |
| The sensors on robot and/or station are dirty. | Clean all the sensors of the robot and the station. | |
| A No-Go zone was placed too close to the station | Don't save No-Go zones too close to the station. | |
| The station has been placed on a spot with very bright light. | Don't put the station in a place with very bright light (like direct sun light) this may interfere with the infra red signal. | |
| The robot pushes the station away. | The station is not standing close to a wall. | Place station with the back towards a wall. |
| The sensors on robot and/or station are dirty. | Clean all the sensors of the robot and the station. | |
| The station doesn't have enough space around it (0,5 meter to each side and 1,5 m to the front). | Make sure the station has enough space around it. | |
| The robot doesn't clean properly. | The dust bin of the robot is full. Empty the dust bin of the robot. | |
| The water tank is empty. Refill the water tank in time. | ||
| Obstacles are stuck in the brushes. | Remove all obstacles from the brushes. | |
| The filter has not been cleaned. Clean the filter regularly. | ||
| The filter has not been placed back or has not been placed back correctly. | Place the filter back correctly. | |
Problem Possible cause Solution
| The washable mop needs to be replaced. | Replace the XV1430 washable mop. Purchase a new XV1430 washable mop via de app or on www.philips.com/homerun2000 | |
| The robot uses no or little water during mopping. | The water level is set too low. Set the water level higher in the app. | |
| Too much water comes out of the mop / the robot makes the floor too wet. | The water level is set too high. Set the water level lower in the app. | |
| IMPORTANT: For mopping sensitive hard floors, such as parquet floors, set the water level in the app to the lowest level. | ||
| Robot misses areas for cleaning/ robot does not clean the whole area/ robot has began to miss certain spots | The sensors of the robot are no longer clean. | Clean the robot's sensors with a dry cloth. |
| The robot is working on slippery polished floors. | Make sure the floor is dried before the robot starts cleaning. | |
| The robot is unable to reach certain areas blocked by furniture or barriers. | Tidy up the area to be cleaned by putting furniture and small objects in their proper place. | |
| The cleaning area is not tidy. Remove small objects from the floor and tidy up the cleaning area before the robot starts cleaning. | ||
| The robot keeps a safety margin in the distance close to No-Go zones and No-Mop zones, and this can cause that the robot won't pass a certain area. | Make the No-Go zone or No-Mop zone in the app a bit smaller. | |
| The robot has blocked itself by eating a cable. | There are cables on the floor which the robot is unable to detect. | Stop the robot and remove the brush cover. Take away main brush and check if something is stuck in the side brush: remove side brush, take away the cable, reattach the side brush. Remove all cables from the floor before you start a cleaning run. |
| The robot falls from stairs. The anti-drop sensors on the bottom of the robot are dirty. | Clean the anti-drop sensors on the bottom of the robot. If the robot continues to fall from stairs, draw a virtual wall on the top of the stairs in the app. | |
Problem Possible cause Solution
| Objects have been placed on the top step of the stairs that the robot detects and therefore thinks it is safe to drive. | Remove the any objects that are placed on the top step of the stairs. | |
| The robot doesn't charge or discharges very quickly. | The robot is stored in a space that is too hot or too cold. | Charge and store the robot at a temperature between 8 °C and 35 °C. |
| The Auto-Empty station doesn't collect dust from the robot. | The dust bag has not been placed back or placed back correctly. | Place a dust bag correctly in the Auto-Empty station. |
| The dust bag is full. Place an empty dust bag in the Auto-Empty station. | ||
| The quiet mode or do not disturb setting has been activated in the app. | De-select the quiet mode or do not disturb in the app. | |
| The Auto-Empty station inlet is blocked. | Clean the Auto-Empty station inlet. | |
| There is foam buildup in the water tank and the robot moves strangely. | Detergent has been added to the water tank, causing the robot to be slippery. | Never add detergent to the water tank again. Clean the robot and its wheels, including a thorough rinse of the water tank. |
| The robot is making an abnormal noise. | The filter has not been placed back or has not been placed back correctly. | Check if filter is placed back correctly. |
| The robot has cleaned up a hard piece of dirt, which is now moving around inside the dustbin. | Empty the dustbin. | |
| The brushes are no longer turning. | Hairs are stuck in the main brush. | Remove hairs with the brush cleaning tool provided with the robot. |
| Other obstacles are stuck in the brushes. | Remove other obstacles from the brushes. | |
| The main brush was not placed back correctly. | Remove the main brush and reassemble it. | |
| When main brush is not placed back correctly: reassemble correctly the square shaft into the square hole. | ||
| The side brush gets deformed. | Something may have gotten stuck in the side brush. | Put brush in hot water for a while and let it dry. |
| Purchase a new side brush via the app or on www.philips.com/homerun2000 | ||
Problem Possible cause Solution
| The robot won't drive on to a black floor. | The robot thinks a pitch black floor is a falling hazard - the cliff detection is activated. | Make sure lights are switched on in the room with pitch black flooring. |
| Clean the anti-drop sensor on the bottom of the robot. | ||
| A schedule is set, but the robot doesn't start cleaning according to the schedule. | The 'do not disturb' function may be activated. | Check in the app if the 'do not disturb' function is switched on at the same time as the schedule. |
| The robot is in sleep mode. Make sure that the robot is charging in the station. The robot will go into sleep mode if it has not returned to the station. Press the on/off button for 3 seconds or longer to awake the robot. Then send it to the station via the app or by pressing the return-to-station button. | ||
| The wrong time zone has been selected in the app. | You can change the time zone in the app in 'My Account' under 'Profile'. | |
| The robot has lost connection with the Wi-Fi network. | Make sure the Wi-Fi network is working. | |
| The battery of the robot is empty. | Make sure that the station is connected to the power supply. | |
| It is not possible to log in to the robot app account. | The email address has been changed. | Create a new app account in case the email address has been changed. |
| The password is wrong. Enter the correct password. | ||
| In case the password is forgotten, click 'forgot password' and follow the steps. | ||
| The wrong country region is selected. | Select the correct country region in the app. | |
| Pop-up messages about app or firmware updates continue to be received. | App updates or firmware updates are not installed. | For continuous improvement of the robot we recommend installing all updates. |
| The Philips HomeRun robot app is not available in my country. | VPN may be blocking access to the right country information. | Disable any VPN service you are using. |
| Google or Apple account may be set to a different country. | Change the Google or Apple account information to match the country you bought the robot in. | |
| The firmware update fails. The battery level is too low The battery level of the robot needs to be more than 20% in order to install an update. | ||
Problem Possible cause Solution
| The robot is not at the station Make sure the robot is charging in the station when you install the update. | ||
| The Wi-Fi signal is not good enough. | Ensure the robot is in a spot with strong wifi | |
| The robot finished mapping, but I do not see a map in the app. | The robot did not start and finish at the station. | To create a map, make sure that the robot starts and finishes at the station. Once the map has been saved in the app, you can use the robot without station. |
| The robot got stuck or blocked while mapping. | Return the robot to the station and restart the mapping process. Identify the location where the robot got stuck earlier and remove any obstacles or block the robot from accessing that area. Once the map has been created, you can create a no-go zone to prevent the robot from entering that area again. | |
| My map is lost from the app. The maximum amount of maps had been reached. | The robot will create a new map when it recognizes a new environment. If you already have 5 maps, the robot will override an old one. If you want to make sure the robot does not override a map, lock it in the app. You can lock 3 maps at the same time. | |
| I do not want to use the WiFi function. | The WiFi function can be deactivated on your device. | To deactivate the robot's WiFi function, press the bumper on the front side of the robot and return-to-station button for 10 seconds. You can still use basic functions without WiFi, but for full access to all features, we highly recommend pairing the robot with WiFi. |
lsi
Pendahuluan
Vaskbart filter Hver maned 3 - 6 maneder
10 Skub det vaskbare filter ned.
11 Luk lagetildetvaskbare filter.

FC8022 Stovposer (anti-allergi-s- poser)
FC8022
FC8022 Stovposer (anti-allergiposer)
Fjerne det oppladbare batteriet
Følg retningslinjene nedenfor for á ta ut det oppladbare batteriet. Ta med roboten til et autorisert Philips-servicesenter for á fã batteriet skiftet nr du ikke lenger kan lade det, eller när det gãr tomt for strøm raskt. Kontakt Philips-kundesservicen for ditt land for á fã adressen til et servicesenter nær deg.
Følg nodsvendige sikkerhetsregler nár du bruker verktøy for Å apne produit, og nár du kaster det oppladbare batteriet.
Repor/restaurar o robot
Encomendar acessórios
(LiDAR) 360^
Cdo muaj -
Cdo muaj -
4 Cho cho den khi robot duoc sac day.
Luu y: Dam bao robot duoc sac day truck hi ban su dung lan dau.
i Luu y: Den LED trang trn tram cung sang len de cho biet robot dang sac.
Tái的能量 xuǒng, dǎng kěyà kět nòi vòi Wi-Fi
Robot lam sach nhu the nao
Trong'ung dung, ban co the chon cac ke hoach lam sach sah dai:
Ke hoach Mô tà
Lau sān Robot chi lau sān.
Noctabraye Ha cTaHcIyTa
1 NocTabete cTaHnIa Tb rpaHnIte Ha npaBnIHHe pa3Mepn 3a noctabRHe.
3a6eIeKka: OctaBeTe 0,5 MeTpa CBO6oJHO npocTpaHCTBO OT BcKa CTpaHa Ha cTaHcIyra n 1,5 MeTpa OTnpEi.
2 BkIouhe t cTahnra Ta KbM eIeKtpo3axpaHbaHeTo.
3 YBepete ce, ye octaHaJaTa YaCT Ha 3axpaHbAunKa6e e Do6pe cKpnta 3aI CTAHnraT, Taka Ye po6oTbT da He MoKe Da MNHaBa npe3 He.
4 NocTabete Top6nukata 3a npax B OTdeneHneTo Ha Top6nukata 3a npax Ha CTahnura.
IocTaBraHe Ha IbpxKaHa 3a NOpJIoKka 3a 3a6bpcBaHe, MneUaTa ce NOpJIOxKaTa 3a 3a6bpcBaHe n CtpaHnUHaTa YeTka
1 PnKpeTe cTpaHnUHaTa yeTka, KaTo Ja pKaHeTe B npaBnHTo nOJoxHeNe OT DoJIHaTa cTpaHa Ha po6ota.
2 PnKpeTe Ibpxa 3a noIIOxka 3a 3abpcBaHe KbM DOnHaTa CtpaHa Ha KOHTeHepa 3a BODa Ha po6Ota.

3ПьзHeI npaBata cTpaHa Ha Mneuata Ce noJIOxka 3a 3abpcBaHe B npabHnHa yIeH Na Dbpxkaa 3a noJIOxka 3a 3abpcBaHe.
4 IpnKpeTe Mneuata Ce noIIOXka 3a 3abpcBaHe KbM BeIkpO MaTePnAHa Nbpxkaa 3a NoIOXka 3a 3abpcBaHe.
3apekdahe ha po6ota
1 HaTnchete 6yToHa Bk./n3Kn. OT DoJHaTa CtpaHa Ha po6Ota, 3a da ro BKJIIOUHTe.
2 3aBbptete po6oTa B npabunHOT My noLoXeHne I rO nocTaBeTe Ha noJa nped cTahnraTa.
3 YBepete Ce, Ye cTaHcIyTa e BKIOueHa B eJeKtpnueckn KOHTaKT.
4 HaTnchHeTe 6yToHa Home. Po6oTbT ce npuBnxBa Do npaBnHTo nOLOXKeHne B CTAHcYraTa.
5 N3aKaITe,doKaTo po6oTbT ce 3apeHnBnHO. Ako 6aTeepra e n3ToUeHa,po6oTbT HMa da ce npuDvXn Do npaBnHOTO noLoxHeH.E TO3n cnyau n3PbLnHeTe CneBaunTe CTbKn:
1 3aBbptete po6oTa B npabHnHTo My noLoXeHne I ro nocTaBeTe Ha noDa nped cTahnra. KoHTeHepbT 3a BOda Tp8Ba Da rIeDa KbM cTahnraTa.
2 IopapBHeTe KOHTaKTHnTe TocKn 3a 3apeKdAHe Ha KOHTeHepa 3a BodaHa po6oTa C KOHTaKTHnTe TOckn 3a 3apeKdaHe Ha CTaHcIyTa.
3 ByTHHeTo pO6Ota KbM CtAHcHraTa, TaKa Ye KOHTaKTnTe 3a 3apeXdaHe Ha po6Ota Da OnpaT B KOHTaKTnTe 3a 3apeXdaHe Ha CtAHcHraTa.
i 3a6eJekka: PpOBepTe daJIH po6oTbTe B npabINHO nOLOKeHne i 3aNoUba Da ce 3apeKda. CBeTIHHnTE uHnIKAtOpN B DBaTa 6yToHa OT rOpHata cTpaHa Ha po6oTa MmRat 6aBHo. Ako 6aTePnra e n3ToUeHa, MoKe Da OTHeme N3BeCTHO BpeMe, PpeDN po6oTbT da NOKaKe, Ye ce 3apeXda.
i BnmaHne: Oopn aKO 3apeXdaTe po6ota 3a nbpBn nbT, cTaHcIra Ta 3aOnueHa n3npa3Ba C BaKyyM po6ota. ToBa He e rpeWka, a YaCT OT oBuHaHaTa npOeDypa Ha 3apeKdaHe.
4 I3yaKaITe,doKaTo po6oTbT ce 3apeiHnblHO.
3a6eIexKa: PpOBepTe daHnpo6oTbTe HAnbInHO 3apeH, npEi Da ro n3no3BaTe 3a npBB nbT.
3a6eIexka: BJIyT LED nHnKATOp Ha cTaHcNtA cbIo 3aNoUBa da CBETn, 3a Da nokaxe, ye po6oTbT ce 3apeXda.
I3TeTJIHe Ha npINOJKeHneTo, peRnCTpnpaHe n CBbP3BaHe KbM Wi-Fi
CbIbpxKaHne Ha npJIOxKeHneTo
Moxete da ynpablaBaTe po6oTa c npiloxeHneTo 3a po6oTu Philips HomeRun. PnloxehneTo BV n03BOJyBa da ynpablaBaTe po6oTa cn i npedna rnoMoU n noDpBkka:
1 BndeoklnnoBe c nHCTpyKcun 3a HaunHa Ha n3NoJ3BaHe.
2 PbJHOpbKOBOCTBO3a notpe6nTeJIa.
3 YeCTO 3aIaBaHn Bbnpocn.
4 Bpb3ka cOTdela 3a o6cnyXBaHe Ha KIneHTn.
5 Cb3daBaHe Ha KapTa Ha Doma BN.
6 136op Ha cTaN 3a NOUcTBaHe.
7 136op mekjny pa3nuyn pejmm Ha nouctBaHe n HacptpoKn 3a BCja CtaJ.
8 IperIeHa CbCTOaHHeTo Ha cKbJa Ha NoUcTbaHe B peaHObBpeMe HNBOTO Ha 6aTeepra.
9 NolyuhaBaHe Ha n3BecTn I npdynpeXdeHn.
10ПланиранеHaцкьнHa noчсТва.
11IperJIeHa cBcTOAHnETo Ha noDpBxKaTa HAMnpaHe Ha pe3epBHN YaCTN.
I3TeTJIHe Ha npNUOKeHneTo
1 CkaHpaIe QR kOJa OTJbBO nJn Bbpy OaKOBKaTa Ha po6oTa, 3a da n3TeJIte npJIoXeHneTo 3a po6oTa Philips HomeRun.
Mn:
IotbpcTe npiloxeHneTo 3a po60n Philips HomeRun B mara3nHa 3a npiloxeHn3a Apple nIn B mara3nHa 3a npiloxeHn3a Android.
2 I3TeIeTe n HCTaIIpaTepnIOKeHHeTo.
3 CneBaIte INHCTpyKcUNTE B npNIOKeHHeTo.


PertpnpaHaJIueHakayHT
Mokete da pernctpapate Iuueh akaynt n da ce Bb3noJ3BaTe OT cneHnTe npeIMCTBa:
- YnpabJIeHHe Ha po6Ota OT NOBue OTe eHNO yCTpoIcTBo, HAnpIMep cMapTfoH n Ta6JeT, IIN Do6aBHe Ha HRAKoJko NOTpe6uTeIi B DOMaKInHCTBOTO.
3ana3BaHe Ha pe3epBHO KOINe Ha BaXHn DaHHN, KaTo nepcoHaJn3npaHn PnaHOBe 3a NOuCTBaHe 3a BaWnI DOM.
3a6eIexKa: Ako cmeHnte TelefoHa cn n HMaTe akayHT, 3aRy6nte BCnUKN nepcoHaJIIN3npaHn PnaHOBe 3a NocCTBaHe.
BaxHo: Philips ueHn uyBaxKaBa Baawata noBepntelnoct. Ipeu da ce pernctpupaTe B npIoXeHneTo, MoXeTe Da BnDnTe Bpb3KaTa KbM 6eIexKkata HN 3a noBepntelnoct.
HactpoKa Ha Wi-Fi Bpb3KaTa
I Ipei Da 3aOnuHete: yBepTe ce, ye po6oTbT mO6nHTo Bn yCTpoiCTBO Imat do6po Wi-Fi nokpntne.
1 HaTnchete 6byToHa Add robot (OobAByHe Ha po6oT) B npInnoXeHneTo n CneDBAIte INHCTpyKcunTe.
2 CndBoeTe po6ota c Wi-Fi B npniloxeHneTo. YBepTe ce, ye pa3nolarate c npolarata cn 3a Wi-Fi.
3 HaTnucHeTe 3aIpbXte eHOBpeMeHHo 6yToHa 3a CTapT/CTon n 6yToHa home B npOdbJIxKeHne Ha Tpu cekyHdN. CBeTnHHnte HnDkAtoPn B 6yToHnte ue MmraT B opaHXeBO, 3a Da NOKaKaT, ye po6oTbTe B pexIm Ha HacTpOiKa Ha Wi-Fi.
4 4paKHeTe Bbpxy 6yToHa 3a npncbeHnBaHe, aKO e BnIMB npINOxHeNTo, 3a da ce CbpxeTe c MpeXaTa Philips robot.
i 3a6eJekKa:Ako 6yToHbT 3a npncBcEHHBaHe He e BnIM B npNIOKeHneTo, n3Je3Te OT Hero n OTnde Ha Wi-Fi B, "HaCtpoKu" Ha Mo6NJHOto cn yCTpoIcTBo.Tam MoXeTe Da n36epTe MpeXaTa Philips robot n da ce CbbpXeTe KbM He.
i 3a6eIekKa: Baunr po6oT moKe da ce cBbP3Ba KaKTo c 2,4 GHz, taKa n c 5 GHz WiFi yeCTOnH JIeHTN.
Ako CDbOraBaHeTo Ha Wi-Fi e HeycneuHo:
- PpOBepTe BaWata Wi-Fi Bpb3ka.
- PpOBepeTe dani Cte n36paI npaBnHna MoJeJI.
- Поверете дал стевьевлправлината napola 3a Wi-Fi.
- PpOBepeTe DaJI npo6OtBc BCE Oue e B pexm Ha HacTpoiKa Ha Wi-Fi.
i 3a6eJexka: Moxete da pa36epete TOBa, aKO CBETNIHHITe INHdNKaTOpN B IBaTa 6yToHa Ha po6ota BCE OSe MmraT B opaHKeBO.
i 3a6eJexka: Ako He moKTe Da pa3peuHte npo6JIema, nocTeTe www.philips.com/homerun2000 3a INΦOpMaUg OTHOCHO NOIpBxKaTa N daHHnTe 3a KOHTaKT C OTdela 3a o6cLyXBaHe Ha KJIeHTN.
3ByKOBn cnHaJIi

E3NKbT Ha rIacOBnTe npedynpeXeHnHa po6oTa MoKe da 6bJe IpomHeH OT aHrnnckn Ha MeCTHnBn e3NK. 3a da npomeHnTe e3Nka, n3TerIeTe npJIOxEHnTo n CBpXeTe po6oTa C Wi-Fi, taKa ye da MoKe da n3TerIi HOBnE3NK.
-Пилжehнeto ue n3daBa npedynpejdeHnHaHOMHnA,akpO60TbT ce hyxdae OT BnHMaHne. NTo3n HauHn ige 6bJeTe HaNBJHo INΦOpMnpaHn 3a CbCToRHeTo B peaJIHO BpeMe Iopn aKO pO60TbT NOUcTBa, KOraTO Bn HЯMa y DoMa.
3aandahe Ha e3nka Ha rIacobTe ppeDynpexKdHnA
i Moxete Da 3aJaTe e3nKa Ha rIacOBtpe npEynpeKdHn HEnocpeDCTBeHO CNeI KaTO CBbPxTe po6To KbM Wi-Fi.
1 YBepTe ce, ye po6oTbTe cBbP3aH C npnloXeHneTo.
2 Ha IBe MeCTa B npNJIOXeHneTO MOxTe Da HAmepNTe ONuTAta 3a npOMHa Ha e3Nka Ha rIacOBOTO npEynpeKJeHne:
Ha cblnnaekpaH Ha npiloxeHneTo, KbTeTo ce ncka da daTe Hme Ha po6ota.
- Iann KaTo HaTnCHeTe IKoHaTa 3a HAcTpOoiB TOpHnA DeceH bTbN n CneI TOBa n36epeTe pa3deJa 3a HAcTpOoiKa Ha po6ota.
3 CneI ToBa n36epeTe oTTaM e3nKa Ha rnaCoBOTo npdeynpexKeHHe.
Kak pa60tn po60TbT
Cb3daBaHe Ha KapTa
Kak pa6otn kaptorpaΦnpaHeTo
Po6oTbT ce npnBnxBa n3 cTaTe n Ja3epHaTa HABnraun 6bP3O rN cKaHnpa, 3a da cb3daNe KapTa a etaxa.
PepaTnPaHe Ha KapTa
B npnloxehneTo mokeTe da n3noJ3BaTe Map Edit (PeJaKtupHe Ha KapTa) 3a:
peaKTpaHe Ha cTaIe (cNbAHe/pa3JeJaHe Ha cTaIe,HaMeHyBaHe Ha cTaIe), 3a da MoKeTe Da nepcoHaJIIN3uPaTe npOrpaMaTa 3a NouchTbaHe Ha po6ota 3a Bcra Ka CTA;
HaCTpOJa Ha OgrpaHnueHn 30Hn, 3a Da yKaXeTe KbJe e pa3peSeHo Ha po6ota da NouchTa b N KbJe He;
- Cb3daBaHe Ha KapTa 3a BCEKN eTAX Ha BaUNI DOM N CbXpaHRAHe Ha Do 5 KapTN. Korato n3NoJ3BaTe ypeDa, ToN Cb3JaBA HOBa KapTa B HOBa cpeDa. Ako Imate KapTN, KOINTo n3NoJ3BaTe YecTo H He NCKaTe Da rN 3aMeHInTe C HOBn IO HeBHUMAHne, MoKTe Da 3akJIOUHTe Do 3 KapTN.
PoirotobKa Ha ctaTa 3a KaptorpaΦnpahe
Ipei Da 3aOnuHHeTe KapTOrpaΦnPaHTo, Ce yBepTe, Ye cTe HappaNIM CneHOTo:
Pa3Tpe6eTe 30HaTa.
- PpemeCTeMe6eJIHTe Ha npaBnHOTo MxCTO.
- Pnp6epeTe BCnukn CBO6oJHo CTOaU N MaJKN npenTCTBna.
i 3a6eIexka: Toba e BaxHo, 3a da ce n36erHe cBxpaHHe 3a NOCTOHHo Ha npenTCTBnTa Bbpxy KapTa.
OTBopeTe BCnKn BbTpEshn BpaTn B IOMa Cn N 3aTBopeTe BpaTnTe 3a HaBbH.
i BaxHo: YBepTe ce, Ye po6oTbT He MoKe Ja 6bJe 6IokupaH No BpeMe Ha ynoTpe6a.
Cb3daBaHe n peaKtnpaHe Ha KapTa
i Baxho: Io BpeMe Ha KapTorpaΦnupaHeTo po6Ot bT He nouNCtBa.
1 3a da cb3daTe KapTa, upaKaHeTe Bbpy, Cb3daBaHe Ha KapTa"Ha HauaHnHaekpaH HenocpeDCTBeHO cIe d CdbOraBaHe Ha po6oTa c npuLoXeHneTo nIINKOrato IpeDi TOBa He e 6nla cb3daJeHa KapTa. IInu UpaKaHeTe BbpyUkoHaTa 3a HaCtpoIKn B rOpHna DeceH bbl, n36epTe ,MOnTe KApTn" IN36epeTe NkOHata +"B rOpHna DeceH bbl. CIeD TOBa cIeDbaiTeHHCTpyKcUNTe B npuLoXeHneTO.
2 3a da pedaKTnpate KapTaTa cn, n36epete IKoHaTa Ha KapTaTa Ha haayanHna ekpan nnu npakHeTe Bbpxy IKoHaTa 3a HacTpoKn B rOpHna DeceH bI, n36epete "MOnTe KaPTn" n n36epete "PeDAKTnpaHe Ha KapTa" 3a KapTaTa, KOrTo NCKaTe Da pedaKTnpate.
Kak da kajkeTe Ha po6Ota Kbde Ja He NOUcTba C NOMoUTa Ha OgrpaHnueHn 30Hn 3a NouCtBaHe
B npiloxeHneTo moxete da 3aDaBaTe orpaHnueHn 30HN, 3a da nocoute Kbde e pa3peSeHo Ha po6Ota da nouchTa u KbDe He.
BnptyaHa cTeHa n 3oHn, 3a6paHeHn 3a BIn3aHe
Cb3daIte BnptyaJIHn CTehn 30Hn, 3a6paHeHn 3a BnI3aHe, 30HNTe, BV KOnTO He nCKaTe pO6OTbT da BnI3a. MoKeTe HapPImep Da cb3daJeTe BnptyaJIHn CTehn IIN 30Hn, 3a6paHeHn 3a BnI3aHe, 3a:
3aunTa Ha yynnBn npedMeTn. Po6oTbT He moKe da pa3nUaBa MaKn npenrTCTBn, KaTo o6yBKn, nIpaKn nn Ka6eJn, HnTo 6JeCTa, npO3paHn (HaNPmep cTBKnO) nn TbMn npenrTCTBn nn NOBbpxHOCTn.
- npeɪnə3BaHe Ha pɒbʊTa ᵠ He 3aCeɪdHe, ἀɒkʌtO nɔuɪctBa.
3a6eJekKa: Po6oTbT MoKe Da 3aceHHe B KUJIIMN C DblbF KOCbM, KUJIIMN CpeCHN Nm MHOrO JeKN NoCTeKn, KaTO Te3N B 6aHrTa. Po6oTbT cbuO TaKa He MoKe Da pa3No3HaBa Ka6eIi No nOda.
- 3aunTaHa pO6oTa.
3a6eIexka: Po6oTbT Tp8Ba Da ce Ibpxn HactpaHa OT TeuHocTn MOKpn 3OHn, KaTo HapnIpMep Kynn 3a Domaunn IIObumn n Tabn 3a pa3caDn.
Baxho:BnptyaJIHNTe CTeHN 3OHTe,3a6paHeH 3a BIn3aHe,He Tp8Ba da ce N3IIOJ3BaT 3a 3aUHTa OT ONaCHOCTN.
Baxho:BnptyaJIHnte cTeHn n 3OHHe,3a6paHeH 3a BIn3aHe,He Tp6Ba da npueat Ha po6Ota Da ce BbPhe B CTAHCnIyTa.
30Ha, 3a6paHeHa 3a MOKpo NOUcTbaHe
Cb3aTe 3oHn, 3a6paHeHn 3a MOKpo NOUcTbaHe 3a da nonpeuHTe Ha pO6Ota Da NoUcTba C MoN KUNIMM NIN NocTeJKN.
i 3a6eIexka: PobotbT 7e n36yra 3oHnTe, 3a6paHeH 3a MOKpo nouCTBaHe, KOrato e npikpehen DbpXaayt 3a noJIOxka 3a 3a6bpcaHe. Korato dbpXaayt 3a noJIOxka 3a 3a6bpcaHe He e npikpehen KbM po6Ota, TOn 7e noUcTba C Bakyym 30HaTa, 3a6paHeHa 3a MOKpo nouCTBaHe.
Kak nouchTba po6oTbT
B npiloxeHneTo mOrat da ce n3bpaT cneHNte npoRpaMn 3a nouchTaBe:
ПэрорампОписане
6 OToBopeTe KaNaKa Ha MneuNca ce HnItbp.
7 3BaTeMeuCeBb3NyWeHΦnTbp.
8 I3nlaKHeTe MneuIe Ce nIITbp C BODa n rO n3CyWeTe Ha Bb3dyX.
3a6eJekKa: He n3noJ3BaIte nouchTbaun npenapatn.
3abenekka: He n3noJ3BaIte npuHnHaunH, 3a da noDcyuBaTe Mneuie ce cnTbp.
9 YBepTe ce, Ye MneuT ce fHnTbp e Hnblno cyx, cnei Koeto ro noctabe T Bpxy 6Ioknpobkata Ha fHnTbpa Ha KOHTeHepa 3a npax n ro 6yTHete HABTppe.
10 HatncheTe HanoJy MneuIe ce qnTbp.
11 3aTbOpTe KaNaKa Ha MneuIe ce qnIITbp.
12 Плбз Hedge KOHTeHepa 3a npax OTHOBHa MЯCTOTO My B KOHTeHepa 3a BOda.
I3BaXdAnHe Ha akymylaTopHaTa 6aTePnA
3a da n3BaInte akymylaTopHaTa 6atepy, cIeIbaiTe IHCTpyKcIInTe NO-dOly. CbIo Taka moKeTe Da 3aHeceTe po6ToB OToPn3npaH cepBn3eH ueHTbp Ha Philips 3a n3BaXdaHe Ha akymylaTopHaTa 6atepy. CbpxKeTe ce c LcHTbpa 3a o6CnyXbaHe Ha KJIeENTn Ha Philips BbB BaWata cTpHa 3a aDpeca Ha cepBn3 6Jn3o Do Bac.
B3eMeTe BCnKHeo6xOIMM MepKn 3a 6e3OpacHocT, KOraTo 6opaBNTe C nHcTpymEnTu 3a OTbapJe Ha npOdyKta N KOraTo n3XBbPJIte akymylaTopHaTa 6aTeprna.
IpeynpejxdeHne: Ipei Da n3BaJnte 6aTePnra, ce yBepTe, yeypebTe n3KIOueH OT cTaHcNraT a N 6aTePnraTa e n3ToUeHa HanblHo.
1 CstaptnpaIte po6ota OT HAKOE MRCTO B CTaTa, a HE OT CTahUraTa.
2 Octabete po6ota da pa6oTH,doKATO akymyIaTOPHaTa 6aTePnA ce n3ToUH, 3a da cTe cnrypHn, ye e HAnbIHO pa3peDeHa, npeN da y n3BaInte n da y n3XBbPInTe.
3 Pa3BnIe BnHTOBeTe Ha KaNaka Ha OTJeHneTo 3a 6aTePnra n CbaJeTe KaNaka.
4 N3BaIeTe akymyIaTOPHaTa 6aTePnI y pa3KaYeTe, KaTO HaTncHeTe MaKkTaTa
5 3ahecepeo6ota n akymylatopHaTa 6aTeepnB nyHKT 3a cb6npaHe Ha OTnaIbTu OT eJekTpueckn N eJekTpOHH npOdykTN.
TapaHcIy I IOdIpbJkKa
Ako ce hyxdaete ot nHopMaunu nn noDpBka, nocTeTe www.philips.com/support nn npOeTe Te JnCTOBkata 3a MexnyHapOnHa rapaHn.
Baata npaxocmykaKa-po6ot e npoeKtnpaHa n pa3pa6toHa no Ha-ido6pna Bb3MOKeH hauH. Ako BbIpeKn ToBa ce HanoXn Ta da 6bJe peMOHTnpaHa, LcHTbpbT 3a 06cnykBaHe Ha KIneHTN BbB Baata cTpaHa Ie BN CbJeCTBa 3a IpeiPmeMaHe Ha Heo6xOIMITE peMOHTN BbB Bb3MOXHO Ha-KpaTBK cPOK I npMakCmamHo ydo6CTBO 3a Bac. Ako BbB Baata cTpaHa Hma LcHTbp 3a 06cnykBaHe Ha KIneHTn, O6bPhete Ce KbM MeCTHnra TbProBeu Ha ypeDi Ha Philips.
I3xBbPJIHe n peuzKlnpaHe
He n3xBpIaIe po6Ota npn obNKHOBeHInTe 6HTOBN OTNaDbu. 3aHeceTe ro B 6n3Kna NyHKT 3a peuKJnpaHe Ha eJeKTpruecko o6OpyDbaHe.
Отствану Неницьоста
В Таи Глава са обобшии най-очтite поблеми, конт може да сршету, при ИЗползвае на урEDA. Ако не можete да разpeшITE поблема с помошта на Инфорmaцята NO-дoly, OTворетe пиюжени.To 3a poботи Philips HomeRun ини постete www.philips.com/homerun2000, К biodeto можete сьто да наимерпг ВИDEОКЛПОBE 3a подрьжka и чесTo 3aДаВани Быэр检. Можete сьто дa ce obьрпerte КьМ цENTьра 3a обслухвае на КленьTN BвВ BaшаТа ДьрЖаВа.
PpO6Jem Bb3MOxHa npuHnHa PeSeHne
IperJIeHa npOn3BODOT 981
Ipei npBaTa ynoTpe6a 982
IoproToBka 3a KopncTeHe 983
PoiJHeBe Ha po6oToT 984
Ipe3emete ja anlinaaunjata, pernctpnpajte ce n nobp3e te co Wi-Fi 985
3ByuHn cunHaJIi 987
Noctabete ro ja3nKOT Ha rnaocBnTe npedynpeyBaHa 987
KakoФункционираpo6oToT 988
HanpaBetekapta 988
KaKeTe My Ha po6oToT KaIe Ia He YnCTn co 3OHNte orpaHnueHn 3a YnCTeHb. 989
Kako chnt np60TOT 990
IocTabe npetnouHTAH noCTaBKn 3a YnCTeHbe, HnpeHN noCTaBKn n peoCneHa YnCTeHbe 990
KopncTeHbe Ha po6oToT 992
Iodrotobka 3a chntebe 992
3aNouchete ja BaShaTa npBa npOrpama 3a YnCTe Npeky anIkaunjaTata 993
KopncTeHeHa po6oToT 6e3 anJIkaUjata 993
Lema 3a quintehe ha po6oToT 994
BpaKaHe Ha cTaHnCata 994
AByomatcko noJIHeIe I npOIOJKyBaIbe 994
YncTeHbe n OdpKyuBaHbe 994
Kora nI3BpUyBaTe oJpxuBaHbe 994
Kako da ce uicstat KpnaTa 3a 6pnue He n caot 3a npaunHa 995
YinsteHeHape3epBoaopoT3aB0da 998
YnCTeHbHa rJaBHaTa yeTka 999
YncTeHe Ha cTpaHnUHaTa YeTka 100
YnCTeHbHe Ha rIaBHInTe TpkaJIua n Ha npEiHOTo BpTlNBO TpkaJIue 100
YnCTeHbHe Na ceH3OpntE, KOHTaKTHTe ToUKN npO3opeoT 3a IR-cuHaJ. 100
3aMeHa Ha KeCaTa 3a npaunHa 100
Ako cnapyBaHBeTo co Wi-Fi He ycnee:
- Поверете щашata Wi-Fi Брcka.
PpOBepeTe daJIcTc Ro oI6paJI npaBUNHnOT MoJeJI. - Поверете дал ст ќа вени точна Лозика за Wi-Fi.
- PpOBepeTe daJIH po6OTcCe yUte ce HaOra BO peKIM Ha nocTaByBaHe WiFi.
i 3a6eneuka: Moxete da ro npeno3haeTe Oba aKO CBetnaTb O Bo DBeTe KOnHbHa ha pobotot cyeuTe TpeKaaT Bo nopToKaIOba 6oja.
i 3a6eneuka: IOKoIky He moKeTe da ro peuHte npObeMOT, OeTe Ha www.philips.com/homerun2000 3a INHOpMaUu 3a NODpUka u 3a DeTalnte 3a KOHTaKT 3a TpIXKa 3a KOpNCnU.
3ByuHn cnHaJIi

Ja3IKOT 3a rIacOBHOTo npedynpeyBaHe Ha po6OT MOxE da ce cMeHN OaHrnnckn Ha Baunot Iokaleh ja3NK. 3a da ro cMeHnte ja3IKOT, npe3eMeTe jaanlkaunjata n Nobp3eTe ro po6OTc Wo-Fi, taKa wTo Ke moXe da ro npesMe HOBnOT ja3NK.
AnnkajataKe dae npedypeyBaHa NOTcETNuI DOKOLky Ha po60T My Tpe6a BHMaHne. Taka Ke 6uJeTe cENoCHO I3BeCTeHN 3a COcToj6aTa BO peaJIHO BpeMe Dypn n aKO p60OT uCtN DoDEKa CTe N3JIe3EHN.
IocTaBeTe ro ja3nKOT Ha rJaCoBnTe ppeDyPpeDyBaHa
i Moxete da ro noctabute ja3nKOT Ha rnaCOBHnTe npedynpeyBaHaBeHaW otkako ke ro noBp3e pe6oToT co Wi-Fi.
1 Ocnypete ce deka po60T e noBp3aH co anlinaqjata.
2 Ha IBe MeCTa BO anIIkaIjata MoXeTe Da ja HajTe OIunjaTa 3a MeHyBaHBe Ha ja3IKOT Ha IlacOBHTo npEynpeyBaHBe.
Ha nCTnOT ekpaH Ha anIIkaunjata KaTe 7TO Bn ce 6apa Da ro mEmHyBaTe po60TOT.
- IInco npntnckaHe Ha nkoHaTa 3a noCTaByBaHbe BO rOpHNOT Decen aroJn Notoa co n3bnpaHe Ha ja3uHcTo 3a NoCTaBKn Ha pO60TOT.
3 Notoa n36epeTe ro ja3nKOT Ha rJaCoBHOTo npeDynpEyBaHBe TaMy.
Kajkete My Ha po6OT KaJe Da He YnCTn CO 3OHNTe orpaHnueHn 3a YnCTeHbe.
Bo anlinaaunjata moxete da noctabnte orpaHnueHN 30Hn 3a da ykaXeTe Kahe Ha po6oTOT My e DO3BOJeHO da YnCTN, a Kahe He.
BnptyeIeH sI n 3oHa 3a6paHeTa 3a OndeHbe
Hapabete BnptyeJnnsIOBn 30Hn 3a6paHeTn 3a OeHe 6bnaCTnte Kaede wTO He cakte po6OT Da oN. Ha npimep, moKeTe da Hapabite BnptyeJnnsIOBn IIN 30Hn 3a6paHeTn 3a OeHe 3a Da:
3aHTNTe KpJINBn PpeMeTu. Po6OT He MoKe Da OTKPbA MaI INpeuKn KaKo YeBn, IrgpaUKN nn Ka6N, HHTy NaK MoKe Da OTKPbA cajHn, pposnHn (Ha np. ctaKNo) nnn TemHn PpeKn nIn NOBpHHn.
- cnpeuHTe po60ToT da ce 3aIaNbYBa dOJeKa uCTn.
3a6eileka: Po60TOT MoKeJa Ce 3aIabN Ha BnCOKn TeNcN, TeNcN Co pecn HmHory Jecn TcNcN KaKo Tne To rHa Ma Bo 6aHaTa. NcTo TaKa, po60TOT He MoKe Ja OTKpne Ka6Jn Ha NoDTo.
- ro 3aHTnTne po6oToT.
3a6eileka: Po6oToT Tpe6a da ce cyBa IOnJaIeKy oJ TeuHocn N BlaXHN MeCTa KaKo 1to Ce caIOBn 3a XpaHeBe MInJeHnCn I NpDIOrN 3a CaKcN.
i BaxHo:BnptyIeHITe SIOBn I 3OHTe 3a6paHETn 3a OJeHe He Tpe6a Da ce KopNCTaT 3a 3aHTtA OJ ONaCHOCTN.
Baxho:Bnptyehnte sIOBn n 3oHnTe 3a6paHeTn 3a OeHe He Tpe6a da ro cnpeyuBaat po6OT Ta ce BpaTn Do CTaHncaTa.
3oHa 6e3 6pNiSeHbE
IpaBte 30Hn 6e3 6pNiueHea da cnpeHTe po6OT da npe6pnuBa TeNCS NII YepRnHb.
i 3a6eileka: Pobotot Ke r nizhehyBa 3oHnTe 6e3 6pniuebe Kora npkaot Ha kpnata 3a 6pniuebe e npikaueh. Kora dpkaot Ha kpnata 3a 6pniuebe He e npikaueh Ha p6oToT, Toj ke ja nomHe co npabocmyKaHe 3oHaTa 6e3 6pniuehe.
Kako qnctn po60tOT
Bo anlkaunjata moke da ce n36epaT cneHnBe pyTuHn 3a YncTeHe:
PyTuHa OnnC
| Овишино Рedingнот чinctе ваменeto 3а вашто Hopмално сековдnevни ртуни за чinctе. Робот ѩ чinctи секоja соба BO согласост со поставктошто стей Ги habелу за уваю Во падот за чinctе. Ако срешина та не биде пrenoизсану, робот ѩ манира срешина та чinctи согласно последно поставенot реким. Ако тоа e реким co Функцида за бриrese, по не о инсталега крna, робот ѩ he paclрскува вoda.标明о ке завши чinctеъю, роботот се вракая на.stаницata. | |
| Соба Зона | - Соба: роботчinctи edna или nobeke соби по рeoocleiodOT shto кe Ги habeledte. - Зона: роботчinctи зона bo собашто кe ja habeledte. О Tinaко кe изберete edna od ropeнаведенite onци, можete ду Изберete реким на чinctе в пrelizniho ду Нагдente вашто петноитани поставки за чinctею напreedнITE поставки. |
IocTaBte npetnoHTaHn NOCTaBKn 3a YncTeHbe, HappeHNIOCTaBKn n peDocJIeH na YncTeHbe
Bo anlinajata moxeTe da n36epeTe peT pa3nHn pexmHa uCTeHe 3a cekoja coba. Tne ce cTaHapdHn pexmM wTo moxE da ce KopncTaT BO NOBeKeTo cnTuacnn. Moxete da ro npucnoc6nte pexmOT ha uCTeHe npeky npuez3HO hAoDyBaHe Ha npetnoHTaHnTe noCTaBKn 3a uCTeHeTo HnnpedHnTe noCTaBKn.
PeknHa nCteHe
Pekim Onnc