
RS50N3513WW - Fridge SAMSUNG - Free user manual and instructions
Find the device manual for free RS50N3513WW SAMSUNG in PDF.
| Brand | Samsung |
| Model | RS50N3513WW |
| Product Type | French Door Refrigerator with Drawer Freezer |
| Dimensions (H x W x D) | 1778 x 908 x 739 mm (estimated) |
| Net Weight | 97 kg (estimated) |
| Climate Class | SN-T (temperate to tropical) |
| Energy Class | E (estimated) |
| Total Net Capacity | 505 L (estimated) |
| Net Refrigerator Capacity | 340 L (estimated) |
| Net Freezer Capacity | 165 L (estimated) |
| Power Supply | 220-240 V, 50 Hz |
| Main Features | Multi-Flow Cooling, Automatic Defrost, Electronic Control, Digital Display |
| Defrost Type | Automatic |
| Refrigerant | R-600a (isobutane) (estimated) |
| Noise Level | 42 dB(A) (estimated) |
| User-Replaceable Parts | Handles, gaskets, drawers, hinges |
| Maintenance and Cleaning | Regular interior cleaning, checking gaskets, manual defrosting if necessary |
| Safety | Unplug before repair, use safety gloves, handle doors with two people |
| General Information | Manual available in multiple languages, spare parts on Samsung Support website |
Frequently Asked Questions - RS50N3513WW SAMSUNG
User questions about RS50N3513WW SAMSUNG
0 question about this device. Answer the ones you know or ask your own.
Ask a new question about this device
Download the instructions for your Fridge in PDF format for free! Find your manual RS50N3513WW - SAMSUNG and take your electronic device back in hand. On this page are published all the documents necessary for the use of your device. RS50N3513WW by SAMSUNG.
USER MANUAL RS50N3513WW SAMSUNG
French - Français ......9
German - Deutsch ......17
Dutch - Nederlands......25
Italian - Italiano 33
Hungarian - Magyar ....57
Polish - Polski......65
Czech - Čeština....73
Slovakian - Slovenčina......81
Serbian - Srpski......97
Greek - ελληνικά......105
Croation - Hrvatski......121
Albanian - Shqip ......129
Norwegian - Norsk......177
Finnish - Suomi ....185
Swedish - Svenska......193
Slovenian - Slovenščina ..... 201
User servicing manual
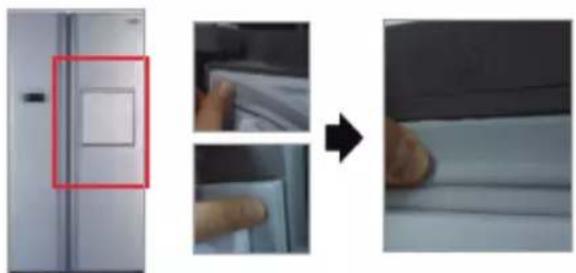
- You can check where to buy replacement parts at http://samsung.com/support
- Visit the part purchase site and enter the model code of your product to check the parts available for purchase. The model code is labelled on the outer side of your product.
- You can check the model code and version on the barcode label at the bottom left of the product.
- For replacement parts, make sure the part name matches that of the illustration in this manual.
- User-serviceable parts are limited to handles (some models only), gaskets, drawers, and hinges.

NOTE
Following the repair by a non-authorised service provider, self-repair or non-professional repair of the product, Samsung is not liable for any damage to the product, any injury or any other product safety issue caused by any attempt to repair the product which does not carefully follow these repair and maintenance instructions. Any damage to the product caused by an attempt to repair the product by any person other than a Samsung certified service provider will not be covered by the warranty.

CAUTION
- The part name listed on the site may di°er from that in this manual. Please make sure you choose the right part name.
• Replacing hinges requires extreme caution because it involves detaching the door.
- Be sure to wear safety gloves while making repairs.
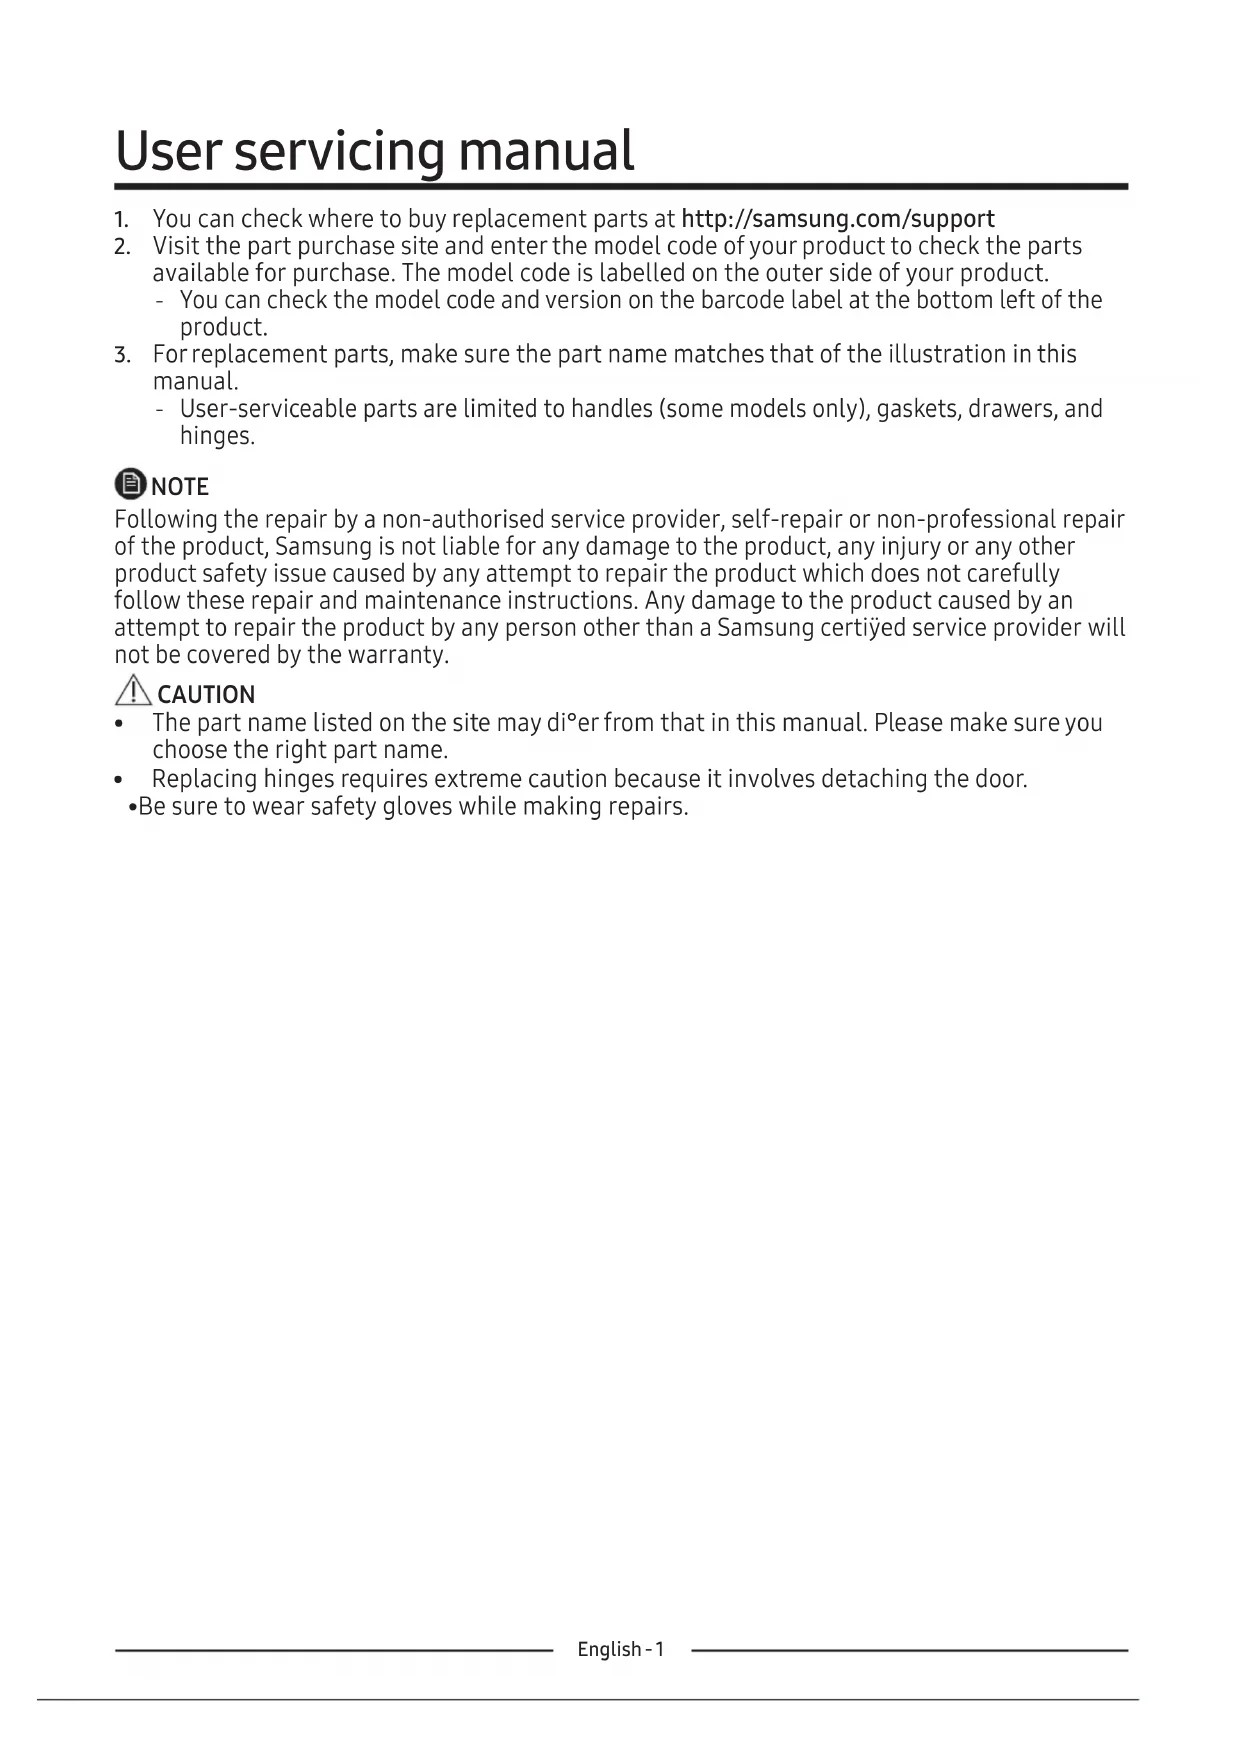
The actual image and provided parts of the refrigerator may differ, depending on the model and the country.
01 Handle
02 Drawer
03 Top hinge
04 Gasket
05 Bottom hinge
Handle replacement
Model name looks like this: RS54**3****, RS52**3****, RS50**3****, What replaces the asterisks may differ depending the model.
Asterisk(s) in the model code indicate a variant model and may replace (0-9) or (A-Z) in the model code.

CAUTION
- When replacing the door handle, take care not to scratch the front of the door.
- Firmly press the handles at the supports. Make sure there is no gap between the supports and the door.
•Tightly fasten the screws when attaching the handle. - Check that the handle is rmly attached before using the product.
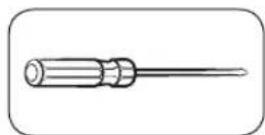
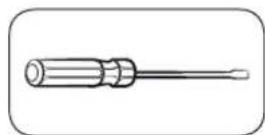
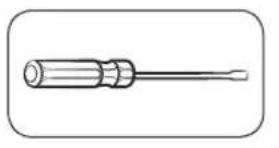
Tools required (not provided)

Philips screwdriver Flat-head screwdriver
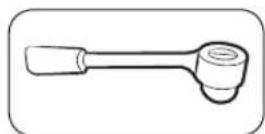
To detach the handles

NOTE
This procedure applies to both the fridge and freezer compartment.
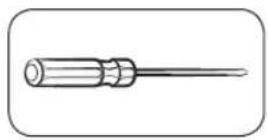
natural_image
Close-up of a metallic cylindrical object with a glossy surface, possibly a pipe or tube, against a plain background (no visible text or symbols)- Handle Assemblies are located on the front of the refrigerator door.

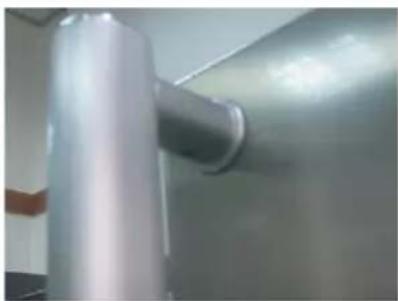
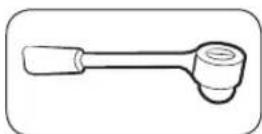
natural_image
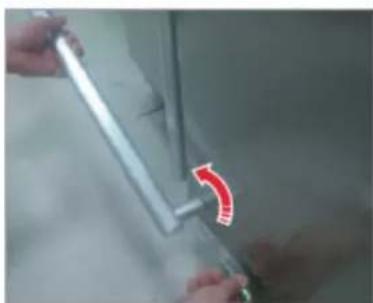
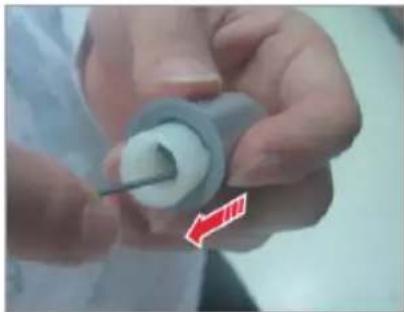
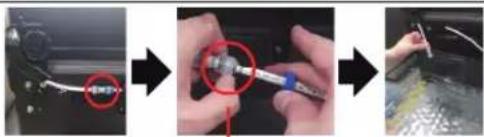
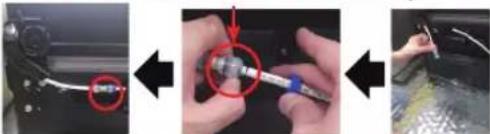
Close-up of a metallic mechanical component with a red arrow indicating rotation (no text or symbols visible)- Insert the small flat-head driver to the hole at the bottom of Cap support handle and pull the handle assembly out to the front side with turning driver to one side.
natural_image
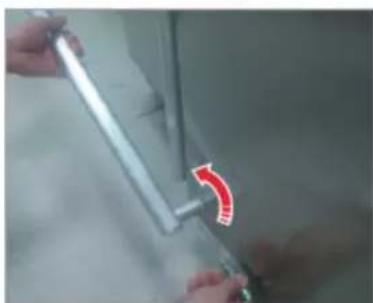
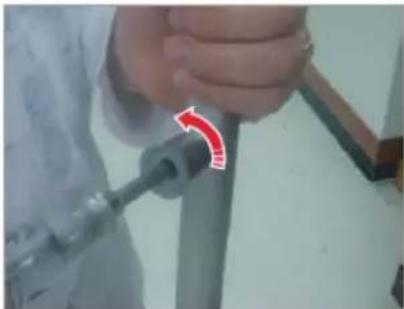
Close-up of hands holding a metal rod with a red curved arrow indicating rotation (no text or symbols visible)
Turn around the Handle assembly to one side to dissemble about the bottom position

natural_image
Close-up of a person using a tool to adjust or install a pipe fitting (no visible text or symbols)- Unscrew 4 screws to diassemble Cap support handle and Support handle.

natural_image
Close-up of hands holding a small white cylindrical object with a black rod inserted, no visible text or symbols- Pull the Support handle out using hex wrench as shown or flat-head driver pushing the back side.
Gasket replacement

CAUTION
Make sure you ÿrmly attach the gasket. Otherwise, cold air from the refrigerator may leak.
To remove the gasket
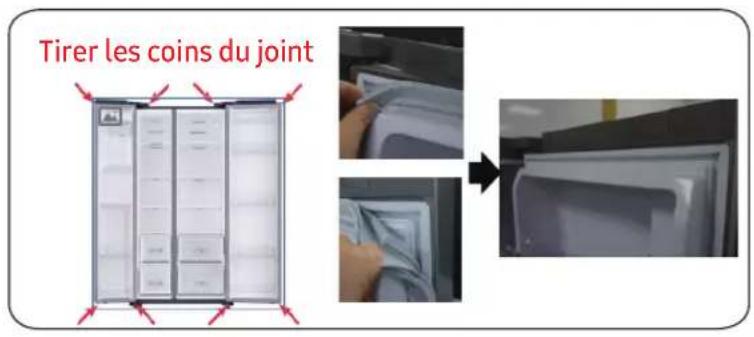
Pull the corne of Gasket
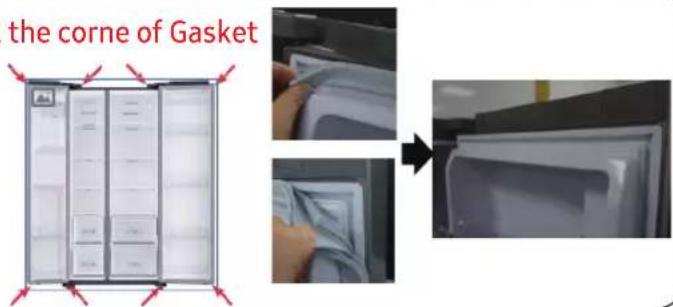
- Pull the 4 corners of gasket.
- Pull the center of gasket.
To replace the gasket
Pull the corne of Gasket
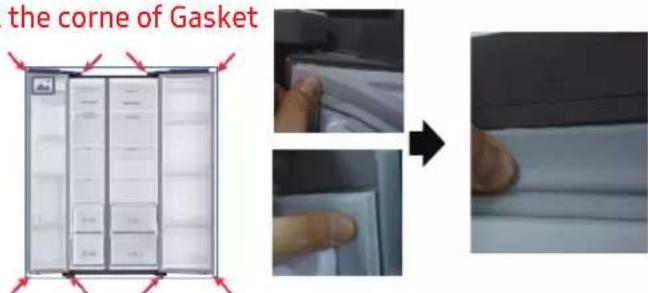
- Push the 4 corners of gasket.
- Push the center of gasket.
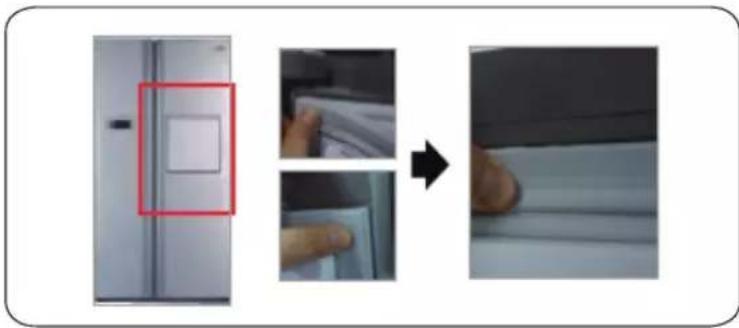
- Push the 4 corners of gasket.
- Push the center of gasket.
Drawer replacement
CAUTION
Check that the drawer is inserted properly into the rail during assembly.
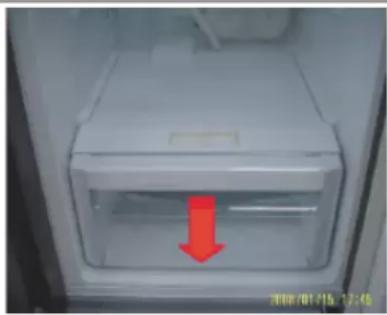
To remove the drawer
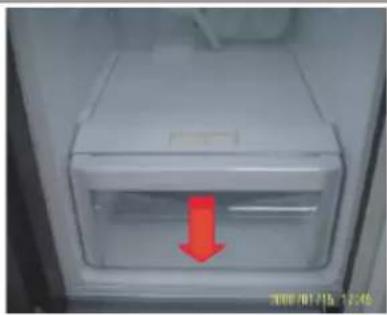
natural_image
Interior view of a refrigerator with a red arrow pointing to the door (no visible text or symbols)-
Pull out the drawer as far as it goes.
-
Tilt the drawer up and pull it out until it is removed.
To reattach the drawers
Reattaching the drawers follows the reverse order of their respective removal steps.
Hinge replacement
To replace the hinges, you must remove the doors first.
CAUTION
- When removing the doors, take extreme caution because the doors are heavy.
- Before replacing the hinges, put a soft pad such as cardboard on the floor to prevent scratches on the door when you place the doors down.
- As the hinges must be handled carefully and replaced by two or more persons, we recommend you to call for professional technical service.
• If you remove the hinge without holding the door, the door may fall and cause injury. - Ensure that the shaft is firmly tightened on the hinge.
- Check that the hinge is firmly attached to the cabinet.
- Make sure the wire connectors are connected properly.
- Be careful not to damage the wires when fastening the top cover.
WARNING
- Tilting/laying the refrigerator requires a minimum of 2 people.
- Disconnect the power cord before reversing the doors.
Tools required (not provided)
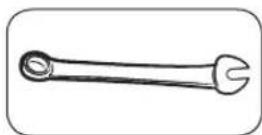
Philips screwdriver Flat-head screwdriver 11 mm spanner

10 mm socket wrench 8 mm socket wrench 10 mm spanner
Reversing the door

NOTE
For the models with handles, reverse the handles first. (For detailed information, see the "Reversing the door handle position (For models with bar handles)" section.)
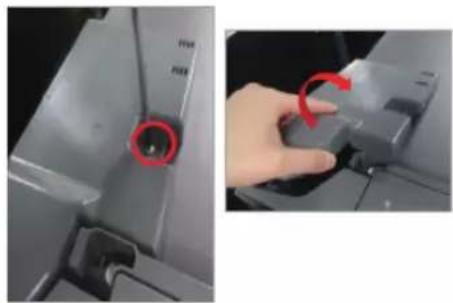
natural_image
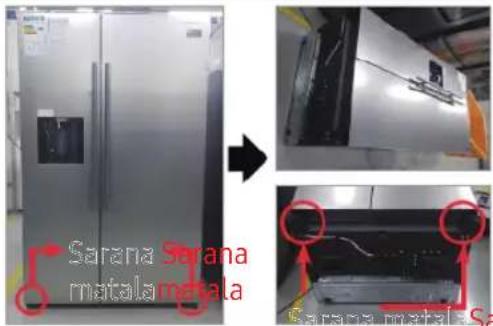
Close-up of a hand pressing a button on a device component, showing red circular annotation (no text or symbols visible)- Disconnect the power cord, and remove 1 cover screws using a Phillips screwdriver. Then open the Freezer door and pull the hooks on the sides to loosen the cover. Lift up the cover towards you to detach it.

natural_image
Close-up of a hand holding a small electronic component with wires and connectors (no visible text or symbols)- Disconnect the two top housings.

natural_image
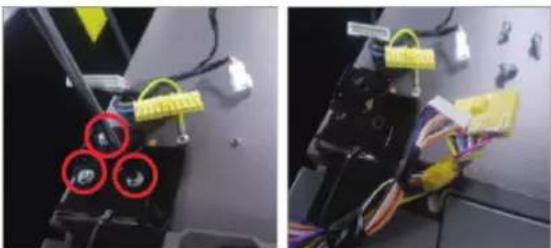
Two-panel photo showing a robotic device with three red circular components and yellow tags, mounted on a wall (no visible text or symbols)- Remove the three bolts holding the hinge.

natural_image
Close-up of a hand holding a black robotic arm with yellow and blue components, surrounded by wires (no visible text or symbols)- Disassemble the top hinge from


- Disconnect the Power Cord.
- Lay down the set.


Must working more than 2 people.
Be sure to unplug the power cord before performing the operation above.
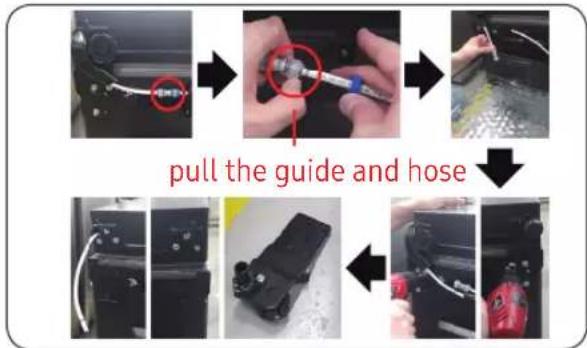
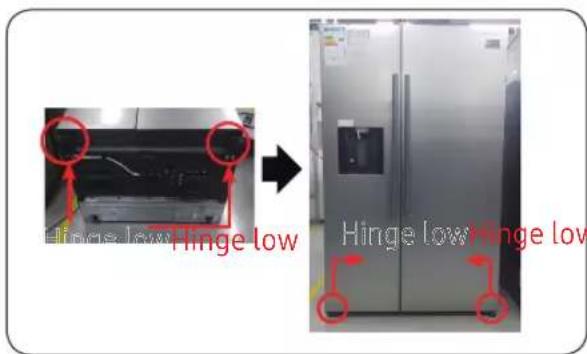
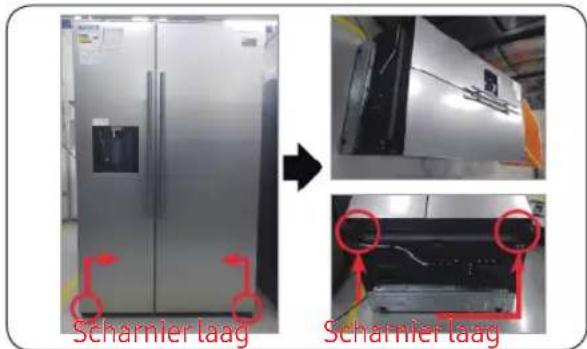
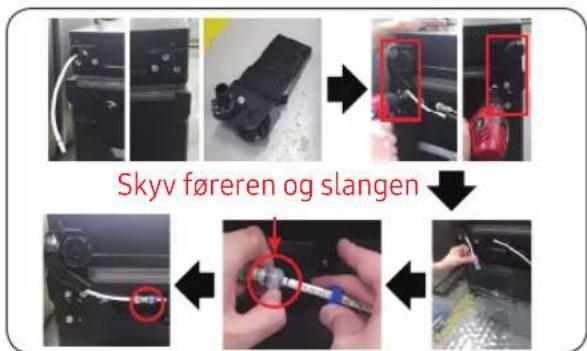
- DisconnectHose. (Only Hinge Low Left)
- Exhaust water in Hose. (Only Hinge Low Left)
- RemoveBolt(3ea). (Using spanner or 10mm Box wrench)
- Remove Hinge Low R/L.
- Assemble hinge low on bottom. (Using spanner or 10mm Box wrench)
- connect Hose (Only Hinge Low Left)
- Assemble water in Hose. (Only Hinge Low Left)

Be sure to unplug the power cord before performing the operation above.
- Assemble Hinge low R/L.
- Put up the set.

Must working more than 2 people.
01 Poignée
natural_image
Close-up of a metallic cylindrical object with a glossy surface, possibly a mechanical component or tool (no visible text or symbols)natural_image
Close-up of a metallic mechanical component with a red circular arrow indicating rotation (no text or symbols visible)natural_image
Close-up of hands holding a metal rod with a red curved arrow indicating rotation (no text or symbols visible)
natural_image
Close-up of a hand holding a tool with a red curved arrow pointing to a pipe fitting (no visible text or symbols)natural_image
Close-up of hands holding a small mechanical component with a red arrow indicating direction (no visible text or symbols)Pour retirer le joint
natural_image
Interior view of a refrigerator with a red arrow pointing to the door panel (no text or symbols visible)natural_image
Close-up of a mechanical component with a red circular mark and 'N/A' label, no readable text or symbols beyond the markings.
natural_image
Hand pressing a button on a device (no visible text or symbols)
natural_image
Hand holding a yellow plastic component with red and white connectors, next to a black electrical plug (no visible text or symbols)
natural_image
Close-up of a mechanical device with three red-circled components and yellow tape (no visible text or symbols)
natural_image
Close-up of electrical wiring and components with yellow connectors (no visible text or symbols)
natural_image
Hand holding a black device with yellow connectors and multicolored wires, no visible text or symbols01 Griff
03 Oberes Scharnier
natural_image
Close-up of a metallic cylindrical object with a glossy surface, possibly a valve or pipe (no visible text or symbols)natural_image
Close-up of a metallic mechanical component with a red arrow indicating rotation (no text or symbols visible)natural_image
Close-up of hands holding a metal rod with a red arrow indicating a curved edge (no text or symbols visible)
natural_image
Close-up of a hand holding a tool with a red curved arrow pointing to a pipe fitting (no visible text or symbols)natural_image
Close-up of hands holding a small mechanical component with a red arrow indicating direction (no visible text or symbols)natural_image
Three-panel image showing a refrigerator interior, hand placing a paper, and a close-up of hands holding a piece of paper (no text or symbols visible)natural_image
Interior view of a refrigerator with a red arrow pointing to the door panel (no text or symbols visible)natural_image
Close-up of a hand pressing a button on a device component, showing red circular annotation (no text or symbols visible)natural_image
Close-up of a hand holding a small electronic component with wires and connectors (no visible text or symbols)natural_image
Two-panel photo showing a device with three circular components and colored wires, no visible text or symbols.natural_image
Close-up of a hand holding a black robotic arm with yellow and blue components, surrounded by wires (no visible text or symbols)01 Handgreep
03 Bovenscharnier
05 Onderscharnier
02 Lade
04 Bovenbeugel
Reserve deurgreep
natural_image
Simple line drawing of a screwdriver with no text or symbolsnatural_image
Simple line drawing of a screwdriver with a flat blade (no text or symbols)natural_image
Close-up of a metallic cylindrical object with a glossy surface, possibly a pipe or tube, against a plain wall (no text or symbols visible)natural_image
Close-up of a metallic mechanical component with a red arrow indicating rotation (no text or symbols visible)natural_image
Close-up of hands holding a metal rod with a red arrow indicating rotation (no text or symbols visible)natural_image
Close-up of a hand holding a tool with a red curved arrow pointing to a pipe fitting (no visible text or symbols)- Schroef 4 schroeven los om de kap en handgreep te demonteren.
natural_image
Close-up of hands holding a small mechanical component with a red arrow indicating direction (no visible text or symbols)natural_image
Three-panel image showing a refrigerator with a red-outlined door, before and after assembly or cleaning (no text or symbols visible)natural_image
Interior view of a refrigerator with a red arrow pointing to the door (no visible text or symbols)natural_image
Close-up of a hand pressing a button on a device component, showing red circular annotation (no text or symbols visible)natural_image
Close-up of a hand holding a small electronic component with wires and connectors (no visible text or symbols)natural_image
Two-panel photo showing a robotic device with three red circular components and yellow tags, mounted on a wall (no visible text or symbols)natural_image
Close-up of a hand holding a black robotic arm with yellow and blue components, surrounded by wires (no visible text or symbols)- Demonteer de bovenste scharnier.
01 Maniglia
natural_image
Simple line drawing of a screwdriver (no text or symbols)
natural_image
Close-up of a metallic cylindrical object with a pointed tip, possibly a pipe or tube, against a plain background (no text or symbols visible)natural_image
Close-up of a metallic mechanical component with a red arrow indicating rotation (no visible text or symbols)natural_image
Close-up of hands holding a metal rod with a red curved arrow indicating rotation (no text or symbols visible)
natural_image
Close-up of a hand holding a tool with a red curved arrow pointing to a pipe fitting (no visible text or symbols)natural_image
Close-up of hands holding a small mechanical component with a red arrow indicating direction (no visible text or symbols)natural_image
Interior view of a refrigerator with a red arrow pointing to the door panel (no text or symbols visible)natural_image
Close-up of a hand pressing a button on a device component, showing red circular annotation (no text or symbols visible)natural_image
Close-up of a hand holding a small electronic component with wires and connectors (no visible text or symbols)natural_image
Two-panel photo showing a robotic device with three red circular components and yellow tags, mounted on a wall (no visible text or symbols)natural_image
Close-up of a hand holding a black robotic arm with yellow and blue components, surrounded by wires (no visible text or symbols)natural_image
Sequence of four photos showing a device being processed, with one panel highlighting the process (no visible text or symbols)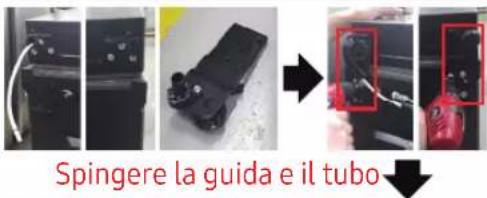
natural_image
Three-step automotive assembly line showing tool installation and cleaning process (no text or symbols visible)01 Manípulo
03 Dobradiça superior
05 Dobradiça inferior
02 Gaveta
04 Junta
natural_image
Simple line drawing of a screwdriver (no text or symbols)
Chave Phillips Chave de fenda
de ponta plana
Para separar os manípulos
NOTA
natural_image
Close-up of a metallic cylindrical object mounted on a wall, possibly a valve or pipe (no visible text or symbols)natural_image
Close-up of a metallic mechanical component with a red circular arrow indicating rotation (no text or symbols visible)natural_image
Close-up of hands holding a metal rod with a red arrow indicating a curved edge (no text or symbols visible)natural_image
Close-up of a hand holding a tool with a red curved arrow pointing to a pipe fitting (no visible text or symbols)natural_image
Close-up of hands holding a small mechanical component with a red arrow indicating direction (no visible text or symbols)Para remover a gaveta
natural_image
Interior view of a refrigerator with a red arrow pointing to the door panel (no text or symbols visible)Para voltar a colocar as gavetas
natural_image
Close-up of a mechanical component with a red circular mark and 'N/A' label, no readable text or symbols beyond the markings.
natural_image
Hand pressing a button on a device (no visible text or symbols)
natural_image
Hand holding a yellow plastic component with red and white wires, next to a black electrical plug (no visible text or symbols)natural_image
Close-up of a mechanical component with three red-circled holes and yellow tape, no visible text or symbols
natural_image
Close-up of electrical wiring and components with yellow connectors (no visible text or symbols)natural_image
Hand holding a black device with yellow connectors and multicolored wires, no visible text or symbols- Desmontar a dobradiça superior.
natural_image
Four-panel photo sequence showing a device being processed with a tool, no visible text or symbols
natural_image
Four-panel photo sequence showing a device being processed, with a magnified inset highlighting the final step (no text or symbols visible)natural_image
Three-step photo showing a tool being inserted into a car body, with no visible text or symbols.01 Bisagra superior
03 Asa superior
05 Bisagra inferior
02 Cajón
04 Empaquetamiento
Reemplazo de asa
natural_image
Simple line drawing of a screwdriver with no text or symbolsDestornillador Philips
natural_image
Simple line drawing of a screwdriver with a flat blade (no text or symbols)natural_image
Close-up of a metallic cylindrical object with a pointed tip, possibly a pipe or tube, against a plain background (no visible text or symbols)
natural_image
Close-up of a metallic mechanical component with a red arrow indicating rotation (no text or symbols visible)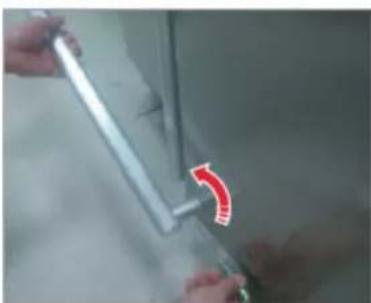
natural_image
Close-up of hands holding a metal tool with a red arrow indicating rotation (no text or symbols visible)natural_image
Close-up of a hand holding a tool with a red curved arrow pointing to a pipe fitting (no visible text or symbols)natural_image
Close-up of hands holding a small mechanical component with a red arrow indicating direction (no visible text or symbols)natural_image
Interior view of a refrigerator with a red arrow pointing to the door panel (no text or symbols visible)natural_image
Close-up of a mechanical component with a red circular mark and 'PWR' label (no readable text or symbols beyond labels)
natural_image
Hand pressing a button on a device (no visible text or symbols)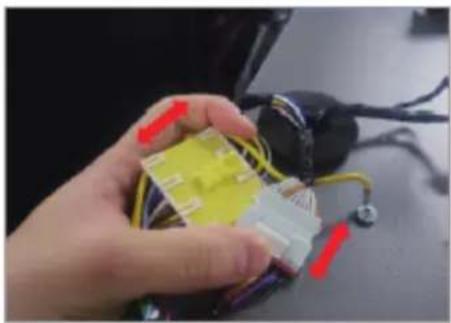
natural_image
Hand holding a yellow plastic component with red and white connectors, surrounded by wires (no visible text or symbols)
natural_image
Close-up of a mechanical device with three red-circled components and yellow tape (no visible text or symbols)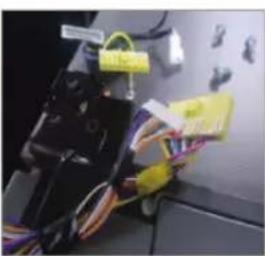
natural_image
Close-up of electrical wiring and components in a lab setting (no visible text or symbols)
natural_image
Hand holding a black device with yellow connectors and multicolored wires, no visible text or symbolsnatural_image
Four-panel photo sequence showing a device being processed, with one panel highlighting the internal components (no visible text or symbols)
natural_image
Three-panel photo showing a device being processed, with a magnified view of the final component highlighted in red (no text or symbols visible)natural_image
Step-by-step photo showing tool application on a car interior, with red circles highlighting a component (no text or symbols visible)01 Fogantyú
03 Felső csuklópánt
05 Alsó csuklópánt
02 Fiók
04 Kosár
Fogantyúk cseréje
natural_image
Close-up of a metallic cylindrical object with a pointed tip, possibly a container or tube, against a plain background (no visible text or symbols)natural_image
Close-up of a metallic pipe joint with a red circular arrow indicating rotation (no text or symbols visible)natural_image
Close-up of hands holding a metal rod with a red curved arrow indicating rotation (no text or symbols visible)
natural_image
Close-up of a person using a tool to adjust or install a pipe fitting (no visible text or symbols)natural_image
Close-up of hands holding a small white object with a black pen inserted, no visible text or symbolsnatural_image
Three-panel image showing a refrigerator with a red-out box, before and after a photo of hands holding a paper (no text or symbols visible)natural_image
Interior view of a refrigerator with a red arrow pointing to the door (no visible text or symbols)natural_image
Close-up of a mechanical component with a red circular hole and scale markings (no readable text or symbols)
natural_image
Close-up of a hand pressing a button with a red arrow indicating rotation (no text or symbols visible)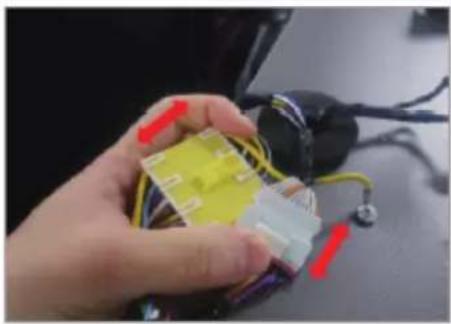
natural_image
Hand holding a yellow plastic component with red and purple connectors, next to a black electrical plug (no visible text or symbols)
natural_image
Close-up of a mechanical component with three red-circled features and yellow tape (no visible text or symbols)
natural_image
Close-up of electrical wiring and components with yellow connectors and labels (no readable text or symbols)
natural_image
Hand holding a black robotic device with yellow and blue components, attached to a desk with wires and electronic devices (no visible text or symbols)natural_image
Four-panel photo sequence showing a device being processed, with one panel highlighting the process (no visible text or symbols)
natural_image
Four-panel photo sequence showing a device being processed, with a red zoomed-in detail highlighting the final step (no text or symbols visible)natural_image
Three-step photo showing a tool being inserted into a device, with arrows indicating the process (no text or symbols visible)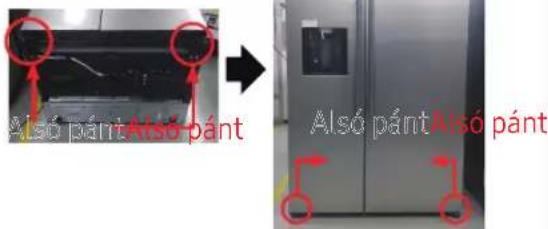
01 Uchwyt
03 Górny zawias
05 Dolny zawias
02 Szuflada
04 Uszczelka
Wymiana uchwytu
natural_image
Simple line drawing of a screwdriver with no text or symbolsnatural_image
Close-up of a metallic cylindrical object mounted on a wall, possibly a valve or pipe (no visible text or symbols)
natural_image
Close-up of a metallic mechanical component with a red arrow indicating rotation (no text or symbols visible)
natural_image
Close-up of hands holding a metal rod with a red curved arrow indicating rotation (no text or symbols visible)natural_image
Close-up of a hand holding a tool with a red curved arrow pointing to a pipe fitting (no visible text or symbols)natural_image
Close-up of hands holding a small mechanical component with a red arrow indicating direction (no visible text or symbols)natural_image
Interior view of a refrigerator with a red arrow pointing to the door (no visible text or symbols)natural_image
Close-up of a mechanical component with a red circular mark and 'PWR' label (no readable text or symbols beyond labels)
natural_image
Hand pressing a button on a device (no visible text or symbols)
natural_image
Hand holding a yellow plastic component with red and white connectors, next to a black electrical plug (no visible text or symbols)
natural_image
Close-up of a mechanical device with three red-circled components and yellow tape (no visible text or symbols)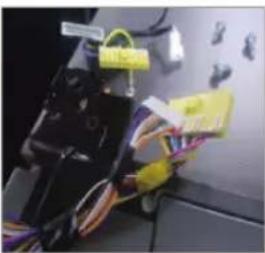
natural_image
Close-up of electrical wiring and components with yellow connectors (no visible text or symbols)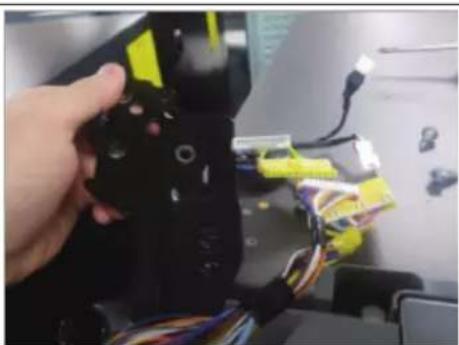
natural_image
Hand holding a black device with yellow connectors and multicolored wires, no visible text or symbolsnatural_image
Sequence of industrial equipment steps showing wire connection, mechanical component assembly, and tool application (no visible text or symbols)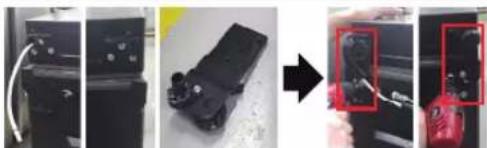
natural_image
Three-panel photo sequence showing a device being processed, with a close-up of a red button highlighting the final state (no text or symbols visible)natural_image
Three-step photo showing a tool being inserted into a car's head, with arrows indicating direction (no text or symbols visible)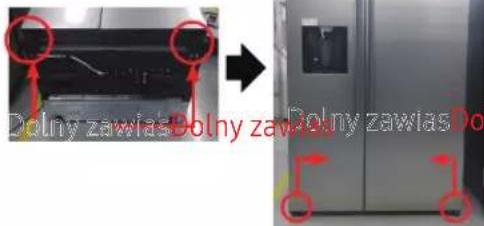
01 Madlo
03 Horní závěs
05 Spodní závěs
02 Zásuvka
04 Těsnění
Výměna madla
natural_image
Close-up of a metallic cylindrical object mounted on a wall, possibly a valve or pipe (no visible text or symbols)natural_image
Close-up of a metallic pipe joint with a red arrow indicating rotation (no text or symbols visible)natural_image
Close-up of hands holding a metal tool with a red curved arrow indicating motion (no text or symbols visible)
natural_image
Close-up of a hand holding a tool with a red curved arrow pointing to a pipe fitting (no visible text or symbols)natural_image
Close-up of hands holding a small mechanical component with a red arrow indicating direction (no visible text or symbols)natural_image
Interior view of a refrigerator with doors and shelves, no visible text or symbols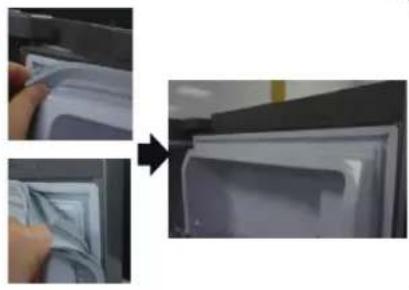
natural_image
Two-step photo showing a hand inserting a plastic bag into a refrigerator (no text or symbols visible)natural_image
Interior view of a refrigerator with doors open and red arrows pointing to the front panel (no text or symbols visible)
natural_image
Close-up of a hand pressing down on a white sheet, showing a magnified view (no text or symbols visible)natural_image
Three-panel image showing a refrigerator interior, hand inserting paper, and a close-up of a hand holding a piece of paper (no text or symbols visible)natural_image
Interior view of a refrigerator with a red arrow pointing to the door (no visible text or symbols)natural_image
Close-up of a hand pressing a button on a device component, showing red circular annotation (no text or symbols visible)natural_image
Close-up of a hand holding a small electronic component with wires and connectors (no visible text or symbols)natural_image
Two-panel photo showing a robotic arm with yellow tags and three red circular highlights on the left, and a close-up of a mechanical device with wires and a yellow tag on the right (no visible text or symbols)natural_image
Close-up of a hand holding a black robotic device with yellow and blue wires, no visible text or symbols01 Rukovät
03 Vrchný pánt
05 Spodný pánt
02 Zásuvka
04 Tesnenie
Výmena rukoväti
natural_image
Close-up of a metallic cylindrical object with a pointed tip, possibly a pipe or tube, against a plain background (no text or symbols visible)natural_image
Close-up of a metallic pipe joint with a red circular arrow indicating rotation (no text or symbols visible)- Vsuňte malý vodič s plochou hlavou do diery na spodku Cap podpornej rukováti a vytiahnite zostavu rukováti do prednej strany pri otáčaní vodiča do jednej strany.
natural_image
Close-up of hands holding a metal rod with a red curved arrow indicating rotation (no text or symbols visible)
Otočte zostavu rukováti do jednej strany, aby ste ju odmontovali v spodnej polohe

natural_image
Close-up of a hand holding a tool with a red curved arrow pointing to a pipe fitting (no visible text or symbols)natural_image
Close-up of hands holding a small mechanical component with a red arrow indicating direction (no visible text or symbols)natural_image
Three-panel image showing a door with a red-outlined square, then being handled by a hand to press or attach a piece of paper (no text or symbols visible)- Zatlačte 4 rohy tesnenia.
- Zatlačte stred tesnenia.
Výmena zásuvky

UPOZORNENIE
natural_image
Interior view of a refrigerator with a red arrow pointing to the door (no visible text or symbols)natural_image
Close-up of a mechanical component with a red circular hole and a black handle (no visible text or symbols)
natural_image
Close-up of a hand pressing a button with a red arrow indicating rotation (no text or symbols visible)
natural_image
Close-up of a hand holding a small electronic component with wires and connectors (no visible text or symbols)
natural_image
Close-up of a mechanical component with three red-circled features and yellow tape (no visible text or symbols)
natural_image
Close-up of electronic components with wires and connectors, no visible text or symbols
natural_image
Hand holding a black robotic arm with yellow and blue components, attached to a computer monitor (no visible text or symbols)01 Mâner
natural_image
Close-up of a metallic cylindrical object with a glossy surface, possibly a mechanical part or tool (no visible text or symbols)natural_image
Close-up of a metallic mechanical component with a red arrow indicating rotation (no visible text or symbols)natural_image
Close-up of hands holding a metal rod with a red curved arrow indicating rotation (no text or symbols visible)
natural_image
Close-up of a hand holding a tool with a red curved arrow pointing to a pipe fitting (no visible text or symbols)natural_image
Close-up of hands holding a small mechanical component with a red arrow indicating direction (no visible text or symbols)natural_image
Three-panel image showing a refrigerator with a red-out panel, before and after assembly or cleaning (no text or symbols visible)natural_image
Interior view of a refrigerator with a red arrow pointing to the door (no visible text or symbols)natural_image
Close-up of a hand pressing a button on a device component, showing red circular annotation (no text or symbols visible)natural_image
Hand holding a yellow plastic component with red and purple connectors, next to a black electrical plug (no visible text or symbols)natural_image
Two-panel photo showing a robotic arm with yellow tags and three red circular highlights on the left, and a close-up of a mechanical device with wires and a yellow tag on the right (no visible text or symbols)natural_image
Close-up of a hand holding a black robotic device with yellow and blue wires, no visible text or symbols01 Drška
03 Gornja šarka
05 Donja šarka
02 Fijoka
04 Zaptivka
Zamena ručke
natural_image
Simple line drawing of a screwdriver (no text or symbols)Philips krstasti odvijač

Ravan odvijač
Da odvojite ručke

NAPOMENA
natural_image
Close-up of a metallic cylindrical object with a glossy surface, possibly a valve or pipe (no visible text or symbols)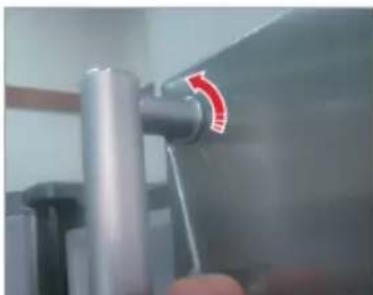
natural_image
Close-up of a metallic pipe joint with a red circular arrow indicating rotation (no text or symbols visible)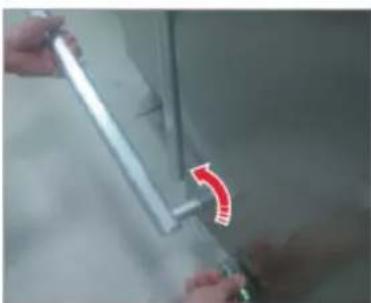
natural_image
Close-up of hands holding a metallic tool with a red curved arrow indicating a motion or change (no text or symbols visible)natural_image
Close-up of a hand holding a tool with a red curved arrow pointing to a pipe fitting (no visible text or symbols)- Odvrnite 4 zavrtnja da biste rastavili podpornu dršku ručke i nosač ručke.

natural_image
Close-up of hands holding a small mechanical component with a red arrow indicating direction (no visible text or symbols)- Pritisnite 4 ugla zaptivke.
- Pritisnite sredinu zaptivke.
Zamena fioke

OPREZ
Proverite da li je fioka pravilno postavljena u šine tokom montaže.
Da biste uklonili fioku

natural_image
Interior view of a refrigerator with a red arrow pointing to the door (no visible text or symbols)-
Izvucite fioku do kraja.
-
Nagnite fioku prema gore i izvucite je dok je ne izvadite.
Da ponovo pričvrstite fioke
Ponovno postavljanje fioka sledi obrnutom redosledu koraka za njihovo uklanjanje.
Zamena šarke
Da biste zamenili šarke, prvo morate skinuti vrata.

OPREZ
- Prilikom uklanjanja vrata budite izuzetno oprezni jer su vrata teška.
- Pre nego što zamenite šarke, stavite na pod mekanu podlogu, kao što je karton, kako biste sprečili ogrebotine na vratima kada vrata skinete.
- Budući da sa šarkama treba pažljivo rukovati i da u njihovoj zameni treba da učestvuju dve ili više osoba, preporučujemo vam da pozovete stručnu tehničku službu.
- Ako uklonite šarku bez držanja vrata, vrata mogu pasti i prouzrokovati povrede.
- Uverite se da je osovina čvrsto zategnuta na šarki.
•Proverite da li je šarka čvrsto pričvršćena za kućište.
•Uverite se da su žičani priključci pravilno povezani. - Pazite da ne oštetite žice prilikom pričvršćivanja gornjeg poklopca.

UPOZORENJE
- Naginjanje / postavljanje frižidera treba da rade najmanje 2 osobe.
- Isključite kabl za napajanje pre nego što započnete preokretanje vrata.
natural_image
Close-up of a mechanical component with a red circular hole and scale markings (no readable text or symbols)
natural_image
Close-up of a hand pressing a button with a red arrow indicating rotation (no text or symbols visible)
natural_image
Hand holding a yellow plastic component with red and purple connectors, next to a black electrical plug (no visible text or symbols)
natural_image
Close-up of a mechanical component with three red-circled features and yellow tape (no visible text or symbols)
natural_image
Close-up of electrical wiring and components with yellow connectors (no visible text or symbols)
natural_image
Hand holding a black robotic arm with yellow and blue components, attached to a computer monitor (no visible text or symbols)-
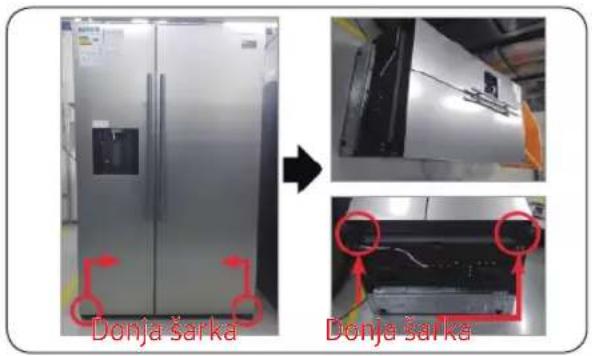
Isključite kabal za napajanje i uklonite 1 zavrtanj poklopca pomoću Phillips odvijača. Zatim otvorite vrata zamrzivača i povucite kuke sa strane da biste olabavili poklopac. Podignite poklopac prema sebi da biste ga odvojili.
-
Odvojte dva gornja kućišta.
-
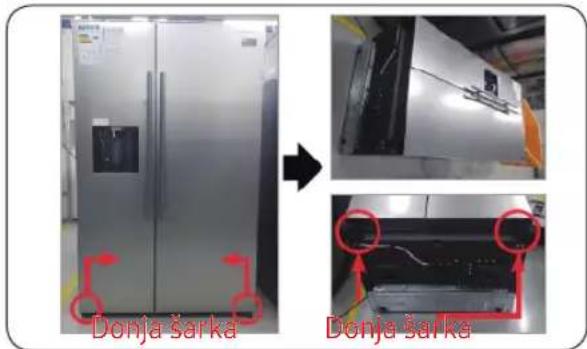
Uklonite tri vijka koji drže šarku.
-
Skinite gornju šarku.
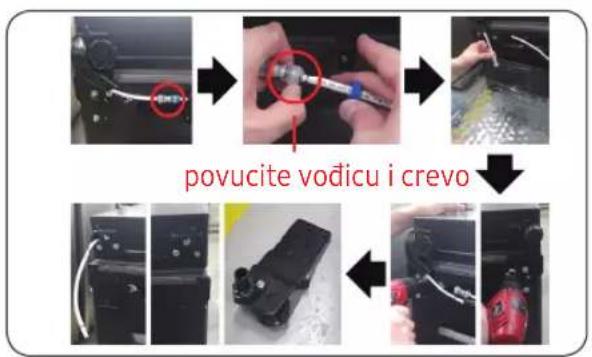
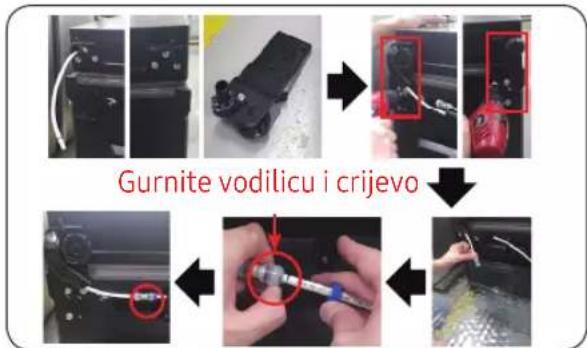
flowchart
graph TD
    A["Device Installation"] --> B["Repair with Gurnite vodicu"]
    B --> C["Reinjection of the component"]
    C --> D["Close-up of repair with a tool"]
    D --> E["Final Assembly"]

- Isključite kabal za napajanje.
- Položite set.

To moraju da rade više od 2 osobe.

Obavezno iskopčajte kabal za napajanje pre nego što započnete gore navedenu operaciju.
- Odvojitecrevo. (Samo šarka dole levo)
- Iscrpite vodu u crevu. (Samo šarka dole levo)
- Uklonitevijak(3ea). (Korišćenje ključa za matice ili ključa sa kutijom od 10 mm)
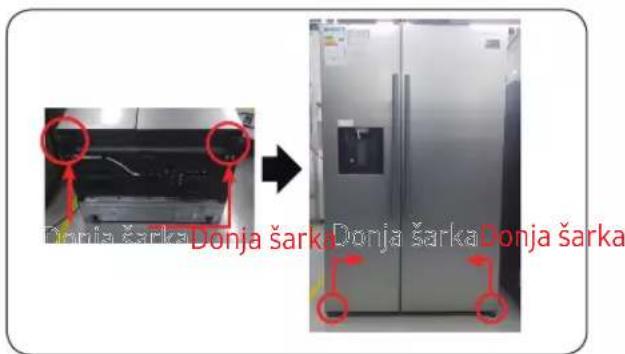
- Uklonite donju šarku D / L.
- Montirajte šarku nisko na dnu. (Korišćenje ključa za matice ili ključa sa kutijom od 10 mm)
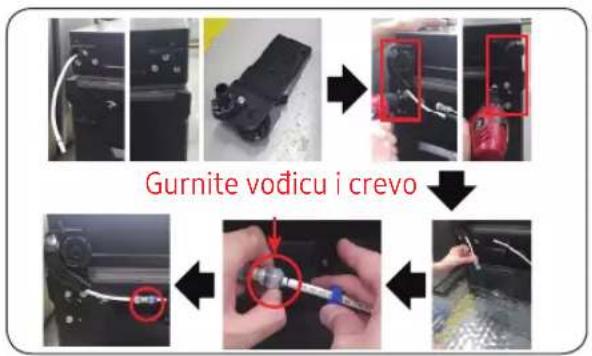
- Priključite crevo (samo šarka dole levo)
- Priključite vodu u crevo (Samo šarka dole levo)

Obavezno iskopčajte kabal za napajanje pre nego što započnete gore navedenu operaciju.
- Sastavite donju šarku D / L.
- Stavite set.

To moraju da rade više od 2 osobe.
01 Λαβή
03 Πάνω μεντεσές
05 Κάτω μεντεσές
02 Συρτάρι
04 Φλάντζα
Αντικατάσταση λαβής
natural_image
Close-up of a metallic cylindrical pipe or tube mounted on a wall, with no visible text or symbols.natural_image
Close-up of a metallic mechanical component with a red curved arrow indicating rotation (no text or symbols visible)natural_image
Close-up of hands holding a metallic tool with a red curved arrow indicating rotation (no text or symbols visible)natural_image
Close-up of a hand holding a tool with a red curved arrow pointing to a pipe fitting (no visible text or symbols)natural_image
Close-up of hands holding a small mechanical component with a red arrow indicating direction (no visible text or symbols)natural_image
Interior view of a refrigerator with a red arrow pointing to the door (no visible text or symbols)natural_image
Close-up of a hand pressing a button on a device (no visible text or symbols)
natural_image
Close-up of a hand holding a small electronic component with wires and connectors (no visible text or symbols)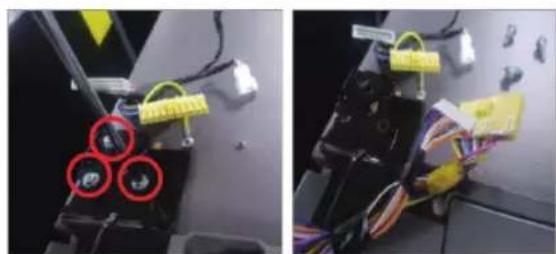
natural_image
Two-panel photo showing a robotic arm with yellow tags and three red circular highlights on the left panel, and a close-up of a black mechanical device with yellow tags and wires on the right panel (no visible text or symbols)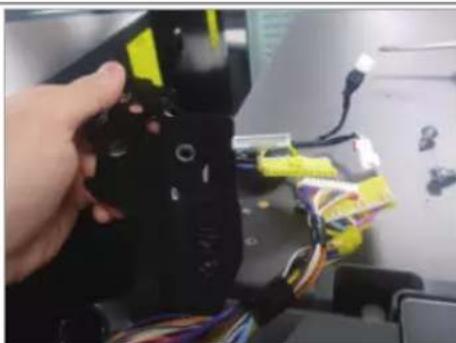
natural_image
Close-up of a hand holding a black robotic device with yellow and blue wires, no visible text or symbols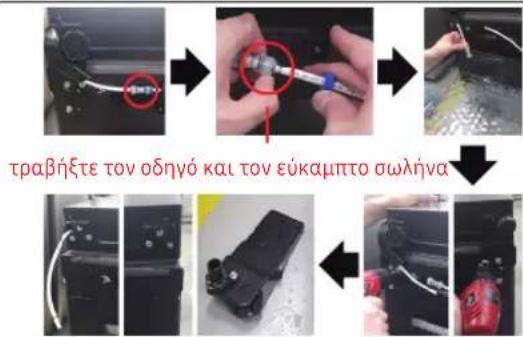
01 Дръжка
03 Горна панта
05 Долна панта
02 Чекмедже
04 Уплътнение
Подмяна на дръжка
natural_image
Close-up of a metallic cylindrical object with a glossy surface, possibly a valve or pipe (no visible text or symbols)natural_image
Close-up of a metallic mechanical component with a red arrow indicating rotation (no text or symbols visible)natural_image
Close-up of hands holding a metal rod with a red curved arrow indicating rotation (no text or symbols visible)
natural_image
Close-up of a hand holding a tool with a red curved arrow pointing to a pipe fitting (no visible text or symbols)natural_image
Close-up of hands holding a small mechanical component with a red arrow indicating direction (no visible text or symbols)natural_image
Three-panel image showing a refrigerator interior, hand placing a paper, and a close-up of hands holding a piece of paper (no text or symbols visible)natural_image
Interior view of a refrigerator with a red arrow pointing to the door panel (no text or symbols visible)natural_image
Close-up of a mechanical component with a red circular hole and scale markings (no readable text or symbols)
natural_image
Close-up of a hand pressing a button with a red arrow indicating rotation (no text or symbols visible)
natural_image
Hand holding a yellow plastic component with red and purple connectors, next to a black electrical plug (no visible text or symbols)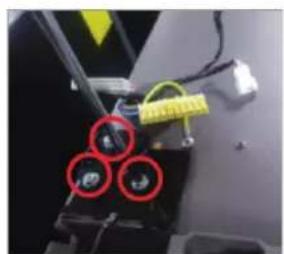
natural_image
Close-up of a mechanical component with three red-circled features and yellow tape (no visible text or symbols)
natural_image
Close-up of a black electronic device with attached wires and a yellow tag, placed on a surface (no visible text or symbols)
natural_image
Close-up of a hand holding a black robotic device with yellow and blue wires, no visible text or symbolsnatural_image
Two-panel photo showing a refrigerator with a door and a close-up of its interior panel (no visible text or symbols)
natural_image
Step-by-step photo showing a tool being inserted into a device, with no visible text or symbolsnatural_image
Sequence of industrial equipment steps showing a black device being processed, with a red tool partially visible (no text or symbols)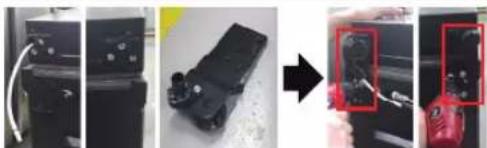
natural_image
Four-panel photo showing a device being processed, with a magnified view of the final component highlighted in red (no text or symbols visible)natural_image
Three-step automotive assembly process showing tool installation, repair, and cleaning steps (no text or symbols visible)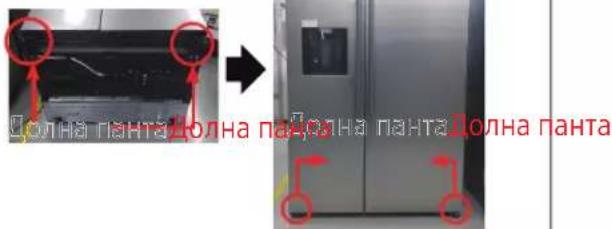
- Разкачете захранващия кабел.
- Поставете комплекта в легнало положение.

ВНИМАНИЕ

ВНИМАНИЕ
01 Ručka
03 Gornja šarka
05 Donja šarka
02 Ladica
04 Brtva
Zamjena ručke
Naziv modela izgleda ovako: RS54**3****, RS52**3****, RS50**3****, Što zamjenjuje zvjezdice, može se razlikovati ovisno o modelu.
Zvjezdica(e) u kodu modela označava(ju) varijantu modela i mogu mijeniti (0-9) ili (A-Z) u kodu modela.

OPREZ
- Prilikom zamjene ručke na vratima, pazite da ne ogrebete prednji dio vrata.
- Čvrsto pritisnite ručke na nosače. Pazite da nema praznine između nosača i vrata.
- Čvrsto pričvrstite vijke prilikom postavljanja ručke.
- Prije uporabe proizvoda provjerite je li ručka čvrsto pričvršćena.
natural_image
Two identical line drawings of a screwdriver with no text or symbolsnatural_image
Close-up of a metallic cylindrical object with a glossy surface, possibly a valve or pipe (no visible text or symbols)natural_image
Close-up of a metallic mechanical component with a red arrow indicating rotation (no text or symbols visible)natural_image
Close-up of hands holding a metal rod with a red curved arrow indicating rotation (no text or symbols visible)
Okrenite sklop ručke na jednu stranu da biste rastavili pri donjem položaju.
natural_image
Close-up of a hand holding a tool with a red curved arrow pointing to a pipe fitting (no visible text or symbols)- Odvijte 4 vijka da biste rastavljali kapicu nosača ručke i nosač ručke.

natural_image
Close-up of hands holding a small mechanical component with a red arrow indicating direction (no visible text or symbols)natural_image
Three-panel image showing a refrigerator with a red-outlined door, before and after being placed on a surface (no text or symbols visible)- Pritisnite 4 kuta brtve.
- Pritisnite sredinu brtve.
Zamjena ladice

OPREZ
natural_image
Interior view of a refrigerator with a red arrow pointing to the door (no visible text or symbols)-
Izvucite ladicu do kraja.
-
Nagnite ladicu prema gore i izvucite je dok je ne uklonite.
Da ponovno postavite ladice
natural_image
Close-up of a mechanical component with a red circular hole and a black handle (no visible text or symbols)
natural_image
Close-up of a hand pressing a button with a red arrow indicating rotation (no text or symbols visible)
natural_image
Close-up of a hand holding a small electronic component with wires and connectors (no visible text or symbols)
natural_image
Close-up of a mechanical component with three red-circled features and yellow tape (no visible text or symbols)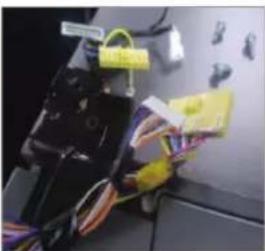
natural_image
Close-up of electrical wiring and components with yellow connectors and labels (no readable text or symbols)
natural_image
Hand holding a black robotic arm with yellow and blue components, attached to a computer monitor (no visible text or symbols)-
Isključite kabel za napajanje i uklonite 1 pokrovni vijak pomoću Phillips odvijača. Zatim otvorite vrata zamrzivača i povucite kuke sa strane kako biste olabavili poklopac. Podignite poklopac prema sebi da biste ga odvojili.
-
Odvojite dva gornja kućišta.
-
Uklonite tri vijka koji drže šarku.
-
Odspojite gornju šarku.

flowchart
graph TD
    A["Move vodilicu"] --> B["Close-up"]
    B --> C["Close-up with red annotation"]
    C --> D["Cross-rijevo"]
    D --> E["Close-up with red annotation"]
- Odspojite kabel napajanja.
- Položite set.

01 Doreza
natural_image
Two identical line drawings of a cylindrical object with a flat tip, shown in two rounded corners (no text or symbols)natural_image
Close-up of a metallic cylindrical object with a curved edge, possibly a pipe or tube, against a plain background (no visible text or symbols)natural_image
Close-up of a metallic mechanical component with a red arrow indicating rotation (no text or symbols visible)natural_image
Close-up of hands holding a metal rod with a red curved arrow indicating rotation (no text or symbols visible)
natural_image
Close-up of a hand holding a tool with a red curved arrow pointing to a pipe fitting (no visible text or symbols)natural_image
Close-up of hands holding a small mechanical component with a red arrow indicating direction (no visible text or symbols)natural_image
Interior view of a refrigerator with a red arrow pointing to the door (no visible text or symbols)natural_image
Close-up of a mechanical component with a red circular mark and 'PWR' label (no readable text or symbols beyond labels)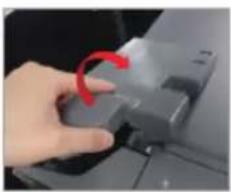
natural_image
Hand pressing a button on a device (no visible text or symbols)
natural_image
Hand holding a yellow plastic component with red and white connectors, surrounded by wires (no visible text or symbols)
natural_image
Close-up of a mechanical device with three red-circled components and yellow tape (no visible text or symbols)
natural_image
Close-up of electrical wiring and components with yellow connectors (no visible text or symbols)
natural_image
Hand holding a black device with yellow connectors and multicolored wires, no visible text or symbolsnatural_image
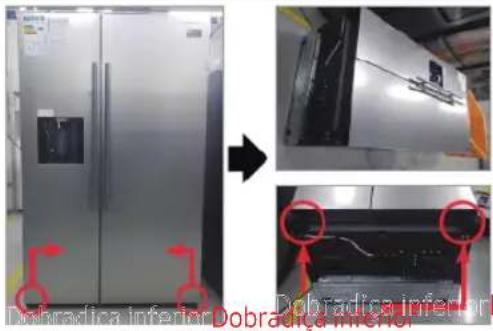
Exterior view of a modern stainless steel refrigerator with attached air conditioner unit (no visible text or symbols)Mentesha e poshtme Mentesha e poshtme
natural_image
Step-by-step photo showing a tool being inserted into a device, with no visible text or symbolsnatural_image
Four-panel photo sequence showing a device being processed with a tool, no visible text or symbols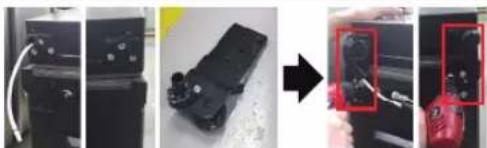
natural_image
Four-panel photo showing a device being processed, with a magnified inset highlighting a red button (no text or symbols visible)natural_image
Three-step automotive assembly process showing tool installation, disassembly, and cleaning (no text or symbols visible)
- Shkëputni kordonin elektrik.
- Shtrini setin.

KUJDES
01 Рачка
03 Горна шарка
05 Долна шарка
02 Фиока
04 Подлошка
Замена на рачка
natural_image
Close-up of a metallic cylindrical object with a curved edge, possibly a pipe or tube, against a plain background (no text or symbols visible)natural_image
Close-up of a metallic mechanical component with a red arrow indicating rotation (no text or symbols visible)natural_image
Close-up of hands holding a metal rod with a red arrow indicating rotation (no text or symbols visible)
natural_image
Close-up of a hand holding a tool with a red curved arrow pointing to a pipe fitting (no visible text or symbols)natural_image
Close-up of hands holding a small mechanical component with a red arrow indicating direction (no visible text or symbols)natural_image
Three-panel image showing a refrigerator interior, hand placing a paper, and a close-up of hands holding a piece of paper (no text or symbols visible)natural_image
Interior view of a refrigerator with a red arrow pointing to the door panel (no text or symbols visible)natural_image
Close-up of a hand pressing a button on a device (no visible text or symbols)natural_image
Hand holding a yellow plastic component with red and purple connectors, next to a black electrical plug (no visible text or symbols)natural_image
Two-panel photo showing a device with three circular components and colored wires, no visible text or symbols.natural_image
Hand holding a black robotic device with yellow and blue components, attached to a desk with wires and electronic devices (no visible text or symbols)natural_image
Four-panel photo sequence showing a device being processed with a tool, no visible text or symbols
natural_image
Four-panel photo sequence showing a device being processed, with a magnified view of the device being held (no visible text or symbols)natural_image
Three-step photo showing a tool being inserted into a device, with arrows indicating the process (no text or symbols visible)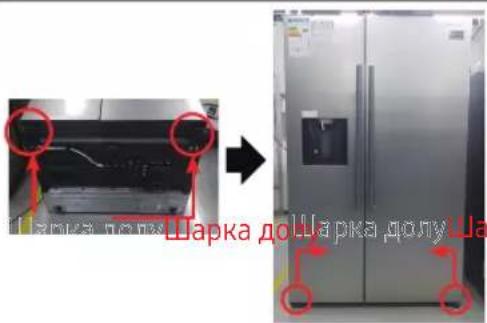
01 Rokturis
03 Augšējā enğe
05 Apakšējā en̩ge
02 Atviktne
04 Blive
Roktura nomaina
natural_image
Close-up of a metallic cylindrical object with a curved rod inserted, next to a wall (no visible text or symbols)natural_image
Close-up of a metallic pipe joint with a red arrow indicating rotation (no text or symbols visible)natural_image
Close-up of hands holding a metal rod with a red curved arrow pointing to the end (no text or symbols visible)
natural_image
Close-up of a hand holding a tool with a red curved arrow pointing to a pipe fitting (no visible text or symbols)natural_image
Close-up of hands holding a small mechanical component with a red arrow indicating direction (no visible text or symbols)natural_image
Interior view of a refrigerator with doors and shelves, no visible text or symbols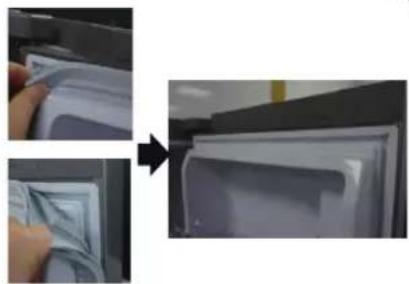
natural_image
Two-step photo showing a hand inserting a plastic bag into a refrigerator (no text or symbols visible)natural_image
Interior view of a refrigerator with doors open and red arrows indicating ventilation or airflow direction (no text or symbols)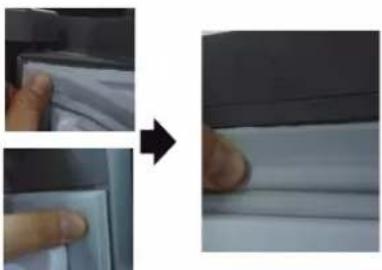
natural_image
Close-up of a hand pressing down on a white sheet, showing the process from left to right (no text or symbols visible)- Piespiediet 4 blīves stūrus.
- Piespiediet blīves vidu.
natural_image
Three-panel image showing a refrigerator with a red-out box, a hand inserting a paper into a drawer, and a close-up of hands cleaning the interior (no text or symbols visible)- Piespiediet 4 blīves stūrus.
- Piespiediet blīves vidu.
Atvilktnu nomaina

UZMANIBU
natural_image
Interior view of a refrigerator with a red arrow pointing to the door (no visible text or symbols)natural_image
Close-up of a hand pressing a button on a device (no visible text or symbols)natural_image
Hand holding a yellow plastic component with red and purple connectors, next to a black electrical plug (no visible text or symbols)natural_image
Two-panel photo showing a device with three circular components and yellow tags, no visible text or symbols.- Iznemiet tris skrüves, kas tur enği.

natural_image
Close-up of a hand holding a black robotic device with yellow and blue wires, no visible text or symbolsnatural_image
Three-panel photo sequence showing a device being processed, with one panel highlighting a red tool (no visible text or symbols)natural_image
Four-panel photo showing a device being processed, with a red zoomed-in detail highlighting the final step (no text or symbols visible)Pastumiet limenrādi un cauruli
natural_image
Three-step diagram showing a tool being inserted into a device, with arrows indicating the process (no text or symbols present)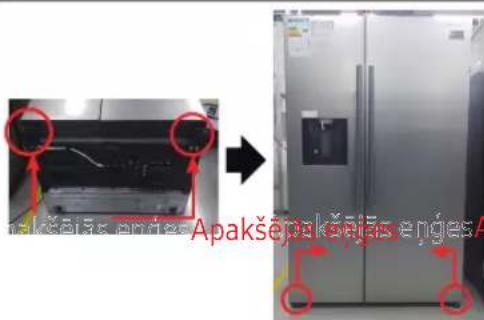
01 Käepide
03 Ülemine hing
05 Alumine hing
02 Sahtel
04 Tihend
natural_image
Simple line drawing of a screwdriver (no text or symbols)
Philipsi kruvikeeraja Lamepeaga
kruvikeeraja
natural_image
Close-up of a metallic cylindrical object with a pointed tip, possibly a pipe or tube, against a plain background (no text or symbols visible)natural_image
Close-up of a metallic mechanical component with a red arrow indicating rotation (no text or symbols visible)natural_image
Close-up of hands holding a metal rod with a red arrow pointing to it, against a blurred background (no text or symbols visible)
natural_image
Close-up of a hand holding a tool with a red curved arrow pointing to a pipe fitting (no visible text or symbols)natural_image
Close-up of hands holding a small mechanical component with a red arrow indicating direction (no visible text or symbols)- Lükake tihendi 4 nurka.
- Lükake tihendi keskosa.
Sahtli asendamine

ETTEVAATUST
natural_image
Interior view of a refrigerator with a red arrow pointing to the door (no visible text or symbols)natural_image
Close-up of a hand pressing a button on a device, showing the circular dial and red rotation arrow (no text or symbols visible)natural_image
Hand holding a yellow plastic component with red and white connectors, surrounded by wires (no visible text or symbols)natural_image
Two-panel photo showing a device with three red circular components and yellow connectors, no visible text or symbols.natural_image
Hand holding a black device with yellow connectors and multicolored wires, no visible text or symbolsnatural_image
Three-panel photo sequence showing a device being processed, with one panel highlighting a red object (no text or symbols visible)natural_image
Four-panel photo showing a device being processed, with a magnified view of the final component highlighted in red (no text or symbols visible)natural_image
Step-by-step photo showing a tool being inserted into a car body, with red circles highlighting the component (no text or symbols present)-
Paigaldage P/V alumine hing.
-
Pange komplekt valmis.

ETTEVAATUST
01 Rankena
03 Viršutinis vyris
05 Apatinis vyris
02 Stalčius
04 Tarpinè
Rankenos keitimas
natural_image
Close-up of a metallic cylindrical object with a cylindrical rod inserted, against a plain wall (no text or symbols visible)natural_image
Close-up of a metallic mechanical component with a red curved arrow indicating rotation (no text or symbols visible)natural_image
Close-up of hands holding a metal tool with a red curved arrow indicating rotation (no text or symbols visible)
natural_image
Close-up of a hand holding a tool with a red curved arrow pointing to a pipe fitting (no visible text or symbols)natural_image
Close-up of hands holding a small mechanical component with a red arrow indicating direction (no visible text or symbols)natural_image
Three-panel image showing a refrigerator with a red-out square window, before and after assembly or cleaning (no text or symbols visible)natural_image
Interior view of a refrigerator with a red arrow pointing to the door (no visible text or symbols)natural_image
Close-up of a hand pressing a button on a device component, showing red circular annotation (no text or symbols visible)natural_image
Close-up of a hand holding a small electronic component with wires and connectors (no visible text or symbols)- Atjunkite du viršutinius korpusus.
natural_image
Two-panel photo showing a robotic device with three red circular components and yellow tags, mounted on a wall (no visible text or symbols)natural_image
Close-up of a hand holding a black robotic arm with yellow and blue components, no visible text or symbolsnatural_image
Three-step photo sequence showing tool application: adding a cable to a component, then using a screwdriver to adjust the part (no text or symbols visible)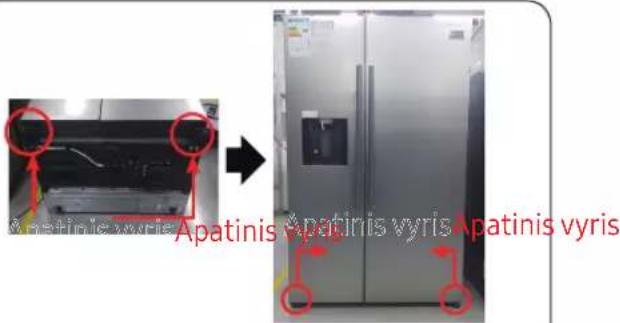
01 Håndtere
03 ∅verste hængsel
05 Nederste hængsel
02 Skuffe
04 Pakning
natural_image
Close-up of a metallic cylindrical object with a pointed tip, possibly a valve or pipe (no visible text or symbols)natural_image
Close-up of a metallic mechanical component with a red arrow indicating rotation (no text or symbols visible)natural_image
Close-up of hands holding a metal rod with a red arrow indicating rotation (no text or symbols visible)
natural_image
Close-up of a hand holding a tool with a red curved arrow pointing to a component (no visible text or symbols)natural_image
Close-up of hands holding a small cylindrical object with a needle inserted, no visible text or symbolsnatural_image
Interior view of a refrigerator with a red arrow pointing to the door (no visible text or symbols)natural_image
Close-up of a mechanical component with a red circular hole and scale markings (no readable text or symbols)
natural_image
Close-up of a hand pressing a button with a red arrow indicating rotation (no text or symbols visible)
natural_image
Hand holding a yellow plastic component with red and purple connectors, next to a black electrical plug (no visible text or symbols)
natural_image
Close-up of a mechanical component with three red-circled features and yellow tape (no visible text or symbols)
natural_image
Close-up of electrical wiring and components with yellow connectors (no visible text or symbols)
natural_image
Hand holding a black robotic arm with yellow and blue components, attached to a computer monitor (no visible text or symbols)flowchart
graph TD
    A["Tool Path"] --> B["Close-up"]
    B --> C["Close-up with Red Arrow"]
    C --> D["Close-up with Blue Arrow"]
    D --> E["Close-up with Black Arrow"]
    E --> F["Close-up with Black Arrow"]
    F --> G["Close-up with Black Arrow"]
    G --> H["Close-up with Black Arrow"]
    H --> I["Close-up with Black Arrow"]
    I --> J["Close-up with Black Arrow"]
    J --> K["Close-up with Black Arrow"]
    K --> L["Close-up with Black Arrow"]
    L --> M["Close-up with Black Arrow"]
    M --> N["Close-up with Black Arrow"]
    N --> O["Close-up with Black Arrow"]
    O --> P["Close-up with Black Arrow"]
    P --> Q["Close-up with Black Arrow"]
    Q --> R["Close-up with Black Arrow"]
    R --> S["Close-up with Black Arrow"]

01 Håndtak
03 Topphengsel
05 Nederste hengsel
02 Skuff
04 Pakning
natural_image
Simple line drawing of a screwdriver with no text or symbolsStjernejern- skrutrekker

natural_image
Line drawing of a screwdriver with a cylindrical head and threaded shaft (no text or symbols)Flat skrutrekker
natural_image
Close-up of a metallic cylindrical object with a pointed tip, possibly a pipe or tube, against a plain background (no text or symbols visible)
natural_image
Close-up of a metallic mechanical component with a red arrow indicating rotation (no text or symbols visible)
natural_image
Close-up of hands holding a metal tool with a red curved arrow indicating rotation (no text or symbols visible)natural_image
Close-up of a hand holding a tool with a red curved arrow pointing to a component (no visible text or symbols)natural_image
Close-up of hands holding a small cylindrical object with a needle inserted, no visible text or symbolsnatural_image
Three-panel image showing a refrigerator with a red-out panel, before and after assembly or cleaning (no text or symbols visible)-
Trykk på de fire hjørnene av pakningen.
-
Trykk på midten av pakningen.
Utskifting av skuff

VARSOMHET
natural_image
Interior view of a refrigerator with a red arrow pointing to the door (no visible text or symbols)natural_image
Close-up of a mechanical component with a red circular hole and a black handle (no visible text or symbols)
natural_image
Close-up of a hand pressing a button with a red arrow indicating rotation (no text or symbols visible)
natural_image
Close-up of a hand holding a small electronic component with wires and connectors (no visible text or symbols)
natural_image
Close-up of a mechanical component with three red-circled features and yellow tape (no visible text or symbols)
natural_image
Close-up of electronic components with wires and connectors, no visible text or symbols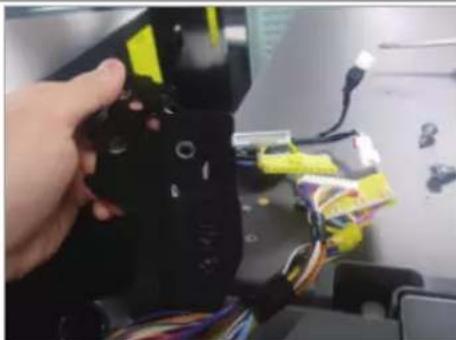
natural_image
Hand holding a black robotic arm with yellow and blue components, attached to a computer monitor (no visible text or symbols)flowchart
graph TD
    A["Start"] --> B["Reveraging with lever"]
    B --> C["Close-up"]
    C --> D["Slanging"]
    D --> E["Sliding with lever"]
    E --> F["End"]
01 Käsitellä
03 Yläsana
05 Ala sarana
02 Cajón
04 Tiiviste
Kahvan vaihto
natural_image
Simple line drawing of a screwdriver with a cylindrical head and threaded shaft (no text or symbols)Philipsin ruuvimeisseli
natural_image
Simple line drawing of a screwdriver with a cylindrical head and shaft (no text or symbols)natural_image
Close-up of a metallic cylindrical object with a glossy surface, possibly a pipe or tube, against a plain background (no text or symbols visible)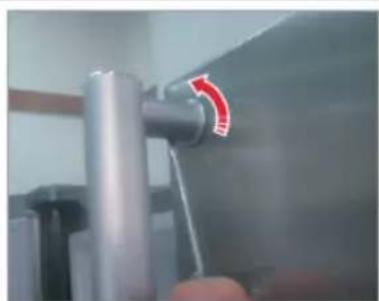
natural_image
Close-up of a metallic mechanical component with a red arrow indicating rotation (no text or symbols visible)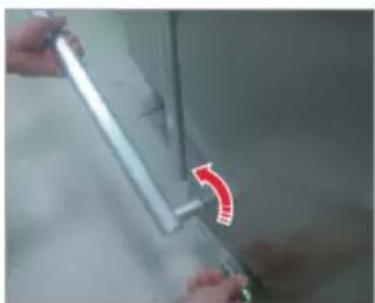
natural_image
Close-up of hands holding a metal rod with a red arrow indicating a curved edge (no text or symbols visible)natural_image
Close-up of a hand holding a tool with a red curved arrow pointing to a component (no visible text or symbols)natural_image
Close-up of hands holding a small cylindrical object with a pointed tip, no visible text or symbolsnatural_image
Interior view of a refrigerator with a red arrow pointing to the door (no visible text or symbols)natural_image
Close-up of a mechanical component with a red circular hole and a black handle (no visible text or symbols)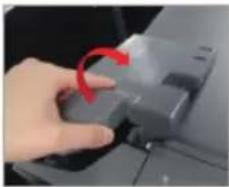
natural_image
Close-up of a hand pressing a button with a red arrow indicating rotation (no text or symbols visible)
natural_image
Close-up of a hand holding a small electronic component with wires and connectors (no visible text or symbols)natural_image
Close-up of a mechanical device with three red-circled components and yellow tape (no visible text or symbols)
natural_image
Close-up of electronic components with wires and connectors, no visible text or symbolsnatural_image
Hand holding a black robotic arm with yellow and blue components, attached to a computer monitor (no visible text or symbols)- Pura yläsana
01 Handtag
03 Övre gångjärn
05 Nedre gångjärn
02 Låda
04 Packning
Byte av handtag
natural_image
Close-up of a metallic cylindrical object with a glossy surface, possibly a valve or pipe (no visible text or symbols)natural_image
Close-up of a metallic pipe joint with a red circular arrow indicating rotation (no text or symbols visible)natural_image
Close-up of hands holding a metallic tool with a red curved arrow indicating a motion or change (no text or symbols visible)
natural_image
Close-up of a hand holding a tool with a red curved arrow pointing to a component (no visible text or symbols)natural_image
Close-up of hands holding a small cylindrical object with a pointed tip, no visible text or symbolsnatural_image
Interior view of a refrigerator with a red arrow pointing to the door (no visible text or symbols)natural_image
Close-up of a hand pressing a button on a device component, showing red circular annotation (no text or symbols visible)natural_image
Close-up of a hand holding a yellow plastic component with red and black wires, next to an electrical plug (no visible text or symbols)natural_image
Two-panel photo showing a mechanical device with yellow connectors and three red circular highlights on its body (no visible text or symbols)natural_image
Hand holding a black robotic device with yellow and blue components, attached to a desk with wires and electronic devices (no visible text or symbols)natural_image
Four-panel photo sequence showing a device being processed, with a close-up of the component being inserted (no visible text or symbols)
natural_image
Four-panel photo sequence showing a device being processed, with a close-up of a red tool in the final panel (no visible text or symbols)natural_image
Three-step automotive assembly process showing tool installation and repair (no text or symbols visible)01 Ročaj
03 Zgornji tečaj
05 Spodnji tečaj
02 Predal
04 Tesnilo
Zamenjava ročaja
natural_image
Close-up of a metallic cylindrical object with a glossy surface, possibly a valve or pipe (no visible text or symbols)natural_image
Close-up of a metallic pipe joint with a red circular arrow indicating rotation (no text or symbols visible)natural_image
Close-up of hands holding a metallic tool with a red curved arrow pointing to it (no visible text or symbols)
natural_image
Close-up of a person using a tool on a mechanical component, no visible text or symbolsnatural_image
Close-up of hands holding a small cylindrical object with a pointed tip, no visible text or symbols- Potisnite 4 vogale tesnila.
- Potisnite sredino tesnila.
Zamenjava predala

POZOR
natural_image
Interior view of a refrigerator with a red arrow pointing to the door (no visible text or symbols)-
Izvlecite predal, kolikor lahko gre.
-
Predal nato magnite navzgor in ga vlecite, dokler ga ne odstranite.
natural_image
Close-up of a mechanical component with a red circular hole and a black handle (no visible text or symbols)
natural_image
Close-up of a hand pressing a button with a red arrow indicating rotation (no text or symbols visible)
natural_image
Close-up of a hand holding a small electronic component with wires and connectors (no visible text or symbols)
natural_image
Close-up of a mechanical component with three red-circled features and yellow tape (no visible text or symbols)
natural_image
Close-up of electrical wiring and components with yellow connectors (no visible text or symbols)