AFP 880 - Food Processor ELECTROLUX - Free user manual and instructions
Find the device manual for free AFP 880 ELECTROLUX in PDF.
| Product type | Food processor |
| Brand | Electrolux |
| Model | AFP 880 |
| Power | 800 W |
| Supply voltage | 230 - 240 V |
| Mixing bowl capacity | 1.5 L |
| Multifunction bowl capacity (liquid) | 1.75 L |
| Multifunction bowl capacity (solid) | 1.5 L |
| Mixing bowl material | Glass (AFP 880 model) |
| Number of speeds | Variable + Pulse button |
| Main functions | Blend, chop, slice, grate, juice, whisk, knead, emulsify |
| Included accessories | Mixing bowl, multifunction bowl, metal blade, plastic blade, cutting discs (6 types), emulsifying disc, citrus press, spatula, pusher, lids |
| Safety | Lid locking, overheating protection, automatic shut-off, child safety |
| Care and cleaning | Motor block cleanable with a damp cloth; bowls and accessories washable by hand or dishwasher (plastic parts in top rack, blades by hand) |
| Repairability | Reset button after overheating; repair by authorized service |
| Cord length | Retractable, not specified |
| General information | Device intended for domestic use; follow safety instructions |
Frequently Asked Questions - AFP 880 ELECTROLUX
User questions about AFP 880 ELECTROLUX
0 question about this device. Answer the ones you know or ask your own.
Ask a new question about this device
Download the instructions for your Food Processor in PDF format for free! Find your manual AFP 880 - ELECTROLUX and take your electronic device back in hand. On this page are published all the documents necessary for the use of your device. AFP 880 by ELECTROLUX.
USER MANUAL AFP 880 ELECTROLUX
Assistant Food Processor AFP8..
PAGE
S Bruksanvisning 7
Brugsanvising 19
Bruksanvisning 32
FIN Käyttoohje 45
Instruction book 58
Gebrauchsanweisung. 71
F Mode d'emploi 85
NL Gebruiksaanwijzing. 99
① Istruzione per l'uso .112
E Instrucciones de uso. 125
P Instruções de utilizesçao . 138
C2 Navod k pouziti 152
PL Instrukcja obslugi 165
Hasznalati utmutato.179
SK Navod na obsluhu 193
SLD Navodilo za uporabo .207
HR Prirucnik. 221
SRR Priročnik za navodila . . . 234
Instruetioni deutilizare.248
Rokasgramata. 262
Instrukcija 276
Est Kasutusjuhend .290
TR Kullanma kilavuzu 304
86 YnTBAHe 3a pa6ota. . . .318
UA IHCtpyKzir 3 ekcnnyatau..333


3

T Skyddstock for mixerns driving
U Degskrapa
- AFP 850 ar forsedd med en mixerbä-gare i plast, AFP 880 med en mixerbä-gare i glas.

Sakerhetsforeskrifter
L Kabelopvikling (apparatbagside)
M Typeskilt (apparatunderside)
N Knap til overbelastningssikring (apparatunderside)
O Indsatholder
P Plastikkniv
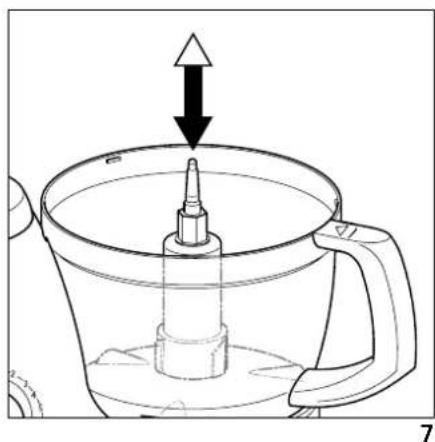
Sette inn spindel (fig. 7)
Sett spindelen (fig. 1/H) pa tapping midt i universalbollen.
Sette inn utstyr
Skjaer kjottet i ca. 2 cm store terninger for bearbeiding.
Gronnsaker
80 g smeltet smor el. margarin
2 dl lunken melk

Anvendt tilbehör:
Please read these operating instructions through carefully.
Above all please follow the safety instructions on the first few pages of these operating instructions! Please keep the operating instructions for future reference. If applicable pass these instructions on to the next owner of the appliance.

With the warning triangle and/or by means of key words (Danger!, Caution!, Attention!), information is emphasized which is important for your safety or the correct functioning of the appliance. It is essential that this information is observed.

This symbol guides you step by step through the operating procedure for your appliance.

After this symbol you receive supplementary information on the practical application and use of the appliance.

Tips and information about the economical and environmentally friendly use of the appliance are marked with the clover.
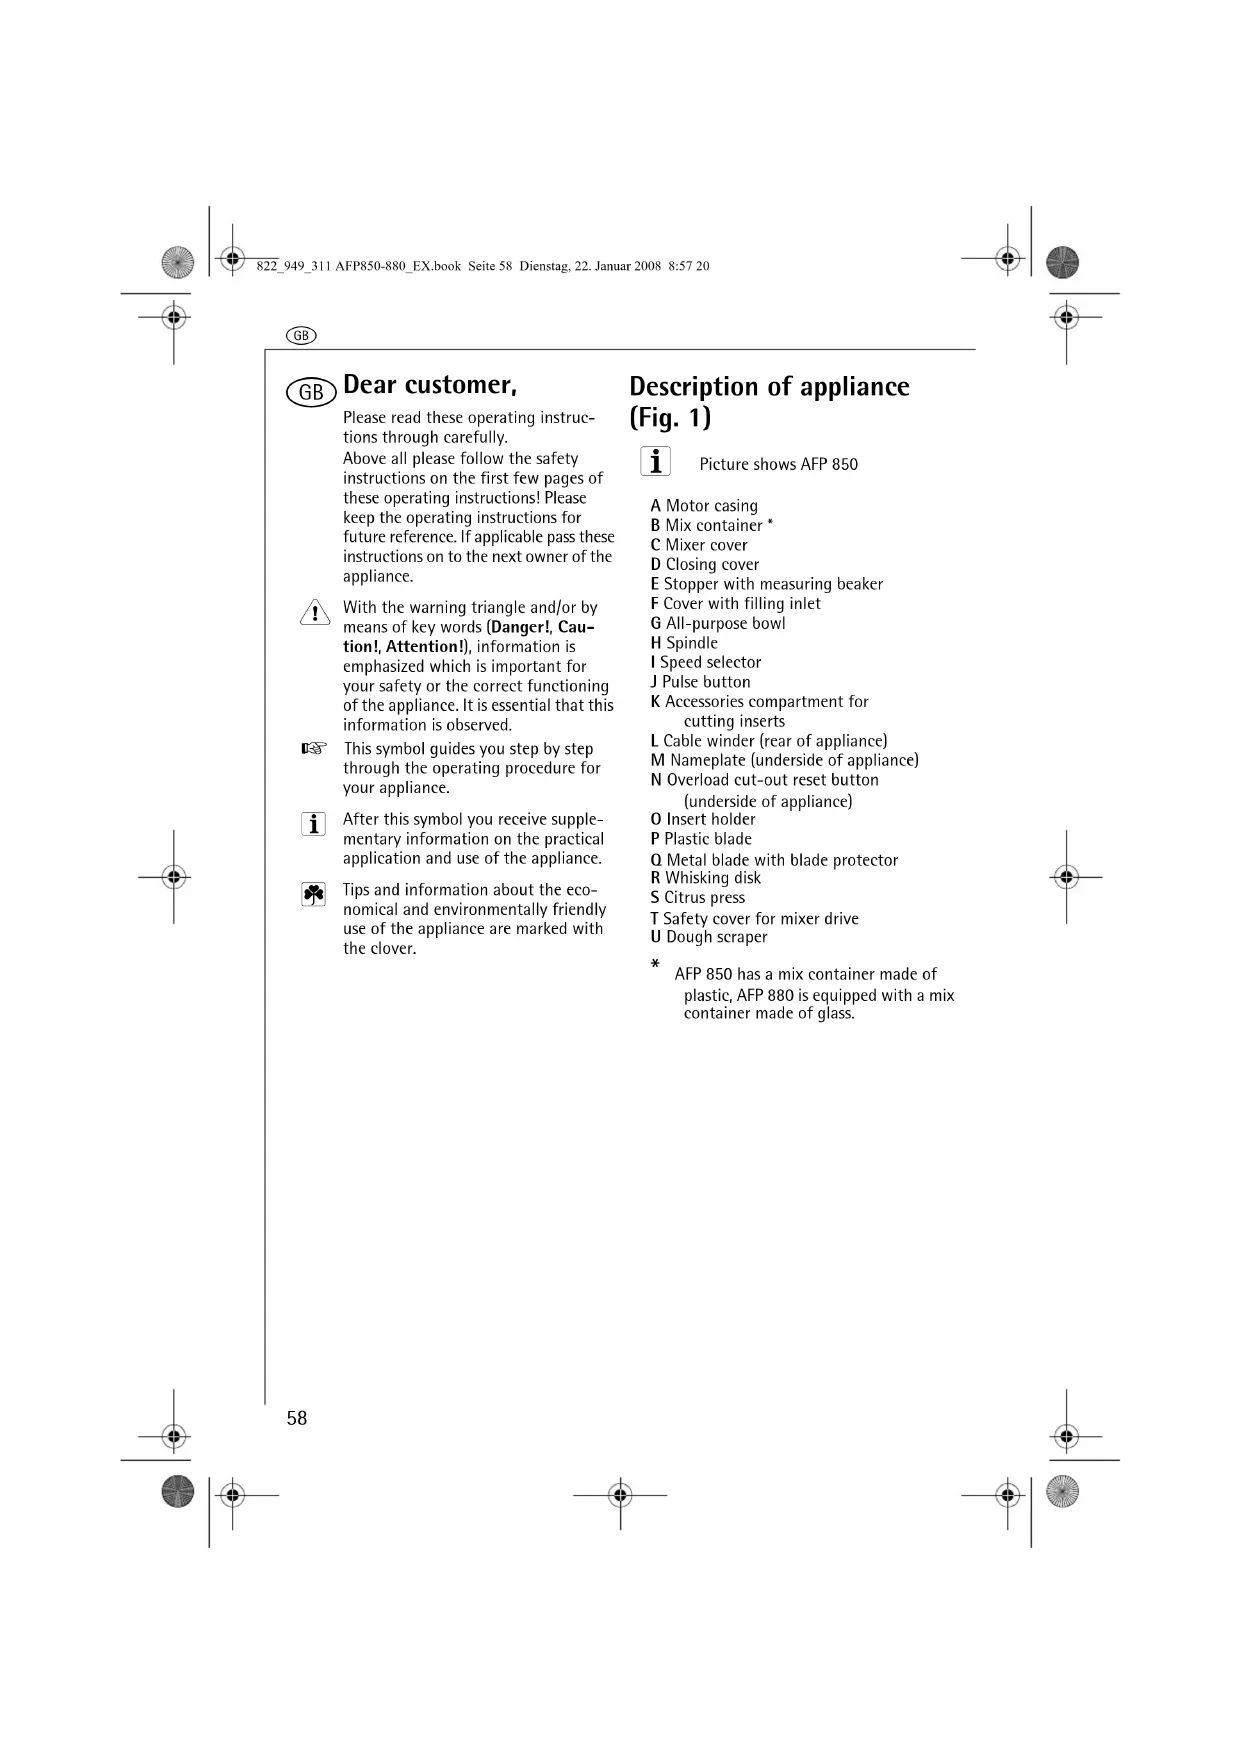
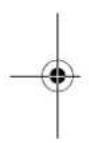
Description of appliance (Fig. 1)

Picture shows AFP 850
A Motor casing
B Mix container
C Mixer cover
D Closing cover
E Stopper with measuring beaker
F Cover with filling inlet
G All-purpose bowl
H Spindle
I Speed selector
J Pulse button
K Accessories compartment for cutting inserts
L Cable winder (rear of appliance)
M Nameplate (underside of appliance)
N Overload cut-out reset button (underside of appliance)
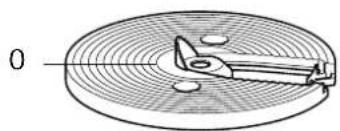
0 Insert holder
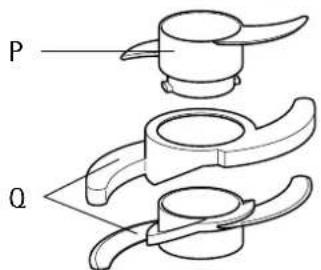
P Plastic blade
Q Metal blade with blade protector
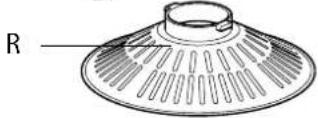
R Whisking disk
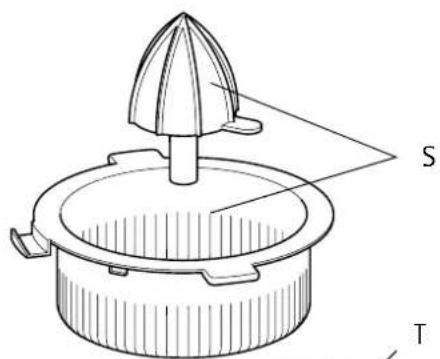
S Citrus press
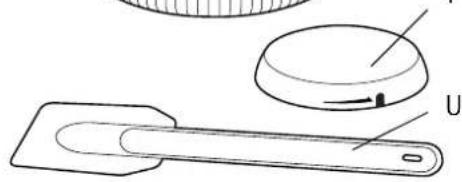
T Safety cover for mixer drive
U Dough scraper

AFP 850 has a mix container made of plastic, AFP 880 is equipped with a mix container made of glass.
! Safety instructions
This appliance corresponds to accepted technological standards with regards to safety and to the German Appliance Safety Law. Nevertheless as a manufacturer we are committed to familiarise you with the following safety instructions:
General safety
- The appliance may only be connected to a power supply whose voltage and frequency comply with the specifications on the rating plate!
- Never pick up the appliance if
- the lead is damaged,
- the housing is damaged.
- Never use the lead to pull the plug out from the socket.
In order to avoid danger, if the connection lead of this appliance is damaged, it must be replaced by the manufacturer, its customer service department or a similarly qualified person. - Repairs to this appliance may only be carried out by qualified service engineers. Considerable danger may result from improper repairs. If repairs become necessary, please contact the Customer Care Department or your authorised dealer.
The appliance is only intended for processing foods in the home. The manufacturer accepts no liability for damage caused by improper use or use other than for the intended purpose. - This appliance is not intended for use by persons (including children) with reduced physical, sensory or mental capabilities, or lack of experience and knowledge, unless they have been given supervision or instruction concerning use of the appliance by a person responsible for their safety.
Safety of children
- Never leave the appliance unattended when on and supervise particularly carefully if young children are around!
Children should be supervised to ensure that they do not play with the appliance.
To be noted when using the food processor
- Never put the appliance into use when the hands are wet.
- No paints (lacquer, polyester, etc.) must be stirred with the appliance - Explosion danger!
- Switch the appliance off and withdraw the mains plug each time before cleaning and maintenance.
- Never dip the motor casing (fig. 1/A) in water or other liquids.
The manufacturer accepts no liability for possible damage caused by improper or incorrect use. - The tools must only be inserted or removed from the appliance when it is disconnected from the mains supply.
- Caution: The metal blade (fig. 1/0) is extremely sharp! Danger of injury! The metal blade should only be held by the handle and only stored with the blade protector fitted! Caution when rinsing!
- Caution: The cutting inserts (fig. 9) are very sharp! Danger of injury! Keep the inserts only in the accessories compartment provided (fig. 1/K). Caution when rinsing!
- Caution: The blade unit of the mixer (fig. 14/a) is very sharp. Danger of injury! Care should be taken when disassembling and assembling the mixer.
- Caution: Never reach with the fingers in the filling inlet (fig. 1/F)! Danger of injury!
- Caution: No hard objects (e.g. spoons) must be placed in the mixer while running and do not reach into the mix container with the hands. Danger of injury!
The cover should only be removed when the tools are stationary. - Do not hold long objects (blade, wooden spoon, dough scraper or the like) in the filling inlet. Danger of
GB
injury! Work only with the stopper (fig. 1/E) to compress the cut food.
- Do not fill hot liquids (only cold or warm) in the mix container or all-purpose bowl.
Always place the all-purpose bowl (fig. 1/G) on the motor casing before inserting the spindle (fig. 1/H) and the tools.
- For normal work (stirring light doughs, etc.) the appliance can be used for up to 10 minutes without stopping. It should be allowed to cool each time following prolonged, continuous operation (for at least 20 minutes after using for 10 minutes without stopping). When processing very heavy items, e.g. 1.5kg dough, the appliance should not be switched on for longer than 1 minute without stopping.
Always first remove the tools and spindle before removing the contents of the bowl.
- Do not exceed the maximum filling volume.
Only use the appliance under supervision. The mains plug should be withdrawn even when leaving the room for a short time.
After finishing work switch off the appliance and withdraw the mains plug.
Disposal

Packaging material
The packaging materials are environmentally friendly and can be recycled. The plastic components are identified by markings, e.g. >PE< , >PS< , etc. Please dispose of the packaging materials in the appropriate container at the community waste disposal facilities.

Old appliance
The symbol on the product or on its packaging indicates that this product may not be treated as household waste. Instead it shall be handed over to the applicable collection point for the recycling of electrical and electronic equipment. By ensuring this pro
duct is disposed of correctly, you will help prevent potential negative consequences for the environment and human health, which could otherwise be caused by inappropriate waste handling of this product. For more detailed information about recycling of this product, please contact your local city office, your household waste disposal service or the shop where you purchased the product.
General operating instructions
The food processor helps in many ways for the preparation of food:
- The mixer is used for the preparation of a wide range of mixed drinks, to crush ice, reduce fruit and vegetables, etc.
The multifunction unit can be used for example for
-preparing dough ... - chopping meat, nuts or similar items ...
- cutting, grating or rasping vegetabies or fruit ...
-cutting French fries ...
whisking cream or egg white ...
and squeezing lemons, oranges, grapefruit
Safety system
The appliance has various safety systems.
- The mixer or all-purpose bowl can only be put into operation when the relevant container and associated cover are correctly fitted.
- The all-purpose bowl can only be put into operation when the mix container is removed and the safety cover for the mixer drive (figs. 1/T and 4) is fitted.

Children should nevertheless be kept away from the appliance.

The appliance should only be operated on a level, dry working surface.
Overload cut-out
The appliance is equipped with an overload cut-out, which switches the appliance off if it starts to overheat, protecting the unit from damage. When this happens, the overload cutout reset button (Fig. 1/N) jumps out.

If this happens, proceed as follows. Failure to follow this procedure can result in damage to the appliance, which is not covered by the guarantee.

Allow the appliance to cool down for at least 15 seconds.

Turn the speed selector (Fig. 1/I) left to "0" position (Fig. 16/①).

Remove the mix container or all-purpose bowl (Fig. 16/2 and 3), as described at the relevant point in these operating instructions.

Remove the mains plug from the socket (Fig. 17/①).

Lay the appliance on its back to gain access to the bottom (Fig. 17/②).

Press the overload cut-out reset button (Fig. 1/N) on the bottom of the appliance. If the appliance has cooled down sufficiently, the button will engage (Fig. 17/3). If it jumps back out, allow the appliance to cool down a little longer, then repeat the process.

Once the reset button has engaged, put the appliance back to its normal working position (Fig. 18/①).

Plug the power lead back into the mains socket (Fig. 18/2).

Replace the mix container or all-purpose bowl (Fig. 18/3 and 4), as described at the relevant point in these operating instructions.

The appliance is now ready for use again. Turn the speed selector to the right to the required position (Fig. 18/5) and continue with the function that was interrupted.
Mixer
The mixer is used to prepare a wide range of mixed drinks, to crush ice, reduce fruit and vegetables, etc.
Preparing mixer
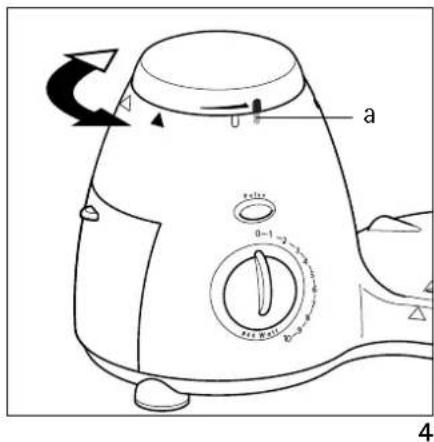
In order to fit the mix container, the safety cover for the mixer drive (figs. 1/T and 4) must be removed.

Turn the safety cover clockwise and remove.
The red warning lamp (fig. 4/a) flashes.

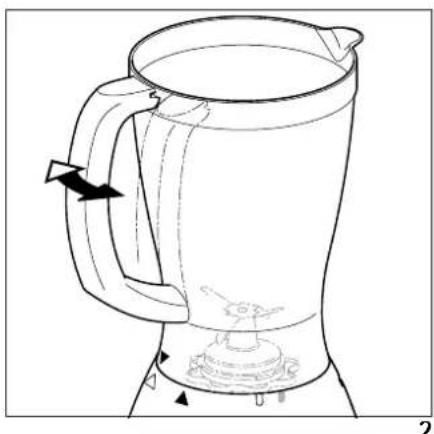
Place the mix container (figs. 1/B and 2) on the mixer drive (arrow arrow and turn counter-clockwise to the stop. The mix container is heard to engage. The two black arrows must coincide.
The red warning lamp (fig. 4/a) extinguishes.

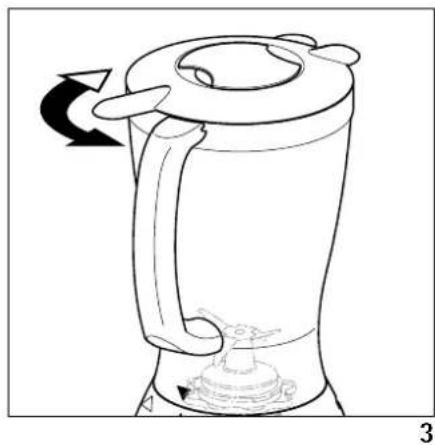
Only AFP 850: Place mixer cover (figs. 1/C and 3) on mix container and turn until the nose of the cover is directly above the handle. The cover can be heard to engage.

The mixer can only be switched on when the container and cover are fitted correctly.

Only AFP 880: Place mixer cover on mix container.

The mixer can only be switched on when the container is fitted correctly.

Fit closing cover (fig. 1/D) and lock.
Operating mixer

Open cover (fig. 1/C) and fill all ingredients required in the container. Caution: Do not exceed maximum filling volume of 1.5 litres!

During operation further ingredients can be added through the filling inlet. The sealing cover (fig. 1/D) can also be used as a filling beaker for this purpose. Close the filling inlet again
GB
immediately every time to avoid splashing.
Start the mixer: turn speed selector (fig. 1/I) to the right to the desired speed or press the pulse button (fig. 1/J).
It is recommended to start at a slow speed and then to increase the speed. The mixer operates at maximum speed by pressing the pulse button. Refer to the section "Tips on using mixer" for reference values for setting the speed.
Switch off appliance: turn speed selector left to "0" position.
After mixing, turn container clockwise and remove. Then turn the cover and remove.
Multifunction section
Tools and their application possibilities
The following tools can be used in the multifunction section:
Whisking disk (fig. 1/R) Whisking cream and egg whites, preparation of cream and light doughs.
Metal blade (fig. 1/0) For chopping raw meat, chocolate, nuts, etc.
- Plastic blade (fig. 1/P) For kneading and blending heavy doughs.
- Insert holder (fig. 1/0) with cutting insert (fig. 10)
The inserts are marked by a number (1 to 6) on the handle. The desired insert is placed in the insert holder.
1 Fine cutter
For cutting fruit, vegetables, raw meat or sausage (e.g. salami) etc. in thin slices.
PG1 Potato grater
For grating potatoes.
3 French fries cutter
For cutting potatoes for French fries.
4 Cheese grater
For grating hard cheese, e.g. Parmesan etc.
5 Coarse rasp
For coarse rasping of vegetables and fruit, etc.
6 Fine rasp
For fine rasping of vegetables, fruit, chocolate, garlic, etc.
Preparing multifunction section
Fit safety cover (fig. 4)
The multifunction section can only be put into operation when the mix container is removed and the safety cover for the mixer drive (figs. 1/T and 4) is fitted.
Remove mix container as described under "Mixer".
The red warning lamp (fig 4/a) flashes.
Place safety cover on mixer drive (mark) on mark and turn counter
clockwise to the stop. The safety cover is heard to engage. The mark must be above the warning lamp (fig. 4).
The red warning lamp (fig. 4/a) extinguishes.
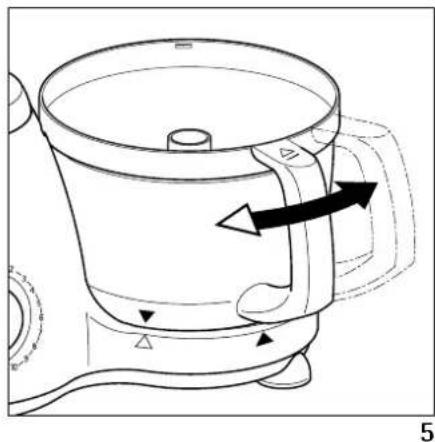
Fitting all-purpose bowl (fig. 5)
Place all-purpose bowl (fig. 1/G) on
appliance (arrow on arrow) and turn counter-clockwise to the stop. The all-purpose bowl can be heard to engage. The two black arrows must coincide.
Inserting spindle (fig. 7)
Place spindle (fig. 1/H) on spigot in centre of all-purpose bowl.
Inserting tools
The following tools can be selected for insertion:
- Whisking disk (fig. 1/R) or
Metal blade (fig. 1/Q) or - Plastic blade (fig. 1/P) or
- Insert holder (fig. 1/0) with cutting insert (fig. 9)
The insert holder must be fitted with the appropriate insert depending on the purpose of application (see "Inserting cutting insert in insert holder").
Place desired tool on spindle.
- Whisking disk, metal blade and plastic blade (fig. 8) mesh with the teeth underneath on the spindle.
- The insert holder (fig. 11) rests on the hexagonal spindle.
i Preferably hold the insert holder with two fingers in the two handle holes.
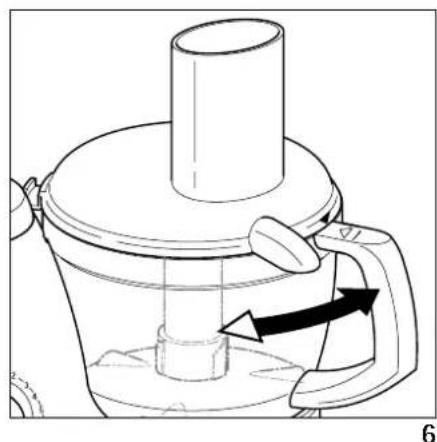
Fitting the cover (fig. 6)
Place cover (fig. 1/F) on the all-purpose bowl (arrow arrow) and turn counter-clockwise to the stop. The cover can be heard to engage. The nose of the cover is then directly above the handle, both black arrows must coincide.
Insert stopper (fig. 1/E) in filling inlet.
Inserting cutting insert in insert holder (fig. 10)
The appropriate insert must be placed in the insert holder depending on use.
The inserts are contained in the hinged accessories compartment (fig. 1/K) in the motor casing.
The inserts are very sharp. They should be held only with the handle!
Open accessories compartment by pulling the handle (fig. 9).
Take required insert by the handle from the accessories compartment (fig. 9).
Place the insert with the tip at the centre of the insert holder and place in the recess of the disk (fig. 10).
To remove the insert draw slightly outwards with the handle and raise.
Operating multifunction section
Open cover (fig. 1/F) and place all ingredients required in the all-purpose bowl. Caution: Do not exceed maximum filling volume: - liquid 1.75 litres solid 1.5 litres
Further ingredients can be added during operation through the filling inlet. The filling beaker in the stopper (fig. 1/E) can also be used for this purpose. Close the filling inlet immediately each time to avoid splashes.
Use the stopper exclusively to compress the cutting items!
Start the appliance: turn speed selector (fig. 1/1) right to the desired speed setting or press the pulse button (fig. 1/J).
It is recommended to start at a slow speed and then to increase the speed. The appliance operates at maximum speed by pressing the pulse button. Refer to the section "Tips on using multifunction section" for reference values.
If the warning lamp (fig. 4/a) flashes and the appliance cannot be started, the safety cover for the mixer drive (figs. 1/T and 4) is not properly fitted.
Switch off appliance: turn speed selector left to the "0" position.
After using, turn cover clockwise and remove.
Only remove the cover when the tool has come to a complete stop!
Remove the tool and spindle.
Turn the all-purpose bowl clockwise and remove.
Citrus press
Preparation (fig. 13)
Fit all-purpose bowl as described above (fig. 5).
Place sieve insert of citrus press (fig. 13/a) on all-purpose bowl (arrow on arrow and turn cunter-clockwise to the stop. The sieve insert can be heard to engage, arrow must coincide with arrow
Insert press cone (fig. 13/b) in sieve insert.
Operating citrus press
Start appliance: turn speed selector (fig. 1/l) right to position 1.
The citrus press must only be operated at the lowest speed.
Switch off appliance: turn speed selector left to the "0" position.
Remove press cone after use.
Turn sieve insert clockwise and remove.
Turn all-purpose bowl clockwise and remove.
The appliance can be used for up to 10 minutes without stopping. It should be allowed to cool each time following prolonged, continuous operation (for at least 20 minutes after using for 10 minutes without stopping).
Cleaning and care
Motor casing
! Ensure that no liquid enters the motor casing!
Clean the motor casing with a moist cloth. Never immerse in water or hold under running water!
Mixer
i Container and blade can be cleaned easily and properly with the aid of the pulse position.
Fill the mix container half full with warm (not hot!) water and add a few drops of detergent.
Press the pulse button briefly.
Then rinse the container under running water.
Dismantle/fit blade unit (fig. 14)
If necessary, the blade unit can also be dismantled and cleaned separately.
Caution: The blade is very sharp! Danger of injury!
Release blade unit (fig. 14/a) from mix container using the closing cover (fig. 1/D and fig. 14/c) as tool. The grooves of the closing cover fit the ribs of the blade unit. Turn counter-clockwise and remove while holding slightly at an angle.
Remove gasket (fig. 14/b) from blade unit.
The blade unit is very sharp. The gasket can be damaged.
Rinse the components carefully by hand (danger of injury!). Use only water and detergent for cleaning. Do not clean the blade unit in a dishwasher.
Insert gasket in blade unit.
Insert blade unit in container from below. Hold blade unit at a slight angle. Tighten blade unit using the closing cover as tool by turning clockwise (fig. 14).
All-purpose bowl and tools
The all-purpose bowl and tools should be cleaned in rinsing water.
Caution: The metal blade is extremely sharp! Danger of injury!

Plastic parts age more quickly if cleaned frequently in a dishwasher. If they are nevertheless to be cleaned in a dishwasher, they must be placed in the upper basket.
Inserts

Clean inserts with brush or cloth under running water or in a dishwasher!

Caution: The inserts are very sharp! Danger of injury!
Storage
All accessories except the citrus press can be stored directly in the appliance.
- Store the inserts in the accessories compartment (fig. 1/K).

Caution: The inserts are very sharp. Danger of injury! They should only be held by the handle!

- Stow the accessories away in the all-purpose bowl as shown in fig. 12.
Caution: The metal blade (fig. 1/Q) is extremely sharp! Danger of injury! Hold the metal blade only by the handle and store only with the blade guard fitted! - Wind the cable round the two hooks at the rear of the appliance (fig. 15).
Technical data
Mains voltage: 230 - 240V
Power consumption: 800 W

This appliance conforms with the following EC Directives:
Low Voltage Directive 2006/95/EC
EMC Directive 89/336/EEC with amendments 92/31/EEC and 93/68/EEC

GB
Tips for use
Mixer
The mixer is very well suited for chopping small amounts of food such as nuts, breadcrumbs or herbs.
- Sauce which have separated can be quickly saved again in the mixer.
- Cut or break up foods to be processed in the mixer into cubes of about 2 to 3 cm.
Always remove the stones of fruit and bones from meat, since these can damage the blade unit.
- Grinding ice: always add a little water to the container before crushing ice.
- When processing dry mixtures it may be necessary to switch off the appliance occasionally, to open the mixer lid and scrape the mixture from the walls of the container with the scraper.
- When mixing liquid and solid ingredients first mix the liquid items and then add the dry ingredients.
- Allow hot liquids to cool before processing in the mixer.
If hot ingredients must be processed, the mix container must be aerated by removing the closing cover.
| Food Speed* Notes | |||
| Mixing | Milk shakes | 5 - 10 | Use cold milk. |
| Chopping Nuts, chocolate, garlic, herbs | Pulse Only | process 1/2 cup at a time to ensure everything is finely chopped | |
| Making bread-crumbs | Bread roll, biscuits, toast 5- | 10 Crumble coarsely before processing | |
| Crushing ice Pulse Add 1/4 cup water. | Press pulse button 3-4 times | ||
| Emulsifying Salad dressing 7 - 10 | Mix well. | Oil can be added through the filling hole while mixing | |
| Mixing Cake mixes, pancake dough | 1 Only mix ingredients well, do not whisk too long. | ||
| Pureeing | Soups, vegetables, fruit | 3 - 10 | Mix until the mixture is thick |
*Always start at a low speed and then increase the speed.
Multifunction section
Chopping
For a uniform result pieces of size as equal as possible should be processed. The food should be cut or broken up before processing into pieces of equal size.
Ensure that the container is not too full.
Minced meat
Cut the meat into cubes of approx. 2 cm before processing.
Vegetables
Peel and quarter vegetables such as onions for processing.
Mixing
The amount for processing varies according to the viscosity of the foods processed.
Adding ingredients
Place dry ingredients such as flour in the all-purpose bowl before processing. The ingredients do not have to be mixed before processing. Liquid ingredients can be added through the filling inlet while processing.
Liquid ingredients can be added through the filling inlet while processing.
Note: When processing sauces or semi-liquid ingredients it may be necessary to switch off the appliance occasionally, to open the cover of the all-purpose bowl and scrape the mixture from the wall of the bowl with the scraper.
Working with the insert holder
Correct supply of the foods through the filling inlet is very important.
Cut the prepared foods a little smaller if necessary, so that they pass easily through the filling inlet.
Add the items for filling as vertically as possible simultaneously in the filling inlet.
Compress the items evenly with the slopper. The degree of pressure influences the concentration of the cut food.

Use only the stopper for further additions. Never reach in the filling inlet with the fingers!
The appliance can be damaged by pressing too hard with the stopper!

There is always a little unprocessed food remaining between the stopper and the insert holder.
Grating cheese
Cool soft cheese such as Emmental or mozzarella well before grating.
Process hard cheese such as Parmesan at room temperature.
Note: Parmesan should be processed with little pressure on the stopper.

GB
| Tool Food | Max. | amount | Speed Notes | |
| Chopping | Metal blade Vegetables, e.g. onions | 800 g | 3 - 5 | Fruit and vegetables should be fresh and firm, use pieces of roughly equal size |
| fruit | 3 | |||
| fresh herbs | 1 bunch | |||
| nuts, almonds | 500 g | |||
| chocolate | 400 g | |||
| Chopping meat | Metal blade Meat, fish fillets (filleted), bacon | 500 g 4 | 6 Remove bones and sinews, cut into cubes of approx. 2 cm | |
| Making bread crumbs | Metal blade Dry bread, biscuits 125 g 3 or 4 Crumble coarseely before | processing | ||
| Pureeing | Metal blade Boiled fruit or vegetables up to 1.75 l | 3 - 10 | Add a little water if necessary while processing | |
| Mixing | Metal blade Light cake mixes, pancake dough, etc. | 800 ml 3 | - 7 Start with setting 1 to mix the ingredients, then increase speed | |
| Mixing | Metal blade Mayonnaise | 1 l | Pulse or 3 | Do not switch off appliance while adding oil |
| Kneading | Plastic blade Heavy doughs, e.g. bread and pizza dough | 1.5 kg | 1 - 5 | Start with setting 1 to mix the ingredients, then increase speed |
| Cutting | Fine cutter (no. 1) Vegetables, e.g. gherkins, zucchini, carrots, etc. Fruit, e.g. apples, tomatoes, meat, sausage, salami, etc. | 800 g 1 | 2 Select fruit and vegetables of roughly equal size Cut meat suitable for the filling inlet | |
| Grating | Potato grater (no. P G 1) Potatoes | up to 1 kg | 1 - 2 | e.g. for potato dumplings |
| Cutting strips | French fries cutter (no. 3) Potatoes, carrots, parsnips | 1 kg | 1 - 2 | |
| Grating Cheesegrater(no. 4) | Parmesan cheese | 500 g 1 | 2 Do not press too hard with stopper | |
| Rasping (coarse or fine) | Coarse, fine rasp (no. 5 or 6) Block chocolate fruit, e.g. apples vegetables, e.g. carrots | 500 g 1 kg 1 kg | 1 - 2 Break cooking chocolate into 2-3 pieces | |
| Beating | Beating disk Light cake mixes egg whites cream | 1 kg | 4 - 5 2 - 10 4 - 6 Do not beat egg white too long | |
Recipes
Basic recipe for sponge
4 white of egg
4 tbsp. cold water
200 g sugar
1 puck. vanilla sugar
4 yolk of egg
80 g flour
80 g cornflour
1 tsp. baking powder
i Accessories required: all-purpose bowl with whisking disk
Place white of egg and water in the all-purpose bowl and whisk on setting 5 for about 1 minute until stiff.
Add sugar and vanilla sugar through the filling inlet and whisk for a further 1 minute or so until the sugar has dissolved.
Add egg yolk and stir in with several pulses.
Mix flour, cornflour and baking powder, add to creamy mass and stir briefly with several pulses.
Fill dough in a spring mould and bake.
Basic recipe for cake mix
500 g flour
1 puck. baking powder
250 g soft margarine or butter
250 g sugar
1 pck. vanilla sugar
1 pinch salt
4 eggs
150 ml milk
i Accessories required: all-purpose bowl with plastic blade
Place all ingredients in the all-purpose bowl in the order stated.
Stir for 1 to 112 minutes on setting 3-4 until the dough is smooth and creamy.
If the dough is thrown too far outwards during processing, switch off the appliance, open the cover and move the dough inwards with the scraper from the edge of the bowl.
Fill the dough in a suitable baking tin and bake.
The dough can be modified slightly as required by the addition of other flavourings. Example for marble cake:
Fill 2/3 of the dough in the tin. Add 1 tablespoon cocoa powder and 1 tablespoon milk to the remaining dough and stir in again briefly with several pulses.
Fill the dark dough over the light in the baking tin. Draw a fork in spiral motion through both layers of dough to obtain the marble pattern.
GB
Basic recipe for short pastry
250 g flour
1 tsp. baking powder
125 g cold margarine or butter
60 g sugar
1 pinch salt
1 egg
1 tbsp. cold water
i Accessories required: all-purpose bowl with plastic blade
Place flour, baking powder, salt and sugar in the all-purpose bowl. Cut cold butter into pieces and add.
Stir for about 1 minute on setting 3-4, add the egg and cold water through the filling inlet and continue stirring until the dough forms a ball around the blade.
Take the dough from the bowl and continue kneading briefly with the hands.
Allow the dough to rest in the refrigerator for about 30 minutes before processing further.
Roll out dough, place in a well greased mould and add fruit, e.g. apples or plums, as desired
Basic recipe for yeast dough
500 g flour
40 g yeast (fresh) or 1 puck. dry yeast
80 g sugar
1 pinch salt
80 g margarine, melted
200 ml lukewarm milk
i Accessories required: all-purpose bowl with plastic blade
Place all ingredients in the bowl in the order stated.
Stir for 1 to 112 minutes on setting 3-4 until the dough forms a ball around the blade.
Take dough from bowl and knead briefly further with the hands.
Then knead in ingredients with the hands which are not to be reduced, e.g. raisins.
Before further processing allow the dough to expand in a covered bowl in a warm place until about twice the size.
Application possibilities: plaited leavened bread, yeast fancy biscuits, fruit flans, hollow noodles. For spicy cakes,e.g.onion cake,prepare the yeast dough without sugar.
F Chere cliente, Cher client,
Preparation (figure 13)
Doucieraniaziemniakow.
3 Noz do frytek
Do cièca ziemniaków i frytek.
4 Tarka do serów
Do tarcia twardego sera, np.
parmezanu itd.
5 Tarka do ucierania na grubo
1 Jed. zI. pecilni prasek
125 g mrzla margarina ali surovo maslo
60 g sladkor
1 s cepec sol
1 j a j
1 Jed. Žl. mrzla voda
Opis uredaja (Slika 1)

Slika prikazuje AFP 850
A KuciSTE motora
B Posuda miksera
C Poklopac miksera
D Poklopac za zatvaranje
Opis uredaja (Slika 1)
i Slika prikazuje AFP 850
B Posuda miksera
C Poklopac miksera
D Poklopac za zatvaranje
E Cep sa mernim levkom
A Kucište motora
F Poklopac sa grlom za punjenje
G Visenamenska posuda
H Vreteno
1 Selektor brzina
J Impulsni taster
K Odeljak za rezneprikljud
L Motalica za Kabel (zadnja strana uredaja)
M Nazivna pločica (dno urežaja)
N Dugme za resetovanje sklopke preopterecenja (dno aparata) O Drza crikliucka
P Plastici nož
Q Metalni nož sa štitnikom oštrice
R Disk za bučkanje
S Cedilka za agrume
T SigurnosniPoklopac za pogon miksera
U Strugač za testo
- AFP 850 ima posudu miksera od plastike, AFP 880 je opremljen posudom miksera od stakla.
Ptorosnja snage: 800 W

Ovaj uredaj usaglasen je sa sledecim EC direktivama:
- Direktiva o niskom naponu 2006/95/EC
EMC Direktiva 89/336/EEC sa amandmanima 92/31/EEC i 93/68/EEC
SRB
Introducerea sculelor
OCHOBHn HNCTpyKcnn 3a pa6oTa
KyxHeNCKnT pO6OT NOMara NO MHOro HaunHn PnPnroTbReHo Ha XpaHa:
MnKcebT Ce n3no3Ba 3a npiroTBHe Ha uPoka rama MmKcnpaHn HAnrKn, 3a HApOwabaHn Nei, 3a p3aHe Ha NIOBOe N3eHcyuN T.H.
MyTnФyHKUHOHaHHaTa YAcT MOKe Da ce N3NOJ3Ba HAnpIMep 3a
- npnroTBReHa Tecto...
-pra3aHe Ha Meco, JaKn n dp. NpO6Hn ...
-pra3aHe,HaCTbprBaHe HIN peHIOcBaHe Ha IIOdoBe H 3eIeHuu...
-pra3aHe Ha KapToΦn 3a ΠbpxKeH e ...
pa3bnuBaHe Ha CMeTaHa Nm
JyueH6eJIbK ...
I N3CTNCKBaHe Ha JIMMOH, NOPTOKAn, rpeINΦpyT
PpeDna3Ha cncTeMa
YpeBt mpa3nHn npedna3Hn CNTEMN.
MnKcebT yHnBepcaJIHaTa Kyna MORAT Da CE BKNIOvAT CaMO AKO CbOTBeTHaTc Kya N KaNk Ca NOCTaBeHN PpaBUNHO.
YHnBepcaHaHaTkyaMoKe da ce BKNIOc Camo aKO KaHata 3a pa36bPKBaHe e N3BaJeHa, a npedna3HnT Kanak Ha 3aDnKBAUm MExAHN3bM Ha MInKcepa (fir.1/T n4) e noCTaBeH.
1
BbnpkeTobaIpbXTe ypeDaJIaueOT Deua.
1
PaboTe c ypea cmo Bbpxy paBen, cyx paoTeH nnot.
3aunTa oT npTeTOBapBaHe
YpeBt o60pyBaH cbc 3aunTa OT npTeOBapBaHe, KOrTOO n3KnOyBa, aKo 3anOuYe da npepraBa, npedna3Baikn ro ot NOBpeJdaHe. B TaKB Clyuay KOnTuETo Ha 3auTata O TnpTeOBapBaHe (fN.1/N)OTcKaaHaHBn.
1
AkoToBa CtaHe, HanpaBete CneHTo. B IpOtnBc Hcyuai MOKe Da BB3HNKHaT NOBpeN BypeDa, KOnTO He Ca BKNIOueHb RapaHnraTa.
呼
Octabete ypeda da n3ctnHe nohe 3a15 ckyHn.
3aBbptete perynataHaCKOpocTta (pHr.1/1) HanaBO HaNo3uN "0"(pHr.16/①).
N3BaTe KaHaTa 3a pa36bPkBaHe, CbOTBeTHO YHNBepCaHnHaTAt Kyna (mI.16/2 u ③),KaKTo e ONcHo HA CbOTBETHOTO MACTO B HAcTOUeYbTBaHe 3a pa6ota.
图
I3BaTe Ie nCeNa OT KOHTaKTa (fur.17/①).
Cnoxete ypeDa da nerHe, 3a da noJyHte Doctb n do DonHa t cTpaHa Ha ypeDa (fir. 17/②).
HaTnCHete konHTo Ha 3aunTaTa OT npTeOBapBaHe (fH.1/N) Bbpyx OOnnHa TcPAnHa ypeDa.AkO ypeBt ce e OxJaHn DoCTaTbUHO, KOnHTo 3aenu (fH.17/③). Ako OTCKOHbHO HABhO OCTabEtyePa Da ce OxnaN Ose MANKO, CneT ToBA NobTOpeTe npoueDypata.
CneKaToKoUHeTo3aCenn, BbpHete ypeDaB HopMaHHTO My pa6oTHoNoIoxKeHne (pHr.18/①).
PbXHete uenceHa 3axpaHbaunKa6en o6paTHOB KOHTAKTa (fur.18/2).
Cnoxete o6paTHo KaHata 3a pa36bPKBaHe, CbOTBeTHO yHnBepCaHaTa Kya (FInr.18/ ③ and ④ ),KaKTo e OOncaHo Ha
BG
CbOTBETHOTOMARCTOBHACTOHTO yntBaHe 3a pa6ota.
时
CeraypeBt e roTOB da 6bde n3nON3BaH OTHOBO.3aBpTepeYNaTopa Ha ckOpocTTa Ha JeHaHATA No3uN (fur.18/5) npOdbJxKeTe paBota c npekcbatata yHKUra.
Mukcep
MnKcebT ce n3noJ3Ba 3a npiroTBAHe Ha WnPoka rama MmKcnpaHn HAnITKn, 3a HATPOwABaHe Ha NEd, 3a P3aHe Ha IIODoBe IV 3eNeHcyuN T.H.
IodrotBHe Ha MmKcepa
3a da noctabte KaHata 3a pa36bpkBaHe, Tp86Ba da n3BaDnTe npEJa3HnKa nakHa DnBraTeHNnMexAHn3bM (fur.1/Rn4).
3aBbptTe npedna3Hn Kaak no nocoka Ha yacOBHKoBaTa CTpeIka Iro CBanete.
- YepBHeHata npdeynpeDntenHa lamna (fur. 4/a) 3anoohBa da Mura.
CnoxeteKaHaTa3a pa36bpkBaHe (fur.1/Bn2)BbpyDVBiratEnnna
MexAHm3bMaHa MmKcepa (CTpeNka Bpxy CTpeNka ) n
3aBbptTe o6paTHo Ha
YacOBHnKBoTa CTEpKa Do
OrpaHnHTe. KaHata 3a
pa36bPkBAHe 3actaHa MaRCTo C
n3uPakBaHe.DBeTe YepHn
CTpeKN Tpr6Ba Da cBbnaDat.
- YepBeHata PpeDynpeDntenHa
Jamna (fur.4/a) n3racBa.
Camo 3a AFP 850:CnoKTe KaNaka Ha MmKepa (fur.1/Cn3) Bbpy KaHata 3a pa36bPKBaHe n ro 3aBbPTe, DOKATO HocbT Ha KaNaka 3actaHe dIpuekTHo Ha dPbXkata. KaNkBT 3acTaba Ha MACTO Cn3UpaKaBaHe.
i
MnKcepT MoKe Da Ce BKnHouc
cAmo Ako Kynata N KanakbT Ca
NoCTaBeHn npabUNHO.
Camo 3a AFP 880:Cnoxete Kaaka Ha MmKcepa Bbpxy KaHaTa 3a pa36bpKaBaHe.
i
MnKcepbT MoKe da ce BKnHouc
camo aKO KaHaTa e NoCTaBeHa
npaBnHO.
Cnoxete 3atBapraunKaapan (fur.1/D) n ro 3aknouhe.
Pa6ota c MmKcepa
OTBOPeTe KanaKa (ФИ.1/C) n
ПБХHETe BCMH HeO6XODIMN
CbCTaBKN B KaHATA.
BHMaHHe:He npEbnuBaIte
MAKcMnAHHa OeM Ha NJIHeH
OT 1,5 n!
i
IbpeHa pa6oTa moKTe da
do6aBte CbCTABKn ppe3 OTbopa
3a NJIHeHe. 3a Ta3n cen
yINbTHNTeJIHnT KAnk (fNt.1/D)
MOKe Da CE n3NON3Ba N KATO YaHa
3a NJIHeHe. 3a TBapnTE BnHarn
OTbopa 3a NJIHeHe BeHara, 3a Da
IpeDcTBpaTne HNPbCKBaHe.
中
BkIIOUbaHe Ha MIKcepa: 3aBbptTepeRyataOpHa CKOpocTtA (fur.1)HaJrCHo Ha JeHaHATACKOpOCTNHaHTNCHeTe 6yToHa 3a MOMeHTHO BkIOUbaHe (fur.1/J).
i
IpenopbHTeH0 e da 3aOnuHete Ha HnCKa CKOpOCT, CneJ KOeTO da Ra yBvEInuHTe. MkKepbT pa6oTu Ha MaKcImaHa CKOpOCT npi HaTnCKaHe Ha 6yToHa 3a MOMENTHO BKNIOUBAHe. BnKTe YactTa "CbBetn 3a n3No3BaHe Ha MmKepa" OTHOCO OTnpaBHn CTOnHOCTN 3a HAcTpoBaHe Ha CKOpOCTTa.
N3KIOUBAHe Ha ypeJa: 3aBpTePepeyIaTopa Ha cKOpocTtHaHnBaHO HnO3uJNa "0".

Cne npKIOUbaHe Ha pa6Ota, 3aBbPTeTe KaHATA NO Nocoka Ha YacOBHNKOBA tCTpeNkA nTO cBaIeTe.CneT0Ba3aBbPTeTe KanaKa nTO cBaIeTe.
MhoroФункционалнач act
HctpymEnTuTexHnTe Bb3MOxHN npNOJoxeHHa
CneHnHTeMHCTpyMeHTM MoT Da ce N3NOJ3BAT B MYNTNFOHKNUOHAHLHaTAt Yact:
-ДиСЗа pa36nBaHe (ФИ.1/R) Pa36nBaHc McTeHa NЯЧEH6eNTbU, nprirotBHe Ha KpE m NJIeKn TECTa.
Metaneh HOX (phr.1/Q) 3a HakbIuBaHe Ha CypoBO MECO, WOKOJaD, JIKN T.H.
-Пл actmacob HOX (ФИ.1/P) 3a MeceHe npa36bpkBaHe Ha TEKKN TECTa.
Дьрха(ФИ.1/O)с ржеса npuctabka(ФИ.10) Ппuctыкite ca Маркпан c HOMeP (1do6)ВьрхудрьжКATA. XenaHATA npuctabka ce noctabB BДьрха.
1 Pnuctabka 3a fno pra3ane 3a pr3ane Ha nIOOBe, 3eIeHuyu, CypoBO MECO uN KOn6acn (HAnpIMep Canam) H T.H. Na TbHK Nai6i.
PG1PnCTaBA 3a HacTbprBaHe Ha KapToΦn 3a HacTbprBaHe Ha KapToΦn.
3 Pnctabka 3a npxehn KapToΦn 3a p3aHe Ha KapToΦn 3a npxhe
4 Pnctabka 3a Hactbprbahe Ha cnphe 3a Hactbprbahe Ha TBpdo cnphe, Hanpimep Napme3an H T.H.
5 Edopepehe 3a eoHnactbprBaHe Ha 3eJeHuUuIIOOBe uT.H.
6ФиHo peHd3aФиHO HAcTbprBaHe Ha3eJIeHcyu,IIIOJObe,WOKoJaD,YeCbH T.H.
IodrotBHeHa MyTnФyHKUHOHaHaTa Yact
NocTabrHe Ha npEpa3HnKa nak (pnr. 4)
MynTnФyHKUHOHaHata yact MOKe Da CE BKNOu CAmo aKO KaHaTa 3a pa36bPkBaHe e n3BaDeHa, a PpeJa3HNrT Kanak Ha DnIraTeJHm EmxAHn3bM Ha Mnkcepa (fur.1/Tn4) e noCTaBeH.
N3BaTe KaHata 3a pa36bPkBaHe, KaKTo e OncaHo NOD "MnKcep". -CepBeHaTa npedynpeHtEnHa lamna (Fir.4/a) 3anOyBa da Mira.
IocTaBete npedna3HnKa nak Bbpyx DnuratEnHnMexaHn3BM Ha Mnkcepa (3HaK Bbpxy 3HaK) n ro 3aBpTeO6paTHo Ha YacOBHNKObATA cTpeNka Do orpaHnHTe. PpeNa3HnT Kanak 3actaba Ha MCTOc N3upakBaHe. 3HaKbT Tp8Ba Da e Had npedynpeDInTeHnata lamna (fur.4).
- UepBeha npEynpeHnTeHa nAmna (pN. 4/a) n3racBa.
IocTabrHe Ha yHnBepcaJHaTa Kyna (fnr. 5)
IocTabete yHnBepcaJHaTa Kyna (frr. 1/G) Bbpxy ypea (ctpejka Bbpyc CTpejka ) n J 3aBbptTe 6paTHo Ha YacOBHKnOBaTa CTpejka Do ORpaHnUteJyHnBepcaJHaT a Kya 3actaba Ha MxCTO C N3uPaKBaHe. DBeTe YepHn CTpeJN Tpr6Ba Da cBbnadat.
BG
NoctabnHe Ha octa (fur.7)
IocTabeOcTa(m.1/H)Bbpxu ⅢNkataBcpeDATAHa yHnBepCanHaTaNya.
IocTabrHe Ha HnHcTpymeHTn
Moxete da n3bepete da NOCTaBNTe CnEDHNTe INHCTpymeHTN:
-Дикзаразбивае(ФИ.1/R)нлп
- MeTaneHHOx (ΦnI.1/Q) nIu
-Пл actmacob HOK(ФИ.1/P)nH
-Dbpxka(fur.1/O)cpekea npncTabka(fur.9)
I IbpxkahyT Tp86Ba Da Ce NoCTaBn CbC CbOTBEHTA pNCTABKa B 3aBNCIMOCT OT CEENTHa npINOxKeHHeTO (BnKTe "NoCTABHe HapeXeUa pNCTABKa B Ibpxka).
IocTabeTeKeJIaHnI INCTpyMeHT BbpxOCTa.
-ДИСКБТЗа pa3биBaHe, MeTaNHnT HOx n Пл actmacOBnT HOX (ФИ.8) 3aueBbAT CbC 3b6nte OTdony BbpxOCTa.
-Дьркачт ha npuctabkata (ФИ.11)пжи Вьрху WecToBbJIHATA OC.
i Han-do6pe dpbKTe dbpkaHa Ha npictaBkata C DBA npbCTa B dBete Dynkn 3a 3axBaAaHe.
Noctabhe Ha kanaka (fur.6)
Noctabete kanaka (f.1/F) Bbpxy yHnBepcaJnHaTa Kyna (cTpeKna Vbpxy cTpeKna △) n 3aBbptTe 06paTHo Ha YacOBHNKOBATA cTpeKna Do orpanuHTeJa. KanakbT 3actaba Ha MrcTo Cn3UpaKaBaHe. HocbT Ha Kanaka 3actaba dIpeKTHO HaD npBXkata, DBeTe cepHn cTpeKn Tp8Ba CbBnAdHt.
PbXHeTe npTnCKaHa (pHr. 1/E) B OTBOPa 3a PbJIHeHe.
IocTabaHHe Ha pexeua npuctabKa B Dbpxkaa (fur.10)
IocTabete XeHaHata npuctabKa B DbpxaB 3aBNCIMOCT OT ynotpeba.
I IpnCTaBKeTc Ce HAMpaT B 1 WapHnPHoTO OTdJeHHe 3a IpnCTaBKn (ΦmR. 1/K) B Kopnyca Ha DBriratTeJ.
IpncTaBknte ca MHoro OCTPN. XBaauTe rna camo 3a dpbknte!
OTBopTe OTdeneHMeTo 3a npuctabKnTe, KaTO nDpNaTe dpbkkata (fur.9).
I3BaTe XeNaHata npctabka 3a dpBkkata OT OTeeneHneTo (fur. 9).
Noctabete Bbpxa Ha npuctabkata B ceHTbpa Ha Dbpkaa N cnoxete npuctabkata BbB BdIb6HaTHHata Ha dNcKa (fur.10).
3a da n3BaJnte npncTabkata,ra ⅢdbpnaTe Neko HABbH 3a dpBXKATA N NOBdHHeTc.
Pa6ota c
MyltnyHKnOHaJHaTa YacT
OTbOpTe Kanaka (ФИ.1/F) n CLOXeTe BCnUKN Heo6xOdUMn CBCTaBKn B yHnBepcAHaTa Kya. BHMaHHe: He npEbnuBaIte MaKcMamHnI O6em Ha TbJIHeHe: -TeuHOCTn 1,75 n. -TbPdN IpOdykTn 1,5 n.
I IIO Bpeme Ha pa6oTa MoXeTe Da O6abAte Oue CbCTaBKn ppe3 OTBopa 3a NblHeHe. 3a Ta3n cen MoXeTe Da n3NON3BaTe u yaWata 3a NblHeHe B npNTNcKaHa (fHr. 1/E). BnHarn 3aTbapnTe OTBopa 3a NblHeHe BeDhara, 3a da IpeDoTbpatnte N3npbckBaHe.
13no3BaTe npTuCKaHa n3KIOUHTeJIHO 3a HATnCKaHe Ha xpaHata 3a p3aHe!
BkIIOUBAHe Ha ypea: 3aBbptetepeyNaTopa Ha CKOpocTt (ФИ.1/II)HaJrCHO Ha JKeJaHATA CTeneH HaCKOpocTt HIN HAHTnCHete 6yToHa3a MOMeTHO BkIIOUBAHe (ФИR.1/J).
I IpnopbHTenHO e da 3anoHete Ha HnCKa CKoPocT, CneJ KOeTO da yBEnuHTe. YpeBbT pa60Tu Ha MaKcImaJIHa CKoPocT npi HaTnCKaHe Ha 6yToHa 3a MOMENTHO BKNIOUBAHe. BnKTe YacTTa "CbBETn 3a N3NoJ3BaHe Ha MyITNΦyHKUHOHaHATA Yact" OTHOCHO OTIPaBHN CTOnHOCTN.
Ako npdeynpeintenHata lamna (fnt.4/a) Mura n ypeBt He MoKe Da Ce CTaptnpa, Toraba npedna3nrt Kanak Ha DniratEJIHHMexAHN3bMa HmKcepa (fnt.1/Tn4)He e NOCTABeH npabINHO.
N3KIOUOBAHe Ha ypea: 3aBbptTepeyIaTopa Ha cKOpocTtHaHnRAHO HA N03uIra "0".
Cne npknuvahe Ha pa6ota, 3aBbptete Kanaka No Nocoka Ha yacOBHnKOBata Ctpenka nro cBaJIte.
CbaJrTe Kanaka cmo KOrato HcTpymeHTbTe cnpn HanbHNO!
3BaTe HHTpyMeHTa nOCTa.
3aBpTe yHnBepcAnHaTaN no Nocoka Ha YacOBnKOBata cTpeNk nI n3BaTe.
Cntpycoba npeca
IoproToBka (pHr.13)
IocTaBeTe yHnBepcaHaTa Kyna, KaKTo e onucaHo rope (ФИr.5)
Noctabete uekata Ha UHTpycoBata npeca (pHr. 13/a) Bbpxy yHnBepcaHnata Kyna (CTpeNka Vbpxc CTpeNka OpaTHo Ha YacOBHKnOBA TcpeNka Do ORpanuHnTeIe. Lekkata 3actaba HA MACTO C HsPakBaHe, CTpeNkata Tp6Ba Da CbBnaDHe Cbc CTpeNkata
IocTaBeTe KOHyCa 3a n3eKdaHe (ФИг.13/b)ВцeДКаТ.
Pa6ota c cntrpycoBaTa npeca
BKnUoyBaHe Ha ypea: 3aBbPteTe perylaTopa Ha ckopoctta (pnr.1/I) HADrCHO Ha No3nIg 1.
Cuntpycobata npeca Tpr6ba da ce pa60n caMo Ha Hau-HNCKata ckopocT.
N3KnHoyBaHe Ha ypeHa: 3aBbPteTe peRyNaTopa Ha ckOpocTTa HAnBAO Ha no3nua "0".
Cne ynoTpe6a n3BaTe KOhyca 3a n3eXdHe.
3aBbptete uekata no nocoka Ha yacOBHnKOBATA cTpeNka nЯ n3BaDeTe.
3aBbptete yHNBepcannHaTaNIO NOCOKa Ha YacOBHNKOBaTaCTpenKa n HnBaTe.
! UpeBt MOKe Da ce 3nON3Ba Do 10 MNHyTu 6e3 cnnpaHe. Cnei BCaKO pOoDbJnxIteJIHO n3nON3BaHe 6e3 cnnpaHe oCTaBnTe yPeDa Da ce oxJaDi (NoHe 20 MNHyTu CneI 10 MNHyTHo n3nON3BaHe 6e3 cnnpaHe).
BG
IOnuHCTBaHe n IOndApbXka
Kopnyc Ha dBnraTeJia
BHHMaaIte da He nonada TeHOCB KOpnyca Ha Dniratena!
IIOuHCTBaIte KOpnyca Ha DnBraTeJIa C BnAIXHa KbPna. HnKora He ro notanrTe BB BOda n He ro dpXkTe noT Teyaasa BOda!
Mukcep
CbIbT HoxbT Moar Ta Ce NOYICTAT NecHO INPABUNHO C NOMOHTa Ha 6yTOHa 3a MOMEHTHO BKIOUVAHe.
HaHbJIHeTe KaHata 3a pa36bpKBAHe HAnIOBnHa C TOnla (He ropeuHa! BODa n Doabete HAKONKO KANKn npenapat 3a MneHe!
HaTnCHete 6yToH 3a MOpEHTHO BKNIOBaHe 3a KpaTKO.
CneTOBaH3nPaKHeTe Kynata NOTeuasa Boda.
Pa3rno6BaHe/crrno6BaHe Ha yactTa c hoxa (fnr.14)
I Ipn Hjka qacTc hOka moKe cbio da 6bpe pa3rno6eHa n nouchTeHa OTdEnHO.
BHHMaHHe:HOKbTe MHOro octbp!OnaCHOcOT O HapaHaBaHe!
Ocbo6oTe yactTa c Hoxa (fni. 14/a) ot kaHata 3a pa3bpbKBAhe, nIOn3BaKn 3aTBapAunna KAnak (fni.1D u fni.14/c) kato INCTpyMeNT. BdIb6HaTHINTE B 3aTBapAunna KAnak CbOTBETCTBAT Ha p6oBeTe HA eNemEnTa CHOxa. 3aBbPte O6paTHO Ha YacOBHNKObaTcTpeNka N 3BaJeTe, KaTo DbpxNte NOJNeK bTbn.
N3BaTeYyJIbTHHTENHn npbCTeH (Φm. 14/b) OT yactTa c Hoxa.
HOKbTe MHOTo OCTbp. YnTbTHEHHeTO MOKe Da ce NOBpeN.
I3nJIaKHeTe KOMNoHEHTHtE BHIMaTeJHO Ha pKa (OnaCHOCT OT HapaHaBaHe!). N3noJ3BaIte cAmO BoJa I npenapat 3a MneHe. He MnIe YacTtA C HOxA B CbDOMyJHa MaunHa.
B YactTa C HOxa.
IbXHETe YAcTTa C HOXA B KAnATA O T DONY. IpBXKTE YAcTTa C HOXA NOJ Nek bTn. 3aTeHETe YAcTTa C HOXA, n3NON3BaKn 3aTbapraunr KaNk KATO INHCTpyMeHTn 3aBbPtaNKnNO Nocoka Ha YacOBHNKOBA tCPenka (fnt.14).
YHnBepcaJHa Kyna n HNCTpyMeHTn
YHnBepcaHaTa Kyna INHCTpyMeHTne Ce NOChTBaT B IN3nKaBaA Boda.
BHMaHHe:MeTaHnHT HOKe n3KnIOuHTeIHOocTbP! OnachOCTOT HapaHbAhe!
!PiactMacOBITE qACTN OCTapBaT MHORIO NO-6bp3O,AKO CE MNRY CECTO B CbDOMNHa MaHnHa.AKO BCE NAK KeJAEte Da rN m3MNEe B CbDOMNHa MaHnHa, IN NOCTaBeTe B ROPHOTo OTDeHeHne.
PpncTaBKn
NouchBaIte npCTaBkIte C yeTka NN Kbpna NO TcHa a Boda NIN B CbDOMnHa MaunHa!
BHMaHHe: PnuctaBKnte ca MHOrO OCTpN! OnaCHOcOT HapaHBAHe!
BG
CbxpaHeHne
BcNKn npCTaBKn, Cn3KnUoyHne Ha cItpycOBaT npeca, MoTaJa ce cbxpaHbAT Hanpabo Bypeda.
CbxpnaHbAte npntaBknte B OTdeneHnTo 3a npntaBk (fnr.1/K).

BHHMaHHe: PnCTaBKeTe ca MHOrO octpN. OnaCHOcOT HapaHaBaHe! XbaaIte rN cMo 3a DpbKKeTl
CIOKETe npCTaBNTe ByHnBepcaHHaTa Kyna, KaKTo e NOKa3aHo Ha qnr.12.

BHHMaHHe:MetaHnHT HOX (fHr.1/Q)eMHoroOCTbp! OnaCHOcOT HapaHbAbe! DpbKTe MeTALHnHOx CaMo 3a DpbKkata nro CbXpaHbAite camoC NoCTaBeH npedna3nte!
Habnte ka6ena Ha DBeTe Kykn O3aHa ypeDa (fur. 15).
TexHnueckn daHHN
Hansekehenie
Ha Mpejata:
230
Kohcymaunia
Ha ehepna:
800

Te3n ypeDn ca cbo6pa3EH CbC CneHNTE EC DnpEKTNB:
-Директува 3a HUCbK BOLTak2006/95/EC
EMCДиpeKtNb89/336/EECc n3MeHHe 92/31/EEC n93/68/EEC
BG
CbBETn 3a ynoTpe6a:
Mukcep
MnKcepbTe MHORO noDxOJa 3a HKnBnUbaHe Ha MaNk KOINueCTBa XpaHa KaTO RaKN, rAeta INI NOpnpabKn.
- OTeJeHnTe COcOBe MoT 6bp30 Da 6bDat 3ana3eHN B MmKepa.
Hapeke Te nn Naynete npdyKTte, KOnto ue npepa60tBe B Mkcepa, Hapeta ot no 2 do 3 cm.
BnHaN OTCpaHbAaTe KOCTNkNTe OT NIOOBete KOKAJNTe OT MecOTO, Tb KaTO MORaT Da NOBpeJr TcactTa C Hoxa!
HaTpoWaaBaHe HaJe:BnHarI OobAByTe MaNko BOaB KaHata, npEn Da TPOwnte Je.
- PnO6pa6tKa Ha cyxu Cmecn MoKe Da ce HAnoKu Da N3KJIIOUbATE ypeDa OT BpeMe Ha BpeMe, 3a Da OTBOpNTe KaNakaHa MInKcepa N da OCTbPKeTe CmecTa OT CTeHnTE Ha KaHata C npNCtAbkata 3a CTbpraHe.
- Pn CmecBaHe Ha TeuH N TBbpN CbCTaBKn, NpBO CmecTe TeHHte N CneT TOBA Doababe CyXnte.
- Octabete ropeunite Teuhoctn da n3CTnHaT, npedn da n0bpa6oTBate B Mkcepa.
- PnO6pa6oTKa Ha ropeu CbCTABKn, KaHata 3a pa36bpKBAHe Tp6Ba Da ce npOBETPra, KaTO CBaNITE 3aTbapAun KAnak.
DobabHHe Ha CbCTaBKn
Cnoxete cyxtte cbctabkn, KaTo
Ha npimep 6pausho,B
yHnBepcaHnata Kyna npedn
obpa60kata.He e Heo6xoJMo
da Cmecbte cbCTabKnTe npedn
obpa60kata.Moxe Ta
do6abNTe TeuHc bctabKn npe3
OTbopa 3a NJIHeHe NO Bpeme Ha
obpa60kata.
MoxTe Da Do6aBnteTeuHn CbCTaKn Ipe3 OTbopa 3a NJIHeHe no Bpeme Ha Opa6oTkata.
3a6eKKa:PnOOBaBcKaHa COCOBE NIN NOyTeuHn CbCTaBKn MOKe Da Ce HAnOxN Da N3KNoBaTe yPeDa OT BpeMe Ha BpeMe, Da OTbaprTe KaNaKa Ha YHNBepcalHaTc KyaN Da OCTbprBaTe CmecTa OT CTehata Ha Kynata C npncTabKaTa 3a CTbpraHe.
Pabota c nbpkaHa npncTabkata
MHOBOBAXHOe npabunHOTO NOdaBaHe Ha xpaHa npe3 OTbopa 3a NbHeHe.
Ako e Heo6xOIMo, HapeKeTe roTOBNTe npOdyKTn Ha No-MaIKn napeta, 3a da Morat da MNHaBaT IeCHO ppe3 OTbopa 3a nBJHeHe.
IobabrTe CbCTaBKeTBeB3MOxHO Hn-OTBeCHO eHOBPeMeHHO B OTbopa 3a NJIHeHe.
HATNCKaIe Tn paBHomepHo C npNTNCKaHa. CteneHTa Ha HATNCK BInrE Bbpxy KOHcHTpaunrTa Ha xpanata 3a p3aHe.

N3no3BaIte npTnckcau caMo 3a do6abAHe Ha oue xpaHa. Hnkora He nocraTe C npbCTn B OTbopa 3a nbJHe!
YpeBt MoKe Da ce NOBpei npn ppeKaIeHO CnHOr HATNCKaHe C npNTnCKaHa!

BHHaN OCTaba MaIKO KOJIueCTBO Heo6pa6OteHa XpaHa MExdy npNTnCKaHa N DbPkaHa Ha npNCTabkata.
HactbprBaHe Ha cnpeHe
OxnaTe MeKnte CnpeHa, KaTo EMeHtAn Nm MoaPena, DObpe npEn HAcTbprBaHeto.
O6pa6oTbaIe TBbPdIte CnpeHa KaTo IapMe3aH Ha cTaHa TempePaTypa.
3a6eJekka: CpupeHTo IapMe3aH Tp6Ba da ce o6pa6oTb c neko HATnCKaHe Ha npTuCKaHa.

BG
| ИсторICAL | Храна Мaks. | Кон�уcent BO | Скорост | Уразань | ||
| Кыцане | Метален hoх | Зеленич, наример лук плodов, песни подиравки ореки, бадемшоколад | 800 р. 800 р. 1 връда 500 р 400 р | 3-5 3 2 5 4 | Плобовete и зеленичite Трава за салсяни Травд, мелоградыпарота с приблистену edнakсыba размер | |
| Кыцане на месо | Метален hoх | Месо, Флета от р�б (бez кости), Бекон | 500 р | 4-6 | Остразанete кокалITE и сухожнисту, нарекete на парота от по okono 2 см. | |
| Приrostваима на ралета | Метален hoх | Сух xляб, бисьити | 125 р | 3 по 4 | Нат政府采购у гугу рedingи образботка Ба Ф Т А С Д Е С Д С С С С С С С С С С С С С С С С С С С С С С С С С С С С С С С С С С С С С С С С С С С С С С С С С С C C C C C C C C C C C C C C C C C C C C C C C C C C C C C C C C C C C C C C C C C C C C C C C C C C B B B B B B B B B B B B B B B B B B B B B B B B B B B B B B B B B B B B B B B B B B B B B B B B B B C C C C C C C C C C C C C C C C C C C C C C C C C C C C C C C C C C C C C C C C C C C C C C C C C S S S S S S S S S S S S S S S S S S S S S S S S S S S S S S S S S S S S S S S S S S S S S S S S S S C C C C C C C C C C C C C C C C C C C C C C C C C C C C C C C C C C C C C C C C C C C C C C C C C c c c c c c c c c c c c c c c c c c c c c c c c c c c c c c c c c c c c c c c c c c c c c c c c c c C C C C C C C C C C C C C C C C C C C C C C C C C C C C C C C C C C C C C C C C C C C C C C C C C С С С С С С С С С С С С С С С С С С С С С С С С С С С С С С С С С С С С С С С С С С С С С С С С С S S S S S S S S S S S S S S S S S S S S S S S S S S S S S S S S S S S S S S S S S S S S S S S S S c c c c c c c c c c c c c c c c c c c c c c c c c c c c c c c c c c c c c c c c c c c c c c c c c S S S S S S S S S S S S S S S S S S S S S S S S S S S S S S S S S S S S S S S S S S S S S S S S S s S S S S S S S S S S S S S S S S S S S S S S S S S S S S S S S S S S S S S S S S S S S S S S S S S T. H I J K L M N O P Q R S T U V W X Y Z | Плобовete и зеленичite Трава за салсяни Вра за салсяни Tрава за салсяни Tрава за салсяни Tрава за салсяни Tрава за салсяни Tрава за салсяни Tрава за салсяни Tрава за салсяни Tрава за салсяни Tрава за салсяни Tрава за салсяни Tрава за салсяни Tрава за салсяни Tрава за салodiaни Tрава за салodiaни Tрава за салodiaни Tрава за салodiaни Tрава за салodiaни Tрава за салodiaни Tрава за салodiaни Tрава за салodiaни Tрава за салodiaни Tрава за салodiaни Tрава за салodiaни Tрава за салodiaни Tрава за салodiaни Tравa за салodiaни Tвра за салodiaни Tвра за салodiaни Tвра за салodiaни Tвра за салodiaни Tвра за салodiaни Tвра за салodiaни Tвра за салodiaни Tвра за салodiaни Tвра за салodiaни Tвра за салodiaни Tвра за салodiaни Tвра за салodiaни Tвра за салdiaни Tвра за салdiaни Tвра за салdiaни Tвра за салdiaни Tвра за салdiaни Tвра за салdiaни Tвра за салdiaни Tвра за салdiaни Tвра за салdiaни Tвра за салdiaни Tвра за салdiaни Tвра за салdiaни Tвра за салdiaни Tвpane за салд; Слобовete и зеленичite Трава за салсяни Вра за салсяни Tрава за салсяни Tрава за салсяни Tрава за салсяни Tрава за салсяни Tвра за салodiaни Tвра за салodiaни Tвра за салodiaни Tвра за салodiaни Tвра за салodiaни Tвра за салodiaни Tвра за салodiaни Tвpane за салд; Слобовete и зеленичite Трава за салсяни Вра за салсяни Tрава за салсяни Tвра за салodiaни Tвpane за салodiaни Tвpane за салodiaни Tвpane за салodiaни Tвpane за салodiaни Tвpane за салodiaни Tвpane за салodiaни Tвpane за салodiaни Tвpane за салodiaни Tвpane за салodiaни Tвpane за салodiaни Tвpane за салodiaни Tвpane за салodiaни Tвpane за салdiaни Tвpane за салdiaни Tвpane за салdiaни Tвpane за салdiaни Tвpane за салdiaни Tвpane за салdiaни Tвpane за салdiaни Tвpane за салdiaни Tвpane за салdiaни Tвpane за салdiaни Tвpane за салdiaни Tвpane за салdiaни Tвpane за салdiaни TвPane за салд; Слобовete и зеленичite Трава за салсяни Вра за салсяни Tрава за салсяни Tвpane за салodiaни Tвpane за салodiaни Tвpane за салodiaни Tвpane за салodiaни Tвpane за салodiaни Tвpane за салdiaни Tвpane за салdiaни Tвpane за салdiaни Tвpane за салdiaни Tвpane за салdiaни Tвpane за салdiaни Tвpane за салdiaни TвPane за салdiaни Tвpane за салdiaни Tвpane за салdiaни Tвpane за салdiaни Tвpane за салdiaни Tвpane за салdiaни Tвpane за салdiaни Tвpane за салdiaни Tвpane за салdiaни Tвpane за салdiaни Tвpane за салdiaни Tвpane за салdiaни Tвpane за сал diaни Tвpane за сал diaни Tвpane за сал diaни Tвpane за сал diaни Tвpane за сал diaни Tвpane за сал diaни Tвpane за сал diaни Tвpane за сал diaни Tвpane за сал diaни Tвpane за сал diaни Tвpane за сал diaни Tвpane за сал diaни Tвpane за сал diaни TвPane за сал diaни Tвpane за сал diaни Tвpane за сал diaни Tвpane за сал diaни Tвpane за сал diaни Tвpane за сал diaни Tвpane за сал diaни Tвpane за сал diaни Tвpane за сал diaни Tвpane за сал diaни Tвpane за сал diaни Tвpane за сал diaни Tвpane за салdiaни Tвpane за сал diaни Tвpane за сал diaни Tвpane за сал diaни Tвpane за сал diaни Tвpane за сал diaни Tвpane за сал diaни Tвpane за сал diaни Tвpane за сал diaни Tвpane за сал diaни Tвpane за сал diaни Tвpane за сал diaни TвPane за сал diaни TвPane за сал dia四是 Tб. Слобовete и зеленичite Трава за салсяни Вра за салсяни Tрава за салсяни Tвpane за салodia四是 Tб. Слобовete и зеленичite Трава за салсяни Вра за салсяни Tрава за сался四是 Tб. Слобовete и зеленичite Трава за салсяни Вра за сался四是 Tб. Слобовete и зеленичite Трава за сался四是 Tб. Слобовete и зеленичite Трава за сался四是 Tб. Слобовete и зеленичite Трава за сался四是 Tб. Слобовete и зеленичite Трава за сался四是 Tб. Слобовete и зеленичite Трава за сался四是 Tб. Слобovete и зеленичite Трава за сался四是 Tб. Слобовete и зеленичite Трава за сался四是 Tб. Слобовete и зеленичite Трава за сался四是 Tб. Слобовete и зеленичite Трава за сался四是 Tб. Слобовete и зеленичite Трава засался四是 Tб. Слобовete и зеленичite Трава за сался四是 Tб. Слобовete и зеленичite Трава за сался四是 Tб. Слобовete и зеленичite Трава за сался四是 Tб. Слобовete и зеленичite Трава за сался四是 Tб. Слобовete 和 зеленичite 拜佩п! Слобовete 和 зеленичite 拜佩п! Слобовete 和 зеленичite 拜佩п! Слобовete 和 зеленичite 拜佩п! Слобовete 和 зеленичite 拜佩п! Слобовete 和 зеленичite 拜佩п! Слобовete 和 зеленичite 拜佩戴! Слобовete 和 зеленичite 拜佩戴! Слобовete 和 зеленичite 拜佩戴! Слобовete 和 зеленичite 拜佩戴! Слобовete 和 зеленичite 拜佩戴! Слобовete 和 зеленичite 拜佩戴! Слобовete 和 зеленичite 拜佩戴! Слobovete 和 зеленичite 拜佩戴! Слобовete 和 зеленичite 拜佩戴! Слобовete 和 зеленичite 拜佩戴! Слобовete 和 зеленичite 拜佩戴! Слобовete 和 зеленичite 拜佩戴! Слобовete 和 зеленичite 拜佩戴! Слобовete 和 зelеничite 拜佩戴! Слобовete 和 зеленичite 拜佩戴! Слобовete 和 зеленичite 拜佩戴! Слобовete 和 зеленичite 拜佩戴! Слобовete 和 зеленичite 拜佩戴! Слобовete 和 зеленичite 拜佩戴! Слобовete 和 зеленичite 穿白。 Слобовete 和 зеленичite 穿白。 Слобовete 和 зеленичite 穿白。 Слобовete 和 зеленичite 穿白。 Слобовete 和 зеленичite 穿白。 Слобовete 和 зеленичite 穿白。 Слобовete 和 зеленичite 穿白。 Слобovete 和 зеленичite 穿白。 Слобовete 和 зеленичite 穿白。 Слобовete 和 зеленичite 穿白。 Слобовete 和 зеленичite 穿白。 Слобовete 和 зеленичite 穿白。 Слобовete 和 зеленичite 穿白。 Слобовete 和 зelеничite 穿白。 Слобовete 和 зеленичite 穿白。 Слобовete 和 зеленичite 穿白。 Слобовete 和 зеленичite 穿白。 Слобовete 和 зеленичite 穿白。 Слобовete 和 зеленичite 穿白。 Слобовete 和 зеленичite 拜佩п! Слобовete 和 зеленичite 拜佩п! Слобовete 和 зеленичite 拜佩п! Слобовete 和 зеленичite 拜佩п! Слобовete 和 зеленичite 拜佩п! Слобовete 和 зеленичite 拜佩服! Слобовete 和 зеленичite 拜佩服! Слобовete 和 зеленичite 拜佩服! Слобовete 和 зеленичite 拜佩服! Слобовete 和 зеленичite 拜佩服! Слобовete 和 зеленичite 拜佩服! Слобовete 和 зеленичite 拜佩服! Слobovete 和 зеленичite 拜佩п! Слобовete 和 зеленичite 拜佩п! Слобовete 和 зеленичite 拜佩п! Слобовete 和 зеленичite 拜佩п! Слобовete 和 зеленичite 拜佩п! Слобовete 和 зеленичite 拜佩п! Сlобовete 和 зеленичite 拜佩п! Слобовete 和 зеленичite 拜佩п! Слобовete 和 зеленичite 拜佩п! Слобовete 和 зеленичite 拜佩п! Слобовete 和 зеленичite 拜佩п! Слобовete 和 зеленичite 拜佩п! |
PeCNTn
OchOBHa peuEnTa 3a naHnwnah
46eJtBka
4 c.I. CTyDHa BOda
200 rp 3axap
1naketue BaHnnna
4XbNTbKa
80rp 6paunho
80 rp HnueceTe
1u.n.6aknynBep
Heo6xOdMn npNCtABKn: yHnBepcaJHa Kyna C DnCK 3a pa36nBaHe
CNoKTe 6eTbUte N BODaTaB yHnBepcaJHaTaNpa3bNtE Ha 5-Ta CTeneH 3a OKO1o 1 MNHyTa DO BTBbpJaBaHe.
Dobabe3axapTa n BaHnJnra Ta npes 0TBopa 3a nJIHe He pa36nTe 3a OSe OKoNo 1 MNHyTa Do pa3TBaprHe Ha 3axapTa.
I Do6aBeTe XbJIbTuNTe npa3bPkAaTe C HApKoNko NpUcaun.
CmecTe 6paHOTo, HnIeCTeTo n 6aKnYnBepa, Do6aBeTe KbM KpeMoO6pa3HaTc Cmec n pa3bPkainTe 3a KpATKO C HrKoNko npuncu.
13CnTe TcTToB Taba 3a nehe H ro oneeTe BbB cypha.
OchOBha peuenTa 3a TecTo 3a KeKc
500 rp 6paunho
1 naketue 6aKnyIbep
250 rp Maprapn Hm Macno
250 rp 3axap
1 naketue BaHnJIINr
1uynka con
4a
150 Mπ npraCHO MIAKO
Heo6xOdMn npctabKn: yHbepcAnHa Kyna C nlaactMacOB HOK
CLOXETE BCNUCKCBCTABKNBYHNBepcaJHaTa KyaB NocOeHnpei.
Pa36bpkaIte 3a1do1c MNHytn Ha 3-4-Ta CTeneH, DOKATO TECTOTO CTAHe IJaKO IN KpEmo06pa3HO.
i Ako npn o6pa6oTkata TECTOTO ce N3XBpIa IpeKaJIeHO HABbH, N3KIIIOHTe YpeDa,OTBOpTe KAnaka n N3bTyAITe TECTOTO HABbTpe C pNCTaBkata 3a CTbprAHe OT Pb6a HA Kynata.
13cunete TECTOTOBNOxOuaTaba 3a neeHEnooneTe BbBfypha.
i No JeHaHne MoXeTe Da npOMeHnTe JNeKo TeCTOTo, KaTo Do6aBnTe DpyrN NOpnpaKn. PnIMep 3a MpaMopeH cnaKnI:
13cunete 2/3 ot TECTOTO B tabata. 06abete 1 c.j. kakaon Ha npax n 1 C.I. nprCHO MIAKO B OCTaHANO TECTO n pa36bpkaIte 3a KpaTko C HAKONKO pUlcauu.
N3CINETe TBMHOTOTECTOBbpxy CBETIOTOBaTa.IIpekapaTe BUNUca CbC CNIPAHO DBNXKeHne Ipe3 DbTA CnOJ TECTO,3a Da ce NONYuMpAMOpHATA WapKa.
BG
OchOBha peuente 3a poHnBO TECTO
250 rp 6paunho
1UJ.BaknyIbep
125 rр CTydeH Maprapn Hnn Macno
60rp 3axap
1uikka con
1yue
1 c.n. CTyDHa BOda
Heo6xOdMn npCTaBKn: yHnBepcAnHa Kya C nlaactMacOB HOX
CnoKTe 6paunHO, 6aKnYnBepa, cOnTa n 3axapTa B yHnBepcaNHaTa Kya. HapeKete CTyDcHOTo MacNo Ha napeTa n ro Do6abete.
Pa36bpkaIte 3a OKoI0 1 MNHyTa Ha 3-4-Ta cTeHEn, DoababeTe RnueTo n CTydeHaTbOda Ipe3 OTBopa 3a IIbIHeH e I npOdbJIxKeTe Da pa36bpKbATE, OOKaTO TcTeTO 6pa3yBa TOkA OKOHOHXa.
H3BaTe TcTeTo OT Kynata N npOaJnxTe Da rO Mecnte H3BeCTHO BpeMe Cp bue.
OCTABETe TECTOTBXnAUNHnKa 3aOKoJIO30MNHyTINpeDN da npoDbNKeTe C o6pa6oTKata.
Pa3toye TECTO, CIOXeTe ro B D06pe Hama3aHa C Ma3HnHa Taba n D06abete NO XeNaHne IIOdoBe, HApnpMep RaBKn NnCnBuN.
OchOBha peuente 3a 3aKBaceHo Tecto
500 rp 6paHNO
40 rp Ma(npraHa)n1 1 nakte cyxa ma
80 rp 3axap
1uynka coI
80 rp pa3ToneH maprapnH
200 MЛ XnaIko npraCHO mJIKO
Heo6xOdMn npCTaBKn: yHbepcaHa Kyna C nlaactMaCOB HOX
CJIOXeTE BCNUK CbCTaBKN B Kynata B NOCOHeHn pei.
Pa36bpkaite 3a 1do 1 / 2 MNHytn Ha 3-4-Ta cTeH, DOKATO TECTOTO 06pa3yBa TOnKa OKOHOXKa.
I3BaTe TcTTo OT Kynata n ro OMeCE Te OSe MaJko C pue.
CmeceTc bctabKNTe, KOUTo He Tp8Ba Da ce Hndpo6BAt, HnnpMep ctaΦnD, Cpue.
Ipei no-HaTaBbHa o6pa6oTKa OCTaBeTe TcTOTo Da BTaca B NOKPITa KynHa HTONIO MRCTO, DOKaTO Hapacthe OKOIO DA NBtN.
i B3MOxHn npIOxKeHHa 3aKBaceH xIy6 Ha nnITka, dpe6Hn CnaDKN OT 3aKBaceHO TcTeO, NIOoBN cNaKnHIn, KΦKa. 3a NkAHTHn KeKCOBE, HAnpIMep KEKC C NyK, pNIROTBETe TcTOTO 6e3 3axap.
UaHOBnI nokyneCb!
Byb nacka, yBaKHO npOHTaTe zuo IHcTpkyuio 3 ekCnnyatauii. Hacampeed, Byb nacka, Doepkuyteca IHcTpkyu 3 6e3neKn, HadaHnx Ha nepuHx CTOpIHkax DaHOI IHcTpkyi 3 ekCnnyatauui! Byb nacka, 36epirai Te IHcTpkyi 3 ekCnnyatauui, UoM Math MoKNBicTb 3BepTaTncA do HNX Hadaani. 3a MoKNBOCTI nepedaBaTe ci IHcTpkyi HAcTyHmOy BlaChNKOBIO no6yTOBoiTexHiK.
! PonepeJkyBaJIbHn 3HaK y FOpMi TpIKyTHnKa n/abO KInIOBc CNoBa (He6e3neuHO!, O6epeXHo!, BaKnIbO!) NOBHNI pNBePHyTN BaUy yBary Do iHOpMaui, IIO e BaKlNbO IoI Da Baoi' 6e3NeKN aO npaBnIbHoro fHKioHyBaHH N6yTOBoTexHkNi. HeoXiDHO, 0o6 Ta iHOpMaui 3HaXoDnac Ha BnDHOMY MiCui.
Takn CmBON 03Hauae, 10o BaMa HadaeTbcn pOKpOKoBa IHcTpkyuia DnEeknnyatauii Baworo no6yTOBOrO npnaNy.
I Iopyu i3 TaKIM CmMBONOM Bn noaHTe DoaTKOBy IHOpMaioH npaktuHi NiKa3Kn 0oDo BHKOPNCtAHHa NObyTOBOr npnaLy.
Nopyu 3i 3HaKOM y BnIJI KOHIOUHHBn 3HaJTe Te NkA3KN iHOpMaUIO UDO eKOHOUMIurHO eKONOrIHNO YHCTOBO BNKOPNCtAHN H npHnady.
Onnc npnctpo
(MaI.1)
Ha ManHky 306paXeHo AFP 850
A Kopnyc MoToPa
B KOHTeHep dIa 3MiUyBaHHa
C Kpnska miKcepa
D 3aKpmbaHoua KpnuKa
E 3anpaBHHI WTOBXa3 BIMIPIOBaJIbHOIO EMHICTHO
F Kpnska 3 OTbOpom
G yHibepcaJIbHa eMHICTb
H Ban
I PerynTOp WbNdkocti
J KhoNka Nylbc
K DoataKoBa cekij dnn pikyHx qactnH
L BiDcik dIpy npObOy (3aHny actHa npCtpo)
MПл actHa3HaMeHyBaHHaM (HxKHa qactHa nPnCTpoI)
N Khonka-3anobixHHK Bi nepehaabaHTaxKeHb (HxKHa qactnHa npncTpOo)
OTpIMMaBCTaBok
PПл actikobeJe30
Q Metanebe ne3 1npoTeKtopom
R Dnck 36BaHHa
S Pnec dnnuTpycoBnx
T KpnuKa npNbOy Mkcepa
U Kpe6ok dna Ticta
* AFP 850 Maec mHictb dna 3miuBaHHa 3 nactnka, AFP 880 MaecmHictb dna 3miuBaHHa 3i ckn.a
Ppabnla 6e3neKn
DAnHH npnlaB BiNobiAe npHHTM TexHOJIOIYHM CTaHapram 6e3neK i BmORAM 3aKHOJaBCTa YkpaIH NIOO 6e3neK NObTyOBx npnlaIB. Ppote, kBnpo6Hnk, Mn BBaxaEMC CBOIM O6OB'3KOM O3HaHOMTn Bac 3 HAcTyNHm nPabuNAm TExHIK 6e3neK:
3araJIbHI npabnla 6e3neKu
- Donyckaebc BmkaHn npnady JIne Do Mepeki 3 Hanpyroio I qactoTOIO, IO BiNobidaOb CneunphiauiHa Tabnui 3 TexHiHMn DaHmHa HxKhiy qactnHi npnady!
HikonHe nidiimMaTe npnad,
KUO -Ioro Ka6eJb ykoDkeHn, -Ioro Kopnyc ykoDkeHn.
HikoJIHe BnTraIe TTeNCEbHy BnIKy 3po3ETKn 3a Ka6enb.
YBnAkyyukOKeHHKa6enHO KINBHeHH,IOb yHnKHyTN OdepKaHH TpaBMn, Heo6xIHa NOro 3aMHa Bnpo6HnKOM, Noro cepBicHM ppeCTabHnKOM a60 KBaJIphiKOBaHm nepcoHAnOM.
PemOHTIpoBToCTOCOBHO daHOro npnady MoKyTb npoBODHTNcB HnHrTKOBO KBAJIΦIKOBaHmM φaxIBzMa 3 TexHrHO O6CnyROyBaHH. HenpabnIbHn peMOHT MKe CTaN pniuHHO BnHKHeHH 3NaHoI He6e3neK. y pa3i BnHKHeHH He06xIDHocTI peMOHTy BAPTO 3B'3aTnc3 8 BiDiJom 06CnyROyBaHH NOKyniB a6o BaAMN YNOBHObaKeHM DnIepOM.
JaHn npnnaD npn3HaueHn DnB BKNOpuctaHHB BKNIOuHO BDOMaunix yMOBX.BnO6HnK He HCe BIDNObiDaJIbHoCTI 3a 3bNTKn npn HnPaBbHOMy BKNOpctaHHI npnnda, aO npn BKNOpuctaHHI NOro He 3a npn3HaueHnM.
JaHn npnaHe np3HaeyHn DnBnKOpNCTaHHoOC6aMn (BKIOUaOHy dItei) 3I 3NHKeHMn φi3HnHMM, CECOPHMn a60 PO3yMOBmM MoJINBOCTMa M a60 HeoCTaTHIM DCOBIDOM Ta 3HaHHMa, KPM BnAikB BnKOpNCTaHHr HMM npNaDy NiH HarJADOM a60 nicra IHCTpykTByaHHr OC6oIO, BiNoBaJIbHOo 3a ixHIO be3neky.
Be3neka diTei
He 3aHwaite yBIMKHeHH npnad 6e3 Harny. Y npncyTHOCTI dTei 6yDte oco6JIbO yBaXHi!
- DITN NOBHHI 6yTN NiH HarnrAOM DnA 3an06irAHnnyctOuJIB 3 npnaDoom.
BaxnBi 3ayBaKeHHN zoDo eKcnNyataci KxOHHOro kombny.
He KopncTyntecn npnlaom, kyoBac MOKpi pykn.
Prietaisu negalima maipyti jokiuw daow (Iako, poliestero, t.t.) - Prietaisas gali sprogti!
IpequHnHnmpna3aBxDN BmKnAte No 3aDkepeena eekpOKnBnHn.
He 3aHpyHnTe KOpnyc 3 MoTOpom (MaN.1/A) y Body a60 iHsy piDHy.
Bnpo6HnK He Hece BiINOBiDaJIbHoCTI 3a MoXJIbBi 36HTKn PnHEnpaBInbHOMy BnKOpNCtAHHi npNlaNy, a6o npN BnKOpNCtAHHi NOro He 3a nPm3NaueHHaM.
3MiHHI YACTINHIO3BOJRAETbcBCTABnTn I 3HIMATN 3 npnadyTINbKoNBIiBIDHaHN BIDXKepeNaENEKTPOXNBENHNA
- Ybara: Metanebe ne3o (MaI. 1/Q) Hau3BnuaHno roctpe! He6e3neKa TpaBMyBaHHra! Metanebe ne3o cnid TpIMatn TinbKn 3a pyKu i 36epiratn TinbKn 3 npoteKTOpom ne3a! Byndte o6epexHNm npn MTT!
- YBara: Pjxuyi 3MHHi HacaKn (MaN. 9) Dyke roctpi! He6e3neka TpaBMyBaHnHa! 36epiraTe 3mHHi HacaKn TiIbKn B CneuaJIbHo npnaHaYeHomy BiDiJIeHHi (MaN. 1/K). BydTe oBepeXHMn npu MTTI!
- YBara: Je3o Mikcepa (Ma. 14/a) duKe roCTpe! He6e3neka TpaBMyBaHHr! Ppi 3bnpaHHi Ta po3bnpaHHi Mikcepa cnid 6yTu duKe o6epeKHMn.
- Ybara: He BCtpomnIte nJIbui (MaI. 1/F) B OTBip KpUkN! He6e3neKa TpaBMyBaHH!
- Ybara: 3a60pOHeTbcra KnaCTn TBepi npEmdTe (Hanp. loxkn) y npauoqum Mikcep n BcTpOMJrB EEMHICTb MlKcepa pyKn. He6e3neka TpaBMyBaHH!
KpUkmy MoXHa 3HImaTn TiIbKn KOIN HacaDkn npuHHNn o6epTaTcR.
He TpmaTe DoBri npedMeTn (HIX, DepeB'ry NoKky, uKpe6ok Dna Ticta) B OTbopi KpnuKn. He6e3neKa TpaBMyBaHH! IpaioTe TiIbKn 3 fikcatopom (MaI.1/E) konn noJaace ty.
He naibaTepaPy piHy (TibKn xoJOnHy a6o TeNly) B EMHICTb MIKcepa a6o yHIBepcaJIbHy EMHICTb. -
Iotpi6HO BCTaHOBHTUyHIBePCaJIbHy EMHICTb Ha KOpNcMOTopa (MaI. 1/G) Nepu HIXBCTaBnTn Ban (MaI. 1/H) TaHacaKn.
ДяHopmaJIbHOi pO60Tu (3mUyBaHHpIKKOro TicTa iT.D.) npnA MoKe npauOBaTH He 6Ibue 10 XBnHnB63 3ynHKn. PnpA dy nToPi6HO OxOnOHytN KOHKOro pa3y Nicra TpuBAHO, 6e3nepePBHOi pO6Tu (HaMeHs 20 XBnIHn NcIA KOKHnx 10 XBnHn63nepePBHOi pO6Tu). Pnppo60Ti BaxkIMPeoyBnAMn.Hanp.1.5KrTicTa, npnA dHe NOBIne HpaQOBaTH 6e3nepePBHO DoBue 1 XBnINH. -
IepH HIX BnIMaTH HacaKIN BAN NOTPi6HO BnHrTb BMCT EMHOCTI.
He nepeBnuyte MaKcMaJIbHO O03BOJHnO6'Em HAnOBHeHH.
He BnKOpNCTOByIe npIaI63 HarnJy. Ka6enb KINBIIeHHN NoTpi6HO BITrHn HabItb JAKUO BN 3aJIiShaete KimHaTy Ha KOPOTKn Yac.
Pio60n BmKHiB npuiai BuTgHtB KaebxNbHeHH.
Ytunlaia

NakyBaJIbHi MaTepiAn
NakyBaIbHi MaTepiAn e ekONorIHy ONUCTmM I MOKytb 6ytn NOBTOPO BIKOPnCTaHI.
PiactNKoBi DeTani No3HaeyHi MapkyBaHHamnp.>PE<,>PS<, i T.D.Bydb NaCkA,BuKnDaaiTe nakyBaIbHi MaTepiAn y BiIDNoBIDHn KOHTeHep KOMyHaJIbHnx OpraH3aui DnJ NIKBdaui BIXOxDIB.

Ctapi npianda
Ha npodykti a6o Ha
Ioro ynaKyaBahiO3haue,io
daHn npOyKT He nDnrae
ytunlaui jk nobTyOBcMITTA.
3amictb zuoro Heo6xIDHa NOro
nepeDaayu BIDNOBIDHNIpyHKT
3bopy dnynepepo6kn
eNEKTPnuHoro I eNEKTPoHoro
yCTaTkyBAHN. 3a6e3neuyouu
npabInbHy ytni3auio daHoro
npOdykTu, BN donomaraete
3anobirtn HeratNBHM Hacniikam
dJa HabKOJIuHBo rcepeOBuua i
3IOpOB'aIIOei, npuHNO knx
MOKe cTaTHn HnPaBnBHe
noBOJKeHHN 3 BiXoDAmN daHoro
npOdykTu. DnA oepXaHH
DOKnadHIoi iHΦopMaui npo
nepeo6ky DaHOR npOdykTu, 6yb
Iacka, 38'jkbc3 BaIoHO
MICueBOIO McbkoHO
aDMHiCTpaUcEIO, pPeclTabHNKOM
BaWoo CnyKbo ytni3aui
UA
nobyoRO CMITTA 603 KpamHnueO, De BN npudabnn npdykT.
3araIbHI npaBnla KopncTyBaHHa
KyxOHn KOM6aH 3diuCHIOE
6araTo OepauN IO npuroTyBaHHO
iiKi.
MikcepmoxhabnKOpncToByBatn IINI pInrOryBaHHB EBNKOI KINbKOCTI 3MiWahnx HanoIB, INRA KOENH NBody, NoDpi6HOBAHN HpykTIB Ta OBOiv i T.D.
- YHIBEpcalbHa cekui MoKe BHKOPNCTOBYBATUNI
- npnroTyBaHHr TicTa...
- nopi6HeHHa M'ca, ropixib Ta noi6Hnx npodykTIB ...
-pi3aHHaHTnpaHHa60 pO3TupaHHOBoYIBTa4pyKT
-Hapi3kn Kaptonni Dna XapeHHa ...
-36BbAHH KpemIB TaReCHNX 6iKIB ...
-BNKKMaHnJIIMOHIB, anelbcnHIB, rpeinΦpyTIB
Cnctema 6e3neKn
PpnaMae dekinbka 3ac06iB 6e3neK.
Mikcep i yHibepcaIbHy emHicTh BoKHa BnKOpNCTOByBATNI TJIbKN KOIN npaBnIbHO BCTaHOBNeHa BiIOBIDA HmHicTh i KpUka Do Hei.
YHIBePCaIbHy EMHICTb MOXHa BNKOPNCOTByBaTn TiNbKn KOJN Bi'EdHaHa EMHICTb MIcEpa I Ha npNBiMikcepa BCTaHOBNeHa 3axuCha (MaI.1/T i4) KpnuKa.

IITn He NOBHHI 3HaxOHTNcra no6nn3 npna.

PpIJaOM MoKHa KOpNCTyBaTnC TINbKn Ha pIBHi, cyXi po6oii nobepxhi.
3anobixhnik nepehaBaHTaKeHb
B daHOMynpuiJani neped6auehe 3axnche BmikKaHH,IO BmikKaepuJaad kUo biN noHnae neperpiBatncr, 3axnauohny npuaBid ncyBaHH. KOni ce TpanIaeTbcR, cnpaubOBye KHonka- 3anobixhNk (MaI.1/N)

Kuo ce Tpannctbcr, 3p6ihtb Hactynhe. He BkOHaHH daHoi npoueDpym MOKe np3BecTn DO nCyBaHHnpuNaJy,Ke He niJaRa e rapaHTiHOMy pemOHTy.

PpnaMaeoxoNoHyTxOa6 15cekyHd.

NobepnIb perynatop wBnKocti (Man.1/1) BnIBo Ha no3HaKy "0" (Man. 16/①).

3HIMtB emHicTh Mikcepa YHIBepcaIbHy emHICTb (Ma1. 16/2 i ③), k ce onncaHO B daHIN IHCTpyKUII NO KOpNCTyBaHHIO.

BnTnHtBnKkyKa6eHJXnBHeHH3po3EtKn(Ma1.17/①).

PoklaTb npnaHa 3aHIO qactHy, uob otpumatn doctyn Do HxkbOi qactHn (Ma1.17/②).

HaTnCHiB Ha KhoNky-3anO6ixHnK (Ma1.1/N) B HnXhHi
yactnHInpunady. JaOnOpnad
oxoOnHyB DoCTaTHbO, KHOnKa
HaTnCHetbcra (Ma1.17/③). JaKo
KHONka BuCKOHTb Ha3aD ToDi
npnady Notpi6Ho OxOnHOHTu ige
nicra Yoro NobTopitb npoeDpy.

KIO KNOKA BDAIOCA HATNCHTN, NOCTABTENPUNA B NORO 3BNUaHepo60e noJIOKeHHa (MaI.18/①).

BcTaBTe Ka6enb KINBnEHnBa po3eTKy (Man. 18/2).

IocTaBe Ha Micue EMHICTb Mikcepa YHIBepcaIbHy EMHICTb (Ma1. 18/3 i 4), kE OONCAHO B daHIN IHCTpyKUII NO KOPNUYBaHHIO.

PnnaIAD roTOBNI DO BNKOPNCaHNA NobepHITb perynTOp WbNkOcTi Ha notpi6Hy no3uio (Man. 18/5) i
npoOByTe npoueDpy,ky6yno nepepbHO.
BCTaHOBIb 3akpmbaHOy KPNsKy (MaI.1/D)i aφikcyiTe II
Mikcep
Mikcep MoKHa BnKOpNCToBvBaTn
IINr PnIROTyBaHHBENIKOi
KINbKOcTI 3MIuAHNX HANOIB, DnRA
KOneHHN JbOdy, NpOpiHOBaHH
ΦpyKtIB Ta OBOUIB i T.D.
Po60Ta 3 Mikcepom
BikpnTe KpNkUy (Ma. 1/C)i HANOBHITb EMHICTb Heo6xIDHMn IHrpeJeHTaM.N Ybara:He nepeBnuyte MaKcImaJIbHo Do3BOJEnHn O6'Em HanoBHeHHa 1,5 nIpa!
IiroTObKa Mikcepa
Uo6 BCTaHOBtN cMHiCt b Mikcepa notpiHo 3HrTn 3axnchy KpnKny npbOy (MaN.1/T i4) Mikcepa.
IIOBepHITb 3axnchy KpnuKyo3a roHHNKOBOo Ctpinko0 i 3HIMtB. -CepBOHa nonepdxkyBaIbHa Iamna (MaI.4/a) noyHe MM
IocTabeMHCbDn3MiWyBaHHa (Ma1.1/Bi2)Ha npBmikcepa (ctpiKaHnCtpiKoO △)i NOBepHTb npOTn rOuHHNKOBoi cptiKn Do 3ynHKn.Bn noyTe xapakTePHn 3ByK:EMHcTb DnA 3MiWyBaHHa 3aΦIKCOBaHO.DBi QOpHi cTpiKn NobHHcnIBnadTu. -YepBoHa nonepdKyBaNbHa namna (Ma1.4/a)notyxhe.
TINbKnIg AFP 850: NocTaBKe KpNk Ky MlKepa (MaI. 1/C i 3) Ha EMHicTb MlKcepa i NOBepHtB, IIO6 HOCNK KpNkN 6yB Na pUkoJ. Bn NoHyTe XapaKTepHn 3ByK: KpNk Ky 3aΦiKcObaHo.
Mikcep MOXHA BKNIOUaTN TINbKNOI cMHIcTB i KPNuKa npabUNbHO BCTaHOBJeHi.
TINbKn DnA AFP 880: NocTaBte KpNk Ky MIKcepa Ha emHicTb Mikcepa.
i Mikcep MoxHa BKnHoyaT N TjBKn KOJI EmHiCTb npabNlBHO BCTaHOBneHa.
iPiJyac 3MiUyBaHHHaCtynHl IHrpeiHTn MoKHa DoaBAtu yepe3 OTbip y KpNusi. FikCyHoua Kpnka (MaI. 1/D) TeK MoKe BIKOPNCOTByBaTnCn DnA 3anpaKn IHrpeiHTI.KoXHOrO pa3y 3akPbAte OTbip HeraiHo, u06 yHNKHHTn PO36pN3KyBaHHra.
BMMKAnHm Mikcepy: NoBepHITb peryIaTOp WbNdkOci (Ma.n. 1/1) BnpaBO Ha baxKaHy WbNdkiCt b i HATNCHTb KHONKy "Pynbc"(Ma.n. 1/J).
i PeKOMeHdyetbcn noHNHaTn 3 Hn3bkoI WbNdkoCTi i NOTIM II 36nbWyBatn. Mkcep npaueoe Ha MaKcMaBHi WbNdkoCTi npn HATNCHYTI KHOJI "nybc". 3BeptaTeCb do poziny "Opadn NO BHKOPnCTaHHIO Mkcep" 3a peKOMeHdoBaHmM yCTaHOBkAmn WbNdkoCTi.
BumkaHH npnay: noBepHITb peryIaTOp WBNdkocTi Ha no3HaKy "0".
3aikHbWn 3MiUyBaHHn, NOBepHiTb EMHicTb3a roHNHHKOBOIO CTpIKOIO i 3HIMtB. Notim NOBepHiTb KpnKky i 3HIMtB II.
YHIBEpcalbHa cekciA
HacaikimOxNIOBocTiix BnKOpNCtAHHa
HactynHi HacaKm MOxTyb BnKOpNCToBvBaTncB yHibepcAnbHi cekii:
-ДИСКДПЗИВAHн(Man.1/R) 36ИВАнг КрEMiB TaЯЧиX 6IKNIB, ПИROТУВАнг КрEMiB Ta pIrkOrO TICTa.
Metanebe ne3o (MaJ.1/Q) IIN noPi6HeHH CnpO rCa, wokonady, ropixib i T.D.
-Пл actkoBeJe3o(MaI.1/P) 3amiyBaHHTbepdOrToTicTa
TpIMaC BCTABOK (MaI. 1/O) 3 pIXyOHO BCTABKOHO (MaI. 10) BCTABM MAOTb NOMITky 3a HOMEPOm (BID 1 Do 6) Ha pyuCi. IOTpiBa H BCTABKa BCTAHOBJIIOEbCB R TpIMaH BCTABOK.
1 Tohka Hapi3ka
Дя рizань OBOyIB,фpyKTB, Cnporo M'ra ca 60 KOB6acn (Hanp. calmi) i T.D. TOHKMMCKN6kAMN.
PG1HaTnpaHnKaPtonnI nHaTnpaHHKaPtonnI.
3 Hapi3ka Kaptonni
Дя hapizkn Kaptonni dny
JapeHHa.
4HaTnpaHnC npy
IJa HATnpaHH TBePdoRo
Cnpy, Happ. napMe3any i T.D.
5 Fpy6e po3TnpaHHn Innr py6oro po3TnpaHHn OBOuIB Ta φpykTB i T.D.
6 ToHKe po3TnpaHHn
ДЯToHKOro po3TnpaHHn
OBOiB TaФpyKtIb, WOKoJaNy,
YacHNKy i T.D.
PiIroTOBka yHIBepcaIbHOI cekii
BcTaHOBiTb 3axnchy KpnuKy (MaJ.4)
YHIBEPcAInbHy EMHICTb MOXHa BIKOPNCOTByBaTn TINBKn KOIN BiD'EnHaHa EMHICTb MIKcepa I Ha npNBI MIKcepa BCTaHOBneHa 3axncha (MaI.1/T i4) KpnuKa.
3HIMITb EMHICTb DnA 3MiUyBaHHa, Rk Bka3aHO B po3diNl "Mikcep". -CepBOHa nonepdKyBaIbHa lamna (MaJ.4/a) noOHe Mmrtu
BcTaHOBtB 3axnCHy KpnuKHa npNbID MlKcepa (no3HaUka HAD no3HaKoO O I NOBepHITbnpOTn YacBOoi CTpINKI DO 3ynnKn. Bn NOyTe XapaKTepHNI 3Byk: 3axnCHy KpnuKy 3aqiKcoBaHo. No3HaKa NOBnHnBaYtn HAD nonepeJxvBaJIbHO JAMnIO (Man.4).
- UepBoHa nonepKyBaIbHa nAmna (MaI. 4/a) NoTyXHe.
YctaHObKa yHibepcAnbHoi CMHOCTI (Man. 5)
BCTaHOIByHbepcAebHy EMHicThb (MaI.1/G)Ha npnIad (ctpiKa HAD cTpiKOIO △) i NOBepHIb npOTn roHHNkoBOOJI cTpiKn Do 3ynHKn.BnNohye XapakTePHNI 3ByK: yHbepcAebHy EMHcTb 3aΦICCOBAHO.DBIuOpHi cTpiKn IOBHHi cnBnaDAtn.
YcTaHOBKaBaJa (MaJI.7)
BctaHOBtB BAN (MaN. 1/H) Ha Wtnp B ueHTpi yHibepcaIbHOI EMHOCTi.
YcTaHOBka HacaIOK
MoxHa BnKOpNCTOByBaTu HAcTyNHi HacaKn:
-Диckдя36иванн(MaI.1/R)abo
- Metanebe ne3o (man. 1/Q) a60
-Пл actikoboeJIe3O(MaI.1/P)a6o
- TpMaH BCTaBOK (MaI. 1/O) 3 pIKyOIO BCTaBKOIO (MaI. 9)
B TpIMaH BCTaBKn NOTpi6Ho BCTaHOBHTN BiINOBiHNy BCTaBky 3aJExKHO Bi 3aBdaHHA (INB. "YcTaHOBA pIKyOoi BCTaBKn B TpIMaH BCTaBKn").
BCTaHOBITb NOTPI6Hy HacaIky Ha BAN.
-ДИСКДПЯ36иВаHHЯ,MeTajneBeIe3o i nnaCTNKOBe Ie3o (MaN.8)MaHOTb 3iINITnC3 3y6uKamB HxKHi yactnH Bana.
- TpmaHacaKn (mJ.11) NOBHeH 6yTu NoBepx WeCTNkyTHoi YactnHbana
TpMaay BCTaBKn 6aKaHo TpMaTn, DbOMa naIbCuMn 3a CneuaJIbHi OTBOpN.
YcTaHOBKa KpMUsKn (MaJ.6)
BCTAHOBiTB KPNKUy (MaI.1/F)Ha yHIBePCaIbHy EMHCtB (CTPINKa HAD CTPIKOHO i NOBEPHIb npOTn ROHNHHKOBOI CTPINKn DO 3ynHKn.Bn NoCyTe XapakTepnN 3ByK:KPNIk Ky 3aΦIKCOBaHo.HocNK KPNK MAc 6yt N Ad pyKoTO TaK, UO6 OOpHi CTPIKN cnIBNaJaN.
BCTaBTe wTOBxAu (MaJ.1/E) BOTBIP KpUkN.
YctaHOBka pixyoo BCTaBKn B TpMaay BCTaBKn (MaJ.10)
Notpi6Ha BCTaBA Ka
BCTaHOBJIOEeBCa B TpIMaY
BCTaBOK B 3aJIeXHOcti BiD NotpeBn.
BCTaBKn 36epiraToBcB CneuaJIbHo npn3HaueHOMy BIDIneHHI (MaN.1/K) B Kopnyci MOTopa.
BcTaBKn Dnyke roctpi. TpHMaTn iX noTpi6HO TiNbKn 3a pyky!
BIDKpNIte BIDININEHNNBCTABOK NOTRHyBUN 3a pyky (man.9).
B3bMItb 3a pyky npTpi6Hy BCTaKy 3 BiDineHHn BCTaBOK (MaI.9).
BCTaHOBITbCTaBkyOndHMKiHcEM B CEHTpTrIMaHa BCTaBKn,aIHUM KINHcEMBMicHeHa06oDiNCKa (MaI.10).
Uo6BNTTnBCtABkynerEhko notarHITbpykyHa3OBhi i NiHIMITb.
Po6ota 3 yHIBepcaIbHOIO cekciEIO
BikpnTe KpNkny (Ma1.1/F)i HAnOBHtB cMHiCTb Heo6xIDHMn iHrpeiEHTAMN.
Ybara:He nepeBnUyTe MaKcMaJIbHO Do3BOJIeHn O6'EM HAnOBHeHHr:
-piHa1,75nirpa TBepeOBHn1,5nirpa
iPiJ Yac 3MiUyBaHHHaHAcTynHi IHRpeiHTM MoXHa DoaBaTn Uepe3 OTBip y Kpnu. JTOBXaH (MaI.1/E) TeK MoXe BIKOPNCOTByBaTnc DnA 3aPabKn IHRpeiHTIb.KoXHOrO pa3y 3akpNaBeTe OTBip HeraHo, IO6 yHNKHUTn PO36pN3KyBaHH.
IpaouteTinbkn3uTOBXaYem, kno nptipHO daBHTn Ha npOdyKTn, 0o BN pike!
BMMKAnHn npuJaNy: NOBepHi b perynTOp wBnKocTi (MaN.1/1) BnpaBO Ha 6axaHy WBNkicTB i HATNCHTb KHONKy "nyIbc" (MaN.1/J).
i PeKOMeHdyETbcra NOHaHTn 3 Hn3bKOI WBNkOcTi I NOTIM II 36JIbSyBaTn. PpnaI npaIOe Ha MaKcMmAbHi WBNkOcTi pN HAChyTI KONU"nylbC".
UA
3BepTaIeTcBdo po3diny "PopaHn no BnKOpNCtAHNO yHIBepCaNbHOi cekui" 3a peKOMeHDoBaHmU yCTaHOBkAMu WbNdkOcTi.

Kuo nonepdxyBaJbHa JAMna
NouHaC MrgaTI i npuaI
HEMOXJIbBO BBIMKHuyT,ue
O3Haac, 0o 3axncha Kpuka dJa
npBDOy Mikcepa (Ma1.1/1i4)
HENpaBnblHO BCTaHOBNeHa.

BmkaHn npnay: nobephiTb pernyaTOp wBnKoCTi Ha no3haKy "0".

3aikHbwn 3mUyBaHHn, NOBepHiTb cMHCt63a roHHNKOBIO cTpinkoio i 3HIMtB.

KpuiuKy MoxHa 3Himatn TijbKn KOnn HacaKn npnnnnn noepTaTnc.

3HimItb HacaKy i BaJ.

NoBepHtbyHibepCanbHy EMHICTb3a rOHHNKOBHO CTPIKIO i 3HIMITb.
PrecdnyuTpycoBnx
Iirotobka (Ma1. 13)
YCTaHOBtByHIBePcAblbHyemHiCTb, RkONncaHO Bnue (MaJ.5)
BCTaHOIBIb rpaTAcTy BCTaKy UHTpycoBOrnpecy (MaN.13/a)Ha yHIBepcaJIbHy EMHCtB (ctpiKna HAD cTpiKOIO △) i NOBepHiB npOTn roDHHNKOBoi cTpiKn Do 3ynHNk. Bu Nooye XapaKTePHN 3ByK: rpaTAcTa BCTabKa 3aΦiKcObaHa, cTpiKA NOBHHa CnIBnadTu 3i cTpiKOIO
BCTABTE KOHc (MaI. 13/b) Ha rpaTaycty BCTABky.
Pobota 3 npecom dny uTpycoBux

BmkaHn npnnay: nobepHi bpeynatop wbnkocti (MaI. 1/I) Bnpabo Ha no3nauky 1.

LITpycoBNI pec NOBHeH npauOBaTN TlBKn Ha MIImaIbHi WBNKOCTI.

BumkaHH npnla: noBepHITb peryIaTOp WbNdkocTi Ha No3HaKy "0".

3HIMITb KOHyc NiCnB BUKOpNCaHHa.

NobepHtB rpatyacty BCTaBky 3a roHHNKOBHO CTpINKOIO 3HIMtB.

NObepHt b yHBepcaIbHy EMHicTb3a rOHNHHKOBHO CTpiIKoIO 3HiMITb.

PpIJaM MoKe IpaCIOBAtn He 6iNbSe 10 XbNInH 6e3 3ynnKn. PpIJaDy Ntpi6Ho OxIoHOHTn KOKHOrO pa3y nicra TprBaNoi, 6e3nepePBHOi pOBTo (HaIMeHs 20 XbNInH nicra KOKHNX 10 XbNInH 6e3nepePBHOi pOBTo).
UHnueHHaI DOrJa
Kopnyc MoTopa

PiHa He noBnHa nToPannrB KOpnyc MOTopa!

MnTe Kopnyc MOTopa BOJoroIO raHvipko! He 3aHypnoIte y BDOy i He TpMaIte nID npOTouHO BOJO!
Mikcep

EMHICTbIe30MOXHaJIERKO I npaBnIbHO YNCTHTN 3a DOnOMOHO KHOKN "Tylbc".

3anOBHtB emHICTb mKcepa HANONOBHy TEnIOo (He rapraHO!) BOIOI IO6BaTe DeKiIbKa Kanenb MInOyOrO 3acOby.

HaTnCHiTi b I BiDnyCtITb KhoNkY "nyIbC".

IOTIM npomnTe emHictb nipnpoTuHO BOIO.
3HHTI yctAHOBKa ne3a Mikcepa (Ma.14)
i Kkuo Heo6xHIO,Ne3o Mkcepa MOXHa 3HrTu BmHTu OkpeMo.
Ybara:Je3oDyke roctpe! He6e3neKa TpaBMyBaHHr
3BilbHtJe3oMikcepa(Ma1.14/a) 3EMHOCTi MlKcepA:CKOpNCaTteCra 3aKpNbAIOHO KpnIkoHO(Ma1.1/Di Ma1.14/c)k INCTpyMeHTOM. BnIMKaHa 3akPbAouHi KpnUcI cNIBnAaTOB 3 BuCTynAmu Ha 6NoJI 3Je3OM.NOBepHIb npOTn roDHHNKOBoI CTPIINK i BNIMITb, oBepeXHO TpIMaOHn iDkyTOM.
3HIMITb npoknaKy (MaI. 14/b) 3a ne3a MlKcepa.
JNe30 dyke roctpe. IpoknaKy MOxHa 3incybaTn.
I Ipnomnte Detani o6epexho pykamn (He6e3neka TpaBmyBaHH!.MnTe TIlbKn BOIOIO MNOUHM 3acO6OM. He MnTeJe3o Mikcepa B NocydomnHi MaunHi.
BcTaBTe npoknaKy Ha ocHOBy ne3a.
BCTABTeJe3oBEMHICTb3H3y. TpIMaIteJe3oPiNeBeNikKm KytOM.3akpyTt6bnok3Je3om, BnKOpNCTOBYUOu3AkPBAUoy KpnkkyIKHCTpyMeNTNOBepTaOuy 3a RoHHKOBOIO CTPiIKOo (MaI.14).
YHIEpcalbHa cMHiCTb i Hacaikn
YHIBEpcanbHy EMHICTi Hacaikn CIIIMMTN BIpOTOHBIODI.
YBara: MetaneBe ne3o duKe roctpe! He6e3neka TpaBMyBaHH!
!PiactNKoBI deTani 3HOwYOTbcra WBNiue, kUO MNTn iX B NocydomNHiMaunHi. KUo BCE X BNHKae Heo6xDiHCTb MNTn iX B NocydomNHiMaunHi,Knactn iX NOTpioHO B BepxHIO KOp3Hy.
BCTaBKn
MnIte BCTABK3 MOaJIKOIO YI raHIpKOIO NiD npOTOHIO BOHO a6oB NOcyDomNIHmMaUNHi!
Ybara:BCTaBKn DyJKe roCtpil He6e3neKa TpaBMvBaHH!
36epiraHn
Bci Detani kpm uTrpycoBo rnpeca MoKHa 36epiratn 6e3nocepEnHbO y npnaDi.
36epiraTe BCTaBKn B cneuaJIbHO npn3haueHomy BiDineHHI (MaI.1/K).
Ybara:BcTaBKn dyKe roCTpi. He6e3neKa TpaBMyBaHHa! TpMaTuix notpi6Ho TiNbKn 3a pyky!
TpmaTe HacaKn B yHBepcalbHi E MHOCTI, K noka3aHo Ha MaI.12.
YBara: MetaneBe Ne3o (MaN. 1/Q)
Haad3BnuaHNO roCTpe!
He6e3neKa TpaBMyBaHHa!
MetaneBe Ne3o cnI d TpMAtn
TilbKn 3a pyKy i36epiratn TilbKn 3
npOTekTopom ne3a!
- HamotaTe Ka6enb Ha DaBa KpOKn Ha 3aHni YactnHi npnady (MaI.15).
TexhichiXapakTepncTnKn
Hanpyra B mepexi: 230 - 240 V
CnoKmbaHnTpyKHiCTb:800BT
Te3n ypein ca cbo6pa3EH CbC cnEHNTE EC NipeKTNBn:
-ДиpeKTHBa 3a HnCbK BOITaX2006/95/EC
EMCДирекТиBa89/336/EECc n3MeHeHne 92/31/EEC n93/68/EEC
PekomeHdauci no KopncTyBaHHIO
Mikcep
Mikcep do6pe nixoxntb dna npdi6henn HeBENKx 06'EMi iKi, kropixn, xli6 tpaBn.
Coycn,po3oapyBaIncra, MoKHa WBNIO NOBepHyTn Do ix IOnpeHbOro CTAHy 3a DOnOMOrOIO Mkcepa.
- Iopixte afo nolamaiTe npodyktnIgnaMikcepa Ha ky6npo3mipom 2-3 cm.
3aBKn BnMaIte KICTOcK 3
4pykTIB i KICTKN 3 M'ra, TOMy IO
BOH MoKyTb 3iNcyBaTu Ne30
Mikcepa.
KoJIeHHaJIbOy:3aBxIN IOdaBaIte TPOXn BOuN BcMHiCTb nepeKD OJIeHHaM JbOy.
Pnpo60i cyxMm CymuAMMOKe 6yTN Heo6XiHO BIMNKATN npnaJ Tac BiD Yacy, BiKpNBaTn KpiuKy Mikocep a 3ickpi6aTn Cymu3i CTIOK EMHOCTI uKpe6kOM.
- Pn3miuBaHHi piKnx i TbePnx iHrpdeIeHTB cnoaTky 3MiuaTe piKni npOyKTN, a NotIMdoJaBaTe cyxi iHrpdeIeHTN.
- Fapaym piDnHAM Heo6xioHOn datn oxonohnytn nepeod o6p0koB mikcepi.
KuO noTpi6Ho 3MiuaTu rapuH ihrpeiEHTN,EMHICTb DnA 3MiyBaHHNoTpi6Ho npoBtPNTu BIKPNBUN 3aKnPBauOy KpuWky.
| Пюдунк 斯видасты* 3аувашия | |||
| Змішувань | Молочни кокейни | 5-10 | Викусястовскиехозал'dе молочи. |
| Пождөння | Горixи,шokолад,часник, trари | Пүлс | Образл'te тільки S чашки за одinerраз,шоб подөння булэ ретөлнim |
| Приготүvalпнүпанэрүvalын x сухаigraph | Бүлү, пechимо, тости | 5-10 | Покрштөрөд ошөбкөд |
| Калення льду | Пүлс | Д一步一步е щашку вodи.Нат生态系统 "пүлс" 3-4 рази. | |
| Приготүvalпнү emүлбий | Принрава до canatу | 7-10 | Змішүte ретөлби.Можна д一步一步и оллio черэн отвир в кршлү в поцесi змішvalань. |
| Змішувань | Сүмішдя торговп TCIO Ддя млинцIB | 1 | Змішүte iHRpeɪd'eHTN ретөлби. He зbethайтze зандTo дobro, |
| Приготүvalпнү пcope | Сүл, овонi, Фруktи | 3-10 | Д一步一步и не с低调е ryстю |
*3aBxDn nouHaNe 3 Hn3bKOUI BUnkOcTi i notim 36ilbwyIte ii.
UA
YhibepcaIbHa cekia
Iopip6HHeHH
ДяОТРIMMaHЯ OJHOpiDHOI MaCn WMATKДЯOBpO6KMaOTb 6yTN OJHaKOBOro po3Mipy. IpojYkTn notpi6Ho po3pi3aTu a6o po3diNtTu Ha WMATKДЯHaKOBOro po3Mipy nepeД o6p6ko.
EMHCTb He NOBHHa 6yTN 3aHaTTO 3aIOBHeHOJ.
Py6neHe M'raCo
HapiXTe M'aco Ky6nKamn po3mipom np6nn3HO 2cm nepeD o6p6koJ.
Obooyi
3HIMITb 3OBOyIB, a Taki KcU6yIpo3piKTe Ha YoTnpuCACTINH NpeD O6pO6KOIO.
3miuBaHHa
O6'EM dIa o6p6Kn 3aJIeKHTb BiD B'83KoCTi npOyKTIB.
DoaBaHnIhPeJeCHTiB
HanobHtB cMHcTb cyxMn
IhrpeiHTAM, TAKMN JK
60pOuHO, nepeo6pO6ko.
IhrpeiHTN He NotpiHo
3MiUyBaTu nepeo6pO6koB
Mikcepi.PiKi IhrpeiHTN MoXHa
doBaTu uee3 OTBip B Kpnu B
npoueci 3MiUyBaHH.
Pikhi hPrpeiHm MoXHa DoaBaTn uepe3 OTBip B KpnuB npoecci 3MiUyBaHHa.
3BepHt b yary: npn poboti 3 coycamn a6o HanibpiKmnn iHrpeiHtAm MoKe 6ytn He06xIDHO BMMKaTn Ppnaad Yac BiJ uacy, BiIKpNBaTN KpuKy EMHOCTI 3ickpiBaTN Cymu 3i CTIHOK EMHOCTI Wkpe6kom.
Pobota 3 Tpmaqem BCTaBKn.
PpabnIbHe DoaBaHn npOyKtIB uepe3 OTBip y Kpuuzi Dyke BaxnBO.
HapiKTe nIroTOBNeHi npOyKTn Deo MeHmM mMaTkAmn RaKIO HeoXiIdHO, 0b BOHn IerKO npoxOuNNCKp3b OTBip y KpnU.
IodabaBaiTe npOdyKTN BeptNkAJIbHO i OHOaCHO Yepe3 OTBip B KpnUzI.
PIBHOMIPHO HATNCKaIe TOBkaem Ha npOdykTN, 10 NOaIOTbcra. Bi pIBHr TnCKy 3aJEnKtB KOHcHTpaui HAip3aHx npOdykTb.

IdoaOuH npOdyKTH KOxHOro
HaCTyHOrO pa3y, KopcTsyTeCra
TINbKn wTOBXaYem. He
BCTpOMnIe naIbci B OTBip
KpiuNk!
KuTO TnCHyTN WToBxAqEm DnyKe CNJbHO,MOKH3incyBaTu npnAn.

Mix wTOBxaHem i TpIMaHem BCTABKn 3aBXKn 3aJIINsAeTbcr TPOXn He nepepo6neHoro npOdykTy.
HaTnpaHnC npy
Oxonoitb m'kni cnp, TaKni kEmeHTaIb a6o Moapena nepeH HATnPaHHaM.
Takn Cnp, JapMe3aH Mae 6yTu KIMHaTHOI TEMpepatyp.
3BepHtbybary: NapMeaH cnid o6pO6JIaTn 3 HeBeJIHKM TcCKOM Ha wTOBXaY.
Ba3OBn peCNT nICKOBOro ticta
250r 60pouho
- noxka po3nyuBaay
125 r xoIodHm Maprapn a6o Macno
60r u y
1iinkacinb
1yue
1 CT. JOKKa XOJIOHa BOda
Heo6xidihiHCTpyMeHTN: yHIBePCaIbHa EMHICTb 3 nlaactIKOBIM Je3OM
Tnoklaitb B EMHicb 60pouho, po3nyuBaay, cib Ta Lykop. IopixTe xoJOnHe MaCNo Ha UMaTKn i DoaIte Noro.
Ipepeiuyte6i1xBnHnHa 乌dkocti3-4,Doaateyue ixoNDHyBOyyepe3OTbipi npoobkyTe nepeiuyBaTN,DOKn TICTO He yTBOPNTb KJIO DOBKOna ne3a.
BnIMtB TICTO 3 EMHOCTI I npoDObKyIte 3amUyBaTu pykAMN.
Poknajitb ticTo B xOJnJIbHnK Ha 30 XBnINH npeD noJaIbWIOo 6pO6KOIO.
Po3kaaTe TicTo, BUNOxItbB DObpe 3Ma3aHy MacIOM fOpMy I DoaTe cpykTN, HAnp. RaNyKa Yn CInBn 3a BaKaHHM
Ba3OBn pecnt dpixdkoBO ricta
500r 6opouHNO
40 r 1 ynpkki cyxix npikkiv
80 r o u y p K op 1 winka cinb
80 r Maprapn, po3oTOnJIeHn
200 Mm TENMe MOKO
Heo6xidihi hCTpyMeHTn: yHIBepCaIbHa cMHICTb 3 nlaactNKOBIMJe3OM
Ioknaidihtb iHrpeieHTN B cMHiCTb Byka3aHOMy npAky.
3MiUyIe BiD 1 Do 1/2 XBUNH Ha WBNKoCTi 3-4, DOKN TICTo He YTBOPITb KJIO DOBKONA Ne3a.
BnmiTb ticTo 3 EMHOCTi npoDobKyIte 3amiyBaTu pykAm.
NotimdoaHTeBticTo pykamn IHRpeiEHTN,ki He notpi6Ho NoppiHOBATN,Hanp.izom.
IpeepnoaBbwoo 06pO6koD aTe TCTy niiITn B HAKPITi EMHOCTI B TENlOMy Mci ci 06 Ioro 06'EM 36iNbWBCB BDbvi.
Moknbocti npnaady:
PneTeHnn dpixdkxOBn Xnib,
y3OpHe dpixdkxOBe neuBO,
Bikpnti ppykTObi nporri,
npoxhna.
Dn npiroToyBaHH npraHx
nporib, Hanpknad npora 3
unbyeO, roTyte dpixdkxOBe ticTo
6e3doabAHncaKypy.