
XAC1200 - Router LINKSYS - Free user manual and instructions
Find the device manual for free XAC1200 LINKSYS in PDF.
| Product Type | Smart Wi-Fi AC1200 Wireless Modem Router |
| Brand | Linksys |
| Model | XAC1200 |
| Dimensions | 256 x 40 x 184 mm |
| Weight | 501 g |
| Power Supply | 12 V, 2 A |
| Frequency Bands | 2.4 GHz and 5 GHz |
| Number of Antennas | 2 (2.4 GHz) + 2 (5 GHz) |
| Ports | Power, USB, Internet (yellow), Ethernet (1-4, blue, Gigabit) |
| Switch Port Speed | 10/100/1000 Mbps (Gigabit Ethernet) |
| Wireless Security | WEP, WPA, WPA2, RADIUS, encryption up to 128 bits |
| Key Features | Dual-band Wi-Fi, ADSL2+ modem, parental controls, guest access, media prioritization, USB storage, speed test |
| ADSL Standards | ADSL2+ |
| Wall Mount | Yes, 82 mm spacing |
| Operating Temperature | 0 to 40 °C |
| Operating Humidity | 10 to 80% RH non-condensing |
| Care and Cleaning | Unplug before cleaning. Use a dry cloth. Do not use abrasive products. |
| Spare Parts and Repairability | Power adapter included. No user-serviceable parts. |
Frequently Asked Questions - XAC1200 LINKSYS
User questions about XAC1200 LINKSYS
0 question about this device. Answer the ones you know or ask your own.
Ask a new question about this device
Download the instructions for your Router in PDF format for free! Find your manual XAC1200 - LINKSYS and take your electronic device back in hand. On this page are published all the documents necessary for the use of your device. XAC1200 by LINKSYS.
USER MANUAL XAC1200 LINKSYS
- 1
9.......Windows XP Service Pack - (Juaia nai juiyj) "Your Internet cable is not plugged in"
- . . . . . (a) "Cannot access your router"
1
12 . Linksys XAC1200
aieiie 1e ole o
- XAC1200
3 1
EA-Series
- 4 4
5...LinksysSmartWi-FiJus
5 LinksysSmartWi-Fi
5 1
Linksys XAC-Series
ciell 1e 1a 5di
aill biall
Wi-Fi Protected Setup
aayy0
yds yds yds yds yds yds yds yds yds
1
Jgauuuaauii gai j 1 a, aagaaaiyj gai j Sall .1
j 2
Jaaa Jaa a 3 aae aee ae aee aee aee
yall yll lal yll g4
S 1
Linksys XAC-Series
a_4 = 12
Linksys LdLdLdLdLdLdLdLdLdLdLdLdLdLdLdLdLdLdLdLdLdLdLdLdLdLdLdLdLdLdLdLdLdLdLdLdLdLdLdLdLdLdLdLdLdLdLdLdLdLdLd
:
4aalalal alalg aalal paa
1
4k > 3k
J 1 J 1 J 1 J 1 J 1 J 1 J 1 J 1 J 1 J 1 J 1 J 1 J 1 J 1 J 1 J 1 J 1 J 1 J 1 J 1 J 1 J 1 J 1 J 1 J 1 J 1 J 1 J 1 J 1 J 1 J 1 J 1 J 1 J 1 J
clauail jio uol jol lc gial icso
y
Lknsys.com/support
i
Help Linksys Smart Wi-Fi Linksys Smart Wi-Fi
(2041
4.12g all
gall jaiy iie Jaii 1
jll jll 4 jll jll jll jll jll jll jll jll jll jll jll jll jll jll jll jll jll jll jll jll jll jll jll jll jll jll jll jll jll jll jll jll jll jll jll jll jll jll jll jll jll jll jll
14.45gall gaiy 2
Media Prioritization
Ks#j jJl Jai aee jy jia 111 (ae jll) Speed Test

Speed Test
Ggess

GuestAccess
y 1 y

Parental Controls
Linksys XAC-Series
all
Slll lal (s) 1
aall 10000000000000000000000000000

Troubleshooting
Wileless
sJ 1 1 1 1 1 1 1 1 1 1 1 1 1 1
Wi-Fi Protected Setup

Wireless
Jusll USBdssu (USBj) USB Storage
jba jzj. FTP Jgog bailgall gag aal al 1a 1nla jna (jao
(.USB

USB Storage

Cnnectivity

Connectivity
Linksys XAC-Series
ylll jie! kkygall kyyknyknyknyknyknyknyknyknyknyknyknyknyknyknyknyknyknyknyknyknyknyknyknyknyknyknyknyknyknyknyknyknyknyknyknyknyknyknyknyknykny

Security
Linksys XAC-Series
Troubleshooting
1g2x0g 1b2
Windows XP Service Pack
Linksys Smart Wi-Fi Windows XP Jiaai jiai jiai jiai jiai jiai jiai jiai jiai jiai jiai jiai jiai jiai jiai jiai jiai jiai jiai jiai jiai jiai jiai jiai jiai jiai jiai jiai jiai jiai jiai jiai jiai jiai jiai
CaiyjyI yL pluulal dkiay aegbnll ciai1a jiy iia 0iyyi liui
:Service Pack 3 aoljdo
Microsoft Update - 1 (update.microsoft.com/windowsupdate)
Microsoft 2
g j 111111111111111111111111111111111111111111111111
Cai: ci dai jiān 1ai jiān 1ai
y la y a b d k. Linksys Smart Wi-Fi pla! pae alal plasuily jall gagall (lauwll sale) Reset jll jldnall gao bcl

Jgssll jalil gaiy glaiy jil 1 aja yj gssll yalld ayall jla Jyj yj p 1 1 1 1 1 1 1 1 1 1 1 1 1 1 1 1 1 1 1 1 1
Linksys XAC-Series
Troubleshooting
= g_0g_1 与 J g
Jlkiy jll 1gbiil gil, kii y juskll Jaiil pae aagall lgljgssll jiai
y
View Available Wireless Networks 2
gaiy
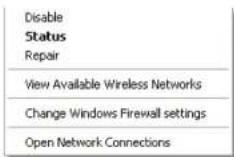
| Disable Status Repair |
| View Available Wireless Networks |
| Change Windows Firewall settings |
| Open Network Connections |
"Your Internet cable is not plugged in"
y1x1 = y2x2
APM103 ADSL2+ Power Modem paaa aai jia jao 1
aepal jaiil jaiil
APM103.485-486-487 ADSL2+Power Modem
APM103 ADSL2+ Power Modem .2 .DSL
gall 3
Linksys XAC-Series
Troubleshooting
Linksys E-Series 2
(Blal (BronzeEagle)
Password 1234567890123456789012345678901234567890123456789012345678901234567890123456789012345678901234567890123456789
(3)OK 2011
.2

jglgall 10 (JlJI) jgsal k5 124 JI Jy Iaalll 4 .4
gall jgsll kgs gss
yLay p3.Mac yuji jai jai jai aill jajai d aikd
L 1
JimsRouter 12001542535555555555555555555555555555555555555555555555555555555555555555555555555555555555555555555555555555
Linksys XAC-Series
J
7.25×1.58×10.8
山
184× 40× 256)
(501)36j17.67
212
3.2.3.1
CE, Wi-Fi a/b/g/n/draft ac, Windows 7
Windows 8, DLNA
(4010)10432
(60-20)140
80% 10
Lii 1iie aie
90% 5
jzai 2y
= 16 × 250
aalil gblal jll, aalllg jlll alglag aaii lal glall
Linksys.com/support
jai jzuiill oce algal
802.11 802.11 IEEE
J 1
i 1
aillglllagagkallpalaiaaiigJgagllalbaia jzilalalljag
g 1111111111111111111111
i#
LinksysXAC1200
Linksys XAC1200
Linksys Smart Wi-Fi Modem Router AC 1200
XAC1200
()10/100/1000
j53.2.4
Reset, Wi-Fi Protected Setup
(b)a 1
aalaiy
(1-4)
UPnP
WEP, WPA, WPA2, RADIUS
128
JooJIgoo
yssll aaleaep
+HFS,NTFS,FAT
T1.413i2, G.992.1 (G.DMT), G992.2 (G.Lite), G.992.3
JADSL2),G.992.5ADSL2+
A,B,M,L
j 4 Fox 4 j Internet Explorer 8
Google Chrome 10
Safari 4
jll jlll lllllllllllllllllllllllllllllllllllllllllllllllllllllllllllllllllllllllllllllllllllllllllllllllllllllllllllllllllllllllllll


Linksys cepna XAC
CbDbpKahne
CbDbpXaHne
06u npereJa npoayKta
XAC1200 1 OCTABHHe IIN CTHEH MOHTAK 3
HactpoBaHe Ha pytepa cepna EA
Kbnde haHamepuTe oue nOmou 4
Kak da nHctanipate pytepa .4
Kak da ce cbpxkTe KbM Linksys Smart Wi-Fi . . . . . . . . . . . . . . . . . . . . . . . . . . . . . . . . . . . . . . . . . . . . . . . . . . . . . . . . . . . . . . . . . . . . . . . . . . . . . . . . . . . Kak da ce cbpxkTe KbM Linksys Smart Wi-Fi 5 Kak da npomehite Hactpoiknite Ha pytepa 5
OTcTpaHЯBaHe Ha Hen3npaBHOCTN
Bawnpytepeehactpoehycnewho.9
Akranyn3aunC Windows XP cepBn3en naker. .9
Cbo6ueHue Your Internet cable is not plugged in (Bawuum unhemem Kaen He e BknoueH) 10
CboobueHue Cnnot access your router (HaMa docmbn do pymepa). 10
CneuΦkaun
Linksys XAC1200. 12
O6u npereIeHa npodyKta
XAC1200
U3rpeOtrope

- INHdkatopha CBeTnna -CBeTN noCToHHo B3eNeHO, Korato pyTeptbE bKnIOeH n cIe yCneuHO CbP3BaHe C Wi-Fi Protected Setup. Mra6abHo no BpeMe Ha 3apexKaheTo, npHa nApRpaXdaHe Ha fbpmyepa H noBpeMe h CbP3BaHe C Wi-Fi Protected Setup. Mra6b30 npr rpeka BWi-Fi Protected Setup.
U3rne o3a
- Byton Wi-Fi Protected SetupTM — HATINCHETe, 3a da KOHΦmHTpynpuate 3aunTaHa 6e3KmHnHaTbPb3Ka 3a MpeKOBU yCTpoNCTBa c AKTNBpAH Wi-Fi Protected Setup.
USB npT — CnOeTe DnCKoBO npocTpaHCTBO C npytn NoTpe6ntEn B mpeXATA INN B nHTepET. CbpxTe USB yCTPOCTBO KbM TO3n NOPT MoXeTe CbIO Taka DA CbBpxTe npHTep c USB n3BOIN da ro CnOeTe no MPexATA.
Ethernetnoprobe—CbpxeTe EthernetkabeniTE (Hapuahn Cbpo MPekobN kaebi) KbM Te3n CnH rna6nbTOBn (10/100/1000) noptoB n KbM KaebniTE Ethernet MPekOBYyCTPOINCTBA B MPeka.
3A6EJENKKA
3a da cn octnpynte Hn-do6pn xapakTePnTnK, n3non3BaTne ka6enCAT5E nn TaKnBA oN-BnCOKaTEROpn.
- INThepHET nopT — Cbpykete Ethernet ka6en (HapuHaN cbio MPekOB ININHTepHET Ka6en) KBM TO3N KblNT NOP T NkbM MoEMa.
- Byton 3a Hynipahe — Hattchete n 3aapbke T b npodbnkne Hn 10 cekHn (DOKATO CBTOnHHNKATOpNTe Ha nopTa 3anoohat da MmraT eHNOBpeMeHNO, 3a Hynipaate pyTePA do fapuHnTE My HactpOKnNo no ppa36pHaPe. MoKTe Da Bb3cTaHOBnTE HAcTpoKnTe No noPpa36pHaPe Nype3 Linksys Smart Wi-Fi.
3axpaHbaa npot CbpxKeTe BkIOueHnB KOMnEKA npomEHIMBOTOKOB 3axpaHbaa aanTep.
BytoHnHa3axpaHbHaTe-HaTncHeTe|BKn),3aJaBKnIOuHTe pyTepea. (Camo 3a MoJeNTe, npEHa3HaueHn 3a EC.)
Linksys cepnia XAC
06u npereIeHa npodyKta
3axpaHbau moem APM103 ADSL2+

HndkaTopHa CBETnHa:
Muraa 3eneha CBeTnHa: 3axpaHbaunr MoeM ce cIaptnpa n yctaHOBA ADSBb3ka
- NocToHHa 3eHeA CBeTmHa: ADSL e cHxpoHn3npaHa c DocTabuKa HnHTepHET yCny
Muraio Kexn6apeHo: Ipo6IeI npI pH3uECKTO Cbbp3BaHe KbM ADSL. (T.e.TeneoOHnrt Ka6e He cBbp3aH KbM CTehnnaKaK)
Byton 3a Hynipane:
PecTAtnpe:HaTnchTe H3aDpBxTe B npOdbNxKeHne Ha 1 cekyHda, CNEI TOBA OTNCHETe
Bb3ctaHOBAHe Ha HAcTPOKHTe No NOpa36npaHe:HaTnCHTe 3aDpXkTe B npOdbJIkeHHe Ha 5 ckyHm
- DSL nopt: Cbbp3Ba ce Kbm ADSL nHHnHa
NoCTaBHe npn CTeHcMHTax
Ha donnna nahan ha pytepa nma Dba Cnota 3a cTeHeh MOThax. Pa3cToHneto MeKdy T82 mm. 3a MoTHnpaHTo Ha pytepa ca Heo6xOuIMn Dba BnHTA.
3ABEJIEXKA
Linksys Hocn OTROBOPHOCT 3a 9eTI, pniuHHeN O T Heo6pe 3akpenen KOMIOHEHTN 3a CTHeH MOHTax.
CneBDAaTe HnCTpyKunTe:
- OnpeIeTe MCTOTo, Ha KoETo NCKate Da MOHTnPATE pyTepa. YBepeTe ce, ye cTeHata, KOrTo Iue n3N0JI3BaTe, e rAJa, PAba, cyHa N 3pPBA. OCBeh ToBa NPoBepTe DaNN MCTOTo E B 6n3OcT Do eNeKTpyCheckn KOHTaK.
2.ПобипгдьвотьогаВстената,КATOИЗПONБATEшблonaHa cnEDBaцагастанц.Уветe ce,Че пASTOHTOМEXДТЯ82 mm. - NocTaBe TBAHTOBeTe, Taka Ye rnaBnTe m Da Ce n3daBaT 3 mm.
4.ПОЗИСИНПАЕТУТЕТAPA,ЧЕСLOTOBETaCTEHEHMOHTAKdCaI NOДРABHEH CNPMAO DBATA BINTA. - Noctabete cIOTOBe 3a CTeHEH MOHTaK HAD BNTOBe I Nb3Hepe pyTepa HADONY, DOkATO BNTOBe BnA3at NbTHoB T E3N CIOTOBE.
WJ6IOH 3a CTeHeH MOHTAX
OTneuataaTe Ta3n CtpaHua B Maua6 100%.
Otpexete no nyktnpaHata liHHn HocTabe Bbpy CTHeTa, 3a da np6neTe pueun3HO OTBOPHT He CbOTBTHNE pa3CToHHN.
HactpoBaeHa pyTepa cepna EA
KbIe da haMepuTe oue nomou
OCBeB T TOBA pKOBODCTBO 3a NOTpe6NTeN MoKeTe Da NOLyUHTe NOMOu Ha CneHnTE MeCTa:
Linksys.com/support(DOKyMeHTaUma, MATEpHann 3a n3ternHe, 43B, TexHHuecka noDpBxKka, Hat BpealHO BpeMe, oopym)
- NOMOa 3a Linksys Smart Wi-Fi (cBbpxe ce c Linksys Smart Wi-Fi, cned KOETO KINKHeTe Bbpxy Help (NOMO) B rohpata hct Ha ekpHa)
Kak da nHcTaIpaTe pyTepa
1.AKcnyk3a 3amraHa Ha cbiueCTbByBaui pyTe, Tp6Ba Da ro N3KIOHHTe. BKnOHTe HOBn pyTe B 3axpaHbAHeTo.
2. Cbbpkete INtHepT Kabeena Ha MoDema KbM KbJTNHa INtHepT NoPT Ha pyTepa. N3uKaaiTe, DOKaTO CBeTONHdNAtokpToB HA zaxPaHbaHeTo OT PnpDHata CTpHa Ha pyTepa 3AnOueH da CEBTI NOCTONHHa CBETnHa.
3. UCTAHOBETBp63Ka KbM 3aunTeHATA 6e3KnUHa MPexKa, uHTo IMe e NOCOUEHO B PkOBoDCTBOTO 3a 6bp30 CTAPtHpAHe, KoTo cTe NOnyHnn 3aEDHO C pyTepa. (MOxete Na CmEHNTe MPEXOBO IMe IN nponata NOKbCHO, NOBpeMe HA HAcTPOKaTc HApTepa.) AKe CE HyKJaTe OT NOMOUI PnC BcbPBAHeTO Kb M PexKaTA, HAnPaBeTe CnpBaKBA B KOMNAKTINCKA KbM DOKUMEHTAUNrTa HA YcTPOuCBTO. 3a6eNeKKa: HMa Da NmATE DOCTbN Do INHTepHET Do OKOHATenHOTIO hCTaIINPAHe Ha pyTepa.
4. OTBopete ye6 6pay3bp n cneBaIte INCTpyKUInTe 3a 3abbpWBAHe Ha HAcTpoiKaTa HA pyTepa.AKO INCTpyKUInTe He ce nOKa3BaT B ye6 6pay3bpa, BBBeDeTe linksyssmartwifi.com BApechataJeHTa.
-
BkpaHaHAcTpoKaTaCnEaBaiTeyKa3aHmHaHaekpHa, 3aDaHAcTpOtne npoHnA cn 3a Linksys Smart Wi-Fi. H3noJ3BaIe Linksys Smart Wi-Fi, 3a da ynpablaBaTe necHO HAcTpoKITe Ha pyTepa, HanpMep:
-
PpommaHa HaMMeTo n NapoJaTa Ha pyTepa
Cb3daabaHndoctbn3a roctn
KoHpynpaHeHa pOHTeNCK KOHTpO
Cbbp3BaHe Ha yctpoiCTba KbMaBaaTaMpexa
TecTBaHe Ha CKOpocTTa Ha INHTepHET Bp3KaTa
3ABENEKKA:
Kato qact ohtaepoBaHTo h npOoH 3a Linksys Smart Wi-Fi ue B6bde n3npaTeHmEeN aotBpXdene.OTbopete HmEna ot Linksys NkKnkeH bPxy nocOeHATAbpKa.
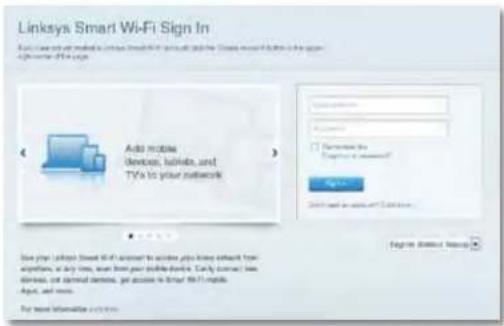
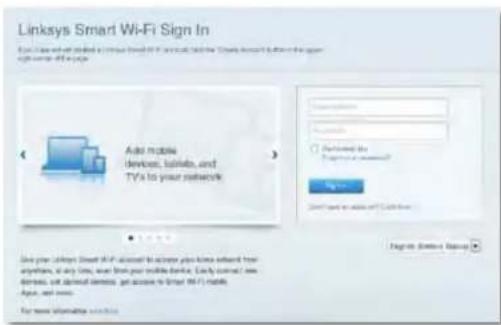
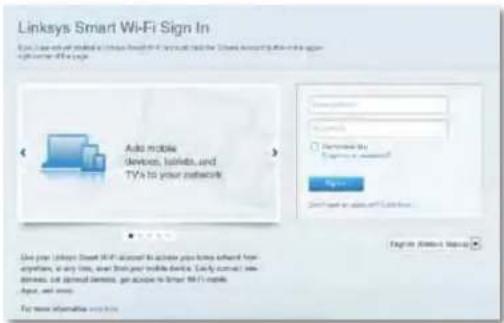
Kak da ce cBbpxeTe KbM Linksys Smart Wi-Fi
Moxete da n3non3Bate Linksys Smart Wi-Fi 3a KOHpypnpaHe Ha pytepa ot BCEKINOMIIOTp, pa3nOlaaC Bpb3ka KbM INHTepHET.
3a da otbopute Linksys Smart Wi-Fi:
- Knikhe Bbpxu kohata Linksys Smart Wi-Fi Bbpxy pa60nra nIOr. -NIN
OToBopeTeye66pay3bpnoTnIeTeHa aIpec www.linksyssmartwifi.com.
- BbBeTe HeaTpoHHeI npEi ToBa HmEi aDpei nnapo, cnei Koeto KlnKHeTe Bbpy Log in (Bxo).
KaKaJa npomEnIte HAcTpoKnTe Ha pyTepa
I3noI3BaIe Linksys Smart Wi-Fi, 3a da npOMeHte HAcTPOKInTe Ha pyTepa n Da HAcTPOTe cneuaHn FyHKuN, KaTO pOHTENCK N KHTPON I DocTbn 3a FOCTN.
3ABENEKKA:
3a DonbHHTenHa NOMOu 3a BCaKO OT MeHOTaT KINKHeTe Bbpxy NOMOu Hau-rope Ha ekpaHa.
3a da npomeHte HactponKte Ha pytepa:
- OToBopTe Linksys Smart Wi-Fi n BnE3e B npofoina cn.
- B M E H I O T O O T N A B O K L N K H E T E B B P X Y H A K O R O N U ZA:
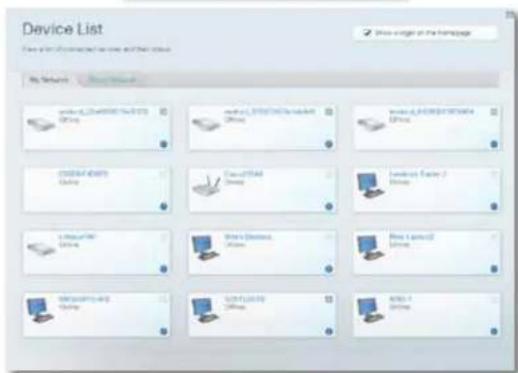
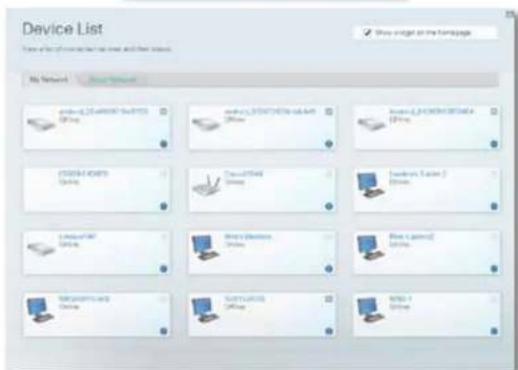
Device List (CnncbKa Ha yctpoHCTBaTa) Bn DaBa BB3MOKHOCT Da BuINITE NynpaBnABate BCNUKN MPeKOBN yCTPOHCTBa, CbP3AHN KbM pytepa. MoKeTe da BaNHTae yCTPOHCTBa T RaNBATA CN MPeKa nn B Ta3u 3a roCTn, da PpeKBcATE Bp3KaTc yCTPOHCTBaTn nn Da BuINITE HhOpMaUNA 3a BCAKO OTTRX.

DeviceList
Linksys cepnia XAC
HactpoBaeHa pyTepa
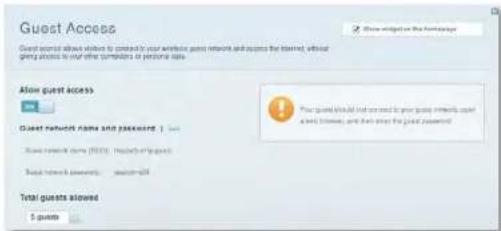
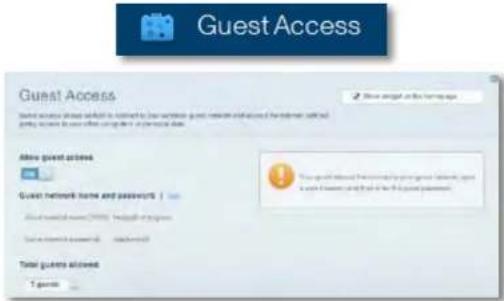
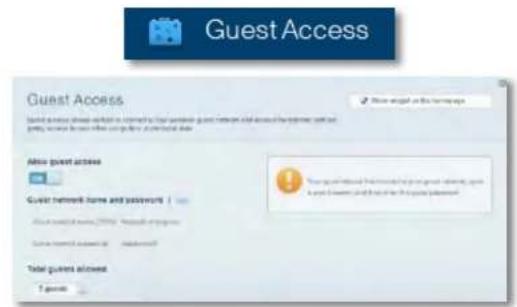
Guest Access (Doc7bn 3a roctn) Bn DaBa Bb3MOXHOCT Da KOHfNpynpate Mpekata Taka, ye roctnte da MORAT da Nonyuabat Doc7bn Do nHTepHET, Ho He Ido BCNUK BAUN MpekOBN pecypcn.
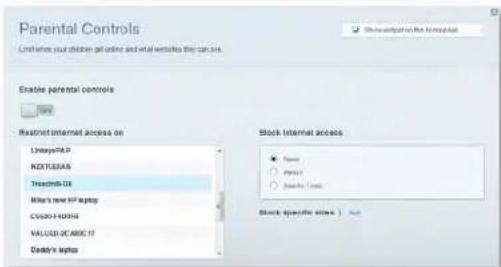
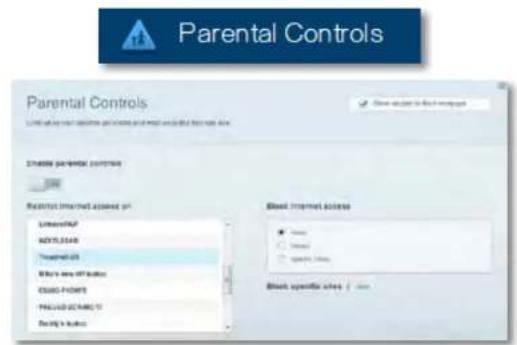
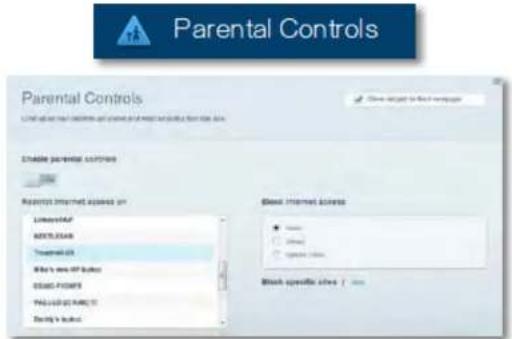
Parental Controls (Ponntenck KOHTpon) Bn daaba Bb3moXHOCT da 6NOKnPATE doctbna do ye6 caTObe n da 3a daabe yacObe 3a DOCTbnp Do INHTepHET.

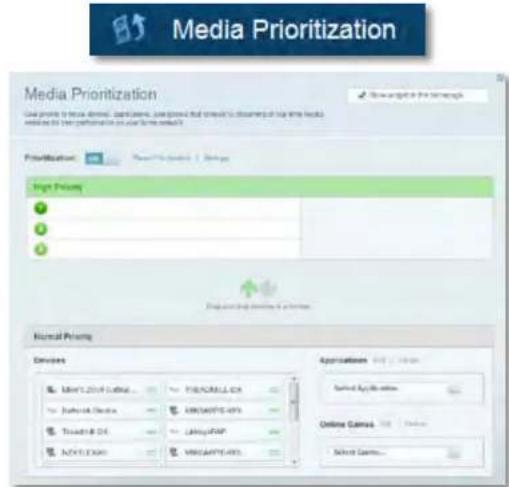
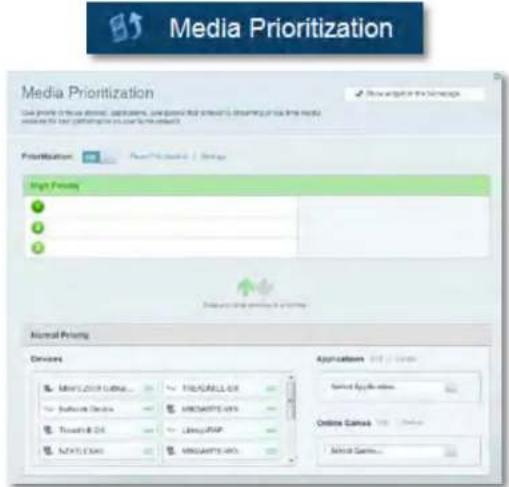
Media Prioritization (PnOpuTn3npaHe Ha MeDn) Bu Daba Bb3MOxHOCT Da 3aDaTe yCTpoNCTBa N PpNOXeHnC Hau-BnCOk PnpoNTB MPeKOBn TpaFnk.
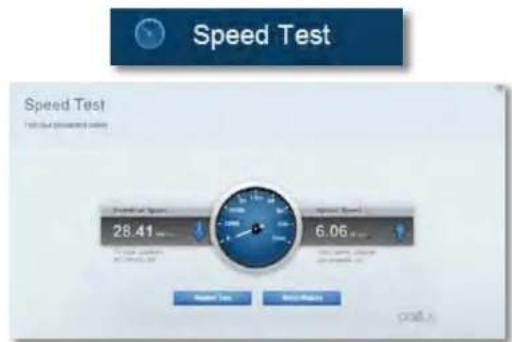
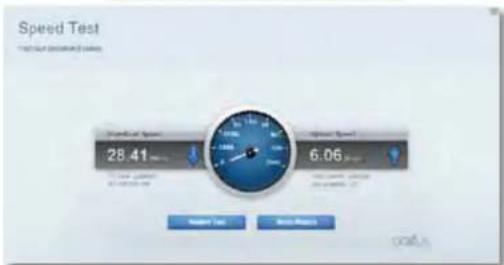
Speed Test (Tect Ha CKOPoCTTa) Bu daBa Bb3MOxHOCT Da TECTBaTe CKOPoCTTa Ha HHTepHET Bpb3kata Ha Mpejata.
Linksys cepnia XAC
HactpoBaeHa pyTepa

Speed Test

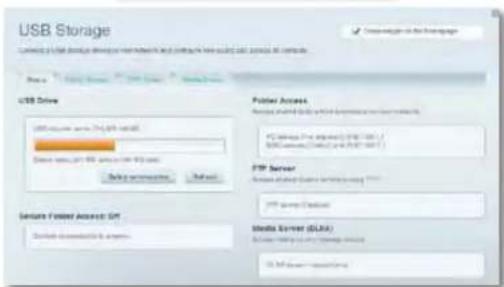
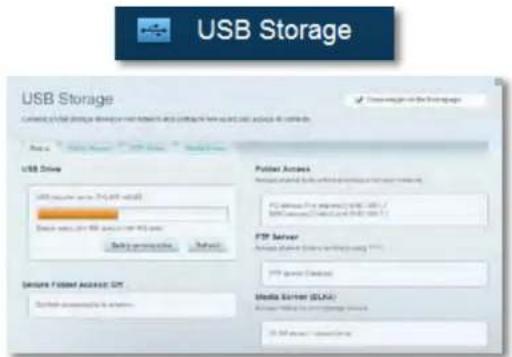
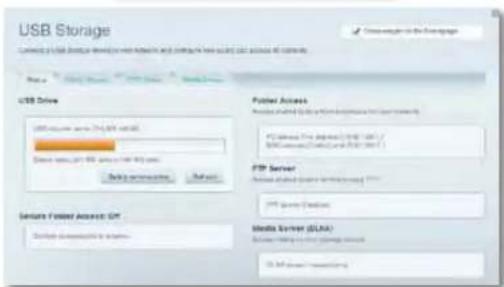
USB Storage (3ana3BaHe B USB yctpoiCTBO) Bn daBa Bb3MOXHocT Da nonynte doctbn Do cBp3aHO USB yctpoiCTBO (He e BkIOHeo H KOMNKeTa) n Da hactpontre cnOpeJeHa foAIOBe, MyITMeMeHc CbpBp np FTP oTbn. (Pnpdna cer ca mo 3a pytepn c USB noptoBe.)

USB Storage
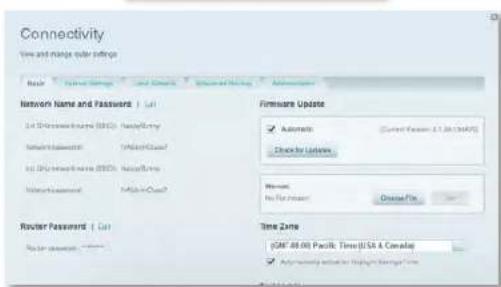
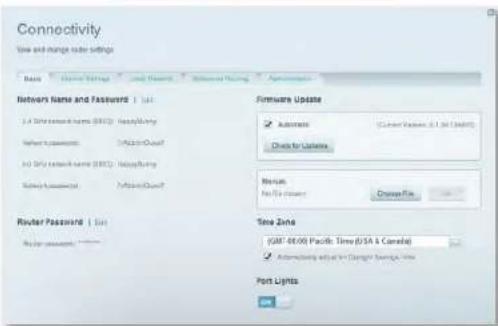
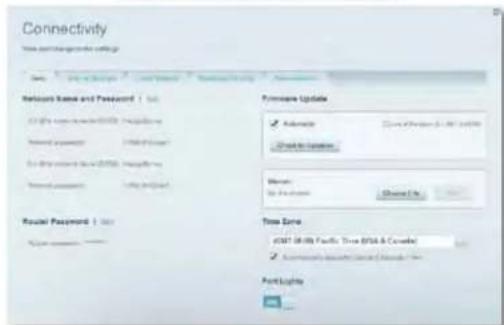
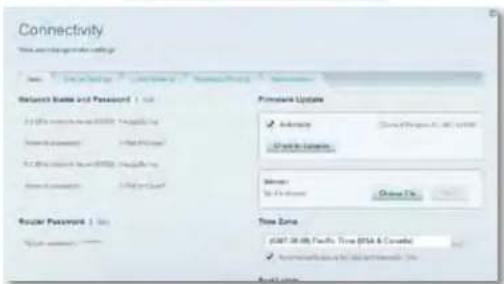
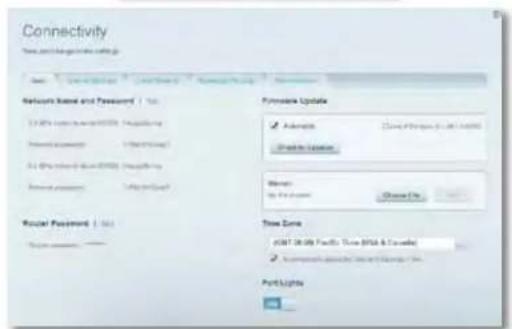
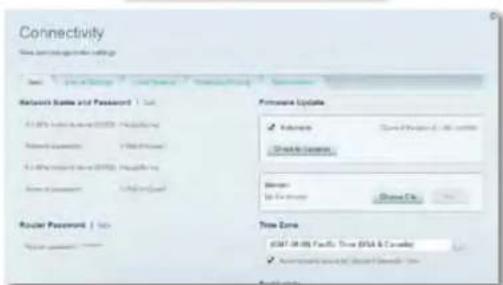
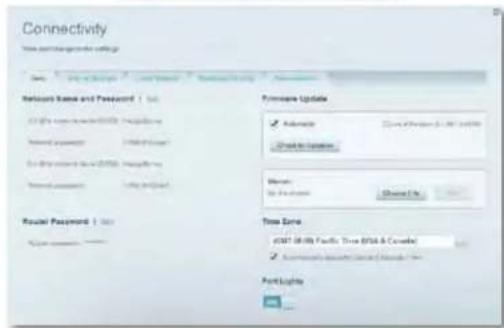
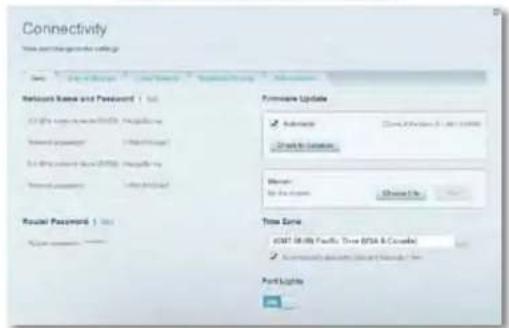
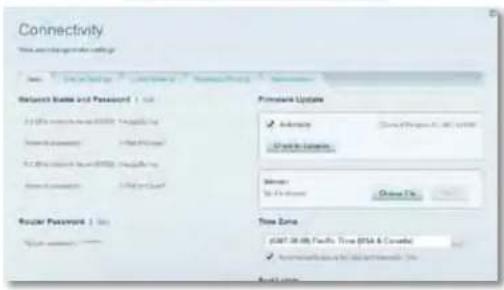
Connectivity (Cbpb3aHocT) Bn DaBa Bb3MoXHOCT da KOHpynpate OCHOBHTI n pa3WpHeHTE MpeKOBn HAcTpOKn.

Connectivity
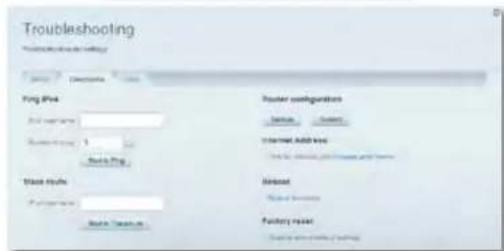
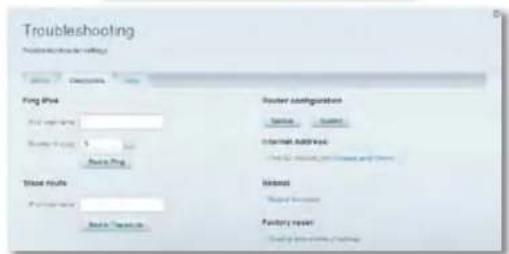
Troubleshooting (OTcpanaHaBe Ha HEn3npaBHOCTn) Bn daBa Bb3MOxHOCt Da npabnte DaarHOCTnKa Ha npo6nem Cpyepa n da npOBepBaTe CbctOAHmETo HA Mpekata.

Troubleshooting
Linksys cepnia XAC
HactpoBbAneHa pyTepa
- Wireless (Be3KuHEn) Bn Daba Bb3MoXHOCT Da KOHpynPapate Be3KuHATA MPexa Ha pytepa. Moxete da CMeHNTe pexima Ha 3auNTa,napoIata,phiTnpaHeto No MAC adpec, kaTO n da CBbpBATE yCTPOCTBa c nomouTa Ha Wi-Fi Protected Setup.

Wireless
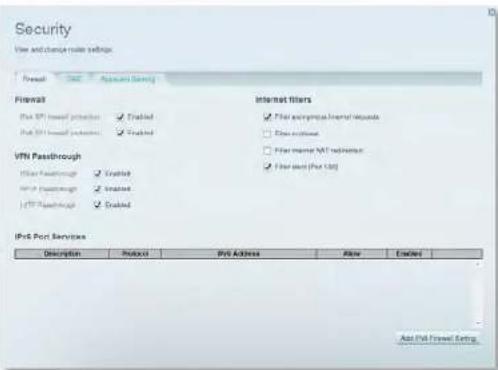
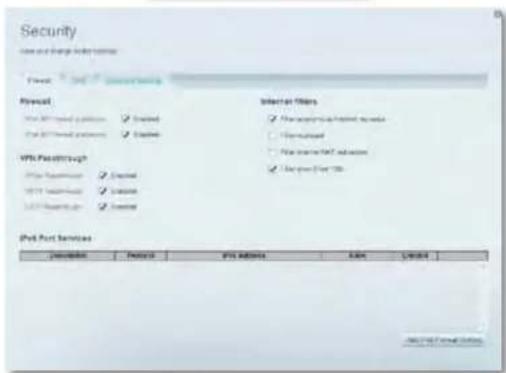
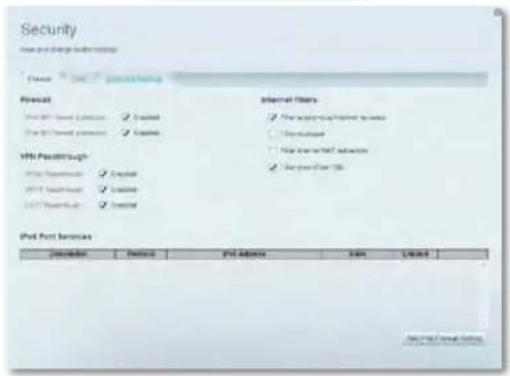
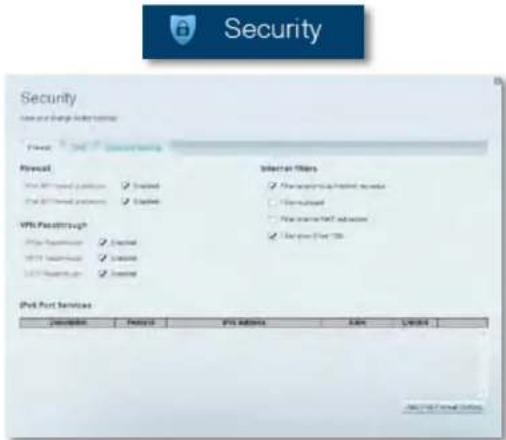
Security (3aunit) Bu da Ba Bb3moXHocT da KOHnpynPate 3auNTata Ha 6e3mnuHata Mpeka Ha pyTepa. MoKTe da HAcTPOnte 3auNTata CTHe, HAcTPOknte 3a VPN, KaKTo n Ha npabite nepcoHaUNsPahn HAcTPOkN 3a npJIOKeHn N IrpN.

Security
OtctpaHbAhe Ha Hn3npaBHOCTn
Cbo6ueHue Your Internet cable is not plugged in (Bauuum uHmephem Ka6e He e BkIoueH)
Ako noyuHte cbo6eHne Your Internet cable is not plugged in (Baunrnt HHTepHET Ka6en He e BKNHOH), KORATO CE ONNTBATE da HaCTPOMTe pyTepa, N3bJIHeTe CNeHNITE CTbKN 3a OTCPAHBAHe HA Hen3npABHOCTM.
3a da peuHnTe npo6nema, npo6BaIe cneHTo:
- YBepete ce, Ye Ethernet kAbenbHa 3aXpaHbaun Moem APM103 ADSL2+ e do6pe Cbbp3aH KbM XbTTn HHTepHET nOPT OT 3aHaTa CTpaHa Ha pyTepa

H32neoam3aHa pymepa
Ethernet kafen hza xaohaaoua omoe AFPM103 ADSL+
- YBepete ce, ye 3axpaHbauNt moem APM103 ADSL2+ e Cbbp3aH KbM 3axpaHbaHe N KBM DSL TenefoHHa HINHA.
3.ИнталларгуретаOTHOBO.
Cbo6ueHue Cannot access your router (HaMa docmbn do pymepa)
Ako Hmate DoctbNo do pytepa, 3a0to KOmmHtbpT He e Cbbp3aH KbM Mpekata, N3bnHeTe CnDnHTe CTbNk 3aOTcPaHaBaHa He Hn3npaBHOCTM.
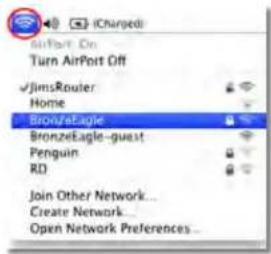
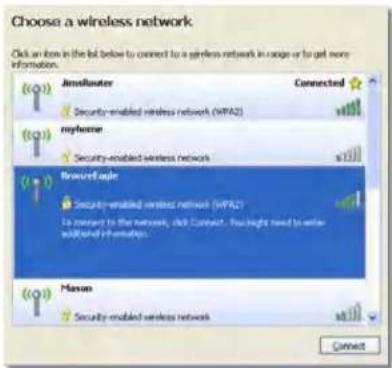
3a da IMate doctbn do pytepa, Tp86ba da 6bneTe CbpaHn KbM c06CTBeHaTa cn MPeka. Ako B MOMeHTa IMate 6e3KmHEn Doctbn DO INTEpHET, IpO6nEMbT MoKe 6n e, ye cnayaino CTe ce Cbpbann Cpyra 6e3KmHa MPeka.
3a da pewnte npo6nema npn KOMNIOtpn noq Windows, Hapabete cneHOTo:
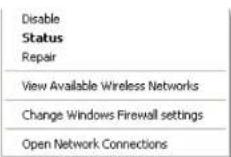
- KInKHeTe C Decenb 6yToH BbPxy IKoHaTa 3a 6e3KmHa BpB3Ka B CnCTemHata Obnact Ha pa60THnI Nt Ha Windows . IKoHaTMOKe da N3rJExJa pa3NHyOB 3abNCMocT OT BepCnTA Ha Windows.

- KlnkHete Bbpxy View Available Wireless Networks (PperneHa HauHnute 6e3xuHn MPexu). Ue ce nokaKe cncsbK c HauHnute 6e3xuHn MPexu.
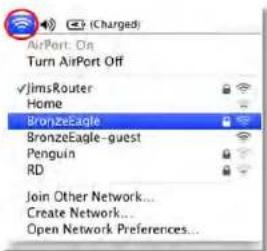
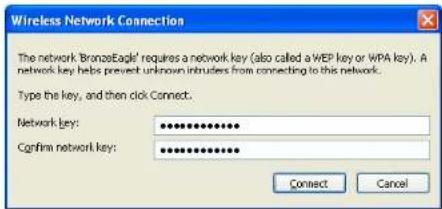
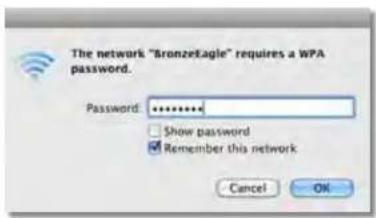
- KInKHeTe Bbpyx IMeTo Ha BaAata 6e3KuHn MaPexa n cne ToBa Bbpyx Connect (Cbbp3BaHe).B daJeHn rno-dOny npIMep KOMNIOTpBpT e Cbbp3An C npya 6e3KuHn MaPexa C Imeto JimsRouter. IMeTo Ha mpekata Linksys cepra E, BronzeEagle B To3n pIMep, ce Noka3Ba KaTO n36paHO.

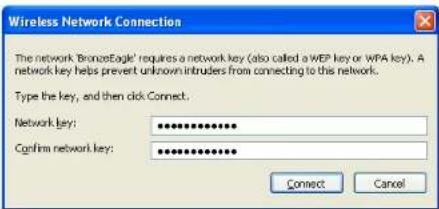
4.AKo nonyunite noqkaHaJa BbBeHete MpeXOB KIOU, BbBeHete nponata cn (KIOU 3a 3auNTa) B nonetata u KNIKKHe Bbpyx Connect (Cbp3BaHe).
KOMNIOBpbT ce Cbbp3Ba cmpexata n Buee Tp8Ba da NMaTe DoCTbn do pytepa.
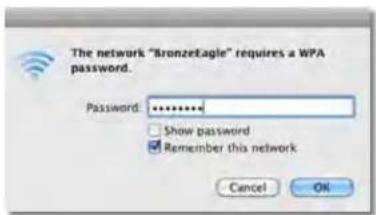
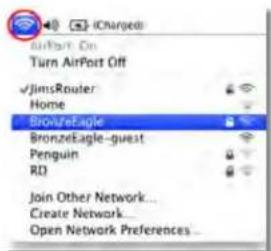
3a da peuHTe npo6nema npu KOMNtpr Mac, Hapabete cneHTo:
- KINKHETE Bbpyx IKOHATA Wi-Fi B neHtata C MEHOTO B rOpHATA qACT Ha ekpaHa. Iue ce nokae Cnncbk C63kMmmpexn. Linksys Smart Wi-Fi 3aadan abTomATuHO MHe Ha Baata Ta 63kMnHa MPeka.
B daenHn no-dony npmep kOMNIObtpbte Cbbp3aH c npya 6e3xuHa mpeka c Imeto JimsRouter. Imeto Ha mpejata Linksys cepna E, BronzeEagle B To3n npmep, ce noka3Ba KaTo N36paHo.
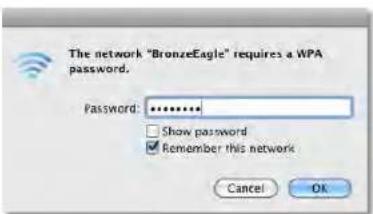
- KInKHeTe Bbpyx NMeTo Ha 6e3XnUHata MpeKa Ha pyTepa Linksys cepna E (BronzeEagle B npImepa).
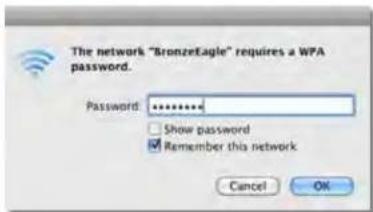
- BbBeTe naponata Ha 6e3xuHATA Mpexa (KIOU 3a 3auNTa) B noneto Password (Iapona) N KIMKHe T Bpxy OK.
Linksys cepnXAC
Cneunfokaun
CpeunΦkauni
Linksys XAC1200
ImeHaMogena LinksysXAC1200
Onncnne Modem/pyTeP Linksys Smart Wi-Fi Modem
Router AC 1200
HomepHaMoedelaXAC1200
CkopocHa
KOMyTnpyemn npT 10/100/1000 Mbps (Gigabit Ethernet)
PapnoecToTa 2,4 n5 GHz
BpOaHTeHn 2(2,4GHz) + 2(5GHz)
NopTOBe 3axpaHbHaBe, USB, nHTepHET, Ethernet (1-4)
ByToHn Reset (HyInpaHe),Wi-Fi Protected Setup
Power (3axpaHbaHe) (cAmO npu MoDenIte 3a
EC)
CBeToDIOIOI TopeH naHen: 3axpaHbAne
3aEN nAHen: INHTepHET, Ethernet (1-4)
UPnP noa bpxca ce
Функлm 3a 3auNTa WEP, WPA, WPA2, RADIUS
BntOBe Ha 3aunTHnKIOu Do 128-6nTOBO WnphiBaHe
PdpbkKaHaaHIOBATA
CnCTema 3a cbxpaHeHne FAT,NTFS n HFS+
Ctahaptn 3a ADSL T1.413i2, G.992.1 (G.DMT), G992.2 (G.Lite),
G.992.3 (ADSL2), G.992.5 (ADSL2+) 3a
PpnoJoxHeN A,B,M,L
IoppbkkaHa6pay3bpn Internet Explorer 8 nnn no-Bncoka Bepcn,
Firefox 4 mnn no-Bncoka Bepcn, Google
Chrome 10 no-no-BnCoka Bepcna
Safari 4 nnn no-BnCoka Bepcnna
DaHHn 3a OKoJHaTa CpeJa
Pazmepn 10,8" x 1,58" x 7,25"
(256 x 40 x 184 mm)
TeroHa yctpoCTBOTO 17,67yHcMn (501r)
3axpaHbaHe 12V,2A
Ceptnuunpahe
Windows 8, DLNA
Pa6oTHa TemnepaTpa
ot 32do 104^ (ot 0do 40^)
Temnepaypata 3a
cxbpaeHne ot-4do 140^ (ot-20do 60^)
Pa6OHa BnaxHocT 10do80%oTHocHTeHbBnaxHocT,
6e3 KOHNDeH3aUna
BnaxKHOCTa cXpaHHeHne 0T5do90%6e3 KOHdH3npaHc
BenexkK
3a HhOpmaHr OTHOCHO HOPMATNBHTA ype6a, rapAHmTAu H 6eONacOCTHa, BnTE KOMIaNtDCKa, DOCTBeC BaWIna PyTe, nnNOnTne Ha aDpc Links.com/support.
CneuikauinTe noJnKat Ha npomHa 6e3 npedn3BecTne.
*Makmamnnte pa60THn Ioka3aTeHn ca nBneeyHn OT cneuqhkaunite Ha C7aHdpT 802.11 Ha IEEE,JeCTbntenHnnte pa60THn Ioka3aTeHn MOE da Ca pa3nnuHH, BKNIOUHTENHO noHNCk Kaanatet 3a pa60Ta B 6e3xNHa MPeka, pnpOyckaTeHn cnooc6oHcT 3a daHHn, dnaa3ao Hn NOKPInHe.EfKeTNBocHTA 3aBnCnOT MHORo PaKToPi, yCNOBn IN PpOMEHNBLB, BKIOUHTENHO paaCTOHNTO TO ToCKATA Ha Dcctbn, O6ema HA MpeXOBnB TpaFHK, CTPONTENHtme MaTePNn IN KOHCTpyKUHrA, n3NOI3BaHata OpeaUNHnCACTeMa, n3NOJ3BAHn KOMPKNT kPpOyKn 3a 6e3xNueHdCtbn, CMySeHnra IN dpyrN He6NaorpnATHy nCNoBnR
Iocete linksys.com/support3a Bpb3ka C hawata TexHuecka nOdpbKkA, yOCTOBaHa C HarpaDn
BELKIN, LINKSYS INHIOHO YUNA HN PNDYTH NOR CA TBOPODOK.
MAPK HN RPNATNPApykceBa EeKn CnoMeHATy KTPoPcK
MAPK HN RPNETPNOA cC0BCTBCHCN HN CSPTBHTHE M
POMKANAFI 2014 EeKn Iternatlonl, Inc. WYNK KHOOBET HA
KOMHAYNA, BCKNYRTOBA qananeh

Linksys rada XAC
Obsah
Obsah
Přehled produktu
XAC1200. 1 Umisteni na stenu 3
T1.413i2, G.992.1 (G.DMT), G992.2 (G.Lite),
dodatek A, B, M, L
G.992.3 (ADSL2), G.992.5 (ADSL2+) pro
Podpora prohligeče
For at abne Linksys Smart Wi-Fi:
For at installere Service Pack 3:
Bagside: Internet, Ethernet (1-4)
UPnP Understet
Sikkerhedsfunktioner WEP, WPA, WPA2, RADIUS
T1.413i2, G.992.1 (G.DMT), G992.2 (G.Lite),
Anneks A, B, M, L
G.992.3 (ADSL2), G.992.5 (ADSL2+) for
Understottede browsere
Internet Explorer 8 erler hoge, Firefox 4 erler
Update"Windows XP Service Pack"
Tasten Reset, Wi-Fi Protected Setup,
ADSL-Standards T1.413i2, G.992.1 (G.DMT), G992.2 (G.Lite),
Annex A, B, M, L
Mriuva To kaiwio Diakitoudeltaivai ouvdeepevo (Your Internet cable is not plugged in)
Mriuva ivai duvatn npoaaon oTo router oac (Cannot access your router)» 10
PpOdeltapaΦeC
Linksys XAC1200. 12
Linksys Σειρα XAC
Enokonnan npoiovtoc
Eπισκόπηση προίντος
XAC1200
Enavow
Evdekikn luxvia- Taepa npaoiv otav elvai evpyonoievkai meta ano mia entuynevn ouvean Wi-Fi Protected Setup. Avbaognevi apyaeuke xpuwa kata tnv ekkvion, katn diapkeia evnepeovuw uikooyoukoui kai katn diapkeia ouveanc Wi-Fi Protected Setup. Avbaobnvei ynpova otav unapxei opalma ouveanc Wi-Fi Protected Setup.
NiwOy
Koumi Wi-Fi Protected SetupTM - PAnthe auto to Koumi yia diauoppwon tnc aaoaaleiac aoupatou diktov ou ooukeuec diktovou nou unoatpocuv to Wi-Fi Protected Setup.
- Oupa USB-Moipaote ie movaDEC biakou me aalouc xpoate cto 6kTuO ac n 0to Internet. 2uveote pia mvaSA USB oe autyn t hupa. Mnpoeite enIanc va uvoeote evav kxtunwn USB kai va kavete Koivn xpoh ton to 0to 6kTuO ac.
Oupc Ethernet -uvdeote oe autec tic mle xpomegaatoc oupec Gigabit (10/100/1000) kaawbia Ethernet (nou ovoaovtai enionkawbia kdtuow) KAI to aao akpo oe evupmuate cokuee ciktuow Ethernet oto sktuoc
ZHMEIΩSH
Ia kautepn ano6oon, xpoaiouoinote kaawda CAT5E n kautepa.
Oupa Internet - SuovseEva kalwio Ethernet (ou ovapctai enionc kalwio sktuou n Internet) o auty tvkipivn Oupa kai oto o a
Koumi enavaopac-Kpatnoe natmveo 10 deetepoenta (muoi Iauvioc Oupac va avaooynovu Tautoxpova) ia enavaopopa Tou router otic epoyootaaika npoeiileyvec puthetaic. Mnpoeite enionc va kavete enavaopopa Tuv poeiileyveu pvthetaew xpnaionowvtac to Linksys Smart Wi-Fi.
Oupatpoopooiae-uvoeTov npexoevu eaoanotn AC.
Koumi npoosoiac—Pntote (evpyonoin) yavaevpyonoine to router. (movo oovtea tnc EE.)
Linksys Σειρα XAC
Enokonn npoiovtc
Puθμioεις tou router oac
PwC v a ouv8e0e1e oTo Linksys Smart Wi-Fi
MnopeTe va xpoiooioeTo Linksys Smart Wi-Fi ia va diaiopwpoeTo router ao oioovonote unoloyoiTne ouvEeOn 1aiaiktu.
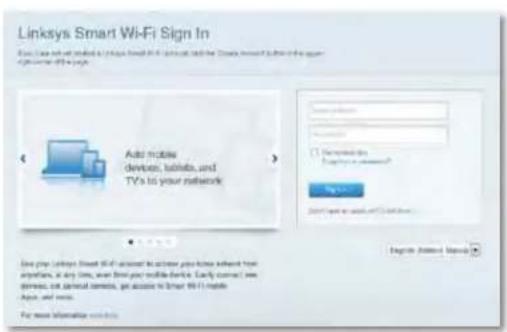
Tia va avoiEto Linksys Smart Wi-Fi:
- Kavte Kaik oTo Eikovidio Linksys Smart Wi-Fi otyn eipaveia epyaiaac
-H
AvoiTe eva npoypauma nepinyonc oTo web kaletae otn sieuovwn www.inksyssmartwifl.com.
- PAnkpoLoyiote n Tieuovan e-mail kai tov kwio npoaaon tou puoiate vipitepa kai kavte kAik OTNV ENIOyI EuVSeon.
Ioc va aalaeTe Tc puoioic tou router
Xpoiaoioiote To Linksys Smart Wi-Fi ia va aIaaeTe tic puhioeic tou router ao kai yia va diapopoeiete Eikic aeitoupyie, onwc oYovkoieyexoi kai npooaonienkemw.
\SHMEIΩΣH:
Tn pooBtbnBcia o onoiOtnote meou, kavte klik otny Eniloyn BOnBcia otnv kopupn tnc oovnc.
Tia va aalaeeticpuoepieic tou router:
Ppoua ADSL T1.413i2, G.992.1 (G.DMT), G992.2 (G.Lite),
G.992.3 (ADSL2), G.992.5 (ADSL2+) yia
Annex A, B, M, L
YIooTpiOeVA
Ppoypauata nepunynonc
Internet Explorer 8 n voepeo, Firefox 4 n
Wall-mounting placement 3
Setting Up Your EA-Series Router
Where to find more help. 4
How to install your router . 4
How to connect to Linksys Smart Wi-Fi. .5
How to connect to Linksys Smart Wi-Fi 5
How to change router settings 5
Troubleshooting
Your router was not successfully set up 9
Windows XP Service Pack update .9
Your Internet cable is not plugged in message 10
Cannot access your router message 10
Specifications
Linksys XAC1200. 12
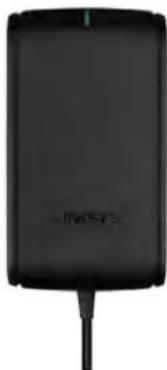
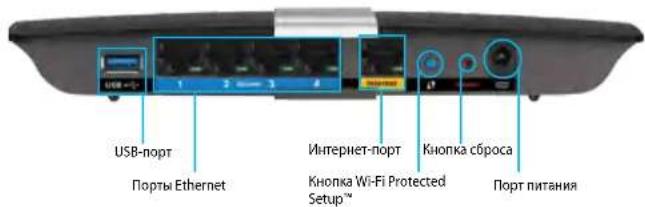
Product Overview
XAC1200
Top view
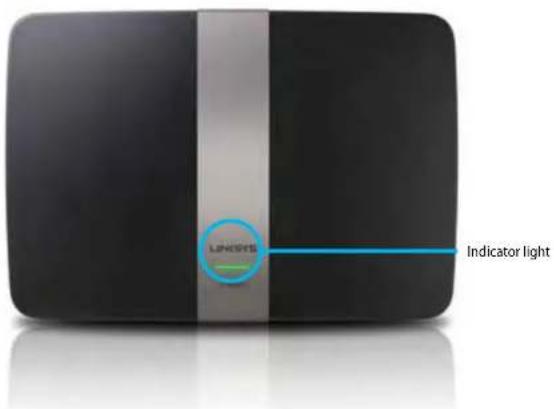
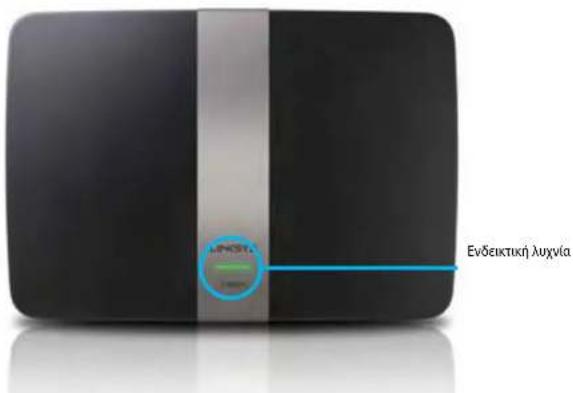
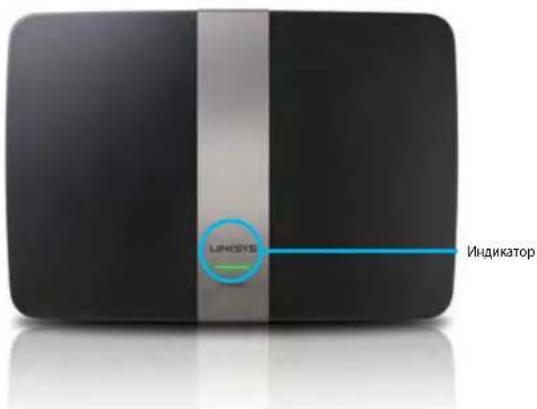
Indicator light—Solid green when on, and after a successful Wi-Fi Protected Setup connection. Blinks slowly while booting up during firmware upgrades, and during a Wi-Fi Protected Setup connection. Blinks quickly when there is a Wi-Fi Protected Setup error.
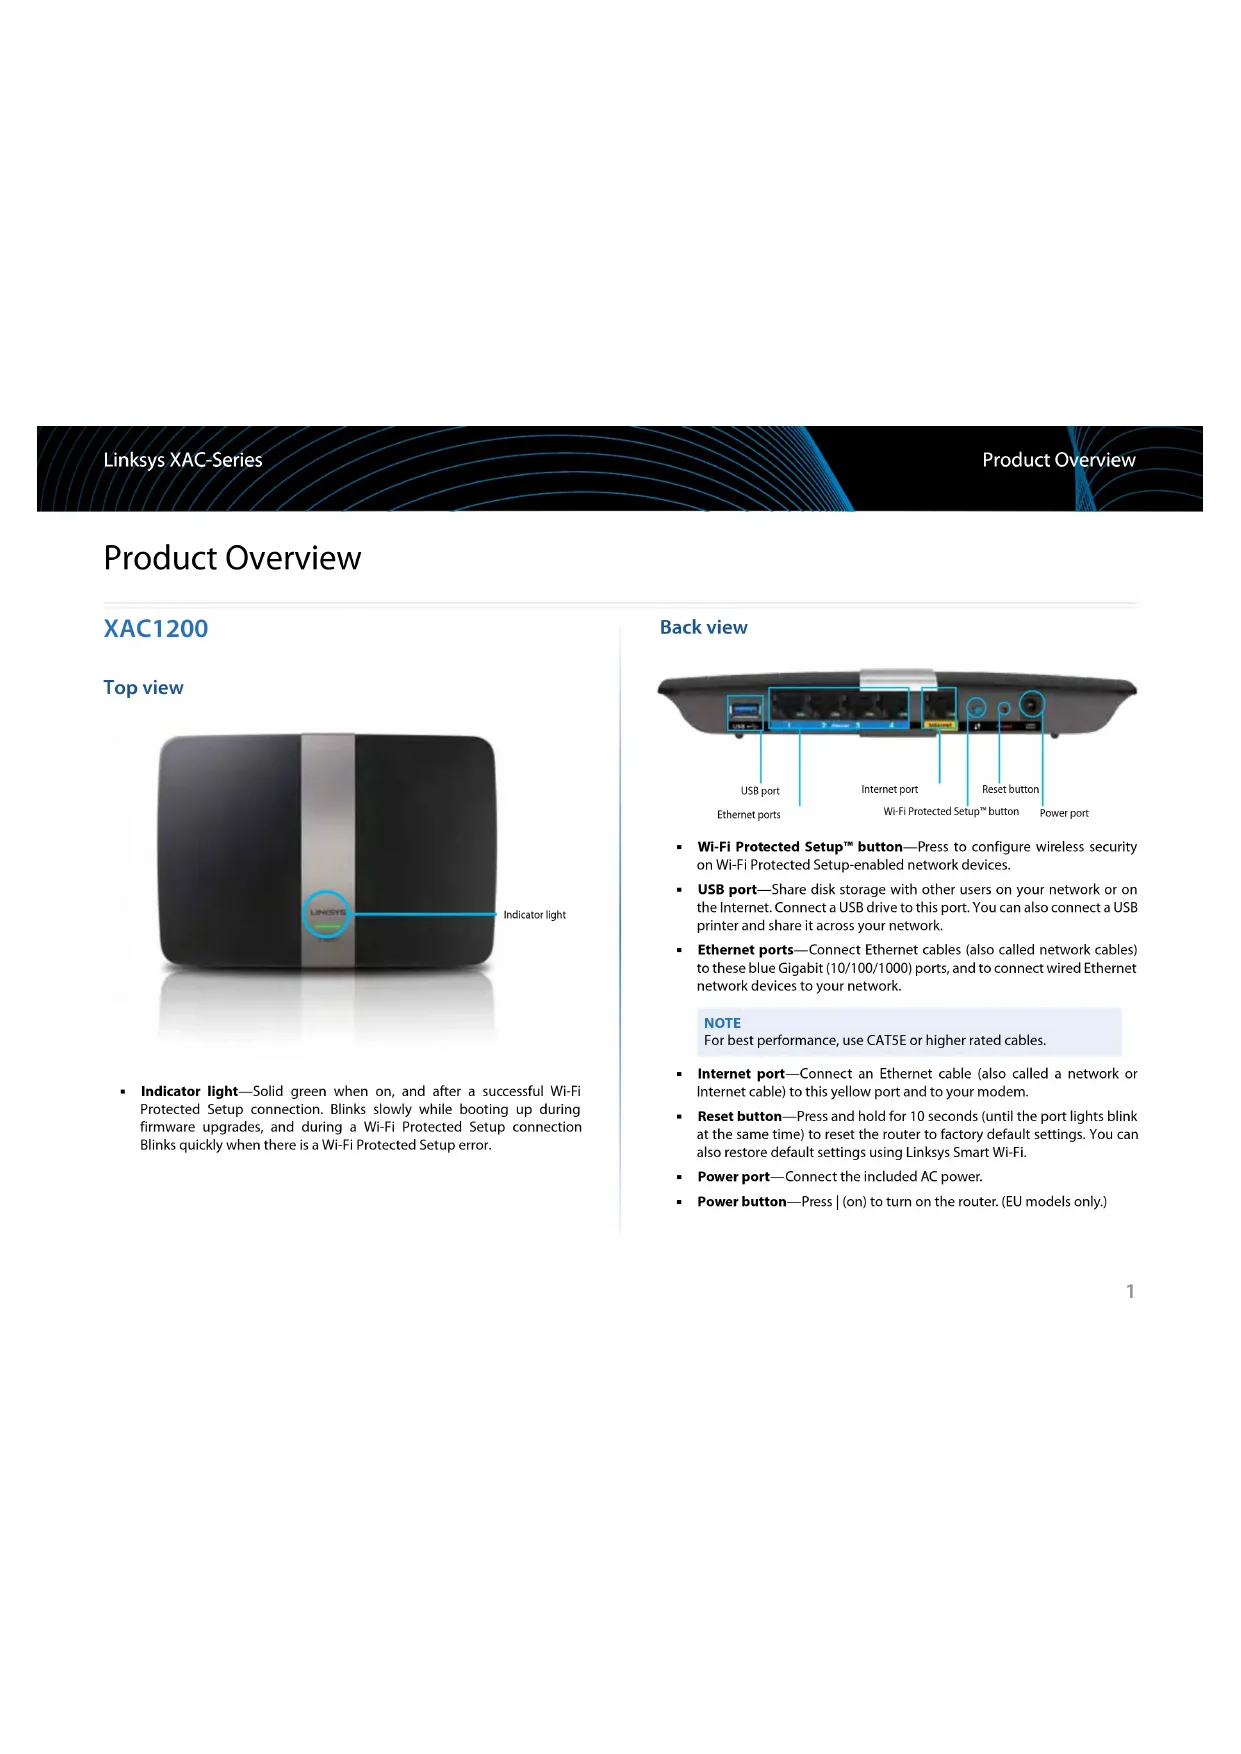
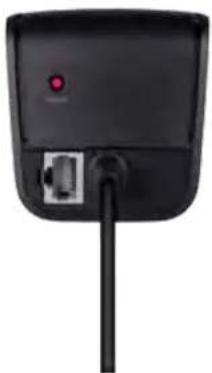
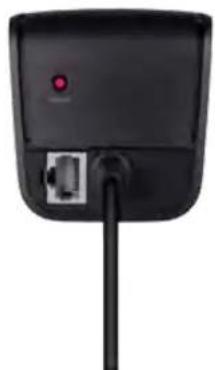
Back view
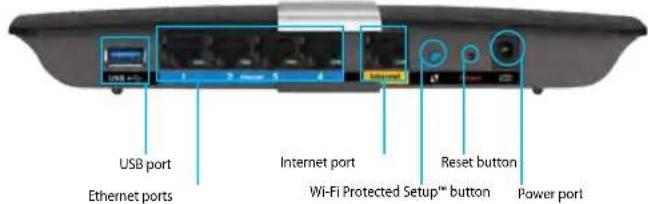
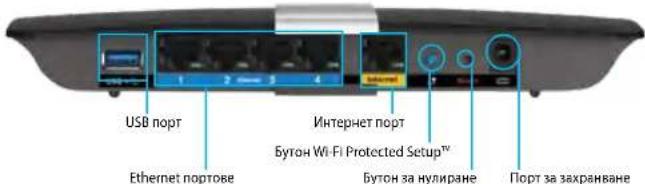
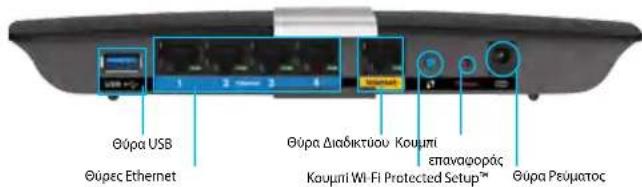
- Wi-Fi Protected Setup™ button—Press to configure wireless security on Wi-Fi Protected Setup-enabled network devices.
- USB port—Share disk storage with other users on your network or on the Internet. Connect a USB drive to this port. You can also connect a USB printer and share it across your network.
- Ethernet ports—Connect Ethernet cables (also called network cables) to these blue Gigabit (10/100/1000) ports, and to connect wired Ethernet network devices to your network.
NOTE
For best performance, use CAT5E or higher rated cables.
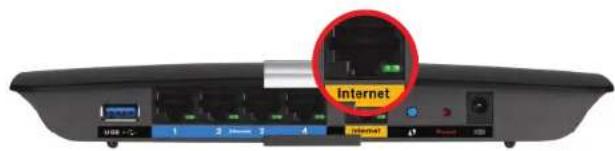
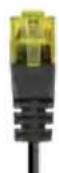
- Internet port—Connect an Ethernet cable (also called a network or Internet cable) to this yellow port and to your modem.
- Reset button—Press and hold for 10 seconds (until the port lights blink at the same time) to reset the router to factory default settings. You can also restore default settings using Linksys Smart Wi-Fi.
Power port—Connect the included AC power.
Power button-Press (on) to turn on the router. (EU models only.)
Linksys XAC-Series
Product Overview
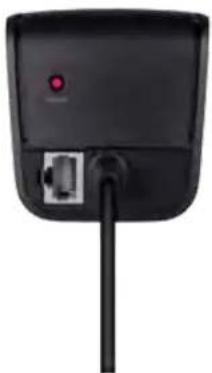
APM103 ADSL2+ Power Modem
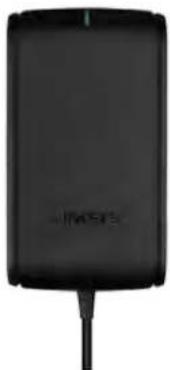

Indicator light:
- Blinking Green: Power Modem starting up and establishing ADSL connection
Solid Green: ADSL synchronized with ISP - Blinking Amber: ADSL physical connection problem. (i.e. phone cable is not connected to wall jack)
ResetButton:
Reboot: Press and hold 1 second and then release
- Restore to default settings: Press and hold 5 seconds
- DSL Port: Connects to the ADSL Line
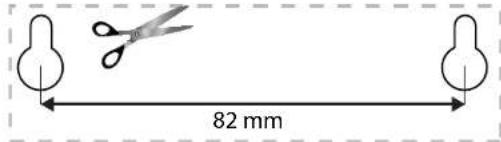
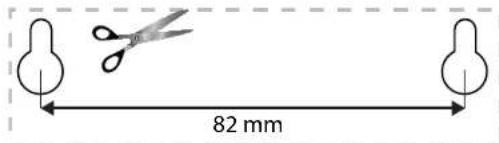
Wall-mounting placement
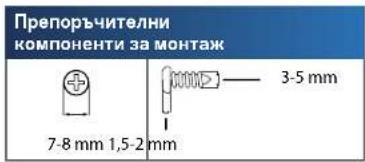
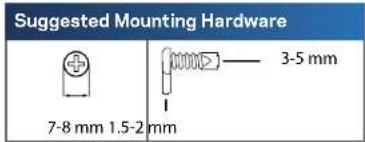
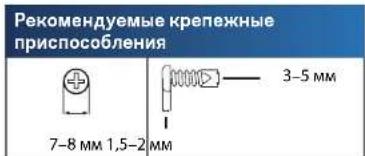
The router has two wall-mount slots on its bottom panel. The distance between the slots is 82mm . Two screws are needed to mount the router.
NOTE
Linksys is not responsible for damages incurred by unsecured wallmounting hardware.
Follow these instructions:
- Determine where you want to mount the router. Make sure that the wall you use is smooth, flat, dry, and sturdy. Also make sure the location is within reach of an electrical outlet.
- Using the template on the next page, drill two holes into the wall. Make sure the holes are 82mm apart.
- Insert screws and leave 3mm of heads exposed.
- Position the router so the wall-mount slots line up with the two screws.
- Place the wall-mount slots over the screws and slide the router down until the screws fit snugly into the wall-mount slots.
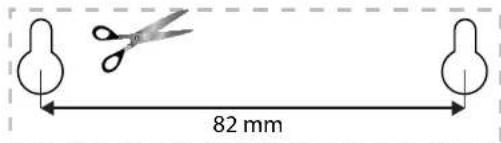
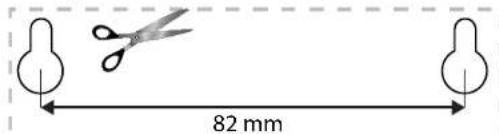
Wall-mounting template
Print this page at 100% size.
Cut along the dotted line, and place on the wall to drill precise spacing.
Setting Up Your EA-Series Router
Where to find more help
In addition to this User Guide, you can find help at these locations:
- Linksys.com/support (documentation, downloads, FAQs, technical support, live chat, forums)
- Linksys Smart Wi-Fi help (connect to Linksys Smart Wi-Fi, then click Help at the top of the screen)
How to install your router
- If replacing an existing router, disconnect it. Power on your new router.
- Connect the Internet cable from your modem to the yellow Internet port on your router. Wait until the power light on the front of the router is solid.
- Connect to the secure wireless network name shown in the Quick Start Guide that came with your router. (You can change the network name and password later during router setup.) If you need help connecting to the network, refer to your device documentation CD. Note: You will not have Internet access until router setup is complete.
-
Open a web browser and follow the instructions to complete your router's setup. If instructions do not appear in the web browser, enter linksyssmartwifi.com in the browser's address bar.
-
At the end of setup, follow the on-screen instructions to set up your Linksys Smart Wi-Fi account. Use Linksys Smart Wi-Fi to easily manage your router's settings, such as:
-
Change your router's name and password
- Set up guest access
- Configure parental controls
- Connect devices to your network
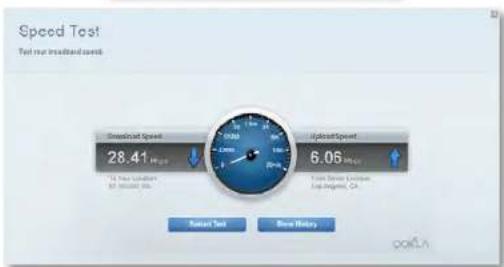
Test your Internet connection speed
NOTE:
As part of Linksys Smart Wi-Fi account setup, you will be sent a verification e-mail. Make sure that you open the e-mail from Linksys and click the provided link.
Linksys XAC-Series
Setting Up Your Router
How to connect to Linksys Smart Wi-Fi
You can use Linksys Smart Wi-Fi to configure your router from any computer that has an Internet connection.
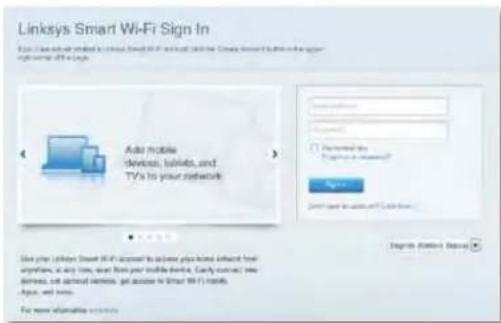
To open Linksys Smart Wi-Fi:
- Click the Linksys Smart Wi-Fi icon on your desktop. -OR-
Open a web browser and go to www.linksyssmartwifi.com.
- Enter the e-mail address and password you set up earlier, then click Log in.
How to change router settings
Use Linksys Smart Wi-Fi to change settings on your router and set up special features such as parental controls and guest access.
NOTE: For additional help on any menu, click Help at the top of the screen.
To change router settings:
- Open Linksys Smart Wi-Fi and log into your account.
In the menu on the left, click an option:
Device List lets you display and manage all network devices connected to your router. You can view devices on your main network and your guest network, disconnect the devices, or display information about each device.

Linksys XAC-Series
Setting Up Your Router
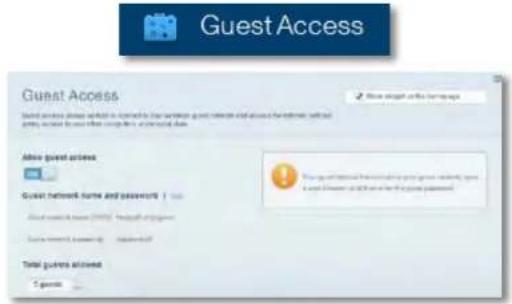
Guest Access lets you configure a network so guests can use the Internet, but not accessall of your network resources.
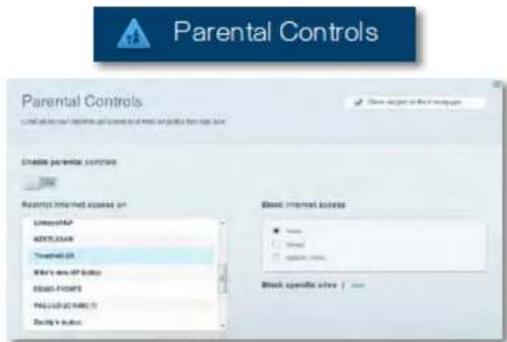
- Parental Controls let you block web sites and set Internet access times.
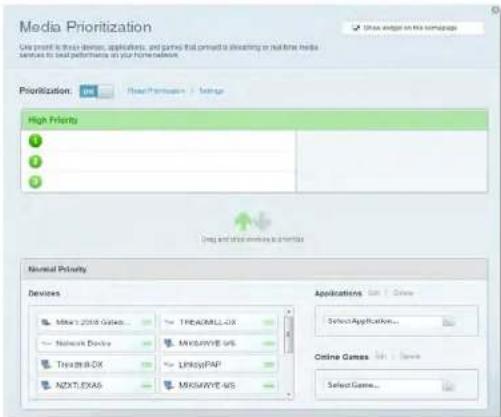
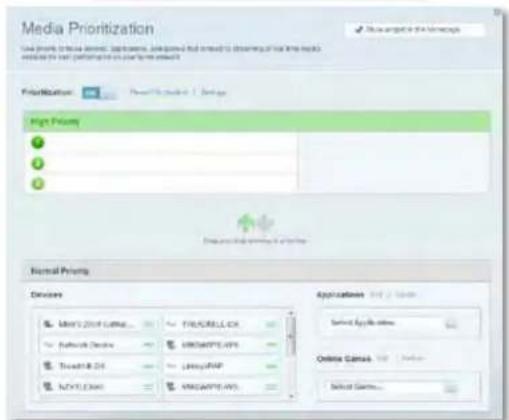
Media Prioritization lets you set which devices and applications have top priority for your network traffic.

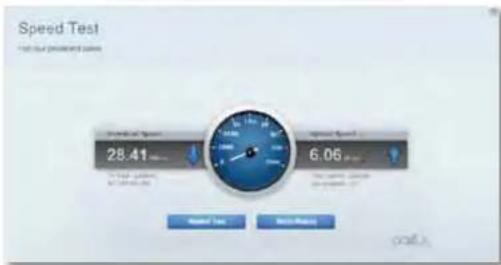
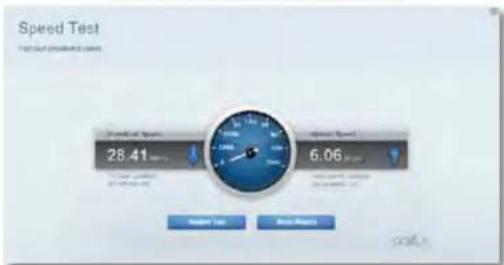
- Speed Test lets you test your network's Internet connection speed.
Linksys XAC-Series
Setting Up Your Router
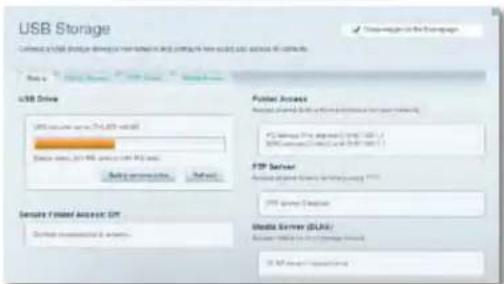
- USB Storage lets you access an attached USB drive (not included) and set up file sharing, a media server, and FTP access. (Available only on routers with USB ports.)
- Connectivity lets you configure basic and advanced network settings.

- Troubleshooting lets you diagnose problems with your router and check the status of the network.

Troubleshooting

- Wireless lets you configure your router's wireless network. You can change the security mode, password, MAC filtering, and connect devices using Wi-Fi Protected Setup.

Wireless
Linksys XAC-Series
Setting Up Your Router
- Security lets you configure your router's wireless security. You can set up the firewall,VPN settings,and make custom settings for applications and games.
Security
Troubleshooting
This chapter can help you solve common setup issues and connect to the Internet. You can find more help from our award-winning customer support at linksys.com/support.
Your router was not successfully set up
If Linksys Smart Wi-Fi did not complete the setup, you can try the following:
- Press and hold the Reset button on your router with a paperclip or pin until the LED starts blinking (about 10 seconds), then install the router again.
- Temporarily disable your computer's firewall (see the security software's

instructions for help), and install the router again.
If you have another computer, use that computer to install the router again.
Windows XP Service Pack update
On Windows XP computers, Linksys Smart Wi-Fi requires Service Pack 3 in order to work. If the currently installed Service Pack is older than version 3, you need to download and install Service Pack 3.
TIP
To temporarily connect to the Internet and download the required Service Pack, you can use the included Ethernet cable to connect your computer directly to your modem.
To install Service Pack 3:
- Connect to the Microsoft Update website (update.microsoft.com/ windowsupdate).
- Follow the instructions on the website or contact Microsoft if you need further help.
- After downloading and installing Service Pack 3, install the router again.
Linksys XAC-Series
Troubleshooting
Your Internet cable is not plugged in
message
If you get a "Your Internet cable is not plugged in" message when trying to set up your router, follow these troubleshooting steps.
To fix the problem, try the following:
- Make sure that the Ethernet cable of the APM103 ADSL2+ Power Modem is securely connected to the yellow Internet port on the back of the router.
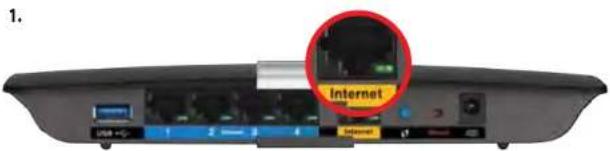
Back view of router
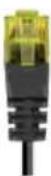
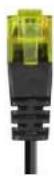
APK103 ADSL2+ Power Modern Ethernet Cable
- Make sure that your APM103 ADSL2+ Power Modem is connected to power and the DSL phone line.
- Install the router again.
Cannot access your router message
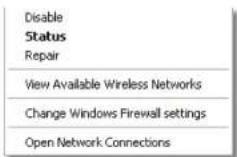
If you cannot access your router because your computer is not connected to your network, follow these troubleshooting steps.
To access your router, you must be connected to your own network. If you currently have wireless Internet access, the problem may be that you have accidentally connected to a different wireless network.
To fix the problem on Windows computers, do the following:
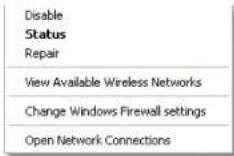
- On your Windows desktop, right-click the wireless icon in the system tray. The icon might differ depending on your version of Windows.

- Click View Available Wireless Networks. A list of available networks will appear.
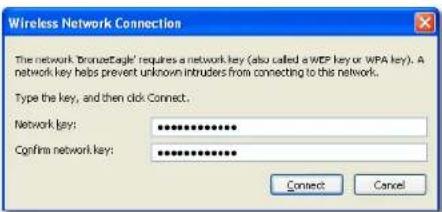
- Click your own network name, and click Connect. In the example below, the computer was connected to another wireless network named JimsRouter. The name of the Linksys E-Series network, BronzeEagle in this example, is shown selected.
Linksys XAC-Series
Troubleshooting

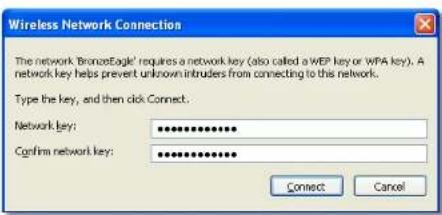
4. If you are prompted to enter a network key, type your password (Security Key) into the fields and click Connect.
Your computer will connect to the network, and you should be able to access the router.
To fix the problem on Mac computers, do the following:
- In the menu bar at the top of the screen, click the Wi-Fi icon. A list of wireless networks will appear. Linksys Smart Wi-Fi has automatically assigned your network a name.
In the example below, the computer was connected to another wireless network named JimsRouter. The name of the Linksys E-Series network, BronzeEagle in this example, is shown selected.

- Click the wireless network name of your Linksys E-Series router (BronzeEagle in the example).
- Type your wireless network password (Security Key) into the Password Field, then click OK.
Linksys XAC-Series
Specifications
Specifications
Linksys XAC1200
Model Name Linksys XAC1200
Description Linksys Smart Wi-Fi Modem Router AC 1200
Model Number XAC1200
Switch Port Speed 10/100/1000 Mbps (Gigabit Ethernet)
Radio Frequency 2.4 and 5 GHz
of Antennas 2 (2.4 GHz) + 2 (5 GHz)
Ports Power, USB, Internet, Ethernet (1-4)
Buttons Reset, Wi-Fi Protected Setup, Power (EU models only)
LEDs Top panel: Power
Back panel: Internet, Ethernet (1-4)
UPnP Supported
Security Features WEP, WPA, WPA2, RADIUS
Security Key Bits Up to 128-bit encryption
Storage File
System Support FAT, NTFS, and HFS+
ADSL Standards T1.413i2, G.992.1 (G.DMT), G992.2 (G.Lite),
G.992.3 (ADSL2), G.992.5 (ADSL2+) for
Annex A, B, M, L
Browser Support Internet Explorer 8 or higher, Firefox 4 or
higher, Google Chrome 10 or higher, and
Safari 4 or higher
Environmental
Dimensions 10.8^ × 1.58^ × 7.25^
(256× 40× 184mm)
Unit Weight 17.67 oz (501 g)
Power
12V,2A
Certifications
CE, Wi-Fi a/b/g/n/draft ac, Windows 7,
Windows 8, DLNA
Operating Temp.
32 to 104^ (0 to 40^ )
Storage Temp.
-4 to 140^ (-20 to 60^)
Operating Humidity
10 to 80% relative humidity,
noncondensing
Storage Humidity
5 to 90% non-condensing
NOTES
For regulatory, warranty, and safety information, see the CD that came with your router or go to Linksys.com/support.
Specifications are subject to change without notice.
Maximum performance derived from IEEE Standard 802.11 specifications. Actual performance can vary, including lower wireless network capacity, data throughput rate, range and coverage. Performance depends on many factors, conditions and variables, including distance from the access point, volume of network traffic, building materials and construction, operating system used, mix of wireless products used, interference and other adverse conditions.
Visit linksys.com/support for award-winning technical support
BELKIN, LINKSYS and many product names and logos are trade marks of the Belkin group of companies. Third party trade marks mentioned are the property of their respective owners. © 2014 Belkin International, Inc. and its affiliates. All rights reserved.

Linksys XAC-Series
Contedio
Tabla de Contents
T1.413i2, G.992.1 (G.DMT), G992.2 (G.Lite),
Annex A, B, M, L
G.992.3 (ADSL2), G.992.5 (ADSL2+) para
Compatible con
exploradores
Internet Explorer 8 o superior, Firefox 4 o
Safari 4 o superior
superior, Google Chrome 10 o superior y
Medioambiente
Dimensiones
10,8" x 1,58" x 7,25"
(256 x 40 x 184 mm)
501g
Peso de la unidad
12V,2A
Alimentación
CE, Wi-Fi a/b/g/n/draft ac, Windows 7,
Certificaciones
de 0 a 40°C
Windows 8, DLNA
Temperatura de
funcionamento
Temperatura de
almacenamento
10 a 80% de humedad relativ,
Humedadde
funcionamento
sin condensation
Humedayde
almacenamento
Botones Restablecer, Wi-Fi Protected Setup
ADSL-i standardid T1.413i2, G.992.1 (G.DMT), G992.2 (G.Lite),
G.992.3 (ADSL2), G.992.5 (ADSL2+)
Lisa A, B, M, L
Brauseri tugi
Internet Explorer 8 voi uem, Firefox 4 voi
uuem, Google Chrome 10 voi uuem ja
Safari 4 voi uuem
Keskkonda puutuv
Möotmed 10.8" x 1.58" x 7.25"
(256× 40× 184mm)
Toote kaal 17.67 oz (501 g)
Toide 12V,2A
Sertifkaadid
Windows 8, DLNA
T1.413i2, G.992.1 (G.DMT), G992.2 (G.Lite),
liitteet A, B, M, L
G.992.3 (ADSL2), G.992.5 (ADSL2+),
Tuetut selaimet
Internet Explorer 8, Firefox 4, Google Chrome
udemmat versiot
Ports Alimentation, USB, Internet, Ethernet (1-4)
Boutons Réinitialisation, Wi-Fi Protected Setup
T1.413i2, G.992.1 (G.DMT), G992.2 (G.Lite),
G.992.3 (ADSL2), G.992.5 (ADSL2+) pour
Annexes A, B, M, L
Navigateurs pris
en charge
Dimensions 256x40x184mm
Poids unitaire 501g
Alimentation 12V,2A
Certifications CE, Wi-Fi a/b/g/n/projet ac, Windows 7,
Windows 8, DLNA
Température de
T1.413i2, G.992.1 (G.DMT), G992.2 (G.Lite),
G.992.3 (ADSL2), G.992.5 (ADSL2+) pour les
Annexes A, B, M, L
T1.413i2, G.992.1 (G.DMT), G992.2 (G.Lite), G.992.3 (ADSL2), G.992.5 (ADSL2+) for
Annex A, B, M, L
Come installment Service Pack 3:
Supporto file system
Standard ADSL T1.413i2, G.992.1 (G.DMT), G992.2 (G.Lite),
G.992.3 (ADSL2), G.992.5 (ADSL2+) per
Annex A, B, M, L
Supporto browser
Safari 4 o superiore
Specliche ambientali
Dimensioni 10,8" x 1,58" x 7,25"
(256× 40× 184mm)
ADSL standartai T1.413i2, G.992.1 (G.DMT), G992.2 (G.Lite), G.992.3 (ADSL2), G.992.5 (ADSL2+)
A,B,M,L priedui
Narsyklès palaikymas
"Safari 4" ar aukstesne
Aplinkos
Matmenys 10,8 x 1,58 x 7,25 col.
(256×40×184mm)
Irenginio svoris 17,67 unc. (501 g)
Maitinimas 12V,2A
Sertifikacjos CE,Wi-Fi a/b/g/n/draft ac",Windows 7", Windows 8",DLNA
Veikimo temperatura 32-104°F (0-40°C)
Laikymo temperatura -4-104°F (-20-60°C)
Veikimo dregnis 10-80% santykinisin dregnis,
neshikondensuojantis
Laikymo dregnis 5-90% nesikondensuojantis
PASTABOS
Noredami suzinoti reikalavimus, garantines salygas ir saugos informacionja, zr. karto sus marsrutizatorium gauta kompaktin diska arba apsilankyike adressu Linksys.com/support.
Techninai duomenys gali buti keiciami is anksto nepraneus.
T1.413i2, G.992.1 (G.DMT), G992.2 (G.Lite), G.992.3 (ADSL2), G.992.5 (ADSL2+)
Pielikums A, B, M, L
Päräka体系建设
Internet Explorer 8 vai jaunaka, Firefox 4 vai jaunaka, Google Chrome 10 vai jaunaka un
Safari 4 vai jaunaka
Arejie
Izmiri 10,8collas x 1,58collas x 7,25collas
(256 x 40 x 184 mm)
Vienibassvars 17.67 unces (501g)
Barosana 12V,2A
Sertifikacijas Windows 8, DLNA
Darba vides temperatura 32 lidz 104^ (0 lidz 40^)
ADSL-standardarden T1.413i2, G.992.1 (G.DMT), G992.2 (G.Lite),
Annex A, B, M, L
Ondersteunde browsers Internet Explorer 8 of hoger, Firefox 4 of hoger,
Safari 4 of hoger
Omgevingsfactoren
Afmetingen 256× 40× 184mm
Mal for veggmontering
Media Prioritization
- Hastighestest - Lar deg teste nettverkets Internett-tilkoblingshastigkeit.

Speed Test
Linksys XAC-serien
Konfigurer ruteren
T1.413i2, G.992.1 (G.DMT), G992.2 (G.Lite),
Tillegg A, B, M, L
G.992.3 (ADSL2), G.992.5 (ADSL2+) for
Stotte for nettleser
Internet Explorer 8 erer senere, Firefox 4 erer
Safari 4 aller senere
Normy ADSL T1.413i2, G.992.1 (G.DMT), G992.2 (G.Lite),
G.992.3 (ADSL2), G.992.5 (ADSL2+) dla
Annex A, B, M, L
Normas ADSL T1.413i2, G.992.1 (G.DMT), G992.2 (G.Lite),
G.992.3 (ADSL2), G.992.5 (ADSL2+) para
Anexo A, B, M, L
Suporte de browser
Safari 4 ou superior
Ambiente
Dimenso 10,8" x 1,58" x 7,25"
(256× 40× 184mm)
Padroes ADSL T1.413i2, G.992.1 (G.DMT), G992.2 (G.Lite),
Anexo A, B, M, L
Suporte a navegador
Safari 4 ou superior
Media Prioritization

- Test de viteza va permite sà testa i viteza conexiunii de Internet a retelei dvs.

Speed Test

Seria Linksys XAC
T1.413i2, G.992.1 (G.DMT), G992.2 (G.Lite),
G.992.3 (ADSL2), G.992.5 (ADSL2+) for
Anexa A, B, M, L
Suport browser Internet Explorer 8 sau mai nou, Firefox 4 sau
Haetpoika MappyTu3aTopa He ydaanac.9
Paket 06HOBNeHnA Windows XP. .9
Co06ueHue «UHmephem-Ka6eIb He nooCoeduHeN» 10
Coo6ueHue «Mapuymuzamop He docmyneH」. 10
TexHnueckne xapaKTepeNCTnKn
LinksysXAC1200 12
Linksys cepn XAC
063op npoodykta
063op npoodykTa
XAC1200
BnD Cbepxy
HnMkKatop-nocTOnHHb3eHehB, KOrdaBKnIoueHn nOcneYcneUHoro noKIOUeHn Wi-Fi Protected Setup. Pekko Muraet BO BpeMa 3arpy3kn npu o6HOJIeHN BCTpoEHnro PO,a TaKke Bo BpeMa nOdkIoUeHn Wi-Fi Protected Setup. BbCtpo Muraet npu oun6Ke Wi-Fi Protected Setup.
BnDc3aDn
Khonka Wi-Fi Protected SetupTM-HaMMITE,HTO6bHaCTPONTb3aunity 6ecnpoBODHOro coeINHeHnHa CeTeBBix yCTpoHCTBax C BKNIOUeHHOny fynKnei Wi-Fi Protected Setup.
USB nopT - co3daIte COBmecThb IocTyI K dNCKOBOMy npOCTpaHCTBy CdpYIMM NIOb3OBATEINMB B Bauw cTe nnuepe3 INTEpHT. NIOkIOHNTe USB-HaONITenB K OTMY NOPTy. Bbl TAKKe MOKeTe NOKIIIOHTb USB-nPnHTE nIoofo IcNOIb3OBAHn B cTeN.
- NopTb Ethernet - noKIOUHTe Ka6enb Ethernet (TaKHe Ha3bAebmB teEBMnKa6EAMN) Krra6BtHbIMnOPTam(10/100/1000) nIOKIOUHTe npOBdHBe CEteBBle yCtPOnCTBa Ethernet KBAWee cTeN.
PIMMEAHNE
JaMaKcMmAbHoH npOn3BODntbHOCTn IcNoIb3yTe Ka6eN KaTepOpnn Nn Bblwe.
- INHTepHET-NOPT - NOKIOUHTe Ka6eB Ethernet (TAKHe Na3bBAemBcTeEBIM Ka6eEM INN INHTepHET-Ka6eEM) K 3TOMY NOPTy KeNTORO UBeTa N KMOEmy.
Khonka6poca - T0bB BepHyb HacTPOKN MauPpyTu3aTopa K 3abOcKIM, HAKMITE N yEpeKINBAITE B TEeHHe 10 cekyHn (Noka HINkAToPbI NpOTOB He MmHYT ODHOBpeMeHHo). TaikKe MOxHO BOCCTAOHBt HAcTPOKN NO yMOJuaHHIO npri nmoiu LInkSyS Smart Wf-Fi. - NopT nTuHn - noKIOUHTe 6NoK nTuHaN AC, BxOJaun B KOMnIeKT.
KhONKaNTaHnHaXMaTe|BKn.(on),4To6bIKNIOHTbMapuPyTu3aTOp. (TOnbko y moDenei nE U.)
LinksyscepnaXAC
063op npodykta
APM103 ADSL2+ Power Modem


HdkaTop:
Muraiozne 3eIeHb:Power Modem 3anyckaetc n yctaHaBnBaet coeHHene ADSL
IIOCTOHHH3eHeBb:coedHHeHne ADSL,cnHXpoHN3npoBaHoe c HHTepHET-npOBAJdepom
Muraoum xentb: ADSL, m3nueckar npo6nema coeHHeHn (r.e. TenefoHHbK a6eb He noknIOeH K cTeHHOMy pa3bemy)
Khonkac6poca:
- Npe3arpy3ka: HaxMnTe u ydepKnBaIte B TeueHne 1 cekyHbI, 3aTeM OTNCTNTe
BocctaHObntb HactpoKn no yMoluaHIO: HxMMTe u ydepKuBaIte B TeueHme 5 cekyHd - Nopt DSL: NpoknouaetcKnnnADSL
Linksys cepna XAC
063op npodykta
KpeHneHne Ha cTeHe
Ha HnKHeN naHEn MauPpyTn3aTopa eCTb Dba n3a dJa KpennneHn K cTeHe. PacToTHe MexyDnaamcoCTabn8 82 MM. JnKpennneHn MaupyyTn3aTopa Tpe6yETcBnHTA.
ПРIMEЧАНЕ
Linksys He Hecet OTBCTBEHHOCTn 3a yuepe6,Bb3BaHbHbHeHaJeKHO 3aKpEnNEHHbIM CTehHbIM KpeIeHMEM.
CneDyIte HNCTpyKUIMHJKe:
- OnpeJenITE MeCTo KpeJIeHnIa MapuPyTn3aTopa. Y6eIInTeCb, YTO CTHe pO8Ha, cyXa HAdEckHa. TaKke y6eInTeCb, cTO pADOM eCTb po3eTKa nITAHn.
- NcnoB3yra 7a6nH, paonoloxeHHbHa CneIyoue CTpaHnce, npocBepInTe DBA OTBepTnB CteHe. Y6eDntecb, yTO paCtOHNMeMxNy HmN CoCTabJrE 82 MM.
3.BkpyTNE BnHTbI,OCaTBN 3 MM CHApyKm - PacnoJoxnTe MapuPyTu3aTOp TaK, YTO6bl Na3bl CTeHOrO KpenneHnCobnaadn C BuHTam..
- CoBmecnte na3bI c BnHTaMn m MedneHNO 3aDbNHeTe MapuPyTu3atop BHn3 TaK, YTO6bI BnHTbI IIOTHO 3aUIN B na3bl.
W6nONCTeHHOTKpENNEHIN
HaneataaTe 3y cTpaHnU y 100% pa3mepe.
BbipexBe No nyHKTHnPHoN NHIN N NOMeCTte Ha CTeHy, YTO6bI TOHOpnpocBepNTb OTBepCTn.
Hac troika mapwpytn3atopa cepnn EA
DononHnteBhble CBeDeHn
POMMO 3TOTO pyKOBODCTBA Nb3OBeTeJI, Bb MoKeTe HaHTN NOJ3HyIOHΦOpMaIO B CnEDyUOxMecTx:
Linksys.com/support (OKyMeHTaUa, 3aPy3K, qacto 3aDaBaEMbE BONPOcbl,TexHnuecknnoepKKaOHnH-HaT,0pymbl)
CnpabKa no Linksys Smart Wi-Fi help (noKIOuHTecb K Linksys Smart Wi-Fi a3aTeM HAKMTe «CnpabKa» (Help) B BepxHei qactn ekpaHa)
YctaHOBKa MapIpyTu3aTopa
- Pn 3aMeHe yKe cyueCTbYIOero MapuTyN3atOpa,OTKIOHTe erO. BkIOHTe HObI mApUpyTN3ATOp.
- NpOcEHNHIne NTHePHT-Ka6Enb MoDeMa K JeTOMy NTHePHT-NOpTy Ha MapuptyN3Atope. DoKHeNTec, Noka INHkAtop PtNaTHA NapeDnei NaEHNI MapuptyN3Atope He CTAEH TOpET NoCTOHHHo.
- NIOKNIIOHTeB K 3aunuHHO6ecnpoBDHOcTn, HMA KOtopoYka3aHO B KpaTkOM pyKOBOCTBe NO Haany paObIb, BXOJAEEM B KOMNNEKT MauPpyTN3aTOPA. (CetEBoe HMa N npAolMb MOxHO mMeHNTbNo3DHee PnHACTpOKe MauPpyTN3aTOPA.) Ecm Bam Tpe6yETCNOMoU8B NOKIIIOUeHN K cTeN, OpaTtNEc K dNCKy C DOKyMeHTaUNeYcTPOCTBa. NpMmueAHMe. IOctyn K INHTepHety 6bETOTcYCTBOBATbDO 3ABEPeHHH HAcTPOKnMauPpyTN3aTOPA.
-
OTKPOIe6pay3epnCleDyTeHnHCTpyKlMnIa3AbepeHnryCTAHOBKn MapuTyN3aTopa.EcIn HnCTpyKUHe NoBIAIOrCa B 6pay3ep, BBeNTe linksyssmartwifi.com B aDpeChyIO CTpOky 6pay3epa.
-
No 3abepuen yctaHOBKn co3aJeT CBOO uYeTHyIO 3aIINcB dN Linksys Smart Wi-Fi, cnEpy INCTpyKuIM HA kPaHE. Pn nmoOn Linksys Smart Wi-Fi moKHO IerKO ynpAIBTb napamETpAMM MaptpyTu3aTopa, B TOM HICNE:
-
Ⅰ3MeHЯть nIMn nnapoNb MappyTu3aTopa
BbINOJIHrTb HAcTpOky roCTeBO rOIOCTyna - BbIOnHb TaHcTpoKy poNtEnbCKoRr KOHTpOJIa
PoiKIOUaTb yCTpoiCTBa KcetN
TectnpoBaTbCKOpocTbNoKnIOueHmK INHTepHeTy
ПРИМЕЧАНЕ.
Ha 3Tane co3aHnna yueTHno 3aHncn Linksys Smart Wi-Fi Bam 6ydet BbIcHNO 3eKTKPOHHe NcMbO C noTBPExJHEm. Bbl DOLKHi bOTKpbITb 3TO COo6UeHne oT Linksys n nepeTn no cOpEpaueenB HEM cBbJIke.
Linksys cepna XAC
Hactpoika MapupytnaTopa
Повлоченьк Linksys Smart Wi-Fi
Pn nomou Linksys Smart Wi-Fi Moxho BbIOnHb HAcTpoKy MapspTy3aTopa cIIO6Oro KOMMbTepe, noKIOuEHHORo KHTepHety.
Yro6bI oTKpbITb Linksys Smart Wi-Fi:
- HaxmTe 3Haoyok Linksys Smart WI-Fi Ha pa6oohcTone.
-NNN
OtkpoTe 6paayepu nppepu nTo c6blke www.linksyssmartwifc.com.
- BBeIte yka3aHbI paHee aIpec 3neKtpOHn NOtbl nnapoB, 3aTeM HaxMtE BxOg BcIcTemy.
I3mehHeHnHaCTpoEeMapuPyTu3aTopa
PpnnomooiLinksysSmartWi-FmoxHOn3MeHnTbnapaMetpbMapuTy3aTopa nHaCTponTb CneuaNbHbIe yHKun, HanpImep, pOHTeBckN KOHTpObn uN roCTeBOJdoCTyn.
IPUMMEYAHNE.
TObb nOyntB DononHnTeIbHy cnpaBky dny IIO6oMeHO, HAKMTe CnpBaKa B BepxHeuactn EkaHa.
4To6bIM3MeHHTb HAcTPOKn MapuPyTu3aTopa:
- OTKpoIe Linksys Smart Wi-Fi n BOUdnte B CBOO yuETHyo 3aNcB.
- B MeHIO B IeBOI qACTN BbI6epTe OIN H3 napaMeTPOB:
Cnncok yctpoNCTB NO3BOJRE NPOCMATPNAbB BCE cTeBBeYcTPOCTBA,NOJKIOHEnHBE KMapUpyTNaTOpY,taKaKe YnpabNTbETMN YcTPOCTBAMM. MoKHO CMOTpeb YcTPOIcTB B OCHOBHINROCTEBOI CETN,OTKNIOuABy TcPOCTBA INI NPOCMATPNAbTB CbeEHNOKaKdOM YcTPOCTBE.

Linksys cepna XAC
Hactpoika MappyTu3aTopa
TocTeB0DocTyN PO3BOJAEHACTpOHTcETb TaKIM O6pa3OM, Yo6bi roCTn MOrJI NOL3OBaTBcA INTEpHEtOM, He NOyuaA DOcTyN KO BcEM pecypcam BaWei cETN.

- Podntenbckn KOthpob no3BONaHT 6noKOpBaT Be6-caTbI orpaHnUmbTa BpMa DOctyna B INHTepHET.
Ha3aHueHne npnopTeTOB HocHTeNe IO3BOJAEoPpeJeTb, KaKHe yCTPOIcTBa INpINOKeHn IOnb3yOTcCeTEbIM TpaΦNKOM Ha npOpNTThbXUCIOBHX.

- PpOBepKa CkOPOCTu no3BONaET npOBepaTb CKoPocTb INHTepHETCOeINHEnIa.
Linksys cepna XAC
Hactpoika MappyTu3aTopa

Speed Test
- USB-namrTaNo3BONrETnONb3oBaTaUSBKaHONITBeB KOMPnKeT) nYctaHaNbMaBtB o6uI mOpuOHTKΦaHAm, MeNaCeBepB, a TAKke OCTyn KFTP. (TonkoImaI mapUpyTmAtopob c USB-noptam.)

USB Storage
- NapaMeTpbl NOkIIOUeHn I03BOJIaOT KOHcIpyPpOBAb OCHOBHIE INoONIHITeBHe HAcTPOKIN CETN.

Connectivity
PONCKNcYcTpaHHeHHeCNpABHcTeeNo3BOJraETDnaIARHOCTnPOBaTb npo6nembl MapuTyH3aTopa HnpOBeprTa COCTOHNHe CETn.

Troubleshooting
Linksys cepn XAC
Hactpoika MappyTu3aTopa
- BécnpOboHàra CBA3b N03BONIeT HAcTaPnBaTb 6ecnpoBoHyIO CeTb MapuPyTuHaTOpA. Bbl MoKTe MEHaTb HAcTpOKn 63oNACHOCTM, napoB, MAC-ΦnIbTp, a TaKKe NoDJIIOHApTa yCtPoIHCTBa c NOMUbBO Wi-Fi Protected SetUp.

- 6e30nacHocTb N3OBJRt HAcTaPnBaTb 6e30nacHocTb 6ecpnoBdoHoi CETn MapuypTu3atopa. MoXHO NaCTpoTb 6paHmay3p,napaMetpy VPN, a TaKoe Bbl6paTb NlB3oBaTeNbckHe NaCTpoHKn Dn npnIOKeHH n HrP.
Ponck nyctpaHne HeNCnpaBHOCTeN
3TOT pa3dien nOMOKET Bam peWHTb pacnpoctpaehHHe np6Iembl yCTaHOBKn INoKIIIOUeHnK INHTepHety. 3a 60lee noPp6HOH INHOpMaueNe 06paauaiTeCB Hnuy yDcOToEHHyu Harpad cnjx6y noDpekkn: linksys.com/support.
HactpoKaMapuPyTu3aTopaHe ydaIacb
Ecnn Linksys Smart Wi-Fi He 3abepuHT yctaHOBky, Bbl MoKeTe nonpo6oBaT bblonHnTb cndyoune deCTBn:
IroJko nnCKpenKo HaxMnte n ydepKnBaTe KhoNky C6poc Ha MappyTu3aTope, noka CBetOnIO He HaHT MrrAtb (npn6n. 10cekyH),3aTeM NOBtOpTE yCTAHOBKy MappyTu3aTopa.

BpeMHeHO OTKIOHHTe 6paHdMaayp HA KOMNbItepe (CM. pyKOBODCTBO nporpaMMHOro 0ecneueHHe 6eONaCHOCTn) n IOBTOpNTe yCTAHOBKY mapUpyTm3aTopa.
EcnnyBaecbDpyroKoMnBIOTeP,BOcNOb3yIteCb3TMMKOMNBIOTepOM DnnoBTOpHOHNONbITKNyCTaHOBKNMapuPyTu3aTopa.
06HOBLeHne naketa Windows XP
Ha Komblotepax c OC Windows XP npnnpabInbHoi pa6oBtI Linksys Smart Wi-Fi Heo6xOIMO nCnOlb3obat NaKet 06HOBHeNIA Service Pack 3. Ecny y bac yctahOBHeN naKeT 06HOBHeNIA Hnke BepcN 3, To Bam Heo6xOIMO 3arpy3ntb uYCTAHOBITb Service Pack 3.
COBET
YTo6bI BpeMeHNO JIOKNIHOHTBCa K Cetn IVHTepHET n 3arpy3ntb Heo6XOJIMMbN NakeT O6HOBNEHIN, MOxHO BOCNJb3OBAtCBs Ka6eM Ethernet dnn NOJKNIOUeyHIN KOMNbOTepa HnOspedCTBEHNO KMODEM.
Yto6bIyctahOBnTB nakETo6hOBnEnHn Service Pack 3:
- 3aɪnɪte Ha æb-ənɪt Microsoft Update (update.microsoft.com/ windowsupdate).
- CnEyIe INHCTpyKUINM Ha Be6-caIte NIN O6paTInTeCb 3a NOMOUIBBO Cnyk6y noDpePkn Microsoft.
- 3aHOBO yCTaHOBIne MapuPyTHaTOp nocne 3arpy3Kn n yCTaHOBKn naKeta o6HOBJIeHnre Service Pack 3.
Linksys cepna XAC
Nonck nyctpaHene HncnpaBHOCTe
Coo6eHne «UHmepHem-Ka6eIb He nodcoeduHeN»
Ecn npn HactpoKe MapwpyntaTop a OTo6paKaetc coo6eHne «NHTepHekabEn He noDcoEINHe, BbInonHInTe cIeNyUOue Warn.
ДяуctpaneHn npo6nembl:
- Y6eHntecb, yTO kAbEh Ethernet APM103 ADSL2+ Power Modem HAdExHo NDoCoEnHeN K XeNTOMy INHTepHET-NoPTy Ha 3aHei nHaHEn MapuPyTHaTopa.

Bud Mapwpymuzamopa c4a
Ko6enb Ethernet APM103 ADSL2+
Power Modem
- Y6eHITecb, cTO APM103 ADSL2+ Power Modem noqKIOUey H K NITaHNO TeneoHHOINHINDSL.
3.YcTaHOBInTeMapIpyTN3aTOp 3aHOBO.
Coo6eHne «Mapwpymuzamop He docmyneH»
EcnH Ye ydaTc nOnyHTb DoCTyn K MapwpyTaatopy, Notomy To KO mNboTeP He NoKnIOeH K CeTN, BblONnHtne CnDyUoNue WArn Dny YcTpaHenHa npOsbM.
TTO6bI NONYUTb DOCTyn K Mapwpytn3atopy, Heo6xodnmo 06ceNeytB NOkHIOUeHne K BAaew COcTBHeHOI CETn. EcnB HactOJIee BpEMBa BnIMeTe 6ecnpOBdHoi DcTn K cTeIN INTEPHT, To, BO3MOJHO, BbI NOkHIOUINMbK YykoH 6ecnpOBdoHoi CETn.
4to6byycpantb npo6emy Ha komnbioTepax Windows:
- Ha pa6oem cTone Windows npaB0 KhoNko Mblu HaaMnte Ha 3HaQOK 6ecnpoBODHO CEt HA NaHEn 3aJa4. 3HaQK MoKeT BbIraTe b no-pa3HOMY B3aBNCmOCTn OT BepCnn Windows.

- HaxMMTE «PocMOTp DOCTynhBix 6ecnpoBodhBix cTeE». PONBNTcCnICOK DOCTynhBix cTeE.
- HaxMMte Ha NIMBaawen CETn, 3aTeM HaxMMte "NOpKnIOHTbcra".Ha npImpe BHN3y KomblbOterep6bnI NOKNIouHc KdpYroB6cnpBOHOH cETn C NImEHem JimsRouter. IM cTn Linksys E-Series, B daHOM cnuyae BronzeEagle, NOKa3AHO Bb6paHHbIM.
Linksys cepna XAC
Nonck nyctpaHene HncnpaBHOCTe


4. Pn noBHeHm 3anpOca cTeBoro KIOUa BBeJte npoIb (KIOUc 6eONacHOCTN) B NOIu HAKMTEe (IOKnIOHTbcra).
BaW KOMMbIOTep NOKIIIOHTcK CcETn, N Bbl NOnyHTe DoCTyn K MapuTyMaTOpY.
106bIyctpaHHTb npo6nemy Ha KomnbIOTepax Mac:
1.BCTPOKe MEHIO B BEPxHeuACTn 3KpaHa HaxMNTe Ha 3HaQOK Wi-Fi. PONBNTcCnCOK 6ecnpoBOJbIX cTeR. Linksys Smart Wi-Fi ABTOMATueCKn Ha3HaUINO MBAeE CETN.
Ha npimpe BnH3y KOMMbToEp 6bl nOdkKUoyen K UyKoB 6ecnpoBOnHO cTeN noD ImHeM JimsRouter.UMa ceTn Linksys E-Series, BdaHHom Cnyae BronzeEagle, nokaaso Bb6paHbIM.

- HaxMMTE Ha HaaBaanHe 6ecnpoBoaHoi CETn BaWero MapuPyTuHaTopa Linksys E-Series (BronzeEagle B npimepe).
- BBeNTe napoB bawen beCnpobOHOH cTe (Security Key) B noJIe «PapOB» N HaKMITE OK.

Linksys cepna XAC
Texnueckne xapaKtepnCTnKn
TexHnueckne xapaKTepeNCTnKN
Linksys XAC1200
Ha3BaHneMoJen LinksysXAC1200
Oncanhe mapuytnaTop Linksys Smart Wi-Fi Modem
AC 1200
Homep moen XAC1200
Ckopoctb
KOMMYTHPuyembix nopTOB 10/100/1000 M6nt/c (rurabnThbien Ethernet)
PaHnoaactota 2,4Tn5T
KoN-Bo aHTeHH 2(2,4Γu) + 2(5Γu)
NopTb Ntahme,HTepHET, Ethernet (1-4)
KhONKn c6poc, 6e3oNaCha yCtHaOBka Wi-Fi
TnTaHne (ToIbKO pN EU MoPeNe)
CBeToOnOdbBepxHnnaHeNb:NTaHne
3aHnra naHb: HHTepHET, Ethernet (1-4)
UPnP
Ponepxmbaetc
T1.413i2, G.992.1 (G.DMT), G.992.2 (G.Lite),
PnpnojKeHn A, B, M, L
PoiDaepeKka6pay3epoB
Internet Explorer 8 nii Bvie, Firefox 4 nii
Safari 4 mnn Bbwee
BbIe,Google Chrome 10nn BbIe n
Pa6oay BnaxKHOCTb 10-80% OTHOCHTeBHO BnaxKHOCTN
6e3 KOHdEHaCmN
Bnaxhnoctb npx xpaheHH 5-90%6e3 KOHdEcaun
PpIMeUAHNIA.
PpaboBryHnDopMaIIO, rapaTHmIbIe yCNOBMA INHΦOpMaIIO o 6e3OpaNCHOTc CMOTpHTe NaNTKe, NOCTabJIeMOM B KOMJIeKTe C mapUpyTtHaTOpOM, HIN NOCETe Linksys.com/support.
Texnueckne xapakTePncTNK MoryT 6bIb N3MeHeHb 6e3 yBeOMnEHn.
MaKcMnAbHnIpnO3BODInTeHbHOCTpaCCHTaHa B COOTBeTCTBnC o CNEUINFMaAINM CTAnDapTa IEEE 802.11. QakTNueckKe xapaKTepnCTNk, BKIOJAAeEMKcTb, npOyCKHyIO CNOcO6HOCTb, dnaA3OH NOKpBTne 6ecnpoBDHO CETn, MOrYOTOnHMtBaCTCBOT yka3AHbIX. IpnO3BODInTeHbHOCT 3ABNCUT OT MHOrNX qAKTOPOB, yCLOBm IN PEPemEHbIX BEINMH, B TOM UcNCE paCCTOHNr OT TOKN DcOtyna, OObEMA CeteBO r TpaFNa, MATEpMaONB IN KOHCTpyKun 3dANHn, MCNoJIb3EyMoH ONepaUNHOH CNCTEmbl, coHeTahn 6ecnpoBDHbIX YcTpoCTB, NOMex n Dpynx He6NaorponrTHbIX yCLOBm.
IocTeIe Iinksys.com/support,TO6bNoJyHtB ydoctoeHHyO HarpadTexnueckyo noDepkky
BELKIN, LINKSYS, a taokn HsHbHrHrHcHmHhOHHpOyHK
BANCTC TAPAHXHxHxHxRyPOMHnHnBelk. YOnHxMHN
TOPHOHN HxHpyTHN HxHxTcOeBHNOHxOHToJx
BauHxDae. 2014 Belkin International, Inc. xnnn oocpApoBHeH
KOHnAHn. Bce npaaaunuHa.

Linksys XAC-Series
Obsah
Obsah
Opis vyrobku
XAC1200. Montaz na stenu 3
Nastavenie smerovača EA-Series
Ziskanie pomoci 4
Instalacia smerovaca .4
Pripojenie k sluzbe Linksys Smart Wi-Fi .5 Pripojenie k sluzbe Linksys Smart Wi-Fi 5 Zmena nastaveni smerovaca 5
Riesenie problemov (Troubleshooting)
Standardly ADSL T1.413i2, G.992.1 (G.DMT), G992.2 (G.Lite), G.992.3 (ADSL2), G.992.5 (ADSL2+) pre
priloha A, B, M, L
T1.413i2, G.992.1 (G.DMT), G992.2 (G.Lite),
Dodatek A, B, M, L
G.992.3 (ADSL2), G.992.5 (ADSL2+) za
Podpora brskalnikov
Internet Explorer 8 ali novejsi, Firefox 4 ali
Safari 4 alinovejsi
novejsi, Google Chrome 10 alinovejsi in
Okolski podatki
Dimenzije 10,8" x 1,58" x 7,25"
(256× 40× 184mm)
Teza enote 17,67 oz (501 g)
Napajanje 12V,2A
Certifikati CE,Wi-Fi a/b/g/n/osnutek ac,Windows 7, Windows 8, DLNA
Temperatura za delovanje 32 do 104^ (0 do 40^)
Temperatura za shranjevanje -4 do 140^ (20 do 60^ )
Vlažnost za delovanje od 10 do 80% relativne vlažnosti,
brezkondenzacije
Vlažnost za shranjevanje od 5 do 90% brez kondenzacije
OPOMBE
Mall for vaggmontering
Media Prioritization

T1.413i2, G.992.1 (G.DMT), G992.2 (G.Lite), G.992.3 (ADSL2), G.992.5 (ADSL2+) for
Annex A, B, M, L
Webbläsarsted
G992.2 (G.Lite), G.992.3 (ADSL2),
G.992.5 (ADSL2+)
BCTAHOBHeHHHa CTiHi 3
Hanaштуваимь Вашор маршутузатopa cepii EA
Ie 3HaTn DoaTkOBy DOnOMory. .4
BCTAHOBHeHHBaWoRo MapuPyTu3aTopa.4
Плкючендо Linksys Smart Wi-Fi.. 5
W6nD BCTaHOBHeHH Ha CTiHi
P03dpykyIte 10cTOpIHky B po3mipi 100%.
BIDpiKTe B3D0BX NyHKnTnpHOi NiHii Ta npNKnAdiB Do CTIN, 106 BNCBepdntn OTBOPn HA ToCHI BiCTaHI.
HanaHTyBaHHaBaworo MapwpyTn3atopa cepii EA
Jxepena odaTkoBoi iHphiOpmaui
Kpim zuoro Nocibnka Kopncybaa, Bu moKeTe 3haTn donomixHy iHOpmaio B HacTyNHx Micax:
- Linksys.com/support (ДOKум entaia,ЗаытackeHHa,aktyanbHi nHTaHHa,TexHuaNITDPUMKa,OHaaiH-CAT,FOpym)
- Dobika Linksys Smart Wi-Fi (3aiaiHa CTOpHky Linksys Smart Wi-Fi i HATNCHTb NocunnaHH Dobika y Bepxhi qactnHi eKpaHa)
Poprajok iHctaIaui II mApwpyTu3aTopa
- y pa3i 3aMIHeHH HABHOrO MapuTyN3aTopa BiE'EnHaIte IHOr. PikIOUHTb HOBm MapuTyN3aTOp Do Jxepena XnBJIeHH.
- PnEHaIe IInepHET Ka6enb BID BaWoro MoDemy Do KOBTOrO IncepHET npTy Ha BaWOMy MapuPyTnAtoPI. 3aueKaIte, DOKN IHINKATOp JXNBHeHHa nepeHni naheni MapuPyTnAtoPAp He 3acBITnbCn NoCTiNo.
- 3'eHaTecb 3 6e3neHIO 6e3npoBIDHO MepeKeio, Ha3Ba JKOi 3a3aueha B IHCTpyKU 70do WBNkOro CTApTy, OTPMaHIN Bam pa3OM 3 MapwpyTt3atOpom. (Bu MoXeTe 3MIHN HsBy MepeXi Ta npoBn iNHIe NiIc HanaHTyBAHHaMapWpyTN3Atopa.) RaQo Bam notp6hA donomora cTocOBH 3'eHaHH 3 MepeXei, neperrHaHbTe KomNaKT-DnCK 3 DokyMeHTaICIE DnBaWoR O npCtPO. PnIMrKa: BN He 3MOxete OTPMaTH DoCTyn Do MepeXi IHTepHe, DOKn He 3aBePunTE HanaHTyBAHH MaupwyTn3Atopa.
-
BiKpnIte Be6-6pay3ep i DotpmyTecb IHcTpkyi dna 3abepeHnHa IanaIyBaHHa MappyTu3aTopa. RaIIO IHcTpkyi He 3'ABJIOTbc Ha ctopiu Be6-6pay3epa, BBedit linksyssmartwifi.com B aIpechnI pAOk.
-
Iicra 3akihueHH npoueynp BCTaHOBnEH HanaWtye O6NIKOBn 3aInc y cnteml Linksys Smart Wi-Fi, DotpmyoHNCb HcTpykui Ha ekpaHI. CucTeMa Linksys Smart Wi-Fi donomarac KepyBaTN npapMeTpamn Mapuptyt3atopa, a came:
3MiHOBaTmI'm'MapuPyTu3aTopa Ta napoB
HanauTOyBaTN DOCTyn IaIroTei
HanaTObyBaTn 6aTbKIBCKn KOHTpObl
PiEHyBAtn npncptoio do cboeMepeke
Bnnp6yBaTn WbNkCtB 3'EnHaHHa 3 lHTepHETOM
NPMIMITKA:
Iiic hanautybaHHo 6nikoboro zaniny Linksys Smart Wi-Fi Bam 6ynde hndcnaHO nekTPOHNI 3aNT npo ndtBepdKHeHH. BIDkPnre eekTPOHNE nobOdomneHH bID Linksys i KaauhithocnauHH, IO mCITbcb HbOMY.
MapushyntaTop «Linksys» cepii XAC
HanauTyBaHHaBaworo MapwpyTnBaTopa
Пдклоченяdo Linksys Smart Wi-Fi
CucTeMa Linksys Smart Wi-Fi 03BONAE 3JINCHOBATn HanaHTyBaHHa MapwpytnaTopa 3a DOnOMoTO 6yNb-RAKO KOMN'OTepa, NiD'EDHaHORO Do lHTepHety.
Ioo6 biikpntu Linksys Smart Wi-Fi:
- Knauchibniktorpamy Linksys Smart Wi-Fi ha po6oomy cToJI. -A50-
Bikpnte6pay3epinepeuiTb3a nocunahnww. www.linksyssmartwifl.com.
- BBeDItb apecy eEeKtpoHHoI noTH Ta napOB iHaTnCHITb KHOHky BxID.
3MiHa napaMeTpib MapuPyTu3aTopa
BukopocTobyTe CnCTeMy Linksys Smart Wi-Fi dIra 3miHn 3haHeNb npaMeTpiB MapuTyBaTaTopa Ta HanaUyBaHHA CneuiJIbHx FyHKui, TaKHX 6BatkIBcBkn KoHTpn I doctyn I da rocten.
PIMMITKA:ДЯOTPMHMAHIOdAToKOBoi iHΦOpMaJI 36yIb-RAKO IyHKTy MeHO KnaHTB NocnHaHH NobiKa y BepXHi qaCTNIk ekpHa.
HanaWtBuHnBaWoRoMapwpyTuBaTopa
《FocbOuBn Doctyn] Do3BONc HanaTuBoByBaTm Mepexy TaKMM uHOM, 106 rocti mortn oTpMaTn doctyn do mepexi IntepHe, aJe He OTPMByaNIOCTynoBCIX pecypciB BaWoi MepeXi.
"BaTbKbcBKn KOthpObn" dae MOKnIBcTB bNOkyBatn neBH Be6caHTn Ta oMekyBatn cac Doctyn do IHTepHety.
BCTaHOBHeHH npioptety dnpctpoBdo3BOJIe BCTaHOBHTI, kki npictpoi i doaTK MaHOt b
npiopntetyBauomymepexhomyTpaiky.
Tect uBnKoctI Oo3BOJAE nepeBipTN uBnKicTb 3'eHaHHa 3 MepeKeio IHTepHcT.
MapuPyTu3aTop «Linksys» cepii XAC
HanauTyBaHHaBaworo MapwpyTnBaTopa

Speed Test
- USB-HaKoONMyBau Do3BOJnE OTPMaTH DocTyn Do npHeHaHOrO USB-Hocia (He BxOInb B KomnKeT) I HanaHTyBaTn 3arAnBnHnn DocTyn D foAinB, Media-cepBepa i DOFTP. (DocTyHnTo TInbKn Ha MapuyptnaTOpax 3 nopTamr USB.)

USB Storage
- PnyKT"MoxnBoCTimepeXeBOIB3aemOoi"D03BOnHaNaTuBaTIN OCHOBHI i03wUpeH HanaTuBaHH MepeXi.

Connectivity
- NykT "CynHeHH HenoAOK" MICTMb 3ac06n DiarHocTNKn npo6nem i3 MapuPyTu3aTopom Ta nepeBipKn cTahy MepeKi.

Troubleshooting
MapuPyTu3aTop «Linksys» cepii XAC
HanauTyBaHHaBaworo MapwpyTuBaTopa
PyHKT "6e3dpoTOBe 3'EDHaHnHa"I03BONHe HanaIITOByBaTH 6e3dpoTOBy MepeKy MappyTu3atOpA. Tyr MoXHa 3MIHOBATn PexHM 6e3neKnnapoB, BCTAHOBIOBAtn pInbTp MAC-aPec Ta nIDcEHyBATn npCtpoi 3aDOnOMOrOy fynKuIz 3axNuHero HanaUHTyBaHH Wi-Fi.

Wireless
Пунк"Бe3neka" Да можлNBICTh 3адаВATи рiBHeb 3axHCTy 6e3dpoToboro 38'3ky МаруpyTN3atopa.TуТ можнHaHauTObYbATn napamTpIn 6paHmayepa,VPN,a TAKOx InHbIyalbHi npamTpIn DЯnpKnaJHIN NpOrpMaTa Irop.

Security

MapuPyTu3aTop «Linksys» cepii XAC
YcyHenHn HEnoJaok
YcyHeHH HeNoJaOK
Ley po3diI donomokBe Bam BnpiunT 3araIbHI npo6IeMn HanaTuBaHHa i niklouehHDo IHTepHeTy. Bu moKeTe 3haHTn 6inbWe donomOrn BiD hawoi yoctoHoi Haropod CnyKbN niTpumKn KIncHtB HA linksys.com/support.
MapшутузаТор He 6уно успihu Hалаштовано
Kycho yhkuia 《Linksys Smart Wi-Fi》 He BnkoHae ycniuho HanaaTuBaHn, cnpo6yTe Hactynhe:
HaTnCHiB Ta yTpmyTe KhoNky BIDHOBNEHnHa MapuTy3aToPi 3a DonomoroKanCenIepbKoi CpkinKn a6o nnInbKn, Donokn cBtIOJIOHN iINkAtop He noUHe MmTaTn (6bn3bko 10cekyH), a nicna IboRo NOBTOPIb npoueDpy HanaWtyBaHHa MapuTy3aTopa.

TMMACOBO BIDKIOHITb MIXMepexeBn Ekapn BaWOro KOMnIOTepa (DnA DOnOMOr NINBITcR IHCTpykui IIOO nporpamHOr 3a6e3neueHHa 3 nHTaHb 6e3neKn) Ta NOBtOpHO HanaTuTe MapuTyN3atOp.
KyO y Bac e ue OIN KOMN'IOTep, TODI cKOpNCaTteCb Hm dno NOBTOPHORO HanaHTyBaHHa MapuTyH3aTopa.
3aBaHTaXeHHa HOBOrO nakeTa OHOBnEhB OC Windows XP
ДяTORI,и6 Linksys Smart Wi-Fi npaobab 3 komn'tepamn Ha Windows XP,notip6HO BCTAHOBNTN Service Pack 3.ЯкоHa данm Mometn Ha Bawomy KOMn'tepeBCTAHOBNEHn Naek OT OHOBNeHb CTAPINH HIX 3-Я BepciB, Bam Heo6xidno 3abaHTaKaHTn Ta BCTAHOBNTN Service Pack 3.
IOPA
TINMACOBORIO NIKKIOUeHHo Do IHTepHety i 3aBaHTaKeHHN Heoo6xIDHO rakoTe OHOBNEb Bn MoKcTe BmKOpCtAn Kabe6EhORnet, AKn DdoAocBa, oO6 NIKKIOuHTN KOMNlOTep 6e3nocepEnho Do BaWOrO moMa.
ДЯВСТАнБЕНHA NaKeTу OHOBNeHB Service Pack 3:
KgUo Bn He Mokete OtpmAtu Doctyny do MappytnaTOpA, 60 KOMNIOteP He npEHaHO Do BaIoTepeKi, DToPMUYIcB HAcTyNHx KpOkB 3cYcHHeH HeNcPbAOCTeN.
Ioo6 Otpnmatn doctyn Do mapwpytn3aTopa, Bn nobHHi 6ytn niiKIOUeHI do Baoi MEPeki. Raio y Bac bke e 6e3pOToBn DOCTyn Do IHTepHety, Todi npo6nema Moje 6ytn B tomy, 0o BN BnAdkOBo nkiKIOuNNnCdo iHouo6e3pOToBOI MEPeki.
Ди Вишеницій npo6nemn ha komп'tepax nid ynpablinHHM OC «Windows»Зpo6iB hactynhe:
- Ha pO6Omy cToJI OC Windows HaTnCHITb npaBOo KhoNkoO MmUKN Ha 3HaQOK 6e3npOBiDHOI MEPeki B o6NaCTi nIKTORpAM Ha naHeni 3aBdAhb. 3HaQOK MoKe BiPip3HATnCBAIeXHoCTi BiD BepciOC «Windows»

- HatncHtB NpeperndoocTynnx 6e3apotobnx MepeK. 3'RBNTbCn nepenik doctynnHex MepeK.
- Hataichi Ta Haa3y Baa0i Bnachoi Mepeki, a TojHa Kaonky Connect, Y HabeEOHOMy HnXue npKnAoi KOMN'OTep 6yoNo 3'EnHAno 3 iHoo 6e3npOBiHO MepeKeIO, KOtpa Ha3nBaCTBCs4 JimsRouter. HAbaMepei cepE II Bp (Linksys), BrOzone npKnAoi demOHCTpyETc8 Ra OpaHa.
MapuPyTu3aTop «Linksys» cepii XAC
YcyHenHn HEnoJadok
- IaKIO 3'ABNTbCn npoxAHN BECTn KIOU MEpeKi, BBeITb Cbi napoi (KIOU 6e3neKn y BiINOBiHNI ONa Ta HATNCHTK Honky (PnpEHaTc).
Bau Komn'tep 3eHaebc3 Mepexeio, npu ubomy Bu nobHHi matn Ierkn doctyn do mapwpytnaTopa.
DnBpuWeHH npo6neMn Ha KOMn'tOpExpax «Mac», 3po6iNb HacTyHne:
- B CTPIU MeHIO 3BEPXy ekpHa HATNCITb Ha 3HaQoK MepeKi «Wi-Fi» 3'ABNTbCn pePENIK 6eIIPOBIDHX MepeK.ФyHKJIA «Linksys Smart Wi-Fi» abTomatNHO dana Ha3By Bauin MepeKi.
Y HabeJeHOMy HnKHe npKnLADI KOMN'IoTeP 6yoNo 3'εDaHaHO 3 I HWOO 6e3npoBIOHIO MepKeEO, KOtpa HauBaEToCBA «JimsRouter」. Ha3Ba MepExi cepiE E Bid «Linksys», «BronzeEagle» B yObmy npKnLADI DEMOHCTpyETbca Rk O6pHa.
- Hatachihb h3By 6e3pOToBOi Mepexi Bauoro MapwpytnaTopa cepii E BiD «Linksys» (BroneEagle) Bucmy npknai).
- BBeItb napoi Baowi 6eepoBidhoI mepexi (3axnchN KIOU) B noJe «Papoi» Ta HATNCHTb «OK».
MapushyntaTop «Linksys» cepii XAC
TexHiHi xaapKTepeNCTnKn
Texhichi xapaKtepncnkn
Linksys XAC1200
Ha3Ba moDeni Linksys XAC1200
Onnc MappnyntaTOp AC 12003 moDemom i
fhyKkjiEo《LinksysSmartWi-Fi》
Homep moeni XAC1200
UWBnKicTb
CTAHUHORO npTy 10/100/1000 M6it/c (Tira6iHTnEhternet)
Paiocrta 2,4i5T
KnbKcTb aHTeH 2(2,4Γu) + 2(5Γu)
NopTN KINBNEHRA,USB, INTEPHT, Ethernet (1-4)
KhONKnpe3aBaTaKeHHHaaxuHe HanaWtBuHHA
Wi-Fi,
CTaHApTn ADSL T1.413i2, G.992.1 (G.DMT), G992.2 (G.Lite),
G.992.3 (ADSL2), G.992.5 (ADSL2+) mTa
IodatkyA,B,M,L
Пдгмка 6payeepiB
Internet Explorer 8 a6o Bnue, Firefox 4 a6o
Bnuie,Google Chrome 10 a6o Bnuie i
Safari 4 a6o Bnue
Ekonoriynn
Po3mipn 10.8" x 1.58" x 7.25"
(256×40×184MM)
Barapncptpo 17,67 yu (501r)
KMBNEHRA 12B,2A
Ceptnikatn CE,Wi-Fi a/b/g/n/draft ac,Windows 7, Windows8,DLNA
TemnepaTpaeknyataui BiD 0do 40^ (biD 32 do 104F)
TemepaIpya 36epiraHHB-20do 60^ (BID-4do 140^
Bonorictb npn ekcnnyataa 10-80% BiDHOCHOI BONOROCTI,
6e3 KOHdEHCauii
Bonorictb npn 36epirahhi 5-90% 6e3 KOHdncaii
PnumITKn
IaTPOPMHnIHΦOPMaJIU ΦO O HOPMTBHO peryIIOBAHHa, rapaHTII IHΦOPMaJIU 3eBNIK INB. KOMPAITNACK, IO NOCTAETBCaPOM3MapWpyTNATOPOM a0o 3aIITbHa
Linksys.com/support.
TexhiXapaKTepeNtIKMOKe 6yTn 3mHeNo 6e3 cnoBiuHHeHH.
MaKcMmAbha npOyKTHBHCb,po3paxoBaHa BiNobiHDo cTaNDbTbIEE 802.11.ΦaKnUHa npOyKTHBHCb MoKe BIdpi3HATnCpe3 Hn3bky npOnyckHy 3daTHcHb MepeKs WbNkCtBpepeDaBHnAHH, dnaaON iNOKPnTTA.
PpOyKTHBnHtB3aENKtB BID 6aRatbox YHHNKiB, yMOB i3MHNX, BKNIOHO 3 BIDCTAHNO BID TOOKI DOCTNY, O6cARMepeKHOrTO pAkiy, MaTepiAni I KOHCTpyKuII 6yDInI, HArBHOI onepauiHOI CTMeTI, CNOnyUeHTb 6e3npoBOOBnx npctpoB, nepekoD Ta IHINX HeCnPnTnNBIHX yMOB.
BiDbiDaIte linksys.com/support,06oTPMAtu BN3HaHy TexHiCy niIDTPMky
"BELKIN, "LINKSYS" a baringi hauhia hina iinomma nooynn ic Toprnnnnaa kaa Kyaanmuae BELkinn 3nrobnai Beknnt 10nncn 2014"Belkin international, Inc." 2014 2014