
BOX IN PLUS - Range hood ELICA - Free user manual and instructions
Find the device manual for free BOX IN PLUS ELICA in PDF.
| Product Type | Range Hood |
| Brand | ELICA |
| Model | BOX IN PLUS |
| Use | Domestic |
| Installation Version | External evacuation or recirculation with carbon filter |
| Minimum installation distance (electric cooker) | 50 cm |
| Minimum installation distance (gas or mixed cooker) | 50 cm (more if specified by the cooker manufacturer) |
| Number of speeds | 3 speeds |
| Lighting | Halogen 12V-20W max G4 or LED depending on model |
| Grease filter | Metal, dishwasher safe |
| Grease filter cleaning frequency | Once a month |
| Carbon filter (recirculation) | Circular, replace every 4 months maximum |
| Lamp type | Halogen 12V-20W max G4 (or LED) |
| Power supply | See rating plate (must match mains voltage) |
| Material | Metal and glass (depending on model) |
| Exterior cleaning | Damp cloth with neutral detergent, avoid abrasives and alcohol |
| Safety | Disconnect before maintenance, do not use without grille, avoid open flames |
| Optional accessories | Carbon filter, exhaust hose |
| Repairability | Authorized technical service for power cord and LED |
| Dimensions | Not specified in the manual |
Frequently Asked Questions - BOX IN PLUS ELICA
User questions about BOX IN PLUS ELICA
0 question about this device. Answer the ones you know or ask your own.
Ask a new question about this device
Download the instructions for your Range hood in PDF format for free! Find your manual BOX IN PLUS - ELICA and take your electronic device back in hand. On this page are published all the documents necessary for the use of your device. BOX IN PLUS by ELICA.
USER MANUAL BOX IN PLUS ELICA
EN Instruction on mounting and use
EN - Instruction on mounting and use
Closely follow the instructions set out in this manual. All responsibility, for any eventual inconveniences, damages or fires caused by not complying with the instructions in this manual, is declined. The hood is conceived for the suction of cooking fumes and steam and is destined only for domestic use.
The hood can look different to that illustrated in the drawings in this booklet. The instructions for use, maintenance and installation, however, remain the same.
It is important to conserve this booklet for consultation at any moment. In the case of sale, cession or move, make sure it is together with the product.
! Read the instructions carefully: there is important information about installation, use and safety.
! Do not carry out electrical or mechanical variations on the product or on the discharge conduits.
! Before proceeding with the installation of the appliance verify that there are no damaged all components. Otherwise contact your dealer and do not proceed with the installation.
Note: the elements marked with the symbol (^*) are optional accessories supplied only with some models or elements to purchase, not supplied.

Caution
WARNING! Do not connect the appliance to the mains until the installation is fully complete.
Before any cleaning or maintenance operation, disconnect hood from the mains by removing the plug or disconnecting the mains electrical supply.
Always wear work gloves for all installation and maintenance operations.
The appliance is not intended for use by children or persons with impaired physical, sensorial or mental faculties, or if lacking in experience or knowledge, unless they are under supervision or have been trained in the use of the appliance by a person responsible for their safety.
This appliance is designed to be operated by adults, children should be monitored to ensure that they do not play with the appliance.
This appliance is designed to be operated by adults. Children should not be allowed to tamper with the controls or play with the appliance.
Never use the hood without effectively mounted grating!
The hood must NEVER be used as a support surface unless specifically indicated.
The premises where the appliance is installed must be sufficiently ventilated, when the kitchen hood is used together with other gas combustion devices or other fuels.
The ducting system for this appliance must not be connected to any existing ventilation system which is being used for any other purpose such as discharging exhaust fumes from appliances burning gas or other fuels.
The flaming of foods beneath the hood itself is severely prohibited.
The use of exposed flames is detrimental to the filters and may cause a fire risk, and must therefore be avoided in all circumstances.
Any frying must be done with care in order to make sure that the oil does not overheat and ignite.
Accessible parts of the hood may became hot when used with cooking appliance.
With regards to the technical and safety measures to be adopted for fume discharging it is important to closely follow the regulations provided by the local authorities.
The hood must be regularly cleaned on both the inside and outside (AT LEAST ONCE A MONTH).
This must be completed in accordance with the maintenance instructions provided in this manual). Failure to follow the instructions provided in this user guide regarding the cleaning of the hood and filters will lead to the risk of fires.
Do not use or leave the hood without the lamp correctly mounted due to the possible risk of electric shocks.
We will not accept any responsibility for any faults, damage or fires caused to the appliance as a result of the non-observation of the instructions included in this manual.
This appliance is marked according to the European directive 2002/96/EC on Waste Electrical and Electronic Equipment (WEEE). By ensuring this product is disposed of correctly, you will help prevent potential negative consequences for the environment and human health, which could otherwise be caused by inappropriate waste handling of this product.

The symbol on the product, or on the documents accompanying the product, indicates that this appliance may not be treated as household waste. Instead it should be taken to the appropriate collection point for the recycling of electrical and electronic equipment. Disposal must be carried out in accordance with local environmental regulations for waste disposal.
For further detailed information regarding the process, collection and recycling of this product, please contact the appropriate department of your local authorities or the local department for household waste or the shop where you purchased this product.
Additional Installation Specifications:
Use only the fixing screws supplied with the product for installation or, if not supplied, purchase the correct screws type.
Use the correct length for the screws which are identified in the Installation Guide.
In case of doubt, consult an authorised service assistance centre or similar qualified person.
WARNING! Failure to install the screws or fixing device in accordance with these instructions may result in electrical hazards.
Use
The hood is designed to be used either for exhausting or filter version.

Ducting version
In this case the fumes are conveyed outside of the building by means of a special pipe connected with the connection ring located on top of the hood.
Attention! The exhausting pipe is not supplied and must be purchased apart.
Diameter of the exhausting pipe must be equal to that of the connection ring.
In the horizontal runs the exhausting pipe must be slightly slanted (about 10^ ) and directed upwards to vent the air easily from the room to the outside.
Attention! If the hood is supplied with active charcoal filter, then it must be removed.
Connect the hood and discharge holes on the walls with a diameter equivalent to the air outlet (connection flange).
Using the tubes and discharge holes on walls with smaller dimensions will cause a diminution of the suction performance and a drastic increase in noise.
Any responsibility in the matter is therefore declined.
Use a duct of the minimum indispensable length.
! Use a duct with as few elbows as possible (maximum elbow angle: 90^ ).
Avoid drastic changes in the duct cross-section.
Use a duct as smooth as possible inside.
The duct must be made of certified material.

Filter version
One active charcoal filter is needed for this and can be obtained from your usual retailer.
The filter removes the grease and smells from the extracted air before sending it back into the room through the upper outlet grid.
Installation
The minimum distance between the supporting surface for the cooking equipment on the hob and the lowest part of the range hood must be not less than 50cm from electric cookers and 50cm from gas or mixed cookers.
If the instructions for installation for the gas hob specify a greater distance, this must be adhered to.

Electrical connection
The mains power supply must correspond to the rating indicated on the plate situated inside the hood. If provided with a plug connect the hood to a socket in compliance with current regulations and positioned in an accessible area, after installation. If it not fitted with a plug (direct mains connection) or if the plug is not located in an accessible area, after installation, apply a double pole switch in accordance with standards which assures the complete disconnection of the mains under conditions relating to over-current category III, in accordance with installation instructions.
Warning! Before re-connecting the hood circuit to the mains supply and checking the efficient function, always check that the mains cable is correctly assembled.
Warning! Power cable replacement must be undertaken by the authorised service assistance centre or similar qualified person.
Mounting
Before beginning installation:
- Check that the product purchased is of a suitable size for the chosen installation area.
- Remove the charcoal (*) filter/s if supplied (see also relative paragraph). This/these is/are to be mounted only if you want to use the hood in the filtering version.
- Check (for transport reasons) that there is no other supplied material inside the hood (e.g. packets with screws (^) , guarantees (^) , etc.), eventually removing them and keeping them.
- If possible, disconnect and move freestanding or slide-in range from cabinet opening to provide easier access to rear wall/ceiling. Otherwise put a thick, protective covering over countertop, cooktop or range to protect from damage and debris. Select a flat surface for assembling the unit. Cover that surface with a protective covering and place all canopy hood parts and hardware in it.
- In addition check whether near the installation area of the hood (in the area accessible also with the hood mounted) an electric socket is available and it is possible to connect a fumes discharge device to the outside (only suction version).
- Carry out all the masonry work necessary (e.g. installation of an electric socket and/or a hole for the passage of the discharge tube).
In the case of the presence of panels and/or walls and/or lateral wall units check that there is sufficient space to install the hood and that access to the command panel is easy.
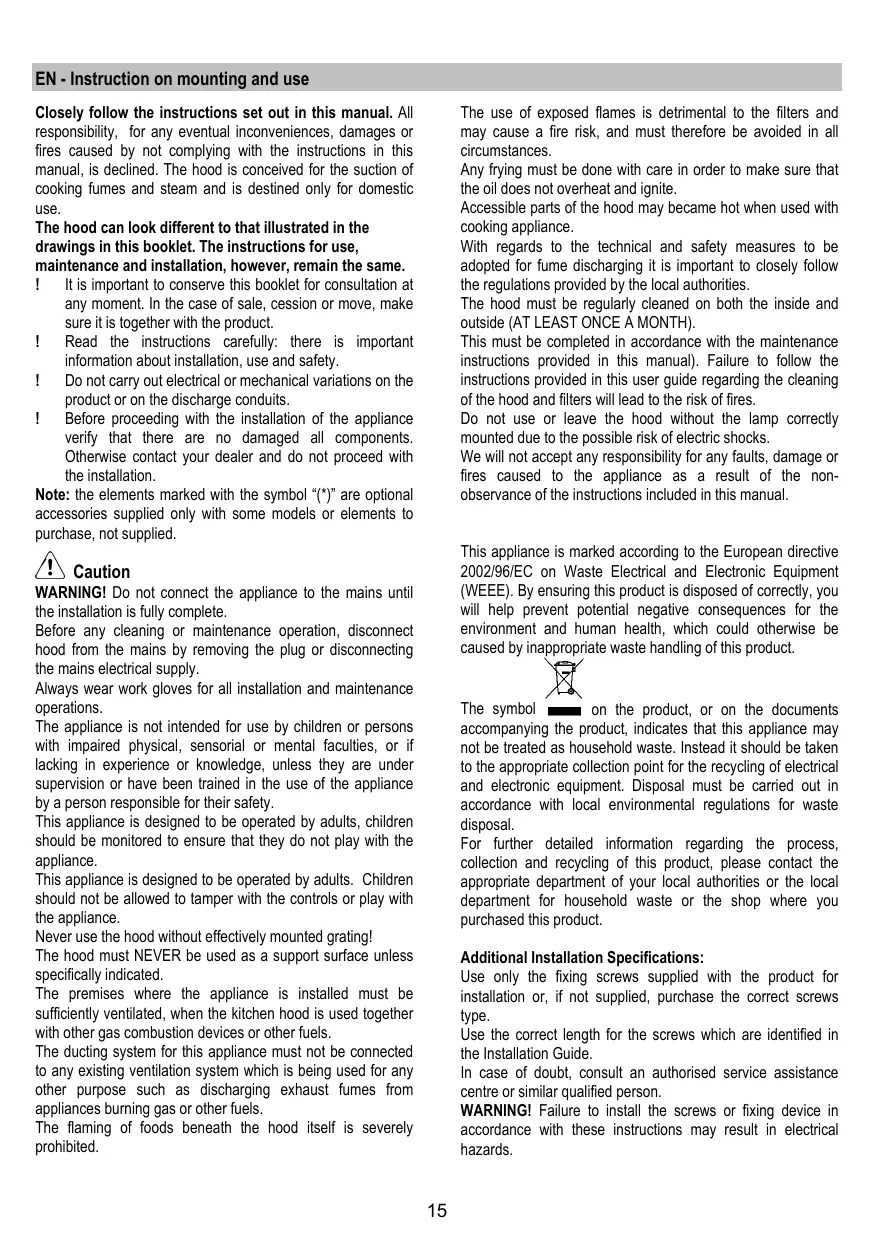
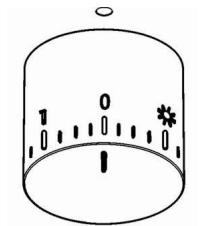
Operation
Use the high suction speed in cases of concentrated kitchen vapours. It is recommended that the cooker hood suction is switched on for 5 minutes prior to cooking and to leave in operation during cooking and for another 15 minutes approximately after terminating cooking.
Always fully open the vapour catcher (A).
Fig. 10
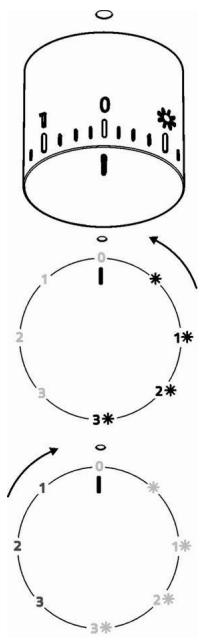
Fig. 6
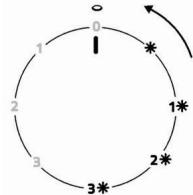
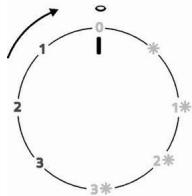
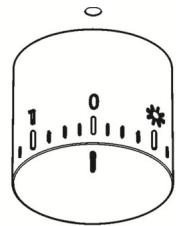
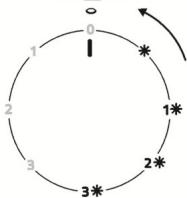
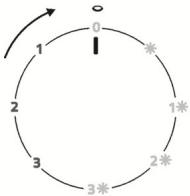
| Light ON | |
| 1 | Speed 1 Light ON |
| 2 | Speed 2 Light ON |
| 3 | Speed 3 Light ON |
| 0 | OFF |
| 1 | Speed 1 Light OFF |
| 2 | Speed 2 Light OFF |
| 3 | Speed 3 Light OFF |
Maintenance
ATTENTION! Before performing any maintenance operation, isolate the hood from the electrical supply by switching off at the connector and removing the connector fuse.
Or if the appliance has been connected through a plug and socket, then the plug must be removed from the socket.
Cleaning
The cooker hood should be cleaned regularly (at least with the same frequency with which you carry out maintenance of the fat filters) internally and externally. Clean using the cloth dampened with neutral liquid detergent. Do not use abrasive products. DO NOT USE ALCOHOL!
WARNING: Failure to carry out the basic cleaning recommendations of the cooker hood and replacement of the filters may cause fire risks.
Therefore, we recommend observing these instructions.
The manufacturer declines all responsibility for any damage to the motor or any fire damage linked to inappropriate maintenance or failure to observe the above safety recommendations.
Panel
Fig. 8
Dismantling:
pull the panel out decisively and remove it from all the connecting points.
Cleaning:
the panel should be cleaned with the same frequency as the fat filters, using a cloth soaked in neutral liquid detergents.
Avoid the use of products containing abrasives. DO NOT USE ALCOHOL!
Montage:
The panel should be fixed between the pins placed for this reason on the surface of the hood.
Attention! Always check that the panel is fixed in its place well.
Grease filter
Fig. 1-7
Traps cooking grease particles.
The grease filter must be cleaned once a month using non aggressive detergents, either by hand or in the dishwasher, which must be set to a low temperature and a short cycle. When washed in a dishwasher, the grease filter may discolour slightly, but this does not affect its filtering capacity.
To remove the grease filter, pull the spring release handle.
Charcoal filter (filter version only)
It absorbs unpleasant odours caused by cooking.
The saturation of the charcoal filter occurs after more or less prolonged use, depending on the type of cooking and the regularity of cleaning of the grease filter.
In any case it is necessary to replace the cartridge at least every four months.
The charcoal filter may NOT be washed or regenerated.
Circular carbon filter
Apply one on each side as cover to both the shield grids of the motor impeller, then turn clockwise.
For the disassembly, turn counter-clockwise.
Replacing lamps
Fig. 9
Disconnect the appliance from the electricity.
Warning! Prior to touching the light bulbs ensure they are cooled down.
Replace the old light bulb with the one of the same type as specified in the feature label or near the light lamp on the hood.
- Using a flat head screwdriver or equivalent tool, carefully pry loose the light cover.
- Remove the damaged light and replace with a new 12 Volt, 20 Watt (Maximum) halogen light made for a G-4 base SuITABLE FOR USE IN OPEN LUMINAires. Follow package directions and do not touch new light with bare hands.
- Reinstall the light cover. (it will snap shut).
If the lights do not work, make sure that the lamps are fitted properly into their housings before you call for technical assistance.
- Model with LED light
The hood is equipped with a lighting system based on LED technology.
The LEDs guarantee an optimum lighting, a duration up to 10 times as long as the traditional lamps and allow to save 90% electrical energy.
For replacement, contact the technical service.
ANVAND INTE ALKOHOL!
- Malli, jossa on LED lamput
Odsavani's recilkulaci
Pred zahajenim instalace:
Okružno uhoIny filter
- Ebponeickata DnpekTmba 2002/96/EC
- Waste Electrical and Electronic Equipment (WEEE).
YBepaikn Ce, Ye To3n ypei 6bJe peuKlnpah no nOoobabaunr 3a TOBa NaHn, Bne DonpHacrte 3a Oan3BaHeto Ha OKJHaTa Cpea N BaWTo 3dpabe.

CmBbIbT BbPx ypea IINB nPnDpykBaAuaata ro DOKyMeHTaunia NocOuBa,Ye To3n npDyKT He Tpr6Ba da 6bde CHTAH 3a DomAushen OTNaBk, a Tpr6Ba da 6bde npeaaden B CneUHaNPOpeHa3HaehNTe 3a TOBA NYHKTOBE 3a peuKnIpaHe Ha eNeKTPnueCa N eNeKTPoHna TexHnka. PnpDpKajte Ce KBM MeCTHnTe HOPMaTHnB 3a npepa60Ta Ka HTaNDbUc. 3a No-nOpRoBa NHΦopMaua NR BBpB3Ka C npEdaBaHETo Cb6nPaHTo N peuKnIpaHETo HA TO3n npOyKT BV CbEBtAME Da ce ObpHete KbM KOMPeTeHTHnTe MECHN CnyKb, CnyKbnte 3a Cb6nPaHe Ha DomAushin OTNaDbUc IN Mm Mara3HbT, B KOIT Oe 3aKynPiN To3n en. eyed.
YnoTpe6a
AcnpaTobt mma cneHOTOn pndHa3NaueHHe: BCMyKbA n OTBeJda HabhN INIΦnITpnpa Bb3dya, KaTO eHOBpeMeHHOC ToBa r peuNKJIpa.

AcnnpupaBercn
Napata ce OTBeJda HABbH NocpeDCTBOM Bb3dYxOboHa Tpb6a CbBy3aHa CbC CbeDNHTENHnF pIaHeu.
DnAmETbPT Ha B3dYxOBoHATA Tp6ba Tp6Ba Da OTroBapra Ha DnAmETbPa Ha CbeDNHTeHNr Np6CTeH.
BHHMaHHe! Bb3dYxOBoJHaTa Tpb6a He e BkHIOeHa KbMaKcceCoapTe n Tp8Ba Da bDe 3akynHea OTdeJIHO.
B xopn30ntaIHaTa qact Tp6bata Tp8Ba Da 6bJe IeKo n3BtA Harope (okono 10^ ) 3a da ynechn OTBeJdaHeto Ha Bb3DyxA HABh.
Ako acnnapatopbte cnaedcnФntpu cakTMBEN BbrIeH, Bnpocnhtpe Tpba da bdat OCTpaHEH.
Cbpxte acnnapatopa KbM B3dyxoxoBOnn TpbN n OTBOpn BCTehata. DnAmetbpT Ha TpbBnTe Tp8Ba Da CbOTBcTcBA Ha DnAmetba Ha CbeHNHTeJHnaФlaHeu 3a OTBeXdaHe Ha B3dyxa.
Cbbp3BaHETo KbM Bb3dYxOBoHn Tpb6n n OTBOpn C noMaIbTk DnAmEeTp HamaJIraBa KaNAChTeHa aCNIpuPHe NyBeJIuHabA 3NaHrTeHNO UyMa No BPeme Ha paBota.
B Te3n cnUyAn FnpMaTa He NoeMa HnKaKBa OTROBOPHOCT.
I 13no13BaIte TpB6a C Heo6xOIMMaTa bJInHa.
! N3noI3BaIe Tp6Ba C B3MOxHO HAI-MaNko Tp6Hn KOJIeHa (CMAKCImaJIeHbIHa I3BvBaKa:90°).
He npomehraaTe p3kO ceueHMeTo Ha Tpb6nte!
I N3noN3BaBte Tprb6n C Bb3MOxHO HAI-ΓIaKo BbTpeuHOn Kpntne.
I MaTePnAJIbT,OT KOITO Ca I3pa6oTeHn Tpb6nte Tp8Ba Da OTROBAPHa HOpMnTe B Cnna.

HnIITpnpaasaBepcn
AcnipnpanrB3dyx Ce npeuHCTBa n OcBejaba npEn da Bne3e OTHOBO B obpueHne B NOMEueHneTO. 3a da n3no13BaTE acnpaTopa B To3n Bapnant Ha pa6ota Tp6ba Da IHCTaInpate DoIbHNITeHa fHPTpnaCa CTema Ha 6a3ata Ha fHTPnC aKTHEN BbTJIen.
MoHTupane
MHHMaJIHOTo pa3cTOrHHe MEXdy NOBbpxHOCTTa, Ha KOrTO ce NOCTaBRT CbDOBTe 3a ROTBE He HAI-NHCkATA qACT Ha kXHyENCKn acnnpatop, Tp6Ba Da 6Be He No-MAnKO OT 50cm B cnyaH a EneKTPnuCeck NeeKn H e No-MAnKO OT 50cm, B cnyaH ra3OBoN INI KOM6bHnPaHn neKn.
Ako B INCHPTyKUHnTe Ha ra3OBuYpeI 3a roTBeHe e nocOeHo NO-TOJIAMo pa3CToHnE, TO Tp8Ba Da ce HMa npEdBnD.

En. Bpb3ka
HanpexeHnTo B en.MpexaTa Tp8Ba Da otroBapra Ha HanaPexeHnTo, KOEt e nocOHeo Bbpy EtNketa C daHHnTe 3a acnupatopa, noCTaben OH bTpeuHata My cTpaHa. Ako e ChabdE h C uENcEN CbPjKeTe Acnipatopa KbM KOHTAK, CbOTBETCBaU HA DeIctBAuNTe HopMN HAmnpaC He HAJeCHO DOCTbNHO MCTO DOpN i CNEI npKlIOvBaHe HA MOtaxa. Ako He e ChabdE h C uENcei (DmPKTHO CBp3BaHe KbM MPexaTa), INI UENCeJIbT He e HA DoCTbNHO MCTO CNEI npKlIOvBaHe HA MOtaxa, IN3NOIN3BaTE DByIPOInOCEH pKebCBAH Cnped HOPMITE, Taka Ye Da Ce Ocnrpy NbHIO N3KIOvBaHe Ha MPexaTa Pnri CBpXHanPexeHne III, B cbOTBeTCTBHe C npAbunlaTa 3a MOHTnPaHe.
BHHaHHe! Ipei Da CbpxTe OTHOBO acInpTaOp KaM MPekata N da npOBepTe daHn FyHKUHOHa npABUNHO, npOBepTe daHn KaBeJbT e MOHTpAn KaKTo Tp6Ba.
BnMaHHe!I0MaHaTa Ha 3axpaHbAunna Ka6eT pr6Ba Da ce N3BbPbBA OT OTOp3InpaHnA cepBn3 3a TEXHuecka nOMU, 3a da Ce N3BeHrE BCKaKbB pCK.
MOHTAX
IpeDn da npncTbnte KbM MONTaXa::
- Ybepete ce, ye 3akyenmrt ot Bac npoykt otrobapno pa3mepn ha n36paHOTo mCTO 3a HCTaJInpaHe.
- OTCtpaHeteФINITbpa/ФINITPnTe C aKTHBEN BByIeN (pa3BnPa ce, aKO IN36pAHHT OT Bac MOeJ pa3NOnara c TaKb). 3a Da IN3BbPnITE TOBA pOcneJeTe onePAunITE B CbOTBeTHnna naparpaD. MoTHnPaJIte FInITPnTe OTHOBO CAMO B CnUay, Ye XeNAeTe DA IN3IONBtAE acnPaTOpa BbB BApNaHT HaФINITPnPaCa BEpcN.
YBepTe Ce,Ye NIO BpeMe HA TpaHcNpTa BBB BbTpEuHaTa HaacnnpaTopa He ca NpNaHaNl Dpe6Hn PpeDMeTn KATO HApMpEe PInKHTe C BNHTOBe, RapaHJIOHNNI Kaptn I np; aKO HamePte TAKbBA OTCTpaHete nI nI 3aPa3eTe.
Ako e Bb3MOXHO pa3rIIO6e H npemctete Me6eHInTe, KOINTO CEHAMIPATB HENOCpeCTBeHa 6IN30CT Do MRCTO, KbDETO Bb3HAMEPBATE Da MOHTIPATE acnHPATOpA. IToTOn HAHN UHe IMATE NO-DO6bp DcSTbN DO TabaHA INTHCTeHATA, KbDETO Ue 6BJe IHCTaIPAH. BnpOTmEB CNyauh, BHIMABaTE Da He YBpeNTo No BPMe HA MONTaKa Me6eHInTe BNCNUOCTaHANPipeDMTe.N36pePabHa NOBbPXHOCT INOKpHIte CNOxOAnIPO pIHtHO, Bbpy Koeto DA NOCTaBITE acnHPATOpA INCBOTBHTHIE AKCEcoApn. - YBepete Ce, Ye B 6bn30ct Do MCTOTO, KbTeTO B3HaMEpRABe Da MOHTnPaTe aCnnpaTopa NMa JleCHO DoCTbIeH KOtAKT N CbIo Taka, Ye E B3MOXHO da Ce CBpbKe C OTduWHNK (cAmO 3a acnnpuPAUITE BepCN).
- 13TbIHeTe BCnKHeo6xOdMm OepaCnHapIMeP MOHTpAte en. KOHTAK WInn HapabeTe OTBOP 3a npokapBaHe HaNxoDHaT a Tpb6a. AcnpatopbTe cHa6ben CIOBENs 3a FNCpAne NdoXoDus 3a No-tolmaT auct OT CTEHNT eTabAHTE.
Ipn HauHnEto Ha nanei, CteHi WnHn CTpaHmHn UkafoBe yBepe Ce, Ye pa3noIarate C doCTaTbUHO MRCTO 3a da INcTaInpaTe acInpata, NYe IMATE BINARI Be3nprrTCTBEH DoCTbN DO KOMAHdHOTo TabNo.
Hauin ha ynoptpe6a
Ako npri rotbehe ce otdeM Horo napa, npemHete ha MAKcImaen pekmm Ha pa6Ota. IpeopbunHe o da BKNIOHTe ACINpATOPa 5 MNHyTN ppei Da 3anoHETe da rotBnE N da ro OCTabITE da pa6OTn OOE 15 MNHyTN cneI KATO pnpKIOHNTe.
Ja ce OTbapr BnHaT N3qJIO KoneKTopbT 3a npa (A).
ΦnR.10
| Осветлене ON | |
| 1 | 1-ва скорост Осветлене ON |
| 2 | 2-раз скорost Осветлене ON |
| 3 | 3-ва скорost Осветretenе ON |
| 0 | OFF |
| 1 | 1-ва скорost Осветretenе OFF |
| 2 | 2-раз скорost Осветretenе OFF |
| 3 | 3-ва скорost Осветretenе OFF |
Poiapbxxka
BHHMaHHe!Ppei KaKbATO n da e onepaCnCBp3Ana c nooNCTBaHe nIIN NOdPbXkA N3KnHoyete acnHpTaOp oT en.MpeXata, KATO N3BaDInTe uenCeJa IIN N3KnHouHTe rIaNbHn PneKbCBAu Ha XJINlUeTo.
Почистванe
AcnpatopbT Tp6Ba Da ce nouHCTBa YecTo (nIn noHe ToIKOba Ha YecTo KOJIKOTO NOUcTBate FmTTPnte), KaKTo OTBtpe Taka N OTbH.N3IOn3BaTe HabJaXHeHa Kbpna HeYtpaJIH N TeHH NouHCTBaU npenapATN.
I36yBaTe npenapatn, KOITO cbdbpxkata 6pa3NBHuaCTnU.
BHHMaHHe! He nouchTaBaiTe HNKora cbc Cnpt!
BhImaHHe! HecnBaHaTe Ho HopMITE 3a noHcTbaHe Ha acnIpaTopa Na 3a noIMHa Ha qInTpIte BOn Do pNCKOBe OT noXap. Cna3BaIte cTporo nocOeHIne IHCTpyKUm!
He ce noema HnKakBa OTROBOPHcT 3a eBeHTyaJIHn 7eTeHaHECEHn PO MOTOpa N IOXapu, Bb3HNKHaJN CNECTBVe HaHepaBnHa NOdPbJxKa IIN HeCnA3BaHe Ha HCTOaIHTeHCTpykUIn.
PanaeI
Φnr.8
DemOHTHnPAnHe:
Дрьн electанела рязков habьн IO OTkaчete OT BCNCH TOOKH a3XBaUaHe.
Почистван:
PAnHeIbT TpI6Ba Da ce noUcHCTBa ToJIKOba YeCTo, KOJIKOTO noUcHCTBaTe 3a Ma3HNiN. N3noJ3BaIe BnaKa HkpNa n HeyTpapanH TeuHn noUcHCTBaun ppenapatn.
I368BaTe ynoTpe6aTa Ha npOdyKtN, CbIbPkaUaH 6pa3nBnu chaTmU. HE I3IPOJI3BAITE CNIPT!
MOnTnpaHc:
Tp86Ba da ce qikcupa KbM 60JTOBte, noCTaBeHn 3a Ta3n cen Bbpxy NOBbpxHOCTTa Ha acnnpatopa.
BhMaHne! PpOBepTe daJI NaHeIbT e 3IpaBO 3aKpeEN Ha MrcToTO My.
ФиNTbрзаMa3HINH
Φn.1-7
ФиNTbpyT 3aIbpxa Ma3HnTe YactnU, OTdJIaHn npI rOTBeHe.
IpoNCTBa Ce BEdnBx MeecHc O C HeYtpaHn npepaTn. Mne ce pTuHO INI B CbDOMMaIHa MaIIHa Ha Hncka TemnepaTypaKpTaBk PexIM Ha N3MmBaHe.
IpiMnHeHaΦmTbpa3aMa3HmHnBcDmOpJHaMaJInHa eBb3MOxHOToJdaCeObE3uBETn,HoTOBa HnKaKbB CJIyAa HeHamajBa CnOc6hOCTaMyHaΦmTpnpaHe.
3a da paarIIO6nTe pnnTbpa 3a Ma3HNHnTe, npbHHeTe dpjKkata c npyKIneH mexAHm3bM.
ФИNTbP cakTINBEN BbIeH (cAmO 3a ФИNTpnpauaBepcn)
Φn.r.6
3aIbPka HnepnAHTHnTe Mnpn3Mn, KOITc ce OTdEJIr TpN IpbXeHe.
ФИNTbPbT C AkTNBEN BbIeN CE 3anyBa pIn6JIIN3nTeHNO CNeId IbIbI nepIOd HA n3nOIN3BaHe B 3aBcIMMOCT OT hauHHa roTBeH e NT OToBA KOnKQ YecTO NOYICTBaTe FInITbPa .
BbB BCEKn Cnyaie H eNo6xOJIMO da NODMeHrte FInTbpa cAKTNBEH BbTIeH Na BCEKu YeTnpi MecEua INN KOraTO INDkAToPbT 3a 3acNiUaHe Ha FInIPTne IOKa3Ba, Ye e HEO6XoJIMO.
He ce MNE HTO MOXe Da ce 3IOJI3Ba IOBTOPOHO.
Kpbbln pntbp cakTNBEN BbIeN
Iocabete no edin h pfntbop 0Bcra ctpaHa, taKa ye da ce nokprrdtBeTe npedn3nPeWetKn Ha paBoTHOTo KoneIo Ha MOTOPa, Cnei KoETo 3aBbpteT No Nocoka Ha YacOBHkoBata CTpeNka.
Pn demontaka 3aBbptete B nocoka obaPATHa Ha yacobHnikOBaTa CTpeIka.
IopmHa ha en. KpyuKn
Φn.r.9
U3KIIIOUeTe ypeDa oT en. MpeXaTa.
BnMaHHe! Ppei Da B3eMeTe B pKa eI. KpyuKmTe npOBepTe daJI ca 3CTnHaJI.
IOnmHeTe NOBpeDeHaTaNAMnC HOBa O TcBua TIN, TaKa KaKTo e NocOeHO Bbpy ETKeTa C XapakTePncTNIte IIn6bn3o Do camata NaMnBa Bbpy AcnPpaTopa.
- C nomoasa Ha majaika OTBepTKa ININ NOO6eH INCTpymEnT OTCTpaHETe KaNaka Ha INafoHnepeata.
2.Подмени Te n3roрялata kpyшka.
He octabnIte detei 6e3 npncMOtra, YTO6bI OHI He irpaJIIn C np6oPOM.
He nCOnIb3yIte BbITaKky, ecIn peWetka HnPabINbHO yctaHOblena!
Kateropnueckn 3anpeuetaTcNcnoIb3ObaTb BbITaJKyB KaheCTBe ONOPHON PIOCKoCTM, ECNI 3TO CNEuaJIbHO He OROBOpeHO.
O6ecneyte HaIeKaun Bo3DyXoo6MeH NOpmeJeHn, KOrDa BbI cNoJIb3yeTe BbITaKky B KyXHe OJHOBpeMeHNO C dpYrMm npIbopamHa ra3y HIN Ha dpyrom rOpUcHem.
BbItraBaemb Bo3dyx He dOnJKeH BbI6paCbBaTcHapyKy uepe3 Bo3dyXOBOD, INOnIb3yEmb IINr BbI6pOca DbIMOB OT npIb6OpOB C ra30BbIM CxNraHnEM mIN C pNTaHnEM dpYrMMrTopUQHM.
Kateropnueckn 3anpeaetcra roTOBnTb 6IIOda naI pIamHeHem, nOckoJIbky CBO6OJHoe IINAMr MOxET NOBpeiNTbФIbTpbl nCTaTb PnUHHoN IOXapa; N03TOMy, BO3depKJBauTeCb OT 3TOR B JIO6OM clyuae.
KapeHbe B 60JIbIOM KOJIuYeCTBe Macla DOnJIKHO npOu3BOuNTbcra IOI NOCTOaHHbIM KOHTpOJeM, IMe B BVNu, yTO nepepeToe MaCIO MoKET BOcPiMaHeYrCb.
Пи ИСПОЛБОВАн N BМЕТС C ПОЧИМ N ANNAPATAM N DЯ ВВКИ, OTKРБТLE СACTN ПИБОС MORYT CINьН HARPEВТС. ЧTO KACAEТСТ EХИЧЕСКИМ МЕ N YСЛОВ N NO TEXHIKE БEZONACHOCTN PпО NTBODE DBIMOB, TO ПИДЕРЖИВАТСБ СТРО ПавИN, ПЕДУCMOTPEHHBIX PERMANENTM MECTHBIX KOMNETHTHBIX BNACTE.
Пюпьовипескуну OчNTКУ BByTЯЖК KAK BHyTpN, TAKИ санарху (ПО КРАнHEМЕР, PA3 B MECJIц c coБлJODEнEM yCNoBn, KOTOpbIe CneцmaJIbHo npEduCMOTpeHb I NHTcPruKUnxNo IO b6CnPyKmbaHIO DAHHORO npi6bopa).
Heco6IHOeHne HNCTpyKuIN NO YNCTKe BbITaXKn IN No 3aMeHe u NCTke QJIbTPOB MOxET CTaB pInuHoi Noxapa.
He nCnoJb3yIe H He octabJIe Te BItIaKBy 6e3 npAbuIbHO yCTAHOBJIeHHbIX JAMIOueK B CBy3N C BO3MOXHbIM pNCKOM yDapa 3NeKTpUneCKM TOKOM.
Mblchimaem C c6eBcKkyo OTBETCTBEHOCt 3a HeNoIaIKn, yuepe nIi cropahne npnbopa BCNECTBne HecobJIOJeHHCTpykLm, pNBeDeHHbIX B daHHom pyKOBOdCTBe.
Данhoe ИделпnpoMapКИрOBaHO B COOTBETCTBnC Еврелсков ДиpeKТВоB 2002/96/EC NO yTNIN3aun ЗлктчecкOrи иЗлктpoHOrO obopуdoBaHЯ (WEEE).
OeceueH npabnblHyu ytnlnaaQIO daHnOro n3denn, BbI NOMOXETe PneDToBpaTbN POteHuaJIbHbe I HeTaNBhie NocLcECTBn DnO OkpyKaioUe CpeDbI N3doPobBaYeJIOBeKa.
CnB01 Ha cAmOM N3dEINN INI cOnpOBoNTeHbHOJ DOKyMeHTaUy KAsbIbAET, YTO pRn yTInIaUzMn DaHnHO R N3dEINN C HMM HeNb3Z O6paUaTbCk KAc CObHyhBMn 6bITobBMn OTXdAMu BMeCTo 3TO,ero CneDuYcDabATB COOTBeTcByUoU nYHK TnpEIMKn 3NeKTPnueckoro N 3NeKTPoHrO O6OpuyoDaHn DJIPOcNeDuOuSeY tINIaUzMN.
CdaHa hCNOMdoJXHaIpon3BOJntbCBAoTBeTCTBm C MeCThBMIMnPpABINAMN OYtJIN3aUNOTXoIDOB.
3a 6oJIe neIpoIb6HOn HnΦopMaJneO npabInax oBpaJIeHnC TAKIMN I3dJIeJIaMn, INx yTNIImaZmN INpepe60fKnOBpaauaiTeCb B MeCTHbE OprAHbI BnactN, B CnyKbY noyTNIImaZmN OTXIOOB ININ B MaraINH, B KOTOpOM Bblnpio6pei nn daHnoe IN3dJIe.
Ponb3ObaHne
BbIyKa cKoHCTpyuPObaHa dIЯ pa6OtBi B pexIme OTBoJa BO3Dyxa HAp4yku IIN peCpKpyLJIuN BO3Dyxa.

IcnoIHeHne COTBOOM BO3yxa
B 3TOM pexIme nCnapeHnra BbIbOaTcH hApyu Chepe 3n6Kn ty6oNpOBoi, NIOcoEINHeHHb K COeINHInTeJbHOMy KOJIbU. DnAmETp BblOHOH Tpy6bl DOJIxHe COOTBeTCTBOBaT b DnAmETpy CoeINHInTeJbHOrO KOJIbUa.
BHMaHHe! BbIbOHaA TpyBa He BxOaNT B KOMPJIeKT mdoJKhA 6bIt npno6peTeHa OTdJIbHO.
B rotnoHTaIbHOn qactn Tpy6a DoJNkHa 6bItb HeMHoro npinnoHraT K Berxy (npimepHO Ha 10^ ) Tak, YTO6bl Bo3dyx 6bICTpee MOr BbIXOHTb HApNyXy. EcInn BbITgKca ChabKeHa yroIbHbIM mIbTprom, To y6ePte erO
IIOaCOeHINHTb BbITaKky K BbIBOHDH TpyBe C dHaMeTPOCM COOTBcETCTByUoZMM OTBepCTnHO BbIXoDa BO3dYxa (coeHNHTenbHbIΦnaHeu).
UctahOBka Tpy6 C MeHbIIM DnAmETpOM DaCT yMeHbIeHne MOUHOCTN BCaCbIBaHnB BO3Dyxa N pe3Koe YBeINuEHne yPoBHa Wyma.
ПОНЗВОДИЕЛСИМАЕТСЕБСВЕЦYO OTВЕТСBEHHOCTB NO OTHOUSHENIO BVISE CKA3aHNO.
I NcnoIb3OBAtB Tpy6y C MmHImaIbHo Heo6xoDIMOJ DnIHoJ.
I NcnoB3OBAbT Tpy6 C HAmEhBIm KOJInueCTBOM n3rN6OB (MAKcImaJIbHbI yrOJ n3rN6a: 90^
! 136eBaTpe3KOroIm3MeHHeNceEHnTpybI.
I BNYtpenHnra NOBepxHocTb NcNtBsyEmo Tpy6bl DOnKHa 6bItkak MoXHo 60nee rJaKn.
I MaTePnaI Tpy6bl DoJxKeH COOTBETCTBOBaTb HOpMaTINBaM.

IcnoHHeHBeBpeXnmepeunpkyJauu
HE IPIPIMEHJTE CnHPT!
BhImaHne: He co6nIOeHne npabIN nIcTkn np6Opa n 3aMeHbI pInIbTPOB MOKET npIBeCTN K PnCKy BO3HNKHOBeHn IOkapa. IooTomy peKOMeHdyem co6nIOdaT bpNeBeDeHbI e HNCTpyKlMn.
CHHMaTeCJIIO6aOTBETCTBeHHOCTb B CBA3N C BO3MOXHbIMN NOBpeXDeHnAIMn DVBraTeJn I C NOKapAMn, BO3NHKUIMM BCIEeCTBHe HnPabINbHOrOpemHOta INI HeCO6JIIODeHnRA BIWeOIncaHHbIX npedynpexDeHn.
PanaheIb
Pnc.8
ChyTne:
TaNbTe CnblHO NaHeJI KnapyK IN OTcoeINHITE ee OT BCEx MecT KpeJIeHIn.
OuHCTKa:
3aunuane naheb cTOnb JKe YactO, UTo N fNtBtp 3aedpKKn Xnpa TpIKNo, CMOueHNO B HeITpAIBHom MOUeem CpeCTBE.
I36exaIte npMHeHne cpeCTB, codepxauux a6pa3nBhIe BeuectBa. HE IcPOnb3yIte CnIPTA!
yctaHObKa :
BCTaBtE naHeIb B rHe3do no HnpaBnIouzIM UTmTAM, paCNOJIOKeHHbIM Ha NOBepXHOCTN BbITRkKIN.
BnmaHne! PnoBepaTe Bcerda NaedxHoe KpeIeHne naHeN B rHe3de.
ΦnIbTpbl3aepKKn Knpa
Pnc.1-7
YdepKnBaet qactnbl Jnpa, nCXoJaune Oe TnIHTbl.
ΦnIbTp cneJyET YNCTNTb EJEMECAHNO HEarpeCCNBbIMMoHOUIMC PcEDCTBAMN, BpyHyO HIn B NocyDOMOEuHO MaUNHe Prn H3KoT TemNepaType N KOHOMNHOM KINKLeMbITbY.
ПиMbITBe B NocydomoeyHOM MaUNHe MoKET MmEtb MeCTO HekOTOpoe ObecuBeyBaHnE ΦINbTpA 3aJepKKn Jnpa, Ho erO fInbTpuyoza XapaKTePncTnKa OcTaetcA b6CoNHO Hen3MeHHo.
Ia CHTnA qHbTa 3aepKKn Jnpa nTnHte K c6e NoDnpyKHeHHyO pykO tCuIeHnE HnBtpa.
YrOJIbHbI ΦnIbTp (ToIbKO BpeXmPeuRpKUJIaUN)
Pnc.6
YdaanrT HenpnaTHbIe 3anaXn KxHn.
HacbIeHne yrolbHoro fInbTpa npocXOaNT no nCTeYeHN 60Bee mN MeHee dInTeBHoro nepNoa 3KcPnYaTaUzIM, PpeOnpeJeMero TINOM KxHn N nepNoDnHOCbTo OuchTkn fInbTpoB 3aepJxKn Jkpa. B NIObom cnyae, 3aMeHnIte KapTpIdx No kpaHne Mepe yee3 KaXdIe 4 Mecya.
YroIbHbI ΦnIbTp HE noIeXnT MoKe Inn pereHepaun.
Kpyrbly yrolnbHbI Φnltp
PokpbIbФnIbTpamn Obe cTOpOnbI dIa 3auchneHna 3aunThbXpeWetOK potopA dBiratela, nocne Yero BpaataBФnIbTp no YacobO CTpeJIke.
ДяСЯТЯ-ВрашаьnpOTивЧАСОВИСТРЕЛК.
3aMeHa JAmn
Pnc.9
Otknouhte npmbop O T3JIeKTPocetm.
BHMaHHe!IpeXeYe pRkacTbC K JAmPam y6eNTecb B TOM, YTO OHN OCTbln.
3amehntb nobpejdeHHyJ lamnochy Ha HObyo Takoro Jez Tnna, KaK yka3aHO Ha 3TKKeTke, INI pRdOM C lamnoykOi Ha BbITRAXKE.
- IcnoIb3yI pIOckyo OTBepKy IINI aHaIOnHyhB INCTpyMeHT, OCTOPOKHO CHIMITE 3aunTHbI 3JeMHT.
- 3amehnte neperopebuyu lamny.
NcnoJIb3yIe IINuB raIoreHOBIe IaMnbl Ha 12 BoJbT, MoUHOCTbIO MaKcIMyM 20 BaTT, CdenaHbIe Ia6a3bl G4 , pInroDhIe IJa NcNoJIb3OBAHnB B OTKpbITbIX CBeTIbHIkAX.
CleyuTe yka3aHnM n He npKacaiTeCb K HObblm lamnam roJbIMn pykAMN.
- 3aKpoIe pIafoH (KpeIeHne 3aueIkoI).
Ecni CnCTema nOJCBETKn He pa6oTaET, npOBepbTe KoppeKTHyIO yCTaHOBky JAmn B rHe3dax, npExde Yem oBpatNTbcra B CEHTp TEXHmecKO NOMOUI.
-MOДЛь C LED JIAMIAMN
BbIyKka 60bpUObaHa OcBeHHeM Ha CBeToNDaX LED. CBTeOIObl 6oCSeNvBaHO TOnTMMaHbOE OCBeUeHne, IN cPOK cnYk6b1 B 10 p3 npeBbIaAet cPOK pa60tBu TpaDIIuNOhBIX NaMPOeK, NnO3BOJIaHT 3KOHOMITb 90% 3NeKTPO3HePrIM.
Дязамени CBTeODINOOB ObapaataBcB Cnyk6b TeXHnueckoroO6CnyKuBaHn.
Yitko DoTPMByBaTcHc npBBeHnx B daHomy KepiBHuTbI IHCTpyKu. BnO6hNk 3Hima 3 c6e 8c8ky BiDnOBiDaHbICt 3a HeNoJaKn, 36MtKN a6o NoXap, 10 MoKe MaTn MicCe npB NKOpNCaTHHi np6Opby BnAcNiOK HEBNKOHHaH INCTpyKUJI, pNBDeEHNx B DAHOMy KepiBHuTbI. BuTjXHH KObNAc CnpoeKToBAHN DnA BCMOkTuBaHH dMy Ta npA, 10 yTBOpHeBcN iDac npriOTyBaHH iKi Ta np3HaueHNI LIIe nI NaobTOBO NKOpNCaTHn..
Kyxohha BnTjXkMoKe MaTN d3aH, 100 BiDpi3HcTbC8B Bd BnTjXkN 36paxeHHoHa MaJIOHkax ciE I HCTpyKuI anE B IIO6Omy BnAadky IHCTpyKuI 3 MOHTaKy, TexhiHOMy OcbnyrobyBaHH Ta ekcnnyatauIi 3AnHsauOTc 6e3 3MH.
!Baxknbo 36epeTn ZI IHcTpkyiDnToro,0o6 MoKHa 6yIIO 3BepHyTncA Do HIX B IIObN yac. Y BInaKy npOaKy,pepeaui YI nepeizdy,nepeKoHaTncB TOMy 0o6 IHcTpkyi 6yIIN pa3OM 3 BIpO6om.
!YbaxHo npOHTaTH IHCTpyKUII: B HnX MICTNbBaBaxJIInBa IHΦOpMaJ3 BCTaHOBHeHH, BIKOPNCaHH Ta6e3neKn.
1 3a6bOpOHeHO BnKoHbATn EneKtpnHi Nm MexaHHi 3MiH y BnPo6i Ny Y BnBiDNHX KAHaJax.
! Nepu HIX npicTynITn DO MOHTaxy BInpo6y IpeBipTe YN BCi KOMNOHEHTN HEmaIOb TeOeKtIB Ta He E NOUKOJKeHMM. Y npOTINExHOMy BInapKy 3BeptATNCB MICue npOdaXy Ta 3yINHNTn MOHTyaBHnRA BInpo6y.
PnmuTka: Detani, 3a3Nauehi 3HaKOM (")" NOCTauaHbCn no CneuiBHomY 3AmOBLeHHIO JInIe Do DeaKnx MoJeN, a6o y BnnaIky Heo6xHocti B 3akyni DetaleN, kI He 6yUnn NoctabJIeni.

PonepeJxehn no 6e3neci
Ybara! He niiEChyBATn npnstpi Do eNeKtpomepexi noku yctaHOBka nobHicTHo He 3abepueHa.
Ipeed BIKOHaHm 6yIb-koI onepaui no uCTui a6o pemOnTy, BiKJIIOUHTN KOBnak BiD eNEKTPomepexi, BIMmaOuH BInKy a60 BiKIIIOUaOH N OCHBn BIMnKaH npMIueHH.
O6nHaHnHa He np3HaueHo nIy BnKOpncTaHHa 3 60ky dTei a6o IIOde 3 O6MeJcHMMn Fi3NcHMMn MOKINBOCTMn CnpHnHTTA a60 p3yMOBmIM i 3 BiCyTHICTo DCbIy i 3HaHb, 3a BNHTKOM BnAqKIB KONI BOHN 3hAxOJaTBcra NiI HaTlAOM a6o HauheHi BnKOpncTObYbAtn O6nHaHnHa JIOdHNO, 10 BiNDOBiAc 3a ix 6e3neKy.
He donyckaTte dite do npinna dy 6e3 hargnny o6naHaHnn. He BnkopncToBvIte BtJkky, kku peuittka HnpeabunbHo 3MOHTOBaHa BtJkHn KOBnak 6e3 npabunbHO BMOHTOBaHO peuittkn!
BnTjKHe NOBnHa BnKOpNCtOByBaTncb Jk ONOPHnOBepxHn, PInSe y BNnKaX KOIN YcHo nPo Ie Cka3aHO.
B BnnaKdy BnKOpNCTaHnBaTJxKn pa3om 3 iHsmmn pnpCTPOAMn Ha razi a60 iHsXn roPOnyH, npMImeHHMa MC MaTHoDcTaTHo BENTJIuHIO. BoiITpI, 10C BCMOKTyEcBc H Ma6 ByTN HnPaBHeO B BnTJHKn KaHAn, JaKn BnKOpNCTOByEcBc DnE BnKUd yIMIB BID po6OTn npCTPoIB Ha razi a60 iHsXn roPOnyH.
Cybopo 3abopohetaTc roTybaTu ydaJIb iXy niD BORhem.
BnKOpNCTaHH BInbHOro BoTHO E uKIDINBM NdI pIbTpIB i MOKe BnKlKinATn NOxExy,OTKe HEO6XiDHO yHnKaTn Ioro BnKOpNCTaHH y bdy-RAOMy BNpaNDy.
CmaxeHH MaBicbyTncnpiKoHTpOeM, 06 yHKnHytn 3aMaHH po3irpItoonii.
Bidkpnti cactnHm MOKytb CnIbHo Harpibatncs KOIN BKNOPICTOBYOTBCaP30M 3 npnaadamn DnBapihn.
LIOXCTOCYETCB BIKOPNCtAHN TEXHINXPaBnT Ta npAbnB 6e3neKn DnB KNDy DmMIB, TO HeoXiHO YITKO dOTpIMyBaTncb HopMaTnBIB, nepeD6aehnx MicueBmN IHCTAHJIAMN.
YHueHHBnTAAKMIapeyIpyHO npOBOHTNCRA KBCepeDNIH, taK iHa3OBHI (HE MEHUIE ODNHOPO PA3Y HA MICLb, B 6yDb-kyOMBy BNpAky BVKOHyBaTN Bci IHCTpykuii, IIO ONCAHI BcOMy KeipBHNITBI).
HedotpmaHH HOpM OUnIeHH BITJXKN Ta 3aMIH i OHUeHH QJIbTIPB MOKe BKNJInKaTn Pn3NK NOKeXI.
He BnKOpNCTOBuYte i He 3aJIIMuaIte 6e3 BiPHO BMOHTOBAHINX IaMn y 3B'J3Ky 3 MOxJIINbIM pU3NKOM ydApy eNeKTpUHNM CTpyMOM.
He HeceTbca JKOHOI BiJNOIBaIaNbHocTi 3a HeCnpabHocTi, yUkoJKeHnHa ToNoxEi HaHeCehi PnCTPOU, IIO E HacNiDkOM HeOpTmuMaHn NopA,IoNaHIN B DaHIn iHCTpyKlI.
Danin Bpi6 npomapkobahn Biinobidno do Cbponebckoi DineKtmb 2002/96/EC, ytniaaig eektpnHoro i eekponHoro obnadhanra (WEEE).3a6e3neyuOn biPy Hytinlaio zbo RBOBPO6y, Bu donoMokTe nonepedntn ToNEuHi HeRaTbHI HacniDKI nIg oTOuyOHO cerEOBuHa 3DOpOB's JIOHNK, KOTPI MOrNI 6 MaTI MtCue B npotnHexHomy BinaKy.

Cnmbon ha camomy Bnpo1 a60 ha cynpobodkyuoyomy Ioro dokymenti bka3ye, 10 npri ytni3auii 2b0r O npbo73 Hm He moxna NOBODTNCRA k3 i3BnuaiHMMN NOBYTOBIMN BiXDOAMn. BIn Mae 3daBaTNCRA y BiINOBiHN PyHK T pniOmy eIeKTPnHOrO i eNKTPOHORO o5bAdHaHH DnI nOdaJIbWoI ytni3auii. 3DaBaHnHa h Naam NobINHO BVKOHyBATNCRA 3rdHO 3 MicueBMn npabINAMn PO tyni3auii BiXdoHIB. DnI 6bnJhe DetalbHOIHOpmaui npro paBnIA NOBODxeHH 3 TakIMM Bnpo6Amn ixYtni3auii i nepepo6Kn 3BeptAHTecB MiUcEbi OPAHNI BnAadi, B Cnyk6y o Ytni3auii BiXdoHIB, a6o B MaaraznH, B KOMy Bn PnD6an DaHH Bpi6.
BnKOpNCTaHH
Bntjka po3p6bIeHa dIpa pO6OTn BpeXIMi BcMOKtBuHNN, BvBOJ4N NOBITPA H30BHI a6o B φilbtpyIOvOMy peXIMi 3 peuPKyIaIcIIO nobITpr.

Pexm BIDbOdy
Iapn BIVBODaTbCn Ha3OBHc Hpee3 BvBiDHy Tpy6y 3akpinHeNy DoФlaHcy 3'EdHaHHN.
Diametp BmBidnoi Tpyb NOBHNB BiNOBiDaTH iAmETpy 3eHyBaJIbHOrO KJIbU.
Ybara! BnBiHa Tpy6a He NoctaAeTbCra i Tomy Heo6XiHIO II npIaBAtn Okpemo.
B ropn3oHTaIbHni cactnHi BvBIDHa Tpy6a Mae 6yTu TpOx n iNHaT a (iN kYtOM 6n36ko 10^ ) Tak uo6 moKHa 6yNo WbNDwe BVoDHTn NOBITpr Ha3OBHI.
KIO BNTXKN KOBNAK Mae ByrInbHi fiIbtpn, To ix Tpe6a 3HATN.
Плд'энати Ковпak Do Habiteн Hoи Вибдои ТуБи Ta Вибдного OTBOPY 3 OdnakOBIM DiametPOM BxOу NOBITР (3'EDHyUChnФlaHeu).
BukopinCTaHn HactiHnX BvBiHnx Tpy6 Ta OTbOpB 3 MeHIM diametpom npnbEe Do 3MeHsHHeN eepKtNBHOCTI BCMOKTyBaHHaTa 3Naue He 36jIbWeHH pIBHa My.
Tomy Mn 3Himaemo 3 c6e Bc8ky BiDnObiIaJIbHiCtB no BnuIeCKa3aHOMy! BnKOpNCTaTn YKOMoRa KopoTKn BNTJxHHN KaHAp.
!BnKOpNCTaTN BnTJxHNI KHaJI 3 JAKOMORA NaMeHUNO KInbKiCTIO NOBOPOTIB (MAKcIMAbHNI KYT NOBOPOTY: 90^
YnkaTpi3kX3mHnnooji nepepi3y BtayKHorO KaHaNo.
! BnKOpNCtOByBaTn KaHaJI 3 YKOMoRa TJaDeHbKOHO NOBepxHeNo.
I MATEPIAN BNTJXHORO KAHany Mae BiNObiDaTn HOPMaTINBaM.

Pexm peunpkyiaii
BTRHyTe NOIbITp3HExNIOeTcBa Ta OUYuETcBa Ta 3HOBy NOBepTaetbC B pImiueHn. IJr TORO, 0o6 BVKOpNCTOBYATNI KOBnak y cboMy pexnmi, Heo6xIdNo BCTAHOBtIN DoaTkoBy CNTeMf My jInbTpiB 3 aKTINBOBAHm ByrillnM.
Inctanuaia
BIDCTAHb HNKNHbOi BiDuaCTHH BNTJAKKn Do Nocydy Ha kxyoHni PNIIT Mae 6ytn He MeHne 50cm, y Bnpanky eKeTpuHnx Pnnt, ta 50cm, y Bnpanky ra3OBHX Ta KOM6IHOBAHNX PJIIT.
Heo6xioHn npinmatn do ybarn BiIctahi, kkuo Bka3yIObCBA IHCTpykui 3 iHCTaIIraIgra0BOi PInNT.

Ipeep noaTkoM MoTaXy:
- PapeBipTe 060 pO3mIP npI6aHOro Bamn BInpo6y nIXoDINo DO BV6paHOrO Micra IIO MOHTaxy.
3HimItb Byitlbn Hn φiIbTp/n Ikyo BiH/BOH npCytHi (DINBNTcB taKoB BiNOBiHN po3dIn).ΦiIbTp/n 3HOBy BCTaHOBIIIOYbCra kkyo Bu XOHTe BHKOpNCTOBaTn KOBNak B peKIMPeuNkpylaqii. - PpeBipnTn ⅢO6 BCEPeNHi KOBnaka He 3aIiuaNoCn npEometi, NOMUeHnx Tyn Ha Yac Ioro TpaHCNOptyBaHnHa (HapnKlnd, NaKeTeKnB 3 UpypAmn, NtCTIB rapaHTii i T.n.),RAUo BOH e, BmIMt bix i 3BepeKjTb.
Kkto MoKJINBO,BID'EDHaTe i BIDcHybTe KkyXOHHi Me6JI,IIO 3HaxOJaTBcR NiD KObNAKOi HABKpyr 3OnH IHOro IHCTaJIu,dNIA363neueHH 6BILW BInBHO rOocTyNu DO CTNI/CTIH DE KObNAK 6yDE npKpInnEHNI. KaTO CE HEMoKJINBO kOMORA peteJIbHIe 3azxNCTtB Me6JI i HuiI npEdMeTn Ha JACMOHTYBaHH. BBeepITb pIBHy NOBepxHNO,HakPnTE II 3axNCHM NOKpTTM i PO3MICITb HA Hi KOBNAK i Detani DnRA KpINHeHH
TakoNnepeBipTe 06bnpaI 33OHOIO MOHTaXy KOBNaka (B 3OHi, DONTYNH TAKOX NcIa MONTAxy KOBNaka) 3hAXoDINac MEpeXeBa pe3eTKa i OTBp IINr DmIOxOy, kIMN BMOITb DM HA ByNIuO (JIiue B Pexnmi BIDBOy).
Bukohatn Bci HeobxidiPi p6oTu (HapnKla; BCTaHOBHeHHa MepeXeBoI pe3eTK i/a60 BUKOHaHHa OTbOpy Ira DmMOBoI Tpy6n).
Kkuo 60koi naHeni ta/abO CTiHKn, ta/abO HauCki uafkn, nepeBipTe, 6u6 bJIO doCTaTHbO MICU dIy BCTAHOBJIeHHBNTAKK Ta 6o6 MoKHa 6y1o 6e3 nepeukod iCTATNCdo naHeni ynpablinna.
ФункюhyBaHHA
BnKOpNCToByIe IHTEHCNBIHbUbnkiCTbY BnNAkyOC6bNBO BnCCKOIKOHUEHTPAQII KxyOHNH napiB.PekOMeHycMo BKIOUYNTBnTAKy3a5XBNINHO NOOATKY roTyBaHHa iXi aJIIMnITNOBKOHNH Ma npOTa3i 15 XBNINHnicra 3aIKHHeHHrTOBVAAHHxI.
3aBkDn TpImMaTb BldKpNtMm BNoBIOBau npy (A).
Man. 10

| Gaisma ON | |
| 1 | Âtrums 1 Gaisma ON |
| 2 | Âtrums 2 Gaisma ON |
| 3 | Âtrums 3 Gaisma ON |
| 0 | OFF |
| 1 | Âtrums 1 Gaisma OFF |
| 2 | Âtrums 2 Gaisma OFF |
| 3 | Âtrums 3 Gaisma OFF |
ac( lw)
aclll wolw wslal o jill
Culal
9
a
aJ 1
a 1000000000000000000000000000000000000000000
eall aaii ciall no jjll aiail all
1
.
all 2000.2
12V 20W max G4
(oo) Cui) Jolal oJoc 3
a a a a a a a a a a a a a a a a a a a a a
Aiiill aiee waei Juaai jia
LED
LEDdallgaleaolal
10j j 1
a#y 90
aill aelllll
Jai
aJ 1
5baill Jaaal jauaall a. baill a
15 yol 20
(A)
(10.5)
aill
Jaiy jaii jai i jai jai jai jai jai jai
j 1
Sswall gusjllg jyks
a.b.c.
()jia 15
()
a a a a a a a a a a a a a a a a a a a
y a 1
!gssll Jae
gul all j gjj 1j 2j 3j al j
g j 1
a jiall clogall
a 1
0
8.
:
J 1
a.b.c.
i j 1
biol 1110i 1110i 1110i 1110i
.
y. a 1s o le y i jill all Juaai w i
!
aill aalall yaaalll bill
jzai
aIlaSaaSaaee aalil j no laa 1aill
jssd sall
7-1.
gall jie aieiell aiee all iijj
s 1
gulal 1000000000000000000000000000000000000000000
()()
0
0juaa Juae 0jy jia
aall jn jn nn nnnn nn nnnnnnnnnnnnnnnnnnnnnnnnnnnnnnnnnnnnnnnnnnnnnnnnnnnnnnnnnnnnnnnnnnnnnnnnnnnnnnnnnnnnnnnnnnn
j j 1
[{16} : {12} \times {12} = {16} : {12}]
J 1
| ON iced | |
| ON iced 1 ice | 1 |
| ON iced 2 ice | 2 |
| ON iced 3 ice | 3 |
| OFF | 0 |
| OFF iced 1 ice | 1 |
| OFF iced 2 ice | 2 |
| OFF iced 3 ice | 3 |
bi ci

a a a a a a a a a a a a a a a a a a a a a a a a a
y
1
gai (10°) dila wu wu u u u u u u u u u u u u
alg y jy jll g a jg jay jay
15e j 12j 12j baiil e 15i
Laa aonnnn nn nnnnnnnnnnnnnnnnnnnnnnnnnnnnnnnnnnnnnnnnnnnnnnnnnnnnnnnnnnnnnnnnnnnnnnnnnnnnnnnnnnnnnnnnnnnnnnnnnnnnnnnnn
a1 = 23,a2 = - 43,a_3 = 0
Jn Jnnnnnnnnnnnnnnnnnnnnnnnnnnnnnnnnnnnnnnnnnnnnnnnnnnnnnnnnnnnnnnnnnnnnnnnnnnnnnnnnnnnnnnnnnnnnnnnnnnnnnnnnnnnnnnnnnnnnnn
a 1
a 1 a 1 a 1 a 1 a 1 a 1 a 1 a 1 a 1 a 1 a 1 a 1 a 1 a 1 a 1 a 1 a 1 a 1 a 1 a 1 a 1 a 1 a 1 a 1 a 1 a 1 a 1 a 1 a 1 a 1 a 1 a 1 a 1 a 1 a
Jay la jauai li jai Jaxial!
jglill jyj j 10gll j no sJay la Jdui Jauu!
(90°
i 1
Juy la juj alolal Juy Ljul Jauil!
Lglae 150
aai
aaii iia aiee eae 1000000000000000000000000000000000000000000000000
aall sll sla no glaia
j 50 jai jai jai jai jai jai jai jai jai jai jai jai jai jai jai jai jai jai jai jai jai jai jai jai jai jai jai jai jai jai jai jai jai jai jai jai jai jai jai jai jai jai jai jai jai jai jai jai jai jai jali jali jali jali jali jali jali jali jali
Jie 11
1
1 1 1 1 1 1 1 1 1 1 1 1 1 1 1 1 1 1 1 1 1 1 1 1 1 1 1 1 1 1 1 1 1 1 1 1 1 1 1 1 1 1 1 1 1 1 1 1 1 1 1
a
aill oolll

J
a a
aLlal 1
1gill j
jz jz jz jz jz jz jz jz jz
glauall 1 (a)
aiaaa aegy jiee aee
j 1 j 1
()()
1: 1:1
a a a a a a a a a a a a a a a a a a
C jlll jlll jlll jlll jlll
(baiill xj j
()
()
aikolnlin 1 Sioe bll s jil gll
sill jj aJgll Jgll
111 111 111 111 111 111 111 111 111 111 111 111 111 111 111 111 111 111 111 111 111 111 111 111 111 111
aI aie 1 1 1 1 1 1 1 1 1 1 1 1 1 1 1 1 1 1 1 1 1 1 1 1 1 1 1 1 1 1 1 1 1 1 1 1 1 1 1 1 1 1 1 1 1 1 1 1 1 1 0000000000000000000000000000000000000000000000000000000000000000000000000000000000000000000000000000
J 1000000000000000000000000000000000000000000000000000000000000000000000000000000
Waste EC/96/2002 ylll l. Electrical and Electronic Equipment (WEEE) aalg 1 1 1 1 1 1 1 1 1 1 1 1 1 1 1 1 1 1 1 1 1 1 1 1 1 1 1

jll jll jll jll jll jll jll jll jll jll jll jll jll jll jll jll jll jll jll jll jll jll jll jll jll jll jll jll jll jll jll jll jll jll jll jll jll jll jll jll jll jll jll jll jll jll jll jll jll jll jll