
BR 40 10 C CLASSIC - Floor cleaner KARCHER - Free user manual and instructions
Find the device manual for free BR 40 10 C CLASSIC KARCHER in PDF.
User questions about BR 40 10 C CLASSIC KARCHER
0 question about this device. Answer the ones you know or ask your own.
Ask a new question about this device
Download the instructions for your Floor cleaner in PDF format for free! Find your manual BR 40 10 C CLASSIC - KARCHER and take your electronic device back in hand. On this page are published all the documents necessary for the use of your device. BR 40 10 C CLASSIC by KARCHER.
USER MANUAL BR 40 10 C CLASSIC KARCHER
71364 Winnenden (Germany)
Tel.: +49 7195 14-0
Fax: +49 7195 14-2212
Winnenden, 2012/12/01
Garantie
Please read and comply with these original instructions prior
to the initial operation of your appliance and store them for later use or subsequent owners.
Contents
Safety instructions EN 1
Function EN 1
Proper use EN 1
Environmental protection . EN . . 1
Operating elements EN 2
Before Commissioning . . . EN 2
Operation EN 2
Transport. EN 4
Storage EN 4
Maintenance and care . EN 4
Faults EN 4
Specifications EN 6
Accessories EN 7
EC Declaration of Conformity EN 7
Warranty EN 7
Spare parts EN 7
Safety instructions
Before using the appliance for the first time, read and observe these operating instructions and the accompanying brochure: Safety information for brush cleaning units and spray-extraction units, 5.956-251.0
Symbols in the operating instructions
Danger
Immediate danger that can cause severe injury or even death.
Warning
Possible hazardous situation that could lead to severe injury or even death.
Caution
Possible hazardous situation that could lead to mild injury to persons or damage to property.
Function
The scrubber vacuum is used for wet cleaning or polishing of level floors.
Two brush rollers located opposite of each other clean the floor by means of the added detergent liquid. A working width of 400 mm and a capacity of 10 l each of the fresh and dirt water reservoirs allow for effective cleaning.
The power supply operation allows a high capacity without a restriction of the working time.
Note
The appliance can be equipped with various accessories depending on the cleaning task. Please request our catalogue or visit us on the Internet at www.kaercher.com.
Proper use
Use this appliance only as directed in these operating instructions.
- This appliance is suited for the commercial use, e.g. in hotels, schools, hospitals, factories, shops, offices, and rental companies.
- The appliance may only be used for the cleaning of hard surfaces that are not sensitive to moisture and polishing operations.
The application temperature ranges from +5^ to +40^ .
- The appliance is not suited for the cleaning of frozen grounds (e.g. in cold stores).
- The appliance may only be equipped with original accessories and spare parts.
- The appliance has been designed for the cleaning of floors inside or covered surfaces. With respect to other applications the usage of alternative brushes must be checked.
- The appliance is not intended for the cleaning of public traffic routes.
Environmental protection
The packaging materials are recyclable. Please do not throw packaging in the domestic waste but pass it on for recycling.
Old units contain valuable recyclable materials. Batteries, oil and similar substances may not be released into the environment. Therefore please dispose of old units through suitable collection systems.
Notes about the ingredients (REACH)
You will find current information about the ingredients at:
www.kaercher.com/REACH

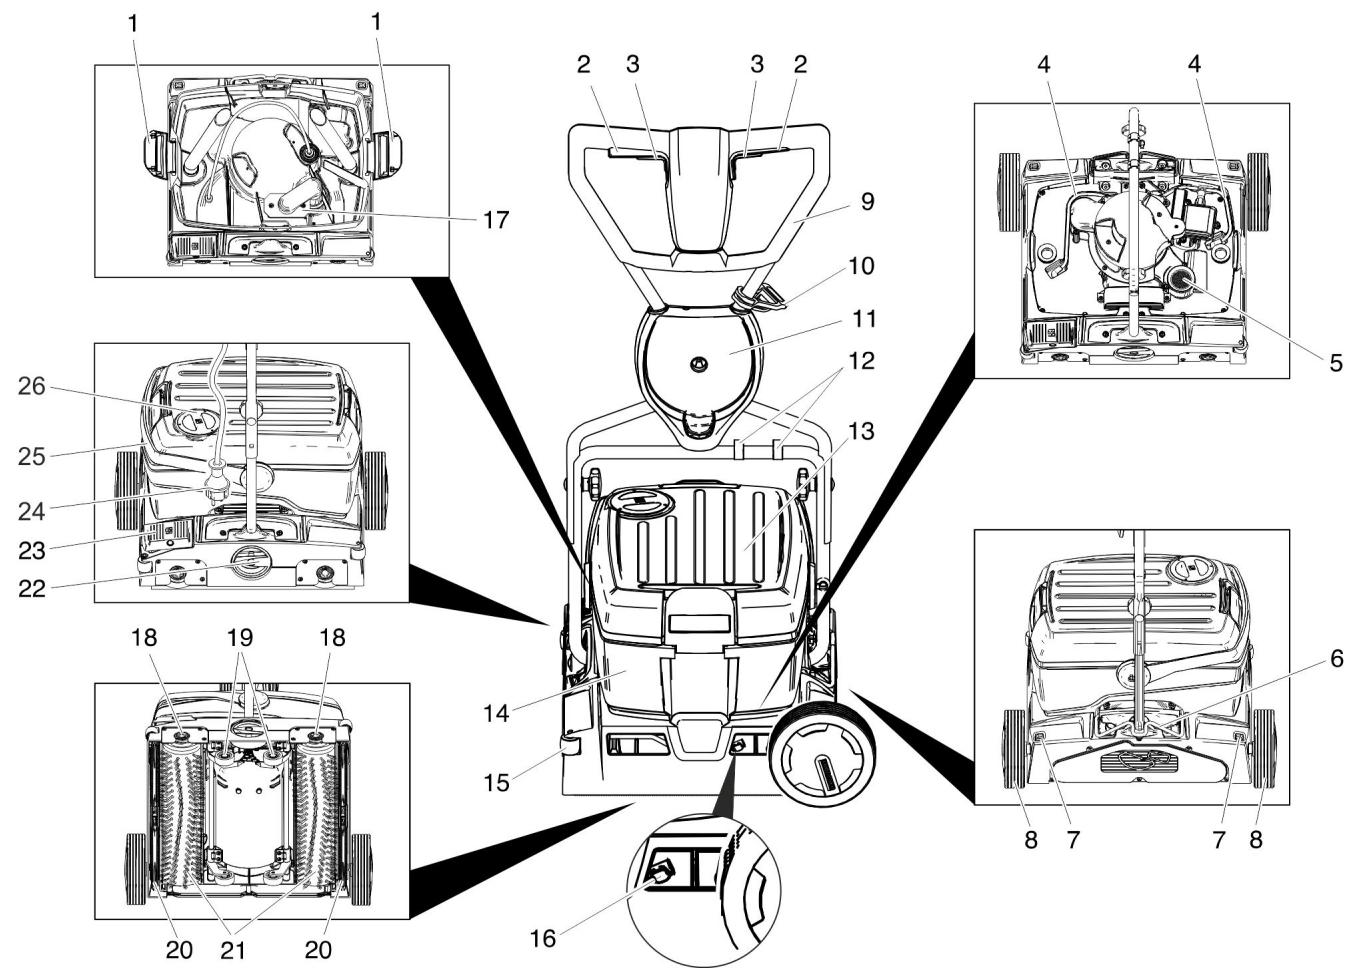
1 Lock for fresh water reservoir
2 Switch for brush drive
3 Switch for detergent solution
4 Hose for detergent solution
5 Lint sieve (suction)
6 Lock of pushing handle
7 Release button for the transport wheel
8 Transport wheel *
9 Push handle
10 Strain relief clamp
11 Support of the transport wheel *
12 Clip
13 Fresh water tank
14 Dirt water reservoir
15 Scaper roller
16 Push-button for vacuum bar change
17 Float
18 Button for brush change
19 Chassis
20 Vacuum bar
21 Brushing rollers
22 Rotating handle for brush contact pressure
23 Pedal to lower vacuum bar
24 Mains plug
25 Carrying handle for wastewater reservoir
26 Fresh water tank cover
- not included in the delivery with BR 40/10
C Classic
Before Commissioning
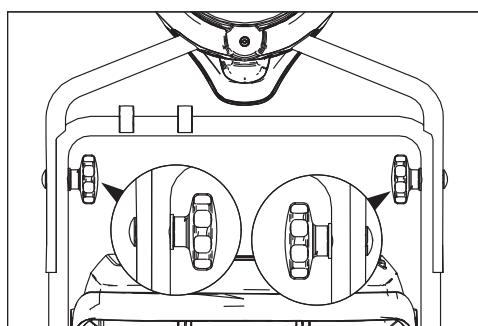
Installing the pushing handle
Slide the upper slider half onto the lower slider half.
Caution
Risk of damage. Do not pinch the cable during the installation.
Align the borings (2 possible height adjustments).
Connect the slider halves to the lock screws, discs and star grips.
Fasten the cable to the slider using clips.
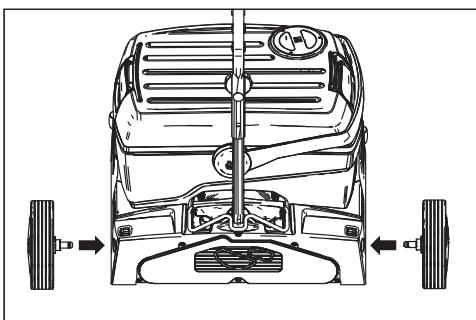
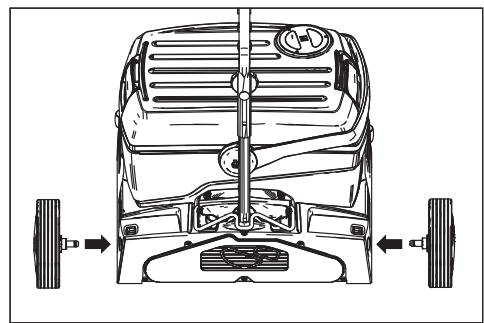
Installing the transport wheels
With the BR 40/10 C Classic, the transport wheels are not included in the delivery. An attachment kit with transport wheels is listed in the chapter "Accessories".
Insert the transport wheel axles into the borings on the appliance and lock them.
Installing the Brushes
The brushes must be installed before the initial operation (see "Maintenance works").
Operation
Note
To take the brush drive out of operation, immediately release brush drive switch.
Filling in detergents
Caution
Risk of damage. Only use the recommended detergents. With respect to different detergents the operator bears the increased risk regarding the operational safety, accident risk and reduced product life of the appliance. Only use detergents that are free from solvents, hydrochloric acid and hydrofluoric acid. Follow the safety instructions for using detergents.
Note
Do not use highly foaming detergents. Observe the dosing notes.
Recommended detergents:
| Application | Detergent |
| Routine cleaning of all water resistant floors | RM 746 RM 780 |
| Routine cleaning of glossy surfaces (e.g. granite) | RM 755 es |
| Routine cleaning and basic cleaning of industrial floors | RM 69 ASF |
| Routine cleaning and basic cleaning of fine stoneware tiles | RM 753 |
| Routine cleaning of tiles in sanitary areas | RM 751 |
| Cleaning and disinfection in sanitary areas | RM 732 |
| Removal of coating from all alkali-resistant floors (e.g. PVC) | RM 752 |
| Removal of coating from li-noleum floors | RM 754 |
Open the cover of the fresh water reservoir.
Pour in water/detergent mixture. Maximum temperature of the liquid 50^
Note
The fresh water reservoir cover can be used to meter the detergent. The capacity of the cover up to the mark represents 1% of the fresh water reservoir capacity.
Close the cover of the fresh water reservoir.
Driving to the Place of Use
Short distances on even surfaces
Place the slider vertically.
Position the rotary handle for the brush contact pressure in the drive position.
Use the pushing handle to push the appliance to the place of use.
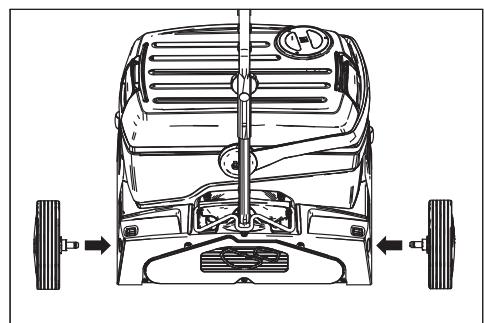
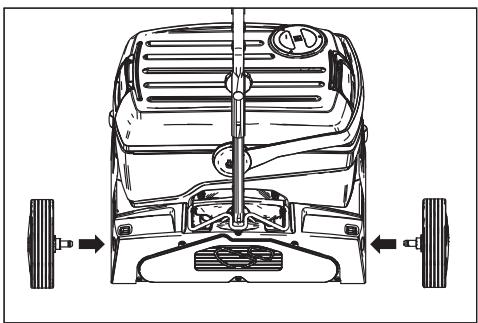
Longer distances on uneven surfaces
Place the slider vertically and tilt the lock up.
Install the transport wheels.
Caution
Danger of damage due to leaking water. Remove the waste water and fresh water reservoirs before tilting the appliance.
Remove the filled waste and fresh water reservoirs from the appliance and transport them separately.
Tilt the appliance to the side and drive it to the place of use on its transport wheels.
If the transport wheels hinder the use of the appliance:
Press the transport wheel release button and pull the transport wheel out.
Insert the transport wheels into their holder until they stop.
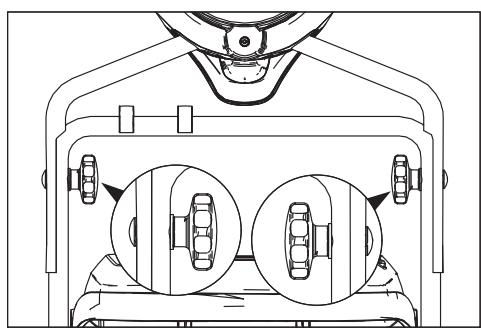
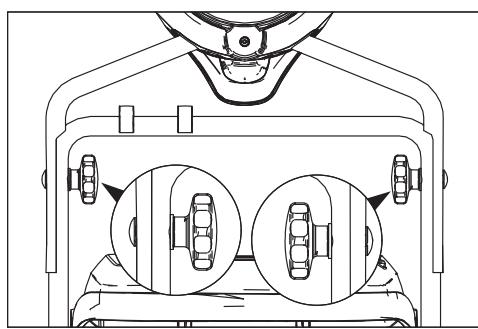
Adjust the brush contact pressure
Place the slider vertically.
Pull out the rotary handle of the brush contact pressure and set it to the desired value.
Note
Carry out the initial cleaning attempts with less contact pressure. Increase contact pressure step-by-step until the desired cleaning result is achieved. A correct setting of the contact pressure reduces the wear and tear of the brushes.
The brush drive is switched off when there is overload.
When cleaning with microfibre rollers, the contact pressure must not be adjusted higher than the position mentioned below. With a higher contact pressure, there is a danger of destroying the microfibre rollers.
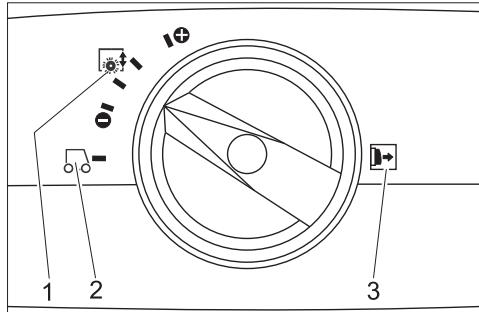
2 Driving
1 Brush contact pressure
3 Note: Pull out the rotary handle for the brush contact pressure prior to this adjustment.
Establish mains contact
Danger
Risk of electric shock. Check the mains cables of the machine each time before using the machine to see that it is not damaged. Never operate a machine with damaged cables. Get the damaged cables replaced by an electrician.
Caution
Risk of damage. The highest allowed net impedance at the electrical connection
point (refer to technical specifications) is not to be exceeded. In case of confusion regarding the power impedance present on your connection, please contact your utilities provider.
Use the extension cord that has an adequate cross-section (see "Technical Data") and unwind it fully from the cable drum.
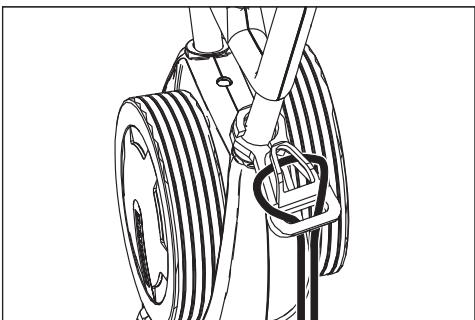
Insert the looped end of the extension cable in the strain relief hook.
Plug in the mains plug.
Cleaning
Danger
Risk of injury on account of electric shock caused by a damaged mains cable. Do not let the mains cable come in contact with the rotating brushes or pads.
Caution
Risk of damage. When cleaning close to a wall, position the appliance so that the deflection rollers point towards the wall.
If the detergent solution is to be vacuumed off after the cleaning process: Check that all vacuum bars are inserted into the appliance Press the pedal to lower the vacuum bar.
Place the slider vertically.
Turn on the brush irrigation by using the switch for the detergent solution.
Turn on the brushes by using the switch for the brush drive.
Swivel the slider toward the operator - the chassis is retracted and the brushes touch the floor.
Move the appliance over the surface to be processed by the slider.
Caution
Risk of damage to the floor covering. Do not operate the appliance on the spot.
Polishing
Remove both vacuum bars from the appliance (see chapter "Maintenance tasks/replacing vacuum bar").
Place the slider vertically.
Turn on the brushes by using the switch for the brush drive.
Swivel the slider toward the operator - the chassis is retracted and the brushes touch the floor.
Move the appliance over the surface to be processed by the slider.
Caution
Risk of damage to the floor covering. Do not operate the appliance on the spot.
Note
To polish underneath furniture, the fresh water and wastewater reservoirs can be removed.
Shutting Down the Appliance
Release the switch for detergent solution.
Push the appliance forward for another 1 - 2m to draw off residual water.
Release the brush drive button.
Press the pedal to lower the vacuum bar.
Place the slider vertically - the brushes are elevated.
Disconnect the mains plug.
Caution
Danger of deforming the brushes. When switching off the appliance, take the load off the appliance by placing the slider vertically.
Emptying the Fresh Water Reservoir
Open the locks for the fresh water reservoir.
Tilt the carrying hanlde for the wastewater reservoir towards the side.
Lift up the fresh water reservoir and carry it to the disposal site.
Warning
Please observe the local provisions regarding the wastewater treatment.
Remove the cover of the fresh water reservoir and pour out the liquid via the notch.
Emptying the Dirt Water Reservoir
Note
If the dirt water reservoir is full the float closes the suction channel. The suction operation is interrupted. Empty the dirt water reservoir.
Remove the fresh water reservoir, as described above.
Lift up the wastewater reservoir and carry it to the disposal site.
Warning
Please observe the local provisions regarding the wastewater treatment.
Pour out dirty water.
Rinse the dirty water tank with clear water.
Transport
Caution
Risk of injury and damage! Observe the weight of the appliance when you transport it.
When transporting in vehicles, secure the appliance according to the guidelines from slipping and tipping over.
To reduce the required space, the pushing handle can be folded or disassembled:
Release the star grips of the pushing handle fastening.
Unscrew the star grips, remove the screws and take off the upper push handle half.
Storage
Caution
Risk of injury and damage! Note the weight of the appliance in case of storage. This appliance must only be stored in interior rooms.
Maintenance and care
Danger
Risk of electric shock, risk of injury! Pull the plug from the mains before carrying out any tasks on the appliance.
Caution
Risk of damage to the appliance on account of water leakage. Drain out dirt water and the remaining free water before wokring at the machine.
Maintenance schedule
After the work
Caution
Risk of damage. Do not wash down the appliance with water and do not use aggressive detergents.
Pour out dirty water.
Rinse the dirty water tank with clear water.
Empty the fresh water reservoir.
Fill the fresh water tank with clear water and rinse the appliance to avoid residue buildup.
Remove the remaining water from the fresh water tank.
Check the seal in the ball valve in the fresh water reservoir.
Check the fluff filter, clean if required.
Let the reservoirs dry prior to closing them to prevent odor creation.
Clean the outside of the appliance with a damp cloth which has been soaked in mild detergent.
Clean the vacuum lips, check for wear and replace the vacuum bar if required.
Check the brushes for wear, replace if required.
Clean the water distribution bars above the brushes, remove if necessary and flush with water.
Monthly
Check the condition of the seals between the appliance and the wastewater reservoir; replace if required.
Clean the brush tunnel.
Yearly
Have the prescribed inspection carried out by the customer service.
Maintenance Works
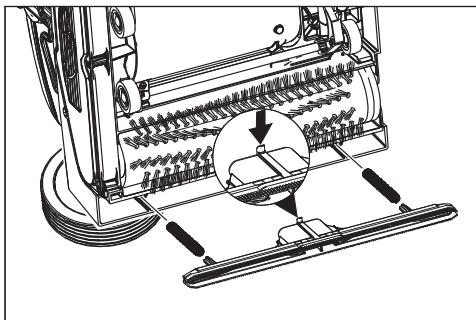
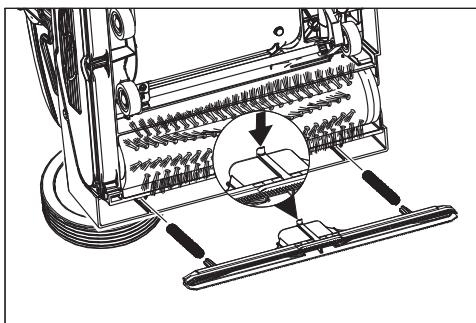
Replacing the vacuum bar
Lift the vacuum bar by activating the pedal for the vacuum bar lowering.
Press the push-button for the vacuum bar change toward the inside - the vacuum bar will release.
Pull off the vacuum bar downwards.
Remove the screw springs and install the new vacuum bar.
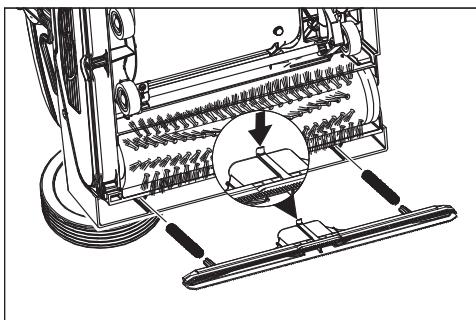
Align the new vacuum bar so that the locking nose points toward the centre of the appliance.
Insert the screw springs into the pickups on the appliance.
Insert the vacuum bar into the appliance and lock it in.
Repeat process on the second bar.
Note
Regular exchanges of the two vacuum bars will improve the scraping effect and will prolong their life.
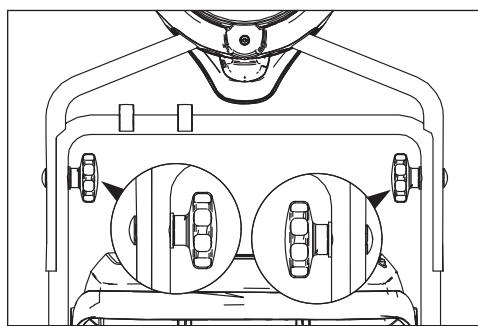
Replacing the brush rollers
Lay the device on its side.
Press the brush change button and simultaneously tilt the brush roller downwards.
Pull out the brush roller.
Place the new brush roller on the driver and lock into place.
Maintenance contract
To ensure a reliable operation of the appliance maintenance contracts can be concluded with the competent Kärcher sales office.
Frost protection
In case of danger of frost:
Empty the fresh and dirt water reservoirs.
Push the button for detergent solution until no more water is expelled.
Store the appliance in a frost-protected room.
Faults
Danger
Risk of electric shock, risk of injury! Pull the plug from the mains before carrying out any tasks on the appliance.
Caution
Risk of damage to the appliance on account of water leakage. Drain out dirt water and the remaining free water before wok-ring at the machine.
In case of faults that cannot be remedied using the table below please contact the customer service.
| Fault | Remedy |
| Appliance cannot be started | Check if the mains plug is connected. |
| Socket fuse rating too low, look for proper socket. | |
| Insufficient water quantity | Check fresh water level, refill tank if necessary. |
| Clean the ball valve in the fresh water reservoir. | |
| Check and ensure that the fresh water reservoir is seated properly on the appliance. | |
| Filter in the fresh water reservoir is plugged, clean filter. | |
| Pull out the water distribution bars above the brushes and flush with water. | |
| Check hoses for blockages; clean if required. | |
| Insufficient vacuum performance | Empty the wastewater reservoir. |
| Check and ensure that the fresh water reservoir is seated properly on the wastewater reservoir. | |
| Check seals on the fresh water reservoir, clean if necessary. | |
| Clean the seals between the appliance and the dirt water reservoir and check for tightness, replace if required. | |
| Clean the fluff filter. | |
| Clean the vacuum lips on the vacuum bar, replace if required | |
| Suction channel plugged, clean. | |
| Check if the vacuum bar is plugged, remove plug if required | |
| Insufficient cleaning result | Increase brush contact pressure. |
| Check the brushes for wear, replace if required. | |
| Use brush rollers suited for the type of dirt and floor covering. | |
| Brushes do not turn | Check if foreign matters block the brushes; remove foreign matter if required. |
| Reduce contact pressure. | |
| Overcurrent protective switch was triggered. The overcurrent protective switch will allow the operation after max. one minute. | |
| Appliance vibrates. | Brush rollers are deformed because they were not unloaded by tilting the slider vertically when parking the appliance; replace brush rollers. |
Specifications
| 1.783-302.0 1.783-310.0 1.783-311.0 1.783-316.0 | 1.783-300.0 | 1.783-303.0 | ||
| Power | ||||
| Nominal voltage | V/Hz | 220...240 / 1~50 | 230 / 1~50 | 230 / 1~60 |
| Average power consumption | W | 1900 | ||
| Suction engine output | W | 500 | ||
| Brush engine output | W | 2100 | ||
| Max. power intake | 2710 | 2210 | 2710 | |
| Maximum allowed net impedance | Ohm | 0.255+j0.159 | 0,256+j0,160 | |
| Extension cable 10 m | mm² | 1,5 | ||
| Extension cord 30 m | mm² | 2,5 | ||
| Vacuuming | ||||
| Cleaning power, air quantity | I/s | 20 | ||
| Cleaning power, negative pressure | kPa | 10 | ||
| Cleaning brushes | ||||
| Working width | mm | 400 | ||
| Brush diameter | mm | 96 | ||
| Brush speed | 1/min | 1100 | 1350 | |
| Dimensions and weights | ||||
| Theoretical surface cleaning performance | m²/h | 400 | ||
| Fresh/dirt water reservoir volume | I | 10 | ||
| Length (without pushing handle) | mm | 520 | ||
| Width (without vacuum bar) | mm | 470 | ||
| Height (without pushing handle) | mm | 380 | ||
| Weight | kg | 44,5 | 43 | 44,5 |
| Values determined as per EN 60335-2-67 | ||||
| Hand-arm vibration value | m/s² | <2,5 | ||
| Uncertainty K | m/s² | 0,2 | ||
| Sound pressure level LpA | dB(A) | 74 | ||
| Uncertainty KpA | dB(A) | 1 | ||
| Sound pressure level LWA | dB(A) | 87 | ||
| Uncertainty KwA | dB(A) | 1 | ||
Accessories
| Order No. | Piece | Machine requires piece | ||
| Brush roller, red (medium, standard) | For cleaning slightly dirtied or sensitive floors. | 4.762-249.0 | 1 | 2 |
| Brush roller, green (grit) | For cleaning heavily dirtied floors. | 4.762-252.0 | 1 | 2 |
| Brush roller, orange (high/ low) | For scrubbing structured floors (safety tiles, etc.). | 4.762-251.0 | 1 | 2 |
| Brush roller, white (soft) | For polishing floors. | 4.762-250.0 | 1 | 2 |
| Pad roller shaft | For intake of roller pads. | 4.762-228.0 | 1 | 2 |
| Pad, very soft, white | For cleaning and polishing sensitive floorings. | 6.369-727.0 | 1 | 2 |
| Pad, soft, yellow | For polishing floors. | 6.369-724.0 | 1 | 2 |
| Pad, medium soft, red | For cleaning slightly dirtied floors. | 6.369-726.0 | 1 | 2 |
| Pad, hard, green | For cleaning normal to heavily dirtied floors. | 6.369-725.0 | 1 | 2 |
| Microfibre roller | To remove grey tint | 4.114-004.0 | 1 | 2 |
| Vacuum bar, standard | 4.777-323.0 | 1 | 2 | |
| Vacuum bar, oil-resistant | 4.777-322.0 | 1 | 2 | |
| Extension cable | 20 m | 6.647-022.0 | 1 | 1 |
| Attachment kit transport wheels | for BR 40/10 C Classic | 2.783-013.0 | 1 | 1 |
EC Declaration of Conformity
We hereby declare that the machine described below complies with the relevant basic safety and health requirements of the EU Directives, both in its basic design and construction as well as in the version put into circulation by us. This declaration shall cease to be valid if the machine is modified without our prior approval.
Product: Floor cleaner
Type: 1.783-xxx
Relevant EU Directives
2006/42/EC (+2009/127/EC)
2004/108/EC
Applied harmonized standards
EN 55014-1: 2006+A1: 2009+A2: 2011
EN 55014-2: 1997+A1: 2001+A2: 2008
EN 60335-1
EN 60335-2-72
EN 61000-3-2: 2006+A1: 2009+A2: 2009
EN 61000-3-3:2008
EN 62233: 2008
Applied national standards
The undersigned act on behalf and under the power of attorney of the company management.

H.Jenner
CEO

S. Reiser
Head of Approbation
Authorised Documentation Representative
S. Reiser
71364 Winnenden (Germany)
Phone: +49 7195 14-0
Fax: +49 7195 14-2212
Winnenden, 2012/12/01
Warranty
The warranty terms published by our competent sales company are applicable in each country. We will repair potential failures of your accessory within the warranty period free of charge, provided that such failure is caused by faulty material or defects in fabrication. In the event of a warranty claim please contact your dealer or the nearest authorized Customer Service center. Please submit the proof of purchase.
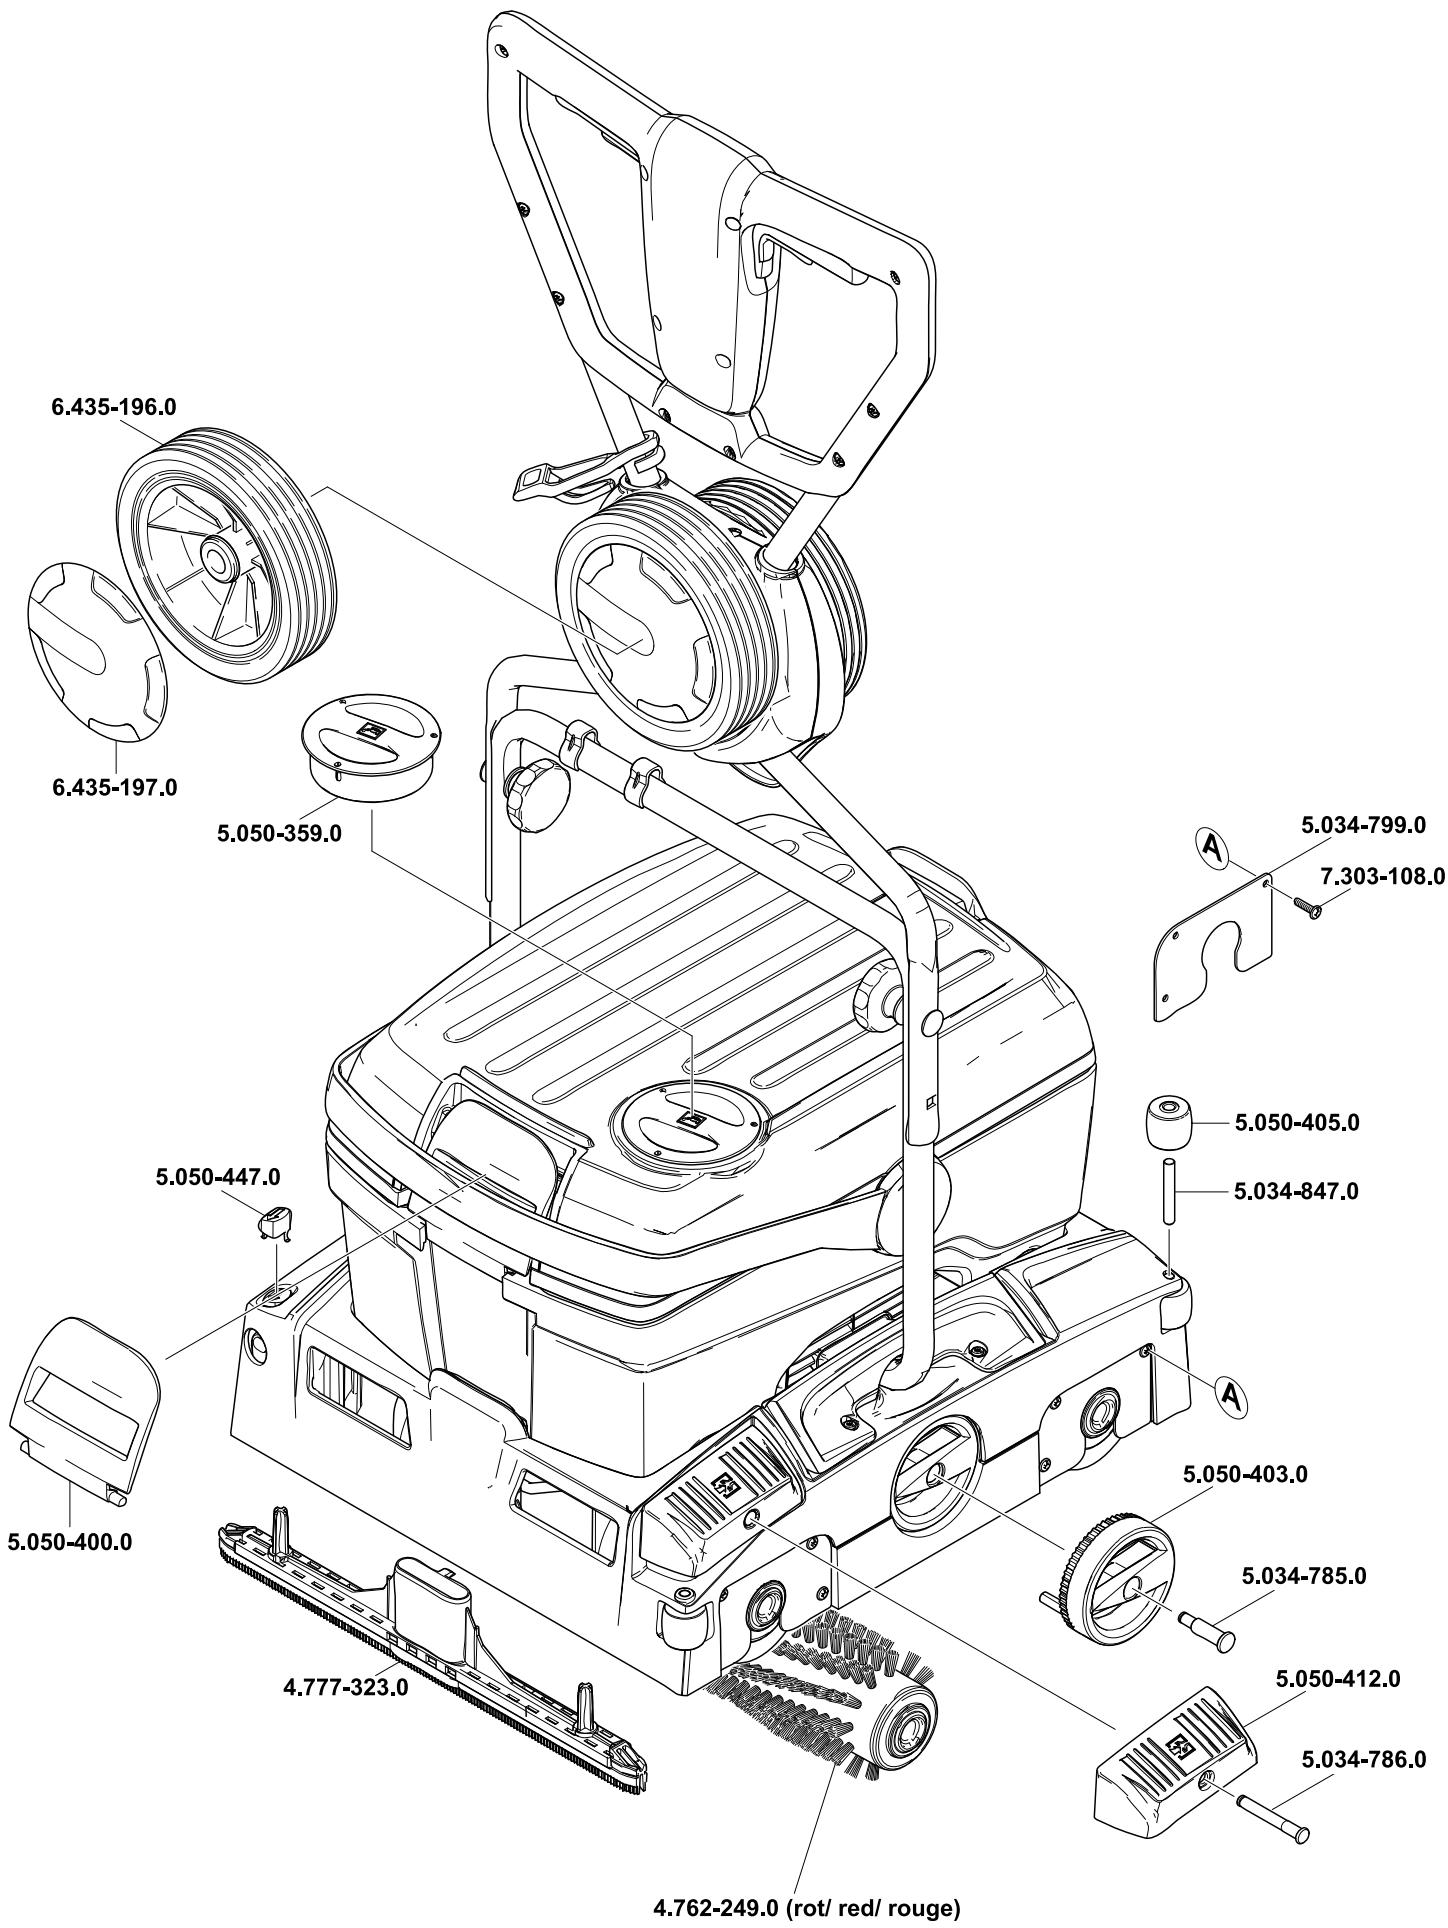
Spare parts
- Only use accessories and spare parts which have been approved by the manufacturer. The exclusive use of original accessories and original spare parts ensures that the appliance can be operated safely and trouble free.
- At the end of the operating instructions you will find a selected list of spare parts that are often required.
- For additional information about spare parts, please go to the Service section at www.kaercher.com.

www.kaercher.com/REACH

2006/42/CE (+2009/127/CE)
2004/108/CE
71364 Winnenden (Germany)
Telephone: +49 7195 14-0
www.kaercher.com/REACH
2006/42/CE (+2009/127/CE)
2004/108/CE
71364 Winnenden (Germany)
Tel.: +49 7195 14-0
Fax: +49 7195 14-2212
Winnenden, 2012/12/01
Garanzia
www.kaercher.com/REACH
Bedieningselementen

1 Vergrendeling schoonwaterreservoir
2 Schakelaar "Borstelaandrijving"
3 Schakelaar reinigingsoplossing
4 Slang reinigingsoplossing
5 Pluizenzeef (afzuiging)
6 Vergrendeling duwbeugel
7 Ontgrendelingsknop transportwiel
8 Transportwiel *
9 Duwbeugel
10 Snoerontlastingshaak
11 Houser transportwiel *
12 Clip
13 Schoonwaterreservoir
14 Vuilwaterreservoir
15 Stootrol
16 Drukknop zuigbalkwissel
17 Vlotter
18 Toets borstelwisseI
19 Onderstel
20 Zuigbalk
21 Borstelwalsen
22 Draaignep borstelaandrukkracht
23 Pedaal Omlaag zetten zuigbalk
24 Netstekker
25 Draaggreep vuilwaterreservoir
26 Deksel schoonwatertank
71364 Winnenden (Germany)
Tel.: +49 7195 14-0
Fax: +49 7195 14-2212
Winnenden, 2012/12/01
Garantie
www.kaercher.com/REACH

2006/42/CE (+2009/127/CE)
2004/108/CE
71364 Winnenden (Germany)
Tele.: +49 7195 14-0
Fax: +49 7195 14-2212
Winnenden, 2012/12/01
Garantía
Montar as rodas de transporte
2006/42/CE (+2009/127/CE)
2004/108/CE
71364 Winnenden (Germany)
Tel.: +49 7195 14-0
Fax: +49 7195 14-2212
Winnenden, 2012/12/01
Garantia
www.kaercher.com/REACH
Betjeningselementer

1 Laseanordning "Ferskvandstank"
2 Kontakt børstedrev
3 Kontakt "Rengöringsoplośninq"
4 Slange "Rengøringsoplosning"
5 Traevlsi (udsugning)
6 Lasekanisme skubbebjole
7 Abningsknap "Transporthjul"
8 Transporthjul*
9 Bøjle
10 Trækaflastningskrog
11 Holder "Transporthjul"
12 Clips
13 Ferskvandtank
14 Snavsevandsbeholder
15 Afbnjningsrulle
16 Trykknap "Sugebjelkeskift"
17 Svommerventil
18 Knap "Borsteskiift"
19 Kørestel
20 Sugebjelke
21 Børstevalser
22 Drejehändtag "Børstemodpresningstryk"
23 Pedal "Sænke sugebjælke"
24Netstik
25 Handtag "Snavsevandstank"
26 Daeksel til friskvandsbeholder
- ved BR 40/10 C Classic seks med i leverancen
Inden idrifttagning
Monter forskydningsbøjlen
2006/42/EF (+2009/127/EF)
2004/108/EF
71364 Winnenden (Germany)
TIf.: +49 7195 14-0
Fax: +49 7195 14-2212
Winnenden, 2012/12/01
Garanti
www.kaercher.com/REACH
Betjeningselementer

1 Lasekanisme rentvannstank
2 Bryter børstedrift
3 Bryter rengjøringsmiddelløsning
4 Slange rengjoringsmiddelløsning
5 Lofilter (utsuging)
6 Låsing skyvebøyle
7 Laseknapp transporthul
8 Transporthjul
9 Skyvebøyle
10 Strekkavlastningskroker
11 Holder transporthjul
12 Klips
13 Rentvannstank
14 Spillvannstank
15 Aviserrulle
16 Trykker sugebomskifte
17 Flottør
18 Tast bostreskifte
19 Driverk
20 Sugebom
21 Børstevalser
22 Dreiehandtak borstetrykk
23 Pedal sugebomsenking
24 Stopsel
25 Baerehandtak bruktvannstank
26 Deksel friskvanntank
Før igangsetting
Monter skyvebøylen

2006/42/EF (+2009/127/EF)
2004/108/EF
71364 Winnenden (Germany)
TIf: +49 7195 14-0
www.kaercher.com/REACH

71364 Winnenden (Germany)
Tel.: +49 7195 14-0
Fax: +49 7195 14-2212
Winnenden, 2012/12/01
Garanti
www.kaercher.com/REACH

71364 Winnenden (Germany)
Puh.: +49 7195 14-0
www.kaercher.com/REACH

OñyúnσTov Tóπo εpyaia

S. Reiser
Head of Approbation
YtEuHuvos teknpiwoans:
S. Reiser
71364 Winnenden (Germany)
Tnλ: +49 7195 14-0
Φαξ: +49 7195 14-2212
Winnenden, 2012/12/01
Eyyúnon
www.kaercher.com/REACH
1 Temiz su tankinin kilidi
2 Firca tahrik salteri
3 Temizlik gezeltisi salteri
4 Temizlik gezeltisi hortumu
5 Toz süzgeci (emme)
6 Itme kolunun kilidi
7 Tasima bandinin kilit açma tusu
8 Tasima tekerleji*
9 Itme yayi
10 Čekme desteşi kancasi
11 Tasima bandinin tutucusu *
12 Klips
13 Temiz su deposu
14 Pis su deposu
15 Boşaltma makarasi
16 Emme kolu degisim bastirici si
17 Samandira
18 Firca deigisim tusu
19 Yuruyen aksam
20 Emme kolu
21 Firca merdanesi
22 Fíçá baski basinci dōner kolu
23 Emme kolunu indirme pedali
24 Sebeke fişi
25 Pis su tankinin taśiyici kolu
26 Temiz su deposunun kapaşi
1 Firca baski basinci
2 Sürus
71364 Winnenden (Germany)
Tel.: +49 7195 14-0
www.kaercher.com/REACH

1 BLOKINPOBka pe3epByapa dJa YnCToI BOJbl
2 BbIKIIOUaTeJIb npINBOJa UeTOK
3 BbIKHouaTeIb YnCTraJero pactBopa
4 ⅢlaHdIyUcTaeero pactbopa
5 CetuatbI qnIbTp (OTOCOC)
6 ΦикcaTop BeDyuei Dyrn
7 KlaBnIa pa36nOKnPOBKn TpaHcnp-THoro KOleca
8 TpaHcnpTHe KOleco *
9 BeDyuaIaIyra
10 kprok dny ka6eJna
11ДержateJB TpaHcnopTHoro KOleca*
12 3axmm
13 BaK YIcToB BOYbl
14 Pe3epByap rpa3HOBbI
15 OTPaKaIouzI pOInK
16 HaxmHaay KhoNka 3aMeHbI BCacbBaIO-ux NpHaOHK
17 NonlaBok
18 Khonka 3aMeHbI uTeTOK
19 UcTpoIcTbO nepeBnKeHn
20 BcabsBaiooJnlaCTnHa
21IeToUHbIEBaJIbI
22 BpaaaHouaJcRpyka yCTaHOBKn daBJIeHn npxKmMa 1eTOK
23 PetaJIb onyckaHnB BCaCbBaIOuX nlaHOK
24 8TeNceJIbHaB BnIka
25 Puyka pe3epByapa dny rpa3HOn BOdbI
26 Kpbiuka pe3epByapa nictoBodbl
*Для пибopa BR 40/10 C Classic He Bxo-DIITВ KOMПЛЕKT NOCTABKN
Ipeed hauanom pa6oTbI

CMOHTnpoBaTb BeDyUyO dyry
→ HaDbHnHybBepXHIOH NOOBnHy BeDy- ⅢeI dyHnHa HxKHOJ.
BhumaHue!
Onachocmb noepexdeHua. Ppu MoHmae He 3axumamb Kaebb.
OTkoppeKTHIPOBaTb NOJIOKeHne OTBepCTNI (BO3MOXHbI 2 yCTaHOBKn IO BbICOTe).
CoeDINHTb NIOBnHKn BeDyuee Duyu INcNoIb3yra KpeEnExHbIe 6oTbI, Wai6bl n rpi6KOBBie pyKoRTKn.
3aKpeNtB Ka6eNb c nOmoIbHO 3aXIMHa BeNyUeN dyre.
YctahOBuTb TpaHCnOpThbIe KoJeca
Для пибopa BR 40/10 C Classic trpaHcnpOTbIe KOJIeCa He BXOJrT B KOMPJIeKT NOCTaBKn. 3JIemENTbI MOHTaXHOro KOMPJIeKtA ДЯТраHcnpOTbIX KOJIeпЕпсLnEhblВ rIaNBe «ДОПОЛНITeIbHoe OБорудованe».
BCTaBnTb OCN TpaHCnOpTHbIX KOJIec B OTBepCTnHa InpIbope n 3aФnKcnpoBaTb.
YctaHOBka 电TOK
IpepeBkJIuOHeHem npi6opa Heo6xoJIMo yCTaHOBnTb 1eTkn (cM. "Pa60tI noTexHnueckomy o6CnyJnBaHHO").
3KcPnPyataaun np6opa
YKa3aHue
Iy He3aMeDnumelbH02 OMKJUoyEnu npueoDa uemok cnedyem HEmedneHNO omnycmmb bIKJUoyamelb npueoDa uemok.
3aOpJHeHne pa6OuX XnDkoCTe
BhumaHue!
Onachocmb noepekdeHn. Pumehmbo mBoKo peKoMeHDoaHHbIe Moouuue cpedcmeBa. B cnyae uCnoJIb3OeaHnue dpuyux moUux cpedcmeB 3Kcnpyamupyooee luio bepem ha c6bI noBtuHnBu pucck c mooku 3peHnB e3onacHocmu paobbl, onachocmu nolyuHnmpaM u yMehbuen HcpoKa cnXkbI npubopa. NcNoJIb30aamb moIbKO moUoue cpedcmeBa, He codepkauue pacmeOpumelue, coJanyu U nnabukoyu (fmpocmoedopodhyu) Kucnomy.
PpuHmB 60 eHMaHue yka3aHn no mexHuke 6e3oNaChocMu, npuBeDeHHbIe Haynakoekax Yucmuaux cpeOme.
Yka3aHue
He ucnolb3oabmb cunbno nehauec moIouue cpedcmba. Cobliodambyka3aHua no do3upo6ke.
PekomeHdyembIe MOIOUne cpeCDtBa:
Pa6oTbI no TexHnueckomy o6cny-XnBaHnIO
3aMeHHTb BCacbIBaIOUne INaHKN
Пднгь BCaыBaIOUипланкиpyTeM HaxkaTЯ NaпeДаь ONyCKaHnB BCaыBAIOuX NlaHOK.
HαKaTb BBepx Ha KHOπKy 3aMeHbI BCAcBbAHOUx ΠIIaHOK - BCaCbIBaHOUne PIIaHNKΦNKCPyIOTc.
→ BbITaHTb BHN3 BCaCbIbAIOJIne INaHKn.
→ CHaTb BInHTOBBIE npyXnHbI n HacaDnTb INx Ha HOBBe BCaCbIbAHOUne PJIaHNK.
HObbIe BCaCbIbAIOUJIne IJaHKn paCNoJIOXHTb TaKIM O6pa3OM, YTO6bl 3aUeJI-
Ka 6bla HnnpabIeHa B ceHTp np6opa.
YCTaHOBntb BnHTOBblI npyKInhbl B nPiEmHoe yCTpOJIcTBO np6Opa.
BCTaBnTb BCacbIBaHOuIIO INaHky B np6op n 3aUeJIKNHyTb.
→Повторы осяразию Дя Второв BCa-cbIBaIOUe ПЯнк.
Yka3aHue
Peaynepna 3aMeHa 8cacbIeauux npanok ynyuwaem npunucn deucmeur ckgbeKa u yebenuvaem npodonxumelbHocmb ezo ucnlonb3oeaHua.
3aMeHa 电TOHbIX BaJIINKOB
→ Πολοχιντό πριδόριν Ḁ δόκ.
HaxkaTb KHONky 3aMeHbI UeTKN OJHOBpeMeHHO OTKNHyTb BHN3 UeTOHbI BaJI.
→ BbIHyTb ⅢeToUHbI BaI.
HacaTb HOBBI UeToCHBaN Ha 3aXbaN 3aФNKcPObaTb ero,
Iorobop O TeXnueckom 06cnyxBaHnn
Дянаджно pa60Ты пибopa c coOTBeTCTByUOuIM TOPRObIM OTdJIeHneMФИрMbI Karcher MoKHO 3aKIIouHTb DOrO-BOp O texHnuecckOM O6cnyKINBaHIn.
3aunTaOT 3aMep3aHn
При onachoctи 3amopo3KOB:
→ CnITb BOyu3 pe3epByapOB dIa YICTOINrpa3HOBBObl,
→ HaxmTaHa BbIKIOuATEnb YnCTaIe-ro pactBopa Do Tex nop, noka He npeKpaNTcRa BbIXoD BObl.
→ NOCTaBtB IprbOp Ha XpaHeneH B He-3aMeP3aUoIeM NOMEuEHN.
Henoladkn
Onachocmb
Onachocmb nopaxeHua 3neKmpomokom, onachocmb nolyeHua mpaMb! Pered hauanom IIObix pa6om c annapa-mom ebimaumb u3 po3emku umencelb-Hyio eunky.
BHumahue!
Onachocmb noepexdeHna ycmpoucmea bimekaoue eodo. Ipeod pa6omou cIumcb ycmpoucmea ep3nyo oody u ocmaawyocyaucmyo body. Pn HencnpabHocTax, KOtOpbie HeBO3-MOJHO yCTpaHnTB C NOMOuBIO daHHoT Ta6NtCb, cNeDyET o6paTntbC B Cnyk6y cepBnCHOrO 06cLyKuBaHNia.

S. Reiser
Head of Approbation
yIIOJIHOMOueHHbI NO DOKymeHTaUIN:
S. Reiser
71364 Winnenden (Germany)
Tei.: +49 7195 14-0
ΦaKc: +49 7195 14-2212
Winnenden, 2012/12/01
RapaHTn
B kajdoi cTpaHe DeiCTbYIO T COOTBeTCT- BeHNO rapaHTnHbIe ycNoBIA, n3daHHbIe yNoJIHOMOeHHo opraHn3aUnne C6bITa HauWe npOdyKcIMN B daHNO CTpaHE. Bo3- MoXhBle HeNCnPabHOCTn np6opa B TeueHne rapaHTnHOrO cPoka Mbl yCTpHaJeM 6ecnlaTHO, ecn npuHa 3aknUOaETcB V deΦeKtax MaTePnAIOB nIN OOn6kax npn I3rTOBLeHm. B cnyae Bo3NHKnHOBeHn npTeH3N B TeueHne rapaHTnHOrO cPoka npoc6Ba o6paatbcra, Ime npi Ce6e Yek O NOKyKe, B TopROByo opraHn3aUnIO, pOdaBswyBam np6obp nIN B 6bnKaJShyU yNoIHOMOeHHyIO cLyXbCyBPncHOrO obClyKmbAHnI.
3anaachbIe yactn
- Pa3pe7aetcra nCnOJIb3OBAt bTOnbKO Te npHnAdIeXKHOCTn 3aNaChbte OaCTn, nCnOJIb3OBAHHe KOToPbIX 6blIO ODo-6peHo n3rTOBHTeIeM. NcNoJIb3OBAHne opRnHaJIbHbIX npHnAdIeXKHOCTe IN 3aNpacte rapaNTnpuyET Bam nAdexKHyIO n 6ecpepeBoHy IO pa60Tu np60pa.
Bb6op Han6oJee cacto HeoXoIMbIX 3aIyacte Bbl HaidTe B KOHcE INCTpyKcUN IO 3KnJIyataCIN.
Дальnevшую Информацию 0 заразсъх ВьИ НадеTe Ha calTe www.kaercher.comВраздени Service.

www.kaercher.com/REACH

Head of Appropriation
71364 Winnenden (Germany)
Tel.: +49 7195 14-0
Fax: +49 7195 14-2212
Winnenden, 2012/12/01
Garancia
www.kaercher.com/REACH

2006/42/ES (+2009/127/ES)
2004/108/ES
71364 Winnenden (Germany)
Tel.: +49 7195 14-0
Fax: +49 7195 14-2212
Winnenden, 2012/12/01
Záruka
www.kaercher.com/REACH

2006/42/ES (+2009/127/ES)
2004/108/ES
71364 Winnenden (Germany)
Tel.: +49 7195 14-0
www.kaercher.com/REACH
Elementy obslugi

2006/42/WE (+2009/127/WE)
2004/108/WE
71364 Winnenden (Germany)
tel.: +49 7195 14-0
faks: +49 7195 14-2212
Winnenden, 2012/12/01
Gwarancja
www.kaercher.com/REACH
Elemente de operare

Directive EG respectate:
2006/42/CE (+2009/127/CE)
2004/108/CE
Norme armonizate utilizezate:
EN 55014-1: 2006+A1: 2009+A2: 2011
EN 55014-2: 1997+A1: 2001+A2: 2008
EN 60335-1
EN 60335-2-72
EN 61000-3-2: 2006+A1: 2009+A2: 2009
EN 61000-3-3:2008
EN 62233: 2008
Norme de aplicare nationale:
Semnatarii actioneaza in numele si prin imputernicirea conducerii societàti.


Insarcinat cu elaborarea documentationiei:
S. Reiser
71364 Winnenden (Germany)
Tel.: +49 7195 14-0
Fax: +49 7195 14-2212
Winnenden, 2012/12/01
Garantie
www.kaercher.com/REACH

2006/42/ES (+2009/127/ES)
2004/108/ES
71364 Winnenden (Germany)
Tel: +49 7195 14-0
Fax: +49 7195 14-2212
Winnenden, 2012/12/01
Záruka
www.kaercher.com/REACH

1 Zapor spremnika svjeze vode
2 Prekidač pogona Četki
3 Prekidač otopine za pranje
4 Crijve otopine za pranje
5 Mrežica za skupljanje vlakana (usisavanje)
6 Učvršćivač potisne ručice
7 Tipka za deblokiranje transportnog ko-tača
8 Transportni kotačić *
9 Potisna rucica
10 Kuka za vračno rasterećenje
11 Držač transportnog kotača *
12 Uskočni zatvarač
13 Sprenik svjeze vode
14 Spremnik prljave vode
15 Zastitni kotačić
16 Gumb za zamjenu usisne konzole
17 Plovak
18 Tipka za zamjenu Četke
19 Vozni mehanizam
20 Usisna konzola
21 Valjkastečetke
22 Okretna ručka za tlak nalijeganja Četki
23 Papučica za spustanje usisne konzole
24 Strujni utikač
25 Rukohvat spremnika prljave vode
26 Poklopac spremnika svjeze vode
Pripe prve uporabe
2006/42/EZ (+2009/127/EZ)
2004/108/EZ
Primijenjene uskladene norme:
EN 55014-1: 2006+A1: 2009+A2: 2011
EN 55014-2: 1997+A1: 2001+A2: 2008
EN 60335-1
EN 60335-2-72
EN 61000-3-2: 2006+A1: 2009+A2: 2009
EN 61000-3-3:2008
EN 62233: 2008
Primijenjeni nacionaln standardi:
Potpisnici rade po nalogu i ovlastjenjem poslovodstva.


71364 Winnenden (Germany)
Tel.: +49 7195 14-0
www.kaercher.com/REACH

1 Bravica rezervaora sveze vode
2 Prekidač pogona Četki
3 Prekidač za rastvor deterdženta
4 Crevo za rastvor deterdženta
5 Mrežica za skupljanje vlakana (usisavanje)
6 Učvršćivač potisne ručke
7 Taster za deblokiranje transportnog točkica
8 Transportni točić *
9 Potisna rucica
10 Kuka za vučno rasterećenje
11 Držač transportnog točkica*
12 Uskočni zatvarač
13 Rezervaor za svežu vodu
14 Rezervoor prljave vode
15 Odbijajuci valjak
16 Dugme za zamenu usisne konzole
17 Plovak
18 Taster za zamenu Četke
19 Transportni mehanizam
20 Usisna konzola
21 Valjkastečetke
22 Obrtna ručka pritiska naleganja Četki
23 Pedala za spustanje usisne konzole
24 Strujni utikač
25 Ručka za nošenje rezervaora za prljavu vodu
26 Poklopac rezervaora sveže vode
* kod BR 40/10 C Classic ici u obimu isporuke
Pre upotrebe
2006/42/EZ (+2009/127/EZ)
2004/108/EZ
Primenjene uskladene norme:
EN 55014-1: 2006+A1: 2009+A2: 2011
EN 55014-2: 1997+A1: 2001+A2: 2008
EN 60335-1
EN 60335-2-72
EN 61000-3-2: 2006+A1: 2009+A2: 2009
EN 61000-3-3: 2008
EN 62233: 2008
71364 Winnenden (Germany)
Tel.: +49 7195 14-0
Yka3aHnna 3a 6e3oNaCHOCT
IpeNi da ekcnloatnpaTe ypeDa 3a nbpBn nbT, npooyete n cb6nOdaBaIte HactO-
yIe Te INCTpyKuIN 3a yNtpe6a n npIno-
XeHATA bpoUpa ,Yka3AHn 3a
6e3OpacHOCT 3a npaxocmykaCkN 3a cyxo n
MOKPO NouchTaBe N5.956-251.0
CnmbolnHa YnbTbaHeTo 3a yno-tpe6a
Onachocm
3a HnocpecdcmeeHo ap03ra ana onacHocm, KOmo bodu do mekku menechu noepdu unu do cMbpm.
IpeynpexdeHue
3a 6b3MOxHa onaHa cumyaucu, KOAmo 6u Moana da doeede do mekku melechu nopedu unu cmbpm.
BhumaHue
3a 6b3MoXHa onacha cumyaucu, kOam 6u MoZna da doBeede do Jeku meLechu noepedu unu mamepuaunu uemu.
ФУHKUЯ
Tbpkaaata N3cMykBaua MaunHa ce n3- nOJ3Ba 3a MOKPO NOUCTBaHe nIi 3a noInpaHe Ha paBn IoIOBe.
Два движши ce eEDIN CpeUy Dpyr BaJRAHa Na YeTkn NOUcHbAT NODa C NOMOuTa HaNoDAeHATA NOUcHbAua TeuHoc. Pa6OTHa TUnPHa OT 400 MM N BMeCTUMOCCTHa pe3epBOaPte 3a YnCTa N MpbCSHa BOaOT CbOTBeTHo NO 10 J daBaT b3MOxHOCT 3a eEKeTtBHO NOUcHbAHe. 3aDeIcTBaHETo B MPexaTa DaBa Vb3MOXHOCT 3a BVCOKa PpON3BOdntJIHOCT 6e3OrpaHnueHne Ha pa6OTHO BpeMe.
Yka3aHue
Bcbomeemcmeue cbc cbomeemhama 3a- daya 3a noucmeane ypeb m moxe da ce obopydea c pa3nuchu npunadnexhocmu. Ionumaime 3a hauy kamaoou nu nu nocememe e Nmephem Ha apec www.kaercher.com.
www.kaercher.com/REACH

1БлOKIpOBkaHape3epBoapa3a YnCTa BOda
2IpeKbCbau 3aDbNkBaHe HaYeTKnTe
3 IpeKbCBaH nouchBaA pa3TBOp
4 Mapky nouchTbaa pa3TBOP
5 Lédka 3a BnacnHKn (N3cmyKbaHe)
6 ΦиксаторблOKираца ckоба
7 Je6IOKpaU 6yToH TpaHcnpTHO KOJIeNo
8 TpaHcnpTHo KOJeno*
9Пльзага ckоба
10 Kyka 3a ka6eIa
11 Hocau TpaHcnpTHo KOJIeNo *
12 Knun
13 PeεepBoaup ncta Boda
14 Pe3epBoap MpbCHa BOda
15 Ot6JIbCKBaIa poJIka
16 BytoH 3a HaTnCKaHe 3a CMraHa Ha JeHTa 3acMyKBaHe
17 PonnabBk
18 ByToH CmHa Ha YeTkn
19 XoIOB mExaHn3bM
20 JIeHTa 3acMyKbaHe
21 BaIOBe c ueTkn
22 Bbptraa ce pbyka haJrahe Ha npTnCKaHe Ha YETKITE
23Пеладлсмьквае на лeнта засмkyквае
24 Lcencen
25Дрьжka pe3epBOap 3a Мрьса BOda
26 Kanak pe3epBoap 3a YnCTa BOda
*При BR 40/10 C Classic He e B obema Ha doctabka
MOnTnpaIe TnIb3raUaTa cKo6a
I36yTaIe rOpHaTa nOJOBuHa Ha nIb3raUaTa cKo6a Bbpxy dOJHaTa noJIOBUnHa.
BhumaHue
Onachocm om ybpekdahe. He 3akaayme kaeba npu mohmaxa.
→ПоДравНеTe OTВОпИTe (ВьзМоЖи Са ДБЕ HabТpoIKN Ha BИСоЧИнАт).
→ Cbpxte nIOBnHnTe Ha nIb3raaata cKo6a c KpeNekn 60NTobe, Cbpxte Ia6nTe n 3Be3DOO6pa3HnTe dpxkN.
3aKpeTe Ka6eNa c KnncOBe Ha nIb3raaata ck06a.
MOHTIpaHe Ha TpaHCnOpTHNte KoJIeJa
Pn BR 40/10 C Classic TpaHcnpTnHTe KOJIeJHe ce cBdIbpxaT B OBeMa Ha DocTabKa. EHa npCTabKa TpaHcnpTHn KOJIeJa e ONIcAna B rIba"PiHaADJIeXHOCTn".
Пocstabete Ocnte Ha TpaHcnOpTnHTe KoIeNa B OTbOpNTe Ha ypeDa n IuФNK-cnpaIte.
MOHTIPAHe Na YeTKeTe
IpeNi nysKaHe B Eeknnoataaue YeKnte Tp8Ba Da ca MOHTnpAHn (Bx. "DeyHocTn noNoDpBxkKaTa").
Ekcpnoataza
YKa3aHue
3a He3a6abHo u3KIOUcBaHe om ekCnIIOamauHa Ha 3adBuxBaHemo Ha YemKume nyScheme npeKbcsau 3adBuxBaHe Ha YemKume.
HantbIHeTe ropuBHN MaTePnaJIIn
BhumaHue
Onachocm om yepexdahe. N3noJ3baume eduncmbeHo npednucHume nouCmeau npenapamu. 3a ocmaHane moUcmeau npenapamu uma nouueHa onachoc 3a nompe6umela n oomoue Hne Ha npou3oDcmeehama 6e3onac-Hocm, onachocm om 3lononyku u Hamanrahe Ha cpoka Ha ekcnloamaua Ha ypeda. Da ce u3noJ3bam camo noucMeau cpeOmea, koumo He cbdpjxam pa3meOpumenu, coHa u fnyopoeodopodHa Kucenuha.
Cna3aume yka3aunma 3a 6e3oanachocm 3a noucmeauume cpecm8a.
Yka3aHue
Ia He ce u3noJ3eam cunHo neHnueu no- yucmeauu cpedmea. Da ce cna3eam yka3aHaura 3a do3upahe.
IpenopbUHTeHNO cpeiCTBO 3a nouNCTBaHe:
CmHa Ha JeHtA 3acMyKBaHe
JeHTa 3acMyKBAHeJaCeNoBdInrHe CbC 3aJeIcTBAHeHaPeJalCMbKBaHeHa JeHTa 3acMyKBAHe.
→ Hattnche TaBbTpe 6yToHa 3a HattncKaHe 3a CmHa Ha JeHTa 3acMyKBaHe -JeHTa 3acMyKBaHe Ce OCBo6OxJaBa.
→ИЗваде Te HaДОЛу ЛЕNTа 3aСмУкВаHe.
→ CbaJIeTe cInpaJIHnIte npyKInn I nI noCTaBeTe Ha HOBaT aJeHTa 3acMyKBaHe.
Плдравнete Нова т lenta 3acMykBa-He Taka, Ye Фиксрацит n3daTbK da coчс срета на урета.
Ппекашие сиралнITE npукинь Mectata 3a поеман Ha ypeda.
Пoctabete Лentа засмквае вуpeда ия рсuaite.
Повторе операцята 3a Втора Лента засмкван.
YKa3aHue
Pedoshama pa3mHa Ha dbeme IeHmu 3acMykeaHe nodo6p8a noUcMbauomo 6b3deUcmeue u ybIkaea cpoKa Ha u3- non3eaHe.
a Ce CmHrT BaIOBete Ha YETKnTe
YpeDa da ce noJIOxHacTpaHn.
→HaTnCHete6yToHa3aCMraHaHaYeTKn I eHOBpEmHoC TOBa3aBbPTeTe BaJIrKa HaYeTkataHaNoJy.
→ИЗва对接е Вая на четкпг.
ПоставeteНов Валяк Ha YeTkataHa MЯCTOTO Ha 3axBaUaHe I GoФИКСИpaIte.
Iorobop 3a noDpBxka
3a haIeXdHa pa6oTa Ha ypeDa MoXeTe DaCKJIouChte DoTOrOBOpn 3a nOДрБxKa C OToPn3IupAno 6bOpO 3a npOdaXbN Ha Karcher.
3aunTa OT 3ampb3BaHe
Ppi onachocT OT n3Mpb3BaHe:
Да ceизпраЗнгт pe3epBoapnte 3aЧИСТА И МьсHA BOДA.
3aDééCTBaIte 6eToHa 3a noUcIbA- ⅢnJa pa3TbOp, DOKaTO cPpe Da n3n3a BOda.
Ypeza da ce npnbepe B nOmeuHne, 3aunTeHOOT 3ampb3BaHe.
PobpeDn
Onachocm
Onachocm om eJekmpuuecku ydap, onac-Hocm om hapaHraVe!
Ipedu ecuku pa6omu no ypeda u3aekdaume uencena.
BhumaHue
Onachocm om yepexdahe 3a ypeda nopadu u3muaua ooda.Mpbchama boda u ocmananama yucma ooda da ce u3moayam npedu pa6oma no ypeda.
PnIOBpeN, KOINTHeMOraTda6bIaT OTCTpaHEnC NOMOHTaHa HAcToAuta Ta6JIuCa, NOBkaIte cepBn3a.

S. Reiser
ad of Approbation
ПьнHOMOUIHK NOДOKуMeHTaUЯТa: S.Reiser
71364 Winnenden (Germany)
Ten.: +49 7195 14-0
ΦaKc: +49 7195 14-2212
Winnenden, 2012/12/01
RapaHcH
BbB BcKa Ca TpaHa Ca BaIiDn H3JaDeHnTe OT OToPi3nPaHn Hn DiCTp6yTop raPahCIOHN YcNOBn. EBeHTaJIHn NOBpeDi Ha BaIiTe PrnHaIeJXHOCTn Ie OTCTpaHIM B paMKITe Ha rapaHcIOnHHn CpK 6e3IIaTHo, Ako Ce Kacae 3a DeΦeKT B MaTePnaJIte Nn Pn PpOIN3BOvCTBO. B Clyuay, Ye Tp8Ba Da npeJABITE npabOTo CN Ha I3NoI3BaHe Ha rapaHcIe Ce ObPHeT KbM CneIaII3nPAHATA TbproBCa MpeXa II NkM Hai-6bn3KnB OToPi3IpaH CepBn3, KaTO ppeIcTAbNTe IN DOKUMeHTIte 3a NOKyPkata.
Pe3epBHN qactn
Morat da ce n3noJ3BaT cAmo npHaJnIeXHoCTn Ipe3epBn Yactn, KOInTO caNo3BOJeHn OT IpOn3BOJntTeJI. OpiNHaJIHnTE pInHaJNeXHoCTn I opuHnHaJIHn pe3epBn Yactn DaBaT rapaHcIy 3a TOBa, ypeJbT da MoKe da ce n3noJ3Ba CnrypHo N be3 NOBpeDi.
CnncbKaHaHa-ueTo Heo6xoDmntPe3epBnuaCTnIe HaMepeBvKpaHa yTBAHeTO 3a EKcnloataun.
Дрги Информаши OTHOCHO pe3epBHNITEЧASTI мОжete ДЯ NOЛучITE на www.kaercher.com В облacrСп.

www.kaercher.com/REACH
Teeninduselemendid

1 Puhta vee paagi lukk
2 Harja ajami luliti
3 Puhastuslahuse luliti
4 Puhastuslahuse voolik
5 Ebemesel (valjaimemine)
6 Tóukesanga fikseering
7 Transpondiratta vabastuslahv
8 Transpordiratas *
9 Tōukesang
10 Tömbekoormuse vähendamise konks
11 Transpordiratta hoidik *
12 Klamber
13 Puhta vee paak
14 Musta veepaak
15 Törjerullid
16 Imiotsaku vahetuse luliti
17 Ujuk
18 Harjavahetuse klahv
19 Sassii
20 Imiotsak
21 Harjavaltsid
22 Harjasurve poorduliti
23 Imiotsaku langetamise pedaal
24 Vorgupistik
25 Musta vee paagi kandesang
26 Puhta vee paagi kaas
S. Reiser
Head of Appropriation
71364 Winnenden (Germany)
Tel: +49 7195 14-0
www.kaercher.com/REACH

1 Tirā udens tvertnes fiksators
2 Suku piedzinas sledzis
3 Tīrīsanas škīduma slelzis
4 Tiri'sanas skiduma slutene
5 Skiedru filtrs (nosukšana)
6 Stumšanas roktura fiksators
7 Riteja atblokeesan taustins
8 Ritenis*
9 Vadāmais rokturis
10 Vada nastiepuma atslogošanas Ākjis
11 Ritena turetajs
12 Skava
13 Tira udens tvertne
14 Netirā udens tvertne
15 Stapritentinš
16 Sūkṣanas stiṇa nomaiṣas klokis
17 Pludins
18 Suku nomiinas taustins
19 Ritoša daja
20 Sūkšanas stienis
21 Sukas veltnji
22 Grozamrokturis suku piespiešanas spēka regulěšanai
23 Pedalis sukstanas stierna nolaiisanai
24 Tíkla kontaktdaksa
25 Netirā udens tvertnes rokturis
26 Tīrū udens tvertnes vāks
- variantam BR 40/10 C Classic neietilpst piegãdes komplektã
71364 Winnenden (Germany)
Tālr.: +49 7195 14-0
Fakss: +49 7195 14-2212
Winnenden, 2012/12/01
Garantija
www.kaercher.com/REACH

1 Švaraus vandens bako fiksatorius
2 Sepeci o pavaros jungiklis
3 Valomojo tirpalo jungiklis
4 Valomojo tirpalo tiekimo Žarna
5 Filtro tinkleles (nusiurbimo)
6 Stūmimo rankenos fiksatorius
7 Transportavimo ratuko atblokavimo mygtukas
8 Transportavimo ratukas *
9 Stūmimo rankena
10 ltemtumo atleidimo kablys
11 Transportavimo ratuko laikiklis *
12 Spaustukas
13 Švárus vandens bakas
14 Užterstó vandens bakas
15 Nukreipiantysis ritinélis
16 Siurbimo rémelio keitimo stūmiklis
17 Pluduras
18 Šepečio keitimo mygtukas
19 Vázziuoklè
20 Siurbimo rémelis
21 Sepeci o velenai
22 Sepecioprispaudimo jagos regulatorius
23 Siurbimo rémelio nuleidimo pedals
24 Maitinimo tinklo kišukas
25 Užterstó vandens bako rankena
26 Šváraus vandens bako dangtis
Pries pradedant naudoti
71364 Winnenden (Germany)
Tel.: +49 7195 14-0
Faksas: +49 7195 14-2212
Winnenden, 2012/12/01
Garantija
www.kaercher.com/REACH

1БLOkyBaHHpe3epByapyIJIyIcToi BOIN
2 Ipeemnka npnbody zuitok
3 Bmukau pozunHy dny uienen
4 Ⅲnahr po3uHny dny uHn
5 Cityactn pInbtp (BiDcMOKTyBaHHa
6 ΦíkcaTop TЯroBoI pyuKn
7 KnaBiHa po36nokyBaHHa TpaHcnpTHoro KoJeca
8 TpaHcnpThe koneco*
9 TaROBa pyUka
10 RaK dJa Ka6eJIo
11 Tpimau TpaHcnpTHoro KOleca
12 3atnckaay
13 Pe3epByap nucToi BODn
14 Pe3epByap 6pydnoBODn
15 Polnik, 0o BiDnBae
16 HaTnCKHa KHOJa 3aMiHN BCMOKTyBaJbHx PnaHOK
17 NonlaBok
18 KhoNka 3amHn zuitok
19 XoIoba yactnHa
20 BCMOKTyBaIbHa IJIaCTnHa
21LITKOBiBaJI
22ПоворOTHe pyKIB'Я yCTaHOBKN TUCKY npNTUCKaHHIitOK
23 PetaJb onyckaHHB CMOKtyBaJIbHnX nHaHOK
24 MepexeBn 1tKepe
25 Puyka pe3epByapa IJIa 6pydnoI BOIN
26 Kpnska pe3epByapa nictoI BODn
- He BxOДиТdo KOMПЛeКТу NOCTaЧнЯ npicntpoI BR 40/10 C Classic
Ipeed BBeDeHnM B ekCnIpyaTuio
BctaHOBIb npOBIHy dIy
HacyHyTN BepxHIO NIOOBHy TAreBOI DyTu Ha HIXKHO.
y8aza!
He6e3neKa yUkOdkxHnHa. Ipu MoHmaki He 3amuckamu Ka6enb.
BiДкоригувати положжehн оТьоров (MOЖЛВИ 2 yctановки по ВИСOTI).
3'εДНТИ NOЛОВИнКИ TЯговоДугИ, BИКОРиСТОВИУOU KрINьHIбОNTИ, ШаIBиТу рпбКOBi pyKoRTkn.
→ 3akpinnt Ka6eJb 3a donomoroh 3aTnCKy Ha TaroBiy dy3i.
BctaHOBNr TpaHcnpThi Kojleca
TpaHcnpTHi KOJeca He BXOJaTb Do
KOMnJIeKtU NoCTauaHnna IprncTpOIO BR 40/
10 C Classic. EInemEnT MoHTaxHoRo
KOMnJIeKtU dIra TpaHCnOpTHnx KOnic
nepepaxObaHi B rIaBi "DOnaTKObe
obJaHaHHa".
BCTaBtntOci TpaHcnpTnX KoJic B OTBOPHa npucTpoTa 3aΦikcyBaTn.
BctaHOBJeHHaTOK
IpepeI nyckom B ekcnnyatauio noTpi6Ho MOHTyBaTu uItKn (DINB. "Po60Tu 3 TEXHnHO 06cnyroByaHHa")
Ekcnnyatacia
Bka3ieKa
Ignaeauhozo bioknuehennpueody uimok cnid heaunho biynycmumu eumukay npueody uimok.
3anOBHeHHpo6OuXpiIN
yeaza!
He6e3neka yuKoDkeHn.
3acmocobyamu minbku pekomehdohai MuHi 3ac6bu. Y eunadky eukopucmaHHia Hux MuHux 3acobie kcnnya ocoba bepe Ha cebe nidwuuehu pu3uk 3 moku 3opy be3neku pobomu, he6e3neku mpaemyeanra ma 3meHweHHn mepMH cyx6bu npucmpoio. Bukopucmoeyamu minbku mi MuHi 3ac6bu, uO He Micmmb po3unHnuKcu, coJHy ma nnaeikooy (fmopuohy) kucnomy.
Dompumyamuc ekazieok no mexhi zu 6e3neku, haeedehux Ha ynakoeu 3acobie dnyuueHH.
Bka3ieka
He eukopucmoeyamucunbno nihuei Muhi zacobu. Dompumyeamucb ekazieok no do3yeaHHIO.
PekomehdoBahi MNUOchi 3acO6n:
PnB BnKOpNCaHHI TpaHcnpTnX KoJic npncTiPi CXODntb 3i WJxy:
IognJaTaTexHicHe 06cJnyroByBaHHa
△O6epexHo!
He6e3neKa ypaXeHH eJeKmpocmpymOM, He6e3neKa npaHEnHra!
Peped noamkom ycix po6om 3 npunaod om eumayhymu umekep 3 pozemku.
Yeaza!
Hebe3neka yukodkene npucmpo oedoo, 0eumika. Neped pobomoo 3nmu i3 npucmpo bpydy body ma yucmy body, 0o 3auiuunac.
ПланТexоглду
Picla pobotu
yeaza!
He6e3neKa yukodKeHHa. He 6bnpuckyume npucmpiB odoMo he 6ukopucmoye apecuHi MuHi 3acobu.
→ BnJIHTn 6pydHy BOy.
→ Pe3epByap 6pydHoi BODn npomntu HCTOIO BOIOI.
→ BvdaJntn Bmict i3 pe3epByapa dna YnCTO'BODN.
3anOBHnTn pe3epByap IJny ChcToI BOJN YnCTOIO BOJIO Ta npOMNTn npncTpii, 0o6 yHnKHyTI yTBOpEHn BIDKJaDeHb.
→ Bùndaɪntɪn 3aɪnɪsOK BOɪn 3 peʒepBvapə dʌŋyɪncTɔf BOɪn.
IpeebipuTu yuilbHeHH KylboBOrO kIanaHa B pe3epByapi IJy NcToi BOIN.
→ nepeBipnCiTuaTniΦijIbTp, npi Heo6XiDnOcTi - 3po6nTuNueHnn.
BucyuHTn pe3epByap npei 3akpTTM dIy 3aNoBirHnnoBn 3axOdy.
OuHCTHTI npiJa3 33OBHI, BnKOpNCTOBYUOnI DJIa Cb0rO BOJOry raHcIPKy, npocOeHy cna6kIM JyXHM pO3HHOM.
OuHCTnTn BCMOKTyBaJIbHi KpaIKN, nepeBipTuIX Ha 3HOUyBaHHa, npn Heo6XiIDHOCTi 3AmIHNTu BCMOKTyBaJIbHi PJIaHKn.
IpebeBipNTn ⅢITKN Ha npedmet 3HOuYBaHH, pni Heo6xidHocTi 3amHtN.
OuHCTnTn npHcTpii po3noJInbHnka BOHN HaI ZITKAMN, pNi Heo6XiHocTi BnHrTn Ioro Ta npOMTu BOHOJ.
Uomica
Ipebeipntu cTah yuiiNbHeh b mixk npicstpoem Ta pe3epByapom dIra 6pydnoi BOIN, pni Heo6xidHocti -3amHHTn.
→ПючистптkaналшITK.
UoiuHo
3a6e3neuHTn npoBeHnnaPOnHOBaHOrO orJyClyK6oToTexHiHOiPiTpIMKn.
PpOphiJaKTHuHi pO6oTu
3amHHTN BCMOKTyBaIbHi nlaHKn
ПиДнЯТИВСМОКТУВАЛБИ ПЛАНКI
шлЯхOMHaTиССКаHHЯHa NeДАЛБ
ONуССАНХВСМОКТУВАЛБИNHIX ПЛАHOK.
→ HaTnCHyTu Habepx Ha KhoNky 3amHn BCMOKTyBaJbHnx PnaHok - BCMOKTyBaJbHi PJaHKn φikcyHtbcr.
BnTgHTn Bn3 BCMOKTyBaJIbHi nlaHKn.
3HrTn rBnHTOBI npyKHH Ta HacaIITN IX Ha HOBI BCMOKTyBaJbHi PnaHKn.

Hobi BCMOKTyBaJIbHi ПlaHKnpo3TaUyBaTn TaKIM YInHOM, Uo63acyBka 6yJa CnpraMoBaHa B ZeHTp npicrpoI.
YCTaHOBHTn TBHNTOBI npyKHHN B npHOMHn npNCtpi anapaty.
BCTaBHTN BCMOKTyBaJIbHy pIaNKBy B npIcTpi Ta 3aIeHnyTu.
→Повторионерацюдядруоi BCMOKTYBaNbHOI ПпанКИ.
Bka3i8ka
PeaynpaHa 3amHa EcmOKmyealbHex
PnaHOK noniWye npunucn diwKpe6ka ma
36ilbwyE mpuBanicmb uo2o
eukopucmanha.
3amHHTB BANMKI 1tOK
TloklaCTn npncTpii Ha 6ik.
Hakatn KhoNk y3amHn 1tKn Ta OndHocHo BiKnHyTu BnI3 1tKOBn BaI.
→ BuiHrTn ⅢtKOBn BaI
HacaHTN HOBNI ⅢIKOBN BaHa 3axBaT Ta 3aΦiKCyBaTN Ioro.
Dorobip Ha texo6cnyrobyaHHa
IЯ NaDiHoiPobOTn npucTpo 3 BiIDOBiDHM TOPROBEnbHM BiDJIeHNrM φipmKarcher moXHa yKnactn dorObip npo TexHicHe o6cnyroByaHHa.
3axnCT BiMOPo3iB
Bpa3i He6e3neK 3aMeP3aHnA:
→ 3bInbHnTn pe3epByapn uNCToI Ta 6pydHOI BOIN.
→HaTnCKaTN Ha BVMnKaU po3uHy dIJIyIeHH, POKI He npINHHTbcra BxID BOiN.
36epiraTe npunaB 3axuHOMy BiMOPo3y npmIeHHi.
Henolapdkn
O6epeXHo!
Hebe3neka ypaxeHHra eJeKmpocmpymom, Hebe3neka npaHennr!
Ipeod noaykom ycix pobom 3 npunaDom
Bumrahymu wmekep 3 pozemku.
yeaza!
He6e3neKa yuKoOxEnnHa npucmpo0 odoio, 0o eumkae. Peped pobomoo 3Imu i3 npucmpoio 6pyDny oody ma qucmy oody, 0o 3aIuwunacr.
B pa3i BnHnKHeHHNoIWoKOJXeHb, kAi He MoKHa yCyHyTn 3a DOnOMoROU ciEi TabJIuCi, TeNeΦOHyTe Do cepBicHOU cHTpy.

S. Reiser
Head of Approbation
YNOBHOBAxKeHNI PO DOKyMeHTaUii:
S. Reiser
71364 Winnenden (Germany)
Ten.: +49 7195 14-0
ΦaKc: +49 7195 14-2212
Winnenden, 2012/12/01
Tapaantia
YKoKHi KpaIi NiDIOb yMOBn rapaHTi, 100
HaadaTcBnaHO BIDNObiJaNbHOIO
ΦipMOHO-PrOdaBcEM. HEnoJAKn Bpo6oTi
BaWoTO OblaHAnHnM NycBaEMO
6e3KOuTobHO IpOTraGOM TepMHy DII
rapaHTi, JkUO BOHN BVKlNiKaHbPakOM
MaTepiAly a6O BnPo6HnHmBpaKom. Y
rapaTIiHOMy BnPaIky 3BeptaIteCb, 6yDb
JaCKa, 3 DOkUMeHTAmN, 100
PiTBePdXyOTb NOKyNkPynpCTPOO, DO
BaWoTO TopROBOr aReNTa a6o Do
HabeDeHnx HnXype NyHKTIB rapaTtiHoro
OcbCyroBvBaHHa KJIeHTIB.
3anachi yactHH
- PpiuBOMy6dyTb BnKOpNCTOByBaTncb liuwe Ti KOMPiKeKTuOHi ta 3anachi qactHNI, 10HaJaIoTBcra BnPo6HnKOM. OprirHaihBi KOMPiKeKTuOHi ta 3anachi qactHNI 3amOBJIaIbTCbNo rapaHTii, 106 MoXHa 6byo 6e3neuHO ta 6e3 nepeuKOd BnKOpNCTOByBaTn npicTpri.
AcoptnmeT 3anachnx YacTHN, LQO yacto Heo6xidiH, MoXHa 3HaHTN B KInu iHctpyKuii no EKCnnyatauii.
Iopalbsha iHOpMaizno 3aapanm uactnham eHa caiTi www.kaercher.com B po3diCepbic.
5.962-521.0 07.11.2007