
RP-AC55 - Access Point ASUS - Free user manual and instructions
Find the device manual for free RP-AC55 ASUS in PDF.

| Product Type | Wireless Access Point |
| Brand | Asus |
| Model | RP-AC55 |
| Dimensions (L x W x H) | 80 x 80 x 40 mm |
| Weight | 100 g |
| Power Supply | 5 V / 1 A via micro USB |
| Wi-Fi Standards | IEEE 802.11a/b/g/n/ac |
| Frequency Bands | 2.4 GHz and 5 GHz |
| Maximum Data Rate | Up to 1200 Mbps (300 + 867 Mbps) |
| Ports | 1 Gigabit Ethernet port (RJ45) |
| Main Functions | Access point, repeater, router mode; configuration via ASUS app |
| Wireless Security | WPA2-PSK, WPA-PSK, WEP (64/128 bits) |
| Antennas | 2 internal antennas |
| Cleaning and Maintenance | Clean with a soft dry cloth; avoid liquids |
| Operating Temperature | 0 to 40 °C |
| Operating Humidity | 10 to 90% (non-condensing) |
| Certifications | CE, FCC, RoHS |
| Package Contents | RP-AC55 access point, micro USB cable, power adapter, quick start guide |
| Warranty | 2 years (depending on country) |
| Repairability | Spare parts available; repair by authorized center |
Frequently Asked Questions - RP-AC55 ASUS
User questions about RP-AC55 ASUS
0 question about this device. Answer the ones you know or ask your own.
Ask a new question about this device
Download the instructions for your Access Point in PDF format for free! Find your manual RP-AC55 - ASUS and take your electronic device back in hand. On this page are published all the documents necessary for the use of your device. RP-AC55 by ASUS.
USER MANUAL RP-AC55 ASUS
IN SEARCH OF INCREDIBLE
RP-AC55
Wireless AC1200 Repeater
natural_image
Line drawing of a Huawei 8.0 network device with two Ethernet ports and a USB port (no text or symbols on the device body)Quick Start Guide
U14322/ Third Edition / May 2018


Table of contents
English....3
Български....9
Hrvatski 15
Čeština....21
Dansk 27
Nederlands 33
Eesti....39
Français 45
Suomi....51
Deutsch 57
Ελληνικά....63
Magyar 69
Italiano 75
Lietuvių 81
Latviski 87
Norsk....93
Português....99
Polski 105
Русский....111
Română 117
Español....123
Srpski 129
Slovensky....135
Slovenščina 141
Svenska 147
Türkçe 153
Українська....159


Package contents

RP-AC55 Wireless AC1200 Repeater Quick Start Guide


Warranty Card
NOTE: If any of the items is damaged or missing, please contact your retailer.
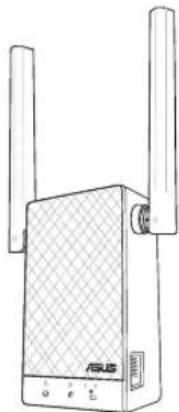
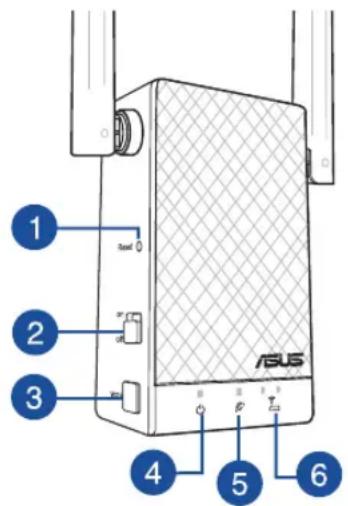
A quick look

1) Reset button
2) Power switch
3) WPS button
4) Power LED
On: RP-AC55 is power on.
Off: RP-AC55 is power off.
5) Existing network LED
On: Connected to the router/AP.
Off: Not connected to the router/AP.
6) More closer

Need to move RP-AC55 closer to the router/AP.

Move away slightly
Need to move RP-AC55 slightly away from the router/AP.


ENGLISH
Setting up the Repeater
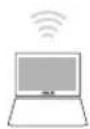
Turning the Repeater on
- Place your RP-AC55 near your Router/AP and plug it to a power outlet. Press the power switch to ON.
- Wait until the power LED changes from red to solid blue, indicating that RP-AC55 is ready to connect to the existing network.
natural_image
Illustration of a laptop, wireless router, and network device (no text or symbols)Connecting to a network
Select one of the following ways to connect the Repeater to a network.
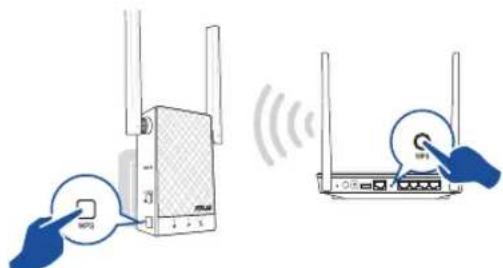
Method One: Using WPS (Wi-Fi Protected Setup)
- Press the WPS button on the router/AP.
- Press the WPS button of RP-AC55 for more than five (5) seconds until the Power LED starts to blink.
NOTE: Refer to the section A quick look for the location of the WPS button.
- Check if RP-AC55's Wi-Fi indicator turns solid light, which indicates that the Repeater has connected to the wireless network successfully. The Repeater's wireless network name (SSID) changes to your existing Wi-Fi network name, ending with _RPT or _RPT5G. For example:
Existing Wi-Fi network name: existing NetworkName
New Extender 2.4GHz network name: existing NetworkName_RPT
New Extender 5GHz network name: existing NetworkName_RPT5G
To connect an additional Wi-Fi device to your extended network, use the same network password as that of your existing wireless router.
Method Two: Connecting through GUI
- Use a Wi-Fi enabled device, such as your desktop PC/note-book/tablet, to find and connect to ASUS_RPAC55/ASUS_RPAC55_5G wireless network.
- Launch a web browser and enter http://repeater.asus.com in the address bar to access the Repeater.


- Follow the Quick Extender Setup steps to set up the Repeater:
- Connect to a Wi-Fi network and when prompted, enter the security key. If your Wi-Fi network is hidden, click Manual setting.
- Tick Same with Parent AP SSID/Password to copy the router/AP's SSID and password for your extended network. You could also set a unique SSID and password for your extended network by typing in the text box. When done, click Apply.
NOTE: The Repeater's default SSID and password is the same as that of your router/AP, with the SSID ending with _RPT or _RPT5G. You can change these default settings to a unique SSID and password.
- Connect your wireless devices to the new extended network.
natural_image
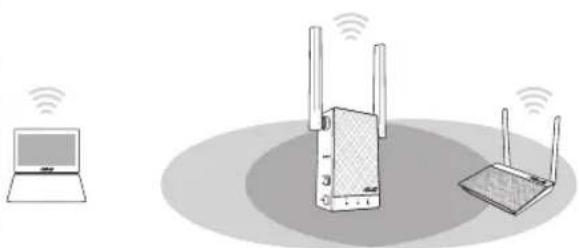
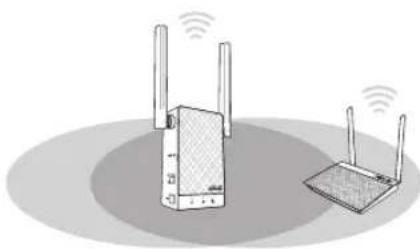
Illustration of two wireless devices with WiFi antennas, no text or symbols presentMoving the Repeater
- When the connection is complete, place your RP-AC55 between the router/AP and the wireless device to get the best performance.
• After placing your RP-AC55 in an ideal location, RP-AC55 connects to your router/AP in about one (1) minute.


Frequently Asked Questions
Q1: What should I do if my router does not support WPS?
- You can use Method Two to set up RP-AC55.
Q2: Why is it that the LED indicator for the current network does not light up after the Wi-Fi setup is complete?
- You may have entered the wrong password for the router/AP. Please restart your RP-AC55, enter the correct password, and try to set up your RP-AC55 again.
Q3: Why is it that I cannot see the login page after entering http://repeater.asus.com in the browser?
- Ensure that your computer is connected to your RP-AC55 network only, and set your computer to Obtain an IP address automatically. If you still cannot find the login page, please download the ASUS Device Discovery utility. You can download the utility for Windows and Mac from https://www.asus.com/Networking/RP-AC55/HelpDesk_Download/.
Q4: How do I reset RP-AC55?
- Press the RESET button on the side of RP-AC55 for about two (2) seconds. Wait for about five (5) seconds until the existing network LED blinks slowly.
Q5: I cannot access the web GUI to configure the RP-AC55 settings.
- Close all running web browsers and launch again.
- Follow the steps below to configure your computer settings based on its operating system.
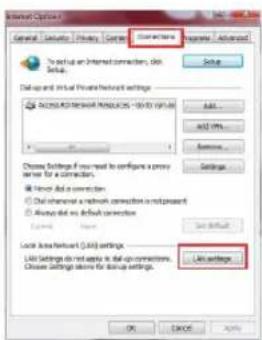
Windows 7
A. Disable the proxy server, if enabled.
- Click Start > Internet Explorer to launch the web browser.
- Click Tools > Internet options > Connections tab > LAN settings.
- From the Local Area Network (LAN) Settings screen, untick Use a proxy server for your LAN.
- Click OK when done.


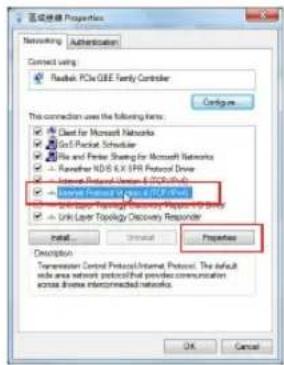
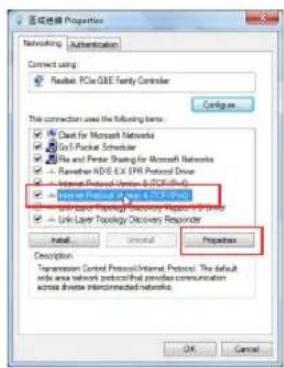
B. Set the TCP/IP settings to automatically obtain an IP address.
- Click Start > Control Panel > Network and Internet > Network and Sharing Center > Manage network connections.
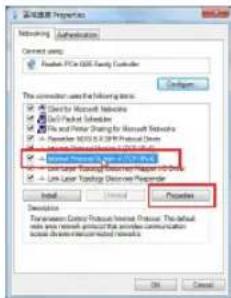
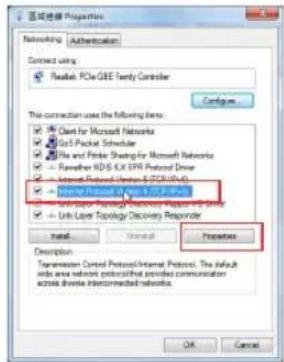
- Select Internet Protocol Version 4 (TCP/IPv4), then click Properties.
- Tick Obtain an IP address automatically.
- Click OK when done.

Mac OS
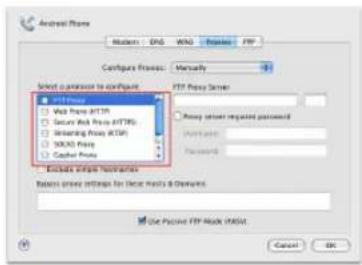
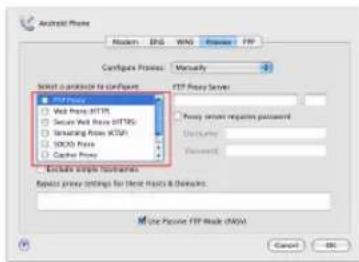
A. Disable the proxy server, if enabled.
- From the menu bar, click Safari > Preferences... > Advanced tab.
- Click Change Settings... in the Proxies field.
- From the list of protocols, deselect FTP Proxy and Web Proxy (HTTP).
- Click OK when done.


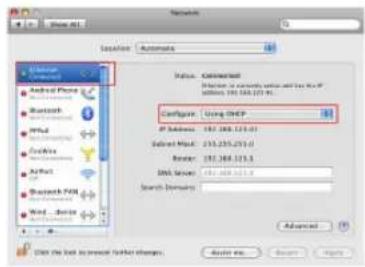
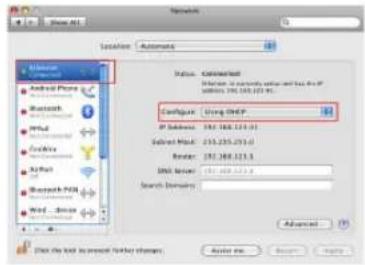
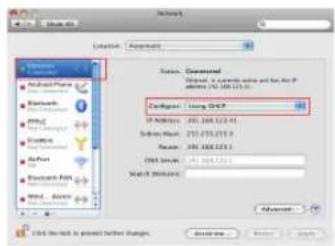
B. Set the TCP/IP settings to automatically obtain an IP address.
- Click the Apple icon 📄 > System Preferences > Network.
- Select Ethernet and select Using DHCP in the Configure field.
- Click Apply when done.


natural_image
Illustration of a laptop connected to two wireless devices (two wireless, one Wi-Fi) with no visible text or symbols.Свързване към мрежа
natural_image
Illustration of two wireless devices with Wi-Fi signal waves (no text or symbols)12


Mac OS


Sadržaj pakiranja

natural_image
Illustration of two wireless devices with antennas and WiFi signals (no text or symbols)Spajanje na mrežu
Odaberite jedan od sljedećih načina za spajanje repetitor na mrežu.
Mogućnost jedan: Korištenje WPS-a (Postavljanje WLAN zaštićenog pristupa)
- Provjerite svijetli li neprekidno indikator Wi-Fi mreže uređaja RP-AC55, što označuje da je repetitor uspješno spojen na bežičnu mrežu. Naziv bežične mreže repetitor (SSID) mijenja se na naziv postojeće Wi-Fi mreže, završava na _RPT ili _RPT5G. Primjerice:
Naziv postojeće Wi-Fi mreže: postojeći NetworkName
Naziv nove mreže proširivača 2,4 GHz: postojeći NetworkName_RPT
Naziv nove mreže proširivača 5 GHz: postojeći NetworkName_RPT5G
Za spajanje dodanog Wi-Fi uređaja na proširenu mrežu, koristite istu lozinku mreže kao i za postojeći bežični usmjerivač.
Mogućnost dva: Spajanje putem GUI
- Koristite uređaj s omogućenom Wi-Fi mrežom, kao što je stolno/prijenosno računalo/tablet za nalaženje i spajanje na ASUS_RPAC55 /ASUS_RPAC55_5G bežičnu mrežu.
- Pokrenite web preglednik i unesite http://repeater.asus.com u traku za adrese, za pristup repetitor.


- Slijedite korake u Quick Extender Setup (Brzo postavljanje proširivača) za postavljanje repetitor:
- Spojite se na Wi-Fi mrežu i kod upita unesite sigurnosni ključ. Ako je Wi-Fi mreža skrivena, kliknite Manual setting (Ručno podešavanje).
- Stavite kvačicu na Same with Parent AP SSID/Password (Isto kao AP SSID/lozinka za roditelje) ako želite kopirati lozinku usmjerivača/pristupne točke za proširenu mrežu. Također, možete odrediti jedinstveni SSID i lozinku za proširenu mrežu upisom u polje za tekst. Kada budete gotovi, kliknite Apply (Primijeni).
natural_image
Illustration of two wireless devices with WiFi antennas, no text or symbols present


B. Postavite TCP/IP postavke tako da automatski dohvaćaju IP adresu.
- Kliknite Start > Control Panel (Upravljačka ploča) > Network and Internet (Mreže i internet) > Network and Sharing Center (Centar za mrežu i zajednički rad) > Manage network connections (Upravljaj mrežnim vezama).
- Odaberite Internet Protocol Version 4 (TCP/IPv4) (Internetski protokol, verzija 4 (TCP/Ipv4), a zatim kliknite Properties (Svojstva).
- Kvačicom označite mogućnost Obtain an IP address automatically (Automatski dohvaćaj IP adresu).
- Kliknite OK (U redu) kada ste gotovi.

Mac OS


B. Postavite TCP/IP postavke tako da automatski dohvaćaju IP adresu.
- Kliknite ikonu Apple 📄 > System Preferences (Postavke sustava) > Network (Mreža).
- Odaberite Ethernet i odaberite Using DHCP (Upotreba DHCP) u polju Configure (Konfiguriraj).
- Kliknite Apply (Primijeni) kada ste gotovi.


Obsah krabice

natural_image
Illustration of two wireless devices with Wi-Fi signal waves (no text or symbols)Připojení k síti
natural_image
Illustration of two wireless devices with antennas and signal waves (no text or symbols)Umístění opakovače


Operační systém Mac
A. Deaktivujte server proxy, je-li aktivován.


ČEŠTINA


Pakkens indhold
natural_image
Illustration of a laptop, wireless router, and Wi-Fi antenna with signal waves (no text or symbols)natural_image
Illustration of two wireless devices with Wi-Fi signal waves, no text or symbols presentFlyt repeateren


Mac OS
A. Deaktiver proxyserveren, hvis den er aktiveret.


DANSK


Inhoud verpakking

RP-AC55 Draadloze AC1200 repeater Voetstuk


natural_image
Illustration of a laptop, Wi-Fi router, and Wi-Fi antenna with signal waves (no text or symbols)natural_image
Illustration of two wireless devices with Wi-Fi signal waves (no text or symbols)


Mac OS


Pakendi sisu

RP-AC55 Traadita repiiter AC1200 Garantiikaart


Lühijuhend
natural_image
Illustration of two wireless devices with antennas and Wi-Fi signals (no text or symbols)Ühendumine vörku
natural_image
Illustration of two wireless devices with attached antennas and a switch, showing wireless signal connections (no text or symbols)natural_image
Illustration of two wireless devices with WiFi antennas, no text or symbols present


Mac OS


EESTI


Contenu de la boîte

natural_image
Illustration of a laptop connected to two wireless devices with visible signal waves (no text or symbols)natural_image
Illustration of two wireless devices with WiFi antennas, no text or symbols present


Sous Mac


Pakkauksen sisältö

RP-AC55 Langaton AC1200 -toistin Pikaopas


Takuukortti
natural_image
Illustration of a laptop, WiFi, and wireless router with signal waves (no text or symbols)natural_image
Illustration of two wireless devices with Wi-Fi signal waves (no text or symbols)


Mac OS


SUOMI


Verpackungsinhalt

natural_image
Illustration of two wireless devices with WiFi antennas and signal waves (no text or symbols)natural_image
Illustration of two wireless devices with wireless signal waves (no text or symbols)natural_image
Illustration of two wireless devices with WiFi signal waves, no text or symbols present


Mac OS


GERMAN


natural_image
Illustration of a laptop connected to two wireless devices with visible signal waves (no text or symbols)Σύνδεση σε δίκτυο
natural_image
Illustration of two wireless devices with WiFi antennas, no text or symbols present


Mac OS


A csomag tartalma
natural_image
Illustration of two wireless devices with antennas and signal waves (no text or symbols)natural_image
Illustration of two wireless devices with Wi-Fi signal waves (no text or symbols)72


Mac OS


MAGYAR


Avvicinate RP-AC55 al router/AP.

natural_image
Illustration of a laptop connected to two wireless devices with visible signal waves (no text or symbols)natural_image
Illustration of two wireless devices with WiFi antennas and signal waves (no text or symbols)


Mac OS


Pakuotės turinys
RP-AC55 Belaidis kartotuvas AC1200
Darbui vadovas

natural_image
Illustration of two wireless devices with antennas and Wi-Fi signals (no text or symbols)natural_image
Illustration of two wireless devices with WiFi antennas, no text or symbols presentKartotuvo pastatymas


„Mac OS“


LIETUVIŲ


Iepakojuma saturs
natural_image
Illustration of two wireless devices with WiFi antennas and signal waves (no text or symbols)natural_image
Illustration of two wireless devices with WiFi antennas, no text or symbols present


Operētājsistēma Mac


LATVISKI


Innhold i pakken

natural_image
Illustration of a laptop connected to two wireless devices with visible signal waves (no text or symbols)Koble til et nettverk
natural_image
Illustration of two wireless devices with Wi-Fi signal waves (no text or symbols)Flytte repeateren


Mac OS
A. Deaktiver proxyserveren, hvis denne er aktivert.
- Fra menylinjen, klikk på Safari > Preferences... (Valg...) > Kategori-en Advanced (Avansert).
- Klikk på Change Settings... (Endre innstillinger...) i feltet Proxies (Proxyer).
- Fra listen over protokoller, fravelg FTP Proxy og Web Proxy (HTTPS).
- Klikk på OK när du er ferdig.


natural_image
Illustration of two wireless devices with Wi-Fi signal waves (no text or symbols)Ligar a uma rede
natural_image
Illustration of two wireless devices with WiFi antennas, no text or symbols present102


Mac OS
A. Desactive o servidor proxy, caso esteja activado.


natural_image
Illustration of a laptop connected to two wireless devices with visible signal waves (no text or symbols)Łaczenie z siecią
natural_image
Illustration of two wireless devices with Wi-Fi signal waves, no text or symbols present


Комплект поставки

natural_image
Illustration of a laptop connected to two wireless devices, one with signal waves and the other with antenna (no text or symbols)Подключение к сети
natural_image
Illustration of two wireless devices with WiFi antennas, no text or symbols present


Mac OS


РУССКИЙ


natural_image
Illustration of two wireless devices with WiFi antennas and signal waves (no text or symbols)Conectarea la o retea
natural_image
Illustration of two wireless devices with WiFi signal waves (no text or symbols)


Mac 10.5.8


natural_image
Illustration of a laptop, wireless router, and Wi-Fi signal icons (no text or symbols)natural_image
Illustration of two wireless devices with WiFi antennas, no text or symbols presentMover el repetidor


Sadržaj paketa
RP-AC55 Bežični AC1200 Repeater Vodič za brzo korišćenje
Garanciji
NAPOMENA: Ukoliko bilo koja od dole navedenih stavki nedostaje ili je oštećena, kontaktirajte svog prodavca.
Brzi pregled
1) Taster za resetovanje
2) Prekidač za napajanje
3) WPS taster
4) Svatleća dioda za napajanje
Uključeno: RP-AC55 je uključen.
Isključeno: RP-AC55 je isključen.
5) Lampica postojeće mreže
Uključeno: Povezano preko rutera/pristupne tačke.
Isključeno: Nije povezano preko rutera/pristupne tačke.
6) Ponderite bliže
Treba da pomerite RP-AC55 bliže ruteru/pristupnoj tački.
Udaljite malo
Treba da pomerite RP-AC55 malo dalje od rutera/pristupne tačke.


SRPSKI
Podešavanje proširivača dometa
natural_image
Illustration of a laptop connected to two wireless devices with visible network lines (no text or symbols)- Proverite da li Wi-Fi indikator RP-AC55 uređaja gori postojanim svetlom, što ukazuje da je proširitelj opsega povezan na bežičnu mrežu. Ime bežične mreže (SSID) proširitelja opsega se menja u ime vaše postojeće Wi-Fi mreže i završava se sa _RPT ili _RPT5G. Na primer:
Ime postojeće bežične mreže: postojeće Mrežnolme
Ime mreže novog proširivača 2,4 GHz: postojeće ImeMreže_RPT
Ime mreže novog proširivača 5 GHz: postojeće ImeMreže_RPT5G
Da povežete dodatni bežični uređaj za mrežu vašeg proširivača, upotrebite istu mrežnu lozinku koju ste upotrebili za svoj postojeći bežični ruter.
Opcija 2: Povezivanje preko GUI-ja (Grafičkog korisničkog interfejsa)
- Koristite uređaj sa aktiviranim Wi-Fi-jem, poput desktop PC-ja/laptopa/tableta da pronadete i da se povežete na ASUS_RPAC55/ASUS_RPAC55_5G bežičnu mrežu.
- Pokrenite internet pretraživač i unesite http://repeater.asus.com u polju za adresu da biste pristupili proširivaču dometa.


-
Pratite korake date u Quick Extender Setup(Brzo podešavanje za proširivač) da podesite proširivač dometa:
-
Povežite se za Wi-Fi mrežu i kada budete upitani, unesite bezbednosnu šifru. Ukoliko je vaša Wi-Fi mreža sakrivena, kliknite na Manual setting (Ručno podešavanje).
- Odaberite Same with Parent AP SSID/Password (Isto sa roditeljskom AP SSID/lozinkom) da biste iskopirali SSID i lozinku rutera/pristupne tačke za svoju proširenu mrežu. Takođe treba da podesite jedinstveni SSID i lozinku za svoju proširenu mrežu kucanjem u polje za tekst. Kada završite, kliknite na Apply (Primeni).
NAPOMENA: Podrazumevani SSID i lozinka Repeater-a su isti kao i za vaš ruter/pristupnu tačku, sa SSID-om koji se završava na _RPT ili _RPT5G. Možete da promenite ova podrazumevana podešavanja na jedinstveni SSID i lozinku.
natural_image
Illustration of two wireless devices with Wi-Fi signal waves (no text or symbols)Pomeranje Repeater-a
- Kada se povezivanje obavi, postavite svoj RP-AC55 između rutera/pristupne tačke i bežičnog uređaja za najbolji rad.
- Nakon što postavite svoj RP-AC55 na idealnu lokaciju, RP-AC55 se povezuje na svoj ruter/tačku pristupa (AP) za otprilike jedan (1) minut.


Često postavljana pitanja (FAQs)


B. Podesite TCP/IP podešavanja da automatski pribave IP adresu.
- Kliknite na Start > Control Panel (Kontrolni panel) > Network and Internet (Mreža i Internet) > Network and Sharing Center (Centar za mrežu i deljenje) > Manage network connections (Upravljanje mrežnim konekcijama).
- Odaberite Internet Protocol Version 4 (TCP/IPv4) (Internet protokol verziju 4), a potom kliknite na Properties (Svojstva).
- Štiklirajte Obtain an IP address automatically (Automatski pribavi IP adresu).
- Kliknite na OK kada završite.
Mac OS


Obsah balenia

RP-AC55 Bezdrôtový retranslátor AC1200
natural_image
Illustration of two wireless devices with WiFi antennas and signal waves (no text or symbols)Pripojenie k sieti
natural_image
Illustration of two wireless devices with WiFi connections and signal waves (no text or symbols)natural_image
Illustration of two wireless devices with WiFi antennas, no text or symbols presentPresun retraslátora
138


B. Nastavte nastavenia protokolu TCP/IP pre automatické ziskanie IP adresy.
- Kliknite na Start (Štart) > Control Panel (Ovládací panel) > Network and Internet (Siet'a internet) > Network and Sharing Center (Centrum pre sieťové pripojenie a zdielanie) > Manage network connections (Spravovat sieťové pripojenia).
- Zvolte Internet Protocol Version 4 (TCP/IPv4) a následne kliknite na Properties (Vlastnosti).
- Začiarknite Obtain an IP address automatically (Získat' adresu IP automaticky).
- Po dokončení kliknite na OK.

Operačný systém Mac
A. Ak je povolený, zakážte server Proxy.
- V paneli s ponukami kliknite na Safari > Preferences... (Preferencie...) > karta Advanced (Rozšírené).
- V políčku Proxies (Servery Proxy) kliknite na Change Settings... (Zmenit nastavenia...).
- V rámci zoznamu protokolov zrušte volbu FTP Proxy a Web Proxy (HTTPS).
- Po dokončení kliknite na OK.


B. Nastavte nastavenia protokolu TCP/IP pre automatické získanie IP adresy.


Vsebina paketa
RP-AC55 Brezžični repetitor AC1200
Vodnik za hitri zagon
Garancijski kartice
natural_image
Illustration of two wireless devices with WiFi antennas and a central router (no text or symbols)natural_image
Illustration of two wireless devices with WiFi antennas, no text or symbols presentPremikanje repetitorja


B. Nastavite nastavitve TCP/IP na samodejno pridobivanje IP naslova.
- Kliknite Start > Control Panel (Nadzorna plošča) > Network and Internet (Omrežje in internet) > Network and Sharing Center (Središče za omrežje in skupno rabo) > Manage network connections (Upravljanje omrežij).
- Izberite Internet Protocol Version (različica internetnega protokola) 4 (TCP/IPv4), nato pa kliknite Properties (Lastnosti).
- Obkljukajte Obtain an IP address automatically (Samodejno pridobi IP naslov).
- Ko končate, kliknite OK (v redu).
Operacijski sistem Mac


B. Nastavite TCP/IP tako, da boste samodejno prejeli naslov IP.
- Kliknite na ikono Apple 📄 > System Preferences (Sistemske možnosti) > Network (Omrežje).
- Izberite Ethernet in Using DHCP (Uporaba DHCP) v polju Configure (Konfiguriraj).
- Ko končate, kliknite Apply (potrdi).


natural_image
Illustration of two wireless devices with WiFi antennas and signal waves (no text or symbols)natural_image
Illustration of two wireless devices with WiFi antennas, no text or symbols present


Mac OS


Paket içeriği
natural_image
Illustration of two wireless devices with WiFi antennas, no text or symbols presentBir ağa bağlanma
natural_image
Illustration of two wireless devices with WiFi antennas, no text or symbols present


natural_image
Illustration of two wireless devices with antennas and WiFi signals (no text or symbols)natural_image
Illustration of two wireless devices with WiFi antennas and signal waves (no text or symbols)


OC Mac


Federal Communications Commission Statement
This device complies with Part 15 of the FCC Rules. Operation is subject to the following two conditions:
• This device may not cause harmful interference.
• This device must accept any interference received, including interference that may cause undesired operation.
This equipment has been tested and found to comply with the limits for a class B digital device, pursuant to part 15 of the FCC Rules. These limits are designed to provide reasonable protection against harmful interference in a residential installation.
This equipment generates, uses and can radiate radio frequency energy and, if not installed and used in accordance with the instructions, may cause harmful interference to radio communications. However, there is no guarantee that interference will not occur in a particular installation. If this equipment does cause harmful interference to radio or television reception, which can be determined by turning the equipment off and on, the user is encouraged to try to correct the interference by one or more of the following measures:
• Reorient or relocate the receiving antenna.
- Increase the separation between the equipment and receiver.
- Connect the equipment into an outlet on a circuit different from that to which the receiver is connected.
- Consult the dealer or an experienced radio/TV technician for help.


Warning: Any changes or modifications not expressly approved by the party responsible for compliance could void the user's authority to operate the equipment. Prohibition of Co-locationThis device and its antenna(s) must not be co-located or operating in conjunction with any other antenna or transmitter.
Prohibition of Co-location
This device and its antenna(s) must not be co-located or operating in conjunction with any other antenna or transmitter.
IMPORTANT NOTE:
Radiation Exposure Statement: This equipment complies with FCC radiation exposure limits set forth for an uncontrolled environment. End users must follow the specific operating instructions for satisfying RF exposure compliance. To maintain compliance with FCC exposure compliance requirement, please follow operation instruction as documented in this manual.

WARNING! This equipment must be installed and operated in accordance with provided instructions and the antenna(s) used for this transmitter must be installed to provide a separation distance of at least 20 cm from all persons and must not be co-located or operating in conjunction with any other antenna or transmitter.


Compliance Statement of Innovation, Science and Economic Development Canada (ISED)
This device complies with Innovation, Science and Economic Development Canada licence exempt RSS standard(s). Operation is subject to the following two conditions: (1) this device may not cause interference, and (2) this device must accept any interference, including interference that may cause undesired operation of the device.
Operation in the band 5150–5250 MHz is only for indoor use to reduce the potential for harmful interference to co-channel mobile satellite systems. CAN ICES-3(B)/NMB-3(B)
Radio Frequency (RF) Exposure Information
The radiated output power of the ASUS Wireless Device is below the Innovation, Science and Economic Development Canada radio frequency exposure limits. The ASUS Wireless Device should be used in such a manner such that the potential for human contact during normal operation is minimized.
This equipment should be installed and operated with a minimum distance of 20cm between the radiator any part of your body. This device has been certified for use in Canada. Status of the listing in the Innovation, Science and Economic Development Canada's REL (Radio Equipment List) can be found at the following web address: http://www.ic.gc.ca/eic/site/ceb-bhst.nsf/eng/h_tt00020.html
Additional Canadian information on RF exposure also can be found at the following web: https://www.ic.gc.ca/eic/site/smt-gst.nsf/eng/sf08792.html
Complying with the REACH (Registration, Evaluation, Authorisation, and Restriction of Chemicals) regulatory framework, we published the chemical substances in our products at ASUS REACH website at http://csr.asus.com/english/REACH.htm
ASUS Recycling/Takeback Services
ASUS recycling and takeback programs come from our commitment to the highest standards for protecting our environment. We believe in providing solutions for you to be able to responsibly recycle our products, batteries, other components, as well as the packaging materials. Please go to http://csr.asus.com/english/Takeback.htm for the detailed recycling information in different regions.
Precautions for the use of the device
a. Pay particular attention to the personal safety when use this device in airports, hospitals, gas stations and professional garages.
b. Medical device interference: Maintain a minimum distance of at least 15 cm (6 inches) between implanted medical devices and ASUS products in order to reduce the risk of interference.
c. Kindly use ASUS products in good reception conditions in order to minimize the radiation's level.
d. Keep the device away from pregnant women and the lower abdomen of the teenager.
• UK support e-mail: network support uk@asus.com
- For more information, visit the ASUS support site at: https://www.asus.com/Networking/RP-AC55/HelpDesk/


English
CE statement
Simplified EU Declaration of Conformity
ASUSTek Computer Inc. hereby declares that this device is in compliance with the essential requirements and other relevant provisions of Directive 2014/53/EU. Full text of EU declaration of conformity is available at https://www.asus.com/Networking/RP-AC55/HelpDesk/.
Declaration of Conformity for Ecodesign directive 2009/125/EC
Testing for eco-design requirements according to (EC) No 1275/2008 and (EU) No 801/2013 has been conducted. When the device is in Networked Standby Mode, its I/O and network interface are in sleep mode and may not work properly. To wake up the device, press the Wi-Fi on/off, reset, or WPS button.
This equipment complies with EU radiation exposure limits set forth for an uncontrolled environment. This equipment should be installed and operated with minimum distance 20 cm between the radiator & your body.
All operational modes:
2.4GHz: 802.11b, 802.11g, 802.11n (HT20), 802.11n (HT40),
5GHz: 802.11a, 802.11n(HT20), 802.11n(HT40), 802.11ac(VHT80)
The frequency, mode and the maximum transmitted power in EU are listed below:
For WLAN: 2412-2472MHz (802.11g 6 Mbps): 19.99 dBm
5180-5240MHz (802.11a 6 Mbps): 22.7 dBm
5260-5320MHz (802.11a 6 Mbps): 22.83 dBm
5500-5700MHz (802.11a 6Mbps): 27.54 dBm
For Bluetooth: 2402-2480MHz (GFSK): 9.45 dBm
The device is restricted to indoor use only when operating in the 5150 to 5350 MHz frequency range.
The adapter shall be installed near the equipment and shall be easily accessible.
| AT BE | BG | CZ | DK | EE FR | ||||
| DE | IS | IE | IT EL | ES | CY | |||
| LV | LI | LT | LU | HU | MT | NL | ||
| NO PL | PT | RO SI | SK TR | |||||
| FI | SE | CH UK | HR | |||||


Bulgarian
CE statement
• Use this product in environments with ambient temperatures between 0^ C( 32^ F) and 40^ C( 104^ F).
• Refer to the rating label on the bottom of your product and ensure your power adapter complies with this rating.
• DO NOT place on uneven or unstable work surfaces. Seek servicing if the casing has been damaged.
• DO NOT place or drop objects on top and do not shove any foreign objects into the product.
• DO NOT expose to or use near liquids, rain, or moisture. DO NOT use the modem during electrical storms.
• DO NOT cover the vents on the product to prevent the system from getting overheated.
• DO NOT use damaged power cords, accessories, or other peripherals.
• If the Adapter is broken, do not try to fix it by yourself. Contact a qualified service technician or your retailer.
• To prevent electrical shock hazard, disconnect the power cable from the electrical outlet before relocating the system.

Bulgarian
Safety Notices
natural_image
Color gradient bar transitioning from black to white with no text or symbols


- RP-AC55
- Wireless AC1200 Repeater
- Table of contents
- Package contents
- ENGLISH
- Setting up the Repeater
- Turning the Repeater on
- Connecting to a network
- Method One: Using WPS (Wi-Fi Protected Setup)
- Method Two: Connecting through GUI
- Moving the Repeater
- Frequently Asked Questions
- Q1: What should I do if my router does not support WPS?
- Q2: Why is it that the LED indicator for the current network does not light up after the Wi-Fi setup is complete?
- Q3: Why is it that I cannot see the login page after entering http://repeater.asus.com in the browser?
- Q4: How do I reset RP-AC55?
- Q5: I cannot access the web GUI to configure the RP-AC55 settings.
- Windows 7
- Disable the proxy server, if enabled.
- Mac OS
- Свързване към мрежа
- Sadržaj pakiranja
- Spajanje na mrežu
- Mogućnost jedan: Korištenje WPS-a (Postavljanje WLAN zaštićenog pristupa)
- Mogućnost dva: Spajanje putem GUI
- Obsah krabice
- Připojení k síti
- Umístění opakovače
- Operační systém Mac
- ČEŠTINA
- Pakkens indhold
- Flyt repeateren
- Deaktiver proxyserveren, hvis den er aktiveret.
- DANSK
- Inhoud verpakking
- Pakendi sisu
- Ühendumine vörku
- EESTI
- Contenu de la boîte
- Sous Mac
- Pakkauksen sisältö
- SUOMI
- Verpackungsinhalt
- GERMAN
- Σύνδεση σε δίκτυο
- A csomag tartalma
- MAGYAR
- Pakuotės turinys
- Kartotuvo pastatymas
- „Mac OS“
- LIETUVIŲ
- Iepakojuma saturs
- Operētājsistēma Mac
- LATVISKI
- Innhold i pakken
- Koble til et nettverk
- Flytte repeateren
- Ligar a uma rede
- Łaczenie z siecią
- Комплект поставки
- Подключение к сети
- РУССКИЙ
- Conectarea la o retea
- Mac 10.5.8
- Mover el repetidor
- Sadržaj paketa
- SRPSKI
- Podešavanje proširivača dometa
- Opcija 2: Povezivanje preko GUI-ja (Grafičkog korisničkog interfejsa)
- Pomeranje Repeater-a
- Često postavljana pitanja (FAQs)
- Obsah balenia
- Pripojenie k sieti
- Presun retraslátora
- Operačný systém Mac
- Vsebina paketa
- Premikanje repetitorja
- Operacijski sistem Mac
- Paket içeriği
- Bir ağa bağlanma
- OC Mac
- Federal Communications Commission Statement
- Prohibition of Co-location
- IMPORTANT NOTE:
- Compliance Statement of Innovation, Science and Economic Development Canada (ISED)
- Radio Frequency (RF) Exposure Information
- ASUS Recycling/Takeback Services
- Precautions for the use of the device
- CE statement
- Simplified EU Declaration of Conformity
- Declaration of Conformity for Ecodesign directive 2009/125/EC
- Bulgarian
- Safety Notices
Brand : ASUS
Model : RP-AC55
Category : Access Point