USER MANUAL PWP60 SCHEPPACH
natural_image
Technical line drawing of a mechanical pump assembly (no text or labels)

Made in P.R.C.
PWP32/PWP60
GB Petrol water pump | Translation of the original operating instructions.... 20
2

natural_image
Simple diagram showing two circular components connected by a line to a labeled value '18a' (no text or symbols beyond label)

natural_image
Simple diagram of four circular objects connected by lines to a black square base (no text or symbols)
flowchart
graph TD
    A["Top cylinder"] --> C["18"]
    B["Bottom cylinder"] --> C["18"]
natural_image
Simple diagram of four empty cups connected by a black line to a black square at the bottom (no text or symbols)
scheppach


Inhaltsverzeichnis
Günzburger Straße 69
D-89335 Ichenhausen
Verehrter Kunde
13 Transport (Abb. 1)
Günzburger Straße 69
D-89335 Ichenhausen
Division Manager Product Center

Andreas Pecher
Head of Project Management
Garantiebedingungen
Revisionsdatum 26.11.2021
https://www.scheppach.com/de/service
Explanation of the symbols on the product
Symbols are used in this manual to draw your attention to potential hazards. The safety symbols and the accompanying explanations must be fully understood. The warnings themselves will not rectify a hazard and cannot replace proper accident prevention measures.
 | Before commissioning, read and observe the operating manual and safety instructions! |
 | Wear hearing protection. |
 | Naked flames or smoking near the device is strictly prohibited! |
 | No naked flames. |
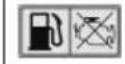
| [XYZ] | Danger of poisoning! Only use the product outdoors and never in closed or poorly ventilated rooms. |
 | Important. Always switch off the engine before refuelling. Do not refill during operation. |
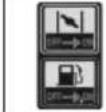 | Choke positionFuel valve position |
| ATTENTION! Operating materials are flammable and explosive - danger of burning. Do not refuel while the engine is hot or running. |
 | Tank contents |
 | Check the oil level. |
 | Direction of rotation of the pump |
 | Flow rate per hour |
 | Max. fluid temperature |
 | Max. pressure delivered |
 | Weight kg |
 | Suction line. |
 | Pressure line. |
 | Guaranteed sound power level of the product. |
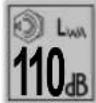 | Guaranteed sound power level of the product. |
 | The product complies with the applicable European directives. |
 | The product complies with the applicable Serbian directives. |
1 Introduction
Manufacturer:
Scheppach GmbH
Günzburger Straße 69
D-89335 Ichenhausen
Dear Customer
We hope your new product brings you much enjoyment and success.
Note:
In accordance with the applicable product liability laws, the manufacturer of this product assumes no liability for damage to the product or caused by the product arising from:
- Improper handling
• Non-compliance with the operating manual
• Repairs carried out by third parties, unauthorised specialists
• Installing and replacing non-original spare parts
- Improper use
Note:
The operating manual is part of this product.
It includes important instructions for the safe, proper and economic operation of the product, for avoiding danger, for minimising repair costs and downtimes and for increasing the reliability and extending the service life of the product. In addition to the safety instructions in this operating manual, you must also observe the regulations applicable to the operation of the product in your country.
Familiarise yourself with all operating and safety instructions before using the product. Only operate the product as described and for the specified areas of application. Keep the operating manual in a good place and hand over all documents when passing the product on to third parties.
2 Product description (Fig. 1-11)
- Handle (frame)
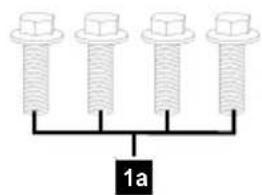
1a. Screws
1b. Rubber foot
- Fuel tank
2a. Fuel filter insert
- Fuel filler cap
- Air filter cover
4a. Wing nut
4b. Air filter
- Spark plug connector
5a. Spark plug
- Exhaust pipe
- Carburettor
7a. Carburettor screw
- Water filler port
8a. Cover
- On/off switch
- Oil dipstick
10a. Oil drain plug
- Pull starter
- Fuel valve
- Choke
- Throttle
- Water drain plug
- Suction connection
- Pressure connection
- Hose adapter
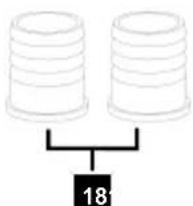
18a. Union nut
18b. Seal
- Hose clamp
- Pre-filter
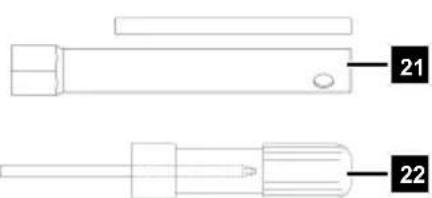
- Spark plug wrench
- Screwdriver
3 Scope of delivery (Fig. 2)
Item QuantityDesignation
1a. 4 x Screws
1b. 4 x Rubber foot
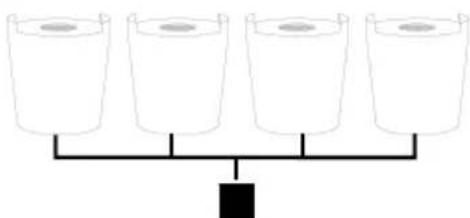
18. 2 x Hose adapter
18a. 2 x Union nut
18b. 2 x Seal
19. 3 x Hose clamp
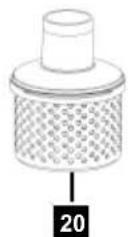
20. 1 x Pre-filter
21. 1 x Spark plug wrench
22. 1 x Screwdriver
1 x Petrol water pump
1 x Operating manual
4 Proper use
The product is suitable for watering and irrigating green areas, vegetable beds and gardens and for operating lawn sprinklers. Suitable pumping media are clear water (fresh water), rainwater and light detergent/soap solutions. With a pre-filter, water can be drawn from ponds, streams, rainwater barrels, rainwater cisterns and wells. The maximum temperature of the pumped liquid must not exceed +35°C in continuous operation.
The product may only be used in the intended manner. Any use beyond this is improper. The user, not the manufacturer, is responsible for damages or injuries of any type resulting from this.
An element of the intended use is also the observance of the safety instructions, as well as the assembly instructions and operating information in the operating manual.
Persons who operate and maintain the product must be familiar with the manual and must be informed about potential dangers.
The liability of the manufacturer and resulting damages are excluded in the event of modifications of the product.
The product may only be operated with original parts and original accessories from the manufacturer.
The safety, operating and maintenance specifications of the manufacturer, as well as the dimensions specified in the technical data, must be observed.
Please note that our products were not designed with the intention of use for commercial or industrial purposes. We assume no guarantee if the product is used in commercial or industrial applications, or for equivalent work.

WARNING
For your own safety, please thoroughly read this manual and the general safety instructions before turning the product on. If you give the product to third parties, always include these usage instructions.
4.1 Improper use
The use of the pump is strictly prohibited for the following substances:
• Paints and varnishes of all kinds
• All types of solvents or thinners
• All types of fuels or lubricants
• Propane or other liquefied gases
• Flammable liquids of all kinds
• Food for people and animals
- Granules or substances with solid particles
- Chemicals
• Liquids with temperatures above 40°C
- All liquids not explicitly referred to in this manual
• Liquids with anti-parasites, herbicides and pesticides.
Follow the safety instructions
ATTENTION
The pump must not be used for filling containers which may explode under excess pressure.
- The pump is not suitable as a safety device for fire extinguishing systems.
- The pump is not suitable for continuous operation (e.g. industrial use, continuous circulation operation).
- The pump is approved exclusively for use in pumping water and neutral liquids at room temperature.
Explanation of the signal words in the operating manual

DANGER
Signal word to indicate an imminently hazardous situation which, if not avoided, will result in death or serious injury.

WARNING
Signal word to indicate a potentially hazardous situation which, if not avoided, could result in death or serious injury.

CAUTION
Signal word to indicate a potentially hazardous situation which, if not avoided, could result in minor or moderate injury.
ATTENTION
Signal word to indicate a potentially hazardous situation which, if not avoided, could result in product or property damage.
5 Safety instructions
ATTENTION
Attention!
When using products, several safety warnings must be observed to prevent injuries and damage. For this reason, please carefully read this operating manual / safety instructions. If you hand the product over to another person, please hand over this operating manual / safety instructions as well. We accept no liability for accidents or damage that occur due to a failure to observe this manual and the safety instructions.
Follow the safety instructions
Keep all safety information and instructions for future reference!
5.1 Product-specific safety instructions
- Place the product on a level, even surface (such that it cannot topple).
- Check the entire product for loose parts (nuts, bolts, screws, etc.). Service or replace if necessary before using the product.
ATTENTION
For your own safety, only use accessories and additional equipment that are indicated in the operating manual or have been recommended or indicated by the manufacturer. Use of other tools or accessories that those recommended in the operating manual or in the catalogue could represent a personal danger to you.
• People should keep a safe distance of at least 15 metres from the work area.
- Do not use the product if it is damaged. Never remove protective devices from the product. This can result in serious injuries.
• Children are not permitted to use the product. Children should be supervised in order to ensure that they do not play with the product.
- Do not leave the product unattended.
• People under the influence of alcohol, drugs and medication, as well as those who are tired or ill.
5.2 Handling fuel

DANGER
Risk of fire and explosion!
When filling, fuel may ignite and even explode. This can lead to severe burns or death.
- Only store fuel in containers (canisters) designed for this purpose.
- The tank caps must always be properly screwed on and tightened.
- Fuel must be filled before starting the engine. While the engine is running or immediately after switching off the product, do not open the fuel filler cap or add fuel.
- Before refuelling, switch off the combustion engine and let it cool down.
- Refuel outdoors only and do not smoke while refuelling.
- Never store the product with fuel in the tank inside a building. Any fuel vapours produced can come into contact with naked flames or sparks and ignite.
- Do not place the product and fuel tank near heaters, radiant heaters, welding machines or other sources of heat.
- If fuel has overflowed, do not start the combustion engine until the area contaminated with fuel has been cleaned. Avoid starting the engine until the fuel vapours have evaporated (wipe dry).
- For safety reasons, check fuel line, fuel tank, fuel cap and connections regularly for damage, ageing (brittleness), tight fit and leaks and replace if necessary.
5.3 Residual risks
The product has been built according to state-of-the-art and the recognised technical safety rules. However, individual residual risks can arise during operation.
- Residual risks can be minimised if the "Safety Instructions" and the "Intended Use" together with the operating manual as a whole are observed.
- Use the product in the way that is recommended in this operating manual. This is how to ensure that your product provides optimum performance.
- Prevent the product being unintentionally started up.
- Keep your hands away from the working area when the product is in operation.
- Comply with the stipulated maintenance and safety instructions in the operating manual.
• Furthermore, despite all precautions having been met, some non-obvious residual risks may still remain.
6 Technical data
| PWP32 | PWP60 |
| Motor 4-Stroke engine/ | air cooled | 4-Stroke engine/ air cooled |
| Displacement 212 cm^3 | 212 cm^3 | |
| Max. Output power (kW) | 3.9 kW/5.3 HP | 3.9 kW/5.3 HP |
| Max. engine speed 380 | 0±50 rpm 3800±50 | rpm |
| Max. idle speed 1600±1 | 150 rpm 1600±150 | rpm |
| Max. flow rate in l 3200 | 0 l/h 60000 l/h | |
| Suction connection 2" | 3" | |
| Pressure connection | 2" | 3" |
| Max. delivery height | 30 m | 28 m |
| Max. suction height | 7 m | 7 m |
| Max. pressure | 3 bar | 2.8 bar |
| Fuel | Petrol | Petrol |
| Tank contents | 3.2 l | 3.2 l |
| Spark plug | F7RTC | F7RTC |
| CO ^2 output 767 g/kWh | 767 g/kWh | |
| Weight | 20 kg | 21 kg |
Subject to technical changes!
Noise and vibration

WARNING
Noise can have serious effects on your health. If the machine noise exceeds 85 dB, please wear suitable hearing protection for you and persons in the vicinity.
The noise emission values have been determined in accordance with EN ISO 3744:1995.
Noise data
| PWP32 | PWP60 |
| Sound pressure level L_pA | 91.2 dB | 95.5 dB |
| Sound power level L_wA | 103.9 dB | 108.2 dB |
| Guaranteed sound power level L_wA | 106 dB | 110 dB |
| Measurement uncertainty K | 2.19 dB | 2.19 dB |
If necessary, adhere to rest periods and limit the duration of work to the bare minimum.
7 Unpacking

WARNING
The product and the packaging material are not children's toys!
Do not let children play with plastic bags, films or small parts! There is a danger of choking or suffocating!
- Open the packaging and carefully remove the product.
- Remove the packaging material, as well as the packaging and transport safety devices (if present).
- Check whether the scope of delivery is complete.
- Check the product and accessory parts for transport damage. Immediately report any damage to the transport company that delivered the Product. Later claims will not be recognised.
- If possible, keep the packaging until the expiry of the warranty period.
- Familiarise yourself with the product by means of the operating manual before using for the first time.
- With accessories as well as wearing parts and replacement parts use only original parts. Spare parts can be obtained from your specialist dealer.
- When ordering please provide our article number as well as type and year of manufacture for the product.
8 Assembly
Tool required:
- Open-ended spanner/socket spanner, size 13 mm*
* = may not be included in the scope of delivery!
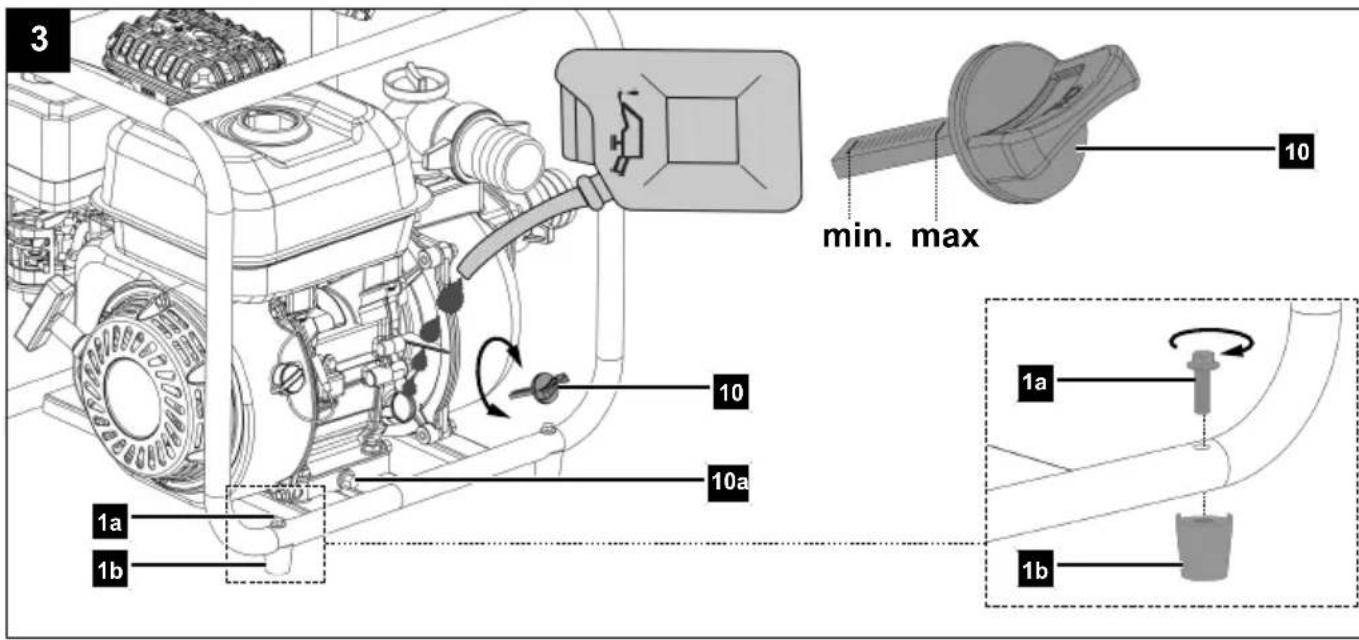
8.1 Fitting the rubber feet (1b) (Fig. 3)
- Place a pad on the floor to avoid damage to the product.
- Insert the four M6 screws (1a) through the holes provided on the frame (1) and secure them with a rubber foot (1b) each.
9 Before commissioning

WARNING
Health hazard!
Inhalation of fuel / lubricating oil vapours and exhaust gases can cause serious damage to health, unconsciousness and in extreme cases death.
- Do not breathe fuel / lubricating oil vapours and exhaust gases.
- Operate the product outdoors only.
* = may not be included in the scope of delivery!
Note:
The product has a centrifugal clutch. This creates a frictional connection as the speed increases by pressing the clutch facings against the inner wall of the clutch housing due to the centrifugal force.
Check before operation
- Check all sides of the engine for oil or fuel leaks.
- Check the fuel level – the fuel tank should be at least half-full.
- Check the condition of the air filter.
- Check the condition of the fuel lines.
- Look for signs of damage.
- Check that all protective covers are in place and all screws, nuts and bolts are tightened.
- Ensure that the product is sufficiently ventilated.
- Make sure that the spark plug connector is attached to the spark plug.
- The suction and pressure lines must be installed in such a way that they do not exert any mechanical pressure on the pump.
- Screwdriver (22)
- Funnel*
- Rag/cloth*
* = may not be included in the scope of delivery!
9.1 Filling up with engine oil (Fig. 3)
ATTENTION
The product is delivered without engine oil. Therefore, ensure that you add oil before starting it up. Use multigrade oil (SAE 10W-30 or 10W-40) for this.
Check the oil level regularly before commissioning. An oil level that is too low can damage the motor.
- Unscrew the oil dipstick (10).
- Fill the tank with engine oil using a funnel.
Do not exceed the maximum filling level (see Technical Data).
Carefully fill the oil up to the lower edge of the filling port.
- Wipe the oil dipstick (10) with a clean, lint-free cloth.
-
Reinsert the oil dipstick (10) without screwing the oil dipstick (10) back on.
-
Pull the oil dipstick (10) out and read the oil level in the horizontal position. The oil level must be between L (low) and H (high) on the oil dipstick (10).
- If the oil level is too low, add the recommended amount of oil (see Technical Data).
- Then screw the oil dipstick (10) in again.
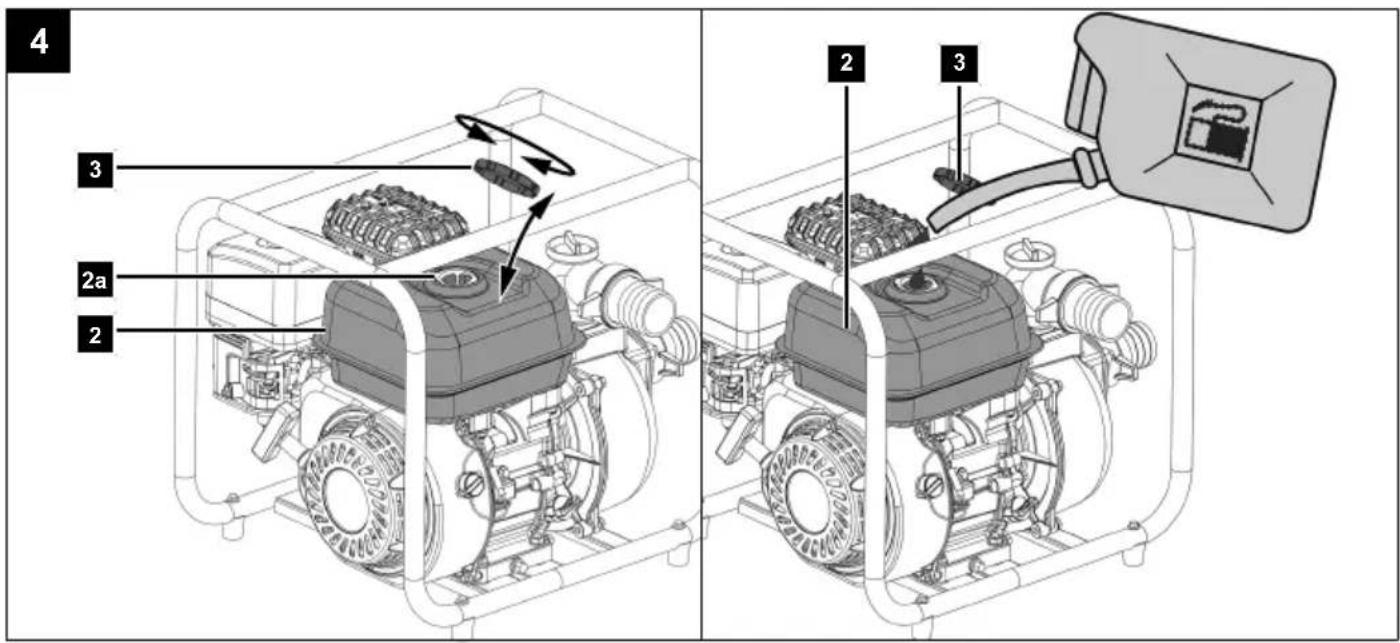
9.2 Filling up with fuel (Fig. 4)

DANGER
Risk of fire and explosion!
Only fill the fuel when the engine is switched off and has cooled down. Do not smoke when refuelling the product.

DANGER
Risk of fire and explosion!
When filling, fuel may ignite and even explode. This can lead to severe burns or death.
- Switch off the engine and let it cool down.
- Keep heat, flames and sparks away.
- Only fill up with fuel outdoors.
- Wear protective gloves.
- Avoid contact with skin and eyes.
- Start the product at a distance of at least 3 m from the fuel filling point.
- Watch out for leaks. If fuel is leaking, do not start the engine.
• Always use a fuel filter insert.
- Use a suitable funnel or filler pipe for refuelling so that no fuel can spill onto the combustion engine and housing.
Do not overfill the fuel tank!
ATTENTION
The product is delivered without fuel. It is therefore essential to fill with fuel before commissioning. Use Super E5 petrol for this.
- Clean the area surrounding the filling area.
Impurities in the fuel tank (2) lead to operational faults.
- Carefully open the tank cover (3) so that any possible overpressure can be relieved.
- Fill the fuel tank (2) with petrol using a funnel.
Do not exceed the maximum filling level (see Technical Data).
Carefully fill the fuel up to the lower edge of the filling port.
- Close the tank cover (3) again.
Ensure that the fuel filler cap (3) is tightly sealed.
- Clean the tank cover (3) and the surroundings.
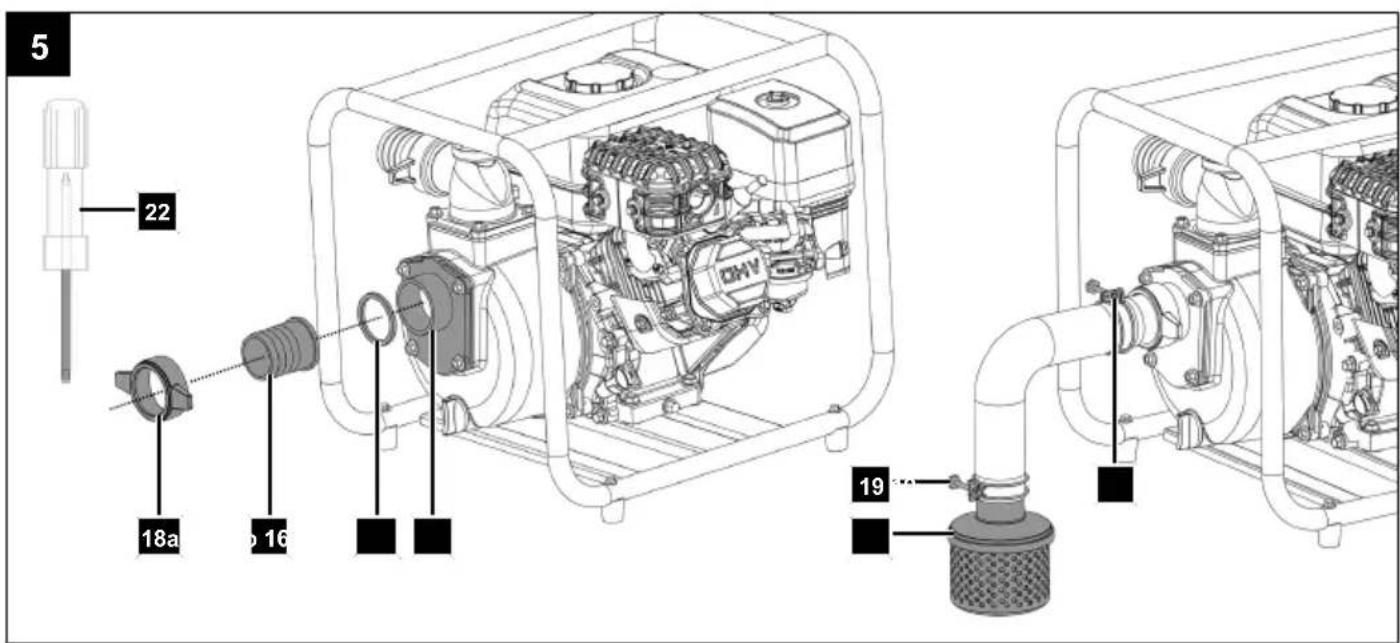
9.3 Installing the suction line\* (Fig. 5)
Notes:
The pump has a non-return valve which prevents the water from flowing back into the suction line.
- The suction line* must be reinforced with rigid walls or wire mesh.
- Do not use a hose* that is smaller than the suction line* of the pump.
- The suction line* should only be as long as necessary.
- Pumping performance is best when the pump is as close to the surface of the water as possible and the hoses* are short.
-
A leaking suction line* will prevent the water from being sucked in due to air ingress.
-
Insert the hose adapter (18) into the union nut (18a).
-
Insert the seal (18b) into the union nut (18a).
-
Screw a union nut (18a) onto the suction connection (16) and tighten it firmly (8 - 10 Nm). Make sure that the seal (18b) of the union nut (18a) is in contact with the suction connection (16).
-
Attach the suction line* to the hose adapter (18) of the suction line* with a hose clamp (19) to avoid air leakage and loss of suction power.
Use screwdrivers (22).
-
Fit the pre-filter (20) to the other end of the suction line* and fasten it with a hose clamp (19).
Use a screwdriver (22).
Avoid sucking in foreign bodies (sand etc.).
If necessary, fit a pre-filter (20).
-
Disassembly takes place in reverse order.
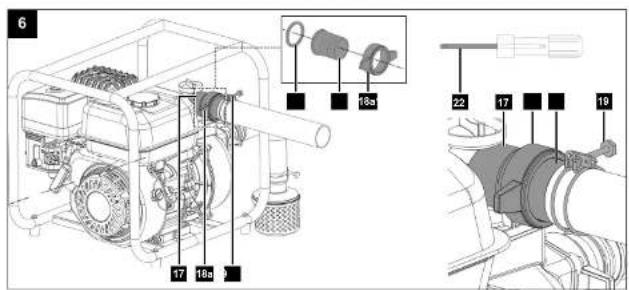
9.4 Installation of the pressure line\* (Fig. 6)
- Insert the hose adapter (18) into the union nut (18a).
- Insert the seal (18b) into the union nut (18a).
- Screw a union nut (18a) onto the pressure connection (17) and tighten it firmly (8-10 Nm). Make sure that the seal (18b) of the union nut (18a) is in contact with the pressure connection (17).
- To improve pump performance and reduce fluid friction, use a short, large diameter pressure line*. A long or thin hose* increases fluid friction and reduces pumping performance.
- Attach the pressure line* to the hose adapter (18) of the pressure line* with a hose clamp (19).
Use a screwdriver (22).
- Disassembly takes place in reverse order.
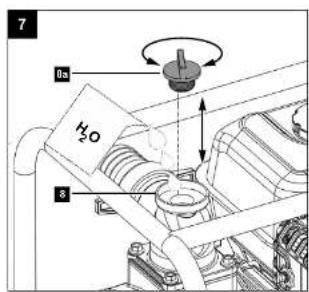
9.5 Priming the product with water (Fig. 7)
Notes:
Dry operation of the pump will cause damage to the pump seals. If the pump runs dry, switch off the engine immediately and let the pump cool down before priming with water.
If the pump is removed after use, it is essential to fill up with water again when it is reconnected and put into operation.
Filling the suction line with water is not necessary!
- Before starting the engine, remove the cover (8a) of the water filling plug (8) from the pump chamber and fill the pump chamber with water.
- Screw in the cover (8a) of the water filling plug (8) again and tighten it firmly.
10 Operation
10.1 Start the engine (Fig. 8)

DANGER
Danger of poisoning!
Only use the product outdoors and never in closed or poorly ventilated rooms.
ATTENTION
- Do not let the pull starter whip back in. This can result in damage.
- In case of cool weather, it may be necessary to repeat the starting process numerous times.
NOTE
Only use the fuel pump "primer" when the engine is cold!
NOTE
If the engine is being started for the first time, several tries are required to start until the fuel has been delivered from the tank to the engine.
10.1.1 When the engine is "cold"
- Turn the on/off switch (9) to the "ON" position.
- Set the fuel valve (12) to "ON".
- Set the "CHOKE" (13) to the "ON" position.
- Now pull the pull starter (11) and the engine should start.
If the engine does not start, repeat the process.
- Once the engine is started (after approx. 15-30 seconds), move the "CHOKE" (13) from the "ON" position to the "OFF" position.
- Use the throttle to set the required speed (14).
This is how you increase or decrease the delivery rate.
LOW = Engine at idle speed
FAST = Maximum delivery rate
- If the engine does not start even after several attempts, read the "Troubleshooting" chapter.
Note:
Let the engine warm up at idle for about 10 minutes.
10.1.2 When the engine is "warm"
- Set the fuel valve (12) to "ON".
- Now pull the pull starter (11) quickly. The product should start after 2 pulls. If the product has still not started, repeat the procedure described under 10.1.1.
- Use the throttle to set the required speed (14).
This is how you increase or decrease the delivery rate.
LOW = Engine at idle speed
FAST = Maximum delivery rate
Note:
Let the engine warm up at idle for about 10 minutes.
10.2 Switch off the engine (Fig. 8, 10)
Note:
Allow the product to run for a short time (approx. 30 seconds) switching it off so that the engine can cool down.
- To switch off the engine, turn the on/off switch (10) to the "OFF" position.
- Set the fuel valve (12) to "OFF".
- Disconnect the spark plug connector (5) from the spark plug (5a) to prevent the engine from restarting.
10.3 After end of work (Fig. 1)
- Remove the pressure line*.
- Remove the suction line*.
- Unscrew the water drain plug (15) and let the water flow out of the pump chamber.
- Refit the water drain plug (15).
* = may not be included in the scope of delivery!
11 Cleaning and maintenance
WARNING
Have maintenance and repair tasks that are not described in this operating manual, carried out by a specialist workshop. Use only original spare parts.
! WARNING
Improper maintenance or cleaning work can cause injuries!
WARNING
The product may start unexpectedly and cause injuries and burns during cleaning, repair and maintenance work.
- Switch the product off.
- Remove the spark plug connector from the spark plug.
- Allow the product to cool.
11.1 Cleaning
- Only carry out cleaning and maintenance work to the extent specified in this operating manual. Further work must be carried out by qualified specialists.
- Keep protective devices, air vents and the motor housing as free of dust and dirt as possible. Rub the product clean with a clean cloth* or blow it off with compressed air* at low pressure. We recommend that you clean the product directly after every use.
- Clean the product at regular intervals using a damp cloth* and a little soft soap. Do not use any cleaning products or solvents; they could attack the plastic parts of the product. Make sure that no water can penetrate the product interior.
* = may not be included in the scope of delivery!
11.1.1 Cleaning the fuel filter insert (2a) (Fig. 4)
Note:
The petrol filter is a fuel filter insert cup, which is located directly under the fuel cap and filters all the fuel that is filled in.
- Unscrew the fuel filler cap (3).
- Remove the fuel filter insert (2a). Clean it in a non-flammable solvent or a solvent with a high flash point.
- Reinsert the fuel filter insert (2a).
- Retighten the fuel filler cap (3).
11.2 Maintenance (Fig. 1, 2)
Tool required:
- Spark plug wrench (21)
- Screwdriver (22)
- Oil pump*
- Collection bucket*
- Fuel extraction pump*
- Open-ended spanner, size 10 mm*
- Wire brush*
- Feeler gauge*
* = may not be included in the scope of delivery!
11.2.1 Checking the oil level (Fig. 3)
WARNING
Health hazard!
Inhalation of fuel / lubricating oil vapours and exhaust gases can cause serious damage to health, unconsciousness and in extreme cases death.
- Do not breathe fuel / lubricating oil vapours and exhaust gases.
- Operate the product outdoors only.
ATTENTION
Product damage!
Using the product without or with too little engine and gear oil can result in engine damage.
- Fill with fuel and oil before commissioning. The product is supplied without engine and gearbox oil.
- Only use SAE 10W-30 or SAE 10W-40 engine oil.
ATTENTION
Environmental damage!
Spilled oil can pollute the environment permanently. The liquid is highly toxic and can quickly lead to water pollution.
- Fill/empty oil only on level, paved surfaces.
- Use a filling nozzle or funnel.
– Collect drained oil in a suitable container.
- Wipe up spilled oil carefully immediately and dispose of the cloth according to local regulations.
– Dispose of oil as per local regulations.
©
- Push the hose of the fuel extraction pump into the fuel tank (2) and drain out the fuel tank completely using the fuel extraction pump.
- Reinsert the fuel filter insert (2a).
- Retighten the fuel filler cap (3).
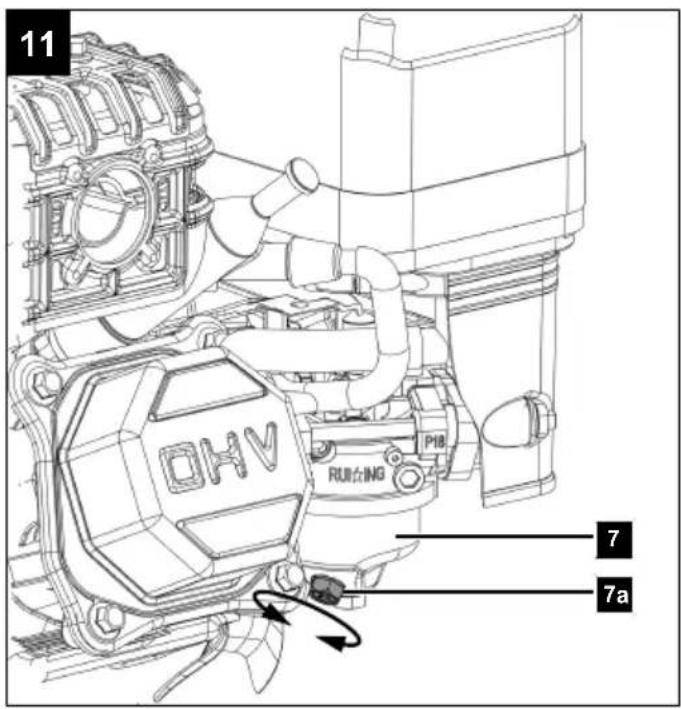
- To ensure that no fuel remains in the carburettor, the remaining fuel must be drained out of the carburettor. To do this, place a collection bucket under the carburettor (7) and open the carburettor screw (7a) with the aid of an open-end wrench AF10.
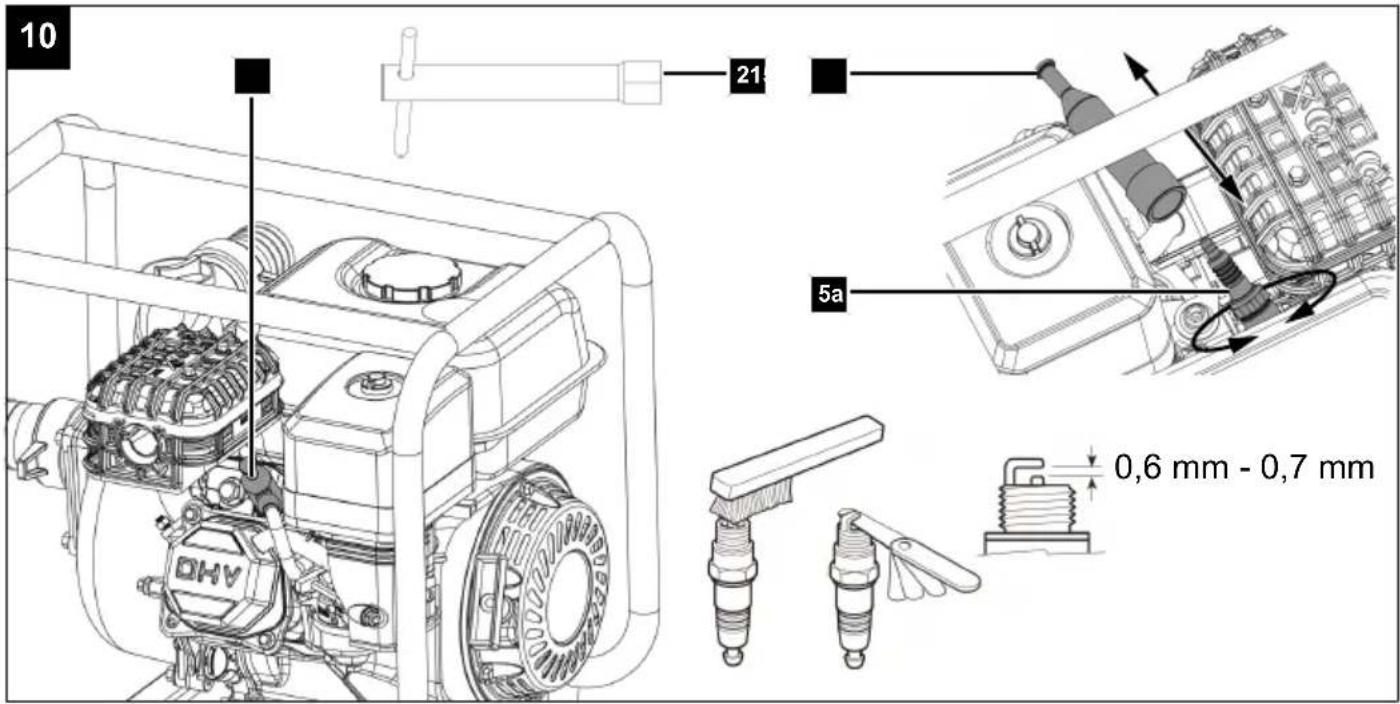
12.2 Preparing for storage (Fig. 1, 10)
WARNING
Do not remove the fuel in enclosed spaces, near fire or when smoking. Petrol fumes can cause explosions and fire.
- Empty the fuel tank (2) (see 12.1).
- Carry out an oil change (see 11.2.2).
- Remove the spark plug connector (5) from the spark plug (5a).
Remove the spark plug (5a) with a spark plug wrench (21) (see 11.2.4).
- Fill the cylinder with approx. 0.2 l of oil from an oil can.
- Pull the pull starter (11) slowly so that the oil protects the inside of the cylinder.
- Screw the spark plug (5a) back in.
- Be sure to clean the entire product to protect the paint.
- Store the product in a well-ventilated place or area.
13 Transport (Fig. 1)
Preparation for transport
- Empty the fuel tank using a petrol extraction pump into an approved container.
- If operational, keep the engine running until the remaining fuel has been used up.
- Remove the spark plug connector from the spark plug.
- Secure the product against slipping using a tension strap, for example.
- The product can be lifted and moved via the handle (1).
* = may not be included in the scope of delivery!
14 Repair and ordering spare parts
After repairs or maintenance, make sure that all safety-related parts are installed and are in perfect condition. All parts which may cause injury must be kept where they are inaccessible to children or others.
ATTENTION
According to the German Product Liability Act, no liability is accepted for damage caused by improper repairs or by not using original spare parts.
Such work should be performed by a customer service centre or an authorised specialists. The same applies to accessory parts.
Spare parts and accessories can be obtained from our Service Centre. To do this, scan the QR code on the front page.
NOTE
Important note in the case of repairs
When returning the product for repair, for safety reasons, ensure that it is free of oil and fuel when it is sent to the service centre.
14.1 Ordering spare parts
Please provide the following information when ordering spare parts:
- Model designation
- Item number
- Type plate data
Spare parts / accessories
| Hose set 2" - Article no.: 7914600701 | |
| Hose set 3" - Article no.: 7914600702 | |
| Suction basket - Article no.: 5914602016 | |
| Air filter insert - Article no.: 5914602029 | |
| Hose connection piece - Article no.: 5914602007 | |
| Union nut - Article no.: 5914602008 | |
| Hose clamp - Article no.: 79690002 | |
| Spark plug - Article no.: | 3904601090 |
With this product, it is necessary to note that the following parts are subject to natural or usage-related wear, or that the following parts are required as consumables.
Wearing parts*:
* = not included in the scope of delivery!
15 Disposal and recycling
Notes for packaging


The packaging materials are recyclable. Please dispose of packaging in an environmentally friendly manner.
You can find out how to dispose of the disused device from your local authority or city administration.
Fuels and oils
- Before disposing of the product, the fuel tank and the engine oil tank must be emptied!
- Fuel and engine oil do not belong in household waste or drains, but must be collected or disposed of separately!
- Empty oil and fuel tanks must be disposed of in an environmentally friendly manner.
16 Maintenance plan
Always comply with the following maintenance intervals in order to ensure problem-free operation. Attention! The fuel must be filled in before the device is used for the first time.
| Component Before every | use | Every 3 months or 20h | Every 6 months or 50h | Every 12 months or 100h | Every 2 years or 300h |
| Checking the air filter | Check X | | | | | |
| Clean X | | | | | |
| Spark plug Check | and adjust X X X | | | | | |
| Replace X | | | | | |
| Spark plug connector | Clean X | | | | | |
| Cooling fins Test | | | | X | | |
| Fasteners such as screws and nuts | Check (tighten if necessary) | X | | | | |
| Seals of the connecting elements | Check and replace if necessary | | | | X | |
| Idle | Check and adjust | | | | X | |
| Combustion chamber | Clean X | | | | | |
| Fuel | Check X | | | | | |
| Fuel tank | Check | | | | X | |
| Fuel line | Check | Every year (replace if necessary) |
| Attention: Have points “X” carried out only by an authorised specialist company. | |
17 Troubleshooting
The following table shows fault symptoms and describes remedial measures in the event of your product failing to work properly. If you cannot localise and rectify the problem with this, please contact your service workshop.
| Troubleshooting during commissioning |
| Fault | Possible cause | Remedy |
| No ignition spark | Spark plug | Carbon deposit between the spark plug electrodes | Clean the spark plug.Set the electrode gap to 0.6 to 0.7 mm.Replace the spark plug. |
| Other | Ignition coil defective, flywheel magnet too weak | Contact customer service for this. |
| Weak spark | Compression | Too much fuel in the combustion chamber, bad fuel or water in the tank | Remove spark plug and allow to dry, change fuel. |
| Troubleshooting during operation |
| Fault | Possible cause | Remedy |
| Engine does not come up to speed | Choke is in the “ON” position. | Set the choke to the “OFF” position. |
| Movable elements worn out | Replace |
| Exhaust system blocked, no air supply | Replace exhaust system, check or replace ignition coil, clean/replace air filter. |
| Ignition spark weak, cylinder head sooty | Set the electrode gap to 0.6 to 0.7 mm. |
| Carburettor leaking | Carburettor gasket worn | Contact customer service for this. |
Translation of the original Declaration of Conformity
Manufacturer:
Scheppach GmbH
Günzburger Straße 69
D-89335 Ichenhausen
We declare under our sole responsibility that the product described here complies with the applicable directives and standards.
Brand: SCHEPPACH
Art. designation: Petrol water pump
PWP32/PWP60
* The object of the declaration described above fulfils the regulations of the directive 2011/65/EU of the European Parliament and Council from 8th June 2011, on the restriction of the use of certain hazardous substances in electrical and electronic equipment.
2016/1628/EU
Emission. No:
e24*2016/1628*2017/656SRA1/P*0080*00
Applied standards:
EN 809:1998/A1:2009;
EN ISO 14982:2009
Documentation authorised representative:
David Rümpelein
Günzburger Str. 69
D-89335 Ichenhausen
Division Manager Product Center

Andreas Pecher
Head of Project Management
Sommaire
1 Introduction 31
Günzburger Straße 69
D-89335 Ichenhausen
Cher client,
13 Transport (fig. 1)
Günzburger Straße 69
D-89335 Ichenhausen
2006/42/UE, 2000/14/CE_2005/88/CE, 2011/65/EU*, 2014/30/UE,
Division Manager Product Center

Andreas Pecher
Head of Project Management
Indice
Günzburger Straße 69
D-89335 Ichenhausen, Germania
Egregio cliente,
Günzburger Straße 69
D-89335 Ichenhausen
Division Manager Product Center

Andreas Pecher
Head of Project Management
Inhoudsopgave
Günzburger Straße 69
D-89335 Ichenhausen
Geachte klant,
10.1 Motor starten (afb. 8)

GEVAAR
13 Transport (afb. 1)
Günzburger Straße 69
D-89335 Ichenhausen
Division Manager Product Center

Head of Project Management
Índice
Günzburger Straße 69
Günzburger Straße 69
D-89335 Ichenhausen
Division Manager Product Center

Head of Project Management
Índice
Günzburger Straße 69
Günzburger Straße 69
D-89335 Ichenhausen
Division Manager Product Center

Andreas Pecher
Head of Project Management
Obsah
Günzburger Straße 69
D-89335 Ichenhausen
Vážený zákazníku,
Günzburger Straße 69
D-89335 Ichenhausen
Division Manager Product Center

Andreas Pecher
Head of Project Management
Obsah
Günzburger Straße 69
D-89335 Ichenhausen
Vážený zákazník,
Günzburger Straße 69
D-89335 Ichenhausen
Division Manager Product Center

Andreas Pecher
Head of Project Management
Tartalomjegyzék
Günzburger Straße 69
D-89335 Ichenhausen
Tisztelt Ügyfelünk!
Günzburger Straße 69
D-89335 Ichenhausen
Division Manager Product Center

Andreas Pecher
Head of Project Management
Spis treści
Günzburger Straße 69
D-89335 Ichenhausen
Szanowny Kliencie
13 Transport (rys. 1)
Günzburger Straße 69
D-89335 Ichenhausen
Division Manager Product Center

Andreas Pecher
Head of Project Management
Popis sadržaja
1 Uvod.... 135
2 Opis proizvoda (sl. 1-11).... 136
3 Opseg isporuke (sl. 2).... 136
4 Namjenska uporaba.... 136
5 Sigurnosne napomene.... 137
6 Tehnički podatci 138
7 Raspakiravanje 138
8 Montaža 138
9 Prije stavljanja u pogon.... 139
10 Rukovanje 140
11 Čišćenje i održavanje.... 141
12 Skladištenje.... 142
13 Transport (sl. 1).... 143
14 Popravak i naručivanje rezervnih dijelova...... 143
15 Zbrinjavanje i recikliranje.... 143
16 Plan održavanja 144
17 Otklanjanje neispravnosti.... 144
18 EU izjava o sukladnosti.... 145
19 Povećani crtež.... 293
Günzburger Straße 69
D-89335 Ichenhausen
Poštovani kupče
Želimo vam mnogo zadovoljstva i uspjeha prilikom rada s novim proizvodom.
Napomena:
Prema važećem njemačkom Zakonu o odgovornosti za proizvode, proizvođač ovog proizvoda ne odgovara za štete koje nastanu na ovom proizvodu ili koje ovaj proizvod uzrokuje u slučaju:
- neispravnog rukovanja
13 Transport (sl. 1)
Priprema za transport
Günzburger Straße 69
D-89335 Ichenhausen
Division Manager Product Center

Andreas Pecher
Head of Project Management
Kazalo
Günzburger Straße 69
D-89335 Ichenhausen
Spoštovani kupec,
Želimo vam veliko veselja in uspeha pri delu z vašim novim izdelkom.
Napotek:
Proizvajalec tega izdelka skladno z veljavnim zakonom o odgovornosti za izdelke ne jamči za poškodbe na tem izdelku ali poškodbe s tem izdelkom, do katerih pride pri:
13 Transport (sl. 1)
Priprave na transport
Günzburger Straße 69
D-89335 Ichenhausen
Division Manager Product Center

Andreas Pecher
Head of Project Management
Sisukord
Günzburger Straße 69
D-89335 Ichenhausen
Austatud klient!
Günzburger Straße 69
D-89335 Ichenhausen
Division Manager Product Center

Andreas Pecher
Head of Project Management
Turinys
Günzburger Straße 69
D-89335 Ichenhausen
Gerbiamas kliente,
Günzburger Straße 69
D-89335 Ichenhausen
2006/42/EB, 2000/14/EB_2005/88/EB, 2011/65/ES*, 2014/30/ES,
Division Manager Product Center

Andreas Pecher
Head of Project Management
Satura rādītājs
Günzburger Straße 69
Günzburger Straße 69
D-89335 Ichenhausen
Division Manager Product Center

Andreas Pecher
Head of Project Management
Günzburger Straße 69
D-89335 Ichenhausen
Bästa Kund!
Günzburger Straße 69
Division Manager Product Center

Andreas Pecher
Head of Project Management
Sisällysluettelo
Günzburger Straße 69
D-89335 Ichenhausen
Arvoisa asiakas
Günzburger Straße 69
D-89335 Ichenhausen
Division Manager Product Center

Andreas Pecher
Head of Project Management
Indholdsfortegnelse
Günzburger Straße 69
D-89335 Ichenhausen, Tyskland
Kære kunde
13 Transport (fig. 1)
Günzburger Straße 69
D-89335 Ichenhausen, Tyskland
Division Manager Product Center

Andreas Pecher
Head of Project Management
Innholdsfortegnelse
Günzburger Straße 69
D-89335 Ichenhausen
Kjære kunde
Fare for forgiftning!
13 Transport (fig. 1)
Forberedelse for transport
Günzburger Straße 69
D-89335 Ichenhausen
Division Manager Product Center

Andreas Pecher
Head of Project Management
Съдържание
Günzburger Straße 69
D-89335 Ichenhausen, Германия
Уважаеми клиенти,
Günzburger Straße 69
D-89335 Ichenhausen
Division Manager Product Center

Andreas Pecher
Head of Project Management
Günzburger Straße 69
D-89335 Ichenhausen
Αξιότιμε πελάτη
Günzburger Straße 69
D-89335 Ichenhausen
Division Manager Product Center

Andreas Pecher
Head of Project Management
Cuprins
Günzburger Straße 69
D-89335 Ichenhausen
Stimate client
Günzburger Straße 69
D-89335 Ichenhausen
Division Manager Product Center

Andreas Pecher
Head of Project Management
Sadržaj
1 Uvod....271
2 Opis proizvoda (sl. 1-11).... 272
3 Opseg isporuke (sl. 2).... 272
4 Namenska upotreba.... 272
5 Sigurnosne napomene 273
6 Tehnički podaci 274
7 Raspakivanje....274
8 Montaža 274
9 Pre stavljanja u pogon.... 275
10 Rukovanje 276
11 Čišćenje i održavanje.... 277
12 Skladištenje.... 278
13 Transport (sl. 1)....279
14 Popravka i naručivanje rezervnih delova ..... 279
15 Odlaganje na otpad i reciklaža.... 280
16 Plan održavanja 280
17 Pomoć za otklanjanje smetnji.... 281
18 EU izjava o usaglašenosti.... 281
19 Znak eksplozije 293
Günzburger Straße 69
D-89335 Ichenhausen
Poštovani kupče
13 Transport (sl. 1)
Priprema za transport
- Ispraznite rezervoar za gorivo u odgovarajuću prihvatnu posudu pomoću pumpe za usisavanje goriva.
- Ukoliko je spreman za rad, pokrenite motor i pustite ga da radi sve dok se preostalo gorivo ne potroši.
- Uklonite konektor sa svećice za paljenje.
- Osigurajte proizvod od klizanja, na primer pomoću traka za stezanje.
- Proizvod se može dizati i premeštati pomoću ručke (1).
* = nije obavezno sadržano u opsegu isporuke!
14 Popravka i naručivanje rezervnih delova
Uverite se nakon popravke ili održavanja da su svi bezbednosno-tehnički delovi postavljeni i da se nalaze u besprekornom stanju. Delove koji predstavljaju opasnost od povreda držite van domašaja drugih osoba i dece.
PAŽNJA
Prema zakonu o odgovornosti za proizvod ne postoji odgovornost za štete koje su prouzrokovane nepravilnim popravkama ili nekorišćenjem originalnih rezervnih delova.
Angažujte korisničku službu ili ovlašćenog stručnjaka. Isto važi i za delove dodatne opreme.
Rezervne delove i dodatnu opremu možete nabaviti u našem servisnom centru. Potrebno je da skenirate QR kod na naslovnoj strani.
NAPOMENA
Günzburger Straße 69
D-89335 Ichenhausen
Division Manager Product Center

Andreas Pecher
Head of Project Management
İçindekiler
Günzburger Straße 69
D-89335 Ichenhausen
İthalatçı:
Günzburger Straße 69
D-89335 Ichenhausen
Division Manager Product Center

Andreas Pecher
Head of Project Management
Garantie DE
Obvious defects must be reported within 8 days after receipt of the goods, otherwise the purchaser loses all claims due to such defects. We guarantee our machines, if handled correctly, for the duration of the statutory warranty period from handover in such a way that we will replace free of charge any machine part that demonstrably becomes unusable within this period as a result of material or manufacturing defects. For parts that we do not manufacture ourselves, we only provide a warranty to the extent that we are entitled to warranty claims against the upstream suppliers. The purchaser shall bear the costs of fitting the new parts. Claims for conversion and reduction and other claims for damages are excluded.
Garantie FR