
SFC216100G - Vacuum Cleaner GORENJE - Free user manual and instructions
Find the device manual for free SFC216100G GORENJE in PDF.

| Product Type | Cordless 2-in-1 stick vacuum (dry and wet) |
| Model | SFC216100G |
| Brand | Gorenje |
| Power Supply | Rechargeable lithium-ion battery, included AC adapter |
| Charging Time | Approximately 4 hours (estimated) |
| Clean Water Tank Capacity | Approximately 400 ml (estimated) |
| Dirty Water Tank Capacity | Approximately 200 ml (estimated) |
| Suction Speeds | 2 modes: ECO and MAX |
| Functions | Dry cleaning, wet cleaning, automatic roller cleaning, hard floor vacuuming |
| Motorized Brush | Yes, with built-in comb for cutting hair |
| Docking Station | Yes, with charging and storage |
| Filter | Washable filter (large frame + small filter) |
| Safety | Overheat protection, automatic shut-off when tank is full, immersion protection |
| Maintenance | Clean tanks, rollers and filters after each use; self-cleaning function |
| Spare Parts | Battery, roller, filter, adapter available from after-sales service |
| Warranty | 24 months for battery, 2 years for appliance (according to local legislation) |
| Usage | Domestic, indoors only |
Frequently Asked Questions - SFC216100G GORENJE
User questions about SFC216100G GORENJE
0 question about this device. Answer the ones you know or ask your own.
Ask a new question about this device
Download the instructions for your Vacuum Cleaner in PDF format for free! Find your manual SFC216100G - GORENJE and take your electronic device back in hand. On this page are published all the documents necessary for the use of your device. SFC216100G by GORENJE.
USER MANUAL SFC216100G GORENJE
natural_image
Exterior view of a Gorenje vacuum cleaner with attached power cord and base mount (no text or symbols visible)SI Navodila za uporabo....14
EN Instruction manual....30
natural_image
Line drawing of a vertical cylindrical device with a base and mounting base (no text or symbols)
natural_image
Line drawing of a vertical cylindrical object with a knob and base, resembling a stylus or tool (no text or symbols)2.

natural_image
Illustration of a hairdryer with a black cord and cable, labeled with number 4 (no text or symbols on the device itself)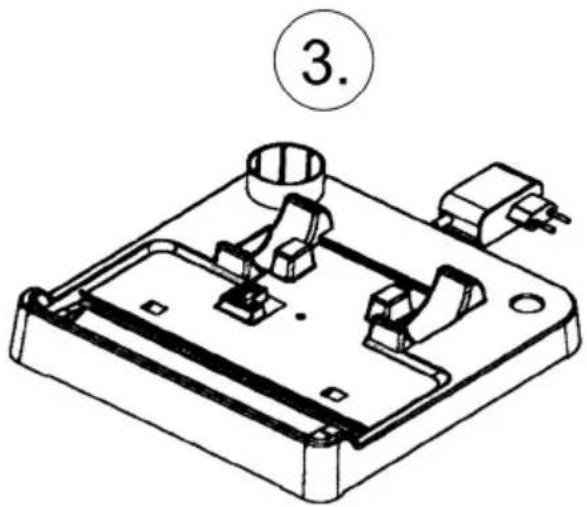
natural_image
Technical line drawing of a mechanical component with no visible text or symbols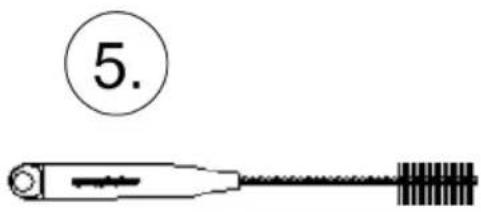
flowchart
graph TD
    A["Powertrain Battery"] --> B["Switch"]
    B --> C["Motor"]
    C --> D["Box"]

natural_image
Line drawing of a vacuum cleaner with a scroll wheel and base-mounted device (no text or symbols)
natural_image
Technical line drawing of a vacuum cleaner with a cylindrical component and mounting base (no text or symbols)
natural_image
Technical line drawing of a vacuum cleaner with valve mechanism (no text or symbols)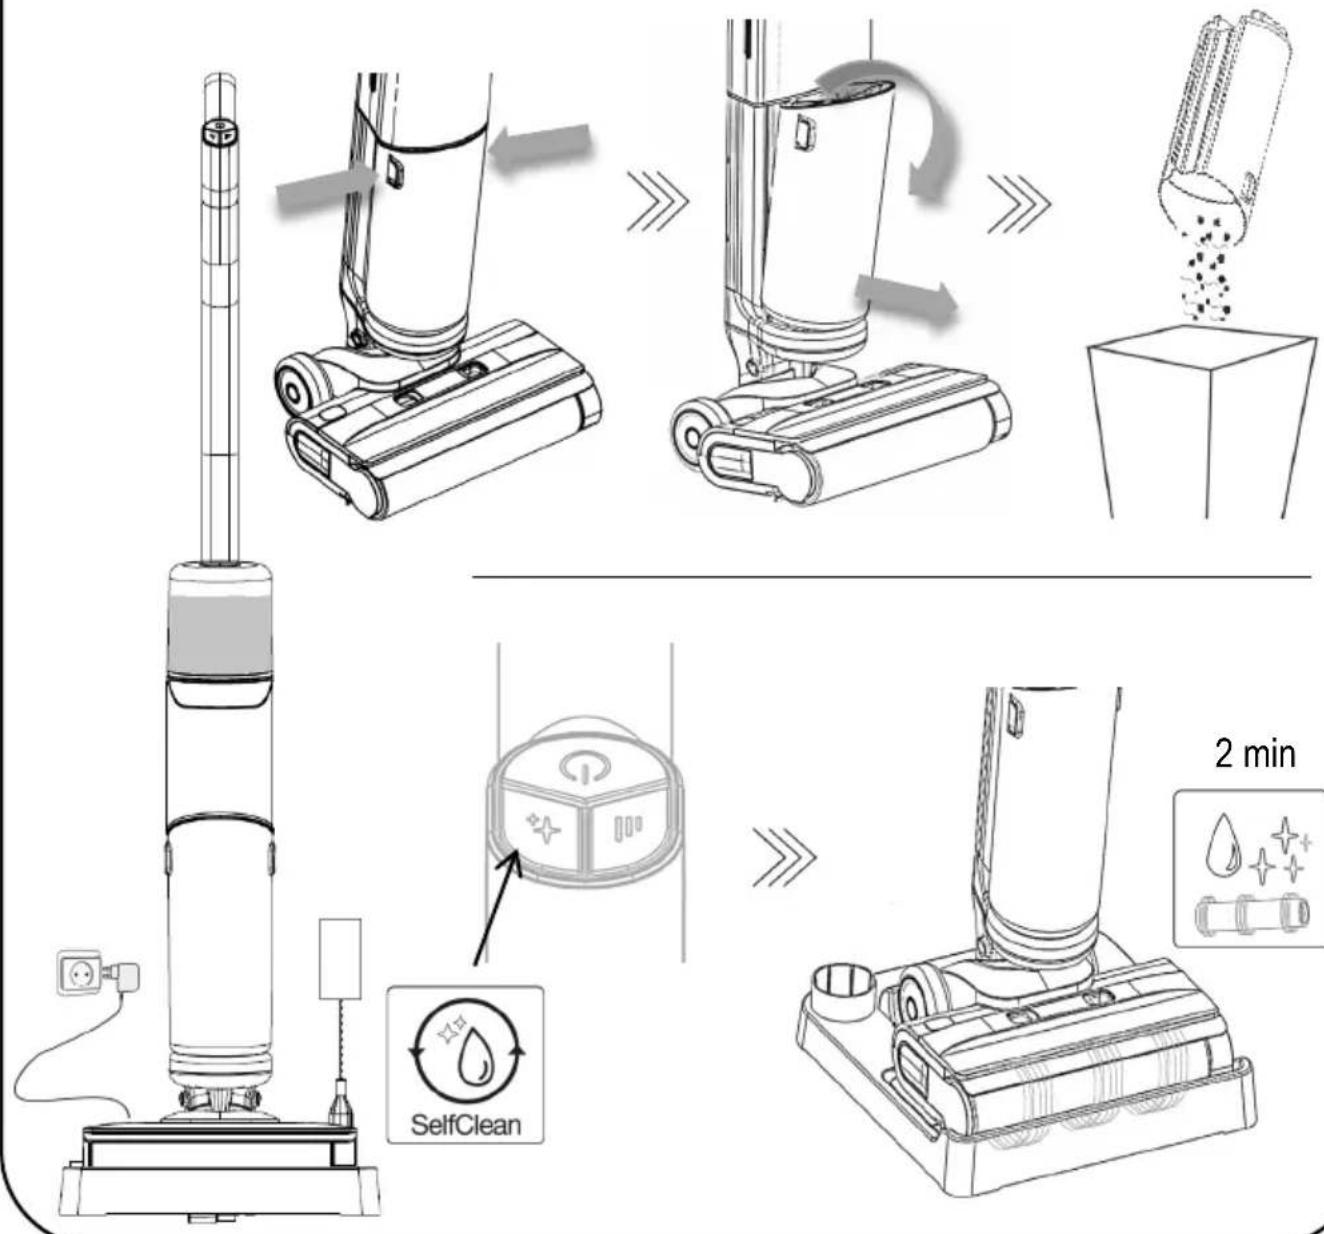
flowchart
graph TD
    A["SelfClean"] --> B["2 min"]
    B --> C["100% cleaning steps"]
    C --> D["2 minutes of cleaning"]
    style A fill:#f9f,stroke:#333
    style B fill:#ccf,stroke:#333
    style C fill:#cfc,stroke:#333
    style D fill:#fcc,stroke:#333
flowchart
graph TD
    A["Initial cleaning device"] --> B["Add air pump into a box"]
    B --> C["Add air pump into a container with liquid"]
    C --> D["Add air pump into a vacuum cleaner"]
    D --> E["Add air pump into a cleaner with liquid"]
    E --> F["Add air pump into a cleaner with drywell"]
    F --> G["Final cleaning device with hand icons and 1x6 months mark"]
    style A fill:#f9f,stroke:#333
    style B fill:#ccf,stroke:#333
    style C fill:#cfc,stroke:#333
    style D fill:#fcc,stroke:#333
    style E fill:#cff,stroke:#333
    style F fill:#ffc,stroke:#333
    style G fill:#cfc,stroke:#333

natural_image
Line drawing of a vacuum cleaner's base with attached circuit board (no text or symbols)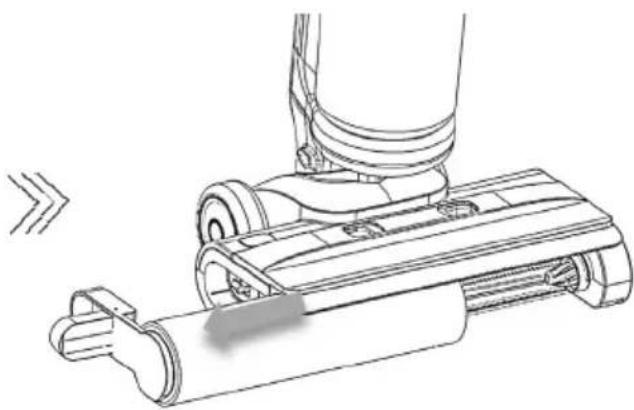
natural_image
Line drawing of a vacuum cleaner's mechanical component, showing blade and housing assembly (no text or symbols)
natural_image
Line drawing of a vacuum cleaner blade assembly (no text or symbols)
natural_image
Technical line drawing of a vacuum cleaner component with two views (top and side), no text or symbols present.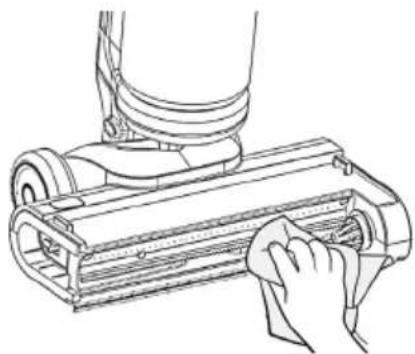
natural_image
Line drawing of a hand cleaning a vacuum cleaner's side panel (no text or symbols)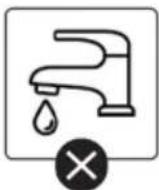
natural_image
Technical line drawing of two rectangular electronic components with mounting holes and a curved top section (no text or symbols)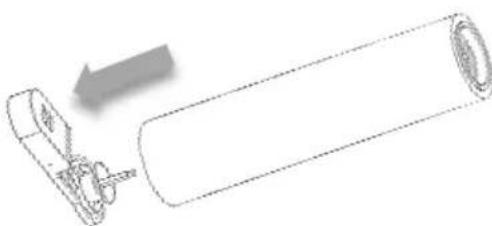
natural_image
Diagram of a cylindrical object with internal components and an arrow indicating direction (no text or symbols)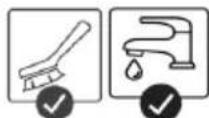
natural_image
Line drawing of a hand cleaning a mechanical component with no text or symbols
NAVODILA ZA UPORABO SI
Splošna opozorila
When using the vacuum cleaner always observe the following basic safety precautions: Carefully read this instruction manual and only use the appliance in accordance with the instructions herein. Before using the appliance for the first time, remove all protective film or plastics. // Never leave the appliance unattended during use. // Before using the appliance, carefully assemble all of its parts. // Only use the appliance indoors and in dry areas. // Only use the appliance with the parts recommended by the manufacturer. // Do not use the appliance if it has been dropped, if it is damaged, if it has been kept outdoors, or if it has be dropped or immersed in a liquid. // Regular cleaning can extend the appliance's useful life. // Make sure your hair, loose parts of your garments, fingers or other parts of the body do not come into contact with the vents or moving parts of the appliance. // The appliance complies with all required standards regarding electricity, and radio interference regulations. // The appliance is not intended to be used by children and persons with impaired physical or men abilities. This appliance may be used by children aged 8 years and more, and by persons with reduced physical, sensory or mental capabilities or lack of experience and knowledge, they are supervised during the use of the appliance or if they have been provided relevant instructions regarding the use of the appliance in a safe way, and they understand the hazard involved. Keep children under supervision while they are using the appliance and make sure they do not play with it. // Children should not perform any cleaning or maintenance tasks or the appliance, unless they are older than 8 years, and they do so under supervision. // Switch off the appliance after use.
Danger
Do not immerse the main unit/appliance housing or the charging base in water or any other liquid and do not rinse them under running water.
Special warnings
Before connecting the appliance or the charging base with the power cord to the power main make sure the indicated voltage matches the voltage of the power mains in your home. // Do not used a damaged vacuum cleaner or a damaged charging base (or adapter – depending on your vacuum cleaner model). // If the charging base (or adapter) is damaged, replace it only with an original spare part in order to avoid danger. // A transformer is integrated into the adapter. Removal and replacement of adapter with another one are not allowed as this may lead to a dangerous situation. // Only charge the vacuum cleaner with the supplied adapter and charging base. The adapter may heat up during charging. This is a normal occurrence. (Depending on your model, if it has an adapter.) // Switch off the appliance during charging. // Never use the vacuum cleaner without filters or filtering unit in place. // The exhaust vents may not be blocked during vacuum cleaning. // Only use the appliance for household purposes and indoors. // Keep the suction vents clean and free in order to ensure optimum and unimpeded suction power of the appliance. It is highly recommended to regularly clean
the open parts of the suction hose, and to remove dust, hair, or anything else that may block the airflow. // Before cleaning the support or the charging base, unplug it from the power socket. // Never use the vacuum cleaner to clean up embers or filings, cigarette butts, matches, liquids (e.g. water, carpet cleaning foam), or sharp or pointed objects (broken glass etc.). // Keep the suction tube or the open part of the appliance away from your face and body. // Never use the appliance to vacuum construction material (such as fine sand, lime, cement powder, toner dust etc.). This can cause damage to the appliance.
Problems and solution
| Problem | Possible reason | Solution |
| Rolling brush does not rotate. | No battery | Charge the floor washer. |
| The roller brush is pressed by a heavy object or entangled in too much hair. | Remove any heavy objects and clean up the hair. | |
| No water from the pump | The water in the clean water tank has been used up. | Refill the clean water tank. |
| It is blocked by a foreign body. | Clean the dirt on the nozzle and clean the dirty water tank. | |
| Insufficient use time after charging | Insufficient charging time | The battery is a consumable product. You can buy a new battery pack at the designated repair point. |
| Battery age |
Environment

Do not throw away the appliance with the normal household waste at the end of its life. Hand it in at an official collection point for recycling. By doing this, you help to preserve the environment.
This appliance is marked according to the European directive 2012/19/EU on Waste Electrical and Electronic Equipment (WEEE). This guideline is the frame of a European-wide validity of return and
recycling on Waste Electrical and Electronic Equipment.
Guarantee & service
If you need information or if you have a problem, please contact the our Customer Care Centre in your country (the phone number is in the worldwide warranty declaration).
Note: The warranty on the battery of vacuum cleaner is 12 months.
For personal use only!
For easier transport, some appliance parts are separately and securely placed in the main packaging unit. // Before first use, read and follow the assembly and safety instructions. // Safely remove all labels before first use. // The appliance is intended for dry vacuuming in a home environment and for household use.

PARTS
1 Housing with motor
2 Handle
3 Cleaning tray and charging dock
4 Battery charging adapter
5 Cleaning brush 2-in-1

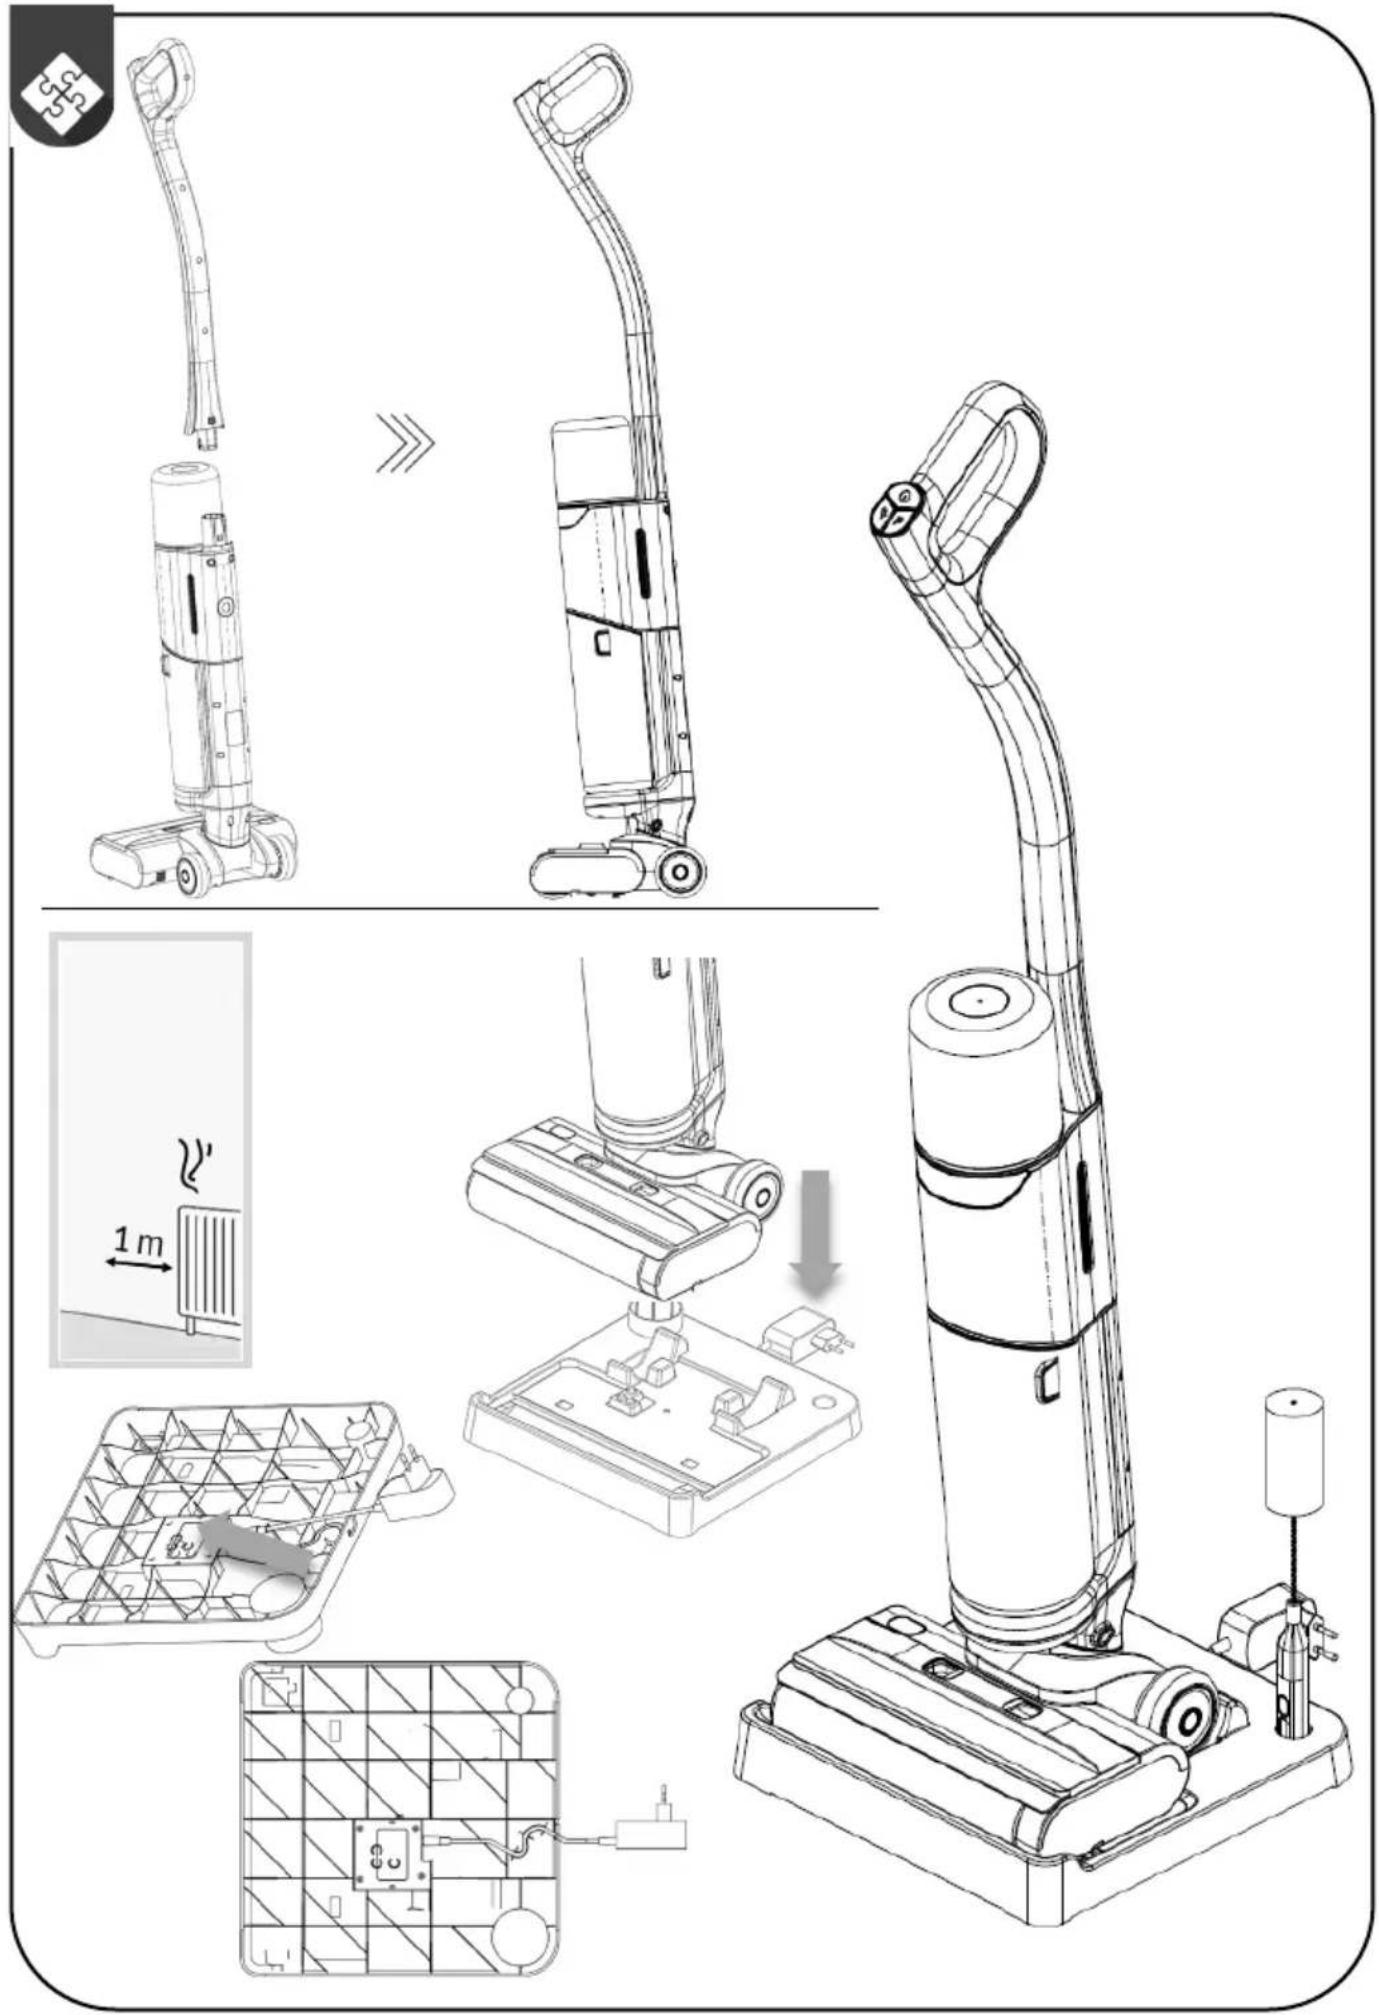
INSTALLATION
Assemble the cleaner by inserting the upper part of the handle into the lower part. // It is correctly assembled when you hear a slight click. // If you want to detach the handle, push a thin object into the opening on the back and lift the handle.
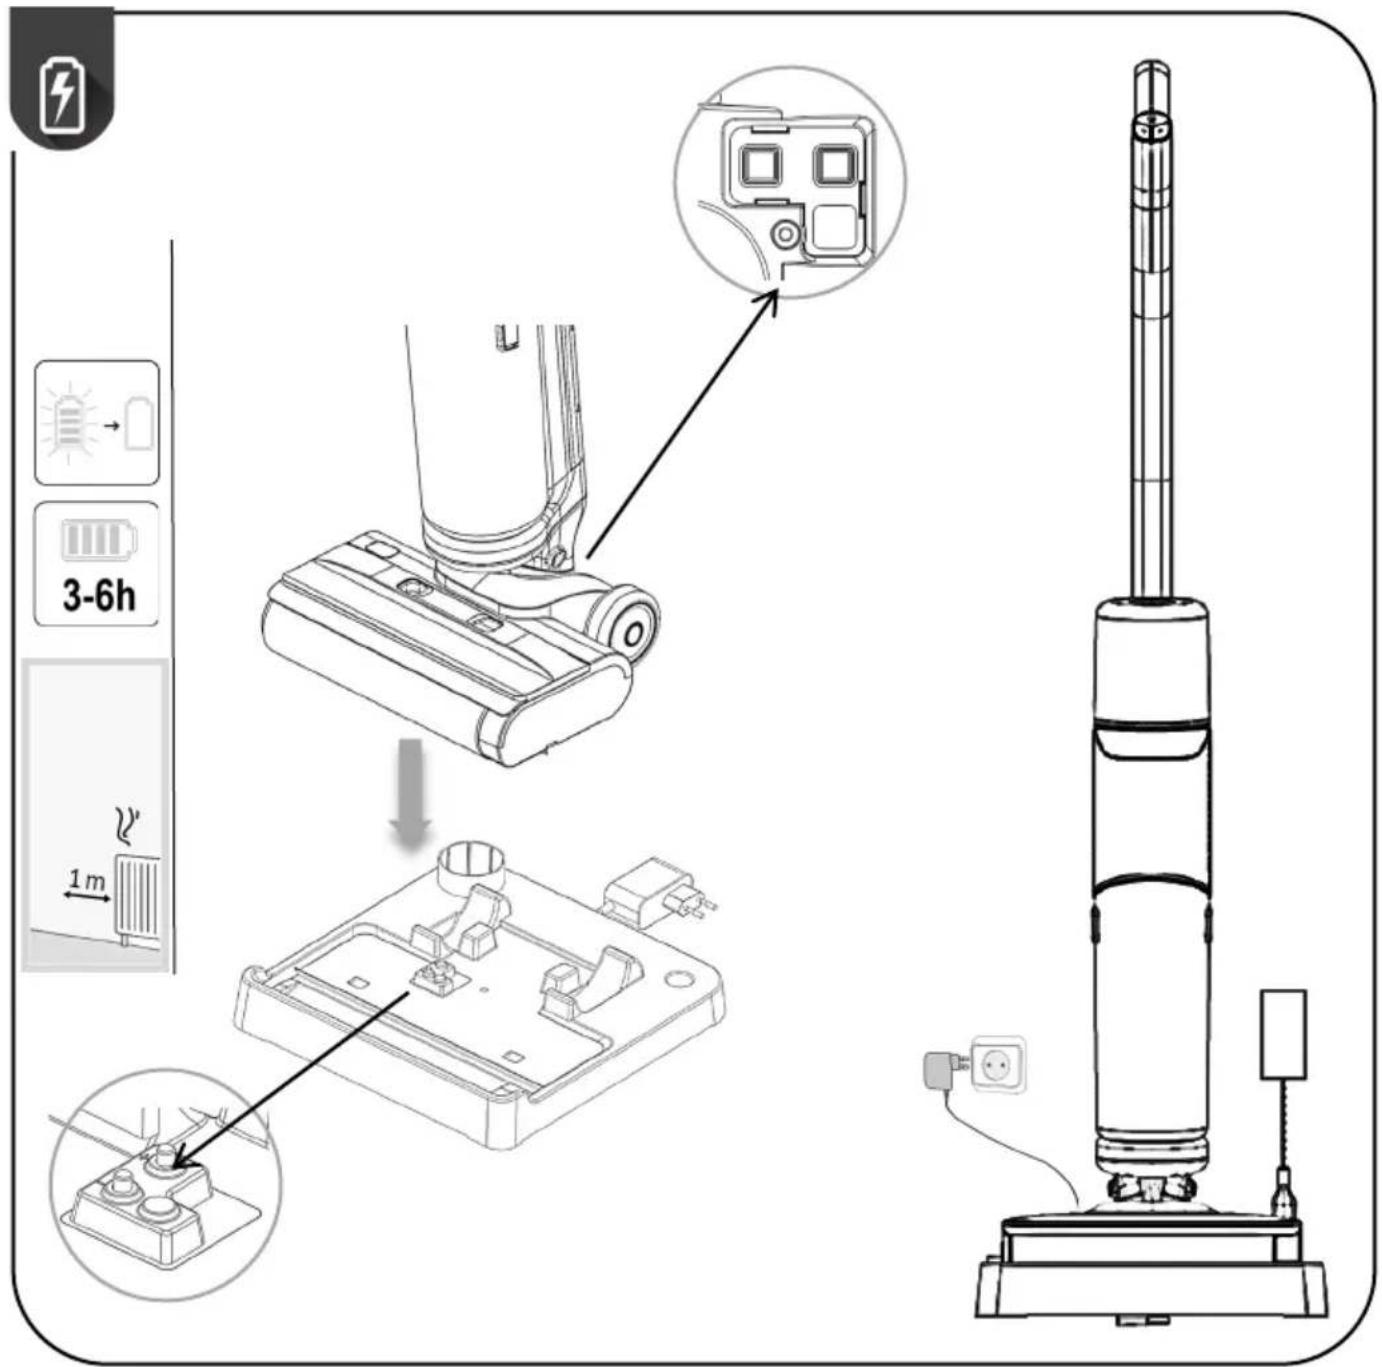
Place the dock on water-resistant floor. // The dock must be at least 1 metre away from any heat sources. // A charging adapter is included in the kit. // The adapter must be inserted into the slot on the underside of the charging tray. // Store the cleaning brush in the designated slots on the tray.

USE
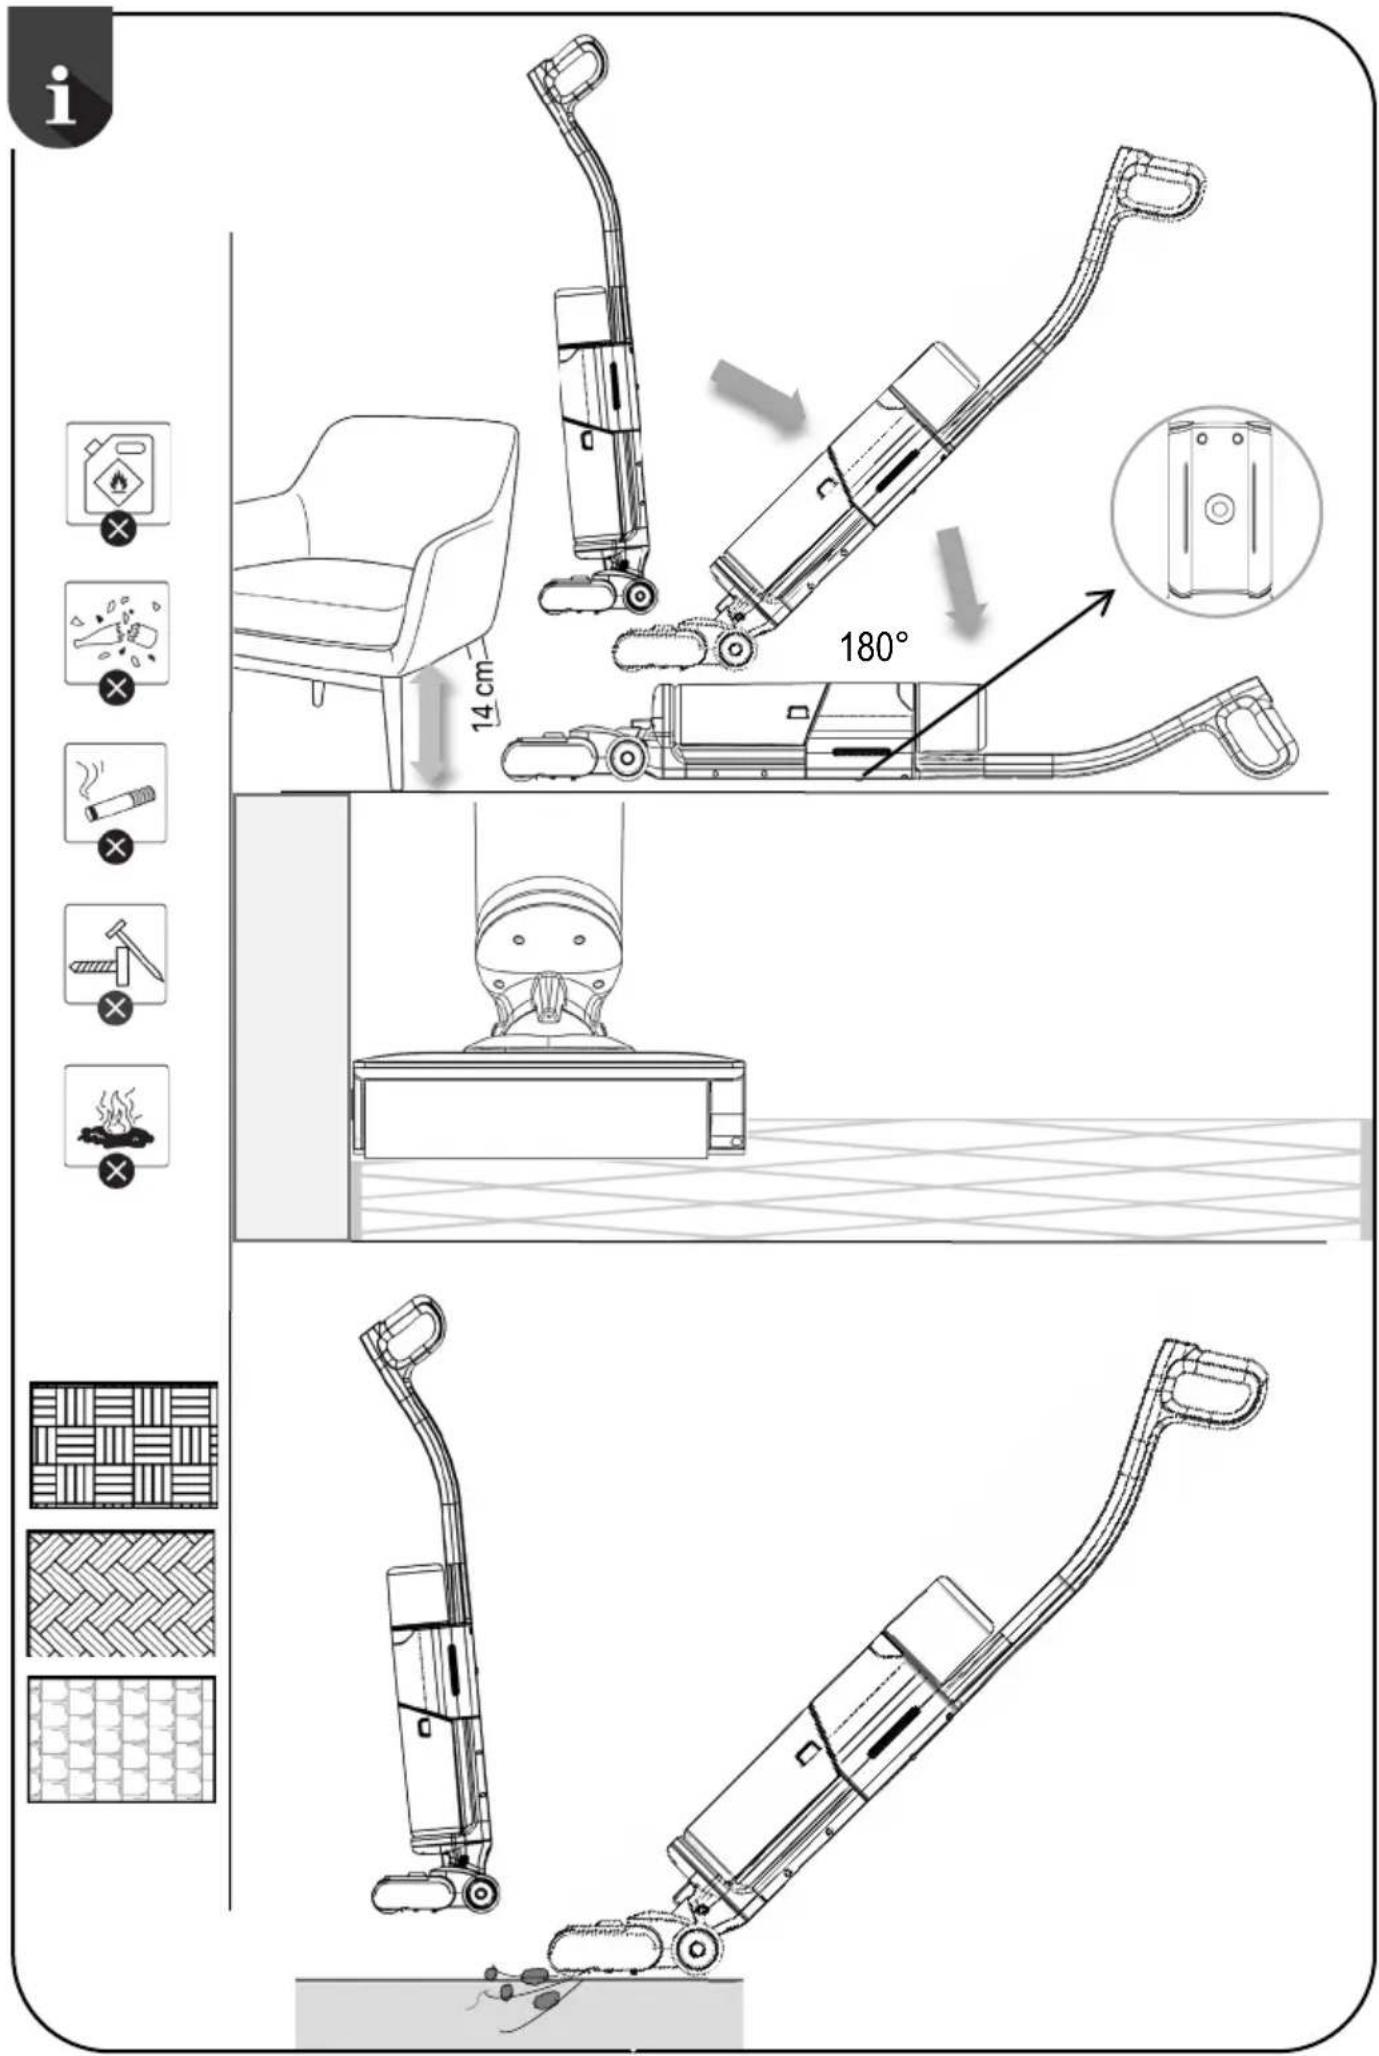
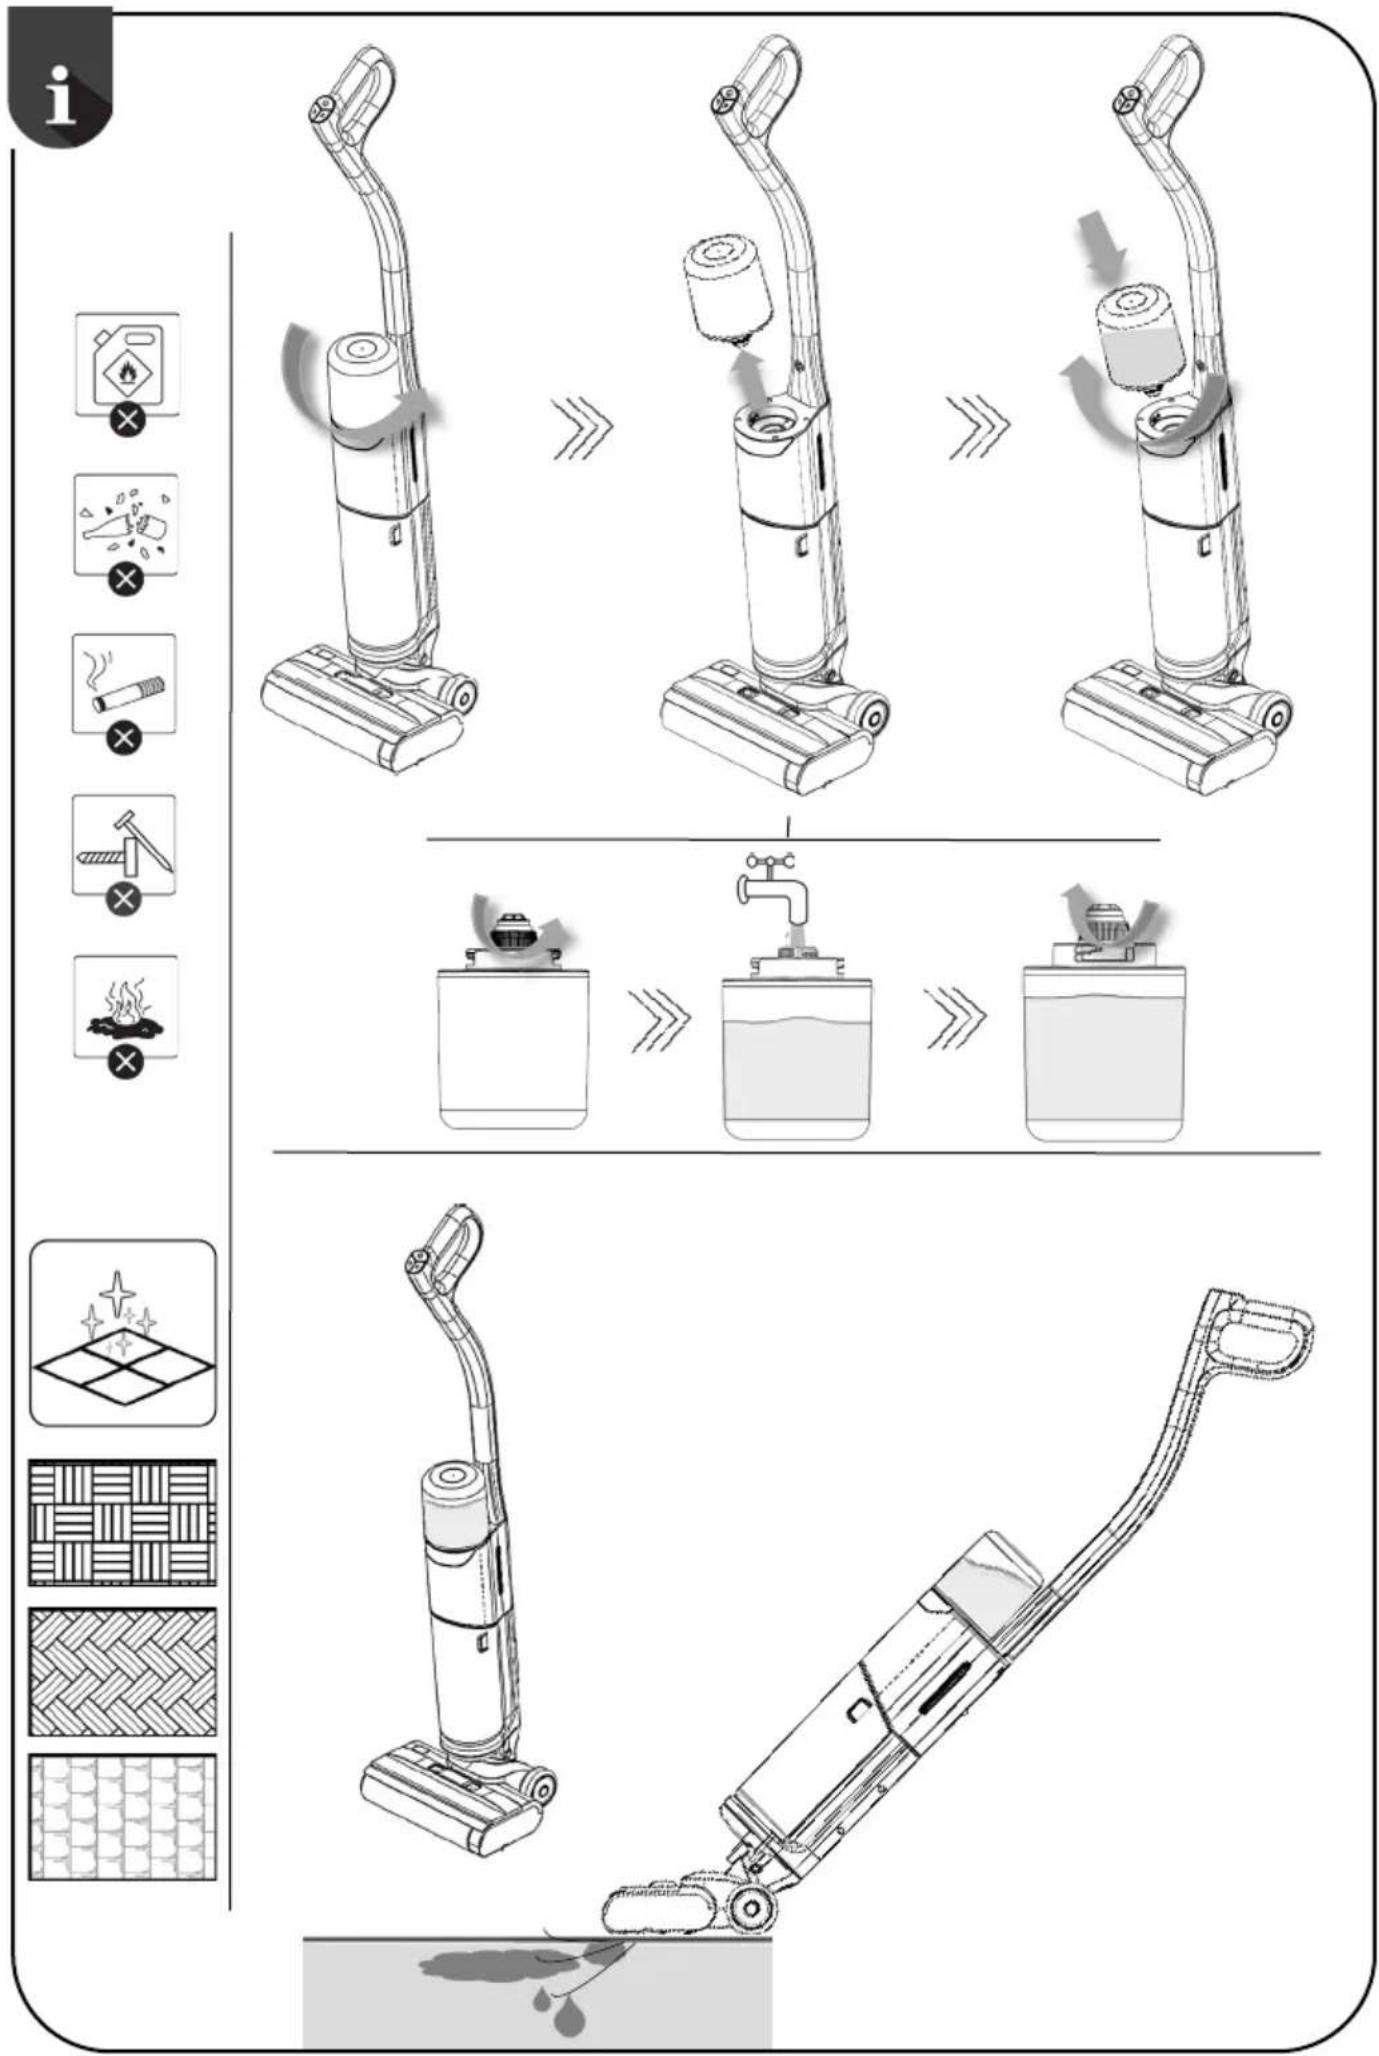
The cleaner is not intended for vacuuming foamy detergents, glass, ashes, fire, or sharp objects that could damage the appliance. Do not use it with foamy detergents, as this may damage the cleaner. // The cleaner is suitable for cleaning all hard floor surfaces. // Due to its shape, it is suitable for cleaning objects that are up to 14 cm above the floor. // There is a small wheel at the back of the motor unit, which prevents the motor unit from being damaged. // If the cleaner is running in a reclined position, the operation will be slowed down, as this prevents the dirty water from the tank from getting into the motor unit and thus damaging the cleaner. // The brush is suitable for cleaning near the edges of various objects. // The motorized brush makes cleaning easier. // The cleaner can be used for dry and wet cleaning. // The upper container is for clean water, and waste water and dirt are collected in the lower container during cleaning. // If the red light comes on during operation, it means that the dirty water tank is full, in which case it must be emptied. If the red light is still on, it means that large pieces of dirt have entangled the roller or the air supply to the brush is blocked. In this case, it is necessary to clean the brush. // When you turn off the appliance, the white light will come on and then go off.
- The cleaner can be used for vacuuming all hard floor surfaces. In this case, the upper container should be empty // Tilt the handle towards you at an angle and press theon/off button. // During vacuuming, dirt will be collected in the large container.
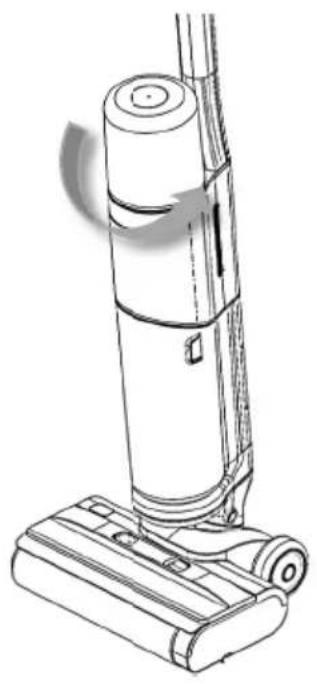
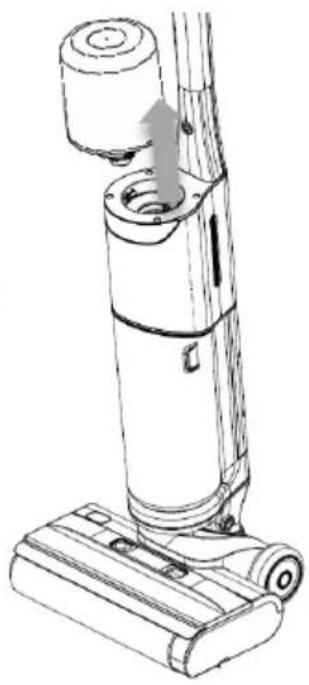
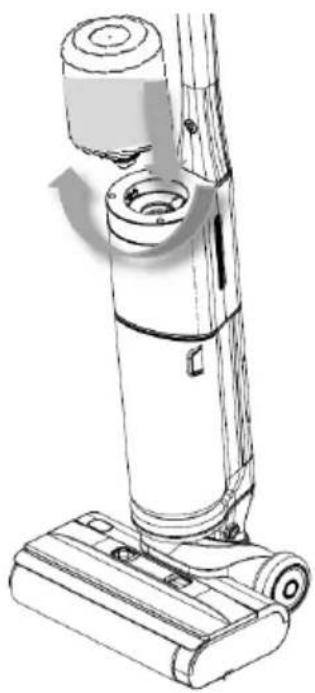
- The cleaner can be used for dry and wet cleaning. // The upper tank is for clean water. // Unscrew the tank, pour in room temperature water and screw it back onto the cleaner. // Tilt the handle at an angle and press the on/off button. The cleaner will detect water in the tank and start automatically dispensing it to the rollers. // The motorized brush will clean the floor and dirty water and rubbish will be collected in the large tank. // When the rollers are wet, do not leave the cleaner on a sensitive floor.

CHARGING
Assemble the adapter with the cleaner charging cable correctly so that the cleaner will charge when placed on the dock. On the underside of the brush, there is a slot, through which the appliance will charge automatically when in contact with the dock. // Charge the cleaner at least 1 m from any heating surfaces. // Make sure that the contact area between the dock and the bottom of the brush is not wet. When the battery is charging, the front light turns white. When the battery is full, the light goes out after a minute. // When the battery is low, a white light comes on as a warning that the appliance needs to be charged.

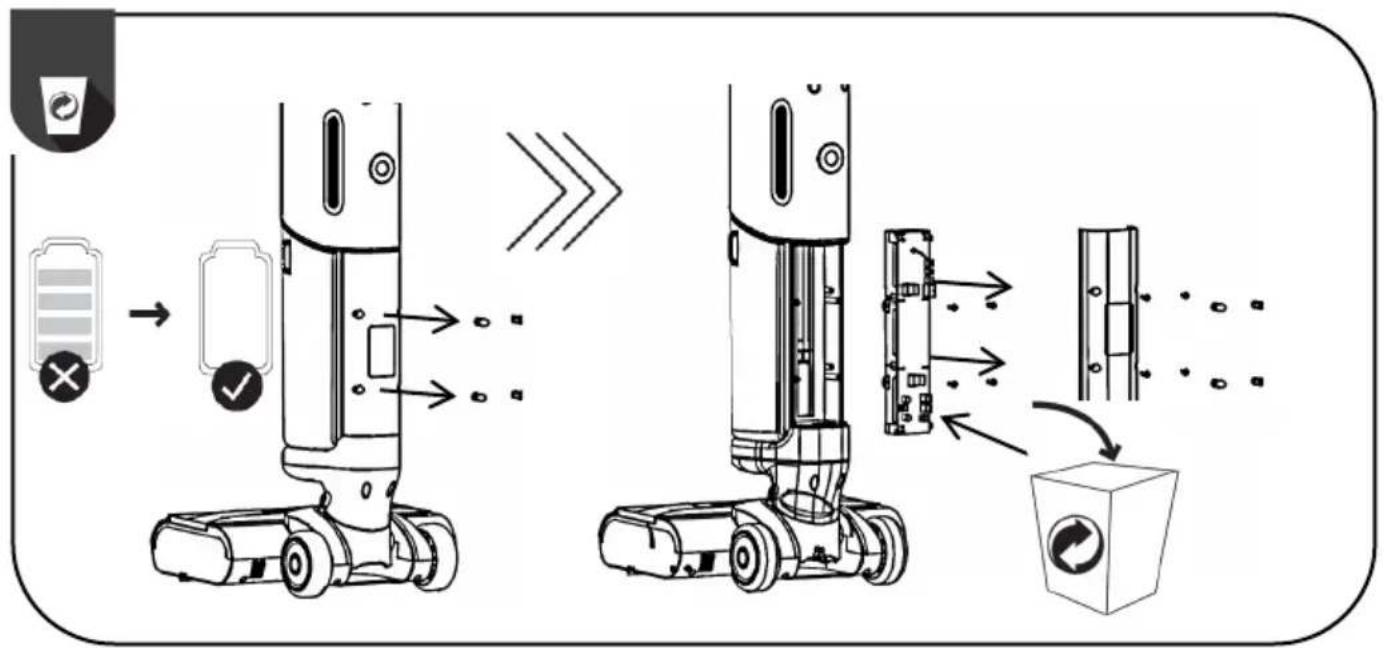
APPLIANCE DISPOSAL
If you want to replace the appliance or no longer need it, please also consider environmental protection.
Before disposing of the vacuum cleaner, the battery must be removed. // For safe removal of the battery, ensure that the battery is completely discharged. If the appliance does not have a removable battery, please follow the instructions in the pictorial booklet. // Follow the illustrated instructions to properly dispose of the battery.

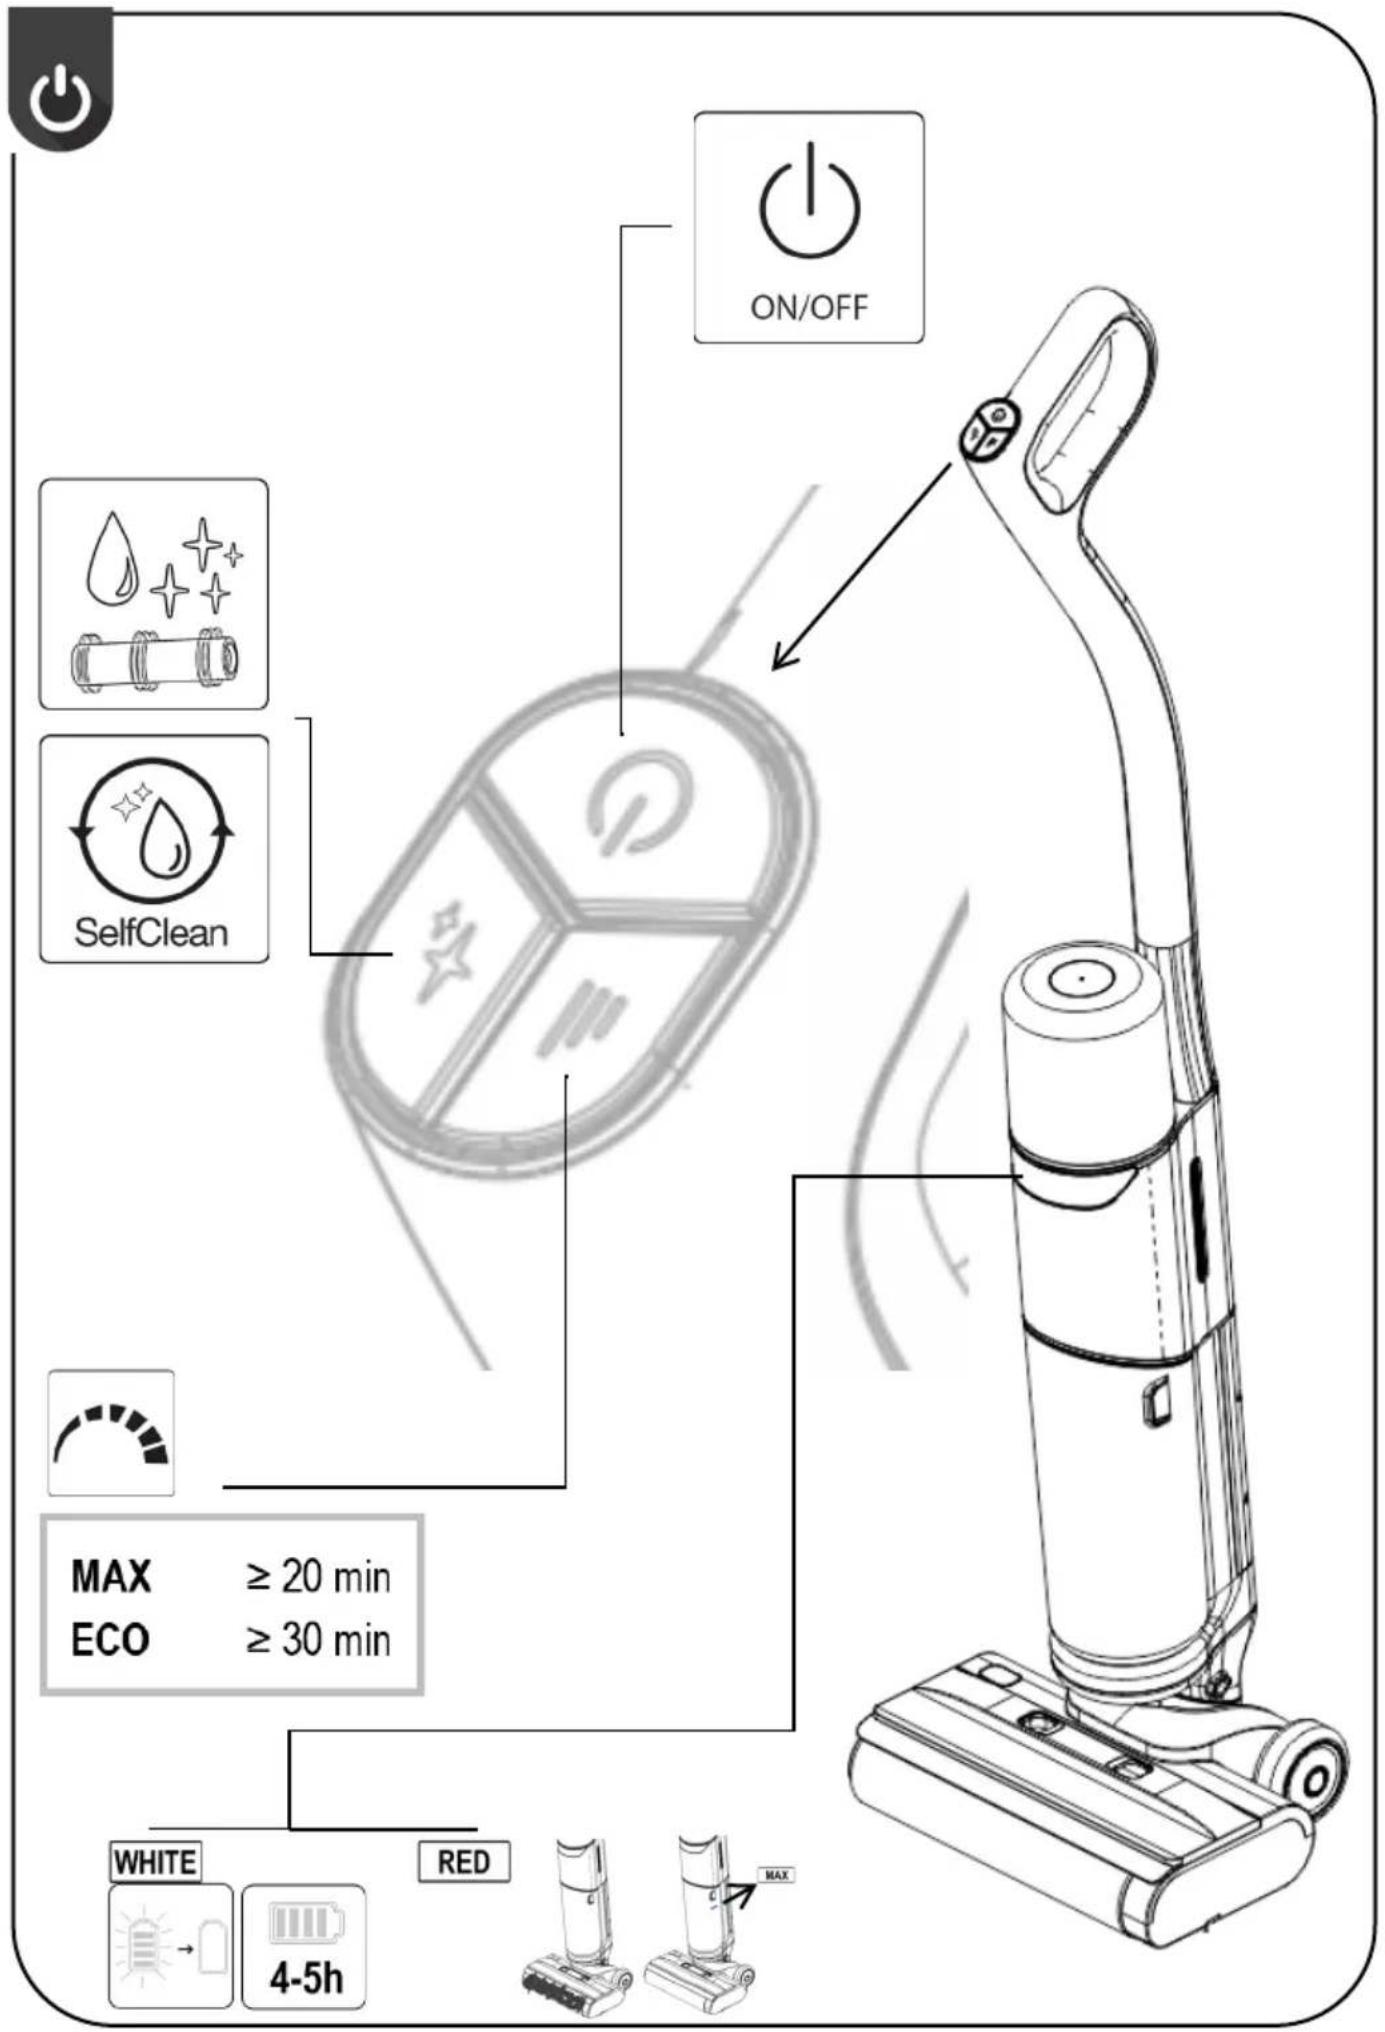
OPERATION
There are three function buttons on the cleaner handle.
- On/off button. It is used to switch the cleaner on and off
- Cleaning speed button.
ECO (battery-saving mode, maximum runtime on a single charge), MAX (medium runtime on a single charge).
- Auto-cleaning button for rollers. When using this button, make sure that the cleaner is placed on the dock and connected to power. If the battery is empty, it will be necessary to wait a while until the battery is at least partially charged.

AUTOMATIC CLEANING, DUST CONTAINER AND FILTERS
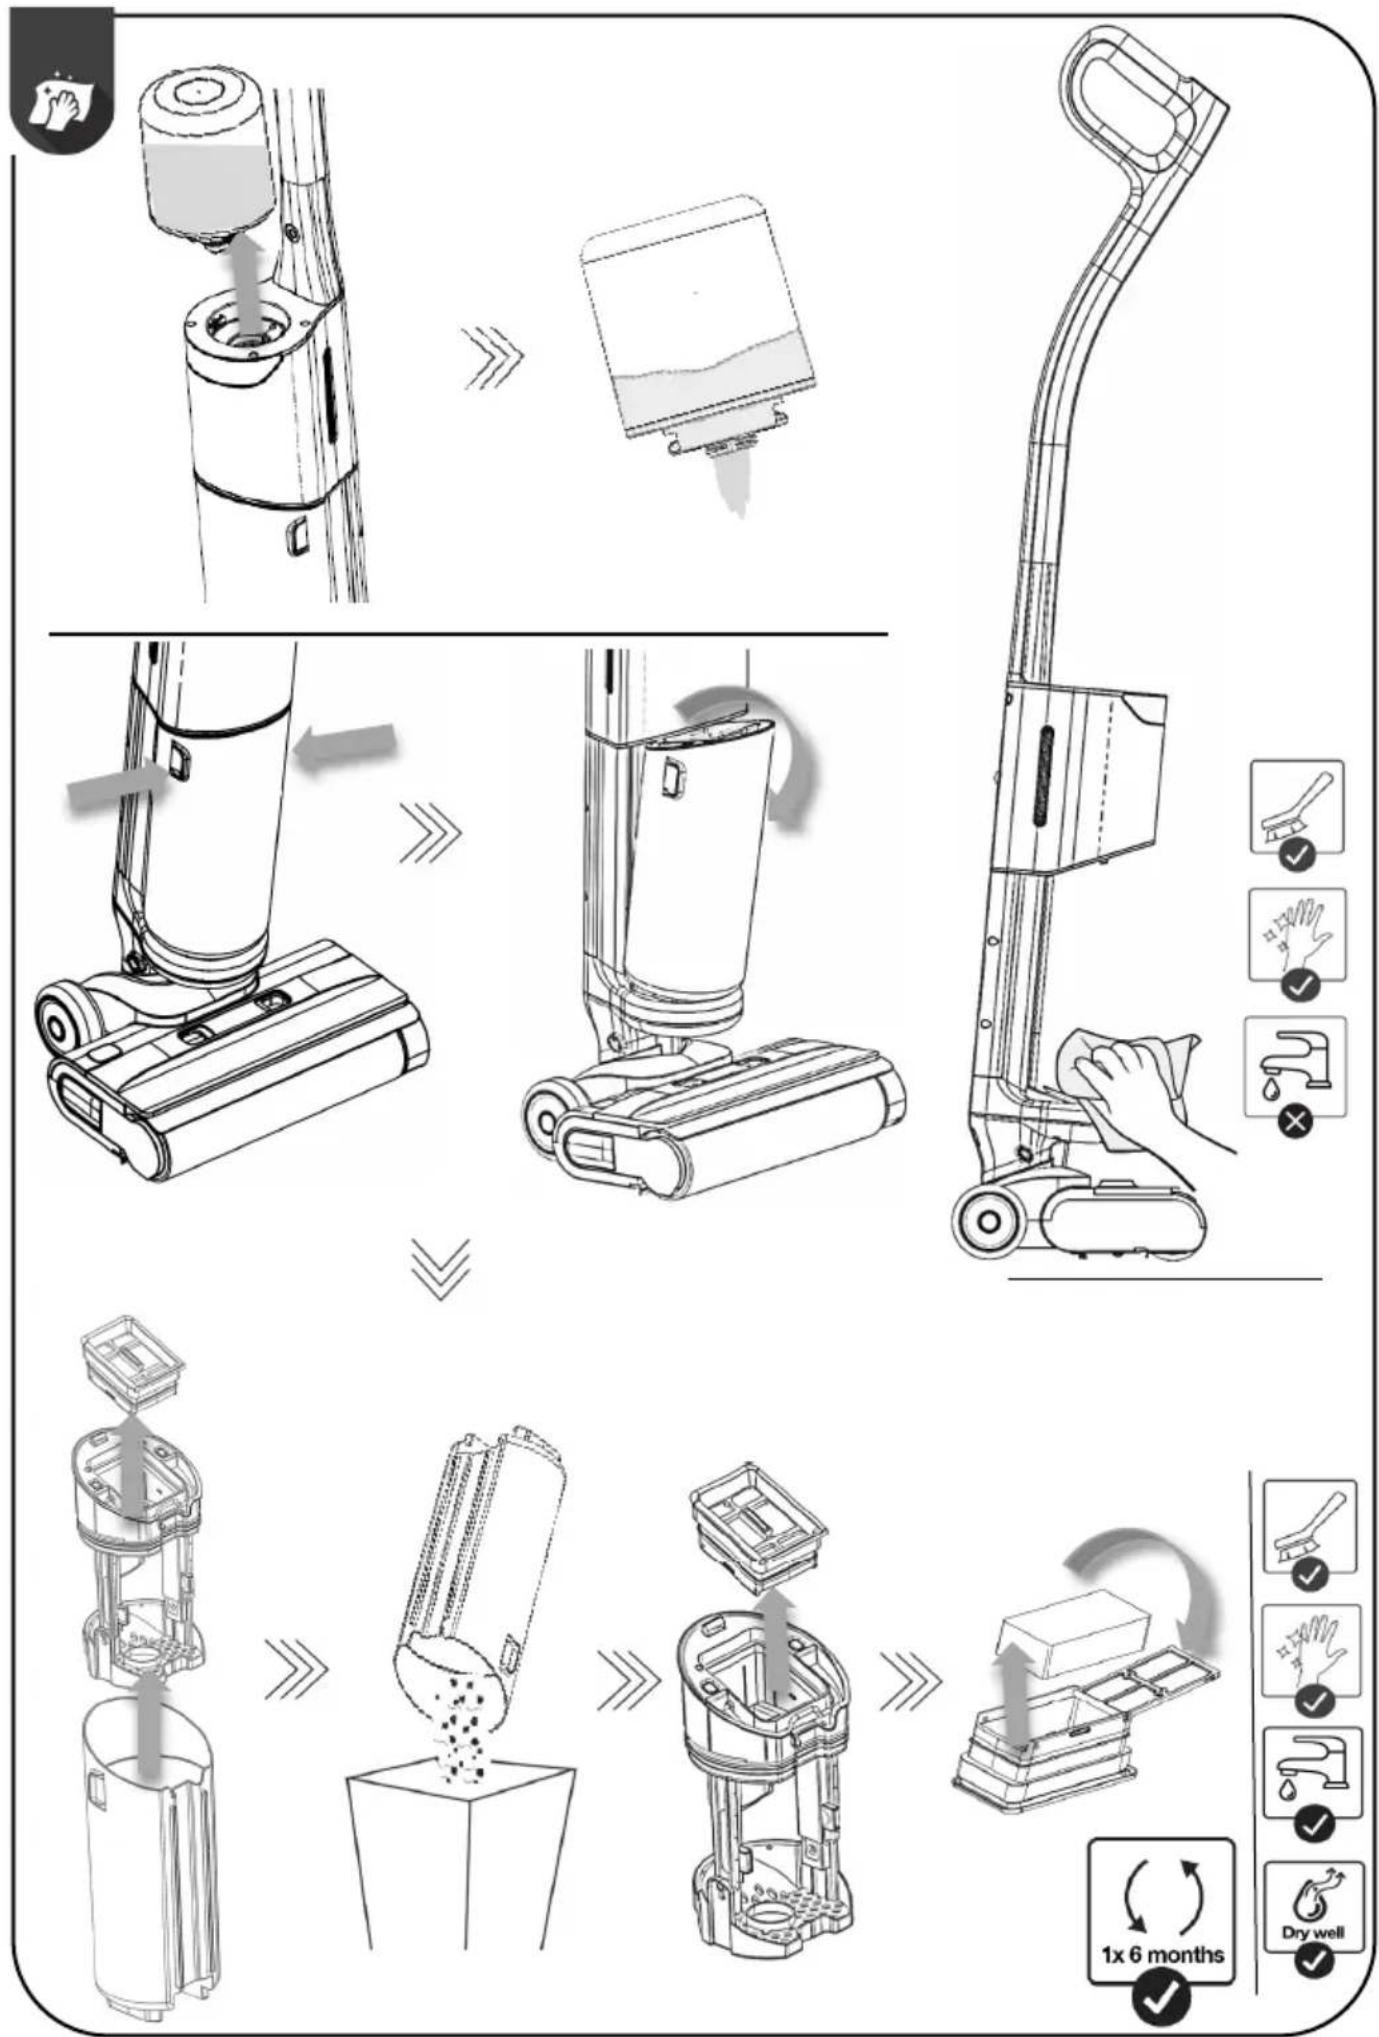
Self-clean function
When you stop cleaning and want to clean the appliance, do the following. The clean water tank must be filled. // Empty the dirty water tank. // Place the cleaner on the dock and make sure that the battery is at least partially charged and that the dock is connected to power. // On the handle, press the automatic cleaning button. // The automatic cleaning process takes about two minutes. // Clean water from the tank will be dispensed on the rollers, which will rotate and get cleaned. The brush comes equipped with a comb, which helps the user to cut off excess hair before cleaning, thus reducing the overall effort required to clean the appliance completely.
Cleaning the tanks and containers:
After the automatic cleaning is complete, it is necessary to unscrew the clean water tank and pour out excess water. // Leave the container and the lid of the container to dry completely.
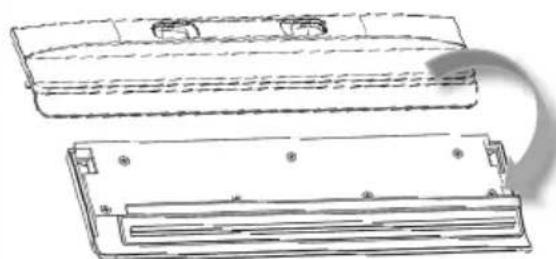
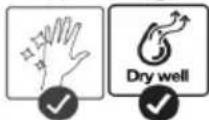
Remove the dirty water tank from the cleaner. Pull out the large filter rim from the container and pull out the small filter from it. Wash all parts thoroughly, as they may develop an unpleasant odor if not cleaned regularly. Leave all parts to dry completely.
Ensure that all parts are reassembled and properly inserted into the cleaner before using it again. // The dirty water tank must first be inserted at the lower part and only then attached at the upper part.
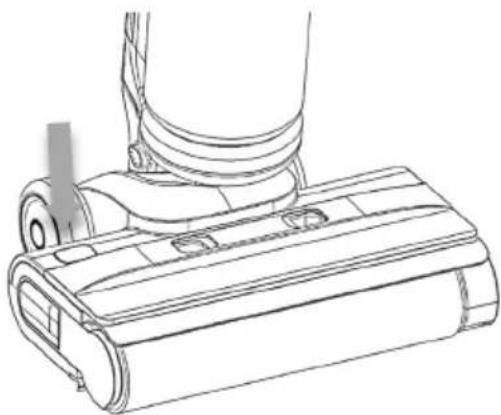
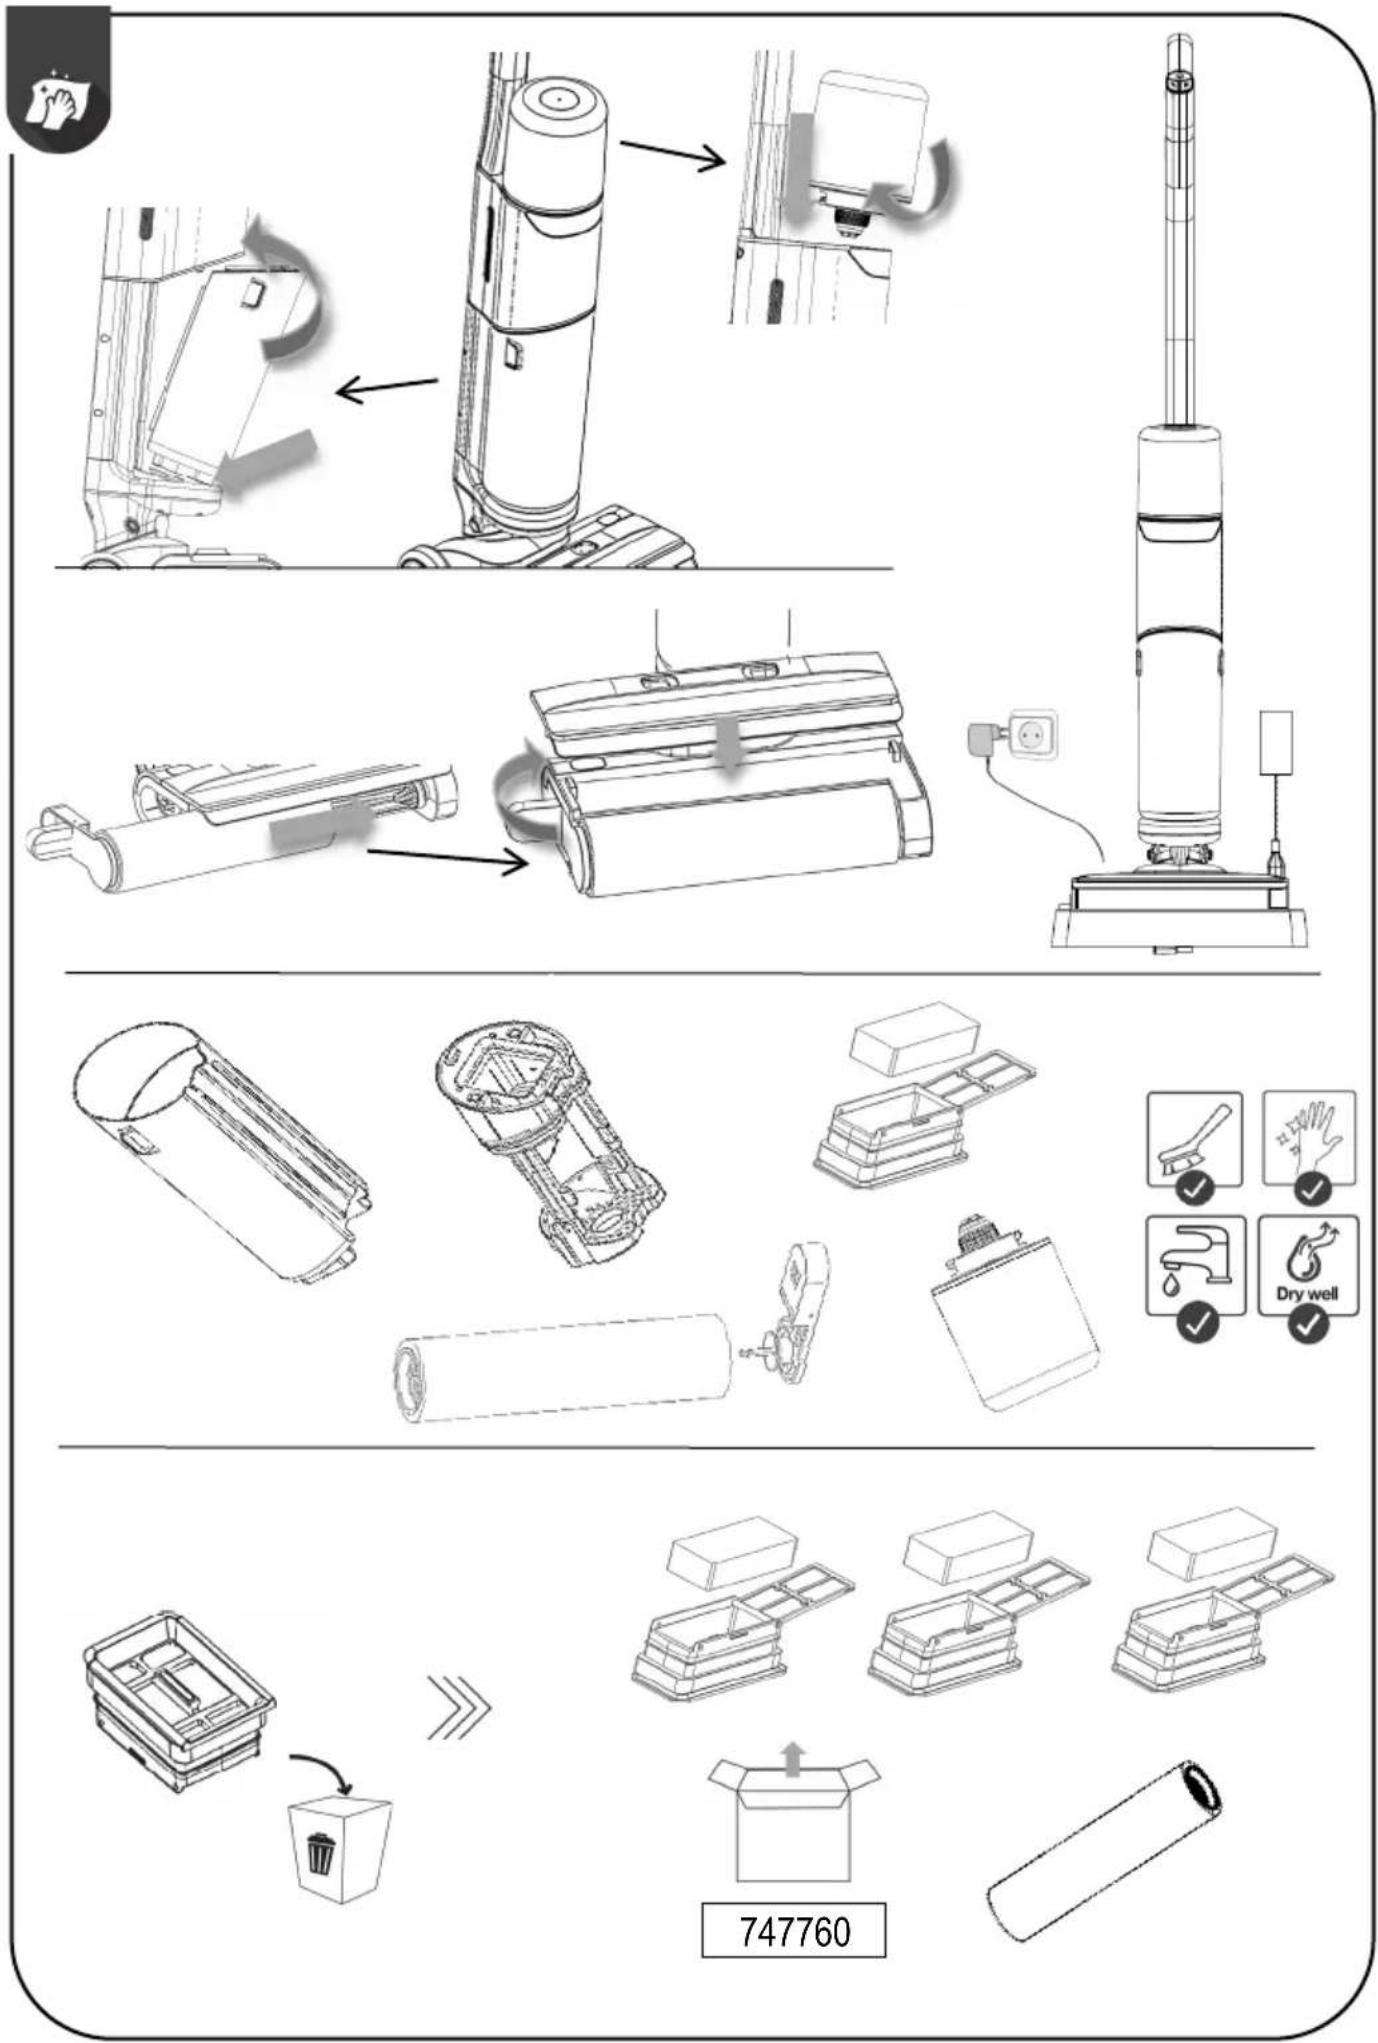
Cleaning the motorized brush
On the back of the brush, there is a button. // By pressing it, you release the roller handle on the side so that you can safely remove it from the brush. // With the supplied smaller brush, you can clean the internal parts of the brush. If you pull the handle on the small brush, you can pull out a small tool for cutting the remaining hair off the roller.
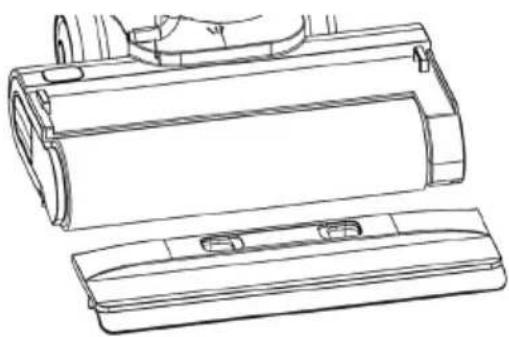
There is a brush cover on the upper part, which you can remove by pressing both buttons. Wipe the cover and wash it under water.
Dry the roller and cover thoroughly before reuse.
Insert the roller correctly back into the brush. // You know you have inserted it correctly if the roller handle locks when pushed back into the brush.
Charging dock
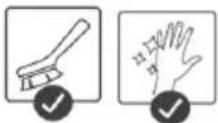
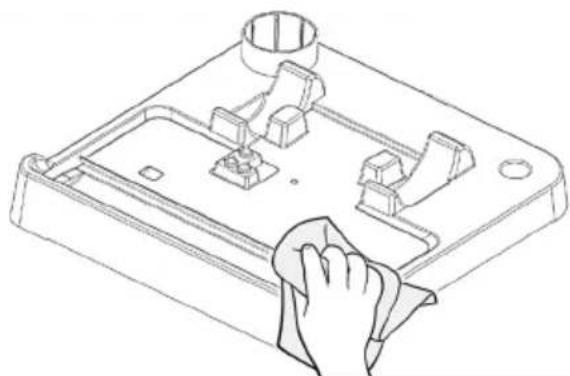
Do not immerse the dock in water, this may damage the power supply part. Simply wipe it with a damp cloth, then dry. Do not touch the part for charging the cleaner.
Follow the illustrated instructions at the beginning of the leaflet.
Never clean the floor without the filter inserted, as it prevents excess dirt and water from reaching the motor unit and consequently damaging or even destroying the cleaner.
Regular cleaning and proper use extend the service life of the appliance.
TROUBLESHOOTING
| Problem | Cause | Solution |
| The appliance can not be charged. | Loose plug/socket connection | Check adapter plug and power socket. |
| Improper placement | Reposition the appliance correctly. | |
| Battery temperature too low/high | Allow battery to reach normal temperature before charging. | |
| Damaged power PCB | Contact our after-sales service department. | |
| The appliance does not work. | Low/Empty battery | Place the appliance on the charging dock for a full charge. |
| Appliance in upright position | Tilt the appliance to activate operation. | |
| Full wastewater tank | Empty the wastewater tank. | |
| Overheating protection activated due to blockage | Clear blockage and wait for appliance to cool. | |
| Handle/wastewater tank not secured | Ensure proper installation before use. | |
| Reduced cleaning performance | Debris in floor brush suction or pipes | Clear obstructions from the suction port/pipes. |
| Clogged filter or filter cartridge | Clean or replace the filter/filter cartridge. | |
| Excessive wear on roller or filter | Replace the roller or filter cartridge. | |
| Abnormal motor noise | Overfilled wastewater tank | Empty the wastewater tank. |
| Blocked suction port | Clear suction port blockage. | |
| Floor brush not dispensing water | Clean water tank not installed. | Reinstall the clean water tank properly. |
| The clean water tank is lack of water. | Refill the clean water tank. | |
| Wastewater tank full indicator illuminates. | Full wastewater tank Empty and clean the wastewater tank. | |
| Roller not rotating/Blockage indicator illuminates | Roller tangled with debris or not installed | Remove debris or reinstall the roller. |
| Self-cleaning failure | Poor contact with charging dock | Reposition the appliance securely on the charging dock. |
| Full or improperly installed wastewater tank | Clean the wastewater tank and reinstall it properly. |
AVHENDING AV APPARATET
MANUEL D'INSTRUCTIONS FR
LCBOSM MO ZSDSGMOBOOMGDMO DOOMOGDDO
_3b_0_3b_5: _3b_0m_1s_1m_2m_3n_1s_2m_3m_4s_3m_4m_5s_6m_7s_8m_9s_10s_11s_12s_13s_14s_15s_16s_17s_18s_19s_20s_21s_22s_23s_24s_25s_26s_27s_28s_29s_30s_31s_32s_33s_34s_35s_36s_37s_38s_39s_40s_41s_42s_43s_44s_45s_46s_47s_48s_49s_50s_51s_52s_53s_54s_55s_56s_57s_58s_59s_60s_61s_62s_63s_64s_65s_66s_67s_68s_69s_70s_71s_72s_73s_74s_75s_76s_77s_78s_79s_80s_81s_82s_83s_84s_85s_86s_87s_88s_89s_90s_91s_92s_93s_94s_95s_96s_97s_98s_99s_100
zs63y03b0mos dbmmmq 30msqo zsdmygbdolomzou!
s367d05 cos3m6y06b6d05 3s6d7b05:
szymdszyjno fdybqou cslyngyngdou dgygz syngyngdquos lygous fyuou szbou dmblbs ws bgnqdyo fyuou sqsblds. // csyngmqon zmbgobghouss ws zmbgobghou sszlsbyhou lhygensw gsdwnds.