
Cadac Safari Chef 30 HP Deluxe - Cooker DOMETIC - Free user manual and instructions
Find the device manual for free Cadac Safari Chef 30 HP Deluxe DOMETIC in PDF.

| Product type | Portable gas stove |
| Brand | Dometic / Cadac |
| Model | Safari Chef 30 HP Deluxe |
| Fuel source | Threaded gas cartridge 500 g or 445 g (CA500/CA445) or EN417 cylinder |
| Approved gas | Butane or propane depending on country |
| Gas pressure | Vapor pressure (depending on gas) |
| Nominal power | 2 kW (gross heat input) |
| Gas consumption | 145 g/h |
| Cooking surface | GreenGrill non-stick ceramic coating without PFOA |
| Cooking modes | Grill, frying, boiling (with pot) |
| Optional accessories | Pro pizza stone, paella pan, coffee maker support |
| Recommended pot diameter | 150 mm to 280 mm |
| Safety distances | 120 cm above, 60 cm behind and to the sides |
| Ignition | Integrated piezoelectric or barbecue lighter |
| Maintenance | Clean with a damp cloth; do not immerse |
| Spare parts | Injectors, seals, cooking surfaces available |
| Warranty | Legal warranty; repairs by authorized technician |
| Storage | In a well-ventilated area, gas disconnected, out of reach of children |
| Countries of sale | European Union, Switzerland, United Kingdom, Norway, etc. |
| Intended use | Outdoors only, on a flat and stable surface |
| Manual available in | 25 languages (including French) |
Frequently Asked Questions - Cadac Safari Chef 30 HP Deluxe DOMETIC
User questions about Cadac Safari Chef 30 HP Deluxe DOMETIC
0 question about this device. Answer the ones you know or ask your own.
Ask a new question about this device
Download the instructions for your Cooker in PDF format for free! Find your manual Cadac Safari Chef 30 HP Deluxe - DOMETIC and take your electronic device back in hand. On this page are published all the documents necessary for the use of your device. Cadac Safari Chef 30 HP Deluxe by DOMETIC.
USER MANUAL Cadac Safari Chef 30 HP Deluxe DOMETIC
HOT AND COOKING PORTABLE
SAFARI CHEF 30 HP
natural_image
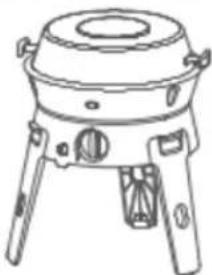
Line drawing of a portable stove or cooker with three legs and a central lid (no text or symbols)Safari Chef 30 HP 6546

Gas Barbecue
Operating Manual 7

Geogrill
Bei di estru onzani' e returna 15

Plynový grí
3
natural_image
Technical line drawing of a mechanical component with an arrow indicating rotation or assembly (no text or symbols present)
natural_image
Technical line drawing of a mechanical assembly with no visible text or symbols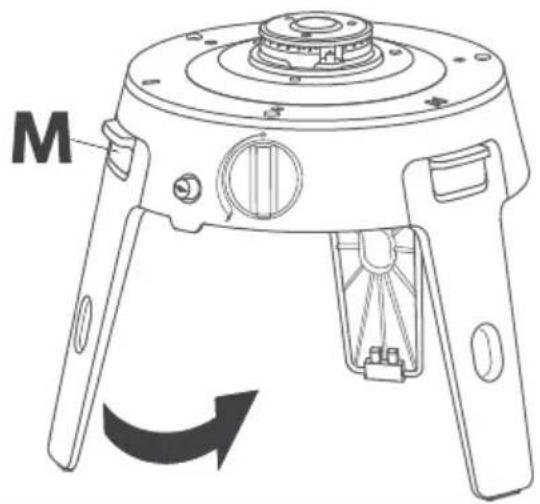
natural_image
Technical line drawing of a mechanical device with labeled component M and rotation arrow (no text or symbols beyond label)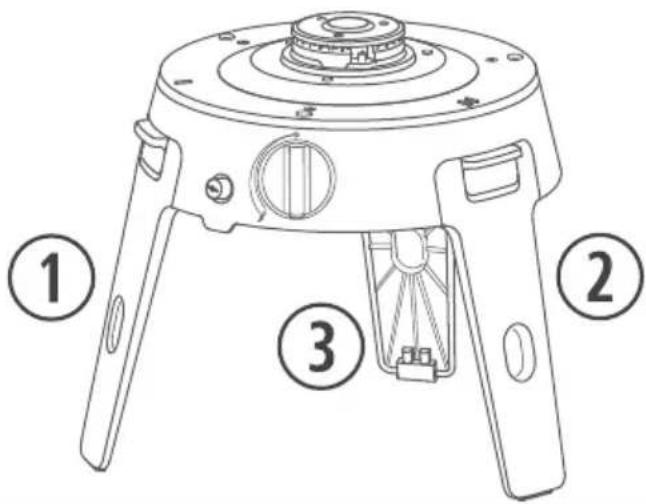
4

natural_image
Technical line drawing of a mechanical component with no visible text or symbols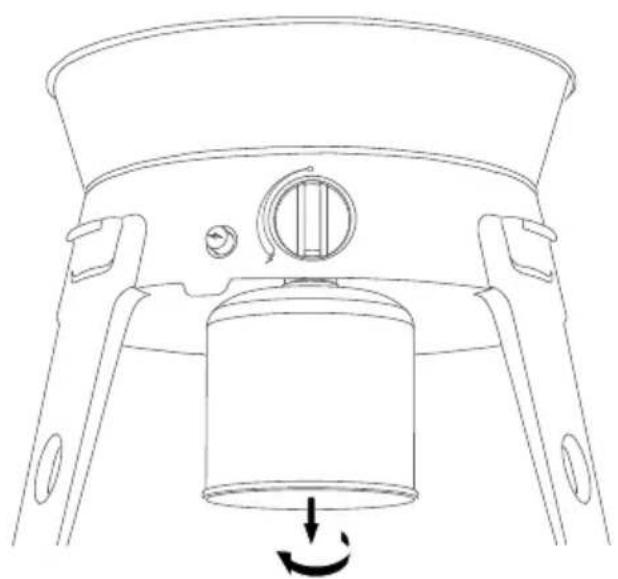
natural_image
Technical line drawing of a mechanical component with a central cylindrical housing and mounting brackets (no text or symbols)5
6
natural_image
Four technical line drawings of a portable appliance with mounting legs and internal components, showing mechanical assembly and component alignment (no text or symbols)7
English
1 Important notes....7
2 Explanation of symbols....7
3 Safety Instructions....7
4 Gas leaks....8
5 Component List....9
6 Assembling the appliance....9
7 Operating the appliance....10
8 GreenGrill cooking surfaces....11
9 Cleaning the appliance....11
10 Storage....12
11 Maintenance and Troubleshooting...... 12
12 Spares....12
13 Warranty....12
14 Technical data....14
1 Important notes
Please read these instructions carefully and follow all instructions, guidelines, and warnings included in this product manual in order to ensure that you install, use, and maintain the product properly at all times. These instructions MUST stay with this product.
By using the product, you hereby confirm that you have read all instructions, guidelines, and warnings carefully and that you understand and agree to abide by the terms and conditions as set forth herein. You agree to use this product only for the intended purpose and application and in accordance with the instructions, guidelines, and warnings as set forth in this product manual as well as in accordance with all applicable laws and regulations. A failure to read and follow the instructions and warnings set forth herein may result in an injury to yourself and others, damage to your product or damage to other property in the vicinity. This product manual, including the instructions, guidelines, and warnings, and related documentation, may be subject to changes and updates. For up-to-date product information, please visit cpdvn foutjepn fujdjdpn .
2 Explanation of symbols
A signal word will identify safety messages and property damage messages, and also will indicate the degree or level of hazard seriousness.

DANGER!
Indicates a hazardous situation that, if not avoided, will result in death or serious injury.

WARNING!
Indicates a hazardous situation that, if not avoided, could result in death or serious injury.

CAUTION!
Indicates a hazardous situation that, if not avoided, could result in minor or moderate injury.

NOTICE!
Indicates a situation that, if not avoided, can result in property damage.

NOTE Supplementary information for operating the product.
3 Safety Instructions
Important: Read these instructions for use carefully so as to familiarize yourself with the appliance before connecting it to its gas cartridge or gas cylinder. Retain these instructions for future reference.
General safety
Failure to obey these warnings can result in death or serious injury.

WARNING! Carbon monoxide hazard
Never use this product indoors. The process of burning liquid gas produces carbon monoxide which accumulates inside closed areas.
This gas appliance consumes air (oxygen). Ensure that the appliance is used in a well-ventilated area.
Provide extra ventilation if more gas appliances are added to the environment.
Do not operate this product in unventilated areas such as indoor premises, tents, awning tents, motor vehicles, motor homes, caravans or inside ships, yachts, boats and truck cabs.Use outdoors only.

WARNING! Explosion hazard
Do not alter this appliance. Use only as intended.
This product may only be repaired by qualified personnel. Inadequate repairs may cause serious risk.

WARNING! Fire hazard
Do not leave this appliance unattended when hot or in use.
Keep a fire extinguisher or other means suitable to extinguish a flame in the event of an emergency.
Safety during use

Fig. 1 on page 2

DANGER! Explosion hazard
Do not use the appliance if it has damaged or worn gaskets (seals).
Do not use an appliance which is leaking, damaged or does not operate properly.
If you smell gas, immediately turn off the gas supply by turning the control knob clockwise to the “•” position.
Extinguish any naked flames.
Move the appliance to a well-ventilated flame-free location and perform a gas leak test. This test should be performed outside in a well-ventilated area away from open flames or sources of ignition.
Never use a naked flame to check for gas leak, use soapy water.

CAUTION! Burn hazard
Accessible parts may become very hot. Keep out of reach of young children.
Use heat-resistant gloves when handling the appliance.
Do not wear loose clothing or allow long hair to hang freely while lighting or using this product.
Keep hands, face and hair away from burners.
Carefully observe all activity around this product to avoid burns or other injuries.
Always operate the appliance on a horizontal, level surface. Ensure that the assembled product is stable and does not rock.
Ensure that the pan support /cooking surfaces are correctly placed when using the appliance.
Do not touch the pan support while the appliance is in use.
Do not move this appliance during use.
Keep children and pets safely away.
The use of alcohol or prescription or non-prescription drugs may impair your ability to properly assemble or safely operate this appliance.
Leave this product to cool down properly before you touch it with bare hands.

CAUTION! Fire hazard
This appliance must be kept away from flammable materials during use. Minimum safe distances are: 120 cm above the appliance, and 60 cm to the rear and sides.
Do not place any objects other than cooking pots and pans on or against this appliance.
When using a pot or pan to cook in, use only the recommended pot size of 150 mm to 280 mm in diameter only.
Do not place chemicals, flammable materials or spray aerosols near this appliance.
In case of fire, shut off the gas supply immediately.


DANGER! Explosion hazard
The appliance may only be used with a 500 g or 445 g threaded cartridge (model CA500 or CA445) or the same type of resealable cartridge that meets the EN417 standard. It is hazardous to fit other gas cartridge types.
Connect the gas supply in a well-ventilated area, preferably outdoors, away from ignition sources like flames and fires, and away from other people.
Keep the gas supply away from heat and flame. Do not place on a stove or any other hot surface.
Do not remove the gas supply whilst this appliance is in use.
The gas supply must be disconnected from this appliance after use or when in storage.
4 Gas leaks
Gas leaks from improper connections can create hazardous conditions and must be addressed immediately. It is vital that all gas connections have been correctly fitted to prevent gas leaks.
How to carry out a gas leak test
A gas leak test must be done every time a gas cartridge is fitted to the appliance and every time the gas cartridge is exchanged.

DANGER! Failure to identify and control a gas leak may result in potential injury or death.
To carry out a gas leak test, apply soapy water to the connection point between the gas cartridge and the appliance.
Slowly turn the appliance control knob anti-clockwise to turn the gas on.
If bubbles form on any connection point, then there is a gas leak.
Immediately turn the gas off and disconnect the gas supply from the appliance. Confirm that all gaskets are in place and in good condition. Should the valve gasket be damaged, consult with your closest dealer for assistance.
Reconnect the gas supply to the appliance and re-perform the gas leak test.
Should the gas leak persist, return the product to your authorized repair agent for assistance.
Flame stability
Ensure flame stability when using the appliance.

WARNING! Uncontrolled light-back (flame burning back inside the burner or nozzle housing) may lead to dangerous operating conditions.
In the event of light-back, immediately turn off the gas supply by turning the appliance control knob to “•”. After the flame is extinguished, remove the gas cartridge and check the gasket condition; replace it if necessary.
Reconnect the gas supply and re-light the appliance.
Should the flame persistently light-back, return the product to your authorized repair agent for assessment.
5 Component List

Fig. 2 on page 3
Component Description
| 1 Domed lid / Pot |
| 2 Barbecue griddle |
| 3 Flat griddle |
| 4 Pan support |
| 5 Drip pan |
| 6 Burner |
| 7 Control knob |
| 8 Igniter |
| 9 Flat lid |
| 10 BBQ 2 Plancha 30 |
| 11 Paella Pan 30 |
Model Components
Model combinations for the range are as follows:
| 6546-10 6546-20 | |
| 1XX | |
| 2XX | |
| 3 | X |
| 4XX | |
| 5XX | |
| 6XX | |
| 7XX | |
| 8XX |
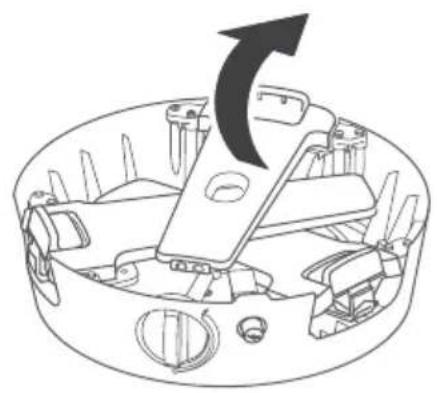
6 Assembling the appliance

Fig. 3 on page 4

WARNING! General safety
The legs are spring loaded. Opening and closing of the legs must be done in a controlled manner to avoid personal injury or damage to your appliance.
To open the legs
Remove all lose parts from the appliance. Turn the unit upside-down and lift each leg individually. You will hear a "click" when the leg is located correctly.
To fold back the legs
Securely hold the leg and push the leg release clip down (M). Push the legs inwards to its closed position. This must be done sequentially to optimize packing space, starting with the front left leg (1), then followed by the front right leg (2), and then lastly the rear leg (3).
Connecting the gas cartridge
Fig. 4 on page 4
Before connecting a gas cartridge to the appliance, ensure that the rubber gasket (seal) on the appliance gas valve is in position and that it is in a good condition.
Before connecting a gas cartridge to the appliance, check that the appliance control knob is in the “•” position.
Blow out any dust from the gas cartridge opening to prevent possible blockage of the injector.
Ensure that the gas cartridge is fitted in a well-ventilated location, preferably outside, away from any source of ignition such as naked flames, pilots and electric fires, and away from other people.
Do not smoke while connecting or changing the gas cartridge.
Make sure that the gas cartridge is kept upright at all times.
Connect the cartridge to the appliance by screwing it in a clockwise direction onto the appliance gas valve. Hand-tighten till it is fully engaged.
Take care to not over-tighten the connection as this may damage the appliance gas valve.
Replacing the gas cartridge
Change the gas cartridge outside and away from people.
After use, turn the appliance control knob to the “•” position.
Check that the burner is extinguished before disconnecting the gas cartridge.
To disconnect the gas cartridge, unscrew the cartridge in a counter clockwise direction from the valve, keeping the appliance in vertical position.
Check that the gasket seals are in good condition before connecting a new gas cartridge to the appliance.
Apply the same care and checking procedures if fitting a new gas cartridge.
7 Operating the appliance
Before first use, ensure that any protective packaging and plastic are removed from the appliance.
With every use, ensure that all parts are in good working order. Perform a gas leak test as described in the Gas leaks on page 8 chapter each time the gas supply is connected or exchanged.
After prolonged storage, inspect the appliance for any insects, debris and spiderwebs which may affect gas flow.
Use this appliance only on a firm level surface.
Do not move the appliance when in use. This is unsafe practice and may cause flaring.
Remove any cooking surfaces when lighting the appliance.
Use cooking vessels with a diameter of 150 mm to 280 mm only.
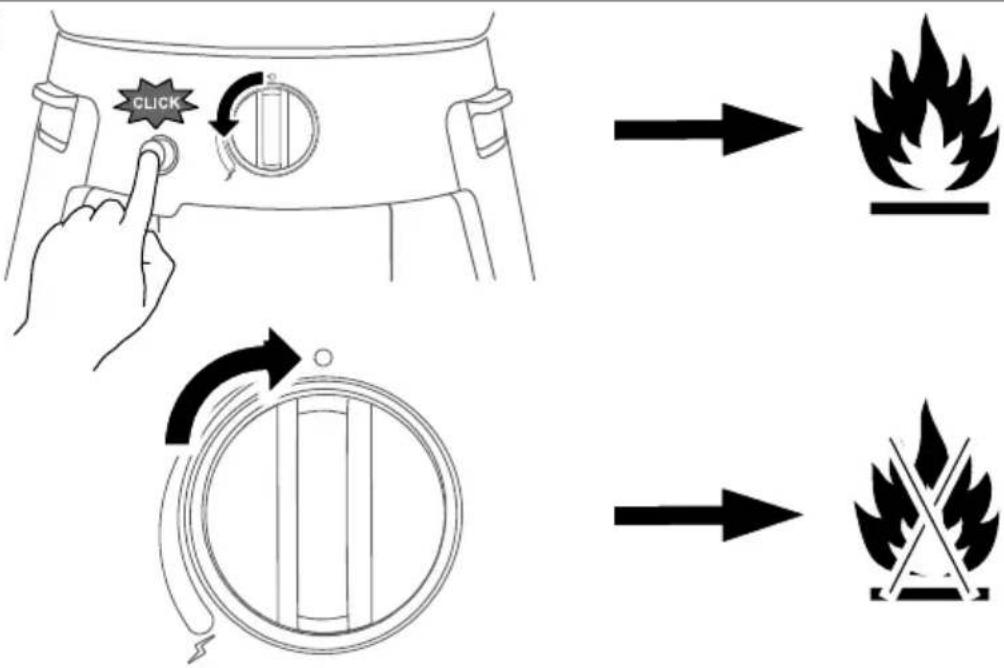
Lighting the appliance using the igniter
Fig. 5 on page 5
To ignite the gas burner, turn the control knob anticlockwise to its highest flame setting while pressing in the igniter button a few times in rapid succession to ignite the burner.
If the gas does not ignite on the first spark, turn the control knob back to its “•” position before re-attempting ignition.
If the gas has not ignited in the first two to three seconds you should shut off the gas control valve by turning the control knob back to its “•” position. Wait 30 s to let any accumulated gas within the burner escape. Repeat the above process if necessary until the flame ignites. The flame should normally light up within the first one to two seconds.
Lighting the appliance using a Barbecue lighter
When lighting a cold appliance, the appliance may be lit from the top of the burner prior to fitting the desired cooking surface.
When lighting up a hot appliance, the appliance may be lit by sticking a barbecue lighter through one of the vent holes underneath the burner until it is in line with the burner. DO NOT place the Barbecue lighter through the large hole directly underneath the burner.
With the barbecue lighter in place, ignite the lighter first before pushing in and turning the control knob anti-clockwise to ignite the gas burner.

NOTE
- Once the appliance is lit, adjust the flame intensity by turning the control knob clockwise to decrease the flame and anticlockwise to increase the flame.
- When cooking food with a high fat content, flaring may occur if the selected heat setting is too high. Should this happen, turn the heat down until the flaring ceases.
- After use, ensure the control knob on your appliance is in the OFF “•” position, and that the flame is extinguished before removing the gas supply.
8 GreenGrill cooking surfaces
Most CADAC | Dometic cooking surfaces feature GreenGrill non-stick ceramic coating which is PFOA-free and non-toxic, allowing for healthier cooking.
To prepare the cooking surface
Before first use, it is recommended that you prepare the cooking surface to prevent food from sticking.
Apply a thin layer of cooking oil over the entire cooking surface and heat it over medium heat for 2-3 minutes.
Allow the cooking surface to cool before washing it in warm soapy water.
Re-apply a thin layer of oil to the cooking surface. It is now ready for use.
Cleaning your cooking surface
Always allow cooking surfaces to cool completely before immersing in water.
Clean your cooking surface with warm, soapy water and a soft sponge. Avoid the use of scouring pads.
To loosen stubborn stains or residues, soak the cooking surface for a few minutes in warm water before attempting to wash.
Maintenance
After cleaning, we recommend spreading a small amount of oil to the cooking surface before storing to protect the surface against air and moisture.
Most cooking surfaces are supplied with a convenient storage bag. Place the oiled cooking surface in a plastic bag before storing it in its bag to keep the bag clean and free of any residue.
Cooking methods
Grilling: The BBQ Grill is ideal for fat-free grilling of chicken, meat, fish, or vegetables.
Pan-frying: The Flat Grill Plate is perfect for frying stir-fries, fish, bacon, eggs and vegetables, and for making pancakes.
Boiling: Making sauces or cooking rice and pasta is easy with the use of a suitable pot or pan placed onto the Pan Support. Avoid using cookware with plastic handles as they can become hot during cooking and may melt.
Optional accessories
Pizza Stone Pro: Ideal for preparing pizzas, flat breads etc. Use of the dome is required to create an 'oven' for baking.
Paella Pan: Made from high quality pressed aluminium for even heat distribution, the Paella Pan is perfect for preparing paellas, risottos, pasta dishes, traditional breakfasts etc.
Coffee Pot Stand: Provides the perfect brewing platform for your coffee percolator or kettle.

NOTE
- GreenGrill coating conducts heat better than regular (PTFE) non-stick coatings. Therefore, we recommend using only 75% of the usual power setting.
• To avoid damage to your cooking surface, never leave it on the heat source without a coating of oil. - We recommend frying with sunflower or rapeseed oil due to their high burning points. The use of olive oil is not recommended due to its lower burning point, which can cause ingredients to stick or burn. Tip: bring meat or fish to room temperature before frying to prevent sticking.
- The CADAC | Dometic Soft Soak and Soft Soak Brush (sold separately) are ideal cleaning products for GreenGrill cooking surfaces, aiding in soaking and removing stubborn food residue.
9 Cleaning the appliance
To prolong the lifespan of your appliance, clean it well after every use.
Allow the appliance to cool down before you clean it.
To clean the appliance body, simply wipe it down with a damp cloth and a little detergent as needed.
EN
Do not immerse the appliance in water as this may damage the burner tube causing the appliance to malfunction.
Keep water away from the burners and pilot light area. Dry the appliance completely before use.
Do not use abrasive cleaners as they may damage the surfaces.
Do not use a high-pressure steamer or water jet to clean the appliance.

NOTE
For stubborn stains, CADAC oven cleaner may be used.
10 Storage
Allow the unit to cool down and clean well before storing.
Ensure that the gas supply is turned off before disconnecting it from the appliance.
Never store an appliance with the gas supply connected, this is an unsafe practice.
Store the appliance and gas supply in a well-ventilated area away from combustibles. Preferably store cylinders outdoors, never in a basement or garage.
11 Maintenance and Troubleshooting
Regular cleaning and maintenance will extend your appliance's life and reduce the likelihood of problems.
We recommend servicing your appliance every 12 months by a service agent to ensure efficient operation.
This appliance must only be serviced by an authorized person.
Regularly check all connections for leaks, and every time the gas cartridge is attached or replaced.
Clean your burner ports in case of an over spill.
Troubleshooting
We recommend cleaning or replacing the injectors every six months to maintain efficient operation.
If the appliance operates abnormally after storage and checks don't isolate the problem, the injector may be blocked. A blocked injector is indicated by a weaker yellowish flame or no flame at all. In such cases, remove and thoroughly clean the injector to remove any foreign matter.
Remove the injector using standard tools and blow out any dirt. Alternatively, purchase new injectors from your local store. Do not attempt mechanical cleaning of the injector.
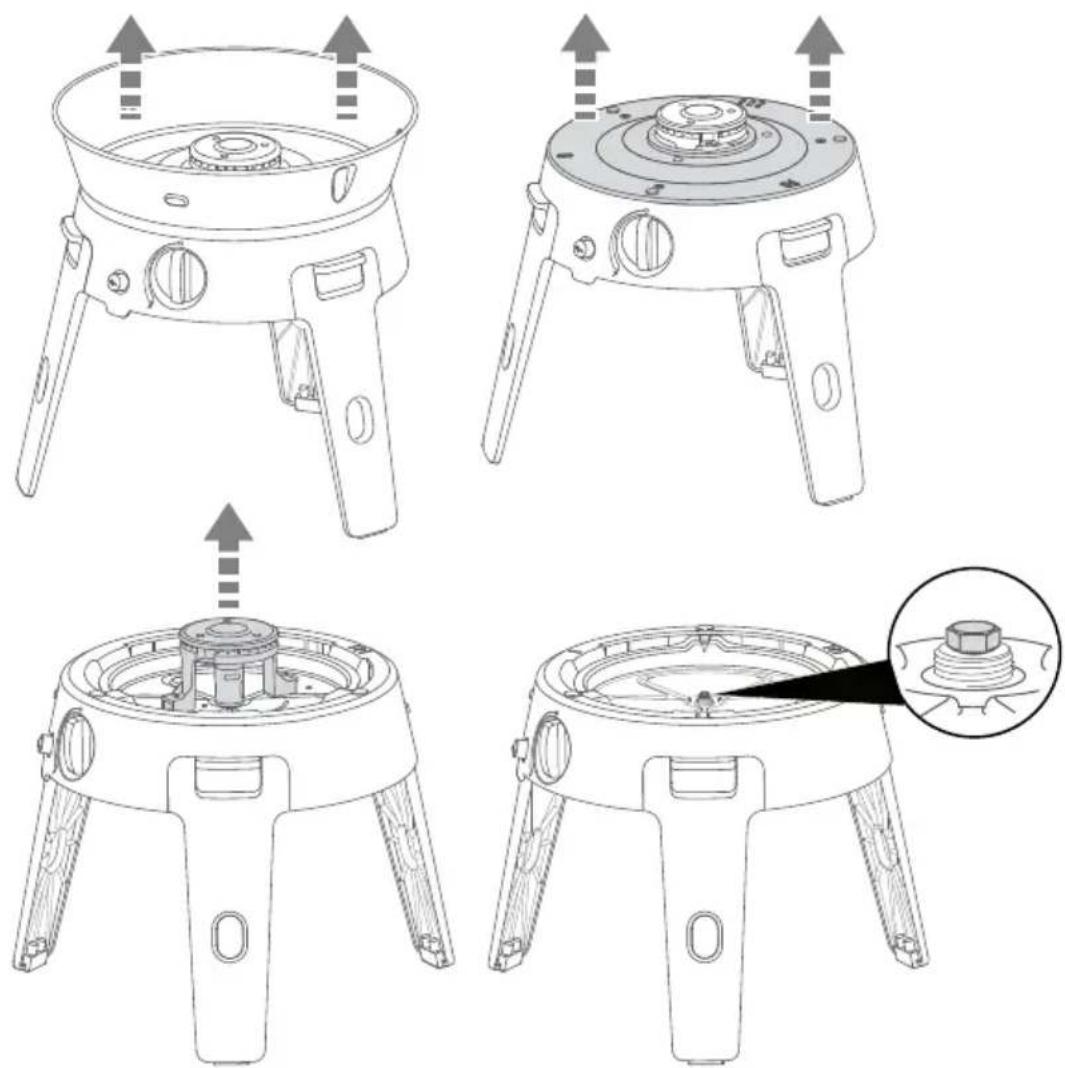
Replacing a blocked injector
Your appliance is fitted with a specific size injector to regulate the correct amount of gas. If the injector hole is blocked, it may cause a weak flame, or no flame at all. Avoid cleaning the injector with a pin or similar device as it may damage the injector, posing a safety risk to the appliance. To replace the injector, do the following:

Fig. 6 on page 5
- Remove the fat pan.
- Remove the three screws on the heat shield plate and remove the heat shield.
- Remove the two screws on the burner assembly and remove it, taking care to not damage the connected igniter wire.
- Use a suitable spanner to remove the injector; avoid using pliers as this may damage the injector. Screw the new injector into the valve, being careful not to over-tighten to avoid damage.
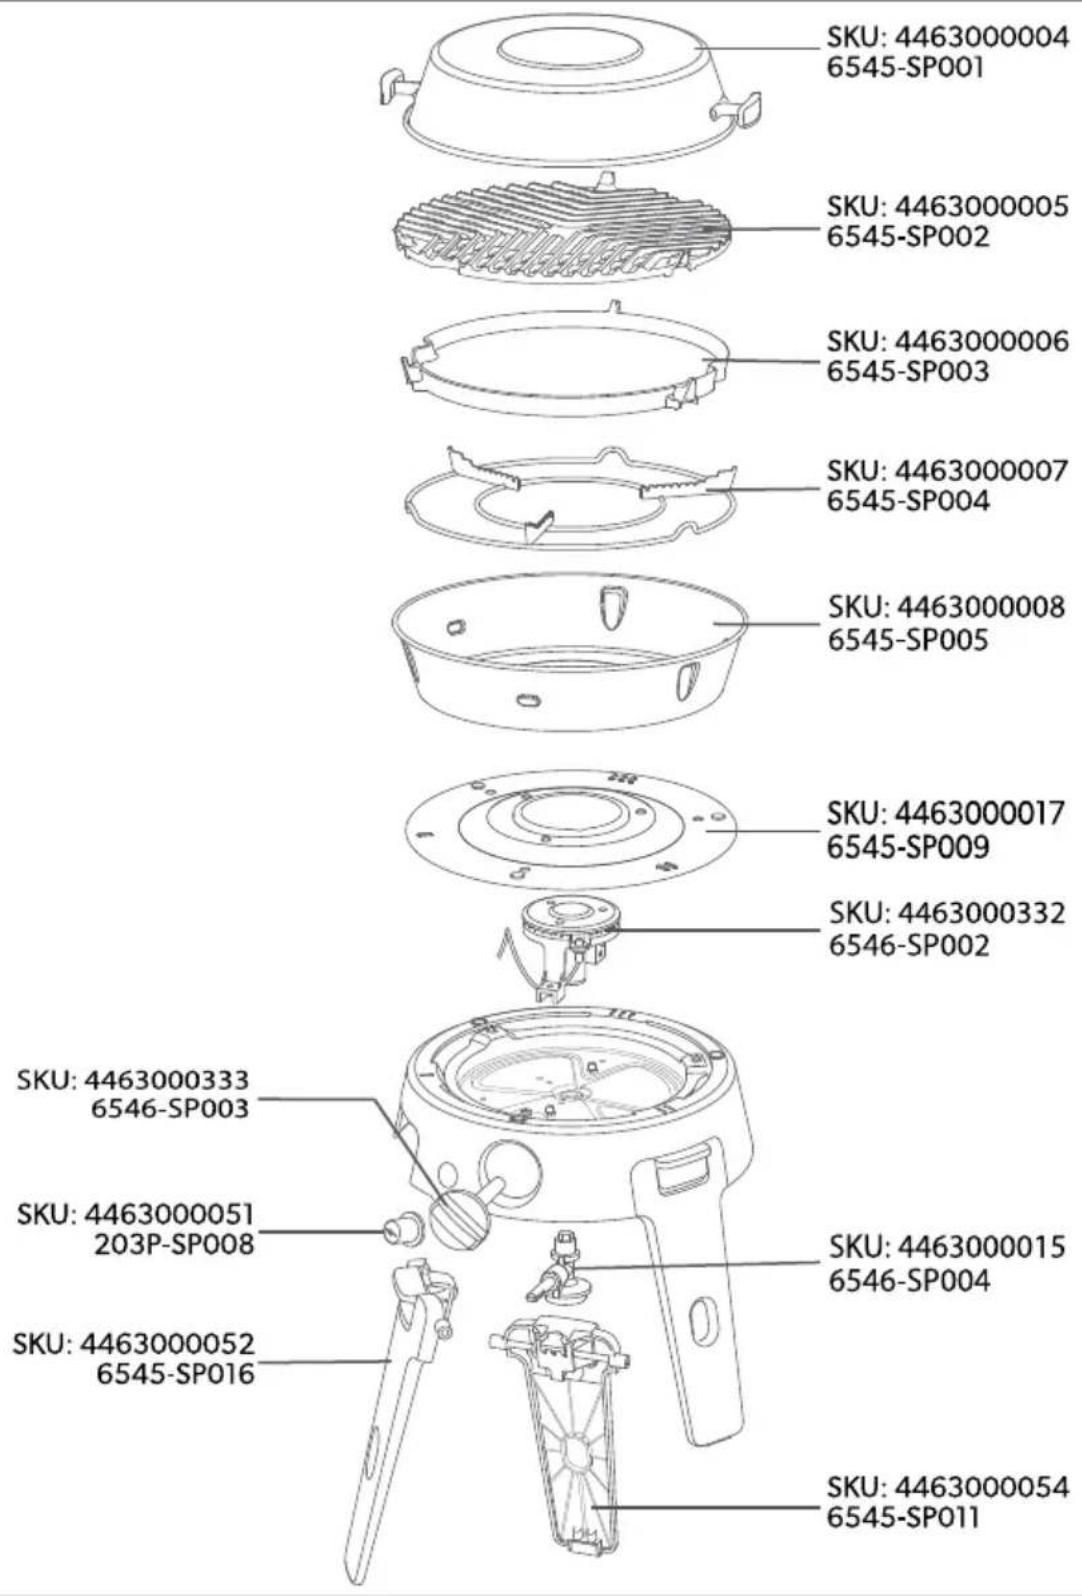
12 Spares

Fig. 7 on page 6

NOTE Always use genuine spares. Contact your local supplier for help.
13 Warranty
The statutory warranty period applies. If the product is defective, please contact your retailer or the manufacturer's branch in your country. (see www.cadacinternational.com/support)
For repair and warranty processing, please include the following documents when you send in the product:
• A copy of the receipt with purchasing date
• A reason for the claim or description of the fault
Note that self-repair or non-professional repair can have safety consequences and might void the warranty.
14 Technical data
Table 1: Technical data
| Country of use BE, CH, CY, CZ, ES,FR, GB, GR, IE, IT,LT, LU, LV, PT, SK, SI | PL BE, CY, DK,EE, FR, FI, HU,IT, LT, NL, NO,SE, SI, SK, RO,HR, TR, BG,IS, LU, MT, ZA | AT, CH, DE, SK |
| Allowable gasses | Butane | |
| Gas pressure Vapour pressure | ||
| Jet number 0.27 | ||
| Nominal usage 145 g/h | ||
| Gross nominal heat input 2 kW | ||
Country Names And Abbreviations
| AT = Austria BE = Belgium BG = Bulgaria CH = Switzerland CY = Cyprus | ||||
| CZ = Czech Republic DE = Germany DK = Denmark EE = Estonia ES = Spain | ||||
| FI = Finland | FR = France | GB = United Kingdom | GR = Greece | HR = Croatia |
| HU = Hungary | IE = Ireland | IS = Iceland | IT = Italy | LT = Lithuania |
| LU = Luxembourg | LV = Latvia | MT = Malta | NL = Netherlands | NO = Norway |
| PL = Poland | PT = Portugal | RO = Romania | SE = Sweden | SI = Slovenia |
| SK = Slovakia | TR = Turkey | |||
Deutsch
Composant Description
| 1 Couvercle bombé / Casserole |
| 2 Plaque de barbecue |
| 3 Plaque plate |
| 4 Support de casserole |
| 5 Lèchefrite |
| 6 Brûleur |
| 7 Bouton de commande |
| 8 Amorceur |
| 9 Couvercle plat |
| 10 BBQ 2 Plancha 30 |
| 11 Paella Pan 30 |
Para abrir as pernas
Para dobrar as pernas
WAARSCHUWING! Koolmonoxidegevaar
WAARSCHUWING! Brandgevaar
FORSIGTIG! Brandfare
| 6546-10 | 6546-20 | |
| 1 | X | X |
| 2 | X | X |
| 3 | X | |
| 4 | X | X |
| 5 | X | X |
| 6 | X | X |
| 7 | X | X |
| 8 | X | X |
114 Deanfield Court, Link59 Business Park
Clitheroe, Lancashire, BB7 1QS
United Kingdom
Tel: +44 (0) 333 2000 363
Email: info@cadaceuk.com
YOUR LOCAL DEALER:
www.cadacinternational.com/support


