
04-634 - Multitools NEO tools - Free user manual and instructions
Find the device manual for free 04-634 NEO tools in PDF.

| Brand | NEO tools |
| Model | 04-634 |
| Product Type | 2-in-1 Pole Gardening Tool: Chainsaw and Hedge Trimmer |
| Supply Voltage | 230 V AC |
| Frequency | 50 Hz |
| Protection Class | II (double insulation) |
| Protection Rating | IPX0 |
| Chainsaw Power | 750 W |
| Hedge Trimmer Power | 550 W |
| Guide Bar Length (Chainsaw) | 250 mm |
| Chain Type | 3/8" .043 x 40 DL |
| Chain Pitch | 0.375" (9.53 mm) |
| Chain Linear Speed (No Load) | 12 m/s |
| Oil Tank Capacity | 0.06 L |
| Cutting Length (Hedge Trimmer) | 440 mm |
| Cutting Blade Length | 460 mm |
| Max Cutting Thickness (Hedge Trimmer) | 20 mm |
| Idle Speed (Hedge Trimmer) | 1600 min⁻¹ |
| Max Working Length (Chainsaw) | 2.37 m |
| Max Working Length (Hedge Trimmer) | 2.67 m |
| Weight of Chainsaw Alone | 3.3 kg |
| Weight of Chainsaw with Extension | 4.7 kg |
| Weight of Hedge Trimmer Alone | 2.9 kg |
| Weight of Hedge Trimmer with Extension | 4.5 kg |
| Sound Pressure Level (Chainsaw) | 87.3 dB(A) K=3 dB(A) |
| Sound Power Level (Chainsaw) | 101.2 dB(A) K=3 dB(A) |
| Sound Pressure Level (Hedge Trimmer) | 84.2 dB(A) K=3 dB(A) |
| Sound Power Level (Hedge Trimmer) | 95.0 dB(A) K=2.05 dB(A) |
| Vibrations (Chainsaw) | 3.32 m/s² K=1.5 m/s² |
| Vibrations (Hedge Trimmer) | 2.91 m/s² K=1.5 m/s² |
| Recommended Chain Oil | SAE 10W-30 |
| Year of Manufacture | 2025 |
Frequently Asked Questions - 04-634 NEO tools
User questions about 04-634 NEO tools
0 question about this device. Answer the ones you know or ask your own.
Ask a new question about this device
Download the instructions for your Multitools in PDF format for free! Find your manual 04-634 - NEO tools and take your electronic device back in hand. On this page are published all the documents necessary for the use of your device. 04-634 by NEO tools.
USER MANUAL 04-634 NEO tools
natural_image
Three NED angle hedges displayed against a plain background (no text or symbols visible)04-634


natural_image
Icon of a person using a computer inside a circle (no text or symbols)
natural_image
Close-up of a black-handled tool with a labeled part (13), no visible text or symbols beyond the label.C

D
(PL) INSTRUKCJA OBSŁUGI ORYGINALNA....7
(EN) TRANSLATION OF THE ORIGINAL INSTRUCTIONS....11
(UA) ПЕРЕКЛАД ОРИГІНАЛЬНОЇ ІНСТРУКЦІЇ....14
(RO) TRADUCEREA INSTRUCTIUNILOR ORIGINALE....18
(HU) AZ EREDETI HASZNÁLATI UTASÍTÁS FORDÍTÁSA....22
(IT) TRADUZIONE DELLE ISTRUZIONI ORIGINALI ....26
(FR) TRADUCTION DES INSTRUCTIONS ORIGINALES....30
(DE) ÜBERSETZUNG DER ORIGINALANLEITUNG....34
(RU) ПЕРЕВОД ОРИГИНАЛЬНЫХ ИНСТРУКЦИЙ....38
(CZ) PŘEKLAD PŮVODNÍCH POKYNŮ 42
(SK) PREKLAD PÔVODNÝCH POKYNOV....45
(HR) PRIJEVOD IZVORNIH UPUTA....49
(LT) ORIGINALIŲ INSTRUKCIJŲ VERTIMAS....53
(LV) ORIGINĀLĀS INSTRUKCIJAS TULKOJUMS....56
(SL) PREVOD IZVIRNIH NAVODIL....60
(BG) ПРЕВОД НА ОРИГИНАЛНИТЕ ИНСТРУКЦИИ....64
(SR) ПРЕВОД ОРИГИНАЛНИХ УПУТСТАВА....68
(GR) ΜΕΤΑΦΡΑΣΗ ΤΩΝ ΑΡΧΙΚΩΝ ΟΔΗΓΓΩΝ....72
(NL) VERTALING VAN DE OORSPRONKELIJKE INSTRUCTIES....76
(PT) TRADUÇÃO DAS INSTRUÇÕES ORIGINAIS....80
(ES) TRADUCCIÓN DE LAS INSTRUCCIONES ORIGINALES....84
(EE) ORIGINAALJUHISTE TÖLGE 88
(PL)
INSTRUKCJA OBSŁUGI ORYGINALNA
Producent: GTX Poland Sp. z o.o. Sp.k,
GTX Poland Sp. Z o.o. Sp.k.
Ul. Pograniczna 2/4
02-285 Warszawa

Paweł Kowalski
NOTE: BEFORE USING THE EQUIPMENT, PLEASE READ THIS MANUAL CAREFULLY AND KEEP IT FOR FUTURE REFERENCE. PERSONS WHO HAVE NOT READ THE INSTRUCTIONS SHOULD NOT CARRY OUT ASSEMBLY, ADJUSTMENT OR OPERATION OF THE EQUIPMENT.
SPECIFIC SAFETY PROVISIONS
NOTE!
Read the operating instructions carefully, follow the warnings and safety conditions contained therein. The appliance has been designed for safe operation. Nevertheless: installation, maintenance and operation of the appliance can be dangerous. Following the following procedures will reduce the risk of fire, electric shock, injury and will reduce the installation time of the appliance
READ THE USER MANUAL CAREFULLY TO FAMILIARISE YOURSELF WITH THE APPLIANCE, KEEP THIS MANUAL FOR FUTURE REFERENCE.
SAFETY RULES
Specific safety conditions for chain saws and hedge trimmers
WARNING! Safety regulations must be observed when using the chainsaw. For your own safety and the safety of bystanders, you are asked to read this manual before operating the chainsaw. You are asked to keep the instructions for future reference.
Safety warnings for hedge trimmers
- Keep all parts of the body away from the blade. Do not attempt to push back the material being cut or hold it against the running blade. Remove jammed material only after switching off the machine. A moment's inattention when using the hedge trimmer can lead to serious injury.
- Hold the power tool by the insulated planes of the handle, as the knife may encounter hidden electrical wires. Contact of the knife with a live wire can cause voltage to appear on metal parts and lead to electric shock.
- Hold the unit by the handle when the blade is not working. Always wear a protective cover when transporting or storing. Careful handling reduces the risk of injury from contact with the blade.
- Electrical wires must be removed from the cutting zone. During operation, the wire may hide in the hedge and be accidentally cut.
Hedge trimmer use
• Work only in daylight or under very good artificial lighting.
- Avoid pruning a wet hedge.
• Always make sure you are standing firmly with both feet.
- Do not use hedge trimmers with damaged guards, housings or without the enclosed guards.
- Start the engine as instructed making sure that the limbs are away from the cutting element.
- Ensure that the ventilation openings in the housing are free of debris.
- Keep hands and feet away from moving parts.
- Repairs to hedge trimmers should only be carried out by authorised persons.
- Only spare parts recommended by the manufacturer should be used.
- The appliance should not be made available for use by children or anyone who has not read these instructions.
- Do not operate the appliance if there are bystanders in the immediate vicinity.
- Maintain a safe distance of 15 m between the end of the blade and the electrical line.
Safety warnings for the chainsaw:
- Do not bring any part of your body close to the chainsaw chain while the saw is running. Make sure the chain does not touch any object before starting the saw. A moment's inattention while operating the chainsaw can cause the chain to catch on clothing or body parts.
- Always hold the chainsaw in such a way as to prevent the saw from kicking back during operation. Holding the chainsaw incorrectly or too weakly may cause a risk of injury and is not permitted.
- Safety goggles and hearing protection should be worn. Additional safety equipment for head, hands, legs and feet is recommended. Suitable protective clothing reduces the risk of injury from flying material fragments or accidental contact with the chainsaw chain.
- Do not use the chain saw in a tree. Use of the chainsaw by an operator in a tree can cause injury.
- The operator must always stand firmly on the ground and may only use the chainsaw when standing on a stationary, safe and level surface. When standing on slippery or unstable ground, such as a ladder, the operator may lose balance or control of the saw.
- When cutting branches where there is tension, beware of the possibility of rebound. When tension is released in the wood fibres, the branch may strike the operator or cause the operator to lose control of the saw.
- Special care should be taken when cutting shrubs and young trees. Flexible parts can catch on the saw and hit the operator, causing loss of balance.
- Carry the chainsaw when switched off, holding it by the handle and away from your body. Always fit the bar cover when transporting and storing the chainsaw. By handling the saw correctly, you can reduce the likelihood of accidental contact with the moving chain.
- Follow the instructions for lubricating, tensioning the chain and replacing accessories. An improperly tensioned or lubricated chain can break or increase the risk of kickback.
- Saw handles should be dry, clean and not contaminated with oil or grease. Grips that are greasy or contaminated with oil can cause loss of control of the saw.
- The chainsaw is designed exclusively for cutting wood. Do not use the chainsaw for anything other than its intended purpose. For example, do not use the chainsaw to cut plastics or building materials made of materials other than wood. If you use your chainsaw for purposes other than those for which it is intended, it may cause dangerous situations.
Electrical safety
- The plug of the power tool must fit into the socket. The plug must not be modified in any way. Do not use any adapters with grounded power tools.
- Unmodified plugs and matched sockets reduce the risk of electric shock.
- Avoid body contact with earthed surfaces such as pipes, radiators, cookers and refrigerators. Body contact with earthed surfaces increases the risk of electric shock.
- Do not expose power tools to rain, as water entering the power tool increases the risk of electric shock.
- Never use the cable to carry, pull or disconnect the power tool.
- The cable should be placed away from heat sources, oil, sharp edges or moving parts.
- Damaged or tangled wires increase the risk of electric shock.
- When using the power tool outdoors, use an extension cord suitable for outdoor use. Using a cord suitable for outdoor use reduces the risk of electric shock.
- If it is unavoidable to operate a power tool in a damp area, a residual current circuit breaker should be used. The use of a residual current circuit breaker reduces the risk of electric shock.
Causes and ways to prevent rejection:
- Jetting can occur if the chain is jammed and stuck in the notch.
- Safety in use is enhanced by the safety guard over the top edge of the saw. Only cut branches with the part of the chain that is on the bottom edge of the bar.
NOTE: We cut downwards not upwards!
ATTENTION: It is not permissible to remove or in any way modify the top guard as this reduces user safety. Beware of the possibility of
accidentally touching the cutting material with the tip of the guide bar to protect against kickback.
A jammed chainsaw chain can cause the bar to recoil rapidly towards the operator.
You may lose control of the chainsaw which could lead to serious injury. Do not rely solely on the chainsaw's safety devices. It is the responsibility of the user to carry out measures to avoid accidents and injury during operation.
The recoil is the result of incorrect use of the chainsaw or incorrect operating procedures or conditions and can be avoided by taking the following measures:
- Hold the saw firmly with the hands, with the thumb and fingers firmly clamped on the saw handle, and positioning the body and hands so as to limit the recoil force. The recoil force can be controlled by the operator provided appropriate countermeasures are taken. The chainsaw must not be released from the hand.
- Do not reach too far with the saw or make cuts at a height higher than shoulder height. This avoids unintentional touching with the end of the saw and allows better control of the saw in unexpected situations.
- Only use the guide bars and chains specified by the manufacturer. Replacing bars and chains with unsuitable ones can lead to chain breakage or kickback.
- Follow the manufacturer's instructions for sharpening and maintaining the chain saw.
Additional safety tips:
- Hold the chainsaw only by the insulated handles due to the fact that the chain of the chainsaw may touch an invisible electric wire. If the chainsaw chain touches a live wire, voltage may be applied to exposed parts of the tool and the operator may receive an electric shock.
PICTOGRAMS AND WARNINGS

- Read the operating instructions, observe the warnings and safety conditions contained therein!
2.Protect from moisture and rain
3.Secondary protection class. - Use personal protective equipment: protective gloves
- Wear personal protective equipment: eye protection, hearing protection and dust mask.
6.Wear personal protective equipment: Protective clothing - Wear personal protective equipment: protective footwear
- Caution risk of cutting hands, cutting fingers.
9.For outdoor use - Keep out of the reach of children
11.Disconnect the power cord before servicing or repairing.
12.Recyclable
13.Do not dispose of with household waste - Keep hands away from the blade
DESCRIPTION OF THE GRAPHIC ELEMENTS
The numbering below refers to the components of the device shown on the graphic pages of this manual.
Fig. A Chainsaw
| Designation | Description |
| 1 | Main handle |
| 2 | Switch trigger |
| 3 | Oil tank |
| 4 | Front handle |
| 5 | Chain brake |
| 6 | Guide |
| 7 | Chain |
| 8 | Oil level gauge |
| 9 | Chain tensioning knob |
| 10 | Drive wheel cover |
| 11 | Main handle lock |
| 12 | Claw buttress |
| 13 | Work lock button |
| 14 | Cable hook |
| 15 | Power cable |
| 16 | Guide cover |
| Designation | Description |
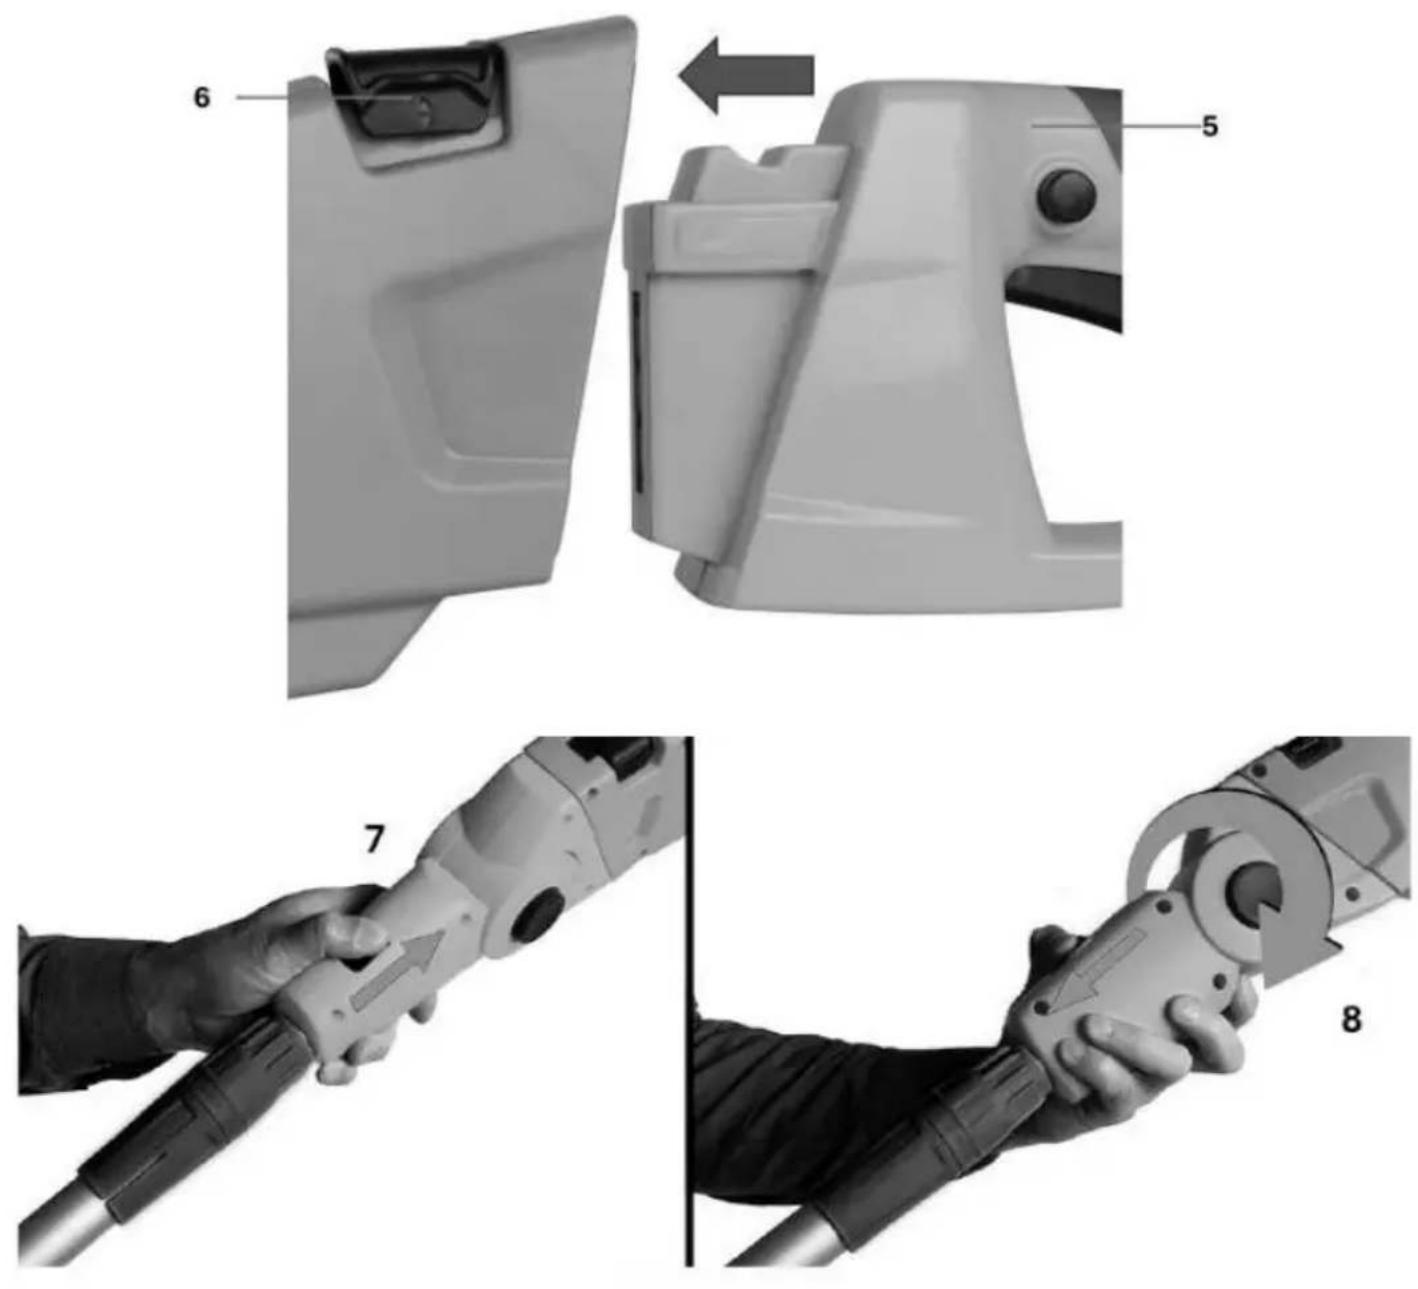
| 1 | Suspension mount/safety guard |
| 2 | Aluminium guide |
| 3 | Cover |
| 4 | Front handle |
| 5 | Handle lock button auxiliary |
| 6 | Top cover |
| 7 | Main handle |
| 8 | Switch |
| 9 | Hook for power cable |
| 10 | Power cable |
| 11 | Work lock button |
| 12 | Main handle lock |
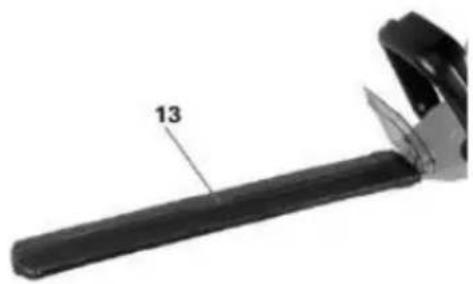
| 13 | Knife sheath |
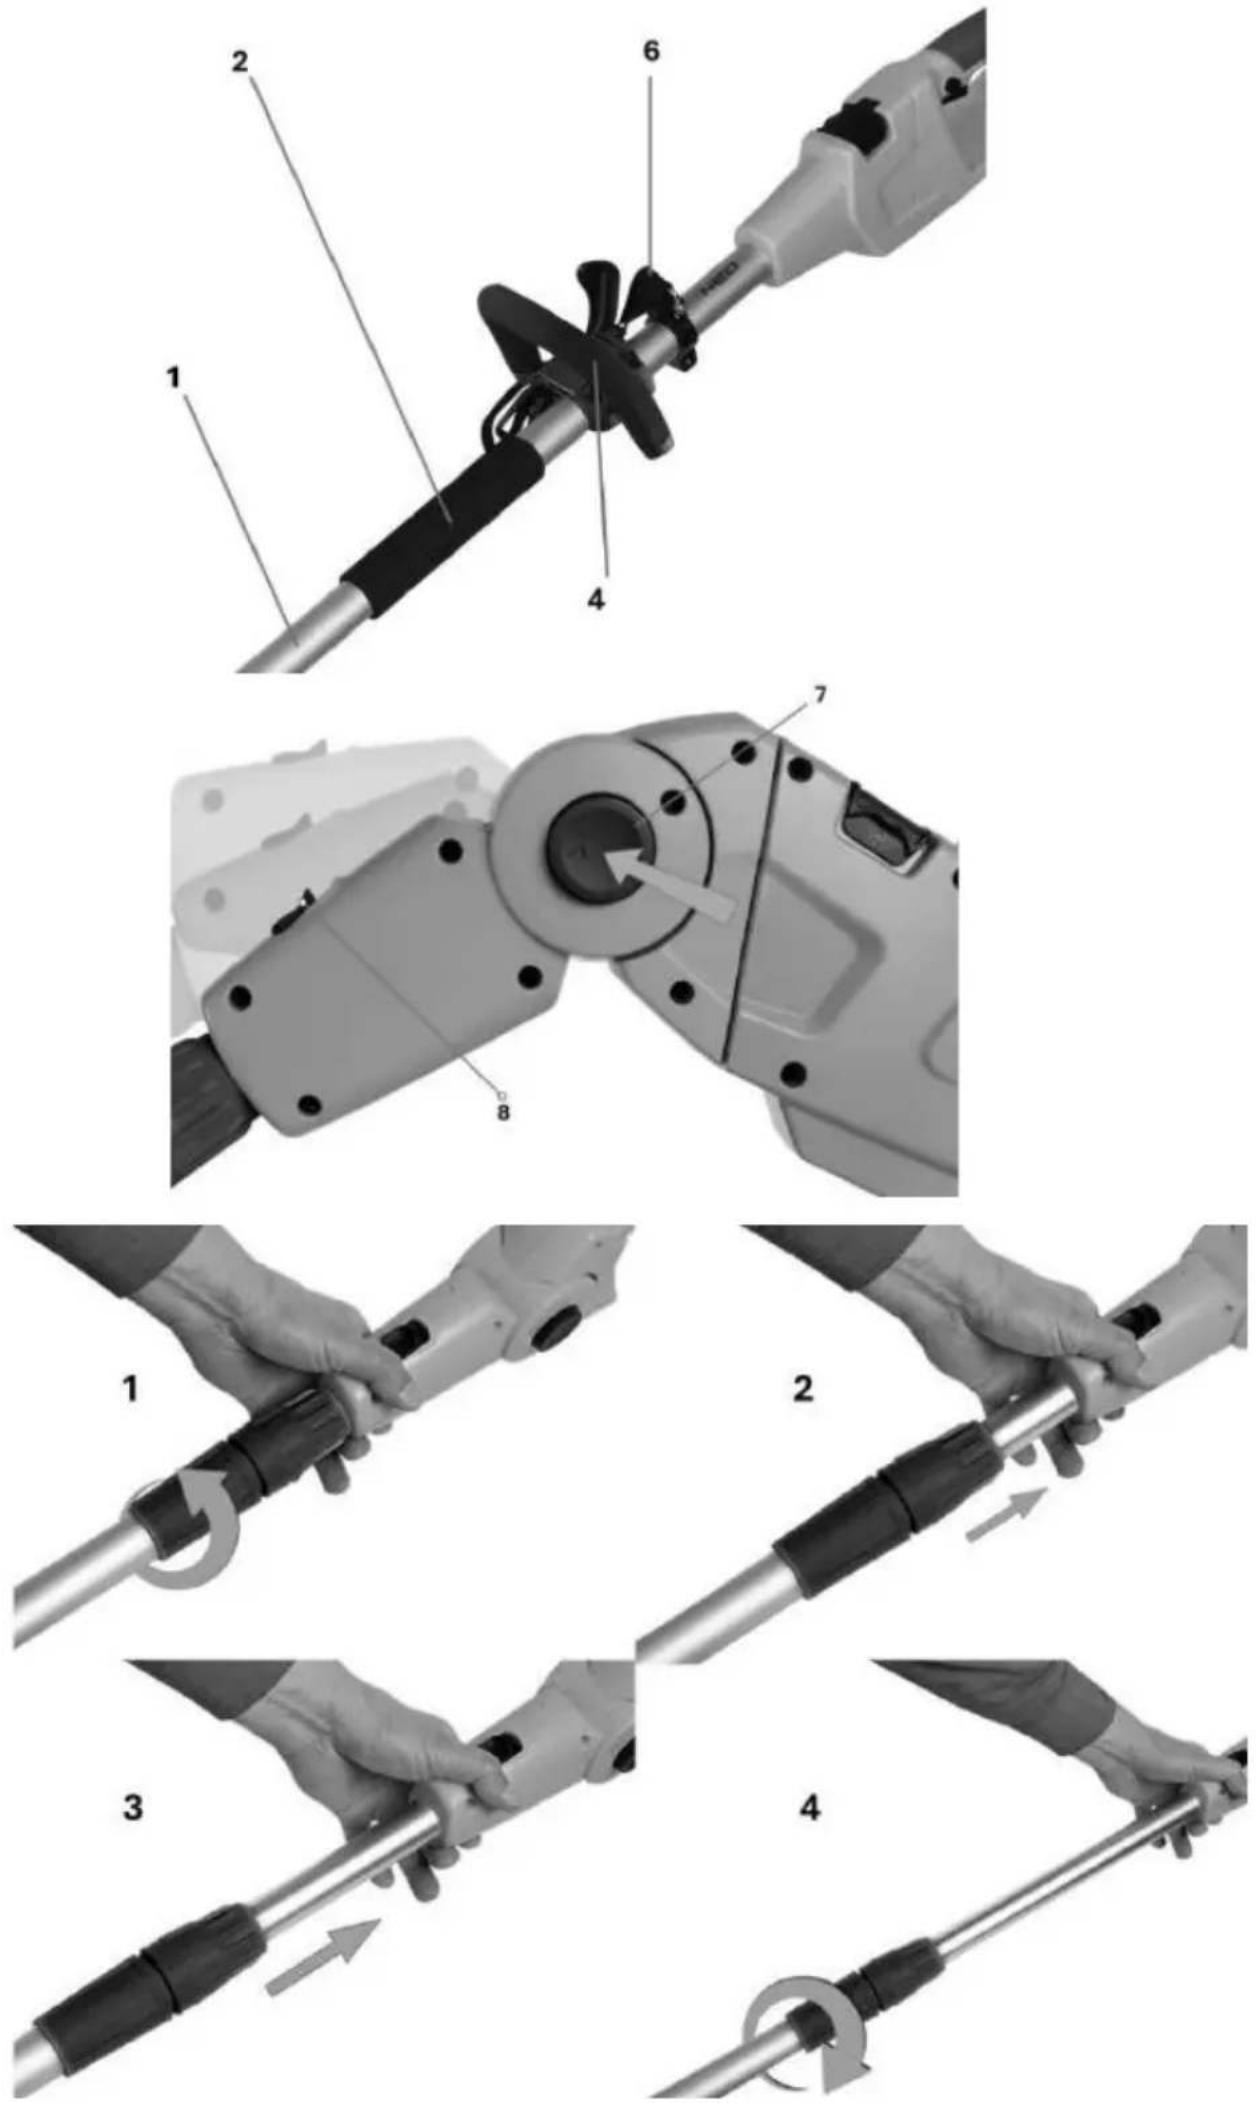
Fig. C Extension rod
| Designation | Description |
| 1 | Stick |
| 2 | Non-slip handle |
| 3 | Length adjustment handle |
| 4 | Supporting handle for scissors |
| 5 | Rear rod holder |
| 6 | Shoulder strap |
| 7 | Head angle adjustment button |
| 8 | Angle adjustment button |
Fig. D Assembly of the extension bar
| Designation | Description |
| 1 | Unscrew the length adjustment handle |
| 2 | Pull out the rod to the required length |
| 3 | |
| 4 | Tighten the length adjustment handle |
| 5 | Main handle |
| 6 | Main handle lock |
| 7 | Press the working angle adjustment button |
| 8 | Turn to the required setting |
* There may be differences between the graphic and the actual product
PURPOSE
The chain saw and boom hedge trimmer set are hand-held devices. They are driven by a single-phase AC motor. These types of power tools are designed to perform work in the domestic garden. The chainsaw and hedge trimmer can be used for tree pruning, branch trimming, hedge trimming, firewood preparation, wood for the fireplace and other applications also at height by using an extension arm.
FITTING A CHAIN SAW
- Fully unscrew the chain tensioning knob (Fig. A9) by turning it counterclockwise and remove the drive wheel cover.
- Fit the chain (Fig. A7) onto the guide bar (Fig. A6), making sure that the knives are pointing in the direction of rotation.
- Place the guide bar (Fig. A6) and chain (Fig. A7) in place, making sure the chain is around the sprocket. Also make sure that the pin fits with the bar. If it does not fit, adjust it using the chain tensioning knob (Fig. A9). During the operation the chain (Fig. A7) must not slip from the guide bar (Fig. A6).
- Pull the guide bar (Fig. A6) forward until the chain (Fig. A7) is firmly seated. Ensure that all drive links are in the groove of the guide bar.
- Fit the sprocket cover (Fig. A10) and secure it with the chain tensioning knob.
CHAIN TENSIONING
- Place the device on a flat surface
- Adjust the chain tension with the knob (Fig. A9).
- Turning the knob clockwise increases tension and turning the knob counterclockwise decreases chain tension.
- Tension is correct when the chain can be pulled 3mm away from the bar using your finger and thumb. Do not over-tension the chain as this will shorten the life of the chain and bar.
NOTES:
- The chain (Fig. A7) should be adjusted before first use, again after 2-3 minutes of operation and re-checked and adjusted as necessary after every 30 minutes of use. Take care not to overtighten the chain.
WORK CHAINSAW
- Connect the supply cable (Fig. A15) to the 230V 50Hz power source
- To start the tool, press the work lock button (Fig. A13) then press switch trigger (Fig. A2).
- To switch off the saw, release the switch trigger (Fig. A2). The integrated brake will stop the running saw in a very short time.
- Press the claw buttress against the wood (Fig. A12), making sure that the chain (Fig. A7) does not come into contact with the material to be cut.
- Start cutting by holding the handle (Fig. A4) by the front lever and lifting the main handle (Fig. A1).
- If the wood cannot be cut in one stroke, pull the front handle (Fig. A4) lightly and continue cutting, pull the saw back a little and then press the claw buttress (Fig. A12) a little lower and finish cutting by lifting the main handle (Fig. A1).
- Withdraw the saw from the cutting area while the chain is still running.
SAFETY CHAIN BRAKE
- The chainsaw is equipped with a chain safety brake that stops the chain in a fraction of a second. It is activated when the hand guard is moved forward. The chain saw stops.
TOPPING UP THE OIL TANK
- Thoroughly clean the oil tank (Fig. A3) around the cap to prevent dirt from entering the container.
- Unscrew the plug of the oil container and pour in the oil up to the level of the lower edge of the filler neck.
- Seal the oil container tightly (Fig. A3).
- Carefully remove any oil that has overflowed.
NOTE
Only refill with the engine switched off and the power plug pulled!
CHAINSAW CHAIN LUBRICATION
Never operate the chainsaw if sufficient chain lubrication is not provided. Otherwise the life of the chainsaw will be shortened. Before starting work, check the oil level in the tank (3) and the oil supply.
Check the oil feed rate by following the instructions below:
- Start the electric chain saw.
- Hold the working chain saw approximately 15 cm above the trunk or ground (use a suitable surface).
- If lubrication is sufficient, light traces of oil will be visible as oil will be spun off the chain. Pay attention to the direction of the blowing wind and avoid unnecessary exposure to sprayed oil!
- Always ensure that the tool is switched off and unplugged before servicing or maintenance.
- Never use petrol, thinner, alcohol, etc. This can cause discolouration, deformation or cracking.
- Clean the ventilation slots regularly with a brush or compressed air.
INSTALLATION OF HEDGE TRIMMERS
ON - OFF
The hedge trimmer has a safety switch, requiring the use of both hands to activate.
- Plug the plug (Fig. B10) into a 230-240V 50Hz socket
- Remove the blade guard (Fig. B13) from the guide bar (Fig. B2).
- Press the action lock button (Fig. B.11) and then press the switch (Fig. B8).
- To stop the machine, release the on/off switch (Fig. B8).
ATTENTION! The shear does not operate until the auxiliary handle switch (Fig. B5) is pressed with one hand and the switch (Fig. B8) is pressed with the other hand simultaneously. Releasing the pressure on one of the switches stops the shear operation. The safety brake on the movement of the blades immobilises the blades in less than 1 s after the switch is released.
INSTRUCTIONS FOR SAFE USE
NOTE!
- Carefully inspect the hedge for invisible objects such as fences, netting, etc. before starting work.
- When pruning long branches, work should be done gradually, in layers.
- The shears must only be used when the hedge is dry.
- When work is complete, replace the knife bar cover.
HEDGE TRIMMING
- In addition to trimming hedges, shears can also be used to trim shrubs and bushes.
- The best cutting result is obtained by guiding the blade bar so that it is pointed at an angle of approximately 15^ to the hedge.
- The double-sided knife bar and counter-rotating knives allow cutting in both directions or in a swinging motion.
- To achieve a uniform hedge height, it is advisable to stretch a string or rope along the trimmed edge of the hedge. Branches protruding above the line to be cut off
- To guide the branches under the knives, move the knife bar evenly forward or backward along the cutting line.
- The sides of the hedge should be trimmed using a curved movement, from bottom to top.
WARNING!
Take care due to the sharp edges of the cutting blades. When the shears are not in use the knife bar should always be protected by a guard.
MAINTENANCE AND STORAGE
- It is recommended to clean the device after each use.
- The motor housing should, as far as possible, always be free of dust and dirt.
- Wipe the unit with a clean cloth or blow it with low-pressure compressed air.
- Do not use any cleaning agents or solvents, as these may damage the plastic parts.
- Care must be taken to ensure that no water enters the unit.
- Inspect the shears for obvious defects such as a loose or damaged blade, loose screw connections and worn or damaged components.
- Check that covers and safety devices are undamaged and properly fitted. Carry out any necessary maintenance and repair work before using the shears.
- Clean the knife bar after each use and spray it with a preservative spray. During longer jobs, it is recommended to lubricate the knives with a thin layer of oil at regular intervals.
- Check the condition of the knife blades.
- Use only original accessories and original spare parts.
- Store shears in a safe, dry place that is out of the reach of children.
- Do not place other objects on the shear housing.
- Any defects should be rectified by the manufacturer's authorised service department.
FITTING AN EXTENSION BAR
- To fit the extension bar you need to:
- Insert the main handle (Fig. A1 / Fig. B7 / Fig. D5) into the rear rod holder (Fig. C5).
- Once in position, secure with main handle lock (Fig. A11 / Fig. B12 / Fig. D6)
- On the other side of the pole, attach the chain saw / hedge trimmer with the locking device
CUTTING ANGLE ADJUSTMENT
- To adjust the cutting angle, press the angle change button (Fig. C7).
- Adjust the hedge trimmer to the desired angle.
- Recommended cutting angles range from -20 degrees to 60 degrees.
- To adjust the angle in the axis, press the button (Fig. C8) and set the desired angle
RATING DATA
| 2-in-1 boom garden deviceChainsaw and hedge trimmer 04-634 | |
| Parameter | Value |
| Supply voltage | 230 V AC |
| Supply frequency | 50Hz |
| Protection class | II |
| IP degree of protection | IPX0 |
| Year of production | 2025 |
| Chainsaw | |
| Rated power | 750W |
| Linear speed of chain (no load) | 12 m/s |
| Guide | 250mm |
| Chain type | 3/8.043 x 40DL |
| Chain pitch | 0.375" (9.53 mm) |
| Chain thickness/bar groove width | 0.043" (1.09mm) |
| number of cells | 40 |
| Sprocket (teeth x pitch) | 6x0,375" |
| Chain oil | SAE10W-30 |
| Chain oil tank capacity | 0,06 l |
| Maximum working length | 2,37 m |
| Chainsaw weight | 3.3kg |
| Weight of saw chain with extension | 4.7kg |
| Hedge trimmers | |
| Rated power | 550W |
| Idle speed | 1600 min-1 |
| Cutting width | 440 mm |
| Cutting bar length | 460 mm |
| Maximum thickness of cut stem | 20 mm |
| Maximum working length | 2,67 m |
| Weight of shears | 2.9kg |
| Weight of scissors with extension | 4.5kg |
| 04-634 indicates both the type and the designation of the machine | |
NOISE AND VIBRATION DATA - CHAINSAW
| Sound pressure level | L_PA = 87.3 dB(A) K=3 dB(A) |
| Sound power level | L_Wa=101.2 dB(A)K=3 dB(A) |
| Vibration acceleration values | a_n=3.32 m/s2K=1.5 m/s2 |
NOISE AND VIBRATION DATA - HEDGE TRIMMER
| Sound pressure level | L_PA=84.2 dB(A) K=3 dB(A) |
| Sound power level | L_Wa=95.0 dB(A) K=2.05 dB(A) |
| Vibration acceleration values | a_h=2.91 m/s2 K=1.5 m/s2 |
Information on noise and vibration
The noise emission level of the equipment is described by: the emitted sound pressure level L and the sound power level Lw (where K denotes measurement uncertainty). The vibration emitted by the equipment is described by the vibration acceleration value (where K is the measurement uncertainty).
The sound pressure level Lp sound power level Lw and vibration acceleration value a specified in these instructions were measured in accordance with EN 62841-1. The specified vibration level can be used for comparison of equipment and for preliminary assessment of vibration exposure.
The vibration level quoted is only representative of the basic use of the unit. If the unit is used for other applications or with other work tools, the vibration level may change. A higher vibration level will be influenced by insufficient or too infrequent maintenance of the unit. The reasons given above may result in increased vibration exposure during the entire working period.
In order to accurately estimate vibration exposure, it is necessary to take into account periods when the device is switched off or when it is switched on but not used for work. When all factors are accurately estimated, the total vibration exposure may be significantly lower.
In order to protect the user from the effects of vibration, additional safety measures should be implemented, such as cyclical maintenance of the machine and working tools, securing an adequate hand temperature and proper work organisation.
ENVIRONMENTAL PROTECTION

Electrically-powered products should not be disposed of with household waste, but should be taken to appropriate facilities for disposal. Contact your product dealer or local authority for information on disposal. Waste electrical and electronic equipment contains substances that are not environmentally friendly. Unrecycled equipment poses a potential risk to the environment an human health.
"GTX Poland Spółka z ograniczoną odpowiedzialnością" Spółka komandytowa with its registered office in Warsaw, ul. Pograniczna 2/4 (hereinafter: "GTX Poland") informs that all copyrights to the content of this manual (hereinafter: "Manual"), including among others. All copyrights to the contents of this Manual (hereinafter referred to as "Manual"), including but not limited to its text, photographs, diagrams, drawings, as well as its composition, belong exclusively to GTX Poland and are subject to legal protection pursuant to the Act of February 4, 1994 on Copyright and Related Rights (i.e. Journal of Laws 2006 No. 90 Item 631 as amended). Copying, processing, publishing, modifying for commercial purposes the entire Manual as well as its individual elements without the written consent of GTX Poland is strictly prohibited and may result in civil and criminal liability.
EC Declaration of Conformity
Manufacturer: GTX Poland Sp. z o.o. Sp.k,
Product: 2-in-1 boom garden device
Chainsaw and hedge trimmer
Model: 04-634
Trade name: NEO TOOLS
Serial number: 00001 ÷ 99999
Electromagnetic Compatibility Directive 2014/30/EU
RoHS Directive 2011/65/EU as amended by Directive 2015/863/EU
Machinery Directive 2006/42/EC
Noise Emission Directive 2000/14/EC as amended by 2005/88/EC
Guaranteed sound power level LWA= 105 dB(A)
Measured sound power level LwA=101.2dB(A) K=3dB(A)
And meets the requirements of the standards:
EN IEC 55014-1:2021; EN IEC 55014-2:2021; EN IEC 61000-3-
2:2019/A2:2024; EN 61000-3-3:2013/A2:2021
EN IEC 63000:2018
Chainsaw:
EN 62841-1:2015+A11:2022, EN 62841-4-1:2020, EN ISO 11680-
1:2021
Hedge trimmers:
EN 62841-1:2015+AC:2015+A11:2022, EN 62841-4-
2:2019+A1:2022+A11:2022
This declaration relates only to the machinery as placed on the market and does not include components
added by the end user or carried out by him/her subsequently.
Name and address of the EU resident person authorised to prepare the technical dossier:
Signed on behalf of:
GTX Poland Sp. z o.o. Sp.k.
Technical Documentation Officer GTX Poland
Warsaw, 2025-05-15
(UA)
GTX Poland Sp. z o.o. Sp.k.
GTX Poland Sp. z o.o. Sp.k.
GTX Poland Sp. z o.o. Sp.k.
2/4 Via Pograniczna
02-285 Varsavia
Paweł Kowalski
DONNÉES D'ÉVALUATION
Fabricant : GTX Poland Sp. z o.o. Sp.k,
2/4 rue Pograniczna 02-285 Varsovie
GTX Poland Sp. z o.o. Sp.k.
2/4 rue Pograniczna
02-285 Varsovie

Paweł Kowalski
INSTALLATION VON HECKENSCHEREN
EIN - AUS
GTX Poland Sp. z o.o. Sp.k.
GTX Poland Sp. z o.o. Sp.k.
GTX Poland Sp. z o.o. Sp.k.
PODACI O BUCI I VIBRACIJAMA - MOTORNA PILA
| Razina zvučnog tlaka | LPA= 87,3 dB(A) K=3 dB(A) |
| Razina zvučne snage | LWa= 101.2 dB(A) K=3 dB(A) |
| Vrijednosti ubrzanja vibracija | ah= 3,32 m/s2 K=1,5 m/s2 |
PODACI O BUCI I VIBRACIJAMA - ŠKARE ZA ŽIVICU
| Razina zvučnog tlaka | LPA= 84,2 dB(A) K=3 dB(A) |
| Razina zvučne snage | LWa= 95.0 dB(A) K=2.05 dB(A) |
| Vrijednosti ubrzanja vibracija | ah= 2,91 m/s2 K=1,5 m/s2 |
Informacije o buci i vibracijama
GTX Poland Sp. z o.o. Sp.k.
GTX Poland Sp. z o.o. Sp.k.
GTX Poland Sp. z o.o. Sp.k.
NAVODILA ZA VARNO UPORABO
POZOR!
GTX Poland Sp. z o.o. Sp.k.
GTX Poland Sp. z o.o. Sp.k.
GTX Poland Sp. z o.o. Sp.k.
2/4 Pograniczna
02-285 Βαρσοβία
Paweł Kowalski
Tootja: GTX Poland Sp. z o.o. Sp.k.
Toode: 2-in-1 aiapoomi seade
GTX Poland Sp. z o.o. Sp.k.

- (PL)
- INSTRUKCJA OBSŁUGI ORYGINALNA
- SPECIFIC SAFETY PROVISIONS
- NOTE!
- SAFETY RULES
- Safety warnings for hedge trimmers
- Hedge trimmer use
- Safety warnings for the chainsaw:
- Electrical safety
- Causes and ways to prevent rejection:
- NOTE: We cut downwards not upwards!
- Additional safety tips:
- PICTOGRAMS AND WARNINGS
- DESCRIPTION OF THE GRAPHIC ELEMENTS
- PURPOSE
- FITTING A CHAIN SAW
- CHAIN TENSIONING
- NOTES:
- WORK CHAINSAW
- SAFETY CHAIN BRAKE
- TOPPING UP THE OIL TANK
- NOTE
- CHAINSAW CHAIN LUBRICATION
- INSTALLATION OF HEDGE TRIMMERS
- ON - OFF
- INSTRUCTIONS FOR SAFE USE
- HEDGE TRIMMING
- WARNING!
- MAINTENANCE AND STORAGE
- FITTING AN EXTENSION BAR
- CUTTING ANGLE ADJUSTMENT
- Information on noise and vibration
- ENVIRONMENTAL PROTECTION
- EC Declaration of Conformity
- INSTALLATION VON HECKENSCHEREN
- EIN - AUS
- Informacije o buci i vibracijama
- NAVODILA ZA VARNO UPORABO
- POZOR!
Brand : NEO tools
Model : 04-634
Category : Multitools