Avent SCD330 - Bottle Warmer PHILIPS - Free user manual and instructions
Find the device manual for free Avent SCD330 PHILIPS in PDF.


| Product Type | Bottle Warmer (Bain-Marie) |
| Brand | Philips |
| Model | Avent SCD330 |
| Power Supply | Mains (220-240 V) |
| Power | Approximately 200 W |
| Capacity | Compatible with bottles up to 260 ml |
| Main Functions | Rapid heating, keep warm, automatic shut-off |
| Heating Type | Bain-Marie (hot water) |
| Heating Temperature | Automatic setting for breast milk or food |
| Heating Time | Approximately 3 to 5 minutes |
| Safety | Automatic shut-off in case of overheating or lack of water |
| Compatibility | Philips Avent bottles (plastic and glass) |
| Material | Heat-resistant plastic (ABS, PP) |
| Dimensions (L x W x H) | Approximately 20 x 20 x 25 cm |
| Weight | Approximately 0.8 kg |
| Care and Cleaning | Clean the exterior with a damp cloth. Regular descaling required. |
| Spare parts and repairability | Not user-repairable. Contact Philips customer service for parts. |
| Warranty | 2 years (standard Philips) |
| General Information | Use under adult supervision. Do not use in microwave. |
Frequently Asked Questions - Avent SCD330 PHILIPS
User questions about Avent SCD330 PHILIPS
0 question about this device. Answer the ones you know or ask your own.
Ask a new question about this device
Download the instructions for your Bottle Warmer in PDF format for free! Find your manual Avent SCD330 - PHILIPS and take your electronic device back in hand. On this page are published all the documents necessary for the use of your device. Avent SCD330 by PHILIPS.
USER MANUAL Avent SCD330 PHILIPS
Finding the right teat is important:
If your newborn baby is consistently not taking enough milk throughout the feeding sessions or has complications in getting milk, switch to a teat with a higher flow rate.
If persistent feeding issues occur, consult a healthcare professional.
ČEŠTINA
EAC
www.philips.com/avent
Philips Consumer Lifestyle B.V.
Tussendiepen 4, 9206 AD Drachten, The Netherlands / les Pays-Bas / Paesi Bassi / Holandija
Trademarks are the property of Koninklijke Philips N.V. /
Les marques commerciales sont la propriété de Koninklijke Philips N.V. / I marchi commerciali e depositati sono di proprietà di Koninklijke Philips N.V.
Read all instructions carefully before use. Keep the user manual and product packaging for future reference.
For your child's safety and health WARNING!
Continuous and prolonged sucking of fluids will cause tooth decay. Always check food temperature before feeding.
Throw away at the first signs of damage or weakness.
Keep components not in use out of the reach of children. Never attach to cords, ribbons, laces or loose parts of clothing.
The child can be strangled.
- Never use feeding teats as a soother.
-Glass bottles may break
-Always use this product with adult supervision.
It is not recommended to use a microwave to warm up baby food or drinks. Microwaves may destroy valuable nutrients in food/drinks and may produce localized high temperatures. If you decide to use the microwave, take extra care to stir heated food/drinks to ensure even heat distribution and check the temperature before serving. Only place the container in the microwave, without the screw ring, teat and cap. Do not allow children to play with small parts or walk/run while using bottles. Always discard any breast milk that is left over at the end of a feed. Inspect before each use and pull the feeding teat in all directions. Throw away at the first signs of damage or weakness. Do not use metal inside the glass bottle to stir contents or for cleaning. This can damage the glass. Do not use bottles if there are any cracks on or glass fragments in the bottle. Do not use bottle handles with glass bottles. Prolonged wear or development of scratches may lead to breakage.
Before first use
Disassemble all parts, clean and then sterilize the parts by placing in boiling water for 5 minutes or sterilize by using a Philips Avent sterilizer. This is to ensure hygiene.
Assembly
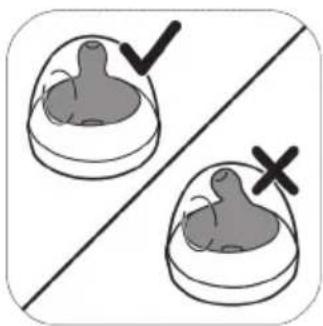
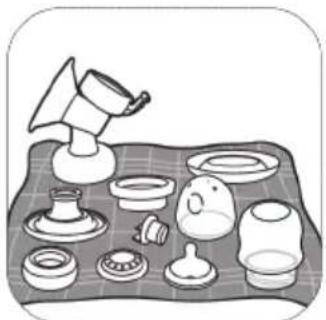
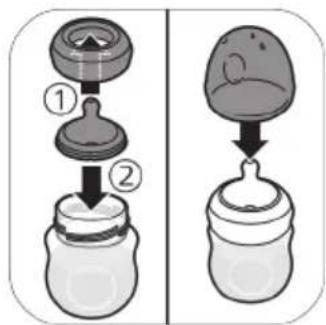
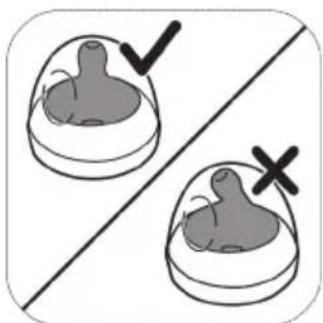
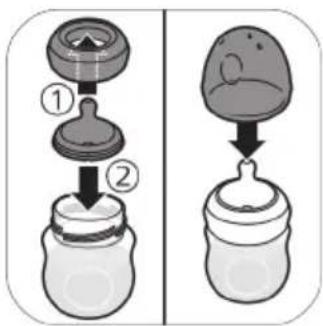
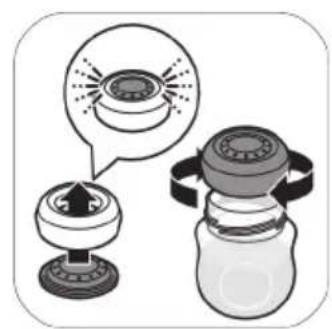
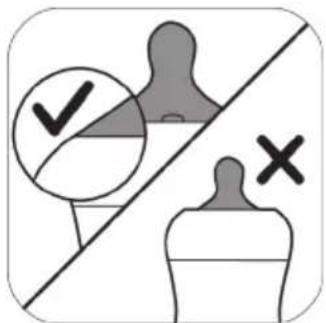
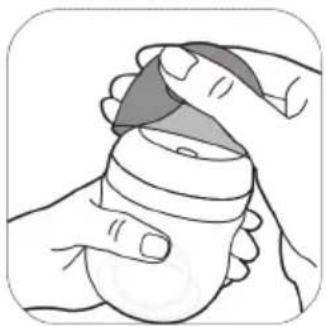
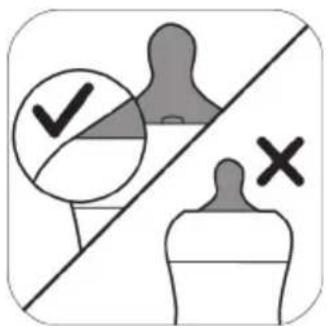
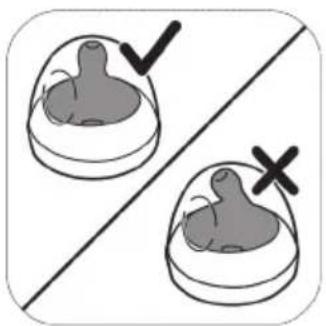
Make sure that the feeding teat is fully pulled through the screw ring as shown in the image (Fig. 1, 2).
Cleaning and storage
Clean all parts before each use to ensure hygiene. After each use, disassemble all parts, wash in warm, soapy water, remove any food residues and rinse thoroughly. If you use a brush to clean the tip of the feeding teat, clean it as carefully as possible to avoid damage. Then sterilize using a Philips Avent sterilizer or boil for 5 minutes. Make sure that you wash your hands thoroughly and that the surfaces are clean before contact with sterilized components. During sterilization with boiling water, prevent the parts from touching the side of the pot. This can cause irreversible product deformation, defect or damage that Philips cannot be held liable for. Food colorings may discolor parts. This product is dishwasher safe. Do not place the product in a heated oven. Do not bring the bottle parts in contact with or place on surfaces with abrasive or antibacterial cleaning agents. We recommend replacing feeding teats every 3 months. Keep feeding teats in a dry, covered container. Do not leave a feeding teat in direct sunlight or heat, or leave in disinfectant (sterilizing solution) for longer than recommended, as this may weaken the teat.
Compatibility
Replacement teats are available separately. To learn more about choosing the right teat for your baby, visit us at www.philips.com/avent. These bottle parts are compatible only with Philips Avent Natural teats.
Support
If you need information or support, please visit
www.philips.com/support.
CESTINA
www.philips.com/support
ECDAYOL
www.philips.com/support
ITALIANO
www.philips.com/support
MAGYAR
www.philips.com/support
SUOMI
www.philips.com/support
The storage cup is a plastic container with a leakproof lid that can be used to store and transport liquid or food. The storage cup is a part of a reusable storage system specifically designed for mothers to express breast milk into and feed it from the same container.
Read all instructions carefully before use. Keep the user manual and product packaging for future reference.
For your child's safety and health
WARNING!
-Continuous and prolonged sucking of fluids will cause tooth decay.
-Always check food temperature before feeding.
-Throw away at the first signs of damage or weakness.
-Keep components not in use out of the reach of children.
- Never attach to cords, ribbons, laces or loose parts of clothing. The child can be strangled.
- Never use feeding teats as a soother.
-Always use this product with adult supervision.
It is not recommended to use a microwave to warm up baby food or drinks. Microwaves may destroy valuable nutrients in food/drinks and may produce localized high temperatures. If you decide to use the microwave, take extra care to stir heated food/drinks to ensure even heat distribution and check the temperature before serving. Only place the container in the microwave, without the lid. Be aware that milk and food may heat up faster in these storage cups than in standard bottles or containers. Do not allow children to play with small parts or walk/run while using bottles or cups. Always discard any breast milk that is left over at the end of a feed. Inspect before each use and pull the feeding teat in all directions. Throw away at the first signs of damage or weakness.
Before first use
Disassemble all parts, clean and then sterilize the parts by placing in boiling water for 5 minutes or sterilize by using a Philips Avent sterilizer. This is to ensure hygiene.
Assembly
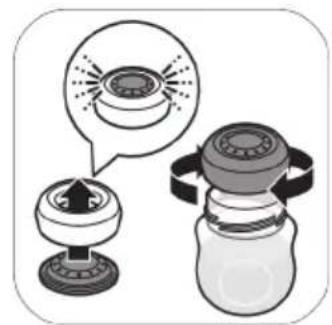
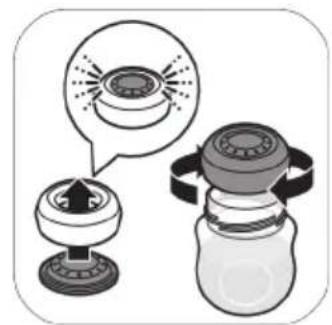
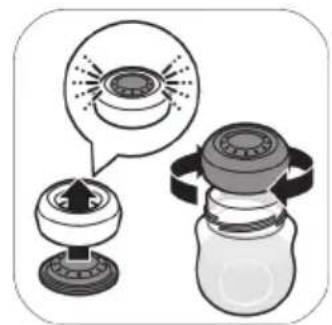
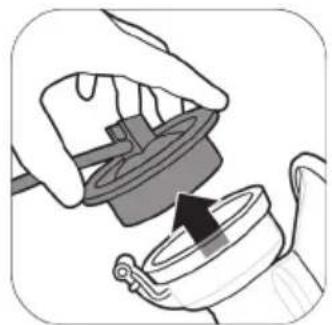
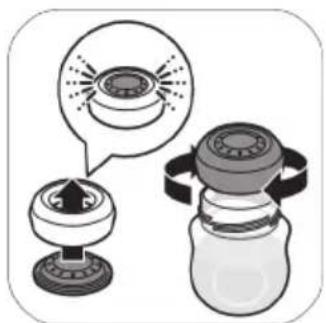
Assemble the storage cup following the steps shown in the images. If you decide to use the storage cup with a feeding teat, make sure that the feeding teat is fully pulled through the screw ring as shown in the image.
Storage of milk and food
Expressed breast milk or baby food can be stored in cleaned, sterilized and closed Philips Avent storage cups in the refrigerator for up to 4 days or in the freezer for up to 6 months. Write the expression date on the storage cup with a pencil or marker. Never refreeze breast milk or add fresh breast milk to already frozen milk.
Cleaning and storage
Clean all parts before each use to ensure hygiene. After each use, disassemble all parts, wash in warm soapy water, remove any food residues and rinse thoroughly. Then sterilize using a Philips Avent sterilizer or boil for 5 minutes. Philips Avent storage cups are suitable for all methods of sterilization. Make sure that you wash your hands thoroughly and that the surfaces are clean before contact with sterilized components. During sterilization with boiling water, prevent the parts from touching the side of the pot. This can cause irreversible product deformation, defect or damage that Philips cannot be held liable for. Food colorings may discolor parts. This product is dishwasher safe. Do not place in a heated oven. Do not bring the cup parts in contact with or place on surfaces with abrasive or antibacterial cleaning agents. We recommend replacing feeding teats every 3 months. When not in use, store in clean and dry covered container. Do not leave a feeding teat in direct sunlight or heat, or leave in disinfectant (sterilizing solution) for longer than recommended, as this may weaken the teat.
Compatibility
Replacement teats are available separately. To learn more about choosing the right teat for your baby, visit us at www.philips.com/avent. With the adapter for cup, the Philips Avent storage cup is compatible with Philips Avent breast pumps, screw rings and feeding teats of the Natural and Anti-colic ranges.
Support
If you need information or support, please visit www.philips.com/support.
Bahasa Indonesia
Keterangan umum
이없음 Percentage가 없었으며 This will be a non-percentage factor for the percentage of the total percentage of the total percentage of the total percentage of the total percentage of the total percentage of the total percentage of the total percentage of the total percentage of the total percentage of the total percentage of the total percentage of the total percentage of the total percentage of the total percentage of the total percentage of the total percentage of the total percentage of the total percentage of the total percentage of the total percentage of the total percentage of the total percentage of the total percentage of the total percentage of the total percentage of the full percentage of the total percentage of the total percentage of the total percentage of the total percentage of the total percentage of the total percentage of the total percentage of the total percentage of the total percentage of the total percentage of the total percentage of the total percentage of the total percentage of the total percentage of the total percentage of the total percentage of the total percentage of the total percentage of the total percentage of the total percentage of the total percentage of the total percentage of the total percentage of the total percentage of the whole percentage of the whole percentage of the whole percentage of the whole percentage of the whole percentage of the whole percentage of the whole percentage of the whole percentage of the whole percentage of the whole percentage of the whole percentage of the whole percentage of the whole percentage of the whole percentage of the whole percentage of the whole percentage of the whole percentage of the whole percentage of the whole percentage of the whole percentage of the whole percentage of the whole percentage of the whole percentage of the whole percentage of the whole percentage of the entire percentage
ก่อนใช้งานครั้งแรก
The quick brown fox jumps over the lazy dog.
SCP603

Philips Consumer Lifestyle B.V.
Tussendiepen 4, 9206 AD Drachten, The Netherlands /
The Philips Avent breast milk storage bags offer a safe and convenient way to collect your precious breast milk. They are made of dual layer, reinforced plastic and have a strong seal, to ensure your milk remains protected while being stored. A wide and sturdy opening ensures safe and easy filling and pouring. For ultimate hygiene, every bag comes disinfected with a tamper-evident seal.
Important
Read this user manual carefully before you use the breast milk storage bags. Keep the user manual and product packaging for future reference.

Warning
- Do not microwave (Fig. 1).
- Keep the breast milk storage bags out of the reach of children.
- Always check the temperature of the milk before you feed your baby.
To prevent the milk from overheating, do not defrost the breast milk storage bag with breast milk in the microwave, in freshly boiled water or in a bottle warmer.

Caution
- The Philips Avent breast milk storage bags have a limited shelf life, with an expiration date of 5 (five) years. The packaging of the milk storage bags contains the production/fabrication (FAB) date and expiration (EXP) date. Do not use the breast milk storage bags after the expiration date, but discard them. Before the expiration date, it is safe to use your breast milk storage bags if the bags are still unopened, not damaged, appear clean, are not sticky and have been stored in a clean, dark place, away from direct sunlight.
- To ensure stability and protect the product from
deterioration, follow the storage instructions
You can store breast milk in the storage bag in the refrigerator for up to 4 days or in the freezer for up to 6 months.
Never refreeze thawed breast milk or add fresh breast milk to already frozen breast milk.
- The breast milk storage bags are intended for one-time use only.
- Thoroughly wash your hands before you fill and empty the breast milk storage bags.
Filling the breast milk storage bag
1 Use a pen to write down the date of expression and other information on the labeling area. Do not write on the filling part to prevent puncturing the bag (Fig. 2).
2 Open the breast milk storage bag by tearing off the tamper-evident seal at the top of the bag (Fig. 3). Keep the torn-off seal away from children and dispose of it safely.
3 To open the bag, place your thumbs inside the plastic above the zip and gently pull both sides apart (Fig. 4).
4 Pour the expressed milk into the bag. Do not fill the bag beyond the 180 ml/6 oz level, as breast milk expands when frozen (Fig. 5). The actual amount of milk in the bag may deviate slightly from the level indications on the bag.
5 Carefully remove excess air by flattening the part of the bag above the milk (Fig. 6).
6 Seal the bag by closing the zip (Fig. 7).
Defrosting breast milk
To defrost breast milk overnight, place the breast milk storage bag in the refrigerator.
To defrost breast milk prior to feeding, place the breast milk storage bag in warm water.
Pouring milk from the breast milk storage bag
1 Tear off the labeling area to eliminate potential contamination of the breast milk during pouring (Fig. 8).
2 To open the bag, place your thumbs inside the plastic above the zip and pull both sides apart (Fig. 9).
3 Hold the bag by the zip and pour the milk into a container (Fig. 10).
Tip. Lightly squeeze the zip to make pouring easier
4 Throw away the breast milk storage bag after use. Do not reuse the breast milk storage bag.
5 To heat the milk, place the container with defrosted milk in a bottle warmer or in a bowl of hot water.
Note. Always discard any breast milk that is left over at the end of a feed.
Storage
Keep dry and avoid direct sunlight.
Storage temperature: -25 °C to 70 °C.
Support
If you need information or support, please visit
www.philips.com/support.
Explanation of symbols
This symbol indicates
- that the material used for the packaging is
corrugated board (Fig. 11).
- that the material used for the packaging is non-corrugated cardboard/fiberboard (Fig. 12).
- that the material used for the plastic packaging
bag is low density polyethylene (Fig. 13).
- that the product must be kept out of direct sunlight (Fig. 14).
- that the product or packaging needs to be sorted or brought to a recycling point (Fig. 15).
FSC
DANSK
Introduktion
www.philips.com/support
Fylle brystmelkposen
www.philips.com/support
Επεξήγηση συμβόλων
The following table is provided in the image:
17) OF HONGHAI KING, 246 HONG YU, HONG BAN
.
בַרְשָׁה
The image is too blurry to recognize any text content.
7y. now (wn) 5 7u qin-19 7wny ny, o7110
Single/Double Electric Breast Pump

English 6
Bahasa Melayu 32
Čeština 61
Dansk 87
Deutsch 113
Eesti 141
Español 167
Français 195
Hrvatski 223
Italiano 249
Latviešu 275
Lietuviškai 302
Magyar 328
Nederlands 356
Norsk 383
Polski 409
Português 436
Română 463
Shqip 490
Slovenščina 517
Slovensky 543
Srpski 569
Suomi 595
Svenska 621
Ελληνικά 646
Български 675
Македонски 702
Українська 731
繁體中文 758
العربية 782
Contents
Introduction 6
General description 7
Intended use 7
Important safety information ____ 8
Before first use 10
Cleaning and disinfecting 10
Using the breast pump 13
Feeding breast milk with the bottle 20
Compatibility 22
Ordering accessories and spare parts 22
Recycling 23
Battery removal instructions 23
Support 24
Troubleshooting 24
Supplemental information 26
Storage conditions 27
Electromagnetic fields (EMF) 27
Technical information 27
Explanation of symbols 28
Introduction
Congratulations on your purchase and welcome to Philips Avent! To fully benefit from the support that Philips Avent offers, register your breast pump at www.philips.com/mybreastpump.
The Philips Avent single/double electric breast pump Premium is inspired by babies and their natural suction movement. The soft silicone cushion stimulates the nipple with gentle massaging movements, helping you to express milk comfortably and effectively. The combination of suction and nipple stimulation triggers fast milk flow. The no-lean-forward design enables you to sit in a relaxed, upright position while expressing.
Healthcare professionals and the World Health Organization recommend to exclusively feed children with breast milk during the first six months of life and to continue giving them breast milk for two years next to offering additional nutritious foods. This is because your breast milk is specially adapted to your baby's needs and helps to protect your baby against infection and allergies. To breastfeed longer, you can express and store your milk so that your baby can still enjoy the benefits of it, even if you cannot be there to provide it yourself. As the pump is compact, quiet and discrete to use, you can take it with you anywhere, allowing you to express milk at your own convenience and to maintain your milk supply.
If breastfeeding goes well, it is advisable (unless recommended otherwise by your healthcare professional) to wait until your milk supply and breastfeeding schedule are established (normally at least 2 to 4 weeks after giving birth) before you start expressing.
General description
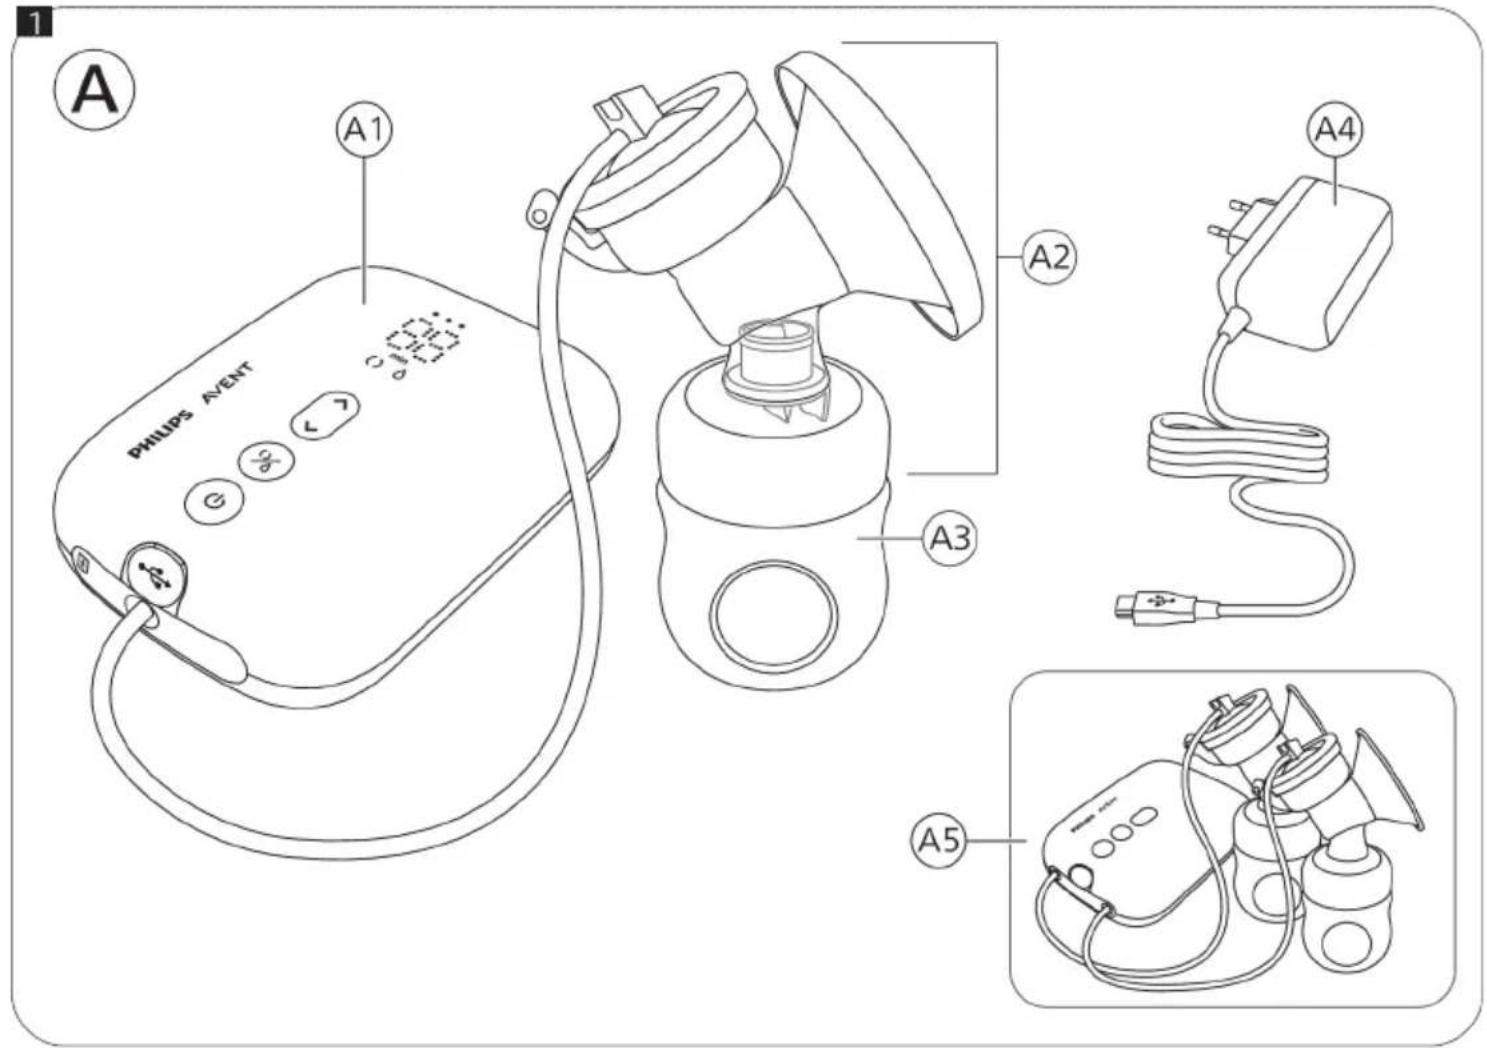
① Note: The double breast pump comes with two pieces of the items shown in Figures B and C.
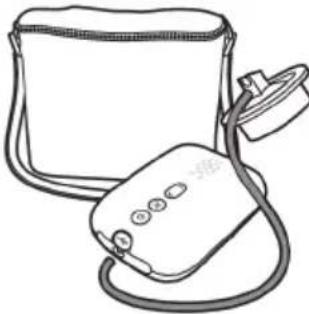
Product description (Fig. A)
A1 Motor unit
A5 Double breast pump
A2 Breast pump kit
* The adapter supplied may vary for different countries.
A3 Bottle
A4 Adapter*
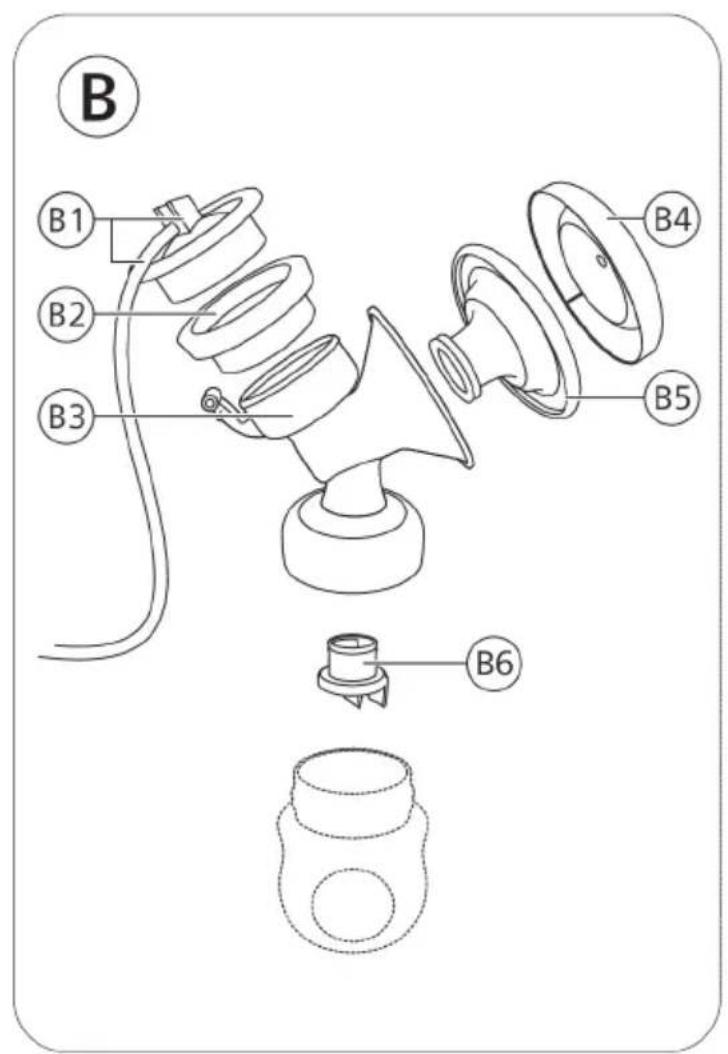
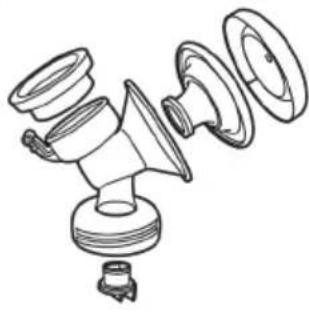
Breast pump kit (Fig. B)
B1 Silicone tube and cap
B4 Cover
B2 Silicone diaphragm
B5 Cushion
B3 Pump body
B6 White valve
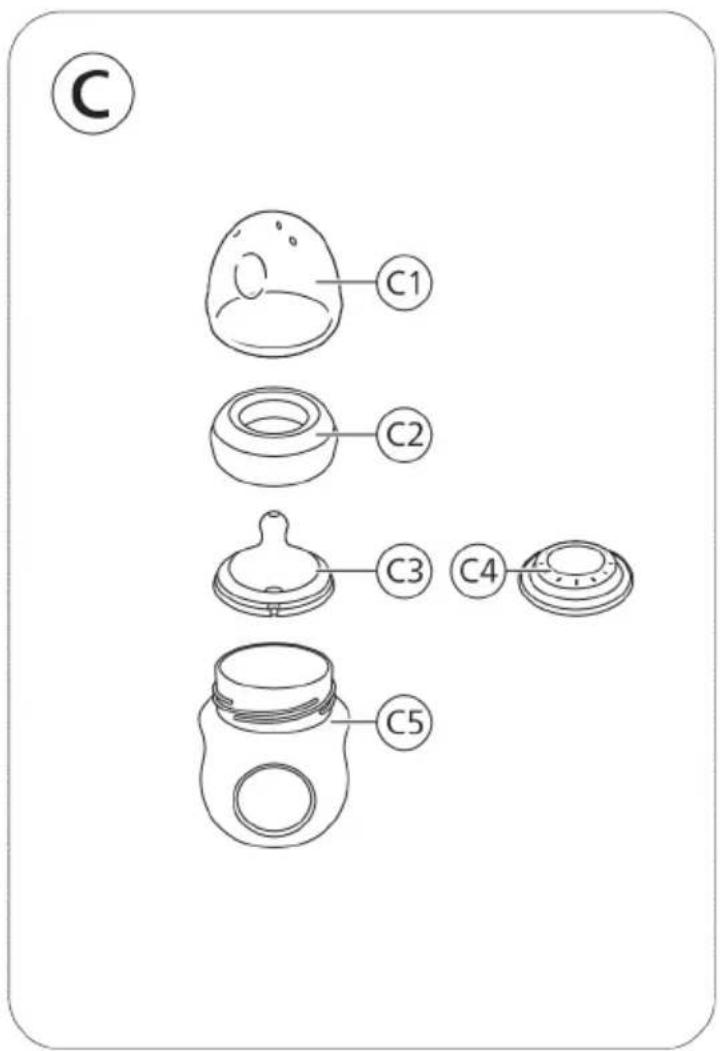
Philips Avent Natural bottle (Fig. C)
C1 Bottle cap
C4 Sealing disc
C2 Screw ring
C5 Bottle
C3 Teat
Accessories
There are multiple versions of this breast pump package, which all come with a different combination of the following Philips Avent accessories:
- Breast pads
- Storage cups with adapter*
- Travel bag
- Breast milk storage bags*
- Insulation pouch
- Natural bottles
- Cleaning brush
* For these accessories, a separate user manual is provided.
Intended use
The Philips Avent single/double electric breast pump Premium is intended to express and collect milk from the breast of a lactating woman. The device is intended for a single user.
Important safety information
Read this user manual carefully before you use the breast pump and save it for future reference.
Warning

- Never use the breast pump while you are pregnant, as pumping can induce labor.

Warnings to avoid choking, strangulation and injury:
- Do not allow children or pets to play with the motor unit, the adapter, packaging materials or accessories.
- Always unplug the breast pump after use and when fully charged. Store the breast pump when not in use.
- This breast pump is not intended for use by persons (including children) with reduced physical, sensory or mental capabilities, or lack of experience and knowledge. Such persons can only use this breast pump if they are supervised by or have received proper instruction concerning use of the appliance by a person responsible for their safety.
Warning to prevent transmitting infectious diseases:
- If you are a mother who is infected with Hepatitis B, Hepatitis C or Human Immunodeficiency Virus (HIV), expressing breast milk will not reduce or remove the risk of transmitting the virus to your baby through your breast milk.
Warnings to avoid electric shock:
- Inspect the breast pump, including the adapter, for signs of damage before each use. Do not use the breast pump if the adapter or plug is damaged, if it does not work properly or if it has been dropped or submerged in water.
- Only use the adapter (S009AHz050yyyy) provided with this breast pump.
- Always ensure that it is easy to disconnect the device from the mains in case of malfunction. The adapter is considered the disconnection device.
Warnings to avoid contamination and to ensure hygiene:
- For hygienic reasons, the breast pump is only intended for repeated use by a single user.
- Clean and disinfect all parts that come into contact with the breast and breast milk before first use and after each use.
- Do not use antibacterial or abrasive cleaning agents to clean the breast pump parts as this may cause damage.
- Wash your hands thoroughly with soap and water before you touch breast pump parts and breasts to prevent contamination. Avoid touching the inside of containers or lids.
Warnings to avoid breast and nipple problems including pain:
- Do not use the breast pump if the silicone diaphragm appears to be damaged or broken. See 'Ordering accessories and spare parts' for information on how to obtain replacement parts.
- Only use accessories and parts recommended by Philips Avent.
- No modification of the breast pump is allowed. If you do so, your warranty becomes invalid.
- Never use the breast pump while you are sleepy or drowsy to avoid lack of attention during use.
- Always switch off the breast pump before you remove the pump body from your breast, in order to release the vacuum.
-
If the vacuum is uncomfortable or causes pain, switch off and remove the breast pump from your breast.
-
Do not continue pumping for more than five minutes at a time if you do not succeed in expressing any milk. Try to express at another time during the day.
- If the process becomes very uncomfortable or painful, stop using the breast pump and consult your healthcare professional.
Warnings to prevent damage and malfunction of the breast pump:
- Portable radio frequency (RF) communications equipment (including mobile phones and peripherals such as antenna cables and external antennas) should not be used closer than 30 cm (12 in) to any part of the breast pump, including adapter. This could have a negative effect on the performance of the breast pump.
- Use of this equipment adjacent to or stacked with other equipment should be avoided because it could result in improper operation.
Battery safety instructions
- Only use the product for its intended purpose. Read this important information carefully before you use the product and its batteries and accessories, and save it for future reference. Misuse can lead to hazards or serious injuries. Accessories supplied may vary for different products.
- To charge the battery, only use the detachable adapter (S009AHz050yyyy) provided with the product. Do not use an extension cord.
- Charge, use and store the product at the temperature ranges indicated in the technical specifications table in this user manual.
- Keep product and batteries away from fire and do not expose them to direct sunlight or high temperatures.
- If the product becomes abnormally hot or smelly, changes color or if charging takes longer than usual, stop using and charging the product and contact Philips.
- Do not place products and their batteries in microwave ovens or on induction cookers.
- Do not open, modify, pierce, damage or dismantle the product or battery to prevent batteries from heating up or releasing toxic or hazardous substances. Do not short-circuit, overcharge or reverse charge batteries.
- If batteries are damaged or leaking, avoid contact with the skin or eyes. If this occurs, immediately rinse well with water and seek medical care.
Caution

Cautions to prevent damage to and malfunctioning of the breast pump:
- Prevent the adapter and motor unit from coming into contact with water.
- Never put the motor unit or the adapter in water or in a dishwasher, as this causes permanent damage to these parts.
- Keep the adapter and the silicone tubes away from heated surfaces to avoid overheating and deformation of these parts.
Before first use
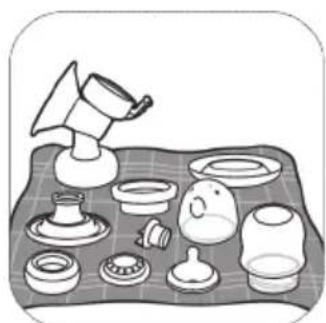
Disassemble, clean and disinfect all parts that come into contact with the breast and breast milk before you use the breast pump for the first time and after each use.
Fully charge the device before you use it for the first time or after a long period of non-use.
Cleaning and disinfecting
Overview
Clean and disinfect the parts that come into contact with the breast and breast milk as described below:
| When How | ||
 | Clean and disinfect before first use and after every use. | Disassemble all parts and then clean them as described in chapter 'Cleaning' and disinfect them as described in chapter 'Disinfecting'. |
 |
The following parts do not come into contact with the breast and breast milk; clean them as described below:
| When How | ||
 | Clean when needed. Wipe with a clean, | damp cloth with water and mild detergent. |
Step 1: Disassembling
![graph TD A["Top Cover"] --> B["Inner Ring"] B --> C["Shuttered Pad"] C --> D["Shuttered Ring with Top Cover"] D --> E["Shuttered Pad with Bottom Cover"] E --> F["Bottom Cover with Down Arrow"]](/content/2026/04/727827/images/b905f06cc2b652f84b45f9b327c240794406f6423a8e5529f15e80c3ab06cc8e.jpg)
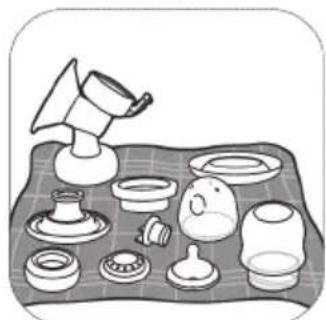
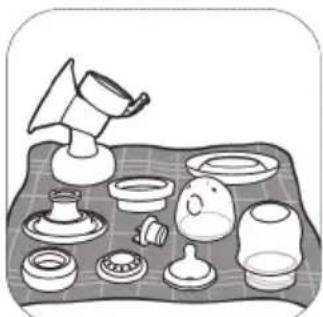
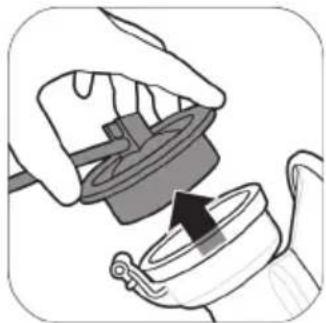
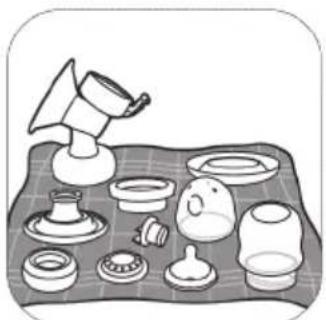
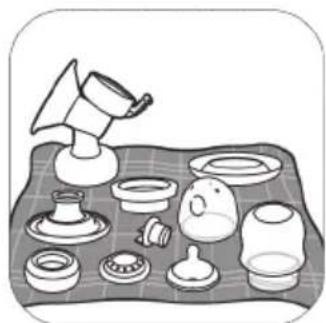
Disassemble the breast pump, bottle and storage cup completely. Also remove the white valve from the pump body (Fig. B3).
Step 2: Cleaning
The parts that come into contact with the breast and breast milk can be cleaned manually or in the dishwasher.
⚠ Warning: Do not use antibacterial or abrasive cleaning agents to clean the breast pump parts as this may cause damage.
Caution: Never put the motor unit or the adapter in water or in a dishwasher, as this causes permanent damage to these parts.
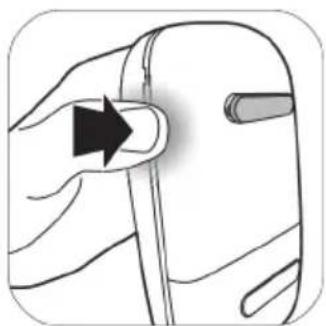
Caution: Be careful when you remove and clean the white valve. If it gets damaged, your breast pump does not function properly. To remove the white valve, gently pull at the ribbed tab on the side of the valve. To clean the white valve, rub it gently between your fingers in warm water with some dishwashing liquid. Do not insert objects into the white valve, as this may cause damage.
Step 2A: Manual cleaning
Supplies needed:
- Mild dishwashing liquid
- Drinking-quality water
- Soft, clean brush

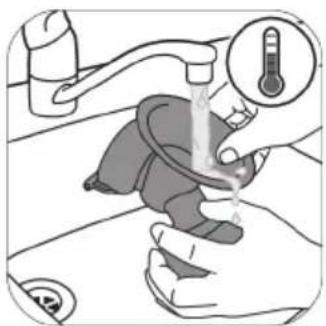
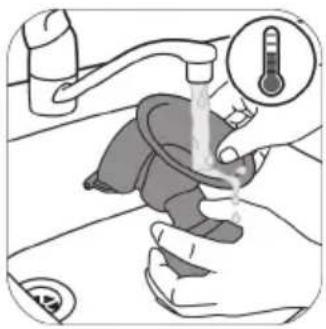
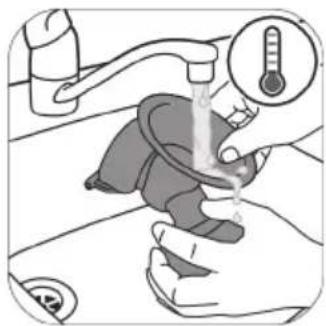
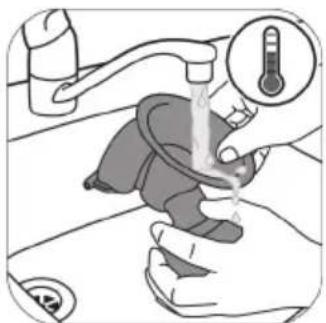
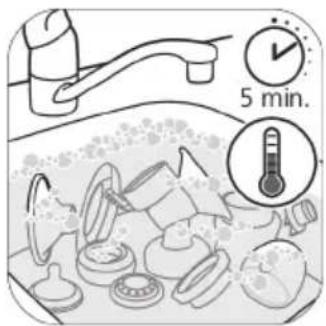
- Rinse all parts under a running tap with lukewarm water.
-
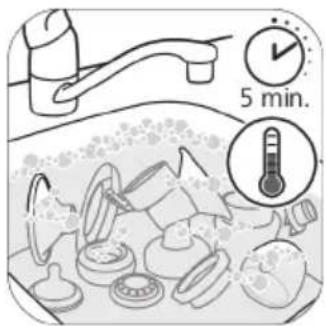
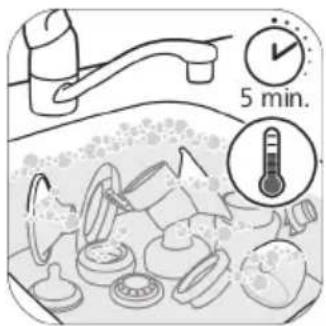
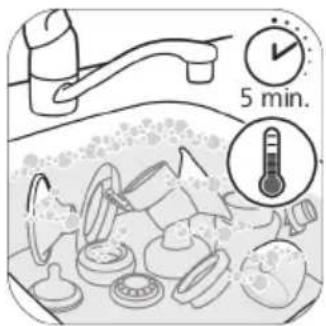
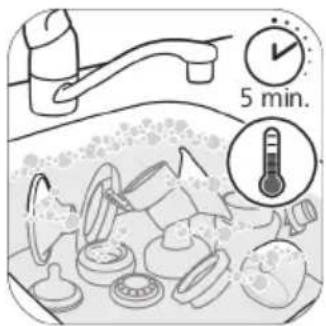
Soak all parts for 5 minutes in warm water with some mild dishwashing liquid.
-
Clean tea towel or drying rack
- Clean sink or bowl
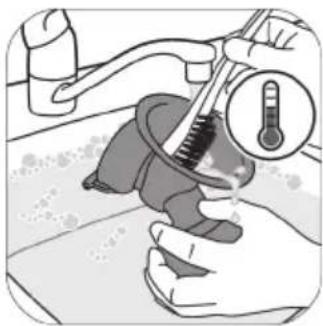
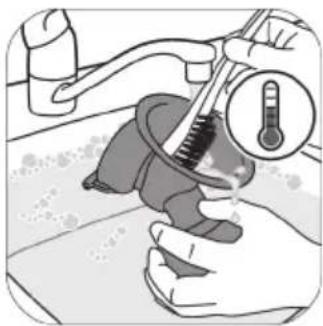
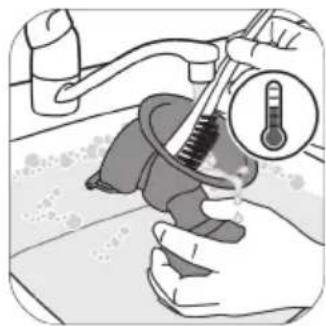
- Clean all parts with a cleaning brush in warm water with some mild dishwashing liquid. If you use a brush to clean the tip of the feeding teat, clean it as carefully as possible to avoid damage.
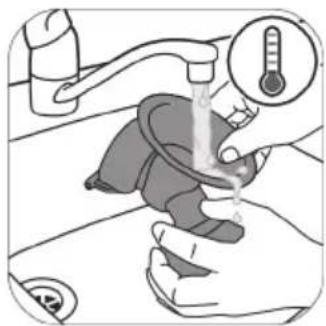
- Thoroughly rinse all parts under a running tap with cold clear water.
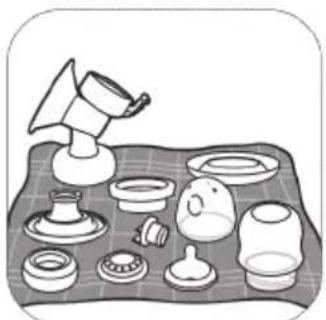
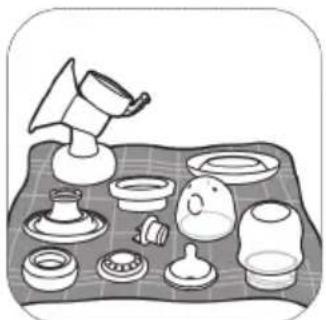
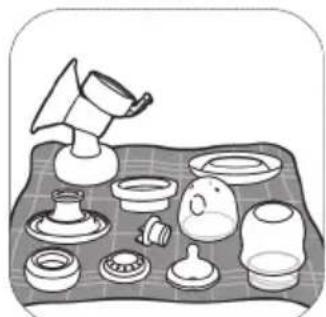
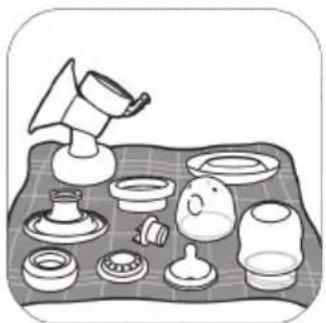
- Leave all parts to air-dry on a clean tea towel or drying rack.
Step 2B: Cleaning in the dishwasher
Supplies needed:
- Mild dishwashing liquid or a dishwashing tablet
- Drinking-quality water
① Note: Food colorings may discolor parts.
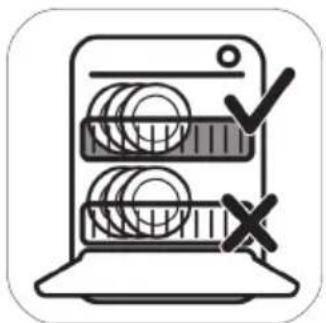
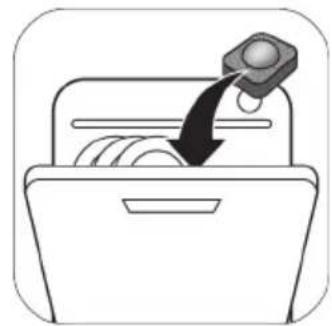
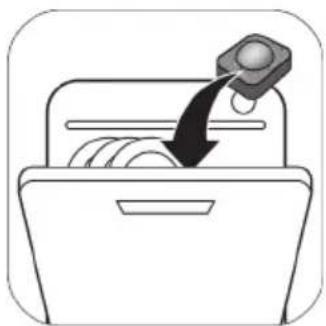
- Place all parts on the top rack of the dishwasher.
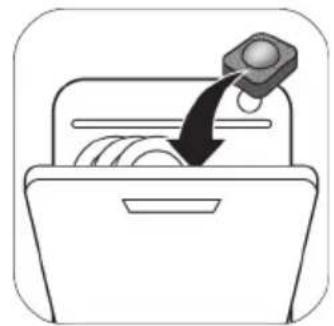
- Put dishwashing liquid or a tablet in the machine and run a standard program.
- Leave all parts to air-dry on a clean tea towel or drying rack.
Step 3: Disinfecting
Supplies needed:
- A household pot
- Drinking-quality water
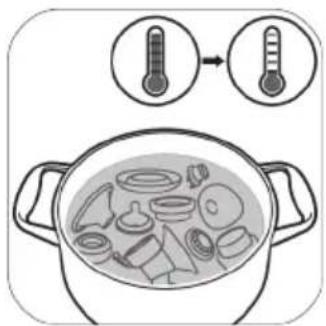
Caution: During disinfection with boiling water, prevent the bottle or other parts from touching the sides of the pot. This can cause irreversible product deformation or damage that Philips cannot be held liable for.
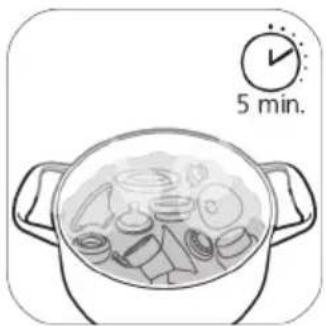
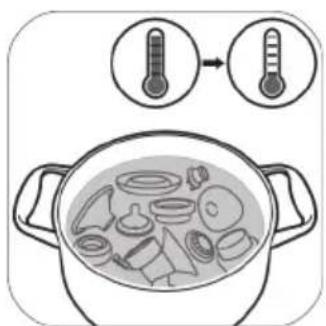
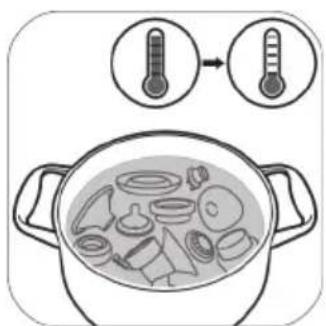
- Fill a household pot with enough water to cover all parts and place all parts in the pot. Let the water boil for 5 minutes. Make sure the parts do not touch the sides of the pot.
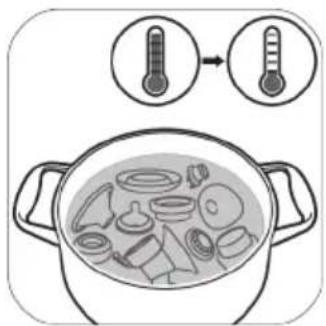
- Allow the water to cool down.
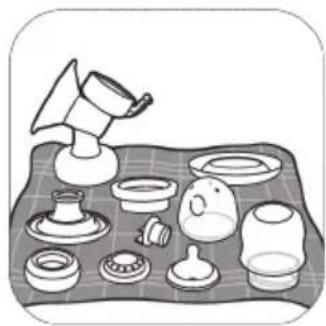
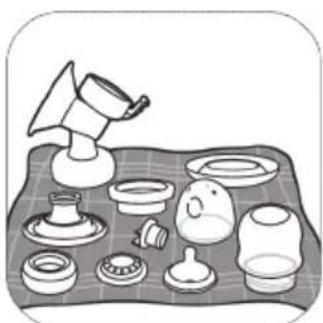
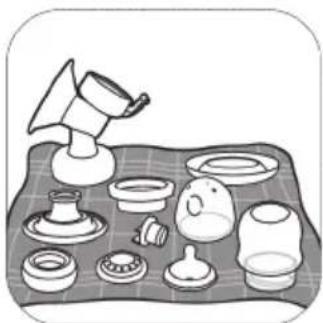
- Gently remove the parts from the water. Place the parts on a clean surface/tea towel or drying rack to air-dry.
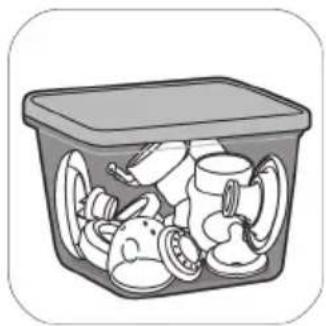
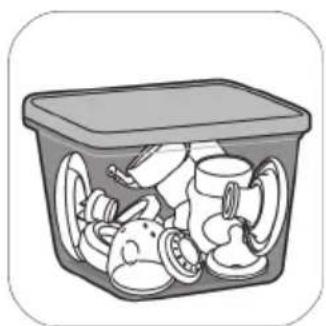
- Store the dry items safely in a clean, protected area until needed. Ensure that the clean parts have air-dried completely before storing them to help prevent germs and mold from growing.
Using the breast pump
Cushion size
The Philips Avent single/double electric breast pump Premium has a soft, active cushion. There is only one cushion size. It gently stimulates your nipple to trigger milk flow. The cushion is made of flexible silicone, fitting nipple sizes up to 30 mm.
Charging the breast pump
Fully charge the battery before you use the breast pump for the first time and when the battery is low. Fully charging the battery takes up to 4 hours.
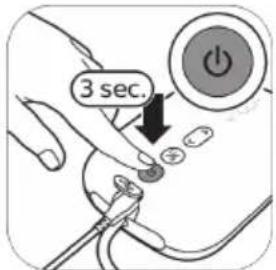
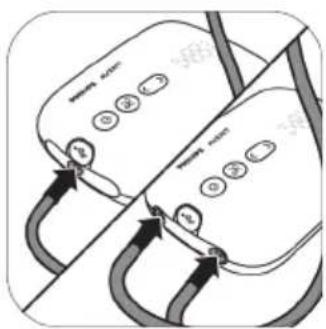
- Switch off the device.
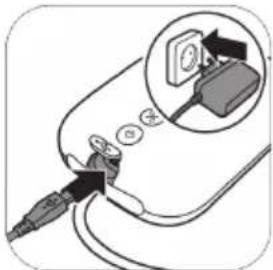
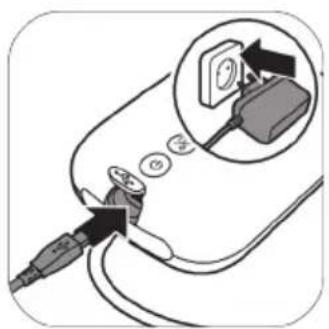
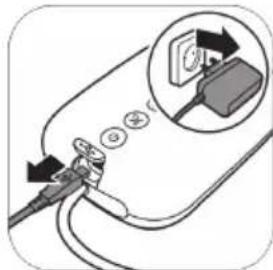
- Insert the adapter into the wall socket and insert the small plug at the other end into the motor unit.
![graph TD A[" "] --> B[" "] B --> C[" "] C --> D[" "] D --> E[" "] E --> F[" "] style A fill:#fff,stroke:#000 style B fill:#fff,stroke:#000 style C fill:#fff,stroke:#000 style D fill:#fff,stroke:#000 style E fill:#fff,stroke:#000 style F fill:#fff,stroke:#000](/content/2026/04/727827/images/5c1274cab0b14ae6a89480daa137e1dcdb77dc017a1e0e57e11a82ad6665202b.jpg)
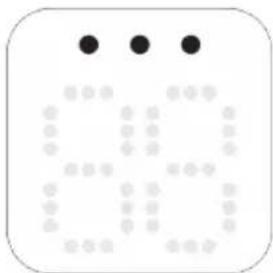
- The battery lights light up one by one and then all go out: the battery is charging.
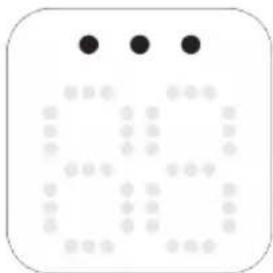
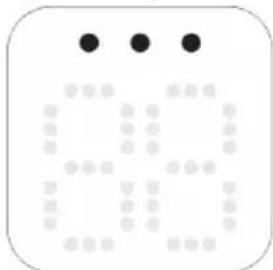
- All lights are steady on: the battery is fully charged.
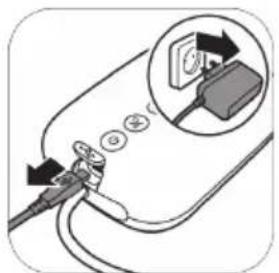
- Remove the adapter from the wall socket and pull the small plug out of the motor unit.
Battery indicator light description
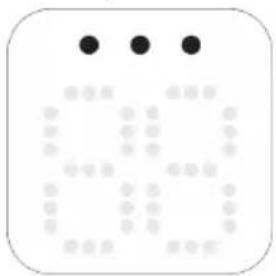
All lights are steady on. The battery is fully charged. Charged battery operates approximately 3 pumping sessions.*
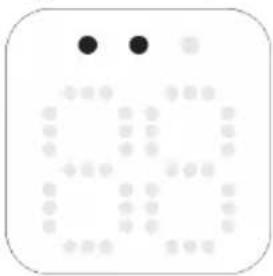
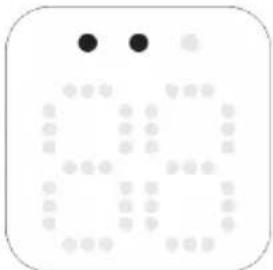
Two lights are steady on.
The battery is charged sufficiently for maximum two sessions.*
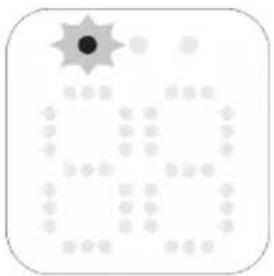
First light flashes slowly.
The battery is charged sufficiently for maximum one session.*
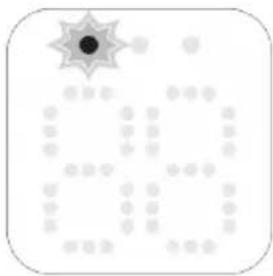
First light flashes quickly.
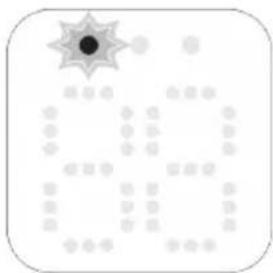
The battery is very low, the device will soon stop operating, charging is needed.
![graph TD A[" "] --> B[" "] B --> C[" "] C --> D[" "] D --> E[" "] E --> F[" "] F --> G[" "] G --> H[" "] H --> I[" "] I --> J[" "] J --> K[" "] K --> L[" "] L --> M[" "] M --> N[" "] N --> O[" "] O --> P[" "] P --> Q[" "] Q --> R[" "] R --> S[" "] S --> T[" "] T --> U[" "] U --> V[" "] V --> W[" "]…](/content/2026/04/727827/images/70c2dda974241976eeda3452e12beb6d61ae20a7bb7b7f13967806406f4ea52e.jpg)
Battery lights light up one by one and go out all together. The battery is charging.
Assembling the breast pump
⚠ Warning: Be careful, when you have disinfected the breast pump parts by boiling them, they can be very hot. To prevent burns, only start assembling the breast pump when disinfected parts have cooled down.
⚠ Warning: Wash your hands thoroughly with soap and water before you touch breast pump parts and breasts to prevent contamination. Avoid touching the inside of containers or lids.
Make sure you have cleaned and disinfected the parts of the breast pump that come into contact with the breast and breast milk.
Check the breast pump kit parts for wear or damage before use and replace them if necessary.
① Note: Correct placement of the white valve, cushion, silicone diaphragm and silicone tube is essential for the breast pump to form a proper vacuum.
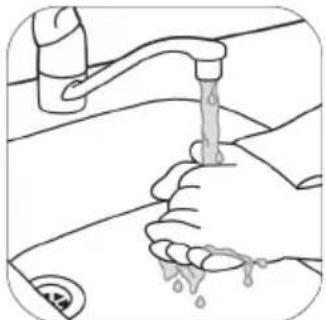
- Wash your hands thoroughly with soap and water.
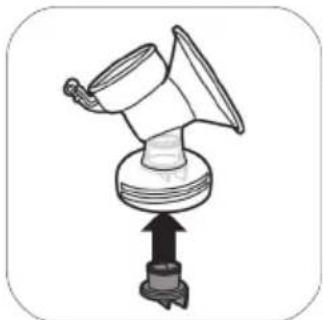
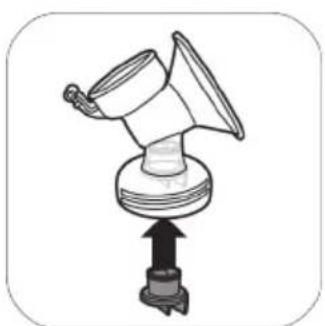
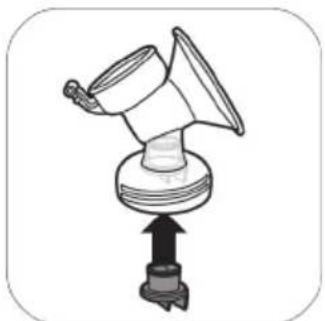
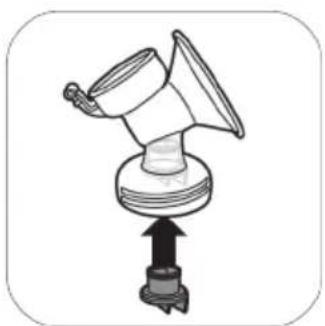
- Push the white valve in the pump body as far as possible.
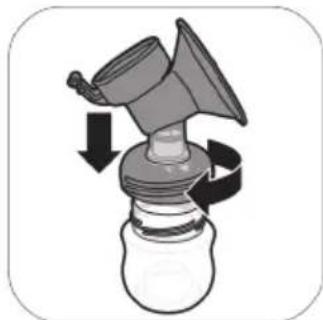
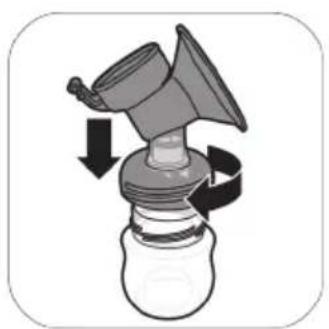
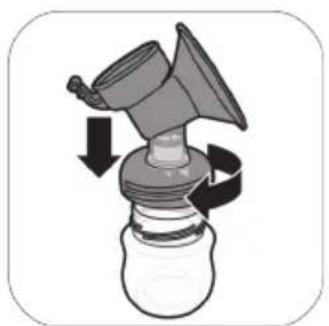
- Screw the pump body onto the bottle.
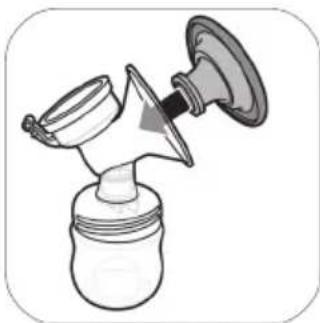
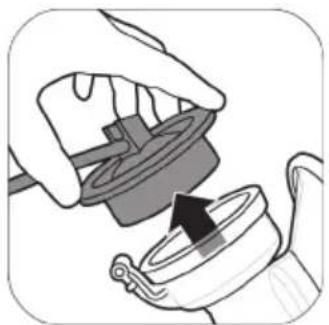
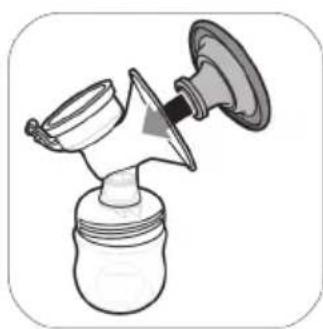
- Place the cushion in the pump body and make sure that the rim covers the pump body.
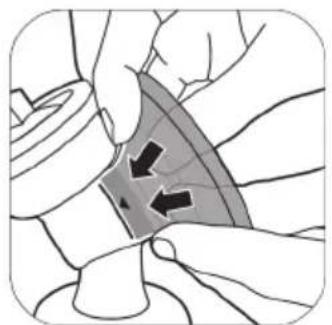
4A. Push the inner part of the cushion into the funnel against the line (indicated with an arrow).
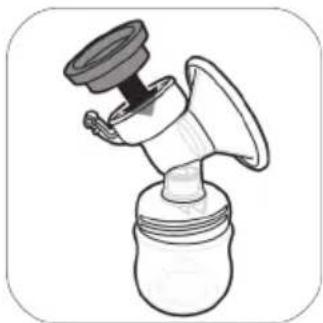
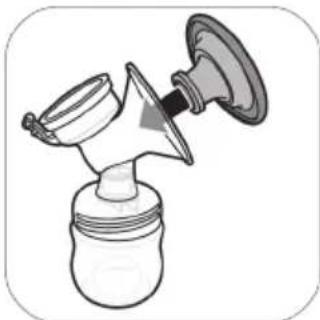
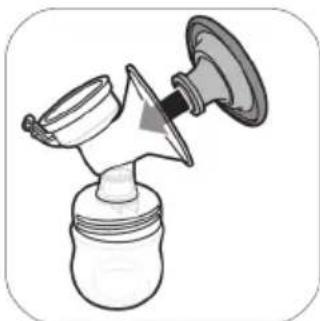
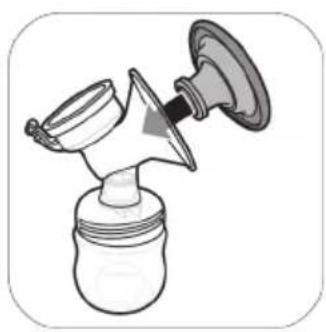
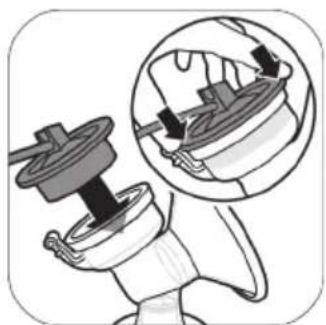
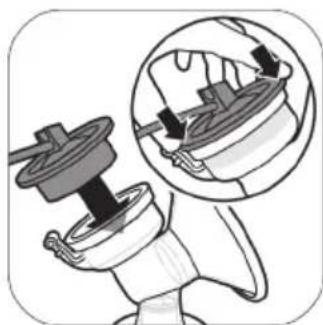
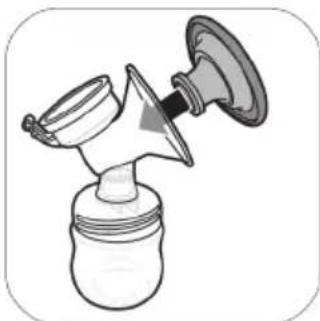
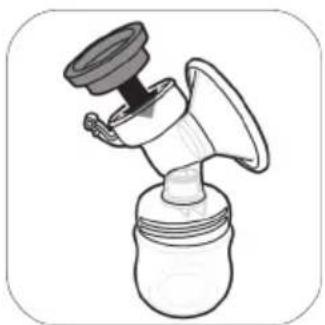
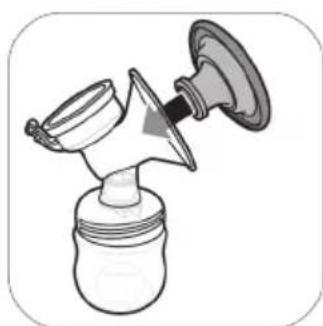
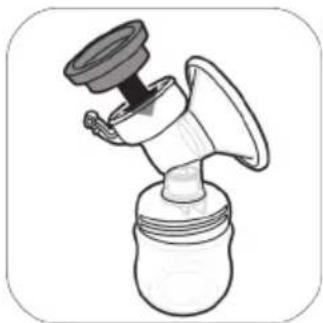
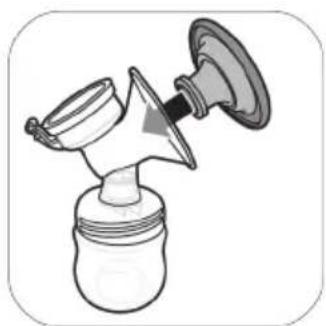
- Place the silicone diaphragm in the pump body.
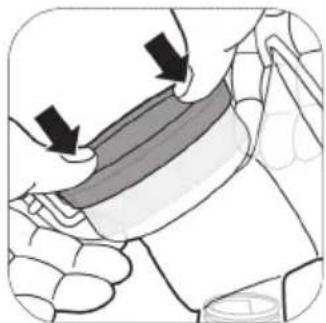
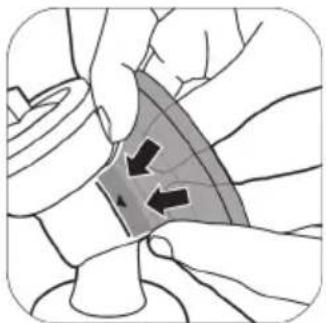
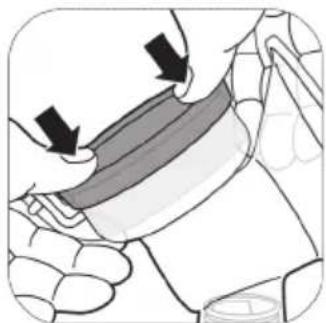
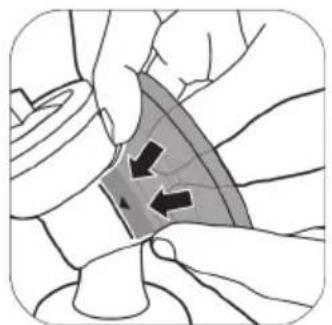
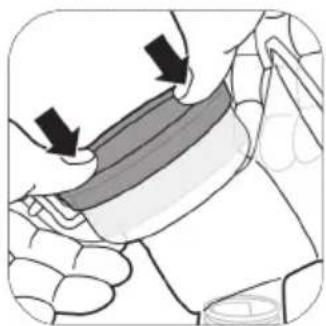
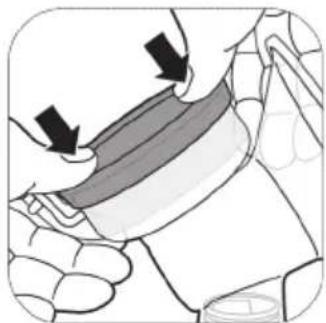
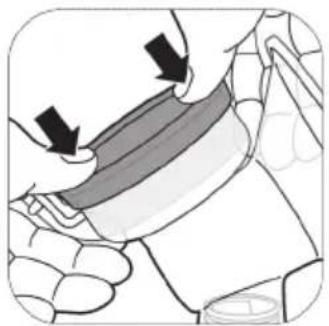
5A. Make sure that the silicone diaphragm fits securely around the rim by pressing it down with your thumbs.
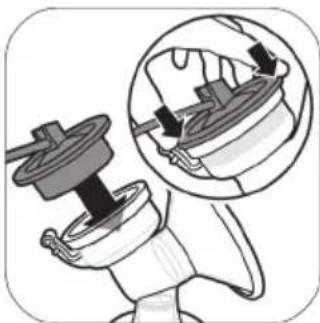
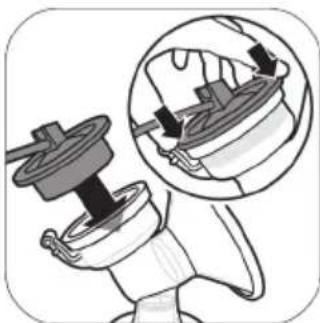
- Attach the silicone tube and cap onto the silicone diaphragm. Push down the cap until it is securely in place.
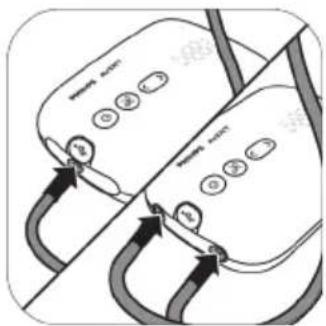
- Connect the tube(s) to the motor unit.
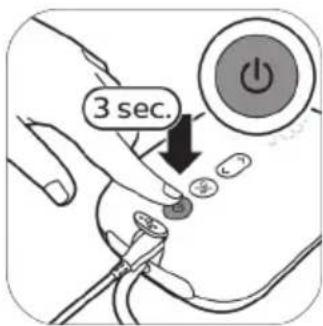
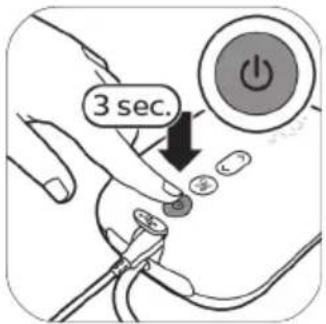
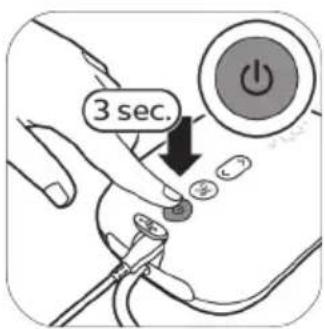
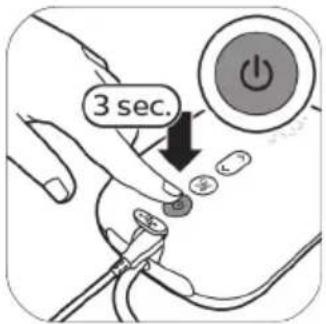
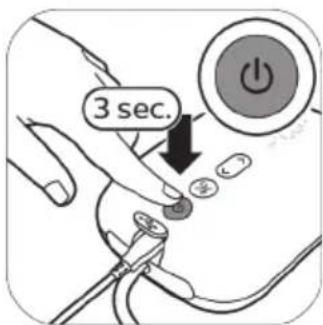
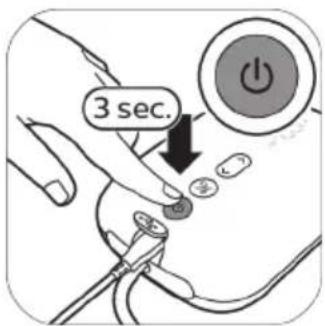
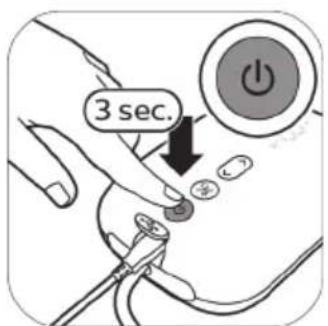
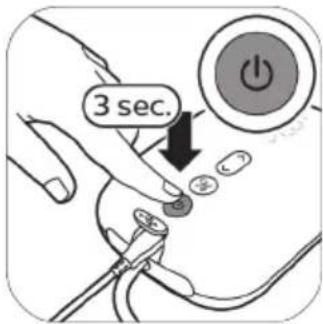
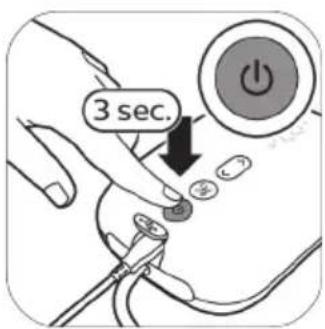
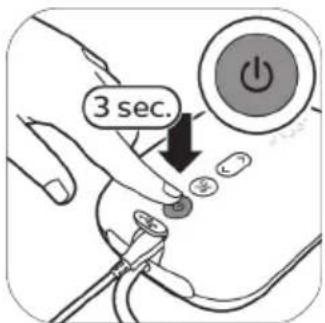
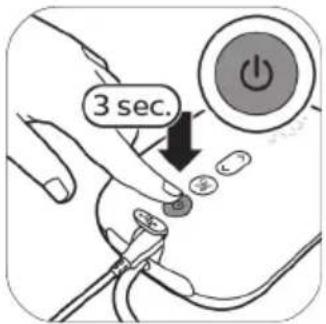
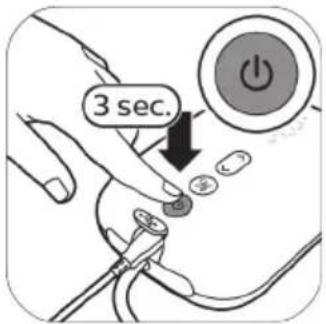
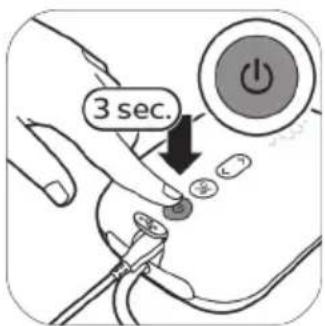
8A. When the breast pump is charged, you can use it cordless. Press and hold the on/off button until the device switches on.
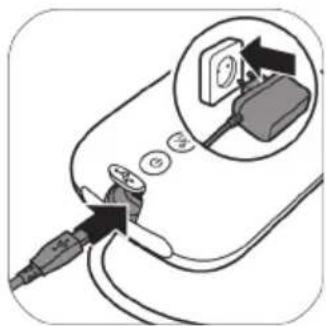
8B. You can also use the breast pump connected to the wall socket. If the battery is low, insert the adapter into the wall socket and insert the small plug at the other end into the motor unit.
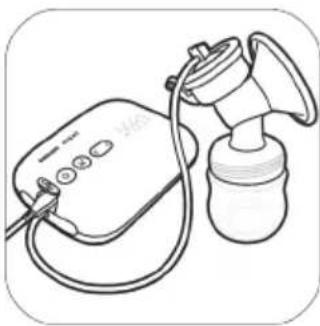
- The breast pump is now ready for use.
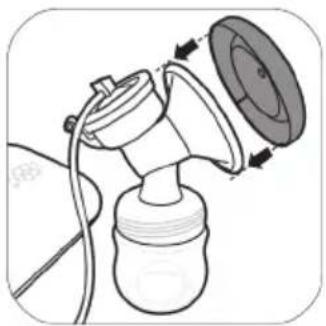
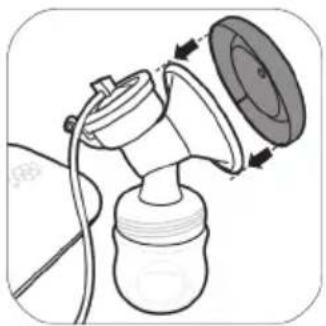
① Note: You can place the cover over the cushion to keep the breast pump clean when you take it with you and while you are preparing for expressing.
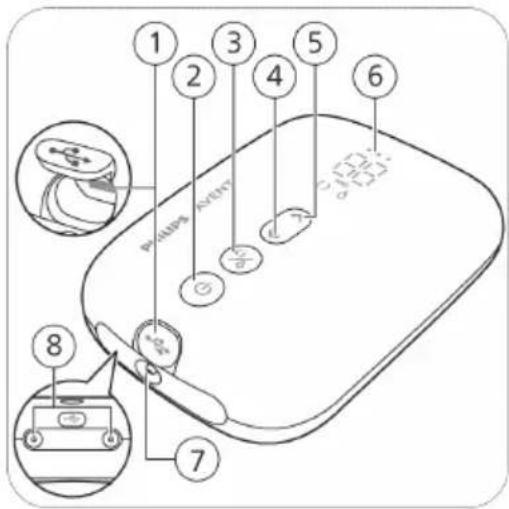
Motor unit part description
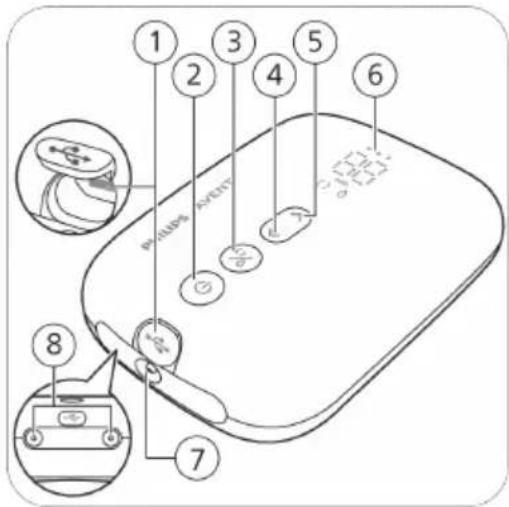
1 USB power inlet
2 On/off button with pause/play function
3 Mode selection button
4 'Level down' button
5 'Level up' button
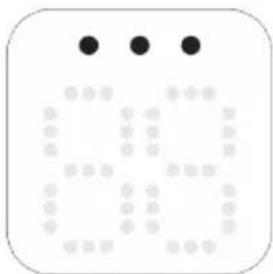
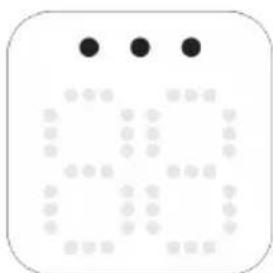
6 LED display
7 Tubing port for single breast pump
8 Tubing ports for double breast pump
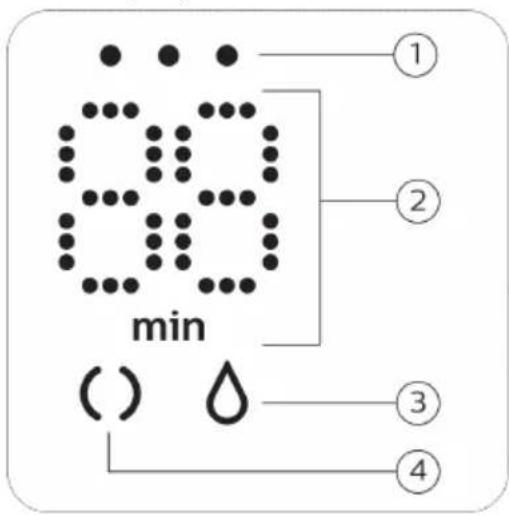
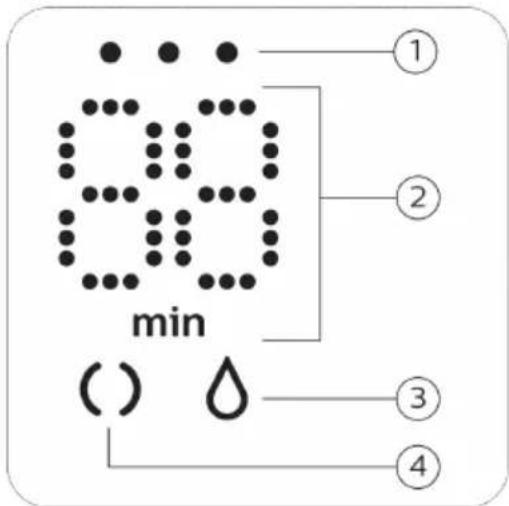
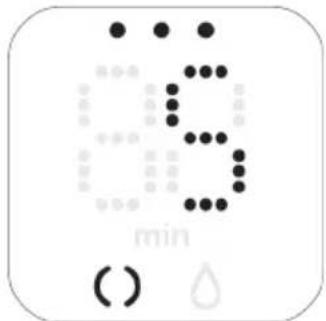
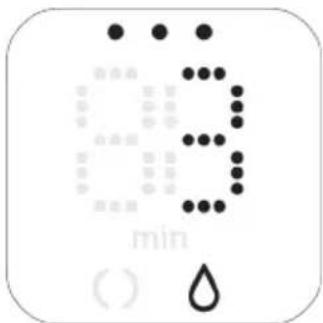
LED display description
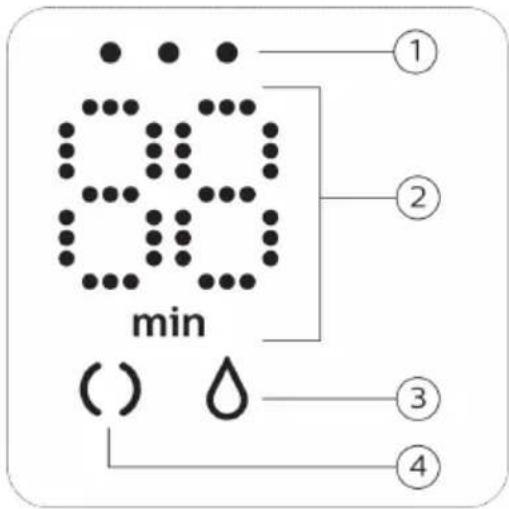
1 Battery indicator lights
2 Timer (minutes) and vacuum level indication
3 Expression icon
4 Stimulation icon
Explanation of modes
The breast pump has two modes. Below you can find an explanation of these modes.
| Mode icons Mode Explanation No. of suction levels | |||
 | Stimulation mode M  | Mode to stimulate the breast to start up the milk flow. | 8 suction levels |
 | Expression mode M  | Mode for efficient milk removal after milk has started flowing. After 90 sec. of stimulation, the device automatically switches to the expression mode. | 16 suction levels |
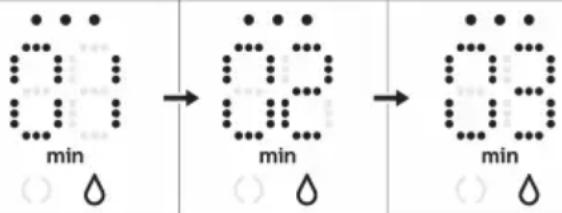 | The number on the display shows the running time in minutes. | ||
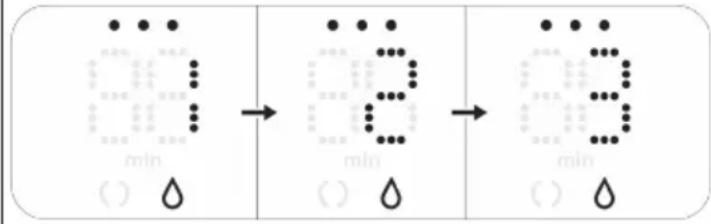 | When you change the suction level, the display shows the selected suction level for a few seconds and then shows the running time again. | ||
Pumping instructions
⚠ Warning: Always switch off the breast pump before you remove the pump body from your breast, in order to release the vacuum.
⚠ Warning: Do not continue pumping for more than five minutes at a time if you do not succeed in expressing any milk. Try to express at another time during the day.
⚠ Warning: If the process becomes very uncomfortable or painful, stop using the breast pump and consult your healthcare professional.
Note: If you regularly express more than 125 ml/4 fl oz per session, you can purchase and use a 260 ml/9 fl oz Philips Avent Natural bottle to prevent overfilling and spillage.
① Note: The breast pump can be used cordless if it is sufficiently charged, but you can also use it connected to the wall socket.
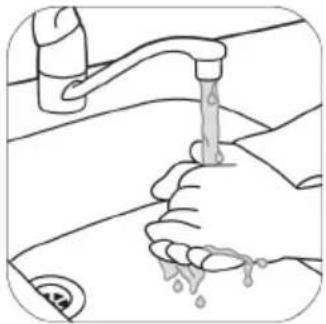
- Wash your hands thoroughly with soap and water and make sure that your breast is clean.
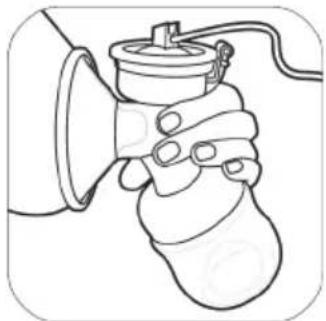
- Place the breast pump kit onto your breast. Make sure that you center your nipple.
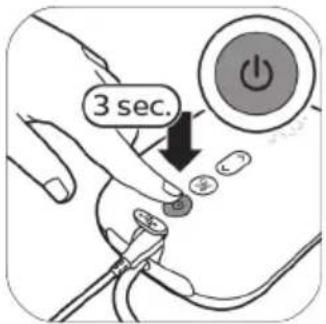
- Press and hold the on/off button until the device switches on. The indicator lights go on to indicate that the device is in stimulation mode.
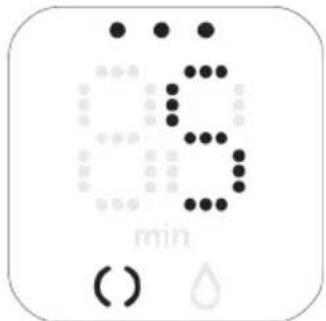
- The breast pump starts in the stimulation mode and slowly increases its vacuum to the last used stimulation suction level (or level 5 when used for the first time).
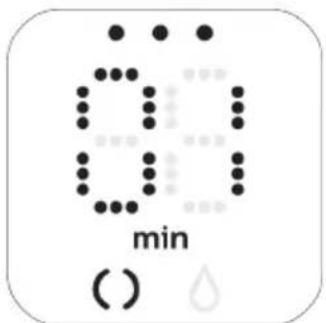
- The display shows the running time.
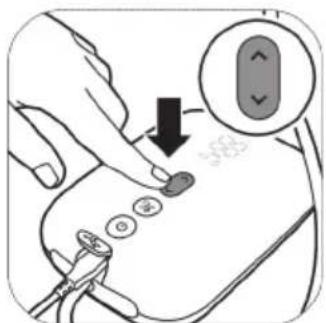
- Use the 'level up' and 'level down' buttons to change the suction level to your preference.
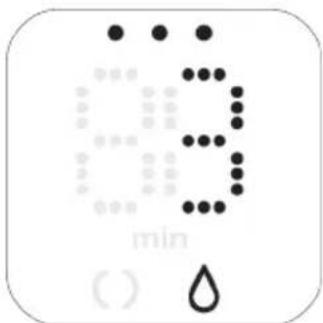
- After 90 seconds, the breast pump will switch smoothly to expression mode and slowly increase its vacuum to the last used expression suction level (or level 11 when used for the first time).
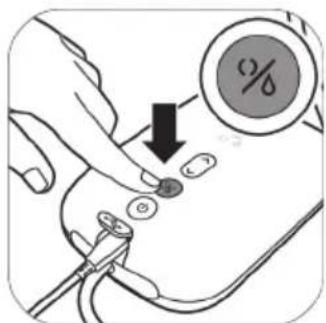
- If your milk starts flowing earlier or if you want to switch from expression to stimulation mode, you can switch modes with the mode selection button.
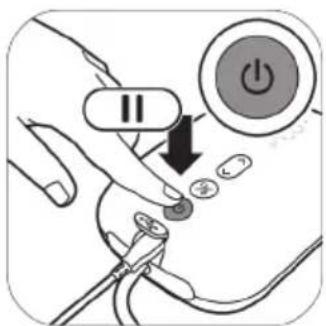
- Briefly press the on/off button if you want to pause. To continue, briefly press the on/off button again.
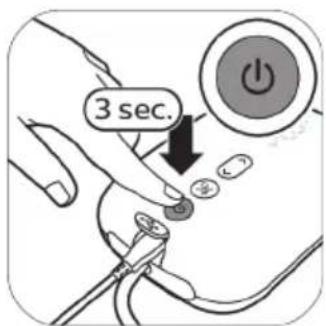
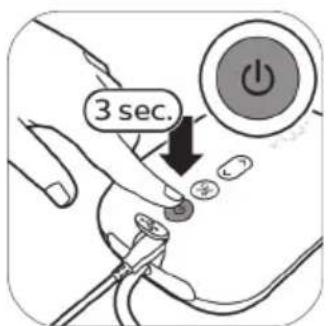
- Press and hold the on/off button to switch off.
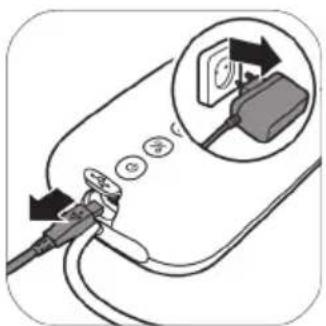
- Unplug the adapter from the wall socket and pull the small plug out of the motor unit.
Tip: For optimal expression, choose the highest setting that still feels comfortable. This setting may differ across different sessions.
Tip: You can use the double breast pump as a single breast pump by connecting only the tube of one pump kit to the motor unit.
① Note: The breast pump will switch off automatically after 30 minutes in order to prevent overheating.
After use
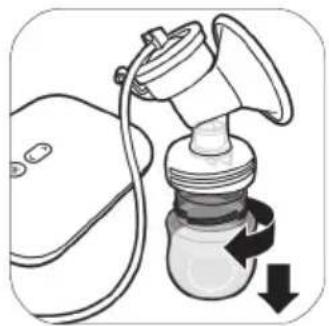
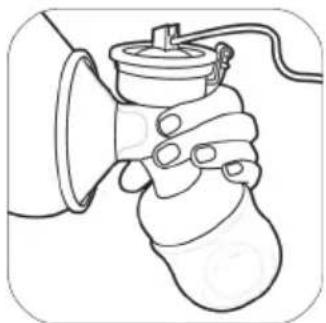
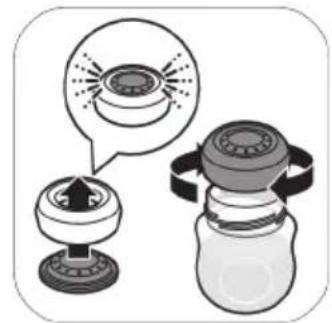
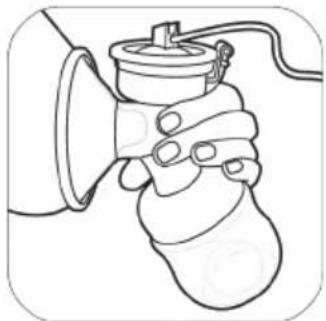
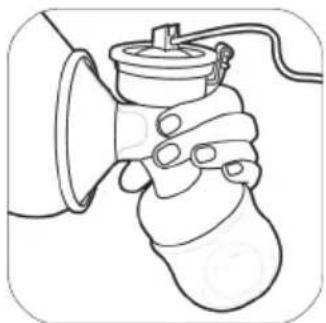
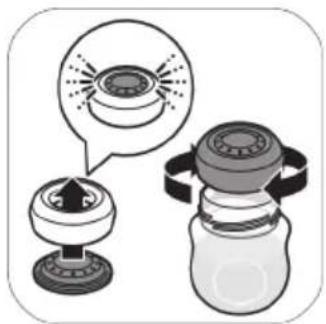
- Unscrew the bottle. 2A.
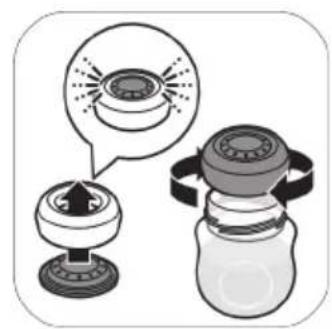
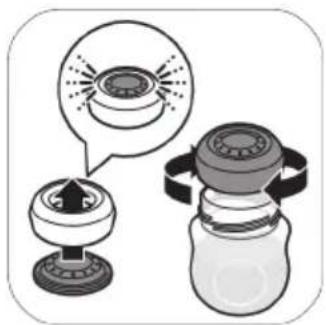
To store the breast milk: close the bottle with the sealing disc and screw ring.

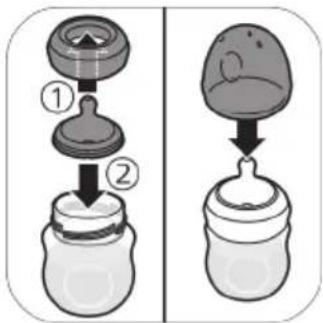
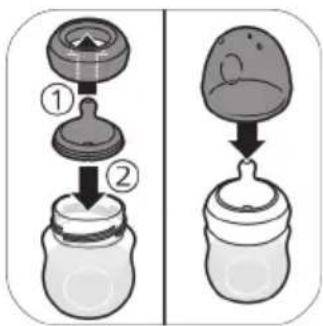
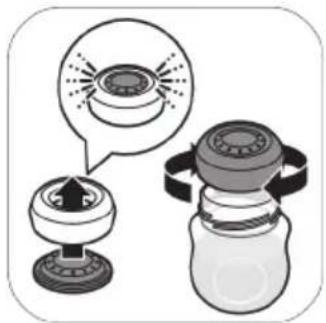
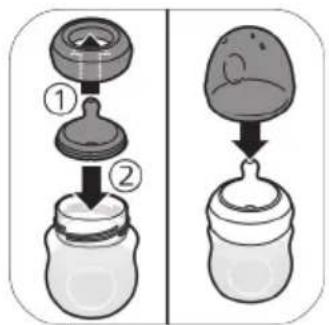
2B. To prepare the bottle for feeding your baby: place a teat in a screw ring and screw the assembled screw ring onto the bottle. Seal the teat with the bottle cap (see 'Assembling the bottle').
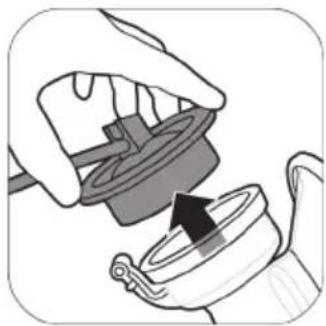
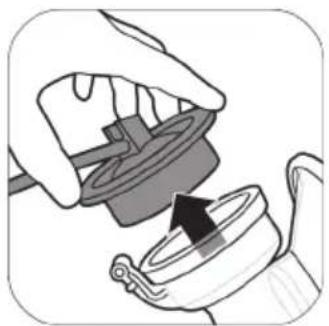
- Remove the silicone tube and cap from the breast pump kit.
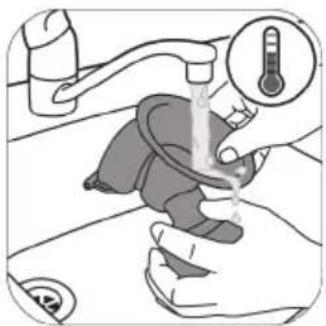
- Disassemble, clean and disinfect all parts that have been in contact with the breast and breast milk (see 'Cleaning and disinfecting').
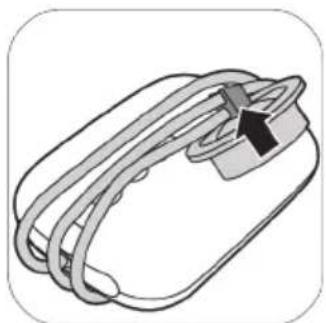
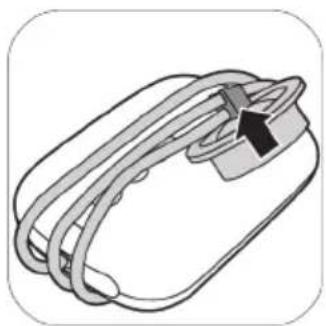
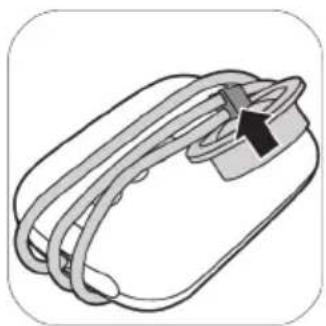
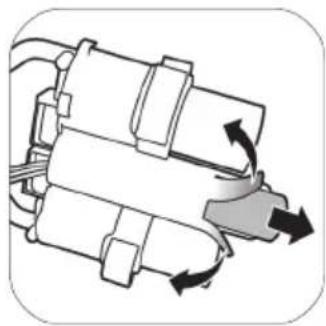
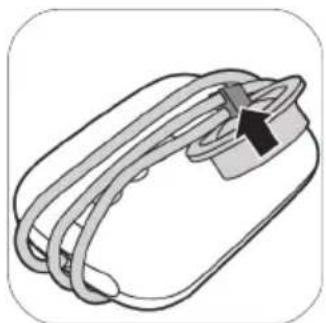
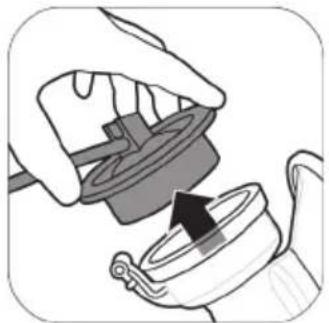
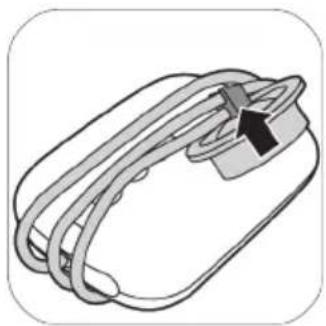
- For easy storage, wrap the silicone tube around the motor unit and clip the cap onto the tube.
⚠ Warning: Refrigerate or freeze expressed breast milk immediately or keep it at a temperature of 16-29 °C for a maximum of 4 hours before you feed your baby.
① Note: For more information about the breast pump and tips for expressing milk, visit www.philips.com/support.
Storing breast milk
Below you find guidelines for storing breast milk:
Storage location Temperature Max. storage duration
Room 16-29 °C 4 hours
Refrigerator 4 °C 4 days
Freezer < -4 °C 6 months
⚠ Warning: Never refreeze thawed breast milk to avoid a decrease in milk quality.
⚠ Warning: Never add fresh breast milk to frozen breast milk to avoid a decrease in milk quality and unintended thawing of the frozen milk.
Feeding breast milk with the bottle
Choosing the right teat for your baby

Finding the right teat is important:
If your newborn baby is consistently not taking enough milk throughout the feeding sessions or has complications in getting milk, switch to a teat with a higher flow rate.
If persistent feeding issues occur, consult a healthcare professional.
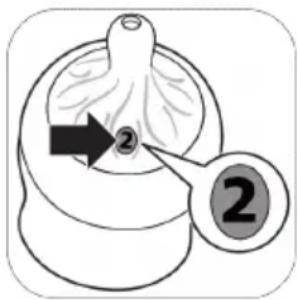
Philips Avent Natural Response teats are available with different flow rates. The breast pump comes with teat number 2 (Slow).
Use a higher flow rate if your baby falls asleep during feeding, gets frustrated, or plays with the teat instead of drinking. Use a lower flow rate if your baby is gulping the milk down or if milk drips out of its mouth during feeding.
Philips Avent Natural Response teats are clearly numbered on the side, to indicate flow rate. For more information, see www.philips.com/avent.
For your child's safety and health
WARNING!

- Continuous and prolonged sucking of fluids will cause tooth decay.
- Always check food temperature before feeding.
- Throw away at the first signs of damage or weakness.
- Keep components not in use out of the reach of children.
- Never attach to cords, ribbons, laces or loose parts of clothing. The child can be strangled.
-
Never use feeding teats as a soother.
-
Always use this product with adult supervision.
- Keep the bottle cap away from children to avoid suffocation.
- Do not allow children to play with small parts or walk/run while using bottles.
- Inspect all parts before use and pull the feeding teat in all directions. Throw away any part at the first signs of damage or weakness.
- Always discard any breast milk that is left over at the end of a feed.
Caution: To avoid damage to the bottle

- Do not place in a heated oven, plastic can melt.
- Plastic material properties may be affected by disinfection and high temperatures. This can affect the fit of the bottle cap.
- Do not leave a feeding teat in direct sunlight or heat, or leave in disinfectant for longer than recommended because this may damage the product.
Before using the bottle
- Inspect the bottle and feeding teat before each use and pull the feeding teat in all directions to prevent a choking hazard. Throw away at the first signs of damage or weakness.
- Clean and disinfect the bottle before first use and after every use (see 'Cleaning and disinfecting').
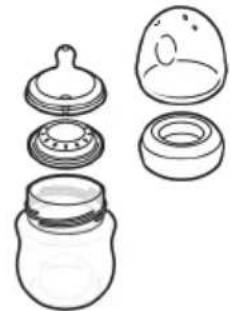
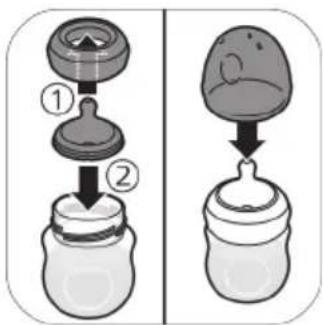
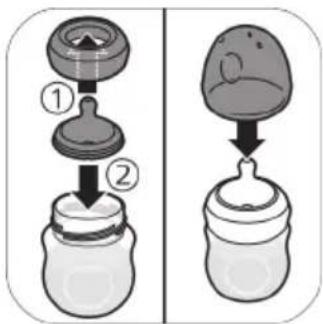
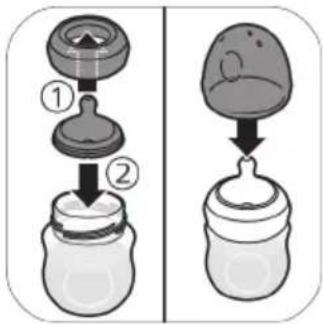
Assembling the bottle
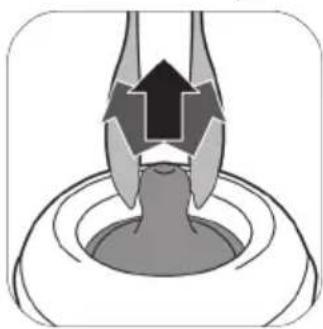
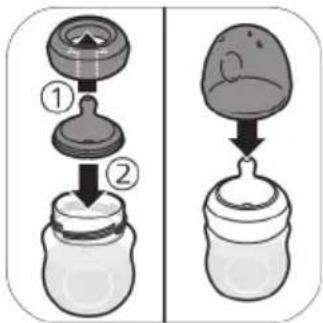
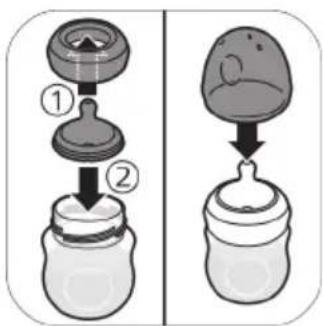
- The teat is easier to assemble if you move it back-and-forth while pulling it upwards instead of pulling it up in a straight line.
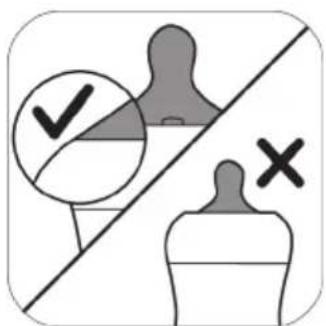
- Make sure you pull the teat through until its lower part is aligned with the screw ring.
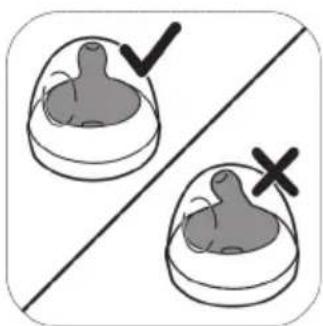
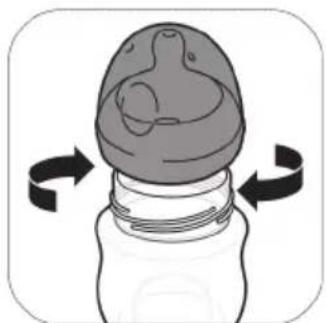
- Make sure you place the cap vertically onto the bottle so that the teat sits upright.
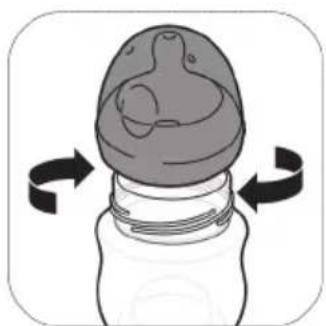
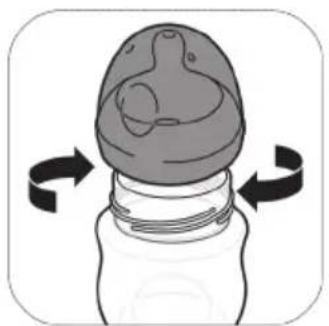
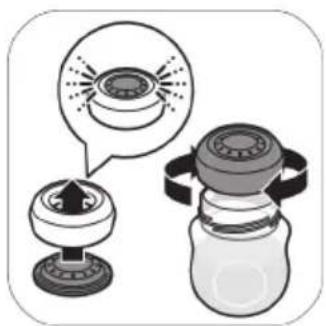
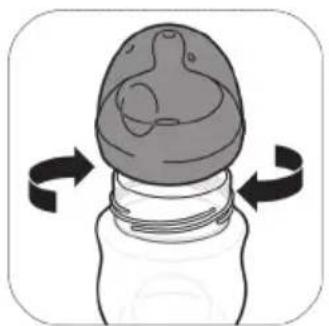
- Screw the screw ring with teat and cap on the bottle.
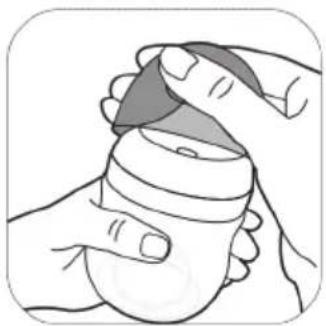
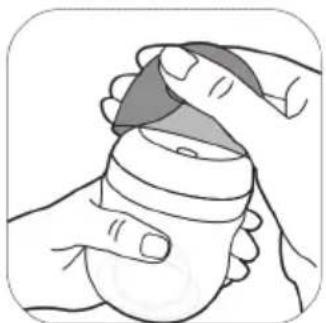
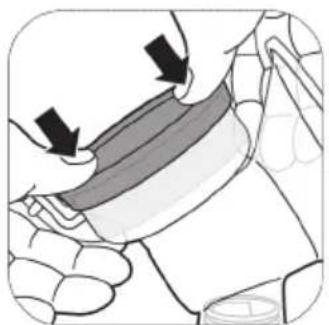
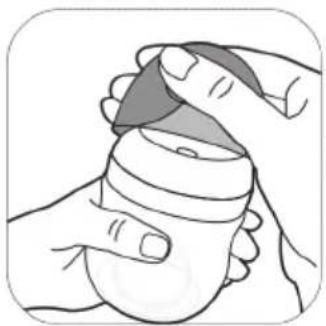
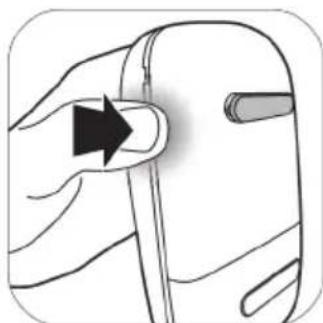
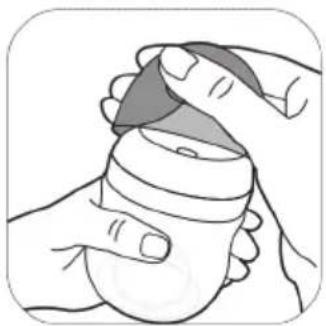
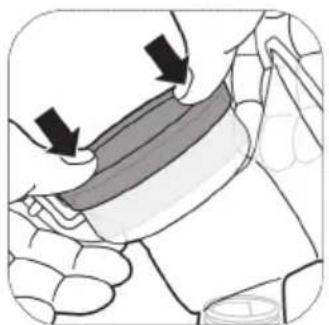
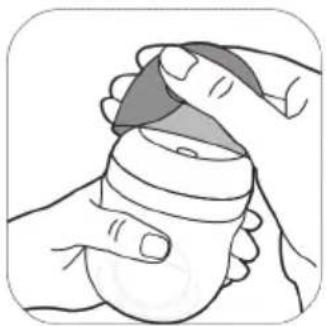
- To remove the cap, place your hand over the cap and your thumb in the dent of the cap.
Heating breast milk
If you use frozen breast milk, let it defrost completely before you heat it.
① Note: If you need to feed your baby quickly, you can defrost the milk in a bowl of hot water.
Heat the bottle with defrosted or refrigerated breast milk in a bowl of hot water or in a bottle warmer. Remove the screw ring and sealing disc from the bottle.
⚠ Warning: It is not recommended to use a microwave to warm up breast milk. Microwaves might alter the quality of breast milk and destroy some valuable nutrients and may produce localized high temperatures. If you heat up breast milk in the microwave, only place the container without screw ring, teat and cap in microwave. Always stir heated breast milk to ensure even heat distribution and check the temperature before serving.
Storing the bottles
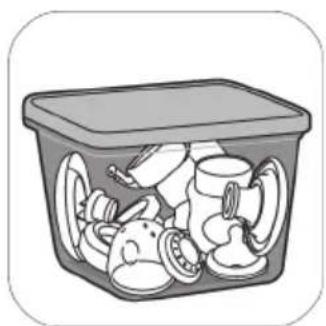
- Store all parts in a dry, clean and covered container.
- Do not leave a feeding teat in direct sunlight or heat, or leave in disinfectant for longer than recommended because this may damage the product.
- For hygiene reasons, we recommend replacing the teats after 3 months.
Compatibility
The Philips Avent single/double electric breast pump Premium is compatible with all baby bottles in the Philips Avent Natural range and Philips Avent storage cups with adapter. We do not recommend using the Philips Avent Natural glass bottles with the breast pump.
Ordering accessories and spare parts
To buy accessories or spare parts, visit www.philips.com/support or go to your Philips dealer. You can also contact the Philips Consumer Care Center in your country.
When you order spare teats, make sure that you use a teat with the correct flow rate for your baby (see 'Choosing the right teat for your baby') and do not mix Philips Avent Anti-colic bottle parts and teats with parts of the Philips Avent Natural bottles. They do not fit and could cause leakage or other issues.
Recycling
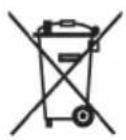
- This symbol means that electrical products and batteries shall not be disposed of with normal household waste.
- Follow your country's rules for the separate collection of electrical products and batteries.
- Correct disposal helps prevent negative consequences for the environment and human health.
Battery removal instructions
The built-in rechargeable battery must only be removed by a qualified professional when the appliance is discarded.
- When you handle batteries, make sure that your hands, the product and the batteries are dry.
- To avoid accidental short-circuiting of batteries after removal, do not let battery terminals come into contact with metal objects (e.g. coins, hairpins, rings). Do not wrap batteries in aluminum foil. Tape battery terminals or put batteries in a plastic bag before you discard them.
- If batteries are damaged or leaking, avoid contact with the skin or eyes. If this occurs, immediately rinse well with water and seek medical care.
(i) Note: Only remove the rechargeable battery when you discard the product. Before you remove the battery, make sure that the product is disconnected from the wall socket and that the battery is completely empty.
(i) Note: Take any necessary safety precautions when you handle tools to open the product and when you dispose of the rechargeable battery.
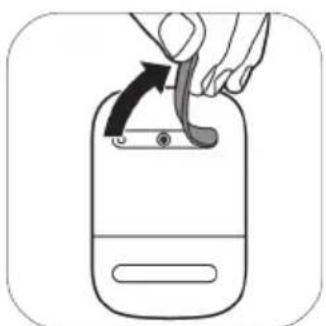
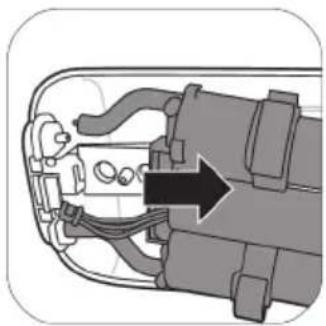
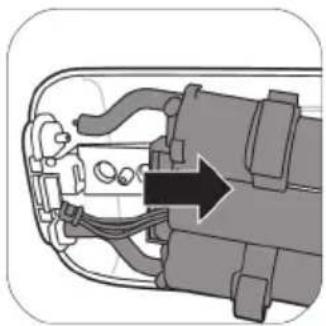
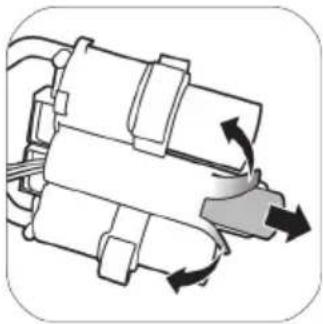
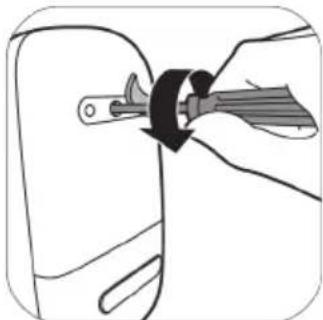
- Remove the rubber feet from the bottom of the motor unit.
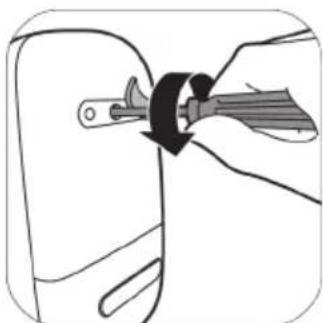
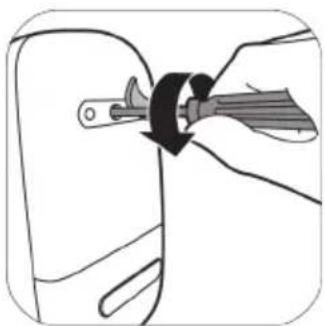
- Remove the screw with a torx screwdriver.
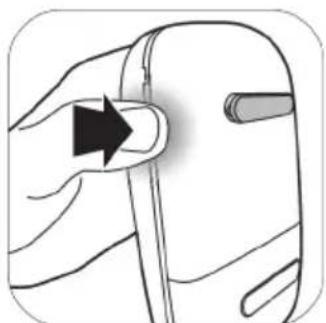
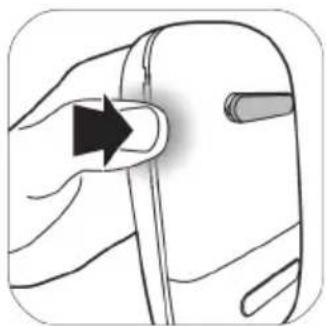
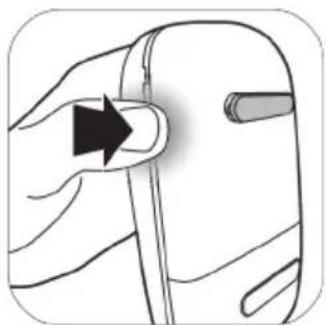
- Open the motor unit by pressing at the sides of the device.
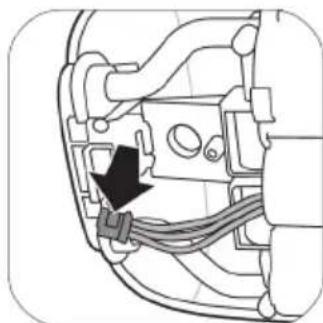
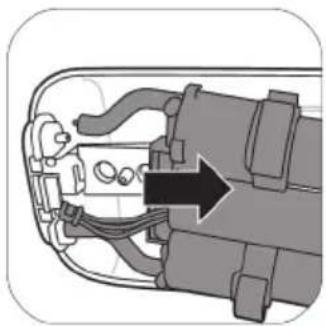
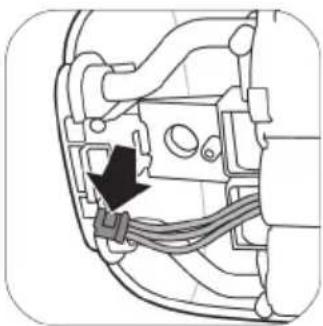
- Disconnect the connectors from the printed circuit board.
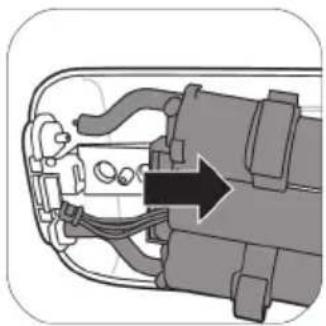
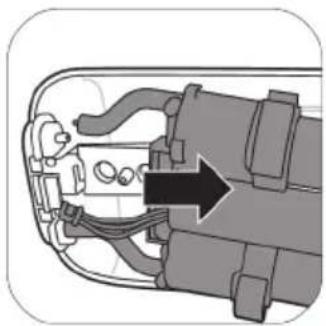
- Remove the frame from the motor unit.
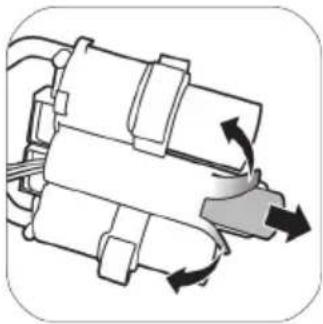
- Cut or fold the edges of the plastic battery frame. Remove the battery from the plastic battery frame.
① Note: Dispose of the rechargeable battery at a separate local collection point. Other parts can be disposed at a specific place for disposal of electric equipment.
Support
For all product support, power consumption details and the EU Declaration of Conformity, please visit www.philips.com/support.
Troubleshooting
This chapter summarizes the most common problems you could encounter with the breast pump. If you are unable to solve the problem with the information below, visit www.philips.com/support for a list of frequently asked questions or contact the Consumer Care Center in your country.
| Problem Solution | |
| I experience pain when I use the breast pump. | - Choose a suction level that is comfortable for you.- Check if the silicone diaphragm is not damaged (does not have small cracks, holes etc.).- Make sure that your nipple is placed in the center of the cushion.- If the pain persists, stop using the breast pump and consult your healthcare professional. |
| The breast pump does not switch on while it is connected to the wall socket. | - Only use the adapter supplied.- Make sure that the adapter has been inserted correctly into the wall socket and that the small plug has been inserted correctly into the motor unit.- Connect the adapter to another wall socket. Then press and hold the on/off button to check if the breast pump can be switched on.- If the problem persists, contact the Consumer Care Center via www.philips.com/support. |
| The breast pump does not switch on (indicator lights do not go on). | - Make sure that the battery is charged (see 'Charging the breast pump') or connect the breast pump to the wall socket. |
| The breast pump is not charging. | - Only use the adapter supplied.- Make sure that the adapter has been inserted correctly into the wall socket and that the small plug has been inserted correctly into the motor unit.- The breast pump is too cold or too hot for charging. Let the breast pump acclimatize to room temperature for 30 minutes.- If the problem persists, contact the Consumer Care Center via www.philips.com/support. |
| Charging the breast pump takes a very long time. | - Only use the adapter supplied.- Make sure that the adapter has been inserted correctly into the wall socket and that the small plug has been inserted correctly into the motor unit.- The breast pump is too cold or too hot. It is recommended to charge the breast pump at room temperature.- If the problem persists, contact the Consumer Care Center via www.philips.com/support. |
| I do not feel any suction/the suction level is too low. | - If possible, try a higher suction level.- Check if the silicone diaphragm is assembled correctly (see 'Assembling the breast pump').- Check if the white valve is not damaged and is assembled correctly (see 'Assembling the breast pump').- Check if the other parts of breast pump are intact and assembled correctly (see 'Assembling the breast pump').- Make sure that the breast pump is positioned correctly on the breast to allow a seal between breast pump and breast.- If you still do not feel any suction, please contact the Consumer Care Center via www.philips.com/support. |
| The suction of the breast pump is too strong. | - If possible, try a lower suction level. When you express for the first time, start with the default suction level (level 5 in stimulation mode, level 11 in expression mode) and increase/decrease the level when needed. During different expression sessions, different levels may feel most comfortable for you.- Make sure that you only use the breast pump parts provided with this breast pump.- Check if the silicone diaphragm is not damaged (does not have small cracks, holes etc.).- If the problem persists, contact the Consumer Care Center via www.philips.com/support. |
| I express little/no milk when I use my breast pump. | - If you do not feel enough suction, please check Troubleshooting item 'I do not feel any suction/the suction level is too low'.- If you are using the Philips Avent breast pump for the first time, you may need some practice before you are able to express any milk. More expressing tips can be found on the Philips website www.philips.com/mybreastpump. |
| When I switch on the breast pump after storage, it does not start working immediately. | - Make sure that the battery is fully charged (see 'Charging the breast pump') or connect the breast pump to the wall socket.- Perhaps you stored the breast pump at a temperature below the minimum storage temperature or above the maximum storage temperature. Let the breast pump acclimatize in a room of 20 °C for 30 minutes to adjust its temperature to the operating range (5 °C to 40 °C). |
| The display shows 'Er' and the device switches off automatically. | - If you are operating the breast pump on battery power, let it cool down for 30 minutes and try to switch it on again.- If you are operating the breast pump with the adapter connected to the wall socket, check if you are using the adapter that was supplied with the device.- If the problem persists, contact the Consumer Care Center via www.philips.com/support. |
Supplemental information
Below some common breastfeeding-related conditions are described. If you experience any of these symptoms, contact a healthcare professional or breastfeeding specialist.
| Common breastfeeding-related condition | Description |
| Pain sensation Pain felt on | the breast or nipple, or felt as a response to the suction being above a comfortable level. |
| Sore nipples Persistent pain | in the nipples at the beginning of the pumping session, or that lasts throughout the entire pumping session, or pain between sessions. |
| Engorgement Swelling of | the breast. The breast may feel hard, lumpy and tender. May include erythema (redness) of the breast area and fever. Usually occurs during the first days of lactation. |
| Bruise A reddish-purple discoloration that does not fade when pressed. When a bruise fades, it may become green and brown. | |
| Thrombus Thrombus can | result into tenderness, pain, redness, swelling and/or heat. |
| Injured tissue on nipple (nipple trauma) | - Fissures or cracked nipples.- Skin tissue peeling off the nipple. Normally occurs in combination with cracked nipples and/or blisters.- Nipple tear.- Blister. Looks like small bubbles on the surface of the skin.- Bleeding. Cracked or torn nipples can lead to bleeding of the affected area. |
| Clogged mammary ducts | A red, tender lump on the breast. May include erythema (redness) of the breast area. Can lead to mastitis (breast inflammation) and fever if left untreated. |
Storage conditions
Keep the breast pump out of direct sunlight as prolonged exposure may cause discoloration. Store the breast pump and its accessories in a safe, clean and dry place.
If the device has been stored in a hot or cold environment, place it in an environment with a temperature of 20\ °C for 30 minutes to let it reach a temperature within the usage conditions ( 5\ °C to 40\ °C ) before you use it.
Fully charge the battery before storing your breast pump for an extended period of time.
Electromagnetic fields (EMF)
This Philips device complies with all applicable standards and regulations regarding exposure to electromagnetic fields.
Technical information
| Single electric breast pump Double | electric breast pump | |
| Vacuum level Stimulation: -60 to -200 mbar (-45 to -150 mmHg)Expression: -60 to -360 mbar (-45 to -270 mmHg)Adjustable in steps of 20 mbarIntermittent vacuum | ||
| Cycle speed 53-120 cycles/min. | ||
| Motor unit rated input 5 V direct current / 1.1 A 5 V direct current / 1.8 A | ||
| Mains adapter rated input 100-240 V~50/60 Hz400 mA | ||
| Mains adapter rated output 5 V direct current / 1.1 A 5 V direct current / 1.8 A | ||
| Adapter type number S009AHz050yyyy The letters "yyyy" represent the output current from 0100 (1000 mA) to 0180 (1800 mA), increments in steps of 100 mA. The letter "z" denotes type of plug, it can be: U, V, B, S, C, A, D, K, T, I, E, F. | ||
| Battery Rechargeable battery: 3.6 V 2600 mAh (non-replaceable) | ||
| Operating conditions Temperature: 5 °C to 40 °CRelative humidity: 15 to 90 % (non-condensing) | ||
| Storage and transportation conditions | Temperature: -20 °C to 45 °CRelative humidity: up to 90 % (non-condensing) | |
| Operating and storage pressure | 700-1060 hPa (<3000 m altitude) | |
| Net weight Approximately 275 g Approximately 355 g | ||
| External dimensions Motor unit: 145 mm x 95 mm x 45 mm (length x width x height) | ||
| Device classification IEC 6033 | 5-1: System: Class II; motor unit: Class III Construction | |
| Materials ABS, silicone (motor unit)Polypropylene, silicone (other parts) | ||
| Service life 500 hours | ||
| Mode of operation Continuous operation Non-continuous operation | 55 min on, 180 min off at 22 °C (duty cycle 23 %)20 min on, 90 min off at 40 °C (duty cycle 18 %) | |
| Automatic power-off After 30 minutes (after last user interaction) | ||
| Ingress protection IP22 (motor unit), IP20 (adapter) | ||
Explanation of symbols
The warning signs and symbols are essential to ensure that you use this device safely and correctly and to protect you and others from injury. Below you find the meaning of the warning signs and symbols on the label and in the user manual.
| Symbol Explanation | |
 | Indicates to follow the instructions for use. |
 | Indicates important information such as warnings and cautions. |
 | Indicates usage tips, additional information or a note. |
 | Indicates the manufacturer. |
 | Indicates the manufacturing date. |
 | Indicates that the manufacturer has taken all necessary measures to ensure that the device complies with the applicable safety legislation for distribution within the European Union. |
 | Indicates manufacturer's catalog number of the breast pump. |
 | Indicates the batch number of the breast pump. |
 | Indicates that the part of the appliance that comes into physical contact with the user (also known as the applied part) is of type BF (Body Floating) according to IEC 60601-1. The applied part is the breast pump kit. |
| IP22 | Indicates the protection against ingress of solid foreign objects greater than 12.5 mm and against harmful effects due to the ingress of dripping water when tilted at 15 degrees. |
 | Indicates the protection against ingress of solid foreign objects greater than 12.5 mm and no protection against ingress of water. |
| Indicates 'alternating current'. | |
| Indicates 'direct current'. | |
 | Indicates 'Class II Equipment'. The adapter is double-insulated (Class II). |
 | Indicates USB. |
| Indicates the storage and transportation temperature limits to which the device can be safely exposed: -20 °C to 45 °C. | |
 | Indicates the relative humidity upper limits to which the device can be safely exposed: up to 90 %. |
| Indicates 2-year Philips worldwide guarantee. | |
 | Indicates Forest Stewardship Council. The FSC trademarks enable consumers to choose products that support forest conservation, offer social benefits, and enable the market to provide an incentive for better forest management. |
| This symbol means that electrical products and batteries shall not be disposed of with normal household waste. | |
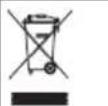 | Indicates that the product should not be discarded as unsorted waste but must be sent to separate collection facilities for recovery and recycling. |
| Indicates that a specific adapter is required for connecting the breast pump. | |
 | Indicates that the adapter meets the requirements of the applicable India safety standards. |
 | Indicates that this product has been certified by the Bureau of Indian Standards. |
 | Indicates that the breast pump meets the requirements of the UK regulations. |
 | Indicates that the material used in the product is safe for food contact. |
 | This logo confirms that the product complies with Ukrainian technical regulations. |
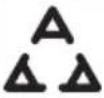 | This logo confirms that the product complies with Serbian technical regulations. |
 | Indicates that the breast pump meets the requirements of the Argentina regulations. |
 | Indicates that the material used for the packaging is corrugated board. |
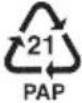 | Indicates that the material used for the packaging is non-corrugated cardboard/fiberboard. |
 | Indicates that the material used for the plastic bag is low density polyethylene. |
 | Certification mark for Australia and New Zealand that shows that this product conforms with relevant safety and Electromagnetic Compatibility (EMC) requirements. |
 | Indicates indoor use only. |
 | Indicates that the appliance is intended to be usable up to the maximum altitude of 3000 m. |
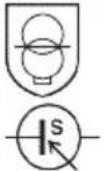 | Indicates that the separate power supply unit (adapter) contains a short-circuit-proof safety isolating transformer. |
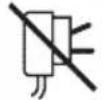 | Indicates that the power supply unit shall not be used if pins of the plug part are damaged. |
 | Indicates the maximum temperature at which the separate power supply unit (adapter) may be used continuously under normal operating conditions. |
 | Indicates that the part is certified with six level energy efficiency rating. |
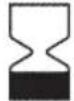 | Indicates that the product should not be used after the period accompanying the symbol. The symbol indicates the expiry date of x years from the manufacturing date (FAB). |
 | Indicates that the paper packaging should be deposited in the blue container. |
 | Indicates that the plastic bags should be deposited in the yellow container. |
 |  |
 |  Points de collecte sur www.quefairedemesdechets.fr Points de collecte sur www.quefairedemesdechets.fr |
Kandungan
Pengenalan 32
Perihalan umum 33
- Skrukan badan pam ke atas botol.
- Pastikan anda meletakkan penutup secara menegak pada botol supaya putingnya duduk tegak.
Lahev Philips Avent Natural (obr. C)
C1 Víčko lahve
- Lahev odšroubujte. 2A.
Chladnička 4 °C 4 dny
- Fjern låget ved at placere hånden over låget og tommelfingeren i fordybningen i låget.
Olulised ohutusjuhised 143
Olulised ohutusjuhised
- Keerake pumba korpus lutipudelile.
- Pange silikoonmembraan pumba korpusesse.
5A. Vajutades silikoonmembraanile pöialdega, veenduge, et silikoonmembraan oleks kindlalt ümber ääre.
- Asetage kokkupandud rinnapump rinnale. Veenduge, et nibu oleks keskel.
2B. Lutipudeli ettevalmistamine beebi toitmiseks: pange lutt kinnitusröngasse ja keerake lutiga kinnitusröngas lutipudelile. Pange lutipudeli kork lutile peale (vaadake „Lutipudeli kokkupanek“).
Tuba 16–29 °C 4 tundi
Külmik 4 °C 4 päeva
- Veenduge, et tömbate lutti seni, kuni selle alumine osa on keeratava kinnitusröngaga ühetasa.
- Keerake luti ja korgiga kinnitusröngas lutipudelile.
- Eemaldage Torx-kruvikeeraja abil kruvi.
Philips Avent Natural bočica (sl. C)
C1 Poklopac bočice
C2 Prsten s navojem
C3 Sisač
C4 Disk za brtvljenje
C5 Bočica
Dodaci
Postoji više verzija ovog paketa izdajalice, a svi se isporučuju s različitim kombinacijama sljedećih dodataka Philips Avent:
- Jastučići za dojke
- Putna torbica
- Izolacijska torbica
- Sve dijelove isperite pod mlakom vodom iz slavine.
- U uređaj stavite tekućinu ili tabletu za pranje posuđa i pokrenite standardni program.
- Lonac za kuhanje napunite s dovoljnom količinom vode da prekrije sve dijelove koje ćete u njega staviti. Pustite da voda vrije 5 minuta. Pazite da dijelovi ne dodiruju bočnu stjenku lonca.
- Pustite da se voda ohladi.
- Utaknite adapter u zidnu utičnicu i umetnite mali utikač na drugom kraju u jedinicu motora.
![graph TD A[" "] --> B[" "] B --> C[" "] C --> D[" "] D --> E[" "] E --> F[" "] F --> G[" "] G --> H[" "] H --> I[" "] I --> J[" "] J --> K[" "] K --> L[" "] L --> M[" "] M --> N[" "] N --> O[" "] O --> P[" "] P --> Q[" "] Q --> R[" "] R --> S[" "] S --> T[" "] T --> U[" "] U --> V[" "] V --> W[" "]…](/content/2026/04/727827/images/c1b75d8f7afa74cb260704c32a44b020595b1c597706bed3b21392d6b0738c61.jpg)
- Svjetla baterije uključuju se jedno po jedno i sva se zajedno isključuju. Baterija se puni.
- Uklonite adapter za napajanje iz zidne utičnice, a mali utikač izvucite iz jedinice motora.
- Bijeli ventil gurnite što dublje u glavni dio izdajalice.
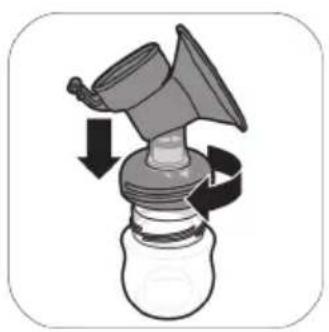
- Pričvrstite glavni dio izdajalice na bočicu.
- Jastučić postavite u glavni dio izdajalice i pazite da ga rub prekriva.
- Silikonsku opnu postavite u glavni dio izdajalice.
5A. Pazite da je ona čvrsto postavljena oko ruba tako da je palcima pritisnete prema dolje.
- Cijevi pričvrstite na jedinicu motora.
8A. Kada je izdajalica napunjena, možete je upotrebljavati bežično. Pritisnite gumb za uključivanje/isključivanje dok se uredaj ne uključi.
- Izdajalica je sada spremna za upotrebu.
① Napomena: Dok se pripremate za izdajanje i kad izdajalicu nosite sa sobom, preko jastučića možete staviti poklopac kako bi izdajalica ostala čista.
- Temeljito operite ruke sapunom i vodom, pa provjerite je li vam dojka čista.
- Postavite komplet izdajalice na dojku. Morate centrirati bradavicu.
- Iskopčajte adapter za napajanje iz zidne utičnice, a mali utikač izvucite iz jedinice motora.
- Odvrnite bočicu. 2A. Za pohranu
izdojenog mlijeka: bočicu zatvorite diskom za brtvljenje i navojnim prstenom.
2B. Za pripremu bočice za hranjenje bebe: sisač postavite na navojni prsten, a zatim sastavljeni navojni prsten zavnite na bočicu. Zabrtvite sisač grlom (vidi „Sastavljanje bočice“) bočice.
- Uklonite silikonsku cijev i skinite poklopac s kompleta izdajalice.
-
Rastavite, očistite i dezinficirajte sve dijelove koji su bili u dodiru s dojkom i izdojenim mlijekom (vidi „Čišćenje i dezinfekcija”).
-
Radi lakše pohrane omotajte silikonsku cijev oko jedinice motora i prikvačite poklopac na cijev.
⚠ Upozorenje: Izdojeno mlijeko odmah stavite u hladnjak ili zamrzivač ili ga držite na temperaturi u rasponu od 16 do 29 °C najviše 4 sata prije hranjenja dojenčeta.
① Napomena: više informacija o izdajalici i savjete za izdajanje mlijeka možete pronaći na web-mjestu www.philips.com/support.
Pohranjivanje izdojenog mlijeka
Sisači Philips Avent Natural Response dostupni su s različitim brzinama protoka. Izdajalica se isporučuje sa sisačem broj 2 (spor protok).
- Pazite da poklopac postavite okomito na bočicu tako da sisač bude u uspravnom položaju.
- Kako biste skinuli poklopac, preko njega stavite ruku, a palac u udubljenje na poklopcu.
Grijanje izdojenog mlijeka
- Odvojite vijak pomoću torx odvijača.
- Odvojite priključke bateriju od tiskane pločice.
- Odrežite ili preklopite rubove plastičnog okvira baterija. Izvadite bateriju iz plastičnog okvira baterije.
B2 Diaframma in silicone
B3 Tiralatte
B4 Coperchio
B5 Cuscinetto
B6 Valvola bianca
Biberon Philips Avent Natural (Fig. C)
C1 Cappuccio del biberon
C2 Ghiera
C3 Tettarella
C4 Dischetto sigillante
C5 Biberon
Accessori
Adapteri iespraudiet sienas kontaktligzdā, bet mazo kontaktspraudni iespraudiet motora bloka otrā galā.
![graph TD A["Top Step"] --> B["Step 1"] B --> C["Step 2"] C --> D["Step 3"] D --> E["Step 4"] E --> F["Step 5"] F --> G["End"]](/content/2026/04/727827/images/0b75fc9a9e56610bb8a8b5540c94091c8e693891b0c6325df94d42b1adf2d225.jpg)
- Akumulatora indikatori iedegas pa vienam un vienlaikus nodziest. Notiek akumulatora uzlāde.
- Atvienojiet adapteri no sienas kontaktligzdas un izvelciet mazo kontaktdakšu no motora bloka.
Akumulatora indikatora gaismas signālu apraksts
- Atvienojiet adapteri no sienas kontaktligzdas un izvelciet mazo kontaktdakšu no motora bloka.
- Pārgrieziet vai salokiet akumulatora plastmasas rāmja malas. Izņemiet akumulatoru nō plastmasas rāmja.
- Prijunkite vamzdelj (-ius) prie variklio jrenginio.
- Nuo variklio bloko nuimkite réma.
- Csavarja le a cumisüveget.
- Skyll alle delene under lunkent springvann.
-
La alle delene ligge i bløt i 5 minutter i varmt vann tilsatt litt mildt oppvaskmiddel.
-
Et rent kjøkkenhändkle eller en tørkehylle
- Ren kum eller bolle
- Skyll alle delene grundig under kaldt springvann.
- La alle delene lufttørke på et rent kjøkkenhändkle eller en tørkehylle.
- La alle delene lufttørke på et rent kjøkkenhändkle eller en tørkehylle.
Trinn 3: Desinfisering
Nødvendig utstyr:
- En gryte
- Vann i drikkevannskvalitet
- Plasser puten i pumpehuset, og påse at kanten dekker pumpehuset.
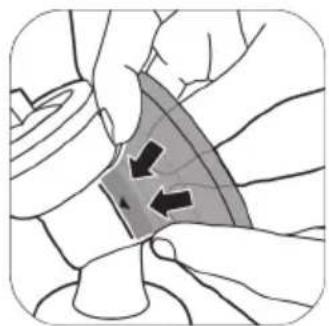
4A. Den innvendige delen av puten i trakten trykkes mot linjen (angitt med en pil).
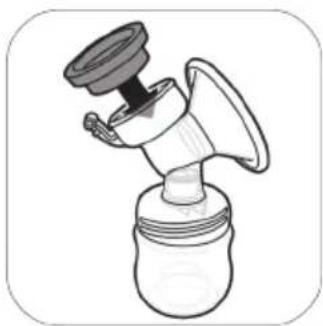
- Plasser silikonmembranen i pumpehuset.
- Koble slangen(e) til motorenheten.
1 USB-strøminngang
2 Av/på-knapp med pause/start-funksjon
3 Knapp for modusvalg
4 "Nivå ned"-knapp
5 "Nivå opp"-knapp
6 LED-display
7 Slangeport for enkel brystpumpe
8 Slangeporter for dobbel
brystpumpe
LED-display, beskrivelse
- Trykk inn av/på-knappen en kort stund hvis du vil ta en pause. Trykk inn av/på-knappen en kort stund en gang til for å fortsette.
- Skru av flasken. 2A. Slik oppbevarer du morsmelken: lukk flasken med tetningsskiven og skruringen.
Philips Avent Natural Response-smokkene fås med forskjellige gjennomstrømningshastigheter. Brystpumpen leveres med tätesmokk nummer 2 (Langsomme).
- Pass på at du drar smokken helt gjennom til den nedre delen er på linje med skruringen.
- Skru skruringen med smokken og toppen på flasken.
- Fjern skruen med en torx-skrutrekker.
Biberão Natural Philips Avent (Fig. C)
C1 Tampa do biberão
C2 Anel de rosca
C3 Tetina
C4 Disco vedante
C5 Biberão
Acessórios
- Coloque o(s) tubo(s) no motor.
- Deconectați conectorii de placa de circuite imprimate.
- Zhvidhosni shishen. 2A.
- Shkëputini fishat nga qarku elektronik.
Steklenička Philips Avent Natural (sl. C)
C1 Pokrovček za stekleničko
C2 Navojni obroč
C3 Cucelj
C4 Tesnilni pokrov
C5 Steklenička
Dodatna oprema
- Vse dele temeljito izperite s hladno tekočo vodo.
- Vse dele postavite v kuhinjski lonec in nalijte toliko vode, da jih prekrijete. Voda naj vre 5 minut. Pazite, da se deli črpalke ne dotikajo strani lonca.
- Pustite, da se voda ohladi.
- Ko se deli osušijo, jih varno shranite na čisto in varno mesto, dokler jih ne boste spet potrebovali. Poskrbite, da se bodo čisti deli popolnoma posušili na zraku, šele nato jih pospravite; tako se ne bodo mogle razviti bakterije in plesen.
- Z milom in vodo si temeljito umijte roke.
5A. S palcema pritisnite nanjo, da se popolnoma zatesni okoli roba.
- Silikonsko cevko in pokrovček pritrdite na silikonsko membrano. Pokrovček potisnite navzdol, da ostane na mestu.
- Cevko ali cevke pritrdite na motorno enoto.
- Roke si temeljito umijte z milom in vodo ter poskrbite, da so dojke čiste.
Če želite shraniti mleko: stekleničko zaprite s tesnilnim pokrovom in navojnim obročem.
- S kompleta prsne črpalke odstranite silikonsko cevko s pokrovčkom.
- Za lažje shranjevanje ovijte silikonsko cevko okoli motorne enote in pritrdite pokrovček na cevko.
- Navojni obroč skupaj s cucljem in pokrovčkom privijte na stekleničko.
- Z dna motorne enote odstranite gumijasti nogi.
- Motorno enoto odprite s pritiskom na obe strani aparata.
- Z motorne enote odstranite okvir.
- Vodu nechajte vychladnút.
- Dôkladne si umyte ruky mydlom a vodou.
- Naskrutkujte telo odsávačky na fl'ašu.
- K pohonnej jednotke pripojte hadičku (hadičky).
- Nasadte si súpravu odsávačky na prsník. Uistite sa, že je bradavka uprostred.
- Odskrutkujte fl'ašu. 2A. Ak chcete materské mlieko uskladnit, zatvorte fl'ašu tesniacim diskom a krúžkom so závitom.
- Cumlík nasadíte jednoduchšie, ak ho namiesto priameho vytahovania vytiahnete nahor pohybmi dopredu a dozadu.
- Naskrutkujte krúžok so závitom spolu s cumlíkom a viečkom na flášu.
Potpuno rasklopite pumpicu za izmlazanje, flašicu i čašu za odlaganje. Uklonite i beli ventil sa tela pumpice (sl. B3).
2. korak: Čišćenje
Delove koji dolaze u kontakt sa dojkama i izmlazanim mlekom možete očistiti ručno ili u mašini za pranje sudova.
- Isperite sve delove pod mlazom mlake vode sa česme.
-
Potopite sve delove 5 minuta u toploj vodi sa blagim sredstvom za pranje sudova.
-
Čista krpa ili stalak za sušenje
- Čista sudopera ili posuda za pranje
- Očistite sve delove četkom za čišćenje u toploj vodi sa blagim sredstvom za pranje sudova. Ako koristite četku za čišćenje vrha cule za hranjenje, očistite je što pažljivije kako biste izbegli oštećenje.
- Temeljno isperite sve delove pod mlazom čiste hladne vode sa česme.
- Stavite sve delove na gornju rešetku mašine za pranje sudova.
- U mašinu stavite sredstvo za pranje sudova ili tabletu i pokrenite standardni program.
- Napunite lonac sa dovoljno vode tako da svi delovi budu prekriveni i postavite sve delove u lonac. Ostavite vodu da ključa 5 minuta. Proverite da delovi ne dodiruju stranu posude.
- Ostaviti da se voda ohladi.
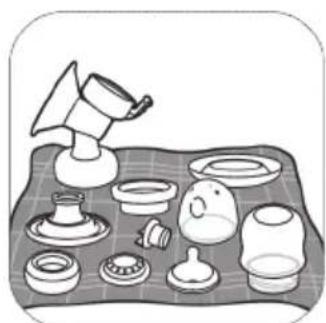
- Pažljivo izvadite delove iz vode. Stavite delove na čistu površinu/krpu ili stalak za sušenje da se osuše.
- Jedan kraj adaptera uključite u zidnu utičnicu, a mali utikač na drugom kraju u jedinicu motora.
![graph TD A[" "] --> B[" "] B --> C[" "] C --> D[" "] D --> E[" "] E --> F[" "] F --> G[" "] G --> H[" "] H --> I[" "] I --> J[" "] J --> K[" "] K --> L[" "] L --> M[" "] M --> N[" "] N --> O[" "] O --> P[" "] P --> Q[" "] Q --> R[" "] R --> S[" "] S --> T[" "] T --> U[" "] U --> V[" "] V --> W[" "]…](/content/2026/04/727827/images/78faa7eca68547bf19924356852b0c3c2f37b51aa6e1d026e0f8d35395292463.jpg)
- Indikatori baterije se jedna po jedna pale i zatim se gase: baterija se puni.
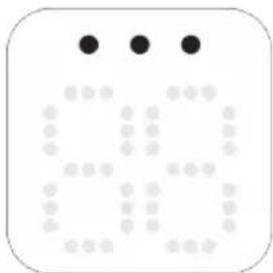
- Sve lampice neprekidno svetle: baterija je potpuno napunjena.
- Uklonite adapter iz zidne utičnice i izvucite mali utikač iz jedinice motora.
Opis lampice indikatora baterije
Sve lampice svetle neprekidno. Baterija je potpuno napunjena. Napunjena baterija omogućava oko 3 sesije izmlazanja.*
- Gurnite beli ventil u telo pumpice što je dalje moguće.
- Navijte flašicu na telo pumpice.
- Postavite jastučić na telo pumpice i vodite računa da prsten pokriva telo pumpice.
4A. Gurnite unutrašnji deo jastučeta u levak u pravcu linije (označeno strelicom).
- Postavite silikonsku membranu u telo pumpice.
5A. Uverite se da je silikonska membrana čvrsto postavljena oko oboda tako što ćete pritisnuti prstima na dole.
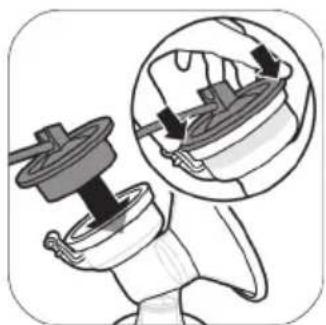
- Prikačite silikonsku cev i poklopac na silikonsku membranu. Gurnite zatvarač nadole dok potpuno ne legne na mesto.
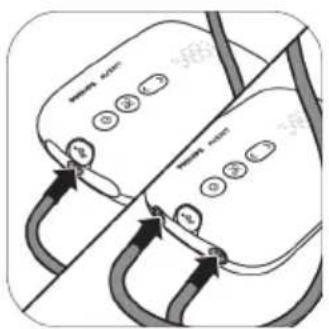
- Spojite cevi sa jedinicom motora.
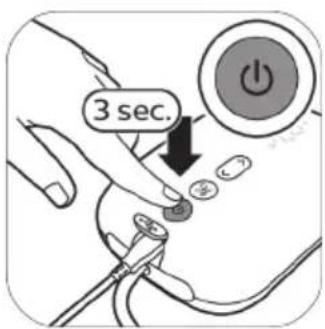
8A. Kada se pumpica za izmlazanje napuni, možete je koristiti bežično. Pritisnite i zadržite dugme za uključivanje/isključivanje dok se aparat uključi.
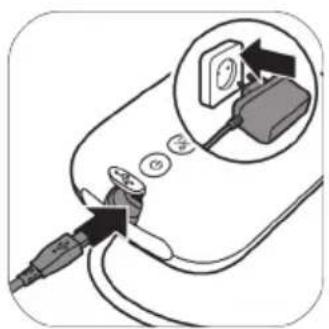
- Pumpica za izmlazanje je sada spremna za upotrebu.
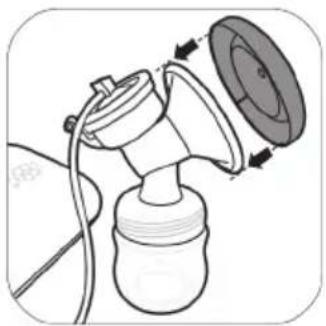
① Napomena: Možete da postavite poklopac preko jastučeta da bi pumpica za izmlazanje ostala čista dok je nosite sa sobom i dok se spremate za izmlazanje mleka.
Opis dela motorne jedinice
1 Ulaz za USB napajanje
2 Dugme za
uključivanje/isključivanje sa
funkcijom
pauziranja/pokretanja
3 Dugme za biranje režima
4 Dugme „Donji nivo intenziteta“
5 Dugme „Gornji nivo intenziteta“
6 LED ekran
7 Cevni priključak za
jednostruku pumpicu za
izmlazanje
8 Cevni priključci za dvostruku
pumpicu za izmlazanje
Opis LED ekrana
- Operite temeljno ruke sapunom i vodom i vodite računa da grudi budu čiste.
- Postavite komplet pumpice za izmlazanje na grudi. Proverite da li je bradavica na sredini.
- Pritisnite i zadržite dugme za uključivanje/isključivanje dok se aparat uključi. Indikatorske lampice počinju da svetle što znači da je uređaj u režimu stimulacije.
- Koristite dugme 'gornji nivo intenziteta' i 'donji nivo intenziteta' da biste promenili nivo usisavanja prema vašim potrebama.
- Kratko pritisnite dugme za uključivanje/isključivanje ukoliko želite da pauzirate. Da biste nastavili, ponovo kratko pritisnite dugme za uključivanje/isključivanje.
- Isključite adapter iz zidne utičnice i izvucite mali utikač iz jedinice motora.
- Odvijte flašicu. 2A. Da biste čuvali
majčino mleko: zatvorite flašicu diskom za pričvršćivanje i prstenom sa navojem.
2B. Da biste pripremili flašicu za hranjenje bebe: postavite cuclu u prsten sa navojem i navijte sklopljen prsten sa navojem na flašicu. Zatvorite cuclu poklopcem (pogledajte 'Sastavljanje flašice') flašice.

- Skinite silikonsku cev i poklopac sa kompleta pumpice za izmlazanje.
- Rasklopite, očistite i dezinfikujte sve delove koji su bili u dodiru sa dojkom i izmlazanim mlekom (pogledajte 'Čišćenje i dezinfekcija').
- Za jednostavnije odlaganje, obmotajte silikonsko crevo oko jedinice motora i pričvrstite zatvarač na crevo.
⚠ Upozorenje: Odmah stavite izmlazano majčino mleko u frižider ili zamrzivač ili ga držite na temperaturi od 16 do 29°C najviše 4 sata pre nego što ćete nahraniti bebu.
① Napomena: Više informacija o pumpici za izmlazanje i savete za izmlazanje mleka potražite na stranici www.philips.com/support.
Čuvanje izmlazanog mleka
U nastavku ćete naći smernice za čuvanje majčinog mleka:
Lokacija za odlaganje Temperatura Maksimalno trajanje odlaganja
Soba 16–29°C 4 sat
Frižider 4 °C 4 dana
Philips Avent Natural Response cucle su dostupne sa različitim protocima. Uz pumpicu za izmlazanje isporučuje se cucla broj 2 (cnop).
Koristite veću brzinu protoka ako beba zaspi tokom hranjenja, postane nervozna ili ako se igra cuclom umesto da pije mleko. Koristite cucle sa manjom brzinom protoka ako vaša beba guta mleko ili ako joj mleko curi iz usta tokom hranjenja.
Philips Avent Natural Response cucle su jasno numerisane sa strane, kako bi ukazale na brzinu protoka. Za više informacija, pogledajte www.philips.com/avent.
- Cucla se lakše sklapa ako je pomerate naprednazad dok je vučete nagore umesto da je vučete pravo nagore.
- Proverite da li ste cuclu povukli tako da njen donji deo bude poravnat sa prstenom sa navojem.
- Proverite da li je poklopac postavljen vertikalno na flašicu tako da cucla stoji uspravno.
- Navijte prsten sa navojem sa cuclom i poklopac na flašicu.
- Da biste skinuli poklopac, postavite ruku preko njega, a palac u udubljenje na poklopcu.
Zagrevanje izmlazanog mleka
Ako koristite smrznuto majčino mleko, pustite da se potpuno odmrzne pre nego što ga podgrejete.
① Napomena: Ukoliko imate potrebu da nahranite bebu odmah, možete odmrznuti mleko u posudi sa vrućom vodom.
- Skinite gumene stopice sa dna jedinice motora.
- Otvorite jedinicu motora tako što ćete pritisnuti ivice aparata.
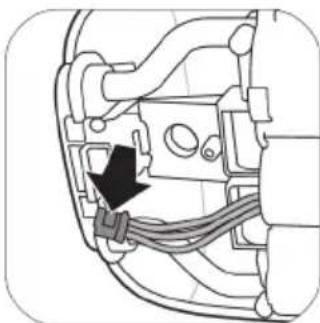
- Odvojite konektore od štampane ploče.
- Isecite ili presavijte ivice plastičnog rama za bateriju. Izvadite bateriju iz plastičnog rama za baterije.
- Aseta silikonikuppi pumpun runkoon.

- Poista ruuvi Torx-ruuvitaltan avulla.
- Skruva på pumpenheten på flaskan.
4A. Tryck kuddens innerdel i tratten mot linjen (se pilindikering).
- Placera silikonmembranet i pumpenheten.
- Развийте бутилката.
- Одвртете го шишето.
將吸乳器、奶瓶和儲存杯徹底拆開。
- 在水龍頭下用溫水沖洗所有零件。
- 在水龍頭下用冷水徹底沖洗所有零件。
- 將所有零件放入洗碗機上層架。
- 等水冷卻。3. 輕輕地從水中取出零
第一個指示燈緩慢閃爍。
電池充電量足以進行最多一次吸乳。*
第一個指示燈快速閃爍。
- 用肥皂和水徹底洗淨雙手。
- 盡可能將白色閥門推入吸乳器本體。
- 將吸乳器本體轉到瓶子上。
- 將矽膠隔膜裝到吸乳器本體上。
- 將矽膠管連接至馬達座。
- 這時就可以開始使用吸乳器。
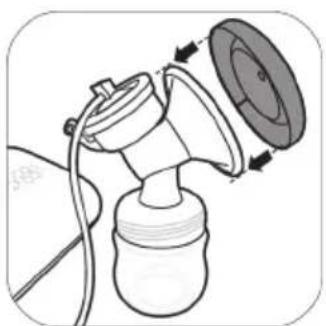
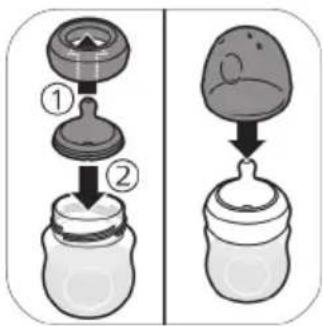
3.從吸乳器套件上拔下矽膠管和蓋子。
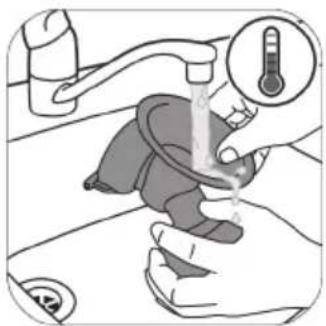
- 另外,請確定奶嘴底部與螺旋環確實對齊。
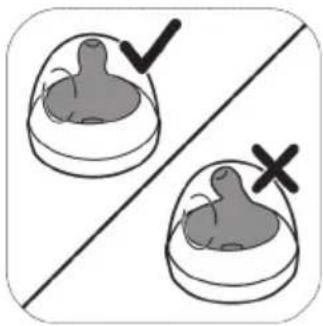
- 移除馬達座底部的橡膠墊。
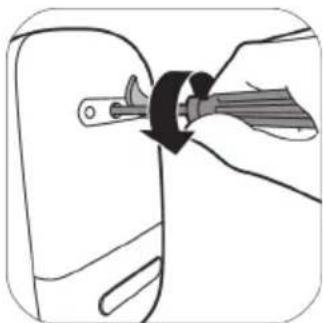
- 使用螺絲起子取下螺絲。
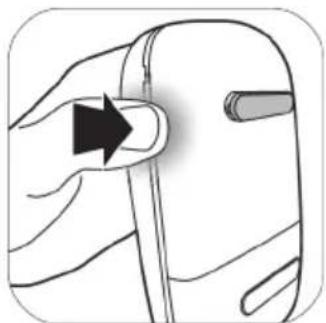
- 按壓裝置兩側打開馬達座。
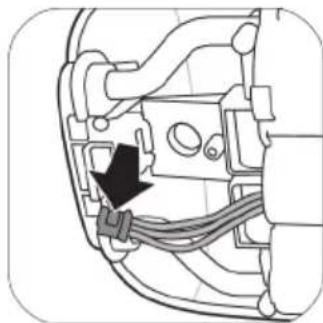
- 將接頭從塑膠印刷電路板上拔下。
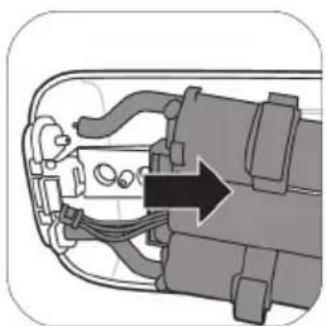
- 取下馬達座上的電池框。
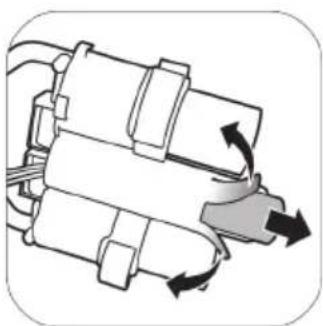
- فك الرضťاعة.
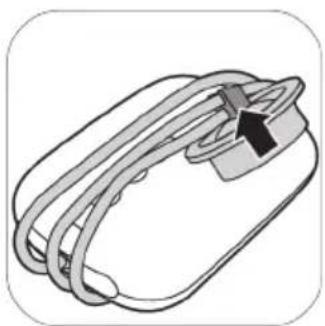

- FINDING THE RIGHT TEAT IS IMPORTANT
- ČEŠTINA
- EAC
- FOR YOUR CHILD'S SAFETY AND HEALTH WARNING
- BEFORE FIRST USE
- ASSEMBLY
- CLEANING AND STORAGE
- COMPATIBILITY
- SUPPORT
- CESTINA
- WWW.PHILIPS.COM/SUPPORT
- ECDAYOL
- ITALIANO
- MAGYAR
- SUOMI
- FOR YOUR CHILD'S SAFETY AND HEALTH
- WARNING
- STORAGE OF MILK AND FOOD
- BAHASA INDONESIA
- KETERANGAN UMUM
- ก่อนใช้งานครั้งแรก
- IMPORTANT
- CAUTION
- FILLING THE BREAST MILK STORAGE BAG
- DEFROSTING BREAST MILK
- POURING MILK FROM THE BREAST MILK STORAGE BAG
- STORAGE
- EXPLANATION OF SYMBOLS
- DANSK
- INTRODUKTION
- FYLLE BRYSTMELKPOSEN
- ΕΠΕΞΉΓΗΣΗ ΣΥΜΒΌΛΩΝ
- בַרְשָׁה
- CONTENTS
- INTRODUCTION
- GENERAL DESCRIPTION
- PRODUCT DESCRIPTION (FIG. A)
- BREAST PUMP KIT (FIG. B)
- PHILIPS AVENT NATURAL BOTTLE (FIG. C)
- ACCESSORIES
- INTENDED USE
- IMPORTANT SAFETY INFORMATION
- WARNINGS TO AVOID CHOKING, STRANGULATION AND INJURY
- WARNING TO PREVENT TRANSMITTING INFECTIOUS DISEASES
- WARNINGS TO AVOID ELECTRIC SHOCK
- WARNINGS TO AVOID CONTAMINATION AND TO ENSURE HYGIENE
- WARNINGS TO AVOID BREAST AND NIPPLE PROBLEMS INCLUDING PAIN
- WARNINGS TO PREVENT DAMAGE AND MALFUNCTION OF THE BREAST PUMP
- BATTERY SAFETY INSTRUCTIONS
- CAUTIONS TO PREVENT DAMAGE TO AND MALFUNCTIONING OF THE BREAST PUMP
- CLEANING AND DISINFECTING
- OVERVIEW
- STEP 1: DISASSEMBLING
- STEP 2: CLEANING
- STEP 2A: MANUAL CLEANING
- SUPPLIES NEEDED
- STEP 2B: CLEANING IN THE DISHWASHER
- STEP 3: DISINFECTING
- USING THE BREAST PUMP
- CUSHION SIZE
- CHARGING THE BREAST PUMP
- BATTERY INDICATOR LIGHT DESCRIPTION
- ASSEMBLING THE BREAST PUMP
- MOTOR UNIT PART DESCRIPTION
- LED DISPLAY DESCRIPTION
- EXPLANATION OF MODES
- PUMPING INSTRUCTIONS
- AFTER USE
- STORING BREAST MILK
- FEEDING BREAST MILK WITH THE BOTTLE
- CHOOSING THE RIGHT TEAT FOR YOUR BABY
- CAUTION: TO AVOID DAMAGE TO THE BOTTLE
- BEFORE USING THE BOTTLE
- ASSEMBLING THE BOTTLE
- HEATING BREAST MILK
- STORING THE BOTTLES
- ORDERING ACCESSORIES AND SPARE PARTS
- RECYCLING
- BATTERY REMOVAL INSTRUCTIONS
- TROUBLESHOOTING
- SUPPLEMENTAL INFORMATION
- STORAGE CONDITIONS
- ELECTROMAGNETIC FIELDS (EMF)
- KANDUNGAN
- LAHEV PHILIPS AVENT NATURAL (OBR. C)
- OLULISED OHUTUSJUHISED
- PHILIPS AVENT NATURAL BOČICA (SL. C)
- DODACI
- POHRANJIVANJE IZDOJENOG MLIJEKA
- GRIJANJE IZDOJENOG MLIJEKA
- BIBERON PHILIPS AVENT NATURAL (FIG. C)
- ACCESSORI
- AKUMULATORA INDIKATORA GAISMAS SIGNĀLU APRAKSTS
- TRINN 3: DESINFISERING
- LED-DISPLAY, BESKRIVELSE
- BIBERÃO NATURAL PHILIPS AVENT (FIG. C)
- ACESSÓRIOS
- STEKLENIČKA PHILIPS AVENT NATURAL (SL. C)
- DODATNA OPREMA
- KORAK: ČIŠĆENJE
- OPIS LAMPICE INDIKATORA BATERIJE
- OPIS DELA MOTORNE JEDINICE
- OPIS LED EKRANA
- ČUVANJE IZMLAZANOG MLEKA
- ZAGREVANJE IZMLAZANOG MLEKA
Brand : PHILIPS
Model : Avent SCD330
Category : Bottle Warmer