
SCF205 - Bottle warmer PHILIPS - Free user manual and instructions
Find the device manual for free SCF205 PHILIPS in PDF.

| Product type | Bottle warmer |
| Brand | Philips |
| Model | SCF205 (home) / SCF215 (home and car) |
| Mains power supply | 230 V AC, 100 W (SCF205) |
| Car power supply | 12 V DC (SCF215 model only, cigarette lighter adapter included) |
| Ambient operating temperature | +7 °C to +37 °C |
| Compatibility | All types of bottles and baby food jars |
| Heating technology | PTC regulation (temperature control) |
| Main functions | Heating of bottles and baby food jars, keep warm |
| Warming time (bottle) | Approximately 8 minutes for 200 ml of milk (from 20 °C to 37 °C) |
| Warming time (baby food jar) | Approximately 12 to 15 minutes depending on consistency |
| Keep warm | Yes, up to 1 hour (hygiene precaution) |
| Temperature settings | Rotary knob with positions: off, bottle, baby food jar, keep warm |
| Indicator light | Indicates ongoing heating and thermostatic regulation |
| Tank | With water filling up to 2 cm from the edge |
| Extraction mechanism | For bottles and baby food jars |
| Cord storage | Under the device |
| Cleaning | Tank and exterior with a damp cloth; do not immerse |
| Safety | Do not use without water; do not repair yourself; warranty void if tampered |
| Box contents | Bottle warmer, cigarette lighter adapter (SCF215), instructions |
Frequently Asked Questions - SCF205 PHILIPS
User questions about SCF205 PHILIPS
0 question about this device. Answer the ones you know or ask your own.
Ask a new question about this device
Download the instructions for your Bottle warmer in PDF format for free! Find your manual SCF205 - PHILIPS and take your electronic device back in hand. On this page are published all the documents necessary for the use of your device. SCF205 by PHILIPS.
USER MANUAL SCF205 PHILIPS
natural_image
Illustration of an open book with a grid pattern and a curved arrow pointing to the right page (no text or symbols)1
ENGLISH 6
DANSK 12
DEUTSCH 18
ΕΛΛΗΝΙΚΑ 25
ESPAÑOL 32
SUOMI 39
FRANÇAIS 45
ITALIANO 52
NEDERLANDS 59
NORSK 66
PORTUGUÊS 72
SVENSKA 79
TÜRKÇE 85
Introduction
Congratulations on your purchase of the Philips Baby Bottle Warmer. The Philips Baby Bottle Warmer is designed to heat food quickly and to keep it warm. It is fitted with a new temperature control system (PTC) that meets the highest safety requirements. The click-step control knob allows you to always set the correct food temperature. Thanks to its unique design the Philips Baby Bottle Warmer fits all bottles and jars of baby food. The Philips Baby Bottle Warmer is a high-performance product that warms both bottles and jars of baby food, and belongs to a complete range of Philips Baby-Care products.
Philips Baby-Care, Taking Care Together!
These instructions for use are applicable for two Philips Baby Bottle Warmermodels:
Model SCF205; For use at home.
Model SCF215; For use at home and in the car (with extra car adapter).
Note: Please read these instructions carefully and retain for future reference.
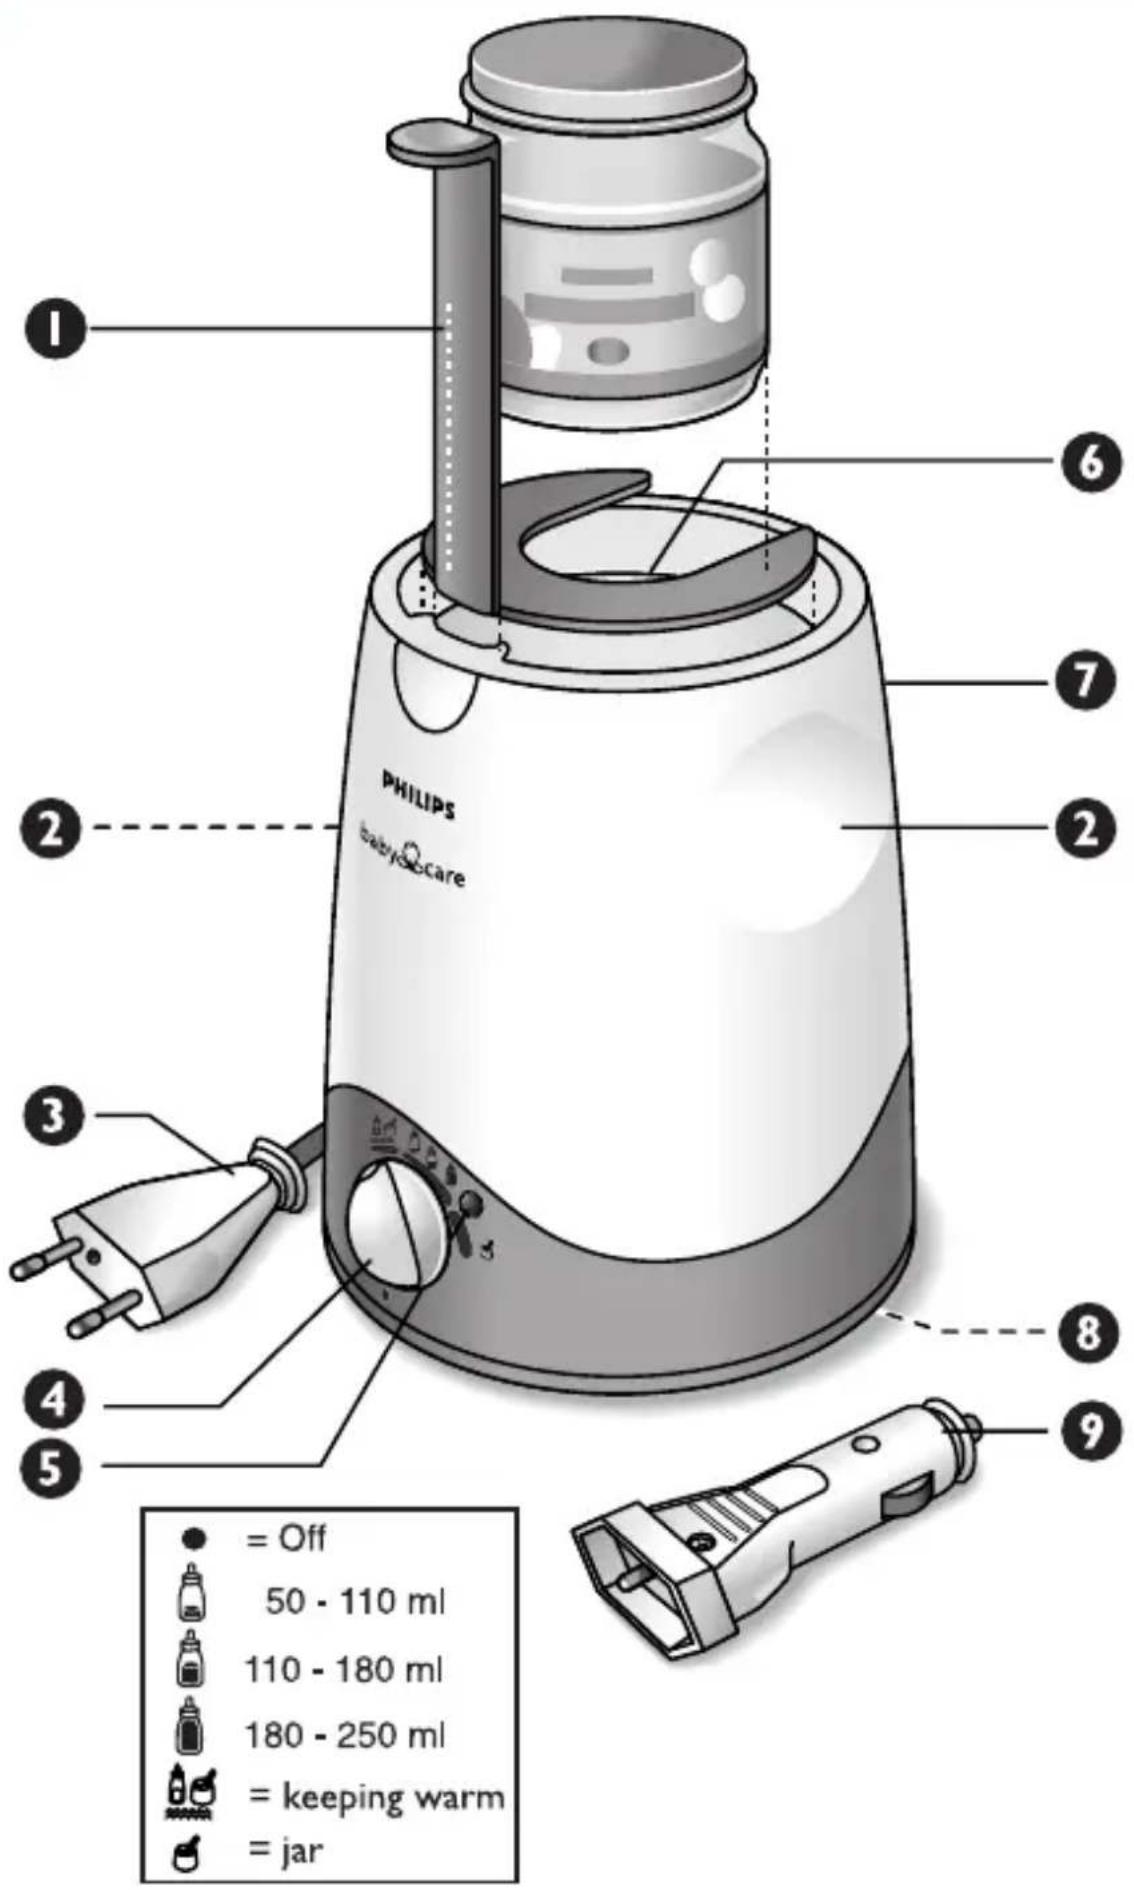
General description (Fig. 1)
1 Bottle and jar lifter
2 Hand grips
3 Mains plug
4 Click-step control knob
5 Indicator lamp
6 Rim
⑦ Container
8 Cable reservoir
9 Car adapter
Installation
For use at home
Before connecting the Baby Bottle Warmer to the mains, check to ensure that the mains outlet is 230V AC.
1 Place the Baby Bottle Warmer out of the reach of children and on a dry, non-slip, horizontal surface.
2 Turn the click-step control knob 4 to the ● position.
3 Unreel the required cable length from the cable reservoir 8 and plug into the mains outlet.
For use in the car
1 Place the Baby Bottle Warmer out of the reach of children and on a dry, non-slip horizontal surface.
2 Turn the click-step control knob 4 to the ● position.
3 Connect the car adapter 9 to the mains plug 3.
4 Unreel the required length of cable from the cable reservoir 8 and connect the car adapter to the cigarette lighter socket of the car. (12V DC).
Notes:
- Never use the Baby Bottle Warmer when the car is in motion.
- Never use the Baby Bottle Warmer without water in it.
- Only use the Baby Bottle Warmer when the ambient temperature is between +7 °C and +37 °C.
Caution: Change the water in the bottle warmer often for hygienic reasons.
Operation
Warming of baby bottles
1 Turn the click-step control knob 4 to the ● position.
2 Place the bottle in the container 7 and fill the space between the bottle and the inner container with water up to two centimeters from the rim 6. For smaller bottles fill up to just above the milk line in the bottle.
3 Set the required temperature using the click-step control knob. The indicator lamp lights to indicate the heating operation.
ENGLISH8
After approximately 8 minutes the milk will have reached just the right temperature for your baby. The indicator lamp goes out. The indicator lamp then switches on and off intermittently to indicate the thermostat is controlling the temperature of the water.
4 Remove the bottle from the container and turn the control knob to the ● position.
5 Shake the bottle a little to distribute the heat evenly before you allow your baby to drink.
Notes:
- Always check that the contents of the bottle are at the correct temperature by pouring a few drops on the back of your hand.
- The heating of baby food depends not only on the temperature setting but also on the initial temperature of the food and water, the wall thickness of the glass and the amount and consistency of the food. The symbol “BOTTLE” is an indication for rapid warming up. After a short while you will find the best setting to obtain the ideal temperature for your baby’s food. Our information is based on warming 200ml milk from 20 °C up to 37 °C.
Warming of baby food jars
1 Remove the label and lid from the jar.
2 Turn the click-step control knob 4 to the ● position.
3 Place the jar in the container 7 using the lifter and fill the space between the jar and the inner container with water up to two centimetres from the rim 6. For small jars fill-up to just below the top of the jar.
4 Set the click-step control knob to the "jar" symbol.
The indicator lamp lights to indicate that the thermostat is working.
5 Use the lifter to stir the contents of the jar frequently for more rapid distribution of heat.
After approximately 12-15 minutes (depending on the consistency of food) the food will have reached just the right temperature for your baby. The indicator lamp goes out.
6 Remove the jar from the container and turn the control knob to the ● position.
Note: Always check that the contents of the jar are at the correct temperature, by testing some on the back of your hand.
Keeping warm
With the Baby Bottle Warmer you can also keep the bottles and jars warm for a short time. To do this set the control knob to position 🎨. The thermostat ensures that the set temperature is maintained. For microbiological and hygienic reasons baby food should never be kept warm for longer than one hour.
Operation in the car
Follow the same instructions as mentioned above.
Note: For quickly warming up baby food in bottles and jars, adjust the click-step control knob to the “jar” symbol. Because the car battery is now being used instead of the mains supply, the time required for warming up may be slightly longer.
Warning: Prolonged use of the Baby Bottle Warmer (several hours) can weaken your car battery.
Maintenance
Cleaning
Disconnect the Baby Bottle Warmer from the mains (or the cigarette lighter socket) and allow it to cool down. Clean the container and the outside of the Baby Bottle Warmer with a damp cloth.
Notes:
- Never immerse the Baby Bottle Warmer in water.
- Do not use cleaning or scouring agents.
The type plate is located at the bottom of the product.
Warning: If a fault occurs, consult your dealer or Philips' service centre.
Under no circumstances should you try to repair the unit yourself, as this would invalidate the warranty.
Guarantee & service
Guarantee & service If you need information or if you have a problem, please visit the Philips website at www.philips.com or contact the Philips Customer Care Centre in your country (you will find its phone number in the worldwide guarantee leaflet). If there is no Customer Care Centre in your country, turn to your local Philips dealer or contact the Service Department of Philips Domestic Appliances and Personal Care BV.
Technical Specifications
| Model SCF205 Model SCF215 | |
| Power supply (mains) | 230V AC 230V AC |
| Power consumption (mains) | 100 Watts 90 Watts |
| Power supply (car battery) | - 12V DC |
| Power consumption (car battery) | - Power consumption (car battery) |
| Operational ambient temperature | between +7 °C between +7 °C and +37 °C and +37 °C |
Trouble shooting
Comments Solutions
Overflow of water You have put too much
water into the inner container
Temperature too low
Continue heating for a few seconds after the indicator light has switched off, or increase the adjustment setting
Temperature too high Lower the adjustment setting
The jar has not heated correctly
Stir the contents from time to time while heating. Check that the click-step control knob is in the “jar” position
The indicator light switches on and off while keeping warm
This is normal; it may turn on or off while heating
Introduktion
Lysindikatoren lyser for at indikere, at termostaten fungerer.
Philips Baby Care, Taking Care Together!
Model SCF205 Model SCF215
Model SCF205 Model SCF215
Indikatorlampen lyser for å vise at termostaten fungerer.
