ASC 1.3 E - Lawn mower ALPINA - Free user manual and instructions
Find the device manual for free ASC 1.3 E ALPINA in PDF.

| Product type | Electric walk-behind scarifier/aerator |
| Brand | Alpina |
| Model | ASC 1.3 E |
| Rated power | 1300 W |
| Power supply | 230 V / 50 Hz, mains plug with outdoor extension cord |
| Working width | 32 cm |
| Weight (without bag) | 12 kg |
| Interchangeable rotors | Rigid blade rotor (scarification) and spring rotor (aeration/raking) |
| Depth adjustment | 4 positions (1 to 4) via lever |
| Starting system | Double-action switch (button + lever) |
| Safety stop | Immediate rotor stop when releasing the lever |
| Collection bag | Yes, with frame and plastic profiles |
| Stone guard | Yes, integrated |
| Power cord | With cable clamp and connector on the machine |
| Guaranteed sound power level | 96 dB(A) |
| Maintenance | Manual cleaning, no water jets; sharpening by specialist center |
| Spare parts | Use only original parts |
| Double insulation | Class II |
| Areas of use | Private garden lawns, aeration and scarification |
Frequently Asked Questions - ASC 1.3 E ALPINA
User questions about ASC 1.3 E ALPINA
0 question about this device. Answer the ones you know or ask your own.
Ask a new question about this device
Download the instructions for your Lawn mower in PDF format for free! Find your manual ASC 1.3 E - ALPINA and take your electronic device back in hand. On this page are published all the documents necessary for the use of your device. ASC 1.3 E by ALPINA.
USER MANUAL ASC 1.3 E ALPINA
EN Pedestrain-controlled mains-operated lawn scarifiers and aerators OPERATOR'S MANUAL
WARNING: read thoroughly the instruction booklet before using the machine.
MANUAL DE INSTRUÇÕES
MANUAL DE INSTRUCTIUNI
ENGLISH - Translation of the original instruction ...... EN
B
| SV 213 E | ||
| [61] | kW | 1300 |
| [62] | min^-1 | 3900 |
| [63] | kg | 11 |
| [64] | cm | 32 |
| [65][66] | dB(A)dB(A) | 823 |
| [67][66] | dB(A)dB(A) | 913 |
| [68] | dB(A) | 94 |
| [69][66] | m/s^2 m/s^2 | 3,221,5 |
| [70] | STIGA SpA | 118802309/0 |
| KINGCLEAN | J2420000171R | |
| [71] | STIGA SpA | 118802313/0 |
1.1
1.2
natural_image
Line drawing of a lawn mower with a water spray and a cross mark on the blade (no text or symbols)INDICE
- NORME DI SICUREZZA.... 1
- CONOSCERE LA MACCHINA 3
- USO DELLA MACCHINA....5
5. USO DELLA MACCHINA
5.1 OPERAZIONI PRELIMINARI
5.3 FASTHÆGTNING AF POSE (FIG. 3.3)
5.6 T∅MNING AF POSEN (FIG. 3.6)
5.7 AFSLUTNING AF ARBEJDET (FIG. 3.7)
1. SAFETY REGULATIONS
1.1 GENERAL POWER TOOL SAFETY WARNINGS
WARNING Read all safety warnings, instructions, illustrations and specifications provided
with this power tool. Failure to follow all instructions listed below may result in electric shock, fire and/or serious injury.
Save all warnings and instructions for future reference.
The term "power tool" in the warnings refers to your mains-operated (corded) power tool or battery-operated (cordless) power tool.
1) Work area safety
a) Keep the work area clean and well lit. Cluttered and dark areas invite accidents.
b) Do not operate power tools in explosive atmospheres, such as in the presence of flammable liquids, gases or dust. Power tools create sparks which may ignite the dust or fumes.
c) Keep children and bystanders away while operating a power tool. Distractions can cause you to lose control.
2) Electrical safety
a) Power tool plugs must match the outlet. Never modify the plug in any way. Do not use any adapter plugs with earthed (grounded) power tools. Unmodified plugs and matching outlets will reduce risk of electric shock.
b) Avoid body contact with earthed or grounded surfaces, such as pipes, radiators, ranges and refrigerators. There is an increased risk of electric shock if your body is earthed or grounded.
c) Do not operate the lawnmower in rain or wet conditions. This may increase the risk of electric shock.
d) Do not abuse the cord. Never use the cord for carrying, pulling or unplugging the power tool. Keep cord away from heat, oil, sharp edges or moving parts. Damaged or entangled cords increase the risk of electric shock.
e) When operating a power tool outdoors, use an extension cord suitable for outdoor use. Use of a cord suitable for outdoor use reduces the risk of electric shock.
f) If operating a power tool in a damp location is unavoidable, use a residual current device (RCD) protected supply. Use of an RCD reduces the risk of electric shock.
3) Personal safety
a) Stay alert, watch what you are doing and use common sense when operating a power tool. Do not use a power tool while you are tired or under the influence of drugs, alcohol or medication. A moment of inattention while operating power tools may result in serious personal injury.
b) Use personal protective equipment. Always wear eye protection. Protective equipment such as a dust mask, non-skid safety shoes, hard hat or hearing protection used for appropriate conditions will reduce personal injuries.
c) Prevent unintentional starting. Ensure the switch is in the off-position before connecting to power source and/or battery pack, picking up or carrying the tool. Carrying power tools with your finger on the switch or energising power tools that have the switch on invites accidents.
d) Remove any adjusting key or wrench before turning the power tool on. A wrench or a key left attached to a rotating part of the power tool may result in personal injury.
e) Do not overreach. Keep proper footing and balance at all times. This enables better control of the power tool in unexpected situations.
f) Dress properly. Do not wear loose clothing or jewellery. Keep your hair and clothing away from moving parts. Loose clothes, jewellery or long hair can be caught in moving parts.
g) If devices are provided for the connection of dust extraction and collection facilities, ensure these are connected and properly used. Use of dust collection can reduce dust-related hazards.
h) Do not let familiarity gained from frequent use of tools allow you to become complacent and ignore tool safety principles. A careless action can cause severe injury within a fraction of a second.
4) Power tool use and care
a) Do not force the power tool. Use the correct power tool for your application. The correct power tool will do the job better and safer at the rate for which it was designed.
b) Do not use the power tool if the switch does not turn it on and off. Any power tool that cannot be controlled with the switch is dangerous and must be repaired.
c) Disconnect the plug from the power source and/or remove the battery pack, if detachable, from the power tool before making any adjustments, changing accessories, or storing power tools. Such preventive safety measures reduce the risk of starting the power tool accidentally.
d) Store idle power tools out of the reach of children and do not allow persons unfamiliar with the power tool or these instructions to operate the power tool. Power tools are dangerous in the hands of untrained users.
e) Maintain power tools and accessories. Check for misalignment or binding of moving parts, breakage of parts and any other condition that may affect the power tool's operation. If damaged, have the power tool repaired before use. Many accidents are caused by poorly maintained power tools.
f) Keep cutting tools sharp and clean. Properly maintained cutting tools with sharp cutting edges are less likely to bind and are easier to control.
g) Use the power tool, accessories and tool bits etc. in accordance with these instructions, taking into account the working conditions and the work to be performed. Use of the power tool for operations different from those intended could result in a hazardous situation.
h) Keep handles and grasping surfaces dry, clean and free from oil and grease. Slippery handles and grasping surfaces do not allow for safe handling and control of the tool in unexpected situations.
5) Service
a) Have your power tool serviced by a qualified repair person using only identical replacement parts. This will ensure that the safety of the power tool is maintained.
1.2 LAWN SCARIFIER AND LAWN AERATOR SAFETY WARNINGS
a) Do not use the machine in bad weather conditions, especially when there is a risk of lightning. This decreases the risk of being struck by lightning.
b) Thoroughly inspect the area for wildlife where the machine is to be used. Wildlife may be injured by the machine during operation.
c) Thoroughly inspect the area where the machine is to be used and remove all stones, sticks, wires, bones, and other foreign objects. Thrown objects can cause personal injury.
d) Before using the machine, always visually inspect to see that the tines and the tines assembly are not worn or damaged. Worn or damaged parts increase the risk of injury.
e) Before use, check the supply cord and any extension cord for signs of damage or aging. Do not use the machine if the cord is damaged or worn. If the cord is damaged or worn during use, switch off the machine and do not touch the cord before disconnecting it from the supply. A damaged supply cord or extension cord may result in electric shock, fire and/or serious injury.
f) Check the catcher frequently for wear or deterioration. A worn or damaged catcher may increase the risk of personal injury.
g) Keep guards in place. Guards must be in working order and be properly mounted. A guard that is loose, damaged, or is not functioning correctly may result in personal injury.
h) Keep all cooling air inlets clear of debris. Blocked air inlets and debris may result in overheating or risk of fire.
i) While operating the machine, always wear non-slip and protective footwear. Do not operate the machine when barefoot or wearing open sandals. This reduces the chance of injury to the feet from contact with the moving tines.
j) While operating the machine, always wear long trousers. Exposed skin increases the likelihood of injury from thrown objects.
k) Do not operate the machine in wet grass. Walk, never run. This reduces the risk of slipping and falling which may result in personal injury.
I) Do not operate the machine on excessively steep slopes. This reduces the risk of loss of control, slipping and falling which may result in personal injury.
m) When working on slopes, always be sure of your footing, always work across the face of slopes, never up or down and exercise extreme caution when changing direction. This reduces the risk of
loss of control, slipping and falling which may result in personal injury.
n) Use extreme caution when reversing or pulling the machine towards you. Always be aware of your surroundings. This reduces the risk of tripping during operation.
o) Keep the supply cord away from the tines. A damaged supply cord may result in electric shock, fire and/or serious injury.
p) Switch off and remove plug from mains if the cord is entangled or damaged. Entangled or damaged cords can increase the risk of electric shock.
q) Hold the machine by insulated gripping surfaces only, because the tines may contact hidden wiring or its own cord. Tines contacting a "live" wire may make exposed metal parts of the machine "live" and could give the operator an electric shock.
r) Do not touch tines and other hazardous moving parts while they are still in motion. This reduces the risk of injury from moving parts.
s) When clearing jammed material or cleaning the machine, make sure all power switches are off and the power cord is disconnected. Unexpected operation of the machine may result in serious personal injury.
1.3 MAINTENANCE AND STORAGE

Before cleaning or doing maintenance work, disconnect the machine from the mains and read the relevant instructions. Wear proper clothing and protective gloves whenever your hands are at risk.

Never use the machine with worn or damaged parts. Faulty or worn-out parts must always be replaced and not repaired. Only use original spare parts: the use of non-original and/or incorrectly fitted parts will jeopardize the safety of the machine, may cause accidents or personal injuries for which the Manufacturer is under no circumstance liable or responsible.
IMPORTANTE Any adjustments or maintenance operations not described in this manual must be carried out by your Dealer or a specialized Service Centre with the necessary knowledge and equipment to ensure that the work is done correctly maintaining the machine's original safety level. Any operations performed in unauthorized centres or by unqualified persons will totally invalidate the Warranty and all obligations and responsibilities of the Manufacturer.
1) After each use, disconnect the machine from the mains and check for damage.
2) Keep all nuts, bolts and screws tight to be sure the machine is in safe working condition. Routine maintenance is essential for safety and for maintaining a high performance level.
3) Check that the cutting means screws are properly tightened on a regular basis.
4) Wear work gloves when handling, disassembling and reassembling all cutting means.
5) Keep the cutting means well balanced during sharpening. All work on the cutting means (disassembly, sharpening, balancing, reassembly and/or replacing) are demanding jobs that require special skills as well as special tools. For safety reasons, these jobs are best carried out at a specialised centre.
6) Be careful during adjustment of the machine to prevent entrapment of the fingers between moving parts of the cutting means and fixed parts of the machine.
7) Do not touch the cutting means until the machine is disconnected from the mains socket and the cutting
means is completely stationary. When servicing the cutting means, bear in mind that, even though the power supply is switched off, the cutting means can still move.
8) Check the side discharge guard, the rear discharge guard and the grass catcher frequently for signs of wear or deterioration. Replace them if they are damaged.
9) Replace any instruction or warning message stickers, if damaged.
10) Store the machine out of the reach of children!
11) Allow the motor to cool down before storing in any enclosure.
12) To reduce fire hazards, keep the lawnmower and, in particular, the motor free of grass, leaves, or excessive grease. Always empty the grass catcher and do not leave containers full of cut grass inside storage areas.
1.4 PROTECTING THE ENVIRONMENT
Safeguarding the environment must be a relevant and priority aspect of machine use, of benefit to the community and the environment we live in.
- Avoid being a disturbance to the neighbourhood. Use this machine at reasonable times of the day only (not early morning or late evening when the noise could cause disturbance).
- A certain amount of chain lubricating oil is released into the environment when the machine is running, so only use biodegradable oils made specifically for this use. Use of a mineral oil or motor oil causes serious damage to the environment.
- Comply with local regulations for the disposal of packaging, deteriorated parts or any elements with a strong environmental impact; this waste must not be disposed of as normal waste, it must be separated and taken to specified waste disposal centres where the material will be recycled.
- Comply with local regulations for the disposal of waste materials
- When the machine is withdrawn from service, do not dispose of it in the environment, but take it to a waste disposal facility in accordance with the local regulations in force.

Do not throw electrical equipment away with domestic waste. According to the European Directive 2012/19/EU on electrical and electronic equipment waste and its implementation, according to UK Regulation “The waste electrical and electronic equipment regulations 2013 (as amended)" and according to national regulations, old electrical equipment must be collected separately, for eco-compatible recycling. If electrical equipment is disposed of in landfills or in the ground, hazardous substances can leak into the groundwater and contaminate the food chain, damaging your health and well-being. For further information on the disposal of this product, contact your dealer or a domestic waste collection service.

Separate waste collection of the products and packaging used allows the materials to be recycled and reused. Reuse of recycled materials help to prevent environmental pollution and reduces the demand for raw materials.
2. GETTING TO KNOW THE MACHINE
2.1 DESCRIPTION OF THE MACHINE AND PLANNED USE
This machine is a garden tool, and precisely an electric aerator/scarifier, that is pedestrian controlled.
The machine is essentially composed of a motor which drives a working rotor enclosed in a casing, equipped with wheels and a handle. The operator is able to operate the machine and use the main controls, always staying behind the handle at a safe distance from the rotating parts. If the operator leaves the machine, the motor and rotating parts will stop within a few seconds.
- Intended use
This machine was designed and manufactured for aerating and scarifying the ground, done by a pedestrian operator. The difference of the effect made on the ground is obtained according to the structure of the interchangeable working rotors and the depth in the ground.
- Improper use
Any other use differing from the above mentioned ones could be hazardous and harm people and/or damage things. Examples of improper use may include, but are not limited to:
- transporting persons, children or animals on the machine;
– letting oneself be transported by the machine;
– using the machine to tow or push loads;
– use of the machine by more than one person;
– lowering or operating the working rotor on firm surfaces or with gravel or stones.
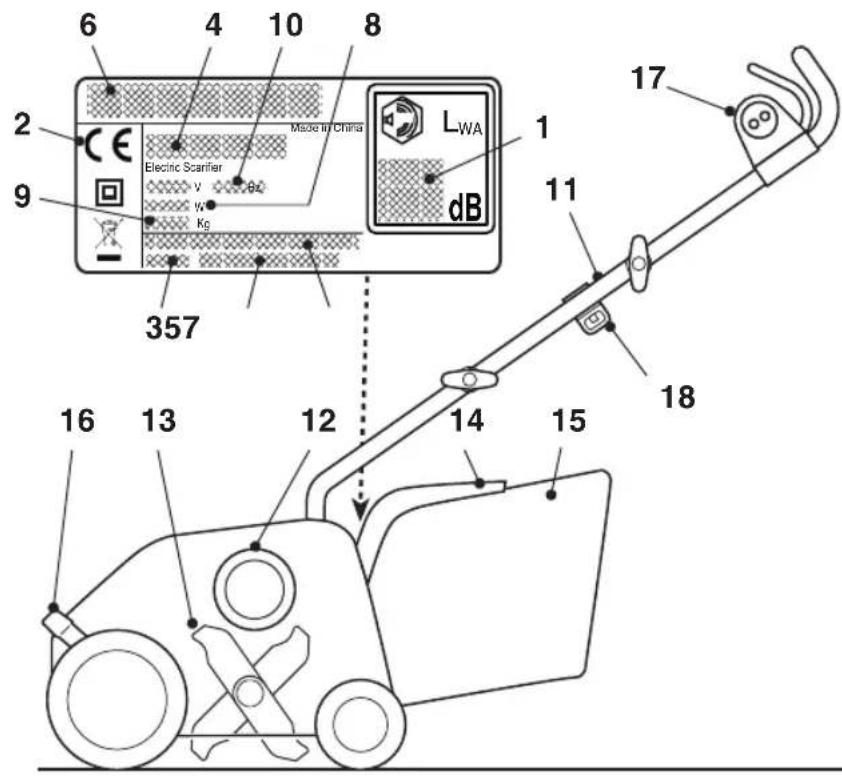
2.2 IDENTIFICATION LABEL AND MACHINE COMPONENTS (FIG. A)
- Acoustic power level
- Conformity marking
- Year of manufacture
- Type of machine
- Serial number
- Name and address of Manufacturer
- Article Code
- Motor power
- Weight in kg
- Power supply voltage and frequency
- Handle
- Motor
- Working rotor (with rigid blades or springs)
- Stone-guard
- Grass-catcher
- Depth regulator
- Control lever
- Electric cable fitting
2.3 SAFETY REQUIREMENTS
Your machine must be used carefully. Symbols have therefore been placed on various parts of the machine to remind you of the main precautions to be taken. Their meaning is explained below. You are also asked to carefully read the safety regulations in the specific chapter of this manual. Replace damaged or illegible labels.
Meaning of symbols:

Attention! Read the instructions before operating the machine.

Danger! The failure to use this machine correctly can be hazardous for oneself and others.
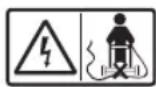
Warning! Risk of thrown objects. Keep all persons away from the work area whilst working
Attention! Disconnect the plug from the mains before commencing maintenance work or if the power cable is damaged. Do not put hands or feet near or under the opening of the cutting means
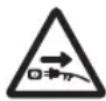
Warning! keep the power cable away from the cutting means.

Attenzion! Risk of exposure to noise and dust. Wear protection a gainst noise and protective glasses.
Danger! Unplug the machine immediately if the cable (or extension lead) is cut or damaged.

IMPORTANT Any damaged or illegible decals must be replaced. Order replacement decals from an authorised service centre.
2.4 TECHNICAL DATA (FIG.B)
[61] Nominal power
[62] Max. motor operation speed
[63] Machine weight
[64] Working width
[65] Measured acoustic pressure level
[66] Measurement uncertainty
[67] Measured acoustic power level
[68] Guaranteed acoustic power level
[69] Measured vibration level
[70] Code working rotor with rigid blades
[71] Code working rotor with springs
The example of the conformity declaration is found in the penultimate page of the manual.
NOTE The declared vibration total value(s) and the declared noise emission value(s) have been measured in accordance with a standard test method and may be used for comparing one machine with another;
— The declared vibration total value(s) and the declared noise emission value(s) may also be used in a preliminary assessment of exposure.
The vibration and noise emissions during actual use of the machine can differ from the declared total value depending on the ways in which the machine is used and of the need to identify safety measures to protect the operator that are based on an estimation of exposure in the actual conditions of use (taking ac-
count of all parts of the operating cycle such as the times when the machine is switched off and when it is running idle in addition to the trigger time).
3. COMPLETE ASSEMBLY
NOTE The machine can be supplied with some parts already assembled.
⚠ - Unpacking and completing the assembly should be done on a flat and stable surface, with enough space for moving the machine and its packaging, always using suitable equipment.
Disposal of the packaging should be done in accordance with the local regulations in force.
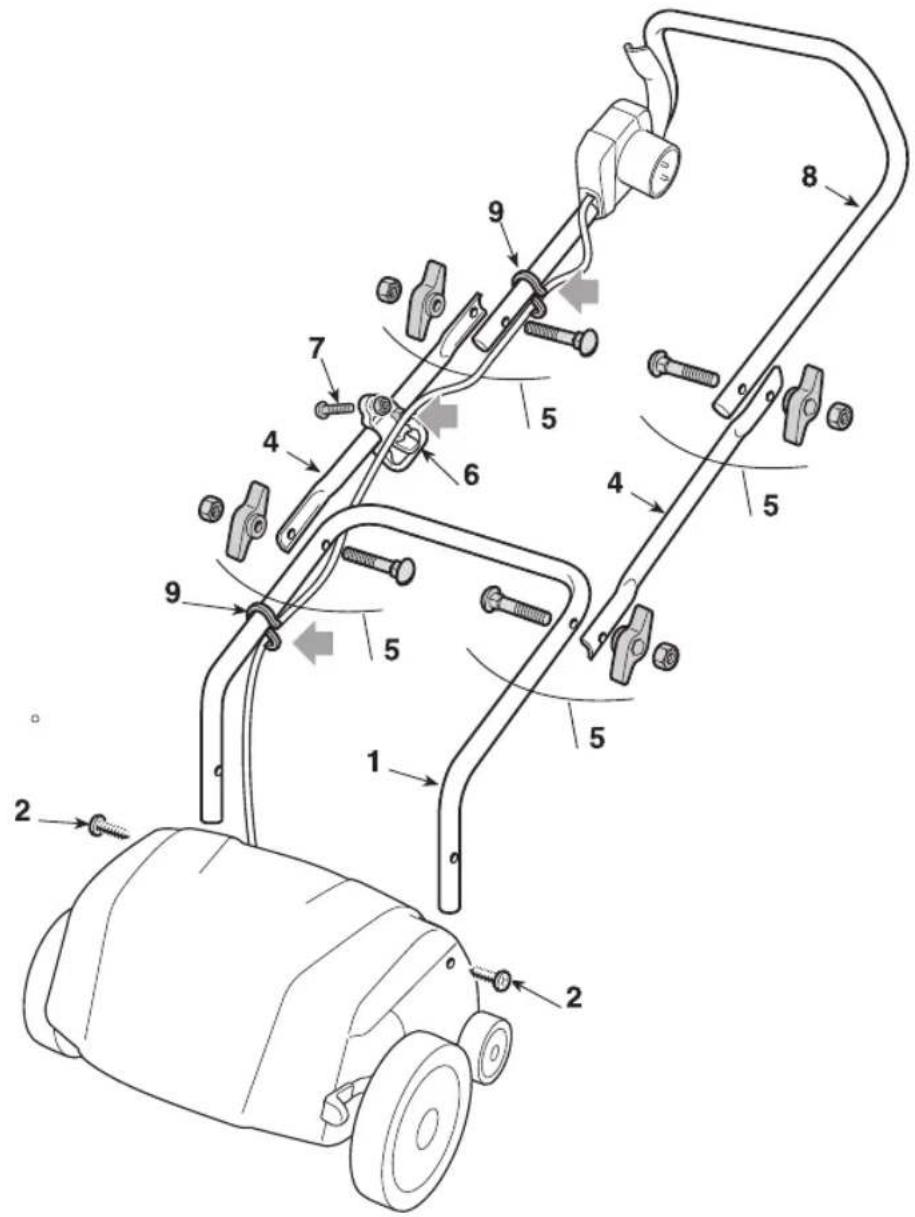
3.1 HANDLE ASSEMBLY (FIG.1.1)
Insert the bottom of the handle (1) in the chassis holes and lock into position with the supplied screws (2).
Attach the two middle elements (4) to the bottom (1) using the knobs (5) and the supplied screws as shown.
Fit the cable fastener (6) in the indicated position and fasten it using the screw and nut (7).
Attach the upper part of the handle (8) using the knobs (5) and the supplied screws as shown.
Fit the cable fastener (9) in the indicated position and attach the electric cable (10).
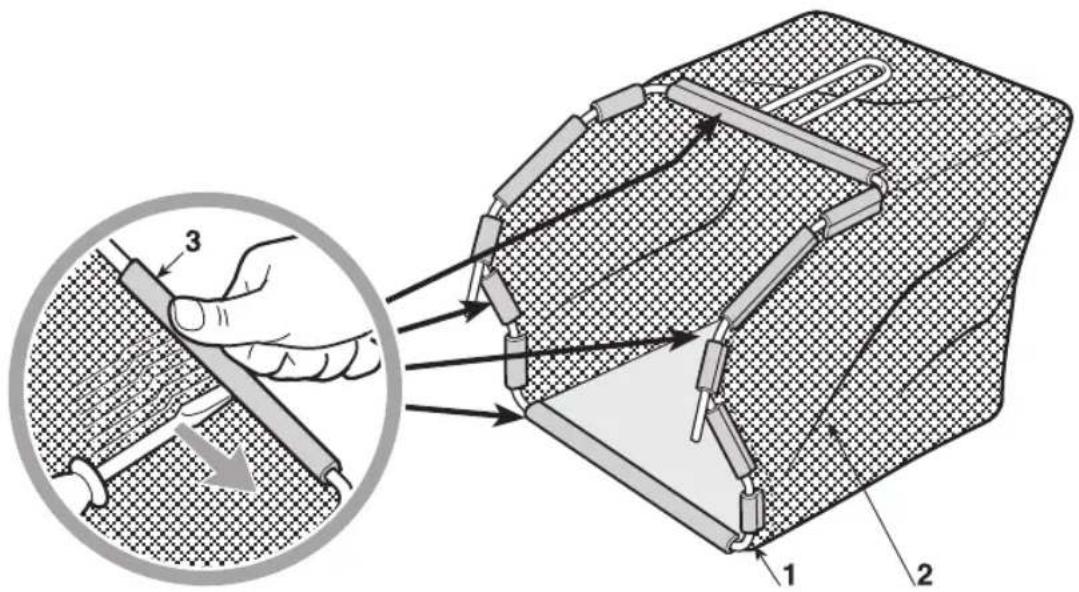
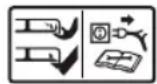
3.2 FITTING THE GRASS-CATCHER (FIG.1.2)
Insert the frame (1) in the grass-catcher (2) and fasten all the plastic sections (3) as illustrated using a screwdriver.
4. CONTROL DESCRIPTION
Symbols on controls:

Stop.

Run
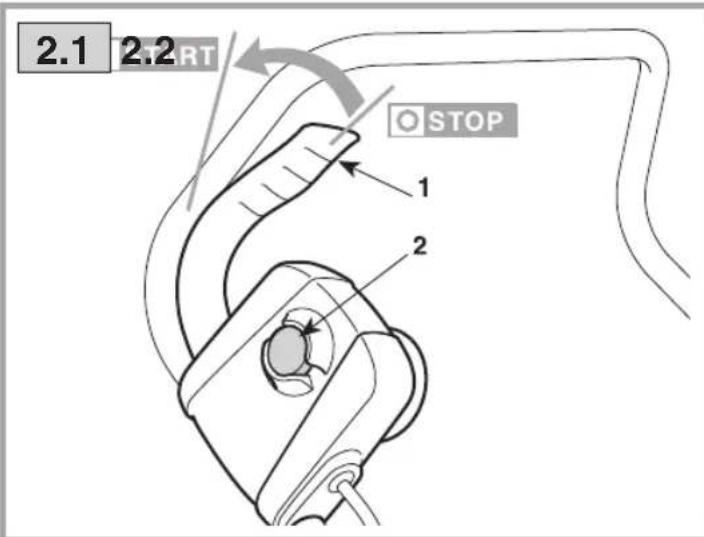
4.1 DUAL-ACTION SWITCH (FIG.2.1)
The motor is controlled by a dual-action switch to prevent accidental start ups.
Press the button (2) and pull the lever (1) for start up.
⚠️ - Starting up the motor will engage the working rotor contemporaneously.
The motor stops automatically when the lever (1) is released.
4.2 DEPTH REGULATOR (FIG.2.2)
The lever (1) allows the working rotor position to be regulated to four different heights, thereby varying the depth of the working rotor in the ground.
⚠ - Movement from one position to another can only take place with the motor off and the working rotor stopped.
5. USING THE MACHINE
5.1 PRELIMINARY PROCEDURES
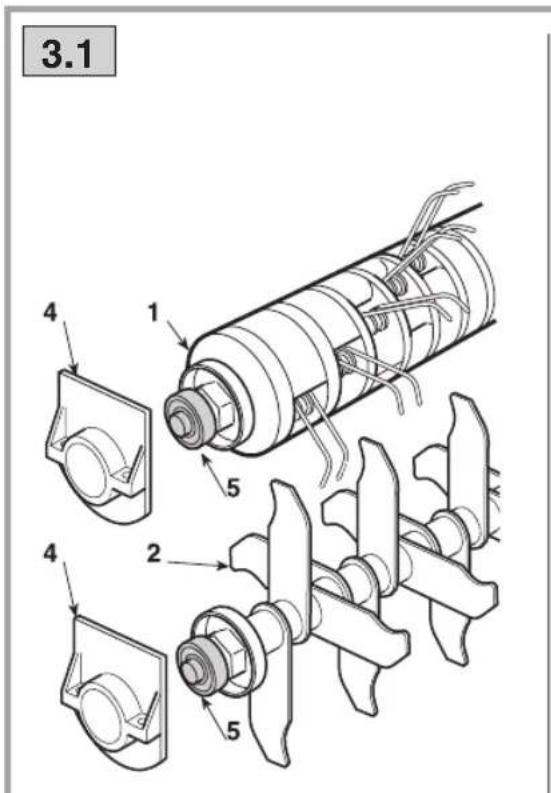
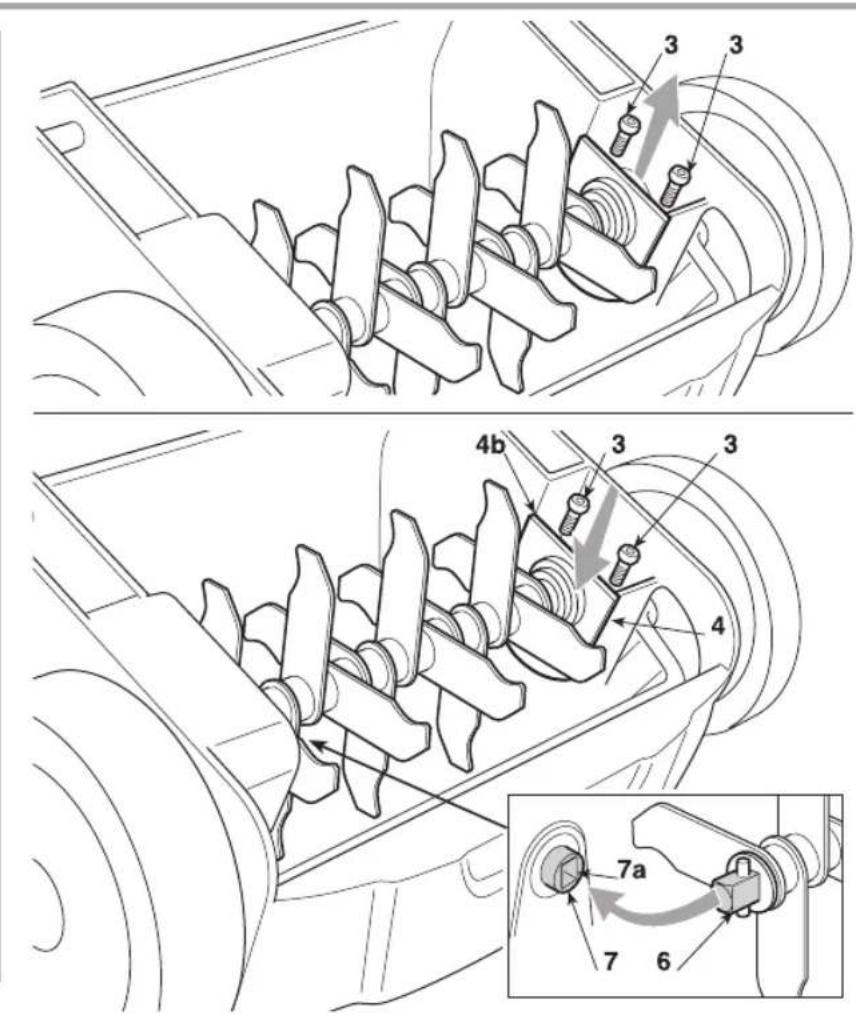
5.1.1 Setting up the rotor (Fig. 3.1)
The machine is equipped with two different working rotors, to be used according to the type of work to be done:
- with springs (1) for raking and surface aeration of the ground;
– with rigid blades (2) for scarifying the ground.
To disassemble the working rotor:
– unplug the machine from the mains;
- wear work gloves and turn the machine over;
- loosen the two screws (3) on the right side of the machine;
- lift the working rotor from the right side and extract it from the left side.
– remove the plastic support (4).
To reassemble the working rotor:
- fit the plastic support (4) on the bearing (5) located on the end of the working rotor;
- first insert the left end (6) of the working rotor in the protruding shaft (7), making sure it fits perfectly in the shaft slot (7a).
- insert the right end with the support (4) in its housing, with the flat part (4b) turned outward.
– reassemble and fully tighten the two screws (3).
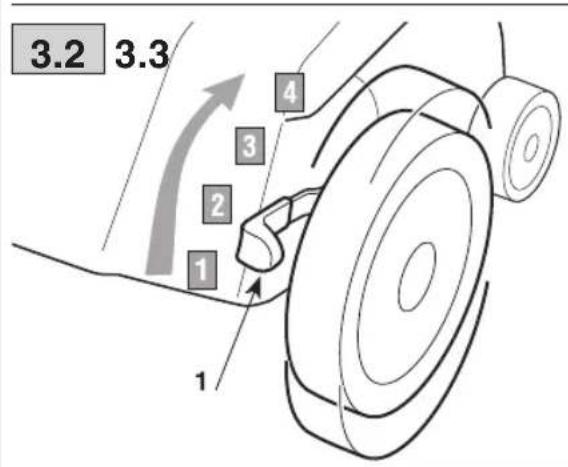
5.1.2 Regulating depth (Fig. 3.2)
Select the depth according to the type of work mode and the type of working rotor used, following these basic indications:
«1» = Transfer (for moving the machine, with the working rotor lifted that does not touch the ground).
«2» = With the working rotor with springs and grass-catcher, for raking leaves and grass on the surface and for aerating the ground, collecting removed material;
«2» = With the working rotor with rigid blades and grass-catcher, for scarifying the surface of the ground, collecting removed material;
«3» «4» = With the working rotor with rigid blades and no grass-catcher, for more or less deep scarification of the ground, leaving removed material on the ground. In optimal conditions, the grass-catcher can be fitted and the removed material can be collected, as long as the working rotor is not clogged.
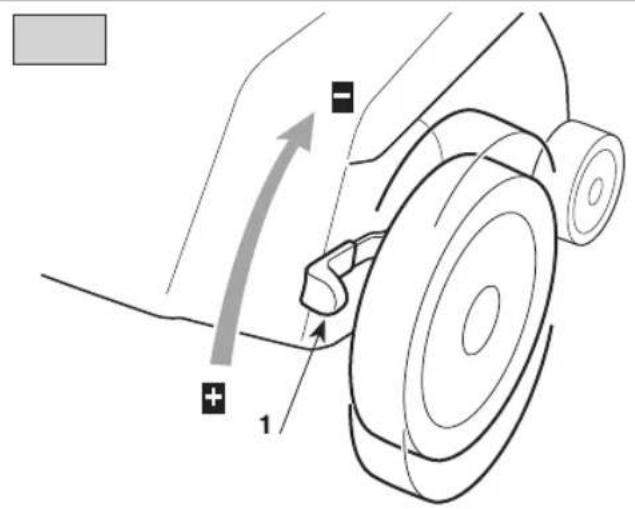
5.1.3 Fitting the grass-catcher (Fig. 3.3)
Lift the stone-guard (1) and fasten the grass-catcher (2) correctly as shown in the illustration.
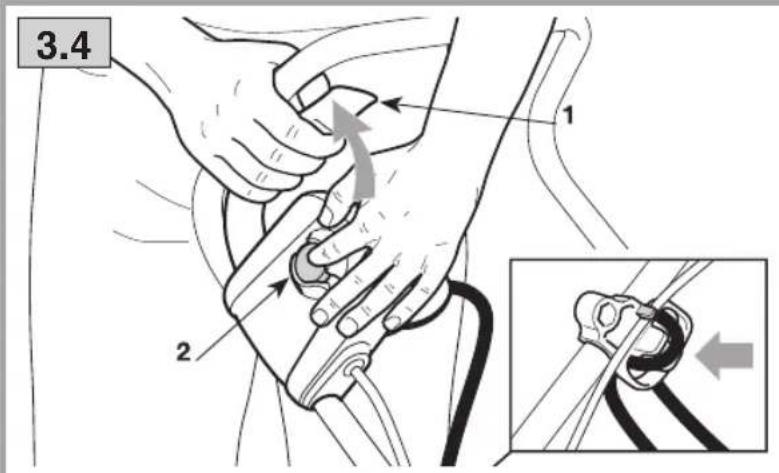
5.2 STARTING (FIG. 3.4)
Fasten the extension cable correctly as shown.
To start the motor, push the safety button (2) and pull the switch lever (1).
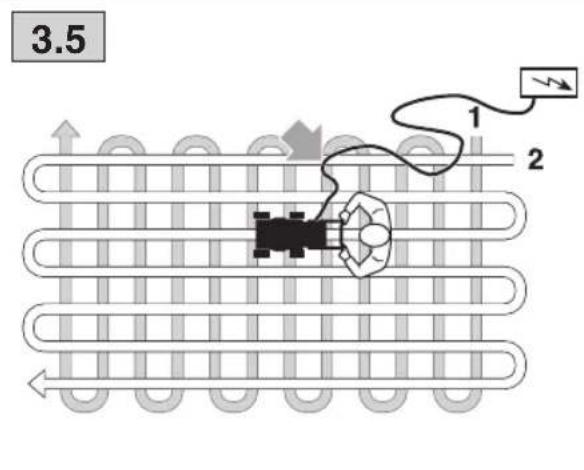
5.3 AERATING AND SCARIFYING THE GROUND (FIG. 3.5)
While working, make sure the electric cable is always behind you and on the side of the area you have finished.
Two crossed passages, a week apart, will give the best results.
NOTE Lawn care suggestions
- Over time, a layer of moss and grass residue forms on the ground surface reducing its supply of oxygen and stopping water and nutritious substances from penetrating. This impoverishes the lawn and makes it yellow.
- The ideal period for aerating and scarifying a lawn is in autumn or spring.
- Optimal working conditions consist of low and slightly wet grass, as working on ground that is dry or softened with too much water impedes collection of material and may damage the lawn.
- It is always advisable to remove leaves from the lawn before aerating or scarifying.
- You can remove that surface felt with a surface aerating action (with reduced tine depth in the ground).
- By increasing depth (scarifying), that removal action involves the harder ground layer and, at the same time, separates grass roots and increases them. This makes your lawn thicker with more blades of grass.
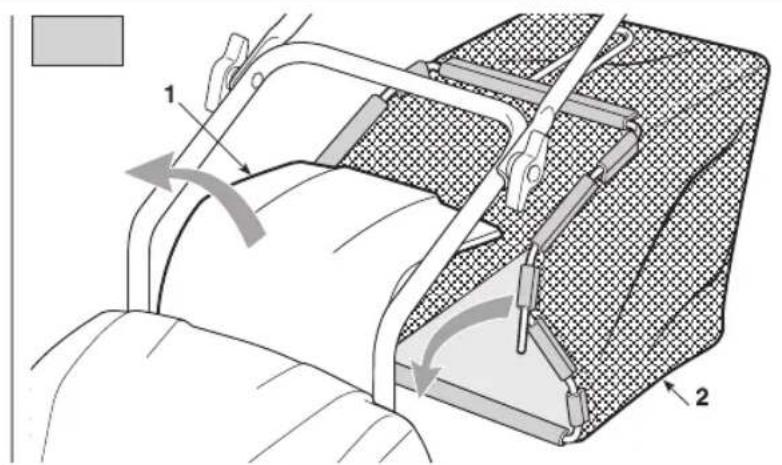
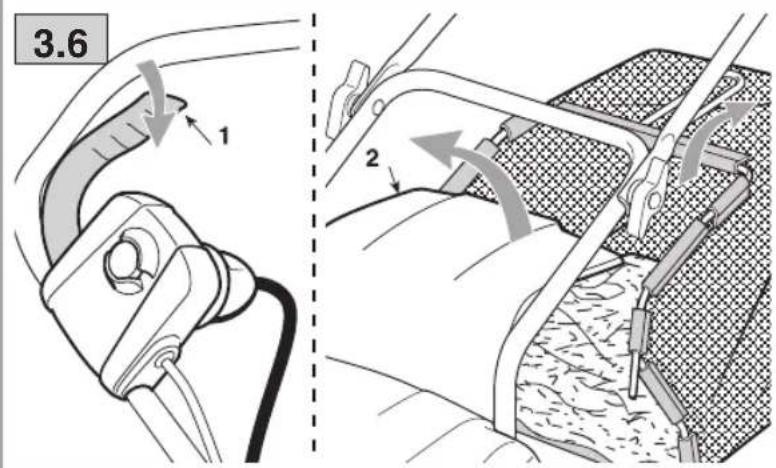
5.4 EMPTYING THE GRASS-CATCHER (FIG. 3.6)
To remove and empty the grass-catcher,
- release the switch lever (1) and wait for the working rotor to stop;
- lift the stone-guard (2), grasp the handle and remove the grass-catcher keeping it in an erect position.
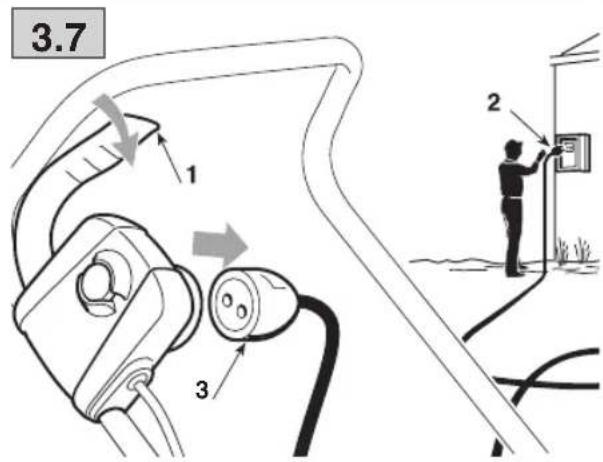
5.5 WHEN WORK IS FINISHED (FIG. 3.7)
Release the lever (1) when work has been completed. Disconnect the extension cable FIRST from the general socket (2) THEN from the side of the machine switch (3).
⚠️ WAIT UNTIL THE WORKING ROTOR STOPS before making any adjustments to the machine.
IMPORTANT If the motor stops because it is overheated while working, you must wait about 5 minutes before restarting it.
6. ROUTINE MAINTENANCE
IMPORTANT Routine and accurate maintenance is essential in maintaining original machine safety and performance levels.
Store the machine in a dry place.
1) Wear sturdy work gloves before cleaning, maintaining or adjusting the machine.
2) Clean the machine after each use; remove debris and mud accumulated on the working rotor and on tines, to prevent it drying and making the next removal difficult.
3) Avoid using petrol or solvents on the plastic parts of the machine to prevent damaging them. The warranty does not cover damage to plastic parts caused by the use of petrol or solvents.
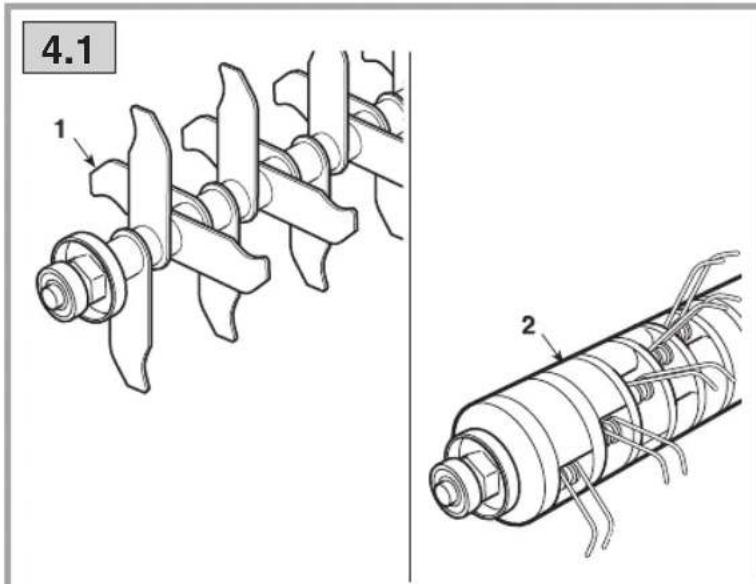
6.1 ROTOR MAINTENANCE (FIG. 4.1)
Working rotors are composed of different elements that are factory assembled and cannot be replaced individually by the user; if a blade or spring breaks, you must replace the entire working rotor or contact your Dealer for repair work.
Replacements must be made according to the indications at point 5.1.1.
Rotors with rigid blades (1) or springs (2) bearing the code indicated on the chart on page 2 should be used on this machine.
Given product evolution, the above mentioned rotors may be replaced in time with others having similar interchangeable and operating safety features.
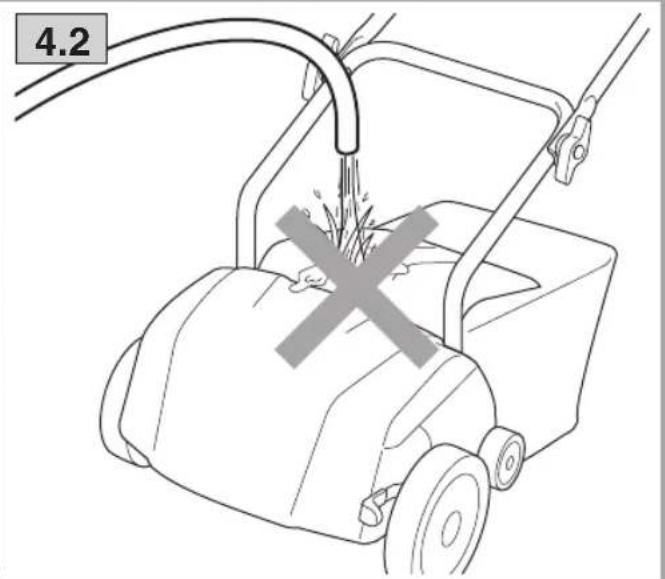
6.2 CLEANING THE MACHINE (FIG. 4.2)
Do not spray water onto and avoid wetting the motor and electrical components.
Do not use aggressive liquids to clean the chassis.
7. ENVIRONMENTAL PROTECTION
Environmental protection should be a priority of considerable importance when using the machine, for the benefit of both social coexistence and the environment in which we live.
– Try not to cause any disturbance to the surrounding area.
- Scrupulously comply with local regulations for the disposal of waste materials after working.
- Scrupulously comply with local regulations for the disposal of packaging, deteriorated parts or any elements with a strong environmental impact; this waste must not be disposed of as normal waste, it must be separated and taken to specified waste disposal centres where the material will be recycled.
- When decommissioning, do not pollute the environment with the machine, hand it over to a disposal centre, in accordance with the local regulations in force.
- DIAGNOSTICS
| What to do when ... | |
| Source of problem Corrective action | |
| 1. The machine does not work | |
| Electric current does not reach the machine | Check the electrical connection |
| 2. The current cuts off when the machine is started | |
| The mains socket amperage is not sufficient | Connect the machine to a mains socket with sufficient amperage |
| Other electrical appliances are working | Do not connect other appliances to the same mains socket at the same time |
| 3. The machine stops during work | |
| The protection device triggers Wait | at least 5 minutes before restarting the motor |
| 4. The machine stops frequently during work or it does not operate in a regular manner | |
| Demanding working conditions Check that the working rotor has been regulated accordingly with the conditions of the lawn and/or regulate it to a higher level | |
| The working rotor is clogged Unplug the machine from the mains, put on protective gloves and clean the working rotor and surrounding area | |
| The grass-catcher is clogged Empty | the grass-catcher regularly before it fills completely |
| 5. Poor and unsatisfactory performance levels | |
| Working rotor with worn or missing blades or springs | Replace the working rotor with an original part |
| Grass too tall Cut the grass to an adequate height | |
| Ground too wet | Regulate the working rotor to a higher level or postpone work until ground conditions improve |
For any doubts or problems, please do not hesitate to contact your nearest Customer Service Centre or Your Dealer.
INDICE
1.3 HUOLTO JA SÄILYTYS
2.3 SIGURNOSNE UPUTE
Vaš stroj morate oprezno koristiti. U tu svrhu, na stroju postoje piktogrami koji će vas podsjetiti na osnovne mje-re predestrožnosti prilikom uporabe. Njihovo značenje je objašnjeno u nastavku. Pored toga, preporučujemo vam da pažljivo pročitate poglavlje u ovom priručniku koje se odno-si na pravila o sigurnosti. Zamijenite oštećene ili nečitljive etikete.
Objašnjenje simbola:

6. PLĀNOTĀ TEHNISKĀ APKOPE
1.4 BESCHERMING VAN DE OMGEVING
7. BESCHERMING VAN DE OMGEVING
1.3 VEDLIKEHOLD OG OPPBEVARING
2. BLI KJENT MED MASKINEN
2.1 BESKRIVELSE AV MASKINEN OG BRUKSOMRÅDET
4.2 REGULATOR FOR ARBEIDSDYBDEN (FIG. 2.2)
5.5 VED ARBEIDETS SLUTT (FIG. 3.7)
6. ORDINÆRT VEDLIKEHOLD
6.1 VEDLIKEHOLD AV ROTORENE (FIG. 4.1)
INNEHÅLLSFÖRTECKNING
- SÄKERHETSNORMER 1
- LÄRA KÄNNA MASKINEN 3
- SLUTFÖRA MONTERINGEN 4
- BESKRIVNING AV REGLAGEN 4
- ANVÄNDNING AV MASKINEN....5
- LÖPANDE UNDERHÅLL 5
- MILJÖSKYDD 6
- DIAGNOS 6
1. SÄKERHETSNORMER
1.1 ALLMÄNNA SÄKERHETSFÖRESKRIFTER FÖR ELEKTRISKA VERKTYG
UK DECLARATION OF CONFORMITY
(Supply of Machinery (Safety) Regulations 2008, S.I. 2008 No. 1597, Annex II, part A)
The company: ST. S.p.A. – Via del Lavoro, 6 – 31033 Castelfranco Veneto (TV) – Italy
Hereby declares under its own responsibility that the machine: Pedestrain-controlled mains-operated lawn scarifiers and aerators, aerating / scarifying land
[Non-Text]
SV 213 E
25A··SCA000001 ÷ 99L··SCA999999
Electric
a) Homologation type:
c) Serial number
d) Engine
- Conforms to UK Regulations:
• S.I. 2008/1597 - Supply of Machinery (Safety) Regulations 2008
• S.I. 2001/1701 - Schedule 8 - Noise Emission in the Environment by Equipment for use Outdoors Regulations
e) Notified Body: /
• S.I. 2016/1091 - Electromagnetic Compatibility Regulations 2016 • S.I. 2012/3032 - The Restriction of the Use of Certain Hazardous Equipment Regulations 2012
g) Measured sound power le
h) Guaranteed sound power
k) Net power installed
m = 311
[Non-Text]
m = 311
SV 213 E
25A--SCA000001 ÷ 99L--SCA999999
Elettrico
a) Tipo / Modello Base
c) Numero di serie
d) Motore
EN • The content and images in this User Manual were produced expressly for ST. SpA and are protected by copyright – any unauthorised reproduction or modification to the document, either partially or in full, is prohibited.
Stiga LTD (UK Importer)
6 Stansted Courtyard, Parsonage Road,
Takeley, Bishop's Stortford, Essex, England,
CM22 6PU, United Kingdom