
BL 320 E - Lawn mower ALPINA - Free user manual and instructions
Find the device manual for free BL 320 E ALPINA in PDF.


| Product type | Cordless electric lawn mower |
| Brand | Alpina |
| Model | BL 320 E |
| Cutting width | 32 cm |
| Adjustable cutting height | 20 - 60 mm (5 positions) |
| Power type | Lithium-ion battery |
| Battery voltage | 40 V |
| Grass collection bag capacity | 30 L |
| Weight | 11.5 kg |
| Motor type | Brushless electric motor |
| Rotation speed | 3200 rpm |
| Wheel diameter | Front: 15 cm, Rear: 18 cm |
| Handle | Foldable for compact storage |
| Sound level (LpA) | 82 dB(A) |
| Vibrations | 2.5 m/s² |
| Safety protection | Automatic shutdown in case of overload |
| Cutting type | Mulching and rear discharge |
| Maintenance | Clean the housing after each use |
| Warranty | 2 years |
| Repairability | Spare parts available from the manufacturer |
| User manual | Available online for free |
Frequently Asked Questions - BL 320 E ALPINA
User questions about BL 320 E ALPINA
0 question about this device. Answer the ones you know or ask your own.
Ask a new question about this device
Download the instructions for your Lawn mower in PDF format for free! Find your manual BL 320 E - ALPINA and take your electronic device back in hand. On this page are published all the documents necessary for the use of your device. BL 320 E by ALPINA.
USER MANUAL BL 320 E ALPINA
natural_image
Icon of a person using a computer inside a black circle (no text or symbols)EN Pedestrian-controlled walk-behind electrically powered lawn mower OPERATOR'S MANUAL
WARNING: read thoroughly the instruction booklet before using the machine.
2
natural_image
Illustration of a person in a cap and mask reading a document at a table with a box containing items (no visible text or symbols)



natural_image
Illustration of a hand pressing down on a vehicle wheel, showing motion arrows (no text or symbols)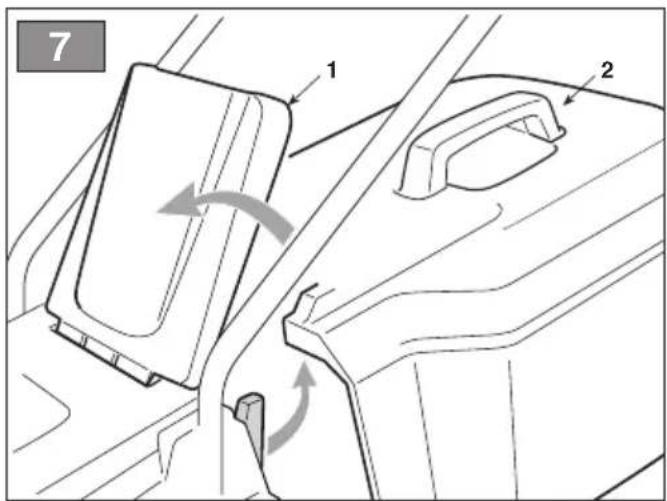



natural_image
Line drawing of a lawn mower with a pipe and explosion symbol (no text or labels)[2] Rated voltage*
[3] Max. motor operating speed *
[4] Machine weight *
[5] Power supply frequency and voltage
[6] Cutting width
[7] Acoustic pressure level
[8] Measurement uncertainty
[9] Measured acoustic power level
[10] Guaranteed acoustic power level
[11]Vibrationlevel
[12] Dimensions (length/width/height)
[13] Cutting means code
[14] Attachments
[15] Mulching kit
- Please refer to the data indicated on the machine's identification label for the exact figure.
a) NOTE: the declared total vibration value was measured using a normalised test method and can be used to conduct comparisons between one tool and another. The total vibration value can also be used for a preliminary exposure evaluation.
b) WARNING: the vibrations emitted during actual use of the tool can differ from the declared total value according to how the tool is used. Whilst working, therefore, it is necessary to adopt the following safety measures designed to protect the operator: wear protective gloves whilst working, use the machine for limited periods at a time and decrease the time during which the throttle trigger lever is pressed.
[1] ES - DATOS TÉCNICOS
[1] FI - TEKNISET TIEDOT
[2] Nimellisteho
[1] LT - TECHNINIAI DUOMENYS
[2] Vardinè galia
[3] Maksimalus variklio veikimo greitis *
[4] [renginio svoris*
[5] Maitinimo jtampa ir dažnis
[6] Pjovimo plotis
[7] Garso slègio lygis
[8] Matavimo paklaida
[9] Išmatuotas garso galios lygis
4.3 MONTAGGIO DEL SACCO DI RACCOLTA (FIG. 4, Tipo "I" e "II")
7. USO DELLA MACCHINA
4.3 MONTAŽA VREĆE ZA SKUPLJANJE TRAVE (SL.4, TIP "I", "II")
4.3 MONTERING AF OPSAMLINGSPOSE (FIG. 4, TYPE "I", "II")
6.1 INDSTILLING AF KLIPPEH∅JDE (FIG. 6)
- GENERAL ASPECTS ...... 1
- SAFETY REGULATIONS....2
- GETTING TO KNOW THE MACHINE......5
3.1 Description of the machine and planned use....5
3.2 Identification label and Main components (fig. 1)....6
3.3 Safety signs 6 - ASSEMBLY....6
4.1 UNPACKING (FIG.2)......7
4.2 Assembling the handle (Fig. 3)......7
4.3 Assembling the grass catcher (FIG. 4, Type“I”, “II”)....7 - CONTROLS....7
5.1 Dual-action switch (Fig. 5)....7 - PRELIMINARY PROCEDURES......7
6.1 Cutting height adjustment (Fig. 6) ..... 8
6.2 Preparation for grass cutting and collection in the grass catcher (Fig. 7)....8 - USING THE MACHINE....8
7.1 start-up (Fig. 8)......8
7.2 Grass cutting (Fig. 9)....8
7.3 Stop (Fig. 10) 8 - MAINTENANCE 8
8.1 GENERAL INFORMATION .... 8
8.2 ROUTINE MAINTENANCE......8 - STORAGE 9
- HANDLING AND TRANSPORTATION ..... 9
- ASSISTANCE AND REPAIRS......9
12.WARRANTY COVERAGE 9
13.MAINTENANCE TABLE.... 10 - TROUBLESHOOTING.....10
1. GENERAL ASPECTS
1.1 HOW TO READ THE MANUAL
Some paragraphs in the manual contain important information regarding safety and operation and are emphasized in this manner:
NOTE or IMPORTANT These give details or further information on what has been previously indicated and aim to prevent damage to the machine or cause other damage.
The symbol highlights danger. Failure to observe the warning can lead to the risk of injury to oneself and others and/or damage.
The paragraphs inside a grey dotted frame refer to optional features not available on all the models referred to in this booklet.
Check if the characteristic is on this model.
Whenever reference is made to a position on the machine "front", "back", "left" or "right" hand side, this refers to the operator's working position.
1.2 REFERENCES
1.2.1 Figures
The figures in these instructions for use are numbered 1, 2, 3, etc.
The components indicated in the figures are identified with letters A, B, C, and so on.
Reference to component C in figure 2 is indicated with the wording: "See fig. 2.C" or simply "(Fig. 2.C)".
The figures are given as a guide only. The actual pieces can differ from those illustrated in this document.
1.2.2 Titles
The manual is divided into chapters and paragraphs. The title of paragraph "2.1 Training" is a subtitle of "2. Safety regulations". References to titles or paragraphs are marked with the abbreviation chap. or par. and the relevant number. Example: "chap. 2" or "par. 2.1".
2. SAFETY REGULATIONS
2.1 GENERAL POWER TOOL SAFETY WARNINGS
WARNING Read all safety warnings, instructions, illustrations and specifications provided
with this power tool. Failure to follow all instructions listed below may result in electric shock, fire and/or serious injury.
Save all warnings and instructions for future reference.
The term “power tool” in the warnings refers to your mains-operated (corded) power tool or battery-operated (cordless) power tool.
1) Work area safety
a) Keep the work area clean and well lit. Cluttered and dark areas invite accidents.
b) Do not operate power tools in explosive atmospheres, such as in the presence of flammable liquids, gases or dust.
Power tools create sparks which may ignite the dust or fumes.
c) Keep children and bystanders away while operating a power tool. Distractions can cause you to lose control.
2) Electrical safety
a) Power tool plugs must match the outlet. Never modify the plug in any way. Do not use any adapter plugs with earthed (grounded) power tools. Unmodified plugs and matching outlets will reduce risk of electric shock.
b) Avoid body contact with earthed or grounded surfaces, such as pipes, radiators, ranges and refrigerators. There is an increased risk of electric shock if your body is earthed or grounded.
c) Do not expose power tools to rain or wet conditions. Water entering a power tool will increase the risk of electric shock.
d) Do not abuse the cord. Never use the cord for carrying, pulling or unplugging the power tool. Keep cord away from heat, oil, sharp edges or moving parts. Damaged or entangled cords increase the risk of electric shock.
e) When operating a power tool outdoors, use an extension cord suitable for outdoor use. Use of a cord suitable for outdoor use reduces the risk of electric shock.
f) If operating a power tool in a damp location is unavoidable, use a residual current
device (RCD) protected supply. Use of an RCD reduces the risk of electric shock.
3) Personal safety
a) Stay alert, watch what you are doing and use common sense when operating a power tool. Do not use a power tool while you are tired or under the influence of drugs, alcohol or medication. A moment of inattention while operating power tools may result in serious personal injury.
b) Use personal protective equipment. Always wear eye protection. Protective equipment such as a dust mask, non-skid safety shoes, hard hat or hearing protection used for appropriate conditions will reduce personal injuries.
c) Prevent unintentional starting. Ensure the switch is in the off-position before connecting to power source and/or battery pack, picking up or carrying the tool. Carrying power tools with your finger on the switch or energising power tools that have the switch on invites accidents.
d) Remove any adjusting key or wrench before turning the power tool on. A wrench or a key left attached to a rotating part of the power tool may result in personal injury.
e) Do not overreach. Keep proper footing and balance at all times. This enables better control of the power tool in unexpected situations.
f) Dress properly. Do not wear loose clothing or jewellery. Keep your hair and clothing away from moving parts. Loose clothes, jewellery or long hair can be caught in moving parts.
g) If devices are provided for the connection of dust extraction and collection facilities, ensure these are connected and properly used. Use of dust collection can reduce dust-related hazards.
h) Do not let familiarity gained from frequent use of tools allow you to become complacent and ignore tool safety principles. A careless action can cause severe injury within a fraction of a second.
4) Power tool use and care
a) Do not force the power tool. Use the correct power tool for your application. The correct power tool will do the job better and safer at the rate for which it was designed.
b) Do not use the power tool if the switch does not turn it on and off. Any power tool that cannot be controlled with the switch is dangerous and must be repaired.
c) Disconnect the plug from the power source and/or remove the battery pack, if detachable, from the power tool before
making any adjustments, changing accessories, or storing power tools. Such preventive safety measures reduce the risk of starting the power tool accidentally.
d) Store idle power tools out of the reach of children and do not allow persons unfamiliar with the power tool or these instructions to operate the power tool. Power tools are dangerous in the hands of untrained users.
e) Maintain power tools and accessories. Check for misalignment or binding of moving parts, breakage of parts and any other condition that may affect the power tool's operation. If damaged, have the power tool repaired before use. Many accidents are caused by poorly maintained power tools.
f) Keep cutting tools sharp and clean. Properly maintained cutting tools with sharp cutting edges are less likely to bind and are easier to control.
g) Use the power tool, accessories and tool bits etc. in accordance with these instructions, taking into account the working conditions and the work to be performed. Use of the power tool for operations different from those intended could result in a hazardous situation.
h) Keep handles and grasping surfaces dry, clean and free from oil and grease. Slippery handles and grasping surfaces do not allow for safe handling and control of the tool in unexpected situations.
5) Service
a) Have your power tool serviced by a qualified repair person using only identical replacement parts. This will ensure that the safety of the power tool is maintained.
2.2 LAWNMOWER SAFETY WARNINGS
a) Do not use the lawnmower in bad weather conditions, especially when there is a risk of lightning. This decreases the risk of being struck by lightning.
b) Thoroughly inspect the area for wildlife where the lawnmower to be used. Wildlife may be injured by the lawnmower during operation.
c) Thoroughly inspect the area where the lawnmower is to be used and remove all stones, sticks, wires, bones, and other foreign objects. Thrown objects can cause personal injury.
d) Before using the lawnmower, always visually inspect to see that the blade and the blade assembly are not worn or
damaged. Worn or damaged parts increase the risk of injury.
e) Before use, check the supply cord and any extension cord for signs of damage or aging. Do not use the lawnmower if the cord is damaged or worn. If the cord is damaged or worn during use, switch off the lawnmower and do not touch the cord before disconnecting it from the supply. A damaged supply cord or extension cord may result in electric shock, fire and/or serious injury.
f) Check the grass catcher frequently for wear or deterioration. A worn or damaged grasscatcher may increase the risk of personal injury.
g) Keep guards in place. Guards must be in working order and be properly mounted.
A guard that is loose, damaged, or is not functioning correctly may result in personal injury.
h) Keep all cooling air inlets clear of debris.
Blocked air inlets and debris may result in overheating or risk of fire.
i) While operating the lawnmower, always wear non-slip and protective footwear. Do not operate the lawnmower when barefoot or wearing open sandals. This reduces the chance of injury to the feet from contact with the moving blade.
j) While operating the lawnmower, always wear long trousers. Exposed skin increases the likelihood of injury from thrown objects.
k) Do not operate the lawnmower in wet grass. Walk, never run. This reduces the risk of slipping and falling which may result in personal injury.
I) Do not operate the lawnmower on excessively steep slopes. This reduces the risk of loss of control, slipping and falling which may result in personal injury.
m) When working on slopes, always be sure of your footing, always work across the face of slopes, never up or down and exercise extreme caution when changing direction. This reduces the risk of loss of control, slipping and falling which may result in personal injury.
n) Use extreme caution when reversing or pulling the lawnmower towards you. Always be aware of your surroundings. This reduces the risk of tripping during operation.
o) Keep the supply cord away from the cutting blades. A damaged supply cord may result in electric shock, fire and/or serious injury.
p) Switch off and remove plug from mains if the cord is entangled or damaged.
Entangled or damaged cords can increase the risk of electric shock.
q) Do not touch blades and other hazardous moving parts while they are still in motion. This reduces the risk of injury from moving parts.
r) When clearing jammed material or cleaning the lawnmower, make sure all power switches are off and the power cord is disconnected. Unexpected operation of the lawnmower may result in serious personal injury.
2.3 ADDITIONAL WARNINGS FOR ELECTRIC LAWNMOWER
1) Do not use the machine in explosive atmospheres, such as in the presence of flammable liquids, gases or dust. Power tools create sparks which may ignite the dust or fumes.
2) Keep the extension lead away from the cutting means. The cutting means can damage the cable and cause contact with energised parts.
3) Never run the lawnmower over the electric cable. While mowing, always drag the cable behind the lawnmower on the side where the grass has already been cut. Use the cable fastener to prevent the cable from disconnecting accidentally as indicated in this manual. Make sure it is connected to the socket without being forced.
4) Power up the machine using a differential switch (RCD - Residual Current Device) with a tripping current of max. 30 mA.
5) Machine plugs must always match the relative outlets. Never modify the plug in any way. Do not use any adapter plugs with earthed (grounded) machines. Unmodified plugs and matching outlets will reduce risk of electric shock.
6) If the machine's power cable is damaged, it can only be replaced with an original spare part by your dealer or an authorised service centre.
7) The permanent connection of any electrical equipment to the mains of a building must be installed by a qualified electrician in conformity with the regulations in force. Incorrect wiring can cause serious injury and even death.
8) WARNING: DANGER! Moisture and electricity are not compatible:
Always handle and connect electric cables in dry conditions:
– never allow electric sockets or cables to come into contact with wet areas (puddles or wet grass);
- connections between cables and sockets must always be watertight. Only use extension leads with intact, watertight and approved sockets sold on the market.
9) The quality of the power cables must be no less than H07RN-F or H07VV-F, with a minimum section of 1.5 mm^2 and a recommended maximum length of 25 m.
10) Attach the power cable to the cable fastener before igniting the machine.
11) Do not use the cable improperly. Never use the cable for carrying, pulling or unplugging the machine. Keep the cable away from heat, oil, sharp edges or moving parts. Damaged or entangled cables increase the risk of electric shock.
12) To avoid overheating, do not keep the extension lead rolled up during use.
13) Avoid body contact with earthed or grounded surfaces, such as pipes, radiators, cookers and refrigerators. There is an increased risk of electric shock if your body is earthed or grounded.
14) Do not overload the machine. Use a machine that is suitable for the job. A suitable machine will do the job better and safer at the rate for which it was designed.
2.4 MAINTENANCE AND STORAGE

Before cleaning or doing maintenance work, disconnect the machine from the mains and read the relevant instructions. Wear proper clothing and protective gloves whenever your hands are at risk.

Never use the machine with worn or damaged parts. Faulty or worn-out parts must always be replaced and not repaired. Only use original spare parts: the use of non-original and/or incorrectly fitted parts will jeopardize the safety of the machine, may cause accidents or personal injuries for which the Manufacturer is under no circumstance liable or responsible.
IMPORTANTE Any adjustments or maintenance operations not described in this manual must be carried out by your Dealer or a specialized Service Centre with the necessary knowledge and equipment to ensure that the work is done correctly maintaining the machine's original safety level. Any operations performed in unauthorized centres or by unqualified persons will totally invalidate the Warranty and all obligations and responsibilities of the Manufacturer.
1) After each use, disconnect the machine from the mains and check for damage.
2) Keep all nuts, bolts and screws tight to be sure the machine is in safe working condition. Routine maintenance is essential for safety and for maintaining a high performance level.
3) Check that the cutting means screws are properly tightened on a regular basis.
4) Wear work gloves when handling, disassembling and reassembling all cutting means.
5) Keep the cutting means well balanced during sharpening. All work on the cutting means (disassembly, sharpening, balancing, reassembly and/or replacing) are demanding jobs that require special skills as well as special tools. For safety reasons, these jobs are best carried out at a specialised centre.
6) Be careful during adjustment of the machine to prevent entrapment of the fingers between moving parts of the cutting means and fixed parts of the machine.
7) Do not touch the cutting means until the machine is disconnected from the mains socket and the cutting means is completely stationary. When servicing the cutting means, bear in mind that, even though the power supply is switched off, the cutting means can still move.
8) Check the side discharge guard, the rear discharge guard and the grass catcher frequently for signs of wear or deterioration. Replace them if they are damaged.
9) Replace any instruction or warning message stickers, if damaged.
10) Store the machine out of the reach of children!
11) Allow the motor to cool down before storing in any enclosure.
12) To reduce fire hazards, keep the lawnmower and, in particular, the motor free of grass, leaves, or excessive grease. Always empty the grass catcher and do not leave containers full of cut grass inside storage areas.
2.5 PROTECTING THE ENVIRONMENT
Safeguarding the environment must be a relevant and priority aspect of machine use, of benefit to the community and the environment we live in.
- Avoid being a disturbance to the neighbourhood. Use this machine at reasonable times of the day only (not early morning or late evening when the noise could cause disturbance).
- A certain amount of chain lubricating oil is released into the environment when the machine is running, so only use biodegradable oils made specifically for this use. Use of a mineral oil or motor oil causes serious damage to the environment.
- Comply with local regulations for the disposal of packaging, deteriorated parts or any elements with a strong environmental impact; this waste must not be disposed of as normal waste, it must be separated and taken to specified waste disposal centres where the material will be recycled.
- Comply with local regulations for the disposal of waste materials
- When the machine is withdrawn from service, do not dispose of it in the environment, but take
it to a waste disposal facility in accordance with the local regulations in force.

Do not throw electrical equipment away with domestic waste. According to the European Directive 2012/19/EU on electrical and electronic equipment waste and its implementation, according to UK
Regulation “The waste electrical and electronic equipment regulations 2013 (as amended)” and according to national regulations, old electrical equipment must be collected separately, for eco-compatible recycling. If electrical equipment is disposed of in landfills or in the ground, hazardous substances can leak into the groundwater and contaminate the food chain, damaging your health and well-being. For further information on the disposal of this product, contact your dealer or a domestic waste collection service.

Separate waste collection of the products and packaging used allows the materials to be recycled and reused. Reuse of recycled materials help to prevent environmental pollution and reduces the demand for raw materials.
3. GETTING TO KNOW THE MACHINE
3.1 DESCRIPTION OF THE MACHINE AND PLANNED USE
This machine is a garden tool and more precisely a pedestrian-controlled lawnmower.
The machine is essentially composed of a motor which drives a cutting means enclosed in a casing, equipped with wheels and a handle.
The operator is able to operate the machine and use the main controls, always staying behind the handle at a safe distance from the rotary cutting means. If the operator leaves the machine, the motor and cutting means will stop within a few seconds.
3.1.1 Intended use
This machine was designed and manufactured for cutting (and collecting) grass in gardens and grassy areas, in areas in proportion to its cutting capacity, done by a pedestrian operator.
3.1.2 Improper use
Any other usage not in keeping with the above-mentioned ones may be hazardous and harm persons and/or damage things.
Examples of improper use may include, but are not limited to:
- transporting persons, children or animals on the machine;
– letting oneself be transported by the machine;
– using the machine to tow or push loads;
– using the machine for leaf or debris collection;
– using the machine to trim hedges, or for cutting vegetation other than grass;
– use of the machine by more than one person; - using the rotary cutting means on surfaces other than grass.
IMPORTANT Improper use of the machine will invalidate the warranty, relieve the Manufacturer from all liability, and the user will consequently be liable for all and any damage or injury to himself or others.
3.1.3 User types
This machine is intended for use by consumers, i.e. non-professional operators. The machine is intended for “DIY” use only.
3.2 IDENTIFICATION LABEL AND MAIN COMPONENTS (FIG. 1)
- Acoustic power level
- Conformity marking
- Year of manufacture
- Type of lawnmower
- Serial number
- Name and address of Manufacturer
- ArticleCode
- Motor rated power and maximum operating speed
- Weight in kg
- Power supply voltage and frequency
10a. Electrical protection rating
11.Chassis
12.Motor
-
Cutting means
-
Rear discharge guard
15.Grasscatcher
-
Handle
-
Controllever
-
Electric cable fitting
Write the identification data of the machine in the specific space on the label on the back of the cover page.
The example of the Declaration of Conformity is provided on the penultimate page of the owner's manual
3.3 SAFETY SIGNS
The machine has various symbols on it (fig. 1). They are used to remind the operator of the behaviour to follow to use it with the necessary attention and caution.
Meaning of symbols:

Read the instructions before operating the machine.

Danger! The failure to use this machine correctly can be hazardous for oneself and others.

Warning! Risk of thrown objects. Keep all persons away from the work area whilst working

Attention! Disconnect the plug from the mains before commencing maintenance work or if the power cable is damaged. Do not put hands or feet near or under the opening of the cutting means

Warning! keep the power cable away from the cutting means.

Only for battery-operated lawnmowers.

Danger! Do not leave the machine in the rain or in damp conditions.

Attention! The cutting means continues to turn even after the motor has been switched off.
IMPORTANT Any damaged or illegible decals must be replaced. Order replacement decals from an authorised service centre.
4. ASSEMBLY
The safety regulations to follow are described in chap. 2. Strictly comply with these instructions to avoid serious risks or dangers.
For storage and transport purposes, some components of the machine may not be installed in the factory and have to be assembled after unpacking. Follow the instructions below.
⚠️ Unpacking and completing the assembly should be done on a flat and stable surface, with enough space for machine handling and its packaging, always making use of suitable equipment. Do not use the machine until all the instructions provided in the “ASSEMBLY” section have been carried out.
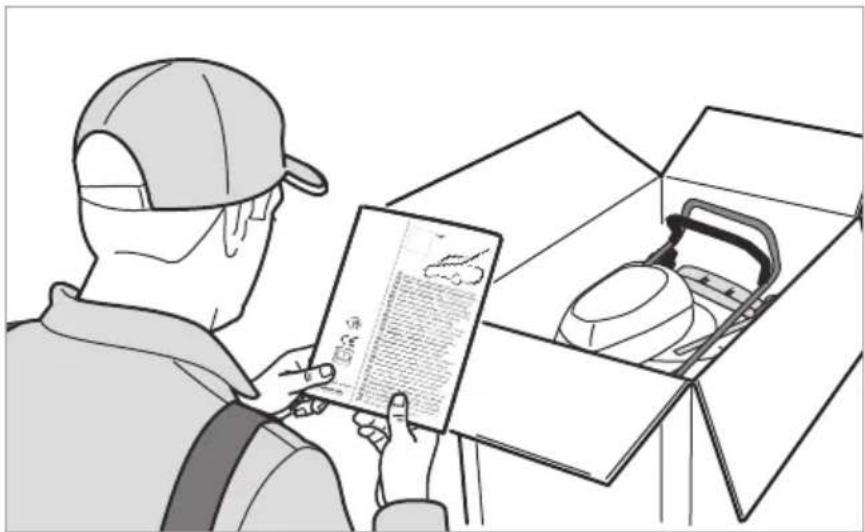
4.1 UNPACKING (FIG.2)
- Carefully open the packaging, paying attention not to lose components.
- Consult the documentation in the box, including these instructions.
- Remove all the unassembled parts from the box.
- Remove the machine from the box.
- Dispose of the box and packaging in compliance with local regulations.
4.2 ASSEMBLING THE HANDLE (FIG. 3)
4.2.1 HandleType“I”
- Insert the lower right (1) and left (2) parts of the handle into the respective holes and fasten them in place with the supplied screws (3).
- Apply the cable fastener (4) to the top of the handle (5) in the indicated position and fasten it with the supplied screw (6) and bolt (7).
- Fasten the top of the handle (5) to the bottom parts using the knobs (8) and the supplied nuts and bolts as shown, using one of the two holes provided for adjusting the height of the handle to the operator's stature.
- Align the slot on the switch (9) to the support guide (10) and push the switch (9) in the direction indicated by the arrows as far as possible, making sure it fits securely.
- Fit the cable fastener (11) in the indicated position and then attach the cable (12).
4.2.2 HandleType“II”
- Assemble the lower right (1) and left (2) parts of the handle to the screws (3a) protruding from the chassis and fasten them with the supplied knobs (3).
- Apply the cable fastener (4) to the top of the handle (5) in the indicated position and fasten it with the supplied screw (6) and bolt (7).
-
Fasten the top of the handle (5) to the bottom parts using the knobs (8) and the supplied nuts and bolts as shown, using one of the two holes provided for adjusting the height of the handle to the operator's stature.
-
Align the slot on the switch (9) to the support guide (10) and push the switch (9) in the direction indicated by the arrows as far as possible, making sure it fits securely.
- Fit the cable fastener (11) in the indicated position and then attach the cable (12).
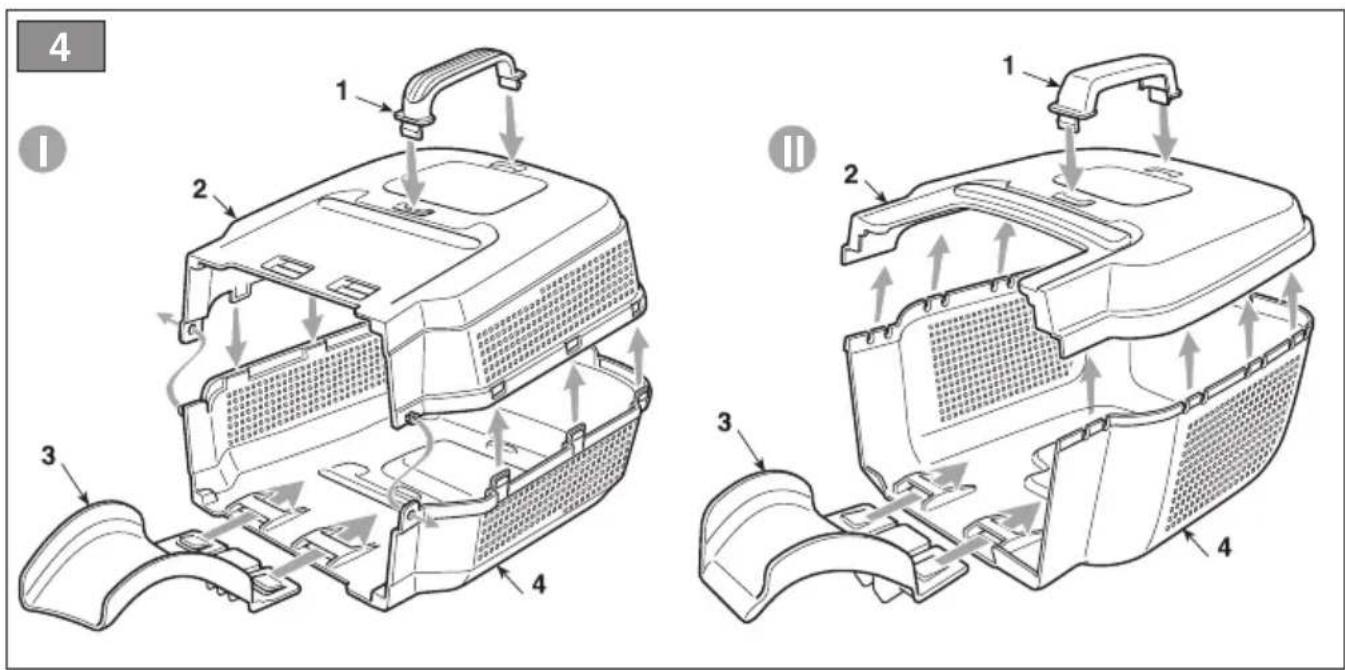
4.3 ASSEMBLINGTHEGRASS CATCHER (FIG. 4, Type“I”, “II”)
- Assemble the handle (1) on the top part of the grass catcher (2), snapping it into the appropriate seats.
- Apply the extension (3) to the bottom part of the grass catcher (4), snapping it into the appropriate seats.
- Assemble the two parts (2) and (4), making sure you have securely inserted the fittings in their seats until they snap into place.
5. CONTROLS
Symbols on controls:


WARNING! Ignition of the motor simultaneously engages the cutting means

Stop.
Run
5.1 DUAL-ACTION SWITCH (Fig. 5)
The motor is controlled by a dual-action switch to prevent accidental start ups. To start:
- Press the button (2)
- pull the lever (1).
Ignition of the motor simultaneously engages the cutting means.
NOTE The engine will stop automatically when the lever (1) is released.
6. PRELIMINARY PROCEDURES
NOTE This machine can be used to mow lawns in a number of different ways; before starting work, prepare the machine based on how the lawn is to be mowed. DO THIS WHEN THE MOTOR IS SWITCHED OFF.
6.1 CUTTING HEIGHT ADJUSTMENT (Fig. 6)
To adjust the cutting height, turn the machine over on one side and position the wheel axis in one of the three provided slots inside the chassis. The height must be the same for both axes.
Do this when the cutting means is stationary.
6.2 PREPARATION FOR GRASS CUTTING AND COLLECTION IN THE GRASS CATCHER (FIG. 7)
- Lift the rear discharge guard (1)
- fasten the grass catcher (2) correctly
NOTE When the grass catcher is too full, grass collection is no longer efficient and the sound of the lawnmower changes.
To remove and empty the grass catcher,
- release the switch lever and wait for the cutting means to stop;
- lift the rear discharge guard, grasp the handle and remove the grass catcher keeping it in an erect position.
7. USING THE MACHINE
7.1 START-UP (FIG. 8)
Fasten the extension lead correctly as shown.
To start the motor:
- push the safety button (2)
- pull the switch lever (1).
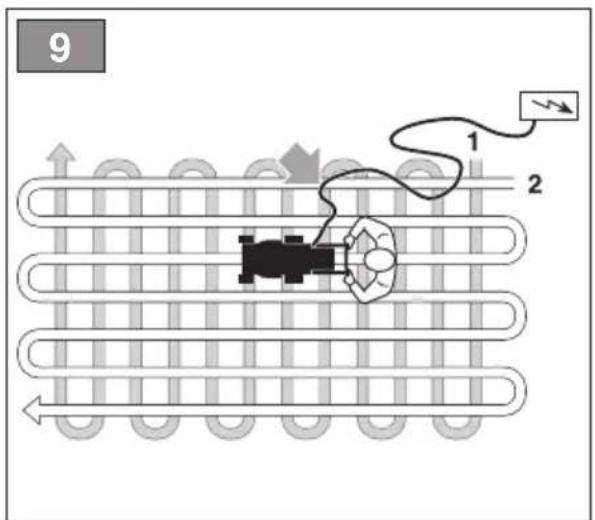
7.2 GRASS CUTTING (FIG. 9)
IMPORTANT While mowing, make sure the electric cable is always behind you and on the side of the lawn that has already been cut.
NOTE The appearance of the lawn will improve if you alternate cutting in both directions (1,2) at the same height.
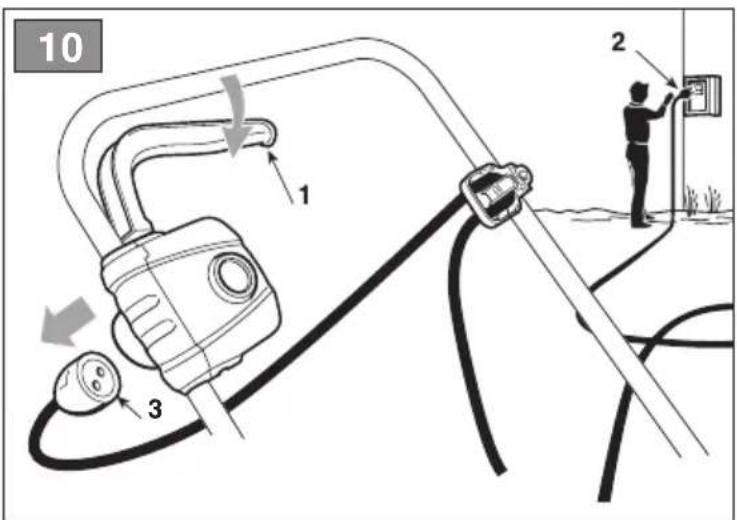
7.3 STOP (FIG. 10)
To stop the machine:
- release the lever (1).
- FIRST disconnect the extension lead from the general socket (2), THEN from the side of the lawnmower switch (3).
⚠️ WAIT UNTIL THE CUTTING MEANS STOPS before making any adjustments to the lawnmower.
IMPORTANT If the motor stops while mowing due to overheating, you must wait about 5 minutes before restarting it.
8. MAINTENANCE
8.1 GENERAL INFORMATION
The safety regulations to follow are described in chap. 2. Strictly comply with these instructions to avoid serious risks or dangers.
⚠️ Before commencing any inspections, cleaning or maintenance/adjustments on the machine:
- Stop the machine.
- Disconnect the machine from the power supply.
- Make sure that any moving component has stopped.
- Wait until the engine cools down.
- Read the relevant instructions.
- Use suitable clothing, protective gloves and goggles.
⚠️ Adjustments or maintenance operations must only be performed with the motor switched off and the machine disconnected from the mains power supply.
NOTE Store the lawnmower in a dry place.
8.2 ROUTINE MAINTENANCE
The frequency and types of maintenance are summarised in the “Maintenance Table” (chapter 13).
IMPORTANT Any maintenance and adjustment operations not described in this manual must be carried out by your Authorised Service Centre.
IMPORTANT Routine and accurate maintenance is essential in maintaining original machine safety and performance levels.
1) Wear strong protective gloves before cleaning, maintaining or adjusting the machine.
2) Accurately wash the machine with water after cutting, remove grass debris and mud accumulated in the chassis to prevent it from drying and causing problems the next time the lawnmower is used.
3) Always make sure the air intakes are free of debris.
8.2.1 Cutting means maintenance
IMPORTANT It is best if all interventions on the cutting means are done at a specialised Centre that has the most appropriate tools and equipment.
NOTE The cutting device code is shown in the "TECHNICAL DATA" table.
- Reassemble the cutting means (2) with the code facing the ground (Fig. 11),
- Tighten the central screw (1) using a dynamometric key calibrated at 15 Nm.
8.2.2 Cleaning the machine
Do not spray water onto the motor and electrical components and prevent them from getting wet (Fig.12).
Do not use aggressive liquids to clean the chassis.
9. STORAGE
When the machine is to be stored away:
- clean the machine thoroughly;
- check the integrity of the machine;
-
store the machine:
-
in a dry place;
- protected from inclement weather;
- in a place out of children's reach;
- making sure that keys or tools used for maintenance are removed.
10. HANDLING AND TRANSPORTATION
Whenever the machine is to be handled, raised, transported or tilted you must:
- Stop the machine until the moving parts come to a complete halt.
- Wear heavy work gloves.
- Hold the machine in the points offering a safe grip, taking into account the weight and its division.
- Use an appropriate number of people for the weight of the machine and the characteristics of the vehicle or the place where it must be placed or collected.
- Make sure that machine movements do not cause damage or injuries.
When transporting the machine on a vehicle or trailer, always:
- Use an access ramp of suitable strength, width and length.
- Load the machine with the motor switched off and pushed by an adequate number of people.
- Lower the cutting means assembly.
- Position it so that it cannot cause a hazard for anybody.
- Fasten firmly to the means of transport using ropes or chains to prevent it from tipping over.
11. ASSISTANCE AND REPAIRS
This manual provides all the necessary information to run the machine and for correct basic maintenance operations which can be performed by the user. Any regulations and maintenance operations not described herein must be carried out by your Dealer or Authorised Service Centre, which have the necessary knowledge and equipment to ensure that the work is carried out correctly, maintaining the correct degree of safety and the original operating conditions of the machine.
Any operations performed in unauthorised centres or by unqualified persons will totally invalidate the Warranty and all obligations and responsibilities of the Manufacturer.
- Only authorised service centres can carry out guaranteed repairs and maintenance.
- The authorised service centres only use genuine spare parts. Genuine spare parts and accessories have been designed specifically for machines.
- Non-genuine spare parts and accessories are not approved. Use of non-genuine spare parts and accessories cause the warranty to be invalidated.
- It is advisable to send your machine once a year to an authorised service centre for servicing, assistance and safety device inspection.
12. WARRANTY COVERAGE
The warranty covers all material and manufacturing defects. The user must follow all the instructions provided in the accompanying documentation.
The warranty does not cover damages caused by:
- Failure to become familiar with the documentation accompanying the machine.
- Carelessness.
- Incorrect or prohibited use or assembly.
- Use of non-genuine spare parts.
- Use of accessories not supplied or approved by the manufacturer.
The warranty does not cover:
- Normal wear and tear of consumables, such as cutting means, safety bolts.
• Normal wear and tear.
The purchaser is protected by his or her own national legislation. The purchaser's rights under the national laws or his or her own country are not in any way restricted by this warranty.
13. MAINTENANCE TABLE
| Intervention Frequency | |
| MACHINE | |
| Check all fasteners; Safety checks/check controls; Check the rear discharge guard; Check the grass catcher; Check the cutting means. | Before use |
| General cleaning and inspection; Checking for any damage to the machine. If necessary, contact the authorised service centre. | After each use |
| Replacing the cutting means. - | |
| POWER SUPPLY | |
| Check the integrity of the power cable and good condition of the sockets.If the cable is damaged it must be replaced. Contact a service center | Before use |
14. TROUBLESHOOTING
| What to do if .... | |
| Problem description Corrective Action | |
| 1. The electric lawnmower doesn't work | |
| The machine has no power supply Check the electrical connection. | |
| 2. The electric lawnmower trips the power supply. | |
| The mains socket amperage is insufficient Connect the machine to a mains socket with sufficient amperage | |
| Other electrical appliances are being used | Do not connect other appliances to the same mains socket at the same time. |
| 3. The cut grass is not collected in the grass catcher | |
| The cutting means has received a knock Have the cutting means sharpened or replace itCheck the fins that direct the grass towards the grass catcher | |
| The inside of the chassis is dirty Clean the inside of the chassis to ease the grass dischargetowards the grass catcher | |
| 4. Mowing is difficult | |
| The cutting means is not in good condition Have the cutting means sharpened or replace it | |
| 5. The machine starts to vibrate abnormally | |
| Damaged or loose parts Stop the machine and disconnect the plug from the socket.Inspect for damageCheck for and tighten any loose partsHave all checks, repair work and replacements carried out by a specialized Centre only. | |
| 6. The motor shuts down whilst working | |
| The thermal protection has tripped due to overheating of the motor. | Stop the machine and disconnect the plug from the socket.Always make sure the air intakes are free of debris. |
If problems persist after having performed the above operations, contact your dealer.
ÍNDICE
1.1 KUIDAS KASUTUSJUHENDIT LUGEDA
- paina painiketta (2);
- vedä vivusta (1).
4.3 MONTAGE DU BAC DE RAMASSAGE (GIG.4, TYPE "I", "II")
10. MANUTENTION ET TRANSPORT
8.2 PLĀNOTĀ TEHNISKĀ APKOPE
2.5 BESCHERMING VAN DE OMGEVING
4.3 MONTAGE VAN DE OPVANGZAK (AFB.4, TYPE "I" EN TYPE "II")
2.4 VEDLIKEHOLD OG OPPBEVARING
3. BLI KJENT MED MASKINEN
3.1 BESKRIVELSE AV MASKINEN OG BEREGNET BRUK
4.1 UTPAKKING (FIG. 2)
4.3 MONTERING AV OPPSAMLEREN (FIG. 4, TYPE "I" OG TYPE "II")
6.1 JUSTERING AV KLIPPEH∅YDEN (FIG. 6)
6.2 KLARGJ∅RING FOR KLIPPING OG OPPSAMLING AV GRESSET I OPPSAMLEREN (FIG. 7)
7.2 KLIPPING AV GRESS (FIG. 9)
8.2 ORDINÆRT VEDLIKEHOLD
13. VEDLIKEHOLDSTABELL
4.3 MONTAGEM DO SACO DE RECOLHA (FIG. 4, TIPO "I" E "II")
4.3 MONTAREA SACULUI DE COLECTARE (FIG.4, TIP "I" SI "II")
4.2 MONTÁŽ RUKOVÄTE (OBR. 3)
4.2.1 typ „l“
4.3 MONTAŽA VREĆE ZA SKUPLJANJE TRAVE (SL. 4, TIP "I" I TIP "II")
- Postavite ručku (1) na gornji deo vreće za skupljanje trave (2), tako da ona škljocne u odgovarajućim ležištima.
- Postavite produžetak (3) u osnovu donjeg dela vreće za skupljanje trave (4), tako da on škljocne u odgovarajućim ležištima.
- Namontirajte dva dela (2) i (4), pazeći da do kraja umetnete spojnice u njihova ležišta, sve dok ne škljocnu.
5. UPRAVLJAČKE KOMANDE
Simboli na komandama:

PAŽNJA! Pokretanje motora istovremeno dovodi do istovremenog pokretanja rezne glave.

Zaustavljanje

Kretanje
5.1 PREKIDAČ SA DVOSTRUKIM DEJSTVOM (SL. 5)
INNEHÅLLSFÖRTECKNING
4.1 UPPACKNING (FIG. 2)
4.3 MONTERING AV UPPSAMLINGSPÅSEN (FIG. 4, TYP "I" OCH TYP "II")
6.1 REGLERING AV SKÄRHÖJD (FIG. 6)
4.3 TOPLAMA SEPETİNİN MONTAJI (RES. 4, "I" VE "II" TİPİ)
7.1 BAŞLATMA (RES. 8)
7.2 ÇİM KESİMİ (RES. 9)
UK DECLARATION OF CONFORMITY
(Supply of Machinery (Safety) Regulations 2008, S.I. 2008 No. 1597, Annex II, part A)
- The company: ST. S.p.A. – Via del Lavoro, 6 – 31033 Castelfranco Veneto (TV) – Italy
Hereby declares under its own responsibility that the machine: Pedestrian-controlled mains-operated lawn scarifiers and aerators, aerating / scarifying land
(1) = 12( + ) + 12( + ) + 12
E 320
a) Tipo / Modello Base
25A••WBH000001 ÷ 99L••WBH999999
Elettrico
c) Numero di serie
d) Motore
EN IEC 62841-4-3:2021+A11:2021 EN IEC 55911-1-2021
EN IEC 55014-1:2021 EN IEC 55014-2:2021
EN IEC 61000-3-2:2019+A1:2021 EN 61000-3-2:2013+A2:2021
EN IEC 63000:2018
UK DECLARATION OF CONFORMITY
(Supply of Machinery (Safety) Regulations 2008, S.I. 2008 No. 1597, Annex II, part A)
- The company: ST. S.p.A. – Via del Lavoro, 6 – 31033 Castelfranco Veneto (TV) – Italy
Hereby declares under its own responsibility that the machine: Pedestrian-controlled mains-operated lawn scarifiers and aerators, aerating / scarifying land
a) Homologation type:
c) Serial number
d) Engine
E 380
c) Numero di serie
d) Motore
E 380
25A••WBH000001 ÷ 99L••WBH999999
Electric
25A--WBH000001 ÷ 99L--WBH999999
Eletrico
1
(1) AD = BD = 1
CEO Stiga Group Sean Robinson

o) Castelfranco V.to, 04.03.2026

171513881/14
171513881/14
g) Measured sound power level h) Guaranteed sound power level i) Cutting width
93.8 dB(A) 96 dB (A) 32 cm
n) Person authorised to compile the technical file:
31033 Castelfranco Veneto (TV)- Italia
CEO Stiga Group Sean Robinson

| FI (Altupenästen ojeiden käsminki) | CS (Preklad povedniho navedu k použkimi) | PL (Thurnaczenie instrukcji oryginalne) |
| EY-VAATIMUSTENMUKA/SUUSVAKUUTUS(Kone directivki 2006/42/EY, Lille II, osa A)1. Yegs2. Vakuuttas omala vastuillaan, että lone: Kavallen ojaltava ruchonlekturil ruchonlekkuu b) Typ i / Pritomili b) Kulikatai vamidusvusi c) Sarjannero d) Mootori : sihiköinen 3. On yindermukainen seurasvien direkliven asetlamiens vastmuston kanssa; e) Sertifikinltyrs: El goveletovosse b) EY-pplylistekrada: El goveletovoraz 4. Visitais harmonisotutih standardinih m) Visitu santieneatosz b) Tsaitu santieneoso z) Leikkuuleveys n) Iaklston asielojyen laatmiseen valturutatu henkilio: o) Palika je palimalärä | ES – Prohléseni o shode (Směrnice o Strojnih zařízenich 2006/42/EY, Pilloha II, část A)1. Spočnost2. Prohlášuje na vlastní odpovrednost, že stroj. Sekoška se skljící otsujky u sekoška na brávu b) Typ i Zakadni moda b) Masi o Rok výroby c) Výrobni číslo d) Motor elektricky 3. Jo va shođa s nařbranční směnici c) Certifikáční organ. Neize použit f) ES žiškýna zkoška Typu WE. Né dýlovy z 4. Osklady na Harmonizované normy g) Namětené úroveň akustického vykonu h) Zaručená úroveň skustického vykonu i) Šilka lezani n) Osoba autorizovaná pro výročení Technického spisu: o) Misto i Datum | Dektarsoja zgodnočki WE (Drekytywa masznovya 2006/42/WE, Załoznik II, częć a)1. Spolčka 2. Oswadrza na vlasnę odpowierznałość, že maszyne: Koslerka prowadzona przez operatora pieszego i ócleu gravy a) Typ i Mosal podstarwovy b) Vlasiej o Rok produkcji c) Numer seryjny d) Šilnik elektryczny 3. Spolnia podstawne wymogi nastuprujących Dyraktyvr a) Jednotska certifikujama: Nie dovožy i) Bedančný zakoula typu WE. Né dýlovy z 4. Odnisiono do Nom zharmonizowanych v) Zmierzony poziom mocy akustycznej h) Gwanetowany poziom mocy akustycznej i) Szerckoće oeda n) Osoba upoznomena do zmasagowania Dokumentacji techniczne; o) Miejscowość i data |
| SL (Prevod izvinnih navodil)ES ľijava o skladnosti (Direktiva 2006/42/ES), priloga II, dei A)1. Družba 2. pod lastno odgovornosjo izavlja, da je stroj. Kosilnice za stoječega delava / košnja trave a) Tip / osnovni model b) Mesec i Teło izdeiave c) Serijska slevičko a) Mostr. elektricky 3. Skladen je z določili direktiv: e) Ustarnova, ki izda potdilo. Se ve uporatija f) ES pregled lapa: Se ne uporabije 4. Sklicevanje na uskládene specipise g) Izmejnen iovo zvočne modi h) Zagoloviem zvočne moti i) Obseg košnje n) Osoba, poslaščena za sestava tehnične knjižice: o) Kra in datum | BS (Prijevod originalnih uputa)EZ ičjava o sukladnosti (Direktiva o mašlarna 2006/42/EZ, Prilog II, deo A)1. Fims 2. Daje izlavju pod vlaslom odgovornoviču da je matins: Kosilica na guranje / Košenje trave a) Tip / Osnovni model b) Mesec i Godina proizvodnje c) Serijski broj d) Mostr. elektricky 3. sukladna s osnovnim zahtljelima direktive: e) Certifikaciono lijeto. Niše priylenjivo f) EZ ispitivanje lapa: Niše priylenjivo 4. Pozvanje na uskladene norme g) Izmejnen iovo zvočne snage h) Saravičná úroveň akustického vykonu i) Srina košenja n) Osoba ovlătena za izradu tehničke brošure: o) Mesto i datum | SK (Preklad povedněho navedu na použilė)ES vyhlásenie o zhode (Snermica o Strojnych zariadenisch 2006/42/ES, Priloga II, část A)1. Spočnost 2. Vyhlasuje na vlaslní zodpovednost, že stroj: Kosoška so stojacou obslutou / kosačka na brávu a) Typ i Zakadni model b) Velec i Rok výrocy c) Výrobniční d) Výrobniční d) Výrobniční d) Výrobniční d) Výrobniční d) Výrobniční d) Výrobniční d) Výrobniční d) Výrobniční d) Výrobniční d) Výrobniční d) Výrobniční d) Výrobniční d) Výrov. elektricky 3. Je v zhode s naradeniemni smernic: e) Certifikáční organ. Nepoučilelné f) Škuška typu ES: Nepoučilelné d) Odkaz na Harmonizované normy g) Namovani zroveň akustického vykonu h) Zaručená úroveň akustického vykonu i) Širka kosenia n) Osoba autorizovaná na vytvorenie Technického spisu: o) Mesto i Datum |
| RO (Traducerea manuslului fabricantului)CE - Declaratie de Conformitate (Direktiva Mapin 2005/42/CE, Anexa II, partes A)1. Societates 2. Declarė je propria rispundere oši mašina. Msiną de turis larba cu conduciosor pedestru / lašat larba a) Tip / Model de sača b) Luna opeci fabricaţo c) Numir de seriš e) Mostr. elektricky 3. Este în conformitate cu specificajite direktivelor: a) Organism de certificano: Nu se aplicd f) Examinare CE de Tip. Nu se aplica 4. Referija la Standardele armonizale g) Nivel de pušere sored násrati nivel de paristras skonarč garant i) Lajmines de šliere n) Perscani autorizatii sā ši intocmevasa Dosarul Tehnic o) Locul ji Data | LT (Originsiu instrukolju verimas)ES abliktes deklaracija (Mašinu direktyva 2006/42/CE, Piedias II, dalis A)1. Bendrove 2. Prisima atsakomyb, kad jreginy: Pesčio operatorius valdorna vesajopveň zoles pijovimas a) Tipas i Bazinis Modelis b) Mānou i Pagaminnimo motai c) Serijs numeris 2. Valkiec elektricky 3. Altinka direktycese patelikas specifikacjas: e) Sertifikavimo istagsa. Netalkoma f) CE tipo tyrimas. Netalkoma 4. Nucoroda i sudelinlas Normas g) Birmatucas garso gallos lygis h) Uthrinnamas garso gallos lygis i) Pijovinc pilosis n) Autorizatous asmuo sudaryli Technine Dokumentaciją: o) Vieta ir Data | LV (Instrukciju tulokjums no originalvalodas)EK ablik Bahamas deklaracija (Direktiva 2006/42/EK par mašinam, pielikums II, daja A)1. Uzemums 2. Uzemnoties per to plinu stilibflu, pazjno, ka matšina: Pesčio operatorius valdorna vesajopveň záles piaušana a) Tipi i Gazes modelis b) Vencis bazodanas gadis c) Sērijas numurs d) Volors elektrakis 3. Ablist šadu direktivu prasibam: e) Sertifikacijas lestáde. Nav pienčirojans f) CE tipverda párbaude. Nav pienčirojans 4. Asaouce uz harmonizelm i slendaričem g) Imenials skunas intensitales limnen i) Piaušanas platums n) Pilvarolas darbniques, kas sagalavoya tehnisko dokumentaciją: o) Viela un dalums |
| SR (Prevod originalnih uputstival)EC deklaracija o usglašencesti (Direktiva disiklimna 2008/42/EC, Prilog II, deo A)1. Produzlo 2. Daje izlavju pod vlaslom odgovornoviču da je matina: Kosačica na guranje / košenje trava a) Tip / Osnovni model b) Mesec i Godina proizvodnje c) Serijski broj d) Mostr. elektricky 3. u skladu a osnovnim zehstynma direktva: e) Sertifikaciono telo: Niše priylenjivo f) EC ispitivanje tips: Niše priylenjivo 4. Pozvanje na uskladeno norme g) Izmenoni iovo zvočne snaga h) Garantovanim zvočne snage i) Širina košenja... n) Osoba ovlătena za sastavjanje technicka brošure o) Mesto i datum | BG (Prevod na originaliinite инструкции)EO декларация за съответствие (Дирастна Кашини 2006/42/EQ, Приjakzenie II, част A)1. Дручесто 2. На собствена отсервност деклирарна, че машината: Kosana с изправен водач! разване на трева a) Вид и Базиса мода b) Mesec i godina на производство c) Сершен номер r) Моног «спартникски» 3. Es в съответствие съ слафициката на директилите: a) Сернифирища орган: Nie ne пропожамо е) EO исключите на вида: Не в приложило 4. Базирана на хармонизраните норми ж) Нило на изміRNA aceutrina мощност к) Гараждано ніки на аукстична мощност о) Широмпа на коспие p) Пикс, уплідноєдно до състави Технимесота Документация o) Mesto i data | ET (Aguparase kasutusjuhendi tělge)EU vastušvedeklatorsion (Masnadiracitiv 2006/42/EU, Lisa II, osa A)1. Fims 2. Knnitlab omal vastusel, el masin: Seisa juhiga murunitija / murunitija a) Taup i Poinudel b) Kou aega i Toconissasta c) Matnikeli d) Vodoris elektrilne 3. Vestaa direktivne nobutele: e) Kinnitav asutus: Et ole kohaldatav f) EU üütsihindamine: Et ole kohaldatav 4. Vidne untistatud standardite g) Möddutus halvõmsuse tase b) Garantulut belvõmsuse tase o) Liškielius e) Techniska Lehe autorisserius kosstaja: o) Kont je Kuupav |
| FR (Traduction de la notice originale)Declaration CE de Conformité(Directive Machines 2006/42/CE, Annex II, partie A)1. La Société2. Declars sous sa propria responsabilità que la machine : Tondeuse à gazon a conducteur a sled / coupe du gazona) Type / Modele de Sazeb) Mots / Aments de constructionc) Serted) Moteur: électrique3. Est conforme aux prescriptions des directives ;e) Organisme de certification : Non applicablef) Examen CE du Type : Non applicableg) Renvolat aux normes harmoniséesh) Niveau de puissance sonore mesumh) Niveau de puissance sonore gerantii) Largeur de coupen) Personne habilitée à établir le Dossier Technique :o) Lieu et Date | EN (Translation of the original instruction)EC Declaration of Conformity(Machine Directive 2006/42/EC, Annex II, part A)1. The Company2. Herby declares under its own responsibility that the machine. Pedestrian controlled lawn mower / Crass cuttinga) Type / Base feedb) Waint / Wear of manufacturec) Sertel numberd) Motor: electric3. Conforms to directive specifications:a) Certifying body: Not applicablef) EG examination of Type: Not applicableg) Reference to harmonise Standardsh) Sound power level measuredh) Sound power level guaranteedn) Range of cutn) Person authorised to create the Technical Folder.o) Plass and Date | DE (Übersetzung der Originalbetriebsanleitung)EG-Konformitätserklärung(Maschinenriönnlinie 2006/42/EG, Anhang II, Teil A)1. Die Gesellschaft2. Enkart auf eigene Verantwortung, dass die Maschine Handgeführer Raserimäher / RaserschnitdTyp / Basignmodelb) Mover / Bauperc) Sertennummerd) Motor: retuern3. Der Anforderungen der folgenden Richtlinien entsprichts z Zentralzungsstelle: onzufandt?IE-G-Baumusterprüfung: unzureffend? 4. Bezugterer und die harmonisierten Normeng) Gemassener Schilleistungspegeln) Gerantierter Schelliestungspegeln) Schnittbrilenn) Zur Verlassung der technischen Unterlagen befügte Persono) Ort und Datum |
| NL (Vertaling van de consponktelijke gebruikssenzivizing)EG-verklaring van overeenstemning(Richtlijn Machines 2006/42/CE, Billage II, deel A)1. Het bedriif2. Verklart onder zijn eigen verantwoordelijkheid dat de machine: Lopend bediende grasmaiter / grasmaitera) Type / Model modelb) Maand / Bouvisarc) Seriennummerd) Motor : elektrisch5. Voldot dan de specifities van de richtlijnen; e) Certificaise institut. Viel voorpasserb) EG specifische notific. Weet reeparbaar4. Verwijzing naar de Gehamsoniaerde normen g) Gemeiten niveau van geludervermogen h) Gegarandeerd niveau van geluidvermögen i) Snijbreediten) Beroueld person voor het opstellen van het Technisch Dossierp) Plats en Datum | ES (Traducción del Manual Original)Declaración de Conformidad CE(Directiva Máquinas 2006/42/CE, Anexo II, parte A)1. La Empresa2. Declara bajo su propia responsabilidad que la máquina: Cortadora de parte con operador de pie / corte hierbaa) Tipo / Modelo Beseb) Vies / Año de fabricac) Matrículad) Motor: eléctrico3. Cumple con las especificaciones de las direttivas: e) Ente identificador. No adicaf) Escenten CE del Tipo e tipica4. Referancia a las Normes amonzadasg) Nivel de potencia sonora medidoh) Nivel de potencia sonora garantizadoi) Amplitul de corten) Persona autorizada a realizar el Manual Tecnico:o) Lugar y Fecha | PT (Traducción do manual original)Declaração CE de Conformidade(Directiva de Maquinas 2006/42/CE, Anexo II, parte A)1. A Empress2. Declara sob a própria responsabilidade que a máquina: Corta relvas para operador apeado / corte da relvaa) Tipo / Modelo Beseb) Vies / Año de fabricoc) Matriculad) Motor: eléctrico3. E conforme es especificações das direttives: e) Órgido certificador. Não aplicávelf) Exercice de tipo: Naúllicável4. Referência às Normes harmonizadasg) Nivel medido de potência sonorah) Nivel garantido de potência sonorai) Amplitul de corten) Persona autorizada a elaborar o Caderno Técnicoo) Local e Data |
| EL (Mensapazin neu prorovátou na oščinyu vrypóng)(Oblýna Mýngován 2006/42/CE, Papáripírau II, μέρος A) E Tojroo2. Δυκονούπευδα οιτη μηρανι; Xloακοπική μηχανή μεσθερο φαραγία / κοη τηχ ελόγια) Túros / Bavikó Montevábo) Mýroç / Etoic katrescensi) Arópoře μηρώσοι) Kovnípírocs; έλεκριάκο3. Συφαρανωτα με της προδογρασες της οδήγιας:e) Opyruvácić titorio: ιλικό ακτική, δεν σραφάδται) Eξεσμοί CE του Túros - Δεν αφαράδεσια4. Ávaporáci στοις Κανονομούς εναρυμόνισηςε) Ετάδη μέρησης ακαυστική εκρόχοιςz) Συβυη εγυγιμένεις ακαυστικής καύχοιε) Eúroc κασήε) Ecosompañúváce órcipo για την κατάρτοη του Τρχικού φυλούδιοι;o) Tóros και Χρόνος | TR (Original Tallalmann Tercūnesi)AT Uygurnlik Beyani(2006/42/CE Makine Direktili, Ek II, bölüm A)1. Seke2. Şehi sorumluluğu slunda apajadaki makinenin. Ayak kurnalandı gin bigne makinesi / ģim kesiniia) Tip / Standart modelb) Ürelinin Ay / yilc) Srol numarasid) Motor: elektrikli3. Apajadaki direktiferin özelliklera uygun alduguru beyan elinkredirti4. Serrifikādaran kurum: Uygulanamazf) Tipi CE inclemesi: Uygulanamaz8. Harmonizone standillara zaf9. Ölüden ses güy sèviyesi9. Garantil edels ses güy sèviyesi9. Kesintan porpiigin) Teknik Dosayyi pluturmaya yetőki kipso) Yer ve Tarih | MK (Преход на сривалините упастства)Депларация за усогласности со ЕУ(Директива за машин 2006/42/CE, Annex II, дел A)КонденнатеСузнелки и полосна лична од сверност века следица машина: Тревокосанка со оператор на нозе / коселья треваa) Tari / оренен модел6) Месей / Тодина на производствoe елигета7) мотор на струј3. Усогласено со оплижикающий според дверкимите. що тело за серификация: Не се применуєа8) тест CE за типот: Не се применуєа9. Реформация за усогласни норматикиаАукции прийкихк) измеренко надо на звука мойностаНисс на гарантора злуена мойностіопластное лицо за составуанаю на Техничката брошурао) место и датум |
| NO (Oversetalse av orginali bruksansning)EF-Sansvarserkörzung(Mapkindirekv 2006/42/EF, Vedlegg II, del A)1. Firmset2. Enksterer på eget ansvar at maskinen: Händfert grosskippori grossklickpinga) Type / Modellb) Måned / Byggeärc) Sonenummerd) Motor: elektrisk3. Oppfyller kravene i direktiverne e) Sordiföringsnotspart4. EF-typspræving : Jike aktuiver4. Henvisning til harmoniserte standardorg) Målt lydeffektinivä) Garantiert lydeffektinivä) Kippabradde n) Perforza har fullmakt til å ulferdige teknisk dokumentasjon:o) Stod og dato | SV (Oversättning av bruksansning i original)EG-forsäkran om överensstämmelse(Maskindirekv 2006/42/EG, bilag II, de la)1. Företags2. Försäkrar på eget ansvar at maskinen: Färarieds grasskliporans / grassklickpinga) Typ / Besmodelb) Måned / Tilverkrinkingsärc) Sonenummerd) Motor: elektrisk3. Övereinsämmer med föreskriferna i direktivetA) Impgarvon. Annid organ. Inde allämpbarf) EG typogesinanda: Jute Námpbar4. Referons til harmonisrade standardorg) Uppristil fudeffektinivä) Garantard fudeffektinivä) Skantmoudn) Aktionsrad person für upprätabandet av den tekniskadokumentationen:o) Ort och datum | DE (Oversathelse at den originala bruksansning)EF-overensstemmaltesserskörling(Maskindirekv 2006/42/EF, bilag II, del A)1. Firmset2. Enksterer på eget ansvar, at maskinen: Planeklipper botenti afganciso persconer / klipring af grasseta) Type / Modelb) Måned / Konstruktionsärc) Sonenummerd) Motor: elektrisk3. Er i overensstemmelse med specifikationerne ifsigedirektoringorgan: Juke anvenaligEF-typsprævning: Jike anvenaliy4. Henvisning til harmoniserede standarderg) Målt fydeffektinivä) Garantiert lydeffektinivä) Kippabradden) Person, der har bemyndigelse til at udarbejde det tekniske dossier:o) Stod og dato |
| HU (Eredeti hasznati utatisla forditása)EK-maglóslokági nyitletkozets(2006/42/EK géprányely. II. meléklet "A" rész)1. Alulnott Vallist4. Felölösägsägnök teljes tudataban kijekonti, hogy ez ábbi galyp: Gyalogvezetáldi tünyrgóp é/ tünyírásB) Typo / AlcalipureC) Kárdová čekéva | RU (Porcopod copyrightalnych instrucций)Декарвия «смашинном оборудованием 2006/42/EC. Приложение II, часть A)1. Предпрятнік2. Звеляет под собственную ответственность, что машина: Гасрокосипла с пешеходным управлением/с трами еденаe) Typ / Базовая модельb) Месиц. Под изотративанк) Паспортc) Диглатели: электрический3. Соответствует требовним следующих, директив:Сертификирующий орган: Непрахозный4. ИспусникЕС типомова образа: Непрахозный5. Солики на гаимонизированные нормы6. Измеренный уровень звуковой мощности7. Гарантирумский уровень звуковой мощности8. Аппитуда кошения9. Пади, Уплінкоючненое на подготовку технической документации:o) Место и дата | HR (Prijovod originalnih uputa)IKK Izjava o suktadnost!(Direktiva 2006/42/EC z strojevima, dodatak II, dio A)1. Tortka2. pod vlastom odgovorność izjavljuje da je stroj: Raúno uprevljana xcelloa traver kolerja trava8. Vrsta / Orogny modelb) Garantiert lydeffektinivä) Metlonli brocD) Motor: elektrini3. sukladan s temojnim zahytivima direktiva:c) Cortifikacsiko tipo: Maiy pentyrgivoD) Tipako lipitvanje EZ: Nie priyengvoH) Tipajeringa su sirdote harmonizatranne norme:i) Impregnera razina zuvične snagej) Zapimona razina zuvične snagei) Sirina rezanjan) Osoba ovlastena za pravljeryna Tehničko datoteloko:o) Mjesto a datuo |
EN • The content and images in this User Manual were produced expressly for ST. S.p.A. and are protected by copyright – any unauthorised reproduction or modification to the document, either partially or in full, is prohibited.
Type: ....
STIGA LTD (UK Importer)
6 Stansted Courtyard, Parsonage Road, Takeley, Bishop's Stortford, Essex, England, CM22 6PU, United Kingdom



- [1] ES - DATOS TÉCNICOS
- [1] FI - TEKNISET TIEDOT
- [1] LT - TECHNINIAI DUOMENYS
- MONTAGGIO DEL SACCO DI RACCOLTA (FIG. 4, Tipo "I" e "II")
- USO DELLA MACCHINA
- MONTAŽA VREĆE ZA SKUPLJANJE TRAVE (SL.4, TIP "I", "II")
- MONTERING AF OPSAMLINGSPOSE (FIG. 4, TYPE "I", "II")
- INDSTILLING AF KLIPPEH∅JDE (FIG. 6)
- GENERAL ASPECTS
- HOW TO READ THE MANUAL
- REFERENCES
- Figures
- Titles
- SAFETY REGULATIONS
- GENERAL POWER TOOL SAFETY WARNINGS
- WARNING Read all safety warnings, instructions, illustrations and specifications provided
- Save all warnings and instructions for future reference.
- 1) Work area safety
- 2) Electrical safety
- 3) Personal safety
- 4) Power tool use and care
- LAWNMOWER SAFETY WARNINGS
- ADDITIONAL WARNINGS FOR ELECTRIC LAWNMOWER
- MAINTENANCE AND STORAGE
- PROTECTING THE ENVIRONMENT
- GETTING TO KNOW THE MACHINE
- DESCRIPTION OF THE MACHINE AND PLANNED USE
- Intended use
- Improper use
- User types
- IDENTIFICATION LABEL AND MAIN COMPONENTS (FIG. 1)
- SAFETY SIGNS
- ASSEMBLY
- UNPACKING (FIG.2)
- ASSEMBLING THE HANDLE (FIG. 3)
- HandleType“I”
- HandleType“II”
- ASSEMBLINGTHEGRASS CATCHER (FIG. 4, Type“I”, “II”)
- CONTROLS
- DUAL-ACTION SWITCH (Fig. 5)
- Ignition of the motor simultaneously engages the cutting means.
- PRELIMINARY PROCEDURES
- CUTTING HEIGHT ADJUSTMENT (Fig. 6)
- Do this when the cutting means is stationary.
- PREPARATION FOR GRASS CUTTING AND COLLECTION IN THE GRASS CATCHER (FIG. 7)
- USING THE MACHINE
- START-UP (FIG. 8)
- GRASS CUTTING (FIG. 9)
- STOP (FIG. 10)
- MAINTENANCE
- GENERAL INFORMATION
- ROUTINE MAINTENANCE
- Cutting means maintenance
- Cleaning the machine
- STORAGE
- HANDLING AND TRANSPORTATION
- ASSISTANCE AND REPAIRS
- WARRANTY COVERAGE
- MAINTENANCE TABLE
- TROUBLESHOOTING
- ÍNDICE
- KUIDAS KASUTUSJUHENDIT LUGEDA
- MONTAGE DU BAC DE RAMASSAGE (GIG.4, TYPE "I", "II")
- MANUTENTION ET TRANSPORT
- PLĀNOTĀ TEHNISKĀ APKOPE
- BESCHERMING VAN DE OMGEVING
- MONTAGE VAN DE OPVANGZAK (AFB.4, TYPE "I" EN TYPE "II")
- VEDLIKEHOLD OG OPPBEVARING
- BLI KJENT MED MASKINEN
- BESKRIVELSE AV MASKINEN OG BEREGNET BRUK
- UTPAKKING (FIG. 2)
- MONTERING AV OPPSAMLEREN (FIG. 4, TYPE "I" OG TYPE "II")
- JUSTERING AV KLIPPEH∅YDEN (FIG. 6)
- KLARGJ∅RING FOR KLIPPING OG OPPSAMLING AV GRESSET I OPPSAMLEREN (FIG. 7)
- KLIPPING AV GRESS (FIG. 9)
- ORDINÆRT VEDLIKEHOLD
- VEDLIKEHOLDSTABELL
- MONTAGEM DO SACO DE RECOLHA (FIG. 4, TIPO "I" E "II")
- MONTAREA SACULUI DE COLECTARE (FIG.4, TIP "I" SI "II")
- MONTÁŽ RUKOVÄTE (OBR. 3)
- typ „l“
- MONTAŽA VREĆE ZA SKUPLJANJE TRAVE (SL. 4, TIP "I" I TIP "II")
- UPRAVLJAČKE KOMANDE
- PREKIDAČ SA DVOSTRUKIM DEJSTVOM (SL. 5)
- INNEHÅLLSFÖRTECKNING
- UPPACKNING (FIG. 2)
- MONTERING AV UPPSAMLINGSPÅSEN (FIG. 4, TYP "I" OCH TYP "II")
- REGLERING AV SKÄRHÖJD (FIG. 6)
- TOPLAMA SEPETİNİN MONTAJI (RES. 4, "I" VE "II" TİPİ)
- BAŞLATMA (RES. 8)
- ÇİM KESİMİ (RES. 9)
- UK DECLARATION OF CONFORMITY
- E 320
- E 380
- STIGA LTD (UK Importer)
Brand : ALPINA
Model : BL 320 E
Category : Lawn mower