
TI 2648 Li - Lawn mower ALPINA - Free user manual and instructions
Find the device manual for free TI 2648 Li ALPINA in PDF.


| Product type | Cordless lawn mower |
| Brand | Alpina |
| Model | TI 2648 Li |
| Cutting width | 48 cm |
| Power type | Lithium-ion battery |
| Battery voltage | 36 V |
| Grass bag capacity | 60 L |
| Cutting height adjustment | Central, 6 positions (25-75 mm) |
| Mulching function | Yes (mulching plug included) |
| Motor | Brushless |
| Weight | 22 kg |
| Dimensions (L x W x H) | 140 x 55 x 105 cm |
| Sound level | 82 dB(A) (guaranteed) |
| Measured vibrations | 2.5 m/s² |
| Battery runtime | Approximately 40 min (depending on conditions) |
| Charging time | Approximately 2 h |
| Recommended battery type | Alpina 36V 4.0 Ah |
| Maintenance | Clean after use, sharpen blade regularly |
| Spare parts available | Yes (blade, battery, charger, bag) |
| Warranty | 2 years |
Frequently Asked Questions - TI 2648 Li ALPINA
User questions about TI 2648 Li ALPINA
0 question about this device. Answer the ones you know or ask your own.
Ask a new question about this device
Download the instructions for your Lawn mower in PDF format for free! Find your manual TI 2648 Li - ALPINA and take your electronic device back in hand. On this page are published all the documents necessary for the use of your device. TI 2648 Li by ALPINA.
USER MANUAL TI 2648 Li ALPINA
Type TI 48 Li




IT
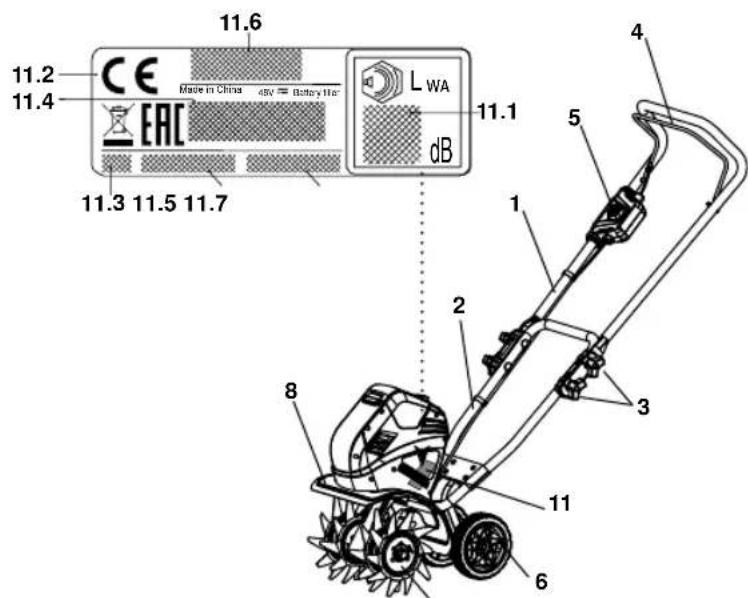
COMPONENTI DELLA MACCHINA
- Upper handle 2. Lower handle 3. Wing nuts 4. Bale Switch 5. Safety lock-out button 6. Wheel 7. Tine 8. Tine cover 9. Battery 10. Battery charger
MACHINE IDENTIFICATION LABEL
11.1 Acoustic power level according to directive 2000/14/EC
11.2 Conformity marking according to directive 2006/42/EC
11.3 Year of manufacture
11.4 Type of machine
11.5 Serial number
11.6 Name and address of Manufacturer
11.7 Article code
As soon as you have purchased the machine, write the identification numbers (11.3 - 11.4 - 11.5) in the spaces on the last page of the manual.
The example of the Declaration of Conformity is provided on the penultimate page of the manual.
BATTERY IDENTIFICATION LABEL
9.1 Manufacturer
9.2 Voltage and capacity
BATTERY CHARGER IDENTIFICATION LABEL
10.1 Manufacturer
10.2 Voltage and frequency of power supply / Absorption
10.3 Charging voltage and current
ENVIRONMENTAL PROTECTION
- Environmental protection should be a priority of consi importance when using the machine, for the benefit of both social coexistence and the environment in which we live.
èreTryénot-to cause any disturbance to the surrounding area.
- Scrupulously comply with local regulations for the disposal of packaging, deteriorated parts or any elements with a environmental impact; this waste must not be disposed of as normal waste, it must be separated and taken to specified waste disposal centres where the material will be recycled.
- When decommissioning, do not pollute the environment with the machine, hand it over to a disposal centre, in accordance with the local regulations in force.
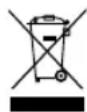
Do not dispose of electrical equipment with household waste material. In observance of European Directive 2012/19/EC on waste electrical and electronic equipment and its implementation in accordance with national regulations, electric equipment that has reached the end of its life must be collected separately and recycled in an ecologically compatible way. If electrical equipment is disposed of in dumps or in landfills, hazardous substances can leak into the ground and get into the food chain, damaging your health and well-being. For further information on the disposal of this product, contact a domestic waste collection authority or your dealer.
DESCRIPTION OF SYMBOLS ON CONTROLS (where applicable)
SAFETY REQUIREMENTS - Your machine must be used carefully. Symbols have therefore been placed on various parts of the machine
to remind you of the main precautions to be taken. Their meaning is explained below. You are also asked to carefully read the safety regulations in the specific chapter of this manual. Replace damaged or illegible labels.
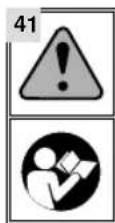
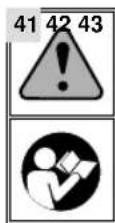
- Warning: Read the instruction manual before using the machine.
- Do not expose machine to rain or wet conditions.
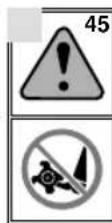
- Danger of cutting yourself. moving rotary tools.
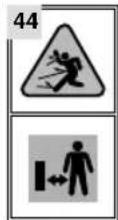
- Risk of thrown objects. Keep all persons away from the work area during use.
- Risk of exposure to noise and dust. Wear protection against noise and protective glasses.

Maximum noise and vibration levels
| Model | TI 48 Li |
| Operator ear noise pressure level | 73 |
| – Measurement uncertainty | 3 |
| Measured acoustic power level | 89.6 |
| – Measurement uncertainty | 3 |
| Guaranteed acoustic power level | 93 |
| Vibration level | < 2.5 |
| – Measurement uncertainty | 1.5 |
DE
MASCHINENBAUTEILE
BESCHERMING VAN DE OMGEVING


BATTERI MÄRKPLÅT




IDENTIFIKAČNÍ ŠTÍTEK AKUMULÁTORU




Ne bacati električni otpad u kućno smeće. Pren Evropskoj smjernici 2012/19/EC o električnim i elektronskim otpacima, te u saglasnosti sa lokalnim propisima, električni otpad se mora odlagati odvojeno, da bi se omogućila njegova eko-reciklaža. Električni aparati
bačeni na ot-pad ili u prirodu, stvaraju otrovne supstand mogu završiti u podze-mnim vodama i lancu ishrane te na taj način štetiti vašem zdravlju. Za de-taljnije informacije o odlagan proizvoda, kontaktirati odgovarajuću Službu za odnošenje otpada iz domaćinstva, ili vašeg Prodavca.
IMPORTANT – READ CAREFULLY BEFORE USING THE MACHINE. KEEP FOR FUTURE REFERENCE
INTENDED USE - This equipment is intended for soil cultivation only. Use the equipment for this purpose only. Using for any other purposes may cause serious injury and/or damage to the equipment.
- Do not insert battery into the equipment until it is ready to be used.
- Be familiar with the controls and proper use of the equipment.
- Never allow children or people unfamiliar with the instructions to use the machine. Local regulations can restrict the age of the operator.
- Never work while people, especially children, or pets are nearby.
- Do not operate the equipment while under the influence of drugs, alcohol, or any medication.
- Keep in mind that the operator or user is responsible for accidents or hazards occurring to other people or their property.
B) PREPARATION
- While working, always wear substantial footwear and long trousers. Do not operate the equipment when barefoot or wearing open sandals.
- Thoroughly inspect the area where the equipment is to be used and remove all objects which can be thrown up by the machine.
- Before using, always visually inspect to see that the tools are not worn out or damaged. Replace worn out or damaged elements and bolts in sets to preserve balance.
C) OPERATION
- Work only in daylight or in good artificial light.
- When working on slopes:
-
Make sure that there are no children or other people within a working range of 20 meters (66 ft), also pay attention to any animals in the working vicinity. Otherwise stop using the tool.
– always be sure of your footing,
– work across the slopes, never up and down,
– exercise extreme caution when changing direction on slopes. -
Do not work on excessively steep slopes.
-
Walk, never run with the machine.
-
Use extreme caution when reversing or pulling the machine towards you.
-
Start the motor carefully according to manufacturer instructions and with feet well away from the tool(s).
-
Do not put your hands or feet near or under rotating parts.
-
Never pick up or carry a machine while the motor is running.
-
Switch off the equipment and remove the battery in the cases below:
- whenever you leave the machine unattended,
– before clearing blockages.
- Pay particular attention on hard or stony field because the machine tends to be much less stable than on cultivated ground and use slow speed for ploughing.
- Before storing the machine in a confined or closed place, let it cool down for a sufficient period of time.
- Keep all nuts, bolts and screws tight to ensure the equipment is in safe working condition.
- To reduce the fire hazard, keep the motor, battery compartment and storage area free of vegetative material and excessive grease.
- Switch off the equipment and remove the battery in the cases below:
- before checking, cleaning or working on the machine,
– after striking a foreign object. Inspect the machine for damage and make repairs before restarting and operating the machine, - if the machine starts to vibrate abnormally. Inspect for damage and replace or repair any damaged parts. Check for
and tighten any loose parts.
E) BATTERY TOOL USE AND CARE
- Recharge only with the charger specified by the manufacturer. A charger that is suitable for one type of battery pack may create a risk of fire when used with another battery pack.
- Use power tools only with specifically designated battery packs. Use of any other battery packs may create a risk of injury and fire.
- When battery pack is not in use, keep it away from other metal objects, like paper clips, coins, keys, nails, screws or other small metal objects, that can make a connection from one terminal to another. Shorting the battery terminals together may cause burns or a fire.
- Under abusive conditions, liquid may be ejected from the battery; avoid contact. If contact accidentally occurs, flush with water. If liquid contacts eyes, additionally seek medical help. Liquid ejected from the battery may cause irritation or burns.
F) SERVICE
- Have your power tool serviced by a qualified repair person using only identical replacement parts. This will ensure that the safety of the power tool is maintained.
- Follow instruction for lubricating and changing accessories.
- Keep handles dry, clean and free from oil and grease.
SAVE THESE INSTRUCTIONS.
WARNING - DO NOT let comfort or familiarity with product (gained from repeated use) replace strict adherence to safety rules for the subject product. MISUSE or failure to follow the safety rules stated in this instruction manual may cause serious personal injury.
EN OPERATING INSTRUCTIONS
NOTE - The number which precedes each paragraph links the references in the text to the respective illustrations (listed on page 2 and following pages).
1) COMPLETE ASSEMBLY
Unpacking
This product requires assembly.
- Carefully remove the tool and any accessories from the box. Make sure that all items listed in the packing list are included.
- Do not discard the packing material until you have carefully inspected and satisfactorily operated the tool.
- If any parts are damaged or missing, please call customer service for assistance.
WARNING - This new product has been shipped in a partially assembled condition as described below. Carefully check the packing list below to ensure all items are included in the package; the packing list describes all loose items that are not assembled to the product as shipped. Do not operate the product if any packing list items are already assembled to your product when you unpack it. Call the customer service number below for assistance. Operation of a product that may have been improperly preassembled could result in serious personal injury.
WARNING - If any parts are damaged or missing do not operate this tool until the parts are replaced. Failure to heed this warning could result in serious personal injury.
WARNING - Do not attempt to modify this tool or create accessories not recommended for use with this tool. Any such alteration or modification is misuse and could result in a hazardous condition leading to possible serious personal injury.
WARNING - Do not insert the battery until assembly is complete. Failure to comply could result in accidental starting and possible serious personal injury.
1.1 Assembling the handle bar
Align the holes on the upper handle with the holes on the lower handle. Insert the bolts (1), and tighten them using the wing nuts (2) provided.
NOTE - Do not use force. If there is binding, continue to loosen the knobs. Do not allow the switch cable to become pinched when raising the handlebar.
1.2 Assembling the wheel / drag stake assembly
- Disconnect and remove the battery.
- The wheels are used to control the depth of operation to adjust the height of the wheels.
- Place cultivator in a stable position and transport as shown.
- Insert the wheel / drag stake assembly (1) into the support rod (2).
1.3 Installing the tines
The cultivator has four tines — two inner tines stamped B (2) and C (3), and two outer tines stamped A (1) and D (4). For correct operation of the unit, the tines must be installed in the correct orientation.
NOTE - Disconnect and remove the battery. Lean the unit back on its wheels so that the handlebar rests on the ground.
- Place tine C on the tine shaft to the left of the gear box. The stamped side of the tine should face away from the gear box.
- Place tine B on the tine shaft to the right of the gear box. The stamped side of the tine should face away from the gear box.
- Place a felt washer (5) on each side of the tine shaft, and slide to rest against the inner tines.
- Place the outer tine stamped D on the left side of the tine shaft. The stamped side should face in toward tine C.
- Place the outer tine stamped A on the right side of the tine shaft.
The stamped side should face in toward tine B.
- Insert the hitch pin (6) into the holes in order to secure the tines to the tine shaft.
NOTE - The unit will not operate properly if the tines are installed incorrectly. If you notice a problem with the cultivating operation of the unit, check for proper time positioning.
Tines installed correctly
NOTE - When the tines are installed correctly, the flute on the tines should line-up, and the angled edge of the tine blades should point towards the ground.
NOTE - The tiller will not operate properly if the tines are not installed correctly. If there is a problem with the cultivating operation of the tiller, check the tines for proper positioning.
NOTE - The directional arrow that is displayed on each tine should point toward the front.
Installing two tines for tilling a narrow area
Place tine (A) onto the shaft, and place tine (D) onto the other side shaft. Insert the hitch pin into the holes in order to secure the tines to the tine shaft.
2) OPERATION
WARNING - Do not allow familiarity with tools to make you careless. Remember that a careless fraction of a second is sufficient to inflict serious injury.
WARNING - Always wear safety goggles or safety glasses with side shields when operating tools. Failure to do so could result in objects being thrown into your eyes, resulting in possible serious injury.
WARNING - Do not use any attachments or accessories not recommended by the manufacturer of this tool. The use of attachments or accessories not recommended can result in serious personal injury.
WARNING - Do not allow hands, feet, or any other part of the body or clothing near the rotating tines or any other moving part. The tines begin to rotate forward once the switch trigger is depressed. The tines continue to rotate until the switch trigger is released. Failure to avoid contact could cause serious personal injury.
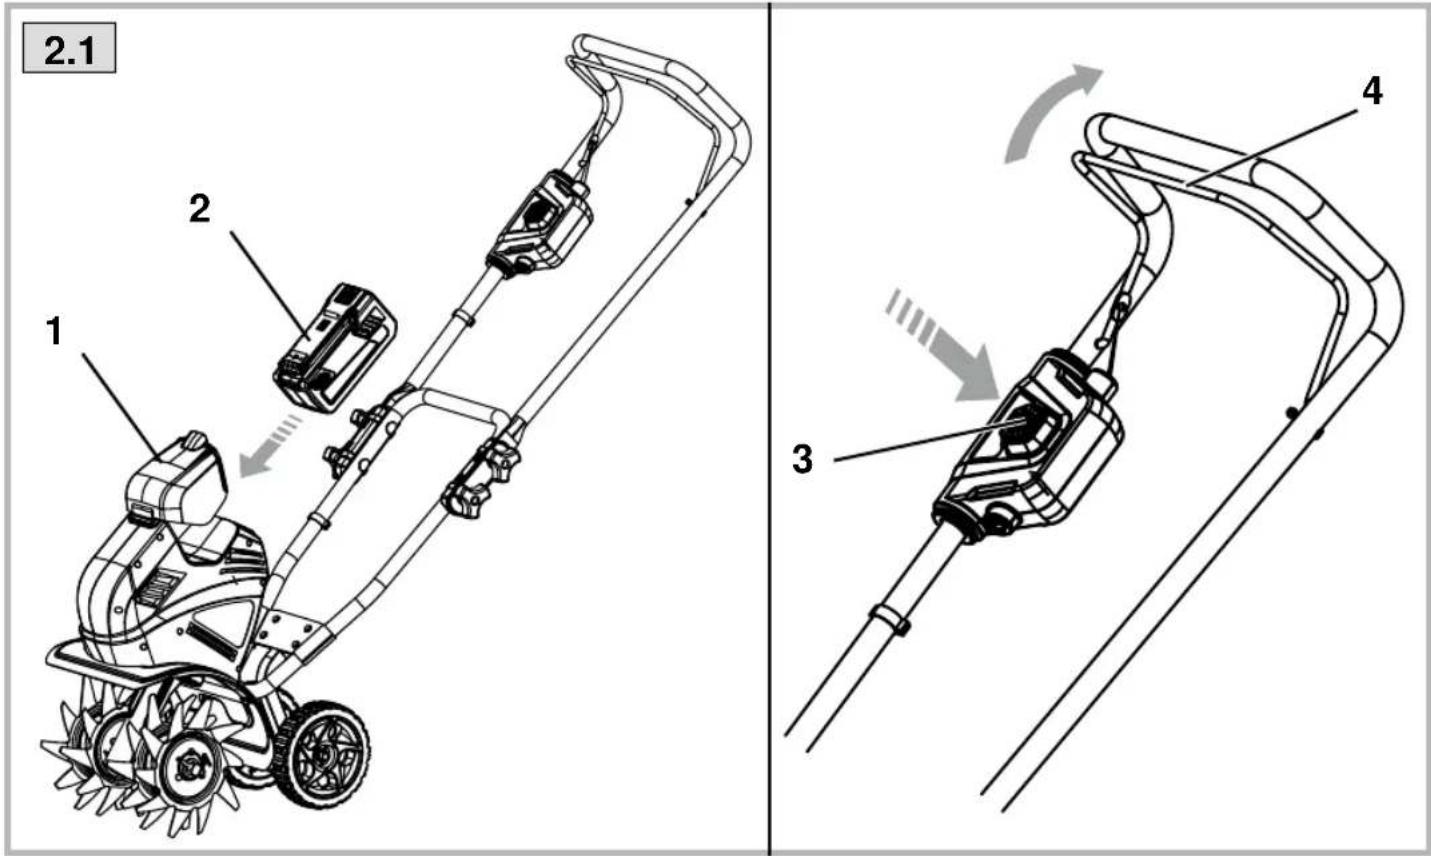
2.1 Starting the cultivator
- Lift and hold up the battery door (1).
- Place the battery pack (2) on the tool. Align raised ribs on battery pack with grooves in the product's battery port.
- Make sure the latch on bottom of the battery pack snaps in place and that battery pack is fully seated and secure in the product before beginning operation.
- Press the Safety-lock out button (3) and pull the Bale Switch (4) upwards to the handle bar to begin the rotation. Release Safety lock-out button while continuing to hold upward on Bale Switch to continue use.
2.1 Stopping the tiller/cultivator
Release bale switch (4) to stop the cultivator.
Preparing the seed bed
The cultivator can be used to break up gardensoil and prepare a seedbed for planting. Plan ahead to leave enough room between theseed rows to allow for machine cultivating after the plants have grown.
Tilling sod
Tilling sod into the soil is not recommended. If sod must be removed to perform application then it is suggested to do as follows:
- Map out the area of sod required to be removed.
- Lift the sod from the edges using a shovel sliding below at theroots.
- Remove the sod. Carry sod to compost or other pile turned
grass down to allow grass to decompose.
- Once sod layer is removed, begin to till the soil to desired depth.
General cultivating
Shallow cultivating less than 5cm. deep can be used to disrupt weeds and aerate soil, without injuring nearby plant roots. It should be done often so that weeds do not grow large and cause tangling in the tines of the unit. The two outer tine blades can be removed from the unit to allow a more narrow cultivating width. To remove the two outer tines:
- Remove the battery from cultivator.
- Remove the hitch pins from the holes on the ends of the tine shaft.
- Remove the outside tine blades and felt washers from the tine shaft.
- Place hitch pins in the holes that were uncovered when felt washers were removed.
2.2 Adjusting wheel position
The wheel position of the unit is adjustable.
Adjusting cultivator speed and depth
The wheel / drag stake assembly may be used to help control the cultivator's speed and depth of operation.
To adjust the height of the wheel / drag stake assembly (4):
1. Remove the hitch pin (1) and locking pin (2).
2. Adjust the wheel / drag stake assembly to the desired position.
3. To place the wheel / drag stake assembly in a deep position, insert the locking pin through the first hole (3). For a shallow position, insert the locking pin through the second or third hole.
4. Replace the hitch pin (1) and locking pin (2).
Clearing tines of foreign objects
During operation, a stone or root could become lodged in the tines, or tall grass or weeds may become wrapped around the tine shaft. To clear the tines, release the trigger lever. Unplug the tiller, and dislodge or remove any obstacles from the tines or tine shaft.
To ease removal of tall grass or weeds that are wrapped around the tine shaft, remove one or more of the tines from the tine shaft. See Tine Removal and Installation in the manual.
3) TRANSPORT
CAUTION! Before transporting the application, switch off the motor.
The tines and the unit may be damaged even if you move the application with the motor switched off, e.g. over solid ground. Prevent the tines from touching the ground by carrying out the application by its guide bar.
WARNING - When servicing, use only identical replacement parts. Use of any other parts may create a hazard or cause product damage.
WARNING - Always wear safety goggles or safety glasses with side shields during cultivator operation or when blowing dust. If operation is dusty, also wear a dust mask.
WARNING - Before inspecting, cleaning or servicing the machine, remove the battery and wait for all moving parts to stop. Failure to follow these instructions can result in serious personal injury or property damage.
General maintenance
Avoid using solvents when cleaning plastic parts. Most plastics are susceptible to damage from various types of commercial solvents and may be damaged by their use. Use clean cloths to remove dirt, dust, oil, grease, etc.
WARNING - Do not at any time let brake liquids, gasoline, petroleum-based products, penetrating oils, etc., come in contact with plastic parts. Chemicals can damage, weaken or destroy plastic which may result in serious personal injury.
Only the parts shown on the parts list are intended to be repaired or replaced by the customer. All other parts should be replaced at an Authorized Service Center.
Storing the cultivator
The following steps should be taken before storing the cultivator for the season.
- Clean dirt, grass, and other materials from the entire unit.
- Wipe the tines with oil or spray them with silicone lubricant to prevent rusting.
- Oil the switch trigger cable and all visible moving parts. Do not remove the motor cover.
- Order new parts to replace any that are badly worn or broken.
- Store in an upright position in a clean, dry place. Store with the handles in the extended position, or loosen handle knobs and fold handles down. Do not allow switch trigger cable to become pinched when lowering the handle bar.
- Store in a dry and clean place and out of reach of children.
5) TROUBLESHOOTING
| PROBLEM CAUSE REMEDY | ||
| Motor fails to start when switch trigger is depressed. | The battery is not inserted in or connection is loose.Cultivator circuit overload protection is tripped. | Insert the battery into unit.Let unit rest for 4 minutes, then repeat steps to start. |
| Motor runs but tines do not move. Gear train failure. Take unit to authorized service center. | ||
CONSERVAR ESTAS INSTRUÇÕES.
[Non-Text]
[Non-Text]
[Non-Text]
[Non-Text]
[Non-Text]
[Non-Text]
[Non-Text]
[Non-Text]
[Non-Text]
[Non-Text]
[Non-Text]
[Non-Text]
[Non-Text]
[Non-Text]
[Non-Text]
[Non-Text]
[Non-Text]
[Non-Text]
[Non-Text]
[Non-Text]
[Non-Text]
[Non-Text]
[Non-Text]
[Non-Text]
[Non-Text]
[Non-Text]
[Non-Text]
[Non-Text]
[Non-Text]
[Non-Text]
[Non-Text]
[Non-Text]
[Non-Text]
[Non-Text]
[Non-Text]
[Non-Text]
[Non-Text]
[Non-Text]
[Non-Text]
[Non-Text]
[Non-Text]
[Non-Text]
[Non-Text]
[Non-Text]
[Non-Text]
[Non-Text]
[Non-Text]
[Non-Text]
[Non-Text]
[Non-Text]
[Non-Text]
[Non-Text]
[Non-Text]
[Non-Text]
[Non-Text]
[Non-Text]
[Non-Text]
[Non-Text]
[Non-Text]
[Non-Text]
[Non-Text]
[Non-Text]
[Non-Text]
[Non-Text]
[Non-Text]
[Non-Text]
[Non-Text]
[Non-Text]
[Non-Text]
[Non-Text]
[Non-Text]
[Non-Text]
[Non-Text]
[Non-Text]
[Non-Text]
[Non-Text]
[Non-Text]
[Non-Text]
[Non-Text]
[Non-Text]
[Non-Text]
[Non-Text]
[Non-Text]
[Non-Text]
[Non-Text]
[Non-Text]
[Non-Text]
[Non-Text]
[Non-Text]
[Non-Text]
[Non-Text]
[Non-Text]
[Non-Text]
[Non-Text]
[Non-Text]
[Non-Text]
[Non-Text]
[Non-Text]
[Non-Text]
[Non-Text]
MK ПРАВИЛА ЗА УПОТРЕБА
SKAL OVERHOLDES SVÆRT N∅YE
VIKTIG - SKAL LESES N∅YE F∅R MASKINEN TAS I BRUK SKAL BEVARES FOR FREMTIDIGE BEHOV
D) VEDLIKEHOLD OG OPPBEVARING
4) VEDLIKEHOLD OG OPPBEVARING
VAROITUS - This new product has been shipped in a partially assembled condition as described below. Carefully check the packing list below to ensure all items are included in the package; the packing list describes all loose items that are not assembled to the product as shipped. Do not operate the product if any packing list items are already assembled to your product when you unpack it. Call the customer service number below for assistance. Operation of a product that may have been improperly preassembled could result in serious personal injury.
HR SIGURNOSNA PRAVILA
KOJIH SE TREBA SAVJESNO PRIDRŽAVATI
VAŽNO - PAŽLJIVO PROČITAJTE PRIJE UPORABE STROJA ČUVAJTE ZA BUDUĆE POTREBE
SK BEZPEČNOSTNÉ POKYNY
VYŽADUJÚ DÔSLEDNÉ DODRŽIAVANIE
DÔLEŽITÉ – K POZORNÉMU PREČÍTANIU PRED POUŽITÍM STROJA USCHOVAJTE KVÔLI DALŠIEMU POUŽITIU
SR SIGURNOSNA PRAVILA
KOJIH SE TREBA STROGO PRIDRŽAVATI
VAŽNO - PAŽLJIVO PROČITATI PRE UPOTREBE KOSAČICE SAČUVATI ZA BUDUĆE POTREBE
PREDVIDENA UPOTREBA - Ovaj uređaj je projektovan isključivo za obradu zemlje. Koristite ga samo u ovu svrhu. Za vreme svake druge neodgovarajuće upotrebe može doći do ozbiljnih povreda i/ili oštećenja uređaja.
SR PRAVILA KORIŠĆENJA
NAPOMENA - Slaganje između uputstava sadržanih u tekstu i odgovarajućih figura (koje se nalaze na str. 2. i narednim stranama) dato je brojem koji prethodi svakom paragrafu.
1) ZAVRŠITI MONTIRANJE
Uklanjanje ambalaže
Ovaj proizvod se mora montirati.
[Non-Text]
[Non-Text]
[Non-Text]
[Non-Text]
и на
бъде по-
айте
[Non-Text]
HOIDKE JUHISED ALLES.
1.3 Freeside monteerimine
D. Lgs. 262/2002, ANNEX VI, proc. 1 (Italy)



- IT
- COMPONENTI DELLA MACCHINA
- MACHINE IDENTIFICATION LABEL
- BATTERY IDENTIFICATION LABEL
- BATTERY CHARGER IDENTIFICATION LABEL
- ENVIRONMENTAL PROTECTION
- DESCRIPTION OF SYMBOLS ON CONTROLS (WHERE APPLICABLE)
- DE
- MASCHINENBAUTEILE
- BESCHERMING VAN DE OMGEVING
- BATTERI MÄRKPLÅT
- IDENTIFIKAČNÍ ŠTÍTEK AKUMULÁTORU
- IMPORTANT – READ CAREFULLY BEFORE USING THE MACHINE. KEEP FOR FUTURE REFERENCE
- PREPARATION
- OPERATION
- BATTERY TOOL USE AND CARE
- SERVICE
- SAVE THESE INSTRUCTIONS
- EN OPERATING INSTRUCTIONS
- COMPLETE ASSEMBLY
- UNPACKING
- 1.1 ASSEMBLING THE HANDLE BAR
- 1.2 ASSEMBLING THE WHEEL / DRAG STAKE ASSEMBLY
- 1.3 INSTALLING THE TINES
- TINES INSTALLED CORRECTLY
- INSTALLING TWO TINES FOR TILLING A NARROW AREA
- 2.1 STARTING THE CULTIVATOR
- 2.1 STOPPING THE TILLER/CULTIVATOR
- PREPARING THE SEED BED
- TILLING SOD
- GENERAL CULTIVATING
- 2.2 ADJUSTING WHEEL POSITION
- ADJUSTING CULTIVATOR SPEED AND DEPTH
- CLEARING TINES OF FOREIGN OBJECTS
- TRANSPORT
- GENERAL MAINTENANCE
- STORING THE CULTIVATOR
- CONSERVAR ESTAS INSTRUÇÕES
- MK ПРАВИЛА ЗА УПОТРЕБА
- SKAL OVERHOLDES SVÆRT N∅YE
- VIKTIG - SKAL LESES N∅YE F∅R MASKINEN TAS I BRUK SKAL BEVARES FOR FREMTIDIGE BEHOV
- VEDLIKEHOLD OG OPPBEVARING
- HR SIGURNOSNA PRAVILA
- KOJIH SE TREBA SAVJESNO PRIDRŽAVATI
- VAŽNO - PAŽLJIVO PROČITAJTE PRIJE UPORABE STROJA ČUVAJTE ZA BUDUĆE POTREBE
- SK BEZPEČNOSTNÉ POKYNY
- VYŽADUJÚ DÔSLEDNÉ DODRŽIAVANIE
- DÔLEŽITÉ – K POZORNÉMU PREČÍTANIU PRED POUŽITÍM STROJA USCHOVAJTE KVÔLI DALŠIEMU POUŽITIU
- SR SIGURNOSNA PRAVILA
- KOJIH SE TREBA STROGO PRIDRŽAVATI
- VAŽNO - PAŽLJIVO PROČITATI PRE UPOTREBE KOSAČICE SAČUVATI ZA BUDUĆE POTREBE
- SR PRAVILA KORIŠĆENJA
- ZAVRŠITI MONTIRANJE
- UKLANJANJE AMBALAŽE
- HOIDKE JUHISED ALLES
- 1.3 FREESIDE MONTEERIMINE
Brand : ALPINA
Model : TI 2648 Li
Category : Lawn mower