JS750MAX - Saw MSW - Free user manual and instructions
Find the device manual for free JS750MAX MSW in PDF.

| Product type | Jigsaw |
| Brand | MSW |
| Model | JS750MAX |
| Power supply voltage | 230 V ~ 50 Hz |
| Rated power | 750 W |
| Stroke rate | 800-3000 min⁻¹ |
| Dimensions (L x W x H) | 235 x 270 x 285 mm |
| Weight | 2.45 kg |
| Protection class | II |
| Blade type | T-shank |
| Parallel guide | Included |
| Laser guide | Integrated, class 2, 650 nm, ≤ 1 mW |
| Speed adjustment | 6 positions via dial |
| Balancing action | 3 adjustable positions |
| Cutting angle adjustment | Yes, with Allen key |
| Dust extraction connection | Vacuum adapter included |
| Continuous operation function | With locking button |
| Maintenance | Clean with damp cloth, no solvents |
| Storage | Dry place, out of reach of children |
Frequently Asked Questions - JS750MAX MSW
User questions about JS750MAX MSW
0 question about this device. Answer the ones you know or ask your own.
Ask a new question about this device
Download the instructions for your Saw in PDF format for free! Find your manual JS750MAX - MSW and take your electronic device back in hand. On this page are published all the documents necessary for the use of your device. JS750MAX by MSW.
USER MANUAL JS750MAX MSW
natural_image
Yellow and black M45 power shaver tool with metal base (no visible text or symbols)natural_image
Illustration of a hand operating a sewing machine with a checkmark indicating the operation (no text or symbols present)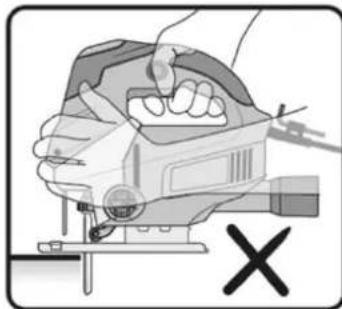
natural_image
Illustration of a hand using a tool to cut a mechanical component, with no visible text or symbols.Start-up
C. Dickes Material (Holz und Kunststoff).
natural_image
Technical illustration of a mechanical device with a component and base, showing internal components and assembly (no text or symbols)1- Arbeitsstück
2- Altholz
Gerader Schnitt
natural_image
Mechanical assembly diagram showing a sewing machine needle inserted into a workpiece with two circular components (no text or symbols visible)This User Manual has been translated using machine translation. We have made every effort to ensure the translation is accurate, but please note that automated translations are not perfect and are not meant to replace human translators. The official version of the User Manual is in English. Any differences between the translated version and the original English are not legally binding. If you have any questions about the accuracy of the translation, please refer to the English version, which is the official reference. More language versions are available upon request via info@expondo.com.
Technical data
| Parameter description | Parameter value |
| Product name | Jig saw |
| Model | MSW-JS750MAX |
| Voltage [V] / Frequency [Hz] | 230~ / 50 |
| Power [W] | 750 |
| n_0 /min | 800-3000 |
| Wavelength [nm] | 650 |
| Protection class | II |
| Power [mW] | ≤ 1 |
| Dimensions (Width x Length x Height) [mm] | 235x270x285 |
| Weight [kg] | 2.45 |
LASER LIGHT | LASER RADIATION
Do not stare into beam. Class 2 laser product. EN 60825-1:2014
Product overview
natural_image
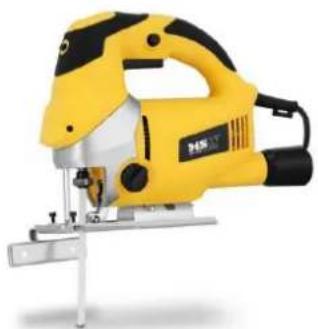
Yellow and black piece of a power tool with metal base (no visible text or symbols)The product is a tool used for cutting irregular curves and shapes in wood, metal, or other materials. It operates with a reciprocating blade, making it ideal for tasks such as cutting intricate patterns or openings in walls for electrical outlets. This product is commonly used in carpentry, construction, and home DIY projects to achieve precise cuts that other saws may struggle to accomplish.
The user is liable for any damage resulting from unintended use of the product.
Using instructions
Assembly
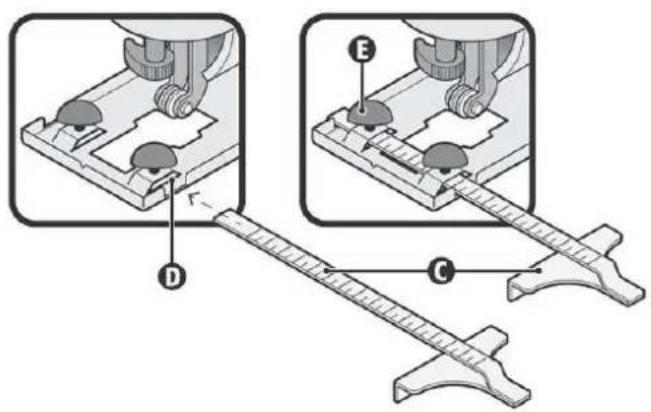
Parallel guide
Insert the parallel guide (C) through the slots (D) in the base plate. Slide the guide to the desired position and fix it into place with the adjusting knobs (E).
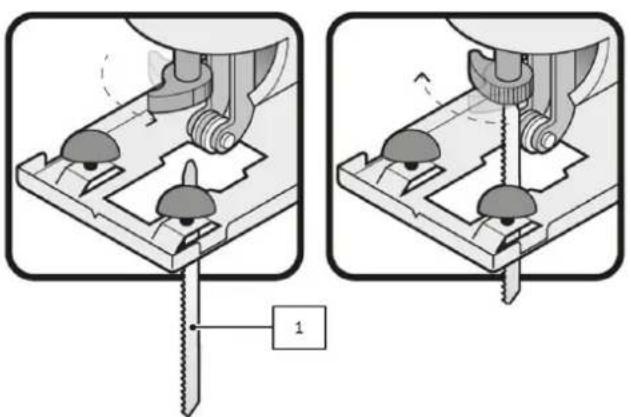
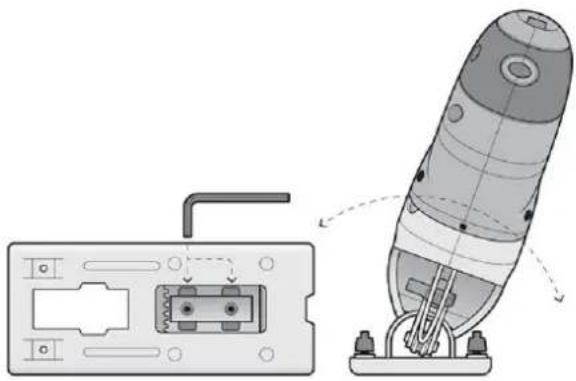
Blade set up

ATTENTION
- Before any work on the machine itself, pull the mains plug.
-
Wear gloves when you change or insert a new saw blade.
-
Ensure that the blade support opening is free of sawdust.
- Rotate the lever to the right to open the blade support.
- Fully insert the blade into the blade support, making sure the backside of the blade fits into the roller guide slot.
- Turn the lever to the left to secure the blade by closing the blade support.
natural_image
Mechanical assembly diagram showing two views of a tool interacting with a base plate (no text or symbols)1- This jigsaw uses T-shank blade. To get better cutting results make sure to use the adequate blade for the material and cut to be made.
Handling

WARNING
Always hold the electric tool with one hand on the front handling area and one hand on the handle! Never try to use the electric tool with only one hand when using it!
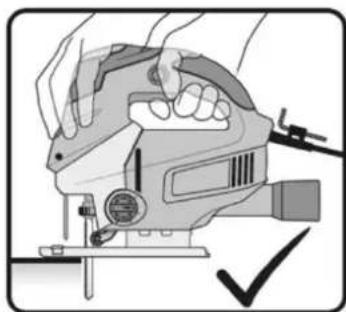
- Grip the jigsaw securely, placing one hand on the handle and the other on the front holding area.
- Use your index finger to press the on/off switch.
- Engage the lock by pressing it with your thumb.
natural_image
Illustration of a hand using a sewing machine to adjust or install a piece of material (no text or symbols visible)
natural_image
Illustration of a hand using a sewing machine to cut a component, with a cross symbol indicating no text or symbols.Start up
Starting and operation control
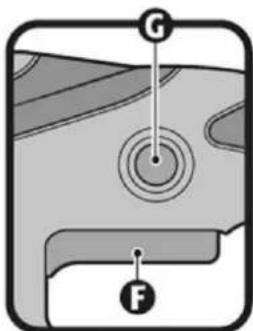
- Intermittent operation: Connect the plug into the outlet. Press the switch (F) to start up the tool. To stop the tool, simply release the switch.
- Continuous operation: Connect the plug into the outlet. Press the switch (F) and block it by pressing the continuous use button (G). To stop the tool, press and release the switch.
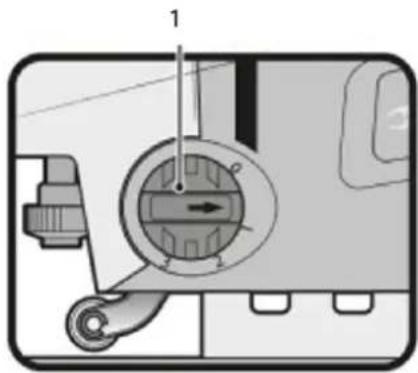
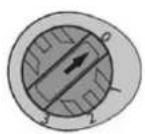
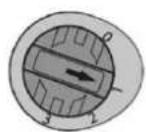
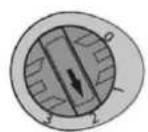
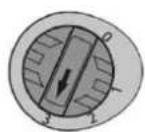
Speed control
With the speed dial (1), the required stroke rate can be selected (also while running).
1-2 = low stroke rate
3-4 = medium stroke rate
5-6 = high stroke rate
• Light pressure on the on/off switch means low stroke-rate.
• Increasing pressure on the on/off switch results in higher stroke-rate.
Dust extraction
Dust extraction prevents large accumulations of dust, high concentration of dust in the ambient air and facilitates disposal.
For long periods of working with wood or for commercial use on materials that produce dust that is detrimental to health, the machine is to be connected to a suitable external dust extraction device.
Balancing action control
The balancing action varies the cutting angle of the blade to increase cutting efficiency, it can also be adjusted while operating with no load. To get more details see selection table for the balancing action. Do not apply excessive force over the blade when cutting with balancing action. The blade only cuts when travelling upwards.
1- Balancing action control
Diagram for balancing action selection
A
B
C
D
A. Thin material. Fine cuts. Close curves.
B. Thick material (steel and chipboard).
C. Thick material (wood and plastic).
D. Fast cuts (soft wood). Cutting along the wood grain.
Adjusting the cutting angle
- Disconnect the unit from the power source.
- Loosen the two screws on the base plate with the Allen key included.
- When screws are loose, adjust the base plate into the desired angle with the serrated guide in the shoe.
- Tighten the screws back.
- Immediately put the Allen key back in its holder in the power cable protector.
natural_image
Technical illustration of a mechanical device with attached components and a close-up view (no text or symbols)Cut wood sheets
When cutting most wood sheets or very thin wood use a blade with fine teeth. Reduce splinters in the edges. Clamp scrap pieces of wood onto both faces of the workpiece and start cutting.

CAUTION
Do not use the balancing action when cutting much closed circles and angles.
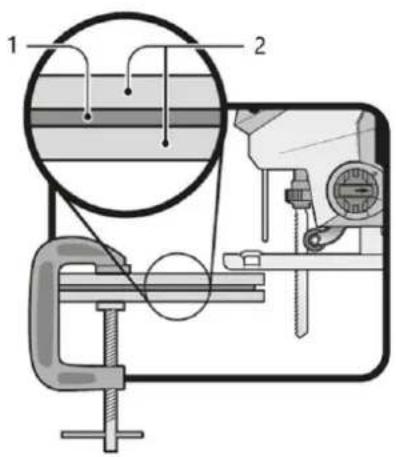
1- Work piece
2- Scrap wood
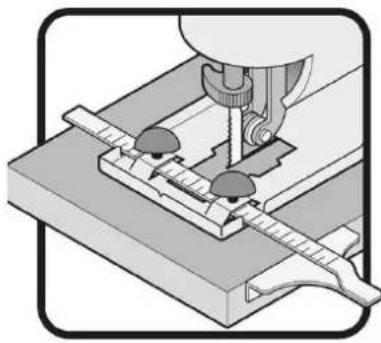
Straight cut
To get much defined straight cuts use the parallel guide supplied with the tool. Support the guide to the work piece edge. Straight cuts can also get a fine finish by cutting slowly over a line previously marked.

natural_image
Mechanical assembly diagram showing a sewing machine needle stitching fabric pieces (no text or symbols)Circular Cut
Just like straight cuts, circular cuts can achieve a fine finish by slowly following a previously marked line. Although a circular guide is not included, using one can enable the jigsaw to produce perfect circular cuts.
Laser guide
The built-in laser guide is intended to obtain a precision cut. Use the laser guide every time the work requires precision cuts, as when following pre-drawn lines on a surface
- Set the I/O laser switch to the position on to activate the laser guide.
- Press the On/Off switch, and start cutting the workpiece following the pre-drawn line with the projected laser line on the surface.
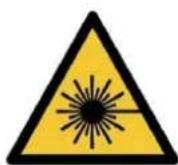
Laser light Do not look in the beam
Laser class 2 = 650nm;P≤ 1mW
EN 60825-1:2014

Viewing the laser output with telescopic optical instruments (for example, telescopes and binoculars) may pose an eye hazard and thus the user should not direct the beam into an area where such instruments are likely to be used.
Maintenance and storage

CAUTION
Before any work on the machine itself, pull the mains plug.
- Always keep the tool and the ventilation slots (if present) cleaned. Regular cleaning and maintenance of the appliance will ensure efficiency and prolong the life of your tool.
- If the tool should fail despite the rigorous manufacturing and testing procedures, the repair should be carried out by an authorized customer service.
- Keep all nuts, bolts, and screws tight, to be sure the tool is in safe working condition.
- Replace worn or damaged parts for safety.
- Use only original spare parts. Parts not produced by the manufacturer may cause poor fit and possible injury.
• Store the tool in a dry room out of reach of kids and away from any flammable material. - Never wet the device or spray water on it!
• Use a damp cloth to clean the plastic elements. Do not use any cleansers, solvents, or pointed objects. - Regularly clean any dust that is stuck to the ventilation slots and moving parts with a soft brush or a paint brush.
Environmental protection and disposal
CAUTION
This product has been marked with a symbol relating to removing electric and electronic waste. This means that this product shall not be discarded with household waste but that it shall be returned to a collection system which conforms to the European WEEE Directive. Contact your local authorities or stocks for advice on recycling. Then it will be recycled or dismantled in order to reduce the impact on the environment. Electric and electronic equipment can be hazardous for the environment and for human health since they contain hazardous substances.
Parts

1- Speed control
2- Laser guide
3- Protection bar
4- Parallel guide adjusting knobs
5- Continuous use button
6- Handle
7- Switch
8- Blade support
9- Roller guide
10- Base plate
11- Balancing action control
12- Allen key
13- Power cord
14- Vacuum cleaner adapter
15- Parallel guide

natural_image
Yellow and black manual push tool with metal frame (no visible text or symbols)Ustawienie ostrza

UWAGA
natural_image
Illustration of a hand using a sewing machine to clean or adjust the product (no text or symbols visible)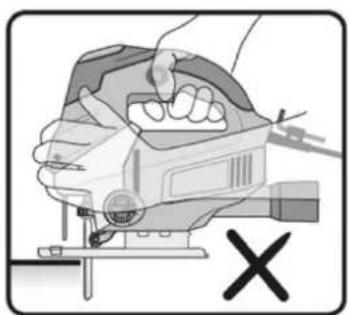
natural_image
Illustration of a hand using a power tool to cut a saw blade, with a 'X' symbol indicating no text or symbols on the diagram itself.Rozpocząć
natural_image
Diagram of a device with a switch and internal components, showing no text or symbolsnatural_image
Mechanical assembly diagram showing a sewing machine needle inserted into a base block with clamps (no text or symbols visible)Ciecie kołowe
natural_image
Yellow and black striped JF50 power tool with metal base (no visible text or symbols)Čepel nastavena

POZOR
natural_image
Illustration of hands using a sewing machine to adjust or install a piece of material (no text or symbols visible)
natural_image
Illustration of a hand using a sewing machine to cut a component, with a 'X' symbol indicating no text or symbols on the diagram itself.Nastartujte
natural_image
Technical illustration of a mechanical device with a component and base, showing assembly steps (no text or symbols)1- Pracovní kus
2- Šrot dřeva
Rovný střih
natural_image
Mechanical assembly diagram showing a sewing machine needle inserted into a workpiece with two circular components (no text or symbols visible)Kruhový řez
natural_image
Yellow and black power shaver with metal base (no visible text or symbols)Configuration de la lame

ATTENTION
natural_image
Illustration of a hand using a sewing machine to clean or adjust the product (no text or symbols visible)
natural_image
Illustration of a hand using a tool to adjust or install a device, with no visible text or symbols.Démarrer
natural_image
Diagram showing a device with internal components and a separate panel, no text or symbols presentnatural_image
Mechanical assembly diagram showing a sewing machine needle inserted into a workpiece with clamps (no text or symbols visible)Coupe circulaire
natural_image
Yellow and black manual push tool with metal frame (no visible text or symbols)natural_image
Mechanical assembly diagram showing two views of a mechanical component with a tool inserted (no text or symbols)natural_image
Illustration of a hand using a power tool to cut a saw (no text or symbols visible)
natural_image
Illustration of a hand using a power tool to cut a device, with a 'X' symbol indicating no text or symbols on the device itself.Avviare
natural_image
Diagram showing a device with a connector and a separate panel, no text or symbols presentnatural_image
Mechanical assembly diagram showing a sewing machine needle stitching fabric pieces on a base (no text or symbols)Taglio circolare
natural_image
Yellow and black electric shaver with lever mechanism (no visible text or symbols)natural_image
Mechanical assembly diagram showing two views of a mechanical component with a tool inserted, no text or symbols present.natural_image
Illustration of hands operating a manual power shaver with a checkmark indicating action (no text or symbols present)
natural_image
Illustration of a hand using a sewing machine to cut a component, with a 'X' symbol indicating no text or symbols on the diagram itself.Puesta en marcha
natural_image
Diagram showing a device with a switch connected to a device panel, no text or symbols present1- Pieza de trabajo
natural_image
Mechanical assembly diagram showing a sewing machine needle stitching fabric pieces on a base (no text or symbols)Corte circular
natural_image
Yellow and black M4R power shaver tool with metal frame (no visible text or symbols)Penge beállítása

FIGYELEM
natural_image
Mechanical assembly diagram showing two configurations of a tool or component with a labeled step '1' (no text or symbols on the diagrams themselves)natural_image
Illustration of a hand using a sewing machine to clean or adjust the product (no text or symbols visible)
natural_image
Illustration of a hand using a tool to adjust or install a device, with no visible text or symbols.Indítás
natural_image
Diagram of a device with labeled points G and F, showing internal components without any readable text or symbols.Sebességszabályozás
natural_image
Technical illustration of a mechanical device with a connector and base mount (no text or symbols)Vágott fa lapok
1- Munkadarab
2- Fahulladék
Egyenes vágás
natural_image
Mechanical assembly diagram showing a sewing machine needle inserted into a workpiece with clamps (no text or symbols visible)Kör alakú vágás
natural_image
Yellow and black striped folding tool with metal base (no visible text or symbols)Opsætning af klinge

OPMÆRKSOMHED
natural_image
Mechanical assembly diagram showing two views of a mechanical component with a tool inserted, no text or symbols present.natural_image
Illustration of hands operating a manual sewing machine with a checkmark indicating approval (no text or symbols present)
natural_image
Illustration of a hand using a sewing machine to adjust a component, with no visible text or symbols.Start op
natural_image
Diagram showing a device with a switch and internal components, connected to a base with a tool (no text or symbols present)Skær træplader til
1- Arbejdsemne
2- Skrot af træ
Lige snit
natural_image
Mechanical assembly diagram showing a sewing machine needle stitching fabric pieces on a base (no text or symbols)Cirkulært snit
natural_image
Yellow and black manual shaver with metal frame (no visible text or symbols)Terä asetettu

HUOMIO
natural_image
Mechanical assembly diagram showing two views of a mechanical component with adjustment pins and a labeled step '1' (no text or symbols beyond the label)natural_image
Illustration of a hand using a sewing machine to adjust or install a piece of material (no text or symbols visible)
natural_image
Illustration of a hand using a sewing machine to cut a component, with a 'X' symbol indicating no text or symbols on the diagram itself.Käynnistä
natural_image
Diagram of a handheld device with attached ports and a separate panel, showing internal components and wiring (no text or symbols)Leikkaa puulevyt
natural_image
Mechanical assembly diagram showing a sewing machine needle stitching fabric pieces on a base (no text or symbols)Pyöreä leikkaus
1- Nopeudensäätö
2- Laser opas
3- Suojapalkki
natural_image
Yellow and black striped JSCR tool with metal frame (no visible text or symbols)Blad instellen

AANDACHT
natural_image
Mechanical assembly diagram showing two views of a mechanical component with a tool inserted, no text or symbols present.natural_image
Illustration of a hand using a power tool to cut a saw (no text or symbols visible)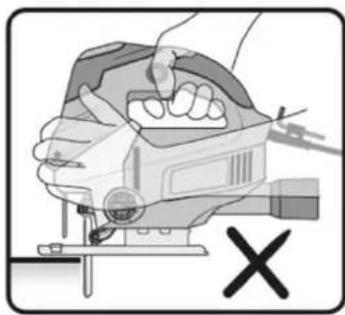
natural_image
Illustration of a hand using a power tool to cut a device, with a 'X' symbol below (no text or labels)Opstarten
Start- en bedieningscontrole
natural_image
Diagram showing a device with a switch connected to a panel, illustrating the process of mounting or disassembly (no text or symbols present)1- Werkstuk
2- Schroot hout
Rechte snede
natural_image
Mechanical assembly diagram showing a sewing machine needle stitching fabric pieces on a base (no text or symbols)Cirkelvormige snede
natural_image
Yellow and black electric shaver with metal frame (no visible text or symbols)Blad satt opp

OPPMERKSOMHET
natural_image
Illustration of hands operating a manual sewing machine with a checkmark indicating approval (no text or symbols present)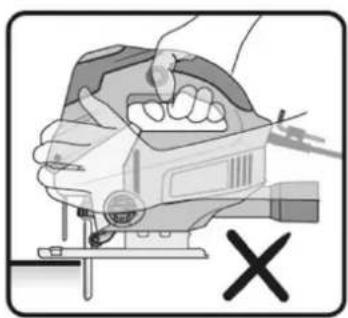
natural_image
Illustration of a hand using a sewing machine to adjust a component, with no visible text or symbols.Start opp
natural_image
Technical illustration of a mechanical device with a connector and base mount (no text or symbols)Kutt treplater
1- Arbeidsstykke
2- Skrapved
Rett kutt
natural_image
Mechanical assembly diagram showing a sewing machine needle inserted into a workpiece with clamps (no text or symbols visible)Circular Cut
natural_image
Yellow and black piece of a manual push tool with metal frame (no visible text or symbols)Blad inställt

UPPMÄRKSAMHET
natural_image
Illustration of a hand using a sewing machine to clean or adjust the product (no text or symbols visible)
natural_image
Illustration of a hand using a sewing machine to cut a component, with a 'X' symbol indicating no text or symbols on the diagram itself.Starta upp
natural_image
Technical illustration of a mechanical device with a connector and base mount (no text or symbols)Skär träskivor
1- Arbetsstycke
2- Skrot trä
Rak skärning
natural_image
Mechanical assembly diagram showing a sewing machine needle inserted into a workpiece with clamps (no text or symbols visible)Cirkulärt snitt
Laser klass 2 X = 650 nm; P ≤ 1mW
EN 60825-1:2014

natural_image
Yellow and black M4R power shaver tool with metal base (no visible text or symbols)natural_image
Illustration of hands using a manual power shaver to adjust or install a tool, with no visible text or symbols.
natural_image
Illustration of a hand using a power tool to cut a saw blade, with a cross symbol indicating no text or symbols on the diagram itself.Comece
5-6 = alta taxa de braçada
natural_image
Diagram of a device with a switch and internal components, showing wiring connections (no text or symbols)Folhas de madeira cortadas
1- Peça de trabalho
2- Madeira de sucata
Corte reto
natural_image
Mechanical assembly diagram showing a sewing machine needle inserted into a workpiece with tools and components (no text or labels visible)Corte circular
natural_image
Yellow and black electric shaver with metal frame (no visible text or symbols)Nastavenie čepele

POZOR
natural_image
Mechanical assembly diagram showing two views of a mechanical component with a tool inserted (no text or symbols present)natural_image
Illustration of a hand using a power tool to cut a saw (no text or symbols visible)
natural_image
Illustration of a hand using a power tool to cut a device, with a 'X' symbol indicating no text or symbols on the device itself.Naš tartujte
natural_image
Diagram of a device with labeled points G and F, showing internal components without any readable text or symbols.Ovládanie rýchlosti
Pomocou rýchlostnej vol'by (1) je možné zvolit požadovanú frekvenciu zdvihov (aj za chodu).
natural_image
Diagram showing a device with a switch and internal components, connected to a base with a tool (no text or symbols present)Rezané drevené dosky
1- Pracovný kus
2- Odpadové drevo
Rovný strih
natural_image
Mechanical assembly diagram showing a sewing machine needle inserted into a workpiece with two circular components (no text or symbols visible)Kruhový rez
Laser triedy 2 A = 650 nm; P ≤ 1 mW
EN 60825-1:2014

natural_image
Yellow and black electric shaver with metal frame (no visible text or symbols)natural_image
Illustration of a hand using a sewing machine to clean or adjust the circuit (no text or symbols visible)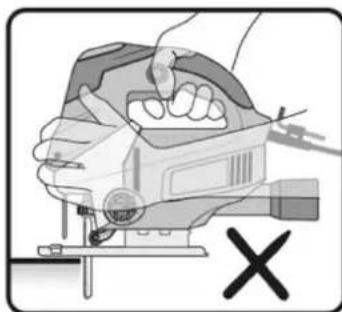
natural_image
Illustration of a hand using a tool to cut a device into a machine (no text or symbols visible)Стартирайте
natural_image
Diagram of a device with labeled points G and F, showing internal components without any readable text or symbols.natural_image
Technical illustration of a mechanical device with a component and base, showing internal components and assembly (no text or symbols)natural_image
Mechanical assembly diagram showing a sewing machine needle inserted into a base block (no text or symbols visible)Кръгъл разрез
natural_image
Yellow and black M45 power shaver with metal frame (no visible text or symbols)Ρύθμιση λεπίδας

ΠΡΟΣΟΧΗ
natural_image
Mechanical assembly diagram showing two configurations of a tool or component with a labeled step '1' (no text or symbols on the diagrams themselves)natural_image
Illustration of a hand using a sewing machine to adjust or install a piece of material (no text or symbols visible)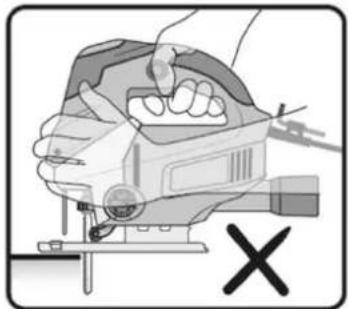
natural_image
Illustration of a hand using a power tool to cut a device (no text or symbols visible)Εκκίνηση
natural_image
Diagram showing a device with a switch connected to a device panel, no text or symbols presentΚόψτε φύλλα ξύλου
natural_image
Mechanical assembly diagram showing a sewing machine needle inserted into a base block with clamps (no text or symbols visible)Κυκλική τομή
natural_image
Yellow and black striped J-turn tool with metal frame (no visible text or symbols)Proizvod je alat koji se koristi za rezanje nepravilnih krivulja i oblika u drvu, metalu ili drugim materijalima. Radi s klipnom oštricom, što ga čini idealnim za zadatke poput rezanja zamršenih uzoraka ili otvora u zidovima za električne utičnice. Ovaj se proizvod obično koristi u stolariji, građevinarstvu i kućnim DIY projektima za postizanje preciznih rezova koje druge pile možda teško izvode.
Oštrica postavljena

PAŽNJA
1- Ova ubodna pila koristi oštricu s T-krakom. Kako biste dobili bolje rezultate rezanja, pobrinite se da koristite odgovarajuću oštricu za materijal i rez koji želite napraviti.
Rukovanje

UPOZORENJE
natural_image
Illustration of a hand using a sewing machine to adjust or install a piece of material (no text or symbols visible)
natural_image
Illustration of a hand using a sewing machine to cut a component, with a cross symbol indicating no text or symbols.Pokrenuti
Kontrola pokretanja i rada
- Isprekidani rad: Uključite utikač u utičnicu. Pritisnite prekidač (F) za pokretanje alata. Za zaustavljanje alata jednostavno otpustite prekidač.
- Kontinuirani rad: Uključite utikač u utičnicu. Pritisnite prekidač (F) i blokirajte ga pritiskom na gumb za kontinuiranu upotrebu (G). Za zaustavljanje alata pritisnite i pustite prekidač.

Kontrola brzine
natural_image
Technical illustration of a mechanical device with a component and base, showing internal components and assembly (no text or symbols)Izrežite drvene listove
Pri rezanju većine drvenih ploča ili vrlo tankog drva koristite oštricu s finim zubima. Smanjite krhotine na rubovima. Pričvrstite komade drva na obje strane obratka i počnite rezati.

OPREZ
1- Radni komad
2- Drveni otpad
Ravni kroj
Za postizanje jasnih ravnih rezova koristite paralelnu vodilicu isporučenu s alatom. Poduprite vodilicu na rub obratka. Ravni rezovi također mogu dobiti finu završnu obradu polaganim rezanjem preko prethodno označene linije.
natural_image
Mechanical assembly diagram showing a sewing machine needle inserted into a base with clamps (no text or symbols visible)Kružni rez
Baš kao i ravni rezovi, kružni rezovi mogu postići fini završetak polaganim praćenjem prethodno označene linije. Iako kružna vodilica nije uključena, korištenje jedne može omogućiti ubodnoj pili da proizvodi savršene kružne rezove.
Laserski vodič
1- Kontrola brzine
2- Laserski vodič
3- Zaštitna šipka
4- Gumbi za podešavanje paralelne vodilice
5- Gumb za kontinuiranu upotrebu
6- Ručka
7- Prekidač
8- Podrška oštrice
9- Valjkasta vodilica
10- Osnovna ploča
11- Kontrola balansiranja radnje
12- imbus ključ
13- Kabel za napajanje
14- Adapter za usisavač
15- Paralelni vodič

natural_image
Yellow 3450 power shaver with black handle and metal base (no visible text or symbols)Ašmenys sumontuoti

DÈMESIO
natural_image
Mechanical assembly diagram showing two views of a mechanical component with a tool inserted (no text or symbols present)natural_image
Illustration of a hand using a sewing machine to adjust or install a piece of material (no text or symbols visible)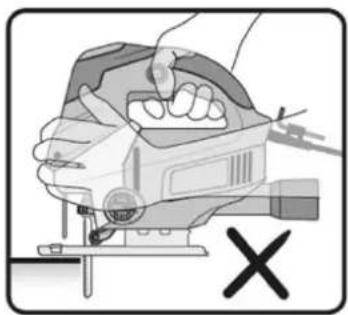
natural_image
Illustration of a hand using a power tool to cut a device, with a 'X' symbol indicating no text or symbols on the device itself.Praděti
natural_image
Diagram showing a device with a switch connected to a device panel, no text or symbols present1- Darbiné dalis
2- Medžio laužas
Tiesus kirpimas
natural_image
Mechanical assembly diagram showing a sewing machine needle inserted into a base plate with a measuring tool (no text or symbols visible)Apvalus kirpimas
natural_image
Yellow and black electric shaver with metal frame (no visible text or symbols)Lama instalată

ATENTIE
natural_image
Mechanical assembly diagram showing two views of a mechanical component with a tool inserted, no text or symbols present.natural_image
Illustration of hands using a sewing machine to adjust or install a piece of material (no text or symbols visible)
natural_image
Illustration of a hand using a sewing machine to cut a component, with a 'X' symbol indicating no text or symbols on the main image.Lansare
Controlul pornirii si functionarii
C. Material gros (lemn si plastic).
natural_image
Diagram of a device with a connector and base mount, showing internal components and wiring (no text or symbols)Tăiați foi de lemn
1- Piesa de lucru
2- Deşeuri de lemn
Croiala dreaptă
natural_image
Mechanical assembly diagram showing a sewing machine needle stitching fabric pieces on a base (no text or symbols)Tăiere circulară
1- Controlul vitezei
2- Ghid laser
natural_image
Yellow and black 3450 power tool with metal base (no visible text or symbols)Rezilo nastavljeno