
SK25IB00TE - Dishwasher SIEMENS - Free user manual and instructions
Find the device manual for free SK25IB00TE SIEMENS in PDF.

| Product type | Dishwasher |
| Brand | Siemens |
| Model | SK25IB00TE |
| Number of baskets | 2 baskets (60 cm model) or 1 basket (45 cm model) |
| Spray arm type | Removable lower spray arm |
| Filtration system | Coarse filter and microfilter, removable |
| Drain pump | Accessible and replaceable drain pump cover |
| Power plug | Locking plug with safety pins, removable |
| Door | Separate outer and inner door, replaceable lower and main door seals |
| Control panel | Removable, fixed by fastening pin |
| Detergent dispenser | Cover with return spring, removable |
| Door springs | Two tension springs with cable and pulley system |
| Hinge | Hinge with grounding connection, replaceable |
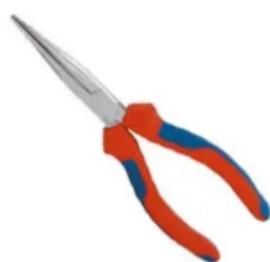
| Required repair tools | Torx T20 screwdriver with hole, Torx T15, flathead screwdriver, needle-nose pliers |
| Electrical safety | Disconnect the appliance 60 seconds before repair; comply with VDE 0701 standard |
| Personal protection | Wear protective gloves and safety shoes during repairs |
| Spare parts | Use only genuine Siemens spare parts |
| Repairability | Designed to be repairable by the user according to ecodesign regulation (03/2021) |
Frequently Asked Questions - SK25IB00TE SIEMENS
User questions about SK25IB00TE SIEMENS
0 question about this device. Answer the ones you know or ask your own.
Ask a new question about this device
Download the instructions for your Dishwasher in PDF format for free! Find your manual SK25IB00TE - SIEMENS and take your electronic device back in hand. On this page are published all the documents necessary for the use of your device. SK25IB00TE by SIEMENS.
USER MANUAL SK25IB00TE SIEMENS
PnCK OT NOBpeHa Ha eJekTpocTaTuHc YyBCTBNTeHH KOMNoHEHTN (ESD).
He DoKocBaIte MoDyIInTe, BKNHouHTeJIHO Bp3KNTe IN BEPITNE C npOBODHNU.
2.3.2 CtpyKtypa Ha npedynpeXeHnra


ONACHOCT
H3noxehn yactn noi HanpexeHne
PnCKOTcMbptOTTOKOByap.
N3KJIIOUeTe UpeDa OT eJIeKtpuYeckaT MapeKa.
He DoKocBaTe KOpnyca, pAMKaTa IINI KOMNoHEHTNe.
Ako e Heo6xOmo TcTeBaHe noHnpeKeHne, n3non3BaTe npedna3e HnpBkIOuBaTeI.
YBepTe Ce,Ye CbnpoTnBHeHneTo Ha 3a3eMaBauI npoBOHNK He HADBnJaaBA CTaHdapTu3npaHnTe cToHocTu.


BHIMAHNE
B cnuyaHa noBpea oroneHte qactn ot npoBoNDnMoKe da ca nOd HappeKeHne.
PnCKOT CmBpT OT TKOB yap.
13KIOUeTe ypea ot eJektpueckaTa Mpeka.
He doKocBaTe Kopnyca, pAmKaTa UIN KOMnOHeHTNe.
Ako Heo6xOIMOTcTaBHe NOI HanpeXeHne, n3No13BaTe npedna3EHnpEKNIOvBaTeI.
YBepete Ce,Ye CbnpoTnBnEHeMeTo Ha 3a3eMaBauNpnoBOHnK He HAdBnUaBA CTaHdapTu3nPaHHTeCTOINHOCTn.


bDETE BHIMATEJIHNI
HapaBaan no npraBaHn no oCtpnp6oBe.
HocTe npedna3n pbkabni.
HoceteIIMUHNnpedna3Hn cpeCTBa.


BbDETE BHIMATEJIHNI
3apeHn KOHeH3aTopn
PnckOT hapaHbAne OTe TKOB ynap n peakun Ha ynap.
Pa3peTe KOHdEHaTOpNTe npEnn3BbPbBaHe Ha pa6ota no ypea.
BHIMAHME
KOMNOHEHTC eJEKTOCTaTNUHa onaCHOCT.
YHIOXOkaBaHe Ha KOMIOHEHTI npI DoNIp.
IpeBnBCa pa6oTa,Cbbp3Ha C KOMNoHEHTN C eJekTPOCTaTNuHa ONaCHOCT, INHCTaJIpaTe CNCTema 3a eJekTPOCTaTNuHa 3auNTa.
CneBaNTe MePKNTe 3a 3aUNTa Ha KOMNHOHTNE c eNEKTPoCTaTNHa ONaCHOCT.
BHIMAHME
YHnOxKaBaHe Ha KOMNoHErN NopaIN 6e3pa36OpHa NOmHa Ha Yactn.
YHIIIOXKABaHe Ha KOMHOHeTHn npnDOnnp.
3BbpuWeTeOTcTaPraHbAHeHaHEIN3PpABHOCTn,IpeDNaIOmEHNTeKOMNoHEHTN.
PpOBepaBnTe CnCTeMaTHNo.
CneBaiTeTexHueckKaTa DOKymeHTaIyA.
1368BaIe HeHyXhATo NOmHa Ha KOMnOHeHTN.
3 INHCTPYMEHTI N IOMOUHN CPEIDCTBA
I3aBpnaTe MmKpoΦnITbpa HAdony.
HaTnCHete KncpuaTe naiu (1) n3dbpnaTe Harope qntbpa 3a eepn Yactu (2).

4.2.2 Инстадирае на силтпгte
1.ПпснctалрайтфиNTьрнata сntema.
YBepete ce, Ye e3nueTaHa qnnTbpa 3a eepn YactuN upaKaBt Ha MRCTO.
2. NocTaBete fHNTbPHaTcNCTema B ypeJa n 3aBbPteTe fHNTbPa 3a eDn YactuIN No NOcOKa Ha YacOBHNKOBaTc TpeNka.
YBepete Ce, Ye MapKnpoBknTe CbC CTpeKNCbBnAdT.
4.3 CmHa Ha NOMnTa 3a n3TOUbaHe
HeoXoDmN yCIOBnIa:
N3knOyTe ypea O T 3axpaHbAHeTo.
N3BaTe rOpHaTa nDOnHaTa KOUHnua.
CbaTeΦnTpnte.
H3TOUeTe HAnbIHO OCTaTbYHaTa BOJa. N3NON3BaIte Tb6a, aKO e Heo6xOIMO.
4.3.1 CbAraHe Ha Kanaka Ha NOMnata 3a N3ToUBaHe


b
BHIMATEJIHIN
OnachOCTOTHapaHBAHe
HocTe npedna3n pbKaBn.
BHHMaTeJIHOOTcPaHTeHaTpynBaHnTe BbHnHn YactnU.
OTBnTe KpeneKHNTE BHTOBe Ha Kanaka Ha nomnata (torx T 20).
N3dbpnaTe Kanaka Ha nomnata Harope.
OCTpHaTe oCTaTbUte OT XpHa N BbHUn HacTnU, OCTaHaJI N Bype#.
4.3.2 MoHTnpaHe Ha KaNaKa Ha NOMnTa 3a N3TOUbaHe
Noctabete Kanaka Ha nomnata.
HaTnchTe HaIOny Iro 3aBnTe.
HCTanpaTne HntbPHaTa CnTeMa.
Noctabete rophata n doJHa ta KowHua.
4.4 CmHa Ha uencena

BHIMAHNE
IperpraBaHe Ha OCHOBHaTa Bpb3ka!
OnachocT O3anaIbAhe Ha ypea
Korato CMeHrTe BxOndnKa6eHn Ha ypeHa, 3a Da ro H3NON3BaTe C KOHTAKTN B DaJeHa CTpaHa, Tpr6Ba CbIo Da npOBepnTe HanpexKeHneTo N YecTcTata B CbotBETHaTcPaHa.
BkapaTe ro nIbTHo,doKaTo yyeTe upaKaBaHe.
BbCINHnIeTaOTDBeTeCTpaHnIpeHa3BaTcencelaOT HeBOHHO paXna6BaHe HnOtDeJHHe OTypea.
4.4.1 Crno6BaHe
4.4.2 Pa3rJIO6BaHe
UenceIbT ce n3BaXka OTe KOHTaHa ypeDa, KaTo ce IbIXn BHNMaTeJIHO HAcTpAH N CbUeBpEmHo Ce IbPna.
4.5 CnCTeMn OT KOoHnCn
60-caHTHMETPOBNTe MoJeIN UMaT 2 KOUHNI.
45-caHTmETpOBNTe MoDEJIIMMAt cAmO eHNa KOUHNIua.
4.5.1 CbBaem npbky
Te BnH3aT B npouen B nnaCTmacOBaTa NOdnopa OTCpaHn.
HaTnchTe IocTa HAppe, Korato npbukte He ca Heo6xoDmM.

4.6 CmHa Ha BbHnHn KOpnyc
Heo6xOJIMO yCIOBHe:
YpeBt Da e INKInoueH OTeNekTpueCeKaTa MpeKa.
YpeBt Da e nKIIuChEoT BoOcHbDInTeHnHaT MaPeKa.
CbaIeOCHOBbTaOTypea.
4.6.1 Pa3rno6eTe BbHnHnKopnyc
OTbopTe BpaTata.
CbaIeTe 4-Te BInHa torx T20 ot npedHa t act Ha Kopnyca.
CbaIeTe 4-Te BnHTa torx T20 ot 3aHaTa Ha cKpNyca.
Ocbo6oDeTe Dbata DoJIHn fIKCaTopa OT dBete cTpaHI.
CbaIeTe Kopnyca.
4.6.2 MoHTnpaHe Ha Kopnyca
IocTaBeTe Kopnyca Bbpxy ypeJa
IouykaTe 3aHaTa DOnHa Yact OT Dbete cTpaHn, 3a da ce noBepe Kopnyca.
Iouykaite 3aHaT aOnHa Yact OT DBeTe CtpaHn, 3a Da 3aBbPwnte MOHTnpaHTo Ha KOpnyca.
3aBnTe 4-Te BnHTa torx 20 otnped n ot3ad.
HCTannpaTe 3a3emnteHaTbPb3ka BdoJHaTa OCHOBA.
IocTabete DoJIHHa KanaK.
4.7 CmHa Ha BbHnHaTa BpaTa
Heo6xOaMn ycNoBna:
YpeBt Da e HsKnHoueH OT eNekTpueckaTa MpeJa.
YpeBt Da e N3KJIUeH OTOBODcHa6dnteHnHaT aMpeKa.
4.7.1 CbanaHe Ha BbHnHaTa Bpata
OTCTpaHHe BnHToBeTe, OINcaHN IO-dOJy C oTBepTkA torx 15.
1-OTbopeTe BpaTaTa.
2-OTcpaheTe 10-Te BnHTa.
3-3aTbOpTe BpaTaTa KaTo RaBpKIne OTe eHaTa CtpaHa.
4- Ocb6oTe BpaTata KaTo DpbHHeTe fNkCaTopNe HaOny.
5-Pa3KaueTe 3a3EmBaunn npoBOnHK OT BpataTa.
Ocbo6oTe BpaTata ODonHnTe fKnCnpaun nau.


PAnHeHn BnHToBe
Bbtpewhata Bpata e 3akpeneha KbMaHTnte c NOMOHTa Ha HeHHTe DaCpaHnHn BNHTa.
4.7.2 MoHTpaHe Ha BbHnHaTa BpTa
CneBaeTe cTbnKeTe B o6paTeH peI.

BHIMAHNE
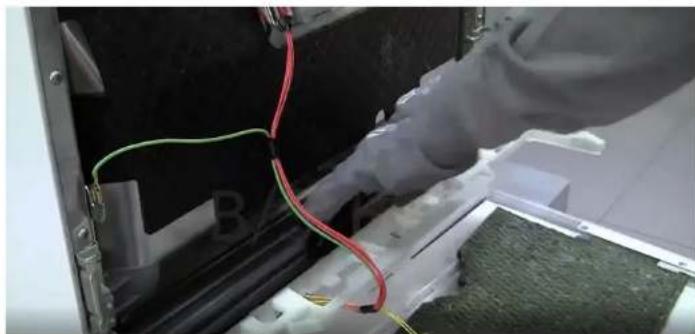
He do6pe 3aKpeHn Hn Hn npabunho pa3noJoxeHn Ka6enn!
Onachoct OT nobpeHa KaebHnH CHon.
PocTaBeTe Ka6eJInte I rN cKpaIte CbC 3aJIenBaIaJIeHTa.
IocTabete npabnHNO Ka6eHHN CHON B DoJIHaTa onopa Ha ynnbTHHeHNeTO.
IocTaBeTe BbHsHaTbPaTa Ha DonHaTOnopa Ha yNtBHeHnTo Ha BpaTata.
NocTaBete BbTpewHaTa BpTa Ha BpaTaTa.
3aBnTe BnHTOBeHa BpaTaT.
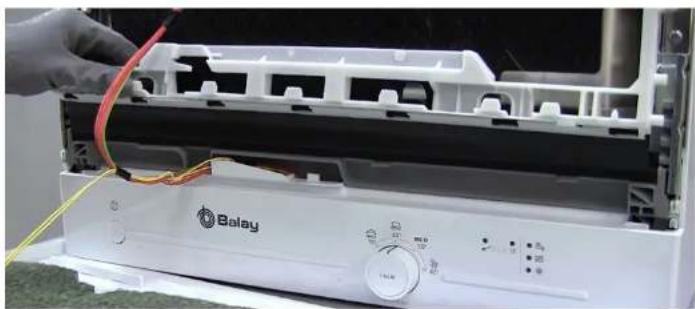
4.8 CmHa Ha KOHTPOHnnaHeI
Heo6xoamn ycnoBna:
YpeBt Da e INKIIIOUeH OT eNEKtpuueckata Mpeka.
YpeBt Da e N3KJIQUeH OT BDOChA6IITeHHaT aMpexa.
DOnHaTa OCHOBa Da e CBAneHa.
4.8.1 CbajrHe Ha KOHTponnnaHEn
HaTnCHTeΦnKcnpaunuIuΦT.
I3dbpnaTe KOHTPOJHnnaHeI Harope.
4.8.2 MoHTnpaIte KOHTpOJIHH naHeJ.
IocTaBeTe KOHTponHnaHen Taka,Ye uHbT Ha naHena da ce nnb3He NOI,IIaCTMacOBnBaOdaH OCHOBaTa.
HaTnckaIteDOKaTOΦHKcnpaunrT uΦTce3akpen.
4.9 CmHa Ha KaNaKkata Ha Do3aTopa 3a NouHCTBaU npenapat
Kato IIOCTOB INHCTpyMeHT MOKeTe Da N3IIOJI3BaTe MaIIKa OTBepTKa.
HeoXoAnMo yCNoBHe:
YpeBt Da e INKIOUeH OT eNEKTPuueckaTa MpeKa.
YpeBt Da e N3KIOUeH OT BDOChA6DHTeHnHaT MaPexKa.
BpataTa Da e oTbopeHa.
KanaKaTa 3a noHCTBaunipenapat da e otBopeHa.
4.9.1 CbajHe Ha KaaKaTa 3a NoocTbaunn npenapat
- Ππb3Hete Kanaykata 3a NOUcTBaunn npenapat HABbTpce C5 MM.
- 3nON3BaIte NoCT, 3a Da CBAInTe KanaUkata 3a NoOHTBaUNI npenapat OT DoHATA CtpaHa Ha HAnpaBnaBaUNTe UHHN CBanete KanaUkata OT rOpHATA CtpaHa Ha BOeUNTe UHHN.
CbaIe npyKnHaT.
4.9.2 NocTabrHe Ha npyKnHaTa
- NocTaBete Dblnna KpaH Na npyKnHaTb MOHTaxHn OTBOp Ha yCTpoiCtBOTo 3a Do3nPaHe (1).
- NocTaBete KbcnKpA Ha npyXnHATA B MOHTaXnO rOB pKa kanaKaTa 3a nouHCTBaUur npenapat (2).
- HatncheTe Kanaykata Bbpxy Do3aTopa (3).

4.9.3 MoHTnpaHHe Ha KaNaqKaTa 3a NouCTBaun npenapat
IocTabete KaanaykaTa 3a NouchBaunn npenapat Ha pa3ctoHne 5 MM OT MAKcmaJIHO OTBOpeHo NIOXKeHne B HAnpaBnaBaunTe uHHN OT eHaTc TpaHa. Be3 da npinaraTe MHOrO Cnla, HATNCHe TnpOTNBONIOxHaTc TpaHa Ha HAnpaBnaBaunTe uHHN.
- PpOBepe Ta pa6oTaHa KaNaUkata 3a nouNCTBaun npenapat.
4.10 CmraHa Ha donHTo ynnbTHeHne Ha BpaTaTa
Heo6xOJIMO yCIOBHe:
BbHnHaTa Bpata da e pa3rno6eHa.
4.10.1 CbanyHe Ha donHTo ynnbTHeHne Ha BpaTaTa
CbaIeTe Ka6eHnH CHONOT 6eHnB ODaHa cKo6aTa.
I3BaTeToOToJIoHToMyNoIOXeHHeHa3aKpenBaHe.

I3dbpnaHte Harope, 3a da ro oTKaHTe ot ochOBata.
4.10.2 MoHTnpaHc Ha dONHTo yNtBTHHeHc HbPaTaTa
TocTaBeteKa6eJIHHa CHon.
Kato n3non3BaTe pBcTe CN, npNTncHeTe DOJHOTO yNtBtHeHne Bbpxy 1aata OCHOBA, DOKATO TO 3actaHE NtBTHO B CBOrTa No3nua.

PpOBepTe daJIy yIbTHHeHTo e I3paBHeO c DoJIHaTa OCHOBA.
4.11 CmHa Ha ynIbTheHneTo Ha BpaTaTa
HeoXoDIMO yCIOBne
UpeBt Da e INKIOueH OT eNekTpnueckaTa MPexa.
UpeBt Da e INKIOueH OT BOOCha6DNTENHaT MPe
4.11.1 CbAJIHe Ha ynnbTHHeHNeTo Ha BpaTaTa
CbaTe ynnbTHHeHneTo OT BbTpewHaTa pamka.
4.11.2 MoHTnpaHe Ha yNtBTHeHnETo Ha BpaTaTa
YBepeTe ce, ye npoФиNT Ha yNtBTHHeHnTo Ha BpaTata e B npaBnHOTO NOJoxHeHne.
YbepeTe ce,Ye brrnTe He ca orbHaTn mnn yckaHn.
IocTabete Kpa Ha ynnbTHHeHMeTo npaBO HanpeD, noD BbTpewHaTa
Bpata.YnnbTHHeHMeTo Tpr6Ba Da neHrBe Bb3MOxHO Ha-NNbTHo Do
BaHaTa.


4.12 CmHa Ha DoJIHHa KaIak
HeoXoDnMo yCNoBne
YpeBt Da e INKInoueH OTeNekTpueCeKaTa MpeKa.
YpeBt Da e nKJIoueH OT BDOCha6dHTeHnHaT MaPexa.
4.12.1 CbanyHe Ha doJHnKa nak
1 Pa3BnTe DaBaTa 3aIbpxkaun BuHTa torx 20.
2I3IbpaIeOTD0HnO TBOp,IOKaTO KAnaKbT Ce OcBO6oOn OTΦHKcnpaUuNΦT.
H3non3BaTe nnocka OTBepTKa, 3a Da ro OTKaHTe OT DBeTe CTpaHn.
3PaKaayeTe 3aEmBaunI npoBOnHk.
4.12.2 Ctrno6BaHe
1 P03nIOHOHPaTe DoJHNA KaNk, KATO BKapate N3NbKHAnITE p6oBe B XJIe6OBETe B NAACTMACOBATA OCHOBa HA BaHaTa.
2 VHCTaJInpaIte 3a3eMBAuIg NPOBODHNK B OCHOBaTa.
3 3aBnTe DbTa 3aDbpxkaun BnHTa.
4.13 CmHa Ha npyKnHHe Ha BpaTaTa
Heo6xoJMo yCNoBne
YpeBt Da e INKInoueH OT eNeKtpnueckaTa MpeKa.
YpeBt Da e nKJIoueH OT BDOCha6dHTeHnHaT MaPexa.
4.14.2 MoHTnpaHe Ha NaHTaTa


ONACHOCT
OnachocOT TOKOB ynap npaN qactn noD HanpeXeHne
PuckOT HapaHbAHe OT TKOB yap n peaknHa ydap.
EneKtpnuecknte KOMnoHeHTnp6Ba da ce peMOHTnpaT OT KBaHnФuPapA eNEKtpoTexHnK.
CnepeMOHTa ce yBepeTe, ye e n3Bbpuhen TecT 3a 6e3oNaChOCT B c0TBetCTBne Cbc CTaHApT VDE 0701 ININ CNEuΦnHnTE CTaHApTn Ha CtpaHata.
Ioctabete nantata Bbpxy ypea (1).
PpemecTe TaHtata HdoIy (2), DOKaTO ce FIKcnpa KbM ypeJa.
CbpxKeTe 3a3emBaunna npoBOnHK Ha naHTaTa.

JIINCBaUa 3a3eMNTeHbB3Ka MoKe Da DOBeDe Do HAnpeXeHne Ha BpaTata.


PRIRUÇNIK ZA POPRAVKE
GV550 TT
1 UVOD
1.1 Svrha dokumenta
1.2 Opce oznake
1.3 Relevantne sigurnosne oznake
2 SIGURNOST
2.1 Oznake stupnjeva opasosti
2.2 Oznake fizickog ostecenja
2.3 Opé sigurnosne upute
3 ALATI POMAGALA
Traek mikrofilteret ned.
Tryk pa Iasetapperne (1), og traek grofvfilteret (2) op.
4.2.2 Montering af filtrene
- Montér filtersystemet igen.
Sorg for, at grovfelterets hager laer pa plads.
- Saet filtersystemet i apparatet, og drej grofvfilteret med uret.
Sorg for, at pilemaerkerne passer.
Fare for brand i apparatus
1.1 Purpose of the document
1.2 General symbols
1.3 Relevant safety symbols
2 SAFETY
2.1 Signage for risk levels
2.2 Signage for physical damage
2.3 General safety instructions
3 TOOLS AND AIDS
Designation
Details
Image
Torx screwdriver with T20 bit and hole

Torx screwdriver with T15 bit
Length 80 mm

Slotted screwdriver
200 mm

Needle nose pliers.
Length: 200 mm, straight.
4 REPAIR
4.1 Replace spray arms
4.2 Replace the filters
4.3 Replace the drain pump cover
4.4 Replace plug
4.5 Basket systems
4.6 Replace the outer housing
4.7 Replace outer door
4.8 Replace the control panel
4.9 Replace the detergent dispenser cover
4.10 Replace the lower door seal
4.11 Replace the door seal
4.12 Replace the lower cover
4.13 Replace door springs
4.14 Replace hinge
1 INTRODUCTION
1.1 Purpose of the document
These repair tips help the customer to repair the appliances themselves in accordance with the applicable eco-design regulation (from 03/2021).
They contain information about the way to replace defined spare parts, including warnings and risks.
If in doubt, contact our customer service department. We will only be liable for damage if the repair instructions have been followed correctly.
1.2 General symbols
Symbol Meaning

Special information
1.3 Relevant safety symbols
| Symbol Meaning | |
| ! | General warning |
| Danger from electrical voltage | |
| Danger of cutting | |
| Danger of crushing | |
| Hot surfaces | |
| Explosion hazard | |
| Strong magnetic field | |
| Non-ionising radiation | |
2 SAFETY
2.1 Signage for risk levels
| Signage Meaning | |
| DANGER | Imminent danger which may lead to death or serious injury if it is not avoided. |
| WARNING | Possible imminent danger which may lead to death or serious injury if it is not avoided. |
| BE CAREFUL | Possible imminent danger which may lead to minor injury or physical damage if it is not avoided. |
2.2 Signage for physical damage
| Signage Meaning | |
| WARNING | Warning about possible physical damage |
2.3 General safety instructions
Read the repair manual and follow the instructions contained in it.
Proceed systematically and follow the instructions for locating and repairing faults.
2.3.1 All domestic appliances
Electric shock hazard due to live parts
Errors in repairs on electrical components can lead to electric shock!
Unplug the appliance from the mains at least 60 seconds before starting the work.
After the repair, ensure that a safety test is performed in accordance with standard VDE 0701 or the country's specific standards.
Risk of injury due to sharp edges.
Wear protective gloves!
Risk of crushing during repairs, maintenance, troubleshooting and technical servicing due to heavy, moving parts.
Wear protective footwear!
Secure heavy components to prevent them from falling down.
Do not insert body parts into moving components.
Risk to the appliance's safety / operation.
Only use original spare parts!
Risk of damage to electrostatic sensitive components (ESD).
Do not touch the modules, including the connections and conductive paths.
2.3.2 Warning structure


DANGER
Exposed live parts
Risk of death by electrocution.
Disconnect the appliance from the mains.
Do not touch the housing, frame or components.
If live testing is necessary, use a safety switch.
Make sure that the earth wire resistance does not exceed the standardised values.


BE CAREFUL
Injuries from cuts on sharp edges.
Wear protective gloves.
Wear personal protective equipment.


BE CAREFUL
Charged capacitors
Risk of injury from electrocution and response to shock.
Discharge the capacitors in the appliance before performing the work.


WARNING
In the event of a fault, the touchable conductive parts may be live.
Risk of death by electrocution.
Disconnect the appliance from the mains.
Do not touch the housing, frame or components.
If live testing is necessary, use a safety switch.
Make sure that the earthing conductor's resistance does not exceed the standardised values.
WARNING
Components with electrostatic hazard.
Destruction of components when touched.
Before any work involving components with an electrostatic hazard, install an electrostatic protection system.
Follow the measures to protect the components with an electrostatic hazard.
WARNING
Destruction of components due to indiscriminate replacement of parts.
Destruction of components when touched.
Perform troubleshooting before replacing components.
Check systematically.
Follow the technical documentation.
Avoid needlessly replacing components.
3 TOOLS AND AIDS
| Designation | Details | Image |
| Torx screwdriver with T20 bit and hole (00340764) | 100 mm for screws with safety pin | |
| Torx screwdriver with T15 bit | Length 80 mm | |
| Slotted screwdriver | blade 10 mm x 1.6 mm x 200 mm | |
| Needle nose pliers [00340871] | Length: 200 mm, straight |
4 REPAIR
4.1 Replace spray arms
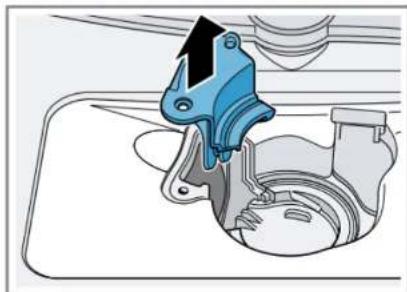
4.1.1 Remove lower spray arm
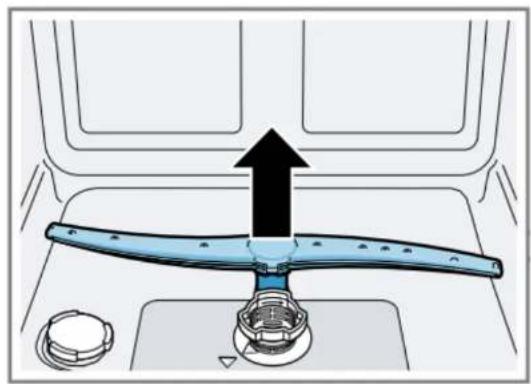
Push the lower spray arm upwards.
4.1.2 Install lower spray arm
Insert the lower spray arm. It will click when it is in position.
4.2 Replace the filters
4.2.1 Remove the filters
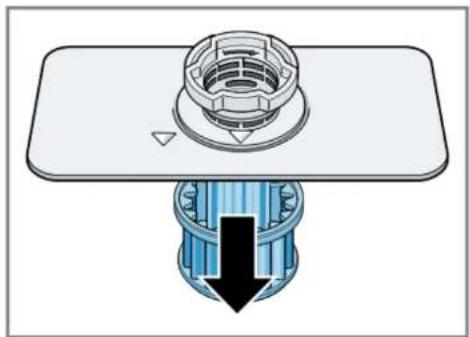
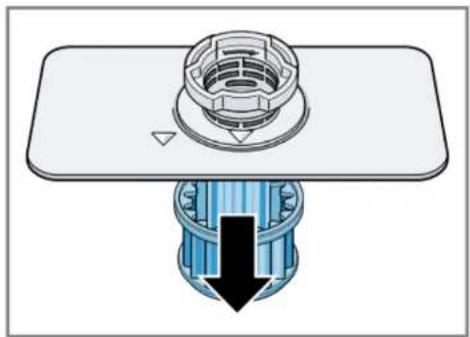
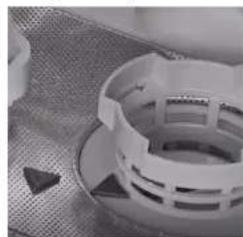
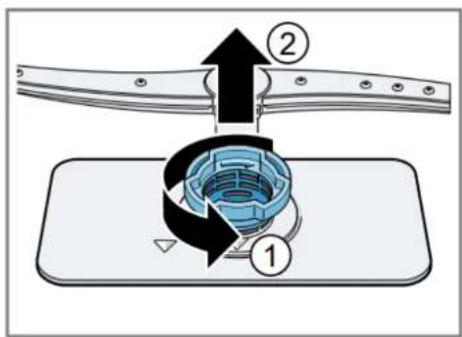
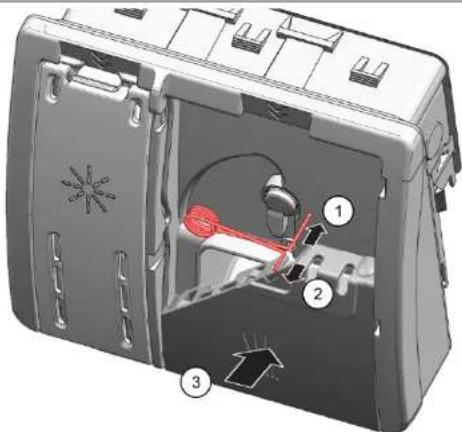
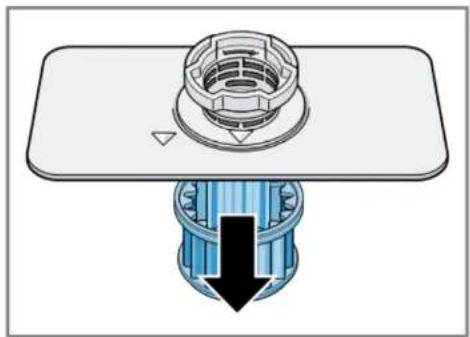
Turn the coarse filter (1) anticlockwise and remove the filter system (2).
Pull down the microfilter.
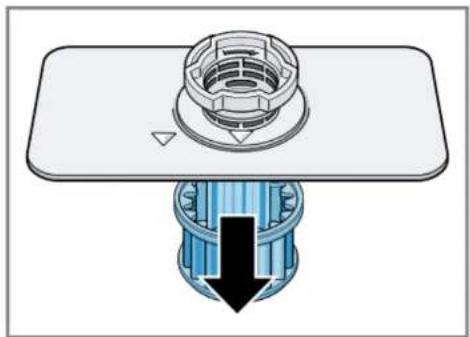
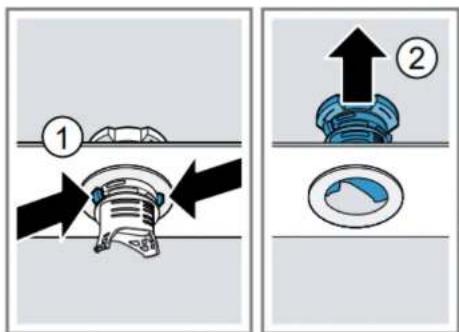
Press the catch tappets (1) and pull up the coarse filter (2).
4.2.2 Install the filters
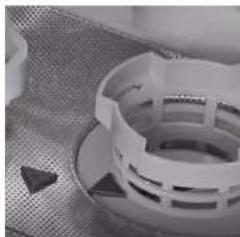
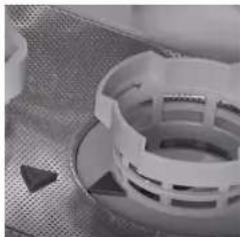
- Reinstall the filtration system.
Make sure that the coarse filter's latches snap into position. - Insert the filtration system into the appliance and turn the coarse filter clockwise.
Make sure that the arrow markings match up.
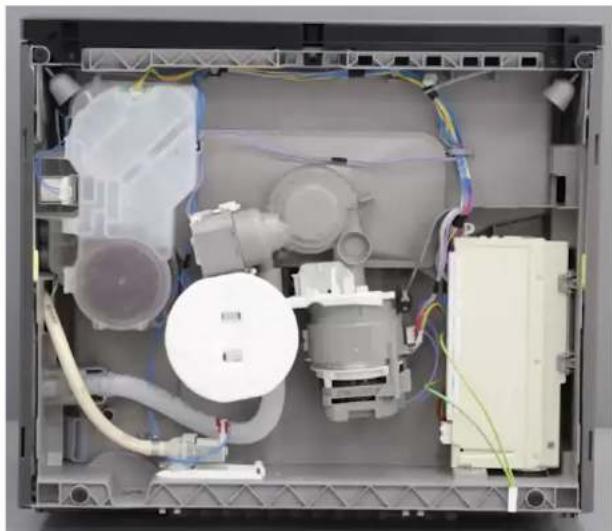
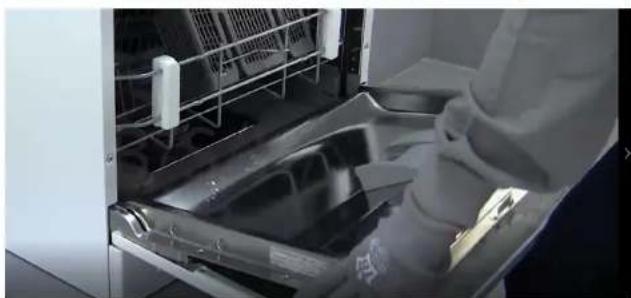
4.3 Replace the drain pump cover
Prerequisites:
Disconnect the appliance from the power supply.
Remove the upper and lower baskets.
Remove the filters.
Drain any water that is present. Use a sponge if necessary.
4.3.1 Remove the drain pump cover


BE CAREFUL
Risk of injury
Wear protective gloves.
Carefully remove any build-up of foreign matter.
Undo fastening screws of the pump cover ( T 20 torx).
Pull the pump cover upwards.
Remove any food residue and foreign matter inside the appliance.
4.3.2 Install the drain pump cover
Fit the pump cover.
Press it down and screw it in.
Install the filter system.
Insert the upper and lower baskets.
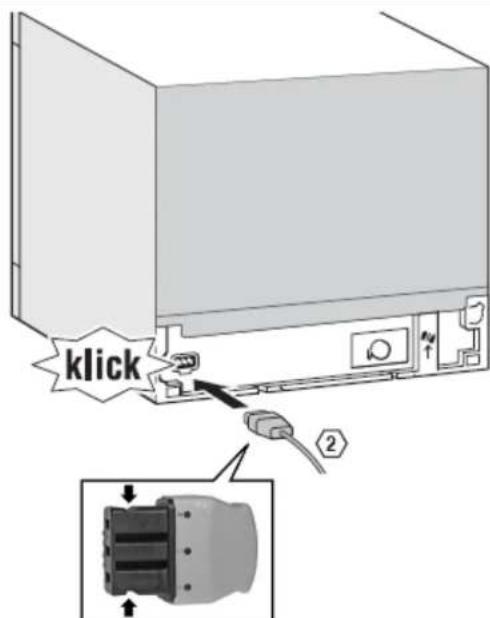
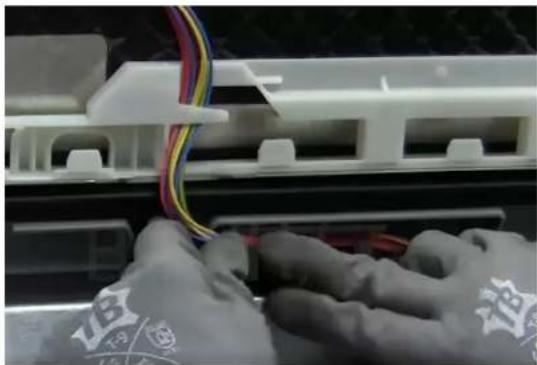
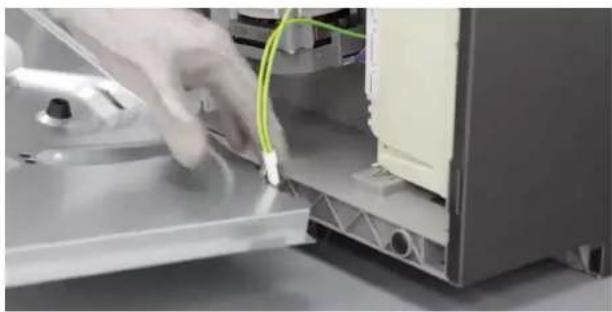
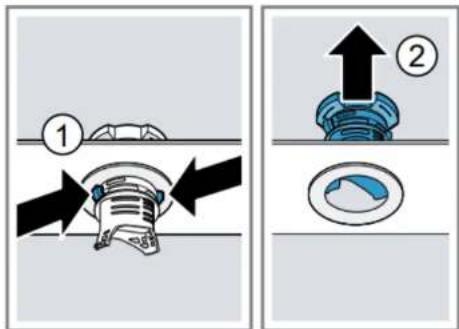
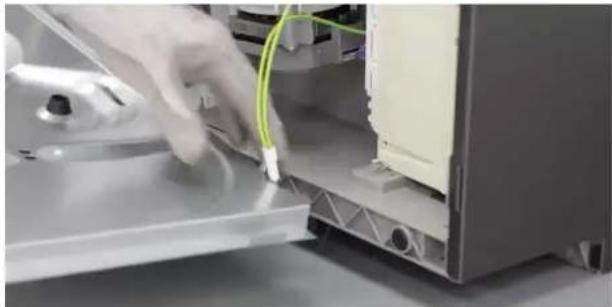
4.4 Replace plug

WARNING
Overheating of main connection!
Risk of fire in the appliance
When changing the appliance's input cable for use with sockets in the country, you should also check the country's voltage and frequency.
Firmly insert it until you hear a click.
Two strong pins on either side prevent the plug from inadvertently coming loose or detached from the appliance.
4.4.1 Assembly
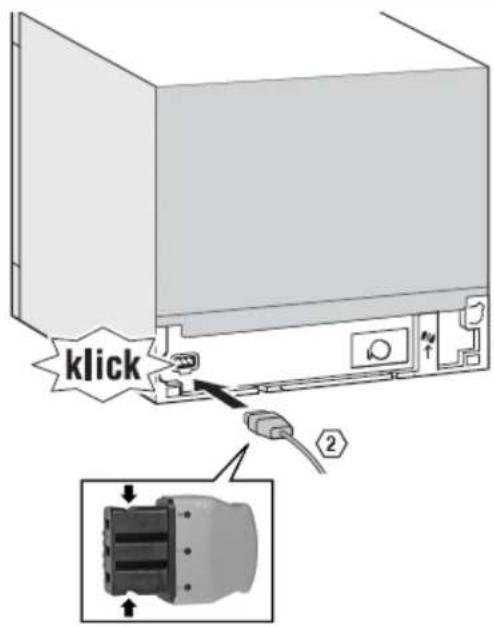
4.4.2 Disassembly
The plug is removed from the socket in the appliance by gently moving it sideways and pulling at the same time.
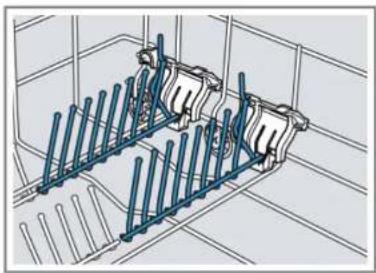
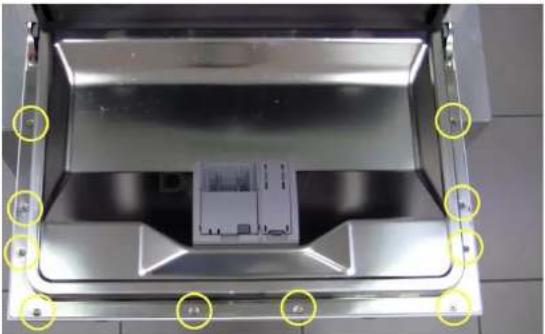
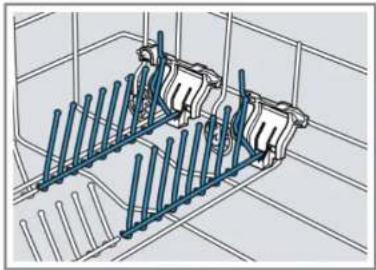
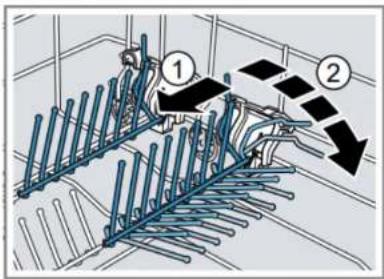
4.5 Basket systems
The 60 cm models have 2 baskets.
The 45~cm models only have one basket.
4.5.1 Folding sticks
They fit into a slit in the plastic support on the side.
Press the lever forwards when the sticks are not needed.
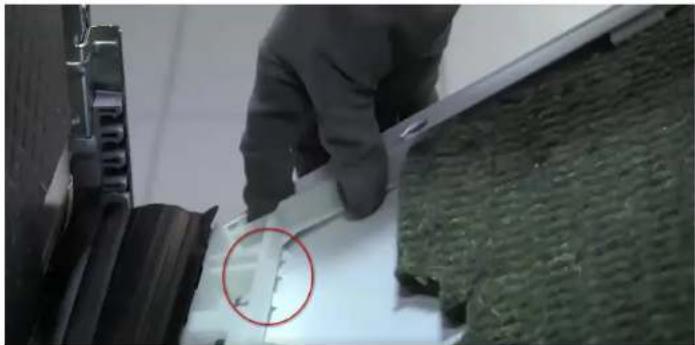
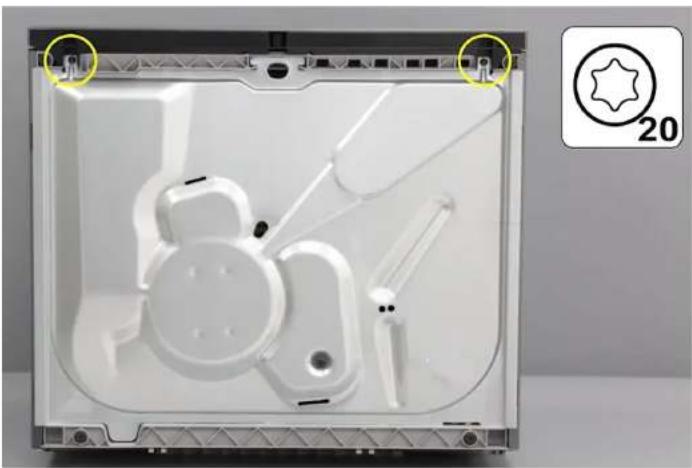
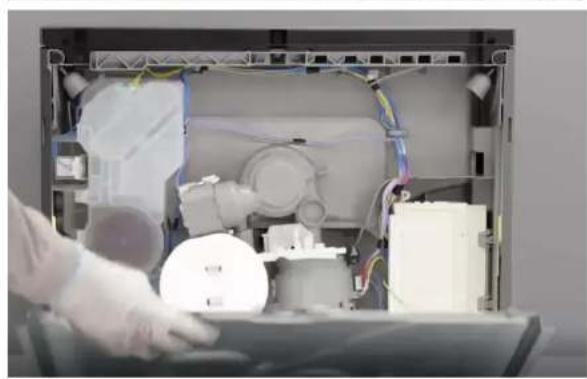
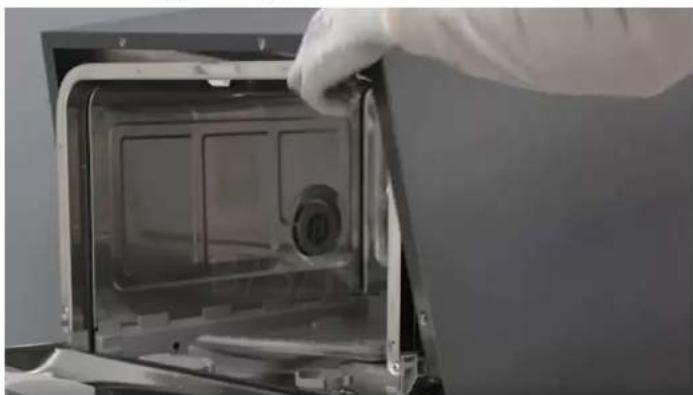
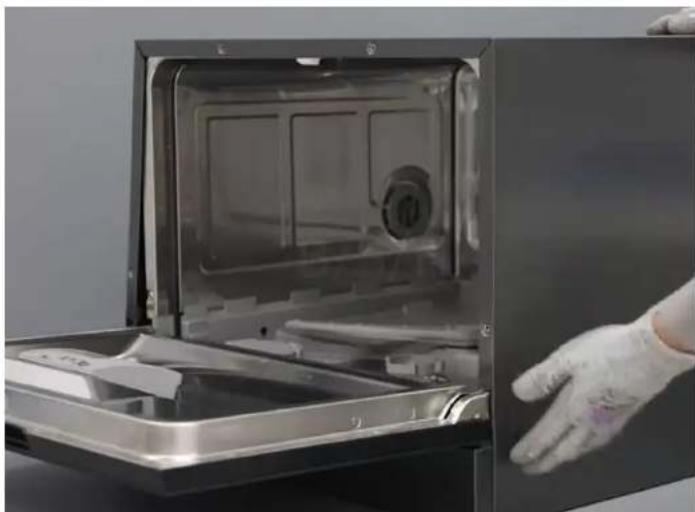
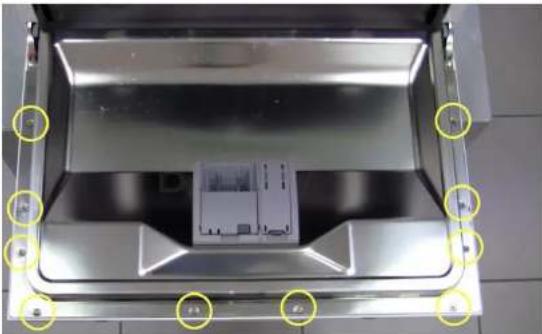
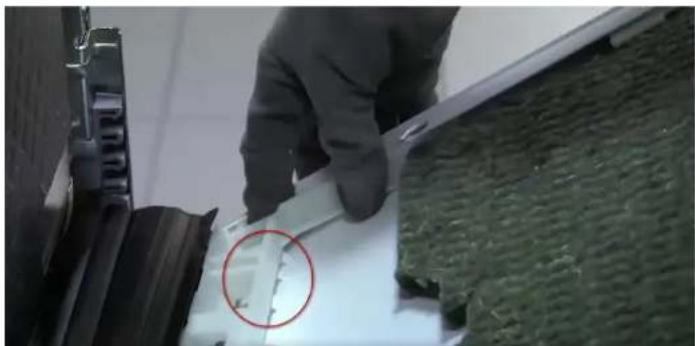
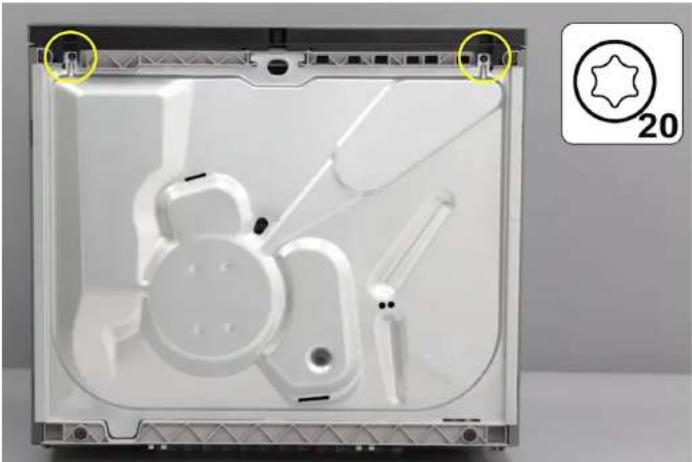
4.6 Replace the outer housing
Prerequisite:
Appliance is disconnected from the mains.
Appliance is disconnected from water supply.
Remove the base from the appliance.
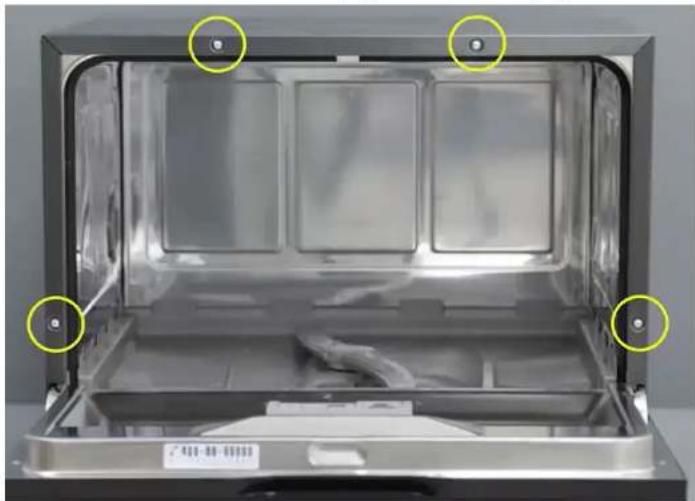
4.6.1 Disassemble the outer housing
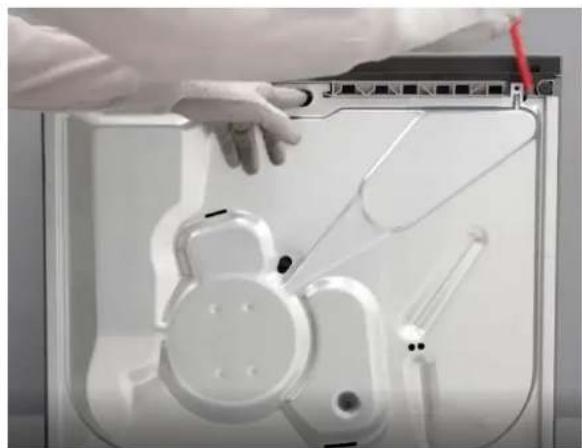
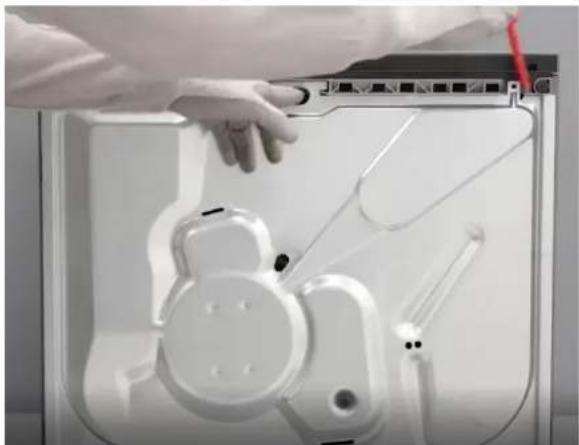
Open the door.
Remove the 4 torx T20 screws from the front of the housing.

Remove the 4 torx T20 screws from rear of the housing.

Release the two lower latches on either side.
Remove the housing.
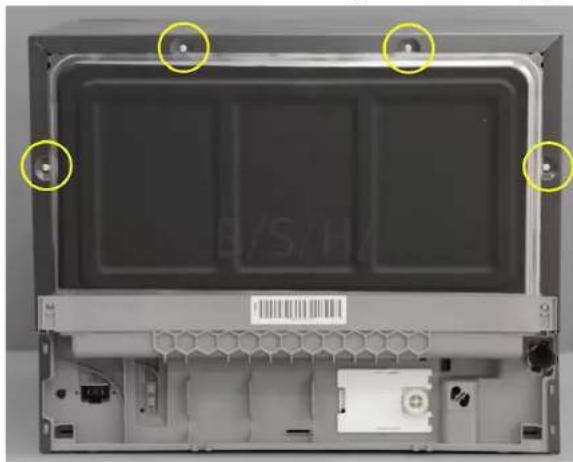
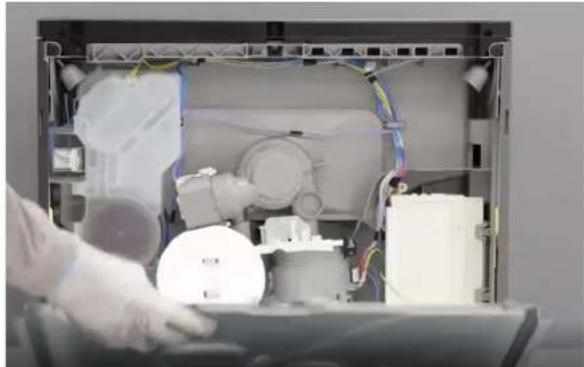
4.6.2 Install the housing
Place the housing on the appliance
Tap on the back lower part of both sides to fit the housing.
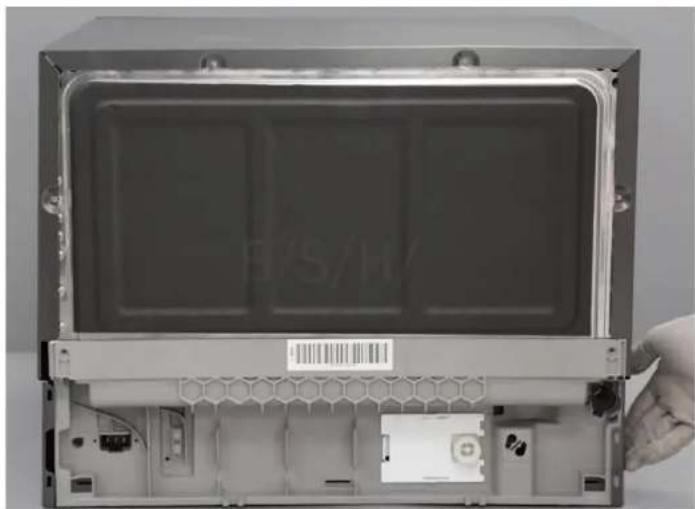
Tap on the front lower part of both sides to finish fitting the housing.
Screw in the 4 front and rear torx 20 screws. Install the earth connection in the lower base. Install the bottom cover.
Appliance is disconnected from the mains.
Appliance is disconnected from water supply.
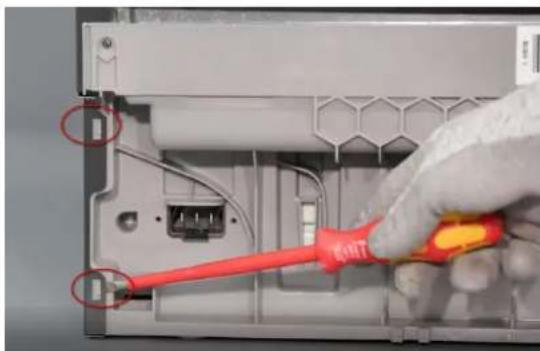
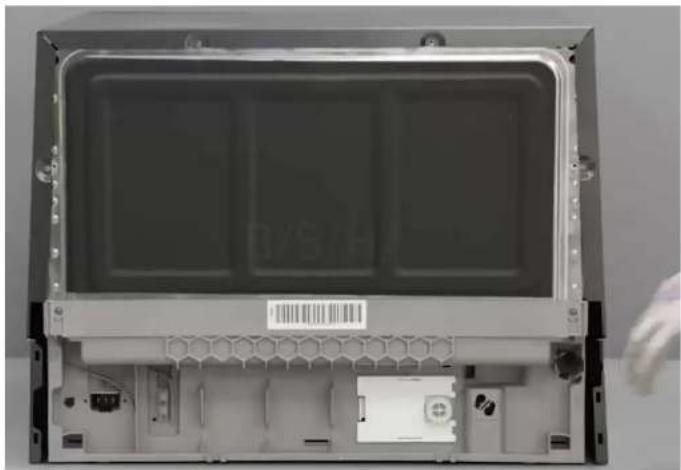
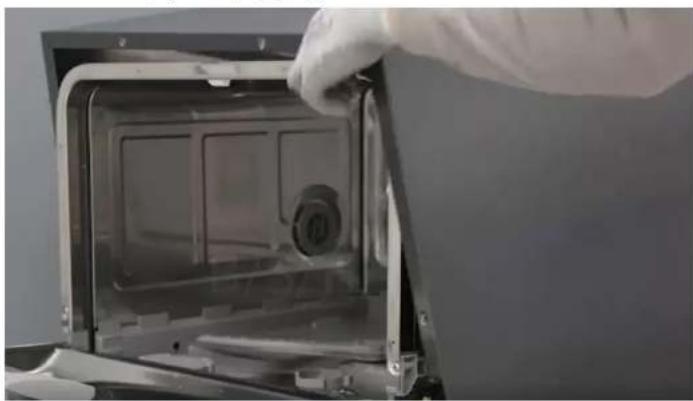
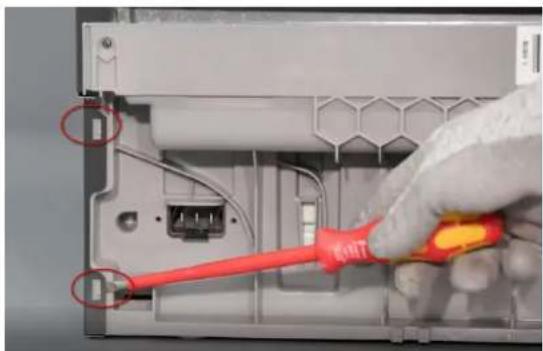
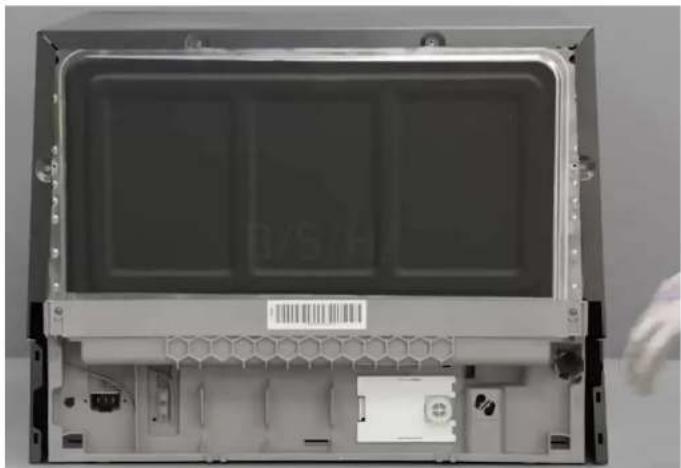
4.7.1 Remove the outer door
Remove the screws described below with a torx 15 screwdriver.
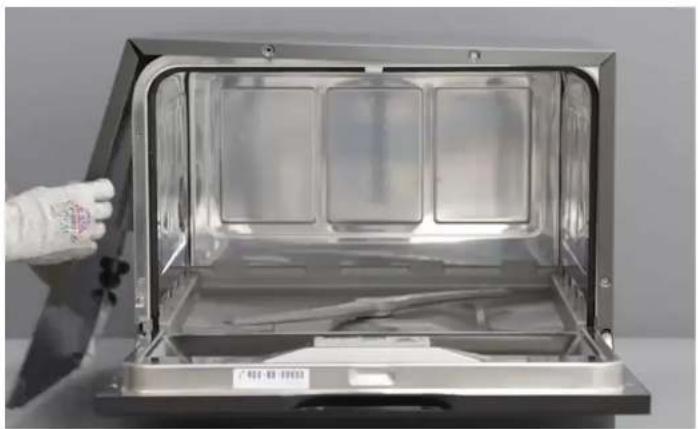
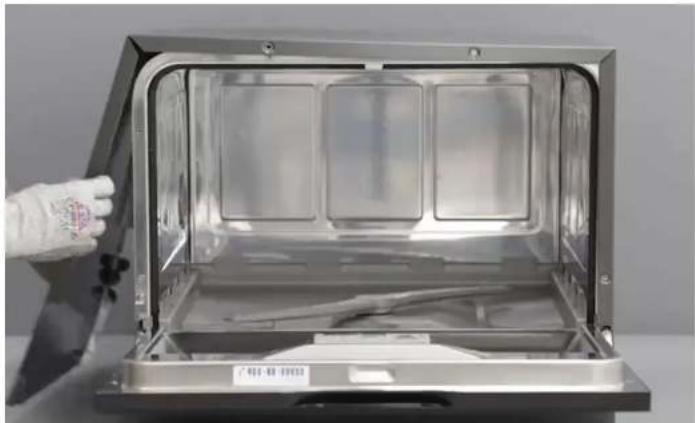
1- Open door.
2- Remove 10 screws.
3- Close the door by holding it on one side.
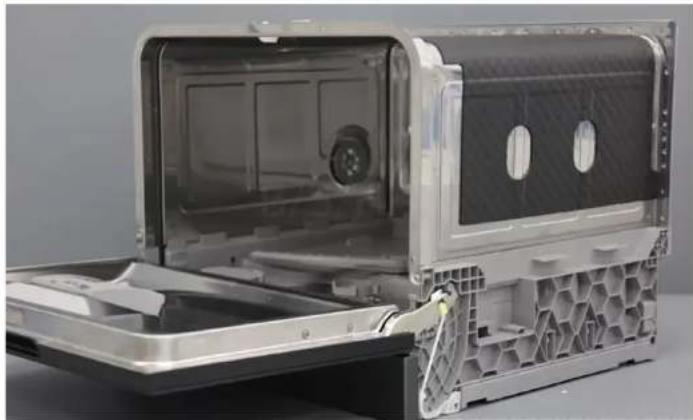
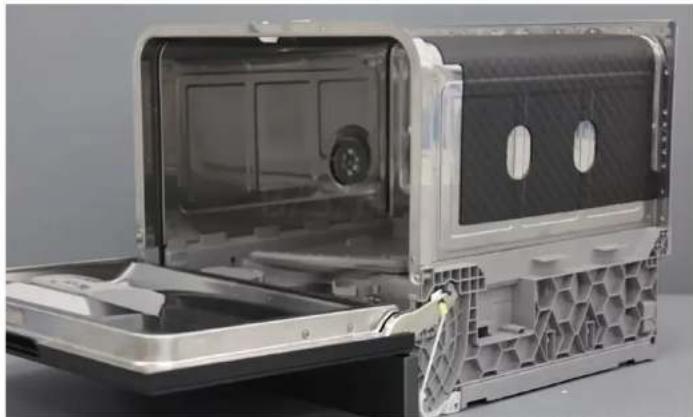
4- Release the door by pulling down on its latches.
5- Disconnect the earth wire from the door.

Release the door from the lower retaining latches.
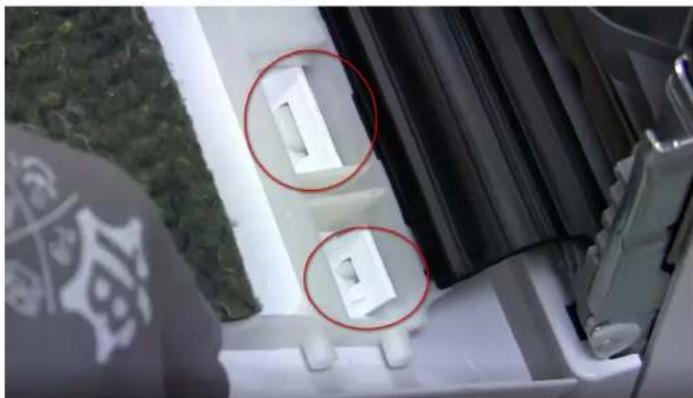

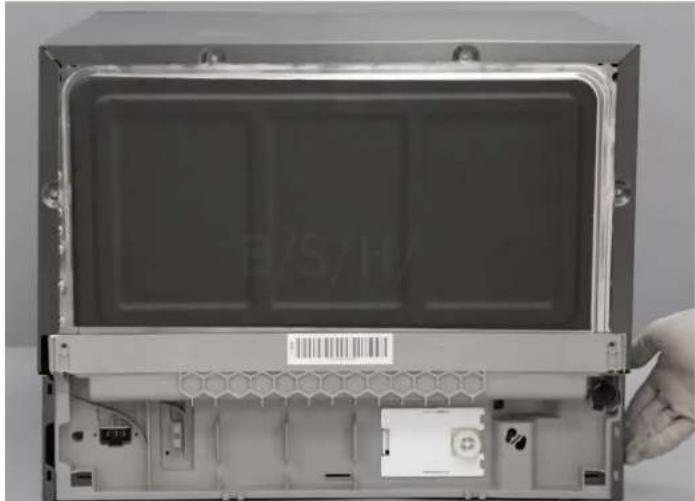
Panel screws
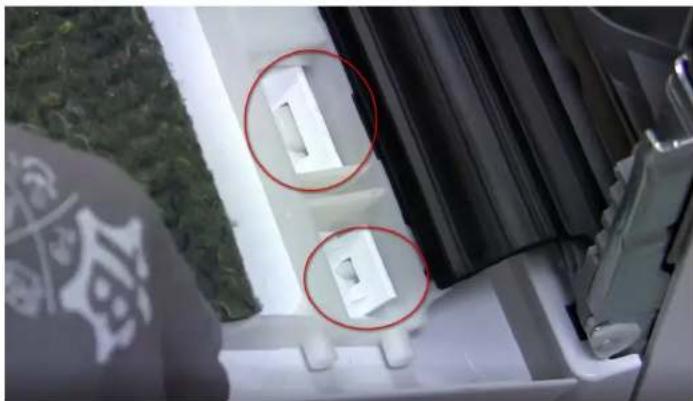
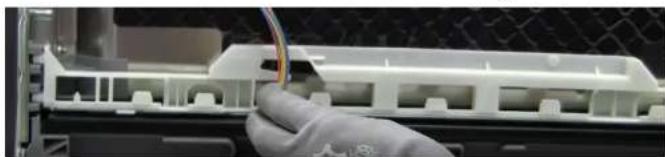
The inner door's 2 lateral screws secure the hinges to the inner door.
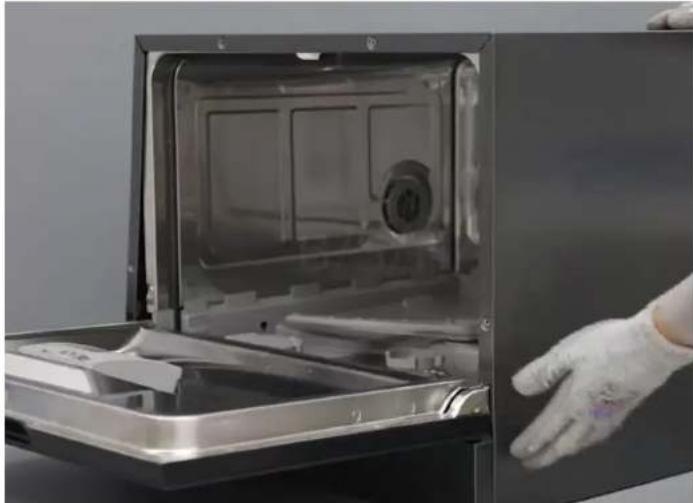
4.7.2 Install the outer door
Follow the steps in reverse order.

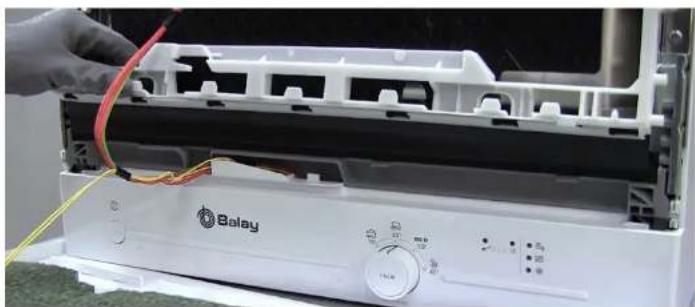
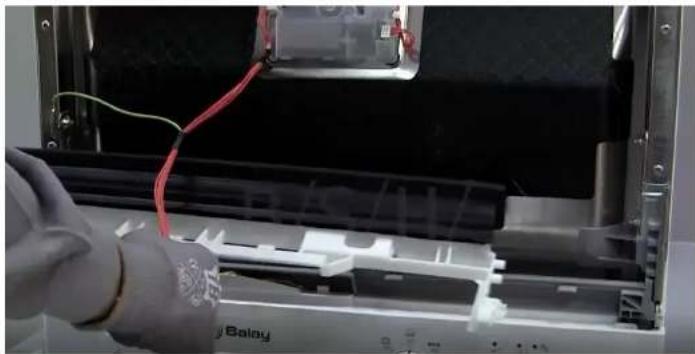
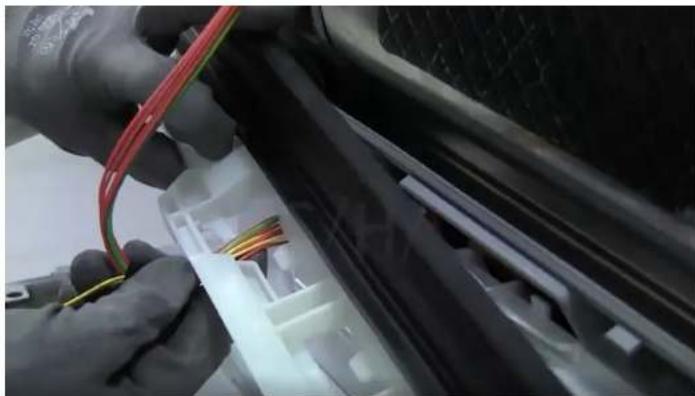
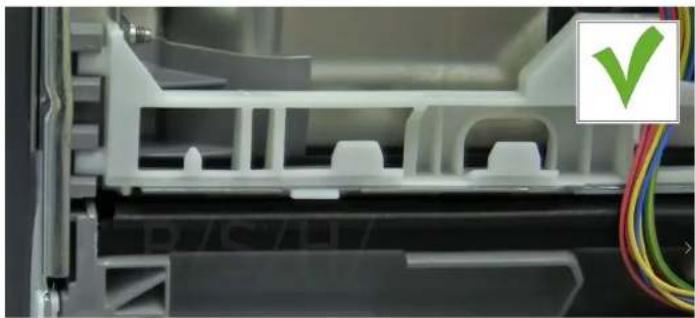
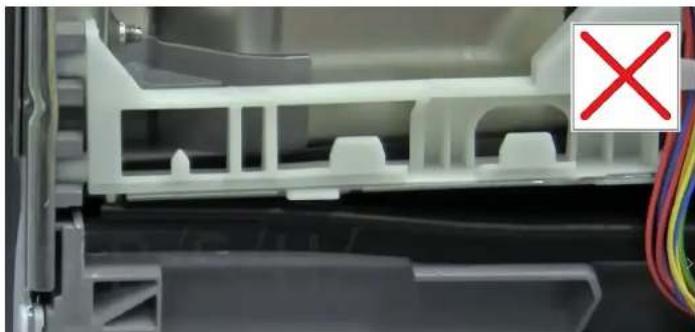
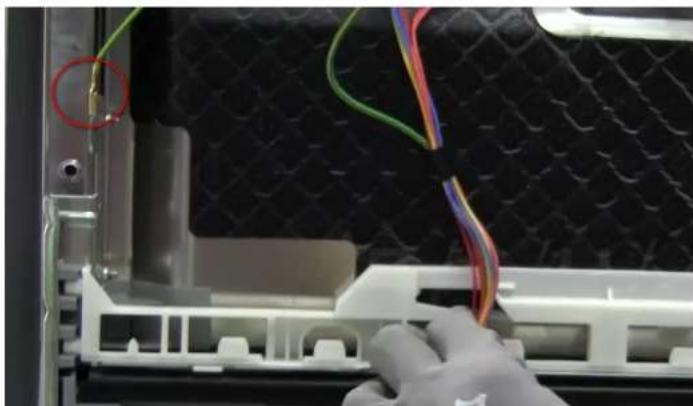
WARNING
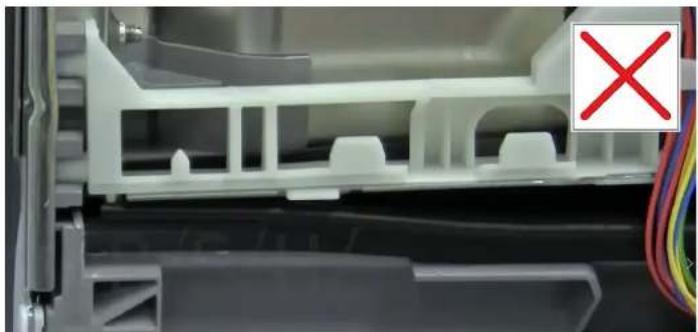
Cables not properly secured or incorrectly positioned!
Risk of damage to cable harness.
Position the cables and secure in place with adhesive tape.

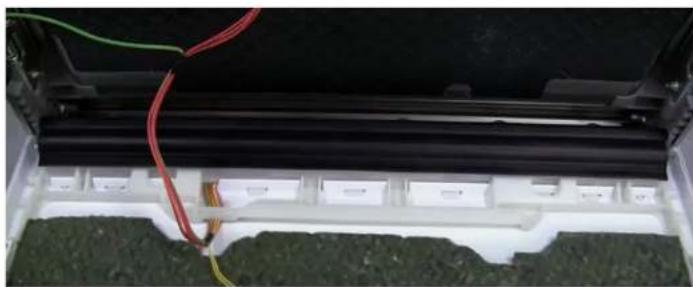
Fit the outer door on the lower door seal support.
Position the cable harness correctly in the lower seal support.
Fit the inner door on the door.
Screw in the door.
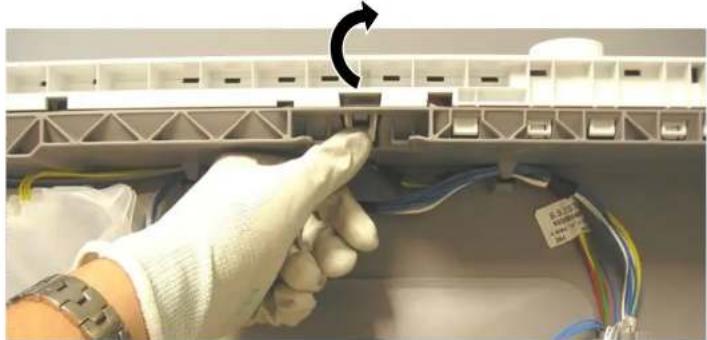
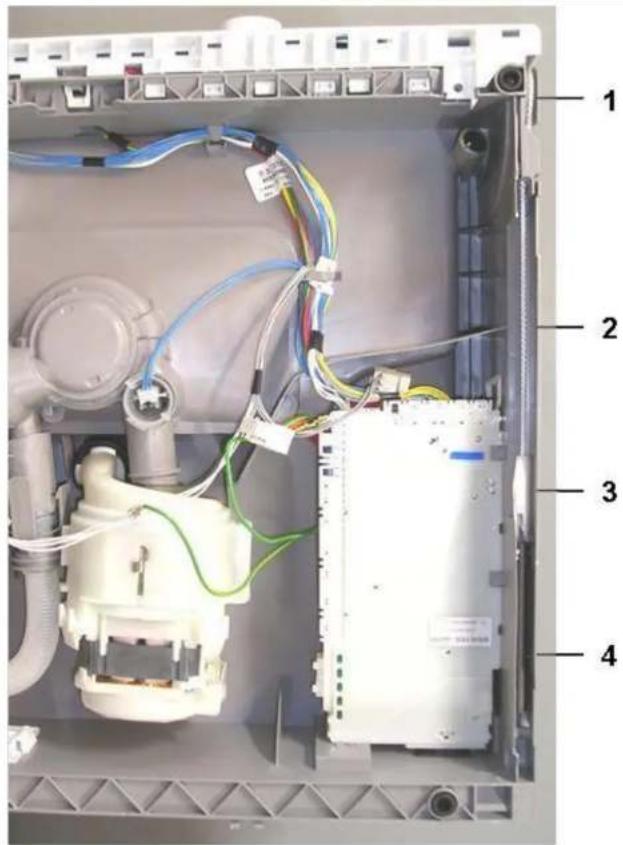
4.8 Replace the control panel
Prerequisites:
Appliance is disconnected from the mains.
Appliance is disconnected from water supply.
The lower base has been removed.
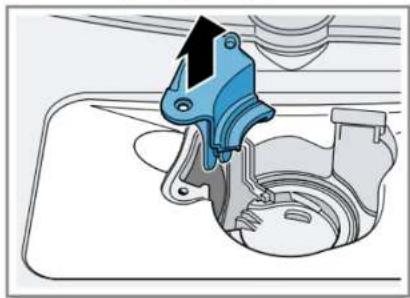
4.8.1 Remove the control panel
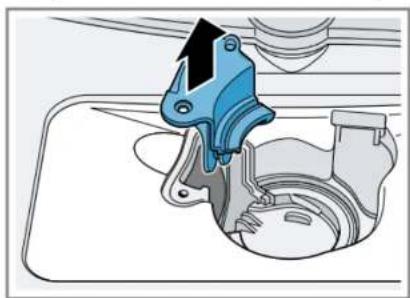
- Press the fixing pin.
Pull the control panel upwards.


4.8.2 Install control panel.
- Position the control panel so that the panel's pin slides under the plastic base guide.
Press until the fixing pin is secured.
4.9 Replace the detergent dispenser cover
A small screwdriver can be used as a levering tool.
Prerequisite:
Appliance is disconnected from the mains.
Appliance is disconnected from water supply.
Door has been opened.
Detergent cover has been opened.
4.9.1 Remove the detergent cover
- Slide the detergent cover inwards 5mm .
- Use a lever to remove the detergent cover from the underside of the guide rails and remove the detergent cover from the upper side of the guide rails.
- Remove the spring.
4.9.2 Insert the spring
- Insert the long end of the spring into the mounting hole of the dispenser device (1).
- Insert the short edge of the spring into the mounting hole of the detergent cover (2).
- Press the cover onto the dispenser (3).
4.9.3 Install the detergent cover
- Insert the detergent cover into the guide rails on one side, to 5 mm before the fully open position. Gently applying force, press the opposite side of the guide rails.
- Check the operation of the detergent cover.
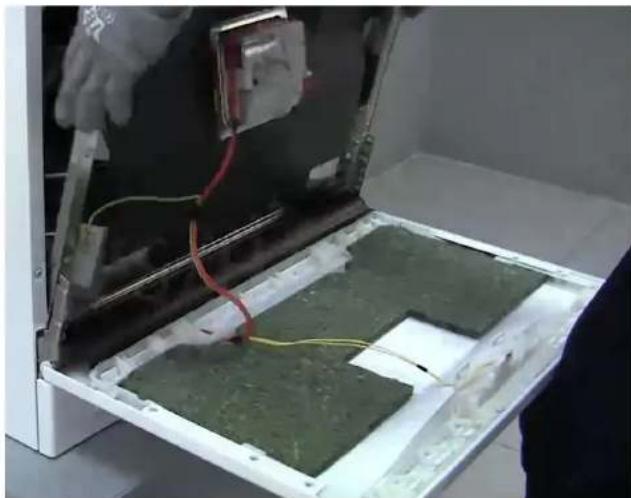
4.10 Replace the lower door seal
Prerequisite:
Outer door is disassembled.
4.10.1 Remove the lower door seal
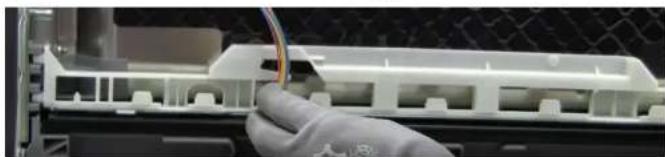
Remove the cable harness from the white bracket guide.
Remove it from its lower attachment position.
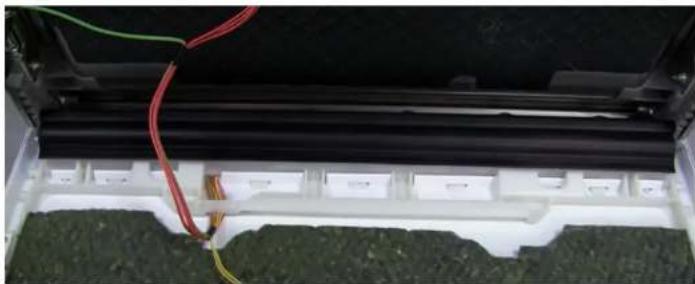
Pull it upwards to detach from the base.


4.10.2 Install the lower door seal
Position the cable harness.

Use your hands to press the lower seal onto the whole base to fit it firmly in position.
Check that the seal is flush with the lower base.

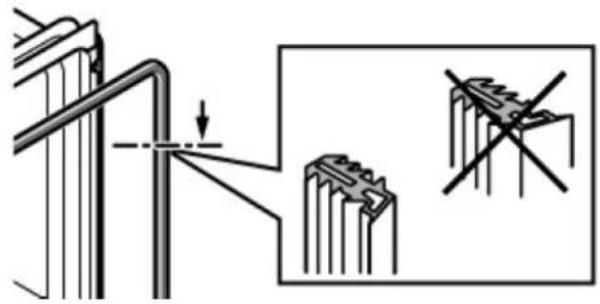
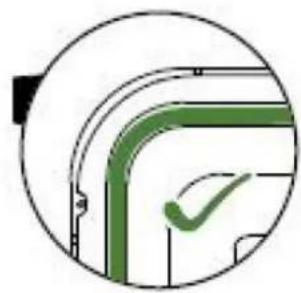
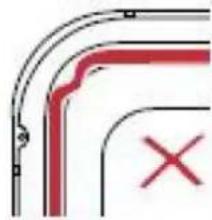
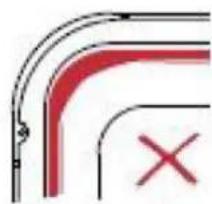
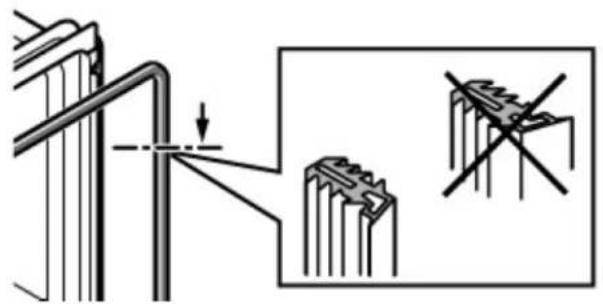
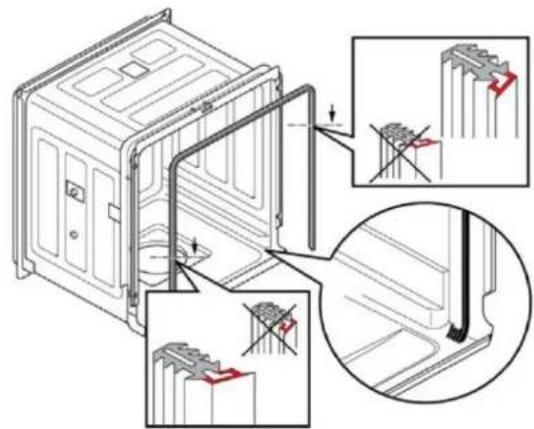
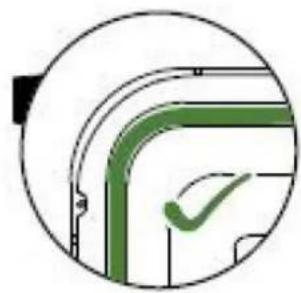
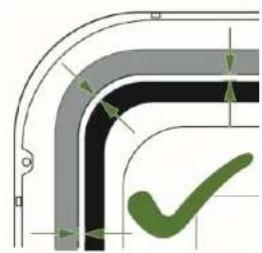
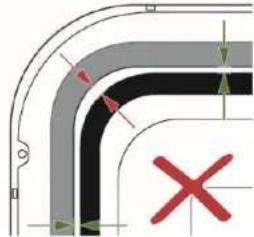
4.11 Replace the door seal
Prerequisite
Appliance is disconnected from the mains.
Appliance is disconnected from water supply.
4.11.1 Remove the door seal
Remove the seal from the inner frame.
Make sure that the profile of the door seal is in the correct position.
Make sure that the corners are not bent or twisted.
Place the end of the seal straight forwards, below the inner door. The seal should rest on the side of the tub as much as possible.


4.12 Replace the lower cover
Prerequisite
Appliance is disconnected from the mains.
Appliance is disconnected from water supply.
4.12.1 Remove the lower cover
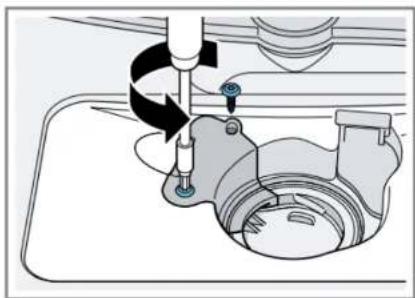
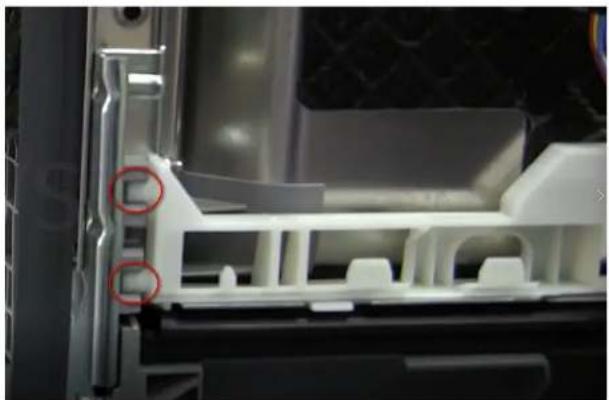
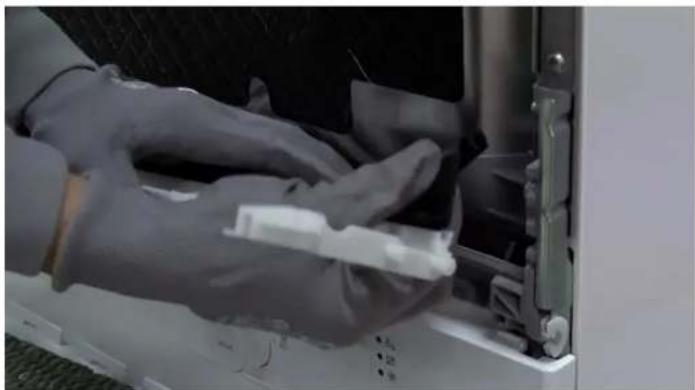
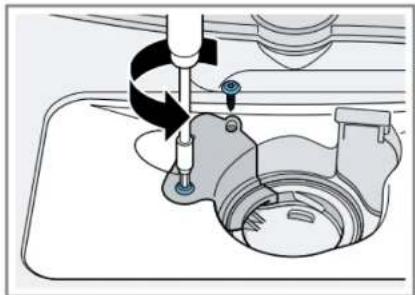
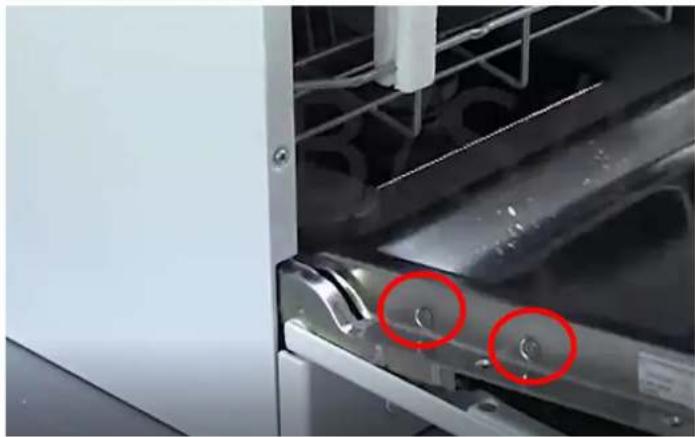
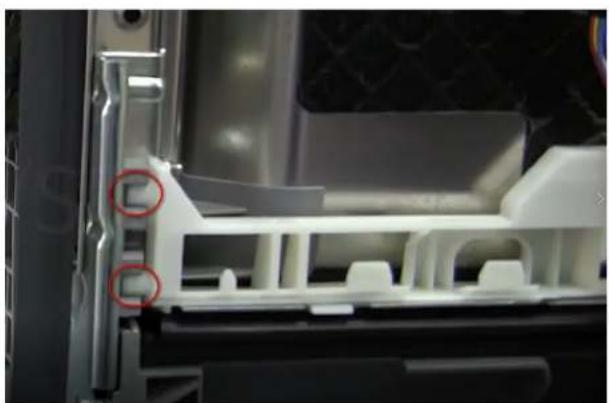
1 Unscrew the two torx 20 retaining screws.
2 Pull from the lower hole until it is free from the fixing pin. Use a slotted screwdriver to detach on both sides.
3 Detach the earth wire.

4.12.2 Assembly
1 Position the lower part of the base by inserting the protruding edges into the grooves in the tub's plastic base.
2 Install the earth wire in the base.
3 Screw in the two retaining screws.
Appliance is disconnected from the mains.
Appliance is disconnected from water supply.
Lower base plate removed.
4.13.1 Disassembly
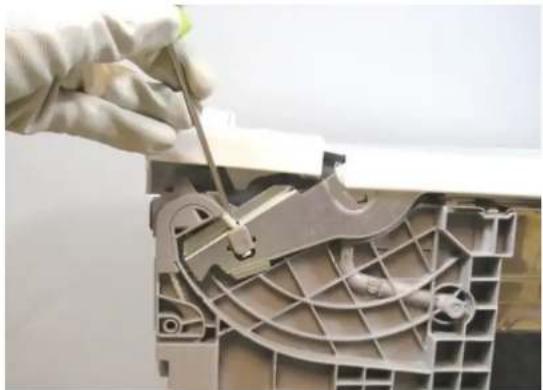
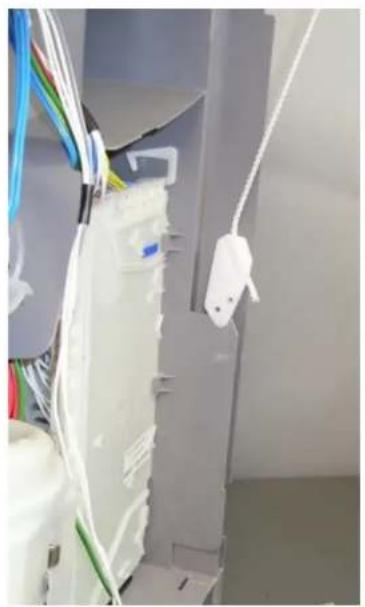
- Rest the rope's plastic holder on the protruding edge of the plastic base.
- Use a screwdriver to detach the rope from the hinge.
- When the rope is detached, the spring can be removed.
4.13.2 Assembly
Assemble in reverse order.

Holder
The rope holder is automatically released from its position when the door is closed.
4.13.3 Door hinge springs
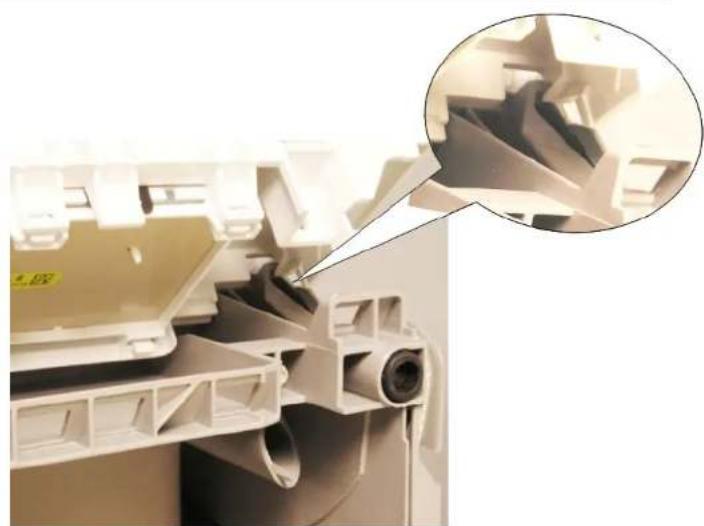
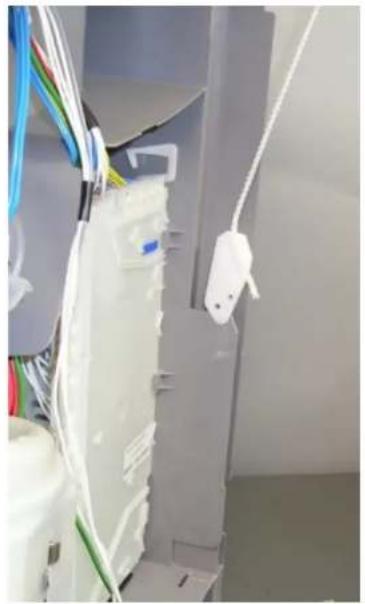
The appliance has two springs that control the opening and closing force of the dishwasher's door. They are on either side of the appliance.
The spring tension is transmitted via a rope to the hinge, through a plastic tensioner.
The spring's tension force cannot be adjusted.
The spring and transmission system automatically adapt to the door weight.
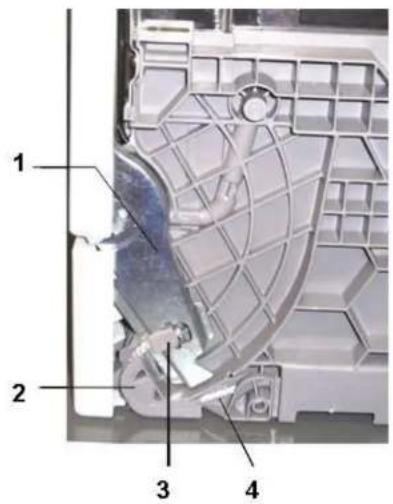
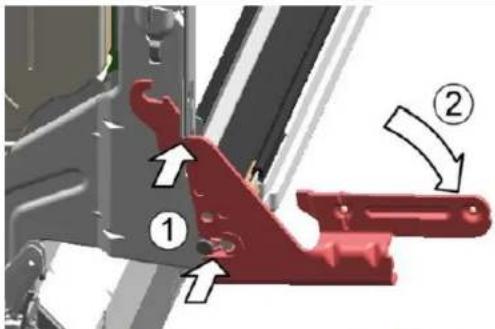
1 Hinge
2 Sheave 4 Rope
3 Rope attachment piece
1 Sheave
2 Rope 4 Tension spring
4.14 Replace hinge
Prerequisites:
Appliance is disconnected from the mains.
Appliance is disconnected from water supply.
Remove the outer and inner doors.
Remove the lower base.
Detach the cabinets.
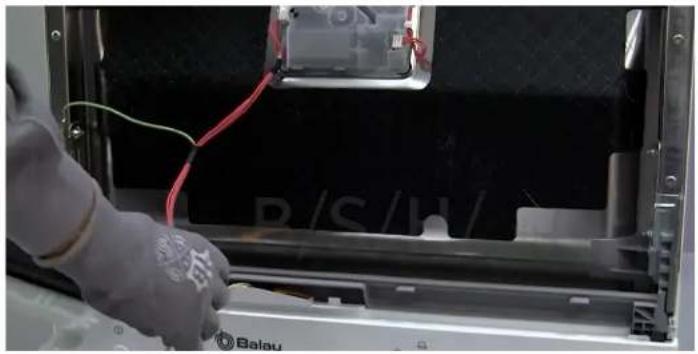
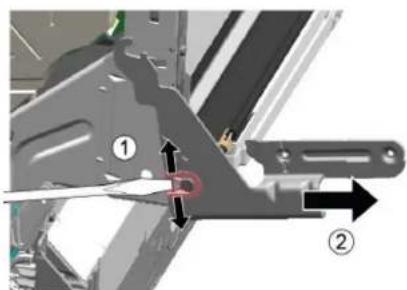
4.14.1 Remove the hinge
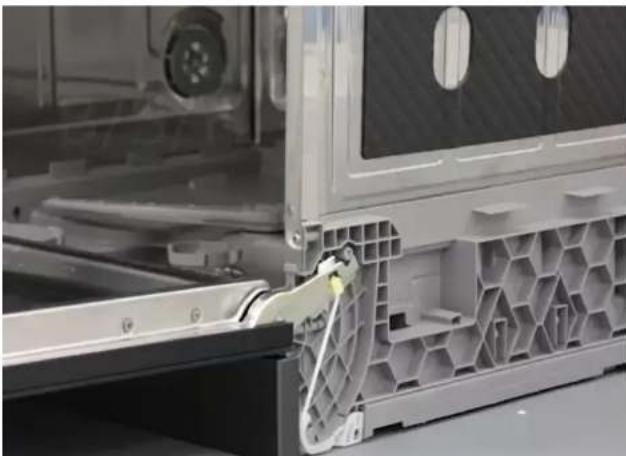
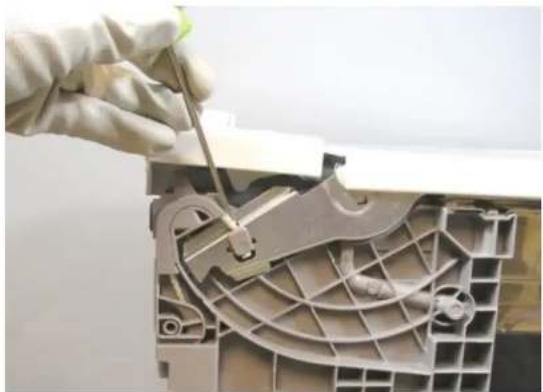
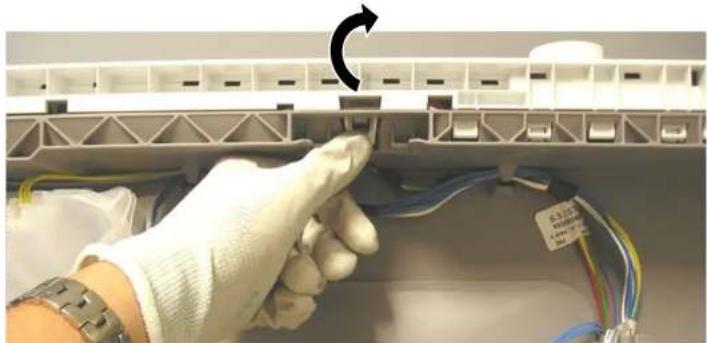
Use a screwdriver (1) to release the latch.
Pull outwards (2).
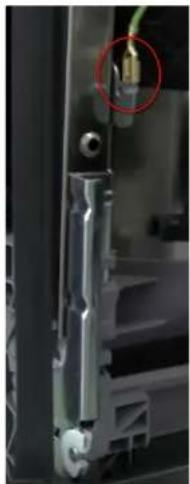
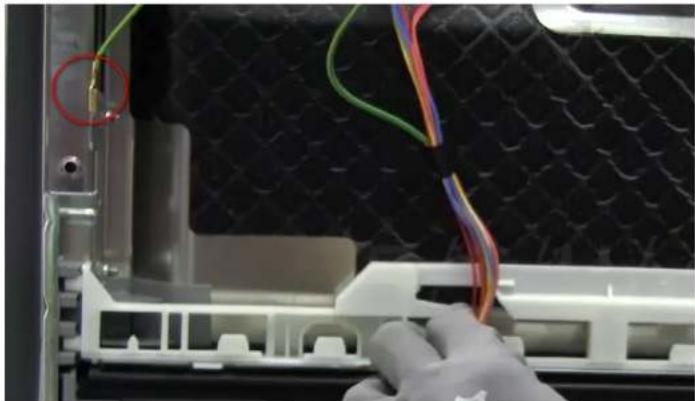
Disconnect the earthing connection from the hinge.
4.14.2 Install the hinge


DANGER
Electric shock hazard due to live parts
Risk of injury from electrocution and response to shock.
Electrical components should be repaired by a qualified electrician.
After the repair, ensure that a safety test is performed in accordance with standard VDE 0701 or the country's specific standards.
Position the hinge on the appliance (1).
Move the hinge downwards (2) until it fits onto the appliance.
Connect the hinge's earth wire.

A missing earthing connection can lead to voltage at the door.
REMONDIJUHEND
GV550 TT
1 SISSEJUHATUS
4.4.2 Demonteerimine
4.13.1 Demonteerimine
-
Asetage trossi plasthoidik plastaluse valjaulatuvale servale.
-
Kasutage kruvikeerajatrossi lahutamiseks hinge kuljest.
- Kui tross on lahutatud, saab vedru eemaldada.

4.13.2 Monteirimine
2.3 Evikcs oyniecs aosaaiaas
Aiaabaote To EYxEpiBIO EITIOKEUnc KAI aKoAouOHTe TIG OOnyIEC TIOU TEPiExovTai o auto.
PpOxWpHnTe OuaTnMaTikKa aKoAouhnte TcS obnyieC yia tov EvTOIIOPO KAI TNY EITIOKEUn BAaBw.
2.3.1 OEs oikiaKc oukeuE
Kivduvo nAekptponIgac Aoywn Aektpopopwepov
Ta opaalata aTIO ETIOKEUEc OE NAEKTPIKA EApTnmuata mTPOei va Tpokaaleouv nEeKPToTTnIgia!
AIOouvdeote nouakeun aTo TnV piciya ia Toulaixiotov 60
DEUTEPOAEETTATPIV aTo Nv evapSnTwv epyaowv.
MetaTnVETIOKEunBepaiWtheta6OTiTaTpaaypatoToinTeEAEyXOS aopalaIacouwvaeTO TPOTuTO VDE 0701 nTa TPOTuTA TNS ouykepiEvnsxwpas.
Kivvovos rpaunoiou aTkoPepes akpe.
Φopáte TTpooTATEUká yávtia!
Kivuvoc uovthetaiunks kata tis etiokeuec, tn ouvtnpnon, nV avntetwmion pobanpatwv kai to texviok oepic ato bapi kai KIOUeva np.
Φopáte TpOoTATEUtiKa UToBnμata!
Aopaiote ta Bapiia npn wote va atotpeyete TIV TTWOH.
Mny eaye Tou Piaoiou Ota Kivouevaepn.
Kivduvoia nvaopaaleia /tn AEIOUpyia nsc ouoKEunc.
Xpnoiopoioite movo yvna avtalaktkia!
Kivuvoc npokanons nC eapntmaeuaioetaa oToV Otaiko nEeKtpiOe (ESD).
MnyayyieteTICMOvadec,ouuTEPIaabavovEvwTwvouvdeoeW KAI TWAYwywTwVTAAKETWV.
2.3.2 ouin ppoeiOtoiOnns


KINAYNOZ
EkTeBéIeVApepn UTo Taon
Kivduovoc gavatou aTIO nAektpoTTnEia.
AIOouvBéTE Tn OUOKeUN aTTO nλEKTpiKo δiktuo.
Mny ayyiTeTo TepiBAnu, To Tlaio n Eapntmuata.
Eav aataitei dokun uto taon, xpnoiotnoote evav aqpaaleiodaikottn.
Bebaiowte 0ti n avriotaon kawoiou yiwans dev utepbaivei TIGTUTTOINIEVECS TIIES.


PPOEIADONIOIH
TnV TepiTTwoBaaBns, ta aTtaywYmu HEPNTOpei va BpiKovTu uTo Taon.
Kivvoc avatou aTo nAektpoanEia.
AToouvOeTe TOnoUaKeUn aTIO to nAekTpiko dIKTuO.
MnyayyizEToTepiBAnu,ToTlaio nEgaptnua.
Eav aataitei dokunnto taon, xpooiotoinote eva aopaaioiaokotttn.
Bebaathei 0ti n avtotaan twv aywyw yiwos dev utepbaive TIT TUTTOTIOINeV ES TIE.


PPOsOXH
Tpaupatiooi aro kouipata naixnpes akpc.
Dra mikrofilteret ned.
Sett pā pumpedeekslet.
Settinn over-og underkurven.
4.4 Skiffe ut plugg

ADVARSEL
Zdjac oslone pompy do gory.
- Wcisnac bolec mocujacy.
Pociagnac panel obslugi do gory.

4.8.2 Montaz panelu obslugi.
Remova as portas interior e exterior.
Remova a base inferior.
Lungime: 200 mm, drept.
